1
BEDIENUNGSANLEITUNG
USER MANUAL
CMP-2000
DUAL CD/MP3 PLAYER
Für weiteren Gebrauch aufbewahren!
Keep this manual for future needs!
© Copyright
Nachdruck verboten!
Reproduction prohibited!
2/52
00074823.DOC, Version 1.0
3/52
00074823.DOC, Version 1.0
4/52
00074823.DOC, Version 1.0
5/52
00074823.DOC, Version 1.0
6/52
00074823.DOC, Version 1.0
Inhaltsverzeichnis
1. EINFÜHRUNG ............................................................................................................................................... 9
2. SICHERHEITSHINWEISE ............................................................................................................................. 9
3. BESTIMMUNGSGEMÄSSE VERWENDUNG ............................................................................................ 11
4. GERÄTEBESCHREIBUNG ........................................................................................................................ 12
Features ....................................................................................................................................................... 12
Steuereinheit ................................................................................................................................................ 13
Laufwerkeinheit ............................................................................................................................................ 17
5. INBETRIEBNAHME .................................................................................................................................... 18
Installation .................................................................................................................................................... 18
Anschlüsse ................................................................................................................................................... 18
6. ALLGEMEINE BEDIENUNG ...................................................................................................................... 19
Gerät einschalten/ausschalten..................................................................................................................... 19
CD einlegen ................................................................................................................................................. 19
USB-Geräte und laden und anwählen ......................................................................................................... 19
Titel und Ordner anwählen ........................................................................................................................... 19
Wiedergabe starten/unterbrechen ............................................................................................................... 20
Schneller Vor- und Rücklauf ........................................................................................................................ 20
Exaktes Anfahren einer Stelle...................................................................................................................... 20
7. GRUNDEINSTELLUNGEN ......................................................................................................................... 21
Wiedergabemodus wählen .......................................................................................................................... 21
Auto-Cue-Punkt............................................................................................................................................ 21
Zeitanzeige umschalten ............................................................................................................................... 21
ID3-Tag anzeigen......................................................................................................................................... 21
BPM ermitteln............................................................................................................................................... 21
8. ERWEITERTE FUNKTIONEN .................................................................................................................... 22
Wiedergabegeschwindigkeit verändern ....................................................................................................... 22
Mastertempo-Funktion aktivieren................................................................................................................. 22
Titel im Takt angleichen (Pitch Bend) .......................................................................................................... 22
Sprung zum Liedanfang oder einer bestimmte Stelle (Cueing) ................................................................... 23
Endlosschleife abspielen ............................................................................................................................. 23
Start- und Endpunkt einer Endlosschleife editieren ..................................................................................... 24
Wiederholfunktion anwählen ........................................................................................................................ 24
Verwendung der Faderstart-Funktion .......................................................................................................... 24
Relay-Betrieb (automatischer Start des anderen Laufwerks) ...................................................................... 24
9. EFFEKTFUNKTIONEN ............................................................................................................................... 24
Scratch-Modus ............................................................................................................................................. 24
Bremseffekt .................................................................................................................................................. 24
Stottereffekte erzeugen ................................................................................................................................ 24
10. SYSTEMEINSTELLUNGEN ..................................................................................................................... 25
Systemeinstellungen aufrufen...................................................................................................................... 25
Playlist [Kriterium für Datenbanksuche festlegen] ....................................................................................... 25
Sensitivity [Empfindlichkeit] .......................................................................................................................... 25
Sleep Time [Ruhemodus] ............................................................................................................................ 25
Line Setup [Anzeigeverhalten Textzeile] ..................................................................................................... 25
Bit rate [Bitrate ein-/ausblenden].................................................................................................................. 25
Version [Versionen anzeigen] ...................................................................................................................... 25
Load Defaults [Werkseinstellung] ................................................................................................................ 25
Exit & Save [Menü verlassen und Einstellungen dauerhaft speichern] ....................................................... 25
11. DATENBANKGESTÜTZTE MUSIKVERWALTUNG ................................................................................ 26
Software aus dem Internet herunterladen und installieren .......................................................................... 26
Musikdatenbank erstellen ............................................................................................................................ 28
Datenbankgestützte Suche mit dem CMP-2000 .......................................................................................... 29
12. PROBLEMBEHEBUNG ............................................................................................................................ 29
13. REINIGUNG UND WARTUNG.................................................................................................................. 29
14. TECHNISCHE DATEN .............................................................................................................................. 30
Hinweise zu abspielbaren Discs und Dateien .............................................................................................. 30
Systemanforderungen Database Builder ..................................................................................................... 30
Diese Bedienungsanleitung gilt für die Artikelnummer: /This user manual is valid for item: 10602409
7/52
00074823.DOC, Version 1.0
Table of contents
1. INTRODUCTION ......................................................................................................................................... 31
2. SAFETY INSTRUCTIONS .......................................................................................................................... 31
3. OPERATING DETERMINATIONS .............................................................................................................. 33
4. DESCRIPTION ............................................................................................................................................ 34
Features ....................................................................................................................................................... 34
Control unit ................................................................................................................................................... 35
Player mechanism unit ................................................................................................................................. 39
5. SET UP ........................................................................................................................................................ 40
Installation .................................................................................................................................................... 40
Connections ................................................................................................................................................. 40
6. OPERATION ............................................................................................................................................... 41
Switching on/off ............................................................................................................................................ 41
Inserting a CD .............................................................................................................................................. 41
Loading and removing USB devices ............................................................................................................ 41
Selecting titles and folders ........................................................................................................................... 41
Starting playback/pause ............................................................................................................................... 42
Fast forward and reverse ............................................................................................................................. 42
Precise selection of a spot ........................................................................................................................... 42
7. BASIC SETTINGS....................................................................................................................................... 43
Selecting the operating mode ...................................................................................................................... 43
Auto cue point .............................................................................................................................................. 43
Switching over the time indication................................................................................................................ 43
Indicating ID3 tags ....................................................................................................................................... 43
Detecting the BPM ....................................................................................................................................... 43
8. ADVANCECED FUNCTIONS ..................................................................................................................... 44
Pitch adjustment........................................................................................................................................... 44
Activating Master Tempo ............................................................................................................................. 44
Matching the beat between two titles (Pitch Bend) ...................................................................................... 44
Return to the starting point of the title or to a defined spot (cueing) ............................................................ 45
Playing a continuous loop ............................................................................................................................ 45
Editing starting and end point of a loop ....................................................................................................... 46
Selecting the repeat function ....................................................................................................................... 46
Using the fader start function ....................................................................................................................... 46
Relay mode (automatic start of the other player mechanism) ..................................................................... 46
9. EFFECT FUNCTIONS ................................................................................................................................. 46
Scratch mode ............................................................................................................................................... 46
Brake effect .................................................................................................................................................. 46
Creating stutter effects ................................................................................................................................. 46
10. SYSTEM SETTINGS ................................................................................................................................. 47
Calling the system settings .......................................................................................................................... 47
Playlist [Selecting a criterion for database search] ...................................................................................... 47
Sensitivity [Jogdial sensitivity] ...................................................................................................................... 47
Sleep Time [Sleep mode] ............................................................................................................................. 47
Line Setup [Display mode text line].............................................................................................................. 47
Bit rate [Show/hide bit rate] .......................................................................................................................... 47
Version [View information] ........................................................................................................................... 47
Load Defaults [Reset settings] ..................................................................................................................... 47
Exit & Save [Exit and save settings permanently] ....................................................................................... 47
11. MUSIC DATABASE MANAGEMENT ....................................................................................................... 48
Downloading the software from the internet and installing it ....................................................................... 48
Creating a music database .......................................................................................................................... 50
Database search on the CMP-2000............................................................................................................. 51
12. TROUBLESHOOTING .............................................................................................................................. 51
13. CLEANING AND MAINTENANCE ........................................................................................................... 51
14. TECHNICAL SPECIFICATIONS............................................................................................................... 52
Regarding playable discs and files .............................................................................................................. 52
System requirements Database Builder ...................................................................................................... 52
Das neueste Update dieser Bedienungsanleitung finden Sie im Internet unter/
You can find the latest update of this user manual in the Internet under: www.omnitronic.com
8/52
00074823.DOC, Version 1.0
BEDIENUNGSANLEITUNG
CMP-2000
Doppel-CD-/MP3-Player
Lesen Sie vor der ersten Inbetriebnahme zur eigenen Sicherheit diese Bedienungsanleitung sorgfältig durch!
Alle Personen, die mit der Aufstellung, Inbetriebnahme, Bedienung, Wartung und Instandhaltung dieses
Gerätes zu tun haben, müssen
- entsprechend qualifiziert sein
- diese Bedienungsanleitung genau beachten
- die Bedienungsanleitung als Teil des Produkts betrachten
- die Bedienungsanleitung während der Lebensdauer des Produkts behalten
- die Bedienungsanleitung an jeden nachfolgenden Besitzer oder Benutzer des Produkts weitergeben
- sich die letzte Version der Anleitung im Internet herunter laden
1. EINFÜHRUNG
Wir freuen uns, dass Sie sich für den OMNITRONIC CMP-2000 entschieden haben. Wenn Sie
nachfolgende Hinweise beachten, sind wir sicher, dass Sie lange Zeit Freude an Ihrem Kauf haben werden.
Nehmen Sie das Gerät aus der Verpackung.
2. SICHERHEITSHINWEISE
ACHTUNG!
Seien Sie besonders vorsichtig beim Umgang mit gefährlicher Netzspannung. Bei dieser Spannung können Sie einen lebensgefährlichen elektrischen Schlag erhalten!
9/52
00074823.DOC, Version 1.0
Dieses Gerät hat das Werk in sicherheitstechnisch einwandfreiem Zustand verlassen. Um diesen Zustand zu
erhalten und einen gefahrlosen Betrieb sicherzustellen, muss der Anwender unbedingt die Sicherheitshinweise und die Warnvermerke beachten, die in dieser Gebrauchsanweisung enthalten sind.
Unbedingt lesen:
Bei Schäden, die durch Nichtbeachtung dieser Bedienungsanleitung verursacht werden, erlischt der
Garantieanspruch. Für daraus resultierende Folgeschäden übernimmt der Hersteller keine Haftung.
Bitte überprüfen Sie vor der ersten Inbetriebnahme, ob kein offensichtlicher Transportschaden vorliegt.
Sollten Sie Schäden an der Netzleitung oder am Gehäuse entdecken, nehmen Sie das Gerät nicht in Betrieb
und setzen sich bitte mit Ihrem Fachhändler in Verbindung.
Der Aufbau entspricht der Schutzklasse II. Das Gerät ist schutzisoliert. Der Netzstecker darf nur an eine
Steckdose angeschlossen werden, deren Spannung und Frequenz mit dem Typenschild des Gerätes genau
übereinstimmt. Ungeeignete Spannungen und ungeeignete Steckdosen können zur Zerstörung des Gerätes
und zu tödlichen Stromschlägen führen.
Den Netzstecker immer als letztes einstecken. Der Netzstecker muss dabei gewaltfrei eingesetzt werden.
Achten Sie auf einen festen Sitz des Netzsteckers. Lassen Sie die Netzleitung nicht mit anderen Kabeln in
Kontakt kommen! Seien Sie vorsichtig beim Umgang mit Netzleitungen und -anschlüssen. Fassen Sie diese
Teile nie mit feuchten Händen an! Feuchte Hände können tödliche Stromschläge zur Folge haben.
Netzleitungen nicht verändern, knicken, mechanisch belasten, durch Druck belasten, ziehen, erhitzen und
nicht in die Nähe von Hitze- oder Kältequellen bringen. Bei Missachtung kann es zu Beschädigungen der
Netzleitung, zu Brand oder zu tödlichen Stromschlägen kommen. Die Kabeleinführung oder die Kupplung
am Gerät dürfen nicht durch Zug belastet werden. Es muss stets eine ausreichende Kabellänge zum Gerät
hin vorhanden sein. Andernfalls kann das Kabel beschädigt werden, was zu tödlichen Stromschlägen führen
kann. Achten Sie darauf, dass die Netzleitung nicht gequetscht oder durch scharfe Kanten beschädigt
werden kann. Überprüfen Sie das Gerät und die Netzleitung in regelmäßigen Abständen auf
Beschädigungen.
Werden Verlängerungsleitungen verwendet muss sichergestellt werden, dass der Adernquerschnitt für die
benötigte Stromzufuhr des Gerätes zugelassen ist. Alle Warnhinweise für die Netzleitung gelten auch für
evtl. Verlängerungsleitungen. Gerät bei Nichtbenutzung und vor jeder Reinigung vom Netz trennen! Fassen
Sie dazu den Netzstecker an der Grifffläche an und ziehen Sie niemals an der Netzleitung! Ansonsten kann
das Kabel und der Stecker beschädigt werden was zu tödlichen Stromschlägen führen kann. Sind Stecker
oder Geräteschalter, z. B. durch Einbau nicht erreichbar, so muss netzseitig eine allpolige Abschaltung
vorgenommen werden.
Wenn der Netzstecker oder das Gerät staubig ist, dann muss es außer Betrieb genommen werden, der
Stromkreis muss allpolig unterbrochen werden und das Gerät mit einem trockenen Tuch gereinigt werden.
Staub kann die Isolation reduzieren, was zu tödlichen Stromschlägen führen kann. Stärkere Verschmutzungen im und am Gerät dürfen nur von einem Fachmann beseitigt werden.
Es dürfen unter keinen Umständen Flüssigkeiten aller Art in Steckdosen, Steckverbindungen oder in
irgendwelche Geräteöffnungen oder Geräteritzen eindringen. Besteht der Verdacht, dass - auch nur
minimale - Flüssigkeit in das Gerät eingedrungen sein könnte, muss das Gerät sofort allpolig vom Netz
getrennt werden. Dies gilt auch, wenn das Gerät hoher Luftfeuchtigkeit ausgesetzt war. Auch wenn das
Gerät scheinbar noch funktioniert, muss es von einem Fachmann überprüft werden ob durch den
Flüssigkeitseintritt eventuell Isolationen beeinträchtigt wurden. Reduzierte Isolationen können tödliche
Stromschläge hervorrufen. In das Gerät dürfen keine fremden Gegenstände gelangen. Dies gilt
insbesondere für Metallteile. Sollten auch nur kleinste Metallteile wie Heft- und Büroklammern oder gröbere
Metallspäne in das Gerät gelangen, so ist das Gerät sofort außer Betrieb zu nehmen und allpolig vom Netz
zu trennen. Durch Metallteile hervorgerufene Fehlfunktionen und Kurzschlüsse können tödliche
Verletzungen zur Folge haben.
ACHTUNG: Endstufen immer zuletzt einschalten und zuerst ausschalten! Kinder und Laien vom Gerät fern
halten!
ACHTUNG: Zu hohe Lautstärken können das Gehör schädigen!
Beachten Sie bitte, dass Schäden, die durch manuelle Veränderungen an diesem Gerät verursacht werden,
nicht unter den Garantieanspruch fallen. Im Geräteinneren befinden sich keine zu wartenden Teile.
Eventuelle Servicearbeiten sind ausschließlich dem autorisierten Fachhandel vorbehalten!
10/52
00074823.DOC, Version 1.0
3. BESTIMMUNGSGEMÄSSE VERWENDUNG
Der CMP-2000 mit zwei Laufwerken ist speziell konzipiert für DJ-Anwendungen kann aber auch für
andere Beschallungszwecke eingesetzt werden (z. B. Restaurants, Fitnessstudios oder Einzelhandel). Das
Gerät besitzt eine ganze Reihe von Funktionen, die genau auf die Anforderungen von DJs abgestimmt sind,
wie z. B. Beatcounter, regelbare Wiedergabegeschwindigkeit, Cueing, nahtlose Wiedergabe einer
Endlosschleife, Einzeltitelwiedergabe und bequeme Suche über ein Jogdial.
Auf dem CMP-2000 lassen sich Audio-CDs/-Rs/-RWs (CD-DA) sowie CDs und USB-Geräte mit Titeln im
MP3-Format abspielen.
Der CMP-2000 ist mit zwei 20-sekündigen Anti-Shock-Speichern ausgestattet, die Störungen durch
Stöße oder Vibration ausgleichen können.
Zur komfortablen Musiksuche mit dem CMP-2000 ist das PC-Programm Database Builder zum
Download erhältlich. Dieses Programm analysiert USB-Speichergeräte und legt spezielle Indexdateien auf
ihnen an. Dadurch kann der CMP-2000 Datenträger nach bestimmten Kriterien wie Titel oder Interpret
absuchen.
Dieses Produkt ist nur für den Anschluss an 100-240 V AC, 50/60 Hz Wechselspannung zugelassen und
wurde ausschließlich zur Verwendung in Innenräumen konzipiert.
Vermeiden Sie Erschütterungen und jegliche Gewaltanwendung bei der Installierung oder Inbetriebnahme
des Gerätes.
Achten Sie bei der Wahl des Installationsortes darauf, dass das Gerät nicht zu großer Hitze, Feuchtigkeit
und Staub ausgesetzt wird. Vergewissern Sie sich, dass keine Kabel frei herumliegen. Sie gefährden Ihre
eigene und die Sicherheit Dritter!
Die Umgebungstemperatur muss zwischen 5° C und +35° C liegen. Halten Sie das Gerät von direkter
Sonneneinstrahlung (auch beim Transport in geschlossenen Wägen) und Heizkörpern fern.
Die relative Luftfeuchte darf 65 % bei einer Umgebungstemperatur von 23° C nicht überschreiten.
Dieses Gerät darf nur in einer Höhenlage zwischen -20 und 2000 m über NN betrieben werden.
Nehmen Sie das Gerät erst in Betrieb, nachdem Sie sich mit seinen Funktionen vertraut gemacht haben.
Lassen Sie das Gerät nicht von Personen bedienen, die sich nicht mit dem Gerät auskennen. Wenn Geräte
nicht mehr korrekt funktionieren, ist das meist das Ergebnis von unsachgemäßer Bedienung!
Reinigen Sie das Gerät niemals mit Lösungsmitteln oder scharfen Reinigungsmitteln, sondern verwenden
Sie ein weiches und angefeuchtetes Tuch.
Soll das Gerät transportiert werden, verwenden Sie bitte die Originalverpackung, um Transportschäden zu
vermeiden.
Der Serienbarcode darf niemals vom Gerät entfernt werden, da ansonsten der Garantieanspruch erlischt.
Wird das Gerät anders verwendet als in dieser Bedienungsanleitung beschrieben, kann dies zu Schäden am
Produkt führen und der Garantieanspruch erlischt. Außerdem ist jede andere Verwendung mit Gefahren, wie
z. B. Kurzschluss, Brand, elektrischem Schlag, etc. verbunden.
11/52
00074823.DOC, Version 1.0
4. GERÄTEBESCHREIBUNG
Features
Doppel-CD- und MP3-Player für DJs
• Audio-CD, CD-R, CD-RW, MP3-CD
• 2 USB-Schnittstellen für Speichergeräte und tragbare Player (FAT 32)
• Easy Source Select: CD- und USB-Quellen lassen sich beiden Abspieleinheiten beliebig zuweisen
• Combined Device Access: Beide Abspieleinheiten können gleichzeitig auf eine USB-Quelle zugreifen und
parallel abspielen
• Schneller und einfacher auf Musikdateien zugreifen dank intelligenter datenbankgestützter
Musikverwaltung mit der kostenlosen PC-Software Database Builder
• Filtern Sie USB-Geräte blitzschnell nach Titel, Künstler, Album oder Genre
• Systemmenü für benutzerdefinierte Einstellungen
• 2 x 20 Sekunden Anti-Shock-Puffer
• Überragende Einlesezeit der Dateien (Sofortstart schon nach 10 ms)
• Automatischer Beatcounter (auf manuelle Betriebsart umschaltbar)
• Mastertempo-Funktion (gleichbleibende Tonhöhe bei Geschwindigkeitsänderung)
• 2 alphanumerische LCD-Displays für ID3-Tags
• Berührungsempfindliche Jogdials mit einstellbarer Empfindlichkeit und Moduswahl: Scratchen oder Pitch
Bend
• Pitchregelung ±4 %, ±8 %, ±16 %, ± 100 % (MP3-CD ±16 %)
• Faderstart
• Relay-Funktion
• Ordnernavigation
• Pitch-Bend-Tasten
• Cue-/Autocue-Funktion
• Nahtlose Loop-/Reloop-Funktion
• Einzel- oder Gesamttitelwiedergabe
• Wiederholfunktion
• Anzeige von Titelabspielzeit, Titelrestspielzeit (MP3-Dateien) oder Gesamtrestspielzeit (Audio-CD)
• Bargraph-Anzeige
• Anzeige der Geschwindigkeitsänderung in %
• Große hinterleuchtete Play/Pause- und Cue-Tasten
• Laufwerke sind gegen unbeabsichtigtes Öffnen gesichert
• Rackeinbau
• Die Software Database Builder ist im Downloadbereich unter www.omnitronic.com erhältlich
12/52
00074823.DOC, Version 1.0
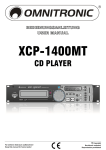
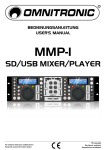
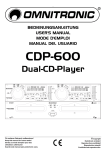
Steuereinheit
1 Bedienfeld Abspieleinheit 1
2 Bedienfeld Abspieleinheit 2
3 Taste [ ]
Öffnet und Schließt die CD-Schublade. Während
des Abspielens einer CD ist die CD-Schublade
gegen unbeabsichtigtes Öffnen verriegelt.
4 Taste SOURCE SELECT
Im Pausemodus kann durch kurzen Tastendruck
zwischen den Datenträgern CD, USB 1 und USB 2
umgeschaltet werden. Die LEDs zeigen Ihnen,
welche Quelle angewählt ist. Beide Abspieleinheiten können gleichzeitig auf ein USBSpeichergerät zugreifen und Titel parallel
abspielen.
5 LCD-Anzeige
Zeigt alle Funktionen des Geräts und Daten der
Datenträger an. Eine detaillierte Beschreibung der
Symbole finden Sie im Abschnitt DISPLAY.
6 Taste SGL/CTN
Zum Einstellen des Wiedergabemodus und der
Funktion Auto Cue:
• Grundeinstellung Gesamttitelwiedergabe: alle Titel
des Datenträgers werden fortlaufend wiedergegeben und das Gerät schaltet nach dem letzten
Titel auf Pause
• Durch kurzen Tastendruck wird Einzeltitelwiedergabe gewählt (Anzeige „SINGLE“): ist ein
Titel zu Ende gespielt, schaltet das Gerät am
Anfang des nächsten Titels auf Pause
• Langer Tastendruck: Aktiviert/deaktiviert die
Funktion Auto Cue. Bei aktivierter Funktion
blendet das Display AUTO CUE ein.
7 Taste TIME
Zur Umschaltung der Zeitanzeige und zum Aufrufen
der Systemeinstellungen:
• Grundeinstellung: Titelrestspielzeit (REMAIN)
• Erster
kurzer
Tastendruck:
Titelabspielzeit
(ELAPSED)
• Zweiter kurzer Tastendruck: Gesamtrestspielzeit
(TOTAL REMAIN), nicht im MP3-Betrieb
• Langer Tastendruck: Zum Aufrufen der Systemeinstellungen.
8 Jogdial
• Betriebsmodus Pitch Bend: im Wiedergabemodus
zur Funktion Pitch Bend und im Pausenmodus
zum exakten Anfahren einer bestimmten Stelle
• Betriebsmodus Scratch: zum Erzeugen von
Scratch-Effekten
• Zur Musiksuche in der Datenbank eines USBSpeichergeräts.
• Zum Editieren des Start- und Endpunkts einer
Endlosschleife (Seamless Loop).
9 Taste JOG MODE mit LEDs
Bestimmt den Betriebsmodus des Jogdials. Die
LEDs neben der Taste zeigen, welcher Modus
angewählt ist.
• Pitch Bend: im Wiedergabemodus zur Funktion
Pitch Bend und im Pausenmodus zum exakten
Anfahren einer bestimmten Stelle
• Scratch: zum Erzeugen von Scratch-Effekten
10 Taste CUE
• Mit Tastendruck im Pausemodus oder während
der Wiedergabe stoppt das Gerät und kehrt zum
Cue-Punkt zurück und befindet sich im
Pausemodus (LED leuchtet rot).
• Im Pausemodus kann durch Gedrückthalten der
Taste vorgehört werden. Sobald Sie Ihren Finger
wieder von der Taste nehmen, kehrt das Gerät
zum Cue-Punkt zurück.
13/52
00074823.DOC, Version 1.0
10 Taste CUE (Fortsetzung)
• Wenn ein neuer Cue-Punkt gesetzt wird, blinkt die
LED wiederholt.
• Durch mehrfaches kurzes Drücken lassen sich
Stottereffekte erzeugen.
11 Taste [►II]
Zum Umschalten zwischen Wiedergabe und Pause.
Während der Wiedergabe leuchtet die gelbe LED,
im Pausemodus blinkt sie.
12 Taste FOLDER mit LED []
• Kurzer Tastendruck: Zum Umschalten zwischen
Titel- und Ordnerwahl mit dem Druckregler
TRACK []. Im Ordnermodus leuchtet die
Kontroll-LED.
• Langer Tastendruck: Aktiviert/deaktiviert die Wiederholfunktion. Bei aktivierter Wiederholfunktion
werden alle Titel im angewählten Ordner ständig
wiederholt. Das Display blendet „REPEAT“ ein.
13 Druckregler TRACK []
• Für die Titelsuche drehen Sie den Regler. Wenn
Sie den Regler beim Drehen gleichzeitig gedrückt
halten, springen Sie um 10 Titel vor- bzw. zurück.
Titelnummer und -name (im MP3-Betrieb) werden
im Display angezeigt.
• Für die Ordnersuche aktivieren Sie zunächst den
Ordner-Suchmodus mit der Taste FOLDER.
Drehen Sie dann den Regler, um durch die
Ordner zu navigieren. Wenn Sie den Regler beim
Drehen gleichzeitig gedrückt halten, springen Sie
um 10 Ordner vor- bzw. zurück. Ordnernummerund name werden im Display angezeigt.
• Mit wiederholtem kurzem Druck auf den Regler
werden jeweils die verschiedenen Daten des ID3Tags des Titels auf dem Display dargestellt: Title
(Titelname), Artist (Künstler), Album, Genre, File
Name (Dateiname). Zusätzlich wird immer noch
die Bitrate angezeigt.
14 Taste TAP BPM
• Wenn der automatische Beatcounter kein
eindeutiges
Signal
erkennt,
können
die
Taktschläge eines Titels auch manuell ermittelt
werden. Tippen Sie dazu die Taste mehrere Male
im Takt des Titels an, bis der Wert im Display
angezeigt wird.
• Alternativ kann der BPW-Wert auch direkt mithilfe
des Druckreglers TRACK [] eingegeben
werden. Halten Sie dazu die Taste TAP BPM
gedrückt und stellen Sie dann durch Drehen des
Druckreglers TRACK [] den BPM-Wert ein.
Zum Einstellen der Nachkommastelle halten Sie
den Druckregler [] TRACK zusätzlich
gedrückt.
• Langer Tastendruck: aktiviert/deaktiviert des
automatischen Beatcounters; bei aktivierter
Funktion blendet das Display „AUTO BPM“ ein
und 16 % für MP3-Dateien). Solange Sie die Taste
[–] gedrückt halten, wird der Takt des Titels
verlangsamt. Solange Sie die Taste [+] gedrückt
halten wird der Takt des Titels erhöht. Sobald Sie
Ihren Finger von den Tasten nehmen, kehrt das
Gerät zur vorher eingestellten Geschwindigkeit
zurück.
16 Taste [◄►] RELAY mit LED
Zum automatischen Starten des anderen Laufwerks
am Ende eines Titels (im Modus Einzeltitelwiedergabe) oder am Ende des letzten Titels des Datenträgers (im Modus Gesamttitelwiedergabe). Bei
aktivierter Funktion leuchtet die rote Kontroll-LED.
17 Tasten IN, OUT, RELOOP
Tasten zum Speichern und zur Wiedergabe einer
Endlosschleife (Seamless Loop).
• IN: Bestimmt den Startpunkt einer Schleife (LED
leuchtet rot) und setzt einen Cue-Punkt ohne
Musikunterbrechung („on the fly").
• OUT: Bestimmt den Endpunkt einer Schleife, die
daraufhin sofort gestartet wird (LEDs IN und OUT
blinken). Die Schleife wird solange wiederholt, bis
Sie die Taste erneut drücken.
• RELOOP: Startet die erneute Wiedergabe der
Schleife (LEDs IN und OUT blinken) und erzeugt
durch mehrfaches kurzes Drücken Stottereffekte.
Drücken Sie die Taste OUT, um die Schleife zu
beenden.
18 Tasten [] und [] SEARCH
• []: schneller Vorlauf
• []: schneller Rücklauf
19 Taste [ ] KEY LOCK
Zum Aktivieren/Deaktivieren der MastertempoFunktion. Bei aktivierter Funktion blendet das
ein und der Pitch-Schieberegler kann zur
Display
Beschleunigung
und
Verlangsamung
der
Wiedergabegeschwindigkeit verwendet werden,
ohne die Stimmlage eines Titels zu verändern.
20 Taste % [PITCH ON] mit LED
• Langer Tastendruck: Aktiviert/deaktiviert den
Pitch-Schieberegler. Bei aktiviertem Regler
leuchtet die Kontroll-LED.
• Durch kurzes Drücken der Taste und kann der
Geschwindigkeitseinstellbereich
ausgewählt
werden: 4 %, 8 %, 16 % und 100 % für AudioCDs, bis zu 16 % bei MP3-Dateien.
21 Pitch-Schieberegler
Bestimmt die Wiedergabegeschwindigkeit (bei
gedrückter Taste [ ] MASTER TEMPO ohne
Änderung der Tonhöhe), wenn die Funktion mit der
Taste % [PITCH ON] eingeschaltet wurde.
Schieben Sie den Regler nach oben, um die
Geschwindigkeit zu verringern und nach unten, um
die Geschwindigkeit zu erhöhen. Die PitchProzentzahl wird im Display angezeigt.
15 Tasten PITCH BEND [+] und [–]
Die Funktion Pitch Bend erzeugt eine temporäre
Veränderung der Wiedergabegeschwindigkeit in
Abhängigkeit des gewählten Geschwindigkeitseinstellbereichs (bis zu 100 % für Audio-CDs
14/52
00074823.DOC, Version 1.0
22 Buchse CONTROL START 2
3,5-mm-Mono-Klinkenbuchse für die Fernsteuerung
der Funktion Start/Cue der Abspieleinheit 2 von
einem Mischpult aus (Faderstart-Funktion).
24 Anschluss Laufwerkeinheit
Buchse zum Anschluss der Laufwerkeinheit über
das beiliegende Mini-DIN-Anschlusskabel.
23 Buchse CONTROL START 1
3,5-mm-Mono-Klinkenbuchse für die Fernsteuerung
der Funktion Start/Cue der Abspieleinheit 1 von
einem Mischpult aus (Faderstart-Funktion).
15/52
00074823.DOC, Version 1.0
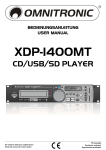
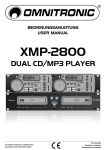
a CUE
Leuchtet im Cuemodus und blinkt wiederholt, wenn
ein neuer Cue-Punkt gesetzt wurde.
j AUTO BPM
Der automatische Beatcounter ist aktiviert.
k Taktgeschwindigkeit (BPM) des aktuellen Titels
b Wiedergabemodus/Pausemodus
l Geschwindigkeitsanpasssung in %
c Nummer des angewählten Ordners
m KEY
Leuchtet auf, wenn das berührungsempfindliche
Jogdial betätigt wird.
d Nummer des angewählten Titels
e SINGLE
Betriebsart Einzeltitelwiedergabe
n [ ] Mastertempo
Die Mastertempo-Funktion ist aktiviert.
f REPEAT
Die Wiederholfunktion ist aktiviert.
g Bargraph
Grafische Anzeige der verstrichenen und noch
verbleibenden Zeit. 30 Sekunden vor Ende der
Spielzeit beginnt die Anzeige zu blinken.
h Zeitanzeige
Titelabspielzeit
(ELAPSED),
Titelrestspielzeit
(REMAIN) oder Gesamtrestspielzeit (TOTAL
REMAIN) dargestellt in Minuten (M), Sekunden (S)
und Frames (F)
o LOOP
Zeigt an, dass ein Schleife gespeichert ist und zum
erneuten Abrufen zur Verfügung steht.
p RELOOP
Zeigt durch Blinken, dass eine Schleife abgespielt
wird.
q AUTO CUE
Die Funktion Auto Cue ist aktiviert.
i Textzeile
• Durchlaufende Textinformationen zum aktuellen
Titel im MP3-Betrieb: Ordnername oder
Dateiname und Bitrate (Grundeinstellung). Mit
dem Druckregler TRACK [] lassen sich die
anderen Daten des ID3-Tags darstellen.
• Für die Anzeige von Funktionen wie den Systemeinstellungen.
16/52
00074823.DOC, Version 1.0
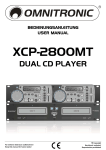
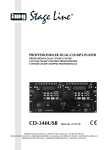
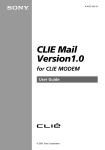
Laufwerkeinheit
25 Taste [ ]
Öffnet und schließt die CD-Schublade. Während
des Abspielens einer CD ist die CD-Schublade
gegen unbeabsichtigtes Öffnen verriegelt.
26 USB-Anschluss 1
Frontseitiger USB-Anschluss (Typ
Einstecken eines USB-Speichergeräts.
A)
zum
29 USB-Anschluss 2
Rückseitiger USB-Anschluss (Typ
Einstecken eines USB-Speichergeräts.
A)
zum
30 Netzanschluss
Stecken Sie hier die beiliegende Netzleitung ein.
31 Line-Ausgang Abspieleinheit 2
Audioausgang (Cinch, Links/Rechts) mit Line-Pegel
von Abspieleinheit 2 zum Anschluss an Verstärker,
Mischpulte bzw. andere Geräte mit Line-PegelEingängen.
27 CD-Schublade
Zum Einlegen von Audio-CDs und CDs mit Titeln im
MP3-Format.
28 Netzschalter mit Betriebsanzeige
Drücken Sie den Netzschalter, um das Gerät einund auszuschalten. Die Betriebsanzeige zeigt den
eingeschalteten Zustand an.
32 Anschluss Steuereinheit
Buchse zum Anschluss der Steuereinheit über das
beiliegende Mini-DIN-Anschlusskabel.
33 Line-Ausgang Abspieleinheit 1
Audioausgang (Cinch, Links/Rechts) mit Line-Pegel
von Abspieleinheit 1 zum Anschluss an Verstärker,
Mischpulte bzw. andere Geräte mit Line-PegelEingängen.
17/52
00074823.DOC, Version 1.0
5. INBETRIEBNAHME
Installation
Stellen Sie die Steuer- und Laufwerkeinheit auf einer ebenen Fläche auf oder installieren Sie die Geräte in
Ihrem Rack. Für den Einbau in ein 19"-Rack (483 mm) benötigen die Geräte jeweils 2 HE. Die Geräte
können mit jeweils vier Schrauben M6 im Rack befestigt werden. Die Laufwerkeinheit muss waagrecht
betrieben werden. Die Steuereinheit kann zur besseren Bedienbarkeit auch geneigt installiert werden.
Achten Sie bei der Standortwahl darauf, dass genügend Abstand zu anderen Geräten vorhanden ist bzw.
dass die warme Luft aus dem Rack entweichen kann, um die Wärmeabstrahlung zu verbessern. Dauerhafte
Überhitzung kann zu Schäden an den Geräten führen.
Anschlüsse
Schalten Sie den CMP-2000 vor dem Anschließen oder Ändern bestehender Anschlüsse aus.
1
Schließen Sie die Laufwerkeinheit mit dem beiliegenden Mini-DIN-Anschlusskabel an die Steuereinheit
an. Verbinden Sie dazu Buchse [CONNECT TO REMOTE CONTROL] der Laufwerkeinheit mit der
Buchse [CONNECT TO MAIN UNIT] der Steuereinheit.
2
Schließen Sie nachfolgende Geräte mit Line-Pegel-Eingängen wie Verstärker oder Mischpult über die
beiliegenden Cinch-Kabel an die Cinch-Ausgänge auf der Laufwerkeinheit an. Achten Sie darauf, dass
die Belegung rechts/links an den Geräten übereinstimmt.
3
Die Laufwerke des CMP-2000 lassen sich mit einem externen Mischpult mit Faderstart-Funktion
fernbedienen (z. B. OMNITRONIC MX-540). Verwenden Sie die mitgelieferten Mini-Klinkenkabel,
um die Ausgänge [CONTROL START UNIT 1] und [CONTROL START UNIT 2] des CMP-2000
jeweils mit dem entsprechenden Eingang am Mischpult zu verbinden.
Bitte beachten Sie, dass die Faderstart-Funktion nur in Verbindung mit geeigneten Mischpulten funktioniert
(z. B. MX-540 und EX-820). Funktionsweise: Das anzuschließende Mischpult wird über einen 3,5-mmKlinkenstecker mit dem CMP-2000 verbunden. Zum Start der Wiedergabe wird der positive Anschluss
(Spitze) des Klinkensteckers über einen kurzen Impuls mit der Audiomasse verbunden. Zum Pausieren der
Wiedergabe wird der negative Anschluss (Schaft) des Klinkensteckers über einen kurzen Impuls mit der
Audiomasse verbunden. Das Mischpult muss mit einem Schalter, Taster oder Fader ausgestattet sein, der bei
Betätigung des entsprechenden Kanals zum Start die Spitze des Klinkensteckers und zum Pausieren den
Schaft des Klinkensteckers mit der Audiomasse des CMP-2000 verbindet.
4
Schließen Sie den CMP-2000 mit der beiliegenden Anschlussleitung ans Netz an (100-240 V AC,
50/60 Hz).
18/52
00074823.DOC, Version 1.0
6. ALLGEMEINE BEDIENUNG
• Beide Abspieleinheiten können gleichzeitig
auf ein USB-Gerät zugreifen und Titel
parallel abspielen.
• Das Display zeigt zunächst „Connecting“
(Verbindungsaufbau)
und
nach
dem
Einlesevorgang
(Anzeige
„Reading…")
folgen Informationen zum ersten Titel.
• Ist kein Gerät angeschlossen, wird „Please
insert memory device" (bitte Speichermedium einsetzen) angezeigt.
Die Bedienung der beiden Abspieleinheiten ist
identisch.
Gerät einschalten/ausschalten
1
2
Schalten Sie den CMP-2000 mit dem
Netzschalter ein. Die rote Betriebsanzeige
leuchtet.
• Nach einer kurzen Einstellphase (Anzeige
„Welcome") prüft das Gerät zunächst ob eine
CD eingelegt ist (Anzeige „Reading...").
• Wenn sich eine CD in der CD-Schublade
befindet, zeigt das Display nach dem
Einlesevorgang kurz die Gesamtanzahl der
Titel
und
die
Gesamtspielzeit
und
anschließend die Informationen zum ersten
Titel an.
• Ist keine CD eingelegt, wird „No Disc" (keine
CD) angezeigt.
Hinweise zu USB-Geräten
• Das Gerät unterstützt USB-Geräte mit dem
Dateisystem FAT32 und mit einer Kapazität bis
32 GB.
• Das Gerät unterstützt USB-Massenspeichergeräte der Kategorie „Mass Storage Class“
(MSC) 1.0, 1.1, 2.0, einschließlich tragbare
Flash-Memory-Geräte
und
digitale
Audioplayer. Externe Festplattenlaufwerke,
optische Speicher wie externe CD-/DVDLaufwerke werden jedoch nicht erkannt. Bei
Verwendung von bestimmten USB-Geräten ist
u. U. keine einwandfreie Wiedergabe möglich.
• Sollte ein Datenträger nicht auf Anhieb erkannt
werden, entfernen Sie ihn bitte nochmals und
setzen ihn erneut ein.
Beenden Sie vor dem Ausschalten immer
zuerst die Wiedergabe mit der Taste [►II].
CD einlegen
1
Zum Einlegen einer CD öffnen Sie die CDSchublade mit der Taste [ ].
• Im Display erscheint „Open" (Schublade
öffnet).
2
Legen Sie die CD mit der beschrifteten Seite
nach oben ein und schließen Sie die CDSchublade wieder mit der Taste [ ].
• Im Display erscheint „Close“ (Schublade
schließt).
Titel und Ordner anwählen
Mit dem Druckregler TRACK [] können Titel
und Ordner angewählt werden.
1
Für die Titelsuche drehen Sie den Druckregler TRACK [].
• Titelnummer und -name (im MP3-Betrieb)
werden im Display angezeigt.
• Wenn Sie den Regler beim Drehen
gleichzeitig gedrückt halten, springen Sie um
10 Titel vor- bzw. zurück.
2
Für die Ordnersuche aktivieren Sie zunächst
den Ordnersuchmodus mit der Taste
FOLDER []. Die Kontroll-LED über der
Taste leuchtet. Drehen Sie dann den
Druckregler TRACK [], um durch die
Ordner zu navigieren.
• Ordnernummer- und name werden im
Display angezeigt.
• Wenn Sie den Regler beim Drehen
gleichzeitig gedrückt halten, springen Sie um
10 Ordner vor- bzw. zurück.
• Zum Zurückschalten auf die Titelwahl
drücken Sie erneut die Taste FOLDER [].
Die Kontroll-LED erlischt.
USB-Geräte und laden und anwählen
1
2
Für
die
Verwendung
von
USBSpeichermedien steht auf der Frontplatte
USB-Anschluss 1 und auf der Rückseite
USB-Anschluss 2 zur Verfügung. Stecken
Sie hier USB-Geräte ein. Um ein USB-Gerät
zu entfernen, ziehen Sie es aus dem USBAnschluss.
• Beenden Sie vor dem Entfernen immer die
Wiedergabe, um Schäden oder Datenverlust
zu vermeiden.
Um von CD auf
schalten, drücken
SOURCE SELECT.
• Das Gerät muss
befinden.
• Die LEDs zeigen
aktiviert ist.
ein USB-Gerät umzuSie den Umschalter
sich im Pausemodus
Ihnen, welche Quelle
19/52
00074823.DOC, Version 1.0
Wiedergabe starten/unterbrechen
1
Drücken Sie die Taste [►II], um die
Wiedergabe zu starten.
• Das Display zeigt ►.
• Während der Wiedergabe leuchtet die gelbe
LED.
• Der Startpunkt des Titels (Cue-Punkt) wird
automatisch gespeichert. Das Gerät kehrt
zum Cue-Punkt zurück, indem Sie kurz die
Taste CUE drücken.
2
Die Wiedergabe kann jederzeit mit der Taste
[►II] unterbrochen werden.
• Das Display zeigt II und die gelbe LED blinkt.
• Drücken Sie die Taste [►II] zum
Weiterspielen.
• Die Wiedergabe wird auch unterbrochen,
wenn Sie die Taste CUE drücken. Das Gerät
kehrt dann zum Cue-Punkt zurück.
Schneller Vor- und Rücklauf
Die Tasten [] und [] SEARCH dienen zum
schnellen Vor- und Rücklauf. Für den schnellen
Vorlauf halten Sie die Taste [] gedrückt, für den
schnellen Rücklauf die Taste [].
• Je länger Sie die Tasten gedrückt halten, desto
höher ist die Suchgeschwindigkeit.
Exaktes Anfahren einer Stelle
Mit dem Jogdial lässt sich eine Stelle bis auf ein
Frame (1/75 Sekunde) genau anfahren. Wählen
Sie dazu mit der Taste JOG MODE den
Betriebsmodus Pitch Bend und unterbrechen Sie
die Wiedergabe mit der Taste [►II]. Fahren Sie
nun die die Stelle mit dem Jogdial exakt an.
• Nach dem Drehen wird die momentane Stelle
ständig wiederholt, bis die Wiedergabe mit der
Taste [►II] gestartet wird.
20/52
00074823.DOC, Version 1.0
verringert sich die Anzahl der Segmente mit
abnehmender Restspielzeit.
• 30 Sekunden vor Ende der Spielzeit beginnt
der Bargraph in seiner vollen Länge zu
blinken.
7. GRUNDEINSTELLUNGEN
Nach dem Einschalten sind verschiedene Grundeinstellungen aktiv, die geändert werden können.
Wiedergabemodus wählen
Als Grundeinstellung ist immer die Gesamttitelwiedergabe aktiviert. Alle Titel werden fortlaufend
wiedergegeben. Drücken Sie die Taste SGL/CTN,
um auf Einzeltitelwiedergabe umzuschalten. Das
Gerät schaltet dann nach jedem gespielten Titel
auf Pause und zeigt „SINGLE“ an.
ID3-Tag anzeigen
1
Als Grundeinstellung zeigt das Display
durchlaufende
Textinformationen
zum
aktuellen Titel an: Ordnername bzw.
Dateiname und Bitrate.
2
Durch wiederholtes Drücken des Druckreglers TRACK [] lässt sich die
Textzeile
auf
eine
der
folgenden
Informationen des ID3-Tags umschalten:
Title (Titelname) Artist (Künstler) Album
Genre und wieder auf File Name
(Dateiname).
Auto-Cue-Punkt
Als Grundeinstellung ist immer die Funktion Auto
Cue aktiviert. Das Display zeigt „AUTO CUE“ an.
1
2
Die Funktion ermöglicht Ihnen, die
Übergänge zwischen zwei Titeln zu
minimieren. Das Gerät steht nach dem
Einlesen eines Datenträgers oder nach dem
Anwählen eines Titels exakt an der Stelle, an
der die Musik einsetzt und nicht bei Zeitindex
0:00:00. Diese Stelle wird automatisch als
Startpunkt gespeichert.
BPM ermitteln
Als Grundeinstellung ist immer der automatische
Beatcounter aktiviert. Das Display zeigt nach dem
Einlesevorgang die ermittelte Taktgeschwindigkeit
an und blendet „AUTO BPM“ ein.
Mit einem langen Druck auf die Taste
SGL/CTN wird die Funktion Auto Cue
deaktiviert.
• Die Anzeige „AUTO CUE“ erlischt.
• Zwischen den Titeln bleibt nun ein
Zeitintervall, bis die Musik einsetzt.
Zeitanzeige umschalten
1
Wenn der automatische Beatcounter kein
eindeutiges Signal erkennt (z. B. bei ruhigen
Musiktiteln), können die Taktschläge eines
Titels auch manuell ermittelt werden. Tippen
Sie dazu die Taste TAP BPM mehrere Male
im Takt des Titels an, bis der Wert im
Display angezeigt wird.
2
Alternativ kann der BPW-Wert auch direkt
mithilfe des Druckreglers TRACK []
eingegeben werden. Halten Sie dazu die
Taste TAP BPM gedrückt und stellen Sie
dann durch Drehen des Druckreglers
TRACK [] den BPM-Wert ein. Um
anschließend
die
Nachkommastelle
einzustellen, halten Sie erneut die Taste TAP
BPM gedrückt und den Druckregler []
TRACK während des Drehens zusätzlich
gedrückt.
3
Durch
das
manuelle
Ermitteln
der
Taktschläge
wird
der
automatische
Beatcounter deaktiviert und die Anzeige
„AUTO BPM“ erlischt. Durch einen langen
Tastendruck auf TAP BPM wird der
automatische Beatcounter wieder aktiviert.
Als Grundanzeige zeigt das Display die
Restspielzeit des aktuellen Titels (Anzeige
„REMAIN“) numerisch in Minuten, Sekunden und
Frames (1 Frame = 1/75 Sekunde).
1
2
Mit der Taste TIME kann die Zeitanzeige
umgeschaltet werden:
• erster Tastendruck: Titelabspielzeit (Anzeige
„ELAPSED“)
• zweiter Tastendruck: Gesamtrestspielzeit
(Anzeige „TOTAL REMAIN“), nicht im MP3Betrieb
• dritter
Tastendruck:
Grundeinstellung
(Anzeige „REMAIN“)
Zusätzlich zur numerischen Zeitanzeige
erscheint darüber die grafische Darstellung
durch die Länge des Bargraphs.
• In der Einstellung Titelabspielzeit (Anzeige
„ELAPSED“) erhöht sich die Anzahl der
Segmente des Bargraphs mit zunehmender
Abspielzeit.
• In den Einstellungen Titelrestspielzeit
(Anzeige
„REMAIN“)
und
Gesamtrestspielzeit (Anzeige „TOTAL REMAIN“)
21/52
00074823.DOC, Version 1.0
8. ERWEITERTE FUNKTIONEN
Titel im Takt angleichen (Pitch Bend)
Mit der Funktion Pitch Bend lässt sich der Takt
eines Titels auf Abspieleinheit 1 an den Takt eines
Titels auf Abspieleinheit 2 anpassen (synchronisieren) oder umgekehrt. Dadurch wird beim
Überblenden von einem zum anderen Titel der
Rhythmus nicht unterbrochen. Anders als die
Einstellung mit dem Pitch-Schieberegler, erhöht
oder verringert die Funktion Pitch Bend die
Titelgeschwindigkeit während der Wiedergabe nur
vorübergehend.
Wiedergabegeschwindigkeit verändern
Die Wiedergabegeschwindigkeit kann mit dem
Pitch-Schieberegler stufenlos um bis zu ±100 %
verändert werden (bei MP3-Betrieb bis zu ±16 %).
1
2
Wählen Sie zunächst den Einstellbereich mit
der Taste % [PITCH ON]. Durch Drücken
der Taste wird zwischen 4 %, 8 %, 16 % und
100 % umgeschaltet.
• Die entsprechende LED leuchtet.
• Bei 100 % leuchten alle LEDs auf.
Durch einen langen Tastendruck auf %
[PITCH ON] wird der Pitch-Schieberegler
aktiviert und die Kontroll-LED über der Taste
leuchtet (Grundeinstellung).
3
Schieben Sie nun den Regler PITCH nach
oben, um die Geschwindigkeit zu verringern
und nach unten, um die Geschwindigkeit zu
erhöhen.
• Das Display zeigt die prozentuale Änderung
der Geschwindigkeit an.
• Der Schieberegler rastet in der Mittelstellung
ein. In dieser Position wird ein Titel mit
Normalgeschwindigkeit abgespielt.
4
Tipp: Wird die Wiedergabegeschwindigkeit
bis zu einem Höchstwert von -100 %
verringert, bleibt der Titel stehen. Dieser
Effekt ähnelt dem Stoppvorgang eines
analogen Plattenspielers.
1
Gleichen Sie zunächst die Geschwindigkeit
der beiden Musikstücke auf die gleiche
Anzahl von Taktschlägen (BPM) mit dem
Pitch-Schieberegler an.
2
Wählen Sie mit der Taste JOG MODE den
Betriebsmodus Pitch Bend für das Jogdial
und legen Sie dann durch Drehen des
Jogdials die Taktschläge beider Musikstücke
genau übereinander.
• Die Drehgeschwindigkeit des Rads bestimmt
die Pitch-Prozentzahl: die kontinuierliche
Drehung
nach
links
verringert
die
Wiedergabegeschwindigkeit, die kontinuierliche Drehung nach rechts erhöht die
Wiedergabegeschwindigkeit.
• Beim Loslassen des Rads kehrt die
Wiedergabegeschwindigkeit automatisch zur
zuvor eingestellten Geschwindigkeit zurück.
3
Tipp: Wird das Jogdial kontinuierlich nach
links
gedreht,
verringert
sich
die
Wiedergabegeschwindigkeit bis zu einem
Höchstwert von -100 % und der Titel bleibt
stehen. Dieser Effekt ähnelt dem Stoppvorgang eines analogen Plattenspielers.
4
Alternativ zum Jogdial können auch die
Tasten PITCH BEND zur Taktangleichung
verwendet werden.
• Solange die Taste [+] oder [–] gehalten wird,
läuft der Titel in Abhängigkeit des gewählten
Geschwindigkeitseinstellbereichs (bis zu 100
% für Audio-CDs und 16 % für MP3-Dateien)
schneller bzw. langsamer.
• Nach dem Loslassen der Tasten PITCH
BEND kehrt das Gerät automatisch wieder
zur zuvor eingestellten Geschwindigkeit
zurück.
Mastertempo-Funktion aktivieren
Mit einer veränderten Wiedergabegeschwindigkeit
ändert sich auch proportional die Tonhöhe. Wird
die Mastertempo-Funktion aktiviert, bleibt die
Tonhöhe konstant. Drücken Sie dazu die Taste
[ ] KEY LOCK.
• Die Kontroll-LED über der Taste leuchtet und
das Display blendet ein.
22/52
00074823.DOC, Version 1.0
Sprung zum Liedanfang oder einer
bestimmte Stelle (Cueing)
Endlosschleife abspielen
Ein zeitlich unbegrenzter Abschnitt kann beliebig
oft ohne Tonunterbrechung wiederholt werden.
Diese Endlosschleife (Seamless Loop) kann
jederzeit überschrieben werden. Durch Anwählen
des nächsten Titels, Wechseln des Datenträgers
oder Aus- und erneutes Einschalten wird die
Endlosschleife gelöscht.
Um schnell zurück zum Liedanfang oder zu einer
bestimmten Stelle zu springen, lässt sich
temporär auf die Taste CUE ein Startpunkt (CuePunkt) speichern. Der Cue-Punkt wird beim
Erreichen oder Anwählen des nächsten Titels mit
dem
Anfangspunkt
des
nächsten
Titels
überschrieben.
1
•
•
•
•
2
1 • Startpunkt
„on the fly" bestimmen:
Drücken Sie während der Wiedergabe die
Taste IN, wenn der gewünschte Startpunkt
der Schleife erreicht ist.
• Die Wiedergabe wird nicht unterbrochen.
• Die Taste leuchtet rot.
Um zum Liedanfang zurückzuspringen,
drücken Sie im Pausemodus oder während
der Wiedergabe die Taste CUE.
Das Gerät stoppt und kehrt zum Liedanfang
(Cue-Punkt) zurück und befindet sich im
Cuemodus.
Die Taste leuchtet rot.
Nach dem Zurückspringen zum Cue-Punkt
kann die Wiedergabe mit der Taste [►II]
gestartet werden.
Alternativ kann auch durch Gedrückthalten
der Taste CUE vorgehört werden. Das
Display zeigt II. Nach dem Loslassen der
Taste kehrt das Gerät zum Cue-Punkt
zurück und befindet sich im Pausemodus.
• Startpunkt bis auf 1 Frame (1/75 Sekunde)
genau bestimmen: Wählen Sie mit der
Taste JOG MODE den Betriebsmodus Pitch
Bend und unterbrechen Sie die Wiedergabe.
Fahren Sie nun die Stelle mit dem Jogdial
exakt an. Nach dem Drehen wird die
momentane Stelle ständig wiederholt.
Drücken Sie die Taste IN, um den Startpunkt
zu speichern.
2 • Endpunkt
„on the fly" bestimmen:
Drücken Sie während der Wiedergabe die
Taste OUT, wenn der gewünschte Endpunkt
der Schleife erreicht ist.
• Der Abschnitt zwischen dem Start- und
Endpunkt wird fortlaufend wiederholt.
• Die LEDs der Tasten IN und OUT blinken.
• Das Display blendet die Anzeigen „LOOP“
und „RELOOP“ ein.
Um den Cue-Punkt an einer anderen Stelle
des Titels zu setzen können Sie Ihn mit der
Taste IN „on the fly" markieren oder mit dem
Jogdial bis auf ein Frame (1/75 Sekunde)
genau bestimmen.
• Cue-Punkt „on the fly" markieren:
Drücken Sie während der Wiedergabe die
Taste IN, wenn die gewünschte Stelle
erreicht ist.
• Die Wiedergabe wird nicht unterbrochen.
• Die Taste blinkt wiederholt.
• Endpunkt bis auf 1 Frame (1/75 Sekunde)
genau bestimmen: Unterbrechen Sie die
Wiedergabe und fahren Sie die Stelle mit
dem Jogdial exakt an. Die Stelle ist
fortlaufend zu hören. Drücken Sie die Taste
OUT, um den Endpunkt zu speichern.
Drücken Sie dann die Taste RELOOP, um
die Wiedergabe der Schleife zu starten.
• Cue-Punkt exakt bestimmen: Wählen Sie
mit der Taste JOG MODE den Betriebsmodus Pitch Bend und unterbrechen Sie die
Wiedergabe. Fahren Sie nun die die Stelle
mit dem Jogdial exakt an. Die Stelle ist
fortlaufend zu hören. Sobald Sie die
Wiedergabe mit der Taste [►II] starten, ist
ein neuer Cue-Punkt gespeichert (die Taste
CUE blinkt wiederholt).
23/52
3
Um die Schleife zu verlassen und die Musikwiedergabe normal fortzusetzen drücken Sie
die Taste OUT.
• Die LEDs der Tasten IN und OUT hören auf
zu blinken, sie leuchten jedoch weiterhin und
zeigen an, dass eine Schleife gespeichert ist
und zum erneuten Abrufen zur Verfügung
steht.
• Durch Anwählen eines anderen Titels wird
die Schleife ebenfalls verlassen.
4
Zur erneuten Wiedergabe der Schleife
drücken Sie die Taste RELOOP.
• Die Tasten IN und OUT blinken wieder.
00074823.DOC, Version 1.0
2
Drücken Sie die Taste [◄►] RELAY, um
den Relay-Betrieb zu aktivieren (rote
Kontroll-LED leuchtet) und starten Sie die
Wiedergabe an der ersten Abspieleinheit.
Am Ende des Titels oder des Datenträgers
(je nach Wiedergabemodus) startet die
Wiedergabe automatisch an der anderen
Abspieleinheit und die erste Abspieleinheit
wechselt in den Cuemodus.
3
Um die Funktion zu deaktivieren und wieder
zur normalen Wiedergabe zurückzukehren,
drücken Sie erneut die Taste [◄►] RELAY
(Kontroll-LED erlischt).
Start- und Endpunkt einer Endlosschleife editieren
Um eine Endlosschleife zu perfektionieren,
können der Start- und Endpunkt auch verschoben
werden.
1
Starten Sie die Wiedergabe einer Schleife
und halten Sie die Taste RELOOP gedrückt,
bis das Display den Zeitindex des Endpunkts
anzeigt.
2
Bestimmen Sie jetzt den neuen Endpunkt mit
dem Jogdial.
3
Drücken Sie kurz die Taste OUT, um den
Editiervorgang zu beenden oder kurz die
Taste RELOOP, um auch den Startpunkt zu
verschieben.
• Das Display blendet „IN EDIT“ ein.
4
9. EFFEKTFUNKTIONEN
Scratch-Modus
Bestimmen Sie den neuen Startpunkt mit
dem Jogdial und drücken Sie danach die
Taste IN, um den Editiervorgang zu
beenden.
Wählen Sie mit der Taste JOG MODE den
Betriebsmodus Scratch, um die Scratch-Funktion
für das für das Jogdial zu aktivieren. Durch Hinund Herbewegen des Jogdials lassen sich nun
Scratch-Effekte erzeugen.
Wiederholfunktion anwählen
Durch einen langen Tastendruck auf die Taste
FOLDER [] lässt sich die Wiederholfunktion
aktivieren. Es werden dann alle Titel im
angewählten Ordner ständig wiederholt.
• Das Display blendet „REPEAT“ ein.
• Durch einen erneuten langen Tastendruck
schalten Sie zurück auf normale Musikwiedergabe. Die Einblendung „REPEAT“ erlischt.
Bremseffekt
Wird das Jogdial im Betriebsmodus Pitch Bend
kontinuierlich nach links gedreht, verringert sich
die Wiedergabegeschwindigkeit bis zu einem
Höchstwert von -100 % und der Titel bleibt
stehen. Auch mit dem Pitch-Schieberegler kann
die Wiedergabegeschwindigkeit bis zu einem
Höchstwert von -100 % verringert werden (nur
Audio-CD). Dieser Effekt ähnelt dem Stoppvorgang eines analogen Plattenspielers.
Verwendung der Faderstart-Funktion
Wenn Sie den CMP-2000 über die
mitgelieferten Steuerkabel an ein Mischpult mit
Kontaktsteuerung angeschlossen haben, kann die
Funktion
Start/Cue
mit
dem
Mischpult
ferngesteuert werden. Durch Aufziehen des
Mischpult-Faders wechselt die jeweilige Abspieleinheit in den Wiedergabemodus. Durch Zuziehen
kehrt sie zum zuletzt gespeicherten Cue-Punkt
zurück und schaltet auf Pause.
Stottereffekte erzeugen
Der Startpunkt einer Endlosschleife und der CuePunkt können auch zum Erzeugen von
Stottereffekten
verwendet
werden.
Diese
entstehen durch mehrfaches kurzes Drücken der
Taste RELOOP.
Relay-Betrieb (automatischer Start des
anderen Laufwerks)
Am Ende eines Titels (im Modus Einzeltitelwiedergabe) oder am Ende des letzten Titels des
Datenträgers (im Modus Gesamttitelwiedergabe)
kann automatisch das andere Laufwerk gestartet
werden.
1
Laden Sie auf jeder Laufwerkseite einen
Datenträger und bestimmen Sie den
Wiedergabemodus.
24/52
00074823.DOC, Version 1.0
10. SYSTEMEINSTELLUNGEN
Im
Systemmenü
können
Sie
Einstellungen des Geräts verändern.
Sensitivity [Empfindlichkeit]
wichtige
Hier lässt sich die Empfindlichkeit des Jogdials in
einem Bereich von ±20 einstellen.
Systemeinstellungen aufrufen
1
2
3
4
5
Sleep Time [Ruhemodus]
Um die Systemeinstellungen aufzurufen,
halten Sie die Taste TIME für 3 Sekunden
gedrückt.
• Das Display zeigt den ersten Menüpunkt
„Playlist“ an.
Drehen Sie den Druckreglers TRACK [],
um durch die Menüpunkte zu navigieren.
Drücken Sie den Druckregler TRACK [],
um den gewünschten Menüpunkt aufzurufen
und Einstellungen zu ändern.
Drehen Sie den Druckregler TRACK [],
um die Einstellungen zu ändern und drücken
Sie anschließend den Regler, um zu
bestätigen.
Um die Systemeinstellungen zu verlassen
und Ihre Einstellungen temporär zu speichern,
drücken Sie kurz die Taste TIME.
• Wird im Menümodus für 20 Sekunden keine
Auswahl getroffen, verlassen Sie das Menü
automatisch.
Das Gerät schaltet automatisch in den
Ruhemodus, wenn über den festgelegten
Zeitraum im angehaltenen Status (Pause- oder
Cuemodus) keine Tasten betätigt werden. Das
Display blendet „SLEEP“ ein. Dadurch werden der
Antriebsmotor und die Lasereinheit geschont und
ihre Lebensdauer verlängert. Drücken Sie die
Taste CUE oder [►II], um den Ruhemodus
wieder zu verlassen. Einstellbar sind 5 bis 120
Minuten. Mit der Einstellung [No Sleep] bleibt das
Gerät dauerhaft eingeschaltet.
Line Setup [Anzeigeverhalten
Textzeile]
Hier können Sie das Anzeigeverhalten der
Textzeile
einstellen.
Drei
verschiedene
Anzeigemodi sind wählbar [MODE 1 - 3].
Bit rate [Bitrate ein-/ausblenden]
In der Grundeinstellung [Display ON] erscheint in
der Textzeile als zweite Information des ID3-Tags
die Bitrate des aktuellen Titels. In der Einstellung
[Display OFF] wird die Information nicht
eingeblendet.
Playlist [Kriterium für Datenbanksuche
festlegen]
Wenn Sie eine Datenbank für ein USB-Speichermedium mit dem Programm Database Builder
erstellt haben, können Sie hier das Kriterium zur
Musiksuche in der Datenbank festlegen.
• Normal: In der Grundeinstellung Normal werden
die Titel entsprechend der angelegten Datenbankstruktur angezeigt.
• Title: Bei der Suche nach Titelname werden
Ihnen die Namen aller Titel der Datenbank, die
mit Database Builder indexiert wurden
alphabetisch geordnet angezeigt.
• Artist: Bei der Suche nach Künstler werden
Ihnen alle Künstler alphabetisch geordnet
angezeigt. Sie können die Menge der
gefundenen Daten reduzieren, indem Sie zuerst
den Künstler auswählen und dann in dessen
Titeln suchen.
• Album: Die Albumsuche erlaubt es Ihnen, nach
dem Namen des Albums zu suchen, auf dem
sich der gewünschte Titel befindet. Wenn Sie ein
Album gefunden haben, können Sie durch alle
Titel innerhalb des Albums navigieren.
• Genre: Haben Sie die Suche nach Genres
ausgewählt, bekommen Sie eine alphabetisch
geordnete Liste aller in der Datenbank
gefundenen Genres angezeigt. Wenn Sie ein
Genre aus ausgewählt haben, können Sie durch
alle Titel innerhalb des Genres navigieren.
Version [Versionen anzeigen]
Hier lassen sich Informationen über das Gerät
sich auf dem Display darstellen: [CON:XX]
bezeichnet die Steuerversion, [DSP:XX] die DSPVersion und [SER:XX] die Servoversion.
Load Defaults [Werkseinstellung]
Hier können Sie das Gerät auf die
Werkseinstellungen zurücksetzen. Das Display
zeigt „Load OK“. Alle persönlichen Einstellungen
werden gelöscht und das Gerät stellt auf die
werkseitige Grundeinstellung zurück.
Exit & Save [Menü verlassen und
Einstellungen dauerhaft speichern]
Änderungen von Einstellungen mit dem
Druckregler TRACK [] wirken sich sofort auf
das Gerät aus. Um die Einstellungen dauerhaft
zu erhalten, verlassen Sie das Menü mit [Exit &
Save]. Das Display zeigt „Saving“ und die
Einstellung stehen auch beim nächsten
Einschalten des Geräts zur Verfügung.
25/52
00074823.DOC, Version 1.0
11. DATENBANKGESTÜTZTE MUSIKVERWALTUNG
Für eine schnelle und komfortable Musiksuche, bietet der CMP-2000 in Verbindung mit der PC-Software
Database Builder die Möglichkeit, USB-Speichergeräte mit Titeln im MP3-Format nach bestimmten Kriterien
zu durchsuchen. Das Programm analysiert dazu den Datenträger und legt spezielle Indexdateien basierend
auf den ID3-Tags der Musikdateien an. Dadurch kann eine Musiksammlung blitzschnell nach verschiedenen
Kriterien wie Titel oder Interpret durchsucht werden.
Software aus dem Internet herunterladen und installieren
Das Programm kann kostenlos aus dem Internet heruntergeladen werden unter: http://www.omnitronic.com.
Entpacken Sie das Archiv und kopieren Sie den Inhalt auf Ihre Festplatte. Führen Sie dann die
Installationsdatei [DB_Builder_Pro.exe] aus und folgen Sie den Anweisungen des Installationsprogramms.
26/52
1
Starten Sie den Installationsvorgang mit einem Klick auf
„Next“.
2
Wählen Sie hier den Ordner, in
dem das Programm gespeichert
werden soll und bestätigen Sie mit
„Next“.
00074823.DOC, Version 1.0
27/52
3
Das Programm kann nun installiert
werden. Klicken Sie auf „Install“.
4
Das
Programm
installiert.
5
Um die Installation erfolgreich
abzuschließen, klicken Sie im
letzten Schritt auf „Finish“.
wird
jetzt
00074823.DOC, Version 1.0
Musikdatenbank erstellen
Starten Sie das Programm Database Builder und schließen Sie Ihr USB-Speichergerät an einen USBAnschluss des Computers an.
28/52
1
Wählen Sie im ersten Schritt
Ihr USB-Speichermedium in
der Auswahlliste an und
klicken Sie im zweiten Schritt
auf „BUILD“, um das Erstellen
der Datenbank zu starten.
• Das Speichermedium wird
nun analysiert und das
Programm legt Indexdateien
basierend auf den ID3-Tags
der Musikdateien an.
• Die Geschwindigkeit dieses
Vorgangs hängt von der
Anzahl an gespeicherten
Dateien auf Ihrem Speichermedium ab.
2
Nach erfolgreicher Analyse
können Sie das Programm
schließen. Ihr USB-Speichermedium ist nun erfolgreich
indexiert worden und zur
Verwendung
mit
dem
CMP-2000 bereit.
• Wiederholden
Sie
den
Vorgang immer, sobald Sie
den Inhalt des Speichermediums ändern.
00074823.DOC, Version 1.0
Datenbankgestützte Suche mit dem CMP-2000
Nachdem Sie eine Datenbank für Ihr USB-Speichermedium mit dem Database Builder erstellt haben,
können Sie es in den CMP-2000 laden und ganz einfach und schnell Ihre Musiksammlung durchsuchen.
1
2
3
•
•
4
•
•
Rufen Sie mit der Taste TIME die Systemeinstellungen auf und wählen Sie eine der Suchkriterien im
ersten Menüpunkt „Playlist“ aus. Sie können nach Titelname, Künstler, Album oder Genre suchen.
Verlassen Sie die Systemeinstellungen.
Für eine Datenbanksuche aktivieren Sie zunächst den Ordnersuchmodus mit der Taste FOLDER []
(Kontroll-LED leuchtet).
Wenn Sie bspw. das Suchkriterium Künstler (Artist) in den Systemeinstellungen gewählt haben, werden
Ihnen alle in der Datenbank gefundenen Künstler alphabetisch geordnet angezeigt. Wählen Sie nun
den gewünschten Künstler, indem Sie:
entweder den Druckregler TRACK [] gleichzeitig gedrückt halten und drehen
oder den Druckregler TRACK [] gedrückt halten und das Jogdial drehen.
Drücken Sie die Taste FOLDER [] (Kontroll-LED erlischt), um auf Titelwahl zurückzuschalten. Jetzt
können Sie in den Titeln des Künstlers navigieren, indem Sie:
entweder den Druckregler TRACK [] drehen
oder den Druckregler TRACK [] gedrückt halten und das Jogdial drehen.
12. PROBLEMBEHEBUNG
Sollten bei der Verwendung des Programms Database Builder Probleme auftreten, liegt das häufig an
begrenzten Benutzerrechten. Beim Versuch das Programm auszuführen, erscheint eine Abfrage der
Benutzerkontensteuerung. Geben Sie hier Ihr Administratorkennwort ein und bestätigen Sie mit „Ja“.
13. REINIGUNG UND WARTUNG
LEBENSGEFAHR!
Vor Wartungsarbeiten unbedingt allpolig vom Netz trennen!
Das Gerät sollte regelmäßig von Verunreinigungen wie Staub usw. gereinigt werden. Verwenden Sie zur
Reinigung ein fusselfreies, angefeuchtetes Tuch. Auf keinen Fall Alkohol oder irgendwelche Lösungsmittel
zur Reinigung verwenden! Im Geräteinneren befinden sich keine zu wartenden Teile. Wartungs- und
Servicearbeiten sind ausschließlich dem autorisierten Fachhandel vorbehalten!
Sollten einmal Ersatzteile benötigt werden, verwenden Sie bitte nur Originalersatzteile. Sollten Sie noch
weitere Fragen haben, steht Ihnen Ihr Fachhändler jederzeit gerne zur Verfügung.
29/52
00074823.DOC, Version 1.0
14. TECHNISCHE DATEN
Spannungsversorgung:
Gesamtanschlusswert:
Typ:
Geeignete CDs:
Geeignete Speichermedien:
D/A-Wandler:
Samplingfrequenz:
Frame-Genauigkeit:
Geschwindigkeitsanpassung:
Display:
Klirrfaktor:
Geräuschspannungsabstand:
Frequenzgang:
Audioausgang:
Maße (LxBxH):
Gewicht:
100-240 V AC, 50/60 Hz
16 W
Doppel-CD-/MP3-Player
CD/-R/-RW im CD-DA- und MP3-Format (8 und 12 cm)
USB-Geräte bis 32 GB (FAT32)
8-fach/1 Bit
44,1 kHz
1/75 s
±4 %, ±8 %, ±16 % (MP3-CD), ±100 % (Audio-CD)
ID3-Tags, Titelabspielzeit, Titelrestspielzeit, Gesamtrestspielzeit
0,008 % (CD), 0,007 % (USB)
126 dB (CD), 85 dB (USB)
17-20000 Hz (CD), 17-16000 Hz (USB)
2 x Stereo-Cinch/ 2 V
482 x 267 x 89 mm (Laufwerke),
482 x 91 x 94 mm (Steuerung),
Rackeinbau mit je 2 HE
6,3 kg
Hinweise zu abspielbaren Discs und Dateien
Abspielbare Disc-Typen CD/-R/-RW im CD-DA- und MP3-Format
Disc-Schreibverfahren
Aufnahmeformat
Unterstützte MP3Formate
Dateierweiterungen
Dateisystem
Ordneranzahl
Dateianzahl
Disc-At-Once und Track-At-Once
Multisession
Besteht die erste Session aus CD-DA, werden nur die CDDA-Dateien wiedergegeben. Besteht die erste Session
aus MP3, werden die MP3-Dateien wiedergegeben.
ISO 9660
maximal 63 Zeichen
Joliet
maximal 63 Zeichen
CD-ROMBereichsformat
MPEG-1
nur Modus 1
Audio-Layer-3 (ISO/IEC 1172-3) mit Abtastfrequenzen
von 32, 44,1 und 48 kHz und Bitraten (VBR, VRBI, Xing)
von 32-320 kBit/s
MPEG-2
Audio-Layer-3 (ISO/IEC 13818-3) mit Abtastfrequenzen
von 16, 22,05 und 24 kHz und Bitraten (VBR, VRBI, Xing)
von 32-160 kBit/s
MPEG-2,5
Audio-Layer-3 mit Abtastfrequenzen von 8, 11,025 und
12 kHz und Bitraten (VBR, VRBI, Xing) von 32-160
kBit/s
.mp3, .MP3, .mP3 und .Mp3
FAT 12/16/32
maximal 255 (CD), maximal 999 (USB)
maximal 999; 255 pro Ordner (CD), maximal 999 (USB)
Systemanforderungen Database Builder
Betriebssystem:
Mindestsystemanforderungen:
Windows XP SP3, Vista SP2, 7 und 8
Intel Pentium 4, 1 GHz oder höher
512 MB RAM
100 MB freier Festplattenspeicher
Bitte beachten Sie: Technische Änderungen ohne vorherige Ankündigung und Irrtum vorbehalten.
27.02.2013 ©
30/52
00074823.DOC, Version 1.0
USER MANUAL
CMP-2000
Dual CD/MP3 Player
CAUTION!
Keep this device away from rain and moisture!
Unplug mains lead before opening the housing!
For your own safety, please read this user manual carefully before you initially start-up.
Every person involved with the installation, operation and maintenance of this device has to
- be qualified
- follow the instructions of this manual
- consider this manual to be part of the total product
- keep this manual for the entire service life of the product
- pass this manual on to every further owner or user of the product
- download the latest version of the user manual from the Internet
1. INTRODUCTION
Thank you for having chosen the OMNITRONIC CMP-2000. If you follow the instructions given in this
manual, we are sure that you will enjoy this device for a long period of time.
Unpack your CMP-2000.
2. SAFETY INSTRUCTIONS
CAUTION!
Be careful with your operations. With a dangerous voltage you can suffer a dangerous
electric shock when touching the wires!
31/52
00074823.DOC, Version 1.0
This device has left our premises in absolutely perfect condition. In order to maintain this condition and to
ensure a safe operation, it is absolutely necessary for the user to follow the safety instructions and warning
notes written in this user manual.
Important:
Damages caused by the disregard of this user manual are not subject to warranty. The dealer will
not accept liability for any resulting defects or problems.
If the device has been exposed to drastic temperature fluctuation (e.g. after transportation), do not switch it
on immediately. The arising condensation water might damage your device. Leave the device switched off
until it has reached room temperature.
Please make sure that there are no obvious transport damages. Should you notice any damages on the A/C
connection cable or on the casing, do not take the device into operation and immediately consult your local
dealer.
This device falls under protection-class II and features a protective insulation. The power plug must only be
plugged into a suitable outlet. The voltage and frequency must exactly be the same as stated on the device.
Wrong voltages or power outlets can lead to the destruction of the device and to mortal electrical shock.
Always plug in the power plug least. The power plug must always be inserted without force. Make sure that
the plug is tightly connected with the outlet. Never let the power cord come into contact with other cables!
Handle the power cord and all connections with the mains with particular caution! Never touch them with wet
hands, as this could lead to mortal electrical shock.
Never modify, bend, strain mechanically, put pressure on, pull or heat up the power cord. Never operate next
to sources of heat or cold. Disregard can lead to power cord damages, fire or mortal electrical shock. The
cable insert or the female part in the device must never be strained. There must always be sufficient cable to
the device. Otherwise, the cable may be damaged which may lead to mortal damage. Make sure that the
power cord is never crimped or damaged by sharp edges. Check the device and the power cord from time to
time. If extension cords are used, make sure that the core diameter is sufficient for the required power
consumption of the device. All warnings concerning the power cords are also valid for possible extension
cords.
Always disconnect from the mains, when the device is not in use or before cleaning it. Only handle the power
cord by the plug. Never pull out the plug by tugging the power cord. Otherwise, the cable or plug can be
damaged leading to mortal electrical shock. If the power plug or the power switch is not accessible, the
device must be disconnected via the mains. If the power plug or the device is dusty, the device must be
taken out of operation, disconnected and then be cleaned with a dry cloth. Dust can reduce the insulation
which may lead to mortal electrical shock. More severe dirt in and at the device should only be removed by a
specialist.
There must never enter any liquid into power outlets, extension cords or any holes in the housing of the
device. If you suppose that also a minimal amount of liquid may have entered the device, it must immediately
be disconnected. This is also valid, if the device was exposed to high humidity. Also if the device is still
running, the device must be checked by a specialist if the liquid has reduced any insulation. Reduced
insulation can cause mortal electrical shock.
There must never be any objects entering into the device. This is especially valid for metal parts. If any metal
parts like staples or coarse metal chips enter into the device, the device must be taken out of operation and
disconnected immediately. Malfunction or short-circuits caused by metal parts may cause mortal injuries.
CAUTION: Turn the amplifier on last and off first! Keep away children and amateurs!
CAUTION: High volumes can cause hearing damage!
Please note that damages caused by manual modifications on the device or unauthorized operation by
unqualified persons are not subject to warranty. There are no serviceable parts inside the device.
Maintenance and service operations are only to be carried out by authorized dealers.
32/52
00074823.DOC, Version 1.0
3. OPERATING DETERMINATIONS
The CMP-2000 with two player mechanisms has been specially designed for DJ applications but can
also be used for various other PA applications (e.g. restaurants, fitness studios or retail locations). The unit
features many functions that precisely meet the requirements of DJs, e.g. beat counter, adjustable pitch,
cueing, seamless playback of a continuous loop, single title replay, and convenient search via jogdial.
The CMP-2000 plays audio CDs/-Rs/-RWs (CD-DA) as well as CDs and USB memory devices with titles
in the MP3 format.
The CMP-2000 is provided with two 20-second anti-shock memories which are able to compensate
shocks or vibrations.
For convenient music search on the CMP-2000 the PC program Database Builder is available for
download. This program analyzes USB storage media and creates database files in order for the
CMP-2000 to search for criteria such as title or artist.
This product is allowed to be operated with an alternating current of 100-240 V AC, 50/60 Hz and was
designed for indoor use only.
Do not shake the device. Avoid brute force when installing or operating the device.
When choosing the installation spot, please make sure that the device is not exposed to extreme heat,
moisture or dust. There should not be any cables lying around. You endanger your own and the safety of
others!
The ambient temperature must always be between 5° C and +35° C.
The relative humidity must not exceed 65 % with an ambient temperature of 23° C.
This device must only be operated in an altitude between -20 and 2000 m over NN.
Operate the device only after having familiarized with its functions. Do not permit operation by persons not
qualified for operating the device. Most damages are the result of unprofessional operation!
Never use solvents or aggressive detergents in order to clean the device! Rather use a soft and damp cloth.
Please use the original packaging if the device is to be transported.
Never remove the serial barcode from the device as this would make the guarantee void.
If this device will be operated in any way different to the one described in this manual, the product may suffer
damages and the guarantee becomes void. Furthermore, any other operation may lead to dangers like shortcircuit, burns, electric shock, etc.
33/52
00074823.DOC, Version 1.0
4. DESCRIPTION
Features
Dual CD and MP3 player for DJs
• Audio CD/CD-R/CD-RW/MP3 CD
• 2 USB ports for storage media and portable players (FAT 32)
• Easy Source Select: route USB sources to both drives as desired
• Combined Device Access: both drives can access the same USB medium simultaneously
• Access music files more easily and quickly via smart music database management with free PC software
Database Builder
• Sort USB devices lightning-fast by title, artist, album and genre
• System menu for user-defined settings
• 2 x 20 seconds anti-shock protection
• Outstanding reading time of the files (instant start within 10 ms)
• Automatic beat counter (switchable to manual operation)
• Master tempo (tonal pitch remains constant when speed is changed)
• 2 alphanumeric LCDs with ID3 tag indication
• Touch-sensitive jog dials with mode selector: scratch or pitch bend
• Pitch adjustment ±4 %, ±8 %, ±16 %, ± 100 % (MP3 CD ±16 %)
• Fader start
• Relay function
• Folder navigation
• Pitch bend buttons
• Cue/auto cue function
• Seamless loop/reloop
• Single or continuous play
• Indication of elapsed time, remain time (MP3 files) or total remain time (audio CD)
• Bargraph display
• Pitch adjustment is displayed in %
• Extra large play/pause and cue buttons with color illumination
• Drives are locked in play mode
• Rack installation
• The Database Builder software is available under www.omnitronic.com
34/52
00074823.DOC, Version 1.0
Control unit
1 Control panel player 1
2 Control panel player 2
3 Button [ ]
Opens and closes the CD tray. While playing a CD,
the CD tray is locked against unintentional opening.
4 Button SOURCE SELECT
In pause mode, short actuation of the button allows
switching between the data carriers CD, USB 1 and
USB 2. Both drives can access the same USB
medium simultaneously. The LEDs will verify which
source is selected.
5 LCD
Indicates all functions of the unit and information of
the data carriers. The display icons will be
explained in section DISPLAY.
6 Button SGL/CTN
For selecting the operating mode and the function
Auto Cue:
• Basic setting continuous mode: continuous play of
all titles of the data carrier.
• Short actuation activates single title play
(indication SINGLE): after playing a title, the unit is
set to pause at the start of the next title.
• Long actuation: activates/deactivates the function
Auto Cue; with the function activated, AUTO CUE
is indicated.
8 Jog dial
• Operating mode Pitch Bend: in play mode for the
function Pitch Bend and in pause mode for
precisely selecting a certain spot.
• Operating mode Scratch: to create scratch effects
• For searching for music in the database of a USB
storage device.
• For editing the starting and end point of a
seamless loop.
9 Button JOG MODE with LEDs
Determines the operating mode of the jog dial. The
LEDs next to the button indicate which mode is
selected.
• Pitch Bend: in play mode for the function Pitch
Bend and in pause mode for precisely selecting a
certain spot.
• Scratch: to create scratch effects.
10 Button CUE
• When pressing the button in pause mode and
during playback the unit stops and returns to the
starting point of the title (cue point) and is in pause
mode (LED lights red).
• When keeping the button pressed in pause mode,
the title is momentarily played. As soon as you
release the button the unit instantly returns to the
cue point.
• Every time a new cue point is set, the LED flashes
repeatedly.
• Short repeated actuation creates stutter effects.
11 Button [►II]
7 Button TIME
Switches between play and pause. During playback
For switching over the time indication and calling
the yellow LED lights, in pause mode it flashes.
the system settings:
• Basic setting: remaining title time (REMAIN).
• First short actuation: elapsed title time (ELAPSED).
• Second short actuation: total remaining time
(TOTAL REMAIN), not in MP3 mode.
• Long actuation: for calling the system settings.
35/52
00074823.DOC, Version 1.0
12 Button FOLDER with indicator []
• For switching over between title and folder
selection mode with the press control TRACK
[]. In folder mode, the red control LED lights.
• Long actuation: activates/deactivates the repeat
function. With the function activated, all titles in
the folder selected will be continuously repeated.
The display indicates “REPEAT”.
13 Press control TRACK []
• Turn the control to browse the titles. Title number
and title name (MP3 files only) are indicated in the
display. If you keep the control pressed while
turning it at the same time, you can jump 10 titles
forward or backward.
• To browse folders, first press the button FOLDER
[] to activate the folder selection mode. Then
turn the control to browse the folders. If you keep
the control pressed while turning it at the same
time, you can jump 10 folders forward or
backward. The folder number and name are
indicated in the display.
• Short repeated actuation of the control allows
indicating the individual ID3 tag information of the
title: Title, Artist, Album, Genre, File Name. The bit
rate will always be displayed additionally.
14 Button TAP BPM
• If the automatic beat counter is not able to
determine the number of beats per minute (BPM)
of the current title, this button allows you to
manually set the BPM. For this, tap the button
several times to the beat of the music until the
determined BPM are indicated.
• Alternatively, you can directly enter the BPM value
with the press control TRACK []. For this,
keep the button TAP BPM pressed and turn the
press control TRACK [] to adjust the BPM
value. To adjust the decimal value, additionally
hold down the press control TRACK [].
• Long
actuation:
activates/deactivates
the
automatic beat counter; with the function
activated, “AUTO BPM” is indicated.
17 Buttons IN, OUT, RELOOP
Buttons to memorize and play a seamless loop.
• IN: Sets the starting point of a loop (LED lights
red) and defines a cue point without interrupting
the music ("on the fly").
• OUT: Defines the end point of a continuous loop
which is instantly started (LEDs IN and OUT will
be flashing). The loop will continue to play until the
button OUT is pressed once again.
• RELOOP: Starts the loop once again (LEDs IN
and OUT will be flashing) and creates stutter
effects by short repeated actuation. Press the
button OUT to exit the loop.
18 Buttons [] and [] SEARCH
• []: fast forward
• []: fast reverse
19 Button [ ] KEY LOCK
Short actuation activates/deactivates the master
tempo function. With the function activated, the
and the tonal pitch of the title
display indicates
remains constant when the speed is changed with
the pitch slide control.
20 Button % [PITCH ON] with indicator
• Long actuation: Activates/deactivates the pitch
slide control. With the control activated, the red
control LED lights.
• Short actuation: Selects the pitch adjustment
range: 4 %, 8 %, 16 %, and 100 % for audio CDs;
up to 16 % for MP3 CDs.
21 Pitch control
This slide control sets the playback speed (without
changing the pitch when the button [ ] MASTER
TEMPO is pressed), when the function has been
activated with the button % [PITCH ON]. Slide it up
to decrease the pitch, slide it down to increase the
pitch. The pitch percentage is indicated in the
display.
15 Buttons PITCH BEND [+] and [–]
During playback, the function Pitch Bend creates a
temporary change of speed depending on the pitch
adjustment range selected (up to 100 % for audio
CDs; up to 16 % for MP3 files. As long as the
button [–] is actuated, the title is played slower. As
long as the button [+] is actuated, the title is played
faster. As soon as you release the buttons, the
BPM will automatically return to normal.
16 Button [◄►] RELAY with indicator
For automatic start of the other player mechanism
at the end of a title (in single mode) or at the end of
the last title on the data carrier (in continuous
mode). With the function activated, the red control
LED lights.
36/52
00074823.DOC, Version 1.0
22 Jack CONTROL START 2
3.5 mm mono jack for remote control of the function
Start/Cue of player mechanism 2 from a mixer
(fader start function).
24 Connection player mechanism unit
Jack for connecting the player mechanism unit via
the supplied mini DIN connection cable.
23 Jack CONTROL START 1
3.5 mm mono jack for remote control of the function
Start/Cue of player mechanism 1 from a mixer
(fader start function).
37/52
00074823.DOC, Version 1.0
a CUE
Lights in cue mode and flashes every time a new
cue point is set.
j AUTO BPM
The automatic beat counter is activated.
k Beats per minute (BPM) of the current title
b Play/pause mode
l Change of speed in %
c Number of the selected folder
m KEY
Lights up when the touch-sensitive jogdial is
actuated.
d Number of the selected title
e SINGLE
Operating mode single title play.
n [ ] Master tempo
The Master Tempo function is active.
f REPEAT
The repeat function is active.
g Bargraph
Visual indication of the elapsed and remaining time.
The bargraph will begin to flash 30 seconds before
a title is ending.
h Time indication
ELAPSED, REMAIN or TOTAL REMAIN time
indicated in minutes (M), seconds (S) and frames
(F).
o LOOP
Indicates that a loop has been stored and is ready
to be engaged.
p RELOOP
Flashes to indicate that a loop is played.
q AUTO CUE
The Auto Cue function is activated.
i Text line
• Scrolling text information for the current title for
MP3 files: folder name or file name (basic setting).
The press control TRACK [] allows indicating
the other data of the ID3 tag.
• For indicating functions like the system settings.
38/52
00074823.DOC, Version 1.0
Player mechanism unit
25 Button [ ]
Opens and closes the CD tray. While playing a CD,
the CD tray is locked against unintentional opening.
27 CD tray
For entering audio CDs and CDs with titles in the
MP3 format.
26 USB port 1
Front USB port (type A) for connecting a USB
storage device.
28 Power switch with indicator
Press this button to turn the unit on and off. When
powered on, the indicator lights up.
29 USB port 2
Rear USB port (type A) for connecting a USB
storage device.
32 Connection control unit
Jack for connecting the control unit via the supplied
mini DIN connection cable.
30 Power input
Plug in the supplied power cable here.
33 Line output player 1
Audio output (RCA left/right) with line level of player
1 for connecting an amplifier, a mixer or other units
with line level inputs.
31 Line output player 2
Audio output (RCA left/right) with line level of player
2 for connecting an amplifier, a mixer or other units
with line level inputs.
39/52
00074823.DOC, Version 1.0
5. SET UP
Installation
Install the control unit and the player mechanism unit on a plane surface or in your rack. For 19" (483 mm)
rack installation, 2 units are required each. You can fix each unit with four screws M6 in the rack. The player
mechanism unit must be operated in a horizontal position. The control unit may be installed in a tilted
position for better handling. When choosing the installation spot make sure that there is enough space
around the units for ventilation or that heated air from the rack can be passed on to improve heat radiation.
Steady overheating will damage the units.
Connections
Prior to connecting or changing existing connections switch off the CMP-2000.
1
Connect the control unit and the player mechanism unit with the supplied mini DIN connection cable.
For this purpose, connect the jack [CONNECT TO REMOTE CONTROL] of the player mechanism unit
to the jack [CONNECT TO MAIN UNIT] of the control unit.
2
Connect subsequent units with line level inputs (e.g. amplifier or mixer) via the supplied RCA cables to
the RCA outputs on the player mechanism unit. Make sure that the right/left occupation is the same at
the devices.
3
The player mechanisms of the CMP-2000 can be started or set to pause via an external mixer with
fader start function. Use the supplied mini jack cables to connect the outputs [CONTROL START UNIT
1] and [CONTROL START UNIT 2] to the corresponding input on the mixer.
Please note that the fader start function only works with compatible mixers (e.g. MX-540 and EX-820).
Mode of operation: The mixer has to be connected via a 3.5 mm jack with the CMP-2000. For starting the
playback, the jack's positive pin (tip) is to be connected with the audio mass via a short impulse. For pausing
the playback, the jack's negative pin (sleeve) is to be connected with the audio mass via a short impulse. The
mixer has to be equipped with a switch, button or fader that will connect the tip with the audio mass of the
CMP-2000 for starting the playback and the sleeve for pausing the playback when the respective channel
is activated.
4
Use the supplied power cable to connect the CMP-2000 to the mains (100-240 V AC, 50/60 Hz).
40/52
00074823.DOC, Version 1.0
6. OPERATION
Regarding USB devices
The operation of the two players is identical.
• This unit supports USB devices and memory
cards with the file system FAT32 and with a
capacity up to 32 GB.
• This unit supports MSC (Mass Storage Class)
USB storage devices 1.0, 1.1, 2.0 including
external portable flash memory devices and
digital audio players. However, hard discs,
optical discs such as external CD/DVD drives
will not be recognized. Depending on the
device used, proper playback may not be
possible with all USB devices.
• If a data carrier is not recognized at the first
try, remove it and insert it again.
Switching on/off
1
Switch on the CMP-2000 with the
POWER button. The red power indicator
lights.
• After a short initialization process (indication
“Welcome”) the unit will automatically detect
if a CD is inserted (indication "Reading... “).
• If a CD is inserted, the display will shortly
indicate the total number of titles and the
total remain time followed by information
concerning the first title after the read-in.
• If no CD is inserted "No Disc" will be
displayed.
2
Prior to switching the unit off, always
terminate the playback with the button [►II].
Selecting titles and folders
With the press control TRACK [], you can
select titles and folders.
Inserting a CD
1
To insert a CD, open the CD tray with the
button [ ].
• The display will show "Open".
2
Insert the CD with the lettering facing
upwards and close the CD tray again with
the button [ ].
• The display will show "Close".
Loading and removing USB devices
1
•
2
•
•
•
•
•
For the use of USB devices, USB port 1 is
provided at the front and USB port 2 at the
rear panel. Insert USB devices here. To
remove a USB device, disconnect it from the
USB port.
Prior to removing a USB device, set the unit
to pause. Otherwise damage or loss of data
may occur.
To switch from the CD to a USB device,
press the selector switch SOURCE SELECT.
The unit must be in pause mode.
The LEDs will verify which source is active.
Both drives can access the same USB
medium simultaneously and play titles in
parallel.
First, the display shows “Connecting” and
after the read-in (indication "Reading…")
information concerning the first title will
follow.
If no device is inserted, "Please insert
memory device" will be displayed.
41/52
1
For browsing the titles, turn the press control
TRACK [].
• Title number and title name (MP3 files only)
are indicated in the display.
• If you keep the control pressed while turning
it at the same time, you can jump 10 titles
forward or backward.
2
For browsing the folders, first press the
button FOLDER [] to activate the folder
selection mode. The control LED above the
button lights up. Then turn the press control
TRACK [] to browse the folders.
• The folder number and name are indicated in
the display.
• If you keep the control pressed while turning
it at the same time, you can jump 10 folders
forward or backward.
• To switch back to the title selection mode
press the button FOLDER [] again. The
control LED extinguishes.
00074823.DOC, Version 1.0
Starting playback/pause
1
Press the button [►II], to start playback.
• The display indicates ►.
• During playback, the yellow LED lights.
• The starting point of the title will
automatically be stored in the memory as the
cue point. The unit will return to this cue
point by shortly pressing the button CUE.
2
Playback can be interrupted at any time with
the button [►II].
• The display indicates II and the yellow LED
starts flashing.
• To continue, press the button [►II] once
again.
• Pressing the button CUE during playback
also interrupts the playing and returns the
title to the cue point.
Fast forward and reverse
The buttons [] and [] SEARCH are used for
fast forward and reverse. For fast forward, keep
the button [] pressed, for fast reverse keep the
button [] pressed.
• The longer you keep the buttons pressed the
faster is the search speed.
Precise selection of a spot
The jogdial can be used for precisely selecting a
spot to one frame (1/75 second). For this, select
the operating mode Pitch Bend with the button
JOG MODE and set the unit to pause with the
button [►II]. Then use the jogdial to go to the
precise spot.
• After turning, the current spot is constantly
repeated until playback is started with the button
[►II].
42/52
00074823.DOC, Version 1.0
7. BASIC SETTINGS
After switching on, several basic settings will be
active. These settings can be changed.
Indicating ID3 tags
1
As a basic setting, the display will show
scrolling text information for the current title:
folder name or title name and bit rate.
Selecting the operating mode
2
Short repeated actuation of the press control
TRACK [] allows switching over the text
line to one of the following information of the
ID3 tag: Title Artist Album Genre
and back to File Name.
After switching on, continuous play is always
activated. All titles are played one after the other.
Press the button SGL/CTN to switch to single title
play. After playing a title, the unit is set to pause at
the start of the next title and indicates “SINGLE”.
Detecting the BPM
Auto cue point
As a basic setting, the automatic beat counter is
always activated. After the read-in, the display
indicates the determined number of beats per
minute (BPM) and inserts “AUTO BPM”.
As a basic setting, the function Auto Cue is
always activated. The display indicates “AUTO
CUE”.
1
The function allows minimizing the
changeover between titles. After reading in a
data carrier or after selecting a title, the unit
is precisely on the spot where the music
starts and not at time index 0:00:00. This
spot will be automatically stored.
• Long actuation of the button SGL/CTN
deactivates the function Auto Cue.
• The indication “AUTO CUE” extinguishes. A
time slice will now remain between the titles
until playback starts.
Switching over the time indication
As a basic setting, the display will show the
remaining time of the current title (indication
“REMAIN”) numerically in minutes, seconds and
frames (1 frame = 1/75 second).
1
With the button TIME the time indication can
be switched over:
• first actuation of the button: elapsed title time
(indication "ELAPSED")
• second actuation of the button: total
remaining
time
(indication
"TOTAL
REMAIN"), only with audio CDs
• third actuation of the button: basic setting
(indication “REMAIN”)
2
In addition to numerical time indication, the
playing time is indicated graphically by the
length of the bargraph.
• When set to ELAPSED, the number of
segments of the bargraph will be increased
with increased playing time.
• When set to TOTAL REMAIN and REMAIN,
the number of segments of the bargraph will
be reduced with increased playing time.
• The bargraph will begin to flash 30 seconds
before a title is ending.
43/52
1
If the automatic beat counter is not able to
determine the BPM of the current title (e.g. in
case of calm music titles), you can manually
set the BPM. For this, tap the button TAP
BPM several times to the beat of the music
until the determined BPM are indicated.
2
Alternatively, you can directly enter the BPM
value with the press control TRACK [].
For this, keep the button TAP BPM pressed
and turn the press control TRACK [] to
adjust the BPM value. Afterwards, hold down
and turn the press control TRACK [] to
adjust the decimal value.
3
By setting the BPM manually, the automatic
beat counter is deactivated and the insertion
“AUTO BPM” extinguishes. Long activation
of the button TAP BPM reactivates the
automatic beat counter.
00074823.DOC, Version 1.0
8. ADVANCECED FUNCTIONS
Matching the beat between two titles
(Pitch Bend)
With the function pitch bend, the beat of a title on
player 1 can be matched (synchronized) to the
beat of a title on player 2 or vice versa. Thus the
rhythm will not be interrupted while crossfading
from one title to another. Unlike the adjustment
with the pitch slide control this function will
temporarily increase or decrease a title's speed
during replay.
Pitch adjustment
The playback speed can be adjusted variably up
to ±100 % with the pitch slide control (in MP3
mode up to ±16 %).
1
First select the adjusting range with the
button % [PITCH ON]. Each actuation of the
buttons switches the unit between 4 %, 8 %,
16 %, and 100 %.
• The corresponding LED lights up.
• When 100 % is selected, all LEDs light up.
2
Long actuation of the button % [PITCH ON]
activates the pitch slide control and the
control LED above the button lights up (basic
setting).
3
Then slide up the pitch control to decrease
the pitch and slide it down to increase the
pitch.
• The display shows the percentage deviation
from the standard speed.
• The control locks into place in mid-position.
In this position a title is played at standard
speed.
4
Tip: Decreasing the playback speed to a
maximum of -100 % causes a standstill of
the title. This effect corresponds to the
stopping of an analog turntable.
Activating Master Tempo
With the change of speed, the tonal pitch is also
changed proportionally. However, with the Master
Tempo function activated, the tonal pitch will
remain constant. To activate the Master Tempo
press the button [ ] KEY LOCK.
• The control LED above the button lights up and
the display indicates .
44/52
1
First use the pitch slide control to adjust the
same number of beats (BPM) for both music
pieces.
2
Select the operating mode Pitch Bend for the
jogdial with the button JOG MODE. Then
synchronize the beats of the two music
pieces by turning the jogdial.
• The change of speed depends on the turning
speed of the jogdial: Rotating the wheel in a
clockwise direction will increase your title
speed and rotating the wheel in a
counterclockwise direction will decrease your
title speed.
• As soon as you stop turning the wheel the
BPM will automatically return to normal.
3
Tip: If the wheel is continuously turned in a
counterclockwise direction, the playback
speed will decrease to a maximum of -100
%, i.e. the standstill of the title. This effect
corresponds to the stopping of an analog
turntable.
4
Alternatively to the jogdial you can also use
the buttons PITCH BEND for matching the
beat. As long as the button [+] or [–] is kept
pressed, the title is played faster or slower.
• The deviation from the standard speed
depends on the pitch adjustment range
selected (up to 100 % for audio CDs; up to
16 % for MP3 files).
• As soon as you release the buttons PITCH
BEND the BPM will automatically return to
normal.
00074823.DOC, Version 1.0
Return to the starting point of the title
or to a defined spot (cueing)
Playing a continuous loop
A section unlimited in time can be repeated as a
seamless continuous loop as many times as
desired. This loop can be overwritten at any time
and is deleted when selecting another title,
changing the data carrier or switching the unit off
and on again.
To quickly jump back to the starting point of the
title or to a defined spot, a starting point (cue
point) can be stored temporarily for the button
CUE. The cue point will be overwritten with the
starting point of the next title when the next title is
reached or when the next title is selected.
1
•
•
•
•
2
1 • Setting the starting point "on the fly": In
To jump to the starting point of a title, press
the button CUE in pause or play mode.
The unit stops and returns to the starting
point of the title (cue point) and is in cue
mode.
The button lights red.
After jumping to the cue point, playback can
be started with the button [►II].
Alternatively, you can keep the button CUE
pressed and momentarily play the title. The
display shows II. As soon as you release the
button the unit instantly returns to the cue
point and is in pause mode.
play mode, shortly actuate the button IN
(LED lights red) when the desired starting
point of the loop is reached.
• Playback is not interrupted.
• The button lights red.
To set the cue point during playback at a
different spot of the title, you can use the
button IN to set it “on the fly” or the jogdial to
set it exactly to one frame (1/75 second).
2 • Setting the end point "on the fly": In play
• Setting the starting point precisely to 1
frame (1/75 second): Select the operating
mode Pitch Bend with the button JOG MODE
and set the unit to pause. Then use the
jogdial to go to the precise spot. After
turning, the current spot is constantly
repeated. Shortly actuate the button IN to set
the starting point.
mode, shortly actuate the button OUT (LED
lights red) when the desired end point of the
loop is reached.
• The section between the starting point and
the end point of the loop is continuously
repeated.
• The LEDs of the buttons IN and OUT will be
flashing.
• The
display
indicates
“LOOP”
and
“RELOOP”.
• Setting a cue point "on the fly": Press the
button IN when the desired spot is reached.
• Playback is not interrupted.
• The button flashes repeatedly.
• Setting a cue point precisely: Select the
operating mode Pitch Bend with the button
JOG MODE and set the unit to pause. Then
use the jogdial to go to the precise spot.
After turning, the current spot is constantly
repeated. As soon as playback is started
with the button [►II] a new cue point is
memorized (the button CUE flashes
repeatedly).
• Setting the end point precisely to 1 frame
(1/75 second): Set the unit to pause. Then
use the jogdial to go to the precise spot.
After turning, the current spot is constantly
repeated. Shortly actuate the button OUT to
set the end point. Then actuate the button
RELOOP to start playing the loop.
45/52
3
To exit the loop and to continue the title,
press the button OUT.
• The LEDs of the buttons IN and OUT will
stop flashing but will remain on to indicate
that a loop has been memorized and is ready
to be engaged.
• By selecting another title it is also possible to
exit the loop.
4
To restart the loop, press the button
RELOOP.
• The buttons IN and OUT will be flashing
again.
00074823.DOC, Version 1.0
3
Editing starting and end point of a
loop
To deactivate the function and continue
normal play, press the button [◄►] RELAY
again (control LED extinguishes).
To perfect a seamless loop, you can edit the
starting and end point.
1
Start playing the loop and keep the button
RELOOP pressed until the display indicates
the time index of the end point.
2
Now determine the new end point with the
jogdial.
3
Shortly press the button OUT to finish editing
or shortly press the button RELOOP to edit
the starting point as well.
• The display inserts “IN EDIT“.
4
Determine the new starting point with the
jogdial; then press the button IN to finish
editing and exit the loop.
9. EFFECT FUNCTIONS
Scratch mode
Select the Scratch operating mode with the button
JOG MODE to switch on the scratch function for
the jogdial. Now turn the jogdial back and forth to
create scratch effects.
Brake effect
If the jogdial is continuously turned in a
counterclockwise direction in Pitch Bend mode,
the playback speed will decrease to a maximum
of -100 %, i.e. the standstill of the title. You can
also use the pitch control to decrease the
playback speed to a maximum of -100 % (audio
CD only). This effect corresponds to the stopping
of an analog turntable.
Selecting the repeat function
Long actuation of the button FOLDER []
activates the repeat function. Then all titles in the
folder selected will be continuously repeated.
• The display indicates “REPEAT”.
• Renewed long actuation of the button
deactivates the repeat function and continues
normal play.
Creating stutter effects
The starting point of a continuous loop and the
cue point can also be used for creating stutter
effects. For this purpose, shortly press the button
RELOOP several times.
Using the fader start function
When the CMP-2000 is connected to a mixer
with contact control via the supplied control
cables, the function start/cue can be operated
remotely with the mixer. By advancing the mixer's
fader the respective player mechanism is set to
play mode. By closing the mixer's fader the player
mechanism returns to the last set cue point and
changes into pause mode.
Relay mode (automatic start of the
other player mechanism)
At the end of a title (in single title mode) or at the
end of the last title of the data carrier (in
continuous mode) the other player mechanism
can be started automatically.
1
Load a data carrier in each player and select
the operating mode.
2
Press the button [◄►] RELAY to activate
the relay mode (red control LED lights) and
start playback on the first player. At the end
of the title or data carrier (depending on the
operating mode selected) playback on the
other player will begin automatically and the
first player will enter cue standby mode.
46/52
00074823.DOC, Version 1.0
10. SYSTEM SETTINGS
Sensitivity [Jogdial sensitivity]
This menu allows you to change important system
settings for the player.
Here you can adjust the sensitivity of the touchsensitive jogdial within a range of ±20.
Calling the system settings
1
Keep the button TIME pressed for 3 seconds
to call the system settings.
• The display indicates the first menu item
“Playlist“.
2
Turn the press control TRACK [] to
browse the menu items.
3
Press the control to select the desired menu
item and change adjustments.
4
Turn the press control TRACK [] to
change adjustments and then press the
control to confirm.
5
To exit the system settings and save your
settings temporarily, shortly press the button
TIME.
• If no adjustment is made with the press
control TRACK [] for 20 seconds while in
menu mode, the setting procedure will be
cancelled and you will exit the menu
automatically.
Sleep Time [Sleep mode]
The player automatically will automatically step
into sleep mode if no button is actuated in pause
or cue mode for a defined period of time. The
display inserts “SLEEP“. This extends the life of
your motor drive and laser. Press the button CUE
or [►II], to exit sleep mode. You can select 5 to
120 minutes. In the basic setting [No Sleep] the
player is always switched on.
Line Setup [Display mode text line]
Here you can select the display mode of the text
line. There are three different display modes
selectable: [MODE 1 - 3].
Bit rate [Show/hide bit rate]
In the basic setting [Display ON], the bit rate of the
title selected is shown in the text line as second
information of the ID3 tag. If the setting [Display
OFF] is selected, the bit rate is not shown.
Playlist [Selecting a criterion for
database search]
Here you can select the criterion when searching
for music in the database of a USB storage
device: [Normal, Title, Artist, Album, Genre].
Version [View information]
• Normal: In the basic setting Normal the titles are
indicated according to the established data
structure.
Here you can view information in the display
about the product: [CON:XX] is for control version,
[DSP:XX] is for DSP version and [SER:XX] is for
servo version.
• Title: When you search by title name, all titles in
the database created with the Database Builder
will be displayed in alphabetical order.
Load Defaults [Reset settings]
• Artist: When you search by artist name, all
artists will be displayed in alphabetical order.
You can narrow down the amount of results by
first selecting the artist you wish to browse, and
then you can select the title you want to play.
Here you can reset the player to factory settings.
The display shows “Load OK”. All personal
settings will be deleted and the unit returns to
factory settings.
• Album: Using the search by Album option will
allow you to search by the name of the album
that a title is from. Once you select an album, all
of the titles found under that album will be
displayed.
Exit & Save [Exit and save settings
permanently]
Modifications of settings with the press control
TRACK [] affect the player immediately. To
keep the adjustments permanently, exit the menu
with [Exit & Save]. The display shows „Saving“
and the settings are kept even after disconnecting
the unit from the mains.
• Genre: When search by Genre is chosen, you
will be presented with a list of all of the genres
found in the database. Because not every MP3
file has ID3 genre tagging, some titles may not
be displayed in this search. Once you select a
genre from the list, you will be able to browse all
songs within that genre.
47/52
00074823.DOC, Version 1.0
11. MUSIC DATABASE MANAGEMENT
For a quick and convenient music search, the CMP-2000–together with the PC software Database
Builder–is able to search USB storage media with titles in the MP3 format for certain criteria. The software
analyzes data carriers and creates special database files based on the ID3 tags of the music files allowing
you to search a music library lightning-fast and by certain criteria such as artist and title name.
Downloading the software from the internet and installing it
The program can be downloaded from the internet free of charge under: http://www.omnitronic.com. Extract
the archive and copy the contents to your hard disk. Then start the installation file [DB_Builder_Pro.exe]
and follow the instructions of the installation program.
48/52
1
Start the installation and click
“Next“.
2
Select the path where you would
like to store the program and
confirm with “Next“.
00074823.DOC, Version 1.0
49/52
3
Now the program can be installed.
Click “Install“.
4
Now the
installed.
5
In order to complete the
installation click ”Finish“ in the last
step.
program
is
being
00074823.DOC, Version 1.0
Creating a music database
Start the Database Builder software and connect your USB storage device to an available USB port on your
computer.
50/52
1
First select your USB device
from the drop-down menu.
Then click ”BUILD“ to start
creating the database.
• The USB device will now be
analyzed and the program will
create database files based
on the ID3 tags of the music
files.
• The speed of this procedure
directly relates to how many
songs are stored on the USB
device.
2
After a successful analysis
you can close the program.
Your USB device has now
been successfully analyzed
and is ready for use with the
CMP-2000.
• Always repeat the procedure
whenever you change the
contents of your USB device.
00074823.DOC, Version 1.0
Database search on the CMP-2000
After having created a database on your USB device with the Database Builder, you can connect the data
carrier to the CMP-2000 and search through your music library quickly and efficiently.
1
Call the system settings with the button TIME and select one of the search criteria from the first menu
item “Playlist“. You can search by title name, artist, album or genre. Exit the system settings.
2
In order to search the USB device’s database, first activate the folder selection mode with the button
FOLDER [] (control LED lights).
3
If you have selected the search criterion Artist in the system settings for example, now all artists found
in the database will be displayed in alphabetical order. Now select the desired artist by:
• either keeping the press control TRACK [] pressed while turning it at the same time
• or keeping the press control TRACK [] pressed and turning the jogdial.
4
Press the button FOLDER [] (control LED extinguishes) to switch back to title selection mode. Now
you can browse the artist’s titles by:
• either turning the press control TRACK []
• or keeping the press control TRACK [] pressed and turning the jogdial.
12. TROUBLESHOOTING
If the use of the software causes problems, a user account control (UAC) limitation may likely be the cause.
When trying to run the program, a UAC query pops up. Enter your admin password and confirm with “Yes”.
13. CLEANING AND MAINTENANCE
DANGER TO LIFE!
Disconnect from mains before starting maintenance operation!
We recommend a frequent cleaning of the device. Please use a soft lint-free and moistened cloth. Never use
alcohol or solvents!
There are no serviceable parts inside the device. Maintenance and service operations are only to be carried
out by authorized dealers.
Should you need any spare parts, please use genuine parts. Should you have further questions, please
contact your dealer.
51/52
00074823.DOC, Version 1.0
14. TECHNICAL SPECIFICATIONS
Power supply:
Power consumption:
Type:
Available disc:
D/A converter:
Sampler frequency:
Frame accuracy:
Pitch adjustment:
Display:
Distortion:
S/N ratio:
Frequency range:
Audio output:
Dimensions (LxWxH):
Weight:
100-240 V AC, 50/60 Hz
16 W
dual CD/MP3 player
CD/-R/-RW in CD-DA and MP3 format (8 and 12 cm)
8-fold/1 bit
44.1 kHz
1/75 sec
±4 %, ±8 %, ±16 % (MP3 CD), ±100 % (audio CD)
ID3 tags, elapsed time, remain time, total remain time
0.008 % (CD), 0.007 % (USB)
126 dB (CD), 85 dB (USB)
17-20000 Hz (CD), 17-16000 Hz (USB)
2 x stereo RCA/ 2 V
482 x 267 x 89 mm (player units), 482 x 91 x 94 mm (control unit),
Rack installation with 2 U each
6.3 kg
Regarding playable discs and files
Playable disc types
Disc writing method
CD/-R/-RW in CD-DA and MP3 format
Disc-At-Once and Track-At-Once
Multisession If the first session is CD-DA, only CD-DA tracks can be played.
If the first session is MP3, only MP3 files can be played.
Recording format
ISO9660
Joliet
max. 63 characters
max. 63 characters
CD-ROM
mode 1 only
sector format
Supported MP3
formats
supports Audio Layer-3 (ISO/IEC 1172-3) sampling frequencies
32, 44.1, and 48 kHz, with bit rates (VBR, VRBI, Xing) of 32 to
320 Kbps.
MPEG-2
supports Audio Layer-3 (ISO/IEC 13818-3) sampling frequencies
16, 22.05, and 24 kHz, with bit rates (VBR, VRBI, Xing) of 32 to
160 Kbps.
MPEG-2.5 supports Audio Layer-3 sampling frequencies 8, 11.025, and 12
kHz, with bit rates (VBR, VRBI, Xing) of 32 to 160 Kbps.
File extensions
File systems
.mp3, .MP3, .mP3, and .Mp3
Number of folders
Number of files
MPEG-1
FAT 12/16/32
max. 255 (CD), max. 999 (USB)
max. 999; 255 per folder (CD), max. 999 (USB)
System requirements Database Builder
Operating system:
Minimum hardware requirements:
Windows XP SP3, Vista SP2, 7 and 8
Intel Pentium 4, 1 GHz or better
512 MB RAM
100 MB free disk space
Please note: Every information is subject to change without prior notice. 27.02.2013 ©
52/52
00074823.DOC, Version 1.0