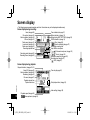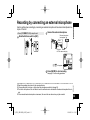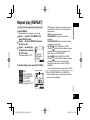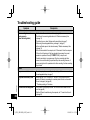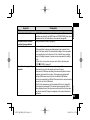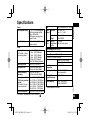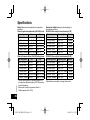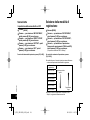
1
Operating Instructions
Bedienungsanleitung
Istruzioni per l’uso
Mode d’emploi
Instrucciones de funcionamiento
Manual de Instruções
ENGLISH
IC Recorder
Digitales Diktiergerät
Registratore IC
Magnétophone à puce
Grabadora IC
Gravador de IC
ESPAÑOL
Model No.
E
VQT4J81_RR-XS450_420-E_En.indd 1
DEUTSCH
ITALIANO
FRANÇAIS
PORTUGUÊS
RR-XS450
RR-XS420
VQT4J81
M0512KZ0
2012/05/29 9:35:40
Dear customer
Thank you for purchasing this product.
For optimum performance and safety, please read these
instructions carefully.
Before connecting, operating or adjusting this product,
please read the instructions completely. Please keep this
manual for future reference.
Supplied accessories
Please check and identify the supplied
accessories.
Use numbers indicated in parentheses
when asking for replacement parts.
(Product numbers correct as of May
2012. These may be subject to change.)
VQT4J81
1 AAA rechargeable Ni-MH battery [HHR-4AGE]
* Indicated as rechargeable battery in the text.
1 Battery carrying bag [RFC0156-Q]
1 USB extension cable [K2ZZ04Y00005]
Make sure to buy [HHR-4MVE] for Europe or [HHR4MVT] for Asia and Latin America and use one of the
pair when replacing the rechargeable battery.
g For the United Kingdom and Ireland
customers
(Sales and Support Information)
Customer Communications Centre
• For customers within the UK: 0844 844 3899
• For customers within Ireland: 01 289 8333
• For further support on your product, please visit our
website: www.panasonic.co.uk
Direct Sales at Panasonic UK
• Order accessory and consumable items for your
product with ease and confidence by phoning our
Customer Communications Centre
Monday–Thursday 9:00 a.m.–5:30 p.m., Friday 9:30
a.m.–5:30 p.m. (Excluding public holidays)
• Or go on line through our Internet Accessory ordering
application at www.pas-europe.com.
• Most major credit and debit cards accepted.
• All enquiries transactions and distribution facilities are
provided directly by Panasonic UK.
• It couldn’t be simpler!
• Also available through our Internet is direct shopping
for a wide range of finished products. Take a browse on
our website for further details.
2
2
VQT4J81_RR-XS450_420-E_En.indd 2
2012/05/29 9:35:40
Recording
This unit supports the Linear PCM (hereinafter
referred to as “PCM”) recording. Also, you can use the
zoom recording function to reduce the sounds in the
surrounding environment to clearly record the sound
source in front of you.
A wide range of recording settings optimised
according to recording scene are provided, enabling
you to turn on the power, select a recording setting,
and then start recording immediately.
Playing back to listen
• Recorded file
• WMA/MP3 music file
• Support for playback of files recorded with a device
other than this unit
Connecting this unit to a computer
• Support for USB charging
• Move and organise recording/music/data files
Recording/Playback using the Timer
You can record at a specified time. You can also set
an alarm to sound or file to play back at a specified
time.
Basic Operations
Switching microphone position .....................................14
Recording .....................................................................15
Playing ..........................................................................17
Listening to the audio using earphones........................18
Deleting files .................................................................19
Advanced Operations
Selecting the recording scene ......................................20
Direct scene..................................................................23
Selecting recording mode .............................................25
Switching microphone sensitivity ..................................26
Reducing low frequency noise during recording...........26
Setting the recording level manually .............................27
Setting the recording EQ ..............................................29
Self timer ......................................................................30
VQT4J81
Features
Preparation
Supplied accessories......................................................2
Features .........................................................................3
Part names .....................................................................5
Screen display ................................................................6
Inserting the battery/Charging ........................................7
Turning the Power ON/OFF ............................................9
Hold function.................................................................10
Setting the clock ...........................................................11
File and Folder ..............................................................12
Selecting the folder .......................................................12
Selecting the folder or file in the list screen ..................13
ENGLISH
Table of contents
3
3
VQT4J81_RR-XS450_420-E_En.indd 3
2012/05/29 9:35:40
VQT4J81
Table of contents
4
Preventing unnecessary recording (VAS) .....................31
Past recording function (PRE-RECORD) .....................32
Recording by connecting an external microphone .......33
Copying to other devices ..............................................34
Recording from other devices .......................................35
Index function ...............................................................38
Changing the playback speed ......................................39
A-B Repeat play ...........................................................39
Playback from a specified position (TIME SEARCH) ...40
Slight return playback ...................................................40
Repeat play (REPEAT) .................................................41
Skip at regular intervals (TIME SKIP) ...........................42
Shadowing ....................................................................43
Making sound easier to hear (VOICE EMPHASIS) ......44
Setting the playback EQ (SOUND EQ).........................45
Using an SD Card.........................................................46
Using the file search function .......................................47
Listening to music on this unit
(WMA/MP3 music files) ............................................48
Using the playlist function .............................................49
Editing: Dividing files.....................................................51
Editing: Combining files ................................................52
Editing: Copying or moving files....................................53
Recycle bin function .....................................................54
Using the timer .............................................................55
Common menu .............................................................58
BEEP SOUND/REC LED/BATT. SETTING/
AUTO POWER OFF/BACKLIGHT/CONTRAST/
RECYCLE BIN/FORMAT/INIT MENU/VERSION
Using with a computer
System requirements....................................................62
Connecting this unit to a computer ...............................63
Opening folders of this unit ...........................................65
Importing files to a computer/Organising files ..............66
File name ......................................................................67
Folder structure on this unit ..........................................69
Transferring music files to this unit................................71
Other
Q & A (Frequently Asked Questions).................................72
Error messages ............................................................72
Troubleshooting guide ..................................................77
Specifications ...............................................................85
Care and use ................................................................87
Maintenance .................................................................90
4
VQT4J81_RR-XS450_420-E_En.indd 4
2012/05/29 9:35:40
bl i (Fast forward)
bm External microphone/Line-in jack ( )
bn OPR/HOLD switch (OPR: Operation)
bo STOP g/RETURN
bp REC *
bq Recording indicator (Status indicator)
br ERASE/A-B &
bs Built-in speaker
bt Headphone/earphone jack (W)
ck Mic/Line switch
cl Battery/SD card slot cover
cm USB plug lever
cn Strap eyelet
co SD card slot (When cl is open)
cp USB cover
ENGLISH
Part names
1 Built-in microphone
2 Zoom/stereo switch
3 LCD display
4 F1, F2
The F1 and F2 buttons
operate the function
shown in the display.
VQT4J81_RR-XS450_420-E_En.indd 5
5 MENU
6 + (Volume up)
7 u (Fast backward)
8 q OK
9 LIST
bk – (Volume down)
VQT4J81
It is stored inside the unit when the unit
is connected to a computer.
cq USB plug
5
5
2012/05/29 9:35:40
Screen display
• The following screen examples explain each item. Some items may not be displayed simultaneously.
Screen display during recording:
Index (➜ page 38)
File number (➜ page 16)
Status indication (➜ page 16)
SD card (➜ page 12)
Folder name (➜ page 12)
Level meter (➜ page 16)
Direct scene (➜ page 23)
Recording elapsed time
Recording mode (➜ page 25)
Recording Scene (➜ page 20)
Timer indication (➜ page 57)
Battery indicator (➜ page 10)
Battery setting (BATT. SETTING) (➜ page 59)
OVER indication (➜ page 16)
Low cut filter (➜ page 26)
” Synchro recording (➜ page 37)
“
Remaining recording time
Input: Built-in microphone
”: External microphone (➜ page 33)
“
”: Line-in (➜ page 35)
“
Microphone sensitivity (➜ page 26)
Recording level (➜ page 27)
“
”: VAS (➜ page 31)
Screen display during playback:
Repeat indication (➜ pages 39, 41)
Sound EQ (➜ page 45)
Status indication (➜ page 39)
Shadowing (➜ page 43)
File name (➜ page 67)
VQT4J81
Playback elapsed time
Playback status bar
6
Time skip (➜ page 42)
Total playback time (➜ page 18)
Index setting (➜ page 38)
Playback speed (➜ page 39)
: Voice emphasis (➜ page 44)
6
VQT4J81_RR-XS450_420-E_En.indd 6
2012/05/29 9:35:41
Inserting the battery/Charging
Use your computer for charging. If the battery has
completely run out, it takes approx. 2 hours for a full
recharge.
2
Insert the unit’s USB plug into the
computer.
ENGLISH
Upon purchasing, charge once before initial
use.
USB cover
Inserting the rechargeable battery (supplied)
1 AAA rechargeable Ni-MH
battery Make sure the battery
faces the right direction.
Insert the USB plug straight
in the same direction as that
of the terminal.
Firmly insert the USB plug all
the way in. (The USB cover
will not impede insertion as it
is stored inside the unit.)
If the unit cannot be connected to the computer
directly, use the USB extension cable (supplied).
• Start the computer beforehand.
• Turn the unit off beforehand. (➜ page 9)
The first time you connect the unit to your
PC
1
Because multiple “Found New Hardware” messages
will appear, do not disconnect the unit from your PC
until all messages disappear.
* Never disconnect the unit or remove the SD
card while “ACCESS…” is displayed, otherwise
this unit may be damaged.
Take out the USB plug.
Push and slide
until a “click”
sound is heard.
Storing the USB plug:
VQT4J81
A message is displayed on the screen.
Charging the battery
7
7
VQT4J81_RR-XS450_420-E_En.indd 7
2012/05/29 9:35:41
Inserting the battery/Charging
3
4
Slide the OPR/HOLD switch to the [ON] side.
Slide the OPR/HOLD switch to the [OFF]
side.
OPR/HOLD
switch
Status indicator
The status indicator lights and recharging starts.
Also, “CHARGING” is shown in the unit’s display and
the battery indicator changes as shown below.
CHARGING
* While charging, sliding the OPR/HOLD switch to the
[ON] side can cancel charging halfway.
* When the status indicator goes out, charging is complete.
VQT4J81
g Disconnecting the unit
8
Double-click the icon (Windows XP: [ ], Windows Vista/
Windows 7: [ ]) on the task tray at the bottom of the
computer screen and follow the on-screen instructions
to remove the unit. (The icon may not be displayed
depending on the OS settings.)
After the unit is removed, this unit turns off.
* If BATT. SETTING in the common menu is set to
“ALKALINE”, the battery cannot be charged.
* When using a rechargeable battery, use the supplied
rechargeable battery or the optional rechargeable
battery (➜ page 2). If commercially sold batteries
other than the above are used, operation is not
guaranteed. Do not charge a dry cell battery.
* If charging does not start, slide the OPR/HOLD switch
to the [ON] side once, and then to the [OFF] again.
* If the temperature of this unit has risen, an
undesignated rechargeable battery has been inserted,
or BATT. SETTING has been set to “ALKALINE”, “ ”
is displayed. (➜ page 77)
* When the computer is in sleep mode or is restarted,
recharging may be impossible.
* Charging is possible even during data transfer.
* The rechargeable battery does not need to be fully
depleted before recharging.
* The rechargeable battery or this unit may become hot
while charging, but this is not a malfunction.
* If the usage time becomes remarkably short even
though the battery is fully recharged, the battery
has reached the end of its lifespan. Purchase a new
rechargeable battery (➜ page 2).
8
VQT4J81_RR-XS450_420-E_En.indd 8
2012/05/29 9:35:41
* An AAA LR03 alkaline battery (not supplied) can also
be used.
* If you use an alkaline battery, set the BATT. SETTING
in the common menu to “ALKALINE”. (➜ page 59)
OPR/HOLD switch
Turning the power ON:
Slide the OPR/HOLD switch to [ON] side to turn the
power on. Then, the display lights on.
ENGLISH
Turning the Power ON/OFF
g When using a dry cell battery (not supplied)
Set the current date and time when turning this unit
on for the first time. (➜ page 11)
Turning the power OFF:
Slide the OPR/HOLD switch to [OFF] side while the unit
is in the stop state.
g Auto power off
VQT4J81
The power automatically turns off after a preset time (the
factory setting is 15 minutes) elapses while recording is
stopped.
If the power is turned off by the auto power off function,
slide the OPR/HOLD switch to the [OFF] side before
turning the power on. (➜ page 59)
9
9
VQT4J81_RR-XS450_420-E_En.indd 9
2012/05/29 9:35:42
Turning the Power ON/OFF
Hold function
g About the battery indicator
Button operations are ignored when the Hold function
is on.
The remaining battery level is displayed as below
while this unit is operating.
VQT4J81
Blinking
10
* If the battery runs out, “ ” blinks. Replace the
battery or charge the rechargeable battery as soon as
possible.
* Please replace battery within approx. 1 minute for
preservation of the clock data.
* Depending on the battery status or the operation
content to use, even if the power turns off due to the
battery exhaustion, this unit may be used for a while if
turned on again. However, the unit may suddenly turn
off during operation due to the low level of battery.
* Some level of battery is required when recording, or
performing Deleting files (➜ page 19), Dividing files
(➜ page 51), Deleting index (➜ page 38), FORMAT
(➜ page 60). If the battery indicator shows “ ”
(blinking) and these operations are performed, the
power turns OFF automatically.
* Remove the battery from the unit if you will not use it
for a long period of time.
* Make sure to turn the power off before removing
the battery.
• If the battery is removed while the unit is on, data
may be lost or this unit may be damaged.
To switch the Hold function on:
Slide the OPR/HOLD switch to the [HOLD] side during
recording or playback.
To switch the Hold function off:
Slide the OPR/HOLD switch in the opposite direction of
[HOLD].
* When the Hold function is on, operation is ignored
even if the buttons are pressed while the power is on
(“HOLD ON” is displayed), enabling you to prevent
unintended operations such as the stopping of
recording or playback.
* When recording or playback finishes while the Hold
function is on, the power turns off automatically.
10
VQT4J81_RR-XS450_420-E_En.indd 10
2012/05/29 9:35:42
The clock has not been set at the time of purchase.
The clock is used as a file name (➜ page 67) or to preserve recording date and time
information. Set the correct date and time. If the power is turned on when the clock is
not set, the screen shown in step 4 is displayed.
1
2
3
4
5
6
Press [MENU].
Press +, – to select “COMMON
MENU” and press [q OK] to enter.
Press +, – to select “DATE & TIME”
and press [q OK] to enter.
Press +, – to set
the year and press
i.
The above illustration is a display example.
Press +, – to set the month and
press i.
Press +, – to set the date and press
i.
7
Press +, – to set the clock
indication method and press i.
F2
“ 24h ” and “ AM / PM ” are displayed for the
24-hour display and the 12-hour display
respectively.
8
9
Press +, – to set the hour and press
i.
Press +, – to set the minute.
10
Press [q OK] to enter.
To change the setting, press u, i to
move between the items, and then press
+, – again to make the setting.
The date and time are set and the clock
starts to operate.
To exit the setting screen, press
[F2 (CLOSE)].
* The clock operates with the monthly loss/gain of approx. 60 seconds at normal temperature.
* The clock setting will be lost if the battery is removed or completely exhausted.
VQT4J81
• Turn the power on. (➜ page 9)
MENU
ENGLISH
Setting the clock
11
11
VQT4J81_RR-XS450_420-E_En.indd 11
2012/05/29 9:35:42
File and Folder
File
Recorded audio data from the starting point to the ending
point is saved as a file.
The saved data is called a file.
VQT4J81
Folder
This is where files are stored. This unit has the following
folders.
• “A”, “B”, “C” and “D” folders for microphone recording
(➜ page 15).
• “L” folder for files recorded from other devices
connected to this unit (➜ page 35).
• “ ” folder (Recycle) where deleted files are placed
(➜ page 54).
• “M” folder for music (➜ page 48).
• “ ” (OTHER FOLDER) where the folders created by
the device other than this unit are placed (➜ page 70).
Using each folder according to the purposes of recording
enables you to search files easily later. Up to 199 files
can be recorded in each recording folder.
Folders are created in the internal memory. When an SD
card (➜ page 46) is inserted, folders are created in the
same way on the SD card.
In this manual, microSD/microSDHC card is written as
“SD card”.
12
Selecting the folder
• Press [STOP g/RETURN] to stop the unit.
1
2
Press [F2 (FOLDER)].
Press +, –, u, i to
select the folder and
press [q OK] to enter.
“P1 to P5” present playlist files
(➜ page 49).
• “ ” (OTHER FOLDER) is for the playback of files
recorded by a device other than this unit. This
unit can also play music files recorded with (or
transferred by) some Panasonic Stereo System
devices equipped with the USB recording function.
Switching between the internal memory
and SD card:
If the SD card is inserted, the items for SD card
are displayed on the screen in step 2 . Press
[F1 (MEMORY)] to select the memory.
When the internal memory is selected
When the SD card is selected
When the SD card is selected,
“ ” is displayed on the screen.
12
VQT4J81_RR-XS450_420-E_En.indd 12
2012/05/29 9:35:42
1
2
Press [LIST ] for approx. 1 second or
more.
Go to step 2 if an SD card is inserted (➜ page 46),
and step 3 if not.
Press +, – to select “INT.
MEMORY” (internal
memory ) or “microSD
CARD” and press [q OK]
to enter.
List screen
3
Press +, – to select the
folder and press [q OK]
to enter.
If folders have been created in
the MUSIC folder or OTHER
FOLDER ( ), repeat step 3
to select the target folder.
4
Press +, – to select the file
and press [q OK] to enter.
File playback starts.
: Folder
When “MUSIC” or “OTHER FOLDER” is selected in step
3 , PLAYLIST folders (only for MUSIC) and folders or files
transferred from the computer are displayed. (For details of
PLAYLIST, see page 49.) If a folder exists (on the second
hierarchy) under the folder (e.g. Artist A), select “Artist
A” and press [q OK]. Then, the folder under “Artist A” is
displayed. (For details of folder hierarchy, see page 69.)
Pressing u several times on the screen in step 4 will
switch the screen to screens in steps 2 or 3 . Also, it
is possible to move among folder hierarchies to select
folders and files.
* When there is no file in the selected folder, “NO FILE”
is displayed.
* The “A”, “B”, “C”, “D”, “L”, “M”, “ (recycle bin)” and
“ ” folders are displayed as “MIC_A (MIC_A_SD),
MIC_B (MIC_B_SD), MIC_C (MIC_C_SD), MIC_D
(MIC_D_SD), LINE (LINE_SD), MUSIC, RECYCLE
and OTHER FOLDER” respectively on the list screen.
(The indications in the brackets are displayed when
using the SD card.)
* Pressing [LIST ] while the unit is stopped or during
playback will directly display the screen (current folder)
shown in step 4 .
VQT4J81
• Press [STOP g/RETURN] to stop the unit.
ENGLISH
Selecting the folder or file in the list screen
13
13
VQT4J81_RR-XS450_420-E_En.indd 13
2012/05/29 9:35:42
Switching microphone position
You can switch the microphone position to ZOOM to record with the sound in front of you emphasised. Switch the
microphone position depending on the use.
STEREO
Microphone position
STEREO
ZOOM
Recommended uses
Suitable for recording events such as a meeting or
performance by a large number of people.
Operates as an ordinary stereo microphone.
ZOOM
Suitable for recording events such as a lecture or
interview, where sound is emitted from a specific
direction.
Records with the sound in front of you emphasised.
VQT4J81
The indication changes depending
on the microphone position.
14
* This unit has recording scenes (➜ page 20) for which the recommended recording settings are registered for each
use, and switching the microphone position also changes the recording scene. (Direct scene (➜ page 23))
* Do not switch the microphone position during recording. The intended recording characteristics will not be obtained.
* The microphone position function operates when the built-in microphone is used. It does not operate when an external microphone
is connected for recording (➜ page 33) or when a different device is connected for recording to this unit (➜ page 35).
14
VQT4J81_RR-XS450_420-E_En.indd 14
2012/05/29 9:35:42
STOP g/RETURN
F2
REC *
• Turn the power on. (➜ page 9)
• Press [STOP g/RETURN] to stop the unit.
• Select the microphone position. (➜ page 14)
1
2
Press [F2 (FOLDER)].
Press u, i
to select the
recording
destination folder
and press [q OK]
to enter.
3
4
Press [REC *] (Recording starts).
The recording indicator
lights on.
Press [STOP g/RETURN] to stop
recording.
ENGLISH
Recording
To pause recording:
1 Press [REC *] during recording.
Recording indicator blinks.
2 Press [REC *] again to resume recording.
* Change the recording mode or microphone sensitivity as necessary. (➜ pages 25, 26)
* A function is available for simultaneously retrieving all the recording settings recommended for
the recording scene. (➜ page 20)
* If the file size exceeds 2 GB during recording, the recording stops tentatively at the point when
the data reaches 2 GB. Then, the recording resumes with a new file. Recording is not available
during the interval (approx. 2 seconds) from when the recording stops to when the recording
resumes.
* Note if your finger or an object touches this unit during recording, the noise will be
recorded through the microphone.
VQT4J81
For microphone recording, select a folder
among folders “A”, “B”, “C” and “D”.
(The factory setting is “A”)
When you select a folder except for “A”, “B”,
“C” or “D”, recording is automatically saved
in “A”.
15
15
VQT4J81_RR-XS450_420-E_En.indd 15
2012/05/29 9:35:42
Recording
Note when recording
Screen display during recording:
1
2
3
5
6
4
VQT4J81
1 Status indication
7
* : During recording
h : During recording pause, recording standby, past recording
standby
2 Folder name (➜ page 12), File number
3 Level meter
Displays the volume input into this unit. (Stereo (L/R))
L and R volumes are displayed respectively during monaural
recording (➜ page 25) as well. Note that the monaural
recording data are synthesised from L and R.
4 Recording mode (➜ page 25)
5 OVER indication
If the input volume is excessive and the level meter swings,
” is displayed.
“
6 Possible remaining recording time
Displays the remaining recording time (possible recording time)
in the selected recording mode.
7 Microphone sensitivity (➜ page 26)
See page 6 for other screen displays.
16
16
VQT4J81_RR-XS450_420-E_En.indd 16
This unit is equipped with a high-sensitivity
microphone. Accordingly, if a breath or wind
directly hits the microphone during recording,
the wind-cutting sound may be recorded or
voice may be difficult to hear.
1. This can be
prevented by
blocking the
wind with your
body so that
the wind does
not directly hit the unit.
2. During dictation
recording, slightly
Keep distance
move this unit
from front of your
mouth or keep
distance.
Turning the “LOW CUT FILTER” (➜ page 26) to
“ON” reduces the sound of low frequency range.
This may help the reduction of the wind-cutting
sound.
* Sound may jump during recording (especially
PCM recording) depending on use conditions
of the internal memory and SD card.
Formatting them on this unit (➜ page 60)
before recording is recommended.
2012/05/29 9:35:42
1
Press [q OK] (Playback starts).
Adjusting the volume
Turn up the volume: Press +.
Turn down the volume: Press –.
Volume range is 0 to 20.
(The factory setting is “10”.)
If you turn the unit off with the volume set to 17
or more, the volume will be set to 16 next time
the unit is turned on.
Operations during playback
Jump (Skip): Press u, i.
Press u midway while playing a file and
the playback jumps to the beginning of the
file. To return to the previous file, press u
within approx. 1 second from the beginning
of the file.
Fast backward/Fast forward (Search):
Press and hold u, i.
To stop: Press [STOP g/RETURN].
Select a file
Press u, i to select.
Each time you press, the file number changes.
File number/Total number of files
in the folder
Folder
name
Memory
usage
indication
Remaining
recording time
FOLDER
(➜ page 12)
Screen display example while stopped
You can also select the file on the list screen.
(➜ page 13)
* The unit remembers the last file played and
the stop position for each folder.
VQT4J81
STOP g/RETURN
• Press [STOP g/RETURN] to stop the unit.
• Select a folder. (➜ page 12)
• Select a file. (➜ right)
ENGLISH
Playing
17
17
VQT4J81_RR-XS450_420-E_En.indd 17
2012/05/29 9:35:42
Playing
Checking information
You can check the file information or current time.
• Press [STOP g/RETURN] to stop the unit.
1
Press [STOP g/RETURN].
The information screen
appears.
Listening to the audio
using earphones
Connect stereo earphones (not supplied).
Plug type: ø 3.5 mm stereo mini plug
Recommended additional earphones:
Panasonic RP-HV154, RP-HJE120
(the product number is correct as of May 2012.)
Monitoring the
recording in progress
VQT4J81
2
18
Move the information screen up or down
using + or –.
The following contents can be confirmed on the
information screen.
Current time
: Current time
Remaining recording time : Possible remaining
(Possible recording time) recording time in the
recording mode currently
being set
Recording date and time : Date and time when the
selected file was recorded
Total playback time
: Length of the selected file
File format
: Format of the selected file
This is not displayed for the M (MUSIC) folder or
OTHER FOLDER ( ).
To exit the information screen:
Press [STOP g/RETURN].
Adjusting the volume:
You can adjust the volume by
pressing +, –, but the recording
level (➜ page 27) is not
affected.
Built-in speaker
Listening to the audio
during playback
Insert
securely.
The audio during playback
comes from the speaker.
Listening may be difficult in
noisy places due to the speaker
output. In that case, connect
stereo earphones (not supplied).
* The built-in speaker is turned
off when earphones are
connected.
18
VQT4J81_RR-XS450_420-E_En.indd 18
2012/05/29 9:35:43
STOP g/RETURN
F2
• Select a file to delete beforehand. (➜ page
17)
• Press [STOP g/RETURN] to stop the unit.
1
2
3
Press [ERASE/A-B&].
Press +, – to
select “FILE” and
press [q OK] to
enter.
Press +, – to select “YES” and
press [q OK] to enter.
To exit the deletion screen, press
[F2 (CLOSE)].
Deleting files from the list
screen
ENGLISH
Deleting files
Select files on the list screen (➜ page 13) and
press [ERASE/A-B&]. Then, the screen to
delete the file appears. Select the folder and
press [ERASE/A-B&]. Then, the screen to
delete all files in the folder appears.
ERASE/A-B&
* When the recycle bin function is ON, files are moved to the recycle bin ( ) folder. When the
recycle bin function is OFF, files are deleted immediately without being moved to the recycle bin
( ) folder. (➜ pages 54 and 60)
* Files in the MUSIC (M) or OTHER FOLDER ( ) are deleted immediately irrespective of the
recycle bin settings.
* The file numbers displayed on this unit are moved forward after deleting files. (➜ page 67)
* Read-only WMA/MP3 music files transferred from the computer, files that cannot be played by the
unit, subfolders (➜ pages 69 and 71) in the MUSIC folder created on the computer, or subfolders
in the OTHER FOLDER cannot be deleted using this unit. Delete them on the computer. (➜ page
66)
VQT4J81
While deleting, the status indicator blinks and
“ERASING” is displayed. It may take several
minutes until the deletion is complete.
Selecting “FOLDER” in step 2 will move to
the screen to delete all files in the selected
folder.
19
19
VQT4J81_RR-XS450_420-E_En.indd 19
2012/05/29 9:35:43
Selecting the recording scene
This unit offers recommended recording settings for each recording scene. Selecting
the recording scene enables easy recording with the most appropriate settings.
MENU
• Press [STOP g/RETURN] to stop the unit.
F2
REC *
1
Press [MENU] for
approx. 1 second
or more.
3
Press +, – to select “LOAD” and
press [q OK] to enter.
To exit the setting screen, press
[F2 (CLOSE)].
The screen to select
the recording scene is
displayed.
VQT4J81
2
Press +, – to select the scene and
press [q OK] to enter.
If you select “USER”, skip the step 3 .
The selected recording
scene is displayed.
When [REC *] is pressed, recording is
performed with the selected recording scene
setting.
* If you select “USER” in step 2 , the state immediately before the recording scene was set is
restored, and the recording scene indication disappears.
* If you individually change settings such as the recording mode when the recording scene is set,
the settings overwrite the “USER” settings, and the recording scene indication disappears.
* The recording scene operates when microphone recording is used. Recording scene does not
operate when another device is connected and the Mic/Line switch is set to [LINE] (➜ page 35).
STOP g/RETURN * You can also set the recording scene by pressing [MENU] and selecting “SCENE SELECT” from
“MIC REC MENU”.
20
20
VQT4J81_RR-XS450_420-E_En.indd 20
2012/05/29 9:35:43
Setting Item
(page)
Recording mode
(25)
Microphone
sensitivity (26)
Recording level
(27)
Low cut filter
(26)
Recording peak
limiter (28)
Self timer recording
(30)
VAS setting
(31)
Past Recording
Settings (32)
MUSIC PERF. CONVERSATION MEETING
LECTURE
FAVORITE
Records a
broad sound
band. For
recording
meetings
etc.
You can
Records
register your
sounds
own settings
such as in
classroom
lectures etc.
PCM:
44.1 kHz
HIGH
Recording
other
people’s
voices for
interviews
or meetings
etc.
MP3:
64 kbps
HIGH
MP3:
192 kbps
HIGH
MP3:
192 kbps
HIGH
MP3:
192 kbps
HIGH
MANUAL
MANUAL
AUTO
AUTO
AUTO
AUTO
ON
OFF
OFF
ON
ON
ON
OFF
OFF
ON
OFF
OFF
OFF
OFF
OFF
OFF
OFF
OFF
OFF
OFF
OFF
OFF
OFF
OFF
OFF
OFF
OFF
OFF
OFF
OFF
OFF
OFF
OFF
OFF
OFF
OFF
Recording
your own
voice for
pronunciation
practice etc.
Loud volume
recording
such as
karaoke
High quality
recording
such as
musical
performances
MP3:
192 kbps
HIGH
MP3:
320 kbps
HIGH
AUTO
Preset an appropriate recording level to enable recordings with superior sound. For details, see “Setting the
recording level manually” (➜ pages 27 and 28).
ENGLISH
Recording Scene LANG. STUDY KARAOKE
Application
VQT4J81
g The factory setting of recording scenes
21
21
VQT4J81_RR-XS450_420-E_En.indd 21
2012/05/29 9:35:43
Selecting the recording scene
Changing recording scene settings
The setting details of each recording scene can
be changed according to preference.
• Press [STOP g/RETURN] to stop the unit.
1
2
3
4
VQT4J81
5
22
6
Press [MENU] for approx. 1 second or more.
Press +, – to select the
recording scene and
press [q OK] to enter.
Press +, – to select
“CHANGE SETTING” and
press [q OK] to enter.
Press +, – to select the item you want to
change and press [q OK] to enter.
Press +, – to select the setting and press
[q OK] to enter.
Repeat steps 4 and 5 to change other items.
When you have
completed the settings,
press +, – to select “OK”
and press [q OK] to enter.
To select the changed recording scene, select
“LOAD” (➜ page 20).
To exit the setting screen, press [F2 (CLOSE)].
Initialising recording scene settings
Returns individual recording scenes whose settings have
been changed to the factory settings.
• Press [STOP g/RETURN] to stop the unit.
1
2
3
4
Press [MENU] for approx. 1 second or more.
Press +, – to select the recording scene
you want to initialise and press [q OK] to
enter.
Press +, – to select
“INITIALIZE” and press
[q OK] to enter.
Press +, – to select “YES” and press
[q OK] to enter.
The selected recording scene setting is returned to
the factory setting.
To select the initialised recording scene, select
“LOAD” (➜ page 20)
To exit the setting screen, press [F2 (CLOSE)].
22
VQT4J81_RR-XS450_420-E_En.indd 22
2012/05/29 9:35:43
Microphone position
Recording scene
STEREO
ENGLISH
Direct scene
This function is for switching the recording scene (➜ page 20) linked to switching the microphone position. (The
factory setting is “ON”)
You can switch to the recording scene assigned to each microphone position.
ZOOM
VQT4J81
Factory setting
* At the time of purchase, “MEETING” is assigned to STEREO, and “LECTURE” is assigned to ZOOM.
You can also change the recording scene assigned to a microphone position. Select the desired recording scene
from seven recording scenes. (➜ page 24)
* Switch the microphone position when the unit is in the stopped state. During an operation such as recording or
playback, the recording scene cannot be changed even by switching the microphone position.
* If you wish to switch only the stereo and zoom functions of the microphone without linking the recording scenes, set
direct scene setting to “OFF”. (➜ page 24)
* When an external microphone is connected, the recording scene cannot be switched even by switching the
microphone position.
23
23
VQT4J81_RR-XS450_420-E_En.indd 23
2012/05/29 9:35:43
Direct scene
Changing direct scene setting
Setting direct scene setting to OFF
• Press [STOP g/RETURN] to stop the unit.
• Press [STOP g/RETURN] to stop the unit.
1
2
1
2
3
4
VQT4J81
5
Press [MENU].
Press +, – to select “MIC REC MENU” and
press [q OK] to enter.
Press +, – to select “DIRECT SCENE” and
press [q OK] to enter.
Press +, – to select the
microphone position
(“STEREO” or “ZOOM”)
and press [q OK] to enter.
Press +, – to select the
recording scene and
press [q OK] to enter.
If you wish to change the recording scene for the
other microphone position, perform steps 4 and 5
to set the recording scene.
To exit the setting screen, press [F2 (CLOSE)].
24
3
4
5
Press [MENU].
Press +, – to select “MIC REC MENU” and
press [q OK] to enter.
Press +, – to select “DIRECT SCENE” and
press [q OK] to enter.
Press +, – to select “SETTING” and press
[q OK] to enter.
Press +, – to select
“OFF” and press
[q OK] to enter.
To exit the setting screen, press [F2 (CLOSE)].
Direct scene setting indication
: ON
Nothing is displayed for “OFF”
• During playback, recording, or recording standby, “ ” is
not displayed even if you set direct scene setting to “ON”.
24
VQT4J81_RR-XS450_420-E_En.indd 24
2012/05/29 9:35:43
You can change the sound quality. This allows you to provide the best sound quality for
the particular purpose.
• Press [STOP g/RETURN] to stop the unit.
MENU
F2
1
2
3
4
Press [MENU].
Press +, – to
select “MIC REC
MENU” and press
[q OK] to enter.
Press +, – to
select the setting
(PCM sampling
frequency/MP3
bitrate) and press
[q OK] to enter.
ENGLISH
Selecting recording mode
(The factory setting is “MP3 192kbps”.)
Press +, – to select “MIC REC
MODE” and press [q OK] to enter.
To exit the setting screen, press
[F2 (CLOSE)].
The selected recording mode
is displayed.
High quality recording
STOP g/RETURN
Recording
format
PCM
44.1 kHz
MP3
320 kbps
MP3
192 kbps
MP3
128 kbps
MP3
64 kbps
Long recording
MP3
32 kbps
* When the recording mode is set to “MP3 32kbps”, the recording becomes monaural.
VQT4J81
* Depending on the recording mode setting, the sound quality and remaining recording time
(➜ page 86) will differ.
25
25
VQT4J81_RR-XS450_420-E_En.indd 25
2012/05/29 9:35:43
Switching microphone sensitivity Reducing low frequency
Switch the microphone sensitivity according
noise during recording
to the volume of the sound source. When the
sound source volume is loud, set the sensitivity
to “LOW”. When it is low, set the sensitivity to
“HIGH”.
• Press [STOP g/RETURN] to stop the unit.
1
2
3
4
Press [MENU].
Sound of low frequency range is reduced during
microphone recording. This is effective when
reducing noise of air conditioning equipment,
etc. while recording at a meeting, etc. (LOW CUT
FILTER)
• Press [STOP g/RETURN] to stop the unit.
Press +, – to select “MIC REC MENU”
and press [q OK] to enter.
Press +, – to select “MIC SENS.”
and press [q OK] to enter.
Press +, – to select “HIGH” or “LOW” and
press [q OK] to enter.
(The factory setting is “HIGH”.)
To exit the setting screen, press [F2 (CLOSE)].
1
2
3
4
Press [MENU].
Press +, – to select “MIC REC MENU”
and press [q OK] to enter.
Press +, – to select “LOW CUT FILTER”
and press [q OK] to enter.
Press +, – to select “ON” and press [q OK]
to enter.
(The factory setting is “OFF”.)
VQT4J81
To exit the setting screen, press [F2 (CLOSE)].
26
When the microphone position is
“STEREO” (➜ page 14), “
” is
displayed for High, and “ ” for Low.
When the microphone position is “ZOOM”, “
displayed for High, and “ ” for Low.
“
” is displayed.
” is
26
VQT4J81_RR-XS450_420-E_En.indd 26
2012/05/29 9:35:44
The recording level can be adjusted automatically or manually on this unit. When the
recording level adjustment is AUTO, the sound distortion is reduced by adjusting the
recording level automatically. To record the original sound volume level faithfully such
as an instrument playing and nature sound, set the recording level adjustment to
MANUAL. (The factory setting is “AUTO”.)
F2
REC *
Setting the recording level
adjustment to MANUAL
Adjusting the recording level
manually
• Press [STOP g/RETURN] to stop the unit.
• Set the recording level adjustment to
MANUAL beforehand. (When the recording
level adjustment is AUTO, the unit does not
enter the recording standby.)
1
2
3
4
Press [MENU].
Press +, – to select “MIC REC MENU”
and press [q OK] to enter.
Press +, – to select “REC LEVEL
ADJ.” and press [q OK] to enter.
Press +, – to select “MANUAL” and
press [q OK] to enter.
To exit the setting screen, press
[F2 (CLOSE)].
1
The unit enters the
recording standby.
Blinks
2
3
STOP g/RETURN
The recording level is
displayed.
Press and hold
[REC *] for 1
second or more.
Aim the microphone at the sound
source to record.
Press u, i to adjust the
recording level (➜ page 28).
Adjustment range is 0 to 30.
(The factory setting is “15”.)
Pressing [REC *] starts recording.
VQT4J81
MENU
ENGLISH
Setting the recording level manually
27
27
VQT4J81_RR-XS450_420-E_En.indd 27
2012/05/29 9:35:44
Setting the recording level manually
Setting the recording peak limiter to ON
OVER indication
Level meter
Recording level
* If the level meter swings and “
” is displayed, this
means the recording level is too high. Adjust the level
within the “ ” range even if the recording sound
reaches the highest level.
* The input level (volume input to this unit) for recording
is combination of the recording level and microphone
sensitivity.
The input level image is as below.
Even if the recording level adjustment is
MANUAL, when the excessive volume is input,
the recording level is automatically adjusted and
the sound distortion is reduced.
• Press [STOP g/RETURN] to stop the unit.
1
2
3
4
Press [MENU].
Press +, – to select “MIC REC MENU”
and press [q OK] to enter.
Press +, – to select “PEAK LIMITER”
and press [q OK] to enter.
Press +, – to select “ON”
and press [q OK] to enter.
(The factory setting is “OFF”.)
VQT4J81
Recording
1
level
MIC SENS.
28
30 1
LOW
30
HIGH
* No sound is recorded at the recording level 0, and
“ MUTE ” is displayed.
* The recording level can also be adjusted during
recording or while recording is paused.
* When [MENU] is pressed during recording standby,
the microphone sensitivity (➜ page 26), “LOW CUT
FILTER” (➜ page 26) and recording EQ (➜ page 29)
can be set.
To exit the setting screen, press [F2 (CLOSE)].
* When the recording level adjustment is AUTO, the
recording peak limiter function will be activated
regardless of the above setting.
* If the level meter swings, “
” is displayed regardless
of the recording peak limiter setting.
28
VQT4J81_RR-XS450_420-E_En.indd 28
2012/05/29 9:35:44
Using the recording EQ enables you to set bass, middle and treble range of recording level according to
your preferred settings for recording.
The recording EQ includes 7 types of fixed mode and the “USER” mode with which you can set the
recording level according to each frequency band.
1
Press and hold [REC *] for 1 second or more.
2
3
Press [MENU].
4
The unit enters the recording standby.
Press +, – to select “REC EQ” and press
[q OK] to enter.
Press +, – to select the recording EQ mode.
Press [F1 (CONFIRM)] to confirm the details. Press
[F1] again to return to the previous screen.
When you select modes other than “USER”, go to
step 5 .
Setting when selecting “USER”:
1 After step 4 , press
[F1 (EDIT)].
150 Hz band is selected.
2 Press u, i to select the frequency band to
change, and press +, – to adjust the recording
level (±12 dB).
5
3 When the settings for the frequency band to
change are all complete, go to step 5 .
Press [q OK] to enter.
To exit the setting screen, press [F2 (CLOSE)].
The EQ mode name is not displayed after exiting
the setting screen.
Pressing [REC *] starts recording.
EQ mode
Effect and application
This (basic) mode does not emphasise
a specific sound range.
EXTRA BASS Emphasise the bass range strongly.
BASS
Emphasise the bass range slightly.
MIDDLE
Emphasise the middle range.
BASS&TREBLE Emphasise the bass and treble ranges slightly.
TREBLE
Emphasise the treble range slightly.
EXTRA TREBLE Emphasise the treble range strongly.
This mode enables adjustment of
USER
frequency bands of 150 Hz, 500 Hz,
1 kHz, 4 kHz and 12 kHz.
FLAT
(The factory setting is “FLAT”.)
* When the recording level adjustment is AUTO, the
recording EQ does not function.
VQT4J81
• Set the recording level adjustment to MANUAL beforehand.
(➜ page 27) (When the recording level adjustment is AUTO,
the unit does not enter the recording standby.)
ENGLISH
Setting the recording EQ
29
29
VQT4J81_RR-XS450_420-E_En.indd 29
2012/05/29 9:35:44
Self timer
You can select your preferred time period from when [REC *] is pressed until when the
recording starts. This function is very useful where you need time for preparation before
recording should start – for example in musical instrument practice.
• Press [STOP g/RETURN] to stop the unit.
1
2
3
4
Press [MENU].
Press +, – to select “MIC REC MENU”
and press [q OK] to enter.
Press +, – to select “SELF TIMER”
and press [q OK] to enter.
Press +, – to
select the time
and press [q OK]
to enter.
* When [REC *] is pressed, countdown starts.
Then, recording starts after the set time. The
recording indicator blinks during countdown.
* Once the self timer is set, the setting is
preserved until the self timer setting is set to
OFF or the settings of this unit are initialised.
(➜ page 61)
* Pressing [REC *] during countdown starts
recording immediately.
* If you press [STOP g/RETURN] during
countdown, the self timer recording can be
stopped.
MENU
F2
REC *
(The factory setting is “OFF”.)
VQT4J81
To exit the setting screen, press
[F2 (CLOSE)].
STOP g/RETURN
30
30
VQT4J81_RR-XS450_420-E_En.indd 30
2012/05/29 9:35:44
When VAS (Voice Activated System) is set, if silence continues for approx. 2 seconds during
microphone recording, the recording is paused automatically. If the unit detects sound, the recording
resumes.
• Set the recording level adjustment to AUTO
beforehand. (➜ page 27)
• Press [STOP g/RETURN] to stop the unit.
1
2
3
4
“
ENGLISH
Preventing unnecessary recording (VAS)
” is displayed.
Press [MENU].
Press +, – to select “MIC REC MENU”
and press [q OK] to enter.
Press +, – to select “VAS” and press
[q OK] to enter.
Press +, – to select “ON” and press [q OK]
to enter.
To start VAS recording, press [REC *].
Adjusting the VAS operation level:
Press u, i during VAS
recording.
(The factory setting is “3”.)
(The factory setting is “OFF”.)
* You can adjust the sound detection level from 1 to 5.
* If the audio to record is low, increase the VAS value
(sensitivity level). If the sound is loud, decrease the
VAS value.
* When the recording level adjustment is MANUAL (➜ page 27), even if the VAS setting is set to ON, the setting
does not change to the VAS recording.
* For important recording, set the VAS setting to OFF.
* If the “LOW CUT FILTER” setting is “ON”, low frequency sound may be cut out and VAS recording may not activate.
In this case, change the “LOW CUT FILTER” setting to “OFF”. (➜ page 26)
* If the recording is paused with no sound state, “
” blinks. When [REC *] is pressed from this recording pause
state, the status is changed to normal recording pause state and “
” lights up.
VQT4J81
To exit the setting screen, press [F2 (CLOSE)].
31
31
VQT4J81_RR-XS450_420-E_En.indd 31
2012/05/29 9:35:44
Past recording function (PRE-RECORD)
If you start recording from the standby state of the past recording function, recording can be started
with the audio approx. 3 seconds before the recording operation.
To set the past recording to ON:
1 Press and hold [REC *] for 1 second or more.
• Press [STOP g/RETURN] to stop the unit.
1
2
Press [MENU].
3
Press +, – to select
“PRE-RECORD” and
press [q OK] to enter.
Press +, – to select “MIC REC MENU”
and press [q OK] to enter.
2
The unit enters the past
recording standby mode.
Changes to 1 sec, 2 sec, 3
sec and stops at 3 sec. The
microphone audio data approx.
3 seconds before recording are
always updated and the unit is
on standby.
Press [REC *].
The recording indicator lights, and recording is started
continuing directly after the preserved audio data.
To stop: Press [STOP g/RETURN].
4
Press +, – to select “ON”
and press [q OK] to enter.
(The factory setting is “OFF”.)
VQT4J81
To exit the setting screen, press [F2 (CLOSE)].
32
To record using the past recording
function:
When recording mode is PCM, the past recording
function does not operate.
• Set the recording mode to MP3. (➜ page 25)
• Press [STOP g/RETURN] to stop the unit.
* The sound that occurs when the recording button is pressed
is also recorded. (When the built-in microphone is used, etc.)
* When the recording level adjustment (➜ page 27) is set
to MANUAL, the unit enters the past recording standby
and recording standby at the same time.
* When the unit enters the standby state again after the
microphone position is switched (➜ page 14), the past
recording standby screen is cancelled on the menu or
the stop operation is performed, audio data is freshlystored from that point.
* The past recording function operates when recording
actually starts. It does not operate when recording is
paused.
* If the recording remaining time is less than 10 seconds,
the past recording function does not operate.
32
VQT4J81_RR-XS450_420-E_En.indd 32
2012/05/29 9:35:45
Use this setting when recording by connecting an external microphone to the external microphone/Linein jack of this unit.
• Press [STOP g/RETURN] to stop the unit.
2 Connect the external microphone.
1
External microphone
(not supplied)
Slide the Mic/Line switch to [MIC].
ENGLISH
Recording by connecting an external microphone
Insert
securely.
Plug type:
ø 3.5 mm stereo mini plug
“
Press [REC *] to start recording.
See page 15 for recording operations.
* Read the operating instructions for the connected device.
* If the recording level is too low or high, adjust the microphone sensitivity. (➜ page 26)
* The built-in microphone of this unit does not work if another device is connected to the external microphone/Line-in
jack.
* If the connected external microphone is monaural, the sound for one channel may only be recorded.
VQT4J81
3
” is displayed.
33
33
VQT4J81_RR-XS450_420-E_En.indd 33
2012/05/29 9:35:45
Copying to other devices
1
Connect the headphone/earphone jack
(W) of this unit with the audio input (mic)
terminal of the external device with an
audio cable.
Audio Cable
with resistor
(not supplied)
2
3
Start recording on the external device.
Play the file that you want to copy on this
unit.
Stereo
Monaural
mini plug mini plug
To audio
input (mic)
terminal
Insert
securely.
Plug type:
ø 3.5 mm stereo mini
plug
External device
VQT4J81
* Read the operating instructions for the connected device.
* Use the connection cable that matches monaural/stereo of the connected device.
Wrong connection may cause recording trouble (i.e. Only 1 channel is copied.).
* The copied sound quality may differ from the sound quality of this unit.
* Adjust the volume on this unit to copy with a proper volume.
34
34
VQT4J81_RR-XS450_420-E_En.indd 34
2012/05/29 9:35:45
This is the method to record to the “L” folder by connecting an external device to the external
microphone/Line-in jack of this unit.
1
2
3
4
5
6
Slide the Mic/Line
switch to [LINE].
Press [MENU].
Press +, – to select “LINE REC” and press
[q OK] to enter.
Press +, – to select “LINE INPUT” and
press [q OK] to enter.
Press +, – to select
the setting and press
[q OK] to enter.
When connecting to the headphone terminal of
external device or the line output terminal of portable
device, select “HIGH” or “LOW” respectively.
(The factory setting is “HIGH”.)
Press [F2 (CLOSE)].
7
Connect the external device
Audio Cable without resistor
(not supplied)
Insert
securely.
Plug type:
ø 3.5 mm stereo
mini plug
Audio device
To audio output To LINE OUT
(headphone)
(audio out)
terminal
terminal
L
R
Connect with the external device and slide the Mic/
Line switch to “LINE”. Then, the selected line input
setting and the line recording mode will appear.
(➜ page 37)
Line input setting
: HIGH
: LOW
Line recording mode
VQT4J81
• Press [STOP g/RETURN] to stop the unit.
ENGLISH
Recording from other devices
35
35
VQT4J81_RR-XS450_420-E_En.indd 35
2012/05/29 9:35:45
Recording from other devices
8
Press and hold [REC *]
for 1 second or more.
The unit enters the recording
standby.
Blinks
9
Play back the external device and adjust the
input/output level.
” is displayed,
1 If the level meter swings and “
the volume of the external device is too high.
Adjust the volume of the external device to the
“ ” range, even if the volume is turned to the
maximum.
To reconfigure the line input settings, press
[MENU] and follow steps 4 to 6 .
2 After you finish adjusting the input/output level,
stop the sound source of the other device at the
position where you want to start recording.
VQT4J81
10
11
36
Press [REC *] to start recording.
Play the external device.
* Read the operating instructions for the connected device.
* Disconnecting the audio cord during recording will
stop recording.
* Change the line recording mode as necessary.
(➜ page 37)
* The L folder will be automatically selected for
recording when line input sound is recorded.
This unit has the following synchro recording function.
This function detects the silence between tracks, etc.
and then records each track into different files, such as a
first track, second track, etc. If detecting sound from the
external device, recording starts automatically. If detecting
silence for approx. 2 seconds or more, recording is
paused. Detecting sound again will resume recording.
Synchro recording setting
• Press [STOP g/RETURN] to stop the unit.
1
2
3
4
Press [MENU].
Press +, – to select “LINE REC” and press
[q OK] to enter.
Press +, – to select “SYNCHRO REC” and
press [q OK] to enter.
Press +, – to select “ON
(Auto Stop)” or “ON
(Manual Stop)” and press
[q OK] to enter.
Auto: The recording pauses if approx. 2 seconds or
more of silence is detected and stops if silence
continues approx. 15 seconds or more.
Manual: Even if silence continues, the recording
continues to be paused (standby) until
[STOP g/RETURN] is pressed.
(The factory setting is “OFF”.)
36
VQT4J81_RR-XS450_420-E_En.indd 36
2012/05/29 9:35:45
Connect the device, slide the Mic/
Line switch to [LINE] and “
” is
shown on the display.
* Automatic stop is useful when recording CDs etc. that
have more than approx. 2 seconds of silence between
tracks using line recording.
* Manual stop is useful when recording onto cassette
tapes etc. that need switching from side A to side B
causing silence of more than 15 seconds.
* When [MENU] is pressed during recording standby in
step 8 on page 36, the synchro recording setting can
be made.
* If the start of a track is cut from the recording, turn
synchro recording “OFF”.
* Synchro recording cannot be used when using timer
recording for line recording.
Synchro recording:
• Make the synchro recording setting beforehand.
Selecting line recording mode
The sound quality can be changed when recording
with line recording. See page 25 for information about
recording modes.
• Press [STOP g/RETURN] to stop the unit.
1
2
3
4
Press [MENU].
Press +, – to select “LINE REC” and press
[q OK] to enter.
Press +, – to select “LINE REC MODE” and
press [q OK] to enter.
Press +, – to select the setting (PCM
sampling frequency/MP3 bitrate) and press
[q OK] to enter.
(The factory setting is
“MP3 192kbps”.)
Perform steps 1 to 11 on pages 35 and 36.
* When connecting to the headphone output terminal
of the external device, the synchro recording may not
function properly.
To exit the setting screen, press [F2 (CLOSE)].
VQT4J81
1
* When approx. 2 seconds or more of silence cannot be
detected, or depending on the combination of external
devices, the synchro recording may not function.
ENGLISH
To exit the setting screen, press [F2 (CLOSE)].
37
37
VQT4J81_RR-XS450_420-E_En.indd 37
2012/05/29 9:35:45
Index function
By adding Index (position information on the file) to the file, playback position jumps to
the specified position by skip operation (➜ page 17) during playback.
Files within the MUSIC (M) folder, OTHER FOLDER ( ) and recycle bin ( ) folder cannot
be indexed. Also, indexes cannot be added during timer recording or playback.
Adding index
Deleting index
1
• Select a file which has Index to be deleted.
(➜ page 17)
• Press [STOP g/RETURN] to stop the unit.
During recording or playback or
while recording is paused, press
[F2 (INDEX)] at the position where
you want to add an index.
“ ” (blinking) and
“ADDING INDEX” are
displayed.
VQT4J81
“ ” (lighting) is
displayed for the file
to which indexes are
added.
38
* Up to 36 indexes per 1 file can be added.
* Indexes are deleted when the file is deleted
or divided.
* When the battery indicator shows “ ”
(blinking), indexes cannot be added. Also,
adding the index may be impossible on the
border of “ ” and “ ” (blinking).
* During playback, even if you press u at the
position within approx. 2 seconds after the
index point, playback does not stop at the point.
1
2
3
ERASE/A-B&
F1
F2
Press [ERASE/A-B&].
Press +, – to select “INDEX” and
press [q OK] to enter.
Press +, – to
select “YES” and
press [q OK] to
enter.
Indexes are deleted.
* Deleting index marks from a file does not
delete the audio part of the file.
* When more than 1 index are added in 1 file,
they cannot be deleted one by one.
STOP g/RETURN
38
VQT4J81_RR-XS450_420-E_En.indd 38
2012/05/29 9:35:45
Status indication
During playback,
the playback speed
is displayed.
The display will stop
blinking when the
speed is fixed.
Playback speed:
The playback speed can be adjusted in 10% steps for
speeds faster than normal speed (100%), and 5% steps
for speeds slower than normal speed.
Status indication during playback:
Normal speed playback, playback faster and playback
slower are displayed as “ ”, “ ” and “ ” respectively.
* The speed cannot be adjusted for playback using
folder cue (➜ page 49) or timer playback (➜ page 55).
* When the playback speed is other than 100%, voice
emphasis (➜ page 44) does not work.
Playback repeats between the start point (A) and
finish point (B) if those points are set.
1 Press [ERASE/A-B&]
while playing.
The start point (A) is set and
“
” (lighting) and “ ”
(blinking) are displayed.
2
Press [ERASE/A-B&] at
the finish point (B).
The display changes to “
”
(lighting) and repeat play starts.
Cancelling A-B Repeat:
Press [ERASE/A-B&], u, i or [STOP g/RETURN].
* You cannot set A-B Repeat when the time between
the start point (A) and finish point (B) is approx. 2
seconds or less.
* When only the start point (A) is set and playback
continues until the end of the file, the end becomes the
finish point (B) and A-B Repeat begins.
* A-B Repeat by setting the range using 2 files is not
possible.
VQT4J81
The playback speed can be adjusted in 21 steps
from the slow speed of 0.5 times normal speed
(50%) to the fast speed of 2 times normal speed
(200%).
1 Press [F1 (SPEED)]
during playback.
2 Press [F1 (SLOW)] or [F2 (FAST)] to select
the speed and press [q OK] to enter.
ENGLISH
Changing the playback speed A-B Repeat play
39
39
VQT4J81_RR-XS450_420-E_En.indd 39
2012/05/29 9:35:46
Playback from a specified Slight return playback
function returns a short amount of time
position (TIME SEARCH) This
during playback to enable you to listen again. It is
Playback is possible from the time-specified
position.
• Put the unit into the stopped state or playback state.
1
Press [MENU].
2
Press +, – to select “PLAY MENU” and
press [q OK] to enter.
Press +, – to select “TIME SEARCH” and
press [q OK] to enter.
Set the playback start
position.
3
4
a useful function for language learning, or if you
miss hearing something.
1 Press [q OK] during playback.
Each time the button is pressed, playback rewinds by
approx. 3 seconds (factory setting).
(When playback is in progress, go to step 3 .)
(Change the value for “TIME” to
set the start position.)
Setting the return time:
• Put the unit into the stopped state or playback state.
1
Press [MENU].
2
Press +, – to select “PLAY MENU” and
press [q OK] to enter.
Press +, – to select “SLIGHT RETURN” and
press [q OK] to enter.
Press +, – to select the
number of seconds (1 to 5)
and press [q OK] to enter.
3
4
VQT4J81
5
40
Press u, i to select “00:00:00” (hour:minute:
second) and press +, – to change the values.
Press [q OK].
(When playback is in progress, go to step 3 .)
(The factory setting is “3 sec”.)
Playback starts from the specified position.
Press [F2 (CLOSE)] to stop the setting
process midway.
To exit the setting screen, press [F2 (CLOSE)].
* Time search playback applies only to the currently
selected file.
40
VQT4J81_RR-XS450_420-E_En.indd 40
2012/05/29 9:35:46
• Put the unit into the stopped state or playback state.
1
Press [MENU].
2
Press +, – to select “PLAY MENU” and
press [q OK] to enter.
Press +, – to select “REPEAT” and press
[q OK] to enter.
Press +, – to select type
of Repeat play and press
[q OK] to enter.
3
4
(When playback is in progress, go to step 3 .)
(The factory setting is “OFF”.)
To exit the setting screen, press [F2 (CLOSE)].
Repeat indication
* When “FOLDER RANDOM” or “ALL RANDOM” is
selected in Repeat play, it is not possible to skip to the
previous file during playback.
VQT4J81
“
”: “ONE”
“
”: “FOLDER REPEAT”
“
”: “FOLDER RANDOM”
“
”: “ALL REPEAT”
“
”: “ALL RANDOM”
Nothing is displayed for “OFF”.
OFF: Playback is performed in succession from the
selected file to the last file in one folder, and then
playback stops.
ONE: Plays one file repeatedly.
FOLDER REPEAT: Plays all files in the folder
repeatedly.
FOLDER RANDOM: Plays all files within the folder
repeatedly, in random order.
ALL REPEAT: For the MUSIC (M) or OTHER
FOLDER (
), all files within the folder are played
repeatedly. For other folders, the operation is the
same as that for “FOLDER REPEAT”.
ALL RANDOM: For the MUSIC (M) or OTHER
FOLDER (
), all files within the folder are played
repeatedly, in random order. For other folders,
the operation is the same as that for “FOLDER
RANDOM”.
The maximum number of recognised files is 3,000.
ENGLISH
Repeat play (REPEAT)
41
41
VQT4J81_RR-XS450_420-E_En.indd 41
2012/05/29 9:35:46
Skip at regular intervals (TIME SKIP)
This function skips the set time using skip operation (➜ page 17) during playback.
This allows you to quickly move to a position for playback, or repeat playback of the
same portion in a file.
Skip at regular intervals
To change the skip interval
1
• Put the unit into the stopped state or playback state.
Press [q OK] for approx. 1 second
or more during playback.
The mode switches to time skip mode and
“ ” is displayed.
The skip mode
switches each time the
button is pressed.
1
Press [MENU].
2
Press +, – to select “PLAY MENU”
and press [q OK] to enter.
Press +, – to select “TIME SKIP”
and press [q OK] to enter.
Press +, – to
select the time
and press [q OK]
to enter.
3
4
VQT4J81
2
Press u, i.
Each time the button is pressed, 5 seconds
are skipped (factory setting).
When playback is stopped, the mode
returns to the file skip mode.
MENU
F2
(When playback is in progress, go to step 3 .)
You can set the skip interval to 5 sec, 10 sec,
30 sec, 1 min, 5 min, 10 min, or 15 min.
(The factory setting is “5sec”.)
To exit the setting screen, press
[F2 (CLOSE)].
* If the beginning of a file or the index point is present at the position closer than the set skip
interval, the playback skips to such a position.
42
42
VQT4J81_RR-XS450_420-E_En.indd 42
2012/05/29 9:35:46
Shadowing is a learning method to repeat an example immediately after it is heard.
You can use the shadowing function of this unit to alternately repeat the A-B repeat section (example)
and a no-sound or small-volume section (practice). This is convenient for pronunciation or listening
practice for language learning.
To exit the setting screen, press [F2 (CLOSE)].
Practice
Example
A-B repeat section
“
ENGLISH
Shadowing
”is displayed.
No-sound or small-volume
section
Repeat
• Put the unit into the stopped state or playback state.
2
3
4
(When playback is in progress, go to step 3 .)
Press +, – to select “PLAY MENU” and
press [q OK] to enter.
Press +, – to select “SHADOWING” and
press [q OK] to enter.
Press +, – to select the
type of shadowing and
press [q OK] to enter.
If you select “ON (small volume)”,
the volume will be approximately
a third of the current volume
during shadowing.
(The factory setting is “OFF”.)
VQT4J81_RR-XS450_420-E_En.indd 43
Using shadowing function:
1 Perform A-B repeat playback (➜ page 39)
Shadowing is performed using no-sound or smallvolume after A-B repeat playback.
Blinks during shadowing.
Adjusting the volume for shadowing:
You can adjust the volume of just the shadowing portion
separately from the A-B repeat playback portion.
• If A-B repeat is canceled or the shadowing setting is
changed during playback, the volume of the shadowing
portion is returned to the original setting.
VQT4J81
Setting shadowing:
1 Press [MENU].
43
43
2012/05/29 9:35:46
Making sound easier to hear (VOICE EMPHASIS)
This function makes the target sound easier to hear by reducing noise during playback and partially
emphasising the stereo sound at the front, left, or right.
• Put the unit into the stopped state or playback state.
1
Press [MENU].
2
Press +, – to select “PLAY MENU” and
press [q OK] to enter.
Press +, – to select “VOICE EMPHASIS”
and press [q OK] to enter.
Press +, – to select the
type of voice emphasis
and press [q OK] to enter.
3
4
(When playback is in progress, go to step 3 .)
(The factory setting is
“NORMAL”.)
To exit the setting screen, press [F2 (CLOSE)].
VQT4J81
“
44
”: “NOISE CXL L”,
“NOISE CXL H”
“ ”: “FOCUS FRONT”,
“FOCUS LEFT”,
“FOCUS RIGHT”
Nothing is displayed for
“NORMAL”.
The set voice emphasis indication
NORMAL: Plays sound as it was recorded.
NOISE CXL L: Performs a small amount of noise
reduction.
NOISE CXL H: Performs a large amount of noise
reduction.
FOCUS FRONT: Emphasises the sound at the front.
FOCUS LEFT: Emphasises the sound at the left.
FOCUS RIGHT: Emphasises the sound at the right.
* The result may not be sufficient depending on the
sound source.
* Voice emphasis will not work in the following cases.
• During fast/slow playback (➜ page 39)
• During WMA file playback
• During playback of a file with a sampling frequency
of less than 16 kHz
• When “FOCUS FRONT”, “FOCUS LEFT”, or
“FOCUS RIGHT” is selected for playback of a file
recorded with the microphone position set to ZOOM
or a monaural audio file
is only displayed during playback.
44
VQT4J81_RR-XS450_420-E_En.indd 44
2012/05/29 9:35:46
Using the sound EQ enables you to set bass, middle and treble range of volume level according to your
preferred settings for playback.
The sound EQ includes 6 types of fixed mode and the “USER” mode with which you can set the volume
level according to each frequency band.
The sound EQ is effective only when listening with the earphones.
• Put the unit into the stopped state or playback state.
2
Press +, – to select “PLAY MENU” and
press [q OK] to enter.
Press +, – to select “SOUND EQ” and press
[q OK] to enter.
Press +, – to select the sound EQ mode.
3
4
(When playback is in progress, go to step 3 .)
Press [F1 (CONFIRM)] to confirm the details. Press
[F1] again to return to the previous screen.
When you select modes other than “USER”, go to step 5 .
Setting when selecting “USER”:
1 After step 4 , press
[F1 (EDIT)].
150 Hz band is selected.
2 Press u, i to select the frequency band to
change, and press +, – to adjust the volume level
(±6 dB).
5
3 When the settings for the frequency band to
change are all complete, go to step 5 .
Press [q OK] to enter.
To exit the setting screen, press [F2 (CLOSE)].
The selected sound EQ
mode is displayed.
EQ mode
FLAT
BASS
CLEAR
HEAVY
SOFT
VOICE
USER
Effect and application
The sound equalizer function is not used. You
hear the original sound without any change.
Emphasise the bass range strongly.
Emphasise the treble range strongly.
Emphasise the bass and treble ranges slightly.
Emphasise the middle range.
Reduce noise to make human voice easily heard.
This mode enables adjustment of frequency bands
of 150 Hz, 500 Hz, 1 kHz, 4 kHz and 12 kHz.
(The factory setting is “FLAT”.)
VQT4J81
1
Press [MENU].
ENGLISH
Setting the playback EQ (SOUND EQ)
45
45
VQT4J81_RR-XS450_420-E_En.indd 45
2012/05/29 9:35:46
Using an SD Card
You can use a microSD/microSDHC card in addition to the internal memory.
Use this unit to format a new SD card (➜ page 60) before use.
Inserting the SD card
1
Turn off the power
and open the battery/
SD card slot cover.
2
Insert the SD card and
close the battery/SD
card slot cover.
Align the SD card in the
correct direction ( ) and
insert it fully until a “click”
sound is heard.
VQT4J81
To remove the SD card:
1 Turn off the power and
Terminal side
down
Terminal
side
* You can switch between the internal memory and SD
card by pressing [F2 (FOLDER)] for more than
1 second when the stopped screen is displayed.
* This unit is compatible with 2 GB microSD cards, and
4 GB to 32 GB microSDHC cards. (As of May 2012)
* This unit may not operate correctly depending on the
manufacturer or type of SD card.
* For details on SD cards that are confirmed to operate
correctly according to our manufacturing standards,
see the support site below.
http://panasonic.net/support/
* If an SD card is inserted but “microSD” is not displayed
on the SELECT FOLDER screen, etc., this unit does
not recognise the SD card. Turn off the power and
reinsert the SD card.
* Keep the Memory Card out of reach of children to
prevent swallowing.
open the battery/SD card
slot cover.
2 Gently push the SD card.
3 When the SD card
protrudes slightly, slowly
pull the card out.
46
46
VQT4J81_RR-XS450_420-E_En.indd 46
2012/05/29 9:35:46
Using the file search function
“ ” (internal memory) or “ ”
(SD card) is displayed as the
search target.
CALENDAR
Recorded files are refined by date and
SRCH
displayed in a list.
DAY OF WEEK Recorded files are refined by day of the
week and displayed in a list.
RECENT R.
Recorded files are displayed in
FILE
recording date order, starting from the
most recent. (20 files)
When “CALENDAR SRCH” is selected:
Press +, –, u, i to select
the recorded date and press
[q OK] to enter.
The cursor only moves to dates
on which files were recorded.
File search
When “DAY OF WEEK” is selected:
• Press [STOP g/RETURN] to stop the unit.
1
2
Press [LIST ] for approx. 1 second or
more.
Go to step 2 if an SD card is inserted (➜ page 46),
and step 3 if not.
Press +, – to select “INT.
MEMORY” (internal
memory ) or “microSD
CARD” and press [F1
(SEARCH)].
Press +, – to select the
type of file search and
press [q OK] to enter.
ENGLISH
3
Press +, – to select the day of
the week and press [q OK] to
enter.
Only one day of the week can
be selected.
4
Press +, – to select the file and press
[q OK] to enter.
VQT4J81
Using the file search function enables you to
search the files recorded on this unit.
You cannot search for files in the MUSIC (M)
folder or OTHER FOLDER ( ).
g Types of file search
47
47
VQT4J81_RR-XS450_420-E_En.indd 47
2012/05/29 9:35:47
Listening to music on this unit (WMA/MP3 music files)
• Transfer music files to this unit from the
computer. (➜ page 71)
Selecting a file from folder “M”:
See page 12 for selecting a folder and pages 13
and 17 for selecting a file.
1
Select the file and press [q OK].
1
2
3
Playback elapsed time
VQT4J81
Total playback time
(Length of the selected
file (duration of time))
If the file contains track information (ID3 tag,
etc.), 1 track name, 2 artist name and 3
album name are displayed. (If there is no track
name, the file name is displayed. If there is
no artist name or album name, “UNKNOWN
ARTIST” or “UNKNOWN ALBUM” is
displayed.) If they are not fitted in the screen,
the scroll display will appear.
See page 17 for playback operations.
* In MUSIC folder, up to 199 files per one
folder can be recognised and played back.
If subfolders are created, number of files
playable is reduced by the equivalent number
of subfolders created. (➜ “Folder structure on
this unit”, page 69)
* Copyright-protected WMA/MP3 music files
cannot be played.
* WMA/MP3 music files with variable bit rate
may be played, but the playback elapsed time
display or bit rate display may differ from the
actuality, or the repeat positions during A-B
repeat may differ from the set positions.
* If the ID3 tag of the file contains data that
this unit cannot read, the track name, artist
name, etc. may not be displayed properly.
* A file of 2 GB or more in size cannot be
played back.
* If playback of a file of 100 hours or more
playback time has exceeded 100 hours, the
“hour” indication in “hour: minute: second”
blinks.
ID3 tag: track name and other information
stored in MP3 files.
F1
F2
STOP g/RETURN
* Only WMA/MP3 files and PCM (WAV) files
recorded on this unit can be played.
48
48
VQT4J81_RR-XS450_420-E_En.indd 48
2012/05/29 9:35:47
This function enables you to switch subfolders
within the MUSIC (M) folder easily while playing
back files in the MUSIC folder.
Folder cue cannot be performed while playing a
PLAYLIST.
1
Press [F2 (
Registering your favourite tracks to
a playlist
1
CUE)] during playback.
“FOLDER SKIP” is displayed,
which changes to the folder cue
display “ ”.
2
You can register tracks in the MUSIC (M) folder to
a playlist and play them in the desired order.
Press u, i when “
Cancelling folder cue:
You can also select OTHER FOLDER (
2
” is displayed.
• The first track in the previous or following folder is
cued.
• While folder cue is being displayed, the playback
speed cannot be changed. Also, Fast forward/Fast
backward operations are not available. Also, the
MENU or LIST button cannot be operated.
The setting can be cancelled using any of the following
methods. When this is cancelled, files can be skipped
using u, i.
• Press [F2 ( CUE)] again.
• Press [q OK].
• Press [STOP g/RETURN]. (Playback is completed.)
Select the MUSIC (M) folder on the list
screen (➜ page 13).
).
Press +, – to select the file
or the folder and press
[F1 (PLAYLIST)] to enter.
When selecting folders or
selecting files by switching
folders, press u and you can
move within hierarchies. (For
details of file and folder selection
methods, see page 13.)
3
Press u, i to select the playlist
and press [q OK] to enter. (Select from
PLAYLIST 1 to 5.)
The file or all files within the folder are registered to
the selected playlist.
* Playlist files are displayed as “PLAYLIST1.M3U to
PLAYLIST5.M3U” in “PLAYLIST” folder within “MUSIC” folder.
* Do not edit PLAYLIST 1 to 5.M3U on a computer.
* A maximum of 99 files can be registered to 1 playlist.
VQT4J81
Folder cue function
ENGLISH
Using the playlist function
49
49
VQT4J81_RR-XS450_420-E_En.indd 49
2012/05/29 9:35:47
Using the playlist function
Playing tracks registered to the playlist
1
2
Select the playlist (from P1 to P5) (➜ page 12).
Press u, i to select the file to play and
press [q OK].
Changing the order of playlist tracks
1
2
3
Select the playlist (from P1 to P5) on the list
screen (➜ page 13).
Press +, – to select the file
that you want to change
and press [F1 (EDIT)].
Press +, – to select “CHANGE ORDER” and
press [q OK] to enter.
“
4
” is added to the left side of the selected file name.
Cancelling tracks registered to the
playlist
1
2
3
Select the playlist (from P1 to P5) on the list
screen (➜ page 13).
Press +, – to select the file that you want to
erase and press [F1 (EDIT)].
Press +, – to select
“ERASE FILE” and press
[q OK] to enter.
When cancelling all registered tracks:
1 Press +, – to select “ERASE ALL” and press
4
[q OK] to enter.
Press +, – to select “YES” and press
[q OK] to enter.
Press +, – to move
the selected file to the
desired position and
press [q OK] to enter.
VQT4J81
The track order is changed.
50
* Even if files are erased from the playlist, the original file is not deleted from the unit.
* If the original file is deleted, the playback elapsed time and file total playback time are displayed as “-:--”. If this file
is played, playback skips to the next file after approx. 2 seconds.
* If you have deleted an original file, also cancel the track registered to the playlist.
50
VQT4J81_RR-XS450_420-E_En.indd 50
2012/05/29 9:35:47
Using the editing settings, you can edit files recorded on this unit in a variety of methods.
Displaying the editing setting screen
2
• Press [STOP g/RETURN] to stop the unit.
3
3
Press [MENU].
Press +, – to select “EDIT MENU” and
press [q OK] to enter.
Press +, – to select the
item to edit and press
[q OK].
• Press [F1 (TAB)] to switch to other setting screens.
• The setting details and change methods differ
according to the item. For details, see the
corresponding page.
To exit the setting screen, press [F2 (CLOSE)].
Dividing files
You can divide 1 file into 2 files at a specified
position.
1 While playing, press [STOP g/RETURN] at
the point where you wish to divide the file.
While the file is being divided, the status indicator
flashes.
* Files in the MUSIC (M) folder, OTHER FOLDER ( )
or recycle bin ( ) folder cannot be divided.
* A file length of approx. 2 seconds or more is
necessary for dividing a file.
* You cannot divide a file at the beginning of the file.
* Divided files cannot be recovered. It is recommended
that you make a backup copy of the file in advance.
* After the file is divided, the number of files in the folder
increases by one. (➜ page 67)
* If a file containing index marks is divided, the
index marks will disappear after the file is divided.
(➜ page 38)
* If there is no empty space in the internal memory or
SD card or if there is already a total of 199 files in the
folder, you cannot use this function to divide a file.
VQT4J81
1
2
Select “DIVIDE” in the editing setting
screen (➜ left).
Press +, – to select “YES”
and press [q OK] to enter.
ENGLISH
Editing: Dividing files
51
51
VQT4J81_RR-XS450_420-E_En.indd 51
2012/05/29 9:35:47
Editing: Combining files
2 files recorded on this unit can be combined into 1 file.
1
2
3
Select “COMBINE” in the editing setting
screen (➜ “Displaying the editing setting
screen”, page 51).
Press +, – to select “PREVIOUS FILE” and
press [q OK] to enter.
Press +, – to select the file
to be combined and press
[q OK] to enter.
When selecting the file in another
folder, you can move within folder
hierarchies by pressing u. (For
details of file and folder selection
methods, see page 13.)
4
VQT4J81
5
Press +, – to select “NEXT FILE” and press
[q OK] to enter.
Press +, – to select the file to
be combined at the back of
the previous file and press
[q OK] to enter.
6
7
Press +, – to select “NEXT” and press
[q OK] to enter.
Press +, – to select “YES” and press
[q OK] to enter.
While the files are being combined, the status
indicator flashes.
• If you press [F2 (CLOSE)] before combining is
complete, the combine process is cancelled.
* Combined files cannot be returned to their original
state. It is recommended that you make backup copies
of the files in advance.
* If indexed files are combined, the indexing is erased.
* The combined file is saved in the same folder as the
previous files.
Files cannot be combined in following cases.
* Files in the MUSIC (M) folder, OTHER FOLDER ( ) or
recycle bin ( ) folder.
* When the battery indicator displays “
” (blinking) or
”.
“
* Combining files from the internal memory with files
from the SD card.
* If the total file size after combining will exceed 2 GB.
* If there is less free memory space than the size of the
“NEXT FILE”.
* If the recording mode of the two files is different.
52
52
VQT4J81_RR-XS450_420-E_En.indd 52
2012/05/29 9:35:47
Recorded files can be copied or moved between the internal memory and SD card. Microphone
recording files can be copied or moved among folders A, B, C and D.
Copying file
2
3
Select “COPY” in the editing setting screen
(➜ “Displaying the editing setting screen”,
page 51).
Press +, – to select the file to be copied
and press [q OK] to enter.
• When selecting the file in another folder, you can
move within folder hierarchies by pressing u.
(For details of file and folder selection methods,
see page 13.)
• When copying files in the LINE (LINE_SD) folder,
go to step 5 .
Press +, – to select the copy
destination folder and press
[q OK] to enter.
5
Press +, – to select “YES” and press
[q OK] to enter.
While the file is being copied, the status indicator
flashes.
Moving files
Select “MOVE” in step 1 on the left to move files. The
operation is the same as that for file copy.
Press +, – to select the copy
destination (“INTERNAL
MEMORY” or “microSD
CARD”) and press [q OK]
to enter.
* If you press [F2 (CLOSE)] before copying or moving is complete, the process is cancelled.
* Files in the MUSIC (M) folder, OTHER FOLDER ( ) or recycle bin ( ) folder cannot be copied or moved.
” (blinking) or “
”, files cannot be copied or moved.
* When the battery indicator displays “
* If the size of the file to be copied or moved exceeds the amount of free space in the destination, the file cannot be
copied or moved.
VQT4J81
1
4
ENGLISH
Editing: Copying or moving files
53
53
VQT4J81_RR-XS450_420-E_En.indd 53
2012/05/29 9:35:47
Recycle bin function
When deleting files with the recycle bin function set to ON, deleted files are moved to the recycle bin
( ) folder (excluding MUSIC (M) folder or OTHER FOLDER ( )). Files moved to the recycle bin can
be returned to the original folders, so you do not have to worry about deleting files by mistake.
If files are deleted with the recycle bin function set to OFF, deleted files are completely erased without
being moved to the recycle bin (The factory setting is “ON”.).
Returning files in the recycle bin to
the original folder
• Press [STOP g/RETURN] to stop the unit.
1
2
3
VQT4J81
4
54
5
Press [F2 (FOLDER)].
Press +, –, u, i to select “
[q OK] to enter.
” and press
The recycle bin folders exist in the internal memory
and SD card respectively.
Use u, i to select the
1
file you want to return,
2
and press [ERASE/
A-B&] to enter.
1 Stored folder before deletion
2 File number before deletion
Press +, – to select “RESTORE FILE” and
press [q OK] to enter.
Press +, – to select “YES” and press
[q OK] to enter.
The status indicator flashes, and the selected file is
returned to the end of the original folder.
Press [q OK] to return to the screen in step 3 .
54
VQT4J81_RR-XS450_420-E_En.indd 54
* If “✽ FOLDER FULL. CAN’T RESTORE” is displayed,
✽ folder has reached the maximum recordable number
(199). Delete files in the folder, and then try the
procedure again from the beginning.
Emptying the recycle bin folder
When the recycle bin folder is emptied, all of the files
in the recycle bin are completely deleted. Be sure to
save all required data onto a computer or other external
device before emptying the recycle bin folder.
• Press [STOP g/RETURN] to stop the unit.
1
2
3
Press [ERASE/A-B&].
Press +, – to select “EMPTY RECYCLE
BIN” and press [q OK] to enter.
When the recycle bin folder is selected, select
“EMPTY” in step 2 and press [q OK].
Press +, – to select “YES” and press
[q OK] to enter.
The status indicator flashes, and the recycle bin
folder is emptied.
* When the recycle bin function is “ON”, possible remaining
recording time (free space) does not increase even if files
are deleted. To increase the remaining recording time, empty
the recycle bin ( ) folder and erase the files completely.
2012/05/29 9:35:48
Audio can be recorded at the set date and time. The timer can also be used as an
alarm by playing back files or sounds. Set the clock correctly beforehand. (➜ page 11)
ERASE/A-B&
MENU
F2
• Press [STOP g/RETURN] to stop the unit.
1
2
3
4
Press [MENU].
Press +, – to select “COMMON
MENU” and press [q OK] to enter.
Press +, – to select “TIMER &
ALARM” and press [q OK] to enter.
Set items such as
the date and time,
and sound source.
For details on the
items, see page 56.
* Be sure to perform the “OK” operation in
step 5 . If this operation is not performed,
the timer will not operate correctly. If a button
such as [F2 (CLOSE)] is pressed while
setting the timer, “REGISTER SETTING?”
may be displayed. Select “YES” or “NO” and
press [q OK] to enter.
* The sound volume at the timer playback is
the same volume as when the timer was set.
Set the appropriate sound volume before
setting the timer.
ENGLISH
Using the timer
1 Press +, – to select the item and press
[q OK] to enter.
2 Press +, –, u, i to select the setting
STOP g/RETURN
Press +, – to select “OK” and press
[q OK] to enter.
To exit the setting screen, press
[F2 (CLOSE)].
VQT4J81
5
and press [q OK] to enter.
Repeat steps 1 and 2 to complete the
settings.
55
55
VQT4J81_RR-XS450_420-E_En.indd 55
2012/05/29 9:35:48
VQT4J81
Using the timer
Setting Item
Details
SETTING
OFF: Timer does not operate.
ON: Timer operates.
REPEAT
ONCE: Recording or playback is
performed just once.
DAILY: Recording or playback is
performed daily.
SELECT: Recording or playback is
performed every week on the selected
day.
1 Press +, – to select the day and use
[q OK] to add a check mark. (Press
[q OK] again to clear the selection.)
2 When the day is selected, select “OK”
and press [q OK].
TIME 1
Set the start time and end time
Select the item (select the start hour,
minutes, end hour, minutes) using u,
i and set using +, –.
• Up to 12 hours can be set for the period
from start time until end time.
REC/PLAY PLAY: Plays a set file, or plays the alarm
sound.
REC: Records the set sound source.
56
Setting Item
Details
PLAY 2
ALARM: Plays the alarm sound.
FILE: Plays a file.
The file list of the folder being selected is
displayed.
Press +, – to select the file and press
[q OK]. When selecting files by switching
folders, press u and you can move
within hierarchies. (For details of file and
folder selection methods, see page 13.)
SOURCE 3 MIC: Microphone recording.
LINE: Records sound from an external
device.
MODE 3
PCM 44.1kHz, MP3 320kbps,
MP3 192kbps, MP3 128kbps,
MP3 64kbps, MP3 32kbps
REC TO 3
Select the folder in which to save the
recorded file.
• If an SD card folder is selected, insert
the SD card.
When setting the start time and end time, do not mix
up a.m. and p.m.
AM12:00 and PM12:00 represent 0:00 a.m. and noon
respectively. When performing timer recording at 0:00
a.m., set the start time to “AM12:00”.
2
Displayed when “PLAY” is selected for “REC/PLAY”.
3
Displayed when “REC” is selected for “REC/PLAY”.
1
56
VQT4J81_RR-XS450_420-E_En.indd 56
2012/05/29 9:35:48
: Timer is set. The display flashes when the timer is
executed.
: When the repeat settings are “ONCE”, this is displayed if the timer recording fails. To clear the display,
change the settings to “OFF”, or set the timer again.
: When the repeat setting is “DAILY” or “SELECT”, this
is displayed if the timer recording fails. If the next timer
operates normally, the “ ” indication is redisplayed.
* If the power is off at the specified time, the power
turns on and the timer recording starts, and then the
power turns off at the end time. When the power is off
at timer playback time, the file playback starts a little
behind the scheduled time.
* During timer recording (playback), only stop operation
and volume adjustment can be performed. Switch the
Hold function to off before operation if it is on.
* To stop an alarm, press one of the buttons on this unit.
You can stop an alarm even if the Hold function is on.
* After setting the file to be played for timer playback, if
the set file is deleted, the alarm sounds at the timer
start time.
* If a file shorter than the period from the start to end is
specified for timer playback, that file is played repeatedly.
ENGLISH
Timer indication
* When the file playback is assigned as playback
source, the files are played back at the scheduled time
with the playback settings (SOUND EQ (➜ page 45)
etc.) which have already been set when the timer
playback setting was made.
* When MIC or LINE is assigned as recording source,
the recording is made at the scheduled time with
the recording settings (microphone sensitivity
(➜ page 26), the line input setting (➜ page 35), etc.)
which have already been set when the timer recording
setting was made. (excluding the recording mode
(➜ page 25))
* If the clock setting (DATE & TIME) is returned to the
factory setting, the timer operation setting (SETTING)
is automatically turned OFF.
* 1 minute before the timer recording start time, the
recording indicator blinks, and the mode switches to
recording standby.
VQT4J81
g Checking the timer condition or execution
state
57
57
VQT4J81_RR-XS450_420-E_En.indd 57
2012/05/29 9:35:48
Common menu
The following are the settings used for both recording and playback.
Common settings operation
• Press [STOP g/RETURN] to stop the unit.
1
2
3
4
The button operation sound can be set.
Press +, – to select “COMMON
MENU” and press [q OK] to enter.
Press +, – to
select the setting
item and press
[q OK] to enter.
Press +, – to change the setting
and press [q OK] to enter.
For details on “DATE & TIME” (➜ page 11)
and “TIMER & ALARM” (➜ page 55), see the
respective pages.
58
MENU
F2
Press [MENU].
To exit the setting screen, press
[F2 (CLOSE)].
VQT4J81
BEEP SOUND
OFF: No operation beep.
ON: Operation beep is ON.
(The factory setting is “ON”.)
• When “ON” is selected, press +, – to select
your preferred volume and press [q OK] to
enter. (The factory setting is “MIDDLE”.)
REC LED (Recording indicator)
You can choose whether to set the
recording indication light ON or OFF.
OFF: Not lit ON: Lit
(The factory setting is “ON”.)
* Even if it is set to OFF, REC LED lights on
(blinks) as a status indicator while charging
or editing files.
STOP g/RETURN
58
VQT4J81_RR-XS450_420-E_En.indd 58
2012/05/29 9:35:48
BACKLIGHT
Set the backlight lighting time when the button is
pressed.
Type of battery
: Rechargeable battery
: Alkaline battery
AUTO POWER OFF
This function automatically turns the power off if there
is no operation for a certain period of time such as
when recording is stopped. This function helps you
save battery when you forget to turn off the power.
AUTO POWER OFF: 0 min (OFF) to 15 min
(The factory setting is “15min”.)
* You can set the time in 1-minute increments.
* When “OFF” is set, the “AUTO POWER OFF” function
does not operate.
VQT4J81_RR-XS450_420-E_En.indd 59
Lighting time: OFF (does not light), 5 sec, 15 sec, always
ON
(The factory setting is “15 sec”.)
* The backlight may not light when the remaining
battery power is low.
* The backlight does not light in the following conditions.
– While a file is being moved, copied or combined.
CONTRAST
Use this function to adjust the contrast of the
screen. You can choose from 10 levels for the
adjustment.
VQT4J81
Type of battery: RECHARGEABLE, ALKALINE
(The factory setting is “RECHARGEABLE”.)
* If the type of battery and setting do not match, the
battery indicator is not displayed correctly.
* If BATT. SETTING is set to “ALKALINE”, the
rechargeable battery cannot be charged.
ENGLISH
BATT. SETTING
Set the type of batteries used (rechargeable nickel
metal-hydride batteries or alkaline batteries).
Contrast adjustment: 1 (L) to 10 (H)
(The factory setting is “5”.)
59
59
2012/05/29 9:35:48
Common menu
RECYCLE BIN
When the recycle bin function is used, deleted
files are moved to the recycle bin. Before the
recycle bin is emptied, deleted files can be
restored so you do not have to worry about
deleting files by mistake.
or “microSD CARD” and press
[q OK] to enter.
2 Select “YES” and press
[q OK] to enter.
* Save necessary files to the computer or external
devices before formatting.
* When formatted, files in the recycle bin are also
deleted and cannot be restored.
* Cancelling is not possible while formatting.
* Do not remove the battery or SD card while formatting.
* Use this unit to format a new SD card before use.
VQT4J81
OFF: Do not use the recycle bin function
ON: Use the recycle bin function
(The factory setting is “ON”.)
* When the recycle bin function is “OFF”, files that are
deleted cannot be restored.
FORMAT
All files on the internal memory or SD card are
deleted. Deleted files cannot be recovered.
1 Select “INTERNAL MEMORY”
60
60
VQT4J81_RR-XS450_420-E_En.indd 60
2012/05/29 9:35:48
VERSION
VQT4J81
You can check the firmware version of this unit.
ENGLISH
INIT MENU
If the settings of this unit are initialised, settings
except for the “DATE & TIME” setting are restored
to the default state.
Select “YES”, press [q OK] to enter and the
settings are initialised.
61
61
VQT4J81_RR-XS450_420-E_En.indd 61
2012/05/29 9:35:48
System requirements
(As of May 2012)
VQT4J81
Computer
IBM PC/AT compatible machines, Macintosh
• Microsoft® Windows® XP Home Edition/Professional and Service
Pack 2, Service Pack 3
• Microsoft® Windows Vista® Home Basic/Home Premium/Business/
• Pre-installed version
Ultimate and Service Pack 1, Service Pack 2
OS
• Microsoft® Windows® 7 Starter/Home Basic/Home Premium/
Professional/Ultimate and Service Pack 1
• Mac OS X 10.2.8 - 10.7
Interface
USB port (Operation cannot be guaranteed if you use a USB hub.)
✽ Even if the system requirements mentioned in this document are fulfilled, some personal computers cannot be
used.
✽ (Macintosh) This software operates on the standard driver of OS.
✽ Operation is guaranteed only on a compliant OS.
✽ Operation is not guaranteed on an upgraded OS.
✽ Operation is not guaranteed on home-made computers.
✽ When using Windows Media® Player, your computer must fulfill the system requirements of Windows Media®
Player. Please consult Microsoft Corporation for details of Windows Media® Player.
✽ Microsoft, Windows, Windows Media and Windows Vista are registered trademarks or trademarks of Microsoft
Corporation of the U.S. and other countries.
✽ MPEG Layer-3 audio coding technology licensed from Fraunhofer IIS and Thomson.
✽ IBM and PC/AT are registered trademarks of International Business Machines Corporation of the U.S.
✽ Macintosh and Mac OS are trademarks of Apple Inc.
✽ Other system names and product names appearing in this document are in general the registered trademarks or
trademarks of the respective developer companies. Note that the ™ mark and ® mark do not appear in this document.
✽ Depending on the computer environment, malfunctions may occur (e.g. Audio data recorded on this unit cannot
be used. etc.). Panasonic and Panasonic dealers cannot be held liable for any lost audio data or other direct or
indirect damage except in cases of intentional of gross negligence.
62
62
VQT4J81_RR-XS450_420-E_En.indd 62
2012/05/29 9:35:48
You can copy files recorded on this unit to the
computer.
• Start the computer beforehand.
• Turn the unit off beforehand.
1
Take out the unit’s USB plug.
Push and slide
until a “click”
sound is heard.
Storing the USB plug:
Do not use the supplied cable with other devices.
Caution: Use only the supplied USB extension cable
with a ferrite core when connecting to computer.
* The first time you connect the unit to your PC
Because multiple “Found New Hardware” messages
will appear, do not disconnect the unit from your PC
until all messages disappear.
* Screen display during connection with PC
During connection
ENGLISH
Connecting this unit to a computer
During file transfer
ACCESS...
Connect the unit to a computer using the USB
port.
USB cover
Insert the USB plug straight
in the same direction as that
of the terminal.
Firmly insert the USB plug all
the way in. (The USB cover
will not impede insertion as it
is stored inside the unit.)
If the unit cannot be connected to the computer directly,
use the USB extension cable (supplied).
* Do not use any other USB extension cables except the
supplied one.
* This unit cannot be operated while connected to the
computer.
* When the unit is connected to your PC, it can operate
without the battery, because power is supplied by the
computer.
* When the unit is connected to the computer, the
computer may not start (restart). It is recommended
that the unit is removed from the computer when
starting (restarting) the computer.
VQT4J81
2
63
63
VQT4J81_RR-XS450_420-E_En.indd 63
2012/05/29 9:35:48
Connecting this unit to a computer
g Disconnecting the unit
Double-click the icon (Windows XP: [ ], Windows Vista/
Windows 7: [ ]) on the task tray at the bottom of the
computer screen and follow the on-screen instructions
to remove the unit. (The icon may not be displayed
depending on the OS settings.)
After the unit is removed, this unit turns off.
When this unit is turned on after deleting, etc. files on
this unit using the computer, “UPDATING FILE NAME” is
displayed. It may take several minutes until updating is
complete.
g USB mass storage function
This unit functions as a USB memory and is recognised as a
computer’s external storage device.
Data files in the computer can be transferred and saved
on this unit.
VQT4J81
* Operation is not guaranteed in the following cases.
• When two or more USB devices are connected to
one computer (excluding the mouse and keyboard in
normal operation)
• When a USB hub is used
• When a USB extension cable other than the
supplied one is used
* When the unit is connected to the computer, if you
start (restart) the computer or the computer enters
standby mode, the computer may not recognise
the unit. Disconnect the unit and reconnect to the
computer or reconnect the unit after the computer is
restarted.
* Please see the Operating Instructions for the
computer.
64
64
VQT4J81_RR-XS450_420-E_En.indd 64
2012/05/29 9:35:49
The illustrations show Windows XP (OS). The display may differ depending on the OS.
• Connect this unit to a Computer beforehand.
(➜ page 63)
1. Click [start] → [My Computer].
2. Right-click to open the “IC RECORDER (G:)”
(this unit).
(Folder structure on this unit: ➜ page 69)
ENGLISH
Opening folders of this unit
The internal memory and SD card of this unit are
displayed as the following names.
Internal Memory: IC RECORDER
SD card: IC REC SD
3. Right-click to open the folder.
This unit’s files are displayed.
If an SD card is not inserted or an SD card that was
not formatted on this unit is inserted, [Removable Disk]
is displayed.
* Depending on the computer settings, a file with the
extension “.INX” may be displayed. This file contains
index information. If this file is deleted from your
computer, the index information will be deleted.
VQT4J81
ユーザー名
65
65
VQT4J81_RR-XS450_420-E_En.indd 65
2012/05/29 9:35:49
Importing files to a computer/Organising files
• Connect this unit to a Computer beforehand.
(➜ page 63)
Importing files recorded on this unit
to a computer
1. Select the recorded file in this unit, rightclick and select [Copy].
2. Select a folder in the computer, right-click
and select [Paste] to import to the computer.
Folder in this unit
Folder in the computer
Playing recorded files on the computer:
VQT4J81
Select the recorded file in this unit, right-click and select
[Play].
* Using [drag and drop], you can import the files to the
computer as well.
* Never disconnect the unit or remove the SD card
while “ACCESS…” is displayed, otherwise this unit
may be damaged.
* Do not format this unit or the SD card using a
computer.
* File extensions displayed on the computer are “MP3”
for MP3 recording files and “WAV” for PCM recording
files.
* Use the “DATA” folder to save data files from the
computer.
* If you change the names of folders such as
“MIC_A(MIC_A_SD), MIC_B(MIC_B_SD),
MIC_C(MIC_C_SD), MIC_D(MIC_D_SD), LINE(LINE_
SD), MUSIC”, etc. of this unit on the computer, new
folders of the original names will be generated next
time the unit is turned on. (The indications in the
brackets are displayed when using the SD card.) The
folders with changed names are shown in the OTHER
FOLDER ( ) on this unit (➜ page 70).
Delete unnecessary files using the
computer:
Select the recorded file in this unit, right-click, select
[Delete] and [Yes] to enter.
66
66
VQT4J81_RR-XS450_420-E_En.indd 66
2012/05/29 9:35:49
File name
ENGLISH
File naming rules when recording on this unit:
Example: Recording information: September 20, 2012, 17:20/folder A/MP3
001_120920_1720A0.MP3 1 File number (001 to 199)
2 Recording information (1-byte number, 6 characters)
1
2
3 45 6 3 Recording time (1-byte number, 4 characters)
4 Folder name (A to D and L)
“_” (1-byte)
5 Keyword Number (0 in this unit)
6 File extension (.MP3/.WAV)
The above file name is displayed on the computer, however, “001_” is not displayed on this unit’s screen.
“120920_1720A0.MP3” is displayed instead.
Automatic change of file name by file deletion or editing:
Deleting/combining a recorded file on this unit will move subsequent files forward and file numbers are automatically
reassigned.
Example: When “002_120925_0905A0.MP3” is deleted
001_120920_1720A0.MP3
002_120925_0905A0.MP3
003_121003_1233A0.MP3
004_121231_1915A0.MP3
001_120920_1720A0.MP3
002_121003_1233A0.MP3
003_121231_1915A0.MP3
VQT4J81
File number parts of all file names following the deleted or combined file are changed.
1 file is newly added by dividing or copying a file, etc. The file numbers of the files followed by the added file are
automatically moved backward and file number parts of those file names are changed.
67
67
VQT4J81_RR-XS450_420-E_En.indd 67
2012/05/29 9:35:49
File name
File name in the MUSIC folder and order of
playback:
By returning the files imported to the computer to this
unit, such files can be played back on this unit. (If file
names are changed, those files cannot be played.)
However, if the names of files on this unit have been
changed by deleting files, etc., the files to be returned
may duplicate the file numbers of files on this unit. In
this case, the returned files may not be played back
on this unit. When playing back after returning files
that were once imported to the computer to this unit,
playback by transferring those files to the MUSIC folder
is recommended. (➜ pages 48, 71)
If numbers are added at the beginning of file names in
the MUSIC folder, playback is performed from the file
with the smallest number in priority. Up to 3 digits of
number can be identified. If additional methods differ
such as 1, 01, 001, then “001 to 999” takes the first
priority, “01 to 99” takes the second and “1 to 9” takes
the third priority. You can change the order of playback
according to your preference by adding numbers at
the beginning of file names, such as 001musicA.MP3,
002musicB.MP3. The displayed order will also be the
same as the playback order.
For transferring files to the MUSIC folder, see page 71.
For playback of such files, see page 48.
VQT4J81
Returning the files imported to the computer
to this unit:
68
68
VQT4J81_RR-XS450_420-E_En.indd 68
2012/05/29 9:35:49
Folders “A”, “B”, “C”, “D”, “L” and “M” are displayed as “MIC_A”, “MIC_B”, “MIC_C”, “MIC_D”, “LINE” and
“MUSIC” (for the internal memory) respectively on the computer or the list screen of this unit.
The “DATA” folder is used to store data files.
Folder hierarchy of this unit:
: Folder
MIC_A (MIC_A_SD)
001_120920_1720A0.MP3
002_120925_0905A0.MP3
MIC_B (MIC_B_SD)
MIC_C (MIC_C_SD)
MIC_D (MIC_D_SD)
LINE (LINE_SD)
MUSIC ✽
RECYCLE
: File
✽ The MUSIC folder is used when transferring WMA/MP3 music files, etc. from the computer.
You can create subfolders in the MUSIC folder. The structure example is shown as below.
First hierarchy
Second hierarchy
Third hierarchy
MUSIC
Music 01.MP3
PLAYLIST
PLAYLIST1.M3U
PLAYLIST2.M3U
Playlist files
(➜ page 49)
Artist A
Music A.MP3
Album A1
OTHER FOLDER (➜ page 70)
Music A1-1.MP3
Album A2
DATA
Artist B
Playback is available to
the second hierarchy.
Files on the third
hierarchy and after
cannot be played.
Album A2-1
• In MUSIC folder and OTHER FOLDER, up to 199 files per one folder can be recognised and played back. (If
subfolders are created, number of files playable is reduced by the equivalent number of subfolders created.)
VQT4J81
Internal memory (SD card)
ENGLISH
Folder structure on this unit
69
69
VQT4J81_RR-XS450_420-E_En.indd 69
2012/05/29 9:35:49
Folder structure on this unit
g OTHER FOLDER (
)
Folders creating using a device other than this unit and
the “DATA” folder are displayed in “OTHER FOLDER”.
“OTHER FOLDER” is displayed on this unit, but the
folders are directly displayed without displaying “OTHER
FOLDER” on a computer.
Playing files in OTHER FOLDER:
You can select and play files in the same way as with the
MUSIC (M) folder (➜ page 48).
The folder cue function (➜ page 49) can also be used in
the same way.
(Example of folder structure)
First hierarchy
Second hierarchy
OTHER FOLDER
DATA
TIMER
Third hierarchy
Playback is available to
the second hierarchy. Files
on the third hierarchy and
after cannot be played.
T1
Meeting1.MP3
T2
* The types of files that can be played, number of files
that can be recognised, and other conditions are the
same as for the MUSIC (M) folder (➜ page 48).
When there are subfolders in “OTHER FOLDER”, files
up to the second level can be played.
* Files transferred directly to the internal memory or an
SD card cannot be played with this unit. Transfer files
to the MUSIC (M) folder or insert them in a folder and
then transfer them.
g RECYCLE folder
This is the recycle bin. When the recycle bin
function is “ON”, deleted recording files are
moved to the RECYCLE folder (recycle bin).
* Files in the MUSIC (M) folder or OTHER FOLDER
( ) are not moved to the recycle bin and are
completely deleted from the unit irrespective of the
recycle bin function settings.
* Numbers such as “001_” are attached to the start of
file names for files moved to the recycle bin to show
the order in which they were moved. This number is
only displayed on a computer.
VQT4J81
VOICE
Lecture1.MP3
70
70
VQT4J81_RR-XS450_420-E_En.indd 70
2012/05/29 9:35:49
You can enjoy music by transferring music files stored in the computer to this unit.
This unit can play back MP3, WMA, and PCM (WAV) music files.
Up to 199 of transferred files can be played on this unit.
If subfolders are created, number of files playable is
reduced by the equivalent number of subfolders created.
* Never disconnect the unit or remove the SD card
while “ACCESS…” is displayed, otherwise this unit
may be damaged.
* You can create subfolders in the MUSIC folder to
transfer and play back files. For folder structure, see
page 69.
* You can play the files in each folder in the desired
order by adding numbers to the beginning of file
names. (➜ page 68)
* This unit does not support PD-DRM and DRM10.
VQT4J81
Only PCM (WAV) files recorded on this unit.
*Transferring
Using [drag and drop],
you can
import
filesunit
to the
music
files
tothe
this
computer as well.
computer
*from
Never the
disconnect
the unit or remove the SD card
while MUSIC
“ACCESS…”
is this
displayed,
otherwise this unit
• Open
folder of
unit beforehand.
maypage
be damaged.
(➜
65)
* You can create subfolders in the MUSIC folder to
play back
For folderand
structure,
see
1. transfer
Select and
a music
file,files.
right-click
select
page
69.
[Copy].
*
back
files inof
the
MUSIC
the order
2. When
Selectplaying
MUSIC
folder
this
unit,folder,
right-click
of playback will be the same as the order of transfer to
and select [Paste] to transfer to this unit.
this unit. (When transferring multiple files at a time, the
computer determines the order of transfer.) However,
if numbers are added at the beginning of file names,
the order of playback is determined based on the
numbers. (➜ page 68)
* This unit does not support PD-DRM and DRM10.
ENGLISH
Transferring music files to this unit
71
71
VQT4J81_RR-XS450_420-E_En.indd 71
2012/05/29 9:35:49
Q & A (Frequently Asked Questions)
Question
Answer
Can I play files recorded on other • You can play files recorded on IC recorders using MP3 or PCM format
by transferring them to MUSIC folder. (➜ page 71) However, cannot
Panasonic IC recorders?
play files with other formats (i.e. ADPCM and TRC formats) because
the recording format is different.
What kind of files can be played? • WMA/MP3 files, and PCM (WAV) files recorded on this unit can be
played. AAC and other files cannot be played.
Error messages
Error message
• NO PLAYABLE FILES
• NO FILE
PLEASE INSERT microSD CARD
VQT4J81
CAN’T READ microSD CARD.
INSERT CARD AGAIN
CAN’T READ INTERNAL MEMORY
CAPACITY FULL
72
Checkpoints
• This is displayed when there are no files in the folder and you attempt to
play back, perform Time Search or delete a file.
• This is displayed when you attempt to format without the SD card
inserted.
• This is displayed when copying or moving a file within the LINE folder
without the SD card inserted.
• This is displayed when the SD card fails to be recognised or is broken.
(➜ page 46) Insert the card again.
• Format it on this unit. (➜ page 60) If the problem persists, the internal
memory may be damaged. Consult your dealer.
• This is displayed when you attempt to record to the internal memory or
SD card without free space.
• This is displayed when you attempt to combine files when the free space
is smaller than the size of back file.
72
VQT4J81_RR-XS450_420-E_En.indd 72
2012/05/29 9:35:49
INDEX FULL
INDEX ERROR
CAN’T CREATE ANY MORE FILES IN
THIS FOLDER
VQT4J81
NOT ENOUGH SPACE FOR DIVIDING
Checkpoints
• This is displayed when you attempt to record with the number of
files exceeding maximum recordable number (199) in each folder.
(➜ page 12)
• This is displayed when you attempt to add the index exceeding the
maximum number (36) of indexes that can be added in 1 file.
• This is displayed when you attempt to add the index at the same
position.
• This is displayed when you attempt to add the index while the battery
indicator shows “ ” (blinking).
• The file cannot be divided because the number of files in the folder
has reached the limit (199). Delete unnecessary files and divide.
(➜ page 19)
• This is displayed when you attempt to divide a file when there is not
enough free space required to divide a file. Delete unnecessary files and
divide.
ENGLISH
Error message
FILE FULL
73
73
VQT4J81_RR-XS450_420-E_En.indd 73
2012/05/29 9:35:49
Error messages
Error message
Checkpoints
• This may be displayed when recording is performed using a slow write
speed SD card, or using the internal memory/SD card whose writing
speed is temporarily slow due to fragmentation*. Changing the recording
mode to MP3 may remedy the problem. To solve the fragmentation
problem, save necessary files to the computer or external device and
format the internal memory or SD card on this unit. (➜ page 60)
• If the error persists even after formatting, check if compatibility of your
SD card has been verified according to our manufacturing standards.
(➜ page 46)
If you repeat writing or deleting files, the file alignment becomes
discontinuous in the internal memory, and continuous space area may
be reduced (called fragmentation). If the fragmentation advances, filewriting speed becomes slow and writing may not be performed properly.
CAN’T DIVIDE.
• This is displayed when you attempt to divide a file of a short recording
REC TIME IS TOO SHORT
time (approx. less than 2 seconds).
CAN’T DIVIDE FILE AT THIS POSITION • This is displayed when you attempt to divide a file at the position where
file division is impossible (around the start or the end of the file).
CAN’T COMBINE.
• This is displayed when the total size of files to be combined exceeds
TOTAL SIZE EXCEEDS 2GB
2 GB.
• This is displayed when you attempt to combine files whose recording
CAN’T COMBINE.
modes differ from each other.
DIFFERENT FILE FORMATS (REC
QUALITY)
• This is displayed when you attempt to copy, combine or move files while
• LOW BATTERY. CHARGE BATTERY
the battery indicator shows “ ” (blinking) or “ ”. (➜ page 10)
BEFORE ✽✽✽ FILES
• LOW BATTERY. REPLACE BATTERY
BEFORE ✽✽✽ FILES
VQT4J81
• MEMORY WRITE SPEED IS SLOW
• microSD CARD WRITE SPEED IS
SLOW
74
74
VQT4J81_RR-XS450_420-E_En.indd 74
2012/05/29 9:35:49
EMPTY RECYCLE BIN
✽ FOLDER FULL
CAN’T RESTORE
CAN’T MOVE FILE.
EMPTY RECYCLE BIN
CAN’T FORMAT
CAN’T ADD FILES.
PLAYLIST FULL
CAN’T ADD ALL FILES TO PLAYLIST
CAN’T EDIT PLAYLIST.
NO FILE
ENGLISH
Checkpoints
• The file cannot be copied (moved) because the number of files in the
copy (move) destination folder has reached the limit (199). Delete files
in the copy (move) destination folder or specify another folder as copy
(move) destination.
• This is displayed when you attempt to delete files or folders with the
maximum number of files (199) present in the recycle bin folder and no
more files can be moved to the recycle bin ( ). (➜ page 54)
• This is displayed when you attempt to restore files from the recycle
bin ( ) to the original folder and the maximum number of recordable
files are present in the original folder. (✽ means the folder name for the
original folder.) (➜ page 54)
• This may be displayed when there is no free space on the SD card.
(➜ page 54)
• The internal memory or the SD card may be damaged. Consult your
dealer.
• This is displayed when you attempt to register files with the playlist
with the number exceeding maximum number (99) of files that can be
registered with each playlist. (➜ page 49)
• This is displayed when not all files can be registered because the
number of files exceeds the maximum number (99) of files that can be
registered while registering the files with playlist. (➜ page 49)
• The editing operation for the playlist is impossible because there are
no files registered in the selected playlist (PLAYLIST1 to 5.M3U).
(➜ page 49)
VQT4J81
Error message
COPY/MOVE DESTINATION
FOLDER FULL
75
75
VQT4J81_RR-XS450_420-E_En.indd 75
2012/05/29 9:35:49
Error messages
Error message
✽✽✽ USE ONLY ALPHANUMERICS
INSERT microSD CARD FOR TIMER
RECORDING
CAN’T START TIMER OPERATION
CAN’T ✽✽✽. FILE IS OUTSIDE PLAY
RANGE OF ALL SONG MODE (MAX
3,000 SONGS)
Checkpoints
• Some of the character strings in the file name or folder name are not
supported (characters other than Japanese and English). Such files and
folders cannot be added to the playlist.
• This is displayed when the SD card is not inserted at the completion of
the timer recording setting.
• This is displayed when the timer has failed such as when the SD card
is not inserted or the recording is in progress during timer recording
setting.
• This is displayed when you attempt to select files beyond the playback
range (max. 3,000 files) for all repeat (random) of MUSIC or OTHER
FOLDER, or when you attempt to set all repeat (random) while selecting
files beyond the playback range (max. 3,000 files). (➜ page 41)
VQT4J81
“✽✽✽” indication differs depending on the operations.
76
76
VQT4J81_RR-XS450_420-E_En.indd 76
2012/05/29 9:35:49
Symptom
Checkpoints
Battery
Cannot use a battery that can
• This unit considers the battery as empty even if there is actually power left in
still be used on other equipment.
it. This is to preserve the clock setting.
• Did you set the “AUTO POWER OFF” function? (This function turns the
power off if there is no operation for a certain period of time* such as when
the unit is stopped.) (➜ page 59)
The factory setting is 15 minutes.
Playback is extremely short
• The rechargeable battery life is over. (Number of recharging times of
despite recharging.
supplied rechargeable battery: Approx. 300) Replace with a new specified
rechargeable battery (optional).
• The temperature of this unit has risen. Disconnect the unit from the computer
“
” is displayed when the
and leave it for a while. Then, recharge the battery again.
battery is recharged.
• Are you trying to recharge a battery other than the specified rechargeable
Cannot recharge batteries.
battery or an alkaline battery? Insert the specified rechargeable battery
(supplied) and recharge it.
• The rechargeable battery is not properly inserted. Remove the battery
completely once. Then, insert it again.
• Is alkaline battery set in the battery switching setting?
Switch the setting to the rechargeable battery setting and recharge it.
(➜ page 59)
VQT4J81
Before requesting service, make the following checks. If you are in doubt about some of the check points, or if the
remedies indicated in the chart do not solve the problem, consult your dealer for instructions.
ENGLISH
Troubleshooting guide
77
77
VQT4J81_RR-XS450_420-E_En.indd 77
2012/05/29 9:35:49
Troubleshooting guide
Symptom
Operations
The unit does not start.
No operation.
Checkpoints
• Make sure the battery is correctly inserted. Remove the battery completely
and then insert it back into the unit again.
• The battery has run down. When using the specified rechargeable battery
(supplied), recharge it. When using the AAA (LR03) battery, replace it with a
new one. (➜ page 7)
• The Hold function is on. Switch Hold off. (➜ page 10)
• You cannot operate on this unit when the unit is connected to a computer.
Recording
VQT4J81
The memory is used completely
earlier than expected.
• Remaining recording time largely differs depending on the recording mode.
(➜ page 86) Select a suitable recording mode according to the purpose for
use. (➜ page 25)
• Is much data stored? Delete unnecessary files.
• VAS is functioning. (➜ page 31)
Recording is suspended by
itself.
Howling occurs when listening
• Turn down the volume. (➜ page 17)
to the recording in progress with • Keep earphones and this unit separate. (➜ page 18)
earphones.
• When you are using an external microphone, keep earphones and external
microphone separate.
Recording ended halfway.
• If the unit receives a shock (e.g. it is dropped), if the battery comes off or the
battery runs out during recording, recording data may not be updated.
• There may be no space left in the memory.
78
78
VQT4J81_RR-XS450_420-E_En.indd 78
2012/05/29 9:35:49
• You formatted the internal memory of this unit or the SD card using the
computer. If they are formatted using the computer, the optimum performance
of this unit may not be achieved. Format it on this unit. (➜ page 60)
• This unit may not operate correctly depending on the SD card manufacturer
or type of SD card.
• For details on cards that are confirmed to operate correctly according to our
manufacturing standards, see the support site below.
http://panasonic.net/support/
• VAS is functioning. (➜ page 31)
Noise is heard from the recorded • If you brush this unit with your hand or an object touches this unit during
voice.
recording, noise will be recorded through the microphone. Avoid contact of
object during recording.
• Set the microphone sensitivity to “LOW” or keep the microphone distance
Recorded sound is distorted.
farther away from the recording source. (➜ page 26)
There is a noise at the beginning
If the sound is still distorted, set the Low Cut filter setting to ON (➜ page 26),
of sound.
set the recording level adjustment to Manual and adjust the recording level
before recording. (➜ page 27)
Recorded sounds contain noise • Move a mobile telephone away from this unit when you use the two in the same area.
that make it difficult to hear
• Set the “LOW CUT FILTER” to “ON”. Noise is reduced and listening may
sounds.
become easier. (➜ page 26)
• Perform test recording switching the recording mode (➜ page 25) or
microphone sensitivity (➜ page 26) and set the most appropriate recording
environment.
Recorded sound differs from the • Is Recording EQ (➜ page 29) or “LOW CUT FILTER” (➜ page 26) set?
actual sound.
ENGLISH
Sound skipping on the recorded
file.
Checkpoints
VQT4J81
Symptom
Recording
79
79
VQT4J81_RR-XS450_420-E_En.indd 79
2012/05/29 9:35:49
Troubleshooting guide
Symptom
Recording
Sound is recorded in a
recording mode other than the
set recording mode.
Recorded sound is too loud or
too low.
The level meter does not move
during recording. The recorded
file produces no sound.
Checkpoints
• Did you change the microphone position before recording? When the direct
scene setting is set to ON, changing the microphone position will change the
recording mode to the set recording mode. (➜ page 23)
• Is the recording level adjustment set to manual? (➜ page 27) If so, set the
proper recording level (➜ page 28) or set the recording level adjustment
setting to AUTO.
• Switch the microphone sensitivity. (➜ page 26)
• Is the recording level adjustment set to “MANUAL” and is the recording level
set to “0”? Adjust the recording level. (➜ page 28)
Playing
VQT4J81
No sound from the speaker.
Cannot hear any sound.
A file in the MIC_A to MIC_D,
LINE or RECYCLE folder cannot
be played.
• There is no sound when you have connected earphones. (➜ page 18)
• Adjust the sound volume. (➜ page 17)
• The file name was changed. Only files named according to the file naming
rules can be played in folder MIC_A through MIC_D, LINE or RECYCLE.
Even if file names are not changed, if some file numbers overlaps in the
folder, those files cannot be played. (➜ page 68) Playback is possible if they
are transferred to the MUSIC (M) folder. (➜ page 71)
• The transfer destination is wrong. If the file transferred from the computer is
stored in the recording folder, it cannot be played back on this unit. Transfer
the file to the MUSIC (M) folder. (➜ page 71)
80
80
VQT4J81_RR-XS450_420-E_En.indd 80
2012/05/29 9:35:49
Cannot play a file in the MUSIC
(M) folder or OTHER FOLDER
( ), or the playback is not
correct.
• PCM (WAV) files recorded on this unit and WMA/MP3 files can be played on
this unit. Other file formats such as AAC cannot be played.
• In MUSIC folder and OTHER FOLDER, up to 199 files per one folder can
be recognised and played back. (If subfolders are created, number of
files playable is reduced by the equivalent number of subfolders created.)
Transferred files exceeding the maximum number cannot be played.
• For MUSIC (M) folder or OTHER FOLDER ( ), playback is available to
the second hierarchy. Files on the third hierarchy and after cannot be played
(➜ page 69).
• Copyright-protected files cannot be played even if they are transferred via
Explorer.
• Was the file erased after registered with the playlist? Transfer the file as it
was or delete the file name from the playlist. (➜ page 50)
Playback speed is too fast or slow. • You changed the playback speed. (➜ page 39)
• Ensure the plug is inserted firmly.
There is no sound from the
• Wipe the plug clean.
earphones or it is difficult to
hear or noisy.
• If this unit is connected to the computer and then a file on the unit is deleted,
The selected file changes on
the file selected on this unit may change. For the MUSIC folder, the file
its own.
immediately under the MUSIC folder is selected. If there are no files, “NO
“NO PLAYABLE FILES” is
PLAYABLE FILES” is displayed. Reselect the file.
displayed.
There is no sound or the
• Is the shadowing function set to ON? (➜ page 43)
volume is low during A-B repeat
playback.
ENGLISH
Checkpoints
VQT4J81
Symptom
Playing
81
81
VQT4J81_RR-XS450_420-E_En.indd 81
2012/05/29 9:35:50
Troubleshooting guide
Symptom
Checkpoints
Timer
Timer recording does not
operate properly.
(Timer Recording failed.)
• Set the clock with correct date and time. (➜ page 11)
• The folder at the recording destination is full. Delete unnecessary files.
(➜ page 19)
• The battery has run down. Replace with a new battery. (➜ page 7)
When using the rechargeable battery, recharge it. (➜ page 7)
• Is there sufficient space in the internal memory? Delete unnecessary files.
(➜ page 19)
• Is the unit connected to the computer, etc.? Disconnect it from the computer.
• If the unit is still used even if the timer playback time comes, the current
operation is prioritised. Press [STOP g/RETURN] to stop the unit.
• If another recording is in progress even if the timer recording start time
comes, the current recording is prioritised. Stop the recording. However, if
you are using the unit for operations other than recording, the timer recording
is prioritised.
Others
The power cannot be turned on.
VQT4J81
The power automatically turns
off.
SD card cannot be recognised.
82
• The battery may have run out. Replace the battery with the new one or charge
the rechargeable battery. (➜ page 7)
• Did you set the “AUTO POWER OFF” function? (This function turns the
power off if there is no operation for a certain period of time* such as when
the unit is stopped.) (➜ page 59)
The factory setting is 15 minutes.
• The SD card is not properly inserted. Turn off the unit and reinsert the SD
card. (➜ page 46)
• Was the SD card formatted using the computer, etc.? Format it on this unit.
(➜ page 60)
82
VQT4J81_RR-XS450_420-E_En.indd 82
2012/05/29 9:35:50
Cannot delete a file or folder.
Free space does not increase
even after files were deleted.
Cannot divide a file.
This unit is not recognised by a
computer.
• If WMA/MP3 music files transferred from the computer are Read-only, or
subfolders are created in the MUSIC folder or OTHER FOLDER, they cannot
be deleted on this unit. Delete them on the computer. (➜ page 66)
• Empty the recycle bin folder. (➜ page 54)
• Is there sufficient space in the internal memory?
• 199 recorded files (maximum recordable number) may be present in the
folder. If the folder contains 199 recorded files, dividing a file is not possible.
• Is the recording time for the file too short? Use a file with longer recording
length. A file length of approx. 2 seconds or more is necessary for dividing
a file.
• Play the file up to the position where you want to divide it, and then press
[STOP g/RETURN]. (➜ page 51)
• Connect this unit with the computer properly. (➜ page 63)
• Disconnect this unit from the computer and connect it again.
• Disconnect all USB devices (excluding the mouse and keyboard in normal
operation) and connect this unit alone. If the computer is equipped with
multiple USB terminals, connect this unit to a different USB terminal.
• Is the unit connected via the USB hub? Disconnect the hub once and directly
connect this unit to the USB terminal.
• The OS on the computer may not be compliant with this unit. (➜ page 62)
• Is the network drive assigned? If the network drive is assigned, the drive
letters (alphabet letters in the drive name) conflict and this unit’s drive name
may become invisible. Change the assignment of the network drive before
connection.
ENGLISH
Checkpoints
VQT4J81
Symptom
Others
83
83
VQT4J81_RR-XS450_420-E_En.indd 83
2012/05/29 9:35:50
Troubleshooting guide
Symptom
Checkpoints
Others
The file name of the recorded
file or recording date and time
information differ from the real
date and time.
Date and time are not displayed
correctly.
• Has the unit been left for a long period of time after the battery was removed
or the battery was exhausted?
Set the clock (DATE & TIME) again. (➜ page 11)
• File search is for searching for files in the recording folder based on the file
names assigned at the time of recording (➜ page 67). Therefore, it cannot
properly search for any file recorded when the clock was not set correctly,
renamed using a computer, or moved to the MUSIC folder or another folder
using a computer.
• File search is executed only for the files in the selected memory. Select the
memory (internal memory or SD card) before starting file search.
VQT4J81
File search does not operate
properly.
• Set the clock. (➜ page 11)
84
84
VQT4J81_RR-XS450_420-E_En.indd 84
2012/05/29 9:35:50
Audio
Sampling frequency
(The bracket [ ] shows
the recording mode.)
44.1 kHz [PCM 44.1kHz]
44.1 kHz [MP3 320kbps]
44.1 kHz [MP3 192kbps]
44.1 kHz [MP3 128kbps]
22.05 kHz [MP3 64kbps]
16 kHz [MP3 32kbps] (Monaural)
Recording format
Linear PCM (16 bit)/MP3
Playable bit rate 1
16 kbps to 320 kbps (MP3)
32 kbps to 192 kbps (WMA)
Playable sampling
8 kHz to 48 kHz (MP3)
frequency 1
22.05 kHz to 48 kHz (WMA)
Frequency characteristic 20 Hz to 21,000 Hz [PCM 44.1kHz]
(-10 dB, during recording/ 20 Hz to 21,000 Hz [MP3 320kbps]
playback.)
20 Hz to 20,000 Hz [MP3 192kbps]
20 Hz to 17,000 Hz [MP3 128kbps]
(The bracket [ ] shows
20 Hz to 7,500 Hz [MP3 64kbps]
the recording mode.)
20 Hz to 6,700 Hz [MP3 32kbps]
Built-in microphone S/N 45 dB (PCM 44.1 kHz) Filter (JIS A)
1
For MUSIC (M) folder and OTHER FOLDER (
)
USB
Audio Earphone
Output
Speaker
Output
Audio External
Input
Microphone/
Line-in
USB2.0 (Hi-Speed) DC 5 V / 500 mA
ø 3.5 mm, 16 Ω,
Max. 11 + 11 mW
ø 20 mm, 8 Ω,
90 mW (RMS)
ø 3.5 mm,
0.80 mV plug in power
Max. Dimensions (W × H × D)
40.8 mm × 103.1 mm × 16.2 mm
Cabinet Dimensions (W × H × D)
38.5 mm × 102.5 mm × 14.8 mm
Mass
Approx. 54 g with battery
Approx. 43 g without battery
Operating
0 °C to 40 °C
Temperature
Operating Humidity
20% RH to 80% RH
(No condensation)
Rechargeable
5 °C to 35 °C
temperature range
Internal Memory
2
4 GB
2 GB
Usable capacity will be less.
2
2
(RR-XS450)
(RR-XS420)
VQT4J81
Power
Rechargeable battery DC 1.2 V (1 AAA rechargeable
Ni-MH (nickel-metal hydride)
battery, HHR-4AGE)
USB charging (charging time:
approx. 2 hours)
Dry-cell battery
DC 1.5 V (1 AAA LR03 battery
(alkaline battery))
ENGLISH
Specifications
85
85
VQT4J81_RR-XS450_420-E_En.indd 85
2012/05/29 9:35:50
Specifications
Battery life (may be less depending on the operating
conditions.)
When the supplied rechargeable battery (HHR-4AGE) is used
Recording mode
PCM 44.1kHz (Stereo)
MP3 320kbps (Stereo)
MP3 192kbps (Stereo)
MP3 128kbps (Stereo)
MP3 64kbps (Stereo)
MP3 32kbps (Monaural)
Rec 1
approx. 17 h. 30 min.
approx. 20 h. 30 min.
approx. 20 h. 30 min.
approx. 21 h.
approx. 25 h.
approx. 27 h. 30 min.
Play 2
approx. 10 h.
approx. 10 h. 30 min.
approx. 10 h. 30 min.
approx. 10 h. 30 min.
approx. 11 h.
approx. 11 h.
When the Panasonic alkaline (AAA LR03) battery is used
Recording mode
PCM 44.1kHz (Stereo)
MP3 320kbps (Stereo)
MP3 192kbps (Stereo)
MP3 128kbps (Stereo)
MP3 64kbps (Stereo)
MP3 32kbps (Monaural)
Rec 1
approx. 25 h.
approx. 30 h.
approx. 30 h.
approx. 31 h.
approx. 36 h. 30 min.
approx. 38 h.
Without recording monitor, Recording indicator: OFF,
recording level adjustment setting: AUTO, When using
the internal memory
2
When audio is output from speaker (Volume: 11,
Playback speed control: 100%)
1
VQT4J81
Play 2
approx. 19 h.
approx. 20 h. 30 min.
approx. 20 h. 30 min.
approx. 20 h. 30 min.
approx. 21 h. 30 min.
approx. 21 h. 30 min.
Standard recordable time (may be less depending on
the operating conditions.)
RR-XS450: When using the internal memory (4 GB)
Recording mode
PCM 44.1kHz (Stereo)
MP3 320kbps (Stereo)
MP3 192kbps (Stereo)
MP3 128kbps (Stereo)
MP3 64kbps (Stereo)
MP3 32kbps (Monaural)
Recording time
approx. 6 h.
approx. 27 h.
approx. 45 h.
approx. 68 h.
approx. 136 h.
approx. 272 h.
Bit rate
1411 kbps
320 kbps
192 kbps
128 kbps
64 kbps
32 kbps
RR-XS420: When using the internal memory (2 GB)
Recording mode
PCM 44.1kHz (Stereo)
MP3 320kbps (Stereo)
MP3 192kbps (Stereo)
MP3 128kbps (Stereo)
MP3 64kbps (Stereo)
MP3 32kbps (Monaural)
Recording time
approx. 3 h.
approx. 13 h.
approx. 22 h.
approx. 33 h. 30 min.
approx. 67 h.
approx. 134 h.
Bit rate
1411 kbps
320 kbps
192 kbps
128 kbps
64 kbps
32 kbps
* Specifications are subject to change without notice.
86
86
VQT4J81_RR-XS450_420-E_En.indd 86
2012/05/29 9:35:50
g Unit
• Avoid using or placing this unit near sources of
heat.
• To avoid product damage, do not expose this
product to rain, water or other liquids.
• The unit’s speaker does not have magnetic
shielding. Do not place the unit near televisions,
personal computers, magnetised cards (bank cards,
commuter passes) or other devices easily influenced
by a magnet.
g Batteries
• Do not peel off the covering on batteries and do
not use the batteries if the covering has been
peeled off.
• Align the poles ( and ) correctly when
inserting the battery.
• Remove the battery if you do not intend to use
the unit for a long time.
• Do not heat or expose to flame.
• Do not leave the battery(ies) in a car exposed
to direct sunlight for a long period of time with
doors and windows closed.
• Do not attempt to recharge dry cell batteries.
• Battery mishandling can cause electrolyte
leakage which can damage items the fluid
contacts and may cause a fire. If electrolyte
leaks from the batteries, consult your dealer.
Wash thoroughly with water if electrolyte comes
in contact with any part of your body.
• Keep the AAA LR03 batteries and the
rechargeable batteries out of reach of children
to prevent swallowing. Accidental swallowing of
batteries can result in stomach and intestinal
damage.
• When carrying batteries in a pocket or bag, ensure
no metal objects such as necklaces are placed
together with them. Contact with metal may cause
short-circuiting which can cause a fire. For safety,
carry the batteries in the battery carrying case.
g Rechargeable battery
• To store or carry the rechargeable battery,
put the removed battery into the battery case
(supplied), avoiding metallic objects (clip, etc.).
VQT4J81
To reduce risk of radio interference caused by
headphone-, earphone- or microphone cables,
only use adequate accessories with a cable
length of less than 3 m.
ENGLISH
Care and use
87
87
VQT4J81_RR-XS450_420-E_En.indd 87
2012/05/29 9:35:50
Care and use
VQT4J81
g SD card compatibility
microSD card and microSDHC card can be used
on devices that support each card. (microSD
card can also be used on devices that support
microSDHC card. ) Using on devices that do not
support those cards may format the SD cards or
erase the recorded contents. Also, computers or
devices that do not support microSDHC card may
display a message that encourages you to format
the SD card. If you format the SD card, the data
will be erased. Erased data cannot be recovered.
Do not format the SD card.
g Notice for when transferring to another
party, or disposing of the SD card or the unit
If the internal memory and SD card are formatted
or the data on them are deleted, such data cannot
be played back, however, the data are not erased
completely.
If you want to erase the data completely for
security, use a commercially sold data erasing
software for computer. Or format the internal
memory or SD card and then record up to the end
to clear off the data.
g Allergies
• Discontinue use if you experience discomfort
with the earphones or any other parts that
directly contact your skin.
• Continued use may cause rashes or other
allergic reactions.
• microSDHC Logo is a trademark of SD-3C, LLC.
This product is protected by certain intellectual
property rights of Microsoft Corporation and third
parties. Use or distribution of such technology
outside of this product is prohibited without a
license from Microsoft or an authorized Microsoft
subsidiary and third parties.
88
88
VQT4J81_RR-XS450_420-E_En.indd 88
2012/05/29 9:35:50
150mV
2) Wide band characteristic voltage(earphones):
75mV
VQT4J81
CAUTION
• Danger of explosion if battery is incorrectly
replaced. Replace only with the type
recommended by the manufacturer.
• When disposing the batteries, please contact
your local authorities or dealer and ask for the
correct method of disposal.
ENGLISH
Precautions for listening with the Headphones or Earphones
• Do not play your headphones or earphones at a high volume. Hearing experts advise against
continuous extended play.
• If you experience a ringing in your ears, reduce volume or discontinue use.
• Do not use while operating a motorized vehicle. It may create a traffic hazard and is illegal in many areas.
• You should use extreme caution or temporarily discontinue use in potentially hazardous situations.
• Even if your headphones or earphones are the open-air type designed to let you hear outside sounds,
don’t turn up the volume so high that you can’t hear what’s around you.
Be sure to use the supplied or recommended
This unit may receive radio interference caused
headphones or earphones.
by mobile telephones during use. If such
interference occurs, please increase separation
Based on EN 50332-2:2003
between this unit and the mobile telephone.
1) Maximum output voltage(earphone output) :
89
89
VQT4J81_RR-XS450_420-E_En.indd 89
2012/05/29 9:35:50
Maintenance
Clean this unit with a dry and soft cloth.
VQT4J81
• If the unit becomes too dirty, wring a cloth moistened in water, wipe the dirt with it and clean with a dry cloth.
• Do not use solvents including benzine, thinner, alcohol, kitchen detergent, a chemical wiper, etc. This might
cause the exterior case to be deformed or the coating to come off.
90
90
VQT4J81_RR-XS450_420-E_En.indd 90
2012/05/29 9:35:50
These symbols on the products, packaging, and/or accompanying documents mean that used
electrical and electronic products and batteries should not be mixed with general household waste.
For proper treatment, recovery and recycling of old products and used batteries, please take them
to applicable collection points, in accordance with your national legislation and the Directives
2002/96/EC and 2006/66/EC.
ENGLISH
Information for Users on Collection and Disposal of Old Equipment and used Batteries
By disposing of these products and batteries correctly, you will help to save valuable resources and
prevent any potential negative effects on human health and the environment which could otherwise
arise from inappropriate waste handling.
For more information about collection and recycling of old products and batteries, please contact your
local municipality, your waste disposal service or the point of sale where you purchased the items.
Penalties may be applicable for incorrect disposal of this waste, in accordance with national legislation.
For business users in the European Union
If you wish to discard electrical and electronic equipment, please contact your dealer or supplier for
further information.
Note for the battery symbol (bottom two symbol examples):
This symbol might be used in combination with a chemical symbol. In this case it complies with the
requirement set by the Directive for the chemical involved.
Cd
VQT4J81
[Information on Disposal in other Countries outside the European Union]
These symbols are only valid in the European Union. If you wish to discard these items, please
contact your local authorities or dealer and ask for the correct method of disposal.
91
91
VQT4J81_RR-XS450_420-E_En.indd 91
2012/05/29 9:35:50
VQT4J81
VQT4J81_RR-XS450_420-E_En.indd 92
Plasma/LCD televisions / displays (screen size greater than 103 cm)
PRO-031-F11 Issue: 4.0
1 Innovation Road, Macquarie Park NSW 2113
ACN 001 592 187 ABN 83 001 592 187
Panasonic Australia Pty. Limited
01-01-2011
If you require assistance regarding warranty conditions or any other enquiries, please visit the
Panasonic Australia website www.panasonic.com.au or contact by phone on 132 600
If phoning in, please ensure you have your operating instructions available.
THIS WARRANTY CARD AND THE PURCHASE DOCKET (OR SIMILAR PROOF OF PURCHASE)
SHOULD BE RETAINED BY THE CUSTOMER AT ALL TIMES
If there is a major failure in regard to the product which cannot be remedied then you must notify us within a
reasonable period by contacting the Panasonic Customer Care Centre. If the failure in the product is not a major
failure then Panasonic may choose to repair or replace the product and will do so in a reasonable period of time
from receiving notice from you.
In addition to your rights under this warranty, Panasonic products come with consumer guarantees that cannot be
excluded under the Australian Consumer Law. If there is a major failure with the product, you can reject the
product and elect to have a refund or to have the product replaced or if you wish you may elect to keep the goods
and be compensated for the drop in value of the goods. You are also entitled to have the product repaired or
replaced if the product fails to be of acceptable quality and the failure does not amount to a major failure.
Panasonic Authorised Service Centres are located in major metropolitan areas and most regional centres of
Australia, however, coverage will vary dependant on product. For advice on exact Authorised Service Centre
locations for your product, please telephone our Customer Care Centre on 132600 or visit our website and use
the Service Centre Locator.
7. The warranties hereby conferred do not extend to, and exclude, any costs associated with the installation, deinstallation or re-installation of a product, including costs related to the mounting, de-mounting or remounting
of any screen, (and any other ancillary activities), delivery, handling, freighting, transportation or insurance of
the product or any part thereof or replacement of and do not extend to, and exclude, any damage or loss
occurring by reason of, during, associated with, or related to such installation, de-installation, re-installation or
transit.
-
6. To claim warranty service, when required, you should:
• Telephone Panasonic’s Customer Care Centre on 132600 or visit our website referred to below and use
the Service Centre Locator for the name/address of the nearest Authorised Service Centre.
• Send or take the product to a Panasonic Authorised Service Centre together with your proof of purchase
receipt as a proof of purchase date. Please note that freight and insurance to and / or from your nearest
Authorised Service Centre must be arranged by you.
• Note that home or pick-up/delivery service is available for the following products in the major metropolitan
areas of Australia or the normal operating areas of the nearest Authorised Service Centres:
5. Some products may be supplied with Ethernet connection hardware. The warranty is limited on such products
and will not cover
(a) Internet and or DLNA connection / setup related problems
(b) Access fees and or charges incurred for internet connection
(c) The use of incompatible software or software not specifically stipulated in the product operations manual;
and
(d) Any indirect or consequential costs associated with the incorrect use or misuse of the hardware, its
connection to the internet or any other device.
4. This warranty does not cover the following items unless the fault or defect existed at the time of purchase:
(a) Cabinet Part(s)
(e) DVD, Blu-ray or Recordable Discs
(b) Video or Audio Tapes
(f) Video / Audio Heads from wear and tear in normal use
(c) SD cards or USB devices
(g) Information stored on Hard Disk Drive, USB stick or SD card
(d) User replaceable Batteries
(h) DTV reception issues caused by TV Aerial / Cabling / Wall socket(s)
etc
3. This warranty only applies if the product has been installed and used in accordance with the manufacturer’s
recommendations (as noted in the operating instructions) under normal use and reasonable care (in the
opinion of Panasonic). The warranty covers normal domestic use only and does not cover damage,
malfunction or failure resulting from use of incorrect voltages, incorrect installation, accident, misuse, neglect,
build-up of dirt or dust, abuse, maladjustment of customer controls, mains supply problems, thunderstorm
activity, infestation by insects or vermin, tampering or repair by unauthorised persons (including unauthorised
alterations), introduction of sand, humidity or liquids, commercial use such as hotel, office, restaurant, or other
business or rental use of the product, exposure to abnormally corrosive conditions or any foreign object or
matter having entered the product.
2. This warranty only applies to Panasonic products purchased in Australia and sold by Panasonic Australia or
its Authorised Distributors or Dealers and only where the products are used and serviced within Australia or
it's territories. Warranty cover only applies to service carried out by a Panasonic Authorised Service Centre
and only if valid proof of purchase is presented when warranty service is requested.
1. The product is warranted for 12 months from the date of purchase. Subject to the conditions of this warranty
Panasonic or its Authorised Service Centre will perform necessary service on the product without charge for
parts or labour, if in the opinion of Panasonic, the product is found to be faulty within the warranty period.
Panasonic Warranty
ONLY FOR AUSTRALIA
92
92
2012/05/29 9:35:50
93
VQT4J81_RR-XS450_420-E_En.indd 93
800-PANA (800-7262)
01-8000-94PANA (01-8000-947262)
1800-PANASONIC (1800-726276)
800-PANA737 (800-7262737)
800-PANA (800-7262)
1-801-811-PANA (1-801-811-7262)
800-390-602
From a cell phone: 797-5000
800-PANA-800 (800-7262-800)
0-800-PANA (0-800-7262)
0800-00726
0800-333-PANA (0800-333-7262)
0810-321-PANA (0810-321-7262)
VQT4J81
01800-VIP-PANA (01800-847-7262) - Interior
(55) 5000-1200 - Mexico D.F. and Metropolitan Area
Or you may contact us in the next following phones numbers:
ENGLISH
email: [email protected]
To obtain information in the Republic of Mexico contact us at:
Mexico Service
Venezuela
Uruguay
Peru
Argentina
Panama
Colombia
Ecuador
Costa Rica
El Salvador
Guatemala
Chile
Also you may contact us directly by our Contact Center:
http://www.lar.panasonic.com
Obtain products information and operative assistant; localize the closer distributor or
Service Center; buy spare parts and accessories by our web site to Latin American:
Customer Service Directory
Customer Service
Useful Information
For Latin American Countries Only
93
2012/05/29 9:35:50
Dieses Handbuch beschreibt die grundlegenden
Arbeitsvorgänge und Funktionen des Geräts.
Mitgeliefertes Zubehör
1 AAA Ni-MH-Akku
*Im Text als Akku angegeben.
1 Batterietransporttasche
1 USB-Verlängerungskabel
Den wiederaufladbaren Akku durch einem Akku vom Typ
[HHR-4MVE] für Europa oder [HHR-4MVT] für Asien und
Lateinamerika ersetzen. (Stand Mai 2012)
Einlegen der Batterie
1 AAA Ni-MH-Akku (mitgeliefert)
Auf korrekte Ausrichtung der Batterie
achten.
3 Den OPR/HOLD-Schalter auf die [ON]-Seite schieben.
4 Den OPR/HOLD-Schalter auf die [OFF]-Seite schieben.
Die Statusanzeige leuchtet auf und das Aufladen beginnt.
*Wird der OPR/HOLD-Schalter in Richtung [ON]-Seite geschoben,
kann das Laden während des Ladevorgangs abgebrochen werden.
*Wenn die Statusanzeige erlischt, ist der Ladevorgang abgeschlossen.
Doppelklicken auf das Bildsymbol (Windows XP: [ ], Windows Vista/
Windows 7: [ ]) in der Taskleiste am unteren Rand des Bildschirms
und den Anweisungen auf dem Bildschirm zum Entfernen des
Geräts folgen. (Je nach den im Betriebssystem vorgenommenen
Einstellungen erscheint dieses Symbol u.U. nicht in der Taskleiste.)
Nach dem Abtrennen des Gerätes, stellt sich das Gerät aus.
1 Herausnehmen des USB-Steckers.
VQT4J81
Wenn das Gerät nicht direkt mit dem Computer verbunden werden
kann, das USB-Verlängerungskabel (mitgeliefert) benutzen.
Erstmaliger Anschluss des Gerätes an den PC
Da mehrere „Neue Hardware gefunden“ Meldungen
erscheinen werden, das Gerät nicht vom PC abtrennen bis alle
Meldungen verschwinden.
*Das Gerät nie von der Stromversorgung trennen und die
SD-Karte nicht entfernen, während „ACCESS…“ angezeigt
wird, ansonsten kann das Gerät beschädigt werden.
g Trennen des Gerätes
Aufladen der Batterie
Drücken und gleichzeitig
schieben, bis ein „Klick“Laut zu hören ist.
2 USB-Stecker des Geräts in den Computer stecken.
*Bei Verwendung eines wiederaufladbaren Akkus den mitgelieferten
wiederaufladbaren Akku oder den als optionales Zubehör erhältlichen,
aufladbaren Akku verwenden. Bei einer Verwendung von anderen,
handelsüblichen Batterien und Akkus ist der Betrieb nicht gewährleistet.
*Es kann auch eine Alkalibatterie vom Typ AAA LR03 (nicht
mitgeliefert) verwendet werden.
Aufbewahren des USB-Steckers:
2
94
VQT4J81_RR-XS450_420-E_GE.indd 94
2012/05/28 14:49:48
Ein- und Ausschalten des Gerätes
Einstellen der Uhr
Einschalten des Gerätes:
1 [MENU] drücken.
Ausschalten des Gerätes:
2 +, – drücken, um „COMMON MENU“ auszuwählen
und [q OK] zur Eingabe drücken.
Den OPR/HOLD-Schalter zur [OFF]-Seite schieben, während das
Gerät im gestoppten Zustand ist.
3 +, – drücken, um „DATE & TIME“ auszuwählen und
g Automatisches Abschalten:
4 +, – zur Einstellung der Jahreszahl drücken und
Nach einer voreingestellten Zeit (die Werkseinstellung lautet
15 Minuten) wird das Gerät automatisch ausgeschaltet, wenn die
Aufzeichnung unterbrochen wird.
Wenn der Strom durch die automatische Ausschaltfunktion
ausgeschaltet wurde, vor dem Einschalten den OPR/HOLDSchalter in Richtung [OFF]-Seite schieben.
(➜ Seite 24)
HOLD-Funktion
Bei angestellter HOLD-Funktion sind die Tastenbetätigungen
gesperrt.
Zum Einschalten der Hold-Funktion:
Den OPR/HOLD-Schalter während der Aufnahme oder der
Wiedergabe auf die [HOLD]-Seite schieben.
Zum Ausschalten der Hold-Funktion:
Den Schalter OPR/HOLD-Schalter in die entgegengesetzte
Richtung von [HOLD] schieben.
[q OK] zur Eingabe drücken.
i drücken.
5 +, – zur Einstellung des Monats drücken und i
drücken.
DEUTSCH
Den OPR/HOLD-Schalter auf die [ON]-Seite schieben, um das Gerät
einzuschalten. Anschließend schaltet sich die Display-Beleuchtung ein.
6 +, – zur Einstellung des Datums drücken und i
drücken.
7 +, – zur Einstellung des Uhranzeigeverfahrens
drücken und i drücken.
„ 24h “ und „ AM / PM “ werden jeweils für die
24-Stundenanzeige und die 12-Stundenanzeige angezeigt.
8 +, – zur Einstellung der Stunde drücken und i
drücken.
9 +, – zur Einstellung der Minute drücken.
u, i zur Änderung der Einstellung drücken, um zwischen
den Punkten hin und her zu schalten und anschließend +, –
erneut drücken, um die Einstellung vorzunehmen.
10 [q OK] zur Eingabe drücken.
[F2 (CLOSE)] drücken, um den Einstellungsbildschirm zu
verlassen.
VQT4J81
Das Datum und die Uhrzeit sind eingestellt und die Uhr beginnt
mit dem Betrieb.
3
95
VQT4J81_RR-XS450_420-E_GE.indd 95
2012/05/28 14:49:49
Auswahl des Ordners
1 Drücken von [F2 (FOLDER)].
2 +, –, u, i drücken, um den Ordner
auszuwählen und [q OK] zur Eingabe drücken.
• „ “ (OTHER FOLDER) dient zur Wiedergabe von Dateien,
die von einem anderen Gerät als diesem aufgezeichnet wurde.
Dieses Gerät kann auch Musikdateien wiedergeben, die mit mit
USB-Aufnahmefunktion ausgestatteten Panasonic-Stereogeräten
aufgezeichnet (oder von diesen übertragen) wurden.
Umschalten zwischen dem internen Speicher und einer SD-Karte:
Wenn die SD-Karte eingesetzt ist, werden die Punkte für die
SD-Karte im Gleichschritt mit 2 angezeigt. Zur Auswahl des
Speichers [F1 (MEMORY)] drücken.
• In diesem Handbuch wird eine microSD/microSDHC-Karte
als „SD-Karte“ bezeichnet.
Wechseln der Mikrofonposition
Mikrofonposition
Empfohlene Einsatzweisen
STEREO
Funktioniert wie
ein gewöhnliches
Stereomikrofon.
Geeignet zum Aufzeichnen
von Ereignissen wie einer
Besprechung oder einer
Aufführung mit vielen Beteiligten.
ZOOM
Verstärkt während der
Aufnahme den Ton
unmittelbar vor Ihnen.
Geeignet zum Aufzeichnen von
Ereignissen wie Vorlesungen oder
Interviews, bei denen der Ton
aus einer bestimmten Richtung
kommt.
Auswahl des Ordners oder der
Datei im Listen-Bildschirm
1 [LIST ] etwa 1 Sekunde oder länger gedrückt halten.
Zu Schritt 2 gehen, wenn eine SD-Karte (➜ Seite 18)
eingesetzt ist, und zu 3 , falls dies nicht der Fall ist.
VQT4J81
2 +, – drücken, um „INT. MEMORY “ (interner
4
Speicher) oder „microSD CARD“ auszuwählen,
und zur Eingabe [q OK] drücken.
3 +, – drücken, um den Ordner auszuwählen und
[q OK] zur Eingabe drücken.
Wenn Ordner im Ordner MUSIC oder OTHER FOLDER ( ) erstellt
worden sind, Schritt 3 zur Auswahl des Zielordners wiederholen.
4 +, – drücken, um die Datei auszuwählen und
[q OK] zur Eingabe drücken.
Die Wiedergabe der Datei beginnt.
96
VQT4J81_RR-XS450_420-E_GE.indd 96
2012/05/28 14:49:49
Aufnahme
Prüfung der Information.
1 Drücken von [F2 (FOLDER)].
1 [STOP g/RETURN] drücken.
2 u, i drücken, um den Aufnahme-Zielordner
2 Den Informationsschirm unter Benutzung von
3 [REC *] drücken (Aufnahme startet).
+ oder – auf- oder abwärts bewegen.
So verlassen Sie den Informationsbildschirm:
[STOP g/RETURN] drücken.
4 [STOP g/RETURN] drücken, um die Aufnahme zu
stoppen.
Zum Pausieren der Aufnahme:
1 [REC *] während der Aufnahme drücken.
Aufnahmeanzeige blinkt.
2 [REC *] erneut drücken, um mit der Aufnahme fortzufahren.
Mithören des Tons über Ohrhörer
Stereo-Ohrhörer (nicht mitgeliefert) anschließen.
Steckerausführung: ø 3,5 mm Stereo-Klinkenstecker
Empfohlener zusätzlicher Ohrhörer: Panasonic RP-HV154, RP-HJE120
(Stand Mai 2012)
Überwachen der aktuellen
Aufnahme
Wiedergabe
1 [q OK] drücken (Wiedergabe beginnt).
Einstellen der Lautstärke
Erhöhen der Lautstärke: + drücken.
Verringern der Lautstärke: – drücken.
Funktionen bei Wiedergabe
Sprung (Skip): u, i drücken.
Suchlauf rückwärts/vorwärts:
u, i gedrückt halten.
Beenden der Aufnahme: [STOP g/RETURN] drücken.
DEUTSCH
Für die Mikrofonaufnahme einen Ordner aus den Ordnern „A“,
„B“, „C“ und „D“ wählen. (Die Werkseinstellung ist „A“.)
Einstellen der Lautstärke:
Eingebauter
Lautsprecher
Die Lautstärke des mitgehörten Tons
kann durch Drücken von +, – eingestellt
werden, ohne den Aufnahmepegel zu
beeinflussen.
Abhören des
Wiedergabetons
Stecker fest Während der Wiedergabe wird der Ton
anschließen. über den eingebauten Lautsprecher
ausgegeben. In einer lauten Umgebung
ist der Lautsprecherton möglicherweise
schwer zu hören. In einem solchen
Fall empfiehlt sich der Anschluss eines
Stereo-Ohrhörers (nicht mitgeliefert).
VQT4J81
auszuwählen und [q OK] zur Eingabe drücken.
Der Informationsschirm erscheint.
5
97
VQT4J81_RR-XS450_420-E_GE.indd 97
2012/05/28 14:49:49
Löschen von Dateien
Auswahl des Aufnahme-Ortes
1 [ERASE/A-B&] drücken.
1 [MENU] etwa 1 Sekunde oder länger gedrückt
2 +, – drücken, um „FILE“ auszuwählen und [q OK]
zur Eingabe drücken.
3 +, – drücken, um „YES“ auszuwählen und [q OK]
zur Eingabe drücken.
Während des Löschens blinkt die Statusanzeige und
„ERASING“ wird angezeigt. Es kann mehrere Minuten dauern,
bis das Löschen abgeschlossen ist.
Durch die Auswahl von „FOLDER“ in Schritt 2 ist es möglich,
zum Löschbildschirm aller Dateien im ausgewählten Ordner
zu gelangen.
Zum Verlassen des Löschbildschirms [F2 (CLOSE)] drücken.
Löschen von Dateien aus dem
Listenbildschirm.
Dateien auf dem Listenbildschirm (➜ Seite 4) wählen und dann
[ERASE/A-B&] drücken. Danach erscheint der Bildschirm zum
Löschen der Datei. Den Ordner wählen und [ERASE/A-B&]
drücken. Danach erscheint der Bildschirm zum Löschen aller
Dateien im Ordner.
halten.
Der Bildschirm zum Auswählen des Orts der Aufnahme wird
angezeigt.
2 +, – drücken, um den Ort auszuwählen und [q OK]
zur Eingabe drücken.
Bei Auswahl von „USER“ den Schritt 3 überspringen.
3 +, – drücken, um „LOAD“ auszuwählen und
[q OK] zur Eingabe drücken.
[F2 (CLOSE)] drücken, um den Einstellungsbildschirm zu verlassen.
Beim Drücken von [REC *] wird eine Aufnahme mit der
ausgewählten Aufnahmeorts-Einstellung gewählt.
Ort der Aufnahme
LANG.
STUDY
KARAOKE
MUSIC
PERF.
CONVERSATION
MEETING
VQT4J81
LECTURE
FAVORITE
Anwendung
Aufnahme der eigenen Stimme für
Ausspracheübungen usw.
Aufnahme bei großer Lautstärke, z.B. für
Karaoke
Aufnahmen von hoher Qualität, wie etwa
bei Musikaufführungen
Aufnehmen der Stimmen anderer
Personen für Interviews oder bei Meetings
usw.
Nimmt eine große Tonbandbreite auf. Zum
Aufnehmen von Meetings usw.
Nimmt Laute wie etwa bei Vorträgen in
einem Hörsaal usw. auf.
Ihre eigenen Einstellungen können
festgelegt werden
6
98
VQT4J81_RR-XS450_420-E_GE.indd 98
2012/05/28 14:49:49
Direktszene
1 [MENU] etwa 1 Sekunde oder länger gedrückt halten.
Diese Funktion dient dazu, die Aufnahmeszene in Verbindung mit
dem Umschalten der Mikrofonposition umzuschalten.
*Zum Zeitpunkt des Kaufs ist STEREO „MEETING“ zugewiesen,
und ZOOM ist „LECTURE“ zugewiesen.
3
4
5
Die Schritte 4 und 5 zur Änderung anderer Punkte wiederholen.
6 Nach Fertigstellung der Einstellungen, +, –
drücken, um „OK“ auszuwählen und [q OK] zur
Eingabe drücken.
Zur Auswahl des geänderten Aufnahmeorts, „LOAD“
auswählen.
[F2 (CLOSE)] drücken, um den Einstellungsbildschirm zu verlassen.
Initialisieren der Einstellungen für den Aufnahme-Ort
1 [MENU] etwa 1 Sekunde oder länger gedrückt halten.
2 +, – drücken, um den Aufnahme-Ort auszuwählen
und [q OK] zur Eingabe drücken.
3 +, – drücken, um „INITIALIZE“ auszuwählen und
[q OK] zur Eingabe drücken.
4 +, – drücken, um „YES“ auszuwählen und [q OK]
zur Eingabe drücken.
Der ausgewählte Aufnahme-Ort wird wieder auf die
Voreinstellung zurückgesetzt.
Zum Initialisieren des geänderten Aufnahmeorts, „LOAD“
auswählen.
[F2 (CLOSE)] drücken, um den Einstellungsbildschirm zu verlassen.
VQT4J81_RR-XS450_420-E_GE.indd 99
Ändern der Direktszeneneinstellung
1 [MENU] drücken.
2 +, – drücken, um „MIC REC MENU“ auszuwählen,
und [q OK] zur Eingabe drücken.
3 +, – drücken, um „DIRECT SCENE“ auszuwählen,
und [q OK] zur Eingabe drücken.
4 +, – drücken, um die Mikrofonposition („STEREO“
oder „ZOOM“) auszuwählen, und [q OK] zur
Eingabe drücken.
5 +, – drücken, um die Aufnahmeszene auszuwählen,
und [q OK] zur Eingabe drücken.
Wenn Sie die Aufnahmeszene für das andere Mikrofonposition
ändern wollen, führen Sie zum Einstellen der Aufnahmeszene
die Schritte 4 und 5 aus.
[F2 (CLOSE)] drücken, um den Einstellungsbildschirm zu
verlassen.
VQT4J81
2
+, – drücken, um den Aufnahme-Ort auszuwählen
und [q OK] zur Eingabe drücken.
+, – drücken, um „CHANGE SETTING“
auszuwählen und [q OK] zur Eingabe drücken.
+, – drücken, um den Punkt, der geändert werden
soll, auszuwählen und [q OK] zur Eingabe drücken.
+, – drücken, um die Einstellung auszuwählen und
[q OK] zur Eingabe drücken.
DEUTSCH
Ändern der Einstellungen für den Aufnahme-Ort
7
99
2012/05/28 14:49:49
Direktszene
Wahl des Aufnahmemodus
Einstellen der Direktszeneneinstellung auf OFF
1 [MENU] drücken.
1 [MENU] drücken.
2 +, – drücken, um „MIC REC MENU“ auszuwählen
2 +, – drücken, um „MIC REC MENU“ auszuwählen,
3 +, – drücken, um „MIC REC MODE“ auszuwählen
und [q OK] zur Eingabe drücken.
3 +, – drücken, um „DIRECT SCENE“ auszuwählen,
und [q OK] zur Eingabe drücken.
4 +, – drücken, um „SETTING“ auszuwählen, und
[q OK] zur Eingabe drücken.
5 +, – drücken, um „OFF“ auszuwählen, und [q OK]
zur Eingabe drücken.
[F2 (CLOSE)] drücken, um den Einstellungsbildschirm zu
verlassen.
und [q OK] zur Eingabe drücken.
und [q OK] zur Eingabe drücken.
4 +, – drücken, um die Einstellung (PCM
Abtastfrequenz-/ MP3-Bitrate) auszuwählen und
[q OK] zur Eingabe drücken.
(Die Werkseinstellung ist „MP3 192kbps“.)
[F2 (CLOSE)] drücken, um den Einstellungsbildschirm zu
verlassen.
*Je nach eingestelltem Aufnahmemodus sind die Tonqualität und
die verbleibende Aufnahmezeit unterschiedlich.
Aufnahmeformat
PCM: 44,1 kHz
Hochwertige
Aufnahme
MP3: 320 kbit/s
MP3: 192 kbit/s
MP3: 128 kbit/s
MP3: 64 kbit/s
Lange
Aufnahme
*Wenn der Aufnahmemodus auf „MP3 32kbps“ eingestellt ist,
wird die Aufnahme monophon.
VQT4J81
MP3: 32 kbit/s
8
100
VQT4J81_RR-XS450_420-E_GE.indd 100
2012/05/28 14:49:49
2 +, – drücken, um „MIC REC MENU“ auszuwählen
und [q OK] zur Eingabe drücken.
3 +, – drücken, um „MIC SENS.“ auszuwählen und
[q OK] zur Eingabe drücken.
4 +, – drücken, um „HIGH“ oder „LOW“
auszuwählen und [q OK] zur Eingabe drücken.
(Die Werkseinstellung ist „HIGH“.)
[F2 (CLOSE)] drücken, um den Einstellungsbildschirm zu
verlassen.
Reduzieren von niederfrequenten
Störgeräuschen während der Aufnahme
1 [MENU] drücken.
2 +, – drücken, um „MIC REC MENU“ auszuwählen
und [q OK] zur Eingabe drücken.
3 +, – drücken, um „LOW CUT FILTER“ auszuwählen
und [q OK] zur Eingabe drücken.
4 +, – drücken, um „ON“ auszuwählen und [q OK]
zur Eingabe drücken.
(Die Werkseinstellung ist „OFF“.)
[F2 (CLOSE)] drücken, um den Einstellungsbildschirm zu
verlassen.
Einstellung des Aufnahmepegels auf
MANUELL stellen
1 [MENU] drücken.
2 +, – drücken, um „MIC REC MENU“ auszuwählen
und [q OK] zur Eingabe drücken.
3 +, – drücken, um „REC LEVEL ADJ.“ auszuwählen
DEUTSCH
1 [MENU] drücken.
Manuelle Einstellung des
Aufnahmepegels
und [q OK] zur Eingabe drücken.
4 +, – drücken, um „MANUAL“ auszuwählen und
[q OK] zur Eingabe drücken.
[F2 (CLOSE)] drücken, um den Einstellungsbildschirm zu
verlassen.
Manuelle Anpassung des Aufnahmepegels
1 [REC *] für 1 Sekunde oder länger gedrückt
halten.
Das Gerät geht in den Aufnahme-Bereitschaftszustand über.
2 Das Mikrofon zur Aufnahme auf die Tonquelle
richten.
3 u, i drücken, um den Aufnahmepegel
anzupassen.
Anpassungsbereich liegt bei 0 bis 30.
(Die Werkseinstellung ist „15“.)
Drücken von [REC *] startet Aufnahme.
VQT4J81
Umschalten der
Mikrofonempfindlichkeit
9
7
101
VQT4J81_RR-XS450_420-E_GE.indd 101
2012/05/28 14:49:49
Manuelle Einstellung des Aufnahmepegels
Einstellung des Aufnahme-Peak-Limiters
(Aufnahme-Spitzenwertbegrenzer) auf ON
1 [MENU] drücken.
2 +, – drücken, um „MIC REC MENU“ auszuwählen
und [q OK] zur Eingabe drücken.
3 +, – drücken, um „PEAK LIMITER“ auszuwählen
und [q OK] zur Eingabe drücken.
4 +, – drücken, um „ON“ auszuwählen und [q OK]
zur Eingabe drücken.
(Die Werkseinstellung ist „OFF“.)
[F2 (CLOSE)] drücken, um den Einstellungsbildschirm zu verlassen.
Einstellung des Aufnahme-EQ
1 [REC *] für 1 Sekunde oder länger gedrückt halten.
[F2 (CLOSE)] drücken, um den Einstellungsbildschirm zu verlassen.
Nach dem Verlassen des Einstellungsbildschirms wird der
EQ-Modusname nicht angezeigt.
Drücken von [REC *] startet Aufnahme.
EQ-Modus
Wirkung und Anwendung
Dieser (Basis)-Modus verstärkt keinen
bestimmten Tonbereich.
EXTRA BASS
Verstärkt den Bassbereich sehr stark.
BASS
Verstärkt den Bassbereich leicht.
MIDDLE
Verstärkt den Mittelbereich.
BASS&TREBLE Verstärkt den Bass- und den Hochtonbereich leicht.
TREBLE
Verstärkt den Hochtonbereich leicht.
EXTRA TREBLE Verstärkt den Hochtonbereich sehr stark.
Dieser Modus ermöglicht die Anpassung der
USER
Frequenzbänder von 150 Hz, 500 Hz, 1 kHz,
4 kHz und 12 kHz.
FLAT
(Die Werkseinstellung ist „FLAT“.)
Das Gerät geht in den Aufnahme-Bereitschaftszustand über.
2 [MENU] drücken.
3 +, – drücken, um „REC EQ“ auszuwählen und
[q OK] zur Eingabe drücken.
4 +, – drücken, um den Aufnahme-EQ-Modus zu wählen.
Bei der Wahl eines anderen Modus als „USER“, fortfahren mit Schritt 5 .
VQT4J81
Einstellung bei Auswahl von „USER“:
10
1 Nach Schritt 4 , [F1 (EDIT)] drücken
2 u, i drücken, um das zu ändernde Frequenzband zu wählen,
und +, – drücken, um den Aufnahmepegel (±12 dB) anzupassen.
3 Wenn die Einstellungen für das zu ändernde Frequenzband
abgeschlossen sind, fortfahren mit Schritt 5 .
5 [q OK] zur Eingabe drücken.
Selbstauslöser
1 [MENU] drücken.
2 +, – drücken, um „MIC REC MENU“ auszuwählen
und [q OK] zur Eingabe drücken.
3 +, – drücken, um „SELF TIMER“ auszuwählen und
[q OK] zur Eingabe drücken.
4 +, – drücken, um die Zeit auszuwählen und [q OK]
zur Eingabe drücken.
(Die Werkseinstellung ist „OFF“.)
[F2 (CLOSE)] drücken, um den Einstellungsbildschirm zu verlassen.
102
VQT4J81_RR-XS450_420-E_GE.indd 102
2012/05/28 14:49:49
1 [MENU] drücken.
2 +, – drücken, um „MIC REC MENU“ auszuwählen
und [q OK] zur Eingabe drücken.
3 +, – drücken, um „VAS“ auszuwählen und [q OK]
zur Eingabe drücken.
4 +, – drücken, um „ON“ auszuwählen und [q OK]
zur Eingabe drücken.
(Die Werkseinstellung ist „OFF“.)
[F2 (CLOSE)] drücken, um den Einstellungsbildschirm zu verlassen.
[REC *] drücken, um mit der VAS-Aufnahme zu beginnen.
Anpassung des VAS-Betriebspegels:
u, i während der VAS-Aufnahme drücken.
(Die Werkseinstellung ist „3“.)
Frühere Aufnahmefunktion (PRE-RECORD)
1 [MENU] drücken.
2 +, – drücken, um „MIC REC MENU“ auszuwählen
Zur Aufnahme unter Benutzung der früheren
Aufnahmefunktion:
1 [REC *] für 1 Sekunde oder länger gedrückt halten.
Das Gerät wechselt in den Aufnahme-Standby-Modus.
Schaltet auf 1 Sek., 2 Sek., 3 Sek. um und hält bei 3 Sek. an.
Die Mikrofon-Audiodaten werden stets etwa 3 Sekunden vor
der Aufnahme aktualisiert, und das Gerät befindet sich im
Standby.
2 [REC *] drücken.
Die Aufnahmeanzeigen leuchten und die Aufnahme beginnt
direkt nach dem erhaltenen Audio-Inhalt.
DEUTSCH
Verhindern einer unerwünschten
Aufnahme (VAS)
Beenden der Aufnahme: [STOP g/RETURN] drücken
Aufnahme mit einem extern
angeschlossenen Mikrofon
1 Den Mic/Line-Schalter auf [MIC] schieben.
2 Das externe Mikrofon anschließen.
Externes Mikrofon
(nicht mitgeliefert)
und [q OK] zur Eingabe drücken.
und [q OK] zur Eingabe drücken.
4 +, – drücken, um „ON“ auszuwählen und [q OK]
zur Eingabe drücken.
(Die Werkseinstellung ist „OFF“.)
[F2 (CLOSE)] drücken, um den Einstellungsbildschirm zu verlassen.
Stecker fest
anschließen.
Steckerausführung:
ø 3,5 mm Stereo-Klinkenstecker
3 [REC *] zum Starten der Aufnahme drücken.
VQT4J81
3 +, – drücken, um „PRE-RECORD“ auszuwählen
11
103
VQT4J81_RR-XS450_420-E_GE.indd 103
2012/05/28 14:49:49
Aufnahme von anderen Geräten
11 Spielen des externen Gerätes.
2 [MENU] drücken.
Dieses Gerät hat die folgende Synchron-Aufnahmefunktion.
3 +, – drücken, um „LINE REC“ auszuwählen und
[q OK] zur Eingabe drücken.
4 +, – drücken, um „LINE INPUT“ auszuwählen und
[q OK] zur Eingabe drücken.
5 +, – drücken, um die Einstellung auszuwählen und
[q OK] zur Eingabe drücken.
Beim Anschluss an den Kopfhörer-Anschluss eines externen
Gerätes oder den Line-Ausgang eines tragbaren Gerätes
„HIGH“ beziehungsweise „LOW“ wählen.
(Die Werkseinstellung ist „HIGH“.)
6 Drücken von [F2 (CLOSE)].
7 Anschließen des externen Gerätes
An das externe Gerät anschließen und den Mic/Line-Schalter
auf „LINE“ schieben. Dann erscheint die ausgewählte LineEingangs-Einstellung und der Line-Aufnahme-Modus.
8 [REC *] für 1 Sekunde oder länger gedrückt halten.
Das Gerät geht in den Aufnahme-Bereitschaftszustand über.
9 Wiedergabe des externen Geräts und Einstellung
VQT4J81
des Input / Output-Levels.
1 Wenn das Level-Meter schwankt und „
12
10 [REC *] zum Starten der Aufnahme drücken.
1 Den Mic/Line-Schalter auf [LINE] schieben.
“ angezeigt wird, ist
die Lautstärke des externen Gerätes zu hoch. Die Lautstärke
des externen Geräts auf den Bereich „ “ einstellen, selbst
wenn so die Lautstärke auf Maximum gedreht wird.
Zur Rekonfiguration der Einstellungen des Line-Inputs,
[MENU] drücken und den Schritten 4 bis 6 folgen.
2 Wenn Sie den Eingangs-/Ausgangspegel eingestellt haben,
halten Sie die Tonquelle des anderen Geräts an der Stelle an, an
der Sie die Aufnahme beginnen wollen.
Diese Funktion erkennt die Stille zwischen Titeln usw. und zeichnet
jeden Titel als separate Datei auf, z. B. als ersten Titel, zweiten
Titel usw. Wird ein Ton vom externen Gerät erkannt, beginnt die
Aufnahme automatisch. Wird für etwa 2 Sekunden oder mehr
Stille erkannt, wird die Aufnahme angehalten. Durch das erneute
Erkennen von Ton wird die Aufnahme wieder aufgenommen.
Synchron-Aufnahmeeinstellung
1 [MENU] drücken.
2 +, – drücken, um „LINE REC“ auszuwählen und
[q OK] zur Eingabe drücken.
3 +, – drücken, um „SYNCHRO REC“ auszuwählen
und [q OK] zur Eingabe drücken.
4 +, – drücken, um „ON (Auto Stop)“ oder
„ON (Manual Stop)“ auszuwählen und [q OK] zur
Eingabe drücken.
Auto: Die Aufnahme pausiert, wenn etwa 2 Sekunden lang
oder länger Stille erkannt wird, und sie stoppt, wenn die
Stille etwa 15 Sekunden oder länger andauert.
Manual: Selbst wenn die Stille andauert, wird die Aufnahme
weiterhin angehalten (Standby) bis
[STOP g/RETURN] gedrückt wird.
(Die Werkseinstellung ist „OFF“.)
[F2 (CLOSE)] drücken, um den Einstellungsbildschirm zu
verlassen.
Synchron-Aufnahme:
1 Die Schritte
1 bis 11 ausführen (➜ links).
104
VQT4J81_RR-XS450_420-E_GE.indd 104
2012/05/28 14:49:49
Ändern der
Wiedergabegeschwindigkeit
2 +, – drücken, um „LINE REC“ auszuwählen und
1 [F1 (SPEED)] während der Wiedergabe drücken.
(Die Werkseinstellung ist „MP3 192kbps“.)
[F2 (CLOSE)] drücken, um den Einstellungsbildschirm zu verlassen.
Indexfunktion
Index hinzufügen
1 Während der Aufnahme oder der Wiedergabe
oder während die Aufnahme angehalten wird,
[F2 (INDEX)] bei der Position drücken, wo ein
Index hinzugefügt werden soll.
“ “ (blinkt) und „ADDING INDEX“ werden angezeigt.
“ “ (leuchtet) wird für die Datei angezeigt, zu der Indexe
hinzugefügt werden.
Index löschen
1 [ERASE/A-B&] drücken.
2 +, – drücken, um „INDEX“ auszuwählen und
[q OK] zur Eingabe drücken.
3 +, – drücken, um „YES“ auszuwählen und [q OK]
zur Eingabe drücken.
2 [F1 (SLOW)] oder [F2 (FAST)] zum Auswählen der
Geschwindigkeit drücken und [q OK] zur Eingabe
drücken.
Wiedergabegeschwindigkeit:
Die Wiedergabegeschwindigkeit kann in 10%-Schritten für
im Vergleich zur Normalgeschwindigkeit (100%) schnellere
Geschwindigkeiten angepasst werden, und in 5%-Schritten
für im Vergleich zur Normalgeschwindigkeit langsamere
Geschwindigkeiten angepasst werden.
Statusanzeige während der Wiedergabe:
Wiedergabe mit Normalgeschwindigkeit, schnellere Wiedergabe
und langsamere Wiedergabe werden jeweils als „ “, „ “ bzw.
„ “ angezeigt.
A-B-Wiederholwiedergabe
1 Bei der Wiedergabe [ERASE/A-B&] drücken.
Der Startpunkt (A) ist festgelegt und „
„ “ (blinkt) werden angezeigt.
“ (leuchtet) und
2 [ERASE/A-B&] am gewünschten Endpunkt (B)
drücken.
Die Anzeige wechselt auf „
“ (leuchtet) und der
festgelegte Abschnitt wird wiederholt abgespielt.
Aufheben der A-B-Wiederholwiedergabe:
[ERASE/A-B&], u, i oder [STOP g/RETURN] drücken.
VQT4J81
[q OK] zur Eingabe drücken.
3 +, – drücken, um „LINE REC MODE“ auszuwählen
und [q OK] zur Eingabe drücken.
4 +, – drücken, um die Einstellung (PCM
Abtastfrequenz-/ MP3-Bitrate) auszuwählen und
[q OK] zur Eingabe drücken.
DEUTSCH
1 [MENU] drücken.
Wahl des Line-Aufnahmemodus
13
105
VQT4J81_RR-XS450_420-E_GE.indd 105
2012/05/28 14:49:49
Wiedergabe von einer festgelegten
Position (TIME SEARCH)
Wiederholwiedergabe (REPEAT)
1 [MENU] drücken.
2 +, – drücken, um „PLAY MENU“ auszuwählen und
2 +, – drücken, um „PLAY MENU“ auszuwählen und
3 +, – drücken, um „REPEAT“ auszuwählen und
3 +, – drücken, um „TIME SEARCH“ auszuwählen
4 +, – drücken, um Art der Wiedergabewiederholung
(Während der Wiedergabe zu Schritt 3 wechseln.)
[q OK] zur Eingabe drücken.
und [q OK] zur Eingabe drücken.
4 Die Wiedergabestartposition einstellen.
(Den Wert für „TIME“ ändern, um die Startposition einzustellen.)
u, i drücken, um „00:00:00“ (Stunden:Minuten:Sekunden)
zu wählen und +, – zum Ändern der Werte drücken.
5 [q OK] drücken.
Die Wiedergabe beginnt von der festgelegten Position.
Um den Einstellvorgang abzubrechen, [F2 (CLOSE)] drücken.
Wiedergabe mit geringfügigem Rücklauf
1 [q OK] während der Wiedergabe drücken.
Bei jedem Drücken des Knopfes läuft die Wiedergabe für
ungefähr 3 Sekunden (Werkseinstellung) zurück.
Einstellung der Rücklaufzeit:
1 [MENU] drücken.
(Während der Wiedergabe zu Schritt 3 wechseln.)
2 +, – drücken, um „PLAY MENU“ auszuwählen und
VQT4J81
[q OK] zur Eingabe drücken.
14
3 +, – drücken, um „SLIGHT RETURN“ auszuwählen
und [q OK] zur Eingabe drücken.
4 +, – drücken, um die Anzahl der Sekunden (1 bis 5)
1 [MENU] drücken.
(Während der Wiedergabe zu Schritt 3 wechseln.)
[q OK] zur Eingabe drücken.
[q OK] zur Eingabe drücken.
auszuwählen und [q OK] zur Eingabe drücken.
(Die Werkseinstellung ist „OFF“.)
[F2 (CLOSE)] drücken, um den Einstellungsbildschirm zu
verlassen.
OFF: Die Wiedergabe wird nacheinander von der
ausgewählten Datei bis zur letzten Datei in einem Ordner
durchgeführt, und dann stoppt die Wiedergabe.
ONE: Die laufende Datei wird wiederholt abgespielt.
FOLDER REPEAT: Alle Dateien des Ordners werden
wiederholt abgespielt.
FOLDER RANDOM: Alle Dateien im Ordner werden wiederholt
abgespielt.
ALL REPEAT: Beim Ordner MUSIC (M) oder OTHER
FOLDER (
) werden alle Dateien* im Ordner wiederholt
abgespielt. Für andere Ordner ist die Funktionsweise die
gleiche wie für „FOLDER REPEAT“.
ALL RANDOM: Beim Ordner MUSIC (M) oder OTHER
FOLDER (
) werden alle Dateien* im Ordner wiederholt in
zufälliger Reihenfolge abgespielt. Für andere Ordner ist die
Funktionsweise die gleiche wie für „FOLDER RANDOM“.
Die maximale Anzahl der erfassten Dateien ist 3.000
auszuwählen und [q OK] zur Eingabe drücken.
(Die Werkseinstellung ist „3 sec“.)
[F2 (CLOSE)] drücken, um den Einstellungsbildschirm zu verlassen.
106
VQT4J81_RR-XS450_420-E_GE.indd 106
2012/05/28 14:49:49
Sprünge in regulären Intervallen
1 Während der Wiedergabe [q OK] etwa 1 Sekunde
oder länger gedrückt halten.
Der Modus wechselt zum Time-Skip-Modus und „ “ wird
angezeigt. Der Skip-Modus wechselt jedes Mal, wenn der
Knopf gedrückt wird.
2 u, i drücken.
Bei jedem Drücken des Knopfes werden 5 Sekunden
übersprungen (Werkseinstellung).
Zum Wechseln des Sprungintervalls
1 [MENU] drücken.
Shadowing
Einstellen des Shadowing:
1 [MENU] drücken.
(Während der Wiedergabe zu Schritt 3 wechseln.)
2 +, – drücken, um „PLAY MENU“ auszuwählen und
[q OK] zur Eingabe drücken.
3 +, – drücken, um „SHADOWING“ auszuwählen
und [q OK] zur Eingabe drücken.
4 +, – drücken, um die Art des Shadowing
auszuwählen, und [q OK] zur Eingabe drücken.
DEUTSCH
Sprünge in regulären
Intervallen (TIME SKIP)
Wenn Sie „ON (small volume)“ wählen, beträgt die Lautstärke
beim Shadowing etwa ein Drittel der aktuellen Lautstärke.
(Die Werkseinstellung ist „OFF“.)
[F2 (CLOSE)] drücken, um den Einstellungsbildschirm zu
verlassen.
(Während der Wiedergabe zu Schritt 3 wechseln.)
2 +, – drücken, um „PLAY MENU“ auszuwählen und
[q OK] zur Eingabe drücken.
3 +, – drücken, um „TIME SKIP“ auszuwählen und
[q OK] zur Eingabe drücken.
4 +, – drücken, um die Zeit auszuwählen und [q OK]
zur Eingabe drücken.
[F2 (CLOSE)] drücken, um den Einstellungsbildschirm zu
verlassen.
VQT4J81
Das Sprungintervall kann auf 5 Sek., 10 Sek., 30 Sek., 1 Min.,
5 Min., 10 Min., oder 15 Min. eingestellt werden.
(Die Werkseinstellung ist „5sec“.)
15
107
VQT4J81_RR-XS450_420-E_GE.indd 107
2012/05/28 14:49:49
Shadowing
Verwenden der Shadowing-Funktion:
1 Die A-B-Wiederholwiedergabe ausführen.
(➜ Seite 13)
Das Shadowing erfolgt bei A-B-Wiederholwiedergabe ohne
Ton oder mit leisem Ton.
Einstellen der Lautstärke zum Shadowing:
Sie können die Lautstärke des Shadowing-Teils getrennt vom A-BWiederholwiedergabeteil einstellen.
• Wenn A-B-Wiederholwiedergabe abgebrochen wird oder die
Shadowing-Einstellung während der Wiedergabe geändert wird,
wird die Lautstärke des Shadowing-Teils auf die ursprüngliche
Einstellung zurückgesetzt.
Ton besser hörbar machen
(VOICE EMPHASIS)
1 [MENU] drücken.
(Während der Wiedergabe zu Schritt 3 wechseln.)
2 +, – drücken, um „PLAY MENU“ auszuwählen und
[q OK] zur Eingabe drücken.
3 +, – drücken, um „VOICE EMPHASIS“
auszuwählen und [q OK] zur Eingabe drücken.
4 +, – drücken, um die Art der Stimmverstärkung
auszuwählen, und [q OK] zur Eingabe drücken.
(Die Werkseinstellung ist „NORMAL“.)
[F2 (CLOSE)] drücken, um den Einstellungsbildschirm zu
verlassen.
VQT4J81
NORMAL: Ton wird so wiedergegeben, wie er aufgenommen
wurde.
NOISE CXL L: Störgeräusche werden in geringem Umfang
reduziert.
NOISE CXL H: Störgeräusche werden in großem Umfang
reduziert.
FOCUS FRONT: Der Ton auf der Vorderseite wird verstärkt.
FOCUS LEFT: Der Ton auf der linken Seite wird verstärkt.
FOCUS RIGHT: Der Ton auf der rechten Seite wird verstärkt.
16
108
VQT4J81_RR-XS450_420-E_GE.indd 108
2012/05/28 14:49:49
1 [MENU] drücken.
(Während der Wiedergabe zu Schritt 3 wechseln.)
2 +, – drücken, um „PLAY MENU“ auszuwählen und
[q OK] zur Eingabe drücken.
3 +, – drücken, um „SOUND EQ“ auszuwählen und
[q OK] zur Eingabe drücken.
4 +, – drücken, um den Ton-EQ-Modus zu wählen.
Bei der Wahl eines anderen Modus als „USER“, fortfahren mit
Schritt 5 .
EQ-Modus
FLAT
BASS
CLEAR
HEAVY
SOFT
VOICE
USER
Wirkung und Anwendung
Die Tonequalizer-Funktion wird nicht verwendet. Der
Originalton ohne Veränderung wird gehört.
Verstärkt den Bassbereich sehr stark.
Verstärkt den Hochtonbereich sehr stark.
Verstärkt den Bass- und den Hochtonbereich leicht.
Verstärkt den Mittelbereich.
Reduziert Geräusche, um menschliche Stimmen
besser hörbar zu machen.
Dieser Modus ermöglicht die Anpassung der Frequenzbänder
von 150 Hz, 500 Hz, 1 kHz, 4 kHz und 12 kHz.
DEUTSCH
Einstellung des WiedergabeEQ (SOUND EQ)
(Die Werkseinstellung ist „FLAT“.)
Einstellung bei Auswahl von „USER“:
1 Nach Schritt 4 , [F1 (EDIT)] drücken.
2 Auf u, i drücken, um das Frequenzband auszuwählen,
das geändert werden soll; auf +, – drücken, um die
Lautstärke einzustellen (±6 dB).
3 Wenn die Einstellungen für das zu ändernde Frequenzband
abgeschlossen sind, fortfahren mit Schritt 5 .
5 [q OK] zur Eingabe drücken.
VQT4J81
[F2 (CLOSE)] drücken, um den Einstellungsbildschirm zu
verlassen.
17
109
VQT4J81_RR-XS450_420-E_GE.indd 109
2012/05/28 14:49:49
Benutzung einer SD-Karte
Einsetzen der SD-Karte
Unter Benutzung der
Dateisuchfunktion
1 Das Gerät ausschalten und die Abdeckung des
g Arten von Dateisuche
Batteriefachs/SD-Kartensteckplatzes öffnen.
2 Die SD-Karte einstecken und die Abdeckung des
Batteriefachs/SD-Kartensteckplatzes schließen.
Die Karte in die korrekte Richtung ( ) ausrichten und sie
vollständig einsetzen, bis ein „Klick“-Ton zu hören ist.
Zum Entfernen der SD-Karte:
1 Das Gerät ausschalten und die Abdeckung des Batteriefachs/
CALENDAR SRCH
Gespeicherte Dateien werden nach Datum
geordnet und in einer Liste angezeigt.
DAY OF WEEK
Gespeicherte Dateien werden nach
Wochentag geordnet und in einer Liste
angezeigt.
RECENT R. FILE
Die gespeicherten Dateien werden
in chronologischer Reihenfolge nach
Aufnahmedatum angezeigt, beginnend mit
dem jüngsten Datum. (20 Dateien)
SD-Kartensteckplatzes öffnen.
2 Die SD-Karte vorsichtig schieben.
3 Wenn die SD-Karte ein wenig hervorsteht, die Karte langsam
VQT4J81
herausziehen.
*Umschalten zwischen dem internen Speicher und der SD-Karte
durch das Drücken von [F2 (FOLDER)] für mehr als als
1 Sekunde bei Anzeige des gestoppten Bildschirms ist möglich.
*Dieses Gerät ist kompatibel mit 2 GB microSD-Karten und 4 GB
bis 32 GB microSDHC-Karten. (Stand Mai 2012)
*Je nach Hersteller oder Typ der Karte arbeitet das Gerät
eventuell nicht richtig.
*Für Details bezüglich der Karten, für die eine Bestätigung
vorliegt, dass sie gemäß unseren Herstellungsstandards
ordnungsgemäß funktionieren, siehe die unten angegebene
Support-Webseite.
http://panasonic.net/support/
*Wenn eine SD-Karte eingesetzt, aber „microSD“ nicht auf dem
SELECT FOLDER-Bildschirm angezeigt wird usw., erkennt das
Gerät die SD-Karte nicht.
*Bewahren Sie die Speicherkarte außerhalb der Reichweite von
Kindern auf, damit sie nicht von diesen verschluckt werden kann.
18
Dateisuche
1 [LIST ] etwa 1 Sekunde oder länger gedrückt halten.
Zu Schritt 2 gehen, wenn eine SD-Karte eingesetzt ist, und
zu 3 , falls dies nicht der Fall ist.
2 +, – drücken, um „INT. MEMORY“ (interner
Speicher) oder „microSD CARD“ auszuwählen,
und dann [F1 (SEARCH)] drücken.
3 +, – drücken, um die Art der Dateisuche
auszuwählen und [q OK] zur Eingabe drücken.
“ “ (interner Speicher) oder „
angezeigt.
“ (SD-Karte) wird als Suchort
Wenn „CALENDAR SRCH“ ausgewählt ist:
+, –, u, i drücken, um den gespeicherten Termin
auszuwählen und [q OK] zur Eingabe drücken.
Wenn „DAY OF WEEK“ ausgewählt ist:
+, – drücken, um den Wochentag auszuwählen, und [q OK]
zur Eingabe drücken.
Es kann nur ein Wochentag ausgewählt werden.
110
VQT4J81_RR-XS450_420-E_GE.indd 110
2012/05/28 14:49:50
Verwendung der Playlist-Funktion
4 +, – drücken, um die Datei auszuwählen und
[q OK] zur Eingabe drücken.
Ihre Lieblingstitel in einer Playlist registrieren
Wahl einer Datei aus dem Ordner „M“:
1 Datei auswählen und [q OK] drücken.
) wählen.
Bei der Auswahl von Ordnern, u drücken, um sich innerhalb der
Rangfolge der Hierarchieebenen zu bewegen. (Einzelheiten hinsichtlich
der Datei- und Ordnerauswahlmethoden sind auf Seite 4 zu finden.)
3 u, i drücken, um die Playlist auszuwählen und [q OK]
zur Eingabe drücken. (Aus der PLAYLIST 1 bis 5 wählen.)
CUE)] während der Wiedergabe drücken.
„FOLDER SKIP“ wird angezeigt, zur Ordner-Cue-Anzeige „
2 u, i drücken, wenn „
Sie können auch OTHER FOLDER (
2 +, – drücken, um die Datei oder den Ordner
auszuwählen und [F1 (PLAYLIST)] zur Eingabe drücken.
Ordner-Cue-Funktion
1 [F2 (
1 Den Ordner MUSIC (M) im Listenbildschirm wählen (➜ Seite 4).
“ angezeigt wird.
Aufheben der Ordner-Cue-Funktion:
Diese Einstellung kann durch eine der folgenden Methoden
aufgehoben werden.
• [F2 ( CUE)] noch einmal drücken. Wenn dies abgebrochen
wird, können Dateien mit, u, i übersprungen werden.
• [q OK] drücken.
• [STOP g/RETURN] drücken. (Wiederhabe ist abgeschlossen.)
DEUTSCH
Hören von Musik mit diesem Gerät
(Abspielen von WMA/MP3 -Musikdateien)
“.
• Die Datei oder alle Dateien in dem Order werden in der
ausgewählten Playlist registriert.
Wiedergabe von in einer Playlist registrierten Titeln
1 Die Playlist auswählen (von P1 bis P5) (➜ Seite 4).
2 u, i drücken, um die Datei, die wiedergegeben
werden soll, auszuwählen. Dann [q OK] drücken.
Ändern der Reihenfolge der Playlist-Titel
1 Die Playlist (von P1 bis P5) im Listenbildschirm auswählen
(➜ Seite 4).
2 +, – drücken, um die Datei auszuwählen, die
und [q OK] zur Eingabe drücken.
„
“ wird auf der linken Seite zum ausgewählten Dateinamen hinzugefügt.
4 +, – drücken, um die ausgewählte Datei zur gewünschten
Position zu bewegen und [q OK] zur Eingabe drücken.
• Die Reihenfolge der Titel ist nun geändert worden.
VQT4J81
geändert werden soll, und [F1 (EDIT)] drücken.
3 +, – drücken, um „CHANGE ORDER“ auszuwählen
19
111
VQT4J81_RR-XS450_420-E_GE.indd 111
2012/05/28 14:49:50
Verwendung der Playlist-Funktion
Löschen von in einer Playlist registrierten
Tracks (Titeln)
1 Die Playlist (von P1 bis P5) im Listenbildschirm
auswählen (➜ Seite 4).
2 +, – drücken, um die Datei auszuwählen, die
gelöscht werden soll, und [F1 (EDIT)] drücken.
3 +, – drücken, um „ERASE FILE“ auszuwählen und
[q OK] zur Eingabe drücken.
Beim Abbrechen aller registrieren Tracks (Titel):
1 +, – drücken, um „ERASE ALL“ auszuwählen und [q OK]
zur Eingabe drücken.
Punkt drücken, an dem die Datei geteilt werden soll.
2 „DIVIDE“ im Bearbeitungs-Einstellungsbildschirm
(➜ links) auswählen.
3 +, – drücken, um „YES“ auszuwählen und [q OK]
zur Eingabe drücken.
Während die Datei geteilt wird, blinkt die Statusanzeige.
Bearbeiten: Zusammenführen von Dateien
1 „COMBINE“ im Bearbeitungs-Einstellungsbildschirm
(➜ links) auswählen.
2 +, – drücken, um „PREVIOUS FILE“ auszuwählen
Bearbeiten: Teilen von Dateien
3 +, – drücken, um die Datei, die zusammengeführt werden
Anzeigen des Einstellbildschirms für das
Bearbeiten
1 [MENU] drücken.
2 +, – drücken, um „EDIT MENU“ auszuwählen und
[q OK] zur Eingabe drücken.
3 +, – drücken, um den zu bearbeitenden Punkt
auszuwählen und [q OK] zur Eingabe drücken.
VQT4J81
1 Während der Wiedergabe [STOP g/RETURN] an dem
4 +, – drücken, um „YES“ auszuwählen und [q OK]
zur Eingabe drücken.
20
Teilen von Dateien
• [F1 (TAB)] drücken, um zu anderen Einstellungsbildschirmen
umzuschalten.
• Die Einstellungsdetails und Änderungsmethoden sind für
verschiedene Einstellpunkte unterschiedlich. Für nähere
Informationen, siehe die entsprechende Seite.
[F2 (CLOSE)] drücken, um den Einstellungsbildschirm zu
verlassen.
und [q OK] zur Eingabe drücken.
soll, auszuwählen, und [q OK] zur Eingabe drücken.
Wenn die Datei in einem anderen Ordner ausgewählt wird,
kann sie durch Drücken von u innerhalb der Ordnerhierarchie
verschoben werden. (Einzelheiten hinsichtlich der Datei- und
Ordnerauswahlmethoden sind auf Seite 4 zu finden.)
4 +, – drücken, um „NEXT FILE“ auszuwählen und
[q OK] zur Eingabe drücken.
5 +, – drücken, um die Datei auszuwählen, die nach
der vorherigen Datei angehängt werden soll, und
[q OK] zur Eingabe drücken.
6 +, – drücken, um „NEXT“ auszuwählen und
[q OK] zur Eingabe drücken.
7 +, – drücken, um „YES“ auszuwählen und [q OK]
zur Eingabe drücken.
Während die Dateien zusammengeführt werden, blinkt die Statusanzeige.
• Wenn [F2 (CLOSE)] gedrückt wird, bevor das Zusammenführen
abgeschlossen ist, wird der Zusammenführungsprozess abgebrochen.
112
VQT4J81_RR-XS450_420-E_GE.indd 112
2012/05/28 14:49:50
Kopieren von Dateien
1 „COPY“ im Bearbeitungs-Einstellungsbildschirm
(➜ Seite 20) auswählen.
2 +, – drücken, um die Datei, die kopiert werden soll,
auszuwählen, und [q OK] zur Eingabe drücken.
• Wenn die Datei in einem anderen Ordner ausgewählt
wird, kann sie durch Drücken von u innerhalb der
Ordnerhierarchie verschoben werden. (Einzelheiten
hinsichtlich der Datei- und Ordnerauswahlmethoden sind auf
Seite 4 zu finden.)
• Beim Kopieren von Dateien in den LINE (LINE_SD)-Ordner,
zu Schritt 5 gehen.
3 +, – drücken, um den Kopie-Zielspeicher
(„INTERNAL MEMORY“ oder „microSD CARD“)
auszuwählen, und zur Eingabe [q OK] drücken.
4 +, – drücken, um den Kopier-Zielordner
auszuwählen und [q OK] zur Eingabe drücken.
5 +, – drücken, um „YES“ auszuwählen und [q OK]
zur Eingabe drücken.
Papierkorbfunktion
Zurückbewegen von Dateien aus dem
Papierkorb zum ursprünglichen Ordner
1 Drücken von [F2 (FOLDER)].
2 +, –, u, i drücken, um „ “ auszuwählen und
[q OK] zur Eingabe drücken.
Der Papierkorb-Ordner ist im internen Speicher bzw. der
SD-Karte vorhanden.
3 u, i benutzen, um die Datei, die zurückgeführt
DEUTSCH
Bearbeiten: Kopieren oder
Verschieben von Dateien
werden soll, auszuwählen und [ERASE/A-B&] zur
Eingabe drücken.
4 +, – drücken, um „RESTORE FILE“ auszuwählen
und [q OK] zur Eingabe drücken.
5 +, – drücken, um „YES“ auszuwählen und [q OK]
zur Eingabe drücken.
Die Statusanzeige blinkt, und die ausgewählte Datei wird zum
Ende des ursprünglichen Ordner zurückbewegt.
[q OK] drücken, um zum Bildschirm im Schritt 3
zurückzukehren.
Während die Datei kopiert wird, blinkt die Statusanzeige.
VQT4J81
Verschieben von Dateien
„MOVE“ unter Schritt 1 links auswählen, um die Daten zu
verschieben. Das Vorgehen ist das gleiche wie beim Kopieren
einer Datei.
21
113
VQT4J81_RR-XS450_420-E_GE.indd 113
2012/05/28 14:49:50
Papierkorbfunktion
Benutzung des Timers
Leeren des Papierkorbordners
1 [MENU] drücken.
1 [ERASE/A-B&] drücken.
2 +, – drücken, um „COMMON MENU“ auszuwählen
2 +, – drücken, um „EMPTY RECYCLE BIN“
3 +, – drücken, um „TIMER & ALARM“ auszuwählen
auszuwählen und [q OK] zur Eingabe drücken.
Wenn der Papierkorb-Ordner ausgewählt wird, „EMPTY“ in
Schritt 2 auswählen und [q OK] drücken.
3 +, – drücken, um „YES“ auszuwählen und [q OK]
zur Eingabe drücken.
Die Statusanzeige blinkt und der Papierkorbordner wird
geleert.
und [q OK] zur Eingabe drücken.
und [q OK] zur Eingabe drücken.
4 Punkte wie etwa das Datum, die Zeit und die
Tonquelle einstellen.
1 +, – drücken, um den Punkt auszuwählen und [q OK] zur
Eingabe drücken.
2 +, –, u, i drücken, um die Einstellung auszuwählen und
[q OK] zur Eingabe drücken.
Die Schritte 1 und 2 zur Vervollständigung der Einstellungen
wiederholen.
5 +, – drücken, um „OK“ auszuwählen und [q OK]
zur Eingabe drücken.
[F2 (CLOSE)] drücken, um den Einstellungsbildschirm zu
verlassen.
VQT4J81
Einstellpunkt
22
Einzelheiten
SETTING
OFF: Timer ist nicht aktiviert.
ON: Timer ist aktiviert.
REPEAT
ONCE: Aufnahme oder Wiedergabe wird nur
einmal durchgeführt.
DAILY: Aufnahme oder Wiedergabe wird täglich
durchgeführt.
SELECT: Aufnahme oder Wiedergabe wird
wöchentlich am ausgewählten Tag durchgeführt.
1 +, – drücken, um den Tag auszuwählen und [q OK]
benutzen, um eine Markierung hinzuzufügen.
([q OK] zur Aufhebung der Auswahl drücken.)
2 Wenn der Tag ausgewählt ist, „OK“ wählen und
[q OK] drücken.
114
VQT4J81_RR-XS450_420-E_GE.indd 114
2012/05/28 14:49:50
PLAY
PLAY: Spielt eine eingestellte Datei oder spielt
den Alarmton.
REC: Nimmt die eingestellte Tonquelle auf.
ALARM: Spielt den Alarmton.
FILE: Sorgt für das Abspielen einer Datei.
Die Dateiliste des ausgewählten Ordners wird angezeigt.
+, – drücken, um die Datei auszuwählen und [q OK]
drücken. Bei der Auswahl von Dateien durch das Wechseln
von Ordnern, u drücken, um sich innerhalb der
Rangfolge der Hierarchieebenen zu bewegen. (Einzelheiten
hinsichtlich der Datei- und Ordnerauswahlmethoden finden
sind auf Seite 4 zu finden.)
SOURCE
MIC: Mikrofonaufnahme.
LINE: Nimmt Geräusche bzw. Töne von einem
externen Gerät auf.
MODE
PCM 44,1 kHz, MP3 320 Kbit/s, MP3 192 Kbit/s,
MP3 128 Kbit/s, MP3 64 Kbit/s, MP3 32 Kbit/s
REC TO
Den Ordner auswählen, in welchem die
aufgenommene Datei gespeichert werden soll.
• Falls ein SD-Karten-Ordner ausgewählt wurde,
die SD-Karte einführen.
Allgemeines Menü
Gemeinsame Einstellungsbetriebe
1 [MENU] drücken.
2 +, – drücken, um „COMMON MENU“ auszuwählen
und [q OK] zur Eingabe drücken.
3 +, – drücken, um den Einstellpunkt auszuwählen
und [q OK] zur Eingabe drücken.
4 +, – drücken, um die Einstellung zu ändern und
[q OK] zur Eingabe drücken.
DEUTSCH
REC/PLAY
Einzelheiten
Start- und Endzeit einstellen
Auswahl des Punktes (Auswahl der Startstunde,
-minuten, die Endstunde, -minuten) unter
Benutzung von u, i und Einstellung unter
Benutzung von +, –.
• Für den Zeitraum zwischen Anfang und Ende
können bis zu 12 Stunden festgelegt werden.
[F2 (CLOSE)] drücken, um den Einstellungsbildschirm zu
verlassen.
Für Details zu „DATE & TIME“ (➜ Seite 3) und „TIMER &
ALARM“ (➜ Seite 22), siehe die entsprechenden Seiten.
BEEP SOUND
Der Tastenbetätigungston kann eingestellt werden.
OFF: Kein Betriebs-Piepton.
ON: Betriebs-Piepton ist ON.
(Die Werkseinstellung ist „ON“.)
REC LED (Aufnahmeanzeige)
Es kann ausgewählt werden, ob die Beleuchtung der
Aufnahmeanzeige auf ON oder OFF eingestellt sein soll.
OFF: Keine Beleuchtung
ON: Beleuchtung
(Die Werkseinstellung ist „ON“.)
VQT4J81
Einstellpunkt
TIME
23
115
VQT4J81_RR-XS450_420-E_GE.indd 115
2012/05/28 14:49:50
Allgemeines Menü
BATT. SETTING
Die Einstellung der benutzten Batterieart (wiederaufladbare
Nickel-Metall-Hybrid-Batterien oder Alkali-Batterien).
Art der Batterie: RECHARGEABLE, ALKALINE
(Die Werkseinstellung ist „RECHARGEABLE“.)
AUTO POWER OFF
Diese Funktion schaltet das Gerät automatisch aus, wenn für eine
gewisse Zeit keine Bedienvorgänge vorgenommen werden, wie
zum Beispiel, wenn die Aufnahme gestoppt wird. Diese Funktion
hilft dabei, die Batterie zu schonen, wenn vergessen wurde, das
Gerät auszuschalten.
AUTO POWER OFF: 0 Min. (OFF) bis 15 Min.
(Die Werkseinstellung ist „15min“.)
BACKLIGHT
Die Beleuchtungszeit der Hintergrundbeleuchtung kann
vorgenommen werden, wenn die Taste gedrückt wird.
Beleuchtungszeit: OFF (leuchtet nicht), 5 Sek., 15 Sek., immer ON
(Die Werkseinstellung ist „15 sec“.)
CONTRAST
FORMAT
Alle Dateien im internen Speicher oder auf der SD-Karte werden
gelöscht. Gelöschte Dateien können nicht wiederhergestellt
werden.
1 „INTERNAL MEMORY“ oder „microSD CARD“ auswählen und
[q OK] zur Eingabe drücken.
2 „YES“ auswählen und [q OK] zur Eingabe drücken.
INIT MENU
Wenn die Einstellungen dieses Gerätes initialisiert werden, werden
alle Einstellungen außer für die Einstellung „DATE & TIME“ auf
den Standardstatus wiederhergestellt.
„YES“ wählen, [q OK] zur Eingabe drücken und die Einstellungen
werden initialisiert.
VERSION
Überprüfen der Firmware-Version dieses Gerätes kann überprüft
werden.
VQT4J81
Diese Funktion kann verwendet werden, um den Kontrast des
Bildschirmes anzupassen. Für die Anpassung kann aus 10 Stufen
gewählt werden.
Kontrastanpassung: 1 (L) bis 10 (H)
(Die Werkseinstellung ist „5“.)
RECYCLE BIN
Wenn die Papierkorbfunktion benutzt wird, werden gelöschte
Dateien in den Papierkorb verschoben. Bevor der Papierkorb
geleert wird, können gelöschte Dateien wiederhergestellt werden,
so dass Sie sich keine Sorgen über versehentliches Löschen von
Dateien machen müssen.
OFF: Die Papierkorbfunktion wird nicht benutzt
ON: Benutzen der Papierkorbfunktion
(Die Werkseinstellung ist „ON“.)
24
116
VQT4J81_RR-XS450_420-E_GE.indd 116
2012/05/28 14:49:50
Systemanforderungen
(Stand Mai 2012)
Schnittstelle
• Microsoft® Windows® XP Home Edition/Professional und Service Pack 2, Service
Pack 3
• Microsoft® Windows Vista® Home Basic/Home Premium/Business/Ultimate und
Service Pack 1, Service Pack 2
• Microsoft® Windows® 7 Starter/Home Basic/Home Premium/Professional/Ultimate
und Service Pack 1
• Vorinstallierte Version
• Mac OS X 10.2.8 - 10.7
USB-Anschluss (bei Verwendung eines USB-Hub ist der Betrieb nicht gewährleistet.)
✽ Bestimmte PCs können möglicherweise auch dann nicht verwendet werden, wenn sie die obigen Systemanforderungen erfüllen.
✽ (Macintosh) Diese Software läuft auf dem Standardtreiber von OS.
✽ Ein einwandfreier Betrieb ist nur unter einem kompatiblen Betriebssystem gewährleistet.
✽ Bei Einsatz mit einem Betriebssystem-Upgrade ist kein einwandfreier Betrieb gewährleistet.
✽ Bei Einsatz mit selbstgebauten Computern ist kein einwandfreier Betrieb gewährleistet.
✽ Bei Verwendung von Windows Media® Player muss der Computer die Systemanforderungen von Windows Media® Player erfüllen.
Einzelheiten zum Windows Media® Player sind von Microsoft Corporation erhältlich.
✽ Bei Microsoft, Windows, Windows Media und Windows Vista handelt es sich um eingetragene Marken bzw. Marken der Microsoft
Corporation in den Vereinigten Staaten und anderen Ländern.
✽ Der Einsatz von MPEG Layer-3 Audiodecodierungs-Technologie bei diesem Gerät erfolgt unter Lizenz von Fraunhofer IIS und
Thomson.
✽ Bei IBM und PC/AT handelt es sich um eingetragene Marken von International Business Machines Corporation der Vereinigten
Staaten.
✽ Macintosh und Mac OS sind eingetragene Warenzeichen von Apple Inc.
✽ Bei allen anderen in diesem Dokument erwähnten System- und Produktbezeichnungen handelt es sich generell um eingetragene
Marken bzw. Marken der betreffenden Unternehmen. Die Symbole ™ und ® werden in diesem Dokument nicht verwendet.
✽ Je nach der Betriebsumgebung des Computers kann es vorkommen, dass Fehlfunktionen auftreten (z.B. Audiodaten, die auf diesem
Gerät aufgenommen wurden, können nicht verwendet werden. usw.). Panasonic und Panasonic-Fachhändler übernehmen keinerlei
Haftung für den Verlust von Audiodaten sowie andere direkte oder Folgeschäden, die nicht auf vorsätzliche oder grobe Fahrlässigkeit
auf Hersteller- bzw. Vertriebsseite zurückzuführen sind.
Interner Speicher
4 GB (RR-XS450), 2 GB (RR-XS420)
Der tatsächlich nutzbare Speicherplatz ist geringer.
DEUTSCH
Betriebssystem
IBM PC/AT-kompatible Personal-Computer, Macintosh
VQT4J81
Computer
25
117
VQT4J81_RR-XS450_420-E_GE.indd 117
2012/05/28 14:49:50
Anschließen dieses Gerätes an
einen Computer
1 Herausnehmen des USB-Steckers des Gerätes.
2 Anschließen des Gerätes an einen Computer über
den USB-Port.
Wenn das Gerät nicht direkt mit dem Computer verbunden werden
kann, das USB-Verlängerungskabel (mitgeliefert) benutzen.
*Nur das mitgelieferte USB-Verlängerungskabel verwenden.
Auf keinen Fall das mitgelieferte Kabel mit einem anderen Gerät
verwenden.
VQT4J81
Achtung: Zum Anschließen dieses Gerätes an einen PC
ausschließlich das mitgelieferte USB-Verlängerungskabel mit
Ferritkern verwenden.
26
*Erstmaliger Anschluss des Gerätes an den PC
Da mehrere „Neue Hardware gefunden“ Meldungen erscheinen werden,
das Gerät nicht vom PC abtrennen bis alle Meldungen verschwinden.
*Solange dieses Gerät mit dem Computer verbunden ist, kann es
nicht betrieben werden.
*Wenn das Gerät an Ihren PC angeschlossen ist, funktioniert es ohne
die Batterie, da die Stromversorgung über den Computer erfolgt.
*Wenn das Gerät an den Computer angeschlossen ist, startet
der Computer möglicherweise nicht (Neustart). Daher wird
empfohlen, das Gerät vom Computer abzutrennen, wenn der
Computer gestartet (bzw. neu gestartet) wird.
*Betrieb ist in den folgenden Fällen nicht garantiert.
• Wenn zwei oder mehr USB-Geräte an einem Computer
angeschlossen sind
(mit Ausnahme der Maus und der Tastatur bei normalem Betrieb)
• Wenn ein USB-Verteiler (USB-Hub) benutzt wird
• Wenn als USB-Verlängerungskabel ein anderes als das
mitgelieferte benutzt wird.
*Wenn das Gerät an den Computer angeschlossen ist und
der Computer gestartet (bzw. neu gestartet) wird oder in den
Bereitschaftszustand umschaltet, kann es vorkommen, dass
der Computer dieses Gerät nicht erkennt. Das Gerät einmal
vom Computer trennen und dann erneut anschließen, oder das
Gerät nach einem System-Neustart erneut an den Computer
anschließen.
*Bitte auch im Benutzerhandbuch des Computers nachschlagen.
g Trennen des Gerätes
Doppelklicken auf das Bildsymbol (Windows XP: [ ], Windows Vista/
Windows 7: [ ]) in der Taskleiste am unteren Rand des Bildschirms
und den Anweisungen auf dem Bildschirm zum Entfernen des Geräts
folgen. (Je nach den im Betriebssystem vorgenommenen Einstellungen
erscheint dieses Symbol u.U. nicht in der Taskleiste.) Nach dem
Abtrennen des Gerätes, stellt sich das Gerät aus. Wenn das Gerät
nach dem Löschen usw. von Dateien auf diesem Gerät mithilfe des
Computers eingeschaltet wird, erscheint die Anzeige „UPDATING
FILE NAME“. Es kann mehrere Minuten dauern, bis die Aktualisierung
abgeschlossen ist.
g USB-Massenspeicherfunktion
Dieses Gerät arbeitet als ein USB-Speichergerät und wird als das
externe Speichergerät eines Computers erkannt.
Datendateien können vom Computer übertragen und in diesem
Gerät abgespeichert werden.
118
VQT4J81_RR-XS450_420-E_GE.indd 118
2012/05/28 14:49:50
VQT4J81
Die Außenflächen des Gerätes mit einem trockenen, weichen
Tuch reinigen.
• Bei starker Verschmutzung des Gerätes ein Tuch mit Wasser
anfeuchten, gründlich auswringen, die Schmutzflecken damit
abwischen und anschließend mit einem trockenen Tuch nachreiben.
• Keine Lösungsmittel wie etwa Benzin, Verdünner, Alkohol,
Spülmittel, chemikaliengetränkte Wischtücher etc. verwenden. Dies
könnte zur Verformung des äußeren Gehäuses oder Ablösung der
Beschichtung führen.
DEUTSCH
Pflege und Instandhaltung
27
119
VQT4J81_RR-XS450_420-E_GE.indd 119
2012/05/28 14:49:50
microSDHC Logo ist ein Markenzeichen von SD-3C, LLC.
Für dieses Produkt gelten bestimmte geistige Eigentumsrechte
der Microsoft Corporation und von Dritten. Die Verwendung
oder Verbreitung derartiger Technologie außerhalb dieses
Produkts ist ohne Lizenz von Microsoft oder einem autorisierten
Microsoft-Tochterunternehmen bzw. von Dritten untersagt.
Dieses Gerät kann beim Betrieb Hochfrequenzstörungen
auffangen, die von einem in der Nähe verwendeten Handy
verursacht werden. Falls eine solche Störbeeinflussung
festgestellt wird, sollte das Handy in größerer Entfernung von
diesem Gerät betrieben werden.
Die AAA LR03-Batterien und die Akkus außerhalb der Reichweite
von Kindern aufbewahren, um versehentliches Verschlucken zu
verhindern.
ACHTUNG
• Bei Austausch gegen einen ungeeigneten Ersatzakku besteht
Explosionsgefahr! Den Originalakku ausschließlich gegen
einen Akku des vom Hersteller vorgeschriebenen Typs
austauschen.
• Beim Entsorgen verbrauchter Akkus die einschlägigen
Umweltschutzbestimmungen einhalten, über die Auskünfte
von der zuständigen Behörde oder dem Fachhändler erhältlich
sind.
• Keiner Hitze aussetzen oder in die Nähe von offenen Flammen
bringen.
• Lassen Sie die Batterien niemals für längere Zeit in einem
Fahrzeug liegen, das direktem Sonnenlicht ausgesetzt ist und
dessen Türen und Fenster geschlossen sind.
VQT4J81
Kopfhörer oder Ohrhörer zu verwenden.
Gemäß EN 50332-2:2003
1) Maximale Ausgangsspannung (Kopfhörerausgang): 150mV
2) Charakteristische Breitbandspannung (Kopfhörer): 75mV
28
120
VQT4J81_RR-XS450_420-E_GE.indd 120
2012/05/28 14:49:50
Diese Symbole auf den Produkten, Verpackungen und/oder Begleitdokumenten bedeuten, dass benutzte
elektrische und elektronische Produkte und Batterien nicht in den allgemeinen Hausmüll gegeben werden sollen.
Bitte bringen Sie diese alten Produkte und Batterien zur Behandlung, Aufarbeitung bzw. zum Recycling gemäß Ihrer
Landesgesetzgebung und den Richtlinien 2002/96/EG und 2006/66/EG zu Ihren zuständigen Sammelpunkten.
Indem Sie diese Produkte und Batterien ordnungsgemäß entsorgen, helfen Sie dabei, wertvolle Ressourcen
zu schützen und eventuelle negative Auswirkungen auf die menschliche Gesundheit und die Umwelt zu
vermeiden, die anderenfalls durch eine unsachgemäße Abfallbehandlung auftreten können.
Wenn Sie ausführlichere Informationen zur Sammlung und zum Recycling alter Produkte und Batterien
wünschen, wenden Sie sich bitte an Ihre örtlichen Verwaltungsbehörden, Ihren
Abfallentsorgungsdienstleister oder an die Verkaufseinrichtung, in der Sie die Gegenstände gekauft haben.
DEUTSCH
Benutzerinformation zur Sammlung und Entsorgung von veralteten Geräten und benutzten Batterien
Gemäß Landesvorschriften können wegen nicht ordnungsgemäßer Entsorgung dieses Abfalls Strafgelder
verhängt werden.
Für geschäftliche Nutzer in der Europäischen Union
Wenn Sie elektrische oder elektronische Geräte entsorgen möchten, wenden Sie sich wegen genauerer
Informationen bitte an Ihren Händler oder Lieferanten.
[Informationen zur Entsorgung in Ländern außerhalb der Europäischen Union]
Diese Symbole gelten nur innerhalb der Europäischen Union. Wenn Sie solche Gegenstände entsorgen
möchten, erfragen Sie bitte bei den örtlichen Behörden oder Ihrem Händler, welches die ordnungsgemäße
Entsorgungsmethode ist.
VQT4J81
Hinweis zum Batteriesymbol (unten zwei Symbolbeispiele):
Dieses Symbol kann in Kombination mit einem chemischen Symbol verwendet werden. In diesem Fall erfüllt
es die Anforderungen derjenigen Richtlinie, die für die betreffende Chemikalie erlassen wurde.
Cd
29
121
VQT4J81_RR-XS450_420-E_GE.indd 121
2012/05/28 14:49:50
In questo manuale vengono illustrate le operazioni e le funzioni
di base dell’unità.
Accessori in dotazione
1 Batteria Ni-MH ricaricabile AAA
*Indicata come batteria ricaricabile nel testo.
1 Borsa da trasporto per batteria
1 Cavo di prolunga USB
Acquistare [HHR-4MVE] per l’Europa o [HHR-4MVT] per l’Asia e
l’America Latina e usare una delle due in caso di sostituzione della
batteria ricaricabile. (a partire da maggio 2012)
Inserimento della batteria
1 batteria Ni-MH ricaricabile AAA (in dotazione)
Accertarsi che la batteria sia rivolta nelle
direzioni corrette.
2 Inserire la spina USB dell’unità nel computer.
Se l’unità non può essere collegata direttamente al computer,
utilizzare il cavo di prolunga USB (in dotazione).
La prima volta che si collega l’unità al PC
Poiché appariranno diversi messaggi “Trovato nuovo
hardware”, non disconnettere l’unità dal PC prima che tutti i
messaggi siano scomparsi.
*Non scollegare mai l’unità o rimuovere la scheda SD
mentre è visualizzato “ACCESS…”; in caso contrario,
l’unità potrebbero danneggiarsi.
3 Fare scorrere l’interruttore OPR/HOLD verso il
lato [ON].
4 Fare scorrere l’interruttore OPR/HOLD verso il
lato [OFF].
L’indicatore di stato si illumina e ha inizio la ricarica.
*Durante la ricarica, portare l’interruttore OPR/HOLD in posizione
[ON] può annullare la ricarica mentre questa è in corso.
*Quando l’indicatore di stato si spegne, la ricarica è terminata.
g Scollegamento dell’unità
Caricamento della batteria
VQT4J81
1 Estrarre la spina USB.
Spingere e far scorrere fino a
Conservazione della spina USB:
quando viene riprodotto un “clic”.
Fare doppio clic sull’icona (Windows XP: [ ], Windows Vista/
Windows 7: [ ]) nella barra delle applicazioni sul lato inferiore
dello schermo del computer e seguire le istruzioni a schermo
per rimuovere l’unità (l’icona potrebbe non essere visualizzata
a seconda delle impostazioni del sistema operativo). Dopo la
rimozione dell’unità, l’unità si spegne.
*Se viene utilizzata una batteria ricaricabile, usare la batteria
ricaricabile fornita in dotazione o la batteria ricaricabile
opzionale. Non si garantisce il funzionamento in caso di utilizzo
di batterie disponibili in commercio diverse da quelle specificate
sopra.
*È inoltre possibile utilizzare una batteria alcalina LR03 AAA (non
in dotazione).
2
122
VQT4J81_RR-XS450_420-E_It.indd 122
2012/05/28 14:17:53
Accensione/spegnimento
Impostazione dell’orologio
Accensione:
1 Premere [MENU].
Spegnimento:
2 Premere +, – per selezionare “COMMON MENU”,
quindi premere [q OK] per confermare.
Fare scorrere l’interruttore OPR/HOLD sul lato [OFF] mentre
l’unità è arrestata.
3 Premere +, – per selezionare “DATE & TIME”
g Spegnimento automatico:
4 Premere +, – per impostare l’anno, quindi premere
L’unità si spegne automaticamente una volta trascorso un periodo
predefinito (l’impostazione di fabbrica è 15 minuti) mentre la
registrazione è arrestata.
Se l’unità viene spenta con la funzione di spegnimento automatico,
portare l’interruttore OPR/HOLD in posizione [OFF] prima di
accendere l’unità. (➜ pagina 24)
Funzione di blocco
Le operazioni con i tasti vengono ignorate quando si attiva la
funzione di blocco.
Per attivare la funzione di blocco:
Fare scorrere l’interruttore OPR/HOLD verso il lato [HOLD]
durante la registrazione o la riproduzione.
Per disattivare la funzione di blocco:
Far scorrere l’interruttore OPR/HOLD in direzione opposta a
[HOLD].
quindi premere [q OK] per confermare.
i.
5 Premere +, – per impostare il mese, quindi
premere i.
6 Premere +, – per impostare la data, quindi
premere i.
ITALIANO
Fare scorrere l’interruttore OPR/HOLD verso il lato [ON] per
accendere l’unità. Il display si illumina.
7 Premere +, – per impostare il metodo di
indicazione dell’orario, quindi premere i.
“ 24h ” e “ AM / PM ” vengono visualizzati rispettivamente per
i formati a 24 ore e a 12 ore.
8 Premere +, – per impostare l’ora, quindi premere i.
9 Premere +, – per impostare i minuti.
Per cambiare l’impostazione, premere u, i per spostarsi
tra le voci, quindi premere nuovamente +, – per effettuarne
l’impostazione.
10 Premere [q OK] per confermare.
La data e l’ora vengono impostate e l’orologio entra in funzione.
VQT4J81
Per uscire dalla schermata di impostazione, premere [F2 (CLOSE)].
3
123
VQT4J81_RR-XS450_420-E_It.indd 123
2012/05/28 14:17:54
Selezione della cartella
1 Premere [F2 (FOLDER)].
2 Premere +, –, u, i per selezionare la cartella,
quindi premere [q OK] per confermare.
• “ ” (OTHER FOLDER) è per la riproduzione di file registrati con un
dispositivo diverso dalla presente unità. Su questa unità è inoltre possibile
riprodurre file musicali registrati con (o trasferiti da) alcuni dispositivi
Panasonic Stereo System dotati della funzione di registrazione USB.
Passare dalla memoria interna alla scheda SD e viceversa:
Se la scheda SD è inserita, le voci della scheda SD
sono visualizzate sullo schermo nel punto 2 . Premere
[F1 (MEMORY)] per selezionare la memoria.
• Nel presente manuale, la scheda microSD/microSDHC viene
indicata come “Scheda SD”.
Cambiamento della posizione
del microfono
Posizione del microfono
Utilizzi raccomandati
STEREO
Funziona come un normale
microfono stereo.
Adatto per registrare eventi
come riunioni o esibizioni con
un gran numero di persone.
ZOOM
Consente di registrare con
una resa ottimale dell’audio
frontale.
Adatto per registrare
eventi come una lezione o
un'intervista, dove l'audio
proviene da una specifica
direzione.
Selezione della cartella o del
file nella schermata di elenco
1 Premere [LIST ] per almeno 1 secondo.
Andare al punto 2 se è inserita una scheda SD
(➜ pagina 18), altrimenti al punto 3 .
2 Premere +, – per selezionare “INT. MEMORY”
VQT4J81
(memoria interna) o “microSD CARD”, quindi
premere [q OK] per confermare.
3 Premere +, – per selezionare la cartella, quindi
premere [q OK] per confermare.
4
Se sono state create delle cartelle nella cartella MUSIC o
OTHER FOLDER ( ), ripetere il punto 3 per selezionare la
cartella di destinazione.
4 Premere +, – per selezionare il file, quindi premere
[q OK] per confermare.
Ha inizio la riproduzione del file.
124
VQT4J81_RR-XS450_420-E_It.indd 124
2012/05/28 14:17:54
Registrazione
Controllo delle informazioni.
1 Premere [F2 (FOLDER)].
1 Premere [STOP g/RETURN].
2 Premere u, i per selezionare la cartella di
2 Spostare in alto o in basso la schermata delle
Per uscire dalla schermata informativa:
premere [STOP g/RETURN].
3 Premere [REC *] (inizia la registrazione).
4 Premere [STOP g/RETURN] per arrestare la
registrazione.
Per mettere in pausa la registrazione:
1 Premere [REC *] durante la registrazione.
L’indicatore di registrazione lampeggia.
2 Premere nuovamente [REC *] per riprendere la registrazione.
Riproduzione
Ascolto dell’audio utilizzando
le cuffie
Collegare gli auricolari stereo (non in dotazione).
Tipo di spina: presa mini ø 3,5 mm stereo
Auricolari addizionali consigliati: Panasonic RP-HV154,
RP-HJE120
(a partire da maggio 2012)
Monitoraggio della
registrazione in corso
1 Premere [q OK] (viene avviata la riproduzione).
Regolazione del volume:
Regolazione del volume
Per alzare il volume: Premere +.
Per abbassare il volume: Premere –.
Altoparlante
incorporato
Operazioni durante la riproduzione
Salta (Skip): Premere u, i.
Indietro veloce/Avanti veloce (Ricerca):
Tenere premuto u, i.
Per arrestare l’unità: Premere [STOP g/RETURN].
ITALIANO
Per la registrazione microfonica, selezionare una delle cartelle
“A”, “B”, “C” e “D”. (L’impostazione di fabbrica è “A”)
informazioni premendo il tasto + o –.
Inserire
saldamente.
Il volume può essere regolato premendo
+, –, ma ciò non ha alcun effetto sul
livello di registrazione.
Ascolto del suono durante
la riproduzione
Il suono durante la riproduzione proviene
dall’altoparlante. L’ascolto potrebbe
essere difficile in luoghi rumorosi, a
causa dell’uscita dall’altoparlante. In tal
caso, collegare gli auricolari stereo (non
in dotazione).
VQT4J81
destinazione della registrazione, quindi premere
[q OK] per confermare.
Viene visualizzata la schermata delle informazioni.
5
125
VQT4J81_RR-XS450_420-E_It.indd 125
2012/05/28 14:17:54
Eliminazione dei file
Selezione della scena di registrazione
1 Premere [ERASE/A-B&].
1 Premere [MENU] per almeno 1 secondo.
2 Premere +, – per selezionare “FILE”, quindi
2 Premere +, – per selezionare la scena, quindi
premere [q OK] per confermare.
3 Premere +, – per selezionare “YES”, quindi
premere [q OK] per confermare.
Mentre è in atto l’eliminazione, l’indicatore di stato lampeggia
e viene visualizzato “ERASING”. L’eliminazione può richiedere
alcuni minuti.
Selezionando “FOLDER” al punto 2 apparirà la schermata
per eliminare tutti i file nella cartella selezionata.
Per uscire dalla schermata di eliminazione, premere
[F2 (CLOSE)].
Eliminazione di file dalla schermata di elenco.
Selezionare i file sulla schermata di elenco (➜ pagina 4) e
premere [ERASE/A-B&]. Viene quindi visualizzata la schermata
di eliminazione del file. Selezionare la cartella, quindi premere
[ERASE/A-B&]. Viene quindi visualizzata la schermata di
eliminazione di tutti i file nella cartella.
Viene visualizzata la schermata di selezione della scena di registrazione.
premere [q OK] per confermare.
Se si seleziona “USER”, saltare il punto 3 .
3 Premere +, – per selezionare “LOAD”, quindi
premere [q OK] per confermare.
Per uscire dalla schermata di impostazione, premere [F2 (CLOSE)].
Premendo [REC *], la registrazione viene eseguita con
l’impostazione di scena di registrazione selezionata.
Registrazione della scena
LANG.
STUDY
KARAOKE
MUSIC
PERF.
CONVERSATION
MEETING
LECTURE
VQT4J81
FAVORITE
6
Applicazione
Registrazione della propria voce per
esercizi di pronuncia, ecc.
Registrazione ad alto volume, ad esempio
karaoke
Registrazione ad alta qualità, ad esempio
per eventi musicali
Registrazione delle voci di altre persone
per interviste o riunioni, ecc.
Registrazione di un’ampia banda audio. Ad
esempio per la registrazione di riunioni, ecc.
Registra i suoni, ad esempio le lezioni in
aula e così via.
Registrazione delle proprie impostazioni
Modifica delle impostazioni della scena di registrazione
1 Premere [MENU] per almeno 1 secondo.
2 Premere +, – per selezionare la scena di
registrazione, quindi premere [q OK] per confermare.
126
VQT4J81_RR-XS450_420-E_It.indd 126
2012/05/28 14:17:54
Ripetere i punti 4 e 5 per modificare altre voci.
6 Al termine delle impostazioni, premere +, – per
selezionare “OK”, quindi premere [q OK] per
confermare.
Per selezionare la scena di registrazione modificata,
selezionare “LOAD”.
Per uscire dalla schermata di impostazione, premere [F2 (CLOSE)].
Inizializzazione delle impostazioni della scena
di registrazione
1 Premere [MENU] per almeno 1 secondo.
2 Premere +, – per selezionare la scena di
registrazione che si desidera inizializzare, quindi
premere [q OK] per confermare.
3 Premere +, – per selezionare “INITIALIZE”, quindi
premere [q OK] per confermare.
4 Premere +, – per selezionare “YES”, quindi
premere [q OK] per confermare.
La scena di registrazione selezionata viene ripristinata
sull’impostazione di fabbrica.
Per selezionare la scena di registrazione inizializzata,
selezionare “LOAD”.
Per uscire dalla schermata di impostazione, premere [F2 (CLOSE)].
Scena diretta
Questa funzione consente di cambiare la scena di registrazione in
base alle variazioni della posizione del microfono.
*Al momento dell’acquisto, “MEETING” è assegnata a STEREO,
e “LECTURE” è assegnata a ZOOM.
Modifica dell’impostazione di scena diretta
1 Premere [MENU].
2 Premere +, – per selezionare “MIC REC MENU”,
quindi premere [q OK] per confermare.
3 Premere +, – per selezionare “DIRECT SCENE”,
quindi premere [q OK] per confermare.
4 Premere +, – per selezionare la posizione del
ITALIANO
quindi premere [q OK] per confermare.
4 Premere +, – per selezionare la voce che si
desidera modificare, quindi premere [q OK] per
confermare.
5 Premere +, – per selezionare l’impostazione,
quindi premere [q OK] per confermare.
microfono (“STEREO” o “ZOOM”), quindi premere
[q OK] per confermare.
5 Premere +, – per selezionare la scena di
registrazione, quindi premere [q OK] per
confermare.
Se si desidera modificare la scena di registrazione per l’altra
posizione del microfono, eseguire i punti 4 e 5 per impostare
la scena di registrazione.
Per uscire dalla schermata di impostazione, premere
[F2 (CLOSE)].
VQT4J81
3 Premere +, – per selezionare “CHANGE SETTING”,
7
127
VQT4J81_RR-XS450_420-E_It.indd 127
2012/05/28 14:17:54
Impostazione della scena diretta su OFF
Selezione della modalità di
registrazione
1 Premere [MENU].
1 Premere [MENU].
2 Premere +, – per selezionare “MIC REC MENU”,
2 Premere +, – per selezionare “MIC REC MENU”,
Scena diretta
quindi premere [q OK] per confermare.
3 Premere +, – per selezionare “DIRECT SCENE”,
quindi premere [q OK] per confermare.
4 Premere +, – per selezionare “SETTING”, quindi
premere [q OK] per confermare.
5 Premere +, – per selezionare “OFF”, quindi
premere [q OK] per confermare.
Per uscire dalla schermata di impostazione, premere [F2 (CLOSE)].
quindi premere [q OK] per confermare.
3 Premere +, – per selezionare “MIC REC MODE”,
quindi premere [q OK] per confermare.
4 Premere +, – per selezionare l’impostazione
(frequenza di campionamento PCM/bit rate MP3),
quindi premere [q OK] per confermare.
(L’impostazione di fabbrica è “MP3 192kbps”.)
Per uscire dalla schermata di impostazione, premere
[F2 (CLOSE)].
*La qualità del suono e il tempo di registrazione restante differiscono
a seconda dell’impostazione della modalità di registrazione.
Formato di
registrazione
PCM: 44,1 kHz
Registrazione ad alta
qualità
MP3: 320 kb/sec.
MP3: 192 kb/sec.
VQT4J81
MP3: 128 kb/sec.
8
MP3: 64 kb/sec.
MP3: 32 kb/sec.
Registrazione
lunga
*Quando la modalità di registrazione è impostata su “MP3
32kbps”, la registrazione diventa monoaurale.
128
VQT4J81_RR-XS450_420-E_It.indd 128
2012/05/28 14:17:54
1 Premere [MENU].
2 Premere +, – per selezionare “MIC REC MENU”,
quindi premere [q OK] per confermare.
3 Premere +, – per selezionare “MIC SENS.”, quindi
premere [q OK] per confermare.
4 Premere +, – per selezionare “HIGH” o “LOW”,
quindi premere [q OK] per confermare.
(L’impostazione di fabbrica è “HIGH”.)
Per uscire dalla schermata di impostazione, premere [F2 (CLOSE)].
Impostazione manuale del
livello di registrazione
Impostazione della regolazione del livello di
registrazione su MANUAL
1 Premere [MENU].
2 Premere +, – per selezionare “MIC REC MENU”,
quindi premere [q OK] per confermare.
3 Premere +, – per selezionare “REC LEVEL ADJ.”,
quindi premere [q OK] per confermare.
4 Premere +, – per selezionare “MANUAL”, quindi
premere [q OK] per confermare.
ITALIANO
Cambiare la sensibilità del
microfono
Per uscire dalla schermata di impostazione, premere [F2 (CLOSE)].
Riduzione del rumore a bassa
frequenza durante la registrazione
1 Tenere premuto [REC *] per più di 1 secondo.
1 Premere [MENU].
2 Direzionare il microfono verso la fonte sonora da
quindi premere [q OK] per confermare.
3 Premere +, – per selezionare “LOW CUT FILTER”,
quindi premere [q OK] per confermare.
4 Premere +, – per selezionare “ON”, quindi premere
[q OK] per confermare.
(L’impostazione di fabbrica è “OFF”.)
Per uscire dalla schermata di impostazione, premere [F2 (CLOSE)].
L’unità entra in standby durante la registrazione.
registrare.
3 Premere u, i per regolare il livello di
registrazione.
La gamma di regolazione va da 0 a 30.
(L’impostazione di fabbrica è “15”.)
Premere [REC *] per iniziare la registrazione.
VQT4J81
2 Premere +, – per selezionare “MIC REC MENU”,
Regolazione manuale del livello di registrazione
9
129
VQT4J81_RR-XS450_420-E_It.indd 129
2012/05/28 14:17:54
Impostazione manuale del livello di registrazione
Attivazione del limitatore di picchi in registrazione
Per uscire dalla schermata di impostazione, premere [F2 (CLOSE)].
Il nome della modalità EQ non viene visualizzato una volta
usciti dalla schermata di impostazione.
1 Premere [MENU].
Premere [REC *] per iniziare la registrazione.
2 Premere +, – per selezionare “MIC REC MENU”,
quindi premere [q OK] per confermare.
3 Premere +, – per selezionare “PEAK LIMITER”,
quindi premere [q OK] per confermare.
4 Premere +, – per selezionare “ON”, quindi premere
[q OK] per confermare.
(L’impostazione di fabbrica è “OFF”.)
Per uscire dalla schermata di impostazione, premere [F2 (CLOSE)].
Impostazione della registrazione EQ
1 Tenere premuto [REC *] per più di 1 secondo.
L’unità entra in standby durante la registrazione.
Modalità EQ
Effetti e applicazioni
Questa modalità (di base) non enfatizza alcuna
frequenza audio specifica.
EXTRA BASS Enfatizza molto le basse frequenze.
BASS
Enfatizza leggermente le basse frequenze.
MIDDLE
Enfatizza le medie frequenze.
BASS&TREBLE Enfatizza leggermente le basse e le alte frequenze.
TREBLE
Enfatizza leggermente le alte frequenze.
EXTRA TREBLE Enfatizza molto le alte frequenze.
Questa modalità consente la regolazione di
USER
bande di frequenza di 150 Hz, 500 Hz, 1 kHz,
4 kHz e 12 kHz.
FLAT
(L’impostazione di fabbrica è “FLAT”.)
2 Premere [MENU].
3 Premere +, – per selezionare “REC EQ”, quindi
premere [q OK] per confermare.
4 Premere +, – per selezionare la modalità di
registrazione EQ.
In caso di selezione di modalità diverse da “USER”, andare al punto 5 .
VQT4J81
Impostazione quando si seleziona “USER”:
10
1 Dopo il punto 4 , premere [F1 (EDIT)]
2 Premere u, i per selezionare la banda di frequenza da modificare,
quindi premere +, – per regolare il livello di registrazione (±12 dB).
3 Quando sono state completate tutte le impostazioni per la
banda di frequenza da modificare, andare al punto 5 .
5 Premere [q OK] per confermare.
Auto timer
1 Premere [MENU].
2 Premere +, – per selezionare “MIC REC MENU”,
quindi premere [q OK] per confermare.
3 Premere +, – per selezionare “SELF TIMER”,
quindi premere [q OK] per confermare.
4 Premere +, – per selezionare l’ora, quindi premere
[q OK] per confermare.
(L’impostazione di fabbrica è “OFF”.)
Per uscire dalla schermata di impostazione, premere [F2 (CLOSE)].
130
VQT4J81_RR-XS450_420-E_It.indd 130
2012/05/28 14:17:54
2 Premere +, – per selezionare “MIC REC MENU”,
quindi premere [q OK] per confermare.
3 Premere +, – per selezionare “VAS”, quindi
premere [q OK] per confermare.
4 Premere +, – per selezionare “ON”, quindi premere
[q OK] per confermare.
(L’impostazione di fabbrica è “OFF”.)
Per uscire dalla schermata di impostazione, premere [F2 (CLOSE)].
Per avviare la registrazione VAS, premere [REC *].
Regolazione del funzionamento del VAS:
Premere u, i durante la registrazione VAS.
(L’impostazione di fabbrica è “3”.)
Funzione di registrazione
differita (PRE-RECORD)
1 Premere [MENU].
2 Premere +, – per selezionare “MIC REC MENU”,
quindi premere [q OK] per confermare.
3 Premere +, – per selezionare “PRE-RECORD”,
quindi premere [q OK] per confermare.
4 Premere +, – per selezionare “ON”, quindi premere
[q OK] per confermare.
(L’impostazione di fabbrica è “OFF”.)
Per uscire dalla schermata di impostazione, premere [F2 (CLOSE)].
L’unità entra in modalità standby di registrazione preliminare.
Cambia a 1 sec., 2 sec., 3 sec. e si arresta a 3 sec. I dati audio
del microfono vengono sempre aggiornati circa 3 secondi
prima della registrazione e l’unità è in standby.
2 Premere [REC *].
L’indicatore di registrazione si illumina e la registrazione viene
avviata proseguendo direttamente dopo i dati audio memorizzati.
Per arrestare l’unità: Premere [STOP g/RETURN]
Registrazione mediante un
microfono esterno
ITALIANO
1 Premere [MENU].
Per registrare con la funzione di registrazione preliminare:
1 Tenere premuto [REC *] per più di 1 secondo.
1 Far scorrere l’interruttore Mic/Line su [MIC].
2 Collegare il microfono esterno.
Microfono esterno
(non in dotazione)
Inserire
saldamente.
Tipo di spina:
presa mini ø 3,5 mm stereo
3 Premere [REC *] per iniziare la registrazione.
VQT4J81
Prevenzione delle registrazioni
inutili (VAS)
11
131
VQT4J81_RR-XS450_420-E_It.indd 131
2012/05/28 14:17:54
Registrazione da altri dispositivi
11 Mettere in riproduzione il dispositivo esterno.
2 Premere [MENU].
Questa unità è dotata della seguente funzione di registrazione
sincronizzata.
3 Premere +, – per selezionare “LINE REC”, quindi
premere [q OK] per confermare.
4 Premere +, – per selezionare “LINE INPUT”, quindi
premere [q OK] per confermare.
5 Premere +, – per selezionare l’impostazione,
quindi premere [q OK] per confermare.
Quando si effettua il collegamento all’uscita cuffie del
dispositivo esterno o all’uscita di linea del dispositivo portatile,
selezionare rispettivamente “HIGH” o “LOW”.
(L’impostazione di fabbrica è “HIGH”.)
Impostazione della registrazione sincronizzata
1 Premere [MENU].
2 Premere +, – per selezionare “LINE REC”, quindi
7 Collegare il dispositivo esterno
3 Premere +, – per selezionare “SYNCHRO REC”,
8 Tenere premuto [REC *] per più di 1 secondo.
L’unità entra in standby durante la registrazione.
9 Attivare la riproduzione sul dispositivo esterno e
regolare il livello di ingresso/uscita.
1 Se l’indicatore di livello balza in alto e viene visualizzato
VQT4J81
Questa funzione rileva il silenzio tra due brani, ecc., quindi
registra ogni brano in diversi file, ad esempio un primo brano,
un secondo brano, ecc. Se rileva suono dal dispositivo esterno,
la registrazione si avvia automaticamente. Se rileva silenzio per
circa 2 secondi o più, la registrazione viene messa in pausa. Se
viene rilevato nuovamente suono, la registrazione continua.
6 Premere [F2 (CLOSE)].
Collegarsi al dispositivo esterno e far scorrere l’interruttore
Mic/Line verso “LINE”. Quindi, vengono visualizzate
l’impostazione di ingresso linea selezionata e la modalità di
registrazione linea.
12
10 Premere [REC *] per iniziare la registrazione.
1 Far scorrere l’interruttore Mic/Line su [LINE].
“
”, il volume del dispositivo esterno è troppo alto.
Regolare il volume del dispositivo esterno sulla gamma “
”, anche se il volume è al livello massimo.
Per riconfigurare le impostazioni dell’ingresso della linea,
premere [MENU] e seguire i punti da 4 a 6 .
2 Dopo aver terminato la regolazione del livello di ingresso/
uscita, arrestare la sorgente audio dell’altro dispositivo nella
posizione in cui si desidera iniziare a registrare.
premere [q OK] per confermare.
quindi premere [q OK] per confermare.
4 Premere +, – per selezionare “ON (Auto Stop)”
oppure “ON (Manual Stop)”, quindi premere
[q OK] per confermare.
Auto: La registrazione viene messa in pausa se si rileva
silenzio per circa 2 secondi o più, e viene interrotta se il
silenzio continua per circa 15 secondi o più.
Manual: anche se il silenzio continua, la registrazione rimane in
pausa (standby) fino alla pressione di [STOP g/RETURN].
(L’impostazione di fabbrica è “OFF”.)
Per uscire dalla schermata di impostazione, premere
[F2 (CLOSE)].
Registrazione sincronizzata:
1 Eseguire i passaggi da 1 a 11 (➜ sinistra).
132
VQT4J81_RR-XS450_420-E_It.indd 132
2012/05/28 14:17:54
1 Premere [MENU].
Variazione della velocità di
riproduzione
2 Premere +, – per selezionare “LINE REC”, quindi
1 Premere [F1 (SPEED)] durante la riproduzione.
premere [q OK] per confermare.
3 Premere +, – per selezionare “LINE REC MODE”,
quindi premere [q OK] per confermare.
4 Premere +, – per selezionare l’impostazione
(frequenza di campionamento PCM/bit rate MP3),
quindi premere [q OK] per confermare.
(L’impostazione di fabbrica è “MP3 192kbps”.)
Per uscire dalla schermata di impostazione, premere [F2 (CLOSE)].
Funzione indice
2 Premere [F1 (SLOW)] o [F2 (FAST)] per
selezionare la velocità, quindi premere [q OK] per
confermare.
Velocità di riproduzione:
La velocità di riproduzione può essere regolata in incrementi
del 10% per le velocità superiori a quella normale (100%) e in
decrementi del 5% per le velocità inferiori a quella normale.
Indicazione di stato durante la riproduzione:
ITALIANO
Selezione della modalità di registrazione della linea
Le velocità di riproduzione normale, più veloce e più lenta sono
visualizzate rispettivamente come “ ”, “ ” e “ ”.
Aggiunta di un indice
registrazione è in pausa, premere [F2 (INDEX)] quando ci si
trova sulla posizione dove si intende aggiungere un indice.
Vengono visualizzati “ ” (lampeggiante) e “ADDING INDEX”.
Viene visualizzato “ ” (illuminato) per i file a cui sono stati
aggiunti indici.
Eliminazione di indici
1 Premere [ERASE/A-B&].
2 Premere +, – per selezionare “INDEX”, quindi
premere [q OK] per confermare.
3 Premere +, – per selezionare “YES”, quindi
premere [q OK] per confermare.
Ripetizione A-B
1 Premere [ERASE/A-B&] durante la riproduzione.
Viene impostato il punto d’inizio (A) e vengono visualizzati
“
” (illuminati) e “ ” (lampeggiante).
2 Premere [ERASE/A-B&] nel punto finale (B).
L’indicazione cambia in “
ripetizione della riproduzione.
” (illuminato) e viene avviata la
Cancellazione della ripetizione A-B:
Premere [ERASE/A-B&], u, i o [STOP g/RETURN].
VQT4J81
1 Durante la registrazione o la riproduzione oppure mentre la
13
133
VQT4J81_RR-XS450_420-E_It.indd 133
2012/05/28 14:17:54
Riproduzione a partire da un
posizione specifica (TIME SEARCH)
4 Premere +, – per selezionare il numero di secondi
(da 1 a 5), quindi premere [q OK] per confermare.
(L’impostazione di fabbrica è “3 sec”.)
1 Premere [MENU].
Per uscire dalla schermata di impostazione, premere [F2 (CLOSE)].
2 Premere +, – per selezionare “PLAY MENU”,
Riproduzione con ripetizione
(REPEAT)
(mentre è in corso la riproduzione, andare al punto 3 .)
quindi premere [q OK] per confermare.
3 Premere +, – per selezionare “TIME SEARCH”,
quindi premere [q OK] per confermare.
4 Impostare la posizione di avvio riproduzione.
(Modificare il valore di “TIME” per impostare la posizione di avvio.)
Premere u, i per selezionare “00:00:00” (ora:minuti:
secondi), quindi premere +, – per modificare i valori.
5 Premere [q OK].
La riproduzione parte dalla posizione specificata.
Premere [F2 (CLOSE)] per arrestare l’impostazione in corso.
1 Premere [MENU].
(mentre è in corso la riproduzione, andare al punto 3 .)
2 Premere +, – per selezionare “PLAY MENU”,
quindi premere [q OK] per confermare.
3 Premere +, – per selezionare “REPEAT”, quindi
premere [q OK] per confermare.
4 Premere +, – per selezionare il tipo di ripetizione,
quindi premere [q OK] per confermare.
(L’impostazione di fabbrica è “OFF”.)
Riproduzione leggermente
all’indietro
1 Premere [q OK] durante la riproduzione.
VQT4J81
Ogni volta che si preme il tasto, la riproduzione viene riavvolta
di circa 3 secondi (impostazione di fabbrica).
14
Impostazione del tempo di ritorno:
1 Premere [MENU].
(mentre è in corso la riproduzione, andare al punto 3 .)
2 Premere +, – per selezionare “PLAY MENU”,
quindi premere [q OK] per confermare.
3 Premere +, – per selezionare “SLIGHT RETURN”,
quindi premere [q OK] per confermare.
Per uscire dalla schermata di impostazione, premere [F2 (CLOSE)].
OFF: La riproduzione viene eseguita in successione dal file
selezionato all’ultimo file nella cartella e successivamente si arresta.
ONE: Viene riprodotto ripetutamente un solo file.
FOLDER REPEAT: Vengono riprodotti ripetutamente tutti i file
nella cartella.
FOLDER RANDOM: Vengono riprodotti ripetutamente tutti i file
nella cartella in ordine casuale.
ALL REPEAT: Per la cartella MUSIC (M) o OTHER FOLDER ( )
vengono riprodotti ripetutamente tutti i file nella cartella. Per le altre
cartelle, l’operazione è analoga a quella per “FOLDER REPEAT”.
ALL RANDOM: Per la cartella MUSIC (M) o OTHER FOLDER
( ) vengono riprodotti ripetutamente tutti i file nella cartella
in ordine casuale. Per le altre cartelle, l’operazione è analoga a
quella per “FOLDER RANDOM”.
Il numero massimo di file riconosciuti è 3.000
134
VQT4J81_RR-XS450_420-E_It.indd 134
2012/05/28 14:17:54
Salto a intervalli regolari
1 Premere [q OK] per almeno 1 secondo durante la
riproduzione.
La modalità passa alla modalità di salto temporale e viene
visualizzato “ ”. La modalità di salto cambia ogni volta che si
preme il tasto.
2 Premere u, i.
Ogni volta che si preme il tasto, circa 5 secondi vengono saltati
(impostazione di fabbrica).
Per modificare l’intervallo di salto
1 Premere [MENU].
Shadowing
Impostazione dello shadowing:
1 Premere [MENU].
(mentre è in corso la riproduzione, andare al punto 3 .)
2 Premere +, – per selezionare “PLAY MENU”,
quindi premere [q OK] per confermare.
3 Premere +, – per selezionare “SHADOWING”,
quindi premere [q OK] per confermare.
4 Premere +, – per selezionare il tipo di shadowing,
quindi premere [q OK] per confermare.
Se si seleziona “ON (small volume)”, il volume sarà circa un
terzo del volume corrente durante lo shadowing.
(L’impostazione di fabbrica è “OFF”.)
ITALIANO
Salto a intervalli regolari
(TIME SKIP)
Per uscire dalla schermata di impostazione, premere
[F2 (CLOSE)].
(mentre è in corso la riproduzione, andare al punto 3 .)
2 Premere +, – per selezionare “PLAY MENU”,
quindi premere [q OK] per confermare.
3 Premere +, – per selezionare “TIME SKIP”, quindi
premere [q OK] per confermare.
4 Premere +, – per selezionare l’ora, quindi premere
[q OK] per confermare.
Per uscire dalla schermata di impostazione, premere
[F2 (CLOSE)].
VQT4J81
È possibile impostare l’intervallo di salto su 5 sec, 10 sec,
30 sec, 1 min, 5 min, 10 min o 15 min.
(L’impostazione di fabbrica è “5sec”.)
15
135
VQT4J81_RR-XS450_420-E_It.indd 135
2012/05/28 14:17:54
Shadowing
Utilizzo della funzione di shadowing:
1 Eseguire la ripetizione A-B. (➜ pagina 13)
Lo shadowing viene eseguito senza audio o a basso volume
dopo la ripetizione A-B.
Regolazione del volume di shadowing:
È possibile regolare il volume dello shadowing separatamente
rispetto alla ripetizione A-B.
• Se la ripetizione A-B viene annullata o l’impostazione di
shadowing viene modificata durante la riproduzione, il volume
dello shadowing ritorna all'impostazione originale.
Ascolto facilitato
(VOICE EMPHASIS)
1 Premere [MENU].
(mentre è in corso la riproduzione, andare al punto 3 .)
2 Premere +, – per selezionare “PLAY MENU”,
quindi premere [q OK] per confermare.
3 Premere +, – per selezionare “VOICE EMPHASIS”,
quindi premere [q OK] per confermare.
4 Premere +, – per selezionare il tipo di
enfatizzazione della voce, quindi premere [q OK]
per confermare.
(L’impostazione di fabbrica è “NORMAL”.)
Per uscire dalla schermata di impostazione, premere
[F2 (CLOSE)].
VQT4J81
NORMAL: Consente di riprodurre l’audio così come è stato
registrato.
NOISE CXL L: Consente di eseguire una leggera riduzione
del rumore.
NOISE CXL H: Consente di eseguire una consistente
riduzione del rumore.
FOCUS FRONT: Consente di enfatizzare l’audio frontale.
FOCUS LEFT: Consente di enfatizzare l’audio a sinistra.
FOCUS RIGHT: Consente di enfatizzare l’audio a destra.
16
136
VQT4J81_RR-XS450_420-E_It.indd 136
2012/05/28 14:17:54
1 Premere [MENU].
(mentre è in corso la riproduzione, andare al punto 3 .)
2 Premere +, – per selezionare “PLAY MENU”,
quindi premere [q OK] per confermare.
3 Premere +, – per selezionare “SOUND EQ”, quindi
premere [q OK] per confermare.
4 Premere +, – per selezionare la modalità di suono EQ.
In caso di selezione di modalità diverse da “USER”, andare al
punto 5 .
Impostazione quando si seleziona “USER”:
1 Dopo il punto 4 , premere [F1 (EDIT)].
2 Premere u, i per selezionare la frequenza di banda
Modalità
EQ
Effetti e applicazioni
FLAT
La funzione di equalizzazione del suono non è in uso.
Viene riprodotto il suono originale senza alcuna modifica.
BASS
Enfatizza molto le basse frequenze.
CLEAR
Enfatizza molto le alte frequenze.
HEAVY
Enfatizza leggermente le basse e le alte frequenze.
SOFT
Enfatizza le medie frequenze.
VOICE
Riduce il rumore affinché la voce umana si possa
udire più facilmente.
USER
Questa modalità consente la regolazione di bande di
frequenza di 150 Hz, 500 Hz, 1 kHz, 4 kHz e 12 kHz.
(L’impostazione di fabbrica è “FLAT”.)
ITALIANO
Impostazione della
riproduzione EQ (SOUND EQ)
da modificare, quindi premere +, – per regolare il livello del
volume (±6 dB).
3 Quando sono state completate tutte le impostazioni per la
banda di frequenza da modificare, andare al punto 5 .
5 Premere [q OK] per confermare.
VQT4J81
Per uscire dalla schermata di impostazione, premere
[F2 (CLOSE)].
17
137
VQT4J81_RR-XS450_420-E_It.indd 137
2012/05/28 14:17:54
Uso di una scheda SD
g Tipi di ricerca di file
1 Spegnere l’unità e aprire il coperchio
CALENDAR SRCH I file registrati sono ordinati in base alla data
e visualizzati sotto forma di elenco.
dell’alloggiamento della batteria/scheda SD.
2 Inserire la scheda SD e chiudere il coperchio
dell’alloggiamento della batteria/scheda SD.
Allineare la scheda SD nella direzione corretta ( ) e inserirla
completamente fino a quando si sente un “clic”.
Per rimuovere la scheda SD:
1 Spegnere l’unità e aprire il coperchio dell’alloggiamento della
batteria/scheda SD.
2 Spingere delicatamente la scheda SD.
3 Quando la scheda SD fuoriesce leggermente, estrarla
lentamente.
VQT4J81
Uso della funzione di ricerca del file
Inserimento della scheda SD
*È possibile commutare tra la memoria interna e la scheda
SD premendo [F2 (FOLDER)] per più di 1 secondo quando è
visualizzata la schermata di arresto.
*Questa unità è compatibile con le schede microSD da 2 GB e
le schede microSDHC da 4 GB e 32 GB. (a partire da maggio
2012)
*L’unità potrebbe non funzionare correttamente a seconda del
produttore o del tipo di scheda SD.
*Per informazioni dettagliate sulle schede SD che funzionano
correttamente in base agli standard di produzione, visitare la
seguente home page di assistenza.
http://panasonic.net/support/
*Se è inserita una scheda SD ma “microSD” non è visualizzato
nella schermata SELECT FOLDER, ecc., l’unità non riconosce
la scheda SD.
*Tenere la scheda di memoria fuori della portata dei bambini, per
evitare che possano inghiottirla.
18
DAY OF WEEK
I file registrati sono ordinati in base al giorno
della settimana e visualizzati sotto forma
di elenco.
RECENT R. FILE
I file registrati sono visualizzati in base alla
data di registrazione, a partire dalla data più
recente. (20 file)
Ricerca di file
1 Premere [LIST ] per almeno 1 secondo.
Andare al punto 2 se è inserita una scheda SD, altrimenti al
punto 3 .
2 Premere +, – per selezionare “INT. MEMORY”
(memoria interna) o “microSD CARD”, quindi
premere [F1 (SEARCH)].
3 Premere +, – per selezionare il tipo di ricerca file e
premere [q OK] per confermare.
“ ” (memoria interna) o “
come obiettivo di ricerca.
” (scheda SD) viene visualizzato
Quando è selezionato “CALENDAR SRCH”:
Premere +, –, u, i per selezionare la data di
registrazione, quindi premere [q OK] per confermare.
Quando è selezionato “DAY OF WEEK”:
Premere +, – per selezionare il giorno della settimana, quindi
premere [q OK] per confermare.
È possibile selezionare solo un giorno della settimana.
4 Premere +, – per selezionare il file, quindi premere
[q OK] per confermare.
138
VQT4J81_RR-XS450_420-E_It.indd 138
2012/05/28 14:17:55
Ascolto della musica con questa
unità (file musicali WMA/MP3)
Uso della funzione playlist
Selezione di un file dalla cartella “M”:
1 Selezionare il file, quindi premere [q OK].
1 Selezionare la cartella MUSIC (M) sulla schermata
di elenco (➜ pagina 4).
È anche possibile selezionare OTHER FOLDER (
Quando si selezionano le cartelle o si selezionano i file sfogliando
le cartelle, premere u per spostarsi tra le gerarchie. (Per
dettagli sui metodi di selezione di file e cartelle, si veda pagina 4.)
Vengono visualizzati “FOLDER SKIP” e l’indicatore della
modalità di salto delle cartelle “ ”.
Annullamento dell’attacco cartella:
L’impostazione può essere annullata tramite uno dei seguenti
metodi.
• Premere nuovamente [F2 ( CUE)]. Se l’impostazione viene
annullata, i file possono essere saltati utilizzando u, i.
• Premere [q OK].
• Premere [STOP g/RETURN]. (La riproduzione è terminata.)
”.
3 Premere u, i per selezionare la playlist, quindi premere
[q OK] per confermare. (selezionare da PLAYLIST 1 a 5).
• Il file o tutti i file all’interno della cartella vengono registrati
nella playlist selezionata.
ITALIANO
quindi premere [F1 (PLAYLIST)] per confermare.
CUE)] durante la riproduzione.
2 Premere u, i quando viene visualizzato “
).
2 Premere +, – per selezionare il file o la cartella,
Funzione di attacco cartella
1 Premere [F2 (
Registrazione dei brani preferiti su una playlist
Riproduzione di brani registrati nella playlist
1 Selezionare la playlist (da P1 a P5) (➜ pagina 4).
2 Premere u, i per selezionare il file da
riprodurre e premere [q OK].
Modifica dell’ordine dei brani nella playlist
1 Selezionare la playlist (da P1 a P5) sulla
schermata di elenco (➜ pagina 4).
2 Premere +, – per selezionare il file che si desidera
quindi premere [q OK] per confermare.
“
” viene aggiunto a sinistra del nome del file selezionato.
4 Premere +, – per spostare il file selezionato nella posizione
desiderata, quindi premere [q OK] per confermare.
• L’ordine del brano viene modificato.
VQT4J81
modificare, quindi premere [F1 (EDIT)].
3 Premere +, – per selezionare “CHANGE ORDER”,
19
139
VQT4J81_RR-XS450_420-E_It.indd 139
2012/05/28 14:17:55
Uso della funzione playlist
Divisione di file
Eliminazione dei brani registrati nell’elenco di riproduzione
1 Durante la riproduzione, premere [STOP g/RETURN]
1 Selezionare la playlist (da P1 a P5) sulla
2 Selezionare “DIVIDE” nella schermata di modifica
2 Premere +, – per selezionare il file che si desidera
3 Premere +, – per selezionare “YES”, quindi
schermata di elenco (➜ pagina 4).
eliminare, quindi premere [F1 (EDIT)].
3 Premere +, – per selezionare “ERASE FILE”,
quindi premere [q OK] per confermare.
Per eliminare tutti i brani registrati:
1 Premere +, – per selezionare “ERASE ALL”, quindi premere
[q OK] per confermare.
4 Premere +, – per selezionare “YES”, quindi
premere [q OK] per confermare.
nel punto in cui si desidera dividere il file.
delle impostazioni (➜ sinistra).
premere [q OK] per confermare.
Mentre l’unità esegue la divisione del file, l’indicatore di stato lampeggia.
Modifica: Associazione di file
1 Selezionare “COMBINE” nella schermata di
modifica delle impostazioni (➜ sinistra).
2 Premere +, – per selezionare “PREVIOUS FILE”,
quindi premere [q OK] per confermare.
Modifica: divisione di file
Visualizzazione della schermata delle
impostazioni di modifica
1 Premere [MENU].
VQT4J81
quindi premere [q OK] per confermare.
Quando si seleziona il file in un’altra cartella, è possibile spostarsi
tra i livelli gerarchici della cartella premendo u. (Per dettagli sui
metodi di selezione di file e cartelle, si veda pagina 4.)
4 Premere +, – per selezionare “NEXT FILE”, quindi
premere [q OK] per confermare.
2 Premere +, – per selezionare “EDIT MENU”, quindi
5 Premere +, – per selezionare il file da associare
3 Premere +, – per selezionare la voce da
6 Premere +, – per selezionare “NEXT”, quindi
premere [q OK] per confermare.
20
3 Premere +, – per selezionare il file da associare,
modificare, quindi premere [q OK].
• Premere [F1 (TAB)] per passare alle schermate delle altre
impostazioni.
• I dettagli di impostazione e i metodi di modifica variano in
base alla voce. Per dettagli, si veda la pagina corrispondente.
Per uscire dalla schermata di impostazione, premere [F2 (CLOSE)].
all’inizio, quindi premere [q OK] per confermare.
premere [q OK] per confermare.
7 Premere +, – per selezionare “YES”, quindi
premere [q OK] per confermare.
Mentre l’unità esegue la combinazione dei file, l’indicatore di
stato lampeggia.
• Premendo [F2 (CLOSE)] prima che la combinazione sia
terminata, la combinazione viene annullata.
140
VQT4J81_RR-XS450_420-E_It.indd 140
2012/05/28 14:17:55
Copia di file
1 Selezionare “COPY” nella schermata di modifica
delle impostazioni (➜ pagina 20).
2 Premere +, – per selezionare il file da copiare,
quindi premere [q OK] per confermare.
• Quando si seleziona il file in un'altra cartella, è possibile
spostarsi tra i livelli gerarchici della cartella premendo u.
(Per dettagli sui metodi di selezione di file e cartelle, si veda
pagina 4.)
• Per copiare i file nella cartella LINE (LINE_SD), andare al
passo 5 .
3 Premere +, – per selezionare la destinazione della
copia (“INTERNAL MEMORY” o “microSD CARD”),
quindi premere [q OK] per confermare.
4 Premere +, – per selezionare la cartella di
destinazione della copia, quindi premere [q OK]
per confermare.
5 Premere +, – per selezionare “YES”, quindi
premere [q OK] per confermare.
Funzione cestino
Ripristino dei file nel cestino nella cartella
originale
1 Premere [F2 (FOLDER)].
2 Premere +, –, u, i per selezionare “ ”, quindi
premere [q OK] per confermare.
Le cartelle del cestino si trovano rispettivamente nella memoria
interna e sulla scheda SD.
3 Usare u, i per selezionare il file che
si desidera ripristinare, quindi premere
[ERASE/A-B&] per confermare.
4 Premere +, – per selezionare “RESTORE FILE”,
quindi premere [q OK] per confermare.
5 Premere +, – per selezionare “YES”, quindi
premere [q OK] per confermare.
ITALIANO
Modifica: copia o spostamento
di file
L’indicatore di stato lampeggia e il file selezionato viene
ripristinato alla fine della cartella originale.
Premere [q OK] per tornare alla schermata del punto 3 .
Mentre l’unità esegue la copia del file, l’indicatore di stato
lampeggia.
VQT4J81
Spostamento di file
Selezionare “MOVE” al passo 1 a sinistra per spostare i file.
L’operazione è identica alla copia dei file.
21
141
VQT4J81_RR-XS450_420-E_It.indd 141
2012/05/28 14:17:55
Funzione cestino
Uso del timer
Svuotamento della cartella cestino
1 Premere [MENU].
1 Premere [ERASE/A-B&].
2 Premere +, – per selezionare “COMMON MENU”,
2 Premere +, – per selezionare “EMPTY RECYCLE
3 Premere +, – per selezionare “TIMER & ALARM”,
BIN”, quindi premere [q OK] per confermare.
Quando è selezionata la cartella del cestino, selezionare
“EMPTY” al passo 2 e premere [q OK].
3 Premere +, – per selezionare “YES”, quindi
premere [q OK] per confermare.
L’indicatore di stato lampeggia e la cartella cestino viene
svuotata.
quindi premere [q OK] per confermare.
quindi premere [q OK] per confermare.
4 Impostare voci quali la data e l’ora e la fonte sonora.
1 Premere +, – per selezionare la voce, quindi premere
[q OK] per confermare.
2 Premere +, –, u, i per selezionare l’impostazione,
quindi premere [q OK] per confermare.
Ripetere i punti 1 e 2 per completare le impostazioni.
5 Premere +, – per selezionare “OK”, quindi premere
[q OK] per confermare.
Per uscire dalla schermata di impostazione, premere
[F2 (CLOSE)].
VQT4J81
Voce di
impostazione
22
Dettagli
SETTING
OFF: Timer non in funzione.
ON: Timer in funzione.
REPEAT
ONCE: La registrazione o la riproduzione viene
eseguita solo una volta.
DAILY: La registrazione o la riproduzione viene
eseguita giornalmente.
SELECT: La registrazione o la riproduzione viene
eseguita ogni settimana nel giorno selezionato.
1 Premere +, – per selezionare il giorno, quindi
premere [q OK] per aggiungere un segno di
spunta. (Premere nuovamente [q OK] per
deselezionare la selezione).
2 Dopo aver selezionato il giorno, selezionare
“OK” e premere [q OK].
142
VQT4J81_RR-XS450_420-E_It.indd 142
2012/05/28 14:17:55
Dettagli
Imposta l’ora di inizio e di fine
Selezionare la voce (selezionare l’ora e i minuti
di inizio e l’ora e i minuti di fine) tramite u, i,
quindi impostare premendo +, –.
• È possibile impostare fino a 12 ore per l’intervallo
di tempo tra l’ora di inizio e l’ora di fine.
REC/PLAY
PLAY: Riproduce un file prestabilito o la sveglia.
REC: Registra la fonte audio prestabilita.
PLAY
ALARM: Riproduce la sveglia.
FILE: Riproduce un file.
Viene visualizzato l’elenco dei file sulla cartella
selezionata.
Premere +, – per selezionare il file, quindi premere
[q OK]. Quando si selezionano i file passando da
una cartella all’altra, premere u per spostarsi
tra le gerarchie. (Per informazioni dettagliate sui
metodi di selezione dei file e delle cartelle, vedere
pagina 4.)
SOURCE
MIC: Registrazione con il microfono.
LINE: Registra l’audio da un dispositivo esterno.
MODE
PCM 44,1 kHz, MP3 320 kb/sec.,
MP3 192 kb/sec., MP3 128 kb/sec.,
MP3 64 kb/sec., MP3 32 kb/sec.
REC TO
Selezionare la cartella in cui salvare il file registrato.
• Se è selezionata la cartella di una scheda SD,
inserire la scheda SD.
Menu comune
Operazioni sulle impostazioni comuni
1 Premere [MENU].
2 Premere +, – per selezionare “COMMON MENU”,
quindi premere [q OK] per confermare.
3 Premere +, – per selezionare la voce
dell’impostazione, quindi premere [q OK] per
confermare.
4 Premere +, – per modificare l’impostazione, quindi
premere [q OK] per confermare.
Per uscire dalla schermata di impostazione, premere
[F2 (CLOSE)].
ITALIANO
TIME
Per dettagli su “DATE & TIME” (➜ pagina 3) e “TIMER &
ALARM” (➜ pagina 22), si vedano le rispettive pagine.
BEEP SOUND
È possibile impostare il suono emesso alla pressione dei tasti.
OFF: Nessun suono.
ON: Riproduzione del suono.
(L’impostazione di fabbrica è “ON”.)
REC LED (indicatore di registrazione)
È possibile configurare l’indicatore di registrazione su ON oppure
su OFF.
OFF: Non si illumina
ON: Si illumina
(L’impostazione di fabbrica è “ON”.)
VQT4J81
Voce di
impostazione
23
143
VQT4J81_RR-XS450_420-E_It.indd 143
2012/05/28 14:17:55
Menu comune
BATT. SETTING
Impostare il tipo batterie utilizzate (batterie ricaricabili al nichelmetallo idruro o batterie alcaline).
Tipo di batteria: RECHARGEABLE, ALKALINE
(L’impostazione di fabbrica è “RECHARGEABLE”.)
AUTO POWER OFF
Questa funzione spegne l’unità automaticamente quando non
vengono effettuate operazioni per un certo periodo di tempo,
ad esempio dopo che la registrazione è stata arrestata. Questa
funzione aiuta ad evitare il consumo della batteria quando ci si
dimentica di spegnere l’unità.
AUTO POWER OFF: da 0 min (OFF) a 15 min
(L’impostazione di fabbrica è “15min”.)
BACKLIGHT
Impostare il tempo di retroilluminazione quando si preme il
pulsante.
Tempo di illuminazione: OFF (non si illumina), 5 sec, 15 sec,
sempre illuminato
(L’impostazione di fabbrica è “15 sec”.)
CONTRAST
RECYCLE BIN
Quando si utilizza la funzione cestino, i file eliminati vengono
spostati nel cestino. Prima di svuotare il cestino, è possibile
ripristinare i file eliminati in modo che non ci si debba preoccupare
dei file eliminati per errore.
OFF: Non usare la funzione cestino
ON: Usare la funzione cestino
(L’impostazione di fabbrica è “ON”.)
FORMAT
Tutti i file sulla memoria interna o sulla scheda SD vengono
eliminati. I file eliminati non possono essere recuperati.
1 Selezionare “INTERNAL MEMORY” o “microSD CARD”, quindi
premere [q OK] per confermare.
2 Selezionare “YES”, quindi premere [q OK] per confermare.
INIT MENU
Se le impostazioni di questa unità vengono inizializzate, tutte le
impostazioni vengono riportate ai valori di fabbrica, ad eccezione
di “DATE & TIME”.
Selezionare “YES”, quindi premere [q OK] per confermare. Le
impostazioni verranno inizializzate.
VERSION
È possibile verificare la versione del firmware dell’unità.
VQT4J81
Questa funzione consente di regolare il contrasto dello schermo. È
possibile scegliere tra 10 livelli di regolazione.
Regolazione del contrasto: da 1 (L) a 10 (H)
(L’impostazione di fabbrica è “5”.)
24
144
VQT4J81_RR-XS450_420-E_It.indd 144
2012/05/28 14:17:55
Requisiti di sistema
(a partire da maggio 2012)
Sistema
operativo
Interfaccia
Computer compatibili IBM PC/AT, Macintosh
• Microsoft® Windows® XP Home Edition/Professional e Service Pack 2, Service
Pack 3
• Microsoft® Windows Vista® Home Basic/Home Premium/Business/Ultimate e
Service Pack 1, Service Pack 2
• Microsoft® Windows® 7 Starter/Home Basic/Home Premium/Professional/Ultimate
e Service Pack 1
• Mac OS X da 10.2.8 a 10.7
Porta USB (il funzionamento non è garantito se si utilizza un hub USB).
• Versione preinstallata
Memoria interna
4 GB (RR-XS450), 2 GB (RR-XS420)
La capacità utilizzabile è inferiore.
VQT4J81
✽ Anche qualora i requisiti di sistema menzionati in questo documento siano soddisfatti, alcuni personal computer non possono essere
utilizzati.
✽ (Macintosh) Questo programma funziona con il driver standard di OS.
✽ Il funzionamento è garantito soltanto con i sistemi operativi compatibili.
✽ Il funzionamento non è garantito con un sistema operativo aggiornato.
✽ Il funzionamento non è garantito con i computer assemblati.
✽ Se si usa Windows Media® Player, il computer deve soddisfare i requisiti di sistema di Windows Media® Player. Rivolgersi a Microsoft
Corporation per i dettagli su Windows Media® Player.
✽ Microsoft, Windows, Windows Media e Windows Vista sono marchi o marchi registrati di Microsoft Corporation negli Stati Uniti
d’America e in altri Paesi.
✽ Tecnologia di codifica audio MPEG Layer-3 su licenza da Fraunhofer IIS e Thomson.
✽ IBM e PC/AT sono marchi o marchi registrati di International Business Machines Corporation degli Stati Uniti d’America.
✽ Macintosh e Mac OS sono marchi depositati di Apple Inc.
✽ Altri nomi di sistemi e nomi di prodotti che appaiono in questo documento sono generalmente marchi o marchi registrati delle
rispettive imprese di sviluppo. Tenere presente che il marchio ™ e il marchio ® non appaiono in questo documento.
✽ A seconda dell’ambiente del computer potrebbero verificarsi malfunzionamenti (ad esempio i dati audio registrati in questa unità
potrebbero essere inutilizzabili, ecc.). Panasonic e i rivenditori Panasonic non possono essere ritenuti responsabili per perdita dei dati
audio o altri danni diretti o indiretti, eccetto nei casi di negligenza intenzionale o grave.
ITALIANO
Computer
25
145
VQT4J81_RR-XS450_420-E_It.indd 145
2012/05/28 14:17:55
Collegamento di questa unità
a un computer
1 Estrarre la spina USB dell’unità.
2 Collegare l’unità a un computer mediante la porta
USB.
Se l’unità non può essere collegata direttamente al computer,
utilizzare il cavo di prolunga USB (in dotazione).
*Non utilizzare un cavo di prolunga USB diverso da quello in
dotazione.
Il cavo in dotazione non deve essere usato con altri dispositivi.
VQT4J81
Precauzione: per il collegamento al computer, usare soltanto il
cavo di prolunga USB con nucleo in ferrite in dotazione.
26
*La prima volta che si collega l’unità al PC
Poiché appariranno diversi messaggi “Trovato nuovo hardware”,
non disconnettere l’unità dal PC prima che tutti i messaggi siano
scomparsi.
*Non è possibile utilizzare l’unità quando è collegata al computer.
*Quando l’unità è collegata al PC può funzionare senza la
batteria, poiché l’alimentazione è fornita dal computer.
*Quando l’unità viene collegata al computer, il computer potrebbe
non avviarsi (riavvio). Si consiglia di staccare l’unità dal
computer quando si avvia (riavvia) il computer.
*Il funzionamento non è garantito nei seguenti casi.
• Quando due o più dispositivi USB sono collegati a un
computer (tranne il mouse e la tastiera in condizioni normali di
funzionamento)
• Quando si utilizza un hub USB
• Quando si utilizza un cavo di prolunga USB diverso da quello
in dotazione.
*Il computer potrebbe non riconoscere l’unità se essa è stata
collegata al computer durante l’avvio (riavvio) o mentre esso
si trova in modalità standby. Staccare l’unità e ricollegarla al
computer, o ricollegare l’unità dopo aver riavviato il computer.
*Vedere le istruzioni per l’uso del computer.
g Scollegamento dell’unità
Fare doppio clic sull’icona (Windows XP: [ ], Windows Vista/
Windows 7: [ ]) nella barra delle applicazioni sul lato inferiore
dello schermo del computer e seguire le istruzioni a schermo
per rimuovere l’unità (l’icona potrebbe non essere visualizzata
a seconda delle impostazioni del sistema operativo). Dopo la
rimozione dell’unità, l’unità si spegne. Quando l’unità viene
accesa dopo l’eliminazione di file od operazioni simili attraverso
il computer, viene visualizzato il messaggio “UPDATING FILE
NAME”. L’aggiornamento può richiedere alcuni minuti.
g Funzione di memoria di massa USB
Questa unità funziona come memoria USB e viene riconosciuta
come un dispositivo di memoria esterna del computer.
I file di dati sul computer possono essere trasferiti e salvati su
questa unità.
146
VQT4J81_RR-XS450_420-E_It.indd 146
2012/05/28 14:17:55
Manutenzione
VQT4J81
ITALIANO
Pulire l’unità con un panno morbido e asciutto.
• Se l’unità è molto sporca, strizzare un panno inumidito con
acqua, togliere lo sporco e terminare la pulizia con un panno
asciutto.
• Non usare solventi, compresi benzolo, diluenti, alcol, detersivi da
cucina, detergenti chimici, ecc. Tali prodotti potrebbero deformare
l’involucro o rovinare la vernice.
27
147
VQT4J81_RR-XS450_420-E_It.indd 147
2012/05/28 14:17:55
Il logo microSDHC è un marchio di SD-3C, LLC.
Il prodotto è protetto dai diritti sulla proprietà intellettuale di
Microsoft Corporation e terze parti. L’utilizzo o la distribuzione
di tale tecnologia al di fuori di questo prodotto è vietato senza
una licenza concessa da Microsoft o sussidiaria o terza parte
autorizzata da Microsoft.
Durante l’uso, questo prodotto potrebbe essere soggetto
all’interferenza radio causata dal cellulare. Se si dovesse
verificare tale interferenza, aumentare la distanza tra questo
prodotto e il cellulare.
Tenere le batterie AAA LR03 e le batterie ricaricabili fuori della
portata dei bambini per evitare che possano ingoiarle.
Precauzione
• Pericolo di esplosione se la batteria viene sostituita
scorrettamente. Sostituirla soltanto con il tipo consigliato dal
produttore.
• Per disfarsi delle batterie, rivolgersi alle autorità locali o al
rivenditore, e chiedere il modo corretto di rottamazione.
• Non scaldare e non esporre a fiamme libere.
• Non lasciare le pile in un’automobile esposta alla luce diretta del
sole per un periodo di tempo prolungato con porte e finestrini
chiusi.
VQT4J81
Assicurarsi di utilizzare cuffie e auricolari che siano raccomandati
o forniti in dotazione.
In base allo standard EN 50332-2:2003
1) Tensione di uscita massima (uscita auricolare): 150mV
2) Tensione caratteristica ampia banda (auricolari): 75mV
28
148
VQT4J81_RR-XS450_420-E_It.indd 148
2012/05/28 14:17:55
Informazioni per gli utenti sulla raccolta e l’eliminazione di vecchie apparecchiature e batterie usate
Smaltendo correttamente questi prodotti e le batterie, contribuirete a salvare importanti risorse e
ad evitare i potenziali effetti negativi sulla salute umana e sull’ambiente che altrimenti potrebbero
verificarsi in seguito ad un trattamento inappropriato dei rifiuti.
Per ulteriori informazioni sulla raccolta e sul riciclaggio di vecchi prodotti e batterie, vi preghiamo di contattare il
vostro comune, i vostri operatori per lo smaltimento dei rifiuti o il punto vendita dove avete acquistato gli articoli.
ITALIANO
Questi simboli sui prodotti, sull’imballaggio, e/o sulle documentazioni o manuali accompagnanti i prodotti indicano
che i prodotti elettrici, elettronici e le batterie usate non devono essere buttati nei rifiuti domestici generici.
Per un trattamento adeguato, recupero e riciclaggio di vecchi prodotti e batterie usate, vi preghiamo di portarli
negli appositi punti di raccolta, secondo la legislazione vigente nel vostro Paese e le Direttive 2002/96/EC e
2006/66/EC.
Sono previste e potrebbero essere applicate sanzioni qualora questi rifiuti non siano stati smaltiti in
modo corretto ed in accordo con la legislazione nazionale.
Per utenti commerciali nell’Unione Europea
Se desiderate eliminare apparecchiature elettriche ed elettroniche, vi preghiamo di contattare il
vostro commerciante od il fornitore per maggiori informazioni.
[Informazioni sullo smaltimento rifiuti in altri Paesi fuori dall’Unione Europea]
Questi simboli sono validi solo all’interno dell’Unione Europea. Se desiderate smaltire questi articoli,
vi preghiamo di contattare le autorità locali od il rivenditore ed informarvi sulle modalità per un
corretto smaltimento.
VQT4J81
Nota per il simbolo delle batterie (esempio con simbolo chimico riportato sotto il simbolo principale):
Questo simbolo può essere usato in combinazione con un simbolo chimico; in questo caso è
conforme ai requisiti indicati dalla Direttiva per il prodotto chimico in questione.
Cd
29
149
VQT4J81_RR-XS450_420-E_It.indd 149
2012/05/28 14:17:55
Ce mode d’emploi décrit les opérations et les fonctions de base
de l’appareil.
Accessoires fournis
1 Pile rechargeable Ni-MH AAA
*Désignée par pile rechargeable dans le texte.
1 Étui de transport de la pile
1 Câble prolongateur USB
Veillez à acheter [HHR-4MVE] pour l’Europe ou [HHR-4MVT]
pour l’Asie et l’Amérique Latine et utilisez l’un des deux lorsque
vous remplacez les piles rechargeables. (À partir de mai 2012)
2 Insérez la fiche USB de l’appareil dans l’ordinateur.
Si l’appareil ne peut pas être directement raccordé à
l’ordinateur, utilisez le câble prolongateur USB (fourni).
Première connexion de l’appareil à votre ordinateur
Comme beaucoup de messages tels que “nouveau
périphérique détecté” vont apparaître, ne débranchez pas
l’appareil de votre ordinateur avant leur complète disparition.
*Ne jamais débrancher l’appareil ou retirer la carte SD lorsque
“ACCESS…” s’affiche, sinon cet appareil pourrait être endommagé.
3 Faites glisser le commutateur OPR/HOLD du côte
[ON].
4 Faites glisser le commutateur OPR/HOLD du côte
[OFF].
Insérer la pile
1 pile rechargeable Ni-MH AAA (fournie)
Assurez-vous que la pile est
orientée dans le bon sens.
Le voyant d’état s’allume et le rechargement commence.
*Faire glisser le commutateur OPR/HOLD sur [ON] peut
interrompre le chargement.
*Le chargement est terminé lorsque l’indicateur de fonctionnement s’éteint.
g Débrancher l’appareil
Double-cliquez sur l’icône (Windows XP : [ ], Windows Vista/
Windows 7 : [ ]) de la barre des tâches, au bas de l’écran
de l’ordinateur, et suivez les instructions à l’écran pour retirer
l’appareil. (Suivant les réglages du système d’exploitation, il se
peut que l’icône ne s’affiche pas.) Une fois l’appareil retiré, il
s’éteint.
Charger la pile
VQT4J81
1 Sortez la fiche USB.
Appuyez et faites
glisser jusqu’à ce
que se produise
un “clic”.
Stocker le connecteur
USB :
*Lors de l’utilisation d’une batterie rechargeable, utilisez la
batterie rechargeable fournie ou une batterie rechargeable
facultative. Si des batteries vendues dans le commerce
différentes de celles ci-dessus sont utilisées, le fonctionnement
n’est pas garanti.
*Une pile alcaline AAA LR03 (non fournie) peut également être
utilisée.
2
150
VQT4J81_RR-XS450_420-E_FR.indd 150
2012/05/28 14:46:10
Mettre l’appareil sous/hors tension Régler l’horloge
Faites glisser le commutateur OPR/HOLD du côté [ON] pour
mettre l’appareil sous tension. L’écran s’allume.
Mettre l’appareil hors tension :
Faites glisser le commutateur OPR/HOLD sur [OFF] pendant que
l’appareil est en état d’arrêt.
g Extinction automatique :
L’appareil s’éteint automatiquement au bout d’un délai prédéfini
(le réglage d’usine est 15 minutes) si aucun enregistrement n’est
effectué.
Si l’appareil s’est éteint automatiquement, faites glisser le
commutateur OPR/HOLD sur [OFF] avant de rallumer l’appareil.
(➜ page 24)
Fonction de verrouillage
Les commandes de touches sont ignorées lorsque la fonction de
verrouillage est activée.
Pour activer la fonction de verrouillage :
Positionnez le commutateur OPR/HOLD sur [HOLD] pendant
l’enregistrement ou la lecture.
Pour désactiver la fonction de verrouillage :
Faites glisser le commutateur OPR/HOLD à l’opposé de [HOLD].
1 Appuyez sur [MENU].
2 Appuyez sur +, – pour sélectionner “COMMON
MENU” et appuyez sur [q OK] pour valider.
3 Appuyez sur +, – pour sélectionner “DATE & TIME”
et appuyez sur [q OK] pour valider.
4 Appuyez sur +, – pour régler l’année puis appuyez
sur i.
5 Appuyez sur +, – pour régler le mois puis appuyez
sur i.
6 Appuyez sur +, – pour régler la date puis appuyez
sur i.
7 Appuyez sur +, – pour choisir la méthode
d’indication de l’horloge puis appuyez sur i.
“ 24h ” et “ AM / PM ” sont affichés respectivement pour
l’affichage 24 heures et pour l’affichage 12 heures.
FRANÇAIS
Mettre l’appareil sous tension :
8 Appuyez sur +, – pour régler l’heure puis appuyez
sur i.
9 Appuyez sur +, – pour régler les minutes.
Pour modifier les réglages, appuyez sur u, i pour vous
déplacer entre les éléments, puis appuyez encore sur +, –
pour effectuer les réglages.
10 Appuyez sur [q OK] pour valider.
VQT4J81
La date et l’heure sont réglées et l’horloge commence à fonctionner.
Pour quitter l’écran de réglage, appuyez sur [F2 (CLOSE)].
3
151
VQT4J81_RR-XS450_420-E_FR.indd 151
2012/05/28 14:46:11
Sélectionner le dossier
1 Appuyez sur [F2 (FOLDER)].
2 Appuyez sur +, –, u, i pour choisir le dossier
et appuyez sur [q OK] pour valider.
• “ ” (OTHER FOLDER) est utilisé pour la lecture de fichiers
enregistrés par un autre appareil. Cet appareil peut aussi lire
les fichiers audio enregistrés avec (ou transférés via) certains
appareils système stéréo de Panasonic fournissant une
fonction d’enregistrement USB.
Passer entre la mémoire interne et la carte SD :
Si la carte SD est insérée, ses éléments apparaissent à l’écran à
l’étape 2 . Appuyez sur [F1 (MEMORY)] pour choisir la mémoire.
• Dans ce manuel, le terme carte microSD/microSDHC est
remplacé par “carte SD”.
Changer la position du
microphone
Position du microphone
Utilisations recommandées
STEREO
Fonctionne comme
un microphone stéréo
ordinaire.
Adéquat pour enregistrer des
réunions ou des spectacles par un
nombre important de personnes.
ZOOM
Accentue le son
devant l’appareil durant
l’enregistrement.
Adéquat pour enregistrer des
conférences ou des interviews,
lorsque le son est émis d’une
direction spécifique.
Sélectionner le dossier ou le
fichier sur l’écran de liste
1 Appuyez au moins une seconde sur [LIST ].
Passez à l’étape 2 si une carte SD est insérée (➜ page 18),
et à l’étape 3 dans le cas contraire.
2 Appuyez sur +, – pour sélectionner “INT. MEMORY”
VQT4J81
(mémoire interne) ou “microSD CARD”, puis
appuyez sur [q OK].
3 Appuyez sur +, – pour sélectionner le dossier et
appuyez sur [q OK] pour valider.
4
Si des dossiers ont été créés dans les dossiers MUSIC ou
OTHER FOLDER ( ), répétez l’étape 3 pour sélectionner
le dossier cible.
4 Appuyez sur +, – pour sélectionner le fichier et
appuyez sur [q OK] pour valider.
La lecture du fichier commence.
152
VQT4J81_RR-XS450_420-E_FR.indd 152
2012/05/28 14:46:11
Enregistrer
Vérifier les informations.
1 Appuyez sur [F2 (FOLDER)].
1 Appuyez sur [STOP g/RETURN].
2 Appuyez sur u, i pour choisir le dossier de
2 Faites défiler l’écran des informations vers le haut
3 Appuyez sur [REC *] (l’enregistrement commence).
4 Appuyez sur [STOP g/RETURN] pour arrêter
l’enregistrement.
Pour mettre l’enregistrement en pause :
1 Appuyez sur [REC *] pendant l’enregistrement.
Le voyant d’enregistrement clignote.
2 Appuyez à nouveau sur [REC *] pour faire reprendre
l’enregistrement.
Lire
Pour quitter l’écran d’informations :
Appuyez sur [STOP g/RETURN].
Écouter des données audio
avec les écouteurs
Connectez des écouteurs stéréo (non fournis).
Type de fiche : mini-fiche stéréo ø 3,5 mm
Écouteurs supplémentaires recommandés :
Panasonic RP-HV154, RP-HJE120
(À partir de mai 2012)
Contrôler l’enregistrement
en cours
1 Appuyez sur [q OK] (la lecture commence).
Régler le volume :
Régler le volume
Montez le volume : Appuyez sur +.
Baissez le volume : Appuyez sur –.
Haut-parleur intégré
Vous pouvez ajuster le volume en
appuyant sur +, –, mais cela n’affecte
pas le niveau d’enregistrement.
Écouter ce qui est lu
Opérations pendant la lecture
Saut (passer une piste) : Appuyez sur u, i.
Recul rapide/Avance rapide (Recherche) :
Maintenez enfoncées les touches u, i.
Pour arrêter : Appuyez sur [STOP g/RETURN].
FRANÇAIS
Pour un enregistrement au microphone, choisissez un dossier parmi
les dossiers “A”, “B”, “C” et “D”. (Le réglage d’usine est “A”.)
ou le bas en utilisant + ou –.
Insérez-le
fermement.
Le son est émis par le haut-parleur
pendant la lecture. L’écoute peut être
difficile dans les endroits bruyants du
fait de la puissance de sortie du hautparleur. Le cas échéant, connectez des
écouteurs stéréo (non fournis).
VQT4J81
destination de l’enregistrement et appuyez sur
[q OK] pour valider.
L’écran des informations apparaît.
5
153
VQT4J81_RR-XS450_420-E_FR.indd 153
2012/05/28 14:46:11
Supprimer des fichiers
Sélectionner la scène d’enregistrement
1 Appuyez sur [ERASE/A-B&].
1 Appuyez au moins une seconde sur [MENU].
2 Appuyez sur +, – pour sélectionner “FILE” et
2 Appuyez sur +, – pour choisir la scène et appuyez
appuyez sur [q OK] pour valider.
3 Appuyez sur +, – pour sélectionner “YES” et
appuyez sur [q OK] pour valider.
Pendant la suppression, le voyant d’état clignote et “ERASING”
est affiché. L’opération de suppression peut prendre plusieurs
minutes.
Si vous sélectionnez “FOLDER” à l’étape 2 , vous passerez
à l’écran qui permet de supprimer tous les fichiers du dossier
sélectionné.
Pour quitter l’écran de suppression, appuyez sur [F2 (CLOSE)].
Supprimer des fichiers de l’écran de liste.
Sélectionnez des fichiers sur l’écran de liste (➜ page 4) et
appuyez sur [ERASE/A-B&]. L’écran d’effacement des fichiers
apparaît alors. Sélectionnez le dossier et appuyez sur [ERASE/
A-B&]. L’écran d’effacement de tous les fichiers du dossier
apparaît alors.
L’écran de sélection de la scène d’enregistrement est affiché.
sur [q OK] pour valider.
Si vous sélectionnez “USER”, ignorez l’étape 3 .
3 Appuyez sur +, – pour sélectionner “LOAD” et
appuyez sur [q OK] pour valider.
Pour quitter l’écran de réglage, appuyez sur [F2 (CLOSE)].
Après une pression de [REC *], l’enregistrement a lieu avec le
réglage de scène d’enregistrement sélectionné.
Scène d’enregistrement
LANG.
STUDY
KARAOKE
MUSIC
PERF.
CONVERSATION
MEETING
LECTURE
VQT4J81
FAVORITE
6
154
VQT4J81_RR-XS450_420-E_FR.indd 154
Application
Enregistrement de votre propre voix pour
pratiquer la prononciation, etc.
Enregistrement à un volume élevé tel que
pour le karaoké
Enregistrement de haute qualité tel que
pour des représentations musicales
Enregistrement de la voix d’autres personnes
pour des entretiens ou des réunions, etc.
Enregistre une large bande sonore. Pour
l’enregistrement de réunions, etc.
Enregistrement de cours en salles de
classe, etc.
Vous pouvez enregistrer vos propres
réglages
Changer les réglages d’une scène d’enregistrement
1 Appuyez au moins une seconde sur [MENU].
2 Appuyez sur +, – pour sélectionner la scène
d’enregistrement et appuyez sur [q OK] pour valider.
2012/05/28 14:46:11
Scène en direct
Répétez les étapes 4 et 5 pour modifier d’autres éléments.
6 Une fois que vous avez terminé les réglages,
Cette fonction permet de changer la scène d’enregistrement
définie selon la position du microphone.
*Lors de l’achat, “MEETING” est réglé sur STEREO, et
“LECTURE” est réglé sur ZOOM.
Changer le réglage de scène en direct
1 Appuyez sur [MENU].
appuyez sur +, – pour sélectionner “OK” et
appuyez sur [q OK] pour valider.
2 Appuyez sur +, – pour sélectionner “MIC REC
Pour choisir la scène d’enregistrement modifiée, sélectionnez
“LOAD”.
3 Appuyez sur +, – pour sélectionner “DIRECT
Initialiser les réglages d’une scène
d’enregistrement
1 Appuyez au moins une seconde sur [MENU].
2 Appuyez sur +, – pour sélectionner la scène
d’enregistrement que vous souhaitez initialiser et
appuyez sur [q OK] pour valider.
3 Appuyez sur +, – pour sélectionner “INITIALIZE”
et appuyez sur [q OK] pour valider.
4 Appuyez sur +, – pour sélectionner “YES” et
appuyez sur [q OK] pour valider.
La scène d’enregistrement sélectionnée reprend son réglage
d’usine.
Pour choisir la scène d’enregistrement initiale, sélectionnez
“LOAD”.
Pour quitter l’écran de réglage, appuyez sur [F2 (CLOSE)].
SCENE”, puis appuyez sur [q OK].
4 Appuyez sur +, – pour sélectionner la position
du microphone (“STEREO” ou “ZOOM”), puis
appuyez sur [q OK].
5 Appuyez sur +, – pour sélectionner la scène
d’enregistrement, puis appuyez sur [q OK].
Si vous voulez changer la scène d’enregistrement pour l’autre
position du microphone, effectuez les étapes 4 et 5 pour
régler la scène d’enregistrement.
Pour quitter l’écran de réglage, appuyez sur [F2 (CLOSE)].
VQT4J81
Pour quitter l’écran de réglage, appuyez sur [F2 (CLOSE)].
MENU”, puis appuyez sur [q OK].
FRANÇAIS
3 Appuyez sur +, – pour sélectionner “CHANGE
SETTING” et appuyez sur [q OK] pour valider.
4 Appuyez sur +, – pour sélectionner l’élément que vous
souhaitez modifier et appuyez sur [q OK] pour valider.
5 Appuyez sur +, – pour sélectionner le réglage et
appuyez sur [q OK] pour valider.
7
155
VQT4J81_RR-XS450_420-E_FR.indd 155
2012/05/28 14:46:11
Scène en direct
Sélectionner le mode d’enregistrement
Fonction scène en direct sur OFF
1 Appuyez sur [MENU].
1 Appuyez sur [MENU].
2 Appuyez sur +, – pour sélectionner “MIC REC
2 Appuyez sur +, – pour sélectionner “MIC REC
3 Appuyez sur +, – pour sélectionner “MIC REC
MENU”, puis appuyez sur [q OK].
3 Appuyez sur +, – pour sélectionner “DIRECT
SCENE”, puis appuyez sur [q OK].
4 Appuyez sur +, – pour sélectionner “SETTING”,
puis appuyez sur [q OK].
5 Appuyez sur +, – pour sélectionner “OFF”, puis
appuyez sur [q OK].
Pour quitter l’écran de réglage, appuyez sur [F2 (CLOSE)].
MENU” et appuyez sur [q OK] pour valider.
MODE” et appuyez sur [q OK] pour valider.
4 Appuyez sur +, – pour sélectionner le réglage
(fréquence d’échantillonnage PCM/débit binaire
MP3) et appuyez sur [q OK] pour valider.
(Le réglage d’usine est “MP3 192kbps”.)
Pour quitter l’écran de réglage, appuyez sur [F2 (CLOSE)].
*La qualité sonore et le temps d’enregistrement restant diffèrent
selon le réglage du mode d’enregistrement.
Format
d’enregistrement
PCM : 44,1 kHz
Enregistrement en
haute qualité
MP3 : 320 ko/s
MP3 : 192 ko/s
MP3 : 128 ko/s
MP3 : 64 ko/s
VQT4J81
MP3 : 32 ko/s
Enregistrement long
*Si le mode d’enregistrement est réglé sur “MP3 32kbps”,
l’enregistrement devient monophonique.
8
156
VQT4J81_RR-XS450_420-E_FR.indd 156
2012/05/28 14:46:11
Régler le niveau de
l’enregistrement manuellement
1 Appuyez sur [MENU].
Régler le niveau d’enregistrement sur MANUAL
2 Appuyez sur +, – pour sélectionner “MIC REC
1 Appuyez sur [MENU].
(Le réglage d’usine est “HIGH”.)
Pour quitter l’écran de réglage, appuyez sur [F2 (CLOSE)].
2 Appuyez sur +, – pour sélectionner “MIC REC
MENU” et appuyez sur [q OK] pour valider.
3 Appuyez sur +, – pour sélectionner “REC LEVEL
ADJ.” et appuyez sur [q OK] pour valider.
4 Appuyez sur +, – pour sélectionner “MANUAL” et
appuyez sur [q OK] pour valider.
Pour quitter l’écran de réglage, appuyez sur [F2 (CLOSE)].
Réduire les bruits à basse
fréquence durant l’enregistrement
Ajuster le niveau de l’enregistrement
manuellement
1 Appuyez sur [MENU].
1 Maintenez enfoncé [REC *] pendant 1 seconde
2 Appuyez sur +, – pour sélectionner “MIC REC
MENU” et appuyez sur [q OK] pour valider.
3 Appuyez sur +, – pour sélectionner “LOW CUT
FILTER” et appuyez sur [q OK] pour valider.
4 Appuyez sur +, – pour sélectionner “ON” et
appuyez sur [q OK] pour valider.
(Le réglage d’usine est “OFF”.)
Pour quitter l’écran de réglage, appuyez sur [F2 (CLOSE)].
FRANÇAIS
MENU” et appuyez sur [q OK] pour valider.
3 Appuyez sur +, – pour sélectionner “MIC SENS.” et
appuyez sur [q OK] pour valider.
4 Appuyez sur +, – pour sélectionner “HIGH” ou
“LOW” et appuyez sur [q OK] pour valider.
ou plus.
L’appareil passe en attente d’enregistrement.
2 Dirigez le microphone vers la source sonore à
enregistrer.
3 Appuyez sur u, i pour régler le niveau de
l’enregistrement.
La plage de réglage s’étend de 0 à 30.
(Le réglage d’usine est “15”.)
Appuyer sur [REC *] commence l’enregistrement.
VQT4J81
Changer la sensibilité du
microphone
9
157
VQT4J81_RR-XS450_420-E_FR.indd 157
2012/05/28 14:46:11
Régler le niveau de l’enregistrement manuellement
Régler le limiteur de pic d’enregistrement sur ON
Pour quitter l’écran de réglage, appuyez sur [F2 (CLOSE)].
Le nom du mode d’égaliseur n’est plus affiché une fois que
vous avez quitté l’écran de réglage.
1 Appuyez sur [MENU].
Appuyer sur [REC *] commence l’enregistrement.
2 Appuyez sur +, – pour sélectionner “MIC REC
MENU” et appuyez sur [q OK] pour valider.
3 Appuyez sur +, – pour sélectionner “PEAK
LIMITER” et appuyez sur [q OK] pour valider.
4 Appuyez sur +, – pour sélectionner “ON” et
appuyez sur [q OK] pour valider.
(Le réglage d’usine est “OFF”.)
Pour quitter l’écran de réglage, appuyez sur [F2 (CLOSE)].
Régler l’égaliseur d’enregistrement
1 Maintenez enfoncé [REC *] pendant 1 seconde ou plus.
L’appareil passe en attente d’enregistrement.
Mode d’égaliseur
Effet et application
Ce mode (basique) n’accentue pas de
gamme particulière de son.
EXTRA BASS
Accentue fortement les sons graves.
BASS
Accentue légèrement les sons graves.
MIDDLE
Accentue les sons médiums.
BASS&TREBLE Accentue légèrement les sons graves et aigus.
TREBLE
Accentue légèrement les sons aigus.
EXTRA TREBLE Accentue fortement les sons aigus.
Ce mode permet l’ajustement des bandes de
USER
fréquence de 150 Hz, 500 Hz, 1 kHz, 4 kHz
et 12 kHz.
FLAT
(Le réglage d’usine est “FLAT”.)
2 Appuyez sur [MENU].
3 Appuyez sur +, – pour sélectionner “REC EQ” et
appuyez sur [q OK] pour valider.
4 Appuyez sur +, – pour sélectionner le mode
d’égaliseur d’enregistrement.
Si vous choisissez un mode autre que “USER”, rendez-vous à l’étape 5 .
VQT4J81
Réglage en cas de sélection du mode “USER” :
10
1 Après l’étape 4 , appuyez sur [F1 (EDIT)]
2 Appuyez sur u, i pour choisir la bande de fréquence
à modifier, et appuyez sur +, – pour ajuster le niveau
d’enregistrement (±12 dB).
3 Lorsque les réglages pour chaque bande de fréquence à
modifier sont terminés, passez à l’étape 5 .
5 Appuyez sur [q OK] pour valider.
Retardateur
1 Appuyez sur [MENU].
2 Appuyez sur +, – pour sélectionner “MIC REC
MENU” et appuyez sur [q OK] pour valider.
3 Appuyez sur +, – pour sélectionner “SELF TIMER”
et appuyez sur [q OK] pour valider.
4 Appuyez sur +, – pour sélectionner le temps et
appuyez sur [q OK] pour valider.
(Le réglage d’usine est “OFF”.)
Pour quitter l’écran de réglage, appuyez sur [F2 (CLOSE)].
158
VQT4J81_RR-XS450_420-E_FR.indd 158
2012/05/28 14:46:11
1 Appuyez sur [MENU].
2 Appuyez sur +, – pour sélectionner “MIC REC
MENU” et appuyez sur [q OK] pour valider.
3 Appuyez sur +, – pour sélectionner “VAS” et
appuyez sur [q OK] pour valider.
4 Appuyez sur +, – pour sélectionner “ON” et
appuyez sur [q OK] pour valider.
(Le réglage d’usine est “OFF”.)
Pour quitter l’écran de réglage, appuyez sur [F2 (CLOSE)].
Pour démarrer l’enregistrement VAS, appuyez sur [REC *].
Ajuster le niveau de fonctionnement VAS :
Appuyez sur u, i pendant l’enregistrement VAS.
(Le réglage d’usine est “3”.)
Fonction de pré-enregistrement
(PRE-RECORD)
Pour enregistrer en utilisant la fonction de pré-enregistrement :
1 Maintenez enfoncé [REC *] pendant 1 seconde
ou plus.
L’appareil passe en mode attente de pré-enregistrement.
Passe à 1 sec, 2 sec, 3 sec et s’arrête à 3 sec. Les
données audio du microphone environ 3 secondes avant
l’enregistrement sont toujours mises à jour et l’appareil passe
en mode veille.
2 Appuyez sur [REC *].
Le voyant d’enregistrement s’allume et l’enregistrement
commence directement après les données audio pré-enregistrées.
Pour arrêter : Appuyez sur [STOP g/RETURN]
Enregistrer en branchant un
microphone externe
FRANÇAIS
Éviter les enregistrements inutiles
(VAS)
1 Faites glisser le commutateur Mic/Line sur [MIC].
2 Branchez le microphone externe.
Microphone externe
(non fourni)
Insérez-le
fermement.
1 Appuyez sur [MENU].
MENU” et appuyez sur [q OK] pour valider.
Type de fiche :
mini-fiche stéréo ø 3,5 mm
3 Appuyez sur +, – pour sélectionner “PRE-
RECORD” et appuyez sur [q OK] pour valider.
4 Appuyez sur +, – pour sélectionner “ON” et
appuyez sur [q OK] pour valider.
(Le réglage d’usine est “OFF”.)
Pour quitter l’écran de réglage, appuyez sur [F2 (CLOSE)].
3 Appuyez sur [REC *] pour commencer
l’enregistrement.
VQT4J81
2 Appuyez sur +, – pour sélectionner “MIC REC
11
159
VQT4J81_RR-XS450_420-E_FR.indd 159
2012/05/28 14:46:11
Enregistrer à partir d’autres appareils
1 Faites glisser le commutateur Mic/Line sur [LINE].
2 Appuyez sur [MENU].
3 Appuyez sur +, – pour sélectionner “LINE REC” et
appuyez sur [q OK] pour valider.
4 Appuyez sur +, – pour sélectionner “LINE INPUT”
et appuyez sur [q OK] pour valider.
5 Appuyez sur +, – pour sélectionner le réglage et
appuyez sur [q OK] pour valider.
Si vous connectez à la prise écouteur d’un appareil externe
ou la prise de sortie d’un appareil portable, sélectionnez
respectivement “HIGH” ou “LOW”.
(Le réglage d’usine est “HIGH”.)
6 Appuyez sur [F2 (CLOSE)].
7 Branchez le dispositif externe
Branchez le dispositif externe et faites glisser le commutateur
Mic/Line sur “LINE”. Le réglage sélectionné de l’entrée ligne et
le mode d’enregistrement par entrée ligne s’afficheront alors.
8 Maintenez enfoncé [REC *] pendant 1 seconde ou plus.
VQT4J81
L’appareil passe en attente d’enregistrement.
9 Mettez le dispositif externe en lecture et réglez le
niveau d’entrée/sortie.
” s’affiche,
1 Si le compteur de niveau oscille et que “
12
le volume du dispositif externe est trop élevé. Réglez le
volume du dispositif externe sur la plage “
”, même si le
volume est monté au maximum.
Pour reconfigurer les réglages de l’entrée ligne, appuyez
sur [MENU] et suivez les étapes 4 à 6 .
2 Une fois le niveau d’entrée/sortie ajusté, arrêtez la source
sonore de l’autre appareil à la position à laquelle vous
voulez lancer l’enregistrement.
10 Appuyez sur [REC *] pour commencer
l’enregistrement.
11 Activez le dispositif externe.
Cet appareil est équipé de la fonction d’enregistrement synchronisé suivante.
Cette fonction détecte les silences entre les pistes, etc. puis
enregistre chaque piste dans un fichier différent, à savoir une
première piste, une deuxième piste, etc. Lorsque l’appareil détecte
du son provenant de l’appareil externe, l’enregistrement commence
automatiquement. S’il détecte un silence qui dure plus de 2 secondes
environ, l’enregistrement est mis en pause. L’enregistrement reprend
ensuite lorsque l’appareil détecte à nouveau du son.
Réglage de l’enregistrement synchronisé
1 Appuyez sur [MENU].
2 Appuyez sur +, – pour sélectionner “LINE REC” et
appuyez sur [q OK] pour valider.
3 Appuyez sur +, – pour sélectionner “SYNCHRO
REC” et appuyez sur [q OK] pour valider.
4 Appuyez sur +, – pour sélectionner “ON (Auto
Stop)” ou “ON (Manual Stop)” et appuyez sur
[q OK] pour valider.
Auto : L’enregistrement est suspendu si un silence d’environ
2 secondes ou plus est détecté ; il s’arrête en cas d’un
silence d’environ 15 secondes ou plus.
Manual : L’enregistrement se poursuit même si le silence
perdure, jusqu’à ce que vous appuyiez sur
[STOP g/RETURN].
(Le réglage d’usine est “OFF”.)
Pour quitter l’écran de réglage, appuyez sur [F2 (CLOSE)].
Enregistrement synchronisé :
1 Effectuez les étapes de 1 à 11 (➜ gauche).
160
VQT4J81_RR-XS450_420-E_FR.indd 160
2012/05/28 14:46:11
2 Appuyez sur +, – pour sélectionner “LINE REC” et
appuyez sur [q OK] pour valider.
3 Appuyez sur +, – pour sélectionner “LINE REC
MODE” et appuyez sur [q OK] pour valider.
4 Appuyez sur +, – pour sélectionner le réglage
(fréquence d’échantillonnage PCM/débit binaire
MP3) et appuyez sur [q OK] pour valider.
(Le réglage d’usine est “MP3 192kbps”.)
Pour quitter l’écran de réglage, appuyez sur [F2 (CLOSE)].
Fonction d’index
Ajouter un index
1 Pendant l’enregistrement ou la lecture, ou lorsque
l’enregistrement est en pause, appuyez sur [F2 (INDEX)]
à la position où vous désirez ajouter un index.
“ ” (clignotant) et “ADDING INDEX” sont affichés.
“ ” (allumé) est affiché pour le fichier sur lequel l’index est ajouté.
Supprimer un index
1 Appuyez sur [ERASE/A-B&].
2 Appuyez sur +, – pour sélectionner “INDEX” et
appuyez sur [q OK] pour valider.
3 Appuyez sur +, – pour sélectionner “YES” et
appuyez sur [q OK] pour valider.
1 Appuyez sur [F1 (SPEED)] durant la lecture.
2 Appuyez sur [F1 (SLOW)] ou [F2 (FAST)] pour
sélectionner la vitesse de lecture, puis appuyez
sur [q OK].
Vitesse de lecture :
La vitesse de lecture peut être ajustée par étapes de 10 % pour un
taux supérieur à la vitesse normale (100 %), et par étapes de 5 %
pour un taux inférieur à la vitesse normale.
Indication de l’état pendant la lecture :
Les vitesses de lecture normale, plus rapide et plus lente, sont
indiquées avec “ ”, “ ” et “ ”.
Lecture répétée A-B
FRANÇAIS
1 Appuyez sur [MENU].
Changer la vitesse de lecture
1 Appuyez sur [ERASE/A-B&] pendant la lecture.
Le point de début (A) est spécifié et “
(clignotant) sont affichés.
” (allumé) et “ ”
2 Appuyez sur [ERASE/A-B&] au point de fin (B).
L’affichage devient “
commence.
” (allumé) et la lecture répétée
Annuler la lecture répétée A-B :
Appuyez sur [ERASE/A-B&], u, i ou [STOP g/RETURN].
VQT4J81
Sélectionner le mode d’enregistrement par
entrée ligne
13
161
VQT4J81_RR-XS450_420-E_FR.indd 161
2012/05/28 14:46:12
Lecture à partir d’une position
définie (TIME SEARCH)
Lecture répétée (REPEAT)
1 Appuyez sur [MENU].
2 Appuyez sur +, – pour sélectionner “PLAY MENU”
2 Appuyez sur +, – pour sélectionner “PLAY MENU”
3 Appuyez sur +, – pour sélectionner “REPEAT” et
3 Appuyez sur +, – pour sélectionner “TIME
4 Appuyez sur +, – pour sélectionner le type de
(Lors de la lecture, passez à l’étape 3 .)
et appuyez sur [q OK] pour valider.
SEARCH” et appuyez sur [q OK] pour valider.
4 Définissez la position de départ de la lecture.
(Changez la valeur qui suit le mot “TIME” pour définir la position de départ.)
Appuyez sur u, i pour choisir “00:00:00” (heure:minutes:secondes),
puis appuyez sur +, – pour modifier les valeurs.
5 Appuyez sur [q OK].
La lecture débute à partir de la position définie.
Appuyez sur [F2 (CLOSE)] pour arrêter le réglage avant d’avoir terminé.
Lecture avec un bref retour en arrière
1 Appuyez sur [q OK] pendant la lecture.
À chaque pression, la lecture retourne en arrière d’environ
3 secondes (réglage d’usine).
Régler le temps de retour :
1 Appuyez sur [MENU].
(Lors de la lecture, passez à l’étape 3 .)
2 Appuyez sur +, – pour sélectionner “PLAY MENU”
VQT4J81
et appuyez sur [q OK] pour valider.
14
3 Appuyez sur +, – pour sélectionner “SLIGHT
1 Appuyez sur [MENU].
(Lors de la lecture, passez à l’étape 3 .)
et appuyez sur [q OK] pour valider.
appuyez sur [q OK] pour valider.
lecture répétée et appuyez sur [q OK] pour valider.
(Le réglage d’usine est “OFF”.)
Pour quitter l’écran de réglage, appuyez sur [F2 (CLOSE)].
OFF : La lecture est effectuée successivement du fichier
sélectionné jusqu’au dernier fichier du dossier, puis s’arrête.
ONE : Lit un fichier de manière répétée.
FOLDER REPEAT : Tous les fichiers du dossier sont lus de
manière répétée.
FOLDER RANDOM : Tous les fichiers du dossier sont lus de
manière répétée, dans un ordre aléatoire.
ALL REPEAT : Pour les dossiers MUSIC (M) ou OTHER
FOLDER (
), tous les fichiers sont lus en boucle. Pour les
autres dossiers, le fonctionnement est identique à celui de
“FOLDER REPEAT”.
ALL RANDOM : Pour les dossiers MUSIC (M) ou OTHER
FOLDER (
), tous les fichiers sont lus en boucle, en ordre
aléatoire. Pour les autres dossiers, le fonctionnement est
identique à celui de “FOLDER RANDOM”.
Le nombre maximum de fichiers reconnus est de 3.000
RETURN” et appuyez sur [q OK] pour valider.
4 Appuyez sur +, – pour sélectionner le nombre de
secondes (de 1 à 5) et appuyez sur [q OK] pour valider.
(Le réglage d’usine est “3 sec”.)
Pour quitter l’écran de réglage, appuyez sur [F2 (CLOSE)].
162
VQT4J81_RR-XS450_420-E_FR.indd 162
2012/05/28 14:46:12
Sauter à des intervalles réguliers
1 Appuyez au moins une seconde sur [q OK]
durant la lecture.
L’appareil passe en mode de saut par intervalle et “ ”
s’affiche. Le mode de saut change à chaque pression.
2 Appuyez sur u, i.
Chaque fois que le bouton est pressé, 5 secondes sont
passées (réglage d’usine).
Pour modifier l’intervalle de saut
1 Appuyez sur [MENU].
(Lors de la lecture, passez à l’étape 3 .)
2 Appuyez sur +, – pour sélectionner “PLAY MENU”
et appuyez sur [q OK] pour valider.
3 Appuyez sur +, – pour sélectionner “TIME SKIP” et
appuyez sur [q OK] pour valider.
4 Appuyez sur +, – pour sélectionner le temps et
appuyez sur [q OK] pour valider.
Répétition parallèle
Régler la répétition parallèle :
1 Appuyez sur [MENU].
(Lors de la lecture, passez à l’étape 3 .)
2 Appuyez sur +, – pour sélectionner “PLAY MENU”
et appuyez sur [q OK] pour valider.
3 Appuyez sur +, – pour sélectionner
“SHADOWING” et appuyez sur [q OK] pour
valider.
4 Appuyez sur +, – pour sélectionner le type de
répétition, puis appuyez sur [q OK].
Si vous sélectionnez “ON (small volume)”, le volume sera
approximativement à un tiers du volume actuel pendant la
répétition parallèle.
(Le réglage d’usine est “OFF”.)
Pour quitter l’écran de réglage, appuyez sur [F2 (CLOSE)].
FRANÇAIS
Sauter à des intervalles
réguliers (TIME SKIP)
Vous pouvez régler l’intervalle de saut à 5 s, 10 s, 30 s, 1 min,
5 min, 10 min ou 15 min.
(Le réglage d’usine est “5sec”.)
VQT4J81
Pour quitter l’écran de réglage, appuyez sur [F2 (CLOSE)].
15
163
VQT4J81_RR-XS450_420-E_FR.indd 163
2012/05/28 14:46:12
Répétition parallèle
Utiliser la répétition parallèle :
1 Effectuez la lecture répétée A-B. (➜ page 13)
La répétition est effectuée sans son ou à faible volume après
la lecture répétée A-B.
Faciliter l’écoute du son
(VOICE EMPHASIS)
1 Appuyez sur [MENU].
(Lors de la lecture, passez à l’étape 3 .)
2 Appuyez sur +, – pour sélectionner “PLAY MENU”
Ajuster le volume pour la répétition parallèle :
Vous pouvez ajuster le volume du segment de répétition parallèle
séparément du segment de lecture répétée A-B.
• Si la lecture répétée A-B est annulée ou si le réglage de
répétition parallèle est modifié durant la lecture, le volume du
segment de répétition parallèle est rétabli au réglage initial.
et appuyez sur [q OK] pour valider.
3 Appuyez sur +, – pour sélectionner “VOICE
EMPHASIS” et appuyez sur [q OK] pour valider.
4 Appuyez sur +, – pour sélectionner l’accentuation
vocale, puis appuyez sur [q OK].
(Le réglage d’usine est “NORMAL”.)
Pour quitter l’écran de réglage, appuyez sur [F2 (CLOSE)].
VQT4J81
NORMAL : Joue le son comme enregistré.
NOISE CXL L : Effectue une réduction modérée du bruit.
NOISE CXL H : Effectue une réduction importante du bruit.
FOCUS FRONT : Accentue le son sur l’avant.
FOCUS LEFT : Accentue le son sur la gauche.
FOCUS RIGHT : Accentue le son sur la droite.
16
164
VQT4J81_RR-XS450_420-E_FR.indd 164
2012/05/28 14:46:12
1 Appuyez sur [MENU].
(Lors de la lecture, passez à l’étape 3 .)
2 Appuyez sur +, – pour sélectionner “PLAY MENU”
et appuyez sur [q OK] pour valider.
3 Appuyez sur +, – pour sélectionner “SOUND EQ”
et appuyez sur [q OK] pour valider.
4 Appuyez sur +, – pour régler le mode d’égaliseur de son.
Si vous choisissez un mode autre que “USER”, rendez-vous
à l’étape 5 .
Réglage en cas de sélection du mode “USER” :
1 Après l’étape 4 , appuyez sur [F1 (EDIT)].
2 Appuyez sur u, i pour choisir la bande de fréquence
à modifier, et appuyez sur +, – pour ajuster le niveau de
volume (±6 dB).
3 Lorsque les réglages pour chaque bande de fréquence à
modifier sont terminés, passez à l’étape 5 .
Mode
d’égaliseur
Effet et application
FLAT
La fonction d’égaliseur de son n’est pas utilisée. Vous
entendez le son original sans aucun changement.
BASS
Accentue fortement les sons graves.
CLEAR
Accentue fortement les sons aigus.
HEAVY
Accentue légèrement les sons graves et aigus.
SOFT
Accentue les sons médiums.
VOICE
Permet de réduire le bruit pour que la voix humaine
soit plus facile à entendre.
USER
Ce mode permet l’ajustement des bandes de
fréquence de 150 Hz, 500 Hz, 1 kHz, 4 kHz et 12 kHz.
(Le réglage d’usine est “FLAT”.)
FRANÇAIS
Régler l’égaliseur de lecture
(SOUND EQ)
5 Appuyez sur [q OK] pour valider.
VQT4J81
Pour quitter l’écran de réglage, appuyez sur [F2 (CLOSE)].
17
165
VQT4J81_RR-XS450_420-E_FR.indd 165
2012/05/28 14:46:12
Utiliser une carte SD
g Types de recherche de fichier
1 Éteignez l’appareil et ouvrez le couvercle de la
CALENDAR SRCH Les fichiers enregistrés sont triés par date et
affichés sous forme de liste.
pile/carte SD.
2 Insérez la carte SD et refermez le couvercle de la
pile/carte SD.
Alignez la carte SD dans le bon sens ( ) et insérez-la
complètement jusqu’à ce que se produise un “clic”.
Pour retirer la carte SD :
1 Éteignez l’appareil et ouvrez le couvercle de la pile/carte SD.
2 Appuyez doucement sur la carte SD.
3 Lorsque la carte SD dépasse légèrement, tirez-la doucement
hors de la fente.
VQT4J81
Utiliser la fonction de recherche de fichier
Insérer la carte SD
*Vous pouvez passer de la mémoire interne à la carte SD (et
inversement) en maintenant [F2 (FOLDER)] en appuyé pendant
au moins 1 seconde lorsque l’écran d’arrêt est affiché.
*Cet appareil est compatible avec les cartes microSD de 2 Go et
les cartes microSDHC de 4 Go à 32 Go. (À partir de mai 2012)
*Cet appareil peut ne pas fonctionner correctement selon le
fabricant ou le type de carte SD.
*Pour avoir des détails sur les cartes SD dont le bon
fonctionnement a été confirmé conformément à nos standards
de fabrication, consultez la page d’assistance ci-dessous.
http://panasonic.net/support/
*Si une carte SD est insérée, mais que “microSD” n’est pas
affiché à l’écran SELECT FOLDER, etc., la carte SD n’est pas
reconnue par cet appareil.
*Conservez la carte mémoire hors de portée des enfants afin
qu’ils ne puissent pas l’avaler.
DAY OF WEEK
Les fichiers enregistrés sont triés par jour de
la semaine et affichés sous forme de liste.
RECENT R. FILE
Les fichiers enregistrés sont affichés
par ordre de date d’enregistrement, en
commençant par le plus récent. (20 fichiers)
Recherche de fichier
1 Appuyez au moins une seconde sur [LIST ].
Passez à l’étape 2 si une carte SD est insérée, et à l’étape
3 dans le cas contraire.
2 Appuyez sur +, – pour sélectionner “INT.
MEMORY” (mémoire interne) ou “microSD CARD”,
puis appuyez sur [F1 (SEARCH)].
3 Appuyez sur +, – pour sélectionner le type de recherche
de fichier et appuyez sur [q OK] pour valider.
“ ” (mémoire interne) ou “
cible de recherche.
” (carte SD) est affiché comme
Avec “CALENDAR SRCH” sélectionné :
Appuyez sur +, –, u, i pour sélectionner la date
enregistrée et appuyez sur [q OK] pour valider.
Avec “DAY OF WEEK” sélectionné :
Appuyez sur +, – pour sélectionner un jour, et appuyez sur
[q OK] pour valider.
Vous ne pouvez sélectionner qu’un seul jour.
4 Appuyez sur +, – pour sélectionner le fichier et
appuyez sur [q OK] pour valider.
18
166
VQT4J81_RR-XS450_420-E_FR.indd 166
2012/05/28 14:46:12
Écouter de la musique sur cet appareil
(fichiers musicaux WMA/MP3)
Utiliser la fonction de liste de lecture
Sélectionner un fichier du dossier “M” :
1 Sélectionnez le fichier et appuyez sur [q OK].
1 Sélectionnez le dossier MUSIC (M) dans l’écran de liste (➜ page 4).
Annuler le repère d’un dossier :
).
” est affiché.
Le réglage peut être annulé en utilisant l’une des méthodes
suivantes.
• Appuyez à nouveau sur [F2 ( CUE)]. Dans ce cas, les fichiers
peuvent être ignorés avec u, i.
• Appuyez sur [q OK].
• Appuyez sur [STOP g/RETURN]. (La lecture est terminée.)
Lors de la sélection de dossiers ou de fichiers en changeant
de dossier, appuyez sur u et vous pourrez vous déplacer au
sein des hiérarchies. (Pour des détails relatifs aux méthodes
de sélection des fichiers et des dossiers, voir la page 4.)
3 Appuyez sur u, i pour sélectionner la liste
de lecture et appuyez sur [q OK] pour valider.
(Sélectionnez entre PLAYLIST 1 à 5.)
• Le fichier ou tous les fichiers contenus dans le dossier sont
enregistrés dans la liste de lecture sélectionnée.
Lire des pistes enregistrées dans la liste de lecture
FRANÇAIS
CUE)] pendant la lecture.
“FOLDER SKIP” est affiché et est remplacé par l’affichage du
repère du dossier “ ”.
2 Appuyez sur u, i lorsque “
Vous pouvez aussi sélectionner OTHER FOLDER (
2 Appuyez sur +, – pour sélectionner le fichier ou le
dossier et appuyez sur [F1 (PLAYLIST)] pour valider.
Fonction de repère de dossier
1 Appuyez sur [F2 (
Enregistrer vos piste favorites dans une liste de lecture
1 Sélectionnez la liste de lecture (de P1 à P5) (➜ page 4).
2 Appuyez sur u, i pour sélectionner le fichier
à lire et appuyez sur [q OK].
Modifier l’ordre des pistes d’une liste de lecture
1 Sélectionnez la liste de lecture (de P1 à P5) dans
l’écran de liste (➜ page 4).
vous souhaitez modifier et appuyez sur [F1 (EDIT)].
3 Appuyez sur +, – pour sélectionner “CHANGE
ORDER” et appuyez sur [q OK] pour valider.
“
” est ajouté à gauche du nom du fichier sélectionné.
4 Appuyez sur +, – pour déplacer le fichier sélectionné à la
position souhaitée et appuyez sur [q OK] pour valider.
• L’ordre des pistes est modifié.
VQT4J81_RR-XS450_420-E_FR.indd 167
VQT4J81
2 Appuyez sur +, – pour sélectionner le fichier que
19
167
2012/05/28 14:46:12
Utiliser la fonction de liste de lecture
Annuler des pistes enregistrées dans la liste
de lecture
1 Sélectionnez la liste de lecture (de P1 à P5) dans
l’écran de liste (➜ page 4).
2 Appuyez sur +, – pour sélectionner le fichier que
vous souhaitez supprimer et appuyez sur [F1 (EDIT)].
3 Appuyez sur +, – pour sélectionner “ERASE FILE”
et appuyez sur [q OK] pour valider.
Lors de l’annulation de toutes les pistes enregistrées :
1 Appuyez sur +, – pour sélectionner “ERASE ALL” et
appuyez sur [q OK] pour valider.
4 Appuyez sur +, – pour sélectionner “YES” et
appuyez sur [q OK] pour valider.
Diviser des fichiers
1 Pendant la lecture, appuyez sur [STOP g/RETURN] au
moment ou vous voulez effectuer la division du fichier.
2 Sélectionnez “DIVIDE” à l’écran de réglage des
modifications (➜ gauche).
3 Appuyez sur +, – pour sélectionner “YES” et
appuyez sur [q OK] pour valider.
Pendant la division du fichier, le voyant d’état clignote.
Modification : Combiner des fichiers
1 Sélectionnez “COMBINE” à l’écran de réglage des
modifications (➜ gauche).
2 Appuyez sur +, – pour sélectionner “PREVIOUS
FILE” et appuyez sur [q OK] pour valider.
3 Appuyez sur +, – pour sélectionner le fichier à
combiner, et appuyez sur [q OK] pour valider.
Modifier : Diviser des fichiers
Afficher l’écran de réglage des modifications
1 Appuyez sur [MENU].
4 Appuyez sur +, – pour sélectionner “NEXT FILE”
2 Appuyez sur +, – pour sélectionner “EDIT MENU”
5 Appuyez sur +, – pour sélectionner le fichier à
et appuyez sur [q OK] pour valider.
3 Appuyez sur +, – pour sélectionner l’élément à
VQT4J81
modifier et appuyez sur [q OK].
20
Si vous sélectionnez le fichier dans un autre dossier, vous
pouvez naviguer l’arborescence des dossiers en appuyant sur
u. (Pour des détails relatifs aux méthodes de sélection des
fichiers et des dossiers, voir la page 4.)
• Appuyez sur [F1 (TAB)] pour passer à d’autres écrans de
réglage.
• Les détails du réglage et les méthodes de modification
dépendent de l’élément. Pour plus de détails, voir la page
correspondante.
Pour quitter l’écran de réglage, appuyez sur [F2 (CLOSE)].
et appuyez sur [q OK] pour valider.
combiner au dos du fichier précédent et appuyez
sur [q OK] pour valider.
6 Appuyez sur +, – pour sélectionner “NEXT” et
appuyez sur [q OK] pour valider.
7 Appuyez sur +, – pour sélectionner “YES” et
appuyez sur [q OK] pour valider.
Pendant la combinaison des fichiers, le voyant d’état clignote.
• Si vous appuyez sur [F2 (CLOSE)] avant la fin de la
combinaison, le processus de combinaison est annulé.
168
VQT4J81_RR-XS450_420-E_FR.indd 168
2012/05/28 14:46:12
Copier des fichiers
1 Sélectionnez “COPY” à l’écran de réglage des
modifications (➜ page 20).
2 Appuyez sur +, – pour sélectionner le fichier à
copier, et appuyez sur [q OK] pour valider.
• Si vous sélectionnez le fichier dans un autre dossier, vous
pouvez naviguer l’arborescence des dossiers en appuyant
sur u. (Pour des détails relatifs aux méthodes de sélection
des fichiers et des dossiers, voir la page 4.)
• Lors de la copie de fichiers dans le dossier LINE (LINE_SD),
rendez-vous à l’étape 5 .
3 Appuyez sur +, – pour sélectionner la destination
de la copie (“INTERNAL MEMORY” ou “microSD
CARD”) et appuyez sur [q OK] pour valider.
4 Appuyez sur +, – pour sélectionner le dossier de
destination de la copie et appuyez sur [q OK]
pour valider.
5 Appuyez sur +, – pour sélectionner “YES” et
appuyez sur [q OK] pour valider.
Fonction corbeille
Restaurer des fichiers se trouvant dans la
corbeille vers leur dossier d’origine
1 Appuyez sur [F2 (FOLDER)].
2 Appuyez sur +, –, u, i pour sélectionner “ ”
et appuyez sur [q OK] pour valider.
La corbeille existe dans la mémoire interne et dans la carte SD.
3 Utilisez u, i pour sélectionner le fichier que
vous souhaitez restaurer et appuyez sur
[ERASE/A-B&] pour valider.
4 Appuyez sur +, – pour sélectionner “RESTORE
FILE” et appuyez sur [q OK] pour valider.
5 Appuyez sur +, – pour sélectionner “YES” et
appuyez sur [q OK] pour valider.
Le voyant d’affichage clignote et le fichier sélectionné est
restauré à la fin du dossier d’origine.
Appuyez sur [q OK] pour retourner à l’écran de l’étape 3 .
FRANÇAIS
Modifier : Copier ou déplacer
des fichiers
Pendant la copie du fichier, le voyant d’état clignote.
VQT4J81
Déplacer des fichiers
Sélectionnez “MOVE” à l’étape 1 , à gauche, pour déplacer des
fichiers. L’opération est identique à la copie d’un fichier.
21
169
VQT4J81_RR-XS450_420-E_FR.indd 169
2012/05/28 14:46:12
Fonction corbeille
Utiliser le retardateur
Vider la corbeille
1 Appuyez sur [MENU].
1 Appuyez sur [ERASE/A-B&].
2 Appuyez sur +, – pour sélectionner “COMMON
2 Appuyez sur +, – pour sélectionner “EMPTY
3 Appuyez sur +, – pour sélectionner “TIMER &
RECYCLE BIN” et appuyez sur [q OK] pour
valider.
Avec la corbeille sélectionnée, choisissez “EMPTY” à l’étape
2 et appuyez sur [q OK].
3 Appuyez sur +, – pour sélectionner “YES” et
appuyez sur [q OK] pour valider.
Le voyant d’affichage clignote et la corbeille est vidée.
MENU” et appuyez sur [q OK] pour valider.
ALARM” et appuyez sur [q OK] pour valider.
4 Définissez les éléments tels que la date et l’heure
ou la source sonore.
1 Appuyez sur +, – pour sélectionner l’élément et appuyez sur
[q OK] pour valider.
2 Appuyez sur +, –, u, i pour sélectionner le réglage et
appuyez sur [q OK] pour valider.
Répétez les étapes 1 et 2 pour terminer les réglages.
5 Appuyez sur +, – pour sélectionner “OK” et
appuyez sur [q OK] pour valider.
Pour quitter l’écran de réglage, appuyez sur [F2 (CLOSE)].
VQT4J81
Élément réglé
Détails
SETTING
OFF : Le retardateur est désactivé.
ON : Le retardateur est activé.
REPEAT
ONCE : L’enregistrement ou la lecture est exécuté
une seule fois.
DAILY : L’enregistrement ou la lecture est exécuté
quotidiennement.
SELECT : L’enregistrement ou la lecture est
exécuté toutes les semaines au jour choisi.
1 Appuyez sur +, – pour sélectionner le jour et
utilisez [q OK] pour ajouter une coche. (Appuyez à
nouveau sur [q OK] pour supprimer la sélection.)
2 Une fois le jour choisi, sélectionnez “OK” et
appuyez sur [q OK].
22
170
VQT4J81_RR-XS450_420-E_FR.indd 170
2012/05/28 14:46:12
REC/PLAY
PLAY : Lit un fichier défini ou le son d’alarme.
REC : Enregistre la source sonore définie.
PLAY
ALARM : Lit le son d’alarme.
FILE : Lit un fichier.
La liste des fichiers du dossier sélectionné est
affichée.
Appuyez sur +, – pour sélectionner le fichier
et appuyez sur [q OK]. Lors de la sélection
de fichiers en changeant de dossier, appuyez
sur u et vous pourrez vous déplacer au
sein des hiérarchies. (Pour des détails relatifs
aux méthodes de sélection des fichiers et des
dossiers, voir la page 4.)
SOURCE
MIC : Enregistrement au microphone.
LINE : Enregistre le son provenant d’un dispositif
externe.
MODE
PCM 44,1 kHz, MP3 320 ko/s, MP3 192 ko/s,
MP3 128 ko/s, MP3 64 ko/s, MP3 32 ko/s
REC TO
Sélectionnez le dossier dans lequel sauvegarder
le fichier enregistré.
• Si un dossier de la carte SD est sélectionné,
insérez la carte SD.
Menu commun
Opération de réglages communs
1 Appuyez sur [MENU].
2 Appuyez sur +, – pour sélectionner “COMMON
MENU” et appuyez sur [q OK] pour valider.
3 Appuyez sur +, – pour sélectionner l’élément à
régler et appuyez sur [q OK] pour valider.
4 Appuyez sur +, – pour modifier le réglage et
appuyez sur [q OK] pour valider.
Pour quitter l’écran de réglage, appuyez sur [F2 (CLOSE)].
Pour plus de détails concernant “DATE & TIME” (➜ page 3)
et “TIMER & ALARM” (➜ page 22), voir les pages
respectivement indiquées.
BEEP SOUND
FRANÇAIS
Détails
Définissez l’heure de début et l’heure de fin
Sélectionnez l’élément (sélectionnez l’heure et les
minutes de début, l’heure et les minutes de fin) en
utilisant u, i et définissez en utilisant +, –.
• Jusqu’à 12 heures peuvent être réglées pour la
période depuis l’heure de début à l’heure de fin.
Le son des touches de commandes peut être réglé.
OFF : Pas de bip de commande.
ON : Le bip de commande est activé.
(Le réglage d’usine est “ON”.)
REC LED (Voyant d’enregistrement)
Vous pouvez choisir si vous voulez ou non régler le voyant
d’enregistrement sur ON ou OFF.
OFF : Ne s’allume pas
ON : S’allume
(Le réglage d’usine est “ON”.)
VQT4J81
Élément réglé
TIME
23
171
VQT4J81_RR-XS450_420-E_FR.indd 171
2012/05/28 14:46:12
Menu commun
BATT. SETTING
Définit le type de pile utilisé (pile rechargeable nickel-hydrure
métallique ou pile alcaline).
Type de pile : RECHARGEABLE, ALKALINE
(Le réglage d’usine est “RECHARGEABLE”.)
AUTO POWER OFF
Cette fonction éteint automatiquement l’appareil si aucune
opération n’est effectuée pendant un certain temps, par exemple si
l’enregistrement est arrêté. Cette fonction permet d’économiser la
pile lorsque vous oubliez d’éteindre l’appareil.
AUTO POWER OFF : 0 min (OFF) à 15 min
(Le réglage d’usine est “15min”.)
BACKLIGHT
Définissez la durée d’allumage du rétro-éclairage lors de la
pression du bouton.
Durée d’allumage : OFF (ne s’allume pas), 5 s, 15 s, toujours
allumé
(Le réglage d’usine est “15 sec”.)
CONTRAST
FORMAT
Tous les fichiers de la mémoire interne ou de la carte SD
sont supprimés. Il n’est pas possible de récupérer les fichiers
supprimés.
1 Sélectionnez “INTERNAL MEMORY” ou “microSD CARD” et
appuyez sur [q OK] pour valider.
2 Sélectionnez “YES” et appuyez sur [q OK] pour valider.
INIT MENU
Si les paramètres de l’appareil sont réinitialisés, tous les réglages
exceptés “DATE & TIME” sont restaurés aux valeurs par défaut.
Sélectionnez “YES”, appuyez sur [q OK] pour valider et les
paramètres seront réinitialisés.
VERSION
Vous pouvez contrôler la version du microprogramme de cet
appareil.
VQT4J81
Utilisez cette fonction pour régler le contraste de l’écran. Vous
pouvez choisir parmi 10 niveaux pour l’ajustement.
Ajustement du contraste : 1 (Faible) à 10 (Élevé)
(Le réglage d’usine est “5”.)
RECYCLE BIN
Lorsque la fonction corbeille est utilisée, les fichiers supprimés
sont déplacés vers la corbeille. Avant que la corbeille ne soit vidée,
les fichiers supprimés peuvent être restaurés, de sorte que vous
n’ayez pas à vous inquiéter de supprimer des fichiers par erreur.
OFF : Ne pas utiliser la fonction corbeille
ON : Utiliser la fonction corbeille
(Le réglage d’usine est “ON”.)
24
172
VQT4J81_RR-XS450_420-E_FR.indd 172
2012/05/28 14:46:12
Configuration système requise
Système
d’exploitation
Interface
(À partir de mai 2012)
Ordinateurs compatibles IBM PC/AT, Macintosh
• Microsoft® Windows® XP Édition Familiale/Professionnel et Service Pack 2, Service Pack 3
• Microsoft® Windows Vista® Édition Familiale Basique/Édition Familiale Premium/
• Version préinstallée
Professionnel/Édition Intégrale et Service Pack 1, Service Pack 2
• Microsoft® Windows® 7 Édition Starter/Édition Familiale Basique/Édition Familiale
Premium/Professionnel/Édition Intégrale et Service Pack 1
• Mac OS X 10.2.8 à 10.7
Port USB (Il n’est pas possible de garantir le fonctionnement si un concentrateur de ports USB est utilisé.)
✽ Certains ordinateurs ne peuvent être utilisés même s’ils possèdent la configuration système requise spécifiée dans ce document.
✽ (Macintosh) Ce logiciel s’utilise sur le lecteur standard du système d’exploitation.
✽ Le fonctionnement n’est garanti que sur les systèmes d’exploitation conformes.
✽ Le fonctionnement n’est pas garanti sous un système d’exploitation mis à niveau.
✽ Le fonctionnement n’est pas garanti sur les ordinateurs fabriqués par l’utilisateur lui-même.
✽ Lors de l’utilisation de Windows Media® Player, l’ordinateur doit posséder la configuration système requise pour Windows Media®
Player. Pour plus de détails sur Windows Media® Player, s’informer auprès de Microsoft Corporation.
✽ Microsoft, Windows, Windows Media et Windows Vista sont des marques, déposées ou non, de Microsoft Corporation aux États-Unis
et/ou dans d’autres pays.
✽ La technologie de codage audio MPEG Layer-3 est sous licence de Fraunhofer IIS et Thomson.
✽ IBM et PC/AT sont des marques déposées de International Business Machines Corporation aux États-Unis.
✽ Macintosh et Mac OS sont des marques de commerce d’Apple Inc.
✽ En règle générale, les autres noms de systèmes et de produits mentionnés dans ce document sont des marques, déposées ou non,
de leurs développeurs respectifs. Noter que les symboles ™ et ® n’apparaissent pas dans ce document.
✽ Suivant l’environnement de l’ordinateur, des dysfonctionnements (tels que l’impossibilité d’utiliser les données audio enregistrées sur
cet appareil) peuvent se produire. Panasonic et les revendeurs de produits Panasonic ne peuvent être tenus responsables pour toute
perte de données audio ni pour tout autre dommage direct ou indirect, à l’exception des cas de négligence grossière intentionnelle.
4 Go (RR-XS450), 2 Go (RR-XS420)
La capacité réelle disponible sera moindre.
VQT4J81
Mémoire interne
FRANÇAIS
Ordinateur
25
173
VQT4J81_RR-XS450_420-E_FR.indd 173
2012/05/28 14:46:12
Raccorder cet appareil à un
ordinateur
1 Sortez la fiche USB de l’appareil.
2 Branchez l’appareil à un ordinateur en utilisant le
port USB.
Si l’appareil ne peut pas être directement raccordé à l’ordinateur,
utilisez le câble prolongateur USB (fourni).
*N’utilisez pas d’autres câbles prolongateur USB à l’exception de
celui fourni.
N’utilisez pas le câble fourni avec d’autres appareils.
VQT4J81
Attention : Utilisez uniquement le câble prolongateur USB
avec un tore magnétique fourni pour raccorder l’appareil à un
ordinateur.
26
*Première connexion de l’appareil à votre ordinateur
Comme beaucoup de messages tels que “nouveau périphérique
détecté” vont apparaître, ne débranchez pas l’appareil de votre
ordinateur avant leur complète disparition.
*Cet appareil ne peut pas être commandé lorsqu’il est connecté
à l’ordinateur.
*Lorsque l’appareil est connecté à votre PC, il peut fonctionner
sans pile car il est alimenté en électricité par l’ordinateur.
*Lorsque l’appareil est connecté à l’ordinateur, il se peut que
l’ordinateur ne puisse pas démarrer (ou redémarrer). Il est
recommandé de déconnecter l’appareil de l’ordinateur lors du
démarrage (redémarrage) de l’ordinateur.
*Le fonctionnement n’est pas garanti dans les cas suivants.
• Lorsque plusieurs périphériques USB sont connectés à
l’ordinateur
(excluant la souris et le clavier en fonctionnement normal)
• Lorsqu’un concentrateur USB est utilisé
• Lorsqu’un câble prolongateur USB différent de celui fourni est utilisé.
*Lorsque l’appareil est raccordé à l’ordinateur, il se peut que
l’ordinateur ne reconnaisse pas l’appareil si vous faites démarrer
(ou redémarrer) l’ordinateur ou s’il entre en mode veille.
Déconnectez l’appareil et reconnectez-le à l’ordinateur, ou
reconnectez l’appareil une fois l’ordinateur redémarré.
*Veuillez consulter le mode d’emploi de l’ordinateur.
g Débrancher l’appareil
Double-cliquez sur l’icône (Windows XP : [ ], Windows Vista/
Windows 7 : [ ]) de la barre des tâches, au bas de l’écran
de l’ordinateur, et suivez les instructions à l’écran pour retirer
l’appareil. (Suivant les réglages du système d’exploitation, il
se peut que l’icône ne s’affiche pas.) Une fois l’appareil retiré,
il s’éteint. Lorsque cet appareil est allumé après que l’on a
supprimé, etc. des fichiers s’y trouvant à partir de l’ordinateur, le
message “UPDATING FILE NAME” apparaît. La mise à jour peut
prendre plusieurs minutes.
g Fonction de mémoire auxiliaire USB
Cet appareil fonctionne en tant que mémoire auxiliaire USB et
est reconnu en tant que périphérique de stockage externe de
l’ordinateur.
Les fichiers de données de l’ordinateur peuvent être transférés et
sauvegardés sur cet appareil.
174
VQT4J81_RR-XS450_420-E_FR.indd 174
2012/05/28 14:46:12
Entretien
VQT4J81
FRANÇAIS
Nettoyez cet appareil avec un chiffon doux et sec.
• Si l’appareil est trop sale, passez un chiffon humidifié dans l’eau,
puis passez un chiffon sec.
• N’utilisez aucun solvant tel que benzène, diluant, alcool, détergent
de cuisine, chiffon imprégné chimiquement, etc. L’utilisation de
ces produits peut causer la déformation du boîtier extérieur ou le
détachement du revêtement.
27
175
VQT4J81_RR-XS450_420-E_FR.indd 175
2012/05/28 14:46:12
Le logo microSDHC est une marque déposée de SD-3C, LLC.
Ce produit est protégé par certains droits de propriété
intellectuelle de Microsoft Corporation et de tiers. Toute
utilisation ou distribution de cette technologie en dehors de ce
produit est interdite sans licence de Microsoft ou d’un affilié de
Microsoft et de tiers.
Ce produit peut être perturbé par les ondes des téléphones
mobiles pendant l’utilisation. Si vous constatez une telle
interférence, éloignez le téléphone mobile du produit.
Conservez les piles AAA LR03 et les piles rechargeables hors de
la portée des enfants afin qu’ils ne puissent pas les avaler.
ATTENTION
• Danger d’explosion si la batterie est remplacée de manière
incorrecte. Remplacez-la uniquement par le type recommandé
par le fabricant.
• Avant de jeter les batteries, veuillez contacter l’autorité locale
compétente ou le revendeur pour connaître la méthode
adéquate de le faire.
• Ne placez pas les batteries près d’une source de chaleur ou
dans un feu.
• Ne laissez pas la ou les batterie dans un véhicule exposé aux
rayons du soleil pendant une période prolongée avec les portes
et vitres fermées.
VQT4J81
Veillez à utiliser le casque ou les écouteurs fournis avec l’appareil
ou recommandés.
Selon EN 50332-2:2003
1) Tension de sortie maximum (sortie oreillette) : 150mV
2) Tension caractéristique de la bande large (oreillettes): 75mV
28
176
VQT4J81_RR-XS450_420-E_FR.indd 176
2012/05/28 14:46:12
Avis aux utilisateurs concernant la collecte et l’élimination des piles et des appareils électriques et électroniques usagés
En éliminant piles et appareils usagés conformément à la réglementation en vigueur, vous
contribuez à prévenir le gaspillage de ressources précieuses ainsi qu’à protéger la santé humaine et
l’environnement contre les effets potentiellement nocifs d’une manipulation inappropriée des déchets.
Pour de plus amples renseignements sur la collecte et le recyclage des piles et appareils usagés,
veuillez vous renseigner auprès de votre mairie, du service municipal d’enlèvement des déchets ou
du point de vente où vous avez acheté les articles concernés.
Le non-respect de la réglementation relative à l’élimination des déchets est passible d’une peine d’amende.
FRANÇAIS
Apposé sur le produit lui-même, sur son emballage, ou figurant dans la documentation qui
l’accompagne, ce pictogramme indique que les piles et appareils électriques et électroniques
usagés doivent être séparés des ordures ménagères.
Afin de permettre le traitement, la valorisation et le recyclage adéquats des piles et des appareils
usagés, veuillez les porter à l’un des points de collecte prévus, conformément à la législation
nationale en vigueur ainsi qu’aux directives 2002/96/CE et 2006/66/CE.
Pour les utilisateurs professionnels au sein de l’Union européenne
Si vous souhaitez vous défaire de pièces d’équipement électrique ou électronique, veuillez vous
renseigner directement auprès de votre détaillant ou de votre fournisseur.
Note relative au pictogramme à apposer sur les piles (voir les 2 exemples ci-contre)
Le pictogramme représentant une poubelle sur roues barrée d’une croix est conforme à la
réglementation. Si ce pictogramme est combiné avec un symbole chimique, il remplit également les
exigences posées par la Directive relative au produit chimique concerné.
Cd
VQT4J81
[Information relative à l’élimination des déchets dans les pays extérieurs à l’Union européenne]
Ce pictogramme n’est valide qu’à l’intérieur de l’Union européenne. Pour connaître la procédure
applicable dans les pays hors Union Européenne, veuillez vous renseigner auprès des autorités
locales compétentes ou de votre distributeur.
29
177
VQT4J81_RR-XS450_420-E_FR.indd 177
2012/05/28 14:46:13
Este manual describe las operaciones y funciones básicas de
la unidad.
Accesorios suministrados
1 Pila AAA de Ni-MH recargable
*Aparece referida en el texto como pila recargable.
1 Bolsa para el transporte de las pilas
1 Cable alargador de USB
Asegúrese de que adquiere [HHR-4MVE] para Europa o
[HHR-4MVT] para Asia y Latinoamérica y de que utiliza una del
par cuando remplace la pila recargable. (Desde mayo de 2012)
Inserción de la pila
1 pila AAA de Ni-MH recargable (incluida)
Compruebe que la pila esté
correctamente orientada.
2 Enchufe la toma USB de la unidad en el ordenador.
Si la unidad no puede conectarse directamente al ordenador,
utilice el cable alargador de USB (incluido).
La primera vez que conecte la unidad a su PC
Aparecerán varios mensajes “Nuevo dispositivo encontrado”,
no desconecte la unidad del ordenador hasta que todos los
mensajes desaparezcan.
*No desconecte nunca la unidad ni retire la tarjeta SD
mientras se esté mostrando “ACCESS…” en la pantalla, si
lo hiciera la unidad podría resultar dañada.
3 Coloque el interruptor OPR/HOLD en la opción [ON].
4 Coloque el interruptor OPR/HOLD en la opción [OFF].
Se encenderá el indicador de estado y se iniciará la recarga.
*Mientras se está efectuando la carga, si se cambia el interruptor
OPR/HOLD a la posición [ON], la carga se puede cancelar
antes de que concluya.
*Cuando el indicador de estado se apaga, la carga se ha
completado.
g Desconexión de la unidad
Haga doble clic en el icono (Windows XP: [ ], Windows Vista/
Windows 7: [ ]) en la bandeja de tareas en la parte inferior de la
pantalla del ordenador y siga las instrucciones en pantalla sobre
cómo retirar la unidad. (Es posible que el icono no se muestre,
dependiendo de la configuración del sistema operativo.) La unidad
se apaga después de retirarla.
Carga de la pila
VQT4J81
1 Saque la clavija USB.
Empújela deslizando
hasta que oiga el
sonido “clic”.
Almacenamiento de la
clavija USB:
*Cuando utilice una pila recargable, use la que se suministra o
la pila recargable opcional. Si se utilizan otras baterías o pilas
recargables que se encuentran disponibles en el mercado pero
que sean distintas a las anteriores no se garantiza el correcto
funcionamiento.
*Se puede utilizar también una pila alcalina AAA LR03 (no incluida).
2
178
VQT4J81_RR-XS450_420-E_SP.indd 178
2012/05/29 11:29:37
Encendido y apagado de la unidad Ajuste del reloj
Deslice el interruptor OPR/HOLD hacia [ON] para activar la
alimentación. A continuación, se encenderá el visualizador.
Apagado de la unidad:
Deslice el interruptor OPR/HOLD en la posición [OFF] mientras la
unidad está detenida.
g Desconexión automática:
La grabadora se apaga automáticamente una vez transcurrido el
tiempo predefinido mientras la grabación está detenida (el ajuste
de fábrica es de 15 minutos).
Si la alimentación se apaga por medio de la función de apagado
automático, coloque el interruptor OPR/HOLD en la posición [OFF]
antes de encender la alimentación. (➜ página 24)
Función de Bloqueo
Las funciones de los botones se ignoran cuando la función de
bloqueo está activada.
Para encender la función de bloqueo:
Deslice el interruptor OPR/HOLD a la posición [HOLD] durante la
grabación o la reproducción.
Para apagar la función de bloqueo:
Deslice el interruptor OPR/HOLD a la posición contraria a [HOLD].
1 Pulse [MENU].
2 Pulse +, – para seleccionar “COMMON MENU” y
pulse [q OK] para confirmar.
3 Pulse +, – para seleccionar “DATE & TIME” y pulse
[q OK] para confirmar.
4 Pulse +, – para establecer el año y pulse i.
5 Pulse +, – para establecer el mes y pulse i.
6 Pulse +, – para establecer el día y pulse i.
7 Pulse +, – para establecer el método de indicación
del reloj y pulse i.
“ 24h ” y “ AM / PM ” se muestran para el modo de
visualización de 24 horas o de 12 horas respectivamente.
8 Pulse +, – para establecer la hora y pulse i.
9 Pulse +, – para establecer los minutos.
Para cambiar los ajustes pulse u, i para desplazarse
entre los elementos, y a continuación pulse +, – de nuevo para
realizar el ajuste.
ESPAÑOL
Encendido de la unidad:
10 Pulse [q OK] para confirmar.
La fecha y hora están ahora ajustadas y el reloj comienza a
funcionar.
VQT4J81
Para salir de la pantalla de ajustes, pulse [F2 (CLOSE)].
3
179
VQT4J81_RR-XS450_420-E_SP.indd 179
2012/05/29 11:29:40
Selección de la carpeta
1 Pulse [F2 (FOLDER)].
2 Pulse +, –, u, i para seleccionar la carpeta y
pulse [q OK] para confirmar.
• “ ” (OTHER FOLDER) sirve para reproducir archivos
grabados con un dispositivo que no sea esta unidad. Esta
unidad también puede grabar archivos musicales grabados con
(o transferidos por) algunos dispositivos de Sistema Estéreo
Panasonic equipados con la función de grabación USB.
Cambio entre la memoria interna y la tarjeta SD:
Si la tarjeta SD está colocada, los elementos de la tarjeta
SD se muestran en la pantalla en el paso 2 . Pulse
[F1 (MEMORY)] para seleccionar la memoria.
• En este manual, las tarjetas microSD/microSDHC aparecen
referenciadas como “tarjeta SD”.
Cambio de la posición del
micrófono
Posición del micrófono
Usos recomendados
STEREO
Funciona como un
micrófono estéreo normal.
Resulta adecuado para grabar
eventos tales como una reunión
o una actuación con un gran
número de asistentes.
ZOOM
Graba resaltando el sonido
existente frente a usted.
Resulta adecuado para grabar
eventos tales como una
conferencia o una entrevista,
donde el sonido se emite en una
dirección concreta.
Selección de una carpeta o un
archivo en la pantalla de lista
1 Pulse [LIST ] durante 1 segundo
aproximadamente o más.
Vaya al paso 2 si ha introducido una tarjeta SD (➜ página 18),
o al paso 3 en caso conatrario.
VQT4J81
2 Pulse +, – para seleccionar “INT. MEMORY”
4
(memoria interna) o “microSD CARD” y luego
pulse [q OK] para confirmar.
3 Pulse +, – para seleccionar la carpeta y pulse
[q OK] para confirmar.
Si se han creado carpetas dentro de la carpeta MUSIC o en OTHER
FOLDER ( ), repita el paso 3 para seleccionar la carpeta de destino.
4 Pulse +, – para seleccionar el archivo y pulse
[q OK] para confirmar.
Se inicia la reproducción del archivo.
180
VQT4J81_RR-XS450_420-E_SP.indd 180
2012/05/29 11:29:40
Grabación
Comprobación de información.
1 Pulse [F2 (FOLDER)].
1 Pulse [STOP g/RETURN].
Para la grabación con micrófono, seleccione una carpeta de entre
las carpetas “A”, “B”, “C” y “D”. (El ajuste de fábrica es “A”)
3 Pulse [REC *] (se inicia la grabación).
4 Pulse [STOP g/RETURN] para detener la grabación.
Para detener la grabación:
1 Pulse [REC *] durante la grabación.
El indicador de grabación parpadea.
2 Pulse [REC *] de nuevo para continuar con la grabación.
Reproducción
Aparecerá la pantalla de información.
2 Mueva la pantalla de información arriba y abajo
utilizando + o –.
Para salir de la pantalla de información: Pulse
[STOP g/RETURN].
Escucha del audio mediante
auriculares
Conecte unos auriculares estereofónicos (no incluidos).
Tipo de clavija: mini clavija estéreo de ø 3,5 mm
Auriculares adicionales recomendados:
Panasonic RP-HV154, RP-HJE120
(Desde mayo de 2012)
Control de la grabación en
curso
1 Pulse [q OK] (se inicia la reproducción).
Ajuste del volumen:
Ajuste del volumen
Subir el volumen: Pulse +.
Bajar el volumen: Pulse –.
Altavoz
incorporado
Podrá ajustar el volumen pulsando +, –,
aunque el nivel de grabación no se verá
afectado.
Escuchar el audio durante
la reproducción
Operaciones durante la reproducción
Saltar: Pulse u, i.
Retroceso rápido/Avance rápido (Búsqueda):
Mantenga pulsado u, i.
Para detener: Pulse [STOP g/RETURN].
ESPAÑOL
de la grabación y pulse [q OK] para confirmar.
Inserte
firmemente.
Durante la reproducción el audio
proviene del altavoz. La escucha puede
ser difícil en lugares ruidosos debido a la
salida del altavoz. En tal caso, conecte
unos auriculares estéreo (no incluidos).
VQT4J81
2 Pulse u, i para seleccionar la carpeta de destino
5
181
VQT4J81_RR-XS450_420-E_SP.indd 181
2012/05/29 11:29:40
Eliminación de archivos
Selección de la situación para la grabación
1 Pulse [ERASE/A-B&].
1 Pulse [MENU] durante 1 segundo aproximadamente o más.
2 Pulse +, – para seleccionar “FILE” y pulse [q OK]
2 Pulse +, – para seleccionar la situación para la
para confirmar.
3 Pulse +, – para seleccionar “YES” y pulse [q OK]
para confirmar.
Durante la eliminación, el indicador de estado parpadea y
se visualiza “ERASING”. La eliminación puede llevar unos
minutos.
Si se selecciona “FOLDER” en el paso 2 , se accede a la
pantalla desde la que se pueden eliminar todos los archivos de
la carpeta seleccionada.
Para salir de la pantalla de borrado, pulse [F2 (CLOSE)].
Borrado de archivos desde la pantalla de lista
Seleccione los archivos en la pantalla de lista (➜ página 4) y pulse
[ERASE/A-B&]. Aparecerá la pantalla para borrar los archivos.
Seleccione la carpeta y pulse [ERASE/A-B&]. Aparecerá la
pantalla para borrar todos los archivos de la carpeta.
Se muestra la pantalla para seleccionar la situación para la grabación.
grabación y pulse [q OK] para confirmar.
Si selecciona “USER”, omita el paso 3 .
3 Pulse +, – para seleccionar “LOAD” y pulse
[q OK] para confirmar.
Para salir de la pantalla de ajustes, pulse [F2 (CLOSE)].
Cuando se pulsa [REC *], se realiza una grabación con el
ajuste seleccionado.
Situación para la grabación
LANG.
STUDY
KARAOKE
MUSIC
PERF.
CONVERSATION
MEETING
LECTURE
VQT4J81
FAVORITE
6
Aplicación
Grabación de su propia voz para practicar
pronunciación, etc.
Grabación de volumen alto, como para
un karaoke
Grabación de alta calidad como para una
actuación musical
Grabación de las voces de otras personas
para entrevistas, reuniones, etc.
Grabación de una banda de sonido amplia.
Para la grabación de reuniones, etc.
Grabación de sonidos como en el caso de
una lección en una clase, etc.
Puede registrar sus propios ajustes
Cambio de los ajustes de situación para la grabación
1 Pulse [MENU] durante 1 segundo aproximadamente o más.
2 Pulse +, – para seleccionar la situación para la
grabación y pulse [q OK] para confirmar.
182
VQT4J81_RR-XS450_420-E_SP.indd 182
2012/05/29 11:29:40
Situación directa
6 Una vez que haya terminado con los ajustes,
pulse +, – para seleccionar “OK” y pulse [q OK]
para confirmar.
Para seleccionar la situación para grabación que se ha
cambiado, seleccione “LOAD”.
Para salir de la pantalla de ajustes, pulse [F2 (CLOSE)].
Inicialización de los ajustes de situación para
la grabación
1 Pulse [MENU] durante 1 segundo aproximadamente
o más.
2 Pulse +, – para seleccionar la situación para la
grabación y pulse [q OK] para confirmar.
3 Pulse +, – para seleccionar “INITIALIZE” y pulse
[q OK] para confirmar.
4 Pulse +, – para seleccionar “YES” y pulse [q OK]
para confirmar.
El ajuste de situación para la grabación seleccionado se
devuelve a su ajuste de fábrica.
Para seleccionar la situación para grabación inicializada,
seleccione “LOAD”.
Para salir de la pantalla de ajustes, pulse [F2 (CLOSE)].
Cambio de configuración de la situación directa
1 Pulse [MENU].
2 Pulse +, – para seleccionar “MIC REC MENU” y
pulse [q OK] para confirmar.
3 Pulse +, – para seleccionar “DIRECT SCENE” y
pulse [q OK] para confirmar.
4 Pulse +, – para seleccionar la posición del
micrófono (“STEREO” o “ZOOM”) y pulse [q OK]
para confirmar.
5 Pulse +, – para seleccionar la situación para la
grabación y pulse [q OK] para confirmar.
ESPAÑOL
Repita los pasos 4 y 5 para cambiar otros elementos.
Esta función sirve para cambiar la situación para la grabación
vinculándola al cambio de posición del micrófono.
*Cuando adquiera la unidad, “MEETING” estará asignado a
STEREO, y “LECTURE” estará asignado a ZOOM.
Si desea cambiar la situación para la grabación a la otra
posición del micrófono, siga los pasos 4 y 5 para establecer
la situación para la grabación.
Para salir de la pantalla de ajustes, pulse [F2 (CLOSE)].
VQT4J81
3 Pulse +, – para seleccionar “CHANGE SETTING” y
pulse [q OK] para confirmar.
4 Pulse +, – para seleccionar el elemento que desea
cambiar y pulse [q OK] para confirmar.
5 Pulse +, – para seleccionar el ajuste y pulse
[q OK] para confirmar.
7
183
VQT4J81_RR-XS450_420-E_SP.indd 183
2012/05/29 11:29:40
Situación directa
Selección del modo de grabación
Configuración de la situación directa en OFF
1 Pulse [MENU].
1 Pulse [MENU].
2 Pulse +, – para seleccionar “MIC REC MENU” y
2 Pulse +, – para seleccionar “MIC REC MENU” y
pulse [q OK] para confirmar.
3 Pulse +, – para seleccionar “DIRECT SCENE” y
pulse [q OK] para confirmar.
4 Pulse +, – para seleccionar “SETTING” y pulse
[q OK] para confirmar.
5 Pulse +, – para seleccionar “OFF” y pulse [q OK]
para confirmar.
Para salir de la pantalla de ajustes, pulse [F2 (CLOSE)].
pulse [q OK] para confirmar.
3 Pulse +, – para seleccionar “MIC REC MODE” y
pulse [q OK] para confirmar.
4 Pulse +, – para seleccionar el ajuste (PCM
sampling frequency/MP3 bitrate) y pulse [q OK]
para confirmar.
(El ajuste de fábrica es “MP3 192kbps”.)
Para salir de la pantalla de ajustes, pulse [F2 (CLOSE)].
*Dependiendo del modo de grabación seleccionado, la calidad
del sonido y el tiempo de grabación restante podrá variar.
Formato de
grabación
PCM: 44,1 kHz
Grabación de alta
calidad
MP3: 320 kbps
MP3: 192 kbps
MP3: 128 kbps
MP3: 64 kbps
VQT4J81
MP3: 32 kbps
Grabación larga
*Si el modo de grabación está ajustado a “MP3 32kbps”, la
grabación será monoaural.
8
184
VQT4J81_RR-XS450_420-E_SP.indd 184
2012/05/29 11:29:40
Modificación de la sensibilidad Configuración manual del
del micrófono
nivel de grabación
pulse [q OK] para confirmar.
3 Pulse +, – para seleccionar “MIC SENS.” y pulse
[q OK] para confirmar.
4 Pulse +, – para seleccionar “HIGH” (ALTO) o
“LOW” (BAJO) y pulse [q OK] para confirmar.
(El ajuste de fábrica es “HIGH”.)
Para salir de la pantalla de ajustes, pulse [F2 (CLOSE)].
Reducción del ruido de baja
frecuencia durante la grabación
1 Pulse [MENU].
2 Pulse +, – para seleccionar “MIC REC MENU” y
pulse [q OK] para confirmar.
3 Pulse +, – para seleccionar “LOW CUT FILTER” y
pulse [q OK] para confirmar.
4 Pulse +, – para seleccionar “ON” y pulse [q OK]
para confirmar.
(El ajuste de fábrica es “OFF”.)
Para salir de la pantalla de ajustes, pulse [F2 (CLOSE)].
Establecimiento del ajuste de nivel de
grabación en MANUAL
1 Pulse [MENU].
2 Pulse +, – para seleccionar “MIC REC MENU” y
pulse [q OK] para confirmar.
3 Pulse +, – para seleccionar “REC LEVEL ADJ.” y
pulse [q OK] para confirmar.
4 Pulse +, – para seleccionar “MANUAL” y pulse
[q OK] para confirmar.
Para salir de la pantalla de ajustes, pulse [F2 (CLOSE)].
Ajuste manual del nivel de grabación
1 Pulse y mantenga pulsado [REC *] durante
ESPAÑOL
2 Pulse +, – para seleccionar “MIC REC MENU” y
1 segundo o más.
La unidad pasará al modo de espera de grabación.
2 Oriente el micrófono hacia la fuente de sonido
que se vaya a grabar.
3 Pulse u, i para ajustar el nivel de grabación.
El margen de ajuste es de 0 a 30.
(El ajuste de fábrica es “15”.)
Al pulsar [REC *] se inicia la grabación.
VQT4J81
1 Pulse [MENU].
9
185
VQT4J81_RR-XS450_420-E_SP.indd 185
2012/05/29 11:29:41
Configuración manual del nivel de grabación
Ajuste del limitador de picos
Para salir de la pantalla de ajustes, pulse [F2 (CLOSE)].
El nombre del modo EQ no se visualiza después de salir de la
pantalla de ajustes.
1 Pulse [MENU].
Al pulsar [REC *] se inicia la grabación.
2 Pulse +, – para seleccionar “MIC REC MENU” y
pulse [q OK] para confirmar.
3 Pulse +, – para seleccionar “PEAK LIMITER” y
pulse [q OK] para confirmar.
4 Pulse +, – para seleccionar “ON” y pulse [q OK]
para confirmar.
(El ajuste de fábrica es “OFF”.)
Para salir de la pantalla de ajustes, pulse [F2 (CLOSE)].
Ajuste de la grabación EQ
1 Pulse y mantenga pulsado [REC *] durante
Modo EQ
Efectos y aplicaciones
Este modo (básico) no enfatiza un rango de
sonido específico.
EXTRA BASS Enfatiza fuertemente el rango de los graves.
BASS
Enfatiza ligeramente el rango de los graves.
MIDDLE
Enfatiza el rango medio.
Enfatiza ligeramente el rango de los agudos
BASS&TREBLE
y graves.
TREBLE
Enfatiza ligeramente el rango de los agudos.
EXTRA TREBLE Enfatiza fuertemente el rango de los agudos.
Este modo habilita el ajuste de las bandas de
USER
frecuencia de 150 Hz, 500 Hz, 1 kHz, 4 kHz y 12 kHz.
FLAT
(El ajuste de fábrica es “FLAT”.)
1 segundo o más.
La unidad pasará al modo de espera de grabación.
2 Pulse [MENU].
Temporizador
3 Pulse +, – para seleccionar “REC EQ” y pulse
1 Pulse [MENU].
[q OK] para confirmar.
4 Pulse +, – para seleccionar el modo de grabación EQ.
VQT4J81
Si selecciona cualquier otro modo que no sea “USER”, vaya al paso 5 .
10
2 Pulse +, – para seleccionar “MIC REC MENU” y
pulse [q OK] para confirmar.
Ajuste al seleccionar “USER”:
3 Pulse +, – para seleccionar “SELF TIMER” y pulse
1 Después del paso 4 , pulse [F1 (EDIT)]
2 Pulse u, i para seleccionar la banda de frecuencia que se quiere
4 Pulse +, – para seleccionar la hora y pulse [q OK]
modificar, y pulse +, – para ajustar el nivel de grabación (±12 dB).
3 Una vez que los ajustes para la banda de frecuencia a
cambiar se hayan completado, vaya al paso 5 .
5 Pulse [q OK] para confirmar.
[q OK] para confirmar.
para confirmar.
(El ajuste de fábrica es “OFF”.)
Para salir de la pantalla de ajustes, pulse [F2 (CLOSE)].
186
VQT4J81_RR-XS450_420-E_SP.indd 186
2012/05/29 11:29:41
Prevención de una grabación
innecesaria (VAS)
1 Pulse [MENU].
2 Pulse +, – para seleccionar “MIC REC MENU” y
pulse [q OK] para confirmar.
3 Pulse +, – para seleccionar “VAS” y pulse [q OK]
para confirmar.
4 Pulse +, – para seleccionar “ON” y pulse [q OK]
para confirmar.
(El ajuste de fábrica es “OFF”.)
Para grabar utilizando la función de grabación anterior:
1 Pulse y mantenga pulsado [REC *] durante
1 segundo o más.
La unidad entra en el modo de espera de grabación anterior.
Cambia a 1 seg., 2 seg., 3 seg. y se detiene en 3 seg. Los
datos de audio recogidos por el micrófono en los 3 segundos
anteriores al inicio de la grabación, aproximadamente, se
añaden siempre a ésta y la unidad se mantiene en espera.
2 Pulse [REC *].
El indicador de grabación se enciende y la grabación se inicia,
continuando directamente después de los datos de audio que
se hayan preservado.
Para detener: Pulse [STOP g/RETURN]
Para iniciar la grabación VAS, pulse [REC *].
Ajuste del nivel de funcionamiento VAS:
Pulse u, i durante la grabación VAS.
(El ajuste de fábrica es “3”.)
Función de grabación anterior
(PRE-RECORD)
1 Pulse [MENU].
2 Pulse +, – para seleccionar “MIC REC MENU” y
Grabación mediante la conexión
de un micrófono externo
1 Deslice el interruptor Mic/Line a la posición [MIC].
ESPAÑOL
Para salir de la pantalla de ajustes, pulse [F2 (CLOSE)].
2 Conecte el micrófono externo.
Micrófono externo
(no incluido)
Inserte
firmemente.
pulse [q OK] para confirmar.
4 Pulse +, – para seleccionar “ON” y pulse [q OK]
para confirmar.
(El ajuste de fábrica es “OFF”.)
Para salir de la pantalla de ajustes, pulse [F2 (CLOSE)].
Tipo de clavija:
mini clavija estéreo de ø 3,5 mm
3 Pulse [REC *] para iniciar la grabación.
VQT4J81
pulse [q OK] para confirmar.
3 Pulse +, – para seleccionar “PRE-RECORD” y
11
187
VQT4J81_RR-XS450_420-E_SP.indd 187
2012/05/29 11:29:41
Grabación desde otros dispositivos
11 Inicie la reproducción en el dispositivo externo.
2 Pulse [MENU].
Esta unidad tiene la siguiente función de grabación de sincronización.
3 Pulse +, – para seleccionar “LINE REC” y pulse
[q OK] para confirmar.
4 Pulse +, – para seleccionar “LINE INPUT” y pulse
[q OK] para confirmar.
5 Pulse +, – para seleccionar el ajuste y pulse
[q OK] para confirmar.
Cuando realice la conexión con la terminal de auriculares de un
dispositivo externo o con la terminal de salida de línea de un dispositivo
portátil, seleccione “HIGH” o “LOW” (alto y bajo) respectivamente.
(El ajuste de fábrica es “HIGH”.)
6 Pulse [F2 (CLOSE)].
7 Conecte el dispositivo externo
Conecte con el dispositivo externo y deslice el interruptor Mic/
Line a la posición “LINE”. Aparecerá entonces el ajuste de
entrada de línea seleccionado y el modo de grabación de línea.
8 Pulse y mantenga pulsado [REC *] durante
VQT4J81
1 segundo o más.
La unidad pasará al modo de espera de grabación.
9 Inicie la reproducción del dispositivo externo y
ajuste el nivel de entrada/salida.
”, quiere
1 Si el indicador de nivel se mueve y se muestra “
12
10 Pulse [REC *] para iniciar la grabación.
1 Deslice el interruptor Mic/Line a la posición [LINE].
decir que el volumen del dispositivo externo es demasiado
alto. Ajuste el volumen del dispositivo externo en el margen
“
”, incluso si el volumen está colocado en el máximo.
Para volver a configurar los ajustes de entrada de línea,
pulse [MENU] y siga los pasos 4 a 6 .
2 Una vez que haya terminado de ajustar el nivel de entrada/
salida, detenga la fuente de sonido del otro dispositivo en
la posición en la que desee iniciar la grabación.
Esta función detecta el silencio entre las pistas y luego graba
cada pista en un archivo diferente como, por ejemplo, la primera
pista, la segunda pista, etc. Si se detecta sonido proveniente del
dispositivo externo, la grabación se inicia de forma automática.
Igualmente, si se detecta un silencio durante aproximadamente
2 segundos o más, la grabación se pone en pausa. La grabación
se reanuda cuando se vuelve a detectar sonido.
Ajuste de grabación sinconizada
1 Pulse [MENU].
2 Pulse +, – para seleccionar “LINE REC” y pulse
[q OK] para confirmar.
3 Pulse +, – para seleccionar “SYNCHRO REC” y
pulse [q OK] para confirmar.
4 Pulse +, – para seleccionar “ON (Auto Stop)” o
“ON (Manual Stop)” y pulse [q OK] para confirmar.
Auto: La grabación se pone en pausa si se detecta un silencio
durante aproximadamente 2 segundos o más, y esta se
detiene si el silencio continúa durante aproximadamente
15 segundos o más.
Manual: Incluso si el silencio continua, la grabación continuará
pausada (modo de espera) hasta que se pulse
[STOP g/RETURN].
(El ajuste de fábrica es “OFF”.)
Para salir de la pantalla de ajustes, pulse [F2 (CLOSE)].
Grabación sincronizada:
1 Realice los pasos del 1 al 11 (➜ izquierda).
188
VQT4J81_RR-XS450_420-E_SP.indd 188
2012/05/29 11:29:41
1 Pulse [MENU].
Modificación de la velocidad
de reproducción
2 Pulse +, – para seleccionar “LINE REC” y pulse
1 Pulse [F1 (SPEED)] durante la reproducción.
[q OK] para confirmar.
3 Pulse +, – para seleccionar “LINE REC MODE” y
pulse [q OK] para confirmar.
4 Pulse +, – para seleccionar el ajuste (PCM
sampling frequency/MP3 bitrate) y pulse [q OK]
para confirmar.
(El ajuste de fábrica es “MP3 192kbps”.)
Para salir de la pantalla de ajustes, pulse [F2 (CLOSE)].
Función Índice
2 Pulse [F1 (SLOW)] o [F2 (FAST)] para seleccionar
la velocidad y pulse [q OK] para confirmar.
Velocidad de reproducción:
La velocidad de reproducción puede ajustarse en pasos de 10 %
para velocidades más rápidas que la normal (100 %), y en pasos
de 5 % en velocidades más lentas que la normal.
Indicación del estado durante la grabación:
La reproducción a velocidad normal, reproducción rápida
y reproducción lenta se muestran como “ ”, “ ” y “ ”
respectivamente.
Añadir Índices
Reproducción de repetición A-B
1 Durante la grabación o reproducción o si la
1 Pulse [ERASE/A-B&] durante la reproducción.
Se muestra “ ” (parpadeando) y “ADDING INDEX”.
Se muestra “ ” (encendido) para el archivo al que se le han
añadido marcas de índice.
Eliminación de índices
1 Pulse [ERASE/A-B&].
2 Pulse +, – para seleccionar “INDEX” y pulse
[q OK] para confirmar.
3 Pulse +, – para seleccionar “YES” y pulse [q OK]
para confirmar.
Se establece el punto de inicio (A) y se muestran “
(iluminado) y “ ” (parpadeando).
”
2 Pulse [ERASE/A-B&] en el punto final (B).
La pantalla cambia a “
reproducción de repetición.
” (iluminado) y comienza la
Cancelación de la repetición A-B:
Pulse [ERASE/A-B&], u, i o [STOP g/RETURN].
VQT4J81
grabación está en pausa, pulse [F2 (INDEX)] en la
posición en la que desea añadir una marca de índice.
ESPAÑOL
Selección del modo de grabación de línea
13
189
VQT4J81_RR-XS450_420-E_SP.indd 189
2012/05/29 11:29:42
Reproducción desde una posición
específica (TIME SEARCH)
Para salir de la pantalla de ajustes, pulse [F2 (CLOSE)].
2 Pulse +, – para seleccionar “PLAY MENU” y pulse
Reproducción de repetición
(REPEAT)
3 Pulse +, – para seleccionar “TIME SEARCH” y
1 Pulse [MENU].
1 Pulse [MENU].
(Cuando la reproducción esté en curso, acuda al paso 3 .)
[q OK] para confirmar.
pulse [q OK] para confirmar.
4 Establezca la posición de inicio de la reproducción.
(Para ajustar la posición de inicio, cambie el valor de “TIME”.)
Pulse u, i para seleccionar “00:00:00” (hora:minuto:
segundo) y pulse +, – para cambiar los valores.
5 Pulse [q OK].
La reproducción comenzará desde la posición especificada.
Pulse [F2 (CLOSE)] para detener el ajuste a mitad del proceso.
(Cuando la reproducción esté en curso, acuda al paso 3 .)
2 Pulse +, – para seleccionar “PLAY MENU” y pulse
[q OK] para confirmar.
3 Pulse +, – para seleccionar “REPEAT” y pulse
[q OK] para confirmar.
4 Pulse +, – para seleccionar el tipo de reproducción
de repetición y pulse [q OK] para confirmar.
(El ajuste de fábrica es “OFF”.)
Para salir de la pantalla de ajustes, pulse [F2 (CLOSE)].
Reproducción con ligero retroceso
1 Pulse [q OK] durante la reproducción.
Cada vez que se pulsa el botón, la reproducción se rebobina
unos 3 segundos (ajuste de fábrica).
Establecimiento del tiempo de retroceso:
1 Pulse [MENU].
(Cuando la reproducción esté en curso, acuda al paso 3 .)
VQT4J81
2 Pulse +, – para seleccionar “PLAY MENU” y pulse
14
[q OK] para confirmar.
3 Pulse +, – para seleccionar “SLIGHT RETURN” y
pulse [q OK] para confirmar.
4 Pulse +, – para seleccionar el número de
segundos (1 a 5) y pulse [q OK] para confirmar.
(El ajuste de fábrica es “3 sec”.)
190
VQT4J81_RR-XS450_420-E_SP.indd 190
OFF: La reproducción es realizada en sucesión desde el
archivo seleccionado hasta el último archivo de la carpeta y
luego se detiene.
ONE: Reproduce un archivo repetidamente.
FOLDER REPEAT: Reproduce todos los archivos de la
carpeta repetidamente.
FOLDER RANDOM: Reproduce todos los archivos de la
carpeta en orden aleatorio.
ALL REPEAT: Para la carpeta MUSIC (M) o la carpeta
OTHER FOLDER (
), se reproducirán repetidamente todos
los archivos de la carpeta. Para otras carpetas, la operación
es la misma que “FOLDER REPEAT”.
ALL RANDOM: Para la carpeta MUSIC (M) o la carpeta
OTHER FOLDER (
), se reproducirán repetidamente todos
los archivos de la carpeta, en orden aleatorio. Para otras
carpetas, la operación es la misma que “FOLDER RANDOM”.
El número máximo de archivos que se reconocen es 3.000
2012/05/29 11:29:42
Saltos a intervalos regulares
(TIME SKIP)
Imitación
Configuración de la imitación:
1 Pulse [MENU].
Saltos a intervalos regulares
(Cuando la reproducción esté en curso, acuda al paso 3 .)
1 Pulse [q OK] durante 1 segundo aproximadamente
o más durante la reproducción.
2 Pulse +, – para seleccionar “PLAY MENU” y pulse
2 Pulse u, i.
4 Pulse +, – para seleccionar el tipo de imitación y
”.
Cada vez que se pulsa el botón, se realizará un salto de
5 segundos (ajuste de fábrica).
Para cambiar el intervalo de salto
1 Pulse [MENU].
(Cuando la reproducción esté en curso, acuda al paso 3 .)
2 Pulse +, – para seleccionar “PLAY MENU” y pulse
[q OK] para confirmar.
3 Pulse +, – para seleccionar “TIME SKIP” y pulse
[q OK] para confirmar.
3 Pulse +, – para seleccionar “SHADOWING” y pulse
[q OK] para confirmar.
pulse [q OK] para confirmar.
Si selecciona “ON (small volume)”, el volumen durante la
imitación será de aproximadamente un tercio del volumen actual.
(El ajuste de fábrica es “OFF”.)
Para salir de la pantalla de ajustes, pulse [F2 (CLOSE)].
ESPAÑOL
El modo cambia a modo de tiempo de salto y se muestra “
El modo de salto cambia cada vez que se pulsa el botón.
[q OK] para confirmar.
4 Pulse +, – para seleccionar la hora y pulse [q OK]
para confirmar.
Puede establecer el intervalo de salto a 5 seg., 10 seg.,
30 seg., 1 min., 5 min., 10 min., o 15 min.
(El ajuste de fábrica es “5sec”.)
VQT4J81
Para salir de la pantalla de ajustes, pulse [F2 (CLOSE)].
15
191
VQT4J81_RR-XS450_420-E_SP.indd 191
2012/05/29 11:29:42
Imitación
Uso de la función de imitación:
1 Lleve a cabo la reproducción de la repetición A-B.
(➜ página 13)
La imitación se lleva a cabo sin sonido o con un volumen bajo
tras la reproducción de la repetición A-B.
Cómo hacer que el sonido se
oiga mejor (VOICE EMPHASIS)
1 Pulse [MENU].
(Cuando la reproducción esté en curso, acuda al paso 3 .)
2 Pulse +, – para seleccionar “PLAY MENU” y pulse
[q OK] para confirmar.
Ajuste del volumen para la imitación:
Se puede ajustar el volumen solo del fragmento para la imitación,
de forma separada del fragmento de reproducción de la repetición
A-B.
• Si se cancela la repetición A-B o se modifica la configuración de
la imitación durante la reproducción, el volumen del fragmento
para la imitación volverá a su ajuste original.
3 Pulse +, – para seleccionar “VOICE EMPHASIS” y
pulse [q OK] para confirmar.
4 Pulse +, – para seleccionar el tipo de voz
resaltada y pulse [q OK] para confirmar.
(El ajuste de fábrica es “NORMAL”.)
Para salir de la pantalla de ajustes, pulse [F2 (CLOSE)].
VQT4J81
NORMAL: El sonido se reproduce tal como se grabó.
NOISE CXL L: Se lleva a cabo una pequeña reducción de
ruido.
NOISE CXL H: Se lleva a cabo una gran reducción de ruido.
FOCUS FRONT: Se resalta el sonido situado al frente.
FOCUS LEFT: Se resalta el sonido situado a la izquierda.
FOCUS RIGHT: Se resalta el sonido situado a la derecha.
16
192
VQT4J81_RR-XS450_420-E_SP.indd 192
2012/05/29 11:29:42
Ajuste de la ecualización de
reproducción (SOUND EQ)
Modo EQ
FLAT
Efectos y aplicaciones
La función del ecualizador de sonidos no está en uso.
Escuchará el sonido original sin cambio alguno.
1 Pulse [MENU].
BASS
Enfatiza fuertemente el rango de los graves.
(Cuando la reproducción esté en curso, acuda al paso 3 .)
CLEAR
Enfatiza fuertemente el rango de los agudos.
2 Pulse +, – para seleccionar “PLAY MENU” y pulse
HEAVY
Enfatiza ligeramente el rango de los agudos y graves.
SOFT
Enfatiza el rango medio.
Si selecciona cualquier otro modo que no sea “USER”, vaya
al paso 5 .
Ajuste al seleccionar “USER”:
1 Después del paso 4 , pulse [F1 (EDIT)].
2 Pulse u, i para seleccionar la banda de frecuencia
que se vaya a modificar, y pulse +, – para ajustar el nivel de
volumen (±6 dB).
3 Una vez que los ajustes para la banda de frecuencia a
cambiar se hayan completado, vaya al paso 5 .
5 Pulse [q OK] para confirmar.
VOICE
Reduce el ruido para que las voces sean más audibles.
USER
Este modo habilita el ajuste de las bandas de
frecuencia de 150 Hz, 500 Hz, 1 kHz, 4 kHz y 12 kHz.
(El ajuste de fábrica es “FLAT”.)
ESPAÑOL
[q OK] para confirmar.
3 Pulse +, – para seleccionar “SOUND EQ” y pulse
[q OK] para confirmar.
4 Pulse +, – para seleccionar el modo EQ.
VQT4J81
Para salir de la pantalla de ajustes, pulse [F2 (CLOSE)].
17
193
VQT4J81_RR-XS450_420-E_SP.indd 193
2012/05/29 11:29:42
Uso de una tarjeta SD
Montaje de la tarjeta SD
Uso de la función de de
búsqueda de archivos
1 Desconecte la alimentación y abra la cubierta de
g Tipos de búsqueda de archivos
la ranura de la batería/tarjeta SD.
2 Introduzca la tarjeta SD y cierre la cubierta de la
ranura de la batería/tarjeta SD.
Alinee la tarjeta SD en la dirección correcta ( ) e introdúzcala
completamente hasta que oiga el sonido “clic”.
Para retirar la tarjeta SD:
1 Desconecte la alimentación y abra la cubierta de la ranura de
la batería/tarjeta SD.
VQT4J81
2 Empuje la tarjeta SD con suavidad.
3 Cuando la tarjeta SD sobresalga ligeramente, sáquela despacio.
*Puede alternar entre la memoria interna y la tarjeta SD
pulsando [F2 (FOLDER)] durante algo más de 1 segundo
cuando se muestra la pantalla de detención.
*Esta unidad es compatible con tarjetas de 2 GB microSD, y
tarjetas microSDHC de 4 GB a 32 GB (Desde mayo de 2012)
*Esta unidad puede no funcionar correctamente, dependiendo
del fabricante o tipo de tarjeta SD.
*Si desea información detallada sobre las tarjetas cuyo correcto
funcionamiento de acuerdo a nuestros estándares de fabricación
está confirmado, acuda a la página de inicio de asistencia a
continuación.
http://panasonic.net/support/
*Si una tarjeta SD está conectada pero no aparece “microSD”
en la pantalla SELECT FOLDER, etc. esta unidad no reconoce
la tarjeta SD.
*Mantenga la tarjeta de memoria fuera del alcance de los niños
para evitar que se la traguen.
18
CALENDAR SRCH Los archivos grabados se refinan por fecha
y se muestran en una lista.
DAY OF WEEK
Los archivos grabados se refinan por día de
la semana y se muestran en una lista.
RECENT R. FILE
Los archivos grabados se muestran en
orden de fecha de grabación, empezando
por la fecha más reciente. (20 archivos)
Búsqueda de archivos
1 Pulse [LIST ] durante 1 segundo
aproximadamente o más.
Vaya al paso 2 si ha introducido una tarjeta SD, o al paso 3
en caso conatrario.
2 Pulse +, – para seleccionar “INT. MEMORY” (memoria
interna) o “microSD CARD” y pulse [F1 (SEARCH)].
3 Pulse +, – para seleccionar el tipo de búsqueda
de archivo y pulse [q OK] para confirmar.
“ ” (memoria interna) o “
destino para la búsqueda.
” (tarjeta SD) se muestran como
Cuando se selecciona “CALENDAR SRCH”:
Pulse +, –, u, i para seleccionar la fecha de grabación y
pulse [q OK] para confirmar.
Cuando se selecciona “DAY OF WEEK”:
Pulse +, – para seleccionar el día de la semana y pulse
[q OK] para confirmar.
Solo se puede seleccionar un día de la semana.
4 Pulse +, – para seleccionar el archivo y pulse
[q OK] para confirmar.
194
VQT4J81_RR-XS450_420-E_SP.indd 194
2012/05/29 11:29:42
Escuchar música en esta unidad
(archivos de música WMA/MP3)
Uso de la función de lista de reproducción
Seleccionar un archivo de la carpeta “M”:
1 Seleccione el archivo y pulse [q OK].
1 Seleccione la carpeta MUSIC (M) en la pantalla de
).
”.
El ajuste puede cancelarse utilizando cualquiera de los siguientes
métodos.
• Pulse [F2 ( CUE)] de nuevo. Cuando esto se cancela, los
archivos se pueden omitir utilizando u, i.
• Pulse [q OK].
• Pulse [STOP g/RETURN]. (Reproducción terminada.)
Cuando esté realizando una selección de carpetas o de archivos cambiando
de carpetas, pulse u y podrá moverse dentro de las jerarquías. (Para
detalles sobre la selección de archivos y carpetas, acuda a la página 4.)
3 Pulse u, i para seleccionar la lista de reproducción y
pulse [q OK] para confirmar. (Seleccione en PLAYLIST 1 a 5.)
• El archivo o todos los archivos dentro de la carpeta se
registran en la lista de reproducción seleccionada.
Reproducción de pistas registradas en la lista de reproducción
1 Seleccione la lista de reproducción (de P1 a P5)
(➜ página 4).
ESPAÑOL
Se muestra “FOLDER SKIP” que cambia a la pantalla de
referencia de carpeta “ ”.
Cancelación de la referencia de carpeta:
También se puede seleccionar OTHER FOLDER (
y pulse [F1 (PLAYLIST)] para confirmar.
CUE)] durante la reproducción.
2 Pulse u, i cuando se muestre “
lista (➜ página 4).
2 Pulse +, – para seleccionar el archivo o la carpeta
Función de referencia de carpeta
1 Pulse [F2 (
Registro de sus pistas favoritas en una lista de reproducción
2 Pulse u, i para seleccionar el archivo y luego pulse [q OK].
Cambio del orden de las pistas de una lista de reproducción
1 Seleccione la lista de reproducción (desde P1 a P5)
en la pantalla de lista (➜ página 4).
2 Pulse +, – para seleccionar el archivo que desee
pulse [q OK] para confirmar.
“
” se añade a la izquierda del nombre del archivo seleccionado.
4 Pulse +, – para mover el archivo seleccionado a la
posición deseada y pulse [q OK] para confirmar.
• El orden de las pistas se ha cambiado.
VQT4J81_RR-XS450_420-E_SP.indd 195
VQT4J81
cambiar y pulse [F1 (EDIT)].
3 Pulse +, – para seleccionar “CHANGE ORDER” y
19
195
2012/05/29 11:29:42
Uso de la función de lista de reproducción
Cancelación de pistas registradas en la lista
de reproducción
1 Seleccione la lista de reproducción (desde P1 a P5)
en la pantalla de lista (➜ página 4).
2 Pulse +, – para seleccionar el archivo que desee
eliminar y pulse [F1 (EDIT)].
3 Pulse +, – para seleccionar “ERASE FILE” y pulse
[q OK] para confirmar.
Cuando se vayan a cancelar todas las pistas
registradas:
1 Pulse +, – para seleccionar “ERASE ALL” y pulse [q OK]
para confirmar.
4 Pulse +, – para seleccionar “YES” y pulse [q OK]
para confirmar.
División de archivos
1 Durante la reproducción, pulse [STOP g/RETURN]
en el punto en el que desea dividir el archivo.
2 Seleccione “DIVIDE” en la pantalla de ajustes de
edición (➜ izquierda).
3 Pulse +, – para seleccionar “YES” y pulse [q OK]
para confirmar.
Mientras el archivo está siendo dividido, el indicador de estado
parpadeará.
Edición: Combinación de archivos
1 Seleccione “COMBINE” en la pantalla de ajustes
de edición (➜ izquierda).
2 Pulse +, – para seleccionar “PREVIOUS FILE” y
pulse [q OK] para confirmar.
3 Pulse +, – para seleccionar el archivo que se va a
combinar y pulse [q OK] para confirmar.
Edición: División de archivos
Visualización de la pantalla de ajustes de edición
4 Pulse +, – para seleccionar “NEXT FILE” y pulse
1 Pulse [MENU].
5 Pulse +, – para seleccionar el archivo que se va a
VQT4J81
2 Pulse +, – para seleccionar “EDIT MENU” y pulse
20
Cuando seleccione un archivo de otra carpeta, puede moverse
dentro de las jerarquías pulsando u. (Para detalles sobre la
selección de archivos y carpetas, acuda a la página 4.)
[q OK] para confirmar.
3 Pulse +, – para seleccionar el elemento que desea
editar y pulse [q OK].
• Pulse [F1 (TAB)] para cambiar a otras pantallas de ajuste.
• Los detalles de ajuste y los métodos de cambio, difieren
dependiendo del elemento. Para una información más
detallada, acuda a la página correspondiente.
Para salir de la pantalla de ajustes, pulse [F2 (CLOSE)].
[q OK] para confirmar.
combinar en la parte posterior del archivo anterior
y pulse [q OK] para confirmar.
6 Pulse +, – para seleccionar “NEXT” y pulse [q OK]
para confirmar.
7 Pulse +, – para seleccionar “YES” y pulse [q OK]
para confirmar.
Mientras los archivos están siendo combinados, el indicador
de estado parpadeará.
• Si pulsa [F2 (CLOSE)] antes de que haya concluido la
combinación, el proceso de combinación se cancela.
196
VQT4J81_RR-XS450_420-E_SP.indd 196
2012/05/29 11:29:43
Copia de archivo
1 Seleccione “COPY” en la pantalla de ajustes de
edición (➜ página 20).
2 Pulse +, – para seleccionar el archivo que se va a
copiar y pulse [q OK] para confirmar.
• Cuando seleccione un archivo de otra carpeta, puede moverse
dentro de las jerarquías pulsando u. (Para detalles sobre la
selección de archivos y carpetas, acuda a la página 4.)
• Cuando esté copiando archivos en la carpeta LINE
(LINE_SD), acuda al paso 5 .
3 Pulse +, – para seleccionar el destino de la copia
(“INTERNAL MEMORY” o “microSD CARD”) y
luego pulse [q OK] para confirmar.
4 Pulse +, – para seleccionar la carpeta de destino
de la copia y pulse [q OK] para confirmar.
5 Pulse +, – para seleccionar “YES” y pulse [q OK]
para confirmar.
Mientras el archivo está siendo copiado, el indicador de estado
parpadeará.
Función de papelera de
reciclaje
Devolución de archivos dentro de la papelera
de reciclaje a la carpeta original
1 Pulse [F2 (FOLDER)].
2 Pulse +, –, u, i para seleccionar “ ” y pulse
[q OK] para confirmar.
Las carpetas de papelera de reciclaje existen en la memoria
interna y en la tarjeta SD.
3 Utilice u, i para seleccionar el archivo que
desea devolver, y pulse [ERASE/A-B&] para
confirmar.
4 Pulse +, – para seleccionar “RESTORE FILE” y
pulse [q OK] para confirmar.
5 Pulse +, – para seleccionar “YES” y pulse [q OK]
para confirmar.
ESPAÑOL
Edición: Copia o movimiento
de archivos
El indicador de estado parpadea y el archivo seleccionado
vuelve al final de la carpeta original.
Pulse [q OK] para volver a la pantalla en el paso 3 .
Movimiento de archivos
VQT4J81
Seleccione “MOVE” en paso 1 a la izquierda para mover los
archivos. La operación es la misma que para copiar un archivo.
21
197
VQT4J81_RR-XS450_420-E_SP.indd 197
2012/05/29 11:29:43
Función de papelera de reciclaje
Vaciado de la carpeta de la papelera de
reciclaje
1 Pulse [ERASE/A-B&].
2 Pulse +, – para seleccionar “EMPTY RECYCLE
BIN” y pulse [q OK] para confirmar.
Cuando se selecciona la carpeta de la papelera de reciclaje,
seleccione “EMPTY” en paso 2 y pulse [q OK].
3 Pulse +, – para seleccionar “YES” y pulse [q OK]
para confirmar.
El indicador de estado parpadea y la papelera de reciclaje se
vacía.
Uso del temporizador
1 Pulse [MENU].
2 Pulse +, – para seleccionar “COMMON MENU” y
pulse [q OK] para confirmar.
3 Pulse +, – para seleccionar “TIMER & ALARM” y
pulse [q OK] para confirmar.
4 Establezca los valores de los ajustes como fecha
y hora y fuente de sonido.
1 Pulse +, – para seleccionar el elemento y pulse [q OK] para
confirmar.
2 Pulse +, –, u, i para seleccionar el ajuste y pulse
[q OK] para confirmar.
Repita los pasos 1 y 2 para completar los ajustes.
5 Pulse +, – para seleccionar “OK” y pulse [q OK]
para confirmar.
Para salir de la pantalla de ajustes, pulse [F2 (CLOSE)].
VQT4J81
Ajuste
Detalles
SETTING
OFF: El temporizador no funciona.
ON: El temporizador funciona.
REPEAT
ONCE: La grabación o reproducción se realiza en
una sola ocasión.
DAILY: La grabación o reproducción se realiza a diario.
SELECT: La grabación o reproducción se realiza
todas las semanas el mismo día seleccionado.
1 Pulse +, – para seleccionar el día y utilice [q OK]
para agregar una marca de comprobación. (Pulse
[q OK] de nuevo para eliminar la selección.)
2 Cuando se haya seleccionado el día,
seleccione “OK” y pulse [q OK].
22
198
VQT4J81_RR-XS450_420-E_SP.indd 198
2012/05/29 11:29:43
PLAY
PLAY: Reproduce un archivo establecido o el
sonido de la alarma.
REC: Graba la fuente de sonido establecida.
ALARM: Reproduce el sonido de la alarma.
FILE: Reproduce un archivo.
Se muestra la lista de archivos de la carpeta seleccionada.
Pulse +, – para seleccionar el archivo y pulse [q OK].
Cuando esté realizando la selección de archivos
cambiando de carpetas, pulse u y podrá moverse
dentro de las jerarquías. (Para detalles sobre la
selección de archivos y carpetas, acuda a la página 4.)
SOURCE
MIC: Grabación a través de micrófono.
LINE: Graba sonido desde un dispositivo externo.
MODE
PCM 44,1 kHz, MP3 320 kbps,
MP3 192 kbps, MP3 128 kbps, MP3 64 kbps,
MP3 32 kbps
REC TO
Seleccione la carpeta en la que va a guardar el
archivo grabado.
• Si selecciona una carpeta de tarjeta SD,
introduzca la tarjeta SD.
Menú común
Operación de ajustes comunes
1 Pulse [MENU].
2 Pulse +, – para seleccionar “COMMON MENU” y
pulse [q OK] para confirmar.
3 Pulse +, – para seleccionar el ajuste y pulse
[q OK] para confirmar.
4 Pulse +, – para cambiar el ajuste y pulse [q OK]
para confirmar.
Para salir de la pantalla de ajustes, pulse [F2 (CLOSE)].
Para más detalles sobre “DATE & TIME” (➜ página 3) y
“TIMER & ALARM” (➜ página 22), acuda a las páginas
respectivas.
BEEP SOUND (Pitido de operación)
Se puede ajustar el sonido de operación del botón.
OFF: Sin pitido de operación.
ON: Pitido de operación activado.
(El ajuste de fábrica es “ON”.)
ESPAÑOL
REC/PLAY
Detalles
Establezca la hora de inicio y de finalización
Seleccione el ajuste (seleccione la hora y los
minutos para el inicio, y la hora y los minutos para
la finalización) utilizando u, i y establezca los
valores utilizando +, –.
• Se puede establecer un periodo de hasta 12
horas desde la hora de inicio a la hora de
finalización.
REC LED (Indicador de grabación)
Puede elegir establecer la luz indicadora de grabación en ON u
OFF.
OFF: Sin luz
ON: Con luz
(El ajuste de fábrica es “ON”.)
VQT4J81
Ajuste
TIME
23
199
VQT4J81_RR-XS450_420-E_SP.indd 199
2012/05/29 11:29:43
Menú común
BATT. SETTING (Tipo de Batería)
Establezca el tipo de pilas a utilizar (pilas de hidruro metálico de
níquel recargables o pilas alcalinas).
Tipo de pila: RECHARGEABLE, ALKALINE
(El ajuste de fábrica es “RECHARGEABLE”.)
AUTO POWER OFF (Apagado Automático)
Esta función desconecta automáticamente la alimentación si no
se realiza ninguna operación durante un cierto período de tiempo
como por ejemplo cuando la grabación está detenida. Esta función
le ayudará a ahorrar energía si olvida desconectar la alimentación.
AUTO POWER OFF: 0 min. (OFF) a 15min.
(El ajuste de fábrica es “15 min”.)
BACKLIGHT (Luz de Fondo)
Establezca el tiempo de luz de retroiluminación cuando se pulsa
el botón.
Tiempo de iluminación: OFF (no se enciende), 5 seg., 15 seg.,
siempre encendida
(El ajuste de fábrica es “15 sec”.)
CONTRAST (Contraste)
FORMAT (Formateo)
Se borran todos los archivos en la memoria interna o en la tarjeta
SD. Los archivos borrados no se pueden recuperar.
1 Seleccione “INTERNAL MEMORY” o “microSD CARD” y pulse
[q OK] para confirmar.
2 Seleccione “YES” y pulse [q OK] para confirmar.
INIT MENU (Inicialización)
Si ha inicializado los ajustes de esta unidad, se restaurarán al
modo predeterminado todos los ajustes exceptuando “DATE &
TIME” .
Seleccione “YES”, pulse [q OK] para confirmar y los ajustes se
inicializarán.
VERSION
Puede comprobar la versión de firmware de esta unidad.
VQT4J81
Utilice esta función para ajustar el contraste de la pantalla. Podrá
elegir entre 10 niveles para el ajuste.
Ajuste del contraste: 1 (L) a 10 (H)
(El ajuste de fábrica es “5”.)
RECYCLE BIN (Papelera de Reciclaje)
Cuando se utiliza la función de papelera de reciclaje, los archivos
eliminados se mueven a la papelera de reciclaje. Antes de
vaciar la papelera de reciclaje, se pueden restaurar los archivos
eliminados, por ello no tiene que preocuparse por archivos que
pueda eliminar por error.
OFF: No utilizar la función de papelera de reciclaje
ON: Utilizar la función de papelera de reciclaje
(El ajuste de fábrica es “ON”.)
24
200
VQT4J81_RR-XS450_420-E_SP.indd 200
2012/05/29 11:29:43
Requisitos del sistema
(Desde mayo de 2012)
Sistema
operativo
Interfaz
Equipos compatibles IBM PC/AT, Macintosh
• Microsoft® Windows® XP Home Edition/Professional y Service Pack 2, Service Pack 3
• Microsoft® Windows Vista® Home Basic/Home Premium/Business/Ultimate y Service
Pack 1, Service Pack 2
• Microsoft® Windows® 7 Starter/Home Basic/Home Premium/Professional/Ultimate y
Service Pack 1
• SO Mac X 10.2.8 a 10.7
Puerto USB (no se puede garantizar el funcionamiento si se usa un concentrador USB.)
• Versión preinstalada
Memoria interna
4 GB (RR-XS450), 2 GB (RR-XS420)
La capacidad utilizable será inferior.
VQT4J81
✽ Aunque se cumplan los requerimientos del sistema mencionados en este manual, algunos ordenadores personales no se podrán
utilizar.
✽ (Macintosh) Este software funciona en la unidad estándar del SO.
✽ El funcionamiento sólo se garantiza con un sistema operativo compatible.
✽ No se garantiza el funcionamiento en un sistema operativo actualizado.
✽ No se garantiza el funcionamiento en ordenadores de fabricación casera.
✽ Cuando utilice Windows Media® Player, su ordenador deberá cumplir con los requisitos del sistema de Windows Media® Player. Para
más detalles sobre Windows Media® Player acuda a Microsoft Corporation.
✽ Microsoft, Windows, Windows Media y Windows Vista son marcas registradas o marcas comerciales de Microsoft Corporation en
Estados Unidos y otros países.
✽ Tecnología de decodificación de audio MPEG Layer-3 de Fraunhofer IIS y Thomson.
✽ IBM y PC/AT son marcas registradas de International Business Machines Corporation de Estados Unidos.
✽ Macintosh y Mac OS son marcas comerciales de Apple Inc.
✽ Otros nombres de sistemas y nombres de productos que aparecen en este documento son en general marcas registradas o marcas
comerciales de las empresas desarrolladoras respectivas. Tenga en cuenta que los símbolos ™ y ® no aparecen en este documento.
✽ Según el entorno del ordenador, pueden producirse fallos de funcionamiento (por ejemplo, no pueden utilizarse los datos de audio
grabados en esta unidad. etc.). Panasonic y los distribuidores de Panasonic no se responsabilizan de ninguna pérdida de datos de
audio u otros daños directos o indirectos excepto en casos de negligencia intencional o grave.
ESPAÑOL
Ordenador
25
201
VQT4J81_RR-XS450_420-E_SP.indd 201
2012/05/29 11:29:43
Conexión de esta unidad a un
ordenador
1 Saque la clavija USB de la unidad.
2 Conecte la unidad a un ordenador utilizando el
puerto USB.
Si la unidad no puede conectarse directamente al ordenador,
utilice el cable alargador de USB (incluido).
*No use cables alargadores de USB distintos del suministrado.
No utilice el cable suministrado con otros dispositivos.
VQT4J81
Precaución: Utilice exclusivamente el cable alargador de USB
incluido, de núcleo de ferrita, cuando se conecte al ordenador.
26
*La primera vez que conecte la unidad a su PC
Aparecerán varios mensajes “Nuevo dispositivo encontrado”,
no desconecte la unidad del ordenador hasta que todos los
mensajes desaparezcan.
*Esta unidad no se puede usar mientras está conectada al
ordenador.
*Cuando está conectada al ordenador, la unidad puede funcionar
sin pila porque utiliza la alimentación suministrada por el
ordenador.
*Cuando la unidad esté conectada al ordenador, éste puede que
no se inicie (reinicie). Se recomienda retirar la conexión de la
unidad con el ordenador cuando se inicie (reinicie) este último.
*El funcionamiento no se garantiza en los casos siguientes.
• Cuando dos o más dispositivos USB están conectados al
ordenador
(excluyendo el ratón y el teclado en normal funcionamiento)
• Cuando se usa un concentrador USB
• Cuando se utiliza un cable alargador de USB que no sea el
incluido.
*Cuando la unidad se conecta al ordenador, si usted inicia
(reinicia) el ordenador o éste entra en el modo de espera, el
ordenador puede no reconocer la unidad. Desconecte la unidad
y vuelva a conectarla al ordenador o vuelva a conectar la unidad
después de reiniciar el ordenador.
*Consulte las instrucciones de funcionamiento del ordenador.
g Desconexión de la unidad
Haga doble clic en el icono (Windows XP: [ ], Windows Vista/
Windows 7: [ ]) en la bandeja de tareas en la parte inferior de la
pantalla del ordenador y siga las instrucciones en pantalla sobre
cómo retirar la unidad. (Es posible que el icono no se muestre,
dependiendo de la configuración del sistema operativo.) La unidad
se apaga después de retirarla. Cuando esta unidad se enciende
después de haber eliminado de ella archivos, etc. a través del
ordenador, se mostrará el mensaje “UPDATING FILE NAME”. La
actualización puede tardar varios minutos en completarse.
g Función de almacenamiento masivo USB
Esta unidad funciona como memoria USB y es reconocida como
dispositivo de almacenamiento externo del ordenador.
Los archivos de datos del ordenador pueden transferirse y
guardarse en esta unidad.
202
VQT4J81_RR-XS450_420-E_SP.indd 202
2012/05/29 11:29:43
Limpie esta unidad con un trapo seco y suave.
• Si la unidad está demasiado sucia, humedezca un trapo en
agua, limpie la suciedad con ese trapo y luego con un trapo
seco.
• No utilice disolventes incluyendo bencina, diluyentes, alcohol,
detergentes de cocina, limpiadores químicos etc, podrían
causar la deformación de la carcasa exterior o el deterioro del
revestimiento.
El símbolo microSDHC es una marca comercial de SD-3C, LLC.
Este producto está protegido por ciertos derechos de propiedad
intelectual de Microsoft Corporation y de terceros. Está
prohibido el uso o distribución de dicha tecnología fuera de
este producto, sin una licencia de Microsoft o de una empresa
subsidiaria autorizada por Microsoft y de terceros.
Este producto puede tener interferencias causadas por
teléfonos móviles durante su utilización. Si tales interferencias
resultan evidentes, aumente la separación entre el producto y
el teléfono móvil.
Mantenga las pilas AAA LR03 y las pilas recargables fuera del
alcance de los niños pequeños, para evitar que las ingieran.
CUIDADO
• Existe peligro de explosión si la batería se reemplaza mal.
Reemplácela por otra del tipo recomendado por el fabricante.
• Cuando se deshaga de las baterías, póngase en contacto
con las autoridades de su localidad o con su concesionario y
pregunte por el método correcto para deshacerse de ellas.
• No las caliente ni las exponga a las llamas.
• No deje la pila en un vehículo expuestas a la luz solar directa
durante un periodo prolongado de tiempo con las puertas y
ventanas cerradas.
VQT4J81
Asegúrese de utilizar los auriculares o audífonos recomendados
o suministrados.
Basado en EN 50332-2:2003
1) Máximo voltaje de salida (salida de auriculares) : 150mV
2) Voltaje característico de banda ancha (auriculares): 75mV
ESPAÑOL
Mantenimiento
27
203
VQT4J81_RR-XS450_420-E_SP.indd 203
2012/05/29 11:29:44
VQT4J81_RR-XS450_420-E_SP.indd 204
800-PANA (800-7262)
01-8000-94PANA (01-8000-947262)
1800-PANASONIC (1800-726276)
800-PANA737 (800-7262737)
800-PANA (800-7262)
1-801-811-PANA (1-801-811-7262)
800-390-602
Desde teléfono Celular: 797-5000
800-PANA-800 (800-7262-800)
0-800-PANA (0-800-7262)
0800-00726
0800-333-PANA (0800-333-7262)
0810-321-PANA (0810-321-7262)
01800-VIP-PANA (01800-847-7262) - Interior
(55) 5000-1200 - México D.F. y Area Metropolitana
O a través de los siguientes números telefónicos:
email: [email protected]
Para obtener información en la República de México contáctenos a través de:
Servicio en México
Venezuela
Uruguay
Perú
Argentina
Panamá
Colombia
Ecuador
Costa Rica
El Salvador
Guatemala
Chile
Además puede contactarnos directamente a través de nuestro Contact Center:
http://www.lar.panasonic.com
Obtenga información de productos y asistencia operativa; localice el distribuidor o
Centro de Servicio más cercano; compre repuestos y accesorios a través de nuestro
Sitio Web para América Latina:
Directorio de Atención al Cliente
Atención al Cliente
Información Útil
VQT4J81
Solo para los países de América Latina
28
204
2012/05/29 11:29:44
Información para Usuarios sobre la recolección y eliminación de aparatos viejos y baterías usadas
Estos símbolos en los productos, embalajes y/o documentos adjuntos, significan que los aparatos
eléctricos y electrónicos y las baterías no deberían ser mezclados con los desechos domésticos.
Para el tratamiento apropiado, la recuperación y el reciclado de aparatos viejos y baterías usadas,
por favor, observe las normas de recolección aplicables, de acuerdo a su legislación nacional y a
las Directivas 2002/96/CE y 2006/66/CE.
Al desechar estos aparatos y baterías correctamente, Usted estará ayudando a preservar recursos
valiosos y a prevenir cualquier potencial efecto negativo sobre la salud de la humanidad y el medio
ambiente que, de lo contrario, podría surgir de un manejo inapropiado de los residuos.
Podrán aplicarse penas por la eliminación incorrecta de estos residuos, de acuerdo a la legislación nacional.
Para usuarios empresariales en la Unión Europea
Si usted desea descartar aparatos eléctricos y electrónicos, por favor contacte a su distribuidor o
proveedor a fin de obtener mayor información.
[Informacion sobre la Eliminación en otros Países fuera de la Unión Europea]
Estos símbolos sólo son válidos dentro de la Unión Europea. Si desea desechar estos objetos, por favor
contacte con sus autoridades locales o distribuidor y consulte por el método correcto de eliminación.
ESPAÑOL
Para mayor información sobre la recolección y el reciclado de aparatos y baterías viejos, por favor, contacte
a su comunidad local, su servicio de eliminación de residuos o al comercio donde adquirió estos aparatos.
Cd
VQT4J81
Nota sobre el símbolo de la batería (abajo, dos ejemplos de símbolos):
Este símbolo puede ser usado en combinación con un símbolo químico. En este caso, el mismo
cumple con los requerimientos establecidos por la Directiva para los químicos involucrados.
29
205
VQT4J81_RR-XS450_420-E_SP.indd 205
2012/05/29 11:29:44
Este manual descreve funções e operações básicas.
Acessórios fornecidos
1 Pilha Ni-MH recarregável AAA
*Designada como pilha recarregável no texto.
1 Saco de transporte da pilha
1 Cabo de extensão USB
Certifique-se de que compra [HHR-4MVE] para a Europa ou
[HHR-4MVT] para a Ásia e América Latina, e utilize uma do par
quando substituir a pilha recarregável. (À data de Maio de 2012)
2 Introduza a ficha USB da unidade no computador.
Se não for possível ligar a unidade ao computador
directamente, utilize o cabo de extensão USB (incluído).
A primeira vez que liga a unidade ao PC
Porque irão aparecer múltiplas mensagens de “Novo hardware
encontrado”, não desligue a unidade do PC até que todas
essas mensagens tenham desaparecido.
*Nunca desligue a unidade do computador nem retire o
cartão SD durante a visualização de “ACCESS…”; se o
fizer, a unidade pode ficar danificada.
3 Faça deslizar o interruptor OPR/HOLD para o lado
[ON].
Introduzir a pilha
4 Faça deslizar o interruptor OPR/HOLD para o lado
1 pilha Ni-MH recarregável AAA (incluída)
Verifique se a pilha está voltada nas
direcções correctas.
[OFF].
O indicador de estado acende e o carregamento é iniciado.
*Durante o carregamento, fazer deslizar o interruptor OPR/HOLD
para o lado ligado [ON] pode cancelar o carregamento a meio.
*Quando o indicador de estado se apagar, o carregamento está
concluído.
g Desligar a unidade do computador
Clique duas vezes no ícone (Windows XP: [ ], Windows Vista/
Windows 7: [ ]) no tabuleiro de tarefas na parte inferior do ecrã
do computador e siga as instruções que aparecem no ecrã para
remover a unidade. (Dependendo das definições do SO o ícone
pode não aparecer.) Depois de ser removida, a unidade desligase.
Carregar a pilha
VQT4J81
1 Puxe a ficha USB para fora.
Empurre e faça
deslizar a patilha até
ouvir um “clique”.
Guardar a ficha USB:
*Quando pretender utilizar uma pilha recarregável, utilize a pilha
recarregável incluída ou a pilha recarregável opcional. Se forem
utilizadas pilhas disponíveis no mercado que não sejam as
mencionadas acima, o funcionamento não é garantido.
*Também é possível utilizar uma pilha alcalina AAA LR03 (não
incluída).
2
206
VQT4J81_RR-XS450_420-E_PT.indd 206
2012/05/28 15:48:00
Ligar/desligar o aparelho
Acertar o relógio
Ligar o aparelho:
1 Pressione [MENU].
Faça deslizar o interruptor OPR/HOLD para o lado [ON] para ligar
o aparelho. Depois, acender-se-á o visor.
Desligar o aparelho:
2 Pressione +, – para seleccionar “COMMON MENU”
e pressione [q OK] para confirmar.
Faça deslizar o interruptor OPR/HOLD para o lado desligado
[OFF] enquanto a unidade estiver no estado de paragem.
3 Pressione +, – para seleccionar “DATE & TIME”
g Desligar automático:
4 Pressione +, – para seleccionar o ano e pressione
O aparelho desliga-se automaticamente depois de passar um
período de tempo predefinido (a programação de fábrica é de
15 minutos) enquanto a gravação está parada.
Se a alimentação for desligada por meio da função de desligar
automático, faça deslizar o interruptor OPR/HOLD para o lado
desligado [OFF] antes de ligar a alimentação. (➜ página 24)
e pressione [q OK] para confirmar.
i.
5 Pressione +, – para seleccionar o mês e pressione
i.
6 Pressione +, – para definir a data e pressione i.
7 Pressione +, – para definir o método de indicação
Função de bloqueio
“ 24h ” e “ AM / PM ” são apresentados para a exibição de
24 horas e para a exibição de 12 horas, respectivamente.
Quando a função de Bloqueio é activada, as operações do botão são ignoradas.
8 Pressione +, – para definir a hora e pressione i.
Activar a função de Bloqueio:
9 Pressione +, – para definir o minuto.
Faça deslizar o interruptor OPR/HOLD para o lado [HOLD]
durante a gravação ou reprodução.
Desactivar a função de Bloqueio:
Faça deslizar o interruptor OPR/HOLD na direcção oposta de
[HOLD].
Para alterar a definição, pressione u, i para se mover
entre os itens e pressione depois +, – novamente para
confirmar a definição.
10 Pressione [q OK] para confirmar.
PORTUGUÊS
do relógio e pressione i.
A data e hora são definidas e o relógio começa a funcionar.
VQT4J81
Para sair do ecrã de definição, pressione [F2 (CLOSE)].
3
207
VQT4J81_RR-XS450_420-E_PT.indd 207
2012/05/28 15:48:01
Seleccionar a pasta
1 Pressione [F2 (FOLDER)].
2 Pressione +, –, u, i para seleccionar a pasta e
pressione [q OK] para confirmar.
• “ ” (OTHER FOLDER) é para a reprodução de ficheiros
gravados por um dispositivo diferente desta unidade. Esta
unidade pode também reproduzir ficheiros de música gravados
com (ou transferidos por) alguns dispositivos com o Sistema
Estéreo Panasonic equipados com a função de gravação USB.
Alternar entre a memória interna e o cartão SD:
Se o cartão SD estiver inserido, os itens contidos no cartão
SD aparecem no ecrã no passo 2 . Pressione [F1 (MEMORY)]
para seleccionar a memória.
• Neste manual, o cartão microSD/microSDHC é designado
como “cartão SD”.
Mudar a posição do microfone
Posição do microfone
Usos recomendados
STEREO
Funciona como um microfone
estéreo normal.
Adequado para a gravação
de eventos, tais como uma
reunião ou espectáculo por um
grande número de pessoas.
ZOOM
Grava com o som à sua frente
enfatizado.
Adequado para a gravação
de eventos, tais como uma
palestra ou entrevista, em que
o som é emitido a partir de
uma direcção específica.
Seleccionar a pasta ou o
ficheiro no ecrã de lista
1 Pressione [LIST ] durante cerca de 1 segundo ou mais.
Avance para o passo 2 se houver um cartão SD inserido
(➜ página 18) e o passo 3 se não.
2 Pressione +, – para seleccionar “INT. MEMORY”
VQT4J81
(memória interna ) ou “microSD CARD” e
pressione [q OK] para confirmar.
3 Pressione +, – para seleccionar a pasta e
pressione [q OK] para confirmar.
4
Se tiverem sido criadas pastas na pasta MUSIC ou OTHER
FOLDER ( ), repita o passo 3 para seleccionar a pasta
pretendida.
4 Pressione +, – para seleccionar o ficheiro e
pressione [q OK] para confirmar.
É iniciada a reprodução do ficheiro.
208
VQT4J81_RR-XS450_420-E_PT.indd 208
2012/05/28 15:48:01
Gravação
Verificar a informação.
1 Pressione [F2 (FOLDER)].
1 Pressione [STOP g/RETURN].
2 Pressione u, i para seleccionar a pasta de
2 Desloque o ecrã de informação para cima ou para
3 Pressione [REC *] (a gravação é iniciada).
4 Pressione [STOP g/RETURN] para parar a gravação.
Pausar a gravação:
1 Pressione [REC *] durante a gravação.
O indicador de gravação pisca.
2 Pressione [REC *] novamente para retomar a gravação.
Reprodução
Sair do ecrã de informação:
Pressione [STOP g/RETURN].
Ouvir o som utilizando
auriculares
Ligue os auriculares estéreo (não incluídos).
Tipo de ficha: Minificha estéreo com um ø de 3,5 mm
Auriculares adicionais recomendados: Panasonic RP-HV154,
RP-HJE120
(À data de Maio de 2012)
Controlar a evolução da
gravação
1 Pressione [q OK] (a reprodução é iniciada).
Ajustar o volume
Aumentar o volume: Pressione +.
Diminuir o volume: Pressione –.
Regular o volume:
Pode regular o volume pressionando
+, –, mas o nível de som da gravação
não é afectado.
Altifalante
incorporado
Operações durante a reprodução
Saltar (Omitir): Pressione u, i.
Avanço/Retrocesso rápido (Procura):
Mantenha pressionado u, i.
Parar: Pressione [STOP g/RETURN].
PORTUGUÊS
Para a gravação de microfone, seleccione uma pasta, entre as
pastas “A”, “B”, “C” e “D”. (A programação de fábrica é “A”.)
baixo com + ou –.
Ouvir o som durante a
reprodução
Introduza
firmemente.
Durante a reprodução o som é emitido
pelo altifalante. Em locais barulhentos a
audição pode ser difícil devido à saída
do altifalante. Se isso acontecer, ligue
uns auriculares estéreo (não incluídos).
VQT4J81
destino da gravação e pressione [q OK] para
confirmar.
Aparece o ecrã de informação.
5
209
VQT4J81_RR-XS450_420-E_PT.indd 209
2012/05/28 15:48:02
Eliminar ficheiros
Seleccionar o cenário de gravação
1 Pressione [ERASE/A-B&].
1 Pressione [MENU] durante cerca de 1 segundo ou mais.
2 Pressione +, – para seleccionar “FILE” e
2 Pressione +, – para seleccionar o cenário e
pressione [q OK] para confirmar.
3 Pressione +, – para seleccionar “YES” e pressione
[q OK] para confirmar.
Durante a eliminação, o indicador de estado pisca e
“ERASING” é apresentado. Podem ser necessários vários
minutos até a eliminação estar terminada.
Ao seleccionar “FOLDER” no passo 2 , passará para o ecrã
para eliminar todos os ficheiros na pasta seleccionada.
Para sair do ecrã de eliminação, pressione [F2 (CLOSE)].
Eliminar ficheiros do ecrã de lista.
Seleccione ficheiros no ecrã de lista (➜ página 4) e pressione
[ERASE/A-B&]. Em seguida, aparece o ecrã para eliminar o
ficheiro. Seleccione a pasta e pressione [ERASE/A-B&]. Em
seguida, aparece o ecrã para eliminar todos os ficheiros contidos
na pasta.
É apresentado o ecrã para seleccionar o cenário de gravação.
pressione [q OK] para confirmar.
Se seleccionar “USER”, salte o passo 3 .
3 Pressione +, – para seleccionar “LOAD” e
pressione [q OK] para confirmar.
Para sair do ecrã de definição, pressione [F2 (CLOSE)].
Ao pressionar [REC *], a gravação é efectuada com a
definição de cenário de gravação seleccionada.
Cenário de gravação
LANG.
STUDY
KARAOKE
Aplicação
Gravação da própria voz para praticar a
pronúncia, etc.
Gravação de volume alto, como karaoke
MUSIC
PERF.
CONVERSATION
LECTURE
Gravação de alta qualidade, como
espectáculos musicais
Gravação das vozes de outras pessoas
para entrevistas, reuniões, etc.
Grava uma amplitude abrangente de som.
Para gravar reuniões, etc.
Grava sons como nas salas de aula, etc.
FAVORITE
Permite registar definições personalizadas
VQT4J81
MEETING
6
Alterar as definições de cenário de gravação
1 Pressione [MENU] durante cerca de 1 segundo ou mais.
2 Pressione +, – para seleccionar o cenário de
gravação e pressione [q OK] para confirmar.
210
VQT4J81_RR-XS450_420-E_PT.indd 210
2012/05/28 15:48:02
Cenário directo
Repita os passos 4 e 5 para alterar outros itens.
6 Depois de concluir as definições, pressione +, –
Esta função é para mudar a cena de gravação ligada à mudança
da posição do microfone.
*No momento da compra, “MEETING” é atribuída a STEREO e
“LECTURE” é atribuída a ZOOM.
Alterar a definição de cenário directo
1 Pressione [MENU].
2 Pressione +, – para seleccionar “MIC REC MENU”
e pressione [q OK] para confirmar.
para seleccionar “OK” e pressione [q OK] para
confirmar.
3 Pressione +, – para seleccionar “DIRECT SCENE”
Para seleccionar o cenário de gravação alterado, seleccione
“LOAD”.
4 Pressione +, – para seleccionar a posição do
Inicializar as definições de cenário de gravação
1 Pressione [MENU] durante cerca de 1 segundo
ou mais.
2 Pressione +, – para seleccionar o cenário de
gravação que pretende inicializar e pressione
[q OK] para confirmar.
3 Pressione +, – para seleccionar “INITIALIZE” e
pressione [q OK] para confirmar.
4 Pressione +, – para seleccionar “YES” e pressione
[q OK] para confirmar.
É reposta a programação de fábrica da definição do cenário
de gravação seleccionado.
Para seleccionar o cenário de gravação inicializado,
seleccione “LOAD”.
Para sair do ecrã de definição, pressione [F2 (CLOSE)].
microfone (“STEREO” ou “ZOOM”) e pressione
[q OK] para confirmar.
5 Pressione +, – para seleccionar o cenário de
gravação e pressione [q OK] para confirmar.
Se desejar alterar o cenário de gravação para a outra posição
do microfone, realize os passos 4 e 5 para definir o cenário
de gravação.
Para sair do ecrã de definição, pressione [F2 (CLOSE)].
VQT4J81
Para sair do ecrã de definição, pressione [F2 (CLOSE)].
e pressione [q OK] para confirmar.
PORTUGUÊS
3 Pressione +, – para seleccionar “CHANGE
SETTING” e pressione [q OK] para confirmar.
4 Pressione +, – para seleccionar o item que
pretende alterar e pressione [q OK] para
confirmar.
5 Pressione +, – para seleccionar a definição e
pressione [q OK] para confirmar.
7
211
VQT4J81_RR-XS450_420-E_PT.indd 211
2012/05/28 15:48:02
Cenário directo
Definir a definição de cenário directo para
OFF
1 Pressione [MENU].
2 Pressione +, – para seleccionar “MIC REC MENU”
e pressione [q OK] para confirmar.
3 Pressione +, – para seleccionar “DIRECT SCENE”
e pressione [q OK] para confirmar.
4 Pressione +, – para seleccionar “SETTING” e
pressione [q OK] para confirmar.
5 Pressione +, – para seleccionar “OFF” e pressione
[q OK] para confirmar.
Para sair do ecrã de definição, pressione [F2 (CLOSE)].
Seleccionar o modo de gravação
1 Pressione [MENU].
2 Pressione +, – para seleccionar “MIC REC MENU”
e pressione [q OK] para confirmar.
3 Pressione +, – para seleccionar “MIC REC MODE”
e pressione [q OK] para confirmar.
4 Pressione +, – para seleccionar a definição
(frequência de amostragem PCM/taxa de bits
MP3) e pressione [q OK] para confirmar.
(A programação de fábrica é “MP3 192kbps”.)
Para sair do ecrã de definição, pressione [F2 (CLOSE)].
*Dependendo da definição do modo de gravação, a qualidade
sonora e o tempo restante de gravação irão variar.
Formato de gravação
PCM: 44,1 kHz
Gravação de
alta qualidade
MP3: 320 kbps
MP3: 192 kbps
MP3: 128 kbps
MP3: 64 kbps
VQT4J81
MP3: 32 kbps
Gravação longa
*Quando o modo de gravação está definido para “MP3 32kbps”,
a gravação fica mono.
8
212
VQT4J81_RR-XS450_420-E_PT.indd 212
2012/05/28 15:48:02
2 Pressione +, – para seleccionar “MIC REC MENU”
e pressione [q OK] para confirmar.
3 Pressione +, – para seleccionar “MIC SENS.” e
pressione [q OK] para confirmar.
4 Pressione +, – para seleccionar “HIGH” ou “LOW”
e pressione [q OK] para confirmar.
(A programação de fábrica é “HIGH”.)
Para sair do ecrã de definição, pressione [F2 (CLOSE)].
Reduzir o som de baixa
frequência durante a gravação
1 Pressione [MENU].
2 Pressione +, – para seleccionar “MIC REC MENU”
e pressione [q OK] para confirmar.
3 Pressione +, – para seleccionar “LOW CUT
FILTER” e pressione [q OK] para confirmar.
4 Pressione +, – para seleccionar “ON” e pressione
[q OK] para confirmar.
(A programação de fábrica é “OFF”.)
Para sair do ecrã de definição, pressione [F2 (CLOSE)].
Definir o ajuste do nível de gravação para
MANUAL
1 Pressione [MENU].
2 Pressione +, – para seleccionar “MIC REC MENU”
e pressione [q OK] para confirmar.
3 Pressione +, – para seleccionar “REC LEVEL
ADJ.” e pressione [q OK] para confirmar.
4 Pressione +, – para seleccionar “MANUAL” e
pressione [q OK] para confirmar.
Para sair do ecrã de definição, pressione [F2 (CLOSE)].
Ajustar manualmente o nível de gravação
1 Pressione e mantenha pressionado [REC *]
durante 1 ou mais segundos.
A unidade entra em espera da gravação.
2 Aponte o microfone para a fonte de som a gravar.
3 Pressione u, i para ajustar o nível de
PORTUGUÊS
1 Pressione [MENU].
Definir manualmente o nível de
gravação
gravação.
O intervalo de ajuste é de 0 a 30.
(A programação de fábrica é “15”.)
Pressionar [REC *] inicia a gravação.
VQT4J81
Alterar a sensibilidade do
microfone
9
213
VQT4J81_RR-XS450_420-E_PT.indd 213
2012/05/28 15:48:02
Definir manualmente o nível de gravação
Configurar o limitador do pico de gravação para ligado (ON)
Para sair do ecrã de definição, pressione [F2 (CLOSE)].
O nome do modo EQ não é apresentado depois de sair do
ecrã de definição.
1 Pressione [MENU].
Pressionar [REC *] inicia a gravação.
2 Pressione +, – para seleccionar “MIC REC MENU” e
pressione [q OK] para confirmar.
3 Pressione +, – para seleccionar “PEAK LIMITER” e
pressione [q OK] para confirmar.
4 Pressione +, – para seleccionar “ON” e pressione
[q OK] para confirmar.
(A programação de fábrica é “OFF”.)
Para sair do ecrã de definição, pressione [F2 (CLOSE)].
Definir o EQ de gravação
1 Pressione e mantenha pressionado [REC *]
durante 1 ou mais segundos.
Modo de EQ
Efeito e aplicação
Este modo (básico) não dá ênfase a uma gama
específica de som.
EXTRA BASS Dá uma forte ênfase à gama baixa.
BASS
Dá uma ligeira ênfase à gama baixa.
MIDDLE
Dá ênfase à gama média.
BASS&TREBLE Dá uma ligeira ênfase às gamas de baixo e agudos.
TREBLE
Dá uma ligeira ênfase à gama de agudos.
EXTRA
Dá uma forte ênfase à gama de agudos.
TREBLE
Este modo permite o ajuste das bandas de
USER
frequência de 150 Hz, 500 Hz, 1 kHz, 4 kHz e 12 kHz.
FLAT
(A programação de fábrica é “FLAT”.)
A unidade entra em espera da gravação.
2 Pressione [MENU].
3 Pressione +, – para seleccionar “REC EQ” e
pressione [q OK] para confirmar.
4 Pressione +, – para seleccionar o modo de EQ de
gravação.
Quando seleccionar modos que não “USER”, avance para o passo 5 .
VQT4J81
Definição quando seleccionar “USER”:
10
214
1 Depois do passo 4 , pressione [F1 (EDIT)]
2 Pressione u, i para seleccionar a banda de frequência a
mudar e pressione +, – para ajustar o nível de gravação (±12 dB).
3 Quando todas as definições para mudar a banda de
frequência estiverem completas, avance para o passo 5 .
Auto-temporizador
1 Pressione [MENU].
2 Pressione +, – para seleccionar “MIC REC MENU”
e pressione [q OK] para confirmar.
3 Pressione +, – para seleccionar “SELF TIMER” e
pressione [q OK] para confirmar.
4 Pressione +, – para seleccionar o tempo e
pressione [q OK] para confirmar.
(A programação de fábrica é “OFF”.)
Para sair do ecrã de definição, pressione [F2 (CLOSE)].
5 Pressione [q OK] para confirmar.
VQT4J81_RR-XS450_420-E_PT.indd 214
2012/05/28 15:48:02
2 Pressione +, – para seleccionar “MIC REC MENU”
e pressione [q OK] para confirmar.
3 Pressione +, – para seleccionar “VAS” e pressione
[q OK] para confirmar.
4 Pressione +, – para seleccionar “ON” e pressione
[q OK] para confirmar.
(A programação de fábrica é “OFF”.)
Para sair do ecrã de definição, pressione [F2 (CLOSE)].
Para iniciar a gravação VAS, pressione [REC *].
Ajustar o nível de funcionamento VAS:
Pressione u, i durante a gravação VAS.
(A programação de fábrica é “3”.)
Função de gravação anterior
(PRE-RECORD)
A unidade entra no modo de espera da gravação anterior.
Muda como 1 seg., 2 seg., 3 seg. e pára em 3 seg. Os dados de
áudio do microfone cerca de 3 segundos antes da gravação são
sempre actualizados e a unidade fica em espera.
2 Pressione [REC *].
O indicador de gravação acende e a gravação continua
directamente após os dados de áudio guardados.
Parar: Pressione [STOP g/RETURN]
Gravar ligando um microfone
externo
1 Faça deslizar o interruptor Mic/Line para [MIC].
2 Ligue o microfone externo.
Microfone externo
(não incluído)
Introduza
firmemente.
1 Pressione [MENU].
2 Pressione +, – para seleccionar “MIC REC MENU”
e pressione [q OK] para confirmar.
3 Pressione +, – para seleccionar “PRE-RECORD” e
pressione [q OK] para confirmar.
4 Pressione +, – para seleccionar “ON” e pressione
[q OK] para confirmar.
(A programação de fábrica é “OFF”.)
Para sair do ecrã de definição, pressione [F2 (CLOSE)].
PORTUGUÊS
1 Pressione [MENU].
Gravar utilizando a função de gravação anterior:
1 Pressione e mantenha pressionado [REC *]
durante 1 ou mais segundos.
Tipo de ficha:
Minificha estéreo com um ø de 3,5 mm
3 Pressione [REC *] para iniciar a gravação.
VQT4J81
Evitar gravações
desnecessárias (VAS)
11
215
VQT4J81_RR-XS450_420-E_PT.indd 215
2012/05/28 15:48:03
Gravar a partir de outros dispositivos
11 Reproduza o dispositivo externo.
2 Pressione [MENU].
Esta unidade tem a seguinte função de gravação sincronizada.
3 Pressione +, – para seleccionar “LINE REC” e
pressione [q OK] para confirmar.
4 Pressione +, – para seleccionar “LINE INPUT” e
pressione [q OK] para confirmar.
5 Pressione +, – para seleccionar a definição e
pressione [q OK] para confirmar.
Quando ligar a unidade ao terminal de auscultadores de um
dispositivo externo ou ao terminal de saída de linha de um
dispositivo portátil, seleccione “HIGH” ou “LOW”, respectivamente.
(A programação de fábrica é “HIGH”.)
6 Pressione [F2 (CLOSE)].
7 Ligue o dispositivo externo
Ligue a unidade ao dispositivo externo e faça deslizar o interruptor
Mic/Line para “LINE”. Em seguida, aparecem a definição de
entrada de linha seleccionada e o modo de gravação de linha.
8 Pressione e mantenha pressionado [REC *]
VQT4J81
durante 1 ou mais segundos.
A unidade entra em espera da gravação.
9 Coloque em reprodução o dispositivo externo e
ajuste o nível de entrada/saída.
”, isso
1 Se o medidor de nível oscilar e aparecer a indicação “
12
216
10 Pressione [REC *] para iniciar a gravação.
1 Faça deslizar o interruptor Mic/Line para [LINE].
significa que o volume do dispositivo externo está demasiado
”,
alto. Ajuste o volume do dispositivo externo para a gama “
mesmo que o volume seja regulado para o máximo.
Para configurar novamente as definições de entrada de
linha, pressione [MENU] e siga os passos 4 a 6 .
2 Quando acabar de ajustar o nível de entrada/saída, pare a
fonte de som do outro dispositivo na posição onde deseja
iniciar a gravação.
VQT4J81_RR-XS450_420-E_PT.indd 216
Esta função detecta o silêncio entre faixas, etc., e depois grava
cada faixa em diferentes ficheiros, como primeira faixa, segunda
faixa, etc. Se detectar som oriundo do dispositivo externo, a
gravação é iniciada automaticamente. Se detectar silêncio
durante cerca de 2 segundos ou mais, a gravação entra em
pausa. A nova detecção de som irá retomar a gravação.
Definição de gravação sincronizada
1 Pressione [MENU].
2 Pressione +, – para seleccionar “LINE REC” e
pressione [q OK] para confirmar.
3 Pressione +, – para seleccionar “SYNCHRO REC”
e pressione [q OK] para confirmar.
4 Pressione +, – para seleccionar “ON (Auto Stop)”
ou “ON (Manual Stop)” e pressione [q OK] para
confirmar.
Auto: A gravação é colocada em pausa se for detectado
silêncio durante cerca de 2 segundos ou mais e é
parada se o silêncio continuar durante cerca de 15
segundos ou mais.
Manual: Mesmo se o silêncio continuar, a gravação continua
pausada (em espera) até que se pressione
[STOP g/RETURN].
(A programação de fábrica é “OFF”.)
Para sair do ecrã de definição, pressione [F2 (CLOSE)].
Gravação sincronizada:
1 Execute os passos 1 a 11 (➜ esquerda).
2012/05/28 15:48:03
1 Pressione [MENU].
Alterar a velocidade de
reprodução
2 Pressione +, – para seleccionar “LINE REC” e
1 Pressione [F1 (SPEED)] durante a reprodução.
(A programação de fábrica é “MP3 192kbps”.)
Para sair do ecrã de definição, pressione [F2 (CLOSE)].
Função índice
Acrescentar índice
1 Durante a gravação ou reprodução ou enquanto a
gravação está em pausa, pressione [F2 (INDEX)]
na posição onde quer acrescentar um índice.
“ ” (a piscar) e “ADDING INDEX” são apresentados.
“ ” (aceso) é apresentado para o ficheiro ao qual são
acrescentados índices.
Apagar índice
1 Pressione [ERASE/A-B&].
2 Pressione +, – para seleccionar “INDEX” e
pressione [q OK] para confirmar.
3 Pressione +, – para seleccionar “YES” e pressione
[q OK] para confirmar.
2 Pressione [F1 (SLOW)] ou [F2 (FAST)] para
seleccionar a velocidade e pressione [q OK] para
confirmar.
Velocidade de reprodução:
A velocidade de reprodução pode ser ajustada em variações de
10% para velocidades superiores à velocidade normal (100%)
e em variações de 5% para velocidades inferiores à velocidade
normal.
Indicação de estado durante a reprodução:
A velocidade de reprodução normal, a reprodução mais rápida e
a reprodução mais lenta são apresentadas como “ ”, “ ” e “ ”,
respectivamente.
Reprodução com repetição de
A-B
1 Pressione [ERASE/A-B&] durante a reprodução.
O ponto de início (A) fica definido e aparecem as indicações
“
” (com luz fixa) e “ ” (a piscar).
PORTUGUÊS
pressione [q OK] para confirmar.
3 Pressione +, – para seleccionar “LINE REC
MODE” e pressione [q OK] para confirmar.
4 Pressione +, – para seleccionar a definição
(frequência de amostragem PCM/taxa de bits
MP3) e pressione [q OK] para confirmar.
2 Pressione [ERASE/A-B&] no ponto de fim (B).
O visor muda para “
começa.
” (aceso) e a reprodução repetitiva
Cancelar a repetição de A-B:
Pressione [ERASE/A-B&], u, i ou [STOP g/RETURN].
VQT4J81
Seleccionar o modo de gravação de linha
13
217
VQT4J81_RR-XS450_420-E_PT.indd 217
2012/05/28 15:48:03
Reprodução a partir de uma posição Reprodução com repetição (REPEAT)
1 Pressione [MENU].
especificada (TIME SEARCH)
(Quando a reprodução estiver a decorrer, avance para o passo 3 .)
1 Pressione [MENU].
2 Pressione +, – para seleccionar “PLAY MENU” e
2 Pressione +, – para seleccionar “PLAY MENU” e
3 Pressione +, – para seleccionar “REPEAT” e
3 Pressione +, – para seleccionar “TIME SEARCH” e
4 Pressione +, – para seleccionar o tipo de
(Quando a reprodução estiver a decorrer, avance para o passo 3 .)
pressione [q OK] para confirmar.
pressione [q OK] para confirmar.
4 Ajuste a posição inicial de reprodução.
(Mude o valor de “TIME” para ajustar a posição inicial.)
Pressione u, i para seleccionar “00:00:00” (horas:minutos:
segundos) e pressione +, – para alterar os valores.
5 Pressione [q OK].
A reprodução começa a partir da posição especificada.
Pressione [F2 (CLOSE)] para parar o processo de definição a meio.
Reprodução com recuo ligeiro
1 Pressione [q OK] durante a reprodução.
Sempre que pressionar o botão, a reprodução recua cerca de
3 segundos (programação de fábrica).
Definir o tempo de recuo:
1 Pressione [MENU].
(Quando a reprodução estiver a decorrer, avance para o passo 3 .)
2 Pressione +, – para seleccionar “PLAY MENU” e
VQT4J81
pressione [q OK] para confirmar.
14
218
3 Pressione +, – para seleccionar “SLIGHT
RETURN” e pressione [q OK] para confirmar.
4 Pressione +, – para seleccionar o número de
pressione [q OK] para confirmar.
pressione [q OK] para confirmar.
reprodução com repetição e pressione [q OK]
para confirmar.
(A programação de fábrica é “OFF”.)
Para sair do ecrã de definição, pressione [F2 (CLOSE)].
OFF: A reprodução é feita sucessivamente a partir do ficheiro
seleccionado até ao último ficheiro numa pasta e depois a
reprodução pára.
ONE: Reproduz um ficheiro repetidamente.
FOLDER REPEAT: Reproduz repetidamente todos os
ficheiros da pasta.
FOLDER RANDOM: Reproduz repetidamente todos os
ficheiros contidos na pasta, por ordem aleatória.
ALL REPEAT: Para MUSIC (M) ou OTHER FOLDER ( ),
todos os ficheiros* dentro da pasta são reproduzidos de forma
repetida. Para outras pastas, a operação é igual à da opção
“FOLDER REPEAT”.
ALL RANDOM: Para MUSIC (M) ou OTHER FOLDER ( ),
todos os ficheiros* dentro da pasta são reproduzidos de forma
repetida, por ordem aleatória. Para outras pastas, a operação
é igual à da opção “FOLDER RANDOM”.
O número máximo de ficheiros reconhecidos é de 3.000
segundos (1 a 5) e pressione [q OK] para confirmar.
(A programação de fábrica é “3 sec”.)
Para sair do ecrã de definição, pressione [F2 (CLOSE)].
VQT4J81_RR-XS450_420-E_PT.indd 218
2012/05/28 15:48:04
Saltar em intervalos regulares
1 Pressione [q OK] durante cerca de 1 segundo ou
mais durante a reprodução.
O modo muda para modo de salto de tempo e aparece a
indicação “ ”. O modo de salto muda sempre que pressionar
o botão.
2 Pressione u, i.
Sempre que pressionar o botão, é efectuado um salto de
5 segundos (programação de fábrica).
Alterar o intervalo de salto
1 Pressione [MENU].
(Quando a reprodução estiver a decorrer, avance para o passo
3 .)
2 Pressione +, – para seleccionar “PLAY MENU” e
pressione [q OK] para confirmar.
3 Pressione +, – para seleccionar “TIME SKIP” e
pressione [q OK] para confirmar.
4 Pressione +, – para seleccionar o tempo e
pressione [q OK] para confirmar.
Seguimento
Definir o seguimento:
1 Pressione [MENU].
(Quando a reprodução estiver a decorrer, avance para o passo
3 .)
2 Pressione +, – para seleccionar “PLAY MENU” e
pressione [q OK] para confirmar.
3 Pressione +, – para seleccionar “SHADOWING” e
pressione [q OK] para confirmar.
4 Pressione +, – para seleccionar o tipo de
seguimento e pressione [q OK] para confirmar.
Se seleccionar “ON (small volume)”, o volume corresponderá
aproximadamente a um terço do volume actual durante o
seguimento.
(A programação de fábrica é “OFF”.)
Para sair do ecrã de definição, pressione [F2 (CLOSE)].
PORTUGUÊS
Saltar em intervalos regulares
(TIME SKIP)
Para sair do ecrã de definição, pressione [F2 (CLOSE)].
VQT4J81
Pode definir o intervalo de salto para 5 seg., 10 seg., 30 seg.,
1 min., 5 min., 10 min. ou 15 min.
(A programação de fábrica é “5sec”.)
15
219
VQT4J81_RR-XS450_420-E_PT.indd 219
2012/05/28 15:48:04
Seguimento
Utilizar a função de seguimento:
1 Realize a reprodução com repetição de A-B.
(➜ página 13)
O seguimento é realizado utilizando nenhum som ou volume
baixo após a reprodução com repetição de A-B.
Ajustar o volume para o seguimento:
Pode ajustar o volume de apenas a parte a seguir em separado a
partir da parte de reprodução com repetição de A-B.
• Se a repetição de A-B for cancelada ou a definição de
seguimento for alterada durante a reprodução, o volume da parte
a seguir é reposto para a definição original.
Tornar o som mais fácil de
ouvir (VOICE EMPHASIS)
1 Pressione [MENU].
(Quando a reprodução estiver a decorrer, avance para o passo
3 .)
2 Pressione +, – para seleccionar “PLAY MENU” e
pressione [q OK] para confirmar.
3 Pressione +, – para seleccionar “VOICE
EMPHASIS” e pressione [q OK] para confirmar.
4 Pressione +, – para seleccionar o tipo de ênfase
vocal e pressione [q OK] para confirmar.
(A programação de fábrica é “NORMAL”.)
Para sair do ecrã de definição, pressione [F2 (CLOSE)].
VQT4J81
NORMAL: Reproduz o som tal como foi gravado.
NOISE CXL L: Realiza uma pequena quantidade de redução
do ruído.
NOISE CXL H: Realiza uma grande quantidade de redução
do ruído.
FOCUS FRONT: Enfatiza o som à frente.
FOCUS LEFT: Enfatiza o som à esquerda.
FOCUS RIGHT: Enfatiza o som à direita.
16
220
VQT4J81_RR-XS450_420-E_PT.indd 220
2012/05/28 15:48:04
Definir o EQ de reprodução
(SOUND EQ)
1 Pressione [MENU].
(Quando a reprodução estiver a decorrer, avance para o passo 3 .)
2 Pressione +, – para seleccionar “PLAY MENU” e
pressione [q OK] para confirmar.
3 Pressione +, – para seleccionar “SOUND EQ” e
pressione [q OK] para confirmar.
4 Pressione +, – para seleccionar o modo de EQ de som.
Quando seleccionar modos que não “USER”, avance para o
passo 5 .
Modo de EQ
BASS
CLEAR
HEAVY
Efeito e aplicação
A função de equalização do som não é utilizada.
Ouve-se o som original sem qualquer alteração.
Dá uma forte ênfase à gama baixa.
Dá uma forte ênfase à gama de agudos.
Dá uma ligeira ênfase às gamas de baixo e agudos.
SOFT
Dá ênfase à gama média.
VOICE
Reduz o ruído para tornar a voz humana facilmente audível.
Este modo permite o ajuste das bandas de
frequência de 150 Hz, 500 Hz, 1 kHz, 4 kHz e 12 kHz.
FLAT
USER
(A programação de fábrica é “FLAT”.)
a mudar e pressione +, – para ajustar o nível de volume
(±6 dB).
3 Quando todas as definições para mudar a banda de
frequência estiverem completas, avance para o passo 5 .
5 Pressione [q OK] para confirmar.
VQT4J81
Para sair do ecrã de definição, pressione [F2 (CLOSE)].
PORTUGUÊS
Definição quando seleccionar “USER”:
1 Depois do passo 4 , pressione [F1 (EDIT)].
2 Pressione u, i para seleccionar a banda de frequência
17
221
VQT4J81_RR-XS450_420-E_PT.indd 221
2012/05/28 15:48:04
Utilizar um cartão SD
g Tipos de procura de ficheiros
1 Desligue o aparelho e abra a tampa da ranhura da
CALENDAR SRCH Os ficheiros gravados são procurados por
data e apresentados numa lista.
pilha/cartão SD.
2 Introduza o cartão SD e feche a tampa da ranhura
da pilha/cartão SD.
Alinhe o cartão SD na direcção correcta ( ) e introduza-o
totalmente até ouvir um “clique”.
Retirar o cartão SD:
1 Desligue o aparelho e abra a tampa da ranhura da pilha/cartão
SD.
2 Empurre cuidadosamente o cartão SD.
3 Quando o cartão SD ficar ligeiramente saliente, puxe o cartão
para fora lentamente.
VQT4J81
Utilizar a função de procura de ficheiros
Introduzir o cartão SD
*Pode alternar entre a memória interna e o cartão SD
pressionando [F2 (FOLDER)] durante mais de 1 segundo
quando aparecer o ecrã de paragem.
*A unidade é compatível com cartões microSD de 2 GB e com
cartões microSDHC de 4 GB a 32 GB. (À data de Maio de 2012)
*A unidade pode não funcionar correctamente, dependendo do
fabricante ou do tipo de cartão SD.
*Para obter mais informações sobre os cartões com confirmação
de funcionamento correcto segundo as nossas normas de
fabrico, consulte a página de suporte abaixo.
http://panasonic.net/support/
*Se estiver inserido um cartão SD, mas a indicação “microSD”
não aparecer no ecrã SELECT FOLDER, etc., isso significa que
a unidade não reconhece o cartão SD.
*Mantenha o Cartão de Memória fora do alcance de crianças
para evitar que elas o engulam.
18
DAY OF WEEK
Os ficheiros gravados são procurados por dia
da semana e apresentados numa lista.
RECENT R. FILE
Os ficheiros gravados são apresentados por
ordem da data de gravação, começando pela
data mais recente. (20 ficheiros)
Procura de ficheiros
1 Pressione [LIST ] durante cerca de 1 segundo ou mais.
Avance para o passo 2 se houver um cartão SD inserido e o
passo 3 se não.
2 Pressione +, – para seleccionar “INT. MEMORY”
(memória interna) ou “microSD CARD” e
pressione [F1 (SEARCH)].
3 Pressione +, – para seleccionar o tipo de procura
de ficheiros e pressione [q OK] para confirmar.
“ ” (memória interna) ou “
como o alvo da procura.
” (cartão SD) é apresentado
Quando seleccionar “CALENDAR SRCH”:
Pressione +, –, u, i para seleccionar a data de gravação
e pressione [q OK] para confirmar.
Quando seleccionar “DAY OF WEEK”:
Pressione +, – para seleccionar o dia da semana e pressione
[q OK] para confirmar.
Só é possível seleccionar um dia da semana.
4 Pressione +, – para seleccionar o ficheiro e
pressione [q OK] para confirmar.
222
VQT4J81_RR-XS450_420-E_PT.indd 222
2012/05/28 15:48:04
Ouvir música na unidade
(ficheiros de música WMA/MP3)
Utilizar a função de lista de reprodução
Seleccionar um ficheiro da pasta “M”:
1 Seleccione o ficheiro e pressione [q OK].
1 Seleccione a pasta MUSIC (M) no ecrã de lista (➜ página 4).
1 Pressione [F2 (
CUE)] durante a reprodução.
Aparece a indicação “FOLDER SKIP”, que muda para a
visualização de preparação de pasta “ ”.
2 Pressione u, i quando aparecer a indicação
“
”.
Cancelar a preparação de pasta:
É possível cancelar a definição utilizando qualquer um dos seguintes
métodos.
• Pressione [F2 ( CUE)] novamente. Quando isto é cancelado,
os ficheiros podem ser ignorados utilizando u, i.
• Pressione [q OK].
• Pressione [STOP g/RETURN]. (A reprodução é concluída.)
Pode também seleccionar OTHER FOLDER (
).
2 Pressione +, – para seleccionar o ficheiro ou a
pasta e pressione [F1 (PLAYLIST)] para confirmar.
Quando seleccionar pastas ou seleccionar ficheiros
alternando entre pastas, pressione u e pode deslocar-se
entre hierarquias. (Para mais informações sobre métodos de
selecção de ficheiros e pastas, consulte a página 4.)
3 Pressione u, i para seleccionar a lista de
reprodução e pressione [q OK] para confirmar.
(Seleccione uma opção de PLAYLIST 1 a 5.)
• O ficheiro ou todos os ficheiros contidos na pasta são
registados na lista de reprodução seleccionada.
Reproduzir faixas registadas na lista de reprodução
1 Seleccione a lista de reprodução (de P1 a P5) (➜ página 4).
2 Pressione u, i para seleccionar o ficheiro que
pretende reproduzir e pressione [q OK].
Alterar a ordem das faixas incluídas numa lista de reprodução
1 Seleccione a lista de reprodução (de P1 a P5) no
PORTUGUÊS
Função de preparação de pasta
Registar faixas favoritas numa lista de reprodução
ecrã de lista (➜ página 4).
2 Pressione +, – para seleccionar o ficheiro que
ORDER” e pressione [q OK] para confirmar.
“
” é acrescentado no lado esquerdo do nome de ficheiro seleccionado.
4 Pressione +, – para mover o ficheiro seleccionado para a
posição pretendida e pressione [q OK] para confirmar.
• A ordem das faixas é alterada.
VQT4J81_RR-XS450_420-E_PT.indd 223
VQT4J81
pretende alterar e pressione [F1 (EDIT)].
3 Pressione +, – para seleccionar “CHANGE
19
223
2012/05/28 15:48:04
Utilizar a função de lista de reprodução
Dividir ficheiros
Cancelar faixas registadas na lista de reprodução
1 Durante a reprodução, pressione [STOP g/RETURN]
1 Seleccione a lista de reprodução (de P1 a P5) no
2 Seleccione “DIVIDE” no ecrã de definições de
2 Pressione +, – para seleccionar o ficheiro que
3 Pressione +, – para seleccionar “YES” e pressione
ecrã de lista (➜ página 4).
pretende apagar e pressione [F1 (EDIT)].
3 Pressione +, – para seleccionar “ERASE FILE” e
pressione [q OK] para confirmar.
Quando pretender cancelar todas as faixas
registadas:
1 Pressione +, – para seleccionar “ERASE ALL” e pressione
[q OK] para confirmar.
4 Pressione +, – para seleccionar “YES” e pressione
[q OK] para confirmar.
no ponto onde pretende dividir o ficheiro.
edição (➜ esquerda).
[q OK] para confirmar.
Enquanto o ficheiro está a ser dividido, o indicador de estado pisca.
Editar: Combinar ficheiros
1 Seleccione “COMBINE” no ecrã de definições de
ediçã (➜ esquerda).
2 Pressione +, – para seleccionar “PREVIOUS FILE”
e pressione [q OK] para confirmar.
3 Pressione +, – para seleccionar o ficheiro que
Editar: Dividir ficheiros
Aceder ao ecrã de definições de edição
1 Pressione [MENU].
2 Pressione +, – para seleccionar “EDIT MENU” e
pressione [q OK] para confirmar.
3 Pressione +, – para seleccionar o item que
VQT4J81
pretende editar e pressione [q OK].
20
• Pressione [F1 (TAB)] para mudar para outros ecrãs de
definição.
• Os detalhes de definição e os métodos de alteração variam
consoante o item. Para mais informações, consulte a página
correspondente.
Para sair do ecrã de definição, pressione [F2 (CLOSE)].
224
VQT4J81_RR-XS450_420-E_PT.indd 224
pretende combinar e pressione [q OK] para confirmar.
Quando seleccionar o ficheiro numa outra pasta, pode deslocar-se dentro
das hierarquias da pasta pressionando u. (Para mais informações
sobre métodos de selecção de ficheiros e pastas, consulte a página 4.)
4 Pressione +, – para seleccionar “NEXT FILE” e
pressione [q OK] para confirmar.
5 Pressione +, – para seleccionar o ficheiro que
pretende combinar atrás do ficheiro anterior e
pressione [q OK] para confirmar.
6 Pressione +, – para seleccionar “NEXT” e
pressione [q OK] para confirmar.
7 Pressione +, – para seleccionar “YES” e pressione
[q OK] para confirmar.
Enquanto os ficheiros estão a ser combinados, o indicador de
estado pisca.
• Se pressionar [F2 (CLOSE)] antes de a combinação estar
concluída, o processo de combinação é cancelado.
2012/05/28 15:48:04
Copiar ficheiro
1 Seleccione “COPY” no ecrã de definições de
edição (➜ página 20).
2 Pressione +, – para seleccionar o ficheiro
que pretende copiar e pressione [q OK] para
confirmar.
• Quando seleccionar o ficheiro numa outra pasta, pode
deslocar-se dentro das hierarquias da pasta pressionando
u. (Para mais informações sobre métodos de selecção de
ficheiros e pastas, consulte a página 4.)
• Quando copiar ficheiros na pasta LINE (LINE_SD), avance
para o passo 5 .
3 Pressione +, – para seleccionar o destino de
cópia (“INTERNAL MEMORY” ou “microSD
CARD”) e pressione [q OK] para confirmar.
4 Pressione +, – para seleccionar a pasta de destino
da cópia e pressione [q OK] para confirmar.
5 Pressione +, – para seleccionar “YES” e pressione
[q OK] para confirmar.
Enquanto o ficheiro está a ser copiado, o indicador de estado
pisca.
Função de reciclagem
Repor ficheiros colocados na reciclagem na
pasta original
1 Pressione [F2 (FOLDER)].
2 Pressione +, –, u, i para seleccionar “ ” e
pressione [q OK] para confirmar.
As pastas de reciclagem existem na memória interna e no
cartão SD, respectivamente.
3 Utilize u, i para seleccionar o ficheiro que
pretende repor e pressione [ERASE/A-B&] para
confirmar.
4 Pressione +, – para seleccionar “RESTORE FILE”
e pressione [q OK] para confirmar.
5 Pressione +, – para seleccionar “YES” e pressione
[q OK] para confirmar.
O indicador de estado pisca e o ficheiro seleccionado é
reposto na parte final da pasta original.
Pressione [q OK] para voltar ao ecrã indicado no passo 3 .
PORTUGUÊS
Editar: Copiar ou mover ficheiros
VQT4J81
Mover ficheiros
Seleccione “MOVE” no passo 1 à esquerda para mover ficheiros.
A operação é igual à da cópia de ficheiros.
21
225
VQT4J81_RR-XS450_420-E_PT.indd 225
2012/05/28 15:48:05
Função de reciclagem
Utilizar o temporizador
Esvaziar a pasta de reciclagem
1 Pressione [MENU].
1 Pressione [ERASE/A-B&].
2 Pressione +, – para seleccionar “COMMON MENU”
2 Pressione +, – para seleccionar “EMPTY
3 Pressione +, – para seleccionar “TIMER &
RECYCLE BIN” e pressione [q OK] para
confirmar.
Quando seleccionar a pasta de reciclagem, seleccione
“EMPTY” no passo 2 e pressione [q OK].
3 Pressione +, – para seleccionar “YES” e pressione
[q OK] para confirmar.
O indicador de estado pisca e a pasta de reciclagem é
esvaziada.
e pressione [q OK] para confirmar.
ALARM” e pressione [q OK] para confirmar.
4 Configure itens como a data e a hora, e a fonte de
som.
1 Pressione +, – para seleccionar o item e pressione [q OK]
para confirmar.
2 Pressione +, –, u, i para seleccionar a definição e
pressione [q OK] para confirmar.
Repita os passos 1 e 2 para concluir as definições.
5 Pressione +, – para seleccionar “OK” e pressione
[q OK] para confirmar.
Para sair do ecrã de definição, pressione [F2 (CLOSE)].
VQT4J81
Item de
definição
22
Detalhes
SETTING
OFF: O temporizador não é activado.
ON: O temporizador é activado.
REPEAT
ONCE: A gravação ou a reprodução é efectuada
apenas uma vez.
DAILY: A gravação ou a reprodução é efectuada
diariamente.
SELECT: A gravação ou a reprodução é efectuada
todas as semanas no dia seleccionado.
1 Pressione +, – para seleccionar o dia e
utilize [q OK] para adicionar uma marca de
verificação. (Pressione [q OK] novamente para
desmarcar a selecção.)
2 Depois de seleccionar o dia, seleccione “OK” e
pressione [q OK].
226
VQT4J81_RR-XS450_420-E_PT.indd 226
2012/05/28 15:48:05
REC/PLAY
PLAY
Detalhes
Definir a hora de início e a hora de fim
Seleccione o item (seleccione hora, minutos de início e
hora, minutos de fim) com u, i e defina com +, –.
• É possível definir um período de até 12 horas
entre a hora de início e a hora de fim.
PLAY: Reproduz um ficheiro definido ou o som
de alarme.
REC: Grava a fonte de som definida.
ALARM: Reproduz o som de alarme.
FILE: Reproduz um ficheiro.
É apresentada a lista de ficheiros da pasta
seleccionada.
Pressione +, – para seleccionar o ficheiro e pressione
[q OK]. Quando seleccionar ficheiros alternando
entre pastas, pressione u e pode deslocar-se entre
hierarquias. (Para mais informações sobre métodos de
selecção de ficheiros e pastas, consulte a página 4.)
SOURCE
MIC: Gravação de microfone.
LINE: Grava som proveniente de um dispositivo
externo.
MODE
PCM 44,1 kHz, MP3 320 kbps, MP3 192 kbps,
MP3 128 kbps, MP3 64 kbps, MP3 32 kbps
REC TO
Seleccione a pasta na qual pretende guardar o
ficheiro gravado.
• Se seleccionar uma pasta no cartão SD,
introduza o cartão SD.
Menu comum
Funcionamento de definições comuns
1 Pressione [MENU].
2 Pressione +, – para seleccionar “COMMON MENU”
e pressione [q OK] para confirmar.
3 Pressione +, – para seleccionar o item de
definição e pressione [q OK] para confirmar.
4 Pressione +, – para alterar a definição e pressione
[q OK] para confirmar.
Para sair do ecrã de definição, pressione [F2 (CLOSE)].
Para mais informações sobre “DATE & TIME” (➜ página 3) e
“TIMER & ALARM” (➜ página 22), consulte as respectivas
páginas.
PORTUGUÊS
TIME
BEEP SOUND
Pode definir-se o som do funcionamento dos botões.
OFF: Sem som de funcionamento.
ON: Som de funcionamento activado (ON).
(A programação de fábrica é “ON”.)
REC LED (Indicador de gravação)
Pode seleccionar se pretende acender (ON) ou apagar (OFF) a
luz do indicador de gravação.
OFF: Apagado
ON: Aceso
(A programação de fábrica é “ON”.)
VQT4J81
Item de
definição
23
227
VQT4J81_RR-XS450_420-E_PT.indd 227
2012/05/28 15:48:05
Menu comum
BATT. SETTING
Defina o tipo de pilhas utilizadas (pilhas de níquel metal-hídrico
recarregáveis ou pilhas alcalinas).
Tipo de pilha: RECHARGEABLE, ALKALINE
(A programação de fábrica é “RECHARGEABLE”.)
AUTO POWER OFF
Esta função desliga automaticamente a alimentação se não
houver funcionamento durante um determinado período de
tempo, como quando a gravação é parada. Esta função ajuda
na poupança de energia quando se esquecer de desligar o
dispositivo.
AUTO POWER OFF: 0 min. (OFF) a 15 min.
(A programação de fábrica é “15min”.)
BACKLIGHT
Defina o tempo de retroiluminação quando pressiona o botão.
Tempo de iluminação: OFF (não acende), 5 seg., 15 seg., sempre
acesa (ON)
(A programação de fábrica é “15 sec”.)
CONTRAST
FORMAT
Todos os ficheiros guardados na memória interna ou no
cartão são apagados. Os ficheiros apagados não podem ser
recuperados.
1 Seleccione “INTERNAL MEMORY” ou “microSD CARD” e
pressione [q OK] para confirmar.
2 Seleccione “YES” e pressione [q OK] para confirmar.
INIT MENU
Se as definições desta unidade forem inicializadas, todas as
definições, com excepção da definição “DATE & TIME”, são
restauradas para o estado padrão.
Seleccione “YES”, pressione [q OK] para confirmar e as
definições são inicializadas.
VERSION
Pode verificar a versão do firmware da unidade.
VQT4J81
Utilize esta função para ajustar o contraste do ecrã. Pode escolher
entre 10 níveis para o ajuste.
Ajuste de contraste: 1 (L) a 10 (H)
(A programação de fábrica é “5”.)
RECYCLE BIN
Quando a função de reciclagem é utilizada, os ficheiros
eliminados são movidos para a reciclagem. Antes de esvaziar a
reciclagem, é possível repor ficheiros eliminados, para não ter de
se preocupar com ficheiros eliminados por engano.
OFF: Não utilizar a função de reciclagem
ON: Utilizar a função de reciclagem
(A programação de fábrica é “ON”.)
24
228
VQT4J81_RR-XS450_420-E_PT.indd 228
2012/05/28 15:48:05
Requisitos do sistema
(À data de Maio de 2012)
SO
Interface
Máquinas compatíveis com IBM PC/AT, Macintosh
• Microsoft® Windows® XP Home Edition/Professional e Service Pack 2, Service
Pack 3
• Microsoft® Windows Vista® Home Basic/Home Premium/Business/Ultimate e
Service Pack 1, Service Pack 2
• Microsoft® Windows® 7 Starter/Home Basic/Home Premium/Professional/Ultimate
e Service Pack 1
• Mac OS X 10.2.8 - 10.7
Porta USB (Não é possível garantir o funcionamento se utilizar um hub USB.)
• Versão pré-instalada
Memória interna
4 GB (RR-XS450), 2 GB (RR-XS420)
A capacidade utilizável é inferior.
VQT4J81
✽ Alguns PC não podem ser utilizados mesmo que respeitem os requisitos do sistema mencionados neste documento.
✽ (Macintosh) Este software funciona na driver padrão do Sistema Operativo.
✽ O funcionamento só é garantido num SO compatível.
✽ O funcionamento não é garantido num SO actualizado.
✽ O funcionamento não é garantido nos computadores construídos em casa.
✽ Quando utilizar o Windows Media® Player, o computador tem de respeitar os requisitos de sistema do Windows Media® Player. Para
mais informações sobre o Windows Media® Player, consulte a Microsoft Corporation.
✽ Microsoft, Windows, Windows Media e Windows Vista são marcas comerciais ou marcas registadas da Microsoft Corporation nos
E.U.A. e noutros países.
✽ Tecnologia de codificação de áudio MPEG Layer-3 licenciada pela Fraunhofer IIS e Thomson.
✽ IBM e PC/AT são marcas registadas da International Business Machines Corporation dos E.U.A.
✽ Macintosh e Mac OS são marcas registadas da Apple Inc.
✽ Os outros nomes de sistemas e produtos que aparecem neste documento são, de uma forma geral, respectivamente marcas
comerciais ou marcas registadas das empresas que os desenvolveram. Note que as marcas ™ e ® não aparecem neste documento.
✽ Dependendo do ambiente do computador, podem ocorrer falhas no funcionamento (por exemplo, não poder utilizar os dados de
áudio gravados no aparelho. etc.). A Panasonic e os distribuidores Panasonic não se responsabilizam pela perda dos dados de áudio
ou outros danos directos ou indirectos, excepto nos casos de negligência intencional ou flagrante.
PORTUGUÊS
Computador
25
229
VQT4J81_RR-XS450_420-E_PT.indd 229
2012/05/28 15:48:05
Ligar a unidade a um computador
1 Puxe a ficha USB da unidade para fora.
2 Ligue a unidade a um computador utilizando a
porta USB.
Se não for possível ligar a unidade ao computador directamente,
utilize o cabo de extensão USB (incluído).
*Não utilize quaisquer outros cabos de extensão USB excepto
o fornecido.
Não utilize o cabo incluído com outros dispositivos.
VQT4J81
Atenção: Utilize apenas o cabo de extensão USB incluído com
um núcleo de ferrite quando ligar a unidade ao computador.
*A primeira vez que liga a unidade ao PC
Porque irão aparecer múltiplas mensagens de “Encontrado novo
hardware”, não desligue a unidade do PC até que todas essas
mensagens tenham desaparecido.
*Esta unidade não pode funcionar enquanto estiver ligada ao
computador.
*Quando a unidade é ligada ao PC, a mesma pode funcionar
sem a pilha porque a alimentação é fornecida pelo computador.
*Quando a unidade está ligada ao computador, este pode
não iniciar (reiniciar). É aconselhável remover a unidade do
computador quando iniciar (reiniciar) o computador.
*O funcionamento não é garantido nos seguintes casos.
• Quando existem dois ou mais dispositivos USB ligados a um
computador
(excluindo o rato e o teclado em funcionamento normal)
• Quando é utilizado um hub USB
• Quando é utilizado um cabo de extensão USB que não o cabo
incluído.
*Quando a unidade está ligada ao computador, se iniciar
(reiniciar) o computador ou este entrar no modo de espera,
o computador pode não reconhecer a unidade. Desligue a
unidade e volte a ligá-la ao computador ou volte a ligar a
unidade depois de reiniciar o computador.
*Consulte o manual de instruções do computador.
g Desligar a unidade do computador
Clique duas vezes no ícone (Windows XP: [ ], Windows Vista/
Windows 7: [ ]) no tabuleiro de tarefas na parte inferior do
ecrã do computador e siga as instruções que aparecem no ecrã
para remover a unidade. (Dependendo das definições do SO o
ícone pode não aparecer.) Depois de ser removida, a unidade
desliga-se. Quando esta unidade é ligada depois de eliminar, etc.,
ficheiros nesta unidade utilizando o computador, “UPDATING FILE
NAME” é apresentado. Podem ser necessários vários minutos até
a actualização estar terminada.
g Função de armazenamento em massa USB
Esta unidade funciona como uma memória USB e é reconhecida
como um dispositivo de armazenamento externo do computador.
Os ficheiros de dados do computador podem ser transferidos e
guardados nesta unidade.
26
230
VQT4J81_RR-XS450_420-E_PT.indd 230
2012/05/28 15:48:05
O logótipo microSDHC é uma marca comercial da SD-3C, LLC.
Este produto encontra-se protegido por determinados direitos
de propriedade intelectual da Microsoft Corporation e terceiros.
É proibido utilizar ou distribuir essa tecnologia fora do âmbito do
produto sem uma licença da Microsoft ou de uma subsidiária
Microsoft e terceiros autorizados.
Este produto pode estar sujeito a interferências de rádio
provocadas por telefones móveis durante a sua utilização.
Se detectar essas interferências, afaste o telefone móvel do
produto.
Guarde as pilhas AAA LR03 e as pilhas recarregáveis longe do
alcance das crianças para evitar que as possam engolir.
CUIDADO
• Há perigo de explosão se a bateria for substituída
incorrectamente. Substitua a bateria apenas por uma do tipo
recomendado pelo fabricante.
• Quando deitar fora as baterias, contacte as autoridades locais
ou o distribuidor para saber qual é o método de eliminação
correcto.
• Não aquecer ou expor a chamas.
• Não deixe a(s) bateria no interior de um automóvel que esteja
exposto directamente à luz do sol durante um período longo de
tempo com as portas e janelas fechadas.
VQT4J81
Certifique-se de que utiliza os auscultadores internos ou externos
recomendados.
Baseado na norma EN 50332-2:2003
1) Tensão máxima de saída (saída de auriculares): 150mV
2) Tensão de característica de banda larga (auriculares): 75mV
PORTUGUÊS
Manutenção
Limpe a unidade com um pano seco macio.
• Se a unidade estiver muito suja, limpe-a com um pano
humedecido em água, bem torcido, e depois seque-a com um
pano seco.
• Não utilize solventes, incluindo benzina, diluente, álcool,
detergente de cozinha, um produto de limpeza química, etc. Se o
fizer, pode deformar a caixa exterior ou danificar o revestimento.
27
231
VQT4J81_RR-XS450_420-E_PT.indd 231
2012/05/28 15:48:05
<Manuseio de baterias usadas>
Para países da América Latina apenas
Informação
Atenção ao Cliente
Diretório de Atenção ao Cliente
VQT4J81
Cobrir os terminais positivo (4) e negativo (3) com uma
fita isolante adesiva, antes de depositar numa caixa
destinada para o recolhimento. O contato entre partes
metálicas pode causar vazamentos, gerar calor, romper
a blindagem e produzir fogo.
Não desmonte, não remova o invólucro, nem amasse
a bateria. O gás liberado pela bateria pode irritar a
garganta, danificar o lacre do invólucro ou o vazamento
provocar calor, ruptura da blindagem e produzir fogo
devido ao curto circuito dos terminais. Não incinere nem
aqueça as baterias, elas não podem ficar expostas a
temperaturas superiores a 100°C (212°F).
O gás liberado pela bateria pode irritar a garganta,
danificar o lacre do invólucro ou o vazamento provocar
calor, ruptura da blindagem e produzir fogo devido ao
curto circuito dos terminais provocado internamente.
Evite o contato com o liquido que vazar das baterias.
Caso isto ocorra, lave bem a parte afetada com bastante
água. Caso haja irritação, consulte um médico.
Obtenha informações de produtos e assitência operacional; encontre o distribuidor ou
Centro de Serviço mais perto, compre peças e acessórios através da nossa página
web para America Latina.
http://www.lar.panasonic.com
E também diretamente com o nosso Contact Center:
Panamá
Colombia
Ecuador
Costa Rica
El Salvador
Guatemala
Chile
Venezuela
Uruguay
Peru
Argentina
800-PANA (800-7262)
01-8000-94PANA (01-8000-947262)
1800-PANASONIC (1800-726276)
800-PANA737 (800-7262737)
800-PANA (800-7262)
1-801-811-PANA (1-801-811-7262)
800-390-602
Desde telefone celular: 797-5000
800-PANA-800 (800-7262-800)
0-800-PANA (0-800-7262)
0800-00726
0800-333-PANA (0800-333-7262)
0810-321-PANA (0810-321-7262)
Serviço no Mexico
Para obter informação na República do Mexico, contactar-nos através de:
email: [email protected]
Ou através dos telefones:
01800-VIP-PANA (01800-847-7262) - Interior
(55) 5000-1200 - Mexico D.F. e Area Metropolitana
28
232
VQT4J81_RR-XS450_420-E_PT.indd 232
2012/05/28 15:48:05
Informações para Utilizadores referentes à Recolha e Eliminação de Equipamentos Velhos e Baterias.
Estes símbolos nos produtos, embalagens e documentos significam que os produtos eléctricos e
electrónicos usados nao podem ser misturados com os resíduos urbanos.
Para o tratamento apropriado, recuperação e reciclagem de produtos velhos e baterias usadas,
solicitamos que os coloque em pontos de recolha próprios, de acordo com a Legislacao Nacional e
com as Directivas Europeias 2002/96/EC e 2006/66/EC.
A eliminação correcta deste produto ajudará a poupar recursos valioso e evitar quaisquer potenciais efeitos
negativos na saúde humana e no ambiente, os quais poderiam resultar de um tratamento incorrecto de Resíduos.
Para mais informacoes sobre a recolha e reciclagem de produtos velhos e baterias, por favor,
contacte as autoridades locais responsáveis pela recolha de resíduos ou o ponto de venda onde o
produto foi adquirido.
[Informação sobre a eliminação noutros países fora da União Europeia]
Estes símbolos são válidos, apenas, na União Europeia. Se pretender eliminar este produto
contacte, por favor, as autoridades locais responsáveis pela recolha de resíduos ou o ponto de
venda onde o produto foi adquirido e solicite informação sobre o método de eliminação correcto.
Nota para os símbolos de baterias (dois exemplos de símbolos):
Este símbolo pode ser utilizado em conjugação com um símbolo químico. Neste caso, terá de
proceder em conformidade com o estabelecido na Directiva referente aos produtos químicos
utilizados.
Cd
VQT4J81
Para Uitlizadores Não Particulares da União Europeia
Se pretender eliminar equipamentos eléctricos e electrónicos, por favor, contacte o seu
Distribuídor ou Produtor para obter mais informações.
PORTUGUÊS
De acordo com a legislacao nacional, podem ser apçlicadas multas caso seja feita a eliminação
incorrecta destes resíduos.
29
233
VQT4J81_RR-XS450_420-E_PT.indd 233
2012/05/28 15:48:06
ZOOM/STEREO
F2
F1
OPR/HOLD
MENU
STOP "/RETURN
VOL
LIST
REC MIC/LINE
USB
ERASE/A-B EU
EU
Pursuant to at the directive 2004/108/EC, article 9(2)
Panasonic Testing Centre
Panasonic Marketing Europe GmbH
Winsbergring 15, 22525 Hamburg, Germany
Web Site: http://panasonic.net
© Panasonic Corporation 2012
VQT4J81_RR-XS450_420-E_En.indd 94
En
Ge
It
Fr
Sp
Pr
VQT4J81
2012/05/29 9:35:50