1
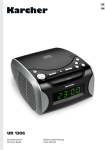
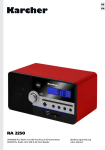
DE
EN
RA 2040
Unterbau-Küchenradio mit CD-Player
Under-Cabinet Kitchen Radio with CD Player
| Bedienungsanleitung
| User Manual
DE
Vorwort
Vielen Dank, dass Sie sich für dieses Produkt entschieden haben. Bitte lesen Sie diese
Bedienungsanleitung sorgfältig, damit Sie in der Lage sind, die maximale Leistungsfähigkeit dessen
auszuschöpfen und die Sicherheit bei Installation, Verwendung und Wartung gewährleistet wird.
Bewahren Sie diese Bedienungsanleitung so auf, dass Sie sie immer griffbereit haben.
Unsere Hotline für technische Fragen:
0900/1000036
(Mo. – Do.: 8.00 – 16.30 Uhr | Fr.: 8.00 – 15.00 Uhr | 0,99 €/Min. aus dem deutschen Festnetz)
Bitte machen Sie von dieser Hotline Gebrauch, da technische Probleme meist hier schon behoben werden können, ohne dass Sie Ihr Gerät einsenden müssen.
Internet:www.karcher-products.de
E-Mail:[email protected]
DE | 3
Sicherheitshinweise
1.
2.
3.
4.
5.
6.
7.
8.
9.
10.
11.
12.
13.
14.
15.
16.
17.
18.
19.
4 | DE
Bedienungsanleitung lesen – Lesen Sie die Bedienungsanleitung aufmerksam, um sich mit der
Bedienung des Gerätes vertraut zu machen.
Bedienungsanleitung aufbewahren – Bewahren Sie die Bedienungsanleitung sorgfältig auf.
Hinweise beachten – Beachten Sie alle Hinweise und Anweisungen in der Bedienungsanleitung.
Wasser und Feuchtigkeit – Das Gerät darf nicht in der Nähe von Wasser (z. B. einer Badewanne, einem Waschbecken, einem Schwimmbecken, etc.) oder an feuchten Orten, bzw. in
tropischem Klima verwendet werden. Stellen Sie keine mit Flüssigkeiten befüllten Objekte oder
Gefäße (z. B. Vasen) auf das Gerät. Setzen Sie das Gerät weder Tropf- noch Spritzwasser aus.
Aufstellung – Das Gerät darf nur auf einer stabilen, ebenen Oberfläche aufgestellt werden. Platzieren Sie das Gerät so, dass es keinen Erschütterungen ausgesetzt werden kann.
Wandmontage – Eine Wand- oder Deckenmontage darf nur dann erfolgen, wenn das Gerät
dafür vorgesehen ist.
Belüftung – Stellen Sie das Gerät immer so auf, dass die Lüftungsöffnungen nicht blockiert oder
verdeckt (z. B. von einem Vorhang, einer Decke, einer Zeitung, etc.) werden. Das Gerät darf z.
B. nicht auf einem Bett, Sofa, Teppich, etc. aufgestellt werden. Für eine ausreichende Belüftung
sollte ein Freiraum von mindestens 5 cm um das Gerät herum eingehalten werden.
Hitze – Das Gerät darf nicht in die Nähe von Hitzequellen, wie z. B. einer Heizung, einem Herd
oder anderen Geräten gelangen.
Stromversorgung – Das Gerät darf nur mit der auf der Geräterückseite angegebenen Spannung betrieben werden.
Kabel & Stecker – Das Netzkabel und der Netzstecker müssen immer in einwandfreiem Zustand
sein. Der Netzstecker muss jederzeit erreichbar sein, um das Gerät vom Netz trennen zu können.
Sämtliche Kabel sollten immer so ausgelegt werden, dass diese keine Stolperfalle darstellen und
nicht beschädigt werden können. Stellen Sie keine Objekte auf Kabel. Wandsteckdosen, Verlängerungskabel und Mehrfachsteckerleisten dürfen niemals überbelegt werden.
Reinigung – Reinigen Sie das Gerät ausschließlich mit einem trockenen, weichen und sauberen
Tuch. Verwenden Sie niemals chemische Reinigungsmittel. Ziehen Sie vor dem Reinigen den
Netzstecker.
Nichtverwendung – Wenn Sie das Gerät für längere Zeit nicht verwenden, ziehen Sie den
Netzstecker.
Eintritt von Objekten oder Flüssigkeiten – Es dürfen keine Objekte in das Gehäuse des Gerätes gelangen. Das Gerät darf niemals in Kontakt mit irgendwelchen Flüssigkeiten gelangen.
Wann Sie eine Servicestelle aufsuchen sollten – Ziehen Sie umgehend den Netzstecker und
suchen Sie eine qualifizierte Servicestelle auf, wenn einer der folgenden Ereignisse eintritt:
a) Wenn der Netzstecker oder das Netzkabel beschädigt ist.
b) Wenn Objekte in das Gehäuse eingedrungen sind oder das Gerät in Kontakt mit einer Flüssigkeit war.
c) Wenn das Gerät nicht ordnungsgemäß funktioniert. Nehmen Sie selbst nur solche Einstellungen vor, die in dieser Bedienungsanleitung erklärt werden.
d) Wenn das Gerät heruntergefallen ist oder in sonstiger Weise einer Erschütterung ausgesetzt war.
Reparaturen – Reparaturen und Wartungsarbeiten dürfen nur von qualifiziertem Fachpersonal
durchgeführt werden. Versuchen Sie niemals, das Gerät selbst zu reparieren. Öffnen Sie niemals
das Gehäuse.
Offenes Feuer – Halten Sie das Gerät fern von offenem Feuer. Stellen Sie keine brennenden
Kerzen oder ähnliches auf das Gerät.
Gewitter – Während eines Gewitters sollten Sie den Netzstecker ziehen.
Sicherheitscheck – Nach einer Reparatur sollte der durchführende Techniker einen Sicherheitscheck des Gerätes vornehmen, um zu versichern, dass das Gerät einwandfrei funktioniert.
Batterien – Setzen Sie Batterien immer richtig gepolt in elektrische Geräte ein. Explosionsgefahr wenn Batterien falsch eingesetzt werden. Ersetzen Sie alte Batterien stets mit neuen des
gleichen Typs. Verwenden Sie alte und neue Batterien nie gleichzeitig. Alte Batterien gehören
nicht in den Hausmüll, sondern müssen separat in den dafür vorgesehenen Behältern entsorgt
DE
20.
21.
werden. Batterien dürfen nicht übermäßiger Hitze, wie z. B. durch Sonnenschein, Feuer o. ä.
ausgesetzt werden.
Lautstärke – Um Hörschäden vorzubeugen, vermeiden Sie es, zu lange bei hohen Lautstärken
zu hören.
Kopfhörer – Eine zu hohe Lautstärke bei Verwendung von Ohr- oder Kopfhörern kann zu Hörschäden führen.
VORSICHT
GEFAHR EINES ELEKTROSCHOCKS
WARNUNG: Um das Risiko eines Feuers oder
elektrischen Schlags zu verringern, setzen Sie dieses
Gerät niemals Wasser, Regen oder Feuchtigkeit aus.
WARNUNG: Um die Gefahr eines
elektrischen Schlags zu verringern, öffnen
Sie niemals das Gehäuse dieses Gerätes.
Versuchen Sie niemals, das Gerät selbst
zu reparieren. Wartungsarbeiten und
Reparaturen dürfen ausschließlich von
qualifiziertem Fachpersonal durchgeführt
werden.
Dieses Symbol weist den Benutzer auf gefährliche Spannung innerhalb des Gerätes hin.
Es besteht die Gefahr eines elektrischen Schlags.
Dieses Symbol weist den Benutzer auf Teile hin, deren Funktion und Wartung genauestens
beschrieben sind.
SEHEN SIE NIEMALS DIREKT IN
DEN LASERSTRAHL!
Batterien und Akkus
Batterien und Akkus dürfen nicht mit dem normalen Hausmüll entsorgt werden. Jeder Verbraucher ist verpflichtet, alte Batterien und Akkus bei einer Sammelstelle seiner Gemeinde,
seines Stadtteils oder im Handel abzugeben, so dass sie einer umweltschonenden Entsorgung zugeführt werden können.
Entsorgung von Elektro- und Elektronikaltgeräten
Dieses Symbol auf dem Produkt weist darauf hin, dass dieses nicht zusammen mit
dem normalen Hausmüll entsorgt werden darf. Für zu entsorgende Elektro- und
Elektronikaltgeräte gibt es ein besonderes, kostenfreies Entsorgungssystem. Weitere
Informationen erhalten Sie von Ihrem lokalen Entsorgungsunternehmen oder von dem
Händler, bei dem Sie dieses Produkt erworben haben. Mit der getrennten Entsorgung
helfen Sie, die Umwelt und Gesundheit Ihrer Mitmenschen zu schützen.
DE | 5
1. Umgang mit Disks
•
Das Disk-Fach Ihres Gerätes muss stets geschlossen sein, sodass kein Staub und Schmutz eindringen können, die die Linse beschädigen würden.
•
Berühren Sie niemals die bespielte Seite einer Disk.
•
Bekleben und beschreiben Sie niemals eine Disk.
•
Biegen Sie Disks nicht.
•
Halten Sie Disks immer an deren äußeren Kanten.
2. Aufbewahrung von Disks
•
Bewahren Sie Disks stets in ihren jeweiligen Schutzhüllen auf.
•
Setzen Sie Disks niemals dem direkten Sonnenlicht, Staub, Schmutz, hohen Temperaturen, hoher
Luftfeuchtigkeit oder Nässe aus.
3. Reinigen von Disks
•
Sollte eine Disk einmal verschmutzt sein, so verwenden Sie zum Säubern ein sauberes, trockenes
Tuch.
•
Ziehen Sie das Tuch vorsichtig von der Mitte der Disk zur äußeren Kante:
Richtig
•
Falsch
Verwenden Sie niemals chemische Reinigungsmittel, Wasser, Verdünnungsmittel oder antistatisches Spray.
4. Kompatibilität
•
Aufgrund der Vielzahl von Komprimierungsverfahren kann es vorkommen, dass vereinzelte Disks
nicht wiedergegeben werden können.
HINWEISE ZU DIESER BEDIENUNGSANLEITUNG
1. Diese Bedienungsanleitung wird vom Hersteller ohne jegliche Gewährleistung veröffentlicht. Korrekturen und Änderungen dieser Bedienungsanleitung zur Beseitigung typographischer Fehler
und redaktioneller Ungenauigkeiten sowie aufgrund von (technischen) Verbesserungen (Änderungen) der Geräte können vom Hersteller jederzeit ohne Ankündigung vorgenommen werden.
Änderungen dieser Art werden in zukünftigen Ausgaben dieser Bedienungsanleitung berücksichtigt. Alle Rechte vorbehalten.
2. Alle Abbildungen dienen ausschließlich der Illustration und zeigen nicht immer die exakte Darstellung des Artikels.
3. Dieses Gerät ist nicht dafür bestimmt, durch Personen (einschließlich Kinder) mit eingeschränkten physischen, sensorischen oder geistigen Fähigkeiten oder mangels Erfahrung und / oder
mangels Wissen benutzt zu werden, es sei denn, sie werden durch eine für ihre Sicherheit
zuständige Person beaufsichtigt oder erhielten von ihr Anweisung, wie das Gerät zu benutzen ist.
Kinder sollten beaufsichtigt werden, um sicherzustellen, dass sie nicht mit dem Gerät spielen.
WEITERE HINWEISE ZUM GERÄT
Einstellen einer sicheren Lautstärke
•
Beim ständigen Hören lauter Musik gewöhnt sich Ihr Gehör daran und lässt die Lautstärke gerin6 | DE
DE
•
•
•
•
•
ger erscheinen.
Was normal erscheint, kann schon lange zu laut und gesundheitsschädlich sein.
Stellen Sie zu Ihrer eigenen Sicherheit die Lautstärke niedrig ein.
Erhöhen Sie die Lautstärke langsam.
Die Hörschäden können weitreichend und nicht heilbar sein.
Wenden Sie sich bei Hörproblemen bitte unverzüglich an Ihren Hausarzt.
Kondensation
•
Beim Umsetzen des Geräts von einer kalten in eine warme Umgebung kann es zu Kondensationsbildung kommen. In diesem Fall sind Fehlfunktionen nicht auszuschließen. Schalten Sie das
Gerät nicht ein und benutzen es für etwa 1 Stunde nicht, bis es ausgetrocknet ist.
Energie sparen
•
Bei längerer Nichtbenutzung den Netzstecker aus der Steckdose ziehen.
Auspacken
•
Nehmen Sie Ihr Gerät vorsichtig aus der Verpackung. Sie sollten die Verpackung zur weiteren
Verwendung aufheben.
•
Entfernen Sie vorsichtig etwaige Schutzkartons und Schutzfolien.
Bedienelemente
1
8
9
10
11
12
2
3
4
5 6
7
13 14 15
18
19
20
21
22
16
1.
2.
3.
4.
5.
6.
7.
8.
17
POWER-Taste
FUNCTION-Taste
AL.SET-Taste (Wecker einstellen)
LAUTSTÄRKE-Tasten (VOL+/VOL-)
LICHT EIN/AUS-Taste (LIGHT ON/OFF)
MEMORY-Tasten (M+/M-)
LCD-Display & Fernbedienungssensor
CD-Fach
DE | 7
9.
10.
11.
12.
13.
14.
15.
16.
17.
18.
19.
20.
21.
22.
OPEN/CLOSE-Taste
◄
RANDOM/REPEAT-Taste
■ STOP-Taste
►/|| PLAY/PAUSE-Taste
PROGRAM-Taste
|◄◄ SKIP- Taste
►►| SKIP+ Taste
Schraubengewinde für Unterbaumontage
Netzkabel
AUX In 3,5 mm
Kopfhörerausgang 3,5 mm
Lautsprecher
Backup-Batterie-Fach
LED-Arbeitsflächenbeleuchtung
Fernbedienung
1.
2.
3.
4.
5.
6.
7.
8.
9.
10.
11.
12.
13.
14.
15.
16.
17.
POWER-Taste
■ STOP-Taste
VOLUME+ Taste
|◄◄ BACK-Taste
VOLUME- Taste
MEMORY-Tasten (M+/M-)
FUNCTION-Taste
TIME SET-Taste
SNOOZE-Taste
MEM PROG-Taste
MUTE-Taste
REPEAT-Taste
►►| FORWARD-Taste
►/|| PLAY/PAUSE-Taste
AL. SET-Taste
OPEN/CLOSE-Taste
SLEEP-Taste
1
10
11
MEM
PROG
2
3
4
5
REPEAT
13
14
M+
AL. SET
6
7
8
9
Bohrer 1/4”
Lineal oder Maßband
Nagel
Schere
Kreuzschlitzschraubendreher
Klebeband
Schutzbrille
FUNCTION
OPEN/
CLOSE
16
TIME
SET
SNOOZE
SLEEP
17
Karcher
Im Lieferumfang
enthalten
3x Distanzstücke
3x Unterlegscheiben
3x Schrauben
Schablone
Vor der Montage
Nehmen Sie alle Gegenstände aus dem Schrank,
unter dem Sie das Radio montieren möchten, heraus
und säubern Sie diesen. Entfernen Sie sämtliche
Fettrückstände.
8 | DE
15
M-
Montage
Benötigte Werkzeuge
12
DE
Wichtig:
•
Die Montage sollte ausschließlich durch einen qualifizierten Fachmann durchgeführt werden.
•
Um eine sichere Montage zu gewähren, müssen die Schrauben mindestens einen Zentimeter in
das Radio geschraubt werden.
Schritt 1
Wenn Ihr Schrank keinen Überhang hat:
a) Positionieren Sie die Schablone an der gewünschten Stelle an der Unterseite des Schrankes.
b) Kleben Sie die Schablone mit leicht zu entfernenden Klebestreifen fest und gehen Sie zu Schritt 2.
Vorderkante
des Schranks
Schablone
Wenn Ihr Schrank einen Überhang hat:
a) Messen Sie die Dicke des Überhangs.
b) Falten Sie die Vorderseite der Schablone an der Linie entsprechend der Dicke Ihres Schrankes.
c) Kleben Sie die Schablone mit einfach zu entfernenden Klebestreifen fest.
Hinweis: Es wird empfohlen, während dem Bohren eine Schutzbrille zu tragen.
Schablone an gestrichelter Linie falten
Dicke des Schranküberhangs messen
Schritt 2
Bohren Sie 3 Löcher gemäß der Schablone mit einem Durchmesser von ¼ Zoll in die Unterseite des
Schrankes.
Schritt 3
Entfernen Sie die Schablone und säubern Sie den Schrank.
Schritt 4
Wenn Ihr Schrank keinen Überhang hat, gehen Sie zu Schritt 5.
Wenn Ihr Schrank einen Überhang hat, wählen Sie ein Abstandsstück, das der Länge des Überhangs
entspricht.
DE | 9
Schranküberhang
Distanzstück
Schrankboden
Gleichlang oder länger als Schranküberhang
Gewählte Schrauben, die
die Mindestlänge erfüllen,
aber nicht die Maximallänge überschreiten
Schritt 5
Schrauben Sie die Schrauben von der Innenseite des Schrankes. Verwenden Sie immer die Unterlegscheiben.
Wenn Ihr Schrank keinen Überhang hat, gehen Sie zu Schritt 7.
Schritt 6
Drücken Sie die Schraubenköpfe nach unten, während Sie die Abstandsstücke unter dem Schrank auf
die Schrauben drücken.
Schritt 7
Richten Sie das Radio unter den Schrauben aus. Befestigen Sie die Schrauben gleichmäßig, so dass
das Radio stabil befestigt ist.
Erste Inbetriebnahme
Stromversorgung
•
Stecken Sie den Netzstecker in eine geeignete Steckdose. Achten Sie darauf, dass die Ausgangsleistung der Steckdose mit der auf dem Gerät angegebenen benötigten Spannung übereinstimmt.
Backup-Batterien einsetzen (nicht im Lieferumfang):
1. Öffnen Sie das Batteriefach.
2. Setzen Sie 2 Stk. Batterien der Größe „AAA” 1,5V ein. Achten Sie auf die korrekte Polarität („+“
und „-“). Im Falle eines Stromausfalls werden Uhrzeit und andere Einstellungen gespeichert,
sodass diese nicht erneut eingestellt werden müssen.
3. Um das Batteriefach zu schließen, setzen Sie den Deckel auf und drücken Sie vorsichtig, bis
dieser einrastet.
Hinweise:
•
Wenn das Gerät für längere Zeit nicht verwendet wird, entfernen Sie die Batterien und ziehen Sie
den Netzstecker.
•
Wenn die Batterien schwach sind, funktioniert die Backup-Funktion evtl. nicht. Ersetzen Sie in
diesem Fall die Batterien rechtzeitig.
10 | DE
DE
Grundfunktionen
Uhrzeit einstellen
1. Während sich das Gerät im Standby-Modus befindet (Uhrzeit wird angezeigt), halten Sie die Taste PROG. am Gerät oder die Taste TIME SET auf der Fernbedienung 2 Sekunden lang gedrückt.
Die Stunde beginnt zu blinken.
2. Stellen Sie die aktuelle Stunde anhand der Tasten |◄◄ / ►►| ein.
3. Drücken Sie erneut die Taste PROG. oder TIME SET. Nun blinkt die Minute.
4. Stellen Sie die aktuellen Minuten anhand der Tasten |◄◄ / ►►| ein.
5. Drücken Sie erneut die Taste PROG. oder TIME SET, um zwischen 12- und 24-Stunden-Anzeige
auszuwählen.
6. Drücken Sie erneut die Taste PROG. oder TIME SET, um alle Einstellungen zu speichern. Die
Uhrzeit ist nun eingestellt.
Wecker einstellen
1. Während sich das Gerät im Standby-Modus befindet, halten Sie die Taste AL. SET am Gerät
oder auf der Fernbedienung 2 Sekunden lang gedrückt. Das Weckersymbol 1 (Alarm 1) wird nun
angezeigt und die Stunde blinkt.
2. Stellen Sie die gewünschte Stunde des Weckers 1 andhand der Tasten |◄◄ / ►►| ein.
3. Drücken Sie erneut die Taste AL. SET. Die Minuten blinken nun.
4. Stellen Sie die gewünschten Minuten des Weckers anhand der Tasten |◄◄ / ►►| ein.
5. Drücken Sie erneut die Taste AL. SET. Nun können Sie den Weckton (Buzzer, Radio oder CD)
auswählen:
Buzzer als Weckton:
Dies ist die Standardeinstellung (kein Symbol oberhalb der Uhrzeit wird angezeigt).
Radio als Weckton:
Drücken Sie die Taste |◄◄ oder ►►| bis „FM” im Display angezeigt wird (oberhalb der Uhrzeit).
Zur eingestellten Weckzeit ertönt nun der zuletzt eingestellte Radiosender.
CD als Weckton:
Drücken Sie die Taste |◄◄ oder ►►| bis das CD-Symbol im Display angezeigt wird (oberhalb
der Uhrzeit). Damit dies funktioniert, muss eine CD in das CD-Fach eingelegt sein. Diese wird
dann zur eingestellten Weckzeit abgespielt.
6.
7.
8.
Drücken Sie erneut die Taste AL. SET, um Ihre Einstellungen für Wecker 1 zu speichern.
Nun erscheint das Symbol für Wecker 2 (Alarm 2) im Display und die Stunde blinkt.
Wiederholen Sie die Schritte 1 - 6, um die zweite Weckzeit (Wecker 2) einzustellen.
Um auszuwählen, welcher der beiden Wecker aktiv sein soll, so drücken Sie wiederholt die Taste AL.
SET während sich das Gerät im Standby-Modus befindet (Uhrzeit wird angezeigt). Mit jedem Tastendruck wird zuerst das Symbol des Wecker 1, dann Wecker 2 und dann beide angezeigt. Drücken Sie
die Taste AL. SET, um beide Wecker zu deaktivieren (kein Weckersymbol wird angezeigt).
Snooze-Funktion:
Anhand der Snooze-Funktion können Sie einen Wecker um 9 Minuten verschieben. Drücken Sie hierzu die Taste SNOOZE auf der Fernbedienung während der Wecker aktiv ist. Im Display wird „SNOOZE“ angezeigt. Der Wecker wird stumm gestellt und ertönt nach 9 Minuten erneut. Um die SnoozeFunktion und den Wecker auszuschalten, drücken Sie die POWER-Taste.
Wecker ausschalten:
Um einen aktiven Wecker auszuschalten, drücken Sie die POWER-Taste am Gerät oder auf der
Fernbedienung.
DE | 11
Lautstärke einstellen
•
Um die Lautstärke zu erhöhen, drücken Sie die Taste VOL+ am Gerät oder auf der Fernbedienung.
•
Um die Lautstärke zu verringern, drücken Sie die Taste VOL- am Gerät oder auf der Fernbedienung.
LED-Arbeitsflächenbeleuchtung
Dieses Gerät verfügt über eine LED-Arbeitsflächenbeleuchtung.
•
Um das Licht einzuschalten, drücken Sie die Taste LIGHT ON/OFF am Gerät.
•
Die Ausrichtung des Lichts kann verstellt werden. Gehen Sie hierbei jedoch vorsichtig vor.
•
Um das Licht auszuschalten, drücken Sie die Taste LIGHT ON/OFF erneut.
Sleep-Funktion
Wenn das Gerät eingeschaltet ist, können Sie anhand der Sleep-Funktion einen Timer einstellen, nach
dessen Ablauf sich das Gerät automatisch in den Standby-Modus schaltet.
•
Drücken Sie wiederholt die Taste SLEEP auf der Fernbedienung bis die gewünschte Dauer
erreicht ist.
•
Wenn der Sleep-Timer aktiviert ist, können Sie die noch verbleibende Zeit bis zum Ausschalten
anzeigen, indem Sie die Taste SLEEP einmal drücken.
•
Um den Sleep-Timer zu deaktivieren, drücken Sie wiederholt die Taste SLEEP bis die Anzeige
„SLEEP“ aus dem Display gelöscht wird.
Radio
Radiobetrieb
1. Drücken Sie die POWER-Taste, um das Gerät einzuschalten.
2. Drücken Sie die FUNCTION-Taste, um die FM-Radio-Funktion auszuwählen („FM“ wird im Display angezeigt).
3. Um automatisch nach dem vorherigen/nächsten empfangbaren Sender zu suchen, halten Sie
die Taste |◄◄ oder ►►| 2 Sekunden lang gedrückt. Es wird nach dem nächsten empfangbaren
Sender gesucht und dieser gespielt.
4. Um manuell nach einem Sender zu suchen, drücken Sie wiederholt die Taste |◄◄ oder ►►| bis
die gewünschte Frequenz erreicht wird.
5. Dieses Gerät unterstützt FM-Stereo-Empfang. Wenn ein Sender gefunden wird, der in stereo
sendet, so wir das Stereo-Symbol im Display angezeigt.
Senderspeicher
Es können bis zu 20 Sender gespeichert werden.
1. Suchen Sie nach einem gewünschten Radiosender wie zuvor beschrieben.
2. Um diesen Sender zu speichern, drücken Sie die Taste PROG. am Gerät oder die Taste MEM
PROG auf der Fernbedienung. Der erste Senderspeicherplatz „P01” blinkt im Display.
3. Wählen Sie anhand der Tasten |◄◄ / ►►| einen Speicherplatz (P01 - P20) auf welchem der
aktuell eingestellte Sender gespeichert werden soll.
4. Drücken Sie die Taste PROG. am Gerät oder die Taste MEM PROG auf der Fernbedienung
erneut, um zu speichern.
5. Wiederholen Sie die Schritte 1 - 4, um bis zu 20 Radiosender zu speichern.
Hinweis: Ein gespeicherter Sender kann nur gelöscht werden, indem ein anderer Sender auf diesem
Speicherplatz gespeichert wird.
Ein gespeicherten Radiosender aufrufen
Um einen gespeicherten Radiosender aufzurufen, schalten Sie das Radio ein und drücken Sie die
Tasten M-/M+ wiederholt bis der entsprechende Speicherplatz erreicht wird.
Hinweis: Wenn Sie das Gerät vom Stromnetz trennen oder bei einem Stromausfall gehen die gespei12 | DE
DE
cherten Sender verloren, es sei denn, Sie haben Backup-Batterien eingelegt.
CD-Player
CD-Wiedergabe
1. Drücken Sie die POWER-Taste, um das Gerät einzuschalten.
2. Drücken Sie die FUNCTION-Taste, um die CD-Funktion auszuwählen (CD-Symbol wird im Display angezeigt).
3. Drücken Sie die Taste OPEN/CLOSE, um das CD-Fach zu öffnen.
4. Legen Sie eine Disk mit der bedruckten Seite nach oben zeigend ein. Versichern Sie sich, dass
die Disk korrekt eingelegt ist.
5. Drücken Sie die Taste OPEN/CLOSE erneut, um das CD-Fach zu schließen.
6. Drücken Sie die Taste ►/|| PLAY/PAUSE, um die Wiedergabe zu starten.
7. Um die Wiedergabe anzuhalten, drücken Sie die Taste ►/|| PLAY/PAUSE. Um die Wiedergabe
fortzusetzen, drücken Sie die Taste erneut.
8. Um die Wiedergabe zu beenden, drücken Sie die Taste ■ STOP.
Schnellvorlauf/Schnellrücklauf & Titel überspringen
•
Um an den Anfang des aktuellen Titels zu springen, drücken Sie die Taste |◄◄ SKIP- einmal.
Drücken Sie die Taste ein zweites Mal, um zum vorherigen Titel zu springen.
•
Um zum nächsten Titel zu springen, drücken Sie die Taste ►►| SKIP+.
•
Um beim aktuellen Titel einen Schnellvorlauf durchzuführen, halten Sie die Taste ►►| SKIP+
gedrückt. Wenn Sie die gewünschte Stelle im Titel erreichen, lassen Sie die Taste los und der
Titel wird wieder normal wiedergegeben.
•
Um beim aktuellen Titel einen Schnellrücklauf durchzuführen, halten Sie die Taste |◄◄ SKIP- gedrückt. Wenn Sie die gewünschte Stelle im Titel erreichen, lassen Sie die Taste los und der Titel
wird wieder normal wiedergegeben.
Wiederholfunktion und Zufallswiedergabe
Dieses Gerät ermöglicht die wiederholte Wiedergabe eines Titels oder der ganzen Disk.
1. Drücken Sie während der CD-Wiedergabe die Taste ◄ RANDOM/REPEAT einmal, um den aktuellen Titel zu wiederholen. Im Display wird „REPEAT” angezeigt.
2. Drücken Sie die Taste ◄ RANDOM/REPEAT ein zweites Mal, um die gesamte Disk zu wiederholen. Im Display wird „REPEAT ALL” angezeigt.
3. Drücken Sie die Taste ◄ RANDOM/REPEAT ein drittes Mal, um zur Zufallsfunktion zu wechseln:
Alle Titel auf der eingelegten CD werden nun in zufälliger Reihenfolge abgespielt. Im Display wird
hierbei „RAND” angezeigt.
4. Um die Wiederhol- und Zufallsfunktionen auszuschalten, drücken Sie die Taste ◄ RANDOM/
REPEAT ein viertes Mal.
Wiedergabereihenfolge festlegen
Sie können eine Reihenfolge von bis zu 20 Titeln festlegen, in welcher diese abgespielt werden sollen.
1. Drücken Sie im CD-Stopp-Modus (mit eingelegter Disk) die Taste PROG. am Gerät oder die
Taste MEM PROG auf der Fernbedienung. Der erste Speicherplatz „01“ blinkt im Display.
2. Wählen Sie mit den Tasten |◄◄ / ►►| den Titel, der als erstes abgespielt werden soll. Drücken
Sie dann die Taste PROG. am Gerät oder die Taste MEM PROG auf der Fernbedienung, um Ihre
Auswahl zu bestätigen.
3. Der zweite Speicherplatz „02“ blinkt nun. Wiederholen Sie Schritt 2, um bis zu 20 Titel für Ihre
Reihenfolge festzulegen.
4. Um die Wiedergabe der festgelegten Reihenfolge zu starten, drücken Sie die Taste ►/|| PLAY/
PAUSE.
5. Um die Wiedergabe zu beenden, drücken Sie die Taste ■ STOP.
6. Um die festgelegte Reihenfolge zu löschen, drücken Sie die Taste ■ STOP erneut.
DE | 13
AUX-Eingang
An den AUX-Eingang an der Geräteunterseite können Sie ein externes Gerät, wie z. B. einen MP3Player anschließen, um dessen Sound über die Gerätelautsprecher wiederzugeben.
•
Um das externe Gerät anzuschließen, verbinden Sie dieses über ein 3,5 mm Audiokabel (nicht
im Lieferumfang) mit dem AUX-Eingang an der Geräteunterseite.
•
Drücken Sie die FUNCTION-Taste, um „AUX“ auszuwählen
•
Schalten Sie das externe Gerät (z. B. MP3-Player) ein.
•
Starten Sie die Wiedergabe am externen Gerät und stellen Sie die gewünschte Lautstärke ein.
•
Wenn Sie das Gerät ausschalten, schaltet sich das externe Gerät nicht ebenfalls aus. Sie müssen das externe Gerät separat ausschalten.
Kopfhöreranschluss
An den 3,5 mm Kopfhöreranschluss an der Geräteunterseite können Sie entsprechende Kopfhörer
anschließen.
Sobald Kopfhörer angeschlossen sind, sind die Lautsprecher deaktiviert. Um die Lautsprecher wieder
einzuschalten, ziehen Sie die Kopfhörer ab.
Beachten Sie die Sicherheitshinweise bzgl. der Verwendung von Kopfhörern.
Technische Daten
Stromversorgung:
Leistungsaufnahme (max.):
Batterie-Backup:
Radiofrequenzbereich:
Gerätemaße (BxTxH) ca.:
AC 230V ~ 50 Hz
12W
DC 3V
(2x 1,5V Batterien Größe „AAA“, nicht im Lieferumfang)
FM 88 - 108 MHz
250 x 228 x 64 mm
Technische und optische Änderungen jederzeit vorbehalten.
14 | DE
Safety Information
1.
2.
3.
4.
5.
6.
7.
8.
9.
10.
11.
12.
13.
14.
15.
16.
17.
18.
19.
Read Instructions - All the safety and operating instructions should be read before the appliance
is operated.
Retain Instructions - The safety and operating instructions should be retained for future reference.
Heed Warnings - All warnings on the appliance and in the operating instructions should be
adhered to.
Water and Moisture – Do not use the apparatus near water (e.g. bath tub, sink, swimming pool)
or in wet places or tropical climates. Do not place objects filled with liquids, such as vases, on top
of the apparatus. Do not expose the apparatus to dripping or splashing.
Setup – The apparatus should only be placed on a stable, flat surface. Do not let the apparatus fall
down or expose it to shock.
Wall or Ceiling Mounting - The appliance should be mounted to a wall or ceiling only as
recommended by the manufacturer.
Ventilation - The appliance should be situated so that its location or position does not interfere
with its proper ventilation. For example, the appliance should not be situated on a bed, sofa,
rug, or similar surface that may block the ventilation openings; or, placed in a built-in installation,
such as a bookcase or cabinet that may impede the flow of air through the ventilation openings.
Ensure a minimum distance of 5 cm around the apparatus for sufficient ventilation. Ensure that the
ventilation is not impeded by covering the ventilation openings with items such as newspapers,
table-cloths, curtains, etc.
Heat - The appliance should be situated away from heat sources such as radiators, heat registers,
stoves, or other appliances (including amplifiers) that produce heat.
Power Sources - The appliance should be connected to a power supply only of the type described
in the operating instructions or as marked on the appliance.
Cables and Plugs – The mains plug shall remain readily operable. All cables should be routed so
that they are not likely to be walked on or pinched by items placed upon or against them, paying
particular attention to cords at plugs, convenience receptacles, and the point where they exit from
the appliance.
Cleaning - The appliance should be cleaned only as recommended by the manufacturer. Clean
by wiping with a dry and clean cloth. Do not use chemical cleaners or detergents. Always pull the
mains plug before cleaning the unit.
Non-use Periods - The power cord of the appliance should be unplugged from the outlet when left
unused for a long period of time.
Object and Liquid Entry - Care should be taken so that objects do not fall and liquids are not
spilled into the enclosure through openings.
Damage Requiring Service - The appliance should be serviced by qualified service personnel
when:
a) The power-supply cord or the plug has been damaged; or
b) Objects have fallen, or liquid has been spilled into the appliance; or
c) The appliance has been exposed to rain; or
d) The appliance does not appear to operate normally or exhibits a marked change in
performance; or
e) The appliance has been dropped, or the enclosure damaged.
Servicing - The user should not attempt to service the appliance beyond that described in the
operating instructions. All other servicing should be referred to qualified service personnel.
Open Fire – Keep the apparatus away from open fires. Do not place naked flame sources, such
as lighted candles on the apparatus.
Thunderstorms – During a thunderstorm the mains plug should be unplugged.
Safety Check – After servicing the technician should conduct a safety check in order to ensure that
the apparatus is working properly and safely.
Batteries – Always place batteries in the correct polarization into electrical components. Danger of
explosion if battery is incorrectly replaced. Replace only with the same or equivalent type. Do not
mix old and new batteries. Take attention to the environmental aspects of battery disposal. Batteries
shall not be exposed to excessive heat such as sunshine, fire or the like. Remove batteries before
disposing of the product.
16 | EN
20. Volume Levels – To prevent possible hearing damage, do not listen at high volume levels for long
periods.
21. Headphones – Excessive sound pressure from earphones and headphones can cause hearing
loss.
CAUTION
RISK OF ELECTRO SHOCK
WARNING: To reduce the risk of electric
shock, do not remove cover (or back).
No user serviceable parts inside. Refer
servicing to qualified service personnel.
DO NOT OPEN
WARNING: To reduce the risk of fire or electric shock, do
not expose this appliance to dripping or splashing.
The lightning flash with arrowhead symbol within an equilateral triangle is intended to alert
the user to the presence of uninsulated dangerous voltage within the product’s enclosure
that may be of sufficient magnitude to constitute a risk of electric shock to persons.
The exclamation point within an equilateral triangle is intended to alert the user to the
presence of important operating and maintenance (servicing) instructions in the literature
accompanying the appliance.
DO NOT STARE INTO BEAM –
INVISIBLE LASER RADIATION
Batteries
Batteries may not be disposed of in regular house hold trash. Every consumer has the
obligation to return batteries to special disposal locations.
Disposal of Used Electrical & Electronic Equipment
The meaning of the symbol on the product, its accessory or packaging indicates that this
product shall not be treated as household waste. Please, dispose of this equipment at your
applicable collection point for the recycling of electrical & electronic equipments waste. By
ensuring the correct disposal of this product, you will help prevent potential hazards to the
environment and to human health, which could otherwise be caused by unsuitable waste
handling of this product. The recycling of materials will help conserve natural resources.
For more detailed information about recycling of this product, please contact your local
city office, your household waste disposal service or the shop where you purchased the
product.
EN | 17
EN
1. Handling discs
•
Always keep the CD compartment shut to prevent dust or dirt from getting into the CD mechanism.
•
Do not touch the recorded surface.
•
Do not stick paper or write on either side of the CD.
•
Do not bend the CD.
•
Only handle a disc on its outer edges.
2. Storing discs
•
To avoid scratches/damages always put CDs back into their cases after use.
•
Do not expose CDs to direct sunlight, dust, dirt, high temperatures, high humidity or water.
3. Cleaning discs
•
Use a soft cloth to wipe fingerprints and dust from the disc surface.
•
Carefully move the cloth from the center of the disc to its edge:
Correct
•
False
Never use benzene, thinners, record cleaner fluid or antistatic spray to clean CDs.
4. Compatibility
•
Due to the numerous compression methods, some discs may not play.
NOTES ABOUT THIS INSTRUCTION MANUAL
1. This instruction manual is published by the manufacturer without any warranty. Corrections and
changes of this instruction manual for the removal of typographic mistakes and editorial inaccuracies as well as due to (technical) improvements (changes) of the devices can be done by the
manufacturer at any time without announcement. Changes of this kind are considered in future
versions of this user manual. All rights reserved.
2. All figures are only for illustration and do not always show the exact representation of the product.
3. This unit is not intended for use by persons (including children) with reduced physical, sensory, or
mental capacities, or lack of experience and knowledge, unless they have been given supervision
or instruction concerning use of the appliance by a person responsible for their safety. Children
should be supervised to ensure that they do not play with the unit.
FURTHER NOTES ON THE DEVICE
Setting a safe volume level
•
If you continually listen to loud music, your hearing gradually adapts to it and gives you the impression that the volume is lower.
•
What seems normal to you can be already for long time too loud and unhealthy.
•
To protect yourself from this, set the volume to a low level.
•
Increase the volume slowly.
•
Damage to your hearing can be extensive and cannot be reversed.
•
If you notice a hearing problem, please consult a doctor.
18 | EN
Condensation
•
Condensation may occur when moving the device from a cold to a warm environment. If there is
moisture inside the player, it may not operate properly. Don’t turn on the device and wait about
one hour for the moisture to evaporate.
Saving energy
•
If the unit is not used for a long period of time, it should be unplugged from the AC socket
Unpacking
•
Take out carefully the unit from the packing. Please keep the packing for further use.
•
Carefully remove possible protection cardboards and slipcovers.
Location of Controls
1
8
9
10
11
12
2
3
4
5 6
7
13 14 15
18
19
20
21
22
16
1.
2.
3.
4.
5.
6.
7.
8.
9.
10.
11.
12.
13.
14.
15.
16.
17
POWER button
FUNCTION button
AL.SET (alarm set) button
VOLUME buttons (VOL+/VOL-)
LIGHT ON/OFF button
MEMORY buttons (M+/M-)
LCD Display & Remote Sensor
CD Drawer
OPEN/CLOSE button
◄
RANDOM/REPEAT button
■ STOP button
►/|| PLAY/PAUSE button
PROGRAM button
|◄◄ SKIP- button
►►| SKIP+ button
Screw holes for under-cabinet mounting
EN | 19
EN
17.
18.
19.
20.
21.
22.
AC cord
AUX In 3,5 mm
Headphone Out 3,5 mm
Speakers
Backup Battery Compartment
LED Downlight
Remote Control
1.
2.
3.
4.
5.
6.
7.
8.
9.
10.
11.
12.
13.
14.
15.
16.
17.
POWER button
■ STOP button
VOLUME+ button
|◄◄ BACK button
VOLUME- button
MEMORY buttons (M+/M-)
FUNCTION button
TIME SET button
SNOOZE button
MEM PROG button
MUTE button
REPEAT button
►►| FORWARD button
►/|| PLAY/PAUSE button
AL. SET button
OPEN/CLOSE button
SLEEP button
1
10
11
MEM
PROG
2
3
4
5
REPEAT
13
14
M+
AL. SET
6
7
8
9
12
15
M-
FUNCTION
OPEN/
CLOSE
16
TIME
SET
SNOOZE
SLEEP
17
Karcher
Cabinet Mounting
Tools required
Drill and 1/4” drill bit
Ruler or tape measure
Nail
Scissors
Phillips head screwdriver
Masking tape
Safety glasses
Included
3x Spacers
3x Washers
3x Screws
Mounting template
Before Mounting
Empty contents of the selected cabinet under which
the unit will be mounted and thoroughly clean the
underside of the cabinet to remove any grease residue which might be present. We recommend the unit
be mounted at the front edge of the cabinet.
Important:
•
The installation of the unit under a cabinet should only be carried out by a qualified technician.
•
For secure mounting, the screws must go into the radio to a depth of at least 3/8”. If the overall
length from the bottom of the cabinet shelf to the bottom of the over hand is more the 1-3/4”.
Then a wood shim will be necessary. A shim can be made from a sheet of plywood, using the
Template to located the central lines for drilling the 1/4” mounting holes; the shim can be located
between the cabinet shelf bottom and spacers. Make sure the wood is at least as thick as the
20 | EN
exces over 1-3/4” if a shim is necessary, longer screws are required. Longer screws (Type#1032) are available at most local hardware stores Cut out the template on the line indicated. The
template size and the screw hold positions are identical to the top of the clock radio.
Step 1
If your cabinet does not have a overhang :
a) Position template in desired location on underside of cabinet, flush with front edge.
b) Then tape template in pace and go to step 2.
Front edge of
cabinet
Template
If your cabinet has overhang:
a) Measure the thickness of the overhang.
b) Fold front of the template downward along the printed guideline that is closet to the thickness of
your cabinet.
c) Tape fold-down portion to backside of overhand, tape template to cabinet underside.
Note: If your cabinet has glue blocks or other obstructions, cut out corresponding areas on the template to clear them. Do not cut or cut through the screw holes indicated on the template.
CAUTION: It is recommended that safety glasses be worn while drilling screw holes to prevent the
possibility of eye injury.
Fold template on dotted line
Measure thickness of
cabinet overhang
Step 2
Drill 1/4” inches diameter holes through the underside of the cabinet bottom shelf using the three
points marked on the template.
Step 3
Remove template and clean drill shavings from inside and underside of cabinet.
Step 4
If your cabinet does not have an overhang. Go to Step 5.
If your cabinet has an overhang. Select the spacer or combination of spacers that is equal to or longer
than the cabinet overhang.
EN | 21
EN
Cabinet overhang
Washer
Cabinet bottom
Equal to or longer
than cabinet overhang
Selected screws which
meet minimum, but do not
exceed maximum length
Step 5
Insert screws from inside the cabinet. The washers must be used on metal cabinets, and on wood
cabinets if you did not countersink the drilled holes. Position washers, flat side down, and place
screws into the holes.
If your cabinet does not have an overhang, go to Step 7.
Step 6
Hold screw heads down while you push the selected spacers onto the screws under the cabinet.
Be sure to push up spacers until they fully nested (if more then one is in used).
Step 7
Align radio under the screws. Hold the screw holes in the top of the clock radio against the mounting
screws and partially tighten the screws.
Do not fully tighten until all 3 screws have been started (the top front edge of the clock radio should
clear the overhang.).
First Installation
Power Supply
•
Connect the AC plug into a suitable wall outlet. Make sure that the output power of the wall outlet
matches the required power supply as indicated on the unit.
Inserting backup batteries (not included):
1. Open the battery compartment cover.
2. Insert 2 batteries “AAA” 1.5V into the battery compartment. These batteries keep at short power
outages the clock and the data stored in the processor, but will not be shown in the display.
Please observe the correct polarity marked inside the battery compartment (“+” and “-”).
3. Place the cover again onto the battery compartment and press it carefully until it snaps in.
Notes:
•
If the unit is not in use for a longer period of time, take out the batteries and disconnect the AC
plug.
•
If the batteries are low on power, the backup function might not work.
22 | EN
Basic Functions
EN
Setting the Clock
1. While the unit is in standby mode, press and hold for 2 seconds the PROG. button on the unit or
the TIME SET button on the remote control. The hour will blink.
2. Set the desired hour by pressing the |◄◄ / ►►| buttons.
3. Press the PROG. button or TIME SET button again. The minutes will start blinking.
4. Set the desired minute by pressing the |◄◄ / ►►| buttons.
5. Press the PROG. button or TIME SET button again to select between 24 and 12 hour display.
6. Press the PROG. button or TIME SET button again to confirm all settings. The time is now set.
Setting an Alarm
1. While the unit is in standby mode, press and hold for 2 seconds the AL. SET button on the unit or
on the remote control. The alarm icon (Alarm 1) appears and the hour is blinking.
2. Set the desired hour of Alarm 1 by pressing the |◄◄ / ►►| buttons.
3. Press the AL. SET button again. The minutes will start blinking.
4. Set the desired minutes of Alarm 1 by pressing the |◄◄ / ►►| buttons.
5. Press the AL. SET button again. You can now select whether the alarm should go on to Buzzer,
Radio or CD:
Wake to Buzzer:
This is the default setting (no indication on the display above the time).
Wake to Radio:
Press the |◄◄ / ►►| buttons until “FM” is shown in the display (above the time). At the set time
the alarm will go on at the radio station you last listened to.
Wake to CD:
Press the |◄◄ / ►►| buttons until the CD icon is shown in the display (above the time). This
feature only works when you have a CD inserted in the CD drive. This CD will be played at the
set alarm time.
6.
7.
8.
Press the AL. SET button again to confirm your settings for Alarm 1.
The alarm icon (Alarm 2) appears and the hour is blinking.
Repeat steps 1 - 6 in order to set Alarm 2.
To select which of the 2 alarms should be active, press the AL. SET button repeatedly while the unit
is in standby mode (clock display). The display will show consecutively the Alarm 1 icon, then Alarm 2
icon, then both Alarm icons. Press the AL. SET button once again to deacitvate the alarms (no alarm
icon will be displayed).
Snooze Function:
The snooze function allows you to delay an active alarm for 9 minutes. To do so, press the SNOOZE
button on the remote control once while the alarm is active. “SNOOZE” will appear in the display. The
alarm will stop and come on again after 9 minutes. To turn off the snooze function and the alarm, press
the POWER button.
Turning Off the Alarm:
To switch off an alarm while active, press the POWER button on the unit or on the remote control.
Adjusting the Volume
•
To increase the volume, press the VOL+ button on the unit or on the remote control.
•
To decrease the volume, press the VOL- button on the unit or on the remote control.
LED Downlight
This unit is equipped with an LED downlight for your workspace.
EN | 23
•
•
•
To turn the light on, press the LIGHT ON/OFF button on the unit.
The direction of the light can be adjusted. Only do this carefully.
To turn the light off, press the LIGHT ON/OFF button once again.
Sleep Function
When the unit is switched on you can select a time intervall after which the unit switches itself automatically into standby mode.
•
Press the SLEEP button on the remote control repeatedly until the desired time is reached. The
display will show “SLEEP”.
•
With the sleep timer activated you can check how much time is left until the unit switches itself
into standby by pressing the SLEEP button once.
•
To deactivate the sleep timer, press the SLEEP button repeatedly until “SLEEP” disappears from
the display.
Radio
Playing the Radio
1. Press the POWER button to switch the unit on.
2. Press the FUNCTION button to select the FM Radio function (“FM” is shown in the display).
3. To automatically tune to the previously/next available radio station, press and hold for 2 seconds
the |◄◄ or ►►| button. The tuning will stop at the first station found.
4. To manually tune to a radio station, press the |◄◄ or ►►| button repeatedly until you reach the
desired frequency.
5. This unit supports FM Stereo reception. If a station is found which broadcasts in stereo, the
display will show the stereo symbol.
Station Memory
This unit enables you to store up to 20 radio channels.
1. Search for a desired radio station as described above.
2. To store this radio station in the memory, press the PROG. button on the unit or the MEM PROG
button on the remote control. The first memory preset “P01” will blink in the display.
3. By pressing the |◄◄ / ►►| buttons, select the preset (P01 - P20) on which you would like to
store the tuned in radio station.
4. Press the PROG. button the unit or the MEM PROG button on the remote control ance again to
confirm.
5. Repeat steps 1 - 4 to store up to 20 radio stations.
Note: A stored frequency can only be erased by storing another frequency in its place.
Selecting a Stored Radio Station
In order to recall a stored radio station, turn on the radio and press the M-/M+ buttons repeatedly until
you reach the desired memory preset.
Note: When you disconnect the AC power or in case of a power outage, the preset stations will be lost
and must be reset, unless you have backup batteries installed.
CD Player
CD Playback
1. Press the POWER button to switch the unit on.
2. Press the FUNCTION button to select the CD function (CD symbol is shown in the display).
3. Press the OPEN/CLOSE button to open the CD drawer.
4. Insert a disc with the printed side facing up. Ensure that the disc is inserted correctly.
24 | EN
5.
6.
7.
8.
Press the OPEN/CLOSE button again to close the CD drawer.
Press the ►/|| PLAY/PAUSE button to start playback.
To pause playback temporarily, press the ►/|| PLAY/PAUSE button. To resume playback, press
it again.
To stop playback, press the ■ STOP button.
Fast Forward / Fast Rewind & Skipping Tracks
•
To jump to the beginning of the currently playing track, press the |◄◄ SKIP- button once. Press it
a second time to skip to the previous track.
•
To skip to the next track, press the ►►| SKIP+ button once.
•
To fast forward the currently playing track, press and hold the ►►| SKIP+ button. Once you reach
the desired section of the track, release the button to resume normal playback.
•
To fast rewind the currently playing track, press and hold the |◄◄ SKIP- button. Once you reach
the desired section of the track, release the button to resume normal playback.
Repeat Function & Random Play
This unit enables you to repeatedly play one track or the whole disc.
1. During CD playback, press the ◄ RANDOM/REPEAT button once to repeat the current track
repeatedly. The display will show “REPEAT”.
2. Press the ◄ RANDOM/REPEAT button a second time to repeat the complete disc. The display
will show “REPEAT ALL”.
3. When you press the ◄ RANDOM/REPEAT button a third time, the unit will switch to random
playback: All tracks on the CD will now be played in random order and the display shows
“RAND”.
4. To exit Repeat and Random modes, press the ◄ RANDOM/REPEAT button a fourth time.
Program Function
You can select up to 20 tracks to be played in a specific order determined by you.
1. While in CD stop mode (with a disc inserted) press the PROG. button on the unit or the MEM
PROG button on the remote control. The first memory preset “01” will blink in the display.
2. By pressing the |◄◄ / ►►| buttons, select the track to be played first. Press the PROG. button
on the unit or the MEM PROG button on the remote control again to confirm your selection.
3. The second memory preset “02” will blink in the display. Repeat step 2 to select up to 20 tracks
for your order.
4. To start playback of your programmed order, press the ►/|| PLAY/PAUSE button.
5. To stop playback, press the ■ STOP button.
6. To clear your programmed order, press the ■ STOP button once again.
AUX Input
You can connect the audio output of an external device such as an MP3 player to this unit to listen to
the sound of that device through the amplifier of this music system.
•
To connect the external device please use a standard stereo audio cable (3.5 mm to 3.5 mm
plugs) (not included) to connect the headphone out or audio line out of the external device to the
AUX input socket of this unit.
•
Press the FUNCTION button to select “AUX”.
•
Switch the external device (e.g. MP3 player) on.
•
Start playback of the external device and adjust the volume control of the main unit to the desired
level.
•
Remember to switch off the unit when you are finished using the external device.
EN | 25
EN
Headphone Connector
You can connect headphones to the 3,5 mm headphone jack on the unit.
Once the headphones are connected, the speakers will be turned off. To turn the speakers back on,
unplug the headphones from the unit.
Please mind the safety instructions concerning the use of headphones.
Specifications
Power Supply:
Power Consumption (max.):
Battery Backup:
Radio Frequency Range:
Dimensions (WxDxH) ca.:
AC 230V ~ 50 Hz
12W
DC 3V
(2x 1,5V Batterien Größe „AAA“, nicht im Lieferumfang)
FM 88 - 108 MHz
250 x 228 x 64 mm
Technical specifications and design may change without notice.
26 | EN
www.karcher-products.de