1
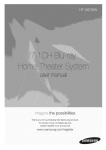
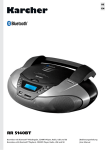
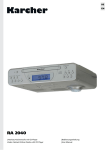
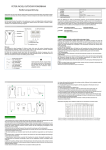
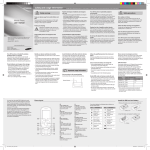
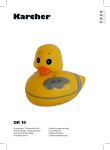
DE
EN
DR 40BT
Bluetooth®-Duschradio| Bedienungsanleitung
Bluetooth® Shower Radio
| User Manual
DE
Vorwort
Vielen Dank, dass Sie sich für dieses Produkt entschieden haben. Bitte lesen Sie diese
Bedienungsanleitung sorgfältig, damit Sie in der Lage sind, die maximale Leistungsfähigkeit dessen
auszuschöpfen und die Sicherheit bei Installation, Verwendung und Wartung gewährleistet wird.
Bewahren Sie diese Bedienungsanleitung so auf, dass Sie sie immer griffbereit haben.
Unsere Hotline für technische Fragen:
0900/1000036
(Mo. – Do.: 8.00 – 16.30 Uhr | Fr.: 8.00 – 15.00 Uhr | 0,99 €/Min. aus dem deutschen Festnetz)
Bitte machen Sie von dieser Hotline Gebrauch, da technische Probleme meist hier schon behoben werden können, ohne dass Sie Ihr Gerät einsenden müssen.
Internet:www.karcher-products.de
E-Mail:[email protected]
Karcher AG | Gewerbestr. 19 | 75217 Birkenfeld
DE | 3
Sicherheitshinweise
1.
2.
3.
4.
5.
6.
7.
8.
9.
10.
11.
12.
13.
14.
Bedienungsanleitung lesen – Lesen Sie die Bedienungsanleitung aufmerksam, um sich mit
der Bedienung des Gerätes vertraut zu machen.
Bedienungsanleitung aufbewahren – Bewahren Sie die Bedienungsanleitung sorgfältig auf.
Hinweise beachten – Beachten Sie alle Hinweise und Anweisungen in der Bedienungsanleitung.
Wasser und Feuchtigkeit – Dieses Gerät ist gegen allseitiges Spritzwasser geschützt
(Schutzklasse IPx4). Setzen Sie das Gerät keiner stärkeren Belastung aus, z. B. durch
starkes Strahlwasser, kurzzeitiges oder dauerndes Untertauchen.
Ggf. kann es vorkommen, dass Wasser durch die Lautsprecheröffnungen auf die
Lautsprechermembran gelangt. Dies führt zu einer kurzfristigen Dämpfung des Tons.
Sobald das Wasser von der Membran abgetropft oder getrocknet ist, ist der Ton wieder
normal.
Aufstellung – Das Gerät darf nur auf einer stabilen, ebenen Oberfläche aufgestellt oder an
dessen Griff aufgehängt werden. Platzieren Sie das Gerät so, dass es keinen Erschütterungen ausgesetzt werden kann.
Belüftung – Stellen Sie das Gerät immer so auf, dass die Lüftungsöffnungen nicht blockiert
oder verdeckt (z. B. von einem Vorhang, einer Decke, einer Zeitung, etc.) werden. Das Gerät
darf z. B. nicht auf einem Bett, Sofa, Teppich, etc. aufgestellt werden. Für eine ausreichende
Belüftung sollte ein Freiraum von mindestens 5 cm um das Gerät herum eingehalten werden.
Hitze – Das Gerät darf nicht in die Nähe von Hitzequellen, wie z. B. einer Heizung, einem
Herd oder anderen Geräten gelangen.
Reinigung – Reinigen Sie das Gerät ausschließlich mit einem trockenen, weichen und
sauberen Tuch. Verwenden Sie niemals chemische Reinigungsmittel. Ziehen Sie vor dem
Reinigen den Netzstecker.
Eintritt von Objekten oder Flüssigkeiten – Es dürfen keine Objekte in das Gehäuse
des Gerätes gelangen. Das Gerät darf niemals in Kontakt mit irgendwelchen Flüssigkeiten
gelangen.
Reparaturen – Reparaturen und Wartungsarbeiten dürfen nur von qualifiziertem Fachpersonal durchgeführt werden. Versuchen Sie niemals, das Gerät selbst zu reparieren. Öffnen Sie
niemals das Gehäuse.
Offenes Feuer – Halten Sie das Gerät fern von offenem Feuer. Stellen Sie keine brennenden
Kerzen oder ähnliches auf das Gerät.
Sicherheitscheck – Nach einer Reparatur sollte der durchführende Techniker einen
Sicherheitscheck des Gerätes vornehmen, um zu versichern, dass das Gerät einwandfrei
funktioniert.
Batterien – Setzen Sie Batterien immer richtig gepolt in elektrische Geräte ein. Explosionsgefahr wenn Batterien falsch eingesetzt werden. Ersetzen Sie alte Batterien stets mit neuen des
gleichen Typs. Verwenden Sie alte und neue Batterien nie gleichzeitig. Alte Batterien gehören
nicht in den Hausmüll, sondern müssen separat in den dafür vorgesehenen Behältern entsorgt werden. Batterien dürfen nicht übermäßiger Hitze, wie z. B. durch Sonnenschein, Feuer
o. ä. ausgesetzt werden.
Lautstärke – Um Hörschäden vorzubeugen, vermeiden Sie es, zu lange bei hohen Lautstärken zu hören.
Weitere Hinweise zur Verwendung von Bluetooth®-Geräten
•
Die Funksignale eines Bluetooth®-Gerätes können die Funktion anderer elektrischer und
medizinischer Geräte stören.
•
Schalten Sie das Gerät aus, wenn die Verwendung eines solchen verboten ist.
Kompatibilität
•
Die Funktion hängt von der Bluetooth®-Technologie Ihres externen Gerätes ab. Beachten
Sie die Bedienungsanleitung Ihres externen Gerätes.
•
Der Hersteller ist nicht verantwortlich für Verlust oder Beschädigung von Daten jeglicher Art.
4 | DE
DE
VORSICHT
GEFAHR EINES ELEKTROSCHOCKS
WARNUNG: Um das Risiko eines Feuers oder
elektrischen Schlags zu verringern, setzen Sie dieses
Gerät niemals Wasser, Regen oder Feuchtigkeit aus.
Dieses Symbol weist den Benutzer auf
gefährliche Spannung innerhalb des
Gerätes hin. Es besteht die Gefahr
eines elektrischen Schlags.
WARNUNG: Um die Gefahr eines
elektrischen Schlags zu verringern,
öffnen Sie niemals das Gehäuse dieses
Gerätes. Versuchen Sie niemals,
das Gerät selbst zu reparieren.
Wartungsarbeiten und Reparaturen
dürfen ausschließlich von qualifiziertem
Fachpersonal durchgeführt werden.
Dieses Symbol weist den Benutzer auf
Teile hin, deren Funktion und Wartung
genauestens beschrieben sind.
Batterien und Akkus
Batterien und Akkus dürfen nicht mit dem normalen Hausmüll entsorgt werden. Jeder
Verbraucher ist verpflichtet, alte Batterien und Akkus bei einer Sammelstelle seiner Gemeinde, seines Stadtteils oder im Handel abzugeben, so dass sie einer umweltschonenden Entsorgung zugeführt werden können.
Entsorgung von Elektro- und Elektronikaltgeräten
Dieses Symbol auf dem Produkt weist darauf hin, dass dieses nicht zusammen mit
dem normalen Hausmüll entsorgt werden darf. Für zu entsorgende Elektro- und
Elektronikaltgeräte gibt es ein besonderes, kostenfreies Entsorgungssystem. Weitere
Informationen erhalten Sie von Ihrem lokalen Entsorgungsunternehmen oder von dem
Händler, bei dem Sie dieses Produkt erworben haben. Mit der getrennten Entsorgung
helfen Sie, die Umwelt und Gesundheit Ihrer Mitmenschen zu schützen.
HINWEISE ZU DIESER BEDIENUNGSANLEITUNG
1.
Diese Bedienungsanleitung wird vom Hersteller ohne jegliche Gewährleistung veröffentlicht.
Korrekturen und Änderungen dieser Bedienungsanleitung zur Beseitigung typographischer
Fehler und redaktioneller Ungenauigkeiten sowie aufgrund von (technischen) Verbesserungen (Änderungen) der Geräte können vom Hersteller jederzeit ohne Ankündigung
vorgenommen werden. Änderungen dieser Art werden in zukünftigen Ausgaben dieser
Bedienungsanleitung berücksichtigt. Alle Rechte vorbehalten.
2.
Alle Abbildungen dienen ausschließlich der Illustration und zeigen nicht immer die exakte
Darstellung des Artikels.
3.
Dieses Gerät ist nicht dafür bestimmt, durch Personen (einschließlich Kinder) mit eingeschränkten physischen, sensorischen oder geistigen Fähigkeiten oder mangels Erfahrung
und / oder mangels Wissen benutzt zu werden, es sei denn, sie werden durch eine für ihre
Sicherheit zuständige Person beaufsichtigt oder erhielten von ihr Anweisung, wie das Gerät
zu benutzen ist. Kinder sollten beaufsichtigt werden, um sicherzustellen, dass sie nicht mit
dem Gerät spielen.
WEITERE HINWEISE ZUM GERÄT
Einstellen einer sicheren Lautstärke
•
Beim ständigen Hören lauter Musik gewöhnt sich Ihr Gehör daran und lässt die Lautstärke
geringer erscheinen.
•
Was normal erscheint, kann schon lange zu laut und gesundheitsschädlich sein.
•
Stellen Sie zu Ihrer eigenen Sicherheit die Lautstärke niedrig ein.
•
Erhöhen Sie die Lautstärke langsam.
•
Die Hörschäden können weitreichend und nicht heilbar sein.
•
Wenden Sie sich bei Hörproblemen bitte unverzüglich an Ihren Hausarzt.
DE | 5
Batterien
Bei längerer Nichtverwendung sollten die Batterien aus dem Gerät herausgenommen werden.
Auspacken
•
Nehmen Sie Ihr Gerät vorsichtig aus der Verpackung. Sie sollten die Verpackung zur weiteren Verwendung aufheben.
•
Entfernen Sie vorsichtig etwaige Schutzkartons und Schutzfolien.
Bedienelemente
5
11
6
1
12
7
2
3
9
10
6
4
1.
2.
3.
4.
5.
6.
7.
8
Taste STANDBY
Taste FUNC/TIME-SET
Taste SKIP+
Taste SKIPGriff (abnehmbar) zur Aufhängung
Lautsprecher
LCD-Display
8.
9.
10.
11.
12.
13.
Taste VOL+
Taste VOLTaste PLAY/AL-SET
Aufhängung
Batteriefach
Tischständer
Batterien einsetzen
1. Lösen Sie die Schraube mit
einem geeigneten Schraubenzieher und nehmen Sie den
Batteriedeckel ab.
6 | DE
2. Setzen Sie 4 Batterien der
Größe „AAA” ein (nicht im
Lieferumfang). Beachten Sie
die Hinweise zu Batterien
im Abschnitt „Sicherheitshinweise“.
13
DE
3. Schließen Sie den Batteriedeckel und ziehen Sie die
Schraube fest. Überdrehen
Sie die Schraube nicht, da
dies zu Beschädigungen
führen kann.
Erste Schritte
Aufstellung
Das Gerät kann auf verschiedene Arten positioniert werden:
•
Um das Gerät auf einen Tisch oder einer anderen Oberfläche zu stellen, klappen Sie den
Tischständer an der Geräterückseite heraus.
•
Um das Gerät an einer Duschstange, einem Rohr oder ähnlichem aufzuhängen, nehmen
Sie den Griff ab, legen Sie diesen um die Stange o. ä. und bringen Sie den Griff wieder am
Gerät an.
•
Das Gerät hat an seiner Rückseite außerdem eine Aufhängung, mit der es an einen Nagel,
Haken o. ä. aufgehangen werden kann.
Das Gerät ein- und ausschalten und Grundfunktionen
•
Um das Gerät einzuschalten, drücken Sie die Taste STANDBY.
•
Um zwischen dem Radio- oder Bluetooth®-Modus zu wechseln, drücken Sie wiederholt die
Taste FUNC/TIME-SET.
•
Um die Lautstärke zu erhöhen oder zu verringern, drücken Sie die Taste VOL+, bzw. VOL-.
•
Um das Gerät auszuschalten, drücken Sie die Taste STANDBY erneut. Im Standby-Modus
wird nur die Uhrzeit im Display angezeigt.
Uhrzeit und Wecker einstellen
Uhrzeit einstellen
Die Uhrzeit kann nur im Standby-Modus eingestellt werden.
1.
Drücken Sie die Taste FUNC/TIME-SET einmal, während sich das Gerät im Standby-Modus
befindet. Die Stunde blinkt nun.
2.
Stellen Sie die aktuelle Stunde anhand der Tasten SKIP+ oder SKIP- ein. Bestätigen
Sie Ihre Auswahl, indem Sie die Taste FUNC/TIME-SET erneut drücken. Nun blinken die
Minuten.
3.
Stellen Sie die aktuelle Minute anhand der Tasten SKIP+ oder SKIP- ein. Bestätigen
Sie Ihre Auswahl, indem Sie die Taste FUNC/TIME-SET erneut drücken. Nun blinkt das
Uhrzeitformat.
4.
Wählen Sie anhand der Tasten SKIP+ oder SKIP- das gewünschte Uhrzeitformat (12h oder
24h). Bestätigen Sie Ihre Auswahl, indem Sie die Taste FUNC/TIME-SET erneut drücken.
5.
Die Uhrzeit ist nun eingestellt.
Wecker einstellen
Der Wecker kann nur im Standby-Modus eingestellt werden.
1.
Halten Sie die Taste PLAY/AL-SET, während sich das Gerät im Standby-Modus befindet,
2 Sekunden lang gedrückt, bis die Stunde blinkt. Gleichzeitig wird das Weckersymbol im
Display angezeigt.
DE | 7
2.
3.
4.
5.
6.
Stellen Sie die Stunde der gewünschten Weckzeit anhand der Tasten SKIP+ oder SKIPein. Bestätigen Sie Ihre Auswahl, indem Sie die Taste PLAY/AL-SET erneut drücken. Nun
blinken die Minuten.
Stellen Sie die Minuten der gewünschten Weckzeit anhand der Tasten SKIP+ oder SKIPein. Bestätigen Sie Ihre Auswahl, indem Sie die Taste PLAY/AL-SET erneut drücken.
Die Weckzeit ist nun eingestellt und das Display schaltet zurück zur normalen Uhrzeitanzeige. Das Weckersymbol wird nach wie vor im Display angezeigt.
Um den Weckmodus einzustellen, drücken Sie einmal die Taste PLAY/AL-SET, während
sich das Gerät im Standby-Modus befindet. Drücken Sie dann wiederholt die Taste PLAY/
AL-SET, um zwischen den folgenden Modi auszuwählen:
Buzzer: Im Display wird „bU” angezeigt. Zur eingestellten Weckzeit ertönt der Buzzer.
Radio: Im Display wird die Radiofrequenz angezeigt, die zuletzt im Radiomodus eingestellt
wurde. Zur eingestellten Weckzeit schaltet sich das Radio in der zuletzt eingestellten
Frequenz ein.
OFF: Wenn OFF ausgewählt wird, so ist die Weckfunktion deaktiviert und der Wecker ertönt
nicht zur eingestellten Weckzeit (das Weckersymbol erlischt aus dem Display).
Um einen aktiven Wecker auszuschalten, drücken Sie die Taste STANDBY einmal. Der
Wecker ertönt erneut am nächsten Tag zur eingestellten Weckzeit, es sei denn, die Weckfunktion wird deaktiviert (siehe Schritt 5).
Radio
1.
2.
3.
4.
5.
6.
Schalten Sie das Gerät ein, indem Sie die Taste STANDBY drücken.
Das Gerät schaltet im zuletzt eingestellten Modus ein (Radio oder Bluetooth®). Falls notwendig, drücken Sie die Taste FUNC/TIME-SET, um in den Radiomodus zu wechseln.
Um manuell nach einem Sender zu suchen, drücken Sie wiederholt die Taste SKIP+ oder
SKIP-, bis Sie die entsprechende Frequenz erreichen.
Um automatisch nach dem nächsten verfügbaren Sender suchen zu lassen, halten Sie die
Taste SKIP+ oder SKIP- 2 Sekunden lang gedrückt.
Stellen Sie anhand der Tasten VOL+ oder VOL- die gewünschte Lautstärke ein.
Um das Radio auszuschalten, drücken Sie die Taste STANDBY.
Bluetooth®-Verbindung
Einstellungen am Gerät
1.
Schalten Sie das Gerät ein, indem Sie die Taste STANDBY drücken.
2.
Das Gerät schaltet im zuletzt eingestellten Modus ein (Radio oder Bluetooth®). Falls notwendig, drücken Sie die Taste FUNC/TIME-SET, um in den Bluetooth®-Modus zu wechseln („bL“
blinkt im Display).
Einstellungen am externen Gerät
1.
Schalten Sie die Bluetooth®-Funktion an Ihrem Gerät ein.
2.
Suchen Sie nach DR 40BT.
3.
Koppeln Sie Ihre Gerät mit dem DR 40BT. Falls Sie nach einem Passwort gefragt werden,
geben Sie „0000” ein.
4.
Das Koppeln ist nun beendet und Sie können Musik auf das Duschradio streamen.
Musik via Bluetooth® streamen
•
Sie können direkt am DR 40BT zwischen Liedern springen, indem Sie die Taste SKIP+ oder
SKIP- drücken.
•
Sie können die Wiedergabe direkt am DR 40BT pausieren und fortsetzen, indem Sie die
Taste PLAY/AL-SET drücken.
8 | DE
•
•
Stellen Sie anhand der Tasten VOL+ oder VOL- die gewünschte Lautstärke ein.
Zusätzlich können Sie die Lautstärke und den Equalizer an Ihrem externen Gerät einstellen,
um den bestmöglichen Sound zu erhalten.
Fehlerbehebung
Sollte an diesem Gerät einmal wider Erwarten ein Fehler auftreten, so versuchen Sie zunächst,
diesen anhand der folgenden Tipps selbst zu beheben:
•
DR 40BT lässt sich nicht einschalten
Versichern Sie sich, dass die Batterien richtig eingesetzt und diese nicht erschöpft sind.
•
Es besteht keine Bluetooth®-Verbindung zwischen DR 40BT und dem externen Gerät
Versichern Sie sich, dass Ihr externes Bluetooth®-Gerät das A2DP-Profil unterstützt. Schlagen Sie
in dessen Bedienungsanleitung für weitere Hinweise nach.
Des weiteren können Sie folgendes versuchen:
•
Löschen Sie den Eintrag DR 40BT aus Ihrem gekoppelten Bluetooth®-Gerät und führen Sie
die Schritte aus dem Abschnitt „Bluetooth®-Verbindung“ durch, um Ihr Gerät erneut mit DR
40BT zu koppeln.
•
Versichern Sie sich, dass weder DR 40BT noch Ihr Bluetooth®-Gerät mit anderen Geräten
verbunden sind.
•
Bei manchen Bluetooth®-Geräten müssen Sie ggf. DR 40BT als Ihr Standardausgabegerät
festlegen, nachdem es gekoppelt ist. Schlagen Sie in der Bedienungsanleitung des externen
Geräts für weitere Hinweise nach.
•
Bluetooth®-Verbindung ist hergestellt aber es spielt keine Musik
Versichern Sie sich, dass die Lautstärke des Lautsprechers und die des externen Gerätes nicht auf
Null gestellt ist (stummgeschaltet).
Bei manchen Computern mit integriertem Bluetooth®, USB-Bluetooth®-Dongles von Drittanbietern
oder anderen Geräten, müssen Sie ggf. den Audioausgang als DR 40BT festlegen. Schlagen Sie in
der Bedienungsanleitung des externen Geräts für weitere Hinweise nach.
Technische Daten
Stromversorgung:
DC 6V
(4x Batterien 1,5V „AAA” , nicht im Lieferumfang)
Gerätemaße (BxTxH) ca.: 75 x 36 x 200 mm
Technische und optische Änderungen jederzeit vorbehalten.
Die Bluetooth®-Wortmarke und -Logos sind Eigentum der Bluetooth SIG, Inc., und jegliche Verwendung der Marken durch Karcher ist lizenziert. Andere Marken und Markennamen sind Eigentum
ihrer jeweiligen Besitzer.
Bluetooth® QDID: B020863
DE | 9
DE
Safety Information
1.
2.
3.
4.
5.
6.
7.
8.
9.
10.
11.
12.
13.
14.
Read Instructions - All the safety and operating instructions should be read before the
appliance is operated.
Retain Instructions - The safety and operating instructions should be retained for future
reference.
Heed Warnings - All warnings on the appliance and in the operating instructions should be
adhered to.
Water and Moisture – This unit is protected against spray water from any angle (IPx4 class).
Refrain from exposing the unit to any water beyond this, such as heavy water streams, short
term submerging or permanent submerging.
Eventually it might occur that water gets through the speaker openings and onto the
speaker membrane. This leads to a short term dampening of the audio output. Once the
water has dripped or dried off the membrane, the audio output will be normal again.
Setup – The apparatus should only be placed on a stable, flat surface or hung up by its
handle. Do not let the apparatus fall down or expose it to shock.
Ventilation - The appliance should be situated so that its location or position does not
interfere with its proper ventilation. For example, the appliance should not be situated on
a bed, sofa, rug, or similar surface that may block the ventilation openings; or, placed in a
built-in installation, such as a bookcase or cabinet that may impede the flow of air through the
ventilation openings. Ensure a minimum distance of 5 cm around the apparatus for sufficient
ventilation. Ensure that the ventilation is not impeded by covering the ventilation openings with
items such as newspapers, table-cloths, curtains, etc.
Heat - The appliance should be situated away from heat sources such as radiators, heat
registers, stoves, or other appliances (including amplifiers) that produce heat.
Cleaning - The appliance should be cleaned only as recommended by the manufacturer.
Clean by wiping with a dry and clean cloth. Do not use chemical cleaners or detergents.
Always pull the mains plug before cleaning the unit.
Object and Liquid Entry - Care should be taken so that objects do not fall and liquids are not
spilled into the enclosure through openings.
Servicing - The user should not attempt to service the appliance beyond that described in the
operating instructions. All other servicing should be referred to qualified service personnel.
Open Fire – Keep the apparatus away from open fires. Do not place naked flame sources,
such as lighted candles on the apparatus.
Safety Check – After servicing the technician should conduct a safety check in order to
ensure that the apparatus is working properly and safely.
Batteries – Always place batteries in the correct polarization into electrical components.
Danger of explosion if battery is incorrectly replaced. Replace only with the same or
equivalent type. Do not mix old and new batteries. Take attention to the environmental aspects
of battery disposal. Batteries shall not be exposed to excessive heat such as sunshine, fire or
the like. Remove batteries before disposing of the product.
Volume Levels – To prevent possible hearing damage, do not listen at high volume levels for
long periods.
Additional Guidelines for Bluetooth® Devices
•
The short wave radio signals of a Bluetooth® device may impair the operation of other
electronic and medical devices.
•
Switch off the device where it is prohibited.
Compatibility Disclaimer
Wireless performance is dependent on your device’s Bluetooth® wireless technology. Refer to your
device’s user manual. The manufacturer cannot be held liable for any loss or leakage of or damage
to data.
10 | EN
CAUTION
RISK OF ELECTRO SHOCK
DO NOT OPEN
WARNING: To reduce the risk of
electric shock, do not remove cover
(or back). No user serviceable parts
inside. Refer servicing to qualified
service personnel.
WARNING: To reduce the risk of fire or electric shock, do
not expose this appliance to dripping or splashing.
The lightning flash with arrowhead
symbol within an equilateral triangle
is intended to alert the user to the
presence of uninsulated dangerous
voltage within the product’s enclosure
that may be of sufficient magnitude
to constitute a risk of electric shock
to persons.
The exclamation point within an
equilateral triangle is intended to
alert the user to the presence of
important operating and maintenance
(servicing) instructions in the literature
accompanying the appliance.
Batteries
Batteries may not be disposed of in regular house hold trash. Every consumer has the
obligation to return batteries to special disposal locations.
Disposal of Used Electrical & Electronic Equipment
The meaning of the symbol on the product, its accessory or packaging indicates that
this product shall not be treated as household waste. Please, dispose of this equipment
at your applicable collection point for the recycling of electrical & electronic equipments
waste. By ensuring the correct disposal of this product, you will help prevent potential
hazards to the environment and to human health, which could otherwise be caused by
unsuitable waste handling of this product. The recycling of materials will help conserve
natural resources. For more detailed information about recycling of this product, please
contact your local city office, your household waste disposal service or the shop where
you purchased the product.
NOTES ABOUT THIS INSTRUCTION MANUAL
1.
This instruction manual is published by the manufacturer without any warranty. Corrections
and changes of this instruction manual for the removal of typographic mistakes and editorial
inaccuracies as well as due to (technical) improvements (changes) of the devices can be
done by the manufacturer at any time without announcement. Changes of this kind are
considered in future versions of this user manual. All rights reserved.
2.
All figures are only for illustration and do not always show the exact representation of the
product.
3.
This unit is not intended for use by persons (including children) with reduced physical,
sensory, or mental capacities, or lack of experience and knowledge, unless they have been
given supervision or instruction concerning use of the appliance by a person responsible for
their safety. Children should be supervised to ensure that they do not play with the unit.
FURTHER NOTES ON THE DEVICE
Setting a safe volume level
•
If you continually listen to loud music, your hearing gradually adapts to it and gives you the
EN | 11
EN
impression that the volume is lower.
What seems normal to you can be already for long time too loud and unhealthy.
To protect yourself from this, set the volume to a low level.
Increase the volume slowly.
Damage to your hearing can be extensive and cannot be reversed.
If you notice a hearing problem, please consult a doctor.
•
•
•
•
•
Condensation
•
Condensation may occur when moving the device from a cold to a warm environment. If
there is moisture inside the player, it may not operate properly. Don’t turn on the device and
wait about one hour for the moisture to evaporate.
Saving energy
•
If the unit is not used for a long period of time, the batteries should be removed.
Unpacking
•
Take out carefully the unit from the packing. Please keep the packing for further use.
•
Carefully remove possible protection cardboards and slipcovers.
Location of Controls
5
11
6
1
12
2
3
9
12 | EN
10
6
4
1.
2.
3.
4.
5.
6.
7.
8
7
STANDBY button
FUNC/TIME-SET button
SKIP+ button
SKIP- button
Handle
Speakers
LCD Display
8.
9.
10.
11.
12.
13.
VOL+ button
VOL- button
PLAY/AL-SET button
Hanger
Battery door
Table top stand
13
Inserting Batteries
1. Loosen the screw with a
suitable screwdriver and take
off the battery lid.
EN
2. Install 4 batteries “AAA”
size (not included). Mind the
remarks about batteries in
the chapter “Safety Information” above.
3. Close the battery lid and
tighten the screw. Do not
overtighten it as this may lead
to damage of the unit.
Getting Started
Unit Setup
The unit can be positioned in several ways:
•
The unit has a foldable stand on its back to place it on a table top or other surface.
•
To hang the unit onto a bar, a pipe, a hose or any other fixture, detach the handle from the
unit, place it on the fixture and attach the handle again to the unit.
•
The unit has a hanger on its back with which it can be attached to a nail, a hook or similar
items in the wall.
Switching the Unit On and Off and Basic Operation
•
To switch the unit on, press the STANDBY button.
•
To select between radio or Bluetooth® mode, press the FUNC/TIME-SET button repeatedly.
•
To increase or decrease the volume in either mode, press the VOL+ or VOL- button.
•
To switch the unit off, press the STANDBY button again. In standby model only the time will
be shown in the display.
Clock and Alarm Setting
Clock Setting
To set the time, the unit must be in standby mode.
1.
With the unit in standby mode, press the FUNC/TIME-SET button once. The hour will be
blinking.
2.
Set the current hour by pressing the SKIP+ or SKIP- button. To confirm your setting, press
FUNC/TIME-SET button again. The minutes will be blinking.
3.
Set the current minutes by pressing the SKIP+ or SKIP- button. To confirm your setting,
press FUNC/TIME-SET button again. The clock format will be blinking.
4.
Set the desired clock format (12h or 24h) by pressing the SKIP+ or SKIP- button. To confirm
your setting, press FUNC/TIME-SET button again.
EN | 13
5.
The clock is now set.
Alarm Setting
To set the alarm, the unit must be in standby mode.
1.
With the unit in standby mode, press and hold for 2 seconds the PLAY/AL-SET button until
the hour is blinking. At the same time the alarm symbol will be shown in the display.
2.
Set the hour of the desired alarm time by pressing the SKIP+ or SKIP- button. To confirm
your setting, press PLAY/AL-SET button again. The minutes will be blinking.
3.
Set the minutes of the desired alarm time by pressing the SKIP+ or SKIP- button. To confirm
your setting, press PLAY/AL-SET button again.
4.
The alarm time is now set and the display will switch back to normal clock display with the
alarm symbol showing as well.
5.
To select the alarm mode, press the PLAY/AL-SET button once while the unit is in standby
mode. Then press the PLAY/AL-SET button repeatedly to select between the following
modes:
Buzzer: Display shows “bU”. At the set alarm time, the buzzer will ring.
Radio: The display shows the radio frequency which has been selected last in radio mode.
At the set alarm time, the radio will switch on at the frequency last selected.
OFF: When OFF is selected, the alarm function will be deactivated and not come on at the
set time (the alarm symbol will disappear from the display).
6.
To turn off an activated alarm, press the STANDBY button once. The alarm will come on
again the next day at the set time, unless the alarm function deactivated (see step 5).
Radio
1.
2.
3.
4.
5.
6.
Turn the unit on by pressing the STANDBY button.
The unit will be in the mode last listened to (radio or Bluetooth®). If necessary, press the
FUNC/TIME-SET button to select the radio mode.
To manually tune to a desired radio station, repeatedly press the SKIP+ or SKIP- button until
you reach the desired frequency.
To automatically search for the next available radio station, press and hold for 2 seconds the
SKIP+ or SKIP- button.
Set the desired volume by pressing the VOL+ or VOL- button.
To switch the radio off, press the STANDBY button.
Bluetooth® Connection
Settings on the Unit
1.
Turn the unit on by pressing the STANDBY button.
2.
The unit will be in the mode last listened to (radio or Bluetooth®). If necessary, press the
FUNC/TIME-SET button to select the Bluetooth® mode (“bL” will be blinking in the display).
Settings on Your External Device
1.
Turn on the Bluetooth® feature on your device.
2.
Search for DR 40BT.
3.
Pair and connect to DR 40BT. If prompted for a password, enter “0000”.
4.
Pairing successful and ready to stream music.
Ready to Stream Music via Bluetooth®
•
You can select a desired song directly from the DR 40BT by pressing the SKIP+ or SKIPbutton.
•
You can pause and resume playback directly from the DR 40BT by pressing the PLAY/
14 | EN
•
•
AL-SET button.
Press the VOL+ or VOL- buttons to adjust the volume on the unit.
Additionally you can set the volume and equalizer on your device in order to reach the
perfect sound.
Reconnection Between Bluetooth® Device and DR 40BT
You can reconnect your paired Bluetooth® device to your speaker easily:
•
Select the DR 40BT entry on the Bluetooth® device to reconnect.
•
To connect another external device you need to disconnect the other device first.
Troubleshooting
If there should be any problem with this product, please try to solve it with the help of the following
information before contacting service. Most problems can be solved easily.
DR 40BT cannot be powered on
•
Make sure that the batteries are inserted properly. Make sure that the batteries are not empty.
•
There is no Bluetooth® link between DR 40BT and the external device
Ensure that your Bluetooth® enabled device supports the A2DP profie. Refer to its user manual on
how to turn on the Bluetooth® functions and capabilities.
You may also try the following:
•
Delete the DR 40BT name entry from your Bluetooth® device paired memory list and perform
the steps from “Bluetooth® Connection” to re-pair your device with DR 40BT.
•
Ensure that both DR 40BT and your Bluetooth® device are not connected to any other
devices.
•
On some Bluetooth® devices you may need to select DR 40BT as your default output device
after pairing is completed.
•
Bluetooth® link is established and paired between the devices but there is no music
Make sure that the volume of the shower radio and the external device is not set to zero (muted).
With some built-in Bluetooth® enabled computers, 3rd party USB Bluetooth® dongles or other devices, you may be required to manually specify/set-up the audio output as DR 40BT. Please refer
to the documentation of the external device for further information.
Specifications
Power Supply:
DC 6V
(4x 1.5V “AAA” size batteries, not included)
Dimensions (WxDxH) ca.: 75 x 36 x 200 mm
Technical specifications and design may change without notice.
The Bluetooth® word mark and logos are registered trademarks owned by Bluetooth SIG, Inc. and
any use of such marks by Karcher is under license. Other trademarks and trade names are those
of their respective owners.
Bluetooth® QDID: B020863
EN | 15
EN
www.karcher-products.de