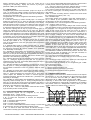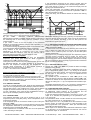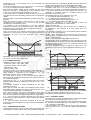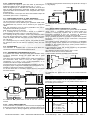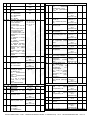
1
Vertikale kühlvitrinen Kühlschränke und tiefkühlschränke
Ihr Nordcap Fachhändler:
Kälte-Berlin
Am Pfarracker 41
12209 Berlin
Fon: +49 30 74 10 40 22
Fax: +49 30 74 10 40 21
Mail: [email protected]
Internet: www.kaelte-berlin.com
ALLGEMEINE GEBRAUCHSANWEISUNGEN
Cod. 26.23.073
Rev. 6
INDEX
1
1.1
1.2
2
2.1
2.2
2.3
2.4
S.A.V.E. Control System
Self Assessment of Variable Environment
Y39E- Y39SE
DIGITAL ELECTRONIC FREEZER
CONTROLLER
2.5
2.6
3
3.1
3.2
3.3
3.4
4
4.1
4.2
4.3
4.4
4.5
4.6
4.7
4.8
4.8.1
4.8.2
4.8.3
4.8.4
OPERATING INSTRUCTIONS
Vr. Mondial Group (ENG) - 10/10
ASCON TECNOLOGIC S.r.l.
VIA INDIPENDENZA 56
27029 VIGEVANO (PV) ITALY
TEL.: +39 0381 69871
FAX: +39 0381 698730
http:\\www.ascontecnologic.com
e-mail: [email protected]
FOREWORD
This manual contains the information
necessary for the product to be installed
correctly and also instructions for its
maintenance
and
use;
we
therefore
recommend that the utmost attention is paid to
the following instructions and to save it.
This document is the exclusive property of
ASCON TECNOLOGIC which forbids any reproduction and
divulgation , even in part, of the document, unless expressly
authorized.
ASCONT ECNOLOGIC reserves the right to make any formal or
functional changes at any moment and without any notice.
Whenever a failure or a malfunction of the device may cause
dangerous situations for persons, thing or animals, please
remember that the plant has to be equipped with additional
devices which will guarantee safety.
ASCON TECNOLOGIC and its legal representatives do not
assume any responsibility for any damage to people, things or
animals deriving from violation, wrong or improper use or in
any case not in compliance with the instrument’s features.
4.8.5
4.9
4.10
4.10.1
4.10.2
4.10.3
4.11
4.12
4.12.1
4.12.2
4.12.3
5
6
6.1
6.2
6.3
7
7.1
7.2
7.3
7.4
7.5
INSTRUMENT DESCRIPTION
GENERAL DESCRIPTION
FRONT PANEL DESCRIPTION
PROGRAMMING
FAST PROGRAMMING OF SET POINT
STANDARD MODE PARAMETERS PROGRAMMING
PARAMETER PROTECTION USING THE PASSWORD
CUSTOMIZED MODE PARAMETER PROGRAMMING
(PARAMETERS PROGRAMMING LEVEL)
RESET PARAMETERS TO DEFAULT VALUE/LEVEL
KEYBOARD LOCK FUNCTION
INFORMATION ON INSTALLATION AND USE
PERMITTED USE
MECHANICAL MOUNTING
ELECTRICAL CONNECTIONS
ELECTRICAL WIRING DIAGRAM
FUNCTIONS
ON / STAND-BY FUNCTION
NORMAL MODE AND ECONOMIC MODE
MEASURING AND VISUALIZATION
DIGITAL INPUT
OUTPUTS AND BUZZER CONFIGURATION
TEMPERATURE CONTROL
COMPRESSOR PROTECTION FUNCTION AND DELAY
AT POWER-ON
DEFROST CONTROL
AUTOMATIC DEFROST STARTS
MANUAL DEFROST
END DEFROST
DEFROSTS IN EVENT OF EVAPORATOR PROBE
ERROR
DEFROST DISPLAY LOCK
EVAPORATOR FANS CONTROL
ALARM FUNCTIONS
TEMPERATURE ALARMS
EXTERNAL ALARM (DIGITAL INPUT)
OPEN DOOR ALARM
FUNCTION OF KEYS “U” AND “DOWN/AUX”
ACCESSORIES
PARAMETERS CONFIGURATION BY “A01”
TVR Y” REMOTE DISPLAY
RS 485 SERIAL INTERFACE BY “TLCNV”
PROGRAMMABLE PARAMETERS TABLE
PROBLEMS , MAINTENANCE AND GUARANTEE
SIGNALLING
CLEANING
GUARANTEE AND REPAIRS
TECHNICAL DATA
ELECTRICAL DATA
MECHANICAL DATA
MECHANICAL DIMENSIONS, PANEL CUT-OUT AND
MOUNTING
FUNCTIONAL DATA
INSTRUMENT ORDERING CODE
1 - INSTRUMENT DESCRIPTION
1.1 - GENERAL DESCRIPTION
The model Y39SE is a digital controller with microprocessor that is
typically used in cooling applications that have temperature control
with ON/OFF regulation and defrosting control at intervals time, at
reaching evaporator temperature or at reaching compressor
running time by stopping compressor or by means of electrical
heating or hot gas/reverse cycle. The instrument is equipped with
special features to optimize the defrosts and functions used to
achieve energy savings of the controlled unit. The instrument has
up to 3 relay outputs, up to 2 inputs for PTC or NTC temperature
probes and one digital input, in addition can be equipped with an
internal buzzer that is the sound system for alarms. The 3 outputs
can be can all be configured for controlling the compressor or the
temperature control device, the defrosting device, the evaporation
fan or ,alternatively any of the previous functions, using an heating
ASCON TECNOLOGIC - Y39E - OPERATING INSTRUCTIONS - Vr. Mondial Group - 10/10 - ISTR-MY39EENGmondial - PAG. 1
device, an auxiliary device or an alarm. The 2 inputs for
temperature probes can be used to measure the control
temperature, the evaporator temperature, products or aux
temperature, while the digital input can be programmed to carry
out various functions such as door opened signal, defrosting
commands, selecting a different set of temperature regulations,
external alarm signals, activating a continuous cycle, and activating
an auxiliary output etc.
1.2 - FRONT PANEL DESCRIPTION
11
10
8
4
6
3
9
2
1
7
12
Aux
5
1 - Key P : Used for setting the Set point (press and release) and
for programming the function parameters (hold pressed for 5 sec.)
In programming mode is used to enter in parameters edit mode and
confirm the values. In programming mode it can be used together
with the UP key to change the programming level of the
parameters.
When the keyboard is locked it can be used together with the UP
(hold pressed for 5 sec.) key to unlock the keyboard.
2 - Key DOWN/Aux : In programming mode is used for decreasing
the values to be set and for selecting the parameters. In normal
mode it can also be programmed via the parameter “t.Fb” to carry
out other functions (hold pressed for 1 sec.) such as activating the
Aux output, starting up the continuous cycle, etc. (see functions of
keys U and Down).
3 - Key UP/DEFROST : In normal mode can be used to start/stop
manual defrosting (hold pressed for 5 sec.). In programming mode
is used for increasing the values to be set and for selecting the
parameters. In programming mode can be used togetherwith key P
to change parameters level. Pressed together with the key P for 5
sec. allow the keyboard unlock
4 - Key U : Used (press and release) for visualising the instrument
variables (measured temperatures etc.). In programming mode can
be used to come back in normal mode (hold for 2 sec.). In normal
mode it can also be programmed via the parameter “t.UF” to carry
out other functions (hold pressed for 1 sec.) such as turning on
and off (stand-by) the device, activating the Aux output, starting up
the continuous cycle, etc. (see functions of keys U and Down).
5 - Led SET : In normal mode it serves to indicate when a key is
pressed. In programming mode indicates the programming level of
the parameters.
6 - Led OUT - COOL : Indicates the output status (compressor or
temperature control device) when the istrument is programmed for
cooling operation; on (on), off (off) or inhibited (flashing).
7 - Led OUT - HEAT : Indicates the output status (compressor or
temperature control device) when the istrument is programmed for
heating operation; on (on), off (off) or inhibited (flashing).
8 - Led DEFROST : Indicates defrosting in progress (on) or
drainage time in progress (flashing)
9 - Led FAN : Indicates fan output status on (on), off (off) or
delayed after defrosting (flashing)
10 - Led ALARM : Indicates the alarm status (on), off (off) and
silenced or memorized (flashing)
11 - Led AUX : Indicates AUX output status on (on), off (off) or
inhibited (flashing)
12 - Led Stand-By: Indicate the Stand-by status.
These keys increase or decrease the value one digit at a time, but
if the button is pressed for more than one second the value
increase or decreases rapidly, and after two seconds pressed, the
speed increases even more to all the desired valued to be reached
rapidly.
However, through par. "t.Ed” is possible to determine whether and
which Sets are set with the fast mode bybutton P.
The parameter is programmable with a value between oF and 4
which means that:
oF = Nothing is set with the key P (the P pressed and released has
no effect)
1 = can be adjusted only SP (normal)
2 = can be adjusted only SPE (economic)
3 = can be adjusted both SP and SPE
4 = can be adjusted the active set (SP or or SPE)
For example, if the parameter "t.Ed" = 1 or 3, the procedure is as
follows:
Press key P then release it and the display will show "SP" alternate
value.
To modify press key UP or DOWN to increase the value to
decrease.
If there is only the Set Point 1 ("t.Ed" = 1) once the desired value by
pressing the P button to exit the Set programming mode.
If is also programmable the EconomicSet Point ("t.Ed" = 3) by
pressing and releasing the P key again the display will show "SPE"
alternate to the set value.
To modify press key UP or DOWN like Set “SP”.
When the desired value is set press the key P to exit from Set
Point programming mode.
Exiting the Set mode is achieved by pressing the P key or
automatically if no key is pressed for 10 seconds. After that time
the display returns to the normal function mode.
2.2 - STANDARD MODE PARAMETERS PROGRAMMING
To access the instrument’s function parameters when password
protection is disable, press the key P and keep it pressed for about
5 seconds, after which the display will visualised the code that
identifies the first parameter.
Using the UP and DOWN keys, the desired parameter can be
selected and pressing the P key, the display will alternately show
the parameter code and its setting that can be changed with the UP
and DOWN keys.
Once the desired value has been set, press the key P again: the
new value will be memorised and the display will show only the
code of the selected parameter.
Pressing the UP and DOWN keys, it is possible to select another
parameter and change it as described.
To exit the programming mode, do not press any key for about 30
seconds, or keep the U key pressed for 2 sec. until it exits the
programming mode.
H o ld fo r
5 sec.
H o ld fo r
2 sec.
2.3 - PARAMETER PROTECTION USING THE PASSWORD
The instrument has a parameter protection function using a
2 - PROGRAMMING
password that can be personalised, through the “t.PP” parameter.
If one wishes to have this protection, set the password number
desired in the parameter “t.PP”. When the protection is activate,
2.1 - FAST PROGRAMMING OF SET POINT
Press the key P then release it and the display will show “SP” (or press the P key to access the parameters and keep it press for
about 5 seconds, after which the display will show “r.P” .
“SPE”) alternating with the set value.
To change it press the UP key to increase the value or DOWN to
decrease it.
ASCON TECNOLOGIC - Y39E - OPERATING INSTRUCTIONS - Vr. Mondial Group - 10/10 - ISTR-MY39EENGmondial - PAG. 2
At this point press P, the display show “0”, using the UP and
DOWN keys, set the password number programmed and press the
key P.
If the password is correct, the display will visualise the code that
identifies the first parameter and it will be possible to program the
instrument in the same ways described in the previous section.
Protection using a password can be disabled by setting the
parameter “t.PP” = oF.
Note: If the Password gets lost, just swith off and on the instrument
supply, push P key during the initial test and keeping the key
pressed for 5 seconds.
In this way it’s possible to have access to all the parameters, verify
and modify the par. “t.PP”.
Hold for
5 sec.
Hold for
2 sec.
2.5 - RESET PARAMETERS TO DEFAULT VALUE/LEVEL
The instrument allows the reset of the parameters to values
programmed in factory as default.
To restore to the values of default the parameters set the value -48
to “r.P” password request.
Once confirmed the password with the key P the display it shows "--" for 2 sec. therefore the instrument effects the parameters reset..
2.6 - KEYBOARD LOCK FUNCTION
On the instrument it’s possibile to lock completely the keyboard.
This function is particularly useful when the regulator is reachable
by the users and it’s desired to avoid any modification.
To activate the keyboard lock it’s enough program the par. “t.Lo”
to a different value to oF.
The value program to this parameter it is the time of inactivity of the
keys afterwhich the keyboard will be locked.
Insofar not pressing any key for the time "t.Lo" the instrument
automatically disable the normal functions of the keys.
When the keyboard is lock, if any of the key is pushed, on the
display will appear “Ln” to indicate the active lock.
To unlock the keyboard it’s enough to contemporarily push key P
and UP and keep them pushed for 5 sec., afterwhich the label “LF”
will appear on the display and all the keys functions will be
available again .
3 - INFORMATION ON INSTALLATION AND USE
2.4 - CUSTOMIZED MODE PARAMETER PROGRAMMING
(PARAMETERS PROGRAMMING LEVEL)
The password protection hides all the configuration parameters
behind a factory set password to avoid unwanted changes being
made to the programming of the controller.
To make a parameter accessible without having to enter the
password when “t.PP” password protection is activate follows this
procedure.
Enter the programming using the Password “t.PP” and select the
parameter which is desired to be accessible with no password
protection.
Once the parameter has been selected, if the SET led is blinking,
this means that the parameter is programmable by entering the
password (it’s then “protected”) if it’s instead on, this means the
parameter is programmable without password (not protected).
If you want to change the accessibility of the parameter push P
key, keep it pressed and press together also the key UP.
The led SET will change its state indicating the new access level of
the parameter (on = not protected; blinking = protected by
password).
In case some parameters are not protected, when one tries to have
access at the programming, the display will show all the
parameters not protected and the par. “r.P” (through which will be
possible to have access to the “protected” parameters.)
Hold for
5 sec.
Hold for
2 sec.
3.1 - PERMITTED USE
The
instrument
has
been projected and
manufactured as a measuring and control device to
be used according to EN60730-1 for the altitudes
operation until 2000 ms. The use of the instrument
for applications not expressly permitted by the above mentioned
rule must adopt all the necessary protective measures.
The instrument CANNOT be used in dangerous environments
(flammable or explosive) without adequate protection.
The instrument used with NTC 103AT11 probe (identifiable by the
printed code “103AT-11” visible on the sensor part) is compliant
with standard EN 13485 ("Thermometers for measuring the air and
product temperature for the transport,storage and distribution of
chilled, frozen, deep-frozen/quick-frozen food and ice cream”) with
the following classification: [EN13485 air, S, A, 2,- 50°C +90°C]
Remember that the end user must periodically checks and verify
the thermometers in compliance with standard EN 13486.
The installer must ensure that EMC rules are respected, also after
the instrument installation, if necessary using proper filters.
Whenever a failure or a malfunction of the device may cause
dangerous situations for persons, thing or animals, please
remember that the plant has to be equipped with additional devices
which will guarantee safety.
3.2 - MECHANICAL MOUNTING
The instrument, in case 78 x 35 mm, is designed for flush-in panel
mounting. Make a hole 71 x 29 mm and insert the instrument, fixing
it with the provided special brackets. We recommend that the
gasket is mounted in order to obtain the front protection degree as
declared. Avoid placing the instrument in environments with very
high humidity levels or dirt that may create condensation or
introduction of conductive substances into the instrument. Ensure
adequate ventilation to the instrument and avoid installation in
containers that house devices which may overheat or which may
cause the instrument to function at a higher temperature than the
one permitted and declared. Connect the instrument as far away as
possible from sources of electromagnetic disturbances such as
motors, power relays, relays, solenoid valves, etc.
3.3 - ELECTRICAL CONNECTION
Carry out the electrical wiring by connecting only one wire to each
terminal, according to the following diagram, checking that the
power supply is the same as that indicated on the instrument and
that the load current absorption is no higher than the maximum
electricity current permitted. As the instrument is built-in equipment
with permanent connection inside housing, it is not equipped with
either switches or internal devices to protect against overload of
ASCON TECNOLOGIC - Y39E - OPERATING INSTRUCTIONS - Vr. Mondial Group - 10/10 - ISTR-MY39EENGmondial - PAG. 3
current: the installation will include an overload protection and a
two-phase circuit-breaker, placed as near as possible to the
instrument, and located in a position that can easily be reached by
the user and marked as instrument disconnecting device which
interrupts the power supply to the equipment. It is also
recommended that the supply of all the electrical circuits connected
to the instrument must be protect properly, using devices (ex.
fuses) proportionate to the circulating currents. It is strongly
recommended that cables with proper insulation, according to the
working voltages and temperatures, be used. Furthermore, the
input cable of the probe has to be kept separate from line voltage
wiring. If the input cable of the probe is screened, it has to be
connected to the ground with only one side. Whether the
instrument is F o G (12 / 24 V) supply version it’s recommended to
use an external transformer TCTR, or with equivalent features
(Class II insulation) , and to use only one transformer for each
instrument because there is no insulation between supply and
input. We recommend that a check should be made that the
parameters are those desired and that the application functions
correctly before connecting the outputs to the actuators so as to
avoid malfunctioning that may cause irregularities in the plant that
could cause damage to people, things or animals.
3.4 - ELECTRICAL WIRING DIAGRAM
OUT1: 16A-AC1 (6A-AC3) / 250 VAC;
1HP 250VAC, 1/2HP 125VAC
OUT2: 8A-AC1 (3A-AC3) / 250 VAC;
1/2HP 250VAC,1/3HP 125VAC
OUT3: 5A-AC1 (2A-AC3) / 250 VAC;
1/8HP 250/125 VAC
C: 16A MAX
Out2
Out1 Out3
INTERNAL
BUZZER
C NO
NC NO NO
Y39E
INPUTS
1 2 3 4 5 6 7 8 9 10 11 12
SUPPLY
100...240
VAC
Pr1 Pr2 Dig.
12...24
VAC/VDC
4 - FUNCTIONS
4.1 - ON / STAND-BY FUNCTION
The instrument, once powered up, can assume 2 different
conditions:
- ON : means that the controller uses the control functions.
- STAND-BY : means that the controller does not use any control
function and the display is turned off except for the Stand-by led.
If there is no power, and then power returns, the system always
sets itself in the condition it was in before the black-out.
The ON/Stand-by function can be selected:
- Pressing the key U for at least 1 sec. if the parameter "t.UF" = 3.
-Pressing the key DOWN/AUX for at least 1 sec. if the parameter
"t.Fb" = 3.
- using the digital input if the parameter “i.Fi” = 7
4.2 - NORMAL MODE AND ECONOMIC MODE
The instrument allows up to 2 different Set points to be pre-set:
“SP” (normal) and “SPE” (Economic) with two different hysteresis
(differential) “r.d” (normal) and “r.Ed”.
This function can be used if it is necessary to switch two different
function temperatures (e.g. day/night or working days/ holidays)
NORMAL / ECONOMIC mode can be selected manually:
- Using the key U if the parameter "t.UF" = 2.
- Using the key DOWN/AUX if the parameter "t.Fb" = 2.
- Using the digital input if the parameter. “i.Fi” = 6
- Using the parameter “t.SA” (0 = norm.; 1 = Eco)
NORMAL / ECONOMIC mode can be selected automatically:
- After Time "i.Et" closing the door (switching from Norm. to Eco)
- At the door opening if it's active Economic mode switched by time
“i.Et” (switching from Eco to Norm.)
For this function, use the digital input configured as "i.Fi" = 1, 2 or
3.
If "i.Et" = oF the selection mode Eco / Norm. through the digital
input is disabled.
The economic mode activated is indicated by the label "Eco".
If "i.dS" = Ec the display in economy mode show always "Eco"
otherwise the label "Eco" appears every 10 seconds.
The selection of the Economic mode it is also combined to the
function of switch off Auxiliary output if used as light ("o.Fo" = 3)
The Set point "SP" can be set with a value between the
programmed value in parameter. “S.LS” and the programmed
value in parameter “S.HS”.
The Set point "SPE" can be set with a value between the
programmed value in parameter. “SP” and the programmed value
in parameter “S.HS”.
Note: in the examples that follow, the Set point is generally
indicated as "SP" and the histeresis as “r.d”, how when operating
the instrument will work according to the Set point and histeresis
selected as actives.
4.3 - MEASURING AND VISUALIZATION
Via the parameter “i.SE” it is possible to select the type of probes
that one wishes to use and which can be: thermistores PTC
KTY81-121 (Pt) or NTC 103AT-2 (nt).
Via the parameter “i.uP”, it is possible to select the temperature
unit of measurement the desired measurement resolution (C0=°C /
1° ; C1=°C / 0.1° ; F0= °F / 1°; F1= °F / 0.1°).
The instrument allows the measuring to be calibrated, that can be
used for re-calibrating the instrument according to application
needs, through the parameters “i.C1” (for the input Pr1) and “i.C2”
(for the input Pr2).
The functions carried out by Pr2 probe is defined by the parameter
“i.P2”.
This parameter can be configured for the following functions:
= EP - Evaporator probe: used to managing the defrost and the
evaporator fans (see relative functions)
= Au - Auxiliary probe
= dG - Digital input
If probe Pr2 is not used, set the relative parameter “i.P2”= oF.
Using the parameter “i.Ft”, it is possible to set the time constant
for the software filter for measuring the input values to be able to
reduce the sensitivity to measurement disturbances (increasing the
time).
Through the parameter “i.dS”, it is possible to fix the normal
visualisation on the display that can be the measurement of the
probe Pr1 (P1), the measurement of the probe Pr2 (P2), the active
set point value (SP), the label “Eco” when the instrument is in Eco
mode (Ec) or it can have the numerical display switched off (oF).
Through the parameter “i.CU”, it is possible to program an
measure offset that will be applied to the temperature show on the
display (only if i.dS”= P1, P2, Ec).
All the controls will always happen in operation of the measure
corrected only by the calibration parameters (“i.C1”, “i.C2”).
The normal visualisation on the display is established by par.
“i.dS”, but it is possible to visualise all the variables and the highest
and lowest Pr1 peak measurement values in rotation by quickly
pressing and releasing key U.
The display will alternately show the code that identifies the
variable and its value.
The variable are:
“Pr1” - Pr1 temperature
“Pr2” - Pr2 temperature ( on/oF state if is progr. as digital input )
“Lt” and the lowest Pr1 peak temperature
“Ht” and the highest Pr1 peak temperature
When the instrument is switched off, peak values are always re-set.
However, it is also possible to reset these values if the instrument
is switched on by using the DOWN key hold for 3 sec. during peak
visualization.
The display will show “---” and peak memory will be reset.
The exit of this visualisation mode occurs automatically 15 seconds
after the last pressing on the key U.
ASCON TECNOLOGIC - Y39E - OPERATING INSTRUCTIONS - Vr. Mondial Group - 10/10 - ISTR-MY39EENGmondial - PAG. 4
Please remember that visualisation of the Pr1 probe can be = -t - to control a silenceable alarm device through a contact that is
changed by the defrosting display lock function, by using the normally closed, and then open when the alarm sounds.
parameter “d.dL” (see defrost function).
= -L - control an alarm that cannot be silenced through a contact
that is normally closed and open when the alarm sounds.
4.4 - DIGITAL INPUT
= on - Output on when the instrument is in on state. This mode can
The digital input present on the instrument (at pin 12 or at pin 11 if be used to control lights, non-misting resistance on room door or
“i.P2” = 3) accepts free voltage contacts, the function carried out is other utilities
defined by the parameter “i.Fi” and the action can be delayed for = HE - to control an heating device in neutral zone control mode
the time set in parameter “i.ti”.
the compressor or however (“r.HC” = nr).
The parameter “i.Fi” can be configured for the following functions:
= oF - Disabled output
= 0 - No function
The function carried out for auxiliary output (par. desired output =
= 1 -Cell door opening by contact normally open: on closing the Au) is defined by the parameter “o.Fo” and the function is
digital input (and after the “i.ti” time) the instrument visualises oP conditioned by the time set in parameter “o.tu”.
and the variable set in parameter “i.dS” alternately on the display. The parameter “o.Fo” can be configured for the following functions:
With this function mode, the action of the digital input also activates = oF - Auxiliary output not active
the time that can be set in parameter "A.oA" after which the alarm = 1 - Temperature control output delayed with contact normally
is activated to signal that the door has been left open.
open: the auxiliary output is activated with delay that can be set on
=2 -Cell door opening with fan stop by contact normally open: on the parameter "o.tu" compared to the output configured as ot. The
closing the digital input (and after the “i.ti” time) the fans are output is then turned off at the same time as the ot output is
stopped and the instrument visualises oP and the variable set in disabled. This function mode can be used as a command for a
parameter “i.dS” alternately on the display. With this function mode, second compressor or for all other working utilities according to the
the action of the digital input also activates the time that can be set same ot output conditions, but which must be delayed after the
in parameter "A.oA" after which the alarm is activated to signal that start up of the compressor to avoid excess electricity absorption.
the door has been left open and the fan restart.
= 2 - Activation by front key (U or DOWN/AUX) or by digital input
= 3 - Cell door opening with compressor and fan stop by contact with contact normally open: the output is activated by pressing the
normally open: similar to “i.Fi” = 5 but with fan and compressor keys U or DOWN/AUX suitably configured (“t.UF” or “t.Fb” = 1).
stop. At the intervention of the door open alarm alarm compressor These commands have a bi-stable function, Which means that
and fan restarts.
when first pressed, the output key is activated while the second is
= 4 - External alarm signal by contact normally open: on closing disabled. In this mode, the AUX output can be turned off
the digital input (and after the “i.ti” time) the alarm is activated and automatically after a certain time that can be set on the parameter
the instrument visualises AL and the variable set in parameter "o.tu". With "o.tu" = oF the output is activated and deactivated only
manually, using the key (U or DOWN/AUX). Differently, the output,
“i.dS” alternately on the display.
= 5 - Signalling of external alarm with disablement of all the control once activated, is turned off automatically after the set time. This
outputs by contact normally open: on closing the digital input (and function can be used, for example, as a cell light command, for
after the “i.ti” time) all the control outputs are disabled, the alarm is non-misting resistance or other utilities.
activated and the instrument visualises AL and the variable set in = 3 - Light output managed by Normal / Economy mode.
This output will be on in Normal mode and off in Economy mode
parameter “i.dS” alternately on the display.
= 6 - Selecting the active set point (SP/SPE) with contact normally operation.
open: on closing the digital input (and after the “i.ti” time) the = 4 - Internal Light output managed by digital input. This output will
temperature set point “SPE” is activated. When instead the input is be on when door is opened (only if “i.Fi”= 1, 2, 3).
The internal buzzer (if present) can be configured by par. “o.bu”
open the set point “SP” is active.
= 7 - Switching on/switching off (Stand-by) of instrument by contact for the following functions:
normally open: on closing the digital input (and after the “i.ti” time) oF = Buzzer always disable
the instrument is switched on while it is placed in Stand-by when 1 = Buzzer signal active alarms only
2 = Buzzer signal key pressed only (no alarm)
opened.
= 8 - Signalling of external alarm without alarm signalling activation 3 = Buzzer signal active alarms and key pressed
and with disablement of all the control outputs by contact normally
open: on closing the digital input (and after the “i.ti” time) all the 4.6 - TEMPERATURE CONTROL
control outputs are disabled, the alarm is activated and the The regulation of the instrument is ON/OFF and acts on the outputs
instrument visualises noF and the variable set in parameter “i.dS” configured as “ot” and “HE” depending on the measuring of probe
alternately on the display.
Pr1, of the active Set Point “SP” (or “SPE”), the intervention
= 9 - Signalling of external alarm with disablement of all the control differential “r.d” (or “r.Ed”) and the function mode “r.HC” .
outputs by contact normally open: on closing the digital input (and Depending on the function mode programmed on the parameter
after the “i.ti” time) all the control outputs are disabled, the alarm is “r.HC” the differential is automatically considered by the regulator
activated and the instrument visualises noF and the variable set in with positive values for a Refrigeration control (“r.HC”=C) or with
parameter “i.dS” alternately on the display.
negative values for a heating control (“r.HC”=H).
= -1, -2, -3, etc. - Like “i.Fi” with positive values but with function Temp.
Temp.
Pr1
Pr1
logic reversed (contact normally closed)
SP
r.d
4.5 - OUTPUTS AND BUZZER CONFIGURATION
r.d
The instrument outputs can be configured by the relative
SP
parameters “o.o1” , “o.o2”, “o.o3”.
time
time
The outputs can be configured for the following functions:
ON
ON
ON
ON
ON
ON
= ot - to control the compressor or however, the temperature
Out
Out
control device
(ot)
(ot)
off
off
off
off
= dF - to control the defrosting device
= Fn - to control the fans
r.HC=C
r.HC=H
= Au - to control the auxiliary device
If
“r.HC”
=
nr
the
output
configured
as
“ot”
work
with Cooling Action
= At - to control a silenceable alarm device through a contact that
(like
“r.HC”=C)
and
the
output
configured
as
“HE”
work with Heating
is normally open, and then closed when the alarm sounds
= AL - to control an alarm that cannot be silenced through a Action
contact that is normally open and closed when the alarm sounds.
ASCON TECNOLOGIC - Y39E - OPERATING INSTRUCTIONS - Vr. Mondial Group - 10/10 - ISTR-MY39EENGmondial - PAG. 5
The differential is automatically considered by the regulator with Third control (par. “P.P3” ) foresees an inhibition to the activation
positive values for the Coolig Action or with negative values for the of the output "Out" by a time delay that starts when the output was
heating action.
turning on last time (delay between switching-on).
Temp.
Pr1
r.d
SP
r.d
Temp.
Pr1
r.d
SP
ON
Out
(HE)
Out
(ot)
time
0N
0N
off
off
Out
(ot)
ON
off
ON
off
time
off
0N
off
P.P3
off
All time protections described in the next paragraph (P.P1, P.P2,
P.P3) always act only on the output configured as “ot”.
In the event of probe error, it is possible to set the instrument so
that that the output “ot”continues to work in cycles according to the
times programmed in the parameter “r.t1” (activation time) and
“r.t2” (deactivation time).
If an error occurs on the probe the instrument activates the output
for the time “r.t1”, then deactivates it for the time “r.t2” and so on
whilst the error remains.
Programming “r.t1” = oF the output in probe error condition will
remain switched off.
Programming instead “r.t1” to any value and “r.t2” = oF the output
in probe error condition will remain switched on.
Remember that the temperature regulation function can be
conditioned by the “Compressor Protection and output delay at
power-on”, “Defrost”, “Door open” and “external alarm with outputs
disable” functions.
4.7 - COMPRESSOR PROTECTION FUNCTION AND DELAY AT
POWER-ON
The function “Compressor Protection” aims to avoid close start ups
of the compressor controlled by the instrument in cooling
applications.
This function foresees 3 time controls on the switching on of the
output configured as “ot” associated with the temperature
regulation request.
The protection consists of preventing the output being switched on
during the times set in the parameters “P.P1”, “P.P2” and “P.P3”
and therefore that any activation occurs only after all the times has
finished.
First control (par. “P.P1” ) foresees a delay to the output activation
(switching-on delay).
P.P3
P.P3
During the output inhibition the led OUT (Cool o Heat) blinking.
It is also possible to prevent activation of the output after the
instrument is turned on, for the time set in the parameter “P.od”.
During the power on delay phase, the display shows the indication
od, alternating with the normal visualisation.
All the functions are disabled by relative parameters = oF.
4.8.1 - AUTOMATIC DEFROST STARTS
The automatic control of defrost occours:
- By interval times (regular or dynamic)
- By Evaporator temperature
- By continuous compressor running time
Defrost by regular interval time
The automatic defrost function is activate when at the parameter
“d.di” is set the defrost interval time.
The first defrost after swiching on can be set by par. “d.Sd”
This allows to perform the first defrost to a different interval from
"d.di." time.
If it is desired that to every instrument power on a defrost cycle is
realized (as long as the conditions set in the parameters “tS” and
"tE" apply) program the par. "d.Sd" = oF.
This allows the evaporator to be permanently defrosted, even when
frequent interruptions to power supply occur that may cause the
cancellation of the various defrosting cycles.
Instead if is desired all defrost to the same interval program "d.Sd"
= "d.di."
Automatic defrost function by interval is disable when “d.di” = oF.
“Dynamic Defrost Intervals System”.
If “d.dd” = 0 the Dynamic defrost is disable.
Note: For this function is necessary to use the evaporator probe.
This mode allows to dynamically reduce in progress the defrost
interval counting ("d.di" or "d.Sd" if is the first defrost), anticipating
Temp.
so the execution of a defrost when it was necessary, in order to an
Pr1
algorithm that allows to notice a decrease performances of
r.d
refrigerator thermal exchange.
SP
Besides it maintains activates the mode "St" that it allows a further
possibility of control of the defrost in order to notice a decrease
ON
ON
ON
performances of refrigerator thermal exchange.
time
Out
The algorithm allows to esteem a reduction of thermal exchange in
off
off
off
base to the increase of the difference of temperature between Pr1
(ot) off
(controlled temperature) and evaporator (“EP” probe) that is
memorized by the instrument in proximity of the Set Point.
Second control (par. “P.P2” ) foresees an inhibition to the The advantage of the “Dynamic Defrost Interval” is the possibility to
activation of the output by a time delay that starts when the output program a defrost interval time more longer than normal.
The instrument will have the possibility to anticipate the defrost if
is turning off (delay after switching-off).
necessary or to start the cycle after the programmed time.
If the system results set correctly is possible to to avoid many non
Tem p.
necessary defrosting cycles (and therefore to obtain an energy
Pr1
saving) that could instead happens in the normal operation when,
r.d
to guarantee with greater certainty the system efficency , the
SP
defrost interval is programmed at a too low time.
ON
Out
(ot)
ON
ON
off
off
P.P2
P.P2
tim e
off
P.P2
ASCON TECNOLOGIC - Y39E - OPERATING INSTRUCTIONS - Vr. Mondial Group - 10/10 - ISTR-MY39EENGmondial - PAG. 6
If the temperature measured by the probe is higher than the
temperature set in the parameter "d.tE" the defrosting is inhibited.
The active defrost is shown on the instrument display with the
lighting up of the DEFROST led
At the end of defrosting, it is possible to delay the new start up of
the compressor (output “ot”) at the time set in parameter “d.td” to
allow the evaporator to drain.
During this delay, the led Defrost flashes to indicate the draining
state.
Temp.
d.tE
Pr1
SP+r.d
EP
r.d
SP
DT0
DT1
DT2
DT3
1°
Temp.
EP
d.tS
Phase
0
1
2
time
3
d.tE
Cool
(ot)
ON
ON
off
ON
off
ON
off
d.di / d.Sd time to defrost Ph. 0, 1
time to defrost Ph. 3
Defrost
(dF)
ON
ON
time to defrost Ph. 2
dF
off
A
off
Defrost
d.dE
d.di/d.Sd
esempio funzionamento “dynamic defrost intervals system” con
riduzione “d.dd” = 40 % e fine sbrinamento per temperatura.
By par.: “d.dd” - DEFROST INTERVAL PERCENTAGE
REDUCTION is possible to establish the percentage of reduction of
the remaining time to start defrost when the conditions for the
reduction happen.
If par. "d.dd" = 100% at the first increase of the memorized
difference of temperature between cell (Pr1) and evaporator (> 1 °)
a defrost start immediately
For correct functioning the instrument needs a first reference value
of the temperature difference between cell and evaporator.
Every variation of the value of the Active Set Point, of the
differential "r.d", the start of a continuous cycle or the a defrost
execution delete this reference value and any reduction will be
performed until the acquisition of a new reference value.
Defrost by temperature evaporator
The instrument starts a defrost cycle when the temperature
evaporator (“EP” probe) goes below the “d.tF” programmed
temperature for “d.St” programmed time.
This system can be used in heat pump defrost system (in this case
the defrosting intervals are usually disabled) or to guarantee a
defrost if the evaporator reaches very low temperatures that
normally result symptomatic of a bad thermal exchange in
comparison to the normal working conditions.
If “d.tF” = -99.9 the function is disable.
B
d.di
time
off
C
(NO defrost)
d.di
d.di
Examples: defrosting A ends due to reaching of temperature “dtE”,
defrosting B ends at the end of the “d.dE” time as the temperature
“d.tE” is not reached, defrosting C does not take place as the
temperature is higher than “d.tE”.
4.8.4 - DEFROSTS IN EVENT OF EVAPORATOR PROBE ERROR
In event of evaporator probe error the defrosts occur at intervals
"d.Ei" and duration "d.EE”.
In case an error occurs when the time remaining to the start or the
end of defrost it’s lower than that normally set the parameters
related to error conditions probe, the start or the end take place
with the shortest time.
The functions are provided because when the evaporator probe is
used the defrost endurance time is usually set longer than
necessary (the time “d.dE” is a security time-out) and in case is
used the "Dynamic Intervals Defrost System” the interval is usually
set more longer than what is normally programmed into instruments
that do not have the function.
4.8.5 - DEFROST DISPLAY LOCK
Through par. “d.dL” and “A.dA” it’s possible to define the display
behaviour during defrost.
The “d.dL” parameter pemits the display visualization lock on the
last Pr1 emperature reading (“d.dL” = on) during all the defrost
Defrost by continuous compressor running time
cycle until, at the end of defrost, the temperature has not reached
The instrument start a defrost cycle when the compressor is turned the lock value or the value [”SP” + “r.d”] or is elapsed the time
on continuously for the time "d.Cd”.
setted on par. "A.dA".
This function is used because the continuous operation of the
Or it permits only the visualization of label “dEF” (“d.dL” = Lb)
compressor for an extended period is usually symptomatic of a bad during the defrost cycle and, after the defrost, of label “PdF” until,
thermal exchange in comparison to the normal working conditions. at the end of defrost, the Pr1 temperature has not reached the lock
If "d.Cd" = oF the function is disabled.
value or the value [”SP” + “r.d”] or is elapsed the time setted on par.
"A.dA".
4.8.2- MANUAL DEFROST
The display will otherwise (“d.dL”= oF) continue to visualize the Pr1
To start up a manual defrosting cycle, press the key UP/DEFROST temperature measured by the probe during the defrost cycle.
when it is not in programming mode and keep it pressed for about 5
seconds after which, if the conditions are correct, the led Defrost 4.9 - EVAPORATOR FANS CONTROL
will light up and the instrument will carry out a defrosting cycle.
The control of the fans on the output configured as “Fn” depending
To stop a defrosting cycle, press the key UP/DEFROST during a on determined control statuses of the instrument and the
defrost cycle and keep it pressed for about 5 sec.
temperature measured by the evaporator probe (EP).
In the case that the evaporator probe is not used or in error , the
4.8.3 - DEFROST ENDS
output Fn is activated only depending on the parameters “F.tn”,
The automatic defrosting cycle can be ended by time or, if an “F.tF” and “F.FE”.
evaporator probe is used (“EP” probe), when a temperature on the The parameters “F.tn” e “F.tF” decides the funs functioning when
evaporator is reached.
the output configured as “ot” (compressor) is off.
If the evaporator probe is not used the duration cycle is set by the When output “ot” is off , it is possible to set the instrument so that
parameter “d.dE”.
that the output “Fn”continues to work in cycles according to the
If instead the evaporator probe is used the defrost cycle end when times programmed in the parameter “F.tn” (fan activation time)
the temperature measured by the evaporator probe exceeds the and “F.tF” (fan deactivation time).
temperature set in the parameter “d.tE”.
When output “ot” is switched off the instrument activates the output
If this temperature is not reached in the time set in the parameter “Fn for the time “F.tn”, then deactivates it for the time “F.tF” and so
“d.dE”, defrosting is interrupted.
on whilst the otuput “ot” remains off.
ASCON TECNOLOGIC - Y39E - OPERATING INSTRUCTIONS - Vr. Mondial Group - 10/10 - ISTR-MY39EENGmondial - PAG. 7
Programming “F.tn” = oF the output “Fn” in “ot” off condition will
remain switched off.
Programming instead “F.tn” to any value and “F.tF” = oF the output
“Fn” in “ot” off condition will remain switched on.
The parameter “F.FE” instead decides whether the fans must
always be switched on independently of the defrosting status
(“F.FE”=on) or switched off during defrosting (“F.FE”=oF).
In this latter case, it is possible to delay the start up of the fans
even after the end of the defrosting of the time set in the parameter
“F.Fd”.
When this delay is active the led FAN flashing to signal the delay in
progress.
When the evaporator probe is used the fans, as well as being
conditioned by the parameters “F.tn”, “F.tF and “F.FE”, are also
conditioned by a temperature control.
It is possible to set the disablement of the fans when the
temperature measured by the evaporator probe is higher than the
temperature set in the parameter “F.FL” (temperature too hot)
The relative differential is fixed at 1 °.
Notes: It is necessary to pay attention to the correct use of this fans
temperature control functions because in the typical application of
refrigeration the stop of the fans evaporator stops
thermal
exchange.
Tem p.
EP
F .F L
1°
ON
Fn
o ff
tim e
o ff
alarm thresholds set in parameters “A.HA” (maximum alarm) and
“A.LA” (minimum alarm) and the relative differential “A.Ad”.
Through the parameter “A.Ay” it is possible to set if the alarm
thresholds “A.HA” and “A.LA” must be considered as absolute or
relative to the Set Point , if the reference temperature must be Pr1
or “Au” probe measurement and if the display must be show the
messages Hi (maximum alarm)/ Lo (minimum alarm) to the
intervention of the alarms or no.
The possible selections of the parameter “A.Ay” are:
= 1 : Pr1 Absolute Alarms with labels (Hi - Lo)
= 2 : Pr1 Relative Alarms with labels (Hi - Lo)
= 3 : “Au” probe Absolute Alarms with labels (Hi - Lo)
= 4 : “Au” probe Relative Alarms with labels (Hi - Lo)
Using some
parameters
it is also possible to delay the
enablement and the intervention of these alarms.
These parameters are:
“A.PA” - is the temperature alarm exclusion time on switching on
the instrument if the instrument is in alarm status when it is
switched on.
If the instrument at power on is not in temperature alarm conditions
the time "A.PA is not considered.
“A.dA” - is the temperature alarm exclusion time at the end of
defrosting (and , if programmed, at the end of draining) and at the
end of a continuous cycle.
“A.At” - is the temperature alarm delay activation time
The temperature alarm is enabled at the end of exclusion time and
is enabled after the “A.At” time when the temperature measured by
the probe exceeds or goes below the respective maximum and
minimum alarm thresholds.
The alarm thresholds will be the same as those set on the
parameters “A.HA” and “A.LA” if the alarms are absolute (“A.Ay”=1,
3).
Tem p.
A .H A
1°
Remember that the fans functioning can be conditioned by the
“Door open” function by the digital input.
4.10 - ALARM FUNCTIONS
The alarm conditions of the instrument are:
- Probe errors : “E1”, “-E1”, “E2”, “-E2”
- temperature alarms: “Hi” and “Lo”
- External alarm: “AL”
- Open door alarm: “oP”
The alarm functions of the instrument work on the ALARM led, on
internal buzzer (if present and programmed by par. “o.bu”) and on
output desired, if configured by the parameters “o1”, “o2”,
depending on what is set on the said parameters.
Any active alarm is shown on the instrument display with the
lighting up of the ALARM led, the silenced alarm status is shown by
the ALARM led flashing .
The buzzer (if “o.bu” = 1 or 3) is activated in alarm and can be
disabled (alarm silencing) manually by pressing any key of the
instrument.
The possible selections of output parameters for the alarm
signalling function are:
= At - when one wants the output to be activated in alarm and can
be disabled (alarm silencing) manually by pressing any key of the
instrument (typical application for sound signal).
= AL - when one wants the output to be activated in alarm status
but cannot be disabled manually and are therefore only disabled
when the alarm status ceases (typical application for a light signal).
= -t - when one wants the function described as At but with an
inverse function (output activated in normal condition and disabled
in alarm status).
= -L - when one wants the function described as AL but with
inverse logic (output activated in normal conditions and disabled in
alarm status).
1°
A .L A
AL
o ff
ON
ON
Hi
Lo
o ff
tim e
o ff
or will be the values [”SP”+”A.HA”] and [”SP”+”A.LA”] if the alarms
are relative (“A.Ay”=2, 4).
Tem p.
1°
A .H A
SP
A .L A
1°
ON
AL
o ff
Hi
ON
o ff
Lo
tim e
o ff
The maximum and minimum temperature alarms can be disabled
by setting the relative parameters "A.HA" and "A.LA" = oF.
The alarms histeresis (differential switching point) is fixed at 1°.
4.10.2 - EXTERNAL ALARM
The instrument can signal an external alarm by activating the digital
input with the function programmed as “i.Fi” = 4 or 5.
At the same time as the signalling of the configured alarm output,
the instrument visualising AL and the variable set in parameter
“i.dS” alternately on the display.
In alarm conditions with “i.Fi”= 9 all the control outputs will be off.
4.10.1 - TEMPERATURE ALARMS
Similar function to "i.Fi" = 5 but with the display message noF is
The temperature alarms work according to the programmed probe "i.Fi" = 9.
measurement, the type of alarm set in the parameter “A.Ay” the
ASCON TECNOLOGIC - Y39E - OPERATING INSTRUCTIONS - Vr. Mondial Group - 10/10 - ISTR-MY39EENGmondial - PAG. 8
to visualize the temperature measured by the probe Pr1 through a
4.10.3 - OPEN DOOR ALARM
The instrument can signal an open door alarm by activating the 2 ½ digit display.
digital input with the function programmed as “i.Fi” = 1, 2 or 3.
SUPPLY
When the digital input is activated the instrument show oP and
after the delay programmed in parameter “A.oA”, the instrument
cable 10 m MAX.
signals the alarm via the activation of the configured alarm output
(buzzer/ouput).
At the intervention of the open door alarm the inhibited output will
reactivated (fans or fans + compressor).
4.11 - FUNCTIONING OF KEYS “U” AND “DOWN/AUX”
Two of the instrument keys, in addition to their normal functions,
can be configured to operate other commands.
The U key function can be defined by the parameter “t.UF” while
the DOWN/AUX key function can be defined by the parameter
“t.Fb”
Both the parameters have the same possibilities and can be
configured for the following functions:
=oF - The key carries out no function.
= 1 - Pressing the key for at least 1 second, it is possible to
enable/disable the auxiliary output if configured (“o.Fo”=2).
= 2 - Pressing the key for at least 1 second, it is possible to select
the mode Economic/Normal in rotation. Once selection has been
made, the display will flash the active set point code for about 1
sec. (SP, Eco).
= 3 - Pressing the key for at least 1 second, it is possible to switch
the instrument from the ON status to Stand-by status and vice
versa.
TVR Y
For additional info, please have a look at the TVR Y instruction
manual.
4.12.4 -RS 485 SERIAL INTERFACE BY “TLCNV”
The instrument can be connected by a special cable to the TLCNV
device (mod. C - TTL/RS485 interface), by means of which it is
possible to connect the regulator with a net to which other
instruments (regulators of PLC) are connected, all depending
typically on a personal computer used as plant supervisor.
Using a personal computer it is possible to acquire all the function
information and to program all the instrument’s configuration
parameters.
The software protocol adopted for the instrument is a MODBUS
RTU type, widely used in several PLC and supervision programs
available on the market (YE and ZE series protocol manual is
available on request).
4.12 - ACCESSORIES
If the instrument is used with TLCNV program by the parameter
The instrument is equipped with a connector that allows the
"t.Ad" the station Address.
connection of some accessories described as follow.
Set a different number for each station, from 1 to 255.
Note: The baud-rate are fixed at 9600 baud.
4.12.1 -PARAMETERS CONFIGURATION BY “A01”
TLCNV interface is directly supplied by the instrument.
It is possible the transfer from and toward the instrument of the
SUPPLY
functioning parameters through the device A01 with 5 poles
connector.
cable
This device A01 it’s mainly useable for the serial programming of
the instruments which need to have the same parameters
TLCNV
configuration or to keep a copy of the programming of an
instrument and allow its rapid retransmission.
The same device can connect the instrument via USB to a PC and
through the proper configuration software tools "UniversalConf”, it’s
possible to configure the operating parameters.
To use the device A01 it’s necessary that the device or instrument GND B A RS 485
are being supplied.
1
2
3
TLCNV
TTL
TX/RX
ON
SUPPLY
USB
7
8
9
4
5
6
For additional info, please have a look at the TLCNV instruction
manual.
5 - PROGRAMMABLE PARAMETERS TABLE
Here below is a description of all the parameters available on the
instrument. Some of them may not be present because depend on
the model/type of instrument.
Par.
USB
1
2
3
4
S.LS
S.HS
SP
SPE
5
6
i.SE
i.Ft
7
i.uP
SUPPLY ADAPTER
12 VDC
AC SUPPLY
For additional info, please have a look at the A01 instruction
manual.
4.12.2 - “TVRY” REMOTE DISPLAY
To the instrument it is possible to connect the remote display TVR
Y through the special cable that can have a maximum length of 10
m. The device TVR Y, directly supplied by the instrument, it allows
Description
Range
S. - parameters relative to Set Point
Minimum Set Point
-99.9 ÷ S.HS
Maximum Set Point
S.LS ÷ 999
Set Point
S.LS ÷ S.HS
Eco Set Point
SP ÷ S.HS
i. -parameters relative to inputs
Probes Type
Pt / nt
Measurement filter
oF ÷ 20.0
sec
Unit of measurement C0 / F0 / C1 /
F1
and
resolution
(decimal point)
C0 = °C with 1° res.
F0 = °F with 1° res.
C1 =°C with 0,1° res.
F1 = °F with 0,1° res.
Def.
Note
-50.0
99.9
0.0
0.0
nt
2.0
C1
ASCON TECNOLOGIC - Y39E - OPERATING INSTRUCTIONS - Vr. Mondial Group - 10/10 - ISTR-MY39EENGmondial - PAG. 9
8
i.C1 Pr1 Probe Calibration
9
10
11
12
13
14
15
16
17
18
19
20
-30.0 ÷ 30.0
0.0
°C/°F
-30.0 ÷ 30.0
0.0
i.C2 Pr2 Probe Calibration
°C/°F
0.0
i.CU Measure offset on the -30.0 ÷ 30.0
display
°C/°F
oF / EP / Au /
EP
i.P2 Pr2 input function:
oF = No function
dG
EP = Evaporator
Au = Aux
dG = Digital
0
i.Fi Function and function -9 / -8 / -7 / -6
logic of digital input:
/ -5 / -4 / -3 / -2
0 = No function
/ -1 / 0 / 1 / 2 /
1= Door open
3/4/5/6/7/
2= Door open with fan
8/9
stop
3= Door open with fan
and compressor stop
4= External alarm
5= External alarm with
deactivation of control
outputs
6= Selection of active
Set Point
7= Switch on/Switch
off (Stand-by)
8= External signalling
with label “noF” and
deactivation of control
outputs
(no
alarm
output)
9= External alarm with
label
“noF”
and
deactivation of control
outputs
i.ti Delay in acquiring oF/ 0.01 ÷ 9.59 oF
digital input
(min.sec ) ÷
99.5
(min.sec.x10)
i.Et Delay to Eco mode oF/ 0.01 ÷ 9.59 oF
with door closed
(hrs.min. ) ÷
oF = No function
99.5
(hrs.min.x10)
visualized P1 / P2 / Ec /
P1
i.dS Variable
SP / oF
normally on display:
oF=Display off
P1=
measurement
probe Pr1
P2=
measurement
probe Pr2
Ec = Pr1 in normal
mode, Eco in Eco
mode
SP= Active Set Point
r. - parameters relative to temperature control
0.0 ÷ 30.0
2.0
r.d Differential
(Hysteresis)
°C/°F
0.0 ÷ 30.0
2.0
r.Ed Differential
°C/°F
(Hysteresis) in Eco
mode
r.t1 Output activation time oF/ 0.01 ÷ 9.59 oF
for probe error
(min.sec ) ÷
99.5
(min.sec.x10)
deactivation oF/ 0.01 ÷ 9.59 oF
r.t2 Output
time for probe error
(min.sec ) ÷
99.5
(min.sec.x10)
H - C - nr
C
r.HC Output operating mode
H= Heating
C= Cooling
nr = Neutral Zone
d. - parameters relative to defrosting control
EL / in
EL
d.dt Defrosting Type:
EL=
Electrical
heating/stop. compr.
in= hot gas/reverse
cycle
22 d.di Defrosting interval
oF/ 0.01 ÷ 9.59 6.00
(hrs.min. ) ÷
99.5
(hrs.min.x10)
23 d.Sd Delay first defrost after oF/ 0.01 ÷ 9.59 6.00
power-on
(hrs.min. ) ÷
(oF = Defrost at power99.5
on)
(hrs.min.x10)
24 d.dE Lenght
(max.)
of oF/ 0.01 ÷ 9.59 20.0
defrost cycle
(min.sec ) ÷
99.5
(min.sec.x10)
8.0
25 d.tE Defrost
stop - 99.9 ÷ 999
temperature
°C/°F
26 d.Ei Defrosting interval for oF/ 0.01 ÷ 9.59 6.00
evaporator probe error
(hrs.min. ) ÷
99.5
(hrs.min.x10)
27 d.EE Lengh of defrost cycle oF/ 0.01 ÷ 9.59 10.0
for evaporator probe (min.sec ) ÷
error
99.5
(min.sec.x10)
-99.9
28 d.tF Defrost
start - 99.9 ÷ 999
temperature
°C/°F
29 d.St Delay start defrost by oF/ 0.01 ÷ 9.59 1.00
temperature
(min.sec ) ÷
99.5
(min.sec.x10)
30 d.dd Dynamic
Defrost
0 ÷ 100 %
0
Percentage reduction
31 d.cd Delay start Defrost by oF/ 0.01 ÷ 9.59 oF
(hrs.min. ) ÷
continuous
99.5
compressor
running
time
(hrs.min.x10)
32 d.dL Defrost display Lock
oF - on - Lb
oF
oF= display free
on=
Lock
on
temperature
Pr1
before defrost
Lb= Lock on label
“dEF”
(during
defrosting) and “PdF”
(during
postdefrosting)
33 d.td Compressor
delay oF/ 0.01 ÷ 9.59 oF
after defrost (drainage (min.sec ) ÷
time)
99.5
(min.sec.x10)
F. parameters relative to evaporator fans control
34 F.tn Fan time activation oF/ 0.01 ÷ 9.59 5.00
with
ot
output (min.sec ) ÷
(compressor) off
99.5
(min.sec.x10)
35 F.tF Fan time deactivation oF/ 0.01 ÷ 9.59 oF
with
ot
output (min.sec ) ÷
(compressor) off
99.5
(min.sec.x10)
36 F.FL High temperature fan - 99.9 ÷ 999
10.0
deactivation
°C/°F
oF - on
oF
37 F.FE Fan
status
during
defrost
38 F.Fd Fan delay after defrost oF/ 0.01 ÷ 9.59 oF
(min.sec ) ÷
99.5
(min.sec.x10)
P. parameters relative to compressor protection and power
21
ASCON TECNOLOGIC - Y39E - OPERATING INSTRUCTIONS - Vr. Mondial Group - 10/10 - ISTR-MY39EENGmondial - PAG. 10
on delay
39 P.P1 Output “ot” delay at oF/ 0.01 ÷ 9.59 oF
switch on
(min.sec ) ÷
99.5
(min.sec.x10)
40 P.P2 Output “ot” delay after oF/ 0.01 ÷ 9.59 oF
switch off
(min.sec ) ÷
99.5
(min.sec.x10)
41 P.P3 Output
“ot”
delay oF/ 0.01 ÷ 9.59 oF
between switching-on
(min.sec ) ÷
99.5
(min.sec.x10)
42 P.od Delay outputs at power oF/ 0.01 ÷ 9.59 oF
on
(min.sec ) ÷
99.5
(min.sec.x10)
A. - parameters relative to alarms
43 A.Ay Temperature
alarms
1/2/3/4
1
Type:
1 = Pr1 absolute with
label (Hi - Lo)
2 = Pr1 Relative with
label (Hi - Lo)
3 = “Au” absolute with
label (Hi - Lo)
4 = “Au” Relative with
label (Hi - Lo)
oF
44 A.HA High
temperature oF / -99.9 ÷
Alarm threshold
999 °C/°F
oF
45 A.LA Low
temperature oF / -99.9 ÷
Alarm threshold
999 °C/°F
46 A.At Temperature Alarms
oF/ 0.01 ÷ 9.59 oF
delay
(min.sec ) ÷
99.5
(min.sec.x10)
47 A.PA Temperature
Alarms oF/ 0.01 ÷ 9.59 2.00
delay at power on
(hrs.min. ) ÷
99.5
(hrs.min.x10)
48 A.dA Temperature
Alarms oF/ 0.01 ÷ 9.59 1.00
delay after defrost, and (hrs.min. ) ÷
unlock display delay
99.5
after defrost
(hrs.min.x10)
49 A.oA Alarm delay with door oF/ 0.01 ÷ 9.59 3.00
open
(min.sec ) ÷
99.5
(min.sec.x10)
o. - parameters relative to configuration of outputs and
buzzer
50 o.o1 OUT1 function:
oF/ot/dF/
ot
oF= No function
Fn/Au/At/ AL/ot=
Temperature
t/-L/on/HE
control (compressor)
dF= Defrosting
Fn= fan
Au= Auxiliary
Silenceable
At/-t=
alarm
AL/-L= Not silenceable
Alarm
on=
on
when
instrument switch on
HE = Heating (Neutral
zone control)
51 o.o2 OUT2 function:
oF/ot/dF/
dF
see “o.o1”
Fn/Au/At/ AL/t/-L/on/HE
52 o.o3 OUT3 function:
oF/ot/dF/
Fn
see “o.o1”
Fn/Au/At/ AL/t/-L/on/HE
53 o.bu Buzzer function mode
oF / 1 / 2 / 3
3
oF = disable
1 = active alarms only
2 = key pressed only
3 = active alarms and
key pressed
54 o.Fo Function
mode oF / 1 / 2 / 3 / 4 oF
auxiliary output:
oF= No Function
1= control output “ot”
delayed
2= manual activation
by key or digital input.
3 = light with economy
mode (on in Normal
mode off in Eco mode)
4 = internal light (off
with door closed and
on with door opened)
55 o.tu Time
relative
to oF/ 0.01 ÷ 9.59 oF
auxiliary output
(min.sec ) ÷
99.5
(min.sec.x10)
t. - parameters relative to configuration of the keyboard (and
to communication)
56 t.UF Function mode key oF / 1 / 2 / 3
oF
DOWN/AUX:
oF= No function
1= Auxiliary output
command
2= Norm. / Eco mode
Selection
3=
Switch
on/off
(Stand-by)
oF
57 t.Fb Function mode key oF / 1 / 2 / 3
Down/Aux: see “t.UF”
58 t.Lo Keyboard lock function oF/ 0.01 ÷ 9.59 oF
delay
(min.sec ) ÷
30.0
(min.sec.x10)
59 t.Ed Set Visibility with fast oF / 1 / 2 / 3 / 4
4
procedure by key P:
oF = None
1 = SP
2 = SPE
3 = SP and SPE
4 = Active SP
0÷1
0
60 t.SA Active mode:
0 = Normal
1 = Economic
oF ÷ 999
oF
61 t.PP Access Password to
parameter functions
0 ÷ 255
1
62 t.AS Station address (for
serial communication)
6 - PROBLEMS, MAINTENANCE AND GUARANTEE
6.1 - SIGNALLING
Errore
Reason
The probe may be
E1 -E1
interrupted (E) or in
E2 -E2
short circuit (-E), or may
measure a value outside
the range allowed
Internal
EEPROM
EPr
memory error
Other Signalling:
Message
od
Ln
Hi
Lo
oP
Action
Check
the
correct
connection of the probe
with the instrument and
check the probe works
correctly
Press key P
Reason
Delay at power-on in progress
Keyboard lock
Maximum temperature alarm in progress
Minimum temperature alarm in progress
Door opened
ASCON TECNOLOGIC - Y39E - OPERATING INSTRUCTIONS - Vr. Mondial Group - 10/10 - ISTR-MY39EENGmondial - PAG. 11
dEF
PdF
Eco
Defrosting in progress with “d.dL”=Lb
Post-defrosting in progress with “d.dL”=Lb
Eco mode active
7.3 - MECHANICAL DIMENSIONS, PANEL CUT-OUT AND
MOUNTING [mm]
78
35
6.2 - CLEANING
We recommend cleaning of the instrument only with a slightly wet
cloth using water and not abrasive cleaners or solvents.
6.3 - GUARANTEE AND REPAIRS
The instrument is under warranty against manufacturing flaws or
faulty material, that are found within 12 months from delivery date.
The guarantee is limited to repairs or to the replacement of the
instrument.
The eventual opening of the housing, the violation of the instrument
or the improper use and installation of the product will bring about
the immediate withdrawal of the warranty’s effects.
In the event of a faulty instrument, either within the period of
warranty, or further to its expiry, please contact our sales
department to obtain authorisation for sending the instrument to
our company.
The faulty product must be shipped to ASCONTECNOLOGIC with
a detailed description of the faults found, without any fees or
charge for ASCONTECNOLOGIC, except in the event of alternative
agreements.
Aux
28
6
64
6
12,2
7 - TECHNICAL DATA
64
BRACKETS
MAX 12 mm
PANEL + GASKET
34
min. 15 mm
29
71
min. 12 mm
7.2 - MECHANICAL DATA
Housing: Self-extinguishing plastic, UL 94 V0
Heat and fire resistance category: D
Dimensions: 78 x 35 mm, depth 64 mm
Weight: 130 g approx.
Mounting: Flush in panel (thickness max. 12 mm) in 71 x 29 mm
hole
2
2
Connections:
2,5 mm screw terminals block or 2,5 mm
extractable screw terminals block
Degree of front panel protection : IP 65 mounted in panel with
gasket
Pollution situation: 2
Operating temperature: 0 T 50 °C
Operating humidity: < 95 RH% without condensation
Storage temperature: -25 T 60 °C
28
7.1 - ELECTRICAL DATA
Power supply: 12 VAC/VDC, 12...24 VAC/VDC, 100...240 VAC +/10%
Frequency AC: 50/60 Hz
Power consumption: 4 VA approx.
Input/s: 2 inputs for temperature probes: PTC (KTY 81-121, 990 Ω
@ 25 °C) or NTC (103AT-2, 10KΩ @ 25 °C); 1 digital input for free
voltage contacts
Output/s: up to 3 relay outputs. OUT1: SPST-NO (16A-AC1, 6AAC3, 1HP 250VAC, 1/2HP 125 VAC); OUT2: SPDT (8A-AC1, 3AAC3 1/2HP 250VAC, 1/3HP 125 VAC) OUT3: SPST-NO (5A-AC1,
2A-AC3 250 VAC 1/8HP 125-250VAC); 16 A Max. for common (pin.
1), 12 A Max. for extractable terminal block model
Electrical life for relay outputs: 100000 op. (om. VDE)
Action type: type 1.B (EN 60730-1)
Overvoltage category: II
Protection class : Class II
Insulation: Reinforced insulation between the low voltage part
(supply H type and relay outputs) and front panel; Reinforced
insulation between the low voltage section (supply H type and relay
outputs) and the extra low voltage section (inputs); Reinforced
between supply and relay outputs; No insulation between supply F
or G type and inputs.
RECOMMENDED
PANEL CUTOUT
7.4 - FUNCTIONAL FEATURES
Temperature Control: ON/OFF mode
Defrost control: interval cycles or evaporator temperature by
Electric Heating /stopping compressor or hot-gas / reverse cycle
Measurement range: NTC: -50...109 °C / -58...228 °F; PTC: 50...150 °C / -58 ... 302 °F
ASCON TECNOLOGIC - Y39E - OPERATING INSTRUCTIONS - Vr. Mondial Group - 10/10 - ISTR-MY39EENGmondial - PAG. 12
Display resolution: 1 ° or 0,1°
Overall accuracy: +/- (0,5 % fs + 1 digit)
Sampling rate: 130 ms.
Display: 3 Digit Red (Blue optional) h 15,5 mm
Software class and structure : Class A
Compliance: ECC directive EMC 2004/108/CE (EN55022: class B;
EN61000-4-2: 8KV air, 4KV cont.; EN61000-4-3: 10V/m; EN610004-4: 2KV supply, inputs, outputs; EN61000-4-5: supply 2KV com.
mode, 1 KV\ diff. mode; EN61000-4-6: 3V), LV 2006/95/CE (EN
60730-1, EN 60730-2-7, EN 60730-2-9)
Directive 37/2005/CE (EN13485 air, S, A, 2,- 50°C +90°C with
probe NTC 103AT11)
7.5 - INSTRUMENT ORDERING CODE
Y39E (instrument with mechanical keyboard )
Y39SE (instrument with Sensitive Touch keyboard )
a b c d e f g h i j kk ll
a : POWER SUPPLY
H = Supply 100..240 VAC
G = Supply 12..24 VAC/VDC
F = Supply 12 VAC/VDC
b : OUT1
R = Out1 Relay SPST-NO 16A-AC1
c : OUT2
R = Out2 Relay SPDT 8A-AC1
- = (No)
d : OUT3
R = Out3 Relay SPST-NO 5A-AC1
- = (No)
e: BUZZER
B = Buzzer
- = (No)
f : TERMINAL BLOCK
- = (Standard)
E = Extractable
g : DISPLAY
- = Red
B = Blue
h, i, j : INTERNAL CODES
kk, ll : SPECIAL CODES
ASCON TECNOLOGIC - Y39E - OPERATING INSTRUCTIONS - Vr. Mondial Group - 10/10 - ISTR-MY39EENGmondial - PAG. 13
DEUTSCH
Wir danken Ihnen das Sie sich für unser Produkt entschieden haben. Sie haben eine gute Investition getätigt die sich auszahlt. Funktionsweise, Design
und die verwendeten Komponenten dieses Gerätes wurden im Hinblick auf die besonderen Anforderungen entwickelt.
Darüber hinaus wurde das Gerät vor dem Versand einer vollständigen Kontrolle unterzogen. Bitte beachten Sie bei der Benutzung dieses Gerätes die
nachstehenden Empfehlungen. Es wird es Ihnen mit einer langen Lebensdauer danken.
BITTE FOLGEN SIE VORSICHTIG DIE FOLGENDEN A NWEISUNGEN, UM DIE G AFAHREN FÜR DIE BENUTZER UND DIE BESCHÄDIGUNG DES GERÄTES ZU VERMEIDEN ODER
DIE VORAUSSETZUNGEN DER RICHTIGEN ARBEITSWEISE NICHT ZU VERÄNDERN. U NSERE FIRMA LEHNT JEDE V ERANTWORTUNG AB, FALLS DIE STAMMENDE
ZWECKMÄßIGKEIT DES GERÄTES VON DER MODIFIZIERUNG VERSCHIEDENEN ART (DES ZUSATZES ODER DER BESEITIGUNG DER ELEKTRISCHEN ODER MECHANISCHER
TEILEN) ODER DER NICHTBEACHTUNG DER HIER GESCHRIEBENEN A NWEISUNGEN ABHÄNGEN WÜRDEN.
1
INBETRIEBNAHME
Nach dem Entfernen der Verpackung sind alle Teile des Schrankes mit einem weichen , sauberen Tuch zu reinigen, wie in Punkt 5 PERIODISCHE
WARTUNG beschrieben.
u.a.
1.
Gerät nicht im freien aufstellen und dem Regen aussetzen: Die Umgebungsbedingungen für eine Einwandfreie Funktion sind in TECHNISCHE
DATEN angegeben.
2.
Das Gerät auf einer ebenen Fläche aufstellen. Für einen guten Betrieb ist eine perfekte Nivellierung unerlässlich: hierzu die verstellbaren Füsse
regulieren..
3.
Der Schrank darf nicht in der Nähe von Wärmequellen (Heizkörper , Öfen etc.) aufgestellt werden und ist vor Sonneneinstrahlung zu schützen. Um
das Gerät zu Beleuchten empfehlen wir eine Fluoreszenzlampe.
4.
Das Geraet muss an eine Wand gestellt werden. Bitte vorher überprüfen ob Distanzbolzen vorhanden sind. Um das Gerät zu verschieben bitte
vorher den Stecker aus der Stechdose ziehen. Wenn man wegen Installationserfordernisse das Gerät an die Wand nicht lehnen kann, soll man das
Schutzgitter vom Motorraum auf die vier Schrauben, die auf der unteren Rückseite vom Möbel installiert sind, montieren (eventuell kann man zum
Erzeuger das benötigte Material verlangen).
5.
Die Türe (n) können mit Schloss nachgerüstet werden, ( Option) Schlüssel nicht Kindern zugänglich machen, damit sich spielende Kinder nicht
selbst einschliessen können- sie ersticken.
6.
Gerät auf Transportschäden prüfen.
ACHTUNG:
ELEKTRISCHE TEILE VOR KONTAKT MIT WASSER SCHÜTZEN.
TEILE DES KÄLTEAGREGAT VOR BESCHÄDIGUNG BEWARHEN.
GERÄT NICHT IN EINEM FEUERGEFÄHRLICHEN ODER EXPLOSIONSGEFÄHRDETEN RAUM AUFSTELLEN.
LAGERN SIE KEINE EXPLOSIVEN STOFFE ODER SPRÜHDOSEN MIT BRENNBAREN TREIBMITTELN, WIE Z.B. BUTAN, PROPAN, PENTAN
USW. IM GERÄT. EVENTUELL AUSTRETENDE GASE KÖNNTEN DURCH ELEKTRISCHE BAUTEILE ENTZÜNDET WERDEN.
INBETRIEBNAHME
Vor Inbetriebnahme das Gerät nach den Transport 1 Stunde ruhen lassen. Ist das Gerät liegend transportiert worden sollte es erst nach 24 Stunden in
Betrieb genommen werden, damit das Oel wieder in den Kompressor zurückfliessen kann.
Der Schrank muss über das beiliegende Netzkabel an eine geerdete Steckdose mit 230 Volt 50 HZ angeschlossen werden. Vergewissern Sie sich vor
dem Anschluss, dass Spannung und Frequenz des Netzes mit den entsprechenden Daten des Gerätes übereinstimmen die auf dem Typenschild
angegeben sind. Keine Gegenstände auf den Schrank stellen. Der Abstand von Schrank zu Decke sollte 50cm betragen. Die nichteinhaltung dieses
Aufstellungshinweises kann zu einer starken Herabsetzung der Leistung des Gerätes führen.
Die Stromleitung/Steckdose an welcher der Kühlschrank angeschlossen wird, muss laut den geltenden Vorschriften zweckentsprechend geschützt und
an der Haupterdungsanlage angeschlossen werden (z. B. vom hochempfindlichen Differentialwärmeschalter (In = 16 A, Id = 30 mA).
DIE ERDUNG DES GERÄTES IST EINE SICHERHEITSNORM UND WIRD ZUSÄTZLICH VOM GESETZGEBER VORGESCHRIEBEN. UNSERE
FIRMA HAT DEN SCHRANK NACH DEN DERZEIT GELTENDEN VORSCHRIFTEN GEBAUT,UND ÜBERNIMMT KEINE HAFTUNG FÜR ETWAIGE
SCHÄDEN AN PERSONEN UND SACHEN BEI FEHLENDER ANSCHLIESSUNG AM EXTERNEN ERDUNGSNETZ
Zum Anschluss absolut keine Reduzierungen, Steckdosenleisten bzw. Verlängerungen benützen und sich vergewissern, dass die Stromleistung der
Elektroanlage und die Steckdosen den geltenden Richtlinien sowie der Geräteleistung auf dem Maschinenschild entsprechen. Bei Bedenken und zur
periodischen Kontrolle der allgemeinen Sicherheit der Anlage und der Benutzer, wenden Sie sich ein ausgebildetes und qualifiziertes Personal.
Das Gerät mindestens 2 Stunden lang in leerem Zustand laufen lassen, danach kann die aufzubewahrende Ware eingelegt werden.
Bitte beachten Sie die Stappelgrenze beim beladen des Gerätes.
Die Lüfteröffnung darf nicht verstellt werden um eine gute Umluftzirkulation zu gewährleisten.
Kontrollieren Sie die Temperatur des Kühlschrankes je nach Art der gelagerten Produkte.
(Siehe TECHNISCHE DATEN)
BEACHTEN SIE BITTE, DASS DIE INNENTEMPERATUR VON DER RAUMTEMPERATUR, DEM AUFSTELLUNGSORT, DER HÄUFIGKEIT DES
TÜRÖFFNENS UND VON DER BESCHICKUNG BEEINFLUSST WERDEN KANN.
2
UMGEBUNG
Um eine stabile Umgebungstemperatur und Feuchtigkeit des Aufstellungsortes zu gewährleisten kann es notwendig sein den Raum zu klimatisieren. Zu
hohe Luftfeuchtigkeit sowie Umgebungs-temperatur kann zu einer starken Herabsetzung der Leistung des Gerätes führen.
Das Gerät nicht in nähe von warmen Luftaustritten ( Heizung oder Klimaanlage ) und Durchzug aufstellen.
3
ZUBEHÖR
Nur Standardmässiges Zubehör verwenden. Fremdteile können die Umluftzirkulation im inneren des Gerätes stören und somit zu Funktionsproblemen
führen.
4
ENTSORGUNG SHINWEIS
Verpackung:
Die Verpackung als Schutz des Gerätes und einzelner Teile ist aus wiederverwertbaren Materialien
hergestellt. Bringen Sie bitte das Verpackungsmaterial zur nächstgelegenen Sammelstelle, so dass die verschiedenen Materialien wiederverwendet bzw.
verwertet werden können.
Das Produkt:
Das ausgediente Gerät enthält wertvolle Materialien, nicht einfach mit dem Sperrmüll entsorgen. Ausgediente Geräte sofort unbrauchbar machen.
Netzstecker ziehen und Anschlusskabel durchtrennen. Schnapp- oder Riegelschloss entfernen oder unbrauchbar machen, damit sich Kinder nicht selbst
einschliessen können- Erstickungsgefahr Achten Sie darauf , dass das ausgediente Gerät bis zu seiner Entsorgung am Kältemittelkreislauf nicht
beschädigt wird. So ist sichergestellt, dass das enthaltene Kältemittel nicht unkontrolliert entweicht.Bitte beachten Sie die örtlichen
Entsorgungshinweise.
In Übereinstimmung mit den Anforderungen der EuropäischenRichtlinie 2002/96/EG über Elektro- und Elektronik-Altgeräte(WEEE) ist vorliegendes
Gerät mit einer Markierung versehen.Sie leisten einen positiven Beitrag für den Schutz der Umwelt und dieGesundheit des Menschen, wenn Sie dieses
Gerät einer gesonderten Abfallsammlung zuführen. Im unsortierten Siedlungsmüll könnte ein solches Gerät durch unsachgemäße Entsorgung negative
Konsequenzen nach sich ziehen. Auf dem Produkt oder der beiliegenden Produktdokumentation ist folgendes Symbol einer durchgestrichenen
Abfalltonne abgebildet. Es weist darauf hin, dass eine Entsorgung im normalen Haushaltsabfall nicht zulässig ist Entsorgen Sie dieses Produkt im
Recyclinghof mit einer getrennten Sammlung für Elektro- und Elektronikgeräte. Die Entsorgung muss gemäß den örtlichen Bestimmungen zur
Abfallbeseitigung erfolgen. Bitte wenden Sie sich an die zuständigen Behörden Ihrer Gemeindeverwaltung, an den lokalen Recyclinghof für
Haushaltsmüll oder an den Händler, bei dem Sie dieses Gerät erworben haben, um weitere Informationen über Behandlung, Verwertung und
Wiederverwendung dieses Produkts zu erhalten.
5
PERIODISCHE WARTUNG
Die mechanischen Teile des Kühlgerätes bedürfen keiner periodischen Wartung.
Für eine lange Lebensdauer des Gerätes ist jedoch eine sorgfältige, regelmässige Reinigung unerlässlich.
Schalten Sie das Gerät aus und ziehen Sie den Netzstecker aus der Steckdose.
Gehäuse: Die Reinigung mit einem trockenen Tuch genügt, bei hartnäckigen Flecken ist warmes Wasser mit neutralen Reinigungsmittel zu benutzen;
gut nachspühlen und trocknen.
Chromstahlteile: Mit einem trockene Tuch reinigen, bei hartnäckigen Flecken ein mit einem geeigneten geruchlosen Produkt getränktes Tuch
benutzen. Keine scheuerartigen Produkte verwenden.
Innenbehälter: Für die Reinigung ist Wasser mit einen Neutralen Reinigungsmittel zu verwenden.
Verwenden Sie Reinigungsmittel nicht konzentriert und keinesfalls sand- oder säurehaltige Putz- bzw. chemische Lösungsmittel.
Für die Reinigung des Innenbehälters folgende Anweisung beachten:
1.
Gerät ausschalten und Stecker ziehen.
2.
Kühlgut ausräumen und Roste entfernen
3.
Türe offen lassen bis Gerät abgetaut ist
4.
Innenraum und Ausstattungsteile mit lauwarmem Wasser und etwas Spühlmittel von Hand reinigen und nachträglich gut trocknen
5.
Nicht mit Dampfreinigungsgeräten reinigen – beachten Sie die Verletzungs - und Beschädigungsgefahr
Das Gerät mindestens 1 Stunden lang in leerem Zustand laufen lassen, danach kann die aufzubewahrende Ware wider eingelegt werden
Einmal im Jahr muss die Türdichtung mit lauwarmen Wasser und neutralem Reinigungsmittel gereinigt werden. Gut abtrocknen und nachträglich mit
Vaseline einreiben, damit bleibt die Gummidichtung flexibel.
Für diese Arbeit keine spitzen oder scharfe Gegenstände benutzen , welche die Türdichtung beschädigen könnten.
Achtung: Folgende Arbeit muss von einem Servicetechniker ausgeführt werden.
Schalten Sie das Gerät aus und ziehen Sie den Netzstecker aus der Steckdose.
Mindestens viermal im Jahr muss der Statische Kondensator an der Rückwand mit einer weichen Bürste, oder noch besser mit dem Staubsauger
gesäubert werden. Am Kondensator setzt sich leicht.
Staub und Schmutz ab der die Wärmeabgabe vermindert und zu erhöhtem Stromverbrauch führt.
MANUELLE ABTAUUNG
An den Innenwänden aller Kühlgeräte bildet sich aufgrund der Luftkondensation Reif. Diese Reifschicht stellt eine echte Isolierung dar und vermindert
die Leistung des Gerätes.
Diese Reifschicht sollte öfters entfernt werden , wobei ein Kunststoffschaber zu benutzen ist.
Keinesfalls sollten Messer oder andere Metallgegenstände verwendet werden
Wenn die Reifschicht 4-5 mm beträgt, ist das Gerät vollkommen abzutauen.
•
Schalten Sie das Gerät aus und ziehen Sie den Netzstecker aus der Steckdose.
•
Für die Modelle
•
Statischer Tiefkühlschrank: Plastik T Stück vorne unten herausziehen und in die richtige Position bringen für das ablaufen des Tauwassers in ein
Auffangbecken.
•
Umluft Kühlschrank: der Ablauf befindet sich im hinteren Teil der Bodenwanne.
•
Die Ware herausnehmen und in einem anderen Kühl- oder Tiefkühlschrank lagern.
Sollte kein anderer Kühl- oder Tiefkühlschrank vorhanden sein, die Ware in einen Karton legen und in Decken oder Zeitungspapier einwickeln, in
diesem fall muss der Abtauvorgang beschleunigt werden.
•
Die Eisschicht mit einem Kunststoffschaber oder mit einem in warmem Wasser getränkten Schwamm entfernen.
•
Das Wasser und Reif entfernen.
•
Den Innenbehälter gut abtrocknen.
•
Den Stecker wider in die Steckdose stecken und das Gerät einschalten, und nach einer kurzen Betriebszeit die Ware wieder in das Gerät legen.
Wenn das Gerät über einen längeren Zeitraum nicht benutzt werden soll, müssen folgende Vorkehrungen getroffen werden:
•
Schalten Sie das Gerät aus und ziehen Sie den Netzstecker aus der Steckdose.
•
Türe leicht offen lassen, damit sich kein Geruch bildet.
•
An einem trocken Ort lagern und das Gerät mit einem Tuch abdecken.
ERSETZUNG DER BATTERIEN FÜR DAS LCD THERMOMETER.
Achtung: die unten angegebenen Aktionen müssen von einem spezialisierten Techniker ausgeführt werden.
Der Stecker von der Steckdose auseinander nehmen.
Die Protektion des serigraphierten Koppeltischs durch eine Kratzersspitze weg nehmen; die zwei Kreuzkopfsschrauben abschrauben und die Abdeckung
aus Plastik des Koppeltischs herausziehen.
Das Thermometer herausziehen und die Batterien ersetzen. Das Thermometer wieder in seine Stelle wieder legen.
Die Abdeckung aus Plastik des Koppeltischs mit den eigens dazu bestimmten Schrauben wieder montieren und der serigraphierte Schutz wieder
einfügen.
ACHTUNG: REPARATUREN UND EINGRIFFE AN DEM GERÄT NUR VON DEM KUNDENDIENST AUSFÜHREN LASSEN, SONST KÖNNEN
ERHEBLICHE GEFAHREN FÜR DEN BENUTZER ENTSTEHEN.
6
STÖRUNG
Ihr Gerät ist so konstruiert und hergestellt, dass Störungsfreiheit und lange Lebensdauer gegeben sind.
Sehr häufig werden Funktionsfehler durch einen mangelhaften Stromanschluss verursacht bzw. durch geringfügige Störungen die leicht von einem
Elektriker oder Kältemonteur behoben werden können.
Folgende Störungen können Sie durch prüfen der möglichen Ursachen selbst beheben.
Das
•
•
•
Gerät läuft nicht:
Ist das Gerät ordnungsgemäss eingeschaltet ?
Ist der Stecker richtig in der Steckdose ?
Ist die Sicherung der Steckdose in Ordnung ?
Die Kühltemperatur ist nicht ausreichend tief:
•
Schliesst die Türe richtig, wurde die Türe zu häufig geöffnet ?
•
Steht das Gerät neben einer Wärmequelle ?
•
Ist der Temperaturregler richtig eingestellt ?
•
Ist die Be- und Entlüftung in Ordnung ?
•
Ist der Kondensator voll Staub und Schmutz? zum reinigen Bürste oder Staubsauger verwenden.
Die Geräusche sind zu laut:
•
Steht das Gerät fest auf dem Boden, werden nebenstehende Gegenstände von dem laufenden Kühlaggregat in Vibration gesetzt?
•
Achten Sie darauf, dass alle Teile an der Rückwand frei schwingen können; evtl. anliegende Teile vorsichtig wegbiegen.
•
Bedenken Sie das Strömungsgeräusche im Kältekreislauf nicht zu vermeiden sind.
Wenn sich Feuchtigkeit im Inneren bildet:
•
Ist normal wenn wegen Klimatischen Verhältnissen eine sehr hohe Luftfeuchtigkeit herrscht.
•
Wenn die Lebensmittel nicht mit Folie abgedeckt oder in Behältnissen sind kann sich im inneren des Schrankes eine hohe Luftfeuchtigkeit bilden.
•
Achten Sie darauf, dass die Türe nur kurz geöffnet wird und nicht offen stehen bleibt.
REPARATUREN AN ELEKTROGERÄTEN DÜRFEN NUR VON FACHKRÄFTEN DURCHGEFÜHRT
REPARATUREN KÖNNEN ERHEBLICHE GEFAHREN FÜR DEN BENUTZER ENTSTEHEN.
WERDEN.
DURCH
UNSACHGEMÄSSE
HINWEIS ZUM AUSWECHSELN DER FLUORESZENZLAMPE
A
1.
2.
3.
4.
5.
INNENBELEUCHTUNG
Schalten Sie das Gerät aus und ziehen Sie den Netzstecker aus der Steckdose.
Die Schirmlampe von dem Scherkopf durch Schraubenzieher wegnehmen.
Entfernen Sie die Lampenabdeckung indem Sie sie leicht nach rechts schieben und nach unten ziehen.
Leuchtstofflampe auswechseln.
Lampenabdeckung wieder montieren in umgekehrter Reihenfolge.
B
1.
DISPLAYBELEUCHTUNG
Schalten Sie das Gerät aus und ziehen Sie den Netzstecker aus der
Steckdose.
Lampenabdeckung abschrauben.
Leuchtstofflampe auswechseln.
Lampenabdeckung wieder festschrauben.
2.
3.
4.
IST DAS SPEISEKABEL BESCHÄDIGT, MUSS DIESES VOM HERSTELLER BZW. SEINEM KUNDENDIENST ODER AUF JEDEM FALL VON EINER
QUALIFIZIERTEN PERSON ERSETZT WERDEN, UM RISIKEN ZU VERMEIDEN.
7
LÄNGERE Z EIT
AUSSER
BETRIEB
SETZEN
Wenn das Gerät über einen längeren Zeitraum nicht benutzt werden soll, sollen folgende Vorkehrungen getroffen werden:
1.
Ausser Betrieb setzen
•
Schalten Sie das Gerät aus und ziehen Sie den Netzstecker aus der Steckdose.
•
Türe leicht offen lassen, damit sich kein Geruch bildet.
•
An einem trocken Ort lagern und das Gerät mit einem Tuch abdecken.
2.
Gerät wieder in Betrieb nehmen
•
Das Gerät mindestens 2 Stunden lang in leerem Zustand laufen lassen, danach kann die aufzubewahrende Ware eingelegt werden.
•
Bitte beachten Sie die Stappelgrenze beim beladen des Gerätes.
•
Die Lüfteröffnung darf nicht verstellt werden um eine gute Umluftzirkulation zu gewährleisten.
8
STEUERUNG
Die Steuerung umfasst je nach Modell Hauptschalter, Kontrollampen und Temperaturregler
sowie Temperaturanzeige. ( Siehe Technische Daten )
( 1 ) Schalter für Beleuchtung
Das Gerät ist mit einem Schalter für die Beleuchtung ausgestattet, beim drücken des Schalter
schaltet die Innenbeleuchtung ein, bei Geräten mit Werbeleuchtkasten schaltet auch dies Beleuchtung ein.
( 2 ) Fernthermometer
Zeigt die Temperatur vom Innenraum an
( 3 ) Thermostat
Temperatur einstellen im Gegenuhrzeigersinn wärmere Temperatur, im Uhrzeigersinn kältere Temperatur. Beachten Sie bitte, dass
Innentemperatur von der Raumtemperatur, dem Aufstellungsort, der Häufigkeit des Türöffnens und von der Beschickung beeinflusst werden kann.
( 4 ) Elektronischer Thermostat
Bitte beachten Sie die beigelegte Bedienungsanleitung.
9
die
TÜRANSCHLAG WECHSELN
Reparaturen an Elektrogeräten dürfen nur von Fachkräften durchgeführt werden. Durch unsachgemässe Reparaturen können erhebliche
Gefahren für den Benutzer entstehen.
ES WIRD ERINNERT, DEN BAUSATZ ZUM WECHSEL DER TÜRRICHTUNG BEI DER HERSTELLERFIRMA ZU FORDERN.