1
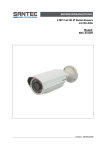
(D) Bedienungsanleitung
IR518C Wärmebildkamera, Art.-Nr. 31381
Kapitel 1
Einführung
Diese Wärmebildkamera (WBK) ist ein äußerst
kompaktes und doch leistungsstarkes Gerät,
das Wärmequellen sichtbar macht, die das
menschliche Auge nicht erkennen kann. Auf
Grund dieser Tatsache ist es möglich, Tiere aufzuspüren und zu verfolgen.
1
Eigenschafter der WBK
✦
✦
✦
✦
✦
✦
Hoch auflösende ungekühlte FPA Technologie.
2-fach Vergrößerung.
Das Infrarotbild kann eingefroren werden.
Das Infrarotvideo kann gespeichert werden.
Sowohl das Infrarotbild- wie auch das Video können auf dem Okular- Monitor angeschaut werden.
Sowohl das Infrarotbild- wie auch das Video können über den USB-Port an einen PC überspielt
werden.
✦ Durch Übernahme der Interpolationszoommethode um die elektronische Vergrößerung darzustellen,
ist es möglich, keine Mosaikeffekte zu erhalten. So können auch Objekte in großer Entfernung
beobachtet werden.
✦ Automatische/halbautomatische Helligkeits-und Kontrasteinstellung.
Kapitel 2
Vorsichtsmaßnahmen und Wartung
✦ Richten Sie die WBK nicht in starke Strahlungsquellen, wie z.B direkt in die Sonne, Laserlicht oder
Schweißgeräteblitze.
✦ Richten Sie die WBK beim Einschalten nicht auf eine Wärmequelle.
✦ Bei Nichtgebrauch oder während des Transportes entfernen Sie bitte die Batterien aus dem Gerät.
✦ Die WBK beinhaltet hochempfindliche optische und statisch empfindliche Bauteile. Bitte schützen
Sie deshalb das Gerät vor Stößen und vor Quellen statischer Aufladung.
✦ Unternehmen Sie keine Reparaturversuche sondern senden Sie das Gerät bei Fehlern an den
Vertreiber ein.
Um lange Freude an der WBK zu haben, sollten Sie folgende Punkte unbedingt beachten:
✦ Lesen Sie die Bedienungsanleitung sorgfältig durch. Bei Unklarheiten nehmen Sie bitte Kontakt
mit Ihrem Lieferanten auf.
✦ Halten Sie die WBK ruhig, während Sie mit Ihr arbeiten.
✦ Benutzen Sie die WBK nicht außerhalb der angegebenen Umgebungstemperaturen.
✦ Schalten Sie das Gerät nicht ständig ein-und aus. Zwischen Ein- und Ausschalten sollte
mindestens 20 Sekunden vergehen.
✦ Stecken Sie keine Anschlusskabel in das Gerät ein oder aus, während es eingeschaltet ist.
Schalten Sie immer erst das Gerät aus, bevor Sie Kabel ein-oder ausstecken.
✦ Wenn Sie die Beobachtung abgeschlossen haben, schalten Sie das Gerät aus und lassen Sie es
nicht unnötige Zeit eingeschaltet.
✦ Achten Sie auf einwandfreien Zustand aller Kabel und Stecker.
✦ Reinigen Sie das Gerät niemals mit aggressiven Reinigern. Benutzen Sie ein weiches fusselfreies
Tuch. Die Objektivlinse ist beschichtet und extrem empfindlich. Vermeiden Sie deshalb Schmutz
auf der Linse und reinigen Sie nur, wenn es unbedingt sein muss. Benutzen Sie dann ein
Linsenreinigungstuch.
2
Kapitel 3 Technische Daten
Sensor
Ungekühlter FPA Mikrobolometer
8~14μm
384×288
25μm×25 m
Weniger 110 mK
Linse
Linse
50mm/F1.1 automatisch scharfstellende Linse
Blickwinkel
10.97°×8.24°
Brennweite
50mm
Scharfstellbereich
5m~∞
Bildeinstellungen
Video output
PAL System
Elektronischer Zoom
2X
Bildfrequenz
50Hz
Einstellung
Autom./halbautom. Einstellung der Helligkeit und des Kontrastet
Polarität
Schwarz- oder Weißdarstellung für Wärmequellen wählbar
Okular-Sucher
Display
Pixel 852×600
Suchergrößer 12,78 x 9 mm
Grauwert 256
Stromversorgung
AC/DC Adapter
110-240V zu 9VDC
Akkus
4 x 1.2V/2500mAh
Energieverlust
<5W bei 25°
Arbeitszeit
>2 Stunden bei 25°
Umgebungsbedingungen
Geeignete Umgebungstemp.: -40℃~+60℃
Lagertemperaturen
-45℃~+65℃
Vibration
Sinus 5Hz – 200 Hz - 5 Hz Querbeschleunigung 1,5 g
6 min x axiale Vibration
Schlagempfindlichkeit
halbe Sinuskurve Beschleunigung 30 g
Dauer 6 ms x Axial Schock 3 mal
Interface
Interface
Analog video output / USB port/ RS232
Physikalische Eigenschaften
Farbe
Schwarz
Gewicht
760g
Maße
182mmx97mmx68mm
Detektortyp
Spektralbereich
Pixel
Pitch
NETD
3
Kapitel 4 Gerätebeschreibung
Bedienknöpfe
automatisch
Standby Abschaltung,
wenn das Gerät
kein Gesicht vor
dem Okular erkennt
Batterie
Trageschlaufe
Linsenabdeckung
Okular
Bedienknöpfe
POWER
M
+
-
Infrarotlinse
Anschlußbuchse
Funktion
Drücken Sie den Knopf 5 sek. Lang um das Gerät ein/auszuschalten
Drücken Sie kurz, um das Gerät manuell zu kalibrieren
Wenn kein Menu angezeigt wird: Drücken Sie den Knopf für 3 sek
kurz drücken um zwischen weiß/schwarz Anzeige zu wechseln
Wenn das Menu angezeigt wird: drücken Sie den Knopf um den Menüpunkt auszuwählen.
Wenn Menu angezeigt wird: drücken Sie den Knopf um sich von links nach
rechts durch das Menu durchzuwählen
Wenn kein Menu angezeigt wird: drücken Sie den Knopf um von 1-fach auf
2-fach Vergrößerung zu wechseln
Wenn Menu angezeigt wird: drücken Sie den Knopf um sich von rechts nach
links durch das Menu durchzuwählen
Wenn kein Menü angezeigt wird: kurz Druck löst Fotoschuß aus, langer Druck
löst Videoaufnahme aus
Die Bedienknöpfe befinden sich auf der Oberseite des Gerätes.
Kapitel 5 Kurzeinführung
5.1 Vorbereitung
1) Der Benutzer kann das Gerät in der Hand halten oder auf einem Stativ montieren.
2) Schließen Sie das beiliegenden Video/USD Kabel und Stromkabel entsprechend der Skizze an.
Achten Sie beim Anschluss des Steckers in das Gerät darauf, dass die konvexe Seite des Steckers in
die konkave Form der Buchse eingeführt wird.
9VDC
Video
Monitor
110-240VAC➞9VDC
Adapter
USB
PC
USB
RS232
PC port
110-240VAC
Achtung: Wenn das Gerät über den USD-port mit einem PC verbunden ist, sind alle Bedienknöpfe
außer Funktion. Deshalb sollte das Gerät nur mit einem PC verbunden werden, um Bilder oder Videos
zu überspielen
3) Benutzen Sie 4 Stück AA Batterien 1,2 V Ni-MH um das Gerät mit Strom zu versorgen. Setzen Sie die Batterien entsprechend dem Schaubild ein.
4) Die SD Karte setzen Sie bitte entsprechend dem Schaubild ein.
5) Schließen Sie den Deckel, wenn Sie die Batterien und die SD Karte eingesetzt haben.
4
5.2 Schnellstart
1) Nachdem Sie das Gerät geprüft haben, drücken Sie für
5 Sek. den Power-Knopf.
2) Danach erscheint im Sucher dieses Bild
3) Das Gerät überprüft sich nun selbst. Im Sucher sehen Sie dieses
Bild.
4) Drehen Sie an den Okularen, bis das Bild scharf ist.
5) Das Gerät führt die Kalibrierung selbsttätig durch.
6) Drücken Sie kurz auf
den Power Knopf um die Kalibrierung manuell auszuführen.
7) Richten Sie das Gerät auf ein Ziel und beobachten Sie es
8) Scharfstellen
a. Drehen Sie an den Okularen, bis Sie entsprechend Ihrer Sehstärke scharf eingestellt sind.
b. Richten Sie das Gerät auf das Ziel.
c. Das Gerät ist auf automatische Scharfstellung eingestellt. Sie können aber die Helligkeit und den
Kontrast verändern (siehe Kapitel 6.5.1).
Sie können auch durch Drehen des Objektivs manuell scharfstellen.
Achtung: Wenn Sie nicht durch das Okular sehen, geht das Gerät automatisch in den StandbyModus. Sobald Sie sich dem Okular wieder nähern, schaltet das Gerät wieder ein.
9) Wie Sie die einzelnen Menüpunkte einstellen, wird im folgenden Kapitel erklärt
10) Wenn Sie das Gerät abschalten wollen, setzen Sie zunächst die Schutzkappe wieder vor die Linse
und drücken dann lang den Power-Knopf, bis das Gerät den letzten Balken im Runterfahrmodus erreicht hat. Danach können Sie alle angeschlossenen Kabel vorsichtig entfernen.
5
Kapitel 6 Genaue Funktionsbeschreibungen
6.1 Betrieb mit externer Stromversorgung
Am rechten oberen Bildrand erscheint ein EURO-Stecker Symbol.
Beim Betrieb mit Batterien erscheint ein Batteriesymbol. Die Anzahl
der Striche innerhalb der Batterie zeigen den Ladezustand der Batterien.
Wenn die Batterien leer sind, erscheint ein Warnhinweis, dass das
Gerät gleich wegen Strommangel abschaltet.
6.2 Menüführung
Nachdem Sie den Power Knopf gedrückt haben und das Gerät hochgefahren ist, drücken Sie den M-Knopf. Im Sucher erscheint folgendes
Bild.
Drücken Sie +/- um den gewünschten Menüpunkt auszuwählen und
bestätigen Sie mit „M-Knopf“. Dadurch gelangen Sie automatisch in
das Sub-Menü.
6
6.3 Hilfe
Wählen Sie durch +/- Taste das Menü Hilfe und bestätigen Sie mit M. Drücken Sie nochmals M verlassen Sie das Hilfemenü.
6.4 Wählen Sie durch
+/- Taste das Menü Hilfe und bestätigen Sie mit M. Drücken Sie nochmals M verlassen Sie das Hilfemenü
6.5 Bildeinstellung
6,5,1 Automatische –oder Halbautomatische Einstellung
Wählen Sie im Menü „Auto/SemiAuto“ und drücken Sie M zur Bestätigung.
Wählen Sie entsprechend als nächstes die Helligkeit und Kontrast Einstellung manuell oder automatische Einstellung.
Mode
Auto
Semi-auto
Menu Inhalt
Helligkeit/Kontrast
Helligkeit/Kontrast
Resultat
automatische Rauf-Runterregelung
automatische Runterregelung, manuelle Raufregelung
Helligkeit und Kontrast werden automatisch auf den durchschnittlichen Wert des ganzen Bildes eingestellt. Eine Nachkorrektur kann notwendig sein, um bestimmte Bildbereiche besser zu erkennen.
6.5.2 Helligkeit und Kontrastregelung
Im „Automatik-Modus“ können Sie über Menu-Punkt „B“ die Helligkeit und üer Menu-Punkt „C“ den
Kontrast einstellen. Die Veränderung findet sofort in Echtzeit statt. Die Werte werden in % angezeigt.
Im „Halbautomatischen Modus“ können Sie die Helligkeit einstellen und das Gerät stellt automatisch
den dazu passenden Kontrastwert ein. Werte werden in % dargestellt.
Der Benutzer kann die Helligkeit und
den Kontrast anpassen.
6.5.3 Elektronischer Zoom
Das Gerät hat eine elektronische 2-fach Zoom-Funktion. Wenn kein Menu angezeigt wird, drücken Sie
+ um den Zoom einzuschalten.
Einfache Vergrößerung (Z: 1)
2-fache Vergrößerung (Z: 2)
7
6.5.4 Polarität
Die WBK benutzt Grauabstufungen, um die unterschiedlichen Temperaturbereiche anzuzeigen. Bei
positiver Polarität stellen die helleren Grauwerte die wärmeren Temperaturbereiche an. Bei negativer
Polarität zeigen die helleren Grauwerte die kälteren Temperaturbereiche an. Wenn kein Menu angezeigt wird, drücken Sie kurz auf die Taste „M“ um zwischen den beiden Polaritäten zu wechseln.
Wärme weiß
Wärme schwarz
6.6 Einfrieren und sichern des Infrarotbildes-oder Videos
6.6.1 Bevor Sie das Foto schießen, visieren Sie das Motiv an und stellen Sie das Bild scharf, halten Sie die WBK ruhig. Wenn kein Menu angezeigt wird, drücken Sie auf „-„, um das Foto zu schießen. Es wird
automatisch auf der SD Karte gespeichert. Es wird kein Dateiname des
Bildes im Sucher angezeigt. Die WBK kehrt dann automatisch wieder in
den Normalmodus zurück.
6.6.2 Wenn kein Menu angezeigt wird, drücken Sie lange auf „-„ um ein
Video zu erstellen. Das Video wird automatisch auf der SD Karte gespeichert. Das Gerät zeigt die noch verbleibende Videozeit an, die von
dem Speicherplatz auf der SD Karte abhängt.
Im nebenstehenden Bild wird der Dateiname, die Aufnahmezeit und die
verbleibende Restzeit angezeigt. Langes Drücken auf „-„ beendet die
Videoaufnahme.
6.7 Bilder und Videos ansehen
Wählen Sie „REPLAY“ und dann „M“ um in das unten angezeigte Menu zu kommen.
Mit „+“ oder „-„ rufen Sie die gespeicherten Bilder oder Videos auf.
Durch nochmaliges Drücken
der Taste „+“ oder „-”
blättern Sie durch die
gespeicherten Bilder
oder Videos.
Drei Möglichkeiten haben Sie innerhalb dieses Menupunktes:
1) Drücken Sie nochmal „M“ um in den Normalmodus zurückzukehren
2) Drücken Sie „+“ um in das „Playback-Menu“ zurückzukehren
3) Drücken Sie „-„ um in das Löschmenu zu gelangen
8
Im Löschmodus haben Sie wieder drei Möglichkeiten
1) Drücken Sie „M“ um in den Normalmodus zurückzukehren
2) Drücken Sie „-„ um ein Bild zu löschen und dann in den Playbackmodus zurückzukehren
3) Drücken Sie „+“ und Sie gelangen in das nächste Menu
Hier können Sie alle vorhandenen Fotos auf einmal löschen. Drücken
Sie „-„ um zu bestätigen, dass Sie alle Fotos löschen wollen. Drücken
Sie „M“ um den Löschvorgang abzubrechen und in den Playbackmodus zurückzukehren.
Für Videos gelten die gleichen Schritte
6.8 SD Karte formatieren
Wählen Sie „FORMAT“-Menu und drücken Sie „M“, um die SD-Karte zu formatieren.
Das Display zeigt dann
nebenstehendes Bild. Durch „-„
beenden Sie das Formatieren.
Durch „+“ wird das Formatieren
durchgeführt.
6.9 Werkseinstellung wieder herstellen
Wählen Sie das Menu „DEFAULT“ und drücken Sie dann „M“. Es erscheint dann nebenstehendes Bild.
Durch Drücken von „-„ beenden Sie diesen Schritt. Durch Drücken von
„+“ werden die Werkseinstellungen wieder hergestellt.
6.10 Übertragen von Bildern oder Videos auf einen PC
Verbinden Sie die WBK über das USB-Kabel mit einem PC. Dieser wird die Speicherkarte der WBK
erkennen um als „GUIDE_IR“ darstellen. Klicken Sie doppelt auf dieses Symbol. Der Ordner enthält
die Dateien“Fotots“ und Videos“. Sie können die gespeicherten Dateien nun auf einen PC-Ordner verschieben, Dateien löschen oder bearbeiten, wie Sie es von einer normalen Kamera kennen. Entfernen
Sie danach die WBK Kamera und ziehen das USB Kabel heraus.
9
7. Batterieladezustand
Die WBK kann mit 2 Ni-MH AA Akkus betrieben werden oder mit 2 entsprechenden AA-Batterien
7.1 Laden der Akkus.
1) Das Laden kann nur mit einem externen Ladegerät (nicht im Lieferumfang) geladen werden. Setzen
Sie hierzu die Batterien entsprechend der angegebenen Polarität in das Ladegerät ein.
2) Stecken Sie das Ladegerät in eine 230 V Steckdose
3) Es ist normal, dass das Ladegerät während der Aufladung warm wird
Mögliche Fehlerursachen:
Nr.
1
Fehleranzeige
Die WBK läßt sich nicht
Häufigster Fehler
Batterie bzw. Akkuspannung zu schwach
einschalten
Falsche Polarität oder Batteriefach nicht richtig geschlossen
System ausschalten und nach 20 Sekunden neu starten
(booten)
2
Bild ist verschwommen/
unklar
Richtig fokussieren (Okular und Objektiv)
3
Das Bild ist zu hell
bzw. zu dunkel
Siehe Punkt 6.5
4
Keine Bildausgabe/
anzeige
Kabelanschlüsse zum Ausgabemedium überprüfen
IR518C Teileliste
NAME
IR518C Wärmebildkamerar
Power/video/USB/RS232 Kabel
AC adapter(Input:110-240VAC Output:9VDC)
Bedienungsanleitung
Tragetasche
Anzahl
1
1
1
1
1
Voerder Straße 83 - 58135 Hagen - Tel. 02331-62400-0
10
(GB) User manual
IR518C Thermal Imager, Art.-Nr. 31381
Chapter 1 Introduction
IR 518C is of ultra-compact, lightweight & unparalleled design, low power dissipation, more
reliable functionality and robust performance.
IR 518C can penetrate through haze, smoke,
rain, snow and total darkness to track and aim
target which is difficult to be observed by
human eyes in both day and night, and all weather condition. It makes the war field “singletrack clarity” for us and meets various demands
of high accuracy for night vision, identification,
tracking, analysis, and etc, reach the international military standard.
11
Features:
✦
✦
✦
✦
✦
✦
✦
✦
✦
✦
✦
✦
✦
✦
✦
✦
High resolution uncooled FPA technology ✦ Two versions (384 and 160) are available,
Choices of lens. 2X extender is available. ✦ Monocular viewer displays.
Able to freeze and save the picture of infrared image. ✦ Able to record the video of infrared image.
The saved infrared picture and video can be played on the thermal imager.
The saved infrared image and video can be transmitted to the PC via the USB port.
Adopt the interpolation zoom method to perform the electronic magnification, and there are no
mosaic appeared. It takes good effect on distant observation.
Auto/Semi-auto brightness and contrast. ✦ Small size, light weight, and easy operation
High reliability, compact structure ✦ License free ✦ High resolution uncooled FPA technology
Two versions (384 and 160) are available, ✦ Choices of lens. 2X extender is available.
Monocular viewer displays. ✦ Able to freeze and save the picture of infrared image.
Able to record the video of infrared image.
The saved infrared picture and video can be played on the thermal imager.
The saved infrared image and video can be transmitted to the PC via the USB port.
Adopt the interpolation zoom method to perform the electronic magnification, and there are no
mosaic appeared. It takes good effect on distant observation.
Auto/Semi-auto brightness and contrast. ✦ Small size, light weight, and easy operation
High reliability, compact structure ✦ License free.
Chapter 2 Precautions and maintenance
✦ Do not direct the IR518C Thermal Imager at very high intensity radiation sources such as the sun,
carbon dioxide lasers or arc welders etc.
✦ Do not direct the IR518C Thermal Imager at high temperature target when power-on the IR518C
Thermal Imager.
✦ When the IR518C Thermal Imager is not in use or is to be transported, ensure that the battery is
taken out and the unit is stored in the protective carry case.
✦ The IR518CThermal Imager integrates precision optical equipment and static-sensitive
electronics,
so please do not casually place, knock, or shock the thermal imager and accessories, and make
it far off the static to avoid any damages.
✦ Never attempt to disassemble or open the imager body, as this action will void the warranty.
Contact manufacturer for calibration or repair.
To ensure that the IR518C Thermal Imager is kept in a good working condition and remains
fully functional operation, the following guidelines should be respected at all times:
✦ All User Manuals and leaflets should be read thoroughly before proceeding with operation of the
equipment, please contact us if there is any unclear.
✦ Keep the IR518C Thermal Imager steady during operation.
✦ Do not use the IR518C Thermal Imager beyond the specified operation condition scope.
✦ Do not apply the non-fitted thermal imager adapter.
✦ Do not frequently power on/off the imager. The time between on and off should be not less than 20 sec.
✦ Do not pull in/out all the cables when the imager is power-on; and highly recommend to cut off
the power of all the connected electric systems when pull in/out the cables.
✦ If the observation is over or in holding state, please timely cut off the power so as to effectively
extend the imager lifetime.
✦ Pay attention to the protection of the various cables and wires that connected with thermal imager.
✦ Do not clean with chemical solvent, diluents. The clean, soft and dry flannelette is available.
As the thermal imager lens had been coated an antireflective film layer and often clean will
damage the coating, the optical surfaces of the imager lens should only be cleaned when visibly
dirty. Please avoid touching the exposed lens surface, as the acid substance on the print will
damage the coatings and lens substrates. Use only a proprietary lens cleaning tissue.
12
Chapter 3 IR518C Technical SpecificationsInterface
Detector
Uncooled FPA microbolometer
8~14μm
384×288
25μm×25 m
Less than 110mk
Image Performance
Lens:
50mm/F1.1 Motorize lens
FOV:
10.97°×8.24°
Focal length:
50mm
Focus range:
5m~∞
Image presentation
Video output:
PAL
Electronic Zoom:
2X
Frame Rate
50Hz
Adjust
Auto/Semi-auto brightness and contrast adjustment
Polarity
Black/White hot
OLED viewfinder
Display:
Pixel 852×600
Displaying area 12.78×9mm2
256 level gray
Power System
AC/DC adapter:
110-240VAC 9VDC
Rechargeable Ni-MH battery: 1.2V/2500mAh X4
Power dissipation:
<5W@25
Operation time:
>2 hours@25
Environmental Parameters
perating Temperature::
-40℃~+60(not include batteries)℃
Storage Temperature:
-45℃~+65(not include batteries)℃
Vibration
Sine wave 5Hz~200Hz~5Hz accelerated speed: 1.5g duration
6min X axial vibration
Shock:
Half-sine wave accelerated speed: 30g
duration 6ms X axial shock 3times
Interface
Interfaces:
Analog video output / USB port/ RS232
Physical Characteristics
Colour:
Black
Weight:
760g (with batteries and SD card)
Size:
182mmx97mmx68mm
Detector Type:
Spectral range:
Pixel:
Pitch:
NETD
13
Chapter 4 Buttons and interface of imager
IR 518C Thermal Imager figure
Buttons
Wrist Strap
Lens cap
Eyes
detector
Battery
Buttons
POWER
M
+
-
Oled
Infrared lens
Interface
Function
Press 5 sec to power on/off the imager
Short press to calibrate the imager manually.
When no menu displayed:Press 3 sec to bring out menu.
Short press to switch between white/black hot.
When menu displayed:Press this button to select the menu items
When menu displayed: Press this button to choose the menu from left to right.
When no menu displayed: Switch between original image and 2X image
When menu displayed: Press this button to choose the menu from right to left.
When no menu displayed:Short press to take and save infrared image.
Long press to take and save image video
IR518C imager can be used as handheld device or can be stably installed on tripod, please see the
screw hold on the bottom side of the camera.
Chapter 5 Quick start guide
5.1. Preparation
1) The operator could hand hold the IR518C Thermal Imager, or fix it on the tripod.
2) According to the thermal imager interface definition, connect the enclosed video/USB cable, power
cable and 9V power adapter to the display equipment and AC power shown as below picture. When
Insert the cable plug into the thermal camera socket, please aim the convex part to the concave part
and slightly insert.
9VDC
Video
Monitor
110-240VAC➞9VDC
Adapter
USB
PC
USB
RS232
PC port
110-240VAC
Note: When the camera connected with the PC by USB port, all button operation will be ineffective.
Thus, please do not connect the camera with the PC when observing, and only connecting when
transmitting the picture or video. The RS232 communication function is reserved.
3) Please use the 1.2VNi-MH batteries (4 of them) to power on the imager. Insert them
into the imager as the following picture
4) SD card is inserted into the imager as the following picture.
5) Close the battery cover,make sure the battery and SD card are accurately inserted.
14
5.2 Quick start guide
1) After careful checking,press for
5 sec to power on the imager.
2) Starting-up image isas following picture:
3) Self-checking process is shown on the screen.
4) Manually turn the oculars until you see the clear image on the screen.
5) The Thermal Imager will do non-uniformity-calibration automatically.
6) Short press
to calibrate the imager if there is any non-uniformity occurs during the operation.
7) Aim the thermal imager to the target and observe.
8) Imaging:
a) Rotate the viewfinder until the target can be clearly observed.
b) Aim the Thermal Imager to the target.
c) The default mode is AUTOMATIC MODE which provides user with a clear image after simply focusing. User can also adjust the brightness and contrast to get a qualified satisfying image.
Adjust the focus manually to get clear image.
Note: When human eye left the eye detector, the imager will enter stand-by mode, when eyes get
close to the eye detector, the OLED will lighten again!
9) Function Brief: Detailed button operation instructions such as Brightness and Contrast adjustment,
Polarity selection, cursor choosing and checking, setting language and button instruction, parameters
save, freeze, save and playback pictures, record and playback infrared video, focus adjustment, nonuniformity calibration and etc functions, please refer to OPERATION INSTRUCTIONS in the next
section.
10) Power-off: When operation completed, firstly put back the lens cover, then press and hold the
power button till the shut-down progress bar on the screen reach its right end. After that, remove the
cables from the sight by holding the lock pin on the cable and pulling it out. Do not pull the cable by
force, otherwise damage may occur!
15
Chapter 6 System operation
6.1 Power Instructions icon
When the thermal imager works with the external power supply, a plug
mark will present on the right corner of the screen as the below image
shown.
When the thermal imager works with the enclosed Li-ion battery, a battery mark will present in the right corner of the screen as the below
image shown.
The system continuously monitors the power supply voltage. If the
power is not enough, there will
be a window jump out to warn the user, if user does not take any measures for it, the system will automatically shut down after a certain
power decrease.
6.2 Menue Instruction
After start-up, press the “M” button, and the menu bar will be presented on the screen as the below image shown. The button instruction
will be displayed to state the buttons function on the screen, and user
can operate as the button instruction。
Menu as follows will display on the screen.
Press “+” or “-” buttons to adjust the parameters of selected item,
press“M” to confirm the select and enter to sub-menu.
16
6.3 Help menu
Choose “Help” then press“M”to enter to Help Menu. Press“+”、“-”to view the helping information.
Press “M” again to exit this menu.
6.4 Button instruction setting
Select “Note.” then press “M” to choose whether the button instruction shall be displayed or not.
We suggest users to open the button instruction.
6.5 Image adjustment
6.5.1 Auto/Semi-auto mode setting
Choose“Auto/SemiAuto”then press“M” to switch between Auto and Semi-auto mode, and correspondingly to select the brightness, contrast Auto/SemiAuto adjustment ways
Mode
Auto
Semi-auto
Menue Content
Brightness, Contrast
Brightness, Contrast
Effect
Auto offset and gain
Auto offset, manual gain
In the above table, brightness is the expect value of the average of the actual value of the whole or
part of the image; contrast is the expect value of the actual contrast of the whole or part of the image;
offset and gain are two parameters related to brightness and contrast in the brightness and contrast
calculation
6.5.2 Brightness and contrast adjustment
In the automatic mode, user can adjust menu item “B” to get satisfying image brightness, and adjust
menu item “C” to get satisfying image contrast. System sets offset and gain in real time as per your
input to obtain acceptable image quality. Parameters of menu item “B” and “C” values are shown in
percentage.
In the semiautomatic condition, user can adjust menu item “B” to get satisfying image Brightness.
System automatically sets offset as per your input brightness value. User can adjust gain manually.
Parameters of menu item “B” and “C” values are shown in percentage.
Notice:
If user find the contrast is low when using the imager just like below.
User can adjust contrast according to
the circumstance condition in order to
make a satisfying image.
6.5.3 Electronic Zoom
The thermal imager can also conduct electronic zoom function. When no menu displays, press the “
+” to switch the original image and 2 times zooming image.
Original image (Z: 1)
2 times zooming image (Z: 2)
17
6.5.4 Polarity
IR 518CC uses different gray level to indicate different temperature. Under positive polarity mode,
brighter part represents higher temperature. While under negative polarity mode, brighter part represents lower temperature. When no menu displays, short press “M” to switch between 2 polarity
modes .
White Hot
Black Hot
6.6 Freeze and save the infrared image and video
6.6.1 Freeze and save the infrared image
Before taking photo, firstly aim to the target and adjust the focus, then
keep the thermal imager body stable, so as to obtain a clear image,
when no menu displays, press“-”to freeze infrared image and save it
into the built-in SD card, there is indication of the file name on the
upper left side of the screen. After saving, the thermal imager will return
to the real time infrared image status.
6.6.2 Take and save the infrared video
When no menu displays, long press“-”to take infrared video, and save
it in the built-in SD card.IR518C shows the recording time that left according to the memory space.
In the above picture, the file name, recording time and left recording
time are displayed. Long press “-” to stop the video taking.
6.7 Infrared image and video playback
Choose “Replay” then press“M”to enter the below interface.
User operate according to the indication,
press“+”to enter the interface shown
below.
According to the indications,
press“+”、“-”to browse infrared
images, press “M”to enter the
interface that shown below.
Three operations can be done according to the indications shown in
the above picture:
1) Press“M”to exit playback menu and back to live infrared image.
2) Press“+”to return image playback menu.
3) Press“-”to enter “image delete” menu.
18
Three operations can be done according to indications shown above.
1) Press“M”to return image playback menu.
2) Press“-”to delete one infrared image and then return back to image
playback menu.
3) Press“+”, you will see the picture shown as below.
According to the indication, press“-”to confirm the delete of all infrared
images, then return back to playback menu; Press“M”to cancel the delete operation ,then return to image delete menu.
The operation of video playback is the same as images.
6.8 Formatting SD card
Infrared images and videos can be stored
in the built-in SD card. Choose
Format”menu, then press“M”to format
the SD card.
According to the indications shown
in the picture, press“-”to exit the
operation;Press“+”to format
SD card, see below picture
6.9 Restore factory setting
Choose “Default”then press“M”, the below picture will shown on the
screen
According to the indications, press“-”to cancel the operation; Press
“+”to restore factory setting.
6.10 Transmit the image and video from the thermal imager to PC
The method of transmitting the image and video from the thermal imager to PC is the same as the digital camera picture transmitting.
Connect the thermal imager and PC via the USB cable; the PC can identify the removable storage
device. Double-click the “GUIDE_IR” disc mark to open the storage device; there are two folders in
the storage device, “PICTURE” and “VIDEO”, and these two folders are respectively stored infrared
pictures and videos. User can conduct copy, cut, and delete and etc operations as the normal files.
After operation, please eject the removable storage device “GUIDE_IR” and then pull out the USB
cable plug.
19
Chapter 7 Battery Status
IR518C thermal imager is power supplied by 2 units of replaceable and rechargeable Ni-MH AA
batteries, average operation time is 2 hours.
7.1 Battery charging method:
1) Aim the batteries electrode to the charger’s electrode, and insert the battery into the charger.
Please pay attention to the inserting direction and position
2) Insert the 100-240VAC/9VDC adaptor plug into the AC charge socket. Connect the AC adaptor
cable to the 100~240VAC socket to start charging
3) When start the charging, the red and blue indicator will flicker alternatively.
4) In the process of charging, the red indicator is lightening, when fully charged, the blue indicator is
lightening.
5) It’s normal that the AC adaptor will get heat during the charging process.
If the IR518C meets troubles please check the items listed below first, if the troubles beyond those
ones please contact us as soon as possible.
No.
1
Trouble
The Thermal Imager can
not be turned on
Reason/Measure
No battery or lack of power; remove battery an install a fully
charged on.
Battery bad connection; reinstall the battery and tighten the
battery cover.
Switch off the system, and reboot it after 20 seconds.
2
The image is blurry
Adjust focus till image clear.
3
The image is too dark
Perform NUC function manually.
or too bbright
Adjust brightness and contrast manually or set to auto
brightness/contrast mode.
No image output
Display equipment connection problem or video cable
connection problems
4
IR518C Standard Packing List
NAME
IR518C Thermal Imager
Power/video/USB/RS232 cable
AC adapter(Input:110-240VAC Output:9VDC)
User manual
Equipment case
QTY
1
1
1
1
1
Voerder Straße 83 - 58135 Hagen - Tel. 02331-62400-0
20