1
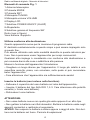
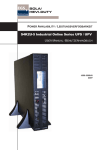
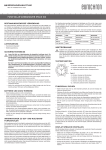
R
• RADIO MULTIBNDA DIGITALE - MANUALE DI ISTRUZIONI
• DIGITAL MULTIBANDRADIO - USE INSTRUCTIONS
• RADIO MULTIBANDES RECORDABLE - MANUEL D’INSTRUCTIONS
• MULTIBANDRADIO - BETRIEBSANLEITUNG
• RADIO MULTIBANDA DIGITAL - MANUAL DE INSTRUCCIONES
Cod.: EL.103
ITALIANO
pag. 3
ENGLISH
pag. 10
FRANÇAIS
pag. 16
DEUTSCH
pag. 22
ESPAÑOL
pag. 29
Radio multibanda digitale - Manuale di istruzioni
Norme di sicurezza generali
Prima di mettere in funzione questo apparecchio, leggere molto attentamente le istruzioni per l’uso e conservarle con cura unitamente al certifi
cato di garanzia, allo scontrino e, se possibile, alla scatola di cartone con
la confezione interna. Se passate l‘apparecchio a terzi, consegnate anche
le istruzioni per l‘uso.
• Per evitare il rischio di incendio o di scosse, non si deve mai tenere
l’apparecchio sotto la pioggia o in ambienti umidi. Quindi non usare l’apparecchio nelle immediate vicinanze di acqua, per esempio in un bagno, in
prossimità di una piscina o in una cantina umida.
• Utilizzare l’apparecchio solo per l’uso previsto.
• Quando si utilizzano alimentatori esterni, controllare la corretta polarità
e la tensione.
Inserire le batterie sempre dalla parte giusta.
• Collocare l’apparecchio in modo che le aperture per l’aerazione esistenti
non vengano coperte.
• Non togliere mai la protezione dell’apparecchio. Riparazioni non a regola
d’arte possono causare notevoli pericoli per l’utente. Se l’apparecchio è
guasto, non metterlo più in funzione, ma lasciarlo riparare da un tecnico
specializzato.
• Se l’apparecchio non è in uso per un periodo prolungato, estrarre le batterie.
Bambini e persone fragili
• Per sicurezza tenere l’imballaggio (sacchetto di plastica, scatola, polistirolo, ecc,) fuori dalla portata dei bambini.
AVVISO!
Non lasciar giocare i bambini piccoli con la pellicola. Pericolo di soffocamento!
• Quest’apparecchio non è destinato all’uso da parte di persone (compresi
i bambini) con capacità fisiche, psichiche, sensorie o intellettive limitate,
o da persone sprovviste della necessaria esperienza e conoscenza, ad
eccezione del fatto che ciò avvenga sotto la sorveglianza di una persona
responsabile ed addetta alla loro sicurezza, o che ricevano da questa persona istruzioni su come debba essere utilizzato l’apparecchio.
• Evitare che i bambini giochino con l’apparecchio.
3
Radio multibanda digitale - Manuale di istruzioni
Elementi di comando Fig. 1
1 Antenna telescopica
2 Pulsante MODE
3 Pulsante SET
4 Manopola TUNING
5 Manopola volume VOLUME
6 Display LCD
7 Selettore POWER ON/OFF (On/Off)
8 Altoparlante
9 Selettore gamma di frequenza SW
Retro (non in figura)
Vano batterie -Supporto
Utilizzo conforme alla destinazione
Questo apparecchio serve per la ricezione di programmi radio.
E‘ destinato esclusivamente a questo scopo e può essere impiegato solo
a questo fine.
Può essere utilizzato solo nelle modalità descritte in queste istruzioni per
l‘uso. Non è permesso usare l‘apparecchio per scopi commerciali.
Qualsiasi altro impiego è considerato non conforme alla destinazione e
può causare danni alle cose o addirittura alle persone.
Messa in funzione dell’apparecchio/ Introduzione
• Scegliere un luogo idoneo per l’apparecchio. Il luogo più adatto è una
superficie asciutta, piana, non scivolosa, sulla quale si può comandare
bene l’apparecchio.
• Fare attenzione che l’apparecchio sia sufficientemente aerato!
Inserire le batterie (non incluso nella fornitura)
• Sollevare il coperchio del vano batterie sul retro dell’apparecchio.
• Inserire 2 batterie del tipo AAA R03 1,5 V. Fare attenzione alla polarità
corretta (v. fondo vano batterie).
• Richiudere il vano batterie.
ATTENZIONE:
• Non usare batterie nuove con quelle già usate oppure di un altro tipo.
• Non gettare le batterie nei rifiuti domestici. Buttare le batterie usate negli
appositi contenitori o restituirle al negoziante.
AVVISO: Non esporre le batterie a calore oppure a raggi di sole. Non buttare mai le batterie nel fuoco. Pericolo di esplosione!
4
Radio multibanda digitale - Manuale di istruzioni
Configurazione delle impostazioni
Configurare tutte le impostazioni con il pulsante MODE. Cambiare la modalità selezionata con il pulsante SET.
NOTA: Premere il pulsante SET quando sul display è visualizzata l’ora
per mostrare le seguenti impostazioni: ora della sveglia, data e secondi.
Se si preme il pulsante MODE quando vengono visualizzati i secondi è
possibile azzerare.
Accendere e spegnere l‘apparecchio
Accendere
Accertarsi che l’interruttore POWER ON/OFF (7) sia su “ON”. La frequenza attualmente selezionata apparirà sul display.
Spegnere: Accertarsi che l’interruttore POWER ON/OFF sia su OFF.
Impostazione dell’ora e della data
Impostazione oraria
1. Premere il pulsante MODE (2) sei volte. Vengono mostrati l’ora e il formato di visualizzazione.
• A = AM (Mattino, visualizzazione in formato 12 ore),
• P = PM (Sera, visualizzazione in formato 12 ore),
• H = visualizzazione in formato 24 ore
2. Premere il pulsante SET (3) fin quando l’ora è programmata nel formato
di visualizzazione desiderato.
3. Premere il pulsante MODE per confermare. Vengono visualizzati i minuti.
4. Impostare i minuti con il pulsante SET.
5. Premere il pulsante MODE per confermare.
6. Quando si accendono i due punti, premere il pulsante SET ancora una
volta per completare l’inserimento. I due punti lampeggiano e viene mostrata l’ora corrente.
Impostazione della data
La data è collegata all’ora. Quando si imposta l’ora e si supera il limite delle
24 ore, la data viene regolata automaticamente. Si consiglia pertanto di
impostare prima l’ora, poi la data.
1. Premere il pulsante MODE quattro volte. Viene visualizzato il mese.
2. Impostare il mese con il pulsante SET.
3. Confermare l’inserimento con il pulsante MODE. Viene visualizzato il
giorno.
5
Radio multibanda digitale - Manuale di istruzioni
4. Impostare il giorno con il pulsante SET. Premere il pulsante MODE tre
volte per tornare alla modalità normale. Viene visualizzata l’ora.
Funzione sveglia
Impostare l‘allarme
1. Premere il pulsante MODE due volte. L’orario della sveglia correntemente impostato lampeggia.
2. Premere il pulsante SET fin quando è impostata l’ora.
3. Premere il pulsante MODE per confermare. I minuti lampeggiano.
4. Impostare i minuti con il pulsante SET.
5. Premere il pulsante MODE. Viene visualizzata l’ora.
Impostazione della modalità della sveglia
1. Premere il pulsante MODE una volta. L’orario della sveglia impostato
lampeggia sul display.
2. Selezionare la modalità della sveglia con il pulsante SET.
• Segnale acustico di 30 secondi:
Se si preme il pulsante SET una volta, sul display appare il simbolo ” “. Al
raggiungimento dell’orario impostato verrà emesso un segnale acustico.
Se non viene premuto alcun tasto l’allarme si spegne automaticamente
dopo 30 secondi.
• Segnale acustico + funzione promemoria:
Se si preme il pulsante SET due volte, sul display appaiono i simboli “ “
e ” “. Al raggiungimento dell’orario impostato verrà emesso un segnale
acustico.
Un segnale acustico singolo verrà emesso anche allo scadere di ogni ora.
• Funzione promemoria:
Se si preme il pulsante SET tre volte, sul display appare il simbolo “ “. Un
segnale acustico singolo verrà emesso allo scadere di ogni ora.
3. Premere il pulsante MODE tre volte per tornare alla modalità normale.
Viene visualizzata l’ora.
Spegnere la sveglia prima del tempo
Premere il pulsante MODE quando si sente il segnale di allarme per disattivare la sveglia fino al giorno dopo.
6
Radio multibanda digitale - Manuale di istruzioni
Ascoltare la radio
1. Accendere l’apparecchio portando l‘interruttore POWER ON/OFF (7)
su ON. Girare la manopola VOLUME finché è stato impostato il volume
desiderato.
2. Selezionare la banda di frequenza desiderata. Far scorrere l’interruttore
della gamma di frequenza (9) nella posizione desiderata.
• Onda ultracorta (UKW) = tasto FM,
• Onda media (MW) = tasto AM,
• Onda corta (KW) = interruttore SW (da1 a 7)
3. Estrarre l’antenna telescopica e cambiare la sua posizione per migliorare la ricezione.
4. Con il regolatore TUNING (4) ci si può sintonizzare sull’emittente desiderata. La frequenza attualmente impostata viene visualizzata nel display.
5. Spegnere l‘apparecchio dopo l‘uso.
Pulizia e cura
ATTENZIONE:
• Non usare additivi o solventi! Possono danneggiare le diciture o addirittura la custodia dell’apparecchio.
• Non immergete l’apparecchio in acqua.
• Le macchie esterne si possono pulire con un panno umido, senza aggiunta di altre sostanze.
Dati tecnici
Funzionamento batterie: 2 x 1,5 V, tipo AAA
Componente della radio:
Gamma di frequenza: FM: 87,5 ~ 108 MHz
AM: 531 ~ 1611 kHz
SW 1: 5,90 ~ 6,20 MHz
SW 2: 7,10 ~ 7,35 MHz
SW 3: 9,40 ~ 9,90 MHz
SW 4: 11,60 ~ 12,10 MHz
SW 5: 13,57 ~ 13,87 MHz
SW 6: 15,10 ~ 15,80 MHz
SW 7: 21,45 ~ 21,85 MHz
In un ottica di miglioramento continuo Beper si riserva la facoltà di
apportare modifiche e migliorie al prodotto in oggetto senza previo
preavviso.
7
Radio multibanda digitale - Manuale di istruzioni
TRATTAMENTO DEI RIFIUTI DELLE APPARECCHIATURE ELETTRICHE ED ELETTRONICHE
Il prodotto al termine del suo ciclo di vita deve essere smaltito seguendo le norme vigenti relative allo smaltimento differenziato e non può essere trattato come un semplice rifiuto urbano.
Il prodotto deve essere smaltito presso i centri di raccolta dedicati o deve essere restituito al rivenditore nel caso
si voglia sostituire il prodotto con un altro equivalente nuovo.
Il costruttore si farà carico delle spese necessarie allo smaltimento del prodotto secondo quanto prescritto
dalla legge.
Il prodotto è composto da parti non biodegradabili e sostanze che possono inquinare l’ambiente circostante se
non opportunamente smaltite. Inoltre parte di questi materiali possono essere riciclati evitando l’inquinamento
dell’ambiente. E’ vostro e nostro dovere contribuire alla salute dell’ambiente.
Il simbolo
indica che il prodotto risponde ai requisiti richiesti dalle nuove direttive introdotte a tutela del
l’ambiente (2011/65/EU) e che deve essere smaltito in modo appropriato al termine del suo ciclo di vita.
Chiedere informazioni alle autorità locali in merito alle zone dedicate allo smaltimento dei rifiuti.
Chi non smaltisce il prodotto seguendo quanto indicato in questo paragrafo ne risponde secondo le norme
vigenti.
8
Radio multibanda digitale - Manuale di istruzioni
CERTIFICATO DI GARANZIA
Questo apparecchio è stato controllato in fabbrica. La garanzia di applicazione è valida 24 mesi
dalla data di acquisto per difetti di materiale o di fabbricazione. Lo scontrino di acquisto e il certificato
di garanzia si devono presentare assieme nel caso di reclami.
Se l’apparecchio dovesse richiedere assistenza tecnica rivolgersi al venditore o presso la nostra
sede. Questo per conservare inalterata l’efficienza del vostro apparecchio e per NON invalidare la
garanzia. Eventuali manomissioni dell’apparecchio da parte di personale non autorizzato invalideranno automaticamente la garanzia.
Condizioni di garanzia
Se ci sono guasti a causa di difetti di materiale e/o fabbricazione durante il periodo di garanzia,
garantiamo la riparazione del prodotto gratuitamente, a patto che:
- l’apparecchio sia stato usato in modo corretto ed ai fini per cui è stato costruito;
- l’apparecchio sia stato riparato da esperti, cioè da persone incaricate dal fornitore;
- venga presentato lo scontrino;
- non rientrano in garanzia le parti che dimostrano un normale logoramento.
Sono quindi escluse tutte le parti che hanno subito rotture accidentali o che sono soggette ad
usura (tra le quali lampade, batterie, resistenze) e difetti derivanti da un utilizzo non domestico
dell’apparecchio, negligenza nell’uso o nella manutenzione, danni da trasporto e tutti quei danni
non imputabili direttamente al produttore.
Se entro il periodo di garanzia emerge un difetto che non può essere riparato, l’apparecchio viene
cambiato gratuitamente.
Assistenza tecnica
Anche dopo il periodo di garanzia prestiamo molta attenzione alle riparazioni.
Per l’assistenza tecnica e/o riparazioni fuori dal periodo di garanzia ci si può rivolgere direttamente
all’indirizzo sottostante.
BEPER SRL
Via Salieri, 30
37050 - Vallese di Oppeano - Verona
Tel. 045/7134674 – Fax 045/6984019
e-mail: [email protected]
9
Digital Multibandradio - Use instructions
General Safety Instructions
Read the operating instructions carefully before putting the appliance into
operation and keep the instructions including the warranty, the receipt and,
if possible, the box with the internal packing. If you give this device to other
people, please also pass on the operating
instructions.
• To avoid the risk of fi re or an electric shock, you should not expose
the device to rain or moisture. Consequently, do not use the device in the
immediate vicinity of water – for example bathroom, near a swimming pool
or in a damp cellar.
• Use the device only for the intended purpose.
• When using external power supplies, check the correct polarity and voltage, Always insert the batteries the right way round.
• Assemble the device in such a way that the available ventilation openings
are not covered.
• Never open the housing of the device. Incorrect repairs can constitute
a considerable risk for the user. Do not use the device any more if it is
damaged, but have it repaired by a specialist.
• If you intend not to use the device for a prolonged period, please remove
the batteries.
Children and Frail Individuals
• In order to ensure your children’s safety, please keep all packaging (plastic bags, boxes, polystyrene etc.) out of their reach.
WARNING!
Caution! Do not allow small children to play with the foil as there is a danger of suffocation!
• This device is not intended to be used by individuals (including children)
who have restricted physical, sensory or mental abilities and/or insufficient
knowledge and/or experience, unless they are supervised by an individual
who is responsible for their safety or have received instructions on how to
use the device.
• Children should be supervised at all times in order to ensure that they do
not play with the device.
Intended Use
This device is used for the reception of radio programmes.
It is intended exclusively for this purpose and may only be used as such.
It may only be used in the manner described in these instructions for use.
The device must not be used for commercial purposes.
10
Digital Multibandradio - Use instructions
ENGLISH
DESCRIPTION Fig. 1
1 Telescopic antenna
2 MODE button
3 SET button
4 TUNING control
5 VOLUME control
6 LCD display
7 POWER ON/OFF selector
8 Loudspeaker
9 SW Frequency range selector
Back side, not shown in the figure
Battery holder
Start-up of the device/Introduction
• Select a suitable location for the radio recorder, such as a dry, flat, nonslip surface on which it is easy to operate the machine.
• Ensure that the radio recorder is sufficiently ventilated!
Inserting the Batteries (not supplied)
• Open the lid of the battery compartment on the back.
• Insert 2 batteries of type AAA/R03 1.5 V. Match the polarities correctly
(see the inside of the battery compartment)!
• Close the battery compartment again.
• If the device is not used for a long period of time, remove the batteries to
avoid the “spilling” of battery acid.
Different battery types or new and used batteries must not be used together.
• Batteries are not to be disposed of together with domestic wastes. Dispose of the used batteries at the relevant collection bin or at your dealer’s.
WARNING:
Do not expose the batteries to high temperatures or direct sunlight. Never
throw batteries into the fire. There is a danger of explosion!
Configuring the settings
Configure all settings with the MODE button. Change the currently selected mode with the SET button
NOTE:
Push the SET button during the time display to show the following settings:
Set alarm time, date, and seconds. If you push the MODE button while the
seconds are shown, you can reset it to zero.
11
Digital Multibandradio - Use instructions
Switching the Device on and Off
Switching on
Move the POWER ON/OFF switch (7) to the ON position. The currently
selected frequency will appear in the display.
Switching off
Move the POWER ON/OFF switch to the OFF position.
Setting the time and date
Setting the Time
1. Push the MODE button (2) six times. The hours and the display format
are shown.
• A = AM (Morning, 12-hour display),
• P = PM (Afternoon,12-hour display),
• H = 24-hour display
2. Push the SET button (3), until the hour is programmed in the desired
display format.
3. Push the MODE button for confirmation. The minutes are shown.
4. Set the minutes with the SET button.
5. Push the MODE button to confirm.
6. When the colon lights up, press the SET button once more to complete
the entry. The colon will flash and show the current time.
Setting the date
The date is linked to the time. As soon as the time is adjusted and the date
line is thus exceeded, the date is also automatically adjusted. We therefore
recommend to first set the time, and then the date.
1. Push the MODE button four times. The month is shown.
2. Set the month with the SET button.
3. Confirm your entry with the MODE button. The day is shown.
4. Set the day with the SET button. Press the MODE button three times to
switch to normal mode. The time is shown.
Alarm function - Setting the Alarm
1. Push the MODE button twice. The currently set hour of the alarm time
will flash.
2. Push the SET button until the hour is set.
3. Push the MODE for confirmation. The minutes will flash.
4. Adjust the minutes with the SET button.
5. Push the MODE button. The time is shown.
12
Digital Multibandradio - Use instructions
Setting the alarm mode
1. Push the MODE button one time. The set alarm time will flash in the
display.
2. Select the alarm mode with the SET button.
• Beep sound for 30 seconds:
If you push the SET button one time, the symbol “ “ will appear in the
display.
When getting to the set alarm time, a beep sound will be heard. If no button
is pushed, the alarm sound will automatically turn off after 30 seconds.
• Beep sound + reminder function:
If you push the SET button twice, the symbols “ “ and “ “ will appear in the
display. When the set alarm time is reached, a beep sound will be heard.
An individual beep sound can also be heard at the top of every hour.
• Reminder function:
If you push the SET button three times, the symbol “ “ will appear in the
display.
An individual beep sound can be heard at the top of every hour.
3. Push the MODE button three times to switch to normal mode. The time
will be shown.
Turning off the alarm ahead of time
Push the MODE button while hearing the alarm sound to turn off the alarm
until the next day.
Listening to the Radio
1. Turn the device on by moving the POWER ON/OFF switch (7) to the
ON position. Turn the VOLUME control until you have reached the desired
volume.
2. Select the required frequency band. Slide the frequency range switch
(9) to the desired position.
• Very high frequency (VHF) = FM,
• Medium wave (MW) = AM,
• Shortwave (SW) = SW switch (1 to7)
3. Pull out the telescopic antenna and change its position to improve the
reception.
4. With the TUNING control (4) you can tune in to the desired station. The
frequency currently set is shown in the display.
5. Please turn the device off after use.
13
Digital Multibandradio - Use instructions
Cleaning and Maintenance
CAUTION:
• Do not use any additives or solvents! These may damage the inscriptions
or even the housing.
• Do not dip the appliance in water.
• Any marks on the surface can be wiped off with a slightly damp cloth
without any additives.
TECHNICAL DATA
DC3V , AAA*2 battery
RADIO FREQUENCY: FM 88---108 MHz
AM 530----1600KHz
SW1-SW7 4.2----22MHz
OUTPUT POWER: 0.5W
For any improvement reasons, Beper reserves the right to modify or
improve the product without any notice.
DISPOSAL OF OLD ELECTRICAL APPLIANCES
The European directive 2011/65/EU on Waste Electrical and Electronic Equipment (WEEE), requires that old household electrical appliances must not be disposed of in the normal unsorted
municipal waste stream. Old appliances must be collected separately in order to optimize the recovery and recycling of the materials they contain, and reduce the impact on human health and
the environment.
The crossed out “wheeled bin” symbol
on the product reminds you of your obligation,
that when you dispose of the appliance, it must be separately collected.
14
Digital Multibandradio - Use instructions
GUARANTEE CERTIFICATE
This appliance has been checked in the factory. From the date of original purchase a 24 month
guarantee applies to material and production defects. The purchase receipt and the guarantee certificate must be submitted together in case of claim to guarantee.
For any technical assistance, please contact directly the seller or our head office in order to preserve
the appliance’s efficiency and NOT TO void the guarantee. Any intervention on this appliance by
non-authorized persons will automatically void the guarantee.
Guarantee conditions
If the appliance shows defects as a result of faulty material and/or production during the period of
guarantee, we guarantee repair free of charge on condition that:
- The appliance has been used properly and for the purpose for which it has been intended.
- Repairs are professionally carried out by qualified persons who are appointed by the supplier.
- The purchase receipt shall be presented.
- The appliance showing a fair wear and tear shall not be covered by this guarantee.
Therefore, any part that could be accidentally broken or having visible signs of use in consumable products (such as lamps, batteries, heating elements…) is excluded from the guarantee, and
any defect whatsoever resulting from non-respect of the rules for use, negligence in usage and/
or maintenance of the appliance, damage during transport and any other damage not attributable
the supplier.
For every defect that could not be repaired within the guarantee period, the appliance will be replaced free of charge.
Technical assistance
Even after the guarantee period we will always pay attention to repairs for defected appliances.
For technical assistance and/or repairs after the guarantee period you can directly contact the below
address:
CONTACT YOUR DISTRIBUTOR IN YOUR COUNTRY OR AFTER SALES DEPARTMENT
BEPER. E-MAIL [email protected]
WHICH WILL FORWARD YOUR ENQUIRIES TO YOUR DISTRIBUTOR.
15
Radio multibandes recordable - Manuel d’instructions
Mode d’emploi
Merci d’avoir choisi notre produit. Nous espérons que vous en serez satisfait. Symboles de ce mode d’emploi
Les informations importantes pour votre sécurité sont particulièrement indiquées. Veillez à bien respecter ces indications afin d’éviter tout risque
d’accident ou d’endommagement de l’appareil :
AVERTISSEMENT : Prévient des risques pour votre santé et des risques
éventuels de blessure.
ATTENTION : Indique les risques pour l’appareil ou tout autre appareil.
NOTE : Attire votre attention sur des conseils et informations.
Conseils généraux de sécurité
Lisez attentivement ce mode d’emploi avant de mettre l’appareil en marche pour la première fois. Conservez le mode d’emploi ainsi que le bon de
garantie, votre ticket de caisse et si possible, le carton avec l’emballage
se trouvant à l’intérieur. Si vous remettez l‘appareil à des tiers, veuillez-le
remettre avec son mode d‘emploi.
• Pour éviter tout risque d’incendie ou d’électrocution ne mettez en aucun
cas votre appareil en contact avec la pluie ou de l’humidité. Ne laissez
jamais fonctionner votre appareil à proximité d’eau (par ex. salle de bain,
bassin de piscine, cave humide).
• N’utilisez l’appareil qu’aux fi ns auxquelles il est destiné.
• Lorsque vous utilisez une alimentation électrique externe, vérifiez la polarité et la tension, Toujours placer les piles dans le bon sens.
• Installez toujours l’appareil de façon à ce que les ouvertures de ventilation ne soient pas obstruées.
• N’ouvrez jamais le bloc moteur de l’appareil. Des réparations mal appropriées peuvent entraîner des risques importants pour l’utilisateur. En cas‚
endommagement de l‘appareil, ne plus mettre en marche ce dernier, mais
le faire réparer par un professionnel.
• Lorsque vous n’utilisez pas l’appareil pendant un certain temps, veuillezen retirer les piles.
Enfants et personnes fragiles
• Par mesure de sécurité vis-à-vis des enfants, ne laissez pas les emballages (sac en plastique, carton, polystyrène) à leur portée.
AVERTISSEMENT: Ne pas laisser les jeunes enfants jouer avec le film. Il
y a risque d’étouffement !
• Le présent appareil n’est pas destiné à être utilisé par des personnes
(y compris les enfants) aux facultés mentales, sensorielles ou physiques
limitées ou n’ayant pas
16
Liste des différents éléments de commande Fig. 1
1 Antenne télescopique
2 Bouton MODE
3 Bouton SET
4 Régleur TUNING
5 Régleur de volume VOLUME
6 Écran LCD
7 Bouton POWER ON/OFF (Marche/Arrêt)
8 Haut-parleurs
9 SW Sélecteur gamme d’ondes
Arrière (non illustré)
Compartiment des piles
Support
Utilisation conforme
Cet appareil sert de récepteur de programmes radio.
Il est destiné uniquement à cet usage à l’exclusion de toute autre utilisation.
Son utilisation est réservée au seul mode décrit dans la notice d’emploi.
Vous ne devez pas exploiter l’appareil à des fi ns commerciales.
Toute autre utilisation est considérée comme non conforme et risque de
provoquer des dommages matériels voire même des blessures.
Avant la première utilisation/Introduction
• Choisissez un endroit approprié pour l’appareil, par ex. une surface
sèche, plane et stable sur laquelle vous pouvez utiliser l’appareil sans
difficulté.
• Veillez à ce que l’appareil soit suffisamment ventilé !
Pose des piles (non comprises à la livraison)
• Ouvrez le couvercle du compartiment des piles (18) sur le dos.
• Introduisez 2 piles de type AAA/ R03, de 1,5 V. Veillez à respecter la
polarité (voir fond du compartiment).
• Refermez le compartiment des piles.
• Si l’appareil ne doit pas être utilisé pendant une période prolongée, retirez les piles pour éviter que l’acide des piles ne “coulent”.
ATTENTION :
• Différents types de batterie ou batteries neuves et utilisées ne doivent
pas être utilisés ensemble.
17
FRANÇAIS
Radio multibandes recordable - Manuel d’instructions
Radio multibandes recordable - Manuel d’instructions
• Ne jetez en aucun cas vos piles avec les ordures ménagères. Vous êtes
priés de rapporter vos piles à une borne de recyclage ou à votre revendeur.
AVERTISSEMENT : Ne pas exposer les piles à une grande chaleur ou
directement aux rayons du soleil. Ne jetez jamais les piles dans le feu.
Risque d’explosion !
Configuration des réglages
Configurez tous les réglages à l’aide du bouton MODE. Changez le mode
sélectionné en utilisant le bouton SET.
NOTE : Appuyez sur le bouton SET quand l’heure est affichée pour faire
apparaitre les réglages
suivants : Réglage de l’heure d’alarme, date et secondes. Si vous appuyez
sur le bouton MODE quand les secondes sont affichées, vous pouvez les
remettre à zéro.
Mettre en marche voire arrêter l’appareil
Mise en marche
Poussez la touche POWER ON/OFF (7) sur la position ON. La fréquence
actuellement sélectionnée apparaitra sur l’affichage.
Arrêter l’appareil
Poussez la touche POWER ON/OFF sur la position OFF.
Réglage de l’heure et de la date
Régler l’heure
1. Appuyez six fois sur le bouton MODE (2). Les heures et le format d’affichage apparaissent.
• A = AM (Matin, affichage 12 heures),
• P = PM (Après-midi, affichage 12 heures),
• H = affichage 24 heures
2. Appuyez sur le bouton SET (3), jusqu’à ce que l’heure soit programmée
au format d’affichage voulu.
3. Appuyez sur le bouton MODE pour confirmer. Les minutes s’affichent.
4. Réglez les minutes avec le bouton SET.
5. Appuyez sur le bouton MODE pour confirmer.
6. Lorsque les deux points s’allument, appuyez sur le bouton SET une
fois de plus pour terminer la saisie, les deux points clignoteront et l’heure
actuelle s’affichera.
Réglage de la date
La date est liée à l’heure. Dès que l’heure est ajustée et que la ligne de
18
Radio multibandes recordable - Manuel d’instructions
Fonction d’alarme
Régler l’heure de l’alarme
1. Appuyez deux fois sur le bouton MODE. L’heure réglée de l’alarme se
met à clignoter sur l’écran.
2. Appuyez sur le bouton SET jusqu’à ce que l’heure soit réglée.
3. Appuyez sur le bouton MODE pour confirmer. Les minutes clignotent.
4. Ajustez les minutes avec le bouton SET.
5. Appuyez sur le bouton MODE. L’heure s’affiche.
Réglage du mode d’alarme
1. Appuyez une fois sur le bouton MODE. L’heure réglée de l’alarme se
met à clignoter sur l’écran.
2. Sélectionnez le mode d’alarme à l’aide du bouton SET.
• Avertisseur sonore de 30 secondes :
Si vous appuyez une fois sur le bouton SET, le symbole “ “ apparaitra sur
l’écran.
Lorsque vous réglez l’heure de l’alarme, un avertisseur sonore retentit. Si
aucun bouton n’est actionné, le son de l’alarme s’éteindra automatiquement après 30 secondes.
• Fonction avertisseur sonore + rappel :
Si vous appuyez deux fois sur le bouton SET, les symboles “ “ et “ “ apparaitront sur l’écran. Lorsque l’heure de l’alarme est atteinte, un avertisseur sonore retentit. Un avertisseur sonore unique retentira également à
chaque heure.
• Fonction de rappel :
Si vous appuyez trois fois sur le bouton SET, le symbole ” “ apparaitra
sur l’affichage.
Un avertisseur sonore unique retentira à chaque heure.
3. Appuyez trois fois sur le bouton MODE pour passer au mode normal.
L’heure s’affichera.
Désactiver l’alarme à l’avance
Appuyez sur le bouton MODE quand l’alarme retentit pour éteindre l’alarme jusqu’au Lendemain
Écouter la radio
1. Mettez l’appareil en marche en réglant l’interrupteur POWER ON/OFF
(7) sur la position ON. Tournez le régulateur du volume VOLUME jusqu’à
ce que vous ayez réglé le volume désiré.
2. Sélectionnez la bande de fréquence désirée. Faites coulisser le commutateur de plage de fréquence (9) sur la position voulue.
19
Radio multibandes recordable - Manuel d’instructions
• Ondes ultra coutres (OUC) = FM,
• Ondes moyennes (OM) = AM,
• Ondes courtes (OC) = touche SW (1 à 7)
3. Déployez l’antenne télescopique et placez-la dans la position permettant la meilleure réception.
4. Vous pouvez accorder la station désirée à l’aide du bouton TUNING (4).
La fréquence respective réglée est affichée à l’écran.
5. Arrêtez l’appareil après l’usage.
Nettoyage et entretien
ATTENTION :
• N’utilisez jamais de détergents ! Ils risquent de détériorer les inscriptions
voir même
la surface des parois de l’appareil.
• Ne plongez jamais l’appareil dans l’eau.
• Essuyez les taches extérieures avec un chiffon légèrement humide, sans
agent additif.
Données techniques
Fonctionnement piles : 2 x 1,5 V, Type AAA
Partie radio :
Gammes de fréquence : FM: 87,5 ~ 108 MHz
AM: 531 ~ 1611 kHz
SW 1: 5,90 ~ 6,20 MHz
SW 2: 7,10 ~ 7,35 MHz
SW 3: 9,40 ~ 9,90 MHz
SW 4: 11,60 ~ 12,10 MHz Dans un soucis d’amélioration permanent
SW 5: 13,57 ~ 13,87 MHz
Beper se réserve le droit d’apporter des
SW 6: 15,10 ~ 15,80 MHz
modifications et améliorations au produit
SW 7: 21,45 ~ 21,85 MHz
sans aucun préavis.
TRAITEMENT DES DECHETS DES APPAREILS ELECTRIQUES
ET ELECTRONIQUES
Le symbole
indique que le produit répond aux normes requises par les nouvelles
directives introduites en faveur de l’environnement (2011/65/EU) et que le produit doit être détruit de façon
appropriée au terme du cycle de vie.
Au besoin, informez-vous auprès des autorités locales compétentes en matière d’élimination des déchets de
votre commune. Toute personne qui ne tiendra pas compte de ces règles d’élimination des déchets indiquées
dans ce paragraphe en répondra selon la loi en vigueur.
20
Radio multibandes recordable - Manuel d’instructions
CERTIFICAT DE GARANTIE
Cet appareil a été contrôlé en usine. La garantie est valable 24 mois à partir de la date d’achat pour
tout défaut de matériel ou de fabrication. En cas de réclamation, le ticket de caisse et la garantie
devront être présentés ensemble.
En cas de besoin et pour toute assistance technique, veuillez contacter votre revendeur ou vous
adresser à notre siège. Cela vous permettra de conserver votre appareil dans de meilleures conditions et de NE PAS invalider la garantie. Toute manipulation de l’appareil par une personne non
autorisée ou non qualifiée annulera automatiquement la garantie.
Conditions de garantie
Pendant la durée de garantie, si des pannes provenant d’un défaut de materiel et/ou de fabrication apparaissent, nous assurons gratuitement la réparation aux conditions énoncées ci-dessous :
- l’appareil a été correctement utilisé et ce uniquement à l’usage pour lequel il a été fabriqué ;
- l’appareil a été réparé par des experts, c’est-à-dire par des personnes mandatées par le fournisseur ;
- la présentation du ticket de caisse est obligatoire;
- les pièces présentant les signes évidents d’usure ne sont pas pris en compte dans la garantie.
En conséquence, sont exclus de la garantie toutes les pièces qui auraient subi des dommages
accidentels ou présentant des signes d’usure normale (parmi lesquelles, ampoules, batteries, piles,
résistances), toutes les pièces comportant des défauts dus à la non utilisation domestique, la négligence dans la manipulation et l’entretien, les dommages lors du transport et tous les dommages
non imputables directement au producteur.
Si un défaut survient lors de la période de garantie et ne peut être réparé, l’appareil sera remplacé
gratuitement.
Assistance technique
Même après la fin de la garantie, nous accordons toujours une grande importance à la reparation.
Pour toute assistance technique et/ou reparations en dehors de la garantie, veuillez vous adresser
directement à l’adresse ci-desous :
LE SERVICE APRÈS-VENTE EST EFFECTUÉ PAR VOTRE REVENDEUR OU PAR
L’IMPORTATEUR/DISTRIBUTEUR DES PRODUITS BEPER.
ÉCRIVEZ UN E-MAIL AU [email protected] POUR CONNAITRE LE CENTRE SERVICE
AGRÉE BEPER LE PLUS PROCHE DE CHEZ VOUS.
21
Multibandradio - Betriebsanleitubg
Allgemeine Sicherheitshinweise
Lesen Sie vor Inbetriebnahme dieses Geres die Bedienungsanleitung sehr
sorgftig durch und bewahren Sie diese inkl. Garantieschein, Kassenbon
und nach Mlichkeit den Karton mit Innenverpackung gut auf. Falls Sie das
Geran Dritte weitergeben, geben Sie auch die Bedienungsanleitung mit.
• Das Gerät nicht in unmittelbarer Nähe von Wasser betreiben (z.B. Badezimmer, Schwimmbecken, feuchte Keller).
• Verwenden Sie das Gerät nur für den vorgesehenen Zweck.
• Bei Verwendung von externen Netzteilen auf die richtige Polarität und
Spannung achten, Batterien stets richtig herum einlegen.
• Das Gerät so aufstellen, dass vorhandene Lüftungsöffnungen nicht verdeckt werden.
• Niemals das Gehäuse des Gerätes öffnen. Durch unsachgemäße Reparaturen können erhebliche Gefahren fden Benutzer entstehen. Bei Beschigung des Geres das Gernicht mehr in Betrieb nehmen, sondern von einem
Fachmann reparieren lassen.
• Benutzen Sie das Gerät längere Zeit nicht entnehmen Sie die Batterien.
Kinder und gebrechliche Personen
• Zur Sicherheit Ihrer Kinder lassen Sie keine Verpackungsteile (Plastikbeutel, Karton, Styropor etc.) erreichbar liegen. Lassen Sie kleine Kinder nicht mit Folie spielen. Es besteht Erstickungsgefahr!
• Dieses Gerät ist nicht dafür bestimmt, durch Personen (einschließlich
Kinder) mit eingeschrkten physischen, sensorischen oder geistigen Figkeiten oder mangels Erfahrung und/oder mangels Wissen benutzt zu werden,
es sei denn, sie werden durch eine fihre Sicherheit zustdige Person beaufsichtigt oder erhielten von ihr Anweisungen, wie das Gerzu benutzen
ist.
• Kinder sollten beaufsichtigt werden, um sicherzustellen, dass sie nicht
mit dem Gerät spielen.
Übersicht der Bedienelemente
1 Teleskopantenne
2 MODE Taste
3 SET Taste
4 TUNING Regler
5 VOLUME Lautstärkeregler
6 LCD Display
7 POWER ON/OFF Schalter (Ein/Aus) 9 SW Frequenzbereichsschalter
Rückseite (ohne Abbildung)
8 Lautsprecher
Batteriefach Aufsteller
22
Bestimmungsgemäßer Gebrauch
Dieses Gerät dient als Empfänger von Radioprogrammen.
Es ist ausschließlich für diesen Zweck bestimmt und darf nur dafür verwendet werden.
Es darf nur in der Art und Weise benutzt werden, wie es in dieser Gebrauchsanleitung beschrieben ist. Sie dürfen das Gerät nicht für gewerbliche
Zwecke einsetzen.
Jede andere Verwendung gilt als nicht bestimmungsgemäß und kann zu
Sachschäden oder sogar zu Personenschäden führen.
Die ETV – Elektro-Technische Vertriebsgesellschaft mbH übernimmt keine
Haftung für Schäden, die durch nicht bestimmungsgemäßen Gebrauch
entstehen.
Inbetriebnahme des Gerätes/Einführung
• Wählen Sie einen geeigneten Standort für das Gerät. Geeignet wäre eine
trockene, ebene, rutschfeste Fläche, auf der Sie das Gerät gut bedienen
können.
• Achten Sie darauf, dass das Gerät ausreichend belüftet wird!
Batterien einlegen (Batterien nicht im Lieferumfang enthalten)
• Öffnen Sie den Batteriefachdeckel auf der Rückseite.
• Legen Sie 2 Batterien des Typs AAA/ R03 1,5V ein. Achten Sie auf die
richtige Polarität (siehe Batteriefachboden)!
• Schließen Sie das Batteriefach.
• Wird das Gerät längere Zeit nicht benutzt, entnehmen Sie die Batterien,
um ein „Auslaufen“ zu vermeiden.
ACHTUNG:
• Ungleiche Batterietypen oder neue und gebrauchte Batterien dürfen nicht
zusammen verwendet werden.
• Batterien gehören nicht in den Hausmüll. Bitte geben Sie verbrauchte
Batterien bei zuständigen Sammelstellen oder beim Händler ab.
WARNUNG: Setzen Sie Batterien keiner hohen Wärme oder dem direkten
Sonnenlicht aus. Werfen Sie Batterien niemals ins Feuer. Es besteht Explosionsgefahr!
Einstellungen vornehmen
Sie nehmen alle Einstellungen mit der MODE Taste vor. Den aktuell
ausgewählten Modi ändern Sie mit der SET Taste.
23
DEUTSCH
Multibandradio - Betriebsanleitubg
Multibandradio - Betriebsanleitubg
HINWEIS: Drücken Sie während der Uhrzeitanzeige die SET Taste, um
sich die folgenden Einstellungen anzuzeigen: Eingestellte Alarmzeit, das
Datum, und die Sekunden. Drücken Sie die MODE Taste während die
Sekunden angezeigt werden, können Sie diese auf null zurücksetzen.
Gerät ein- bzw. ausschalten
Einschalten
Schieben Sie den POWER ON/OFF Schalter (7) in Position ON. Die
aktuell eingestellte Frequenz erscheint im Display.
Ausschalten Schieben Sie den POWER ON/OFF Schalter in Position OFF.
Uhrzeit und Datum einstellen
Uhrzeit einstellen
1. Drücken Sie 6x die MODE Taste (2). Die Stunden und das Anzeigenformat werden angezeigt.
• A = AM (Vormittags, 12 Stunden-Anzeige),
• P = PM (Nachmittags,12 Stunden-Anzeige),
• H = 24 Stunden-Anzeige
2. Drücken Sie die SET Taste (3), bis die Stunde im gewünschten Anzeigenformat eingestellt ist.
3. Drücken Sie zum Bestätigen die MODE Taste. Die Minuten werden angezeigt.
4. Stellen Sie die Minuten mit der SET Taste ein.
5. Drücken Sie die MODE Taste zum Bestätigen.
6. Wenn der Doppelpunkt leuchtet, drücken Sie noch einmal auf die SET
Taste, um die Eingabe abzuschließen. Der Doppelpunkt blinkt und zeigt
die laufende Uhrzeit an.
Datum einstellen
Das Datum ist an die Uhrzeit gekoppelt. Sobald die Uhrzeit verstellt wird
und dabei die Datumsgrenze überschritten wird, verstellt sich automatisch
auch das Datum. Daher empfehlen wir zuerst die Uhrzeit einzustellen und
dann das Datum.
1. Drücken Sie 4x die MODE Taste. Der Monat wird angezeigt.
2. Stellen Sie den Monat mit der SET Taste ein.
3. Bestätigen Sie Ihre Eingabe mit der MODE Taste. Der Tag wird angezeigt.
4. Stellen Sie mit der SET Taste den Tag ein. Drücken Sie 3x die MODE
Taste, um in den Normalbetrieb zu schalten. Die Uhrzeit wird angezeigt.
24
Multibandradio - Betriebsanleitubg
Weckfunktion
Alarmzeit einstellen
1. Drücken Sie 2x die MODE Taste. Die aktuell eingestellte Stunde der
Alarmzeit blinkt.
2. Drücken Sie die SET Taste, bis die Stunde eingestellt ist.
3. Drücken Sie zum Bestätigen die MODE Taste. Die Minuten blinken.
4. Stellen Sie die Minuten mit der SET Taste ein.
5. Drücken Sie die MODE Taste. Die Uhrzeit wird angezeigt.
Alarm-Modus einstellen
1. Drücken Sie 1x die MODE Taste. Die eingestellte Alarmzeit blinkt im
Display.
2. Wählen Sie mit der SET Taste den Alarm-Modus.
• Piepton für 30 Sekunden:
Drücken Sie die SET Taste 1x, erscheint das Symbol „ “ im Display. Beim
Erreichen der eingestellten Weckzeit ertönt ein Piepton. Wird keine Taste
gedrückt,
schaltet sich der Alamton nach 30 Sekunden automatisch aus.
• Piepton + Erinnerungsfunktion:
Drücken Sie die SET Taste 2x, erscheinen die Symbole „ “ und „ “ im Display.
Beim Erreichen der eingestellten Weckzeit ertönt ein Piepton. Zusätzlich
ist zu jeder vollen Stunde ein einzelner Piepton zu hören.
• Erinnerungsfunktion:
Drücken Sie 3x die SET Taste, erscheint das Symbol „ “ im Display. Es ist
zu jeder vollen Stunde ein einzelner Piepton zu hören.
3. Drücken Sie 3x die MODE Taste, um in den Normalbetrieb zu schalten.
Die Uhrzeit wird angezeigt.
Alarm vorzeitig abstellen
Drücken Sie während der Alarmton zu hören ist die MODE Taste, um den
Alarm bis zum nächsten Tag abzustellen.
Radio hören
1. Schalten Sie das Gerät ein, indem Sie den POWER ON/OFF Schalter
(7) auf Position ON stellen. Drehen Sie den VOLUME Lautstärkeregler
soweit, bis Sie die gewünschte Lautstärke eingestellt haben.
25
Multibandradio - Betriebsanleitubg
2. Wählen Sie das gewünschte Frequenzband aus. Schieben Sie den Frequenzbereichsschalter (9) auf die gewünschte Position.
• Ultrakurzwelle (UKW) = FM,
• Mittelwelle (MW) = AM,
• Kurzwelle (KW) = SW Schalter (1 bis 7)
3. Ziehen Sie die Teleskopantenne aus und verändert Sie deren Position,
um den Empfang zu verbessern.
4. Mit dem TUNING Regler (4) können Sie den gewünschten Sender abstimmen. Die aktuell eingestellte Frequenz wird im Display angezeigt.
5. Schalten Sie das Gerät nach dem Gebrauch aus.
Reinigung und Pflege
ACHTUNG:
• Verwenden Sie keine Zusatz- oder Lösungsmittel! Diese können die Beschriftungen
oder sogar das Gehäuse beschädigen.
• Tauchen Sie das Gerät nicht ins Wasser.
• Äußere Flecken können Sie mit einem leicht feuchten Tuch, ohne Zusatzmittel, abwischen.
Technische Daten
Batteriebetrieb: 2 x 1,5 V, Typ AAA
Radioteil:
Frequenzbereiche: FM : 87,5 ~ 108 MHz
AM: 531 ~ 1611 kHz
SW 1: 5,90 ~ 6,20 MHz
SW 2: 7,10 ~ 7,35 MHz
SW 3: 9,40 ~ 9,90 MHz
SW 4: 11,60 ~ 12,10 MHz
SW 5: 13,57 ~ 13,87 MHz
SW 6: 15,10 ~ 15,80 MHz
SW 7: 21,45 ~ 21,85 MHz
In Hinblick auf eine Verbesserungsperspektive behält sich Beper das
Recht vor, das betreffende Produkt ohne Voranmeldung zu ändern
bzw. umzubauen.
26
Multibandradio - Betriebsanleitubg
VERFAHREN FÜR DIE ENTSORGUNG VON ELEKTRO- UND
ELEKTRONIKGERÄTE ABFALL
Die WEEE-Richtlinie (von engl.: Waste Electrical and Electronic Equipment; deutsch: (Elektround Elektronikgeräte-Abfall) ist die EG-Richtlinie 2011/65/EU zur Reduktion der zunehmenden
Menge an Elektronikschrott aus nicht mehr benutzten Elektro- und Elektronikgeräten. Ziel ist das
Vermeiden, Verringern sowie umweltverträgliche Entsorgen der zunehmenden Mengen an Elektronikschrott durch eine erweiterte Herstellerverantwortung.
Ihr Gerät enthält wertvolle Rohstoffe, die wieder verwertet werden können.
Bringen Sie das Gerät zur Entsorgung zu einer Sammelstelle Ihrer Stadt oder Gemeinde.
Elektro- und Elektronikgeräte mit folgender Kennzeichnung
versehen und dürfen
nicht mehr über Restmüll, sondern nur noch über die öffentlichen Entsorgungsträger und anschließende Rückgabe an die Hersteller und Importeure entsorgt werden.
27
Multibandradio - Betriebsanleitubg
GARANTIE
Wir übernehmen für das von uns vertriebene Gerät eine Garantie von 24 Monaten ab Kaufdatum
(Kassenbon).
Kaufbeleg und Garantieschein sind wesentlich für die Gültigkeit der Garantie. Ohne diesen Nachweis kann ein kostenloser Austausch oder eine kostenlose Reparatur nicht erfolgen.
Im Garantiefall geben Sie bitte das komplette Gerät in der Originalverpackung
zusammen mit dem Kassenbon an Ihren Händler.
Die Garantie erlischt bei Fremdeingriff.
Garantiebedingungen
Innerhalb der Garantiezeit beseitigen wir unentgeltlich die Mängel des Gerätes oder des Zubehörs*,
die auf Material- oder Herstellungsfehler beruhen, durch Reparatur oder, nach unserem Ermessen,
durch Umtausch. Garantieleistungen bewirken weder eine Verlängerung der Garantiefrist, noch beginnt dadurch ein Anspruch auf eine neue Garantie!
Kaufbeleg und Garantieschein sind wesentlich für die Gültigkeit der Garantie. Ohne diesen Nachweis kann ein kostenloser Austausch oder eine kostenlose Reparatur nicht erfolgen.
*Schäden an Zubehörteilen führen nicht automatisch zum kostenlosen Umtausch
des kompletten Gerätes. Wenden Sie sich in diesem Fall bitte an unsere Rufnummer.
Sowohl Defekte an Verbrauchszubehör bzw. Verschleißteilen (z.B. Motorkohlen,
Knethaken, Antriebsriemen, Ersatzfernbedienung, Ersatzzahnbürsten, Sägeblättern
usw.), als auch Reinigung, Wartung oder der Austausch von Verschleißteilen,
fallen nicht unter die Garantie und sind deshalb kostenpfl ichtig!
Nach der Garantie
Nach Ablauf der Garantiezeit können Reparaturen kostenpfl ichtig vom entsprechenden
Fachhandel oder Reparaturservice ausgeführt werden.
TRETEN SIE BITTE IN VERBINDUNG MIT IHREN HÄNDLER IN IHREM LAND
ODER POST SALES ABTEILUNG
VON FA. BEPER. E-MAIL [email protected] DIE IHREN HÄNDLER NENNEN WIRD
28
Radio multibanda digital - Manual de instrucciones
Indicaciones generales de seguridad
Antes de la puesta en servicio de este aparato lea detenidamente el manual de instrucciones y guarde este bien incluido la garantía, el recibo de
pago y si es posible también el cartón de embalaje con el embalaje interior.
En caso de dejar el aparato a terceros, también entregue el manual de
instrucciones.
• Vd. no debe dejar expuesto el aparato ni a la lluvia ni a la humedad, a fi
n de disminuir así el riesgo de incendio o de sacudida eléctrica. Por tanto,
no debe utilizar el aparato cerca de agua – por ejemplo, en el cuarto de
baño, cerca de una piscina o de un sótano húmedo.
• Utilice el aparato únicamente para la fi nalidad para la que ha sido construido.
• Si utiliza una fuente de alimentación externa, compruebe que la polaridad
y el voltaje son correctos, colocar las pilas siempre de forma correcta.
• El aparato se ha de dejar puesto de modo que no se tapen los orifi cios
de aireación existentes.
• Jamás se abrirá la carcasa del cuerpo del aparato. Las reparaciones mal
hechas pueden generar considerables peligros para el usuario. En caso
de avería del aparato, no poner el aparato más en servicio, sino dejar
repararlo por un especialista.
• Si no utiliza el aparato durante un periodo largo, retire las pilas.
Niños y personas débiles
• Para la seguridad de sus niños no deje material de embalaje (Bolsas de
plástico, cartón, poliestireno etc.) a su alcance.
AVISO: No deje jugar a los niños con la lámina. ¡Existe peligro de asfixia!
29
ESPAÑOL
Instrucciones de servicio
Gracias por elegir nuestro producto. Esperamos que disfrute usándolo.
Símbolos en este manual de instrucciones
Advertencias importantes para su seguridad están señaladas en especial. Siga estas advertencias incondicionalmente, para evitar accidentes
y daños en el aparato:
AVISO: Advierte ante los peligros para su salud y demuestra posibles riesgos de herida.
ATENCIÓN: Indica los posibles riesgos para el aparato u otros objetos.
NOTA: Pone en relieve consejos e informaciones para usted.
Radio multibanda digital - Manual de instrucciones
• Este equipo no está destinado al uso por personas (niños incluidos) que
tengan capacidades físicas, sensóricas o mentales limitadas o una falta de
experiencia y/o conocimientos.
Sólo pueden utilizar el equipo si una persona responsable por su seguridad se les vigile o se les instruye sobre el uso.
• Los infantiles deberían ser vigilados, para asegurar que no jueguen con
el aparato.
Indicación de los elementos de manejo Fig. 1
1 Telescopic antenna
2 Botón MODE
3 Botón SET
4 Regulador TUNING
5 Regulador de volumen VOLUME
6 LCD Display
7 Interruptor POWER ON/OFF
8 Altavoz
9 Selector de frecuencia de onda corta (SW)
Parte posterior (no se muestra)
Cámara para pilas
Colocador
Empleo conforme al uso prescrito
Este aparato sirve como receptor de programas de radio.
Solamente está destinado para esta finalidad y tan sólo se puede utilizar
para esto. Se puede utilizar únicamente de la manera descrita en el manual de instrucciones. El aparato no se debe usar para fines comerciales.
Todas las demás aplicaciones se consideran como no conformes al uso
prescrito y pueden originar daños materiales o incluso daños personales.
Puesta en servicio del aparato/Introducción
• Elija un lugar adecuado para el aparato, por ejemplo una superficie seca,
plana y no resbaladiza en la que puede manejar bien el aparato.
• ¡Preste atención a que el aparato sea ventilado suficientemente!
Introducir baterías (no está incluido en el suministro)
• Abra la tapa del compartimento de pilas en el dorso.
• Introduzca 2 baterías del tipo AAA/ R03 1,5 V. Tenga atención con la
polaridad correcta (vea la indicación en el suelo del compartimento de
baterías).
30
Radio multibanda digital - Manual de instrucciones
• Cierre de nuevo la cámara de baterías.
• Si el aparato no se utiliza durante largo tiempo, saque las pilas para
evitar todo “derrame” del ácido de pilas.
ATENCIÓN:
• Tipos de pila desiguales o pilas nuevas y usadas no se pueden utilizar
conjuntamente.
• Las baterías no se deben tirar a la basura doméstica. Por favor lleve
las baterías usadas a sitios especiales de recogida o a su concesionario.
AVISO: No exponga las pilas al alto calor o a la luz solar directa. Nunca
tire las baterías al fuego.
¡Existe peligro de explosión!
Configuración
Todas las opciones se configuran con el botón MODE. Cambie el modo
seleccionado actualmente con el botón SET. En la página 37 encontrará
un listado de los diferentes modos.
NOTA: Pulse el botón SET mientras se visualiza la hora para las siguientes opciones: configuración de alarma, fecha y segundero. Si pulsa el
botón MODE mientras se visualiza el segundero, puede restablecerlo y
ponerlo a cero.
Conectar es decir desconectar el aparato
Conexión
Empuje el interruptor POWER ON/OFF (7) en posición ON. Aparecerá en
la pantalla la frecuencia seleccionada actualmente.
Desconexión
Empuje el interruptor POWER ON /OFF en posición OFF.
Configuración de fecha y hora
Ajustar la hora
1. Pulse el botón MODE (2) seis veces. Aparecerán las horas y el formato
de visualización.
• A = AM (Mañana, formato de 12 horas),
• P = PM (Tarde, formato de 12 horas),
• H = formato de 24 horas
2. Pulse el botón SET (3), hasta programar la hora en el formato deseado.
3. Pulse el botón MODE para confirmar. Aparecerán los minutos.
4. Configure los minutos con el botón SET.
31
Radio multibanda digital - Manual de instrucciones
5. Pulse el botón MODE para confirmar.
6. Cuando se iluminen los dos puntos, pulse el botón SET una vez más
para completar la configuración. Los dos puntos parpadearán y se visualizará la hora actual.
Configuración de la fecha
La fecha está asociada a la hora. Cuando se ajusta la hora y se sobrepasa
la línea de cambio de fecha, ésta también se ajusta automáticamente. Por
ello, recomendamos que primero configure la hora y después la fecha.
1. Pulse el botón MODE cuatro veces. Aparecerá el mes.
2. Ajuste el mes con el botón SET.
3. Confirme con el botón MODE. Aparecerá el día.
4. Ajuste el día con el botón SET. Pulse el botón MODE tres veces para
cambiar al modo normal. Aparecerá la hora.
Función alarma
Ajustar hora de alarma
1. Pulse el botón MODE dos veces. Parpadeará la hora establecida actualmente para la alarma.
2. Pulse el botón SET hasta ajustar la hora.
3. Pulse MODE para confirmar. Los minutos parpadearán.
4. Ajuste los minutos con el botón SET.
5. Pulse el botón MODE. Se mostrará la hora.
Configuración del modo alarma
1. Pulse el botón MODE una vez. La hora establecida para la alarma parpadeará en la pantalla.
2. Seleccione el modo alarma con el botón SET.
• Alarma durante 30 segundos:
Si pulsa el botón SET una vez, aparecerá el símbolo ” “ en la pantalla. A la
hora establecida, sonará la alarma. Si no pulsa ningún botón, el sonido de
la alarma se apagará automáticamente a los 30 segundos.
• Alarma + recordatorio:
Si pulsa el botón SET dos veces, aparecerán los símbolos “ “ y ” “ en la
pantalla.
A la hora establecida, sonará la alarma. También sonará un pitido al inicio
de cada hora.
32
Radio multibanda digital - Manual de instrucciones
• Recordatorio:
Si pulsa el botón SET tres veces, aparecerá el símbolo “ “ en la pantalla.
Sonará un pitido al inicio de cada hora.
3. Pulse el botón MODE tres veces para volver al modo normal. Aparecerá
la hora.
Apagar la alarma antes de tiempo
Pulse el botón MODE al sonar la alarma para apagarla hasta el día siguiente.
Escuchar la radio
1. Conecte el aparato, poniendo el interruptor POWER ON/OFF (7) en
posición ON.
Gire el regulador de volumen VOLUME hasta alcanzar el volumen deseado.
2. Seleccione la banda de frecuencias deseada. Ajuste el selector de frecuencia (9) a la posición deseada.
• Onda ultracorta (OUC) = FM,
• Onda media (OM) = AM,
• Onda corta (OC) = Interruptor SW (1 a 7)
3. Extienda la antena telescópica y muévala para mejorar la recepción.
4. Con el regulador TUNING (4) puede sintonizar el emisor deseado. La
frecuencia actualmente ajustada se indica en el display.
5. Después del uso desconecte el aparato.
Limpieza y conservación
ATENCIÓN:
• ¡No utilice aditivos o disolventes! Estos podrían estropear las marcaciones o incluso la carcasa.
• No sumerja el aparato en agua.
• Las manchas exteriores pueden limpiarse con un paño ligeramente
húmedo, sin detergente adicional.
33
Radio multibanda digital - Manual de instrucciones
Datos técnicos
Funcionamiento de pila: 2 x 1,5 V, Tipo AAA
Componente de radio:
Gama de frecuencias: FM: 87,5 ~ 108 MHz
AM: 531 ~ 1611 kHz
SW 1: 5,90 ~ 6,20 MHz
SW 2: 7,10 ~ 7,35 MHz
SW 3: 9,40 ~ 9,90 MHz
SW 4: 11,60 ~ 12,10 MHz
SW 5: 13,57 ~ 13,87 MHz
Con el objetivo de una mejora continua, Beper se reserva el derecho
de añadir cambios y mejoras al producto sin previo aviso.
PROCEDIMIENTO DE ELIMINACIÓN DE LOS EQUIPOS
ELÉCTRICOS Y ELECTRÓNICOS
Al término de la vida útil del aparato, no eliminar como residuo municipal sólido mixto sino eliminarlo
en un centro de recogida específico colocado en vuestra zona o entregarlo al distribuidor a la hora
de comprar un nuevo aparato del mismo tipo y destinado a las mismas funciones. El distribudor se
cargarà el costo de eliminación de los equipos siguendo las normas actuales.
Este procedimiento de recogida separada de los equipos eléctricos y electrónicos se realiza con el
propósito de una política del medioambiente comunitaria con objetivos de salvaguardia, defensa y
mejoramiento de la calidad del medioambiente y para evitar efectos potenciales en la salud de los
seres humanos debido a la presencia de dentro de estos equipos o a un uso inapropiado de los
mismos o de algunas de sus partes.
Està Vuestra y nuestra competencia aiudar la defensa del medioambiente.
El símbolo
indica que este producto respecta la normativa europea de mdioam
biente ( 2011/65/EU) y le recuerda que todos los productos electrónicos y eléctricos deben ser
objeto de recogida por separado al finalizar su ciclo de vida. Para obtener información sobre el
reciclaje de este producto y dónde encontrar puntos de recogida llame las supuestas autoridades
locales.
Una eliminación no correcta de este producto podría conllevar sanciones.
34
Radio multibanda digital - Manual de instrucciones
CERTIFICADO DE GARANTĺA
Este aparato ha sido controlado en fábrica. La garantía es valida 24 meses a partir de la fecha de
compra para todos los defectos de material o de fabricación. En caso de reclamación, tiene que
presentar juntos el recibo fiscal y la garantía.
Para la asistencia técnica, es necesario contactar su revendedor o nuestra empresa. Eso le permitirá conservar su aparato en mejores condiciones y no invalidar la garantía. Toda manipulación
del aparato por una persona no autorizada o no cualificada cancelará automáticamente la garantía.
Condiciones de garantía
Durante la garantía, si algunas averías aparecen a causa de un defecto de material y/o fabricación,
garantizamos gratuitamente la reparación a las condiciones siguientes :
- el aparato ha sido utilizado correctamente y esto solamente al uso para el cual ha sido fabricado ;
- expertos repararon el aparato, es decir, personas designadas por el proveedor ;
- es obligatorio de presentar el recibo fiscal;
- las partes que presentan señales evidentes de desgaste no se tienen en cuenta en la garantía.
En consecuencia, todas las partes que habrían sufrido daños accidentales o que presentaban
señales de uso normal se excluyen de la garantía (entre las cuales, bombillas, baterías, pilas, resistencias), todas las partes implicando defectos debidos a la no utilización doméstica, la negligencia
en la manipulación y el mantenimiento, los daños en el transporte y todos los daños no imputables
directamente al fabricante.
Si un defecto aparece durante la garantía y no puede estar reparado, el aparato se sustituirá gratuitamente.
Asistencia técnica
Después del final de la garantía, concedemos siempre una gran importancia a la reparación.
Para la asistencia técnica y/o reparaciones fuera de la garantía, es necesario contactar directamente la dirección siguiente :
CONTACTE CON EL DISTRIBUIDOR DE SU PAIS O EL DEPARTAMENTO
DE POST VENTA DE BEPER .
ENVIE UN E-MAIL [email protected] Y LE ENVIAREMOS
DATOS DE SU SERVICIO TECNICO EN SU PAIS.
35
R
BEPER SRL
Via Salieri, 30
37050 - Vallese di Oppeano - Verona
Tel. 045/7134674 – Fax 045/6984019
e-mail: [email protected]
www.beper.com