1
DESCRIPTION
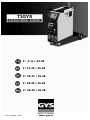
Thank you for choosing the T3GYS In order to make the most of your Mig welder please read the following
instructions carefully:
The T3GYS is recommended for welding steel, stainless steel, aluminium and for “MIG Brazing” of high-tensile
strength steels with CuSi and CuAl wires (ideal for car body repairs). Adjustment is easy and fast thanks to its
« synergic wire speed » function. It works on a 400v Three-phase power supply.
ELECTRICITY SUPPLY
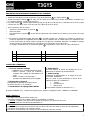
The absorbed current (I1eff) is indicated on the device, for use at maximum use settings. Check that the power
supply and its protection (fuse and/or circuit breaker) are compatible with the current needed during use.
The device must be placed in such way that the power socket is always accessible. Wire section > 2,5 mm².
The T3GYS is supplied with a 16A plug of RS-015 CEE 400V. It has to be connnected to a 400 V (50Hz) earthed
power supply with a a circuit breaker 10A and 1 differential 30mA.
ACCESSORIES
ref. 033108: T3GYS is supplied with 2 torches (without manometer or balancing system):
1 x 3 metre torch, equipped for 0.8 mm steel, stainless steel, CuSi3 or CuAl8 wires.
1 x torch with 3 metre Teflon sheath, equipped for 0.8mm aluminium wire.
ref. 033023: T3GYS is supplied with 3 torches and a balancing system (without manometer):
2 x 3 metre torches equipped for 0.8 mm steel, stainless steel, CuSi3 or CuAl8 wires.
1 x 4 meter Spool gun torch equipped for 0.8mm aluminium wire
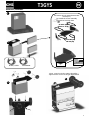
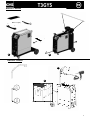
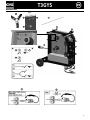
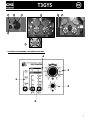
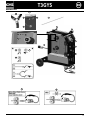
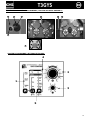
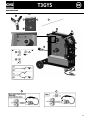
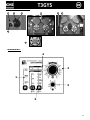
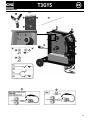
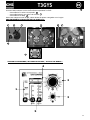
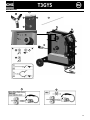
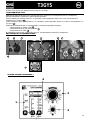
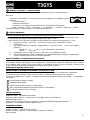
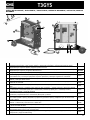
T3 GYS CONTROLS AND FEATURES (FIG ON PAGE.4)
1
2
3
4
5
6
On – Off Switch
Power adjustment switch (7 positions)
Setting adjustment panel
European standard torch connection
Spool Gun command connection
Thermal protection light
7
8
9
10
11
Torch support
Torch Cable support
Power Cable
Earth cable with a 200A clamp
Gas bottles support (max 2 bottles
of 4m3)
12
13
14
15
16
17
Fastening chain for bottles
Reel support Ø 200 mm
Reel support Ø 200 or 300 mm
Solenoid valve torch 1 (T1)
Solenoid valve torch 2 (T2)
Solenoid valve for Spool Gun
SEMI-AUTOMATIC WELDING FOR STEEL / STAINLESS STEEL (MAG MODE)
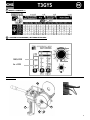
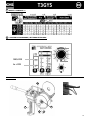
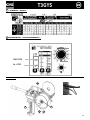
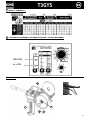
The T3GYS can weld 0.6/0.8 and 1mm steel and stainless steel wires .(figure
20
)
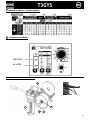
The device is capable of working with Ø 0.8 mm steel wire (contact tube Ø 0.8, roller Ø 0.6/0.8 and Ø 0.8/1.0)
If you need to use Ø 0.6mm wire, you will have to change the contact tube, and ensure that the reversible rollers in the wire
feeder are posititioned correctly (so that the writing that states “0.6mm” is visible when in place)
For Steel or Stainless Steel, you will need to use specific gas - Argon + CO2 (Ar + CO2). The proportion of CO2 will vary
depending on usage. The gas flow in steel is between 8 and 12L / min depending on the environment and experience of the
welder. For the specific requirements, seek advice from your gas distributor.
SEMI-AUTOMATIC WELDING FOR ALUMINIUM (MIG MODE)
The T3GYS can weld 0.8 and 1mm aluminium wire 21
To weld aluminium, neutral gas “pure argon” (AR) is required. When choosing gas, ask a gas distributor for advice. The gas
flow in aluminium should be between 15 and 25 L / min depending on the environment and experience of the welder.
Things to note when welding with Aluminium
- Set the pressure rollers of the wire feeder on the wire at the minimum pressure so as not topinch the wire
- Remove the capillary tube before connecting the aluminium torch
- When welding aluminium use a special aluminium torch with Teflon sheath to reduce friction.
Do not cut the sheath near the connector! It is used to guide the wire from the rollers. (See diagram 21 )
Contact Tip: Use a contact tip SPECIAL aluminum corresponding to the diameter of the wire.
- Contact Tip: Use the specific Aluminium contact tip corresponding to the diameter of the wire.
SEMI-AUTOMATIC BRAZING WELDING FOR HIGH-TENSILE STRENGTH STEELS (MIG MODE)
The T3gys is recommended by car manufacturers to braze-weld high-tensile strength plates with a cuprosilicium CusI3 wire or
cuproaluminium CuAl8 wire (Ø 0.8 mm and Ø 1 mm). The welder must use a neutral gas: pure argon (Ar). For specific gas
requirements, seek advice from your gas distributor. The gas flow required s between 15 and 25 L / min.
GAS CONNECTION
Connect the manometer (flowmeter) to the gas bottle (manometer not supplied with the product).
For use with one or two bottles of gas.
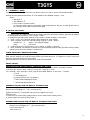
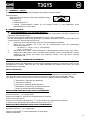
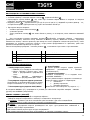
To connect two bottles of gas to three torches, split the pipe into 3 pieces and attach a 3-way “Y” connector. (See picture 18 )
To link a single bottle of gas with 3 torches, cut the pipe into 4 pieces and attach two 3-way “Y” connectors (See picture 18 )
Connect each bottle to the solenoid valves in the following order:
- T1 solenoid valve to the top left 15
- Spool gun solenoid to the top right 17
- T2 solenoid valve to the bottom 16
To avoid any gas leaks, always use the collars supplied with the product.
13