1
ENGLISH
Follow these instructions and those published by the
battery manufacturer, vehicle manufacturer and
manufacturer of any equipment you intend to use with
this unit. Review warning labels on these products and
on the vehicle.
X
This appliance is not designed to be used as a
replacement for a vehicular battery. Do not attempt to
operate a vehicle that does not have a battery installed.
X
The appliance must only be connected to a 12 V leadacid battery. Do not use the appliance for charging drycell batteries that are commonly used with home
appliances. These batteries may burst and cause injury
to persons and damage property.
Warning! Explosive gas may be vented from the lead-acid
batteries when charging and under extreme conditions
battery leakage may occur. Make sure that the area is well
ventilated when conducting jump starting and charging
procedures.
X
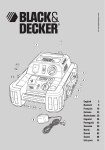
The following symbols are marked on the appliance:
Power LED indicator.
Boosting LED indicator.
Features
1.
2.
3.
4.
5.
6.
Power LED indicator
Boosting LED indicator
Plug storage
Cord storage
12 Vdc accessory plugs
Housing
Use
Warning! Make sure that the car is in neutral and the parking
brake is applied.
Step 1
X
Connect the black 12 Vdc accessory plug (5) into the
12 V outlet on the working vehicle and make sure that
the power LED (1) lights.
X
Start the engine on the working vehicle.
Step 2
Warning! Make sure that car is in neutral and the parking
brake is applied.
X
Fully unwind the cord from the cord storage (4) and
connect the orange 12 Vdc accessory plug (5) into the
12 V outlet on the dead vehicle and make sure that the
boosting LED (2) lights.
Step 3
X
When the dead car is sufficiently boosted to start the
engine both the power LED (1) and the boosting LED (2)
will change colour to green (approx. 20 minutes).
X
Remove the orange 12 Vdc accessory plug (5) from the
dead car and try starting the vehicle in 3-5 second
bursts.
Note: The housing (6) and the 12 Vdc accessory plugs (5)
will become warm during the boosting process. This is
normal.
Step 4
X
Remove the black 12 Vdc accessory plug (5) from the
working car and coil the cable around the cord storage
(4) and fit the 12 Vdc accessory plugs (5) into the plug
storage apertures (3).
Maintenance
Your Black & Decker tool has been designed to operate over
a long period of time with a minimum of maintenance.
Continuous satisfactory operation depends upon proper
care and regular cleaning.
Warning! Before performing any maintenance or cleaning
on the appliance, unplug the appliance.
X
From time to time wipe the appliance with a damp cloth.
Do not use any abrasive or solvent-based cleaner. Do
not immerse the appliance in water.
X
Clean the outside case with a soft cloth and, if
necessary, mild soap solution.
X
Do not allow liquid to enter the unit. Do not operate
when the unit is wet.
X
Keep the cords coiled during storage to prevent damage
to the cords.
Troubleshooting
If the power and boosting LED’s (1 & 2) do not light up check
the following:
X
Check that the donor vehicles 12 V accessory socket is
live, some cars require the key to be in the accessory
position before the socket is live.
X
Check that the 12 Vdc accessory plugs (5) are fully
inserted.
X
Check for blown fuses in the 12 Vdc accessory
plugs (5).
If your car fails to start:
X
Repeat steps 2-4 in the ‘use’ section and continue the
boosting process for a further 10 minutes or until the
LED’s change to green.
X
If your car still fails to start we suggest you have your
battery checked by a qualified auto-electrician.
3