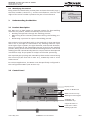
1
Bedienungsanleitung • User’s Manual • Manuel utilisateur SPG 2.0 HÜRNER SCHWEISSTECHNIK GmbH Nieder-Ohmener Str. 26 35325 Mücke (Atzenhain) +49 (0)6401 91 27 0 +49 (0)6401 91 27 39 [email protected] http://www.huerner.de Version Mai 2014 HÜRNER Schweißtechnik GmbH Nieder-Ohmener Str. 26 35325 Mücke, Deutschland Inhalt 1 2 2.1 2.2 2.3 2.4 2.5 2.6 2.7 2.8 3 3.1 3.2 3.3 3.4 4 4.1 4.2 4.2.1 4.2.2 4.2.3 4.2.4 4.2.5 4.3 4.3.1 4.3.2 4.3.3 4.3.4 4.4 4.4.1 4.4.2 4.4.3 4.4.4 4.4.5 4.4.6 4.4.7 4.4.8 4.5 4.7 5 5.1 5.2 5.3 5.4 5.5 5.6 6 7 8 Einleitung............................................................................................................. 5 Sicherheitshinweise............................................................................................. 5 Benutzung der Bedienungsanleitung................................................................. 5 Symbolerklärung . ............................................................................................... 5 Sicheres Arbeiten mit dem Produkt.................................................................... 5 Pflichten des Betreibers und des Schweißers..................................................... 6 Bestimmungsgemäße Verwendung.................................................................... 6 Gewährleistung.................................................................................................... 6 Transport und Lagerung...................................................................................... 6 Kennzeichnung des Produkts.............................................................................. 7 Maschinenbeschreibung...................................................................................... 7 Produktbeschreibung.......................................................................................... 7 Bedienfeld............................................................................................................ 7 Anschlüsse............................................................................................................ 8 Technische Daten................................................................................................. 8 Betrieb.................................................................................................................. 8 Einschalten des Geräts und Festlegen seiner Grundeinstellungen................... 8 Konfiguration der Grundbetriebseinstellungen der Maschine........................ 10 Erläuterungen zum Untermenü „Einstellungen“............................................ 10 Wahl der Anzeige-Sprache................................................................................ 11 Stellen von Datum und Uhrzeit........................................................................ 11 Einstellen der Summerlautstärke...................................................................... 11 Erläuterungen zum Untermenü „Protokollierung“........................................ 11 Eingabe von normierten und frei definierbaren Rückverfolgbarkeitsdaten.12 Eingabe des Schweißercodes............................................................................. 12 Eingabe oder Änderung der Kommissionsnummer......................................... 13 Eingabe oder Änderung der Nahtnummer...................................................... 13 Eingabe oder Änderung weiterer Daten zur Bauteilrückverfolgung............. 13 Durchführung der Stumpfschweißung............................................................. 14 Hobeln................................................................................................................ 14 Versatzkontrolle und Ermittlung des Bewegungsdrucks................................ 14 Möglichkeit zum Ändern der Schweißparameter............................................ 15 Gesamtdruckeinstellung und Angleichphase................................................... 15 Anwärmphase.................................................................................................... 16 Umstellphase...................................................................................................... 16 Füge- und Abkühlphase.................................................................................... 16 Ende der Schweißung........................................................................................ 17 Abbruch der Schweißung.................................................................................. 17 Anzeige von Protokollen und Druck von Etiketten mit ViewWeld................ 18 Ausgabe der Protokolle..................................................................................... 18 Wahl des Dateiformats und der Schweißart.................................................... 19 Ausgabe aller Protokolle................................................................................... 19 Ausgabe von Kommissionsnummer, Datums- oder Protokollbereich............ 19 Ablauf der Protokollausgabe............................................................................ 19 Löschen des Speicherinhalts.............................................................................. 19 Erhalt des Speicherinhalts................................................................................. 20 Wartung und Reparatur.................................................................................... 20 Anschrift für Wartung und Reparatur.............................................................. 20 Zubehör/Ersatzteile für das Produkt................................................................. 20 Version Mai 2014 Bedienungsanleitung HÜRNER SPG 2.0 DE 3 HÜRNER Schweißtechnik GmbH Nieder-Ohmener Str. 26 35325 Mücke, Deutschland Die ordnungsgemäße Schweißnaht hängt davon ab, dass die korrekten Drücke, Zeiten und Temperatur eingehalten werden. Die korrekten Vorsicht Druckwerte hängen vom Zylinderquerschnitt der Schweißmaschine ab. Vergewissern Sie sich unbedingt, dass an der Protokolliereinheit die richtige Maschine ausgewählt ist. 4 DE Bedienungsanleitung HÜRNER SPG 2.0 Version Mai 2014 HÜRNER Schweißtechnik GmbH Nieder-Ohmener Str. 26 35325 Mücke, Deutschland 1 Einleitung Sehr geehrter Kunde, Wir danken für das in unser Produkt gesetzte Vertrauen und wünschen Ihnen viel Erfolg und einen zufriedenstellenden Arbeitsablauf. Bei der Entwicklung, Fertigung und Prüfung der Protokolliereinheit für den Schweißprozess HÜRNER SPG 2.0 haben wir größten Wert auf Betriebssicherheit und Benutzerfreundlichkeit gelegt. Das Produkt ist nach dem neusten Stand der Technik und nach anerkannten sicherheitstechnischen Regeln gefertigt und geprüft worden. Bitte beachten Sie zu Ihrer Sicherheit die Hinweise zum bestimmungsgemäßen Gebrauch und die Unfallverhütungsvorschriften genau. Vielen Dank. 2 Sicherheitshinweise Diese Bedienungsanleitung enthält wichtige Hinweise, um das Produkt bestimmungsgemäß und sicherheitsgerecht zu bedienen. Sie ist von allen Personen zu beachten, die mit dem Produkt arbeiten. 2.1 Benutzung der Bedienungsanleitung Die Bedienungsanleitung ist in Kapitel untergliedert, welche die verschiedenen Funktionen des Produkts erklären. Alle Rechte, insbesondere das Recht der Vervielfältigung oder Reproduktion in jeglicher Form (Druck oder Datenerfassung) und Verbreitung sowie der Übersetzung bleiben vorbehalten und bedürfen der schriftlichen Genehmigung. 2.2 Symbolerklärung In der Betriebsanleitung werden folgende Benennungen und Zeichen für Gefährdungshinweise verwendet: Dieses Zeichen bedeutet, dass Nichtbeachten einer Anweisung zu einer möglicherweise gefährlichen Situation führt, die eventuell Vorsicht Verletzungen oder Sachbeschädigungen zur Folge hat. Dieses Symbol gibt wichtige Hinweise für den sachgerechten Umgang mit dem Produkt. Das Nichtbeachten dieses Zeichens Wichtig kann zu Störungen und Schäden am Produkt führen. Unter diesem Symbol erhalten Sie Anwendungstipps und nützliche Informationen, welche eine effektivere und wirtschaftlichere Hinweis Nutzung des Produkts ermöglichen. 2.3 Sicheres Arbeiten mit dem Produkt Beachten Sie zu Ihrer eigenen Sicherheit die folgenden Hinweise: • Das Netzkabel und die Sensorkabel sind vor scharfen Kanten zu schützen. Beschädigte Kabel sind unverzüglich durch eine autorisierte Servicewerkstatt ersetzen zu lassen. • Das Produkt darf nur von eingewiesenen und dazu befugten Personen bedient und gewartet werden. • Das Produkt ist nur unter Beaufsichtigung zu betreiben. Version Mai 2014 Bedienungsanleitung HÜRNER SPG 2.0 DE 5 HÜRNER Schweißtechnik GmbH Nieder-Ohmener Str. 26 35325 Mücke, Deutschland • • • • Vor jedem Gebrauch ist das Produkt auf beschädigte Teile zu überprüfen und ggf. sind diese Teile durch eine autorisierte Servicewerkstatt zu reparieren oder auszuwechseln. Die Schutzkappe für die Schnittstelle muss während des Schweißens aufgesetzt sein, damit keine Verunreinigungen und keine Feuchtigkeit in das Gehäuse eindringen können. Die Anschlussbedingungen der Energieversorger, VDE-Bestimmungen, DIN / CE-Vorschriften und nationale Vorschriften sind zu beachten. Ohne Genehmigung des Herstellers dürfen keine Veränderungen am Produkt vorgenommen werden. Unter Spannung stehende Teile Nach dem Öffnen bzw. Entfernen des Gehäuses werden Teile zugänglich, welche unter Spannung stehen können. Es darf nur Vorsicht durch eine autorisierte Servicewerkstatt geöffnet werden. Bedienungsanleitung Die Bedienungsanleitung muss stets am Einsatzort verfügbar sein. Eine unvollständige oder unleserliche Bedienungsanleitung ist umgehend zu ersetzen. Hierbei sind wir Ihnen selbstverständlich Hinweis gerne behilflich. 2.4 • • Pflichten des Betreibers und des Schweißers Das Produkt ist nur unter Beaufsichtigung zu betreiben. Schweißer müssen in den Betrieb des Systems angemessen eingewiesen sein bzw. eine entsprechende Schulung absolviert haben. Der Betreiber verpflichtet sich, sich in angemessenen Abständen davon zu überzeugen, dass die Schweißer mit dem System bestimmungsgemäß und unter Wahrung der Arbeitssicherheit arbeiten. Das System darf nur in technisch einwandfreiem Zustand und nur für Arbeiten entsprechend seiner bestimmungsgemäßen Verwendung in Betrieb genommen werden. Der Schweißer hat sich vor dem Schweißen vom einwandfreien Zustand des Systems zu überzeugen. Wichtig 2.5 Die Schutzkappe für die Datenübertragungsschnittstelle muss während des Schweißbetriebs aufgesetzt sein, damit keine Verunreinigungen und Feuchtigkeit an die Kontakte gelangen. Bestimmungsgemäße Verwendung Die Protokolliereinheit dient ausschließlich der Steuerung und Aufzeichnung von Stumpfschweißprozessen mit Heizelement-Maschinen, die für den Anschluss an sie geeignet sind. Zur bestimmungsgemäßen Verwendung gehört auch: • die Beachtung aller Hinweise aus der Bedienungsanleitung • die Einhaltung der Inspektions- und Wartungsarbeiten Andere Verwendungen als die oben aufgeführten sind verboten und führen zum Erlöschen jeglicher Herstellerhaftung und ‑gewährleistung. Bei nicht bestimmungsgemäßem Gebrauch können Wichtig erhebliche Gefahren und Sachschäden auftreten. 2.6 Gewährleistung Gewährleistungsansprüche können nur dann geltend gemacht werden, wenn die Gewährleistungsbedingungen aus den Allgemeinen Verkaufsund Lieferbedingungen beachtet werden. 2.7 Transport und Lagerung Die Anlieferung des Produkts erfolgt in einem Transportkoffer. Das 6 DE Bedienungsanleitung HÜRNER SPG 2.0 Version Mai 2014 HÜRNER Schweißtechnik GmbH Nieder-Ohmener Str. 26 35325 Mücke, Deutschland Gerät ist in dem Transportkoffer trocken und vor Nässe geschützt zu lagern. 2.8 Kennzeichnung des Produkts Das Produkt ist durch ein Typenschild gekennzeichnet. Es verzeichnet den Typ, die Seriennummer und den Hersteller. Die ersten zwei Stellen der Seriennummer bezeichnen das Baujahr. 3 Schweißprotokollier-Gerät SPG 2.0 Seriennr. CE 14432901 Hürner Schweisstechnik Nieder-Ohmener Str. 26 D - 35325 Mücke Tel. +49 6401 9127 0 Maschinenbeschreibung 3.1 Produktbeschreibung Das SPG 2.0 ist ein Protokolliergerät für Kunststoff-Stumpfschweißmaschinen, welches im Wesentlichen drei Aufgaben erfüllt: • Führung des Bedieners durch den Schweißvorgang • Überwachung aller relevanten Parameter während des Schweißvorgangs • Protokollierung des Schweißvorgangs Das Produkt ist sowohl mit Werkstatt- als auch mit Baustellenmaschinen einsetzbar und kann prinzipiell an jede Schweißmaschine angeschlossen werden. Das Gerät errechnet nach Eingabe der Kunststoffart, des Rohrdurchmessers und der Wandstärke alle für den Schweißablauf wichtigen Parameter unter Berücksichtigung der gewählten Schweißmaschine. Der gesamte Schweißablauf wird automatisch abgespeichert und kann auf verschiedene Arten zur Auswertung ausgelesen und weiterverarbeitet werden. Die betreffenden Daten zu Verschweißung und Bauteilrückverfolgung (Traceability) sind mit den Pfeiltasten (vgl. ersten Hinweis in Abschn. 4.1) einzugeben oder von einem Strichcode oder einer RFID-Karte einzulesen. Das SPG 2.0 kann über ein Einstell-Menü entsprechend den persönlichen Anforderungen konfiguriert werden (s. Abschn. 4.2). 3.2 Bedienfeld Anzeigedisplay Lesefeld für RFID-Karte MENÜ- und Pfeiltasten Schweißprozessdiagramm START/SET- und STOP/RESET-Taste Haltevorrichtung zur Anbringung an Stumpfschweißhydraulik Version Mai 2014 Bedienungsanleitung HÜRNER SPG 2.0 DE 7 HÜRNER Schweißtechnik GmbH Nieder-Ohmener Str. 26 35325 Mücke, Deutschland 3.3 Anschlüsse Hauptschalter Außentemperaturfühler Drucksensoranschluss Summer USB-Port Temperatursensoranschluss Scanneranschluss Netzkabel 3.4 Technische Daten Abmessungen (L x B x H) Gewicht Leistung Eingangsspannung Eingangsfrequenz Schutzart Protokollspeicher Schnittstelle 4 ca. 240 x 120 x 185 mm 3,0 kg 22 Watt 230 V, 110 V - 240 V 50 Hz / 60 Hz IP 54 10 000 Schweißungen USB A Betrieb Es ist darauf zu achten, dass alle Anschlüsse fest aufgesteckt sind und dass der Betrieb einer Stumpfschweißmaschine auf Baustellen nur über Stromverteiler mit FI-Sicherheitsschalter erfolgen Wichtig darf. Das Gerät wird nach dem Anschluss des Versorgungskabels ans Netz oder an den Generator mit dem Hauptschaltschalter eingeschaltet. Es ist darauf zu achten, dass die Spannung der Stromversorgung derjenigen entspricht, die die Maschine benötigt. Bei Verwendung von Verlängerungskabeln ist Folgendes zu beachten: Vorsicht Querschnitt 1,5 mm² = max. 20 m lang Querschnitt 2,5 mm² = max. 75 m lang Querschnitt 4,0 mm² = max. 100 m lang 4.1 Einschalten des Geräts und Festlegen seiner Grundeinstellungen Nach dem Einschalten erscheint Anzeige 1. Anschließend führt die Maschine automatisch einen Selbsttest durch; es werden die Sensoren und die Echtzeit-Uhr getestet sowie der noch freie Speicherbereich ermittelt. Der Test kann durch Gedrückt-Halten der STOP/ RESET-Taste, wenn Anzeige 1 im Display steht, umgangen werden. ******************** HUERNER * * SPG 2.0 * * ******************** Anzeige 1 8 DE Bedienungsanleitung HÜRNER SPG 2.0 Version Mai 2014 HÜRNER Schweißtechnik GmbH Nieder-Ohmener Str. 26 35325 Mücke, Deutschland Wird beim Selbsttest ein Fehler festgestellt, so erscheint „Systemfehler“ in der Anzeige. Die Protokolliereinheit muss dann vom Netz und der Maschine getrennt werden und zur Reparatur ins Vorsicht Herstellerwerk zurück. Während des Selbsttests erscheinen mehrere Bildschirme ähnlich Anzeige 2. In ihnen wird der Schweißer über den aktuell ausgewählten Druck- und Temperatursensor, die aktuelle Außentemperatur, Netzspannung, Uhrzeit und Datum sowie über den gerade ausgewählten Maschinentyp und die ausgewählte Schweißrichtlinie informiert. Durch Drücken der Taste MENÜ können alle Daten, die nicht zu den bevorstehenden Schweißungen passen sollten, über das Einstell-Menü geändert werden. Es folgt Anzeige 3 mit den Daten, die für die nächsten Schweißung gelten werden (die Nahtnummer wird nur angezeigt wenn diese Funktion im Einstell-Menü eingeschaltet wurde). Von ihr aus lässt sich das Einstell-Menü aufrufen, in welchem die grundlegende Konfiguration vorgenommen wird. Dazu ist die MENÜ-Taste zu betätigen und bei der folgenden Codeabfrage mit den Pfeiltasten der Zugangscode einzutippen oder die MenücodeTransponderkarte vor das RFID-Lesegerät zu halten. **Maschinen-Daten*** HST-355 Zylinder : 06.60 Drucksens.: 160bar Anzeige 2 Naechste Schweissung 15:44:52 29.05.12 235V 135C/220C Prot.-Nr.00072/00002 CODE : 415311 Anzeige 3 Die Eingabe von Daten mit den Pfeiltasten geschieht wie folgt: Mit den Pfeiltasten ï und ð wird der Cursor auf eine bestimmte Stelle auf dem Bildschirm bewegt. Danach wird mit den PfeilHinweis tasten ñ und ò der Wert (Buchstabe, Zahl) gewählt, der dort stehen soll. In der Regel ist eine Eingabe mit der START/SET-Taste zu bestätigen. Mit den Pfeiltasten ñ und ò kann im sich öffnenden Menü (Anzeige 4) eine Option ausgewählt werden; durch erneutes Drücken der MENÜ-Taste öffnet sich das zugehörige Untermenü. Im Untermenü Maschinendaten muss angegeben werden, an welchen Maschinentyp (Bezeichnung und zugehöriger Zylinderquerschnitt) Steuerund Protokolliereinheit angeschlossen ist (vgl. den Pfeil in Anzeige 5). Die Auswahl erfolgt mit den Pfeiltasten ñ und ò, die Bestätigung der Änderung durch die START/SET-Taste. Zur Sicherheit wird der Zylinderquerschnitt der gewählten Maschine noch einmal separat angezeigt und ist erneut mit der START/SET-Taste zu bestätigen. Das Maschinendatenmenü ist durch einen zusätzlichen Zugangscode geschützt, der nur Autorisierten beim Betreiber mitgeteilt wird. Bei falsch ausgewählter Maschine werden alle Solldrücke falsch berechnet! Die Einstellung einer anderen Maschine erfordert zwingend die Rücksprache mit dem Hersteller oder einem autoWichtig risierten Wartungsbetrieb, da auch ein Sensorabgleich angeraten ist. Dieser kann nur von Autorisierten erledigt werden. Zusätzlich zu den vorinstallierten Maschinen können an den freien Menüeinträgen benutzerdefinierte Maschinen erstellt werden (Bezeichnung des Maschinentyps und zugehöriger Zylinderquerschnitt). Die Eingabe erfolgt mit den Pfeiltasten, und die Angaben sind dann mit der START/ SET-Taste zu bestätigen. Im Untermenü Sensorparameter des Einstell-Menüs können der Temperatursensor (PT100, PT1000) und der Drucksensor (160 bar, 250 bar, 600 bar) abgeglichen werden (vgl. Anzeige 6). Einstellungen >Protokollierung Sensor-Parame. Maschinen-Daten -M-M-M-M- Anzeige 4 ***Grundmaschine**** >HST 250 05.10 HST 315 05.89 HST 355 06.60 Anzeige 5 SENSOR-PARAMETER >Heizelem.kalibr.-MDruckm. kalibr. -MAnzeige 6 Mit den Pfeiltasten ñ und ò wird der jeweilige Punkt ausgewählt und Version Mai 2014 Bedienungsanleitung HÜRNER SPG 2.0 DE 9 HÜRNER Schweißtechnik GmbH Nieder-Ohmener Str. 26 35325 Mücke, Deutschland mit der Taste MENÜ aufgerufen. Unter „Druckmessung kalibrieren“ wird zunächst ein Nulldruck-Abgleich der Maschine durchgeführt. Hierzu fahren Sie die Maschine vollständig auf und drücken anschließend die Taste START/SET. Die Anzeige zeigt dann den Referenz-Solldruck, z. B 8,0 bar, falls der 160 bar-Drucksensor aktuell ausgewählt ist (s. Anzeige 7). Dieser angezeigte, je nach Drucksensor unterschiedliche Referenzdruck ist nun mit Hilfe des Druck-Manometerw an der angeschlossenen Maschine einzustellen und mit den Pfeiltasten ñ und ò auf dem Display abzugleichen. Mit Betätigen der START/SET-Taste werden die Daten übernommen. *Druck kalibrieren** [SET] Soll-Druck : 80.0bar Ist-Druck : 00.0bar Anzeige 7 Der Abgleich des Heizselements ist unter „Heizelement kalibrieren“ möglich. Er erfolgt ebenfalls mit den Pfeiltasten ñ und ò und Bestätigung durch die Taste START/SET. Beim Abgleich des Werts auf dem Bildschirm mit den Pfeiltasten ñ und ò öndern sich die Werte schneller, wenn die jeweilige Taste gedrückt gehalten wird. Hinweis 4.2 Konfiguration der Grundbetriebseinstellungen der Maschine In den Untermenüs des Einstell-Menüs lassen sich unter „Einstellungen“ die Einstellungen zum Gerät selbst und seinem Betrieb definieren. Unter „Protokollierung“ werden die Rückverfolgbarkeitsdaten ein- oder ausgeschaltet, die in den Schweißprotokollen erscheinen oder nicht erscheinen sollen. Die Auswahl geschieht mit den Pfeiltasten ñ und ò. Um das jeweilige Untermenü aufzurufen, ist dann die MENÜ-Taste zu drücken. Mit den Pfeiltasten ñ und ò wird in beiden Teilen des Einstell-Menüs der gewünschte Konfigurationspunkt gewählt. Mit der Pfeiltaste ð wird die gewählte Konfigurationseinstellung von „ein“ auf „aus“ geschaltet und umgekehrt. Steht bei einer Konfigurationseinstellung ein „M“, so kann durch Drücken der MENÜ-Taste ein Untermenü aufgerufen werden. Auf beiden Menüebenen (Einstell-Menü und zugehörige Untermenüs) werden die Daten durch Drücken der Taste START/SET übernommen bzw. wird durch Drücken der STOP/RESET-Taste die Wichtig Menüebene verlassen, ohne eventuell gemachte Änderungen zu übernehmen. 4.2.1 Erläuterungen zum Untermenü „Einstellungen“ „Schweißercode prüfen ein“ bedeutet, dass der Schweißercode noch gültig, nicht ausgelaufen sein muss (normale Gültigkeitsdauer 2 Jahre ab Kartenausgabe) und sonst das Schweißen nicht gestartet werden kann, „aus“, dass die Gültigkeit des Codes nicht überprüft wird. „Speicher-Kontrolle ein“ bedeutet, dass bei vollem Protokollspeicher der Schweißautomat blockiert ist, bis die Protokolle ausgedruckt oder übertragen werden, „aus“, dass er nicht blockiert ist und das älteste Protokoll überschrieben wird. „Automode ein“ bedeutet, dass im WeldControl-Modus mit der Automode-Funktion zur Durchführung der Schweißung (vgl. Abschn. 4.3.4) gearbeitet werden kann, „aus“, dass die Funktion nicht verfügbar ist. „Umgebungstemperatur ein“ bedeutet, dass die Umgebungstemperatur vor Schweißbeginn gemessen wird, „aus“, dass das nicht geschieht (bei Temperatur < 0°C sollte nur geschweißt werden, wenn entsprechende Vorkehrungen getroffen wurden, z. B. Zelt oder Heizung). „Schweißercode-Optionen – M – “ bedeutet, dass durch Betätigen der MENÜ-Taste das Untermenü aufgerufen wird, in dem bestimmt wird, wie oft der Schweißercode, wenn er unter „Protokollierung“ eingeschaltet ist, eingegeben werden muss: immer, d. h. vor jeder 10 DE Bedienungsanleitung HÜRNER SPG 2.0 ** EINSTELLUNGEN ** Schw. Code pr. Aus Speicher-Kontr. Ein >Man. Eingabe Ein Anzeige 8 Version Mai 2014 HÜRNER Schweißtechnik GmbH Nieder-Ohmener Str. 26 35325 Mücke, Deutschland Schweißung, nur nach Einschalten des Geräts oder nur bei der ersten Schweißung eines neuen Tags/Datums. „Sprache – M – “ bedeutet, dass durch Betätigen der MENÜ-Taste das Untermenü zum Auswählen der Bedienersprache aufgerufen wird (vgl. Abschn. 4.1.3). „Datum/Uhrzeit – M – “ bedeutet, dass durch Betätigen der MENÜTaste das Untermenü zum Stellen der Uhr aufgerufen wird (vgl. Abschn. 4.1.4). „Summer Lautstärke – M – “ bedeutet, dass durch Betätigen der MENÜTaste das Untermenü zum Einstellen der Summerlautstärke aufgerufen wird (vgl. Abschn. 4.1.5). „Temperatureinheit – M – “ bedeutet, dass durch Betätigen der MENÜTaste das Untermenü zur Wahl von Celsius oder Fahrenheit als Temperatureinheit aufgerufen wird. „Druckeinheit – M – “ bedeutet, dass durch Betätigen der MENÜ-Taste das Untermenü zur Wahl von bar oder Pfund pro Quadratzoll (psi) als Druckeinheit aufgerufen wird. „Längeneinheit – M – “ bedeutet, dass durch Betätigen der MENÜ-Taste das Untermenü zur Wahl von metrischen oder angloamerikanischen Längeneinheiten aufgerufen wird. „Inventarnummer – M – “ bedeutet, dass durch Betätigen der MENÜ-Taste das Untermenü zur Eingabe der Nummer, unter der das Gerät bei der Betreiberfirma intern inventarisiert ist, aufgerufen wird. „Anzahl Etiketten – M – “ bedeutet, dass durch Betätigen der MENÜTaste das Untermenü zur Eingabe der Anzahl Etiketten aufgerufen wird, die nach einer Schweißung automatisch über den optionalen Etikettendrucker ausgegeben werden sollen, falls ein solcher angeschlossen ist. „Richtlinie – M – “ bedeutet, dass durch Betätigen der MENÜ-Taste das Untermenü zur Wahl des für der Schweißung geltenden Norm (Standard/Richtlinie) aufgerufen wird. 4.2.2 Wahl der Anzeige-Sprache Nach Wahl des Untermenüs „Sprache wählen“ erscheint das in Anzeige 7 wiedergegebene Display. ***** SPRACHE >Deutsch English Francais Anzeige 9 Mit den Pfeiltasten ñ und ò wird zwischen „Deutsch“, „English“, und „Français“ gewählt und mit der START/SET-Taste die Auswahl bestätigt. 4.2.3 Stellen von Datum und Uhrzeit Nach Wahl des Untermenüs „Uhr einstellen“ erscheint das in Anzeige 8 wiedergegebene Display. Die Uhrzeit und das Datum können unter Verwendung der Tastatur geändert werden. Dabei werden die Abschnitte „Stunde“, „Minute“, „Tag“, „Monat“ und „Jahr“ je einzeln eingestellt. Mit der START/SET-Taste werden die Einstellungen bestätigt. 4.2.4 Einstellen der Summerlautstärke Nach Wahl des Untermenüs „Lautstärke einstellen“ erscheint das in Anzeige 9 wiedergegebene Display. Zusätzlich ist der Summer zu hören. Die Lautstärke des Summers wird mit den Pfeiltasten ï, ð wie gewünscht eingestellt (zwischen 0 und 100) und die Einstellung mit der START/SETTaste bestätigt. 4.2.5 Erläuterungen zum Untermenü „Protokollierung“ „Schweißercode ein“ bedeutet, dass je nach Einstellung unter „Schweißercode-Optionen“ der Schweißercode eingelesen werden muss, „aus“, dass das nicht möglich ist. „Kommissionsnummer ein“ bedeutet, dass vor jeder Schweißung die Version Mai 2014 Bedienungsanleitung HÜRNER SPG 2.0 ***** Datum/Uhrzeit 21.06.13 14:28 Anzeige 10 Summer Lautstaerke < ------20-------- > Anzeige 11 ** PROTOKOLLIERUNG *** >Schweissercode ein Kommissions-Nr. ein Nahtnummer aus Anzeige 12 DE 11 HÜRNER Schweißtechnik GmbH Nieder-Ohmener Str. 26 35325 Mücke, Deutschland Kommissionsnummer neu eingegeben oder bestätigt werden muss, „aus“, dass sie nicht abgefragt wird. „Nahtnummer ein“ bedeutet, dass das Gerät eine automatisch hochgezählte Nahtnummer für jede neue Schweißung im Rahmen einer bekannten Kommission vergibt, welche dann am Display neben der Protokollnummer angezeigt wid, „aus“, dass ganz ohne Nahtnummern geschweißt und protokolliert wird. „Zusatzdaten ein“ bedeutet, dass vor jeder Schweißung die Zusatzdaten neu eingegeben werden müssen, „aus“, dass sie nicht abgefragt werden. „Formteilcode ein“ bedeutet, dass vor jeder Schweißung der zweite, sogenannte Rückverfolgbarkeitscode des Elektroschweißfittings eingegeben werden muss, „aus“, dass das nicht möglich ist. „Rohrcodes ein“ bedeutet, dass vor jeder Schweißung die Codes beider Rohre/Werkstücke (ISO-Schweiß- und Rückverfolgbarkeitscodes) eingegeben werden müssen, „aus“, dass das nicht möglich ist. „Rohrlänge ein“ bedeutet, dass vor jeder Schweißung die Länge beider Rohre/Werkstücke eingegeben werden muss, „aus“, dass das nicht möglich ist. „Witterung ein“ bedeutet, dass vor jeder Schweißung die Witterungsbedingungen in einer Liste gewählt werden müssen, „aus“, dass das nicht möglich ist. „Verlegefirma ein“ bedeutet, dass vor jeder Schweißung die Firma, die die Arbeiten durchführt, eingegeben werden muss, „aus“, dass das nicht möglich ist. „Etiketten drucken – M – “ bedeutet, dass durch Betätigen der MENÜTaste das Untermenü zum Ausdruck eines/mehrerer Etikett(en) zu einer Schweißung mit dem optionalen Etikettendrucker aufgerufen wird. „Winkel – M – “ bedeutet, dass durch Betätigen der MENÜ-Taste das Untermenü zur Eingabe des Winkels, in dem die Werkstücke miteinander verschweißt werden, aufgerufen wird. Alle Eingaben, die im Chip einer Transponderkarte gespeichert sind, können auch durch Halten der Karte vor das Lesegerät vorgenommen werden. Sie können, falls sie als Strichcode vorliegen, Hinweis auch mit dem Scanner eingelesen werden. 4.3 Eingabe von normierten und frei definierbaren Rückverfolgbarkeitsdaten Es sind alle im Einstell-Menü unter „Protokollierung“ (vgl. Abschn. 4.1.5) eingeschalteten Rückverfolgbarkeitsdaten zur Schweißung vor der Schweißung einzugeben. Das Schweißgerät fragt sie vor dem eigentlichen Schweißprozess ab. Je nach der einzelnen Angabe ist entweder die Neueingabe zwingend erforderlich (z. B. beim Schweißercode; vgl. Abschn. 4.3.1) oder kann eine zuvor bereits eingegebene Angabe geändert und bestätigt oder unverändert bestätigt werden (z. B. bei der Kommissionsnummer; vgl. Abschn. 4.3.2). 4.3.1 Eingabe des Schweißercodes Wird von Anzeige 3 aus die Schweißung durch Drücken der Taste START/ SET gestartet, erscheint, falls dies im Einstell-Menü aktiviert ist, zunächst die Abfrage zur Eingabe des Schweißercodes (vgl. Anzeige 13). Der Code muss ein ISO-gemäßer Code sein. Seine Eingabe kann mit den Pfeiltasten geschehen (vgl. den ersten Hinweis in Abschn. 4.1), wobei die Eingabe durch die Taste START/SET abzuschließen ist, oder durch Einlesen von einer RFID-Transponderkarte oder von einem Strichcode mittels des optionalen Handscanners. ***Schweissercode*** ++++++++++++++++++++ ++++++++++ Anzeige 13 Das korrekte Eingeben oder Einlesen des Codes wird durch akustisches Signal bestätigt. 12 DE Bedienungsanleitung HÜRNER SPG 2.0 Version Mai 2014 HÜRNER Schweißtechnik GmbH Nieder-Ohmener Str. 26 35325 Mücke, Deutschland 4.3.2 Eingabe oder Änderung der Kommissionsnummer Von Anzeige 3 aus bzw. nach Eingabe des Schweißercodes wird von der Maschine die maximal 32-stellige Kommissionsnummer abgefragt, falls dies im Einstell-Menü aktiviert wurde. Ist bereits eine Kommissionsnummer vorhanden, so wird diese angeboten. Sie kann entweder durch die START/ SET-Taste direkt bestätigt oder mit den Pfeiltasten (vgl. den ersten Hinweis in Abschn. 4.1) bzw. durch Einlesen mit dem Scanner oder von einer RFIDKarte geändert und dann mit der Taste START/SET bestätigt werden. **Kommissionsnummer* ++++++++++++++++++++ ++++++++++++ Anzeige 14 Eine Kommissionsnummer, die bereits im Protokollspeicher existiert, kann anstatt der angezeigten ausgewählt werden, indem die Pfeiltasten ï und ð gleichzeitig gedrückt werden. Dadurch erscheint ein KommissionsnummerAuswahlbildschirm. Mit den Pfeiltasten und kann dann eine bereits vorhandene Kommissionsnummer ausgewählt und mit START/SET für die nächste Schweißung bestätigt werden. Um den Suchlauf zu verlassen, ohne eine Kommissionsnummer auszuwählen, ist die Taste STOP/RESET zu drücken. 4.3.3 Eingabe oder Änderung der Nahtnummer Von Anzeige 3 aus bzw. nach Eingabe der Kommissionsnummer wird von der Maschine die Nahtnummer abgefragt, falls dies im Einstell-Menü aktiviert wurde. Die Nahtnummer ist kommissionsnummerbezogen. Das bedeutet, dass sie um 1 hoch gezählt wird für jede Schweißung, die in der laufenden Kommission (deren Kommissionsnummer ja eingegeben wurde) geschweißt wird. Im Beispiel in Anzeige 3 wird die nächste Schweißung im Protokoll mit der laufenden Nummer 72 abgespeichert und diese Schweißung ist Naht Nr. 2 der aktuellen Kommission. Die erste Naht einer Kommission, für die im Speicher noch keine Naht abgelegt ist, erhält immer die Nahtnr. 1. Sind im Speicher für die gewählte Kommission bereits Nähte abgelegt, ermittelt die Hinweis Maschine die höchste für die Kommission vorhandene Nummer und gibt der nächsten Schweißung diese Nahtnummer plus 1. Die so ermittelte Nummer wird dem Nutzer am Bildschirm vorgeschlagen; er kann sie übernehmen oder ändern. Ändert der Nutzer die Nummer, obliegt es ihm, darauf zu achten, dass in einer Kommission keine Nahtnummer doppelt vergeben wird. Falls eine Doppelvergabe vorkommt, bleibt dies ohne Auswirkung auf die Schweißung und ihre Dokumentation. In der betreffenden Kommission lassen sich jedoch zwei Nähte nicht an ihrer Nummer unterscheiden. Falls durch Nutzereingaben bestimmte Nahtnummern nicht belegt sind (etwa für eine Kommission Naht Nr. 1, 2, 3, 5, 6, 9), werden diese Lücken nicht gefüllt und als automatisch ermittelte Nummer für die nächste Naht stets die höchste vorhandene plus 1 (in diesem Beispiel also 10) angeboten. Die Nahtnummer kann auch eingegeben werden durch gleichzeitiges Betätigen der Pfeiltasten und ð, wenn Anzeige 4 angezeigt wird. 4.3.4 Eingabe oder Änderung weiterer Daten zur Bauteilrückverfolgung In derselben Weise wie Schweißercode, Kommissions- und Nahtnummer können alle weiteren Bauteildaten eingegeben werden, die im EinstellMenü aktiviert wurden. Alle Daten können mit den Pfeiltasten (vgl. den ersten Hinweis in Abschn. 4.1) eingegeben und mit der START/SET-Taste bestätigt werden oder, sofern vorhanden, von einem Strichcode mit Hilfe des optionalen Version Mai 2014 Bedienungsanleitung HÜRNER SPG 2.0 DE 13 HÜRNER Schweißtechnik GmbH Nieder-Ohmener Str. 26 35325 Mücke, Deutschland Handscanners bzw. von einer RFID-Karte mit dem Transponderlesegerät eingelesen werden. Eine Ausnahme bildet die Witterung (s. Anzeige 15). Hier erfolgt die Auswahl in einem Menü mit den Tasten ñ und ò, die Bestätigung ebenfalls mit der Taste START/SET. 4.4 Witterung >sonnig heiter Regen Anzeige 15 Durchführung der Stumpfschweißung Nach Eingabe aller im Einstell-Menü aktivierten Rückverfolgbarkeitsdaten erscheint Anzeige 3 („Nächste Schweißung“) auf dem Display. Von ihr aus lässt sich die eigentliche Schweißung mit der Taste START/SET starten. Es sind zuerst die Rohrkenndaten einzugeben. Falls bereits Rohrkenndaten von einer vorigen Schweißung vorhanden sind und kein Codefehler festgestellt wurde, werden die Daten der letzten Schweißung angezeigt und können en bloc bestätigt werden (vgl. Anzeige 18). Von dieser Anzeige aus können durch Drücken von STOP/RESET die Rohrkenndaten geändert werden. Dazu ist zunächst in einer Auswahlliste mit den Pfeiltasten ñ und ò das Rohrmaterial zu wählen und mit START/SET zu bestätigen (vgl. Anzeige 16). Dann sind mit den Pfeiltasten (vgl. den ersten Hinweis in Abschn. 4.1) der Durchmesser und die Wandstärke einzugeben und wiederum mit START/SET zu bestätigen (vgl. Anzeige 17). Anstelle der Wandstärke kann auch die SDR-Druckstufe eingegeben werden; dazu rufen Sie diese durch gleichzeitiges Drücken der Pfeiltasten ï und ð auf. Sie erscheint anstelle der Wandstärke, und Sie können den SDR-Wert eingeben. Abschließend werden die Kenndaten nochmals zusammenfassend angezeigt. Bei Fehleingaben kann man entweder durch Betätigen von STOP/RESET alle Daten erneut eingeben oder durch Drücken der Pfeiltaste ñ jeweils einen Eingabeschritt zurückgehen, um Daten einzeln zu berichtigen. Falls unter den zuvor eingelesenen Rückverfolgbarkeitsdaten die Rohrcodes waren, bietet die Maschine automatisch die Rohrkenndaten aus den eingelesenen Codes zur Bestätigung an. 4.4.1 Hobeln Zum Hobeln muss der Planhobel in die Maschine eingesetzt und eingeschaltet werden. Danach sind die Rohre zusammen zu fahren und so lange abzuhobeln, bis sich ein umlaufender Span zwei bis drei Mal um die Rohrenden legt und die Rohrenden plan sind. Der Hobelvorgang wird durch Auseinanderfahren der Maschine beendet. Durch Drücken der Taste START/SET als Bestätigung des Endes des Hobelns springt die Protokolliereinheit zum nächsten Ablaufschritt (vgl. Anzeige 20). Mit STOP/RESET kommen Sie zurück zum Anfang des Schweißvorgangs. Wird festgestellt, dass die Rohrenden noch nicht plan sind, kann so der Hobelvorgang wiederholt werden. Sind die Rohrenden plan gehobelt, muss die Versatzkontrolle durchgeführt werden. 4.4.2 Versatzkontrolle und Ermittlung des Bewegungsdrucks Lassen Sie nach dem Hobeln die Maschine vollständig zusammen fahren, um zu prüfen, ob der waagerechte und senkrechte Versatz der Rohre in der Toleranz liegt, welche die anwendbare Norm vorgibt. Der maximal zulässige Versatz wird im Display angezeigt (vgl. Anzeige 20). Ist der Versatz in Ordnung, muss dies mit der Taste START/SET bestätigt werden. Wenn der Versatz zu groß ist, sind ggf. die Rohrenden in den Spannbügeln nachzujustieren und der Hobelvogang zu wiederholen. Ist der Versatz in Ordnung, fahren Sie die Maschine vollständig auseinander, um den Bewegungsdruck zu ermitteln. Wenn der Hydraulikkreislauf vollständig druckentlastet ist, erhöhen Sie an der Maschine langsam den 14 DE Bedienungsanleitung HÜRNER SPG 2.0 *Rohrmat. auswählen* >PE100 PE-HD PP Anzeige 16 *Rohrdim. eingeben** Durchmesser : 0250mm Wandstärke : 22.7mm Anzeige 17 PE100 Durchmesser : 0315mm Wandstärke : 50.0mm RESET SDR 28.6 SET Anzeige 18 Rohrenden hobeln 230°C IST 0.5bar Anzeige 19 Rohrversatz pruefen Max. Versatz :2.5mm 230°C IST 3.5bar Anzeige 20 Version Mai 2014 HÜRNER Schweißtechnik GmbH Nieder-Ohmener Str. 26 35325 Mücke, Deutschland Druck und beobachten dabei, bei welchem Druck sich die Grundmaschine in Bewegung setzt. Bewegungsdruck Der Bewegungsdruck muss größer als 2,0 bar sein. 230°C IST 3.5bar Anzeige 21 Die START/SET-Taste ist zu drücken, sobald der Schlitten der Maschine sich in Bewegung setzt. So wird der Bewegungsdruck für diese Schweißung im Speicher abgelegt. Der genaue Bewegungsdruck hängt von mehreren Faktoren ab (Rohrmaterial und ‑durchmesser, Ort der Grundmaschine usw.) und muss daher für jede Schweißung neu ermittelt werden. Wichtig 4.4.3 Möglichkeit zum Ändern der Schweißparameter Im Anschluss an die Einstellung des Bewegungsdrucks zeigt das Display Anzeige 22, sofern im Einstell-Menü unter Protokollierung die manuelle Eingabe eingeschaltet ist. Die beiden Anzeigen zur manuellen Eingabe der Verschweißungsparameter (Anzeige 22 und 23) erlauben die Änderung der Parameter mit Hilfe der Pfeiltasten ñ, ò, ï, ð (vgl. ersten Hinweis in Abschn. 4.1). Mit der Taste START/SET werden sie abgespeichert. Durch Drücken von START/SET wechselt die Steuereinheit auch zur jeweils nächsten Anzeige. Die manuell eingestellten Werte bleiben auch nach dem Ausschalten der Maschine erhalten. Lediglich die Druckwerte werden bei jedem Schweißprozess neu berechnet. Ändern sich die Rohrkenndaten, so müssen alle Parameter wieder neu eingestellt werden. Hinweis Die Maschine erkennt automatisch die Änderung der Rohrkenndaten und führt den Bediener direkt zu dem Menüschritt zum Ändern der Parameter. 4.4.4 Gesamtdruckeinstellung und Angleichphase Nach Hobeln, Versatzkontrolle und Bestätigung der Schweißkenndaten beginnt der eigentliche Schweißprozess mit der Einstellung des Gesamtdrucks (d.i. der höchste Druck, der während des gesamten Schweißprozesses, nämlich in der Angleich- und am Ende der Fügephase, erreicht wird). Während der Schweißer entsprechend der Soll-Vorgabe auf dem Bildschirm den Gesamtdruck einstellt, wird der Ist-Druck ebenfalls im Display angezeigt (s. Anzeige 24) und das Programm fährt fort, sobald der Ist-Druck in der Toleranz liegt. Die Angleichphase beginnt damit dem Einlegen des Heizelements zwischen die Rohrenden. Darauf wird der Schweißer am Display hingewiesen (Anzeige 25). Sollte zu diesem Zeitpunkt das Heizelement die Soll-Temperatur noch nicht erreicht haben, weist die entsprechende Displayanzeige den Schweißer darauf hin. Denn die Heizelementtemperatur wird von der Protokolliereinheit ständig überwacht. Anzeige 25 erscheint erst, wenn das Heizelement die geforderte Temperatur hat. Nachdem das Heizelement eingelegt ist, drücken Sie die Taste START/SET und stellen Sie an der Schweißmaschine den Gesamtdruck her, damit sie die Rohrenden an das Heizelement presst. Warten Sie, bis die Wulst die vorgeschriebene Breite bzw. Höhe, je nach verwendeter Schweißrichtlinie, erreicht hat. Ist die auch im Display angezeigte Soll-Wulsthöhe erreicht, muss der Bediener die Taste START/SET betätigen, um die Angleichphase zu beenden. Angl.Dru. :030.5bar Anwärmdr. :010.5bar Anwärmzeit : 0120 s Umstellzeit: 0005 s Anzeige 22 Abkühlz.t5 Abkühlz.t6 Abkühld.t6 Fügerampe : 0727 s : 0000 s :002.0bar : 012 s Anzeige 23 Gesamtdruck einst. 230°C 229°C SOLL IST 16.5bar 3.5bar Anzeige 24 Heizspiegel einleg. 222°C 221°C SOLL IST 16.5bar 0.5bar Anzeige 25 Wulsthöhe :2.0mm Angleichzeit :68 s 230°C SOLL 16.5bar 229°C IST 12.5bar Anzeige 26 Version Mai 2014 Bedienungsanleitung HÜRNER SPG 2.0 DE 15 HÜRNER Schweißtechnik GmbH Nieder-Ohmener Str. 26 35325 Mücke, Deutschland 4.4.5 Anwärmphase Nach der Angleichphase (1. LED im Schweißdiagramm) muss der Druck abgesenkt werden (2. LED im Diagramm). Der verringerte Druck steht dann während der gesamten Anwärmphase an (3. LED im Diagramm), während die Rohre weiter vom Heizelement gewärmt werden. Wichtig Dauert das Absenken des Drucks auf den Anwärmdruck länger als 10 sec, bricht der Schweißvorgang mit Fehlermeldung ab. ANWAERM-PHASE Anwärmzeit : 148s 230°C MAX 5.0bar 229°C IST 3.5bar Anzeige 27 Die Druckabsenkung auf den Anwärmdruck ist am Display zu überwachen. Etwaige Druckschwankungen sind vom Bediener auszugleichen. Auch wenn der Schweißer – etwa weil die Wulst bereits sauber ausgebildet ist – vor Ablauf der angezeigten Angleichzeit den Druck unter den Maximaldruck während der Anwärmphase absenkt, wechselt die Maschine selbsttätig in die Anwärmphase. Dieser Druckabfall muss aber rasch geschehen. In diesem Fall wird die durch vorzeitige Absenkung verkürzte Angleichzeit als Angleichzeit dieser Schweißung gespeichert und für etwaige spätere Automode-Angleichphasen als Richtdauer angesetzt. Während der gesamten Anwärmphase muss trotz Druckabsenkung voller Kontakt zwischen Schweißwulst und Heizelement bestehen. Sollte sich zwischen beiden an einer Stelle ein Leck Wichtig bilden, ist die Schweißung abzubrechen und zu wiederholen. Auch wenn die Steuerung einen Fehler feststellt (etwa zu geringer Druck, der nicht vom Schweißer nachgeregelt wird, oder zu lange Anwärmphase), bricht sie die Schweißung mit Fehlermeldung ab. 4.4.6 Umstellphase Ein akustisches Signal zeigt in den letzten 10 Sekunden der Anwärmphase die nahende Umstellphase an. Hinweis Am Ende der Anwärmphase sind die Spannwerkzeuge der Maschine auseinanderzufahren. Nehmen Sie anschließend das Heizelement zwischen den Rohren heraus. Das Herunterzählen der Anwärmzeit muss abgewartet werden. Die Rohrenden dürfen nicht zuvor vom Heizelement genommen werden. Erst wenn Anzeige 28 erscheint, darf die Anwärmphase beendet werden. Nach der Umstellphase muss sofort die Fügephase beginnen. Die im Display für die Schweißung angezeigte Umstellzeit darf nicht überschritten werden. Andernfalls bricht die Maschine automatisch mit Fehlermeldung ab. 4.4.7 Füge- und Abkühlphase Bauen Sie unter Beobachtung des Druckwerts im Display gleichmäßig den Fügedruck auf. Der Aufbau des Fügedrucks muss einer linear ansteigenden Rampe entsprechen, so wie es die Sollwerte im Display vorgeben. Im Schweißdiagramm auf der Hydraulik blinkt die 5. LED. In der Füge- und Abkühlphase ist es besonders wichtig, dass die Soll-Werte für den Druck konsequent eingehalten werden. Direkt nach Abschluss der Fügerampe und am Beginn der Abkühlzeit kann es systembedingt zu einem leichten Druckabfall kommen. Dieser ist umgehend vom Schweißer auszugleichen. Wichtig In diesem Fall steht in der ersten Zeile von Anzeige 30 „Druck halten“. 16 DE Bedienungsanleitung HÜRNER SPG 2.0 Heizpiegel entnehmen Umstellzeit : 8 s 230°C MAX 16.5bar 229°C IST 2.5bar Anzeige 28 Fügedruck aufbauen 230°C 229°C SOLL IST 16.5bar 14.5bar Anzeige 29 ABKÜHL-PHASE Abkühlzeit :1234s 230°C SOLL 16.5bar 229°C IST 16.5bar Anzeige 30 Version Mai 2014 HÜRNER Schweißtechnik GmbH Nieder-Ohmener Str. 26 35325 Mücke, Deutschland Je nach Richtlinie oder Angaben des Rohr- bzw. Formteilherstellers ist eventuell nach Abschluss der Fügephase eine Nachkühlzeit einzuhalten, in der auf die neue Verbindung keine äußeren Kräfte einwirken dürfen. Sie wird von der Hydraulik-, Steuer- und Protokolliereinheit nicht überwacht. Für diese ist die Schweißung mit dem Aufleuchten der 7. LED als beendet anzusehen. 4.4.8 Ende der Schweißung Die Schweißung endet nach Abschluss der Füge- und Abkühlphase. Der Schweißer kann die Rohre dann druckentlasten. 4.5 ABKÜHL-PHASE Abkühlzeit beendet 229°C IST 16.6bar Anzeige 31 Abbruch der Schweißung Falls ein Fehler auftritt, bricht die Schweißung mit einer Fehlermeldung ab. Der aufgetretene Fehler wird dann im Display angezeigt (s. Anzeige 32). Zusätzlich blinkt im Schweißdiagramm die LED für die Phase, in der der Fehler geschah. SCHWEISSUNG ABGEBR. Fehler Angleichdruck 229°C IST 1.5bar Anzeige 32 Die in der folgenden Tabelle aufgeführten Fehler können angezeigt werden. Fehlertyp Beschreibung a. Dateneingabe Eingabefehler Fehler bei der Eingabe von Daten mit den Pfeil- oder alphanumerischen Tasten. Codefehler Fehler beim Einlesen von Daten von einem Strichcode oder einer RFID-Karte. b. System und Zustand Systemfehler Das Schweißsystem muss sofort von Netz und Fitting getrennt werden. Der Selbsttest hat Fehler im System gefunden. Das Schweißsystem darf nicht mehr verwendet werden und muss zur Reparatur eingeschickt werden. Uhr defekt Die interne Uhr der Maschine ist defekt; Uhr im Einstell-Menü neu stellen. Netzunterbrechung bei der letzten Schweißung Die vorherige Schweißung ist unvollständig. Das Schweißsystem wurde während ihr von der Versorgungsspannung getrennt. Um weiter arbeiten zu können, muss die Meldung durch Drücken der STOP/RESET-Taste quittiert werden. Außentemperatur zu hoch Außentemperatur außerhalb des Bereichs von – 10°C bis + 50°C Außentemperatur zu niedrig Außentemperatur außerhalb des Bereichs von – 10°C bis + 50°C Drucksensor defekt Heizsensor defekt Temperatursensor defekt Der angezeigte Sensor (Hydarulikdruck, Heizelementtemperatur, Außentemperatur) ist defekt; wo möglich, auch den Stecker über prüfen; ggf. die Maschine vom Kundendienst überprüfen lassen. Drucker nicht bereit Der optional erhältliche Drucker ist nicht bereit (mögliche Ursachen: keine Verbindung oder fehlerhaftes Kabel). Ausgabe abgebrochen Während des Audrucks oder der Übertragung von Schweißdaten ist ein Fehler aufgetreten, der nicht behoben werden konnte. Protokollspeicher voll Der Protokollspeicher ist voll. Die Schweißprotokolle ausgeben oder die Speicherkontrolle ausschalten. Bei ausgeschalteter Speicher kontrolle überschreibt ein neues Protokoll das älteste vorhandene. ((betrifft nur Etikettendrucker)) c. Schweißprozess Temperatur zu niedrig Heizelement-Temperatur wird automatisch erhöht. Temperatur zu hoch Heizelement-Temperatur wird automatisch abgesenkt. Umstellzeit abgelaufen Herausnehmen des Heizelements und Zufahren der Maschine hat zu lange gedauert; Schweißprozess muss wiederholt werden Version Mai 2014 Bedienungsanleitung HÜRNER SPG 2.0 DE 17 HÜRNER Schweißtechnik GmbH Nieder-Ohmener Str. 26 35325 Mücke, Deutschland Fehlertyp Beschreibung Fehler Bewegungsdruck Der Bewegungsdruck kann nicht ermittelt werden; eventuell müssen die Rohre neu eingespannt werden; oder der Bewegungs druck ist niedriger als 1 bar, was systembedingt ausgeschlossen ist. Fehler Angleichdruck Der Angleichdruck ist zu hoch oder zu niedrig; der Druck wurde nicht rechtzeitig nachgeregelt Fehler Anwärmdruck Anwärmdruck zu hoch; der Druck wurde nicht rechtzeitig nachgeregelt Fehler Fügedruck Fügedruck zu hoch oder zu niedrig; der Druck wurde nicht rechtzeitig nachgeregelt Abkühlzeit abgebrochen Der Bediener hat mit der STOP/RESET-Taste die Abkühlzeit abgebrochen. Fehler Spiegeltemperatur Heizelement‑ (Spiegel‑) temperatur außerhalb der Toleranz; Temperatur konnte nicht nachgeregelt werden; eventuell war die Umgebungstemperatur zu niedrig Prozess abgebrochen Der Schweißprozess oder ein Ablaufschritt wurden durch eine externe Ursache beendet. 4.7 Anzeige von Protokollen und Druck von Etiketten mit ViewWeld Die Funktion ViewWeld erlaubt, eine Kurzform des während der letzten Schweißung aufgezeichneten Protokolls anzuzeigen und als Etikett für die Schweißverbindung auf dem optionalen Etikettendrucker auszudrucken. Die ViewWeld-Zusammenfassung zeigt Protokollnummer, Schweißungsdatum und ‑uhrzeit sowie die Kenndaten zur Verschweißung und eine Beurteilung der Naht-/Schweißungsgüte (vgl. Anzeige 33). 0011 27.05.14 08:25 PE-HD 630mm SDR26.0 Kein Fehler Anzeige 33 Das ViewWeld-Kurzprotokoll wird vom Anfangsbildschirm (vgl. Anzeige 3) durch Drücken der ñ-Taste aufgerufen. Um ein Etikett auszudrucken, drücken Sie im ViewWeld-Bildschirm auf die START/SET-Taste. Nach dem Aufruf des ViewWeld-Protokolls der letzten Schweißung kann in den Kurzprotokollen mit den Pfeiltasten ï und ð geblättert werden. 5 Ausgabe der Protokolle Schnittstelle USB A-Schnittstelle für den Anschluss von USB-Speichermedien (z.B. USB-Stick) Die Schnittstelle entspricht der USB Version 2.0-Spezifikation (d.h. maximale Datenrate von 480 Megabit pro Sekunde). Vor dem Übertragen von Schweißdaten sollten Sie den Schweißautomaten aus- und wieder einschalten. Geschieht dies nicht, kann es zu fehlerhafter Datenübertragung kommen und die Wichtig Protokolle im Schweißautomaten können unlesbar werden. Wenn Sie Schweißprotokolle an einen USB-Stick ausgeben, warten Sie stets bis die Meldung „Ausgabe beendet“ auf dem Display des Produkts erscheint, bevor Sie die Verbindung zum USB-Stick Wichtig trennen. Trennen Sie die Verbindung vorher, kann es vorkommen, dass das Schweißgerät Ihnen das Löschen der Protokolle im Speicher anbietet, obwohl sie nicht ordnungsgemäß übertragen wurden. Falls Sie dann den Speicherinhalt löschen, gehen die 18 DE Bedienungsanleitung HÜRNER SPG 2.0 Version Mai 2014 HÜRNER Schweißtechnik GmbH Nieder-Ohmener Str. 26 35325 Mücke, Deutschland Protokolle unwiderruflich verloren, obwohl sie nirgendwo sonst gespeichert sind. 5.1 Wahl des Dateiformats und der Schweißart Nach Anschließen des Speichermediums erscheint der Bildschirm zur Auswahl des Formats, in dem die Daten ausgegeben werden: PDF-Datei mit Kurz- oder Langbericht oder Datei im Schweißungsdatenbankformat DataWork. Mit den Pfeiltasten ñ und ò kann das Gewünschte gewählt werden. Die Wahl muss mit der START/SET-Taste bestätigt werden. Die Option eines Service-Protokolls ist für den Normalbetrieb ohne Belang. Dieser Bericht gibt im Rahmen der computergestützten Gerätewartung Auskunft über die Ereignisse, die mit der Instandhaltung des Geräts zu tun haben. *Dateityp auswählen* DataWork Datei >PDF-Kurzprotokoll PDF-Langprotokoll Anzeige 34 Die Protokolle werden im hier gewählten Format an den USB-Speicher gesendet. 5.2 Ausgabe aller Protokolle Nach der Wahl des Dateiformats und der Schweißart kann im nächsten Bildschirm die Option „Alle Protokolle“ gewählt werden. Dadurch werden alle im Protokollspeicher befindlichen Daten oder alle Protokolle der gewählten Schweißart im zuvor gewählten Format ausgegeben. 5.3 Ausgabe von Kommissionsnummer, Datums- oder Protokollbereich Nach der Wahl des Dateiformats und der Schweißart können im nächsten Bildschirm die Optionen „Nach Kommissionsnummer“, „Nach Datumsbereich“ und „Nach Protokollbereich“ gewählt werden. Je nach Auswahl kann dann mit den Pfeiltasten ñ und ò aus der Liste aller gespeicherten Kommissionen die gewünschte, deren Protokolle ausgegeben werden sollen, ausgewählt werden, oder es kann durch Eingabe mit den Pfeiltasten (vgl. Hinweis in Abschn. 4.1) eines Anfangs- und Enddatums bzw. des ersten und letzten Protokolls ein Datums- bzw. ein Protokollbereich bestimmt werden, dessen Protokolle ausgegeben werden sollen. Durch Drücken der START/ SET-Taste wird die Ausgabe der ausgewählten Protokolle Speichermedium gestartet. 5.4 Ablauf der Protokollausgabe Nach der Auswahl unter den Optionen wird der Ausgabevorgang automatisch gestartet. Warten Sie, bis die gewählten Protokolle übertragen sind und am Bildschirm der Hinweis „Ausgabe beendet“ erscheint. Sollte während der Ausgabe ein Problem entstehen, erscheint die Fehlermeldung „Nicht bereit“. Nach Beseitigung des Problems wird die Ausgabe automatisch wieder aufgenommen. Falls während der Übertragung der Schweißdaten ein Problem auftritt, das sich nicht beheben lässt, nimmt das Gerät den die Ausgabe nicht wieder auf und zeigt die Fehlermeldung „Ausgabe Hinweis abgebrochen“ an. Diese Meldung ist durch Drücken auf die Taste START/SET zu quittieren. 5.5 Löschen des Speicherinhalts Der Speicherinhalt kann erst nach der Ausgabe aller Protokolle gelöscht werden. Dies wird mit dem Hinweis „Ausgabe beendet“ angezeigt. Nach dem Entfernen des Speicher-Sticks kommt die Abfrage „Protokolle löschen“. Bei Bestätigung mit der START/SET-Taste erscheint die Sicherheitsab- Version Mai 2014 Bedienungsanleitung HÜRNER SPG 2.0 DE 19 HÜRNER Schweißtechnik GmbH Nieder-Ohmener Str. 26 35325 Mücke, Deutschland frage „Protokolle wirklich löschen“, die nochmals mit der START/SET-Taste bestätigt werden muss. Daraufhin wird der Speicherinhalt gelöscht. 5.6 Erhalt des Speicherinhalts Nach dem Entfernen des Kabels oder Sticks kommt die Abfrage „Speicher löschen“. Durch Drücken der STOP/RESET-Taste wird der Speicherinhalt erhalten und der Druckvorgang kann nochmals wiederholt werden. Wichtig 6 Beachten Sie unbedingt die Hinweise eingangs von Abschn. 5 zur Datenintegrität, um das versehentliche Löschen der Protokolle im Speicher zu vermeiden. Wartung und Reparatur Da es sich um ein im sicherheitsrelevanten Bereich eingesetztes Produkt handelt, darf die Wartung und Reparatur nur in unserem Hause bzw. von Vertragspartnern, welche von uns speziell ausgebildet und autorisiert sind, durchgeführt werden. Dies garantiert einen gleichbleibend hochwertigen Geräte- und Sicherheitsstandard. Wichtig 7 Bei Zuwiderhandlung erlischt die Gewährleistung und Haftung für das Produkt und eventuell entstehende Folgeschäden. Anschrift für Wartung und Reparatur Hürner Schweißtechnik GmbH Nieder-Ohmener Str. 26 Tel.: +49 (0)6401 9127 0 35325 Mücke, Deutschland Fax: +49 (0)6401 9127 39 Web: www.huerner.de Hinweis 8 Te c h n i s c h e vorbehalten. Mail: [email protected] Änderungen am Produkt bleiben Zubehör/Ersatzteile für das Produkt Sensorkabel für Druckmessung Sensorkabel für Temperaturmessung Barcode-Scanner USB-Stick Schweißer-Ausweis 600-100-030 600-100-031 206-030-253 300-010-154 216-080-031 Nur der Einsatz von Originalersatzteilen ist zulässig. Nicht-Originalersatzteile lassen Herstellerhaftung und ‑gewährleistung Hinweis erlöschen. Wenden Sie sich zur Beratung und Bestellung von Ersatzteilen an den Vertreiber oder den Hersteller des Produkts. 20 DE Bedienungsanleitung HÜRNER SPG 2.0 Version Mai 2014 HÜRNER Schweisstechnik GmbH Nieder-Ohmener Str. 26 35325 Mücke, Germany Contents 1 2 2.1 2.2 2.3 2.4 2.5 2.6 2.7 2.8 3 3.1 3.2 3.3 3.4 4 4.1 4.2 4.2.1 4.2.2 4.2.3 4.2.4 4.2.5 4.3 4.3.1 4.3.2 4.3.3 4.3.4 4.4 4.4.1 4.4.2 4.4.3 4.4.4 4.4.5 4.4.6 4.4.7 4.4.8 4.5 4.7 5 5.1 5.2 5.3 5.4 5.5 5.6 6 7 8 Introduction......................................................................................................... 5 Safety Messages................................................................................................... 5 The User's Manual............................................................................................... 5 Explaining Icons................................................................................................... 5 Operating the Product Safely............................................................................. 5 Owner and Operator Obligations....................................................................... 6 Intended Use........................................................................................................ 6 Warranty............................................................................................................... 6 Transport and Storage......................................................................................... 6 Identifying the Product....................................................................................... 7 Understanding the Machine............................................................................... 7 Product Description............................................................................................. 7 Control Panel....................................................................................................... 7 Connectors........................................................................................................... 8 Technical Specifications....................................................................................... 8 Operation............................................................................................................. 8 Switching the Data Logger on and Setting its Basic Parameters...................... 8 Setting the Default Configuration of Machine Operation............................. 10 Understanding the “Settings” Sub-menu........................................................ 10 Selecting the Display Language........................................................................ 11 Setting the Clock................................................................................................ 11 Setting the Buzzer Volume............................................................................... 11 Understanding the “Recording” Sub-menu..................................................... 11 Entering Preformatted and User-defined Traceability Data........................... 12 Entering the Welder ID Code............................................................................ 12 Entering or Changing the Commission Number.............................................. 13 Entering or Changing the Joint Number.......................................................... 13 Entering oder Changing Further Data on Component Traceability............... 13 Performing the Butt Welding........................................................................... 14 Facing the Pipe Butts......................................................................................... 14 Checking Pipe Alignment and Determining Drag Pressure............................ 14 Possibility to Change Welding Parameters....................................................... 15 Setting the Maximum Pressure and Starting the Bead Build-up Stage.......... 15 Heating Stage.................................................................................................... 16 Change-over Stage............................................................................................ 16 Joining and Cooling Stage................................................................................ 16 End of Welding.................................................................................................. 17 Aborted Welding Process.................................................................................. 17 Using ViewWeld to View Welding Reports and Print Tags............................. 18 Downloading the Reports................................................................................. 18 Selecting the File Format and the Welding Process......................................... 19 Downloading All Reports.................................................................................. 19 Downloading by Commission Number, Date or Report Range....................... 19 Understanding the Report Download Process................................................. 19 Deleting Data from Memory............................................................................. 19 Keeping Data in Memory.................................................................................. 20 Service and Repair............................................................................................. 20 Service and Repair Contact............................................................................... 20 Accessories/Parts for the Product...................................................................... 20 Version May 2014 HÜRNER SPG 2.0 User’s Manual EN 3 HÜRNER Schweisstechnik GmbH Nieder-Ohmener Str. 26 35325 Mücke, Germany The success of the jointing operation depends on the proper pressures, times, and temperatures used in the process. The corCaution rect pressure value depends on the section of the cylinder of the welding machine. Prior to welding, verify carefully that correct machine is set/selected in the data logger. 4 EN HÜRNER SPG 2.0 User’s Manual Version May 2014 HÜRNER Schweisstechnik GmbH Nieder-Ohmener Str. 26 35325 Mücke, Germany 1 Introduction Dear Customer: Thank you very much for purchasing our product. We are confident that it will bring you success and meet your expectations. The development, manufacture, and check of the data logger for recording welding processes HÜRNER SPG 2.0 has been performed with a view to superior operation safety and user-friendliness. The product was manufactured and checked according to state-of-the-art technology and widely recognized safety provisions. To ensure maximum operation safety, please conform to the appropriate messages in this booklet and the rules for the prevention of accidents. Thank you. 2 Safety Messages This User’s Manual contains important instructions for the intended and safe operation of the product. Every person who operates the product has to conform to the instructions of this manual. 2.1 The User's Manual The User’s Manual is presented according to sections which explain the different functions of the product. All rights, in particular the right to copy or reproduce (in print or electronic form) and distribute as well as to translate, are reserved and subject to prior written consent. 2.2 Explaining Icons The following expressions and icons are used in this User’s Manual to refer to safety-related issues: Caution This icon indicates that non-compliance may result in a hazardous situation that possibly causes bodily injury or material damage. This icon indicates important messages related to the correct use of the product. Non-compliance may cause problems of Important operation and damage to the product. This icon indicates tips and useful information for using the product more efficiently and more economically. Info 2.3 Operating the Product Safely For your own safety, comply with the following instructions • Protect the power supply cord and ssensor cables from cutting edges. Have an authorized service shop replace damaged cables immediately. • The product may be operated and serviced exclusively by authorized staff who were briefed on it. • The product may be operated only when observed. • Before operating the product, always check for damaged parts Version May 2014 HÜRNER SPG 2.0 User’s Manual EN 5 HÜRNER Schweisstechnik GmbH Nieder-Ohmener Str. 26 35325 Mücke, Germany and have them repaired or replaced by an authorized service shop as needed. The dust cap of the interface port has to be closed during welding in order to prevent contaminants and humidity from entering the enclosure. Mains suppliers’ wiring regulations, VDE provisions, DIN / CE regulations, and applicable national legislation have to be respected. Without prior authorization by the manufacturer, modifications to the product are unacceptable. • • • Parts Under Power After opening the enclosure or removing the cover, parts of it are accessible that may be under power. It may be opened Caution exclusively by an authorized service shop. Info 2.4 • • Owner and Operator Obligations The system may be operated only when observed. Welders must have been briefed properly on the operation of the system or must have participated in a dedicated training. The operating/ owning organization engages to check at reasonable intervals if the system is operated by the welders as intended and under proper guidelines of occupational safety. The system must be operated only when in proper state of repair and for one of the intended uses. Before welding, the welder is required to make sure that the state of the system is in order. Important 2.5 User’s Manual The User’s Manual has to be available at any time on the site where the product is used. If the User’s Manual becomes incomplete or unreadable, replace it without delay. Feel free to contact us for assistance. The dust cap for the data tranfer interface port has to cover the port during operation, in order to keep humidity and contaminations away. Intended Use The data logger is intended exclusively controlling and recording buttwelding processes with heating element performed with machines that are compatible with it and can be connected to it. The notion of intended use also includes: • Compliance with the instructions in the User’s Manual • Observation of all service and maintenance intervals All uses other than those mentioned above are not allowed and will cancel any and all liability or warranty by the manufacturer. Unintended use may cause considerable hazards and Important material damage. 2.6 Warranty Warranty claims may be raised only if the conditions for warranty given in the General Terms and Conditions of Sale and Delivery obtain. 2.7 Transport and Storage The product ships in a transport case. Store it dry and protected from humidity in this case. 6 EN HÜRNER SPG 2.0 User’s Manual Version May 2014 HÜRNER Schweisstechnik GmbH Nieder-Ohmener Str. 26 35325 Mücke, Germany 2.8 Identifying the Product Every product is identified by a name plate. It shows the model (“Typ”), the serial number (“Seriennr.”), and the manufacturer. The first two digits of the serial number represent the year of manufacture. 3 Understanding the Machine Schweißprotokollier-Gerät SPG 2.0 Seriennr. CE 14432901 Hürner Schweisstechnik Nieder-Ohmener Str. 26 D - 35325 Mücke Tel. +49 6401 9127 0 3.1 Product Description The SPG 2.0 is a data logger to generate reports for butt-welding machines for plastics, which has basically three functions: • Guiding the operator through the welding process; • Monitoring all the relevant parameters during the welding process; • Generating a protocol to report the welding process. The product can be used both with on-site and with in-shop machines and it can in principle be connected to any welding machine. Upon entering the type of plastic, the pipe diameter, and the wall thickness, the unit calculates all the parameters that are critical for the welding process, taking into account the selected welding machine. The entire welding process is automatically saved to a report and can be exported in different ways for purposes of analysis and further processing. The required pipe jointing and traceability data can be entered using the cursor keys (see first Info in Sect. 4.1), a RFID chip card or a bar code scanner. For various applications, the SPG 2.0 can be specifically configured in the Configuration Menu (see section 4.2). 3.2 Control Panel Display Screen Reader for RFID Cards MENU and Cursor Keys Welding Process Diagram START/SET and STOP/RESET Keys Support Bracket for Installation to Buttwelding Hydraulics Version May 2014 HÜRNER SPG 2.0 User’s Manual EN 7 HÜRNER Schweisstechnik GmbH Nieder-Ohmener Str. 26 35325 Mücke, Germany 3.3 Connectors On/Off Switch Ambient Temperature Sensor Pressure Sensor Connector Buzzer USB Port Temperature Sensor Connector Scanner Connector Power Supply Cord 3.4 Technical Specifications Dimensions (L x W x H) Weight Power Input Voltage Input Frequency Ingress Protection Welding Report Memory Interface 4 approx. 240 x 120 x 185 mm 3.0 kg 22 watts 230 V, 110 V - 240 V 50 Hz / 60 Hz IP 54 10 000 joints USB A Operation Make sure all connectors are tight in their sockets and note that operation of butt-welding machines on a worksite is only acceptable if the power supply has earth-leakage circuit Important breakers. After connecting the power supply cord to the mains power supply or a generator, turn the unit on at the On/Off switch. It has to be ensured that the voltage of the power source the machine is connected to corresponds to the rated voltage of the machine. Also the following has to be respected when Caution using extension cables: wire section 1.5 mm² = max. 20 m long wire section 2.5 mm² = max. 75 m long wire section 4.0 m m² = max. 100 m long 4.1 Switching the Data Logger on and Setting its Basic Parameters After the machine was switched on, Display 1 shows on the screen. The machine will then automatically start the auto-test process to check the sensors and the system clock and to determine the number of free welding reports. This test can be bypassed by holding down the STOP/RESET key when Display 1 is showing. 8 EN HÜRNER SPG 2.0 User’s Manual ******************** * HUERNER * *WeldControl EF 2.0* ******************** Display 1 Version May 2014 HÜRNER Schweisstechnik GmbH Nieder-Ohmener Str. 26 35325 Mücke, Germany If during the auto-test an error is detected, a “System Error” message shows on the display. When this happens, the report generator has to be disconnected from the power suppy and Caution the welding machine and has to be returned to the manufacturer for repair. During the auto-test several screens resembling Display 2 appear. They inform the welder of the currently selected pressure and temperature sensor, the current outside temperature, power supply voltage, time, and date as well as of the kind of machine and welding standard selected at that point. By pressing the MENU key, you can access the Configuration Menu to change all parameters to be applied to the imminent welding which are not currently selected as they should be. Then Display 3 appears with the parameters that will be used for the next welding (the joint number will show only if this function has been enabled in the Configuration Menu). From this screen it is possible to access the Configuration Menu in which the default behavior of the data logger can be configured. To access it, press the MENU key and then, on the following enter code screen, enter the access code using the cursor keys or hold the transponder card with the menu access code in front of the RFID reader. Info ****Machine Data**** HST-355 Cylinder : 06.60 Pres.Sens.: 160bar Display 2 Next welding 15:44:52 29.05.12 235V 135C/220C Rep. No. 00072/00002 CODE : 415311 Display 3 To enter information using the cursor keys, proceed as follows: The ï and ð cursor keys position the cursor at the desired digit/character on the display screen. The ñ and ò cursor keys are used to select the value (letter, number) that should appear at this place. In general, the START/SET must then be pressed to confirm that input. Pressing the ñ and ò cursor keys in the menu that appears (Display 4), you can select a menu option, then access the selected sub-menu by pressing the MENU key again. In the Machine Data sub-menu, the type of machine (its designation and its cylinder section) to which the hydraulic, control, and data logging/report generation unit is connected, has to be defined (see the arrow symbol in Display 5). To change the selected machine, select the desired machine type by pressing the ñ or ò cursor keys and confirm by pressing the START/SET key. For added safety, the section of the selected machine’s cylinder is once more displayed and has to be confirmed again by START/SET. An access code is required to open the Machine Data sub-menu. This code will be disclosed only to authorized personnel with the operating company. Settings -M>Reporting -MSensor Parameter-MMachine Data -MDisplay 4 **Machine Chassis*** >HST 250 05.10 HST 315 05.89 HST 355 06.60 Display 5 If the wrong machine is selected in this menu, all pressure computations that the unit makes, will be wrong! Changing to another machine requires consultation with the manufacImportant turer or an authorized service shop, as a sensor calibration is then also recommended. This step requires proper authorization. As an addition to the preinstalled machines, user-defined types can be set as needed at the unused menu entries (a designation for the machine and its cylinder section have to be entered). Enter the required data using the cursor keys and confirm by START/SET. SENSOR PARAMETERS >Calib. Heat.El. -MCalib. Press.S. -MDisplay 6 From the Configuration Menu’s Sensor Parameters option, the tem- Version May 2014 HÜRNER SPG 2.0 User’s Manual EN 9 HÜRNER Schweisstechnik GmbH Nieder-Ohmener Str. 26 35325 Mücke, Germany perature sensor (PT100, PT1000) and the pressure sensor (160 bar, 250 bar, 600 bar) can be selected/calibrated (see Display 6). Use the ñ or ò cursor keys to select the desired item and press the MENU key to confirm your selection. Under Calibrate Pressure Sensor, you can calibrate for connected the machine, i.e. determine the zero pressure point for the sensor. To do so, move the carriage to the farthest point and then press the START/SET key. The display screen then shows the reference pressure, e. g. 80.0 bar if the 160 bar pressure sensor is currently selected (see Display 7). The displayed reference pressure, which is not the same for all available pressure sensors, has to be set on the machine using its pressure gauge, and the display value, to be adjusted accordingly using the ñ or ò cursor keys. By pressing the START/SET key, the data are saved to the system. Calib. Press. Values [SET] Act. Pres. : 80.0bar Nom. Pres. : 00.0bar Display 7 The heating element can be calibrated under the Calibrate Heating Element option. Use the ñ or ò cursor keys and the START/SET key in the same manner. Info 4.2 When matching the displayed value to the reference using the ñ and ò keys, holding the respective key down will make the values change faster. Setting the Default Configuration of Machine Operation In the sub-menus of the Configuration Menu, at “Settings,” the parameters related to the welding unit itself and its operation can be set. At “Recording,” the traceability data that have to or need not be recorded and written into the reports can be enabled or disabled. The desired sub-menu is selected using the ñ and ò arrow keys. Then to access that sub-menu, press the MENU key. In both parts of the configuration menu, use the ñ and ò arrow keys to select the desired set-up option. Use the ð arrow key to toggle between “on” and “off” for that set-up option. If a “M” is shown next to a set-up option, this indicates that a submenu is accessible here by pressing the MENU key. On both menu levels (Configuration Menu and its respective sub-menus), press the START/SET key to save the settings to memory or press the STOP/RESET key to return to the previImportant ous menu level without saving possible changes. 4.2.1 Understanding the “Settings” Sub-menu “Check Code Expiry on” means that the welder identification code has to be current and not expired (default period of validity 2 years from code issuance), or the welding operation cannot be started, “off,” that the validity of the code is not checked at all. “Memory Control on” means that when the system memory is full of reports, the unit will be blocked until the reports are printed or downloaded, “off,” that it works but that the oldest report will be overwritten. “Manual Input on” means that the manual input of welding parameters or computed parameters is possible, “off,” that the manual input is not allowed. “Check Ambient Temperature on” means that the outside temperature is measured before welding, “off,” that it not; if the temperature is below 0°C (32°F), welding should be performed only after taking appropriate steps (heating, tent, for instance). “Welder Code Options – M – ” means that by pressing the MENU 10 EN HÜRNER SPG 2.0 User’s Manual SETTINGS *** Check Code Exp. Memory Control >Manual Input *** Off On On Display 8 Version May 2014 HÜRNER Schweisstechnik GmbH Nieder-Ohmener Str. 26 35325 Mücke, Germany key, the user can access a sub-menu that allows determining when the welder code, if it is enabled at “Recording,” has to be entered:always, i. e. before evey single welding operation, only before the first welding operation after switching the unit on or only after the first welding operation of a new day/date. “Language – M – ” means that by pressing the MENU key, the user can access a sub-menu for selecting the display and report language (see Sect. 4.1.3). “Date/Time – M – ” means that by pressing the MENU key, the user can access a sub-menu for setting the clock (see Sect. 4.1.4). “Buzzer Volume – M – ” means that by pressing the MENU key, the user can access a sub-menu for setting the volume of the status buzzer (see Sect. 4.1.5). “Temperature Unit – M – ” means that by pressing the MENU key, the user can access a sub-menu for selecting centigrade or Fahrenheit as the unit for the temperature. “Pressure Unit – M – ” means that by pressing the MENU key, the user can access a sub-menu for selecting bars or pounds per square inch (psi) as the unit for the pressure. “Length Unit – M – ” means that by pressing the MENU key, the user can access a sub-menu for selecting metric or U. S./Imperial units for the length. “Inventory Number – M – ” means that by pressing the MENU key, the user can access a sub-menu for entering the number under which the unit is inventorized with the operating company. “Number of Tags – M – ” means that by pressing the MENU key, the user can access a sub-menu for entering the number of tags that are printed automatically after welding with the optional label tag printer if such a printer is connected. “Standard – M – ” means that by pressing the MENU key, the user can access a sub-menu for selecting the standard (guideline, normative scheme) applicable to the welding operation. 4.2.2 Selecting the Display Language When the “Select Language” sub-menu was selected, the screen changes and the display reproduced in Display 7 appears. Use the arrow keys ñ and ò to select one of the options, “Deutsch,” “English,” and “Français” and confirmby pressing the START/SET key. 4.2.3 Setting the Clock When the “Set Clock” sub-menu was selected, the screen changes and the display reproduced in Display 8 appears. The time of day and the date can be set using the keypad. The portions “Hour,” “Minute,” “Day,” “Month,” and “Year” are set separately. Press the START/SET key to confirm your settings. 4.2.4 Setting the Buzzer Volume When the “Set Volume” sub-menu was selected, the screen changes and the display reproduced in Display 9 appears. The buzzer can also be heard. Turn the buzzer volume up or down to the desired value using the ï, ð arrow keys (from 0 to 100) and confirm your setting by pressing the START/SET key. 4.2.5 Understanding the “Recording” Sub-menu “Welder Code on” means that the welder identification code has to be entered as set with “Welder Code Options,” “off,” that this is impossible. Version May 2014 HÜRNER SPG 2.0 User’s Manual ***** LANGUAGE ***** >Deutsch English Francais Display 9 Date/Time 21.06.13 14:28 Display 10 Buzzer Volume < ------20-------- > Display 11 ** CONFIGURATION ** >Welder Code On Commission No. On Joint No. Off Display 12 EN 11 HÜRNER Schweisstechnik GmbH Nieder-Ohmener Str. 26 35325 Mücke, Germany “Commission Number on” means that the commission number (job number) will have to be entered or confirmed before every new welding, “off” that the user is not prompted to enter it. “Joint Number on” means that the unit assigns an automatically incremented joint number to every welding operation belonging to a commission already known, and displays this number on the screen next to the report number, “off” that no joint numbers will be assigned at all. “Additional Data on” means that the additional data will have to be entered or confirmed before every new welding, “off” that the user is not prompted to enter them. “Fitting Code on” means that the second, so-called traceability code of the electrofusion fitting has to be entered before every welding, “off,” that this is not possible. “Pipe Codes on” means that the codes of both pipes/components (ISOcompliant welding and treaceability codes) have to be entered before every welding, “off,” that this is not possible. “Pipe Length on” means that the length of both pipes/components has to be entered before every welding, “off,” that this is not possible. “Weather Conditions on” means that the weather has to be selected in a list before every welding, “off,” that this is not possible. “Installing Company on” means that the company that performs the installation work has to be entered before every welding, “off,” that this is not possible. “Print Tags – M – ” means that by pressing the MENU key, the user can access a sub-menu for starting to print (a) label(s) with reference to a given welding operation, with the optional label tag printer. “Angle – M – ” means that by pressing the MENU key, the user can access a sub-menu for entering the angle, in degrees, between the two components that are going to be welded. Info 4.3 All data that are available in the chip of a transponder card can be entered by placing the card in front of the card reader. If they are encoded in a bar code, they can be read using the handheld scanner. Entering Preformatted and User-defined Traceability Data All traceability data enabled in the configuration menu at “Recording” (see Sect. 4.1.5) have to be entered before the welding process. The welding unit prompts the user to enter them before the welding process proper. Depending on what data is entered, either its repeated input is mandatory (e. g., the welder ID code; see Sect. 4.3.2) or previously entered data can be changed and confirmed or confirmed without changes (e. g. the commission number; see Sect. 4.3.2). 4.3.1 Entering the Welder ID Code When the welding is started by pressing the START/SET key while Display 3 is showing, first the input of the welder identification code is requested, if it is enabled in the Configuration Menu (see Display 13). The code has to be an ISO-compliant code. It can be entered either using the cursor keys (see the first info in Sect. 4.1) and confirming the input by pressing the START/SET key, or by reading a RFID transponder card or scanning it from a bar code with the optional handheld scanner. **** Welder Code *** ++++++++++++++++++++ ++++++++++ Display 13 When the code was properly scanned or entered, this is confirmed by an audible signal. 12 EN HÜRNER SPG 2.0 User’s Manual Version May 2014 HÜRNER Schweisstechnik GmbH Nieder-Ohmener Str. 26 35325 Mücke, Germany 4.3.2 Entering or Changing the Commission Number From Display 3 or after the welder identification code was entered, the machine requests the input of the job number, or commission number, of a maximum 32 characters if it was enabled in the Configuration Menu. If a commission number exists already in memory, this one is proposed. You can either confirm it by pressing START/SET or change it using the cursor keys (see the first info in Sect. 4.1) or reading it with the scanner or from a RFID card and then confirm the new number by pressing the START/SET key. ** Commission No. ** ++++++++++++++++++++ ++++++++++++ Display 14 It is possible to select a previously saved commission number instead of the one shown on the screen by pressing the ï and ð cursor keys simultaneously. This causes a commission number selectrion screen to be displayed, and you can scroll through the commission numbers in memory using the and keys, to select a number and then confirm it by the START/SET key. This number will be used for the next welding. To quit the scroll mode without selecting a commission, press the STOP/RESET key. 4.3.3 Entering or Changing the Joint Number From Display 3 or after the commission number was entered, the machine requests the input of the welding number, or joint number, if it was enabled in the Configuration Menu. The joint number, or welding number, is based on the job/commission number. This means that it increments by 1 for every welding operation performed in the scope of the current commission (identified previously by entering the appropriate job number). In the example in Display 3, the next welding operation will be saved to welding report number 72 while the joint itself is joint number 2 of the current job/ commission. Info The first joint of a commission for which no joint has been saved to memory so far, always receives no. 1. If the memory already holds joints for a commission, the machine finds the highest number of the joints existing for that commission and uses this number plus 1. The user is shown the number thus found on the screen and can apply or change it. If the user changes the joint number, it is his responsibility to make sure that no number is assigned twice in one commission. If a joint number appears twice in a commission, this will not affect the welding process and the logging of its data in any way. However, in that commission two joints will not be distinguished by a unique number. If user inputs leave some joint numbers unused (for instance, for a given commission no. 1, 2, 3, 5, 6, 9), the gaps do not get filled, and the automatically found number proposed for the next welding operation will still be the highest existing number plus 1 (that is, 10 in this example). The joint number can also be entered after simultaneously pressing the cursor keys and ð when Display 3 is showing on the screen. 4.3.4 Entering oder Changing Further Data on Component Traceability In the same way as welder identification code, commission and welding number, other data relating to the components can be entered if they were enabled in the Configuration Menu. All data can be entered by using the cursor keys and confirming them by pressing the START/SET key or can be scanned from a bar code or Version May 2014 HÜRNER SPG 2.0 User’s Manual EN 13 HÜRNER Schweisstechnik GmbH Nieder-Ohmener Str. 26 35325 Mücke, Germany an RFID card, if available, with the scanner or transponder reader. One exception is the weather (see Display 15). This option is presented as a list in which the applicable conditions can be selected by pressing ñ or ò and confirmed by pressing the START/SET key. 4.4 Weather >sunny clear rain Display 15 Performing the Butt Welding After all traceability data enabled in the configuration menu were entered, Display 3 shows on the screen. From this screen, the welding process proper is started by pressing the START/SET key. First, the parameters of the pipes to be welded have to be entered. If pipe parameters of an earlier welding are available and no code error was detected, all welding parameters of the previous welding are proposed and can be confirmed in one go (see Display 18). From this display, it is possible to change the pipe parameters by pressing the STOP/RESET key. Then the first thing is to select the pipe material in a list; use the ñ and ò cursor keys and confirm by pressing the START/SET key (see Display 16). Then the cursor keys (see the first info in Sect. 4.1) allow entering the diameter and the wall thickness, both confirmed by the START/SET key (see Display 17). Instead of the wall thickness, you may want to enter the Standard Dimension Ratio (SDR); then display this input line instead of the wall thickness line by pressing the ï and ð simultaneously and enter the SDR value. The machine then displays the whole set of parameters as an overview. In case there are errors, it is possible either to enter all data once more by pressing the STOP/RESET key, or to return to the previous step by pressing ñ and correct the data one at a time. If pipe codes were entered previously in the traceability data for the joint, the machine automatically presents the welding parameters contained in the pipe codes for confirmation. *Select Pipe Mater.* >PE100 PE-HD PP Display 16 ** Enter Pipe Size** Pipe Diameter:0250mm Wallthickness:22.7mm Display 17 PE100 Pipe Diameter:0250mm Wallthickness:22.7mm RESET SDR11.0 SET Display 18 4.4.1 Facing the Pipe Butts To ensure that the pipe butts are level, insert the pipe facing tool between the machine carriages and turn it on. Then have the pipes close in on the facing tool and work them until a continuous shaving blade is cut that rolls twice or three times around the pipe ends, so the butts are level. Facing is stopped by moving the carriage apart. Now press the START/SET key as a confirmation that facing is properly finished, to make the report generator go on to the next process step (see Display 20). By pressing STOP/RESET you return to the beginning of the welding process. It is thus possible, too, if the butts are still not level, to start over and repeat the facing process. When facing is properly done, pipe alignment has to be checked. 4.4.2 Checking Pipe Alignment and Determining Drag Pressure When the pipes are properly faced, close in the movable carriage completely to check whether a potential vertical and horizontal pipe misalignment is within the tolerance allowed by the applicable welding standard. The maximum acceptable gap between them is displayed (see Display 20). If pipe alignment is in order, confirm this by pressing the START/SET key. If the misalignment is out of tolerance, the pipes may have to be readjusted in the clamps and facing may have to be repeated. When pipe alignment is appropriate, move the movable carriage apart in order to determine the drag pressure, i. e. the minimum pressure needed to “drag” the movable carriage on. When there is zero pres14 EN HÜRNER SPG 2.0 User’s Manual Face Pipe Ends 230°C ACT. 0.5bar Display 19 Check Pipe Alignment Max. Al. Gap :2.5mm 230°C ACT. 3.5bar Display 20 Version May 2014 HÜRNER Schweisstechnik GmbH Nieder-Ohmener Str. 26 35325 Mücke, Germany sure in the hydraulic circuit, slowly increase the pressure and watch closely to observe at which pressure level the carriage is “dragged” to start moving. The drag pressure for moving the pipes has to be higher than 2.0 bar. Drag Pressure 230°C ACT. 3.5bar Display 21 The START/SET key has to be pressed when the carriage starts moving, in order to save the drag pressure applicable to this welding to memory. Important The exact drag pressure depends on various conditions (pipe size and material, position of the machine, etc.) and has to be determined for every welding individually. 4.4.3 Possibility to Change Welding Parameters Subsequent to setting the drag pressure, Display 23 shows on the screen, provided that manual data input is enabled in the Reporting sub-menu of the Configuration Menu. The two screens enabling manual input of welding parameters (Displays 22 and 23) allow value changes using the ñ, ò, ï, ð cursor keys (se first Info in Sect. 4.1). The START/SET key serves to confirm the inputs. By pressing the START/SET key, you also make the control unit go on to the next screen. Info The parameters set manually are kept in memory when the machine is turned off. Only the pressure values are computed individually for every welding process. If the pipe parameters change, all parameters have to be set once again. The machine recognizes the change of pipe parameters and brings the operator directly to the menu that allows changing them. 4.4.4 Setting the Maximum Pressure and Starting the Bead Build-up Stage After butt facing, pipe alignment check, and confirmation of the welding parameters are done, the welding process proper starts by setting the maximum pressure that will be reached during the process, in the bead build-up stage and at the end of the joining stage. While the welder is setting the maximum pressure dislayed as the nominal value on the screen, the actual pressure also shows (see Display 24), and the control software moves on to the next step as soon as the actual pressure is within tolerance. At the start of the bead build-up stage, place the heating element between the pipe butts. The display tells you so (Display 25). If the heating element does not have the nominal temperature yet at this point, an information message on the screen tells you so. For the heating element temperature is continuously monitored by the data logger. The Insert Heating Element screen is displayed only when the heating element exhibits the required temperature. When the heating element is ready in place, press the START/SET key and set the machine to maximum pressure, so it pushes the pipes against the heating element. Wait for the weld bead to reach the required height or width, depending on the used welding standard. When the nominal bead height, which is also indicated on the display, is reached, the operator has to press the START/SET key to terminate the build-up stage. Bead B. Pr.:030.5bar Heating Pr.:010.5bar Heating Tm : 0120 s Change Tm : 0005 s Display 22 Cooling t5 Cooling t6 Cool Pr t6 Pres. Ramp : 0727 s : 0000 s :002.0bar : 012 s Display 23 Max. Pressure 230°C 229°C NOM. ACT. 16.5bar 3.5bar Display 24 Insert Heating Elem. 222°C NOM. 16.5bar 221°C ACT. 0.5bar Display 25 Bead Height :2.0mm Bead B. Time :68 s 230°C NOM. 16.5bar 229°C ACT. 12.5bar Display 26 Version May 2014 HÜRNER SPG 2.0 User’s Manual EN 15 HÜRNER Schweisstechnik GmbH Nieder-Ohmener Str. 26 35325 Mücke, Germany 4.4.5 Heating Stage After the bead build-up stage (1 st LED in the welding diagram) was completed, pressure must be decreased (2nd LED in the diagram). The decreased pressure will then be applied for the entire duration of the heat-soaking stage (3 rd LED in the diagram), in which the pipe butts continue to soak heat from the plate. HEAT SOAK PHASE Heating Time :148s 230°C MAX 5.0bar 229°C ACT. 3.5bar Display 27 If decreasing the pressure to heating pressure takes longer than 10 sec, the welding process aborts and throws an Important error. The pressure decrease has to be observed on the display. It is under the operator’s responsibility to respond to possible pressure fluctuations. The machine also moves on to the heating stage if the welder decreases the pressure to a level below the heat-soaking maximum before the countdown of the bead build-up stage is completely over – which may happen if the bead is o.k. earlier than expected. However, such a pressure decrease has to be quick. In these cases, the bead build-up time shortened by the early decrease is saved to memory as the buildup time for this welding and will be used as a reference for possible automode-managed build-up stages at a later time. Full contact has to be continuously established between the heating plate and the bead, even with lower pressure. While Important heating, if contact between them is lost somewhere along the circumference, welding has to be aborted and repeated. If the control unit detects an error (such as insufficient pressure not readjusted by the welder or excessive heating time), it also aborts welding and displays an error message. 4.4.6 Change-over Stage An audible signal indicates the imminent change-over during the last 10 seconds of the heat-soaking stage. Info Remove plate Change-over : 8 s 230°C MAX 5.0bar 229°C ACT. 3.5bar Display 28 At the end of the heating stage, move the carriage apart. Then remove the heating plate from in-between the pipes. The count-down of the heating time has to be complete. It is prohibited to remove the pipe butts away from the heating element early. Only when Dispay 28 shows on the screen, it is acceptable to end the heating stage. The change-over has to be followed immediately by the joining stage. The change-over time given on the display must not be exceeded. If it is, the welding is aborted automatically and an error is displayed. 4.4.7 Joining and Cooling Stage Build the joining pressure while watching the value on the screen. Building the joining pressure must correspond to a linear increase, as predicted by the nominal values on the screen. The 5th LED of the diagram on the hydraulic unit flashes. In the joining and cooling stage it is particularly important to keep the pressure at the nominal level. Right after the end of the linear pressure ramp, at the very beginning of the cooling, pressure may drop slightly for technical reasons. The welder has to compensate for this drop Important immediately. In this case, the first line of Display 30 reads, “Keep the pressure.” 16 EN HÜRNER SPG 2.0 User’s Manual Build Joining Press. 230°C 229°C NOM. ACT. 16.5bar 14.5bar Display 29 COOLING PHASE Cooling time :1234s 230°C NOM. 16.5bar 229°C ACT. 16.5bar Display 30 Version May 2014 HÜRNER Schweisstechnik GmbH Nieder-Ohmener Str. 26 35325 Mücke, Germany Depending on the welding standard used or on information provided by the pipe or fitting manufacturer, a cool-on time may be required during which the new joint must not be exposed to external forces. This, however, is not monitored by the hydraulic, control, and data logging unit, for which the welding has to be considered finished when the 7 th LED is lit. 4.4.8 End of Welding The welding is finished at the end of the successful joining and cooling stage. The welder can then releases the pressure. 4.5 COOLING PHASE Cooling time over 229°C ACT. 0.0bar Display 31 Aborted Welding Process If an error condition is detected, the welding process aborts and the error is displayed. The error that made the welding abort is displayed on the screen (see Display 32). Additionally, in the welding diagram the LED that belongs to the welding stage with the malfunction starts flashing. WELDING ABORTED Error Build-up Pres. 229°C ACT. 1.5bar Display 32 The errors listed in the following table can be displayed on the screen. Type of Error Description a. Data Input Input Error Error while entering data with the alphanumeric and cursor keys. Code Error Error while reading data from a bar code or an RFID card. b. System and Conditions System Error The welding system has to be disconnected immediately from both the power supply and the fitting. The auto-test has detected an error in the system. The welder must no longer be operated and has to be sent to an approved shop for check and repair. Clock Error The internal clock of the machine is defective; re-set the clock in the Configuration Menu. Power Supply Failure at Last The last welding is incomplete. The welding unit was disconnected Welding from the power supply voltage while it was in progress. To go on using the unit, this error has to be acknowledged by pressing the STOP/RESET key. Ambient Temperature high Outside temperature outside the range from – 10°C to + 50°C. Ambient Temperature low Outside temperature outside the range from – 10°C to + 50°C. Pressure Sensor Defective The sensor indicated on the display (hydraulic pressure, heating element temperature, ambient temperature) is defective; where possible, check the connections/plug; have the machine inspected by an authorized service shop if needed. Heating Sensor Defective Temperature Sensor Defective Printer not Ready The optional printer is not ready (possible reasons also: no communication or faulty cable). Download Cancelled During data transfer or printing, an error condition occurred which could not be cleared. Memory Full The system memory is full of welding reports. Print or download the reports in memory or switch memory control off. Without memory control, a new report overwrites the oldest existing one. (only label tag printer) c. Welding Process Temperature low Heating element temperature will be increased automatically. Temperature high Heating element temperature will be reduced automatically. Error Changeover It took too long to retract the heating plate and bring the pipes to joining; welding will have to be repeated. Version May 2014 HÜRNER SPG 2.0 User’s Manual EN 17 HÜRNER Schweisstechnik GmbH Nieder-Ohmener Str. 26 35325 Mücke, Germany Type of Error Description Error Drag Pressure Impossible to determine the drag pressure; maybe pipes will have to be clamped once again; or the pressure is below 1 bar, which is not feasible for technical reasons. Error Build-up Pressure Build-up pressure too high or too low and was not re-adjusted in time. Error Heat Soak Pressure Heat-soaking pressure too high and was not re-adjusted in time. Error Joining Pressure Joining pressure too high or too low and was not re-adjusted in time. Cooling Stopped Operator has stopped the cooling time by pressing the STOP/REST key. Error Plate Temperature Heating element temperature is out of tolerance; impossible to re‑adjust the temperature; maybe the ambient temperature was too low. Process Stopped The welding process or a process step were stopped by an external agent. 4.7 Using ViewWeld to View Welding Reports and Print Tags The ViewWeld feature offers viewing an abstracted version of the welding report recorded during the last welding process and printing it as a label tag to be affixed to the joint on the optionally available tag printer. The ViewWeld abstract shows the report number, the date and time of the welding and the welding parameters along with an evaluation of the quality of the joint/welding operation (see Display 33). To call the ViewWeld abstract of a welding report, press the ñ key in the start screen (see Display 3). To print a tag of this operation, press the START/SET key in the ViewWeld screen. 0011 27.05.14 08:25 PE-HD 630mm SDR26.0 No Error Display 33 After the ViewWeld abstract was accessed, it is possible to browse through all abstracts in memory by pressing the ï and ð cursor keys. 5 Downloading the Reports Interface USB A Interface Port for connecting USB mass storage media (such as a memory stick) The interface port complies with the USB version 2.0 specification (i.e., maximum data rate of 480 megabits per second). Before transferring data, it is highly recommended to switch the welding unit off and on again. If this fails to happens, there is a risk of data transfer failure, or reports in the weldImportant ing unit may be corrupted. When transferring welding reports to a USB stick, always be sure to wait until the display shows the “Download finished” message before you disconnect the USB stick from Important the product. If you disconnect it too early, the unit may ask you whether you want to delete the reports in memory, although they were not properly transferred. In this case, if you delete the contents of the report memory, the welding 18 EN HÜRNER SPG 2.0 User’s Manual Version May 2014 HÜRNER Schweisstechnik GmbH Nieder-Ohmener Str. 26 35325 Mücke, Germany reports would be irrevocably lost and would not be available elsewhere either. 5.1 Selecting the File Format and the Welding Process Connecting the storage media causes the the screen to appear in which the format of the output file with the welding reports can be selected: a PDF file with an abstracted or extended version of the report or the format of the welding data management application DataWork. Using the ñ and ò arrow keys, select the file type you need and confirm your selection by pressing the START/SET key. * Select File Type * DataWork File >PDF Abstract PDF Ext'd Report Display 34 The Service Report option is not important for normal operation. In the scope of computer-assisted unit service, this report lists the events related to the maintenance of the welding unit. The reports will then be sent to the USB mass media in the previously selected format. 5.2 Downloading All Reports After the file type and the welding process were selected, the next screen offers a “Print All Reports” option. Selecting it will download all welding reports currently in system memory, or all of the previously selected welding process, in the previously selected file format. 5.3 Downloading by Commission Number, Date or Report Range After the file type and the welding process were selected, the next screen offers a “By Commission Number,” a “By Date Range,” and a “By Report Range” options. Depending on the selection, the ñ and ò arrow keys can be used to select from the commissions currently in system memory the desired one, of which the reports should be downloaded, or the cursor keys can be used (see first info in Sect. 4.1) to enter a start date and an end date, or the first and the last report, that define a range of dates or a range of reports of which the reports should be downloaded. When you press the START/SET key, you cause the selected reports to be transferred to the storage media. 5.4 Understanding the Report Download Process The download starts automatically after a selection was made among the options. Wait for all the selected reports to transfer and the “Download completed” message to appear on the screen. If a problem occurs while the download is in progress, a “Not ready” message shows. After the problem condition is cleared, the download resumes automatically. Info 5.5 If the unit recognizes a problem that cannot be cleared while the data transfer is in progress, it does not resume the process and displays a “Download cancelled” error message. To acknowledge this error, press the START/SET key. Deleting Data from Memory The report data in memory can be deleted only after all welding reports were transferred, which is indicated by the “Download completed” message. When the storage media is unplugged, a “Delete Memory” message appears. If the START/SET key is pressed at this point, a further confirmation message “Delete Memory, sure?” is shown, which has to be confirmed by pressing the START/SET key once again. Then, the report data in memory are deleted. Version May 2014 HÜRNER SPG 2.0 User’s Manual EN 19 HÜRNER Schweisstechnik GmbH Nieder-Ohmener Str. 26 35325 Mücke, Germany 5.6 Keeping Data in Memory When the cable or storage media is unplugged, a “Delete Memory” message is displayed. Press the STOP/RESET key to keep the current report data in memory. They can then be printed off once again. Important 6 Make a habit of handling the internal storage as described at the beginning of Sect. 5, to maintain data integrity and avoid any inadvertent deletion of the reports in memory. Service and Repair As the product is used in applications sensitive to safety considerations, it may be serviced and repaired only on our premises or by partners who were specifically trained and authorized by us. Thus, constantly high standards of operation quality and safety are maintained. Non-compliance with this provision will dispense the manufacturer from any warranty and liability claims for the product Important and any consequential damage. 7 Service and Repair Contact Hürner Schweisstechnik Nieder-Ohmener Str. 26 35325 Mücke, Germany Tel.: +49 (0)6401 9127 0 Fax: +49 (0)6401 9127 39 Web: www.huerner.de E-mail: [email protected] Info 8 We reserve the right to change technical specifications of the product without prior notice. Accessories/Parts for the Product Sensor Cable for Pressure Sensor Sensor Cable for Temperature Sensor Bar Code Scanner USB Stick Welder ID Card Info 600-100-030 600-100-031 206-030-253 300-010-154 216-080-031 Only genuine spare parts are acceptable. The use of nongenuine parts voids any and all liability and warranty on the part of the manufacturer. For consultation and ordering spare parts, refer to the seller or manufacturer of the product. 20 EN HÜRNER SPG 2.0 User’s Manual Version May 2014 HÜRNER Schweisstechnik GmbH Nieder-Ohmener Str. 26 35325 Mücke, Allemagne Sommaire 1 2 2.1 2.2 2.3 2.4 2.5 2.6 2.7 2.8 3 3.1 3.2 3.3 3.4 4 4.1 4.2 4.2.1 4.2.2 4.2.3 4.2.4 4.2.5 4.3 4.3.1 4.3.2 4.3.3 4.3.4 4.4 4.4.1 4.4.2 4.4.3 4.4.4 4.4.5 4.4.6 4.4.7 4.4.8 4.5 4.7 5 5.1 5.2 5.3 5.4 5.5 5.6 6 7 8 Introduction......................................................................................................... 5 Consignes de sécurité.......................................................................................... 5 Le manuel utilisateur........................................................................................... 5 Explication des symboles..................................................................................... 5 Fonctionnement du produit en sécurité............................................................. 5 Obligations du soudeur et de l'exploitant......................................................... 6 Usage prévu......................................................................................................... 6 Garantie................................................................................................................ 6 Transport et stockage.......................................................................................... 6 Identification du produit..................................................................................... 7 Description de la machine................................................................................... 7 Descriptif de l'appareil........................................................................................ 7 Panneau de commande....................................................................................... 7 Prises..................................................................................................................... 8 Fiche technique.................................................................................................... 8 Fonctionnement................................................................................................... 8 Mise sous tension et réglage des paramètres fondamentaux.......................... 8 Définition des réglages par défaut du fonctionnement................................. 10 Légende du sous-menu « Réglages »................................................................ 10 Choix de la langue d’affichage......................................................................... 11 Réglage de l’horloge......................................................................................... 11 Réglage du volume du signal sonore............................................................... 11 Légende du sous-menu « Documentation ».................................................... 11 Saisie des données de traçabilité prédéfinies et personnalisables................. 12 Saisie du code de soudeur................................................................................. 12 Saisie ou modification du numéro de commission.......................................... 13 Saisie ou modification du numéro de soudure................................................ 13 Saisie ou modification d'autres données de traçabilité des composants....... 13 Réalisation du soudage..................................................................................... 14 Rabotage des extrémités des tubes.................................................................. 14 Vérification du parallélisme des tubes et détermination de la pression de contact.......................................................... 14 Possibilité de modifier les paramètres de soudage......................................... 15 Détermination de la pression totale et phase d'égalisation avant retrait..... 15 Phase de chauffe................................................................................................ 16 Phase de mise en contact.................................................................................. 16 Phase de fusion et de refroidissement............................................................. 16 Fin du soudage................................................................................................... 17 Interruption de la procédure de soudage........................................................ 17 Affichage d'un résumé de soudage et impression d'étiquettes avec ViewWeld........................................................... 18 Transfert/sortie des rapports de soudage......................................................... 18 Choix du type de fichier et du procédé de soudage........................................ 19 Transfert/sortie de tous les rapports................................................................. 19 Sortie d'un numéro de commission, plage de dates ou de rapports.............. 19 Processus de transfert des rapports de soudage.............................................. 19 Effacement de la mémoire................................................................................ 19 Conservation des rapports de soudage en mémoire....................................... 20 Entretien et remise en état............................................................................... 20 Contact pour le service et l'entretien............................................................... 20 Accessoires/pièces du produit............................................................................ 20 Version Mai 2014 Manuel utilisateur HÜRNER SPG 2.0 FR 3 HÜRNER Schweisstechnik GmbH Nieder-Ohmener Str. 26 35325 Mücke, Allemagne Une soudure réussie dépend du respect des pressions, durées et températures convenables. La valeur correcte de la pression à retenir Attention dépend de la section du vérin de la machine à souder. Avant de lancer le soudage, assurezvous soigneusement que la machine effectivement reliée à l’unité de documentation est bien sélectionnée dans son Menu des réglages. 4 FR Manuel utilisateur HÜRNER SPG 2.0 Version Mai 2014 HÜRNER Schweisstechnik GmbH Nieder-Ohmener Str. 26 35325 Mücke, Allemagne 1 Introduction Cher Client, Nous vous remercions de l’achat de notre produit et de la confiance que vous nous témoignez ainsi. Nous souhaitons qu’il vous donne entière satisfaction. Le développement, la fabrication et les vérifications de l’unité de documentation enregistrant les procédures de soudage HÜRNER SPG 2.0 ont été menés en portant une attention particulière à la sécurité de fonctionnement et à la facilité d’utilisation du produit. Il a été fabriqué et sa conformité à été vérifiée en tenant compte des dernières évolutions technologiques et des standards de sécurité reconnus. Pour votre sécurité, veuillez respecter scrupuleusement les informations relatives à l’usage prévu et les règlements de prévention des accidents. Merci beaucoup ! 2 Consignes de sécurité Le présent manuel utilisateur contient des informations importantes sur l’usage prévu et en toute sécurité du produit. Ces informations doivent être respectées par toutes les personnes qui manipulent le produit. 2.1 Le manuel utilisateur Le Manuel utilisateur est présenté par sections dont chacune est destinée à expliquer certaines fonctionnalités du produit. Tous droits, notamment de copie et de reproduction (sur support papier ou numérique) et de dissémination ainsi que de traduction sont réservés et soumis à l’autorisation écrite préalable. 2.2 Explication des symboles Les symboles et expressions suivants sont utilisés, dans le manuel, pour identifier des paragraphes qui renvoient à des dangers potentiels. Attention Ce symbole signale que le non-respect d’une consigne peut entraîner une situation dangereuse provoquant potentiellement des blessures corporelles ou des dommages matériels. Ce symbole signale une remarque importante quant à l’utilisation correcte du produit. Son non-respect peut entraîner des dysfoncImportant tionnements et des dommages subis par le produit. Ce symbole signale des informations et des astuces utiles pour se servir du produit de manière plus efficace et plus économique. Info 2.3 Fonctionnement du produit en sécurité Pour votre sécurité, respecter impérativement les consignes suivantes : • Protéger le câble d’alimentation et les câbles des capteurs des objets coupants. Faire remplacer sans délai les câbles endommagés par un service technique agréé. • La manipulation et la maintenance du produit seront assurées uniquement par des personnes habilitées ayant été initiées au produit. • Le produit ne doit être utilisé que sous surveillance. Version Mai 2014 Manuel utilisateur HÜRNER SPG 2.0 FR 5 HÜRNER Schweisstechnik GmbH Nieder-Ohmener Str. 26 35325 Mücke, Allemagne • Avant chaque mise en marche, il faut s’assurer qu’aucune pièce du produit n’est endommagée ; au besoin, faire réparer ou remplacer des pièces défectueuses par un service technique agréé. Pendant le soudage, le port de données doit être protégé par le capuchon prévu à cet effet, afin que des contaminations et de l’humidité ne pénètrent pas dans le boîtier. Les règles de raccordement des fournisseurs d’électricité, les normes VDE, les prescriptions selon DIN / CE et les directives nationales doivent être respectées. Sans l’accord préalable du fabricant, aucune modification ne doit être apportée au produit. • • • Pièces sous tension Après que le boîtier a été ouvert ou enlevé, des pièces sont accessibles qui pourraient être sous tension dangereuse. Seul un Vorsicht service technique agréé a le droit d’ouvrir l’appareil. Info 2.4 • • Obligations du soudeur et de l'exploitant Le système ne sera mis en service que sous surveillance. Il faut que les soudeurs aient été adéquatement initiés au système ou aient suivi une formation spécifique. Le gérant/propriétaire s’engage à vérifier, à des intervalles réguliers, que les soudeurs utilisent le système selon les usages prévus et les règlements en vigueur de sécurité au travail. Le système ne sera pas mis en marche s’il n’est pas en parfait état ni pour un usage non prévu. Avant le soudage, le soudeur s’assurera du bon état de fonctionnement du système. Important 2.5 Manuel utilisateur Le manuel utilisateur doit être disponible à tout moment à l’endroit où le produit est en service. Veiller à remplacer sans délai un manuel devenu incomplet ou illisible. Dans ce cas, ne pas hésiter à demander notre assistance. Pendant le soudage, protéger le port de transmission des données contre les contaminations et l’humidité en le couvrant du capuchon prévu à cet effet. Usage prévu L’unique usage auquel l’unité de documentation est prévue est la gestion et l’enregistrement des procédure de soudage bout-à-bout avec une machine à élément chauffant compatible avec elle et prête à y être reliée. La notion d’usage prévu comprend aussi : • le respect de toutes les consignes données dans le présent manuel • le respect de toutes les interventions de maintenance et de révision Tout usage autre que ceux signalés ci-dessus est interdit et rendra caduques la responsabilité et la garantie assumées par le fabricant. Les usages non prévus peuvent provoquer des dangers et Important des dommages matériels considérables. 2.6 Garantie La garantie ne saura être accordée que si les conditions de garantie des Conditions Générales de vente et de livraison sont respectées. 2.7 Transport et stockage Le produit est livré dans une mallette de transport. L’appareil doit être stocké dans cette mallette pour le tenir à l’abri de l’humidité et de le protéger de ses effets. 6 FR Manuel utilisateur HÜRNER SPG 2.0 Version Mai 2014 HÜRNER Schweisstechnik GmbH Nieder-Ohmener Str. 26 35325 Mücke, Allemagne 2.8 Identification du produit L’identification du produit se fait par une plaque nominative. Elle renseigne du modèle (« Typ »), du numéro de série (« Seriennr. ») et du fabricant. Les deux premiers chiffres du numéro de série représentent l’année de fabrication. 3 Schweißprotokollier-Gerät SPG 2.0 Seriennr. CE 14432901 Hürner Schweisstechnik Nieder-Ohmener Str. 26 D - 35325 Mücke Tel. +49 6401 9127 0 Description de la machine 3.1 Descriptif de l'appareil Le SPG 2.0 est une unité de documentation créant des rapports de soudage pour les machines bout-à-bout pour le plastique qui a principalement trois fonctions : • Guider l’utilisateur tout au long de la procédure de soudage ; • Contrôler tous les paramètres pertinents pendant la procédure de soudage ; • Enregistrer la procédure de soudage dans un rapport. Le produit se prête à l’utilisation avec des machines prévues pour l’atelier ou pour le chantier et il peut en principe se raccorder à toute machine à souder bout-à-bout. Après la saisie du type de plastique, du diamètre du tube, et de l’épaisseur de la paroi, l’appareil calcule, en tenant compte de la machine à souder sélectionnée, tous les paramètres qui importent pendant la procédure de soudage. La totalité de la procédure est enregistrée automatiquement et peut ainsi être exportée de différentes façons pour réaliser diverses sortes de traitement ultérieur. Les données sur l’assemblage des pièces et leur traçabilité peuvent être saisies à l’aide des touches de défilement (v. la première Info à la section 4.1) ou lues à l’aide d’un scanneur pour codes-barres ou le lecteur RFID. Le SPG 2.0 dispose aussi d’un Menu des réglages qui permet son paramétrage selon vos besoins spécifiques (voir la section 4.2). 3.2 Panneau de commande Écran afficheur Lecteur de badges RFID Touches MENU et de défilement Diagramme du soudage Touches START/SET et STOP/RESET Support de montage pour mise en place sur le boîtier hydraulique Version Mai 2014 Manuel utilisateur HÜRNER SPG 2.0 FR 7 HÜRNER Schweisstechnik GmbH Nieder-Ohmener Str. 26 35325 Mücke, Allemagne 3.3 Prises Interrupteur principal Sonde de température ambiante Prise de la sonde de pression Signal sonore Port de données USB Prise du capteur de température Prise du scanneur Câble d'alimentation 3.4 Fiche technique Dimensions (L x l x H) Poids Puissance Tension d’entrée Fréquence d’entrée Indice de protection Mémoire de rapports Interface 4 240 x 120 x 185 mm env. 3,0 kg 22 watts 230 V, 110 V - 240 V 50 Hz / 60 Hz IP 54 10 000 soudures USB A Fonctionnement Il est obligatoire de s’assurer que tous les raccordements sont bien serrés et que les travaux avec une machine bout-à-bout en chantier se font uniquement sur des sites avec des circuits d’aliImportant mentation pourvus de disjoncteurs différentiels. Après avoir relié le câble d’alimentation de l’appareil au secteur ou à un groupe électrogène, la mettre en marche à l’interrupteur principal. Il faut vérifier que la tension de l’alimentation électrique est bien celle dont la machine a besoin. Les rallonges ne seront utilisées que dans le respect de ce qui suit : Attention section de 1,5 mm² = longueur maxi. de 20 m section de 2,5 mm² = longueur maxi. de 75 m section de 4,0 mm² = longueur maxi. de 100 m 4.1 Mise sous tension et réglage des paramètres fondamentaux Après la mise sous tension à l’interrupteur principal, l’Écran 1 s’affiche. Puis, un auto-test est lancé par la machine automatiquement ; il sert à vérifier les sondes/capteurs et l’horloge et à déterminer combien de rapports de soudage sont encore vierges. Il est possible de sauter ce test en maintenant enfoncée la touche STOP/RESET lorsque l’Écran 1 est affiché. ******************** * HUERNER * *WeldControl EF 2.0* ******************** Écran 1 8 FR Manuel utilisateur HÜRNER SPG 2.0 Version Mai 2014 HÜRNER Schweisstechnik GmbH Nieder-Ohmener Str. 26 35325 Mücke, Allemagne Si une erreur est détectée à l’auto-test, l’écran affiche le message « Erreur système ». Dans ce cas, il faut débrancher l’unité de documentation de la machine et de l’alimentation et la retourner Attention au fabricant pour vérification. Pendant l’auto-test plusieurs écrans semblables à l’Écran 2 s’affichent. Ils renseignent le soudeur des capteur actuellement sélectionnés de pression et de température, la température ambiante, la tension d’alimentation, l’heure et la date actuelles ainsi que du type de machine et la directive de soudage actuellement sélectionnés. Tous les paramètres qui ne conviendraient pas pour l’intervention qui est prévue peuvent être modifiés quand vous accédez par la touche MENU au Menu des réglages. Suit l’Écran 3 avec les informations qui vaudront pour la prochaine soudure (le numéro de soudure ne sera affiché que si cette fonction a été activée au Menu des réglages). Depuis lui, le Menu des réglages est accessible ; il sert à définir la configuration de base de l’unité de documentation. Pour y accéder, appuyer sur la touche MENU et, lorsque l’appareil le demande à l’écran suivant, saisir à l’aide des touches de défilement le code qui y donne accès ou tenir le badge avec le code du menu devant le lecteur RFID. Info ***PARAMS MACHINE*** HST-355 VERIN : 06.60 SONDE PRES: 160bar Écran 2 PROCHAINE SOUDURE 15:44:52 29.05.14 235V 135C/220C No RAPP. 00072/00002 CODE : 415311 Écran 3 Pour rentrer des informations à l’aide des touches de défilement, faire comme suit : Les touches ï et ð servent à faire avancer le curseur à l’endroit souhaité à l’écran. Ensuite, les touches ñ et ò s’utilisent pour définir la valeur souhaitée (lettre, chiffre) qui doit y apparaître. De façon générale, une saisie doit encore être validée par une action sur la touche START/SET. Pour sélectionner une option du menu qui s’affiche (Écran 4), appuyer sur les touches de défilement ñ et ò, puis aller au sous-menu choisi en appuyant de nouveau sur MENU. Au sous-menu Paramètres de machine, le type (son nom et la section de son vérin) de la machine à laquelle l’unité hydraulique, de commande et de documentation est reliée, doit être renseigné (voir la flèche à l’Écran 5). Pour changer de machine, sélectionner celle qui convient à l’aide des touches ñ et ò et valider le choix par une action sur la touche START/SET. Ensuite, la section du vérin de cette machine est affichée encore une fois, pour validation pour la touche START/SET. Le sous-menu des paramètres de machine est protégé par un code d’accès qui ne sera révélé qu’à des personnes autorisées chez l’exploitant. Si la machine sélectionnée n’est pas la bonne, tous les calculs des pressions seront fautifs ! Le passage à une autre machine demande la consultation du fabricant ou d’un atelier agréé, car Important il est conseillé alors de réaliser aussi l’ajustage des sondes. Cette démarche est réservé aux personnes agréées ou autorisées. En complément des machines préinstallées, il est possible de définir des types de machine personnalisés aux entrées vierges du menu (donner un nom à la machine et renseigner la section de son vérin). Cela se fait au moyen des touches de défilement et la saisie se valide par une action sur la touche START/SET. Sous l’option Paramètres sondes du Menu des réglages, il est possible de vérifier l’ajustement des capteurs de température (PT100, PT1000) et de pression (160 bar, 250 bar, 600 bar) (voir l’Écran 6). REGLAGES >DOCUMENTATION PARAMS SONDES PARAMS MACHINE -M-M-M-MÉcran 4 **CHASSIS MACHINE*** >HST 250 05.10 HST 315 05.89 HST 355 06.60 Écran 5 PARAMETRES SONDES >CALIBR. EL. CHF -MCALIBR. SDE PR. -MÉcran 6 Les touches de défilement ñ et ò servent à positionner le curseur sur une Version Mai 2014 Manuel utilisateur HÜRNER SPG 2.0 FR 9 HÜRNER Schweisstechnik GmbH Nieder-Ohmener Str. 26 35325 Mücke, Allemagne ligne, la touche MENU à sélectionner celle-ci. À « Calibrer sonde pression », la sonde de pression de l’appareil est calibrée, c’est-à-dire ajustée par rapport au point zéro de la machine connectée. Pour déterminer la pression zéro, écarter le chariot de la machine au maximum et appuyez sur la touche START/SET. L’écran affiche ensuite la pression de référence, par exemple 80,0 bar si la sonde 160 bar est actuellement active (voir l’Écran 7). À l’aide du manomètre de pression, régler la machine raccordée à cette pression de référence, qui est différent en fonction de la sonde de pression, et ajuster la valeur à l’écran en appuyant sur les touches de défilement ñ et ò. En appuyant sur START/SET ensuite, valider cette calibration. CAL. VAEURS PRESS. [SET] PR. REELLE : 80.0bar PR. NOMIN. : 80.0bar Écran 7 La calibration, par rapport à son point zéro, de la plaque chauffante (appelée aussi miroir chaud) se fait, à « Calibrer élément chauffant », de la même manière, avec les touches de défilement ñ et ò et la touche START/ SET pour valider. Info 4.2 Lors de l’ajustement de la valeur affichée à l’écran à la référence avec les touches ñ et ò, le défilement des valeurs peut être accéléré en maintenant enfoncée la touche en question. Définition des réglages par défaut du fonctionnement Aux sous-menus du Menu des réglages, sous « Réglages », on peut définir les paramètres du poste de soudage lui-même et de son fonctionnement. Sous « Documentation », les informations de traçabilité à documenter, ou non, sur les rapports de soudage sont activées ou désactivées. La sélection se fait à l’aide des touches flèches ñ et ò. Puis, pour accéder au sous-menu en question, appuyer sur la touche MENU. Dans les deux parties du menu des réglages, un réglage de configuration peut être sélectionné avec les touches ñ et ò. Pour basculer entre Oui et Non pour cette option, appuyer sur la touche ð. La présence d’un « M » à une option signale que pour celle-ci un sous-menu est accessible par une action sur la touche MENU. Aux deux niveaux de menu (Menu des réglages et ses divers sousmenus), la touche START/SET sert à enregistrer et appliquer les réglages, la touche STOP/RESET à retourner au niveau précédent Important sans enregistrer les éventuelles modifications faites. 4.2.1 Légende du sous-menu « Réglages » « Vérification code soudeur oui » : il est obligatoire que le code de soudeur soit encore valide et non expiré (validité par défaut 2 ans à compter de l’émission du badge), faute de quoi le soudage ne peut être lancé ; « non » : la validité du code n’est pas contrôlée. « Contrôle mémoire oui » : si la mémoire est saturée de rapports, l’appareil est bloqué jusqu’à ce que les rapports soient imprimés ou transférés ; « non » : il n’est pas bloqué et le plus ancien rapport en mémoire est écrasé par le nouveau. « Saisie manuelle oui » : il est possible de rentrer à la main les paramètres de soudage ou de modifier ceux que la machine a caclulés ; « non » : ce mode de saisie n’est pas disponible. « Relevé température ambiante oui » : la température ambiante est mesurée avant le soudge ; « non » : elle ne l’est pas ; à température < 0°C, un soudage ne devrait être lancé qu’après avoir pris les précautions d’utilité (par exemple, tente, chauffage). « Options code soudeur M » : l’action sur la touche MENU ouvre un sousmenu qui permet de définir quand il faut saisir le code de soudeur, pourvu qu’il soit activé sous « Documentation » : toujours, c’est-à-dire avant chaque soudure individuelle, à la première soudure après la 10 FR Manuel utilisateur HÜRNER SPG 2.0 REGLAGES ** ** VERIF CODE SOUD.Non CONTR. MEMOIRE Oui >SAISIE MANUELLE Oui Écran 8 Version Mai 2014 HÜRNER Schweisstechnik GmbH Nieder-Ohmener Str. 26 35325 Mücke, Allemagne mise sous tension du poste ou à la première soudure d’une nouvelle date/journée. « Langue M » : l’action sur la touche MENU ouvre un sous-menu qui permet de choisir la langue des textes affichés et figurant dans les rapports (voir à la section 4.1.3). « Date/Heure M » : l’action sur la touche MENU ouvre un sous-menu qui permet de régler l’horloge interne (voir à la section 4.1.4). « Volume signal M » : l’action sur la touche MENU ouvre un sous-menu qui permet de régler le volume du signal sonore (voir à la section 4.1.5). « Unité de température M » : l’action sur la touche MENU ouvre un sous-menu qui permet de choisir soit Celsius, soit Fahrenheit pour la température. « Unité de pression M » : l’action sur la touche MENU ouvre un sous-menu qui permet de choisir soit les bars, soit les livres par pouce carré (psi) pour la pression. « Unité de longueur M » : l’action sur la touche MENU ouvre un sousmenu qui permet de choisir soit les unités métriques, soit les unités angloaméricaines pour la longueur. « Numéro d’inventaire M » : l’action sur la touche MENU ouvre un sous-menu qui permet de rentrer le numéro sous lequel le poste est repertorié chez la société qui l’utilise. « Nombre d’étiquettes M » : l’action sur la touche MENU ouvre un sousmenu qui permet de rentrer le nombre d’étiquettes qu’il faut imprimer automatiquement après une procédure de soudage sur l’imprimante d’étiquettes disponible en option, si une telle est reliée au système. « Directive M » : l’action sur la touche MENU ouvre un sous-menu qui permet de choisir la directive (norme, standard) réglementaire qui doit être observée pour le soudage. 4.2.2 Choix de la langue d’affichage La sélection de l’option « Choisir langue » entraîne l’affichage de l’Écran 7. Les touches flèches ñ et ò permettent de sélectionner une des options « Deutsch », « English » et « Français », sélection à valider par la touche START/SET. 4.2.3 Réglage de l’horloge La sélection de l’option « Régler horloge » entraîne l’affichage de l’Écran 8. L’heure et la date peuvent être modifiées sur le clavier de l’appareil. La modification se fait individuellement pour les parties « Heure », « Minute », « Jour », « Mois » et « Année ». Le nouveau réglage doit être validé par une action sur la touche START/SET. 4.2.4 Réglage du volume du signal sonore La sélection de l’option « Régler volume » entraîne l’affichage de l’Écran 9. En plus, le signal sonore retentit. Pour régler le volume du signal, appuyer sur les touches ï et ð afin d’atteindre le volume souhaité (entre 0 et 100), puis valider en appuyant sur la touche START/SET. 4.2.5 Légende du sous-menu « Documentation » « Code soudeur oui » : il est obligatoire de saisir le code de soudeur en fonction du réglage des « Options code soudeur » ; « non » : il est impossible de le saisir. « N° de commission oui » : il est obligatoire de saisir ou de confirmer le numéro de commission avant chaque soudage ; « non » : il est impossible de le faire. « N° de soudure oui » : l’appareil attribue un numéro de soudure automaVersion Mai 2014 Manuel utilisateur HÜRNER SPG 2.0 ****** LANGUE ****** >Deutsch English Francais Écran 9 DATE/HEURE 21.06.13 14:28 Écran 10 VOLUME SIGNAL < ------20-------- > Écran 11 ** DOCUMENTATION ** >CODE SOUDEUR Oui No COMMISSION Oui No SOUDURE Non Écran 12 FR 11 HÜRNER Schweisstechnik GmbH Nieder-Ohmener Str. 26 35325 Mücke, Allemagne tiquement incrémenté à chaque nouvelle soudure faisant partie d’une commission connue et affiche ce numéro à l’écran, près du numéro de rapport ; « non » : aucun numéro de soudure n’est enregistré. « Données supplémentaires oui » : il est obligatoire de saisir ou de confirmer les données supplémentaires avant chaque soudage ; « non » : il est impossible de le faire. « Code de raccord oui » : il est obligatoire de renseigner le second code, dit code de traçabilité, du raccord électrosoudable ; « non » : il n’est pas possible de le faire. « Codes de tubes oui » : il est obligatoire de renseigner les codes des deux tubes (codes conformes ISO de soudage et de traçabilité) ; « non » : il n’est pas possible de le faire. « Longueur des tubes oui » : il est obligatoire de renseigner la longueur des deux tubes ; « non » : il n’est pas possible de le faire. « Conditions météorologiques oui » : il est obligatoire de sélectionner dans une liste défilante la météo ambiante avant le soudage ; « non » : il n’est pas possible de le faire. « Conditions météorologiques oui » : il est obligatoire de sélectionner dans une liste défilante la météo ambiante avant le soudage ; « non » : il n’est pas possible de le faire. « Société installatrice oui » : il est obligatoire de renseigner la société qui réalise les travaux ; « non » : il n’est pas possible de le faire. « Imprimer étiquettes M » : l’action sur la touche MENU ouvre un sous-menu qui permet de lancer l’impression d’une/des étiquette(s) relative(s) à une soudure sur l’imprimante d’étiquettes disponible en option. « Angle M » : l’action sur la touche MENU ouvre un sous-menu qui permet de rentrer l’angle auquel les deux pièces à souder vont être assemblées l’une par rapport à l’autre. Info 4.3 Toutes les données qui sont disponibles sur la puce du badge à transpondeur peuvent être rentrées aussi en mettant la carte devant le lecteur. Si elles sont encodées par des codes-barres, elles peuvent être lues avec le scanneur. Saisie des données de traçabilité prédéfinies et personnalisables Toutes les données de traçabilité activées au menu des réglages, sous « Documentation », (voir à la section 4.1.5) doivent être rentrées avant le soudage. Le poste de soudage demande leur saisie avant le soudage à proprement parler. En fonction de la donnée en question, soit elle doit être rentrée chaque fois qu’on y accède (le code de soudeur par exemple ; voir à la section 4.3.1), soit une information rentrée préalablement peut être modifiée, puis validée ou validée telle quelle (le numéro de commission ; voir à la section 4.3.2). 4.3.1 Saisie du code de soudeur Lorsque le soudage est lancé en appuyant sur START/SET pendant que l’Écran 3 est affiché, la machine demande d’abord que l’identifiant du soudeur soit renseigné, à condition que cela soit activé au Menu des réglages (cf. l’Écran 13). Ce code identifiant doit être un code ISO. Il peut être rentré soit au moyen des touches de défilement (cf. la première info à la section 4.1), saisie à valider par la touche START/SET, soit par la lecture d’un badge à transpondeur RFID ou en capturant un code-barres au moyen du scanneur à main disponible en option. *** CODE SOUDEUR *** ++++++++++++++++++++ ++++++++++ Écran 13 La saisie ou la capture optique correcte du code est indiqué par un signal sonore de la machine. 12 FR Manuel utilisateur HÜRNER SPG 2.0 Version Mai 2014 HÜRNER Schweisstechnik GmbH Nieder-Ohmener Str. 26 35325 Mücke, Allemagne 4.3.2 Saisie ou modification du numéro de commission Depuis l’Écran 3 ou bien après la saisie du code de soudeur, la machine demande que le numéro de commission, de 32 caractères maximum, soit renseigné, à condition que cela soit activé au Menu des réglages. Si un numéro de commission existe déjà en mémoire, celui-ci vous est proposé. Vous pouvez soit le valider tout de suite, en appuyant sur la touche START/ SET, soit d’abord le modifier à l’aide des touches de défilement (cf. la première info à la section 4.1) ou le lire avec un scanneur ou d’un badge RFID et valider ensuite le numéro ainsi modifié en appuyant sur la touche START/SET. *** No COMMISSION ** ++++++++++++++++++++ ++++++++++++ Écran 14 Il est possible de sélectionner un numéro de commission déjà présent en mémoire, au lieu de celui affiché, en appuyant simultanément sur les touches de défilement ï et ð. Cette action affiche un écran de sélection de la commission. Vous pouvez ensuite faire défiler la liste de tous les numéros de commission actuellement en mémoire à l’aide des touches et afin d’en sélectionner une et de valider cette sélection en appuyant sur la touche START/SET pour retenir celle-ci pour la prochaine soudure. Afin de quitter la liste des numéros de commission sans en sélectionner un, appuyer sur la touche STOP/RESET. 4.3.3 Saisie ou modification du numéro de soudure Depuis l’Écran 3 ou bien après la saisie du numéro de commission, la machine demande que le numéro de soudure soit renseigné, à condition que cela soit activé au Menu des réglages. Les numéros de soudure s’énumèrent par rapport au numéro de commission. Cela veut dire qu’ils ne sont incrémentés de 1 que pour les soudures réalisées dans le cadre de la commission en cours (identifiée précédemment en rentrant son numéro de commission). Dans le cas reproduit à l’Écran 3, le rapport qui sera enregistré de la prochaine soudure, reçoit le numéro d’ordre 72 ; cette soudure sera la soudure n° 2 de la commission en cours. Info La première soudure d’une commission pour laquelle aucun soudage n’a été enregistré en mémoire, porte systématiquement le n° 1. S’il existe des soudures en mémoire pour la commission choisie, la machine reconnaît le numéro le plus élevé des soudures existantes de la commission et attribue au soudage suivant celui-là plus 1. Ce numéro est proposé à l’usager à l’écran et il peut le retenir ou le modifier. Si l’usager modifie le numéro de soudure, il est sous sa responsabilité de s’assurer qu’aucun numéro n’apparaît deux fois. Si une doublette de numéro de soudure existe pour une commission donnée, cela reste sans conséquence aucune pour le soudage et sa documentation. Pourtant, pour la commission en question, deux soudures ne seront pas identifiables par leur numéro individuel. Si les saisies par le soudeur font que certains numéros ne sont pas retenus (par exemple, pour une commission les soudures n° 1, 2, 3, 5, 6, 9), ces lacunes ne sont pas comblées et le numéro de soudure proposé automatiquement pour le soudage suivant est toujours le plus élevé des existants plus 1 (donc 10, dans cette illustration). Le numéro de soudure peut aussi être rentré après une action simultanée sur les touches de défilement et ð lorsque l’Écran 3 est affiché. 4.3.4 Saisie ou modification d'autres données de traçabilité des composants De la même manière que le code du soudeur, le numéro de commission et le numéro de soudure, l’on peut rentrer d’autres données relatives aux composants, si cela est activé au Menu des réglages. Version Mai 2014 Manuel utilisateur HÜRNER SPG 2.0 FR 13 HÜRNER Schweisstechnik GmbH Nieder-Ohmener Str. 26 35325 Mücke, Allemagne Toutes les données sont rentrées à l’aide des touches alphanumériques et validées par une action sur la touche START/SET ou bien elles sont lues à partir d’un code-barres ou badge, si disponible, à l’aide du scanneur ou lecteur RFID. Les conditions météorologiques, par contre, sont renseignées (cf. l’Écran 15) à partir d’une liste dans laquelle la sélection se fait par les touches ñ ou ò, à valider par une action sur la touche START/SET 4.4 METEO >SOLEIL SEREIN PLUIE Écran 15 Réalisation du soudage Après que toutes les données de traçabilité dont la saisie est activée au Menu des réglages, ont été renseignées, l’Écran 3 s’affiche. À partir de cette écran, l’on lance le soudage proprement dit en appuyant sur la touche START/SET. Il faut d’abord rentrer les paramètres des tubes à souder. Si des paramètres d’une soudure antérieure sont trouvés en mémoire et qu’aucune erreur de code ne soit détectée, tous les paramètres de l’intervention antérieure sont proposés et peuvent être validés ensemble (voir l’Écran 18). Depuis cet écran, les paramètres de soudage des tubes peuvent être modifiés suite à une action sur STOP/RESET. Il faut d’abord choisir le matériau des tubes dans une liste, ce qui se fait par les touches ñ et ò suivis d’une validation par START/SET (cf. l’Écran 16). Ensuite, rentrer le diamètre et l’épaisseur de la paroi à l’aide des touches de défilement (voir la première info à la sectoin 4.1), à valider eux aussi par la touche START/SET (cf. l’Écran 17). Si vous préférez rentrer le rapport diamètre/paroi (SDR), remplacer la ligne Paroi par la ligne SDR en appuyant sur les touches ï et ð simultanément et rentrer la valeur SDR. Pour terminer, la machine récapitule l’ensemble des paramètres de soudage. En cas d’erreur, il est possible de reprendre la saisie de tous les paramètres au début en appuyant sur STOP/RESET, ou bien de retourner à la dernière saisie en appuyant sur la touche ñ et de corriger les données une par une. **CHOIX MATER. TUBE* >PE100 PE-HD PP Écran 16 * SAISIE DIAM. TUBE* DIAMETRE PAROI :0250mm :22.7mm Écran 17 PE100 DIAMETRE :0250mm PAROI :22.7mm RESET SDR 11.0 SET Si des codes de tube figurent parmi les données de traçabilité précédemment rentrées, la machine présente automatiquement les paramètres de soudage encodés dans ces codes-barres et vous en demande la validation. 4.4.1 Rabotage des extrémités des tubes Pour dresser les extrémités des tubes, placer le rabot entre eux et le mettre en marche. Rapprocher les tubes pour en raboter les extrémités jusqu’à ce qu’un copeau continu se forme et fasse deux ou trois tours du tube et que les extrémités soient bien dressées. Pour terminer le rabotage, écarter le chariot mobile de la machine à l’aide du levier de déplacement. Écran 18 RABOTER EXTR. TUBES 230°C REEL 0.5bar Écran 19 Une fois les tubes rabotés, appuyer sur la touche START/SET afin de valider un rabotage correct, pour faire avancer l’unité de documentation à l’étape suivante (voir l’Écran 20). Pour retourner au début du soudage, appuyer sur SSTOP/RESET. De cette manière, il est possible aussi, si un désaffleurement des tubes est encore constaté, de répéter l’opération. Quand les extrémités sont correctement rabotées, il faut vérifier leur parallélisme. 4.4.2 Vérification du parallélisme des tubes et détermination de la pression de contact Après le rabotage, rapprocher le chariot mobile du chariot fixe afin de vérifier s’il existe un décalage horizontal ou vertical entre les tubes et si oui, si cet écart par rapport au parallélisme idéal est inférieur à la tolérance prévue par la directive de soudage applicable. Le décalage maximal acceptable s’affiche (cf. l’Écran 20). Si le parallélisme est suffisant, le valider en appuyant sur la touche START/SET. Si le décalage entre les tubes est trop important et hors tolérance, il faut éventuellement les repositionner dans les mors et, si besoin, répéter le rabotage. 14 FR Manuel utilisateur HÜRNER SPG 2.0 VERIF. PARALLELISME ECART MAXI.: 2.5mm 230°C REEL 3.5bar Écran 20 Version Mai 2014 HÜRNER Schweisstechnik GmbH Nieder-Ohmener Str. 26 35325 Mücke, Allemagne Lorsque le parallélisme est correct, écarter complètement le chariot mobile de la machine pour relever la pression de contact, c’est-à-dire la pression minimale nécessaire pour faire bouger le chariot mobile et mettre les tubes en contact. Lorsque la pression dans le circuit hydraulique est complètement coupée, augmenter lentement la pression, en observant l’affichage afin de connaître la pression à laquelle le chariot du châssis commence à bouger. PRESSION CONTACT 230°C REEL 3.5bar Écran 21 La pression minimal pour mise en contact doit être supérieure à 2,0 bar. Il faut appuyer sur la touche START/SET au moment où le chariot commence à bouger, afin d’enregistrer en mémoire la pression de contact, appelée aussi pression minimale, qui vaut pour le soudage à réaliser. Important La pression de contact exacte dépend de plusieurs facteurs (matériau et diamètre du tube, lieu où se trouve la machine etc.), et il faut donc la déterminer à chaque nouvelle soudure. 4.4.3 Possibilité de modifier les paramètres de soudage Suite à la détermination de la pression de contact, l’afficheur affiche l’Écran 22, à condition que la saisie manuelle soit activée au sous-menu Documentation du Menu des réglages. Les trois écrans permettant de modifier manuellement les paramètres de soudage (Écrans 22 et 23 et un troisième avec la température nominale de l’élément chauffant) s’utilisent au moyen des actions sur les touches de défilement ñ, ò, ï, ð (voir la première info à la section 4.1). Chaque modification doit être validée par la touche START/SET. La touche START/ SET sert aussi à passer d’un écran à l’autre. Info Même après que la machine a été éteinte, les valeurs réglées manuellement restent en mémoire. Les valeurs de pression sont les seules à être calculées de nouveau à chaque nouvelle soudure. Lors d’un changement des paramètres caractéristiques des tubes, toutes les valeurs doivent être reparamétrées. La machine reconnaît automatiquement le changement des paramètres de tube et amène l’utilisateur directement au menu de saisie pertinent. 4.4.4 Détermination de la pression totale et phase d'égalisation avant retrait Après le rabotage, la vérification du parallélisme et la validation des paramètres de soudage, le soudage proprement dit commence par le réglage de la pression totale (c’est-à-dire la pression maximale qui sera atteinte au cours de la totalité de la procédure de soudage, en phase d’égalisation et à la fin de la phase de fusion). Pendant que le soudeur règle la pression totale pour atteindre la valeur nominale affichée, la pression réelle s’affiche en de ssous d’elle (voir l’Écran 24). Dès que celle-ci est dans la tolérance, le logiciel de commande avance à l’étape suivante. PR.EGALIS. :030.5bar PR.CHAUFFE :010.5bar TPS CHAUFFE:0120 s DELAI CONT.:005 s Écran 22 REFROID t5 REFROID t6 PR.REFR.t6 EV. FUSION : 0727 s : 0000 s :002.0bar : 012 s Écran 23 PRESSION TOTALE 230°C 229°C NOM. REEL 16.5bar 3.5bar Écran 24 La phase d’égalisation commence par la mise en place de l’élément chauffant entre les extrémités des tubes. L’écran vous demande de le faire (Écran 25). Si, à cet instant, l’élément chauffant n’a pas encore atteint la température nominale, un message vous en avertit à l’écran. Car la température de l’élément est contrôlée en permanence par l’appareil. Le message demandant d’insérer l’élément chauffant ne s’affiche pas avant que celui-ci ait atteint la température qu’il faut. INSERER ELEM. CHAUFF Après la mise en place de l’élément chauffant, appuyer sur la touche START/ SET et régler la pression totale pour appuyer les tubes contre l’élément chauffant. Attendre que le bourrelet des tubes atteigne la hauteur/largeur normative, en fonction de la directive de soudage retenue. Quand le bourrelet a atteint l’épaisseur nominale, affichée aussi à l’écran, le soudeur appuiera sur la touche START/SET afin de terminer la phase d’égalisation. BOURRELET TPS EGALIS. 230°C NOM. 229°C REEL Version Mai 2014 Manuel utilisateur HÜRNER SPG 2.0 222°C NOM. 16.5bar 221°C REEL 0.5bar Écran 25 :2.0mm :68 s 16.5bar 12.5bar Écran 26 FR 15 HÜRNER Schweisstechnik GmbH Nieder-Ohmener Str. 26 35325 Mücke, Allemagne 4.4.5 Phase de chauffe Écoulée la phase d’égalisation (1er témoin sur le diagramme de soudage), la pression doit être ramenée (2e témoin du diagramme) à la valeur en phase de chauffe. Cette pression réduite sera appliquée pendant la durée totale de celle-ci (3e témoin du diagramme), pendant laquelle les tubes continuent à être sous l’effet de la chaleur de l’élément chauffant. Important PHASE CHAUFFE TPS CHAUFFE : 148s 230°C MAXI 5.0bar 229°C REEL 3.5bar Écran 27 La réduction de la pression à la pression de chauffe ne doit pas prendre plus de 10 sec ; sinon le soudage s’interrompt et une erreur est enregistrée. La réduction de la pression en fin de phase doit être observée à l’écran. Il appartient au soudeur de réagir à d’éventuelles fluctuations de la pression. La machine passe automatiquement en phase de chauffe aussi au cas où le soudeur abaisserait la pression en dessous du maximum acceptable en phase de chauffe avant la fin du compte à rebours de la phase d’égalisation – ce qui peut arriver lorsque le bourrelet se forme complètement plus vite que prévu. Cependant, cette baisse de la pression doit être instantanée. Dans ce cas, le temps d’égalisation raccourci par la baisse précoce de la pression est mémorisé et servira de temps d’égalisation qui convient à ce soudage, en vue des phases d’égalisation ultérieures négociées par l’automode. Malgré la réduction de la pression en phase de chauffe, il faut que le bourrelet maintienne pleinement le contact avec l’élément chauffant. S’il se détache quelque part, il faut abandonner et Important recommencer. De même, si l’unité de commande détecte une erreur (pression insuffisante non réajustée par le soudeur ou durée de chauffe excessive, par exemple), elle abandonne et affiche l’erreur. 4.4.6 Phase de mise en contact La phase de mise en contact imminente est signalée par un signal sonore pendant les 10 dernières secondes de la phase de chauffe. Info À la fin de la phase de chauffe, il faut écarter le chariot pour éloigner les tubes de l’élément chauffant. Ensuite, retirer ce dernier. Cependant, il faut attendre la fin du compte à rebours de la phase de chauffe à l’écran. Il est défendu d’éloigner les tubes de l’élément chauffant auparavant. L’apparition de l’Écran 28 signale que la phase de chauffe est bien terminée. Le passage de la mise en contact à la fusion doit être immédiat. Le délai de mise en contact maximal affiché à l’écran ne doit pas être dépassé, faute de quoi l’unité abandonne le soudage et affiche l’erreur. 4.4.7 Phase de fusion et de refroidissement En observant ce qui s’affiche à l’écran, créer la pression de fusion. L’augmentation de la pression en phase de fusion doit se faire sous forme d’une rampe uniforme, dans le respect des valeurs nominales que l’écran affiche pendant cette phase. Le 5e témoin du diagramme sur le boîtier clignote. En phase de fusion et de refroidissement, il est particulièrement important de maintenir la pression aux valeurs nominales. Tout de suite après que la pression en fusion a atteint son maximum, au tout début du refroidissement, une légère chute de pression est possible pour des raisons techniques. Le soudeur doit Important y réagir sans tarder. Dans ce cas, la première ligne de l’Écran 30 signale « Maintenir la pression ». 16 FR Manuel utilisateur HÜRNER SPG 2.0 ENLEVER PLAQUE DEL. CONTACT : 8 s 230°C MAX 16.5bar 229°C REEL 2.5bar Écran 28 CREER PRESS. FUSION 230°C 229°C NOM. REEL 16.5bar 14.5bar Écran 29 PHASE REFRODISSEMT TPS REFRDSMT :1234s 230°C NOM. 16.5bar 229°C REEL 16.5bar Écran 30 Version Mai 2014 HÜRNER Schweisstechnik GmbH Nieder-Ohmener Str. 26 35325 Mücke, Allemagne En fonction de la directive retenue ou des informations fournies par le fabricant des pièces, il est possible qu’il faille attendre un délai de refroidissement après coupure de la pression pendant lequel aucune force externe ne doit être exercée sur le nouvel assemblage. Pourtant, l’unité hydraulique, de commande et de documentation ne négocie pas un éventuel délai de cette nature ; quant à elle, il faut considérer que le soudage est terminé lorsque le 7e témoin du diagramme de soudage s’est allumé. 4.4.8 Fin du soudage Le soudage prend fin lorsque la phase de fusion et de refroidissement se termine comme prévu. La soudeur peut alors couper la pression. 4.5 PHASE REFRODISSEMT REFROIDISMT TERMINE 229°C REEL 0.0bar Écran 31 Interruption de la procédure de soudage Si une erreur est constatée au cours de la procédure de soudage, cette dernière s’interrompt et l’erreur s’affiche. L’erreur qui a provoqué l’interruption s’affiche à l’écran (voir l’Écran 32) et le témoin du diagramme de soudage représentant la phase en question clignote. SOUDAGE INTERROMPU ERREUR PRES.EGALIS. 229°C REEL 1.5bar Écran 32 Les erreurs listées dans le tableau suivant peuvent être affichées. Type d'erreur Description a. Saisie des données Erreur de saisie Erreur à la saisie des données au clavier, par les touches de défilement ou alphanumériques. Erreur de code Erreur à la lecture des données par le scanneur ou le lecteur RFID. b. Système et conditions Erreur système Le système de soudage doit immédiatement être débranché du secteur et du manchon de raccord à souder. L’auto-test a détecté une irrégularité du système. Tout usage ultérieur doit être suspendu et la soudeuse doit être envoyée à un atelier agréé pour réparation. Erreur d'horloge L’horloge interne de la machine s'est déréglée ; depuis le Menu des réglages, régler l’horloge. Coupure secteur au dernier soudage Le dernier soudage est incomplet. Pendant qu’il était en cours, le poste de soudage a été coupé de l’alimentation secteur ou groupe électrogène. Pour pouvoir continuer à travailler, il faut valider avoir noté l’erreur en appuyant sur STOP/RESET. Temp° ambiante insuffisante La température ambiante n'est pas comprise entre – 10°C et + 50°C. Temp° ambiante excessive La température ambiante n'est pas comprise entre – 10°C et + 50°C. Défaut sonde de pression La sonde signalée à l'écran (pression hydraulique, température de l'élément chauffant, température ambiante) est tombée en panne ; dans les cas où ceci est possible, vérifier le raccordement ; au besoin, faire réviser la machine par un service agréé. Défaut sonde de chauffage Défaut sonde de température Imprimante pas prête L'imprimante disponible en option n'est pas prête (possible aussi : pas de communication ou câble endommagé). Sortie interrompue Une erreur est survenue pendant l’impression ou le transfert des données de soudage, et il a été impossible de trouver une solution au problème. Mémoire saturée La mémoire est saturée de rapports de soudage ; les imprimer ou basculer l’appareil en mode « Contrôle mémoire non ». Sans le contrôle de la mémoire, un nouveau rapport de soudure écrase le plus ancien en mémoire. (concerne l'imprimante d'étiquettes) c. Procédure de soudage Température insuffisante La température de l’élément chauffant augmente automatiquement. Température excessive La température de l’élément chauffant se réduit automatiquement. Version Mai 2014 Manuel utilisateur HÜRNER SPG 2.0 FR 17 HÜRNER Schweisstechnik GmbH Nieder-Ohmener Str. 26 35325 Mücke, Allemagne Type d'erreur Description Délai de contact passé Le retrait de l'élément chauffant et le rapprochement des tubes ont pris trop de temps ; la soudure doit être répétée. Erreur Pression de contact Impossible de déterminer la pression de contact pour bouger les tubes ; éventuellement, les réajuster dans les mors ; ou bien la pression est en dessous de 1 bar, ce qui n'est pas autorisé pour de raisons techniques. Erreur Pression d'égalisation Pression d'égalisation excessive ou insuffisante, non réajustée à temps. Erreur Pression de chauffe Pression de chauffe excessive, non réajustée à temps. Erreur Pression de fusion Pression de fusion excessive ou insuffisante, non réajustée à temps. Refroidissement annulé En appuyant sur STOP/RESET, l’utilisateur a interrompu la phase de refroidissement. Erreur Température de l'élément chauffant La température de la plaque (élément) chauffante dépasse les seuils de tolérance ; impossible de réajuster ; éventuellement, la température ambiante a été trop basse. Procédure arrêtée La procédure de soudage ou une de ses étapes a été arrêtée ou interrompue par une cause extérieure. 4.7 Affichage d'un résumé de soudage et impression d'étiquettes avec ViewWeld La fonctionnalité ViewWeld permet la consultation d’un résumé du rapport de soudage enregistré pendant la dernière procédure de soudage et l’impression de celui-là sous forme d’étiquette pour l’assemblage sur l’imprimante d’étiquettes disponible en option. Le résumé ViewWeld affiche le numéro de rapport, la date et l’heure du soudage ainsi que les paramètres du soudage et une évaluation du soudage/de la soudure (cf. l’Écran 33). 0011 27.05.14 08:25 PE-HD 630mm SDR26.0 PAS D'ERREUR Écran 33 Pour afficher le résumé ViewWeld, appuyer sur la touche ñ à l’écran affiché après la mises sous tension (cf. l’Écran 3). Pour imprimer son étiquette, appuyer sur la touche START/SET à l’écran ViewWeld. Une fois le résumé ViewWeld du dernier soudage affiché, il est possible de feuilleter tous les résumés en mémoire à l’aide des touches ï et ð. 5 Transfert/sortie des rapports de soudage Interface de données Port d’interface USB A pour relier des mémoire externes USB (par exemple une clé USB) Le port d’interface est conforme à la spécification USB version 2.0 (c’est-àdire taux de transmission maximal de 480 mégabits par seconde). Avant de lancer le transfert des données, il est vivement conseillé d’éteindre et de redémarrer le poste de soudage. Si cela est négligé, le transfert des données risque de souffrir des erreurs et Important les rapports dans le poste de soudage, d’être inutilisables. Lorsque vous transférez les rapports de soudage vers une clé USB, attendre systématiquement le message « Sortie terminée » qui s’affiche à l’écran du produit, avant de débrancher la clé USB. Si Important la connexion est coupée prématurément, le poste de soudage risque de proposer la suppression des rapports de soudage en mémoire bien que ceux-ci ne soient pas transférés correctement. 18 FR Manuel utilisateur HÜRNER SPG 2.0 Version Mai 2014 HÜRNER Schweisstechnik GmbH Nieder-Ohmener Str. 26 35325 Mücke, Allemagne Si, dans ce cas, vous décidez de les supprimer, ils seraient perdus irrémédiablement sans être sauvegardés ailleurs. 5.1 Choix du type de fichier et du procédé de soudage Quand le câble de la mémoire USB est branché sur le poste de soudage, un écran s’affiche qui permet de sélectionner le format des rapports qui seront sortis : fichier PDF avec un rapport résumé ou développé ou fichier au format du gestionnaire de données de soudage DataWork. Les touches flèches ñ et ò servent à choisir ce qui est souhaité, choix à valider par la touche START/SET. SELECT. TYPE FICHIER FICHIER DATAWORK >RAPPORT PDF RESUME RAPPORT PDF DEVEL. Écran 34 L’option du rapport d’entretien n’est d’aucune utilité pour le fonctionnement normal. Dans le cadre de l’entretien assisté par ordinateur, ce rapport recense les événements liés à la maintenance du poste. Les rapports ici seront envoyés à la mémoire USB au format préalablement sélectionné. 5.2 Transfert/sortie de tous les rapports Après le choix du type de fichier et du procédé de soudage souhaités, l’écran suivant propose l’option « Imprimer tous les rapports ». Celle-ci lance la sortie de tous les rapports de soudage, ou de tous les rapport apparenant au procédé préalablement sélectionné, actuellement en mémoire au format préalablement sélectionné. 5.3 Sortie d'un numéro de commission, plage de dates ou de rapports Après le choix du type de fichier et du procédé de soudage souhaités, l’écran suivant propose les options « Par numéro de commission », « Par plage de dates » et « Par plage de rapports ». En fonction de la sélection, à l’aide des touches ñ et ò, on peut sélectionner, parmi les commissions actuellement en mémoire, celle dont les rapports doivent être sortis, ou, à l’aide des touches de défilement (voir l’Info à la section 4.1), rentrer une date de début et une date de fin, ou le premier et le dernier rapport, définissant une plage de dates ou une plage de rapports dont les rapports doivent être sortis. Une fois sélectionné les rapports souhaités, une action sur START/SET envoie leurs données vers la mémoire raccordée. 5.4 Processus de transfert des rapports de soudage Quand la sélection a été faite aux options, la transmission démarre automatiquement. Attendre que tous les rapports sélectionnés soient sortis et que le message « Sortie terminée » s’affiche à l’écran. Si, au cours du transfert, un problème se manifeste, le message « Pas prêt » s’affiche. Le problème résolu, le transfert continue automatiquement. Info 5.5 Si, au cours du transfert des données, l’unité de documentation reconnaît un problème auquel il sera impossible de trouver une solution, il abandonne le processus et affiche le message d’erreur « Sortie interrompue ». Pour valider que vous avez pris note de l’erreur, appuyer sur la touche START/SET. Effacement de la mémoire La mémoire ne peut être effacée qu’après la transmission de tous les rapports en mémoire, ce que le message « Sortie terminée » signale. Après que la mémoire a été débranchée, le poste de soudage demande : « Effacer mémoire? » Après la validation par START/SET, un message de confirmation s’affiche : « Effacer vraiment? » Valider de nouveau par START/SET. C’est alors seulement que la mémoire s’efface. Version Mai 2014 Manuel utilisateur HÜRNER SPG 2.0 FR 19 HÜRNER Schweisstechnik GmbH Nieder-Ohmener Str. 26 35325 Mücke, Allemagne 5.6 Conservation des rapports de soudage en mémoire Après que l’imprimante ou la mémoire externe a été débranchée, le poste de soudage demande : « Effacer mémoire? » En appuyant sur la touche STOP/RESET, vous pouvez garder les rapports en mémoire et les imprimer encore une fois. Important 6 Respecter impérativement les consignes données sur l’intégrité des données au début de la section 5, afin d’éviter toute suppression des rapports de soudage en mémoire par inadvertance. Entretien et remise en état Comme le produit est utilisé dans un domaine qui relève de considérations de sécurité particulières, toute intervention de maintenance ou de remise en état doit se faire obligatoirement en notre maison ou chez un de nos partenaires formés et agréés par nos soins. C’est ainsi qu’un niveau supérieur de qualité et de sécurité est constamment garanti pour votre produit. Le non-respect de cette disposition rend caduque toute garantie et toute responsabilité dont le produit pourrait faire l’objet, y Important compris quant aux dommages indirects. 7 Contact pour le service et l'entretien Hürner Schweisstechnik Nieder-Ohmener Str. 26 35325 Mücke, Allemagne Tél. : +49 (0)6401 9127 0 Fax : +49 (0)6401 9127 39 Web: www.huerner.de Mail: [email protected] Nous nous réservons le droit d’apporter des modifications techniques au produit sans avis préalable. Info 8 Accessoires/pièces du produit Câble de sonde de pression Câble de capteiur de température Scanneur de codes-barres Clé USB Carte de soudeur Info 600-100-030 600-100-031 206-030-253 300-010-154 216-080-031 Seules les pièces détachées originales sont acceptables. L’utilisation de pièces non originales rend caduques la responsabilité et la garantie assumées par le fabricant. Pour se faire conseiller et commander des pièces détachées, prendre contact avec le vendeur ou le fabricant du produit. 20 FR Manuel utilisateur HÜRNER SPG 2.0 Version Mai 2014 KONFORMITÄTSERKLÄRUNG Declaration of Conformity Déclaration de conformité Wir / We / Nous HÜRNER Schweißtechnik Nieder-Ohmener Str. 26 D-35325 Mücke-Atzenhain erklären in alleiniger Verantwortung, dass das Produkt declare under our sole responsibility that the product déclarons sous notre seule responsabilité que le produit HÜRNER SPG 2.0 Protokollier- und Aufzeichnungseinheit für Stumpschweißmaschinen mit Heizelement Data Logger and Report Generator for Butt-welding Machines with Heating Element Unité de documentation et création de rapport pour machines bout-à-bout à élément chauffant, auf die sich diese Erklärung bezieht, mit den folgenden Normen oder normativen Dokumenten übereinstimmen to which this declaration relates, are in conformity with the following standards or standardizing documents auxquels se réfère cette déclaration, sont conformes aux normes et documents de normalisation suivants CE-Konformität / CE Conformity / Conformité CE Richtlinie 2002/96/EG Richtlinie 2004/108/EG Richtlinie 2006/95/EG Richtlinie 2006/42/EG (soweit anwendbar / insofar as applicable / pour autant que pertinente) Richtlinie 2011/65/EU Andere Normen / Other Standards / Autres normes DIN EN 61000-6-2 DIN EN 61000-6-3 DIN EN IEC 60335-1 DIN EN 60529 ISO 12176-2 Bei einer nicht mit uns abgestimmten Änderung der Maschine oder einer Reparatur von Personen, die nicht von uns im Hause geschult und autorisiert wurden, verliert diese Erklärung ihre Gültigkeit. Any and all modifications of the device without our prior approval, and any repairs by persons who were not trained and authorized by us, shall cause this declaration to become void. En cas de modification apportée à l’appareil sans notre accord préable ainsi que de réparation effectuée par des personnes non formées et agréées par non soins, cette déclaration deviendra caduque. Mücke-Atzenhain den 10.05.2014 ............................................................................ Dipl.-Ing. Michael Lenz Geschäftsführer General Manager Directeur général