1
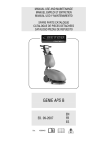
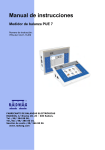
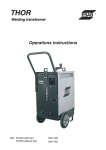
• BILANCIA DA CUCINA ELETTRONICA MANUALE DI ISTRUZIONI • ELECTRONIC KITCHEN SCALE - USE INSTRUCTIONS • BALANCE DE CUISINE ÉLECTRONIQUE MANUEL D’INSTRUCTIONS • ELEKTRONISCHE KÜCHENWAAGE - BETRIEBSANLEITUNG • BÁSCULA DE COCINA ELECTRÓNICA MANUAL DE INSTRUCCIONES Cod.: 90.125 ITALIANO pag. 4 ENGLISH pag. 10 FRANÇAIS pag. 16 DEUTSCH pag. 22 ESPAÑOL pag. 28 For further information and/or for instructions for use in other languages, please visit: www.beper.com Fig. 1 Fig. 2 60s Idle for 60 seconds 1. 2. Fig. 9 Fig. 3 Fig. 10 Fig. 4 Fig. 5 Milk volume mode Weighing mode Load weighing object Show weighing reading Fig. 6 Fig. 7 Fig. 8 Put on a liquid Press shortly container Press Press for 3 seconds shortly Press shortly Press shortly Pour in liquid Press for 3 seconds Press shortly Press shortly Press shortly Bilancia da cucina elettronica Manuale di istruzioni AVVERTENZE GENERALI LEGGERE QUESTE ISTRUZIONI PRIMA DI USARE L’ARTICOLO. Prima e durante l’uso dell’articolo è necessario seguire alcune precauzioni elementari. Dopo aver tolto l’imballaggio assicurarsi dell’integrità dell’articolo. In caso di dubbio non utilizzare l’articolo e rivolgersi a personale professionalmente qualificato. Gli elementi dell’imballaggio (sac chetti di plastica, polistirolo, ecc.) non devono essere lasciati alla portata dei bambini, in quanto potenziali fonti di pericolo. Questo articolo dovrà essere destinato solo all’uso per il quale è stato espressamente concepito. Ogni altro uso è da considerarsi improprio e quindi pericoloso, nonché far decadere la garanzia. Il costruttore non può essere considerato responsabile per eventuali danni derivati da usi impropri, erronei ed irragionevoli. L’installazione deve essere effettuata secondo le istruzioni del costruttore. Un’errata installazione può causare danni a persone, animali o cose, nei confronti dei quali il costruttore non può essere considerato responsabile, nonché far decadere la garanzia. Non toccare l’articolo con mani bagnate o umide. Non usare l’articolo a piedi nudi. Non immergere mai l’articolo in acqua o in altri liquidi. Non lasciare esposto l’articolo ad agenti atmosferici (pioggia, sole, etc.); non collocare l’articolo all’esterno. Non tenere l’articolo vicino a fonti di calore (es. termosifone). Proteggere l’articolo da spruzzi di liquidi. Questo articolo non deve essere utilizzato da persone (compresi i bambini) con capacità fisiche, sensoriali o mentali ridotte; da persone che manchino di esperienza e conoscenza dell’articolo, a meno che siano attentamente sorvegliate o ben istruite relativamente all’utilizzo dell’articolo stesso da parte di una persona responsabile della loro sicurezza. Assicurarsi che i bambini non giochino con l’articolo. Allorché si decida di smaltire come rifiuto questo articolo, si raccomanda di renderlo inoperante togliendo le batterie. Si raccomanda inoltre di rendere innocue quelle parti dell’articolo suscettibili di costituire un pericolo, specialmente per i bambini che potrebbero servirsi dell’articolo per i propri giochi. AVVERTENZE D’USO In caso di guasto e/o di cattivo funzionamento, spegnere e non manomettere la bilancia. Per l’even tuale riparazione rivolgersi solamente ad un centro autorizzato dal costruttore e richiedere l’utilizzo di ricambi originali. Il mancato rispetto di quanto sopra può comprometterne la sicurezza. Non permettere che la bilancia venga usata da bambini o da incapaci, senza sorveglianza. Tenere lontano dalla portata di animali domestici. Questa bilancia è solo per uso domestico. Non per uso commerciale. Collocare la bilancia su superfici piane, lisce e stabili o appese al muro, per assicurare un corretto funzionamento. Collocare la bilancia lontano da fonti di calore, umidità, in punti dove non possa arrecare danno o pericolo, scegliendo quindi una sistemazione stabile e sicura. Non collocare la bilancia nelle immediate vicinanze (ma ad una distanza di almeno 1,5 metri) di radio, tv per evitare interferenze elettromagnetiche che potrebbero causare un malfunzionamento della bilancia. Non immergere la bilancia nell’acqua. Non fare penetrare liquidi all’interno della bilancia, né spruzzare acqua o detergenti per la pulizia direttamente sulla bilancia. 4 Bilancia da cucina elettronica Manuale di istruzioni Non fare penetrare liquidi all’interno della bilancia, né spruzzare acqua o detergenti per la pulizia direttamente sulla bilancia. I cibi da pesare devono essere contenuti in un imballo o contenitore, in modo che non siano a diretto contatto con la bilancia. Non pigiare i tasti della bilancia violentemente o con oggetti appuntiti (penne, matite, ecc.). Non lasciare oggetto o cibo sulla bilancia per lungo tempo. L’operazione di pesatura deve essere relativamente veloce. Terminate le operazioni di pesatura, assicurarsi che sul piatto della bilancia non rimanga alcun og getto; la bilancia non deve essere utilizzata come sostegno o piano di appoggio per oggetti. Non lasciar cadere la bilancia né sottoporla ad urti violenti. Prima di utilizzare la bilancia rimuovere la pellicola trasparente nel compartimento batterie, qualora sia presente. All’accensione della bilancia, se sul display non appare niente, controllare l’esatto montaggio delle batterie rispettandone le polarità. Se continua a persistere il problema, le batterie potrebbero essere scariche. Sostituirle con nuove. Utilizzare esclusivamente il tipo di batterie specificato nel libretto di istruzioni. Il danneggiamento o la rottura della bilancia, dovuti alla non curanza di quanto descritto in questo manuale, non sono riconosciuti in garanzia. DISPLAY Fig. 1 1. Tara 2. Valore negativo 3. Peso azzerato 4. Modalità pesatura 5. Modalità volume latte 6. Modalità volume acqua 7. Unità di peso (lb:oz) 8. Unità di volume (fl’oz) 9. Unità di volume (ml) 10. Unità di peso (g) 11. Ora AM/PM IMPOSTAZIONE ORA Fig. 2 1.installare le batterie, la bilancia entra in automatico nella modalità di impostazione dell’ora. Quan do l’ora lampeggia nel display premere MODE per impostare l’ora. Fare attenzione alla dicitura AM (mattina) e PM (pomeriggio). 2.Premere il tasto di conversione dell’unità di misura per confermare e procedere con l’impostazione dei minuti. 3.premere il tasto di conversione per finire l’impostazione dell’ora ed entrare nella modalità di pe satura. REIMPOSTARE L’ORA Fig. 3 Quando il display mostra l’ora, premere il tasto di conversione modalità di impostazione. Impostare prima l’ora e poi i minuti. Premere il tasto MODE per impostare l’ora e per confermare. 5 per 3 secondi per entrare nella Bilancia da cucina elettronica Manuale di istruzioni TASTO DI CONVERSIONE Fig. 4 Sotto la bilancia si trova un tasto di conversione dell’unità di misura. È possibile scegliere tra grammi g, il peso verrà calcolato il grammi (g) e il volume di acqua e latte in millilitri (ml), e lb, il peso verrà calcolato il libbre (lb:oz) e il volume di acqua e latte in millilitri (fz’oz). Premere il tasto MODE per scegliere l’unità di misura da calcolare tra peso, volume d’acqua e di latte. PESATURA Fig. 5 1.Posizionare la bilancia in una superficie piatta e solida. 2.Posizionare sopra il contenitore degli ingredienti da pesare prima di accendere la bilancia. 3.Premere la mano sulla bilancia per accendere la bilancia. 4.Attendere che il display mostri tutte le informazioni. 5.Inserire nel contenitore gli ingredienti da pesare per iniziare la pesatura, il display mostrerà il peso. 6.Se l’ingrediente da pesare è acqua o latte, premere il tasto MODE per scegliere l’unità di misura volume e il display mostrerà il volume dell’ingrediente pesato. VOLUME Fig. 6 1.Posizionare la bilancia in una superficie piatta e solida. 2.Premere la mano sulla bilancia per accendere la bilancia. 3.Attendere che il display mostri “0” e premere il tasto MODE per scegliere l’unità di misura volume acqua o latte. 4.Posizionare sopra la bilancia il contenitore dei liquidi da pesare. 5.Premere il tasto ZERO per resettare il display a “0”. 6.Inserire nel contenitore i liquidi, il display mostrerà il loro volume. 7.Premere il tasto MODE per scegliere l’unità di misura peso e il display mostrerà il peso dell’ingre diente. FUNZIONE ZERO E TARA Fig. 7 Questa funzione viene usata per pesare diversi ingredienti consecutivamente senza rimuoverli dalla bilancia. Mettere gli ingredienti nella bilancia, ottenete il peso. Premere il tasto ZERO per resettare il display a “0” prima di aggiungere il nuovo ingrediente. È pos sibile ripete questa operazione più volte. FUNZIONE ZERO: Quando la somma totale di tutti gli ingredienti sulla bilancia è inferiore o uguale al 4% della capacità di peso massima della bilancia. (200 gr con una capacità massima di 5000 gr) Il display mostrerà “---“ o “0g” ogni volta che viene premuto il tasto ZERO. Il simbolo “---“ significa che il peso non è stabile, attende qualche secondo. “0g” contemporaneamente al simbolo “o” in basso a sinistra del display significa che la funzione ZERO è attiva. La capacità di peso massima rimane invariata. FUNZIONE TARA: Quando la somma totale di tutti gli ingredienti sulla bilancia è superiore al 4% della capacità di peso massima della bilancia. (200 gr con una capacità massima di 5000 gr) Il display mostrerà “---“ o “0g” ogni volta che viene premuto il tasto ZERO. 6 Bilancia da cucina elettronica Manuale di istruzioni Il simbolo “---“ significa che il peso non è stabile, attende qualche secondo. “0g” contemporaneamente al simbolo “TARA” (T) in alto a sinistra del display significa che la fun zione TARA è attiva. La capacità di peso massima diminuisce del peso totale di tutti gli ingredienti. Premendo il tasto ZERO è possibile vedere il peso totale di tutti gli ingredienti sopra la bilancia. Se si vuole pesare ancora ingredienti basta premere il tasto ZERO per resettare nuovamente il display a “0”. METODI DI PESATURA Fig. 8 La bilancia è in grado di misurare in grammi o in libbre. 1.premere il tasto nel retro per cambiare l’unità di misura tra grammi e libbre 2.premere il tasto MODE per 3 secondi per entrare nella modalità di cambiamento dell’unità di mi sura di solidi e liquidi. CONVERSIONE TRA MODALITA’ DI PESATURA E FUNZIONE OROLOGIO Fig. 9 INDICATORI DI ATTENZIONE Fig. 10 1.Sostituire la batteria 2.Bilancia sovraccaricata. Rimuovere gli ingredienti per evitare danni alla bilancia. La capacità di peso massimo è indicata nella bilancia. ALIMENTAZIONE 1. Rimuovere la bilancia dall’imballo. 2. Facendo molta attenzione, aprire il vano delle batterie posto sul retro della bilancia. 3. Inserire 3 batterie tipo AAA facendo molta attenzione alla polarità della batteria. 4. Chiudere il vano batterie. ATTENZIONE Le batterie scariche diventano pericolose per la possibile perdita di liquido elettrolita che è molto corrosivo. Per evitare danni all’apparecchio causati da tale eventualità, sostituire senza indugio le batterie scariche. Se la bilancia resta inutilizzata per un lungo periodo di tempo, si raccomanda di togliere le batterie dal relativo vano. Questo per evitare che il liquido corrosivo al suo interno possa fuoriuscire provo cando seri danni alla bilancia. EVENTUALI DANNI CAUSATI DAL LIQUIDO DELLE BATTERIE NON VENGONO RICO NOSCIUTI IN GARANZIA. SOSTITUZIONE BATTERIE Quando la bilancia non si accende e sul display compare la scritta “LO” o il suo funzionamento è anomalo significa che le batterie sono scariche. Sostituirle con altre nuove dalle stesse caratteristi che tecniche. Facendo attenzione, aprire il vano batteria posto sul retro della bilancia. Inserire la batteria nell’apposito vano secondo la corretta polarità. Attenzione alla corretta polarità di collegamento. L’errata installazione può provocare dan neggiamenti alla bilancia. Chiudere il vano batteria. 7 Bilancia da cucina elettronica Manuale di istruzioni Le batterie esauste devono essere smaltite mediante l’apposita rete di raccolta. Non gettare le bat terie nel fuoco. Non disperdere nell’ambiente le batterie. PULIZIA DELLA BILANCIA La bilancia può essere pulita con un panno morbido leggermente umidificato con acqua calda. Mai pulire con diluenti, prodotti abrasivi in genere; questi potrebbero danneggiare la superficie della bilancia. Non immergere la bilancia in acqua. Proteggere dalle infiltrazioni di liquidi. Tenere lontano dalla bilancia preparati per capelli, cosmetici o soluzioni da bagno; esse possono essere causa di danneggiamento delle parti estetiche e del circuito interno della bilancia. CARATTERISTICHE TECNICHE Portata massima : 10000 g Graduazione: 1 gr Alimentazione: 2 batterie tipo AAA In un’ottica di miglioramento continuo Beper si riserva la facoltà di apportare modifiche e migliorie al prodotto in oggetto senza previo preavviso. Il simbolo del cestino barrato riportato sull’apparecchio indica che il prodotto, alla fine della propria vita utile, dovendo essere trattato separatamente dai rifiuti domestici, deve essere conferito in un centro di raccolta differenziata per apparecchiature elettriche ed elettroniche oppure riconsegnato al rivenditore al momento dell’acquisto di una nuova ap parecchiatura equivalente. L’adeguata raccolta differenziata per l’avvio successivo dell’apparecchio al riciclaggio, al trattamen to e allo smaltimento ambientalmente compatibile contribuisce ad evitare possibili effetti negativi sull’ambiente e sulla salute e favorisce il recupero dei materiali di cui è composto. L’utente è responsabile del conferimento dell’apparecchio a fine vita alle appropriate strutture di raccolta. Per informazioni più dettagliate inerenti i sistemi di raccolta disponibili, rivolgersi al servizio locale di smaltimento rifiuti, o al negozio dove è stato effettuato l’acquisto. Chiunque abbandona o cestina questo apparecchio e non lo riporta in un centro di raccolta differen ziata per rifiuti elettrici-elettronici è punito con la sanzione amministrativa pecuniaria prevista dalla normativa vigente in materia di smaltimento abusivo di rifiuti 8 CERTIFICATO DI GARANZIA Questo apparecchio è stato controllato in fabbrica. La garanzia di applicazione è valida 24 mesi dalla data di acquisto per difetti di materiale o di fabbricazione. Lo scontrino di acquisto e il certificato di garanzia si devono presentare assieme nel caso di reclami. Se l’apparecchio dovesse richiedere assistenza tecnica rivolgersi al venditore o presso la nostra sede. Questo per conservare inalterata l’efficienza del vostro apparecchio e per NON invalidare la garanzia. Eventuali manomissioni dell’apparecchio da parte di personale non autorizzato invalide ranno automaticamente la garanzia. Condizioni di garanzia Se ci sono guasti a causa di difetti di materiale e/o fabbricazione durante il periodo di garanzia, garantiamo la riparazione del prodotto gratuitamente, a patto che: - l’apparecchio sia stato usato in modo corretto ed ai fini per cui è stato costruito; - l’apparecchio sia stato riparato da esperti, cioè da persone incaricate dal fornitore; - venga presentato lo scontrino; - non rientrano in garanzia le parti che dimostrano un normale logoramento. Sono quindi escluse tutte le parti che hanno subito rotture accidentali o che sono soggette ad usura (tra le quali lampade, batterie, resistenze) e difetti derivanti da un utilizzo non domestico dell’appa recchio, negligenza nell’uso o nella manutenzione, danni da trasporto e tutti quei danni non imputa bili direttamente al produttore. Se entro il periodo di garanzia emerge un difetto che non può essere riparato, l’apparecchio viene cambiato gratuitamente. Assistenza tecnica Anche dopo il periodo di garanzia prestiamo molta attenzione alle riparazioni. Per l’assistenza tecnica e/o riparazioni fuori dal periodo di garanzia ci si può rivolgere direttamente all’indirizzo sottostante. BEPER SRL Via Salieri, 30 37050 - Vallese di Oppeano - Verona Tel. 045/7134674 – Fax 045/6984019 e-mail: [email protected] Electronic kitchen scale Use instructions PRECAUTIONS READ CAREFULLY THESE INSTRUCTIONS BEFORE USING THE DEVICE. Before and when using the device it is necessary to follow basic instructions . After removing packaging make sure the device is intact. If any doubt do not use the device and contact a professional. The elements of the packing (plastic bags, polystyrene, etc) do not have to be accessible to the children, in order to preserve them from danger sources. This device is to be destined to its special purpose only. Any other use is to be considered as impro per and thus dangerous. The manufacturer cannot be responsible for any damages deriving from improper, wrong or incautious use. This device is for HOUSEHOLD USE ONLY. The installation must be made according to the instructions of the manufacturer. A bad installation can cause damages to people, pets or objects, for those the manufacturer cannot be responsible, and avoid the warranty. Do not touch the device with damp or wet hands. Do not use the device with naked feet. Do never immerge the device into water or other liquids. Do not expose the device to atmospheric agents such as rain, sun, etc. Do not use the device outdoors. Do not place the device near to a heat source (ex : heater). Protect the device from water spray. This device cannot be used by disabled people or children ; by people with a lack of experience or knowledge of the device, except if there is a close supervision by a person responsible of their security. Make sure that children do not play with the device. When no longer used it is recommended to remove the batteries, and remove all the parts of the device that could be dangerous, particularly for children that could use the device for playing. USE PRECAUTIONS In case of breakdown and/or bad use, turn off the scale and do not manipulate it. For make it repai red only contact the assistance centre authorized by the manufacturer and ask for original spare parts. The non-respect of these rules may compromise your security. Do not let children or disabled peoples using the scale without supervision. Keep away from pets. The scale has been manufactured only for household use and not for commercial purpose. Place the scale on a flat, smooth and stable surface or hooked to the wall, to ensure a perfect use. Place the scale away from heat source, moisture, and on a safe and stable position. Do not place the scale near to radio, tv (but at least 1,5 meter) to avoid electromagnetic interferen ces that could avoid the scale to work correctly. Do not immerge the scale into water. Do not introduce liquids into the scale, spay water or detergent directly on the device. The food must be packed or placed into a container in order to not to touch directly the scale. Do not strongly press the scale switch or with sharp objects (pen, pencil, etc). Do not let objects of food for too long on the scale, the weight must be quite quick. When finished, make sure no objects remain on the scale platform. Do not make the scale fall to the floor or being struck. Before using the scale remove the transparent film of the battery case, if necessary. When turn on the scale, check the batteries and polarity if the display doesn’t’ work. If the problem persists, the batteries may be damaged ; replace them with new ones. Only use the same kind of batteries as written in the instruction manual. If the scale is broken or damaged, due to bad use and non respect of the rules written above, the warranty becomes void. 10 ENGLISH Electronic kitchen scale Use instructions LCD DISPLAY Fig. 1 1. Tare weight 2. Negative value 3. Zero weight 4. Weight mode 5. Milk volume mode 6. Water volume mode 7. Weight unit (lb:oz) 8. Volume unit (fl’oz) 9. Volume unit (ml) 10. Weight unit (g) 11. AM/PM hour TO SWITCH ON AND TO SET TIME Fig. 2 1. Install battery and enter time setting mode automatically. When hour display is flashing, touch MODE to set hour. Please mind AM/PM selection during set ting. 2. Press to confirm and prompt to minute setting. When minute display is flashing, press MODE to set minute. 3. Press to finish time setting and enter weighing mode. Remark: In time setting process, enter weighing display automatically after idling for 60 seconds. After entering weighing mode, return to real time display automatically after idling for 60 seconds. Remark: The time mode (12/24 hour) depends on sales destination or the requirement of distributor. TO RE-SET TIME Fig. 3 Under real time display mode, press for 3 seconds to enter time setting mode. Set hour first, then minute. Press to adjust time and for confirmation. (Continuous pressing will speed up the advance of value). UNIT CONVERSION BUTTON Fig. 4 The unit conversion button is placed under the scale. It is possible to choose between g, and millimetres ml, and pounds lb and fluid ounce fl’oz. Press MODE button to choose the weight unit to calculate between weight, water and milk volume. TO START WITH WEIGHING Fig. 5 1.Weighing mode A. Place the scale on a solid and flat surface. B. Gently press on the scale by hand to wait until LCD shows “0”. C. If LCD shows weighing mode, please enter to Step D directly. If LCD shows volume mode, please press MODE to convert to weighing mode, and then enter Step 11 Electronic kitchen scale Use instructions D. Load weighing object on scale (or bowl) to start weighing, LCD will show the weighing reading. E. Place bowl (if used) on the scale and tare the reading before weighing. ( Tare function described additionally). 2. Volume indication mode Fig. 6 A. Place the scale on a solid and flat surface B. Gently press MODE on the scale by hand to wait until LCD shows “0 “ C. Press MODE to convert to Water or Milk mode (Refers to mode setting specifically) D. Put a liquid container onto the scale platform, LCD shows the weight of container. E. Press MODE to reset “0” and tare. F. Pour liquid (water or milk) into the container, LCD shows the volume of the liquid. G. Press MODE to convert to weighing mode, and check the weight of liquid. UNIT AND MODE SETTING Fig. 7 If the scale is with both measuring systems of Metric (g,kg) and Imperial (oz,lb), you can press “unit” convert between two systems during the course of weighing: 1. Press shortly to convert weight unit between Metric and Imperial systems. 2. Press MODE for 3 seconds to enter mode setting and convert between weighing mode and vo lume mode (water or milk). ZERO OR TARE FUNCTION Fig. 8 To weigh different loads consecutively without removing loads from the scale. Put first load on the scale, get weight reading. Press ZERO button to reset the LCD reading to “0” before adding next load. You can repeat this operation. ZERO FUNCTION : When total sum of all loads on scale is lower or equal to 4% of scale’s max. weight capacity (200 gr when capacity is 5000 gr) LCD shows “---“ or “0g” each time ZERO is pressed. “---“ means not stable, please wait for a moment. “0g” and meanwhile an icon “o” on lower left corner of LCD mean ZERO function is active. Max. weight capacity remains unchanged. TARE FUNCTION : When total sum of all loads on scale is bigger than 4% of scale’s max. weight capacity (200 gr when capacity is 5000 gr) LCD shows “---“ ou “0g” each time ZERO is pressed. “---“ means not stable, please wait for a moment. “0g” and meanwhile an icon “TARE” (T) on upper left corner of LCD mean TARE FUNCTION is active. Max. weight capacity is reduced by total weight of all loads. By pressing ZERO you can see the total weight of all loads on the scale. If you want to weigh more loads, just press ZERO to reset LCD reading to “0” again. 12 Electronic kitchen scale Use instructions TO CONVERT BETWEEN WEIGHING MODE AND REAL TIME DISPLAY MODE Fig. 9 WARNING INDICATORS Fig. 10 1.Replace new battery 2.Scale overload. Remove item to avoid damage. Max. weight capacity is indicated on the scale. POWER 1. Remove the scale from the packing. 2. Open the battery case. 3. Insert 3 batteries type AAA (3V) paying attention to polarity. 4. Close the battery case. ATTENTION Low battery become dangerous for the possible loss of very corrosive liquid. To avoid any damage, replace the battery as soon as necessary. If the scale is not used for a long period, it is recommended to remove battery from the case, in order to avoid damages with the corrosive liquid into the scale. EVERY DAMAGES CAUSED BY BATTERY LIQUID WILL VOID THE WARRANTY. TO INSTALL AND REMPLACE BATTERY When the scale does not turn on anymore or the LCD shows “LO” or if does not work correctly, that means that the battery is low. Replace it with new one. Open the battery case and insert battery new battery respecting polarity. A bad use can cause damages to the scale. Close the battery case. The used battery have to be recycled. Do not throw into fire or environment. CLEANING Clean the scale with a slightly damp cloth. Do never clean with thinners, abrasive substances that could damage the surface of the scale. Do not immerse the scale into water. Protect the device from liquids. Keep the scale away from hair detergent, cosmetics or bath detergents that could damage the scale. FEATURES Maximum weight: 10000 g/ 11 lb Graduation : 1 g/ 1 Oz Power : 2 batteries type AAA, 3 V For any improvement reasons, Beper reserves the right to modify or improve the product without any notice. 13 Electronic kitchen scale Use instructions The European directive 2011/65/EU on Waste Electrical and Electronic Equipment (WEEE), requires that old household electrical appliances must not be disposed of in the normal unsorted municipal waste stream. Old appliances must be collected separately in order to optimize the recovery and recycling of the materials they contain, and reduce the impact on human health and the environment. The crossed out “wheeled bin” symbol on the product reminds you of your obligation, that when you dispose of the appliance, it must be separa tely collected. 14 GUARANTEE CERTIFICATE This appliance has been checked in the factory. From the date of original purchase a 24 month guarantee applies to material and production defects. The purchase receipt and the guarantee cer tificate must be submitted together in case of claim to guarantee. For any technical assistance, please contact directly the seller or our head office in order to preserve the appliance’s efficiency and NOT TO void the guarantee. Any intervention on this appliance by non-authorized persons will automatically void the guarantee. Guarantee conditions If the appliance shows defects as a result of faulty material and/or production during the period of guarantee, we guarantee repair free of charge on condition that: - The appliance has been used properly and for the purpose for which it has been intended. - Repairs are professionally carried out by qualified persons who are appointed by the supplier. - The purchase receipt shall be presented. - The appliance showing a fair wear and tear shall not be covered by this guarantee. Therefore, any part that could be accidentally broken or having visible signs of use in consuma ble products (such as lamps, batteries, heating elements…) is excluded from the guarantee, and any defect whatsoever resulting from non-respect of the rules for use, negligence in usage and/or maintenance of the appliance, damage during transport and any other damage not attributable the supplier. For every defect that could not be repaired within the guarantee period, the appliance will be repla ced free of charge. Technical assistance Even after the guarantee period we will always pay attention to repairs for defected appliances. For technical assistance and/or repairs after the guarantee period you can directly contact the below address: CONTACT YOUR DISTRIBUTOR IN YOUR COUNTRY OR AFTER SALES DEPARTMENT BEPER. E-MAIL [email protected] WHICH WILL FORWARD YOUR ENQUIRIES TO YOUR DISTRIBUTOR. Balance de cuisine électronique Manuel d’instructions PRECAUTIONS LIRE ATTENTIVEMENT CES INSTRUCTIONS AVANT D’UTILISER L’APPAREIL. Avant et pendant l’utilisation de l’article il est nécessaire de suivre quelques précautions élémen taires. Après avoir retirer l’emballage s’assurer de l’intégrité de l’article. En cas de doute ne pas utili ser l’article et s’adresser à un professionnel qualifié. Les éléments d’emballage (sacs plastique, polystyrène, etc.) ne doivent pas être laissés à la portée des enfants, car potentielles sources de danger. Cet article est destiné uniquement à l’usage pour lequel il a été expressément conçu. Tout autre utilisation sera considérée comme inadaptée et donc dangereuse, et annulera la garantie. Le con structeur ne peut être tenu pour responsable pour d’éventuels dommages dérivants d’une mauvaise utilisation ou inadaptée. L’installation doit être effectuée selon les instructions du constructeur. Une mauvaise installation peut causer des dommages aux personnes, animaux ou objets, pour lesquels le constructeur ne peut être tenu pour responsable, et faire annuler la garantie. Ne pas toucher l’article avec les mains mouillées ou humides. Ne pas utiliser l’article avec les pieds nus. Ne jamais immerger l’article dans l’eau ou d’autres liquides. Ne pas exposer l’article aux agents atmosphériques tels que la pluie, le soleil, etc. Ne pas utiliser l’article en extérieur. Ne pas placer l’article près de sources de chaleur (ex : radiateur). Protéger l’article de jets d’eau. Cet article ne doit pas être utilisé par des personnes (y compris les enfants) avec des capacités physiques, sensorielles, ou mentales réduites ; par des personnes qui manquent d’expérience ou de connaissances de l’article, à moins qu’elles ne soient attentivement surveillées ou bien informées sur l’utilisation de l’article par une personne responsable de leur sécurité. S’assurer que les enfants ne jouent pas avec l’article. Lors de la destruction de l’appareil il est recommandé d’enlever les piles, de rendre inactives toutes les parties de l’appareil pouvant constituer un danger, en particulier pour les enfants qui pourraient utiliser l’appareil comme un jouet. PRECAUTIONS D’USAGE En cas de panne et/ou mauvais fonctionnement, éteindre la balance et ne pas la manipuler. Pour d’éventuelles réparations s’adresser uniquement au centre d’assistance autorisé par le constructeur et demander les pièces originales. Le manquement du respect des indications précédemment énoncées peut compromettre votre sécurité. Ne pas laisser les enfants ou personnes avec un handicap utiliser la balance, sans surveillance. Tenir hors de portée des animaux domestiques. Cette balance est uniquement destinée à usage domestique et non commercial. Placer la balance sur une surface plate, lisse et stable ou accrochée au mur, pour assurer un parfait fonctionnement. Placer la balance loin de sources de chaleur, de l’humidité, dans des points où elle ne puisse pas causer de dommage en choisissant la position la plus sûre et stable. Ne pas placer la balance proche de radio, tv (mais à une distance d’au moins 1,5 mètre) pour éviter les interférences électromagnétiques qui pourraient entraîner un mauvais fonctionnement de la balance. Ne pas immerger la balance dans l’eau. Ne pas faire pénétrer de liquide à l’intérieur de la balance, ni vaporiser d’eau ou de détergent di rectement sur la balance. 16 Balance de cuisine électronique Manuel d’instructions FRANÇAIS Les aliments à peser doivent être emballés ou disposés à l’intérieur d’un contenant de façon à ne pas être en contact direct avec la balance. Ne pas appuyer violemment sur les touches de la balance ou avec des objets pointus (stylo, cra yons, etc). Ne pas laisser d’objets ou d’aliment sur la balance trop longtemps. La pesée doit être relativement rapide. Une fois le pesée terminée, s’assurer qu’aucun objet ne reste sur le plateau de la balance ; la balance ne doit pas être utilisée comme soutien ou plan d’appui. Ne pas faire tomber la balance ni provoquer de chocs violents. Avant d’utiliser la balance retirer la pellicule transparente du compartiment à piles, si présente. Lors de l’allumage de la balance, s’il rien ne s’affiche, contrôler les pile set respecter la polarité. Si le problème persiste, les piles pourraient être déchargées. Les remplacer par de nouvelles piles. Utiliser exclusivement le type de piles indiqué dans le livret d’instructions. La casse ou dommage occasionnés à la balance, dus à une mauvaise utilisation et non respect des règles énoncées dans ce manuel, ne sont pas reconnus par la garantie. ECRAN Fig. 1 1. Tare 2. Valeur négative 3. Mise à zéro 4. Modalité pesée 5. Modalité volume lait 6. Modalité volume eau 7. Unité de pesée (lb:oz) 8. Unité de volume (fl’oz) 9. Unité de volume (ml) 10. Unité de pesée (g) 11. AM/PM CONFIGURATION DE L’HEURE Fig. 2 1.Installer les piles, la balance entre automatiquement dans la modalité de la configuration de l’heu re. Quand l’heure clignote sur l’écran, appuyer sur la touche MODE pour mettre l’heure. Faire attention à la légende AM (matin) et PM (après-midi). 2.Appuyer sur le pulsant de conversion de l’unité de mesure pour confirmer et procéder à la configuration des minutes. 3.Appuyer sur le pulsant de conversion pour finir la configuration de l’heure et entrer dans la modalité de pesage. RÉINITIALISER L’HEURE Fig. 3 Quand l’écran montre l’heure, appuyer sur le pulsant de configuration pour 3 minutes, pour entrer dans la modalité de configuration. Configurer avant l’heure et puis les minutes. Appuyer sur le pulsant MODE pour configurer l’heure et pour confirmer. 17 Balance de cuisine électronique Manuel d’instructions TOUCHE DE CONVERSION Fig. 4 La touche de conversion des unités de mesure se trouve sous la balance. Il est possible de choisir entre grammes g, et millilitres ml, et entre livres lb et millilitres fl’oz. Appuyer sur la touche MODE pour choisir l’unité de mesure à calculer entre le poids, volume d’eau et de lait. PESÉE Fig. 5 1.Placer la balance sur une surface plate et solide. 2.Mettre le bol de la balance avant d’allumer l’appareil. 3.Appuyer sur la touche on/off pour activer la modalité de pesée. 4.Attendre que l’écran montre toutes les informations. 5.Placer les aliments à peser dans le bol et commencer la pesée, l’écran indiquera le poids. 6.Si l’aliment à peser est de l’eau ou di lait, appuyer sur la touche MODE pour choisir l’unité de mesure volume adaptée, l’écran indiquera le volume pesé. VOLUME Fig. 6 1.Placer la balance sur une surface plate et solide. 2.Appuyer sur la touche on/off pour allumer la balance. 3.Attendre que l’écran affiche “0” et appuyer sur la touche MODE pour choisir l’unité de mesure volume d’eau ou de lait. 4.Placer le bol des liquides à peser sur la balance. 5.Appuyer sur la touche ZERO pour remettre l’écran à “0”. 6.Mettre les liquides à mesurer dans le bol, l’écran affichera le volume. 7.Appuyer sur la touche MODE pour choisir l’unité de mesure du poids, l’écran affichera le poids de l’aliment. FONCTION ZERO ET TARE Fig. 7 Cette fonction est utilisée pour peser divers aliments successivement sans les retirer de la balance. Mettre les ingrédients sur la balance, lire le poids. Appuyer sur la touche ZERO pour remettre l’écran à “0” avant d’ajouter un autre ingrédient. Il est possible de répéter plusieurs fois cette opération. FONCTION ZERO: Quand la somme totale de tous les ingrédients sur la balance est inférieure ou égale à 4% de la capacité maximum de la balance (200 gr avec une capacité maximum de 5000 gr) L’écran affichera “---“ o “0g” à chaque pression de la touche ZERO. Le symbole “---“ signifie que le poids n’est pas stable, attendre quelques secondes. L’affichage “0g” avec le symbole “o” en bas à gauche de l’écran indique que la fonction ZERO est active. La capacité maximum de pesée reste inchangée. FONCTION TARE : Quand la somme de tous les ingrédients sur la balance est supérieure à 4% de la capacité de poids maximum de la balance (200 gr avec une capacité maximum de 5000 gr) L’écran affichera “---“ o “0g” à chaque pression de la touche ZERO. Le symbole “---“ signifie que le poids n’est pas stable, attendre quelques secondes. L’affichage “0g” avec le symbole “TARE” (T) en haut à gauche de l’écran indique que la fonction tare est active. La capacité de pesée maximum diminue en fonction du poids total de tous les in grédients. 18 Balance de cuisine électronique Manuel d’instructions En appuyant sur la touche ZERO il est possible de voir le poids total de tous les ingrédients sur la balance. Si vous souhaitez encore peser des aliments, il suffit d’appuyer sur la touche ZERO pour remettre à nouveau l’écran à “0”. MÉTHODES DE PESAGE Fig. 8 La balance est dans la mesure de mesurer en grammes et en livres. 1.Appuyer sur le bouton à l’arrière pour changer l’unité de mesure en grammes et en livres. 2.Appuyer sur le pulsant MODE pour 3 secondes, pour entrer dans la modalité de changement de l’unité de mesure, de solides et de liquides. CONVERSION ENTRE LA MODALITÉ DE PESAGE ET LA FONCTION DE L’HORLOGE Fig. 9 INDICATEURS Fig. 10 1.Changer les piles 2.Balance surchargée. Retirer les ingrédients pour éviter d’endommager la balance. La capacité de poids maximum est indiquée sur la balance. ALIMENTATION 1. Retirer la balance de son emballage. 2. Ouvrir le compartiment à piles situé au dos de la balance, en faisant attention. 3. Insérer les 3 piles plates type AAA (3V) en faisant attention à la polarité. 4. Fermer le compartiment à piles. ATTENTION Les piles déchargées deviennent dangereuses pour la perte possible de liquide très corrosif. Pour éviter tout dommage de l’appareil, remplacer sans attendre les piles déchargées. Si la balance est inutilisée pendant une longue période, il est recommandé de retirer les piles du compartiment, ceci pour éviter que le liquide corrosif ne se répande à l’intérieur provoquant des dommages à la balance. LES EVENTUELS DOMMAGES CAUSES PAR LE LIQUIDE DES PILES NE SONT PAS RECONNUS PAR LA GARANTIE. REMPLACEMENT DES PILES Quand la balance ne s’allume plus et l’écran affiche “LO” ou son fonctionnement semble anormal, cela signifie que les piles sont déchargées. Les remplacer avec des piles identiques neuves. Ouvrir avec soin le compartiment à piles situé au dos de la balance. Insérer les piles en respectant la polarité. Une mauvaise installation peut provoquer des dommages à la balance. Refermer le compartiment à piles. Les piles usées doivent être détruites selon les normes en vigueur. Ne pas jeter les piles dans le feu ni dans l’environnement. 19 Balance de cuisine électronique Manuel d’instructions NETTOYAGE DE LA BALANCE La balance peut être nettoyée avec un chiffon doux légèrement humidifié avec de l’eau chaude. Ne jamais nettoyer avec des diluants, produits abrasifs en général ; ceux-ci pourraient endommager la surface de l’appareil. Ne pas immerger la balance dans l’eau. Protéger l’appareil des infiltrations de liquides. Tenir la balance loin de produits capillaires, cosmétiques ou produits pour le bain ; ceux-ci pourra ient endommager les parties esthétiques et circuit interne de la balance. CARACTERISTIQUES TECHNIQUES Portée maximum : 10000 g Graduation : 1 g/ 1 Oz Alimentation : 2 piles type AAA Dans une optique d’amélioration constante Beper se réserve le droit de modifier ou améliorer cet appareil sans préavis. Le produit en fin de vie doit être détruit selon les normes en vigueur relatives à l’élimination des déchets et ne peut être traité comme simple déchet ménagé. Le produit doit être détruit dans un centre d’élimination des déchets adapté ou être restitué au revendeur dans le cas d’une substitution avec un autre produit équivalent neuf. Le fabricant prendra à sa charge les frais occasionnés pour la destruction du produit selon les termes de la loi en vigeur. Le produit est composé de pièces non biodégradables et substances qui peuvent polluer l’environ nement si détruites de façon inapropriée . Par ailleurs, certaines parties de ces matières peuvent être recyclées évitant ainsi toute pollution pour l’environnement. Il est de votre et notre devoir de préserver la santé de l’environnement. Le symbole indique que le produit répond aux normes requises par les nouvelles directives introduites en faveur de l’environnement (2011/65/EU) et que le produit doit être détruit de façon appropriée au terme du cycle de vie. Si besoin, informez-vous auprès des autorités locales compétentes en matière d’élimination des déchets de votre commune. Toute personne qui ne tiendra pas compte de ces règles d’élimination des déchets indiquées dans ce paragraphe en répondra selon la loi en vigueur. 20 CERTIFICAT DE GARANTIE Cet appareil a été contrôlé en usine. La garantie est valable 24 mois à partir de la date d’achat pour tout défaut de matériel ou de fabrication. En cas de réclamation, le ticket de caisse et la garantie devront être présentés ensemble. En cas de besoin et pour toute assistance technique, veuillez contacter votre revendeur ou vous adresser à notre siège. Cela vous permettra de conserver votre appareil dans de meilleures con ditions et de NE PAS invalider la garantie. Toute manipulation de l’appareil par une personne non autorisée ou non qualifiée annulera automatiquement la garantie. Conditions de garantie Pendant la durée de garantie, si des pannes provenant d’un défaut de materiel et/ou de fabrication apparaissent, nous assurons gratuitement la réparation aux conditions énoncées ci-dessous : - l’appareil a été correctement utilisé et ce uniquement à l’usage pour lequel il a été fabriqué ; - l’appareil a été réparé par des experts, c’est-à-dire par des personnes mandatées par le fournis seur ; - la présentation du ticket de caisse est obligatoire; - les pièces présentant les signes évidents d’usure ne sont pas pris en compte dans la garantie. En conséquence, sont exclus de la garantie toutes les pièces qui auraient subi des dommages accidentels ou présentant des signes d’usure normale (parmi lesquelles, ampoules, batteries, piles, résistances), toutes les pièces comportant des défauts dus à la non utilisation domestique, la négli gence dans la manipulation et l’entretien, les dommages lors du transport et tous les dommages non imputables directement au producteur. Si un défaut survient lors de la période de garantie et ne peut être réparé, l’appareil sera remplacé gratuitement. Assistance technique Même après la fin de la garantie, nous accordons toujours une grande importance à la reparation. Pour toute assistance technique et/ou reparations en dehors de la garantie, veuillez vous adresser directement à l’adresse ci-desous : LE SERVICE APRÈS-VENTE EST EFFECTUÉ PAR VOTRE REVENDEUR OU PAR L’IMPORTATEUR/DISTRIBUTEUR DES PRODUITS BEPER. ÉCRIVEZ UN E-MAIL AU [email protected] POUR CONNAITRE LE CENTRE SERVICE AGRÉE BEPER LE PLUS PROCHE DE CHEZ VOUS. Elektronische Küchenwaage Betriebsanleitung GEBRAUCHSANWEISUNGEN Im Fall von Defekt oder Funktionsstörungen, Gerät sofort ausschalten. Sollten sich Störungen erweisen, darf die Reparatur oder der Ersatz von originellen Teilen nur von genehemigten Fachkräf ten durchgeführt werden. Andernsfalls wird die Garantie als ungültig erklärt. Gerät für unbewachte Kinder und Ungeschickten nicht geeignet. Gerät von Tieren fern halten. Küchenwaage ist nur für den Hausgebrauch vorgesehen. Küchenwaage für die richtige Inbetriebnahme auf einen festen ebenen Untergrund aufstellen oder an die Wand hängen. Küchenwaage von Heizquellen und Wasser fern halten. Gerät stabil und sicher aufstellen, indem es keine Gefahren und Schäden anrichtet. Küchenwaage entfernt (wenigstens 1, 5 m) von Radioanlagen und TV halten, um elektromagneti sche Wellen zu vermeiden, die Betriebsstörungen verursachen könnten. Gerät niemals in Wasser tauchen. Kontakt mit Flüssigkeiten verhindern, kein Wasser bzw. Reinigungsmittel direkt auf der Küchenwa age sprühen. Direkten Kontakt mit den Lebensmitteln verhindern. Sie müssen immer in der Verpackung bzw. in einem Behälter gewogen werden. Küchenwaageknöpfe leicht und ohne spitze Objekte (Bleistift, Füller, usw.) drücken. Belasten Sie die Plattform ausschließlich zum Abwiegen. Lassen Sie nach dem Wiegen nichts auf der Plattform liegen, weil es sonst zu Funktionsstörungen kommen kann! Das Abwiegen soll relativ schnell sein. Nach dem Abwiegen soll der Wiegeteller der Küchenwaage leer sein; Gerät soll nicht als Unterstützung oder Arbeitsfläche benutzt werden. Küchenwaage nicht fallen lassen oder heftig stoßen. Vor der ersten Inbetriebnahme der durchsichtige Film (wenn enthalten) im Batteriefach heraus ziehen. Beim Einschalten des Geräts überprüfen Sie die richtige vorgeschriebene Polrichtung, wenn das Display keine Meldung gibt. Sollte das Problem ungelöst bleiben, können die Batterien erschöpft sein. Neue Batterien einlegen. Nur die in der Bedienungsanleitung genannten Batterien benutzen. Die Beschädigung der Küchenwaage, die von der Nichteinhaltung der Bedienungsanleitung ent steht, wird nicht durch die Garantie gedeckt. DISPLAY Fig. 1 1. Tara-Funktion 2.negatives Vorzeichen 3.Gewicht-Reset 4.Abwiegen-Modus 5.Milchvolumen 6. Wasservolumen 7. Gewichtseinheit (lb:oz) 8. Volumeneinheit (fl’oz) 9. Volumeneinheit (ml) 10. Gewichtseinheit (g) 11. Heute AM/PM 22 Elektronische Küchenwaage Betriebsanleitung UHREINSTELLUNG Fig. 2 1.Sobald die Batterien einlegt werden, ist die Waage bereit für die Einstellung der Uhrzeit. Wenn die Uhrzeit im Display blinkt, drücken Sie die MODE-Taste zur Einstellung der Uhrzeit. Beachten Sie auf AM (Vormittag) und PM (Nachmittag) während der Einstellung der Uhrzeit. 2.Umschaltungstaste zur Einstellung und Bestätigung der gewünschten Gewichtseinheit drü cken. Vorgang für die Einstellung der Minuten wiederholen. 3.Umschaltungstaste betätigen. am Ende der Uhrzeiteinstellung drücken und um die Wiegefunktion zu UHRZEIT ERNEUT EINSTELLEN Wenn die Uhrzeit im Display erscheint, drücken Sie die Umschaltungstaste 3 Sekunden lang, um die Uhrzeit einzustellen. Stellen Sie zunächst einmal Uhr und dann Minuten ein. WIEGEFUNKTION Fig. 3 Die Waage kann sowohl in Gramm als auch in Pfund wiegen. 1.Taste hinter des Geräts je nach der gewünschten Gewichtseinheit betätigen. 2.MODE-Taste ca. 3 Sekunden zur Auswahl der Gewichts- bzw. Volumeneinheit (für Flüs sigkeiten) drücken. UMSCHALTUNGSKNOPF Fig. 4 Ein Umschaltungsknopf der Maßeinheit steht unter der Küchenwaage. Die Anzeige kann zwischen Gewicht und Volumen umgeschaltet werden. Das heißt, Flüs sigkeiten wie Milch und Wasser können für das Gewicht in lb:oz bzw. g und für das Volu men in ml bzw. fz’oz angezeigt werden. MODE-Taste drücken, um die Maßeinheit für Gewicht und Milch-und Wasservolumen au szuwählen DEUTSCH MODE-Taste zur Einstellung der Uhrzeit und zur Bestätigung drücken. WIEGEN Fig. 5 1. Küchenwaage auf eine ebene und feste Fläche aufstellen. 2. Vor der Einschaltung legen Sie den Behälter für das Wiegen auf die Küchenwaage. 3. ON/OFF-Schalter zum Wiegen der Lebensmittel betätigen. 4. Warten Sie ab, dass alle Informationen im Display erscheinen. 5.Wägegut in den Behälter legen und Werte ablesen. Vorgang für andere Wägegut wie beschrieben wiederholen. 6. Sollten Sie Wasser bzw. Milch wiegen, drücken Sie die MODE-Taste zur Auswahl der Volume neinheit. Im Display wird dann das Gewicht gezeigt. LAUTSTÄRKE Fig. 6 1. Küchenwaage auf eine feste und ebene Fläche aufstellen. 2. ON/OFF-Schalter zur Einschaltung des Geräts betätigen. 3. Warten Sie ab, bis „0“ im Display erscheint. MODE-Taste zur Auswahl der Volumeneinheit Wasser bzw. Milch betätigen. 4. Behälter der zu wiegenden Flüssigkeiten auf die Waage auflegen. 5. ZERO drücken, um das Gerät auf „0“ wieder zu tarieren. 23 Elektronische Küchenwaage Betriebsanleitung 6. Flüssigkeiten in dem Behälter hineingießen. Das Volumen erscheint dann im Display. 7. MODE-Taste zur Auswahl der Gewichtseinheit betätigen. Im Display erscheint das Gewicht der Lebensmittel. NULL-FUNKTION UND TARIEREN Diese Funktion dient zum Wiegen von unterschiedlichen Zutaten hintereinander, ohne sie von der Küchenwaage zu entfernen. Wägegüter auf die Waage auflegen und Gewichtswert ablesen. Taste ZERO drücken, um Reset vorzunehmen, bevor Sie das neue Wägegut auflegen. Diesen Vor gang können Sie mehrmals wiederholen. Der maximale Wiegebereich bleibt unverändert NULL-FUNKTION: Wenn das gesamte Gewicht von allen Wägegütern weniger (oder =) als 4% des maximalen Wiege bereichs ist (i.e. 200 gr mit einem maximalen Wiegebereich von 5000 gr), erscheint im Display „---“ oder „0g” jedes Mal, dass die Taste ZERO gedrückt wird. Beim Symbol „---“ ist das Gewicht nicht stabil. Warten Sie einige Sekunden ab. „0g“ zusammen mit dem Symbol „o“ unten links im Display heißt, dass die NULL-FUNKTION aktiv ist. TARIEREN: Wenn das gesamte Gewicht aller Wägegüter über 4% des maximalen Wiegebereich ist, (i.e. 200 gr mit einem maximalen Wiegebereich von 5000 gr), erscheint im Display „---“ oder „0g” jedes Mal, dass die Taste ZERO gedrückt wird. Beim Symbol „---“ ist das Gewicht nicht stabil. Warten Sie einige Sekunden ab. „0g“ zusammen mit dem Symbol „TARA“ (T) oben links im Display heißt, dass die TARA-FUNKTION aktiv ist. Der maximale Wiegebereich wird niedriger im Vergleich zum gesamten Gewicht. Beim Betätigen der Taste ZERO erscheint im Display das gesamte Gewicht von allen Zutaten, die auf die Küchenwaage aufgelegt wurden. Wenn Sie die Zutaten erneut wiegen möchten, drücken Sie nochmal die Taste ZERO, um das Di splay wieder auf „0“ einzustellen. AUTOMATISCHE ABSCHALTUNG Fig. 7 Gerät wird automatisch abgeschaltet, wenn „0“ bzw. das gleiche Gewicht länger als 2 Minuten im Display erscheinen. MANUELLE ABSCHALTUNG Fig. 8 Zu einer besseren Leistung der Batterien drücken Sie immer den ON/OFF-Schalter nach dem Ge brauch zur kompletten Ausschaltung des Geräts. Hinweis: wenn „0“ im Display erscheint, drücken Sie den ON/OFF-Schalter zur Ausschaltung des Geräts: wenn das Gewicht von dem Wägegut im Display erscheint, drücken Sie den ON/OFFSchalter 3 Sekunden lang zur Ausschaltung des Geräts. MELDUNGEN 1. neue Batterien einlegen. 2. Die Waage ist überlastet. Entfernen Sie die Zutaten, um keine Schäden anzurichten. Der maxi male Wägebereich ist auf dem Gerät gezeigt. 24 Elektronische Küchenwaage Betriebsanleitung LEISTUNG 1.Verpackungsmaterial komplett auspacken. 2.Batteriefach hinter der Küchewaage vorsichtig öffnen. 3. Drei Batterie 3 Typ AAA unter Berücksichtigung der richtigen Polrichtung einlegen. 4.Batteriefach wieder schließen. HINWEIS Erschöpfte Batterien können wegen Verlust von extrem korrosiver elektrolytischen Flüssigkeit sehr gefährlich sein. Batterien so oft wie nötig ersetzen, um solche Schäden zu vermeiden. Batterien aus dem Gerät entfernen, wenn Sie das Gerät für längere Zeit nicht verwenden. Batterien enthalten Chemikalien. Wenn diese auslaufen, können Beschädigungen an Gegenstän den und körperliche Verletzungen entstehen. DIE GARANTIE WIRD FÜR UNGÜLTIG ERKLÄRT IM FALL FÜR DIE OBEN GENANNTEN SCHÄDEN. BATTERIENERSATZ Die Batterien sind erschöpft, wenn die Küchenwaage eingeschaltet ist und auf dem Display die Meldung “LO” erscheint oder wenn das Gerät nicht läuft. Mit neuen Batterien von dem selben Typ ersetzen. Batteriefach hinter der Küchenwaage vorsichtig öffnen. Batterien unter Berücksichtigung der richtigen Polrichtung in dem geeigneten Fach einlegen. Beachten Sie die richtige Polrichtung. Eine fehlerhafte Installation kann das Gerät beschädigen. Batteriefach wieder schließen. Erschöpfte Batterien müssen nach dem geeigneten Versammlungsnetz entsorgt. Verbrauchte Batterien niemals in Feuer werfen. Nach dem Gebrauch ordnungsgemäß entsorgen. UMSCHALTUNG ZWISCHEN WIEGEFUNKTION UND UHRFUNKTION Fig. 9 REINIGUNG UND PFLEGE Küchenwaage kann mit einem weichen und mit warmen Wasser angefeuchten Tuch gereinigt. Keine Schleifmittel bzw. Verdünnungsmittel für die Reinigung; sie können die Außenseiten des Geräts beschädigen. Küchenwaage niemals in Wasser tauchen. Kontakt mit Flüssigkeiten vermeiden. Gerät von Haar-und Körperpflegeprodukten und Kosmetika fern halten; sie können die Warenästhe tik und den Stromkreis beschädigen. Ein Umschaltungsknopf der Maßeinheit steht unter der Küchenwaage. Die Anzeige kann zwischen Gewicht und Volumen umgeschaltet werden. Das heißt, Flüssigkeiten wie Milch und Wasser können für das Gewicht in lb:oz bzw. g und für das Volumen in ml bzw. fz’oz angezeigt werden. MODE-Taste drücken, um die Maßeinheit für Gewicht und Milch-und Wasservolumen auszuwählen. 25 Elektronische Küchenwaage Betriebsanleitung TECHNISCHE DATEN Tragkraft: 10000g Teilung: 1 g/ 1 Oz Leistung: 2 Batterie X Typ AAA In Hinblick auf eine Verbesserungsperspektive behält sich Beper das Recht vor, das betreffende Produkt ohne Voranmeldung zu ändern bzw. umzubauen. Die WEEE-Richtlinie (von engl.: Waste Electrical and Electronic Equipment; deutsch: (Elektro- und Elektronikgeräte-Abfall) ist die EG-Richtlinie 2011/65/EU zur Reduktion der zunehmenden Menge an Elektronikschrott aus nicht mehr benutzten Elektro- und Elektro nikgeräten. Ziel ist das Vermeiden, Verringern sowie umweltverträgliche Entsorgen der zu nehmenden Mengen an Elektronikschrott durch eine erweiterte Herstellerverantwortung. Ihr Gerät enthält wertvolle Rohstoffe, die wieder verwertet werden können. Bringen Sie das Gerät zur Entsorgung zu einer Sammelstelle Ihrer Stadt oder Gemeinde. Elektro- und Elektronikgeräte mit folgender Kennzeichnung versehen und dürfen nicht mehr über Restmüll, sondern nur noch über die öffentlichen Entsorgungsträger und anschließende Rückgabe an die Hersteller und Importeure entsorgt werden. 26 GARANTIE Wir übernehmen für das von uns vertriebene Gerät eine Garantie von 24 Monaten ab Kaufdatum (Kassenbon). Kaufbeleg und Garantieschein sind wesentlich für die Gültigkeit der Garantie. Ohne diesen Na chweis kann ein kostenloser Austausch oder eine kostenlose Reparatur nicht erfolgen. Im Garantiefall geben Sie bitte das komplette Gerät in der Originalverpackung zusammen mit dem Kassenbon an Ihren Händler. Die Garantie erlischt bei Fremdeingriff. Garantiebedingungen Innerhalb der Garantiezeit beseitigen wir unentgeltlich die Mängel des Gerätes oder des Zubehörs*, die auf Material- oder Herstellungsfehler beruhen, durch Reparatur oder, nach unserem Ermessen, durch Umtausch. Garantieleistungen bewirken weder eine Verlängerung der Garantiefrist, noch be ginnt dadurch ein Anspruch auf eine neue Garantie! Kaufbeleg und Garantieschein sind wesentlich für die Gültigkeit der Garantie. Ohne diesen Na chweis kann ein kostenloser Austausch oder eine kostenlose Reparatur nicht erfolgen. *Schäden an Zubehörteilen führen nicht automatisch zum kostenlosen Umtausch des kompletten Gerätes. Wenden Sie sich in diesem Fall bitte an unsere Rufnummer. Sowohl Defekte an Verbrauchszubehör bzw. Verschleißteilen (z.B. Motorkohlen, Knethaken, Antriebsriemen, Ersatzfernbedienung, Ersatzzahnbürsten, Sägeblättern usw.), als auch Reinigung, Wartung oder der Austausch von Verschleißteilen, fallen nicht unter die Garantie und sind deshalb kostenpfl ichtig! Nach der Garantie Nach Ablauf der Garantiezeit können Reparaturen kostenpfl ichtig vom entsprechenden Fachhandel oder Reparaturservice ausgeführt werden. TRETEN SIE BITTE IN VERBINDUNG MIT IHREN HÄNDLER IN IHREM LAND ODER POST SALES ABTEILUNG VON FA. BEPER. E-MAIL [email protected] DIE IHREN HÄNDLER NENNEN WIRD Báscula de cocina electrónica Manual de instrucciones ADVERTENCIAS GENERALES LEER ESTAS INSTRUCCIONES ANTES DE UTILIZAR EL ARTÍCULO • Antes y durante el uso del artículo es necesario seguir algunas precauciones básicas. • Tras haber quitado el embalaje, asegurarse de la integridad del artículo. En caso de duda, no utilizar el artículo y dirigirse a personal profesionalmente cualificado. • Los elementos del embalaje (bolsas de plástico, polistirolo, etc.) no deben dejarse cerca del alcan ce de los niños al representar un peligro para ellos. • Este artículo deberá destinarse sólo al uso para el que ha sido creado. Otro tipo de usos serán considerados inapropiados y, por lo tanto, peligrosos y harán perder el derecho a la garantía. El fabbricante no podrá ser considerado responsable de los posibles daños derivados de usos inade cuados, erróneos e irracionales. • La instalación deberá realizarse según las instrucciones del constructor. Una incorrecta instalación puede acarrear daños a personas, animales y cosas que no podrán atribuirse al fabricante y hará perder los derechos de garantía. • No tocar el artículo con las manos mojadas o húmedas. • No usar el artículo con los pies descalzos. • No introducir nunca el artículo en agua u otros líquidos. • No dejar el artículo expuesto a agentes atmosféricos (agua, sol, etc.); no colocar el artículo en el exterior. • No dejar el artículo cerca de fuentes de calor (ej. calefacción) • Proteger el artículo de vaporizadores de líquidos. • Este artículo no debe ser utilizado por personas (incluido niños) con capacidad física, sensorial o mental reducida; por personas con escasez de experiencia del artículo, salvo que estén controla das o bien instruidas respecto al uso de este artículo por parte de una persona responsable de su seguridad. • Asegurarse de que los niños no juegan con él. • Cuando se decida eliminar este artículo como desecho, se recomienda convertirlo en inutiliza ble quitándole las pilas. Se recomienda, asimismo, de convertir en inócuas las partes del artículo susceptibles de constituir un peligro, especialmente para los niños, que podrían utilizarlo como un juguete. ADVERTENCIAS DE USO En caso de desgaste o de mal funcionamiento, apagar y no manipular la balanza. Para las posibles reparaciones, acudir sólo a centros autorizados por el fabricante y solicitar el uso de recambios originales. El hecho de no respetar estas indicaciones puede comprometer la propia seguridad. No permitir que la balanza sea utilizada por niños o incapacitados sin supervisión. Tener el producto alejado del alcance de animales domésticos. Esta balanza es sólo de uso domético, no comercial. Colocar la balanza sobre superficies planas, lisas y estables o colgadas de la pared para asegurar su correcto funcionamiento. Colocar la balanza lejos de fuentes de calor, humedad o puntos donde pueda sufrir daños o peligro, eligiendo por lo tanto, un sistema estable y seguro. No colocar la balanza muy cerca (respetar una distancia de almenos 1,5 metros) de radio, tv para evitar interferencias electromagnéticas que podrían causar un mal funcionamiento de la balanza. No introducir la balanza en el agua. No permitir que penetren líquidos en el interior de la balanza, ni rociar agua o detergente para lim piar la balanza. 28 Báscula de cocina electrónica Manual de instrucciones Los alimentos deben estar embalados o en un contenedor de tal forma que no estén en contacto directo con la balanza. No presionar los botones de la balanza de forma brusca o con objetos punzantes (bolígrafos, lapi ceros, etc.) No dejar objetos o alimentos sobre la balanza durante mucho tiempo. La operación de pesado debe ser relativamente rápida. Terminada la operación de pesado, asegurarse de que sobre la base de la balanza no queda ningún objeto; la balanza no debe ser utilizada como elemento de apoyo de objetos. No dejar caer la balanza ni someterla a movimientos violentos. Antes de utilizar la balanza, quitar la película transparente del compartimento baterías, que hasta el momento estará presente. Al encender la balanza, si sobre el display no aparece nada, controlar el correcto montaje de las pilas respetando la polaridad de las mismas. Si continua persistendo el problema, las pilas estar descargadas. Sustituirlas por otras nuevas. Utilizar exclusivamente el tipo de pilas especificado en el folleto de instrucciones. El daño o rotura de la balanza, debidos a la falta de los cuidados descritos en este manual, no estarán reconocidos por la garantía. Programación de la hora Fig. 2 1.Ponga las baterías y la balanza se enciende automáticamente en la modalidad de pro gramación de la hora. Cuando la hora relampague en la pantalla pulse MODE para poner la hora. Ponga atención en la sigla AM (mañana) PM(Tarde). 2.Pulse la tecla de conversión de la unidad de medida para confirmar y avance con la programación de los minutos. 3.pulse otra vez la tefcla de conversión para terminar la programación de la hora y entrar en la función de pesaj. Programar la hora Cuando la pantalla maestre la hora, pulse la tecla de conversión durante tres segundos para cambiar las horas y los minutos. Pulse la tecla MODE para programar la hora y también para confirmar. 29 ESPAÑOL DISPLAY FIG.1 1. Tara 2. Valor negativo 3. Peso 4. Modalidad de pesado 5. Modalidad volumen de leche 6. Modalidad volumen de agua 7. Unidad de peso (lb:oz) 8. Unidad de volume (fl’oz) 9. Unidad de volume (ml) 10. Unidad de peso (g) 11. Ahora AM/PM Báscula de cocina electrónica Manual de instrucciones MÉTODOS DE PESAJES Fig. 3 La balanza mide en gramos o en libras 1.Pulse la tecla colocada de tras del aparato para cambiar la unidad de medida de gramos a libras 2.pulse la tecla MODE durante tres segundos para cambiar la unidad de medida del estrado sólido al líquido TECLA DE CONVERSIÓN Fig. 4 Bajo la balanza se encuentra un botón de conversión de la unidad de medida. Es posible elegir entre gramos (g), el peso será calculado en gramos (g) y el volumen de agua y leche en milímetros (ml), y lb, el peso será culaculado en libras (lb:oz) y el volumen de agua y leche en milímetros (fz’oz). Presionar el botón MODE para elegir la unidad de medida a calcular entre peso, volumen de agua y de leche. PESADO Fig. 5 1.Posicionar la balanza en una superficie plana y sólida. 2.Posicionar sobre el contenedor los ingredientes para pesar antes de encencer la balanza. 3.Presionar el botón on/off parab activar la modalidad de pesado. 4.Controlar que el display muestre todas las informaciones. 5.Introducir en el contenedor los ingredientes para comenzar el pesado. El display mostrará el peso. 6.Si el ingrediente a pesar es agua o leche, presionar la tecla MODE para elegir la unidad de medi da volumen y el display mostrará el volumen del ingrediente pesado. VOLUMEN Fig. 6 1.Posicionar la balanza en una superficie plana y sólida. 2.Presionar el botón on/off para encender la balanza. 3.Esperar a que el display muestre “0” y presionar el botón MODE para elegir la unidad de medida volumen de agua o leche. 4.Posicionar sobre la balanza el contenedor de líquidos para pesar. 5.Presionar el botón CERO para dejar la pantalla a “0” 6.Introducir en el contenedor los líquidos, la pantalla mostrará cuál es su volumen. 7.Presionar el botón MODE para elegir la unidad de medida de peso y el display mostrará el peso del ingrediente. FUNCIÓN CERO Y TARA Fig. 7 Esta función se utiliza para pesar diferentes ingredientes consecutivamente sin la necesidad de quitarlos de la balanza. Meter los ingredientes en la balanza para obtener el peso. Presionar el botón CERO para resetear la pantalla a “0” antes de añadir un nuevo ingrediente. Es posible repetir esta operación varias veces. FUNCIÓN CERO: Cuando la suma total de todos los ingredientes sobre la balanza es inferior o igual al 4% de la ca pacidad de peso máxima de la balanza (200 gr con una capacidad máxima di 5000 gr) La pantalla mostrará “---“ o “0g” cada vez que se presione la tecla CERO. El símbolo “---“ significa che el peso no es estable, esperar un par de segundos. “0g” contemporaneamente al símbolo “o” en la zona de abajo a la derecha de la pantalla significa que la función CERO está activa. La capacidad de peso máxima no varía. 30 Báscula de cocina electrónica Manual de instrucciones FUNCIÓN TARA: Cuando la suma total de todos los ingredientes de la balanza es superior al 4% de la capacidad de peso máxima de la balanza (200 gr con una capacidad máxima de 5000 gr) La pantalla mostrará “---“ o “0g” cada vez que se presione la tecla CERO. El símbolo “---“ significa que el peso no está estable, esperar un par de segundos. “0g” contemporaneamente al símbolo “TARA” (T) en la zona en alto a la izquierda de la pantalla significa que la función TARA está activa. En alto a la izquierda de la pantalla si¬gnifica que la función TARA está activa. La capacidad de peso máximo disminuye del peso total de todos los ingredientes. Presionando el botón CERO es posible ver el peso total de todos los ingredientes que están sobre la balanza. Si se desea pesar algún ingrediente más, presionar el botón CERO para resetear nuevamente la pantalla a “0”. AUTOAPAGADO Fig. 8 El autoapagado se activa cuando el display muestra “0” o el mismo peso durante 2 minutos segui dos. Conversión de modalidad de pesaje y función reloj Fig. 9 INDICADORES DE ATENCIÓN Fig. 10 1. Sustituir la batería 2. Balanza sobrecargada. Quitar los ingredientes para evitar daños a la balanza. La capacidad de peso máximo se indica en la balanza. ALIMENTACIÓN 1.Quitar la balanza del embalaje 2.Abrir con mucho cuidado el espacio de las pilas colocado en la parte trasera de la balanza. 3.Introducir 3 pilas del tipo AAA teniendo cuidado con la polaridad de la batería. 4.Cerrar el espacio de las baterías. ATENCIÓN Las baterías descargadas son peligrosas por la posibilidad de perder el líquido que contienen, que es altamente corrosivo. Para evitar daños al aparato causados por este motivo, conviene sustituir las baterías descargadas. Si la balanza no se utiliza durante un largo periodo de tiempo, se reco mienda quitar las pilas del espacio donde se alojan con el objetivo de evitar que el líquido corrosivo que contienen puede emerger al exterior provocando serios daños a la balanza. LOS POSIBLES DAÑOS CAUSADOS POR EL LÍQUIDO DE LAS BATERÍAS NO SERÁN RECONOCIDOS POR LA GARANTÍA. 31 Báscula de cocina electrónica Manual de instrucciones SUSTITUCIÓN DE LAS PILAS Cuando la balanza no se aciende y en el display aparece la palabra “LO” o el funcionamiento es anormal significa que las pilas están descargadas. Sustituirlas por otras nuevas de las mismas características técnicas. Con cuidado, abrir el espacio de las pilas sistuado en la parte posterior de la balanza. Introducir la batería en su espacio según la correcta polaridad. Poner atención en la correcta polaridad. La icnorrecta instalación puede provocar daños a la ba lanza. Cerrar el espacio de las pilas Las pilas acabadas deben ser eliminadas a través de las redes de recogida. No tirar las pilas al fuego. No abandonar en el medio ambiente las pilas. LIMPIEZA DE LA BALANZA La balanza deberá limpiarse con un paño suave ligeramente humedecido con agua caliente. No limpiarla nunca con diluentes ni productos abrasivos en general dado que podrían dañar la superficie de la balanza. No introducir la balanza en agua. Protegerla de posibles infiltraciones de agua. Tener alejados de la balanza productos para el pelo, cosméticos o de baños; dado que pueden dañar las zonas estéticas del productos y el circuito interno de la balanza. CARACTERÍSTICAS TÉCNICAS Capacidad máxima: 10000 g Graduación: 1 g/ 1 Oz Alimentación: 2 batterias de tipo AAA En un objetivo de mejora continua, Beper se reserva la capacidad de aportar cambios y mejoras en el producto sin previo aviso. Al término de la vida útil del aparato, no eliminar como residuo municipal sólido mixto sino eliminarlo en un centro de recogida específico colocado en vuestra zona o entregarlo al distribuidor a la hora de comprar un nuevo aparato del mismo tipo y destinado a las mismas funciones. El distribudor se cargarà el costo de eliminación de los equipos siguendo las normas actuales. Este procedimiento de recogida separada de los equipos eléctricos y electrónicos se realiza con el propósito de una política del medioambiente comunitaria con objetivos de salvaguardia, defensa y mejoramiento de la calidad del medioambiente y para evitar efectos potenciales en la salud de los seres humanos debido a la presencia de dentro de estos equipos o a un uso inapropiado de los mismos o de algunas de sus partes. Està Vuestra y nuestra competencia aiudar la defensa del medioambiente. El símbolo indica que este producto respecta la normativa europea de mdioam biente ( 2011/65/ EU) y le recuerda que todos los productos electrónicos y eléctricos deben ser objeto de recogi da por separado al finalizar su ciclo de vida. Para obtener información sobre el reciclaje de este producto y dónde encontrar puntos de recogida llame las supuestas autoridades locales. Una eliminación no correcta de este producto podría conllevar sanciones. 32 CERTIFICADO DE GARANTĺA Este aparato ha sido controlado en fábrica. La garantía es valida 24 meses a partir de la fecha de compra para todos los defectos de material o de fabricación. En caso de reclamación, tiene que presentar juntos el recibo fiscal y la garantía. Para la asistencia técnica, es necesario contactar su revendedor o nuestra empresa. Eso le per mitirá conservar su aparato en mejores condiciones y no invalidar la garantía. Toda manipulación del aparato por una persona no autorizada o no cualificada cancelará automáticamente la garantía. Condiciones de garantía Durante la garantía, si algunas averías aparecen a causa de un defecto de material y/o fabricación, garantizamos gratuitamente la reparación a las condiciones siguientes : - el aparato ha sido utilizado correctamente y esto solamente al uso para el cual ha sido fabricado ; - expertos repararon el aparato, es decir, personas designadas por el proveedor ; - es obligatorio de presentar el recibo fiscal; - las partes que presentan señales evidentes de desgaste no se tienen en cuenta en la garantía. En consecuencia, todas las partes que habrían sufrido daños accidentales o que presentaban señales de uso normal se excluyen de la garantía (entre las cuales, bombillas, baterías, pilas, resi stencias), todas las partes implicando defectos debidos a la no utilización doméstica, la negligencia en la manipulación y el mantenimiento, los daños en el transporte y todos los daños no imputables directamente al fabricante. Si un defecto aparece durante la garantía y no puede estar reparado, el aparato se sustituirá gra tuitamente. Asistencia técnica Después del final de la garantía, concedemos siempre una gran importancia a la reparación. Para la asistencia técnica y/o reparaciones fuera de la garantía, es necesario contactar directamen te la dirección siguiente : CONTACTE CON EL DISTRIBUIDOR DE SU PAIS O EL DEPARTAMENTO DE POST VENTA DE BEPER . ENVIE UN E-MAIL [email protected] Y LE ENVIAREMOS DATOS DE SU SERVICIO TECNICO EN SU PAIS. beper.com BEPER SRL Via Salieri, 30 37050 - Vallese di Oppeano - Verona Tel. 045/7134674 – Fax 045/6984019 e-mail: [email protected] beper.com