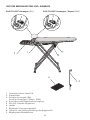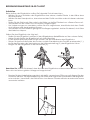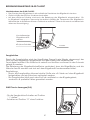
1
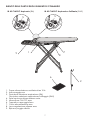
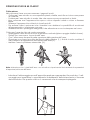
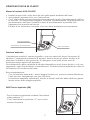
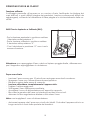
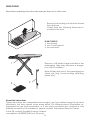
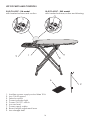
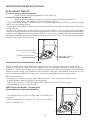
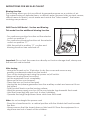
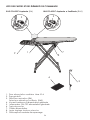
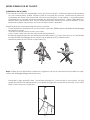
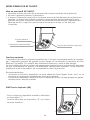
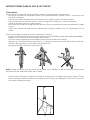
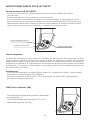
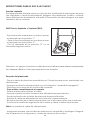
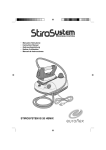
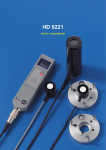
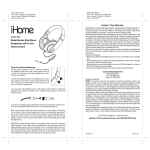
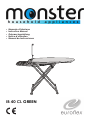
•
•
•
•
•
Manuale d’istruzione
Instruction Manual
Gebrauchsanleitung
Notice d’utilisation
Manual de Instrucciones
IB 40 CL GREEN
2
INDICE
PAGINA
Avvertenze di sicurezza ........................................................................ 4
Disimballaggio ....................................................................................... 6
A proposito delle istruzioni.................................................................... 6
Elenco delle parti e degli elementi di comando .............................. 7
Istruzioni d’uso IB 40 CLASSIC ............................................................... 8
Collocazione ............................................................................... 8
Messa in funzione IB 40 CLASSIC ............................................... 9
Funzione aspirante ...................................................................... 9
Funzione soffiante ........................................................................ 10
Dopo aver stirato ........................................................................ 10
Manutenzione ....................................................................................... 11
Congratulazioni! Con l’acquisto di questa stazione stirante si è assicurato un prodotto di alta qualità realizzato con la massima cura. Con un’adeguata manutenzione
la stazione stirante fornirà degli ottimi risultati per molto tempo. Prima della messa in
funzione iniziale, la preghiamo comunque di leggere attentamente le seguenti istruzioni d’uso e soprattutto di osservare in modo preciso le avvertenze di sicurezza.
3
AVVERTENZE DI SICUREZZA
Prima dell’uso
• Leggere attentamente tutte le informazioni riportate di seguito. Contengono utili
indicazioni riguardo all’utilizzo, la sicurezza e la manutenzione dell’apparecchio.
Conservate con cura queste istruzioni ed eventualmente consegnatele ai futuri
proprietari.
• Questi apparecchi soddisfano le condizioni delle direttive europee 89/336/CEE
“compatibilità elettromagnetica” e 2006/95/CEE “ Sicurezza dei prodotti elettrici”. L’apparecchio riporta sulla targhetta identificativa il marchio CE.
• Il costruttore si riserva il diritto di apportare modifiche di progettazione e dotazione dell’apparecchio senza preavviso.
• Non accendere mai l’apparecchio se il tubo del vapore presenta danni evidenti
(crepe/tagli), se il cavo d’alimentazione è danneggiato o se si sospetta la presenza di danni non visibili (ad esempio in seguito ad una caduta).
• Collegate l’apparecchio solo dopo esservi assicurati che il voltaggio della rete
elettrica corrisponda a quello indicato sulla targhetta dell’apparecchio.
• La presa di corrente deve essere dotata d’interruttore automatico a 16A.
• Se si usano prolunghe elettriche, verificare che siano idonee all’impiego e da 16A.
• Le prolunghe elettriche devono essere completamente srotolate prima dell’uso.
• Assicurarsi che la presa di corrente sia dotata di messa a terra.
• Assicurarsi prima di utilizzare gli accessori vapore che quest’ultimi siano saldamente collegati tra loro. Nel caso in cui non fossero fissati correttamente, il vapore che
fuoriesce dalle giunzioni potrebbe causare scottature.
Prestare molta attenzione.
Indicazioni generali
• Il ferro deve essere utilizzato e lasciato a riposo su una superficie stabile.
• Quando si ripone il ferro sul suo appoggiaferro, assicurarsi che la superficie su cui è collocato l’appoggiaferro sia stabile.
• Il ferro non deve essere utilizzato se è stato fatto cadere, se vi sono segni di danni visibili o
se perde.
• Nel caso in cui l’apparecchio risultasse danneggiato a seguito di un uso improprio, di
una riparazione o manutenzione non conforme, il costruttore declina ogni responsabilità per eventuali danni a cose e persone.
• Le riparazioni devono essere effettuate esclusivamente da parte di personale autorizzato dall’azienda costruttrice. Gli apparecchi riparati da personale non autorizzato
rappresentano un pericolo per chi li utilizza e annullano la garanzia.
• Il cavo d’alimentazione deve essere sostituito esclusivamente dal personale dei centri
d’assistenza autorizzati dal costruttore.
• Riporre l’apparecchio in un luogo asciutto.
• Non riporre l’apparecchio all’aperto.
• Non esporre l’apparecchio ad agenti atmosferici, all’umidità o a fonti di calore.
• Per pulire l’apparecchio utilizzare un panno asciutto o leggermente umido.
• Utilizzare esclusivamente gli accessori raccomandati dal fabbricante.
4
AVVERTENZE DI SICUREZZA
Indicazioni sulla sicurezza
• Questo apparecchio non è adatto all’uso per persone (bambini compresi) con possibilità fisiche, sensitive o mentali ridotte, o con mancanza di esperienza e conoscenza,
a meno che siano state date corrette istruzioni per l’uso dell’apparecchio da una persona responsabile della loro sicurezza.
• I bambini dovrebbero essere sorvegliati per accertarsi che non giochino con l’apparecchio.
• Dopo l’ uso riporre il prodotto in un luogo sicuro e soprattutto fuori dalla portata dei
bambini.
• A seguito di una caduta dell’apparecchio, staccare immediatamente la spina
dalla corrente e rivolgersi ai centri d’assistenza tecnica autorizzata.
• Non tirare il cavo o l’apparecchio per disinserire la spina.
• Verificare che il cavo d’alimentazione non entri in contatto con spigoli taglienti.
• Le parti in tensione (interruttore, spina, componenti elettronici, ecc) non devono
entrare a contatto con l’acqua
• Prima d’ogni operazione di manutenzione, di pulizia nonché dopo l’utilizzo, staccare l’apparecchio dalla presa di corrente.
• Non lasciare l’apparecchio acceso incustodito. Staccare la spina se necessario
assentarsi anche per pochi minuti.
• Durante l’utilizzo si raccomanda di non capovolgere o inclinare l’apparecchio.
• Non dirigere il getto di vapore verso persone, animali e piante.
• Non utilizzare il prodotto con mani bagnate o a piedi nudi.
• Non utilizzare l’apparecchio vicino a sostanze infiammabili e/o esplosive
5
DISIMBALLAGGIO
Conservare accuratamente queste istruzioni d’uso e consegnarle in ogni caso a eventuali
altri utenti.
- Togliere l’asse dall’imballaggio.
- Controllare che i seguenti elementi
siano presenti nell’imballaggio:
IB 40 CLASSIC
1. Asse da stiro.
2. Astina reggicavo.
3. Tappetino appoggiaferro
Distruggere eventuali sacchetti di plastica:
potrebbero diventare un giocattolo
pericoloso per i bambini!
1
Nota: Conservare l’imballaggio per
eventuali futuri trasporti (ad es. traslochi,
riparazioni, ecc.).
3
2
A PROPOSITO DELLE ISTRUZIONI
Queste istruzioni d’uso non possono tener conto di ogni possibile impiego.
Per ulteriori informazioni oppure in caso di problemi non trattati o trattati in modo
insufficiente nelle presenti istruzioni, rivolgersi al Centro di Assistenza tecnico
autorizzato più vicino a voi.
6
ELENCO DELLE PARTI E DEGLI ELEMENTI DI COMANDO
IB 40 CLASSIC Aspirante (RA)
IB 40 CLASSIC Aspirante e Soffiante (RAS)
5
4
5
4
3
3
9
1
8
7
6
2
1. Presa alimentazione ausiliaria Max 10 A
2. Astina reggicavo
3. Deviatore selezione aspirazione (RA)
Deviatore selezione aspirazione/soffiaggio (RAS)
4. Spia luminosa alimentazione asse
5. Interruttore ON-OFF asse
6. Tappetino appoggia ferro
7. Cavo alimentazione asse
8. Leva regolazione altezza asse
9. Ripiano poggia stirella
7
ISTRUZIONI D’USO IB 40 CLASSIC
Collocazione
Nel collocare l’asse occorre osservare i seguenti punti:
- Collocare l’asse da stiro su una superficie piana, stabile, asciutta e vicina a una presa
di corrente.
- Posizionare l’asse da stiro in modo tale che nessuno possa rovesciarlo o ferirsi.
- Non collocare mai l’apparecchio sopra o vicino superfici calde o vicino a fiamme
libere.
- Utilizzare l’apparecchio soltanto in locali asciutti.
- Per evitare ustioni, assicurarsi che i bambini non abbiano la possibilità di avvicinarsi
all’apparecchio o di giocare con esso.
- Utilizzare soltanto prolunghe adeguate; fate attenzione a non inciampare nel cavo.
Collocare l’asse da stiro nel modo seguente:
- Appoggiare l’asse da stiro al suolo in posizione verticale (ripiano poggia stirella in basso).
- Tenere con una mano la punta dell’asse.
- Con l’altra mano tenere la parte superiore delle gambe dell’asse.
- Divaricare con forza la punta del tavolo dalle gambe (1.), finché si sente scattare il
meccanismo di regolazione dell’altezza dell’asse (2.).
- Mettere l’asse in posizione orizzontale (3.).
1
3
2
Nota: Attenzione che i piedi dell’asse non scivolino sul pavimento liscio durante le operazioni
di apertura/chiusura dell’asse.
- Introdurre l’astina reggicavo nell’apposita apertura e appendervi il monotubo. L’astina reggicavo impedisce lo spostamento indesiderato della biancheria e l’«usura»
del monotubo. Per questo motivo e’ necessario che sia sempre impiegata.
8
ISTRUZIONI D’USO IB 40 CLASSIC
Messa in funzione IB 40 CLASSIC
• Inserire la spina del vostro ferro da stiro nella presa ausiliaria dell’asse.
• Accendere l’apparecchio con l’interruttore.
• Con l’interruttore «acceso/spento» viene azionato anche il riscaldamento dell’asse da stiro. Un termostato integrato controlla costantemente la temperatura di
riscaldamento dell’asse. Durante la fase di riscaldamento è possibile che
l’apparecchio emetta dei rumori.
Si tratta di un fenomeno normale, che non deve destare preoccupazione.
Spia accensione
Interruttore acceso/spento
Tasto deviatore
Funzione aspirante
L’aspirazione assorbe il vapore superfluo, che non serve più dopo il processo di
stiratura. L’aspirazione permette di tenere il tessuto fermo sul piano da stiro e di
eliminare l’umidità in esso presente. Si ottengono capi puliti e ben asciutti,
pronti per essere riposti nell’armadio.
Il riscaldamento della superficie di stiratura impedisce che il piano da stiro, e di conseguenza i capi di biancheria, si inumidiscano. Questa funzione impedisce inoltre la
formazione di condensa nell’asse.
Raccomandazione:
- Con la funzione aspirante, i tessuti leggeri (seta ecc.) possono essere «fissati» sull’asse da stiro, impedendo così che scivolino.
- La funzione aspirante raffredda il tessuto e «fissa» il risultato della stiratura, garantendo ad es. delle pieghe perfette.
IB40 Classic Aspirante (RA)
- Per la funzione aspirante mettere il deviatore
sulla posizione “I”.
- Con il deviatore in posizione “0” non si avrà
nessuna funzione.
Deviatore
9
ISTRUZIONI D’USO IB 40 CLASSIC
Funzione soffiante
Il soffiaggio permette di lavorare su un cuscino d’aria, facilitando la stiratura dei
capi delicati, o punti difficili (pieghe dei pantaloni, tasche,cuciture,punti difficili da
raggiungere), evitando la formazione di false pieghe e lo schiacciamento delle cuciture.
IB40 Classic Aspirante e Soffiante (RAS)
- Per la funzione aspirante in continuo mettere
il deviatore sulla posizione “I”.
- Per la funzione soffiante in continuo mettere
il deviatore sulla posizione “II”.
- Con il deviatore in posizione “0” non si avrà
nessuna funzione.
Deviatore
Attenzione: non appoggiare il ferro caldo sul ripiano poggia stirella, utilizzare sempre il tappetino appoggiaferro in dotazione.
Dopo aver stirato
-
Lasciare l’asse acceso per 10 minuti per asciugare eventuali condense.
Spegnere l’asse con l‘interrruttore «acceso/spento».
Estrarre la spina dalla presa di corrente.
Lasciare raffreddare completamente l‘apparecchio.
Togliere l‘astina reggicavo.
Scollegare il ferro dalla presa ausiliaria.
Avvolgere il cavo di alimentazione sull’apposito supporto.
Bloccare la gamba dell‘asse col piede per evitare che scivoli.
Azionare la leva regolazione altezza e richiudere l’asse.
Nota: non impigliare il cavo di alimentazione.
- Assicurarsi sempre che l‘asse non scivoli né si ribalti. Custodire l‘apparecchio in un
luogo asciutto e fuori dalla portata dei bambini.
10
MANUTENZIONE IB40 CLASSIC
Cambiare la fodera del vostro IB 40
Con l’uso la fodera con mollettone si consuma e deve quindi essere sostituita.
Per motivi di sicurezza (superficie dell‘asse riscaldata) e per garantire una perfetta
funzionalità sarebbe meglio impiegare soltanto fodere e mollettoni originali.
Fodere rivestite (ad es. un rivestimento espanso sul lato inferiore della fodera oppure
un «rivestimento argentato» sul lato superiore) non sono adatti a questo apparecchio
e potrebbero provocare un surriscaldamento. La fodera con mollettone è
disponibile presso i nostri Centri di assistenza tecnica autorizzati.
Avvertenza:
In caso di guasti, di apparecchio difettoso o se si sospetta un danno in seguito
ad una caduta, estrarre immediatamente la spina dalla presa di corrente.
Le riparazioni devono essere eseguite esclusivamente presso il Centro di
Assistenza. Riparazioni eseguite da personale non specializzato possono
comportare gravi pericoli per l’utente. Non si assumono responsabilità
in caso di danni causati da riparazioni eseguite da personale non specializzato.
In questi casi si estingue anche il diritto alla garanzia.
11
TABLE OF CONTENTS
PAGE
Safety instructions.................................................................................. 13
Unpacking ............................................................................................. 15
About the instructions .......................................................................... 15
List of parts and control elements ....................................................... 16
Instructions for use IB 40 CLASSIC ........................................................ 17
Positioning .................................................................................... 17
IB 40 CLASSIC start up ................................................................. 18
Suction function .......................................................................... 18
Blowing function.......................................................................... 19
After ironing ................................................................................. 19
Maintenance ......................................................................................... 20
ELECTRICAL CONNECTION (UK ONLY)
For your safety please read the following information.
Warning: This appliance must be earthed.
The appliance must be connected to a 220-240 volts 50 cycle AC supply by means of a three
pin socket, suitably earthed and should be protected by a 13 amp fuse in the plug.
The appliance is supplied with a rewireable 13 amp 3 pin plug fitted with a 13 amp fuse. Should
the fuse require replacement, it must be replaced with a fuse rated at 13 amp and approved
to BS1362.
If the mains plug is unsuitable for the socket outlet in your home or is removed for any other
reason, then the cut off plug should be disposed of safely to prevent the hazard of electric
shock.
There is a danger of electric shock if the cut off plug is inserted into any 13 amp socket outlet.
How to wire a 13 amp plug.
Important
The wires in the mains lead on this appliance are coloured in accordance with the following
code:
Green and Yellow - Earth
Blue – Neutral
Brown – Live
The green and yellow wire must be connected to
the terminal in the plug which is marked with the
letter E or with the earth symbol
.
The blue wire must be connected to the terminal marked N.
The brown wire must be connected to the terminal marked L.
Congratulations!
By purchasing this ironing unit you have acquired a high quality, precision-engineered product. If used in accordance with the instructions and subject to regular maintenance, the ironing unit will provide excellent results for a long time.
Before start up , you are recommended to carefully read the following operating
instructions taking special note of the safety warnings.
12
SAFETY INSTRUCTIONS
Before use
• Read carefully all information set forth herein. It contains useful indications regarding
the use, safety and maintenance/care of the appliance. Save these instructions
for future reference and, if possible, hand them over to the future owners of the
appliance.
• The appliance comply with European safety standards (CE) and current legislation
as regards appliance safety.
• These appliances comply with the requirements of Directive 89/336/EEC on
“Electromagnetic compatibility” and Directive 2006/95/EEC on “Safety of electrical
equipment”. The appliance carries the CE safety standard label.
• The manufacturer reserves the right to modify the specifications of the appliance
or its basic kit without prior notice.
• Do not turn the appliance on if the steam hose or the power cord appear to be
damaged
• (cracks/slits) or if the appliance has been dropped and internal damage may have
occurred.
• Connect the appliance only after ensuring that the voltage on the rating plate
corresponds to the voltage in your home.
• The socket must be fitted with a 16 A automatic switch.
• Only use extension cables which are suitable for 16 A.
• All extension cables have to be completely unrolled prior to use.
• Make sure that the socket has an earth pin.Before operating the appliance please
check, that all accessories (steam-vacuum) have been put together correctly in
order to avoid that these can come off and the outcoming steam can lead to
scaldings. Please pay attention!
General instructions
• The iron must be used and rested on a stable surface;
• When placing the iron on its stand, ensure that the surface on which the stand is
placed is stable;
• The iron is not to be used if it has been dropped, if there are visible signs of
damage or if it is leaking.
• Do not use the appliance in vertical position.
• The manufacturer can not be hold responsible of any personal and/or items damage if the appliance is damaged due to improper use or unauthorized repair or
servicing.
• Any repair must be carried out solely by authorized technicians of the manufacturing company. Appliances repaired by unauthorised technicians can represent
a danger to the users and render the warranty void.
• The power cord must be replaced solely by a repair service centre authorised by
the manufacturer.
• Store the appliance in a dry place.
• Do not store the appliance outdoors.
• Do not expose the appliance to atmospheric agents, humidity or heat sources.
• Clean the appliance with a dry or slightly damp cloth.
• Only accessories which have been recommended by the manufacturer are to be
used.
13
SAFETY INSTRUCTIONS
Safety instructions
• This appliance is not intended for use by persons (including children) with reduced
physical, sensory or mental capabilities, or lack of experience and knowledge,
unless they have been given supervision or instruction concerning use of the appliance by a person responsible for their safety.
• Children should be supervised to ensure that they do not play with the appliance
• The appliance must be stored in a safe place after use and out of the reach of
children.
• In case the appliance has fallen down please unplug the appliance from the
electrical socket and contact the authorised repair service.
• Do not yank cord or appliance to disconnect the plug.
• Ensure that the power cord does not come into contact with sharp edges.
• Live parts (switch, plug, electronic components, etc.) must not get in contact with
water.
• Before any maintenance or cleaning and also after use, disconnect the appliance
from the electrical socket.
• Do not leave the appliance unattended while plugged in. Turn it off, even if you
need to leave for a short while.
• Do not turn the appliance upside down and do not drop it in use!
• Do not insert any objects into the various openings of the appliance and do not
use the appliance in case one of the openings is blocked!
• Do not operate the appliance with wet hands or bare feet.
• Do not operate the appliance in the presence of inflamable and / or explosive
fiumes!
14
UNPACKING
Keep these operating instruction safe and pass them on to other users.
- Remove the ironing unit and the board
from the box.
- Check that the following items are included in the box:
IB 40 CLASSIC
1. Iron board.
2. Iron Cord Support.
3. Iron-rest mat .
1
Dispose of all plastic bags included in the
packaging, they may become a dangerous toy for children!
Note: Retain the rest of the packaging for
future use. (e.g. house moving, servicing,
repair etc.).
3
2
About the instructions
These instructions are comprehensive enough to get you started using the product
effectively, but they cannot cover every detail. For further product information, replacement covers and accessories, or if you have a problem not covered or only
partially covered in this handbook, please contact the nearest Service Center.
In the UK contact Euroflex Products Limited,
our helpline is 02380821960 (not 24 hours).
15
LIST OF PARTS AND CONTROLS
IB 40 CLASSIC - RA model
with heated surface and suction
5
4
IB 40 CLASSIC - RAS model
with heated surface,suction and blowing
5
4
3
3
9
1
8
7
6
2
1.
2.
3.
4.
5.
6.
7.
8.
9.
Auxiliary power supply socket Max 10 A
Iron Cord Support
Selector switch
Power indicator light
Power ON-OFF switch
Iron rest mat
Power supply cable
Board height adjustment lever
Iron storage shelf
16
INSTRUCTIONS FOR USE IB 40 CLASSIC
POSITIONING
When setting up the ironing board please note the following:
- Place the ironing board on a flat, even, dry surface, near an earthed mains socket.
- Position the ironing board securely so that nobody can knock it over or get hurt.
- Never put the appliance on or near warm surfaces or near flames.
- Use the appliance in dry rooms only.
- To avoid scalding, keep the appliance away from children.
- Use only the correct extension cables in accordance with the advice given on page 13;
be careful not to trip over the cord.
Put up the ironing board as follows:
- Place the ironing board upright on the floor (folded shelf end downward).
- Hold the end of the ironing board with one hand.
- With the other hand hold the upper part of the ironing board legs.
- Firmly pull the ironing board wide apart (1.) until the adjustment height device
- locks in place (2.).
- Place the ironing board in a horizontal position (3.).
- Unfold the shelf as shown in the illustration on page 16.
1
3
2
Note: Be careful that the feet of the ironing board don’t slip on smooth floors while
opening/closing the ironing board.
Insert the iron cord support in one of the small holes each side of the ironing board and hang
the steam/power cord. The iron cord support prevents unwanted movement by cord-drag of
the garment being ironed as well as the “wear” of the steam/power cord.
There are two holes one each side at the rear end of the ironing board so that the cord support
can be positioned for right or left handed use.
17
INSTRUCTIONS FOR USE IB 40 CLASSIC
IB 40 CLASSIC START UP
If you are using a steam generator
Place the iron/steam generator on the shelf (9).
If you are using a steam iron
Place the iron (soleplate down) on the iron rest mat which should be
positioned at the rear end of the ironing surface.
- Plug the power supply cord from your iron/steam generator into the auxillary socket
built-in to the ironing board.
- Plug the power supply cord from your ironing board into a 13amp wall socket and switch
the socket on.
- Switch the equipment on using the power on/off switch. The power on/off switch activates the ironing board and the steam generator or steam iron plugged into the auxillary
socket. An integrated thermostat constantly controls the board heating temperature.
During the heating phase the equipment may emit noises. This is a normal phenomenon,
which is nothing to worry about.
Power indicator light
Power on/off switch
Selector switch
Suction function and heating of board
The suction absorbs the superfluous steam, which is no longer used after the ironing
process. The suction helps hold the garment on the ironing surface and helps to dry the
garment. Clean ,dry clothes are obtained, ready to be placed straight in the wardrobe
without further airing. The heated ironing surface stays dry, and keeps the steam hot so
that it passes through the cover and board to be expelled without condensing.
Recommendation:
- Through the suction function, light fabrics (silk etc.) can be held in place on the
ironing board, preventing them from slipping.
- The suction function cools the fabric and “fixes” the results of the ironing,
guaranteeing for ex. perfect folds
IB40 Classic RA Model - Suction only
This model has no blowing function
- For continuous suction set the selector switch on
position “I”.
- With the switch in position “0” the suction function is switched off.
Selector
switch
18
INSTRUCTIONS FOR USE IB 40 CLASSIC
Blowing function
The blowing allows you to iron without downward pressure on a cushion of air.
This makes ironing of delicate items, or difficult areas (trousers folds, pockets, seams,
difficult areas to reach), much easier and avoids the “false ceases” that seam
crushing can produce.
IB40 Classic RAS Model - Suction and Blowing
This model has the additional blowing function
- For continuous suction function set the selector
switch on position “I”.
- For continuous blowing function set the selector
switch on position “II”.
- With the switch in position “0” suction and
blowing functions are switched off.
Selector switch
Important: Do not rest the warm iron directly on the Iron storage shelf, always use
the iron-rest mat included.
After ironing
- Leave the board on for 10 minutes to dry the cover and remove any
possible condensed water from the board.
- Turn off the ironing board using the power on/off switch.
- Remove the plug from the socket.
- Let the equipment cool completely.
- Remove the iron cord support.
- Place the iron on the iron rest pad.
- Unplug the iron/steam generator from the auxillary socket and remove it from
the board.
- Fold the shelf back over the ironing surface.
- Wind the power supply cord on to the cord winder lugs beneath the board.
- Hold the board leg with your foot to stop it skidding.
- Operate the height adjustment lever and close the board.
Note: do not entangle the power cord
- Store the closed board in a vertical position with the folded shelf end towards
the floor.
- Always ensure that the board does not skid and tilt. Store the equipment in a
dry place and out of reach of the children.
19
MAINTENANCE IB40 CLASSIC
Changing the cover of your IB 40
For safety reasons (heated board surface) and to guarantee a perfect operation of
the product we recommend that you use only Euroflex ironing board covers.
Meatalised heat reflective covers and covers with thick lining are not suitable for this
equipment and may cause overheating of the suction motor.
Original Euroflex covers and other accessories are avalable from authorised technical service centres.
In the UK please telephone Euroflex on 02380821960 for service.
Warning:
In case of failure, of faulty equipment or if damage due to falling over is suspected,
immediately remove the plug from the socket. Repairs should be exclusively performed at the authorised Service Centre. Repairs performed by unskilled personnel
may cause serious dangers for users. Responsibility is declined for damages caused
by repairs performed by unskilled personnel.
In these cases the warranty right is also cancelled.
20
INHALTSVERZEICHNIS
SEITE
Sicherheitsvorschriften .......................................................................... 22
Verpackung ........................................................................................... 24
Anmerkung zur Gebrauchsanweisung ............................................... 24
Liste der Bedienungsteile und -elemente .......................................... 25
Bedienungsanleitung IB 40 CLASSIC ................................................... 26
Aufstellen...................................................................................... 26
Inbetriebnahme der IB 40 CLASSIC ........................................... 27
Saugfunktion................................................................................ 27
Blasfunktion .................................................................................. 28
Nach dem Bügeln ....................................................................... 28
Wartung ................................................................................................. 29
Gratulation! Mit dem Kauf dieser Bügelstation haben Sie ein mit größter Sorgfalt hergestelltes Produkt von höchster Qualität erworben. Bei entsprechender Wartung garantiert diese Bügelstation lange Zeit optimale Ergebnisse. Vor der Erstinbetriebnahme, diese Betriebsanleitung bitte sorgfältig durchlesen und die Sicherheitshinweise
genau beachten.
21
SICHERHEITSVORSCHRIFTEN
Vor dem Gebrauch
• Bitte lesen Sie alle im folgenden aufgeführten Informationen aufmerksam durch. Sie
geben wichtige Hinweise für den Einsatz, die Sicherheit sowie die Wartung/Pflege
der Geräte. Bewahren Sie die Gebrauchsanleitung sorgfältig auf und geben Sie
diese gegebenenfalls an den Nachbesitzer weiter.
• Das Geräte entspricht den CE-Sicherheitsnormen und dem aktuellen Gerätesicherheitsgesetz.
• Diese Geräte erfüllen die Anforderungen der EG-Richtlinien 89/336/EWG „Elektromagnetische Verträglichkeit“ und 2006/95/EG „Niederspannungsrichtlinie“. Das
Gerät trägt auf dem Typenschild die CE-Kennzeichnung.
• Der Hersteller behält sich Konstruktions- und Ausstattungsänderungen ohne vorherige Ankündigung vor.
• Das Gerät nicht in Betrieb nehmen, wenn das Gehäuse erkennbare Schäden (Risse/Brüche) aufweist, die Anschlussleitung defekt ist oder der Verdacht auf einen
unsichtbaren Defekt (z. B. nach einem Sturz) besteht.
• Das Gerät nur dann anschließen, wenn die auf dem Typenschild angegebene
Spannung mit der Netzspannung übereinstimmt.
• Die Steckdose muss über einen 16 A-Sicherungsautomaten abgesichert werden.
• Verlängerungskabel nur verwenden, wenn dieses für eine Stromstärke von 16 Ampere ausgelegt ist.
• Bei der Verwendung einer Kabeltrommel unbedingt das Kabel komplett von der
Trommel abwickeln, da dies sonst zur Zerstörung der Kabeltrommel führen kann.
• Die Steckdose muss mit einem wirkungsvollen Schutzkontakt geerdet sein.
• Kontrollieren Sie vor Inbetriebnahme des Gerätes, dass die Zubehörteile (Dampfsaugen) „gesichert“ (richtig montiert) sind, da diese sich sonst lösen und der austretende Dampf zu Verbrühungen führen kann. Bitte beachten!
Allgemeine Hinweise
• Das Eisen verwendet werden müssen und ausgeruht auf eine stabile Oberfläche;
• Wenn Sie das Eisen auf seinem Ständer, sicherzustellen, dass die Oberfläche, auf
der der Stand ist stabil;
• Das Eisen ist nicht verwendet werden, wenn sie fallengelassen wurde, wenn Es gibt
sichtbare Anzeichen von Schäden oder wenn sie undicht ist.
• Das Gerät nur in wagrechtem Zustand in Betrieb nehmen.
• Wird das Gerät zweckentfremdet, unsachgemäß bedient oder nicht fachgerecht
repariert und gewartet, wird vom Hersteller keine Haftung für eventuelle Sachund/oder Personenschäden übernommen.
• Reparaturen dürfen nur von vom Hersteller dazu autorisierten Fachkräften ausgeführt werden. Nicht fachgerecht reparierte Geräte stellen eine Gefahr für den
Benutzer dar und verlieren den Garantieanspruch.
• Die Netzanschlussleitung darf nur von einer vom Hersteller autorisierten Kundendienstwerkstatt ersetzt werden.
• Nur in trockenen Räumen aufbewahren.
• Das Gerät nicht im Freien aufbewahren.
• Gerät keinen Witterungseinflüssen, keiner Feuchtigkeit und keinen Hitzequellen
aussetzen.
• Das Gerät nur trocken oder mit einem leicht feuchten Tuch reinigen.
• Es ist ausschliesslich das vom Hersteller empfohlene Zubehör zu verwenden.
22
SICHERHEITSVORSCHRIFTEN
Sicherheitshinweise
• Das Gerät ist kein Spielzeug, der Gebrauch dieses elektrischen Gerätes in der Nähe von
Kindern darf nur unter kontinuierlicher Überwachung durch einen Erwachsenen erfolgen.
• Sorgen Sie dafür, dass Kinder das Gerät nicht benutzen.
• Das Gerät nach Gebrauch an einem sicheren Ort, ausserhalb der Reichweite von Kindern,
zu verstauen.
• Sollte das Gerät umfallen, ziehen Sie bitte sofort den Netzstecker aus der Steckdose und
wenden Sie sich an eine der vom Hersteller autorisierten Kundendienststellen.
• Den Stecker nie über die Anschlussleitung aus der Steckdose ziehen.
• Die Anschlussleitung nicht über scharfe Kanten ziehen oder einklemmen.
• Die stromführenden Teile (Schalter, Stecker, Elektronik etc.) dürfen nicht mit Wasser in Berührung kommen.
• Vor jeder Wartung, Reinigung und nach dem Gebrauch das Gerät ausschalten, den Netzstecker ziehen und Dampfeinheit abkühlen lassen.
• Das eingeschaltete Gerät niemals unbeaufsichtigt lassen. Bei Arbeitsunterbrechnungen den
Netzstecker ziehen.
• Verwenden Sie zum Befüllen des Druckkessels nur klares Wasser ohne Zusätze, ohne Parfüm
und ohne chemische Zusätze jeglicher Art!
• Keine Gegenstände in die verschiedenen Öffnungen des Gerätes stecken und das Gerät
niemals benutzen falls eine der Öffnungen blockiert sein sollte!
• Das Gerät nicht mit nassen Händen oder barfüssig nutzen!
• Das Gerät nicht in der Nähe von entzündlichen und / oder explosiven Substanzen benutzen!
23
VERPACKUNG
Die Bedienungsanleitung sorgfältig aufbewahren und an eventuelle weitere Benutzer weitergeben.
Bügelbrett aus der
Verpackung nehmen.
- Überprüfen, ob folgende Teile vorhanden sind:
-
IB 40 CLASSIC
1. Bügelbrett.
2. Kabelhalter.
3. Matte
1
Alle Plastikhüllen wegwerfen, sie könnten
zu einem gefährlichen Spielzeug für Kinder
werden!
3
2
Hinweis: Verpackungsschachtel für eventuelle spätere Transporte aufbewahren
(z.B. Übersiedlungen, Reparaturen, etc.).
Anmerkung zur Gebrauchsanweisung
Diese Gebrauchsanweisung kann nicht jede mögliche Verwendung des Gerätes berücksichtigen.
Bitte wenden Sie sich für weitere Informationen oder im Falle von in dieser Gebrauchsanweisung
unzureichend oder gar nicht angeführten Schwierigkeiten an einen autorisierten technischen
Kundendienst in Ihrer Nähe.
24
LISTE DER BEDIENUNGSTEILE UND -ELEMENTE
IB 40 CLASSIC Ansaugen (RA)
5
4
IB 40 CLASSIC Ansaugen / Blasen (RAS)
5
4
3
3
9
1
8
7
6
2
1. Zusatzsteckdose Max 10 A
2. Kabelhalter
3. Schalter Ansaugen (RA)
Schalter Ansaugen / Blasen (RAS)
4. Kontrollleuchte Bügelbrettversorgung
5. EIN-AUS Schalter Bügelbrett
6. Matte
7. Bügelbrett Versorgungskabel
8. Hebel für die Höhenverstellung des Bügelbretts
9. Bügelsystem Abstellfläche
25
BEDIENUNGSANLEITUNG IB 40 CLASSIC
Aufstellen
Beim Aufbau der Bügelstation sollten Sie folgende Punkte beachten:
- Wählen Sie zum Aufstellen des Bügeltisches eine ebene, stabile Fläche in der Nähe einer
Stromsteckdose.
- Wählen Sie den Standpunkt so, dass niemand das Gerät umstoßen oder sich daran verletzen
kann.
- Stellen Sie die Station nie über oder in der Nähe von heißes Flächen bzw. offenem Feuer auf.
- Verwenden Sie das Gerät nur in trockenen Umgebungen.
- Um Verbrennungen zu vermeiden, sollten Sie sich vergewissern, dass Kinder sich dem Gerät
nicht nähern oder damit spielen können.
- Verwenden Sie ausschließlich geeignete Verlängerungskabel. Achten Sie darauf, nicht über
das Kabel zu stolpern.
Stellen Sie den Bügeltisch wie folgt auf:
- Stellen Sie den Bügeltisch senkrecht (den Bügelsystem Abstellfläche auf der unteren Seite)
- Halten Sie die Spitze des Bügeltisches mit einer Hand fest
- In die andere Hand nehmen Sie den oberen Teil der Standbeine des Bügeltischs
- Ziehen Sie kraftvoll die Spitze des Tisches und die Standbeine des Gestells auseinander (1.),
bis Sie das Einrasten des Mechanismus der Höheneinstellung (2.) des Bügeltischs hören.
- Bringen Sie den Bügeltisch in die Horizontale (3.).
1
3
2
Beachten Sie: Achten Sie darauf, dass die Füße des Bügeltisches während des Öffnens / Schließens nicht auf einem glatten Untergrund wegrutschen.
-
Stecken Sie den Kabelhalterungsstab in die dafür vorgesehene Öffnung und hängen Sie den
Schlauch darüber. Die Kabelhalterung verhindert das ungewollte Verschieben der Bügelwäsche und den „Verschleiß“ des Schlauches. Aus diesem Grunde sollte sie ausnahmslos immer
verwendet werden.
26
BEDIENUNGSANLEITUNG IB 40 CLASSIC
Inbetriebnahme der IB 40 CLASSIC
• Den Stecker Ihres Bügeleisens in die zusätzliche Steckdose des Bügelbretts stecken.
• Gerät mit Hilfe des Ein/Aus Schalters einschalten.
• Mit dem «Ein/Aus» Schalter wird auch die Beheizung des Bügelbretts eingeschaltet. Ein
im Bügelbrett integrierter Thermostat kontrolliert ständig die Temperatur des Bügelbretts.
Während der Aufheizfhase können Geräusche auftreten. Diese sind normal und daher kein
Anlass zur Beunruhigung.
Kontrollanzeige
Bügeleisentemperatur
«Ein/Aus» Schalter
Schalter
Saugfunktion
Durch die Saugfunktion wird der überflüssige Dampf beim Bügeln abgesaugt, der
Stoff auf dem Bügelbrett festgehalten und gleichzeitig die verbleibende
Feuchtigkeit entfernt. Die Wäsche ist sauber und trocken und bereit in den Schrank
gelegt zu werden.
Die Beheizung der Bügelbrettoberfläche verhindert, dass die Bügelfläche und die
Wäsche feucht werden und sich auf dem Bügelbrett Kondenswasser bildet.
Empfehlung:
- Durch die Saugfunktion können leichte Stoffe wie z.B. Seide auf dem Bügelbrett
festgehalten und ein Rutschen verhindert werden.
- Die Saugfunktion kühlt auch den Stoff ab und fixiert so das Bügelergebnis,
wodurch z.B. perfekte Falten garantiert werden.
IB40 Classic Ansaugen (RA)
- Für die Saugfunktion Schalter auf Position
“ I “ stellen.
- Schalter auf Position “0” ohne Funktion.
Schalter
27
BEDIENUNGSANLEITUNG IB 40 CLASSIC
Blasfunktion
Die Blasfunktion ermöglicht ein Bügeln auf einem Luftkissen, wodurch das Bügeln
von empfindlichen Wäschestücken oder schwierigen Stellen (Bügelfalten, Taschen,
Nähte, schwierig zu erreichende Stellen) erleichtert und Faltenbildung oder das
Flachdrücken von Nähten verhindert wird.
IB40 Classic Ansaugen / Blasen (RAS)
- Für die Saugfunktion in ständiges Schalter
auf Position “ I “ stellen.
- Für die Blasfunktion in ständiges Schalter
auf Position “ II “ stellen.
- Schalter auf Position “0” ohne Funktion.
Schalter
Achtung: Warmes Bügeleisen nicht auf die Bügelsystem Abstellfläche, benutzen sie
immes die Matte aus dem Zuberios.
Nach dem Bügeln
- Bügelbrett noch weitere 10 min. eingeschaltet lassen, um eventuell vorhandenes
kondenswasser zu trocknen.
- Bügelstation mit dem «Ein/Aus» Schalter ausschalten.
- Netzstecker aus der Steckdose ziehen.
- Gerät völlig auskühlen lassen.
- Kabelhalter abnehmen.
- Bügeleisen auf der dafür vorgesehenen Abstellunterlage abstellen.
- Bügeleisen vom Bügelbrett nehmen und dabei den Verbindungsstecker ziehen.
- Versorgungskabel auf Kabelwickler aufrollen.
- Mit dem Fuß Bügelbrettbein blockieren, um ein Wegrutschen zu verhindern.
- Höheneinstellhebel betätigen und Brett schließen.
Hinweis: Versorgungskabel nicht einklemmen
- Aufpassen, dass das Bügelbrett nicht rutscht und nicht umfällt. Gerät an einem
trockenen Ort und außerhalb der Reichweite von Kindern aufbewahren.
28
WARTUNG
Wechseln des Überzugs Ihrer IB 40
Überzug und Filz nutzen sich mit der Zeit ab und müssen daher ausgetauscht werden. Aus
Sicherheitsgründen (Bügelbrettoberfläche beheizt) und um perfekte Funktionalität zu garantieren, wäre es besser, nur Originalüberzüge und -Filz zu verwenden.
Gefütterte Überzüge (z.B. mit einem elastischen Futter oder mit Silberfolie an der Oberseite)
eignen sich nicht für dieses Gerät und könnten zur Überhitzung führen. Originalüberzüge mit Filz
gibt es in unseren Kundendienstzentren.
Sicherheitshinweis:
Im Fall von Störungen oder Defekten am Gerät, die vermutlich durch einen Sturz verursacht
wurden, sofort den Netzstecker aus der Steckdose ziehen. Reparaturen dürfen ausschließlich
von einem autorisierten Kundendienstzentrum durchgeführt werden. Von Nichtfachpersonal
ausgeführte Reparaturen können eine große Gefahr für den Benutzer darstellen. Es wird keine
Haftung für Schäden aus unsachgemäß durchgeführten Reparaturen übernommen. In diesem
Fall erlischt auch jeder Garantieanspruch.
29
INDEX
PAGE
Instructions de sécurité ......................................................................... 35
Déballage……… ................................................................................... 37
A propos des instructions ..................................................................... 37
Liste des parties et des éléments de commande ............................. 38
Mode d’emploi IB 40 CLASSIC ............................................................. 39
Installation .................................................................................... 39
Mise en marche IB 40 CLASSIC .................................................. 40
Fonction aspirante ......................................................................................40
Fonction soufflante ......................................................................................41
Après le repassage .....................................................................................41
Entretien...................................................................................................42
Félicitations! Avec l’achat de cette station de repassage vous avez acquis un produit haut de gamme réalisé avec le plus grand soin. Le centre de repassage convenablement entretenu, fournira d’excellents résultats pour une longue période.
Avant la première mise en service, nous vous prions de lire attentivement le mode
d’emploi et surtout de respecter strictement les instructions de sécurité.
30
INSTRUCTIONS DE SÉCURITÉ
Avant l’emploi
• Lire attentivement toutes les informations indiquées ci-après. Ils contiennent d’utiles
indications concernant l’emploi, la sécurité et l’entretien de l’appareil. Conservez
soigneusement ces instructions et éventuellement livrez-les aux futurs propriétaires.
• L’appareil est conforme aux normes de sécurité CE et aux lois en vigueur en matière
de sécurité des appareils.
• Ces appareils remplissent les conditions des directives européennes 89/336/CEE
“compatibilité électromagnétique” et 2006/95/CEE “Sécurité des matériels électriques”. Le marquage CE est apposé sur la plaque signalétique de l’appareil.
• Le fabricant se réserve le droit d’apporter toute modification de conception et
dotation de l’appareil sans préavis.
• Ne jamais allumer l’appareil si le tuyau de la vapeur présente des dommages évidents (fissures/coupures), si le câble d’alimentation est abîmé ou si vous soupçonnez
la présence de dommages non visibles (par exemple à la suite d’une chute).
• Ne branchez l’appareil que quand vous vous êtes assurés que le voltage du réseau
électrique correspond à celui indiqué sur la plaque signalétique de l’appareil.
• La prise de courant doit être adaptée et l’instalation électrique conforme aux
normes en vigueur.
• Assurez-vous que la prise de courant est équipée avec mise à la terre.
• Avant d’utiliser les accessoires vapeur assurez-vous qu’ils sont solidement reliés entre
eux. Au cas où ils ne seraient bien fixés, la vapeur qui sort des jonctions pourrait
causer des brûlures. Prêter beaucoup d’attention.
Indications générales
• Le fer doit être utilisé et reposé sur une surface stable,
• Lorsque vous placez le fer sur son stand, assurez-vous que la surface sur laquelle
est placé le stand est stable,
• Le fer ne doit pas être utilisé s’il a été abandonné, si Il ya des signes visibles de
détériorationou si elle est étanche.
• Dans le cas où l’appareil serait endommagé suite à, un mauvais emploi, une
réparation,d’un entretien non conforme, ou d’un choc, le fabricant décline toute
responsabilité pour d’éventuels dommages à personnes ou biens.
• Les réparations doivent être effectuées exclusivement par du personnel autorisé
par la société fabricante. Les appareils réparés par du personnel non autorisé
représentent un danger pour les utilisateurs et annulent la garantie.
• Le câble d’alimentation doit être remplacé exclusivement par le personnel des
services après-vente agréés par le fabricant.
• Ranger l’appareil dans un endroit sec.
• Ne pas ranger l’appareil en plein air.
• Ne pas exposer l’appareil aux agents atmosphériques, à l’humidité ou à sources
de chaleur.
• Pour nettoyer l’appareil employer un chiffon sec ou légèrement mouillé.
• Utiliser uniquement les accessoires recommandés par le fabricant.
31
INSTRUCTIONS DE SÉCURITÉ
Indications sur la sécurité
• Cet appareil n’est pas prévu pour les personnes (enfants y compris) avec des
possibilités physiques, sensorielles ou mentales réduites, ou le manque
d’expérience et de connaissance, à moins qu’elles aient la surveillance d’un
tiers chargé de leur sûreté pour la bonne instruction du produit.
• Des enfants devraient être encadrés pour s’assurer qu’ils ne jouent pas avec
l’appareil.
• Après l’emploi ranger le produit dans un endroit sûr et surtout hors de la portée des
enfants.
• A la suite d’une chute de l’appareil, débranchez immédiatement la fiche de la
prise de courant et adressez-vous aux services après-vente agréés.
• Ne pas tirer le câble ou l’appareil pour débrancher la fiche.
• Vérifiez que le câble d’alimentation n’entre pas en contact avec des bords coupants.
• Les parties sous tension (interrupteur, fiche, composants électroniques, etc.) ne
doivent pas entrer en contact avec l’eau.
• Avant toute opération d’entretien, de nettoyage ainsi que après l’emploi, débranchez l’appareil de la prise de courant.
• Ne pas laisser l’appareil allumé sans surveillance. Débranchez la fiche si vous devez
vous absenter même si seulement pour quelques minutes.
• N’introduire aucun objet dans les différentes ouvertures et ne pas utiliser l’appareil
si une des ouvertures est bouchée.
• Ne pas utiliser le produit avec les mains mouillées ou pieds nus.
• Ne pas utiliser l’appareil près de substances inflammables et/ou explosives
32
DÉBALLAGE
Garder soigneusement cette notice d’utilisation et la donner en tout cas à d’autres utilisateurs éventuels.
- Enlever le fer à repasser et la planche
de l’emballage
- Contrôler que dans l’emballage il y a
les éléments suivants :
IB 40 CLASSIC
1. Planche à repasser
2. Tige guide fil
3. Tapis repose-fer
1
Détruire les sachets en plastique éventuels:
ils pourraient être dangereux pour les enfants!
Note: Garder l’emballage pour d’autres
transports éventuels (par ex. déménagements, réparations, etc.).
3
2
A propos des instructions
Pour tout renseignements ou informations complémentaires, ou en cas de problèmes
non traités ou traités insufsamment dans ce manuel d’emploi, s’adresser au service
après-vente plus près de chez vous, ou à EUROFLEX France 01.49.28.07.93
ou par mail : euroflexnoos.fr
33
LISTE DES PARTIES ET DES ÉLÉMENTS DE COMMANDE
IB 40 CLASSIC Aspirante (RA)
5
4
IB 40 CLASSIC Aspirante e Soufflante (RAS)
5
4
3
3
9
1
8
7
6
2
1. Prise alimentation auxiliaire Max 10 A
2. Tige guide fil
3. Selecteur aspiration (RA)
Selecteur aspiration/soufflerie (RAS)
4. Voyant lumineux d’alimentation générale
5. Interrupteur ON-OFF alimentation générale
6. Tapis repose-fer
7. Câble alimentation
8. Levier réglage hauteur planche
9. Grille repose centrale de repassage
34
MODE D’EMPLOI IB 40 CLASSIC
Installation de la table
Pour placer la station de repassage, suivre les points suivants : Mettre la planche à repasser
sur une surface plate, stable, sèche et près d’une prise de courant positionner la planche
à repasser de façon que personne ne puisse la renverser ou se blesser ne jamais placer
l’appareil sur ou près de surfaces chaudes ou près de flammes libres- utiliser l’appareil seulement dans des endroits secs Afin d’éviter les brûlures, assurez-vous que les enfants ou les
personnes inaptes ne puissent avoir de contacts avec l’appareil
Placer la planche à repasser dans la façon suivante :
- Poser la planche à repasser au sol en position verticale (Grille repose centrale de repassage
de vapeur en bas).
- Tenir le bout de la planche avec une main.
- Avec l’autre main tenir le haut des pieds de la planche.
- Ecartez énergiquement le bout de la planche des pieds (1.), jusqu’à ce que vous n’entendez
le mécanisme de réglage de la hauteur de la planche (2.) se déclencher.
- Mettre la planche en position horizontale (3.).
1
3
2
Note: Veillez que les pieds de la planche ne glissent pas sur le plancher lisse pendant les opérations de dépliage/pliage de la planche.
-
Introduire la tige guide-fil dans l’ouverture spéciale et y accrocher le monotube. La tige
guide-fil empêche le déplacement non désiré du linge et l’«usure» du monotube. Pour cette
raison il faut toujours l’employer.
35
MODE D’EMPLOI IB 40 CLASSIC
Mise en marche IB 40 CLASSIC
• Introduire la fiche de vôtre fer à repasser dans la prise auxiliaire de la planche.
• Allumer l’appareil à travers l’interrupteur.
• A travers l’interrupteur «on/off» on actionne aussi le réchauffement de la planche à
repasser. Un thermostat intégré contrôle la température de réchauffement de la
planche de façon constante. Pendant la phase de réchauffement l’appareil peut
faire des bruits. Il s’agit d’un phénomène normal pour lequel on ne doit pas
s’inquiéter.
Voyant marche
Interrupteur marche/arrêt
Touche de sélection asp/souf
Fonction aspirante
L’aspiration absorbe la vapeur superflue qui n’est plus nécessaire après le repassage. L’aspiration permet de garder le tissu ferme sur la planche à repasser et d’en
éliminer l’humidité. On obtient des vêtements bien secs, prêts à être ranger.
Le réchauffement de la surface de repassage empêche que la planche à repasser
et par conséquent les pièces d’habillement deviennent humides. Cette fonction
empêche aussi la formation de condensation dans la planche.
Recommandation:
- A travers la fonction aspiration on peut «fixer» les tissus légers (soie, etc.) sur la
planche à repasser en empêchant ainsi qu’ils glissent.
- La fonction aspiration refroidit le tissu et «fixe» le résultat du repassage en garantissant par ex. des plis parfaits.
IB40 Classic Aspirante (RA)
- Pour la fonction aspiration mettre le sélecteur
sur la position “I”.
- Avec le sélecteur sur la position “0” on n’aura
aucune fonction.
sélecteur
36
MODE D’EMPLOI IB 40 CLASSIC
Fonction soufflerie
Le soufflage permet de travailler sur un coussin d’air en facilitant le repassage
de vêtements délicats ou de points difficiles (plis des pantalons, poches,
coutures, points difficiles à atteindre) en évitant la formation de faux plis et
l’écrasement des coutures.
IB40 Classic Aspirante e Souflante (RAS)
- Pour la fonction aspiration en continue mettre
le sélecteur sur la position “I”.
- Pour la fonction soufflerie en continue mettre
le sélecteur sur la position “II”.
- Avec le sélecteur sur la position “0” on n’aura
aucune fonction.
sélecteur
Attention: ne pas appuyer le fer chaud sur le grille repose centrale de repassage,
utiliser toujours le tapis repose-fer en dotation.
Après le repassage
- Laisser la planche allumée pendant 10 minutes afin d’éliminer la condensation
- Eteindre l’appareil à avec l’interrupteur «on/off».
- Extraire la fiche de la prise électrique.
- Laisser refroidir l’appareil complètement.
- Enlever la tige guide fil.
- Enlever le fer de la planche en enlevant la prise de connexion.
- Enrouler le câble d’alimentation sur le support spécial.
- Bloquer la jambe de la planche avec votre pied pour éviter qu’elle glisse.
- Actionner le levier réglage de hauteur et fermer la planche.
Note: ne pas attraper le câble d’alimentation.
- Assurez vous que la planche ne glisse pas ni se renverse. Garder l’appareil dans
un endroit sec et hors la portée des enfants.
37
ENTRETIEN
Changer la housse de vôtre IB 40
Avec le temps la housse avec molleton s’use, pour des raisons de sécurité (surface
de la planche réchauffée) et pour garantir une fonctionnalité parfaite il est conseillé
d’utiliser uniquement des housses avec molletons d’origines.
Housses revêtues (par ex. Un revêtement expansé sur le côté inférieur de la housse
ou un «re-vêtement argenté» sur le côté supérieur) ne sont pas indiquées à cet appareil et pourraient provoquer une surchauffe. La housse avec molleton est disponible auprès de nos Centres d’as-sistance technique autorisés.
Avertissement:
En cas de défaillance, d’appareil défectueux ou si on pense à une défaillance
après une chute, extraire tout de suite la fiche de la prise électrique. Les réparations
doivent être faites exclusivement auprès du Centre d’Assistance. Les réparations
faites par du personnel non spécialisé peuvent causer de graves dangers pour l’utilisateur. On ne s’assume pas de responsabilité en cas de dégâts causés par des
réparations faites par du personnel non spécialisé. En ce cas on annule aussi le droit
à la garantie.
38
ÍNDICE
PÁGINA
Normas de seguridad............................................................................................44
Desembalaje..........................................................................................................46
Sobre las instrucciones .........................................................................................46
Lista de las partes y de los elementos de mando.............................................47
Instrucciones para el uso IB 40 CLASSIC.............................................................48
Colocación..................................................................................................48
Puesta en marcha IB 40 CLASSIC..............................................................49
Función aspirante........................................................................................49
Función soplante ...................................................................................….50
Después del planchado .......................................................................….50
Mantenimiento......................................................................................................51
¡Felicitaciones! Comprando la estación de planchado tiene la garantía de un producto de
elevada calidad fabricado con el máximo cuidado. Con un adecuado mantenimiento la
estación de planchado garantizará excelentes resultados por un largo tiempo. Antes de poner el aparato en marcha por primera vez, lea atentamente las instrucciones para el uso
incluidas en el presente manual y observe con cuidado las normas de seguridad.
39
NORMAS DE SEGURIDAD
Antes de utilizar el aparato.
• Lea atentamente las informaciones incluidas en el presente manual. Encontrará
indicaciones útiles sobre el uso, la seguridad y el mantenimiento del aparato.
Guarde con cuidado las instrucciones y entréguelas a los posibles futuros propietarios.
• El aparato se conforma con las normas de seguridad CE y con las leyes vigentes
sobre la seguridad de los aparatos.
• Estos aparatos cumplen con las indicaciones de las directivas europeas 89/336/CEE
“compatibilidad electromagnética” y 2006/95/CEE “Seguridad de los aparatos
eléctricos”. El aparato lleva en la placa de características la marca CE.
• El fabricante se reserva el derecho de aportar al aparato modificaciones de proyecto y equipamiento sin aviso previo.
• No ponga en función nunca el aparato si el tubo del vapor está dañado (grietas/cortes), si el cable de alimentación está dañado o si el aparato puede tener
daños no visibles (por ejemplo si ha tenido una caída).
• Antes de utilizar el aparato, asegúrese de que el voltaje de su red eléctrica corresponda al indicado en la placa de características del aparato.
• La toma de corriente debe estar dotada con interruptor automático de 16 A.
• Si utiliza cables eléctricos de extensión, asegúrese de que sean adecuadas al uso
y con capacidad de 16 A.
• Desenrolle completamente los cables eléctricos de extensión antes de utilizarlos.
• Asegúrese de que la toma de corriente esté dotada con toma de tierra.
• Antes de utilizar los accesorios vapor, asegúrese de que estén firmemente conectados. En el caso de que no estén instalados correctamente, el vapor que sale de
las junturas puede producir quemaduras. Tener mucho cuidado.
Instrucciones generales
• El hierro se deben utilizar y descansaba sobre una superficie estable,
• Al colocar el hierro sobre su soporte, asegúrese de que la superficie sobre
la que se colocará el soporte es estable;
• El hierro no debe utilizarse si se ha caído, si Hay signos visibles de daños o si se
trata de fugas.
• No utilice el aparato en posición vertical.
• Si el aparato está dañado debido a un uso inadecuado, a una reparación o a
un mantenimiento no conforme, el fabricante declina toda responsabilidad por
posibles daños a personas u objetos.
• Las reparaciones deben ser efectuadas sólo por personal autorizado por el fabricante.
Los aparatos reparados por personal no autorizado representan un peligro por quien
los utiliza y anulan la garantía.
• El cable de alimentación debe ser substituido sólo por el personal de los centros
de asistencia autorizados por el fabricante.
• Guarde el aparato en un lugar seco.
• No guarde el aparato en exteriores.
• No exponga el aparato a los agentes atmosféricos, humedad o fuentes de calor.
• Para limpiar el aparato utilice un paño seco o ligeramente húmedo.
• Utilice exclusivamente los accesorios recomendados por el fabricante.
40
NORMAS DE SEGURIDAD
Normas de seguridad
• Este aparato no esta pensado para el uso de las personas con deficiencia de capacidad
fisica, sensorial o mentales reducidas (incluidos los niños), o con carencia de experiencia y
de conocimiento, a menos que lo hagan con supervisión o instrucción referente a su uso,
por parte de personas responsables de su seguridad.
• Deben vigilar a los niños cuando se este utilizando el aparato para que no jueguen con
el mismo.
• Después del uso guarde el aparato en un lugar seguro y no al alcanze de los niños.
• Si el aparato ha tenido una caída, desconecte de inmediato el enchufe de la toma de
corriente y dirígase a los centros de asistencia técnica autorizados.
• No tire del cable o del aparato para desconectar el enchufe.
• Asegúrese de que el cable de alimentación no esté en contacto con aristas cortantes.
• No ponga en contacto con agua las partes en tensión (interruptor, enchufe, componentes
electrónicos, etc.).
• Antes de cualquiera operación de mantenimiento, de limpieza y después de cada utilizo,
desenchufe el aparato de la toma de corriente.
• No deje el aparato en función sin vigilancia. Desenchufe el aparato si necesita ausentarse
aunque sea por poco tiempo.
• No inserte algun objeto en las aberturas y no utilice el aparato si alguna abertura está obstruida.
• No utilice el aparato con la manos mojadas o descalzo
• No utilice el aparato en presencia de substancias inflamables y/o explosivas.
41
DESEMBALAJE
Guarde con cuidado las presentes instrucciones para el uso y entréguelas a los futuros usuarios.
- Saque la plancha y la tabla del
embalaje
- Averigüe que los siguientes elementos
estén incluidos en el embalaje:
IB 40 CLASSIC
1. Tabla de planchar.
2. Asta para sostener el cable
3. Suela apoya-plancha
1
3
Elimine las bolsas de plástico: podrían ser
utilizadas como un juguete peligroso por
los niños.
2
Nota: Conserve el embalaje para posibles
futuros transportes (por ejemplo: mudanzas, reparaciones, etc.).
Sobre las instrucciones
Las instrucciones incluidas en el presente manual no pueden describir todos los
posibles empleos. Para más informaciones o en el caso de problemas no descritos
o descritos insuficientemente por las instrucciones, dirígase al Centro de Asistencia
técnico autorizado más cercano.
42
LISTA DE LAS PARTES Y DE LOS ELEMÉNTOS DE MANDO
IB 40 CLASSIC Aspirante (RA)
5
4
IB 40 CLASSIC Aspirante y Soplante (RAS)
5
4
3
3
9
1
8
7
6
2
1. Toma de alimentación auxiliar Max 10 A
2. Asta para sostener el cable
3. Desviador para seleccionar modalidad aspiracción (RA)
Desviador para seleccionar modalidad aspiracción/soplaje (RAS)
4. Señal luminosa alimentación tabla de planchar
5. Interruptor ON-OFF tabla de planchar
6. Suela apoya-plancha
7. Cable de alimentación tabla de planchar
8. Manilla de regulación de la altura de la tabla de planchar
9. Rellano para sistema de planchado
43
INSTRUCCIONES PARA EL USO IB 40 CLASSIC
Colocación
Para colocar la estación de planchado, observe las siguientes indicaciones:
- posicione la tabla de planchar sobre una superficie llana, estable, seca y cerca de una
toma de corriente
- posicione la tabla de planchar de manera que nadie pueda volcarla o herirse.
- nunca posicione el aparato sobre o cerca superficies calientes o cerca de llamas
- utilice el aparato sólo en cuartos secos
- par evitar quemaduras, asegúrese de que los niños no puedan acercarse al aparato o jugar
con el
- utilice sólo cables de extensiones adecuados; tenga cuidado con no tropezarse con el
cable.
Posicione la tabla de planchar de la siguiente manera:
- ponga la tabla de planchar al suelo en posición vertical (Rellano para sistema de planchado)
- agarre con una mano la extremidad de la tabla
- con otra mano agarre la extremidad superior de las patas de la tabla
- separe con fuerza la tabla y las patas (1.), hasta que sienta el sonido de bloqueo del mecanismo de regulación de la altura de la tabla (2.)
- ponga la tabla en posición horizontal (3.)
1
3
2
Nota: Tenga cuidado que las patas de la tabla no se deslizen sobre el suelo liso durante las
operaciones de abertura/cierre de la tabla.
-
introduzca el asta para sostener el cable en la abertura y cuelgue el tubo del vapor. El asta
para sostener el cable impide el movimiento de la ropa y el “desgaste” del tubo. Por eso es
necesario utilizarla siempre.
44
INSTRUCCIONES PARA EL USO IB 40 CLASSIC
Puesta en marcha IB 40 CLASSIC
- Conecte el enchufe de su plancha en la toma de corriente auxiliar de la tabla
de planchar.
- Ponga el aparato en funcionamiento con el interruptor.
- Con el interruptor “encendido/apagado” se acciona también el calentamiento de la
tabla de planchar. Un termostato integrado controla constantemente la temperatura de
calentamiento de la tabla. Durante la fase de calentamiento el aparato puede producir
ruidos. Se trata de un fenómeno normal y no debe preocuparse por eso.
señal de alimentación
interruptor ON/OFF
Mando desviador
Función aspirante
La aspiración absorbe el vapor residual, inútil después del proceso de planchado. La aspiración permite mantener la ropa firme sobre la tabla de planchar y eliminar la humedad
presente en los tejidos. Puede obtener prendas limpias y completamente secas, listas para reponerlas en los armarios. El calentamiento de la superficie de planchado impide que la tabla
de planchar y, en consecuencia, la ropa, se humedezca. Esta función impide la formación de
condensación en la tabla.
Advertencia:
- Con la función aspirante, los tejidos ligeros (seda, etc.) pueden ser “fijados” sobre la tabla
de planchar, de manera que no se deslizen.
- La función aspirante enfría el tejido y “fija” el resultado del planchado, garantizando,
por ejemplo, pliegues perfectos.
IB40 Classic Aspirante (RA)
- Para la función aspirante poner el desviador
en la posición “I”.
- Con el desviador en la posición “0” no se
obtendrá ninguna función
Mando
desviador
45
INSTRUCCIONES PARA EL USO IB 40 CLASSIC
Función soplante
El soplaje permite trabajar sobre un cojín de aire, facilitando el planchado de prendas delicadas o áreas problemáticas (pliegues de pantalones, bolsillos, costuras,
áreas difícilmente alcanzables) evitando la formación de falsos pliegues y el aplastamiento de las costuras.
IB40 Classic Aspirante y Soplante (RAS)
- Para la función aspirante en continuo poner
el desviador en la posición “I”.
- Para la función soplante en continuo poner
el desviador en la posición “II”.
- Con el desviador en la posición “0” no se
obtendrá ninguna función
Deviatore
Atención: no apoyes la plancha calientesobre el rellano para sistema de planchado, siempre utilizar la Suela apoya-plancha en dotación.
Después del planchado
- Dejar la tabla de planchar encendida por 10 minutos para secar eventuales condensaciones.
- Apague la estación de planchado con el interruptor “encendido/apagado”.
- Desconecte el enchufe de la toma de corriente.
- Deje enfriar completamente el aparato.
- Saque el asta para sostener el cable .
- Apoyar la plancha sobre la respectiva alfombrita apoya plancha.
- Sacar la plancha de la tabla de planchar desenchufándola.
- Enrollar el cable de alimentación en el soporte correspondiente.
- Bloquear la pata de la tabla de planchar con el pie para evitar che se resbale.
- Accionar la manilla de regulación de la altura y cerrar la tabla de planchar.
Nota: no enredar el cable de alimentación
- Asegurarse siempre que la tabla de planchar no se resbale ni se pliegue. Resguardar el aparato en un lugar seco y fuera del alcance de los niños.
46
MANTENIMIENTO
Cambiar la funda de su IB 40
Con el uso la funda acolchada se desgasta y por lo tanto debe ser sustituida. Por
motivos de seguridad (superficie de la tabla de planchar calentada) y para garantizar un perfecto funcionamiento sería mejor utilizar únicamente fundas y acolchados originales.
Fundas revestidas (por ejemplo un revestimiento espandido en el lado inferior de la
funda o un «revestimiento plateado» en el lado superior) no son aptos para este
aparato y podrían provocar un sobrecalentamiento. La funda acolchada se encuentra disponible en nuestros centros de asistencia técnica autorizados.
Advertencia:
En el caso de averías, de aparatos con defectos o de un posible un daño debido
a una caída, remueva de inmediato el enchufe de la toma de corriente. Las reparaciones deben ser efectuadas exclusivamente en el Centro de asistencia. Reparaciones efectuadas por personal no calificado pueden causar peligro para el
usuario. El fabricante no es responsable en el caso de daños producidos por reparaciones efectuadas por personal no calificado. En estos casos la garantía se anula.
47
Smaltimento delle apparecchiature obsolete
Disposal of your old appliance
Entsorgung von Altgeräten
Élimination des appareillages obsolètes
Como deshacerse de aparatos eléctricos y electrónicos viejos
Eliminação do seu antigo aparelho
IT
Smaltimento delle apparecchiature obsolete
1. Quando su un prodotto è riportato il simbolo di un bidone della
spazzatura sbarrato da una croce
significa che il prodotto è coperto
dalla Direttiva Europea 2002/96/EC.
2. Tutti i prodotti elettrici ed elettronici dovrebbero essere smaltiti separatamente rispetto alla raccolta
differenziata municipale, mediante impianti di raccolta specifici designati dal governo o dalle autorità
locali.
3. Il corretto smaltimento delle
apparecchiature obsolete contribuisce a prevenire possibili conseguenze negative sulla salute umana e sull’ambiente.
4. Per informazioni più dettagliate
sullo smaltimento delle apparecchiature obsolete, contattare il
comune, il servizio di smaltimento
rifiuti o il negozio in cui è stato acquistato il prodotto.
FR
Élimination des appareillages obsolètes
1. Quand figure sur un produit le
symbole représentant une poubelle
barrée d’une croix, cela indique
que le produit est assujetti à la Directive européenne 2002/96/EC.
2. Tous les appareils et composants
électriques et électroniques doivent
être éliminés auprès de déchetteries spécifiques indiquées par les
pouvoirs publics nationaux ou par
les autorités locales.
3. La bonne élimination des appareillages obsolètes contribue à
prévenir les conséquences dommageables pour la santé des personnes et pour l’environnement.
4. Pour plus d’informations concernant l’élimination des appareillages
obsolètes, veuillez contacter votre
mairie, le service d’élimination des
ordures ou encore le magasin où le
produit a été acheté.
UK
Disposal of your old appliance
1. When this crossed-out bin symbol appears on a product it means
that the product is covered by European Directive 2002/96/EC.
2. All electrical and electronic
products should be disposed of
separately from the municipal
waste stream via specific collection facilities designated by the
government or the local authorities.
3. Proper disposal of your old appliance will help prevent potential
negative consequences for the
environment and human health.
4. For more detailed information
about disposal of your old appliance, please contact your municipality, the waste disposal service
or the shop where you purchased
the product.
ES
Como deshacerse de aparatos
eléctricos y electrónicos viejos
1. Si en un producto aparece el
símbolo de un contenedor de basura tachado, significa que este se
acoge a la Directiva 2002/96/EC.
2. Los aparatos eléctricos no se
deben desechar junto con los residuos domésticos, sino a través de
puntos de recogida designados
por el gobierno o las autoridades
locales.
3. La correcta recogida y tratamiento de los dispositivos inservibles contribuye a evitar riesgos
potenciales para el medio ambiente y la salud pública.
4. Para obtener más información
sobre cómo deshacerse de sus
aparatos eléctricos y electrónicos viejos, póngase en contacto
con su ayuntamiento, el servicio
de recogida de basuras o el establecimiento donde adquirió el
producto.
DE
Entsorgung von Altgeräten.
1. Wenn dieses Symbol eines
durchgestrichenen Abfalleimers
auf einem Produkt angebracht ist,
unterliegt dieses Produkt der europäischen Richtlinie 2002/96/EC.
2. Alle Elektro–und Elektronik-Altgeräte müssen getrennt vom Hausmüll über dafür staatlich vorgesehene Stellen entsorgt werden.
3. Eine ordnungsgemäße Entsorgung des Altgeräts trägt dazu bei,
Schäden an der Umwelt und der
menschlichen Gesundheit zu vermeiden.
4. Weitere Informationen zur Entsorgung des Altgeräts erhalten
Sie bei der Stadtverwaltung, beim
Entsorgungsamt oder in dem Geschäft, in dem Sie das Produkt erworben haben.
PT
Eliminação do seu antigo aparelho
1. Quando este símbolo de caixote do lixo com uma cruz em cima
estiver afixado a un produto, significa que o produto se encontra
abrangido pela Directiva Europeia 2002/96/EC.
2. Todos os produtos eléctricos
e electrónicos devem ser eliminados separadamente do lixo
domèstico atravès de pontos de
recolha designados para o efeito
pelo governo ou pelas autoridades locais.
3. A eliminação crrecta do seu
aparelho antigo ajuda a evitar potenciais consequências negativas
para o ambiente e para a saúde
humana.
4. Para obter informações mais
detalhadas acerca da eliminação do seu aparelho antigo,
contacte as autoridades locais,
um serviço de eliminação de resíduos ou a loja onde comprou o
produto.
NOTES
........................................................................................................................
........................................................................................................................
........................................................................................................................
........................................................................................................................
........................................................................................................................
........................................................................................................................
........................................................................................................................
........................................................................................................................
........................................................................................................................
........................................................................................................................
........................................................................................................................
........................................................................................................................
........................................................................................................................
........................................................................................................................
........................................................................................................................
........................................................................................................................
........................................................................................................................
........................................................................................................................
........................................................................................................................
........................................................................................................................
Cod.6809896.0 03/08
EUROFLEX srl
via dei Colli, 59
31058 Susegana (TV) Italy
Tel. ++39.0438.661711 ++39.0438.661712
http: www.euroflex.tv
E-mail: euroflex@euroflex.tv