1
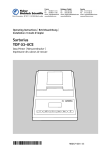
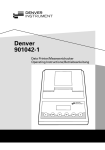
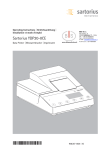
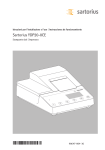
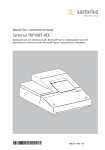
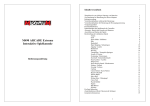
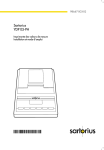
Operating Instructions | Betriebsanleitung |
Installation et mode d’emploi
Sartorius YDP10-0CE
Data Printer | Messwertdrucker | Imprimante des valeurs de mesure
98647-004-31
English – page 3
In cases involving questions of interpretation,
the German-language version shall prevail.
Deutsch – Seite 17
Im Auslegungsfall ist die deutsche Sprache
maßgeblich.
Français – page 31
En cas de questions concernant l’interprétation,
la version en langue allemande fera autorité.
2
Contents
Intended Use
4
Troubleshooting Guide
9
Safety Instructions
4
Maintenance
10
Installation
5
Accessories
14
Operation
8
Specifications
14
Printing a Measured Value from the
Connected Weighing Instrument
Electromagnetic Compatibility
15
8
Configuration
8
Using the Printer in Legal Metrology 15
Test Certificate
16
3
Intended Use
Safety Instructions
Model YDP 10-0CE is a data printer
designed to receive weighing data
from a connected weighing instrument
and print it on plain paper (roll width:
57.5 mm). Text and data are printed
with up to 24 characters per line.
The data printer complies with the EC
Directives and Standards for electrical
equipment and electromagnetic compatibility.
The data printer meets the quality
standards for research in the chemical
and pharmaceutical industries, in compliance with the requirements of GLP
(Good Laboratory Practice) and GMP
(Good Manufacturing Practice).
The printer can be used for output
of weighing data. Data is sent to the
output port either automatically or at
the press of a key. The printer can
be used as auxiliary equipment with
a weighing instrument that has been
verified for use in legal metrology; see
“Using the Printer in Legal Metrology”
for more information.
Use only rechargeable nickel-metal
hydride, size AA (order no. 69Y03136).
Avoid draining the batteries completely,
as this will reduce their recharging
capacity. Used batteries are hazardous
waste and must be properly disposed of
in accordance with your local hazardous
waste disposal regulations.
As a rule, the printer is powered over
the data cable connected to the weighing instrument.
Depending on your weighing instrument model, it may be necessary to use
a different external power source. To do
this, use only an original Sartorius AC
adapter (see “Accessories”). If you have
any difficulties, contact our Service
Center or your Sartorius dealer.
Use only a moist cloth to wipe down the
printer to ensure that no liquid enters
the printer housing during cleaning.
Caution: The serrated edge for tearing
off printouts is sharp; direct contact can
result in injury.
4
Installation
Equipment Supplied
The following components are supplied:
– Interface cable for connecting the printer
to a weighing instrument
– Ink ribbon
– 4 rechargeable batteries
– Paper roll
Installing the Rechargeable Batteries
§ Remove the 4 batteries from the packaging (they are
discharged)
§ Lift the cover of the paper roll compartment
§ To open the battery compartment, tilt back the cover.
LF
CN
N/ N
STAT
DA TE
§ Install the 4 rechargeable batteries in the battery
compartment. Make sure that the poles match the
+ and – signs.
§ Close the battery compartment
§ Close the paper roll compartment
– You cannot thread the paper roll until the printer has
been turned on.
5
Connecting the Data Printer to a Weighing Instrument
§ Connect the interface cable to the printer and to the
weighing instrument. Secure the connection.
Turning On the Weighing Instrument and the Printer
§ Plug in the AC adapter to power the weighing instrument
§ Turn on the weighing instrument
> The printer switches on automatically
> The green LED on the left-hand side of the front panel
lights up
Charging the Batteries during Initial Operation
§ Charge the batteries by leaving the weighing instrument
turned on
> The batteries are charged while the weighing instrument
is in standby mode
> It takes 28 hours to charge the batteries to full capacity
$ The LED flashes red to indicate that there is not enough
charge in the batteries to power the printer.
If the LED does not stop flashing after a maximum of
3 hours charging, the batteries must be replaced
(see page12 ).
Installing the Ink Ribbon Cassette
§ For details on installing the ink ribbon cassette, see the
section entitled “Maintenance” (page 11).
Inserting the Paper Roll
6
§ For details on inserting the paper roll, see the section
entitled “Maintenance” (page 10).
§ Plug the original Sartorius AC adapter into an electrical
outlet
§ Insert the right-angle plug into the jack on the righthand side of the printer’s rear panel. The green LED
lights up to indicate the presence of voltage.
$ For details on installing the batteries, see page 6
$ Follow the steps described in the previous section to
connect the printer and the weighing instrument
7
Operation
The data printer has 2 function keys for
operation:
: Line feed; advances the paper by one blank line.
: Print measured value or begin automatic
printing
Printing a Measured Value from the Connected
Weighing Instrument
$
123456789012345678901234
001:
+
123.4
g
§
>
Advance paper to desired position, if necessary:
Press the key (repeatedly if desired), or press
and hold for continuous line feed
To print data, press the key
A sample printout is shown here on the left
Configuration
Configuring the Operating Menu
Note:
The connected weighing instrument must be
configured for data communication with the
printer.
Configuring the Weighing Instrument’s Printer
Port
The following settings are configured in the
printer at the factory:
9600 baud, 8 bits, odd parity, one stop bit, hardware handshake (CTS/DTR)
When the printer is turned on, these settings are
loaded in the printer’s memory (EEPROM) for use
during operation.
8
Troubleshooting Guide
LED
Cause
Solution
Red
Data in printer memory
(EEPROM) defective
(checksum invalid)
§ Press the key
Red
The capacity of the
input buffer has been
exceeded
§ Switch the weighing instrument
off and then on again
§ Press the key
Red
No control signal from
printer
§
§
$
$
Flashing red
Low battery power
§ Recharge batteries (see
“Maintenance”)
> Factory settings are loaded
$ It may be necessary to configure
menu settings for the printer port
and in the statistics application
Press the key
Check the batteries
Recharge batteries if necessary
Replace the batteries if necessary
Batteries dead
Red
Transmission error
in a data string
§ Make sure the interface parameter
settings in the printer match those in
the weighing instrument
§ Press the key
9
Maintenance
Replacing the Paper Roll
–
–
–
–
–
The paper rolls used with your data printer must have
the following specifications (see “Accessories”):
Standard paper roll
Wood-free paper, 60 g
Width: 57.5 ± 0.5 mm
Diameter: Max. 65 mm
Core diameter: Min. 8 mm
§ Lift the cover of the paper roll compartment
§ Pull out the roll holders from both sides of the roll core
as shown on the left
§ Remove the old roll core
LF
CN
N/ N
STAT
DA TE
$ Place a new paper roll on a flat surface
$ The open end must be on the bottom of the roll and
facing the front of the printer
§ Hold the paper roll above the paper roll compartment
between thumb and index finger of one hand
§ Thread the paper through the slot underneath the ink
ribbon with your other hand
§ To transport the paper through the ink ribbon cassette,
press the key repeatedly, or hold it down
> The paper will be threaded into, then out of the ink
ribbon cassette
10
§ To align the paper roll, hold it so that you can push
both roll holders into the core
§ Release the roll holders on both sides
§ Close the paper roll compartment
Replacing the Ink Ribbon Cassette
Your data printer requires a black ink ribbon cassette,
type ERC-22 (see “Accessories”).
§ Lift the cover of the paper roll compartment
§ To remove the paper from the ink ribbon cassette,
turn the paper roll opposite to the paper feed direction
Press down on the right-hand side of the cassette
> The left-hand side of the cassette rises
§ Remove the cassette
§ Insert a new ink ribbon cassette from the top
> The cassette locks into place
$ Turn the small tension wheel located on the left in the
direction of the arrow until the ribbon is stretched taut
in front of the paper
§ To thread the paper, see “Replacing the Paper Roll”
§ Close the paper roll compartment
11
$
>
>
$
Charging the Batteries
If the LED is red (not flashing), the batteries are completely drained.
The LED flashes red to indicate that the batteries are
charging; do not switch off the weighing instrument.
The batteries are charged while the weighing instrument is in standby mode
It takes 28 hours to charge the batteries to full capacity
If the LED does not stop flashing red within a maximum of 3 hours, replace the batteries
Replacing the Batteries
! Avoid draining the batteries completely, as this will
reduce their recharging capacity.
! Use only size AA rechargeable nickel-metal hydride
batteries (see “Accessories”; order no. 69Y03136).
§ Lift the cover of the paper roll compartment
§ To open the battery compartment, tilt back the cover
! Remove the 4 batteries
Do not dispose of batteries in normal household waste.
Rechargeable batteries contain toxic materials and must
be disposed of in accordance with local waste disposal
regulations.
$ If you have any questions, please contact your local
Sartorius Service Center
§ Place the 4 new batteries in the battery compartment.
Make sure that the poles match the + and – signs
§ Press down on the cover to close the battery compartment
§ Close the paper roll compartment
12
Cleaning the Data Printer
! When cleaning the data printer, make sure that no
liquid enters the housing
! Do not use any aggressive cleaning agents (solvents or
similar agents).
§ Disconnect the power supply by unplugging the interface cable (connecting the weighing instrument) from
the rear panel of the printer.
$ If you are using an external power supply, unplug
the AC adapter from the electrical outlet (mains supply)
§ Use only a cloth moistened with a mild detergent (soap)
to wipe down the printer housing
§ After cleaning, wipe down the printer with a soft,
dry cloth
13
Accessories
Product
Spare paper rolls (box of 5)
Ink ribbon cassette
AC adapter with specifications rated for:
Europe
UK
USA
Australia
South Africa
Set of 4 rechargeable batteries (nickel-metal hydride, size AA)
Data cable for connecting the printer to a weighing instrument
or other device of an older design series (MP technology), for use
in residential areas (EN55022, Class B)
Order No.
6906937
6906918
6971412
6971414
6971413
6971411
6971410
69Y03136
VF1503
(Fast Factory)
Specifications
Dimension
Length
Width
Height
Weight (without batteries or paper roll)
Operating temperature
Allowable storage temperature
14
Value
230 mm
158 mm
80 mm
Approximately 800 g
0°C to +40°C
(32°F to 104°F)
-40°C to +70°C
(-40°F to +158°F)
Electromagnetic Compatibility
C Marking
Using the Printer in Legal Metrology
The printer complies with the following
EC Directives and European Standards:
2004/108/EC “Electromagnetic Compatibility (EMC)” Applicable European
Standards: Limitation of emissions:
In accordance with product standard
EN 61326-1 Class B (residential area)
Defined immunity to interference:
in accordance with product standard
EN 61326-1 (industrial environment)
The German National Institute of
Physics and Metrology (PTB) has issued
an independent test certificate for the
YDP10-0CE (see certificate for number).
With this certificate, the printer is permitted for use in legal metrology in the
EU and the EEA. This applies only when
the printer is connected to a weighing
instrument that has an EC type approval
certificate, or a national equivalent,
verifying that the weighing instrument
is verifiable for legal metrology.
Note: The operator shall be responsible
for any modifications to Sartorius
equipment and for any connections
of cables or equipment not supplied by
Sartorius and must check and, if necessary, correct these modifications and
connections. On request, Sartorius will
provide information on the minimum
operating specifications (in accordance
with the standards listed above for
defined immunity to interference).
Council Directive 2006/95/EC:
“Electrical equipment designed for use
within certain voltage limits”
Applicable European Standards:
EN 61010-1 Safety requirements for
electrical equipment for measurement,
control and laboratory use Part 1:
General requirements If you use electrical equipment in installations and under
ambient conditions subject to stricter
safety standards than those described in
the manual, you must comply with the
provisions as specified in the applicable
regulations for installation in your
country.
If the weighing instrument has one or
more display digits marked (e = d), the
printer must mark these digits as well;
for example, with brackets or inverse
printing. This does not apply for weighing instruments of accuracy class I with
a verification scale interval e = 1 mg
and a scale interval of d < 0.1 mg.
For weighing instruments with e = d,
marking digits is not permitted.
Data output from the weighing instrument must be configured so that the
marking of digits is passed to the printer
and included on the printout.
If the printer is subsequently connected
to a verified weighing instrument already
in use in legal metrology, notify your
local weights and measures inspection
office or contact your local Sartorius
service center if you wish to have the
data printer configured and prepared
for verification for use in legal metrology.
The above does not concern printers
that are immediately used in legal
metrology.
15
16
Inhalt
Verwendungszweck
17
Fehlermeldungen
23
Sicherheitshinweise
18
Instandhaltung
24
Installation
19
Zubehör
28
Betrieb
22
Technische Daten
28
Messwert der angeschlossenen
Waage drucken
Elektromagnetische Verträglichkeit
29
22
Einsatz im eichpflichtigen Verkehr
29
Voreinstellungen
22
Prüfschein
30
17
Verwendungszweck
Sicherheitshinweise
Der Typ YDP 10-0CE ist ein Messwertdrucker, der Wägedaten von einer angeschlossenen Waage übernimmt und auf
Normalpapier (Rollenbreite: 57,5 mm)
ausdruckt. Text wird mit bis zu 24 Zeichen pro Zeile ausgegeben.
Der Drucker entspricht den Richtlinien
und Normen für elektrische Betriebsmittel und elektromagnetische Verträglichkeit.
Der Drucker erfüllt die Qualitätsstandards aus Chemie und Pharmaziedie im
Bereich der Forschung unter dem
Begriff GLP (Good Laboratory Practice)
und in der Fertigung unter dem Begriff
GMP (Good Manufacturing Practice)
eingeführt sind.
Mit dem Drucker können einzelne
Wägedaten ausgegeben werden.
Die Datenausgabe kann auf Tastendruck oder automatisch erfolgen.
Der Messwertdrucker ist als Zusatzeinrichtung bei einer geeichten Waage
einsetzbar, siehe unter »Einsatz im
eichpflichtigen Verkehr«.
Es darf nur folgender Akkutyp
(keine Batterien) verwendet werden:
Nickel-Metall-Hybrid, Typ AA
Best.-Nr. 69Y03136.
Tiefentladung der Akkus vermeiden, da
sonst die maximale Ladekapazität sinkt.
Verbrauchte Akkus müssen als Sondermüll entsorgt werden.
Bei externer Spannungsversorgung nur
Original Sartorius Netzgerät für diesen
Drucker verwenden (siehe Kapitel Zubehör). Das externe Netzgerät ist nur bei
bestimmten Waagenserien erforderlich.
Im Problemfall den Service oder den
Sartorius Händler ansprechen.
Die externe Spannungsversorgung
erfolgt über das Datenkabel der angeschlossenen Waage.
Beim Reinigen dürfen keine Flüssigkeiten in den Drucker gelangen: nur
leicht angefeuchtetes Reinigungstuch
verwenden.
Vorsicht, die gezahnte Papierabrisskante
ist scharf, bei direkter Berührung
besteht Verletzungsgefahr!
18
Installation
Lieferumfang
–
–
–
–
Folgende Einzelteile werden mitgeliefert:
Datenleitung Drucker – Waage
Farbband
4 Akkus
Papierrolle
Akkus einlegen
§ 4 Akkus aus der Verpackung entnehmen (Akkus sind
entladen)
§ Papierfach öffnen: Papierfachabdeckung anheben
§ Akkufach öffnen: Akkufachabdeckung aufklappen.
LF
CN
N/ N
STAT
DA TE
§ 4 Akkus in Akkufach einsetzen: Polarität beachten!
§ Akkufach schließen: Akkufachabdeckung schließen
§ Papierfach schließen: Papierfachabdeckung nach vorne
herunterklappen
– Die Papierrolle kann erst eingefädelt werden, wenn der
Drucker eingeschaltet ist.
19
Drucker an Waage anschließen
§ Datenverbindungskabel am Drucker und an der Waage
anschließen und sichern
Waage und Drucker einschalten
§ Waage mit Netzspannung versorgen: Netzgerätstecker
einstecken
§ Waage einschalten
> Drucker schaltet automatisch ebenfalls ein
> Die grüne Kontroll-LED links auf der Frontlolie
leuchtet.
Akkus aufladen bei Erst-Inbetriebnahme
§ Akkus aufladen: Waage eingeschaltet lassen
> Akkus werden im Standby-Betrieb der Waage geladen
> nach 28 Stunden sind die Akkus im Drucker aufgeladen
$ Wenn die rote LED blinkt, sind die Akkus nicht geladen.
Falls die rote LED blinkt und nach spätestens 3 Stunden
nicht erlischt: Akkus wechseln, siehe Seite 26
Farbband einlegen
§ Farbband einlegen: siehe Kapitel Instandhaltung,
Seite 25
Papierrrolle einlegen
20
§ Papierrolle einlegen:
siehe Kapitel Instandhaltung, Seite 24
§ Original Sartorius Netzgerät an Netzsteckdose
anschließen
§ Winkelstecker des Netzgeräts an rechten Ausgang der
Druckerrückseite anschließen
Die grüne LED leuchtet, Netzspannung vorhanden.
$ Akkus einlegen: siehe Seite 20
$ Drucker und Waage anschließen und einschalten:
siehe vorherigen Abschnitt
21
Betrieb
Für den Betrieb des Druckers stehen 2 Tasten
zur Verfügung:
: Leerzeile drucken; Papiervorschub um 1 Zeile
Messwert ausdrucken oder automatisch
ausdrucken
Messwert der angeschlossenen Waage
ausdrucken
$
123456789012345678901234
001:
+
123.4
g
>
§
Ggf. einige Leerzeilen drucken (Papiervorschub):
Taste (mehrfach) drücken oder gedrückt
halten
Nebenstehender Ausdruck erscheint (Beispiel)
Messwert ausdrucken: Taste drücken
Voreinstellungen
Voreinstellungen im Menü
Hinweis:
Alle Einstellungen der Schnittstellenparameter
müssen in der angeschlossenen Waage realisiert
werden!
»Waage, Drucker-Schnittstelle« vornehmen
Der Drucker ist ab Werk fest konfiguriert auf:
9600 Baud , 8 bit, odd parity, ein Stop bit,
hardware Handshake (CTS/DTR)
Alle Voreinstellungen werden beim Start des
Druckers aus dem Druckerspeicher (EEPROM)
gelesen und anschließend vom Drucker für den
Betrieb übernommen.
22
Fehlermeldungen
LED
Ursache
Abhilfe
leuchtet rot
Daten im Druckerspeicher
(EEPROM) sind fehlerhaft
(Prüfsumme stimmt nicht)
§ -Taste drücken
> Werksvoreinstellungen
werden geladen
$ Ggf. Menü Drucker-Schnittstelle und
Menü Statistik-Anwendungen neu
konfigurieren
leuchtet rot
Überschreitung
der Eingangskapazität
des Eingangspuffers
§ Waage ausschalten
und neu einschalten
§ -Taste drücken
leuchtet rot
Steuersignale des Drucker
fehlen
§
§
$
$
blinkt rot
Akkuladung zu gering
§ Akku aufladen (siehe
Kapitel Instandhaltung)
-Taste drücken
Akkus überprüfen
Akkus ggf. aufladen
Akkus ggf. wechseln
Akku entladen
leuchtet rot
Übertragungsfehler
in einer Datenkette
§ Einstellungen der
Schnittstellenparameter
Waage/Drucker auf Gleichheit prüfen
§ -Taste drücken
23
Instandhaltung
Papierrolle wechseln
–
–
–
–
–
Für den Betrieb wird eine Papierrolle mit folgenden
Eigenschaften benötigt (siehe auch Kapitel Zubehör):
Standard-Papierrolle
Holzfreies 60 g Papier
Breite: 57,5 ± 0,5 mm
Durchmesser: max. 65 mm
Offener Kerndurchmesser: min. 8 mm
§ Papierfach öffnen: Papierfachabdeckung anheben
§ Rollenhalterungen an beiden Seiten des Rollenkerns
nach außen ziehen
§ Alten Rollenkern entnehmen
LF
CN
N/ N
STAT
DA TE
$ Neue Papierrolle flach auf eine Fläche legen
$ Papieranfang der Rolle muss sich unten befinden und
auf Ihren Körper zeigen
§ Papierrolle mit einer Hand zwischen Daumen und
Zeigefinger senkrecht über dem Rollenfach halten
§ Papieranfang mit der anderen Hand in den Einführschlitz unter dem Farbband einführen
§ Papier durch die Farbbandkassette transportieren:
Bei eingeschaltetem Drucker Taste mehrfach
drücken oder gedrückt halten
> Papier wird in die Farbbandkassette eingezogen und
nach oben ausgeführt
24
§ Papierrolle einrichten: Papierrolle so halten, dass die
Rollenhalterungen in die Kernöffnung der Papierrolle
zusammengeschoben werden können
§ Rollenhalterungen an beiden Seiten loslassen
§ Papierfach schließen: Papierfachabdeckung nach vorne
herunterklappen
Farbband wechseln
Für den Betrieb wird ein schwarzes Farbband vom
Typ ERC-22 benötigt (siehe auch Kapitel Zubehör).
§ Papierfach öffnen: Papierfachabdeckung anheben
§ Papier aus Farbbandkassette entfernen:
Papierrolle zurückdrehen
§ Von oben auf die rechte Seite des Farbbandes drücken
> Linke Seite des Farbbandes hebt sich
§ Farbband entnehmen
§ Neues Farbband von oben einsetzen
> Farbband rastet ein
$ Ggf. Farbband straff ziehen: Aufwickelkern auf der
linken Seite des Farbbandes in Pfeilrichtung drehen
§ Papier einfädeln: siehe Papierrrolle wechseln
§ Papierfach schließen: Papierfachabdeckung nach vorne
herunterklappen
25
Akkus laden
Die LED leuchtet rot (Akkus sind tiefenentladen).
$ Die LED blinkt, Akkus aufladen: Waage eingeschaltet
lassen
> Akkus werden im Standby-Betrieb der Waage geladen
> nach 28 Stunden sind die Akkus im Drucker aufgeladen
$ Falls das Symbol nach spätestens 3 Stunden nicht
erlischt: Akkus wechseln
Akkus wechseln
! Tiefentladung der Akkus vermeiden, da sonst die
maximale Ladekapazität sinkt.
! Nur Standard Mignon Akkus vom Typ Nickel-Metall-
Hybrid Typ AA verwenden (siehe auch »Zubehör«)
Sartorius Best.-Nr. 69Y03136
§ Papierfach öffnen: Papierfachabdeckung anheben
§ Akkufach öffnen: Akkufachabdeckung nach hinten aufklappen
! 4 Akkus entnehmen
Verbrauchte Akkus sind Sondermüll (kein Hausmüll):
Akkus gemäß Abfallwirtschaftsgesetz als Sondermüll
speziell entsorgen
$ Ggf. Sartorius Kundendienstleitstelle befragen
§ 4 neue Akkus in Akkufach einsetzen: Polarität beachten
§ Akkufach schließen: Akkufachabdeckung nach vorne
herunterklappen
§ Papierfach schließen: Papierfachabdeckung nach vorne
herunterklappen
26
Drucker reinigen
! Es darf keine Flüssigkeit in den Drucker gelangen
! Keine aggressiven Reinigungsmittel (Lösungsmittel o. ä.)
verwenden
§ Spannungsversorgung trennen: Datenkabel (zur Waage)
an der Rückseite des Druckers lösen
$ Bei externer Spannungsversorgung ggf. Netzgerät aus
der Steckdose ziehen
§ Drucker mit in Seifenlauge leicht angefeuchtetem Tuch
reinigen
§ Drucker mit weichem Tuch abtrocknen
27
Zubehör
Bezeichnung
Papierrolle (5er Pack)
Farbband
Steckernetzgerät für Norm
Europa
Großbritannien
USA
Australien
Südafrika
Akkusatz (4- Nickel-Metall-Hydrid Typ AA)
Datenleitung Drucker <–> Gerät älterer Bauart
(MP…-Technologie) zum Einsatz im Wohnbereich
(EN55022, Klasse B)
Best.-Nr.
6906937
6906918
6971412
6971414
6971413
6971411
6971410
69Y03136
VF1503
(Fast Factory)
Technische Daten
Bezeichnung
Länge
Breite
Höhe
Gewicht (ohne Akkus, Papierrolle)
Betriebstemperatur
Lagertemperatur
28
Größe
230 mm
158 mm
80 mm
ca. 800 g
0 bis +40°C
–40 bis +70°C
Elektromagnetische Verträglichkeit
C-Kennzeichnung
Einsatz im eichpflichtigen Verkehr
Das Gerät erfüllt die Anforderungen der
Richtlinien des Rates der Europäischen
Union:
2004/108/EG »Elektromagnetische
Verträglichkeit (EMV)«
Zugehörige Europäische Normen:
Störaussendung:
nach Produktnorm EN 61326-1 Kl.B
(Wohnbereich)
Störfestigkeit:
nach Produktnorm EN 61326-1
(Industriebereich)
Der Drucker YDP10-0CE verfügt über
einen eigenständigen Prüfbericht der
PTB Deutschland (siehe Prüfschein).
Hierdurch kann der Drucker im eichpflichtigen Verkehr in der EU und des
EWR eingesetzt werden. Dies gilt nur
bei Anschluss an geeichte Waagen, die
durch eine EG oder nationale Bauartzulassung zur Eichung zugelassen sind.
Hinweis:
Modifikationen der Geräte sowie der
Anschluss von nicht von Sartorius gelieferten Kabeln oder Geräten unterliegen
der Verantwortung des Betreibers und
sind von diesem entsprechend zu prüfen
und falls erforderlich zu korrigieren.
Sartorius stellt auf Anfrage Angaben zur
Betriebsqualität zur Verfügung (gemäß
den o. g. Normen zur Störfestigkeit).
2006/95/EG »Elektrische Betriebsmittel
zur Verwendung innerhalb bestimmter
Spannungsgrenzen«
Zugehörige Europäische Normen:
EN61010-1
Sicherheitsanforderungen an elektrische
Mess-, Steuer-, Regel- und Laborgeräte
Teil 1: Allgemeine Anforderungen
Bei Verwendung elektrischer Betriebsmittel in Anlagen und Umgebungsbedingungen mit erhöhten Sicherheitsanforderungen sind die Auflagen gemäß
den zutreffenden Errichtungsbestimmungen zu beachten.
Hat die Waage eine oder mehrere
gesondert gekennzeichnete Anzeigestellen (e = d), so muss der Drucker
diese Stellen ebenfalls kennzeichnen,
z.B. in Klammern oder Inversdruck.
Dies gilt nicht bei Waagen der Genauigkeitsklasse I mit einem Eichwert e = 1
mg und einem Teilungswert d < 0,1 mg.
Bei Waagen mit e = d ist eine Kennzeichnung nicht zulässig.
Die Datenausgabe der Waage muss
so konfiguriert werden, dass die Kennzeichnung einer gesondert gekennzeichneten Anzeigestelle mit ausgegeben und an den Drucker übermittelt
wird.
Wenn der Drucker nachträglich an eine
geeichte und bereits im eichpflichtigen
Verkehr eingesetzte Waage angeschlossen wird, ist in Deutschland eine
Information an das zuständige Eichamt
gefordert. Der sofortige Einsatz im
gesetzlichen Messwesen ist davon nicht
betroffen.
29
30
Table des matières
Description générale
32
Messages d’erreur
37
Conseils de sécurité
32
Entretien
38
Installation
33
Accessoires
42
Fonctionnement
36
Caractéristiques techniques
42
Compatibilité électromagnétique
43
Utilisation en métrologie légale
43
Certificat d’essai
44
Impression de la valeur mesurée par la
balance connectée
36
Réglages
36
31
Description générale
Conseils de sécurité
Le modèle YDP10-0CE est une imprimante qui reçoit les données de pesée
d’une balance connectée et les imprime
sur du papier normal (largeur du rouleau
: 57,5 mm). Le texte et les données sont
imprimés avec au maximum
24 caractères par ligne.
L’imprimante répond aux directives
et aux normes concernant les moyens
d’exploitation électriques et la compatibilité électromagnétique.
L’imprimante répond aux normes de
qualité exigées dans les secteurs de la
chimie et de la pharmacie et qui ont
été introduites dans la recherche sous
le nom de BPL (Bonnes Pratiques de
Laboratoire) et dans la production sous
le nom de BPF (Bonnes Pratiques de
Fabrication).
L’imprimante permet d’éditer des
données de pesée individuelles.
La transmission des données peut se
faire automatiquement ou manuellement
en appuyant sur une touche.
L’imprimante peut également être
utilisée comme dispositif auxiliaire d’une
balance approuvée pour l’utilisation en
usage réglementé (voir le chapitre
« Utilisation en métrologie légale »).
Seuls les types d’accus suivants
(pas de batteries) doivent être utilisés :
nickel-métal hybride, type AA référence
69Y03136.
Evitez une décharge profonde des accus
sinon la capacité de charge maximale
diminue.
Les accus usagés doivent être recyclés en
tant qu’ordures spéciales.
En cas d’alimentation électrique externe,
n’utilisez pour cette imprimante
que des blocs d’alimentation d’origine
Sartorius (voir le chapitre « Accessoires »).
Le bloc d’alimentation externe n’est
nécessaire que pour certaines séries de
balances. Si nécessaire, adressez-vous au
service après-vente ou à votre revendeur
Sartorius.
L’alimentation électrique externe
s’effectue par l’intermédiaire du câble de
données de la balance connectée.
Lors du nettoyage, veillez à ce qu’aucun
liquide ne pénètre dans votre imprimante :
utilisez uniquement un chiffon de
nettoyage légèrement mouillé.
Attention : vous risquez de vous blesser
si vous touchez le bord denté servant
à couper le papier.
32
Installation
Contenu de la livraison
–
–
–
–
La livraison comprend les éléments suivants :
câble de données imprimante-balance
ruban encreur
4 accus
rouleau de papier
Mise en place des accus
§ Retirez les 4 accus de leur emballage (les accus sont
déchargés).
§ Soulevez le cache du compartiment du rouleau de
papier.
LF
CN
N/ N
STAT
DA TE
§ Pour ouvrir le compartiment à accus, relevez le cache
vers l’arrière.
§ Insérez les 4 accus dans le compartiment à accus.
Respectez la polarité !
§ Fermez le compartiment à accus en rabattant le cache
vers l’avant.
§ Fermez le compartiment du rouleau de papier en
rabattant le cache vers l’avant.
– Le rouleau de papier ne peut être inséré que si l’imprimante est sous tension.
33
Raccordement de l’imprimante à la balance
§ Raccordez le câble de données à l’imprimante et à la
balance et assurez la connexion.
Mise sous tension de la balance et de l’imprimante
§ Pour alimenter la balance avec la tension du secteur,
branchez la fiche du bloc d’alimentation.
§ Mettez la balance sous tension.
> L’imprimante est également mise automatiquement
sous tension.
> Le voyant de contrôle vert situé à gauche s’allume.
Chargement des accus lors de la première mise en
service
§ Chargez les accus en laissant la balance sous tension.
> Les accus se chargent lorsque la balance se trouve en
mode de veille.
> Les accus de l’imprimante sont chargés au bout de
28 heures.
$ Si le voyant rouge clignote, les accus ne sont pas
chargés.
Si le voyant rouge clignote et ne s’est toujours pas
éteint au bout de 3 heures, changez les accus, voir
page 40
Insertion du ruban encreur
§ Pour insérer le ruban encreur, voir le chapitre
« Entretien » page 39.
34
Insertion du rouleau de papier
§ Pour insérer le rouleau de papier,
voir le chapitre « Entretien » page 38.
§ Raccordez le bloc d’alimentation d’origine Sartorius
à une prise du secteur.
§ Raccordez la fiche coudée du bloc d’alimentation
à la sortie droite se trouvant sur la face arrière de
l’imprimante.
$ Le voyant vert s’allume ; l’appareil est alimenté en
courant.
$ Mettez en place les accus : voir page 40.
$ Raccordez l’imprimante et la balance et mettez-les sous
tension : voir la partie précédente.
35
Fonctionnement
Pour faire fonctionner l’imprimante, vous
disposez de 2 touches :
Impression d’un interligne ; fait avancer le papier
d’une ligne
Impression de la valeur mesurée ou impression
automatique
Impression de la valeur mesurée par la balance
connectée
$
123456789012345678901234
001:
+
123.4
g
>
§
Le cas échéant, imprimez quelques interlignes
(faites avancer le papier) en appuyant sur la
touche (plusieurs fois) ou en la maintenant
enfoncée.
L’impression ci-contre apparaît (exemple).
Appuyez sur la touche pour imprimer la
valeur mesurée.
Réglages
Réglages dans le menu
Remarque :
Tous les réglages des paramètres de l’interface
doivent être effectués dans la balance connectée.
Effectuer « Balance, Interface imprimante »
L’imprimante est configurée en usine sur :
9600 bauds, 8 bits, parité impaire, un bit d’arrêt,
handshake hardware (CTS/DTR)
Lors du démarrage de l’imprimante, tous les
réglages sont lus dans la mémoire de l’imprimante
(EEPROM) et sont ensuite repris par l’imprimante
pour le fonctionnement.
36
Messages d’erreur
Voyant
Cause
Remède
est rouge
Les données dans la
mémoire de l’imprimante
(EEPROM) sont incorrectes
(la somme de contrôle n’est
pas exacte)
§ Appuyer sur la touche est rouge
La capacité d’entrée
de la mémoire tampon
d’entrée est dépassée
§ Eteindre la balance
et la remettre sous tension
§ Appuyer sur la touche est rouge
Les signaux de commande
de l’imprimante manquent
§
§
$
$
> Les réglages d’usine
sont chargés
$ Le cas échéant, configurer
de nouveau le menu de l’interface
de l’imprimante et le menu des
applications statistiques
Appuyer sur la touche Contrôler les accus
Le cas échéant, charger les accus
Le cas échéant, changer les accus
clignote en rouge La charge des accus
est trop faible
Les accus sont déchargés
§ Charger les accus (voir
le chapitre « Entretien »)
est rouge
§ Contrôler que les réglages
des paramètres de l’interface
balance/imprimante sont les mêmes
§ Appuyer sur la touche Erreur de transmission
dans une chaîne de données
37
Entretien
Changement du rouleau de papier
–
–
–
–
–
Pour le fonctionnement, il faut utiliser un rouleau
de papier ayant les caractéristiques suivantes
(voir également le chapitre « Accessoires ») :
Rouleau de papier standard
Papier de 60 g sans bois
Largeur : 57,5 ± 0,5 mm
Diamètre : 65 mm max.
Diamètre de la bobine : 8 mm min.
§ Pour ouvrir le compartiment du rouleau de papier,
soulevez le cache.
§ Tirez vers l’extérieur les fixations du rouleau qui se
trouvent sur les deux côtés de la bobine du rouleau.
LF
CN
N/ N
STAT
DA TE
§ Enlevez l’ancienne bobine.
$ Placez un nouveau rouleau de papier sur une surface
plane.
$ Le début du rouleau de papier doit se trouver en
dessous et vous faire face.
§ Tenez le nouveau rouleau de papier d’une main entre
le pouce et l’index à la verticale au-dessus du compartiment du rouleau de papier.
§ De l’autre main, introduisez le papier dans la fente
située sous le ruban encreur.
§ Pour faire avancer le papier à travers la cartouche
du ruban encreur, appuyez plusieurs fois sur la touche
ou maintenez-la enfoncée lorsque l’imprimante
est sous tension.
> Le papier est introduit dans la cartouche du ruban
encreur et ressort vers le haut.
38
§ Pour mettre le rouleau de papier en place, tenez-le de
telle sorte que les fixations puissent être enfoncées
dans l’ouverture de la bobine du rouleau de papier.
§ Lâchez les fixations du rouleau des deux côtés.
§ Pour fermer le compartiment du rouleau de papier,
rabattez le cache vers l’avant.
Changement du ruban encreur
Pour faire fonctionner l’imprimante, il faut utiliser un
ruban encreur noir de type ERC-22 (voir également le
chapitre « Accessoires »).
§ Soulevez le cache du compartiment du rouleau de
papier.
§ Pour enlever le papier de la cartouche du ruban
encreur, tournez le rouleau dans le sens opposé
à l’avance.
§ Appuyez sur le côté supérieur droit du ruban encreur.
> Le côté gauche du ruban encreur se soulève.
§ Retirez le ruban encreur.
§ Insérez un nouveau ruban encreur en l’introduisant par
le haut.
> Le ruban encreur s’enclenche.
$ Le cas échéant, tournez dans le sens de la flèche la
bobine se trouvant sur le côté gauche du ruban encreur
pour tendre le ruban encreur.
§ Insérez le papier : voir « Changement du rouleau de
papier ».
§ Fermez le compartiment du rouleau de papier en
rabattant le cache vers l’avant.
39
$
>
>
$
Chargement des accus
Le voyant rouge est allumé (décharge profonde des accus).
Le voyant clignote, chargez les accus en laissant la
balance sous tension.
Les accus se chargent lorsque la balance se trouve en
mode de veille.
Les accus de l’imprimante sont chargés au bout de
28 heures.
Au cas où le symbole ne s’est toujours pas éteint au bout
de 3 heures, changez les accus.
Changement des accus
! Evitez une décharge profonde des accus sinon la capacité
de charge maximale diminue.
! Utilisez uniquement des accus standard Mignon de type
nickel-métal hybride AA (voir également « Accessoires »)
référence Sartorius 69Y03136.
§ Soulevez le cache du compartiment du rouleau de papier.
§ Pour ouvrir le compartiment à accus, relevez le cache
vers l’arrière.
! Retirez les 4 accus.
Les accus usagés sont des ordures spéciales (pas des
ordures ménagères) : ils doivent être traités en
conformité avec la loi sur les ordures spéciales.
$ Le cas échéant, adressez-vous au centre de service
après-vente Sartorius.
§ Insérez 4 nouveaux accus dans le compartiment à accus
en respectant la polarité.
§ Fermez le compartiment à accus en rabattant le cache
vers l’avant.
§ Fermez le compartiment du rouleau de papier en
rabattant le cache vers l’avant.
40
Nettoyage de l’imprimante
! Veillez à ce qu’aucun liquide ne pénètre dans
l’imprimante.
! N’utilisez pas de produits de nettoyage corrosifs
(solvants ou produits similaires).
§ Pour débrancher l’appareil de l’alimentation
électrique : débranchez le câble de données (vers la
balance) sur la face arrière de l’imprimante.
$ En cas d’alimentation en courant externe, débranchez
le bloc d’alimentation de la prise de courant.
§ Nettoyez l’imprimante avec un chiffon humecté d’eau
savonneuse.
§ Essuyez l’imprimante avec un chiffon doux.
41
Accessoires
Désignation
Rouleau de papier (paquet de 5)
Ruban encreur
Bloc d’alimentation pour normes
Europe
Grande-Bretagne
USA
Australie
Afrique du Sud
Jeu d’accus (4 nickel-métal hybride type AA)
Câble de données entre l’imprimante et un
appareil ancien modèle (technologie MP…) pour utilisation
en environnement résidentiel (EN55022, classe B)
Référence
6906937
6906918
6971412
6971414
6971413
6971411
6971410
69Y03136
VF1503
(Fast Factory)
Caractéristiques techniques
Désignation
Longueur
Largeur
Hauteur
Poids (sans accus, rouleau de papier)
Température de fonctionnement
Température de stockage
42
230 mm
158 mm
80 mm
env. 800 g
0 à +40°C
–40 à +70°C
Compatibilité électromagnétique
Marque C
Utilisation en métrologie légale
L’appareil répond aux exigences des directives du Conseil de l’Union européenne :
2004/108/CE « Compatibilité électromagnétique (CEM) »
Normes européennes applicables :
Emissions parasites :
Selon la norme du produit EN 61326-1 cl.
B (environnement résidentiel)
Immunité à ces émissions :
Selon la norme du produit EN 61326-1
(environnement industriel)
L’imprimante YDP10-0CE dispose de
son propre rapport d’essai délivré par
l’Institut fédéral allemand de physique
et de métrologie (PTB), voir certificat
d’essai. Il est ainsi possible d’utiliser
l’imprimante en métrologie légale dans
l’Union européenne et dans l’Espace
économique européen.
Cela est valable uniquement en
connexion avec des balances approuvées pour l’utilisation en usage réglementé qui disposent d’un certificat
d’approbation de type CE ou national
en vue de la vérification.
Remarque :
L’utilisateur engage sa propre responsabilité concernant toutes modifications et
tout raccordement de câbles ou d’appareils non livrés par Sartorius. C’est à lui de
vérifier et, si nécessaire, de corriger ces
modifications.
Sur simple demande, Sartorius met à disposition une documentation concernant
les caractéristiques de fonctionnement
minimales des appareils (conformément
aux normes concernant la définition
de l’immunité aux émissions parasites
ci-dessus mentionnées).
2006/95/CE « Matériel électrique
destiné à être employé dans certaines
limites de tension »
Normes européennes applicables :
EN61010-1
Règles de sécurité pour appareils électriques de mesurage, de régulation et de
laboratoire
Partie 1 : Prescriptions générales
En cas d’utilisation de matériel électrique
dans des installations et des conditions
d’environnement exigeant des mesures de
sécurité accrues, vous devez respecter les
instructions conformément aux consignes
d’installation correspondantes.
Si la balance a un ou plusieurs incréments d’affichage identifiés de manière
particulière (e d), l’imprimante doit
également identifier ces chiffres, par ex.
par des parenthèses ou en vidéo inverse.
Cela n’est pas valable pour les balances
de la classe de précision I avec un échelon de vérification e = 1 mg et un échelon partiel d < 0,1 mg. Avec les balances
avec e = d, l’identification n’est pas
autorisée.
L’édition des données de la balance doit
être configurée de manière à ce que
l’identification particulière d’un incrément d’affichage soit également éditée
et transmise à l’imprimante.
Si l’imprimante est connectée ultérieurement à une balance vérifiée et déjà
utilisée en métrologie légale, il faut, en
Allemagne, faire parvenir une information au Bureau de vérification des poids
et mesures compétent. L’utilisation
immédiate en métrologie légale n’est
pas concernée par cette mesure.
43
44
Sartorius AG
Weender Landstrasse 94–108
37075 Goettingen, Germany
Phone +49.551.308.0
Fax +49.551.308.3289
www.sartorius-mechatronics.com
Copyright by Sartorius AG,
Goettingen, Germany.
All rights reserved. No part
of this publication may
be reprinted or translated in
any form or by any means
without the prior written
permission of Sartorius AG.
The status of the information,
specifications and illustrations
in this manual is indicated
by the date given below.
Sartorius AG reserves the
right to make changes to the
technology, features,
specifications and design of the
equipment without notice.
Status:
August 2008, Sartorius AG,
Goettingen, Germany
Printed in Germany on paper that has
been bleached without any use of chlorine
W1A000 · KT
Publication No.: WYD6134-t08081