1
Silver Crest SNM 33 A1
List of contents
Guarantee.....................................................................................................................................................1
Service number.............................................................................................................................................1
Important safety instructions / Appropriate use.............................................................................................2
Details of the Machine ..................................................................................................................................3
Accessories ..................................................................................................................................................3
Fitting the snap-in sewing table ....................................................................................................................3
Connecting machine to power source ..........................................................................................................4
Changing the bulb.........................................................................................................................................4
Inserting the needle ......................................................................................................................................5
Two-step presser foot lever ..........................................................................................................................5
Adjuste presser foot pressure.......................................................................................................................6
Attaching the presser foot holder..................................................................................................................6
Winding the bobbin .......................................................................................................................................7
Inserting the bobbin ......................................................................................................................................7
Threading the upper thread ..........................................................................................................................8
Thread tension..............................................................................................................................................9
Bringing up the lower thread.........................................................................................................................9
Starting to sew ............................................................................................................................................10
Matching needle/ fabric/ thread ..................................................................................................................10
How to choose your pattern ........................................................................................................................11
Straight stitching and needle position .........................................................................................................11
Zigzag stitching...........................................................................................................................................12
Zippers and piping ......................................................................................................................................12
Blind hem foot .............................................................................................................................................13
Sewing on buttons ......................................................................................................................................13
How to sew buttonholes..............................................................................................................................14
Overlock stitches ........................................................................................................................................15
3-step zig-zag .............................................................................................................................................15
Stitch selection............................................................................................................................................16
Patch work ..................................................................................................................................................16
Monogramming and embroidering with embroidery hoop ..........................................................................17
Applique......................................................................................................................................................17
Scallop stitching..........................................................................................................................................18
Twin needle.................................................................................................................................................18
Maintenance ...............................................................................................................................................19
Trouble shooting guide ...............................................................................................................................20
Disposal ......................................................................................................................................................21
Technical data.............................................................................................................................................21
Silver Crest SNM 33 A1
Guarantee
Congratulations on the purchase of your
sewing machine.You have bought a top
quality product which has been manufactured with great care.
GUARANTEE
There is a three year guarantee on this
device starting from the purchase date.
The device was inspected carefully and
thoroughly before delivery.
Please keep your receipt as proof of purchase.
In case of a guarantee complaint, please call
your service centre.
This is the only way to ensure free shipment
of your goods to us.
The guarantee scope only covers material
or manufacturing defects, it does not cover
wear parts or damage to fragile parts e.g.
switches. The product is only intended for
private and not commercial use.
In the event of misuse or improper handling,
force or any kind of intervention, which has
not been performed by our service office,
the guarantee will lapse.
This guarantee does not limit your statutory
rights.
These Operating Instructions contain all
you need to know about using your sewing
machine.
We hope you enjoy your sewing machine
and wish you Success.
Service number
These Operating Instructions cannot
cover all possible applications.
For more information or in case of
problems not covered or inadequately
covered in these Operating Instructions,
please contact the service number
+442030244354
Please keep these Operating Instructions
in a safe place and pass on to any future
users.
Service-Address:
Crown Technics GmbH
Lerchenstrasse 2
DE-74226 Nordheim
1
Silver Crest SNM 33 A1
Important safety instructions / Appropriate use
When using an electrical appliance, basic safety should always be followed, including the following:
Read all instructions before using this sewing machine.
DANGER - To reduce the risk of electric shock:
1.
2.
3.
An appliance should never be left unattended when plugged in.
Always unplug this appliance from the electric outlet immediately after using and before cleaning.
Always unplug before replacing the lamp. Replace bulb with same type rated 10 watts (110-120V area) or 15
watts (220-240V area).
WARNING - To reduce the risk of burns, fire, electric shock, or injury to persons:
1.
2.
3.
4.
5.
6.
7.
8.
9.
10.
11.
12.
13.
14.
15.
16.
17.
18.
19.
20.
21.
Do not allow to be used as a toy. Close attention is necessary when this appliance is used by or near children.
Use this appliance only for its intended use as described in this manual. Use only attachments
recommended by the manufacturer as contained in this manual.
Never operate this appliance if it has a damaged cord or plug, if it is not working properly, if it has been
dropped or damaged, or dropped into water. Return the appliance to the nearest authorized dealer or
service center for examination, repair, electrical or mechanical adjustment.
Never operate the appliance with any air openings blocked. Keep ventilation openings of the sewing
machine and foot controller free from accumulation of lint, dust, and loose cloth.
Keep fingers away from all moving parts. Special care is required around the sewing machine needle.
Always use the proper needle plate. The wrong plate can cause the needle to break.
Do not use bent needles.
Do not pull or push fabric while stitching. It may deflect the needle causing it to break.
Switch the sewing machine off ("O") when making any adjustments in the needle area, such as threading
needle, changing needle, threading bobbin, or changing presser foot, and the like.
Always unplug sewing machine from the electrical outlet when removing covers, lubricating, or when making
any other user servicing adjustments mentioned in the instruction manual.
Never drop or insert any object into any opening.
Do not use outdoors.
Do not operate where aerosol spray products are being used or where oxygen is being administered.
To disconnect, turn all controls to the off ("O") position, then remove plug from outlet.
Do not unplug by pulling on cord. To unplug, grasp the plug, not the cord.
The sound pressure level under normal operating conditions is 75dB(A).
Please turn off the machine or unplug when the machine is not operating properly.
Never place anything on the foot controller.
If the supply cord that is fixed with foot controller is damaged, it must be replaced by the manufacturer or its
service agent or a similar qualified person in order to avoid a hazard.
This appliance is not intended for use by persons (including children) with reduced physical, sensory or
mental capabilities, or lack of experience and knowledge, unless they have been given supervision or
instruction concerning use of the appliance by a person responsible for their safety.
Children should be supervised to ensure that they do not play with the appliance.
SAVE THESE INSTRUCTIONS
This sewing machine is intended for household use only.
Appropriate use
The sewing machine is intended ...
- for use as a movable machine,
- for sewing of typical household textiles and ...
- only for private household use.
The sewing machine is not intended ...
- to be installed at a fixed location,
- for processing of other materials (e.g. leather or other heavy materials such as tent or sail fabrics)
- for commercial or industrial use.
2
Silver Crest SNM 33 A1
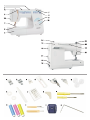
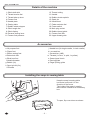
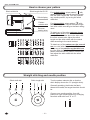
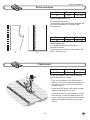
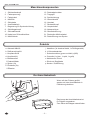
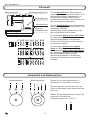
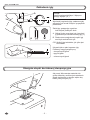
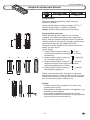
Details of the machine
1. Stitch width dial
2. Thread tension dial
3. Thread take-up lever
4. Presser foot
5. Needle plate
6. Sewing table
7. Bobbin winder stopper
8. Stitch length dial
9. Stitch display
10. Reverse sewing lever
11. Presser foot pressure
12. Thread cutting
13. Handle
14. Bobbin winder spindle
15. Spool pin
16. Hand wheel
17. Patten selector dial
18. Power switch
19. Main plug socket
20. Bobbin thread guide
21. Presser foot lifter
22. Upper thread guide
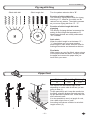
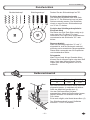
Accessories
a. All purpose foot
b. Zipper foot
c. Button sewing foot
d. Buttonhole foot
e. Blind hem foot
f. Needle threader
g. Bobbin (3x)
h. Spool pin felt (2x)
i. Oil bottle
j. Needle box (3x single needle, 1x twin needle)
k. L-screwdriver
l. Screwdriver (L&S)
m. Threads (1x blue, 1x pink, 1x yellow)
n. Seam ripper/ brush
o. Darning plate
p. Edge/ quilting guide
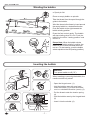
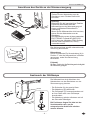
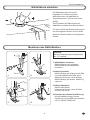
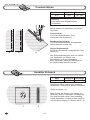
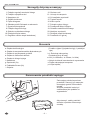
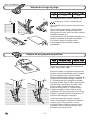
Installing the snap-in sewing table
Keep the snap-in sewing table
horizontal, and push it in the
direction of the arrow.
The inside of the snap-in sewing
table can be utilized as an accessory
box.
To open, flip cover down as shown.
3
Silver Crest SNM 33 A1
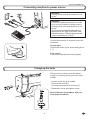
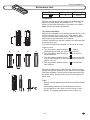
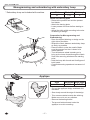
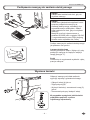
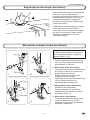
Connecting machine to power source
Attention:
Unplug power cord when machine is not
in use.
A
Attention:
Consult a qualified electrician if in doubt
as to connect machine to power source.
Unplug power cord when machine is not
in use.
The foot control must be used with the
appliance by KD-2902 (220-240V area)
manufactured by FDM (zhejiang founder
motor corporation ltd, China).
Connect the machine to a power source as
illustrated.
Sewing light
Press main switch (A) for power and light on.
(" l ")
Foot control
Foot control regulates the sewing speed.
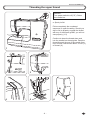
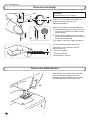
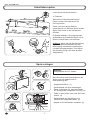
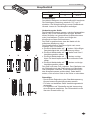
Changing the bulb
Disconnect the machine from the power
supply by removing the plug from the main
socket!
B
-
A
Loosen screw (A) as illustrated.
Remove the cover (B).
Unscrew the bulb and fit new one (C).
Replace the cover and tighten screw.
Should there be any problem. Ask your
local dealer for advice.
C
4
Silver Crest SNM 33 A1
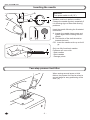
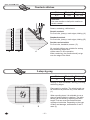
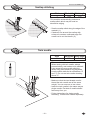
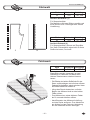
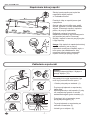
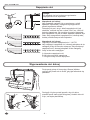
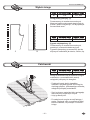
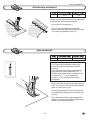
Inserting the needle
Attention:
Turn power switch to off ("O").
D
A
Needles must be in perfect condition.
Change the needle regularly, especially if
it is showing signs of wear and causing
problems.
C
Insert the needle following the illustrated
instructions.
A. Loosen the needle clamp screw and
tighten again after inserting the new
needle.
B. The flat side of the shaft should be
towards the back.
C/D. Insert the needle as far up as it will
go.
B
Only use fully-functional needles:
Problems can occur with:
- Bent needles
- Blunt needles
- Damage points
Two-step presser foot lifter
When sewing several layers or thick
fabrics, the presser foot can be raised a
second stage for easy positioning of the
work. (A)
5
Silver Crest SNM 33 A1
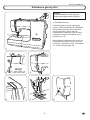
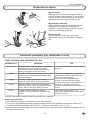
Adjust presser foot pressure
The presser foot pressure of the machine
has been pre-set and requires no particular
readjustment according to the type of fabric
(light-or-heavy weight).
However, if you need to adjust the presser
foot pressure, turn the presser adjusting
screw with a coin.
For sewing very thin fabric, loosen the
pressure by turning the screw counter
clockwise, and for heavy fabric, tighten by
turning it clockwise.
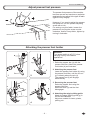
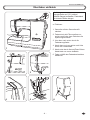
Attaching the presser foot holder
Attention:
Turn power switch to off ("O") when
carrying out any of the above
operations!
a
e
1. Raise the presser bar (a) with the
presser foot lifter. Attach the presser
foot holder (b) as illustrated.
c
d
2. Attaching the presser foot
Lower the presser foot holder (b) using
the presser foot lifter, until the cut-out
(c) is directly above the pin (d)
The presser foot (f) will engage
automatically.
f
b
1
2
e
g
3. Removing the presser foot
Raise the presser foot using the
presser foot lifter.
Raise the lever (e) and the foot
disengages.
4. Attaching the edge/ quilting guide
Attach the edge/ quilting guide (g) in
the slot as illustrated.
Adjust as needed for hems, pleats,
quilting, etc.
3
4
6
Silver Crest SNM 33 A1
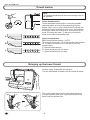
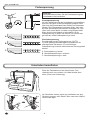
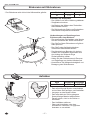
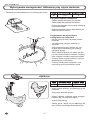
Winding the bobbin
a. Spool pin felt
a
Place an empty bobbin on spindle.
Take the thread from the spool through the
guide to the bobbin.
Wind the thread a few times by hand around
the empty bobbin in a clockwise direction.
Push the bobbin to the right towards the
bobbin winding position.
Press the foot control gently. The bobbin
will stop winding when it is full. Push the
bobbin to the left to "sewing position" and
remove it.
Please Note: When the bobbin winder
spindle is in "bobbin winding" position, the
machine will not sew-the hand wheel will
not turn. To start sewing, push the bobbin
winder spindle to the left (sewing position).
Inserting the bobbin
Attention:
Turn power switch to off ("O").
When inserting or removing the bobbin, the
needle must be fully raised.
2
- Open the hinged cover. (1)
- Hold the bobbin case with one hand.
Insert the bobbin (2) so that the thread
runs in a clockwise direction (arrow). (3)
3
1
- Put the thread under the tension spring.
(4)
- Hold the bobbin case by the hinged latch.
(5)
4
- Insert it into the shuttle. (6)
5
6
7
Silver Crest SNM 33 A1
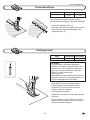
Threading the upper thread
a
Attention:
Turn power switch to off ("O"). Raise
the needle bar.
a. Spool pin felt
Follow completely the numbered
sequence in upper threading. Should you
skip or fail to properly engage the thread
with any of the thread guides, you will not
sew properly. (1-5)
Continue to draw the thread down and
into the needle bar thread guide. Pass the
thread through the eye of the needle from
front to back. Leave loose about 10 cm (4")
of thread. (6)
1
2
3
4
5
6
8
Silver Crest SNM 33 A1
Thread tension
Note:
The bobbin thread tension does not normally have to
be adjusted.
Lower thread tension
To test the bobbin thread tension, remove the bobbin
case and bobbin and hold it by suspending it by the
thread. Jerk it once or twice. If the tension is correct, the
thread will unwind by about an inch or two. If the tension
is too tight, it does not unwind at all. If the tension is too
loose, it will drop too much. To adjust, turn the small
screw on the side of the bobbin case.
A
B
C
Upper thread tension
Basic thread tension setting: "AUTO"
To increase the tension, turn the dial to the next number
up. To reduce the tension, turn the dial to the next
number down.
A. Normal thread tension
B. Upper thread tension too loose
C. Upper thread tension too tight
Bringing up the lower thread
Hold the upper thread with the left hand.
Turn the handwheel forwards until the needle is raised.
Pull on the upper thread to bring the lower thread up
through the stitch plate hole. Lay both threads to the
back under the presser foot.
9
Silver Crest SNM 33 A1
Starting to sew
Reverse sewing
At the end of seam, press down the reverse
sewing lever. Sew a few reverse stitches.
Release the lever and the machine will sew
forwards again. (A)
A
Removing the work
Turn the handwheel towards to bring the thread
take up lever to its highest position, raise the
presser foot and remove work towards the back.
B
Cutting the thread
Hold the threads behind the presser foot with
both hands, guide them to the slit (B) and press
down.
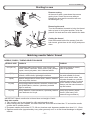
Matching needle/ fabric/ thread
NEEDLE, FABRIC, THREAD SELECTION GUIDE
NEEDLE SIZE FABRICS
9-11(65-75)
THREAD
Light-duty thread in cotton,
Lightweight fabrics-thin cottons, voile, serge, silk ,
muslin, Qiana, interlocks, cotton knits, tricot, jerseys, nylon or polyester.
crepes, woven polyester, shirt & blouse fabrics.
Most threads sold are medium
size and suitable for these
fabrics and needle sizes. Use
polyester threads on synthetic
materials and cotton on natural
woven fabrics for best results.
Always use the same thread on
top and bottom.
12(80)
Medium weight fabrics-cotton, satin, kettleclote,
sailcloth, double knits, lightweight woollens.
14(90)
Medium weight fabrics-cotton duck, woolen, heavier
knits, terrycloth, denims.
16(100)
Heavyweight fabrics-canvas, woolens, outdoor tent
and quilted fabrics, denims, upholstery material
(light to medium).
18(110)
Heavy woollens, overcoat fabrics, upholstery fabrics, Heavy duty thread, carpet
some leathers and vinyls.
thread. (Use heavy foot
pressure-large numbers.)
IMPORTANT: Match needle size to thread size and weight of farbic.
Note twin needle:
1. Twin needles, can be purchased for utility and decorative work.
2. When sewing with twin needles, the stitch width dial should be set at less than "3" and set the needle
position dial to middle position.
3. European needles show sizes 65, 70, 80 etc. American and Japanese needles show size 9, 11, 12 etc.
4. Replace needle often (approximately every other garment) and / or at first thread breakage or skipped
stitches.
10
Silver Crest SNM 33 A1
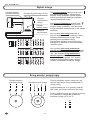
How to choose your pattern
Stitch length dial S1-S2
Stitch width dial
Stitch display
Pattern
selector dial
A
Reverse
sewing lever
For straight stitch, select pattern " " with
pattern selector dial. Adjust the stitch length
with the stitch length dial. You may choose
any needle position, by turning the stitch
width dial.
For zigzag stitch, select pattern " " with
pattern selector dial. Adjust the stitch length
and stitch width according to the fabric being
used.
To obtain any of the other patterns shown
in the upper row on the stitch selection
panel, select the letter above the stitch with
the stitch selector dial. Adjust the stitch
length and the stitch width with the control
dials according to the result desired.
To obtain any of the patterns on the second
row, turn the stitch length dial to "S1", to
obtain any of the patterns on the third row,
turn the stitch length dial to "S2", select the
pattern desired with the pattern selector dial
and adjust the stitch width with the stitch
width dial.
Straight stitching and needle position
Stitch width dial
2.5
3 2 1
2
3
2
0.5
1
0
4
Generally speaking, the thicker the fabric,
thread and needle, the longer the stitch should
be.
Choose your needle position, from left
position to right needle position by changing
the stitch width dial from "0" to "5".
1
S2
4
3
4
0
5
0
Turn the pattern selector dial so that the
stitch display shows the "A" (straight stitch).
S1
S1
5
Stitch length dial
11
Silver Crest SNM 33 A1
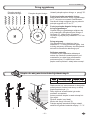
Zig zag stitching
Stitch length dial
Stitch width dial
Turn the pattern selector dial to "B".
Function of stitch width dial
The maximum zigzag stitch width for zigzag
stitching is "5"; however, the width can be
reduced on any pattern. The width increases
as you move zigzag dial from "0" - "5".
5
4
3
1
0
Function of stitch length dial while
zigzaging
The density of zigzag stitches increase as the
setting of stitch length dial approaches "0".
Neat zigzag stitches are usually achieved at
"2.5" or below.
3 2 1
4
0
5
2
Satin stitch
When the stitch length is set between "0" "1", the stitches are very close together
producing the "satin stitch" which is used for
making buttonholes and decorative stitches.
Fine fabric
When sewing on very fine fabric, place a piece
of thin paper under the fabric. It is easy to tear
the paper and remove the paper after you
have finish your seam.
Zipper foot
Stitch
A
Stitch width Stitch length
2.5
1~4
The zip foot can be inserted right or left,
depending on which side of the foot you are
going to sew. (1)
To sew past the zip pull, lower the needle into
the fabric, raise the presser foot and push the
zip pull behind the presser foot. Lower the foot
and continue to sew.
It is also possible to sew in a length of cord,
into a bias strip to form a "welt".
According to thickness of fabric to set stitch
length control. (2)
1
2
12
Silver Crest SNM 33 A1
Blind hem foot
Stitch
D
1
Stitch width Stitch length
1~2
3~5
For hems, curtains, trousers, skirts, etc.
4
Blind hem/ lingerie for firm fabrics.
3
2
Fold the fabric as illustrated with the wrong
side uppermost. (1)
Place the fabric under the foot. Turn the
handwheel forwards by hand until the needle
swings fully to the left. It should just pierce the
fold of the fabric. If it does not, adjust the stitch
width accordingly. (2)
Adjust the guide (3) by turning the knob (4)
so that the guide just rests against the fold.
Sew slowly, by pressing the foot control
lightly guiding the fabric along the edge of the
guide.
Button sewing foot
Stitch
B
Stitch width Stitch length
0~5
0
Install the darning plate. This will cover the
feeddog and the stitch length will be disabled.
Position the work under the foot. Place the
button on the marked position, lower the foot,
adjust stitch width to "0" and sew a few
securing stitches. Adjust the stitch width
according to the button. Turn the handwheel
to check that the needle goes cleanly into the
left or right hole of the button, and sew on the
button. Adjust the stitch width to "0" and sew
a few securing stitches.
If a shank is required, place a darning needle
on top of the button and sew. For buttons
with 4 holes, sew through the front two holes
first, push work forward and then sew
through the back two holes as described.
13
Silver Crest SNM 33 A1
Buttonhole foot
Stitch
Stitch width
Stitch length
5
0.5~1
Preparation:
Remove the zigzag foot and attach the buttonhole foot.
Adjust the stitch length dial between "0.5" - "1". The
density of the stitch depends on thickness of the fabric.
Note: Always test sew a buttonhole.
a
e
b
c
d
To prepare the fabric:
Measure the diameter of the button and add 0.3cm (1/8")
for the bartacks. If you have a very thick button, add
more to the diameter measurement. Mark the position
and length of the buttonhole on the fabric.
Position the fabric so that the needle is on the mark that
is furthest from you.
Pull the buttonhole foot towards you as far as it will go.
Lower the foot.
a. Turn the pattern selector dial to " ". Sew at
moderate speed until you reach the end mark.
b. Turn the pattern selector dial to " " and sew 5-6
bartack stitches.
c. Turn the pattern selector dial to " " and sew the left
side of the buttonhole to the mark at the end which is
further from you.
d. Turn the pattern selector dial to " " and sew bar
tack stitches.
Remove the fabric from under the foot. Draw the upper
thread through the backside of the fabric and knot upper
and lower threads. Cut the center of the buttonhole with
the seam ripper, being careful not to cut the stitches on
either side.
Tips:
- Slightly reduce upper thread tension to produce better
results.
- Use backing material for fine and stretchy fabrics.
- It is advisable to use a gimp cord for stretch or knit
fabrics. The zigzag should sew over the gimp. (e)
14
Silver Crest SNM 33 A1
Overlock stitches
Stitch
E, F
Stitch width Stitch length
3~5
S1, S2
Attention:
Use new needles or ball point needles or
stretch needle!
Seams, neatening, visible hems.
Stretch overlock
For fine knits, jerseys, neck edges, ribbing. (A)
Standard overlock
For fine knits, jerseys, neck edges, ribbing. (B)
Double overlock stitch
For fine knits, handknits, seams. (C)
A
B
All overlock stitches are suitable for sewing
and neatening edges and
visible seams in one operation.
When neatening, the needle should just go
over the edge of the fabric.
C
3-step zig-zag
Stitch
C
Stitch width Stitch length
3~5
1~2
Sewing on lace and elastic, darning, mending,
reinforcing edges.
Place patch in position. The stitch length can
be shortened to produce very close stitches.
(1)
1
When mending tears, it is advisable to use a
piece of backing fabric to reinforce. The stitch
density can be varied by adjusting the stitch
length. First sew over the centre and then
overlap on both sides. Depending on the type
of fabric and damage, sew between 3 and 5
rows. (2)
2
15
Silver Crest SNM 33 A1
Stitch selection
Stitch
A
Stitch width Stitch length
2.5
S1, S2
Triple straight stitch: (1)
For hardwearing seams.
The machine sews two stitches forwards and
one stitch backwards. This gives triple
reinforcement.
Stitch
B
1
Stitch width Stitch length
3~5
S1, S2
Triple zig-zag: (2)
For hardwearing seams, hems and
decorative seams.
Triple zig-zag is suitable for firm fabrics like
denim, corduroy, etc.
2
Patch work
Stitch
F
Stitch width Stitch length
3~5
S1
To join two pieces of fabric while leaving a
space between their edges.
- Fold over the edges of the two pieces of
fabric for the hem and baste the edges to a
thin piece of paper leaving a small space
between them.
- Stitch along the edge, pulling both threads
slightly when beginning to sew.
- Use thicker than normal threads for sewing.
- After sewing, remove the basting and the
paper. Finish by tying knots on the reverse
side at the beginning and the end of the
seams.
16
Silver Crest SNM 33 A1
Monogramming and embroidering with embroidery hoop
* Embroidery hoop not included with machine.
Stitch
B
Stitch width Stitch length
1~5
0
Attach the darning plate
- Remove the presser foot and the presser
foot holder.
- Attach the darning plate.
- Lower presser foot lever before starting to
sew.
- Adjust the stitch width according to the size
of lettering or design.
Preparation for Monogramming and
Embroidering*
- Draw the desired lettering or design on the
right side of the fabric.
- Stretch the fabric between embroidery hoop
as firmly as possible.
- Place the fabric under the needle. Make
sure the presser foot bar is down in its
lowest position.
- Turn the balance wheel towards you to
bring up the lower thread through the fabric.
Sew a few securing stitches at the starting
point.
- Hold the hoop with thumb and forefingers of
both hands.
- Coordinate sewing speed and movement of
hoop.
Applique
Stitch
B
Stitch width Stitch length
3~5
0.5~1
- Cut out the applique design and baste it to
the fabric.
- Sew slowly around the edge of the design.
- Trim excess material outside the stitching.
Make sure not to cut any stitches.
- Remove the basting thread.
- Tie top and bottom thread under the
applique to avoid unraveling.
17
Silver Crest SNM 33 A1
Scallop stitching
Stitch
I
Stitch width Stitch length
3~5
1~2
This machine automatically produces a
scallop stitch which may be used as
decorative edging.
- Sew the scallop stitch along the edge of the
material. (1)
1
- If desired, trim around the scallop with
scissors to create a scalloped edge. Be
careful not to cut the thread. (2)
2
Twin needle
Stitch
A
Stitch width Stitch length
2.5
1~4
Please note:
When sewing with twin needle, always
proceed slowly, and make sure to maintain
a low speed to insure quality stitching.
When using twin needle on zig-zag make
sure the stitch width dial is set between "0"
and "3". Do not use twin needle at setting
above "3".
- Make sure that the two threads used to
thread the twin needle are of the same
weight. You can use one or two colors.
- Insert the twin needle in the same way as
single needle. Flat side of needle should
face away from you.
- Follow instructions for single needle
threading. Thread each needle separately.
18
Silver Crest SNM 33 A1
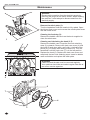
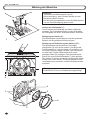
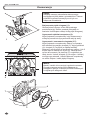
Maintenance
Attention:
Disconnect the machine from the electricity supply by
removing the plug from the mains socket. When cleaning
the machine, it must always be disconnected from the
electricity supply.
Remove the stitch plate (1):
Turn the handwheel until the needle is fully raised. Open
the hinged front cover and unscrew the needle plate screw
with the screw driver.
Cleaning the feed dog (2):
Remove the bobbin case and use the brush supplied to
clean the whole area.
1
Cleaning and lubricating the hook (3-7):
Remove the bobbin case. Snap the two hook retaining
arms (3) outwards. Remove the hook race cover (4) and
the hook (5) and clean with a soft cloth. Lubricate at the
points (6) (1-2 drops) with sewing machine oil. Turn the
handwheel until the hook race (7) is in the left position.
Replace the hook (5). Replace the hook race cover and
snap back the two hook retaining arms. Insert he bobbin
case and bobbin and replace the stitch plate.
Important:
Fabric fluff and threads must be removed regularly.
Your machine should be serviced at regular intervals at
one of our service agencies.
2
6
7
5
4
3
19
Silver Crest SNM 33 A1
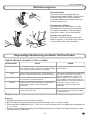
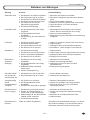
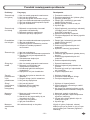
Trouble shooting guide
Problem
Cause
Correction
Upper thread
breaks
1.The machine is not threaded correctly.
2.The thread tension is too tight.
3.The thread is too thick for the needle.
4.The needle is not inserted correctly.
5.The thread is round wound the spool
holder pin.
6.The needle is damaged.
1.Rethread the machine.
2.Reduce the thread tension. (lower number)
3.Select a larger needle.
4.Remove and reinsert the needle. (flat side
towards the back)
5.Remove the reel and wind thread onto reel.
6.Replace the needle.
Lower thread
breaks
1.Remove and reinsert the bobbin case and
1.The bobbin case is not inserted
pull on the thread. The thread should pull
correctly.
2.The bobbin case is threaded wrongly. easily.
3.The lower thread tension is too tight. 2.Check both bobbin and bobbin case.
3.Loosen lower thread tension as described.
Skipped
stitches
1.The needle is not inserted correctly.
2.The needle is damaged.
3.The wrong size needle has been
used.
4.The foot is not attached correctly.
1.Remove and reinsert needle. (flat side
towards the back)
2.Insert a new needle.
3.Choose a needle to suit the thread and fabric.
4.Check and attach correctly.
Needle breaks
1.The needle is damaged.
2.The needle is not correctly inserted.
3.Wrong needle size for the fabric.
4.The wrong foot is attached.
1.Insert a new needle.
2.Insert the needle correctly. (flat side towards
the back)
3.Choose a needle to suit the thread and fabric.
4.Select the correct foot.
Loose stitches
1.The machine is not correctly threaded.
2.The bobbin case is not correctly
threaded.
3.Needle/ fabric/ thread combination is
wrong.
4.Thread tension wrong.
1.Check the threading.
2.Thread the bobbin case as illustrated.
3.The needle size must suit the fabric and
thread.
4.Correct the thread tension.
Seams gather
or pucker
1.The needle is too thick for the fabric. 1.Select a finer needle.
2.The stitch length is wrongly adjusted. 2.Readjust the stitch length.
3.Loosen the thread tension.
3.The thread tension is too tight.
1.Select a better quality thread.
Uneven stitches, 1.Poor quality thread.
2.The bobbin case is wrongly threaded. 2.Remove bobbin case and retread and insert
uneven feed
correctly.
3.Fabric has been pulled.
3.Do not pull on the fabric while sewing, let it
be taken up by the machine.
The machine is
noisy
1.The machine must be lubricated.
2.Fluff or oil have collected on the
hook or needle bar.
3.Poor quality oil has been used.
4.The needle is damaged.
1.Lubricate as described.
2.Clean the hook and feed dog as described.
3.Only use good quality sewing machine oil.
4.Replace the needle.
The machine
jams
Thread is caught in the hook.
Remove the upper thread and bobbin case,
turn the handwheel backwards and forwards
by hand and remove the thread remands.
Lubricate as described.
20
Silver Crest SNM 33 A1
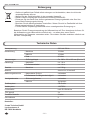
Disposal
-
Dispose of devices with dangerous defects carefully and ensure that they are no longer used.
Do not dispose of the device in normal domestic waste.
This product is produced according to EU directive 2002/96/EC.
Dispose of the device over a registered waste disposal firm or through your communal
waste disposal facility.
- Observe the currently valid regulations. In case of doubt, consult your waste disposal facility.
- Please dispose of all packaging materials in an environmentally friendly manner.
Keep the sewing machine's transport packaging. It may be useful for storing the machine, but
is particularly useful if you want to ship the sewing machine for repair. Most instances of
damage occur when the machines are being transported.
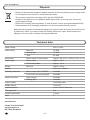
Technical data
230 V/ 50 Hz
Rated voltage
- Machine
70 Watt
- Sewing light
15 Watt
- Total
85 Watt
Dimensions
- When handle is folded down
Approx. 380 x 319 x 185 mm (W x H x D)
Cable length
- Power cable
Approx. 1,8 m
- Foot control cable
Approx. 1,4 m
- Machine
Approx. 5.8 kg
Power rating
Weight
Aluminium / plastic
Material
Operating elements
Display elements
- Mains power switch ON/OFF
Available
- Foot control for sewing speed
Available
- Stitch display
Available
- Sewing light
Available
Looper system
Oscillating Hook
Needle system
130/705H
Interference-free
In acc. with EU Directive
TÜV approved
Yes
Product guarantees
3 years
Class
II
manufacturer:
Crown Technics GmbH
Lerchenstrasse 2
DE-74226 Nordheim
21
Silver Crest SNM 33 A1
Inhaltsverzeichnis
Garantie ........................................................................................................................................................1
Servicenummer.............................................................................................................................................1
Wichtige Sicherheitshinweise / Bestimmungsgemäße Verwendung ............................................................2
Maschinenkomponenten ...............................................................................................................................3
Zubehör ........................................................................................................................................................3
Der Anschiebetisch .......................................................................................................................................3
Anschluss des Geräts an der Stromversorgung ...........................................................................................4
Austausch der Glühlampe ............................................................................................................................4
Einsetzen der Nadel .....................................................................................................................................5
Zweistufen-Nähfußhebel...............................................................................................................................5
Nähfußdruck einstellen .................................................................................................................................6
Montieren des Nähfußhalters .......................................................................................................................6
Unterfaden spulen ........................................................................................................................................7
Spule einlegen ..............................................................................................................................................7
Oberfaden einfädeln .....................................................................................................................................8
Fadenspannung............................................................................................................................................9
Unterfaden heraufholen ................................................................................................................................9
Mit Nähen beginnen....................................................................................................................................10
Gegenseitige Abstimmung von Nadel, Stoff und Faden .............................................................................10
Stichwahl.....................................................................................................................................................11
Geradstich und Nadelposition .....................................................................................................................11
Zick-Zack-Stich ...........................................................................................................................................12
Reißverschlussfuß ......................................................................................................................................12
Blindsaumfuß..............................................................................................................................................13
Knopfannähfuß ...........................................................................................................................................13
Knopflochfuß...............................................................................................................................................14
Overlock-Stiche ..........................................................................................................................................15
Genähter Zickzack......................................................................................................................................15
Stichwahl ....................................................................................................................................................16
Patchwork ...................................................................................................................................................16
Stickereien mit Stickrahmen .......................................................................................................................17
Aufnähen ....................................................................................................................................................17
Festonabschluss.........................................................................................................................................18
Zwillingsnadel .............................................................................................................................................18
Wartung der Maschine................................................................................................................................19
Beheben von Störungen .............................................................................................................................20
Entsorgung .................................................................................................................................................21
Technische Daten .......................................................................................................................................21
Silver Crest SNM 33 A1
Garantie
GARANTIE
Herzlichen Glückwunsch zum Kauf lhrer
Nähmaschine.
Sie haben ein Qualitätsprodukt erworben,
welches mit größter Sorgfalt hergestellt wurde.
Sie erhalten auf dieses Gerät 3 Jahre Garantie
ab Kaufdatum. Das Gerät wurde sorgfältig und
vor Anlieferung gewissenhaft geprüft. Bitte
behalten Sie den Kassenbon als Nachweis für
den Kauf auf. Bitte setzen Sie sich im
Garantiefall mit Ihrer Servicestelle telefonisch
in Verbindung. Nur so kann eine kostenlose
Einsendung Ihrer Ware gewährleistet werden.
Diese Bedienungsanleitung vermittelt lhnen
alles Wissenswerte über die
Anwendungsmöglichkeiten lhrer Nähmaschine.
Sollten dennoch Fragen offen bleiben, bitten
wir Sie, sich an lhren Händler zu wenden.
Die Garantieleistung gilt nur für Material- oder
Fabrikationsfehler, nicht aber für
Verschleißteile oder für Beschädigungen an
zerbrechlichen Teilen, z. B. Schalter. Das
Produkt ist lediglich für den privaten und nicht
für den gewerblichen Gebrauch bestimmt.
Wir wünschen lhnen viel Freude und große
Näherfolge.
Bei missbräuchlicher oder unsachgemäßer
Behandlung, Gewalteingriffen und bei
Eingriffen, die nicht bei unserer autorisierten
Service-Niederlassung vorgenommen wurden,
erlischt die Garantie. Ihre gesetzlichen Rechte
werden durch diese Garantie nicht berührt.
Servicenummer
Bewahren Sie diese Bedienungsanleitung
sorgfältig auf und geben Sie diese allenfalls an
Nachbenutzer weiter.
Diese Betriebsanleitung kann nicht jeden
denkbaren Einsatz berücksichtigen.
Für weitere Informationen oder bei Problemen,
die in dieser Betriebsanleitung nicht oder nicht
ausführlich genug behandelt werden, wenden
Sie sich bitte an die Servicenummer:
+49 (0) 1805 032033
14 Cent/Minute aus dem deutschen
Festnetz, höchstens 42 Cent/Minute aus
den deutschen Mobilfunknetzen
Service-Adresse:
Crown Technics GmbH
Lerchenstrasse 2
DE-74226 Nordheim
1
Silver Crest SNM 33 A1
Wichtige Sicherheitshinweise / Bestimmungsgemäße Verwendung
Wenn Sie ein elektrisches Gerät benutzen, sollten Sie immer die grundlegenden Sicherheitshinweise beachten.
Lesen Sie alle Anleitungen bevor Sie die Nähmaschine benutzen.
Gefahr
1.
2.
- wie das Risiko eines Stromschlages reduziert wird
Die Maschine sollte nie unbeaufsichtigt eingeschaltet sein.
Ziehen Sie immer den Stecker aus der Steckdose, wenn Sie die Maschine unbeaufsichtigt lassen um
Verletzungen durch versehentliches Einschalten zu vermeiden.
Achtung
1.
2.
3.
4.
5.
6.
7.
8.
9.
10.
11.
12.
13.
14.
15.
16.
17.
18.
19.
20.
21.
- wie das Risiko eines Brandes, eines Feuers oder einer Verletzung verringert wird
Gestatten Sie nicht, dass die Nähmaschine als Spielzeug verwendet wird. Eine gründliche Überwachung ist
notwendig, wenn die Maschine in der Nähe von Kindern verwendet wird.
Verwenden Sie die Maschine nur für jene Dinge, wie in der Anleitung beschrieben ist.
Verwenden Sie die Maschine nicht, wenn das Kabel oder der Stecker kaputt ist, wenn Wasser in das Innere
eingedrungen ist oder wenn die Maschine nicht richtig näht. Bringen Sie die Nähmaschine in diesen Fällen in
eine autorisierte Werkstätte, um sie dort überprüfen zu lassen.
Wegen der Auf- und Abwärtsbewegung der Nadel beim Nähen besteht eine Verletzungsgefahr! Arbeiten Sie
stets mit Vorsicht und behalten Sie das Arbeitsfeld im Auge.
Verwenden Sie immer die entsprechende Stichplatte. Eine falsche Stichplatte kann zu Nadelbrüchen führen.
Verwenden Sie keine verbogenen Nadeln.
Ziehen Sie während des Nähens nie am Stoff! Dies kann die Nadel ablenken und zum Nadelbrechen führen.
Schalten Sie die Maschine immer aus, wenn Sie Einstellungen in der Nadelgegend machen, wie z.B. Einfädeln,
Nadeln wechseln, Wechseln des Fußes etc.
Ziehen Sie immer den Netzstecker, bevor Sie den Deckel entfernen, die Maschine ölen oder andere
Wartungsarbeiten, wie im Anleitungsbuch beschrieben, durchführen.
Werfen Sie keine Gegenstände in die Öffnungen der Maschine.
Verwenden Sie die Maschine nicht im Freien.
Um die Maschine abzuschalten, stellen Sie alle Schalter auf ("O") und ziehen den Stecker aus der Steckdose.
Ziehen Sie den Stecker nie am Kabel aus der Steckdose, sondern immer am Stecker.
Der Schalldruckpegel unter normalen Betriebsbedingungen beträgt 75dB(A).
Bitte schalten Sie die Nähmaschine aus oder ziehen Sie den Stecker, wenn die Nähmaschine nicht
ordnungsgemäß funktioniert.
Platzieren Sie keine Gegenstände auf dem Fußpedal.
Wenn das am Fußpedal befestigte Kabel beschädigt ist, muss es vom Hersteller, dessen Kundendienst oder
anderem qualifizierten Personal ausgetauscht werden, um Gefahren zu vermeiden.
Dieses Gerät ist nicht dafür bestimmt, durch Personen (einschließlich Kinder) mit eingeschränkten physischen,
sensorischen oder geistigen Fähigkeiten oder mangels Erfahrung und/oder mangels Wissen benutzt zu werden, es
sei denn, sie werden durch eine für ihre Sicherheit zuständige Person beaufsichtigt oder erhielten von ihr
Anweisungen, wie das Gerät zu benutzen ist.
Kinder sind zu beaufsichtigen, um sicherzustellen, dass sie nicht mit dem Gerät spielen.
Betreiben Sie die Maschine niemals mit blockierten Belüftungsöffnungen. Halten Sie die Belüftungsöffnungen der
Maschine sowie des Fußpedals frei von Fusseln, Staub und Stoffabfällen.
Bewahren Sie die Gebrauchsanweisung an einem geeigneten Ort in der Nähe des Gerätes auf. Händigen Sie
die Gebrauchsanleitung bei der Weitergabe des Gerätes an Dritte ebenfalls mit aus.
Verwahren Sie diese Bedienungsanleitung
Diese Maschine ist nur für den Haushalt gedacht.
Bestimmungsgemäße Verwendung
Die Nähmaschine ist vorgesehen ...
- zur Verwendung als ortsveränderliches Gerät,
- zum Nähen von haushaltsüblichen Textilien und ...
- nur zu Verwendung im privaten Hausgebrauch.
Die Nähmaschine ist nicht vorgesehen ...
- zur ortsfesten Aufstellung,
- zur Verarbeitung von anderen Materialien (z.B. Leder, Zelt-, Segel- und ähnliche schwere Stoffe)
- für eine Verwendung in gewerblichen oder industriellen Bereichen.
2
Silver Crest SNM 33 A1
Maschinenkomponenten
1. Stichbreitenknopf
12. Fadenabschneider
2. Fadenspannung
13. Tragegriff
3. Fadenhebel
14. Spuleinrichtung
4. Nähfüße
15. Garnrollenstift
5. Stichplatte
16. Handrad
6. Anschiebetisch
17. Stichwahlknopf
7. Begrenzung für Spuleneinrichtung
18. Hauptschalter
8. Stichlängenknopf
19. Netzanschluss
9. Stichwahlfenster
20. Oberfadenführung
10. Hebel zum Rückwärtsnähen
21. Zweistufen-Nähfusshebel
11. Nähfußdruck
22. Fadenführung zum Spulen
Zubehör
a. Allzweck-Nähfuß
j. Nadelbox (3x einzelne Nadel, 1x Zwillingsnadel)
b. Reißverschlussfuß
k. L-Schraubendreher
l. Schraubenzieher (gross und klein) (L&S)
c. Knopfannähfuß
d. Knopflochfuß
m. Garnrolle (1x blau, 1x pink, 1x gelb)
e. Blindsaumfuß
n. Nahttrenner/ Pinsel
f. Fadeneinfädler
o. Stick-und Stopfplatte
g. Spulen (3x)
p. Kanten-/ Quiltführung
h. Filzkissen (2x)
i. Ölflasche
Der Anschiebetisch
Wenn auf dem Freiarm genäht
werden soll, den Anschiebetisch in
Pfeilrichtung abziehen.
Das lnnere des Anschiebetisches ist
für Zubehör vorgesehen.
Zum Öffnen die Klappe runterdrücken.
3
Silver Crest SNM 33 A1
Anschluss des Geräts an der Stromversorgung
Achtung:
Ziehen Sie den Netzstecker aus der
Steckdose, wenn Sie das Gerät nicht
benutzen.
A
Achtung:
Bitte treten Sie bei irgendwelchen Zweifeln
hinsichtlich des Anschlusses der
Nähmaschine an der Netzversorgung mit
einem qualifizierten Elektrodienst in
Verbindung.
Wenn Sie die Nähmaschine nicht benutzen,
ziehen Sie den Netzstecker aus der
Steckdose.
Die Nähmaschine muss mit dem passenden
ELECTRONIC Fußpedal KD-2902 (220240-V-Netz) des Herstellers FDM (zhejiang
founder motor corporation ltd, China)
verwendet werden.
Den Netzanschluss gemäß nebenstehender
Zeichnung durchführen.
Beleuchtung
Durch Drücken des Ein-/Ausschalters (A) in
Position "I" wird die Nähmaschine in Betrieb
genommen, wobei ihre Beleuchtung
einschaltet.
Fußpedal
Mit dem Pedal wird die Betriebsgeschwindigkeit
der Maschine geregelt.
Austausch der Glühlampe
Die Nähmaschine durch Abziehen des
Netzsteckers von der Steckdose von der
Stromversorgung trennen.
B
- Die Schraube (A) wie gezeigt lösen.
- Die Abdeckung (B) abnehmen.
- Die Glühlampe (C) herausschrauben und
an ihrer Stelle eine neue Glühlampe
einschrauben.
- Die Abdeckung wieder aufsetzen und mit
der Schraube befestigen.
A
Bei Problemen fragen Sie bitte bei der
Vertriebsstelle nach, wo die
entsprechenden Auskünfte erhalten
werden können.
C
4
Silver Crest SNM 33 A1
Einsetzen der Nadel
Achtung:
Hauptschalter auf "O" stellen!
D
A
Ersetzen Sie die Nadel regelmäßig, vor
allem bei ersten Anzeichen von
Nähschwierigkeiten.
C
Setzen Sie die Nadel wie abgebildet ein.
A. Nadelbefestigungsschraube lösen und
nach dem Einsetzen der Nadel wieder
festschrauben.
B. Flache Kolbenseite muss hinten sein.
Einsetzen der Nadel bis zum Anschlag
am Ende des Schaftes.
C/D. Nadel so tief wie möglich einsetzen.
B
Nur einwandfreie Nadeln benutzen:
Probleme können auftreten bei der
Verwendung von:
- Krummen Nadeln
- Stumpfen Nadeln
- Beschädigten Spitzen
Zweistufen-Nähfußhebel
Beim Nähen von extrem dicken Stoffen
kann der Stoffdurchgang unter dem
Nähfuß vergrössert werden, indem man
den Nähfußhebel weiter anhebt. (A)
5
Silver Crest SNM 33 A1
Nähfußdruck einstellen
Der Nähfußdruck ist auf normal
eingestellt. Zum Nähen extremer
Materialien kann der Nähfußdruck
angepasst werden. (Dünne oder dicke
Stoffe).
Zum Einstellen die Stellschraube für
Nähfußdruck mittels einer Münze drehen.
Für dünne Stoffe die Stellschraube gegen
den Uhrzeigersinn drehen und für dicke
Stoffe die Stellschraube im Uhrzeigersinn
Drehen.
Montieren des Nähfußhalters
Achtung:
Bei allen Anwendungen Hauptschalter
auf ("O") stellen!
a
e
1. Nähfußhalter montieren
Nähfuß-Stange (a) hochstellen.
Nähfußhalter (b) wie abgebildet
montieren.
c
d
f
2. Nähfuß einsetzen
Nähfuß-Stange (a) senken bis die Rille
(c) direkt oberhalb des Stifts (d) ist.
Hebel (e) leicht nach vorne drücken.
Nähfuß-Stange (b) senken, Nähfuß (f)
rastet ein.
b
1
2
e
g
3. Nähfuß abnehmen
Nähfuß hochstellen.
Hebel (e) leicht nach vorne drücken
und der Fuß ist frei.
4. Einsetzen der Kanten-/Quiltführung
Wie die Abbildung zeigt, Kanten/Quiltführung (g) sorgfältig einschieben,
z.B. für Säume, Falten usw.
3
4
6
Silver Crest SNM 33 A1
Unterfaden spulen
Leere Spule auf Achse stecken.
a
a. Filzkissen
Garnrolle auf Garnrollenstift setzen.
Faden von der Garnrolle durch die
Führung ziehen.
Faden von Hand einige Male im
Uhrzeigersinn um die leere Spule wickeln.
Spule nach rechts in die Spulposition
drücken.
Fußpedal betätigen. Spulvorgang stellt
automatisch ab, sobald die Spule voll ist.
Spule zurückdrücken und entfernen.
Achtung: Wenn sich die Spuleinrichtung
in der Spulposition befindet, wird der
Nähvorgang automatisch unterbrochen
und das Handrad gesperrt. Zum Nähen
die Spuleinrichtung nach links drücken
(Nähposition).
Spule einlegen
Achtung:
Hauptschalter auf "O" stellen!
Beim Einsetzen und Herausnehmen der
Spule muss die Nadel immer in
Höchststellung sein.
2
- Klappdeckel öffnen. (1)
- Spulenkapsel mit einer Hand halten.
Spule so einlegen (2), dass der Faden
im Uhrzeigersinn aufgespult ist (Pfeil). (3)
3
1
- Faden in den Schlitz und unter die Feder
ziehen. (4)
- Spulenkapsel mit Zeigefinger und
Daumen am Kläppchen halten. (5)
4
- Kapsel in die Greiferbahn einsetzen. (6)
5
6
7
Silver Crest SNM 33 A1
Oberfaden einfädeln
a
Achtung:
Hauptschalter auf ("O") stellen!
Nähfuß-Stange hochstellen, Fadenhebel
in höchste Position bringen.
a. Filzkissen
1. Garnrolle auf den Garnrollenstift
stecken.
2. Faden durch die Führungsöse von
rechts nach links, dann zwischen die
Spannungsscheiben.
3. Von oben nach unten durch die
Fadenanzugsfeder.
4. Nach oben und von rechts nach links
durch den Fadenhebel.
1
5. Nach unten durch die zwei Ösen führen.
Nadel stets von vorne einfädeln.
6. Faden mithilfe des Fadenabschneiders
abtrennen.
2
3
4
5
6
8
Silver Crest SNM 33 A1
Fadenspannung
Achtung:
Normalerweise müssen Sie die Fadenspannung des
Unterfadens nicht verändern.
A
B
C
Unterfadenspannung
Um die Fadenspannung des Unterfadens zu kontrollieren,
wird die volle Spule in die Spulenkapsel gesteckt. Dann
lässt man die Spulenkapsel samt Greifer am Fadenende
hängen. Die Fadenspannung ist dann richtig, wenn sich
die volle Spulenkapsel bei leichtem Schwingen ca. 5 bis
10cm nach unten abrollt, und dann ruhig hängen bleibt.
Wenn sich die volle Kapsel zu leicht abrollt, ist die
Fadenspannung zu leicht; rollt sie sich nur schwer oder
gar nicht ab, ist die Fadenspannung zu stark.
Oberfadenspannung
Grundeinstellung der Fadenspannung: "AUTO".
Für eine stärkere Oberfadenspannung Skala auf die
nächstgrößere Zahl drehen. Für eine leichtere
Fadenspannung muss die nächst kleinere Zahl eingestellt
werden.
A. Fadenspannung normal
B. Oberfadenspannung zu schwach
C. Oberfadenspannung zu stark
Unterfaden heraufholen
Ende des Oberfadens mit der Hand halten. Das
Handrad nach vorne drehen, bis Nadel wieder oben
steht. (Eine volle Umdrehung).
Am Oberfaden ziehen, damit der Unterfaden aus dem
Stichloch gezogen wird. Beide Fäden unter dem Nähfuß
nach hinten legen.
9
Silver Crest SNM 33 A1
Mit Nähen beginnen
Rückwärtsnähen
Am Ende der Naht angelangt auf den
Rückwärtslauf-Hebel drücken. Einige Stiche
rückwärts nähen. Den Hebel loslassen,
worauf die Nähmaschine wieder nach vorn
zu nähen beginnt. (A)
A
Freisetzen des Nähguts
Das Handrad nach vorn drehen, um den
Fadenspanner möglichst weit anzuheben.
Den Nähfuß hochfahren und das Nähgut
nach hinten ziehen, um es freizusetzen.
B
Durchtrennen des Fadens
Die Fäden mit beiden Händen hinter dem
Nähfuß ergreifen, in die Kerbe (B) einführen
und die Hände nach unten bewegen.
Gegenseitige Abstimmung von Nadel, Stoff und Faden
TABELLE ZUR WAHL VON NADEL, STOFF und FADEN
NADELGRÖßE
9-11(65-75)
STOFF
FADEN
Leichte Stoffe: dünne Baumwolle, Schleier, Serge,
Leichte Baumwoll-, Nylon- oder
Seide, Musselin, Qiana, Interlockware, Baumwolltrikot, Polyesterfäden.
Jersey, Krepp, Polyestergewebe, Hemdstoffe.
12(80)
Mittlere Stoffe: Baumwolle, Satin, grobes Musselin,
Segeltuch, Doppelmaschentrikot, leichte Kammgarne.
14(90)
Mittlere Stoffe: schweres Tuch, Kammgarne,
schweres Trikot, Frotteestoff, Denim.
16(100)
Schwere Stoffe: Drillich, Kammgarne, Zeltstoffe und
wattierte Stoffe, Denim, leichte und mittlere
Polsterstoffe.
18(110)
Schweres Kammgarn, Mantelstoffe, Polsterstoffe,
gewisse Leder oder Vinyl.
Die meisten handelsüblichen Fäden sind
von mittlerer Dicke und sind für diese
Stoffe und Nadelgrößen geeignet. Um
optimale Ergebnisse zu erhalten sind
Polyesterfäden für Kunstfaserstoffe und
Baumwollfäden für natürliche Gewebe zu
verwenden. Immer für Ober- und
Unterfaden die gleiche Fadensorte
verwenden.
Sehr reißfeste Fäden, Teppichfäden (den
Fuß auf starken Anpressdruck einstellen
- hohe Nummern).
Wichtig: Nadelgröße, Schwere des Stoffs und Dicke des Fadens müssen aufeinander abgestimmt werden.
Achtung:
1. Die Zwillingsnadel wird für Ziernähte verwendet.
2. Beim Einsatz der Doppelnadel soll der Stichbreitenknopf unter "3" gestellt werden.
3. Die europäische Nadelstärke ist 65, 70, 80 usw. und die amerikanische und japanische Nadelstärke ist
9, 11, 12 usw.
4. Ersetzen Sie die Nadel regelmäßig (für alle Kleidungsstücke) und/oder beim ersten Fadenbruch oder
Stichübersprung. (Fehlstiche)
10
Silver Crest SNM 33 A1
Stichwahl
Stichbreitenknopf
Stichlängenknopf S1-S2
Stichwahlfenster
Stichwahlknopf
A
Hebel zum
Rückwärtsnähen
Für den Geradstich den Stichwahlknopf
drehen bis der gewünschte Buchstabe "A" im
Sichtfenster erscheint. Nadelposition von
Links bis Mitte wählbar indem Sie den
Stichbreitenknopf drehen. Die Stichlänge mit
dem Stichlängenknopf einstellen.
Für den Zickzack-Stich den Stichwahlknopf
drehen bis der gewünschte Buchstabe "B" im
Sichtfenster erscheint.
Die Stichlänge und die Stichbreite je nach
dem verwendeten Stoff einstellen.
Für die anderen Stiche in der ersten Reihe
den Stichwahlknopf drehen bis der
gewünschte Buchstabe im Sichtfenster
erscheint. Die Stichlänge und Stichbreite je
nach Bedarf einstellen.
Für die anderen Stiche in der zweiten
Reihe den Stichlängenknopf auf "S1" drehen,
für die anderen Stiche in der dritten Reihe
den Stichlängenknopf auf "S2" drehen und
den Stichwahlknopf drehen bis der
gewünschte Buchstabe im Sichtfenster
erscheint. Die Stichbreite je nach Bedarf
einstellen.
Geradstich und Nadelposition
Stichbreitenknopf
2.5
3 2 1
2
3
2
0.5
1
0
4
Generell sagt man, je dicker der Stoff, der
Faden und die Nadel, desto länger sollte der
Stich sein.
Wählen Sie die Nadelposition von links nach
rechts beim Verstellen des
Stichbreitenknopfs von "0" bis "5".
1
S2
4
3
4
0
5
0
Drehen Sie den Stichwahlknopf bis im
Sichtfenster "A" (Geradstich) erscheint.
S1
S1
5
Stichlängenknopf
11
Silver Crest SNM 33 A1
Zick-Zack-Stich
Stichbreitenknopf
5
4
3
4
1
Drehen Sie den Stichwahlknopf auf "B".
Funktion des Stichbreitenknopfs
Die maximale Stichbreite beim Zick-ZackStich ist "5". Die Stichbreite kann bei jeder
Stichart reduziert werden. Die Stichbreite
nimmt zu wenn Sie den Stichbreitenknopf
von "0" bis "5" drehen.
0
3 2 1
Funktion des Stichlängenknopfs beim
Zick-Zack-Stich
Die Dichte des Zick-Zack-Stichs steigt an je
mehr man sich "0" nähert. Für einen
ordentlichen Zick-Zack-Stich verwendet man
normalerweise die Stichbreite "2.5" oder
kleiner.
0
5
2
Stichlängenknopf
Raupennahtstich
Wenn die Stichlänge zwischen "0" und "1"
eingestellt ist, sind die Stiche sehr nahe bei
einander und es entsteht der Raupennahtstich.
Diesen Stich verwendet man für Knopflöcher
und als dekorative Stiche.
Feingewebe
Wenn Sie auf sehr feinem Gewebe nähen,
können Sie ein dünnes Papier unter den Stoff
legen. Nach dem Nähen können Sie das
Papier ganz einfach wegziehen um es zu
entfernen.
Reißverschlussfuß
Stich
Stichbreite
Stichlänge
A
2.5
1~4
Der Reißverschlussfuß kann rechts oder links
eingesetzt werden, je nachdem auf welcher
Seite des Nähfußes genäht wird. (1)
Um dem Reißverschluss-Schieber
auszuweichen, Nadel im Stoff stecken lassen,
Nähfuß anheben und Schieber hinter den
Fuß rücken.
Es ist auch möglich, eine Kordel einzunähen. (2)
Den Stichlängenknopf je nach Stoffdicke
zwischen "1" und "4" einstellen.
1
2
12
Silver Crest SNM 33 A1
Blindsaumfuß
1
Stichbreite
Stichlänge
D
1~2
3~5
Für Säume, Vorhänge, Hosen, Rock usw.
4
Blindsaumstich für elastisches Gewebe.
3
2
Stich
Den Stoff wie abgebildet umlegen, mit der
linken Seite nach oben. (1)
Den umgelegten Stoff unter den Fuß legen.
Das Handrad von Hand nach vorne drehen
bis sich die Nadel ganz links befindet. Sie
sollte die Stofffalte nur wenig anstechen.
Falls sie das nicht macht, muss die
Stichbreite korrigiert werden. (2)
Das Führungslineal (3) an die Stofffalte
bringen, indem Sie den Knopf(4) drehen.
Langsam nähen und den Stoff sorgfältig
führen, damit sich seine Lage am
Führungslineal nicht verändert.
Knopfannähfuß
Stich
Stichbreite
Stichlänge
B
0~5
0
Stopfplatte einsetzen.
Arbeitsstück unter den Fuß schieben. Knopf
auf die bezeichnete Stelle legen, Fuß senken,
Stichbreite auf "0" lassen und erst ein paar
Vernähstiche im linken Loch nähen,
Stichbreite einstellen (meistens zwischen 3-4).
Mit dem Handrad Kontrollstich machen bis
die Nadel genau in das rechte Loch des
Knopfes einsticht (Je nach Knopf Stichbreite
variieren). Knopf annähen. Stichbreite auf "0"
stellen und einige Vernähstiche nähen.
Ist ein Hals erwünscht, wird eine Stopfnadel
auf den Knopf gelegt und übernäht. Bei den
Knöpfen mit 4 Löchern mit den beiden
vorderen beginnen, dann Nähgut nach vorne
schieben und gleich vorgehen wie
beschrieben.
13
Silver Crest SNM 33 A1
Knopflochfuß
Stich
Stichbreite
Stichlänge
5
0.5~1
Vorbereitungen:
Den Nähfuß entfernen und den Knopflochfuß montieren.
Die Stichlängen-Einstellung zwischen "0,5" und "1"
einstellen. Die Stichdichte hängt von der Stoffdicke ab.
Hinweis: Immer ein Test-Knopfloch anfertigen.
a
e
b
c
d
Vorbereitung des Stoffs:
Den Knopfdurchmesser messen und dem festgestellten
Maß 0,3 cm für die Versteifungen zufügen. Bei sehr
dicken Knöpfen zum gemessenen Knopfdurchmesser
mehr hinzuaddieren. Position und Länge des
Knopflochs auf dem Stoff markieren.
Den Stoff so positionieren, dass die Nadel auf die
entferntere Markierung zeigt.
Den Knopflochfuß so weit wie möglich nach vorne
schieben. Den Fuß senken.
a. Die Stich-Wahlscheibe auf " " drehen. Mit mäßiger
Geschwindigkeit bis zur Endmarkierung nähen.
b. Die Stich-Wahlscheibe auf " " stellen und 5 bis 6
Verstärkungsstiche nähen.
c. Die Stich-Wahlscheibe auf " " drehen und den
linken Teil des Knopflochs bis zum entfernten Ende
nähen.
d. Die Stich-Wahlscheibe auf " " drehen und einige
Verstärkungsstiche nähen.
Den Stoff unter dem Fuß vorziehen. Den Oberfaden von
der Rückseite durch den Stoff ziehen und Oberfaden
und Unterfaden verknoten. Die Knopflochöffnung mit
dem Knopflochmesser aufschneiden. Dabei darauf
achten, nicht auf einer Seite in die Stiche zu schneiden.
Ratschläge:
- Durch leichte Reduzierung der Oberfadenspannung
können bessere Ergebnisse erhalten werden.
- Für feine und dehnbare Stoffe Verstärkungsmaterial
verwenden.
- Für dehnbare und Trikotstoffe wird die Verwendung
eines Einsatzes empfohlen. Der Zickzackstich muss
über den Einsatz laufen (e).
14
Silver Crest SNM 33 A1
Overlock-Stiche
Stich
Stichbreite
Stichlänge
E, F
3~5
S1, S2
Achtung:
Neue Nadel oder Kugelspitznadel
verwenden!
Nähte, Nähen und Versäubern von Kanten,
Sichtsaum.
Overlockstich:
Für feinere Maschenware, Tricot,
Halsausschnitte, Kanten (A).
Standard-Overlockstich:
Für feinere Maschenware, Tricotgewebe,
Halsausschnitte, Kanten (B).
A
B
Doppel-Overlockstich:
Für feinere Strickstoffe, handgestrickte Teile,
Nähte (C).
C
Alle Overlockstiche eignen sich zum Nähen
und Versäubern von Kanten und
Sichtsäumen in einem Arbeitsgang.
Beim Versäubern sollte die Stoffkante von
der Nadel knapp übernäht werden.
Genähter Zickzack
Stich
Stichbreite
Stichlänge
C
3~5
1~2
Elastisches Nähen und Spitzen aufsetzen,
Ausbessern, Risse flicken, Kanten verstärken.
Flicken aufsetzen. (1)
Beim Flicken von Rissen ist es ratsam, ein
Stückchen Stoff zu unterlegen (Verstärkung).
Erst über die Mitte nähen, dann beidseitig
knapp überdecken, je nach Art des Gewebes
und der Beschädigung 3-5 Reihen nähen. (2)
1
2
15
Silver Crest SNM 33 A1
Stichwahl
Stich
Stichbreite
Stichlänge
A
2.5
S1, S2
Dreifach Geradstich (1)
Für Strapaziernähte.
Die Maschine näht zwei Stiche vorwärts und
einen Stich zurück. Dies ergibt eine 3fache
Verstärkung.
1
Stich
Stichbreite
Stichlänge
B
3~5
S1, S2
Dreifach-Zickzack (2)
Für Strapaziernähte, Säume und Ziernähte.
Der 3fach Zickzackstich eignet sich für feste
Stoffe wie Jeans, Cord usw.
2
Patchwork
Stich
Stichbreite
Stichlänge
F
3~5
S1
Diese Stiche werden verwendet, um zwei
Stoffstücke zu verbinden und dabei einen
leichten Zwischenraum zwischen ihnen zu
lassen.
- Die Ränder der beiden Stoffstücke für den
Saum zurückschlagen und auf einem dünnen
Papierstück festheften, wobei zwischen ihnen
ein kleiner Abstand zu lassen ist.
- Längs des Rands einstechen und beim
Beginn des Nähens leicht an den beiden
Fäden ziehen.
- Zum Nähen einen etwas dickeren Faden
als für normale Arbeiten wählen.
- Nach Beenden des Nähens die Heftung
und das Papier entfernen. Zum Abschluss
am Anfang und am Ende der Verbindung
auf der Rückseite Knoten anbringen.
16
Silver Crest SNM 33 A1
Stickereien mit Stickrahmen
* Der Stickrahmen wird nicht mit der Nähmaschine geliefert.
Stich
Stichbreite
Stichlänge
B
1~5
0
Einsetzen der Stopfplatte
- Den Nähfuß und seine Halterung abbauen.
- Stopfplatte einsetzen.
- Vor Beginn des Nähens den ZweistufenNähfußhebel senken.
- Die Stichbreite der Breite von Buchstaben
oder Muster entsprechend einstellen.
Vorbereitungen zur Erstellung eines
Zeichens oder einer Stickerei
- Die gewünschten Buchstaben oder Muster
auf der Rückseite des Stoffs aufzeichnen.
- Den Stoff auf dem Stickrahmen möglichst
stark spannen.
- Den Stoff unter die Nadel platzieren.
Zweistufen-Nähfußhebel senken.
- Das Handrad zum Benutzer hin drehen,
sodass der Unterfaden angehoben wird.
Am Anfang der Stickerei einige
Sicherheitsstiche nähen.
- Halten Sie den Stickrahmen mit Daumen
und Zeigefinger von beiden Händen fest.
- Koordinieren Sie Nähgeschwindigkeit und
Bewegung des Stickrahmens.
Aufnähen
Stich
Stichbreite
Stichlänge
B
3~5
0.5~1
- Das aufzunähende Muster ausschneiden
und auf dem Stoff auflegen und festheften.
- Langsam um das Muster nähen.
- Das außerhalb der Stiche gelegene
überschüssige Material abschneiden.
Darauf achten, nicht in die Stiche zu
schneiden.
- Den Heftfaden entfernen.
- Ober und Unterfaden unter dem
Aufnähstück verknoten, um jegliches
Austreten zu vermeiden.
17
Silver Crest SNM 33 A1
Festonabschluss
Stich
Stichbreite
Stichlänge
I
3~5
1~2
Diese Maschine kann automatisch einen
Festonabschluss nähen für dekorative Ränder.
- Auf der Saumlinie nähen (1)
- Stoff dicht der Nählinie entlang abschneiden.
Darauf achten, dass der Nähfaden nicht
mitgefasst wird. (2)
1
2
Zwillingsnadel
Stich
Stichbreite
Stichlänge
A
2.5
1~4
Hinweise:
Vor Nähbeginn Stichbreite einstellen.
Handrad von Hand vorsichtig drehen zur
Überprüfung, ob die Nadel ins Stichloch
geht, ohne an der Stichplatte oder dem
Nähfuß zu streifen oder gar
aufzuschlagen.
Beim Nähen mit einer Zwillingsnadel immer
langsam vorgehen und langsam nähen, um
schöne Nähergebnisse zu erzielen.
- Beim Nähen mit einer Zwillingsnadel
müssen beide Fäden dieselbe Stärke
aufweisen. Es können eine oder zwei
Farben verwendet werden.
- Zwillingsnadel einsetzen.
- Oberfaden und zweiter Faden wie gewohnt
einfädeln.
- Am Schluss den einen Faden in die linke
Nadel einfädeln und den anderen Faden in
die rechte Nadel einfädeln.
18
Silver Crest SNM 33 A1
Wartung der Maschine
Achtung:
Trennen Sie die Nähmaschine von der
Stromversorgung, wozu Sie den Stecker aus der
Steckdose ziehen müssen.
Bei allen Reinigungsarbeiten muss die Nähmaschine
von der Stromversorgung getrennt sein.
Ausbau der Stichplatte (1) :
Durch Drehen des Handrads die Nadel vollständig
anheben. Die Frontklappe öffnen und die Schrauben
der Stichplatte mit dem L-Schraubendreher entfernen.
Reinigung der Greifer (2) :
Die Spulenkapsel herausnehmen und den gesamten
Bereich mit der gelieferten Bürste reinigen.
1
Reinigung und Schmierung des Hakens (3-7) :
Die Spulenkapsel herausnehmen. Die beiden
Hakenhalter (3) nach außen drehen. Den Bügel der
Schiffchenbahn (4) und den Haken (5) entfernen und
mit einem weichen Lappen reinigen. Zum Schmieren
ein oder zwei Tropfen Nähmaschinenöl an der
gezeigten Stelle (6) auftragen. Das Handrad soweit
drehen bis sich die Schiffchenbahn (7) links befindet.
Den Haken (5) wieder einsetzen und die beiden Halter
wieder nach innen drehen. Die Spulenkapsel und die
Unterfadenspule montieren und die Stichplatte wieder
einsetzen.
Wichtig:
Entfernen Sie Flusen und Fadenreste regelmässig!
2
6
7
5
4
3
19
Silver Crest SNM 33 A1
Beheben von Störungen
Störung
Ursache
Fehlerbehebung
Oberfaden reißt
1.
2.
3.
4.
5.
Die Maschine ist falsch eingefädelt
Die Fadenspannung ist zu stark
Der Faden ist zu dick für die Nadel
Die Nadel ist nicht richtig montiert
Der Faden hat sich um die
Spuleinrichtung gewickelt
6. Die Nadel ist beschädigt
1. Maschine und Nadel neu einfädeln
2. Die obere Fadenspannung reduzieren (kleinere
Zahl)
3. Eine größere Nadel verwenden
4. Nadel neu montieren (flache Seite nach hinten)
5. Spule abnehmen und Faden abwickeln
6. Nadel ersetzen
Unterfaden reißt
1. Die Spulenkapsel ist nicht richtig
eingesetzt
2. Die Spulenkapsel ist falsch
eingefädelt
3. Die Spannung des Unterfadens ist
zu stark
1. Spulenkapsel neu einsetzen und am Faden
ziehen. Wenn er leicht abrollt, ist es richtig
2. Spule und Kapsel überprüfen
3. Fadenspannung des Unterfadens laut Anweisung
korrigieren
Fehlstiche
1.
2.
3.
4.
Die Nadel ist falsch montiert
Die Nadel ist beschädigt
Die falsche Nadel ist montiert
Der falsche Fuß ist montiert
1.
2.
3.
4.
Nadel neu montieren (flache Seite nach hinten)
Nadel ersetzen
Nadelgröße dem Stoff und Faden anpassen
Kontrollieren, ob der richtige Fuß montiert ist
Nadelbruch
1.
2.
3.
4.
Die Nadel ist beschädigt
Die Nadel ist nicht richtig montiert
Stoff zu dick/falsche Nadelgröße
Der falsche Fuß ist montiert
1.
2.
3.
4.
Nadel ersetzen
Nadel richtig montieren (flache Seite nach hinten)
Nadelgröße dem Stoff und Faden anpassen
Richtigen Fuß benutzen
Beim Nähen
entstehen
Schlingen
1. Die Maschine ist nicht richtig
eingefädelt
2. Die Spulenkapsel ist nicht richtig
eingefädelt
3. Nadel/Stoff/Faden-Verhältnis
stimmt nicht
4. Falsche Fadenspannung
1. Maschine korrekt einfädeln
2. Kapsel wie aufgezeigt einfädeln
3. Nadelgröße muss mit Faden und Stoff
übereinstimmen
4. Fadenspannung korrigieren
Die Nähte ziehen
sich zusammen
oder kräuseln sich
1. Die Nadel ist zu dick für den Stoff
2. Die Fadenspannung ist zu stark
1. Feinere Nadel verwenden
2. Fadenspannung überprüfen
Unregelmässige
Stiche
unregelmässiger
Transport
1. Der Faden ist zu schwach
2. Die Spulenkapsel ist falsch
eingefädelt
3. Der Stoff wird beim Nähen gezogen
1. Bessere Fadenqualität verwenden
2. Kapsel neu einfädeln und richtig einsetzen
3. Stoff nicht ziehen. Er muss automatisch
transportiert werden
Die Maschine ist
laut und ruppig
1. Die Maschine muss geölt werden
2. Fusseln und Ölreste kleben an
Greifer oder an der Nadelstange
3. Minderwertiges Öl, das die Maschine
verklebt, wurde verwendet
4. Die Nadel ist beschädigt
1. Maschine nach Anweisung ölen
2. Greifer und Transporteur gemäß Anweisung
reinigen
3. Maschine nur mit Nähmaschinenöl ölen
4. Nadel ersetzen
Die Maschine ist
blockiert
Faden im Greifer eingeklemmt
Oberfaden und Spulenkapsel entfernen, von Hand
das Handrad ruckartig vor-und rückwärts drehen,
Fadenreste entfernen. Nach Anweisung ölen.
20
Silver Crest SNM 33 A1
Entsorgung
- Geräte mit gefährlichem Defekt sofort entsorgen und sicherstellen, dass sie nicht mehr
verwendet werden können.
- Werfen Sie das Gerät keinesfalls in den normalen Hausmüll.
- Dieses Produkt unterliegt der europäischen Richtlinie 2002/96/EC.
- Entsorgen Sie das Gerät über einen zugelassenen Entsorgungsbetrieb oder über Ihre
kommunale Entsorgungseinrichtung.
- Beachten Sie die aktuell geltenden Vorschriften. Setzen Sie sich im Zweifelsfall mit Ihrer
Entsorgungseinrichtung in Verbindung.
- Führen Sie alle Verpackungsmaterialien einer umweltgerechten Entsorgung zu.
Bewahren Sie die Transportverpackung der Nähmaschine auf! Zum einen kann sie Ihnen für
die Aufbewahrung der Nähmaschine nützlich sein - vor allem aber, wenn Sie die
Nähmaschine zur Reparatur versenden wollen. Die meisten Schäden entstehen nämlich erst
auf dem Transportweg.
Technische Daten
230 Volt/ 50 Hz
Nennspannung
- Maschine
70 Watt
- Nählicht
15 Watt
- Total
85 Watt
Abmessungen
- Griff eingeklappt
Ca. 380 x 319 x 185 mm (B x H x T)
Kabellänge
- Netzkabel
ca. 1.8 m
- Fußanlasserkabel
ca. 1.4 m
- Maschine
ca. 5.8 kg
Nennleistung
Gewicht
Aluminium / Kunststoff
Material
Bedienungselemente
Anzeigeelemente
- Netzschalter Ein/Aus
vorhanden
- Fußanlasser für Nähgeschwindigkeit
vorhanden
- Stichanzeigefenster
vorhanden
- Nählicht
Vorhanden
Greifersystem
CB-Greifer
Nadelsystem
130/705H
Funkentstört
nach EU-Richtlinie
TÜV gepruft
Ja
Produkte-Garantie
3 Jahre
Schutzklasse
II
Hersteller:
Crown Technics GmbH
Lerchenstrasse 2
DE-74226 Nordheim
21
Silver Crest SNM 33 A1
Spis treœci
Gwarancja . . . . . . . . . . . . . . . . . . . . . . . . . . . . . . . . . . . . . . . . . . . . . . . . . . . . . . . . . . . . . . . . . . . . . . . . . . 1
Numer serwisu. . . . . . . . . . . . . . . . . . . . . . . . . . . . . . . . . . . . . . . . . . . . . . . . . . . . . . . . . . . . . . . . . . . . . . . 1
Wa¿ne instrukcje bezpieczeñstwa / Przeznaczenie . . . . . . . . . . . . . . . . . . . . . . . . . . . . . . . . . . . . . . . . . . 2
Szczegó³y dotycz¹ce maszyny . . . . . . . . . . . . . . . . . . . . . . . . . . . . . . . . . . . . . . . . . . . . . . . . . . . . . . . . . . 3
Akcesoria . . . . . . . . . . . . . . . . . . . . . . . . . . . . . . . . . . . . . . . . . . . . . . . . . . . . . . . . . . . . . . . . . . . . . . . . . . . 3
Zamocowanie przed³u¿ki wysiêgu . . . . . . . . . . . . . . . . . . . . . . . . . . . . . . . . . . . . . . . . . . . . . . . . . . . . . . . . 3
Pod³¹czenie maszyny do zasilania elektrycznego. . . . . . . . . . . . . . . . . . . . . . . . . . . . . . . . . . . . . . . . . . . . 4
Wymiana ¿arówki. . . . . . . . . . . . . . . . . . . . . . . . . . . . . . . . . . . . . . . . . . . . . . . . . . . . . . . . . . . . . . . . . . . . . 4
Zak³adanie ig³y. . . . . . . . . . . . . . . . . . . . . . . . . . . . . . . . . . . . . . . . . . . . . . . . . . . . . . . . . . . . . . . . . . . . . . . 5
DŸwignia stopki dociskowej dwupozycyjna . . . . . . . . . . . . . . . . . . . . . . . . . . . . . . . . . . . . . . . . . . . . . . . . . 5
Regulacja nacisku stopki dociskowej. . . . . . . . . . . . . . . . . . . . . . . . . . . . . . . . . . . . . . . . . . . . . . . . . . . . . . 6
Mocowanie uchwytu stopki dociskowej . . . . . . . . . . . . . . . . . . . . . . . . . . . . . . . . . . . . . . . . . . . . . . . . . . . . 6
Nape³nianie dolnej szpulki . . . . . . . . . . . . . . . . . . . . . . . . . . . . . . . . . . . . . . . . . . . . . . . . . . . . . . . . . . . . . . 7
Zak³adanie szpuleczki . . . . . . . . . . . . . . . . . . . . . . . . . . . . . . . . . . . . . . . . . . . . . . . . . . . . . . . . . . . . . . . . . 7
Zak³adanie górnej nitki. . . . . . . . . . . . . . . . . . . . . . . . . . . . . . . . . . . . . . . . . . . . . . . . . . . . . . . . . . . . . . . . . 8
Naprê¿enie nici . . . . . . . . . . . . . . . . . . . . . . . . . . . . . . . . . . . . . . . . . . . . . . . . . . . . . . . . . . . . . . . . . . . . . . 9
Wyprowadzenie nici dolnej . . . . . . . . . . . . . . . . . . . . . . . . . . . . . . . . . . . . . . . . . . . . . . . . . . . . . . . . . . . . . 9
Rozpoczêcie szycia . . . . . . . . . . . . . . . . . . . . . . . . . . . . . . . . . . . . . . . . . . . . . . . . . . . . . . . . . . . . . . . . . . 10
Zale¿noœæ pomiêdzy ig³¹, materia³em i nici¹ . . . . . . . . . . . . . . . . . . . . . . . . . . . . . . . . . . . . . . . . . . . . . . . 10
Wybór œciegu . . . . . . . . . . . . . . . . . . . . . . . . . . . . . . . . . . . . . . . . . . . . . . . . . . . . . . . . . . . . . . . . . . . . . . . 11
Œcieg prosty i pozycja ig³y . . . . . . . . . . . . . . . . . . . . . . . . . . . . . . . . . . . . . . . . . . . . . . . . . . . . . . . . . . . . . 11
Œcieg zygzakowy . . . . . . . . . . . . . . . . . . . . . . . . . . . . . . . . . . . . . . . . . . . . . . . . . . . . . . . . . . . . . . . . . . . . 12
Stopka do wszywania zamków b³yskawicznych . . . . . . . . . . . . . . . . . . . . . . . . . . . . . . . . . . . . . . . . . . . . 12
Stopka do œciegu krytego . . . . . . . . . . . . . . . . . . . . . . . . . . . . . . . . . . . . . . . . . . . . . . . . . . . . . . . . . . . . . 13
Stopka do przyszywania guzików . . . . . . . . . . . . . . . . . . . . . . . . . . . . . . . . . . . . . . . . . . . . . . . . . . . . . . . 13
Stopka do obrzucania dziurek . . . . . . . . . . . . . . . . . . . . . . . . . . . . . . . . . . . . . . . . . . . . . . . . . . . . . . . . . . 14
Œciegi overlockowe . . . . . . . . . . . . . . . . . . . . . . . . . . . . . . . . . . . . . . . . . . . . . . . . . . . . . . . . . . . . . . . . . . 15
Œcieg zygzakowy trójstopniowy . . . . . . . . . . . . . . . . . . . . . . . . . . . . . . . . . . . . . . . . . . . . . . . . . . . . . . . . 15
Wybór œciegu . . . . . . . . . . . . . . . . . . . . . . . . . . . . . . . . . . . . . . . . . . . . . . . . . . . . . . . . . . . . . . . . . . . . . . . 16
Patchworki . . . . . . . . . . . . . . . . . . . . . . . . . . . . . . . . . . . . . . . . . . . . . . . . . . . . . . . . . . . . . . . . . . . . . . . . . 16
Wykonywanie monogramów i haftowanie przy u¿yciu tamborka. . . . . . . . . . . . . . . . . . . . . . . . . . . . . . . . 17
Aplikacje . . . . . . . . . . . . . . . . . . . . . . . . . . . . . . . . . . . . . . . . . . . . . . . . . . . . . . . . . . . . . . . . . . . . . . . . . . 17
Arkuszowy ornament . . . . . . . . . . . . . . . . . . . . . . . . . . . . . . . . . . . . . . . . . . . . . . . . . . . . . . . . . . . . . . . . . 18
Ig³a podwójna. . . . . . . . . . . . . . . . . . . . . . . . . . . . . . . . . . . . . . . . . . . . . . . . . . . . . . . . . . . . . . . . . . . . . . . 18
Konserwacja . . . . . . . . . . . . . . . . . . . . . . . . . . . . . . . . . . . . . . . . . . . . . . . . . . . . . . . . . . . . . . . . . . . . . . . 19
Poradnik rozwi¹zywania problemów . . . . . . . . . . . . . . . . . . . . . . . . . . . . . . . . . . . . . . . . . . . . . . . . . . . . . 20
Zbycie . . . . . . . . . . . . . . . . . . . . . . . . . . . . . . . . . . . . . . . . . . . . . . . . . . . . . . . . . . . . . . . . . . . . . . . . . . . . 21
Dane techniczne . . . . . . . . . . . . . . . . . . . . . . . . . . . . . . . . . . . . . . . . . . . . . . . . . . . . . . . . . . . . . . . . . . . . 21
Silver Crest SNM 33 A1
Gwarancja
GWARANCJA
Serdeczne ¿yczenia dla kupna maszyny
szwalniczej.
Kupili Pañstwo produkt wysokiej jakoœci, który
zosta³ produkowany z wielk¹ dok³adnoœci¹.
Pañstwa sprzêt ma 3 lata gwarancji o dnia
kupna. Sprzêt zosta³ dok³adnie sprawdzony
przed dostaw¹.
Prosimy zachowaæ paragon jako dowód kupna.
W przypadku gwarancyjnym prosimy
kontaktowaæ telefonicznie serwisow¹ infolinie.
W ten sposób mo¿na gwarantowaæ
bezkosztown¹ wysy³ke do reparatury.
Ta instrukcja daje Pañstwu wszystkie
wartoœciowe informacje o mo¿liwoœciach
u¿ytku maszyny.
Jeœli pozosta³yby pytania prosimy kontaktowaæ
sprzedawce.
Gwarancji podlegaj¹ tylko b³êdy fabrykacyjne i
b³êdy materia³u.
Czêœci które siê zu¿ywaj¹ i czêœci kruche (n.p.
w³¹czniki) nie podpadaj¹ pod gwarancje.
Produkt jest tylko dla prywatnego, nie dla
komercyjnego u¿ycia.
Nadu¿ycie i nieprawid³owe u¿ywanie produktu,
st³uczenia i interwencje nie autoryzowanych
osób doprowadzaj¹ do straty gwarancji.
Prawa zostaj¹ nie dotyczone.
¯yczymy du¿o uciechy.
Numer telefoniczny serwisu
Prosimy o zachowanie tej instrukci dla
Pañstwa albo dla nastêpnego posiadacza
tyj maszyny.
Zachowaj ten podrêcznik i daæ po
u¿ytkowników.
Ta instrukcja nie jest wstanie dotkn¹æ
wszyskich operacji maszyny.
W wypadku dalszych informacji albo
problemów, które nie zosta³y traktowane
wystarczaj¹co w tej instrukcji prosimy
zadzwonic ten numer: +48 501 125 775
Adres serwisu:
F.H.U. "SILVER"; Prebehajla Piotr
Legionowa 10/25
PL - 95-070 Aleksandrów £ódzki
1
Silver Crest SNM 33 A1
Wa¿ne instrukcje bezpieczeñstwa / Przeznaczenie
Przy u¿ywaniu urz¹dzeñ elektrycznych nale¿y zawsze przestrzegaæ podstawowych zasad bezpieczeñstwa podanych
poni¿ej:
Przed u¿yciem maszyny proszê zapoznaæ siê ze wszystkimi instrukcjami.
NIEBEZPIECZEÑSTWO - Aby zredukowaæ ryzyko pora¿enia pr¹dem:
1. Nie pozostawiaæ urz¹dzenia pod³¹czonego do sieci bez nadzoru.
2. Po zakoñczeniu szycia lub przed czyszczeniem nale¿y od³¹czyæ urz¹dzenie od Ÿród³a zasilania.
3. Od³¹czyæ Ÿród³o zasilania przed wymian¹ ¿arówki. Stosowaæ ¿arówki tego samego typu 15 Watt.
UWAGA - Aby zredukowaæ ryzyko poparzenia, po¿aru, pora¿enia pr¹dem lub zranienia:
1. Nie u¿ywaæ jako zabawki. Nale¿y zachowaæ szczególn¹ ostro¿noœæ u¿ywaj¹c maszyny w obecnoœci dzieci.
2. U¿ywaæ urz¹dzenia wy³¹cznie zgodnie z jego przeznaczeniem, jako opisano w instrukcji obs³ugi. Stosowaæ
wy³¹cznie akcesoria zalecane przez producenta, opisane w instrukcji obs³ugi.
3. Nie u¿ywaæ urz¹dzenia z uszkodzonym przewodem zasilaj¹cym, urz¹dzenia po upadku lub uszkodzeniu,
zamoczeniu w wodzie lub wykazuj¹cego usterki w pracy. Nale¿y wówczas skontaktowaæ siê z najbli¿szym punktem
serwisowym w celu sprawdzenia, naprawy lub regulacji.
4. Nie u¿ywaæ urz¹dzenia z zablokowanymi otworami wentylacyjnymi. Utrzymywaæ otwory wentylacyjne maszyny i
rozrusznika w czystoœci, wolne od kurzu, zanieczyszczeñ.
5. Nie zbli¿aæ palców do ruchomych czêœci maszyny. Szczególna ostro¿noœæ zalecana jest w okolicach ig³y.
6. Zawsze u¿ywaæ prawid³owej p³ytki ig³owej, nieprawid³owa mo¿e powodowaæ ³amanie ig³y.
7. Nie u¿ywaæ zgiêtych igie³.
8. Nie ci¹gn¹æ materia³u podczas szycia. Mo¿e to spowodowaæ z³amanie ig³y.
9. Przy wykonywaniu jakichkolwiek czynnoœci w okolicach ig³y, takich jak zak³adanie nitki, wymiana ig³y, zak³adanie
dolnej szpulki, wymiana stopki, itp. nale¿y wy³¹czyæ maszynê prze³¹cznikiem g³ównym do pozycji OFF ("O").
10. Maszynê nale¿y od³¹czyæ od Ÿród³a zasilania (wy³¹czaj¹c wtyczkê z gniazdka) przed wykonywaniem czynnoœci
serwisowych, regulacyjnych jak zdejmowanie obudowy, smarowanie, itp.
11. Nie wk³adaæ ¿adnych przedmiotów do otworów wentylacyjnych maszyny.
12. Nie u¿ywaæ na otwartej przestrzeni.
13. Nie u¿ywaæ w pomieszczeniach, pomieszczeniach których rozpylane by³y aerozole lub tlen.
14. Aby wy³¹czyæ urz¹dzenie z sieci nale¿y ustawiæ wszystkie prze³¹czniki w pozycji OFF ("O"), a nastêpnie wyj¹æ
wtyczkê z gniazda zasilaj¹cego.
15. Nie wy³¹czaæ z sieci ci¹gn¹c za przewód zasilaj¹cy, nale¿y chwyciæ wtyczkê i wyj¹æ j¹ z gniazdka.
16. Poziom ha³asu wytwarzany przez maszynê w standardowych warunkach u¿ytkowania 75 dB (A).
17. Je¿eli maszyna nie dzia³a prawid³owo nale¿y wy³¹czyæ j¹ prze³¹cznikiem g³ównym lub wy³¹czyæ wtyczkê z gniazda
zasilaj¹cego.
18. Nie ustawiaæ ¿adnych przedmiotów na rozruszniku maszyny.
19. Je¿eli uszkodzony jest kabel zasilaj¹cy po³¹czony z rozrusznikiem, musi on koniecznie byæ wymieniony przez
producenta, punkt serwisowy lub inn¹ osobê o odpowiednich kwalifikacjach, aby unikn¹æ niebezpieczeñstwa.
20. Urz¹dzenie to nie mo¿e byæ u¿ywane przez osoby (w tym dzieci) o ograniczonych mo¿liwoœciach fizycznych lub
psychicznych, lub o niewystarczaj¹cej wiedzy i doœwiadczeniu, chyba ¿e znajduj¹ siê pod opiek¹ lub zosta³y
przeszkolone w zakresie obs³ugi maszyny przez osobê odpowiedzialn¹ za ich bezpieczeñstwo.
21. Urz¹dzenie nie mo¿e byæ u¿ywane przez dzieci do zabawy. Nie pozostawiaæ urz¹dzenia bez nadzoru w obecnoœci
dzieci.
ZACHOWAJ TE INSTRUCJE
Maszyna przeznaczona jest wy³¹cznie do u¿ytku domowego.
Przeznaczenie
Maszyna do szycia jest przenaczona...
- do u¿ytku jako urz¹dzenie mobilne,
- do szycia w warunkach domowych ...
- wy³¹cznie do u¿ytku prywatnego.
Maszyna do szycia nie jest przewidzana ...
- do ustawienia stacjonarnego,
- do obróbki innych materia³ów (np. skóry, tkaniny namiotów, ¿agli itp.)
- do u¿ytku komercyjnego i przemys³owego.
2
Silver Crest SNM 33 A1
Szczegó³y dotycz¹ce maszyny
1. Pokrêt³o regulacji szerokoœci œciegu
2. Pokrêt³o naprê¿acza nici
3. Naprê¿acz nici
4. Stopka dociskowa
5. P³ytka œciegowa
6. Sk³adany stolik/ Schowek na akcesoria
7. Ogranicznik szpuleczki
8. Pokrêt³o d³ugoœci œciegu
9. Okienko wyœwietlacza œciegu
10. DŸwignia szycia wstecz
11. Regulator nacisku stopki dociskowej
12. Obcinacz nici
13. Uchwyt do transportu
14. Oœ nawijania szpuleczki
15. Trzpieñ szpulki
16. Kó³ko rêczne
17. Pokrêt³o wyboru œciegu
18. Prze³¹cznik W³¹cz/ Wy³¹cz
19. Gniazdko zasilania sieciowego
20. Nawijacz szpuleczki
21. DŸwignia stopki dociskowej
22. Prowadnik nici górnej
Akcesoria
a. Stopka wielofunkcyjna
b. Stopka do wszywania zamków b³yskawicznych
c. Stopka do przyszywania guzików
d. Stopka do obrzucania dziurek
e. Stopka do œciegu krytego
f. Nawlekacz
g. Szpuleczki (3x)
h. Podk³adka filcowa (2x)
i. Olejarka
j. Pude³ko z ig³ami (3 pojeduñcze ig³y, 1 podwójna
ig³a)
k. L-Œrubokrêt zakrzywiony
l. Œrubokrêt (du¿y & ma³y)
m. Niæ (1x niebieska, 1x ró¿owa, 1x ¿ó³ta)
n. No¿yk do dziurek/ szczoteczka do czyszczenia
o. P³ytka zakrywaj¹ca transporter
p. Linijka k¹tow¹
Zamocowanie przed³u¿ki wysiêgu
Zachowuj¹c po³o¿enie poziome
przed³u¿ki, zamocuj j¹ w maszynie
dosuwaj¹c zgodnie z kierunkiem
strza³ki.
Wnêtrze przed³u¿ki mo¿e byæ
zastosowane jako pude³ko na
wyposa¿enie.
Aby otworzyæ, nale¿y podnieœæ
wieczko w punkcie oznaczonym
strza³k¹.
3
Silver Crest SNM 33 A1
Pod³¹czenie maszyny do zasilania elektrycznego
Uwaga:
Od³¹cz kabel zasilania od sieci, gdy nie
u¿ywasz maszyny.
A
Uwaga:
Je¿eli masz jak¹kolwiek w¹tpliwoœæ co do
sposobu pod³¹czenia maszyny do
zasilania elektrycznego, skontaktuj siê z
wykwalifikowanym elektrykiem. Od³¹cz
kabel zasilania od sieci, gdy nie u¿ywasz
maszyny.
Maszyna musi byæ u¿ywana razem z
peda³em KD-2902 (sieæ o napiêciu 220-240
V) wyprodukowanym przez FDM (zhejiang
founder motor corporation ltd, China)
Pod³¹cz maszynê do zasilania elektrycznego
jak pokazano na rysunku.
Lampa oœwietleniowa
Naciœnij prze³¹cznik W³¹cz / Wy³¹cz (A), aby
pod³¹czyæ maszynê do napiêcia i w³¹czyæ
lampê (pozycja "I").
Peda³
Peda³ s³u¿y do regulowania szybkoœci z jak¹
pracuje maszyna.
Wymiana ¿arówki
Od³¹czyæ maszynê od Ÿród³a zasilania
wyjmuj¹c wtyczkê z gniazda sieciowego.
- Odkrêciæ wkrêt (A) jak na.
B
- Zdj¹æ pokrywê (B).
- Wykrêciæ ¿arówkê i zamontowaæ now¹ (C)
jak na.
A
- Zamocowaæ pokrywê i dokrêciæ wkrêt.
W przypadku wyst¹pienia jakichkolwiek
problemów poprosiæ o pomoc
najbli¿szego sprzedawcê.
C
4
Silver Crest SNM 33 A1
Zak³adanie ig³y
Uwaga:
Ustaw prze³¹cznik W³¹cz / Wy³¹cz w
pozycji Wy³¹cz ("O").
D
A
Wymieniaj regularnie ig³ê, zw³aszcza gdy
wykazuje ona oznaki zu¿ycia i przysparza
problemów.
Za³ó¿ ig³ê, postêpuj¹c zgodnie z
instrukcjami podanymi obok.
A. Odkrêæ œrubê mocuj¹c¹ ig³ê i przykrêæ
j¹ ponownie po w³o¿eniu nowej ig³y (1).
C
B. P³aska strona najgrubszej czêœci ig³y
musi byœ zwrócona do ty³u.
B
C/D. Wciœnij ig³ê tak daleko, jak tylko jest
to mo¿liwe.
U¿ywaæ tylko w pe³ni sprawne ig³y.
Problemy mog¹ wyst¹piæ przy:
- skrzywionych ig³ach
- têpych ig³ach
- zniszczonych ig³ach
DŸwignia stopki dociskowej dwupozycyjna
Aby zszyæ kilka warstw materia³u lub
grube materia³y, mo¿liwe jest ustawienie
stopki dociskowej na drugim z¹bku aby
³atwiej u³o¿yæ szycie (A).
5
Silver Crest SNM 33 A1
Regulacja nacisku stopki dociskowej
Nacisk stopki dociskowej zosta³ wstêpnie
ustawiony i nie wymaga ¿adnych
szczególnych regulacji zale¿nych od typu
materia³u (lekki lub ciê¿ki). Jeœli mimo
wszystko potrzebujesz wyregulowaæ
nacisk stopki dociskowej, obracaj œrubê
za pomoc¹ monety.
Szyj¹c bardzo cienkie materia³y, zmniejsz
nacisk obracaj¹c œrubê w kierunku
odwrotnym do ruchu wskazówek zegara;
gdy tkanina jest gruba, zwiêksz nacisk
obracaj¹c œrubê zgodnie z ruchem
wskazówek zegara.
Mocowanie uchwytu stopki dociskowej
Uwaga:
Podczas wykonywania tych czynnoœci
ustaw prze³¹cznik W³¹cz / Wy³¹cz w
pozycji Wy³¹cz. ("O").
a
e
1. Podnieœ dr¹¿ek stopki dociskowej (a).
Umocuj uchwyt stopki dociskowej (b),
jak pokazano na rysunku.
c
d
2. Mocowanie stopki dociskowej
Opuszczaj uchwyt stopki dociskowej (b),
a¿ wyciêcie uchwytu (c) znajdzie siê
bezpoœrednio nad osi¹ (d).
Popchnij dŸwigniê (e) w kierunku
wskazanym przez strza³kê.
Opuszczaj uchwyt stopki dociskowej (b),
tak aby stopka dociskowa (f)
wpasowa³a siê automatycznie.
f
b
1
2
e
3
g
3. Zdejmowanie stopki dociskowej
Podnieœ stopkê dociskow¹.
Popchnij dŸwigniê (e) w kierunku
wskazanym przez strza³kê, a stopka
dociskowa zwolni siê.
4. Mocowanie linijka k¹tow¹
PrzeprowadŸ linijke k¹tow¹ (g) przez
rowek, jak pokazano na rysunku.
Ustaw go w zale¿noœci od potrzeb do
obrêbków, zak³adek itd.
4
6
Silver Crest SNM 33 A1
Nape³nianie dolnej szpulki
a
Za³o¿yæ pust¹ szpulkê na trzpieñ do
nape³niania dolnej szpulki.
a. Podk³adka filcowa
Prze³o¿yæ nitkê ze szpulki przez dysk
naprê¿acza.
Owin¹æ nitkê rêcznie kilka razy wokó³
szpulki, zgodnie z ruchem wskazówek
zegara. Przesun¹æ szpulkê i trzpieñ w
prawo, do pozycji nape³niania.
Delikatnie nacisn¹æ rozrusznik.
Nape³nianie zakoñczy siê automatycznie
gdy szpulka jest pe³na. Przesun¹æ
szpulkê i trzpieñ w lewo do pozycji szycia
i zdj¹æ szpulkê.
Uwaga: Gdy trzpieñ do nape³niania dolnej
szpulki ustawiony jest w pozycji
nape³niania maszyna nie bêdzie szy³a, a
ko³o rêczne jest zablokowane. Aby
rozpocz¹æ szycie nale¿y przesun¹æ
trzpieñ w lewo (do pozycji szycia).
Zak³adanie szpuleczki
Uwaga :
Ustaw prze³¹cznik W³¹cz / Wy³¹cz w
pozycji Wy³¹cz ("O").
2
Aby za³o¿yæ lub wyj¹æ szpuleczke, ig³a
musi byæ podniesiona do oporu.
- Otwórz pokrywkê na zawiasie. (1)
- Przytrzymaj bêbenek na szpuleczkê
jedn¹ rêk¹.
W³ó¿ szpuleczkê w taki sposób (2), aby
niæ rozwija³a siê zgodnie z ruchem
wskazówek zegara (patrz strza³ka). (3)
3
1
- Przeci¹gnij niæ od wewn¹trz przez
sprê¿ynkê naci¹gow¹. (4)
4
- Trzymaj bêbenek na szpuleczkê za
zatrzask na zawiasie. (5)
5
- UmieϾ go na miejscu. (6)
6
7
Silver Crest SNM 33 A1
Zak³adanie górnej nitki
a
Uwaga:
Przed zak³adaniem nitki wy³¹czyæ
maszynê prze³¹cznikiem g³ównym.
a. Podk³adka filcowa
Podnieœæ igielnicê do jej najwy¿szej
pozycji. Zachowaæ kolejnoœæ zak³adania
nitki pokazan¹ poni¿ej na ilustracjach.
Je¿eli pominiemy któryœ etap lub
nieprawid³owo za³o¿ymy nitkê w któryœ
prowadnik maszyna nie bêdzie szy³a
prawid³owo (1-5).
Kontynuowaæ zak³adanie nitki w dó³ i do
prowadnika przy igle. Za³o¿yæ nitkê do
oczka ig³y od przodu do ty³u. Pozostawiæ
ok. 10 cm nitki poza ig³¹. (6)
1
2
3
4
5
6
8
Silver Crest SNM 33 A1
Naprê¿enie nici
Uwaga:
W zasadzie nie jest konieczne regulowanie
naprê¿enia nici ze szpuleczki.
A
B
C
Naprê¿enie nici dolnej
Aby sprawdziæ napiêcie nici na szpuleczce, wyjmij
bêbenek i szpuleczkê, nastêpnie trzymaj¹c za niæ
pozwól szpuleczce zwisaæ.
Potrz¹œnij ni¹ raz i drugi. Je¿eli naprê¿enie nici jest
w³aœciwe, rozwinie siê ona o oko³o 3 do 5 cm. Jeœli niæ
jest zbyt naprê¿ona, nie rozwinie siê wcale. Natomiast
jeœli naprê¿enie nici jest za s³abe, bêbenek opadnie zbyt
nisko. Aby wyregulowaæ naprê¿enie nici, obracaj ma³¹
œrubk¹ umieszczon¹ na boku bêbenka.
Naprê¿enie nici górnej
Regulacja normalna naprê¿enia nici : "AUTO"
Aby zwiêkszyæ naprê¿enie nici, obracaj pokrêt³em a¿ do
nastêpnej liczby w kierunku rosn¹cym. Aby zmniejszyæ
naprê¿enie nici, obracaj pokrêt³em a¿ do nastêpnej
liczby w kierunku malej¹cym.
A. Normalne naprê¿enie nici
B. Niæ górna nie doœæ naprê¿ona
C. Niæ górna zbyt mocno naprê¿ona
Wyprowadzenie nici dolnej
Przytrzymaj górn¹ niæ lew¹ rêk¹. Obracaj kó³kiem
rêcznym do przodu a¿ do chwili, gdy ig³a ca³kowicie siê
podniesie.
Poci¹gnij niæ górn¹ w taki sposób, aby niæ dolna
przesz³a przez otwór p³ytki œciegowej. Umieœæ obie nici
z ty³u, za stopk¹ dociskow¹.
9
Silver Crest SNM 33 A1
Rozpoczêcie szycia
Szycie wstecz
Zbli¿aj¹c siê do koñca zszywanego odcinka,
naciœnij dŸwigniê szycia wstecz. Przeszyj kilka
œciegów wstecz. Zwolnij dŸwigniê, a maszyna
rozpocznie na nowo szycie do przodu (A).
A
Wyjmowanie materia³u
Obracaj kó³kiem rêcznym do przodu, tak aby
naprê¿acz nici znalaz³ siê w najwy¿szym
po³o¿eniu, podnieœ stopkê dociskow¹ i wyjmij
materia³, popychaj¹c go do ty³u.
Obcinanie nitki
Obiema rêkami trzymaj nici z ty³u stopki
dociskowej, w³ó¿ je do rowka (B) i poci¹gnij w
dó³ .
B
Zale¿noœæ pomiêdzy ig³¹, materia³em i nici¹
TABELA WYBORU IGIE£, MATERIA£ÓW I NICI
ROZMIAR IG£Y
9-11(65-75)
NIÆ
MATERIA£
Materia³y lekkie: cienkie bawe³ny, woal, ser¿a,
jedwab, muœlin, qiana, interlock, trykoty
bawe³niane, d¿ersej, krepa, poliester tkany,
tkaniny na koszule i bluzki koszulowe.
Cienkie nici bawe³niane, nylonowe lub z
poliestru.
12(80)
Materia³y œrednie: bawe³na, satyna, gruby muœlin,
p³ótno ¿aglowe, trykot podwójnie dziany, lekkie
tkaniny we³niane.
14(90)
Materia³y œrednie: grube p³ótno, tkaniny
we³niane, grube trykoty, tkaniny g¹bczaste,
16(100)
Materia³y ciê¿kie: drelich, tkaniny we³niane,
p³ótno namiotowe i tkaniny podszyte watolin¹,
denim, tkaniny obiciowe (lekkie i œrednie).
Wiêkszoœæ dostêpnych w handlu nici
jest œredniej gruboœci i odpowiada tym
tkaninom i rozmiarom ig³y.
Aby uzyskaæ jak najlepsze wyniki,
u¿ywaj nici poliestrowych do szycia
tkanin syntetycznych oraz bawe³nianych
do tkanin i materia³ów naturalnych.
Zawsze u¿ywaj identycznej nici górnej i
dolnej.
18(110)
Ciê¿kie materia³y we³niane, materia³y
ubraniowe, tkaniny obiciowe, niektóre skóry i
winyle.
Nici o du¿ej wytrzyma³oœci, nici
tapicerskie. (Wybierz du¿y docisk stopki
wy¿sze numery.)
UWAGA: Rozmiar ig³y nale¿y dobraæ do gruboœci nici i materia³u.
Uwaga ig³y podwójne:
1. Ig³y podwójne mog¹ byæ stosowane do prac dekoracyjnych.
2. Przy szyciu ig³¹ podwójn¹ pokrêt³o szerokoœci œciegu powinno byæ ustawione na wartoœæ ni¿sz¹ ni¿ "3".
3. Europejskie oznaczenia igie³ to 65,70,80, itp., oznaczenia japoñskie to 9,11,12, itp.
4. Nale¿y czêsto wymieniaæ ig³ê (po uszyciu ka¿dej rzeczy) i przy pierwszych objawach zrywania nitki lub
przepuszczania œciegu.
10
Silver Crest SNM 33 A1
Wybór œciegu
Pokrêt³o regulacji
szerokoœci œciegu
Pokrêt³o d³ugoœci œciegu S1-S2
Okienko
wyœwietlacza
œciegu
Pokrêt³o
wyboru œciegu
A
DŸwignia
szycia wstecz
Dla œciegu prostego nale¿y wybraæ wzór " "
pokrêt³em wyboru œciegu. Wyregulowaæ
d³ugoœæ œciegu pokrêt³em. Mo¿na wybraæ
dowoln¹ pozycjê ig³y obracaj¹c pokrêt³em
regulacji szerokoœci œciegu.
Dla œciegu zygzakowego wybraæ wzór " "
pokrêt³em wyboru œciegu. Wyregulowaæ
d³ugoœæ œciegu pokrêt³em oraz szerokoœæ
œciegu pokrêt³em, dostosowuj¹c je do rodzaju
materia³u.
Aby uzyskaæ inne œciegi pokazane w
górnym rzêdzie na panelu maszyny nale¿y
wybraæ pokrêt³em wyboru œciegu literê
podan¹ ponad symbolem œciegu.
Wyregulowaæ d³ugoœæ i szerokoœæ œciegu
pokrêt³ami, w zale¿noœci od oczekiwanego
rezultatu szycia.
Aby uzyskaæ inne œciegi pokazane w
drugim rzêdzie na panelu maszyny nale¿y
obróciæ pokrêt³o d³ugoœci œciegu do pozycji
"S1", aby uzyskaæ œciegi pokazane w
trzecim rzêdzie nale¿y obróciæ pokrêt³o
d³ugoœci œciegu do pozycji "S2", wybraæ
¿¹dany œcieg pokrêt³em wyboru œciegu i
ustawiæ odpowiedni¹ szerokoœæ œciegu.
Œcieg prosty i pozycja ig³y
Pokrêt³o regulacji
szerokoœci œciegu
Pokrêt³o d³ugoœci œciegu
Obróciæ pokrêt³em wyboru œciegu tak, aby
okienko wybranego œciegu wskazywa³o "A"
(œcieg prosty)
Ogóln¹ zasad¹ jest, i¿ im grubszy materia³,
ig³a i nitka, tym d³u¿szy powinien byæ œcieg.
2.5
3
4
3 2 1
2
3
2
0.5
1
Prosimy wybraæ pozycje ig³y z lewej do prawej
przy ustawianiu pokrêt³a dla ustawienia
szerokoœci œciegu od "0" do "5".
1
0
4
0
S1
S2
5
4
0
S1
5
11
Silver Crest SNM 33 A1
Œcieg zygzakowy
Pokrêt³o regulacji
szerokoœci œciegu
Ustawiæ pokrêt³o wyboru œciegu w pozycji "B".
Pokrêt³o d³ugoœci œciegu
Funkcje pokrêt³a szerokoœci œciegu
Maksymalna szerokoœæ œciegu zygzakowego
to "5", ale mo¿e ona zostaæ zredukowana.
Szerokoœæ œciegu zwiêksza siê przy obrocie
pokrêt³a zygzaka od "0" do "5".
5
4
3
1
0
Funkcje pokrêt³a d³ugoœci œciegu przy
œciegu zygzakowym
Gêstoœæ œciegu zygzakowego zwiêksza siê
przy ustawieniu pokrêt³a d³ugoœci œciegu w
okolicach "0". £adny œcieg zygzakowy
uzyskuje siê zwykle przy ustawieniu "2.5" lub
ni¿szym.
3 2 1
4
0
5
2
Œcieg satynowy
Gdy d³ugoœæ œciegu ustawiona jest w
zakresie "0"-"1" œcieg jest bardzo gêsty. Jest
to œcieg satynowy stosowany do obszywania
dziurek lub elementów dekoracyjnych.
Delikatne materia³y
Podczas szycia materia³ów delikatnych
zaleca siê umieœciæ kawa³ek papieru pod
materia³em (co u³atwi jego przesuwanie
podczas szycia). Po zakoñczeniu szwu
papier mo¿na podrzeæ i wtedy ³atwo usun¹æ.
Stopka do wszywania zamków b³yskawicznych
A
2.5
1~4
Stopka mo¿e byæ zamocowana na lewej albo
prawiej stronie, zale¿nie od strony na której
stopka bêdzie szy³a. (1)
¯eby objechaæ suwak zamka ig³a mo¿e
pozostaæ w materiale:
potem podnieœæ stopke i suwak wsisn¹æ do
ty³u stopki.
Zpuœciæ stopke i szyæ dalej.
Mo¿na te¿ wszyæ sznurek. (2)
Pokrê³o regulacji szerokoœci œciegu ustawiæ
zale¿nie od gruboœci materia³u miêdzy "1" i "4".
1
2
12
Silver Crest SNM 33 A1
Stopka do œciegu krytego
D
1
1~2
3~5
Do obrêbiania zas³on, spodni, spódnic, itd.
4
Œcieg kryty do mat. nieelastycznych.
3
2
Z³ó¿ materia³ jak na rysunku, lew¹ stron¹ do
góry (1).
Wsuñ materia³ pod stopkê. Obracaj ko³em
rêcznym do przodu, a¿ ig³a przesunie siê
maksymalnie w lewo. Musi ona tylko przek³uæ
zak³adkê materia³u (2).
Ustaw prowadnik (3) obracaj¹c pokrêt³em (4),
tak aby prowadnik opiera³ siê na zak³adce.
Szyj powoli, lekko naciskaj¹c peda³ i
przesuwaj¹c materia³ wzd³u¿ krawêdzi
prowadnika.
Stopka do przyszywania guzików
B
0~5
0
Przesun¹æ dŸwigniê z¹bków transportera w
prawo, aby opuœciæ z¹bki.
Wymieniæ stopkê na stopkê do przyszywania
guzików. U³o¿yæ materia³ pod stopk¹. Ustawiæ
guzik w ¿¹danej pozycji i opuœciæ stopkê.
Ustawiæ pokrêt³o wybory œciegu na zygzak "B".
Wyregulowaæ szerokoœæ œciegu w zakresie "34", dostosowuj¹c j¹ do odleg³oœci pomiêdzy
dziurkami guzika. Obróciæ ko³em rêcznym aby
sprawdziæ czy ig³a wchodzi w praw¹ i lew¹
dziurkê guzika. Ustawiæ pokrêt³o wyboru
œciegu na œcieg prosty "A" i wykonaæ kilka
œciegów mocuj¹cych nitkê. Wybraæ œcieg
zygzakowy "B" i powoli przyszyæ guzik 10 ma
œciegami. Ponownie wybraæ œcieg prosty "A" i
wykonaæ kilka œciegów mocuj¹cych.
Je¿eli wymagana jest stopka na guziku
nale¿y u³o¿yæ ig³ê do cerowania i wówczas
przyszyæ guzik. Przy guzikach z 4-ma
dziurkami nale¿y najpierw przeszyæ przez
przednie dziurki, przesun¹æ pracê do ty³u i
przeszyæ przez tylne dziurki.
13
Silver Crest SNM 33 A1
Stopka do obrzucania dziurek
5
0.5~1
Przygotowanie:
Zdemontuj stopkê zygzakow¹ i za³ó¿ stopkê do
obrzucania dziurek.
Ustaw pokrêt³o d³ugoœci œciegu pomiêdzy "0.5" a "1".
Gêstoœæ œciegu zale¿y od gruboœci materia³u.
Uwaga: Zawsze obszyj najpierw dziurkê próbn¹.
a
e
b
c
d
Przygotowanie materia³u:
Zmierz œrednicê guzika i dodaj 0.3 cm na œciegi
rygluj¹ce. Jeœli guzik jest bardzo gruby, dodaj nieco
wiêcej. Zaznacz miejsce i d³ugoœæ dziurki na materiale.
Umieœæ materia³ w taki sposób, aby ig³a znalaz³a siê na
oznaczeniu po³o¿onym jak najdalej od Ciebie.
Poci¹gnij do siebie stopkê do obrzucania dziurek tak
daleko, jak tylko siê da.
Opuœæ stopkê.
a. Ustaw pokrêt³o wyboru œciegu na " ". Szyj z
umiarkowan¹ szybkoœci¹ a¿ dojdziesz do koñca
zaznaczenia.
b. Ustaw pokrêt³o wyboru œciegu na "
" i wykonaj 5
do 6 œciegów rygluj¹cych.
c. Ustaw pokrêt³o wyboru œciegu na " " i obrzucaj
lew¹ stronê dziurki a¿ do koñca zaznaczenia
najbardziej oddalonego od Ciebie.
d. Ustaw pokrêt³o wyboru œciegu na "
" i wykonaj
kilka œciegów rygluj¹cych.
Wyjmij materia³ spod stopki. Wyci¹gnij niæ górn¹ na
lew¹ stronê materia³u i zwi¹¿ niæ górn¹ z doln¹. Przetnij
œrodek dziurki za pomoc¹ no¿yka do dziurek uwa¿aj¹c,
aby nie przeci¹æ œciegów z ¿adnej strony.
Porady:
- Zmniejsz nieznacznie naprê¿enie nici górnej, aby
uzyskaæ lepsze wyniki.
- W przypadku materia³ów cienkich i rozci¹gliwych, u¿yj
materia³u wzmacniaj¹cego.
- W przypadku materia³ów rozci¹gliwych i dzianin,
zaleca siê stosowanie wzmocnienia. Œcieg zygzakowy
musi przejϾ przez wzmocnienie (e).
14
Silver Crest SNM 33 A1
Œciegi overlockowe
E, F
3~5
S1, S2
Uwaga:
Nale¿y u¿ywaæ nowych igie³, igie³ z
zaokr¹glon¹ koñcówk¹ lub do materia³ów
elastycznych.
Stosowane jako szwy, wykoñczenie brzegu,
ozdobne podwiniêcia.
Œcieg overlockowy elastyczny:
Do cienkich dzianin, Jersey, wykoñczeñ
dekoltu (A).
Œcieg overlockowy, standardowy:
Stosowany do cienkich dzianin, jerseyu,
wykoñczeñ dekoltu. (B)
A
B
Œcieg overlockowy zamkniêty:
Do cienkich dzianin, ³¹czenia materia³ów (C).
C
Wszystkie œciegi overlockowe s³u¿¹ do szycia i
wykoñczenia brzegów w jednej operacji lub
wykonywania ozdobnych podwiniêæ.
Przy obrzucaniu brzegów materia³u ig³a
powinna lekko wychodziæ poza brzeg materia³u.
Œcieg zygzakowy trójstopniowy
C
3~5
1~2
Stosowany jest do przyszywania koronek i
gumek, cerowania, napraw i œciegów
wzmocnionych.
U³o¿yæ ³atê na materiale. D³ugoœæ œciegu
mo¿e byæ znacznie zmniejszona, aby uzyskaæ
bardzo gêsty œcieg (1).
1
Przy naprawie rozerwañ zaleca siê
stosowanie tkaniny podk³adowej, dla
wzmocnienia uszkodzonego miejsca. Gêstoœæ
œciegu mo¿na ró¿nicowaæ pokrêt³em d³ugoœci
œciegu. Najpierw nale¿y przeszyæ centralnie
po rozerwaniu, a nastêpnie po prawej i lewej
stronie uszkodzonego miejsca. Wykonaæ 3-5
rzêdów œciegów w zale¿noœci od rodzaju
materia³u i uszkodzenia (2).
2
15
Silver Crest SNM 33 A1
Wybór œciegu
A
2.5
S1, S2
Œcieg prosty potrójny: (1)
Przeznaczony do szwów wzmocnionych.
Maszyna bêdzie wykonywa³a dwa œciegi do
przodu i jeden œcieg do ty³u, co daje potrójne
wzmocnienie szwu.
B
1
3~5
S1, S2
Zygzak trójstopniowy: (2)
Przeznaczony do szwów wzmocnionych,
podwiniêæ i elementów dekoracyjnych.
Zygzak trójstopniowy przeznaczony jest do
sztywnych materia³ów jak denim, sztruks, itp.
2
Patchworki
F
3~5
S1
Œciegi te stosowane s¹ do ³¹czenia brzegów
materia³ów, z pozostawieniem pewnej
odleg³oœci pomiêdzy ich brzegami.
- Podwin¹æ brzegi dwóch kawa³ków
materia³u I przyfastrygowaæ ich brzegi do
cienkiego papieru, pozostawiaj¹c niewielk¹
odleg³oœæ pomiêdzy materia³ami.
- Szyæ po brzegu materia³u lekko poci¹gaj¹c
obie nitki przy rozpoczêciu szycia.
- U¿yæ grubszej nitki.
- Po zakoñczeniu szycia usun¹æ fastrygê i
papier. Zawi¹zaæ nitki na supe³ek na lewej
stronie materia³u, na pocz¹tku i na koñcu
œciegu.
16
Silver Crest SNM 33 A1
Wykonywanie monogramów i haftowanie przy u¿yciu tamborka
* Tamborek nie jest dostarczany z t¹ maszyn¹ do szycia.
B
1~5
0
Zakrywanie z¹bków transportera
- Zdejmij stopkê dociskow¹ i jej uchwyt.
- Za³ó¿ p³ytkê zakrywaj¹c¹ transporter.
- Przed rozpoczêciem szycia opuœæ dŸwigniê
podnoœnika stopki.
- Dobierz szerokoœæ œciegu odpowiedni¹ do
wielkoœci liter lub wzoru.
Przygotowanie do wykonywania
monogramów lub haftowania
- Narysuj litery lub wzór na prawej stronie
materia³u.
- Jak najmocniej naci¹gnij materia³ na
tamborku.
- U³ó¿ materia³ pod ig³¹. Upewnij siê, czy
dr¹¿ek stopki dociskowej jest w swojej
najni¿szej pozycji.
- Obróæ kó³kiem rêcznym do siebie, tak aby
niæ dolna przesz³a przez materia³. Przeszyj
kilka œciegów w miejscu rozpoczêcia haftu.
- Prosimy ramkê trzymac kciukiem i palcem
wskazuj¹cym w obó r¹kach.
- Prosimy koordynowaæ szybkoœæ i ruch
szycia przy pomocy posuwaniu ramki.
Aplikacje
B
3~5
0.5~1
- Wytnij motyw aplikacji i przyfastryguj go na
materiale.
- Szyj powoli dooko³a motywu.
- Odetnij nadmiar materia³u poza œciegami.
Uwa¿aj, aby nie przeci¹æ œciegów.
- Wyjmij nitkê fastrygi.
- Zawi¹¿ górn¹ i doln¹ niæ pod aplikacj¹, tak
aby unikn¹æ wszelkiego wystrzêpiania siê.
17
Silver Crest SNM 33 A1
Arkuszowy ornament
I
3~5
1~2
Maszyna umie automatycznie szyæ arkuszowy
ornament dla dekoratywnej krawêdzi.
- Szycie Na lini brzegowej (1)
- Przy ucinaniu wystaj¹cego materia³u
prosimy uwa¿aæ ¿eby ucinaæ jak naj krótko
i nie uci¹æ przypadkowo nitki. (2)
1
2
Ig³a podwójna
A
2.5
1~4
Uwaga:
Przy szyciu ig³¹ podwójn¹ nale¿y szyæ
powoli dla zapewnienia dobrej jakoœci
œciegów.
Przy wykonywaniu œciegu zygzakowego
ig³¹ podwójn¹ nale¿y sprawdziæ czy
pokrêt³o szerokoœci œciegu ustawione jest
w zakresie "0"-"3". Przy ustawieniu
powy¿ej "3" nie nale¿y stosowaæ ig³y
podwójnej.
- Nitki stosowane do ig³y podwójnej powinny
mieæ t¹ sam¹ gruboœæ. Mo¿na zastosowaæ
jeden lub dwa kolory nitki.
- Za³o¿yæ ig³ê podwójn¹ w taki sam sposób
jak pojedyncz¹ (p³ask¹ stron¹ trzonka ig³y
do ty³u).
- Przy zak³adaniu nitki do ig³y postêpowaæ
zgodnie z instrukcj¹ dla igie³ pojedynczych.
Nawlec ka¿d¹ ig³ê oddzielnie.
18
Silver Crest SNM 33 A1
Konserwacja
Uwaga:
Od³¹czaj maszynê od zasilania elektrycznego,
wyci¹gaj¹c wtyczkê kabla z gniazdka sieci. Zawsze
podczas czyszczenia maszyny musi byæ ona
od³¹czona od zasilania.
Zdejmowanie p³ytki œciegowej (1):
Obracaj ko³em rêcznym a¿ do maksymalnego
podniesienia ig³y. Otwórz przedni¹ pokrywkê na
zawiasie i œrubokrêtem odkrêæ œrubê p³ytki œciegowej.
Czyszczenie z¹bków transportera (2):
Wyjmij bêbenek na szpuleczkê i u¿yj dostarczonej z
maszyn¹ szczotki do wyczyszczenia ca³ej tej strefy.
1
Czyszczenie i smarowanie chwytaka (3-7):
Wyjmij bêbenek na szpuleczkê. Odchyl na zewn¹trz
dwa zatrzaski trzymaj¹ce chwytak (3). Wyjmij pierœcieñ
(4) i chwytak (5) i wyczyœæ je miêkk¹ szmatk¹.
Nasmaruj, wpuszczaj¹c w zaznaczonym miejscu 1 lub 2
krople oleju do maszyn do szycia (6). Obracaj kó³ko
rêczne do momentu, a¿ pierœcieñ (7) znajdzie siê po
lewej stronie. UmieϾ chwytak (5) na miejscu i zamknij
mocuj¹ce go zatrzaski. Umieœæ bêbenek i szpuleczkê
na swoim miejscu i za³ó¿ p³ytkê œciegow¹.
Wa¿ne:
K³aczki i resztki nici musz¹ byæ regularnie usuwane.
Ponadto maszyna powinna byæ oddawana do
przegl¹du w jednym z naszych punktów serwisowych
w regularnych odstêpach czasu.
2
6
7
5
4
3
19
Silver Crest SNM 33 A1
Poradnik rozwi¹zywania problemów
Problemy
Przyczyny
Rozwi¹zania
Zerwanie siê
nici górnej
1. Nici nie zosta³y poprawnie nawleczone.
2. Niæ jest zbyt naprê¿ona.
3. Niæ jest zbyt gruba w stosunku do ig³y.
4. Ig³a nie zosta³a zainstalowana poprawnie.
5. Niæ jest owiniêta wokó³ trzpienia szpulki.
6. Ig³a jest uszkodzona.
1. Ponownie nawlecz nici.
2. Zmniejsz naprê¿enie nici (ni¿sza cyfra).
3. Wybierz grubsz¹ ig³ê.
4. Zdejmij ig³ê i zainstaluj j¹ ponownie
(p³ask¹ stron¹ do ty³u).
5. Zdejmij szpulkê i nawiñ na ni¹ niæ.
6. Wymieñ ig³ê.
Zerwanie siê
nici dolnej
1. Bêbenek na szpuleczkê nie zosta³
poprawnie zainstalowany.
2. Bêbenek zosta³ Ÿle nawleczony.
3. Niæ dolna jest zbyt naprê¿ona.
1. Wyjmij bêbenek, ponownie go zainstaluj
i poci¹gnij za niæ. Niæ powinna
wychodziæ z ³atwoœci¹.
2. SprawdŸ szpuleczkê i bêbenek.
3. Zmniejsz naprê¿enie nici dolnej zgodnie
z opisem.
Przeskakiwa
nie œciegów
1. Ig³a nie zosta³a zainstalowana poprawnie.
2. Ig³a jest uszkodzona.
3. U¿ywana ig³a ma niew³aœciwy rozmiar.
4. Stopka nie zosta³a poprawnie
umocowana.
1. Zdejmij ig³ê i zainstaluj j¹ ponownie
(p³ask¹ stron¹ do ty³u).
2. Za³ó¿ now¹ ig³ê.
3. Dobierz ig³ê odpowiedni¹ do nici i
materia³u.
4. SprawdŸ i zamocuj j¹ poprawnie.
Z³amanie ig³y
1. Ig³a jest uszkodzona.
2. Ig³a nie zosta³a zainstalowana poprawnie.
3. Rozmiar ig³y nie jest odpowiedni do
materia³u.
4. Zainstalowana stopka jest
nieodpowiednia.
1. Za³ó¿ now¹ ig³ê.
2. Zainstaluj ig³ê poprawnie (p³ask¹ stron¹
do ty³u).
3. Dobierz ig³ê odpowiedni¹ do nici i
materia³u.
4. Dobierz odpowiedni¹ stopkê.
Œcieg zbyt
rzadki
1. Nici nie zosta³y poprawnie nawleczone.
2. Bêbenek na szpuleczkê jest
niepoprawnie nawleczony.
3. Kombinacja ig³a/niæ/materia³ jest
niew³aœciwa.
4. Naprê¿enie nici jest niew³aœciwe.
1. SprawdŸ nawleczenie.
2. Nawlecz bêbenek jak pokazano na
rysunku.
3. Rozmiar ig³y musi byæ odpowiedni do
nici i materia³u.
4. Popraw naprê¿enie nici.
Zszycie
pomarszczon
e lub
pofa³dowane
1. Ig³a jest zbyt gruba w stosunku do
materia³u.
2. D³ugoœæ œciegu jest Ÿle ustawiona.
3. Niæ jest zbyt naprê¿ona.
1. Wybierz cieñsz¹ ig³ê.
2. Ponownie ustaw d³ugoœæ œciegu.
3. Zmniejsz naprê¿enie nici.
Œciegi
nieregularne,
przesuw
nieregularny
1. Niæ jest z³ej jakoœci.
2. Bêbenek jest Ÿle nawiniêty.
3. Materia³ by³ poci¹gany.
1. Wybierz niæ lepszej jakoœci.
2. Wyjmij bêbenek, ponownie go nawiñ i
w³ó¿ na miejsce.
3. Nie ci¹gnij za materia³ podczas szycia,
pozostaw przesuw materia³u maszynie.
Maszyna
ha³asuje
1. Maszyna musi koniecznie byæ
nasmarowana.
2. K³aczki lub olej zgromadzi³y siê na
chwytaku lub na igle.
3. U¿yto oleju z³ej jakoœci.
4. Ig³a jest uszkodzona.
1. Nasmaruj zgodnie z instrukcj¹.
2. Wyczyœæ chwytak i z¹bki transportera
zgodnie z instrukcj¹.
3. U¿ywaj tylko dobrej jakoœci oleju do
maszyn do szycia.
4. Wymieñ ig³ê.
Maszyna
zablokowa³a
siê
Niæ zablokowa³a siê w chwytaku.
Wyjmij niæ górn¹ i bêbenek, obracaj
kó³kiem rêcznym w przód i w ty³, po czym
wyjmij resztkê nici. Nasmaruj zgodnie z
instrukcj¹.
20
Silver Crest SNM 33 A1
Zbycie
- Urz¹dzenia nie wolno wyrzucaæ do œmieci wraz z pozosta³ymi odpadkami.
- Ten produkt podpada pod europejsk¹ dyrektywe 2002/96/EC.
- Urz¹dzenie nale¿y oddaæ do odpowiedniego zak³adu usuwania odpadów lub najbli¿szego
miejskiego sk³adowiska odpadów.
- Nale¿y przestrzegaæ aktualnie obowi¹zuj¹cych przepisów. W razie koniecz-noœci nale¿y
skontaktowaæ siê z odpowiednim zak³adem usuwania odpadów.
- Prosimy tylko o ekologiczne zbycie siê ca³ego opakowania.
Nale¿y schowaæ opakowanie transportowe maszyny do szycia! Z jednej strony mo¿e ono
s³u¿yæ do przechowywania maszyny natomiast przede wszystkim s³u¿y ono do zapakowania
maszyny w wypadku jej wysy³ania do naprawy. Najwiêcej uszkodzeñ powstaje bowiem
dopiero podczas transportu.
Tehnièki podaci
230 woltów/ 50 Hz
Napêcie
- maszyna
70 wat
- lampa
15 wat
- ogólnie
85 wat
Rozmiar
- Uchwyt schowany
ca. 380 x 319 x 185 mm (B x H x T)
D³ugoœæ kabla
- kabel pr¹dowy
ca. 1.8 m
- kabel peda³u
ca. 1.4 m
- maszyna
ca. 5.8 Kg
Moc
Masa/ciê¿ar
aluminium / tworzywo sztuczne
Materia³
Elementy operacyjne
Elementy pokazuj¹ce
- w³¹cznik w³¹cz/wy³¹cz
jest
- peda³ kontroli szybkosci szycia
jest
- okno wyœwietlenia sztychu
jest
- lampa
jest
System chwytaka
CB-chwytak
System ig³y
130/705H
Filter inerferencji
wed³ug dyrektywy EU
Certyfikat TÜV
tak
Gwarancja
3 lata
Klasa
II
Wytwórca:
Crown Technics GmbH
Lerchenstrasse 2
DE-74226 Nordheim
21
Service number for complaints:
+442030244354
Servicenummer bei Reklamationen:
+49 (0)1805 032033
14 Cent/Minute aus dem deutschen Festnetz, höchstens 42 Cent/Minute aus den deutschen Mobilfunknetzen
Numer serwisu dla skarg:
+48 501 125 775
www.sewingguide.de
021VG50104(E)(GB/DE/PL) Jun/11
Silver Crest_SNM 33 A1(8750)/A5