1
• Deutsch
Manual 1.1
• English
• Français
• Italiano
• Español
• にほんご
• 中文
Built for creative expression on an epic level
Important Safety Instructions!
Read before connecting!
This product has been built by the manufacturer in
accordance with IEC 60065 and left the factory in safe
working order. To maintain this condition and ensure
non-risk operation, the user must follow the advice and
warning comments found in the operating instructions.
The unit conforms to Protection Class 1 (protectively
earthed). If this product shall be used in vehicles, ships
or aircraft or at altitudes exceeding 2000 m above sea
level, take care of the relevant safety regulations which
may exceed the IEC 60065 requirements.
WARNING: To prevent the risk of fire and shock
hazard, do not expose this appliance to moisture or
rain. Do not open case – no user serviceable parts
inside. Refer service to qualified service personnel.
This symbol, wherever it appears, alerts you to
the presence of uninsulated dangerous voltage
inside the enclosure – voltage that may be
sufficient to constitute a risk of shock.
This symbol, wherever it appears, alerts you to
the presence of externally accessible hazardous
voltage. External wiring connected to any
terminal marked with this symbol must be a “ready
made cable” complying with the manufacturers
recommendations, or must be a wiring installed by
instructed persons only.
This symbol, wherever it appears, alerts you to
important operating and maintenance
instructions in the accompanying literature.
Read the manual.
This symbol, wherever it appears, tells you: Take
care! Hot surface! To prevent burns you must
not touch.
• Read these instructions.
• Keep these instructions.
• Follow all warnings and instructions marked on the
product and in this manual.
• Do not use this product near water. Do not place the
product near water, baths, wash basins, kitchen sinks,
wet areas, swimming pools or damp rooms.
• Do not place objects containing liquid on the product
– vases, glasses, bottles etc.
• Clean only with dry cloth.
• Do not remove any covers or sections of the housing.
• The set operating voltage of the product must match
the local mains supply voltage. If you are not sure of
the type of power available consult your dealer or
local power company.
• To reduce the risk of electrical shock, the grounding
of this product must be maintained. Use only the
power supply cord provided with this product, and
maintain the function of the center (grounding) pin
of the mains connection at any time. Do not defeat
the safety purpose of the polarized or grounding-type
plug.
• Do not defeat the safety purpose of the polarized or
grounding-type plug. A polarized plug has two blades
with one wider than the other. A grounding type
plug has two blades and a third grounding prong.
The wide blade or the third prong are provided for
your safety. If the provided plug does not fit into your
outlet, consult an electrician for replacement of the
obsolete outlet.
• Protect the power cord from being walked on
or pinched particularly at plugs, convenience
receptacles, and the point where they exit from
the device! Power supply cords should always be
handled carefully. Periodically check cords for cuts
or sign of stress, especially at the plug and the point
where the cord exits the device.
• Never use a damaged power cord.
• Unplug this product during lightning storms or when
unused for long periods of time.
• This product can be fully disconnected from mains
only by pulling the mains plug at the unit or the wall
socket. The product must be placed in such a way
at any time, that disconnecting from mains is easily
possible.
• Fuses: Replace with IEC127 (5x20mm) type and rated
fuse only! It is prohibited to use “patched fuses”
or to short the fuse-holder. Replacing any kind of
fuses must only be carried out by qualified service
personal.
• Refer all servicing to qualified service personnel.
Servicing is required when the unit has been
damaged in any way, such as:
- When the power cord or plug is damaged or frayed.
- If liquid has been spilled or objects have fallen into
the product.
- If the product has been exposed to rain or moisture.
- If the product does not operate normally when the
operating instructions are followed.
- If the product has been dropped or the cabinet has
been damaged.
• Do not connect external speakers to this product with
an impedance lower than the rated impedance given
on the product or in this manual. Use only cables
with sufficient cross section according to the local
safety regulations.
• Keep away from direct sunlight.
• Do not install near heat sources such as radiators,
heat registers, stoves or other devices that produce
heat.
• Do not block any ventilation openings. Install in
accordance with manufacturer’s instructions. This
product must not be placed in a built-in installation
such as a rack unless proper ventilation is provided.
• Always allow a cold device to warm up to ambient
temperature, when being moved into a room.
Condensation can form inside it and damage the
product, when being used without warming up.
• Do not place naked flame sources, such as lighted
candles on the product.
• The device must be positioned at least 20 cm/8"
away from walls with free air space inbetween, and
there must be free air space of at least 50 cm / 20"
immediately above the unit within which no object(s)
may be placed or positioned.
• Use only with the cart, stand, tripod, bracket or
table specified by the manufacturer or sold with the
product. When a cart is used, use caution when
moving the cart/product combination to avoid injury
from tip-over.
• Use only accessories recommended by the
manufacturer, this applies for all kind of accessories,
for example protective covers, transport bags,
stands, wall or ceiling mounting equipment. In case
of attaching any kind of accessories to the product,
always follow the instructions for use, provided by
the manufacturer. Never use fixing points on the
product other than specified by the manufacturer.
• This appliance is NOT suitable to be used by any
person or persons (including children) with limited
physical, sensorial or mental ability, or by persons
with insufficient experience and/or knowledge to
operate such an appliance. Children under 4 years
of age must be kept away from this appliance at all
times.
Version 2.3b 01/2015
• Never push objects of any kind into this product
through cabinet slots as they may touch dangerous
voltage points or short out parts that could result in
risk of fire or electric shock.
• This product is capable of delivering sound
pressure levels in excess of 90 dB, which may cause
permanent hearing damage! Exposure to extremely
high noise levels may cause a permanent hearing
loss. Wear hearing protection if continuously exposed
to such high levels.
• The manufacturer only guarantees the safety,
reliability and efficiency of this product if:
- Assembly, extension, re-adjustment, modifications
or repairs are carried out by the manufacturer or by
persons authorized to do so.
- The electrical installation of the relevant area
complies with the requirements of IEC (ANSI)
specifications.
- The unit is used in accordance with the operating
instructions.
- The grounding of the center pin of the mains plug is
maintained to reduce the risk of shock.
Things to do before operating the amp
• Please read these instructions carefully,
particularly the notes on safety, before
operating the amp.
• The manufacturer disclaims any liability on
responsibility whatsoever for any damage or
defect to this and other devices resulting from
misuse.
• Before you plug this amp into a mains power
outlet, make sure its Power and Standby
switches are off and that the voltage rating
indicated on its rear panel matches your local
mains current.
• Do not use this amp without a speaker cabinet
connected. Please make sure the impedance of
the speaker cabinet matches the impedance of
the speaker out it is connected to.
• A word of warning before you fire up your
amp. It’s loud, and high volume levels can
cause hearing damage. To avoid very loud and
unwelcome surprises, make a habit of backing
the Master Volume knob all the way down
before switching on the amp!
We always knew that taking the TriAmp MK II a major step forward would
be a challenge. It would mean creating something radically new – so new,
in fact, that it would have to redefine the status quo in tone, performance
and design. But at the same time, a Mark 3 has to be a continuation on
a theme, to look and feel familiar. So, we considered every single factor
that had helped make the TriAmp MK II the amp of choice for many
artists. Then, we reengineered every single feature in the most forwarding
thinking way possible. The result is a genuine game changer, something
no one in the world of guitar amps has ever seen before – the TriAmp
Mark 3.
Now combine this with 3 pairs of power amp tubes, this will result in
3x12=36 different sounds. If you kick in a second pair of tubes, you get
another 36 combinations (Pair 1+2, Pair 1+3, Pair 2+3). With the third pair,
it will add another 12 options! Each of the six channels has its own Gain,
Volume and 3-band EQ, plus a Stomp Boost that is tailored specifically
to each channel’s character. This makes a total of 12 different base tones
at the touch of a button. Now combine this with three pairs of power
amp tubes – again, all accessible at a touch of a button – and you’ve
got 36 different sounds available at 50 Watts. If you kick in a second
pair of tubes (taking the power up to 100 Watts), you get another 36
combinations (Pair 1+2, Pair 1+3, Pair 2+3). With the third pair engaged
too (that’s now 150 Watts!), you’ve got another 12 options! That’s a total
of 84 different sounds.
The TriAmp Mark 3 doesn’t just offer classic tones, though. The option
to combine channels and power tube combinations like never before lets
you create your own new sounds – the sounds of the future. Never before
has tonal variety been accessible in such an inspiring way.
• にほんご
• Español
• Italiano
TriAmp Mark 3 not only offers three completely independent preamps
with two channels each, but also three truly independent power amps.
Each of the three pairs of power amp tubes can be equipped with EL34s
or 6L6s, and each of the pairs is freely assignable to each of the six
channels – even via MIDI! But you’re not just limited to one pair per
channel – you can also assign different pairs to each, which allows you to
mix the different types of power amp tubes.
• Français
1 Foreword
A whole new chapter in our epic tale of tube
driven tone
• Deutsch
Foreword ..................................................................................... 3
Quick Start ................................................................................... 4
The fundamentals of handling TriAmp Mark 3 .............................. 4
Amps and Channels ..................................................................... 5
Front Panel ................................................................................... 5
Rear panel .................................................................................... 7
MIDI Presets and MIDI Setup ....................................................... 8
TSC™ –Tube Safety Control ....................................................... 10
TSM-432 - The included MIDI board ......................................... 11
AES ............................................................................................ 12
Technical Data ........................................................................... 13
• English
1
2
3
4
5
6
7
8
9
10
11
• 中文
TriAmp Mark 3 – Manual 1.1
3
TriAmp Mark 3 – Manual 1.1
;VKVHTHU\HSYLHKV\[VM[OL[\IL
TH[JOPUNPUZLY[HWPJRPU[V[OLZSV[
HUKJV\U[[OLMSHZOLZVMLHJO3,+
;OLKPMMLYLUJLPUMSHZOLZZOV\SKIL
SLZZ[OHU^P[OPULHJOWHPY[V
N\HYHU[LLILZ[ZV\UK7SLHZLYLMLY
[V[OLTH[JOPUNJOHY[PU[OLTHU\HS
Tube Status Monitor
;:*H\[VTH[PJHSS`PUKPJH[LZ[OLZ[H[\ZVM[OL[\ILZ
HZZVVUHZ[OLHTWPZPUWSH`TVKL:;(5+)@Z^P[JO
PU\WWLYWVZP[PVU0M[OL3,+ZZ[H`VUPUWSH`TVKL
WSLHZLJOLJR[OLHUVKLM\ZL
(SS3,+ZVMMTLHUZ!ILZ[IPHZUVYTHSVWLYH[PVU
6UL3,+VUTLHUZ!UVJ\YYLU[[\ILPZIYVRLUHUK
OHZ[VILYLWSHJLK
6UL3,+MSHZOLZVUL3,+PZVU![OLMSHZOPUN3,+
PUKPJH[LZH[\IL[OH[JH\ZLZV]LYJ\YYLU[[OLV[OLY
3,+PUKPJH[LZHZ^P[JOLKVMM[\IL[VWYV[LJ[[OLHTW
7SLHZLYLWSHJL[OL[\IL[OH[JH\ZLZV]LYJ\YYLU[
;^V3,+ZVUTLHUZ!WHPYVM[\ILZPZZ^P[JOLKVMM
MADE IN GERMANY
SPEAKERS
16 Ohms
1x 8 Ohms
or 2x 16 Ohms
RED BOX™ AE
4 Ohms
Ambience emulated DI Out
*HIPUL[
4VKL
3V^
*\[
0UZLY[N\P[HYWPJR[VYLHK
V\[[\ILTH[JOPUN
7V^LY;\ILZ!
TSC™
MIDI
ILZ[)PHZ
V]LYJ\YYLU[
UVJ\YYLU[
NOISE GATE
Hard
In
Out/Thru
Z^P[JOLKVMM
FX LOOP
Soft
MASTER INSERT
FX Level
Send
Return
*(<;065!9LHYWHULSHUK
]LU[PSH[PVUVWLUPUNZTH`
ILJVTL[VVOV[[V[V\JO
3LH]LLUV\NOZWHJLMVY
WYVWLY]LU[PSH[PVU
;VYLK\JL[OLYPZRVMLSLJ[YPJZOVJRNYV\UKPUNVM
[OLJLU[LYWPUVM[OPZWS\NT\Z[ILTHPU[HPULK
9LWSHJPUNM\ZLZT\Z[VUS`ILJHYYPLKV\[I`
X\HSPMPLKZLY]PJLWLYZVUULS9LWSHJLM\ZLZVUS`
^P[O[`WLHUKYH[PUNZOV^UOLYL
Bright
4HPUZ=VS[HNL
Power Amp In
=e
¶K)
=e
7V^LY(TW;\ILZ
Preamp Out
*(<;065!9PZRVMLSLJ[YPJ
ZOVJR+VUV[VWLU9LMLY
ZLY]PJPUN[VX\HSPMPLK
ZLY]PJLWLYZVUULS
PANEL
Dark
FX Serial
(,:
VUVMM
TSM-432
Serial No.
;90(474HYR
4HPUZ-\ZL!=;(3/a
4H_7V^LY*VUZ\TW[PVU>
,<]LYZPVUVUS`
or
Vol. Pedal
Guitar Cabinet
FX-Unit
Tuner
or
FX-Unit
or
or
Powered
Cabinet
Power Amp
Mixing Desk
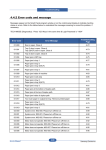
2 Quick Start
Mains In: Connect the factory-included power cord (Mains Lead) to this
socket.
MIDI In: Connect the MIDI Out of the included TSM-432 or your favorite
MIDI controller to the MIDI In. Though this is a 7-pin interface, you
can connect a standard 5-pin MIDI cable and use any standard MIDI
controller. The two additional terminals (1 and 7) serve to supply phantom
power to the Hughes & Kettner TSM-432 MIDI board.
Speaker: Connect a speaker cabinet designed for guitar amps. We
recommend the matching Hughes & Kettner TM and TC Series cabinets.
AES: The EU version of the TriAmp Mark 3 is equipped with an energy
saving mechanism called AES (for more details, see Chapter 10 of this
manual). If AES is activated (as it is by default in the factory settings),
the TriAmp will automatically be switched off after a phase of silence or
inactivity of about 90 minutes. The phase of silence is reset as soon as it
receives an input signal.
TSM-432
3 The fundamentals of handling
TriAmp Mark 3
Operating the TriAmp Mark 3 is as easy as it can get:
• There are six fully independent channels, and each channel features an
identical set of controls.
• The position of each button is connected to the channel and is recalled
with the selected channel.
• The Master controls on the left-hand side of the front panel affect all
channels.
The Stomp Boost and Power Amp Tubes buttons look like global settings,
but they can actually be set for each of the six channels separately. These
settings are memorized automatically when you change channels. This
means, for example, that if you are playing Channel 1A with one pair of
6L6 tubes, Boost on, these settings will be recalled every time you select
channel 1A again – until you change the settings. (With the use of MIDI
Presets, you have even more options – see Chapter 7, MIDI, for more
information.)
The buttons all also serve as indicator LEDs, and they illuminate when
selected to call attention to the active channel or function.
4
TriAmp Mark 3 – Manual 1.1
Channel B: Chimey 60s British Clean
Channel 1B produces high class British-approved tones with that
trademark shimmering top end and tremendously subtle harmonic
distortion. Even at lower gain settings, 1B will still serenade you with rich,
musical overtones in the high mids.
Note: Our recommended power amp setting for Channel 1B is the pair
of EL34 tubes.
4.2 Amp 2
Channel A: Classic 70s British Lead
Channel 2A cranks out the scorching overdriven tones that have graced
almost every genre-defining classic rock production. This channel has
an open, British flavor that works fantastically for raw-edged riffing and
aggressive chord work!
Note: If you want to get the sounds you’d expect from a channel of this
nature, select the pair of EL34 tubes. That said, trying this channel with
one (or even two!) pairs of 6L6s is also highly recommended!
Channel B: ‘Brown’ 80´s British Lead
Channel 2B goes from gritty and fat to singing with days of sustain at the
twist of a knob. So, what’s the secret? Well, 2B features a special circuit
that injects a highly desirable sonic additive into your sound – the kind
of power amp distortion that players just couldn’t get enough of from
5 Front Panel
• 中文
Channel 3B pumps out the most merciless high gain sounds you’ve ever
heard in your life. Drop-tuning devotees and seven and 8-string axe
slingers will swoon at the sound of 3B’s hot, huge and downright dirty
distortion! Engage the Stomp Boost for the ultimate response to your
touch, a feeling that the strings are an extension of your fingers and slaves
to your will. Channel 3B greases up your strings, making riffs and licks fly
off the fretboard with consummate ease.
Note: This is a must-try: play Channel 3B with both pairs of 6L6s, and then
kick in the EL34s too!
• にほんご
Channel 1A sounds full and expansive in the great American tradition.
It´s forte is classy clean tone that stays distortion free - even at high gain
settings - and it delivers the kind of twang that'll make you want to break
out the cowboy boots and get your country stomp on! Make no mistake
about it: Channel 1A's low end is big, tight and focused and will more
than satisfy the needs of even the most ardent low-end connoiusseur.
Note: Channel 1A works exceptionally well with both pairs of 6L6s
engaged.
Channel B: Modern-day High Gain and beyond
• Español
Channel A: Sparkling 50s Californian Clean
Channel 3A is honest and direct, its hair-trigger response reacting
instantly to minute changes in your picking attack and the slightest twist
of your guitar’s volume knob. Pure and distinct, 3A will preserve your
guitar's own unique sound, and the tone will remain crisp and defined –
no matter how high you set the gain control!
Note: Channel 3A works great with one pair of EL34 combined with one
pair of 6L6.
5.1 Power and Standby
Power/On Switch: Flick this switch to On to get the
mains power flowing. The amp lights up, and the tubes
will begin to heat up for the challenges that lie ahead.
Play/Standby Switch: Give the tubes about 30 seconds
to get toasty; then you can flip the Standby switch to
Play. The amp is now ready to rock! When taking a
longer break from playing, flick the switch back to Standby so the tubes
remain at operating temperature. This will help prolong their lifespan.
5.2 Input and Stomp Boost
Input: Instrument input, 1 M-Ohms. Connect your guitar to
this input using a shielded cord equipped with 6.3 mm (1/4")
jack plugs.
Stomp Boost: The Stomp Boost targets specific frequency
ranges in your tone and kicks them up a notch. Depending
on what channel and settings you’ve got dialed in, the Boost
will yield an even more assertive, creamier, or punchier tone. The Stomp
Boost is located right after the input jack and before the input stage of the
• Italiano
4.1 Amp 1
Channel A: Classic 90s American High Gain
• Français
Channels can be selected on the amp itself or via the included TSM432 MIDI board. In order to do this, switch the TSM-432 to Stomp Box
Mode. On this mode, switches 1 to 6 represent the various channels,
while switch 7 controls the Stomp Boost. (The other TSM-432 mode is
Preset Mode, which offers you even more tonal options. See the MIDI
Chapter for more information.)
4.3. Amp 3
• Deutsch
The channels of the TriAmp Mark 3 do not just represent different gain
stages. Rather, each of them represents an era of tone. Highly advanced
new switching technology reconfigures the multiple tube stages and the
power amp tubes with each channel or MIDI Preset you select. This
design pulls every drop of tone out of the all-tube circuitry, giving TriAmp
Mark 3 an incredible tonal flexibility.
their old Plexis. Rich, loud and full of attitude, it’s perfect for two-handed
tapping and huge power chords!
Note: For channel 2B, one pair of EL34 is the right choice to start with.
• English
4 Amps and Channels
5
TriAmp Mark 3 – Manual 1.1
TriAmp Mark 3, and is tailored to each channel’s character, meaning that
it works like six different external solid state stomp boosters.
Clever fact: The Stomp Boost is actually a separate module located on an
additional PCB (printed circuit board) and is switched on or off via true
bypass circuitry.
5.3 Channel Controls
Channel Buttons: Push these to select the desired channel directly.
Gain, Master: Gain determines input sensitivity and therefore the
saturation level of the preamp. Paired with the Stomp Boost, Gain is your
most important sound sculpting tool. Use the separate Master controls to
adjust and match channel levels to your satisfaction!
Bass, Mid, Treble: The three-band voicing section’s sound-shaping action
is fine-tuned for each channel. The individual EQ controls specifically
address the frequency ranges that define the tonal characteristics of their
respective channel.
Heads-up: These are classic passive tone controls that influence one
another. For example, if you crank the Mid knob, the Bass knob will be
less sensitive than when you back the Mid knob down.
Tip: The Presence and Resonance controls work well as a master EQ, and
allow you to adjust your overall sound to different cabinets or venues without having to fiddle with the EQs of your individual channels.
5.5 Power amp Tubes
These three unimposing buttons are actually TriAmp
Mark 3’s secret weapon! They open up a whole new
chapter in the epic tale of tube-driven tone. Each of the
three pairs of power amp tubes is freely assignable to
each of the amp’s six channels – all you need to do is select your desired
channel, and then activate the pair (or pairs!) of tubes you want. Each of
the three pairs of power amp tubes can be equipped with EL34 or 6L6GC
tubes (see the TSC Chapter to learn more about TriAmp’s autobiasing
system). This allows you to mix and match the different kinds of tubes in
any of TriAmp Mark 3’s channels. And, with the use of MIDI Presets, you
can even play the same channel with different power amp tubes at a tap
of a button on the footswitch. (See the MIDI Chapter to learn more about
MIDI Presets).
This lets you do some pretty exotic stuff with TriAmp Mark 3! For
example, over the course of one song you can play lead with one pair of
6L6s at 50 watts (for the intro), add a second pair of 6L6s (at 100 watts)
for riffing, and, instead of using the Boost, kick in the EL34 tubes to add
some creamy midrange punch (at up to 150 watts) for your solo! Trust us:
you will be heard!
Or, imagine this: you can now switch from British EL34 tones to the
distinctive American 6L6 sound within the same channel via Midi. Or,
you could even go from Chinese EL34s to Slovakian EL34s without
changing tubes, or amps, or channels. Among other things, TriAmp Mark
3 genuinely is the world’s first six-channel Tube Comparison Machine!
5.4 Master Controls
Volume: The master Volume control
determines the overall output of
your TriAmp Mark 3. This knob puts
the power of 150 tube-driven watts
between your thumb and forefinger.
Use it wisely, because it can induce
everything from bliss to pain to near madness in your band mates. Though
twisting this knob can be as much fun as the law allows, don’t unleash
all this power rashly.
Exercise restraint, turn it up gradually to a level that suits the venue and is
not harmful to your – and your fellow musicians’ – hearing!
Presence: This knob controls the amount of harmonic overtones
generated by the power amp. The higher the setting, the more intense
the effect. Use the Presence control to dial in razor-sharp tones when you
need your musical statements cut through.
Resonance: Set the Resonance knob to 12 o’clock, and you will hear the
natural resonance created by the combination of the TriAmp Mark 3 and
your chosen cabinet(s). Twisting the Resonance control counterclockwise
dampens the speakers’ and the cabinets’ resonance for a looser, softer
sound. Turning the control clockwise intensifies resonance for a tighter,
punchier low end. Turn it up fully to dig deep into the dark underbelly of
the TriAmp and draw up bowel-shaking sub bass frequencies!
6
Note: The TriAmp Mark 3 can be equipped with other types of poweramp
tubes as well: The following types have been testet in the TriAmp Mark 3
by Hughes & Kettner: KT77, KT66, KT88, 5881 WXT, 6550 A, 6CA7, 7581
5.6 FX Loop
The SmartLoop™ effects routing circuit offers parallel
and serial FX loop modes for patching in external effects
devices. Its status – on or off and parallel or serial – is stored
within each channel or MIDI Preset.
FX Loop: This button switches the effects loop on and off.
Learn more about the Effects Loop in Rear Panel chapter.
5.7 Noise Gate
The ultra-precise IDB™ (Intelligent Dual Breakpoint) noise gate gauges
levels simultaneously at two key points in the signal chain: the Input and
the preamp’s output. The IDB™ technology then uses these two values to
calculate the optimum response, and automatically adapts the standard
attack and threshold parameters for you. You’ll never hear another
extraneous noise from your amp!
The Noise Gate button switches the IDB™ noise gate on and off for each
channel or MIDI preset. When activated, the noise gate kicks in to mute
the preamp as the signal level drops below a certain threshold, removing
SPEAKERS
16 Ohms
1x 8 Ohms
or 2x 16 Ohms
RED BOX™ AE
Ambience emulated DI Out
4 Ohms
*HIPUL[
4VKL
3V^
*\[
0UZLY[N\P[HYWPJR[VYLHK
V\[[\ILTH[JOPUN
TriAmp Mark 3 – Manual 1.1
TSC™
MIDI
NOISE GATE
ILZ[)PHZ
V]LYJ\YYLU[
UVJ\YYLU[
Hard
In
FX LOOP
Soft
Out/Thru
Z^P[JOLKVMM
MASTER INSERT
FX Level
Send
Dark
FX Serial
Return
Preamp Out
*(<;065!9LHYWHULSHUK
]LU[PSH[PVUVWLUPUNZTH`
ILJVTL[VVOV[[V[V\JO
3LH]LLUV\NOZWHJLMVY
WYVWLY]LU[PSH[PVU
;VYLK\JL[OLYPZRVMLSLJ[YPJZOVJRNYV\UKPUNVM
[OLJLU[LYWPUVM[OPZWS\NT\Z[ILTHPU[HPULK
9LWSHJPUNM\ZLZT\Z[VUS`ILJHYYPLKV\[I`
X\HSPMPLKZLY]PJLWLYZVUULS9LWSHJLM\ZLZVUS`
^P[O[`WLHUKYH[PUNZOV^UOLYL
Bright
4HPUZ=VS[HNL
Power Amp In
=e
¶K)
=e
7V^LY(TW;\ILZ
5L]LY\ZL[OPZHTW^P[OV\[ZWLHRLYZJVUULJ[LK
<ZLJSHZZ^PYPUN
*(<;065!9PZRVMLSLJ[YPJ
ZOVJR+VUV[VWLU9LMLY
ZLY]PJPUN[VX\HSPMPLK
ZLY]PJLWLYZVUULS
PANEL
(,:
VUVMM
TSM-432
Serial No.
;90(474HYR
4HPUZ-\ZL!=;(3/a
4H_7V^LY*VUZ\TW[PVU>
,<]LYZPVUVUS`
any unwanted noise. The gate remains shut until you hit the guitar strings.
When you do so, it opens up again without any latency. Learn more about
the noise gate in the Rear Panel chapter.
6.2 Red Box AE
The TriAmp Mark 3 is the first Hughes & Kettner
product to feature the all-new Red Box with
Ambience emulated DI Out
Ambience Emulation. Since its late 80s release, the
original Red Box has been the industry standard
tool for capturing the sound of guitar amps without
using microphones. Red Box delivers unvarying
sound quality at every gig or recording session, putting an end to crosstalk
with other instruments and the hassles of experimenting with microphone
placement.
RED BOX™ AE
Never use this amp without speakers connected!
For connection use a sufficient speaker cable only!
• If you want to run two 8 Ohm cabinets connected in parallel, use the
4 Ohm output. Never connect cabinets with different impedances at
the same time!
• If you want to drive two cabinets with different impedances
simultaneously, you must configure a parallel or serial circuit and
connect it to the appropriate output. Use this formula to figure out the
overall impedance (R) of two cabinets with different impedances (R1,
R2):
The Red Box AE is the latest version of the award-winning speaker
simulator, and it features switchable Low-Cut filtering and a 2nd Cabinet
Mode. The DSP-powered Ambience Emulation delivers a perfect mix of
authentic 4x12 cabinet ambience effects and an ultra-direct attack of
pure tube tone, capturing the signal just after the power amp stage, and
right before the speaker output. The Red Box AE delivers a line signal. The
level of the line signal depends on the level of the power amp, meaning
that the Master Volume effectively determines the level of this DI Out.
Note: Use a microphone cord to patch the Red Box AE’s signal to a mixing
console. Make sure the mixing console’s XLR input is set to line level. If
the mixing console lacks XLR inputs, or if the inputs cannot be set to line
level, you will need an XLR to 6.3 mm (1/4”) jack adapter or cable. These
are readily available in all good music stores.
In parallel: R = (R1 x R2) / (R1 + R2)
6.3 TSC
Here’s an example with one 8 Ohm cab and one 16 Ohm cab:
Note: We have devoted an entire chapter of this manual to Tube Safety
Control. See the TSC chapter to learn more about it.
R = (8 x 16) / (8 + 16) Ohms
R = 128 / 24 Ohms
R = 5.33 Ohms
6.4 MIDI In and Out/Thru
A combination of a 4 Ohm cabinet and an 8 Ohm cabinet connected in
serial will result in 12 Ohms.
MIDI is a great opportunity to switch sounds using
so-called program changes. At the touch of a button,
In
Out/Thru
you can change the channel of the amp and the effects
program on your external effects device simultaneously.
MIDI certainly puts an end to dancing around on your
TSM-432
pedalboard. For this reason, we decided to use MIDI as
the standard protocol for any switching function on TriAmp Mark 3, and
to use it as the interface for the included MIDI board, the TSM-432. To
learn more about the MIDI board, see the TSM-432 chapter.
Tip: The golden rule is that the cabinets’ impedance may never be lower
than the amp’s output impedance. That means that, in our examples, you
would connect the combination of cabs that results in 5.33 Ohms to the 4
Ohm speaker out, and 12 Ohms combination to the 8 Ohm speaker out.
MIDI In: TriAmp Mark 3’s MIDI In is a 7-pin interface, but you can also
connect a standard 5-pin MIDI cable, meaning that any MIDI controller
or board will fit. The two additional pins serve to supply phantom power
to the included Hughes & Kettner TSM-432 MIDI board.
Parallel connection is the standard, but if you find a cabinet with an
output that is wired in series, or if you use custom-made wiring, the
overall impedance is the sum of the impedances of each cab:
In series: R = R1 + R2
MIDI
Heads-up: The TSM-432 comes complete with a 7-pin MIDI cable. Should
the cable get lost and you find yourself needing a quick replacement, a
5-pin MIDI cable will do the job. However, you will need a power supply
• 中文
5L]LY\ZL[OPZHTW^P[OV\[ZWLHRLYZJVUULJ[LK
<ZLJSHZZ^PYPUN
The TriAmp Mark 3 offers separate
outputs for all standard impedances.
You can connect either one 4 Ohm
cabinet, one 8 Ohm cabinet or one or
two 16 Ohm cabinets.
• にほんご
4 Ohms
• Español
1x 8 Ohms
or 2x 16 Ohms
• Italiano
16 Ohms
• Français
6.1 Speakers
3V^
*\[
• Deutsch
*HIPUL[
4VKL
• English
6 Rear Panel
7
TriAmp Mark 3 – Manual 1.1
in this situation. To make things easier, the TSM-432 features an innovative
mains port that accepts any AC or DC adapter rated for nine to 15 volts.
MIDI Out/Thru: MIDI Out/Thru forwards signals patched into MIDI
In to other devices. You can connect any external MIDI-enabled signal
processor that you wish to switch simultaneously with your TriAmp
Mark 3.
Note: We have devoted an entire chapter to TriAmp Mark 3’s various
MIDI functions. See the MIDI Presets and MIDI Setup chapter to learn
more about it.
6.5 Noise Gate Hard/Soft
The Hard/Soft knob on the amp’s rear panel controls
the noise gate’s response. The further you twist this
knob to the right, the softer the noise gate’s response.
The further you twist the knob to the left, the harder the
noise gate kicks in and cuts off signals and unwanted
noise.
NOISE GATE
Hard
Soft
6.7 Master Insert
The TriAmp Mark 3 sports an ancillary serial loop
that lets you control Master Volume via a volume
pedal. The preamp signal is patched out via Preamp
Preamp Out
Power Amp In
Out and in again via Power Amp In. You can also use
the Preamp Out to send the preamp signal to other
power amps, or connect a tuner to it. The Preamp
Out is always active, so connecting this jack does not affect the signal
flow in any way.
MASTER INSERT
Note: Power Amp In is a switching jack: if it is connected, the internal
signal flow is interrupted and only signals that are patched to the Power
Amp In will be routed to the power amp.
6.8 Panel
PANEL
Dark
Tip: 12 0’clock is the universal noise gate setting. If you wish to use the
noise gate as a stylistic device when playing fast staccato riffs at high gain
levels, then dial in a setting towards the Hard end of the control range.
Bright
This knob adjusts the brightness of TriAmp Mark 3’s front
panel illumination. It can also be remote controlled by
MIDI using continuous controller commands. (See the
MIDI chapter for more information.)
7 MIDI Presets and MIDI Setup
6.6 Effects Loop
FX Send: Connect this jack to your
effects processor's input.
FX LOOP
FX Level
Send
Return
¶K)
FX Serial
FX Return: Connect this jack to your
effects processor's output.
-10 dB: This damping switch allows you to adapt the signal level to lowerlevel effects devices. Activate it for instrument level processors that
you would normally use as pre-effects in between the guitar and the
instrument input of the amp (e.g. stomp boxes).
Level: Determines the level of the signal routed into the FX Return.
FX Serial: This button switches the effects loop from serial to parallel
mode. When it is on (the button will light up), the loop is in serial mode.
Tip: In parallel mode, use FX Level to set the desired wet/dry mix (i.e. the
level of the effect versus the dry guitar signal). You can also route any line
signal into the FX Return and use FX Level to mix that signal to the signal
of the preamp.
In serial mode, you can adjust the overall volume of the preamp signal.
This means that you can use it as a 2nd Master Volume – even without
any FX device connected. You can patch the signal from the FX Send
directly to the FX Return, adjust the volume with FX Level, and switch it
by activating the FX Loop.
Every one of TriAmp Mark 3’s buttons can be remote controlled by MIDI
and stored in one of 128 MIDI presets. Each preset can then be recalled
at any time using a corresponding program change number. This can be
done using any standard MIDI controller or sequencer/software. The
included TSM-432 MIDI board also uses MIDI to switch channels and
boost directly (in Stomp Box Mode) or to recall any of the 128 presets,
which are stored in 32 banks with 4 presets per bank (in Preset Mode).
The MIDI factory setting of both the amp and the included TSM-432 MIDI
board is channel 1, so it will work straight out of the box. You will learn
how to change MIDI channels later in this chapter.
Note: We have devoted an entire chapter to the functions of the included
TSM-432 MIDI board – see the TSM-432 Chapter for more information.
7.1 Creating and recalling a MIDI preset
So, what is the difference between a channel setting and a MIDI preset?
Well, there are six channel settings that are automatically stored on TriAmp
Mark 3 – these are selectable when you choose channels manually on the
amp itself, or when you use the TSM-432 in Stomp Box Mode. However,
you can also store any configuration of channels and power amp tubes,
as well as toggling the noise gate, boost and FX loop on or off in up to
128 MIDI presets.
What are MIDI presets good for?
In many cases, when switching between sounds, you will want to switch
a channel, the boost, noise gate and the effects program of our external
MIDI effects processor simultaneously. This lets you switch, for example,
from a clean sound with chorus and reverb to a lead tone with delay,
boost and noise gate, etc.
What’s really unique about TriAmp Mark 3, though, is this: you can also
switch instantly between the three sets of power amp tubes using MIDI.
Imagine being able to play a classic 60s British pop clean tone with a pair
8
TriAmp Mark 3 – Manual 1.1
of EL34s, and then adding some patented American sparkle to it just by
switching to a pair of EL6L6s! Or, imagine you’re playing using a modern
American high gain sound using both pairs of the 6L6s, and then you
instantly whack it up a notch with an extra aggressive mid-range punch –
just by kicking in the pair of EL34s.
If you are using TriAmp Mark 3 as part of an advanced MIDI setup with
multiple devices, you may want to switch OMNI mode to off and set a
dedicated MIDI channel.
Feel free to explore your creative expression! Or, just enjoy the
convenience of being able to fully remote control TriAmp Mark 3 via
MIDI in the studio, or even onstage. Plus, if required, a click track can
switch all your presets – and even the amp’s front panel illumination in
case the stage has to be completely dark. TriAmp Mark 3 truly is the very
first tube amp that can be integrated into your light show!
Set the standby switch from Play to Standby before you
enter the MIDI setup.
How to enter the MIDI setup to change channels and OMNI mode
To enter the MIDI setup, press and hold Noise Gate and FX
Loop buttons simultaneously for three seconds.
How does it work?
Tip: Many effects processors offer MIDI mapping. This allows you to assign the same effects preset to different program change numbers. For
example: program 1 mapped to effects preset 4, program 2 mapped to
effects preset 16, or program 3 mapped to effects preset 4 again.
7.2 Setting the MIDI Channel / OMNI mode
MIDI offers 16 channels to control up to 16 different devices with one
MIDI controller. This is important in a studio environment or for keyboard
players. However, in a guitar amp and FX setup, one channel is usually
enough for most applications. That said, it is important that the ‘MIDI
slave’ (the amp itself) is set to the same channel as the ‘MIDI master’ (the
MIDI board), otherwise the amp will not react properly.
The factory setting for TriAmp Mark 3 and the TSM-432 is channel 1, and
the OMNI mode is set to on. OMNI, by the way, means that the amp will
react to commands that are sent on any MIDI channel.
Tubes 3/4
Tubes 5/6
¢
¢
¢
2
¢
¢
¢
{
3
¢
¢
£
¢
4
¢
¢
£
£
5
¢
£
¢
¢
6
¢
£
¢
£
7
¢
£
£
¢
8
¢
£
£
£
9
£
¢
¢
¢
10
£
¢
¢
£
11
£
¢
£
¢
12
£
¢
£
£
13
£
£
¢
¢
14
£
£
¢
£
15
£
£
£
¢
16
£
£
£
£
• 中文
• にほんご
Tubes 1/2
¢
• Español
FX loop
1
• Italiano
MIDI Channel
Note: If you use an external effects processor, you will have to program it
separately, because the TriAmp Mark 3’s LEARN function only programs
the amp itself (and not external devices). In practice, this means that: if
you want program change number 1 on your MIDI board (or TSM-432) to
recall a clean tone on TriAmp Mark 3 and a chorus/reverb on your effects
processor, the effects processor has to ‘know’ that it needs to recall that
effect when it receives program change number 1. Please refer to the manual of your effects processor for information on how to do this.
• Français
By the way, if you want to quit the programming mode without saving
your current settings, just press the Learn button again (instead of the
MIDI board switch).
• The Noise Gate button now serves to indicate the status of the MIDI
OMNI mode and switch OMNI on/off. If Noise Gate is lit up, this means
OMNI is set to on (factory setting, receives on all MIDI channels). Press
the Noise Gate button if you want to switch it off (receives on one
dedicated MIDI channel).
• FX Loop now serves as a +1/up button to change the MIDI channel
• 5/6 now serves as a -1/down button to change the MIDI channel
• The four FX Loop and Power Amp Tube buttons serve to indicate the
MIDI channel in binary code. See the chart below for more information:
• Deutsch
Now, when TriAmp Mark 3 receives a program change message via the
selected MIDI channel (more on this below), Learn flashes briefly and
TriAmp is configured accordingly.
The Learn button will start flashing to indicate that special
programming functions are now assigned to the following
buttons (to leave the MIDI setup again at this point, press
Learn again for three seconds – the button will stop
flashing, your changes are saved, and the amp will return to standard
operating mode):
• English
Programming TriAmp Mark 3 really couldn’t be any easier. If you want to
save a configuration of channel, boost on/off, noise gate on/off, FX loop
on/off and power amp tubes in a preset, simply activate the settings you
want using the buttons on the amp, arm the amp by briefly pressing the
MIDI Learn button (Learn will light up), and then press the appropriate
switch on your MIDI board that you want to recall this configuration. The
Learn light will switch off, which tells you that TriAmp Mark 3 has saved
your settings to one of the 128 internal preset slots and assigned it to a
program number on your MIDI board.
9
TriAmp Mark 3 – Manual 1.1
7.3 Factory Reset
None of the LEDs lights up
The power tubes are operating normally.
A factory reset is a seldom-needed feature. Nevertheless, please read
these instructions carefully to ensure you don’t accidentally delete your
MIDI presets!
A factory reset may be needed in the rare case that the MIDI
communication is not working at all and you are unsure about the settings
of the MIDI channel and the OMNI mode. A factory reset will set the
MIDI channel to 1 and the OMNI mode to on.
You can perform a factory reset by doing the following:
Press and hold the Learn and Boost buttons simultaneously while
powering the amp up by using the Power/On switch.
Caution: Please note that this procedure is a last-resort option. It will reset
all your settings, including the 128 MIDI presets!
8 TSC™ –Tube Safety Control
0UZLY[N\P[HYWPJR[VYLHK
V\[[\ILTH[JOPUN
TSC™ adjusts the bias of TriAmp Mark 3’s
power tubes to improve the amp’s tonal and
ILZ[)PHZ
technical stability and to extend the tubes’ lives.
V]LYJ\YYLU[
TSC operates automatically and continuously,
UVJ\YYLU[
Z^P[JOLKVMM
so there is nothing for you to do but to enjoy
7V^LY(TW;\ILZ
the convenience of the system! What’s more,
you can swap tubes easily, quickly, and safely,
because all the hard work of biasing gets done
automatically for you. This can be a huge help if a tube runs into problems,
or just if you fancy comparing different types or brands of tubes.
TSC™
Warning: If tubes are replaced by a different type (e.g. EL34 by KT88),
it is recommended to reset the TSC module:
• Switch Power off, switch Standby in Play position
• Switch Power on
• Wait for at least three minutes
To make use of the full information TSC™ can provide you with, you will
have to look at the six LEDs in the TSC section on the rear panel of your
TriAmp Mark 3. Each LED is assigned to the power tube occupying that
corresponding position. The LEDs will give you two different kinds of
information: firstly, they indicate the operating status of the tubes. TSC
constantly performs an error diagnosis and will even shut down defective
tubes if necessary in order to avoid a total failure of the amp. Secondly,
you can easily get a manual read-out of the bias points of each individual
tube. This can be done using any standard guitar pick (see 8.2 below for
how to do this).
8.1 Automatic Status Indications
All LEDs light up and stay on
All the LEDs remain on for as long as the amp is in standby mode. When
you flip the Standby switch to Play, the LEDs will go off after a few
seconds. If all of the LEDs remain illuminated, the most likely cause is a
blown anode fuse that needs to be replaced. The anode fuse can trip if a
tube is already defective when the amp is switched on, and TSC does not
have enough time to measure the idle current (after the tubes have heated
up) and to then shut the faulty tube down.
10
One LED lights up continuously
If only one LED lights up, then the tube assigned to this LED is not
delivering enough current and has been shut down. If the LED does not
go off after a few minutes, then the specific tube it represents needs to
be replaced.
Two/four LEDs light up continuously
This tells you one of two things: either a corresponding pair of tubes are
not delivering enough current and therefore will need replacing, or the
pair of tubes is not active (meaning the relevant Power Amp Tube button
on the front of the amp is switched off).
One LED flashes, the LED next to it lights up continuously
The tube assigned to this flashing LED is generating too much current
and therefore has been shut down. This tube will have to be replaced.
With the type of power amp found in TriAmp Mark 3, it takes a pair of
tubes working together to produce the best sounds. When one tube of a
pair is defective, TSC also switches its counterpart off (indicated by the
continuously lighting up LED), so it doesn’t degrade the tone of the amp’s
other tube pairs. There is no need to replace this second tube in the pair
(the one with the constantly lit LED), because there’s nothing wrong with
it.
And this is where TSC’s intelligence saves your gig: if a tube failure like
this occurs in a conventional amp, its fuse usually trips and you can’t
operate the amp again at all until you replace the tube and the fuse.
Thanks to TSC, though, you can continue playing TriAmp Mark 3 for as
long as the LED remains illuminated.
That said, please note that shutting down one pair of tubes will reduce the
amp’s output power. As well as this, channels and MIDI presets that use
only this pair of tubes will need to be switched to another pair of tubes.
And don’t forget to replace the defective tube after your show!
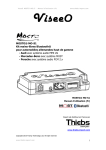
8.2 Manual Read-Out
TSC is able to check the power amp tubes’ bias points to let you determine
if the three tube pairs are optimally matched. This can easily be done by
inserting a guitar pick into the slot to the left of the LEDs while the amp is
switched on (rather than in Standby mode). All the LEDs will flash several
times. The number of flashes each LED makes will give you information
about the tube rating of the assigned tube as well as about its bias.
Please make sure that the difference in flash counts between the single
LEDs of one corresponding pair of tubes (1/2, 3/4, 5/6) is no greater than
four flashes. Only in this situation can TSC ensure optimum sound. If the
difference in flash counts is greater than four, we recommend installing a
matched set of tubes to improve the amp’s tone. This is strictly a matter of
tone, of course – technically speaking, the amp will continue to operate
safely, and there is no obligation for you to make any changes. However,
optimally matched tubes will make you sound better!
Heads-up: TSC is also responsible for switching the respective pairs of
tubes on and off. This means that when you opt to use only one pair of
tubes, TSC will indicate that four of the tubes (i.e. the other two pairs that
you’re not using) are shut down. The LEDs only indicate the right status
when the amp is in idle mode. While playing, the LEDs may flash very
TriAmp Mark 3 – Manual 1.1
occasionally, but this has no effect over the amp or the tubes in operation.
If you do ever swap one tube from a pair, make sure that the replacement
tube’s rating matches that of its counterpart. You can buy replacement
tubes from any good local music store, and please note that you do not
necessarily have to use tubes from Hughes & Kettner!
Caution: Replacing or exchanging tubes is a job best left to qualified professionals!
9 TSM-432 - The included MIDI board
Controller Inputs 1 and 2: You can connect single footswitches and/
or expression pedals to these two 6.3 mm (1/4") jack inputs and assign
additional control functions for TriAmp Mark 3. All of the amp’s buttons
can be remote controlled by a single footswitch, and the illumination of
the front panel can be switched on or off. The brightness of the panel
illumination can even be controlled using an expression pedal! This
might be more of a gimmick than a genuine feature, but we had loads of
requests from TriAmp players, so we thought… well, why not?! Let’s do it!
How to assign functions to the various control inputs is described below
(in Section 9.4: Assigning Control 1 and 2).The factory setting for both
inputs is set to switch the Noise Gate (Control 1) and the FX Loop On/
Off (Control 2).
9.2 Stomp Box Mode
(1A, 1B, 2A, 2B, 3A, 3B, Boost)
MIDI Out: Connect the TSM-432’s MIDI Out to TriAmp Mark 3’s MIDI
In with the included 7-pin MIDI cable. If you are using a standard 5-pin
cable, see the Power Supply section below.
MIDI In: To operate TriAmp Mark 3 with the TSM-432, the MIDI In is not
necessarily needed. You can also use the MIDI In to connect other MIDI
devices to the TSM-432. In this case, the TSM-432 serves as a true MIDI
merger, forwarding the MIDI information from MIDI In to MIDI Out.
Power Supply: If you wish to use a standard 5-pin MIDI cable, you will
need a power supply. To help connectivity wherever you are in the world,
the TSM-432 provides an innovative mains port that accepts any AC or
DC adapter rated for 9 to 15 volts and providing at least 250 mA.
9.3 Preset Mode
(A, B, C, D, Bank up/down, FX)
In Preset Mode, you have access to TriAmp Mark 3’s 128 MIDI presets
and direct access to the FX-loop. The FX button enables you to activate
or deactivate effects without programming a new preset. See the MIDI
Presets and Setup Chapter to learn more about presets.
The A, B, C and D preset buttons: Presets within a bank activate directly.
This means that you can switch straight from A to B within the same bank.
The LEDs above/below the respective A, B, C, and D buttons indicate the
selected preset.
Bank Up/Down: The TSM-432’s display always shows the currently
selected bank number. To access a preset in another bank, select the
target bank using the Up and Down buttons. You can continue playing
with the current preset while you’re navigating. The TSM-432’s display
shows the bank’s number; it flashes until you select a preset in the target
bank by pressing A, B, C, or D. The TSM-432 will not switch over to the
new preset until you do this, unless you activate Direct Mode.
• 中文
• にほんご
• Español
• Italiano
You do not need an external power source for the TSM-432, because
phantom power is provided through TriAmp Mark 3’s 7-pin MIDI In
socket. If the TSM-432 is connected correctly, it will run through the
following starting sequence once the TriAmp is switched on: the display
will show the version number, and all the LEDs will light up from left to
right. After this, the display will either change to ‘1’, if the TSM-432 is
in Preset Mode, or ‘Sb’, if the TSM-432 is in Stomp Box Mode. The LED
below button A lights up continuously in both modes.
Tip: You can also access the Stomp Box Mode on the fly when you are
in Preset Mode. Press and hold the FX and B buttons to change over to
Stomp Box Mode. To return to Preset Mode, press and hold FX and B
again. This is a temporary function: TSM-432 automatically reverts to the
mode that is selected by the sliding switch when powered off.
• Français
9.1 Connections
Note: The LEDs above/below their respective buttons do not always indicate the selected channel and status of the Stomp Boost. If you select
channels or activate Boost manually on the amp, the TSM-432 does not
recognize the changes!
• Deutsch
The TSM-432 is tailored specifically to TriAmp Mark 3, and offers two
modes: Stomp Box Mode and Preset Mode. In Stomp Box mode, the
TSM-432’s buttons serve to access the amp’s six channels and to switch
the Stomp Boost directly. In Preset Mode, the TSM-432 gives you access
to 128 MIDI presets. We recommend you start in Stomp Box mode first,
and get to know TriAmp Mark 3 in basic terms before you move on to the
vast opportunities the world of MIDI presets offers!
In Stomp Box Mode, the six buttons (1A, 1B, 2A, 2B, 3A and 3B) are now
firmly assigned to TriAmp Mark 3’s six channels. The lettering on the
TSM-432 relates to the three preamps (numbered 1,2 and 3) with two
channels each (A/B). In addition, the Stomp Boost can be independently
activated and deactivated at the push of a button.
• English
The TSM-432 MIDI board is based on the FSM-432, which you might
already know from the Hughes & Kettner SwitchBlade, CoreBlade or
GrandMeister models. Should you have an FSM-432, you can use it with
TriAmp Mark 3 to select presets in case the TSM-432 is not available.
The sliding switch above the MIDI connections on the rear side of the
TSM-432 determines if the board is operating in Preset Mode or Stomp
Box Mode. If you move the sliding switch to Stomp Box Mode, the display
shows an ‘Sb’ symbol.
11
TriAmp Mark 3 – Manual 1.1
Direct Mode: Direct Mode lets you trigger a direct program change via
Bank Up/Down. In this mode, the TSM-432 will not wait for your input
by way of the A, B, C, or D buttons, and will switch directly: for example,
from preset B in bank 16 to preset B in bank 17 (Up) or bank 15 (Down).
Here’s how to activate Direct Mode:
• Press and hold FX, and then press Preset A.
• First release Preset A, and then FX. The decimal point in the display
will light up.
Follow the same sequence to deactivate Direct Mode.
The following functions can be assigned:
Name
Control
Number
Range
Note
Mute
9
0 – 63 = off, 64 – 127 = on
This function is only
available via MIDI.
FX Loop
55
0 – 63 = off, 64 – 127 = on
FX Serial
54
0 – 63 = parallel, 64 – 127 = serial
Stomp Boost
64
0 – 63 = off, 64 – 127 = on
Noise Gate
63
0 – 63 = off, 64 – 127 = on
Channels
31
0 – 12 = channel 1 (Amp 1A)
13 – 37 = channel 2 (Amp 1B)
38 – 63 = channel 3 (Amp 2A)
64 – 87 = channel 4 (Amp 3A)
88 – 112 = channel 5 (Amp 3A)
113 – 127 = channel 6 (Amp 3B
To make selecting
a channel via MIDI
commands easy
with third party
controllers, we
recommend using
easy to remember
values, such as:
Channel 1 = 10
Channel 2 = 30
Channel 3 = 50
Channel 4 = 80
Channel 5 = 100
Channel 6 = 120
Tube 1/2
58
0 – 63 = off, 64 – 127 = on
If only one pair of
tubes is active, you
cannot switch it off.
Tube 3/4
59
0 – 63 = off, 64 – 127 = on
Note: Direct Mode is a temporary mode. The TSM-432 automatically reverts to the standard mode when powered off.
Note: The LEDs above/below their respective buttons do not always indicate the selected channel and status of the Stomp Boost. If you select
channels or activate Boost manually on the amp, the TSM-432 does not
recognize the changes!
9.4 Assigning Control 1 and 2
Assigning controller numbers to the two Control inputs works as follows:
Control 1: To access the edit mode, press and hold the FX and D buttons
simultaneously until the display shows the controller number and the dot
behind the second digit starts flashing. You can now change the controller
numbers using the Up and Down buttons. Store the selected controller
number by pressing D. The dot will stop flashing, and the TSM-432 will
return to normal mode.
Control 2: Press and hold FX and C until the display shows the controller
number and the dot behind the first digit starts flashing, then release
them. Change the controller numbers using the Up and Down buttons.
Store and exit by pressing the C button.
Tube 5/6
60
0 – 63 = off, 64 – 127 = on
Panel
Brightness
88
0 – 127, 0 = min (off), 127 = max
You can use a single
footswitch to switch
the illumination
on (to maximum
brightness)/off or
an expression pedal
to dim it from max
to min.
Switch or Pedal?
A switch will always send the minimum value when switched off (0) and
the maximum value when switched on (127), while an expression pedal
can send any value between 0 and 127. However, expression pedals can
be used for switching function as well – if you set your pedal below the
middle position, it will switch the assigned function off; above the middle
position will switch it on.
10 AES (EU version only)
Referred to Commission Regulation (EC) No. 1275/2008, electrical and
electronic devices need to be equipped with an energy-saving mechanism
which automatically switches the device off after not being used for a
certain period of time. On your TriAmp Mark 3, this mechanism is called
AES.
AES can be activated and deactivated with the mini switch right next to
the speaker jack. The factory default is AES on; the mini switch is in the
left position. In this mode, the amp will automatically be switched off
after a phase of silence of about 90 minutes. The phase of silence is reset
and starts again as soon as the amp receives an input signal (e.g. by you
playing a note). A quite gentle signal is enough to trigger the restart of the
90-minute phase of silence until the amp will switch off automatically
again. After automatically being shut down by AES, the amp can be
switched back on by flipping the Power/On and Play/Standby switch off
and then on again.
12
TriAmp Mark 3 – Manual 1.1
11 Technical Data
Inputs
Up to 150 watts
Input jack
6.3 mm (1/4"), unbalanced
Max. power consumption
460 watts
Impedance
1 M ohms
Inrush Current
100 V: 27 A , 120 V: 26 A , 220-240V: 23 A
Max. input Level / 1 kHz (Amp 1A)
0 dBV
Mains voltage tolerance range
+/-10%
Boost off
Boost on
Ambient operating temperature
range
0° to +35° C
Input Sensitivity / 1 kHz (EQ
centered, levels in max. position)
Amp 1A: -33 dBV
Amp 1A: -37 dBV
Mains fuse, 100 volts
250 V / T 5 A
Amp 1B: -49 dBV
Amp 1B: -49 dBV
Mains fuse, 120 volts
250 V / T 5 A
Amp 2A: -56 dBV
Amp 2A: -56 dBV
Mains fuse, 220-230 volts
250 V / T 2 A
Amp 2B: -74 dBV
Amp 2B: -74 dBV
Mains fuse, 240 volts
250 V / T 2 A
Amp 3A: -76 dBV
Amp 3A: -76 dBV
Anode fuse
T 800 mA
Amp 3B: -78 dBV
Amp 3B: -89 dBV
Tube heater fuse
TT 15 A (Schurter 7040.3210)
Art. No.
Type
Origin
Function
1
9440008
7025/E83CC
(ECC83), High-Grade
Slovakia
Input Tube
(active on all channels)
2
9440001
12AX7A-C, select.
China
Channel 1B (Preamp)
3
9440007
ECC83, select.
Slovakia
Channel 1A-1B
(Preamp Output)
4
9440007
ECC83, select.
Slovakia
Channel 2A-2B-3A-3B
(Preamp)
5
9440007
ECC83, select.
Slovakia
Channel 2A-2B
(Preamp Output)
6
9440007
ECC83, select.
Slovakia
Channel 3A
(Preamp Output)
7
9440007
ECC83, select.
Slovakia
Channel 3B
(Preamp)
6.3 mm (1/4"), unbalanced
Impedance
22 k ohms
Max. Level / 1 kHz
+14 dBV
Sensitivity / 1 kHz (Master
centered, max. FX-Level)
-10 dB switch
deactivated
-10 dB switch activated
0 dBV
-10 dBV
Power Amp In jack
6.3 mm (1/4"), unbalanced
Impedance
350 k ohms
Sensitivity / 1 kHz (depending on
the channel)
+6 to +10 dBV
• 中文
No.
FX-Return jack
Outputs
Red Box DI Out
XLR, balanced
Impedance
2 k ohms
Output Level
0 dBV (balanced)
+12 dBV
• にほんご
Tubes
8
9440007
ECC83, select.
Slovakia
FX Buffer
(active on all channels)
Max. Output Level
9
9440007
ECC83, select.
Slovakia
Power Amp Driver
(active on all channels)
FX Send jack
6.3 mm (1/4"), unbalanced
(Max. Volume, EQ centered)
-10 dB switch
deactivated
-10 dB switch
activated
10
6000122
EL34B-STR, select.
China
Power Tubes 1/2
11
6000122
EL34B-STR, select.
China
Power Tubes 1/2
Impedance
2.2 k ohms
680 ohms
12
6000120
6L6GC-STR, select.
China
Power Tubes 3/4
Max. Level / 1 kHz
-2 dBV
+8 dBV
13
6000120
6L6GC-STR, select.
China
Power Tubes 3/4
14
6000120
6L6GC-STR, select.
China
Power Tubes 5/6
15
6000120
6L6GC-STR, select.
China
Power Tubes 5/6
Power Amp Out jack
6.3 mm (1/4"), unbalanced
Max. Level / 1 kHz
+20 dBV
• Español
Power output
• Italiano
General Electrical Data
MIDI Out/Thru
5-pin
Mechanical Data
Power Amp Tubes* / Power Output
8 ohms / THD=10%
8 ohms / THD=5%
2x EL34
84 watts
34 watts
2x 6L6
72 watts
30 watts
4x 6L6
126 watts
93 watts
2x 6L6 + 2x EL34
132 watts
95 watts
4x 6L6 + 2x EL34 (recommended)
145 watts
116 watts
Dimensions (WxHxD)
740 x 393 x 254 mm
Weight
22 kg / 48.5 lbs.
• Deutsch
7-pin (5-pin compatible)
20 V DC phantom power (150 mA)
• English
MIDI In
• Français
MIDI
*as shipped
13
Wichtige Sicherheitshinweise!
Bitte vor Anschluss lesen!
Dieses Produkt wurde gemäß IEC 60065 hergestellt
und hat das Werk in einem sicheren, betriebsfähigen
Zustand verlassen. Um diesen Zustand zu erhalten und
um einen gefahrlosen Betrieb zu gewährleisten, ist es
notwendig, dass der Benutzer die Empfehlungen und
Warnhinweise befolgt, die in der Betriebsanleitung zu
finden sind. Dieses Gerät entspricht der Schutzklasse
1 (Erdungsschutz). Bei Einsatz dieses Produktes in
Fahrzeugen, Schiffen oder Flugzeugen, oder in Höhen
oberhalb 2000 m Meereshöhe müssen die entsprechenden Sicherheitsstandards zusätzlich zur IEC 60065
beachtet werden.
WARNUNG: Um das Risiko von Feuer oder Stromschlag zu verhüten, darf dieses Gerät nicht Feuchtigkeit
oder Regen ausgesetzt werden. Öffnen Sie das Gehäuse nicht – im Inneren gibt es keine Bauteile, die vom
Benutzer wartbar sind. Die Wartung darf nur von einem
qualifiziertem Kundendienst durchgeführt werden.
Dieses Symbol, wo immer es erscheint, warnt
Sie vor gefährlicher, nicht isolierter Spannung im
Gehäuse – Spannung, die möglicherweise
genügt, eine Stromschlaggefahr darzustellen.
Dieses Symbol, wo immer es erscheint, warnt
Sie vor außen zugänglicher, gefährlicher
Spannung. Eine Verbindung zu jeder Anschlussklemme, die mit diesem Symbol versehen ist, darf nur
mit konfektioniertem Kabel hergestellt werden, dass
den Empfehlungen des Herstellers genügt, oder mit
Kabel, das von qualifiziertem Personal installiert wurde.
Dieses Symbol, wo immer es erscheint, macht
Sie auf wichtige Bedienungs- und Wartungsanweisungen aufmerksam, die in beiliegenden
Unterlagen zu finden sind. Bitte lesen Sie das
Handbuch.
Dieses Symbol, wo immer es erscheint, sagt
Ihnen: Vorsicht! Heiße Oberfläche! Um
Verbrennungen zu vermeiden, nicht anfassen.
• Bitte lesen Sie diese Anweisungen.
• Bewahren Sie diese Anweisungen auf.
• Befolgen Sie alle Warnhinweise und Anweisungen auf
dem Gerät und in dieser Anleitung.
• Benutzen Sie dieses Gerät nicht in der Nähe von
Wasser. Stellen Sie das Gerät nicht in der Nähe von
Wasser, Badewannen, Waschbecken, Küchenspülen,
nassen Stellen, Schwimmbecken oder in feuchten
Räumen auf.
• Stellen Sie keine Gefäße, wie Vasen, Gläser, Flaschen
usw., die Flüssigkeiten enthalten, auf das Gerät.
• Reinigen Sie das Gerät nur mit einem trockenen Tuch.
• Entfernen Sie keine Abdeckungen oder Teile des
Gehäuses.
• Die auf dem Gerät eingestellte Betriebsspannung
muss mit der örtlichen Spannung der Netzstromversorgung übereinstimmen. Wenn Sie sich nicht sicher
sind, welche Spannung in Ihrem Netz zur Verfügung
steht, konsultieren Sie bitte Ihren Händler oder den
örtlichen Stromversorger.
• Um das Risiko eines Stromschlags zu verringern,
muss die Erdung des Gerätes beibehalten werden.
Verwenden Sie nur das mitgelieferte Stromführungskabel und behalten Sie die Funktion der seitlichen,
geerdeten Schutzkontakte des Netzanschlusses
immer aufrecht. Versuchen Sie nicht, die Sicherheitsaufgabe des geerdeten Steckers zu umgehen.
• Schützen Sie das Stromführungskabel vor Betreten
und Quetschen, besonders in der Nähe der Stecker,
Gerätesteckdosen – und dort, wo sie am Gerät austreten! Stromführungskabel sollten immer vorsichtig behandelt werden. Kontrollieren Sie die Stromführungskabel in regelmäßigen Abständen auf Einschnitte und
Anzeichen von Abnutzung, besonders in der Nähe
des Steckers und an der Verbindung zum Gerät.
• Benutzen Sie niemals ein beschädigtes Stromführungskabel.
• Ziehen Sie bei Gewittern den Stecker des Gerätes
und wenn das Gerät über einen längeren Zeitraum
nicht benutzt wird.
• Dieses Gerät wird nur vollständig von Stromnetz
getrennt, wenn der Stecker vom Gerät oder aus der
Steckdose gezogen wird. Das Gerät sollte so aufgestellt werden, dass das Trennen vom Stromnetz leicht
möglich ist.
• Sicherungen: Ersetzen Sie Sicherungen nur mit dem
Typ IEC127 (5x20mm) und dem korrekten Nennwert!
Es ist untersagt, kurzgeschlossene Sicherungen zu
verwenden oder den Sicherungshalter zu überbrücken. Sicherungen dürfen nur von qualifiziertem
Personal gewechselt werden.
• Alle Wartungsarbeiten sollten nur von qualifiziertem
Personal ausgeführt werden. Wartung ist notwendig,
wenn das Gerät auf irgendeine Weise beschädigt
wurde, wie zum Beispiel:
- Wenn das Stromführungskabel oder der Stecker
beschädigt oder abgenutzt ist.
- Wenn Flüssigkeit oder Gegenstände in das Gerät
gelangt sind.
- Wenn das Gerät Regen oder Feuchtigkeit ausgesetzt
war.
- Wenn das Gerät nicht ordnungsgemäß funktioniert,
obwohl die Bedienungsanleitung beachtet wurde.
- Wenn das Gerät hingefallen ist oder das Gehäuse
beschädigt wurde.
• Beim Anschluss von Lautsprechern an dieses Gerät
darf die auf dem Gerät oder in dieser Anleitung angegebene Mindestimpedanz nicht unterschritten werden. Die verwendeten Kabel müssen entsprechend
den lokalen Regelungen über einen ausreichenden
Querschnitt verfügen.
• Halten Sie das Gerät vom Sonnenlicht fern.
• Installieren Sie das Gerät nicht in der Nähe von Wärmequellen, wie zum Beispiel Heizkörper, Heizregister, Öfen oder anderen Geräten, die Hitze erzeugen.
• Verstopfen Sie nicht die Lüftungsöffnungen. Installieren Sie das Gerät entsprechend der Anleitung des
Herstellers. Das Gerät darf nicht eingebaut werden
– wie zum Beispiel in einen Gestellrahmen, es sei
denn, dass für angemessene Belüftung gesorgt wird.
• Ein kaltes Gerät sollte immer auf die Umgebungstemperatur erwärmt werden, wenn es in einen Raum
transportiert wird. Es könnte sich Kondensation im
Inneren bilden, die das Gerät beschädigt, wenn es
ohne vorherige Erwärmung benutzt wird.
• Stellen Sie keine offenen Flammen, wie brennende
Kerzen, auf das Gerät.
• Das Gerät sollte mindestens 20 cm von Wänden aufgestellt werden, das Gerät darf nicht bedeckt werden,
es muss ein Freiraum von mindestens 50 cm über
dem Gerät gewährleistet sein.
• Das Gerät darf nur mit Rollwagen, Ständern, Stativen,
Tischen oder Halterungen benutzt werden, die vom
Hersteller spezifiziert sind oder zusammen mit dem
Gerät verkauft wurden. Wenn ein Rollwagen benutzt
wird, seien Sie vorsichtig, wenn Sie die Rollwagen/
Geräte-Kombination transportieren, um Verletzungen
durch Umkippen zu vermeiden.
Version 2.3b 01/2015
• Verwenden Sie nur Zubehör, das vom Hersteller
empfohlen ist. Das gilt für alle Arten von Zubehör,
wie zum Beispiel Schutzabdeckungen, Transporttaschen, Ständer sowie Wand- und Deckenhalterungen.
Wenn Sie irgendein Zubehör am Gerät anbringen,
befolgen Sie immer die Anleitungen des Herstellers.
Benutzen Sie nur die Befestigungspunkte des Geräts,
die vom Hersteller vorgesehen sind.
• Dieses Gerät ist NICHT geeignet für eine Person
oder Personen (einschließlich Kindern) mit eingeschränkten physischen, sensorischen und geistigen
Fähigkeiten, oder für Personen mit unzulänglicher
Erfahrung und/oder Fachkenntnis, um solch ein Gerät
zu bedienen. Kinder unter 4 Jahren sollten stets von
diesem Gerät fern gehalten werden.
• Es sollten keinerlei Gegenstände durch die Gehäuseschlitze eingeführt werden, da dadurch gefährliche,
spannungsführende Bauteile berührt oder kurzgeschlossen werden können. Dies könnte zu einer
Feuer- oder Stromschlaggefahr führen.
• Dieses Gerät ist imstande, Schalldruckpegel von
mehr als 90 dB zu produzieren. Dies könnte zu einem dauerhaften Hörschaden führen! Eine Belastung
durch extrem hohe Geräuschpegel kann zu einem
dauerhaften Gehörverlust führen. Bei einer anhaltenden Belastung durch solch hohe Pegel sollte ein
Gehörschutz getragen werden.
• Der Hersteller gewährleistet die Sicherheit, Zuverlässigkeit und Leistung des Gerätes nur unter folgenden
Voraussetzungen:
- Einbau, Erweiterung, Neueinstellung, Modifikationen
oder Reparaturen werden vom Hersteller oder autorisiertem Personal ausgeführt.
- Die elektrische Installation des betreffenden Bereiches entspricht den Anforderungen der IEC (ANSI)
Maßgaben.
- Das Gerät wird entsprechend der Bedienungsanleitung benutzt.
Vor Inbetriebnahme
• Vor der Inbetriebnahme diese Anleitung inklusive der Sicherheitshinweise bitte sorgfaltig
durchlesen.
• Für Schäden am Gerät oder an anderen
Geräten, die durch unsachgemäßen Betrieb
entstehen, kann seitens des Herstellers keine
Haftung übernommen werden.
• Vor dem Anschluss an das Stromnetz muss
sichergestellt sein, dass der Power-Schalter
und der Standby-Schalter ausgeschaltet sind
und der angegebene Spannungswert auf der
Rückseite des Gerätes mit der ortsüblichen
Netzspannung übereinstimmt.
• Betreibe den Amp nie ohne angeschlossene
Lautsprecherbox! Beachte hierbei die Impedanz der Lautsprecherbox und schließe sie
immer an einen Speaker Out mit passender
Impedanz an.
• Eine letzte Warnung noch, bevor du deinen Amp in Betrieb nimmst: Er ist laut, und
hohe Lautstärken können Gehörschäden
verursachen. Um laute und unwillkommene
Überraschungen zu vermeiden, solltest du
dir angewöhnen, den Master Volume Regler
ganz herunterzudrehen, bevor du den Amp
einschaltest!
Von Anfang an war uns klar, dass die Weiterentwicklung des TriAmp
MK II eine Herausforderung darstellen würde. Wir mussten etwas radikal
Neues zu erschaffen, das wieder Maßstäbe in Klang, Leistung und Design
setzt, ohne uns zu weit vom Original zu entfernen. Unsere Ingenieure
behielten deshalb jedes einzelne Detail bei, das den TriAmp MK II zur
ersten Wahl für Gitarristen werden ließ, und gestalteten jedes einzelne
Feature zukunftsweisend um. So schufen sie einen bahnbrechenden Amp
wie ihn die Gitarrenwelt noch nicht gesehen hat: den TriAmp Mark 3.
Für jeden der sechs Kanäle können Gain und Lautstärke separat
eingestellt werden, jeder Kanal hat seinen eigenen 3-Band-EQ, sowie
einen auf den jeweiligen Charakter zugeschnittenen Stomp-Boost. Es
lassen sich auf Knopfdruck 12 unterschiedliche Grundsounds aufrufen.
In Kombination mit den drei Endstufenröhrenpaaren,die ebenfalls per
Knopfdruck wählbar sind, stehen dir 3x12=36 unterschiedliche Sounds
bei 50 Watt Leistung zur Verfügung. Schaltest du ein zweites Röhrenpaar
hinzu (und steigerst somit die Leistung auf bis zu 100 Watt), hast du noch
mal 36 Optionen (Paar 1+2, Paar 1+3, Paar 2+3). Und mit dem dritten
Röhrenpaar (das macht 150 Watt!) weitere 12! Summa summarum sind
das 84 unterschiedliche Sounds.
Dabei bietet dir der TriAmp Mark 3 nicht nur klassische Sounds: Die
Option, Kanäle und Endstufen in nie dagewesener Vielfalt zu kombinieren,
ermöglicht dir die Gestaltung deiner eigenen neuen Sounds – den Sounds
der Zukunft. Nie zuvor hat ein Amp solch eine inspirierende Soundvielfalt
geboten.
• にほんご
• Español
• Italiano
Der TriAmp Mark 3 bietet nicht nur drei voneinander unabhängige
Preamps mit je zwei Kanälen, sondern auch drei voneinander
unabhängige Endstufen. Jedes der drei Endstufenröhrenpaare kann mit
unterschiedlichen Röhren bestückt werden. Zudem lässt sich jedes Paar
jedem der sechs Kanäle beliebig zuweisen – auch über MIDI. Aber damit
nicht genug: man kann sogar jedem Kanal verschiedene Röhrenpaare
zuweisen und somit die unterschiedlichen Endstufenröhrentypen
mischen.
• Français
1 Vorwort
Eine neue Ära in der Geschichte des
Röhrensounds
• Deutsch
Vorwort ...................................................................................... 15
Quick Start ................................................................................. 16
Bedienungsgrundlagen ............................................................... 16
Amps und Kanäle ....................................................................... 17
Vorderseite ................................................................................. 17
Rückseite.................................................................................... 19
MIDI-Presets und MIDI-Setup .................................................... 20
TSC™ –Tube Safety Control ....................................................... 22
TSM-432 – MIDI Board .............................................................. 23
AES ............................................................................................ 24
Technische Daten....................................................................... 25
• English
1
2
3
4
5
6
7
8
9
10
11
• 中文
TriAmp Mark 3 – Manual 1.1
15
TriAmp Mark 3 – Manual 1.1
;VKVHTHU\HSYLHKV\[VM[OL[\IL
TH[JOPUNPUZLY[HWPJRPU[V[OLZSV[
HUKJV\U[[OLMSHZOLZVMLHJO3,+
;OLKPMMLYLUJLPUMSHZOLZZOV\SKIL
SLZZ[OHU^P[OPULHJOWHPY[V
N\HYHU[LLILZ[ZV\UK7SLHZLYLMLY
[V[OLTH[JOPUNJOHY[PU[OLTHU\HS
Tube Status Monitor
;:*H\[VTH[PJHSS`PUKPJH[LZ[OLZ[H[\ZVM[OL[\ILZ
HZZVVUHZ[OLHTWPZPUWSH`TVKL:;(5+)@Z^P[JO
PU\WWLYWVZP[PVU0M[OL3,+ZZ[H`VUPUWSH`TVKL
WSLHZLJOLJR[OLHUVKLM\ZL
(SS3,+ZVMMTLHUZ!ILZ[IPHZUVYTHSVWLYH[PVU
6UL3,+VUTLHUZ!UVJ\YYLU[[\ILPZIYVRLUHUK
OHZ[VILYLWSHJLK
6UL3,+MSHZOLZVUL3,+PZVU![OLMSHZOPUN3,+
PUKPJH[LZH[\IL[OH[JH\ZLZV]LYJ\YYLU[[OLV[OLY
3,+PUKPJH[LZHZ^P[JOLKVMM[\IL[VWYV[LJ[[OLHTW
7SLHZLYLWSHJL[OL[\IL[OH[JH\ZLZV]LYJ\YYLU[
;^V3,+ZVUTLHUZ!WHPYVM[\ILZPZZ^P[JOLKVMM
MADE IN GERMANY
SPEAKERS
16 Ohms
1x 8 Ohms
or 2x 16 Ohms
RED BOX™ AE
4 Ohms
Ambience emulated DI Out
*HIPUL[
4VKL
3V^
*\[
0UZLY[N\P[HYWPJR[VYLHK
V\[[\ILTH[JOPUN
7V^LY;\ILZ!
TSC™
MIDI
ILZ[)PHZ
V]LYJ\YYLU[
UVJ\YYLU[
NOISE GATE
Hard
In
Out/Thru
Z^P[JOLKVMM
FX LOOP
Soft
MASTER INSERT
FX Level
Send
Return
*(<;065!9LHYWHULSHUK
]LU[PSH[PVUVWLUPUNZTH`
ILJVTL[VVOV[[V[V\JO
3LH]LLUV\NOZWHJLMVY
WYVWLY]LU[PSH[PVU
;VYLK\JL[OLYPZRVMLSLJ[YPJZOVJRNYV\UKPUNVM
[OLJLU[LYWPUVM[OPZWS\NT\Z[ILTHPU[HPULK
9LWSHJPUNM\ZLZT\Z[VUS`ILJHYYPLKV\[I`
X\HSPMPLKZLY]PJLWLYZVUULS9LWSHJLM\ZLZVUS`
^P[O[`WLHUKYH[PUNZOV^UOLYL
Bright
4HPUZ=VS[HNL
Power Amp In
=e
¶K)
=e
7V^LY(TW;\ILZ
Preamp Out
*(<;065!9PZRVMLSLJ[YPJ
ZOVJR+VUV[VWLU9LMLY
ZLY]PJPUN[VX\HSPMPLK
ZLY]PJLWLYZVUULS
PANEL
Dark
FX Serial
(,:
VUVMM
TSM-432
Serial No.
;90(474HYR
4HPUZ-\ZL!=;(3/a
4H_7V^LY*VUZ\TW[PVU>
,<]LYZPVUVUS`
or
Vol. Pedal
Guitar Cabinet
FX-Unit
Tuner
or
FX-Unit
or
or
Powered
Cabinet
Power Amp
Mixing Desk
2 Quick Start
3 Bedienungsgrundlagen
Mains In: Netzbuchse für das mitgelieferte Netzkabel (Mains Lead).
Der TriAmp Mark 3 lässt sich kinderleicht bedienen:
• Die sechs unabhängigen Kanäle verfügen jeweils über einen identischen
Satz Bedienelemente.
• Die Position der jeweiligen Regler wirkt sich nur auf den entsprechenden
Kanal aus.
• Die Regler der Master-Sektion links auf der Vorderseite wirken sich auf
alle Kanäle aus.
MIDI In: Verbinde diese Buchse mit dem MIDI Out des mitgelieferten
TSM-432 oder des MIDI-Controllers deiner Wahl. Obwohl es sich hierbei
um eine 7-polige Buchse handelt, kannst du jedes Standard-5-Pin-Kabel
und jeden handelsüblichen MIDI-Controller verwenden. Die beiden
zusätzlichen Pins (1 & 7) liefern die Phantomspeisung für das Hughes &
Kettner TSM-432 MIDI-Board.
Speaker: Buchse zum Anschluss von Gitarren-Lautsprecherboxen. Wir
empfehlen die auf unsere Amps abgestimmten Boxen der Hughes &
Kettner Serien TM und TC.
AES: Die EU-Versionen des TriAmp Mark 3 verfügen über eine
Energiesparfunktion namens AES (mehr hierzu erfährst du im Kapitel 10).
Bei aktivierter AES (im Auslieferzustand), schaltet sich der TriAmp nach
einer Ruhephase von ca. 90 Minuten automatisch aus. Diese Ruhephase
wird zurückgesetzt und beginnt jedes Mal wieder von vorne, sobald am
Eingang des Amps ein Signal anliegt.
16
TSM-432
Die Stomp-Boost- und Power Amp Tubes-Tasten liegen nur einmal vor,
sind aber für jeden der sechs Kanäle separat einstellbar. Ihre Einstellungen
werden automatisch gespeichert, wenn du zwischen den Kanälen
umschaltest. Wenn du zum Beispiel Kanal 1A mit einem Paar 6L6-Röhren
und Stomp-Boost on spielst, wird diese Einstellung wieder aufgerufen,
wenn du Kanal 1A erneut anwählst – und zwar solange, bis du diese
Einstellungen änderst (noch mehr Optionen hast du mit MIDI-Presets –
mehr hierzu findest du im Kapitel 7 „MIDI“).
Die Tasten dienen auch als LED-Anzeige des aktiven Kanals oder der
aktivierten Funktion.
TriAmp Mark 3 – Manual 1.1
4 Amps und Kanäle
Hinweis: Die richtige Wahl zum Antesten von Kanal 2B ist ein Paar EL34.
Die Kanäle des TriAmp Mark 3 bieten nicht einfach nur drei unterschiedliche
Gain-Stufen. Jeder von ihnen repräsentiert eine eigene Sound-Ära. Unsere
fortschrittliche Elektronik konfiguriert die verschiedenen Röhren der
Vor- und Endstufen für jeden Kanal oder jedes MIDI-Preset neu. Damit
holen wir jedes Quäntchen Sound aus der Röhrenschaltung heraus und
verleihen dem TriAmp Mark 3 eine unglaubliche Klangvielfalt.
4.3. Amp 3
Kanal 1B erzeugt einen amtlichen britischen Sound mit typisch
schimmernden Höhen und äußerst subtiler harmonischer Verzerrung.
Selbst bei niedrigem Gain verwöhnt 1B dich mit einem obertonreichen
High-Mid-Spektrum.
Hinweis: Als Endstufe für Kanal 1B empfehlen wir ein Paar EL34-Röhren.
4.2 Amp 2
Channel A: Klassischer britischer Lead-Sound der Seventies
Kanal 2A liefert den heißen Overdrive-Sound, der so typisch ist für
viele wegweisende klassische Rockproduktionen. Mit seinem offenen
britischen Touch ist dieser Kanal ideal für messerscharfe Riffs und
aggressive Rhythmusarbeit.
Hinweis: Für die typischen Sounds dieses Kanals wählst du am besten
ein EL34-Röhrenpaar. Andererseits kann es sich auch durchaus lohnen,
diesen Kanal mit einem (oder sogar zwei) Paar 6L6-Röhren zu nutzen.
Channel B: Fettester britischer Lead-Sound der Eighties
Das Spektrum von Kanal 2B reicht von düster und fett bis hin zu
singendem, lang anhaltendem Sustain. Wie bekommen wir das hin?
Dank seiner speziellen Schaltung verpasst Kanal 2B dem Sound eine
ordentliche Klangspritze – genau die Verzerrung, die die alten Plexis bei
Gitarristen so beliebt macht. Satt, laut und durchsetzungsstark und somit
ideal für beidhändiges Tapping und brachiale Power-Chords.
5.1 Power und Standby
Power/On-Schalter: Aktiviert die Stromzufuhr in
Stellung „On“. Der Amp leuchtet, und die Röhren
werden für die kommenden Herausforderungen
aufgeheizt.
Play/Standby-Schalter: Nach etwa 30 Sekunden
Aufwärmzeit kannst du von „Standby“ auf „Play“
schalten. Schon ist der Amp bereit zum Abrocken! Bei längeren
Spielpausen bitte immer auf „Standby“ umschalten, damit die Röhren auf
Betriebstemperatur bleiben. Dies verlängert ihre Lebensdauer.
5.2 Input und Stomp-Boost
Input: Instrumenteneingang, 1 M-Ohm, zum Anschluss der
Gitarre mittels eines abgeschirmten Klinkenkabels.
Stomp-Boost: Der Stomp-Boost hebt bestimmte Frequenzbereiche deines Sounds ein wenig an. Je nach Kanal und
Einstellungen kitzelt der Boost einen noch durchsetzungsfähigeren, sahnigeren oder ausdrucksstärkeren Sound heraus. Der StompBoost ist zwischen Eingang und Vorstufe des TriAmp Mark 3 geschaltet
und passend zum Charakter jedes Kanals maßgeschneidert – so funktioniert er wie sechs unterschiedliche externe Transistor-Boost-Pedale.
• 中文
• にほんご
• Español
Channel B: Glockiger britischer Clean-Sound der Sixties
5 Vorderseite
• Italiano
Kanal 1A bietet die volle Pracht der großen amerikanischen Sounds.
Seine besondere Stärke ist der klassische, verzerrungsfreie Clean-Sound
selbst bei hohem Gain – sein knackiger Twang lässt dich die Cowboystiefel
aus dem Schrank holen. Aber lass dich nicht täuschen: Der Bassanteil
von Kanal A ist mächtig, tight, und genügt selbst den Ansprüche der
leidenschaftlichsten Tiefton-Fetischisten.
Hinweis: Kanal 1A arbeitet besonders gut mit zwei 6L6-Paaren.
Kanal 3B liefert gnadenlose High-Gain-Sounds, wie man sie noch nie
erlebt hat. Drop-Tuning-Freunde und Bändiger von 7- und 8-SaiterGitarren werden von der gewaltigen, ungezähmten Verzerrung von 3B
nicht genug bekommen können. Mit Stomp-Boost erhältst du ultimative
Reaktionsgeschwindigkeit auf dein Spiel – als ob die Saiten eine
Verlängerung deiner Finger wären. Kanal 3B sorgt dafür, dass deine Finger
bei Riffs und Licks wie geschmiert übers Griffbrett gleiten.
Hinweis: Unbedingt ausprobieren: Kanal 3B mit beiden 6L6-Paaren – und
dann die EL34 dazuschalten!
• Français
Channel A: Perlender kalifornischer Clean-Sound aus den Fifties
Channel B: Moderner High-Gain und noch viel mehr
• Deutsch
4.1 Amp 1
Kanal 3A ist ehrlich und direkt – er reagiert sofort und äußerst sensibel
auf subtile Änderungen der Anschlagstärke und den kleinsten Dreh am
Volume-Regler der Gitarre. So bewahrt 3A unverfälscht den einzigartigen
Sound deiner Gitarre für einen crispen und definierten Klang – ganz
gleich, wie hoch der Gain-Regler aufgedreht ist.
Hinweis: Kanal 3A arbeitet besonders gut mit einer Kombination von je
einem Paar EL34 und 6L6.
• English
Die Kanäle können am Amp selbst oder mit dem mitgelieferten TSM432 MIDI-Board angewählt werden. Schalte dazu das TSM-432 in den
Stomp Box-Mode. Nun rufen die Schalter 1 bis 6 die jeweiligen Kanäle
auf, während Schalter 7 sich um den Stomp-Boost kümmert (Der andere
Modus des TSM-432, der Preset-Mode, bietet dir noch weitere Optionen.
Mehr hierzu findest du ebenfalls im Kapitel „MIDI“).
Channel A: Klassischer amerikanischer High-Gain-Sound der Nineties
17
TriAmp Mark 3 – Manual 1.1
Das Besondere an der Schaltung ist: Der Stomp-Boost ist ein eigenes Modul auf einer eigenen Schaltplatine und wird durch eine echte BypassSchaltung eingeschleift.
5.3 Die Kanal-Sektion
Channel-Tasten: Hiermit lassen sich die Kanäle direkt anwählen.
Gain, Master: Gain bestimmt die Eingangsempfindlichkeit und damit die
Sättigung des Vorverstärkers. In Kombination mit dem Stomp-Boost ist
er das maßgebliche Werkzeug zur Soundgestaltung. Mit den jeweiligen
Master-Reglern lassen sich die Pegel der einzelnen Kanäle einander
anpassen.
Bass, Mid, Treble: Die Wirkung der Drei-Band-Klangregelung ist präzise
auf den jeweiligen Kanal abgestimmt. Die Regler bearbeiten jeweils die
Frequenzbereiche, die den charakteristischen Klang des betreffenden
Kanals ausmachen.
Achtung: Es handelt sich um eine klassische, passive Klangregelung. Die
Regler beeinflussen sich gegenseitig. Ist z.B. „Mid“ weit aufgedreht, zeigt
„Bass“ weniger Wirkung als wenn „Mid“ abgedreht ist.
5.4 Die Master-Sektion
Volume: Der Master-Volume-Regler
bestimmt
die
Gesamtlautstärke
des TriAmp Mark 3. Mit diesem
Regler hältst du die Macht über
150 Röhrenwatt zwischen Daumen
und Zeigefinger. Bediene ihn mit
Verstand, denn du kannst damit deine Bandkollegen ebenso verzücken,
wie sie in den Wahnsinn treiben. Selbst wenn das Drehen an diesem
Regler jede Menge Spaß garantiert, solltest du dich mäßigen. Reiß ihn
nicht zu weit auf, sondern nur soweit, dass die Lautstärke deinem Gehör
– und dem deiner Bandkollegen – nicht schadet.
Presence: Dieser Regler bestimmt den Anteil an generierten,
harmonischen Obertönen. Je weiter er aufgedreht wird, desto „präsenter“
wirkt der Sound. Mit diesem Regler kannst du bei Bedarf dem Sound
mehr Ausdruck und Durchsetzungskraft verleihen.
Resonance: Bei Mittelstellung des Reglers hört man das natürliche
Resonanz-Verhalten zwischen dem TriAmp Mark 3 und der/den
angeschlossenen Box(en). Durch Linksdrehung wird der Effekt der BoxenResonanz gedämpft, was deine Sounds noch weicher abgerundet. Durch
Rechtsdrehung wird der Effekt verstärkt, was für heftigen Bass-Schub
sorgt. Voll aufgedreht liefert dieser Regler markerschütternde Sub-Bass
Frequenzen.
Tipp: Die Presence- und Resonance-Regler dienen auch als MasterKlangregelung und ermöglichen dir, deinen Gesamtsound an unterschiedliche Boxen und Räumlichkeiten anzupassen, ohne an der Klangregelung
der einzelnen Kanäle etwas ändern zu müssen.
18
5.5 Power Amp Tubes
Diese drei unscheinbaren Tasten sind die Geheimwaffe
des TriAmp Mark 3. Sie schlagen ein völlig neues Kapitel
in der Geschichte der Röhrensounds auf. Jedes der drei
Endstufenröhrenpaare ist jedem der sechs Kanäle frei
zuweisbar – du musst nichts weiter tun, als einen Kanal anzuwählen und
dann das (oder die) gewünschte(n) Röhrenpaar(e) aktivieren. Jedes der drei
Endstufenröhrenpaare kann mit EL34 oder 6L6-Röhren bestückt werden.
Dadurch können in jedem der drei Kanäle des TriAmp Mark 3 problemlos
Röhren unterschiedlichen Klangcharakters gemischt werden. Zudem
kann mithilfe von MIDI-Presets der selben Kanal mit unterschiedlichen
Endstufenröhren genutzt werden – ganz einfach per Fußschalter (mehr
über MIDI-Presets im Kapitel „MIDI“).
Dein TriAmp Mark 3 ermöglicht dir Sound-Eperimente, die bis dahin
unmöglich waren. So kannst du zum Beispiel fürs dezente Intro eines
Songs ein Paar 6L6 mit 50 Watt spielen, ein zweites Paar 6L6 für deine Riffs
dazuschalten und – anstelle des Boosts – die EL34 Röhren dazuschalten,
um dem Solo mehr Punch in den Mitten zu geben (bei bis zu 150 Watt).
So hört man dich auch noch in der letzten Reihe!
Du kannst aber auch im selben Kanal vom britischen EL34-Sound zum
typischen amerikanischen 6L6-Sound per Midi umschalten. Oder von
chinesischen auf slowakische EL34 umschalten – ohne Röhren, Amp
oder Kanäle wechseln zu müssen. Der TriAmp Mark 3 ist somit – unter
anderem – der erste sechskanalige Röhrenvergleich-Apparat!
Hinweis: Es können noch weitere Endstufenröhren-Typen im TriAmp
Mark 3 betrieben werden. Folgende Typen wurden von Hughes & Kettner
getestet: KT77, KT66, KT88, 5881 WXT, 6550 A, 6CA7, 7581
5.6 FX-Loop
Das SmartLoop™ Effekt-Routing bietet parallele und
serielle Einschleifmöglichkeiten externer Effektgeräte. Sein
Status – ein/aus und parallel/seriell – wird für jeden Kanal
und jedes MIDI-Preset gespeichert.
FX-Loop: Hiermit schaltest du den Effektweg ein oder aus. Mehr zu den
Effektwegen erfährst du im Kapitel „Rückseite“.
5.7 Noise-Gate
Das äußerst präzise IDB™ (Intelligent Dual Breakpoint) Noise-Gate misst
simultan den Pegel an zwei Schlüsselstellen der Signalkette: dem Eingang
und dem Vorverstärkerausgang. Aus diesen beiden Werten errechnet
die IDB™-Technologie das optimale Ansprechverhalten und regelt die
Attack- und Threshold-Parameter automatisch.
Mit der Noise-Gate-Taste wird das IDB™-Noise- ein/ausgeschaltet. Das
aktivierte Noise-Gate greift ein und schaltet den Preamp stumm, sobald
der Signalpegel unter eine bestimmte Schwelle sinkt – nerviges Rauschen
ade! Das Gate bleibt solange zu, bis du deine Saiten wieder anschlägst.
Und öffnet dann ohne jegliche Latenz. Mehr übers Noise-Gate erfährst
du im nächsten Kapitel.
SPEAKERS
16 Ohms
1x 8 Ohms
or 2x 16 Ohms
RED BOX™ AE
4 Ohms
Ambience emulated DI Out
*HIPUL[
4VKL
3V^
*\[
0UZLY[N\P[HYWPJR[VYLHK
V\[[\ILTH[JOPUN
TriAmp Mark 3 – Manual 1.1
TSC™
MIDI
ILZ[)PHZ
NOISE GATE
Hard
V]LYJ\YYLU[
In
UVJ\YYLU[
FX LOOP
Soft
Out/Thru
Z^P[JOLKVMM
MASTER INSERT
FX Level
Send
Dark
FX Serial
Return
Preamp Out
;VYLK\JL[OLYPZRVMLSLJ[YPJZOVJRNYV\UKPUNVM
[OLJLU[LYWPUVM[OPZWS\NT\Z[ILTHPU[HPULK
9LWSHJPUNM\ZLZT\Z[VUS`ILJHYYPLKV\[I`
X\HSPMPLKZLY]PJLWLYZVUULS9LWSHJLM\ZLZVUS`
^P[O[`WLHUKYH[PUNZOV^UOLYL
4HPUZ=VS[HNL
Power Amp In
=e
¶K)
=e
(,:
VUVMM
TSM-432
Serial No.
;90(474HYR
4HPUZ-\ZL!=;(3/a
4H_7V^LY*VUZ\TW[PVU>
,<]LYZPVUVUS`
zeitraubendes Experimentieren mit Mikrofonpositionen gehören der
Vergangenheit an.
• Wenn zwei parallel verkabelte 8 Ohm-Boxen genutzt werden
sollen, schließe sie am 4 Ohm-Ausgang. Betreibe niemals Boxen
unterschiedlicher Impedanz an ein und demselben Ausgang!
• Sollen Boxen mit unterschiedlichen Impedanzen gleichzeitig betrieben
werden, müssen sie entweder parallel oder seriell verkabelt an den
geeigneten Ausgang angeschlossen werden. Mit dieser Formel lassen
sich die Gesamtimpedanz (R) zweier Boxen mit unterschiedlichen
Impedanzen (R1, R2) errechnen.
Parallele Verkabelung: R = (R1 x R2) / (R1 + R2)
Ein Beispiel für eine 8 Ohm- und eine 16 Ohm-Box:
R = (8 x 16) / (8 + 16) Ohm
R = 128 / 24 Ohm
R = 5.33 Ohm
Üblich ist heute die parallele Verkabelung, aber wenn du eine Box mit
einem seriell verkabelten Ausgang hast oder beschließt, deine Boxen
seriell zu verkabeln, ist die Gesamtimpedanz die Summe der Impedanzen
der Boxen:
Serielle Verkabelung: R = R1 + R2
Werden eine 4 Ohm- und eine 8 Ohm-Box seriell verkabelt, beträgt die
Gesamtimpedanz also 12 Ohm.
Tipp: Die goldene Regel hierzu: die Impedanz der Boxen darf nie kleiner
sein als die Impedanz des Ausgangs deines Amps. Für unsere Beispiele
bedeutet dies: Die parallel verkabelten Boxen mit 5,33 Ohm Gesamtimpedanz werden an den 4 Ohm-Ausgang angeschlossen, die seriell verkabelten mit 12 Ohm Gesamtimpedanz an den 8 Ohm-Ausgang.
6.2 Red Box AE
Der TriAmp Mark 3 ist als erstes Hughes & Kettner
Produkt mit der neuen Red Box mit Ambience
Ambience emulated DI Out
Emulation (AE) ausgestattet. Seit Ende der Achtziger
ist die Original Red Box der Industrie-Standard, um
den Sound von Gitarrenverstärkern ohne Mikrofon
abzunehmen. Ob Live oder im Studio – die Red Box überträgt den Sound
in gleichbleibender Qualität. Übersprechen anderer Instrumente und
RED BOX™ AE
3V^
*\[
Hinweis: Leite das Signal der Red Box AE mit einem Mikrofonkabel ans
Mischpult. Achte darauf, dass der XLR-Eingang des Mischpults auf Line
eingestellt ist. Falls das Mischpult keine XLR-Eingänge hat oder die Eingänge nicht auf Line umgestellt werden können, brauchst du einen XLR auf
Klinke-Adapter oder ein entsprechendes Kabel, wie du sie in jedem gut
sortierten Fachgeschäft findest.
6.3 TSC
Hinweis: Wir haben ein ganzes Kapitel dieser Bedienungsanleitung dem
Thema Tube Safety Control gewidmet. Mehr hierzu findest du im Kapitel
„TSC“.
6.4 MIDI In und Out/Thru
MIDI ist ideal, um mithilfe von Program-Changes
zwischen verschiedenen Sounds umzuschalten. Per
Knopfdruck kannst du gleichzeitig den Kanal des Amps
In
Out/Thru
und das Effektprogramm deines externen Effektgeräts
umschalten. So gehören Stepptänze auf deinem PedalTSM-432
Board der Vergangenheit an. Deshalb haben wir uns
entschieden, MIDI als Standardprotokoll für sämtliche
Schaltfunktionen des TriAmp Mark 3 zu verwenden und ihn mit einer
Schnittstelle fürs beiliegende MIDI-Board TSM-432 versehen. Mehr über
das MIDI-Board erfährst du im Kapitel „TSM-432“.
MIDI
MIDI In: Der MIDI-Eingang des TriAmp Mark 3 ist 7-polig ausgelegt – man
kann aber auch über ein Standard-5-Pin-Kabel jeden handelsüblichen
MIDI-Controller an diese Buchse anschließen. Die beiden zusätzlichen
Pins liefern die Phantomspeisung für das beiliegende Hughes & Kettner
TSM-432 MIDI-Board.
Achtung: Dem TSM-432 liegt ein 7-Pin-Kabel bei. Solltest du das Kabel
verlieren und rasch Ersatz brauchen, tut es auch ein 5-Pin-Kabel. Allerdings brauchst du dann eine Stromversorgung. Dazu verfügt das TSM-432
über eine innovative Netzbuchse zum Anschluss eines beliebigen Gleichoder Wechselstrom Netzteils, das zwischen 9 und 15 V Spannung liefert.
• 中文
Niemals den Amp ohne angeschlossene Lautsprecher betreiben!
• にほんご
5L]LY\ZL[OPZHTW^P[OV\[ZWLHRLYZJVUULJ[LK
<ZLJSHZZ^PYPUN
Der TriAmp Mark 3 hat getrennte
Ausgänge für alle Standard-Impedanzen.
Es lassen sich entweder eine 4 OhmBox, eine 8 Ohm-Box oder eine bzw.
zwei 16 Ohm-Boxen anschließen.
• Español
4 Ohms
• Italiano
1x 8 Ohms
or 2x 16 Ohms
• Français
16 Ohms
Die Red Box AE ist die neueste Version der preisgekrönten DI-Box mit
Speaker-Emulation und bietet einen schaltbaren Low-Cut-Filter sowie einen
zweiten Boxen-Modus mit anders abgestimmter Klangcharakteristik. Die
DSP-gesteuerte Ambience Emulation erzeugt eine authentische 4x12er
Box-Raumfülle und eine ultradirekten Attack reinsten Röhrensounds,
indem das Signal zwischen der Endstufe und dem Lautsprecherausgang
abgegriffen wird. An der Red Box AE liegt ein Line-Signal an. Der Pegel
des Line-Signals hängt vom Pegel der Endstufe ab – mit anderen Worten:
Das Master-Volume regelt auch den Pegel dieses DI-Ausgangs.
• Deutsch
6.1 Speakers
• English
6 Rückseite
*HIPUL[
4VKL
*(<;065!9LHYWHULSHUK
]LU[PSH[PVUVWLUPUNZTH`
ILJVTL[VVOV[[V[V\JO
3LH]LLUV\NOZWHJLMVY
WYVWLY]LU[PSH[PVU
Bright
7V^LY(TW;\ILZ
5L]LY\ZL[OPZHTW^P[OV\[ZWLHRLYZJVUULJ[LK
<ZLJSHZZ^PYPUN
*(<;065!9PZRVMLSLJ[YPJ
ZOVJR+VUV[VWLU9LMLY
ZLY]PJPUN[VX\HSPMPLK
ZLY]PJLWLYZVUULS
PANEL
19
TriAmp Mark 3 – Manual 1.1
MIDI Out/Thru: Diese Buchse dient zur Weiterleitung der an der MIDI
In-Buchse anliegenden Signale. Du kannst hier jedes externe MIDI-fähige
Gerät anschließen, das zeitgleich mit dem TriAmp Mark 3 umgeschaltet
werden soll.
Hinweis: Wir haben den unterschiedlichen MIDI-Funktionen des TriAmp
Mark 3 ein ganzes Kapitel gewidmet. Mehr hierzu erfährst du im Kapitel
„MIDI-Presets und MIDI-Setup“.
6.5 Noise-Gate Hard/Soft
Mit diesem Regler auf der Rückseite wird das
Ansprechverhalten des Noise-Gates verändert. Je
weiter du den Regler nach rechts drehst, desto sensibler
reagiert das Noise-Gate. Je weiter du den Regler nach
links drehst, desto härter greift das Noise-Gate ein und
schneidet leise Signale und unerwünschtes Rauschen
ab.
NOISE GATE
Hard
Soft
Tipp: Die 12-Uhr-Position ist die universale Einstellung des Noise-Gates.
Wenn du das Noise-Gate als Stilmittel für schnelle Stakkato-Riffs bei hohem Gain-Pegel verwenden willst, drehe es weit nach links
6.7 Master-Insert
Der TriAmp Mark 3 verfügt über einen zusätzlichen
seriellen Loop, über den du die Masterlautstärke
mithilfe eines Lautstärkepedals regeln kannst. Das
Preamp Out
Power Amp In
Preamp-Signal wird am Preamp-Out abgegriffen
und am Power-Amp-In wieder zurückgeführt. Du
kannst über Preamp Out das Preamp-Signal auch an
andere Verstärker weiterleiten oder ein Stimmgerät daran anschließen.
Der Preamp-Out ist immer aktiviert, so dass der Signalweg unbeeinflusst
bleibt, wenn du hier etwas anschließt.
MASTER INSERT
Hinweis: Power-Amp-In ist eine geschaltete Buchse. Wenn du hier etwas
anschließt, wird der interne Signalweg unterbrochen und es werden nur
die an Power-Amp-In anliegenden Signale zur Endstufe weitergeleitet.
6.8 Panel
PANEL
Dark
Bright
Hiermit regelst du die Helligkeit der Frontblendenbeleuchtung des TriAmp Mark 3. Du kannst diesen Regler
auch über kontinuierliche MIDI-Steuerbefehle fernsteuern
(Mehr hierzu erfährst du im Kapitel „MIDI“).
6.6 FX-Loop
FX-Send: Verbinde diese Buchse mit
dem Eingang deines Effektgeräts.
FX LOOP
7 MIDI-Presets und MIDI-Setup
FX Level
Send
Return
¶K)
FX Serial
FX-Return:
Verbinde
diese
Buchse mit dem Ausgang deines
Effektgeräts.
-10 dB: Dieser Dämpfungsschalter ermöglicht es, den Signalpegel an
für niedrige Pegel ausgelegte Effektgeräte anzupassen. Aktiviere ihn für
Vorschalt-Effektgeräte, die normalerweise zwischen Gitarre und Amp
angeschlossen werden (z.B. Verzerrer).
Level: Regelt den Pegel des im FX-Return ankommenden Signals.
FX-Serial: Hiermit schaltest du den Effektweg von seriell auf parallel um.
Leuchtet dieser Schalter, ist der Effektweg im seriellen Modus.
Tipp: Im parallelen Modus kannst du mit FX-Level den wet/dry-Mix einstellen (Verhältnis von Effekt und purem Gitarrensignal). Du kannst zudem jedes Line-Signal zu FX-Return schleifen und mit FX-Level dem Preamp-Signal hinzumischen.
Wenn im seriellen Modus der FX-Send direkt mit dem FX-Return verkabelt
wird, kann mit dem Level-Regler die Gesamtlautstärlke des PreampSignals eingestellt werden, quasi wie ein zweiter Master-Volume- Regler,
der mit ein-/ausschalten des FX-Loops bedient werden kann.
Du kannst jeden einzelnen Taster des TriAmp Mark 3 via MIDI fernsteuern
und die Einstellungen in einem von 128 MIDI-Presets speichern. Über
die entsprechende Program-Change-Nummer kann jedes Preset
jederzeit aufgerufen werden – entweder mit einem beliebigen MIDIController bzw. Sequenzer oder einer entsprechenden Software. Mit dem
beiliegenden TSM-432 MIDI-Board kannst du entweder via MIDI die
Kanäle umschalten und boosten (im Stomp-Box-Mode) oder eines der
128 Presets aufrufen, die in 32 Bänken mit jeweils 4 Presets gespeichert
sind (im Preset-Mode). Im Auslieferzustand ist sowohl für den Amp als
auch das beiliegende TSM-432 MIDI-Board MIDI-Kanal 1 voreingestellt,
damit du direkt loslegen kannst. Später in diesem Kapitel zeigen wir dir,
wie du die MIDI-Kanäle änderst.
Hinweis: Wir haben den Funktionen des beiliegenden TSM-432 MIDIBoards ein ganzes Kapitel gewidmet – mehr hierzu erfährst du im Kapitel
„TSM-432“.
7.1 MIDI-Preset erstellen und aufrufen
Was ist eigentlich der Unterschied zwischen einer Kanaleinstellung und
einem MIDI-Preset?
Es gibt sechs Kanaleinstellungen, die automatisch im TriAmp Mark 3
gespeichert werden – du kannst sie aufrufen, indem du die Kanäle am
Amp selbst anwählst oder dazu das TSM-432 im Stomp-Box-Mode
verwendest. Du kannst allerdings auch jegliche Konfiguration von
Kanälen und Endstufenröhren sowie den Ein-/Aus-Zustand von NoiseGate, Boost und FX-Loop in bis zu 128 MIDI-Presets speichern.
Wozu brauche ich MIDI-Presets?
Wenn du zwischen Sounds umschaltest, willst du oft nicht nur den Kanal,
sondern gleichzeitig auch Boost, Noise-Gate sowie das Effektprogramm
deines externen MIDI-Effektgeräts umschalten. Mit MIDI-Presets kannst
du z.B. von einem Clean-Sound mit Chorus und Reverb umgehend zu
einem Lead-Sound mit Delay, Boost und Noise-Gate umschalten.
20
TriAmp Mark 3 – Manual 1.1
Einzigartig am TriAmp Mark 3 ist, dass du auch die drei Sätze
Endstufenröhren via MIDI sofort umschalten kannst. Stell dir vor, du
spielst einen klassischen, cleanen Sixties-British-Pop-Sound mit einem
Paar EL34 – und legst dann ein bisschen amerikanische Brillanz drüber,
indem du einfach auf ein Paar 6L6 umschaltest. Oder du spielst einen
modernen amerikanischen High-Gain-Sound mit beiden 6L6-Paaren
und setzt noch eine Schippe drauf, indem du für einen aggressiven,
mittenbetonten Punch ein Paar EL34 zuschaltest.
Im Auslieferzustand ist beim TriAmp Mark 3 und beim TSM-432
Kanal 1 ausgewählt und der Omni-Mode aktiviert. Omni bedeutet,
der Amp reagiert auf alle Befehle über alle 16 MIDI-Kanäle. Wenn du
den TriAmp Mark 3 in einer größeren MIDI-Umgebung mit mehreren
Geräten verwendest, solltest du den Omni-Mode deaktivieren und einen
passenden MIDI-Kanal einstellen.
Um Kanäle und den Omni-Mode zu ändern, gelangst du wie folgt in
das MIDI-Setup:
Lass deiner Kreativität freien Lauf! Oder genieße es, den TriAmp Mark
3 im Studio oder auf der Bühne komplett fernsteuern zu können. Und
damit nicht genug: Mit einem MIDI-Clicktrack („Playback-Spur“) kannst
du all deine Presets umschalten – sogar die Frontblendenbeleuchtung
deines Amps, falls es auf der Bühne absolut dunkel sein soll. Damit wird
der TriAmp Mark 3 zum ersten Röhrenverstärker, der in die Lightshow
integriert werden kann.
Stelle den Standby-Schalter von Play auf Standby, bevor du
das MIDI-Setup aufrufst.
Halte die Noise-Gate- und FX-Loop-Tasten gleichzeitig drei
Sekunden lang gedrückt, um das MIDI-Setup aufzurufen.
Wie funktioniert das?
Tipp: Viele Effektgeräte bieten MIDI-Mapping. Damit kannst du dieselben
Effekt-Presets unterschiedlichen Program-Change-Nummern zuweisen.
Zum Beispiel Programm 1 für Effekt-Preset 4, Programm 2 für Effekt-Preset
16 und Programm 3 wieder für Effekt-Preset 4.
7.2 Auswahl des MIDI-Kanals / Omni-Mode
MIDI bietet 16 Kanäle zum Steuern von bis zu 16 unterschiedlichen
Geräten mit einem MIDI-Controller. Dies ist vor allem im Studio oder für
Keyboarder nützlich. Bei einem Gitarrenamp mit einem FX-Setup jedoch
dürfte ein Kanal für die meisten Fälle reichen. Dabei muss am MIDI-Slave
(also der Amp) derselbe MIDI-Kanal ausgewählt werden wie am MIDIMaster (dem MIDI-Board), sonst reagiert der Amp nicht oder nicht richtig.
MIDI-Kanal
Röhren 1/2
Röhren 3/4
Röhren 5/6
1
FX-Loop
¢
¢
¢
¢
2
¢
¢
¢
{
3
¢
¢
£
¢
4
¢
¢
£
£
5
¢
£
¢
¢
6
¢
£
¢
£
7
¢
£
£
¢
8
¢
£
£
£
9
£
¢
¢
¢
10
£
¢
¢
£
11
£
¢
£
¢
12
£
¢
£
£
13
£
£
¢
¢
14
£
£
¢
£
15
£
£
£
¢
16
£
£
£
£
• 中文
• にほんご
• Español
• Italiano
Hinweis: Wenn du einen externen Effektprozessor benutzt, muss dieser
separat programmiert werden, denn die Learn-Funktion des TriAmp Mark
3 programmiert nur den Amp selbst (und keine externen Geräte). Das
heißt: Wenn du mit Program-Change Nr. 1 an deinem MIDI-Board (oder
dem TSM-432) einen Clean-Sound am TriAmp Mark 3 und einen Chorus/Reverb an deinen Effektprozessor aufrufen willst, muss das Effektgerät
erst „lernen“, dass es bei Empfang von Program-Change Nr. 1 diesen Effekt aufrufen soll. Wie dies geht, entnehme bitte der Bedienungsanleitung
deines Effektgerätes.
• Français
Übrigens: Solltest du den Programmiermodus ohne Speichern der
aktuellen Einstellungen verlassen wollen, drücke einfach die Learn-Taste
erneut (anstatt des MIDI-Board-Schalters).
• Die Noise-Gate-Taste zeigt nun den Status des MIDI-Omni-Mode an
und schaltet diesen ein und aus. Leuchtet die Noise-Gate-Taste, ist
der Omni-Mode aktiviert (Auslieferzustand, Empfang auf allen MIDIKanälen). Drücke die Noise-Gaste-Taste, wenn du den Omni-Mode
deaktivieren willst (Empfang auf einem bestimmten MIDI-Kanal).
• Nun kannst du mit FX-Loop in Einserschritten auf den nächsten MIDIKanal umschalten.
• Mit 5/6 wiederum bewegst du dich in Einserschritten durch die MIDIKanäle zurück.
• Die vier FX-Loop- und Power Amp Tube-Tasten zeigen den MIDI-Kanal
als binären Code wie folgt an:
• Deutsch
Empfängt der TriAmp Mark 3 nun einen Program-Change-Befehl über
den gewählten MIDI-Kanal (siehe unten), blinkt Learn kurz, und der
TriAmp ist entsprechend konfiguriert.
Die Learn-Taste blinkt und zeigt dadurch an, dass
bestimmte Programmierfunktionen den folgenden Tasten
zugewiesen sind (wenn du das MIDI-Setup nun verlassen
willst, drücke drei Sekunden lang Learn – die Taste erlischt,
deine Änderung werden gespeichert und der Amp geht in den StandardBetriebsmodus zurück):
• English
Die Programmierung des TriAmp Mark 3 ist sehr intuitiv. Willst du eine
Konfiguration von Kanal, Boost on/off, Noise-Gate on/off, FX-Loop on/
off und Endstufenröhren in einem Preset speichern, aktiviere einfach die
Einstellungen mit den Tasten am Amp, schalte den Amp durch kurzes
Drücken der MIDI-Learn-Taste scharf (Taste leuchtet) und drücke
anschließend den Schalter deines MIDI-Boards, mit dem du diese
Konfiguration aufrufen willst. Wenn die Learn-Taste erlischt, hat der
TriAmp Mark 3 deine Einstellungen in einem der 128 internen PresetSpeicherplätze gespeichert und einer Programmnummer auf deinem
MIDI-Board zugewiesen.
21
TriAmp Mark 3 – Manual 1.1
7.3 Factory-Reset
Keine LED leuchtet
Die Endstufenröhren funktionieren fehlerfrei.
Ein Factory-Reset, also das Zurücksetzen auf die Werkseinstellungen ist
selten nötig. Dennoch solltest du diesem Kapitel erhöhte Aufmerksamkeit
schenken, damit deine MIDI-Presets nicht versehentlich gelöscht werden.
Dauerleuchten einer LED
Ein Factory-Reset kann zum Beispiel nötig sein, wenn die MIDIKommunikation nicht mehr funktioniert und du dir über die Einstellungen
von MIDI-Kanal und Omni-Mode unsicher bist. Der Factory-Reset setzt
den MIDI-Kanal auf 1 zurück und aktiviert den Omni-Mode.
Dauerleuchten von zwei/vier LEDs
Der Factory-Reset wird ausgelöst, indem du beim Einschalten des Amps
die Tasten Learn und Boost gleichzeitig gedrückt hältst.
Vorsicht: Diese Prozedur ist für den Notfall gedacht. Alle gespeicherten
Einstellungen inklusive der 128 MIDI-Presets gehen dabei verloren!
8 TSC™ –Tube Safety Control
0UZLY[N\P[HYWPJR[VYLHK
V\[[\ILTH[JOPUN
TSC™ sorgt für eine höhere technische Stabilität
sowie ein längeres Leben der Endstufenröhren,
indem der Ruhestrom permanent automatisch
ILZ[)PHZ
V]LYJ\YYLU[
angepasst wird. So ist ein optimaler Sound
UVJ\YYLU[
garantiert und du kannst dich voll und
Z^P[JOLKVMM
ganz auf die anderen Features deines Amps
7V^LY(TW;\ILZ
konzentrieren. Es lassen sich zudem Röhren
einfach, schnell und sicher austauschen, denn
TSC™ übernimmt das mühselige Anpassen
des Ruhestroms vollautomatisch. Dies ist nicht nur im Fall eines
Defekts äußerst hilfreich, sondern auch bei der Beurteilung von Röhren
verschiedener Hersteller oder verschiedenen Typs.
TSC
™
Achtung: Bei Austausch der Röhren durch einen andern Röhrentyp (z.B.
EL34 durch KT88) wird empfohlen einen Reset des TSC-Moduls durchzuführen:
- Bei ausgeschaltetem Gerät den Standby-Schalter in Stellung Play bringen
- Gerät einschalten
- Mindestens drei Minuten warten
Diese Technik kann aber noch mehr: Mithilfe der sechs LEDs in der TSCSektion auf der Rückseite lassen sich die Betriebszustände der Röhren
ablesen. Jede LED ist der entsprechend positionierten Endstufenröhre
zugeordnet. TSC™ informiert aber nicht nur über den Betriebszustand der
Röhre, sondern ist auch in der Lage, eine Fehlerdiagnose durchzuführen
und gegebenenfalls defekte Röhren abzuschalten, um einen Ausfall des
Amps zu vermeiden. Zudem kannst du unter Verwendung eines Plektrums
mithilfe der TSC™-LEDs die Kennlinien der Röhren auslesen (siehe 8.2).
8.1 Automatische Statusanzeige
Dauerleuchten aller LEDs
Solange der Amp sich im Standbymodus befindet, leuchten alle LEDs.
Schaltest du den Standby-Schalter auf Play, erlöschen die LEDs nach
einigen Sekunden. Leuchten alle LEDs weiterhin, ist wahrscheinlich
die Anodensicherung defekt und muss ausgetauscht werden. Die
Anodensicherung kann trotz TSC™ durchbrennen, wenn eine Röhre
bereits vor dem Einschalten des Amps defekt ist, und TSC™ keine Zeit
bleibt, (nach Aufwärmen der Röhren) den Ruhestrom zu messen und die
defekte Röhre abzuschalten.
22
Falls nur eine LED leuchtet, erzeugt die betreffende Röhre Unterstrom
und wurde abgeschaltet. Falls die LED nach einigen Minuten nicht
erlischt, muss die betreffende Röhre ausgetauscht werden.
Entweder erzeugen die betreffenden Röhren Unterstrom und müssten
ausgetauscht werden, oder das entsprechende Röhrenpaar ist inaktiv
(d.h. die entsprechende Power Amp Tube-Taste an der Vorderseite ist
ausgeschaltet).
Eine LED blinkt, die nebenan leuchtet
Die der blinkenden LED entsprechende Röhre erzeugt Überstrom und
wurde abgeschaltet. Die Röhre muss ausgetauscht werden. Da das
beste Sound-Ergebnis in den Endstufen des TriAmp Mark 3 immer nur
aus einem gemeinsam arbeitenden Röhrenpaar erzielt wird, wird die
entsprechende zweite Röhre mit abgeschaltet (durch Dauerleuchten
der LED angezeigt), damit die anderen Röhrenpaare ohne Soundverlust
weiterarbeiten können. Du brauchst also die zweite Röhre des Paares
(die der dauerleuchtenden LED entspricht) nicht auszutauschen, da sie
einwandfrei funktioniert.
So kann das intelligente TSC deinen Gig retten, denn wenn in einem
konventionellen Amp eine Röhre ausfällt, spricht dessen Sicherung an,
und kann erst nach Austausch von Röhre und Sicherung wiederverwendet
werden. Dank TSC kann der TriAmp Mark 3 jedoch völlig unbedenklich
weiter betrieben werden.
Sei dir jedoch klar darüber, dass das Abschalten eines Röhrenpaares
die Leistung des Amps reduziert. Zudem wirst du Kanäle und MIDIPresets, die nur das betreffende Röhrenpaar verwenden, auf ein anderes
Röhrenpaar umschalten müssen. Vergiss also nicht, nach dem Gig die
defekte Röhre umgehend austauschen zu lassen.
8.2 Manuelles Auslesen
TSC™ erlaubt das Auslesen der Kennlinien – somit kannst du prüfen,
ob die drei Röhrenpaare der Endstufe optimal aufeinander abgestimmt
sind. Dazu steckst du einfach dein Plektrum in den dafür vorgesehenen
Schlitz neben den LEDs. Hierfür muss der Amp eingeschaltet sein (nicht
auf Standby!). Alle LEDs blinken mehrmals. Die Anzahl der Blinkzeichen
jeder LED gibt nun Aufschluss über die Kennlinie sowie den Ruhestrom
der entsprechenden Röhre.
Dabei sollte die Anzahl der Blinkzeichen der LEDs eines Röhrenpaares
(1/2, 3/4, 4/5) nicht um mehr als 4 Blinkzeichen voneinander abweichen.
Nur dann kann TSC den optimalen Sound garantieren. Bei einer
höheren Abweichung empfehlen wir, das alte Röhrenpaar durch ein
Paar gematchter Röhren zu ersetzen. Dies ist allerdings bloß aus rein
klanglicher Sicht in Betracht zu ziehen – technisch hingegen ergeben
sich keine Nachteile. Aber optimal gematchte Röhren, also Röhren mit
gleicher Kennlinie, klingen einfach besser!
Achtung: TSC™ kümmert sich auch ums Ein- und Ausschalten der jeweiligen Röhrenpaare. Wenn du dich also nur für ein Röhrenpaar entschieden
hast, zeigt TSC an, dass vier Röhren (d.h. die beiden nicht verwendeten
Röhrenpaare) ausgeschaltet sind. Die LEDs zeigen nur den korrekten Sta-
TriAmp Mark 3 – Manual 1.1
tus an, wenn der Amp inaktiv ist. Während du spielst, können die LEDs
hin und wieder blinken, was jedoch keine Hinweise zum Zustand von
Amp oder Röhren gibt. Falls du nur eine Röhre eines Röhrenpaars ersetzt,
achte bitte darauf, dass die Kennlinie der Austauschröhre der ihres Gegenparts entspricht. Austauschröhren sind im Fachhandel erhältlich
Kabel verwenden willst, brauchst du ein Netzteil. Um möglichst große
Unabhängigkeit zu ermöglichen, verfügt das TSM-432 über eine
innovative Netzbuchse zum Anschluss eines beliebigen Gleich- oder
Wechselstrom-Netzteils, das zwischen 9 und 15 Volt Spannung und
mindestens 250 mA liefert.
Vorsicht: Der Austausch von Röhren sollte durch technisch qualifiziertes
Fachpersonal erfolgen.
Controller Inputs 1 und 2: An diese beiden Klinkenbuchsen kannst
du Fußschalter und/oder Pedaleffekte anschließen und damit weitere
Funktionen des TriAmp Mark 3 steuern. Mit einem Fußschalter kannst du
sämtliche Tasten des Amps fernsteuern und die Frontblendenbeleuchtung
ein- oder ausschalten. Mit einem Pedaleffekt kannst du sogar die
Helligkeit der Beleuchtung dimmen. Das mag dem einen oder anderen
als Gimmick erscheinen, aber wir bekamen entsprechende Anfragen von
TriAmp-Nutzern ... und da dachten wir uns: „Warum eigentlich nicht?“
9 TSM-432 – das mitgelieferte MIDIBoard
Wie du den diversen Steuereingängen Funktionen zuweist, wird
weiter unten erklärt (Abschnitt 9.4 Control 1 und 2 zuweisen). Im
Auslieferungszustand schaltet Control 1 das Noise-Gate und Control 2
den FX-Loop ein oder aus.
9.2 Stomp-Box-Mode
Tipp: Du kannst vom Preset-Mode aus schnell in den Stomp-Box-Mode
wechseln, indem du die Tasten FX und B gedrückt hältst. Wiederhole diese Prozedur, um wieder in den Preset-Mode zu gelangen. Diese Funktion ist temporär: Sobald das TSM-432 ausgeschaltet wird, fährt es beim
nächsten Einschalten im per Schiebeschalter ausgewählten Modus hoch.
MIDI Out: Verbinde diese Buchse mithilfe des beiliegenden 7-Pin-Kabels
mit der MIDI-In-Buchse des TriAmp Mark 3. Falls du ein Standard-5-PinKabel verwendest, beachte bitte den Abschnitt „Stromversorgung“ weiter
unten.
Im Preset-Mode stehen dir die 128 MIDI-Presets des TriAmp Mark 3 zur
Verfügung. Außerdem kannst du mit FX den FX-Loop aktivieren oder
deaktivieren ohne dafür ein neues Preset zu programmieren. Mehr hierzu
erfährst du im Kapitel „MIDI-Presets und MIDI-Setup“.
MIDI In: Um den TriAmp Mark 3 mit dem TSM-432 zu bedienen,
brauchst du die MIDI-In-Buchse nicht unbedingt. Du kannst hier andere
MIDI-Geräte ans TSM-432 anschließen. Dadurch wird das TSM-432 zu
einem echten MIDI-Merger, der die MIDI-Nachrichten vom MIDI-In zum
MIDI-Out überträgt.
Preset-Tasten A, B, C und D: Hiermit aktivierst du eines der vier Presets
innerhalb der aktuell angewählten Bank. Die den jeweiligen Tasten A, B,
C und D zugewiesenen LEDs zeigen das aktive Preset an.
Bank Up/Down: Im Display des TSM-432 wird die Nummer der
aktuell angewählten Bank angezeigt. Um ein Preset einer anderen
Bank aufzurufen, musst du zuvor die entsprechende Bank mit den Upund Down-Tasten anwählen. Währenddessen kannst du weiterhin im
Stromversorgung (Power Supply): Wenn du ein Standard-5-Pin-
9.3 Preset-Mode
(A, B, C, D, Bank up/down, FX)
• にほんご
• Español
• Italiano
Das TSM-432 benötigt kein separates Netzteil, da es über die 7-polige
MIDI In-Buchse des TriAmp Mark 3 mit Phantomspeisung versorgt wird.
Ist das TSM-432 korrekt angeschlossen, durchläuft es beim Einschalten
des TriAmp Mark 3 folgende Startsequenz: Im Display erscheint die
Versionsnummer und alle LED blinken nacheinander von links nach
rechts auf. Danach erscheint im Display die „1“, wenn das TSM-432 im
Preset-Mode ist oder „Sb“, wenn es im Stomp-Box-Mode ist. In beiden
Fällen leuchtet die LED unter der Taste A.
• Français
Hinweis: Die den entsprechenden Tasten zugewiesenen LEDs zeigen
nicht immer den angewählten Kanal und den Stomp-Boost-Status an.
Wenn du am Amp selbst einen anderen Kanal anwählst oder den Boost
aktivierst, erkennt das TSM-432 die Änderungen nicht.
• Deutsch
9.1 Anschlüsse
Im Stomp-Box-Mode sind die sechs Tasten (1A, 1B, 2A, 2B, 3A und 3B)
den sechs Kanälen des TriAmp Mark 3 zugewiesen. Die Tasten sind am
TSM-432 entsprechend beschriftet: 1, 2 und 3 für die drei Preamps, A/B
für die beiden Kanäle. Zusätzlich und unabhängig davon kannst du mit
einer weiteren Taste den Stomp-Boost aktivieren oder deaktivieren.
• English
Das TSM-432 ist spezifisch auf den TriAmp Mark 3 zugeschnitten und
bietet zwei Modi: den Stomp-Box-Mode und den Preset-Mode. Im StompBox-Mode kannst du mit den Tasten des TSM-432 die sechs Kanäle des
Amps anwählen und den Stomp-Boost aktivieren. Im Preset-Mode des
TSM-432 stehen dir 128 MIDI-Presets zur Verfügung. Wir empfehlen, mit
dem Stomp-Box-Mode zu beginnen, um den TriAmp Mark 3 erst mal
kennenzulernen, bevor du dich im Preset-Mode in die weite Welt der
unbegrenzten Möglichkeiten wagst.
Mit dem Schiebeschalter über den MIDI-Anschlüssen auf der Rückseite
des TSM-432 kannst du zwischen Preset-Mode und Stomp-Box-Mode
umschalten. Stellst du den Schiebeschalter auf Stomp-Box-Mode,
erscheint im Display „Sb“.
• 中文
(1A, 1B, 2A, 2B, 3A, 3B, Boost)
Das TSM-432 MIDI-Board ist eine Weiterentwicklung des FSM-432, das
du vielleicht schon vom Hughes & Kettner SwitchBlade, CoreBlade oder
GrandMeister kennst. Wenn du ein FSM-432 besitzt, kannst du damit
auch die Presets des TriAmp Mark 3 anwählen, falls dein TSM-432 einmal
nicht zur Verfügung stehen sollte.
23
TriAmp Mark 3 – Manual 1.1
aktuellen Preset spielen, denn solange die Bank-Nummer im Display des
TSM-432 blinkt, ist die neue Bank nicht aktiviert. Dies geschieht erst,
wenn du anschließend ein Preset darin aufrufst, indem du A, B, C oder D
drückst. Anders hingegen ist es im Direct-Mode.
Direct-Mode: Im Direct-Mode kannst du über Bank Up/Down direkt ein
neues Preset aufrufen. Im Direct-Mode wartet das TSM-432 nicht auf
Folgende Funktionen können zugewiesen werden:
Name
MidiControlNummer
Bereich
Hinweis
Mute
9
0 – 63 = aus, 64 – 127 = ein
Diese Funktion ist nur
über MIDI verfügbar.
FX-Loop
55
0 – 63 = aus, 64 – 127 = ein
FX-Serial
54
0 – 63 = parallel, 64 – 127 = seriell
(Up) oder Bank 15 (Down).
StompBoost
64
0 – 63 = aus, 64 – 127 = ein
Den Direct-Mode aktivierst du wie folgt:
Noise-Gate
63
0 – 63 = aus, 64 – 127 = ein
Kanäle
31
0 – 12 = Kanal 1 (Amp 1A)
13 – 37 = Kanal 2 (Amp 1B)
38 – 63 = Kanal 3 (Amp 2A)
64 – 87 = Kanal 4 (Amp 3A)
88 – 112 = Kanal 5 (Amp 3A)
113 – 127 = Kanal 6 (Amp 3B)
Um dir die Anwahl
von Kanälen über
MIDI-Befehle mit
anderen Controllern
zu vereinfachen,
empfehlen wir, Werte
zu verwenden, die
du dir leicht merken
kannst, z. B.:
Kanal 1 = 10
Kanal 2 = 30
Kanal 3 = 50
Kanal 4 = 80
Kanal 5 = 100
Kanal 6 = 120
Röhren 1/2
58
0 – 63 = aus, 64 – 127 = ein
Wenn nur ein
Röhrenpaar aktiv ist,
kannst du es nicht
ausschalten.
Röhren 3/4
59
0 – 63 = aus, 64 – 127 = ein
Röhren 5/6
60
0 – 63 = aus, 64 – 127 = ein
Helligkeit
der
Frontblende
88
0 – 127, 0 = min (aus), 127 = max
deine Eingabe – sprich: das Drücken von Taste A, B, C oder D – sondern
schaltet direkt um, z.B. von Preset B in Bank 16 auf Preset B in Bank 17
• Halte die FX-Taste gedrückt und drücke Preset A.
• Lass zuerst Preset A los, dann FX. Der Dezimalpunkt im Display
leuchtet.
Mit derselben Prozedur kannst du den Direct-Mode wieder deaktivieren.
Hinweis: Auch der Direct-Mode ist temporär. Sobald das TSM-432 ausgeschaltet wird, fährt es beim nächsten Einschalten im Standard-Mode hoch.
Hinweis: Die den entsprechenden Tasten zugewiesenen LEDs zeigen
nicht immer den angewählten Kanal und den Stomp-Boost-Status an.
Wenn du am Amp selbst einen anderen Kanal anwählst oder den Boost
aktivierst, erkennt das TSM-432 die Änderungen nicht.
9.4 Control 1 und 2 zuweisen
Den beiden Control-Eingängen kannst du wie folgt Control-Nummern
zuweisen.
Control 1: Rufe den Editier-Modus auf, indem du die Tasten FX und D
solange gleichzeitig gedrückt hältst, bis im Display die Midi-ControlNummer erscheint und der Punkt hinter der zweiten Ziffer blinkt. Nun
kannst du mit den Tasten Up und Down eine andere Midi-ControlNummer anwählen. Die gewünschte Nummer speicherst du, indem du
Taste D drückst. Der Punkt hört auf zu blinken und das TSM-432 fährt in
den normalen Betriebszustand zurück.
Control 2: Halte die Tasten FX und C solange gleichzeitig gedrückt, bis
im Display die Midi-Control-Nummer erscheint und der Punkt hinter der
zweiten Ziffer blinkt. Nun kannst du mit den Tasten Up und Down eine
andere Control-Nummer anwählen. Drücke Taste C, um deine Wahl zu
speichern und den Editier-Modus zu verlassen.
Mit einem normalen
Fußschalter kannst
du die Beleuchtung
ein- (größte
Helligkeit) und
ausschalten, mit
einem Fußpedal
kannst du sie
von max. zu min.
dimmen.
Schalter oder Pedal – was ist der Unterschied?
Ein Schalter kennt nur zwei Zustände: aus (0) und ein (127). Somit hast
du hiermit nur die Wahl zwischen dem kleinsten und höchsten Wert.
Ein Pedal hingegen kann jeden Wert zwischen 0 und 127 senden. Das
bedeutet jedoch nicht, dass du mit einem Pedal nicht auch schalten
kannst – befindet es sich unterhalb der mittleren Position, schaltet es die
zugewiesene Funktion aus, befindet es sich darüber, schaltet es sie ein.
10 AES (nur bei EU-Geräten)
Gemäß Verordnung Nr. 1275/2008/EG müssen elektrische und
elektronische Geräte mit einer Energiespar-Vorrichtung versehen werden,
die das Gerät nach einer bestimmten Zeit der Nichtbenutzung abschaltet.
Diese Aufgabe übernimmt beim TriAmp Mark 3 das AES, das über den
Minischalter neben der Speaker-Buchse aktiviert und deaktiviert werden
kann. Im Auslieferzustand ist das AES aktiviert – der Minischalter steht
links. In dieser Einstellung schaltet sich der Amp nach einer Ruhephase
von ca. 90 Minuten selbsttätig aus. Die Ruhephase wird zurückgesetzt
und beginnt jedes Mal wieder von vorne, sobald am Eingang des Amps
ein Signal anliegt (z.B. wenn ein kurzer Ton gespielt wird). Ein niedriges
Signal reicht dazu bereits aus, und die 90 Minuten bis zum Abschalten
beginnen von vorne. Hat AES den Amp ausgeschaltet, kann er durch Ausund wieder Einschalten des Power/On- bzw. Standby-Schalters erneut in
Betrieb genommen werden.
24
TriAmp Mark 3 – Manual 1.1
11 Technische Daten
Bis zu 150 Watt
Input-Buchse
6,3 mm Klinke (1/4"), unsymmetrisch
Maximale Leistungsaufnahme
460 Watt
Impedanz
1 M-Ohm
Einschaltstrom
100 V: 27 A , 120 V: 26 A , 220-240 V: 23 A
+/-10%
Maximaler Eingangspegel / 1 kHz
(Amp 1A)
0 dBV
Netzspannungs-Toleranzbereich
Umgebungstemperaturbereich
im Betrieb
0° bis +35° C
Eingangsempfindlichkeit / 1 kHz
(EQ in Mittelstellung, Pegel in
Maximalstellung)
Boost aus
Boost ein
Netzsicherung, 100 Volt
250 V / T 5 A
Amp 1A: -33 dBV
Amp 1A: -37 dBV
Netzsicherung, 120 Volt
250 V / T 5 A
Netzsicherung, 220-230 Volt
250 V / T 2 A
Netzsicherung, 240 Volt
250 V / T 2 A
Anodensicherung
T 800 mA
Sicherung der Röhrenheizung
TT 15 A (Schurter 7040.3210)
Funktion
9440008
7025/E83CC
(ECC83), High-Grade
Slowakei
Eingangsröhre
(in allen Kanälen aktiv)
2
9440001
12AX7A-C, select.
China
Kanal 1B (Preamp)
3
9440007
ECC83, select.
Slowakei
Kanal 1A-1B (Preamp
Output)
4
9440007
ECC83, select.
Slowakei
Kanal 2A-2B-3A-3B
(Preamp)
5
9440007
ECC83, select.
Slowakei
Kanal 2A-2B (Preamp
Output)
6
9440007
ECC83, select.
Slowakei
Kanal 3A (Preamp
Output)
7
9440007
ECC83, select.
Slowakei
Kanal 3B (Preamp)
8
9440007
ECC83, select.
Slowakei
FX Buffer
(in allen Kanälen aktiv)
9
9440007
ECC83, select.
Slowakei
Endstufentreiber
(in allen Kanälen aktiv)
10
6000122
EL34B-STR, select.
China
Endstufenröhren 1/2
Amp 3A: -76 dBV
Amp 3A: -76 dBV
Amp 3B: -78 dBV
Amp 3B: -89 dBV
FX-Return-Buchse
6,3 mm Klinke (1/4"), unsymmetrisch
Impedanz
22 kOhm
Maximalpegel / 1 kHz
+14 dBV
Empfindlichkeit / 1 kHz (Master
auf Mittelstellung, FX-Level auf
Maximalstellung)
-10 dB-Schalter
deaktiviert
-10 dB-Schalter aktiviert
0 dBV
-10 dBV
Power Amp In-Buchse
6,3 mm Klinke (1/4"), unsymmetrisch
Impedanz
350 kOhm
Empfindlichkeit / 1 kHz (je nach
Kanal)
+6 bis +10 dBV
• にほんご
Herkunft
Amp 2B: -74 dBV
Ausgänge
Red Box DI Out
XLR, symmetrisch
Impedanz
2 kOhm
Ausgangspegel
0 dBV (symmetrisch)
Maximaler Ausgangspegel
+12 dBV
11
6000122
EL34B-STR, select.
China
Endstufenröhren 1/2
FX Send-Buchse
6,3 mm Klinke (1/4"), unsymmetrisch
12
6000120
6L6GC-STR, select.
China
Endstufenröhren 3/4
6000120
6L6GC-STR, select.
China
Endstufenröhren 3/4
-10 dB-Schalter
deaktiviert
-10 dB-Schalter aktiviert
13
(Maximale Lautstärke, EQ auf
Mittelstellung)
14
6000120
6L6GC-STR, select.
China
Endstufenröhren 5/6
Impedanz
2,2 kOhm
680 Ohm
Maximalpegel / 1 kHz
-2 dBV
+8 dBV
15
6000120
6L6GC-STR, select.
China
Endstufenröhren 5/6
Power Amp Out-Buchse
6,3 mm Klinke (1/4"), unsymmetrisch
Maximalpegel / 1 kHz
+20 dBV
MIDI
MIDI In
7-Pin (5-Pin kompatibel)
20 V Gleichstrom Phantomspeisung (150 mA)
MIDI Out/Thru
5-Pin
Mechanische Daten
Endstufenröhren* / Ausgangsleistung
8 Ohm / THD=10%
8 Ohm / THD=5%
2x EL34
84 Watt
34 Watt
2x 6L6
72 Watt
30 Watt
4x 6L6
126 Watt
93 Watt
2x 6L6 + 2x EL34
132 Watt
95 Watt
4x 6L6 + 2x EL34 (empfohlen)
145 Watt
116 Watt
Abmessungen (BxHxT)
740 x 393 x 254 mm
Gewicht
22 kg / 48.5 lbs.
• Español
Typ
Amp 2B: -74 dBV
• Italiano
1
Art.-Nr.
Amp 2A: -56 dBV
• Français
Nr.
Amp 1B: -49 dBV
Amp 2A: -56 dBV
• Deutsch
Röhren
Amp 1B: -49 dBV
• English
Ausgangsleistung
• 中文
Eingänge
Allgemeine elektrische Daten
*im Auslieferungszustand
25
Consignes de sécurité
importantes ! A lire avant de se
connecter !
Ce produit a été construit conformément à la norme
IEC 60065 par le fabricant et a quitté l’usine en bon
état de marche. Pour garantir son intégrité et un
fonctionnement sans risque, l’utilisateur se doit de
suivre les conseils et les avertissements préconisés dans
cette notice d’utilisation. Les unités sont conformes
à la classe de protection 1 (protection par mise à
la terre). En cas d’utilisation de ce produit dans un
véhicule terrestre, un navire ou un avion, ou encore
à une altitude supérieure à 2 000 mètres, il convient
de prendre en considération les normes de sécurité
suivantes, en plus de la norme IEC 60065.
ATTENTION : Afin d’éviter tout risque d'incendie et
d'électrocution, n'exposez pas cet appareil à l’humidité
ou à la pluie. N’ouvrez pas le boîtier ; les pièces se
trouvant à l’intérieur ne nécessitent pas d’entretien de
la part des utilisateurs. Adressez-vous à un spécialiste
qualifié pour procéder à l'entretien de l'appareil.
Ce symbole, quel que soit l’endroit où il
apparaît, vous signale des pièces sous tension
non isolées dans le boîtier. Une tension
suffisante pour présenter un risque d’électrocution.
Ce symbole, quel que soit l’endroit où il
apparaît, vous signale des pièces sous tension
accessibles depuis l’extérieur du boîtier. Tous les
câbles extérieurs raccordés à un composant marqué de
ce symbole doivent être de type préfabriqués et
conformes aux spécifications du fabricant ou doivent
avoir été installés par des spécialistes qualifiés.
Ce symbole, quel que soit l’endroit où il
apparaît, vous signale des instructions
importantes relatives à l’utilisation ou l’entretien
de l’appareil à lire dans les documents l’accompagnant.
Lisez la notice d’utilisation.
Ce symbole, quel que soit l’endroit où il
apparaît, vous signale un risque de brûlure dû à
une surface chaude. Ne touchez pas cette
surface afin d’éviter de vous brûler.
• Lisez ces instructions.
• Conservez ces instructions.
• Prenez en compte tous les avertissements et toutes
les instructions mentionnés sur le produit ou dans
cette notice d’utilisation.
• N’utilisez pas ce produit à proximité de l’eau. Ne le
placez pas près de l’eau, d’une baignoire, d’un bassin,
d’un évier, d’une surface humide, d’une piscine ou
d’une pièce humide.
• Ne mettez pas d’objet contenant du liquide sur
l’appareil, par exemple, un vase, un verre ou une
bouteille, etc.
• Nettoyez-le exclusivement avec un chiffon sec.
• N’enlevez pas le boîtier, ne serait-ce que
partiellement.
• La tension de fonctionnement de l’appareil doit
être réglée de manière à correspondre à la tension
d’alimentation de l’endroit où vous vous trouvez.
Si vous n’êtes pas sûr de connaître la tension
d’alimentation, demandez à votre revendeur ou à la
compagnie d’électricité locale.
• Afin de réduire le risque d’électrocution, vous
ne devez jamais supprimer la mise à la terre
de l’appareil. Utilisez uniquement le câble
d’alimentation fourni avec le produit et maintenez la
broche centrale de la prise (mise à la terre) en état de
fonctionnement. Ne négligez pas la sécurité offerte
par les prises polarisées ou avec mise à la terre.
• Protégez le câble d’alimentation afin d’éviter
que quelqu’un marche dessus ou qu’il soit pincé,
notamment près de la prise, de la prise murale ou à la
sortie de l’appareil même ! Les câbles d’alimentation
doivent être tout le temps maniés avec précaution.
Vérifiez régulièrement que le câble n’est pas fendu ou
qu’il ne présente pas de signe d’usure, en particulier
près de la prise et à la sortie de l’appareil.
• N’utilisez jamais de câble d’alimentation usé.
• Débranchez l’appareil en cas d’orage ou si vous ne
l’utilisez pas pendant une longue période.
• Débranchez l’appareil uniquement en le tenant par la
prise au niveau de la prise murale ou de la rallonge.
L’appareil doit être placé de telle manière à ce qu’il
puisse être débranché facilement à tout moment.
• Fusibles : si nécessaire, remplacez-les uniquement
par des fusibles de type IEC127 (5x20 mm). Il
est interdit d’utiliser des fusibles bricolés ou de
raccourcir le porte-fusible. Seul un personnel qualifié
est habilité à remplacer les fusibles.
• Confiez tous les travaux d’entretien à des spécialistes
qualifiés. Il est nécessaire d’effectuer de tels travaux
lorsque l’unité a été endommagée, comme par
exemple dans les cas suivants :
- Lorsque le câble d’alimentation est endommagé ou
effiloché.
- Si du liquide a pénétré ou un objet est tombé dans le
boîtier.
- Si l’appareil a été exposé à la pluie ou à l’humidité.
- Si l’appareil ne fonctionne pas correctement alors que
vous avez suivi toutes les instructions à la lettre.
- Si l’appareil est tombé ou que le boîtier est
endommagé.
• En cas de raccordement de haut-parleurs à cet
appareil, il faut veiller à ne pas descendre sous
l’impédance minimale indiquée sur ledit appareil ou
dans la présente notice. Les câbles employés doivent
présenter une section suffisante, qui soit conforme
aux réglementations locales en vigueur.
• Ne l’exposez pas directement aux rayons du soleil.
• Ne l’installez pas à proximité d’une source de
chaleur, telle qu’un radiateur, une grille de chauffage,
un four ou tout autre appareil susceptible de produire
de la chaleur.
• Ne masquez pas les bouches d’aération. Installez
l’appareil conformément aux instructions du
fabricant. Il ne doit pas être placé dans un
emplacement confiné, comme un rack ou une
console, sauf si une ventilation suffisante est garantie.
• Si vous déplacez l’appareil, attendez qu’il soit à
température ambiante avant de le démarrer, sinon
de la condensation peut se former à l’intérieur et
endommager l’appareil.
• Ne posez pas de d’objet à flamme ouverte sur
l’appareil, comme par exemple une bougie allumée.
• L'appareil doit être situé à 20 cm minimum des murs,
il ne doit en aucun cas être couvert et il convient de
prévoir un espace d'au moins 50 cm au-dessus de
l'appareil.
• Utilisez l’appareil uniquement avec un chariot,
un support, un trépied, des fixations ou une table
recommandés par le fabricant ou vendus avec le
produit. Si vous utilisez un chariot, maniez-le avec
précaution afin d’éviter tout risque de blessure s’il se
renverse.
• Utilisez uniquement les accessoires recommandés
par le fabricant. Cette consigne concerne toute
sorte d’accessoires, qu’il s’agisse de couvercles de
protection, de sacs de transport, de supports ou de
dispositifs de fixation au mur ou au plafond. Si vous
fixez un accessoire à l’appareil, suivez toujours les
instructions d’utilisation du fabricant. N’utilisez pas
d’autres points de fixation que ceux préconisés par
le fabricant.
Version 2.3b 01/2015
• Cet appareil NE convient PAS aux personnes dont
les capacités motrices, sensorielles ou mentales
sont déficientes (y compris les enfants) ou aux
personnes ne disposant pas de l’expérience ou des
connaissances nécessaires pour faire fonctionner le
présent appareil. Cet appareil doit dans tous les cas et
être tenu constamment hors de portée des enfants de
moins de quatre ans.
• N’insérez jamais d'objets à travers les grilles du
boîtier, car ils pourraient toucher des pièces sous
tension dangereuses ou provoquer un courtcircuit pouvant causer un risque d’incendie ou
d’électrocution.
• Cet appareil est capable de délivrer un niveau de
pression acoustique de 90 dB, pouvant ainsi causer
des troubles irréversibles de l’audition ! L’exposition
continue à une nuisance sonore peut provoquer une
perte d’audition permanente. Portez des protections
auditives adéquates si vous vous exposez de manière
continue à un tel niveau de pression acoustique.
• Le fabricant garantit la sécurité, la fiabilité et
l’efficacité de fonctionnement de son produit
uniquement si :
- l’assemblage, l’extension, le réajustement, la
modification ou la réparation de l’appareil ont été
effectués par le fabricant ou par des personnes
agréées pour ce genre de travaux.
- l’installation électrique concernée est conforme aux
normes IEC (ANSI).
- l’unité est utilisée conformément aux instructions
d’utilisation.
Avant la mise en service
• Avant la mise en service, lisez attentivement
la présente notice, consignes de sécurité
comprises.
• Le fabricant décline toute responsabilité en
cas de dommages à l’appareil ou à d’autres
appareils, qui résulteraient d’une utilisation
inappropriée.
• Avant le raccordement au secteur, il convient
de s’assurer que l’interrupteur marche/arrêt
et l’interrupteur de stand-by sont coupés,
et que la valeur de tension affichée au dos
de l’appareil correspond à la tension secteur
locale.
• Ne faites jamais fonctionner l’ampli à vide
(sans haut-parleur raccordé) ! Dans ce cadre,
vérifiez l’impédance des haut-parleurs et
raccordez-les toujours à une sortie Speaker
Out présentant l’impédance adaptée.
• Avant de faire fonctionner votre nouvel
ampli, souvenez-vous encore d’une chose :
cet appareil est puissant et des volumes
élevés peuvent entraîner des troubles de
l’audition. Pour éviter toute surprise auditive
désagréable, prenez donc l’habitude de
ramener le potentiomètre de volume principal
(Master) sur zéro avant de mettre l’ampli sous
tension !
D’emblée, il était clair pour nous que l’évolution du TriAmp MK II
représenterait un défi. Nous nous devions en effet de créer quelque
chose de radicalement nouveau, un ampli qui imposerait de nouvelles
références en matière de son, de puissance et de design, sans pour autant
nous éloigner excessivement de la version originale. Nos ingénieurs ont
ainsi fait en sorte de conserver chacun des détails qui avaient fait du
TriAmp MK II un premier choix pour les guitaristes, tout en modernisant
chacune de ses caractéristiques spécifiques. Résultat : un ampli inédit,
comme jamais encore le monde de la guitare n’en avait connu – le
TriAmp Mark 3.
Parmi ceux-ci, le TriAmp Mark 3 n’offre pas uniquement des sons
classiques : la possibilité de combiner canaux et étages de sortie dans un
éventail inédit vous permet de créer vos propres sons nouveaux – les sons
de demain. Jamais encore un ampli n’avait proposé une telle multiplicité
de sons, propice à l’inspiration.
• にほんご
• Español
Pour chacun des six canaux, les niveaux de Gain et de volume peuvent
être réglés séparément. Chaque canal possède son propre égaliseur 3
bandes, ainsi qu’un Stomp Boost adapté à son caractère spécifique.
Les 12 sons de base peuvent être appelés par simple pression sur un
bouton. Associés aux 3 paires de lampes des étages de sortie, également
sélectionnables par pression sur un bouton, ce sont donc 3x12=36 sons
différents, à 50 watts de puissance, qui sont disponibles. Si vous ajoutez
une deuxième paires de lampes (et grimpez ainsi jusqu’à 100 watts de
puissance), vous disposez alors de 36 options (paires 1+2, paires 1+3,
paires 2+3). Et avec la troisième paire de lampes (soit 150 watts !), vous en
aurez 12 de plus ! Au final, vous avez droit à 84 sons différents !
• Italiano
Le TriAmp Mark 3 offre non seulement 3 préamplis indépendants dotés de
2 canaux chacun, mais aussi 3 étages de sortie également indépendants.
Chacune des 3 paires de lampes des étages de sortie peut recevoir des
lampes différentes. En outre, chaque paire peut être affectée au choix à
n’importe lequel des 6 canaux – y compris via le MIDI. Mais ce n’est pas
tout : vous pouvez même affecter différentes paires de lampes à chaque
canal et ainsi, mixer les différents types de lampes d’étage de sortie.
• Français
1 Avant-propos
Une nouvelle ère dans l’histoire du son à lampes
• Deutsch
Avant-propos.............................................................................. 27
Aide au démarrage rapide .......................................................... 28
Principes d’utilisation ................................................................. 28
Amplis et canaux........................................................................ 29
Face avant .................................................................................. 29
Face arrière ................................................................................ 31
Presets MIDI et paramétrage MIDI ............................................. 32
Système Tube Safety Control (TSC™) ......................................... 34
Pédalier MIDI TSM-432.............................................................. 35
Système AES............................................................................... 36
Caractéristiques techniques ........................................................ 37
• English
1
2
3
4
5
6
7
8
9
10
11
• 中文
TriAmp Mark 3 – Manual 1.1
27
TriAmp Mark 3 – Manual 1.1
;VKVHTHU\HSYLHKV\[VM[OL[\IL
TH[JOPUNPUZLY[HWPJRPU[V[OLZSV[
HUKJV\U[[OLMSHZOLZVMLHJO3,+
;OLKPMMLYLUJLPUMSHZOLZZOV\SKIL
SLZZ[OHU^P[OPULHJOWHPY[V
N\HYHU[LLILZ[ZV\UK7SLHZLYLMLY
[V[OLTH[JOPUNJOHY[PU[OLTHU\HS
Tube Status Monitor
;:*H\[VTH[PJHSS`PUKPJH[LZ[OLZ[H[\ZVM[OL[\ILZ
HZZVVUHZ[OLHTWPZPUWSH`TVKL:;(5+)@Z^P[JO
PU\WWLYWVZP[PVU0M[OL3,+ZZ[H`VUPUWSH`TVKL
WSLHZLJOLJR[OLHUVKLM\ZL
(SS3,+ZVMMTLHUZ!ILZ[IPHZUVYTHSVWLYH[PVU
6UL3,+VUTLHUZ!UVJ\YYLU[[\ILPZIYVRLUHUK
OHZ[VILYLWSHJLK
6UL3,+MSHZOLZVUL3,+PZVU![OLMSHZOPUN3,+
PUKPJH[LZH[\IL[OH[JH\ZLZV]LYJ\YYLU[[OLV[OLY
3,+PUKPJH[LZHZ^P[JOLKVMM[\IL[VWYV[LJ[[OLHTW
7SLHZLYLWSHJL[OL[\IL[OH[JH\ZLZV]LYJ\YYLU[
;^V3,+ZVUTLHUZ!WHPYVM[\ILZPZZ^P[JOLKVMM
MADE IN GERMANY
SPEAKERS
16 Ohms
1x 8 Ohms
or 2x 16 Ohms
RED BOX™ AE
4 Ohms
Ambience emulated DI Out
*HIPUL[
4VKL
3V^
*\[
0UZLY[N\P[HYWPJR[VYLHK
V\[[\ILTH[JOPUN
7V^LY;\ILZ!
TSC™
MIDI
ILZ[)PHZ
V]LYJ\YYLU[
UVJ\YYLU[
NOISE GATE
Hard
In
Out/Thru
Z^P[JOLKVMM
FX LOOP
Soft
MASTER INSERT
FX Level
Send
Return
*(<;065!9LHYWHULSHUK
]LU[PSH[PVUVWLUPUNZTH`
ILJVTL[VVOV[[V[V\JO
3LH]LLUV\NOZWHJLMVY
WYVWLY]LU[PSH[PVU
;VYLK\JL[OLYPZRVMLSLJ[YPJZOVJRNYV\UKPUNVM
[OLJLU[LYWPUVM[OPZWS\NT\Z[ILTHPU[HPULK
9LWSHJPUNM\ZLZT\Z[VUS`ILJHYYPLKV\[I`
X\HSPMPLKZLY]PJLWLYZVUULS9LWSHJLM\ZLZVUS`
^P[O[`WLHUKYH[PUNZOV^UOLYL
Bright
4HPUZ=VS[HNL
Power Amp In
=e
¶K)
=e
7V^LY(TW;\ILZ
Preamp Out
*(<;065!9PZRVMLSLJ[YPJ
ZOVJR+VUV[VWLU9LMLY
ZLY]PJPUN[VX\HSPMPLK
ZLY]PJLWLYZVUULS
PANEL
Dark
FX Serial
(,:
VUVMM
TSM-432
Serial No.
;90(474HYR
4HPUZ-\ZL!=;(3/a
4H_7V^LY*VUZ\TW[PVU>
,<]LYZPVUVUS`
or
Vol. Pedal
Guitar Cabinet
FX-Unit
Tuner
or
FX-Unit
or
or
Powered
Cabinet
Power Amp
Mixing Desk
2 Aide au démarrage rapide
3 Principes d’utilisation
Mains In: Prise secteur pour le cordon d’alimentation livré avec l’appareil
(Mains Lead).
L’utilisation du TriAmp Mark 3 est un véritable jeu d’enfant :
• Chacun des 6 canaux indépendants dispose d’un jeu de commandes
identiques.
• La position des potentiomètres donnés influe uniquement sur le canal
concerné.
• Les potentiomètres de la section Master, situés à l’avant gauche,
commandent l’ensemble des canaux.
MIDI In : Cette douille se raccorde à la sortie MIDI Out du pédalier
TSM-432 fourni ou du contrôleur MIDI de votre choix. Bien qu’il s’agisse
d’une douille 7 pôles, vous pouvez utiliser tout câble 5 pôles standard et
tout contrôleur MIDI courant. Les deux broches supplémentaires (1 et 7)
fournissent l’alimentation fantôme destinée au pédalier MIDI Hughes &
Kettner TSM-432.
Speaker : Douille permettant de raccorder des enceintes guitare. Nous
recommandons à cet égard les enceintes Hughes & Kettner des séries
TM ou TC, adaptées à nos amplis.
AES : Les versions européennes du TriAmp Mark 3 intègrent une fonction
d’économie d’énergie baptisée AES (voir le chapitre 10 pour davantage
d’informations à ce propos). Lorsque l’AES est activée (état à la livraison),
le TriAmp se coupe de lui-même après un temps d’inactivité d’environ
90 minutes. Cette phase est réinitialisée et le compte à rebours relancé à
chaque fois qu’un signal parvient à l’entrée de l’ampli.
28
TSM-432
Les touches Stomp Boost et Power Amp Tubes sont uniques, mais elles
peuvent se régler séparément pour chacun des six canaux. Vos réglages
sont automatiquement mémorisés lorsque vous passez d’un canal à un
autre. Si, par exemple, vous jouez sur le canal 1A avec une paire de
lampes 6L6 et le Stomp Boost activé, ce réglage sera récupéré lorsque
vous sélectionnerez à nouveau le canal 1A, et ce, jusqu’à ce que vous
modifiez ces paramètres (les Presets MIDI offrent encore davantage de
possibilités – cf. à ce propos le chapitre 7 « MIDI »).
Les touches servent également d’affichage à LED pour le canal actif ou la
fonction activée.
TriAmp Mark 3 – Manual 1.1
Canal B : un son British Clean résonnant, typé Sixties
Le canal 1B produit un son anglais en bonne et due forme, avec ses
aigus étincelants typiques et une distorsion harmonique particulièrement
subtile. Même avec un Gain bas, le canal 1B vous offre un spectre riche
en harmoniques dans les aigus et les médiums.
Conseil : Pour le canal 1B, nous recommandons une paire de lampes
EL34.
4.2 Amp 2
Canal A : un son British Lead classique des Seventies
Le canal 2A délivre un son Overdrive particulièrement chaud, typique
de nombreuses productions rock classiques qui ont donné le ton. Avec
sa British Touch particulièrement ouverte, ce canal s’avère idéal pour les
riffs tranchants et un travail de rythmique agressif.
Conseil : Pour obtenir le son typique de ce canal, vous opterez idéalement pour une paire de lampes EL34. Mais il peut également s’avérer intéressant d’exploiter ce canal avec une (voire deux) paire(s) de lampes 6L6.
Canal B : le son British Lead le plus gras des Eighties
Le spectre du canal 2B va du plus sombre et gras au Sustain chantant et
tenant sur la longueur. Comment sommes-nous parvenus à ce résultat ?
Grâce à son circuit spécial, le canal 2B administre au son une poussée
Le canal 3B délivre des sons High Gain sans concession, comme vous
n’en avez encore jamais perçus. Les amis du Drop Tuning et les joueurs
de guitares à 7 ou 8 cordes ne parviendront pas à aller jusqu’au bout de
la distorsion énorme et indomptée du canal 3B. Avec le Stomp Boost,
vous obtenez la plus grande vitesse de réaction par rapport à votre jeu
– comme si les cordes de votre guitare étaient un prolongement de vos
doigts. Le canal 3B vous offre un son qui donne le sentiment que vos
doigts glissent littéralement sur le manche lors de vos riffs et autres licks.
Conseil : À essayer absolument : associer le canal 3B aux deux paires de
lampes 6L6 – puis à l’EL34 !
5 Face avant
5.1 Interrupteurs Power et Standby
Interrupteur Power/On : En position « On », active
l’alimentation électrique principale. L’ampli s’allume
et le processus de mise à température des lampes
commence.
Interrupteur Play/Standby : Après 30 secondes
environ, la phase de mise à température est terminée
et vous pouvez passer du mode « Standby» au mode « Play ». L’ampli
est alors prêt à cracher les watts ! Si vous faites des pauses prolongées,
passez systématiquement en mode « Standby », de façon à ce que les
lampes restent à température de fonctionnement. Vous prolongerez de
cette façon leur durée de vie.
5.2 Input et Stomp Boost
• 中文
• にほんご
Canal B : un High Gain moderne – et bien plus encore
• Español
Le canal 1A offre toute la splendeur des grands sons américains.
Sa force : un son Clean classique, sans distorsion, même avec un Gain
élevé – avec son Twang mordant, vous ressortirez les santiags de l’armoire
à chaussures ! Mais ne vous y trompez pas : la part de basses du canal
A est puissante, clairement définie et répondra même aux exigences des
plus sérieux aficionados des sonorités profondes.
Conseil : Le canal 1A travaille particulièrement bien avec 2 paires de 6L6.
Le canal 3A et franc et direct – il réagit dans l’instant et se montre
particulièrement sensible aux modifications subtiles de la force de votre
jeu et à la moindre rotation du potentiomètre de volume de la guitare. Le
canal 3A préserve parfaitement les sons uniques de votre guitare, pour un
son croustillant et parfaitement défini – et ce, peu importe sur quel niveau
le potentiomètre Gain est réglé.
Conseil : Le canal 3A travaille particulièrement bien avec la combinaison
d’une paire de lampes EL34 et d’une paire de 6L6.
• Italiano
Canal A : un son californien Clean rafraîchissant, tout droit sorti des
Fifties
Canal A : le son High Gain américain classiques des Nineties
• Français
4.1 Amp 1
4.3. Amp 3
• Deutsch
Les canaux du TriAmp Mark 3 ne se contentent pas de proposer 3 niveaux
de Gain différents. Chacun représente en effet une zone sonore propre.
Notre électronique de pointe permet en effet de modifier la configuration
des différentes lampes des étages d’entée et de sortie ou de chaque Preset
MIDI. De cette façon, nous extrayons chaque particule sonore du circuit
des lampes et conférons au TriAmp Mark 3 une multiplicité de sons
incroyable.
Les canaux se sélectionnent sur l’ampli lui-même ou au départ du pédalier
MIDI TSM-432 fourni. Pour ce faire, placez le pédalier TSM-432 en mode
Stomp Box. Les interrupteurs 1 à 6 permettent alors de sélectionner les
différents canaux, tandis que l’interrupteur 7 gère le Stomp Boost (l’autre
mode du TSM-432, le mode Preset, propose encore d’autres options
– consultez le chapitre « MIDI » pour davantage d’informations à ce
propos).
impressionnante – la juste dose de distorsion, celle-là même qui rend
les vieux amplis plexi si précieux aux yeux des guitaristes. Gras, fort et
puissant : l’idéal pour du tapping à deux mains et des Power Chords bien
sentis.
Conseil : Pour explorer au mieux le canal 2B, raccordez-le à une paire de
lampes EL34..
• English
4 Amplis et canaux
Input : Entrée instrument, 1 Mohm, pour raccordement d’une guitare via
un câble jack blindé.
29
TriAmp Mark 3 – Manual 1.1
Stomp Boost : le Stomp Boost rehausse quelque peu certaines
plages de fréquences déterminées de votre son. Selon le canal
et les réglages, le Boost permet de tirer de l’ampli un son encore
plus efficace, crémeux ou expressif. Positionné entre l’entrée
et le préampli du TriAmp Mark 3, le Stomp Boost s’adapte
sur mesure au caractère de chaque canal. Il fonctionne ainsi
comme le feraient six pédales Boost externes à transistors.
Particularité de ce circuit : le Stomp Boost est un module indépendant,
disposant de sa propre carte de circuit imprimé. Il est mis en boucle via
une véritable connexion de type bypass.
5.3 Section Canaux
Touches canaux : Permettent de sélectionner directement les canaux.
Gain, Master : le potentiomètre Gain permet de régler la sensibilité en
entrée et donc, la saturation du préampli. En corrélation avec le Stomp
Boost, il est l’outil essentiel de la formation du son. Les potentiomètres
Master permettent d’adapter le niveau des canaux les uns par rapport
aux autres.
Bass, Mid, Treble : l’effet de cette régulation des trois plages s’adapte
précisément au canal concerné. Chacun des potentiomètres traite la plage
de fréquences correspondant au son caractéristique du canal concerné.
Attention : Il s’agit d’une régulation du son passive classique, dans laquelle les potentiomètres s’influencent mutuellement. Ainsi, si le « Mid »
est fortement tourné, la section « Bass » sera moins efficace qu’avec un
« Mid » réduit.
5.4 Section Master
Volume : Le potentiomètre de
volume principal (Master Volume)
détermine le volume général du
TriAmp Mark 3. C’est grâce à lui
que vous disposez de 150 watts de
puissance lampes entre le pouce et l’index ! À utiliser avec modération !
Même si la rotation de ce bouton garantit tout le plaisir possible, veillez
à ne pas le pousser trop loin. En d’autres termes, faites en sorte de limiter
le volume à un niveau qui n’endommagera pas votre ouïe, ni celle des
autres membres de votre groupe.
Presence : Ce potentiomètre permet de déterminer la part d’harmoniques
générées. Plus il est tourné vers la droite, plus la présence du son est forte.
Il permet de conférer au son, selon les besoins, davantage d’expression
et de puissance.
Resonance : Lorsque ce potentiomètre est en position centrale, vous
entendez le comportement en résonance naturel entre l’ampli TriAmp
Mark 3 et l’enceinte ou les enceintes raccordées. En le tournant vers
la gauche, vous atténuez l’effet de résonance des haut-parleurs, ce
qui arrondit et assouplit encore vos sons. En le tournant vers la droite,
vous renforcez l’effet, ce qui se traduit par une puissante poussée des
30
basses. Tourné complètement vers la droite, ce potentiomètre délivre des
fréquences ultrabasses particulièrement marquantes.
Astuce : Les potentiomètres Presence et Resonance servent également
à réguler le son en Master. Ils vous permettent en effet d’adapter ce son
global à différents types d’enceintes et à la configuration des lieux sans
que vous ne deviez intervenir sur le son des différents canaux.
5.5 Touches Power Amp Tubes
Ces trois petites touches constituent l’arme secrète du
TriAmp Mark 3 : elles ouvrent en fait un tout nouveau
chapitre dans l’histoire du son à lampes. Chacune
des 3 paires de lampes d’étage de sortie peut être
affectée au choix à chacun des 6 canaux – il n’y a rien d’autre à faire
que de sélectionner un canal, puis d’activer la (les) paire(s) de lampes
sélectionnée(s). Chacune des trois paires de lampes des étages de sortie
peut être constituée d'EL 34 ou de 6L6. Ainsi, des lampes au caractère
sonore différent peuvent sans problème être mélangées dans chacun des
3 canaux du TriAmp Mark 3. En outre, grâce à des Presets MIDI, le même
canal peut être employé avec des lampes d’étage de sortie différentes –
tout simplement par pression sur le pédalier (voir le chapitre « MIDI »
pour davantage d’informations sur les Presets).
Votre TriAmp Mark 3 vous permettra de vivre des expériences sonores
jusque-là impossibles. Vous pourrez ainsi jouer proprement l’intro d’un
morceau en 50 watts via une paire de 6L6, puis ajouter une seconde paire
de 6L6 pour attaquer vos riffs et – en lieu et place du Boost – ajouter
encore les EL34 afin de conférer davantage de punch dans les médiums
lors du solo (jusqu’à 150 watts). On vous entendra ainsi jusqu’au dernier
rang !
Via le pédalier MIDI, vous pourrez aussi, sur le même canal, passer
d’un son EL34 typiquement British à celui, typé US, des 6L6. Ou du son
d'EL34 chinoises à celui d'autres EL34 slovaques – sans devoir changer
de lampes, de version d’ampli ou de canaux. Le TriAmp Mark 3 est donc
– entre autres – le premier « testeur de lampes » à 6 canaux !
Conseil : D’autres types d’étages de sortie peuvent encore être associés
au TriAmp Mark. Les types suivants ont été testés par Hughes & Kettner :
KT77, KT66, KT88, 5881 WXT, 6550 A, 6CA7, 7581.
5.6 Touche FX Loop
Le routage d’effets SmartLoop™ offre des possibilités de
mise en boucle, en parallèle ou en série, d’unités d’effets
externes. Son état – on/off et parallèle/série – est sauvegardé
en mémoire pour chaque canal et chaque Preset MIDI.
FX Loop : Permet d’activer ou de désactiver la boucle d’effets. Pour en
apprendre davantage sur les boucles d’effets, passez au chapitre « Face
arrière ».
5.7 Touche Noise Gate
Particulièrement précis, le système Noise Gate IDB™ (Intelligent Dual
Breakpoint) mesure simultanément le niveau à deux points clés de la
chaîne de signal : en entrée et à la sortie du préampli. Sur la base de ces
deux valeurs, la technologie IDB™ calcule le comportement en réponse
optimal et régule automatiquement les paramètres Attack et Threshold.
SPEAKERS
1x 8 Ohms
or 2x 16 Ohms
4 Ohms
Ambience emulated DI Out
*HIPUL[
4VKL
3V^
*\[
TSC™
MIDI
ILZ[)PHZ
V]LYJ\YYLU[
UVJ\YYLU[
NOISE GATE
Hard
In
FX LOOP
Soft
Out/Thru
Z^P[JOLKVMM
MASTER INSERT
FX Level
Send
Dark
FX Serial
Return
Preamp Out
;VYLK\JL[OLYPZRVMLSLJ[YPJZOVJRNYV\UKPUNVM
[OLJLU[LYWPUVM[OPZWS\NT\Z[ILTHPU[HPULK
9LWSHJPUNM\ZLZT\Z[VUS`ILJHYYPLKV\[I`
X\HSPMPLKZLY]PJLWLYZVUULS9LWSHJLM\ZLZVUS`
^P[O[`WLHUKYH[PUNZOV^UOLYL
Bright
4HPUZ=VS[HNL
Power Amp In
=e
=e
(,:
VUVMM
TSM-432
Serial No.
;90(474HYR
4HPUZ-\ZL!=;(3/a
4H_7V^LY*VUZ\TW[PVU>
,<]LYZPVUVUS`
enceintes 16 ohms.
Ne jamais faire fonctionner l'ampli sans haut-parleurs raccordés !
Dernière version de la DI-Box avec émulation Speaker primée, la Red
Box AE offre un Low Cut Filter commutable ainsi qu’un deuxième mode
enceintes présentant une palette sonore à la définition différente. Pilotée
par DSP, l’émulation Ambience fournit une authentique atmosphère 4x12
ainsi qu’une attaque ultradirecte des sons de lampes les plus purs, le
signal étant prélevé entre l’étage de sortie et la sortie du haut-parleur. Un
signal Line est présent au niveau de la Red Box AE. Le niveau du signal
Line dépend de celui de l’étage de sortie. En d’autres termes, le volume
Master régule également le niveau de cette sortie DI.
• Lorsque deux enceintes 8 ohms branchées en parallèle doivent être
employées, raccordez-les à la sortie 4 ohms. Ne branchez jamais
d’enceintes présentant des impédances différentes sur la même sortie !
• Si des enceintes aux impédances différentes devaient être utilisées
simultanément, vous devez les brancher en parallèle ou en série à la
sortie adaptée. Cette formule permet de calculer l’impédance totale
(R) de deux enceintes présentant des impédances différentes (R1, R2).
Conseil : Acheminez le signal de la Red Box AE vers la table de mixage au
moyen d’un câble micro. Veillez à ce que l’entrée XLR de la table de mixage soit réglée sur Line. Au cas où la table de mixage ne disposerait pas
d’entrées XLR ou que les entrées ne puissent être placées sur Line, vous
devrez recourir à un adaptateur XLR/jack ou à un câble correspondant tel
que vous en trouverez dans un magasin spécialisé bien achalandé.
Branchement en parallèle : R = (R1 x R2) / (R1 + R2)
6.3 Système Tube Safety Control (TSC)
Exemple pour une enceinte 8 ohms et une enceinte 16 ohms :
R = (8 x 16) / (8 + 16) ohms
R = 128 / 24 ohms
R = 5,33 ohms
Conseil : Nous avons consacré un chapitre complet de la présente notice
d’utilisation au Tube Safety Control. Consultez le chapitre « TSC » pour
davantage d’informations à ce propos.
Le branchement en parallèle est aujourd’hui courant, mais si vous
disposez d’une enceinte à sortie câblée en série, ou si vous décidez de
brancher vos enceintes en série, l’impédance totale sera la somme des
impédances des enceintes :
Branchement en série : R = R1 + R2
Si une enceinte 4 ohms et une enceinte 8 ohms sont branchées en série,
l’impédance totale est donc de 12 ohms.
Astuce : Règle d’or : l’impédance des enceintes ne peut en aucun cas
être inférieure à l’impédance de sortie de votre ampli. Signification pour
nos exemples : les enceintes branchées en parallèle présentant une impédance totale de 5,33 ohms sont raccordées à la sortie 4 ohms, tandis que
les enceintes branchées en série et présentant une impédance totale de
12 ohms seront reliées à la sortie 8 ohms.
6.4 MIDI In et Out/Thru
La fonctionnalité MIDI est idéale pour changer de son
au moyen des changements de programmes (Program
In
Out/Thru
Changes). Une simple pression sur un bouton suffit en
effet à changer de canal sur l’ampli et de gamme d’effets
sur votre unité d’effets externe. Faire du step sur votre
TSM-432
système de pédales appartient donc désormais au passé
! C’est pourquoi nous avons décidé d’utiliser le système MIDI comme
protocole standard pour l’ensemble des fonctions de commutation du
TriAmp Mark 3, et de doter celui-ci d’une interface pour le contrôleur
MIDI fourni TSM-432. Pour davantage d’informations sur le pédalier
MIDI, passez au chapitre « TSM-432 ».
MIDI
MIDI In : L’entrée MIDI du TriAmp Mark 3 dispose de 7 pôles. Mais
vous pouvez également raccorder le contrôleur MIDI à cette douille
via un câble à 5 broches standard. Les deux broches supplémentaires
• 中文
5L]LY\ZL[OPZHTW^P[OV\[ZWLHRLYZJVUULJ[LK
<ZLJSHZZ^PYPUN
Le TriAmp Mark 3 dispose de sorties
séparées pour toutes les impédances
standard. Vous pourrez ainsi raccorder
au choix une enceinte 4 ohms, une
enceinte 8 ohms, voire une ou deux
3V^
*\[
• にほんご
4 Ohms
*HIPUL[
4VKL
• Español
1x 8 Ohms
or 2x 16 Ohms
Ambience emulated DI Out
• Italiano
6.1 Sorties Speakers
Le TriAmp Mark 3 est le premier produit Hughes
& Kettner doté de la nouvelle Red Box avec
Ambience Emulation (AE). Depuis la fin des années
quatre-vingts, l’Original Red Box est devenue pour
l’industrie le standard permettant de prélever le son
des amplis guitares sans micro. En live ou en studio, la Red Box transmet
ainsi le son avec une qualité constante. Les interférences causées par
d’autres instruments et autres expériences de positionnement de micro
extrêmement consommatrices de temps appartiennent désormais au
passé.
RED BOX™ AE
• Français
6 Face arrière
6.2 Red Box AE
• Deutsch
La touche Noise Gate permet d’activer/de désactiver la technologie IDB™
Noise. La Noise Gate activée intervient et coupe la sortie du préampli
dès que le niveau de signal passe sous un seuil déterminé. Adieu les
bruissements intempestifs ! La Gate reste fermée jusqu’à ce que vous
grattiez à nouveau vos cordes. À noter que celles-ci sonneront alors sans
aucun temps de réponse. Pour davantage d’informations sur le système
Noise Gate, consultez le chapitre suivant.
16 Ohms
*(<;065!9LHYWHULSHUK
]LU[PSH[PVUVWLUPUNZTH`
ILJVTL[VVOV[[V[V\JO
3LH]LLUV\NOZWHJLMVY
WYVWLY]LU[PSH[PVU
¶K)
7V^LY(TW;\ILZ
5L]LY\ZL[OPZHTW^P[OV\[ZWLHRLYZJVUULJ[LK
<ZLJSHZZ^PYPUN
*(<;065!9PZRVMLSLJ[YPJ
ZOVJR+VUV[VWLU9LMLY
ZLY]PJPUN[VX\HSPMPLK
ZLY]PJLWLYZVUULS
PANEL
• English
16 Ohms
RED BOX™ AE
0UZLY[N\P[HYWPJR[VYLHK
V\[[\ILTH[JOPUN
TriAmp Mark 3 – Manual 1.1
31
TriAmp Mark 3 – Manual 1.1
fournissent l’alimentation fantôme de pédalier MIDI Hughes & Kettner
TSM-432.
Attention : Le contrôleur TSM-432 est fourni avec un câble 7 broches. Si
vous égariez ce câble et que vous deviez le remplacer rapidement, un
câble 5 broches fera l’affaire. Mais il vous faut alors aussi une alimentation électrique. C’est pourquoi le pédalier TSM-432 dispose d’une douille
secteur novatrice permettant de raccorder au choix un bloc d’alimentation
en courant continu ou en courant alternatif, fournissant une tension comprise entre 9 et 15 V.
MIDI Out/Thru : Cette prise permet de transmettre les signaux présents
à la douille MIDI In. Vous pouvez y raccorder toute unité d’effets externe
compatible MIDI, qui doit être commutée en même temps que le TriAmp
Mark 3.
Conseil : Nous avons consacré un chapitre entier aux diverses fonctions
MIDI du TriAmp Mark 3. Pour davantage d’informations à ce propos, passez au chapitre « Presets MIDI et paramétrage MIDI ».
Ce potentiomètre situé sur la face arrière de l’ampli
permet de modifier le comportement en réponse du
NOISE GATE
Hard Soft
système Noise Gate. Plus on tourne le potentiomètre
vers la droite, plus le Noise Gate réagit avec une
grande sensibilité. Plus on tourne le potentiomètre vers
la gauche, plus le Noise Gate intervient fortement et
coupe les signaux ainsi que tous les bruits parasites indésirables.
Astuce : La position 12 heures du Noise Gate constitue son réglage universel. Si vous souhaitez utiliser le Noise Gate comme effet de style pour
les riffs rapides en staccato avec un niveau de Gain élevé, vous devez le
tourner fortement vers la gauche.
6.6 FX Loop
FX Send : Reliez cette douille à
l’entrée de votre unité d’effets.
FX Level
Send
Return
¶K)
FX Serial
FX Return : Reliez cette douille à la
sortie de votre unité d’effets.
-10 dB : Cet atténuateur permet d’adapter le niveau de signal à des unités
d’effets prévues pour des niveaux faibles. Activez-le pour les unités
d’effets placées en amont et normalement intercalées entre la guitare et
l’ampli (par ex. disto).
Level : Régule le niveau du signal parvenant au FX Return.
FX Serial : Permet de passer d’un branchement en série à un branchement
en parallèle pour l’unité d’effets. Si ce potentiomètre est allumé, l’unité
d’effets se trouve en mode série.
Astuce : En mode parallèle, le FX Level permet de régler le mix wet/dry
(rapport entre effet et signal de guitare pur). Vous pouvez en outre boucler chaque signal Line vers le FX Return et ajouter le signal de préampli
au FX Level.
Lorsqu’en mode série, le FX Send est directement raccordé avec le FX
Return, le potentiomètre Level permet de régler le volume général du
signal de préampli. Il agit quasiment comme un deuxième Master Volume
qui peut être utilisé par activation/désactivation du FX Loop.
32
Le TriAmp Mark 3 dispose d’une Loop série
supplémentaire, par l’intermédiaire de laquelle vous
pouvez régler le volume principal via une pédale de
Preamp Out
Power Amp In
volume. Le signal de préampli est prélevé au niveau
de la sortie Preamp Out, puis est relayé à l’entrée
Power Amp In. Vous pouvez également, via la sortie
Preamp Out, relayer le signal de préampli à d’autres amplis ou y brancher
un accordeur. La sortie Preamp Out est toujours activée, de façon à ce
que le trajet du signal ne soit pas influencé si vous y branchez autre
chose.
Conseil : L’entrée Power Amp In est une douille commutée. Si vous y
raccordez quoi que ce soit, le trajet de signal est interrompu et seuls les signaux présents au niveau de l’entrée Power Amp In sont transmis à l’étage
de sortie.
MASTER INSERT
6.8 Panel
6.5 Noise Gate Hard/Soft
FX LOOP
6.7 Master Insert
PANEL
Dark
Bright
Ce potentiomètre permet de régler la luminosité de
l’éclairage de la façade du TriAmp Mark 3. Cette fonction
peut également se commander via des ordres de commande
MIDI continus (pour davantage d’informations à ce propos,
passez au chapitre « MIDI »).
7 Presets MIDI et paramétrage MIDI
Chacun des boutons du TriAmp Mark 3 peut être commandé à distance
via le pédalier MIDI. Les réglages ainsi effectués peuvent être mémorisés
dans l’un des 128 Presets MIDI. Chacun des Presets peut être rappelé via
le numéro de Program Change correspondant, soit via un séquenceur ou
un contrôleur MIDI de votre choix, soit via un logiciel correspondant.
Grâce au pédalier MIDI TSM-432 fourni, vous pouvez soit changer de
canal et booster celui-ci (en mode Stomp Box), soit récupérer l’un des 128
Presets répartis dans les 32 banques, chacune comprenant donc 4 Presets
(en mode Preset). À la livraison, l’ampli comme le pédalier MIDI TSM-432
fourni sont réglés sur le canal MIDI 1, afin que vous puissiez commencer
à jouer sans attendre. Plus avant dans le présent chapitre, nous vous
indiquerons comment changer de canal MIDI.
Conseil : Nous avons consacré un chapitre entier aux fonctions du pédalier MIDI TSM-432 fourni. Pour davantage d’informations à ce propos,
passez au chapitre «TSM-432 ».
7.1 Créer et rappeler un Preset MIDI
Quelle est en réalité la différence entre un réglage de canal et un Preset
MIDI ?
Il existe six réglages de canaux, stockés automatiquement sur le TriAmp
Mark 3 et que vous pouvez rappeler en sélectionnant vous-même les
canaux sur l’ampli ou en utilisant en plus le pédalier TSM-432 en mode
Stomp Box. Toutefois, vous pouvez également mémoriser, dans l’un des
128 Presets MIDI, toutes vos configurations de canaux et d’étages de
sortie ainsi que l’état ON/OFF des Noise Gate, Boost et FX Loop.
Pourquoi ai-je besoin de Presets MIDI ?
Lorsque vous passez d’un son à l’autre, vous souhaitez souvent ne pas
changer uniquement de canal, mais aussi de réglages de Boost et de
Noise Gate ainsi que de programmes d’effets au départ de votre unité
TriAmp Mark 3 – Manual 1.1
d’effet MIDI externe. Avec les Presets MIDI, vous pouvez par ex. passer
directement d’un son Clean avec Chorus et Reverb à un son Lead avec
Delay, Boost et Noise Gate.
Ce qui est unique avec le TriAmp Mark 3, c’est que vous pouvez également,
via la fonction MIDI, basculer entre les trois jeux de lampes d’étages
de sortie. Imaginez-vous : vous jouez avec un classique son British pop
clean des sixties avec une paire de lampes EL34 – par dessus lequel vous
rajoutez un peu de brillance américaine en passant tout simplement sur
une paire de 6L6. Ou alors, vous jouez avec un son américain High Gain
moderne au départ de deux paires de 6L6, puis vous en rajoutez encore
une couche en raccordant en plus une paire d’EL34 pour un punch
agressif, fort en médiums.
Laissez libre cours à votre imagination ! Et profitez du fait que vous
pouvez entièrement commander à distance votre TriAmp Mark 3, en
studio comme sur scène. Mais ce n’est pas tout : avec un Click Track MIDI
(piste Playback), vous pouvez naviguer entre tous vos Presets et même
régler l’éclairage de la façade de votre ampli, par exemple s’il doit être
complètement éteint sur scène. Le TriAmp Mark 3 est donc le premier
ampli à lampes qui peut être intégré dans le lightshow !
plupart des cas. Dans ce cadre, c’est le même canal MIDI que sur le
Master MIDI (pédalier MIDI) qui doit être sélectionné sur l’esclave MIDI
(donc l’ampli), faute de quoi l’ampli réagira mal ou ne réagira pas.
À la livraison, le TriAmp Mark 3 et le pédalier TSM-432 sont réglés sur le
canal 1, tandis que le mode Omni est activé. Par mode Omni, on entend
le fait que l’ampli réagisse à toutes les commandes par l’ensemble des 16
canaux MIDI. Si vous utilisez le TriAmp Mark 3 dans un environnement
MIDI plus important, avec plusieurs appareils, vous devez désactiver le
mode Omni et sélectionner un canal MIDI approprié.
Pour modifier les canaux et le mode Omni, passez en mode MIDI Setup
comme suit :
Amenez l’interrupteur Standby de la position Play à la
position Standby, avant d’appeler le menu MIDI Setup.
Pour appeler le mode MIDI Setup, enfoncez simultanément
et pendant trois secondes les touches Noise Gate et FX
Loop.
FX Loop
Lampes 1/
Lampes 3/
Lampes 5/
1
¢
¢
¢
¢
2
¢
¢
¢
{
3
¢
¢
£
¢
4
¢
¢
£
£
5
¢
£
¢
¢
6
¢
£
¢
£
7
¢
£
£
¢
8
¢
£
£
£
Astuce : De nombreuses unités d’effets proposent un Mapping MIDI.
Celui-ci permet d’affecter les mêmes paramétrages d’effets à différents
numéros de changements de programme. Ainsi, le programme 1 peut
être associé au Preset d’effet 4, le programme 2 au Preset d’effet 16 et le
programme 3 à nouveau au Preset d’effet 4.
9
£
¢
¢
¢
10
£
¢
¢
£
11
£
¢
£
¢
7.2 Sélection du canal MIDI / mode Omni
12
£
¢
£
£
La fonction MIDI offre 16 canaux permettant de piloter jusqu’à
16 appareils au moyen d’un même contrôleur MIDI. Une fonctionnalité
particulièrement utile en studio ou pour les claviéristes. Sur un ampli
guitare avec FX Setup, un seul canal devrait toutefois suffire dans la
13
£
£
¢
¢
14
£
£
¢
£
15
£
£
£
¢
16
£
£
£
£
• にほんご
• Español
• Italiano
Canal MIDI
• Français
• La touche Noise Gate indique à présent l’état du mode MIDI Omni et
permet d’activer ou de désactiver celui-ci. Si la touche Noise Gate est
allumée, le mode Omni est activé (état à la livraison, réception sur tous
les canaux MIDI). Appuyez sur la touche Noise Gate pour désactiver le
mode Omni (réception sur un canal MIDI déterminé).
• Vous pouvez à présent, via FX Loop, passer en pas à pas au canal MIDI
suivant.
• Les 5/6 permettent à nouveau de naviguer pas à pas entre les différents
canaux MIDI.
• Les quatre touches FX Loop et Power Amp Tube indiquent le canal,
sous forme de code binaire, comme suit :
• Deutsch
Conseil : Si vous utilisez un processeur d’effets externe, celui-ci doit être
programmé séparément, car la fonction Learn du TriAmp Mark 3 ne programme que l’ampli lui-même (et non des appareils externes). En d’autres
termes, si vous souhaitez, via le changement de programme n°1 sur votre
pédalier MIDI (ou sur le pédalier TSM-432), rappeler un son clean sur le
TriAmp Mark 3 et un Chorus/Reverb sur votre processeur d’effets, l’unité
d’effets doit d’abord « apprendre » qu’elle doit récupérer cet effet à la
réception du changement de programme. Consultez la notice d’utilisation
de votre unité d’effets pour davantage d’informations à ce propos.
La touche Learn clignote alors, vous indiquant que des
fonctions de programmation déterminées sont affectées
aux touches suivantes (lorsque vous souhaiterez quitter le
mode MIDI Setup, appuyez trois secondes sur la touche
Learn – celle-ci s’éteint, les modifications sont enregistrées et l’ampli
revient en mode de fonctionnement standard) :
• English
La programmation du TriAmp Mark 3 est très intuitive. Si vous souhaitez
mémoriser une configuration de canal, Boost on/off, Noise Gate on/off,
FX Loop on/off et lampes d’étages de sortie dans un Preset, il vous suffit
d’activer ces réglages via les touches correspondantes sur l’ampli, de placer
l’ampli en mode programmation par une courte pression sur la touche
Learn MIDI (la touche s’allume), puis d’appuyer sur l’interrupteur de votre
pédalier MIDI par lequel vous souhaitez rappeler cette configuration.
À partir du moment où la touche Learn s’éteint, le TriAmp Mark 3 a
enregistré votre paramétrage dans l’un des 128 emplacements mémoire
de Preset et affecté un numéro de programme correspondant sur votre
pédalier MIDI. Lorsque le TriAmp Mark 3 reçoit un ordre de changement
de programme via le canal MIDI sélectionné (voir ci-dessous), la touche
Learn clignote brièvement et le TriAmp enregistre le changement.
Par ailleurs, si vous souhaitez quitter le mode programmation sans
mémorisation du paramétrage en cours, il vous suffit d’appuyer à nouveau
sur la touche Learn (au lieu d’appuyer sur le bouton du pédalier MIDI).
• 中文
Comment ça marche ?
33
TriAmp Mark 3 – Manual 1.1
7.3 Retour au paramétrage d’usine
Le retour au paramétrage d’usine (Factory Reset) est une fonctionnalité
rarement nécessaire. Pour autant, nous vous recommandons d’accorder
une attention toute particulière à ce point, afin d’éviter de perdre
involontairement vos Presets MIDI.
Un retour au paramétrage d’usine (Factory Reset) peut par exemple être
nécessaire lorsque la communication MIDI ne fonctionne plus et que
vous n’êtes plus sûr des paramétrages du canal MIDI et du mode Omni.
Le retour au paramétrage d’usine ramène l’ampli au canal MIDI 1 et
active le mode Omni.
Pour déclencher cette réinitialisation, maintenez enfoncées les touches
Learn et Boost simultanément à la mise sous tension de l’ampli.
Attention : Cette procédure s’envisage uniquement pour les cas d’urgence.
En effet, tous les paramètres enregistrés, en ce compris les 128 Presets
MIDI, seront perdus !
8 Système Tube Safety Control
(TSC™)
0UZLY[N\P[HYWPJR[VYLHK
V\[[\ILTH[JOPUN
Le système Tube Safety Control (TSC™) assure
une stabilité technique supérieure ainsi qu’une
longévité accrue des lampes des étages de sortie,
ILZ[)PHZ
V]LYJ\YYLU[
en adaptant automatiquement et en permanence
UVJ\YYLU[
Z^P[JOLKVMM
le courant de repos. Vous bénéficiez ainsi
7V^LY(TW;\ILZ
d’un son optimal, ce qui vous permet de vous
consacrer pleinement aux autres fonctionnalités
de votre ampli. En outre, les lampes, peuvent
être remplacées simplement, rapidement et
en toute sécurité, puisque le système TSC™ prend en charge de façon
entièrement automatique l’adaptation fastidieuse du courant de repos.
Cette possibilité s’avère non seulement utile en cas de défaillance d’une
lampe, mais aussi pour tester des lampes de divers fabricants ou types.
TSC™
Aucune LED n’est allumée
Les lampes d’étage de sortie ne présentent aucun dysfonctionnement.
Une seule LED est allumée
Au cas où une seule LED s’allume, la lampe correspondante produit une
sous-intensité et a été coupée. Au cas où cette LED ne s’éteint pas après
quelques minutes, la lampe concernée devra être remplacée.
Deux/quatre LED sont allumées
Soit les lampes concernées produisent une sous-intensité, auquel
cas il faut les remplacer, soit la paire de lampes indiquées est inactive
(autrement dit, la touche Power Amp Tube en face avant est sur off).
Une LED clignote, la LED voisine est allumée
La lampe correspondant à la DEL qui clignote génère une surintensité et
a été coupée. Cette lampe doit être remplacée. Étant donné que, dans
les étages de sortie du TriAmp Mark 3, le meilleur résultat sonore n’est
toujours obtenu qu’à partir d’une paire de lampes travaillant ensemble
(lampes appariées), la lampe liée à la lampe défectueuse (deuxième
lampe indiquée par la LED allumée en continu) est également coupée
afin que les autres paires puissent continuer à travailler sans perte sonore.
Vous ne devez donc pas remplacer la deuxième lampe de la paire (celle
qui correspond à la LED allumée en permanence), car elle fonctionne
parfaitement.
Le TSC intelligent peut donc sauver votre set, car, lorsqu’une lampe lâche
dans un ampli classique, son fusible saute et vous ne pouvez réutiliser
ce circuit qu’après remplacement de la lampe et de son fusible. Grâce
au TSC en revanche, le TriAmp Mark 3 peut continuer à être pleinement
utilisé sans aucun souci.
Vous devez toutefois garder à l’esprit que la désactivation d’une paire
de lampes réduit la puissance de l’ampli. Vous devrez en outre faire
passer sur une autre paire de lampes les canaux et les Presets MIDI
recourant exclusivement à la paire de lampes concernée. N’oubliez donc
pas, après votre concert, de faire remplacer immédiatement les lampes
défectueuses.
Attention : En cas de remplacement des lampes par un autre type de
lampes (p. ex. EL34 par KT88), nous recommandons de réinitialiser le
module TSC :
- Appareil coupé, amener l’interrupteur Standby en position Play.
- Mettre l’appareil sous tension.
- Attendre au moins trois minutes.
8.2 Lecture manuelle
Mais le TSC™ a encore plus à vous offrir : les six LED de la section
TSC en face arrière indiquent l’état de fonctionnement des lampes,
chaque LED correspondant à la lampe d’étage de sortie en regard, mais
le système TSC™ va encore plus loin puisqu'il est en mesure d’effectuer
un diagnostic des erreurs, voire de couper les lampes défectueuses pour
éviter une panne de l’ampli. Vous pouvez de surcroît, en utilisant un
médiator, connaître les courbes caractéristiques des lampes via les LED
du TSC™ (voir point 8.2).
Le système TSC™ permet la lecture des courbes caractéristiques, ce qui
vous permet de vérifier si les trois paires de lampes de l’étage de sortie
sont adaptées de façon optimale les unes par rapport aux autres. Pour ce
faire, il vous suffit d’enfoncer votre médiator dans la fente prévue à cet
effet, juste à côté des LED. L’ampli doit être préalablement activé (pas
en Standby !). Toutes les LED clignoteront plusieurs fois. Le nombre de
clignotements de chaque LED donne des indications sur la caractéristique
ainsi que sur le courant de repos de la lampe correspondante.
8.1 Témoin d’état automatique
Le nombre de clignotements des LED d’une paire de lampes (1/2, 3/4, 4/5)
ne doit pas différer de plus de 4 d’une paire à l’autre. C’est uniquement de
cette façon que le TSC peut garantir un son optimal. En cas de différence
supérieure, nous recommandons de remplacer l’ancienne paire de lampes
par une paire de lampes appariées. Cette intervention est uniquement
à prendre en considération pour le son – en effet, cette situation ne
présente aucun inconvénient techniquement. Mais des lampes appariées
de façon optimale, c’est-à-dire des lampes présentant la même courbe
caractéristique, sonnent tout simplement mieux !
Toutes les LED sont allumées
Tant que l’ampli est en mode Standby, toutes les LED restent allumées. À
partir du moment où vous amenez l’interrupteur de Standby en position
Play, toutes les LED s’éteignent après quelques secondes. Si, par contre,
elles restent allumées, il est probable que le fusible anodique soit grillé.
Celui-ci doit alors être remplacé. En dépit de la présence du TSC™, le
fusible anodique est susceptible de griller lorsqu’une lampe est déjà
34
défectueuse avant mise sous tension de l’ampli et que le TSC™ n’a pas
assez de temps (après montée en température des lampes) pour mesurer
le courant de repos et pouvoir ensuite couper la lampe en question.
TriAmp Mark 3 – Manual 1.1
Attention : Le système TSC™ peut également activer et désactiver les
paires de lampes concernées. Ainsi, si vous n’avez sélectionné qu’une seule paire de lampes, le TSC indique que quatre lampes sont coupées (en
l’occurrence, les deux paires de lampes non utilisées). Les LED indiquent
uniquement l’état correct lorsque l’ampli est inactif. Lorsque vous jouez,
les LED peuvent clignoter, ce qui ne fournit aucune indication sur l’état
de l’ampli ou des lampes. Si vous ne remplacez qu’une lampe dans une
paire de lampes, veuillez à ce que la courbe caractéristique de la lampe
de remplacement corresponde à celle de l’autre lampe de la paire. Des
lampes de remplacement sont disponibles en magasin spécialisé.
ainsi un véritable Merger MIDI qui transfère les informations MIDI de
MIDI-In à MIDI-Out.
Attention : Le remplacement de lampes doit être confié à un personnel
spécialisé qualifié !
Entrées contrôleur (Controller Input) 1 et 2 : Ces deux douilles jacks
permettent de raccorder un pédalier et/ou des pédales d’effet et ainsi,
piloter d’autres fonctions du TriAmp Mark 3. Un pédalier vous permettra
de commander à distance l’ensemble des touches de l’ampli, mais aussi
d’allumer ou d’éteindre l’éclairage de la face avant. Une pédale d’effet
permettra même de régler l’intensité de l’éclairage. On peut considérer
cette fonction comme un gadget, mais en réalité, nous avons reçu un
certain nombre de demandes en ce sens, de la part d’utilisateurs de
TriAmp... et nous nous sommes alors dit : Pourquoi pas ?
Pour en savoir davantage sur la façon d’affecter des fonctions aux diverses
entrées de commande, passez au point 9.4 Affectation de Control 1 et
Control 2). À la livraison, le Control 1 active et désactive le Noise Gate,
et le Control 2, le FX Loop.
Le pédalier TSM-432 n’a pas besoin d’alimentation séparée puisqu’il
bénéficie d’une alimentation fantôme via la douille MIDI In 7 broches du
TriAmp Mark 3. Si le TSM-432 est correctement raccordé, la séquence
de démarrage suivante se lance à la mise sous tension du TriAmp
Mark 3 : sur l’afficheur apparaît le numéro de version et toutes les LED
clignotent brièvement l’une après l’autre, de gauche à droite. Ensuite, le
chiffre « 1 » apparaît sur l’afficheur si le TSM-432 est en mode Preset ou
l’indication « Sb » s'il est en mode Stomp Box. Dans les deux cas, la LED
située sous la touche A s’allume.
MIDI Out : Reliez cette douille à la douille MIDI In du TriAmp Mark 3
au moyen du câble 7 broches fourni. Si vous utilisez un câble 5 broches
standard, veillez à lire le paragraphe « Alimentation électrique » cidessous.
MIDI In : Pour utiliser le TriAmp Mark 3 avec le pédalier TSM-432, vous
n’avez pas absolument besoin de la douille MIDI In. Vous pouvez en effet
raccorder d’autres appareils MIDI au pédalier TSM-432. Celui-ci devient
Conseil : Les LED correspondant aux différents boutons ne montrent pas
toujours le canal sélectionné et l'état du Stomp Boost. Lorsque vous activez le Boost ou que vous sélectionnez un canal différent sur l'ampli luimême, le contrôleur TSM-432 ne reconnaît pas ces changements.
Astuce : Vous pouvez passer rapidement du mode Preset au mode Stomp
Box en maintenant enfoncées les touches FX et B. Pour revenir au mode
Preset, il vous suffira de réitérer cette procédure. Cette fonction est temporaire : dès que le pédalier TSM-432 est coupé, il redémarrera la fois
suivante dans le mode sélectionné au niveau du commutateur.
9.3 Mode Preset
(A, B, C, D, Bank up/down, FX)
En mode Preset, vous avez accès aux 128 Presets MIDI du TriAmp Mark
3. En outre le bouton FX permet d'activer ou de désactiver le FX loop.
Pour davantage d'informations à ce propos, passez au chapitre « Presets
MIDI et paramétrage MIDI ».
Touches Preset A, B, C et D : Permettent d'activer l'un des 4 Presets de la
banque actuellement sélectionnée. Les LED correspondant aux boutons
A, B, C et D indiquent le Preset activé.
• にほんご
• Español
• Italiano
Le commutateur implanté au-dessus des connexions MIDI sur la face
arrière du pédalier TSM-432 permet de basculer du mode Preset au mode
Stomp Box et vice-versa. Avec le commutateur en position Stomp Box,
l'indication « Sb » apparaît sur l'afficheur.
En mode Stomp Box, les 6 boutons (1A, 1B, 2A, 2B, 3A et 3B) sont affectés
aux 6 canaux du TriAmp Mark 3. Les boutons du pédalier TSM-432
s'accompagnent des indications suivantes : 1, 2 et 3 pour les 3 préamplis,
A/B pour les 2 canaux. En outre, et indépendamment de cela, un autre
bouton permet d'activer ou de désactiver le Stomp Boost.
• Français
9.1 Connexions
(1A, 1B, 2A, 2B, 3A, 3B, Boost)
• Deutsch
Le pédalier TSM-432 est spécifiquement adapté au TriAmp Mark 3 et
propose deux modes : Stomp Box et Preset. En mode Stomp Box, vous
pouvez sélectionner les six canaux de l’ampli via les touches du pédalier
et activer le mode Stomp Boost. En mode Preset sur le pédalier TSM432, les 128 Presets MIDI sont disponibles. Nous vous recommandons de
commencer à travailler avec le TriAmp Mark 3 en Stomp Box, de façon à
découvrir celui-ci avant de passer au mode Preset et d’entrer ainsi dans
l’univers illimité des possibilités offertes par le nouvel ampli.
• 中文
9.2 Mode Stomp Box
Le pédalier MIDI TSM-432 est une évolution du FSM-432, que vous
connaissez peut-être déjà parce qu’associé au SwitchBlade, CoreBlade
ou GrandMeister de Hughes & Kettner. Si vous possédez un pédalier
FSM-432, celui-ci vous permettra également de sélectionner les Presets
du TriAmp Mark 3, au cas où vous n’auriez pas le TSM-432 sous la main.
• English
9 TSM-432 : le pédalier MIDI fourni
avec l’ampli
Alimentation électrique (Power Supply) : Si vous souhaitez utiliser un
câble 5 broches standard, vous aurez besoin d’une alimentation séparée.
Pour éviter au maximum une dépendance importante, le pédalier MIDI
TSM-432 dispose d’une douille secteur novatrice permettant de raccorder
un bloc d’alimentation en courant continu comme en courant alternatif,
fournissant une tension comprise entre 9 et 15 volts pour une intensité
minimale de 250 mA.
35
TriAmp Mark 3 – Manual 1.1
Défilement des banques de Presets (Bank Up/Down) : Le numéro de
la banque actuellement sélectionnée apparaît sur l'afficheur du pédalier
TSM-432. Pour activer un Preset dans une autre banque, il convient
d’abord d’accéder à la banque voulue via les flèches de défilement.
Pendant ce temps, vous pouvez continuer à jouer dans le Preset en cours,
car tant que le numéro de banque apparaissant sur l'afficheur du pédalier
TSM-432 clignote, la banque en question n'est pas activée. Elle ne le sera
qu'à partir du moment où vous y aurez choisi un Preset, en appuyant
sur la touche A, B, C ou D. La procédure diffère quelque peu en mode
Direct.
Mode Direct : En mode Direct, vous pouvez appeler directement un
nouveau Preset via les flèches de défilement. En mode Direct, le pédalier
TSM-432 n'attend pas votre sélection – c'est-à-dire une pression sur la
touche A, B, C ou D –, mais commute directement, par exemple pour
passer du Preset B de la banque 16 au Preset B de la banque 17 (flèche
vers le haut) ou de la banque 15 (flèche vers le bas).
Pour activer le mode Direct :
• Maintenez la touche FX enfoncée et appuyez sur le Preset A.
• Relâchez le Preset A, puis la touche FX. Le point des décimales apparaît
alors sur l'afficheur.
La même procédure s'applique pour désactiver à nouveau le mode
Direct.
Conseil : Le mode Direct est également temporaire. Ainsi, après avoir été
coupé, le pédalier TSM-432 redémarrera la fois suivante en mode standard.
Conseil : Les LED correspondant aux différentes touches ne montrent pas
toujours le canal sélectionné et l'état du Stomp Boost. Lorsque vous activez le Boost ou que vous sélectionnez un canal différent sur l'ampli luimême, le contrôleur TSM-432 ne reconnaît pas ces changements.
Les fonctions suivantes peuvent être paramétrées :
Nom
N° de
contrôle
MIDI
Plage
Conseil
Mute
9
0 – 63 = off, 64 – 127 = on
Cette fonction est
uniquement disponible
via MIDI.
FX Loop
55
0 – 63 = off, 64 – 127 = on
FX Serial
54
0 – 63 = parallèle, 64 – 127
= série
Stomp Boost
64
0 – 63 = off, 64 – 127 = on
Noise Gate
63
0 – 63 = off, 64 – 127 = on
Canaux
31
0 – 12 = canal 1 (Amp 1A)
13 – 37 = canal 2 (Amp 1B)
38 – 63 = canal 3 (Amp 2A)
64 – 87 = canal 4 (Amp 3A)
88 – 112 = canal 5 (Amp 3A)
113 – 127 = canal 6 (Amp 3B)
Pour vous simplifier la
sélection de canaux
via des ordres MIDI
au moyen d'autres
contrôleurs, nous vous
recommandons d'utiliser
des valeurs faciles à
reconnaître, comme, par
exemple :
Canal 1 = 10
Canal 2 = 30
Canal 3 = 50
Canal 4 = 80
Canal 5 = 100
Canal 6 = 120
Lampes 1/2
58
0 – 63 = off, 64 – 127 = on
Lorsqu’une seule paire
de lampes est active,
vous ne pouvez pas la
désactiver.
Lampes 3/4
59
0 – 63 = off, 64 – 127 = on
Lampes 5/6
60
0 – 63 = off, 64 – 127 = on
Luminosité
du panneau
avant
88
0 – 127, 0 = min (off), 127 =
max
9.4 Affectation de Control 1 et Control 2
Pour affecter des numéros de contrôle aux deux entrées Control,
procédez comme suit.
Control 1 : Pour appeler le mode Edition, maintenez enfoncées les
touches FX et D jusqu'à ce qu'apparaisse dans l'afficheur le numéro de
contrôle MIDI et que clignote le point situé après le deuxième chiffre.
Vous pouvez à présent, au moyen des flèches de défilement, sélectionner
un autre numéro de contrôle MIDI. Appuyez enfin sur la touche D pour
enregistrer en mémoire le numéro souhaité. Le point cesse alors de
clignoter et le pédalier TSM-432 revient en mode d’utilisation normal.
Control 2 : Enfoncez simultanément les touches FX et C jusqu’à ce
qu’apparaisse sur l’afficheur le numéro de contrôle MIDI et que clignote
le point situé après le deuxième chiffre. Vous pouvez à présent, au moyen
des flèches de défilement, sélectionner un autre numéro de contrôle.
Appuyez enfin sur la touche C pour valider votre sélection et quitter le
mode Edition.
36
Avec un interrupteur au
pied normal, vous pouvez
allumer (luminosité forte)
ou éteindre l'éclairage ;
avec une pédale, en
réduire ou en augmenter
l'intensité.
Interrupteur ou pédale : quelle différence ?
Un interrupteur ne connaît que deux états : arrêt/off (0) et marche/
on (127). Vous n'avez donc que le choix entre valeur minimale et
valeur maximale. Une pédale, en revanche, peut envoyer un signal
correspondant à n'importe laquelle des valeurs comprises entre 0 et
127. Cela ne signifie pas que vous ne pouvez pas commuter au moyen
d'une pédale également. En effet, si celle-ci se trouve sous la position
centrale, elle coupera la fonction affectée et si elle se trouve au-dessus,
elle l'activera.
10 Système AES (uniquement sur appareils pour l'UE)
Selon la directive 1275/2008/CE, les appareils électriques et électroniques
doivent posséder un dispositif économiseur d’énergie qui les coupe après
un certain temps de non-utilisation. Sur le TriAmp Mark 3, c’est l’AES
qui se charge de cette fonction, activable et désactivable via le miniinterrupteur situé près de la douille Speaker. À la livraison, le dispositif
AES est activé – le mini-interrupteur est donc en position gauche. Dans
cette configuration, l’ampli se coupe de lui-même après une phase de
non-utilisation d’environ 90 minutes. Cette phase est réinitialisée et le
compte à rebours recommence à chaque fois qu’un signal parvient à
l’entrée de l’ampli (par exemple, lorsqu’un son bref est joué). Même un
signal faible suffit pour relancer le compte à rebours de 90 minutes avant
extinction de l’appareil. À partir du moment où l'AES a coupé l'ampli,
celui-ci peut être relancé par coupure, puis réactivation de l'interrupteur
Power/On ou Standby.
TriAmp Mark 3 – Manual 1.1
Caractéristiques électriques générales
Entrées
Puissance de sortie
jusqu’à 150 watts
Douille Input
Jack 6,3 mm (1/4"), asymétrique
Puissance absorbée maximale
460 watts
Impédance
1 Mohm
Courant d’enclenchement
100 V : 27 A – 120 V : 26 A – 220-240V : 23 A
+/-10%
Niveau d’entrée maximal / 1 kHz
(Amp 1A)
0 dBV
Plage de tolérance de tension
secteur
Boost activé
De 0° à +35°
Sensibilité en entrée / 1 kHz (EQ
en position centrale, niveau en
position maxi)
Boost désactivé
Plage de température ambiante
en fonctionnement
Fusible secteur, 100 volts
250 V / T 5 A
Amp 1A: -33 dBV
Amp 1A: -37 dBV
Fusible anodique
T 800 mA
Fusible de chauffage de lampe
TT 15 A (Schurter 7040.3210)
Lampes
Amp 2B: -74 dBV
Amp 2B: -74 dBV
Amp 3A: -76 dBV
Amp 3A: -76 dBV
Amp 3B: -78 dBV
Amp 3B: -89 dBV
Douille FX Return
Jack 6,3 mm (1/4"), asymétrique
Impédance
22 kohms
Réf.
Type
Origine
Fonction
Niveau maximal / 1 kHz
+14 dBV
1
9440008
7025/E83CC
(ECC83), High-Grade
Slovaquie
Lampe d’entrée (active sur tous
les canaux)
Interrupteur -10 dB
désactivé
Interrupteur -10 dB
activé
2
9440001
12AX7A-C, sélect.
Chine
Canal 1B (préampli)
Sensibilité / 1 kHz (Master en
position centrale, FX Level en
position maxi)
3
9440007
ECC83, sélect.
Slovaquie
Canal 1A-1B (sortie préampli)
0 dBV
-10 dBV
4
9440007
ECC83, sélect.
Slovaquie
Canal 2A-2B-3A-3B (préampli)
Douille Power Amp In
Jack 6,3 mm (1/4"), asymétrique
5
9440007
ECC83, sélect.
Slovaquie
Canal 2A-2B (sortie préampli)
Impédance
350 kohms
6
9440007
ECC83, sélect.
Slovaquie
Canal 3A (sortie préampli)
Sensibilité / 1 kHz (par canal)
De +6 à +10 dBV
7
9440007
ECC83, sélect.
Slovaquie
Canal 3B (préampli)
8
9440007
ECC83, sélect.
Slovaquie
FX Buffer (active sur tous les
canaux)
9
9440007
ECC83, sélect.
Slovaquie
Diviseur de phase (actif sur tous
les canaux)
Sorties
Red Box DI Out
XLR, symétrique
Impédance
2 kohms
0 dBV (symétrique)
+12 dBV
10
6000122
EL34B-STR, sélect.
Chine
Lampes d’étages de sortie 1/2
Niveau de sortie
Niveau de sortie maximal
11
6000122
EL34B-STR, sélect.
Chine
Lampes d’étages de sortie 1/2
12
6000120
6L6GC-STR, sélect.
Chine
Lampes d’étages de sortie 3/4
13
6000120
6L6GC-STR, sélect.
Chine
Lampes d’étages de sortie 3/4
14
6000120
6L6GC-STR, sélect.
Chine
15
6000120
6L6GC-STR, sélect.
Chine
• にほんご
N°
Douille FX Send
Jack 6,3 mm (1/4"), asymétrique
Lampes d’étages de sortie 5/6
(volume maximal, EQ en position
centrale)
Interrupteur -10 dB
désactivé
Lampes d’étages de sortie 5/6
Impédance
2,2 kohms
680 ohms
Niveau maximal / 1 kHz
-2 dBV
+8 dBV
Interrupteur -10 dB
activé
Douille Power Amp Out
Jack 6,3 mm (1/4"), asymétrique
Niveau maximal / 1 kHz
+20 dBV
MIDI
MIDI In
7 broches (compatible 5 broches), alimentation
fantôme 20 V courant continu (150 mA)
MIDI Out/Thru
5 broches
Caractéristiques mécaniques
Lampes d’étages de sortie* / Puissance
de sortie
8 ohms / THD=10%
8 ohms / THD=5%
2x EL34
84 watts
34 watts
2x 6L6
72 watts
30 watts
4x 6L6
126 watts
93 watts
2x 6L6 + 2x EL34
132 watts
95 watts
4x 6L6 + 2x EL34 (recommandé)
145 watts
116 watts
* Comprises dans la livraison
Dimensions (l x H x P)
740 x 393 x 254 mm
Poids
22 kg / 48.5 lbs.
• Español
250 V / T 2 A
• Italiano
250 V / T 2 A
Fusible secteur, 240 volts
Amp 2A: -56 dBV
• Français
Fusible secteur, 220-230 volts
Amp 1B: -49 dBV
Amp 2A: -56 dBV
• Deutsch
250 V / T 5 A
• English
Fusible secteur, 120 volts
Amp 1B: -49 dBV
• 中文
11 Caractéristiques techniques
37
Istruzioni di sicurezza
importanti. Leggere prima di
effettuare il collegamento!
Il presente prodotto è stato fabbricato dal produttore
in conformità alla norma IEC 60065 ed è uscito dallo
stabilimento in perfette condizioni di funzionamento.
Per preservare tali condizioni e garantirne l’uso sicuro,
l’utente deve attenersi alle indicazioni e alle avvertenze
riportate nelle istruzioni per l’uso. L’unità è conforme
alla Classe di protezione 1 (apparecchio con messa a
terra di protezione). Se volete usare questo prodotto su
veicoli, a bordo di navi o di aerei oppure ad altitudini
superiori a 2000 m dovete badare alle rispettive norme
di sicurezza suppletive alla norma IEC 60065.
AVVISO: Per evitare il rischio di incendio o
folgorazione, non esporre l’apparecchio ad umidità
o pioggia. Non aprire l’involucro poiché al suo
interno non vi sono parti riparabili dall’utente. Per la
riparazione rivolgersi a personale tecnico qualificato.
Questo simbolo segnala la presenza all’interno
dell’involucro di tensione pericolosa priva di
isolamento sufficientemente alta da costituire un
pericolo di folgorazione.
Questo simbolo segnala la presenza di tensione
pericolosa accessibile dall’esterno. Il cablaggio
esterno collegato ad un qualunque morsetto
contrassegnato da questo simbolo deve essere un cavo
preconfezionato conforme ai requisiti indicati dal
produttore o un cablaggio installato da personale
qualificato.
Questo simbolo segnala importanti istruzioni
per l’uso e la manutenzione nella
documentazione allegata. Leggere il manuale.
Questo simbolo ha il seguente significato:
Attenzione! Superficie calda! Non toccare per
evitare scottature.
• Leggere queste istruzioni.
• Conservare queste istruzioni.
• Attenersi a tutti gli avvisi e istruzioni riportati sul
prodotto e nel manuale.
• Non utilizzare il prodotto vicino all’acqua. Non
collocare il prodotto vicino ad acqua, vasche,
lavandini, zone umide, piscine o stanze con presenza
di vapore.
• Non collocare sul prodotto oggetti contenenti liquidi,
quali vasi, bicchieri, bottiglie ecc.
• Pulire solo con un panno asciutto.
• Non togliere alcun coperchio o parti dell’involucro.
• La tensione di esercizio prescritta per il prodotto deve
corrispondere alla tensione di alimentazione della
rete locale. In caso di dubbi sul tipo di alimentazione
disponibile, rivolgersi al proprio rivenditore o
all’azienda di fornitura elettrica locale.
• Per ridurre il rischio di folgorazione, la messa a terra
del prodotto deve essere mantenuta. Utilizzare solo
il cavo di alimentazione in dotazione al prodotto e
mantenere sempre in funzione il connettore centrale
(di terra) del collegamento alla rete. Non escludere la
funzione di sicurezza del connettore polarizzato o di
messa a terra.
• Proteggere il cavo di alimentazione affinché non
venga calpestato o pizzicato, in particolare in
corrispondenza delle prese e degli innesti e nel punto
di uscita dal dispositivo. Maneggiare sempre con cura
i cavi di alimentazione. Controllare periodicamente
la presenza di tagli o usura sui cavi, soprattutto
all’altezza della presa e nel punto di uscita dal
dispositivo.
• Non utilizzare mai il cavo di alimentazione se
danneggiato.
• Scollegare il prodotto in caso di temporale o di lunghi
periodi di inutilizzo.
• Il prodotto si scollega completamente
dall’alimentazione di rete solo staccando la spina
di alimentazione dall’unità o dalla presa a muro.
Il prodotto va collocato sempre in modo che sia
possibile scollegarlo dall’alimentazione con facilità.
• Fusibili: I fusibili utilizzati come ricambio devono
essere di tipo IEC127 (5x20 mm) e dell’amperaggio
nominale richiesto. È vietato utilizzare fusibili riparati
o cortocircuitare il portafusibili. Fate sostituire i
fusibili soltanto da un tecnico qualificato.
• Per tutte le operazioni di riparazione, rivolgersi a
personale qualificato. L’unità va riparata nel caso
abbia subito danni, come nei seguenti casi:
- Il cavo o la presa di alimentazione sono danneggiati
o usurati.
- È penetrato del liquido o degli oggetti all’interno del
prodotto.
- Il prodotto è stato esposto a pioggia o umidità.
- Il prodotto non funziona correttamente seguendo le
istruzioni.
- Il prodotto ha subito una caduta o l’armadio è stato
danneggiato.
• Quando collegate altoparlanti badate di non scendere
sotto l’impedenza minima dichiarata sull’apparecchio
oppure in questo manuale. Usate sempre cavi dello
spessore adatto e corrispondenti alle vigenti norme
locali.
• Non esporre ai raggi solari diretti.
• Non installare accanto a fonti di calore quali
radiatori, bocchette di diffusione d’aria calda, fornelli
o altri dispositivi che generano calore.
• Non chiudere le aperture di ventilazione. Installare
l’unità seguendo le istruzioni fornite dal produttore.
Il prodotto non è adatto all’installazione ad incasso,
ad esempio in un rack, a meno di non garantire
un’adeguata ventilazione.
• Quando viene spostato all’interno di un locale,
attendere sempre che il dispositivo, se freddo,
raggiunga la temperatura ambiente. Qualora venga
utilizzato senza che si sia riscaldato, sussiste il
rischio di formazione di condensa al suo interno e di
conseguenti danni.
• Non collocare sul prodotto fiamme libere, come ad
esempio candele accese.
• Posate l’apparecchio mantenendo una distanza
minima di 20 cm da pareti. Non copritelo e
provvedete a lasciare uno spazio libero di almeno 50
cm al di sopra dell’apparecchio.
• Utilizzare solo in abbinamento al carrello, supporto,
piedistallo, staffa o tavola specificati dal produttore
o venduti insieme al prodotto. Qualora si utilizzi un
carrello, prestare attenzione nello spostare il carrello/
la combinazione di prodotto per evitare lesioni
causate dall’inciampamento.
• Utilizzare solo accessori consigliati dal produttore.
Tale prescrizione si applica a tutti i tipi di accessori,
ad esempio coperchi di protezione, borse per il
trasporto, supporti, dispositivi per il montaggio a
parete o a soffitto, ecc. In caso di applicazione di
qualsiasi tipo di accessorio al prodotto, osservare
sempre le istruzioni per l’uso fornite dal produttore.
Non utilizzare mai punti di fissaggio sul prodotto
diversi da quelli indicati dal produttore.
• Questo apparecchio NON è adatto all’uso da parte
di persone (compresi i bambini) con capacità fisiche,
mentali o sensoriali limitate o da persone prive
della necessaria esperienza e/o conoscenza. Tenere
sempre l’apparecchio al di fuori della portata dei
bambini di età inferiore ai 4 anni.
• Non inserire mai oggetti di alcun tipo all’interno del
prodotto attraverso le fessure dell’armadio, poiché
potrebbero toccare punti con presenza di tensione
pericolosa o causare il cortocircuito dei componenti,
con il conseguente rischio di incendio o folgorazione.
• Questo prodotto genera livelli di pressione sonora
Version 2.3b 01/2015
superiori a 90 dB in grado di causare danni
permanenti all’udito. L’esposizione a livelli di
rumore estremamente elevati può causare la perdita
permanente dell’udito. In caso di esposizione
continua, indossare protezioni per l’udito.
• Il produttore garantisce la sicurezza, l’affidabilità e
l’efficienza del prodotto solo se:
- l’assemblaggio, l’ampliamento, la reimpostazione,
le modifiche o le riparazioni sono eseguiti dal
produttore o da personale autorizzato.
- l’impianto elettrico dell’area interessata è conforme ai
requisiti specificati nelle norme IEC (ANSI).
- l’unità è utilizzata secondo le istruzioni per l’uso.
Prima di usare l'amplificatore
• Leggere attentamente questo manuale e gli avvisi di sicurezza prima di usare l'amplificatore.
• Hughes & Kettner non è responsabile per qualunque danno causato da un utilizzo improprio
dell'amplificatore.
• Verificare che gli interruttori Power e Standby
siano spenti e che la tensione locale corrisponda al valore indicato sul pannello posteriore
dell'amplificatore prima di collegarlo alla rete
di corrente.
• Non usare l'amplificatore senza aver collegato
un cabinet! Badare all'impedenza del cabinet
e collegarlo sempre all'uscita Speaker Out
dall'impedenza adatta.
• Un ultimo avviso prima di avviare
l'amplificatore: L'amplificatore produce alti
livelli di volume che possono danneggiare
l’udito. Per evitare una sorpresa assordante,
vi consigliamo di assuefarvi a chiudere il
controllo Master Volume prima di accendere
l'amplificatore.
Sapevamo dall'inizio che l'evoluzione del TriAmp MK II sarebbe stato
una sfida. Dovevamo creare una radicale innovazione che si presenta
come nuovo punto di riferimento in suono, prestazioni e design senza
essere troppo diverso dal suo predecessore. Perciò i nostri tecnici hanno
conservato ogni dettaglio del TriAmp MK II – il modello di prima scelta per
molti chitarristi – e hanno ridisegnato ciascun aspetto per corrispondere
alle esigenze del futuro. Di questo modo hanno creato un amplificatore
all'avanguardia mai visto nel mondo della chitarra: il TriAmp Mark 3.
E il TriAmp Mark 3 non vi offre soltanto i suoni classici: Grazie alle varie
possibilità di combinare canali e finali di potenza, potete creare i vostri
propri suoni nuovi. Mai prima, un solo amplificatore ha offerto una così
vasta e affascinante gamma di suoni.
• にほんご
• Español
Ciascuno dei sei canali dispone dei suoi propri controlli Gain e Volume
e di una propria sezione voicing a tre canali. Grazie allo stomp boost
che si adatta alle caratteristiche del canale attivo, potete attivare
semplicemente ben 12 suoni basilari. In combinazione con una delle tre
finali di potenza – che vengono attivati semplicemente col rispettivo tasto
– avete a disposizione 3x12=36 suoni diversi con una potenza di 50 W.
Aggiungendo una seconda finale di potenza (e aumentando la potenza
massima a 100 W), l'amplificatore vi offre altre 36 opzioni (finale 1+2,
finale 1+3, finale 2+3). Ed altri 12 se usate anche la terza finale di potenza
(aumentando la potenza a 150 W!). Insomma, il TriAmp Mark 3 vi offre
ben 84 suoni diversi.
• Italiano
Il TriAmp Mark 3 non solo vi offre tre indipendenti preamplificatori a
due canali ma anche tre finali di potenza indipendenti. Potete munire
ciascuna delle tre finali di potenza con valvole di vari tipi. Inoltre,
potete assegnare liberalmente ciascuna finale di potenza a ciascuno dei
sei canali – anche tramite MIDI. Se come questo non bastasse, potete
liberamente combinare le finali di potenza assegnate a ciascun canale e
quindi suonare con diversi tipi di valvole finali.
• Français
1 Prefazione
Una nuova era nella storia del suono valvolare
• Deutsch
Prefazione .................................................................................. 39
Quick Start ................................................................................. 40
Operazione basilare ................................................................... 40
Amplificatori e canali ................................................................. 41
Pannello frontale ........................................................................ 41
Pannello posteriore .................................................................... 43
MIDI-presets e MIDI-setup......................................................... 44
TSC™ –Tube Safety Control ....................................................... 46
TSM-432 – Pedaliera MIDI ......................................................... 47
AES ............................................................................................ 48
Caratteristiche tecniche .............................................................. 49
• English
1
2
3
4
5
6
7
8
9
10
11
• 中文
TriAmp Mark 3 – Manual 1.1
39
TriAmp Mark 3 – Manual 1.1
;VKVHTHU\HSYLHKV\[VM[OL[\IL
TH[JOPUNPUZLY[HWPJRPU[V[OLZSV[
HUKJV\U[[OLMSHZOLZVMLHJO3,+
;OLKPMMLYLUJLPUMSHZOLZZOV\SKIL
SLZZ[OHU^P[OPULHJOWHPY[V
N\HYHU[LLILZ[ZV\UK7SLHZLYLMLY
[V[OLTH[JOPUNJOHY[PU[OLTHU\HS
Tube Status Monitor
;:*H\[VTH[PJHSS`PUKPJH[LZ[OLZ[H[\ZVM[OL[\ILZ
HZZVVUHZ[OLHTWPZPUWSH`TVKL:;(5+)@Z^P[JO
PU\WWLYWVZP[PVU0M[OL3,+ZZ[H`VUPUWSH`TVKL
WSLHZLJOLJR[OLHUVKLM\ZL
(SS3,+ZVMMTLHUZ!ILZ[IPHZUVYTHSVWLYH[PVU
6UL3,+VUTLHUZ!UVJ\YYLU[[\ILPZIYVRLUHUK
OHZ[VILYLWSHJLK
6UL3,+MSHZOLZVUL3,+PZVU![OLMSHZOPUN3,+
PUKPJH[LZH[\IL[OH[JH\ZLZV]LYJ\YYLU[[OLV[OLY
3,+PUKPJH[LZHZ^P[JOLKVMM[\IL[VWYV[LJ[[OLHTW
7SLHZLYLWSHJL[OL[\IL[OH[JH\ZLZV]LYJ\YYLU[
;^V3,+ZVUTLHUZ!WHPYVM[\ILZPZZ^P[JOLKVMM
MADE IN GERMANY
SPEAKERS
16 Ohms
1x 8 Ohms
or 2x 16 Ohms
RED BOX™ AE
4 Ohms
Ambience emulated DI Out
*HIPUL[
4VKL
3V^
*\[
0UZLY[N\P[HYWPJR[VYLHK
V\[[\ILTH[JOPUN
7V^LY;\ILZ!
TSC™
MIDI
ILZ[)PHZ
V]LYJ\YYLU[
UVJ\YYLU[
NOISE GATE
Hard
In
Out/Thru
Z^P[JOLKVMM
FX LOOP
Soft
MASTER INSERT
FX Level
Send
Return
*(<;065!9LHYWHULSHUK
]LU[PSH[PVUVWLUPUNZTH`
ILJVTL[VVOV[[V[V\JO
3LH]LLUV\NOZWHJLMVY
WYVWLY]LU[PSH[PVU
;VYLK\JL[OLYPZRVMLSLJ[YPJZOVJRNYV\UKPUNVM
[OLJLU[LYWPUVM[OPZWS\NT\Z[ILTHPU[HPULK
9LWSHJPUNM\ZLZT\Z[VUS`ILJHYYPLKV\[I`
X\HSPMPLKZLY]PJLWLYZVUULS9LWSHJLM\ZLZVUS`
^P[O[`WLHUKYH[PUNZOV^UOLYL
Bright
4HPUZ=VS[HNL
Power Amp In
=e
¶K)
=e
7V^LY(TW;\ILZ
Preamp Out
*(<;065!9PZRVMLSLJ[YPJ
ZOVJR+VUV[VWLU9LMLY
ZLY]PJPUN[VX\HSPMPLK
ZLY]PJLWLYZVUULS
PANEL
Dark
FX Serial
(,:
VUVMM
TSM-432
Serial No.
;90(474HYR
4HPUZ-\ZL!=;(3/a
4H_7V^LY*VUZ\TW[PVU>
,<]LYZPVUVUS`
or
Vol. Pedal
Guitar Cabinet
FX-Unit
Tuner
or
FX-Unit
or
or
Powered
Cabinet
Power Amp
Mixing Desk
2 Quick Start
3 Operazione basilare
Mains In: Presa per collegare il cavo d'alimentazione compreso (Mains
Lead).
Operare il TriAmp Mark 3 è semplicissimo:
• I sei canali indipendenti vengono regolati individualmente con sei
identici set di controlli.
• La posizione dei controlli di un set vale soltanto per il rispettivo canale.
• I controlli della sezione Master (a sinistra sul pannello frontale)
influiscono su tutti i canali.
MIDI In: Presa a 7 pin per collegare la pedaliera TSM-432 o un altro
controller MIDI. Naturalmente potete anche usare un cavo standard a 5
pin per collegare qualsiasi controller MIDI. I due pin addizionali (1 & 7)
forniscono la tensione virtuale per alimentare la pedaliera MIDI Hughes
& Kettner TSM-432.
Speaker: Presa per collegare cabinet da chitarra. Ti consigliamo di usare
i cabinet della serie Hughes & Kettner TM o TC, sviluppati per l'uso con
i nostri amplificatori.
AES: I modelli venduti nell'UE dispongono della funzione di risparmio
d'energia AES (per saperne di più, leggete capitolo 10). Con AES attivato
(impostazione di fabbrica), il TriAmp Mark 3 si spegne dopo una fase
inattiva di circa 90 minuti. Dal momento che l'amplificatore riceve un
segnale al suo ingresso, il count down della fase inattiva ricomincia
dall'inizio.
40
TSM-432
Il tasto Stomp Boost e i tre tasti Power Amp Tubes servono a regolare
separatamente ciascuno dei sei canali. La loro impostazione viene
memorizzata automaticamente quando scegliete un altro canale. Se per
esempio suonate il canale 1A con due valvole accoppiate 6L6 e stomp
boost, questa impostazione viene riattivata quando scegliete questo
canale nuovamente – finché non la cambiate (avete a disposizione ancora
più possibilità se usate MIDI-Presets – per saperne di più leggete capitolo
7 "MIDI").
I tasti servono anche come indicatori LED del canale o della funzione
attiva.
TriAmp Mark 3 – Manual 1.1
Channel B: Il scampanato suono clean britannico degli anni 60
Il canale 1B produce quel tipico suono britannico con brillanti acuti e una
sottilissima distorsione armonica. Anche a bassi livelli di gain, 1B vi vizia
con medio-alti ricchi di armoniche.
Nota: Come finale di potenza per il canale 1B vi consigliamo una coppia
di valvole EL-34.
4.2 Amp 2
Channel A: Il classico suono lead britannico degli anni 70
Il canale 2A vi offre quel bollente suono overdrive tipico per tante
produzioni ormai classiche della musica rock. Grazie al suo "touch"
britannico, questo canale si propone come scelta adatta per riff imponenti
e ritmi aggressivi.
Nota: Una coppia di valvole EL34 è la finale di potenza ideale per il tipico
suono di questo canale. Comunque vale la pena di usare questo canale
con una coppia (o perfino due coppie) di valvole 6L6.
Channel B: Il cremoso suono lead britannico degli anni 80
Il canale 2B vi offre una vasta gamma di suoni dal cremoso e lugubro
fino a un lungo sustain. Come questo? Grazie al suo circuito speciale,
il canale 2B rinforza il suono con la tipica distorsione dei popolari e
richiesti vecchi modelli plexi. Il suono cupo, forte e sonoro è ideale per il
tapping con due mani e violenti power chords.
5 Pannello frontale
5.1 Power e Standby
Interruttore Power/On: Alimenta l'amplificatore sulla
posizione "On". L'amplificatore si illumina e le valvole
vengono riscaldate per la ventura avventura sonora.
Selettore Play/Standby: Aspettate che siano passati circa 30 secondi per riscaldare le valvole, poi mettete il
selettore su "Play". E via col rock! Se fai una pausa, ti preghiamo di metterlo su "Standby" per evitare che le valvole si raffreddano.
5.2 Input e Stomp Boost
Input: Ingresso strumenti, 1 MΩ, per collegare una chitarra
usando un cavo jack schermato.
Stomp Boost: Lo stomp boost intensifica certe frequenze del
vostro suono. A seconda del canale e delle impostazioni, il
boost provvede a fornire un suono ancora più imponente, cremoso o espressivo. Nella catena del segnale, lo stomp boost si
trova entro l'ingresso e il preamplificatore. È sintonizzato sulle caratteristiche del rispettivo canale attivo e quindi funziona come sei diversi pedali
da boost. La caratteristica particolare di questo circuito:
• 中文
Il canale 3B spara spietati suoni high gain mai sentiti. La formidabile
distorsione sporca del canale 3B sarà la nuova droga degli amici del
drop tuning e l'arma preferita dei domatori delle chitarre a 7 e 8 corde.
Se azionate lo stomp boost, l'amplificatore reagisce al tocco con una
velocità incredibile - come se le corde fossero un prolungamento delle
vostre dita e schiavi della vostra volontà. Il canale 3B lubrica le corde per
lasciarvi suonare i vostri riff e lick come se non fosse niente.
Nota: Provare per crederci: Suonare il canale 3B con due coppie di 6L6 - e
poi attivare anche gli EL34!
• にほんご
Il canale 1A vi offre i grandiosi suoni della grande tradizione americana.
La sua virtù: il classico suono clean senza distorsioni anche ad alti livelli
di gain. Il suo "twang" vi farà venire voglia di mettere i vostri stivali da
cowboy. Man non lasciatevi ingannare: Il canale 1A vi offre anche bassi
potenti che soddisfaranno le esigenze dei più ferventi amatori delle
frequenze basse.
Nota: Il canale 1A funziona specialmente bene con due coppie di valvole
6L6.
Channel B: Il moderno suono high gain e oltre
• Español
Channel A: Il perlato suono clean della California degli anni 50.
Il canale 3A è onesto e diretto: reagisce subito e in modo sensibile ad
ogni variazione del tocco e al controllo di volume della vostra chitarra.
Il canale 3A conserva l'unico suono della vostra chitarra producendo un
suono croccante e definito – anche se avete alzato il controllo Gain al
massimo.
Nota: La combinazione ideale per il canale 3A: una coppia di valvole
EL34 e un'altra 6L6.
• Italiano
4.1 Amp 1
Channel A: Il classico suono high gain americano degli anni 90
• Français
Potete scegliere i canali usando i controlli sull'amplificatore oppure con
la pedaliera MIDI inclusa TSM-432. Per scegliere i canali col TSM-432
dovete prima attivare lo stomp box bode della pedaliera. Ora, i tasti 1 a 6
servono a selezionare i rispettivi canali mentre il tasto 7 si occupa dello
stomp boost (L'altro modo d'utilizzo, il preset-mode, vi offre ancora più
possibilità. Per saperne di più, leggete il capitolo "MIDI").
4.3. Amp 3
• Deutsch
I canali del TriAmp Mark 3 vi offrono ben più di semplicemente tre diversi
livelli di gain. Ciascuno rappresenta i suoni di un'era. La nostra avanzata
elettronica provvede a configurare le valvole dei preamplificatori e delle
finali di potenza per ciascun canale e ciascun MIDI-preset. Di questo
modo, il circuito valvolare presenta sempre le migliore caratteristiche
sonore in qualsiasi delle varie configurazioni del TriAmp Mark 3.
Nota: La scelta giusta per esplorare le prestazioni del canale 2B è una
coppia di valvole EL34.
• English
4 Amplificatori e canali
41
TriAmp Mark 3 – Manual 1.1
Lo stomp boost è un modulo singolo su un separato circuito stampato e
viene inserito nella catena del segnale tramite un circuito bypass.
5.3 La sezione canali
Tasti Channel: Per selezionare i canali direttamente.
Gain, Master: Il controllo Gain regola la sensibilità d’ingresso e quindi
il livello di saturazione del preamplificatore. In combinazione con la
funzione boost, il gain è il mezzo più importante per creare un suono. I
controlli Master servono a adattare i livelli dei rispettivi canali.
Bass, Mid, Treble: La sezione voicing viene modificata per ciascun
canale in modo da fornire sempre la migliore modellazione. I tre controlli
influiscono sempre sulle frequenze caratteristiche del tipico suono
principale di ciascun canale.
Attenzione: Si tratta di una classica sezione voicing passiva. I controlli
influiscono l’uno sull’altro. Un esempio: Con un controllo "Mid" aperto,
l’efficienza del controllo "Bass" risulta minore in confronto a un controllo
"Mid" chiuso.
5.4 La sezione master
Volume: Il controllo Master Volume
regola il volume totale del TriAmp
Mark 3. Questo controllo vi permette
di domare 150 Watt valvolari con
due dita. Usatelo con saggezza per
entusiasmare i membri della vostra
band invece di farli ammattire e per rendere la musica piacevole piuttosto
che un'esperienza fastidiosa. Vi consigliamo di adattare il volume alla
località e di scegliere un livello moderato per non danneggiare il vostro
udito o quello dei vostri amici o del pubblico.
Presence: Controllo per regolare la quantità delle armoniche. Tanto più
questo controllo viene alzato, quanto più il suono si dimostra “presente”.
Questo controllo vi permette di "affilare" il vostro suono per accentuare
la vostra espressione musicale e renderla più potente.
Resonance: Mettete il controllo in posizione “ore 12” per sentire il
“normale” comportamento di risonanza fra amplificatore e cabinet. Per
smussare il vostro suono, potete attenuare l'effetto della risonanza del
cabinet girando il controllo in senso antiorario. Girando il controllo in
senso orario, aumentate l’effetto di risonanza per produrre bassi più
potenti. Alzatelo al massimo per produrre impressionante frequenze subbasse che faranno vibrare viscere e muri.
Consiglio: I controlli Presence e Resonance servono anche come sezione
voicing master e vi permettono di adattare il vostro suono a diversi modelli di cabinet o alla località dove state suonando senza dover cambiare
l'impostazione delle sezioni voicing dei canali.
42
5.5 Power Amp Tubes
Quei tre tasti non appariscenti sono l'arma segreta del
TriAmp Mark 3. Apriranno un nuovo capitolo nella
storia dei suoni valvolari. Potete assegnare ciascuna
delle finali di potenza a valvole liberamente a uno dei
sei canali – basta selezionare un canale per poi attivare la finale/le finali
di potenza desiderata/e. Potete munire ciascuna delle tre finali di potenza
con valvole accoppiate dal tipo EL34 o 6L6. Questo vi permette di
combinare valvole accoppiate di vari tipi in ogni canale del TriAmp Mark
3. Grazie ai MIDI-presets, potete usare una pedaliera MIDI per cambiare
la finale/le finali di potenza del canale attivo mentre state suonando (per
saperne di più, leggete il capitolo "MIDI").
Il TriAmp Mark 3 vi permette di sperimentare à volontà per creare
suoni finora inimmaginabili. Per esempio potete iniziare una canzone
dolcemente con una coppia 6L6 e 50 Watt, azionare una seconda coppia
6L6 per i vostri riffs e – invece di usare il boost – attivare le EL34 per
accentuare i medi del vostro assolo e avere a disposizione ben 150 Watt!
Di questo modo vi farete sentire anche nell'ultima fila della platea.
Oppure potete alternare il carattere del canale attivo scambiando il
tipico suono britannico delle EL34 con quello americano delle 6L6. O
selezionare entro valvole EL34 di produzione cinese e slovacca, senza
dover cambiare valvole, amplificatore o canale. Il TriAmp Mark 3 è il
primo amplificatore a offrirvi queste possibilità – e si dimostra un vero
"apparecchio per paragonare valvole" a sei canali!
Nota: Potete usare anche altri tipi di valvole finali nel TriAmp Mark 3. I seguenti tipi sono stato collaudati da Hughes & Kettner: KT77, KT66, KT88,
5881 WXT, 6550 A, 6CA7, 7581.
5.6 FX Loop
Il loop effetti Smart Loop™ vi permette di collegare processori di effetto
esterni in parallelo o in serie. Il suo stato – on/off e parallelo/serie – è
memorizzato per ogni canale e MIDI-preset.
FX Loop: Interruttore per attivare o disattivare il loop
effetti. Per sapere di più sul loop effetti, leggete il capitolo
"pannello posteriore".
5.7 Noise Gate
Il preciso noise gate IDB™(Intelligent Dual Breakpoint) misura
simultaneamente il livello di due punti importanti della catena del
segnale: l'ingresso e l'uscita del preamplificatore. Partendo da questi
due valori, la tecnologia IDB™ calcola la reattività ideale e regola
automaticamente i parametri attack e threshold. Il tasto Noise Gate serve
a attivare e disattivare il noise gate IDB™.
Quando attivato, il noise gate interrompe la via del segnale per livelli
inferiori a una certa soglia e riduce i rumori di fondo – addio ronzii
indesiderati! Il noise gate resta chiuso finché non tocchiate nuovamente
le corde delle chitarra – aprendosi poi senza alcuna latenza. Per sapere
di più sul noise gate, leggete il capitolo seguente.
SPEAKERS
1x 8 Ohms
or 2x 16 Ohms
4 Ohms
Ambience emulated DI Out
*HIPUL[
4VKL
3V^
*\[
TSC™
MIDI
ILZ[)PHZ
V]LYJ\YYLU[
UVJ\YYLU[
NOISE GATE
Hard
In
FX LOOP
Soft
Out/Thru
Z^P[JOLKVMM
MASTER INSERT
FX Level
Send
Dark
FX Serial
Return
Preamp Out
;VYLK\JL[OLYPZRVMLSLJ[YPJZOVJRNYV\UKPUNVM
[OLJLU[LYWPUVM[OPZWS\NT\Z[ILTHPU[HPULK
9LWSHJPUNM\ZLZT\Z[VUS`ILJHYYPLKV\[I`
X\HSPMPLKZLY]PJLWLYZVUULS9LWSHJLM\ZLZVUS`
^P[O[`WLHUKYH[PUNZOV^UOLYL
Bright
4HPUZ=VS[HNL
Power Amp In
=e
=e
(,:
VUVMM
TSM-432
Serial No.
;90(474HYR
4HPUZ-\ZL!=;(3/a
4H_7V^LY*VUZ\TW[PVU>
,<]LYZPVUVUS`
6 Pannello posteriore
Il TriAmp Mark 3 è il primo prodotto Hughes
& Kettner munito con la nuova Red Box con
Ambience Emulation (AE). Dalla fine degli anni
ottanta, la Red Box, inventata da Hughes & Kettner;
viene considerata come standard industriale per le
DI box per chitarra con emulazione di cabinet. La Red Box vi garantisce
sempre una fidele trasmissione del suono – sia sul palcoscenico che
nello studio di registrazione. Usando la Red Box invece di un microfono
per trasmettere il suono, evitate una diafonia causata da segnali di altri
strumenti musicali. E perlopiù risparmiate di sprecare tempo per trovare
l'ideale posizione del microfono.
Ambience emulated DI Out
Cablatura in parallelo: R = (R1 x R2) / (R1 + R2)
Esempio per un cabinet da 8 ohm e un cabinet da 16 ohm:
R = (8 x 16) / (8 + 16) ohm
R = 128 / 24 ohm
R = 5.33 ohm
Oggi, la cablatura in parallelo è consueta. Ma se avete un cabinet con
un'uscita cablata in serie o se volete cablare i vostri cabinet in serie,
l'impedenza totale risulta dalla somma dell'impedenza dei cabinet.
Cablatura in serie: R = R1 + R2
Se cablate un cabinet da 4 ohm e un cabinet da 8 ohm in serie,
l'impedenza totale ammonta a 12 ohm.
Consiglio: La regola d'oro – l'impedenza totale dei cabinet non deve essere minore all'impedenza dell'uscita dell'amplificatore. Per i nostri esempi,
questo significa: Collegare i due cabinet cablati in parallelo (impedenza
totale 5,33 ohm) all'uscita 4 ohm e quelli cablati in serie (impedenza
totale 12 ohm) all'uscita 8 ohm.
Nota: Usate un cavo da microfono per collegare la Red Box AE a un mixer.
Badate che l'ingresso XLR del mixer sia messo su "line". Se il mixer non
dispone di ingressi XLR o se questi non possono essere messi su "line",
dovete usare un adattatore XLR jack oppure un cavo apposito, disponibili
presso un rivenditore.
6.3 TSC
Nota: Abbiamo dedicato un intero capitolo di questo manuale al circuito
Tube Safety Control. Per saperne di più, leggete il capitolo "TSC".
6.4 MIDI In e Out/Thru
MIDI è il protocollo ideale per selezionare e
cambiare suoni tramite i cosiddetti programIn
Out/Thru
changes.. Basta premere un solo tasto per selezionare
contemporaneamente un altro canale dell'amplificatore
e un altro programma del vostro processore effetti
TSM-432
esterno. Questo vi risparmierà il fastidioso tip-tap
sulla pedaliera per attivare l'impostazione giusta. Per questa ragione
abbiamo deciso di implementare MIDI come protocollo standard per
ogni impostazione del TriAmp Mark 3 e di munirlo con un'interfaccia
per la pedaliera MIDI TSM-432 inclusa. Per sapere di più sulla pedaliera
MIDI, leggete il capitolo "TSM-432".
MIDI
MIDI In: Il TriAmp Mark 3 dispone di un ingresso MIDI a 7 pin, compatibile
anche con cavi MIDI a 5 pin per poter collegare qualsiasi controller MIDI.
I due pin addizionali (1 & 7) forniscono la tensione virtuale per alimentare
• 中文
La Red Box AE è l'ultima versione della premiata DI box e offre un filtro
low cut selezionabile e due modi di emulazione di cabinet con differenti
caratteristiche sonore. L'emulazione di ambiente (Ambience Emulation
AE) avviene tramite un DSP che tratta il segnale prodotto dalla/e finale/i di
potenza per riprodurre l'autentico comportamento sonoro di un cabinet
4x12 e offrirvi un suono valvolare diretto e presente. L'uscita della Red
Box AE fornisce un segnale di linea. Il livello del segnale di linea dipende
dal livello della/e finale/i di potenza. Quindi, il controllo Master Volume
serve anche per regolare il livello dell'uscita DI.
• にほんご
• Se volete usare due cabinet da 8 ohm cablati in parallelo, collegateli
all'uscita 4 ohm. Attenzione se volete collegare cabinet con impedenze
diverse! Mai collegare due cabinet con impedenze diverse a due uscite
separate!
• Se volete usare due cabinet con impedenze diverse, dovete prima
cablarli in parallelo o in serie e poi collegarli all'uscita idonea. Per
calcolare l'impedenza totale "R" di due cabinet con le impedenze "R1"
e "R2" servitevi delle formule seguenti.
• Español
Non usare l'amplificatore senza aver collegato un cabinet!
3V^
*\[
• Italiano
5L]LY\ZL[OPZHTW^P[OV\[ZWLHRLYZJVUULJ[LK
<ZLJSHZZ^PYPUN
*HIPUL[
4VKL
• Français
4 Ohms
Il TriAmp Mark 3 dispone di separate
uscite per collegare cabinet di varie
impedenze standard. Potete collegare un
cabinet da 4 ohm, un cabinet da 8 ohm o
un (risp. due) cabinet da 16 ohm.
• Deutsch
1x 8 Ohms
or 2x 16 Ohms
6.2 Red Box AE
RED BOX™ AE
6.1 Speakers
16 Ohms
*(<;065!9LHYWHULSHUK
]LU[PSH[PVUVWLUPUNZTH`
ILJVTL[VVOV[[V[V\JO
3LH]LLUV\NOZWHJLMVY
WYVWLY]LU[PSH[PVU
¶K)
7V^LY(TW;\ILZ
5L]LY\ZL[OPZHTW^P[OV\[ZWLHRLYZJVUULJ[LK
<ZLJSHZZ^PYPUN
*(<;065!9PZRVMLSLJ[YPJ
ZOVJR+VUV[VWLU9LMLY
ZLY]PJPUN[VX\HSPMPLK
ZLY]PJLWLYZVUULS
PANEL
• English
16 Ohms
RED BOX™ AE
0UZLY[N\P[HYWPJR[VYLHK
V\[[\ILTH[JOPUN
TriAmp Mark 3 – Manual 1.1
43
TriAmp Mark 3 – Manual 1.1
la pedaliera MIDI Hughes & Kettner TSM-432.
6.7 Master Insert
Attenzione: Abbiamo incluso un cavo a 7 pin per collegare la pedaliera
TSM-432. Se perdete questo cavo o se lo avete dimenticato, potete usare
qualsiasi cavo a 5 pin per collegare la pedaliera. In questo caso, però, avrete bisogno di un dispositivo d'alimentazione. Grazie all'innovativa tecnologia di alimentazione del TSM-432, potete usare qualsiasi alimentatore
di corrente continua o alternata con una tensione fra 9 e 15 V.
Il TriAmp Mark 3 vi offre un addizionale loop seriale
per regolare il volume generale usando un pedale
da volume che viene collegato entro Preamp Out
Preamp Out
Power Amp In
e Power Amp In. L'uscita Preamp Out vi permette
anche di mandare il segnale del preamplificatore a
un altro amplificatore o a un accordatore elettrico.
Preamp Out è sempre attivo – se usate questa uscita, la via del segnale
rimane quindi invariata.
MIDI Out/Thru: Presa per trasmettere il segnale MIDI ad altri sistemi
o componenti. Qui potete collegare qualsiasi altro processore MIDI e
controllarlo simultaneamente con il TriAmp Mark 3.
Nota: Abbiamo dedicato un intero capitolo di questo manuale alle varie
funzioni MIDI del TriAmp Mark 3. Per saperne di più, leggete il capitolo
"MIDI-presets e MIDI-setup".
6.5 Noise-Gate Hard/Soft
Controllo per regolare la reattività del noise gate. Più
girate questo controllo nel senso orario, più sensibili
diventano le reazioni del noise gate. Più girate questo
controllo nel senso antiorario, più dura risulterà la
reazione del noise gate - eliminando non solo i rumori
di fondo ma anche "tagliando" il segnale.
NOISE GATE
Hard
Soft
Consiglio: La posizione "ore 12" è l'impostazione universale del noise
gate. Se volete usare il noise gate per accentuare veloci staccati ad alto
livello gain, giratelo nel senso antiorario.
6.6 FX Loop
FX Send: Presa per collegare
l'ingresso di un processore di effetti.
FX LOOP
FX Level
Send
Return
¶K)
FX Serial
FX Return: Presa per collegare
l'uscita di un processore di effetti.
-10 dB: Questo selettore permette di adattare il livello del segnale a
processori di effetti ideati per livelli bassi. Attivate questo selettore per
poter collegare un classico pedale da effetti che normalmente viene
collegato entro chitarra e amplificatore (per esempio un distorsore).
Level: Controllo per regolare il livello del segnale presente al FX Return.
FX Serial: Selettore per scegliere fra il modo parallelo o seriale del loop
effetti. Se questo tasto si illumina, è attivato il modo seriale del loop
effetti.
Consiglio: Nel modo parallelo, FX-Level serve a regolare il wet/dry-mix (la
relazione entro l'effetto e il puro segnale della chitarra). Potete mandare
ogni tipo di segnale di linea al FX-return per aggiungerlo al segnale del
preamplificatore tramite il controllo FX-Level.
Nel modo seriale, potete usare FX-Level come un secondo controllo Master
Volume per regolare il volume totale del segnale del preamplificatore. Per
fare così, collegate FX Send al FX Return e attivate o disattivate questa
seconda impostazione Master col tasto FX Loop.
44
MASTER INSERT
Nota: Quando collegate un apparecchio alla presa Power Amp In, la via
del segnale interna viene interrotta e la finale (o le finali) di potenza ricevono soltanto il segnale fornito dall'ingresso Power Amp In.
6.8 Panel
PANEL
Dark
Bright
Controllo per regolare l'intensità dell'illuminazione del
pannello frontale. Potete telecomandare questa funzione
anche tramite comandi MIDI Continuous-Control (per
saperne di più, leggete il capitolo "MIDI").
7 MIDI-presets e MIDI-setup
Potete telecomandare ogni tasto del TriAmp Mark 3 tramite MIDI e
memorizzare le impostazioni in 128 MIDI-presets. Ciascuno di questi
presets può essere attivato tramite il rispettivo numero program-change
usando un controller MIDI, un sequencer oppure un software adatto.
L'inclusa pedaliera MIDI TSM-432 vi permette di selezionare i canali e il
boost tramite MIDI (stomp-box-mode) oppure di accedere i 128 presets
memorizzati in 32 banchi a 4 presets (preset-mode). Come impostazione
di fabbrica, abbiamo scelto il canale MIDI 1 per l'amplificatore e la
pedaliera MIDI TSM-432. Imparerete più tardi come cambiare questa
impostazione dei canali MIDI se necessario.
Nota: Abbiamo dedicato un intero capitolo alle funzioni della pedaliera
MIDI TSM-432 – per saperne di più, leggete il capitolo "TSM-432".
7.1 Creare e accedere un MIDI-preset
Quale è la differenza entro l'impostazione di un canale e un MIDI-preset?
Il TriAmp Mark 3 memorizza automaticamente le impostazioni dei sei
canali – potete richiamarli selezionando i canali sull'amplificatore o
usando il TSM-432 nello stomp-box-mode. In più, potete memorizzare
qualsiasi configurazione di canali e finali di potenza e le impostazioni del
noise gate, del boost e del loop effetti in 128 MIDI-presets.
A che cosa servono i MIDI-presets?
Se volete selezionare un altro suono, spesso volete non solo cambiare il
canale, ma anche le impostazioni del noise gate, del boost e di un esterno
processore effetti MIDI. I MIDI-presets vi permettono per esempio di
cambiare un suono clean con chorus e riverbero direttamente in un
suono lead con delay, boost e noise gate.
Inoltre, il TriAmp Mark 3 vi offre anche l'opzione di selezionare le tre
finali di potenza tramite MIDI. Immaginatevi di suonare con un classico
suono britannico degli anni 60 con una coppia di EL34 e aggiungere un
pizzico di splendore americano semplicemente selezionando una coppia
TriAmp Mark 3 – Manual 1.1
di 6L6. O immaginatevi di ritmare con un moderno suono americano
high gain con due finali di 6L6 e rincarare la dose azionando anche la
terza coppia di EL34 per accentuare i medi e rendere il suono ancora più
aggressivo.
Come impostazione di fabbrica, abbiamo scelto il canale MIDI 1 per il
TriAmp Mark 3 è il TSM-432 e abbiamo attivato il modo Omni. Nel modo
Omni, l'amplificatore reagisce su tutti comandi sui 16 canali MIDI. Se
volete usare il TriAmp Mark 3 in un ambiente MIDI con altri apparecchi,
dovete disattivare il modo Omni e selezionare un canale MIDI adatto.
Date sfogo alla vostra creatività! Oppure beneficate dalla possibilità di
telecomandare il vostro TriAmp Mark 3 nello studio di registrazione o
Come accedere al MIDI-setup per cambiare canali e modo Omni:
sul palcoscenico. E se come tutto questo non bastasse, potete anche
Mettete il selettore Standby su Standby prima di accedere
al MIDI-setup.
usare un clicktrack MIDI ("pista playback") per cambiare i vostri presets.
Questo vi permette perfino d'integrare il TriAmp Mark 3 nel vostro light
show, spegnendo l'illuminazione del pannello frontale per avere un
palcoscenico buio.
Premete i tasti Noise Gate e FX Loop contemporaneamente
per tre secondi per accedere al MIDI-setup.
Il nostro segreto?
FX Loop
Valvole 3/4
Valvole 5/6
¢
¢
¢
¢
2
¢
¢
¢
{
3
¢
¢
£
¢
4
¢
¢
£
£
5
¢
£
¢
¢
Consiglio: Molti processori effetti offrono un MIDI-mapping, che vi permette di assegnare un certo preset degli effetti a diversi numeri programchange. Per esempio potete assegnare il preset 4 al programma 1, il preset
16 al programma 2 e il preset 4 nuovamente al programma 3.
6
¢
£
¢
£
7
¢
£
£
¢
8
¢
£
£
£
9
£
¢
¢
¢
7.2 Selezionare il canale MIDI / modo Omni
10
£
¢
¢
£
11
£
¢
£
¢
12
£
¢
£
£
13
£
£
¢
¢
14
£
£
¢
£
15
£
£
£
¢
16
£
£
£
£
• 中文
• にほんご
• Español
Valvole 1/2
1
I 16 canali MIDI permettono di controllare fino a 16 apparecchi diversi con
un controller MIDI. Questo è soprattutto utile nello studio di registrazione
o per tastiere. Per un amplificatore di chitarra con un processore di effetti,
di solito basterà un canale. Per funzionare in modo corretto, il schiavo
MIDI (cioè l'amplificatore) è il maestro (cioè la pedaliera MIDI) devono
usare lo stesso canale MIDI.
Canale MIDI
• Italiano
Nota: Se usate un processore effetti esterno, dovete programmarlo separatamente, perché la funzione learn del TriAmp Mark 3 programma
soltanto l'amplificatore (e non influisce su apparecchi esterni). Questo significa: Se per esempio volete usare il program-change n. 1 della pedaliera
MIDI (o del TSM-432) per attivare un suono clean del TriAmp Mark 3 e
un chorus/riverbero sul processore effetti, questo deve prima "imparare"
di attivare questo effetto quando riceve il comando program-change nr.
1. Riferitevi al manuale del processore effetti per sapere come procedere.
• Français
A proposito: Se volete uscire dal modo di programmazione senza
memorizzare le impostazioni attuali, basta premere nuovamente il tasto
Learn (invece del tasto sulla pedaliera MIDI).
• Il tasto Noise Gate indica lo stato del modo MIDI Omni e serve per
attivarlo o disattivarlo. Se il tasto Noise Gate non si illumina, il modo
Omni è attivato (impostazione di fabbrica/ricevimento su tutti i canali
MIDI). Premete il tasto Noise Gate per disattivare il modo Omni
(ricevimento su un certo canale MIDI).
• Ora, FX-Loop funziona come tasto +1/up per scegliere un altro canale
MIDI.
• 5/6 invece serve come tasto -1/down per scegliere un altro canale MIDI.
• Il tasto FX-Loop e i tre tasti Power Amp Tube indicano il canale MIDI
attivo con un codice binario come descritto:
• Deutsch
Se il TriAmp Mark 3 riceve un comando program-change sul canale
MIDI attivo (vedere qui sotto), il tasto Learn lampeggia brevemente per
confermare l'attivazione delle rispettive impostazioni.
Il tasto Learn lampeggia per indicarvi che certe funzioni di
programmazione ora sono state assegnate ai tasti seguenti
(se volete uscire dal MIDI-setup, premete il tasto Learn
per tre secondi finché questo si spenga. Ora, le nuove
impostazioni sono memorizzate e l'amplificatore ritorna al modo di uso
standard):
• English
La programmazione del TriAmp Mark 3 è intuitiva. Se volete memorizzare
una configurazione di canali e finali di potenza e le impostazioni
del boost, noise gate e loop effetti in un preset, basta scegliere le
impostazioni coi rispettivi tasti sull'amplificatore, premere brevemente il
tasto MIDI-Learn (tasto si illumina) e poi premere il tasto sulla pedaliera
MIDI al quale volete assegnare questa configurazione. Se il tasto Learn si
spegne, le impostazioni sono memorizzate in uno dei 128 presets interni
del TriAmp Mark 3 e assegnate al rispettivo numero di programma sulla
vostra pedaliera MIDI.
45
TriAmp Mark 3 – Manual 1.1
7.3 Factory Reset
Nessuna delle spie è illuminata
Le valvole della finale di potenza funzionano senza problemi.
Il factory reset, cioè il ripristino dell'amplificatore alle impostazioni
di fabbrica, è una funzione raramente necessaria. Nonostante ciò vi
consigliamo di leggere attentamente questo paragrafo per evitare di
cancellare i vostri presets per sbaglio.
Il ripristino è necessario quando la comunicazione MIDI non funziona
più o quando siete incerti sulle impostazioni del canale MIDI e del modo
Omni. Il ripristino seleziona nuovamente il canale MIDI 1 e attiva il modo
Omni.
Per ripristinare l'amplificatore, dovete premere i tasti Learn e
Boost contemporaneamente per alcuni secondi mentre accendete
l'amplificatore.
Attenzione: Il ripristino è una soluzione di emergenza. Tutti i parametri
memorizzati e tutti i 128 MIDI-presets saranno irrevocabilmente cancellati.
8 TSC™ –Tube Safety Control
0UZLY[N\P[HYWPJR[VYLHK
V\[[\ILTH[JOPUN
La tecnologia TSC™ crea un ambiente stabile
regolando automaticamente la corrente di
ILZ[)PHZ
riposo (bias) di ogni valvola. Questo serve a
V]LYJ\YYLU[
prolungare la vita delle valvole e ad ottenere
UVJ\YYLU[
Z^P[JOLKVMM
ottime prestazioni sonore. La regolazione
7V^LY(TW;\ILZ
automatica del bias garantita dalla tecnologia
TSC™ vi permette un semplice, veloce e sicuro
ricambio delle valvole. Questo non solo vi sarà
utile nel caso di un difetto, ma vi servirà anche per poter comparare vari
tipi e modelli di valvole.
Attenzione: Se ricambiate valvole con valvole di un altro tipo (per esempio EL34 con KT88), vi consigliamo un reset del modulo TSC:
- Verificare che l'amplificatore sie spento e mettere il selettore Standby
su "Play".
- Accendere l'amplificatore
- Aspettare almeno tre minuti
TSC™
TSC™ vi offre altri vantaggi: Le sei spie LED della sezione TSC sul
pannello posteriore vi permettono di controllare lo stato delle valvole.
La posizione delle spie sull’indicatore corrisponde alla posizione delle
valvole finali. Oltre a questo, il circuito TSC™ può anche eseguire
una diagnosi di errore e disattivare valvole difettose per evitare una
disfunzione dell'amplificatore. Usando un plettro, potete usare le spie
TCM™ per leggere le curve caratteristiche delle valvole (vedere 8.2).
8.1 Indicatore Status automatico
Tutte le spie sono illuminate
Le spie restano illuminate quando l'amplificatore si trova nello Standby.
Se mettete il selettore Standby su Play, le spie si spengono dopo alcuni
secondi. Se invece restano illuminate, è probabilmente saltato il fusibile
dell'anodo. Fatelo sostituire da un tecnico qualificato. Un fusibile
dell’anodo saltato potrebbe indicare che una valvola era difettosa prima
di aver acceso l’amplificatore. In questo caso, il modulo TSC™ non ha
abbastanza tempo per misurare la corrente di riposo (dopo che le valvole
siano scaldate) e disattivare la rispettiva valvola.
46
Una spia si illumina
La rispettiva valvola produce una corrente al disotto del valore nominale
ed è stata disattivata. Se la spia non si spegne dopo alcuni minuti, dovrete
sostituire la valvola.
Due/quattro spie si illuminano
Questa indicazione può avere due cause: O le rispettive valvole
producono una corrente al disotto del valore nominale e devono essere
ricambiate, oppure la coppia di valvole è disattivata (vale a dire il
rispettivo tasto Power Amp Tube sul pannello frontale è spento).
Una spia lampeggia, quella accanto si illumina
La valvola indicata dalla spia lampeggiante produce una corrente al
disopra del valore nominale ed è stata disattivata. Sostituitela con una
valvola nuova. Poiché le sezioni finali di questo tipo usano due valvole
accoppiate, il modulo TSC™ disattiva anche la seconda valvola della
coppia (indicata dalla spia illuminata). Di questo modo, le altre finali
possono funzionare senza perdite sonore. La valvola accoppiata (indicata
dalla spia illuminata) non necessita un ricambio.
Grazie a queste misure di sicurezza, la tecnologia TSC™ vi salverà il
vostro concerto, perché in un amplificatore convenzionale la valvola
difettosa farebbe saltare il fusibile rendendolo inutilizzabile finché non
ricambiate valvola e fusibile. Grazie alla tecnologia TSC, potete usare il
vostro TriAmp Mark 3 senza rischiare danni.
Però dovete rendervi conto che la disattivazione di una coppia di
valvole riduce la potenza dell'amplificatore. Inoltre, dovete scegliere
un'altra finale di potenza per i canali e MIDI-presets assegnati alla finale
disattivata. Perciò vi consigliamo di far ricambiare la valvola difettosa il
più presto possibile.
8.2 Leggere le curve caratteristiche
TSC™ vi permette di leggere le curve caratteristiche delle valvole per
verificare se le coppie delle tre finali di potenza siano sintonizzate in
modo ottimo. Per questo dovete attivare l'alimentazione principale
(selettore Standby su Play) e inserire un plettro nell'apposita fessura
accanto alle spie. Le spie lampeggiano alcune volte indicandovi ciascuna
le curve caratteristiche e la corrente di riposo della rispettiva valvola.
Badate che la deviazione entro il numero dei lampeggi delle spie di due
valvole accoppiate (1/2, 3/4, 5/6) non risulta troppo grande. Il circuito
TSC™ garantisce un ottimo suono finché la differenza entro il numero di
lampeggi non superi il 4. Se la deviazione risulta maggiore, vi consigliamo
di sostituire le valvole accoppiate con una coppia di valvole delle stesse
linee caratteristiche (matched couple). Dal punto di vista tecnico, questo
ricambio non sarà necessario – ma il vostro suono approfitterà di una
nuova coppia di valvole con le stesse linee caratteristiche.
Attenzione: TSC™ è anche responsabile per attivare o disattivare le rispettive finali di potenza a valvola. Se avete attivato soltanto una finale di
potenza, TSC™ vi indica che quattro valvole (corrispondendo alle due
finali non usate) sono disattivate. Le spie vi indicano lo stato corretto soltanto quando l'amplificatore non viene usato. Mentre state suonando, le
spie possono lampeggiare di tanto in quanto. Questo però non da indicazioni sullo stato dell'amplificatore o delle valvole. Se dovete sostituire
TriAmp Mark 3 – Manual 1.1
una valvola di una coppia, badate che questa abbia le stesse linee caratteristiche della valvola rimanente. Troverete valvole da ricambio presso il
vostro rivenditore.
Attenzione: Il ricambio delle valvole deve sempre essere eseguito da un
tecnico qualificato!
9 TSM-432 – la pedaliera MIDI
inclusa
Controller Input 1 e 2: Prese jack per collegare selettori a pedale o
pedali d'espressione per telecomandare altre funzioni del TriAmp Mark
3. Potete usare un selettore a pedale per telecomandare qualsiasi tasto
dell'amplificatore oppure per accendere e spegnere l'illuminazione
del pannello frontale. Se usate un pedale d'espressione, potete perfino
regolare l'intensità dell'illuminazione. Magari questo vi apparirà come
una funzione inutile, ma come avevamo ricevuto alcune richieste dei
nostri clienti ci siamo detti: "Perché no?"
Per sapere come assegnare una funzione agli ingressi di controllo, leggete
il paragrafo 9.4 "Assegnare Control 1 e 2". Al momento della consegna,
Control 1 si occupa del noise gate e Control 2 del loop effetti.
9.2 Stomp-Box Mode
(1A, 1B, 2A, 2B, 3A, 3B, Boost)
MIDI Out: Usate il cavo a 7 pin incluso per collegare questa uscita
all'ingresso MIDI In del TriAmp Mark 3. Se usate un cavo standard a 5
pin, leggete il punto "alimentazione".
MIDI In: L'ingresso MIDI del TSM-432 non è necessario per operare il
TriAmp Mark 3. Questo ingresso vi permette di collegare altri apparecchi
MIDI al TSM-432, rendendolo un vero MIDI-merger che trasmette i
messaggi MIDI dal MIDI In al MIDI Out.
Alimentazione (power supply): Se volete usare un cavo standard a 5
pin, dovete usare un alimentatore. Grazie all'innovativa tecnologia
di alimentazione del TSM-432, potete usare qualsiasi alimentatore di
corrente continua o alternata con una tensione fra 9 e 15 V e almeno
250mA.
• にほんご
• Español
9.3 Preset Mode
(A, B, C, D, Bank up/down, FX)
Il preset-mode vi da accesso ai 128 MIDI-presets del TriAmp Mark 3.
In addizione, potete attivare e disattivare lo FX loop con il tasto FX. Per
saperne di più, leggete il capitolo "MIDI-presets e MIDI-setup".
Tasti Preset A, B, C e D: Tasti per scegliere il rispettivo preset nel banco
attivo. Le spie dei tasti A, B, C e D indicano il preset attivo.
Bank Up/Down: Il display del TSM-432 indica il numero del banco
attivo. Per attivare un preset memorizzato in un altro banco, dovete prima
selezionare il banco coi tasti Up e Down. Durante questa procedura,
potete continuare a suonare nel preset attuale – fintanto che il numero del
banco nel display del TSM-432 lampeggia, il banco nuovo non è attivato.
Il banco nuovo viene attivato quando scegliete il nuovo preset premendo
il tasto A, B, C o D. Nel direct-mode, le cose sono diverse.
Direct Mode: Il direct-mode vi permette di attivare subito un nuovo
preset tramite Bank Up/Down. Nel direct-mode, il TSM-432 non aspetta
che premete il tasto A, B, C o D ma cambia direttamente il rispettivo
preset del nuovo banco – per esempio da preset B nel banco 16 a preset
B in banco 17 (Up) o banco 15 (Down). Per attivare il direct-mode dovete:
• Italiano
Il TSM-432 non necessita un alimentatore separato perché viene
alimentato con una tensione virtuale fornita dalla presa MIDI In a 7
pin del TriAmp Mark 3. Se cablato in modo corretto, il display indica
la seguente sequenza d'inizio: Il numero della versione appare e le spie
lampeggiano una dopo l'altra, iniziando con la spia sinistra. Poi, il display
indica un "1" se il TSM-432 si trova nel preset-mode, oppure un "Sb" se
si trova nello stomp-box-mode. In entrambi casi, la spia sotto il tasto A
si illumina.
Consiglio: Potete anche cambiare entro preset-mode e stomp-box-mode
premendo contemporaneamente i tasti FX e B. Questa impostazione
è temporaria: Se riaccendete il TSM-432 dopo averlo spento, è valida
l'impostazione indicata dal selettore a scorrimento.
• Français
9.1 Connettori
Nota: Le spie dei tasti non indicano sempre il canale attivo e lo stato dello
stomp boost. Se usate i tasti dell'amplificatore per scegliere un altro canale o attivare il boost, il TSM-432 non riconosce la nuova impostazione.
• Deutsch
Il TSM-432 è stato creato specificamente per il TriAmp Mark 3 e vi offre
due modi: lo stomp-box-mode e il preset-mode. Lo stomp-box-mode
serve a selezionare i sei canali dell'amplifcatore e ad attivare lo stomp
boost. Il preset-mode del TSM-432 invece vi permette di controllare i 128
MIDI-presets. Vi consigliamo di iniziare con lo stomp-box-mode per fare
la conoscenza dell'amplificatore prima di avventurarsi nel grande mondo
delle opportunità che vi offre il preset-mode.
Nello stomp-box-mode, i sei tasti (1A, 1B, 2A, 2B, 3A e 3B) sono assegnati
ai sei canali del TriAmp Mark 3. I numeri 1, 2 e 3 dei tasti sul TSM-432
indicano il rispettivo preamplificatore, le lettere A e B il rispettivo canale.
In addizione, potete attivare e disattivare lo stomp boost con un apposito
tasto.
• English
La pedaliera MIDI TSM-432 è un evoluzione del FSM-432 disegnato per
i modelli Hughes & Kettner SwitchBlade, CoreBlade e GrandMeister. Se
possedete un FSM-432, potete anche usarlo per selezionare i presets del
TriAmp Mark 3.
• 中文
Il selettore a scorrimento sopra le prese MIDI sul pannello posteriore del
TSM-432 serve a cambiare entro il preset-mode e lo stomp-box-mode. Se
mettete questo selettore a scorrimento su "stomp-box mode", il display
indica "Sb".
47
TriAmp Mark 3 – Manual 1.1
• Tenere premuto il tasto FX e premere Preset A.
• Rilasciare prima Preset A e poi FX. Il punto decimale nel display si
illumina.
Potete assegnare le seguenti funzioni.
Nome
Numero MIDIcontrol
Campo
Nota
Procedete come descritto per disattivare il direct-mode.
Mute
9
0 – 63 = off, 64 – 127 = on
Nota: Anche il direct-mode è temporaneo. Se riaccendete il TSM-432
dopo averlo spento, è attivato lo standard-mode
Questa impostazione
è soltanto disponibile
tramite MIDI
FX Loop
55
0 – 63 = off, 64 – 127 = on
FX Serial
54
0 – 63 = parallelo,
64 – 127 = seriale
Stomp Boost
64
0 – 63 = off, 64 – 127 = on
Noise Gate
63
0 – 63 = off, 64 – 127 = on
Canali
31
0 – 12 = canale 1 (Amp 1A)
13 – 37 = canale 2 (Amp 1B)
38 – 63 = canale 3 (Amp 2A)
64 – 87 = canale 4 (Amp 3A)
88 – 112 = canale 5 (Amp 3A)
113 – 127 = canale 6 (Amp 3B)
Per semplificarvi
la scelta dei canali
con altri controller
MIDI, vi consigliamo
di usare valori facili
a memorizzare, per
esempio:
Canale 1 = 10
Canale 2 = 30
Canale 3 = 50
Canale 4 = 80
Canale 5 = 100
Canale 6 = 120
Valvole 1/2
58
0 – 63 = off, 64 – 127 = on
Se è stato attivato
soltanto una coppia
di valvole, non potete
disattivarla.
Valvole 3/4
59
0 – 63 = off, 64 – 127 = on
Valvole 5/6
60
0 – 63 = off, 64 – 127 = on
Intensità
dell'illuminazione del
pannello
frontale
88
0 – 127, 0 = min (spento),
127 = max
Nota: Le spie dei tasti non indicano sempre il canale attivo e lo stato dello
stomp boost. Se usate i tasti dell'amplificatore per scegliere un altro canale o attivare il boost, il TSM-432 non riconosce la nuova impostazione.
9.4 Assegnare Control 1 e Control 2
Per assegnare numeri di controllo ai due ingressi di controllo procedete
come descritto qui sotto:
Control 1: Per attivare il modo di assegnamento, premere
contemporaneamente i tasti FX e D finché il display indichi il numero
MIDI-control e il punto dopo la seconda cifra lampeggi. Ora potete
scegliere un altro numero MIDI-control coi tasti Up e Down. Memorizzate
il nuovo numero premendo il tasto D. Il punto smette a lampeggiare e il
TSM-432 ritorna nel modo d'utilizzo normale.
Control 2: Premere contemporaneamente i tasti FX e C finché il display
indichi il numero MIDI-control e il punto dopo la seconda cifra lampeggi.
Ora potete scegliere un altro numero MIDI-control coi tasti Up e Down.
Premete il tasto C per memorizzare la vostra scelta e uscire dal modo di
assegnamento.
Con un selettore
a pedale, potete
attivare (massima
intensità) o
disattivare
l'illuminazione,
con un pedale
d'espressione potete
regolare anche
l'intensità da zero al
valore massimo.
Qual è la differenza entro un selettore a pedale e un pedale d'espressione?
Un selettore conosce soltanto due stati: spento (0) e acceso (127) e vi
permette quindi la scelta entro il valore minimo e massimo. Un pedale
d'espressione invece può trasmettere ogni valore entro 0 e 127. Questo
però non significa che un pedale non si adatti anche come selettore – se
si trova all'inferiore della posizione media (0-63), la funzione assegnata è
disattivata, se si trova al di sopra (64-127), la funzione è attivata.
10 AES (soltanto modelli destinati all'UE)
Per essere conformi al regolamento CE n. 1275/2008 della Commissione
delle Comunità Europee, prodotti che consumano energia devono
contenere tecnologie progettuali per ridurre il loro consumo d'energia.
In altre parole: L'amplificatore si spegne quando non viene usato per un
certo periodo di tempo. Potete disattivare l'AES con un piccolo selettore
che si trova accanto all'uscita Speaker del TriAmp Mark 3. Come
impostazione di fabbrica, l'AES è attivato (selettore scorrevole a sinistra)
e l'amplificatore si spegne automaticamente quando non viene usato per
90 minuti. Dal momento che l'amplificatore riceve il minimo segnale al
suo ingresso (per esempio un breve tocco a una corda), questo count
down di 90 minuti inizierà di nuovo. Se l'amplificatore è stato spento
dopo una pausa di 90 minuti, potete riaccenderlo azionando due volte
l'interruttore Power/On rispettivo il selettore Standby.
48
TriAmp Mark 3 – Manual 1.1
11 Caratteristiche tecniche
Caratteristiche elettriche generali
fino a 150 W
Massimo assorbimento di
potenza
460 W
Corrente di transitorio
100 V: 27 A , 120 V: 26 A , 220-240V: 23 A
Zona di tolleranza corrente di rete
+/-10%
Temperatura ambiente per
l’esercizio
0° fino a +35° C
Fusibile d'alimentazione, 100 Volt
250 V / T 5 A
Fusibile d'alimentazione, 120 Volt
250 V / T 5 A
8 Ohm / THD=10%
8 Ohm / THD=5%
2x EL34
84 Watt
34 Watt
2x 6L6
72 Watt
30 Watt
4x 6L6
126 Watt
93 Watt
2x 6L6 + 2x EL34
132 Watt
95 Watt
4x 6L6 + 2x EL34 (empfohlen)
145 Watt
116 Watt
*al momento della consegna
250 V / T 2 A
Fusibile dell'anodo
T 800 mA
Fusibile per il riscaldamento delle
valvole
TT 15 A (Schurter 7040.3210)
0 dBV
Sensibilità d'ingresso / 1 kHz
(controlli voicing su "ore 12", livelli
massimi)
Boost disattivato
Boost attivato
Amp 1A: -33 dBV
Amp 1A: -37 dBV
Amp 1B: -49 dBV
Amp 1B: -49 dBV
Valvole
Amp 2A: -56 dBV
Amp 2A: -56 dBV
n.
Art.-n.
Tipo
Provenienza
Funzione
Amp 2B: -74 dBV
Amp 2B: -74 dBV
1
9440008
7025/E83CC
(ECC83), High-Grade
Repubblica
Slovacca
Valvola d'ingresso
(attiva in tutti i canali)
Amp 3A: -76 dBV
Amp 3A: -76 dBV
Amp 3B: -78 dBV
Amp 3B: -89 dBV
12AX7A-C, select.
Cina
Canale 1B
(preamplificatore)
3
9440007
ECC83, select.
Repubblica
Slovacca
Canale 1A-1B (uscita
preamplificatore)
4
9440007
ECC83, select.
Repubblica
Slovacca
Canale 2A-2B-3A-3B
(preamplificatore)
5
9440007
ECC83, select.
Repubblica
Slovacca
Canale 2A-2B (uscita
preamplificatore)
6
9440007
ECC83, select.
Repubblica
Slovacca
Canale 3A (uscita
preamplificatore)
7
9440007
ECC83, select.
Repubblica
Slovacca
Canale 3B
(preamplificatore)
Presa FX-Return
jack 6,3 mm (1/4"), non bilanciato
Impedenza
22 k-ohm
Livello massimo / 1 kHz
+14 dBV
Sensibilità / 1 kHz (controllo
Master su "ore 12", FX-Level sul
massimo)
Selettore -10 dB
deattivato
Selettore -10 dB attivato
0 dBV
-10 dBV
Presa Power Amp In
jack 6,3 mm (1/4"), non bilanciato
Impedenza
350 k-ohm
Sensibilità / 1 kHz (secondo il
canale)
+6 fino a +10 dBV
8
9440007
ECC83, select.
Repubblica
Slovacca
FX buffer (attiva in tutti
i canali)
9
9440007
ECC83, select.
Repubblica
Slovacca
Valvola driver della
finale di potenza (attiva
in tutti i canali)
Cina
Valvola di finale di
potenza 1/2
Red Box DI Out
XLR, bilanciato
Impedenza
2 k-ohm
Valvola di finale di
potenza 1/2
Livello di uscita
0 dBV (bilanciato)
Livello di uscita massimo
+12 dBV
10
11
6000122
6000122
EL34B-STR, select.
EL34B-STR, select.
Cina
• Español
9440001
Uscite
• Italiano
2
• にほんご
Fusibile d'alimentazione, 240 Volt
1 M-ohm
Livello massimo d'ingresso /
1 kHz, Amplificatore 1A
12
6000120
6L6GC-STR, select.
Cina
Valvola di finale di
potenza 3/4
Presa FX Send
jack 6,3 mm (1/4"), non bilanciato
13
6000120
6L6GC-STR, select.
Cina
Valvola di finale di
potenza 3/4
(massimo volume, controlli voicing
su "ore 12")
Selettore -10 dB
disattivato
Selettore -10 dB attivato
14
6000120
6L6GC-STR, select.
Cina
Valvola di finale di
potenza 5/6
Impedenza
2,2 k-ohm
680 ohm
15
6000120
6L6GC-STR, select.
Cina
Valvola di finale di
potenza 5/6
Livello massimo / 1 kHz
-2 dBV
+8 dBV
Presa Power Amp Out
jack 6,3 mm (1/4"), non bilanciato
Livello massimo / 1 kHz
+20 dBV
MIDI
MIDI In
7-pin (compatibile con 5-pin), tensione virtuale di
corrente continua 20 V (150 mA)
MIDI Out/Thru
5-Pin
Caratteristiche meccaniche
Dimensioni (L x A x P)
740 x 393 x 254 mm
Peso
22 kg / 48.5 lbs.
• Français
250 V / T 2 A
jack 6,3 mm (1/4"), non bilanciato
Impedenza
• Deutsch
Fusibile d'alimentazione, 220-230
Volt
Presa Input
• 中文
Ingressi
• English
Potenza di uscita
Valvole di finale di potenza* / potenza
d'uscita
49
Importantes instrucciones
de seguridad. ¡Leer antes de
encender!
Este producto ha sido elaborado por el fabricante de
conformidad con IEC 60065 y ha salido de fábrica en
perfecto estado. Para que se mantenga en perfectas
condiciones y asegurar que no exista riesgo alguno,
el usuario deberá observar los avisos y advertencias
que se encuentran en el manual de instrucciones.
La unidad es conforme a la Clase de Protección 1
(puesta a tierra de protección). En caso de utilizar este
producto en vehículos, embarcaciones o aviones, así
como a altitudes superiores a los 2.000 m sobre el
nivel del mar, además de la norma IEC 60065 también
se deberán cumplir las demás normas de seguridad
aplicables
ADVERTENCIA: Para prevenir el riesgo de incendio y el
peligro de electrocución, evite la exposición del equipo
a humedad o lluvia. No abra la cubierta: en el interior
no hay elementos que deba manipular el usuario. El
mantenimiento deberá quedar a cargo de personal
cualificado.
La presencia de este símbolo advierte de la
existencia de tensión peligrosa sin aislar en el
interior que podría ser suficiente para provocar
una electrocución.
La presencia de este símbolo advierte de la
existencia de tensión peligrosa accesible desde
el exterior. Todo cableado externo conectado
con algún terminal marcado con este símbolo deberá
ser un cableado preelaborado que satisfaga las
recomendaciones del fabricante o deberá ser instalado
por personal cualificado.
La presencia de este símbolo advierte de
importantes instrucciones de uso y
mantenimiento en la bibliografía adjunta. Lea el
manual.
La presencia de este símbolo indica:
¡Precaución! ¡Superficie caliente! No tocar para evitar
quemaduras.
• Lea las presentes instrucciones.
• Conserve las presentes instrucciones.
• Observe todas las advertencias e indicaciones
señaladas en el producto y en las instrucciones.
• No utilice el producto cerca del agua. No coloque el
producto cerca de agua, baños, bañeras, fregaderos,
zonas húmedas, piscinas o saunas.
• No coloque objetos que contengan líquidos sobre el
producto, como jarrones, vasos, botellas, etcétera.
• Limpie exclusivamente con paños secos.
• No retire ninguna cubierta ni elementos del armazón.
• La tensión operativa del producto deberá ajustarse
a la tensión del suministro eléctrico local. Si no está
seguro del tipo de electricidad disponible, consulte
con su distribuidor o con la compañía eléctrica local.
• Para reducir el riesgo de electrocución, deberá
mantenerse la puesta a tierra del producto. Utilice
solamente el cable de alimentación suministrado con
el producto y mantenga siempre activo de la patilla
central (puesta a tierra) del cuadro de conexiones.
No desactive la función de seguridad del enchufe
polarizado o con puesta a tierra.
• Proteja el cable de alimentación de pisadas o
pinzamientos, especialmente junto a enchufes,
soportes de dispositivos y el punto de salida desde
el equipo. Los cables de alimentación deberán
manipularse siempre con precaución. Compruebe
periódicamente que los cables no tengan cortes ni
signos de desgaste, especialmente en el enchufe y en
el punto de salida desde el equipo.
• No utilice nunca un cable dañado.
• Desenchufe el producto durante las tormentas con
aparato eléctrico o cuando vaya a estar en desuso
durante periodos prolongados.
• El producto solamente se puede desconectar por
completo de la red extrayendo el enchufe de red
de la unidad o de la toma de la pared. El producto
deberá colocarse en todo momento de tal modo que
su desconexión de la red sea sencilla.
• Fusibles: Reemplace solamente con fusibles de tipo
(5x20 mm) y amperaje según IEC 127. Está prohibido
usar "fusibles parcheados" o cortocircuitar los
portafusibles. La sustitución de los fusibles debe ser
realizada únicamente por personal cualificado.
• El mantenimiento deberá quedar a cargo de personal
cualificado. Será necesaria una revisión si la unidad
resulta dañada de cualquier forma, por ejemplo:
- si el cable de alimentación o el enchufe están
dañados o deshilachados;
- si se han derramado líquidos sobre el producto o han
caído objetos en él;
- si el producto se ha visto expuesto a lluvia o
humedad;
- si el producto no funciona con normalidad pese a
seguirse las instrucciones de uso;
- si el producto ha sido salpicado o el cajetín ha sido
dañado.
• Cuando se conecten altavoces a este aparato no se
podrá sobrepasar el límite de impedancia mínima
especificado en el aparato o en las presentes
instrucciones. La sección de los cables empleados
debe ser suficiente en conformidad con la
reglamentación local.
• Proteja de la luz solar directa.
• No instale cerca de fuentes de calor como
radiadores, difusores de calor, estufas u otros
dispositivos que produzcan calor.
• No bloquee ninguna abertura de ventilación. Instale
de conformidad con las instrucciones del fabricante.
No deberá situarse el producto en una instalación
integrada, como una rejilla, a no ser que exista la
ventilación necesaria.
• Permita siempre que un dispositivo frío se caliente
a temperatura ambiente cuando se traslade a
alguna sala. Pueden formarse condensaciones en
el interior del producto y dañarlo cuando se usa sin
precalentamiento.
• No sitúe fuentes de llama abierta, como velas
encendidas, sobre el producto.
• El aparato debe colocarse, como mínimo, a 20 cm de
cualquier pared, no se debe tapar y debe garantizarse
un espacio libre de, como mínimo, 50 cm por encima
del aparato.
• Utilice solamente con el carro, soporte, trípode,
abrazadera o tablero especificado por el fabricante
o vendido junto con el producto. Cuando se use
un carro, deberá tenerse precaución al mover la
combinación de carro/producto para evitar daños por
vuelcos.
• Utilice solamente accesorios recomendados por el
fabricante; esto será de aplicación para todo tipo de
accesorios, por ejemplo, cubiertas protectoras, bolsas
de transporte, pies, soportes murales o de techo. En
caso de instalación de cualquier tipo de accesorio
en el producto, siga siempre las instrucciones de
uso suministradas por el fabricante. Nunca utilice
puntos de fijación distintos de los especificados por
el fabricante.
• El dispositivo NO es apropiado para su uso por parte
de cualquier persona o personas (niños incluidos)
con las capacidades físicas, sensoriales o mentales
limitadas o sin la experiencia o el conocimiento
suficientes con productos de este tipo. El dispositivo
deberá mantenerse siempre fuera del alcance de los
niños menores de 4 años.
• Nunca introduzca objetos de ninguna clase en
el producto a través de las ranuras del cajetín, ya
Version 2.3b 01/2015
que podrían tocar puntos de tensión peligrosa, ni
cortocircuite elementos que pudieran causar riesgo
de incendio o electrocución.
• El producto puede emitir niveles de presión sonora
por encima de 90 dB, lo que puede causar daños
auditivos permanentes. La exposición a niveles
sonoros extremadamente altos puede causar pérdidas
auditivas permanentes. Lleve protección auditiva si
va a estar expuesto de forma continua a dicho tipo de
elevados niveles.
• El fabricante solamente garantiza la seguridad, la
fiabilidad y la eficiencia del producto si:
- el montaje, la extensión, el reajuste, las
modificaciones o las reparaciones son realizados por
el fabricante o por personal autorizado;
- la instalación eléctrica del área interesada es
conforme con los requisitos de las especificaciones de
IEC (ANSI);
- la unidad se utiliza conforme a las instrucciones de
uso;
Antes de poner en marcha el equipo
• Antes de poner en marcha el equipo, deben
leerse detenidamente el presente manual y
todas las indicaciones de seguridad.
• El fabricante no se hace responsable de los
daños en este u otros equipos que se deban a
un uso incorrecto.
• Antes de conectar el equipo a la corriente
eléctrica, debe comprobarse que el interruptor
Power y el interruptor Standby estén
desconectados, y que la tensión eléctrica
especificada en la parte posterior del equipo
coincida con la de la red eléctrica utilizada.
• ¡No utilizar nunca el amplificador sin los bafles
conectados! Debe observarse la impedancia
de los bafles y estos deben conectarse siempre
a una salida Speaker Out que tenga un valor
de impedancia adecuado.
• Una última cosa que debe tenerse en cuenta
antes de poner en marcha el amplificador:
es un equipo que hace ruido fuerte y, como
tal, puede ocasionar lesiones auditivas. Para
evitar que se produzcan ruidos fuertes y no
deseados sin querer, acostúmbrate a poner el
regulador de volumen maestro al mínimo antes
de encender el amplificador.
Desde el principio, tuvimos claro que la evolución del TriAmp MK II
supondría un gran reto. Teníamos que crear algo radicalmente nuevo que
estableciera nuevas referencias en términos de sonido, rendimiento y
diseño sin alejarnos excesivamente del original. Por este motivo, nuestros
ingenieros mantuvieron todos y cada uno de los detalles que convirtieron
al TriAmp MK II en la primera opción de los guitarristas, y evolucionaron
cada una de sus características con el futuro en mente. El resultado fue un
amplificador con un nivel de innovación nunca visto antes en el mundo
de la guitarra: el TriAmp Mark 3.
La ganancia y el volumen se pueden configurar por separado para
cada uno de los seis canales, y cada canal tiene su propio ecualizador
de 3 bandas y una función Stomp-Boost a medida de su carácter.
Utilizando los botones, se pueden abrir 12 sonidos básicos diferentes. En
combinación con los tres pares de válvulas de etapa final, que también
se pueden seleccionar con los botones, hay disponibles un total de 36
sonidos diferentes (3 x 12) con una potencia de 50 vatios. Si se conecta
un segundo par de válvulas, incrementando la potencia hasta 100 vatios,
hay disponibles 36 opciones más (par 1+2, par 1+3 y par 2+3). ¡Y con la
inclusión del tercer par de válvulas (¡lo que da un total de 150 vatios!),
habrá disponibles otras 12! En total son 84 sonidos diferentes.
Pero el TriAmp Mark 3 no solo ofrece sonidos clásicos: la posibilidad de
combinar los canales y las etapas finales en una variedad de opciones
nunca vista hasta ahora, te permite crear tus propios sonidos nuevos, los
sonidos del futuro. Hasta ahora, ningún amplificador había ofrecido una
variedad sonora tan inspiradora.
• にほんご
• Español
• Italiano
El TriAmp Mark 3 no solo ofrece tres preamplificadores independientes
con dos canales cada uno, sino que también proporciona tres etapas
finales independientes. En cada uno de los tres pares de válvulas de etapa
final se pueden instalar válvulas diferentes. Además, cada par se puede
asignar arbitrariamente a cada uno de los seis canales, también a través
de MIDI. Pero con esto no basta: de hecho, a cada canal se le pueden
asignar distintos pares de válvulas, lo que permite combinar los tipos de
válvulas más variados para las etapas finales.
• Français
1 Prólogo
Una nueva era en la historia del sonido
de válvulas
• Deutsch
Prólogo ..................................................................................... 51
Inicio rápido ............................................................................... 52
Principios de manejo .................................................................. 52
Amps y canales .......................................................................... 53
Parte frontal ............................................................................... 53
Parte trasera .............................................................................. 55
Preajustes y configuración de MIDI ............................................ 56
TSC™ –Tube Safety Control ....................................................... 58
Pedalera TSM-432 ...................................................................... 59
AES ............................................................................................ 60
Datos técnicos............................................................................ 61
• English
1
2
3
4
5
6
7
8
9
10
11
• 中文
TriAmp Mark 3 – Manual 1.1
51
TriAmp Mark 3 – Manual 1.1
;VKVHTHU\HSYLHKV\[VM[OL[\IL
TH[JOPUNPUZLY[HWPJRPU[V[OLZSV[
HUKJV\U[[OLMSHZOLZVMLHJO3,+
;OLKPMMLYLUJLPUMSHZOLZZOV\SKIL
SLZZ[OHU^P[OPULHJOWHPY[V
N\HYHU[LLILZ[ZV\UK7SLHZLYLMLY
[V[OLTH[JOPUNJOHY[PU[OLTHU\HS
Tube Status Monitor
;:*H\[VTH[PJHSS`PUKPJH[LZ[OLZ[H[\ZVM[OL[\ILZ
HZZVVUHZ[OLHTWPZPUWSH`TVKL:;(5+)@Z^P[JO
PU\WWLYWVZP[PVU0M[OL3,+ZZ[H`VUPUWSH`TVKL
WSLHZLJOLJR[OLHUVKLM\ZL
(SS3,+ZVMMTLHUZ!ILZ[IPHZUVYTHSVWLYH[PVU
6UL3,+VUTLHUZ!UVJ\YYLU[[\ILPZIYVRLUHUK
OHZ[VILYLWSHJLK
6UL3,+MSHZOLZVUL3,+PZVU![OLMSHZOPUN3,+
PUKPJH[LZH[\IL[OH[JH\ZLZV]LYJ\YYLU[[OLV[OLY
3,+PUKPJH[LZHZ^P[JOLKVMM[\IL[VWYV[LJ[[OLHTW
7SLHZLYLWSHJL[OL[\IL[OH[JH\ZLZV]LYJ\YYLU[
;^V3,+ZVUTLHUZ!WHPYVM[\ILZPZZ^P[JOLKVMM
MADE IN GERMANY
SPEAKERS
16 Ohms
1x 8 Ohms
or 2x 16 Ohms
RED BOX™ AE
4 Ohms
Ambience emulated DI Out
*HIPUL[
4VKL
3V^
*\[
0UZLY[N\P[HYWPJR[VYLHK
V\[[\ILTH[JOPUN
7V^LY;\ILZ!
TSC™
MIDI
ILZ[)PHZ
V]LYJ\YYLU[
UVJ\YYLU[
NOISE GATE
Hard
In
Out/Thru
Z^P[JOLKVMM
FX LOOP
Soft
MASTER INSERT
FX Level
Send
Return
*(<;065!9LHYWHULSHUK
]LU[PSH[PVUVWLUPUNZTH`
ILJVTL[VVOV[[V[V\JO
3LH]LLUV\NOZWHJLMVY
WYVWLY]LU[PSH[PVU
;VYLK\JL[OLYPZRVMLSLJ[YPJZOVJRNYV\UKPUNVM
[OLJLU[LYWPUVM[OPZWS\NT\Z[ILTHPU[HPULK
9LWSHJPUNM\ZLZT\Z[VUS`ILJHYYPLKV\[I`
X\HSPMPLKZLY]PJLWLYZVUULS9LWSHJLM\ZLZVUS`
^P[O[`WLHUKYH[PUNZOV^UOLYL
Bright
4HPUZ=VS[HNL
Power Amp In
=e
¶K)
=e
7V^LY(TW;\ILZ
Preamp Out
*(<;065!9PZRVMLSLJ[YPJ
ZOVJR+VUV[VWLU9LMLY
ZLY]PJPUN[VX\HSPMPLK
ZLY]PJLWLYZVUULS
PANEL
Dark
FX Serial
(,:
VUVMM
TSM-432
Serial No.
;90(474HYR
4HPUZ-\ZL!=;(3/a
4H_7V^LY*VUZ\TW[PVU>
,<]LYZPVUVUS`
or
Vol. Pedal
Guitar Cabinet
FX-Unit
Tuner
or
FX-Unit
or
or
Powered
Cabinet
Power Amp
Mixing Desk
2 Inicio rápido
3 Principios de manejo
Mains In: conexión para el cable de alimentación suministrado (Mains
Lead).
El TriAmp Mark 3 es muy fácil de utilizar:
• Cada uno de los seis canales independientes dispone de un conjunto
idéntico de elementos de mando.
• Los reguladores de cada una de las secciones solo actúan sobre el canal
correspondiente.
• Los reguladores de la sección maestra, situada en el lado izquierdo de
la parte frontal, actúan sobre todos los canales.
MIDI In: esta conexión debe conectarse a la salida MIDI Out de la TSM432 suministrada o del controlador MIDI utilizado. Aunque se trata de
una conexión de 7 contactos, se puede utilizar un cable estándar de
5 patillas y cualquier controlador MIDI convencional. Las dos patillas
adicionales (1 y 7) se encargan de suministrar la alimentación fantasma
para la pedalera TSM-432 de Hughes & Kettner.
Speaker: conexión para conectar los bafles de guitarra. Recomendamos
utilizar los bafles de las series TM y TC de Hughes & Kettner, puesto que
están perfectamente adaptados a nuestros amplificadores.
AES: las versiones europeas del TriAmp Mark 3 incluyen una función
de ahorro de energía denominada AES (encontrarás más información
en el capítulo 10). Cuando la función AES está activada (estado
predeterminado), el TriAmp se apaga automáticamente tras un periodo
de inactividad de aproximadamente 90 minutos. El temporizador de
inactividad se restablece y vuelve a empezar desde el principio cada vez
que llega una señal a la entrada del amplificador.
52
TSM-432
Los botones Stomp-Boost y Power Amp Tubes solo están una vez, pero
se pueden configurar por separado para cada uno de los seis canales. La
configuración pertinente se guarda automáticamente al cambiar de canal.
Por ejemplo, cuando toques con el canal 1A, un par de válvulas 6L6 y
Stomp-Boost activado, esta configuración se cargará de nuevo la próxima
vez que vuelvas a seleccionar el canal 1A, y así sucesivamente hasta que
se cambie la configuración (los preajustes MIDI ofrecen más opciones,
encontrarás más información en el capítulo 7 "MIDI").
Los botones también tienen un LED que indica el canal o la función que
están activados.
TriAmp Mark 3 – Manual 1.1
Canal B: sonido Clean británico de campana de los años sesenta
El canal 1B genera un típico sonido británico, con sus característicos
agudos chispeantes y una distorsión armónica excepcionalmente sutil.
Incluso con un nivel de ganancia bajo, el canal 1B te regalará un espectro
medio-alto rico en sobretonos.
Nota: como etapa final para el canal 1B, recomendamos un par de
válvulas EL34.
4.2 Amp 2
Canal A: sonido Lead británico clásico de los años setenta
El canal 2A ofrece el sonido Overdrive roto tan característico de
muchas de las producciones de rock más pioneras. Debido a su toque
abiertamente británico, este canal resulta ideal para realizar riffs agudos
y desarrollar ritmos agresivos.
Nota: la mejor elección para reproducir los sonidos característicos de este
canal es un par de válvulas EL34. Por otro lado, también puede merecer
la pena utilizar este canal con uno o incluso dos pares de válvulas 6L6.
Canal B: el sonido Lead británico más potente de los años ochenta
El espectro del canal 2B cubre desde sonidos sombríos y potentes
hasta sostenidos vocales largos. ¿Cómo es eso posible? Gracias a su
conmutación especial, el canal 2B adapta una nítida secuencia de tonos
al sonido, justo con la distorsión que hizo que los guitarristas adoraran
tanto los antiguos plexis. Se obtiene un sonido firme, fuerte y obstinado,
5 Parte frontal
• 中文
El canal 3B ofrece sonidos High-Gain implacables como nunca habías
sentido. Los amantes del Drop-Tuning y los domadores de las guitarras de
7 y 8 cuerdas no podrán dejar la potente e indomable distorsión del 3B.
La función Stomp-Boost te permitirá dotar a tu música de una velocidad
de respuesta imbatible, como si las cuerdas fueran una prolongación de
tus dedos. El canal 3B se encarga de que, durante los riffs y los licks, tus
dedos se deslicen por el diapasón como si estuvieran engrasados.
Nota: es imprescindible que pruebes primero el canal 3B con dos pares
6L6 y que luego añadas los EL34.
• にほんご
Canal B: sonido High-Gain moderno y mucho más
• Español
El canal 1A permite acceder a todo el esplendor de los grandes sonidos
americanos. Su principal punto fuerte es el sonido Clean clásico y sin
distorsiones, incluso con altos niveles de ganancia; su punteo nítido te
permitirá volver a sacar las botas de cowboy del armario. Pero no te dejes
engañar: el canal A posee una proporción de bajos potente y firme que se
basta por sí sola para satisfacer a los apasionados de los graves.
Nota: el canal 1A funciona especialmente bien con dos pares 6L6.
El canal 3A es realista y directo: reacciona inmediatamente y con un
alto nivel de sensibilidad a los sutiles cambios en la fuerza y en los
más leves movimientos del regulador de volumen de la guitarra. El
resultado es que el canal 3A retiene con total fidelidad el sonido único
de tu guitarra, permitiéndote disfrutar de un sonido nítido y definido,
independientemente del ajuste del regulador de ganancia.
Nota: el canal 3A funciona especialmente bien con la combinación de
una EL34 y una 6L6.
5.1 Interruptores Power y Standby
Interruptor Power/On: activa la alimentación de
corriente cuando se coloca en la posición "On". El
amplificador se ilumina y las válvulas se calientan para
lo que está por venir.
Interruptor Play/Standby: cuando el amplificador se
haya calentado durante 30 segundos aproximadamente,
puedes cambiar de "Standby" a "Play". ¡El amplificador ya está listo
para rockear! Siempre que pares de tocar durante mucho rato, pon el
interruptor en la posición "Standby" para que las válvulas se mantengan
a la temperatura de funcionamiento. De esta manera conseguirás alargar
su vida útil.
5.2 Input y Stomp-Boost
Input: entrada de instrumentos de 1 Mohmio para conectar la
guitarra utilizando un cable blindado con conector jack.
Stomp-Boost: la función Stomp-Boost incrementa ligeramente
determinadas gamas de frecuencia del sonido. Dependiendo
del canal y de los ajustes seleccionados, la función Boost pue-
• Italiano
Canal A: nítido sonido Clean californiano de los años cincuenta
Canal A: sonido High-Gain americano clásico de los años noventa
• Français
4.1 Amp 1
4.3. Amp 3
• Deutsch
Los canales del TriAmp Mark 3 no solo ofrecen tres niveles de ganancia
diferentes, sino que cada uno de ellos representa el sonido de una
época diferente. Nuestro avanzado sistema electrónico reconfigura las
diferentes válvulas de las etapas previas y finales para cada canal o
preajuste MIDI. De esta forma, se recoge hasta el más mínimo sonido de
la combinación de válvulas, dotando al TriAmp Mark 3 de una variedad
de sonidos increíble.
Los canales se pueden seleccionar en el propio amplificador o con la
pedalera TSM-432 suministrada. Para este último caso, pon la TSM-432
en el modo Stomp Box. Ahora, con los interruptores 1 a 6 podrás abrir
los canales correspondientes, mientras que el interruptor 7 controla el
Stomp-Boost (el otro modo de la TSM-432, el modo Preset, ofrece incluso
más opciones. Encontrarás más información en el capítulo "MIDI").
ideal para realizar tappings a dos manos y potentes quintas vacías.
Nota: la mejor elección para poner a prueba el canal 2B es un par de
EL34.
• English
4 Amps y canales
53
TriAmp Mark 3 – Manual 1.1
de potenciar la firmeza, la cremosidad y la expresividad del sonido. La
función Stomp-Boost está conectada entre la entrada y la etapa previa del
TriAmp Mark 3 y se adapta al carácter de cada uno de los canales, por lo
que es como si hubiera seis pedales de refuerzo transistorizados externos.
Pero la principal particularidad de esta conexión es que la función StompBoost consiste en un módulo separado con placa propia y que se incluye
en el circuito por medio de una derivación.
5.3 La sección de canales
Botones de los canales: estos botones premien cambiar directamente
los canales.
Gain, Master: el botón Gain define la sensibilidad de entrada y, con ello,
la saturación del preamplificador. En combinación con Stomp-Boost, es
la herramienta decisiva para definir las características del sonido. Los
reguladores Master correspondientes permiten adaptar los niveles de los
distintos canales.
Bass, Mid, Treble: el efecto de la regulación de sonido de tres bandas
está adaptada con precisión a cada uno de los canales. Los reguladores
modifican las gamas de frecuencia que componen el sonido característico
del canal en cuestión.
Atención: esta es una regulación de sonido pasiva clásica. Los reguladores
influyen los unos en los otros de manera recíproca. Por ejemplo, si "Mid"
está más abierto, "Bass" tiene un menor efecto que si "Mid" está más
cerrado.
5.4 La sección Master
Volume: el regulador de volumen
maestro permite definir el volumen
general del TriAmp Mark 3. Este
regulador permite controlar los 150
vatios de potencia de las válvulas
con solo dos dedos. Utilízalo con cabeza, porque también podrías
hacer perder la suya a tus compañeros de grupo. Aunque el uso de este
regulador es sinónimo de diversión, tienes que moderarte. No lo subas
demasiado, solo hasta niveles en los que el sonido no pueda hacerte
daño a ti ni a tus compañeros.
Presence: este regulador determina la proporción de sobretonos
armónicos que se genera. Cuanto más se abra, mayor será la "presencia"
del sonido. Este regulador puede utilizarse para potenciar la expresividad
y la firmeza del sonido cuando sea necesario.
Resonance: cuando este regulador se encuentra en posición central,
se escucha la resonancia natural entre el TriAmp Mark 3 y los bafles
conectados. Girándolo hacia la izquierda se reduce el efecto de
resonancia de los bafles, suavizando así el sonido. Girándolo hacia la
derecha se intensifica el efecto, potenciando los bajos. Cuando está
abierto completamente, este regulador ofrece frecuencias de subbajo
capaces de helar la sangre.
54
Consejo: los reguladores Presence y Resonance también actúan como
una regulación maestra del sonido, por lo que permiten adaptar el sonido
general a distintos tipos de bafles o lugares sin necesidad de modificar la
regulación de sonido en cada uno de los canales.
5.5 Power Amp Tubes
Estos tres botones tan discretos son el arma secreta del
TriAmp Mark 3. Abren un capítulo totalmente nuevo
en la historia del sonido de válvulas. Cada uno de los
tres pares de válvulas de etapa final se puede conectar
libremente a cada uno de los seis canales. Solo tienes que seleccionar
un canal y activar el par o los pares de válvulas que quieras utilizar. En
cada uno de los tres pares de válvulas de etapa final se pueden utilizar
válvulas EL34 o 6L6. Esto significa que, en cada uno de los tres canales
del TriAmp Mark 3, se pueden combinar sin problemas válvulas con
distintos caracteres musicales. Además, los preajustes MIDI de ese mismo
canal también se pueden utilizar con diferentes válvulas de etapa final;
solo necesitas un interruptor de pie (encontrarás más información sobre
los preajustes MIDI en el capítulo "MIDI").
Gracias a esto, con el TriAmp Mark 3 podrás experimentar con el sonido
como nunca antes. Por ejemplo, puedes utilizar un par de válvulas 6L6
a 50 vatios para tocar la entrada discreta de una canción, conectar un
segundo para 6L6 para los riff y, en lugar de utilizar el Boost, agregar las
válvulas EL34 para dar más fuerza al solo central (con hasta 150 vatios).
¡Así te asegurarás de que te oigan incluso desde la última fila!
Sin embargo, las opciones Midi también permiten realizar cambios en
un mismo canal que abarcan desde el sonido británico de los EL34 hasta
el característico sonido americano de los 6L6. O cambiar de los EL34
chinos a eslovacos, sin necesidad de cambiar válvulas, Amps ni canales.
Esto convierte al TriAmp Mark 3, entre muchas otras cosas, en el primer
comparador de válvulas de seis canales.
Nota: el TriAmp Mark 3 también admite otros tipos de válvulas de etapa
final. Hughes & Kettner ha probado los tipos que se indican a continuación: KT77, KT66, KT88, 5881 WXT, 6550 A, 6CA7, 7581.
5.6 FX-Loop
El circuito de efectos SmartLoop™ permite incorporar en
serie o en paralelo equipos de efectos externos. Su estado
(activado/desactivado y conexión en paralelo/serie) se
memoriza para cada canal y para cada preajuste MIDI.
FX-Loop: permite activar y desactivar el circuito de efectos. Encontrarás
más información sobre los circuitos de efectos en el capítulo "Parte
trasera".
5.7 Noise-Gate
La extremadamente precisa función Noise-Gate IDB™ (Intelligent Dual
Breakpoint) mide simultáneamente el nivel en dos puntos clave de la
secuencia de señales: en la entrada y en la salida del preamplificador. A
partir de estos dos valores, la tecnología IDB™ calcula la característica
de respuesta óptima y regula automáticamente los parámetros de ataque
(Attack) y umbral (Threshold).
SPEAKERS
1x 8 Ohms
or 2x 16 Ohms
Ambience emulated DI Out
4 Ohms
*HIPUL[
4VKL
3V^
*\[
TSC™
MIDI
ILZ[)PHZ
V]LYJ\YYLU[
UVJ\YYLU[
NOISE GATE
Hard
In
FX LOOP
Soft
Out/Thru
Z^P[JOLKVMM
MASTER INSERT
FX Level
Send
Dark
FX Serial
Return
Preamp Out
;VYLK\JL[OLYPZRVMLSLJ[YPJZOVJRNYV\UKPUNVM
[OLJLU[LYWPUVM[OPZWS\NT\Z[ILTHPU[HPULK
9LWSHJPUNM\ZLZT\Z[VUS`ILJHYYPLKV\[I`
X\HSPMPLKZLY]PJLWLYZVUULS9LWSHJLM\ZLZVUS`
^P[O[`WLHUKYH[PUNZOV^UOLYL
Bright
4HPUZ=VS[HNL
Power Amp In
=e
=e
(,:
VUVMM
TSM-432
Serial No.
;90(474HYR
4HPUZ-\ZL!=;(3/a
4H_7V^LY*VUZ\TW[PVU>
,<]LYZPVUVUS`
¡El amplificador no debe utilizarse nunca sin un altavoz conectado!
• Para utilizar dos bafles de 8 ohmios cableados en paralelo, conéctalos
a la salida de 4 ohmios. ¡No deben utilizarse nunca bafles con
impedancias diferentes en la misma salida!
• Para utilizar al mismo tiempo bafles con impedancias diferentes, deben
cablearse en paralelo o en serie a la salida adecuada. La siguiente
fórmula permite calcular la impedancia total (R) de dos bafles con
impedancias diferentes (R1, R2).
Cableado en paralelo: R = ( R1 x R2 ) / ( R1 + R2 )
Ejemplo de un bafle de 8 ohmios y uno de 16 ohmios:
R = (8 x 16) / (8 + 16) ohmios
R = 128 / 24 ohmios
R = 5,33 ohmios
Actualmente, la situación más normal es el cableado en paralelo. Sin
embargo, si tienes un bafle con una salida cableada en serie o si quieres
cablear los bafles en serie, la impedancia total se corresponderá a la
suma de las impedancias de los bafles:
Cableado en serie: R = R1 + R2
Es decir, el cableado en serie de un bafle de 4 ohmios y uno de 8 ohmios
da una impedancia total de 12 ohmios.
Consejo: respeta la siguiente regla de oro: la impedancia de los bafles
no debe ser nunca inferior a la de la salida del amplificador. En el caso
del ejemplo anterior, esto significa lo siguiente: los bafles cableados en
paralelo con una impedancia total de 5,33 ohmios se conectan a la salida
de 4 ohmios, y los bafles cableados en serie con una impedancia total de
12 ohmios se conectan a la salida de 8 ohmios.
Nota: la señal de la Red Box AE debe dirigirse a la mesa de mezclas con
un cable de micrófono. Verifica que la entrada XLR de la mesa de mezclas esté ajustada a la posición de línea. Si la mesa de mezclas no tiene
ninguna entrada XLR o si dichas entradas no tienen una posición de línea,
deberás utilizar un adaptador XLR a jack o un cable adecuado (puedes
obtenerlo en cualquier comercio especializado).
6.3 TSC
Nota: este manual de instrucciones cuenta con un capítulo entero dedicado a la función Tube Safety Control. Encontrarás más información en
el capítulo "TSC".
6.4 MIDI In y Out/Thru
MIDI es ideal para realizar cambios entre diferentes
sonidos utilizando los cambios de programa. Con solo
pulsar un botón, puedes cambiar al mismo tiempo
In
Out/Thru
el canal del amplificador y el programa de efectos
del equipo de efectos externo. Esto significa que las
TSM-432
maniobras complicadas con los pies en la pedalera son
cosa del pasado. Por este motivo, hemos decidido utilizar MIDI como el
protocolo estándar para todas las funciones de conmutación del TriAmp
Mark 3 y añadirle una conexión para la pedalera TSM-432 adjunta.
Encontrarás más información sobre la pedalera en el capítulo "TSM-432".
MIDI
MIDI In: la entrada MIDI del TriAmp Mark 3 tiene un diseño de 7
contactos. Sin embargo, esta conexión también admite la conexión de
un controlador MIDI convencional con un cable estándar de 5 patillas.
Las dos patillas adicionales se encargan de suministrar la alimentación
fantasma para la pedalera TSM-432 de Hughes & Kettner adjunta.
Atención: junto con la TSM-432 se incluye un cable de 7 patillas. Si pier-
• 中文
5L]LY\ZL[OPZHTW^P[OV\[ZWLHRLYZJVUULJ[LK
<ZLJSHZZ^PYPUN
El TriAmp Mark 3 tiene salidas separadas
para todas las impedancias estándar. Se
puede conectar un bafle de 4 ohmios, un
bafle de 8 ohmios o uno o dos bafles de
16 ohmios.
• にほんご
4 Ohms
3V^
*\[
• Español
1x 8 Ohms
or 2x 16 Ohms
*HIPUL[
4VKL
• Italiano
6.1 Speakers
El TriAmp Mark 3 es el primero producto de
Hughes & Kettner en equiparse con una Red Box
Ambience emulated DI Out
con Ambience Emulation (AE). Desde finales de
la década de los ochenta, la Red Box original ha
sido el estándar para capturar el sonido de los
amplificadores de guitarra sin micrófono. Ya sea
para directo o grabación, la Red Box ofrece una excepcional calidad de
sonido, evitando de una vez por todas las interferencias provocadas por
otros instrumentos y los problemas de microfonear un amplificador.
La Red Box AE, la versión más reciente de la galardonada caja de inyección
con simulación de altavoces, dispone de un filtro Low-Cut conmutable y
un segundo modo con una característica de sonido diferente. La función
Ambience Emulation, controlada por DSP, genera una sensación de lleno
total con 4 bafles de 12 y ataca directamente a los sonidos de válvulas
más puros, interviniendo en la señal entre las etapas finales y la salida
de los altavoces. La Red Box AE recibe una señal de línea cuyo nivel
depende del nivel de la etapa final. En otras palabras: el volumen maestro
también regula el nivel de esta salida DI.
RED BOX™ AE
• Français
6 Parte trasera
6.2 Red Box AE
• Deutsch
El botón Noise-Gate permite activar y desactivar la función IDB™-Noise.
Cuando la función Noise-Gate está activada, el preamplificador se
silencia en cuanto el nivel de señal desciende de un umbral determinado:
¡Adiós a los ruidos molestos! Esta entrada permanece cerrada hasta que
se vuelven a tocar las cuerdas, momento en el que se abre sin nada de
latencia. Encontrarás más información sobre la función Noise-Gate en el
capítulo siguiente.
16 Ohms
*(<;065!9LHYWHULSHUK
]LU[PSH[PVUVWLUPUNZTH`
ILJVTL[VVOV[[V[V\JO
3LH]LLUV\NOZWHJLMVY
WYVWLY]LU[PSH[PVU
¶K)
7V^LY(TW;\ILZ
5L]LY\ZL[OPZHTW^P[OV\[ZWLHRLYZJVUULJ[LK
<ZLJSHZZ^PYPUN
*(<;065!9PZRVMLSLJ[YPJ
ZOVJR+VUV[VWLU9LMLY
ZLY]PJPUN[VX\HSPMPLK
ZLY]PJLWLYZVUULS
PANEL
• English
16 Ohms
RED BOX™ AE
0UZLY[N\P[HYWPJR[VYLHK
V\[[\ILTH[JOPUN
TriAmp Mark 3 – Manual 1.1
55
TriAmp Mark 3 – Manual 1.1
des este cable y necesitas un sustituto con urgencia, también puedes usar
un cable de 5 patillas. Sin embargo, en este caso también necesitarás una
fuente de alimentación. Por este motivo, la TSM-432 dispone de una innovadora conexión de alimentación a la que se puede conectar una fuente
de alimentación de corriente continua o alterna con una alimentación de
tensión de entre 9 y 15 V.
MIDI Out/Thru: esta conexión permite redireccionar las señales que
entran a la conexión MIDI In. Aquí se puede conectar cualquier equipo
compatible con MIDI que quieras conectar simultáneamente al TriAmp
Mark 3.
Nota: las distintas funciones MIDI del TriAmp Mark 3 se explican en un
capítulo aparte. Encontrarás más información en el capítulo "Preajustes y
configuración de MIDI".
6.7 Master-Insert
El TriAmp Mark 3 dispone de un circuito en serie
adicional que permite regular el volumen maestro
utilizando un pedal de volumen. La señal previa al
Preamp Out
Power Amp In
amplificador se captura en Preamp Out y se devuelve
a Power Amp In. A través de Preamp Out, es posible
redireccionar la señal previa al amplificador hacia
otro amplificador, o también se puede conectar un sintonizador. La
conexión Preamp Out siempre está activada, lo que significa que siempre
que se conecte algo aquí influirá en el direccionamiento de las señales.
Nota: la conexión Power Amp In está conmutada. Esto significa que, cuando aquí hay algo conectado, se interrumpe el circuito interno de las
señales y solo se envían a la etapa final las señales que llegan por Power
Amp In.
MASTER INSERT
6.5 Noise-Gate Hard/Soft
6.8 Panel
Este regulador de la parte trasera permite modificar
NOISE GATE
la reacción de la función Noise-Gate. Girando el
Hard Soft
regulador hacia la derecha se aumenta la sensibilidad
de reacción de la Noise-Gate. Girando el regulador
hacia la izquierda se aumenta la intervención de la
Noise-Gate para eliminar las señales silenciosas y los
ruidos no deseados.
Consejo: el ajuste universal de la Noise-Gate se corresponde a las 12 horas. Para utilizar la Noise-Gate como instrumento estilístico para tocar
riffs staccatos con un nivel de ganancia alto, gíralo más hacia la izquierda.
6.6 FX-Loop
FX-Send: conecta esta conexión a la
entrada del equipo de efectos.
FX LOOP
FX Level
Send
Return
¶K)
FX Serial
FX-Return: conecta esta conexión a
la salida del equipo de efectos.
-10 dB: este interruptor de atenuación permite adaptar el nivel de señal a
equipos de efectos con un nivel más bajo. Actívalo para los equipos de
efectos previos que suelen conectarse entre la guitarra y el amplificador
(p.ej. un pedal de distorsión).
Level: permite regular el nivel de la señal que llega a la conexión FXReturn.
FX-Serial: permite cambiar el circuito de efectos de serie a paralelo.
Cuando el interruptor está iluminado, significa que está activado el modo
en serie.
Consejo: en el modo paralelo, FX-Level permite ajustar la mezcla de mojado y seco (wet/dry, la proporción de efecto y señal pura de la guitarra).
Además, todas las señales de línea se pueden dirigir hacia FX-Return y
añadirles la señal previa al amplificador con FX-Level.
Cuando, en el modo en serie, FX-Send se cablea directamente con FXReturn, con el regulador de nivel se puede ajustar el volumen general de
la señal previa al amplificador, casi igual que si se tratara de un segundo
regulador maestro que pudiera utilizarse activando y desactivando el
circuito FX.
56
PANEL
Dark
Bright
Aquí se puede regular la luminosidad del panel frontal del
TriAmp Mark 3. Este regulador también se puede controlar
de forma remota mediante comandos de mando MIDI
permanentes (encontrarás más información en el capítulo
"MIDI").
7 Preajustes y configuración de MIDI
Todos los botones del TriAmp Mark 3 se pueden controlar de manera
remota a través de MIDI, y los ajustes se pueden guardar en uno de los 128
preajustes MIDI que hay disponibles. Entonces, los preajustes se pueden
activar individualmente utilizando el número de cambio de programa
correspondiente, ya sea con un secuenciador o controlador MIDI, o
utilizando un software adecuado. La pedalera TSM-432 permite cambiar
de canal a través de MIDI, amplificar los canales (en el modo Stomp-Box)
o activar uno de los 128 preajustes, que se guardan en 32 bancos con
4 preajustes cada uno (en el modo Preset). Para que puedas empezar
inmediatamente, el equipo se entrega con el canal MIDI 1 preconfigurado
tanto para el amplificador como para la pedalera TSM-432 adjunta. Más
adelante en este mismo capítulo, encontrarás información sobre cómo
cambiar los canales MIDI.
Nota: las funciones de la pedalera TSM-432 se explican en un capítulo
aparte. Encontrarás más información en el capítulo "TSM-432".
7.1 Crear y activar los preajustes de MIDI
¿En qué se diferencian exactamente la configuración de un canal y un
preajuste MIDI?
El TriAmp Mark 3 dispone de seis configuraciones de canales que se
guardan automáticamente y que se pueden abrir seleccionando los
canales directamente en el amplificador o utilizando la TSM-432 en el
modo Stomp-Box. Asimismo, todas las configuraciones de canales y
válvulas de etapa final, junto con el estado de activación de las funciones
Noise-Gate, Boost y FX-Loop, se pueden guardar en hasta 128 preajustes
MIDI.
¿Para qué sirven los preajustes MIDI?
Al cambiar de sonido, normalmente no se cambia solo el canal, sino que
también se modifican los ajustes de Boost y Noise-Gate, y el programa
de efectos del equipo de efectos MIDI externo. Los preajustes MIDI
permiten, por ejemplo, cambiar inmediatamente de un sonido Clean con
TriAmp Mark 3 – Manual 1.1
seleccionar el mismo canal MIDI que en el maestro MIDI (la pedalera),
ya que, de lo contrario, el amplificador no reaccionaría o no lo haría
correctamente.
Por defecto, en el TriAmp Mark 3 y en la TSM-432 está seleccionado el
canal 1 y el modo Omni está activado. Omni significa que el amplificador
reacciona a todos los comandos en los 16 canales MIDI. Si el TriAmp
Mark 3 se utiliza en un entorno MIDI más amplio con varios equipos,
debes desactivar el modo Omni y configurar un canal MIDI adecuado.
Para cambiar los canales y el modo Omni, primero debes acceder a la
configuración MIDI tal como se explica a continuación:
Antes de activar la configuración MIDI, pon el interruptor
Standby en la posición Standby.
7.2 Selección del canal MIDI / Modo Omni
MIDI dispone de 16 canales para controlar hasta 16 equipos diferentes
con un controlador MIDI. Eso es especialmente útil en los estudios de
grabación y para los teclistas. Sin embargo, para los amplificadores de
guitarra con una configuración FX, en la mayoría de casos debería bastar
con un canal. Para ello, en el esclavo MIDI (el amplificador) se debe
Canal MIDI
FX-Loop
Válvulas 1/2
Válvulas 3/4
Válvulas 5/6
1
¢
¢
¢
¢
2
¢
¢
¢
{
3
¢
¢
£
¢
4
¢
¢
£
£
5
¢
£
¢
¢
6
¢
£
¢
£
7
¢
£
£
¢
8
¢
£
£
£
9
£
¢
¢
¢
10
£
¢
¢
£
11
£
¢
£
¢
12
£
¢
£
£
13
£
£
¢
¢
14
£
£
¢
£
15
£
£
£
¢
16
£
£
£
£
• にほんご
• Español
• Italiano
Nota: si se utiliza un procesador de efectos externo, debe programarse
por separado, puesto que la función de aprendizaje del TriAmp Mark 3
solo programa el propio amplificador (pero no los equipos externos). Es
decir: para que con el número de cambio de programa 1 de la pedalera
(o la TSM-432) se active un sonido Clean en el TriAmp Mark 3 y un coro/
reverberación en el procesador de efectos, primero es necesario "programar" el equipo de efectos para que active estos efectos cuando reciba el
número de cambio de programa 1. Para obtener más información, consulta el manual de instrucciones del equipo de efectos.
Consejo: muchos equipos de efectos tienen funciones de asignación MIDI
que permiten asignar los mismos preajustes de efectos a distintos números
de cambio de programa. Por ejemplo, el programa 1 para el preajuste de
efectos 4, el programa 2 para el preajuste de efectos 16 y el programa 3
de nuevo para el preajuste de efectos 4.
El botón Learn empezará a parpadear para indicar que se
han asignado determinadas funciones de programación a
los botones que se indican a continuación (para salir de
la configuración MIDI en ese momento, mantén pulsado
el botón Learn durante tres segundos; la luz del botón se apagará, los
cambios realizados se guardarán y el amplificador regresará al modo de
funcionamiento estándar):
• El botón Noise-Gate indica el estado del modo Omni de MIDI y
permite activarlo y desactivarlo. Si el botón Noise-Gate está iluminado,
significa que el modo Omni está activado (estado predeterminado,
recepción de todos los canales MIDI). Para desactivar el modo Omni,
pulsa el botón Noise-Gate (se pasará a la recepción de un canal MIDI
específico).
• El botón FX-Loop permite cambiar al siguiente canal MIDI de uno en
uno.
• El botón 5/6 permite retroceder por los canales MIDI también de uno
en uno.
• Los cuatro botones FX-Loop y Power Amp Tube identifican el canal
MIDI utilizando un código binario, tal como se indica a continuación:
• Français
La programación del TriAmp Mark 3 es muy intuitiva. Para guardar un
preajuste con una combinación específica de ajustes de canal, Boost
activado/desactivado, Noise-Gate activada/desactivada, FX-Loop
activado/desactivado y válvulas de etapa final, solo tienes que activar los
ajustes correspondientes utilizando los botones del amplificador, pulsar
brevemente el botón MIDI-Learn para habilitar el amplificador (el botón
se iluminará) y, por último, pulsar el interruptor de la pedalera en el que
quieres guardar esta configuración. Cuando el botón Learn se apaga de
nuevo, significa que el TriAmp Mark 3 ha guardado la configuración
seleccionada en una de las 128 posiciones de preajuste de la memoria
interna y que le ha asignado un número de programa en la pedalera.
Entonces, cuando el TriAmp Mark 3 reciba un comando de cambio de
programa a través del canal MIDI seleccionado (consulta más abajo), el
botón Learn parpadeará brevemente y el TriAmp cargará la configuración
correspondiente.
Información general: para salir del modo de programación sin guardar la
configuración actual, solo tienes que volver a pulsar el botón Learn (en
lugar del interruptor de la pedalera).
• Deutsch
¿Cómo funciona?
• 中文
Mantén pulsados los botones Noise-Gate y FX-Loop
al mismo tiempo durante tres segundos para abrir la
configuración MIDI.
• English
coro y reverberación a un sonido Lead con retardo, refuerzo y NoiseGate.
La particularidad del TriAmp Mark 3 reside en que también permite
cambiar inmediatamente los tres juegos de válvulas de etapa final a través
de MIDI. Por ejemplo, puedes tocar un sonido pop británico de los años
sesenta, clásico y limpio, con un par EL34, y luego añadirle un poco de
esplendor americano cambiando directamente a un par 6L6. O tocar un
moderno sonido High-Gain americano con dos pares 6L6 y mejorarlo
un poco más agregando un par EL34 para aportarle tonos medios más
agresivos.
¡Da rienda suelta a tu creatividad! O disfruta del control totalmente
remoto del TriAmp Mark 3, tanto en el estudio de grabación como en
el escenario. Y si con esto no basta: utiliza una MIDI-Clicktrack ("pista
de playback") para cambiar todos los preajustes, incluso la iluminación
del panel frontal del amplificador, si quieres que el escenario esté en
la oscuridad más absoluta. Con esto, el TriAmp Mark 3 es el primer
amplificador de válvulas que se puede integrar en el juego de luces.
57
TriAmp Mark 3 – Manual 1.1
7.3 Restaurar la configuración de fábrica
Por norma general, no suele ser necesario restaurar la configuración
de fábrica (Factory Reset). Sin embargo, es muy importante que prestes
mucha atención al contenido de este capítulo para evitar borrar sin
querer los preajustes MIDI.
No se ilumina ningún LED
Las válvulas de etapa final funcionan correctamente.
La función de restauración de la configuración de fábrica puede ser
necesaria si la comunicación MIDI deja de funcionar o si no estás seguro
de cómo están configurados los canales MIDI y el modo Omni. Esta
función restablece el canal MIDI a 1 y vuelve a activar el modo Omni.
Se ilumina un LED
Para restaurar la configuración de fábrica, mantén pulsados al mismo
tiempo los botones Learn y Boost cuando enciendas el amplificador.
Se iluminan dos/cuatro LED
Precaución: este procedimiento solo está pensado para las situaciones
de emergencia. ¡Cuando se activa, se borran todas las configuraciones
almacenadas, incluidos los 128 preajustes MIDI!
8 TSC™ –Tube Safety Control
0UZLY[N\P[HYWPJR[VYLHK
V\[[\ILTH[JOPUN
El TSC™ mejora la estabilidad técnica y
alarga la vida útil de las válvulas de etapa
ILZ[)PHZ
final adaptando la corriente en reposo
V]LYJ\YYLU[
constantemente y de forma automática. Esto
UVJ\YYLU[
Z^P[JOLKVMM
asegura un sonido óptimo, para que tu puedas
7V^LY(TW;\ILZ
concentrarte totalmente en las otras funciones
del amplificador. Además, las válvulas se
pueden sustituir de forma rápida y segura,
puesto que el TSC™ se encarga de realizar automáticamente la laboriosa
tarea de adaptar la corriente de reposo. Esto es muy útil no solo cuando
surge un problema, sino también para evaluar las válvulas de distintos
tipos y fabricantes.
TSC™
Atención: para cambiar el tipo de válvulas (p.ej. EL34 por KT88), se recomienda restablecer el módulo TSC:
- Apaga el equipo y pon el interruptor Standby en la posición Play
- Enciende el equipo
- Espera tres minutos como mínimo
Sin embargo, esta tecnología permite mucho más: los seis LED que hay en
la sección TSC de la parte trasera señalizan los estados de funcionamiento
de las válvulas. Cada uno de los LED está asignado a las válvulas de etapa
final de la posición correspondiente. Pero el TSC™ no solo proporciona
información sobre el estado de las válvulas, sino que también puede
realizar un diagnóstico de errores y desactivar las válvulas averiadas
para evitar que surjan problemas en el amplificador. Además, con ayuda
de una púa, los LED del TSC™ también permiten consultar las líneas
características de las válvulas (consulta el apartado 8.2).
8.1 Indicación automática del estado
Todos los LED están iluminados
Cuando el amplificador se encuentra en el modo de espera, se iluminan
todos los LED. Cuando el interruptor Standby se pone en la posición Play,
los LED se apagan al cabo de unos segundos. Si todos los LED continúan
iluminados, es posible que el fusible de ánodo esté defectuoso y que deba
sustituirse. El fusible de ánodo puede fundirse pese a la presencia del
58
TSC™ si una válvula ya estaba averiada antes de encender el amplificador
y el TSC™ no tiene tiempo (después de calentarse las válvulas) para medir
la corriente de reposo y desactivar las válvulas averiadas.
Cuando solo se ilumina un LED, significa que la válvula afectada genera
una subcorriente y que se ha desactivado. Si el LED no se apaga al cabo
de unos minutos, debe sustituirse la válvula afectada.
Esto puede significar que las válvulas afectadas generan subcorriente y
deben sustituirse o que el par de válvulas pertinente está desactivado (es
decir, el botón Power Amp Tube correspondiente de la parte frontal está
desactivado).
Un LED parpadea y el de al lado está iluminado
La válvula correspondiente al LED que parpadea genera una sobrecorriente
y se ha desactivado. Es necesario sustituir la válvula. Puesto que para
lograr los mejores sonidos en las etapas finales del TriAmp Mark 3 siempre
se necesita un par de válvulas que trabajen conjuntamente, la otra válvula
del par también se desactiva (lo cual se indica mediante la iluminación
del LED correspondiente), para que el resto de pares de válvulas puedan
funcionar sin que se vea afectado su sonido. Sin embargo, no es necesario
sustituir la segunda válvula del par (cuyo LED está iluminado), puesto que
funciona correctamente.
Esto significa que el TSC inteligente puede ayudarte a salvar una
actuación, ya que, en un amplificador convencional, cuando falla una
válvula salta el fusible y no se puede volver a utilizar hasta que se ha
sustituido tanto la válvula como el fusible. Sin embargo, gracias al TSC,
el TriAmp Mark 3 puede continuar funcionando con total normalidad.
Sin embargo, deberías tener claro que la desactivación de un par de
válvulas afecta a la potencia del amplificador. Además, los canales y los
preajustes MIDI que solo se utilicen en el par de válvulas afectado se
deberá cambiar a otro par de válvulas. Por último, no olvides sustituir
inmediatamente la válvula averiada cuando termine la actuación.
8.2 Consulta manual
El TSC™ permite consultar las líneas características para comprobar si
los tres pares de válvulas de la etapa final están bien adaptados entre sí.
Para ello, solo tienes que insertar una púa en la ranura que hay junto a los
LED. El amplificador debe estar encendido (¡y no en el modo de espera!).
Todos los LED parpadearán varias veces. El número de parpadeos de
cada LED permite saber la línea característica y la corriente de reposo de
la válvula correspondiente.
El número de parpadeos de los LED de un par de válvulas (1/2, 3/4,
4/5) no debe diferir en más de 4 parpadeos del resto. Esta es la única
manera de que el TSC pueda asegurar un sonido óptimo. Si la diferencia
es mayor, recomendamos sustituir el par de válvulas usadas por otro par
de válvulas iguales. Esta consideración se refiere a un punto de vista
puramente musical, ya que técnicamente no existe ningún inconveniente.
Pero las válvulas bien adaptadas entre sí, es decir, con la misma línea
característica, ¡suenan mucho mejor!
Atención: el TSC™ también se encarga de activar y desactivar los pares
de válvulas correspondientes. Si has decidido utilizar un único par de vál-
TriAmp Mark 3 – Manual 1.1
Nota: los LED asignados a los botones correspondientes no siempre indican el canal seleccionado y el estado de Stomp-Boost. Cuando se selecciona otro canal o se activa la función Boost en el propio amplificador, la
TSM-432 no lo detecta.
9.1 Conexiones
La TSM-432 no necesita ninguna fuente de alimentación separada, puesto
que el TriAmp Mark 3 cuenta con una conexión MIDI In de 7 contactos
con alimentación fantasma. Si la TSM-432 está conectada correctamente,
cuando se enciende el TriAmp Mark 3 se ejecuta la siguiente secuencia
de arranque: en la pantalla se muestra el número de versión y todos los
LED parpadean uno tras otro de izquierda a derecha. A continuación, en
la pantalla se muestra "1" si la TSM-432 está en el modo Preset, o "Sb" si
está en el modo Stomp-Box. En ambos casos, se ilumina el LED que hay
debajo del botón A.
MIDI Out: esta conexión debe conectarse a la conexión MIDI In del
TriAmp Mark 3 utilizando el cable de 7 contactos adjunto. En caso
de utilizar un cable estándar de 5 contactos, consulta el apartado
"Alimentación de corriente" más abajo.
MIDI In: para manejar el TriAmp Mark 3 con la TSM-432 no es obligatorio
utilizar la conexión MIDI In. Esta conexión también se puede utilizar para
conectar otros equipos MIDI a la TSM-432. En este caso, la TSM-432 se
Consejo: para cambiar rápidamente del modo Preset al modo Stomp-Box,
mantén pulsados los botones FX y B. Procede de la misma manera para
regresar al modo Preset. Esta función tiene carácter temporal: cuando se
apaga la TSM-432 y se vuelve a encender, se activa el modo seleccionado
con el control deslizante.
• にほんご
La TSM-432 está adaptada específicamente al TriAmp Mark 3 y tiene
dos modos: el modo Stomp-Box y el modo Preset. En el modo StompBox, los botones de la TSM-432 se pueden utilizar para seleccionar
los seis canales del amplificador y activar la función Stomp-Boost. El
modo Preset de la TSM-432 permite acceder a 128 preajustes MIDI. Se
recomienda empezar con el modo Stomp-Box para familiarizarse con
el TriAmp Mark 3 y luego pasar al modo Preset para adentrarte en un
mundo con posibilidades ilimitadas.
El control deslizante que hay sobre las conexiones MIDI en la parte
trasera de la TSM-432 permite cambiar entre los modos Preset y StompBox. Cuando el control deslizante se coloca en el modo Stomp-Box, en
la pantalla aparece "Sb".
En el modo Stomp-Box, los seis botones (1A, 1B, 2A, 2B, 3A y 3B) están
asignados a los seis canales del TriAmp Mark 3. Los botones están
debidamente rotulados en la TSM-432: 1, 2 y 3 para los tres Amps
previos, y A/B para los dos canales. También hay un botón adicional e
independiente que permite activar y desactivar la función Stomp-Boost.
• Español
(1A, 1B, 2A, 2B, 3A, 3B, Boost)
La pedalera TSM-432 es una evolución de la FSM-432, que seguramente
ya conoces del SwitchBlade, CoreBlade o GrandMeister de Hughes
& Kettner. Si ya tienes una FSM-432, también puedes utilizarla para
seleccionar los preajustes del TriAmp Mark 3 en caso de que alguna vez
no dispusieras de la TSM-432.
• Italiano
9.2 Modo Stomp-Box
• 中文
Controller Input 1 y 2: estas dos conexiones jack permiten conectar
interruptores de pie o pedales de efectos para controlar otras funciones
del TriAmp Mark 3. Los interruptores de pie permiten controlar de
manera remota todos los botones del amplificador y activar y desactivar
la iluminación del panel frontal. Un pedal de efectos solo permite reducir
la intensidad de la iluminación. A algunos, esto puede parecerles un
truco, pero fueron los propios usuarios del TriAmp quienes nos hicieron
llegar este tipo de peticiones... así que pensamos: "¿Por qué no?"
Más abajo se explica cómo asignar funciones a las distintas entradas de
control (apartado 9.4 Asignación de Control 1 y 2). Por defecto, Control
1 permite activar y desactivar la Noise-Gate, y Control 2 hace lo propio
con FX-Loop.
• Français
9 TSM-432 – La pedalera
suministrada
Alimentación de corriente (Power Supply): En caso de utilizar un cable
estándar de 5 contactos, se necesita una fuente de alimentación. Para ser
lo más independiente posible, la TSM-432 tiene una innovadora conexión
de alimentación a la que se puede conectar una fuente de alimentación
de corriente continua o alterna con una alimentación de tensión de entre
9 y 15 voltios y una intensidad de, como mínimo, 250 mA.
9.3 Modo Preset
(A, B, C, D, Bank up/down, FX)
El modo Preset permite acceder a 128 preajustes MIDI del TriAmp Mark
3. También hay un botón adicional e independiente (FX) que permite
activar y desactivar la función FX-Loop. Encontrarás más información en
el capítulo "Preajustes y configuración de MIDI".
Botones de preajustes A, B, C y D: estos botones permiten activar uno
de los cuatro preajustes dentro del banco seleccionado actualmente. Los
LED correspondientes a cada uno de los botones A, B, C y D indican el
preajuste que está activo.
• Deutsch
Precaución: la sustitución de las válvulas debe encargarse a personal especializado debidamente cualificado.
convierte en una verdadera mezcladora MIDI que transmite los mensajes
MIDI procedentes de MIDI In hacia MIDI Out.
• English
vulas, el TSC indicará que cuatro válvulas están desactivadas (los dos pares de válvulas que no se utilizan). Los LED solo indican el estado correcto
cuando el amplificador está inactivo. Mientras tocas, es posible que los
LED se apaguen y se vuelvan a iluminar, pero esto no tiene nada que ver
con el estado del amplificador o de las válvulas. Si solo se sustituye una
válvula de un par, presta atención a que la línea característica de la nueva
válvula se corresponda con la de su pareja. Puedes obtener válvulas de
repuesto en los comercios especializados.
59
TriAmp Mark 3 – Manual 1.1
Bank Up/Down: en la pantalla de la TSM-432 se muestra el número del
banco seleccionado actualmente. Para abrir un preajuste de otro banco,
primero debe seleccionarse con los botones Up y Down. Mientras tanto,
puedes continuar tocando con el preajuste actual, puesto que el nuevo
banco no se activa mientras que en la pantalla de la TSM-432 se muestre
el número del banco actual. Esto no sucede hasta que se pulsa A, B, C
o D para activar un preajuste. Sin embargo, el modo Direct funciona de
otra manera.
Modo Direct: el modo Direct permite activar directamente un nuevo
preajuste con Bank Up/Down. En el modo Direct, la TSM-432 no espera
a tu confirmación, es decir, a que pulsas el botón A, B, C o D. En lugar de
ello, el cambio se realiza directamente, por ejemplo, del preajuste B del
banco 16 al preajuste B del banco 17 (Up) o del banco 15 (Down).
Para activar el modo Direct, procede tal como se explica a continuación:
• Mantén pulsado el botón FX y pulsa el preajuste A.
• Primero suelta el preajuste A y luego pulsa FX. Se iluminará el punto
decimal en la pantalla.
Se pueden asignar las funciones siguientes:
Nombre
Número
de
control
MIDI
Rango
Nota
Mute
9
0 – 63 = desact., 64 – 127 = act.
Esta función sólo
está disponible
mediante MIDI.
FX-Loop
55
0 – 63 = desact., 64 – 127 = act.
FX-Serial
54
0 – 63 = paralelo, 64 – 127 = serie
StompBoost
64
0 – 63 = desact., 64 – 127 = act.
Noise-Gate
63
0 – 63 = desact., 64 – 127 = act.
Canales
31
0 – 12 = Canal 1 (Amp 1A)
13 – 37 = Canal 2 (Amp 1B)
38 – 63 = Canal 3 (Amp 2A)
64 – 87 = Canal 4 (Amp 3A)
88 – 112 = Canal 5 (Amp 3A)
113 – 127 = Canal 6 (Amp 3B)
Para facilitar
la selección de
canales utilizando
comandos MIDI con
otros controladores,
recomendamos
utilizar valores fáciles
de identificar, como
por ejemplo:
Canal 1 = 10
Canal 2 = 30
Canal 3 = 50
Canal 4 = 80
Canal 5 = 100
Canal 6 = 120
Válvulas 1/2
58
0 – 63 = desact., 64 – 127 = act.
Si solo hay activado
un par de válvulas, no
se puede desactivar.
Válvulas 3/4
59
0 – 63 = desact., 64 – 127 = act.
Válvulas 5/6
60
0 – 63 = desact., 64 – 127 = act.
Luminosidad
del panel
frontal
88
0 – 127, 0 = mín. (desact.), 127
= máx.
Para volver a desactivar el modo Direct, procede de la misma manera.
Nota: el modo Direct también tiene carácter temporal. Cuando se apaga
la TSM-432 y se vuelve a encender, se activa el modo estándar.
Nota: los LED asignados a los botones correspondientes no siempre indican el canal seleccionado y el estado de Stomp-Boost. Cuando se selecciona otro canal o se activa la función Boost en el propio amplificador, la
TSM-432 no lo detecta.
9.4 Asignación de Control 1 y 2
A las dos entradas Control se les pueden asignar números de control tal
como se explica a continuación.
Control 1: para abrir el modo de edición, mantén pulsados los botones
FX y D simultáneamente hasta que en la pantalla se muestre el número
de control MIDI y el punto que hay detrás de la segunda cifra parpadee.
A continuación, utiliza los botones Up y Down para seleccionar otro
número de control MIDI. Para guardar el número deseado, pulsa el botón
D. El punto dejará de parpadear y la TSM-432 regresará al modo de
funcionamiento normal.
Control 2: mantén pulsados los botones FX y C hasta que en la pantalla
se muestre el número de control MIDI y el punto que hay detrás de la
segunda cifra parpadee. A continuación, utiliza los botones Up y Down
para seleccionar otro número de control. Pulsa el botón C para guardar la
opción seleccionada y salir del modo de edición.
60
Con un interruptor de
pie normal se puede
encender y apagar la
iluminación, mientras
que un pedal permite
atenuarla del máximo
al mínimo.
Interruptor o pedal. ¿Cuál es la diferencia?
Un interruptor solo detecta dos estados: desactivado (0) y activado
(127). Esto significa que solo se puede elegir entre los valores mínimo y
máximo. Por lo contrario, un pedal puede enviar un valor entre 0 y 127.
Sin embargo, esto no significa que con un pedal no se puedan activar
y desactivar las funciones; si se encuentra por debajo de la posición
intermedia, la función que tiene asignada se desactiva, y cuando se
encuentra por encima, se activa.
10 AES (solo para los equipos de la UE)
De conformidad con la Directiva 1275/2008/CE, los equipos eléctricos
y electrónicos deben dotarse de un dispositivo de ahorro de energía
que apague el equipo después de transcurrir un tiempo determinado sin
utilizarse. En el TriAmp Mark 3, esta función recae sobre el AES, que
se puede activar y desactivar con el miniinterruptor que hay al lado
de la conexión para los altavoces. Por defecto, el AES está activado
(el miniinterruptor se encuentra a la izquierda). En esta posición, el
amplificador se apaga automáticamente después de aproximadamente
90 minutos sin utilizarse. El temporizador de inactividad se restablece y
vuelve a empezar desde el principio cuando llega una señal a la entrada
del amplificador (p.ej. si se toca una nota). Una pequeña señal basta para
que la cuenta a atrás de 90 minutos vuelva a empezar desde el principio.
Cuando el AES apaga el amplificador, se puede volver encender de
nuevo desconectando y volviendo a conectar el interruptor Power/On o
el interruptor Standby.
TriAmp Mark 3 – Manual 1.1
11 Datos técnicos
hasta 150 vatios
Conexión de entrada
6,3 mm jack (1/4"), asimétrico
Consumo de potencia máximo
460 W
Impedancia
1 M-ohmio
Corriente de conexión
100 V: 27 A , 120 V: 26 A , 220-240V: 23 A
+/-10%
Nivel de entrada máxima / 1 kHz
(Amp 1A)
0 dBV
Rango de tolerancia - tensión de red
Rango de temperatura ambiente en
funcionamient
0° hasta +35° C
Sensibilidad de entrada / 1 kHz
(EQ en posición central, nivel en
posición máxima)
Boost desact.
Boost act.
Protección de red, 100 voltios
250 V / T 5 A
Amp 1A: -33 dBV
Amp 1A: -37 dBV
Protección de red, 120 voltios
250 V / T 5 A
Protección de red, 220 -230 voltios
250 V / T 2 A
Protección de red, 240 voltios
250 V / T 2 A
Fusible de ánodo
T 800 mA
Fusible del calentador de tubos
TT 15 A (Schurter 7040.3210)
Función
9440008
7025/E83CC
(ECC83), High-Grade
Eslovaquia
Válvula de entrada (activa
en todos los canales)
2
9440001
12AX7A-C, select.
China
Canal 1B (Preamp)
3
9440007
ECC83, select.
Eslovaquia
Canal 1A-1B (Preamp
Output)
4
9440007
ECC83, select.
Eslovaquia
Canal 2A-2B-3A-3B
(Preamp)
5
9440007
ECC83, select.
Eslovaquia
Canal 2A-2B (Preamp
Output)
6
9440007
ECC83, select.
Eslovaquia
Canal 3A (Preamp Output)
7
9440007
ECC83, select.
Eslovaquia
Canal 3B (Preamp)
8
9440007
ECC83, select.
Eslovaquia
FX Buffer (activo en todos
los canales)
9
9440007
ECC83, select.
Eslovaquia
Controlador etapa final
(activo en todos los
canales)
10
6000122
EL34B-STR, select.
China
Válvulas etapas finales 1/2
11
6000122
EL34B-STR, select.
China
Válvulas etapas finales 1/2
12
6000120
6L6GC-STR, select.
China
Amp 3A: -76 dBV
Amp 3A: -76 dBV
Amp 3B: -78 dBV
Amp 3B: -89 dBV
Conexión FX-Return
6,3 mm jack (1/4"), asimétrico
Impedancia
22 kOhm
Nivel máximo / 1 kHz
+14 dBV
Sensibilidad / 1 kHz (Master
en posición central, FX-Level en
posición máxima)
-10 dB-interruptor
desactivado
-10 dB-interruptor
activado
0 dBV
-10 dBV
Conexión Power Amp In
6,3 mm jack (1/4"), asimétrico
Impedancia
350 kOhm
Sensibilidad / 1 kHz (según canal)
+6 hasta +10 dBV
• にほんご
Procedencia
Amp 2B: -74 dBV
Salidas
Red Box DI Out
XLR, simétrico
Impedancia
2 kOhm
Nivel de salida
0 dBV (simétrico)
Nivel de salida máximo
+12 dBV
Conexión FX Send
6,3 mm jack (1/4"), asimétrico
Válvulas etapas finales 3/4
(Volumen máximo, EQ en posición
central)
-10 dB-interruptor
desactivado
-10 dB-interruptor
activado
13
6000120
6L6GC-STR, select.
China
Válvulas etapas finales 3/4
Impedancia
2,2 kOhm
680 ohmios
14
6000120
6L6GC-STR, select.
China
Válvulas etapas finales 5/6
Nivel máximo / 1 kHz
-2 dBV
+8 dBV
15
6000120
6L6GC-STR, select.
China
Válvulas etapas finales 5/6
Conexión Power Amp Out
6,3 mm jack (1/4"), asimétrico
Nivel máximo / 1 kHz
+20 dBV
MIDI
MIDI In
7 patillas (compatible con 5 patillas), alimentación
fantasma de CC de 20 V (150 mA)
MIDI Out/Thru
5 patillas
Datos mecánicos
Válvulas etapas finales* / potencia de
salida
8 ohmios /
THD=10%
8 ohmios /
THD=5%
2x EL34
84 W
34 W
2x 6L6
72 W
30 W
4x 6L6
126 W
93 W
2x 6L6 + 2x EL34
132 W
95 W
4x 6L6 + 2x EL34 (recomendado)
145 W
116 W
Dimensiones (AxAxP):
740 x 393 x 254 mm
Peso
22 kg / 48.5 lbs.
• Español
Tipo
Amp 2B: -74 dBV
• Italiano
1
Art.-Nº.
Amp 2A: -56 dBV
• Français
Nº.
Amp 1B: -49 dBV
Amp 2A: -56 dBV
• Deutsch
Válvulas
Amp 1B: -49 dBV
• English
Potencia de salida
• 中文
Entradas
Datos eléctricos generales
*en estado de suministro
61
ご利用の前に
• 製品をご利用いただく前に、安全上の注意事項を
含む本マニュアルをよくお読みください。
• 本製品や周辺機器の不適切な使用により生じた
損害は、
メーカーの保証の対象外となります。
• 電源と接続する前に、PowerスイッチとStandby
スイッチがオフになっており、本製品の背面に標示
された電圧レベルと電源のレベルが一致している
ことを確かめてください。
• アンプは必ずスピーカーに接続した状態で使用し
てください。
その際、
スピーカーのインピーダンス
に注意し、必ずインピーダンスがマッチするスピー
カーの出力端子に接続してください。
• アンプをご利用いただく前に、次の点を再度ご
確認ください。大音量により聴覚がダメージを受
ける可能性があります。突然大きな音が生じるの
を防ぐために、製品をよく理解するとともに、
アン
プの電源を入れる前にマスターボリュームのツ
マミを完全に絞っておくようにしてください。
Version 2.3 08/2013
フロントパネル ............................................................................ 65
6
リアパネル .................................................................................. 67
7
MIDIプリセットとMIDIセットアップ .............................................. 68
8
TSC™ ‒Tube Safety Control .................................................. 70
9
TSM-432 ‒ MIDI Board .......................................................... 70
10 AES ........................................................................................... 72
真空管サウンドの歴史を塗り替える
11 技術仕様 ..................................................................................... 72
TriAmp Mark 3は、2チャンネル仕様の独立したプリアンプを3台、
さらにそれ
ぞれ独立したパワーアンプも3台装備しています。
パワーアンプ真空管の3組の
ペアは、
それぞれ別の真空管に接続することができます。
さらに、各ペアを6つ
のチャンネルそれぞれに任意で割り当てることが可能であり、
またMIDIを介す
こともできます。
それだけではありません。各チャンネルを別々の真空管ペアに
割り当て、異なるタイプのパワーアンプ真空管を組み合わせることが可能です。
6つのチャンネルはゲインとボリュームを独立して調整でき、
チャンネルごとに3
バンドイコライザーや、
それぞれのキャラクターに合わせたStomp Boostが
搭載されています。
また、
ボタンを操作することで、12種類の基本的な音色を利
用することができます。
ボタン操作などによりパワーアンプ真空管の3組のペア
を組み合わせれば、50ワット時に3x12=36種類の音色を自在に扱えます。2組
目の真空管ペアを追加で使用すれば(100ワットに高まります)、
さらに36種
類の選択肢を利用できるようになります
(1+2ペア、1+3ペア、2+3ペア)。3組
目の真空管ペアもあわせれば(150ワットになります!)、
さらに12種類増えま
す!これにより、合計で84種類の音色が得られます。
TriAmp Mark 3で得られるのはクラシックなサウンドばかりではありません。
チャンネルとパワーアンプを今までになかった組み合わせで利用することによ
り、全く新しい独自のサウンドが得られます。多様な音色を可能にするこの画期
的なアンプは、
あなたの創造力をかき立てます。
• にほんご
アンプとチャンネル ...................................................................... 65
5
• Español
4
TriAmp MK IIの改良は、開始当初から困難なものでした。
オリジナルバージ
ョンのキャラクターを残しつつ、
サウンド、
パフォーマンス、
デザインのレベル
を高めた全く新しい次元のものを作らなければならなかったのです。
そのた
め技術者たちは細部までこだわり尽くし、ギタリストにとって最高の選択とな
るようTriAmp MK IIの個々の機能を設計し直しました。
そうして、ギターア
ンプの世界にいままで無かった革新的なアンプを生み出すことに成功しまし
た。TriAmp Mark 3です。
• Italiano
基本操作 ..................................................................................... 64
• Français
3
1 はじめに
• Deutsch
はじめに ..................................................................................... 63
クイックガイド ............................................................................. 64
• English
1
2
• 中文
TriAmp Mark 3 – Manual 1.1
63
TriAmp Mark 3 – Manual 1.1
;VKVHTHU\HSYLHKV\[VM[OL[\IL
TH[JOPUNPUZLY[HWPJRPU[V[OLZSV[
HUKJV\U[[OLMSHZOLZVMLHJO3,+
;OLKPMMLYLUJLPUMSHZOLZZOV\SKIL
SLZZ[OHU^P[OPULHJOWHPY[V
N\HYHU[LLILZ[ZV\UK7SLHZLYLMLY
[V[OLTH[JOPUNJOHY[PU[OLTHU\HS
Tube Status Monitor
;:*H\[VTH[PJHSS`PUKPJH[LZ[OLZ[H[\ZVM[OL[\ILZ
HZZVVUHZ[OLHTWPZPUWSH`TVKL:;(5+)@Z^P[JO
PU\WWLYWVZP[PVU0M[OL3,+ZZ[H`VUPUWSH`TVKL
WSLHZLJOLJR[OLHUVKLM\ZL
(SS3,+ZVMMTLHUZ!ILZ[IPHZUVYTHSVWLYH[PVU
6UL3,+VUTLHUZ!UVJ\YYLU[[\ILPZIYVRLUHUK
OHZ[VILYLWSHJLK
6UL3,+MSHZOLZVUL3,+PZVU![OLMSHZOPUN3,+
PUKPJH[LZH[\IL[OH[JH\ZLZV]LYJ\YYLU[[OLV[OLY
3,+PUKPJH[LZHZ^P[JOLKVMM[\IL[VWYV[LJ[[OLHTW
7SLHZLYLWSHJL[OL[\IL[OH[JH\ZLZV]LYJ\YYLU[
;^V3,+ZVUTLHUZ!WHPYVM[\ILZPZZ^P[JOLKVMM
MADE IN GERMANY
SPEAKERS
16 Ohms
1x 8 Ohms
or 2x 16 Ohms
RED BOX™ AE
4 Ohms
Ambience emulated DI Out
*HIPUL[
4VKL
3V^
*\[
0UZLY[N\P[HYWPJR[VYLHK
V\[[\ILTH[JOPUN
7V^LY;\ILZ!
TSC™
MIDI
ILZ[)PHZ
V]LYJ\YYLU[
UVJ\YYLU[
NOISE GATE
Hard
In
Out/Thru
Z^P[JOLKVMM
FX LOOP
Soft
MASTER INSERT
FX Level
Send
Return
Preamp Out
*(<;065!9LHYWHULSHUK
]LU[PSH[PVUVWLUPUNZTH`
ILJVTL[VVOV[[V[V\JO
3LH]LLUV\NOZWHJLMVY
WYVWLY]LU[PSH[PVU
;VYLK\JL[OLYPZRVMLSLJ[YPJZOVJRNYV\UKPUNVM
[OLJLU[LYWPUVM[OPZWS\NT\Z[ILTHPU[HPULK
9LWSHJPUNM\ZLZT\Z[VUS`ILJHYYPLKV\[I`
X\HSPMPLKZLY]PJLWLYZVUULS9LWSHJLM\ZLZVUS`
^P[O[`WLHUKYH[PUNZOV^UOLYL
Bright
4HPUZ=VS[HNL
Power Amp In
=e
¶K)
=e
7V^LY(TW;\ILZ
*(<;065!9PZRVMLSLJ[YPJ
ZOVJR+VUV[VWLU9LMLY
ZLY]PJPUN[VX\HSPMPLK
ZLY]PJLWLYZVUULS
PANEL
Dark
FX Serial
(,:
VUVMM
TSM-432
Serial No.
;90(474HYR
4HPUZ-\ZL!=;(3/a
4H_7V^LY*VUZ\TW[PVU>
,<]LYZPVUVUS`
or
Vol. Pedal
Guitar Cabinet
FX-Unit
Tuner
or
FX-Unit
or
or
Powered
Cabinet
Power Amp
Mixing Desk
2 クイックガイド
3 基本操作
Mains In:付属の電源ケーブルを接続する主電源ジャック
(メイン・リード)。
TriAmp Mark 3の使い方は簡単です。
• 6つの独立したチャンネルのコントロールパネルはすべて同じです。
• 各コントロールパネルは、対象のチャンネルにのみ影響します。
• フロントパネルの左側にあるMasterセクションで設定した内容は、
すべての
チャンネルに影響を与えます。
MIDI In:付属のTSM-432あるいはMIDIコントローラーのMIDI Outを任意
で接続する端子。
これは7ピン用の端子ですが、標準的な5ピンケーブルや市
販のMIDIコントローラーも接続できます。残りのピン
(1と7)
は、Hughes &
KettnerのTSM-432 MIDI-Board用にファンタム電源を供給するためのも
のです。
スピーカー:ギターアンプ用スピーカーキャビネットを接続する端子。Hughes
& KettnerのキャビネットTMおよびTCシリーズを接続することをお勧めし
ます。
AES:EU仕様のTriAmp Mark 3については、AESと呼ばれる省エネ機能を搭
載しています
(詳細については10章をご参照ください)。AESを有効にすると
(
デフォルトで有効)、
およそ90分間休止状態が続いた場合に自動的にTriAmp
の電源がオフになります。
アンプに入力信号があるとこの休止状態が解除さ
れ、再び起動します。
64
TSM-432
Stomp Boostボタンおよびパワーアンプ真空管ボタンは事前に6つのチャン
ネルに対し個別に割り当てることができます。設定内容は、
チャンネルを切り替
えた際に自動的に記憶されます。例えば6L6真空管ペアとStomp Boostとと
もにチャンネル1Aを使用している場合は、再度チャンネル1Aに切り替えた際
にこの設定内容が呼び出されます。
これは、設定内容を変更しない限り有効で
す
(MIDIプリセットではさらに多くのオプションがあります。詳細については7章
「MIDI」
をご参照ください)。
また、各ボタンのLEDランプにより、現在有効になっているチャンネルや機能が
一目でわかります。
TriAmp Mark 3 – Manual 1.1
4 アンプとチャンネル
4.3.アンプ3
TriAmp Mark 3のチャンネルは、単に3段階のゲインを得るためだけのもの
ではありません。
それぞれで異なる時代のサウンドが得られるのです。高度な
電子技術により、各チャンネルやMIDIプリセットのために最適なプリアンプお
よびパワーアンプの真空管を用いて再構成されています。
これによりTriAmp
Mark 3は真空管の電子回路から得られる細かなサウンドを捉えることができ
るため、驚くほど多彩な音色を表現することが可能です。
チャンネルA:90年代アメリカのクラシックなハイゲイン・サウンド
チャンネル1Bでは、典型的なブリティッシュサウンドのきらびやかな高音域、
ご
くわずかに歪んだ倍音が得られます。
ローゲインの場合でも中音域から高音域
にかけて豊かな倍音が得られます。
ヒント:チャンネル1BのパワーアンプにはEL34真空管ペアを1組使用する
のがお勧めです。
4.2 アンプ2
チャンネルA:70年代イギリスのクラシックなリードサウンド
チャンネル2Aでは、歴史的なロックの名盤で聴くことができるようなオーバー
ドライブ・サウンドが得られます。
このブリッティシュライクなサウンドは、鋭い
リフやアグレッシブなリズムギターに最適です。
ヒント:このチャンネルの特徴を活かすには、EL34真空管ペアを1組使用す
るのが最適です。
または、6L6真空管ペアを1組(あるいは2組)使用するのも
良いでしょう。
チャンネルB:80年代イギリスのファットなリードサウンド
チャンネル2Bは、陰りのあるファットなサウンドから、歌声のように長いサステ
インまでをカバーします。
どうしてこれが可能になったのでしょうか?特別な回
路設計により、
チャンネル2Bでは古いPlexiでは十分に得られなかったディスト
ーションサウンドが出せます。
ラウドかつ飽和感のあるこのサウンドは、両手タ
ッピングやアグレッシブなパワーコードに最適です。
ヒント:チャンネル2Bには、
まずはEL34のペア1組から試してみるのが良
いでしょう。
Power/Onスイッチ:
「On」
にすると電源が入ります。
アン
プに電力が供給され、使用可能な状態になるまで真空管を
温めます。
Play/Standbyスイッチ:約30秒の起動時間の後、
「Standby」から
「Play」
に切り替えられるようになります。
これでいつでも演奏開始できます!長い休止時間がある場
合は
「Standby」
に切り替え、真空管の温度を演奏可能な
状態に保つようにしましょう。
またそうすることで、真空管の消耗を抑えること
もできます。
5.2 InputとStomp Boost
Input:ギターシールドを介してギターを接続する1メガΩの入力
ジャック。
Stomp Boost:Stomp Boostは入力した音の特定の音域を少
し増幅させます。使用するチャンネルや設定によっては過激なサ
ウンド、
マイルドなトーンや表現力豊かな音色を得ることができま
す。Stomp BoostはTriAmp Mark 3のInputとプリアンプの間に
接続されており、各チャンネルの性質に合わせて最適化されていま
す。
まるでトランジスタを用いた外付けのブーストペダルを6台あわせて使用し
たかのような感覚が得られます。
回路の特徴:Stomp Boostは独立した回路基板を用いた特殊なモジュールで
あり、
トゥルーバイパス回路で構成されています。
• 中文
• にほんご
5.1 PowerとStandby
• Español
チャンネルB:60年代イギリスのきらびやかなクリアトーン
5 フロントパネル
• Italiano
チャンネル1Aでは、古き良きアメリカンサウンドが得られます。
ハイゲインの場合でも歪みの無いクリアトーンを得られるのが特徴であり、
まさ
にカウボーイブーツが似合う音色です。
それだけではありません。
チャンネルA
の低音域はタイトかつ豊かであり、低音域にうるさい人をも満足させます。
ヒント:チャンネル1Aには2つの6L6真空管ペアを使用するのが効果的で
す。
• Français
チャンネルA:50年代カリフォルニアのビンテージ・クリアトーン
チャンネル3Bでは、今までに聴いたことのないような圧倒的なハイゲイン・サウ
ンドが得られます。
ドロップチューニング、7弦ギターあるいは8弦ギターを使用
する際は、3Bの力強い大胆な歪みが最適です。演奏時にStomp Boostをあわ
せて使用すれば、
まるで弦と手が一体となったかのような最高のレスポンスが
得られます。
これにより、
リフやリックのプレー時、
フレット上での運指が確実に
スムーズになります。
ヒント:チャンネル3Bにはまず、6L6のペア2組を、その後でEL34を試して
みましょう。
• Deutsch
4.1 アンプ1
チャンネルB:モダンなハイゲイン・サウンドを中心とした多彩な音色
• English
さらに、
アンプ自体、
あるいは付属のTSM-432 MIDI-Boardを使用してチャ
ンネルを選択できます。TSM-432により、Stomp Boxモードに切り替えられ
ます。
スイッチ1から6により対応するチャンネルを呼び出すことができ、
またス
イッチ7によりStomp Boostを扱うことができます
(TSM-432のプリセット
モードでは、
さらに多くのオプションが利用できます。詳細については
「MIDI」
の章をご参照ください)。
チャンネル3Aは楽器の音を忠実に再現します。
ピッキングの強さのわずかな変
化、ギターのボリュームノブの細かな調整をも正確に捉えます。
そのためゲイン
をどれだけ上げても、ギターの原音を損なうことはありません。
ヒント:チャンネル3AにはEL34と6L6の真空管ペアを1組ずつ使用するの
が最も効果的です。
65
TriAmp Mark 3 – Manual 1.1
5.3 チャンネルセクション
Channelボタン:チャンネルを直接選択できます。
Gain、Master:Gainは入力に対する感度を調節し、
プリアンプのサチュレーシ
ョンの具合を決定します。Stomp Boostとあわせて利用すれば、
サウンドづく
りの中心的な存在になります。各Masterは、
それぞれ対象のチャンネルのレベ
ルを調節します。
Bass、Mid、Treble:3バンドイコライザーは、各チャンネルに合わせて最適に
調整されています。各音域のレベルを調整し、対象のチャンネルのサウンドづく
りを行えます。
注意:これはクラシックなパッシブイコライザーです。
そのため、各音域を調整す
ると他の音域が影響を受けます。例えば「Mid」
を上げると、
「Mid」
をカットした
場合と比べて
「Bass」が弱まります。
5.4 Masterセクション
5.5 パワーアンプ真空管
この地味な3つのスイッチが、TriAmp Mark 3のサウンドの秘訣です。
これに
より、真空管サウンドの新時代を切り開きます。
チャンネルと任意のペアを選択
するだけで、3組のパワーアンプ真空管ペアそれぞれに6つのチャンネルを任意
で割り当てることができます。
また、
パワーアンプ真空管の3組のペアは、
それぞ
れEL34あるいは6L6真空管に接続することができます。異なる音響特性を持
つ真空管TriAmp Mark 3の3つのチャンネルそれぞれに簡単にミックスする
ことができます。
さらにMIDIプリセットを使用すれば、
フットスイッチを操作す
るだけで同一のチャンネルに異なるパワーアンプ真空管を使用できるようにな
ります
(MIDIプリセットの詳細については
「MIDI」の章をご参照ください)。
またTriAmp Mark 3では、今まで作ることが不可能だったサウンドを実験す
ることもできます。例えばある曲の落ち着いたイントロには6L6ペア1組を50
ワットで使用し、
リフに入るとブーストの代わりに2組目の6L6ペア、
さらにソ
ロが始まるとEL34真空管でパンチの効いたサウンドを演出することができま
す
(これで最大150ワットになります)。最後列の観客にも届くサウンドが得ら
れます!
さらにMIDIを介して、同一のチャンネルをEL34のブリッティシュサウンドから
6L6の典型的なアメリカンサウンドへと変化させることもできます。
あるいは、
真空管、
アンプ、
チャンネルを一切変更することなく、中国製のEL34からスロバ
キア製のものに切り替えることも可能です。TriAmp Mark 3の特筆すべき点
は、
これが6チャンネルを持つ初めての真空管アンプだということです!
ヒント:他のタイプのパワーアンプ真空管をTriAmp Mark 3に使用するこ
とも可能です。次のタイプについてはHughes & Kettnerがテスト済みで
す。KT77、KT66、KT88、5881 WXT、6550 A、6CA7、7581
5.6 FX Loop
Volume:マスターボリューム・ノブは、TriAmp Mark 3全体のボリュームを調
節します。
このツマミにより、親指と人差し指だけで150ワットの真空管を自在
に制御できます。
ただし、節度を持って調節しなければ、
バンド仲間を困惑させ
る原因になります。
ツマミを回すと盛り上がってくるのは確かですが、控えめに
しましょう。
ボリュームを上げ過ぎると、
あなた
(そしてあなたのバンド仲間)が
聴覚にダメージを受けることになります。
Presence:生成される倍音のレベルを調節します。
このツマミを上げれば、
サ
ウンドの
「プレゼンス
(存在感)」が増します。必要に応じて、
より表現力豊かな、
あるいはアグレッシブなサウンドを得られるようにも調節できます。
Resonance:ツマミを中央にセットすれば、TriAmp Mark 3とスピーカーボッ
クスとの間でナチュラルな共鳴効果を得られます。
ツマミを左に回せばボック
スの共鳴効果が抑えられ、丸みを帯びたソフトなサウンドになります。右に回す
と効果が高まり、低域がブーストされた重いサウンドになります。
ツマミを完全
に回せば、凄みのあるサブベース音域を得られます。
メモ:PresenceとResonanceのツマミはMasterのトーンを変化させるため、
個々のチャンネル用のコントロールノブを変更することなく、各スピーカーや空
間内のサウンドを調節できます。
66
「SmartLoop™」
エフェクトループ技術により、外付けのエフェクト機器のパ
ラレルループおよびシリアルループが可能になります。
オン/オフやパラレル/シ
リアルといったステータス情報は各チャンネルおよびMIDIプリセットに保存さ
れます。
FX Loop:エフェクトループのオン/オフを切り替えます。
エフェクトループにつ
いての詳細は
「リアパネル」の章をご参照ください。
5.7 Noise Gate
IDB™(Intelligent Dual Breakpoint)
ノイズゲートは、
シグナルチェーンの最
も重要な2点、入力およびプリアンプの出力のレベルを即座に極めて精確に計
算します。
この2つの値を用い、IDB™技術により最適なレスポンスを計算し、
ア
タックやスレッショルドといったパラメータを自動的に制御します。
また、Noise GateスイッチでIDB™(あるいはノイズの)
オン・オフを切り替える
ことができます。Noise Gateを有効化すると、
ある一定のスレッショルドに満
たないレベルの信号がカットされるようにプリアンプがミュートされます。
これ
で耳障りなノイズを払拭できます!弦に対する次のアタックがあるまでNoise
Gateが持続します。
そして一切の遅延無しで再び有効になります。Noise
Gateの詳細については次の章で取り扱います。
TriAmp Mark 3 – Manual 1.1
16 Ohms
1x 8 Ohms
or 2x 16 Ohms
RED BOX™ AE
Ambience emulated DI Out
4 Ohms
*HIPUL[
4VKL
3V^
*\[
TSC™
0UZLY[N\P[HYWPJR[VYLHK
V\[[\ILTH[JOPUN
SPEAKERS
MIDI
ILZ[)PHZ
V]LYJ\YYLU[
UVJ\YYLU[
NOISE GATE
Hard
In
FX LOOP
Soft
Out/Thru
MASTER INSERT
FX Level
Send
Z^P[JOLKVMM
Dark
FX Serial
Return
Preamp Out
*(<;065!9LHYWHULSHUK
]LU[PSH[PVUVWLUPUNZTH`
ILJVTL[VVOV[[V[V\JO
3LH]LLUV\NOZWHJLMVY
WYVWLY]LU[PSH[PVU
;VYLK\JL[OLYPZRVMLSLJ[YPJZOVJRNYV\UKPUNVM
[OLJLU[LYWPUVM[OPZWS\NT\Z[ILTHPU[HPULK
9LWSHJPUNM\ZLZT\Z[VUS`ILJHYYPLKV\[I`
X\HSPMPLKZLY]PJLWLYZVUULS9LWSHJLM\ZLZVUS`
^P[O[`WLHUKYH[PUNZOV^UOLYL
Bright
4HPUZ=VS[HNL
Power Amp In
=e
¶K)
=e
7V^LY(TW;\ILZ
5L]LY\ZL[OPZHTW^P[OV\[ZWLHRLYZJVUULJ[LK
<ZLJSHZZ^PYPUN
*(<;065!9PZRVMLSLJ[YPJ
ZOVJR+VUV[VWLU9LMLY
ZLY]PJPUN[VX\HSPMPLK
ZLY]PJLWLYZVUULS
PANEL
(,:
VUVMM
TSM-432
Serial No.
;90(474HYR
4HPUZ-\ZL!=;(3/a
4H_7V^LY*VUZ\TW[PVU>
,<]LYZPVUVUS`
ピーカーの音響効果を再現でき、
アンプとスピーカー出力間の信号がタップさ
れ、
ピュアな真空管サウンドを得られます。
また、Red Box AEはラインシグナ
ルを利用します。
ラインシグナルのレベルはパワーアンプのレベルに左右されま
す。言い換えれば、
マスターボリュームによりこのDI出力のレベルを制御するこ
とが可能ということです。
6 リアパネル
6.1 スピーカー
16 Ohms
1x 8 Ohms
or 2x 16 Ohms
4 Ohms
5L]LY\ZL[OPZHTW^P[OV\[ZWLHRLYZJVUULJ[LK
<ZLJSHZZ^PYPUN
TriAmp Mark 3は、標準的なインピーダンスのほとんどに対応できる複数の
出力端子を装備しています。出力端子は、4Ωのスピーカー1台、8Ωのスピーカ
ー1台、16Ωのスピーカー1台もしくは2台のうちから選択することができます。
ヒント:Red Box AEの信号をミキサーに送るためにはマイクケーブルを使
用します。
ミキサーのXLR入力をラインに設定するようにしてください。
ミキ
サーにXLR入力がない、あるいは入力をラインに設定できない場合は、XLR
変換アダプターあるいは適切なケーブルを容易する必要があります。
これらは
大型店で簡単に手に入ります。
6.3 TSC
アンプは必ずスピーカーに接続した状態で使用してください。
直列接続:R = R1 + R2
4Ωおよび8Ωのスピーカーを直列で接続する場合、合成インピーダンスは
12Ωになります。
メモ:鉄則:スピーカーの合成インピーダンスがアンプの出力インピーダンス
を下回ってはいけません。適切な接続例:スピーカーを並列接続し合成イン
ピーダンスが5.33Ωとなった場合は4Ω出力端子に接続する。
スピーカーを
直列接続し合成インピーダンスが12Ωとなった場合は8Ωの出力端子に接
続する。
MIDI In:TriAmp Mark 3のMIDI入力は7ピン用です。
ただし、標準的な5ピン
ケーブルを使用して市販のMIDIコントローラーを接続することもできます。残
りのピンは、付属しているHughes & KettnerのTSM-432 MIDI-Board用
にファンタム電源を供給するためのものです。
注意:TSM-432は7ピンケーブルを使用します。
もしもケーブルが破損し、
すぐに代替品が必要な場合には、5ピンケーブルを使用することも可能で
す。
しかしその場合、電源供給が必要になります。そのためTSM-432は、9
∼15 VのACまたはDC電源と接続可能な画期的な電源ジャックを装備し
ています。
6.2 Red Box AE
TriAmp Mark 3は、
アンビエンス・エミュレーシ
RED BOX™ AE
ョン
(AE)機能付きの新しいRed Boxを搭載し
Ambience emulated DI Out
た、Hughes & Kettner初めての製品です。
マイクなし
でギターアンプの音を録音することに関しては、80年代
後半に初代のRed Boxが業界のスタンダードになりま
した。
ライブであろうとスタジオであろうと、Red Boxは
安定した品質でサウンドを変換します。他の楽器との干渉の問題や、
マイク位置
の調整といった時間のかかる作業はもはや必要ありません。
*HIPUL[
4VKL
3V^
*\[
Red Box AEは、
スピーカーエミュレーション機能付きDIボックスとして受
賞歴のあるモデルの最新バージョンであり、
スイッチで切り替え可能なローカ
ットフィルター、異なる音響特性を持つ第2スピーカーモードを搭載していま
す。DSP制御によるアンビエンス・エミュレーションでリアルな4x12ボックスス
MIDI Out/Thru:この端子は、MIDI In端子に割り当てられた信号を転送する
のに利用します。TriAmp Mark 3と同期させるMIDI対応機器をこちらに接続
できます。
ヒント:TriAmp Mark 3のMIDI機能については、1章を丸ごと割いて解
説しています。詳細については「MIDIプリセットとMIDIセットアップ」の章を
ご参照ください。
• Español
• Italiano
現在では並列接続が主流ですが、直列出力のスピーカーを使用する場合、
スピ
ーカーを直列に接続する場合には、合成インピーダンスは各スピーカーのイン
ピーダンスを足し合わせたものとなります。
MIDIは、複数のサウンド・プログラムを切り替えるのに役立ちます。
ボタンを
押すだけで、
アンプのチャンネルと、外付けのエフェクト機器のプログラムを同
時に切り替えることが可能です。ペダルボードの上でタップダンスを踊る必要
はもはやありません。
そのため、TriAmp Mark 3で何らかの切り替え操作を
行うためのスタンダードプロトコルとしてMIDIを採用し、付属のMIDI-Board
TSM-432用インターフェースが利用できるようになっています。MIDI-Board
の詳細については
「TSM-432」の章をご覧ください。
• Français
Out/Thru
• にほんご
MIDI
In
TSM-432
R = (8 x 16) / (8 + 16) Ω
R = 128 / 24 Ω
R = 5.33 Ω
• 中文
6.4 MIDI InとOut/Thru
• Deutsch
並列接続:R = (R1 x R2) / (R1 + R2)
8Ωおよび16Ωのスピーカーの場合:
ヒント:本マニュアルでは、1章丸ごと割いてTube Safety Controlについて説
明しています。詳細については
「TSC」の章をご参照ください。
• English
• 8Ωのスピーカー2台を並列接続で使用する場合は、4Ωの出力端子に接続し
てください。決して、同一の出力端子に異なるインピーダンスのスピーカーを同
時に接続して使用しないでください。
• 異なるインピーダンスの複数のスピーカーを同時に使用する場合は、
スピー
カーを並列または直列につなぎ、適切な出力端子に接続してください。以下の
公式で、異なるインピーダンス
(R1、R2)の2台のスピーカーを接続した場合の
合成インピーダンス
(R)
を計算することができます。
67
TriAmp Mark 3 – Manual 1.1
6.5 Noise Gate Hard/Soft
NOISE GATE
Hard
6.7 Master Insert
MASTER INSERT
Soft
Preamp Out
リアパネルにあるこのツマミにより、Noise Gateのレスポンスを変化させるこ
とができます。右に回すほどNoise Gateの感度が下がります。左に回すほど
Noise Gateがハードになり、微弱な信号や不要なノイズがカットされるよう
になります。
メモ:Noise Gateのツマミを中央に合わせるのが最も汎用性のある設定
です。ハイゲイン時にスタッカートの効いた素早いリフを効果的に演出するに
は、
ツマミを大きく左に回します。
Power Amp In
演奏者がボリュームペダルを使用して全体のボリュームを調節できるよ
う、TriAmp Mark 3はシリアルループをもう一つ搭載しています。
プリアンプ
信号はPreamp Outでタップされ、
パワーアンプの入力へと戻ります。Preamp
Outを介してプリアンプ信号を他のアンプに送信したり、
チューナーを接続し
たりできます。ジャックに何らかの機器を接続した際に信号が損なわれること
がないよう、Preamp Outは常に有効になっています。
ヒント:Power Amp Inはスイッチ機能のあるジャックです。
このジャック
に何かを接続すると、内部の信号回路が遮断されPower Amp Inからの信
号のみがパワーアンプに送信されるようになります。
6.6 FX Loop
6.8 Panel
FX LOOP
FX Level
Send
Return
FX Serial
¶K)
PANEL
Dark
Bright
TriAmp Mark 3のフロントパネルにある照明の明るさを調節
できます。
これは、MIDIの制御コマンドを用いてリアルタイムで
遠隔制御することもできます。
FX Send:エフェクト機器の入力と接続する端子。
FX Return:エフェクト機器の出力と接続する端子。
-10 dB:この減衰用のスイッチで、信号レベルをローレベルのエフェクト機器
に合わせることができます。通常ギターとアンプの間に接続されているフロント
エンドのエフェクター(ディストーションなど)
に対してこれを有効にします。
Level:FX Returnの入力信号のレベルを調節します。
FX Serial:エフェクトループのシリアルモードとパラレルモードを切り替えま
す。
このスイッチが点灯している場合、
エフェクトループはシリアルモードになっ
ています。
メモ:パラレルモードの場合、FX Levelのツマミでウェットとドライのバラ
ンス
(ギターから送られる生の信号とエフェクト信号の比率)を調節できま
す。FX Returnへの各ライン信号をカットし、FX Levelのツマミによりプ
リアンプ信号をミックスすることもできます。
シリアルモードで直接FX Returnに接続されている場合、FX SendはLevel
制御によりプリアンプ信号の全体のボリュームを調節する第2のマスターボリ
ュームのように働き、
またFX Loopのオン・オフスイッチから起動することがで
きます。
7 MIDIプリセットとMIDIセットアップ
MIDIを介してTriAmp Mark 3の各スイッチを遠隔制御したり、128あるMIDI
プリセットのうちの一つに設定を保存したりできます。MIDIコントローラー、
シ
ーケンサー、対応するソフトウェアを用いて、
プログラム変更番号に対応するプ
リセットをいつでも呼び出すことができます。付属のTSM-432 MIDI-Board
により、MIDIを介してチャンネルを切り替えたり、
ブースト
(Stomp Boxモー
ド)
したり、128あるMIDIプリセットのうちの一つを呼び出したりできます。
ま
たそれらプリセットは、32個のバンクに4つずつ保存されています
(プリセッ
トモード)。
また、初期状態でアンプおよびTSM-432 MIDI-BoardにMIDIチ
ャンネル1がすでに設定されているため、
すぐに使用できる状態になっていま
す。MIDIチャンネルの切り替え方についてはこの章の後半でご説明します。
ヒント:付属のTSM-432 MIDI-Boardの機能については、1章を丸ごと
割いて解説しています。詳細については「TSM-432」の章をご参照ください。
7.1 MIDIプリセットの作成と呼び出し
チャンネル設定とMIDIプリセットの違いとは何でしょうか?
TriAmp Mark 3に自動的に保存されるチャンネル設定が6つあります。
アンプ
自体でチャンネルを指定するか、Stomp Boxモードの場合はTSM-432を使
用してそれらにアクセスできます。
しかし、
チャンネルやパワーアンプ真空管の
設定内容、Noise Gate、Boost、FX Loopのオン・オフの状態を最大128個の
MIDIプリセットに保存しておくこともできます。
MIDIプリセットのメリットとは?
サウンドを切り替えるときは、
チャンネルとあわせてBoost、Noise Gate、
さら
に外付けのMIDIエフェクト機器のプログラムも同時に切り替えたい場合がよ
くあるでしょう。MIDIプリセットを使用すれば、例えばコーラスとリバーブがか
かったクリーントーンから、
ディレイ、Boost、Noise Gateを利用するリードサ
ウンドへと切り替えることができます。
またTriAmp Mark 3が特徴的なのは、3組のパワーアンプ真空管をMIDIを介
して即座に切り替えられる点です。例えば、EL34ペア1組を使用して60年代イ
ギリスのクラシックなポップサウンドで演奏している際に、単純に6L6ペアに切
り替えることできらびやかなアメリカンサウンドを得たいことがあるかもしれま
せん。
あるいは6L6ペアを使用してハイゲインのモダンなアメリカンサウンドで
演奏している際に、EL34ペアに切り替えて中音域の効いたアグレッシブなサウ
ンドを得たい場合にも利用できます。
68
TriAmp Mark 3 – Manual 1.1
チャンネルおよびOmniモードを変更する際は、以下のようにしてMIDIセッ
トアップにアクセスしてください。
MIDIセットアップを呼び出す前にStandbyスイッチをPlayから
Standbyに切り替えます。
どのように機能しますか?
TriAmp Mark 3のプログラミングは直感的な操作で行えます。
チャンネ
ル、Boostのオン・オフ、Noise Gateのオン・オフ、FX Loopのオン・オフ、
パワ
ーアンプ真空管の設定内容をプリセットに保存したい場合、
まずはアンプのス
イッチで設定を有効化し、MIDI Learnボタン
(照明付きボタン)
を軽く押してア
ンプを切り替えた後、
この設定を呼び出すのに使用するMIDI-Boardのスイッ
チを押すだけです。Learnボタンの照明が消えると、128ある内部の保存場所
に設定がプリセットとして保存され、MIDI-Boardにプログラム番号が割り当
てられたことがわかります。
7.2 MIDIチャンネル/Omniモードの選択
MIDIには16チャンネルあり、MIDIコントローラーを持つ機器を最大で16台
制御できます。特にスタジオで、
あるいはキーボーディストには便利です。
しか
し、FXセットアップを有するギターアンプでは、多くの場合チャンネルを共有
させる必要があります。
そのためには、MIDI Master(MIDI-Board)のものと
同一のMIDIチャンネルをMIDI Slave(アンプ)側でも選択する必要がありま
す。
そうでなければ、
アンプが応答しない、
あるいは正しく応答しないことにな
ります。
初期設定ではTriAmp Mark 3およびTSM-432でチャンネル1が選択されて
おり、Omniモードが有効になっています。Omniとは、16あるMIDIチャンネルす
べてのコマンドに対しアンプが応答することを意味します。多数の機器を有す
る大規模なMIDI環境下でTriAmp Mark 3を使用する場合は、Omniモードを
無効化し、適切なMIDIチャンネルを設定してください。
MIDIチャンネル
FX Loop
真空管1/2
真空管3/4
真空管5/6
1
¢
¢
¢
¢
2
¢
¢
¢
{
3
¢
¢
£
¢
4
¢
¢
£
£
5
¢
£
¢
¢
6
¢
£
¢
£
7
¢
£
£
¢
8
¢
£
£
£
9
£
¢
¢
¢
10
£
¢
¢
£
11
£
¢
£
¢
12
£
¢
£
£
13
£
£
¢
¢
14
£
£
¢
£
15
£
£
£
¢
16
£
£
£
£
• 中文
• FX Loop、
パワーアンプ真空管の合計4つのボタンは、MIDIチャンネルを以
下の通りバイナリコードとして示します。
• にほんご
• 5/6以降は、MIDIチャンネルが最初に戻ります。
• Español
メモ:多くのエフェクト機器ではMIDIマッピングを利用できます。
これによ
り、単一のエフェクトプリセットに対し複数のプログラム変更番号を割り当て
ることが可能になります。例えば、
プログラム番号1をエフェクトプリセット4
に、
プログラム番号2をエフェクトプリセット16に、そしてプログラム番号3も
エフェクトプリセット4に割り当てることできます。
• FX loopボタンで次のMIDIチャンネルに切り替えることができます。
• Italiano
ヒント:外付けのエフェクトプロセッサーを使用する場合は、それに対しても
別途プログラミングを行う必要があります。TriAmp Mark 3のLearn
機能ではアンプのみがプログラミングされるためです
(外部機器は対象外)。
すなわち、MIDI-Board(あるいはTSM-432)のプログラム変更番号1で
TriAmp Mark 3にクリーントーンを、エフェクトプロセッサーにコーラス/
リバーブを呼び出したい場合、
プログラム変更番号1を受け取ったら該当す
るエフェクトを呼び出すようエフェクト機器を「学習(Learn)」
させる必要が
あります。
この方法については、
ご利用のエフェクト機器のマニュアルをご参
照ください。
• Noise GateボタンはMIDI Omniモードのステータスを示し、
オン・オフを
切り替えられます。Noise Gateボタンが光っている場合、Omniモードが
有効になっています
(初期状態ではすべてのMIDIチャンネルがこれに該当)
。Omniモードを無効にしたい場合は、Noise Gateボタンを押します
(特定の
MIDIチャンネルに受信されます)。
• Français
参考:現在の設定内容を保存せずにプログラミングモードを終了するには、
(MIDI-Boardのスイッチの代わりに)Learnボタンをもう一度押すだけです。
Learnボタンが点滅し、以下の通り特定のプログラミング機能
が各ボタンに割り当てられたことがわかります
(ここでMIDIセッ
トアップを終了したい場合は、Learnボタンを3秒間押したまま
にします。
すると照明が消えるとともに変更内容が保存され、
ア
ンプが標準モードに戻ります)。
• Deutsch
指定されたMIDIチャンネル
(以下を参照)
に対するプログラム変更コマンドを
Mark 3 TriAmpが受け取ると、Learnボタンが短く点滅し、TriAmpの設定内
容が切り替わります。
Noise GateボタンとFX Loopボタンを同時に3秒間押したま
まにし、MIDIセットアップにアクセスします。
• English
自由な創造力を発揮しましょう!あるいはスタジオやライブでTriAmp Mark
3の遠隔制御を楽しみましょう。
さらに、
それだけではありません。MIDIクリック
トラック
(「プレイバックトラッキング」)
を使用すれば、
プリセットをすべて切り
替えることができます。例えばステージが真っ暗な場合にはアンプのフロント
パネルの照明を切り替えることだってできます。TriAmp Mark 3は、
ステージ
の照明と一体となって機能することが可能な初めての真空管アンプです。
69
TriAmp Mark 3 – Manual 1.1
7.3 初期化
初期化、
すなわち工場出荷時の状態に戻す必要が生じることはあまり多くあり
ません。
しかし、MIDIプリセットの内容を誤って削除してしまわないよう、
この
章をよくお読みください。
初期化が必要となるのは、例えばMIDIが正しく連携しなくなり、MIDIチャンネ
ルやOmniモードの設定がよくわからなくなった場合などです。初期化により
MIDIチャンネルが1に設定し直され、Omniモードが有効になります。
初期化は、LearnボタンとBoostボタンを同時に押したままアンプを起動する
ことで実行できます。
注意:この機能は緊急時にのみご使用ください。128のMIDIプリセットの内
容をはじめ、
すべての設定内容が削除されます。
0UZLY[N\P[HYWPJR[VYLHK
V\[[\ILTH[JOPUN
8 TSC™‒Tube Safety Control
TSC™
ILZ[)PHZ
V]LYJ\YYLU[
UVJ\YYLU[
Z^P[JOLKVMM
7V^LY(TW;\ILZ
TSC™は、無信号時電流を常に自動で最適化する
ことにより、安定性やパワーアンプ真空管の寿命を
改善するものです。
これによりサウンドが最適に保
たれるため、使用者はアンプの他の機能に集中す
ることができます。
また、労力のかかる作業である
バイアス電流の制御を自動で行うため、真空管を
簡単に、素早く、安全に交換できるようになります。
これは不良が発生した際に役立つだけでなく、各メ
ーカーの異なるタイプの真空管を試験する際にも
便利です。
注意:真空管を異なるタイプのもの(例:EL34からKT88へ)
と交換する際
は、TSCモジュールをリセットすることが推奨されます。
- 機器のスイッチを切った状態でStandbyスイッチをPlayに切り替えます
- 機器のスイッチを入れます
- 少なくとも3分間待ちます
この技術のメリットはこれだけではありません。
リアパネルのTSCセクションに
ある6つのLEDにより、真空管の動作状態がわかります。各LEDは該当する位
置にあるパワーアンプ真空管と関連しています。
さらに、TSC™は真空管の動
作状態に関する情報を提供するだけでなく、不良を感知し、故障の可能性があ
る真空管を停止させてアンプが故障するのを防ぎます。
また、TSC™ LEDとピ
ックを利用して、真空管の特性を読み取ることもできます
(8.2を参照)。
8.1 自動ステータス表示
空管が停止されます
(LEDの点灯により示される)。
そのため、正常に機能して
いることから、ペアの2番目の真空管(LEDの点灯により示される)
を交換する
必要はありません。
TSCはライブの際に役立ちます。従来のアンプであれば、真空管が故障した際、
そのヒューズにアクセスし、真空管とヒューズを交換してからの再開を余儀なく
されます。
しかしTSCのおかげで、TriAmp Mark 3にはこういった問題が生じ
ることはありません。
ただし、真空管ペアを停止させることでアンプの消費電力を抑えることができ
るのも確かです。
さらに、該当する真空管ペアを使用するチャンネルとMIDIプリ
セットを別の真空管ペアに割り当て直さなければなりません。
そのため、
ライブ
の終了後に直ちに故障した真空管を交換するようにしてください。
8.2 目視による特性の確認
TSC™により特性を読み取ることが可能です。
これにより、
パワーアンプ真空管
の3つのペアが適切な組み合わせになっているかどうか確認できます。
そうする
には、LEDの隣りにある専用のスロットにピックを差し込みます。
その際、
アン
プが起動していなければなりません
(Standbyは不可!)。
すべてのLEDが数回
点滅します。各LEDの点滅回数により、該当する真空管の特性や無信号時電流
に関する情報が示されます。
各真空管ペア
(1/2、3/4、5/6)のLEDの点滅回数が4回以上違ってはなりませ
ん。
これに従うことで、TSCにより最高のサウンドが保証されます。基本的に、
古い真空管ペアはマッチする真空管ペアと交換することを推奨します。技術面
では何の問題もありませんが、
サウンド面を考慮してこれを避ける可能性はあ
ります。
ただし、
マッチする真空管、
すなわち同じ特性を持つ真空管を使用する
のが単純にサウンド面でも効果的です!
注意:TSC™には、各真空管ペアのオン・オフを切り替える機能もあります。
真空管ペアを1組だけ使用することに決めた場合、TSCは4つの真空管(例:
使用しない2組の真空管ペア)がオフになったことを示します。
アンプがアク
ティブでない場合にのみ、LEDは正しい状態を示します。演奏中にLEDが点
滅することがありますが、
これはアンプや真空管の状態を示すものではありま
せん。真空管ペアのうちの片方だけを交換する場合は、新しい真空管の特性
がもう片方と一致するように注意してください。交換用の真空管は店頭でお求
めいただけます。
注意:技術的に訓練された者が真空管を交換するようにしてください。
9 TSM-432 ‒ 付属のMIDI-Board
すべてのLEDが点灯
アンプがStandbyモードになっている際は、
すべてのLEDが点灯しま
す。StandbyスイッチをPlayに切り替えると、数秒後にLEDが消灯します。LED
がまだ点灯している場合はアノードヒューズの故障が疑われるため、交換して
ください。
アンプの電源を入れる前から真空管が故障しており、TSC™が無信
号時電流を測定して故障した真空管を停止させる十分な時間がない場合に
は、TSC™を利用してもアノードヒューズが焼き切れることがあります。
すべてのLEDが消灯
パワーアンプ真空管が正常に機能しています。
一つのLEDが点灯
LEDが一つだけ点灯した場合は、該当する真空管に不足電流が生じたため停
止されたことを示します。数分経っても消灯しない場合は、真空管を交換する
必要があります。
TSM-432 MIDI-BoardはFSM-432の改良版です。Hughes & Kettnerの
SwitchBlade、CoreBlade、GrandMeisterをすでにご存じの方もおられるか
もしれません。TSM-432の使用が難しい場合、
お持ちであればFSM-432で
TriAmp Mark 3のプリセットを選択することができます。
2つあるいは4つのLEDが点灯
該当する真空管に不足電流が発生したため交換が必要であることを示すか、
あ
るいは該当する真空管ペアが停止した状態である
(例:フロントパネルにあるパ
ワーアンプ真空管スイッチがオフになっている)
ことを示します。
TSM-432はTriAmp Mark 3に特化して作られており、Stomp Boxモー
ドとPresetモードという2つのモードを利用できます。Stomp Boxモード
では、TSM-432のボタンでアンプの6つのチャンネルを選択したり、Stomp
Boostを有効化したりできます。TSM-432のPresetモードでは、128ある
MIDIプリセットを操作できます。TriAmp Mark 3を初めて使用する際は、多く
の機能があるPresetモードの前に、
まずはStomp Boxモードから使用を開始
するよう推奨します。
一つのLEDが点滅し、その隣りが点灯
LEDが点滅している場合、該当する真空管に過電流が生じたため停止されたこ
とを示します。真空管を交換する必要があります。TriAmp Mark 3のパワーア
ンプでは、真空管ペアの両方が機能して初めて最高のサウンドが得られること
から、他の真空管ペアがサウンドを損なうことがないよう、該当する2番目の真
70
TriAmp Mark 3 – Manual 1.1
ヒント:Directモードの機能も一時的なものです。一度TSM-432の電源を
落とすと、次回はスタンダードモードで開始されます。
ヒント:該当するボタンに割り当てられたLEDは、選択中のチャンネルおよび
Stomp Boostのステータスを常に示すわけではありません。
アンプ上で別
のチャンネルを選択したりBoostを有効化した場合は、TSM-432は変更
を認識しません。
入力による制御機能を割り当てる方法については以下で説明しています
(9.4
項:コントロール1と2の割り当て)。初期状態では、Noise Gateのコントロー
ル1およびFX Loopのコントロール2がオンまたはオフになっています。
9.4 コントロール1と2の割り当て
9.2 Stomp Boxモード
2つのコントロールインプットに対し、以下のようにコントロール番号を割り当
てることができます。
(1A、1B、2A、2B、3A、3B、Boost)
TSM-432の背面にあるMIDIターミナル上のスライドスイッチにより、Preset
モードとStomp Boxモードを切り替えることができます。
スライドスイッチが
Stomp Boxモードに入れられると、
ディスプレイに
「Sb」
と表示されます。
Stomp Boxモードでは、6つのボタン
(1A、1B、2A、2B、3Aおよび3B)が
TriAmp Mark 3の6つのチャンネルに割り当てられています。
また、TSM-432
の各ボタンにはラベルが付されています。1、2、3は3つのプリアンプを、AとBは
2つのチャンネルを示します。
さらに、
それとはまた別のボタンでStomp Boxモ
ードを有効化・無効化することもできます。
ヒント:該当するボタンに割り当てられたLEDは、選択中のチャンネルおよび
Stomp Boostのステータスを常に示すわけではありません。
アンプ上で別
のチャンネルを選択したりBoostを有効化した場合は、TSM-432は変更
を認識しません。
メモ:FXボタンとBボタンを押したままにすることで、Presetモードから
Stomp Boxモードへ素早く切り替えることができます。Presetモードに
戻るには、同じ操作を繰り返します。
また、
この機能は一時的なものです。一度
TSM-432の電源を落とすと、次回はスライドスイッチで選択中のモードで
開始されます。
コントロール1:ディスプレイ上にMIDIコントロール番号が表示され、1の位の
右横にあるドットが点滅するまでFXボタンおよびDボタンを押したままにし、
編集モードを起動させます。UpボタンとDownボタンを使用してMIDIコントロ
ール番号を選択できるようになります。Dボタンを押し、保存先の番号を選択し
ます。小数点が点滅しなくなり、TSM-432が通常の状態に戻ります。
コントロール2:ディスプレイ上にMIDIコントロール番号が表示され、10の位
の右横にあるドットが点滅するまでFXボタンおよびCボタンを押したままにし
ます。UpボタンとDownボタンを使用してコントロール番号を選択できるよう
になります。Cボタンを押して、選択内容を保存し編集モードを終了させます。
• 中文
コントローラー入力1および2:この端子にフットスイッチやエフェクトペダルを
接続し、TriAmp Mark 3の各機能を制御することができます。
フットスイッチ
によりアンプのすべてのボタンを制御したり、
フロントパネルの照明のオン・オ
フを切り替えたりできます。
エフェクトペダルを使用し、照明の明るさを絞るこ
とも可能です。
これを子供だましの機能と感じる方もおられるかもしれません
が、私たちはTriAmpユーザーからご要望をいただき、次のように考えました。
「
やってみよう」
Directモードを無効にするには、同じ操作を繰り返します。
• にほんご
電源(パワーサプライ)
:標準的な5ピンケーブルを使用する場合は、電源が必要
になります。高いインピーダンスを実現するため、TSM-432は、電圧が9∼15
V、電流が最低で250 mA用のACまたはDC電源と接続可能な画期的な電源
ジャックを装備しています。
• Español
MIDI In:TSM-432をTriAmp Mark 3と共に使用する場合、MIDI Inジャッ
クは必ずしも必要ではありません。
これはTSM-432に他のMIDIデバイスを接
続するのに使用できます。
これにより、TSM-432はMIDIメッセージをMIDI In
からMIDI Outへと受け渡すMIDIマージャーとして機能します。
Directモード:Directモードでは、Bank Up/Downボタンのみで新しいプリセ
ットへ切り替えることが可能です。Directモードでは、TSM-432はユーザーか
らの入力情報(例:A、B、CあるいはDボタンを押すこと)
を待たず、
その代わり
に、例えばBank 16のプリセットBからBank 17(Upを押した場合)
あるいは
Bank 15(Downを押した場合)のプリセットBへ直接切り替わります。
次のようにしてDirectモードを有効化できます。
• FXボタンを押したままPreset Aを押します。
• まずはPreset Aを、次にFXボタンを放します。
ディスプレイ上の小数点が光
ります。
• Italiano
MIDI Out:これは付属の7ピンケーブルを使用し、TriAmp Mark 3のMIDI In
ジャックと接続します。標準的な5ピンケーブルの使用にあたっては、後にある
「
電源」の項目をお読みください。
Bank Up/Down:TSM-432のディスプレイには、現在選択中のバンクの番号
が表示されます。他のバンクにあるプリセットを呼び出すには、
まずUpボタンと
Downボタンを使用して対象のバンクを選択します。
これと同時進行で、現在選
択中のプリセットで演奏を続けることが可能です。TSM-432のディスプレイ上
のバンク番号が点滅している間は、新しいバンクが有効になりません。A、B、C
あるいはDボタンを押してプリセットを指定して初めて、
これが有効になります。
しかし、Directモードでは動作が異なります。
• Français
TriAmp Mark 3の7ピン仕様のMIDI Inジャックを介してファンタム電源が供
給されるため、TSM-432は独立した電源を必要としません。TSM-432を正し
く接続すると、TriAmp Mark 3の電源を入れた際に次のような順序で起動の
ための準備が行われます。
ディスプレイにバージョン番号が表示され、LEDが
左から右に向かって順番に点滅していきます。次に、TSM-432がPresetモー
ドの場合は
「1」、Stomp Boxモードの場合は
「Sb」がディスプレイに表示され
ます。
どちらの場合も、
ボタンAの下にあるLEDが点灯します。
PresetボタンA、B、CおよびD:現在選択中のバンクにある4つのプリセットの
うち一つを有効化できます。A、B、CおよびDの各ボタンに割り当てられたLED
は、
アクティブなプリセットを示します。
• Deutsch
9.1 接続
(A、B、C、D、Bank Up/Down、FX Loop)
Presetモードでは、TriAmp Mark 3の128あるMIDIプリセットを操作でき
ます。さらに、
それとはまた別のボタンでFXモードを有効化・無効化すること
もできます。詳細については
「MIDIプリセットとMIDIセットアップ」の章をご参
照ください。
• English
9.3 Presetモード
71
TriAmp Mark 3 – Manual 1.1
以下の機能を割り当てることができます。
11 技術仕様
名称
MIDIコ
ントロー
ル番号
範囲
ヒント
Mute
9
0∼63 = オフ、64∼127 = オン
この機能はMIDIを
出力
150ワットまで
最大出力
460ワット
突入電流
100 V:27 A 、120 V:26 A 、220
∼240V:23 A
供給電圧の許容差
+/-10
シリアル
動作温度範囲
0 ∼+35 C
0∼63 = オフ、64∼127 = オン
メインヒューズ、100 V
250 V / T 5 A
メインヒューズ、120 V
250 V / T 5 A
メインヒューズ、220∼230 V
250 V / T 2 A
介してのみ利用で
きます。
FX Loop
55
0∼63 = オフ、64∼127 = オン
FX Serial
54
0∼63 = パラレル、64∼127 =
Stomp
64
Boost
Noise
63
0∼63 = オフ、64∼127 = オン
31
0∼12 = チャンネル1(アンプ1A)
Gate
チャンネル
基本仕様
他のコントローラ
メインヒューズ、240 V
250 V / T 2 A
T 800 mA
TT 15 A (Schurter 7040.3210)
13∼37 = チャンネル2(アンプ
ーでMIDIメッセー
アノードヒューズ
1B)
ジを利用しチャンネ
Tube heater fuse
38∼63 = チャンネル3(アンプ
ルの選択情報を判
2A)
断しやすくするため
64∼87 = チャンネル4(アンプ
に、以下のように覚
3A)
えやすい数値を使
88∼112 = チャンネル5(アン
用することをお勧め
プ3A)
します。
113∼127 = チャンネル6(アン
チャンネル1 = 10
プ3B)
チャンネル2 = 30
チャンネル3 = 50
真空管
No.
型番
タイプ
生産国
機能
1
9440008
7025/E83CC
スロバキア
入力用真空管(すべて
(ECC83)、
ハイグ
2
9440001
12AX7A-C、
セ
中国
レクト
チャンネル4 = 80
チャンネル5 = 100
のチャンネルで有効)
レード
3
9440007
ECC83、
セレクト
スロバキア
チャンネル6 = 120
真空管1/2
58
0∼63 = オフ、64∼127 = オン
だけの場合は、
それ
4
9440007
ECC83、
セレクト
スロバキア
チャンネル2A-2B-
5
9440007
ECC83、
セレクト
スロバキア
チャンネル2A-2B(プ
6
9440007
ECC83、
セレクト
スロバキア
3A-3B(プリアンプ)
リアンプ出力)
を切ることはでき
ません。
真空管3/4
59
0∼63 = オフ、64∼127 = オン
真空管5/6
60
0∼63 = オフ、64∼127 = オン
フロントパ
88
0∼127、0 = 暗(オフ), 127 = 明
ネルの照明
の明るさ
チャンネル3A(プリア
ンプ出力)
7
9440007
ECC83、
セレクト
スロバキア
チャンネル3B(プリ
アンプ)
一般的なフットスイ
ッチで照明のオン
(
8
9440007
ECC83、
セレクト
スロバキア
9
9440007
ECC83、
セレクト
スロバキア
で有効)
れば明るさの加減を
10
6000122
EL34B-STR、
セ
中国
パワーアンプ真空
中国
パワーアンプ真空
中国
パワーアンプ真空
レクト
スイッチとペダル ‒ 違いは何でしょうか?
スイッチには、
オフ
(0)
とオン
(127)
という2つの状態しかありません。
そのた
め、明るさは最大値と最小値の2つから選択することになります。
その一方、ペ
ダルの場合は0から127までのいずれかの値を入力することができます。
これ
は、ペダルではオン・オフの切り替えができないということではありません。
ペダ
ルを中間位置より下げれば割り当てられた機能をオフにし、逆に上げればオン
にすることもできます。
10 AES(EU仕様のみ)
規制番号1275/2008/EGでは、電気・電子デバイスに省エネシステムを導
入し、一定の休止時間の後で電源が切れるようにすることが求められていま
す。TriAmp Mark 3では、Speaker端子の隣りにある小さなスイッチでオン・
オフを制御するAESによりこれが可能になっています。初期状態でAESは有効
化されており、小さなスイッチは左側の位置にあります。
この状態では、
およそ
90分間休止状態が続いた場合に自動的にアンプの電源がオフになります。
ア
ンプに入力信号(例:楽器からのショートトーン)があるとこの休止状態が解除
され、再び起動します。
レベルの低い入力信号があった場合でも、再びこの90
分が一からカウントされます。AESによりアンプがオフになった場合、Power/
OnあるいはStandbyボタンでオン・オフを切り替えることにより再始動させる
ことができます。
パワーアンプドライバー
(すべてのチャンネル
ットペダルを利用す
調節できます。
FXバッファー(すべて
のチャンネルで有効)
明るさ最大)
とオフ
を切り替えられ、
フ
72
チャンネル1A-1B(プ
リアンプ出力)
有効になっている
真空管ペアが1組
チャンネル1B(プリ
アンプ)
11
6000122
12
6000120
EL34B-STR、
セ
管1/2
レクト
6L6GC-STR、
セ
管1/2
レクト
13
6000120
6L6GC-STR、
セ
管3/4
中国
パワーアンプ真空
中国
パワーアンプ真空
中国
パワーアンプ真空
レクト
14
6000120
15
6000120
6L6GC-STR、
セ
管3/4
レクト
6L6GC-STR、
セ
レクト
管5/6
管5/6
TriAmp Mark 3 – Manual 1.1
出力
Red Box DI Out
インピーダンス
2 キロΩ
出力レベル
0 dBV(バランス)
最大出力レベル
+12 dBV
FX Sendジャック
パワーアンプ真空管* / 出力
8Ω /
THD=10%
8Ω /
THD=5%
2x EL34
84ワット
34ワット
2x 6L6
72ワット
30ワット
4x 6L6
126ワット
93ワット
2x 6L6 + 2x EL34
132ワット
95ワット
4x 6L6 + 2x EL34(推奨)
145ワット
116ワット
XLR、
バランス
(ボリューム最大、
イコライ
ザーは中央位置)
6.3 mmジャック
(1/4インチ)、
アンバラ
ンス
-10 DBスイッチ・
オフ
-10 DBスイッチ・
オン
インピーダンス
2.2 キロΩ
680Ω
最大レベル/ 1kHz
-2 dBV
+8 dBV
Power Amp Outジャ
ック
6.3 mmジャック
(1/4インチ)、
アンバ
ランス
最大レベル/ 1 kHz
+20 dBV
インピーダンス
1 メガΩ
最大入力/ 1 kHz(アンプ
1A)
0 dBV
入力感度/ 1 kHz(イコライ
Boostオフ
ザーは中央位置、最大レベル)
Boostオン
アンプ1A:
-33 dBV
アンプ1A:
-37 dBV
アンプ1B:
-49 dBV
アンプ1B:
-49 dBV
アンプ2A:
-56 dBV
アンプ2A:
-56 dBV
アンプ2B:
-74 dBV
アンプ2B:
-74 dBV
アンプ3A:
-76 dBV
アンプ3A:
-76 dBV
アンプ3B:
-78 dBV
アンプ3B:
-89 dBV
FX Returnジャック
6.3 mmジャック
(1/4インチ)、
アンバラ
ンス
インピーダンス
22 キロΩ
最大レベル/ 1 kHz
+14 dBV
感度/ 1 kHz(Masterは中
央位置、FXレベル最大)
-10 DBスイッチ・
オフ
-10 DBスイッチ・
オン
0 dBV
-10 dBV
Power Amp Inジャック
6.3 mmジャック
(1/4インチ)、
アンバラ
ンス
インピーダンス
350 キロΩ
感度/ 1 kHz(チャンネル
による)
+6∼+10 dBV
機械仕様
寸法(幅x高さx奥行き)
740 x 393 x 254 mm
重量
22 kg / 48.5ポンド
• にほんご
5ピン
• Español
MIDI Out/Thru
• Italiano
6.3 mmジャック
(1/4インチ)、
アンバ
ランス
• Français
入力ジャック
• Deutsch
7ピン
(5ピン互換)、20 V DCファンタム
電源(150 mA)
• English
MIDI In
入力
• 中文
MIDI
*出荷時
73
重要安全说明!连接之前请认真阅读!
本产品由制造商按照 IEC 60065 规格生产,出厂时
设置安全。为维持安全状况,确保无风险操作,用
户必须遵守操作说明中的建议和警告注释。如果该
产品用于车辆、船只或飞机或高于海平面 2000 米
的高空,请注意遵守相关安全规章,这些规章可能
比 IEC 60065 更加严格。
警告︰为预防火灾和电击危险,请勿将此器械暴露
在潮湿的空气或雨中。请勿打开机箱,机箱内不含
用户可用部件。如有需要,请向合资格服务人员
求助。
出现该符号,意在警告您封装内部存在非绝
缘危险电压-即足以构成电击危险的电压。
出现该符号,意在警告您存在外部可触及的
危险电压。与任何标有此符号的终端相连的外部接
线,必须是符合制造商建议的“预制电缆”,或必
须是仅由指示人员安装的接线。
出现该符号,意在提示您随附手册中含有重
要的操作和维护说明。请阅读手册。
出现该符号,表示:请当心!表面灼热!为
防止灼伤,请勿触摸。
・
・
・
・
阅读这些说明。
保存好这些说明。
遵守所有标在产品上及本手册的警告和说明。
请勿在靠近水的地方使用该产品。请勿将该产品
置于水、浴缸、洗涤盆、厨房水槽、潮湿区域、
泳池或潮湿的房间附近。
・ 请勿在该产品上放置含有液体的物体,如花瓶、
玻璃杯、瓶子等。
・ 仅用干布清洁。
・ 请勿卸除任何封盖或外壳的任何部分。
・ 产品设定的操作电压必须匹配当地电网的供电电
压。如果您不确定所用电源类型,请咨询经销商
或当地电力公司。
・ 为降低电击危险,必须对该产品接地装置进行维
护。请仅使用本产品提供的电源线,并随时维护
电源接线的中心(接地)引脚功能。切勿损坏极
化或接地类型插头的安全作用。
・ 请避免踩踏或挤压电源线,特别是插头、电源插
座和电源线从设备拔出的地方!请谨记小心处理
电源线。定期检查电源线是否有切口或被压迹
象,特别是插头处和电源线从设备拔出的地方。
・ 切勿使用损坏的电源线。
・ 在雷雨期间或长时间不用时,请拔出该产品电
源插头。
・ 只有拔出该设备或壁插座上的电源插头后,该
产品方能完全从电源处断开。该产品必须总是
以断开电源的方式放置,将其从电源处断开只是
举手之劳。
・ 保险丝︰以 IEC127 (5x20mm) 类型额定保险丝
替换,以获得最佳性能!禁止使用经修补的保险
丝或让保险丝盒断路。更换任何类型的保险丝均
必须由合资格的服务人员执行。
・ 请让合资格服务人员处理所有的维修。无论设备
出现何种形式的损坏,均需要维修,如:
- 电源线或插头损坏或磨损。
- 液体洒到或物体掉入该产品。
- 该产品暴露在雨中或潮湿的环境中。
- 遵守了操作说明,产品仍运转异常。
- 产品功能下降或机箱损坏。
・ 产品请勿连接阻抗若低于对本产品或在该手册中
给出额定阻抗的外部扬声器。请按照当地安全规
章,仅使用横截面足够大的电缆。
・ 避免阳光直射。
・ 请勿在热源附近安置本产品,如散热器、热风调
节器、火炉或其他产生热量的装置。
・ 请勿堵住任何通风口。请按照制造商说明进行安
装。除非提供合适的通风设备,否则该产品不可
置于机架等内置装置中。
・ 搬动至某房间时,请总是加热冷设备的温度至室
温。如果未进行加热,产品内部可能发生冷凝,
从而造成损坏。
・ 请勿将明火源放在产品上,如燃烧的蜡烛。
・ 此设备必须放置在离墙面至少20cm/8"的地方,
后面保持通风。设备上方至少保持50cm/20"的
通风距离,并且不允许放置其他物品。。
・ 只能使用由制造商指定或随产品一起出售的推
车、架子、三脚架、支架或桌子。使用推车时,
请在移动推车/产品组合时小心,避免倾翻而受
到伤害。
・ 仅使用制造商推荐的配件,所有类型的配件均是
如此,例如防护罩、运输包、架子、壁装或天花
板安装设备。在附加任何配件至该产品时,请总
是遵照制造商提供的使用说明。请勿使用制造商
未指定的安装点。
・ 该器械不适合任何体格、知觉或心智受限的人员
(包括儿童)使用,也不适合经验不足和/或知
识不足的人员操作。必须始终避免 4 岁以下儿童
接触该器械。
・ 请勿将任何物体推入机箱插槽,它们可能触碰到
危险电压点或短路部件,造成火灾或电击风险。
・ 该产品可传递超过 90 分贝的声压值,这可能造
成永久的听力损伤!极高噪音可能会造成永久的
听力损失。长期置身于如此高水平噪音的环境中
时,请戴上听力防护。
・ 制造商仅在以下情况下保证该产品的安全、可
靠和有效:
- 装配、重新调整、修改或修理由制造商或授权人
员执行。
- 相关区域的电力装置符合 IEC (ANSI) 规格的要
求。
- 按照操作说明使用该设备。
调试之前
・请在调试之前仔细通读本手册,包括安
全说明。
・对于因操作不当造成本设备或其他设备
的损坏,制造商方面不承担任何责任。
・在与电网连接之前,必须确保已关断电
源开关和待机开关,并且设备背面所规
定的电压值需与本地常用电源电压一
致。
・绝对不要在未连接音箱的情况下运行放
大器!这时请注意音箱的阻抗,并始终
连接有适当阻抗的扬声器输出端。
・在您运行放大器之前还有最后一项警告
提示:设备声音很大,并且较高的音量
会造成听力受损。为了避免音量过高和
受到意外惊吓,您应养成在接通放大器
之前完全调低主音量调节器的习惯!
制造商:Stamer Musikanlagen GmbH,
Magdeburger Str.8, 66606 St. Wendel, Germany
仅适用于海拔2000m 以下地区安全使
用。
仅适用于非热带气候条件下安全使用。
产品中有毒有害物质或元素的名称及含量
部件名称
有毒有害物质或元素
铅
(Pb)
汞
(Hg)
镉
(Cd)
六价铬
(Cr(VI))
多溴联苯
(PBB)
多溴二苯醚
(PBDE)
电路板组件
X
机壳装配件
X
○
X
○
○
○
○
○
○
○
附件
○
○
○
○
○
○
○
○: 表示该有毒有害物质在该部件所有均质材料中的含量均在 SJ/T 11363-2006 标准规定的限量要
求以下。
X: 表示该有毒有害物质至少在该部件的某一均质材料中的含量超出 SJ/T 11363-2006 标准规定的
限量要求。
Version 2.3 08/2013
我们最初便已经明确,TriAmp MK II 的研发将是一项挑战。我
们必须完成的是一种全新的设备,它重新将声音、性能和设计的
标准集于一体,但同时我们又不能使其与原始设计有过大的差
异。因此,我们的工程师保留了每一个细节,使 TriAmp MK II
成为了吉他演奏家的首选,并且其所设计的每一项性能均能够引
领未来的最新潮流。从而创造出这一吉他世界中前所未有的极具
开创性意义的放大器:TriAmp Mark 3。
与此同时,TriAmp Mark 3 所提供的不仅仅是经典的声音:结
合前所未有的声道和功放多样化选项,可创造出您独有的新声
音 - 未来之音。一个放大器便能够提供如此令人激动的声音多样
化功能,这是前所未有的。
• にほんご
• Español
可独立对六个声道中的任何一个进行增益和音量的调节,每个声
道均可以拥有独有的 3 频段均衡器,并可切换至相应功能的单
块效果器。可通过按下按钮调用 12 种不同的基本声音。结合三
对同样可以通过按下按钮进行选择的功放电子管,可在 50 瓦功
率下为您提供 3x12=36 种不同的声音。请再打开第二对电子管
(功率会随之上升至 100 瓦),您则还可再获得 36 种选项(
电子管对 1+2,电子管对 1+3,电子管对 2+3)。打开第三对电
子管(这会导致功率上升至 150 瓦)又可以获得另外 12 种声
音!这样,便总共可以拥有 84 种不同的声音。
• Italiano
TriAmp Mark 3 不仅仅提供了三个分别具有两个声道的独立前
置放大器,还提供了三个独立的功率放大器。三对电子管功放中
每一对均可以配备不同的电子管。此外,可以将每对电子管随意
分配给六个声道中的任何一个 - 还可以通过乐器数字接口进行分
配。但这还不是全部的:人们甚至可为每个声道分配不同的电子
管对,并借此对各种电子管功放型号进行混合。
• Français
1 前言
它开创了电子管音色历史的新纪元
• Deutsch
前言 .............................................................................................. 75
快速开始 ..................................................................................... 76
基本操作 ..................................................................................... 76
放大器和声道 ............................................................................ 77
正面 .............................................................................................. 77
背面 .............................................................................................. 79
乐器数字接口预设和乐器数字接口设置 ........................... 80
TSC –电子管安全控制 ...................................................... 82
TSM-432 –乐器数字接口电路板 ...................................... 83
AES ............................................................................................... 84
技术参数 ..................................................................................... 85
• English
1
2
3
4
5
6
7
8
9
10
11
• 中文
TriAmp Mark 3 – Manual 1.1
75
TriAmp Mark 3 – Manual 1.1
;VKVHTHU\HSYLHKV\[VM[OL[\IL
TH[JOPUNPUZLY[HWPJRPU[V[OLZSV[
HUKJV\U[[OLMSHZOLZVMLHJO3,+
;OLKPMMLYLUJLPUMSHZOLZZOV\SKIL
SLZZ[OHU^P[OPULHJOWHPY[V
N\HYHU[LLILZ[ZV\UK7SLHZLYLMLY
[V[OLTH[JOPUNJOHY[PU[OLTHU\HS
Tube Status Monitor
;:*H\[VTH[PJHSS`PUKPJH[LZ[OLZ[H[\ZVM[OL[\ILZ
HZZVVUHZ[OLHTWPZPUWSH`TVKL:;(5+)@Z^P[JO
PU\WWLYWVZP[PVU0M[OL3,+ZZ[H`VUPUWSH`TVKL
WSLHZLJOLJR[OLHUVKLM\ZL
(SS3,+ZVMMTLHUZ!ILZ[IPHZUVYTHSVWLYH[PVU
6UL3,+VUTLHUZ!UVJ\YYLU[[\ILPZIYVRLUHUK
OHZ[VILYLWSHJLK
6UL3,+MSHZOLZVUL3,+PZVU![OLMSHZOPUN3,+
PUKPJH[LZH[\IL[OH[JH\ZLZV]LYJ\YYLU[[OLV[OLY
3,+PUKPJH[LZHZ^P[JOLKVMM[\IL[VWYV[LJ[[OLHTW
7SLHZLYLWSHJL[OL[\IL[OH[JH\ZLZV]LYJ\YYLU[
;^V3,+ZVUTLHUZ!WHPYVM[\ILZPZZ^P[JOLKVMM
MADE IN GERMANY
SPEAKERS
16 Ohms
1x 8 Ohms
or 2x 16 Ohms
RED BOX™ AE
4 Ohms
Ambience emulated DI Out
*HIPUL[
4VKL
3V^
*\[
0UZLY[N\P[HYWPJR[VYLHK
V\[[\ILTH[JOPUN
7V^LY;\ILZ!
TSC™
MIDI
ILZ[)PHZ
V]LYJ\YYLU[
UVJ\YYLU[
NOISE GATE
Hard
In
Out/Thru
Z^P[JOLKVMM
FX LOOP
Soft
MASTER INSERT
FX Level
Send
Return
Preamp Out
*(<;065!9LHYWHULSHUK
]LU[PSH[PVUVWLUPUNZTH`
ILJVTL[VVOV[[V[V\JO
3LH]LLUV\NOZWHJLMVY
WYVWLY]LU[PSH[PVU
;VYLK\JL[OLYPZRVMLSLJ[YPJZOVJRNYV\UKPUNVM
[OLJLU[LYWPUVM[OPZWS\NT\Z[ILTHPU[HPULK
9LWSHJPUNM\ZLZT\Z[VUS`ILJHYYPLKV\[I`
X\HSPMPLKZLY]PJLWLYZVUULS9LWSHJLM\ZLZVUS`
^P[O[`WLHUKYH[PUNZOV^UOLYL
Bright
4HPUZ=VS[HNL
Power Amp In
=e
¶K)
=e
7V^LY(TW;\ILZ
*(<;065!9PZRVMLSLJ[YPJ
ZOVJR+VUV[VWLU9LMLY
ZLY]PJPUN[VX\HSPMPLK
ZLY]PJLWLYZVUULS
PANEL
Dark
FX Serial
(,:
VUVMM
TSM-432
Serial No.
;90(474HYR
4HPUZ-\ZL!=;(3/a
4H_7V^LY*VUZ\TW[PVU>
,<]LYZPVUVUS`
or
Vol. Pedal
Guitar Cabinet
FX-Unit
Tuner
or
FX-Unit
or
or
Powered
Cabinet
Power Amp
Mixing Desk
TSM-432
2 快速开始
3 基本操作
主电源输入端:随机电源电缆(电源线)的电源插口。
TriAmp Mark 3 操作简单:
・六个独立声道分别具有一组相同的操作元件。
・各控制器的位置仅对相应的声道产生影响。
・正面左侧的主部控制器对所有声道均产生影响。
乐器数字接口输入端:将该插口与 TSM-432 或您选定的乐器
数字接口控制器的乐器数字接口输出端进行连接。尽管这是一
个 7 芯插口,但您仍然可使用所有标准 5 针脚电缆和所有标准
的乐器数字接口控制器。这两个额外的针脚 (1 & 7) 为 Hughes
& Kettner 公司出品的 TSM-432乐器数字接口电路板进行幻象
供电。
扬声器:连接吉他音箱的插口。我们建议使用 Hughes &
Kettner 公司出品的 TM 和TC 系列音箱,它是专为我们的放大
器设计定制的。
仅提供一个单块效果器和放大器电子管按钮电源,但可针对六个
声道中的任何一个独立进行设置。如果您在两个声道之间进行切
换,则会自动保存您的设置。例如,如果您以一对 6L6 电子管
和单块效果器弹奏声道 1A,在您重新选择声道 1A 时 - 只要您
未修改设置,就可以重新调用该设置(您还可以拥有更多的乐器
数字接口预设选项 - 更多相关内容请参见第 7 章“MIDI”)。
按钮可用作激活声道或激活功能的 LED 显示器。
AES:TriAmp Mark 3 欧洲版拥有一项名为 AES 的节能功能(更
多相关内容请参见第 10 章)。如果 AES(在交付状态下)处于
激活状态,当 TriAmp 处于静止状态达到约 90 分钟后,则其会
自动关闭。只要放大器输入端出现了一个信号,则会复位静止状
态,并每次均从前一状态开始工作。
76
TriAmp Mark 3 – Manual 1.1
4 放大器和声道
4.3.放大器 3
TriAmp Mark 3 声道不仅仅提供了三种不同的增益级别。每种
增益级别均代表了一个独有的声音时代。针对每一个声道或每一
种乐器数字接口预设,我们先进的电子元件对前置放大器和功放
的各种电子管均重新进行了配置。借此,我们可以通过电子管电
路提取各种声音点,从而使 TriAmp Mark 3 具有令人难以置信
的多种声音。
声道 A:九十年代的经典美式高增益音色
声道 B:现代高增益音色等等
声道 B:六十年代钟鼓般的英国清音音色
声道 1B 产生一种正宗的英式音色,其具有典型错落有致的高音
和极其微妙的谐波变音。对于较低的增益而言,1B 同样使您充
分享受极具和音的高中音谱。
提示:作为声道 1B 的功放,我们建议使用一对 EL34 电
子管。
5.1 电源和待机
电源/接通开关:切换至“On(接通)”位置,
激活供电。放大器亮起,电子管加热,从容面对
即将来临的挑战。
弹奏/待机开关:在经过约 30 秒的预热时间之
后,您可以从“待机”切换至“弹奏”。放大器
准备好和您一同摇滚!如果弹奏暂停时间较长,
请始终切换至“待机”,这样可以确保电子管始终处于工作温度
下。这样可以延长其使用寿命。
4.2 放大器 2
声道 A:七十年代的经典英式潮流音色
声道 2A 提供了一种广泛流行的音色,这种音色对于众多开创性
的经典摇滚作品而言是如此的独特。凭借其开放式的英伦韵味,
该声道对于犀利的即兴演奏和极具爆炸性的循环演奏而言是极为
理想的。
提示:对于典型音色,建议您最好使用一对 EL34 电子管。此
外,该声道配合一对(或者甚至是两对)6L6 电子管使用,也是
极有意义的。
声道 B:八十年代慵懒的英式潮流音色
声道 2B 的音谱涉及范围极广,从低吟和慵懒的靡靡之音到较长
的脱音。如何才能实现这一点呢?由于其具有特殊的电子电路,
声道 2B 使音色和普通高音存在错拍 - 正是由于这一变音,使旧
版 Plexis 深受吉他演奏家的欢迎。饱和、响亮和极具穿透力,
使其极为适合双手式打击乐器和强烈的和弦。
提示:测试声道 2B 的正确选择是一对 EL34 电子管。
5.2 输入端和单块效果器
输入端:乐器输入端,1 兆欧姆,用于通过有屏蔽层的
插口电缆连接吉他。
单块效果器:单块效果器会略微升高您规定的音色频率
范围。根据不同的声道和设置,效果器会发出更具穿透
力、浓郁或更具表现力的音色。单块效果器于 TriAmp
Mark 3 的输入端和前置放大器之间接通,并根据每个
具体的声道量身定做 - 它像六个不同的外部晶闸管效果
器踏板一样工作。
该电路的特点是:单块效果器是一个独立电路板上的独立模块,
并通过六个真实的旁通电路形成回路。
• にほんご
5 正面
• Español
声道 1A 提供了这一极度辉煌的伟大美国音色。
其优点在于,即使增益较高,也能够保持经典、无失真的清音音
色,- 清脆的鼻音让您产生穿上牛仔靴的冲动。但是,不要被迷
惑了:声道 A 的低音部强劲、有力并能够充分满足激情十足的
低音发烧友的需求。
提示:声道 1A 配合两对 6L6 电子管,效果特别好。
• Italiano
声道 A:五十年代珍珠落盘般的加州清音音色
• Français
提示:一定要尝试一下:配有两对 6L6 电子管的 3B 声道
- 然后切换至 EL34 电子管!
• 中文
声道 3B 能够提供一种前所未有的冷酷的高增益音色。3B 声道
极为强大,并具有野性的失真性能,喜欢降调的朋友和 7 弦及 8
弦吉他的乐队吉他手会完全沉醉其中。通过单块效果器您可以在
弹奏时获得极限反应速度 - 琴弦就仿佛是您手指的延伸。即兴演
奏和轻轻弹奏时,声道 3B 使您的手指如丝般划过指板。
• Deutsch
4.1 放大器 1
提示:声道 3A 配合一对 EL34 和 6L6 电子管中的任何一
种,其效果特别好。
• English
可在放大器本身,或者通过随机的 TSM-432乐器数字接口电路
板对声道进行选择。为此,在单块效果器音箱模式下接通 TSM432。现在,开关 1 至 6 会调用相应的声道,而开关 7 则负责
单块效果器的调用(TSM-432 的其他模式,预设模式,还为您
提供了更多选项。更多相关内容请同样参见章节“MIDI”)。
声道 3A 极为保真和直接 - 哪怕吉他音量控制器进行了最小幅
度的调整,其也会立即作出反应,并对细微变化极为敏感。这
样,3A 便可以保持您的吉他具有独一无二的音色和独特清脆的
声音 - 无论增益控制器所调高的幅度有多大。
77
TriAmp Mark 3 – Manual 1.1
5.3 声道部
声道按钮:可借此直接选择声道。
增益部,主部:增益部确定输入灵敏度,并借此测定前置放大器
的饱和度。结合单块效果器,其成为了音响设计的决定性工具。
通过各主部控制器,踏板可与各独立声道互相调节匹配。
低音、中音、高音:三频段均衡器的作用是精确与相应的声道相
协调。控制器处理每个频率范围,该频率范围是由所涉声道的特
性声音构成的。
注意:它是一种典型的被动音调控制。控制器会对彼此产
生影响。例如,如果继续调高“中音”,则较之于将“中
音”调低,显示的“低音”效果更低。
5.4 主部
5.5 放大器电子管的电源
这三个隐藏的按钮是 TriAmp Mark 3 的秘密武器。它们揭开了
电子管音色历史的崭新篇章。三对功放电子管的任何一对均可
针对六个声道中的一个进行随意分配 - 选择一个声道,并激活所
需的电子管对(或多个)即可,您无需进行其他操作。三对电
子管功放中每一对均可以配备 EL34 或 6L6 电子管。这样,便
可以在 TriAmp Mark 3 的三个声道中的任何一个之中,顺利将
电子管不同的声音特点进行混合。此外,还可以借助同一个声
道的乐器数字接口预设使用不同类型的功放电子管 - 通过脚踏开
关是极为简单的(更多乐器数字接口预设方面的内容请参见章
节“MIDI”)。
您可以通过 TriAmp Mark 3 进行音色实验,这一点以往是无法
实现的。例如,您便可以通过一对 6L6 电子管,以 50 瓦功率
弹奏某首歌曲含蓄的前奏,通过接通另外一对 6L6 电子管进行
您的即兴演奏,- 而无需通过效果器 - 接通 EL34 电子管,在歌
曲中段进行更具力度的独奏(最多可达 150 瓦)。这样,即使
身处后排也可以听到您的弹奏!
您还可以通过乐器数字接口在同一个声道中从英式 EL34 音色切
换至典型的美式 6L6 音色。或者从中国音色切换至斯洛伐克的
EL34 音色 - 无需更换电子管、放大器或声道。TriAmp Mark 3
借此成为了 - 不包括其他方面 - 首个六声道电子管对比式设备!
提示:在 TriAmp Mark 3 中还可以运行其他型号的功放电
子管。以下型号经过 Hughes & Kettner 公司测试:KT77,
KT66, KT88, 5881 WXT, 6550 A, 6CA7, 7581
音量:主部音量控制器确定了 TriAmp Mark 3 的总音量。通过
该控制器,您可以将拇指和食指之间的力度控制在 150 瓦电子
管以上。请理智操作,因为令您的乐队成员沉醉其中的同时,也
会让其陷入疯狂。即使调节控制器能带来巨大乐趣,也同样应保
持克制。不要过度调节,确保音量不会对您 - 及您乐队成员 - 造
成听力受损即可。
现场:该控制器确定产生的谐波和弦的比重。调节得越高,音色
的“现场”效果就越强。通过该控制器,可按照需要使音色更具
表现力和穿透力。
共振:将控制器调节至中间位置,可以听到 TriAmp Mark 3 与
所连接的音箱之间的自然共振比例。向左旋转会抵消音箱共振的
效果,这会使您的音色更加柔和。向右旋转会放大音箱共振的效
果,这会增强重低音。完全调高该控制器,会产生极具震撼力的
超低音频率。
建议:现场控制器和共振控制器还可用作主部声音控制
器,并使您的整体音色与各种不同的音箱和场所相匹配,
从而无需对各声道的声音控制器进行改动。
78
5.6 FX-Loop
SmartLoop 特效路由器可回路式连接并口式和串
口式外部电子音效设备。可针对各个声道和各个乐
器数字接口预设,对其状态 - 接通/关断和并行/串
行 - 进行保存。
FX-Loop:您可借此接通或关断效果回路。更多关于效果回路的内
容请参见章节“背面”。
5.7 噪声门限
极为精确的 IDB (智能式双断点)噪声门限可同时测量信号链
两个关键位置的噪音级别:输入端和前置放大器的输出端。根据
这两个数值,IDB 技术会计算得出最佳的响应比例,并自动调
节攻击参数和音量限度参数。
通过噪声门限按钮可以接通/关断 IDB 噪音。只要信号级别降
至规定的阈值以下,便可接合激活的噪声门限,并将前置放大器
切换至静音 - 与烦人的噪音说再见!门限始终保持关闭状态,直
至您再次拨动琴弦。并且打开时无任何延迟。更多关于噪声门限
的内容请参见下一章节。
SPEAKERS
16 Ohms
1x 8 Ohms
or 2x 16 Ohms
RED BOX™ AE
4 Ohms
Ambience emulated DI Out
*HIPUL[
4VKL
3V^
*\[
0UZLY[N\P[HYWPJR[VYLHK
V\[[\ILTH[JOPUN
TriAmp Mark 3 – Manual 1.1
TSC™
MIDI
ILZ[)PHZ
NOISE GATE
Hard
V]LYJ\YYLU[
In
UVJ\YYLU[
FX LOOP
Soft
Out/Thru
Z^P[JOLKVMM
MASTER INSERT
FX Level
Send
Dark
FX Serial
Return
*(<;065!9LHYWHULSHUK
]LU[PSH[PVUVWLUPUNZTH`
ILJVTL[VVOV[[V[V\JO
3LH]LLUV\NOZWHJLMVY
WYVWLY]LU[PSH[PVU
;VYLK\JL[OLYPZRVMLSLJ[YPJZOVJRNYV\UKPUNVM
[OLJLU[LYWPUVM[OPZWS\NT\Z[ILTHPU[HPULK
9LWSHJPUNM\ZLZT\Z[VUS`ILJHYYPLKV\[I`
X\HSPMPLKZLY]PJLWLYZVUULS9LWSHJLM\ZLZVUS`
^P[O[`WLHUKYH[PUNZOV^UOLYL
Bright
4HPUZ=VS[HNL
Power Amp In
=e
¶K)
=e
7V^LY(TW;\ILZ
5L]LY\ZL[OPZHTW^P[OV\[ZWLHRLYZJVUULJ[LK
<ZLJSHZZ^PYPUN
Preamp Out
*(<;065!9PZRVMLSLJ[YPJ
ZOVJR+VUV[VWLU9LMLY
ZLY]PJPUN[VX\HSPMPLK
ZLY]PJLWLYZVUULS
PANEL
(,:
VUVMM
TSM-432
Serial No.
;90(474HYR
4HPUZ-\ZL!=;(3/a
4H_7V^LY*VUZ\TW[PVU>
,<]LYZPVUVUS`
性的第二音箱模式。DSP 控制式环境仿真功能产生了一种真实的
4x12 的音箱室环绕效果,和一种超高的打击式纯电子管音色,
从而能够在功放和扬声器输出端之间截取信号。在 Red Box AE
上添加了一个线路信号。线路信号的声平取决于功放的声平 - 换
言之:主音量也可以调节 DI 输出端的声平。
绝对不要在未连接扬声器的情况下运行放大器!
・如果使用了两个并行式布线的 8 欧姆音箱,则请关闭 4 欧姆
的输出端。绝对不要在一个和同一个输出端上运行具有不同阻
抗的音箱!
・如果同时运行具有不同阻抗的音箱,则必须以并行或者以串行
的方式在相应的输出端进行布线连接。通过该公式,可以对具
有不同阻抗 (R1, R2) 的第二个音箱的总阻抗 (R) 进行计算。
并行式布线:R = (R1 x R2) / (R1 + R2)
举例:一个 8 欧姆音箱和一个 16 欧姆音箱:
R = (8 x 16) / (8 + 16) 欧姆
R = 128 / 24 欧姆
R = 5.33 欧姆
如今最为常见的是并行式布线,但如果您的音箱具有一个串行式
布线的输出端,或者决定采用并行方式进行音箱布线,则音箱阻
抗总和,即总阻抗为:
6.3 TSC
提示:在本操作说明书中,我们专门针对电子管安全控制的主
题提供了一整个章节的描述说明。更多相关内容请同样参见章
节“TSC”。
6.4 乐器数字接口输入端和输出端/直通
对于借助改动程序在不同的音色之间进行切换,
乐器数字接口是极为适用的。通过按下按钮,您
可以同时对放大器声道和您外部电子音效设备的
In
Out/Thru
效果程序进行切换。从而使踏板成为了过去时。
因此,我们决定将乐器数字接口用作 TriAmp
TSM-432
Mark 3 所有切换功能的标准协议,并针对随
机的乐器数字接口电路板 TSM-432 ,为其提
供了一个接口。更多关于乐器数字接口电路板的内容请参见章
节“TSM-432”。
MIDI
如果将一个 4 欧姆音箱和一个 8 欧姆音箱进行串行式布线连
接,则总阻抗为 12 欧姆。
乐器数字接口输入端:TriAmp Mark 3 的乐器数字接口输入端
为 7 针式设计结构 - 但您仍然可以通过一根标准 5 针式电缆将
所有标准的乐器数字接口控制器连接至该插口。这两个额外的针
脚为随机的 Hughes & Kettner 公司出品的 TSM-432 乐器数字
接口电路板进行幻象供电。
建议:相关黄金规则为:音箱阻抗永远不得小于您放大器
输出端的阻抗。在我们的例子中,这意味着:具有 5.33
欧姆总阻抗的并行布线式音箱连接在 4 欧姆的输出端上,
具有 12 欧姆总阻抗的串行布线式音箱连接在 8 欧姆的输
出端上。
注意:TSM-432 包含一根 7 针式电缆。如果遗失了该电
缆,则需要立即进行更换,也可以使用一根 5 针式电缆。
当然,您还需要一个供电电源。为此,TSM-432 提供了
一个创新式的电源插口,其可用于连接任何直流或交流电
源,供电电压在 9 至 15 V之间。
6.2 Red Box AE
乐器数字接口输出端/直通:该插口用于转发乐器数字接口输入
插口所添加的信号。您可以在此处连接任何外部乐器数字接口功
能设备,并可同时与 TriAmp Mark 3 进行切换。
串行式布线:R = R1 + R2
TriAmp Mark 3 作为 Hughes & Kettner 公司
的首款产品,其配备了具有环境仿真 (AE) 功
能的新型 Red Box。自八十年代末以来,原装
Ambience emulated DI Out
Red Box 便被视作为行业标准,专用于降低未
配有麦克风的吉他放大器的声音。无论是在现
场或是在录音棚中 - Red Box 始终能够传输质
量稳定的声音。其他乐器的串音和对麦克风位
置进行费时的调试均已成为了过去。
RED BOX™ AE
*HIPUL[
4VKL
3V^
*\[
• 中文
针对所有的标准阻抗,TriAmp Mark 3 均具有独立的输出端。
其既可以连接一个 4 欧姆的音箱,一个 8 欧姆的音箱,也可以
连接一个和两个 16 欧姆的音箱。
提示:我们针对 TriAmp Mark 3 的各种乐器数字接口功
能提供了一整个章节的描述说明。更多相关内容请参见章
节“乐器数字接口预设和乐器数字接口设置”。
• にほんご
5L]LY\ZL[OPZHTW^P[OV\[ZWLHRLYZJVUULJ[LK
<ZLJSHZZ^PYPUN
提示:通过一根麦克风电缆将 Red Box AE 的信号传导至
调音台。请确保调音台的 XLR 输入端已调节设置为线路模
式。如果调音台无 XLR 输入端或者输入端未切换至线路模
式,则在插口转接板上需要具有一个 XLR,或者一根相应
的电缆,此类装置可在任何备货充足的专业店中找到。
• Español
4 Ohms
• Italiano
1x 8 Ohms
or 2x 16 Ohms
• Français
16 Ohms
• Deutsch
6.1 扬声器
• English
6 背面
Red Box AE 是屡获殊荣的具有扬声器仿真功能的 DI-Box 的最新
版本,并能够提供一个开关式低切滤波器和具有其他调节声音特
79
TriAmp Mark 3 – Manual 1.1
6.5 硬/软噪声门限
6.7 主机插入端
NOISE GATE
Hard
MASTER INSERT
Soft
Preamp Out
通过背面的控制器,可以修改噪声门限的响应。控制器向右旋转
幅度越大,噪声门限反应就越灵敏。控制器向左旋转幅度越大,
就越是难以接合噪声门限,并且会切断微弱信号和不必要的噪
音。
建议:12 点位置是噪声门限的通用设置。如果您想要在
高增益级别时将噪声门限用作快速断奏即兴演奏的演绎方
式,则将其继续向左旋转
6.6 FX-Loop
Power Amp In
TriAmp Mark 3 拥有一个额外的串行回路,通过该回路您可以
借助音量踏板控制主音量。前置放大器信号会在前置放大器输出
端被截取,并重新将其返回至电源放大器输入端处。您还可以通
过前置放大器输出端将前置放大器信号转发至其他放大器,或者
在该处连接一个调谐器。如果您在该处进行了某些连接,则需要
保证前置放大器输出端始终处于激活状态,以确保不会改变信号
路径。
提示:电源放大器输入端是一个开关式插口。如果您在该
处进行了某些连接,则会中断内部的信号路径,并仅将电
源放大器输入端所添加的信号转发至功放。
6.8 面板
FX LOOP
FX Level
Send
Return
FX Serial
¶K)
PANEL
Dark
Bright
FX 发送端:将该插口与您的电子音效设备输入端连接。
FX 返回端:将该插口与您的电子音效设备输出端连接。
-10 dB:该柔音开关可调节信号电平,使之与专为低声平设计的
电子音效设备相匹配。针对前置电子音效设备将其激活,该前置
电子音效设备通常连接于吉他和放大器之间(例如,变音器)。
等级:调节 FX 返回端中所接受到的信号电平。
FX 串行:可借此将效果回路从串行模式切换至并行模式。如果
该开关亮起,则效果回路处于串行模式。
建议:在并行模式下,您能够以 FX 等级对湿式/干式混音
进行调节设置(效果和纯吉他信号的比值)。您可为此将
任何线路信号移动至 FX 返回端,并以 FX 等级混合前置放
大器的信号。
如果串行模式下的 FX 发送端直接与 FX 返回端进行了布线连
接,则能够以等级控制器对前置放大器的总音量进行调节设置,
几乎就如同拥有了第二个主音量控制器一般,并可通过接通/关
断 FX-Loop 进行操作。
您可在此处对 TriAmp Mark 3 的前面板照明的亮度进行调节控
制。您还可以通过连续式乐器数字接口控制指令对该控制器进行
远程控制(更多相关内容请参见章节“乐器数字接口”)。
7乐器数字接口预设和乐器数字接口设
置
您可以通过乐器数字接口对 TriAmp Mark 3 的各独立按钮进
行远程控制,并在 128 个乐器数字接口预设其中之一对调节设
置进行保存。 通过相应的程序改动编号,可以随时调用任何预
设 - 既可以通过一个随机的乐器数字接口控制器或音序器,也可
以通过合适的软件进行调用。包括随机的 TSM-432 乐器数字接
口电路板在内,您既可以通过乐器数字接口切换和提升(单块效
果器-音箱-模式下)声道,也可以调用 128 个预设其中之一,这
些预设保存在 32 个操作台中,每个操作台中保存 4 个预设(预
设模式下)。在交付状态下,对放大器和随机的 TSM-432 乐器
数字接口电路板的乐器数字接口声道 1 进行了预设,从而可以
立刻开始使用。本章随后还将教您如何修改乐器数字接口声道。
提示:针对随机的 TSM-432 乐器数字接口电路板,我们
提供了一整个章节的描述说明 - 更多相关内容请参见章
节“TSM-432”。
7.1 建立和调用乐器数字接口预设
声道设置和乐器数字接口预设的区别到底是什么?
共有六种声道设置,它们被自动保存在 TriAmp Mark 3 中 - 您
可以对其进行调用,从而自动选择放大器上的声道,或者为此在
单块效果器音箱模式下使用 TSM-432。您当然还可以对声道和
功放电子管的任何配置及噪声门限的开/关状态、最多 128 个乐
器数字接口预设中的效果器和 FX-Loop 进行保存。
80
TriAmp Mark 3 – Manual 1.1
为了对声道和全向模式进行修改,请在乐器数字接口设置
中进行如下操作:
在您调用乐器数字接口设置之前,请将弹奏待机开
关切换至待机状态。
随意发挥您的创造力!或在录音棚中完全沉醉于 TriAmp Mark
3 的享受之中,亦或在舞台上对其实现完全的远程控制。这还不
是全部:通过一个乐器数字接口节拍音轨(“回放追踪”),可
以切换您所有的预设 - 如果舞台上没有任何灯光,甚至可以切换
您放大器的前面板照明。正是由于这一功能, TriAmp Mark 3
成为了首个能够集成灯光秀的电子管放大器。
同时按住噪声门限按钮和 FX-Loop 按钮三秒,以便
调用乐器数字接口设置。
顺便提一下:如果您想要在不保存当前设置的情况下退出编程模
式,只需重新按下示教按钮便可(无需按下乐器数字接口电路板
开关)。
提示:如果您使用了一个外部效果处理器,则必须独立进
行编程,因为 TriAmp Mark 3 的示教功能仅能对放大器本
身进行编程(并且无任何外部设备)。也就是说:如果想
通过您乐器数字接口电路板(或者 TSM-432)上的程序修
改编号 1 对 TriAmp Mark 3 上的清亮音色和您效果处理器
上的合音/混响进行调用,则必须首先将电子音效设备切换
至“示教”模式,其可以在接受到程序修改编号 1 的时候
调用该效果。如何做到这一点,请参见您的电子音效设备
的操作说明书。
建议:很多电子音效设备均提供乐器数字接口映射功能。
这样,您便可以为相同的效果预设分配不同的程序修改编
号。例如,程序 1 对应效果预设 4,程序 2 对应效果预设
16,程序 3 再次对应效果预设 4。
7.2 选择乐器数字接口声道/全向模式
乐器数字接口拥有 16 个声道,最多可用于控制 16 个配有乐器
数字接口控制器的不同类型设备。这首先对录音棚或者键盘手特
别有用。但对于具有 FX 设置的吉他放大器,大多数情况下具有
一个声道足矣。在这种情况下,乐器数字接口辅机(即放大器)
上所选择的声道必须和乐器数字接口主机(乐器数字接口电路
板)上所选择的声道一致,否则放大器将无法做出反应或无法正
确反应。
乐器数字接
口声道
FX-Loop
电子管
1/2
电子管
3/4
电子管
5/6
1
¢
¢
¢
¢
2
¢
¢
¢
{
3
¢
¢
£
¢
4
¢
¢
£
£
5
¢
£
¢
¢
6
¢
£
¢
£
7
¢
£
£
¢
8
¢
£
£
£
9
£
¢
¢
¢
10
£
¢
¢
£
11
£
¢
£
¢
12
£
¢
£
£
13
£
£
¢
¢
14
£
£
¢
£
15
£
£
£
¢
16
£
£
£
£
• にほんご
• Español
TriAmp Mark 3 现在便可以通过所选的乐器数字接口声道(
参见下文)接受一个程序修改指令了,示教按钮短暂闪烁,则
TriAmp 完成了相应的配置。
・噪声门限按钮现在表示乐器数字接口全向模式的状态,并可启
动和关闭该模式。噪声门限按钮亮起,则表示全向模式处于激
活状态(交付状态,接受所有的乐器数字接口声道)。如果您
想要禁用全向模式,请按下噪声门限按钮(接受规定的乐器数
字接口声道)。
・现在您便能够通过 FX-Loop,以增量的方式切换至下一个乐器
数字接口声道。
・转动 5/6 圈,您便能够以增量的方式通过乐器数字接口声道
进行恢复。
・四个 FX-Loop 和电源放大器电子管按钮作为二进制代码,如
下显示乐器数字接口声道:
• Italiano
TriAmp Mark 3 的编程是极为直观的。如果您想要在一个预设
中对声道、效果器开/关、噪声门限开/关、FX-Loop 开/关和功
放电子管的配置进行保存,只需通过放大器上的按钮激活设置,
短暂按下乐器数字接口示教按钮可快速接通放大器(按钮亮起)
,然后按下您乐器数字接口电路板上用于调用配置的开关即可。
如果示教按钮熄灭,则 TriAmp Mark 3 便已成功将您的设置保
存在 128 个内置预设的内存之中,并在您的乐器数字接口电路
板上分配了一个程序编号。
• 中文
示教按钮闪烁,这表示已为以下按钮分配了一定的
程序功能(如果您现在退出乐器数字接口设置,长
按示教按键三秒 - 按钮熄灭,您的修改将被保存,
而且放大器将恢复至标准操作模式):
它是如何工作的?
• Français
TriAmp Mark 3 独有的特点在于,您还可以通过乐器数字接口
立即切换三组功放电子管。您可以想象一下,在您以一对 EL34
电子管弹奏经典的六十年代英国流行音乐时,- 只需切换至一对
6L6 电子管,便可随即弹奏略带美式激情的音乐。或者您在以两
对 6L6 电子管弹奏现代美式高增益音色的时候,接通一对具有
爆炸性中音的 EL34 电子管,从而使弹奏更富激情。
交付状态下,TriAmp Mark 3 和 TSM-432 所选择的是声道 1,
并激活了全向模式。全向是指,放大器会通过所有 16 个乐器数
字接口声道对全部的指令作出响应。如果您在具有多种设备的大
型乐器数字接口环境中使用 TriAmp Mark 3,则应该禁用全向
模式,并设置一个适当的乐器数字接口声道。
• Deutsch
如果您在各种声音之间进行切换,您则通常不仅仅需要切换声
道,还会需要同时切换效果器、噪声门限以及您的外部乐器数字
接口电子音效设备的效果程序。通过乐器数字接口预设,您例如
可以从伴有合音和混音的清亮音色切换至具有延迟、效果器和噪
声门限的潮流音色。
• English
为什么我需要乐器数字接口预设?
81
TriAmp Mark 3 – Manual 1.1
一个 LED 始终亮起
7.3 出厂重置
很少需要进行出厂重置,也就是恢复出厂设置。但是,您还是需
要对该章节加以密切关注,这样可以确保不会意外删除您的乐器
数字接口预设。
如果仅有一个 LED 亮起,则对应的电子管产生欠电流,并将被
禁用。如果该 LED 在几分钟之后仍未熄灭,则必须更换对应的
电子管。
两个/四个 LED 始终亮起
在以下情况下需要进行出厂重置,例如,乐器数字接口通信功能
无法正常工作,以及您对于乐器数字接口声道和全向模式的设置
并不确定。出厂重置会将乐器数字接口声道恢复至 1,并激活全
向模式。
要么对应的电子管产生了欠电流并且必须进行更换,要么对应的
电子管对是无效的(即,前面板上的对应放大器电子管按钮的电
源被关闭)。
一个 LED 闪烁,其旁边的一个则亮起
在接通放大器时同时按住示教和效果器按钮,便可触发出厂重置
功能。
小心:该过程专为紧急状况而设计。进行出厂重置会导致
丢失保存的所有设置,包括 128 个乐器数字接口预设!
0UZLY[N\P[HYWPJR[VYLHK
V\[[\ILTH[JOPUN
8 TSC –电子管安全控制
TSC™
ILZ[)PHZ
V]LYJ\YYLU[
UVJ\YYLU[
Z^P[JOLKVMM
7V^LY(TW;\ILZ
TSC 能够连续地自动调节静态电流,从
而确保提供较高的技术稳定性,并使功放
电子管具有较长的使用寿命。因此,其能
够保证提供最佳的音色,并使您能够完全
专注于您放大器的其他功能特性。其能够
确保简单、快速和安全的更换电子管,因
为 TSC 能够全自动化的进行费力的静态
电流调节工作。该功能不仅仅对于发生损
坏时极有帮助,还有助于对不同制造商提
供的电子管或不同类型电子管进行评估。
注意:在使用一个其他型号电子管更换某一型号电子管(
例如,用 KT88 更换 EL34)的时候,建议对 TSC 模块进
行复位重置:
- 对于已关闭的设备,请将待机开关切换至弹奏位置
- 接通设备
- 至少等待三分钟
然而,该项技术还可以提供更多的帮助:背面的 TSC 部中提供
了六个 LED,可以借此读取电子管的工作状态。每个 LED 均被
分配了适当定位的功放电子管。但是 TSC 并不会提供电子管工
作状态方面的信息,但还是能够进行故障诊断和在必要时禁用损
坏的电子管,以避免造成放大器的失效。此外,在使用一个琴拨
的情况下,您还可以借助 TSC -LED 读取电子管的特性曲线(
参见第 8.2 章)。
8.1 自动状态显示
所有 LED 始终亮起
只要放大器处于待机模式下,则所有 LED 亮起。将待机开关切
换至弹奏位置,则 LED 会在几秒钟之后熄灭。如果所有 LED 仍
然亮起,则很可能阳极保险丝损坏,必须对其进行更换。即使是
对于 TSC ,如果在接通放大器之前,一个电子管已经存在损坏
情况,则 TSC 是没有时间(电子管预热后)对静止电流进行
测量并禁用损坏的电子管的,这可能会造成阳极保险丝烧毁。
无 LED 亮起
功放电子管正常工作。
82
闪烁的 LED 对应的电子管产生欠电流,并被关闭。必须更换该
电子管。一对电子管必须协同工作,才能在 TriAmp Mark 3 的
功放中产生最佳的音色效果,故此应同时禁用对应的两个电子管
(通过 LED 的持续亮起来显示),这样可以确保其他电子管对
的正常继续工作,并且不会造成音色的损失。如果电子管对(对
应持续亮起的 LED)的第二个电子管能够正常工作,则无需对其
进行更换。
对于传统的放大器而言,如果电子管失效,其保险丝也会相应地
失效,必须首先更换电子管和保险丝才能够继续使用,而智能化
的 TSC 则能够拯救您的演出。正是由于存在 TSC,故此 TriAmp
Mark 3 的操作是绝对安全的。
但是您应该明确了解,禁用一对电子管会降低放大器的功率。此
外,如果您需要仅使用了对应电子管对的声道和乐器数字接口预
设,则必须切换至另外一对电子管。切勿忘记在完成演出后立即
更换损坏的电子管。
8.2 手动读取
TSC 允许读取特性曲线 - 这样您便可以检查功放的三对电子管
是否完美匹配。为此,您只需将琴拨插入 LED 旁边所提供的插
槽中即可。为此,必须接通放大器(不得切换至待机状态!)。
所有 LED 多次闪烁。每个 LED 的闪烁次数表示对应电子管的特
性曲线及静态电流的状态。
期间,一对电子管(1/2, 3/4, 4/5)的闪烁次数与其互相之间的闪
烁次数不得存在超过 4 次的差异。只有这样,TSC 才能够保证
提供最佳的音色。如果存在较大的差异,我们则建议使用一对匹
配的电子管替换该对旧的电子管。当然,这纯粹是出于对纯净音
色的考虑 - 其在技术方面是不存在任何缺点的。但是,相匹配的
最佳电子管,也就是具有相同特性曲线的电子管,听起来音质更
优!
注意:TSC 还承担着接通和关断各对电子管的责任。所
以,如果您已经决定了采用一对电子管,则 TSC 会显示四
个电子管(即,两对未使用的电子管)已被关闭。如果放
大器处于无效状态,则 LED 仅显示实时正确的状态。在您
弹奏期间,LED 可能偶尔会闪烁,但这并非对放大器或电
子管的状态作出提示。如果您仅更换了一对电子管中的一
个电子管,则请确保用于更换的电子管特性曲线与被更换
的电子管的特性曲线一致。用于更换的电子管可在专业店
中买到
小心:必须由技术合格的专业人员更换电子管。
TriAmp Mark 3 – Manual 1.1
9 TSM-432 – 随机的乐器数字接口电
路板
9.2 单块效果器-音箱-模式
(1A、1B、2A、2B、3A、3B、BOOST)
TSM-432 背面的乐器数字接口接口上方提供了一个滑动开关,
您可借此在预设模式和单块效果器-音箱-模式之间进行切换。如
果您将滑动开关切换至单块效果器音箱模式,则显示屏中会显
示“Sb”。
在单块效果器音箱模式下,六个按钮(1A、1B、2A、2B、3A
和 3B)各分配了 TriAmp Mark 3 的六个声道。在 TSM-432 上
对这些按钮分别进行了相应的标记:1、2 和 3 分别对应三个前
置放大器,A/B 则分别对应两个声道。此外,您可以通过单块效
果器的一个其他按钮激活或禁用其中的任何一个。
乐器数字接口输出端:借助随机的 7 针式电缆将该插口与
TriAmp Mark 3 的乐器数字接口输入插口连接。 如果您使用了
标准 5 针式电缆,则请遵守下述的“供电电源”章节。
乐器数字接口输入端:为了操作 TriAmp Mark 3 与 TSM-432,
您必须使用乐器数字接口输入插口。此处,您可以将其他乐器数
字接口设备连接至 TSM-432 上。这样,TSM-432 便可成为真
正的乐器数字接口合并器,其从乐器数字接口输入端向乐器数字
接口输出端传输乐器数字接口信息。
供电电源(电源供应):如果您想要使用一根标准 5 针电缆,
则您需要一个电源。为了实现最大程度的独立性,TSM-432 采
用了一种创新式的电源插口,专用于连接随机的直流或交流电
源,其能够提供 9 至 15 V 的电压和最少 250 mA 的电流。
控制器输入端 1 和 2:在这两个插口处,您可以连接脚踏开关
和/或踏板式效果器,并借此控制 TriAmp Mark 3 的其他功能。
通过脚踏开关,您可以对放大器的所有按钮进行远程控制,并接
通或关断前面板照明。通过踏板式效果器,您甚至可以调暗照明
亮度。某些人可能认为这只是一个噱头,但我们的确是出于客户
利益考虑的...,因为我们认为:“为什么不呢?”
您应该为不同的控制输入端分配功能,在下文中将对相关内容
进行讲解(第 9.4 章,分配控制输入端 1 和 2)。在交付状态
下,控制输入端 1 用于接通或关断噪声门限,控制输入端 2 用
于接通或关断 FX-Loop。
在预设模式中,为您提供了 TriAmp Mark 3 的 128 种乐器数字
接口预设。更多相关内容请参见章节“乐器数字接口预设和乐器
数字接口设置”。
预设按钮 A、B、C 和 D:借此,您便可在当前所选的操作台内
部激活四种预设中的一种。对应按钮 A、B、C 和 D 所分配的
LED 则显示激活的预设。
操作台向上/向下:在 TSM-432 的显示屏中会显示当前所选操
作台的编号。为了调用其他操作台的某种预设,您必须事先通过
向上和向下按钮选择对应的操作台。与此同时,只要 TSM-432
的显示屏中操作台编号在闪烁,则您还可以继续调试当前的预
设,尚未激活新的操作台。这种情况只会在您随后通过按下按钮
A、B、C 或 D,在其中调用了一种预设的时候才会发生。与此相
反,其则是直接模式。
直接模式:在直接模式下,您可以通过操作台向上/向下按钮直
接调用一种新的预设。在直接模式下,TSM-432 不会等待您的
输入 - 即:按下按钮 A、B、C 或 D - 或者直接进行切换,例如
从操作台 16 中的预设 B 切换至操作台 17(向上)或操作台 15
(向下)中的预设 B。
您可以如下激活直接模式:
・按住点击按钮并按下预设 A。
・先松开预设 A,然后松开点击按钮。小数点在显示屏中亮起。
以相同的流程,您可以再次禁用直接模式。
提示:直接模式也是暂时性的。只要 TSM-432 被关闭,
便可在下一次接通时进入标准模式中。
提示:对应按钮所分配的 LED 不会一直显示所选择的声道
和单块效果器状态。如果您自行在放大器上选择了一个其
他的声道或激活了效果器,则 TSM-432 无法识别这些改
动。
• にほんご
TSM-432 无需独立电源,因为其是通过 TriAmp Mark 3 的一个
7 针式乐器数字接口输入插口进行幻象供电的。如果正确连接
了 TSM-432,接通 TriAmp Mark 3 时会按照以下启动顺序进行
通电:会在显示屏中出现版本号,并且所有 LED 会从左向右依
次闪烁。然后,如果 TSM-432 处于预设模式下,则显示屏中显
示“1”,如果其处于单块效果器-音箱-模式下,则显示屏中显
示“Sb”。在这两种情况下,按钮 A 下方的 LED 均亮起。
• Español
9.1 连接
• Italiano
(A、B、C、D、操作台向上/向下、FX)
• Français
9.3 预设模式
• 中文
建议:按住按钮 FX 和 B,您便可以退出预设模式,并快
速切换至单块效果器-音箱-模式。重复该过程,以便重新
进入预设模式。该功能为暂时性的:只要 TSM-432 被关
闭,便可在下一次接通时进入通过滑动开关选择的模式
中。
• Deutsch
TSM-432 是为 TriAmp Mark 3 量身定做的,并提供了两种模
式:单块效果器音箱模式和预设模式。在单块效果器音箱模式
下,您可以通过 TSM-432 的按钮选择放大器的六个声道,并激
活单块效果器。在 TSM-432 的预设模式下,提供了 128 种乐
器数字接口预设。我们建议从单块效果器-音箱-模式开始使用,
这样可以对 TriAmp Mark 3 作出充分的了解,从而能够在预设
模式下充分展示您无限的创意。
提示:对应按钮所分配的 LED 不会一直显示所选择的声道和单
块效果器状态。如果您自行在放大器上选择了一个其他的声道或
激活了效果器,则 TSM-432 无法识别这些改动。
• English
TSM-432 乐器数字接口电路板是 FSM-432 的后续研发,您可
能从 Hughes & Kettner 公司出品的SwitchBlade, CoreBlade 或
GrandMeister 型放大器对其有所了解了。在无法使用 TSM-432
的时候,如果您拥有一台 FSM-432,则还可以借此选择 TriAmp
Mark 3 的预设。
83
TriAmp Mark 3 – Manual 1.1
9.4 分配控制输入端 1 和 2
10 AES(仅欧盟设备提供)
您可以按如下方式为两个控制输入端分配控制编号。
按照 1275/2008/EC 号条例,电气和电子设备必须配备一个
节能装置,该装置会在设备停用一段时间后切断供电。对于
TriAmp Mark 3 而言,由 AES 承担这一任务,其可以通过扬声
器插口旁边的微型开关进行激活和禁用。在交付状态下,AES 是
被激活的 - 微型开关位于左侧。在该项设置中,如果放大器处于
静止状态达到约 90 分钟,则其会自动关闭。只要放大器输入端
添加了一个信号,则会恢复静止状态,并每次均重头计起(例
如,如果弹奏一个短促的音调)。对此而言,一个低信号便已足
够,并且 90 分钟将重头计起,直至其被关闭。如果 AES 已将放
大器关闭,则可以通过关闭和重接电源/开启和待机开关重新对
设备进行调试。
控制输入端 1:只要同时按住按钮 FX 和 D,直至显示屏中出现
乐器数字接口控制编号并且第二个数字后面的小数点闪烁,您便
可以调用编辑模式。现在,您便可通过向上和向下按钮选择一个
其他的乐器数字接口控制编号。按下按钮 D,您便可以对所需的
编号进行保存。小数点停止闪烁,TSM-432 恢复到正常工作状
态。
控制输入端 2:同时按住按钮 FX 和 D,直至显示屏中出现乐器
数字接口控制编号并且第二个数字后面的小数点闪烁。现在,
您便可通过向上和向下按钮选择一个其他的控制编号。按下按钮
C,以便保存您的选择,并退出编辑模式。
对以下功能进行了分配:
名称
MIDI 控
制编号
范围
提示
静音
9
0 – 63 = 关闭,64 – 127
= 接通
此项功能仅通过
乐器数字接口可
用。
FX-Loop
55
0 – 63 = 关闭,64 – 127
= 接通
FX 串行
54
0 – 63 = 并行,64 – 127
= 串行
单块效
果器
64
0 – 63 = 关闭,64 – 127
= 接通
噪声门限
63
0 – 63 = 关闭,64 – 127
= 接通
声道
31
0 – 12 = 声道 1(放大器
1A)
13 – 37 = 声道 2(放大
器 1B)
38 – 63 = 声道 3(放大
器 2A)
64 – 87 = 声道 4(放大
器 3A)
88 – 112 = 声道 5(放大
器 3A)
113 – 127 = 声道 6(放大
器 3B)
为了对通过乐器
数字接口指令,
以其他控制器进
行声道选择的过
程加以简化,我
们建议使用您易
于记住的数值,
例如:
声道 1 = 10
声道 2 = 30
声道 3 = 50
声道 4 = 80
声道 5 = 100
声道 6 = 120
电子管
1/2
58
0 – 63 = 关闭,64 – 127
= 接通
如果仅激活了一
对电子管,则您
是无法将其关闭
的。
电子管
3/4
59
0 – 63 = 关闭,64 – 127
= 接通
电子管
5/6
60
0 – 63 = 关闭,64 – 127
= 接通
前面板的
亮度
88
0 – 127, 0 = 最小亮度(关
闭),127 = 最大亮度
通过常用的脚踏
开关,您可以接
通(最大亮度)
和关闭照明装
置,通过脚踏板
您可以从最大亮
度调暗至最小亮
度。
开关或踏板 - 其区别是什么?
开关仅可以识别两种状态:关闭 (0) 和接通 (127)。因此,您仅
可借此在最低值和最高值之间进行选择。踏板则相反可以发送 0
至 127 之间的任何数值。但是,这并不意味着,您不可以通过
踏板进行接通 - 其位于中间位置的下方,则表示关闭了其所分配
的功能,其位于中间位置的上方,则表示已对其进行了接通。
84
TriAmp Mark 3 – Manual 1.1
11 技术参数
通用电气数据
输入插口
6.3 mm 插口 (1/4"),非对称式
输出功率
最高可达 150 瓦
阻抗
1 M-Ohm
最大功耗
460 瓦
最大输入等级 / 1 kHz(放
大器 1A)
0 dBV
起动电流
100 V:27 A , 120 V:26 A ,
220 至 240 V:23 A
输入灵敏度 / 1 kHz(EQ 切
换至中间位置时,等级被调
至为最大设置)
效果器关闭
效果器接通
电源电压公差范围
+/-10
运行时的环境温度范围
0° 至 +35° C
放大器 1A:-33 dBV
放大器 1A:-37 dBV
电源保险丝,100 伏特
250 V / T 5 A
放大器 1B:-49 dBV
放大器 1B:-49 dBV
电源保险丝,120 伏特
250 V / T 5 A
放大器 2A:-56 dBV
放大器 2A:-56 dBV
电源保险丝,220-230 伏特
250 V / T 2 A
放大器 2B:-74 dBV
放大器 2B:-74 dBV
电源保险丝,240 伏特
250 V / T 2 A
放大器 3A:-76 dBV
放大器 3A:-76 dBV
阳极保险丝
T 800 mA
放大器 3B:-78 dBV
放大器 3B:-89 dBV
管式加热器保险丝
TT 15 A (Schurter 7040.3210)
1
9440008
7025/E83CC
(ECC83),高级
斯洛伐克
输入电子管(在所有声
道中均激活 )
2
9440001
12AX7A-C,可选。
中国
声道 1B(前置放大器
3
9440007
ECC83,可选。
斯洛伐克
声道 1A-1B(前置放大
器输出端)
4
9440007
ECC83,可选。
斯洛伐克
声道 2A-2B-3A-3B(
前置放大器)
5
9440007
ECC83,可选。
斯洛伐克
声道 2A-2B(前置放大
器输出端 )
6
9440007
ECC83,可选。
斯洛伐克
声道 3A(前置放大器
输出端)
7
9440007
ECC83,可选。
斯洛伐克
声道 3B(前置放大
器)
最大等级 / 1 kHz
+14 dBV
灵敏度 / 1 kHz(主机切换至
中间位置时,FX 等级被调至
为最大设置)
-10 dB-开关禁用
-10 dB-开关激活
0 dBV
-10 dBV
放大器电源输入插口
6.3 mm 插口 (1/4"),非对称式
阻抗
350 千欧姆
灵敏度 / 1 kHz(根据具体
声道)
+6 至 +10 dBV
• にほんご
功能
输出端
Red Box DI 输出
XLR,对称式
阻抗
2 千欧姆
输出等级
0 dBV(对称式)
+12 dBV
8
9440007
ECC83,可选。
斯洛伐克
FX 缓冲器(在所有声
道中均激活)
最大输出等级
9
9440007
ECC83,可选。
斯洛伐克
功放驱动器(在所有声
道中均激活)
FX 发送端-插口
6.3 mm 插口 (1/4"),非对称式
10
6000122
EL34B-STR,可选。
中国
功放电子管 1/2
(最大音量,EQ 切换至中间
位置)
-10 dB-开关禁用
-10 dB-开关激活
11
6000122
EL34B-STR,可选。
中国
功放电子管 1/2
阻抗
2.2 千欧姆
680 Ohm
12
6000120
6L6GC-STR,可选。
中国
功放电子管 3/4
最大等级 / 1kHz
-2 dBV
+8 dBV
13
6000120
6L6GC-STR,可选。
中国
功放电子管 3/4
14
6000120
6L6GC-STR,可选。
中国
功放电子管 5/6
15
6000120
6L6GC-STR,可选。
中国
功放电子管 5/6
放大器电源输出插口
6.3 mm 插口 (1/4"),非对称式
最大等级 / 1 kHz
+20 dBV
MIDI
乐器数字接口输入
7 针式(兼容 5 针式),20 V 直流电幻象
供电 (150 mA)
乐器数字接口输出/直通
5 针式
机械数据
功放电子管* / 输出功率
8 Ohm /
THD=10%
8 Ohm /
THD=5%
2x EL34
84 瓦
34 瓦
2x 6L6
72 瓦
30 瓦
4x 6L6
126 瓦
93 瓦
2x 6L6 + 2x EL34
132 瓦
95 瓦
4x 6L6 + 2x EL34(建议)
145 瓦
116 瓦
尺寸(宽 x 高 x 深)
740 x 393 x 254 mm
重量
22 公斤 / 48.5 磅
• Español
产地
• Italiano
型号
• Français
商品编号
22 千欧姆
• Deutsch
编
号
6.3 mm 插口 (1/4"),非对称式
阻抗
• English
电子管
FX-返回端-插口
• 中文
输入端
*交付状态下
85
TriAmp Mark 3 – Manual 1.1
86
TriAmp Mark 3 – Manual 1.1
87
Hughes & Kettner
Postfach 1509
66595 St. Wendel
Germany
Tel. +49 (0) 68 51 - 905 0
Fax +49 (0) 68 51 - 905 103
International Inquiries:
Fax: +49 - 68 51 - 905 200
[email protected]
www.hughes-and-kettner.com
9840239 D-2736
facebook.com/hughesandkettner
Copyrights 02/2015 by Music & Sales GmbH.
Subject to change without notice.