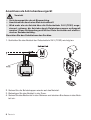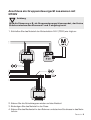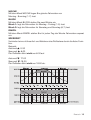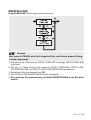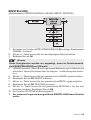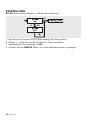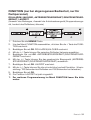
1
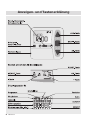
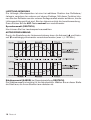
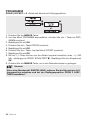
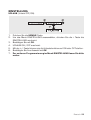
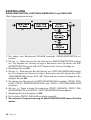
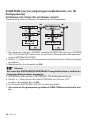
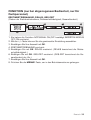
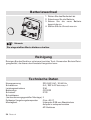
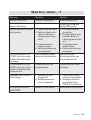
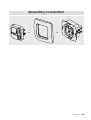
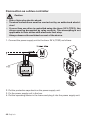
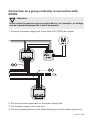
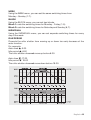
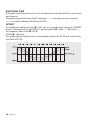
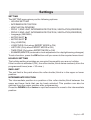
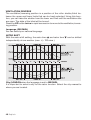
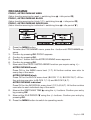
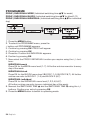
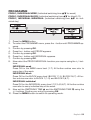
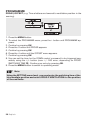
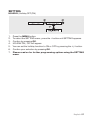
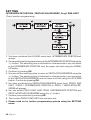
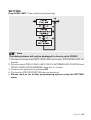
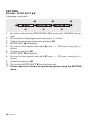
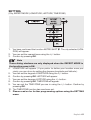
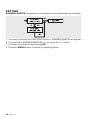
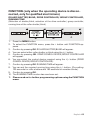
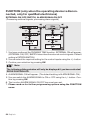
ZEL STG ZSU 24 V
Zeitschaltuhr 24 V
Timer 24 V
Inhaltsverzeichnis
Allgemeines............................................................................................... 4
Gewährleistung.......................................................................................... 4
Sicherheitshinweise................................................................................... 5
Bestimmungsgemäße Verwendung............................................................. 5
Anzeigen- und Tastenerklärung................................................................... 6
Montage/Anschluss................................................................................... 7
Erklärungen..............................................................................................10
Einstellungen............................................................................................15
Inbetriebnahme........................................................................................18
Werkseinstellung.......................................................................................18
Programmierung.......................................................................................19
Batteriewechsel....................................................................................... 34
Reinigung................................................................................................ 34
Technische Daten.................................................................................... 34
Was tun, wenn...?..................................................................................... 35
2
Contents
General................................................................................................... 36
Warranty.................................................................................................. 36
Safety Information.....................................................................................37
Intended use............................................................................................37
Explanation of displays and buttons........................................................... 38
Assembly/connection............................................................................... 39
Explanations............................................................................................ 42
Settings...................................................................................................47
Initial operation........................................................................................ 50
Default setting......................................................................................... 50
Programming............................................................................................51
Changing the battery................................................................................ 66
Cleaning.................................................................................................. 66
Technical data......................................................................................... 66
What to do if...?.........................................................................................67
3
Allgemeines
Die vom Werk mit aktuellem Datum und Uhrzeit (MEZ) ausgelieferte Zeitschaltuhr 24 V (TC52), steuert den Antrieb automatisch zu den Astrozeiten (Sonnenauf- und Untergangszeiten). Eine manuelle Bedienung der Zeitschaltuhr 24 V
(TC52) ist jederzeit möglich.
Durch den Batteriebetrieb ist auch bei abgezogenen Bedienteil eine Programmierung möglich, da die Anzeige erhalten bleibt.
Gewährleistung
Bauliche Veränderungen und unsachgemäße Installationen entgegen dieser
Anleitung und unseren sonstigen Hinweisen können zu ernsthaften Verletzungen von Körper und Gesundheit der Benutzer, z.B. Quetschungen, führen,
so dass bauliche Veränderungen nur nach Absprache mit uns und unserer
Zustimmung erfolgen dürfen und unsere Hinweise, insbesondere in der vorliegenden Montage- und Betriebsanleitung, unbedingt zu beachten sind.
Eine Weiterverarbeitung der Produkte entgegen deren bestimmungsgemäßen
Verwendung ist nicht zulässig.
Endproduktehersteller und Installateur haben darauf zu achten, dass bei Verwendung unserer Produkte alle, insbesondere hinsichtlich Herstellung des
Endproduktes, Installation und Kundenberatung, erforderlichen gesetzlichen
und behördlichen Vorschriften, insbesondere die einschlägigen aktuellen
EMV-Vorschriften, beachtet und eingehalten werden.
4 Deutsch
Sicherheitshinweise
Vorsicht
• Verletzungsgefahr durch Stromschlag.
• Anschlüsse an 230 V Netz müssen durch eine Elektrofachkraft erfolgen.
• Schalten Sie vor der Montage die Anschlussleitung spannungsfrei.
• Die Vorschriften der örtlichen Energieversorgungsunternehmen sowie die Bestimmungen für nasse und feuchte Räume nach VDE 100,
sind beim Anschluss einzuhalten.
• Nur in trockenen Räumen verwenden.
• Verwenden Sie nur unveränderte Roto Originalteile.
• Halten Sie Personen aus dem Fahrbereich der Anlagen fern.
• Halten Sie Kinder von Steuerungen fern.
• Beachten Sie Ihre landesspezifischen Bestimmungen.
• Verbrauchte Batterien fachgerecht entsorgen. Batterien nur durch
identischen Typ (CR 2032) ersetzen.
• Wird die Anlage durch ein oder mehrere Geräte gesteuert, muss der
Fahrbereich der Anlage während des Betriebes einsehbar sein.
• Für den Anschluss von Steuerleitungen (Schutzkleinspannungen)
dürfen nur Leitungstypen mit ausreichender Spannungsfestigkeit
verwendet werden.
• Gerät enthält verschluckbare Kleinteile.
Bestimmungsgemäße Verwendung
Die Zeitschaltuhr 24 V (TC52) darf nur für die Ansteuerung von Rollladen- und
Jalousieanlagen verwendet werden.
Der Anschluss von Fremdgeräten muss in Rücksprache mit dem Fachhandel
durchgeführt werden.
Deutsch 5
Anzeigen- und Tastenerklärung
6 Deutsch
Montage/Anschluss
Deutsch 7
Anschluss als Antriebssteuergerät
Vorsicht
• Verletzungsgefahr durch Stromschlag.
• Anschluss nur durch eine Elektrofachkraft!
• Wird mehr als ein Antrieb über die Zeitschaltuhr 24 V (TC52) angesteuert, müssen die Antriebe durch Relaissteuerungen entkoppelt
werden. Diese Entkopplung entfällt bei Roto-Antrieben mit elektronischer Endabschaltung.
Beachten Sie den Schaltstrom des Gerätes.
1.Schließen Sie das Netzteil der Zeitschaltuhr 24 V (TC52) wie folgt an:
2.Setzen Sie die Schutzkappen wieder auf das Netzteil.
3.Befestigen Sie das Netzteil in der Dose.
4.Setzen Sie das Bedienteil in den Rahmen und stecken Sie dieses in das Netzteil ein.
8 Deutsch
Anschluss als Gruppensteuergerät zusammen mit
NT24V
Achtung
Wird die Steuerung z.B. als Gruppensteuergerät verwendet, darf keine
Brücke zwischen den Klemmen L und C eingelegt sein!
1.Schließen Sie das Netzteil der Zeitschaltuhr 24 V (TC52) wie folgt an:
2.Setzen Sie die Schutzkappen wieder auf das Netzteil.
3.Befestigen Sie das Netzteil in der Dose.
4.Setzen Sie das Bedienteil in den Rahmen und stecken Sie dieses in das Netzteil ein.
Deutsch 9
Erklärungen
Rollladen-Auswahl
Bei der Rollladen¬Funktion fährt der Rollladen nach Betätigung einer Fahrtaste
in Selbsthaltung.
Jalousie-Auswahl
Bei der Jalousie¬Funktion fährt die Jalousie im Tippbetrieb, um eine genaue
Positionierung der Lamellen zu ermöglichen. Drücken Sie eine Fahrtaste länger
als 1 Sekunde, fährt die Jalousie in Selbsthaltung.
Nach Anfahren der programmierten Zwischen- und Endlagenposition wird automatisch eine Wendung der Lamellen durchgeführt (wenn die Wendeposition
programmiert wurde).
Hand/Auto Schiebeschalter
In der Schiebeschalterstellung „ “ werden nur manuelle Fahrbefehle ausgeführt (z.B.: AUF, STOP, AB per Tastendruck).
In der Schiebeschalterstellung „ “ werden automatische Fahrbefehle ausgeführt (z.B. Beschattungsfunktion, Dämmerungsfunktion, Zeit, Astrofunktion,...)
Notsignalkontrollleuchte
Ein Notsignal wird durch das Aufleuchten der Notsignalkontrollleuchte signalisiert. Von einem Notsignal spricht man, wenn ein dauerhaftes Schaltsignal an
den Gruppen- oder Einzelsteuereingängen für länger als 5 Sekunden anliegt.
Gruppensteuerung
Unter einer Gruppe versteht man die Steuerung mehrerer Antriebe zum gleichen Zeitpunkt.
Betriebsmodus
Sie sehen im Display die Uhrzeit und den akt. Betriebsmodus z.B. URLAUB
OK-Taste
Durch Drücken der OK-Taste, werden die aktuell angezeigten Werte gespeichert.
10 Deutsch
+/- Tasten
Folgende Bedienungen sind über + und - möglich:
• Menü -> Wert verändern
• Auto-Betrieb -> Informationen abfragen
• + Taste -> Nächste automatische Schaltzeit s
• - Taste -> Nächste automatische Schaltzeit t
• + Taste und OK Taste -> Astrozeit s
• - Taste und OK Taste -> Astrozeit t
MENUE-Taste
Durch Drücken der MENUE-Taste gelangen Sie in die Menüübersicht oder in
den Betriebsmodus.
Es erfolgt keine Speicherung des aktuell angezeigten Wertes.
RESET-Taste
Durch Drücken der RESET-Taste (mit einem Kugelschreiber oder Ähnlichem)
wird die Zeitschaltuhr 24 V (TC52) in die Werkseinstellung zurückgesetzt.
Ausnahme: Menüpunkt Funktion, Sprachauswahl und Stadtauswahl.
Uhrzeit/Datum
UHR/DAT
In diesem Menü stellen Sie die Uhrzeit und das Datum ein.
Programm
PROGRAMM
Im Menü PROGRAMM haben Sie die Möglichkeit, verschiedene Schaltzeiten
einzustellen:
1. PROG1
• Astro, Astro Abend, Individuell
• Woche (1-7)
• Block1/2 (1-5 und 6,7)
• Einzel (1, 2, 3, 4, 5, 6, 7)
2. PROG 2 (z.B. Mittagsruhe)
• Individuell
• Woche (1-7)
• Block1/2 (1-5 und 6,7)
• Einzel (1, 2, 3, 4, 5, 6, 7)
• OFFSET
Deutsch 11
ASTRO
Die Zeitschaltuhr 24 V (TC52) steuert automatisch den Rollladen oder die Jalousie zu den Sonnenauf- und Sonnenuntergangszeiten. Diese Zeiten gelten
als Richtwerte.
ASTRO ABEND
Steuert die Auffahrt nach der eingestellten Schaltzeit.
Abfahrt nach Astrofunktion.
INDIVIDUELL
Steuert die Auf- und Abfahrt nach den von Ihnen eingestellten Schaltzeiten.
12 Deutsch
WOCHE
Mit dem Menü WOCHE legen Sie gleiche Fahrzeiten von
Montag - Sonntag (1-7) fest.
BLOCK
Mit dem Menü BLOCK stellen Sie zwei Blöcke ein.
Block 1: legt die Fahrzeiten für Montag - Freitag (1-5) fest.
Block 2: legt die Fahrzeiten für Samstag und Sonntag (6,7) fest.
EINZEL
Mit dem Menü EINZEL stellen Sie für jeden Tag der Woche Fahrzeiten separat
ein.
SPERRZEIT
Verhindert ein zu frühes Auf- und Abfahren des Rollladens durch die Astro Funktion.
Beispiel:
Astrozeit s: 5:30
Sperrzeit s: 6:00
Der Rollladen fährt nicht vor 6:00 auf.
Astrozeit t: 17:00
Sperrzeit t: 18:00
Der Rollladen fährt nicht vor 18:00 ab.
Deutsch 13
SCHALTZEIT
Automatische Auf- und Abfahrzeiten für Rollladen und Jalousie.
Bei der Displayanzeige --:-- (zwischen der Uhrzeit 23:59 und 00:00) wird die
Schaltzeit nicht ausgeführt.
OFFSET
Mit dem Menü OFFSET kann eine zusätzliche Schaltzeit t programmiert werden. Diese ist abhängig von der PROG1 Schaltzeit t (max. +/- 240 Min.).
Beispiel:
Astrozeit t: 20:00
Offset t: +60 Min.
Der Rollladen fährt um 20.00 Uhr in Lüftungsposition und um 21.00 Uhr in die
untere Endlage.
14 Deutsch
Einstellungen
EINSTELLUNG
Im Menü EINSTELLUNG haben Sie folgende Möglichkeiten:
• URLAUB
• ZWISCHENPOSITION
• LUEFTUNG/WENDUNG
• PROG1 (ENDLAGE, ZWISCHENPOSITION, LUEFTUNG/WENDUNG)
• PROG2 (ENDLAGE, ZWISCHENPOSITION, LUEFTUNG/WENDUNG)
• Sprachauswahl (DEUTSCH)
• ASTROVERSCHIEBUNG s
• ASTROVERSCHIEBUNG t
• Städteauswahl (KASSEL)
• LAENGE (Erscheint nur bei EXPERT-MOD ON)
• BREITE (Erscheint nur bei EXPERT-MOD ON)
• ZEITZONE (Erscheint nur bei EXPERT-MOD ON)
• SO/WI (Automatische Sommer-/Winterzeitumstellung)
Um Einstellungen vornehmen zu können, drücken Sie die OK-Taste so oft, bis
Sie zu Ihrem gewünschten Menüpunkt kommen.
URLAUB
Die Urlaubsfunktion simuliert ein bewohntes Haus, während Sie im Urlaub sind.
Ist die Funktion aktiv (ON), fährt der Rollladen /Jalousie zeitversetzt zu den programmieren Zeiten (max.+ 30 Min.).
ENDLAGE
Als Endlage wird der Punkt beschrieben, an dem sich der Rollladen/Jalousie in
der oberen oder unteren Position befindet.
ZWISCHENPOSITION
Die Zwischenposition ist eine frei wählbare Position des Rollladens/Jalousie,
zwischen der oberen und unteren Endlage. Diese Position kann nach der Programmierung aus der oberen Position angefahren werden.
Dazu drücken Sie die AB-Taste zweimal kurz nacheinander.
Deutsch 15
LUEFTUNG/WENDUNG
Die Lüftungs-/Wendeposition ist eine frei wählbare Position des Rollladens/
Jalousie, zwischen der unteren und oberen Endlage. Mit dieser Funktion können Sie den Rollladen aus der unteren Endlage soweit wieder auffahren, bis die
Lüftungsschlitze geöffnet sind. Bei der Jalousie erfolgt die Lamellenwendung.
Dazu drücken Sie die AUF-Taste zweimal kurz nacheinander.
Sprachauswahl (DEUTSCH)
Hier können Sie Ihre Landessprache auswählen.
ASTROVERSCHIEBUNG
Durch die Einstellung der Astroverschiebung kann die Astrozeit s und Astrozeit t unabhängig voneinander verschoben werden (max. +/- 120 Min.).
Städteauswahl (KASSEL bei Spracheinstellung DEUTSCH)
Die Städteauswahl ist wichtig für die Astrofunktion. Wählen Sie an dieser Stelle
die Stadt aus, die Ihrem Standort am nächsten ist.
16 Deutsch
LAENGE/BREITE/ZEITZONE (nur bei EXPERTEN MODUS ON)
Ihre Koordinaten ermitteln Sie z.B. mit Hilfe eines Atlas.
SO/WI
SO/WI bezeichnet die automatische Sommer-/Winterzeitumschaltung.
Werkseinstellung ist ON; die Zeitschaltuhr passt sich automatisch an.
FUNKTION
Dieser Modus ist nur für ausgebildetes Fachpersonal bestimmt!
(Erscheint nur bei abgezogenem Bedienteil)
Im Menü FUNKTION haben Sie die Möglichkeit, folgende Funktionen einzustellen:
• ROLLLADEN/JALOUSIE (Auswahl des Behanges)
• ANTRIEBSSTEUERGERAET/GRUPPENSTEUERGERAET
• LAUFZEIT
• EXTERN (SCHALTER/OFF/ON) Schaltung externer Gruppeneingänge
• NOTSIGNAL
• EXPERTEN MODUS
• ERSTINBETRIEBNAHME (für Servicezwecke)
• RELAIS (für Servicezwecke)
• GES-ZEIT (für Servicezwecke)
ANTRIEBSSTEUERGERAET
Der Antrieb wird direkt an die Zeitschaltuhr 24 V (TC52) angeschlossen.
GRUPPENSTEUERGERAET
Die TC 52 steuert eine Gruppe an.
EXTERN OFF/ EXTERN ON/ EXTERN SCHALTER
• EXTERN OFF -> Gruppeneingänge sind immer ausgeschaltet.
• EXTERN ON -> Gruppeneingänge sind immer eingeschaltet.
• EXTERN SCHALTER -> Gruppeneingänge sind im Auto-Modus eingeschaltet, im Hand-Modus ausgeschaltet.
EXPERTEN MODUS
Ist Ihnen die Städteauswahl (EXPERTEN MODUS OFF) zu ungenau, können Sie
eine Feineinstellung über den Längen- und Breiten-Grad einstellen (EXPERTEN
MODUS ON).
Deutsch 17
Inbetriebnahme
Mit dem ersten Tastendruck „wecken“ Sie die Uhr auf. Sie können nun mit den
+/- Tasten die Sprache wählen und diese mir der OK Taste übernehmen. Die
Uhr befindet sich im Automatikmodus.
Werkseinstellung
UHR/DAT:
aktuelle MEZ und aktuelles Datum
PROGRAMM: ASTRO -> BLOCK ->
SPERRZEIT (1-5)
s 06:30 Uhr,
t keine voreingestellten Sperrzeiten
SPERRZEIT (6,7)
s 08:00 Uhr,
t keine voreingestellten Sperrzeiten
EINSTELLUNG:URLAUB OFF
ENDLAGE, Standort
SO/WI ON
FUNKTION:
ROLLLADEN, ANTRIEBSSTEUERGERAET, EXTERN SCHALTER,
NOTSIGNAL ON, EXPERTEN MODUS OFF
Hinweis
Durch Drücken der RESET-Taste (mit einem Kugelschreiber oder Ähnlichem) wird die Zeitschaltuhr 24 V (TC52) in die Werkseinstellung zurückgesetzt.
Ausnahme: Menü Funktion, Sprachauswahl und Städteauswahl.
18 Deutsch
Programmierung
Menüübersicht
1.Drücken Sie die MENUE-Taste UHR/DAT erscheint.
2.Um weitere Menüs auszuwählen, drücken Sie die +/- Tasten.
3.Drücken Sie die MENUE-Taste, um in den Betriebsmodus zu gelangen.
UHR/DAT (Uhrzeit und Datum einstellen)
1.Drücken Sie die MENUE-Taste, UHR/DAT erscheint.
2.Mit OK kommen Sie in den Menüpunkt Uhrzeit.
3.Stellen Sie jetzt mit der +/- Tasten die aktuelle Uhrzeit ein.
4.Ist die Uhrzeit eingestellt, bestätigen Sie mit OK.
5.Verfahren Sie mit der Einstellung JAHR, MONAT und TAG wie oben beschrieben. UHR/DAT erscheint.
6.Drücken Sie die MENUE-Taste, um in den Betriebsmodus zu gelangen.
Deutsch 19
PROGRAMM
PROG1/ ASTRO WOCHE (Astrofunktion für Woche + Sperrzeiten st)
PROG1/ ASTRO BLOCK (Astrofunktion für Block1/2 + Sperrzeiten st)
PROG1/ ASTRO EINZEL (Astrofunktion für Einzel + Sperrzeiten st)
1.Drücken Sie die MENUE-Taste.
2.Um das Menü PROGAMM auszuwählen, drücken Sie die + Taste bis PROGAMM erscheint.
3.Bestätigen Sie mit OK. PROG1 erscheint.
4.Bestätigen Sie mit OK.
5.Drücken Sie die + Taste, bis das Menü ASTRO erscheint.
6.Bestätigen Sie mit OK.
7.Wählen Sie jetzt mit +/- Ihre gewünschte PROG1 ASTRO Funktion aus:
ASTRO Woche
Mit OK kommen Sie in den Menüpunkt WOCHE (1-7). Alle weiteren Eingaben
beziehen sich jetzt auf jeden Tag der Woche.
ASTRO Block
Mit OK kommen Sie in den Menüpunkt BLOCK (BLOCK 1 1-5, BLOCK 2 6,7).
Alle weiteren Eingaben beziehen sich jetzt auf BLOCK 1 (1-5) und BLOCK 2
(6,7).
ASTRO Einzel
Mit OK kommen Sie in den Menüpunkt EINZEL (1,2,3,4,5,6,7). Alle weiteren
Eingaben beziehen sich jetzt auf jeden einzelnen Tag der Woche.
8.Mit den +/- Tasten stellen Sie jetzt die SPERRZEIT s und die SPERRZEIT t
ein. Bestätigen Sie jede Eingabe mit OK.
9.Drücken Sie die MENUE-Taste, um in den Betriebsmodus zu gelangen.
20 Deutsch
PROGRAMM
PROG1/ ASTRO ABEND WOCHE
(Astrofunktion Abend für Woche + Schaltzeit s + Sperrzeit t)
PROG1/ ASTRO ABEND BLOCK
(Astrofunktion Abend für Block1/2 + Schaltzeit s + Sperrzeit t)
PROG1/ ASTRO ABEND EINZEL
(Astrofunktion Abend für Einzel + Schaltzeit s + Sperrzeit t)
1. Drücken Sie die MENUE-Taste.
2. Um das Menü PROGAMM auszuwählen, drücken Sie die + Taste bis PROGAMM erscheint.
3. Bestätigen Sie mit OK. PROG1 erscheint.
4. Bestätigen Sie mit OK.
5. Drücken Sie die + Taste, bis das Menü ASTRO ABEND erscheint
6. Bestätigen Sie mit OK.
7. Wählen Sie jetzt mit +/- Ihre gewünschte PROG1 ASTRO ABEND Funktion
aus:
ASTRO ABEND Woche
Mit OK kommen Sie in den Menüpunkt WOCHE (1-7). Alle weiteren Eingaben beziehen sich jetzt auf jeden Tag der Woche.
ASTRO ABEND Block
Mit OK kommen Sie in den Menüpunkt BLOCK (BLOCK 1 1-5, BLOCK 2
6,7). Alle weiteren Eingaben beziehen sich jetzt auf BLOCK 1 (1-5) und
BLOCK 2 (6,7).
ASTRO ABEND Einzel
Mit OK kommen Sie in den Menüpunkt EINZEL (1,2,3,4,5,6,7). Alle weiteren Eingaben beziehen sich jetzt auf jeden einzelnen Tag der Woche.
8. Mit den +/- Tasten, stellen Sie jetzt die SCHALTZEIT s ein. Bestätigen Sie
die Eingabe mit OK.
9. Mit den +/- Tasten, stellen Sie jetzt die SPERRZEIT t ein. Bestätigen Sie
die Eingabe mit OK.
10. Drücken Sie die MENUE-Taste, um in den Betriebsmodus zu gelangen.
Deutsch 21
PROGRAMM
PROG1/ INDIVIDUELL WOCHE (Individuelle Schaltzeit st für Woche)
PROG1/ INDIVIDUELL BLOCK (Individuelle Schaltzeit st für Block1/2)
PROG1/ INDIVIDUELL EINZEL (Individuelle Schaltzeit st für Einzel)
1.Drücken Sie die MENUE-Taste.
2.Um das Menü PROGAMM auszuwählen, drücken Sie die + Taste bis PROGAMM erscheint.
3.Bestätigen Sie mit OK. PROG1 erscheint.
4.Bestätigen Sie mit OK.
5.Drücken Sie die + Taste INDIVIDUELL erscheint.
6.Bestätigen Sie mit OK.
7.Wählen Sie jetzt mit +/- Ihre gewünschte PROG1 INDIVIDUELL Funktion aus:
INDIVIDUELL Woche
Mit OK kommen Sie in den Menüpunkt WOCHE (1-7). Alle weiteren Eingaben
beziehen sich jetzt auf jeden Tag der Woche.
INDIVIDUELL Block
Mit OK kommen Sie in den Menüpunkt BLOCK (BLOCK 1 1-5, BLOCK 2 6,7).
Alle weiteren Eingaben beziehen sich jetzt auf BLOCK 1 (1-5) und BLOCK 2
(6,7).
INDIVIDUELL Einzel
Mit OK kommen Sie in den Menüpunkt EINZEL (1,2,3,4,5,6,7). Alle weiteren
Eingaben beziehen sich jetzt auf jeden einzelnen Tag der Woche.
8.Mit den +/- Tasten stellen Sie jetzt die SCHALTZEIT s und die SCHALTZEIT
t ein. Bestätigen Sie jede Eingabe mit OK.
9.Drücken Sie die MENUE-Taste, um in den Betriebsmodus zu gelangen.
22 Deutsch
PROGRAMM
PROG2/ INDIVIDUELL WOCHE (Individuelle Schaltzeit st für Woche)
PROG2/ INDIVIDUELL BLOCK (Individuelle Schaltzeit st für Block1/2)
PROG2/ INDIVIDUELL EINZEL (Individuelle Schaltzeit st für Einzel)
1. Drücken Sie die MENUE-Taste.
2. Um das Menü PROGAMM auszuwählen, drücken Sie die + Taste bis PROGAMM erscheint.
3. Bestätigen Sie mit OK.
4. Drücken Sie die + Taste PROG2 erscheint.
5. Bestätigen Sie mit OK.
6. Drücken Sie die + Taste bis INDIVIDUELL erscheint.
7. Bestätigen Sie mit OK.
8. Wählen Sie jetzt mit +/- Ihre gewünschte PROG2 INDIVIDUELL Funktion
aus:
INDIVIDUELL Woche:
Mit OK kommen Sie in den Menüpunkt WOCHE (1-7). Alle weiteren Eingaben beziehen sich jetzt auf jeden Tag der Woche.
INDIVIDUELL Block:
Mit OK kommen Sie in den Menüpunkt BLOCK (BLOCK 1 (1-5), BLOCK
2 (6,7). Alle weiteren Eingaben beziehen sich jetzt auf BLOCK 1 (1-5) und
BLOCK 2 (6,7).
INDIVIDUELL Einzel
Mit OK kommen Sie in den Menüpunkt EINZEL (1,2,3,4,5,6,7). Alle weiteren Eingaben beziehen sich jetzt auf jeden einzelnen Tag der Woche.
9. Mit den +/- Tasten stellen Sie jetzt die SCHALTZEIT s und die SCHALTZEIT
t ein. Bestätigen Sie jede Eingabe mit OK.
10. Drücken Sie die MENUE-Taste, um in den Betriebsmodus zu gelangen.
Deutsch 23
PROGRAMM
PROG2/OFFSET (z.B. Abfahrzeit Abend auf Lüftungsposition)
1.Drücken Sie die MENUE-Taste.
2.Um das Menü PROGAMM auszuwählen, drücken Sie die + Taste bis PROGAMM erscheint.
3.Bestätigen Sie mit OK.
4.Drücken Sie die + Taste PROG2 erscheint.
5.Bestätigen Sie mit OK.
6.Drücken Sie die + Taste, bis das Menü OFFSET erscheint.
7.Bestätigen Sie mit OK.
8.Mit der +/- Taste können sie die Abfahrt separat einstellen (max. +/- 240
Min., abhängig von PROG1 SCHALTZEIT t). Bestätigen Sie Ihre Eingabe mit
OK.
9.Drücken Sie die MENUE-Taste, um in den Betriebsmodus zu gelangen.
Hinweis
Unter dem Menüpunkt EINSTELLUNG, müssen Sie die Fahrzeit der Lüftungsposition angeben und bei der Endlagenposition PROG 2 LUEFTUNG auswählen.
24 Deutsch
EINSTELLUNG
URLAUB (Urlaub OFF/ON)
1. Drücken Sie die MENUE-Taste.
2. Um das Menü EINSTELLUNG auszuwählen, drücken Sie die + Taste bis
EINSTELLUNG erscheint.
3. Bestätigen Sie mit OK.
4. URLAUB ON / OFF erscheint.
5. Mit der +/- Taste können sie die Urlaubsfunktion auf ON oder OFF stellen.
6. Bestätigen Sie Ihre Auswahl mit OK.
7. Zur weiteren Programmierung im Menü EINSTELLUNG lesen Sie bitte
weiter.
Deutsch 25
EINSTELLUNG
ZWISCHENPOSITION, LUEFTUNG/WENDUNG, Prog1 ENDLAGE
(Zeit/Lageprogrammierung)
1.Sie haben den Menüpunkt URLAUB bestätigt. ZWISCHENPOSITION erscheint.
2.Mit der +/- Taste können Sie die Fahrzeit zur ZWISCHENPOSITION einstellen. Die Angabe der Fahrzeit erfolgt in Sekunden oder Sie fahren die ZWISCHENPOSITION mit der AB-/AUF-Taste aus der oberen Endlage an.
3.Bestätigen Sie mit OK.
4.Mit der +/- Taste können Sie die Fahrzeit zur LUEFTUNG/WENDUNG einstellen. Die Angabe der Fahrzeit erfolgt in Sekunden oder Sie fahren die LUEFTUNG/WENDUNG mit der AUF-/AB -Taste aus der unteren Endlage an. Bestätigen Sie mit OK.
5.Sie haben den Menüpunkt LUEFTUNG/WENDUNG bestätigt. PROG1 ENDLAGE/ PROG1 ZWISCHENPOSITION oder PROG1 LUEFTUNG/WENDUNG
erscheint.
6.Mit der +/- Taste können Sie zwischen PROG1 ENDLAGE, PROG1 ZWISCHENPOSITION und PROG1 LUEFTUNG/WENDUNG auswählen.
7.Bestätigen Sie Ihre Auswahl mit OK.
8.Die Funktion PROG1 ENDLAGE ist jetzt eingestellt.
9.Zur weiteren Programmierung im Menü EINSTELLUNG lesen Sie bitte
weiter.
26 Deutsch
EINSTELLUNG
Prog2 ENDLAGE (Zeit/Lageprogrammierung)
Hinweis
Nur wenn in PROG2 eine Zeit eingestellt ist, wird Ihnen dieses Dialogfenster angezeigt.
1.Sie haben den Menüpunkt PROG1 ENDLAGE bestätigt. PROG2 ENDLAGE
erscheint.
2.Mit der +/- Taste können Sie zwischen PROG 2 ENDLAGE, PROG 2 ZWISCHENPOSITION und PROG 2 LUEFTUNG/WENDUNG auswählen.
3.Bestätigen Sie Ihre Auswahl mit OK.
4.Die Funktion PROG2 ENDLAGE ist jetzt eingestellt.
5.Zur weiteren Programmierung im Menü EINSTELLUNG lesen Sie bitte
weiter.
Deutsch 27
EINSTELLUNG
DEUTSCH/ ASTROVERSCHIEBUNG st
(Sprachauswahl, Astroverschiebung)
1. Sie haben den Menüpunkt PROG2 ENDLAGE bestätigt. DEUTSCH erscheint.
2. Mit der +/- Taste können Sie die gewünschte Sprache einstellen.
3. Bestätigen Sie Ihre Sprachauswahl mit OK.
4. ASTROVERSCHIEBUNG s erscheint.
5. Mit der +/- Taste können Sie die gewünschte Astroverschiebung s einstellen (max. +/- 120 Min.)
6. Bestätigen Sie mit OK.
7. ASTROVERSCHIEBUNG t erscheint.
8. Mit der +/- Taste können Sie die gewünschte Astroverschiebung t einstellen (max. +/- 120 Min.)
9. Bestätigen Sie mit OK.
10. Die Funktion ASTROVERSCHIEBUNG t ist jetzt eingestellt.
11. Zur weiteren Programmierung im Menü EINSTELLUNG lesen Sie bitte
weiter.
28 Deutsch
EINSTELLUNG
(Städteauswahl, EXPERTEN MODUS (LAENGE, BREITE, ZEITZONE)
1. Sie haben die Funktion ASTROVERSCHIEBUNG t bestätigt. Stadtauswahl
(KASSEL) erscheint.
2. Mit der +/- Taste können Sie die nächstgelegene Stadt einstellen.
3. Betätigen Sie mit OK.
Hinweis
Diese Dialogfenster werden nur angezeigt, wenn im Funktionsmenü
der EXPERTEN MODUS auf ON steht.
4. LAENGE erscheint. (Wenn Sie eine genauere Bestimmung ihres Standortes
wünschen, können Sie diesen über die Längen-/ und Breitengrade einstellen.)
5. Mit der +/- Taste können Sie den gewünschten LAENGE-ngrad einstellen.
6. Bestätigen Sie mit OK. BREITE erscheint.
7. Mit der +/- Taste können Sie den gewünschten BREITE-ngrad einstellen.
8. Bestätigen Sie mit OK. ZEITZONE erscheint.
9. Mit der +/- Taste können Sie die gewünschte ZEITZONE in der Sie sich
befinden einstellen. Bestätigen Sie mit OK.
10. Die Funktion ZEITZONE ist jetzt eingestellt.
11. Zur weiteren Programmierung im Menü EINSTELLUNG lesen Sie bitte
weiter.
Deutsch 29
EINSTELLUNG
SO/WI (Automatische Sommer-/Winterzeitumstellung)
1.Sie haben die Funktion ZEITZONE bestätigt. SO/WI erscheint.
2.Mit der +/- Taste können Sie SO/WI ein- oder ausschalten.
3.Bestätigen Sie Ihre Auswahl mit OK.
4.Drücken Sie die MENUE-Taste, um in den Betriebsmodus zu gelangen.
30 Deutsch
FUNKTION (nur bei abgezogenem Bedienteil, nur für
Fachpersonal)
ROLLLADEN/JALOUSIE, ANTRIEBSSTEUERGERAET/GRUPPENSTEUERGERAET, LAUFZEIT
(Auswahl des Behanges, Auswahl als Antriebssteuergerät/Gruppensteuergerät, Laufzeit des Rollladens/Jalousie)
1. Drücken Sie die MENUE-Taste.
2. Um das Menü FUNKTION auszuwählen, drücken Sie die + Taste bis FUNKTION erscheint.
3. Bestätigen Sie mit OK. ROLLLADEN/JALOUSIE erscheint.
4. Mit der +/- Taste können Sie zwischen Rollladen/Jalousie auswählen.
5. Bestätigen Sie mit OK. ANTRIEBSSTEUERGERAET/GRUPPENSTEUERGERAET erscheint.
6. Mit der +/- Taste können Sie das gewünschte Steuergerät (ANTRIEBSSTEUERGERAET/GRUPPENSTEUERGERAET) auswählen.
7. Bestätigen Sie mit OK. LAUFZEIT erscheint.
8. Mit der +/- Taste können Sie die erforderliche Laufzeit Einstellen. (Voreinstellung: 120 Sekunden bei Rollladen und 180 Sekunden bei Jalousien).
9. Bestätigen Sie mit OK.
10. Die Funktion LAUFZEIT ist jetzt eingestellt.
11. Zur weiteren Programmierung im Menü FUNKTION lesen Sie bitte
weiter.
Deutsch 31
FUNKTION (nur bei abgezogenem Bedienteil, nur für
Fachpersonal)
EXTERN ON/OFF/SCHALTER, NOTSIGNAL ON/OFF
(Verarbeitung externer Signale, Verarbeitung von Notsignalen)
1.Sie haben die Funktion LAUFZEIT bestätigt. EXTERN ON erscheint. (EXTERN
ON/ OFF/SCHALTER bezeichnet die externen Steuersignale. Werkseinstellung ist EXTERN SCHALTER)
2.Mit der +/- Taste können Sie die gewünschte Einstellung der Steuereingänge
auswählen.
3.Bestätigen Sie Ihre Auswahl mit OK.
Hinweis
Nur wenn Sie ANTRIEBSSTEUERGERAET ausgewählt haben, wird Ihnen
folgendes Dialogfenster angezeigt.
4.NOTSIGNAL ON erscheint. (NOTSIGNAL ON ist Werkseinstellung)
5.Mit der +/- Taste können Sie das NOTSIGNAL auf ON oder OFF
schalten. Bestätigen Sie mit OK.
6.Die Funktion NOTSIGNAL ON/OFF ist jetzt eingestellt.
7.Zur weiteren Programmierung im Menü FUNKTION lesen Sie bitte weiter.
32 Deutsch
FUNKTION (nur bei abgezogenem Bedienteil, nur für
Fachpersonal)
ERSTINBETRIEBNAHME, RELAIS, GES-ZEIT
(Datum der Erstinbetriebnahme, Relaisschalthäufigkeit, Gesamtlaufzeit)
1.Sie haben die Funktion NOTSIGNAL ON/OFF bestätigt EXPERTEN MODUS
OFF/ON erscheint.
2.Mit der +/- Taste können Sie die gewünschte Einstellung auswählen.
3.Bestätigen Sie Ihre Auswahl mit OK.
4.ERSTINBETRIEBNAHME erscheint.
5.Bestätigen Sie mit OK. RELAIS erscheint. (RELAIS bezeichnet die Relaisschalthäufigkeit.)
6.Betätigen Sie mit OK. GES-ZEIT erscheint. (GES-ZEIT bezeichnet die Gesamtlaufzeit der Uhr.)
7.Bestätigen Sie Ihre Auswahl mit OK.
8.Drücken Sie die MENUE-Taste, um in den Betriebsmodus zu gelangen.
Deutsch 33
Batteriewechsel
1. Ziehen Sie das Bedienteil ab.
2.Entnehmen Sie die Batterie.
3.Setzen Sie die neue Batterie
lagerichtig ein.
4.Stellen Sie die Uhrzeit neu ein.
Hinweis
Die eingestellten Werte bleiben erhalten.
Reinigung
Reinigen Sie das Gerät nur mit einem feuchten Tuch. Verwenden Sie kein Reinigungsmittel, da dieses den Kunststoff angreifen kann.
Technische Daten
Nennspannung
230-240 V AC / 50-60 Hz
Schaltstrom
5 A / 250 V AC bei cos ϕ=1
Leistungsaufnahme
2 VA
Batterietyp
CR 2032
Schutzart
IP 20
Schutzklasse
(bei bestimmungsgemäßer Montage) II
Zulässige Umgebungstemperatur
0 bis +55 °C
Montageart
Unterputz Ø 58 mm Wandeinbau
Aufputz in entsprechendem.
AP-Gehäuse
34 Deutsch
Was tun, wenn...?
Störung
Ursache
Abhilfe
Antrieb läuft nicht.
Falscher Anschluss.
Anschluss prüfen.
Antrieb läuft in die
falsche Richtung.
Falscher Anschluss.
Drähte s und t am
Netzteil tauschen.
Astroprogramm schaltet
nicht genau.
1.Datum stimmt nicht.
2.Falsche Stadt oder
falschen Breiten-/
Längengrad eingestellt.
1.Richtiges Datum
einstellen.
2.Richtige Stadt oder
exakten Breiten-/
Längengrad einstellen.
3.Urlaubsfunktion
ausschalten.
4.Astroverschiebung
anpassen.
3.Urlaubsfunktion
eingeschaltet.
4.Astroverschiebung
ist eingestellt.
Die Zeitschaltuhr 24 V
(TC52) führt die eingestellten Schaltbefehle
nicht aus.
Der Schiebeschalter
steht auf Handbetrieb.
Stellen Sie den
Schiebeschalter auf
Automatikbetrieb.
Die Zeitschaltuhr 24 V
(TC52) führt die eingestellten Schaltbefehle
ungenau aus.
Urlaubsfunktion ist
eingeschaltet.
Urlaubsfunktion ausschalten.
Rollladen fährt nicht in
die Endlage.
1.Laufzeit zu kurz
eingestellt.
2.Endlagenposition
nicht eingestellt.
1.Laufzeit im Funktionsmenü anpassen.
2.Endlagenposition
im Einstellmenü
PROG1/2 einstellen.
Im Display erscheint
„BATTERIE“.
Batterie ist schwach.
Neue Batterie einlegen.
Deutsch 35
General
The timer 24 V (TC52), delivered from the factory with the current date and time
(GMT), automatically controls the drive at the astro times (sunrise and sunset).
It is possible to manually operate the timer 24 V (TC52) at any time.
Battery operation makes it also possible to programme the drive when the operating device is disconnected since the display is maintained.
Warranty
Structural modifications and incorrect installation which are not in accordance
with these and our other instructions can result in serious injuries, e.g. crushing
of limbs. Therefore, structural modifications should only be carried out with our
prior approval and in accordance with our instructions, particularly the information contained in these Assembly and Operating Instructions.
Any further processing of the products which does not comply with their intended use is not permitted.
The end product manufacturer and fitter have to ensure that all the current statutory, official regulations and, in particular, EMC regulations are adhered to during utilisation of our products, especially with regard to end product assembly,
installation and customer advice.
36 Englisch
Safety Information
Caution
• Risk of injury through an electric shock.
• Terminal connections to a 230 V network must be carried out by an
authorised electrician.
• Before assembly, disconnect the power lead from the supply.
• The provisions of the local public utilities and stipulations for wet and
damp rooms in accordance with VDE 100 are to be observed when
the system is connected.
• Use in dry rooms only.
• Use only unmodified Roto original parts.
• Keep persons away from the systems guide track.
• Keep away from controls.
• Please comply with national stipulations.
• Dispose of used batteries properly.
Replace batteries with an identical type (CR 2032) only.
• If the system is controlled by one or several devices, the system
guide track must be visible during operation.
• Only types of cable with sufficient electric strength can be used for
connecting control cables (protective low voltages).
• The equipment contains small parts that could be swallowed.
Intended use
The timer 24 V (TC52) may only be used for controlling roller shutter and venetian blind systems.
Connection of other devices must be carried out in consultation with specialised
dealers.
Englisch 37
Explanation of displays and buttons
38 Englisch
Assembly/connection
Englisch 39
Connection as a drive controller
Caution
• Risk of injury by electric shock.
• Terminal connections must be carried out by an authorised electrician!
• If more than one drive is controlled using the timer 24 V (TC52), the
drives must be decoupled by relay controls. This decoupling is not
applicable to Roto drives with electronic limit stop.
Always observe the switched current of the device.
1.Connect the power supply unit to the timer 24 V (TC52) as follows:
2.Put the protective caps back on the power supply unit.
3.Fix the power supply unit in the box.
4.Put the operating device in the frame and plug it into the power supply unit.
40 Englisch
Connection as a group controller in connection with
NT24V
Attention
If the control is used as a group control device, for example, no bridge
can be inserted between the L and C terminals!
1.Connect the power supply unit to the timer 24 V (TC52) as follows:
2.Put the protective caps back on the power supply unit.
3.Fix the power supply unit in the box.
4.Put the operating device in the frame and plug it into the power supply unit.
Englisch 41
Explanations
Selecting roller shutter
When the roller shutter function is used, the roller shutter remains locked after a
control button has been activated.
Selecting venetian blind
When the venetian blind function is being used, the venetian blind moves in
non¬maintained command mode in order to allow the slats to be positioned
more precisely. If you press and hold a control button for longer than 1 second,
the venetian blind will remain locked.
After the programmed intermediate position respectively lower final position has
been reached, the slats will be automatically adjusted (provided the reverse position has been programmed).
MAN/AUTO sliding switch
In the “ ” sliding switch setting, only manual command controls are carried out
(e.g.: UP, STOP, DOWN by pressing the relevant buttons).
In the “ ” sliding switch setting, automatic command controls are carried out
(e.g. shade function, twilight function, time, astro function,...)
Alarm signal control light
When the alarm signal control light is illuminated, this indicates an alarm signal.
If there is a permanent switching signal at the group or individual control inputs
for more than 5 seconds, it is an alarm signal.
Group control
Group control is control of several drives at the same time.
Operating mode
You will see the time and the current operating mode e.g. HOLIDAY in the display.
OK button
When the OK button is pressed, the currently displayed values are saved.
42 Englisch
+/- buttons
The following operations are possible using the + and - buttons:
• Menu -> change value
• Auto mode -> request information
• + button -> next automatic switching time s
• - button -> next automatic switching time t
• + button and OK Taste -> astro time s
• - button and OK Taste -> astro time t
MENU button
By pressing the MENU button, you can see an overview of the menu or the
operating mode.
The currently displayed values are not saved.
RESET button
When the RESET button is pressed (with a ballpoint pen or similar), the timer 24
V (TC52) reverts to the default setting.
Except menu levels of function, language and city.
Time/date
TIME/DATE
This menu is used to set the time and the date.
Programme
PROGRAMME
The PROGRAMME menu allows you to set various switching times:
1. PROG1
• Astro , astro evening, individual
• week (1-7)
• block 1/2 (1-5 and 6,7)
• individual (1, 2, 3, 4, 5, 6, 7)
2. PROG 2 (e.g. lunch break)
• Individual
• week (1-7)
• block 1/2 (1-5 and 6,7)
• individual (1, 2, 3, 4, 5, 6, 7)
• OFFSET
Englisch 43
ASTRO
The timer 24 V (TC52) automatically controls the roller shutters or venetian
blinds at sunrise and sunset. These times are used as guidelines.
ASTRO EVENING
Shutters are raised according to the set switching time.
Shutters are lowered according to the astro function.
INDIVIDUAL
Triggers the UP and DOWN control commands according to the switching times
you have set.
44 Englisch
WEEK
Using the WEEK menu, you can set the same switching times from
Monday - Sunday (1-7).
BLOCK
Using the BLOCK menu, you can set two blocks.
Block 1: sets the switching times for Monday - Friday (1-5).
Block 2: sets the switching times for Saturday and Sunday (6,7).
INDIVIDUAL
Using the INDIVIDUAL menu, you can set separate switching times for every
day of the week.
IDLE PERIOD
Prevents the roller shutter from moving up or down too early because of the
astro function.
For example:
Astro time s: 5:30
Idle period s: 6:00
The roller shutter does not move up before 6:00.
Astro time t: 17:00
Idle period t: 18:00
The roller shutter does not move down before 18:00.
Englisch 45
SWITCHING TIME
Automatic switching times for roller shutters and venetian blinds to be raised
and lowered.
Programming will not take effect if the sign: --:-- is showing on your display.
(--:-- is located between 23.59 and 00:00).
OFFSET
An additional switching time t (OK) can be programmed using the OFFSET
menu. This depends on the PROG 1 switching time t (max. +/- 240 mins.).
For example: astro time t: 20:00
Offset t: +60 mins.
The roller shutter moves to the intermediate position at 20.00 and to the lower
end limit at 21.00.
46 Englisch
Settings
SETTING
The SETTING menu gives you the following options:
• HOLIDAY SETTING
• INTERMEDIATE POSITION
• VENTILATION/REVERSE
• PROG 1 (END LIMIT, INTERMEDIATE POSITION, VENTILATION/REVERSE)
• PROG 2 (END LIMIT, INTERMEDIATE POSITION, VENTILATION/REVERSE)
• Language (GB ENGL)
• ASTRO SHIFT s
• ASTRO SHIFT t
• City (LONDON)
• LONGITUDE (Only when EXPERT MODE is ON)
• LATITUDE (Only when EXPERT MODE is ON)
• TIME ZONE (Only when EXPERT MODE is ON)
• SUMMER/WINTER (automatic clock adjustment for daylight saving changes)
To set a function, press the OK button until you come to the required menu level.
HOLIDAY SETTING
The holiday setting simulates an occupied house while you are on holiday.
If the function is activated (ON), the roller shutter/blind varies randomly from the
programmed times (max.+ 30 mins.).
END LIMIT
The end limit is the point where the roller shutter/blind is in the upper or lower
position.
INTERMEDIATE POSITION
The intermediate position is a position of the roller shutter/blind between the
upper and lower limits that can be freely selected. This position can also be
reached from the upper position after programming.
Press the DOWN button twice in rapid succession to move to the intermediate
position.
Englisch 47
VENTILATION/REVERSE
The ventilation/reversing position is a position of the roller shutter/blind between the upper and lower limits that can be freely selected. Using this function, you can raise the shutter from the lower end limit until the ventilation slits
are open. The slats of the blind will be turned.
Press the UP button twice in rapid succession to move to the ventilation/reversing position.
Language (GB ENGL)
You can select your national language.
ASTRO SHIFT
With the astro shift setting, the astro time s and astro time t can be shifted
independently of one another (max. +/- 120 mins.).
City (LONDON when the language is set to GB ENGL
It is important to select a city for the astro function. Select the city nearest to
where you are located.
48 Englisch
LONGITUDE/LATITUDE/TIME ZONE (only when EXPERT MODE is ON)
You can find out your coordinates, for example, with the aid of an atlas.
SUMMER/WINTER
SUMMER/WINTER describes the automatic clock adjustment for daylight saving changes. If the default setting is ON, the time switch adjusts automatically.
FUNCTION
This mode is only intended for qualified electricians!
(Will only appear when the operating device is disconnected)
The FUNCTION menu gives you the option of setting the following functions:
• ROLLER SHUTTER/BLIND (select either shutter or blind)
• DRIVE CONTROLLER/GROUP CONTROLLER
• RUNNING TIME
• EXTERNAL (SWITCH/OFF/ON) Switches external group inputs
• ALARM SIGNAL
• EXPERT MODE
• INITIAL OPERATION (for purposes of service)
• RELAY (for purposes of service)
• TOTAL RUNNING TIME (for purposes of service)
DRIVE CONTROLLER
The drive is connected directly to the timer 24 V (TC52).
GROUP CONTROLLER
The timer 24 V (TC52) controls a group.
EXTERNAL OFF/EXTERNAL ON/EXTERNAL SWITCH
• EXTERNAL OFF -> group inputs are always switched off.
• EXTERNAL ON -> group inputs are always switched on.
• EXTERNAL SWITCH -> group inputs are switched on in auto mode, switched
off in manual mode.
EXPERT MODE
If selecting the city (EXPERT MODE OFF) is not precise enough, you can make a
fine adjustment by setting the degrees of longitude and latitude (EXPERT MODE
ON).
Englisch 49
Initial operation
Press the button once to „wake up“ the timer. Now you can select the language
with the +/- buttons and accept it with the OK button. The clock is in automatic
mode.
Default setting
TIME/DATE:
current GMT and current date
PROGRAMME: ASTRO -> BLOCK -> IDLE PERIOD (1-5)
s 06:30,
t no default idle period
IDLE PERIOD (6,7)
s 08:00,
t no default idle period
SETTING:
HOLIDAY OFF
END LIMIT, location
SUMMER/WINTER ON
FUNCTION:
ROLLER SHUTTER, DRIVE CONTROLLER, EXTERNAL SWITCH,
ALARM SIGNAL ON, EXPERT MODE OFF
Note
When the RESET button is pressed (with a ballpoint pen or similar), the
timer 24 V (TC52) reverts to the default setting.
Except menu levels of function, language and city.
50 Englisch
Programming
Operating mode Overview of the menu
1.Press the MENU button until TIME/DATE appears.
2.To select further menus, press the +/- buttons.
3.Press the MENU button to switch to operating mode.
TIME/DATE (to set the time and date)
1.Press the MENU button until TIME/DATE appears.
2.By pressing OK, you get to the time menu level.
3.Now set the current time using the +/- buttons.
4.If the time is set correctly, confirm by pressing OK.
5.Repeat the above procedure for the settings YEAR, MONTH and DAY. TIME/
DATE appears.
6.Press the MENU button to switch to operating mode.
Englisch 51
PROGRAMME
PROG1/ ASTRO WEEK (Astro function for week + idle period st)
PROG1/ ASTRO BLOCK (Astro function for block1/2 + idle period st)
PROG1/ ASTRO INDIVIDUAL (Astro function for individual + idle period st)
1.Press the MENU button.
2.To select the PROGAMME menu, press the
+ button until PROGAMME appears.
3.Confirm by pressing OK. PROG1 appears.
4.Confirm by pressing OK.
5.Press the + button until the ASTRO menu appears.
6.Confirm by pressing OK.
7.Now select the PROG1 ASTRO function you require using the +/- buttons:
ASTRO week
Press OK for the WEEK menu level (1-7). All further entries now refer to every
day of the week.
ASTRO block
Press OK for the BLOCK menu level (BLOCK 1 1-5, BLOCK 2 6,7). All further
entries now refer to BLOCK 1 (1-5) and BLOCK 2 (6,7).
ASTRO individual
Press OK for the INDIVIDUAL menu level (1,2,3,4,5,6,7).
All further entries now refer to each individual day of the week.
8.Now set the IDLE PERIOD sand IDLE PERIOD t using the +/- buttons. Confirm each entry by pressing OK.
9.Press the MENU button to switch to operating mode.
52 Englisch
PROGRAMME
PROG1/ ASTRO EVENING WEEK
(Astro function evening for week + switching time s + idle period t)
PROG1/ ASTRO EVENING BLOCK
(Astro function evening for block 1/2 + switching time s + idle period t)
PROG1/ ASTRO EVENING INDIVIDUAL
(Astro function evening for individual + switching time s+ idle period t)
1. Press the MENU button.
2. To select the PROGAMME menu, press the + button until PROGAMME appears.
3. Confirm by pressing OK. PROG1 appears.
4. Confirm by pressing OK.
5. Press the + button until the ASTRO EVENING menu appears.
6. Confirm by pressing OK.
7. Now select the PROG1 ASTRO ABEND function you require using +/- :
ASTRO EVENING week
Press OK for the WEEK menu level (1-7). All further entries now refer to
every day of the week.
ASTRO EVENING block
Press OK for the BLOCK menu level (BLOCK 1 1-5, BLOCK 2 6,7). All further entries now refer to BLOCK 1 (1-5) and BLOCK 2 (6,7).
ASTRO EVENING individual
Press OK for the INDIVIDUAL menu level (1,2,3,4,5,6,7). All further entries
now refer to each individual day of the week.
8. Now set the SWITCHING TIME s using the +/- buttons. Confirm your entry
by pressing OK.
9. Now set the IDLE PERIOD t using the +/- buttons. Confirm your entry by
pressing OK.
10. Press the MENU button to switch to operating mode.
Englisch 53
PROGRAMME
PROG1/INDIVIDUAL WEEK (Individual switching time st for week)
PROG1/INDIVIDUAL BLOCK (Individual switching time st for block1/2)
PROG1/INDIVIDUAL INDIVIDUAL (Individual switching time st for individual
day)
1.Press the MENU button.
2.To select the PROGAMME menu, press the
+ button until PROGAMME appears.
3.Confirm by pressing OK. PROG1 will appear.
4.Confirm by pressing OK.
5.Press the + button until INDIVIDUAL appears.
6. Confirm by pressing OK.
7.Now select the PROG1 INDIVIDUAL function you require using the +/- buttons:
INDIVIDUAL week
Press OK for the WEEK menu level (1-7). All further entries now refer to every
day of the week.
INDIVIDUAL block
Press OK for the BLOCK menu level (BLOCK 1 1-5, BLOCK 2 6,7). All further
entries now refer to BLOCK 1 (1-5) and BLOCK 2 (6,7).
INDIVIDUAL individual
Press OK for the INDIVIDUAL menu level (1,2,3,4,5,6,7).
All further entries now refer to every individual day of the week.
8.Now set the SWITCHING TIME s and the SWITCHING TIME t using the +/buttons. Confirm your entry by pressing OK.
9.Press the MENU button to switch to operating mode.
54 Englisch
PROGRAMME
PROG1/ INDIVIDUAL WEEK (Individual switching time st for week)
PROG1/ INDIVIDUAL BLOCK (Individual switching time st for block1/2)
PROG1/ INDIVIDUAL INDIVIDUAL (Individual switching time st for individual day)
1. Press the MENU button.
2. To select the PROGAMME menu, press the + button until PROGAMME appears.
3. Confirm by pressing OK.
4. Press the + button until PROG2 appears.
5. Confirm by pressing OK.
6. Press the + button until INDIVIDUAL appears.
7. Confirm by pressing OK.
8. Now select the PROG2 INDIVIDUAL function you require using the +/- buttons:
INDIVIDUAL week
Press OK for the WEEK menu level (1-7). All further entries now refer to
every day of the week.
INDIVIDUAL block
Press OK for the BLOCK menu level (BLOCK 1 1-5, BLOCK 2 6,7). All further entries now refer to BLOCK 1 (1-5) and BLOCK 2 (6,7).
INDIVIDUAL individual
Press OK for the INDIVIDUAL menu level (1,2,3,4,5,6,7). All further entries
now refer to every individual day of the week.
9. Now set the SWITCHING TIME s and the SWITCHING TIME t using the
+/- buttons. Confirm your entry by pressing OK.
10. Press the MENU button to switch to operating mode.
Englisch 55
PROGRAMME
PROG2/OFFSET (e.g. Time shutters are lowered to ventilation position in the
evening)
1.Press the MENU button.
2.To select the PROGAMME menu, press the + button until PROGAMME appears.
3.Confirm by pressing OK.
4.Press the + button until PROG2 appears.
5.Confirm by pressing OK.
6.Press the + button until the OFFSET menu appears.
7.Confirm by pressing OK.
8.You can set the time for the DOWN control command to be triggered separately using the +/- button (max. +/- 240 mins, depending on PROG1
SWITCHING TIME t). Confirm your entry by pressing OK.
9.Press the MENU button to switch to operating mode.
Note
Using the SETTING menu level, you must enter the switching time of the
intermediate position and select PROG 2 VENTILATION for the position
of the end limits.
56 Englisch
SETTING
HOLIDAY (Holiday OFF/ON)
1.
2. 3.
4.
5.
6.
Press the MENU button.
To select the SETTING menu, press the + button until SETTING appears.
Confirm by pressing OK.
HOLIDAY ON / OFF will appear.
You can set the holiday function to ON or OFF by pressing the +/- button.
Confirm your selection by pressing OK.
7. Please read on for further programming options using the SETTING
menu.
Englisch 57
SETTING
INTERMEDIATE POSITION, VENTILATION/REVERSE, Prog1 END LIMIT
(Time/ position programming)
1.You have confirmed the HOLIDAY menu level. INTERMEDIATE POSITION will
appear.
2.You can set the switching time to move to the INTERMEDIATE POSITION using the.
+/- button. The switching time is indicated in a few seconds or you can move
to the INTERMEDIATE POSITION from the upper end limit using the DOWN/
UP button.
3.Confirm by pressing OK.
4.You can set the switching time to move to VENTILATION/REVERSE using the
+/- button. The switching time is indicated in a few seconds or you can move
to the VENTILATION/REVERSE from the lower end limit using the UP/DOWN
button. Confirm by pressing OK.
5.You have confirmed the VENTILATION/REVERSE menu level. PROG1 END
LIMIT / PROG 1 INTERMEDIATE POSITION or PROG 1 VENTILATION/REVERSE will appear.
6.You can select PROG 1END LIMIT, PROG 1INTERMEDIATE POSITION and
PROG 1VENTILATION/REVERSE using the +/- button.
7.Confirm your selection by pressing OK.
8.The function PROG1 END LIMIT has now been set.
9.Please read on for further programming options using the SETTING
menu.
58 Englisch
SETTING
Prog2 END LIMIT (Time/position programming)
Note
This dialog window will only be displayed if a time is set in PROG2.
1.You have confirmed the PROG1 END LIMIT menu level. PROG2 END LIMIT will
appear.
2.You can select PROG 2 END LIMIT, PROG 2 INTERMEDIATE POSITION and
PROG 2 VENTILATION/REVERSE using the +/- button.
3.Confirm your selection by pressing OK.
4.The function PROG2 POSITION has now been set.
5.Please read on for further programming options using the SETTING
menu.
Englisch 59
SETTING
GB ENGL/ ASTRO SHIFT st
(Language, astro shift)
1. You have confirmed the PROG2 END LIMIT menu level. GB ENGL will appear.
2. You can set the language required using the +/- button.
3. Confirm the language selected by pressing OK.
4. ASTRO SHIFT s will appear.
5. You can set the required astro shift s (max. +/- 120 mins.) using the +/button.
6. Confirm by pressing OK.
7. ASTRO SHIFT t will appear.
8. You can set the required astro shift t (max. +/- 120 mins.) using the +/button.
9. Confirm by pressing OK.
10. The function ASTRO SHIFT t has now been set.
11. Please read on for further programming options using the SETTING
menu.
60 Englisch
SETTING
(City, EXPERT MODE (LONGITUDE, LATITUDE, TIME ZONE)
1. You have confirmed the function ASTRO SHIFT t. The city selected (LONDON) will appear.
2. You can set the nearest town using the +/- button.
3. Confirm by pressing OK.
Note
These dialog windows are only displayed when the EXPERT MODE in
the function menu is ON.
4. LONGITUDE will appear. (If you prefer to define your location more precisely, you can do so by setting the degrees longitude and latitude.)
5. You can set the degrees LONGITUDE using the +/- button.
6. Confirm by pressing OK. LATITUDE will appear.
7. You can set the degrees LATITUDE using the +/- button.
8. Confirm by pressing OK. TIME ZONE will appear.
9. You can set the TIME ZONE you are in using the +/- button. Confirm by
pressing OK.
10. The TIME ZONE function has now been set.
11. Please read on for further programming options using the SETTING
menu.
Englisch 61
SETTING
SUMMER/WINTER (Automatic clock adjustment for daylight saving changes)
1.You have confirmed the TIME ZONE function. SUMMER/WINTER will appear.
2.You can switch SUMMER/WINTER on or off using the +/- button.
3.Confirm your selection by pressing OK.
4.Press the MENU button to switch to operating mode.
62 Englisch
FUNCTION (only when the operating device is disconnected, only for qualified electricians)
ROLLER SHUTTER/BLIND, DRIVE CONTROLLER/ GROUP CONTROLLER,
RUNNING TIME
(Selection of shutter/blind, selection of the drive controller/ group controller,
running time of the roller shutter/blind)
1. Press the MENU button.
2. To select the FUNCTION menu, press the + button until FUNCTION appears.
3. Confirm by pressing OK. ROLLER SHUTTER/BLIND will appear.
4. You can select either roller shutter or blind using the +/- button.
5. Confirm by pressing OK. DRIVE CONROL DEVICE/GROUP CONTROLLER
will appear.
6. You can select the control device required using the +/- button (DRIVE
CONROL DEVICE/GROUP CONTROLLER).
7. Confirm by pressing OK. RUNNING TIME will appear.
8. You can set the required running time using the +/- button. (Pre-setting:
120 seconds for roller shutters and 180 seconds for venetian blinds).
9. Confirm by pressing OK.
10. The RUNNING TIME function has now been set.
11. Please read on for further programming options using the FUNCTION
menu.
Englisch 63
FUNCTION (only when the operating device is disconnected, only for qualified electricians)
EXTERNAL ON/OFF/SWITCH, ALARM SIGNAL ON/OFF
(Processing external signals, processing alarm signals)
1.You have confirmed the RUNNING TIME function. EXTERNAL ON will appear.
(EXTERNAL ON/ OFF/ SWITCH describes the external control signals. Default
setting is EXTERN SWITCH)
2.You can select the required setting for the control inputs using the +/- button.
3.Confirm your selection by pressing OK.
Note
The following dialog window will only be displayed if you have selected
DRIVE CONTROLLER.
4.ALARM SIGNAL ON will appear. (The default setting is ALARM SIGNAL ON.)
5.You can switch the ALARM SIGNAL to ON or OFF using the +/- button. Confirm by pressing OK.
6.The function ALARM SIGNAL ON/OFF has now been set.
7.Please read on for further programming options using the FUNCTION
menu.
64 Englisch
FUNCTION (only when the operating device is disconnected, only for qualified electricians)
INITIAL OPERATION, RELAY, TOTAL RUNNING TIME
(Date of initial operation, relay switching rate, total running time)
1.You have confirmed the ALARM SIGNAL ON/OFF. EXPERT MODE OFF/ON will
appear.
2.You can select the required setting using the +/- button.
3.Confirm your selection by pressing OK.
4.INITIAL OPERATION will appear.
5.Confirm by pressing OK. RELAY will appear. (RELAY denotes the relay switching rate.)
6.Confirm by pressing OK. TOTAL RUNNING TIME will appear. (TOTAL RUNNING TIME denotes the overall running time of the timer.)
7.Confirm your selection by pressing OK.
8.Press the MENU button to switch to operating mode.
Englisch 65
Changing the battery
1.Disconnect the operating device.
2.Remove the battery.
3.Insert the new battery properly.
4.Reset the time.
Note
The values set are still saved
Cleaning
Clean the device with a damp cloth only. Do not use a cleansing agent since this
could damage the plastic.
Technical data
Nominal voltage
Switched current
Power consumption
Battery type
System of protection
Protection class
(In accordance with the
assembly specifications)
Permissible ambient temperature
Type of installation
66 Englisch
230-240 V AC / 50-60 Hz
5 A / 250 V AC bei cos ϕ =1
2 VA
CR 2032
IP 20
II
0 to +55 °C
Concealed Ø 58 mm wall-mounted
Exposed in appropriate exposed casing
What to do if...?
Problem
Cause
Remedy
Drive is not functioning.
Faulty connection.
Check the connection.
Blind or shutter moves in Faulty connection.
the wrong direction.
Exchange s and t
wires in the power supply unit.
Astro programme does
not function according
to the switching times.
1.Date is incorrect.
2.Wrong city or wrong
latitude/longitude
set.
3.Holiday function is
switched on.
4.Astro shift is set.
1.Set correct date.
2.Set correct city or
exact degrees latitude/longitude.
3.Switch holiday function off.
4.Adjust astro shift.
The timer 24 V (TC52)
does not carry out the
switching commands.
The sliding switch is on
manual.
Move the sliding switch
to automatic.
The timer 24 V (TC52)
does not carry out the
switching commands
precisely.
Holiday function is
switched on.
Switch holiday function
off.
Roller shutter does not
move to the end limit.
1.The set running time
is not long enough.
2.No end limit position
is set.
1.Adjust the running
time in the function
menu.
2.Set the end limit position using the setting menu PROG1/2.
The display is showing
“BATTERY”.
Battery power is low.
Replace battery.
Englisch 67
D
( +49 (0)1805 905051*
7 +49 (0)1805 904051
www.roto-frank.com
GB
( +44 (0) 1788 558600
7 +44 (0) 1788 558606
www.roto-frank.com
E
( 902 25 01 01
7 902 25 01 02
www.maydisa.com
RUS
( +7 495 775 64 71, 81
7 +7 495 775 64 79
Kaliningrad
( +7 401 277 96 44 www.roto.ru
BY
OOO Belpraktika
( +375 17 297 94 35
www.roto-frank.by
HR BIH
( +385 (0)1/ 3490360
7 +385 (0)1/ 3490362
AT SLO
( +43 2757 21313-0 7 +43 2757 21313-50
www.roto-frank.at
www.roto-frank.si
CH
( +41 (0)44 267 47 47 7 +41 (0)44 267 47 46
www.roto-frank.ch
B
IRL
( +353 67 50700 7 +353 67 34631
www.careyglass.com
P
(+ 32 (0)89 778090
7+ 32 (0)89 385788
www.roto.be
PL
( (236) 21 80 72
(236) 21 73 26
7 (236) 21 52 89
www.imporjan.com
EST
( +48 81 855 05 22, 24, 25
7 +48 81 855 05 28
www.roto.pl
LV
BN-EESTI OÜ
( +372 7 346 171
6 +372 7 346 172
SIA BN
( +371 732 77 00
7 +371 732 77 01
VBH Estonia AS
( +372 6 401 331
6 +372 6 401 330
www.roto.ee
SIA VBH Latvia
( +371 738 18 90
6 +371 738 17 92
www.roto.lv
CZ
SK
( +420 272 651428 7 +420 271 750187
www.roto-frank.cz
www.roto.sk
RO
( +40 312 281586 - 88
7 +40 312 281589
www.roto-romania.ro
H
( +36 99 534494
7 +36 99 534498
www. roto.hu
GR
( +30 (2310) 796950 7 +30 (2310) 796783
www.eurotechnica.gr
* 0,14 EUR / Min. aus dem dt. Festnetz. Mobilfunkpreise können abweichen.
4032 630 013 0a 10/08 de/en 309149 01
F
( +33 (0)387 292430
7 +33 (0)387 914901
www.roto-frank.fr
NL
(+ 32 (0)800 0232114
7+ 32 (0)800 0232116
www.roto-frank.nl
UA
Euroizol LTD
( +38 44 566 73 37 7 +38 44 235 98 14
www.roto.ua
LT
UAB Morita
( +370 5 210 90 07
6 +370 5 272 78 77
www.roto.lt
I
( +39 0421 618738
7 +39 0421 345125
www.orsogrilabbaini.com
TR
( + 90 216 573 96 92
7 + 90 216 572 31 48