1
6
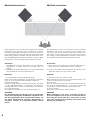
Mittelfeld Installation:
Mid-Field Installation:
Diese Installation ist vom Prinzip her ähnlich wie die Nahfeld
Installation. Diese Variante wird normalerweise bei größeren Monitoren gewählt, wenn diese zu groß oder schwer für
eine Positionierung auf der Studiokonsole sind. Dieses Setup
bietet einen größeren „Hörplatz“ und eine verbesserte räumliche Akustikabbildung. Bei dieser Installation sollte der Bass
der Monitore über der Studiokonsole positioniert werden.
This installation is more or less the same as the closed-field
installation. This variant is usually used if the monitors are
too large or heavy to be placed on the studio console. This
setup offers a larger sweet spot and a better spacial acoustic imaging. In this installation the monitors‘ woofer should
be positioned above the height of the studio console.
Anschlüsse
1. V
erbinden Sie nun Ihre Signalquelle mit der Signal-Eingangsbuchse -4- (XLR), -5- (6,3 mm Klinke) oder -6(Cinch).
2. V
erbinden Sie die Anschlussbuchse -8- mit dem Netzkabel
und schließen Sie es an Ihre Steckdose an.
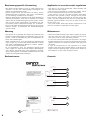
Connections
1. Now connect your signal source with the Signal Input -4(XLR), -5- (6.3 mm Signal Input Jack) or -6- (RCA).
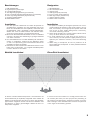
Bedienung
Operation
1. Lautstärkeregler
in Minimalstellung bringen
Bevor Sie das Gerät einschalten, drehen Sie den Lautstärkeregler -3- in die minimale Position (Regler nach links).
2. Strom einschalten
Nachdem alle Anschlüsse vorgenommen wurden, das Gerät
mit dem EIN/AUS Schalter -1- einschalten. Die Stromversorgungs-LED in Form einer 7 leuchtet auf der Vorderseite.
3. Lautstärkeregelung
Sie regeln die Lautstärke mit dem Lautstärkeregler -3-.
1.Set volume control to minimum level
Before switching on the device, turn the Volume Knob -3- to
minimum position (control to the left).
2. Power ON
After all connections have been completed activate the device with the ON/OFF Button -1-. The power supply LED
shaped like a 7 on the front side will be illuminated.
3. Volume control
Control the volume with the Volume Knob -3-.
ACHTUNG!
Vor dem Einschalten des Stroms muss der Lautstärkeregler Ihrer Signalquelle auf Minimum eingestellt sein.
Vor dem Lauterstellen 8 bis 10 Sekunden warten, um
den durch Einschwingung erzeugten Schroteffekt zu
vermeiden, welcher zu Lautsprecherschäden führen
könnte.
CAUTION!
Before switching on the power all volume controls of
your final amplifier must be set to a minimum. Before
increasing the volume wait 8 to 10 seconds to avoid
shot noise caused by the transient effect which could
damage the loudspeakers.
2. H
ook up the Mains Cable Connection -8- with the mains
cable and connect it to your power outlet.