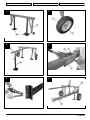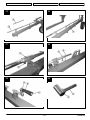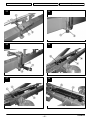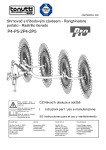
1
OMFR02RAP-0902
2-4GW
Hay rake - Sternradschwader - Andaineurs solaires á roues
WARNING!
ACHTUNG!
ATTENTION
This machine is not accredited for Die Maschine ist nicht für den Machine non homologuée pour la
the circulation on public road.
Straßenverkehr zugelassen.
circulation sur route publique.
Read these operating
instructions carefully before
using the machine.
GB Operating and maintenance manual
Lesen Sie die Bedienungsanleitung
sorgfältig durch, bevor Sie mit dem
Gerät arbeiten.
DE
Bedienungs- und Wartungsanleitung
FR
Manuel d’utilisation et d’entretien
Avant de commencer le travail,
lire attentivement les
consignes d’utilisation.
Tonutti Italy
Factories
Tonutti U.S.A.
Tonutti Russia
Via Gino Tonutti 3 - 33047
Remanzacco (UD) Italy
Tel. + 39 0432 667015
Fax + 39 0432 668282
[email protected]
www.tonutti.it
Remanzacco (UD)
Rivignano (UD)
Vezzano (RE)
Krasnokamsk (RU)
S&T Distributing, Inc.
1909 Thomas Road
Memphis, TN 38134
Phone (901) 385 8841
Fax (901) 385 8288
[email protected]
www.tonutti.com
T. W. Limited
3 Tekhnicheskaya Street
Perm, 614070 Russia
Phone 007 (3422) 909096
Fax 007 (3422) 909096
[email protected]
Data shown on the machine identification plate
Angaben auf dem Typenschild der Maschine
Données figurant sur la plaque d’identification de la machine
Model:
Maschinenmodell:
Modèle de la machine:
Year of fabrication:
Baujahr:
Anno di costruzione:
Serial number:
Seriennummer:
Numéro de matricule:
Date of delivery:
Lieferdatum der Maschine:
Date de livraison de la machine:
Dealer:
Gebietshändler:
Concessionnaire de zone:
Technical assistence center authorized by «TONUTTI» to be
contacted for all technical assistance needs
Von der Firma «TONUTTI » autorisierte Kundendienstwerkstatt
Atelier de réparation agréé par «TONUTTI »
TONUTTI SpA
33047 Remanzacco (UD)Italia -Via Gino Tonutti, 3
Tel.++39 0432 667015 -Fax ++39 0432 668282
ENGLISH
DEUTSCH
FRANÇAIS
INDEX
INHALT
SOMMAIRE
SECTION 1
4
5
9
9
10
ABSCHNITT 1
Beschreibung und Eigenschaften
1.1 Vorwort…………………………...……..
1.2 Garantie………………………....………
1.3 Maschinenbeschreibung.......….………
1.4 Verwendungszweck..………………….
1.5 Technische Daten...……………………
4
5
9
9
10
SECTION 1
Description et caractéristiques de la machine
1.1 Avant-propos…..………………………..
1.2 Garantie…………………………………
1.3 Description de la machine………………..
1.4 Utilisation………………………………….
1.5 Caractéristiques techniques……………
11
15
ABSCHNITT 2
Allgemeine Sicherheitsbestimmungen
2.1 Sicherheit…………..……………………..
2.2 Sicherheitssymbole.………………………
11
15
SECTION 2
Consignes de sécurité générales
2.1 Sécurité…….……………………………….. 10
2.2 Signaux de sécurité………………………. 14
Description and features of the machine
1.1 Foreword …………………………………
1.2 Warranty ………………………………….
1.3 Machine description ……………..……..
1.4 Use ………………………………….…….
1.5 Technical specifications ………….……..
SECTION 2
General safety notes
2.1 Safety …………………………………….
2.2 Safety decals …………………………….
SECTION 3
Movement and handling
3.1 Generality ………………………………...
3.2 Loading/unloading..……………………...
17
18
SECTION 4
Operation
4.1 Before using …………………………….
4.2 Before transporting………………..…....
4.3 Tractor requirements…………………...
4.4 Hitching to tractor……………………….
4.5 Wheels……………………………………
4.6 Working position…..…………………….
4.7 Use of the Rake wheels………………..
4.8 Adjustments ……………………………..
4.9 During work …………………………..…
4.10 Road circulation ……………………….
4.11 After use ………………………………
19
19
19
20
21
21
21
21
24
26
27
SECTION 5
Routine maintenance
5.1 Maintenance …………………………….
5.2 Storage …………………………….……
5.3 Dismantling ……………………………..
SECTION 6
28
31
31
6.1 Assembly the machine……..……………... 32
6.2 Recommended torque values…………… 33
6.3 Assembly…………………………………… 34
OMFR02RAP-0902
ABSCHNITT 3
Fortbewegung
3.1 Allgemeines……………………………....
3.2 Beladen/Abladen .....………………….....
ABSCHNITT 4
Einsatz
4.1 Vor dem Gebrauch......………………….
4.2 Vor dem Transport …….………………....
4.3 Schleppereigenschaften …………………
4.4 Anbau am Schlepper ….........……………
4.5 Räder ………………………………………
4.6 Arbeitsposition ……………………………
4.7 Gebrauch des Sternradschwaders .……
4.8 Einstellungen………….………………….
4.9 Während der Arbeit.......…………………
4.10 Straßentransport....………………………
4.11 Nach dem Gebrauch.……………………
17
18
19
19
19
20
21
21
21
21
24
26
27
4
5
8
8
9
SECTION 3
Manutention
3.1 Généralités………………………………....
3.2 Chargement/déchargement ..…………....
16
17
SECTION 4
Utilisation
4.1 Avant l’utilisation………………………….
4.2 Avant le transport ………………………...
4.3 Caractéristiques du tracteur …………….
4.4 Attelage au tracteur ………………………
4.5 Roues ………………………………………
4.6 Position de travail …………………………
4.7 Utilisation des roues solaires .………..…
4.8 Réglages…….…………………………….
4.9 Pendant le travail…………………………
4.10 Transport sur route….…………………
4.11 Après l’utilisation…………………………
19
19
19
20
21
21
21
21
24
26
27
28
31
31
SECTION 5
Entretien courant
5.1 Entretien……………………………………. 28
31
5.2 Remisage…….…………………………...
5.3 Démantèlement……………………………. 31
ABSCHNITT 6
6.1 Montageanleitungen...……..……………... 32
6.2 Festziehwerte der Schrauben.…………… 33
6.3 Montage.....……………………..…………. 34
SECTION 6
6.1 Assembly the machine……..……………... 32
6.2 Recommended torque values…………… 33
34
6.3 Assembly……………… ……..………….
ABSCHNITT 5
Planmäßige Wartung
5.1 Wartung……………….........…………….
5.2 Einlagerung..……………………………...
5.3 Demontage.......…….…………………….
-3-
ENGLISH
DEUTSCH
SECTION 1
FRANÇAIS
ABSCHNITT 1
SECTION 1
Beschreibung und Eigenschaften der
Maschine
Description et caractéristiques de
la machine
1.1 FOREWARD
This
manual
contains
the
instructions on how to use and
maintain the Finger Wheel Rake
mod. “RAPTOR”
(hereinafter
referred
to
as
machine)
manufactured by TONUTTI SPA of
Remanzacco (UD), Italy (hereinafter
referred to as Manufacture)
1.1 VORWORT
Dieses
Handbuch
enthält
die
Bedienungs- und Wartungsanleitungen
für den Sternradschwader mod.
“RAPTOR”
(im Folgenden auch
Maschine genannt), die von der Firma
TONUTTI SpA in Remanzacco (UD)
Italien hergestellt wird (im Folgenden
auch Hersteller genannt).
1.1 AVANT-PROPOS
Ce manuel contient les instructions
pour l’utilisation et l’entretien
Andaineurs
solaires
mod.
“RAPTOR” (ci-après dénommé
également la machine) fabriqué
par
TONUTTI
S.p.A.
de
Remanzacco
(Udine)
Italie,
dénommé ci-après le Fabricant.
The material in this manual is not
intended to be a complete
description of the parts nor a
detailed
explanation
of
their
operation.
The user, however, will find the kind
of information normally required to
operate the machine correctly and
safely and also to keep it in good
working condition.
Compliance with and observance of
what is described in the manual is
an essential condition for the
trouble-free operation, long life and
cost effective performance of the
machine.
Failure to observe the prescriptions
given in this manual, negligence,
incorrect or improper use of the
machine can be cause of machine
warranty coverage cancellation by
manufacturer.
Service work or overhauls involving
complex
operations must be
entrusted to authorised Technical
Assistance Centres which have the
necessary specialised personnel or
directly to Manufacturer who is at
your complete disposal to ensure
fast
and
complete
technical
assistance and anything else that
can promote improved operation
and optimum performance by the
machine.
Bei den Angaben in diesem Handbuch
handelt es sich um keine vollständige
Beschreibung
der
einzelnen
Maschinen-teile und keine detaillierte
Erläuterung ihrer Funktionsweise.
Dennoch findet der Benutzer hier alle
nützlichen Informationen für den
sicheren
Betrieb
und
die
ordnungsgemäße Instand-haltung der
Maschine.
Von der Beachtung und Einhaltung der
in diesem Handbuch enthaltenen
Angaben sowie von einer sorgfältigen
Wartung hängt die einwandfreie
Funktion, die Lebensdauer und die
Wirtschaftlichkeit der Maschine ab.
Bei Nichtbeachtung dieser Angaben,
bei Nachlässigkeit, unsachgemäßem
Gebrauch
der
Maschine
oder
Durchführung
nicht
genehmigter
Änderungen kann der Hersteller die
von ihm gewährte Maschinengarantie
für ungültig erklären.
Maschinenreparaturen
oderüberholungen, die mit Arbeiten von
einer gewissen Komplexität verbunden
sind, dürfen nur von autorisierten
Kundendienstwerkstätten
mit
entsprechendem Fachpersonal oder
direkt vom Hersteller durchgeführt
werden. Der Hersteller steht in jedem
Fall zur Verfügung, um einen prompten
und akkuraten Kundendienst sowie
jede sonstige Hilfe für die einwandfreie
Funktion
und
größtmögliche
Wirtschaftlichkeit der Maschine zu
gewährleisten.
L’utilisateur trouvera dans ce
manuel tout ce qu’il est utile de
savoir pour l’utilisation en toute
sécurité de la machine et sa bonne
conservation,
même
si
les
descriptions des organes et de leur
fonctionnement ne sont pas
détaillées.
Le fonctionnement correct, la
durée de vie et l’économie
d’exercice
de
la
machine
dépendent
du
respect
des
indications contenues dans ce
manuel et d’un entretien correct.
Le non-respect des indications
reportées dans ce manuel, la
négligence,
une
utilisation
incorrecte de la machine et
l’exécution de modifications non
autorisées peuvent entraîner la
perte de la garantie accordée par
le Fabricant.
Pour les réparations ou les
révisions qui comportent des
opérations complexes, il faut
s’adresser aux Centres AprèsVente agréés qui disposent de
personnel
spécialisé
ou
directement au Fabricant. Celui-ci
est dans tous les cas disponible
afin de fournir une assistance
rapide et complète et tout ce qui
peut être utile pour un meilleur
fonctionnement et un rendement
optimal de la machine.
ACHTUNG
Dieses Handbuch ist an einem
sicheren Ort aufzubewahren, damit
es
während
der
gesamten
Lebensdauer der Maschine jederzeit
zur Hand ist und konsultiert werden
kann.
ATTENTION
Ce manuel doit être rangé dans
un endroit sûr afin d’être
conservé et de pouvoir être
consulté pendant toute la durée
de vie de la machine.
Description and
machine
features
of the
ATTENTION
This Manual must be kept in a
safe place at operator and service
engineer
disposal
for
consultation at any time during
the machine’s entire working life.
It should be delivered with the
machine if this latter is sold.
-4-
OMFR02RAP-0902
ENGLISH
DEUTSCH
FRANÇAIS
1.2 WARRANTY
1.2 GARANTIE
1.2 GARANTIE
Tonutti Spa (hereafter referred to
as the “manufacturer”), warrants to
the original purchaser of each new
agricultural machine (hereafter
referred to as the “product”) that
such product will be free from
defects
in
materials
and/or
workmanship for one full year after
delivery to the original purchaser if
the product has been properly set
up and operated in accordance
with
the
recommendations
contained
in
the
instruction
manual.
This limited warranty applies only
to complete machines.
A Tonutti machine will qualify for
the Tonutti limited warranty only if
the product has been registered
on-line no later than 10 (ten) days
from the date of purchase.
If the product is registered after 10
(ten) days from purchase, the
warranty will automatically be
voided. Parts and accessories not
manufactured by Tonutti will be
warranted only to the extent of
their
original
manufacturer’s
warranty.
During the warranty period, the
authorized Tonutti dealer will
furnish replacement parts at no
charge if the product fails because
of defects in materials and/or
workmanship.
No products or parts may be
repaired, replaced or returned
without prior written authorization
from Tonutti.
The manufacturer’s sole liability
during the warranty period will be
for the repair or replacement of
defective products in the manner
prescribed by this warranty.
In no event will the manufacturer’s
liability exceed the purchase price
of the product.
The manufacturer will not be liable
in any way for incidental or
consequential damages (including,
but not limited to, loss of profits)
that occur for any reason and at
any time. This limited warranty
does not obligate the manufacturer
to be responsible for transportation
costs deriving from the repair or
replacement of defective products.
The manufacturer will not be
responsible for labor or other costs
deriving from the removal or
installation of component parts that
Die Firma Tonutti Spa (“Hersteller”)
garantiert dem Erstkäufer jeder neuen
landwirtschaftlichen Maschine aus
ihrer Produktion (“Produkt”) für die
Dauer von einem Jahr ab dem
Verkaufsdatum an den Erstkäufer,
dass das Produkt frei von Materialund Verarbeitungsfehlern ist, wenn es
entsprechend
den
im
Bedienerhandbuch
enthaltenen
Anweisungen montiert und eingesetzt
wird.
Diese begrenzte Garantie gilt nur für
komplette Maschinen.
Das Produkt ist nur durch die
begrenzte Tonutti-Garantie gedeckt,
wenn die Online-Registrierung der
Garantie binnen 10 (zehn) Tagen
nach dem Kauf erfolgt.
Bei Eingang der Garantieregistrierung
nach Ablauf der Frist von 10 (zehn)
Tagen ab Kaufdatum erlischt die
Garantie automatisch. Nicht von der
Firma Tonutti hergestellte Bau- und
Zubehörteile werden nur im Rahmen
der
Garantie
des
jeweiligen
Originalherstellers
gewährleistet.
Während der Garantiezeit liefert der
autorisierte Tonutti-Händler kostenlos
Ersatzteile, wenn ein Produkt infolge
von
Materialoder
Verarbeitungsfehlern
Schäden
aufweist.
Ohne die vorherige schriftliche
Zustimmung der Firma Tonutti darf
kein Produkt oder Bauteil repariert,
ersetzt oder zurückgesandt werden.
Während der Garantiezeit kann der
Hersteller nur und ausschließlich für
die Reparatur oder den Ersatz von
defekten Bauteilen gemäß den hier
genannten
Garantiebestimmungen
belangt werden.
Der Hersteller kann auf keinen Fall für
einen den Kaufpreis des Produktes
übersteigenden
Betrag
haftbar
gemacht werden.
Der Hersteller haftet gegenüber
Personen keinesfalls für Unfall- oder
Folgeschäden (einschließlich, aber
nicht beschränkt auf Verdienstausfall),
die aus irgendeinem Grund und zu
irgendeinem Zeitpunkt verursacht
werden. Diese Garantie verpflichtet
den Hersteller nicht zur Übernahme
von
Versandkosten
im
Zusammenhang mit der Reparatur
oder dem Austausch von defekten
Produkten.
Der Hersteller ist nicht verpflichtet,
Arbeitskosten
oder
andere
Tonutti Spa (le “Fabricant”) garantit
au premier acheteur de chaque
machine agricole neuve de sa
production (le “Produit”) que le
Produit est exempt de défauts de
matériaux
et/ou
usinage,
à
condition
que
celui-ci
soit
assemblé et utilisé conformément
aux instructions reportées dans le
manuel de l’opérateur, pour la
période d’un an à partir de la date
de vente au premier acheteur.
Cette garantie limitée s’applique
uniquement
aux
machines
complètes.
Le Produit est couvert par la
garantie
limitée
Tonutti
uniquement si l’enregistrement enligne pour la garantie est effectué
sous 10 (dix) jours de la date
d’achat.
Si l’enregistrement de la garantie
est effectué après 10 (dix) jours de
la date d’achat, cela comporte
l’annulation automatique de la
garantie. Pour les composants et
accessoires qui ne sont pas
fabriqués par Tonutti, c’est la
garantie de leur fabricant d’origine
qui s’applique. Si un Produit subit
des dommages à cause de défauts
de matériaux et/ou usinage au
cours de la période de garantie, le
revendeur agréé Tonutti fournira
les pièces de rechange à titre
gratuit.
Aucun Produit ou composant ne
sera réparé, remplacé ou retourné
sans autorisation écrite préalable
de la part de Tonutti.
Au cours de la période de garantie,
l’unique action possible vis-à-vis
du Fabricant est la demande de
réparation ou remplacement de
composants défectueux selon les
termes fixés par la garantie.
Le Fabricant ne sera en aucun cas
responsable pour toute valeur
supérieure au prix de vente du
Produit.
Le
Fabricant
décline
toute
responsabilité pour tout dommage
accidentel ou consécutif aux
personnes (y compris, à titre
d’exemple, le manque à gagner),
quels qu’en soient la cause et le
moment où il se produit. La
présente garantie n’oblige pas le
Fabricant à se charger des frais de
transport liés à la réparation ou au
remplacement
des
Produits
OMFR02RAP-0902
-5-
ENGLISH
have been repaired or replaced
under this limited warranty.
This warranty will not apply to any
machine which has been repaired
or
modified
without
the
manufacturer’s advance written
approval; or which has been
subjected
to
improper
use,
negligence or accident; or which
has not been operated in
accordance
with
the
manufacturer’s printed instructions;
or which has been operated
beyond the recommended capacity
specified by the manufacturer.
This warranty will not apply to
items defined as being subject to
normal wear. Such items include,
but are not limited to: belts, discs,
stone guards, clutches, drive
shafts and universal joints, blades,
and tine holders.
The decision of Tonutti S.p.A as to
warranty claims will be final, and
the original purchaser agrees to
accept the company’s decision
regarding defects and replacement
of parts.
No
agent,
employee
or
representative of Tonutti has the
authority to commit the company to
any additional warranty terms that
differ from what is specifically
expressed in this warranty.
Tonutti reserves the right to modify
or improve any of its products
without incurring any obligation to
replace previously sold products
which
do
not
have
said
modifications or improvements.
DEUTSCH
Aufwendungen in Verbindung mit dem
Aus- und Wiedereinbau eines gemäß
den Bestimmungen dieser begrenzten
Garantie reparierten oder ersetzten
Bauteils zu übernehmen.
Diese
Garantie
gilt
nicht
für
Maschinen, die außerhalb des
Herstellerwerkes und ohne die
schriftliche
Zustimmung
des
Herstellers repariert oder verändert
wurden. Sie gilt auch nicht für
Maschinen,
die
durch
unsachgemäßen
Gebrauch,
Nachlässigkeit oder Unfall beschädigt
wurden, oder für Maschinen, die nicht
gemäß den gedruckten Anleitungen
des Herstellers bzw. nicht innerhalb
der vom Hersteller empfohlenen
Leistungsangaben verwendet wurden.
Diese Garantie gilt nicht für normale
Verschleißteile.
Zu
diesen
Verschleißteilen
zählen
unter
anderem Riemen, Scheiben, Messer,
Steinschutzvorrichtungen,
Kupplungen, Gelenkwellen, Klingen,
Zinkenhalter.
In allen Garantiefällen ist die
Entscheidung
des
Herstellers
endgültig und abschließend und der
Erstkäufer
akzeptiert
die
Entscheidungen des Herstellers in
allen
Fragen
bezüglich
Fehlerhaftigkeit und Austausch von
Bauteilen.
Kein Agent, Mitarbeiter oder Vertreter
der Firma Tonutti ist ermächtigt,
weitere von den in dieser Garantie
ausdrücklich genannten Zusagen
abweichende
Garantieverpflichtungen für die Firma Tonutti
einzugehen.
Die FirmaTonutti behält sich das
Recht
vor,
Änderungen
und
Verbesserungen an jedem beliebigen
Produkt vorzunehmen, ohne dass sie
in diesem Fall verpflichtet ist, ein
zuvor ohne diese Änderung oder
Verbesserung verkauftes Produkt
auszutauschen.
-6-
FRANÇAIS
défectueux.
Le Fabricant est soulevé de
l’obligation de reconnaître les frais
de main-d’oeuvre ou d’autres frais
liés à la dépose et au remontage
d’un
composant
réparé
ou
remplacé selon les termes de la
présente garantie limitée.
Cette garantie ne sera pas
appliquée aux machines ayant
subi
des
réparations
ou
modifications ailleurs qu’au siège
du Fabricant et sans l’autorisation
écrite de celui-ci ; elle ne sera pas
non plus appliquée aux machines
utilisées incorrectement, ayant fait
l’objet de négligence ou subi des
accidents, ni aux machines
utilisées de manière non conforme
aux instructions imprimées par le
Fabricant ou utilisées au-delà des
capacités indiquées dans les
recommandations du Fabricant.
Cette garantie ne couvre pas les
composants
sujets
à
usure
normale.
Ces
composants
comprennent, à titre d’exemple, les
courroies,
les
disques,
les
couteaux, les protecteurs parepierres, les embrayages, les
cardans, les lames, les portedents.
Le jugement du Fabricant au sujet
de tous les cas concernant les
garanties sera sans appel et le
premier acheteur déclare accepter
toutes les décisions du Fabricant
concernant les questions relatives
aux défauts et remplacements des
composants.
Aucun
agent,
employé
ou
représentant
de
Tonutti
n’a
l’autorité d’engager Tonutti en ce
qui concerne les garanties avec
des obligations autres que celles
expressément fixées dans la
présente garantie.
Tonutti se réserve le droit de
modifier
et
d’apporter
des
améliorations sur les Produits sans
que
cela
comporte
aucune
obligation de remplacer un Produit
vendu précédemment sans la
modification ou amélioration en
question.
OMFR02RAP-0902
ENGLISH
DEUTSCH
FRANÇAIS
IMPORTANT NOTICE :
Determine the right or left side of
the machine by viewing it from
the rear.
WICHTIGER HINWEIS :
Bestimmen Sie die rechte oder
linke Seite der Maschine, indem
Sie diese von hinten betrachten.
AVERTISSEMENT IMPORTANT:
Déterminer le côté droit ou
gauche de la machine en la
regardant depuis l’arrière.
Legend:
Legende:
Légende:
A) Direction of travel
1) Rear attachment
2) Rear drawbar
3) Front drawbar
4) Drawbar
5) Pantograph arm
6) Opening arm
7) Arm attaching to frame
8) Crazy wheel
9) Machine identification plate
10) Regulating handle for lift rake
wheels
11) Lift tube
12) Tractor attachment
13) Opening Cylinder
14) Lift rake wheel cylinder
A) Laufrichtung
1) Hinterer Anschluss
2) Zugstange, hinten
3) Zugstange, vorne
4) Zugstange
5) Pantographenarm
6) Öffnungsarm
7) Rahmenanschlussarm
8) Umlaufrad
9) Typenschilder
10) Einstellkurbel Wenderhub
11) Hubrohr
12) Schlepperanschluss
13) Öffnungszylinder
14) Sternradhubzylinder
A) Sens de marche
1) Raccordement arrière
2) Timon arrière
3) Timon avant
4) Timon de traction
5) Bras du pantographe
6) Bras d’ouverture
7) Bras d’attelage au châssis
8) Roue libre
9) Plaquettes d’identification
10) Poignée de réglage du levage
11) Tube de levage
12) Attelage du tracteur
13) Cylindre d’ouverture
14) Cylindre de levage de la roue
soleil
OMFR02RAP-0902
-7-
ENGLISH
DEUTSCH
FRANÇAIS
IMPORTANT NOTICE :
Determine the right or left side of
the machine by viewing it from
the rear.
WICHTIGER HINWEIS :
Bestimmen Sie die rechte oder
linke Seite der Maschine, indem
Sie diese von hinten betrachten.
AVERTISSEMENT IMPORTANT:
Déterminer le côté droit ou
gauche de la machine en la
regardant depuis l’arrière.
Legend:
Legende:
Légende:
A) Direction of travel
1) Rear attachment
2) Rear drawbar
4) Drawbar
5) Pantograph arm
6) Opening arm
7) Arm attaching to frame
8) Crazy wheel
9) Machine identification plate
10) Regulating handle for lift rake
wheels
11) Lift tube
12) Tractor attachment
13) Opening Cylinder
14) Lift rake wheel cylinder
A) Laufrichtung
1) Hinterer Anschluss
2) Zugstange, hinten
4) Zugstange
5) Pantographenarm
6) Öffnungsarm
7) Rahmenanschlussarm
8) Umlaufrad
9) Typenschilder
10) Einstellkurbel Wenderhub
11) Hubrohr
12) Schlepperanschluss
13) Öffnungszylinder
14) Sternradhubzylinder
A) Sens de marche
1) Raccordement arrière
2) Timon arrière
4) Timon de traction
5) Bras du pantographe
6) Bras d’ouverture
7) Bras d’attelage au châssis
8) Roue libre
9) Plaquettes d’identification
10) Poignée de réglage du levage
11) Tube de levage
12) Attelage du tracteur
13) Cylindre d’ouverture
14) Cylindre de levage de la roue
soleil
-8-
OMFR02RAP-0902
ENGLISH
1.3 MACHINE DESCRIPTION
Model «RAPTOR»
hay
are
machines which bear «CE »
marking in compliance with the
standards
dictated
by
the
European Union as provided by
Directive 98/37/CE , and described
in the declaration of conformity
with which each machine is
provided.
1.3.1 IDENTIFICATION
Machine identification plate .
The following data are given:
Manufacturer’s
name
and
address;
- «CE» marking;
A –Machine model;
B –Serial number;
C –Weight of the machine in Kg;
D –Year of manufacturer.
1.4 USE
The machine has been designed
and built to handle previously
cut forage crops and to form
these into swaths.
It can be hitched to tractors of
ad- equate power and weight.
WARNING
Any other use is prohibited.
The implement must only be used
in adequate natural lighting
conditions, otherwise the tractor to
which it is hitched must be fitted
with adequate lights for the
implement and its immediate
surroundings.
OMFR02RAP-0902
DEUTSCH
1.3 MASCHINENBESCHREIBUNG
Die
Sternradschwader
Modell
«RAPTOR» sind mit dem «CEZeichen»
versehen
in
Übereinstimmung mit den von der
Europäischen Union festgelegten und
in der Richtlinie 98/37/EG enthaltenen
Bestimmungen,
wie
in
der
Konformitätserklärung
beschrieben,
die mit jeder Maschine ausgehändigt
wird.
1.3.1 IDENTIFIZIERUNG
Typenschild der Maschine. Es
enthält folgende Angaben:
-Name und Anschrift des Herstellers;
- «CE-Zeichen»;
A –Maschinenmodell;
B –Seriennummer;
C –Maschinengewicht in kg;
D –Baujahr.
1.4 VERWENDUNGSZWECK
Die Maschine wurde zum Lüften
des gemähten Futters und zum
Schwadern desselben entwickelt
und gebaut. Die Maschine kann an
Schlepper mit geeigneter Leistung
udn
geeignetem
Gewicht
angekuppelt werden.
ACHTUNG
Jede andere Verwendung ist
unzulässig.
Das Gerät darf nur bei ausreichenden
Sichtverhältnissen verwendet werden.
Andernfalls muss der Schlepper mit
geeigneter Beleuchtung für das Gerät
und die unmittelbare Umgebung
ausgerüstet werden.
-9-
FRANÇAIS
1.3 DESCRIPTION DE LA MACHINE
Les Andaineurs solaires modèle
«RAPTOR» sont des machines qui
ont la marque “CE ” conformément
aux normes étrablies par l ’Union
Européenne et transcrites dans la
directive 98/37/CE, comme il est écrit
dans la déclaration de conformité qui
accompagne chaque machine.
1.3.1 IDENTIFICATION
Plaquette d’identification de la
machine. Les données indiquent:
- Nom et adresse du Fabricant;
- Marquage «CE »;
A- Modèle de machine;
B- Numéro de matricule;
C- Masse (poids) de la machine en
kg;
D- Année de fabrication.
1.4 EMPLOI
La machine a été projetée et
réalisée pour aérer le fourrage
préalablement coupé et pour
former
des
andains.Elle
est
indiquée pour être attelée à des
tracteurs d ’une puissance et d ’un
poids appropriés.
ATTENTION
Toute autre utilisation doit être
considérée comme interdite.
Cette machine doit être utilisée
uniquement en conditions de lumière
naturelle adéquate; en cas contraire,
prévoir un éclairage artificiel adéquat
sur la machine et immédiatement
autour.
ENGLISH
1.5 TECHNICAL SPECIFICATIONS
DEUTSCH
1.5 TECHNISCHE DATEN
- 10 -
FRANÇAIS
1.5
CARACTÉRISTIQUES
TECHNIQUES
OMFR02RAP-0902
ENGLISH
DEUTSCH
FRANÇAIS
SECTION 2
ABSCHNITT 2
SECTION 2
General safety notes
Allgemeine Sicherheitsbestimmungen
Consignes de sécurité générales
2.1 SAFETY
The user must be informed about
the risks deriving from use of the
machine, about the safety devices
installed to safeguard the operator
and about the general accidentprevention regulations established
by the Directives and by the laws
in force in the country where the
machine is used.
You are therefore advised to read
this
manual
very
carefully,
particularly the safety notes, and to
pay great attention to operations
which could be par-ticularly
hazardous.
It is essential to strictly comply with
the instructions to ensure your
safety, that of the persons in the
vicinity of the machine and to
safeguard the environ-ment.
2.1 SICHERHEIT
Der Benutzer muss über die Gefahren
im Umgang mit der Maschine, über
die
vorhandenen
Sicherheitsvorrichtungen zum Schutz
des Bedieners und über die
allgemeinen
Unfallverhütungsvorschriften gemäß
den
Richtlinien
und
Gesetzesbestimmungen
im
Verwendungsland
der
Maschine
informiert werden.
Es wird deshalb empfohlen, dieses
Handbuch und vor allem die
Sicherheitsbestimmungen
sehr
sorgfältig
durchzulesen
und
besonders gefährliche Arbeiten mit
größter Vorsicht durchzuführen.
Zur eigenen Sicherheit, zur Sicherheit
der Personen, die sich in der Nähe
der laufenden Maschine aufhalten,
und zum Schutz der Umwelt müssen
diese
Bestimmungen
strikt
eingehalten werden.
2.1 SÉCURITÉ
L’utilisateur doit être informé sur les
risques qu’il encourt en utilisant la
machine, sur les dispositifs adoptés
pour la sécurité de l’opérateur et sur
les règles générales de sécurité
prévues par les directives et par la
législation du Pays d’utilisation de la
machine.
Il est donc conseillé de lire avec
attention ce manuel, et notamment
les consignes de sécurité, en
accordant une attention spéciale aux
opérations les plus dangereuses.
Ces
consignes
doivent
être
respectées
pour
la
sécurité
personnelle, pour la sécurité des
personnes qui se trouvent à
proximité de la machine et pour
respecter l’environnement.
The Manufacturer declines all
and every liability for failure to
comply with the safety and
prevention regulations given in
this manual.
The Manufacturer also declines
all liability for damage caused
by improper use of the machine
or by modifications made
without authorization.
Pay attention to this symbol
when it appears in the manual.It
indicates a possible danger
situation.
Der
Hersteller
lehnt
jegliche
Haftung ab, wenn die in diesem
Handbuch
angegebenen
Sicherheits- und Unfallverhütungsvorschriften nicht beachtet werden.
Des Weiteren lehnt er jede Haftung
ab für Schäden, die durch
unsachgemäßen Gebrauch der
Maschine oder ohne Genehmigung
durchgeführte
Änderungen
verursacht werden.
Achten Sie auf dieses im Handbuch
verwendete Symbol. Es weist auf
eine mögliche Gefahrensituation
hin.
OMFR02RAP-0902
- 11 -
Le
Fabricant
décline
toute
responsabilité
en
cas
d’inobservance des consignes de
sécurité et de prévention des
accidents décrites dans ce
manuel.
Il ne sera pas non plus considéré
responsable pour les dommages
provoqués par une utilisation
incorrecte de la machine ou pour
des modifications apportées sans
autorisation.
Faire attention à ce symbole
quand on le rencontre dans le
manuel. Il indique la présence
d’un danger potentiel.
ENGLISH
There are three kinds of danger
notices, which indicate three
levels of danger:
DANGER: This symbol indicates
imminent hazards which will
cause serious personal injury or
death if the instructions described
are not correctly carried out.
WARNING: This symbol indicates
potential hazards which may
cause serious personal injury or
death if the instructions described
are not correctly carried out.
CAUTION: This symbol advises
potential hazards which may
cause damage to the machine if
the instructions described are not
correctly carried out.
2.1.1 CLOTHING
- Do not wear loose or flapping
gar-ments, necklaces, scarves or
ties.
- Always wear adequate footwear:
it is forbidden to work barefoot or
with sandals, slippers or other
types of footwear that could
hamper
the
op-erator’s
movements, impair his stability.
The operator must wear suit-able
safety clothing.
DEUTSCH
FRANÇAIS
Es werden drei Arten von
Gefahrensymbolen verwendet:
Les signaux de danger sont de
trois niveaux:
GEFAHR: Dieses Symbol weist
darauf hin, dass eine nicht korrekte
Ausführung
der
beschriebenen
Arbeitsschritte
zu
schweren
Verletzungen, Tod oder langfristigen
Gesundheitsgefahren führt.
DANGER: Ce signal informe que
l’exécution incorrecte des opérations
décrites provoque des lésions
graves, la mort ou des risques à long
terme pour la santé.
ACHTUNG: Dieses Symbol weist
darauf hin, dass eine nicht korrekte
Ausführung
der
beschriebenen
Arbeitsschritte
zu
schweren
Verletzungen, Tod oder langfristigen
Gesundheitsgefahren führen kann.
VORSICHT: Dieses Symbol weist
darauf hin, dass eine nicht korrekte
Ausführung
der
beschriebenen
Arbeitsschritte Maschinen-schäden
verursachen kann.
2.1.1 ARBEITSKLEIDUNG
- Keine weiten und flatternden
Kleidungsstücke und keine Ketten,
Schals und Krawatten tragen.
-Immer
geeignetes
Schuhwerk
tragen; es ist vorboten, barfuß oder
mit Sandalen, Schlappen und
anderen Schuhen, die eventuell die
Bewegung
und
Standhaftigkeit
beeinträchtigen, zu arbeiten. Der
Bediener
muss
geeignete
Schutzkleidung tragen.
- 12 -
ATTENTION: Ce signal informe que
l’exécution incorrecte des opérations
décrites peut provoquer des lésions
graves, la mort ou des risques à long
terme pour la santé.
PRÉCAUTION: Ce signal informe que
l’exécution incorrecte des opérations
décrites
peut
provoquer
des
dommages à la machine.
2.1.1 VÊTEMENTS
- Éviter de porter des vêtements
larges ainsi que des colliers,
écharpes et cravates.
- Il est recommandé de porter des
chaussures adéquates. Il est interdit
de travailler pieds nus ou avec des
sandales, savates ou autres types de
chaussures pouvant compromettre la
mobilité ou la stabilité. L’opérateur doit
porter des vêtements adéquats et
conformes aux normes de sécurité.
OMFR02RAP-0902
ENGLISH
2.1.2
ECOLOGY
AND
POLLUTION
- Keep lubricants out of children’s
reach.
Carefully
read
the
recommendations and precautions
on the lubricant containers.
Thoroughly wash the affected part
if lubricant splashes on to the skin.
Treat
used
lubricants
in
compliance with the anti-pollution
laws in force.
- Comply with the laws in force in
the country where the machine is
used when it comes to using and
disposing of the products used to
clean and service the machine.
- Comply with the anti-pollution
provi-sions in force in the country
of use if the machine must be
dismantled.
2.1.3 SAFE USE
- Persons who have not read and
un-derstood the instructions in this
manual, incompetent persons,
unauthorized persons and those
whose psycho-physical conditions
of health are not good are
absolutely forbid-den to use the
machine.
- Become familiar with the controls
and
their
functions
before
beginning work.
- Before starting the machine,
make sure that both it and the
safety devices are in perfect
conditions.
- It is absolutely forbidden to touch
moving parts or get between them;
keep at a safety distance.
- It is absolutely forbidden for
bystand-ers to stay within the
range of action of the machine.
- Proceed with the utmost care to
pre-vent
the
machine
from
overturning when you work on soft
ground, embankments, ditches or
slopes.
OMFR02RAP-0902
DEUTSCH
2.1.2 UMWELTSCHUTZ
- Schmierstoffe dürfen nicht in die Hände
von Kindern gelangen.
Die
auf
den
Schmierstoffbehältern
angegebenen
Hinweise und Vorsichtsmaß-nahmen
aufmerksam lesen. Mit Schmierstoff in
Berührung gekommene Körperstellen
gut abwaschen. Alte Schmierstoffe
gemäß
den
gesetzlichen
Umweltschutzbestimmungen entsorgen.
Beim Umgang und bei der
Entsorgung der zur Reinigung und
Wartung der Maschine verwendeten
Produkte
sind
die
im
Verwendungsland
der
Maschine
geltenden Gesetze zu beachten.
2.1.3 BETRIEBSSICHERHEIT
- Personen, die die Angaben in
diesem Handbuch nicht gelesen und
verstanden haben, die nicht über
das
nötige
Sachverständnis
verfügen, nicht zum Bedienen der
Maschine zugelassen sind oder
nicht in guter körperlicher und
geistiger Verfassung sind, ist der
Umgang
mit
der
Maschine
strengstens verboten.
- Machen
Sie
sich
mit
den
Bedienungsvorrichtungen und deren
Funktion vertraut, bevor Sie mit der
Arbeit beginnen.
- Überprüfen Sie den einwandfreien
Zustand
der
Sicherheitsvorrichtungen und der
Maschine, bevor Sie diese in Betrieb
nehmen.
- In Bewegung befindliche Teile auf
keinen Fall berühren oder sich
dazwischen stellen; Sicherheitsabstand
einhalten.
In Reichweite der Maschine
dürfen sich keine fremden Personen
aufhalten.
Es ist mit größter Vorsicht zu
verfahren, damit die Maschine beim
Arbeiten auf weichen Böden, an
Böschungen, Gräben oder Hängen
nicht umkippt.
- 13 -
FRANÇAIS
2.1.2
ENVIRONNEMENT
ET
POLLUTION
-Gardez les lubrifiants hors de la
portée des enfants.
- Lire avec attention les instructions et
les précautions indiquées sur les
récipients des lubrifiants. Se laver
soigneusement en cas de contact.
Traiter et éliminer les lubrifiants
usagés
conformément
aux
dispositions de la loi pour la protection
de l’environnement.
En ce qui concerne l’emploi et
l’élimination des produits utilisés pour le
nettoyage et l’entretien de la machine,
respecter les lois en vigueur dans le
Pays où la machine est utilisée.
2.1.3 UTILISATION EN SÉCURITÉ
- L’utilisation de la machine est
formellement interdite aux personnes
n’ayant pas lu et compris le contenu
de ce manuel, non compétentes, non
autorisées à la conduite de la
machine ou qui ne sont pas en
bonnes
conditions
de
santé
psychophysique.
- Avant de commencer le travail,
apprendre à utiliser les dispositifs de
commande et leurs fonctions.
Avant de mettre la machine en
marche, contrôler que tous les
dispositifs de sécurité et la machine
sont en parfait état.
- Éviter de toucher les organes en
mouvement et de s’interposer entre
ceux-ci; se maintenir à une distance
de sécurité.
Il est formellement interdit à
toute personne de stationner dans le
rayon d’action de la machine.
Quand on travaille sur des sols
instables, des talus, des fossés ou des
terrains
en
pente,
procéder
prudemment afin d’éviter que la
machine se renverse.
ENGLISH
2.1.4 SAFETY REGULATIONS
WHEN
WORKING
WITH
HITCHED IMPLEMENTS
- Before working on implements
hitched to the tractor, disengage
the PTO, stop the engine and
remove the ignition key, apply the
parking brake and lower the
implement to the ground.
- Do not transport passengers on
the machine.
2.1.5 SAFE MAINTENANCE
- Periodically check to make sure
that the entire machine and its
safety devices are in a good
condition.
- Periodically check that the bolts,
nuts
and unions are well
tightened.
- Spare parts must comply with the
Manufacturer’s
specifications.
Only use genuine spare parts.
- It is absolutely forbidden to
remove or tamper with the safety
devices.
- The machine must be serviced
with the engine off, by qualified
persons and in compliance with
the instruc-tions in this manual.
- The instruction manual must be
read,
memorized
and
kept
through-out the life of the machine
until this latter is completely
dismantled. Order a new copy of
the manual from the Manufacturer
if it is lost or mis-laid.
DEUTSCH
2.1.4 SICHERHEITSBESTIMMUNGEN
BEIM
ARBEITEN
MIT
ANGEHÄNGTEN GERÄTEN
Bevor an den vom Schlepper
angetriebenen Geräten Arbeiten
ausgeführt werden, die Zapfwelle
ausschalten, den Motor abstellen
und den Zündschlüssel abziehen.
Die Feststellbremse des Schleppers
anziehen und das Gerät am Boden
abstellen.
-Keine Personen auf der Maschine
mitnehmen.
2.1.6 SICHERE WARTUNG
- Regelmäßig überprüfen, dass die
Maschine
und
die
Schutzvorrichtungen
unversehrt
sind.
Schrauben, Muttern und
eventuelle Anschlüsse regelmäßig
auf festen Sitz überprüfen.
- Die Ersatzteile müssen den
Anforderungen des Herstellers
entsprechen.
Nur
Originalersatzteile verwenden.
- Es ist strengstens verboten, die
Sicherheitsvorrichtungen
zu
entfernen oder zu verändern.
Die Wartung der Maschine
darf nur bei abgestelltem Motor von
qualifiziertem Personal und unter
Beachtung der Angaben in diesem
Handbuch durchgeführt werden.
- Die Bedienungsanleitung muss
gelesen, eingeprägt und während
der gesamten Lebensdauer der
Maschine
bis
zu
deren
vollständigen
Demontage
aufbewahrt werden.
Falls die Anleitung verloren geht, ist
beim Hersteller unverzüglich ein
neues Exemplar anzufordern.
- 14 -
FRANÇAIS
2.1.4 CONSIGNES DE SÉCURITÉ
POUR TRAVAILLER AVEC DES
ÉQUIPEMENTS ATTELÉS
Avant d’intervenir sur les équipements
actionnés par le tracteur, débrayer la
prise de force, arrêter le moteur et
retirer la clé de contact, puis bloquer le
tracteur avec le frein de stationnement
et poser l’équipement au sol.
-Ne transportez pas de personnes sur
la machine.
2.1.6 ENTRETIEN EN SÉCURITÉ
- Contrôler régulièrement l’état de la
machine dans son ensemble et des
dispositifs de protection.
Contrôler régulièrement le
serrage et la tenue des vis, des
écrous et des éventuels raccords.
- Les pièces de rechange doivent
satisfaire les exigences définies par
le fabricant de la faucheuse. Utiliser
exclusivement des pièces de
rechange d’origine.
- Il est formellement interdit d’enlever
ou de modifier les dispositifs de
sécurité.
L’entretien de la machine doit
être exécuté uniquement avec le
moteur du tracteur arrêté, par du
personnel qualifié et en suivant les
indications de ce manuel.
- Le manuel des instructions pour
l’utilisation doit être lu, mémorisé et
conservé pendant toute la durée de
vie de la machine jusqu’à son
démantèlement.
En cas de perte du manuel, demander
immédiatement
une
copie
au
Fabricant.
OMFR02RAP-0902
ENGLISH
DEUTSCH
FRANÇAIS
2.2 SAFETY DECALS
2.2 SICHERHEITSSYMBOLE
2.2 SIGNAUX DE SÉCURITÉ
The machine has been
designed
and
built
in
compliance with all possible
safety standards able to safe
guard those who work with
it.Despite this,there may still
be residue hazards which are
signalled on the machine by
decals.
These decals described in
Fig.2, are affixed to the
machine and indicate the
various
situations
of
insecurity and danger in a
brief form. Keep the decals
clean
and
immediately
replace them if they detach or
become damaged.
Zum Schutz derjenigen, die mit der
Maschine arbeiten, wurden bei der
Konstruktion
alle
möglichen
Sicherheits-vorkehrungen
getroffen.
Trotzdem
können
Restgefahren bestehen, die durch
Aufkleber
an
der
Maschine
entsprechend gekennzeichnet sind.
Diese in Abb. 2 dargestellten
Symbole sind an der Maschine
angebracht und weisen in knapper
Form
auf
die
verschiedenen
Gefahrensituationen hin. Sie sind
sauber
zu
halten
und
bei
Beschädigung unverzüglich zu
ersetzen.
La machine a été réalisée en
adoptant toutes les normes et les
mesures de sécurité pour la
protection de l’opérateur. Malgré
ces précautions, des risques
résiduels sont présents, ils sont
signalés par des symboles au
moyen d’autocollants apposés sur
la machine.
Ces symboles, illustrés sur la Fig.2,
sont apposés sur la machine et
signalent les différentes situations
de risque et de danger sous une
forme essentielle. Il faut les garder
bien propres et les remplacer dès
qu’ils sont abîmés.
2.2.1
BESCHREIBUNG
SICHERHEITSSYMBOLE
AUFKLEBER
DER
UND
2.2.1 LÉGENDE DES SIGNAUX DE
SÉCURITÉ
ET
DES
AUTOCOLLANTS
1) Vor
Arbeitsbeginn
die
Bedienungs-anleitung sorgfältig
lesen.
2) Quetschgfahr bei Verschliessen.
Nicht in der Reichweite der
Maschine stehenbleiben.
3) Am
Mähbalken
besteht
Verletzungsgefahr
für
die
Gliedmaßen.
4) Mitschleppgefahr durch die sich
bewegenden Sternräder. Bei der
Arbeit dafür sorgen, dass sich
keine Personen und Tiere im
Arbeitsbereich aufhalten.
5) Firmenzeichen des Herstellers.
6) Maschinenmodell
7) Maschinenausführung.
8) Kupplungspunkt zum Ausheben
(max.
Tragvermögen
ist
angegeben).
1) Avant de commencer le travail,
lire avec attention ce manuel
d’instructions.
2) Risque d’écrasement. Ne vous
approchez pas du champ d’action
de la machine.
3) Risque d’écrasement. Respecter
la distance de sécurité nécessaire
avec la machine.
4) Risque de rester accroché aux
râteaux en mouvement. Éloigner
les personnes et les animaux
durant la phase de travail.
5) Marque du Fabricant.
6) Modèle de la machine.
7) Version de la machine.
8) Point d’attelage pour le levage
(indication de la portée maxi).
2.2.1 KEY TO THE SAFETY
DECALS (Fig.2)
1) Read
these
operating
instructions carefully before
using the machine.
2) Danger
of squashing.
Keep a safe distance from
the working range of the
machine.
3) Danger
of
squashing.
Keep a safe distance from
the machine.
4) Danger of being hooked by
the
rake
wheels
in
movement. Keep people
and animals at a safe
distance from the working
range of the machine.
5) Manufacturers decal
6) Machine Model decal
7) Version of the machine
decal
8) Attachment point decal
OMFR02RAP-0902
- 15 -
ENGLISH
DEUTSCH
FRANÇAIS
Fig.2
- 16 -
OMFR02RAP-0902
ENGLISH
DEUTSCH
FRANÇAIS
SECTION 3
ABSCHNITT 3
SECTION 3
Transportation and handling.
Transport und Fortbewegung
Transport et Manutention
3.1 GENERALITY
The packing is carried out with
wooden boxes or crates and with
all the devices necessary even
for long distance deliver. The
dimensions of the packing are
variable according to the type
and model of the machine.
The contents of each packing
and its gross weight are indicated
on a label attached to the
wooden box or crate
3.1 ALLGEMEINES
Die Maschine wird in Holzkisten oder
Lattenverschläge verpackt, die auch
für
einen
langen
Versandweg
geeignet sind. Die Abmessungen der
Verpackungen variieren je nach
Maschinentyp und -modell.
Der Inhalt jeder Packung und das
Bruttogewicht derselben sind auf dem
an
der
Holzkiste
oder
dem
Lattenverschlag angebrachten Schild
angegeben.
3.1 INFORMATIONS GÉNÉRALES
La machine est emballée dans des
caisses ou caisses à claire-voie.
Toutes les mesures nécessaires sont
adoptées, même pour les expéditions
de longue durée. Les dimensions des
emballages varient en fonction du
type de machine et du modèle.
Le contenu de chaque emballage et
son poids brut sont indiqués sur la
plaque fixée sur la caisse à clairevoie.
If the machine must be
transported over a long distance
it can be loaded on to a truck or
other means.
The machine loading and
unloading operations can be
very dangerous unless they
are carried out with the utmost
care.
Have all persons not directly in
volved in the operations move
well clear of the area;clear and
delimit
the
loading
and
unloading zone; make sure the
available means are in a
perfect condition and fit for the
purpose.
Make sure that the zone in
whih the operations take place
is uncluttered and that there is
a sufficient “escape route
”,i.e.a clear and safe zone to
which you can move if the
machine should fall.
Wear
safety
clothing
(gloves,protective
footwear,helmet,etc.).
The surface on which the
machine is loaded/unloaded
must be perfectly flat to
prevent the load from shifting.
OMFR02RAP-0902
Für lange Transportwege kann die
Maschine auf einen Lkw oder ein
anderes Transportmittel verladen
werden.
Das Auf- und Abladen der
Maschine kann sehr gefährlich
sein, wenn nicht mit größter
Sorgfalt
vorgegangen
wird.
Unbefugte Personen müssen den
Gefahrenbereich verlassen. Die
Ladestelle räumen und sichern. Die
verfügbaren Arbeitsmittel müssen
geeignet und in einwandfreiem
Zustand sein.
Es ist sicherzustellen, dass der
Arbeitsbereich
frei
von
Hindernissen ist und über einen
ausreichenden
«Fluchtweg»
verfügt, d.h. über einen frei
zugänglichen Bereich, in dem man
sich schnell in Sicherheit bringen
kann,
falls
die
Maschine
herunterfällt.
Geeignete
Schutzausrüstungen
verwenden
(Handschuhe,
Sicherheitsschuhe, Helm usw.).
Die Stell- bzw. Ladefläche der
Maschine muss absolut eben sein, um
eine Verschiebung der Last zu
vermeiden.
- 17 -
S’il faut transporter la machine sur un
long parcours, elle peut être chargée
sur un camion ou sur un autre moyen
de transport.
Les opérations de chargement et
de déchargement peuvent être très
dangereuses si elles ne sont pas
effectuées avec la juste attention.
Éloigner
les
personnes
non
concernées par cette opération.
Libérer et baliser la zone de
chargement
ou
déchargement.
Contrôler que les moyens à
disposition sont en bon état et
qu’ils sont adaptés.
S’assurer que la zone destinée à
ces opérations est libre et qu’il y a
un “espace de dégagement”
suffisant, c’est-à-dire une zone
libre et sûre où aller rapidement en
cas de chute de la charge.
S’équiper des équipements de
protection individuelle nécessaires
(gants, chaussures de sécurité,
casque, etc.).
Le plancher sur lequel la machine
sera chargée/déchargée doit être
parfaitement plat afin d’éviter tout
déplacement du chargement.
ENGLISH
3.2 LOADING/UNLOADING
Make sure the crane and its
swing arm have adequate lifting
capacity.
Fig.3 shows how to harness the
machine for lifting purposes.
Lift the machine carefully and
transfer it slowly onto the truck or
rail
wagon
without
sharp
movements.
Once the machine has been
loaded onto the truck or rail
wagon, make sure it is tied down
in its transport position.
Block the wheels with adequate
wedges.
Fix the machine firmly to the
transport surface using the fixing
points marked with the «Hook
point» stickers using wires or
chains correctly tensioned at the
anchoring point and sized for the
weight of the machine.
Once the transport operation has
been completed, before releasing
the ma-chine from all its tiedowns, check to make sure that
the condition and po-sition of the
machine are not danger-ous.
Remove the wedges and unload
the machine using the same
equip-ment needed to load it.
DEUTSCH
3.2 BE- UND ENTLADEN
Es ist sicherzustellen, dass der
verwendete
Kran
und
der
Auslegerarm über eine ausreichende
Tragfähigkeit verfügen.
Wie das Gerät anzuheben ist, wird in
Abb. 3 dargestellt.
Die Maschine sehr vorsichtig anheben
und
langsam
ohne
abrupte
Bewegungen auf den Lkw oder den
Eisenbahnwaggon verladen.
Nach dem Verladen der Maschine ist
sicherzustellen, dass sie in der
Transportstellung arretiert ist.
Die Räder sind mit Keilen zu
blockieren.
Die Maschine ist an den dafür
vorgesehenen und mit dem «Haken»Zeichen markierten Punkten mit
Seilen oder Ketten an der Ladefläche
zu befestigen. Die Seile oder Ketten
müssen gut gespannt sein und dem
Maschinengewicht standhalten.
Nach dem Transport und bevor die
Transportsicherungen
entfernt
werden, ist der Zustand und die
Position der Maschine zu prüfen, um
sicher zu gehen, dass keine Gefahr
besteht.
Die Seile und Keile entfernen und die
Maschine abladen; dabei ist wie beim
Verladen zu verfahren.
- 18 -
FRANÇAIS
3.2 CHARGEMENT/DÉCHARGEMENT
Utiliser une grue et un palonnier de
capacité adéquate pour le levage de
la machine.
Les modalités d’élingage de la
machine pour le levage sont
indiquées sur la Fig. 3.
Soulever la machine avec précaution
et la transférer lentement, sans faire
de mouvements brusques, sur le
camion ou le wagon.
Une fois la machine chargée sur le
camion ou le wagon, s’assurer qu’elle
reste bloquée à sa place.
Bloquer les roues avec des cales
adéquates.
Fixer fermement la machine sur le
plancher en utilisant les points prévus
à cet effet, signalés par l’autocollant
«crochet». Utiliser des câbles ou des
chaînes en mesure de retenir la
masse et de bloquer son mouvement;
veiller à les tendre et les bloquer
correctement dans les points de
fixation du moyen de transport.
Une fois le transport terminé et avant
de libérer la machine de l’arrimage,
vérifier que son état et sa position ne
constituent pas un danger.
Enlever les câbles et les cales, puis
décharger la machine avec les
moyens et les modalités déjà adoptés
pour le chargement.
OMFR02RAP-0902
ENGLISH
DEUTSCH
FRANÇAIS
SECTION 4
ABSCHNITT 4
SECTION 4
Operation
Einsatz
Utilisation
4.1 BEFORE USING
4.1 VOR DEM GEBRAUCH
4.1 AVANT L’UTILISATION
WARNING
Before running the machine,
the operator must have read
and
understood
all
the
sections
of
this
Manual
especially Section 2 -Safety.
Before beginning work, check to
make sure that the machine is in
good op-erational condition with
all lubricating oil levels correct
and all work parts subject to wear
and tear in good work-ing
condition.
ACHTUNG
Vor Inbetriebnahme der Maschine
muss der Bediener alle Teile dieses
Handbuches und insbesondere den
«Abschnitt 2 » über die Sicherheit
gelesen und verstanden haben.
Vor Arbeitsbeginn den einwandfreien
Zustand der Maschine, den Füllstand
der
Schmieröle
und
die
Funktionstüchtigkeit
aller
Verschleißteile überprüfen.
ATTENTION
Avant la mise en marche de la
machine, l’opérateur doit avoir lu
et compris toutes les sections de
ce manuel et notamment la
«Section 2» dédiée à la sécurité.
Avant de commencer le travail,
vérifier que la machine est en parfait
état, qu’il y a la bonne quantité de
lubrifiant et que tous les organes
sujets à usure sont parfaitement
efficaces.
DANGER
The operations required to
adjust
the
machine
and
prepare it for work must
always be carried out with the
tractor off and blocked.
GEFAHR
Die
Einstellungen
und
Arbeitsvorbereitungen
müssen
immer
bei
abgestelltem
und
gesichertem Schlepper durchgeführt
werden.
DANGER
Les opérations de réglage et
préparation au travail doivent
toujours être effectuées avec le
tracteur à l’arrêt et bloqué.
4.2 VOR DEM TRANSPORT
4.2 AVANT LE TRANSPORT
4.2 BEFORE TRANSPORTING
ACHTUNG
WARNING
Check the state of the hydraulic
hoses and fittings. Replace if worn.
Check the state of the wheels.
Replace if worn. Check the tire
pressure. Inflate to recommended
pressure. Check all safety devices
(chains, guards etc.).
Den
Verschleisszustand
der
Hydraulikschläuche und deren Anschlüsse
überprüfen.
Verschlissene
Teile
austauschen. Abnutzung der Reifen
überprüfen. Stark abgenutzte Reifen
wechseln. Reifendruck überprüfen.
Korrekten Druck gegebenenfalls wieder
herstellen.
Überprüfung
aller
Sicherheitsvorrichtungen
(Ketten,
Schutzvorrichtungen, usw.).
4.3 CHARACTERISTICS
THE TRACTOR
4.3 SCHLEPPEREIGENSCHAFEN
OF
WARNING:
Do not operate or transport the
rake with a tractor which does
not
fulfil
the
following
requirements:
ACHTUNG:
Den Sternradschwader nicht mit
einem Schlepper verwenden oder
transportieren, der nicht folgende
Eigenschaften aufweist:
Miminum required power
*· Vertical muffler
- 22,4 kw (HP 30)
- 70 hpascal h minimum
hydraulic pressure
- suitable brakes, suitable tyre
pressure and good controllability.
Notwendige Mindestleistung
*· Vertikaler Auspufftopf
- 22,4 KW (HP 30)*· 68 ATM
hydraulischer Mindestdruck.
70
hpascal
hydraulischer
Mindestdruck
- Geeignete Bremsen, geeigneter
Reifendruck
OMFR02RAP-0902
- 19 -
ATTENTION
Vérifier l’état d’usure des tuyaux
hydrauliques et des raccords. Si
nécessaire, les remplacer.
Vérifier l’état d’usure des pneumatiques.
Si nécessaire, les remplacer. Vérifier la
pression
des
pneumatiques.
Si
nécessaire, les regonfler.
Vérifier tous les dispositifs de sécurité
(chaînes, protections, etc.).
4.3
CARACTÉRISTIQUES
TRACTEUR
DU
ATTENTION :
Ne pas utiliser ou transporter la
machine avec un tracteur qui ne
présente pas les caractéristiques
suivantes :
Puissance minimum nécessaire
*· Silencieux vertical
- 22,4 kw (HP 30)* · 68 ATM,
pression hydraulique minimum.
- 70 hpascal, pression hydraulique
minimum
- Bons freins, bonne pression des
pneumatiques,
et
bonne
contrôlabilité.
ENGLISH
DEUTSCH
FRANÇAIS
4.4 HITCHING TO TRACTOR
4.4 ANBAU AM SCHLEPPER
4.4 ATTELAGE AU TRACTEUR
DANGER
Hitching to the tractor is a very
dangerous phase.
Make sure that you carry out
this operation following the
instructions.
Hitch the baler to the tractor as
follows:
- Make sure the tractor is rated
for the machine it has to tow.
- Check to make sure there is
nothing (people or animals) in
and around the machine.
- Make sure that the machine
is in a stable, horizontal position
and that the fork of the drawbar
is at the same height as the
hitch on the tractor. Then,
slowly bring the tractor close to
the machine and position it
correctly. Connect the drawbar
of the rake directly to the hitch
of the tractor and fix it by means
of the pin.
GEFAHR
Der Anbau am Schlepper kann
gefährlich sein. Alle Arbeitsschritte
vorsichtig
und
gemäß
den
Anweisungen ausführen.
Für einen korrekten Anbau am
Schlepper ist wie folgt zu verfahren:
- Sicherstellen, dass der Schlepper in
der Lage ist, das verwendete Gerät zu
ziehen.
- Sicherstellen, dass in unmittelbarer
Nähe
der
Maschine
keine
Gegenstände abgestellt sind und dass
sich dort keine Personen oder Tiere
aufhalten. Überprüfen.
- Sicherstellen, dass die Maschine
sich in einer stabilen waagerechten
Position befindet und dass die
Zugstangengabel auf der gleichen
Höhe des Schlepperanschlusses ist.
Den Schlepper nun langsam an die
Maschine annähern und in Position
bringen.
Die
Schwaderschleppstange direkt an den Anschluss des
Schleppers ankuppeln und mit dem
speziellen Stift absichern.
DANGER
L’opération d’attelage au tracteur
comporte des risques. Faire très
attention
et
suivre
rigoureusement
la
procédure
indiquée.
Pour
atteler
correctement
la
machine au tracteur, agir de la façon
suivante:
- S’assurer que le tracteur a une
configuration adaptée pour traîner la
machine.
- S’assurer qu’il n’y a pas d’objets
posés ou des personnes ou des
animaux à proximité de la machine.
- S’assurer que la machine est en
position stable et horizontale et que
la fourche du timon est à la même
hauteur que l’attelage du tracteur.
Puis rapprocher lentement le
tracteur de la machine et le placer
correctement. Accrocher le timon de
l’andaineur solaire directement à
l’attelage du tracteur et le bloquer à
l’aide du pivot prévu à cet effet.
ACHTUNG
Beim Abbiegen und Wenden darauf
achten, dass der Lenkwinkel nicht
zu eng ist (> 45°), damit die
Schleppstange des Schwaders
nicht gegen den Schlepper schlägt,
da die Schleppstange verbiegen
oder
noch
größere
Beschädigungen
auftreten
könnten.
ATTENTION
Au moment de tourner, ne pas
prendre des angles de braquage
trop étroits (> 45° degrés) de
façon à ce que le timon de
l’andaineur solaire ne heurte pas
contre
le
tracteur
ce
qui
provoquerait le pliement du timon
ou
des
dommages
plus
importants.
WARNING
Do not make sharp turns (> 45°
degrees) in order to prevent
the drawbar of the rake from
hitting the tractor, bending the
drawbar or causing even
worse damage.
- 20 -
OMFR02RAP-0902
ENGLISH
WARNING
- Set the support feet in the
transporting position.
- Connect the hydraulic pipes
to the tractor distinguishing
between those for the opening
system and those for the lifting
of the splitter wheels.
- Remove any grease deposits
from the cylinders.
4.5 WHEELS
Always check them for wear and
pressure of the wheels (2,7
hpascal – 40 PSI).
DEUTSCH
FRANÇAIS
ACHTUNG
Den
Stützfuß
in
die
Transportposition bringen.
- Die Hydraulikschläuche an den
Schlepper anschließen und darauf
achten, dass die Schläuche der
Öffnungsanlage
von
den
des
Sternräderhubs
unterschieden
werden.
- Alle Schmierfettablagerungen von
den Zylindern entfernen.
ATTENTION
- Mettre le pied d’appui en
position de transport.
Brancher
les
tuyaux
hydrauliques
au
tracteur,
dissocier ceux pour l’installation
d’ouverture de ceux pour le
levage des roues soleil.
- Enlever tous les dépôts de
graisse des cylindres.
4.5 RÄDER
Regelmäßig den Verschleiß und den
Luftdruck (2,7 hpascal – 40 PSI) der
Räder kontrollieren.
4.5 ROUES
Toujours contrôler l’état d’usure et
la pression des roues (2,7 hpascal
– 40 PSI).
4.6 ARBEITSSTELLUNG
4.6 POSITION DE TRAVAIL
GEFAHR
Wenn die Maschine in Betrieb ist,
MUSS der Maschinenbediener auf
dem Fahrerplatz sitzen, denn nur von
hier aus kann er das Gerät
ordnungsgemäß bedienen. Bevor er
den Fahrerplatz verläßt, MUSS er die
Maschine
stoppen,
die
Feststellbremse anziehen und den
Schlepper abstellen.
DANGER
Quand la machine est en
marche, l’opérateur DOIT rester
assis au poste de conduite, car
c’est uniquement dans cette
position qu’il est possible
d’intervenir correctement. Avant
de quitter le poste de conduite,
l’opérateur DOIT arrêter la
machine, enclencher le frein de
stationnement et arrêter le
moteur.
4.7 GEBRAUCH DES
STERNRADSCHWADERS
Die Maschine wurde zum Schwadern
von Heu, Stroh und anderem Futter
entwickelt und gebaut und formt luftige
Schwaden.
Die Arbeitsgeschwindigkeit wird durch
die
Kombination
verschiedener
Faktoren bestimmt, wie zum Beispiel:
Futtertyp, Dichte, Feuchtigkeitsgehalt
des Futters, Bodenbeschaffenheit und
Windgeschwindigkeit
während
der
Arbeit.
4.7
UTILISATION
DE
L’ANDAINEUR SOLAIRE
Cette machine a été conçue pour
former de minces andains avec le
foin, la paille et d’autres fourrages.
La largeur des andains peut varier
en fonction des exigences de
l’utilisateur.
La
vitesse
de
travail
est
déterminée par la combinaison de
divers facteurs tels que: le type de
fourrage, la densité et l'humidité du
fourrage, les conditions du terrain
et la vitesse du vent durant les
opérations.
4.8 EINSTELLUNGEN
Am
Schwader
sind
folgende
Einstellungen
vorzunehmen:
Schwadbreite,
Arbeitsbreite
und
Anpassung der Sternräder.
4.8 RÉGLAGES
Les réglages à effectuer sur
l’andaineur sont les suivants:
largeur de l’andain, largeur de
travail et adaptation des roues
soleil.
4.6 WORK POSITION
DANGER
When the machine is running,
the operator MUST be in the
driver’s seat because it is only
from this position that he can
operate correctly.
Before leaving the driver’s
seat, the operator MUST stop
the
machine,
put
the
emergency brake on and
switch the tractor off.
4.7 USE OF THE HAY RAKE
All rakes are made to form a soft
windrow from cut wheat, hay and
other forages. The width of the
windrow is variable, according to
single necessities.
The working speed is determined
by a combination of many factors
such as: the kind of forage, the
density and humidity contained in
the forage, the ground conditions
and the speed of the wind during
working operations.
4.8 ADJUSTMENTS
The adjustments to carry out on
the hay rake are the following:
Windrow width, Working width
and Adaptation of the rake finger
wheels
OMFR02RAP-0902
- 21 -
ENGLISH
DEUTSCH
FRANÇAIS
4.8.1
WINDROW WIDTH
ADJUSTMENTS
To adjust the windrow width turn
the handle (1) device that you
will find near the last finger wheel
on both the L.H. and R.H. wing
frames.
As you can see from the drawing,
the last finger wheel arm on both
sides has an angle of working
that varies.
4.8.1
EINSTELLUNG
DER
SCHWADBREITE
Die Einstellung der Schwadbreite
erfolgt durch Einwirken auf die Kurbel
(1) neben dem hinteren Sternrad. Wie
aus der Abbildung ersichtlich ist, sind
die
letzten
beiden
Sternräder
verstellbar, was das Einstellen eines
schmaleren oder breiteren Schwades
ermöglicht.
4.8.1 RÉGLER LA LARGEUR DE
L’ANDAIN
Le réglage de l’andain s’effectue à
l’aide de la poignée (1) placée à
proximité de la roue soleil arrière.
Comme indiqué sur la figure, les
deux dernières roues soleil sont
réglables
et
permettent
de
resserrer ou d’élargir l’andain en
fonction de son angle.
4.8.2
WORKING
WIDTH
ADJUSTMENTS
Your hay rake has an infinite
number of working widths from
the transport position to its
maximum width that according to
the different models.
4.8.2
EINSTELLEN
DER
ARBEITSBREITE
Ihr Schwader verfügt über unendlich
viele
Arbeitsbreiten,
von
der
Transportposition bis zur maximalen
Breite, die von den einzelnen Modellen
abhängt.
4.8.2 RÉGLER LA LARGEUR DE
TRAVAIL
Votre andaineur possède une
infinité de largeurs de travail :
depuis la position de transport à sa
largeur maximum qui varie en
fonction des modèles.
To obtain the desired working
width, or change from the former
one,
just
activate
the
opening/closing
hydraulic
cylinder N. 2.
Zum Einstellen der gewünschten
Arbeitsbreite oder zum Ändern der
gegenwärtig angewandten Breite reicht
es aus, den hydraulischen Öffnungsund Schließzylinder Nr. 2 zu betätigen.
Pour obtenir la largeur de travail
souhaitée ou pour modifier la
largeur actuelle, il suffit d’activer le
cylindre hydraulique d’ouverture et
de fermeture N°2.
WICHTIG: Führen Sie die ÖffnungsSchließungsphase
des
Schwadenrechens
beim
Fahren
durch, um die Belastung des
Öffnungssystems der Maschine zu
verringern.
- 22 -
OMFR02RAP-0902
DEUTSCH
ENGLISH
FRANÇAIS
ADJUSTMENTS
Le réglage de l’andain s’effectue à
l’aide de la poignée (1) placée à
A
sides has an angle of working
4.8.2
WORKING
WIDTH
ADJUSTMENTS
Your hay rake has an infinite
number of working widths from
the transport position to its
maximum width that according to
the different models.
To obtain the desired working
width, or change from the former
one,
just
activate
the
4.8.2
EINSTELLEN
DER
ARBEITSBREITE
Ihr Schwader verfügt über unendlich
viele
Arbeitsbreiten,
von
der
Transportposition bis zur maximalen
Breite, die von den einzelnen Modellen
abhängt.
Zum Einstellen der gewünschten
Arbeitsbreite oder zum Ändern der
4.8.2 RÉGLER LA LARGEUR DE
TRAVAIL
Votre andaineur possède une
infinité de largeurs de travail :
depuis la position de transport à sa
largeur maximum qui varie en
fonction des modèles.
Pour obtenir la largeur de travail
souhaitée ou pour modifier la
WICHTIG: führen Sie folgende
Tätigkeiten
durch,
um
ein
einwandfreies Funktionieren des
Schwadenrechens zu garantieren: A)
tragen
Sie
einen
leichten
Schmierölfilm
auf
die
gekennzeichneten Komponenten auf,
um ein einwandfreies Gleiten der
Teleskopelemente zu garantieren. B)
fetten Sie die Achse der Lenkrollen.
Wiederholen Sie diese Schritte alle
50 Stunden.
IMPORTANT :
procéder
aux
opérations suivantes afin de
garantir
un
fonctionnement
optimum du râteau-andaineur.
A) étaler une légère couche
d’huile lubrifiante sur les parties
mises en évidence afin de
permettre
aux
parties
télescopiques
de
glisser
aisément. B) graisser la cheville
des roues mobiles. Répéter ces
opérations toutes les 50 heures.
cylinder N. 2.
WARNING: Do these operations
to secure an optimal function of
the hay rakes:
- (A) apply a thin layer of
lubrificant oil to secure the good
sliding
of
the
telescopic
components.
- (B) grease with care the pin of
the crazy wheels.
- repeat those operations every
50 hours of work.
OMIT03DST-0612
- 23 -
ENGLISH
4.8.3
FINGER
ADJUSTMENTS
DEUTSCH
WHEEL
Your rake has each finger wheel
independently spring loaded to
allow each wheel to follow
exactly the contour of the ground.
It is very important that the chain
N. 1 that limits the run of the
finger wheels and the spring N.2
that absorbs the shocks of the
finger wheel, are assembled
correctly on the rake arms N.3.
4.8.4
FINGER
WHEELS
GROUND PRESSURE
For a correct raking you should
adjust the rake finger wheels so
that they have an adequate
ground pressure.
This
pressure
may
vary
depending on the type of crop
that you are raking, the quantity
of the product you have and the
different field conditions you may
find.
The rake is supplied with a screw
handle N.4 that allows you to
raise or lower all the finger
wheels at the same time giving
you the possibility of obtaining
the ground pressure you desire.
OMFR02RAP-0902
4.8.3 ANPASSEN DER STERNRÄDER
Die Sternräder des Schwaders drehen
sich unabhängig voneinander und die
Feder sorgt dafür, dass jedes Rad
perfekt dem Bodenprofil folgt.
Es ist sehr wichtig, dass die den
Sternradhub begrenzende Kette Nr. 1
und die die Sternradstöße dämpfende
Feder Nr. 2
korrekt an der
Sternradstange Nr. 3 angebracht sind.
4.8.4 VON DEN STERNRÄDERN
AUSGEÜBTER DRUCK
Zum korrekten Schwadern müssen die
Sternräder des Sternradschwaders
derart eingestellt werden, dass sie
einen angemessenen Druck auf den
Boden ausüben.
Dieser Druck kann variieren und hängt
von dem geschwaderten Futter, der
Produktmenge und den verschiedenen
Feldbedingungen ab.
Der
Schwader
ist
mit
einer
Einstellschraube Nr. 4 ausgestattet, mit
der
alle
Sternräder
gleichzeitig
abgesenkt oder hochgefahren werden
können, um den gewünschten Druck
auf den Boden zu erhalten.
- 24 -
FRANÇAIS
4.8.3 ADAPTATION DES ROUES
SOLEIL
Les roues soleil de l’andaineur
tournent de manière indépendante
les unes des autres. Le ressort
permet à chacune des roues de
suivre exactement le profil du
terrain.
Il est très important que la chaîne
N°1 qui limite la course de la roue
soleil et que le ressort amortisseur
N°2 qui amortit les coups de la
roue soleil soient correctement
assemblés sur le bras porte-roues
soleil N°3.
4.8.4 PRESSION EXERCÉE PAR
LES ROUES SOLEIL
Pour obtenir un bon andainage,
régler les roues soleil de
l’andaineur de façon à ce qu’elles
exercent une pression adéquate
sur le terrain.
Cette pression peut varier car elle
dépend du type de récolte à
andainer, de la quantité de produit
et des différentes conditions dans
lesquelles le terrain peut être.
L’andaineur est muni d’une vis de
réglage N°4 qui permet de lever ou
de baisser en même temps toutes
les roues soleil offrant ainsi la
possibilité d’obtenir la pression
souhaitée sur le terrain.
ENGLISH
DEUTSCH
FRANÇAIS
4.9 DURING WORK
4.9 BEI DER ARBEIT
4.9 DURANT LE TRAVAIL
Warning: It is absolutely
forbidden for bystanders to
stay within the range of action
of the machine.
Achtung: Unbefugten ist es strikt
verboten, sich im Wirkungskreis der
Maschine aufzuhalten.
Attention: Il est absolument
interdit
aux
étrangers
de
stationner dans le champ d’action
de la machine.
4.9.1 DIRECTION OF RAKING
The raking direction will effect
leaf loss and bale formation. For
sickle mowed crops, rake in the
same
direction
as
mower
travelled. For rotary mowed
crops, rake in the opposite
direction to which the mower
travelled.
Tests
may
be
necessary in order to form the
best bale.
4.9.1 ARBEITSRICHTUNG
Die
Schwaderrichtung
hat
Auswirkungen auf das eventuelle
Abfallen
der
Blätter.
Mit
dem
Sichelmähwerk gemähtes Futter muss
in die gleiche Richtung geschwadert
werden. Mit dem Scheibenmähwerk
gemähtes Futter muss dagegen gegen
die Mährichtung geschwadert werden.
Für ein besseres Formen der Ballen
könnten mehrere Versuche notwendig
sein.
4.9.1 SENS D’ANDAINAGE
Le sens d’andainage peut causer
une perte de feuillage. Pour le
fourrage fauché avec la faucheuse
dent lame, andainer dans le même
sens. Pour les fourrages fauchés
avec une faucheuse à disque,
andainer dans le sens contraire à
celui dans lequel la faucheuse a été
transportée. Des tests pourraient
être nécessaires pour obtenir une
meilleure formation des balles.
4.9.2 RAKING SPEED
Optimum raking speed will
depend on the crop being raked,
the terrain and the tractor
horsepower.
Reduced raking speed may be
necessary for hills or rough
terrain. Inexperienced operators
should use slower raking speeds
and avoid rough or uneven
terrain which could lead to tractor
tipping.
4.9.2 ARBEITSGESCHWINDIGKEIT
Die
Arbeitsgeschwindigkeit
der
Maschine hängt vom Futtertyp, vom
Boden und der Schlepperleistung ab.
An Hängen und auf unebenem Boden
kann
eine
reduzierte
Arbeitsgeschwindigkeit notwendig sein.
Schlepperfahrer mit unzulänglicher
Erfahrung sollten langsamer fahren und
Hänge sowie unebenen Boden meiden,
damit der Schlepper nicht stecken
bleibt oder umkippt.
4.9.2 VITESSE DE TRAVAIL
La vitesse de travail optimale de la
machine dépend du type de
fourrage, du terrain et de la
puissance du tracteur.
Pour les collines ou les terrains
accidentés, une vitesse de travail
réduite peut être nécessaire. Les
opérateurs inexpérimentés devraient
utiliser une vitesse de travail
inférieure et éviter les terrains
accidentés ou non uniformes à
cause desquels le tracteur pourrait
s’enliser ou se renverser.
4.9.3 ARBEITSBREITE
Die Arbeitsbreite und die Schwadbreite
hängen
von
der
geschwaderten
Futtermenge und dem Futtertyp ab.
Siehe
Tabelle
mit
den
Maschineneigenschaften
für
die
Arbeits- und Schwadbreiten.
4.9.3 LARGEUR DE TRAVAIL
La largeur de travail et la largeur de
l’andain varient en fonction de la
quantité et du type de fourrage à
andainer. Consulter le tableau
indiquant les caractéristiques de la
machine pour les largeurs de travail
et de l’andain.
4.9.3 WORKING WIDTH
The working width and windrow
width will vary according to the
type and quantity of crop being
raked. Please see the apposite
reference chart to ceck the
windrow and the working width.
B
A
- 25 -
OMFR02RAP-0902
ENGLISH
4.9.4 RAKING PROBLEMS
Most raking problems can be traced to
travelling too slow or too fast, incorrect ground
pressure, or broken or missing tines.
Increase ground pressure only enough to pick
up crop.
4.9.5 HYDRAULIC PROBLEMS
Problem: Hydraulic Sistem Inoperative
Probable Cause: Auxiliary outlet not activated
Possible Solution: Activate auxiliary hydraulic
outlet
Probable Cause: Hose from implement not
properly connected to tractor
Possible Solution :Connect hose.
Probable Cause: Hydraulic oil level too low in
tractor
Possible Solution: Check tractor operator’s
manual for proper oil level
4.9.6 RAKING PROBLEMS
Problem: Field not cleaned well
Cause: Rake wheel assemblies too high
Solution: Adjust assemblies lower to ground
Problem: Hay is bunching
Cause: Tips of teeth collecting dirt; Incorrect
ground speed
Solution: Remove paint and dirt from tips of
teeth; Adjust ground speed
Problem: Rake wheel hoops breaking
Cause: Excessive ground speed;Excessive
ground pressure
Solution: Reduce ground speed;Reduce
ground pressure
Problem: Tines breaking
Cause: Excessive ground speed;Excessive
ground pressure
Solution: Reduce ground speed;Reduce
ground pressure
Problem: One rake wheel does not turn
Cause: Inadequate lubrication; Worn or
damaged bearing
Solution: Lubricate adequately; Replace
bearing
Problem: Poor windrow preparation
Cause: Rake wheel assemblies too high;
Broken or missing tines; Excessive ground
speed; Excessive ground pressure
Solution: Adjust assemblies lower to ground;
Replace tines; Reduce ground speed; Reduce
ground pressure
Problem: Rake wheel assembly on one side
does not turn
Cause: Rake wheel assembly too high; Broken
or missing tines
Solution: Adjust assembly lower to ground;
Replace tines
OMFR02RAP-0902
DEUTSCH
4.9.4 PROBLEME BEI DER ARBEIT
Viele Probleme beim Schwadern sind auf eine zu
niedrige oder zu hohe Geschwindigkeit, einen
falschen Druck der Sternräder auf den Boden oder
abgebrochene Sternradzähne zurückzuführen. Den
Sternraddruck auf den Boden nur erhöhen, wenn
ausreichend Futter vorhanden ist.
4.9.5 HYDRAULIKPROBLEME
Problem: Die Hydraulikanlage arbeitet nicht.
Ursache:
Schnellanschluss
nicht
korrekt
angeschlossen.
Abhilfe:
Den
Schnellanschluss
korrekt
anschließen.
Ursache: Hydraulikschlauch nicht korrekt an den
Schlepper angeschlossen.
Abhilfe: Hydraulikschlauch korrekt anschließen.
Ursache: Zu niedriger Hydraulikölstand im
Schlepper.
Abhilfe: Schlepperhandbuch nachschlagen, um
den korrekten Ölstand wieder herzustellen.
4.9.6 PROBLEME BEIM SCHWADERN
Problem: Schlechtes Schwadern.
Ursache: Sternräder zu hoch.
Abhilfe: Bodenabstand der Sternräder einstellen.
Problem: Futter verstopft die Sternräder.
Ursache: An den Sternradzähnen hat sich Futter
oder anders Material verfangen. Falsche
Arbeitsgeschwindigkeit.
Abhilfe: Das verfangene Material von den
Sternradzähnen entfernen. Arbeitsgeschwindigkeit
korrigieren.
Problem: Abgebrochene Sternradkreise oder –
zähne.
Ursache: Zu hohe Arbeitsgeschwindigkeit.
Abhilfe: Arbeitsgeschwindigkeit reduzieren.
Ursache: Zu hoher Druck auf den Boden.
Abhilfe: Druck auf den Boden reduzieren.
Problem: Eines der Sternräder dreht sich nicht.
Ursache: Schmierung nicht korrekt.
Abhilfe: Schmierung wiederholen
Ursache: Eines der Lager ist verschlissen.
Abhilfe: Lager ersetzen.
Problem: Ungenügende Schwadgröße.
Ursache: Sternräder zu hoch eingestellt.
Abhilfe: Bodenabstand der Sternräder einstellen.
Ursache:
Beschädigte
oder
fehlende
Sternradzähne.
Abhilfe: Zähne ersetzen.
Ursache: Zu hohe Arbeitsgeschwindigkeit.
Abhilfe: Arbeitsgeschwindigkeit reduzieren.
Ursache: Zu hoher Druck auf den Boden.
Abhilfe: Druck auf den Boden reduzieren.
Problem:
Die
Sternräder
an
einer
Sternradschwaderseite drehen sich nicht.
Ursache: Sternräder zu hoch eingestellt.
Abhilfe: Bodenabstand der Sternräder einstellen.
Ursache:
Beschädigte
oder
fehlende
Sternradzähne.
Abhilfe: Zähne ersetzen.
- 26 -
FRANÇAIS
4.9.4 PROBLÈMES D’ANDAINAGE
De nombreux problèmes peuvent se présenter
durant l’andainage, ils peuvent être liés à une
vitesse trop basse ou trop élevée, une
mauvaise pression des roues soleil sur le
terrain ou à des dents cassées des roues soleil.
Augmenter la pression des roues soleil sur le
terrain uniquement lorsqu’il y a suffisamment
de fourrage.
4.9.5 PROBLÈMES HYDRAULIQUES
Problème: Système hydraulique ne fonctionne
pas
Cause: Raccord rapide mal branché
Solution: Brancher correctement le raccord
rapide
Cause: Tuyau hydraulique mal raccordé au
tracteur
Solution: Raccorder correctement le tuyau
hydraulique
Cause: Niveau d’huile hydraulique du tracteur
trop bas.
Solution: Contrôler le manuel du tracteur pour
obtenir le bon niveau d’huile.
4.9.6 PROBLÈMES D’ANDAINAGE
Problème: Andainage imparfait
Cause: Roues soleil trop hautes
Solution: Régler la distance du sol des roues
soleil
Problème: Fourrage enchevêtré
Cause: Du fourrage ou un autre matériel s’est
imbriqué dans les dents des roues soleil.
Vitesse de travail incorrecte
Solution: Enlever le matériel imbriqué des
dents des roues soleil. Corriger la vitesse de
travail
Problème: Rupture des jantes ou des dents
des roues soleil
Cause: Vitesse travail excessive
Solution: Réduire la vitesse de travail
Cause: Pression excessive sur le terrain
Solution: Réduire la pression sur le terrain
Problème: Une des roues soleil ne tourne pas
Cause: Lubrification inadéquate
Solution: Lubrifier de nouveau
Cause: Un des roulements est endommagé
Solution: Remplacer le roulement
Problème: Andain de trop petites dimensions
Cause: Roues soleil trop hautes
Solution: Régler la distance du sol des roues
soleil
Cause: Dents des roues soleil cassées ou
manquantes
Solution: Remplacer les dents
Cause: Vitesse de travail excessive
Solution: Réduire la vitesse de travail
Cause: Pression excessive sur le terrain
Solution: Réduire la pression sur le terrain
Problème: Les roues soleil d’un côté de
l'andaineur ne tournent pas
Cause: Roues soleil trop hautes
Solution: Régler la distance du sol des roues
soleil
Cause: Dents cassées ou manquantes
Solution: Remplacer les dents
ENGLISH
DEUTSCH
FRANÇAIS
4.10 ROAD CIRCULATION
4.10 STRASSENTRANSPORT
4.10 TRANSPORT ROUTIER
WARNING
If the machine must be transported on the
public roads, strictly comply with the
Highway Code provisions in force in the
country where the machine is used.
Before transporting the machine, attach the
safety chain to the drawbar support or other
specified anchor location. The safety chain will
reduce the risk of injury due to collision or loss
of implement control if the drawn implement
becomes unhitched from drawbar. Provide
enough slack in the chain to permit turning.
ACHTUNG
Beim Transport auf öffentlichen Straßen sind
die im Verwendungsland der Maschine
geltenden Straßenverkehrsvorschriften zu
befolgen.
Vor dem Transport der Maschine ist die
Sicherheitskette an dem entsprechenden Halter an
der Schleppstange oder an einer anderen
Verankerungsstelle
–falls
angegebenzu
befestigen. Die Sicherheitskette reduziert den
Schaden bei Kollision oder Abreissen des
Schwaders vom Schlepper. Darauf achten, dass die
Kette ziemlich locker ist, damit man korrekt lenken
und wenden kann.
ATTENTION
Pour le transport sur routes publiques,
respecter les dispositions du code de la route
en vigueur dans le Pays où la machine est
utilisée.
Avant de transporter la machine, attacher la
chaîne de sécurité au support du timon prévu à
cet effet ou à un autre point de fixation spécifique.
La chaîne de sécurité réduira le risque de
dommage dû à une collision ou à la perte de
contrôle de l’andaineur si ce dernier devait se
détacher du tracteur. Faire en sorte que la chaîne
ne soit pas trop tendue et permette de tourner.
4.10.1 BLOCKING THE FINGER WHEELS
Before transporting the rake, clean out any crop
and chaff that has become trapped between
the rake tines and the frame.
To raise and lower the finger wheel assemblies
activate the two hydraulic cylinders lifting the
finger wheels to their maximum height. Slide
out the locking pin N.1 and block the locking pin
with the hair pin clip N.2.
All the finger wheels are now blocked and are
impossible to move even if you have an
accidental pressure failure in the hydraulic
cylinder of the raising/lowering mechanism.
4.10.2 TRANSPORT SAFETY DEVICE
Close the rake by acting on the opening/closing
hydraulic cylinder. When you have reached the
maximum closed position of the rake, move the
safety bar transport from the position A to the
position B.
The rake is now blocked in the transport
position by means of the safety mechanism.
This will prevent any damage to the rake
caused by the rake opening incorrectly while it
is locked and being transported.
4.10.1 SPERREN DER STERNRÄDER
Vor dem Transport des Schwaders sind zwischen
den Zähnen der Sternräder und dem Rahmen des
Schwaders verklemmte Futterreste zu entfernen.
Zum Anheben und Absenken der Sternräder sind
die beiden Hydraulikzylinder zu betätigen. Die
Sternräder auf die maximale Höhe anheben. Den
Sperrzapfen Nr. 1 herausziehen und mit dem
Bogenstift Nr. 2 sperren. Alle Sternräder sind jetzt
gesperrt und können auch dann nicht bewegt
werden, wenn die Hydraulikzylinder des Hub/Absenkmechanismus der Sternräder unabsichtlich
unter Druck gesetzt werden.
4.10.2
TRANSPORTSICHERHEITSVORRICHTUNG
Den Schwader durch Einwirken auf den Schließund Öffnungs-Hydraulikkreis schließen. Sobald der
Schwader die maximale Schließposition erreicht
hat, werden die Transportstangen aus der Stellung
A in Stellung B verstellt.
Der
Schwader
ist
jetzt
mittels
des
Sicherheitsmechanismus in der Transportposition
blockiert, was Beschädigungen bei einem
unbeabsichtigten
Öffnungsversuch
des
geschlossenen und/oder transportierten Schwaders
verhindert.
- 27 -
4.10.1 BLOCAGE DES ROUES SOLEIL
Avant de transporter l’andaineur, nettoyer les
résidus de fourrage coincés entre les dents des
roues soleil de l’andaineur et sur le châssis.
Pour lever et baisser les roues soleil, activer les
deux cylindres hydrauliques en levant les roues
soleil à leur hauteur maximum. Faire sortir le
pivot de fixation N°1 et le bloquer à l’aide de la
goupille à arc N°2. Toutes les roues soleil sont à
présent bloquées et il est impossible de les
déplacer même si les cylindres hydrauliques du
mécanisme de levage et d’abaissement des
roues soleil sont accidentellement mis sous
pression.
4.10.2 DISPOSITIF DE SÉCURITÉ DURANT LE
TRANSPORT
Fermer l’andaineur à l’aide du circuit hydraulique
de fermeture et d’ouverture. Après avoir atteint la
position de fermeture maximum, déplacer les
barres de transport de la position A à la position
B.
L’andaineur est à présent bloqué en position de
transport grâce au mécanisme de sécurité. Ceci
empêchera l’andaineur de s’abîmer en raison de
l’activation incorrecte de l’ouverture alors qu’il est
fermé et/ou qu’il est transporté.
OMFR02RAP-0902
ENGLISH
DEUTSCH
FRANÇAIS
4.11 AFTER USE
4.11 NACH DEM GEBRAUCH
4.11 APRÈS L’UTILISATION
4.11.1 UNHOOKING OF THE
RAKE
4.11.1 ABKUPPELN DER MASCHINE
4.11.1 DÉCROCHAGE DE LA
MACHINE
WARNING
Follow the normal shutdown
procedure described in the
section when unhooking the
implement.
Park the machine on level
ground.
Lower the finger wheels or install
the finger wheels stopper N.1
Set the jack/stand N.2
Unhook the hydraulic hoses N.3
placing them onto the support
provided on the drawbar.
Unhook the pin that attaches the
rake to the tractor hitch.
ACHTUNG
Zum Abkuppeln ist das beschriebene
normale
Abkuppelverfahren
der
Maschine zu befolgen.
Die Maschine auf ebenem Boden
parken.
Die Sternräder absenken oder den
Sperrzapfen Nr.1 anbringen.
Den Fuß Nr. 2 positionieren.
Die Hydraulikschläuche Nr. 3 abtrennen
und an den Halterungen an der
Schleppstange befestigen.
Den Zapfen abkuppeln, der den
Schwader am Schlepper befestigt.
ATTENTION
Suivre la procédure de décrochage
normale décrite pour décrocher la
machine.
Placer la machine sur un terrain
nivelé.
Baisser les roues soleil ou installer
le pivot de fixation N°1.
Mettre en position le pied N°2.
Décrocher les tuyaux hydrauliques
N°3 et les placer dans les
logements prévus à cet effet sur le
timon.
Enlever le pivot qui fixe l’andaineur
au tracteur.
4.11.2 Prepare the machine for
season storage:
4.11.2 Die Maschine auf die
Einlagerung im Winter vorbereiten:
4.11.2 Préparer la machine pour
la période d’inactivité hivernale:
-Futterreste
von
der
Maschine
entfernen. Teile, deren Lackierung
abgeblättert ist, neu lackieren, da sie
sonst rosten können.
- Alle Schmierpunkte der Maschine
schmieren.
-Die Zylinderschäfte schmieren, um sie
vor dem Rosten zu schützen.
Den
Verschleisszustand
der
Hydraulikschläuche überprüfen und
diese gegebenenfalls ersetzen.
- Alle Schrauben, Muttern und
Hydraulikanschlüsse festziehen.
-Beschädigte Teile reparieren oder
ersetzen.
- Beschädigte oder fehlende Aufkleber
ersetzen.
- Si présents, enlever les résidus
de fourrage de la machine.
Repeindre les parties où le vernis
est parti et qui risquent de rouiller.
- Lubrifier les points à graisser sur
la machine.
- Graisser les tiges des cylindres
pour éviter qu’elles ne rouillent.
- Contrôler l’état de détérioration
des tuyaux hydrauliques et, si
nécessaire, les remplacer.
- Resserrer toutes les vis, les
boulons, les écrous et les raccords
hydrauliques.
- Réparer ou remplacer les parties
endommagées.
- Remplacer les autocollants
endommagés ou manquants.
-Remove dirt and crop from
machine. Paint
exposed metal to inhibit rusting.
-Lubricate grease points on the
machine.
-Coat exposed hydraulic cylinder
rod(s) with
grease to prevent rusting.
-Check hydraulic hoses for
deterioration and
replace if necessary.
-Tighten any loose bolts, nuts
and hydraulic fittings
-Repair or replace worn or
broken parts.
-Replace damaged or missing
decals.
OMFR02RAP-0902
- 28 -
ENGLISH
DEUTSCH
FRANÇAIS
SECTION 5
ABSCHNITT 5
SECTION 5
Routine maintenance
Planmäßige Wartung
Entretien courant
5.1 MAINTENANCE
This section describes the few
and simple operations required to
correctly service the machine.
The
servicing
frequencies
indicated in this manual are
indicative as they may vary
depending on the climatic
conditions or place of work. Thus
only the operator’s experience
and common sense can establish
when they actu-ally need to be
carried out.
Extraordinary
maintenance,
repairs
and
particular
adjustments must be carried out
by the Manufacturer’s qualified
and authorized personnel.
5.1 WARTUNG
Im Folgenden werden die wenigen und
einfachen Regeln für eine korrekte
planmäßige Wartung der Maschine
beschrieben.
Bei diesen Regeln handelt es sich um
Richtangaben, da sie von den
Witterungsbedingungen
und
der
Arbeitsumgebung abhängig sind. Sie
unterliegen
deshalb
möglichen
Änderungen, die nur der Bediener auf
Grund
seines
gesunden
Menschenverstandes
und
seiner
Erfahrung festlegen kann.
Außerplanmäßige
Wartungsarbeiten,
Reparaturen
und
besondere
Einstellungen
müssen
durch
qualifiziertes und vom Hersteller
autorisiertes
Personal
ausgeführt
werden.
5.1 ENTRETIEN
Nous
fournissons
ci-après
quelques simples indications pour
un entretien courant correct de la
machine.
Ces indications sont fournies à titre
indicatif, car elles peuvent varier
en
fonction
des
conditions
climatiques
ou
du
milieu
d’utilisation et, en conséquence,
subir des variations que seuls le
bon sens et l’expérience de
l’opérateur peuvent déterminer.
L’entretien
extraordinaire,
les
réparations
et
les
réglages
spéciaux doivent être exécutés par
du personnel qualifié et agréé par
le Fabricant.
DANGER
Before proceeding with any
servicing work,remember to:
-Detach and disengage the
tractor PTO.
-Apply the parking brake.
-Turn off the tractor engine.
-Wait until all moving parts
have come to a complete stop.
- Block the splitter wheels in
the transporting position
Only in these conditions will it
be possible to work safety on
the machine.Always remember
to comply with these safety
procedures to avoid and
prevent accidents.
GEFAHR
Bevor
irgendwelche
Wartungsarbeiten
durchgeführt
werden:
-Die Zapfwelle des Schleppers
ausschalten.
-Die Feststellbremse anziehen.
-Den Schlepper abstellen.
-Warten, bis alle Bewegungen zum
Stillstand gekommen sind.
Die
Sternräder
in
der
Transportposition blockieren.
Nur mit diesen Vorsichtsmaßnahmen
ist ein gefahrloses Arbeiten an der
Maschine möglich.
Denken Sie immer an diese
Sicherheitsvorkehrungen,
um
Unfällen vorzubeugen.
- 29 -
DANGER
Avant de procéder à toute
opération d’entretien, ne pas
oublier de:
- débrayer la prise de force du
tracteur;
- enclencher le frein de
stationnement;
- arrêter le tracteur;
attendre
que
tous
les
mouvements se soient arrêtés;
- Bloquer les roues soleil en
position de transport.
Seules
ces
précautions
permettent de travailler en
sécurité sur la machine.
Toujours
respecter
cette
procédure
afin
d’éviter
et
prévenir les accidents.
OMFR02RAP-0902
ENGLISH
DEUTSCH
FRANÇAIS
5.1.1 MAINTENANCE - after 10
hours of service
After the first hours of operations,
check to make sure that all nuts
and bolts are well tightened.
All hardware should be checked
on a routine basis after every 10
hours of service
5.1.1
WARTUNGnach
10
BETRIEBSSTUNDEN
Nach den ersten Arbeitsstunden alle
mechanischen Anschlüsse überprüfen.
Alle Befestigungselemente (Schrauben,
Schraubbolzen,
usw.)
sollten
normalerweise alle 10 Betriebsstunden
überprüft werden.
5.1.2 MAINTENANCE – after 50
hours of service
Grease all the grease zerks
positioned on the machines as
shown on drawing in section 5.
5.1.2
WARTUNGnach
50
BETRIEBSSTUNDEN
Alle an der Maschine angebrachten
Schmiernippel (siehe Plan in Abschnitt
5) schmieren.
5.1.3 MAINTENANCE - after
250 hours of service
Oil the jack/stand
Oil the screws on the regulating
handles
5.1.4 MAINTENANCE – AS
REQUIRED
Periodically inspect rake and
make necessary repairs.
- Check frame for fatigue or
cracking. Replace or repair worn
or damaged parts.
- Check decals, replace if
missing or damaged.
- Check bolts and fasteners.
Tighten or replace as necessary.
- Check tire pressure. Inflate to
40 psi (2.7 bar)
- Check tires and rims for
damage.
- Check lug nut torque. Torque to
85 ft lb (115 nm).
- Check the condition of the rake
finger wheels.
- Check hydraulic cylinder and
hoses for leaks or damage.
5.1.5 CHECK BEARINGS
Annually, or if ground wheel or
finger wheel bearings do not turn
freely, check bearing grease.
Note: Support implement on
blocks if checking ground wheel
bearing.
OMFR02RAP-0902
5.1.3 WARTUNGnach
BETRIEBSSTUNDEN
Den Stützfuß ölen.
Die Einstellschraube ölen.
250
5.1.4 WARTUNG – BEI BEDARF
Regelmäßig den Schwader überprüfen
und beschädigte Teile reparieren.
- Die Rahmen überprüfen, um zu
kontrollieren, ob diese verbogen oder
beschädigt sind. Beschädigte Teile
reparieren oder auswechseln.
- Die Aufkleber überprüfen. Fehlende
und beschädigte Aufkleber ersetzen.
- Schraubbolzen und Befestigungen
überprüfen.
Schraubbolzen
gegebenenfalls
festziehen
oder
auswechseln.
- Den Reifendruck überprüfen. Auf 40
[psi] (2.7 hpascal) aufpumpen.
- Reifen und Felgen überprüfen.
- Kontrollieren, dass die Schraubbolzen
halten. Mit einem Anzugsmoment
von85 [lb] [ft] (115 [nm]) festziehen.
- Den Zustand der Sternräder
überprüfen.
- Hydraulikzylinder und –schläuche auf
Leckagen überprüfen.
5.1.5 LAGER ÜBERPRÜFEN
Jährlich oder wenn die Räder oder
Sternräder nicht frei laufen, ist das
Schmierfett
in
den
Lagern
zu
überprüfen.
Anmerkung: Die Maschine auf Blöcke
stellen, um die Lager der Räder mit
Gummilaufflächen zu überprüfen.
- 30 -
5.1.1 ENTRETIENaprès 10
HEURES de FONCTIONNEMENT
Après les premières heures
d’utilisation, contrôler tous les
raccordements mécaniques.
Normalement, tous les éléments
de fixation (vis, boulons, etc.)
doivent être contrôlés toutes les 10
heures de fonctionnement.
5.1.2 ENTRETIENaprès 50
HEURES de FONCTIONNEMENT
Graisser tous les graisseurs placés
sur la machine de la façon
indiquée sur le schéma de la
section 5.
5.1.3 ENTRETIENaprès 250
HEURES de FONCTIONNEMENT
Huiler le pied d’appui
Huiler la vis de réglage
5.1.4 ENTRETIEN- NÉCESSAIRE
Contrôler
périodiquement
l’andaineur.
Effectuer
les
réparations nécessaires.
- Contrôler les châssis pour vérifier
s’ils sont usés ou endommagés.
Remplacer ou réparer les pièces
endommagées.
- Contrôler les autocollants.
Remplacer ceux qui manquent ou
sont endommagés.
- Contrôler les boulons et les
fixations. Si nécessaire, les
resserrer ou les remplacer.
- Contrôler la pression des
pneumatiques. Les gonfler à 40
[psi] (2.7 hpascal).
- Contrôler les pneumatiques et les
jantes.
- Contrôler le maintien des
boulons. Les resserrer à 85 ft lb
(115 nm).
- Contrôler l’état des roues soleil.
Contrôler
les
cylindres
hydrauliques
et
les
tuyaux
hydrauliques pour s’assurer de
l’absence de perte.
5.1.5
CONTRÔLER
LES
ROULEMENTS
Une fois par an, ou lorsque les
roues ou les roues soleil ne
tournent plus librement, contrôler
la graisse des roulements.
Note: Placer la machine sur des
blocs pour vérifier les roulements
des roues en caoutchouc.
ENGLISH
DEUTSCH
INSPECT BEARING
1- Remove dust cap (1) ,cotter pin
and castle nut or locking nut (2), and
washer and outer bearing (3).
2 - Inspect bearing: if it is dry, or if
grease is caked or contaminated,
repack bearings; otherwise go to
step 8.
REPACK BEARING
3- Remove wheel and hub. Remove
and inspect seal (5) . Replace if
damaged.
4- Remove the inner bearing (4).
5- Wash bearings and inside of hub
with solvent. Wipe clean and air dry.
Replace damaged bearings or races.
6- Work grease into roller retainers
from edge to fill the entire bearing
with grease.
7- Install inner bearing (4), seal (5),
into hub and mount on spindle.
PRELOAD BEARING
8- Install outside bearing and washer
(3) install nut (2).
9- Tighten nut until slight drag is felt
when turning wheel. Back off nut 1/81/4 turn (locknut type) or until first
slot lines up with hole in spindle and
install cotter pin (castle nut type).
Install dust cap (1).
10- Install wheel and torque nuts or
bolts.
FRANÇAIS
INSPEKTION DES LAGERS
1- Die Staubschutzkappe (1), den Splint und
die selbstsperrende Mutter (2), die
Unterlegscheibe und das äussere Lager (3)
ausbauen.
2- Das Lager überprüfen: Wenn das Lager
trocken ist oder das Fett erhärtet oder
verunreinigt ist, müssen die Lager neu
gepackt werden. Andernfalls auf Punkt Nr. 8
übergehen.
VÉRIFIER LE ROULEMENT
1- Enlever la protection contre la
poussière (1), la goupille élastique et
l’écrou autobloquant (2), la rondelle et
le roulement extérieur (3).
2- Vérifier le roulement : s’il est sec ou
que la graisse a durci ou est
contaminée,
réassembler
les
roulements. Dans le cas contraire,
passer au point n° 8.
NEUPACKEN DER LAGER
3- Rad und Nabe entfernen. Die Dichtung
(5) ausbauen und überprüfen. Wenn
beschädigt auswechseln.
4- Das innere Lager (4) entfernen.
5- Das Lager und den Nabeninnenraum mit
Lösemittel waschen. Mit einem Tuch
reinigen und mit Luft trocknen. Beschädigte
Lager auswechseln.
6- Fett über den Rand in die Rollenkäfige
geben, bis das komplette Lager mit Fett
gefüllt ist.
7- Das innere Lager (4) und die Dichtung (5)
in die Nabe einsetzen und an der Achse
anbringen.
RÉASSEMBLER LE ROULEMENT
3- Enlever la roue et le moyeu. Enlever
et vérifier le joint (5). Le remplacer
lorsqu’il est endommagé.
4- Enlever le roulement intérieur (4).
5- Laver le roulement et l’intérieur du
moyeu avec du solvant. Nettoyer avec
un chiffon et sécher avec de l’air.
Remplacer
les
roulements
endommagés.
6- Mettre de la graisse dans le creux
des rouleaux depuis le bord et remplir
le roulement tout entier de graisse.
7- Installer le roulement intérieur (4), le
joint (5) dans le moyeu et le monter
sur l’essieu.
VORBELASTEN DES LAGERS
8- Das äußere Lager, die Unterlegscheibe
(3) und die Mutter anbringen.
9- Die Mutter festziehen, bis man auf einen
leichten Widerstand trifft und das Rad sich
dreht. Die Mutter ca. 1/8-1/4 Drehung
(selbstsperrender Typ) oder bis die erste
Rille mit dem Loch in
der Achse
ausgerichtet ist, zurückdrehen. Den Splint
einsetzen
(Kronenmuttertyp).
Die
Staubschutzkappe (1) wieder anbringen.
10 – Das Rad anbringen und die Muttern
oder Schraubbolzen festziehen.
PRÉCHARGER LE ROULEMENT
8- Installer le roulement extérieur, la
rondelle (3) et l’écrou (2).
9- Resserrer l’écrou jusqu’à sentir une
légère résistance et que la roue
tourne. Visser l’écrou d’environ 1/8-1/4
vers
l’arrière
(pour
l’écrou
autobloquant) ou jusqu’à ce que la
première rainure soit alignée avec le
trou de l’essieu. Installer la goupille
élastique (pour l’écrou à couronne).
Monter la protection contre la
poussière (1).
10 - Installer la roue et resserrer les
écrous ou les boulons.
4
1
3
5
2
1
2
3
4
2
5
- 31 -
OMFR02RAP-0902
ENGLISH
DEUTSCH
FRANÇAIS
5.1.3 TYRES
Check the tyre pressure after
every 50 hours service (2 bar).
5.1.3 RÄDER
Alle
50
Betriebsstunden
Reifendruck überprüfen (2 bar).
5.2 STORAGE
If the midget tractor is to remain
idle for a long period of time, it is
advis-able to:
- thoroughly clean the entire
machine.
- Make sure that it is in a perfect
con-dition.
Replace
any
damaged or worn parts.
- Proceed by lubricating.
- Cover the machine with a
tarpaulin and store it indoors,
sheltered from adverse weather
conditions,
from
freezing
temperatures and from the damp.
If these operations are carried
out with care, you will fine the
machine in per-fect condition
when you need it again.
5.2 EINLAGERUNG
Wenn die Maschine für längere Zeit
stillsteht, ist es ratsam:
- die ganze Maschine gründlich zu
reinigen.
- zu kontrollieren, dass sie in
einwandfreiem
Zustand
ist,
und
beschädigte oder abgenutzte Teile
gegebenenfalls zu ersetzen.
- die Maschine zu schmieren.
- die Maschine mit einer Plane
abzudecken und an einem überdachten
und gegen Witterung, Frost und
Feuchtigkeit
geschützten
Ort
abzustellen.
Wenn diese Maßnahmen strikt befolgt
werden, findet man zu Saisonbeginn
eine voll funktionstüchtige Maschine
vor.
5.3 DISMANTLING
Divide and recover the various
components if the machine is
dismantled.
Dispose of the remaining parts in
com-pliance with the antipollution laws in force in the
country of use
5.3 DEMONTAGE
Bei der Demontage der Maschine sind
die verschiedenen Bauteile zu trennen
und wiederzuverwerten. Die restlichen
Teile
sind
gemäß
den
im
Verwendungsland
geltenden
Umweltschutzbestimmungen
zu
entsorgen.
OMFR02RAP-0902
- 32 -
den
5.1.3 ROUES
Contrôler la pression des pneus
toutes les 50 heures de travail (2
bars).
5.2 REMISAGE
Si la machine doit rester inutilisée
pendant un certain temps, suivre
les indications suivantes.
- Nettoyer soigneusement toute la
machine.
- Contrôler qu’elle est en
conditions parfaites, remplacer
éventuellement
les
pièces
endommagées ou usées.
- Effectuer un graissage.
- Recouvrir la machine d’une
bâche et la mettre au couvert, à
l’abri des intempéries, du gel et
de l’humidité.
Si ces opérations sont effectuées
scrupuleusement, on retrouve au
début de la saison une machine
parfaitement efficace.
5.3 DÉMANTÈLEMENT
En cas de démantèlement de la
machine, procéder à la séparation
et au recyclage des différents
composants.
Éliminer le reste conformément
aux lois antipollution prévues dans
le Pays d’utilisation.
ENGLISH
SECTION 6
DEUTSCH
ABSCHNITT 6
FRANÇAIS
SECTION 6
6.1 ASSEMBLY INSTRUCTIONS
6.1 MONTAGEANLEINTUGEN
6.1 INSTRUCTIONS DE MONTAGE
This manual describes the
phases involved in assembling a
crated machine.
When
handling
and
assembling the unit, and
subsequently during use and
maintenance,
always
use
suitable personal protection
devices (A): always wear
suitable clothing and the
indicated protections.
See the operating manual
supplied with the unit for
indication of the symbols used
in this manual.
When handling the unit, lift it by
hooking
up
the
special
attachments and using a suitable
hoist or crane rated for the
weight of the unit. This operation
is quite dangerous and must only
be performed by prepared,
responsible
personnel.
The
machine weight is indicated on
the ID label. The hook-up points
are identified by the "hook"
symbol (B). When moving the
unit, make certain that all
protections and safety devices
are in place.
Dieses
Handbuch
enthält
die
Anleitungen für den Zusammenbau
einer in einer Kiste verpackten
Mähmaschine.
Beim Handling, Zusammenbau und
der darauffolgenden Verwendung
und
Wartung
sind
die
erforderlichen
persönlichen
Schutzausrüstungen
(A)
zu
verwenden: Es ist vorgeschrieben,
geeignete
Arbeitskleidung
zu
tragen und die angegebenen
Schutzausrüstungen
zu
verwenden.
Für
Informationen
bezüglich der im vorliegenden
Handbuch enthaltenen Symbole ist
Bezug
auf
die
dem
Gerät
beigestellte Betriebsanleitung zu
nehmen.
Wenn das Gerät bewegt werden
muss, ist es mit einem geeigneten
Flaschenzug
oder
Kran
mit
ausreichender Hubleistung an den
speziellen Hubpunkten zu heben. Auf
Grund seiner Gefährlichkeit muss
dieser Vorgang von ausgebildetem
Fachpersonal durchgeführt werden.
Das Maschinengewicht ist auf dem
Kennschild
angegeben.
Die
Hubpunkte sind an dem Symbol
"Haken"
(B)
erkennbar.
Beim
Handling
der
Maschine
ist
sicherzustellen, dass das Gerät über
die erforderlichen Sicherheits- und
Schutzvorrichtungen verfügt.
Ce manuel décrit les phases
d'assemblage
d'une
machine
emballée en caisse.
Pendant
les
opérations
de
déplacement, d'assemblage puis
d'utilisation et d'entretien, utiliser
les équipements de protection
individuelle adaptés (A) : obligation
de porter les vêtements adéquats
et les protections indiquées. Pour
obtenir des informations sur les
éventuels symboles présents dans
ce manuel, se référer au livret
d'instructions
fourni
avec
l'équipement.
En
cas
de
déplacement
de
l'équipement, il est nécessaire de le
soulever en l'accrochant aux attaches
Prévues à cet effet avec un palan ou
une grue adéquats et de capacité
suffisante. À cause du danger qu'elle
représente, cette opération doit être
exécutée par du personnel préparé et
responsable. La masse de la machine
est indiquée sur la plaquette
d'identification.
Les
points
d'accrochage sont identifiables grâce
à la présence du symbole graphique
"crochet"
(B).
Pendant
le
déplacement,
s'assurer
que
l'équipement possède les sécurités et
les protections nécessaires.
- 33 -
OMFR02RAP-0902
ENGLISH
DEUTSCH
1
2
3
4
5
6
- 34 -
FRANÇAIS
ENGLISH
DEUTSCH
7
FRANÇAIS
8
Select an area that has adequate room for
parts layout and machine assembly.
Select an area that has adequate room for parts
layout and machine assembly.
Select an area that has adequate room for parts
layout and machine assembly.
Begin assembly by removing all components
from the crate. Lay components out
individually for ease of locating during
assembly.
Begin assembly by removing all components from the
crate. Lay components out individually for ease of
locating during assembly.
Begin assembly by removing all components from
the crate. Lay components out individually for
ease of locating during assembly.
1) Position rear frame (A) on assembly
stands (B).
1) Position rear frame (A) on assembly stands (B).
1) Position rear frame (A) on assembly stands
(B).
2) Remove cardboard tubes from hubs.
Mount wheels (A) and fasten with nuts (B)
2) Remove cardboard tubes from hubs. Mount wheels
(A) and fasten with nuts (B).
2) Remove cardboard tubes from hubs. Mount
wheels (A) and fasten with nuts (B).
3) Mount rear drawbar (A) as shown and
support with an assembly stand (B).
3) Mount rear drawbar (A) as shown and support with
an assembly stand (B).
3) Mount rear drawbar (A) as shown and support
with an assembly stand (B).
4) Fasten rear drawbar to plate (A) with
screws M12x140 (B) ,lock washers and
nuts (C).
4) Fasten rear drawbar to plate (A) with screws
M12x140 (B) ,lock washers and nuts (C).
4) Fasten rear drawbar to plate (A) with screws
M12x140 (B) ,lock washers and nuts (C).
5) Apply multipurpose grease to pivot areas
before installing the frame.
5) Apply multipurpose grease to pivot areas before
installing the frame.
5) Apply multipurpose grease to pivot areas
before installing the frame.
6) Connect side frame (A) to the rear frame
(B).
6) Connect side frame (A) to the rear frame (B).
6) ) Connect side frame (A) to the rear frame (B).
7) Connect with half-shell (A). Fasten with
eight M10x 30 cap screws (B) and
locknuts.
7) Connect with half-shell (A). Fasten with eight M10x
30 cap screws (B) and locknuts.
7) Connect with half-shell (A). Fasten with eight
M10x 30 cap screws (B) and locknuts.
8) Use assembly stand (B) and assemble
central frame (A). Fasten with screws
M12x35 (C) and self locking nuts.
8) Use assembly stand (B) and assemble central
frame (A). Fasten with screws M12x35 (C) and self
locking nuts.
8) Use assembly stand (B) and assemble central
frame (A). Fasten with screws M12x35 (C)
and self locking nuts.
- 35 -
ENGLISH
DEUTSCH
9
10
11
12
13
14
- 36 -
FRANÇAIS
ENGLISH
DEUTSCH
15
FRANÇAIS
16
9) Connect the arm attachment (A) to the
frame. Mount wheel support (B) and plate
(C). Fasten with M12x140 screws (D) and
u-bolt (E).
9) Connect the arm attachment (A) to the frame.
Mount wheel support (B) and plate (C). Fasten
with M12x140 screws (D) and u-bolt (E).
9) Connect the arm attachment (A) to the frame.
Mount wheel support (B) and plate (C). Fasten
with M12x140 screws (D) and u-bolt (E).
10) Slide fork (A) into the wheel support.
Mount the brake assembly (B) and the
brake disc (C) as shown. Fix with Elastic
pin 10x70.
10) Slide fork (A) into the wheel support. Mount the
brake assembly (B) and the brake disc (C) as
shown. Fix with Elastic pin.
10) Slide fork (A) into the wheel support. Mount
the brake assembly (B) and the brake disc (C)
as shown. Fix with Elastic pin.
11) Install square-head bolt (A) through
wheel fork (B), 64 mm (2-17/32 in.)
spacer, wheel and tire assembly, 58 mm
(2-9/32 in.) spacer (C) and wheel fork.
Fasten with M24 lock nut (D).
Important : Position the spacers according
to the hub so that wheel is assembled in
the center of the fork.
11) Install square-head bolt (A) through wheel fork
(B), 64 mm (2-17/32 in.) spacer, wheel and tire
assembly, 58 mm (2-9/32 in.) spacer (C) and
wheel fork. Fasten with M24 lock nut (D).
Important : Position the spacers according to the
hub so that wheel is assembled in the center of the
fork.
11) Install square-head bolt (A) through wheel
fork (B), 64 mm (2-17/32 in.) spacer, wheel
and tire assembly, 58 mm (2-9/32 in.) spacer
(C) and wheel fork. Fasten with M24 lock nut
(D).
Important : Position the spacers according to
the hub so that wheel is assembled in the
center of the fork.
12) Position the sliding support (A) inside the
rear drawbar (B).
12) Position the sliding support (A) inside the rear
drawbar (B).
12) Position the sliding support (A) inside the rear
drawbar (B).
13) Position R.H. opening arm (A) and L.H.
opening arm (B) as shown.
13) Position R.H. opening arm (A) and L.H. opening
arm (B) as shown.
13) Position R.H. opening arm (A) and L.H.
opening arm (B) as shown.
14) Attach opening arms to the sliding
support with M27x170 screws (A), spacer
(B) and self locking nut (C).
14) Attach opening arms to the sliding support with
M27x170 screws (A), spacer (B) and self locking
nut (C).
14) ) Attach opening arms to the sliding support
with M27x170 screws (A), spacer (B) and self
locking nut (C).
15) Place the fixed drawbar (A) on two
assembly stands (B).
15) Place the fixed drawbar (A) on two assembly
stands (B).
15) Place the fixed drawbar (A) on two assembly
stands (B).
16) Slide the moveable drawbar (A) inside
the drawbar.
16) Slide the moveable drawbar (A)
drawbar.
16) Slide the moveable drawbar (A) inside the
drawbar.
- 37 -
inside the
ENGLISH
DEUTSCH
17
18
19
20
21
22
- 38 -
FRANÇAIS
ENGLISH
DEUTSCH
23
FRANÇAIS
24
17) Assemble the front frames (A) as shown.
17) Assemble the front frames (A) as shown.
17) Assemble the front frames (A) as shown.
18) Connect the front frames to the drawbar
with bent blades (A) and straight blades
(B) with M20x120 screws (C) and nuts.
Connect the blades to the drawbar with
M18x130 screws (D) and self-locking
nuts.
18) Connect the front frames to the drawbar with bent
blades (A) and straight blades (B) with M20x120
screws (C) and nuts. Connect the blades to the
drawbar with M18x130 screws (D) and self-locking
nuts.
18) Connect the front frames to the drawbar with
bent blades (A) and straight blades (B) with
M20x120 screws (C) and nuts. Connect the
blades to the drawbar with M18x130 screws
(D) and self-locking nuts.
19) Install jackstand (A). Fasten with pin (B)
and spring-locking pin.
19) Install jackstand (A). Fasten with pin (B) and
spring-locking pin.
19) Install jackstand (A). Fasten with pin (B) and
spring-locking pin.
20) Assemble hinge with pivot (A) and selflocking nut (B).
20) Assemble hinge with pivot (A) and self-locking nut
(B).
20) Assemble hinge with pivot (A) and selflocking nut (B).
21) Mount 1 rake wheel extension (A) for
WR2012E and 2 rake wheel extension (B)
for WR2014E.
21) Mount 1 rake wheel extension (A) for WR2012E
and 2 rake wheel extension (B) for WR2014E.
21) Mount 1 rake wheel extension (A) for
WR2012E and 2 rake wheel extension (B) for
WR2014E.
22) Insert the nylon bushing (A) inside the
welded tubes under the frames.
22) Insert the nylon bushing (A) inside the welded
tubes under the frames.
22) Insert the nylon bushing (A) inside the welded
tubes under the frames.
23) Mount the center lift tube (A) as shown.
23) Mount the center lift tube (A) as shown.
23) Mount the center lift tube (A) as shown.
24) Block lift tubes with pin lock (A).
24) Block lift tubes with pin lock (A).
24) Block lift tubes with pin lock (A).
- 39 -
ENGLISH
DEUTSCH
25
26
27
28
29
30
- 40 -
FRANÇAIS
ENGLISH
DEUTSCH
31
FRANÇAIS
32
25) Mount single extension (A) for WR2012E
and double extension (B) for WR2014E.
25) Mount single extension (A) for WR2012E and
double extension (B) for WR2014E.
25) Mount single extension (A) for WR2012E and
double extension (B) for WR2014E.
26) Mount the rear lift tube (A) as shown.
26) Mount the rear lift tube (A) as shown.
26) Mount the rear lift tube (A) as shown.
27) Fasten lift tubes with M8x50 (A) screws
and nuts (B).
27) Fasten lift tubes with M8x50 (A) screws and nuts
(B).
27) Fasten lift tubes with M8x50 (A) screws and
nuts (B).
28) Mount the safety pivot (B) and block with
pin lock (A).
28) Mount the safety pivot (B) and block with pin lock
(A).
28) Mount the safety pivot (B) and block with pin
lock (A).
29) Install plastic handle (B) to lift crank .
Fasten with socket-head cap screw (C)
and nut (A) . Install end cap on handle.
29) Install plastic handle (B) to lift crank . Fasten with
socket-head cap screw (C) and nut (A) . Install end
cap on handle.
29) Install plastic handle (B) to lift crank . Fasten
with socket-head cap screw (C) and nut (A) .
Install end cap on handle.
30) Insert nylon bushing (A) inside pin with
welded bushing (B).
30) Insert nylon bushing (A) inside pin with welded
bushing (B).
30) Insert nylon bushing (A) inside pin with
welded bushing (B).
31) Position nylon bushings (A) as shown
and insert pin (B).
31) Position nylon bushings (A) as shown and insert
pin (B).
31) Position nylon bushings (A) as shown and
insert pin (B).
32) Position pin with bushings (A) as shown
with windrow adjuster blade (B) and M8
screw (D), M12x70 screws (E) and nuts.
Insert pivot with nut (C).
32) Position pin with bushings (A) as shown with
windrow adjuster blade (B) and M8 screw (D),
M12x70 screws (E) and nuts. Insert pivot with nut
(C).
32) Position pin with bushings (A) as shown with
windrow adjuster blade (B) and M8 screw (D),
M12x70 screws (E) and nuts. Insert pivot with
nut (C).
- 41 -
ENGLISH
DEUTSCH
33
34
35
36
37
38
- 42 -
FRANÇAIS
ENGLISH
DEUTSCH
39
FRANÇAIS
40
33) Insert screw (A) and mount strap (B).
Fasten with roll pin 6x40 (C).
33) Insert screw (A) and mount strap (B). Fasten with
roll pin 6x40 (C).
33) Insert screw (A) and mount strap (B). Fasten
with roll pin 6x40 (C).
34) Position bushing (A) and fasten with roll
pin. (B).
34) Position bushing (A) and fasten with roll pin. (B).
34) Position bushing (A) and fasten with roll pin.
(B).
35) Install plastic handle (B) to lift crank .
Fasten with socket-head cap screw (C)
and nut (A). Install end cap on handle.
35) Install plastic handle (B) to lift crank . Fasten with
socket-head cap screw (C) and nut (A). Install end
cap on handle.
35) Install plastic handle (B) to lift crank . Fasten
with socket-head cap screw (C) and nut (A).
Install end cap on handle.
36) Mount hydraulic cylinder (A) and fasten
with pins (B).
36) Mount hydraulic cylinder (A) and fasten with pins
(B).
36) Mount hydraulic cylinder (A) and fasten with
pins (B).
37) Insert rod (A) through spring (B) and
fasten as shown. Fasten two nuts (C).
37) Insert rod (A) through spring (B) and fasten as
shown. Fasten two nuts (C).
37) Insert rod (A) through spring (B) and fasten
as shown. Fasten two nuts (C).
38) Remove two plugs and install breather
(A) and 3/8 pipe thread to flare, 90-degree
elbow fitting (B).
NOTE: Wrap pipe threads with teflon tape
before installing in hydraulic cylinder.
38) Remove two plugs and install breather (A) and 3/8
pipe thread to flare, 90-degree elbow fitting (B).
NOTE: Wrap pipe threads with teflon tape before
installing in hydraulic cylinder.
38) Remove two plugs and install breather (A)
and 3/8 pipe thread to flare, 90-degree elbow
fitting (B).
NOTE: Wrap pipe threads with teflon tape
before installing in hydraulic cylinder.
39) Attach hydraulic hose (A) with straight
female fitting to cylinder fitting. Route
hose around frame and connect 45degree elbow to T-fitting. Install hose
clamps (B) and fasten with M6 x 25
socket-head screws.
NOTE: Be sure that the hoses are
positioned with a large radius to avoid
contact with finger wheel tines.
39) Attach hydraulic hose (A) with straight female
fitting to cylinder fitting. Route hose around frame
and connect 45-degree elbow to T-fitting. Install
hose clamps (B) and fasten with M6 x 25 sockethead screws.
NOTE: Be sure that the hoses are positioned with
a large radius to avoid contact with finger wheel
tines.
39) Attach hydraulic hose (A) with straight female
fitting to cylinder fitting. Route hose around
frame and connect 45-degree elbow to Tfitting. Install hose clamps (B) and fas ten with
M6 x 25 socket-head screws.
NOTE: Be sure that the hoses are positioned
with a large radius to avoid contact with finger
wheel tines.
40) Install the hydraulic cylinder (B) as shown
and fix it with pins (C) and split pins.
Install two 3/8 pipe thread to flare fittings
(D) in hydraulic cylinder.
40) Install the hydraulic cylinder (B) as shown and fix
it with pins (C) and split pins. Install two 3/8 pipe
thread to flare fittings (D) in hydraulic cylinder.
40) Install the hydraulic cylinder (B) as shown and
fix it with pins (C) and split pins. Install two 3/8
pipe thread to flare fittings (D) in hydraulic
cylinder.
- 43 -
ENGLISH
DEUTSCH
41
42
43
44
45
46
- 44 -
FRANÇAIS
ENGLISH
DEUTSCH
FRANÇAIS
47
41) Install hydraulic hoses (A) and (B) on
fittings. Install T-fitting (C) on hydraulic
hoses and fasten with tie bands (D).
41) Install hydraulic hoses (A) and (B) on fittings.
Install T-fitting (C) on hydraulic hoses and fasten
with tie bands (D).
41) Install hydraulic hoses (A) and (B) on fittings.
Install T-fitting (C) on hydraulic hoses and
fasten with tie bands (D).
42) To identify left-hand and right-hand wheel
support assemblies, lay the two
assemblies together as illustrated:
- Left-hand wheel support (A) should have
the wheel hubs facing to the right.
- Right-hand wheel support (B) should
have the wheel hubs facing to the left.
42) To identify left-hand and right-hand wheel support
assemblies, lay the two assemblies together as
illustrated:
- Left-hand wheel support (A) should have the
wheel hubs facing to the right.
- Right-hand wheel support (B) should have the
wheel hubs facing to the left.
42) To identify left-hand and right-hand wheel
support assemblies, lay the two assemblies
together as illustrated:
- Left-hand wheel support (A) should have the
wheel hubs facing to the right.
- Right-hand wheel support (B) should have
the wheel hubs facing to the left.
43) Install left-hand rake wheel arm (A)
through mounting tube. Fasten with 32 x
52 x 5 mm washer and spring-locking pin.
43) Install left-hand rake wheel arm (A) through
mounting tube. Fasten with 32 x 52 x 5 mm
washer and spring-locking pin.
43) Install left-hand rake wheel arm (A) through
mounting tube. Fasten with 32 x 52 x 5 mm
washer and spring-locking pin.
44) Attach spring to wheel arm tab (A). Install
one chain link (B) over wheel suspension
spring hook. Fasten spring hook to lifting
pipe tab (C). Fasten fourth chain link (D)
to wheel arm with clevis link (E) and pin.
44) Attach spring to wheel arm tab (A). Install one
chain link (B) over wheel suspension spring hook.
Fasten spring hook to lifting pipe tab (C). Fasten
fourth chain link (D) to wheel arm with clevis link
(E) and pin.
44) Attach spring to wheel arm tab (A). Install one
chain link (B) over wheel suspension spring
hook. Fasten spring hook to lifting pipe tab
(C). Fasten fourth chain link (D) to wheel arm
with clevis link (E) and pin.
45) There are two tie straps (F) to fix the
chain to the spring in the last two
rakes wheel only.
45) Identify and separate left-hand and right-hand
rake wheels. Lean rake wheels against a wall with
tine mounting clip nuts facing outward.
- If the last bend in the tines curve to a clockwise
direction, it is a left-hand rake wheel (A).
- If the tines curve in a counterclockwise direction,
it is a right-hand rake wheel (B).
45) Identify and separate left-hand and right-hand
rake wheels. Lean rake wheels against a wall
with tine mounting clip nuts facing outward.
- If the last bend in the tines curve to a
clockwise direction, it is a left-hand rake wheel
(A).
- If the tines curve in a counterclockwise
direction, it is a right-hand rake wheel (B).
46) Install right-hand rake wheel to hub (A) with tine
clips to the front. Fasten with six M10 x 25 cap
screws, flat washers, and nuts. Cap screws and
washers should be installed on front side of rake
wheel. Repeat procedure on remaining rake
wheels.
46) Install right-hand rake wheel to hub (A) with
tine clips to the front. Fasten with six M10 x 25
cap screws, flat washers, and nuts. Cap
screws and washers should be installed on
front side of rake wheel. Repeat procedure on
remaining rake wheels.
46) Identify and separate left-hand and righthand rake wheels. Lean rake wheels
against a wall with tine mounting clip nuts
facing outward.
- If the last bend in the tines curve to a
clockwise direction, it is a left-hand rake
wheel (A).
- If the tines curve in a counterclockwise
direction, it is a right-hand rake wheel (B).
47) Install right-hand rake wheel to hub (A)
with tine clips to the front. Fasten with six
M10 x 25 cap screws, flat washers, and
nuts. Cap screws and washers should be
installed on front side of rake wheel.
Repeat procedure on remaining rake
wheels.
- 45-
ENGLISH
DEUTSCH
FRANÇAIS
CENTER KICKER WHEELS
48
49
41” (1041 mm)
50
51
52
53
- 46 -
ENGLISH
54
DEUTSCH
55
FRANÇAIS
56
48) Install right (A) and left frame brackets (B)
onto rear frame members 41” (1041 mm) to
the front of pivot as shown. Secure with
M12x90 Cap Screws and Lock Nuts.
47) Install right (A) and left frame brackets (B) onto
rear frame members 41” (1041 mm) to the front
of pivot as shown. Secure with M12x90 Cap
Screws and Lock Nuts.
47) Install right (A) and left frame brackets (B)
onto rear frame members 41” (1041 mm) to
the front of pivot as shown. Secure with
M12x90 Cap Screws and Lock Nuts.
49) Install right (A) and left (B) rake arms to
brackets and secure each arm with an
M20x90 cap screw and lock nut. Install cable
support bolt (C) to join right and left rake
arms securing bolt with Lock nut.
48) Install right (A) and left (B) rake arms to
brackets and secure each arm with an M20x90
cap screw and lock nut. Install cable support
bolt (C) to join right and left rake arms securing
bolt with Lock nut.
48) Install right (A) and left (B) rake arms to
brackets and secure each arm with an
M20x90 cap screw and lock nut. Install cable
support bolt (C) to join right and left rake arms
securing bolt with Lock nut..
50) Install cable (G), pulley wheel (C) and eyelet
pin (B) into left bracket retaining with a hair
pin cotter pin. Install bracket (E) and spring
(D) to left rake arm securing with an M10
threaded rod, washer and nuts. Assemble
limiting chain (F) to turnbuckle (A) using a
shackle. Add M12 nut to the right hand
threaded leg of each turnbuckle (used to
secure adjustments on turnbuckle). Attach
limiting chain to bracket using M10x30mm
cap screw, washer an nut. Attach turnbuckle
to eyelet pin using a shackle.
Note: Limiting chain will be tight when wheels
are touching the ground.
49) Install cable (G), pulley wheel (C) and eyelet
pin (B) into left bracket retaining with a hair pin
cotter pin. Install bracket (E) and spring (D) to
left rake arm securing with an M10 threaded
rod, washer and nuts. Assemble limiting chain
(F) to turnbuckle (A) using a shackle. Add M12
nut to the right hand threaded leg of each
turnbuckle (used to secure adjustments on
turnbuckle). Attach limiting chain to bracket
using M10x30mm cap screw, washer an nut.
Attach turnbuckle to eyelet pin using a shackle.
Note: Limiting chain will be tight when wheels
are touching the ground.
49) Install cable (G), pulley wheel (C) and eyelet
pin (B) into left bracket retaining with a hair pin
cotter pin. Install bracket (E) and spring (D) to
left rake arm securing with an M10 threaded
rod, washer and nuts. Assemble limiting chain
(F) to turnbuckle (A) using a shackle. Add M12
nut to the right hand threaded leg of each
turnbuckle (used to secure adjustments on
turnbuckle). Attach limiting chain to bracket
using M10x30mm cap screw, washer an nut.
Attach turnbuckle to eyelet pin using a
shackle.
Note: Limiting chain will be tight when wheels
are touching the ground.
51) Install the lift cylinder bracket (A) to left pipe
(B) securing with M12x55mm screw and nut.
Install the spring (C) and the turnbuckle (D)
as shown.
50) Install the lift cylinder bracket (A) to left pipe
(B) securing with M12x55mm screw and nut.
Install the spring (C) and the turnbuckle (D) as
shown.
50) Install the lift cylinder bracket (A) to left
pipe (B) securing with M12x55mm screw and
nut. Install the spring (C) and the turnbuckle
(D) as shown.
52) Attach cable guide (A) to left pivot pin and
route cable through guide. Hook cable end
(B) to cable support bolt (C) and join cable to
turnbuckle using a shackle. Adjust turnbuckle
to achieve the same wheel rake ground
clearance as side rakes when rake is in
operating mode.
Note: Rake wheel cap screws MUST be
installed from the rake wheel side through the
hub, so that the washers and nuts are on the
hub side.
51) Attach cable guide (A) to left pivot pin and
route cable through guide. Hook cable end (B)
to cable support bolt (C) and join cable to
turnbuckle using a shackle. Adjust turnbuckle
to achieve the same wheel rake ground
clearance as side rakes when rake is in
operating mode.
Note: Rake wheel cap screws MUST be
installed from the rake wheel side through the
hub, so that the washers and nuts are on the
hub side.
53) Attach wheel rake (A) to rake arms hub (B)
with (6 each) M10x25mm cap screws
inserted from the wheel rake side, washers
and nuts on the hub side.
52) Attach wheel rake (A) to rake arms hub (B)
with (6 each) M10x25mm cap screws inserted
from the wheel rake side, washers and nuts on
the hub side.
52) Attach wheel rake (A) to rake arms hub (B)
with (6 each) M10x25mm cap screws inserted
from the wheel rake side, washers and nuts
on the hub side.
54) Close rake completely for transport. Place
right bracket (E) over right complete arm
insert M14x120 cap screw (F), transport
safety bar (G), spring (C), spacer (D), washer
(B) and lock nut (A). Leave bracket loose at
53) Close rake completely for transport. Place
right bracket (E) over right complete arm insert
M14x120 cap screw (F), transport safety bar
(G), spring (C), spacer (D), washer (B) and lock
nut (A). Leave bracket loose at this time.
53) Close rake completely for transport. Place
right bracket (E) over right complete arm insert
M14x120 cap screw (F), transport safety bar
(G), spring (C), spacer (D), washer (B) and
lock nut (A). Leave bracket loose at this time.
- 47 -
FRANÇAIS
ENGLISH
DEUTSCH
FRANÇAIS
this time.
55) Place left bracket with pin (B) over left
complete arm in the appropriate position so
that the transport safety bar (A) will fit over
pin and secure with hairpin cotter pin (C).
Insert M14x80 cap screw and lock nut
through bracket, leaving bracket loose at this
time.
Position right (D) and left (B) brackets directly
across from each other on complete arms
and tighten bracket cap screws and lock nuts.
54) Place left bracket with pin (B) over left
complete arm in the appropriate position so that
the transport safety bar (A) will fit over pin and
secure with hairpin cotter pin (C). Insert
M14x80 cap screw and lock nut through
bracket, leaving bracket loose at this time.
Position right (D) and left (B) brackets directly
across from each other on complete arms and
tighten bracket cap screws and lock nuts.
- 48 -
54) Place left bracket with pin (B) over left
complete arm in the appropriate position so
that the transport safety bar (A) will fit over pin
and secure with hairpin cotter pin (C). Insert
M14x80 cap screw and lock nut through
bracket, leaving bracket loose at this time.
Position right (D) and left (B) brackets directly
across from each other on complete arms and
tighten bracket cap screws and lock nuts.
OMFR02RAP-0902
ENGLISH
SPRING ASSEMBLY
ASSEMBLAGE FEDER
STEP 1
STEP 2
STEP 3
STEP 4
STEP 5
Warning: Leave three rings
free, as in the picture
OMFR02RAP-0902
FRANÇAIS
DEUTSCH
STEP 6
Achtung: Drei Ringe freilassen,
siehe Abbildung.
- 49 -
Attenzione: Lasciare liberi tre
anelli come indicato in figura.
ENGLISH
DEUTSCH
FRANÇAIS
CHECK LIST
CHECK LIST
CHECK LIST
NO
OK
NO
OK
NO
OK
- 50 -
OMFR02RAP-0902
ENGLISH
DEUTSCH
FRANÇAIS
CHECK LIST
CHECK LIST
CHECK LIST
OK
NO
NO
OK
OK
WARNING: NEVER GREASE
THE BRAKE DISC
OMFR02RAP-0902
NO
ACHTUNG: DIE BREMSSCHEIBEM DURFEN
NIE GOLT ODER EINGEFETTET WERDEN
- 51 -
ATTENZIONE: NON INGRASSARE
MAI IL DISCO FRENO.
ENGLISH
6.2 RECOMMENDED
VALUES
DEUTSCH
TORQUE
FRANÇAIS
6.2
VALORI
CARICO
DI
SERRAGGIO RACCOMANDATI
6.2 VALORES DE
RECOMENDADOS
TORSIÓN
BOLT
SIZE
GRADE 5.8
M4
M5
M6
M7
M8
M10
M12
M14
M16
M18
M20
M22
M24
M27
M30
GRADE 6.9
GRADE 8.8
GRADE 10.9
GRADE 12.9
FT.
LBS.
Newton
Meters
FT.
LBS.
Newton
Meters
FT.
LBS.
Newton
Meters
FT.
LBS.
Newton
Meters
FT.
LBS.
Newton
Meters
1.1
2.3
3.9
6.5
10
20
34
54
80
114
162
202
245
360
500
1.5
3.1
5.3
8.8
13.5
27
46
73
108.5
155
220
274
332
488
678
1.7
3.5
5.8
9.4
14
29
50
79
122
170
220
318
410
606
815
2.3
4.7
7.8
12.7
19
39
68
107
165
230.5
298
431
556
822
1105
2
4
7
11
18
32
58
94
144
190
260
368
470
707
967
2.7
5.4
9.5
15
24
43
79
127
195
258
353
499
637
959
1311
2.9
6
10
16
25
47
83
133
196
269
366
520
664
996
1357
4
8
13.5
22
34
64
112.5
180
266
365
496
705
900
1351
1840
3.6
7
11
20
29
58
100
159
235
323
440
628
794
1205
1630
5
9.5
15
27
39
79
136
216
319
438
597
852
1077
1634
2210
OMFR02RAP-0902
- 52 -
33047 Remanzacco (UD) Italy - Via Gino Tonutti, 3
Tel. ++39 0432 667015 - Fax ++39 0432 668282
ENGLISH
VERY IMPORTANT !!!!!
WARRANTY REGISTRATION INFORMATION
Dear Customer,
In order to validate the Warranty Registration of your Tonutti implement that you have just purchased, please surf in
the internet at our web site www.tonutti.it – On line Warranty Policy (W.O.P.) section and be sure to fill in the
Warranty Registration Form found therein, in all its details. If by any chance you do not have an internet connection,
please ask your dealer to complete the form for you and forward, by e-mail or fax to Tonutti.
PLEASE DON’T FORGET THAT THIS REGISTRATION FORM MUST BE SUBMITTED WITHIN 10 DAYS
OF THE PURCHASE IN ORDER TO BE COVERED BY TONUTTI LIMITED WARRANTY POLICY.
DEUTSCH
SEHR WICHTIG!!!!!!!!!!
INFORMATIONEN ZUR REGISTRIERUNG DER GARANTIE
Lieber Kunde,
zum Bestätigen der Garantie-registrierung der von Ihnen gekauften Tonutti-Maschine bitten wir Sie, im Internet auf
unsere Web-Seite www.tonutti.it Eintrag “On line Warranty Policy” (W.O.P.) zuzugreifen und alle Felder des
Registrierungsformulars auszufüllen. Falls Sie über keinen Internet-Zugang verfügen, fordern Sie bitte Ihren
Vertragshändler auf, die Registrierung für Sie auszufüllen und per Telefax oder E- Mail an Tonutti zu senden.
BEACHTEN SIE BITTE, DASS DIESE REGISTRIERUNG INNERHALB VON 10 TAGEN NACH DEM
KAUF ERFOLGEN MUSS, DAMIT DAS PRODUKT DURCH DIE TONUTTI-GARANTIE GEDECKT IST.
FRANÇAIS
TRÈS IMPORTANT !!!!!!!
INFORMATIONS SUR L'ENREGISTREMENT DE GARANTIE
Cher client,
Pour confirmer l'enregistrement de garantie de la machine Tonutti que vous venez tout juste d'acquérir, nous vous
prions d'aller sur Internet, de vous rendre sur notre site web www.tonutti.it à la section “On line Warranty Policy”
(W.O.P.) et de remplir le formulaire d'enre-gistrement de garantie dans les moindres détails. Si, pour une quelconque
raison, vous ne possédez pas de connexion Internet, nos vous prions de demander à votre revendeur de remplir le
formulaire pour vous et de l'envoyer à Tonutti par fax ou par e- mail.
N’OUBLIEZ PAS QUE CE FORMULAIRE D’ENREGISTREMENT DOIT ETRE PRESENTE DANS UN
DELAI DE 10 JOURS A COMPTER DE LA DATE D’ACHAT POUR QUE VOTRE PRODUIT SOIT
COUVERT PAR LA GARANTIE TONUTTI.
ITALIANO
MOLTO IMPORTANTE!!!!
INFORMAZIONI DI REGISTRAZIONE DELLA GARANZIA
Caro cliente,
Per convalidare la registrazione di garanzia della macchina Tonutti che avete appena acquistato, per favore navigate
in Internet ed entrate nel nostro sito web www.tonutti.it sezione “On line Warranty Policy” (W.O.P.) e compilate la
registrazione riempiendo tutti i campi. Se per qualche motivo non avete una connessione ad internet, per cortesia
chiedete al vostro rivenditore di compilare la registrazione per voi e di inviarla alla Tonutti a mezzo fax o e-mail.
NON DIMENTICATEVI CHE QUESTA REGISTRAZIONE DEVE ESSERE PRESENTATA ENTRO 10
GIORNI DALL’ACQUISTO PERCHE’ IL PRODOTTO SIA COPERTO DALLA GARANZIA TONUTTI.
ESPAÑOL
¡MUY IMPORTANTE!
INFORMACIONES PARA REGISTRAR LA GARANTÍA
Estimado Cliente:
Para convalidar el registro de garantía de la máquina Tonutti que acaba de comprar, por favor conéctese a internet,
entre en nuestro sitio web www.tonutti.it sección “On line Warranty Policy” (W.O.P.) y complete el registro llenando
todos los campos. Si por cualquier razón no tiene ninguna conexión a internet, le rogamos solicite a su revendedor
que complete el registro por usted y lo envíe a Tonutti por medio de fax o e-mail.
NO OLVIDE QUE EL REGISTRO DEBE EFECTUARSE EN UN PLAZO DE 10 DIAS A PARTIR DE LA
FECHA DE COMPRA PARA QUE EL PRODUCTO ESTE CUBIERTO POR LA GARANTIA TONUTTI.
Remanzacco, February 10th, 2009
[Limited Warranty Policy]
[Online Warranty Registration]
[Online Warranty Claim]
Online Warranty Registration
Dear Dealer, thank you for dealing in Tonutti products.
Please fill out this form to register the sale of a Tonutti product.
This will ensure that your sale has been registered and that the warranty will be activated as of the
purchase date. Registering the warranty online is fast and easy.
You can also register in the following way:
Fax your completed Registration form to Tonutti Customer Care +39-0432-668282
To the Dealer:
By completing and submitting this Warranty Registration form within 10 days from purchase date, you confirm
that:
1. The machine has been correctly assembled in accordance with the manufacturer's instructions.
2. All bolts have been checked and also oil level and grease.
3. All safety guards + warning decals have been placed on machine.
4. PTO has been matched to tractor and greased.
5. All other pre-delivery checks have been completed as per operators manual.
6. Purchaser was given operators manual and instructed in safe and correct usage of the machine and on
limitation of warranty.
7. Machine was tested and operates correctly.
8. The Purchaser acknowledged the machine's correct assembly.
9. The Purchaser acknowledged the receipt of the operators manual, read and fully understood its content.
10.The Purchaser acknowledged his understanding and approves Tonutti Limited Warranty Policy
11.The Purchaser acknowledged having a clear understanding on the correct and safe operation of the machine.
12.The Purchaser acknowledged that the machine needs regular maintenance. as per instructions in the
operators manual.
13.The Purchaser has a clear understanding of the capacity of the machine and is aware of its limitations.
Required Fields marked with*
First Name of person filling out registration*
MARIO
Last Name of person filling out registration*
ROSSI
Firm*
Date of purchase*
ABCDE
Address*
DD --
20 MM --
10 YY ----
City*
VIA ARTIGIANO
ZIP Code *
SAN VALENTINO
State/Province*
33047
Country*
UDINE
ITALY
----------------------------
My Contact is:
Fax
Phone*
e-Mail*
0432-667015
[email protected]
Product model *
DOMINATOR V12
Serial number*
665544
Purchaser information to be completed by the Dealer
Purchaser Name*
GIOVANNI BIANCHI
Purchaser address*
VIA GORIZIA,10 UDINE/ITALY
Submit
08
33047 Remanzacco (UD) Italy - Via Gino Tonutti, 3
Tel. ++39 0432 667015 - Fax ++39 0432 668282
ENGLISH
Declaration of Conformity with 98/37/CE
We declare, accepting full responsibility for this declaration, that this product conforms with the following
European standards: 98/37/CE.
To achieve machine conformity the following Harmonized Standards have been utilized: UNI EN ISO
12100-1:2005, UNI EN ISO 12100-2:2005, UNI EN 294, UNI EN 1553
National and International Technical Specifications : ISO 11684
DEUTSCH
Konformitätserklärung 98/37/CE
Wir erklären und übernehmen die volle Verantwortung für diese Erklärung, dass das Produkt folgenden
europäischen Normen entspricht: 98/37/CE.
Zum Anpassen der Maschine an diese Norm wurden folgende angeglichenen Normen angewandt: UNI
EN ISO 12100-1:2005, UNI EN ISO 12100-2:2005, UNI EN 294, UNI EN 1553
Internationale und Nationale technischen Spezifikationen: ISO 11684
FRANÇAIS
Déclaration de Conformité 98/37/CE
Nous déclarons, et nous assumons la pleine responsabilité de cette déclaration, que le produit est
conforme aux normes européennes suivantes: 98/37/CE.
Pour l’adaptation de la machine, nous avons utilisé les Normes Harmonisées suivantes: UNI EN ISO
12100-1:2005, UNI EN ISO 12100-2:2005, UNI EN 294, UNI EN 1553
Spécifications techniques natinales et internatinales : ISO 11684
ITALIANO
Dichiarazione di Conformità 98/37/CE
Dichiariamo, assumendo la piena responsabilità di tale dichiarazione, che il prodotto è conforme alle
seguenti norme europee: 98/37/CE.
Per l’adeguamento delle macchine sono state utilizzate le seguenti Norme Armonizzate: UNI EN ISO
12100-1:2005, UNI EN ISO 12100-2:2005, UNI EN 294, UNI EN 1553
Specifiche Tecniche Nazionali ed Internazionali : ISO 11684
ESPAÑOL
Declaración de Conformidad 98/37/CE
Declaramos, asumiéndonos la responsabilidad plena de tal declaración,que el producto es conforme a
las siguientes normas europeas: 98/37/CE.
Para la adecuación de la máquina se han utilizado las siguientes Normas Armonizadas: UNI EN ISO
12100-1:2005, UNI EN ISO 12100-2:2005, UNI EN 294, UNI EN 1553
Especificaciones Técnicas Nacionales e Internacionales : ISO 11684
Type
HAY RAKE
Serian Number
DECAL CE ON THE MACHINE
Model
RAPTOR
Date
01-2006
………………….………………….
33047 Remanzacco (UD) Italy - Via Gino Tonutti, 3
Tel. ++39 0432 667015 - Fax ++39 0432 668282