1
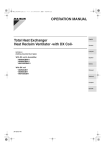
OPERATION MANUAL
REMOTE CONTROLLER
CZ-02RT11P
Operation manual
Remote controller
English
Betriebsanleitung
Fernbedienung
Deutsch
Manuel d'utilisation
Dispositif de commande à distance
Français
Gebruiksaanwijzing
Afstandsbediening
Nederlands
Manual de operación
Control remoto
Español
Manuale d'uso
Comando a distanza
Italiano
∂Á¯ÂÈÚ›‰ÈÔ ÏÂÈÙÔ˘ÚÁ›·˜
∆ËϯÂÈÚÈÛÙ‹ÚÈÔ
EÏÏËÓÈο
Manual de operação
Controlo remoto
Portugues
1
3
6
23 7
8
9
2
1
10
4
11
12
14
22
17
25
16
13
15 18
19
20
29
21
5
24
33
26
35
27
36
37
28
1
30
31
32
34
CZ-02RT11P
Remote controller
THANK YOU FOR PURCHASING THIS
CONTROLLER. READ THE MANUAL
ATTENTIVELY BEFORE USING THE
INSTALLATION. AFTER READING THE
MANUAL, STORE IT IN A SAFE PLACE
FOR FUTURE USE.
Before initial operation, contact your dealer
to obtain all details concerning your air
conditioning installation.
WARNING
- Never let the remote controller get wet, this may
cause an electric shock or fire.
- Never press the buttons of the remote controller
with a hard, pointed object. The remote controller
may be damaged.
- Never inspect or service the remote controller
yourself, ask a qualified service person to do this.
Contents
page
1. Features and functions.......................................... 1
2. Name and function of switches and icons ............. 2
3. Setting up the controller ........................................ 4
4. Description of the operation modes ...................... 5
5. Operation .............................................................. 5
6. Programming the schedule timer ........................ 10
CZ-02RT11P
Remote controller
4PW15515-1
Operation manual
1. Features and functions
The CZ-02RT11P is a state of the art remote
controller that offers full control over your installation.
1
BASIC REMOTE CONTROLLER
The basic remote controller functions are:
•
ON/OFF,
•
operation mode change-over,
•
temperature adjustment,
•
air volume adjustment
•
air flow direction adjustment.
2
CLOCK FUNCTION
The clock functions are:
•
24 hours real time clock,
•
day of the week indicator.
3
SCHEDULE TIMER FUNCTION
The schedule timer functions are:
•
a maximum of 5 actions can be programmed
for each day of the week (totalling 35 actions),
•
schedule timer can be enabled/disabled at any
time,
•
linked to a set temperature or a LIMIT
operation or an OFF operation,
•
"last command" overrules previous command
until next scheduled command.
4
LIMIT OPERATION
Limit operation provides thermostat control within the
range of the set minimum and maximum temperature.
The minimum temperature setting will trigger heating,
the maximum temperature setting will trigger cooling.
Operation manual
1
5
LEAVE HOME
The leave home function prevents the room
temperature from dropping when the occupants are
out for a longer period. If the room temperature drops
below 10°C, heating is started automatically. As soon
as 15°C is reached, the controller returns to its
original status.
6
BUTTON PERMISSION LEVEL
Three hierarchical permission levels can be set to
limit the user action.
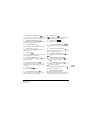
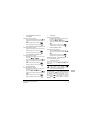
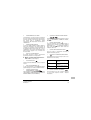
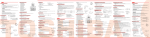
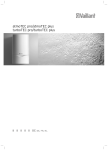
2. Name and function of switches and
icons (Refer to figure 1)
1
ON/OFF BUTTON
Press the ON/OFF button to start or stop the system.
2
OPERATION LAMP
The operation lamp lights up during operation or
blinks if a malfunction occurs.
3
OPERATION MODE ICON
These icons indicate the current operation mode
(FAN, DRY, AUTOMATIC, COOLING, HEATING).
4
VENTILATION MODE ICON
These icons indicate the current ventilation mode
(
only) (AUTOMATIC, HEAT EXCHANGE,
BYPASS).
5
VENTILATION ICON
The ventilation icon appears when the ventilation is
adjusted with the ventilation amount button (
only). Simultaneously, the ventilation amount is
indicated by the fan speed icon (see 22).
Operation manual
2
6
AIR CLEANING ICON
This icon indicates that the air cleaning unit (option) is
operational.
7
LEAVE HOME ICON
The leave home icon shows the status of the leave
home function.
ON
Leave home is enabled
FLASHING
Leave home is active
OFF
Leave home is disabled
8
EXTERNAL CONTROL ICON
This icon indicates that another controller with higher
priority is controlling or disabling your installation.
9
CHANGE-OVER UNDER CENTRALISED
CONTROL ICON
This icon indicates that the change-over of the
installation is under centralised control assigned to
another indoor unit or optional cool/heat selector
connected to the outdoor unit (= master remote
controller).
10
DAY OF THE WEEK INDICATOR
The day of the week indicator shows the current week
day (or the set day when reading or programming the
schedule timer).
11
CLOCK DISPLAY
The clock display indicates the current time (or the
action time when reading or programming the
schedule timer).
CZ-02RT11P
Remote controller
4PW15515-1
12
MAXIMUM SET TEMPERATURE
The maximum set temperature indicates the
maximum set temperature when in limit operation.
21
13
MINIMUM SET TEMPERATURE
The minimum set temperature indicates the minimum
set temperature when in limit operation.
22
14
SCHEDULE TIMER ICON
This icon indicates that the schedule timer is enabled.
15
ACTION ICONS
These icons indicate the actions for each day of the
schedule timer.
16
OFF ICON
This icon indicates that the OFF action is selected
when programming the schedule timer.
NOT AVAILABLE
is displayed whenever a non-installed option
is addressed or a function is not available.
FAN SPEED ICON
This icon indicates the set fan speed.
23
DEFROST/HOTSTART MODE ICON
This icon indicates that the defrost/hotstart mode is
active.
24
AIR FILTER CLEANING TIME ICON
This icon indicates the air filter must be cleaned.
Refer to the manual of the indoor unit.
25
ELEMENT CLEANING TIME ICON
This icon indicates the element must be cleaned
(
only).
17
INSPECTION REQUIRED
and
These icons indicate that inspection is required.
Consult your installer.
26
VENTILATION MODE BUTTON
The ventilation mode button operates the
to the
manual for more details.
18
SET TEMPERATURE DISPLAY
This indicates the current set temperature of the
installation (not shown in LIMIT operation or in FAN or
DRY mode).
27
19
SETTING
Not used, for service purposes only.
20
AIR FLOW DIRECTION ICON
This icon indicates the air flow direction (only for
installations with motorised air flow flaps).
CZ-02RT11P
Remote controller
4PW15515-1
; refer
VENTILATION AMOUNT BUTTON
This button sets the ventilation amount; refer to the
manual for more details.
28
INSPECTION/TEST OPERATION BUTTON
Not used, for service purposes only.
29
PROGRAMMING BUTTON
This button is a multi-purpose button.
Depending on the previous manipulations of the user,
the programming button can have various functions.
Operation manual
3
30
SCHEDULE TIMER BUTTON
This button enables or disables the schedule timer.
31
TIME ADJUST BUTTON
These buttons are used to adjust the clock or, when in
programming mode, to adjust the programmed action
time. Both buttons have an auto-repeat function.
32
TEMPERATURE ADJUST BUTTONS
These buttons are used to adjust the current setpoint
or, when in programming mode, to adjust the
programmed setpoint temperature (step = 1°C). Both
buttons are also used to adjust the day of the week.
33
OPERATION CHANGE/
BUTTON
This button is a multi-purpose button. Depending on
the previous manipulations of the user, it can have
following functions:
1 select the operation mode of the installation
(FAN, DRY, AUTOMATIC, COOLING, HEATING)
2 toggle between minimum temperature and
maximum temperature when in limit operation
34
SETPOINT/LIMIT BUTTON
This button toggles between setpoint, limit operation
or
(programming mode only).
35
FAN SPEED BUTTON
This button toggles between L (Low), H (High), HH
(very High),
(Automatic).
36
AIR FLOW DIRECTION ADJUST BUTTON
This button enables to adjust the air flow direction.
Operation manual
4
37
AIR FILTER CLEANING TIME ICON RESET
BUTTON
This button is used to reset the air filter cleaning time
icon.
3. Setting up the controller
After initial installation, the user can set the clock and
day of the week.
The controller is equipped with a schedule timer that
enables the user to operate the installation
automatically; setting the clock and day of the week is
required to be able to use the schedule timer.
1
CLOCK SETTING FUNCTION
Hold down the
button for 5 seconds. The clock
read-out and the day of week indicator will blink, both
can now be adjusted.
Use the
&
buttons to adjust the
clock. Each time pressing the time adjust button will
in/decrease the time by 1 minute. Keeping the
or
button pressed will in/decrease
the time by 10 minutes.
Use the
&
buttons to adjust the day
of the week. Each time pressing the
or
buttons will display the next or previous day.
Press the
button to confirm the current set time
and day of the week.
If the controller, with blinking clock and day of week
read-out, is left untouched for 5 minutes, the clock
and day of the week will return to their previous
settings; the clock setting function is no longer active.
2
SETTING UP THE SCHEDULE TIMER
To set up the schedule timer, refer to chapter 6.
"Programming the schedule timer" on page 10.
CZ-02RT11P
Remote controller
4PW15515-1
4. Description of the operation modes
1
FAN ONLY OPERATION
In this mode, air only circulates without heating or
cooling.
2
DRY OPERATION
In this mode, the air humidity will be lowered with a
minimal temperature decrease.
The temperature and fan speed are controlled
automatically and cannot be controlled by the remote
controller.
Dry operation will not function if the room temperature
is too low.
3
AUTOMATIC OPERATION
In this mode, the controller will automatically switch
between heating and cooling as required by the
setpoint or limit temperature.
4
COOLING OPERATION
In this mode, cooling will be activated as required by
the setpoint or limit temperature.
5
HEATING OPERATION
In this mode, heating will be activated as required by
the setpoint or limit temperature.
Hot start (heat pump types only)
At the start of a heating operation, the indoor fan is
stopped until a certain indoor heat exchanger
temperature is reached and
is displayed.
This prevents cold air from leaving the indoor unit.
CZ-02RT11P
Remote controller
4PW15515-1
Defrost (heat pump types only)
In heating operation, freezing of the outdoor heat
exchanger may occur. If so, the heating capacity of
the system lowers and the system goes into defrost
operation. The indoor unit fan stops and
is
displayed. After maximum 10 minutes of defrost
operation, the system returns to heating operation
again.
6
LIMIT OPERATION
&
Limit operation is an additional mode that enables to
keep the room temperature within certain limits. The
&
icons are displayed to confirm the
activation of the limit operation.
7
LEAVE HOME
LEAVE HOME is a feature that enables to keep the
room temperature above 10°C when the occupants
are out. This function will switch on heating if the
installation is switched off.
5. Operation
Manual operation
In manual operation, the user decides about the
settings of the installation. The last setting remains
active until the user changes it.
As the controller can be implemented for a wide
variety of installations and features, it might occur that
you select a function that is not available on your
installation; if this is the case, the
message
will appear.
Operation manual
5
Use the
mode.
button to select the desired operation
Fan only operation
Dry operation
•
Fan speed, use the
•
Air flow direction adjust, use the
Cooling operation
•
Ventilation mode, use the
button,
Heating operation
•
Ventilation amount, use the
button.
1
FAN ONLY OPERATION
User adjustable parameters:
•
Fan speed, use the
button,
•
Air flow direction adjust, use the
button,
•
Ventilation mode, use the
button,
Ventilation amount, use the
button.
2
DRY OPERATION
User adjustable parameters:
•
Air flow direction adjust, use the
•
Ventilation mode, use the
button,
•
Ventilation amount, use the
button.
button,
Operation manual
button,
button,
4
COOLING OPERATION
User adjustable parameters:
•
Setpoint temperature, use the
buttons,
•
Fan speed, use the
button,
•
Air flow direction adjust, use the
&
button,
•
Ventilation mode, use the
button,
•
Ventilation amount, use the
button.
5
HEATING OPERATION
User adjustable parameters:
•
Setpoint temperature, use the
&
buttons,
•
Fan speed, use the
button,
•
Air flow direction adjust, use the
button,
•
Ventilation mode, use the
button,
•
Ventilation amount, use the
button.
6
LIMIT OPERATION
User adjustable parameters:
•
Fan speed, use the
button,
•
Air flow direction adjust, use the
button,
•
Ventilation mode, use the
button,
•
6
&
Automatic operation
Press the
button to toggle between limit
operation and the operations listed above.
In limit operation, use the
button to select
minimum and maximum temperature settings. Use
the
or
buttons to adjust the
minimum and maximum temperature settings.
•
3
AUTOMATIC OPERATION
User adjustable parameters:
•
Setpoint temperature, use the
buttons,
Ventilation amount, use the
button.
CZ-02RT11P
Remote controller
4PW15515-1
ADDITIONAL FEATURES OF THE CONTROLLER
1
LEAVE HOME
Press the
and
buttons
simultaneously to enable the LEAVE HOME function.
KEEP IN MIND THAT THE
BUTTON
MUST
BE
OFF TO
GUARANTEE
TRIGGERING OF THE LEAVE HOME
FUNCTION.
2
Adjusting the air flow direction
Use the
button to adjust the air flow direction.
Press the button to switch between fixed or variable
air flow direction. Use the
icon to determine the
fixed air flow direction by pressing the
button
when the
icon indicates the desired direction.
NOTE
Even if fixed air flow direction is selected,
variable air flow direction can be enabled
automatically
to
preserve
proper
operation of your installation.
3
SCHEDULE TIMER
All features and operation and programming of the
schedule timer are described below.
Schedule timer operation
In schedule timer operation, the installation is also
controlled by the schedule timer. The actions
programmed in the schedule timer will be executed
automatically.
The schedule timer always executes the last
command; this means the user can temporarily
overrule the last executed programmed action. Refer
to "Manual operation" on page 5. The next
programmed action (in the schedule timer) will return
control to the schedule timer.
Use the
schedule timer.
CZ-02RT11P
Remote controller
4PW15515-1
NOTE
The schedule timer overrules the
button, only use the
button to
enable or disable the schedule timer. The
schedule timer is enabled when the
icon is visible. The
button only
overrules the schedule timer until the next
programmed action.
The programmed schedule is time driven.
Make sure that the clock and day of the week
are set correctly. Refer to "CLOCK SETTING
FUNCTION" on page 4.
Manually adjust the clock for summertime
and wintertime. Refer to "CLOCK SETTING
FUNCTION" on page 4.
A power failure exceeding 1 hour will reset
the clock and the day of the week. Refer to
"CLOCK SETTING FUNCTION" on page 4
to adjust the clock and the day of the week.
The actions programmed in the schedule
timer will not be lost after a power failure;
reprogramming the schedule timer is not
required.
To set up the SCHEDULE TIMER refer to chapter 6.
"Programming the schedule timer" on page 10.
button to enable or disable the
Operation manual
7
What can the schedule timer do?
The concept of the schedule timer is simple,
straightforward though powerful.
OR
•
The schedule timer can order 3 actions:
1 switch on the installation at a scheduled time, in
combination with a setpoint (exact temperature
control)
2 switch off the installation (end of control)
3 switch on the installation at a scheduled time, in
limit operation
The schedule timer can accept a maximum of 5
actions per day.
For each day of the week a maximum of 5 actions can
be programmed, totalling a maximum of 35
programmed actions. The action that was
programmed first for a certain day is action 1, the last
programmed action for a day could be action 1 (in
case only one action is programmed for that day) to 5.
It is of utmost importance to understand that
the number assigned to the programmed
action, DOES NOT DETERMINE WHEN the
programmed action will be executed. Only
the TIME, being a part of the data entered
when programming the action, will determine
when the programmed action will be
executed.
What will the schedule timer do?
If enabled, the schedule timer will execute the
programmed actions.
It will order the installation to:
•
cool or heat, depending on the current
operation, if applicable; the setpoint will be
displayed,
Operation manual
8
OR
•
switch off the installation (the schedule timer
remains enabled and reactivates the
installation as programmed); the operation
lamp will turn off,
cool or heat, whichever is required to keep the
room temperature within a specified range
(limit operation);
and
are displayed.
The schedule timer will change the operation
mode in LIMIT operation only.
To be able to verify the programmed actions, you can
browse the programmed actions, see below.
What will the schedule timer NOT do?
The schedule timer will not:
•
control fan speed,
•
control air flow direction,
•
control ventilation mode,
•
control ventilation amount,
•
change the operation mode for a scheduled
setpoint.
The parameters listed above can be set manually,
without interfering with the schedule timer.
More sophisticated remote controllers are available.
Consult your dealer for more information.
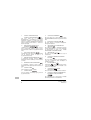
Browsing the programmed actions in
the schedule timer (read-out only)
Refer to figure 2.
Browsing the programmed actions of the schedule
timer is a sequential process. Only 2 buttons are used
to browse the entire schedule timer program.
The
button is used to start browsing, to display
the next programmed action or to exit browsing when
displaying the last programmed action.
CZ-02RT11P
Remote controller
4PW15515-1
The
button is used to exit browsing at once
(without having to scroll through all programmed
actions).
Press the
button to enter the browse mode, the
icon appears,
will blink.
NOTE
NOTE
Browsing always starts on Monday and
ends on Sunday.
Check the
icon. If at least 1 action is
programmed for Monday, will appear.
The clock indicates the time when the programmed
action is scheduled, either
,
or
and
is being displayed.
NOTE
Continue pressing the
button until the day of the
week indicator displays the current day (not blinking),
you have now quit browsing.
The temperatures mentioned above are
for clarifying purposes only, temperature
values on your controller may vary.
If
does not appear, it indicates that there are no
programmed actions for Monday.
Press the
button again to go to the next day of
the week.
will blink, this indicates that the
programmed actions for Tuesday are being browsed.
The process described above is now restarted.
If at least 1 action is programmed for Tuesday, will
appear. The clock indicates the time when the
programmed action will be enabled, either
,
or
and
is being displayed.
If
does not appear, it indicates that there are no
programmed actions for Tuesday.
Press the
button to display the next programmed
action. If a second action is programmed for Tuesday,
will still be blinking and
will appear.
Assuming that 5 actions were programmed for
Tuesday, a total of 5 presses will be required to
display all programmed actions.
CZ-02RT11P
Remote controller
4PW15515-1
The number of times that the
button
will have to be pressed to quit browsing
depends on the number of programmed
actions in the schedule timer.
How do I interpret the programmed
actions
To be able to understand the behaviour of your
installation when the schedule timer is enabled, it is
important to look at all programmed actions for the
current day and maybe the last programmed action of
yesterday.
If the first programmed action for today is not active
yet, the current status of your installation depends,
most probably but not necessarily, on the last
programmed action from yesterday. Read the
important note below.
If the first programmed action for today is already
active, the current status of your installation depends,
most probably but not necessarily, on the parameters
programmed in the first programmed action for today.
Read the important note below.
NOTE
To keep the operation of your installation
simple, the schedule timer settings can
easily be overruled by altering the current
setting ("last command" overrules
previous command until next scheduled
command).
Conclusion: Although
is displayed, somebody
might have altered the settings. The next
programmed action will overrule the altered settings
and all settings return as programmed.
Operation manual
9
Programmed actions might overlap; due to the "last
command overrules" logic, the last scheduled
command will rule.
How do I interpret the readings on the
display when the schedule timer is
active
As described above, the schedule timer settings, (and
as a consequence the display readings) might be
overruled temporarily by a manual intervention.
If you want to be absolutely sure about the schedule
timer settings for this very moment, you must browse
the schedule timer programmed actions. Refer to
"Browsing the programmed actions in the schedule
timer" on page 8.
6. Programming the schedule timer
Getting started
Programming the schedule timer is flexible (you can
add, remove or alter programmed actions whenever
required) and straightforward (programming steps are
limited to a minimum).
Below are some tips and tricks to ensure successful
programming of the schedule timer:
•
•
•
•
•
What do I have to program?
As the schedule timer is based on a week program
(the same actions will be repeated every week) you
will have to select the day of the week first.
Now you must choose an action:
1 switch on the installation at a scheduled time, in
combination with a setpoint (exact temperature
control)
2
•
familiarise yourself with the icons and the
buttons, you will need them when
programming,
familiarise yourself with the browse function,
you will need it to start programming. Refer to
"Browsing the programmed actions in the
schedule timer" on page 8,
fill out the form at the end of this manual; note
the time and the required action for each day
(keep in mind that the number of actions is
limited to 5 per day),
take your time to enter all data accurately,
try to program the actions for each day in
logical sequence (start with action 1 for the
first action and end with the highest number for
the last action). This is not a requirement but it
will make it much easier to interpret the
program later,
keep in mind that you can always alter, add or
remove the programmed actions later.
switch off the installation (end of control)
3 switch on the installation at a scheduled time, in
limit operation
Finally you must enter the time of the day when the
action must be enabled.
NOTE
If you program 2 or more actions on the
same day and at the same time of the
day, only the action with the highest
action number (2 - 5) will be executed.
Operation manual
10
CZ-02RT11P
Remote controller
4PW15515-1
Programming
1
THE SCHEDULE TIMER IS PROGRAMMED
FOR THE FIRST TIME
NOTE
When changing day during programming
you will have to confirm "the last action".
Each day can have 5 programmed
actions (numbered 1 to 5) but for some
reason you might want to delete one,
several or all programmed actions.
To be able to delete programmed actions,
you must select the last action that you
want to keep, this can be 1 to 5 or no
action (
is displayed and no action
displayed).
All programmed actions with a number
HIGHER than the selected one, or all
programmed actions if no last action was
selected will be deleted.
PROGRAMMING THE FIRST DAY OF THE WEEK
NOTE
In the guidelines below it is assumed that
you start programming the schedule
timer actions on Monday and end with the
schedule timer actions for Sunday.
If you prefer NOT to start on Monday, first
browse to the desired day and then enter
the PROGRAM mode.
CZ-02RT11P
Remote controller
4PW15515-1
In this particular case, no actions have been programmed before, all schedule timer actions are idle.
•
Browse to Monday by pressing the
button.
The
icon appears,
will blink and one of
the
icons might be displayed
but all other fields remain blank, indicating that
no actions are programmed for Monday.
•
Enter the program mode by holding down the
button for 5 seconds, the
icon will now
blink too.
•
Press the
button to activate the first
programmed action.
•
A blinking is displayed indicating that the first
programmed action for Monday is being
programmed; The set temperature and clock
display are blinking.
•
Press the
•
temperature,
, or limit operation.
Enter the desired temperature using the
&
buttons.
•
•
button to select either set
Press the
button to toggle between
minimum set temperature and maximum set
temperature in limit operation, the selected
temperature will blink.
Enter the time when the action must start
using the
&
buttons (min.
step = 10 minutes).
NOTE
If, by accident, you pressed the
button, you activated the next action;
is displayed ( steady and
blinking).
Press the
button repeatedly until a
blinking
is displayed. You can now
continue adjusting the settings for the first
schedule timer action.
Operation manual
11
If the action and the corresponding time are correct,
you can proceed to the second schedule timer action.
This is done by pressing the
button, the data is
saved and the next schedule timer action can be
programmed.
Programming the remaining schedule timer actions
for the same day is similar.
You can browse the schedule timer actions by
pressing the
button.
NOTE
Don't worry if you add additional
schedule timer actions by pressing the
button repeatedly, they can be
deleted when finishing the current day.
When all data for the schedule timer actions for
Monday are entered, you must confirm the
programmed actions.
Make sure the last schedule timer action you want to
keep is selected (schedule timer actions with a higher
number will be deleted).
Now you must choose between 2 options:
1 CONFIRM AND COPY TO NEXT DAY
The schedule timer action programmed for the
current day are also valid for the next day: use
the "confirm last action and copy actions to next
day" function by pressing the
and
buttons simultaneously for 5 seconds.
Program mode is quit and depending on the choice
made, the programmed actions are saved for Monday
(and possibly Tuesday).
PROGRAMMING THE OTHER DAYS OF THE WEEK
Programming the other days of the week is identical
to programming the first day of the week.
is
blinking to indicate the selected day,
and
are
steady if actions were copied from Monday to
Tuesday, only
is displayed if no actions were
copied from Monday to Tuesday.
2
I WANT TO EDIT PROGRAMMED ACTIONS
Editing programmed actions is easy.
Make sure you are not in program mode (
not
blinking); if required, press the
button to quit
program mode.
Browse to the programmed actions using the
button, select the day and action you want to edit.
Press the
button for 5 seconds; program mode is
enabled, the
icon and selected action are blinking.
Edit the settings using the same buttons described
above.
Select the "last action" using the
button and
decide if you do or do not want to copy the
programmed action(s) to the next day (pressing the
and
buttons simultaneously or only the
button for 5 seconds).
2 CONFIRM ONLY
The schedule timer action programmed for the
current day are only valid for the selected day:
use the "confirm last action and go to next day"
function by pressing the
button for 5
seconds.
Operation manual
12
CZ-02RT11P
Remote controller
4PW15515-1
3
I WANT TO DELETE ONE OR MORE
PROGRAMMED ACTIONS
Make sure you are not in program mode (
not
blinking); if required, press
to quit program
mode.
Browse to the programmed actions using the
button, select the day you want to edit.
Press the
button for 5 seconds; program mode is
enabled, the
icon and selected action are blinking.
Select the "last action" you want to keep using the
button. All higher actions will be deleted.
Confirm the deletion by pressing the
button for 5
seconds,
OR
confirm the deletion for the current and the next day
too by pressing the
and
buttons
simultaneously for 5 seconds.
NOTE
In the case above, if for example the last
action was 3, the programmed actions 4
and 5 will also be deleted (if they were
present).
4
I WANT TO DELETE ALL PROGRAMMED
ACTIONS AT ONCE
Quit programming or browsing.
Press the
and
buttons simultaneously for 5
seconds; the
icon will invert and disappear to
confirm deletion.
7. Maintenance
The remote controller does not need maintenance.
Remove dirt with a soft damp cloth.
NOTE
8. Troubleshooting
The guidelines below might help to solve your
problem. If you cannot remedy the problem, consult
your installer.
No readings on the remote controller (display
blank)
Check if the mains power is still applied to your
installation.
Only
is displayed
This indicates that the installation has just been
powered, please wait until
disappears.
The schedule timer does work but the
programmed actions are executed at the wrong
time (e.g. 1 hour too late or too early)
Check if the clock and the day of the week are set
correctly, correct if necessary (refer to "CLOCK
SETTING FUNCTION" on page 4).
I cannot enable the schedule timer (the
icon
blinks for 2 seconds and disappears)
The schedule timer has not been programmed yet.
First program the schedule timer (refer to
"Programming the schedule timer" on page 10).
I cannot enable the schedule timer (the
icon is displayed)
The schedule timer can not be enabled when a
centralised control is connected.
Limit operation cannot be selected
Limit operation is not available for cooling only
installations.
Only use clear tapid water to moisten the
cloth.
CZ-02RT11P
Remote controller
4PW15515-1
Operation manual
13
CZ-02RT11P
Fernbedienung
DANKE DASS SIE SICH FÜR DEN KAUF
DIESES
REGLERS
ENTSCHLOSSEN
HABEN. LESEN SIE DIE ANLEITUNG
SORGFÄLTIG DURCH BEVOR SIE DIE
ANLAGE VERWENDEN. WENN SIE DIE
ANLEITUNG DURCHGELESEN HABEN;
BEWAHREN
SIE
SIE
AN
EINEM
SICHEREN PLATZ ZUR WEITEREN
VERWENDUNG AUF.
Nehmen Sie mit Ihrem Händler Kontakt auf
vor der Erstinbetriebnahme um alle Einzelheiten bezüglich der Installation der Klimaanlage zu erhalten.
WARNUNG
- Die Fernbedienung darf niemals nass werden, dies
kann sonst Elektroschock oder Brand verursachen.
- Drücken Sie die Tasten der Fernbedienung niemals
mit einem harten, spitzen Gegenstand. Die Fernbedienung kann dadurch beschädigt werden.
- Die Fernbedienung darf niemals von Ihnen selbst
geprüft oder gewartet werden, beauftragen Sie eine
qualifizierte Fachkraft damit.
Inhaltsverzeichnis
Seite
1. Eigenschaften und Funktionen.............................. 1
2. Name und Funktion der Schalter und Bildsymbole ... 2
3. Einrichten des Reglers .......................................... 5
4. Beschreibung der Betriebsarten............................ 5
Betriebsanleitung
1. Eigenschaften und Funktionen
Die CZ-02RT11P ist eine Fernbedienung nach dem
neuesten Stand der Technik, die Ihnen die
vollständige Regelung Ihrer Anlage ermöglicht.
1
BASIS FERNBEDIENUNG
Die Basisfunktionen der Fernbedienung sind wie
folgt:
•
EIN/AUS,
•
Umschaltung der Betriebsart,
•
Temperatureinstellung,
•
Einstellung der Luftmenge
•
Einstellung der Luftstromrichtung.
2
FUNKTION DER UHR
Die Funktionen der Uhr sind wie folgt:
•
24 Stunden Echtzeituhr,
•
Wochentag-Anzeiger.
3
FUNKTION DER PROGRAMMUHR
Die Funktionen der Programmuhr sind wie folgt:
•
Maximum 5 Maßnahmen können für jeden
Wochentag programmiert werden (insgesamt
35 Maßnahmen),
•
die Programmuhr kann jederzeit aktiviert/
deaktiviert werden,
•
jede Maßnahme bezeichnet entweder einen
EINSCHALT-Betrieb verbunden mit einer
eingestellten Temperatur oder einen GRENZoder einen AUSSCHALT-Betrieb,
•
der "zuletzt eingegebene Befehl" weist den
vorherigen Befehl bis zum nächsten
planmäßigen Befehl zurück.
5. Betrieb................................................................... 6
6. Programmieren der Programmuhr....................... 11
Betriebsanleitung
1
CZ-02RT11P
Fernbedienung
4PW15515-1
4
GRENZBETRIEB
Der Grenzbetrieb sieht die Thermostatregelung
innerhalb des Bereiches der minimalen und maximalen eingestelltenTemperatur vor. Die minimale
Temperatureinstellung löst die Heizung aus, die
maximale Temperatureinstellung jedoch die Kühlung.
5
AUSSER HAUS
Die Funktion Außer Haus verhindert, dass die
Raumtemperatur während einer längeren Abwesenheit der Personen sinkt. Wenn die Raumtemperatur
unter 10°C sinkt, wird die Heizung automatisch
eingeschaltet. Sobald 15°C erreicht werden, nimmt
die Regelung wieder ihren ursprünglichen Status ein.
6
TASTE NIVEAUTOLERANZ
Drei hierarchische Niveautoleranzen können eingestellt werden, um die Benutzertätigkeit einzugrenzen.
2. Name und Funktion der Schalter
und Bildsymbole (Siehe Abbildung 1)
1
EIN/AUS-TASTE
Drücken Sie die EIN/AUS Taste um das System zu
starten oder zu stoppen.
2
BETRIEBSLAMPE
Die Betriebslampe leuchtet auf während des
Betriebes oder blinkt wenn eine Störung auftritt.
3
BILDSYMBOL BETRIEBSART
Diese Bildsymbole geben die aktuelle Betriebsart an
(VENTILATOR, LUFTTROCKNUNG, AUTOMATIK,
KÜHLUNG, HEIZUNG).
4
BILDSYMBOL VENTILATIONSMODUS
Diese Bildsymbole geben den aktuellen Ventilationsmodus
an (
nur) (AUTOMATIK, WÄRMEAUSTAUSCH,
BYPASS).
CZ-02RT11P
Fernbedienung
4PW15515-1
5
BILDSYMBOL VENTILATION
Das Bildsymbol Ventilation erscheint dann, wenn die
Ventilation mit der Taste "Ventilationsmenge"
eingestellt wird (
nur). Die Ventilationsmenge wird
gleichzeitig durch das Bildsymbol "Gebläsestärke"
angegeben (siehe 22).
6
BILDSYMBOL LUFTREINIGUNG
Dieses Bildsymbol zeigt an, dass die Luftreinigungseinheit (Option) betriebsbereit ist.
7
BILDSYMBOL AUSSER HAUS
Das Bildsymbol Außer Haus zeigt den Status der
Funktion Außer Haus an.
EIN
Außer Haus ist aktiviert
BLINKEN
Außer Haus ist aktiv
AUS
Außer Haus ist deaktiviert
8
BILDSYMBOL EXTERNE REGELUNG
Dieses Bildsymbol zeigt an, dass ein anderer Regler
mit höherer Priorität regelt oder Ihre Anlage
deaktiviert.
9
BILDSYMBOL GEREGELTE ZENTRALE
UMSCHALTUNG
Dieses Bildsymbol zeigt an, dass die zentral
geregelte Umschaltung der Anlage für eine andere
Inneneinheit vorgesehen ist oder der optionale Kühl/
Heiz Wahlschalter an die Außeneinheit angeschlossen wird (=Führungs-Fernbedienung).
10
WOCHENTAG ANZEIGER
Der Wochentaganzeiger zeigt den aktuellen
Wochentag an (oder den eingestellten Tag, wenn die
Programmuhr abgelesen oder programmiert wird).
Betriebsanleitung
2
11
UHRANZEIGE
Die Uhranzeige zeigt die aktuelle Uhrzeit an (oder die
Aktionszeit wenn die Programmuhr gelesen oder
programmiert wird).
16
BILDSYMBOL AUS
Dieses Bildsymbol zeigt an, dass die
Maßnahme
gewählt
wird
während
Programmierung der Programmuhr.
12
17
KONTROLLE ERFORDERLICH
und
Diese Bildsymbole zeigen an, dass eine Kontrolle
erforderlich ist. Fragen Sie Ihren Monteur.
MAXIMALE EINGESTELLTE TEMPERATUR
Die maximal eingestellte Temperatur gibt die maximal
eingestellte Temperatur während des Grenzbetriebes
an.
13
MINIMALE EINGESTELLTE TEMPERATUR
Die minimale eingestellte Temperatur gibt die minimal
eingestellte Temperatur während des Grenzbetriebes
an.
14
BILDSYMBOL PROGRAMMUHR
Dieses Bildsymbol zeigt an, dass die Programmuhr
aktiviert ist.
15
BILDSYMBOLE MASSNAHME
Diese Bildsymbole zeigen die täglichen Maßnahmen
der Programmuhr an.
18
AUSder
EINGESTELLTE TEMPERATURANZEIGE
Dies zeigt die aktuell eingestellte Temperatur der
Anlage an (nicht angezeigt im GRENZ-Betrieb oder
im Modus VENTILATOR oder LUFTTROCKNUNG)
19
EINSTELLUNG
Wird nicht verwendet, dient nur zu Wartungszwecken.
20
BILDSYMBOL LUFTSTROMRICHTUNG
Dieses Bildsymbol zeigt die Luftstromrichtung an (nur
für Anlagen mit motorisierten Schwenkklappen).
21
NICHT VERFÜGBAR
wird angezeigt, immer dann wenn eine nicht
installierte Option angesprochen wird oder eine
Funktion nicht verfügbar ist.
22
BILDSYMBOL GEBLÄSESTÄRKE
Dieses Bildsymbol zeigt die eingestellte Gebläsestärke an.
23
BILDSYMBOL MODUS ENTFROSTUNG/
WARMSTART
Dieses Bildsymbol zeigt an, dass der Modus
Entfrostung/Warmstart aktiv ist.
Betriebsanleitung
3
CZ-02RT11P
Fernbedienung
4PW15515-1
24
BILDSYMBOL LUFTFILTER
REINIGUNGSZEITPUNKT
Dieses Bildsymbol zeigt an, dass der Luftfilter
gereinigt werden muss. Siehe Betriebsanleitung der
Inneneinheit.
BILDSYMBOL ELEMENT
REINIGUNGSZEITPUNKT
Dieses Bildsymbol zeigt an, dass das Element
gereinigt werden muss (
nur).
31
TASTE ZEITEINSTELLUNG
Diese Tasten werden verwendet um die Uhr
einzustellen oder, wenn Sie sich im Programmmodus
befinden, um die programmierte Aktionszeit
einzustellen. Beide Tasten verfügen über eine
automatische Wiederholfunktion.
25
26
TASTE VENTILATIONSMODUS
Die Taste Ventilationsmodus betätigt den
;
bezüglich weiterer Einzelheiten
beziehen Sie
sich auf das Handbuch.
32
TASTEN TEMPERATUREINSTELLUNG
Diese Tasten werden verwendet, um den aktuellen
Sollwert einzustellen oder, wenn Sie sich im
Programmmodus befinden, um die programmierte
Sollwert-Temperatur einzustellen (Stufe = 1°C). Beide
Tasten werden ebenfalls zur Einstellung des
Wochentages verwendet.
33
27
TASTE VENTILATIONSMENGE
Diese Taste stellt die Ventilationsmenge ein, bezüglich weiterer Informationen
beziehen Sie sich
auf das Handbuch.
TASTE /
WECHSEL DER
BETRIEBSART
Diese Taste ist eine Mehrzwecktaste. Diese kann
folgende Funktionen aufweisen, abhängig von den
vorherigen Tätigkeiten des Benutzers:
Wird nicht verwendet, dient nur zu Wartungszwecken.
1 Auswahl der Betriebsart der Anlage
(VENTILATOR, LUFTTROCKNUNG,
AUTOMATIK, KÜHLUNG, HEIZUNG)
29
2 Schaltung zwischen Minimum und Maximum
Temperatur währen des Grenzbetriebes
28
TASTE INSPEKTION/PROBELAUF
TASTE PROGRAMM
Diese Taste ist eine Mehrzwecktaste.
Die Programmtaste kann verschiedene Funktionen
haben, abhängig von den vorherigen Tätigkeiten des
Anwenders.
30
TASTE PROGRAMMUHR
Diese Taste aktiviert oder
Programmuhr.
CZ-02RT11P
Fernbedienung
4PW15515-1
34
35
deaktiviert
die
TASTE SOLLWERT/GRENZWERT
Diese Taste schaltet zwischen Sollwert, Grenzwertbetrieb oder
(nur Programmmodus).
TASTE VENTILATORGESCHWINDIGKEIT
Diese Taste schaltet zwischen L (niedrig), H (hoher),
HH (sehr hoher), (Automatik).
Betriebsanleitung
4
36
TASTE LUFTSTROMRICHTUNGEINSTELLUNG
Diese Taste aktiviert die Einstellung der Luftstromrichtung.
37
TASTE LUFTFILTER
REINIGUNGSZEITPUNKT
Diese Taste wird dazu verwendet das Bildsymbol
Luftfilter Reinigungszeitpunkt zurückzustellen.
3. Einrichten des Reglers
Nach der Erstmontage, kann der Benutzer die Uhr
und den Wochentag einstellen.
Der Regler ist mit einer Programmuhr ausgestattet,
die es dem Benutzer ermöglicht, die Anlage
automatisch zu betreiben; das Einstellen der Uhr und
des Wochentages ist erforderlich um die
Programmuhr verwenden zu können.
1
FUNKTION UHREINSTELLUNG
Halten Sie die
Taste etwa 5 Sekunden lang
gedrückt. Die Uhrablesung und der Anzeiger des
Wochentages werden blinken, beides kann jetzt
eingestellt werden.
Verwenden Sie die Tasten
&
um
die Uhr einzustellen. Mit jedem Druck auf die Taste
Zeiteinstellung wird die Zeit um 1 Minute erhöht/
reduziert. Das Halten der gedrückten Taste
oder
bewirkt eine Erhöhung/Reduzierung
der Zeit um 10 Minuten.
Verwenden Sie die Tasten
&
um
den Wochentag einzustellen. Jedes Mal wenn Sie die
Tasten
oder
drücken, wird der
nächste oder vorherige Tag angezeigt.
Drücken Sie die Taste
zur Bestätigung der
gegenwärtig eingestellten Zeit und dem Wochentag.
Betriebsanleitung
5
Wenn der Regler, mit blinkender Uhr und Ablesung
des Wochentages, 5 Minuten lang nicht berührt wird,
dann nehmen die Uhr und der Wochentag ihre
vorherigen Einstellungen wieder ein; die Funktion
Uhrzeiteinstellung ist dann nicht mehr aktiv.
2
EINRICHTEN DER PROGRAMMUHR
Um die Programmuhr einzurichten, beziehen Sie sich
auf Kapitel 6. "Programmieren der Programmuhr" auf
Seite 11.
4. Beschreibung der Betriebsarten
1
REINER VENTILATORBETRIEB
In diesem Modus zirkuliert die Luft nur ohne Heizung
oder Kühlung.
2
LUFTTROCKNUNG
In diesem Modus wird die Luftfeuchtigkeit mit einer
minimalen Temperaturabnahme gesenkt.
Temperatur und Gebläsestärke werden automatisch
geregelt. Eine Regelung mittels Fernbedienung ist
nicht möglich.
Die Lufttrocknung funktioniert nicht wenn die
Raumtemperatur zu niedrig ist.
3
AUTOMATIKBETRIEB
In diesem Modus schaltet der Regler automatisch
zwischen Heizung und Kühlung wie von Sollwert oder
Grenzwerttemperatur gefordert.
4
KÜHLBETRIEB
In diesem Modus wird die Kühlung aktiviert wie von
Sollwert oder Grenzwerttemperatur verlangt.
5
HEIZBETRIEB
In diesem Modus wird die Heizung aktiviert wie von
Sollwert oder Grenzwerttemperatur verlangt.
CZ-02RT11P
Fernbedienung
4PW15515-1
Warmstart (nur bei Ausführungen mit Wärmepumpen)
Beim Start des Heizbetriebes wird der Innenventilator
gestoppt bis eine bestimmte Innentemperatur des
Wärmetauschers erreicht und
angezeigt
wird. Dies verhindert, dass kalte Luft die Inneneinheit
verlässt.
Entfrostung (nur bei Ausführungen mit Wärmepumpen)
Während des Heizbetriebes kann ein Einfrieren des
äußeren Wärmetauschers auftreten. Wenn das
geschieht, wird die Heizkapazität des Systems
abgesenkt und das System geht in den Abtaubetrieb
über. Der Ventilator der Inneneinheit stoppt und
wird angezeigt. Nach einem Abtaubetrieb
von maximal 10 Minuten schaltet das System in den
Heizbetrieb zurück.
6
GRENZBETRIEB
&
Der Grenzbetrieb ist ein zusätzlicher Modus, der es
ermöglicht die Raumtemperatur innerhalb bestimmter
Grenzen konstant zu halten. Die Bildsymbole
&
werden angezeigt um die Aktivierung des
Grenzbetriebes zu bestätigen.
7
AUSSER HAUS
Außer Haus ist eine Funktion, die es ermöglicht die
Raumtemperatur über 10°C zu halten, wenn die
Personen sich außerhalb davon befinden. Diese
Funktion schaltet die Heizung ein, wenn die Anlage
ausgeschaltet ist.
CZ-02RT11P
Fernbedienung
4PW15515-1
5. Betrieb
Manueller Betrieb
Während dem manuellen Betrieb, entscheidet der
Benutzer über die Einstellungen der Anlage. Die
letzte Einstellung bleibt aktiv bis der Benutzer sie
ändert.
Da der Regler für eine Vielzahl von Anlagen und
Funktionen implementiert werden kann, kann es
passieren, dass Sie eine Funktion wählen, die an
Ihrer Anlage nicht verfügbar ist. Wenn das der Fall ist,
wird folgende Meldung
erscheinen.
Verwenden Sie die Taste
Betriebsart zu wählen.
um die gewünschte
Reiner Ventilatorbetrieb
Lufttrocknung
Automatikbetrieb
Kühlbetrieb
Heizbetrieb
Drücken Sie die Taste
um zwischen
Grenzbetrieb und den oben aufgeführten Betriebsmöglichkeiten zu schalten.
Während des Grenzbetriebes, verwenden Sie die
Taste
um Minimum und Maximum
Temperatureinstellungen auszuwählen. Verwenden
Sie die Tasten
oder
um die
Minimum und Maximum Temperatureinstellungen
einzustellen.
Betriebsanleitung
6
1
REINER VENTILATORBETRIEB
Benutzereinstellbare Parameter:
•
Gebläsestärke, verwenden Sie die
Taste,
•
Einstellung der Luftstromrichtung, verwenden
Sie die
Taste,
•
Ventilationsmodus, verwenden Sie die
Taste,
•
Ventilationsmenge, verwenden Sie die
Taste,
2
LUFTTROCKNUNG
Benutzereinstellbare Parameter:
•
Einstellung der Luftstromrichtung, verwenden
Sie die
Taste,
•
Ventilationsmodus, verwenden Sie die
Taste,
•
Ventilationsmenge, verwenden Sie die
Taste,
3
AUTOMATIKBETRIEB
Benutzereinstellbare Parameter:
•
Sollwert Temperatur, verwenden Sie die
&
Taste,
•
Gebläsestärke, verwenden Sie die
Taste,
•
Einstellung der Luftstromrichtung, verwenden
Sie die
Taste,
•
Ventilationsmodus, verwenden Sie die
Taste,
•
Ventilationsmenge, verwenden Sie die
Taste,
4
KÜHLBETRIEB
Benutzereinstellbare Parameter:
•
Sollwert Temperatur, verwenden Sie die
&
Tasten,
•
Gebläsestärke, verwenden Sie die
Taste,
•
Einstellung der Luftstromrichtung, verwenden
Sie die
Taste,
Betriebsanleitung
7
•
•
Ventilationsmodus, verwenden Sie die
Taste,
Ventilationsmenge, verwenden Sie die
Taste,
5
HEIZBETRIEB
Benutzereinstellbare Parameter:
•
Sollwert Temperatur, verwenden Sie die
&
Tasten,
•
Gebläsestärke, verwenden Sie die
Taste,
•
Einstellung der Luftstromrichtung, verwenden
Sie die
Taste,
•
Ventilationsmodus, verwenden Sie die
Taste,
•
Ventilationsmenge, verwenden Sie die
Taste,
6
GRENZBETRIEB
Benutzereinstellbare Parameter:
•
•
•
•
Gebläsestärke, verwenden Sie die
Taste,
Einstellung der Luftstromrichtung, verwenden
Sie die
Taste,
Ventilationsmodus, verwenden Sie die
Taste,
Ventilationsmenge, verwenden Sie die
Taste,
ZUSATZFUNKTIONEN DES REGLERS
1
AUSSER HAUS
Drücken Sie gleichzeitig die Tasten
und
um die Funktion AUSSER HAUS zu
aktivieren.
BEACHTEN SIE DASS DIE TASTE
AUSGESCHALTET SEIN MUSS, UM
SICHERZUSTELLEN DASS DIE FUNKTION
AUSSER HAUS AUSGELÖST WIRD.
CZ-02RT11P
Fernbedienung
4PW15515-1
2
Einstellen der Luftstromrichtung
Verwenden Sie die Taste
um die Luftstromrichtung einzustellen. Drücken Sie die Taste, um
zwischen festgelegter oder variabler Luftstromrichtung zu schalten. Verwenden Sie das Bildsymbol
um die festgelegte Luftstromrichtung zu
bestimmen, indem Sie die Taste
drücken wenn
das Bildsymbol
die gewünschte Richtung
anzeigt.
HINWEIS Auch wenn die festgelegte Luftstromrichtung ausgewählt ist, kann die variable
Luftstromrichtung automatisch aktiviert
werden, um den ordnungsgemäßen
Betrieb Ihrer Anlage zu bewahren.
3
PROGRAMMUHR
Sämtliche Funktionen sowie Bedienung und
Programmierung der Programmuhr werden nachfolgend beschrieben.
Bedienung der Programmuhr
Während des Betriebs der Programmuhr, wird die
Anlage ebenfalls durch die Programmuhr geregelt.
Die Maßnahmen, die in der Programmuhr einprogrammiert sind, werden automatisch ausgeführt.
Die Programmuhr führt immer den letzten Befehl aus;
das heißt der Benutzer kann vorübergehend die
zuletzt ausgeführte programmiert Maßnahme
zurückweisen. Siehe "Manueller Betrieb" auf Seite 6.
Die folgende programmierte Maßnahme (in der
Programmuhr) gibt die Kontrolle der Programmuhr
zurück.
Verwenden Sie die Taste
um die Programmuhr
zu aktivieren oder zu deaktivieren.
CZ-02RT11P
Fernbedienung
4PW15515-1
HINWEIS Die Programmuhr weist die
Taste
zurück, verwenden Sie deshalb nur die
Taste
um die Programmuhr zu
aktivieren oder zu deaktivieren. Die
Programmuhr ist aktiviert wenn das
Bildsymbol
sichtbar ist. Die Taste
weist die Programmuhr nur bis zur
folgenden programmierten Maßnahme
zurück.
Der programmierte Zeitplan wird zeitlich
geregelt. Versichern Sie sich, dass die Uhr
und der Wochentag korrekt eingestellt sind.
Siehe "FUNKTION UHREINSTELLUNG" auf
Seite 5.
Stellen Sie die Uhr manuell auf Sommerund Winterzeit ein. Siehe "FUNKTION
UHREINSTELLUNG" auf Seite 5.
Ein Stromausfall von mehr als einer Stunde
Dauer, setzt die Uhr und den Wochentag
zurück.
Siehe
"FUNKTION
UHREINSTELLUNG" auf Seite 5 um die Uhr
und den Wochentag einzustellen.
Die Tätigkeiten, die in der Programmuhr
einprogrammiert sind, sind nach einem
Stromausfall nicht verloren, eine erneute
Programmierung der Programmuhr ist somit
nicht erforderlich.
Um die PROGRAMMUHR einzurichten, beziehen Sie
sich
auf
Kapitel
6.
"Programmieren
der
Programmuhr" auf Seite 11.
Betriebsanleitung
8
Was kann die Programmuhr tun?
Was wird die Programmuhr tun?
Das Konzept der Programmuhr ist einfach,
unproblematisch und dennoch leistungsfähig.
Wenn sie aktiviert ist, wird die Programmuhr die
programmierten Maßnahmen ausführen.
Sie wird die Anlage dazu veranlassen:
Die Programmuhr kann 3 Maßnahmen anweisen:
1 die Anlage gemäß Zeitplan einschalten in
Verbindung mit einem Sollwert (genaue
Temperaturregelung)
2 die Anlage ausschalten (Ende der Regelung)
3 die Anlage gemäß Zeitplan einschalten, im
Grenzbetrieb
Die Programmuhr kann Maximum 5 Maßnahmen
pro Tag akzeptieren.
Maximum 5 Maßnahmen können für jeden Wochentag programmiert werden, insgesamt maximal
35 programmierte Maßnahmen. Die Maßnahme, die
zuerst für einen bestimmten Tag programmiert wurde,
ist Maßnahme 1, die zuletzt programmierte Maßnahme eines Tages könnte Maßnahme 1 bis 5 sein
(nur falls eine Maßnahme an diesem Tag
programmiert wurde).
Es ist äußerst wichtig zu verstehen, dass die
Nummer die der programmierten Maßnahme zugewiesen wird, NICHT BESTIMMT
WANN die programmierte Maßnahme
ausgeführt wird. Nur die ZEIT, die ein Teil der
eingegebenen Daten darstellt wenn die
Maßnahme
programmiert
wird,
wird
bestimmen, wann die programmierte
Maßnahme ausgeführt werden wird.
Betriebsanleitung
9
•
zu kühlen oder zu heizen, abhängig vom
aktuellen Betrieb, der Sollwert wird angezeigt,
falls anwendbar,
ODER
•
schalten Sie die Anlage aus (die Programmuhr
bleibt dabei aktiviert und aktiviert die Anlage
erneut wie programmiert), die Betriebslampe
wird ausgehen,
ODER
•
kühlen oder heizen, was auch immer erforderlich
ist, um die Raumtemperatur innerhalb des
angegebenen Bereichs konstant zu halten
(Grenzbetrieb);
und
wird angezeigt.
Die Programmuhr ändert die Betriebsart in
einen reinen GRENZ-Betrieb.
Sie können die programmierten Maßnahmen
durchblättern, damit Sie die programmierten Maßnahmen überprüfen können, siehe unten.
Was wird die Programmuhr NICHT tun?
Die Programmuhr wird nicht:
•
die Gebläsestärke regeln,
•
die Luftstromrichtung regeln,
•
den Ventilationsmodus regeln,
•
die Ventilationsmenge regeln,
•
die Betriebsart wechseln für einen zeitlich
festgelegten Sollwert.
Die oben aufgeführten Parameter können manuell
eingestellt werden, ohne die Programmuhr zu
unterbrechen.
Weitere hoch entwickelte Fernbedienungen sind
verfügbar. Fragen Sie Ihren Händler nach weiteren
Informationen.
CZ-02RT11P
Fernbedienung
4PW15515-1
Durchblättern der programmierten
Maßnahmen bei der Programmuhr
(reines Ablesen)
Siehe Abbildung 2.
Das Durchblättern der programmierten Maßnahmen
der Programmuhr ist ein sequentieller Prozess. Nur
2 Tasten sind notwendig, um das gesamte Programm
der Programmuhr durchzublättern.
Die Taste
wird verwendet, um das Durchblättern
zu starten, um die nächste programmierte Maßnahme anzuzeigen oder um das Durchblättern zu
verlassen, wenn die letzte programmierte Maßnahme
angezeigt wird.
Die
Taste wird verwendet, um das Durchblättern sofort zu verlassen (ohne durch alle
programmierten Maßnahmen rollieren zu müssen).
Drücken Sie die Taste
um den Durchblättermodus einzugeben, das Bildsymbol
erscheint,
es wird blinken.
HINWEIS Das Durchblättern beginnt immer am
Montag und endet am Sonntag.
Drücken Sie die Taste
erneut, um zum nächsten
Tag der Woche zu gelangen.
wird blinken, dies
zeigt an, dass die programmierten Maßnahmen für
Dienstag durchgeblättert wurden.
Der oben beschriebene Prozess wird erneut
gestartet.
Wenn mindestens 1 Maßnahme für Dienstag programmiert wird, wird erscheinen. Die Uhr gibt die
Zeit an wann die programmierte Maßnahme aktiviert
wird, entweder
,
oder
und
wird angezeigt werden.
Wenn
nicht erscheint, zeigt es an, dass keine
programmierten Maßnahmen für Dienstag vorliegen.
Drücken Sie die Taste
um die nächste
programmierte Maßnahme anzuzeigen. Wenn eine
zweite Maßnahme für Dienstag programmiert ist,
werden
noch blinken und
wird erscheinen.
Angenommen, 5 Maßnahmen werden für Dienstag
programmiert, dann ist ein 5-maliges Drücken
erforderlich um alle programmierten Maßnahmen
anzuzeigen.
Drücken Sie solange die Taste
bis der
Wochentag-Anzeiger den aktuellen Tag anzeigt (blinkt
nicht), Sie haben nun das Durchblättern verlassen.
HINWEIS
Überprüfen Sie das Bildsymbol
. Wenn
mindestens 1 Maßnahme für Montag programmiert
wird, wird erscheinen.
Die Uhr gibt die Zeit an wann die programmierte
Maßnahme festgelegt wird, entweder
,
oder
und
wird angezeigt werden.
HINWEIS Die Temperaturen, die oben aufgeführt
sind, dienen nur zur Erläuterung, die
Temperaturwerte an Ihrem Regler
können variieren.
Wenn
nicht erscheint, wird angezeigt, dass keine
programmierten Maßnahmen für Montag vorliegen.
CZ-02RT11P
Fernbedienung
4PW15515-1
Die Menge wie oft die Taste
gedrückt
werden muss, um das Durchblättern zu
verlassen, ist abhängig von der Anzahl
der programmierten Maßnahmen in der
Programmuhr.
Wie interpretiere ich die
programmierten Maßnahmen
Um möglichst das Verhalten Ihrer Anlage zu
verstehen, wenn die Programmuhr aktiviert wird, ist
es wichtig alle programmierten Maßnahmen für den
aktuellen Tag zu suchen und vielleicht die letzte
programmierte Maßnahme von gestern.
Betriebsanleitung
10
Wenn die erste programmierte Maßnahme für heute
noch nicht aktiv ist, dann hängt der aktuelle Status
Ihrer Anlage höchstwahrscheinlich, aber nicht
notwendigerweise, von der letzen programmierten
Maßnahme von gestern ab. Lesen Sie den wichtigen
Hinweis unten.
Wenn die erste programmierte Maßnahme für heute
bereits aktiv ist, dann hängt der aktuelle Status Ihrer
Anlage höchstwahrscheinlich, aber nicht notwendigerweise, von den Parametern ab, die in der ersten
programmierten Maßnahme für heute programmiert
werden. Lesen Sie den wichtigen Hinweis unten.
HINWEIS Um den Betrieb Ihrer Anlage einfach
aufrechtzuerhalten,
können
die
Einstellungen der Programmuhr einfach
zurückgewiesen werden durch Änderung
der aktuellen Einstellung ("letzter Befehl"
weist den vorherigen Befehl bis zum
nächsten festgelegten Befehl zurück.
Abschließend: Obwohl
angezeigt wird, könnte
jemand die Einstellungen geändert haben. Die
nächste programmierte Maßnahme wird die
geänderten Einstellungen zurückweisen und alle
Einstellungen zurückstellen wie programmiert.
Programmierte Maßnahmen könnten sich überschneiden; auf Grund der Logik "letzten Befehl
zurückweisen", der letzte festgelegte Befehl wird
angeordnet.
Wie interpretiere ich die Ablesung an
der Anzeige, wenn die Programmuhr
aktiv ist
Wie bereits oben beschrieben, könnten die
Einstellungen der Programmuhr (und als Konsequenz
die Ablesungen der Anzeige) vorübergehend sich
überschneiden durch manuelle Intervention.
Betriebsanleitung
11
Wenn Sie bezüglich der Programmuhreinstellungen
sich in diesem Moment absolut sicher sein wollen,
müssen Sie die programmierten Maßnahmen der
Programmuhr durchblättern. Siehe "Durchblättern der
programmierten Maßnahmen bei der Programmuhr"
auf Seite 10.
6. Programmieren der Programmuhr
Was muss ich programmieren?
Da die Programmuhr auf einem Wochenprogramm
basiert (gleiche Aktionen werden jede Woche
wiederholt), müssen Sie zuerst den Tag der Woche
auswählen.
Nun müssen Sie eine Maßnahme auswählen:
1 Schalten Sie die Anlage gemäß Zeitplan ein in
Verbindung mit einem Sollwert (genaue
Temperaturregelung)
2
Schalten Sie die Anlage aus (Ende der
Regelung)
3 Schalten Sie die Anlage gemäß Zeitplan ein, im
Grenzbetrieb
Schließlich müssen Sie die Uhrzeit des Tages
eingeben, wann die Maßnahme aktiviert werden
muss.
HINWEIS Wenn Sie zwei oder mehrere Maßnahmen
am gleichen Tag und zum gleichen
Zeitpunkt des Tages programmieren, wird
nur die Maßnahme mit der höchsten
Maßnahmennummer (2 – 5) ausgeführt
werden.
CZ-02RT11P
Fernbedienung
4PW15515-1
Starten
Das Programmieren der Programmuhr ist flexibel (Sie
können programmierte Maßnahmen wann immer
erforderlich hinzufügen, entfernen oder ändern) und
unproblematisch (Programmierstufen sind auf ein
Minimum begrenzt).
Unten finden Sie einige Tipps und Tricks, die die
erfolgreiche Programmierung Ihrer Programmuhr
sicherstellen:
•
•
•
•
•
•
Machen Sie sich mit den Bildsymbolen und
Tasten vertraut, Sie werden Sie während des
Programmierens benötigen.
Machen Sie sich vertraut mit der
Durchblätterfunktion, Sie werden Sie
benötigen, um das Programmieren zu starten.
Siehe "Durchblättern der programmierten
Maßnahmen bei der Programmuhr" auf
Seite 10.
Füllen Sie das Formblatt am Ende dieses
Handbuches aus, notieren Sie die Uhrzeit und
die erforderlichen Maßnahmen für jeden Tag
(denken Sie daran, dass die Anzahl der
Maßnahmen auf 5 pro Tag begrenzt ist).
Nehmen Sie sich die Zeit, um alle Daten
akkurat einzugeben.
Versuchen Sie die Maßnahmen für jeden Tag
in logischer Reihenfolge zu programmieren
(beginnen Sie mit Maßnahme 1 für die erste
Maßnahme und enden Sie mit der höchsten
Nummer für die letzte Maßnahme). Dies ist
nicht eine Vorschrift, aber es wird dadurch
erleichtert das Programm später zu
interpretieren.
Denken Sie daran, dass Sie die
programmierten Maßnahmen später immer
ändern, hinzufügen oder entfernen können.
CZ-02RT11P
Fernbedienung
4PW15515-1
Programmierung
1
DIE PROGRAMMUHR WIRD DAS ERSTE
MAL PROGRAMMIERT
HINWEIS Wenn Sie den Tag während der
Programmierung wechseln, müssen Sie
die "letzte Maßnahme" bestätigen. Jeder
Tag kann 5 programmierte Maßnahmen
haben (nummeriert 1 bis 5), aber aus
irgendwelchen Gründen möchten Sie
einen, mehrere oder alle programmierten
Maßnahmen löschen.
Um programmierte Maßnahmen löschen
zu können, müssen Sie die letzte
Maßnahme die Sie aufrechterhalten
wollen auswählen, dies kann 1 bis 5 sein
oder keine Maßnahme (
wird angezeigt und keine Maßnahme angezeigt).
Alle programmierten Maßnahmen mit
einer Nummer HÖHER als die gewählte,
oder alle programmierten Maßnahmen,
wenn keine letzte Maßnahme ausgewählt
wurde, werden gelöscht.
PROGRAMMIERUNG DES ERSTEN TAGES DER
WOCHE
HINWEIS In den Richtlinien unten wird angenommen, dass Sie die Programmierung
der
Programmuhr-Maßnahmen
am
Montag beginnen und die ProgrammuhrMaßnahmen am Sonntag beenden.
Wenn Sie es vorziehen NICHT am
Montag zu beginnen, blättern Sie zuerst
zum gewünschten Tag und geben Sie
dann den PROGRAMM Modus ein.
Betriebsanleitung
12
In diesem besonderen Fall, sind keine Maßnahmen
zuvor programmiert worden, alle Programmuhr
Maßnahmen sind frei.
•
Blättern Sie zu Montag, indem Sie die Taste
drücken. Das Bildsymbol
erscheint,
blinkt und einer der Bildsymbole
könnte angezeigt werden
aber alle anderen Felder bleiben leer, indem
sie anzeigen dass keine Maßnahmen für
Montag programmiert werden.
•
Geben Sie den Programmmodus ein, indem
Sie die Taste
5 Sekunden lang
herunterdrücken, das Bildsymbol
wird jetzt
ebenfalls blinken.
•
Drücken Sie die Taste
um die erste
programmierte Maßnahme zu aktivieren.
•
•
•
•
•
Ein Blinken wird angezeigt und gibt an,
dass die erste programmierte Maßnahme
für Montag programmiert worden ist. Die
eingestellte Temperatur und die Uhranzeige
blinken.
Drücken Sie die Taste
um entweder
die eingestellte Temperatur
oder den
Grenzbetrieb, auszuwählen.
Geben Sie die gewünschte Temperatur mittels
der Tasten
&
ein.
Drücken Sie die Taste
um zwischen der
minimal eingestellten Temperatur und der
maximal eingestellten Temperatur im
Grenzbetrieb zu schalten, die ausgewählte
Temperatur wird blinken.
Geben Sie die Uhrzeit ein wann die
Maßnahme starten muss mit Hilfe der Tasten
&
(min. Stufe = 10 Minuten).
Betriebsanleitung
13
HINWEIS Wenn Sie versehentlich die Taste
gedrückt haben, aktivierten Sie die
nächste Maßnahme;
wird angezeigt
( konstant und blinkend). Drücken Sie
die Taste
wiederholt bis ein Blinken
angezeigt wird. Sie können nun
fortfahren die Einstellungen für die erste
Programmuhr-Maßnahme einzustellen.
Wenn die Maßnahme und die entsprechende Uhrzeit
korrekt sind, können Sie die zweite ProgrammuhrMaßnahme vornehmen. Dies erfolgt durch Drücken
der Taste
, die Daten werden gespeichert und die
nächste Programmuhr-Maßnahme kann programmiert
werden.
Das Programmieren der verbleibenden ProgrammuhrMaßnahmen für den gleichen Tag ist ähnlich.
Sie können die Programmuhr-Maßnahmen durchblättern, indem Sie die Taste
drücken.
HINWEIS Keine Sorge, wenn Sie zusätzliche
Programmuhr-Maßnahmen hinzufügen
durch wiederholtes Drücken der Taste
, diese können gelöscht werden,
wenn Sie den aktuellen Tag abschließen.
Wenn alle Daten für die Programmuhr-Maßnahmen
für Montag eingegeben sind, müssen Sie die
programmierten Maßnahmen bestätigen.
Stellen Sie sicher, dass die letzte ProgrammuhrMaßnahme die Sie aufrechterhalten wollen, ausgewählt ist (Programmuhr-Maßnahmen mit einer
höheren Nummer werden gelöscht).
CZ-02RT11P
Fernbedienung
4PW15515-1
Nun müssen Sie zwischen 2 Optionen auswählen:
1 BESTÄTIGEN SIE UND KOPIEREN SIE ZUM
NÄCHSTEN TAG
Die Programmuhr-Maßnahme, die für den
aktuellen Tag programmiert ist, gilt ebenfalls für
den nächsten Tag. Verwenden Sie die Funktion
"Bestätigen Sie die letzte Maßnahme und
kopieren Sie die Maßnahmen zum nächsten
Tag", indem Sie gleichzeitig die Tasten
und
5 Sekunden lang drücken.
2 BESTÄTIGEN SIE NUR
Die Programmuhr-Maßnahme, die für den
aktuellen Tag programmiert ist, gilt ebenfalls für
den ausgewählten Tag. Verwenden Sie die
Funktion "Bestätigen Sie die letzte Maßnahme
und gehen Sie zum nächsten Tag", indem Sie
gleichzeitig die Taste
5 Sekunden lang
drücken.
Der Programmmodus wird verlassen und von der
Auswahl abhängig gemacht, die programmierten
Maßnahmen werden für Montag gespeichert (und
evt. Dienstag).
2
ICH MÖCHTE PROGRAMMIERTE
MASSNAHMEN EDITIEREN
Das Editieren der programmierten Maßnahmen ist
leicht.
Stellen Sie sicher, dass Sie sich nicht im Programmmodus befinden (
blinkt nicht); drücken Sie, falls
erforderlich die Taste
um den Programmmodus
zu verlassen.
Blättern Sie zu den programmierten Maßnahmen mit
Hilfe der Taste
, wählen Sie den Tag und die
Maßnahme aus, die Sie editieren möchten.
Drücken Sie die Taste
5 Sekunden lang; der
Programmmodus wird aktiviert, das Bildsymbol
und die gewählten Maßnahmen blinken.
Editieren Sie die Einstellungen mit Hilfe der Tasten
wie oben beschrieben.
Wählen Sie die "letzte Maßnahme" mit Hilfe der Taste
und
entscheiden
Sie
ob
Sie
die
programmierte(n) Maßnahme(en) zum nächsten Tag
kopieren wollen oder nicht (drücken Sie die Tasten
und
gleichzeitig oder nur die Taste
5 Sekunden lang).
3
PROGRAMMIERUNG DER ANDEREN TAGE DER
WOCHE
Das Programmieren der anderen Wochentage ist
identisch mit der Programmierung des ersten Tages
der Woche.
blinkt um den gewählten Tag anzuzeigen
und ist konstant wenn Maßnahmen von
Montag nach Dienstag kopiert werden, wird nur
angezeigt, wenn keine Maßnahmen von Montag nach
Dienstag kopiert wurden.
CZ-02RT11P
Fernbedienung
4PW15515-1
ICH MÖCHTE EINEN ODER MEHRERE
PROGRAMMIERTE MASSNAHMEN
LÖSCHEN
Stellen Sie sicher, dass Sie sich nicht im Programmmodus befinden (
blinkt nicht); drücken Sie, falls
erforderlich die Taste
um den Programmmodus
zu verlassen.
Blättern Sie zu den programmierten Maßnahmen mit
Hilfe der Taste
wählen Sie den Tag und die
Maßnahme aus, die Sie editieren möchten.
Drücken Sie die Taste
5 Sekunden lang; der
Programmmodus wird aktiviert, das Bildsymbol
und die gewählten Maßnahmen blinken.
Betriebsanleitung
14
Wählen Sie die "letzte Maßnahme" aus, die Sie aufrechterhalten wollen mit Hilfe der Taste
. Alle
höheren Maßnahmen werden gelöscht.
Bestätigen Sie das Löschen indem Sie die Taste
5 Sekunden lang drücken.
ODER
Bestätigen Sie das Löschen für den aktuellen und
nächsten Tag ebenfalls durch gleichzeitiges Drücken
der Tasten
und
5 Sekunden lang.
8. Fehlerbeseitigung
Die Richtlinien unten könnten hilfreich sein bei der
Lösung Ihres Problems. Wenn Sie das Problem nicht
beseitigen können, fragen Sie Ihren Monteur.
Keine Ablesung an der Fernbedienung (Anzeige
leer)
Überprüfen Sie ob Ihre Anlage noch am Netz
angeschlossen ist.
Nur
HINWEIS Im obigen Fall, war die letzte Maßnahme
beispielsweise 3, die programmierten
Maßnahmen 4 und 5 werden ebenfalls
gelöscht (wenn Sie vorhanden waren).
4
ICH MÖCHTE ALLE PROGRAMMIERTEN
MASSNAHMEN SOFORT LÖSCHEN
Verlassen
Sie
das
Programmieren
oder
Durchblättern.
Drücken Sie die Tasten
und
gleichzeitig
5 Sekunden lang; das Bildsymbol
wird invertiert
und verschwindet um das Löschen zu bestätigen.
7. Wartung
Eine Wartung der Fernbedienung ist nicht
erforderlich.
Entfernen Sie den Schmutz mit einem weichen,
feuchten Tuch.
HINWEIS Verwenden Sie nur klares Leitungswasser um das Tuch anzufeuchten.
Betriebsanleitung
15
wird angezeigt
Dies zeigt an, dass die Anlage unter Strom steht, bitte
warten Sie bis
verschwindet.
Die Programmuhr arbeitet nicht, aber die
programmierten Aktionen wurden zur falschen
Zeit ausgeführt (z.B. 1 Stunde zu spät oder zu
früh).
Prüfen Sie ob die Uhr und der Wochentag korrekt eingestellt sind, korrigieren Sie falls erforderlich (siehe
"FUNKTION UHREINSTELLUNG" auf Seite 5).
Ich kann die Programmuhr nicht aktivieren (das
Bildsymbol
blinkt für 2 Sekunden und
verschwindet)
Die Programmuhr wurde noch nicht programmiert.
Programmieren Sie zuerst die Programmuhr (Siehe
"Programmieren der Programmuhr" auf Seite 11).
Ich kann die Programmuhr nicht aktivieren (das
Bildsymbol
wird angezeigt)
Die Programmuhr kann nicht aktiviert werden, wenn
ein zentraler Regler angeschlossen ist.
Grenzbetrieb kann nicht ausgewählt werden.
Grenzbetrieb ist nicht verfügbar zur reinen Kühlung
von Anlagen.
CZ-02RT11P
Fernbedienung
4PW15515-1
CZ-02RT11P
Dispositif de
commande à distance
MERCI D'AVOIR ACHETE CE DISPOSITIF
DE REGULATION. LIRE ATTENTIVEMENT
LE MANUEL AVANT D'UTILISER L'INSTALLATION. APRES AVOIR LU LE MANUEL,
LE CONSERVER DANS UN ENDROIT SUR
POUR UNE UTILISATION FUTURE.
Avant la première mise en service, contacter
votre concessionnaire pour obtenir tous les
détails concernant votre unité de traitement
de l'air.
AVERTISSEMENT
- Ne jamais laisser le dispositif de régulation à
distance être humide, car cela pourrait provoquer
un choc électrique ou un incendie.
- Ne jamais appuyer sur le bouton du dispositif de
régulation à distance avec un objet dur et pointu.
Le dispositif de régulation à distance pourrait être
endommagé.
- Ne jamais inspecter ou entretenir le dispositif de
régulation à distance vous-même, demander à une
personne qualifiée de le faire.
Table des matières
page
1. Caractéristiques et fonctions ................................. 1
2. Nom et fonction des interrupteurs et icônes.......... 2
3. Régler le dispositif de régulation ........................... 5
4. Description des modes de fonctionnement ........... 5
5. Fonctionnement..................................................... 6
6. Définition de la programmation des temporisations. 11
CZ-02RT11P
Dispositif de commande à distance
4PW15515-1
Manuel d'utilisation
1. Caractéristiques et fonctions
Le CZ-02RT11P est un dispositif de régulation à
distance à la pointe du progrès qui vous offre un
contrôle complet de votre installation.
1
DISPOSITIF DE REGULATION A DISTANCE
DE BASE
Les fonctions de base du dispositif de régulation à
distance sont:
•
Marche/Arrêt
•
commutation mode de fonctionnement,
•
réglage température,
•
réglage volume d'air
•
réglage de la direction d'écoulement de l'air.
2
FONCTION HORLOGE
Les fonctions horloge sont:
•
horloge en temps réel de 24 heures
•
indicateur du jour de la semaine
3
FONCTION PROGRAMMATION DES
TEMPORISATIONS
Les fonctions programmation des temporisations sont:
•
un maximum de 5 actions peuvent être
programmées pour chaque jour de la semaine
(au total 35 actions),
•
la fonction programmation des temporisations
peut être activée/désactivée à tout moment,
•
chaque action désigne soit un fonctionnement
MARCHE liée à une température déterminée
ou un fonctionnement LIMITE ou un
fonctionnement ARRET,
•
"dernière commande" annule la commande
précédente jusqu'à la commande programmée
suivante.
Manuel d'utilisation
1
4
FONCTIONNEMENT LIMITE
Le fonctionnement Limite fournit un contrôle
thermostatique dans l'éventail de la température
minimale et maximale déterminée. Le réglage
température minimale déclenchera le chauffage, le
réglage température maximale déclenchera le
refroidissement.
5
QUITTER LE DOMICILE
La fonction Quitter le domicile empêche que la
température ambiante ne tombe quand les occupants
sont sortis pour une longue période. Si la
température ambiante tombe en dessous de 10°C, le
chauffage démarre automatiquement Dès que l'on
atteint 15°C, le dispositif de régulation retourne à son
statut d'origine.
6
BOUTON NIVEAU D'AUTORISATION
Trois niveaux d'autorisation hiérarchiques peuvent
être réglés pour limiter l'action de l'utilisateur.
2. Nom et fonction des interrupteurs
et icônes (Voir la figure 1)
1
BOUTON MARCHE/ARRÊT
Appuyer sur le bouton MARCHE/ARRET pour
démarrer ou arrêter le système.
2
TEMOIN DE FONCTIONNEMENT
La lampe témoin de fonctionnement s'allume pendant
le fonctionnement et clignote si un dysfonctionnement
se produit.
3
4
ICONE MODE VENTILATION
Ces icônes indiquent le mode ventilation en cours
(uniquement
) (AUTOMATIQUE, ECHANGE DE
CHALEUR, BY-PASS);
5
ICONE VENTILATION
L'icône de ventilation apparaît quand la ventilation est
réglée avec le bouton quantité de ventilation
(uniquement
). La quantité d'air ventilé est
indiqué simultanément par l'icône de vitesse du
ventilateur (voir 22).
6
ICONE NETTOYAGE DE L'AIR
Cette icône indique que l'unité de nettoyage de l'air
(option) est opérationnelle.
7
ICONE QUITTER DOMICILE
L'icône Quitter Domicile montre l'état de la fonction
Quitter domicile.
MARCHE
Quitter Domicile est activé
CLIGNOTEMENT
Quitter Domicile est activé
ARRÊT
Quitter Domicile est désactivé
8
ICONE CONTROLE EXTERIEUR
Cette icône indique qu'un autre dispositif de
régulation à priorité plus élevée est en train de
contrôler ou de désactiver votre installation.
ICONE MODE FONCTIONNEMENT
Ces icônes indique le mode de fonctionnement en cours
(VENTILATION, DESHUMIDIFICATION, AUTOMATIQUE,
REFROIDISSEMENT, CHAUFFAGE).
Manuel d'utilisation
2
CZ-02RT11P
Dispositif de commande à distance
4PW15515-1
9
ICONE DE COMMUTATION SOUS
CONTROLE CENTRALISE
Cette icône indique que la commutation de
l'installation est sous contrôle centralisé attribué à
une autre unité intérieure ou à un sélecteur refroidir/
chauffer connecté à l'unité extérieure (= dispositif
principal de régulation à distance).
10
INDICATEUR JOUR DE LA SEMAINE
L'indicateur du jour de la semaine montre le jour de la
semaine (ou le jour réglé quand on lit ou programme
les temporisations).
11
AFFICHAGE HORLOGE
L'affichage horloge indique l'heure du moment (ou
l'heure de l'action quand on lit ou programme le
temporisateur).
12
TEMPERATURE REGLEE MAXIMALE
La température réglée maximale indique la température maximale en mode fonctionnement limite.
13
TEMPERATURE REGLEE MINIMALE
La température réglée minimale indique la
température minimale en mode fonctionnement
limite.
14
ICONE PROGRAMMATION DE
TEMPORISATION
Cette icône indique que le programme
temporisation est activé.
de
17
INSPECTION NECESSAIRE
et
Ces icônes indiquent qu'une inspection
nécessaire. Consulter votre installateur.
est
18
AFFICHAGE REGLAGE TEMPERATURE
Cet affichage indique la température réglée en cours
de l'installation (pas affichée en fonctionnement
LIMITE ou mode VENTILATION ou SECHAGE)
19
REGLAGE
Non utilisé, uniquement pour entretien.
20
ICONE DE DIRECTION DU DEBIT D'AIR
Cette icône indique la direction de l'écoulement d'air
(uniquement pour les installations avec volets
d'écoulement à moteur).
21
NON DISPONIBLE
s'affiche chaque fois que l'on fait appel à une
fonction non-installée ou qu'une fonction n'est pas
disponible.
22
ICONE VITESSE DE VENTILATION
Cette icône indique la vitesse réglée de ventilation.
23
ICONE MODE DEGIVRAGE/DEMARRAGE A
CHAUD
Cette icône indique que le mode dégivrage/
démarrage à chaud est actif.
15
ICONES ACTION
Ces icônes indiquent les actions pour chaque jour du
programme de temporisation.
16
ICONE ARRET
Cette icône indique que l'action ARRET est sélectionnée lors de la programmation des temporisations.
CZ-02RT11P
Dispositif de commande à distance
4PW15515-1
Manuel d'utilisation
3
24
ICONE NETTOYAGE FILTRE A AIR
Cette icône indique que le filtre à air doit être nettoyé.
Se reporter au manuel d'utilisation de l'unité
intérieure.
25
ICONE NETTOYAGE ELEMENT
Cette icône indique que l'élément doit être nettoyé
(uniquement
).
26
BOUTON MODE VENTILATION
Le bouton mode ventilation fait fonctionner le
;
voir
le manuel d'utilisation pour plus de détails.
32
BOUTONS DE REGLAGE TEMPERATURE
Ces boutons sont utilisés pour régler le point de
consigne en cours, et en mode programmation pour
régler la température de consigne programmée
(étape = 1°C). Les deux boutons sont également
utilisés pour régler le jour de la semaine.
33
BOUTON DE CHANGEMENT/
FONCTIONNEMENT
DE
Ce bouton à une utilité multiple. Suivant les
manipulations précédentes de l'utilisateur, il peut
avoir les fonctions suivantes:
Ce bouton détermine la quantité d'air ventilé; voir
le manuel d'utilisation pour plus de détails.
1 sélectionner le mode de fonctionnement de
l'installation (VENTILATION,
DESHUMIDIFICATION, AUTOMATIQUE,
REFROIDISSEMENT, CHAUFFAGE)
28
2 basculer entre la température minimale et la
température maximale en fonctionnement limite
27
BOUTON QUANTITE D'AIR VENTILE
BOUTON CONTROLE/TEST DE
FONCTIONNEMENT
Non utilisé, uniquement pour entretien.
34
29
Ce bouton bascule entre valeur de consigne,
fonctionnement limite ou
(uniquement en
mode programmation).
BOUTON DE PROGRAMMATION
Ce bouton à une utilité multiple.
Suivant les manipulations précédentes de l'utilisateur,
le bouton programmation peut avoir des fonctions
variées.
30
BOUTON PROGRAMMATION DE
TEMPORISATION
Ce bouton active ou désactive la programmation des
temporisations.
31
BOUTON REGLAGE HEURE
Ces boutons sont utilisés pour régler l'horloge, ou en
mode programmation, pour régler le moment d'action
programmé. Les deux boutons ont une fonction
d'autorépétition.
Manuel d'utilisation
4
35
BOUTON VALEUR DE CONSIGNE/LIMITE
BOUTON VITESSE DE VENTILATION
Ce bouton bascule en L (Faible), H (Haut), HH (Très
Haut)
(Automatique).
36
BOUTON DE RÉGLAGE DE LA DIRECTION
DE L'ÉCOULEMENT D'AIR
Ce bouton permet de régler la direction de
l'écoulement d'air.
37
BOUTON DE REINITIALISATION DE L'ICONE
NETTOYAGE FILTRE A AIR
Ce bouton est utilisé pour réinitialiser l'icône de
nettoyage du filtre à air.
CZ-02RT11P
Dispositif de commande à distance
4PW15515-1
3. Régler le dispositif de régulation
Après l'installation initiale, l'utilisateur peut régler
l'horloge et le jour de la semaine.
Le dispositif de régulation est équipé d'un programme
de temporisation qui permet à l'utilisateur de faire
fonctionner l'installation automatiquement; il est
nécessaire de régler l'horloge et le jour de la semaine
pour pouvoir utiliser le programme de temporisation.
1
FONCTION REGLAGE HORLOGE
Poussez sur le bouton
pendant 5 secondes.
L'affichage horloge et l'indicateur du jour de la
semaine vont clignoter, les deux peuvent maintenant
être réglés.
Utiliser les boutons
&
pour régler
l'horloge. Chaque pression sur le bouton de réglage
de l'heure fait diminuer l'heure d'une minute. En
gardant le bouton
ou
enfoncé, on
diminue de 10 minutes.
Utiliser les boutons
&
pour régler le
jour de la semaine. Chaque pression sur les boutons
ou
affichera le jour suivant ou
précédent.
Appuyer sur le bouton
pour confirmer le réglage
de l'heure et du jour en cours.
Si le dispositif de régulation, avec horloge et
indicateur du jour de la semaine clignotant, est laissé
tel quel pendant 5 minutes, l'horloge et le jour de la
semaine retourneront à leur réglage précédent; la
fonction de réglage d'horloge n'est plus active.
2
REGLER LE PROGRAMME DE
TEMPORISATION
Pour régler le programme de temporisation, voir le
chapitre 6. "Définition de la programmation des
temporisations" à la page 11.
CZ-02RT11P
Dispositif de commande à distance
4PW15515-1
4. Description des modes de
fonctionnement
1
FONCTIONNEMENT VENTILATION
UNIQUEMENT
Dans ce mode, l'air seul circule sans chauffage ou
refroidissement.
2
FONCTIONNEMENT DE
DESHUMIDIFICATION
Dans ce mode, l'humidité de l'air sera diminuée avec
une chute minimale de la température.
La température et la vitesse du ventilateur sont
contrôlées automatiquement et ne peuvent être
contrôlée par le dispositif de régulation à distance.
L'opération de déshumidification ne fonctionnera pas
si la température ambiante est trop basse.
3
FONCTIONNEMENT AUTOMATIQUE
Dans ce mode, le dispositif de régulation passera
automatiquement de chauffage à refroidissement
comme demandé par la température limite de la
valeur de consigne.
4
FONCTIONNEMENT DE REFROIDISSEMENT
Dans ce mode, le refroidissement sera activé comme
demandé par la température limite ou la valeur de
consigne.
5
FONCTIONNEMENT DE CHAUFFAGE
Dans ce mode, le chauffage sera activé comme
demandé par la température limite ou la valeur de
consigne.
Manuel d'utilisation
5
Démarrage à chaud (type à thermopompe
uniquement)
Au commencement d'une opération de chauffage, le
ventilateur intérieur est arrêté jusqu'à ce qu'une
certaine température d'échange de chaleur
soit affichée. Cela empêche l'air froid de
quitter l'unité intérieure.
Dégivrage (type à thermopompe uniquement)
Dans l'opération de chauffage, le gel de l' échangeur
de chaleur extérieur peut se produire. Si c'est le cas,
la capacité de chauffage du système diminue et le
chauffage commence son opération de dégivrage. Le
ventilateur de l'unité intérieure s'arrête
est
affiché. Après au plus 10 minutes en mode
dégivrage, le système revient en mode chauffage.
5. Fonctionnement
Fonctionnement manuel
En fonctionnement manuel, l'utilisateur décide des
réglages de l'installation. Le dernier réglage reste
actif jusqu'à ce que l'utilisateur le modifie.
Comme le dispositif de régulation peut être mis en
œuvre pour une large variété d'installations et de
caractéristiques, il peut arriver que vous sélectionniez
une fonction qui n'est pas disponible sur votre
installation, si c'est le cas, le message
apparaîtra
Utiliser le bouton
pour sélectionner le mode de
fonctionnement souhaité.
Mode ventilateur uniquement
Fonctionnement de déshumidification
Fonctionnement automatique
6
FONCTIONNEMENT LIMITE
&
Le fonctionnement limite est un mode supplémentaire
qui permet de conserver la température ambiante
dans certaines limites. Les
&
icônes sont affichées pour confirmer l'activation du fonctionnement
limite.
7
QUITTER LE DOMICILE
QUITTER LE DOMICILE est une caractéristique qui
permet de conserver la température ambiante audessus de 10°C quand les occupants sont sortis.
Cette fonction se commutera sur chauffage si
l'installation est coupée.
Manuel d'utilisation
6
Mode refroidissement
Mode chauffage
Pousser sur le bouton
pour basculer entre le
fonctionnement limite et les opérations énumérées cidessus.
En fonctionnement limite, utiliser le bouton
pour sélectionner les réglages de température
minimale et maximale. Utiliser les boutons
ou
pour ajuster les réglages température
minimale et maximale.
CZ-02RT11P
Dispositif de commande à distance
4PW15515-1
1
FONCTIONNEMENT VENTILATION
UNIQUEMENT
Paramètres utilisateur réglables:
•
Vitesse de ventilation, utiliser le bouton
,
•
Direction de l'écoulement d'air, régler le bouton
,
•
Mode ventilation, utiliser le bouton
,
•
Quantité ventilation, utiliser le bouton
,
2
FONCTIONNEMENT DE DESHUMIDIFICATION
Paramètres utilisateur réglables:
•
Direction de l'écoulement d'air, régler le bouton
,
•
Mode ventilation, utiliser le bouton
,
•
Quantité ventilation, utiliser le bouton
,
3
FONCTIONNEMENT AUTOMATIQUE
Paramètres utilisateur réglables:
•
Température de la valeur de consigne, utiliser
les boutons
&
,
•
•
Vitesse de ventilation, utiliser le bouton
,
Direction de l'écoulement d'air, régler le bouton
,
•
Mode ventilation, utiliser le bouton
,
•
Quantité ventilation, utiliser le bouton
,
4
REFROIDISSEMENT
Paramètres utilisateur réglables:
•
Température de la valeur de consigne, utiliser
les boutons
&
,
•
•
Vitesse de ventilation, utiliser le bouton
,
Direction de l'écoulement d'air, régler le bouton
,
•
Mode ventilation, utiliser le bouton
,
•
Quantité ventilation, utiliser le bouton
,
CZ-02RT11P
Dispositif de commande à distance
4PW15515-1
5
CHAUFFAGE
Paramètres utilisateur réglables:
•
Température de la valeur de consigne, utiliser
les boutons
&
,
•
•
Vitesse de ventilation, utiliser le bouton
,
Direction de l'écoulement d'air, régler le bouton
,
•
Mode ventilation, utiliser le bouton
,
•
Quantité ventilation, utiliser le bouton
,
6
FONCTIONNEMENT LIMITE
Paramètres utilisateur réglables:
•
•
Vitesse de ventilation, utiliser le bouton
,
Direction de l'écoulement d'air, régler le bouton
,
•
Mode ventilation, utiliser le bouton
,
•
Quantité ventilation, utiliser le bouton
,
CARACTERISTIQUES SUPPLEMENTAIRES
DISPOSITIF DE REGULATION
DU
1
QUITTER LE DOMICILE
Pousser sur les boutons
et
en
même temps pour activer la fonction QUITTER
DOMICILE.
RAPPELEZ-VOUS QUE LE BOUTON
DOIT
ËTRE
SUR
ARRET
POUR
GARANTIR LE DECLENCHEMENT DE LA
FONCTION QUITTER DOMICILE.
2
Réglage de la direction d'écoulement de l'air
Utiliser ce bouton
pour régler la direction de
l'écoulement d'air. Pousser sur le bouton pour passer
de direction d'écoulement d'air variable ou fixe.
Utiliser l'icône
pour déterminer la direction
d'écoulement d'air fixe en poussant sur le bouton
quand
l'icône indique la direction
souhaitée.
Manuel d'utilisation
7
REMARQUE
Même si la direction fixe d'écoulement de
l'air est sélectionnée, la direction variable
d'écoulement de l'air peut être activée
automatiquement pour préserver un
fonctionnement
correct
de
votre
installation.
3
PROGRAMME DE TEMPORISATION
Toutes les caractéristiques, programmation et
fonctionnement du temporisateur sont décrites cidessous.
Fonctionnement du programmateur
de temporisation
En mode temporisation, l'installation est également
contrôlée par le programmateur de temporisation.
Les actions programmées dans le programmateur de
temporisation seront automatiquement effectuées.
Le programmateur de temporisation effectue la
dernière commande, cela signifie que l'utilisateur
peut temporairement ignorer la dernière action
programmée effectuée. Se référer à "Fonctionnement
manuel" à la page 6. L'action suivante programmée
(dans le programmateur de temporisation) renverra le
contrôle au programmateur de temporisation.
Utiliser le bouton
pour activer ou désactiver le
programmateur de temporisation.
REMARQUE
Le programmateur de temporisation
ignore le bouton
, utiliser uniquement le bouton
pour activer ou
désactiver le programmateur de temporisation. Le programmateur de temporisation est activé quand l'icône
est
visible. Le bouton
ignore uniquement le programmateur de temporisation
jusqu'à l'action programmée suivante.
Manuel d'utilisation
8
La temporisation programmée dépend du
temps. L'horloge et la date du jour doivent de
ce fait être réglées correctement. Se référer
à "FONCTION REGLAGE HORLOGE" à la
page 5.
Régler manuellement l'horloge pour l'heure
d'été et l'heure d'hiver. Se référer à
"FONCTION REGLAGE HORLOGE" à la
page 5.
Une panne de courant de plus d'une heure
réinitialisera l'horloge et le jour de la
semaine. Voir "FONCTION REGLAGE
HORLOGE" à la page 5 pour régler l'horloge
et le jour de la semaine.
Les actions programmées dans le
programmateur de temporisation ne seront
pas perdues après une coupure de courant;
reprogrammer
le
programme
de
temporisation n'est pas nécessaire.
Pour régler le programme de temporisation, voir le
chapitre 6. "Définition de la programmation des
temporisations" à la page 11.
Que peut faire le programme de
temporisation?
Le concept du programme de temporisation est
simple, direct mais puissant.
Le programme de temporisation peut ordonner
3 actions:
1 mettre en fonction l'installation à un moment
programmé, combiné à une valeur de consigne
(contrôle exact de la température)
2 fermer l'installation (fin de contrôle)
3 mettre en marche l'installation à un moment
programmé, en fonctionnement limite
CZ-02RT11P
Dispositif de commande à distance
4PW15515-1
Le programme de temporisation peut accepter un
maximum de 5 actions par jour.
Pour chaque jour de la semaine, un maximum de
5 actions peut être programmé, totalisant un
maximum de 35 actions programmées. L'action qui a
été programmée la première pour un certain jour est
l'action 1, la dernière action programmée pour la
journée pourrait être l'action 1 (si uniquement une
action est programmée pour ce jour) à 5.
Il est de la plus grande importance de
comprendre que le numéro attribué à l'action
programmée, NE DETERMINE PAS QUAND
l'action
programmée
sera
exécutée.
Uniquement le MOMENT, en tant qu'élément
de
données
introduit
lors
de
la
programmation de l'action, déterminera
quand l'action programmée sera exécutée.
Que fera le programme de
temporisation?
Si active, le programme de temporisation exécutera
les actions programmées.
Il ordonnera à l'installation de:
•
OU
•
OU
•
refroidir ou chauffer, suivant le fonctionnement
en cours, si d'application, la valeur de
consigne sera affichée.
couper l'installation (le programmateur de
temporisation restera activé et réactivera
l'installation comme programmé); la lampe
témoin de fonctionnement s'éteindra.
refroidir ou chauffer, peu importe pour
conserver la température ambiante dans une
portée spécifiée (fonctionnement limite)
et
sont affichés.
CZ-02RT11P
Dispositif de commande à distance
4PW15515-1
Le
programmateur
de
temporisation
changera le mode fonctionnement en mode
fonctionnement LIMITE uniquement.
Pour pouvoir vérifier les actions programmées, vous
pouvez passer en revue les actions programmées,
voir ci-dessous.
Qu'est-ce que le programme de
temporisation ne fera PAS?
Le programme de temporisation ne s'occupera pas
de:
•
contrôler la vitesse du ventilateur,
•
contrôler la direction de l'écoulement d'air,
•
contrôler le mode ventilation,
•
contrôler la quantité de ventilation,
•
modifier le mode de fonctionnement pour une
valeur de consigne convenue.
Les paramètres énumérés plus haut peuvent être
réglés manuellement, sans interférer avec le
programmateur de temporisation.
Les dispositifs de régulation à distance les plus
sophistiqués sont disponibles. Consulter votre
concessionnaire pour plus d'information.
Passer en revue les actions
programmées dans le programmateur
de temporisation (affichage uniquement)
Se référer à figure 2.
Passer les actions programmées du programmateur
de temporisation est une procédure séquentielle.
Uniquement deux boutons sont utilisés pour balayer
tout le programme de temporisation.
Le bouton
est utilisé pour commencer le
balayage, pour afficher l'action programmée suivante
ou pour sortir du balayage quand la dernière action
programmée a été affichée.
Manuel d'utilisation
9
Le bouton
est utiliser pour sortir de la
consultation d'un coup (dans devoir faire défiler
toutes els actions programmées.
Pousser sur le bouton
pour introduire le mode
consultation, l'icône
apparaît,
se met à
clignoter.
REMARQUE
Le balayage commence toujours le lundi
pour le terminer le dimanche.
Contrôler l'icône
. Si au moins 1 action est
programmée pour le lundi apparaîtra.
L'horloge indique que le moment auquel l'action
programmée est prévue, soit
,
ou
et
est en cours d'affichage.
REMARQUE
Les températures mentionnées audessus ont uniquement un objectif de
clarification, les valeurs température sur
votre dispositif de régulation peuvent
varier.
Si n'apparaît pas, aucune action n'est programmée
pour lundi.
Pousser de nouveau sur le bouton
pour passer
au jour suivant de la semaine.
va clignoter, ce qui
indique que les actions programmées pour mardi
sont en train d'être passée en revue.
La procédure décrite au-dessus est relancée.
Si au moins 1 action est programmée pour le mardi
apparaîtra. L'horloge indique que le moment auquel
l'action programmée est prévue, soit
,
ou
et
est en cours d'affichage.
Si n'apparaît pas, aucune action n'est programmée
pour le mardi.
Manuel d'utilisation
10
Pousser sur le bouton
pour afficher l'action
suivante programmée. Si une seconde action est
programmée pour mardi,
continuera à clignoter
apparaîtra.
En supposant que 5 actions soient programmées
pour le mardi, un total de 5 pressions sera requis
pour afficher toutes les actions programmées.
Continuer à pousser sur le bouton
jusqu'à ce que
l'indicateur du jour de la semaine affiche le jour en
cours (non clignotant), vous avez maintenant quitté le
balayage des actions.
REMARQUE
Le nombre de fois que le bouton
devra être enfoncé pour quitter le
balayage dépendra du nombre d'actions
programmées dans le programme de
temporisation.
Comment dois-je interpréter les
actions programmées?
Pour pouvoir comprendre le comportement de votre
installation quand le programmateur de temporisation
est active, il est important de regarder toutes les
actions programmées du jour en cours et peut-être la
dernière action programmée d'hier.
Si la première action programmée pour aujourd'hui
n'est pas encore active, l'état de votre installation
dépend plus que probablement mais pas
nécessairement de la dernière action programmée
hier. Lire la note importante ci-dessous.
Si la première action programmée pour aujourd'hui
est déjà active, l'état de votre installation dépend plus
que probablement mais pas nécessairement des
paramètres programmés dans la première action
programmée de ce jour. Lire la note importante cidessous.
CZ-02RT11P
Dispositif de commande à distance
4PW15515-1
REMARQUE
Pour que le fonctionnement de votre
installation reste simple, le programmateur de temporisation peut aisément être
ignoré en altérant le réglage en cours ("la
dernière commande" ignore la commande
précédente
jusqu'à
la
commande
programmée suivante).
Conclusion: Même si
est affiché, quelqu'un peut
avoir altéré les réglages. L'action programmée
suivante ignorera les réglages altérés et les réglages
programmés réapparaîtront.
Les actions programmées peuvent se chevaucher, en
raison de la logique "la dernière commande prévaut",
la dernière commande programmée donnera la règle.
Comment dois-je interpréter les
valeurs sur l'affichage quand le
programmateur de temporisation est
actif
Comme décrit ci-dessus, les réglages du
programmateur de temporisation (et par conséquent
les valeurs d'affichage) peuvent être temporairement
ignorés par une intervention manuelle.
Si vous souhaitez être absolument sur des
programmations de temporisation pour le moment
même, vous devez d'abord balayer les actions
programmées du temporisateur. Se référer à "Passer
en revue les actions programmées dans le
programmateur de temporisation" à la page 9.
CZ-02RT11P
Dispositif de commande à distance
4PW15515-1
6. Définition de la programmation des
temporisations
Que dois-je programmer?
Comme la programmation des temporisations se
base sur un programme hebdomadaire (les mêmes
actions se répéteront chaque semaine), vous devrez
d'abord sélectionner le jour de la semaine.
Ensuite, vous devez choisir une action:
1 mettre en fonction l'installation à un moment
programmé, combiné à une valeur de consigne
(contrôle exact de la température)
2
fermer l'installation (fin de contrôle)
3 mettre en marche l'installation à un moment
programmé, en fonctionnement limite
Finalement, vous devez introduire le moment du jour
où l'action doit être activée.
REMARQUE
Si vous programmez 2 ou plusieurs
actions le même jour et au même moment
le même jour, seule l'action ayant le
numéro d'action le plus élevé (2-5) sera
exécutée.
Manuel d'utilisation
11
Démarrer
La programmation du programme de temporisation
est flexible (vous pouvez ajouter, enlever, ou modifier
les actions programmées quand nécessaire) et
directe (les étapes de programmation sont limitées à
un minimum).
Ci-dessous quelques trucs et astuces pour une
programmation
réussie
du
programme
de
temporisation:
•
•
•
•
•
•
habituez-vous aux icônes et boutons, vous en
aurez besoin lors de la programmation,
habituez-vous à la fonction de balayage, vous
en aurez besoin pour démarrer la
programmation. Se référer à "Passer en revue
les actions programmées dans le
programmateur de temporisation" à la page 9.
complétez le formulaire à la fin du présent
manuel, notez le moment et l'action requise
pour chaque jour (rappelez- vous que le
nombre d'actions est limité à 5 par jour)
prenez votre temps pour introduire avec
précision toutes les données,
essayez de programmer les actions de chaque
jour dans une séquence logique (commencer
par l'action 1 pour la première action et
terminer par le numéro le plus élevé pour la
dernière action). Il ne s'agit pas d'une
exigence mais il sera plus aisé d'interpréter le
programme par la suite,
rappelez-vous que vous pouvez toujours
modifier, ajouter ou enlever les actions
programmées plus tard.
Manuel d'utilisation
12
Programmation
1
LE PROGRAMME DE TEMPORISATION EST
PROGRAMME POUR LA PREMIERE FOIS
REMARQUE
Lorsque vous changez de jour Durant la
programmation, vous devrez confirmer
"la dernière action". Chaque jour peut
avoir 5 actions programmées (numéro 1
à 5) mais pour certaines raisons vous
pouvez vouloir annuler une, plusieurs ou
toutes les actions programmées.
Pour pouvoir effacer toutes les actions
programmées, vous devez sélectionner la
dernière action que vous souhaitez
conserver ou pas d'action (
est affiché
et aucune action n'est affichée).
Toutes les actions programmées avec un
numéro SUPERIEUR à celle sélectionnée,
ou toutes les actions programmées si
aucune
dernière
action
n'a
été
sélectionnée seront effacées.
PROGRAMMER
SEMAINE
REMARQUE
LE
PREMIER
JOUR
DE
LA
Dans les directives ci-dessous, on
suppose que vous commencer à
programmer le programmateur de
temporisation le lundi et terminer les
actions le dimanche.
Si vous préférez NE PAS commencer le
lundi, avancez jusqu'au jour désiré et
entrez alors le mode PROGRAMME.
CZ-02RT11P
Dispositif de commande à distance
4PW15515-1
Dans ce cas particulier, aucune action n'ont été
programmée auparavant, toutes les actions du
programme de temporisation sont inoccupées.
•
Parcourer jusqu'à lundi en poussant sur le
bouton
. L'icône
apparaît,
va
clignoter et un des
icônes
pourrait être affiché mais tous les autres
champs restent vierges, indiquant qu'aucune
action n'ont été programmée pour le lundi.
•
Entrer en mode programme en tenant le
bouton
enfoncé durant 5 secondes, l'icône
va maintenant également clignoter.
•
•
•
•
•
•
Pousser sur le bouton
pour activer la
première action programmée.
Un clignotant est affiché indiquant que la
première action programmée pour lundi est
programmée; l'affichage température réglée et
horloge clignotent.
Pousser sur le bouton
pour
sélectionner soit le réglage température,
, ou le fonctionnement limite.
Introduire la température souhaitée en utilisant
les boutons
&
.
Pousser sur le bouton
pour basculer
entre le réglage température minimale et
température maximale en fonctionnement
limite, la température sélectionnée clignotera.
Introduire le moment de démarrage de l'action
en utilisant les boutons
&
(étape min. = 10 minutes).
CZ-02RT11P
Dispositif de commande à distance
4PW15515-1
REMARQUE
Si, par accident, vous poussez sur le
bouton
vous activez l'action suivante;
affiché ( fixe et
clignotant).
Pousser sur le bouton
de façon
répétée jusqu'à ce que soit affiché. Vous
pouvez maintenant continuer à ajuster les
réglages pour la première action du
programmateur de temporisations.
Si l'action et le moment correspondant sont corrects,
vous pouvez passer à l'action suivante. Vous le faites
en poussant sur le bouton
, les données sont
enregistrées et l'action suivante peut être
programmée.
La programmation des actions suivantes du
programmateur de temporisation pour le même jour
est identique.
Vous pouvez parcourir les actions du programmateur
de temporisation en appuyant sur le bouton
.
REMARQUE
Ne vous inquiétez pas si vous ajoutez
des
actions
supplémentaires
en
appuyant sur le bouton
à plusieurs
reprises, elles peuvent être effacées
quand vous terminez le jour en cours.
Quand toutes les données pour le programmateur
des temporisations pour lundi sont introduites, vous
devez confirmer les actions programmées.
Vérifiez que la dernière action du programmateur de
temporisation que vous souhaitez conserver est
sélectionnée (les actions avec un numéro supérieur
seront effacées).
Manuel d'utilisation
13
Maintenant vous devez choisir entre 2 options:
1 CONFIRMER ET COPIER VERS LE JOUR
SUIVANT
L'action programmée du programmateur des
temporisations pour le jour en cours est également
valable pour le jour suivant. utiliser la fonction
"confirmer dernière action et copier actions au jour
suivant" en appuyant sur les boutons
et
simultanément pendant 5 secondes.
2 UNIQUEMENT CONFIRMER
L'action programmée du programmateur des
temporisations pour le jour en cours est
uniquement valable pour le jour sélectionné.
utiliser la fonction "confirmer dernière action et
aller au jour suivant" en appuyant sur le bouton
pendant 5 secondes.
Le mode programme est terminé et suivant le choix
effectué, les actions programmées sont enregistrées
pour le lundi (et peut-être le mardi).
PROGRAMMER LES AUTRES JOURS DE LA
SEMAINE
La programmation des autres jours de la semaine est
identique à la programmation du premier jour de la
semaine
clignote pour indiquer le jour
sélectionné,
et sont stables si des actions ont
été copiées de lundi vers mardi, uniquement
s'affiche si aucune action n'a été copiée de lundi à
mardi.
2
JE SOUHAITE EDITER LES ACTIONS
PROGRAMMEES
Editer des actions programmées est facile.
Veiller à ne pas être en mode programme (
ne
clignotte pas); si nécessaire, pousser sur le bouton
pour quitter le mode programme.
Manuel d'utilisation
14
Parcourir les actions programmées en utilisant le
bouton
, sélectionner le jour et l'action que vous
souhaitez éditer.
Appuyer sur le bouton
pendant 5 secondes; le
mode programme est activé, l'icône
et l'action
sélectionnée clignotent.
Editer les réglages en utilisant les mêmes boutons
que ci-dessus.
Sélectionner la "dernière action" en utilisant le bouton
et décider si vous voulez ou ne voulez pas copier
l'action programmée au jour suivant (en appuyant sur les
boutons
et
simultanément ou uniquement
sur le bouton
pendant 5 secondes).
3
JE VEUX EFFACER UNE OU PLUSIEURS
ACTIONS PROGRAMMEES
Veiller à ne pas être en mode programme (
ne
clignote pas); si nécessaire, pousser sur le bouton
pour quitter le mode programme.
Parcourir les actions programmées en utilisant le
bouton
, sélectionner le jour que vous souhaitez
éditer.
Appuyer sur le bouton
pendant 5 secondes; le
mode programme est activé, l'icône
et l'action
sélectionnée clignotent.
Sélectionner la "dernière action" que vous voulez
conserver en utilisant le bouton
Toutes les
actions supérieures seront effacées.
Confirmer l'effacement en poussant sur le bouton
durant 5 secondes,
OU
confirmer l'effacement pour le jour en cours et le jour
suivant en appuyant sur les boutons
et
simultanément durant 5 secondes.
CZ-02RT11P
Dispositif de commande à distance
4PW15515-1
REMARQUE
Dans le cas ci-dessus, si par exemple la
dernière action était n° 3, les actions
programmées 4 et 5 seront également
effacées (si elles existaient).
4
JE VEUX EFFACER TOUTES LES ACTIONS
PROGRAMMEES EN UNE FOIS
Quitter la programmation ou la navigation.
Pousser sur les boutons
et
simultanément
pendant 5 secondes; l'icône
va s'invertir et
disparaître pour confirmer l'effacement.
7. Maintenance
Le dispositif de régulation à distance ne nécessite
pas de maintenance.
Retirer la saleté avec un chiffon doux humide.
REMARQUE
Utiliser uniquement de l'eau claire pour
humidifier le chiffon.
8. Dépannage
Les directives ci-dessous peuvent vous aider à
résoudre votre problème. Si vous ne pouvez résoudre
le problème, consulter votre installateur.
Seul
est affiché
Indique que l'installation a juste été branchée, veuillez
attendre jusqu'à ce que
disparaisse.
Le programmateur de temporisation ne
fonctionne pas mais les actions programmées
sont exécutées à un mauvais moment
(par ex. 1 heure trop tard ou trop tôt)
Vérifier si l'horloge et le jour de la semaine sont
correctement réglés, corriger si nécessaire (voir
"FONCTION REGLAGE HORLOGE" à la page 5).
Je ne sais pas activer le programmateur de
temporisations (l'icône
clignote pendant
2 secondes et disparaît ensuite)
Le programmateur de temporisation n'a pas encore
été programmé. Programmer d'abord le programmateur de temporisation (voir "Définition de la
programmation des temporisations" à la page 11).
Je ne sais pas activer le programmateur de
temporisation (l'icône
est affiché)
Le programmateur de temporisations ne peut pas
être activer quand un contrôle centralisé est
connecté.
Le fonctionnement limite ne peut pas être
sélectionné
Le fonctionnement limite n'est pas disponible pour le
refroidissement uniquement d'installations.
Pas de valeurs sur le dispositif de régulation à
distance (affichage vierge)
Vérifier si la puissance du réseau est toujours
appliquée à votre installation.
CZ-02RT11P
Dispositif de commande à distance
4PW15515-1
Manuel d'utilisation
15
CZ-02RT11P
Afstandsbediening
ONZE WELGEMEENDE DANK VOOR UW
AANKOOP
VAN
DEZE
AFSTANDSBEDIENING. LEES DE HANDLEIDING
AANDACHTIG
ALVORENS
U
DE
INSTALLATIE GEBRUIKT. BEWAAR DE
HANDLEIDING NA HET RAADPLEGEN OP
EEN VEILIGE PLEK.
Neem voor de ingebruikneming contact op
met uw dealer voor alle details over uw
airconditioning.
WAARSCHUWING
- Laat de afstandsbediening nooit nat worden;
anders loopt u risico op een elektrische schok of
brand.
- Druk nooit met een hard, scherp voorwerp op de
toetsen van de afstandsbediening. De
afstandsbediening kan beschadigd raken.
- Inspecteer of repareer de afstandsbediening nooit
zelf, maar laat dit over aan een bevoegd
servicepersoon.
Inhoud
pagina
1. Eigenschappen en functies ................................... 1
2. Naam en functie van schakelaars en symbolen .... 2
3. Instellen van de afstandsbediening ....................... 5
Gebruiksaanwijzing
1. Eigenschappen en functies
De CZ-02RT11P is een ultramoderne afstandsbediening waarmee u alle functies van uw installatie
kunt bedienen.
1
BASISAFSTANDSBEDIENING
De basisfuncties van de afstandsbediening zijn:
•
AAN/UIT,
•
schakelen werkingsmodus,
•
temperatuurregeling,
•
luchtvolumeregeling
•
regeling luchtstroomrichting.
2
KLOKFUNCTIE
De klokfuncties zijn:
•
24-uurs realtime-klok
•
indicator dag van de week.
3
WEEKTIMERFUNCTIE
De weektimerfuncties zijn:
•
per dag van de week kunt u tot 5 acties
programmeren (35 acties in totaal),
•
de weektimer kan op ieder gewenst ogenblik
worden geactiveerd/gedesactiveerd.
•
elke actie is ofwel een AAN-actie door een
ingestelde temperatuur of een GRENSwerking of een UIT-actie,
•
"laatste opdracht" heeft voorrang op de vorige
opdracht tot de volgende geprogrammeerde
opdracht.
4. Beschrijving van de werkingsmodi ........................ 5
5. Werking ................................................................. 6
6. Programmeren van de weektimer ....................... 11
Gebruiksaanwijzing
1
CZ-02RT11P
Afstandsbediening
4PW15515-1
4
GRENSWERKING
De grenswerking biedt een thermostaatregeling
binnen het bereik tussen de ingestelde minimum- en
maximumtemperaturen. De instelling van de
minimumtemperatuur start de verwarming, terwijl de
instelling van de maximumtemperatuur het koelen
start.
5
LEAVE HOME
De leave home-functie voorkomt dat de kamertemperatuur zakt wanneer de bewoners er gedurende
een lange tijd niet zijn. Als de kamertemperatuur
onder 10°C zakt, wordt de verwarming automatisch
opgestart. Zodra de temperatuur 15°C heeft bereikt,
wordt de besturing weer in de oorspronkelijke stand
geschakeld.
6
TOETS GEBRUIKERSNIVEAU
De gebruikerstoegang kan in drie niveaus worden
ingesteld.
2. Naam en functie van schakelaars
en symbolen (Zie figuur 1)
1
AAN/UIT-TOETS
Druk op de AAN/UIT-toets om het systeem te starten
of te stoppen.
2
WERKINGSLAMP
De werkingslamp brandt tijdens de werking of
knippert in het geval van een storing.
3
SYMBOOL WERKINGSMODUS
4
SYMBOOL VENTILATIEMODUS
Deze symbolen geven de actieve ventilatiemodus aan
(alleen
) (AUTOMATISCH, WARMTEWISSELING,
BYPASS).
5
VENTILATIESYMBOOL
Het ventilatiesymbool verschijnt wanneer u de ventilatie regelt met de ventilatievermogentoets (alleen
). Tegelijkertijd geeft het ventilatorsnelheidssymbool het ventilatievermogen aan (zie 22).
6
SYMBOOL LUCHTREINIGING
Dit symbool geeft aan dat de luchtreinigingseenheid
(optie) werkt.
7
LEAVE HOME-SYMBOOL
Het leave home-symbool geeft de status van de leave
home-functie aan.
AAN
Leave home is ingeschakeld
KNIPPERT
Leave home is actief
UIT
Leave home is uitgeschakeld
8
SYMBOOL EXTERNE BESTURING
Dit symbool geeft aan dat uw installatie door een
andere besturing met een hogere prioriteit wordt
bestuurd of gedesactiveerd.
9
Deze symbolen geven de actieve werkingsmodus aan
(VENTILATOR, DROGEN, AUTOMATISCH, KOELEN,
VERWARMEN).
CZ-02RT11P
Afstandsbediening
4PW15515-1
SYMBOOL SCHAKELEN ONDER
GECENTRALISEERDE BESTURING
Dit symbool geeft aan dat het schakelen van de
installatie gebeurt onder gecentraliseerde besturing
van een andere binnenunit of optionele koelen/
verwarmen-kiezer die op de buitenunit is aangesloten
(= master-afstandsbediening).
Gebruiksaanwijzing
2
10
DAG VAN DE WEEK-INDICATOR
De dag van de week-indicator geeft de dag van de
week aan (of de ingestelde dag wanneer u de
weektimer raadpleegt of programmeert).
11
KLOKWEERGAVE
De klokweergave geeft het uur aan (of het actietijdstip
wanneer u de weektimer raadpleegt of programmeert).
12
MAXIMUM INGESTELDE TEMPERATUUR
18
DISPLAY INGESTELDE TEMPERATUUR
Dit geeft de op dit moment ingestelde temperatuur
van de installatie aan (verschijnt niet in GRENSwerking of in de modus VENTILATOR of DROGEN).
19
-INSTELLING
Niet gebruikt, alleen voor servicedoeleinden.
20
SYMBOOL LUCHTSTROOMRICHTING
Dit symbool geeft de luchtstroomrichting aan (alleen
voor installaties met aangedreven luchtkleppen).
De maximum ingestelde temperatuur geeft de maximale ingestelde temperatuur aan in grenswerking.
21
13
verschijnt wanneer een niet-geïnstalleerde
optie wordt aangesproken of een functie niet
beschikbaar is.
MINIMUM INGESTELDE TEMPERATUUR
De minimum ingestelde temperatuur geeft de minimale ingestelde temperatuur aan in grenswerking.
14
WEEKTIMERSYMBOOL
Dit symbool geeft aan dat de weektimer ingeschakeld
is.
15
ACTIESYMBOLEN
Deze symbolen geven de acties voor elke dag van de
weektimer aan.
16
UIT-SYMBOOL
Dit symbool geeft aan de UIT-actie is geselecteerd
wanneer u de weektimer programmeert.
17
INSPECTIE VEREIST
en
Deze symbolen geven aan dat een inspectie vereist
is. Raadpleeg uw installateur.
Gebruiksaanwijzing
3
22
NIET BESCHIKBAAR
SYMBOOL VENTILATORSNELHEID
Dit symbool toont de ingestelde ventilatorsnelheid.
23
SYMBOOL ONTDOOIEN/WARMSTARTMODUS
Dit symbool geeft aan dat de modus ontdooien/
warmstart actief is.
24
SYMBOOL TIJD OM LUCHTFILTER TE
REINIGEN
Dit symbool geeft aan dat het luchtfilter moet worden
gereinigd. Raadpleeg de handleiding van de
binnenunit.
25
SYMBOOL TIJD OM ELEMENT TE
REINIGEN
Dit symbool geeft aan dat het element moet worden
gereinigd (alleen
).
CZ-02RT11P
Afstandsbediening
4PW15515-1
26
TOETS VENTILATIEMODUS
De ventilatiemodustoets bestuurt de
-handleiding voor meer informatie.
27
33
TOETS WERKING VERANDEREN/
; zie de
TOETS VENTILATIEVERMOGEN
Deze toets heeft meerdere functies. De toets heeft de
volgende functies, afhankelijk van de vorige acties
van de gebruiker:
Deze toets stelt het ventilatievermogen in; zie de
-handleiding voor meer informatie.
1 selecteer de werkingsmodus van de installatie
(VENTILATOR, DROGEN, AUTOMATISCH,
KOELEN, VERWARMEN)
28
2 schakelen tussen minimumtemperatuur en
maximumtemperatuur in de grenswerking
TOETS INSPECTIE/TESTWERKING
Niet gebruikt, alleen voor servicedoeleinden.
29
PROGRAMMEERTOETS
Deze toets heeft meerdere functies.
De functie van de programmeertoets hangt af van de
vorige acties van de gebruiker.
34
35
30
WEEKTIMERTOETS
Deze toets schakelt de weektimer in of uit.
31
TIJDINSTELTOETS
Deze toetsen worden gebruikt om de klok te regelen
of, in de programmeermodus, om de geprogrammeerde actietijd in te stellen. Beide toetsen hebben
een automatische herhaalfunctie.
32
TEMPERATUURREGELTOETSEN
Deze toetsen worden gebruikt om het actieve
instelpunt te regelen of, in de programmeermodus,
om de geprogrammeerde instelpunttemperatuur in te
stellen (stap = 1°C). Beide toetsen worden ook
gebruikt om de dag van de week in te stellen.
CZ-02RT11P
Afstandsbediening
4PW15515-1
TOETS INSTELPUNT/GRENS
Deze toets schakelt tussen instelpunt, grenswerking
of
(alleen programmeermodus).
VENTILATORSNELHEIDSTOETS
Deze toets schakelt tussen L (Laag), H (Hoog), HH
(Heel hoog),
(Automatisch).
36
TOETS REGELING
LUCHTSTROOMRICHTING
Met deze toets kunt u de richting van de luchtstroom
regelen.
37
TERUGSTELTOETS SYMBOOL TIJD OM
LUCHTFILTER TE REINIGEN
Deze toets wordt gebruikt om het symbool "tijd om
luchtfilter te reinigen" terug te stellen.
Gebruiksaanwijzing
4
3. Instellen van de afstandsbediening
Na de initiële montage kan de gebruiker de klok en
dag van de week instellen.
De afstandsbediening is uitgerust met een weektimer
waarmee de gebruiker de installatie automatisch kan
laten werken; de klok en dag van de week moeten
ingesteld zijn om de weektimer te gebruiken.
1
KLOKINSTELFUNCTIE
Druk gedurende 5 seconden op de
-toets. De
klokuitlezing en de dag van de week-indicator
knipperen; u kunt nu deze twee instellingen uitvoeren.
Regel de klok met de
- &
-toetsen.
Bij iedere druk op de tijdinsteltoets gaan de minuten
met 1 vooruit/achteruit. Wanneer u de
- of
-toets ingedrukt houdt, gaan de minuten per
10 vooruit/achteruit.
Regel de dag van de week met de
- &
-toetsen. Bij iedere druk op de
- of
-toetsen verschijnt de volgende of de vorige
dag.
Druk op de
-toets om de ingestelde tijd en dag
van de week te bevestigen.
Als u gedurende 5 minuten niet op een toets van de
afstandsbediening drukt terwijl de uitlezing van de
klok en de dag van de week knipperen, worden de
vorige instellingen van de klok en de dag van de week
opnieuw ingesteld, en wordt de klokinstelfunctie
gedesactiveerd.
2
INSTELLEN VAN DE WEEKTIMER
Om de weektimer in te stellen, raadpleeg hoofdstuk
6. "Programmeren van de weektimer" op pagina 11.
Gebruiksaanwijzing
5
4. Beschrijving van de werkingsmodi
1
ALLEEN VENTILATOR
In deze modus wordt er alleen lucht rondgestuurd,
zonder verwarmen of koelen.
2
DROGEN
In deze modus wordt de luchtvochtigheid verminderd
met een minimale temperatuurdaling.
De temperatuur en de ventilatorsnelheid worden
automatisch bestuurd en kunnen niet met de
afstandsbediening worden geregeld.
Drogen werkt niet als de kamertemperatuur te laag is.
3
AUTOMATISCHE WERKING
In deze modus schakelt de afstandsbediening automatisch tussen verwarmen en koelen volgens de
vereisten van het instelpunt of de grenstemperatuur.
4
KOELEN
In deze modus wordt het koelen geactiveerd volgens
de vereisten van het instelpunt of de grenstemperatuur.
5
VERWARMEN
In deze modus wordt het verwarmen geactiveerd
volgens de vereisten van het instelpunt of de
grenstemperatuur.
Warmstart (alleen voor warmtepompen)
Bij de start van het verwarmen wordt de
binnenventilator stilgelegd tot de warmtewisselaar
van de binnenunit een bepaalde temperatuur heeft
bereikt en verschijnt
op het scherm. Dit
voorkomt dat de binnenunit koude lucht uitblaast.
CZ-02RT11P
Afstandsbediening
4PW15515-1
Ontdooien (alleen voor warmtepompen)
Bij het verwarmen kan de warmtewisselaar van de
buitenunit bevroren zijn. Indien dit het geval is, wordt
de verwarmingscapaciteit van het systeem beperkt
en begint de ontdooifunctie te werken. De ventilator
van de binnenunit stopt en
verschijnt op
het scherm. Na maximaal tien minuten ontdooien
gaat het systeem weer in verwarming.
6
GRENSWERKING
&
Grenswerking is een extra modus waarmee de
kamertemperatuur binnen bepaalde grenzen kan
worden gehouden. De symbolen
&
verschijnen op het scherm om de grenswerking te
bevestigen.
7
LEAVE HOME
LEAVE HOME is een functie waarmee kamertemperatuur boven 10°C kan worden gehouden
wanneer de bewoners er niet zijn. Deze functie
schakelt de verwarming in als de installatie is
uitgeschakeld.
5. Werking
Alleen ventileren
Drogen
Automatische werking
Koelen
Verwarmen
Druk op de
-toets om te schakelen tussen
grenswerking en de hierboven vermelde werkingen.
Druk in de grenswerking op de
-toets om de
instelling van de minimum- en maximumtemperatuur
te selecteren. Druk op de
- of
toetsen om de instelling van de minimum- en
maximumtemperatuur te regelen.
1
ALLEEN VENTILATOR
Door de gebruiker in te stellen parameters:
•
Ventilatorsnelheid, druk op de
-toets,
•
Instelling luchtstroomrichting, druk op de
-toets,
•
Ventilatormodus, druk op de
-toets,
•
Manuele werking
In manuele werking beslist de gebruiker over de
instellingen van de installatie. De laatste instelling
blijft actief tot de gebruiker ze verandert.
Aangezien de afstandsbediening voor een groot
aantal verschillende installaties en eigenschappen
kan worden gebruikt, kunt u soms een functie
selecteren die op uw installatie niet bestaat; in dat
geval verschijnt het bericht
.
Druk op de
-toets
werkingsmodus te selecteren.
CZ-02RT11P
Afstandsbediening
4PW15515-1
om
de
gewenste
Ventilatorvermogen, druk op de
-toets.
2
DROGEN
Door de gebruiker in te stellen parameters:
•
Instelling luchtstroomrichting, druk op de
-toets,
•
Ventilatormodus, druk op de
•
Ventilatorvermogen, druk op de
-toets,
-toets.
3
AUTOMATISCHE WERKING
Door de gebruiker in te stellen parameters:
•
Instelpunttemperatuur, druk op de
-&
-toetsen,
•
Ventilatorsnelheid, druk op de
-toets,
Gebruiksaanwijzing
6
•
Instelling luchtstroomrichting, druk op de
-toets,
EXTRA MOGELIJKHEDEN VAN DE
AFSTANDSBEDIENING
•
Ventilatormodus, druk op de
•
Ventilatorvermogen, druk op de
1
LEAVE HOME
Druk gelijktijdig op de
- en
-toetsen
om de LEAVE HOME-functie in te schakelen.
-toets,
-toets.
4
KOELEN
Door de gebruiker in te stellen parameters:
•
Instelpunttemperatuur, druk op de
-&
-toetsen,
•
Ventilatorsnelheid, druk op de
-toets,
•
Instelling luchtstroomrichting, druk op de
-toets,
•
Ventilatormodus, druk op de
•
Ventilatorvermogen, druk op de
-toets,
-toets.
5
VERWARMEN
Door de gebruiker in te stellen parameters:
•
Instelpunttemperatuur, druk op de
-&
-toetsen,
•
Ventilatorsnelheid, druk op de
-toets,
•
Instelling luchtstroomrichting, druk op de
-toets,
•
Ventilatormodus, druk op de
•
Ventilatorvermogen, druk op de
Ventilatormodus, druk op de
•
Ventilatorvermogen, druk op de
Gebruiksaanwijzing
7
2
Instellen van de luchtstroomrichting
Met de
-toets kunt u de richting van de
luchtstroom regelen. Druk op de toets om te
schakelen tussen een vaste en een variabele
luchtstroomrichting. Aan de hand van het symbool
kunt u de vaste luchtstroomrichting bepalen
met een druk op de
-toets wanneer het symbool
de gewenste richting aangeeft.
LET OP
Zelfs als u een vaste luchtstroomrichting
hebt geselecteerd, kan de variabele
luchtstroomrichting automatisch worden
ingeschakeld om uw installatie goed te
laten werken.
-toets,
-toets.
6
GRENSWERKING
Door de gebruiker in te stellen parameters:
•
Ventilatorsnelheid, druk op de
-toets,
•
Instelling luchtstroomrichting, druk op de
-toets,
•
VERGEET NIET DAT DE
-TOETS OP
UIT MOET STAAN OPDAT DE LEAVE
HOME-FUNCTIE ZOU WERKEN.
3
WEEKTIMER
Hierna worden alle mogelijkheden, werking en
programmering van de weektimer beschreven.
-toets,
-toets.
CZ-02RT11P
Afstandsbediening
4PW15515-1
Werking van de weektimer
In weektimerwerking wordt de installatie bestuurd
door de weektimer. De in de weektimer geprogrammeerde acties worden automatisch uitgevoerd.
De weektimer voert altijd de laatste opdracht uit; dit
betekent dat de gebruiker de laatst uitgevoerde
geprogrammeerde actie tijdelijk door een andere
actie kan vervangen. Raadpleeg "Manuele werking"
op pagina 6. Door de volgende geprogrammeerde
actie (in de weektimer) neemt de weektimer weer de
controle over.
Druk op de
-toets om de weektimer in of uit te
schakelen.
LET OP
De weektimer heeft voorrang op de
-toets, druk alleen op de
toets om de weektimer in of uit te
schakelen. De weektimer is ingeschakeld
wanneer het symbool
op het scherm
staat. De
-toets heeft slechts tot de
volgende
geprogrammeerde
actie
voorrang op de weektimer.
Bij een stroomonderbreking van meer dan één uur
worden de klok en de dag van de week
teruggesteld. Raadpleeg "KLOKINSTELFUNCTIE"
op pagina 5 om de klok en de dag van de week te
regelen.
De in de weektimer geprogrammeerde acties gaan
bij een stroomonderbreking niet verloren; u hoeft
de weektimer niet opnieuw te programmeren.
Om de WEEKTIMER in te stellen, raadpleeg
hoofdstuk 6. "Programmeren van de weektimer" op
pagina 11.
Wat kan de weektimer doen?
Het concept van de weektimer is eenvoudig, maar
krachtig.
De weektimer kan 3 acties laten uitvoeren:
1 de installatie op een bepaald tijdstip inschakelen,
in combinatie met een instelpunt (exacte
temperatuurregeling)
2 de installatie uitschakelen (einde van besturing)
Het geprogrammeerde schema werkt op
basis van tijd. Controleer of de klok en de
dag van de week juist zijn ingesteld.
Raadpleeg "KLOKINSTELFUNCTIE" op
pagina 5.
Stel de zomer- en wintertijd manueel in.
Raadpleeg "KLOKINSTELFUNCTIE" op
pagina 5.
CZ-02RT11P
Afstandsbediening
4PW15515-1
3 de installatie op een bepaald tijdstip inschakelen,
in grenswerking
U kunt tot 5 acties per dag in de weektimer
programmeren.
U kunt tot 5 acties per dag van de week programmeren, dus 35 geprogrammeerde acties in totaal. De
eerst geprogrammeerde actie voor een bepaalde dag
is actie 1, de laatst geprogrammeerde actie voor een
dag kan actie 1 (wanneer u voor die dag slechts één
actie hebt geprogrammeerd) tot 5 zijn.
Gebruiksaanwijzing
8
Het is heel belangrijk dat u begrijpt dat het
nummer van de geprogrammeerde actie
NIET BEPAALT WANNEER de geprogrammeerde actie wordt uitgevoerd. Alleen het
TIJDSTIP, dat een onderdeel is van de
ingevoerde gegevens wanneer u de actie
programmeert,
bepaalt
wanneer
de
geprogrammeerde actie wordt uitgevoerd.
Wat doet de weektimer?
Als hij ingeschakeld is, voert de weektimer de
geprogrammeerde acties uit.
Hij laat de installatie:
•
OF
•
OF
•
koelen of verwarmen, afhankelijk van de
actieve werking, indien van toepassing; het
instelpunt verschijnt op het scherm,
de installatie uitschakelen (de weektimer blijft
ingeschakeld en schakelt de installatie
opnieuw in volgens het programma); het
werkingslichtje wordt gedoofd,
koelen of verwarmen, afhankelijk van wat
vereist is om de kamertemperatuur binnen een
bepaald bereik (grenswerking) te houden;
en
staan op het scherm.
De weektimer verandert de werkingsmodus
alleen in GRENS-werking.
Om de geprogrammeerde acties te kunnen
controleren, kunt u in de geprogrammeerde acties
bladeren (zie hierna).
Gebruiksaanwijzing
9
Wat doet de weektimer NIET?
De weektimer zal de volgende acties niet doen:
•
de ventilatorsnelheid regelen,
•
de luchtstroomrichting regelen,
•
de ventilatiemodus regelen,
•
het ventilatievermogen regelen,
•
de werkingsmodus voor een ingesteld
instelpunt veranderen.
U kunt de hiervoor vermelde parameters manueel
instellen, en zij hebben geen invloed op de
weektimer.
Meer gesofisticeerde afstandsbedieningen zijn ook
verkrijgbaar. Raadpleeg uw verdeler voor meer
informatie.
Bladeren in geprogrammeerde acties
in de weektimer (alleen raadplegen)
Raadpleeg figuur 2.
U kunt sequentieel in de geprogrammeerde acties
van de weektimer bladeren. U kunt met slechts 2
toetsen in het volledige timerprogramma bladeren.
Druk op de
-toets om te beginnen bladeren, om
de volgende geprogrammeerde actie weer te geven
of om het bladeren af te sluiten wanneer de laatste
geprogrammeerde actie wordt weergegeven.
Druk op de
-toets om het bladeren onmiddellijk
af te sluiten (zonder alle geprogrammeerde acties te
moeten doorlopen).
Druk op de
-toets om de bladermodus in te
schakelen, waarna het symbool
verschijnt, en
knippert.
LET OP
Het bladeren begint altijd op maandag en
eindigt met zondag.
CZ-02RT11P
Afstandsbediening
4PW15515-1
Controleer het symbool
. Als u tenminste
1 actie voor maandag hebt geprogrammeerd,
verschijnt .
De klok geeft het tijdstip voor uitvoering van de
geprogrammeerde actie aan,
,
of
en
staan op het scherm.
LET OP
De hiervoor vermelde temperaturen
dienen alleen als voorbeeld – de
temperatuurwaarden
op
uw
afstandsbediening kunnen verschillen.
Als
niet op het scherm staat, zijn er geen
geprogrammeerde acties voor maandag.
Druk opnieuw op de
-toets om naar de volgende
dag van de week te gaan.
knippert; dit geeft aan
dat u bladert in de geprogrammeerde acties voor
dinsdag.
De hiervoor beschreven procedure wordt opnieuw
doorlopen.
Als u tenminste 1 actie voor dinsdag hebt geprogrammeerd, verschijnt . De klok geeft het tijdstip voor
uitvoering van de geprogrammeerde actie aan,
,
of
en
staan op het scherm.
Als
niet op het scherm staat, zijn er geen
geprogrammeerde acties voor dinsdag.
Druk op de
-toets om de volgende geprogrammeerde actie weer te geven. Als voor dinsdag een
tweede actie is geprogrammeerd, blijft
knipperen
en verschijnt
.
Als voor dinsdag 5 acties werden geprogrammeerd,
moet u 5 keer op de toets drukken om alle
geprogrammeerde acties weer te geven.
Blijf op de
-toets drukken tot de dag van de weekindicator de huidige dag aangeeft (knippert niet); het
bladeren is nu afgesloten.
CZ-02RT11P
Afstandsbediening
4PW15515-1
LET OP
Het aantal keer dat u op de
-toets
moet drukken om het bladeren af te
sluiten hangt af van het aantal geprogrammeerde acties in de weektimer.
Hoe interpreteer ik de
geprogrammeerde acties
Om de werking van uw installatie met ingeschakelde
weektimer te begrijpen, moet u rekening houden met
alle geprogrammeerde acties voor die dag en
misschien ook met de laatst geprogrammeerde actie
van de vorige dag.
Als de eerst geprogrammeerde actie voor vandaag
nog niet actief is, wordt de huidige status van uw
installatie (waarschijnlijk, maar niet noodzakelijk)
bepaald door de laatst geprogrammeerde actie van
gisteren. Lees de belangrijke opmerking hierna.
Als de eerst geprogrammeerde actie voor vandaag al
actief is, wordt de huidige status van uw installatie
(waarschijnlijk, maar niet noodzakelijk) bepaald door
de parameters van de eerst geprogrammeerde actie
voor vandaag. Lees de belangrijke opmerking hierna.
LET OP
Om de werking van uw installatie
eenvoudig te houden, kunt u de huidige
instelling van de weektimer gemakkelijk
wijzigen
("laatste
opdracht"
heeft
voorrang op de vorige opdracht tot de
volgende geprogrammeerde opdracht).
Besluit: Hoewel
op het scherm staat, kan toch
iemand de instellingen veranderd hebben. De
volgende geprogrammeerde actie heeft voorrang op
de gewijzigde instellingen en alle instellingen worden
opnieuw zoals geprogrammeerd.
Geprogrammeerde acties kunnen elkaar overlappen;
volgens de logica van "laatste opdracht heeft
voorrang" wordt de laatst geprogrammeerde opdracht
uitgevoerd.
Gebruiksaanwijzing
10
Hoe interpreteer ik de informatie op
het scherm wanneer de weektimer
actief is
Zoals hiervoor beschreven kunnen de instellingen
van de weektimer (en bijgevolg ook de informatie op
het scherm) tijdelijk gewijzigd worden door een
manuele tussenkomst.
Als u absoluut zeker wilt zijn over de instellingen van
de weektimer voor dit moment, moet u in de
geprogrammeerde acties van de weektimer bladeren.
Raadpleeg "Bladeren in geprogrammeerde acties in
de weektimer" op pagina 9.
6. Programmeren van de weektimer
Eerste stappen
Het programmeren van de weektimer is flexibel (u
kunt op ieder gewenst ogenblik geprogrammeerde
acties toevoegen, verwijderen of wijzigen) en
eenvoudig (het aantal stappen is beperkt tot een
minimum).
Hierna volgen enkele tips voor succesvol
programmeren van de weektimer:
•
•
•
Wat moet ik programmeren?
Aangezien de weektimer op een weekprogramma is
gebaseerd (elke week worden dezelfde acties
herhaald), moet u eerst de dag van de week
selecteren.
Vervolgens kiest u een actie:
1 de installatie op een bepaald tijdstip inschakelen,
in combinatie met een instelpunt (exacte
temperatuurregeling)
2
•
•
•
zorg dat u de symbolen en de toetsen kent; u
moet ze begrijpen voor het programmeren,
zorg dat u de bladerfunctie kent; u hebt ze
nodig om te beginnen programmeren.
Raadpleeg "Bladeren in geprogrammeerde
acties in de weektimer" op pagina 9,
vul het overzicht op het einde van deze
handleiding in; noteer het tijdstip en de vereist
actie voor elke dag (vergeet niet dat het aantal
acties per dag beperkt is tot 5),
voer alle gegevens nauwkeurig in,
programmeer de acties voor elke dag in een
logisch volgorde (begin met actie 1 voor de
eerste actie, en eindig met het hoogste
nummer voor de laatste actie). Dit is geen
vereiste, maar zo kunt u het programma
nadien veel gemakkelijker interpreteren,
vergeet niet dat u later altijd geprogrammeerde
acties kunt wijzigen, toevoegen of verwijderen.
de installatie uitschakelen (einde van besturing)
3 de installatie op een bepaald tijdstip inschakelen,
in grenswerking
Tenslotte moet u het uur van de dag invoeren waarop
de actie moet worden ingeschakeld.
LET OP
Als u 2 of meer acties op dezelfde dag en
hetzelfde tijdstip van de dag programmeert,
wordt alleen de actie met het hoogste
actienummer (2 – 5) uitgevoerd.
Gebruiksaanwijzing
11
CZ-02RT11P
Afstandsbediening
4PW15515-1
Programmeren
1
DE WEEKTIMER WORDT VOOR HET EERST
GEPROGRAMMEERD
LET OP
Wanneer u tijdens het programmeren de
dag verandert, moet u de "laatste actie"
bevestigen. Voor elke dag zijn 5
geprogrammeerde acties (van 1 tot 5)
mogelijk, maar misschien wilt u één,
enkele of alle geprogrammeerde acties
verwijderen.
Om geprogrammeerde acties te kunnen
verwijderen, moet u de laatste actie die u
wilt behouden selecteren – dit kan 1 tot 5
zijn of geen actie (
verschijnt op het
scherm en geen actie weergegeven).
Alle geprogrammeerde acties met een
nummer HOGER dan de geselecteerde
(of alle geprogrammeerde acties als u
geen laatste actie had geselecteerd)
worden verwijderd.
DE EERSTE DAG VAN DE WEEK PROGRAMMEREN
LET OP
In de richtlijnen hierna wordt er van
uitgegaan dat u de acties van de
weektimer begint te programmeren met
maandag, en eindigt met de acties voor
zondag.
Als u liever NIET met maandag begint,
blader dan naar de gewenste dag en
schakel de PROGRAMMA-modus in.
CZ-02RT11P
Afstandsbediening
4PW15515-1
In dit bepaald geval zijn geen acties eerder
geprogrammeerd, en zijn alle acties van de
weektimer beschikbaar.
•
Druk op de
-toets om naar maandag te
bladeren. Het symbool
verschijnt,
knippert
en één van de symbolen
verschijnen misschien op het scher m, maar alle
andere velden blijven leeg, wat betekent dat voor
maandag geen acties geprogrammeerd zijn.
•
Druk gedurende 5 seconden op de
-toets
om de programmamodus in te schakelen,
waarna het symbool
nu ook zal beginnen
knipperen.
•
Druk op de
-toets om de eerste
geprogrammeerde actie te activeren.
•
Op het scherm knippert om aan te geven dat
de eerste geprogrammeerde actie voor
maandag wordt geprogrammeerd; de
ingestelde temperatuur en de klokweergave
knipperen.
•
Druk op de
-toets om de ingestelde
temperatuur,
, of grenswerking te
selecteren.
•
Voer de gewenste temperatuur in met de
toetsen
-&
.
•
Druk op de
-toets om te schakelen
tussen de minimum en de maximum
ingestelde temperatuur in grenswerking,
waarna de geselecteerde temperatuur
knippert.
•
Voer het tijdstip waarop de actie moet beginnen
in met de
-&
-toetsen (min.
stap = 10 minuten).
Gebruiksaanwijzing
12
LET OP
U hebt nu de keuze tussen 2 opties:
Als u per ongeluk op de
-toets hebt
gedrukt, hebt u de volgende actie
geactiveerd;
verschijnt ( brandt en
knippert). Druk op de
-toets tot
op het scherm knippert. U kunt nu
verdergaan met de instellingen voor de
eerste actie van de weektimer.
Als de actie en het overeenkomstige tijdstip juist zijn,
kunt u verdergaan naar de tweede actie van de
weektimer. Druk hiervoor op de
-toets, waarna de
gegevens worden opgeslagen en u de volgende actie
van de weektimer kunt programmeren.
1 BEVESTIGEN EN NAAR VOLGENDE DAG
KOPIËREN
De acties van de weektimer die voor deze dag
zijn geprogrammeerd gelden ook voor de
volgende dag: druk gelijktijdig gedurende
5 seconden op de
- en
-toetsen om
de functie "laatste actie bevestigen en acties
naar volgende dag kopiëren" te gebruiken.
2 ALLEEN BEVESTIGEN
De acties van de weektimer die voor deze dag
zijn geprogrammeerd gelden alleen voor de
geselecteerde dag: druk gedurende 5 seconden
op de
-toets om de functie "laatste actie
bevestigen en naar volgende dag gaan" te
gebruiken.
U kunt de overige acties van de weektimer voor
dezelfde dag op dezelfde manier programmeren.
Druk op de
-toets om te bladeren in de acties van
de weektimer.
LET OP
Als u per ongeluk te veel op de
-toets
hebt gedrukt en zo extra acties hebt
toegevoegd, kunt u deze acties
verwijderen bij het beëindigen van de
acties voor die dag.
Wanneer u alle gegevens voor de acties van de
weektimer voor maandag hebt ingevoerd, moet u de
geprogrammeerde acties bevestigen.
Selecteer de laatste actie van de weektimer die u wilt
behouden (acties van de weektimer met een hoger
nummer worden verwijderd).
De programmamodus wordt afgesloten en, afhankelijk van uw keuze, worden de geprogrammeerde
acties opgeslagen voor maandag (en mogelijk
dinsdag).
DE ANDERE DAGEN VAN DE WEEK PROGRAMMEREN
De andere dagen van de week worden op dezelfde
manier als de eerste dag geprogrammeerd.
knippert om de geselecteerde dag aan te geven,
en branden als u acties van maandag naar dinsdag
hebt gekopieerd, alleen
staat op het scherm als u
geen acties van maandag naar dinsdag hebt
gekopieerd.
2
IK WIL GEPROGRAMMEERDE ACTIES
WIJZIGEN
Geprogrammeerde acties kunnen gemakkelijk
worden gewijzigd.
Controleer dat u niet in de programmamodus staat
(
knippert niet); druk indien nodig op de
toets om de programmamodus af te sluiten.
Gebruiksaanwijzing
13
CZ-02RT11P
Afstandsbediening
4PW15515-1
Blader met de
-toets naar de geprogrammeerde
acties, en selecteer de dag en de actie die u wilt
wijzigen.
Druk gedurende 5 seconden op de
-toets; de
programmamodus wordt ingeschakeld, en het
symbool
en de geselecteerde actie knipperen.
Wijzig de instellingen met dezelfde toetsen als
hiervoor beschreven.
Selecteer de "laatste actie" met de
-toets en
beslist of u de geprogrammeerde actie(s) naar de
volgende dag wilt kopiëren (druk gelijktijdig
gedurende 5 seconden op de
- en
toetsen of alleen op de
-toets).
3
IK WIL EEN OF MEER GEPROGRAMMEERDE
ACTIES VERWIJDEREN
Controleer dat u niet in de programmamodus staat
(
knippert niet); druk indien nodig op de
toets om de programmamodus af te sluiten.
Blader met de
-toets naar de geprogrammeerde
acties, en selecteer de dag die u wilt wijzigen.
Druk gedurende 5 seconden op de
-toets; de
programmamodus wordt ingeschakeld, en het
symbool
en de geselecteerde actie knipperen.
Selecteer de "laatste actie" die u wilt behouden met
de
-toets. Alle acties met een hoger nummer
worden verwijderd.
Druk gedurende 5 seconden op de
-toets om het
verwijderen te bevestigen,
CZ-02RT11P
Afstandsbediening
4PW15515-1
OF
druk gedurende 5 seconden gelijktijdig op de
- en
-toetsen om het verwijderen voor deze en ook
de volgende dag te bevestigen.
LET OP
Als in bovenstaand geval de laatste actie
bijvoorbeeld nummer 3 was, worden
geprogrammeerde acties 4 en 5 ook
verwijderd (als ze bestonden).
4
IK WIL ALLE GEPROGRAMMEERDE ACTIES
IN ÉÉN KEER VERWIJDEREN
Sluit het programmeren of bladeren af.
Druk gedurende 5 seconden gelijktijdig op de
- en
-toetsen; het symbool
wordt omgekeerd
weergegeven en verdwijnt dan om het verwijderen te
bevestigen.
7. Onderhoud
De afstandsbediening is onderhoudsvrij.
Verwijder vuil met een zachte vochtige doek.
LET OP
Bevochtig de doek alleen met zuiver lauw
water.
Gebruiksaanwijzing
14
8. Storingsopsporing
Notities
De onderstaande richtlijnen kunnen u helpen om uw
probleem op te lossen. Neem contact op met uw
installateur als u er zelf niet in slaagt het probleem op
te lossen.
Geen informatie op de afstandsbediening (blanco
scherm)
Controleer of uw installatie stroom krijgt.
Alleen
staat op het scherm
Dit geeft aan dat de installatie nog maar net is
opgestart; wacht even tot
verdwijnt.
De weektimer doet het, maar de geprogrammeerde acties worden op het verkeerde tijdstip
uitgevoerd (bijv. 1 uur te laat of te vroeg)
Controleer of de klok en de dag van de week juist zijn
ingesteld, en corrigeer indien nodig (raadpleeg
"KLOKINSTELFUNCTIE" op pagina 5).
Ik kan de weektimer niet inschakelen (het symbool
knippert 2 seconden en verdwijnt dan)
De weektimer is nog niet geprogrammeerd. Programmeer eerst de weektimer (raadpleeg "Programmeren
van de weektimer" op pagina 11).
Ik kan de weektimer niet inschakelen
(het symbool
staat op het scherm)
U kunt de weektimer niet inschakelen wanneer een
gecentraliseerde besturing is aangesloten.
Grenswerking kan niet worden geselecteerd
Grenswerking is niet beschikbaar voor installaties met
alleen koelen.
Gebruiksaanwijzing
15
CZ-02RT11P
Afstandsbediening
4PW15515-1
CZ-02RT11P
Control remoto
GRACIAS
POR
ADQUIRIR
ESTE
CONTROL REMOTO. LEA EL MANUAL DE
INSTRUCCIONES ATENTAMENTE ANTES
DE UTILIZAR LA INSTALACIÓN. DESPUÉS
DE
HABER
LEÍDO
EL
MANUAL,
DEPOSÍTELO EN UN LUGAR ADECUADO
PARA CONSULTARLO EN EL FUTURO.
Antes de comenzar a utilizar el control
remoto, póngase en contacto con su
distribuidor para que le informe de todos los
detalles de su instalación de aire
acondicionado.
ADVERTENCIA
- Nunca deje que el control remoto se moje, porque
puede provocar una descarga eléctrica o incendio.
- Nunca pulse los botones del control remoto con un
objeto de punta dura. El control remoto se puede
dañar.
- Nunca inspeccione o repare el control remoto
usted mismo, pídale a una persona cualificada que
efectúe este trabajo.
Contendido
página
1. Características y funciones ................................... 1
2. Designación y función de interruptores e iconos ... 2
3. Configuración del control remoto .......................... 5
4. Descripción de los modos operativos ................... 5
Manual de operación
1. Características y funciones
El modelo CZ-02RT11P es un control remoto de
última generación que permite un control total sobre
su instalación.
1
FUNCIONES BÁSICAS DEL CONTROL
REMOTO
Estas son las funciones básicas del control remoto:
•
Encendido/apagado,
•
cambio de modo operativo,
•
ajuste de temperatura,
•
ajuste del caudal de aire
•
ajuste de la dirección del flujo de aire.
2
FUNCIÓN RELOJ
Estas son las opciones del reloj:
•
reloj de 24 horas a tiempo real,
•
indicador del día de la semana.
3
FUNCIÓN PROGRAMADOR
Estas son las funciones del programador:
•
es posible programar hasta 5 acciones por
cada día de la semana (35 acciones en total),
•
es posible activar/desactivar el programador
en todo momento,
•
cada acción designa una función de
encendido (ON) vinculada a una programación
de temperatura, un funcionamiento entre
límites de temperatura (LIMIT), o bien una
función de apagado (OFF),
•
"última instrucción" anula la instrucción
anterior, hasta que se realice la siguiente
instrucción programada.
5. Operación.............................................................. 6
6. Uso del programador .......................................... 11
CZ-02RT11P
Control remoto
4PW15515-1
Manual de operación
1
4
LIMITACIÓN DE TEMPERATURA
La función de limitación de temperatura proporciona
control por termostato entre dos temperaturas, una
mínima y otra máxima, establecidas. La temperatura
establecida como mínima activará la calefacción, la
temperatura establecida como máxima activará la
refrigeración.
5
NADIE EN CASA
La función nadie en casa impide que descienda la
temperatura de la habitación si ésta se queda
desocupada durante un espacio de tiempo prolongado.
Si la temperatura de la habitación
desciende por debajo de los 10°C, la calefacción se
pone en marcha automáticamente. En cuanto la
temperatura alcanza los 15°C, el control remoto
vuelve a su estado original.
6
NIVEL DE ACCESO A LOS BOTONES
Se pueden establecer tres niveles jerárquicos de
autorización que sirven para limitar la acción del
usuario.
2. Designación y función de
interruptores e iconos (Vea figura 1)
1
BOTÓN ON/OFF
Pulse el botón ON/ OFF para arrancar o parar el
sistema.
2
LUZ DE FUNCIONAMIENTO
La luz de funcionamiento se enciende durante el
curso de la operación o parpadea en caso de fallo o
avería.
3
ICONO DEL MODO OPERATIVO
4
ICONO DEL MODO DE VENTILACIÓN
Estos iconos indican el modo de ventilación actual
(sólo
) (AUTOMÁTICO, INTERCAMBIO DE
CALOR, DERIVACIÓN).
5
ICONO DE VENTILACIÓN
El icono de ventilación aparece cuando se ajusta la
ventilación con el botón de intensidad de ventilación
(sólo
). Al mismo tiempo, el nivel de ventilación
se indica a través del icono de velocidad del
ventilador (véase 22).
6
ICONO DE PURIFICACIÓN DEL AIRE
Este icono indica que la unidad purificadora de aire
(opcional) se encuentra operativa.
7
ICONO NADIE EN CASA
El icono nadie en casa indica el estado de la función
nadie en casa.
ENCENDIDO
La función nadie en casa está
activada
PARPADEO
La función nadie en casa está en
funcionamiento
APAGADO
La función nadie en casa está
desactivada
8
ICONO DE CONTROL EXTERNO
Este icono indica que otro control de mayor prioridad
está controlando o impidiendo el control de su
instalación en este momento.
Estos iconos indican el modo operativo actual
(VENTILACIÓN, DESHUMIDIFICACIÓN, AUTOMÁTICO,
ENFRIAMIENTO, CALEFACCIÓN).
Manual de operación
2
CZ-02RT11P
Control remoto
4PW15515-1
9
ICONO INDICADOR DE FUNCIÓN DE CAMBIO
BAJO CONTROL CENTRALIZADO
Este icono indica que la función de cambio de la
instalación está bajo control centralizado asignado a
otra unidad interior o a un selector enfriamiento/
calefacción opcional conectado a la unidad exterior
(= control remoto maestro).
10
INDICADOR DE DÍA DE LA SEMANA
16
ICONO OFF (desconexión)
Este icono indica que la acción OFF (desconexión)
ha sido seleccionada durante la planificación con el
programador.
17
INSPECCIÓN NECESARIA
y
Estos iconos indican que el aparato necesita ser
inspeccionado. Consulte a su instalador.
18
El indicador de día de la semana muestra el día de la
semana actual (o el día que se ha establecido
durante la lectura o programación del programador).
11
PANTALLA HORARIA
La pantalla horaria indica la hora actual (o la hora
programada para la acción durante la lectura o
programación del programador).
12
TEMPERATURA LÍMITE MÁXIMA
La temperatura límite máxima indica la máxima
temperatura establecida para la función de limitación
de temperatura.
13
TEMPERATURA LÍMITE MÍNIMA
La temperatura límite mínima indica la mínima
temperatura establecida para la función de limitación
de temperatura.
14
ICONO DEL PROGRAMADOR
Este icono indica que el programador está activado.
15
ICONOS DE ACCIÓN
Estos iconos representan las acciones asignadas a
cada día con el programador.
PANTALLA DEL PUNTO DE AJUSTE DE
TEMPERATURA
Esta pantalla indica la temperatura que ha de
mantener la instalación (no aparece en el modo
LIMITACIÓN de temperatura ni en los modos
VENTILADOR o DESHUMIDIFICACIÓN).
19
CONFIGURACIÓN
No aplicable, sólo está previsto para tareas de
mantenimiento.
20
ICONO DE DIRECCIÓN DEL FLUJO DE AIRE
Este icono indica la dirección del flujo de aire (sólo en
instalaciones con deflectores de aire motorizados).
21
NO DISPONIBLE
aparece en la pantalla cada vez que se
intente utilizar una opción que no esté instalada o
cuya función no esté disponible.
22
ICONO DE VELOCIDAD DEL VENTILADOR
Este icono muestra la velocidad establecida para el
ventilador.
23
ICONO MODO DESESCARCHE/ARRANQUE
EN CALIENTE
Este icono indica que el modo desescarche/
arranque en caliente está activado.
CZ-02RT11P
Control remoto
4PW15515-1
Manual de operación
3
24
ICONO TIEMPO DE LIMPIEZA DEL FILTRO
DE AIRE
32
Este icono indica que se debe limpiar el filtro de aire.
Consulte el manual de la unidad interior.
25
ICONO TIEMPO DE LIMPIEZA DEL
ELEMENTO
BOTONES DE AJUSTE DE TEMPERATURA
Estos botones se usan para establecer el punto de
ajuste actual o bien, durante el modo de programación, para establecer la temperatura programada
(incrementos de 1°C). Los dos botones sirven para
ajustar el día de la semana.
Este icono indica que se debe limpiar el elemento
(sólo
).
33
26
BOTÓN MODO DE VENTILACIÓN
El botón para el modo de ventilación acciona el
para más información, consulte el manual
.
Este botón tiene varias funciones. Dependiendo de
las últimas acciones del usuario, puede realizar las
siguientes funciones:
27
;
BOTÓN DE INTENSIDAD DE VENTILACIÓN
Este pulsador establece el nivel de ventilación; para
más información consulte el manual
.
28
BOTÓN INSPECCIÓN/ COMPROBACIÓN DE
FUNCIONAMIENTO
No aplicable, sólo está previsto para tareas de
mantenimiento.
29
BOTÓN DE PROGRAMACIÓN
Este botón tiene varias funciones.
Dependiendo de las últimas acciones del usuario, el
botón de programación puede realizar diferentes
funciones.
30
BOTÓN DEL PROGRAMADOR
Este botón activa o desactiva el programador.
1 seleccionar el modo operativo de la instalación
(VENTILACIÓN, DESHUMIDIFICACIÓN,
AUTOMÁTICO, ENFRIAMIENTO,
CALEFACCIÓN)
2 cambiar entre temperatura máxima y mínima en
el modo de limitación de temperatura
34
BOTÓN DE AJUSTE HORARIO
Estos botones se usan para poner en hora el reloj o
bien, durante el modo de programación, para ajustar
la hora de la acción programada. Los dos botones
tienen una función de autorepetitiva.
Manual de operación
4
BOTÓN DEL PUNTO DE AJUSTE/
LIMITACIÓN
Este botón bascula entre punto de ajuste, limitación
de temperatura y
(sólo en modo de
programación).
35
BOTÓN DE VELOCIDAD DEL VENTILADOR
Este botón bascula entre L (bajo), H (alto), HH (muy
alto) y
(automático).
36
31
BOTÓN CAMBIO DE OPERACIÓN/
BOTÓN DE AJUSTE DE LA DIRECCIÓN DEL
AIRE
Este botón permite el ajuste de la dirección del flujo
de aire.
CZ-02RT11P
Control remoto
4PW15515-1
37
BOTÓN DE REPOSICIÓN DEL ICONO DE
TIEMPO DE LIMPIEZA DEL FILTRO DE AIRE
2
CONFIGURACIÓN DEL PROGRAMADOR
Para configurar el programador consulte el capítulo 6.
"Uso del programador" en la página 11.
Este botón sirve para restablecer el icono de tiempo
de limpieza del filtro de aire.
4. Descripción de los modos operativos
3. Configuración del control remoto
1
SÓLO VENTILACIÓN
Este modo sirve para hacer circular el aire sin
calefacción ni enfriamiento.
Después de realizar la instalación, el usuario ya
puede configurar la hora en el reloj y el día de la
semana.
El control remoto consta de un programador que
permite al usuario el manejo automático de la
instalación; para poder utilizar el programador es
necesario configurar la hora y el día de la semana.
1
FUNCIÓN AJUSTE DE LA HORA
Mantenga pulsado el botón
durante
5 segundos. En cuanto el indicador de hora y del día
de la semana parpadeen ya se pueden modificar.
Pulse los botones
&
para ajustar el
reloj. Cada vez que pulse el botón de ajuste horario,
la hora se verá incrementada o reducida en 1 minuto.
Al mantener el botón
o
pulsado, la
hora se verá incrementada o disminuida en
10 minutos.
Pulse los botones
y
para ajustar el
día de la semana. Cada vez que pulse el botón
o
aparecerá en pantalla el día
siguiente o el anterior.
Pulse el botón
para confirmar la hora y el día de
la semana que ha establecido.
Si se deja el control remoto con la hora y la lectura
del día de la semana parpadeando, sin manipularlo
durante 5 minutos, tanto la hora como el día de la
semana retornarán a su anterior valor; la función de
ajuste de hora dejará de estar activada.
CZ-02RT11P
Control remoto
4PW15515-1
2
DESHUMIDIFICACIÓN
Este modo sirve para rebajar la humedad del aire con
un descenso mínimo de temperatura.
La temperatura y velocidad del ventilador están
controlados automáticamente y no se pueden
controlar utilizando el control remoto.
No es posible accionar la función de deshumidificación si la temperatura de la habitación es demasiado
baja.
3
OPERACIÓN AUTOMÁTICA
Este modo hace que el control remoto cambie
automáticamente entre la función calefacción y
enfriamiento, según lo requiera el punto de ajuste o la
limitación de temperatura establecidos.
4
ENFRIAMIENTO
Este modo hace posible la activación del sistema de
enfriamiento según lo requiera el punto de ajuste o la
limitación de temperatura.
5
CALEFACCIÓN
Este modo hace posible la activación del sistema de
calefacción, según lo requiera el punto de ajuste o la
limitación de temperatura.
Manual de operación
5
Arranque caliente (sólo modelos con bomba de
calor)
5. Operación
Al inicio de una operación de calentamiento, el
ventilador de la unidad interior permanece parado
hasta que el intercambiador de calor alcanza una
determinada temperatura; en la pantalla aparece
. Esto impedirá que la unidad interior
produzca aire frío.
Operación manual
Desescarche (sólo modelos con bomba de calor)
Durante la operación de calentamiento es posible
que se congele el intercambiador de calor externo. Si
esto ocurre, la capacidad de calentamiento del
sistema se verá reducida y el sistema accionará la
operación de desescarche. El ventilador de la unidad
interior se detiene y en pantalla aparece
.
Tras un máximo de 10 minutos desde el inicio del
desescarche, el sistema retorna al funcionamiento de
calefacción.
6
LIMITACIÓN DE TEMPERATURA
y
La limitación de temperatura es un modo adicional
que sirve para conservar la temperatura de la
habitación dentro de unos límites establecidos. Los
iconos
y
aparecen en pantalla para confirmar
que la limitación de temperatura está activada.
7
NADIE EN CASA
NADIE EN CASA es una función que sirve para
conservar la temperatura de la habitación por encima
de los 10°C mientras que los ocupantes de la misma
están ausentes. Esta función encenderá la
calefacción si la instalación está apagada.
Manual de operación
6
En la operación manual, el usuario decide los valores
de funcionamiento de la instalación. El último valor
introducido permanece activo hasta que el usuario lo
modifique.
Como el control remoto puede aplicarse a una gran
variedad de instalaciones y funciones, podría
suceder que usted haya seleccionado una función no
disponible en su instalación; si esto ocurre aparecerá
el mensaje
.
Utilice el botón
para seleccionar el modo
operativo que usted desee.
Sólo ventilación
Deshumidificación
Operación automática
Enfriamiento
Calefacción
Pulse el botón
para cambiar entre limitación
de temperatura y las otras funciones que aparecen
descritas arriba.
En el modo limitación de temperatura, utilice el botón
para seleccionar el ajuste de temperaturas
mínima y máxima de referencia. Utilice los botones
o
para establecer los valores
deseados de temperatura mínima y temperatura
máxima.
CZ-02RT11P
Control remoto
4PW15515-1
1
SÓLO VENTILADOR
Parámetros ajustables por el usuario:
•
Velocidad del ventilador, pulse el botón
,
•
Ajuste de la dirección del aire, use el botón
,
•
Modo de ventilación, use el botón
,
•
Intensidad de ventilación, pulse el botón
,
2
DESHUMIDIFICACIÓN
Parámetros ajustables por el usuario:
•
Para el ajuste de la dirección del flujo de aire,
use el botón
,
•
Para el modo de ventilación, pulse el botón
,
•
Para el nivel de ventilación, pulse el botón
3
OPERACIÓN AUTOMÁTICA
,
Parámetros ajustables por el usuario:
•
Temperatura de punto de ajuste, pulse los
botones
y
,
•
Para la velocidad del ventilador, pulse el botón
,
•
Para ajustar la dirección del flujo de aire,
presione el botón
,
•
Para el modo de ventilación, pulse el botón
,
•
Para el nivel de ventilación, pulse el botón
,
4
ENFRIAMIENTO
Parámetros ajustables por el usuario:
•
Para la temperatura del punto de ajuste, pulse
los botones
y
,
•
Para la velocidad del ventilador, pulse el botón
,
•
Para el ajuste de la dirección del flujo de aire,
presione el botón
,
•
Para el modo de ventilación, pulse el botón
,
•
Para el nivel de ventilación, pulse el botón
,
CZ-02RT11P
Control remoto
4PW15515-1
5
CALEFACCIÓN
Parámetros ajustables por el usuario:
•
Para la temperatura del punto de ajuste, pulse
los botones
y
,
•
Para la velocidad del ventilador, pulse el botón
,
•
Para el ajuste de la dirección del flujo de aire,
presione el botón
,
•
Para el modo de ventilación, pulse el botón
,
•
Para el nivel de ventilación, pulse el botón
,
6
LIMITACIÓN DE TEMPERATURA
Parámetros ajustables por el usuario:
•
Para la velocidad del ventilador, pulse el botón
,
•
Para el ajuste de la dirección del flujo de aire,
presione el botón
,
•
Para el modo de ventilación, pulse el botón
,
•
Para el nivel de ventilación, pulse el botón
,
FUNCIONES ADICIONALES DEL CONTROL REMOTO
1
NADIE EN CASA
Para activar la función Nadie en casa pulse los
botones
y
simultáneamente.
RECUERDE QUE EL BOTÓN
SIEMPRE DEBE PERMANECER APAGADO
(OFF) PARA GARANTIZAR QUE LA
FUNCIÓN NADIE EN CASA PUEDA
ACTIVARSE.
Manual de operación
7
2
Ajuste de la dirección del flujo de aire
Use el botón
para ajustar la dirección del flujo
de aire. Pulse el botón para cambiar entre dirección
del flujo de aire fija y variable. Utilice el icono
para establecer una dirección fija de flujo de aire
pulsando el botón
cuando el icono
indique la dirección deseada.
NOTA
Incluso habiendo seleccionado una
dirección de flujo de aire fija, es posible
activar la dirección de flujo de aire
variable automáticamente para mantener
el buen funcionamiento de su instalación.
3
PROGRAMADOR
A continuación se describen todas las características,
así como la operación y uso del programador.
Operación del programador
Durante el funcionamiento programado la instalación
es controlada también por el programador. Las
acciones planificadas en el programador se
ejecutarán automáticamente.
El programador siempre obedece la última
instrucción; esto significa que el usuario puede
detener temporalmente la ejecución de la última
orden programada. Vea "Operación manual" en la
página 6. La siguiente acción programada (en el
programador) devolverá el control al programador.
Pulse el botón
para activar o desactivar el
programador.
NOTA
El programador anula el botón
,
utilice sólo el botón
para activar o
desactivar el programador. El programador
está activado cuando el icono
está
visible. El botón
sólo anula al
programador hasta la siguiente acción
programada.
Manual de operación
8
Las acciones programadas siguen un
horario establecido. Asegúrese de que el
reloj y el día de la semana están
configurados correctamente. Vea "FUNCIÓN
AJUSTE DE LA HORA" en la página 5.
Ajuste el reloj manualmente para los
horarios de verano e invierno. Vea
"FUNCIÓN AJUSTE DE LA HORA" en la
página 5.
Si se produce un fallo de alimentación
eléctrica durante más de 1 hora, la hora y el
día de la semana se reinicializarán. Consulte
el capítulo "FUNCIÓN AJUSTE DE LA
HORA" en la página 5 para ajustar la hora
en el reloj y el día de la semana.
Las acciones programadas en el programador no se perderán tras un fallo en el
suministro de energía eléctrica; no será
necesario
programar
de
nuevo
el
programador.
Para configurar el PROGRAMADOR consulte el
capítulo 6. "Uso del programador" en la página 11.
¿Qué posibilidades ofrece el programador?
El concepto del programador es sencillo, directo y sin
embargo, sumamente eficaz.
El programador puede dar 3 tipos de orden:
1 arrancar la instalación a una hora programada,
manteniendo la temperatura establecida como
punto de ajuste (para el control de temperatura
exacta)
2 apagar la instalación (fin del control)
3 encender la instalación a una hora programada,
en el modo de limitación de temperatura
CZ-02RT11P
Control remoto
4PW15515-1
El programador puede aceptar un máximo de
5 acciones al día.
Es posible programar un máximo de 5 acciones
diarias, lo que totaliza un máximo de 35 acciones
semanales. La primera acción programada para un
día determinado es la acción nº 1, la última acción
programada para un día determinado podría ser la
acción nº 1 (en caso de que sólo exista una acción
programada para ese día en concreto) hasta la
acción nº 5.
Es de vital importancia que comprenda que
el número asignado a la acción programada
NO DETERMINA CUÁNDO se va a ejecutar
la acción programada. Sólo la HORA,
siendo parte de la información introducida al
programar la acción, determinará cuándo se
va a ejecutar la acción programada.
¿Cuáles son las funciones que realiza
el programador?
Si se encuentra activado, el programador ejecutará
las acciones programadas.
Dará la orden a la instalación para:
•
enfriar o calentar, dependiendo de la función
actual; el punto de ajuste, en caso aplicable,
aparecerá en pantalla,
O BIEN,
•
apagar la instalación (el programador
permanece activado y reactiva la instalación
tal y como ha sido programada); la luz de
funcionamiento se apagará,
O BIEN,
•
enfriar o calentar, según sea necesario, para
conservar la temperatura de la habitación
dentro de un intervalo determinado (limitación
de temperatura); en la pantalla aparece
y
.
CZ-02RT11P
Control remoto
4PW15515-1
El programador modificará el modo operativo, sólo en la limitación de temperatura.
Para poder verificar las acciones programadas puede
consultar la lista de acciones programadas, como
aparece a continuación.
¿Cuáles son las funciones que NO
realiza el programador?
El programador no ejecuta las siguientes funciones:
•
control de la velocidad del ventilador,
•
control de la dirección del flujo de aire,
•
control del modo de ventilación,
•
control del nivel de ventilación,
•
modificación del modo operativo para un punto
de ajuste programado.
Los parámetros que aparecen en la lista de arriba se
pueden configurar manualmente, sin interferir en el
programador.
Existen otros controles remotos más sofisticados.
Para más información consulte a su distribuidor.
Consulta de las acciones programadas
en el programador (solo lectura)
Consulte el capítulo figura 2.
La consulta de las acciones planificadas en el
programador es un proceso secuencial. Sólo hay que
usar 2 botones para consultar todas las acciones del
programador.
El botón
sirve para iniciar una consulta, para
visualizar la siguiente acción programada o para
finalizar la consulta después de visualizar la última
acción programada.
El botón
sirve para finalizar la consulta
directamente (sin tener que pasar por cada una de
las acciones programadas).
Pulse el botón
para acceder al modo de
consulta, aparecerá el icono
y
parpadeará.
Manual de operación
9
NOTA
La consulta siempre comienza por el
lunes y finaliza en domingo.
Siga pulsando el botón
hasta que el indicador
del día de la semana muestre el día actual (sin
parpadear), entonces habrá finalizado la consulta.
NOTA
Compruebe el icono
. Si existe al menos
1 acción programada para el lunes, aparecerá un .
El reloj indica la hora para la que la acción
programada está prevista, y en pantalla aparecerá,
bien
,
,o
y
.
NOTA
Las temperaturas mencionadas arriba
han sido incluidas únicamente como
ejemplos, los valores de temperatura que
aparecen en su control remoto pueden
ser distintos.
Si no aparece
significa que no existen acciones
programadas para el lunes.
Pulse el botón
de nuevo para pasar al siguiente
día de la semana. Si
parpadea, significa que las
acciones programadas para el martes están siendo
consultadas.
El proceso descrito arriba se reinicia de nuevo.
Si existe al menos 1 acción programada para el
martes, aparecerá un . El reloj indica la hora a la
que la acción programada va a ser activada, y en
pantalla aparecerá
,
,o
y
.
Si no aparece
significa que no existen acciones
programadas para el martes.
Pulse el botón
para visualizar la siguiente acción
programada. Si hay una segunda acción programada
para el martes,
seguirá parpadeando y aparecerá
.
El número de veces que se debe pulsar
el botón
para finalizar la consulta
depende del número de acciones
planificadas en el programador.
Cómo interpretar las acciones
programadas
Para poder comprender el funcionamiento de su
instalación cuando el programador está activado es
importante observar todas las acciones programadas
para el día actual y quizás también la última acción
programada para el día de ayer.
Si la primera acción programada para hoy todavía no
ha sido activada, el estado actual de su instalación
depende, muy probablemente pero no necesariamente, de la última acción programada del día de
ayer. Lea el siguiente comentario con atención.
Si la primera acción programada para hoy ya está
activa, el estado actual de su instalación depende,
muy probablemente pero no necesariamente, de los
parámetros programados en la primera acción
programada de hoy. Lea el siguiente comentario con
atención.
NOTA
Para mantener el funcionamiento sencillo
de su instalación, es posible anular la
configuración del programador modificando sus valores actuales ("última
instrucción" cancela la ejecución de la
última orden dada por el programador
hasta
la
próxima
instrucción
programada).
Suponiendo que se hayan programado 5 acciones
para el jueves, será necesario pulsar 5 veces el botón
para visualizar todas las acciones programadas.
Manual de operación
10
CZ-02RT11P
Control remoto
4PW15515-1
Conclusión: Aunque aparezca en pantalla
, es
posible que alguien haya modificado la configuración.
La siguiente acción programada anulará la configuración modificada y la configuración al completo
volverá a ser tal y como fue programada.
Es posible que exista superposición de unas
acciones sobre otras; debido a la lógica de la "última
instrucción prevalece" será la última instrucción la
que se ejecute.
Cómo interpretar los mensajes de la
pantalla cuando el programador está
activado
Como se ha descrito arriba, la configuración del
programador, (y en consecuencia los mensajes que
aparecen en pantalla) podría anularse temporalmente por intervención manual.
Si desea usted estar completamente seguro de la
configuración del programador para este momento
determinado deberá consultar las acciones planificadas del programador. Consulte el capítulo "Consulta
de las acciones programadas en el programador" en
la página 9.
6. Uso del programador
Finalmente deberá introducir la hora del día cuando
esté previsto activar dicha acción.
NOTA
Primeros pasos
La planificación de acciones con el programador es
flexible (se pueden añadir, eliminar o modificar
acciones programadas cuando sea necesario) y
rápida (los pasos de programación están
simplificados al máximo).
A continuación aparecen algunos consejos útiles
para garantizar la correcta programación del
programador:
•
•
•
Cómo se realiza la programación
Como el programador se basa en una programación
semanal (cada semana se repetirán las mismas
acciones) deberá usted seleccionar primeramente el
día de la semana.
Después deberá seleccionar una acción:
1 arrancar la instalación a una hora programada,
manteniendo la temperatura establecida como
punto de ajuste (para el control de temperatura
exacta)
2 apagar la instalación (fin del control)
3 encender la instalación a una hora programada,
en el modo de limitación de temperatura
CZ-02RT11P
Control remoto
4PW15515-1
Si programa usted 2 o más acciones para
el mismo día y la misma hora, sólo se
ejecutará la acción con el número de
acción más elevado (2-5).
•
•
•
familiarícese con los iconos y botones, ya que
los necesitará a la hora de realizar la
programación,
familiarícese con la función de consulta, la
necesitará al comienzo de la programación.
Consulte el capítulo "Consulta de las acciones
programadas en el programador" en la
página 9,
rellene el formulario que se encuentra al final
de este manual: escriba la hora y la acción
requerida para cada día (recuerde que el
número de acciones está limitado a 5 por día),
tómese el tiempo de introducir toda la
información con exactitud,
intente programar las acciones de cada día en
un orden lógico (comience asignando la
acción 1 a la primera acción y termine
asignando el número más elevado a la última
acción). Esto no es un requisito obligatorio,
pero le facilitará mucho la tarea de interpretar
la programación posteriormente,
recuerde que siempre puede modificar, añadir
o eliminar las acciones programadas
posteriormente.
Manual de operación
11
Programación
1
EL PROGRAMADOR ESTÁ PROGRAMADO
POR PRIMERA VEZ
NOTA
Al cambiar el día durante la programación deberá confirmar "la última acción".
Cada día admite 5 acciones programadas (numeradas del 1 al 5) sin embargo,
es posible que por cualquier motivo usted
desee borrar una, varias o todas las
acciones programadas.
Para borrar las acciones programadas
deberá seleccionar la última acción que
desee conservar, esta podría ser la
acción 1 a 5 o ninguna acción (
aparecerá en la pantalla y no aparece ninguna
acción).
Todas las acciones programadas con un
número MAYOR del seleccionado, o
todas las acciones programadas si no se
ha seleccionado una última acción, se
borrarán.
PROGRAMACIÓN DEL PRIMER DÍA DE LA SEMANA
NOTA
En las instrucciones que aparecen a
continuación se presupone que usted
empezará a programar las acciones del
programador el lunes y terminará programando las acciones previstas para el
domingo.
Si prefiere NO comenzar el lunes, desplácese primero al día que usted desee y
a continuación acceda al modo de
PROGRAMACIÓN.
Manual de operación
12
En este caso no se han programado acciones
anteriormente, todas las acciones del programador
están inactivas.
•
Diríjase hasta el lunes pulsando el botón
.
Aparecerá el icono
,
parpadeará y uno
de los iconos
podría aparecer
en pantalla, sin embargo el resto de los
campos quedarán vacíos, indicando que no
hay acciones programadas para el lunes.
•
Acceda al modo de programación
manteniendo pulsado el botón
durante
5 segundos, el icono
parpadeará ahora
también.
•
Pulse el botón
para activar la primera
acción programada.
•
Visualizaremos un que parpadea, indicando
que la primera acción planificada para el lunes
está siendo programada; la temperatura
establecida y la pantalla del reloj parpadean.
•
Pulse el botón
para seleccionar, bien
ajuste de temperatura a un valor establecido,
, o bien limitación de temperatura.
•
Introduzca la temperatura deseada pulsando
los botones
y
.
•
•
Pulse el botón
para cambiar entre
temperatura mínima y temperatura máxima
que se quiere establecer para la limitación de
temperatura; la temperatura seleccionada
parpadeará.
Introduzca la hora prevista de puesta en
marcha de la acción, pulsando los botones
y
(intervalo mín. =
10 minutos).
CZ-02RT11P
Control remoto
4PW15515-1
NOTA
Si accidentalmente ha pulsado el botón
, acaba de activar la siguiente acción;
en la pantalla aparecerá
( fijo y
parpadeante). Pulse repetidamente el
botón
, hasta que en la pantalla
aparezca un
parpadeante. Ahora
puede continuar, estableciendo los
valores para la primera acción del
programador.
Si la acción y la hora correspondiente son correctas,
puede pasar a la segunda acción planificada del
programador. Esto se realiza pulsando el botón
,
la información se almacena y ya se puede programar
la siguiente acción en el programador.
La programación del resto de las acciones correspondientes al mismo día es similar.
Puede usted consultar las acciones del programador
pulsando el botón
.
NOTA
No se preocupe si añade acciones del
programador adicionales pulsando el
botón
repetidas veces, éstas se
pueden borrar al terminar el día actual.
Cuando ya se han introducido todos los datos para
las acciones del programador previstas para el lunes,
deberá usted confirmar las acciones programadas.
Asegúrese de que la última acción del programador
que desea conservar está seleccionada (las acciones
de programador con un número mayor de aquél se
borrarán).
CZ-02RT11P
Control remoto
4PW15515-1
Después deberá escoger entre 2 opciones:
1 CONFIRMACIÓN Y COPIA AL SIGUIENTE DÍA
Las acciones del programador programadas
para el día actual son válidas también para el
día siguiente: use la función "confirmación de la
última acción y copia de las acciones al día
siguiente" pulsando los botones
y
simultáneamente durante 5 segundos.
2 SÓLO CONFIRMAR
Las acciones del programador programadas
para el día actual son válidas sólo para el día
seleccionado: use la función "confirmación de la
última acción y salto al día siguiente" pulsando
el botón
durante 5 segundos.
El modo de programación es abandonado y dependiendo de la opción escogida, las acciones quedan
programadas para el lunes (y posiblemente para el
martes).
PROGRAMACIÓN DEL RESTO DE LOS DÍAS DE
LA SEMANA
La programación del resto de los días de la semana
es idéntica a la programación del primer día de la
semana.
parpadea para indicar el día
seleccionado,
y están fijos si las acciones han
sido copiadas del lunes al martes; sólo
aparece
en la pantalla si no se ha copiado ninguna acción del
lunes al martes.
Manual de operación
13
2
CÓMO MODIFICAR ACCIONES
PROGRAMADAS
Modificar acciones previamente programadas es
sencillo.
Asegúrese de que no se encuentra en modo de
programación (
no parpadea); si es necesario,
pulse el botón
para abandonar el modo de
programación.
Desplácese hasta las acciones programadas usando
el botón
, seleccione el día y la acción que desea
modificar.
Seleccione la "última acción" que desee conservar
pulsando el botón
. Todas las acciones de un
número superior se borrarán.
Confirme la operación de borrado pulsando el botón
durante 5 segundos,
O BIEN,
confirme la operación de borrado para el día actual y
también para el día siguiente pulsando los botones
y
simultáneamente durante 5 segundos.
NOTA
Pulse el botón
durante 5 segundos; el modo de
programación se activa, el icono
y la acción
seleccionada parpadean.
Modifique la configuración usando los mismos
botones que se describen arriba.
Seleccione la "última acción" por medio del botón
y decida si desea o no desea copiar las acciones
programadas al día siguiente (pulsando los botones
y
simultáneamente, o bien, pulsando
sólo el botón
durante 5 segundos).
3
CÓMO BORRAR UNA O MÁS ACCIONES
PROGRAMADAS
Asegúrese de que no se encuentra en modo de
programación (
sin parpadeo); si es necesario,
pulse el botón
para abandonar el modo de
programación.
Desplácese hasta
pulsando el botón
modificar.
las acciones programadas
, seleccione el día que desea
En el caso de arriba, si por ejemplo, la
última acción fue la número 3, las
acciones programadas números 4 y 5
también se borrarán (si es que existían).
4
CÓMO BORRAR TODAS LAS ACCIONES
PROGRAMADAS DE UNA SOLA VEZ
Abandone la programación o la consulta.
Pulse los botones
y
simultáneamente
durante 5 segundos; el icono
se invertirá y
desaparecerá para confirmar la operación de
borrado.
7. Mantenimiento
El control remoto no necesita mantenimiento.
Retire la suciedad utilizando un paño ligeramente
humedecido.
NOTA
Utilice sólo agua corriente limpia para
humedecer el paño.
Pulse el botón
durante 5 segundos; el modo de
programación se activa, el icono
y la acción
seleccionada parpadean.
Manual de operación
14
CZ-02RT11P
Control remoto
4PW15515-1
8. Solución de problemas
Notas
Las instrucciones que aparecen a continuación
pueden ayudarle a resolver su problema. Si no
encuentra solución al problema, consulte a su
instalador.
No aparecen mensajes en el control remoto
(pantalla en blanco)
Compruebe si la red eléctrica ha sido conectada a su
instalación.
Sólo aparece
en la pantalla
Esto indica que la instalación acaba de ser conectada
a la red de distribución eléctrica, espere hasta que
desaparezca.
El programador funciona pero las acciones
programadas se ejecutan en el momento
inadecuado (por ej., una hora antes o después de
lo previsto)
Compruebe que la hora y el día de la semana estén
configurados correctamente, corrija esto si es
necesario (consulte el capítulo "FUNCIÓN AJUSTE
DE LA HORA" en la página 5).
No puedo activar el programador (el icono
parpadea durante 2 segundos y desaparece)
El programador aún no ha sido programado. Primero
programe el programador (consulte el capítulo "Uso
del programador" en la página 11).
No puedo activar el programador (el icono
aparece en la pantalla)
El programador no puede activarse si un control
centralizado se encuentra conectado.
No se puede seleccionar la limitación de
temperatura
La limitación de temperatura no se encuentra
disponible en instalaciones de sólo enfriamiento.
CZ-02RT11P
Control remoto
4PW15515-1
Manual de operación
15
CZ-02RT11P
Comando a distanza
GRAZIE
PER
AVER
ACQUISTATO
QUESTO
COMANDO.
PRIMA
DI
UTILIZZARE L'APPARECCHIO LEGGERE
ATTENTAMENTE QUESTO MANUALE.
DOPO AVER LETTO IL MANUALE,
CONSERVARLO IN UN LUOGO ACCESSIBILE PER UNA FUTURA NECESSITÀ.
Prima dell'utilizzo, contattare il rivenditore
per tutte le informazioni in merito
all'installazione di climatizzazione.
AVVISO
- Non far bagnare il comando a distanza per evitare
eventuali scosse elettriche o incendi.
- Non premere con un oggetto duro ed appuntito i
pulsanti del comando a distanza. In caso contrario
il comando a distanza potrebbe risultare
danneggiato.
- Non tentare di ispezionare o di manutenere il
comando a distanza. Rivolgersi a una persona
qualificata per il servizio di assistenza tecnica.
Indice
pagina
1. Caratteristiche e funzioni....................................... 1
2. Nomi e funzioni degli interruttori e delle icone ...... 2
3. Impostazione del comando a distanza .................. 5
4. Descrizione delle modalità di funzionamento........ 5
5. Funzionamento...................................................... 6
6. Programmazione del timer .................................. 11
Manuale d'uso
1
Manuale d'uso
1. Caratteristiche e funzioni
Il modello CZ-02RT11P è un comando a distanza
tecnologicamente avanzato che consente il controllo
completo dell'installazione.
1
COMANDO A DISTANZA DI BASE
Le funzioni del comando a distanza di base sono:
•
pulsante ON/OFF
•
commutazione della modalità di
funzionamento
•
regolazione della temperatura
•
regolazione del volume d'aria
•
regolazione della direzione di mandata
dell'aria
2
OROLOGIO
Le funzioni dell'orologio sono:
•
orologio in tempo reale (24 ore)
•
indicatore del giorno della settimana
3
TIMER DI PROGRAMMAZIONE
Le funzioni del timer di programmazione sono:
•
è possibile programmare al massimo 5 azioni
per ogni giorno della settimana (per un totale
di 35 azioni),
•
in qualsiasi momento è possibile attivare/
disattivare il timer di programmazione,
•
ogni azione designa un'operazione di
funzionamento collegata a una temperatura
impostata, un funzionamento con limite oppure
un'operazione di spegnimento,
•
"l'ultimo comando" sostituisce il comando
precedente fino al comando programmato
successivo.
CZ-02RT11P
Comando a distanza
4PW15515-1
4
FUNZIONAMENTO CON LIMITE
Il funzionamento con limite consente il comando del
termostato nella gamma delle temperature minima e
massima impostate. L'impostazione della temperatura minima attiva il riscaldamento, mentre
l'impostazione della temperatura massima attiva il
raffreddamento.
5
FUNZIONE HOME LEAVING
La funzione HOME LEAVING impedisce l'abbassamento della temperatura nella stanza quando gli
occupanti sono assenti per un periodo prolungato. Se
la temperatura della stanza scende sotto i 10°C, il
riscaldamento viene avviato automaticamente. Non
appena vengono raggiunti i 15°C, il comando torna
allo stato iniziale.
6
LIVELLI DI AUTORIZZAZIONE
È possibile impostare tre livelli di autorizzazione
gerarchici per limitare le azioni degli utenti.
2. Nomi e funzioni degli interruttori e
delle icone (Vedere la figura 1)
1
PULSANTE ON/OFF
Premere il pulsante ON/OFF per avviare o arrestare il
sistema.
2
SPIA DI FUNZIONAMENTO
La spia di funzionamento si accende durante l'utilizzo
oppure lampeggia se si verifica un malfunzionamento.
3
ICONA DELLA MODALITÀ DI
FUNZIONAMENTO
Tali icone indicano la modalità di funzionamento corrente
(VENTILAZIONE, DEUMIDIFICAZIONE, AUTOMATICO,
RAFFREDDAMENTO, RISCALDAMENTO).
CZ-02RT11P
Comando a distanza
4PW15515-1
4
ICONA DELLA MODALITÀ VENTILAZIONE
Tali icone indicano la modalità di ventilazione corrente
(solo
) (AUTOMATICA, SCAMBIO DI CALORE,
BYPASS).
5
ICONA DI VENTILAZIONE
L'icona di ventilazione viene visualizzata quando la
ventilazione viene regolata con il relativo pulsante
della quantità (solo
). La quantità di ventilazione
viene inoltre indicata dall'icona della velocità del
ventilatore (vedere 22).
6
ICONA DI DEPURAZIONE DELL'ARIA
Tale icona indica il funzionamento dell'unità di
depurazione dell'aria (optional).
7
ICONA DELLA FUNZIONE HOME LEAVING
L'icona della funzione Home Leaving mostra lo stato
della funzione Home Leaving.
ON/ATTIVAZIONE
La funzione Home Leaving
è attivata
LAMPEGGIANTE
La funzione Home Leaving
è utilizzata
OFF/
DISATTIVAZIONE
La funzione Home Leaving
è disattivata
8
ICONA DI CONTROLLO ESTERNO
Tale icona indica che un altro comando a distanza
con una priorità superiore controlla o disattiva
l'installazione.
Manuale d'uso
2
9
ICONA DI COMMUTAZIONE CON
CONTROLLO CENTRALIZZATO
Tale
icona
indica
che
la
commutazione
dell'installazione è comandata da un controllo
centralizzato assegnato a un'altra unità interna
oppure a un selettore raffreddamento/riscaldamento
optional collegato all'unità interna (= comando a
distanza principale).
16
ICONA OFF/SPEGNIMENTO
Tale icona indica che è stata selezionata l'azione
OFF/SPEGNIMENTO durante la programmazione del
timer.
17
RICHIESTA DI ISPEZIONE
e
Tali icone indicano la necessità di un'ispezione.
Rivolgersi all'installatore.
INDICATORE DEL GIORNO DELLA
SETTIMANA
L'indicatore del giorno della settimana mostra il
giorno corrente della settimana (oppure il giorno
impostato durante la lettura o la programmazione del
timer).
18
11
DISPLAY DELL'OROLOGIO
Il display dell'orologio indica l'ora corrente (oppure
l'ora di un'azione durante la lettura o la
programmazione del timer).
19
IMPOSTAZIONE
Tale icona non viene utilizzata ed è a solo scopo di
manutenzione.
10
INDICAZIONE DELLA TEMPERATURA
IMPOSTATA
Tale indicazione riporta la temperatura impostata
corrente dell'installazione (e non viene visualizzata
nel funzionamento con limite, né in modalità
VENTILAZIONE o DEUMIDIFICAZIONE).
12
TEMPERATURA IMPOSTATA MASSIMA
La temperatura impostata massima indica la
temperatura massima stabilita per il funzionamento
con limite.
20
ICONA DELLA DIREZIONE DI MANDATA
DELL'ARIA
Tale icona indica la direzione di mandata dell'aria
(solo per le installazioni dotate di deflettori di
mandata motorizzati).
13
TEMPERATURA IMPOSTATA MINIMA
La temperatura impostata minima indica la
temperatura minima stabilita per il funzionamento con
limite.
21
NON DISPONIBILE
L'indicazione
viene visualizzata nel momento
in cui viene attivato un optional non installato o una
funzione non è disponibile.
14
ICONA DEL TIMER
Tale icona indica che il timer è attivato.
22
15
ICONE DI AZIONE
Tali icone indicano le azioni per ogni giorno del
programma del timer.
Tale icona indica la velocità impostata del ventilatore.
23
ICONA DELLA VELOCITÀ DEL
VENTILATORE
ICONA DELLA MODALITÀ SBRINAMENTO/
AVVIAMENTO IN RISCALDAMENTO
Tale icona indica che è stata attivata la modalità
sbrinamento/avviamento in riscaldamento.
Manuale d'uso
3
CZ-02RT11P
Comando a distanza
4PW15515-1
24
ICONA DI PULIZIA DEL FILTRO DELL'ARIA
Tale icona indica la necessità di pulire il filtro dell'aria
(consultare il manuale dell'unità interna).
25
ICONA DI PULIZIA DELL'ELEMENTO
Tale icona indica la necessità di pulizia dell'elemento
(solo
).
26
ICONA DELLA MODALITÀ VENTILAZIONE
31
PULSANTI DI REGOLAZIONE DELL'ORA
Tali pulsanti vengono utilizzati per regolare l'orologio
oppure, nella modalità di programmazione, per
regolare l'ora dell'azione programmata. Entrambi i
pulsanti dispongono della funzione di autoripetizione.
32
PULSANTI DI REGOLAZIONE DELLA
TEMPERATURA
Il pulsante della modalità VENTILAZIONE controlla il
(consultare il manuale del
per ulteriori
informazioni).
Tali pulsanti vengono utilizzati per regolare il set point
corrente oppure, in modalità di programmazione, per
regolare la temperatura di set point programmata
(gradino = 1°C). Entrambi i pulsanti vengono inoltre
utilizzati per regolare il giorno della settimana.
27
33
PULSANTE DELLA QUANTITÀ DI
VENTILAZIONE
Tale pulsante imposta la quantità di ventilazione
(consultare il manuale del
per ulteriori
informazioni).
28
PULSANTE DI ISPEZIONE/PROVA DI
FUNZIONAMENTO
Tale pulsante non viene utilizzato ed è a solo scopo di
manutenzione.
29
PULSANTE DI PROGRAMMAZIONE
Tale pulsante è multifunzionale.
A seconda delle operazioni eseguite in precedenza
dall'utente, il pulsante di programmazione può
presentare diverse funzioni.
30
PULSANTE DEL TIMER
Tale pulsante attiva o disattiva il timer.
PULSANTE DELLA COMMUTAZIONE DI
FUNZIONAMENTO
Tale pulsante è multifunzionale. A seconda delle
operazioni eseguite in precedenza dall'utente, tale
pulsante può presentare le seguenti funzioni:
1 seleziona la modalità di funzionamento
dell'installazione (VENTILAZIONE,
DEUMIDIFICAZIONE, AUTOMATICO,
RAFFREDDAMENTO, RISCALDAMENTO)
2 commuta tra la temperatura minima e la
temperatura massima durante il funzionamento
con limite
34
PULSANTE DI SET POINT/LIMITE
Tale pulsante commuta tra il set point, il
funzionamento con limite oppure lo spegnimento
(solo in modalità di programmazione).
35
PULSANTE DELLA VELOCITÀ DEL
VENTILATORE
Tale pulsante commuta tra L (bassa), H (alta), HH
(altissima) e
(automatica).
CZ-02RT11P
Comando a distanza
4PW15515-1
Manuale d'uso
4
36
TASTO DI REGOLAZIONE DELLA
DIREZIONE DI MANDATA DELL'ARIA
Tale pulsante consente di regolare la direzione di
mandata dell'aria.
37
PULSANTE DI RIARMO DELL'ICONA DI
PULIZIA DEL FILTRO DELL'ARIA
Tale pulsante viene utilizzato per riarmare l'icona di
pulizia del filtro dell'aria.
3. Impostazione del comando a distanza
Dopo l'installazione iniziale, è possibile impostare
l'orologio e il giorno della settimana.
Il comando a distanza è dotato di un timer che
consente
il
funzionamento
automatico
dell'installazione. Per utilizzare il timer è necessario
impostare l'orologio e il giorno della settimana.
1
IMPOSTAZIONE DELL'OROLOGIO
Tenere premuto per 5 secondi il pulsante
. Il
valore dell'orologio e l'indicatore del giorno della
settimana lampeggiano. Ora è possibile regolare
entrambe le impostazioni.
Utilizzare i pulsanti
e
per regolare
l'orologio. Ogni pressione del pulsante di regolazione
aumenta/diminuisce l'ora di 1 minuto. Se il pulsante
o
viene tenuto premuto, l'ora viene
aumentata/diminuita di 10 minuti.
Utilizzare i pulsanti
e
per regolare il
giorno della settimana. Ogni pressione dei pulsanti
o
visualizza il giorno successivo o
precedente.
Premere il pulsante
per confermare l'ora e il
giorno della settimana correnti impostati.
Quando i valori dell'orologio e del giorno della
settimana lampeggiano e il comando a distanza viene
lasciato inattivo per 5 minuti, l'orologio e il giorno della
settimana tornano alle impostazioni precedenti. La
funzione di impostazione dell'orologio viene
disattivata.
2
IMPOSTAZIONE DEL TIMER
Per impostare il timer, consultare il capitolo 6.
"Programmazione del timer" a pagina 11.
4. Descrizione delle modalità
di funzionamento
1
FUNZIONAMENTO IN SOLA VENTILAZIONE
In tale modalità, l'apparecchio provoca la circolazione
della
sola
aria
senza
riscaldamento
né
raffreddamento.
2
FUNZIONAMENTO DI DEUMIDIFICAZIONE
In tale modalità, l'umidità dell'aria viene ridotta con
una diminuzione minima della temperatura.
La temperatura e la velocità del ventilatore vengono
controllate automaticamente. Non è possibile
utilizzare il comando a distanza per controllare tali
impostazioni.
Il funzionamento di deumidificazione non è possibile
se la temperatura della stanza è eccessivamente
bassa.
3
FUNZIONAMENTO AUTOMATICO
In tale modalità, il comando a distanza commuta
automaticamente tra il riscaldamento e il raffreddamento in base alla temperatura di set point o di limite.
Manuale d'uso
5
CZ-02RT11P
Comando a distanza
4PW15515-1
4
FUNZIONAMENTO DI RAFFREDDAMENTO
In tale modalità, il raffreddamento viene attivato in
base alla temperatura di set point o di limite.
5
FUNZIONAMENTO DI RISCALDAMENTO
In tale modalità, il riscaldamento viene attivato in
base alla temperatura di set point o di limite.
Avviamento in riscaldamento (solo per i modelli a
pompa di calore)
All'avvio del funzionamento di riscaldamento, il
ventilatore interno viene fermato fino a che non viene
raggiunta una determinata temperatura dello
scambiatore di calore interno e viene visualizzato
. In tal modo non è possibile che l'aria
fredda fuoriesca dall'unità interna.
Sbrinamento (solo per i modelli a pompa di
calore)
Nel funzionamento di riscaldamento, è possibile che
si verifichi il congelamento dello scambiatore di
calore esterno. In tal caso, la capacità di riscaldamento del sistema si riduce e viene avviato
automaticamente il funzionamento in sbrinamento. Il
ventilatore dell'unità interna si ferma e viene
visualizzato
. Dopo un massimo di
10 minuti di funzionamento in sbrinamento il sistema
torna a funzionare in riscaldamento.
6
FUNZIONAMENTO CON LIMITE
e
Il funzionamento con limite è una modalità aggiuntiva
che consente di mantenere la temperatura ambiente
entro determinati limiti. Le icone
e
vengono
visualizzate per confermare l'attivazione del
funzionamento con limite.
CZ-02RT11P
Comando a distanza
4PW15515-1
7
FUNZIONE HOME LEAVING
La funzione HOME LEAVING consente di mantenere
la temperatura ambiente sopra i 10°C quando gli
occupanti non sono presenti nella stanza. Tale
funzione attiva il riscaldamento, se l'installazione è
spenta.
5. Funzionamento
Funzionamento manuale
Nel funzionamento manuale, l'utente decide le
impostazioni dell'installazione. L'ultima impostazione
resta attiva fino alla successiva modifica da parte
dell'utente.
Poiché il comando a distanza può essere utilizzato
per una vasta gamma di installazioni e caratteristiche,
è possibile che l'utente selezioni una funzione non
disponibile nell'installazione corrente. In tal caso,
viene visualizzato il messaggio
.
Utilizzare il pulsante
per selezionare la
modalità di funzionamento desiderata.
Funzionamento in sola ventilazione
Funzionamento di deumidificazione
Funzionamento automatico
Funzionamento di raffreddamento
Funzionamento di riscaldamento
Premere il pulsante
per commutare tra il
funzionamento con limite e le modalità di funzionamento elencate.
Nel funzionamento con limite, utilizzare il pulsante
per selezionare le impostazioni minima e
massima della temperatura. Utilizzare i pulsanti
o
per regolare le impostazioni
minima e massima della temperatura.
Manuale d'uso
6
1
FUNZIONAMENTO IN SOLA VENTILAZIONE
Parametri regolabili dall'utente
•
Velocità del ventilatore: utilizzare il pulsante
•
•
Direzione di mandata dell'aria: utilizzare
il pulsante
Modalità di ventilazione: utilizzare il pulsante
•
Quantità di ventilazione: utilizzare il pulsante
2
FUNZIONAMENTO DI DEUMIDIFICAZIONE
Parametri regolabili dall'utente
•
Direzione di mandata dell'aria: utilizzare il
pulsante
•
Modalità di ventilazione: utilizzare il pulsante
•
Quantità di ventilazione: utilizzare il pulsante
3
FUNZIONAMENTO AUTOMATICO
Parametri regolabili dall'utente
•
Temperatura di set point: utilizzare i pulsanti
e
•
Velocità del ventilatore: utilizzare il pulsante
•
4
FUNZIONAMENTO DI RAFFREDDAMENTO
Parametri regolabili dall'utente
•
Temperatura di set point: utilizzare i pulsanti
e
•
Velocità del ventilatore: utilizzare il pulsante
•
•
Direzione di mandata dell'aria: utilizzare il
pulsante
Modalità di ventilazione: utilizzare il pulsante
•
Quantità di ventilazione: utilizzare il pulsante
5
FUNZIONAMENTO DI RISCALDAMENTO
Parametri regolabili dall'utente
•
Temperatura di set point: utilizzare i pulsanti
e
•
Velocità del ventilatore: utilizzare il pulsante
•
•
Direzione di mandata dell'aria: utilizzare il
pulsante
Modalità di ventilazione: utilizzare il pulsante
•
Quantità di ventilazione: utilizzare il pulsante
•
Direzione di mandata dell'aria: utilizzare il
pulsante
Modalità di ventilazione: utilizzare il pulsante
6
FUNZIONAMENTO CON LIMITE
Parametri regolabili dall'utente
•
Velocità del ventilatore: utilizzare il pulsante
•
Quantità di ventilazione: utilizzare il pulsante
•
Manuale d'uso
7
•
Direzione di mandata dell'aria: utilizzare il
pulsante
Modalità di ventilazione: utilizzare il pulsante
•
Quantità di ventilazione: utilizzare il pulsante
CZ-02RT11P
Comando a distanza
4PW15515-1
CARATTERISTICHE AGGIUNTIVE DEL COMANDO
A DISTANZA
1
FUNZIONE HOME LEAVING
Premere contemporaneamente i pulsanti
e
per attivare la funzione HOME LEAVING.
È BENE RICORDARE CHE IL PULSANTE
DEVE ESSERE DISATTIVATO PER
GARANTIRE
L'ATTIVAZIONE
DELLA
FUNZIONE HOME LEAVING.
2
Impostazione della direzione di mandata
dell'aria
Utilizzare il pulsante
per regolare la direzione di
mandata dell'aria. Premere il pulsante per commutare
tra la direzione di mandata dell'aria fissa o variabile.
Utilizzare l'icona
per determinare la direzione di
mandata dell'aria fissa premendo il pulsante
quando l'icona
indica la direzione desiderata.
NOTA
Anche se è stata selezionata la direzione
di mandata dell'aria fissa, è possibile
attivare automaticamente la direzione di
mandata dell'aria variabile per garantire il
funzionamento ottimale dell'installazione.
3
TIMER
Tutte le caratteristiche, il funzionamento e la
programmazione del timer vengono descritti nella
presente sezione.
Funzionamento del timer
Nel funzionamento con il timer, l'installazione viene
controllata anche dal timer. Le azioni programmate
nel timer vengono eseguite automaticamente.
CZ-02RT11P
Comando a distanza
4PW15515-1
Il timer esegue sempre l'ultimo comando. Questo
significa che l'utente può temporaneamente
scavalcare l'ultima azione programmata eseguita.
Consultare "Funzionamento manuale" a pagina 6.
L'azione programmata successiva (nel timer)
restituisce il comando al timer.
Utilizzare il pulsante
per attivare o disattivare il
timer.
NOTA
Il timer scavalca il pulsante
.
Utilizzare il pulsante
solo per
attivare o disattivare il timer. Il timer è
attivato quando è visualizzata l'icona
.
Il pulsante
scavalca il timer solo
fino all'azione programmata successiva.
Il programma impostato si basa sull'ora.
Assicurarsi che l'orologio e il giorno della
settimana siano stati impostati correttamente.
Consultare
"IMPOSTAZIONE
DELL'OROLOGIO" a pagina 5.
Regolare manualmente l'orologio per l'ora
legale.
Consultare
"IMPOSTAZIONE
DELL'OROLOGIO" a pagina 5.
Un'interruzione dell'alimentazione superiore
a 1 ora azzera l'orologio e il giorno della
settimana. Consultare "IMPOSTAZIONE
DELL'OROLOGIO" a pagina 5 per regolare
l'orologio e il giorno della settimana.
Le azioni programmate nel timer non
vengono cancellate dopo un'interruzione
dell'alimentazione. Non è necessario
riprogrammare il timer.
Per impostare il TIMER, consultare il capitolo 6.
"Programmazione del timer" a pagina 11.
Manuale d'uso
8
Azioni possibili del timer
Il concetto alla base dell'utilizzo del timer è semplice
e diretto, ma utilissimo.
Il timer può ordinare 3 azioni:
1 accendere l'installazione in corrispondenza di
un'ora programmata, in combinazione con un set
point (controllo preciso della temperatura)
2 spegnere l'installazione (fine del controllo)
3 accendere l'installazione in corrispondenza di
un'ora programmata in funzionamento con limite
Il timer può accettare al massimo 5 azioni al
giorno.
Per ogni giorno della settimana è possibile
programmare al massimo 5 azioni, per un totale di
35 azioni programmate. L'azione programmata per
prima in un determinato giorno è l'azione 1, l'ultima
azione programmata per un giorno potrebbe essere
l'azione 1 (se per tale giorno è stata programmata
una sola azione), 2, 3, 4 o 5.
È importantissimo capire che il numero
assegnato all'azione programmata NON
DETERMINA il momento di esecuzione
dell'azione programmata. Solo l'ORA
(immessa insieme ai dati di programmazione
dell'azione) determina il momento di
esecuzione dell'azione.
OPPURE
•
spegnersi (il timer resta attivato e riaccende
l'installazione come programmato). La spia di
funzionamento si spegne.
OPPURE
•
raffreddare o riscaldare, a seconda di quanto
richiesto per mantenere la temperatura
ambiente entro un intervallo specificato
(funzionamento con limite). Vengono
visualizzati
e
.
Il timer può commutare solo alla modalità di
funzionamento con limite.
Per verificare il programma, è possibile visualizzare le
azioni programmate (vedere sotto).
Azioni impossibili del timer
Il timer non:
•
controlla la velocità del ventilatore
•
controlla la direzione di mandata dell'aria
•
controlla la modalità di ventilazione
•
controlla la quantità di ventilazione
•
cambia la modalità di funzionamento per un
set point programmato
I parametri elencati possono essere impostati
manualmente senza interferire con il timer.
Sono disponibili comandi a distanza più complessi.
Rivolgersi al rivenditore per ulteriori informazioni.
Azioni del timer
Se attivato, il timer esegue le azioni programmate.
Il timer ordina all'installazione di:
Visualizzazione delle azioni
programmate nel timer (sola lettura)
•
Consultare figura 2.
La visualizzazione delle azioni programmate nel timer
è un processo sequenziale. Per visualizzare l'intero
programma del timer vengono utilizzati solo
2 pulsanti.
raffreddare o riscaldare, a seconda del
funzionamento corrente (se applicabile). Viene
visualizzato il set point.
Manuale d'uso
9
CZ-02RT11P
Comando a distanza
4PW15515-1
Il pulsante
viene utilizzato per iniziare la
visualizzazione e aprire l'azione programmata
successiva oppure per uscire dalla visualizzazione
dopo aver aperto l'ultima azione programmata.
Il pulsante
viene utilizzato per uscire
immediatamente dalla visualizzazione (senza
scorrere tutte le azioni programmate).
Premere il pulsante
per entrare nella modalità di
visualizzazione. Appare l'icona
e
lampeggia.
NOTA
La visualizzazione inizia sempre con
lunedì e termina con domenica.
Se non viene visualizzato
state programmate azioni.
Premere il pulsante
per visualizzare l'azione
programmata successiva. Se per martedì è stata
programmata una seconda azione,
continua a
lampeggiare e viene visualizzato
.
Se per martedì sono state programmate 5 azioni, per
visualizzare tutte le azioni programmate è necessario
premere 5 volte il pulsante.
Continuare a premere il pulsante
per visualizzare
il giorno della settimana corrente (che non
lampeggia). La visualizzazione è terminata.
NOTA
Controllare l'icona
. Se per lunedì è stata
programmata almeno 1 azione, viene visualizzato .
L'orologio indica l'ora impostata
programmata. Vengono visualizzati
e
.
NOTA
per
,
l'azione
o
Le temperature citate sono solo esplicative: i valori visualizzati sul comando a
distanza possono essere diversi.
Se non viene visualizzato
state programmate azioni.
, per lunedì non sono
Premere nuovamente il pulsante
per passare
al giorno della settimana successivo.
lampeggia ad indicare che è in corso la
visualizzazione delle azioni programmate per
martedì.
Il processo già descritto viene ripetuto.
, per martedì non sono
Il numero di pressioni del pulsante
richieste per uscire dalla visualizzazione
dipende
dal
numero
di
azioni
programmate nel timer.
Interpretazione delle azioni
programmate
Per capire il comportamento dell'installazione con il
timer attivato, è importante esaminare tutte le azioni
programmate per il giorno corrente e forse l'ultima
azione programmata per ieri.
Se la prima azione programmata per oggi non è
ancora attivata, lo stato corrente dell'installazione
dipende probabilmente (ma non necessariamente)
dall'ultima azione programmata per ieri. Leggere la
seguente nota importante.
Se la prima azione programmata per oggi è già
attivata, lo stato corente dell'installazione dipende
probabilmente (ma non necessariamente) dai
parametri impostati per la prima azione programmata
di oggi. Leggere la seguente nota importante.
Se per martedì è stata programmata almeno
1 azione, viene visualizzato . L'orologio indica l'ora
impostata per l'azione programmata. Vengono
visualizzati
,
o
e
.
CZ-02RT11P
Comando a distanza
4PW15515-1
Manuale d'uso
10
NOTA
Per semplificare il funzionamento
dell'installazione, è possibile scavalcare
con facilità le impostazioni del timer
modificando l'impostazione corrente
("l'ultimo
comando"
sostituisce
il
comando precedente fino al comando
programmato successivo).
Conclusione: sebbene venga visualizzato
, è
possibile che le impostazioni siano state modificate.
L'azione programmata successiva sostituisce le
impostazioni modificate e tutte le impostazioni
tornano allo stato programmato.
È possibile che le azioni programmate si
sovrappongano: in tal caso, l'ultimo comando
programmato prevale in base alla logica della "priorità
dell'ultimo comando".
Interpretazione delle letture sul
display con il timer attivo
Come già descritto, le impostazioni del timer (e quindi
le letture sul display) possono essere scavalcate
temporaneamente da un intervento manuale.
Se si desidera accertare con sicurezza le
impostazioni correnti del timer, è necessario
visualizzare le azioni programmate. Consultare
"Visualizzazione delle azioni programmate nel timer"
a pagina 9.
Manuale d'uso
11
6. Programmazione del timer
Impostazioni da programmare
Poiché il timer si basa su un programma settimanale
(le stesse azioni vengono ripetute ogni settimana), è
innanzitutto necessario selezionare il giorno della
settimana.
È quindi necessario scegliere un'azione:
1 accendere l'installazione in corrispondenza di
un'ora programmata, in combinazione con un set
point (controllo preciso della temperatura)
2
spegnere l'installazione (fine del controllo)
3 accendere l'installazione in corrispondenza di
un'ora programmata in funzionamento con limite
Infine, è necessario immettere l'ora del giorno per
l'attivazione dell'azione.
NOTA
Se si programmano 2 o più azioni per lo
stesso giorno e la stessa ora, viene
eseguita solo l'azione associata al
numero più elevato (da 2 a 5).
CZ-02RT11P
Comando a distanza
4PW15515-1
Operazioni preliminari
La programmazione del timer è flessibile (è possibile
aggiungere, eliminare o modificare le azioni
programmate in qualsiasi momento) e diretta (le fasi
di programmazione sono minime).
Di seguito sono indicati alcuni suggerimenti per
garantire la programmazione ottimale del timer.
•
•
•
•
•
•
Imparare le icone e i pulsanti, che saranno
necessari per la programmazione.
Imparare la funzione di visualizzazione, che
sarà necessaria per iniziare la
programmazione. Consultare "Visualizzazione
delle azioni programmate nel timer" a
pagina 9.
Compilare il modulo in fondo al presente
manuale. Annotare l'ora e l'azione richiesta per
ogni giorno (è bene ricordare che è possibile
programmare al massimo 5 azioni al giorno).
Immettere con calma e precisione tutti i dati.
Programmare le azioni per ogni giorno in
sequenza logica (iniziare con l'azione 1 per la
prima azione e terminare con il numero più
elevato per l'ultima azione). Tale accorgimento
non è obbligatorio, ma semplifica
l'interpretazione successiva del programma.
Ricordarsi che è sempre possibile modificare,
aggiungere o eliminare le azioni programmate
in un momento successivo.
Programmazione
1
IL TIMER VIENE PROGRAMMATO PER LA
PRIMA VOLTA
NOTA
Quando si modifica il giorno durante la
programmazione, è necessario confermare "l'ultima azione". Per ogni giorno
è possibile programmare 5 azioni
(numerate da 1 a 5), ma è anche possibile che sia necessario eliminarne una,
svariate o tutte.
Per eliminare le azioni programmate, è
necessario selezionare l'ultima azione da
conservare (un'azione da 1 a 5 oppure
nessuna azione: viene visualizzato
e
non viene visualizzata alcuna azione).
Vengono eliminate tutte le azioni programmate con un numero SUPERIORE
all'azione selezionata oppure tutte le
azioni programmate (se non è stata
selezionata alcuna ultima azione).
PROGRAMMAZIONE DEL PRIMO GIORNO DELLA
SETTIMANA
NOTA
Nelle seguenti linee guida si presuppone
che la programmazione delle azioni del
timer venga iniziata da lunedì e venga
terminata con domenica.
Se si preferisce NON iniziare da lunedì,
visualizzare innanzitutto il giorno desiderato e quindi entrare nella modalità di
programmazione.
CZ-02RT11P
Comando a distanza
4PW15515-1
Manuale d'uso
12
Se non sono già state programmate azioni, tutte le
azioni del timer sono disattivate.
•
Visualizzare lunedì premendo il pulsante
.
Viene visualizzata l'icona
,
lampeggia
ed è possibile che venga visualizzata una delle
icone
. Tutti gli altri campi
restano vuoti ad indicare che per lunedì non
sono state programmate azioni.
•
Entrare nella modalità di programmazione
tenendo premuto per 5 secondi il pulsante
. Anche l'icona
lampeggia.
•
Premere il pulsante
per attivare la prima
azione programmata.
•
Viene visualizzata l'indicazione lampeggiante
ad indicare che la prima azione per lunedì
è in fase di programmazione. La temperatura
impostata e il display dell'orologio
lampeggiano.
•
Premere il pulsante
per selezionare la
temperatura impostata, lo spegnimento
o il funzionamento con limite.
•
Immettere la temperatura desiderata
utilizzando i pulsanti
e
.
•
•
Premere il pulsante
per commutare tra
la temperatura impostata minima e la
temperatura impostata massima in
funzionamento con limite. La temperatura
selezionata lampeggia.
Immettere l'ora di inizio dell'azione utilizzando
i pulsanti
e
(gradino min =
10 minuti).
Manuale d'uso
13
NOTA
Se è stato premuto il pulsante
per
errore, è stata attivata l'azione successiva.
Viene visualizzato
( fisso e
lampeggiante). Premere ripetutamente il
pulsante
fino a che non viene
visualizzata l'indicazione
lampeggiante.
Ora è possibile proseguire la regolazione
delle impostazioni per la prima azione
programmata del timer.
Se l'azione e l'ora corrispondente sono corrette, è
possibile passare alla seconda azione programmata
del timer. Per eseguire tale operazione, premere il
pulsante
. I dati vengono salvati ed è possibile
programmare l'azione successiva del timer.
La programmazione delle azioni restanti del timer per
lo stesso giorno si svolge in modo analogo.
È possibile visualizzare le azioni del timer premendo
il pulsante
.
NOTA
Se sono state aggiunte altre azioni del
timer premendo ripetutamente il pulsante
, è possibile eliminarle al termine del
giorno corrente.
Una volta immessi tutti i dati delle azioni del timer per
lunedì, è necessario confermare le azioni
programmate.
Assicurarsi che l'ultima azione del timer da
conservare sia selezionata (le azioni del timer con un
numero superiore vengono eliminate).
CZ-02RT11P
Comando a distanza
4PW15515-1
Ora è necessario scegliere tra 2 opzioni:
1 CONFERMA E COPIA AL GIORNO SUCCESSIVO
L'azione del timer programmata per il giorno
corrente è valida anche per il giorno successivo:
utilizzare la funzione "conferma ultima azione
e copia azioni al giorno successivo" premendo
contemporaneamente per 5 secondi i pulsanti
e
.
2 SOLO CONFERMA
L'azione del timer programmata per il giorno
corrente è valida solo per il giorno selezionato:
utilizzare la funzione "conferma ultima azione
e vai al giorno successivo" premendo per
5 secondi il pulsante
.
La modalità di programmazione viene chiusa. A
seconda delle impostazioni memorizzate, le azioni
programmate vengono salvate per lunedì (ed
eventualmente per martedì).
PROGRAMMAZIONE DEGLI ALTRI GIORNI DELLA
SETTIMANA
La programmazione degli altri giorni della settimana è
identica alla programmazione del primo giorno della
settimana.
lampeggia ad indicare il giorno
selezionato, le icone
e sono fisse se le azioni
sono state copiate da lunedì a martedì, mentre viene
visualizzato solo
se le azioni non sono state
copiate da lunedì a martedì.
2
MODIFICA DELLE AZIONI PROGRAMMATE
La modifica delle azioni programmate è facile.
Assicurarsi di non essere nella modalità di
programmazione (
non lampeggia). Se richiesto,
premere il pulsante
per uscire dalla modalità di
programmazione.
CZ-02RT11P
Comando a distanza
4PW15515-1
Visualizzare le azioni programmate utilizzando il
pulsante
. Selezionare il giorno e l'azione da
modificare.
Premere per 5 secondi il pulsante
. Viene attivata
la modalità di programmazione, mentre l'icona
e
l'azione selezionata lampeggiano.
Modificare le impostazioni utilizzando gli stessi
pulsanti già descritti.
Selezionare "l'ultima azione" utilizzando il pulsante
e decidere se copiare o meno le azioni
programmate al giorno successivo (premendo
contemporaneamente i pulsanti
e
oppure premendo solo il pulsante
per 5
secondi).D
3
ELIMINAZIONE DI UNA O PIÙ AZIONI
PROGRAMMATE
Assicurarsi di non essere nella modalità di
programmazione (
non lampeggia). Se richiesto,
premere
per uscire dalla modalità di
programmazione.
Visualizzare le azioni programmate utilizzando il
pulsante
. Selezionare il giorno da modificare.
Premere per 5 secondi il pulsante
. Viene attivata
la modalità di programmazione, mentre l'icona
e
l'azione selezionata lampeggiano.
Selezionare "l'ultima azione" da conservare
utilizzando il pulsante
. Tutte le azioni associate a
un numero superiore vengono eliminate.
Confermare l'eliminazione premendo per 5 secondi il
pulsante
.
OPPURE
Confermare l'eliminazione del giorno corrente e del
giorno successivo premendo contemporaneamente
per 5 secondi i pulsanti
e
.
Manuale d'uso
14
NOTA
Se l'ultima azione era associata ad
esempio al numero 3, vengono eliminate
anche le azioni programmate 4 e 5 (se
presenti).
4
ELIMINAZIONE CONTEMPORANEA
DI TUTTE LE AZIONI PROGRAMMATE
Uscire dalla modalità di programmazione o di
visualizzazione.
Premere contemporaneamente per 5 secondi i
pulsanti
e
. L'icona
si inverte e scompare
per confermare l'eliminazione.
7. Manutenzione
Il comando a distanza non necessita di
manutenzione.
Eliminare lo sporco con un panno morbido e umido.
NOTA
Utilizzare solo acqua
inumidire il panno.
tiepida
per
8. Diagnosi delle anomalie
Le seguenti linee guida possono aiutare a risolvere i
problemi. Se non è possibile risolvere il problema,
rivolgersi all'installatore.
Nessuna lettura sul comando a distanza (display
vuoto)
Controllare che l'alimentazione di rete sia ancora
collegata all'installazione.
Viene visualizzato solo
Questo indica che l'installazione è appena stata
accesa. Attendere fino a che
non scompare.
Il timer funziona, ma le azioni programmate
vengono eseguite all'ora sbagliata (ad esempio 1
ora prima o 1 ora dopo).
Controllare che l'orologio e il giorno della settimana
siano impostati correttamente. Correggere le
impostazioni
se
necessario
(consultare
"IMPOSTAZIONE DELL'OROLOGIO" a pagina 5).
Non è possibile attivare il timer (l'icona
lampeggia per 2 secondi e scompare)
Il timer non è ancora stato programmato.
Programmare innanzitutto il timer (consultare
"Programmazione del timer" a pagina 11).
Non è possibile attivare il timer (viene visualizzata
l'icona
)
Non è possibile attivare il timer quando è collegato un
controllo centralizzato.
Non è possibile selezionare il funzionamento con
limite
Il funzionamento con limite non è disponibile per le
installazioni di solo raffreddamento.
Manuale d'uso
15
CZ-02RT11P
Comando a distanza
4PW15515-1
CZ-02RT11P
∆ËϯÂÈÚÈÛÙ‹ÚÈÔ
™∞™ ∂ÀÃ∞ƒπ™∆√Àª∂ ¶√À ∞°√ƒ∞™∞∆∂
∞À∆√ ∆√ Ã∂πƒπ™∆∏ƒπ√. ª∂§∂∆∏™∆∂
¶ƒ√™∂∫∆π∫∞ ∆√ ∂°Ã∂πƒπ¢π√ ¶ƒ√∆√À
Ã∏™πª√¶√π∏™∂∆∂
∆∏¡
∂°∫∞∆∞™∆∞™∏. ∞º√À ¢π∞µ∞™∂∆∂ ∆√
∂°Ã∂πƒπ¢π√, ºÀ§∞•∆∂ ∆√ ™∂ ∞™º∞§∂™
ª∂ƒ√™ °π∞ ª∂§§√¡∆π∫∏ Ã∏™∏.
¶ÚÈÓ ÙËÓ ·Ú¯È΋ ÏÂÈÙÔ˘ÚÁ›·, ÂÈÎÔÈÓˆÓ‹ÛÙÂ
ÌÂ ÙÔÓ ·ÓÙÈÚfiÛˆÔ ÁÈ· Ó· ·ÔÎÙ‹ÛÂÙÂ
fiϘ ÙȘ ÏËÚÔÊÔڛ˜ Û¯ÂÙÈο Ì ÙËÓ
ÂÁηٿÛÙ·ÛË ÙÔ˘ ÎÏÈÌ·ÙÈÛÙÈÎÔ‡.
¶ƒ√∂π¢√¶√π∏™∏
- ªËÓ ‚Ú¤¯ÂÙ ÔÙ¤ ÙÔ ÙËϯÂÈÚÈÛÙ‹ÚÈÔ Î·ıÒ˜
·˘Ùfi ÌÔÚ› Ó· ÚÔηϤÛÂÈ ËÏÂÎÙÚÔÏËÍ›· ‹
˘ÚηÁÈ¿.
- ¶ÔÙ¤ ÌËÓ È¤˙ÂÙ ٷ ÎÔ˘ÌÈ¿ ÙÔ˘ ÙËϯÂÈÚÈÛÙËÚ›Ô˘ Ì ÛÎÏËÚfi, ·È¯ÌËÚfi ·ÓÙÈΛÌÂÓÔ. ∆Ô
ÙËϯÂÈÚÈÛÙ‹ÚÈÔ ÌÔÚ› Ó· ηٷÛÙÚ·Ê›.
- ªËÓ ÂϤÁ¯ÂÙÂ Î·È ÌËÓ ÂȉÈÔÚıÒÓÂÙ ÙÔ
ÙËϯÂÈÚÈÛÙ‹ÚÈÔ ÌfiÓÔÈ Û·˜, ˙ËÙ‹ÛÙ ÙÔ ·fi
ÂÍÂȉÈÎÂ˘Ì¤ÓÔ Ù¯ÓÈÎfi ÚÔÛˆÈÎfi.
¶ÂÚȯfiÌÂÓ·
ÛÂÏ›‰·
1. ÷ڷÎÙËÚÈÛÙÈο Î·È ÏÂÈÙÔ˘ÚÁ›Â˜......................... 1
2. √ÓÔÌ·Û›· Î·È ÏÂÈÙÔ˘ÚÁ›· ‰È·ÎÔÙÒÓ Î·È ÂÈÎÔÓȉ›ˆÓ... 2
3. ƒ‡ıÌÈÛË ÙÔ˘ ÙËϯÂÈÚÈÛÙËÚ›Ô˘ ........................... 5
4. ¶ÂÚÈÁÚ·Ê‹ ÙˆÓ ÙÚfiˆÓ ÏÂÈÙÔ˘ÚÁ›·˜ ................ 5
5. §ÂÈÙÔ˘ÚÁ›·............................................................ 6
6. ƒ‡ıÌÈÛË ÙÔ˘ ¯ÚÔÓԉȷÎfiÙË ÚÔÁÚ·ÌÌ·ÙÈÛÌÔ‡ ...12
CZ-02RT11P
∆ËϯÂÈÚÈÛÙ‹ÚÈÔ
4PW15515-1
∂Á¯ÂÈÚ›‰ÈÔ ÏÂÈÙÔ˘ÚÁ›·˜
1. ÷ڷÎÙËÚÈÛÙÈο Î·È ÏÂÈÙÔ˘ÚÁ›Â˜
∆Ô
ÌÔÓÙ¤ÏÔ
CZ-02RT11P
›ӷÈ
¤Ó·
ÙËϯÂÈÚÈÛÙ‹ÚÈÔ ÙÂÏÂ˘Ù·›·˜ Ù¯ÓÔÏÔÁ›·˜ Ô˘ Û·˜
ÚÔÛʤÚÂÈ Ï‹ÚË ¤ÏÂÁ¯Ô Ù˘ ÂÁηٿÛÙ·Û˘.
1
µ∞™π∫√ ∆∏§∂Ã∂πƒπ™∆πƒπ√
√È ÏÂÈÙÔ˘ÚÁ›Â˜ ÙÔ˘ ‚·ÛÈÎÔ‡ ÙËϯÂÈÚÈÛÙËÚ›Ô˘ ›ӷÈ:
ñ
ON/OFF,
ñ
·ÏÏ·Á‹ ÙÚfiÔ˘ ÏÂÈÙÔ˘ÚÁ›·˜,
ñ
Ú‡ıÌÈÛË ıÂÚÌÔÎÚ·Û›·˜,
ñ
Ú‡ıÌÈÛË ÔÛfiÙËÙ·˜ ·¤Ú·
ñ
Ú‡ıÌÈÛË Î·Ù‡ı˘ÓÛ˘ ÚÔ‹˜ ·¤Ú·.
2
§∂π∆√Àƒ°π∞ ƒ√§√°π√À
√È ÏÂÈÙÔ˘ÚÁ›Â˜ ÙÔ˘ ÚÔÏÔÁÈÔ‡ ›ӷÈ:
ñ
24ˆÚÔ ÚÔÏfiÈ Ú·ÁÌ·ÙÈ΋˜ ÒÚ·˜,
ñ
¤Ó‰ÂÈÍË Ë̤ڷ˜ Ù˘ ‚‰ÔÌ¿‰·˜.
3
§∂π∆√Àƒ°π∞ Ã√¡√¢π∞∫√¶∆∏
¶ƒ√°ƒ∞ªª∞∆π™ª√À
√È ÏÂÈÙÔ˘ÚÁ›Â˜ ÙÔ˘ ¯ÚÔÓԉȷÎfiÙË ÚÔÁÚ·ÌÌ·ÙÈÛÌÔ‡ ›ӷÈ:
ñ
ÌÔÚÔ‡Ó Ó· ÚÔÁÚ·ÌÌ·ÙÈÛÙÔ‡Ó 5 ÂÓ¤ÚÁÂȘ
ÙÔ Ì¤ÁÈÛÙÔ ÁÈ· οı Ë̤ڷ Ù˘ ‚‰ÔÌ¿‰·˜
(Û˘ÓÔÏÈο 35 ÂÓ¤ÚÁÂȘ),
ñ
ÌÔÚ›Ù ӷ ÂÓÂÚÁÔÔÈ‹ÛÂÙÂ/
·ÂÓÂÚÁÔÔÈ‹ÛÂÙ ÙÔ ¯ÚÔÓԉȷÎfiÙË
ÚÔÁÚ·ÌÌ·ÙÈÛÌÔ‡ ÔÔÈ·‰‹ÔÙ ÛÙÈÁÌ‹,
ñ
οı ÂÓ¤ÚÁÂÈ· ·Ó·ı¤ÙÂÈ: ÌÈ· ÏÂÈÙÔ˘ÚÁ›· ON
Ô˘ Û˘Ó‰¤ÂÙ·È Ì ÌÈ· ηıÔÚÈṲ̂ÓË
ıÂÚÌÔÎÚ·Û›·, ‹ ÌÈ· ÏÂÈÙÔ˘ÚÁ›·
¶∂ƒπ√ƒπ™ª√À (LIMIT), ‹ ÌÈ· ÏÂÈÙÔ˘ÚÁ›·
OFF,
ñ
«Ë ÙÂÏÂ˘Ù·›· ÂÓÙÔÏ‹» ·Ó·ÈÚ› ÙËÓ
ÚÔËÁÔ‡ÌÂÓË ÂÓÙÔÏ‹ ̤¯ÚÈ ÙËÓ ÂfiÌÂÓË
ÚÔÁÚ·ÌÌ·ÙÈṲ̂ÓË ÂÓÙÔÏ‹.
∂Á¯ÂÈÚ›‰ÈÔ ÏÂÈÙÔ˘ÚÁ›·˜
1
4
§∂π∆√Àƒ°π∞ ¶∂ƒπ√ƒπ™ª√À
ªÂ ÙË ÏÂÈÙÔ˘ÚÁ›· ÂÚÈÔÚÈÛÌÔ‡ ÌÔÚ›Ù ӷ
‰È·ÙËÚ›ÙÂ
ÙÔ
ıÂÚÌÔÛÙ¿ÙË
ÂÓÙfi˜
ÙˆÓ
ηıÔÚÈÛÌ¤ÓˆÓ ·ÓÒÙ·ÙˆÓ Î·È Î·ÙÒÙ·ÙˆÓ ÔÚ›ˆÓ Ù˘
ıÂÚÌÔÎÚ·Û›·˜.
∏
ÂÏ¿¯ÈÛÙË
Ú‡ıÌÈÛË
Ù˘
ıÂÚÌÔÎÚ·Û›·˜ ı· ÚÔηϤÛÂÈ ı¤ÚÌ·ÓÛË, Ë Ì¤ÁÈÛÙË
Ú‡ıÌÈÛË Ù˘ ıÂÚÌÔÎÚ·Û›·˜ ı· ÚÔηϤÛÂÈ „‡ÍË.
5
∞¶√À™π∞ ∞¶√ ∆√ ™¶π∆π (LEAVE HOME)
∏ ÏÂÈÙÔ˘ÚÁ›· «·Ô˘Û›· ·fi ÙÔ Û›ÙÈ» ‰È·ÙËÚ› ÙÔ
Â›Â‰Ô Ù˘ ıÂÚÌÔÎÚ·Û›·˜ ÒÛÙ ӷ ÌËÓ ÌÂȈı›
fiÙ·Ó ·Ô˘ÛÈ¿˙ÂÙÂ ·fi ÙÔ Û›ÙÈ ÁÈ· ·ÚÎÂÙ‹ ÒÚ·.
∂¿Ó Ë ıÂÚÌÔÎÚ·Û›· ‰ˆÌ·Ù›Ô˘ ¤ÛÂÈ Î¿Ùˆ ·fi
10ÆC, ÂÓÂÚÁÔÔÈÂ›Ù·È ·˘ÙfiÌ·Ù· Ë ÏÂÈÙÔ˘ÚÁ›·
ı¤ÚÌ·ÓÛ˘. ªfiÏȘ Ë ıÂÚÌÔÎÚ·Û›· ÊÙ¿ÛÂÈ ÙÔ˘˜
15ÆC, ÙÔ ÙËϯÂÈÚÈÛÙ‹ÚÈÔ ÂÈÛÙÚ¤ÊÂÈ ÛÙËÓ ·Ú¯È΋
ÙÔ˘ ηٿÛÙ·ÛË.
6
¶§∏∫∆ƒ√ ∂¶π¶∂¢√À Ã∏™∏™
ªÔÚÔ‡Ó Ó· Ú˘ıÌÈÛÙÔ‡Ó 3 ÈÂÚ·Ú¯Ë̤ӷ ›‰·
¯Ú‹Û˘ ÒÛÙ ӷ ÂÚÈÔÚÈÛÙÔ‡Ó ÔÈ ÂÈÙÚÂfiÌÂÓ˜
ÂÓ¤ÚÁÂȘ ¯Ú‹ÛÙË.
2. √ÓÔÌ·Û›· Î·È ÏÂÈÙÔ˘ÚÁ›· ‰È·ÎÔÙÒÓ
Î·È ÂÈÎÔÓȉ›ˆÓ (‚Ϥ ۯ¤Ì·Ù· 1)
1
ON/OFF BUTTON
¶È¤ÛÙ ÙÔ Ï‹ÎÙÚÔ ON/OFF
ÙÂÚÌ·ÙÈÛÌfi ÙÔ˘ Û˘ÛÙ‹Ì·ÙÔ˜.
ÁÈ·
¤Ó·ÚÍË
∂π∫√¡π¢π√ ∆ƒ√¶√À §∂π∆√Àƒ°π∞™
∞˘Ù¿ Ù· ÂÈÎÔÓ›‰È· ‰ËÏÒÓÔ˘Ó ÙÔÓ ÙÚ¤¯ÔÓÙ· ÙÚfiÔ
ÏÂÈÙÔ˘ÚÁ›·˜ (FAN, DRY, AUTOMATIC, COOLING,
HEATING
∞¡∂ªπ™∆∏ƒ∞™,
•∏ƒ∞¡™∏,
∞À∆√ª∞∆√™, æÀÃ√™, £∂ƒª∞¡™∏).
∂Á¯ÂÈÚ›‰ÈÔ ÏÂÈÙÔ˘ÚÁ›·˜
2
∂π∫√¡π¢π√ §∂π∆√Àƒ°π∞™ ∂•∞∂ƒπ™ª√À
∞˘Ù¿ Ù· ÂÈÎÔÓ›‰È· ‰ËÏÒÓÔ˘Ó ÙËÓ ÙÚ¤¯Ô˘Û·
ÏÂÈÙÔ˘ÚÁ›· ÂÍ·ÂÚÈÛÌÔ‡ (
ÌfiÓÔ) (AUTOMATIC,
HEAT EXCHANGE, BYPASS - ∞À∆√ª∞∆√,
∞¡∆∞§§∞°∏ £∂ƒª√∆∏∆∞™, ¶∞ƒ∞∫∞ªæ∏).
5
∂π∫√¡π¢π√ ∂•∞∂ƒπ™ª√À
∆Ô ÂÈÎÔÓ›‰ÈÔ ÙÔ˘ ÂÍ·ÂÚÈÛÌÔ‡ ÂÌÊ·Ó›˙ÂÙ·È fiÙ·Ó Ô
ÂÍ·ÂÚÈÛÌfi˜ Ú˘ıÌ›˙ÂÙ·È Ì ÙÔ Ï‹ÎÙÚÔ Ù˘
ÔÛfiÙËÙ·˜ ·ÚÔ¯‹˜ ·¤Ú· (
ÌfiÓÔ). ∆·˘Ùfi¯ÚÔÓ·,
Ë ÔÛfiÙËÙ· ·ÚÔ¯‹˜ ·¤Ú· ‰ËÏÒÓÂÙ·È Ì ÙÔ
ÂÈÎÔÓ›‰ÈÔ Ù·¯‡ÙËÙ·˜ ÙÔ˘ ·ÓÂÌÈÛÙ‹Ú· (‰Â›Ù 22).
6
∂π∫√¡π¢π√ ∫∞£∞ƒπ™ª√À ∞∂ƒ√™
∞˘Ùfi ÙÔ ÂÈÎÔÓ›‰ÈÔ ‰ËÏÒÓÂÈ fiÙÈ Ë ÌÔÓ¿‰·
ηı·ÚÈÛÌÔ‡ ·¤ÚÔ˜ (ÚÔ·ÈÚÂÙÈ΋) ÏÂÈÙÔ˘ÚÁ›.
7
∂π∫√¡π¢π√ ∞¶√À™π∞ ∞¶√ ∆√ ™¶π∆π
∆Ô ÂÈÎÔÓ›‰ÈÔ «·Ô˘Û›· ·fi ÙÔ Û›ÙÈ» ‰ËÏÒÓÂÈ ÙËÓ
ηٿÛÙ·ÛË Ù˘ ÏÂÈÙÔ˘ÚÁ›·˜ ·Ô˘Û›·˜ ·fi ÙÔ Û›ÙÈ.
∂¡∆√™
∂ÓÂÚÁÔÔÈÂ›Ù·È Ë ÏÂÈÙÔ˘ÚÁ›·
«·Ô˘Û›· ·fi ÙÔ Û›ÙÈ»
∞¡∞µ√™µ∏¡∂π
∏ ÏÂÈÙÔ˘ÚÁ›· «·Ô˘Û›· ·fi
ÙÔ Û›ÙÈ» ›ӷÈ
ÂÓÂÚÁÔÔÈË̤ÓË
∂∫∆√™
∏ ÏÂÈÙÔ˘ÚÁ›· «·Ô˘Û›· ·fi
ÙÔ Û›ÙÈ» ›ӷÈ
·ÂÓÂÚÁÔÔÈË̤ÓË
‹
2
§Àáπ∞ §∂π∆√Àƒ°π∞™
∏ ʈÙÂÈÓ‹ ¤Ó‰ÂÈÍË ÏÂÈÙÔ˘ÚÁ›·˜ ·Ó¿‚ÂÈ Î·Ù¿ ÙËÓ
ÏÂÈÙÔ˘ÚÁ›·
‹
·Ó·‚ÔÛ‚‹ÓÂÈ
ÛÂ
ÂÚ›ÙˆÛË
‰˘ÛÏÂÈÙÔ˘ÚÁ›·˜.
3
4
8
∂π∫√¡π¢π√ ∂•ø∆∂ƒπ∫√À ∂§∂°Ã√À
∞˘Ùfi ÙÔ ÂÈÎÔÓ›‰ÈÔ ‰ËÏÒÓÂÈ fiÙÈ ¤Ó· ¿ÏÏÔ ¯ÂÈÚÈÛÙ‹ÚÈÔ Ì ˘„ËÏfiÙÂÚÔ Â›Â‰Ô ÚÔÙÂÚ·ÈfiÙËÙ·˜
ÂϤÁ¯ÂÈ ‹ ·ÂÓÂÚÁÔÔÈ› ÙËÓ ÂÁηٿÛÙ·ÛË.
CZ-02RT11P
∆ËϯÂÈÚÈÛÙ‹ÚÈÔ
4PW15515-1
9
∞§§∞°∏ ª∂ ∆√ ∂π∫√¡π¢π√ ∫∂¡∆ƒπ∫√À
∂§∂°Ã√À
∞˘Ùfi ÙÔ ÂÈÎÔÓ›‰ÈÔ ‰ËÏÒÓÂÈ fiÙÈ Ë ·ÏÏ·Á‹ ÂϤÁ¯Ô˘
Ù˘ ÂÁηٿÛÙ·Û˘ ‚Ú›ÛÎÂÙ·È ˘fi ÎÂÓÙÚÈÎfi ¤ÏÂÁ¯Ô
Ô˘ ¤¯ÂÈ ·Ó·ÙÂı› Û ¿ÏÏË ÂÛˆÙÂÚÈ΋ ÎÏÈÌ·ÙÈÛÙÈ΋
ÌÔÓ¿‰· ‹ Û ÚÔ·ÈÚÂÙÈÎfi ÂÈÏÔÁ¤· „‡Í˘/
ı¤ÚÌ·ÓÛ˘ Ô˘ Û˘Ó‰¤ÂÙ·È Ì ÙËÓ Â͈ÙÂÚÈ΋
ÎÏÈÌ·ÙÈÛÙÈ΋ ÌÔÓ¿‰· (= ·ÚÈÔ ÙËϯÂÈÚÈÛÙ‹ÚÈÔ).
10
∂¡¢∂π•∏ ∏ª∂ƒ∞™ ∆∏™ ∂µ¢√ª∞¢∞™
∏ ¤Ó‰ÂÈÍË Ë̤ڷ˜ Ù˘ ‚‰ÔÌ¿‰·˜ ‰ËÏÒÓÂÈ ÙËÓ
ÙÚ¤¯Ô˘Û· Ë̤ڷ Ù˘ ‚‰ÔÌ¿‰·˜ (‹ ÙËÓ
ηıÔÚÈṲ̂ÓË
Ë̤ڷ
fiÙ·Ó
‰È·‚¿˙ÂÙÂ
‹
ÚÔÁÚ·ÌÌ·Ù›˙ÂÙÂ
ÙÔ
¯ÚÔÓԉȷÎfiÙË
ÚÔÁÚ·ÌÌ·ÙÈÛÌÔ‡).
11
∂¡¢∂π•∏ ƒ√§√°π√À
∏ ¤Ó‰ÂÈÍË ÚÔÏÔÁÈÔ‡ ‰ËÏÒÓÂÈ ÙËÓ ÙÚ¤¯Ô˘Û· ÒÚ· (‹
ÙËÓ ÒÚ· ÂÓ¤ÚÁÂÈ·˜ fiÙ·Ó ‰È·‚¿˙ÂÙ ‹ ÚÔÁÚ·ÌÌ·Ù›˙ÂÙ ÙÔ ¯ÚÔÓԉȷÎfiÙË ÚÔÁÚ·ÌÌ·ÙÈÛÌÔ‡).
12
ª∂°π™∆∏ ƒÀ£ªπ™∏ £∂ƒª√∫ƒ∞™π∞™
∏ ̤ÁÈÛÙË Ú‡ıÌÈÛË ıÂÚÌÔÎÚ·Û›·˜ ‰ËÏÒÓÂÈ ÙË
̤ÁÈÛÙË Ú˘ıÌÈṲ̂ÓË ıÂÚÌÔÎÚ·Û›· Û ÏÂÈÙÔ˘ÚÁ›·
ÂÚÈÔÚÈÛÌÔ‡.
13
∂§∞Ãπ™∆∏ ƒÀ£ªπ™∏ £∂ƒª√∫ƒ∞™π∞™
∏ ÂÏ¿¯ÈÛÙË Ú‡ıÌÈÛË ıÂÚÌÔÎÚ·Û›·˜ ‰ËÏÒÓÂÈ ÙËÓ
ÂÏ¿¯ÈÛÙË Ú˘ıÌÈṲ̂ÓË ıÂÚÌÔÎÚ·Û›· Û ÏÂÈÙÔ˘ÚÁ›·
ÂÚÈÔÚÈÛÌÔ‡.
14
∂π∫√¡π¢π√ Ã√¡√¢π∞∫√¶∆∏
¶ƒ√°ƒ∞ªª∞∆π™ª√À
∞˘Ùfi ÙÔ ÂÈÎÔÓ›‰ÈÔ ‰ËÏÒÓÂÈ fiÙÈ Ô ¯ÚÔÓԉȷÎfiÙ˘
ÚÔÁÚ·ÌÌ·ÙÈÛÌÔ‡ Â›Ó·È ÂÓÂÚÁÔÔÈË̤ÓÔ˜.
15
∂π∫√¡π¢π∞ ∂¡∂ƒ°∂πø¡
∞˘Ù¿ Ù· ÂÈÎÔÓ›‰È· ‰ËÏÒÓÔ˘Ó ÙȘ ÂÓ¤ÚÁÂȘ ÁÈ·
οı Ë̤ڷ ÙÔ˘ ¯ÚÔÓԉȷÎfiÙË ÚÔÁÚ·ÌÌ·ÙÈÛÌÔ‡.
CZ-02RT11P
∆ËϯÂÈÚÈÛÙ‹ÚÈÔ
4PW15515-1
16
∂π∫√¡π¢π√ ∞¶∂¡∂ƒ°√¶√π∏™∏™
∞˘Ùfi ÙÔ ÂÈÎÔÓ›‰ÈÔ ‰ËÏÒÓÂÈ fiÙÈ Ë ÂÓ¤ÚÁÂÈ·
·ÂÓÂÚÁÔÔ›ËÛ˘
¤¯ÂÈ
ÂÈÏÂÁ›
ηٿ
ÙÔÓ
ÚÔÁÚ·ÌÌ·ÙÈÛÌfi ÙÔ˘ ¯ÚÔÓԉȷÎfiÙË ÚÔÁÚ·ÌÌ·ÙÈÛÌÔ‡.
17
∞¶∞π∆∏∆∞π ∂§∂°Ã√™
ηÈ
∞˘Ù¿ Ù· ÂÈÎÔÓ›‰È· ‰ËÏÒÓÔ˘Ó fiÙÈ ··ÈÙÂ›Ù·È ¤ÏÂÁ¯Ô˜.
™˘Ì‚Ô˘Ï¢ı›Ù ÙÔÓ Ù¯ÓÈÎfi ÂÁηٿÛÙ·Û˘.
18
∂ªº∞¡π™∏ £∂ƒª√∫ƒ∞™π∞™ ƒÀ£ªπ™∏™
∞˘Ùfi ‰ËÏÒÓÂÈ ÙËÓ ÙÚ¤¯Ô˘Û· Ú˘ıÌÈṲ̂ÓË ıÂÚÌÔÎÚ·Û›· Ù˘ ÂÁηٿÛÙ·Û˘ (‰ÂÓ ÂÌÊ·Ó›˙ÂÙ·È ÛÙËÓ
ÏÂÈÙÔ˘ÚÁ›· ¶∂ƒπ√ƒπ™ª√À ‹ ÛÙȘ ÏÂÈÙÔ˘ÚÁ›Â˜
∞¡∂ªπ™∆∏ƒ∞ ‹ •∏ƒ√∆∏∆∞).
19
ƒÀ£ªπ™∏
¢ÂÓ
¯ÚËÛÈÌÔÔÈ›ٷÈ,
ÂȉÈfiÚıˆÛ˘.
ÌfiÓÔ
ÛÂ
ÂÚ›ÙˆÛË
20
∂π∫√¡π¢π√ ∫∞∆∂À£À¡™∏™ ƒ√∏™ ∞∂ƒ∞
∞˘Ùfi ÙÔ ÂÈÎÔÓ›‰ÈÔ ‰ËÏÒÓÂÈ ÙËÓ Î·Ù‡ı˘ÓÛË Ù˘
ÚÔ‹˜ ·¤Ú· (ÌfiÓÔ ÁÈ· ÂÁηٷÛÙ¿ÛÂȘ ÌÂ
Ì˯·ÓÔΛÓËÙ· ÙÂÚ‡ÁÈ· ÚÔ‹˜ ·¤Ú·).
21
¢∂¡ Àºπ™∆∞∆∞π
ÂÌÊ·Ó›˙ÂÙ·È fiÙ·Ó Î·Ï›Ù οÔÈ· ÂÈÏÔÁ‹
Ô˘ ‰ÂÓ ¤¯ÂÈ ÂÁηٷÛÙ·ı› ‹ ·Ó ‰ÂÓ Â›Ó·È
‰È·ı¤ÛÈÌË Î¿ÔÈ· ÏÂÈÙÔ˘ÚÁ›·.
22
∂π∫√¡π¢π√ ∆∞ÃÀ∆∏∆∞™ ∞¡∂ªπ™∆∏ƒ∞
∆Ô ÂÈÎÔÓ›‰ÈÔ ·˘Ùfi ÂÌÊ·Ó›˙ÂÈ ÙË Ú‡ıÌÈÛË Ù·¯‡ÙËÙ·˜
ÙÔ˘ ·ÓÂÌÈÛÙ‹Ú·.
23
∂π∫√¡π¢π√ §∂π∆√Àƒ°π∞™ ∞¶√æÀ•∏™/
£∂ƒª∏™ ∂¡∞ƒ•∏™
∞˘Ùfi ÙÔ ÂÈÎÔÓ›‰ÈÔ ‰ËÏÒÓÂÈ fiÙÈ Â›Ó·È ÂÓÂÚÁ‹ Ë
ÏÂÈÙÔ˘ÚÁ›· ·fi„˘Í˘/ıÂÚÌ‹˜ ¤Ó·Ú͢.
∂Á¯ÂÈÚ›‰ÈÔ ÏÂÈÙÔ˘ÚÁ›·˜
3
24
∂π∫√¡π¢π√ Ã√¡√À ∫∞£∞ƒπ™ª√À
ºπ§∆ƒ√À ∞∂ƒ∞
∞˘Ùfi ÙÔ ÂÈÎÔÓ›‰ÈÔ ‰ËÏÒÓÂÈ fiÙÈ Ú¤ÂÈ Ó·
ηı·ÚÈÛÙ› ÙÔ Ê›ÏÙÚÔ ·¤Ú·. ™˘Ì‚Ô˘Ï¢Ù›Ù ÙÔ
ÂÁ¯ÂÈÚ›‰ÈÔ Ù˘ ÂÛˆÙÂÚÈ΋˜ ÌÔÓ¿‰·˜.
25
∂π∫√¡π¢π√ Ã√¡√À ∫∞£∞ƒπ™ª√À
™∆√πÃ∂π√À
∞˘Ùfi ÙÔ ÂÈÎÔÓ›‰ÈÔ ‰ËÏÒÓÂÈ fiÙÈ ÙÔ ÛÙÔÈ¯Â›Ô Ú¤ÂÈ
Ó· ηı·ÚÈÛÙ› (
ÌfiÓÔ).
26
¶§∏∫∆ƒ√ §∂π∆√Àƒ°π∞™ ∂•∞∂ƒπ™ª√À
∆Ô Ï‹ÎÙÚÔ ÏÂÈÙÔ˘ÚÁ›·˜ ÂÍ·ÂÚÈÛÌÔ‡ ÂϤÁ¯ÂÈ Ùo
. ∞Ó·ÙÚ¤ÍÙ ÛÙÔ ÂÁ¯ÂÈÚ›‰ÈÔ
ÁÈ·
ÂÚÈÛÛfiÙÂÚ˜ ÏÂÙÔ̤ÚÂȘ.
27
¶§∏∫∆ƒ√ ¶√™√∆∏∆∞™ ¶∞ƒ√Ã∏™ ∞∂ƒ√™
31
∞˘Ù¿ Ù· Ï‹ÎÙÚ· ¯ÚËÛÈÌÔÔÈÔ‡ÓÙ·È ÁÈ· ÙË Ú‡ıÌÈÛË
ÙÔ˘ ÚÔÏÔÁÈÔ‡ ‹, fiÙ·Ó ‚Ú›ÛÎÂÛÙÂ ÛÂ ÏÂÈÙÔ˘ÚÁ›·
ÚÔÁÚ·ÌÌ·ÙÈÛÌÔ‡, ÁÈ· ÙË Ú‡ıÌÈÛË Ù˘ ÒÚ·˜ Ù˘
ÚÔÁÚ·ÌÌ·ÙÈṲ̂Ó˘ ÂÓ¤ÚÁÂÈ·˜. ∫·È Ù· ‰‡Ô
Ï‹ÎÙÚ·
‰È·ı¤ÙÔ˘Ó
ÏÂÈÙÔ˘ÚÁ›·
·˘ÙfiÌ·Ù˘
·ӿÏ˄˘.
32
28
∫√Àª¶π ∂¶π£∂øƒ∏™∏™/¢√∫πª∞™∆π∫∏™
§∂π∆√Àƒ°π∞™
¢ÂÓ
¯ÚËÛÈÌÔÔÈ›ٷÈ,
ÂÚÁ·ÛÈÒÓ Û˘ÓÙ‹ÚËÛ˘.
ÌfiÓÔ
ÛÂ
ÂÚ›ÙˆÛË
29
∫√Àª¶π ¶ƒ√°ƒ∞ªª∞∆π™ª√À
∞˘Ùfi ÙÔ Ï‹ÎÙÚÔ Â›Ó·È ÔÏÏ·ÏÒÓ ÏÂÈÙÔ˘ÚÁÈÒÓ.
∞Ó¿ÏÔÁ· Ì ÙÔ˘˜ ÚÔËÁÔ‡ÌÂÓÔ˘˜ ¯ÂÈÚÈÛÌÔ‡˜ ÙÔ˘
¯Ú‹ÛÙË, ÙÔ Ï‹ÎÙÚÔ ÚÔÁÚ·ÌÌ·ÙÈÛÌÔ‡ ÌÔÚ› Ó·
¤¯ÂÈ ‰È¿ÊÔÚ˜ ÏÂÈÙÔ˘ÚÁ›Â˜.
¶§∏∫∆ƒ√ Ã√¡√¢π∞∫√¶∆∏
¶ƒ√°ƒ∞ªª∞∆π™ª√À
∞˘Ùfi ÙÔ Ï‹ÎÙÚÔ ÂÓÂÚÁÔÔÈ› ‹ ·ÂÓÂÚÁÔÔÈ› ÙÔ
¯ÚÔÓԉȷÎfiÙË ÚÔÁÚ·ÌÌ·ÙÈÛÌÔ‡.
∂Á¯ÂÈÚ›‰ÈÔ ÏÂÈÙÔ˘ÚÁ›·˜
4
¶§∏∫∆ƒ√ ∞§§∞°∏™ §∂π∆√Àƒ°π∞™/
∞˘Ùfi ÙÔ Ï‹ÎÙÚÔ Â›Ó·È ÔÏÏ·ÏÒÓ ÏÂÈÙÔ˘ÚÁÈÒÓ.
∞Ó¿ÏÔÁ· Ì ÙÔ˘˜ ÚÔËÁÔ‡ÌÂÓÔ˘˜ ¯ÂÈÚÈÛÌÔ‡˜ ÙÔ˘
¯Ú‹ÛÙË,
ÌÔÚ›
Ó·
¤¯ÂÈ
ÙȘ
·ÎfiÏÔ˘ı˜
ÏÂÈÙÔ˘ÚÁ›Â˜:
1 ÂÈÏÔÁ‹ ÙÔ˘ ÙÚfiÔ˘ ÏÂÈÙÔ˘ÚÁ›·˜ Ù˘
ÂÁηٿÛÙ·Û˘ (FAN, DRY, AUTOMATIC,
COOLING, HEATING - ∞¡∂ªπ™∆∏ƒ∞™,
•∏ƒ√∆∏∆∞, æÀ•∏, £∂ƒª∞¡™∏)
2 ·ÏÏ·Á‹ ÌÂٷ͇ Ù˘ ÂÏ¿¯ÈÛÙ˘ Î·È Ù˘
̤ÁÈÛÙ˘ ıÂÚÌÔÎÚ·Û›·˜ fiÙ·Ó ‚Ú›ÛÎÂÛÙ ÛÂ
ÏÂÈÙÔ˘ÚÁ›· ÂÚÈÔÚÈÛÌÔ‡
34
30
¶§∏∫∆ƒ∞ ƒÀ£ªπ™∏™ £∂ƒª√∫ƒ∞™π∞™
∞˘Ù¿ Ù· Ï‹ÎÙÚ· ¯ÚËÛÈÌÔÔÈÔ‡ÓÙ·È ÁÈ· ÙË Ú‡ıÌÈÛË
ÙÔ˘ ÙÚ¤¯ÔÓÙÔ˜ ÛËÌ›Ԣ Ú‡ıÌÈÛ˘ ‹, fiÙ·Ó
‚Ú›ÛÎÂÛÙ Û ηٿÛÙ·ÛË ÚÔÁÚ·ÌÌ·ÙÈÛÌÔ‡, ÁÈ· ÙË
Ú‡ıÌÈÛË ÙÔ˘ ÚÔÁÚ·ÌÌ·ÙÈṲ̂ÓÔ˘ ÛËÌ›Ԣ Ú‡ıÌÈÛ˘
ıÂÚÌÔÎÚ·Û›·˜ (‚‹Ì· = 1ÆC). ∫·È Ù· ‰‡Ô Ï‹ÎÙÚ·
¯ÚËÛÈÌÔÔÈÔ‡ÓÙ·È Â›Û˘ ÁÈ· Ú‡ıÌÈÛË Ù˘ Ë̤ڷ˜
Ù˘ ‚‰ÔÌ¿‰·˜.
33
∞˘Ùfi ÙÔ Ï‹ÎÙÚÔ Ú˘ıÌ›˙ÂÈ ÙËÓ ÔÛfiÙËÙ· ·ÚÔ¯‹˜
·¤ÚÔ˜. ∞Ó·ÙÚ¤ÍÙ ÛÙÔ ÂÁ¯ÂÈÚ›‰ÈÔ ÙÔ˘
ÁÈ·
ÂÚÈÛÛfiÙÂÚ˜ ÏÂÙÔ̤ÚÂȘ.
¶§∏∫∆ƒ√ ƒÀ£ªπ™∏™ flƒ∞™
¶§∏∫∆ƒ√ ™∏ª∂π√À ƒÀ£ªπ™∏™/
¶∂ƒπ√ƒπ™ª√À
∞˘Ùfi ÙÔ Ï‹ÎÙÚÔ ·ÏÏ¿˙ÂÈ ÌÂٷ͇ ÙÔ˘ ÛËÌ›Ԣ Ú‡ıÌÈÛ˘,
Ù˘ ÂÚÈÔÚÈṲ̂Ó˘ ÏÂÈÙÔ˘ÚÁ›·˜ ‹ Ù˘ ηٿÛÙ·Û˘
(ÌfiÓÔ ÏÂÈÙÔ˘ÚÁ›· ÚÔÁÚ·ÌÌ·ÙÈÛÌÔ‡).
CZ-02RT11P
∆ËϯÂÈÚÈÛÙ‹ÚÈÔ
4PW15515-1
35
∫√Àª¶π ∆∞ÃÀ∆∏∆∞™ ∞¡∂ªπ™∆∏ƒ∞
∞˘Ùfi ÙÔ Ï‹ÎÙÚÔ ·ÏÏ¿˙ÂÈ ÌÂٷ͇ ÙÔÓ ÂӉ›ÍÂˆÓ L
(¯·ÌËÏfi), H (˘„ËÏfi), HH (Ôχ ˘„ËÏfi),
(·˘ÙfiÌ·ÙÔ).
36
∫√Àª¶π ƒÀ£ªπ™∏™ ∫∞∆∂À£À¡™∏™
ƒ√∏™ ∞∂ƒ∞
∆Ô ÎÔ˘Ì› ·˘Ùfi ÂÈÙÚ¤ÂÈ ÙË Ú‡ıÌÈÛË Î·Ù‡ı˘ÓÛ˘
Ù˘ ÚÔ‹˜ ·¤Ú·.
37
∂π∫√¡π¢π√ ∂¶∞¡∞ƒÀ£ªπ™∏™ Ã√¡√À
∫∞£∞ƒπ™ª√À ºπ§∆ƒ√À ∞∂ƒ∞
∞˘Ùfi ÙÔ Ï‹ÎÙÚÔ ¯ÚËÛÈÌÔÔÈÂ›Ù·È ÁÈ· ÙËÓ
·ӷڇıÌÈÛË ÙÔ˘ ÂÈÎÔÓȉ›Ô˘ ¯ÚfiÓÔ˘ ηı·ÚÈÛÌÔ‡
Ê›ÏÙÚÔ˘ ·¤ÚÔ˜.
3. ƒ‡ıÌÈÛË ÙÔ˘ ÙËϯÂÈÚÈÛÙËÚ›Ô˘
∫·ÙfiÈÓ Ù˘ ·Ú¯È΋ ÂÁηٿÛÙ·Û˘, Ô ¯Ú‹ÛÙ˘
ÌÔÚ› Ó· Ú˘ıÌ›ÛÂÈ ÙÔ ÚÔÏfiÈ Î·È ÙËÓ Ë̤ڷ Ù˘
‚‰ÔÌ¿‰·˜.
∆Ô ¯ÂÈÚÈÛÙ‹ÚÈÔ Â›Ó·È ÂÍÔÏÈṲ̂ÓÔ Ì ¯ÚÔÓԉȷÎfiÙË ÚÔÁÚ·ÌÌ·ÙÈÛÌÔ‡ Ô ÔÔ›Ô˜ ÂÈÙÚ¤ÂÈ
ÛÙÔ ¯Ú‹ÛÙË Ó· ¯ÂÈÚ›˙ÂÙ·È ÙËÓ ÂÁηٿÛÙ·ÛË
·˘ÙfiÌ·Ù·. ∞·ÈÙÂ›Ù·È Ë ÚÔËÁÔ‡ÌÂÓË Ú‡ıÌÈÛË ÙÔ˘
ÚÔÏÔÁÈÔ‡ Î·È Ù˘ Ë̤ڷ˜ Ù˘ ‚‰ÔÌ¿‰·˜ ÒÛÙ ӷ
Â›Ó·È ‰˘Ó·Ù‹ Ë ¯Ú‹ÛË ÙÔ˘ ¯ÚÔÓԉȷÎfiÙË
ÚÔÁÚ·ÌÌ·ÙÈÛÌÔ‡.
1
§∂π∆√Àƒ°π∞ ƒÀ£ªπ™∏™ ƒ√§√°π√À
∫Ú·Ù‹ÛÙ ·ÙË̤ÓÔ ÙÔ Ï‹ÎÙÚÔ
ÁÈ· 5
‰Â˘ÙÂÚfiÏÂÙ·. ∏ ÙÈÌ‹ Ù˘ ÒÚ·˜ Î·È Ë ¤Ó‰ÂÈÍË Ù˘
Ë̤ڷ˜ Ù˘ ‚‰ÔÌ¿‰·˜ ı· ·Ú¯›ÛÔ˘Ó Ó·
·Ó·‚ÔÛ‚‹ÓÔ˘Ó, Û˘ÓÂÒ˜ ÌÔÚ›Ù ÙÒÚ· Ó·
Ú˘ıÌ›ÛÂÙ ·˘Ù¤˜ ÙȘ ÂÈÏÔÁ¤˜.
ÃÚËÛÈÌÔÔÈ‹ÛÙÂ Ù· Ï‹ÎÙÚ·
&
ÁÈ· Ó· Ú˘ıÌ›ÛÂÙ ÙÔ ÚÔÏfiÈ. ∫¿ı ÊÔÚ¿ Ô˘ ·Ù¿ÙÂ
ÙÔ Ï‹ÎÙÚÔ Ú‡ıÌÈÛ˘ Ù˘ ÒÚ·˜, Ë ÒÚ· ı·
·˘Í¿ÓÂÙ·È/ÌÂÈÒÓÂÙ·È Î·Ù¿ 1 ÏÂÙfi. ∞Ó ÎÚ·Ù‹ÛÂÙÂ
CZ-02RT11P
∆ËϯÂÈÚÈÛÙ‹ÚÈÔ
4PW15515-1
·ÙË̤ÓÔ ÙÔ Ï‹ÎÙÚÔ
‹
, ÙfiÙÂ Ë
ÒÚ· ı· ·˘Í¿ÓÂÙ·È/ÌÂÈÒÓÂÙ·È Î·Ù¿ 10 ÏÂÙ¿.
ÃÚËÛÈÌÔÔÈ‹ÛÙÂ Ù· Ï‹ÎÙÚ·
&
ÁÈ· Ó· Ú˘ıÌ›ÛÂÙ ÙËÓ Ë̤ڷ Ù˘ ‚‰ÔÌ¿‰·˜. ∫¿ıÂ
ÊÔÚ¿ Ô˘ Ȥ˙ÂÙ ٷ Ï‹ÎÙÚ·
‹
,
ı· ÂÌÊ·Ó›˙ÂÙ·È ·Ó·ÏfiÁˆ˜ Ë ÂfiÌÂÓË ‹ Ë
ÚÔËÁÔ‡ÌÂÓË Ë̤ڷ.
¶È¤ÛÙ ÙÔ Ï‹ÎÙÚÔ
ÁÈ· Ó· ÂȂ‚·ÈÒÛÂÙ ÙËÓ
ÙÚ¤¯Ô˘Û· Ú‡ıÌÈÛË ÒÚ·˜ Î·È Ë̤ڷ˜ Ù˘
‚‰ÔÌ¿‰·˜.
∞Ó ÙÔ ¯ÂÈÚÈÛÙ‹ÚÈÔ, Ì ÙȘ ÂӉ›ÍÂȘ ÙÔ˘ ÚÔÏÔÁÈÔ‡
Î·È Ù˘ Ë̤ڷ˜ Ù˘ ‚‰ÔÌ¿‰·˜ Ó· ·Ó·‚ÔÛ‚‹ÓÔ˘Ó,
·Ú·Ì›ÓÂÈ ˆ˜ ¤¯ÂÈ ÁÈ· 5 ÏÂÙ¿, ÙÔ ÚÔÏfiÈ Î·È Ë
Ë̤ڷ Ù˘ ‚‰ÔÌ¿‰·˜ ı· ÂÈÛÙÚ¤„Ô˘Ó ÛÙȘ
ÚÔËÁÔ‡ÌÂÓ˜ Ú˘ıÌ›ÛÂȘ ÙÔ˘˜. ∏ ÏÂÈÙÔ˘ÚÁ›·
Ú‡ıÌÈÛ˘ ÙÔ˘ ÚÔÏÔÁÈÔ‡ ‰ÂÓ Â›Ó·È Ï¤ÔÓ ÂÓÂÚÁ‹.
2
ƒÀ£ªπ™∏ ∆√À Ã√¡√¢π∞∫√¶∆∏
¶ƒ√°ƒ∞ªª∞∆π™ª√À
°È·
Ó·
Ú˘ıÌ›ÛÂÙÂ
ÙÔ
¯ÚÔÓԉȷÎfiÙË
ÚÔÁÚ·ÌÌ·ÙÈÛÌÔ‡, ·Ó·ÙÚ¤ÍÙ ÛÙÔ ÎÂÊ¿Ï·ÈÔ 6.
"ƒ‡ıÌÈÛË ÙÔ˘ ¯ÚÔÓԉȷÎfiÙË ÚÔÁÚ·ÌÌ·ÙÈÛÌÔ‡"
ÛÙË ÛÏ›‰· 12.
4. ¶ÂÚÈÁÚ·Ê‹ ÙˆÓ ÙÚfiˆÓ ÏÂÈÙÔ˘ÚÁ›·˜
1
§∂π∆√Àƒ°π∞ ª√¡√ ∞¡∂ªπ™∆∏ƒ∞
™Â ·˘Ù‹ ÙËÓ ÏÂÈÙÔ˘ÚÁ›·, ΢ÎÏÔÊÔÚ› ÌfiÓÔ ·¤Ú·˜
¯ˆÚ›˜ ı¤ÚÌ·ÓÛË ‹ „‡ÍË.
2
•∏ƒ∏ §∂π∆√Àƒ°π∞
™Â ·˘Ù‹ ÙËÓ ÏÂÈÙÔ˘ÚÁ›·, Ë ˘ÁÚ·Û›· ·¤ÚÔ˜ ı·
ÌÂȈı› Û˘Óԉ¢fiÌÂÓË ·fi ÌÈ· Ôχ ÌÈÎÚ‹ ÙÒÛË
Ù˘ ıÂÚÌÔÎÚ·Û›·˜.
∏ ıÂÚÌÔÎÚ·Û›· Î·È Ë Ù·¯‡ÙËÙ· ÙÔ˘ ·ÓÂÌÈÛÙ‹Ú·
ÂϤÁ¯ÔÓÙ·È ·˘ÙfiÌ·Ù· Î·È ‰ÂÓ ÌÔÚÔ‡Ó Ó·
ÂÏÂÁ¯ıÔ‡Ó Ì ÙÔ ÙËϯÂÈÚÈÛÙ‹ÚÈÔ.
∏ ÏÂÈÙÔ˘ÚÁ›· ÍËÚfiÙËÙ·˜ ‰ÂÓ ı· Â›Ó·È ‰˘Ó·Ù‹ ·Ó Ë
ıÂÚÌÔÎÚ·Û›· ‰ˆÌ·Ù›Ô˘ Â›Ó·È Ôχ ¯·ÌËÏ‹.
∂Á¯ÂÈÚ›‰ÈÔ ÏÂÈÙÔ˘ÚÁ›·˜
5
3
∞À∆√ª∞∆∏ §∂π∆√Àƒ°π∞
™Â ·˘Ù‹ ÙËÓ ÏÂÈÙÔ˘ÚÁ›·, ÙÔ ¯ÂÈÚÈÛÙ‹ÚÈÔ ·ÏÏ¿˙ÂÈ
·˘ÙfiÌ·Ù· ÌÂٷ͇ Ù˘ ı¤ÚÌ·ÓÛ˘ Î·È Ù˘ „‡Í˘
ηıÒ˜ ··ÈÙÂ›Ù·È ·fi ÙË ıÂÚÌÔÎÚ·Û›· Ú‡ıÌÈÛ˘ ‹
ÙËÓ ıÂÚÌÔÎÚ·Û›· ÂÚÈÔÚÈÛÌÔ‡.
4
§∂π∆√Àƒ°π∞ æÀ•∏™
™Â ·˘Ù‹ ÙËÓ ÏÂÈÙÔ˘ÚÁ›·, ı· ÂÓÂÚÁÔÔÈËı› Ë „‡ÍË
ηıÒ˜ ··ÈÙÂ›Ù·È ·fi ÙË ıÂÚÌÔÎÚ·Û›· Ú‡ıÌÈÛ˘ ‹
ÙË ıÂÚÌÔÎÚ·Û›· ÂÚÈÔÚÈÛÌÔ‡.
5
§∂π∆√Àƒ°π∞ £∂ƒª∞¡™∏™
™Â ·˘Ù‹ ÙËÓ ÏÂÈÙÔ˘ÚÁ›·, ı· ÂÓÂÚÁÔÔÈËı› Ë
ı¤ÚÌ·ÓÛË Î·ıÒ˜ ··ÈÙÂ›Ù·È ·fi ÙË ıÂÚÌÔÎÚ·Û›·
Ú‡ıÌÈÛ˘ ‹ ÙË ıÂÚÌÔÎÚ·Û›· ÂÚÈÔÚÈÛÌÔ‡.
£ÂÚÌ‹ ¤Ó·ÚÍË (ÌfiÓÔ ÁÈ· Ù‡Ô˘˜ ·ÓÙÏÈÒÓ
ıÂÚÌfiÙËÙ·˜)
∫·Ù¿ ÙËÓ ¤Ó·ÚÍË ÌÈ·˜ ÏÂÈÙÔ˘ÚÁ›·˜ ı¤ÚÌ·ÓÛ˘, Ô
ÂÛˆÙÂÚÈÎfi˜ ·ÓÂÌÈÛÙ‹Ú·˜ ÛÙ·Ì·Ù¿ÂÈ Ì¤¯ÚÈ Ó·
ÂÈÙ¢¯ı› ÌÈ· Û˘ÁÎÂÎÚÈ̤ÓË ıÂÚÌÔÎÚ·Û›· ÙÔ˘
·ÓÙ·ÏÏ¿ÎÙË ıÂÚÌfiÙËÙ·˜ Î·È Ó· ÂÌÊ·ÓÈÛÙ› Ë
¤Ó‰ÂÈÍË
. ∞˘Ùfi ·ÔÙÚ¤ÂÈ ÙÔÓ ÎÚ‡Ô
·¤Ú· Ó· ‰È·Ê‡ÁÂÈ ·fi ÙËÓ ÂÛˆÙÂÚÈ΋ ÎÏÈÌ·ÙÈÛÙÈ΋
ÌÔÓ¿‰·.
∞fi„˘ÍË (ÌfiÓÔ ÁÈ· Ù‡Ô˘˜ ·ÓÙÏÈÒÓ ıÂÚÌfiÙËÙ·˜)
™ÙËÓ ÏÂÈÙÔ˘ÚÁ›· ı¤ÚÌ·ÓÛË, ÂӉ¯Ô̤ӈ˜ Ó·
Û˘Ì‚Â›
„‡ÍË
ÙÔ˘
Â͈ÙÂÚÈÎÔ‡
·ÓÙ·ÏÏ¿ÎÙË
ıÂÚÌfiÙËÙ·˜. ™Â ÂÚ›ÙˆÛË Ô˘ Û˘Ì‚Â› οÙÈ
Ù¤ÙÔÈÔ,
Ë
ıÂÚÌ·ÓÙÈ΋
¯ˆÚËÙÈÎfiÙËÙ·
ÙÔ˘
Û˘ÛÙ‹Ì·ÙÔ˜ ÌÂÈÒÓÂÙ·È Î·È ÙÔ Û‡ÛÙËÌ· ·ÏÏ¿˙ÂÈ ÛÂ
ÏÂÈÙÔ˘ÚÁ›· ·fi„˘Í˘. Ô ·ÓÂÌÈÛÙ‹Ú·˜ Ù˘
ÂÛˆÙÂÚÈ΋˜
ÌÔÓ¿‰·˜
ÛÙ·Ì·Ù¿ÂÈ
ηÈ
ÛÙÔ
ÙËϯÂÈÚÈÛÙ‹ÚÈÔ ÂÌÊ·Ó›˙ÂÙ·È Ë ¤Ó‰ÂÈÍË
.
ªÂÙ¿ ·fi 10 ÏÂÙ¿ ÙÔ Ôχ Û ÏÂÈÙÔ˘ÚÁ›·
·fi„˘Í˘, ÙÔ Û‡ÛÙËÌ· ·ӤگÂÙ·È Î·È ¿ÏÈ ÛÂ
ÏÂÈÙÔ˘ÚÁ›· ı¤ÚÌ·ÓÛ˘.
∂Á¯ÂÈÚ›‰ÈÔ ÏÂÈÙÔ˘ÚÁ›·˜
6
6
§∂π∆√Àƒ°π∞ ¶∂ƒπ√ƒπ™ª√À
∫∞π
∏ ÏÂÈÙÔ˘ÚÁ›· ÂÚÈÔÚÈÛÌÔ‡ Â›Ó·È ¤Ó·˜ ÂÈϤÔÓ
ÙÚfiÔ˜ ÏÂÈÙÔ˘ÚÁ›·˜ Ô˘ ÂÈÙÚ¤ÂÈ Ó· ‰È·ÙËÚ›ٷÈ
Ë ıÂÚÌÔÎÚ·Û›· ÙÔ˘ ‰ˆÌ·Ù›Ô˘ ÂÓÙfi˜ οÔȈÓ
Û˘ÁÎÂÎÚÈÌ¤ÓˆÓ ÔÚ›ˆÓ. ∆· ÂÈÎÔÓ›‰È·
ηÈ
ÂÌÊ·Ó›˙ÔÓÙ·È
ÂȂ‚·ÈÒÓÔÓÙ·˜
¤ÙÛÈ
ÙËÓ
ÂÓÂÚÁÔÔ›ËÛË Ù˘ ÏÂÈÙÔ˘ÚÁ›·˜ ÂÚÈÔÚÈÛÌÔ‡.
7
∞¶√À™π∞ ∞¶√ ∆√ ™¶π∆π (LEAVE HOME)
∏ ÏÂÈÙÔ˘ÚÁ›· ∞¶√À™π∞ ∞¶√ ∆√ ™¶π∆π Â›Ó·È ¤Ó·
¯·Ú·ÎÙËÚÈÛÙÈÎfi Ô˘ ‰È·ÙËÚ› ÙË ıÂÚÌÔÎÚ·Û›· ÂÓfi˜
‰ˆÌ·Ù›Ô˘ ¿Óˆ ·fi 10ÆC fiÙ·Ó ·Ô˘ÛÈ¿˙ÂÙÂ. ∞˘Ù‹
Ë ÏÂÈÙÔ˘ÚÁ›· ı· ·ÏÏ¿ÍÂÈ ÛÂ ı¤ÚÌ·ÓÛË ·Ó Ë
ÂÁηٿÛÙ·ÛË ·ÂÓÂÚÁÔÔÈËı›.
5. §ÂÈÙÔ˘ÚÁ›·
ªË ·˘ÙfiÌ·ÙË ÏÂÈÙÔ˘ÚÁ›·
™Â ¯ÂÈÚÔΛÓËÙË ÏÂÈÙÔ˘ÚÁ›·, Ô ¯Ú‹ÛÙ˘ ·ÔÊ·Û›˙ÂÈ
ÁÈ· ÙȘ Ú˘ıÌ›ÛÂȘ Ù˘ ÂÁηٿÛÙ·Û˘. ∏ ÙÂÏÂ˘Ù·›·
Ú‡ıÌÈÛË ·Ú·Ì¤ÓÂÈ ÂÓÂÚÁ‹ ̤¯ÚÈ Ó· ÙËÓ ·ÏÏ¿ÍÂÈ Ô
¯Ú‹ÛÙ˘.
∫·ıÒ˜ ÙÔ ¯ÂÈÚÈÛÙ‹ÚÈÔ ÌÔÚ› Ó· ÂÊ·ÚÌÔÛÙ› ÁÈ·
ÌÈ·
¢Ú›·
ÂÈÏÔÁ‹
ÂÁηٷÛÙ¿ÛˆÓ
ηÈ
¯·Ú·ÎÙËÚÈÛÙÈÎÒÓ, ÂӉ¯Ô̤ӈ˜ Ó· Û˘Ì‚Â› Ó·
ÂÈϤÍÂÙ ÌÈ· ÏÂÈÙÔ˘ÚÁ›· Ô˘ ‰ÂÓ Â›Ó·È ‰È·ı¤ÛÈÌË
Ì ÙËÓ ÂÁηٿÛÙ·Û‹ Û·˜. ™ÙËÓ ÂÚ›ÙˆÛË ·˘Ù‹
ÂÌÊ·Ó›˙ÂÙ·È ÙÔ Ì‹Ó˘Ì·
.
ÃÚËÛÈÌÔÔÈ›ÛÙ ÙÔ Ï‹ÎÙÚÔ
ÁÈ· Ó·
ÂÈϤÍÂÙ ÙÔÓ ÙÚfiÔ ÏÂÈÙÔ˘ÚÁ›·˜ Ô˘ ı¤ÏÂÙÂ.
§ÂÈÙÔ˘ÚÁ›· ÌfiÓÔ ·ÓÂÌÈÛÙ‹Ú·
•ËÚ‹ ÏÂÈÙÔ˘ÚÁ›·
∞˘ÙfiÌ·ÙË ÏÂÈÙÔ˘ÚÁ›·
§ÂÈÙÔ˘ÚÁ›· „‡Í˘
§ÂÈÙÔ˘ÚÁ›· ı¤ÚÌ·ÓÛ˘
CZ-02RT11P
∆ËϯÂÈÚÈÛÙ‹ÚÈÔ
4PW15515-1
¶È¤ÛÙ ÙÔ Ï‹ÎÙÚÔ
ÁÈ· Ó· ·ÏÏ¿ÍÂÙÂ
ÌÂٷ͇ Ù˘ ÏÂÈÙÔ˘ÚÁ›·˜ ÂÚÈÔÚÈÛÌÔ‡ Î·È ÙˆÓ
ÏÂÈÙÔ˘ÚÁÈÒÓ Ô˘ ·ÚÔ˘ÛÈ¿˙ÔÓÙ·È ·ÓˆÙ¤Úˆ.
™ÙËÓ ÏÂÈÙÔ˘ÚÁ›· ÂÚÈÔÚÈÛÌÔ‡, ¯ÚËÛÈÌÔÔÈ›ÛÙ ÙÔ
Ï‹ÎÙÚÔ
ÁÈ· Ó· ÂÈϤÍÂÙ ÙȘ Ú˘ıÌ›ÛÂȘ
Ù˘ ÂÏ¿¯ÈÛÙ˘ Î·È Ù˘ ̤ÁÈÛÙ˘ ıÂÚÌÔÎÚ·Û›·˜.
ÃÚËÛÈÌÔÔÈ›ÛÙ ٷ Ï‹ÎÙÚ·
‹
ÁÈ· Ó· οÓÂÙ ÙȘ Ú˘ıÌ›ÛÂȘ Ù˘ ̤ÁÈÛÙ˘ Î·È Ù˘
ÂÏ¿¯ÈÛÙ˘ ıÂÚÌÔÎÚ·Û›·˜.
1
§∂π∆√Àƒ°π∞ ª√¡√ ∞¡∂ªπ™∆∏ƒ∞
¶·Ú¿ÌÂÙÚÔÈ Ú˘ıÌÈṲ̂ÓÔÈ ·fi ÙÔ ¯Ú‹ÛÙË:
ñ
∆·¯‡ÙËÙ· ·ÓÂÌÈÛÙ‹Ú·, ¯ÚËÛÈÌÔÔÈ‹ÛÙ ÙÔ
Ï‹ÎÙÚÔ
,
ñ
ƒ‡ıÌÈÛË Î·Ù‡ı˘ÓÛ˘ ÚÔ‹˜ ·¤Ú·,
¯ÚËÛÈÌÔÔÈ‹ÛÙÂ ÙÔ Ï‹ÎÙÚÔ
,
ñ
§ÂÈÙÔ˘ÚÁ›· ÂÍ·ÂÚÈÛÌÔ‡, ¯ÚËÛÈÌÔÔÈ›ÛÙ ÙÔ
Ï‹ÎÙÚÔ
,
ñ
¶ÔÛfiÙËÙ· ·ÚÔ¯‹˜ ·¤ÚÔ˜, ¯ÚËÛÈÌÔÔÈ›ÛÙÂ
ÙÔ Ï‹ÎÙÚÔ
,
2
•∏ƒ∏ §∂π∆√Àƒ°π∞
¶·Ú¿ÌÂÙÚÔÈ Ú˘ıÌÈṲ̂ÓÔÈ ·fi ÙÔ ¯Ú‹ÛÙË:
ñ
ƒ‡ıÌÈÛË Î·Ù‡ı˘ÓÛ˘ ÚÔ‹˜ ·¤Ú·,
ñ
ñ
¯ÚËÛÈÌÔÔÈ‹ÛÙÂ ÙÔ Ï‹ÎÙÚÔ
,
§ÂÈÙÔ˘ÚÁ›· ÂÍ·ÂÚÈÛÌÔ‡, ¯ÚËÛÈÌÔÔÈ›ÛÙ ÙÔ
Ï‹ÎÙÚÔ
,
¶ÔÛfiÙËÙ· ·ÚÔ¯‹˜ ·¤ÚÔ˜, ¯ÚËÛÈÌÔÔÈ›ÛÙÂ
ÙÔ Ï‹ÎÙÚÔ
,
3
∞À∆√ª∞∆∏ §∂π∆√Àƒ°π∞
¶·Ú¿ÌÂÙÚÔÈ Ú˘ıÌÈṲ̂ÓÔÈ ·fi ÙÔ ¯Ú‹ÛÙË:
ñ
£ÂÚÌÔÎÚ·Û›· Ú‡ıÌÈÛ˘ , ¯ÚËÛÈÌÔÔÈ›ÛÙ ٷ
Ï‹ÎÙÚ·
ηÈ
,
ñ
∆·¯‡ÙËÙ· ·ÓÂÌÈÛÙ‹Ú·, ¯ÚËÛÈÌÔÔÈ‹ÛÙ ÙÔ
Ï‹ÎÙÚÔ
,
CZ-02RT11P
∆ËϯÂÈÚÈÛÙ‹ÚÈÔ
4PW15515-1
ñ
ñ
ñ
ƒ‡ıÌÈÛË Î·Ù‡ı˘ÓÛ˘ ÚÔ‹˜ ·¤Ú·,
¯ÚËÛÈÌÔÔÈ‹ÛÙÂ ÙÔ Ï‹ÎÙÚÔ
,
§ÂÈÙÔ˘ÚÁ›· ÂÍ·ÂÚÈÛÌÔ‡, ¯ÚËÛÈÌÔÔÈ›ÛÙ ÙÔ
Ï‹ÎÙÚÔ
,
¶ÔÛfiÙËÙ· ·ÚÔ¯‹˜ ·¤ÚÔ˜, ¯ÚËÛÈÌÔÔÈ›ÛÙÂ
ÙÔ Ï‹ÎÙÚÔ
,
4
§∂π∆√Àƒ°π∞ æÀ•∏™
¶·Ú¿ÌÂÙÚÔÈ Ú˘ıÌÈṲ̂ÓÔÈ ·fi ÙÔ ¯Ú‹ÛÙË:
ñ
£ÂÚÌÔÎÚ·Û›· Ú‡ıÌÈÛ˘ , ¯ÚËÛÈÌÔÔÈ›ÛÙ ٷ
Ï‹ÎÙÚ·
ηÈ
,
ñ
∆·¯‡ÙËÙ· ·ÓÂÌÈÛÙ‹Ú·, ¯ÚËÛÈÌÔÔÈ‹ÛÙ ÙÔ
Ï‹ÎÙÚÔ
,
ñ
ƒ‡ıÌÈÛË Î·Ù‡ı˘ÓÛ˘ ÚÔ‹˜ ·¤Ú·,
¯ÚËÛÈÌÔÔÈ‹ÛÙÂ ÙÔ Ï‹ÎÙÚÔ
,
ñ
§ÂÈÙÔ˘ÚÁ›· ÂÍ·ÂÚÈÛÌÔ‡, ¯ÚËÛÈÌÔÔÈ›ÛÙ ÙÔ
Ï‹ÎÙÚÔ
,
ñ
¶ÔÛfiÙËÙ· ·ÚÔ¯‹˜ ·¤ÚÔ˜, ¯ÚËÛÈÌÔÔÈ›ÛÙÂ
ÙÔ Ï‹ÎÙÚÔ
,
5
§∂π∆√Àƒ°π∞ £∂ƒª∞¡™∏™
¶·Ú¿ÌÂÙÚÔÈ Ú˘ıÌÈṲ̂ÓÔÈ ·fi ÙÔ ¯Ú‹ÛÙË:
ñ
£ÂÚÌÔÎÚ·Û›· Ú‡ıÌÈÛ˘ , ¯ÚËÛÈÌÔÔÈ›ÛÙ ٷ
Ï‹ÎÙÚ·
ηÈ
,
ñ
∆·¯‡ÙËÙ· ·ÓÂÌÈÛÙ‹Ú·, ¯ÚËÛÈÌÔÔÈ‹ÛÙ ÙÔ
Ï‹ÎÙÚÔ
,
ñ
ƒ‡ıÌÈÛË Î·Ù‡ı˘ÓÛ˘ ÚÔ‹˜ ·¤Ú·,
¯ÚËÛÈÌÔÔÈ‹ÛÙÂ ÙÔ Ï‹ÎÙÚÔ
,
ñ
§ÂÈÙÔ˘ÚÁ›· ÂÍ·ÂÚÈÛÌÔ‡, ¯ÚËÛÈÌÔÔÈ›ÛÙ ÙÔ
Ï‹ÎÙÚÔ
,
ñ
¶ÔÛfiÙËÙ· ·ÚÔ¯‹˜ ·¤ÚÔ˜, ¯ÚËÛÈÌÔÔÈ›ÛÙÂ
ÙÔ Ï‹ÎÙÚÔ
,
∂Á¯ÂÈÚ›‰ÈÔ ÏÂÈÙÔ˘ÚÁ›·˜
7
6
§∂π∆√Àƒ°π∞ ¶∂ƒπ√ƒπ™ª√À
¶·Ú¿ÌÂÙÚÔÈ Ú˘ıÌÈṲ̂ÓÔÈ ·fi ÙÔ ¯Ú‹ÛÙË:
ñ
∆·¯‡ÙËÙ· ·ÓÂÌÈÛÙ‹Ú·, ¯ÚËÛÈÌÔÔÈ‹ÛÙ ÙÔ
Ï‹ÎÙÚÔ
,
ñ
ƒ‡ıÌÈÛË Î·Ù‡ı˘ÓÛ˘ ÚÔ‹˜ ·¤Ú·,
¯ÚËÛÈÌÔÔÈ‹ÛÙÂ ÙÔ Ï‹ÎÙÚÔ
,
ñ
§ÂÈÙÔ˘ÚÁ›· ÂÍ·ÂÚÈÛÌÔ‡, ¯ÚËÛÈÌÔÔÈ›ÛÙ ÙÔ
Ï‹ÎÙÚÔ
,
ñ
¶ÔÛfiÙËÙ· ·ÚÔ¯‹˜ ·¤ÚÔ˜, ¯ÚËÛÈÌÔÔÈ›ÛÙÂ
ÙÔ Ï‹ÎÙÚÔ
,
∂¶π¶ƒ√™£∂∆∞ Ã∞ƒ∞∫∆∏ƒπ™∆π∫∞ ∆√À Ã∂πƒπ™∆∏ƒπ√À
1
∞¶√À™π∞ ∞¶√ ∆√ ™¶π∆π (LEAVE HOME)
¶È¤ÛÙ ٷ Ï‹ÎÙÚ·
ηÈ
Ù·˘Ùfi¯ÚÔÓ· ÁÈ· Ó· ÂÓÂÚÁÔÔÈËı› Ë ÏÂÈÙÔ˘ÚÁ›·
∞¶√À™π∞ ∞¶√ ∆√ ™¶π∆π.
£Àª∏£∂π∆∂ √∆π ∆√ ¶§∏∫∆ƒ√
¶ƒ∂¶∂π ¡∞ ∂π¡∞π ∞¶∂¡∂ƒ°√¶π∏ª∂¡√
ø™∆∂ ¡∞ §∂π∆√Àƒ°∏™∂π ∂°°À∏ª∂¡∞
∏ §∂π∆√Àƒ°π∞ ∞¶√À™π∞ ∞¶√ ∆√ ™¶π∆π.
2
ƒ‡ıÌÈÛË Ù˘ ‰È‡ı˘ÓÛ˘ ÚÔ‹˜ ÙÔ˘ ·¤Ú·
ÃÚËÛÈÌÔÔÈ‹ÛÙ ÙÔ ÎÔ˘Ì›
ÁÈ· Ó· Ú˘ıÌ›ÛÂÙÂ
ÙËÓ Î·Ù‡ı˘ÓÛË ÚÔ‹˜ ÙÔ˘ ·¤Ú·. ¶È¤ÛÙ ÙÔ
Ï‹ÎÙÚÔ ÁÈ· Ó· ·ÏÏ¿ÍÂÙ ÌÂٷ͇ ÌÈ·˜ ÛÙ·ıÂÚ‹˜
Î·È ÌÈ·˜ ÌÂÙ·‚·ÏÏfiÌÂÓ˘ ηÙ‡ı˘ÓÛ˘ ÚÔ‹˜ ÙÔ˘
·¤Ú·. ÃÚËÛÈÌÔÔÈ›ÛÙ ÙÔ ÂÈÎÔÓ›‰ÈÔ
ÁÈ· Ó·
ηıÔÚ›ÛÂÙ ÙËÓ Î·Ù‡ı˘ÓÛË Ù˘ ÚÔ‹˜ ÙÔ˘ ·¤Ú·,
Ȥ˙ÔÓÙ·˜ ÙÔ Ï‹ÎÙÚÔ
fiÙ·Ó ÙÔ ÂÈÎÔÓ›‰ÈÔ
ÂÌÊ·Ó›ÛÂÈ ÙËÓ Î·Ù‡ı˘ÓÛË Ô˘ ı¤ÏÂÙÂ.
™∏ª∂πø™∏ ∞ÎfiÌ· Î·È ·Ó ÂÈÏÂÁ› Ë ÛÙ·ıÂÚ‹
ηÙ‡ı˘ÓÛË
ÚÔ‹˜
·¤Ú·,
Ë
ÌÂÙ·‚·ÏÏfiÌÂÓË Î·Ù‡ı˘ÓÛË ÚÔ‹˜ ·¤Ú·
ÌÔÚ› Ó· ÂÓÂÚÁÔÔÈËı› ·˘ÙfiÌ·Ù· ÁÈ·
Ó· ‰È·ÙËÚ‹ÛÂÈ ÙË ÛˆÛÙ‹ ÏÂÈÙÔ˘ÚÁ›· Ù˘
ÂÁηٿÛÙ·Û‹˜ Û·˜.
∂Á¯ÂÈÚ›‰ÈÔ ÏÂÈÙÔ˘ÚÁ›·˜
8
3
Ã√¡√¢π∞∫Ÿ¶∆∏™ ¶ƒ√°ƒ∞ªª∞∆π™ª√⁄
ŸÏ· Ù· ¯·Ú·ÎÙËÚÈÛÙÈο, Ë ÏÂÈÙÔ˘ÚÁ›· Î·È Ô
ÚÔÁÚ·ÌÌ·ÙÈÛÌfi˜
ÙÔ˘
¯ÚÔÓԉȷÎfiÙË
ÂÚÈÁÚ¿ÊÔÓÙ·È ·Ú·Î¿Ùˆ.
§ÂÈÙÔ˘ÚÁ›· ¯ÚÔÓԉȷÎfiÙË
ÚÔÁÚ·ÌÌ·ÙÈÛÌÔ‡
™ÙË ÏÂÈÙÔ˘ÚÁ›· ÙÔ˘ ¯ÚÔÓԉȷÎfiÙË ÚÔÁÚ·ÌÌ·ÙÈÛÌÔ‡, Ë ÂÁηٿÛÙ·ÛË ÂϤÁ¯ÂÙ ›Û˘ ·fi ÙÔ
¯ÚÔÓԉȷÎfiÙË. √È ÂÓ¤ÚÁÂȘ Ô˘ ¤¯Ô˘Ó ÚÔÁÚ·ÌÌ·ÙÈÛÙ› ÛÙÔ ¯ÚÔÓԉȷÎfiÙË ı· ÂÎÙÂÏÂÛıÔ‡Ó
·˘ÙfiÌ·Ù·.
√ ¯ÚÔÓԉȷÎfiÙ˘ ÂÎÙÂÏ› ¿Ó· ÙËÓ ÙÂÏÂ˘Ù·›·
ÂÓÙÔÏ‹. ∞˘Ùfi ÛËÌ·›ÓÂÈ fiÙÈ Ô ¯Ú‹ÛÙ˘ ÌÔÚ›
ÚÔÛˆÚÈÓ¿
Ó·
·Î˘ÚÒÛÂÈ
ÙËÓ
ÙÂÏÂ˘Ù·›·
ÚÔÁÚ·ÌÌ·ÙÈṲ̂ÓË ÂÓ¤ÚÁÂÈ· Ô˘ ÂÎÙÂϤÛÙËÎÂ.
™˘Ì‚Ô˘Ï¢Ù›Ù ÙËÓ ÂÓfiÙËÙ· "ªË ·˘ÙfiÌ·ÙË
ÏÂÈÙÔ˘ÚÁ›·" ÛÙË ÛÏ›‰· 6. ∏ ÂfiÌÂÓË ÚÔÁÚ·ÌÌ·ÙÈṲ̂ÓË ÂÓ¤ÚÁÂÈ· (ÛÙÔ ¯ÚÔÓԉȷÎfiÙË) ı·
ÂÈÛÙÚ¤„ÂÈ ÙÔÓ ¤ÏÂÁ¯Ô ÛÙÔ ¯ÚÔÓԉȷÎfiÙË.
ÃÚËÛÈÌÔÔÈ›ÛÙ ÙÔ Ï‹ÎÙÚÔ
ÁÈ· Ó·
ÂÓÂÚÁÔÔÈ‹ÛÂÙÂ ‹ Ó· ·ÂÓÂÚÁÔÔÈ‹ÛÂÙÂ ÙÔ
¯ÚÔÓԉȷÎfiÙË ÚÔÁÚ·ÌÌ·ÙÈÛÌÔ‡.
™∏ª∂πø™∏ √ ¯ÚÔÓԉȷÎfiÙ˘ ÚÔÁÚ·ÌÌ·ÙÈÛÌÔ‡
·Î˘ÚÒÓÂÈ
ÙÔ
Ï‹ÎÙÚÔ
,
¯ÚËÛÈÌÔÔț٠ÌfiÓÔ ÙÔ Ï‹ÎÙÚÔ
ÁÈ·
Ó·
ÂÓÂÚÁÔÔÈ‹ÛÂÙÂ
‹
Ó·
·ÂÓÂÚÁÔÔÈ‹ÛÂÙ ÙÔ ¯ÚÔÓԉȷÎfiÙË.
√ ¯ÚÔÓԉȷÎfiÙ˘ ÚÔÁÚ·ÌÌ·ÙÈÛÌÔ‡
ÂÓÂÚÁÔÔÈÂ›Ù·È fiÙ·Ó ÙÔ ÂÈÎÔÓ›‰ÈÔ
Â›Ó·È ÔÚ·Ùfi. ∆Ô Ï‹ÎÙÚÔ
·Î˘ÚÒÓÂÈ ÙÔ ¯ÚÔÓԉȷÎfiÙË ÌfiÓÔ
̤¯ÚÈ ÙËÓ ÂfiÌÂÓË ÚÔÁÚ·ÌÌ·ÙÈṲ̂ÓË
ÂÓ¤ÚÁÂÈ·.
CZ-02RT11P
∆ËϯÂÈÚÈÛÙ‹ÚÈÔ
4PW15515-1
√ ÚÔÁÚ·ÌÌ·ÙÈÛÌfi˜ ÙˆÓ ÂÓÂÚÁÂÈÒÓ
Á›ÓÔÓÙ·È
‚¿ÛÂÈ
ÒÚ·˜
ÂÎÙ¤ÏÂÛ˘.
µÂ‚·Èˆı›Ù fiÙÈ ÙÔ ÚÔÏfiÈ Î·È Ë Ë̤ڷ Ù˘
‚‰ÔÌ¿‰·˜ ¤¯Ô˘Ó Ú˘ıÌÈÛÙ› ÛˆÛÙ¿.
™˘Ì‚Ô˘Ï¢Ù›ÙÂ
ÙËÓ
ÂÓfiÙËÙ·
"§∂π∆√Àƒ°π∞ ƒÀ£ªπ™∏™ ƒ√§√°π√À"
ÛÙË ÛÏ›‰· 5.
ƒ˘ıÌ›ÛÙ Ì ÙÔ ¯¤ÚÈ ÙÔ ÚÔÏfiÈ ÁÈ· ıÂÚÈÓ‹
Î·È ¯ÂÈÌÂÚÈÓ‹ ÒÚ·. ™˘Ì‚Ô˘Ï¢Ù›Ù ÙËÓ
ÂÓfiÙËÙ·
"§∂π∆√Àƒ°π∞
ƒÀ£ªπ™∏™
ƒ√§√°π√À" ÛÙË ÛÏ›‰· 5.
™Â ÂÚ›ÙˆÛË ‰È·ÎÔ‹˜ Ú‡̷ÙÔ˜ Ë ÔÔ›·
‰È·ÚΛ ÂÚÈÛÛfiÙÂÚÔ ·fi 1 ÒÚ·, ÙÔ ÚÔÏfiÈ
Î·È Ë Ë̤ڷ Ù˘ ‚‰ÔÌ¿‰·˜ ı·
ÌˉÂÓÈÛÙÔ‡Ó. ∞Ó·ÙÚ¤ÍÙ ÙÔ "§∂π∆√Àƒ°π∞
ƒÀ£ªπ™∏™ ƒ√§√°π√À" ÛÙË ÛÏ›‰· 5 ÁÈ·
Ó· Ú˘ıÌ›ÛÂÙ ÙÔ ÚÔÏfiÈ Î·È ÙËÓ Ë̤ڷ Ù˘
‚‰ÔÌ¿‰·˜.
√È ÂÓ¤ÚÁÂȘ Ô˘ ÚÔÁÚ·ÌÌ·Ù›ÛÙËÎ·Ó ÛÙÔ
¯ÚÔÓԉȷÎfiÙË ‰ÂÓ ı· ¯·ıÔ‡Ó Î·ÙfiÈÓ
ÌÈ·˜ ‰È·ÎÔ‹˜ Ú‡̷ÙÔ˜. ™˘ÓÂÒ˜ ‰ÂÓ
··ÈÙÂ›Ù·È Ó· ÚÔÁÚ·ÌÌ·Ù›ÛÂÙ ÂÎ Ó¤Ô˘
ÙÔ ¯ÚÔÓԉȷÎfiÙË.
°È·
Ó·
Ú˘ıÌ›ÛÂÙÂ
ÙÔ
Ã√¡√¢π∞∫√¶∆∏
¶ƒ√°ƒ∞ªª∞∆π™ª√À
(SCHEDULE
TIMER),
·Ó·ÙÚ¤ÍÙ ÛÙÔ ÎÂÊ¿Ï·ÈÔ 6. "ƒ‡ıÌÈÛË ÙÔ˘
¯ÚÔÓԉȷÎfiÙË ÚÔÁÚ·ÌÌ·ÙÈÛÌÔ‡" ÛÙË ÛÏ›‰· 12.
∆È ÌÔÚ› Ó· οÓÂÈ Ô ¯ÚÔÓԉȷÎfiÙ˘
ÚÔÁÚ·ÌÌ·ÙÈÛÌÔ‡;
∏
fiÏË
Û‡ÏÏË„Ë
ÚÔÁÚ·ÌÌ·ÙÈÛÌÔ‡ ›ӷÈ
·Ú¿ÏÏËÏ· ÈÛ¯˘Ú‹.
CZ-02RT11P
∆ËϯÂÈÚÈÛÙ‹ÚÈÔ
4PW15515-1
ÙÔ˘
·Ï‹,
√ ¯ÚÔÓԉȷÎfiÙ˘ ÚÔÁÚ·ÌÌ·ÙÈÛÌÔ‡ ÌÔÚ› Ó·
‰ÒÛÂÈ ÂÓÙÔÏ‹ ÁÈ· 3 ÂÓ¤ÚÁÂȘ:
1 ÂÓÂÚÁÔÔ›ËÛË Ù˘ ÂÁηٿÛÙ·Û˘ Û οÔÈ·
ÚÔÁÚ·ÌÌ·ÙÈṲ̂ÓË ÒÚ·, ÛÂ Û˘Ó‰˘·ÛÌfi ÌÂ
¤Ó· ÛËÌÂ›Ô Ú‡ıÌÈÛ˘ (·ÎÚÈ‚‹˜ ¤ÏÂÁ¯Ô˜
ıÂÚÌÔÎÚ·Û›·˜)
2 ·ÂÓÂÚÁÔÔ›ËÛË Ù˘ ÂÁηٿÛÙ·Û˘
(ÙÂÚÌ·ÙÈÛÌfi˜ ÂϤÁ¯Ô˘)
3 ÂÓÂÚÁÔÔ›ËÛË Ù˘ ÂÁηٿÛÙ·Û˘ Û ÌÈ·
ÚÔÁÚ·ÌÌ·ÙÈṲ̂ÓË ÒÚ·, Û ÏÂÈÙÔ˘ÚÁ›·
ÂÚÈÔÚÈÛÌÔ‡
√ ¯ÚÔÓԉȷÎfiÙ˘ ÚÔÁÚ·ÌÌ·ÙÈÛÌÔ‡ ÌÔÚ› Ó·
·ÔıË·ÛÂÈ Ì¤¯ÚÈ Î·È 5 ÂÓ¤ÚÁÂȘ ÙËÓ Ë̤ڷ.
°È· οı Ë̤ڷ Ù˘ ‚‰ÔÌ¿‰·˜, ÌÔÚÔ‡Ó Ó·
ÚÔÁÚ·ÌÌ·ÙÈÛÙÔ‡Ó Ì¤¯ÚÈ Î·È 5 ÂÓ¤ÚÁÂȘ,
Û˘ÓÔÏÈο
‰ËÏ·‰‹
35
ÚÔÁÚ·ÌÌ·ÙÈṲ̂Ó˜
ÂÓ¤ÚÁÂȘ. ∏ ÂÓ¤ÚÁÂÈ· Ô˘ ÚÔÁÚ·ÌÌ·Ù›ÛÙËÎÂ
ÚÒÙË ÁÈ· ÌÈ· Û˘ÁÎÂÎÚÈ̤ÓË Ë̤ڷ, Â›Ó·È Ë
ÂÓ¤ÚÁÂÈ· 1. ∏ ÂÓ¤ÚÁÂÈ· Ô˘ ÚÔÁÚ·ÌÌ·Ù›ÛÙËÎÂ
ÙÂÏÂ˘Ù·›· ÁÈ· ÌÈ· Ë̤ڷ, ı· ÌÔÚÔ‡Û ӷ Â›Ó·È Ë
ÂÓ¤ÚÁÂÈ·
1
(ÛÂ
ÂÚ›ÙˆÛË
Ô˘
¤¯ÂÈ
ÚÔÁÚ·ÌÌ·ÙÈÛÙ› ÌfiÓÔ 1 ÂÓ¤ÚÁÂÈ· ÁÈ· ÂΛÓË ÙËÓ
Ë̤ڷ) ¤ˆ˜ 5.
∂›Ó·È ȉȷ›ÙÂÚ· ÛËÌ·ÓÙÈÎfi Ó· ηٷÓÔ‹ÛÂÙÂ
fiÙÈ Ô ·ÚÈıÌfi˜ Ô˘ ·Ó·Ù›ıÂÙ·È ÛÙËÓ
ÚÔÁÚ·ÌÌ·ÙÈṲ̂ÓË
ÂÓ¤ÚÁÂÈ·,
¢∂¡
∫∞£√ƒπ∑∂π ¶√∆∂ ı· ÂÎÙÂÏÂÛı› Ë
ÚÔÁÚ·ÌÌ·ÙÈṲ̂ÓË ÂÓ¤ÚÁÂÈ·. ªfiÓÔ Ë øƒ∞
(TIME) ηıÔÚ›˙ÂÈ Ò˜ ı· ÂÎÙÂÏÂÛı› ÌÈ·
ÂÓ¤ÚÁÂÈ·, ηıÒ˜ Â›Ó·È Ì¤ÚÔ˜ ÙˆÓ
ÛÙÔȯ›ˆÓ Ô˘ ÂÈÛ¿ÁÔÓÙ·È Î·Ù¿ ÙÔÓ
ÚÔÁÚ·ÌÌ·ÙÈÛÌfi Ù˘ ÂÓ¤ÚÁÂÈ·˜.
¯ÚÔÓԉȷÎfiÙË
ηٷÓÔËÙ‹ ηÈ
∂Á¯ÂÈÚ›‰ÈÔ ÏÂÈÙÔ˘ÚÁ›·˜
9
∆È ı· οÓÂÈ Ô ¯ÚÔÓԉȷÎfiÙ˘
ÚÔÁÚ·ÌÌ·ÙÈÛÌÔ‡;
∞Ó
ÂÓÂÚÁÔÔÈËı›,
Ô
¯ÚÔÓԉȷÎfiÙ˘
ÂÎÙÂϤÛÂÈ ÙȘ ÚÔÁÚ·ÌÌ·ÙÈṲ̂Ó˜ ÂÓ¤ÚÁÂȘ.
£· ‰ÒÛÂÈ ÂÓÙÔÏ‹ ÛÙËÓ ÂÁηٿÛÙ·ÛË Ó·:
ñ
◊
ñ
◊
ñ
ı·
„‡ÍÂÈ ‹ Ó· ıÂÚÌ¿ÓÂÈ, ·Ó¿ÏÔÁ· Ì ÙËÓ
ÙÚ¤¯Ô˘Û· ÏÂÈÙÔ˘ÚÁ›·, Â¿Ó ÈÛ¯‡ÂÈ, Î·È ı·
ÂÌÊ·ÓÈÛÙ› ÙÔ ÛËÌÂ›Ô Ú‡ıÌÈÛ˘,
·ÂÓÂÚÁÔÔÈËı› Ë ÂÁηٿÛÙ·ÛË (Ô
¯ÚÔÓԉȷÎfiÙ˘ ·Ú·Ì¤ÓÂÈ
ÂÓÂÚÁÔÔÈË̤ÓÔ˜ Î·È ÂÓÂÚÁÔÔÈ› ¿ÏÈ ÙËÓ
ÂÁηٿÛÙ·ÛË Î·ıÒ˜ ›ӷÈ
ÚÔÁÚ·ÌÌ·ÙÈṲ̂ÓÔ) Î·È Ë ÊˆÙÂÈÓ‹ ¤Ó‰ÂÈÍË
ÏÂÈÙÔ˘ÚÁ›·˜ ı· Û‚‹ÛÂÈ,
Ó· „‡ÍÂÈ ‹ Ó· ıÂÚÌ¿ÓÂÈ, fi,ÙÈ ··ÈÙÂ›Ù·È ÁÈ·
Ó· ‰È·ÙËÚËı› Ë ıÂÚÌÔÎÚ·Û›· ‰ˆÌ·Ù›Ô˘
ÂÓÙfi˜ ÙˆÓ Î·ıÔÚÈÛÌ¤ÓˆÓ ÙÈÌÒÓ (ÏÂÈÙÔ˘ÚÁ›·
ÂÚÈÔÚÈÛÌÔ‡), Î·È ı· ÂÌÊ·ÓÈÛÙÔ‡Ó Ù·
ηÈ
.
√ ¯ÚÔÓԉȷÎfiÙ˘ ÚÔÁÚ·ÌÌ·ÙÈÛÌÔ‡ ı·
·ÏÏ¿ÍÂÈ ÙÔÓ ÙÚfiÔ ÏÂÈÙÔ˘ÚÁ›·˜ ÌfiÓÔ ÛÙËÓ
ÏÂÈÙÔ˘ÚÁ›· ¶∂ƒπ√ƒπ™ª√À.
°È· Ó· ÌÔÚ¤ÛÂÙ ӷ ÂȂ‚·ÈÒÛÂÙ ÙȘ ÚÔÁÚ·ÌÌ·ÙÈṲ̂Ó˜
ÂÓ¤ÚÁÂȘ
ÌÔÚ›ÙÂ
Ó·
‰ÈÂÚ¢ӋÛÂÙ ÙȘ ÚÔÁÚ·ÌÌ·ÙÈṲ̂Ó˜ ÂÓ¤ÚÁÂȘ,
‰Â›Ù ·Ú·Î¿Ùˆ.
∆È ¢∂¡ ı· οÓÂÈ Ô ¯ÚÔÓԉȷÎfiÙ˘
ÚÔÁÚ·ÌÌ·ÙÈÛÌÔ‡;
√ ¯ÚÔÓԉȷÎfiÙ˘ ÚÔÁÚ·ÌÌ·ÙÈÛÌÔ‡ ‰ÂÓ ı·:
ñ
¤ÏÂÁ¯Ô˜ Ù·¯‡ÙËÙ·˜ ·ÓÂÌÈÛÙ‹Ú·,
ñ
Ú‡ıÌÈÛË ‰È‡ı˘ÓÛ˘ ÚÔ‹˜ ÙÔ˘ ·¤Ú·,
ñ
ÂϤÁÍÂÈ ÙËÓ ÏÂÈÙÔ˘ÚÁ›· ÂÍ·ÂÚÈÛÌÔ‡,
ñ
ÂϤÁÍÂÈ ÙËÓ ÔÛfiÙËÙ· ·ÚÔ¯‹˜ ·¤Ú·,
ñ
·ÏÏ¿ÍÂÈ ÙÔÓ ÙÚfiÔ ÏÂÈÙÔ˘ÚÁ›·˜ ÁÈ· ¤Ó·
ÚÔÁÚ·ÌÌ·ÙÈṲ̂ÓÔ ÛËÌÂ›Ô Ú‡ıÌÈÛ˘.
∂Á¯ÂÈÚ›‰ÈÔ ÏÂÈÙÔ˘ÚÁ›·˜
10
√È ·Ú¿ÌÂÙÚÔÈ Ô˘ ·Ó·Ê¤ÚÔÓÙ·È ·ÓˆÙ¤Úˆ
ÌÔÚÔ‡Ó Ó· Ú˘ıÌÈÛÙÔ‡Ó Ì ÙÔ ¯¤ÚÈ, ¯ˆÚ›˜
·ÚÂÌ‚ÔÏ‹
ÌÂ
ÙÔ
¯ÚÔÓԉȷÎfiÙË
ÚÔÁÚ·ÌÌ·ÙÈÛÌÔ‡.
¢È·Ù›ıÂÓÙ·È ÙËϯÂÈÚÈÛÙ‹ÚÈ· Ì ÈÔ ÚÔËÁ̤Ó˜
ÏÂÈÙÔ˘ÚÁ›Â˜. °È· ÂÚÈÛÛfiÙÂÚ˜ ÏËÚÔÊÔڛ˜,
Û˘Ì‚Ô˘Ï¢ı›Ù ÙÔÓ ·ÓÙÈÚfiÛˆfi Û·˜.
¢ÈÂÚ‡ÓËÛË ÙˆÓ ÚÔÁÚ·ÌÌ·ÙÈṲ̂ӈÓ
(ÌfiÓÔ
ÂÓÂÚÁÂÈÒÓ ÛÙÔÓ ¯ÚÔÓԉȷÎfiÙË
¤Ó‰ÂÈÍË)
™˘Ì‚Ô˘Ï¢Ù›Ù ÙËÓ ÂÓfiÙËÙ· Û¯¤Ì·Ù· 2.
∏ ‰ÈÂÚ‡ÓËÛË ÙˆÓ ÚÔÁÚ·ÌÌ·ÙÈÛÌ¤ÓˆÓ ÂÓÂÚÁÂÈÒÓ
ÙÔ˘
¯ÚÔÓԉȷÎfiÙË
›ӷÈ
ÌÈ·
‰È·‰Èηۛ·
·ÎÔÏÔ˘ı›·˜. ÃÚËÛÈÌÔÔÈÔ‡ÓÙ·È ÌfiÓÔ 2 Ï‹ÎÙÚ· ÁÈ·
Ó· ‰ÈÂÚ¢ӋÛÂÙ ÔÏfiÎÏËÚÔ ÙÔ ÚfiÁÚ·ÌÌ· ÙÔ˘
¯ÚÔÓԉȷÎfiÙË.
∆Ô Ï‹ÎÙÚÔ
¯ÚËÛÈÌÔÔÈÂ›Ù·È ÁÈ· ¤Ó·ÚÍË Ù˘
‰ÈÂÚ‡ÓËÛ˘,
ÁÈ·
ÚÔ‚ÔÏ‹
Ù˘
ÂfiÌÂÓ˘
ÚÔÁÚ·ÌÌ·ÙÈṲ̂Ó˘ ÂÓ¤ÚÁÂÈ·˜ ‹ ÁÈ· ¤ÍÔ‰Ô ·fi ÙË
‰ÈÂÚ‡ÓËÛË
fiÙ·Ó
ÂÌÊ·ÓÈÛÙ›
Ë
ÙÂÏÂ˘Ù·›·
ÚÔÁÚ·ÌÌ·ÙÈṲ̂ÓË ÂÓ¤ÚÁÂÈ·.
∆Ô Ï‹ÎÙÚÔ
¯ÚËÛÈÌÔÔÈÂ›Ù·È ÁÈ· ¤ÍÔ‰Ô ·fi
ÙË ‰ÈÂÚ‡ÓËÛË ·Ì¤Ûˆ˜ (¯ˆÚ›˜ Ó· ÌÂÙ·‚·›ÓÂÙ ÛÂ
fiϘ ÙȘ ÚÔÁÚ·ÌÌ·ÙÈṲ̂Ó˜ ÂÓ¤ÚÁÂȘ Ì ÙË
ÛÂÈÚ¿).
¶È¤ÛÙ ÙÔ Ï‹ÎÙÚÔ
ÁÈ· Ó· ÂÈÛ¿ÁÂÙÂ ÙË
ÏÂÈÙÔ˘ÚÁ›· ‰ÈÂÚ‡ÓËÛ˘, ÂÌÊ·Ó›˙ÂÙ·È ÙÔ ÂÈÎÔÓ›‰ÈÔ
, ı· ·Ú¯›ÛÂÈ Ó· ·Ó·‚ÔÛ‚‹ÓÂÈ ÙÔ
.
™∏ª∂πø™∏ ∏ ‰ÈÂÚ‡ÓËÛË ·Ú¯›˙ÂÈ ¿ÓÙ· ÙË
¢Â˘Ù¤Ú· Î·È ÙÂÏÂÈÒÓÂÈ ÙËÓ ∫˘Úȷ΋.
∂ϤÁÍÙ ÙÔ ÂÈÎÔÓ›‰ÈÔ
. ∞Ó ¤¯ÂÈ
ÚÔÁÚ·ÌÌ·ÙÈÛı› ÙÔ˘Ï¿¯ÈÛÙÔÓ Ì›· ÂÓ¤ÚÁÂÈ· ÁÈ· ÙË
¢Â˘Ù¤Ú·, ÙfiÙ ı· ÂÌÊ·ÓÈÛÙ› ÙÔ .
CZ-02RT11P
∆ËϯÂÈÚÈÛÙ‹ÚÈÔ
4PW15515-1
∆Ô ÚÔÏfiÈ ‰ËÏÒÓÂÈ ÙËÓ ÒÚ· ÁÈ· ÙËÓ ÔÔ›· ¤¯ÂÈ
ÚÔÁÚ·ÌÌ·ÙÈÛÙ› Ë ÂÎÙ¤ÏÂÛË Ù˘ ÂÓ¤ÚÁÂÈ·˜, ηÈ
ÂÌÊ·Ó›˙ÂÙ·È ÙÔ
, ÙÔ
, ÙÔ
‹ ÙÔ
.
™∏ª∂πø™∏ ∏ ıÂÚÌÔÎڷۛ˜ Ô˘ ·Ó·Ê¤ÚÔÓÙ·È
·Ú·¿Óˆ Â›Ó·È ÌfiÓÔ ÂÓ‰ÂÈÎÙÈΤ˜, ÔÈ
ÙÈ̤˜
ÙˆÓ
ıÂÚÌÔÎÚ·ÛÈÒÓ
ÛÙÔ
¯ÂÈÚÈÛÙ‹ÚÈÔ
Û·˜
ÂÓ‰¤¯ÂÙ·È
Ó·
‰È·Ê¤ÚÔ˘Ó.
∞Ó ÙÔ
‰ÂÓ ÂÌÊ·Ó›˙ÂÙ·È, ÙfiÙ ·˘Ùfi ÛËÌ·›ÓÂÈ fiÙÈ
‰ÂÓ ˘¿Ú¯Ô˘Ó ÚÔÁÚ·ÌÌ·ÙÈṲ̂Ó˜ ÂÓ¤ÚÁÂȘ ÁÈ·
ÙË ¢Â˘Ù¤Ú·.
¶È¤ÛÙ ¿ÏÈ ÙÔ Ï‹ÎÙÚÔ
ÁÈ· Ó· ÌÂÙ·‚›ÙÂ
ÛÙËÓ ÂfiÌÂÓË Ë̤ڷ Ù˘ ‚‰ÔÌ¿‰·˜. £· ·Ú¯›ÛÂÈ
Ó· ·Ó·‚ÔÛ‚‹ÓÂÈ ÙÔ
. ∞˘Ùfi ÛËÌ·›ÓÂÈ fiÙÈ
‰ÈÂÚÂ˘Ó¿ÙÂ
ÙȘ
ÂÓ¤ÚÁÂȘ
Ô˘
›ӷÈ
ÚÔÁÚ·ÌÌ·ÙÈṲ̂Ó˜ ÁÈ· ÙËÓ ∆Ú›ÙË.
∏
‰È·‰Èηۛ·
Ô˘
ÂÚÈÁÚ¿ÊËÎÂ
·ÓˆÙ¤Úˆ
Í·Ó·Ú¯›˙ÂÈ ÙÒÚ·.
∞Ó ¤¯ÂÈ ÚÔÁÚ·ÌÌ·ÙÈÛı› ÙÔ˘Ï¿¯ÈÛÙÔÓ Ì›·
ÂÓ¤ÚÁÂÈ· ÁÈ· ÙË ∆Ú›ÙË, ÙfiÙ ı· ÂÌÊ·ÓÈÛÙ› ÙÔ .
∆Ô ÚÔÏfiÈ ‰ËÏÒÓÂÈ ÙËÓ ÒÚ· Ô˘ ı· ÂÓÂÚÁÔÔÈËı›
Ë ÚÔÁÚ·ÌÌ·ÙÈṲ̂ÓË ÂÓ¤ÚÁÂÈ·, Î·È ÂÌÊ·Ó›˙ÂÙ·È ÙÔ
, ÙÔ
, ÙÔ
‹ ÙÔ
.
∞Ó ÙÔ
‰ÂÓ ÂÌÊ·Ó›˙ÂÙ·È, ÙfiÙ ·˘Ùfi ÛËÌ·›ÓÂÈ fiÙÈ
‰ÂÓ ˘¿Ú¯Ô˘Ó ÚÔÁÚ·ÌÌ·ÙÈṲ̂Ó˜ ÂÓ¤ÚÁÂȘ ÁÈ·
ÙËÓ ∆Ú›ÙË.
¶È¤ÛÙ ÙÔ Ï‹ÎÙÚÔ
ÁÈ· Ó· ÂÌÊ·ÓÈÛÙ› Ë
ÂfiÌÂÓË ÚÔÁÚ·ÌÌ·ÙÈṲ̂ÓË ÂÓ¤ÚÁÂÈ·. ∂¿Ó ¤¯ÂÈ
ÚÔÁÚ·ÌÌ·ÙÈÛı› ÁÈ· ÙËÓ ∆Ú›ÙË ‰Â‡ÙÂÚË ÂÓ¤ÚÁÂÈ·
Â›Ó·È ÚÔÁÚ·ÌÌ·ÙÈṲ̂ÓË, ÙÔ
ı· Û˘Ó¯›ÛÂÈ Ó·
·Ó·‚ÔÛ‚‹ÓÂÈ Î·È ı· ÂÌÊ·ÓÈÛÙ› ÙÔ
.
CZ-02RT11P
∆ËϯÂÈÚÈÛÙ‹ÚÈÔ
4PW15515-1
ÀÔı¤ÙÔÓÙ·˜
fiÙÈ
ÁÈ·
ÙËÓ
∆Ú›ÙË
¤¯Ô˘Ó
ÚÔÁÚ·ÌÌ·ÙÈÛÙ› 5 ÂÓ¤ÚÁÂȘ, ı· ¯ÚÂÈ·ÛÙ› Ó·
·Ù‹ÛÂÙ 5 ÊÔÚ¤˜ ÙÔ Ï‹ÎÙÚÔ ÁÈ· Ó·
ÂÌÊ·ÓÈÛÙÔ‡Ó ÔÈ ÚÔÁÚ·ÌÌ·ÙÈṲ̂Ó˜ ÂÓ¤ÚÁÂȘ.
™˘Ó¯›ÛÙ ӷ ·Ù¿Ù ÙÔ Ï‹ÎÙÚÔ
̤¯ÚÈ Ë
¤Ó‰ÂÈÍË Ù˘ Ë̤ڷ˜ Ù˘ ‚‰ÔÌ¿‰·˜ ÂÌÊ·Ó›ÛÂÈ ÙËÓ
ÙÚ¤¯Ô˘Û· Ë̤ڷ (‰ÂÓ ·Ó·‚ÔÛ‚‹ÓÂÈ), ÙÒÚ· ¤¯ÂÙÂ
‚ÁÂÈ ·fi ÙËÓ Î·Ù¿ÛÙ·ÛË ‰ÈÂÚ‡ÓËÛ˘.
™∏ª∂πø™∏ ∆Ô fiÛ˜ ÊÔÚ¤˜ ı· ȤÛÂÙ ÙÔ
Ï‹ÎÙÚÔ
ÁÈ· Ó· ‚Á›Ù ·fi ÙËÓ
ηٿÛÙ·ÛË ‰ÈÂÚ‡ÓËÛ˘ ÂÍ·ÚÙ¿Ù·È ·fi
ÙÔÓ ·ÚÈıÌfi ÙˆÓ ÚÔÁÚ·ÌÌ·ÙÈṲ̂ӈÓ
ÂÓÂÚÁÂÈÒÓ ÛÙÔ ¯ÚÔÓԉȷÎfiÙË.
¶Ò˜ ÌÔÚÒ Ó· ÂÚÌËÓ‡ۈ ÙȘ
ÚÔÁÚ·ÌÌ·ÙÈṲ̂Ó˜ ÂÓ¤ÚÁÂȘ
°È· Ó· ÌÔÚ¤ÛÂÙ ӷ ηٷÓÔ‹ÛÂÙ ÙË Û˘ÌÂÚÈÊÔÚ¿ Ù˘ ÂÁηٿÛÙ·Û‹˜ Û·˜ fiÙ·Ó ÂÓÂÚÁÔÔÈ›ٷÈ
Ô
¯ÚÔÓԉȷÎfiÙ˘
ÚÔÁÚ·ÌÌ·ÙÈÛÌÔ‡,
›ӷÈ
ÛËÌ·ÓÙÈÎfi Ó· Ú›¯ÓÂÙ ÌÈ· Ì·ÙÈ¿ Û fiϘ ÙȘ
ÚÔÁÚ·ÌÌ·ÙÈṲ̂Ó˜ ÂÓ¤ÚÁÂȘ Ù˘ Ë̤ڷ˜ ηÈ
›Ûˆ˜ ÛÙËÓ ÙÂÏÂ˘Ù·›· ÚÔÁÚ·ÌÌ·ÙÈṲ̂ÓË ÂÓ¤ÚÁÂÈ·
Ù˘ ÚÔËÁÔ‡ÌÂÓ˘ Ë̤ڷ˜.
∂¿Ó Ë ÚÒÙË ÚÔÁÚ·ÌÌ·ÙÈṲ̂ÓË ÂÓ¤ÚÁÂÈ· ÁÈ· ÙËÓ
ÙÚ¤¯Ô˘Û· Ë̤ڷ ‰ÂÓ Â›Ó·È ·ÎfiÌ· ÂÓÂÚÁÔÔÈË̤ÓË,
Ë ÙÚ¤¯Ô˘Û· ηٿÛÙ·ÛË Ù˘ ÂÁηٿÛÙ·Û‹˜ Û·˜
ÂÍ·ÚٿٷÈ, Èı·ÓfiÙÂÚ· ·ÏÏ¿ fi¯È ··Ú·›ÙËÙ·, ·fi
ÙËÓ ÙÂÏÂ˘Ù·›· ÚÔÁÚ·ÌÌ·ÙÈṲ̂ÓË ÂÓ¤ÚÁÂÈ· Ù˘
ÚÔËÁÔ‡ÌÂÓ˘ Ë̤ڷ˜. ¢È·‚¿ÛÙ ÙËÓ ÛËÌ·ÓÙÈ΋
ÛËÌ›ˆÛË ·Ú·Î¿Ùˆ.
∂¿Ó Ë ÚÒÙË ÚÔÁÚ·ÌÌ·ÙÈṲ̂ÓË ÂÓ¤ÚÁÂÈ· ÁÈ· ÙËÓ
ÙÚ¤¯Ô˘Û· Ë̤ڷ Â›Ó·È ‹‰Ë ÂÓÂÚÁÔÔÈË̤ÓË, Ë
ÙÚ¤¯Ô˘Û· ηٿÛÙ·ÛË Ù˘ ÂÁηٿÛÙ·Û‹˜ Û·˜
ÂÍ·ÚٿٷÈ, Èı·ÓfiÙÂÚ· ·ÏÏ¿ fi¯È ··Ú·›ÙËÙ·, ·fi
ÙȘ ·Ú·Ì¤ÙÚÔ˘˜ Ô˘ ÚÔÁÚ·ÌÌ·Ù›ÛıËÎ·Ó ÛÙËÓ
ÚÒÙË
ÚÔÁÚ·ÌÌ·ÙÈṲ̂ÓË
ÂÓ¤ÚÁÂÈ·
Ù˘
ÙÚ¤¯Ô˘Û·˜ Ë̤ڷ˜. ¢È·‚¿ÛÙ ÙËÓ ÛËÌ·ÓÙÈ΋
ÛËÌ›ˆÛË ·Ú·Î¿Ùˆ.
∂Á¯ÂÈÚ›‰ÈÔ ÏÂÈÙÔ˘ÚÁ›·˜
11
™∏ª∂πø™∏ °È· Ó· ‰È·ÙËÚ‹ÛÂÙ ·Ïfi ÙÔ ¯ÂÈÚÈÛÌfi
Ù˘ ÂÁηٿÛÙ·Û‹˜ Û·˜, ÔÈ Ú˘ıÌ›ÛÂȘ
ÙÔ˘
¯ÚÔÓԉȷÎfiÙË
ÌÔÚÔ‡Ó
Ó·
·Î˘ÚˆıÔ‡Ó Â‡ÎÔÏ· ·ÏÏ¿˙ÔÓÙ·˜ ÙËÓ
ÙÚ¤¯Ô˘Û· Ú‡ıÌÈÛË (Ë «ÙÂÏÂ˘Ù·›·»
ÂÓÙÔÏ‹ ·Ó·ÈÚ› ÙËÓ ÚÔËÁÔ‡ÌÂÓË
ÂÓÙÔÏ‹
̤¯ÚÈ
ÙËÓ
ÂfiÌÂÓË
ÚÔÁÚ·ÌÌ·ÙÈṲ̂ÓË ÂÓÙÔÏ‹).
∂›ÏÔÁÔ˜: ∞Ó Î·È ÂÌÊ·Ó›˙ÂÙ·È ÙÔ
, οÔÈÔ˜
ÌÔÚ› Ó· ¤¯ÂÈ ‹‰Ë ÙÚÔÔÔÈ‹ÛÂÈ ÙȘ Ú˘ıÌ›ÛÂȘ. ∏
ÂfiÌÂÓË ÚÔÁÚ·ÌÌ·ÙÈṲ̂ÓË ÂÓ¤ÚÁÂÈ· ı· ·Î˘ÚÒÛÂÈ
ÙȘ ÙÚÔÔÔÈË̤Ó˜ Ú˘ıÌ›ÛÂȘ Î·È fiϘ ÔÈ
Ú˘ıÌ›ÛÂȘ ÂÈÛÙÚ¤ÊÔ˘Ó ÛÙȘ ÚÔÁÚ·ÌÌ·ÙÈṲ̂Ó˜
ÙÈ̤˜ ÙÔ˘˜.
√È ÚÔÁÚ·ÌÌ·ÙÈṲ̂Ó˜ ÂÓ¤ÚÁÂȘ ÂÓ‰¤¯ÂÙ·È Ó·
ÂÈηχÙÔÓÙ·È.
∂Í·ÈÙ›·˜
Ù˘
ÏÔÁÈ΋˜
«Ë
ÙÂÏÂ˘Ù·›· ÂÓÙÔÏ‹ ·Î˘ÚÒÓÂÈ», ı· ÈÛ¯‡ÛÂÈ Ë
ÙÂÏÂ˘Ù·›· ÚÔÁÚ·ÌÌ·ÙÈṲ̂ÓË ÂÓÙÔÏ‹.
¶Ò˜ ÌÔÚÒ Ó· ÂÚÌËÓ‡ۈ ÙȘ ÂӉ›ÍÂȘ
ÛÙËÓ ÔıfiÓË fiÙ·Ó Ô ¯ÚÔÓԉȷÎfiÙ˘
ÚÔÁÚ·ÌÌ·ÙÈÛÌÔ‡ Â›Ó·È ÂÓÂÚÁfi˜
Ÿˆ˜ ÂÚÈÁÚ¿ÊËΠ·ÓˆÙ¤Úˆ, ÔÈ Ú˘ıÌ›ÛÂȘ ÙÔ˘
¯ÚÔÓԉȷÎfiÙË (Î·È Û˘ÓÂÒ˜ ÔÈ ÂӉ›ÍÂȘ Ô˘
ÂÌÊ·Ó›˙ÔÓÙ·È) ÂÓ‰¤¯ÂÙ·È Ó· ·Î˘ÚˆıÔ‡Ó ÚÔÛˆÚÈÓ¿
Ì ¯ÂÈÚÔΛÓËÙË ·Ú¤Ì‚·ÛË.
∞Ó ı¤ÏÂÙ ӷ ›ÛÙ ·Ôχو˜ Û›ÁÔ˘ÚÔÈ ÁÈ· ÙȘ
Ú˘ıÌ›ÛÂȘ ÙÔ˘ ¯ÚÔÓԉȷÎfiÙË ÚÔÁÚ·ÌÌ·ÙÈÛÌÔ‡
ÂΛÓË ÙË ÛÙÈÁÌ‹, ı· Ú¤ÂÈ Ó· ‰ÈÂÚ¢ӋÛÂÙ ÙȘ
ÚÔÁÚ·ÌÌ·ÙÈṲ̂Ó˜
ÂÓ¤ÚÁÂȘ
ÙÔ˘
¯ÚÔÓԉȷÎfiÙË.
™˘Ì‚Ô˘Ï¢Ù›ÙÂ
ÙËÓ
ÂÓfiÙËÙ·
"¢ÈÂÚ‡ÓËÛË ÙˆÓ ÚÔÁÚ·ÌÌ·ÙÈÛÌ¤ÓˆÓ ÂÓÂÚÁÂÈÒÓ
ÛÙÔÓ ¯ÚÔÓԉȷÎfiÙË" ÛÙË ÛÏ›‰· 10.
∂Á¯ÂÈÚ›‰ÈÔ ÏÂÈÙÔ˘ÚÁ›·˜
12
6. ƒ‡ıÌÈÛË ÙÔ˘ ¯ÚÔÓԉȷÎfiÙË
ÚÔÁÚ·ÌÌ·ÙÈÛÌÔ‡
∆È Ú¤ÂÈ Ó· ÚÔÁÚ·ÌÌ·Ù›Ûˆ;
∫·ıÒ˜ Ô ¯ÚÔÓԉȷÎfiÙ˘ ÚÔÁÚ·ÌÌ·ÙÈÛÌÔ‡ ‚·Û›˙ÂÙ·È Û ‚‰ÔÌ·‰È·›Ô ÚfiÁÚ·ÌÌ· (ÔÈ ›‰È˜
ÂÓ¤ÚÁÂȘ ı· ·ӷϷ̂¿ÓÔÓÙ·È Î¿ı ‚‰ÔÌ¿‰·)
ı· Ú¤ÂÈ Ó· ÂÈϤÍÂÙ ÚÒÙ· ÙËÓ Ë̤ڷ Ù˘
‚‰ÔÌ¿‰·˜.
∆ÒÚ· Ú¤ÂÈ Ó· ÂÈϤÍÂÙ ÂÓ¤ÚÁÂÈ·:
1 ÂÓÂÚÁÔÔ›ËÛË Ù˘ ÂÁηٿÛÙ·Û˘ Û οÔÈ·
ÚÔÁÚ·ÌÌ·ÙÈṲ̂ÓË ÒÚ·, ÛÂ Û˘Ó‰˘·ÛÌfi ÌÂ
¤Ó· ÛËÌÂ›Ô Ú‡ıÌÈÛ˘ (·ÎÚÈ‚‹˜ ¤ÏÂÁ¯Ô˜
ıÂÚÌÔÎÚ·Û›·˜)
2
·ÂÓÂÚÁÔÔ›ËÛË Ù˘ ÂÁηٿÛÙ·Û˘
(ÙÂÚÌ·ÙÈÛÌfi˜ ÂϤÁ¯Ô˘)
3 ÂÓÂÚÁÔÔ›ËÛË Ù˘ ÂÁηٿÛÙ·Û˘ Û ÌÈ·
ÚÔÁÚ·ÌÌ·ÙÈṲ̂ÓË ÒÚ·, Û ÏÂÈÙÔ˘ÚÁ›·
ÂÚÈÔÚÈÛÌÔ‡
∆ÂÏÈο, Ú¤ÂÈ Ó· ÂÈÛ¿ÁÂÙ ÙËÓ ÒÚ· Ù˘ Ë̤ڷ˜
Ô˘ Ú¤ÂÈ Ó· ÂÓÂÚÁÔÔÈËı› Ë ÂÓ¤ÚÁÂÈ·.
™∏ª∂πø™∏ ∂¿Ó ÚÔÁÚ·ÌÌ·Ù›ÛÂÙ 2 ‹ ·Ú·¿Óˆ
ÂÓ¤ÚÁÂȘ ÙËÓ ›‰È· ÒÚ· Ù˘ Ë̤ڷ˜,
ÌfiÓÔ Ë ÂÓ¤ÚÁÂÈ· Ì ÙÔÓ ˘„ËÏfiÙÂÚÔ
·ÚÈıÌfi ÂÓÂÚÁ›·˜ (2-5) ı· ÂÎÙÂÏÂÛı›.
CZ-02RT11P
∆ËϯÂÈÚÈÛÙ‹ÚÈÔ
4PW15515-1
°ÓˆÚÈÌ›· Ì ÙË ™˘Û΢‹ Û·˜
√ ÚÔÁÚ·ÌÌ·ÙÈÛÌfi˜ ÙÔ˘ ¯ÚÔÓԉȷÎfiÙË Â›Ó·È
¢¤ÏÈÎÙÔ˜ (ÌÔÚ›Ù ӷ ÚÔÛı¤ÙÂÙÂ, Ó· ·Ê·ÈÚ›ÙÂ
‹ Ó· ÙÚÔÔÔț٠ÙȘ ÚÔÁÚ·ÌÌ·ÙÈṲ̂Ó˜ ÂÓ¤ÚÁÂÈ·˜ fiÔÙ ·˘Ùfi Â›Ó·È ··Ú·›ÙËÙÔ) ηıÒ˜ ηÈ
ηٷÓÔËÙfi˜ (Ù· ‚‹Ì·Ù· ÙÔ˘ ÚÔÁÚ·ÌÌ·ÙÈÛÌÔ‡
ÂÚÈÔÚ›˙ÔÓÙ·È ÛÙÔ ÂÏ¿¯ÈÛÙÔ).
¶·Ú·Î¿Ùˆ ı· ‚Ú›Ù ÌÂÚÈΤ˜ Û˘Ì‚Ô˘Ï¤˜ ηÈ
χÛÂȘ ÁÈ· ÙÔÓ ÂÈÙ˘¯Ë̤ÓÔ ÚÔÁÚ·ÌÌ·ÙÈÛÌfi ÙÔ˘
¯ÚÔÓԉȷÎfiÙË:
ñ
ñ
ñ
ñ
ñ
ñ
Ì¿ıÂÙ ٷ ÂÈÎÔÓ›‰È· Î·È Ù· Ï‹ÎÙÚ·, ı· Ù·
¯ÚÂÈ·ÛÙ›Ù fiÙ·Ó Ú·ÁÌ·ÙÔÔț٠ÙÔÓ
ÚÔÁÚ·ÌÌ·ÙÈÛÌfi,
Ì¿ıÂÙ Ҙ Ó· ¯ÂÈÚ›˙ÂÛÙ ÙË ÏÂÈÙÔ˘ÚÁ›·
‰ÈÂÚ‡ÓËÛ˘, ı· ÙËÓ ¯ÚÂÈ·ÛÙ›Ù fiÙ·Ó
·Ú¯›ÛÂÙ ÙÔÓ ÚÔÁÚ·ÌÌ·ÙÈÛÌfi.
™˘Ì‚Ô˘Ï¢Ù›Ù ÙËÓ ÂÓfiÙËÙ· "¢ÈÂÚ‡ÓËÛË
ÙˆÓ ÚÔÁÚ·ÌÌ·ÙÈÛÌ¤ÓˆÓ ÂÓÂÚÁÂÈÒÓ ÛÙÔÓ
¯ÚÔÓԉȷÎfiÙË" ÛÙË ÛÏ›‰· 10,
Û˘ÌÏËÚÒÛÙ ÙÔ ¤ÓÙ˘Ô Ô˘ ı· ‚Ú›Ù ÛÙÔ
Ù¤ÏÔ˜ ·˘ÙÔ‡ ÙÔ˘ ÂÁ¯ÂÈÚȉ›Ô˘. ™ËÌÂÈÒÛÙÂ
ÙËÓ ÒÚ· Î·È ÙËÓ ··ÈÙÔ‡ÌÂÓË ÂÓ¤ÚÁÂÈ· ÁÈ·
οı Ë̤ڷ (ı˘ÌËı›Ù fiÙÈ Ô ·ÚÈıÌfi˜
ÂÓÂÚÁÂÈÒÓ ÂÚÈÔÚ›˙ÂÙ·È Û 5 ·Ó¿ Ë̤ڷ),
¤¯ÂÙ ¿ÓÂÛË ¯ÚfiÓÔ˘ ÁÈ· Ó· ÂÈÛ·Á¿ÁÂÙ fiÏ·
Ù· ÛÙÔȯÂÈ¿ ÛˆÛÙ¿,
ÚÔÛ·ı‹ÛÙ ӷ ÚÔÁÚ·ÌÌ·Ù›ÛÂÙ ÙȘ
ÂÓ¤ÚÁÂȘ ÁÈ· οı Ë̤ڷ Û ÌÈ· ÏÔÁÈ΋
ÛÂÈÚ¿ (·Ú¯›ÛÙ Ì ÙËÓ ÂÓ¤ÚÁÂÈ· 1 ÁÈ· ÙËÓ
ÚÒÙË ÂÓ¤ÚÁÂÈ· Î·È ÙÂÏÂÈÒÛÙ Ì ÙÔÓ
ÌÂÁ·Ï‡ÙÂÚÔ ·ÚÈıÌfi Ù˘ ÙÂÏÂ˘Ù·›·˜
ÂÓ¤ÚÁÂÈ·˜). ∞˘Ùfi ‰ÂÓ Â›Ó·È ÚÔ¸fiıÂÛË
·ÏÏ¿ ı· Û·˜ ‰È¢ÎÔχÓÂÈ Ó· ÂÚÌËÓ‡ÛÂÙÂ
ÙÔ ÚfiÁÚ·ÌÌ· ·ÚÁfiÙÂÚ·,
ı˘ÌËı›Ù fiÙÈ ÌÔÚ›Ù ¿ÓÙ· Ó·
ÙÚÔÔÔÈ›ÙÂ, Ó· ÚÔÛı¤ÙÂÙ ‹ Ó·
ηٷÚÁ›Ù ·ÚÁfiÙÂÚ· ÚÔÁÚ·ÌÌ·ÙÈṲ̂Ó˜
ÂÓ¤ÚÁÂȘ.
CZ-02RT11P
∆ËϯÂÈÚÈÛÙ‹ÚÈÔ
4PW15515-1
¶ÚÔÁÚ·ÌÌ·ÙÈÛÌfi˜
1
√ Ã√¡√¢π∞∫√¶∆∏™
¶ƒ√°ƒ∞ªª∞∆π∑∂∆∞π °π∞ ¶ƒø∆∏ º√ƒ∞
™∏ª∂πø™∏ ŸÙ·Ó ·ÏÏ¿˙ÂÙ Ë̤ڷ ηٿ ÙË
‰È·‰Èηۛ· ÙÔ˘ ÚÔÁÚ·ÌÌ·ÙÈÛÌÔ‡, ı·
Ú¤ÂÈ Ó· ÂȂ‚·ÈÒÛÂÙ ÙËÓ «ÙÂÏÂ˘Ù·›· ÂÓ¤ÚÁÂÈ·». ∫¿ı Ë̤ڷ ÌÔÚ› Ó·
¤¯ÂÈ 5 ÚÔÁÚ·ÌÌ·ÙÈṲ̂Ó˜ ÂÓ¤ÚÁÂȘ
(Ì ·Ú›ıÌËÛË ·fi ÙÔ 1 ̤¯ÚÈ ÙÔ 5)
·ÏÏ¿ ÁÈ· οÔÈÔ ÏfiÁÔ ›Ûˆ˜ ¯ÚÂÈ·ÛÙ›
Ó· ‰È·ÁÚ¿„ÂÙ ̛·, ÌÂÚÈΤ˜ ‹ fiϘ ÙȘ
ÚÔÁÚ·ÌÌ·ÙÈṲ̂Ó˜ ÂÓ¤ÚÁÂȘ.
°È· Ó· ÌÔÚ›Ù ӷ ‰È·ÁÚ¿ÊÂÙ ÚÔÁÚ·ÌÌ·ÙÈṲ̂Ó˜ ÂÓ¤ÚÁÂȘ, ı· Ú¤ÂÈ
Ó· ÂÈϤÍÂÙ ÙËÓ ÙÂÏÂ˘Ù·›· ÂÓ¤ÚÁÂÈ·
Ô˘ ı¤ÏÂÙ ӷ ‰È·ÙËÚ‹ÛÂÙÂ, ·˘Ù‹
ÌÔÚ› Ó· Â›Ó·È ·fi ÙËÓ 1 ¤ˆ˜ ÙËÓ 5,
‹ η̛· ÂÓ¤ÚÁÂÈ· (ÂÌÊ·Ó›˙ÂÙ·È ÙÔ
Î·È ‰ÂÓ ÂÌÊ·Ó›˙ÂÙ·È Î·Ì›· ÂÓ¤ÚÁÂÈ·).
ŸÏ˜ ÔÈ ÚÔÁÚ·ÌÌ·ÙÈṲ̂Ó˜ ÂÓ¤ÚÁÂȘ
Ì ·ÚÈıÌfi ª∂°∞§À∆∂ƒ√ ·fi ÙËÓ
ÂÈÏÂÁ̤ÓË ÂÓ¤ÚÁÂÈ·, ‹ fiϘ ÔÈ
ÚÔÁÚ·ÌÌ·ÙÈṲ̂Ó˜
ÂÓ¤ÚÁÂȘ
ÛÂ
ÂÚ›ÙˆÛË Ô˘ ‰ÂÓ ¤¯ÂÈ ÂÈÏÂÁ› η̛·
ÂÓ¤ÚÁÂÈ·, ı· ‰È·ÁÚ·ÊÔ‡Ó.
¶ƒ√°ƒ∞ªª∞∆π™ª√™ ∆∏™ ¶ƒø∆∏™ ∏ª∂ƒ∞™
∆∏™ ∂µ¢√ª∞¢∞™
™∏ª∂πø™∏ ™ÙȘ ·Ú·Î¿Ùˆ ÁÂÓÈΤ˜ Ô‰ËÁ›Â˜, ˘ÔÙ›ıÂÙ·È fiÙÈ ·Ú¯›˙ÂÙ ӷ ÚÔÁÚ·ÌÌ·Ù›˙ÂÙÂ
ÙȘ ÂÓ¤ÚÁÂȘ ÙÔ˘ ¯ÚÔÓԉȷÎfiÙË ÙË
¢Â˘Ù¤Ú· Î·È ÙÂÏÂÈÒÓÂÙ Ì ÙȘ ÂÓ¤ÚÁÂȘ
ÙÔ˘ ¯ÚÔÓԉȷÎfiÙË ÁÈ· ÙËÓ ∫˘Úȷ΋.
∞Ó ÚÔÙÈÌ¿Ù ӷ ª∏¡ ·Ú¯›ÛÂÙ ·fi ÙË
¢Â˘Ù¤Ú·, ·Ó·˙ËÙ‹ÛÙ ÚÒÙ· ÙËÓ Ë̤ڷ
Ô˘ ı¤ÏÂÙÂ Î·È ÛÙË Û˘Ó¤¯ÂÈ· ÂÈÛ·Á¿ÁÂÙÂ
ÙËÓ Î·Ù¿ÛÙ·ÛË ¶ƒ√°ƒ∞ªª∞∆π™ª√À
(PROGRAM).
∂Á¯ÂÈÚ›‰ÈÔ ÏÂÈÙÔ˘ÚÁ›·˜
13
™Â ·˘Ù‹ ÙË Û˘ÁÎÂÎÚÈ̤ÓË ÂÚ›ÙˆÛË, ‰ÂÓ ¤¯Ô˘Ó
ÚÔÁÚ·ÌÌ·ÙÈÛÙ› ÚÈÓ ¿ÏϘ ÂÓ¤ÚÁÂȘ, fiϘ ÔÈ
ÂÓ¤ÚÁÂȘ ÙÔ˘ ¯ÚÔÓԉȷÎfiÙË ÚÔÁÚ·ÌÌ·ÙÈÛÌÔ‡
Â›Ó·È ·‰Ú·Ó›˜.
ñ
∞Ó·˙ËÙ‹ÛÙÂ Î·È ÂÈϤÍÙ ÙË ¢Â˘Ù¤Ú·,
·ÙÒÓÙ·˜ ÙÔ Ï‹ÎÙÚÔ
. ∂ÌÊ·Ó›˙ÂÙ·È ÙÔ
ÂÈÎÔÓ›‰ÈÔ
, ÙÔ
ı· ·Ú¯›ÛÂÈ Ó·
·Ó·‚ÔÛ‚‹ÓÂÈ Î·È ¤Ó· ·ÎfiÌ· ·fi Ù· ÂÈÎÔÓ›‰È·
ÂÓ‰¤¯ÂÙ·È ÂÌÊ·ÓÈÛÙ› ·ÏÏ¿
fiÏ· Ù· ¿ÏÏ· ‰›· ·Ú·Ì¤ÓÔ˘Ó ÎÂÓ¿. ∞˘Ùfi
ÛËÌ·›ÓÂÈ fiÙÈ ‰ÂÓ ¤¯Ô˘Ó ÚÔÁÚ·ÌÌ·ÙÈÛÙ›
ÂÓ¤ÚÁÂȘ ÁÈ· ÙË ¢Â˘Ù¤Ú·.
ñ
∂ÈÛ·Á¿ÁÂÙ ÙËÓ ÏÂÈÙÔ˘ÚÁ›· ÚÔÁÚ·ÌÌ·ÙÈÛÌÔ‡ ÎÚ·ÙÒÓÙ·˜ ·ÙË̤ÓÔ ÙÔ Ï‹ÎÙÚÔ
ÁÈ· 5 ‰Â˘ÙÂÚfiÏÂÙ·, ÙÔ ÂÈÎÔÓ›‰ÈÔ
ı·
·Ú¯›ÛÂÈ Ó· ·Ó·‚ÔÛ‚‹ÓÂÈ Â›Û˘.
ñ
ñ
ñ
ñ
ñ
¶È¤ÛÙ ÙÔ ÎÔ˘Ì›
ÁÈ· Ó·
ÂÓÂÚÁÔÔÈ‹ÛÂÙÂ ÙËÓ ÚÒÙË
ÚÔÁÚ·ÌÌ·ÙÈṲ̂ÓË ÂÓ¤ÚÁÂÈ·.
∂ÌÊ·Ó›˙ÂÙ·È ¤Ó· ÂÈÎÔÓ›‰ÈÔ Ô˘
·Ó·‚ÔÛ‚‹ÓÂÈ ‰ËÏÒÓÔÓÙ·˜ ¤ÙÛÈ fiÙÈ
ÚÔÁÚ·ÌÌ·Ù›˙ÂÙ·È Ë ÚÒÙË ÂÓ¤ÚÁÂÈ· ÁÈ· ÙË
¢Â˘Ù¤Ú·. ∞Ó·‚ÔÛ‚‹ÓÔ˘Ó Â›Û˘ Ë
ηıÔÚÈṲ̂ÓË ıÂÚÌÔÎÚ·Û›· Î·È ÙÔ ÚÔÏfiÈ.
¶È¤ÛÙ ÙÔ Ï‹ÎÙÚÔ
ÁÈ· Ó·
ÂÈϤÍÂÙ ›Ù ηıÔÚÈṲ̂ÓË ıÂÚÌÔÎÚ·Û›·,
, ‹ ÏÂÈÙÔ˘ÚÁ›· ÂÚÈÔÚÈÛÌÔ‡.
∂ÈÛ¿ÁÂÙ ÙËÓ ÂÈı˘ÌËÙ‹ ıÂÚÌÔÎÚ·Û›· Ì ٷ
Ï‹ÎÙÚ·
&
.
¶È¤ÛÙ ÙÔ Ï‹ÎÙÚÔ
ÁÈ· Ó· ·ÏÏ¿ÍÂÙÂ
ÌÂٷ͇ Ù˘ ÂÏ¿¯ÈÛÙ˘ ηıÔÚÈṲ̂Ó˘
ıÂÚÌÔÎÚ·Û›·˜ Î·È Ù˘ ̤ÁÈÛÙ˘
ηıÔÚÈṲ̂Ó˘ ıÂÚÌÔÎÚ·Û›·˜ ÛÙËÓ
ÏÂÈÙÔ˘ÚÁ›· ÂÚÈÔÚÈÛÌÔ‡, Ë ÂÈÏÂÁ̤ÓË
ıÂÚÌÔÎÚ·Û›· ı· ·Ú¯›ÛÂÈ Ó· ·Ó·‚ÔÛ‚‹ÓÂÈ.
∂Á¯ÂÈÚ›‰ÈÔ ÏÂÈÙÔ˘ÚÁ›·˜
14
ñ
∂ÈÛ·Á¿ÁÂÙ ÙËÓ ÒÚ· fiÙ·Ó ı· Ú¤ÂÈ Ó·
Á›ÓÂÈ ¤Ó·ÚÍË Ù˘ ÂÎÙ¤ÏÂÛ˘ Ù˘ ÂÓ¤ÚÁÂÈ·˜,
¯ÚËÛÈÌÔÔÈÒÓÙ·˜ Ù· Ï‹ÎÙÚ·
ηÈ
(ÂÏ¿¯ÈÛÙÔ ‚‹Ì· = 10 ÏÂÙ¿).
™∏ª∂πø™∏ ∂¿Ó ηٿ Ï¿ıÔ˜ Ȥ۷Ù ÙÔ Ï‹ÎÙÚÔ
, ¤¯ÂÙ ÂÓÂÚÁÔÔÈ‹ÛÂÈ ÙËÓ ÂfiÌÂÓË
ÂÓ¤ÚÁÂÈ·. ∆fiÙ ÙÔ
( ÂÌÊ·Ó›˙ÂÙ·È
ÛÙ·ıÂÚfi Î·È ÙÔ
·Ó·‚ÔÛ‚‹ÓÂÈ). ¶È¤ÛÙÂ
·ÓÂÈÏËÌ̤ӷ ÙÔ Ï‹ÎÙÚÔ
, ̤¯ÚÈ
Ó· ÂÌÊ·ÓÈÛÙ› ¤Ó· ·Ó·Ï¿ÌÔÓ . ∆ÒÚ·
ÌÔÚ›Ù ӷ Û˘Ó¯›ÛÂÙ ӷ οÓÂÙ ÙȘ
Ú˘ıÌ›ÛÂȘ ÁÈ· ÙËÓ ÚÒÙË ÂÓ¤ÚÁÂÈ· ÙÔ˘
¯ÚÔÓԉȷÎfiÙË ÚÔÁÚ·ÌÌ·ÙÈÛÌÔ‡.
∂¿Ó Ë ÂÓ¤ÚÁÂÈ· Î·È Ë ·ÓÙ›ÛÙÔÈ¯Ë ÒÚ· Â›Ó·È ÛˆÛÙ¿,
ÙfiÙ ÌÔÚ›Ù ӷ Û˘Ó¯›ÛÂÙ Ì ÙÔÓ ÚÔÁÚ·ÌÌ·ÙÈÛÌfi Ù˘ ‰Â‡ÙÂÚ˘ ÂÓ¤ÚÁÂÈ·˜ ÙÔ˘ ¯ÚÔÓԉȷÎfiÙË. ∞˘Ùfi ÌÔÚ›Ù ӷ ÙÔ Î¿ÓÂÙ Ȥ˙ÔÓÙ·˜
ÙÔ Ï‹ÎÙÚÔ
, Ù· ÛÙÔȯ›· ·ÔıË·ÔÓÙ·È Î·È
ÙfiÙ ÌÔÚ›Ù ӷ ·Ú¯›ÛÂÙ ӷ ÚÔÁÚ·ÌÌ·Ù›˙ÂÙÂ
ÙËÓ ÂfiÌÂÓË ÂÓ¤ÚÁÂÈ· ÙÔ˘ ¯ÚÔÓԉȷÎfiÙË.
∏ ‰È·‰Èηۛ· ÙÔ˘ ÚÔÁÚ·ÌÌ·ÙÈÛÌÔ‡ ÁÈ· ÙȘ
˘fiÏÔȘ ÂÓ¤ÚÁÂȘ ÙÔ˘ ¯ÚÔÓԉȷÎfiÙË Ù˘ ›‰È·˜
Ë̤ڷ˜ Á›ÓÂÙ·È Î·Ù¿ ÙÔÓ ›‰ÈÔ ÙÚfiÔ.
ªÔÚ›Ù ӷ ‰ÈÂÚ¢ӋÛÂÙ ÙȘ ÂÓ¤ÚÁÂȘ ÙÔ˘
¯ÚÔÓԉȷÎfiÙË ÚÔÁÚ·ÌÌ·ÙÈÛÌÔ‡ Ȥ˙ÔÓÙ·˜ ÙÔ
Ï‹ÎÙÚÔ
.
™∏ª∂πø™∏ ªËÓ ·ÓËÛ˘¯Â›Ù ·Ó ÂÈÛ¿ÁÂÙ ÂÚÈÛÛfiÙÂÚ˜
ÂÓ¤ÚÁÂȘ ÛÙÔ ¯ÚÔÓԉȷÎfiÙË È¤˙ÔÓÙ·˜
ÙÔ Ï‹ÎÙÚÔ
Û˘Ó¯fiÌÂÓ·. ªÔÚ›Ù ӷ
ÙȘ ·Î˘ÚÒÛÂÙ fiÙ·Ó ÙÂÏÂÈÒÛÂÙ ÙÔÓ
ÚÔÁÚ·ÌÌ·ÙÈÛÌfi Ù˘ ÙÚ¤¯Ô˘Û·˜ Ë̤ڷ˜.
CZ-02RT11P
∆ËϯÂÈÚÈÛÙ‹ÚÈÔ
4PW15515-1
ŸÙ·Ó ¤¯ÂÙ ϤÔÓ ÂÈÛ·Á¿ÁÂÈ fiÏ· Ù· ÛÙÔȯ›· ÁÈ·
ÙȘ ÂÓ¤ÚÁÂȘ ÙÔ˘ ¯ÚÔÓԉȷÎfiÙË ÁÈ· ÙË ¢Â˘Ù¤Ú·,
ı· Ú¤ÂÈ Ó· ÂȂ‚·ÈÒÛÂÙ ÙȘ ÚÔÁÚ·ÌÌ·ÙÈṲ̂Ó˜ ÂÓ¤ÚÁÂȘ.
µÂ‚·Èˆı›Ù fiÙÈ Ë ÙÂÏÂ˘Ù·›· ÂÓ¤ÚÁÂÈ· ÙÔ˘
¯ÚÔÓԉȷÎfiÙË Ô˘ ı¤ÏÂÙ ӷ ‰È·ÙËÚ‹ÛÂÙ ›ӷÈ
ÂÈÏÂÁ̤ÓË (ÔÈ ÂÓ¤ÚÁÂȘ ÙÔ˘ ¯ÚÔÓԉȷÎfiÙË
ÚÔÁÚ·ÌÌ·ÙÈÛÌÔ‡ Ì ÌÂÁ·Ï‡ÙÂÚÔ ·ÚÈıÌfi ı·
‰È·ÁÚ·ÊÔ‡Ó).
∆ÒÚ· ı· Ú¤ÂÈ Ó· ÂÈϤÍÂÙ ÌÂٷ͇ 2 ÂÈÏÔÁÒÓ:
1 ∂¶πµ∂µ∞πø™∏ ∫∞π ∞¡∆πƒ∞º∏ °π∞ ∆∏¡
∂¶√ª∂¡∏ ∏ª∂ƒ∞
∏ ÂÓ¤ÚÁÂÈ· ÙÔ˘ ¯ÚÔÓԉȷÎfiÙË Ô˘
ÚÔÁÚ·ÌÌ·Ù›Û·Ù ÁÈ· ÙËÓ ÙÚ¤¯Ô˘Û· Ë̤ڷ
ÈÛ¯‡ÂÈ Â›Û˘ Î·È ÁÈ· ÙËÓ ÂfiÌÂÓË Ë̤ڷ:
¯ÚËÛÈÌÔÔÈ‹ÛÙ ÙËÓ ÏÂÈÙÔ˘ÚÁ›· «ÂȂ‚·›ˆÛË
Î·È ·ÓÙÈÁÚ·Ê‹ ÂÓÂÚÁÂÈÒÓ ÁÈ· ÙËÓ ÂfiÌÂÓË
Ë̤ڷ» Ȥ˙ÔÓÙ·˜ Ù·˘Ùfi¯ÚÔÓ· Ù· Ï‹ÎÙÚ·
ηÈ
ÁÈ· 5 ‰Â˘ÙÂÚfiÏÂÙ·.
2 ∂¶πµ∂µ∞πø™∏ ª√¡√
∏ ÂÓ¤ÚÁÂÈ· ÙÔ˘ ¯ÚÔÓԉȷÎfiÙË Ô˘
ÚÔÁÚ·ÌÌ·Ù›Û·Ù ÁÈ· ÙËÓ ÙÚ¤¯Ô˘Û· Ë̤ڷ
ÈÛ¯‡ÂÈ ÌfiÓÔ Î·È ÁÈ· ÙËÓ ÂÈÏÂÁ̤ÓË Ë̤ڷ:
¯ÚËÛÈÌÔÔÈ‹ÛÙ ÙËÓ ÏÂÈÙÔ˘ÚÁ›· «ÂȂ‚·›ˆÛË
ÙÂÏÂ˘Ù·›·˜ ÂÓ¤ÚÁÂÈ·˜ Î·È ÌÂÙ¿‚·ÛË ÛÙËÓ
ÂfiÌÂÓË Ë̤ڷ» Ȥ˙ÔÓÙ·˜ ÙÔ Ï‹ÎÙÚÔ
ÁÈ· 5 ‰Â˘ÙÂÚfiÏÂÙ·.
∏ ÏÂÈÙÔ˘ÚÁ›· ÚÔÁÚ·ÌÌ·ÙÈÛÌÔ‡ ‚Ú›ÛÎÂÙ·È ÛÙËÓ
ÂÈÏÔÁ‹ ¤ÍÔ‰Ô˜ Î·È ·Ó¿ÏÔÁ· Ì ÙËÓ ÂÈÏÔÁ‹ Û·˜,
·ÔıË·ÔÓÙ·È ÔÈ ÚÔÁÚ·ÌÌ·ÙÈṲ̂Ó˜ ÂÓ¤ÚÁÂȘ
ÁÈ· ÙË ¢Â˘Ù¤Ú· (Î·È ›Ûˆ˜ ÁÈ· ÙËÓ ∆Ú›ÙË).
CZ-02RT11P
∆ËϯÂÈÚÈÛÙ‹ÚÈÔ
4PW15515-1
¶ƒ√°ƒ∞ªª∞∆π™ª√™ ∆ø¡ À¶√§∂π¶ø¡ ∏ª∂ƒø¡
∆∏™ ∂µ¢√ª∞¢∞™
∏ ‰È·‰Èηۛ· ÚÔÁÚ·ÌÌ·ÙÈÛÌÔ‡ ÙˆÓ ˘ÔÏÔ›ˆÓ
ËÌÂÚÒÓ Â›Ó·È ›‰È· Ì ÙËÓ ‰È·‰Èηۛ· ÚÔÁÚ·ÌÌ·ÙÈÛÌÔ‡ Ù˘ ÚÒÙ˘ Ë̤ڷ˜ Ù˘ ‚‰ÔÌ¿‰·˜. ∆Ô
·Ó·‚ÔÛ‚‹ÓÂÈ ÁÈ· Ó· ‰ËÏÒÛÂÈ ÙËÓ ÂÈÏÂÁ̤ÓË
Ë̤ڷ, Ù·
ηÈ
Â›Ó·È ÛÙ·ıÂÚ¿ ·Ó ÔÈ ÂÓ¤ÚÁÂȘ
·ÓÙÈÁÚ¿ÊËÎ·Ó ·fi ÙË ¢Â˘Ù¤Ú· ÛÙËÓ ∆Ú›ÙË, ÌfiÓÔ
ÙÔ
ÂÌÊ·Ó›˙ÂÙ·È ·Ó ‰ÂÓ ·ÓÙÈÁÚ¿ÊËÎ·Ó ÂÓ¤ÚÁÂȘ
·fi ÙË ¢Â˘Ù¤Ú· ÛÙËÓ ∆Ú›ÙË.
2
£∂§ø ¡∞ ∂¶∂•∂ƒ°∞™£ø
¶ƒ√°ƒ∞ªª∞∆π™ª∂¡∂™ ∂¡∂ƒ°∂π∂™
∏ ÂÂÍÂÚÁ·Û›· ÙˆÓ ÚÔÁÚ·ÌÌ·ÙÈÛÌ¤ÓˆÓ ÂÓÂÚÁÂÈÒÓ Â›Ó·È Â‡ÎÔÏË.
µÂ‚·Èˆı›Ù fiÙÈ ‰Â ‚Ú›ÛÎÂÛÙ ÛÙËÓ Î·Ù¿ÛÙ·ÛË
ÚÔÁÚ·ÌÌ·ÙÈÛÌÔ‡ (ÙÔ
‰ÂÓ ·Ó·‚ÔÛ‚‹ÓÂÈ). ∂¿Ó
Â›Ó·È ··Ú·›ÙËÙÔ, ȤÛÙ ÙÔ Ï‹ÎÙÚÔ
ÁÈ· Ó·
Ú·ÁÌ·ÙÔÔÈ‹ÛÂÙ ¤ÍÔ‰Ô ·fi ÙËÓ ÏÂÈÙÔ˘ÚÁ›·
ÚÔÁÚ·ÌÌ·ÙÈÛÌÔ‡.
¢ÈÂÚ¢ӋÛÙ ÙȘ ÚÔÁÚ·ÌÌ·ÙÈṲ̂Ó˜ ÂÓ¤ÚÁÂȘ ÌÂ
ÙÔ Ï‹ÎÙÚÔ
, ÂÈϤÍÙ ÙËÓ Ë̤ڷ Î·È ÙËÓ
ÂÓ¤ÚÁÂÈ· Ô˘ ı¤ÏÂÙ ӷ ÂÂÍÂÚÁ·Ûı›ÙÂ.
¶È¤ÛÙ ÙÔ Ï‹ÎÙÚÔ
ÁÈ· 5 ‰Â˘ÙÂÚfiÏÂÙ·. ŒÙÛÈ
ÂÓÂÚÁÔÔÈÂ›Ù·È Ë ÏÂÈÙÔ˘ÚÁ›· ÚÔÁÚ·ÌÌ·ÙÈÛÌÔ‡.
∞Ú¯›˙Ô˘Ó Ó· ·Ó·‚ÔÛ‚‹ÓÔ˘Ó ÙÔ ÂÈÎÔÓ›‰ÈÔ
Î·È Ë
ÂÈÏÂÁ̤ÓË ÂÓ¤ÚÁÂÈ·.
∂ÂÍÂÚÁ·Ûı›Ù ÙȘ Ú˘ıÌ›ÛÂȘ ¯ÚËÛÈÌÔÔÈÒÓÙ·˜ Ù·
›‰È· Ï‹ÎÙÚ· Ô˘ ÂÚÈÁÚ¿ÊËÎ·Ó Î·È ·ÓˆÙ¤Úˆ.
∂ÈϤÍÙ ÙËÓ «ÙÂÏÂ˘Ù·›· ÂÓ¤ÚÁÂÈ·» ¯ÚËÛÈÌÔÔÈÒÓÙ·˜
ÙÔ Ï‹ÎÙÚÔ
Î·È ·ÔÊ·Û›ÛÙ ·Ó ı¤ÏÂÙ ‹ fi¯È Ó·
·ÓÙÈÁÚ¿„ÂÙ ÙȘ/ÙËÓ ÂÓ¤ÚÁÂȘ/· ÛÙËÓ ÂfiÌÂÓË Ë̤ڷ
(Ȥ˙ÔÓÙ·˜ Ù· Ï‹ÎÙÚ·
ηÈ
Ù·˘Ùfi¯ÚÔÓ·
‹ ÌfiÓÔ ÙÔ Ï‹ÎÙÚÔ
ÁÈ· 5 ‰Â˘ÙÂÚfiÏÂÙ·).
∂Á¯ÂÈÚ›‰ÈÔ ÏÂÈÙÔ˘ÚÁ›·˜
15
3
£∂§ø ¡∞ ¢π∞°ƒ∞æø ªπ∞ ∏
¶∂ƒπ™™√∆∂ƒ∂™ ¶ƒ√°ƒ∞ªª∞∆π™ª∂¡∂™
∂¡∂ƒ°∂π∂™
µÂ‚·Èˆı›Ù fiÙÈ ‰Â ‚Ú›ÛÎÂÛÙ ÛÙËÓ ÏÂÈÙÔ˘ÚÁ›·
ÚÔÁÚ·ÌÌ·ÙÈÛÌÔ‡ (ÙÔ
‰ÂÓ ·Ó·‚ÔÛ‚‹ÓÂÈ). ∂¿Ó
Â›Ó·È ··Ú·›ÙËÙÔ, ȤÛÙ ÙÔ Ï‹ÎÙÚÔ
ÁÈ· Ó·
Ú·ÁÌ·ÙÔÔÈ‹ÛÂÙ ¤ÍÔ‰Ô ·fi ÙËÓ ÏÂÈÙÔ˘ÚÁ›·
ÚÔÁÚ·ÌÌ·ÙÈÛÌÔ‡.
4
¢ÈÂÚ¢ӋÛÙ ÙȘ ÚÔÁÚ·ÌÌ·ÙÈṲ̂Ó˜ ÂÓ¤ÚÁÂȘ ÌÂ
ÙÔ Ï‹ÎÙÚÔ
, ÂÈϤÍÙ ÙËÓ Ë̤ڷ Ô˘ ı¤ÏÂÙÂ
Ó· ÂÂÍÂÚÁ·Ûı›ÙÂ.
7. ™˘ÓÙ‹ÚËÛË
¶È¤ÛÙ ÙÔ Ï‹ÎÙÚÔ
ÁÈ· 5 ‰Â˘ÙÂÚfiÏÂÙ·. ŒÙÛÈ
ÂÓÂÚÁÔÔÈÂ›Ù·È Ë ÏÂÈÙÔ˘ÚÁ›· ÚÔÁÚ·ÌÌ·ÙÈÛÌÔ‡.
∞Ú¯›˙Ô˘Ó Ó· ·Ó·‚ÔÛ‚‹ÓÔ˘Ó ÙÔ ÂÈÎÔÓ›‰ÈÔ
Î·È Ë
ÂÈÏÂÁ̤ÓË ÂÓ¤ÚÁÂÈ·.
∂ÈϤÍÙ ÙËÓ «ÙÂÏÂ˘Ù·›· ÂÓ¤ÚÁÂÈ·» Ô˘ ı¤ÏÂÙ ӷ
‰È·ÙËÚ‹ÛÂÙÂ, Ì ÙÔ Ï‹ÎÙÚÔ
. ŸÏ˜ ÔÈ
ÂÓ¤ÚÁÂȘ Ì ÌÂÁ·Ï‡ÙÂÚÔ ·ÚÈıÌfi ı· ‰È·ÁÚ·ÊÔ‡Ó.
™∏ª∂πø™∏ ÃÚËÛÈÌÔÔț٠ÌfiÓÔ Î·ı·Úfi ¯ÏÈ·Úfi
ÓÂÚfi ÁÈ· Ó· ‚Ú¤ÍÂÙ ÙÔ ‡Ê·ÛÌ·.
∂Ȃ‚·ÈÒÛÙ ÙË ‰È·ÁÚ·Ê‹ ·ÙÒÓÙ·˜ ÙÔ Ï‹ÎÙÚÔ
ÁÈ· 5 ‰Â˘ÙÂÚfiÏÂÙ·.
◊
ÂȂ‚·ÈÒÛÙ ÙË ‰È·ÁÚ·Ê‹ ÁÈ· ÙËÓ ÙÚ¤¯Ô˘Û· ηÈ
ÙËÓ ÂfiÌÂÓË Ë̤ڷ ›Û˘, Ȥ˙ÔÓÙ·˜ Ù· Ï‹ÎÙÚ·
ηÈ
Ù·˘Ùfi¯ÚÔÓÔ
ηÈ
ÁÈ·
5 ‰Â˘ÙÂÚfiÏÂÙ·.
™∏ª∂πø™∏ ™ÙËÓ ·Ú·¿Óˆ ÂÚ›ÙˆÛË, ·Ó ÁÈ·
·Ú¿‰ÂÈÁÌ· Ë ÙÂÏÂ˘Ù·›· ÂÈÏÂÁ̤ÓË
ÂÓ¤ÚÁÂÈ·
›ӷÈ
Ë
3,
ÙfiÙÂ
ÔÈ
ÚÔÁÚ·ÌÌ·ÙÈṲ̂Ó˜ ÂÓ¤ÚÁÂȘ 4 Î·È 5
ı· ‰È·ÁÚ·ÊÔ‡Ó Â›Û˘ (Â¿Ó ˘¿Ú¯Ô˘Ó).
∂Á¯ÂÈÚ›‰ÈÔ ÏÂÈÙÔ˘ÚÁ›·˜
16
£∂§ø ¡∞ ¢π∞°ƒ∞æø √§∂™ ∆π™
¶ƒ√°ƒ∞ªª∞∆π™ª∂¡∂™ ∂¡∂ƒ°∂π∂™
ª∂ªπ∞™
¶Ú·ÁÌ·ÙÔÔÈ‹ÛÙ ¤ÍÔ‰Ô ·fi ÙÔÓ ÚÔÁÚ·ÌÌ·ÙÈÛÌfi
‹ ÙË ‰ÈÂÚ‡ÓËÛË.
¶È¤ÛÙ ٷ˘Ùfi¯ÚÔÓ· Ù· Ï‹ÎÙÚ·
ηÈ
ÁÈ·
5 ‰Â˘ÙÂÚfiÏÂÙ·. ∆Ô ÂÈÎÔÓ›‰ÈÔ
ı· ·Ó·ÛÙÚ·Ê›
Î·È ı· ÂÍ·Ê·ÓÈÛÙ› ÂȂ‚·ÈÒÓÔÓÙ·˜ ÙË ‰È·ÁÚ·Ê‹.
∆Ô ÙËϯÂÈÚÈÛÙ‹ÚÈÔ ‰ÂÓ ¯ÚÂÈ¿˙ÂÙ·È Û˘ÓÙ‹ÚËÛË.
∞ÔÌ·ÎÚ‡ÓÂÙ·È ÙË ‚ÚˆÌÈ¿ Ì ̷ϷÎfi Î·È ÂÏ·ÊÚÒ˜
‚ÚÂÁ̤ÓÔ ‡Ê·ÛÌ·.
8. ∞ÓÙÈÌÂÙÒÈÛË ¶ÚÔ‚ÏËÌ¿ÙˆÓ
√È ÁÂÓÈΤ˜ Ô‰ËÁ›Â˜ ·Ú·Î¿Ùˆ ›Ûˆ˜ Û·˜
‚ÔËı‹ÛÔ˘Ó Ó· ÂÈχÛÂÙ ÙÔ Úfi‚ÏËÌ¿ Û·˜. ™Â
ÂÚ›ÙˆÛË Ô˘ ‰ÂÓ ÌÔÚ›Ù ӷ ·ÓÙÈÌÂÙˆ›ÛÂÙÂ
ÙÔ Úfi‚ÏËÌ·, Û˘Ì‚Ô˘Ï¢ı›Ù ÙÔÓ Ù¯ÓÈÎfi
ÂÁηٿÛÙ·Û˘.
¢ÂÓ ˘¿Ú¯ÂÈ Î·Ì›· ¤Ó‰ÂÈÍË ÛÙÔ ÙËϯÂÈÚÈÛÙ‹ÚÈÔ
(ÎÂÓ‹ ÔıfiÓË)
∂ϤÁÍÙ ·Ó Ë ÂÁηٿÛÙ·Û‹ Û·˜ ÙÚÔÊÔ‰ÔÙ›ٷÈ
·ÎfiÌ· Ì Ú‡̷.
∂ÌÊ·Ó›˙ÂÙ·È ÌfiÓÔ ÙÔ
.
∞˘Ùfi ‰ËÏÒÓÂÈ fiÙÈ Ë ÂÁηٿÛÙ·ÛË ÌfiÏȘ
ÂÓÂÚÁÔÔÈ‹ıËÎÂ, ÂÚÈ̤ÓÂÙ ¤ˆ˜ fiÙÔ˘ ÙÔ
ÂÍ·Ê·ÓÈÛÙ›.
CZ-02RT11P
∆ËϯÂÈÚÈÛÙ‹ÚÈÔ
4PW15515-1
√ ¯ÚÔÓԉȷÎfiÙ˘ ÏÂÈÙÔ˘ÚÁ›, fï˜ ÔÈ
ÚÔÁÚ·ÌÌ·ÙÈṲ̂Ó˜ ÂÓ¤ÚÁÂȘ ÂÎÙÂÏÔ‡ÓÙ·È ÛÂ
Ï¿ıÔ˜ ÒÚ· (.¯. 1 ÒÚ· ·ÚÁfiÙÂÚ· ‹ ÓˆÚ›ÙÂÚ·)
∂ϤÁÍÙ ·Ó ÙÔ ÚÔÏfiÈ Î·È Ë Ë̤ڷ Ù˘ ‚‰ÔÌ¿‰·˜
¤¯Ô˘Ó Ú˘ıÌÈÛÙ› ÛˆÛÙ¿, ‰ÈÔÚıÒÛÙ ٷ ·Ó ›ӷÈ
··Ú·›ÙËÙÔ
(·Ó·ÙÚ¤ÍÙÂ
ÛÙÔ
"§∂π∆√Àƒ°π∞
ƒÀ£ªπ™∏™ ƒ√§√°π√À" ÛÙË ÛÏ›‰· 5).
™∏ª∂πø™∂π™
¢ÂÓ ÌÔÚÒ Ó· ÂÓÂÚÁÔÔÈ‹Ûˆ ÙÔ ¯ÚÔÓԉȷÎfiÙË
ÚÔÁÚ·ÌÌ·ÙÈÛÌÔ‡ (ÙÔ ÂÈÎÔÓ›‰ÈÔ
·Ó·‚ÔÛ‚‹ÓÂÈ
ÁÈ· 2 ‰Â˘ÙÂÚfiÏÂÙ· Î·È ÂÍ·Ê·Ó›˙ÂÙ·È)
√ ¯ÚÔÓԉȷÎfiÙ˘ ‰ÂÓ ¤¯ÂÈ ÚÔÁÚ·ÌÌ·ÙÈÛÙ›
·ÎfiÌ·. ¶ÚÔÁÚ·ÌÌ·Ù›ÛÙ ÚÒÙ· ÙÔ ¯ÚÔÓԉȷÎfiÙË
(·Ó·ÙÚ¤ÍÙ ÛÙÔ "ƒ‡ıÌÈÛË ÙÔ˘ ¯ÚÔÓԉȷÎfiÙË
ÚÔÁÚ·ÌÌ·ÙÈÛÌÔ‡" ÛÙË ÛÏ›‰· 12).
¢ÂÓ ÌÔÚÒ Ó· ÂÓÂÚÁÔÔÈ‹Ûˆ ÙÔ ¯ÚÔÓԉȷÎfiÙË
ÚÔÁÚ·ÌÌ·ÙÈÛÌÔ‡ (ÂÌÊ·Ó›˙ÂÙ·È ÙÔ ÂÈÎÔÓ›‰ÈÔ
)
√ ¯ÚÔÓԉȷÎfiÙ˘ ÚÔÁÚ·ÌÌ·ÙÈÛÌÔ‡ ‰ÂÓ ÌÔÚ›
Ó· ÂÓÂÚÁÔÔÈËı› fiÙ·Ó Â›Ó·È Û˘Ó‰Â‰Â̤ÓÔ ¤Ó·
ÎÂÓÙÚÈÎfi ¯ÂÈÚÈÛÙ‹ÚÈÔ.
¢ÂÓ ÌÔÚ› Ó· ÂÈÏÂÁ› Ë ÏÂÈÙÔ˘ÚÁ›· ÂÚÈÔÚÈÛÌÔ‡
∏ ÏÂÈÙÔ˘ÚÁ›· ÂÚÈÔÚÈÛÌÔ‡ ‰Â ‰È·Ù›ıÂÙ·È ÁÈ·
ÂÁηٷÛÙ¿ÛÂȘ „‡Í˘ ÌfiÓÔ.
CZ-02RT11P
∆ËϯÂÈÚÈÛÙ‹ÚÈÔ
4PW15515-1
∂Á¯ÂÈÚ›‰ÈÔ ÏÂÈÙÔ˘ÚÁ›·˜
17
CZ-02RT11P
Controlo remoto
AGRADECEMOS-LHE
A
AQUISIÇÃO
DESTE CONTROLO. LEIA ATENTAMENTE
O MANUAL, ANTES DE PROCEDER À
INSTALAÇÃO. DEPOIS DE LER O MANUAL,
GUARDE-O NUM LOCAL SEGURO, PARA
POSTERIOR REFERÊNCIA
Antes da utilização inicial, contacte o fornecedor para obter todos os pormenores
acerca da instalação de ar condicionado.
ATENÇÃO
- Nunca deixe chegar àgua ao controlo remoto, pois
tal pode dar origem a choques eléctricos ou a um
incêndio.
- Nunca pressione os botões do controlo remoto
com um objecto pesado ou afiado. Pode danificar o
controlo remoto.
- Nunca inspeccione nem repare o controlo remoto,
deixe sempre tais acções a cargo de pessoal
qualificado.
Índice
página
1. Características e funcionalidades ......................... 1
2. Nome e utilidade dos ícones e dos interruptores.. 2
3. Configuração do controlo ...................................... 4
4. Descrição dos modos de funcionamento .............. 5
5. Funcionamento...................................................... 5
6. Programação do temporizador............................ 10
Manual de operação
1
Manual de operação
1. Características e funcionalidades
O CZ-02RT11P é um controlo remoto topo-de-gama,
que proporciona controlo total da instalação.
1
ESSENCIAL DO CONTROLO REMOTO
Funções essenciais do controlo remoto:
•
ligar e desligar;
•
comutação do modo de funcionamento;
•
regulação da temperatura;
•
regulação do volume de ar;
•
regulação da direcção do fluxo de ar.
2
RELÓGIO
Funcionalidades do relógio:
•
relógio de 24 horas, tempo efectivo;
•
indicador do dia da semana.
3
TEMPORIZADOR
Funcionalidades do temporizador:
•
podem ser programadas até 5 acções para
cada dia da semana (total: 35 acções);
•
pode-se activar ou desactivar o temporizador
a qualquer momento;
•
cada acção refere-se a uma operação de
LIGAR associada a uma temperatura
específica, a uma operação de LIMITE ou a
uma operação de DESLIGAR;
•
o "último comando" sobrepõe-se ao anterior,
até ao próximo comando temporizado.
4
LIMITE
A funcionalidade de limite permite o controlo por
termóstato, dentro da gama regulada de temperaturas (máxima e mínima). A regulação da temperatura
mínima origina o aquecimento; a regulação da
temperatura máxima origina o arrefecimento.
CZ-02RT11P
Controlo remoto
4PW15515-1
5
ABANDONO DO PONTO DE INSTALAÇÃO
A funcionalidade de abandono do ponto de instalação evita a descida da temperatura ambiente,
quando a sala fica desocupada por um longo período
de tempo. Se a temperatura ambiente baixar dos
10°C, o aquecedor é iniciado automaticamente. Mas
sejam alcançados os 15°C, o controlo regressa ao
estado original.
6
NÍVEL DE ACESSO AOS BOTÕES
Três níveis hierárquicos de acesso estão disponíveis,
para limitar as acções do utilizador.
2. Nome e utilidade dos ícones e dos
interruptores (Ver figura 1)
1
BOTÃO DE LIGAR E DESLIGAR
Carregue neste botão para iniciar ou parar o sistema.
2
LÂMPADA DE FUNCIONAMENTO
Esta lâmpada permanece acesa durante o
funcionamento da unidade. Em caso de avaria, pisca.
3
ÍCONE DO MODO DE FUNCIONAMENTO
Estes ícones indicam o modo actual de funcionamento (VENTOINHA, SECAR, AUTOMÁTICO,
ARREFECIMENTO, AQUECIMENTO).
4
6
ÍCONE DE LIMPEZA DO AR
Indica o bom funcionamento da unidade de limpeza
do ar (opcional).
7
ÍCONE DE ABANDONO DO PONTO DE
INSTALAÇÃO
Apresenta o estado da funcionalidade de abandono
do ponto de instalação.
ACESO
Abandono activado
A PISCAR
Abandono em curso
APAGADO
Abandono desactivado
8
ÍCONE DE CONTROLO EXTERNO
Indica que outro controlo, com maior prioridade, está
a controlar ou a desactivar a instalação.
9
ÍCONE DE COMUTAÇÃO SOB CONTROLO
CENTRAL
Indica que a comutação da instalação está sob
controlo centralizado, atribuído a outra unidade
interior, ou que o selector opcional de aquecimento/
arrefecimento está ligado à unidade exterior
(= controlo remoto principal).
10
INDICADOR DO DIA DA SEMANA
ÍCONE DO MODO DE VENTILAÇÃO
Estes ícones indicam o modo actual de ventilação
(apenas no
) (AUTOMÁTICO, PERMUTAÇÃO
DE CALOR, BYPASS).
5
ÍCONE DE VENTILAÇÃO
Este ícone é apresentado quando se regula a
ventilação, utilizando o botão apropriado (apenas no
). Simultaneamente, a quantidade de ventilação
é indicada pelo ícone da velocidade da ventoinha
(número 22).
CZ-02RT11P
Controlo remoto
4PW15515-1
Indicador que apresenta o actual dia da semana (ou
o dia definido, durante a leitura ou programação do
temporizador).
11
VISOR DO RELÓGIO
Indica a hora actual (ou o tempo de acção, durante a
leitura ou programação do temporizador).
12
TEMPERATURA MÁXIMA DEFINIDA
Indica a temperatura máxima a considerar, durante
funcionamento com limites.
Manual de operação
2
13
TEMPERATURA MÍNIMA DEFINIDA
Indica a temperatura mínima a considerar, durante
funcionamento com limites.
14
ÍCONE DO TEMPORIZADOR
Indica que o temporizador se encontra activado.
15
ÍCONES DE ACÇÃO
Indicam as acções do temporizador para cada dia.
16
ÍCONE DE DESLIGADO
Indica que a acção de desligar foi seleccionada
durante a programação do temporizador.
17
INSPECÇÃO NECESSÁRIA
e
Indicam que é necessário inspeccionar a unidade.
Consulte o responsável pela instalação.
18
VISOR DA TEMPERATURA DEFINIDA
Indica a temperatura actualmente definida para a
instalação (nada é apresentado em funcionamento
com LIMITES nem nos modos VENTOINHA e
SECAR).
19
REGULAÇÃO
Não é utilizado, destina-se apenas à assistência
técnica.
20
ÍCONE DA DIRECÇÃO DE FLUXO DO AR
Indica a direcção de fluxo do ar (apenas para
instalações com aletas motorizadas para controlo do
fluxo de ar).
21
NÃO DISPONÍVEL
é apresentado sempre que é solicitada uma
opção que não está instalada ou uma função que não
está disponível.
22
ÍCONE DA VELOCIDADE DA VENTOINHA
Indica a velocidade regulada para a ventoinha.
Manual de operação
3
23
ÍCONE DO MODO DE DESCONGELAMENTO/
ARRANQUE A QUENTE
Indica que está activo o modo de descongelamento/
arranque a quente.
24
ÍCONE DE LIMPEZA DO FILTRO DE AR
Indica que é necessário limpar o filtro de ar. Consulte
o manual da unidade interior.
25
ÍCONE DE LIMPEZA DE ELEMENTO
Indica que é necessário limpar o elemento (apenas
no
).
26
BOTÃO DO MODO DE VENTILAÇÃO
O botão do modo de ventilação activa o
; consulte o manual do
para obter mais informações.
27
BOTÃO DA QUANTIDADE DE VENTILAÇÃO
Este botão define a quantidade de ventilação; consulte o manual do
para obter mais informações.
28
BOTÃO DE VERIFICAÇÃO/OPERAÇÃO DE
TESTE
Não é utilizado, destina-se apenas à assistência
técnica.
29
BOTÃO DE PROGRAMAÇÃO
Botão multi-funcional.
O botão de programação pode ter várias funções,
conforme as anteriores manipulações do utilizador.
30
BOTÃO DO TEMPORIZADOR
Este botão activa ou desactiva o temporizador.
31
BOTÃO DE AJUSTE TEMPORAL
Estes botões permitem regular o relógio; no modo de
programação, permitem regular a hora da acção
programada. Ambos os botões possuem uma função
de repetição automática.
CZ-02RT11P
Controlo remoto
4PW15515-1
32
BOTÕES DE REGULAÇÃO DA
TEMPERATURA
Estes botões permitem ajustar o ponto de regulação
actual; no modo de programação, permitem ajustar o
ponto programado de regulação da temperatura
(passo = 1°C). Estes botões podem também ser
usados para ajustar o dia da semana.
33
BOTÃO DE ALTERAÇÃO DE FUNCIONAMENTO/
Botão multi-funcional. O botão de programação pode
ter várias funções, conforme as anteriores
manipulações do utilizador:
1 seleccionar o modo de funcionamento da
instalação (VENTILADOR, SECAR,
AUTOMÁTICO, ARREFECIMENTO,
AQUECIMENTO)
2 alternar entre as temperaturas mínimas e
máxima, no funcionamento com limites
34
BOTÃO DE PONTOS DE REGULAÇÃO E
LIMITES
Alterna entre funcionamento com pontos de regulação, limites ou
(apenas no modo de
programação).
35
BOTÃO DE VELOCIDADE DA VENTOINHA
Alterna entre as opções L (baixa), H (alta), HH (muito
alta) e
(automática).
36
BOTÃO DE AJUSTE DE DIREÇÃO DO
FLUXO DE AR
Permite ajustar a direcção do fluxo de ar.
37
BOTÃO DE REINICIALIZAÇÃO DO ÍCONE
DE LIMPEZA DO FILTRO DE AR
Este botão permite reinicializar o ícon de limpeza do
filtro de ar.
3. Configuração do controlo
Após a instalação inicial, o utilizador pode regular o
relógio e o dia da semana.
O controlo está equipado com um temporizador, que
permite ao utilizador utilizar automaticamente a
instalação; para utilizar o temporizador, é necessário
regular o relógio e o dia da semana.
1
FUNCIONALIDADE DE REGULAÇÃO DO
RELÓGIO
Mantenha premido o botão
durante
5 segundos. Os valores da hora e do dia da semana
piscam; tal indica que podem ser regulados.
Utilize os botões
e
para acertar o
relógio. De cada vez que se carrega num botão de
regulação da hora, esta aumenta ou diminui 1 minuto.
Se se mantiver carregados algum dos botões
e
, a hora aumenta ou diminui a
espaços de 10 minutos.
Utilize os botões
e
para acertar o
dia da semana. De cada vez que se carrega num dos
botões
e
, é apresentado o dia
seguinte ou o dia anterior.
Carregue no botão
para confirmar a hora e dia
da semana actuais.
Se não se mexer no controlo durante 5 minutos, com
a hora e o dia da semana a piscar, ambos os valores
são repostos na situação original, e a funcionalidade
de regulação do relógio deixa de estar activa.
2
CONFIGURAÇÃO DO TEMPORIZADOR
Para configurar o temporizador, consulte o capítulo 6.
"Programação do temporizador" na página 10.
CZ-02RT11P
Controlo remoto
4PW15515-1
Manual de operação
4
4. Descrição dos modos de
funcionamento
1
OPERAÇÃO DE VENTILAÇÃO
Neste modo, há apenas circulação de ar, sem
aquecimento nem arrefecimento.
2
SECAGEM
Neste modo, a humidade do ar baixa, verificando-se
apenas uma pequena diminuição da temperatura.
A temperatura e a velocidade da ventoinha são
controladas automaticamente, não sendo possível
controlá-las com o controlo remoto.
A operação de secagem não funciona, se a temperatura ambiente for demasiado baixa.
3
FUNCIONAMENTO AUTOMÁTICO
Neste modo, o controlador alterna automaticamente
entre aquecimento e arrefecimento, conforme o
exigam os pontos de regulação ou os limites de
temperatura.
4
ARREFECIMENTO
Neste modo, o arrefecimento é activado à medida
das necessidades determinadas pelos pontos de
regulação ou pelos limites de temperatura.
5
AQUECIMENTO
Neste modo, o aquecimento é activado à medida das
necessidades determinadas pelos pontos de
regulação ou pelos limites de temperatura.
Arranque a quente (apenas nos modelos com
bomba de aquecimento)
No início do aquecimento, a ventoinha interior pára,
até se alcançar uma determinada temperatura no
permutador de calor e se visualizar
.
Desta forma, evita-se a saída de ar frio da unidade
interior.
Manual de operação
5
Descongelamento (apenas nos modelos com
bomba de aquecimento)
Na operação de aquecimento, pode ocorrer
congelamento do permutador de calor externo. Em
tal situação, a capacidade de aquecimento do
sistema diminui e o sistema entra em descongelamento. A ventoinha da unidade interior pára e é
visualizado
. Após um máximo de
10 minutos de descongelação, o sistema regressa à
operação de aquecimento.
6
FUNCIONAMENTO COM LIMITES
e
O funcionamento com limites é um modo adicional,
que permite manter a temperatura ambiente dentro
de limites específicos. Os ícones
e
são
apresentados, para confirmar a activação do
funcionamento com limites.
7
ABANDONO DO PONTO DE INSTALAÇÃO
ABANDONO DO PONTO DE INSTALAÇÃO é uma
funcionalidade que permite manter a temperatura
ambiente acima dos 10°C, quando a sala está
desocupada. Esta funcionalidade liga o aquecimento,
se a instalação estiver desligada.
5. Funcionamento
Funcionamento manual
Em funcionamento manual, o utilizador é que
determina as regulações da instalação. A última
regulação fica activa, até que o utilizador a altere.
Como o controlo pode ser implementado numa
grande variedade de instalações e condições, pode
ocorrer a selecção de uma função indisponível na
instalação; nestas situações, é apresentada a
mensagem
.
CZ-02RT11P
Controlo remoto
4PW15515-1
Utilize o botão
para seleccionar o modo de
funcionamento desejado.
Ventilação
Secagem
Funcionamento automático
Arrefecimento
Aquecimento
Carregue no botão
para alternar entre o
funcionamento com limites e estes modos.
No funcionamento com limites, utilize o botão
para seleccionar a regulação das temperaturas
máxima e mínima. Utilize os botões
e
para ajustar a regulação das temperaturas
máxima e mínima.
1
VENTILAÇÃO
Parâmetros ajustáveis pelo utilizador
•
Velocidade da ventoinha, utilize o botão
•
Ajuste da direcção do fluxo de ar, utilize o
botão
.
•
Modo de ventilação, utilize o botão
.
•
Quantidade de ventilação, utilize o botão
2
SECAGEM
Parâmetros ajustáveis pelo utilizador
•
Ajuste da direcção do fluxo de ar, utilize o
botão
.
•
Modo de ventilação, utilize o botão
.
•
Quantidade de ventilação, utilize o botão
CZ-02RT11P
Controlo remoto
4PW15515-1
.
.
.
3
FUNCIONAMENTO AUTOMÁTICO
Parâmetros ajustáveis pelo utilizador
•
Ponto de regulação da temperatura, utilize os
botões
e
.
•
Velocidade da ventoinha, utilize o botão
.
•
Ajuste da direcção do fluxo de ar, utilize o
botão
.
•
Modo de ventilação, utilize o botão
.
•
Quantidade de ventilação, utilize o botão
.
4
ARREFECIMENTO
Parâmetros ajustáveis pelo utilizador
•
Ponto de regulação da temperatura, utilize os
botões
e
.
•
Velocidade da ventoinha, utilize o botão
.
•
Ajuste da direcção do fluxo de ar, utilize o
botão
.
•
Modo de ventilação, utilize o botão
.
•
Quantidade de ventilação, utilize o botão
.
5
AQUECIMENTO
Parâmetros ajustáveis pelo utilizador
•
Ponto de regulação da temperatura, utilize os
botões
e
.
•
Velocidade da ventoinha, utilize o botão
.
•
Ajuste da direcção do fluxo de ar, utilize o
botão
.
•
Modo de ventilação, utilize o botão
.
•
Quantidade de ventilação, utilize o botão
.
6
FUNCIONAMENTO COM LIMITES
Parâmetros ajustáveis pelo utilizador
•
Velocidade da ventoinha, utilize o botão
•
Ajuste da direcção do fluxo de ar, utilize o
botão
.
•
Modo de ventilação, utilize o botão
.
•
Quantidade de ventilação, utilize o botão
.
.
Manual de operação
6
FUNCIONALIDADES ADICIONAIS DO CONTROLO
1
ABANDONO DO PONTO DE INSTALAÇÃO
Pressione simultaneamente os botões
e
, para activar a funcionalidade de
ABANDONO DO PONTO DE INSTALAÇÃO.
LEMBRE-SE QUE O BOTÃO
TEM DE
ESTAR DESLIGADO, PARA ASSEGURAR
O FUNCIONAMENTO DA FUNÇÃO DE
ABANDONO DO PONTO DE INSTALAÇÃO.
2
Ajuste da direcção do fluxo de ar
Utilize o botão
para ajustar a direcção do fluxo
de ar. Pressione o botão para alternar entre uma
direcção fixa ou variável para o fluxo de ar. Utilize o
ícone
para determinar a direcção do fluxo de
ar, pressionando o botão
quando o ícone
indicar a direcção desejada.
NOTA
Ainda que esteja seleccionada uma
direcção fixa para o fluxo de ar, pode-se
activar automaticamente uma direcção
variável, para assegurar o funcionamento
adequado da instalação.
3
TEMPORIZADOR
Passam-se a descrever as funcionalidades, as
características e a forma de programação do
temporizador.
Funcionamento do temporizador
Com o temporizador activo, este participa no controlo
da instalação. As acções programadas no
temporizador são executadas automaticamente.
O temporizador executa sempre o último comando;
isto significa que o utilizador pode alterar
temporariamente a última acção de execução
programada. Consulte "Funcionamento manual" na
página 5. A próxima acção programada (no
temporizador) devolve depois o controlo ao
temporizador.
Manual de operação
7
Utilize o botão
temporizador.
NOTA
para activar ou desactivar o
O temporizador sobrepõe-se ao botão
; o botão
só deve ser utilizado
para
activar
ou
desactivar
o
temporizador. O temporizador encontrase activado quando é visível o ícone
.
O botão
só se sobrepõe ao
temporizador até ao momento da
próxima acção programada.
As acções programadas são executadas de
forma temporizada. Certifique-se de que o
relógio e o dia da semana estão
correctamente
definidos.
Consulte
"FUNCIONALIDADE DE REGULAÇÃO DO
RELÓGIO" na página 4.
As horas de Inverno e de Verão têm de ser
reguladas
manualmente.
Consulte
"FUNCIONALIDADE DE REGULAÇÃO DO
RELÓGIO" na página 4.
Caso haja uma falha de energia de duração
superior a 1 hora, o relógio e o dia da
semana são reinicializados. Consulte
"FUNCIONALIDADE DE REGULAÇÃO DO
RELÓGIO" na página 4 para regular o
relógio e o dia da semana.
As acções programadas no temporizador
não se perdem durante uma falha de
energia; não é necessário voltar a
programar o temporizador.
Para configurar o temporizador, consulte o capítulo 6.
"Programação do temporizador" na página 10.
CZ-02RT11P
Controlo remoto
4PW15515-1
Que pode fazer o temporizador?
O conceito de temporizador é simples e objectivo,
mas contudo poderoso.
O temporizador pode originar 3 acções:
1 ligar a instalação a uma hora programada,
associada a um ponto de regulação (controlo
exacto da temperatura)
OU
•
aquecimento ou arrefecimento, conforme o
determine a temperatura ambiente, dentro de
uma gama previamente especificada
(funcionamento com limites); são
apresentadas as indicações
e
.
O temporizador só modifica o modo de
funcionamento no modo com limites.
2 desligar a instalação (finalizar o controlo)
3 ligar a instalação à hora programada, no
funcionamento com limites
O temporizador pode aceitar até 5 acções por dia.
Para cada dia da semana podem-se programar até
5 acções, num total de 35 acções programadas. A
acção programada em primeiro lugar para um determinado dia é a Acção 1; a última pode ter um número
entre 1 (caso só haja uma acção nesse dia) e 5.
É da máxima importância perceber que o
número atribuído a uma acção NÃO
DETERMINA o momento em que essa
acção é executada. Só a HORA, como parte
dos dados introduzidos na programação da
acção, determina o momento de execução
da acção programada.
Que faz o temporizador?
Uma vez activado, o temporizador executa as acções
programadas.
Ordena à instalação as seguintes acções:
•
OU
•
aquecimento ou arrefecimento, se necessário,
conforme o funcionamento em curso,
apresentando o ponto de regulação;
desligar a instalação (o temporizador permanece activo e pode reactivar a instalação,
se estiver programado para tal), desligando-se
também a lâmpada de funcionamento;
CZ-02RT11P
Controlo remoto
4PW15515-1
Para verificar quais são as acções programadas,
proceda da forma que se indica de seguida.
Que tipo de coisas o temporizador
NÃO faz?
O temporizador não:
•
contrla a velocidade da ventoinha;
•
controla a direcção do fluxo de ar;
•
controla o modo de ventilação;
•
controla a quantidade de ventilação;
•
altera o modo de funcionamento de um ponto
de regulação programado.
Estes
parâmetros
podem
ser
regulados
manualmente, sem interferência do temporizador.
Estão disponíveis controlos remotos mais sofisticados.
Consulte o seu representante, para obter mais
informações.
Consulta das acções programadas no
temporizador (leitura, apenas)
Consulte a figura 2.
A consulta das acções programadas no temporizador
é um processo sequencial. Usam-se apenas
2 botões para consultar todo o programa do
temporizador.
Manual de operação
8
O botão
inicia a consulta, permitindo também
avançar pela visualização de acções programadas,
além de permitir concluir a consulta, durante a
visualização da última acção programada.
O botão
permite abandonar imediatamente a
consulta (sem ter de percorrer todas as acções
programadas).
Pressione o botão
para iniciar o modo de
consulta; aparece o ícone
e pisca o sinal
.
NOTA
A consulta inicia-se sempre à segundafeira e termina no domingo.
Verifique o ícone
. Se houver pelo menos
1 acção programada para as segundas-feiras, aparece a indicação .
O relógio indica a hora programada para a acção,
apresentando uma das indicações
,
ou
e
.
NOTA
As temperaturas acima mencionadas
são-no a título exemplificativo, pois os
valores podem ser diferentes noutro
controlador.
Se não aparecer a indicação , tal significa que não
há acções programadas para as segundas-feiras.
Pressione novamente o botão
, para avançar
para o próximo dia da semana. O símbolo
pisca,
indicando a consulta das acções programadas para
as terças-feiras.
Reinicia-se de seguida o processo anteriormente
descrito.
Se houver pelo menos 1 acção programada para as
terças-feiras, aparece a indicação . O relógio indica
a hora programada para a acção, apresentando uma
das indicações
,
ou
e
.
Manual de operação
9
Se não aparecer a indicação , tal significa que não
há acções programadas para as terças-feiras.
Pressione o botão
para visualizar a próxima
acção programada. Se houver mais uma acção
programada para as terças-feiras, o símbolo
continua a piscar, sendo apresentada a indicação
.
Supondo que foram programadas 5 acções para as
terças-feiras, será necessário pressionar cinco vezes
o botão, para poder visualizar todas as acções
programadas.
Volte a pressionar o botão
até que o indicador do
dia da semana apresente o dia actual (parando de
piscar); nesse momento, concluiu a consulta.
NOTA
O número de vezes que é necessário
carregar no botão
, para concluir a
consulta, depende do número de acções
programadas no temporizador.
Como interpretar as acções programadas
Para poder compreender o comportamento da instalação, com o temporizador activado, é necessário
analisar todas as acções programadas para o dia
actual, podendo mesmo ser necessário analisar a
última acção programada para o dia anterior.
Se ainda não se tiver iniciado a primeira acção
programada para o dia actual, então o caso mais
provável (não sendo o único) é que o estado da
instalação dependa da última acção programada
para a véspera. Leia a nota importante que se segue.
Se já se tiver iniciado a primeira acção programada
para o dia actual, então o caso mais provável (não
sendo o único) é que o estado da instalação dependa
dos parâmetros programados para a primeira acção
do dia actual. Leia a nota importante que se segue.
CZ-02RT11P
Controlo remoto
4PW15515-1
NOTA
Para simplificar o funcionamento da
instalação, é fácil sobrepor ordens
directas às programadas no temporizador, alterando para tanto a regulação
actual (o "último comando" substitui o
comando anterior, até ser emitido o
próximo comando programado).
Conclusão: Embora seja visível o símbolo
,
alguém pode ter alterado as regulações. A próxima
acção programada substitui as regulações alteradas,
voltando a aplicar as programadas.
As acções programadas podem sobrepor-se; devido
à lógica "conta o último comando", será válido
apenas o último destes comandos.
Como interpretar as informações do
visor, quando está activo o temporizador
Como se descreveu anteriormente, as regulações do
temporizador (logo, as informações do visor) podem
ser alteradas, temporariamente, por uma intervenção
manual.
Se deseja ter a certeza absoluta das regulações do
temporizador, num dado momento, tem de consultar
as acções programadas no temporizador. Consulte
"Consulta das acções programadas no temporizador"
na página 8.
6. Programação do temporizador
O que é necessário programar?
1 ligar a instalação a uma hora programada,
associada a um ponto de regulação (controlo
exacto da temperatura)
2
NOTA
Se programar 2 ou mais acções para o
mesmo dia, à mesma hora, só é executada
a acção com o número mais elevado (2–5).
Iniciação
A programação do temporizador é flexível (é possível
acrescentar, eliminar ou alterar acções programadas,
sempre que necessário) e prática (os passos da
programação foram minimizados).
Seguem-se alguns conselhos úteis para a boa
programação do temporizador:
•
•
•
•
•
Como o temporizador se baseia num programa
semanal (as acções repetem-se todas as semanas),
é necessário começar por seleccionar o dia da
semana.
Depois, deve escolher uma acção:
•
CZ-02RT11P
Controlo remoto
4PW15515-1
desligar a instalação (finalizar o controlo)
3 ligar a instalação à hora programada, no
funcionamento com limites
Por fim, tem de introduzir a hora de activação da acção.
familiarize-se com os ícones e botões, pois
necessitará de os usar para programar;
familiarize-se com o método de consulta,
necessitará dele para começar a programar
(consulte "Consulta das acções programadas
no temporizador" na página 8);
preencha o formulário no fim deste manual,
apontando a hora a que se deve verificar cada
acção, em cada dia (lembre-se que pode
haver, no máximo, 5 acções por dia);
não se apresse, para que todos os dados
sejam introduzidos correctamente;
tente programar as acções de cada dia
segundo uma sequência lógica (use a acção 1
para a 1ª acção do dia, concluindo com o
número mais elevado para a última acção);
isto não é obrigatório, mas posteriormente
facilita a interpretação do programa;
lembre-se que posteriormente é sempre
possível alterar, acrescentar ou eliminar
acções programadas.
Manual de operação
10
Programação
1
O TEMPORIZADOR É PROGRAMADO PELA
PRIMEIRA VEZ
NOTA
Ao mudar de dia, durante a programação, é necessário confirmar "a última
acção". Em cada dia pode haver
5 acções programadas (numeradas de 1
a 5), mas pode dar-se o caso de querer
eliminar uma, várias ou mesmo todas
elas.
Para poder eliminar acções programadas, é necessário seleccionar a última
acção que se deseja matner, que pode
estar entre a 1 e a 5 ou não ser nenhuma
(
é apresentado, sem aparecer
nenhuma acção).
São eliminadas todas as acções
programadas, que tenham um número
SUPERIOR ao da acção seleccionada;
se não estiver seleccionada nenhuma,
são eliminadas todas as acções.
PROGRAMAÇÃO DO PRIMEIRO DIA DA SEMANA
NOTA
Nas directivas que se seguem, assumese que a programação de acções no
temporizador se inicia na segunda-feira e
se conclui com as acções destinadas aos
domingos.
Se NÃO deseja iniciar pela segundafeira, comece por consultar o dia
desejado antes de entrar no modo de
programação.
Manual de operação
11
Neste caso particular, não havia acções programadas, estando livres todas as acções do temporizador.
•
Desloque-se até à segunda-feira,
pressionando o botão
. Aparece o ícone
, a indicação
pisca e pode ser
apresentado um dos ícones
,
mas os demais campos continuam apagados,
indicando que não há acções programadas
para as segundas-feiras.
•
Aceda ao modo de programação, mantendo
pressionado o botão
durante 5 segundos;
o ícone
irá também piscar.
•
Pressione o botão
para activar a primeira
acção programada.
•
É apresentado um a piscar, indicando que
se está a programar a primeira acção das
segundas-feiras; começam a piscar a
regulação de temperatura e o relógio.
•
Carregue no botão
para seleccionar
uma regulação de temperatura,
ou
optar pelo funcionamento com limites.
•
Introduza a temperatura desejada, usando os
botões
e
.
•
•
Pressione o botão
, para alternar entre a
regulação da temperaturas mínima e máxima,
no funcionamento com limites; a temperatura
escolhida pisca.
Introduza a hora de início da acção, utilizando
os botões
e
(passo mín. =
10 minutos).
CZ-02RT11P
Controlo remoto
4PW15515-1
NOTA
Se, por acidente, tiver pressionado o botão
, activou a acção seguinte; é
apresentada a indicação
( fixo e
a
piscar). Pressione repetidamente o botão
até ser apresentado um a piscar. Pode
então continuar a ajustar as regulações da
primeira acção do temporizador.
Se a acção e a hora respectiva estiverem correctas,
pode avançar para a segunda acção do temporizador. Para tal, pressione o botão
; os dados são
guardados, podendo depois programar-se a próxima
acção do temporizador.
A programação das restantes acções do temporizador para o mesmo dia efectua-se da mesma forma.
Pode-se consultar as acções do temporizador,
pressionando o botão
.
NOTA
Se tiver incluido acções a mais, por ter
pressionado repetidamente o botão
,
não se preocupe, podem ser eliminadas
ao concluir o dia.
Após a introdução de todos os dados para as acções
do temporizador às segundas-feiras, é necessário
confirmar as acções programadas.
Certifique-se de que está seleccionada a última
acção do temporizador que pretende manter (serão
eliminadas as acções com números superiores).
Pode agora escolher entre 2 opções:
1 CONFIRMAR E COPIAR PARA O DIA SEGUINTE
As acções programadas no temporizador para o
dia actual são válidas para o dia seguinte: utilize
esta função pressionando simultaneamente nos
botões
e
durante 5 segundos.
CZ-02RT11P
Controlo remoto
4PW15515-1
2 APENAS CONFIRMAR
As acções programadas no temporizador para o
dia actual só são válidas para o dia
seleccionado: utilize esta função pressionando o
botão
durante 5 segundos.
O modo de programação é concluído; conforme a
opção escolhida, as acções programadas são guardadas para as segundas-feiras (e, possivelmente,
para as terças-feiras).
PROGRAMAÇÃO DOS OUTROS DIAS DA SEMANA
A programação dos outros dias da semana é idência
à programação do primeiro.
está a piscar, para
indicar o dia seleccionado,
e estão acesos, se
as acções foram copiadas da segunda-feira ou da
terça-feira, e se não houve cópia de acções a partir
da segunda-feira nem da terça-feira, apenas
é
apresentado.
2
QUERO EDITAR ACÇÕES PROGRAMADAS
A edição das acções programadas é fácil.
Certifique-se de que não está no modo de
programação (
não está a piscar); se for preciso,
pressione no botão
, para sair do modo de
programação.
Consulte as acções programadas, utilizando o botão
; seleccione o dia e a acção a editar.
Pressione o botão
durante 5 segundos; o modo
de programação é activado, ficando a piscar o ícone
e a acção seleccionada.
Edite as regulações, recorrendo aos botões acima
descritos.
Seleccione a "última acção" usando o botão
e
decida se quer ou não copiar a acção ou acções
programadas para o dia seguinte (pressionando
simultaneamente os botões
e
, ou então
apenas o botão
durante 5 segundos).
Manual de operação
12
3
QUERO ELIMINAR UMA OU MAIS ACÇÕES
PROGRAMADAS
Certifique-se de que não está no modo de
programação (
não está a piscar); se for preciso,
pressione o botão
, para sair do modo de
programação.
Consulte as acções programadas, utilizando o botão
; seleccione o dia e a acção a editar.
Pressione o botão
durante 5 segundos; o modo
de programação é activado, ficando a piscar o ícone
e a acção seleccionada.
Seleccione a "última acção" a manter, utilizando o
botão
. Serão eliminadas todas as acções com
número superior.
Confirme a eliminação, pressionando o botão
durante 5 segundos.
OU
Confirme a eliminação tanto do dia actual como do
seguinte, pressionando simultaneamente os botões
e
, durante 5 segundos.
NOTA
A título de exemplo, se no caso anterior a
última acção tiver sido a 3, também serão
eliminadas as acções 4 e 5 (se existirem).
4
QUERO ELIMINAR DE UMA VEZ TODAS AS
ACÇÕES PROGRAMADAS
Saia da programação ou da consulta.
Pressione simultaneamente os botões
e
,
durante 5 segundos; o ícone
inverte-se e desaparece, para confirmar a eliminação.
7. Manutenção
O controlo remoto não precisa de manutenção.
Retire a sujidade com um pano suave humedecido.
NOTA
As directrizes que se seguem podem ajudar a
resolver o problema que enfrenta. Se não conseguir
soluccioná-lo, consulte o instalador.
Não há indicações no controlo remoto
(visor apagado)
Verifique se a energia eléctrica ainda está ligada à
instalação.
Só é apresentada a indicação
Tal indica que a instalação acabou de receber
energia eléctrica; aguarde até que desapareça a
indicação
.
O temporizador funciona, mas as acções
programadas são executadas à hora errada
(por exemplo: com um atraso ou adiantamento de
1 hora)
Verifique se o relógio e o dia da semana estão
correctamente regulados; corrija-os, se não
estiverem
(consulte
"FUNCIONALIDADE
DE
REGULAÇÃO DO RELÓGIO" na página 4).
Não se consegue activar o temporizador (o ícone
pisca durante 2 segundos e desaparece)
O temporizador ainda não foi programado. Comece
por
programar
o
temporizador
(consulte
"Programação do temporizador" na página 10).
Não se consegue activar o temporizador (é
apresentado o ícone
)
O temporizador não pode ser activado, quando está
ligado um controlo central.
Não é possível seleccionar o funcionamento com
limites
O funcionamento com limites não está disponível em
instalações destinadas apenas a arrefecimento.
Molhe o pano apenas com água limpa,
tépida.
Manual de operação
13
8. Detecção de problemas
CZ-02RT11P
Controlo remoto
4PW15515-1
NOTES
NOTES
2
Start
5s
5s
5s
5s
+
5s
End
2
4PW15515-1