1
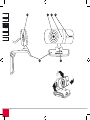
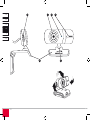
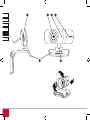
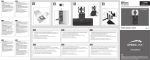
What’s Included • Autofocus Webcam • Software CD • User manual System Requirements • Pentium VI processor or higher • Windows XP with SP2 or Windows Vista • CD-ROM drive • 256MB RAM • Free USB 2.0 port • 500MB free hard disk space for software • Internet connection for video chat Controls (1) Autofocus lens (2) Status LED (3) Microphone (4) Snapshot button (5) Swivel joint (6) Clamp Connecting the Webcam Using the clamp (6), mount the webcam on the frame of your TFT monitor or notebook screen or position the webcam on your desktop. Plug the USB receiver into a free USB port on your notebook. NOTE: The webcam must be plugged into a USB 2.0 port to provide full functionality. For that reason, do not plug the webcam into a USB 1.1 port or hub. DE If you plug the webcam into a USB 2.0 hub, make sure that this has its own additional independent power supply. EN FR Windows will automatically detect that a new device has been connected and will install the necessary driver itself. You do not need to install any additional drivers. ES IT Taking pictures on Windows Click on “My Computer” and double click on “USB Video Device”. After the device has been initialised you will now see live images from the webcam. To take a picture, click on “Take new picture” in the upper left of the window. A miniature preview of the picture that has been taken will now appear below in the file bar. You can now copy this image and paste it into any directory of your choice. Installing the photo and video software Software for taking and editing photos and video is provided on the accompanying CD. To install this software, insert the CD into your CD-ROM drive. The installation menu will launch automatically. If this does not happen then open Windows Explorer and double click on the symbol for your CD-ROM drive and then double click on the file setup.exe. 11 DK