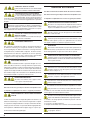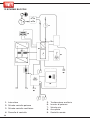
1
Manuale d’Istruzione Instruction Manual
Bedienungsanleitung Manuel d’emploi
Manual de instrucciones
Cod. 910.100.401 REV01
DUKE 74 - TP 104
DUKE 74 - TP 104
TARGA DATI, NOMINAL DATA, LEISTUNGSCHILDER,
PLAQUE DONÉES, PLACA DE CARACTERÌSTICAS
ITALIANO
ENGLISH
DEL MANUALE............................................................................
pag. 5
2.
DESCRIZIONE DELL’APPARATO....................................................
pag. 6
3.
COLLEGAMENTO DELL’ALIMENTAZIONE......................................
pag. 7
4.
CIRCUITO GAS DI TAGLIO.............................................................
pag. 7
5.
COLLEGAMENTO REMOTO .................................................................
pag. 7
5.1
COLLEGAMENTO REMOTO CORRENTE DI TAGLIO........................
pag. 7
6.
ACCENSIONE................................................................................
pag. 8
7.
INCONVENIENTI DI TAGLIO..............................................................
pag. 8
8.
CONSIGLI PRATICI..........................................................................
pag. 8
9.
MANUTENZIONE ORDINARIA DELLA MACCHINA...........................
pag. 8
10. RICERCA GUASTI..........................................................................
pag. 9
11.
PARTI DI RICAMBIO.......................................................................
pag. 10
12. SCHEMA BLOCCHI.....................................................................
pag. 12
FRANÇAIS
CARATTERISTICHE GENERALI E NOTE PER LA CONSULTAZIONE
ESPAÑOL
1.
pag. 2, 3, 4
DEUTSCH
• AVVERTENZE ..................................................................................
1
SIMBOLI
UTILIZZATI
SIMBOLI UTILIZZATI
Situazione che può causare gravi danni alle persone e/o
alla apparecchiatura
Indica il pericolo di ferimento o di morte dovuto a trascuratezza durante l’utilizzo o manutenzione di bombole o valvole per gas compresso
PERICOLO DI FULMINAZIONE
Grave pericolo di fulminazione per le persone
PRECAUZIONI PER
PERICOLO
DI SVILUPPO FIAMMA
Informazione importante da tenere in debito conto. Indica le precauzioni da tenere in conto per una migliore
installazione ed utilizzo.
Indica che è necessario indossare la visiera protettiva per evitare scottature e danni agli occhi
INFORMAZIONI
RELATIVE ALLO SMALTIMENTO
GAS TOSSICI
Indica il pericolo, in condizioni anomale, di sviluppo di gas tossici
ISTRUZIONI
D’INSTALLAZIONE
PERICOLO SCORIE
Indica la possibilità di venir scottati da scorie bollenti
ISTRUZIONI
D’USO
Indica la necessità di indossare occhiali protettivi per
evitare danni dovuti a scorie proiettate
ISTRUZIONI
DI DISIMBALLAGGIO
Leggere il manuale d’istruzioni
UTILIZZABILE IN AMBIENTE A MAGGIOR RISCHIO
DI SCOSSA ELETTRICA
L’ESTINZIONE DELL’INCENDIO
AVVERTENZE
RIGUARDO ALLA SICUREZZA DELL’APPARATO
Questo apparato è un prodotto previsto solamente per uso
industriale e professionale e, come tale, deve essere utilizzato solamente da specialisti o da persone addestrate.
È compito dell’utilizzatore fare in modo che l’apparato non sia accessibile a personale non professionale.
L’utilizzatore deve avere cura del proprio strumento
di lavoro! si rammenta esplicitamente che un utensile o un apparato può diventare pericoloso se non è
integro. Anche apparati ed accessori deteriorati o guasti possono
essere pericolosi: in caso di funzionamento anomalo o di surriscaldamento disconnettere immediatamente l’intero apparato dalla rete elettrica e renderlo al fornitore per l’opportuna riparazione.
TENSIONI PERICOLOSE
L’apparato contiene al suo interno tensioni potenzialmente letali.
Tutte le tensioni pericolose all’interno dell’apparato sono segregate in apposite zone accessibili solamente utilizzando attrezzi non
forniti in dotazione con la macchina.
Tutte le operazioni di manutenzione o riparazione che richiedono
l’accesso a queste parti dell’apparato possono essere effettuate solamente da personale tecnico appositamente istruito dal costruttore.
INTRODUZIONE OGGETTI
Non introdurre oggetti nelle feritoie di aerazione ed evitare il contatto con qualsiasi tipo di sostanza liquida;
provvedere alla pulizia solamente con panno asciutto. Tali attenzioni
devono essere osservate anche a macchina spenta.
CALPESTABILITÀ
La parte superiore delle macchine non sono progettate per
reggere pesi consistenti. Non salire mai sull’apparato.
Leggere il presente manuale prima di utilizzare il vostro sistema
di taglio, questo vi aiuterà ad effettuare un lavoro migliore e in condizioni di maggiore sicurezza.
Tramite la lettura del manuale conoscerete più a fondo le possibilità, le
limitazioni e i potenziali pericoli del lavoro di taglio.
Conservate il presente manuale per tutta la vita dell’apparato e riponetelo in un luogo facilmente accessibile all’addetto all’utilizzo della macchina.
SEZIONE DEI CAVI
Verificare che i cavi dell’impianto siano di sezione adeguata alla corrente di ingresso della macchina. Estendere il controllo ad eventuali prolunghe. Si raccomanda che il cavo della prolunga sia sempre completamente steso: un cavo arrotolato può surriscaldarsi e divenire pericoloso, inoltre un cavo avvolto a matassa o arrotolato sul
proprio rocchetto può determinare grossi malfunzionamenti nella macchina.
Tutti gli apparati connessi alla rete elettrica possono risultare pericolosi se le istruzioni relative all’utilizzo sicuro
dell’apparato non sono conosciute o non sono seguite.
Di conseguenza per ridurre il rischio di morte o di gravi danni dovuti a
scossa elettrica occorre leggere, capire e seguire queste avvertenze
sulla sicurezza. Prestate la massima attenzione al fatto che anche eventuali persone che assistono alle operazioni di taglio devono essere
opportunamente istruite sui pericoli relativi all’attività in corso.
INTERRUTTORE DI PROTEZIONE
Verificare che l’impianto che alimenta la macchina sia dotato di opportuno organo di sezionamento e protezione. L’interruttore deve aprire tutti i cavi di alimentazione (Nel caso di linea monofase: Fase e neutro; nel caso di linea trifase: tutte e tre le fasi; nel caso
di linea a quattro cavi: tutte le fasi e il conduttore di neutro).
Il costruttore declina ogni responsabilità per danni a persone
o cose derivanti da un uso inesperto, improprio o disattento
delle proprie apparecchiature.
Le informazioni sulla sicurezza che troverete nel seguito devono essere considerate come una guida per la vostra incolumità, ma non possono comunque sostituirsi completamente
alla competenza e al corretto comportamento dell’utente.
Il fuoco e le esplosioni possono provocare seri danni a
persone e cose! Per ridurre il rischio di morte o di gravi
danni dovuti al fuoco o ad esplosioni occorre leggere,
capire e seguire queste avvertenze sulla sicurezza. Prestate la massima attenzione al fatto che anche eventuali persone che assistono alle
operazioni di taglio devono essere opportunamente istruite sui pericoli relativi all’attività in corso. Ricordate sempre che l’operazione di taglio,
per sua stessa natura, produce scintille, spruzzi di materiale bollente,
gocce di metallo fuso, scorie e schegge bollenti che possono provocare incendi, bruciare la pelle e danneggiare gravemente gli occhi.
2
CONNESSIONE DI TERRA
Nel caso che la macchina non sia fornita della spina di alimentazione, connettere sempre per primo il cavo di terra. In caso di
scollegamento dell’apparato scollegare il cavo di terra per ultimo.
SPINA E PRESA DI COLLEGAMENTO
Nel caso che la macchina sia fornita di spina di collegamento alla
rete verificare sempre con attenzione che sia conforme al tipo di
presa montata a parete. Non manomettere mai il cavo di collegamento.
COLORAZIONE DEI CAVI
Il cavo di collegamento giallo-verde serve per la connessione
della terra di protezione (non utilizzarlo per altri scopi!)
MOVIMENTAZIONE 1
Alcune tipologie di macchine sono apparati pesanti, effettuare le operazioni di movimentazione con attenzione. Nel caso la macchina sia
utilizzata, anche momentaneamente, in ambienti civili controllare sempre preventivamente la tenuta delle solette e dei pavimenti “sopraelevati”.
MOVIMENTAZIONE 2
Non conservare o trasportare la macchina inclinata o
appoggiata su un lato.
AMBIENTE DI UTILIZZO E/O INSTALLAZIONE1
Apparato non adatto a locali da bagno, docce, piscine o aree
similari. Nel caso sia necessario operare in tali ambienti verificare preventivamente il serraggio di tutti i rubinetti di adduzione dell’acqua
e verificare che per la propria funzione.
AMBIENTE DI UTILIZZO E/O INSTALLAZIONE 2
La macchina non è idonea al funzionamento e immagazinamento sotto pioggia o neve.
AMBIENTE DI UTILIZZO E/O INSTALLAZIONE 3
La macchina non è prevista per essere installata o utilizzata in
luoghi soggetti ad urti o vibrazioni; ad esempio: mezzi di trasporto
su strada, su rotaia, su fune, aerei, navali ed equiparabili (come gru, carri ponte, parti di macchine utensili soggette a movimento o vibrazione)
AMBIENTE DI UTILIZZO E/O DI INSTALLAZIONE 4
Non utilizzare la macchina in ambienti in cui sia presente
una atmosfera esplosiva o corrosiva o abrasiva o salina.
Posizionare sempre nelle immediate vicinanze dell’area di
lavoro un estintore di tipo omologato. Effettuare sempre le
revisioni periodiche all’estintore.
POSIZIONAMENTO
Posizionare lontano da fonti di calore.Posizionare in locali aventi una sufficiente aerazione. Posizionare in locali ben riparati: non
è possibile installarla all’aperto. Non posizionare in locali molto polverosi: la polvere può entrare all’interno dell’apparato impedendone il corretto raffreddamento. La macchina deve essere posizionata su una superficie di sostegno
piana e stabile che si estende oltre la base del prodotto in tutte le direzioni.
PULIZIA DEL LUOGO DI UTILIZZO
Il luogo dove è utilizzata la macchina deve essere mantenuto pulito e asciutto per evitare che
qualsiasi oggetto o liquido possa essere aspirato all’interno dell’apparato. Tale circostanza può portare, oltre che al malfunzionamento dell’apparato, ad un concreto pericolo di incendio.
RIPARAZIONE
Non tentare mai di riparare il prodotto da soli, ma
rivolgersi sempre al costruttore o ad un suo centro
di assistenza autorizzato. Qualsiasi tentativo di riparazione non autorizzato per iscritto e non gestito direttamente dal costruttore oltre ad
essere oggettivamente pericoloso, determina l’immediata scadenza della garanzia e la cessazione di qualsiasi responsabilità per eventuali malfunzionamenti e per le conseguenze che da essi possono derivare.
ASSISTENZA
La macchina dovrà essere consegnata al centro di assistenza quando l’apparato è stato in qualche modo danneggiato, come nei casi in
cui vi sia penetrato del liquido, vi siano caduti sopra o dentro oggetti, quando sia stato esposto alla pioggia o all’umidità (al di fuori dei valori specificati), quando non funziona normalmente, quando presenta evidenti cambiamenti di prestazione o quando è stata fatta cadere.
ACCESSORI
Usare solo accessori previsti dal costruttore, l’utilizzo di accessori di tipo differente può determinare gravi malfunzionamenti dell’apparato. L’utilizzo di accessori non ori-
PROTEZIONE DEL PERSONALE
Oltre alle avvertenze generali precedentemente
riportate occorre rispettare scrupolosamente anche
le seguenti precauzioni
MASCHERA DI PROTEZIONE
Indossare una maschera di protezione per saldatura non infiammabile per proteggersi il collo,
la faccia e i lati della testa. Mantenete il vetro protettivo pulito e sostituirlo se è rotto o crepato. Posizionare un vetro di protezione trasparente tra lo schermo della maschera e la zona di taglio.
ABBIGLIAMENTO
Indossare un abbigliamento di protezione non eccessivamente largo, chiuso, ininfiammabile e senza tasche.
VENTILAZIONE DEL LOCALE
Effettuare l’operazione di taglio in un locale ben ventilato senza accesso diretto ad altri luoghi di lavoro.
PERICOLO PER GLI OCCHI
Non guardare MAI il taglio senza le opportune protezioni.
FUMI E GAS 1
Pulire bene la parte da tagliare da vernici, ruggine o qualsiasi sporcizia per evitare l’emissione di fumi pericolosi
di composizione non conosciuta.
FUMI E GAS 2
Non tagliare MAI metalli contenenti zinco, mercurio, cromo, grafite, metalli pesanti, cadmio o berillio senza che
l’operatore e le persone presenti durante il taglio indossino appositi respiratori.
PROTEZIONE DALLE SCOSSE ELETTRICHE
Oltre alle avvertenze generali precedentemente riportate occorre rispettare scrupolosamente anche le seguenti precauzioni.
SPAZI RISTRETTI
Quando si lavora in spazi ristretti occorre lasciare la sorgente di potenza al di fuori della zona in cui avviene il
taglio e fissare il cavo di terra al pezzo da lavorare.
AREE UMIDE
Non effettuare mai l’operazione di taglio in ambienti umidi o bagnati.
CAVI DANNEGGIATI 1
Non utilizzare mai cavi danneggiati
CAVI DANNEGGIATI 2
Non rimuovere mai i pannelli dalla macchina. Nel
caso in cui la macchina sia dotata di pannelli apribili verificare sempre che, al momento dell’uso,
siano ben chiusi.
PREVENZIONE DEGLI INCENDI
Oltre alle avvertenze generali precedentemente riportate occorre rispettare scrupolosamente anche le seguenti precauzioni. Il
processo di taglio richiede il raggiungimento di temperature elevate, di conseguenza esiste un concreto rischio di incendio.
ginali determina l’immediata scadenza della garanzia e la cessazione
PAVIMENTO DELL’AREA DI LAVORO
di qualsiasi responsabilità per eventuali malfunzionamenti e per le con-
Il pavimento dell’area di lavoro DEVE essere
realizzato in materiale ininfiammabile.
seguenze che da essi possono derivare.
3
PIANO DELL’AREA DI LAVORO
Il piano del tavolo da lavoro su cui si effettua il taglio
DEVE essere realizzato in materiale ininfiammabile.
PROTEZIONE DEI MURI E DEI PAVIMENTI
I muri circostanti l’area di taglio e i pavimenti devono essere protetti da schermi realizzati in materiale ininfiammabile; questo, non solo per ridurre il
rischio di incendio, ma anche per fornire una protezione atta ad evitare che i muri e/o il pavimento siano danneggiati durante le operazioni
di taglio.
ESTINTORE
Posizionare nell’area di lavoro un estintore omologato di tipo e
dimensioni appropriate. Verificarne periodicamente lo stato
(effettuare la manutenzione programmata) e assicurarsi che il personale si opportunamente istruito per il suo utilizzo
PULIZIA DELL’AREA CIRCOSTANTE ALLA
ZONA DI LAVORO
Ripulire accuratamente la zona di lavoro da qualsiasi materiale combustibile.
GRAVISSIMO PERICOLO! 1
Non effettuare assolutamente MAI le operazioni di taglio in
un ambiente ristretto (per esempio un container, una cisterna, un ripostiglio) che abbia contenuto o contenga materiali o liquidi tossici, infiammabili o esplosivi. Prestare la massima attenzione al fatto che soprattutto le cisterne possono
conservare al loro interno gas e vapori tossici, infiammabili
o esplosivi anche dopo anni dal loro svuotamento.
GRAVISSIMO PERICOLO! 2
Non effettuare assolutamente MAI le operazioni di taglio su un serbatoio che abbia contenuto o contenga materiali o liquidi tossici,
infiammabili o esplosivi. Prestare la massima attenzione al fatto che
i serbatoi possono conservare al loro interno vapori infiammabili ed
esplosivi anche dopo anni dal loro svuotamento. Nel caso sia necessario effettuare tagli su di un serbatoio occorre SEMPRE passivarlo
riempiendolo di sabbia o equivalente materiale inerte.
GRAVISSIMO PERICOLO! 3
SCARICHE ELETTRICHE
Per ridurre il rischio di seri danni dovuti alle scariche elettriche,
oltre alle avvertenze generali precedentemente riportate occorre rispettare scrupolosamente anche le seguenti precauzioni.
INFORTUNIO DOVUTO A SCARICA ELETTRICA
Nel caso in cui una persona sia colpita da scarica elettrica
NON prestarle soccorso se è ancora in contatto coi cavi.
Togliere immediatamente tensione e POI soccorrerla.
CONTATTO COI CAVI
Non fare manovre sui cavi di ingresso se l’alimentazione
non è stata interrotta.
STATO DI CONSERVAZIONE DEI CAVI E DELLA PRESA
Verificare spesso l’integrità del cavo di alimentazione e della relativa spina e presa. Ciò è particolarmente necessario
nelle apparecchiature che subiscono ripetuti movimenti.
RIPARAZIONI
Non tentare mai di effettuare in proprio delle riparazioni sulla macchina; questo determina non solo l’immediata decadenza della garanzia, ma può essere fonte di seri pericoli.
APERTURA DELLE ZONE ACCESSIBILI ALL’OPERATORE
Verificare sempre che la macchina sia disconnessa dalla rete
prima di effettuare le manovre di ordinaria manutenzione riportate in questo manuale.
COMPATIBILITA’ ELETTROMAGNETICA
Assicurarsi che vicino alla macchina non passino cavi di
controllo, telefonici e bus di segnale (come reti di computer, bus di campo ecc)
Assicurarsi che vicino alla macchina non vi siano telefoni,
televisori, computer o altri apparati di controllo.
Attenzione non utilizzare mai le apparecchiature per sgelare i tubi dell’acqua
VENTILAZIONE
Oltre alle avvertenze generali precedentemente riportate occorre rispettare scrupolosamente anche le seguenti precauzioni.
VENTILAZIONE DEL LOCALE DOVE AVVIENE IL
TAGLIO.
Assicurarsi che vicino alla macchina non vi siano persone
portatrici di pace-macker.
Non utilizzare la macchina in ambiente ospedaliero o in ambulatori (sia medici che veterinari). Prestare particolare attenzione al fatto che nelle immediate vicinanze della zona di macchina non
vi siano apparecchi elettromedicali in funzione.
Nel caso in cui la macchina provochi disturbi ad altre apparecchiature
si può cercare di diminuirne l’effetto tramite le seguenti precauzioni
Ventilare il locale dove avviene il taglio adeguatamente. Mantenere un
sufficiente flusso d’aria per evitare l’accumulo di gas tossici o esplosivi. L’operazione di taglio effettuata su certi tipi o combinazioni di materiali può generare fumi tossici. In questi casi utilizzare appropriati siste-
1. Verificare che tutti gli sportelli eventualmente presenti nella macchina siano ben chiusi
2. Accorciare i cavi di alimentazione
3. Interporre dei filtri EMC tra la macchina e la linea di alimentazione
mi di respirazione. PRIMA di iniziare a tagliare leggere e capire le pre-
Classificazione per compatibilità elettromagnetica: CISPR
scrizioni di sicurezza della lega di taglio.
11, gruppo2, classe A.
4
I generatori tipo “DUKE 74K” e “TP 104K” sono apparecchiature realizzate con tecnologia
INVERTER; si tratta di apparati estremamente compatti e versatili utilizzabili in tutte le
situazioni in cui, il minimo ingombro, si deve coniugare con le più elevate prestazioni.
ITALIANO
1. CARATTERISTICHE GENERALI E NOTE PER LA CONSULTAZIONE DEL MANUALE
Questi generatori sono sistemi ad inverter con controllo a microprocessore per il taglio al
Portatili, ventilati, con innesco a contatto dell’arco pilota.
Consentono un taglio rapido, senza deformazioni, di tutti i materiali conduttori.
ENGLISH
plasma ad aria compressa.
su superfici isolate e di ottenere risultati di alta qualità. La frequenza di commutazione con
cui opera permette di controllare l'arco elettrico nel modo più adatto al procedimento.
Variazioni di rete o di carico non producono variazione della corrente di taglio. Particolare
attenzione in progettazione è stata prestata allo scopo di produrre una macchina che
DEUTSCH
L'utilizzo dei sistemi a inverter permette di avere un generatore molto compatto, di tagliare
la FIMER ha adottato componenti elettronici allo stato solido, sia per quanto riguarda la
parte di potenza, sia per quella di controllo.
La macchina è anche adatta ad effettuare il taglio di lamiere grigliate.
In ogni caso è opportuno utilizzare per il taglio l’apposito distanziatore (stand-off) fornito a
FRANÇAIS
fornisse garanzie di prestazioni elevate, di longevità e ridotta manutenzione; per tale motivo
Grazie alle avanzate tecniche di controllo adottate, il prodotto ha un’elevatissima affidabilità
e facilità d’uso.
ESPAÑOL
corretdo della torcia di taglio.
Questo manuale di istruzione riporta nel dettaglio le regolazioni e le modalità di
funzionamento della macchina: la sua lettura completa vi permetterà di apprezzarne
l’estrema flessibilità e la praticità di utilizzo.
Attenzione: l'apparecchio può essere utilizzato solo per gli impieghi descritti nel manuale
e non deve essere utilizzato per altri fini impropri.
5
2. DESCRIZIONE DELL’APPARATO
15
12 5 4 3 6
14
13
7 8
FIGURA 1:
9
11
12
10
16
18
17
19
Fig.1
20
21
22
1. Manopola per la regolazione della corrente di taglio.
2. Display indicatore della corrente di taglio:
Durante il taglio: mostra l’effettiva corrente di taglio
In condizione di arco pilota: mostra il valore della corrente
d’arco pilota.
Altrimenti mostra la corrente impostata.
3. Led Rosso: Segnalazione di arco pilota (pulsante torcia
premuto, ma arco taglio non ancora innescato).
4. Led Giallo: Tensione di rete fuori dai limiti.
5. Led Giallo: Segnalazione di insufficiente pressione aria.
6. Led Rosso: Segnalazione di arco taglio.
7. Led giallo: Segnalazione di protezione termica.
Si accende quando la macchina è in blocco per
surriscaldamento.
Questo avviene normalmente se il fattore di intermittenza
della macchina è stato superato. Verificare che le griglie di
aerazione 19 poste sul retro, sul fronte e sul lato non siano
otturate e lasciare accesa la macchina per far raffreddare i
componenti interni; quando il led si spegne, si possono
riprendere le normali operazioni di taglio.
8. Led Giallo: Arco taglio interrotto (strappo dell’arco di taglio).
9. Led Verde: Purge Test (Vedere il pulsante 10)
10. Pulsante di Purge Test: (Led 9 acceso)
Premendo una volta questo pulsante avviene
l’erogazione dell’aria senza l’innesco dell’arco; in questo
modo è possibile tarare la pressione dell’aria o far
raffreddare la torcia.
Premendolo nuovamente l’erogazione dell’aria viene
interrotta.
11. Led Verde: Remote (Vedere il pulsante 12).
12. Pulsante di funzionamento in “Remote”: (Led 11
acceso) Premendo questo pulsante una volta si passa dalla
regolazione in locale alla regolazione in Remoto. Una
successiva pressione riporta la regolazione in locale.
13. Manopola di regolazione della pressione: Per regolare la
pressione occorre procedere come segue.
- azionare la modalità “purge test” (Vedere il pulsante 10 e
il led 9)
- tirare la manopola verso di sé
- regolare la pressione a circa 5/6 Bar (verificare il valore
tramite il manometro 14)
(La rotazione in senso orario aumenta la pressione)
- una volta impostata la corretta pressione premere
nuovamente la manopola, riportandola nella posizione iniziale.
14. Manometro: (Vedere il punto 13).
15. Led Verde: apparecchiatura alimentata
16. Connettore della torcia di taglio.
17. Connettore per il comando remoto.
18. Connettore per il cavo di massa.
19. Prese per il raffreddamento dell’apparato (altre prese
sono previste sul lato posteriore e laterale).
FIGURA 2:
Fig.2
6
20. INTERRUTTORE ON-OFF: Accende e spegne la
macchina.
21. CAVO DI INGRESSO: Collegarlo all’alimentazione di rete.
22. CONNETTORE PER L’ARIA DI TAGLIO: Deve essere
connesso al compressore contenente l’aria.
4. CIRCUITO GAS DI TAGLIO
Controllare che la pressione e le portate
d’aria corrispondano ai valori richiesti dalla
torcia.
Il taglio al plasma utilizza un getto di aria
compressa sia per il soffio dell'arco che per
il raffreddamento della torcia.
Il circuito dell'aria include il regolatore di
pressione (13 fig.1): tararlo a 5/6 bar,
verificando la lettura sul manometro (14 di fig1).
corrente
In ogni caso l’alimentazione dell’aria deve
fornire una portata di minima di 150 Lt./min.
All'innesco dell’arco di taglio, si apre
un’elettrovalvola che permette il passaggio
della portata d’aria.
di taglio, oppure se azionata direttamente
dal pulsante "PURGE TEST" del pannello di
controllo (10 di fig1).
DEUTSCH
5. COLLEGAMENTO REMOTO
In figura 3 sono riportati i collegamenti del
connettore remoto (17 di fig 1).
ITALIANO
Tale valvola permette il passaggio dell'aria
solo se opportunamente pilotata dalla logica
elettronica durante il post-gas e il processo
ENGLISH
3. COLLEGAMENTO
DELL’ALIMENTAZIONE
Prima di collegare la macchina controllare
tensione, numero di fasi e frequenza di
alimentazione. La tensione di alimentazione
ammissibile è indicata sulla targa dati della
macchina. Verificate il corretto collegamento
a terra della saldatrice. Verificare inoltre che
la spina fornita in dotazione con l’apparato
sia di tipo compatibile con la presa di
distribuzione locale. Assicuratevi che
l’alimentazione fornisca una potenza
sufficiente per il funzionamento della
macchina (range di tensioni). La macchina è
fornita di uno specifico cavo di
alimentazione che non dovrebbe essere
prolungato; nel caso ciò fosse necessario,
usarne uno di sezione uguale o maggiore a
quello della macchina in funzione della
lunghezza del cavo. È necessario utilizzare
un cavo tripolare + terra con sezione uguale
o maggiore a 2.5 mm².
5.1 CONTROLLO REMOTO CORRENTE
DI TAGLIO
Tramite il connettore remoto 17 di Fig 1 è
possibile portare la regolazione di corrente
vicino al punto in cui si sta eseguendo il
taglio. Per far questo è necessario
realizzare il collegamento al potenziometro
P mostrato in figura 3. Il valore del
potenziometro non è critico: sono utilizzabili
componenti tra 2.2kOhm e 10kOhm 1/2W.
Ruotando il potenziometro è possibile
settare la corrente di taglio in un range
compreso tra il valore minimo e il massimo
impostato.
ESPAÑOL
Dove:
Sw è il pulsante torcia
è il potenziometro per il controllo della
P
FRANÇAIS
Fig. 3
7
6. ACCENSIONE
Attenzione: Se la torcia non viene inserita
nell'apposito connettore, il generatore
rimane inoperante.
Il circuito si blocca se la pressione viene
regolata sotto i 3,5 bar.
E' sempre opportuno spegnere il generatore
per interventi sulla torcia.
Il concetto che sta alla base del
funzionamento di questi generatori è quello
di fornire una corrente costante pari al
valore impostato, indipendentemente dalla
lunghezza dell’'arco.
Dopo aver effettuato i collegamenti della
torcia, e, acceso il generatore, verificare che
l’aria sia in circolazione nel circuito, agendo
sul tasto PURGE TEST (10 di fig1).
Impostare, quindi, il valore di corrente,
tramite la manopola 1 di fig1.
La Tabella indica approssimativamente i
valori di corrente da impostare in funzione
degli spessori da tagliare.
MATERIALE SPESSORE
MATERIALE
(mm.)
FERRO
VALORE
CORRENTE
(A)
2
10
4
20
6
30
10
50
15
60
20
70
NOTE
TAGLIO A
CONTATTO
TAGLIO
DISTANZIATO
TAGLIO
Per iniziare a tagliare, premere il pulsante
della torcia. Conclusa l’operazione si rilascia
il pulsante con conseguente spegnimento
dell'arco. Il getto d’aria continuerà a defluire
per circa 20 secondi, (post-gas), necessari
per il completo raffreddamento della torcia.
SICUREZZA TORCIA
ATTENZIONE TENSIONE SUPERIORE A
113 V. TORCIA IN CLASSE M.
La torcia di cui è equipaggiato il generatore,
è provvista di una sicurezza che impedisce
all’utilizzatore di venire a contatto con parti
sotto tensione, infatti svitando il terminale
isolato, si disabilita il pulsante torcia.
8
7. INCONVENIENTI DI TAGLIO
1) Insufficiente penetrazione
Le cause di questo inconveniente possono
essere:
- Velocità elevata. Assicurarsi sempre che l'arco
sfondi completamente il pezzo da tagliare e
che non abbia mai un’inclinazione, nel senso
di avanzamento, superiore ai 10-15°
- L'elettrodo deve essere sostituito quando
presenta un cratere profondo circa 1,6 mm.
- L' ugello va sostituito quando presenta il
foro centrale rovinato oppure molto allargato
rispetto a quello del particolare nuovo
- Spessore eccessivo del pezzo.
- Morsetto di massa non in buon contatto
elettrico con il pezzo.
2) L'arco di taglio si spegne
Le cause di questo inconveniente possono
essere:
- Velocità di avanzamento troppo bassa.
- Corrente di taglio troppo alta in rapporto
allo spessore del pezzo da tagliare;
adeguarla allo spessore.
8. CONSIGLI PRATICI
Pur se all’interno dell’apparato è già previsto
un filtro per il trattamento dell’aria, in grado
di trattenere impurità aventi dimensioni a
circa 5mm, se l'aria dell'impianto contiene
umidità ed olio in quantità è bene utilizzare
un filtro essiccatore per evitare un’eccessiva
ossidazione ed usura delle parti di consumo
e di danneggiare la torcia. Le impurità
presenti nell'aria favoriscono l'ossidazione
dell'elettrodo e dell'ugello e possono
rendere più difficoltosa l'accensione
dell'arco pilota. Se questa condizione si
terminale
parte
la
pulire
verifica
dell'elettrodo e l'interno dell'ugello con carta
abrasiva fine. Assicurarsi che l'elettrodo e
l'ugello nuovi che stanno per essere montati
siano ben puliti e sgrassati.
Per evitare di danneggiare la torcia utilizzare
sempre ricambi originali FIMER.
9. MANUTENZIONE ORDINARIA
DELLA MACCHINA
Ogni tre mesi rimuovere periodicamente la
polvere dalle bocchette di aspirazione dell’aria usando aria compressa a bassa pressione. Dirigere sempre il getto d’aria dall’interno della macchina verso l’esterno in
modo da evitare di spingere sporcizia all’interno della saldatrice. Per effettuare questa
operazione accertarsi che la macchina non
sia collegata alla rete elettrica.
Controllare l’allacciamento della
macchina alla rete e la presenza
della tensione.
Contattare assistenza tecnica FIMER.
Alimentare il generatore secondo
le istruzioni.
Controllare il cavo di alimentazione ed
eventuali fusibili esterni.
Verificare la portata dell’impianto di linea
e la presa alla quale ci si è collegati.
Alimentare il generatore secondo
le istruzioni.
Controllare il cavo di alimentazione
ed eventuali fusibili esterni.
Verificare la portata dell’impianto di linea
e la presa alla quale ci si è collegati.
Accensione led giallo 7 di fig1
“PROTEZIONE TERMICA”
La tensione di rete scende sotto i 360V
quando si taglia.
Fattore di intermittenza troppo
elevato.
Temperatura ambiente superiore a
40° gradi centigradi.
Ingresso aria per la ventilazione occluso da sporcizia/generatore in posizione tale da impedire la ventilazione.
Elettroventilatore del generatore guasto. Contattare assistenza tecnica FIMER.
Led giallo 5 di fig1 “PRESSIONE Pressione dell’aria inferiore a 3,5 Bar
ARIA BASSA” acceso
Premere il pulsante “PURGE TEST”
(10 di fig1) e regolare la pressione
secondo le istruzioni.
Portata dell’aria troppo bassa
Controllare il dimensionamento dell’impianto dell’aria (tubi, compressore etc.), premere il pulsante “PURGE
TEST” (10 di fig1) e regolare la pressione secondo le istruzioni.
Smontare
la torcia e controllare la chiuAlla pressione del pulsante della Guasto della torcia (fili interni o pulsante)
sura del circuito fra i pin 1 e 9 della
torcia il led rosso “ARCO PILOTA”
spina a pulsante premuto.
(3 di fig1) non si accende e non
parte l’arcopilota.
Torcia non avvitata bene nel relativo Installare correttamente la torcia
attacco della macchina
seguendo le istruzioni
Accensione led giallo 5 di fig1
“PRESSIONE ARIA BASSA”
all’inizio del taglio
Utilizzare le torce prescritte secondo
le istruzioni
Alla pressione del pulsante della Guasto della torcia (fili interni o pulsante) Smontare la torcia e controllare la chiusura del circuito fra i pin 1 e 9 della
torcia il led rosso “ARCO PILOTA”
spina a pulsante premuto.
(3 di fig1) non si accende e non
parte l’arcopilota.
Torcia non avvitata bene nel relativo Installare correttamente la torcia
attacco della macchina
seguendo le istruzioni
Torcia non adatta al generatore
Torcia non adatta al generatore
Utilizzare le torce prescritte secondo
le istruzioni
Collegare e/o verificare il
collegamento della massa al pezzo
secondo le istruzioni
ITALIANO
Con l’interruttore del generatore su Mancanza tensione di rete.
ON la macchina non si accende (il
led verde 15 di fig1 non si accende)
Guasto generatore.
A generatore acceso il led 4 di fig1 si Cavo di alimentazione troppo lungo
accende e la macchina non funziona.
Mancanza di una fase di alimentazione.
ENGLISH
SOLUZIONE
Contattare assistenza tecnica FIMER.
DEUTSCH
CAUSA
FRANÇAIS
DIFETTO
I fusibili di linea bruciano quando si agi- Corto circuito interno al generatore.
sce sull’interruttore del generatore.
ESPAÑOL
10. RICERCA GUASTI
Qui di seguito sono elencati i più comuni problemi che si possono incontrare e le relative soluzioni.
L’arcopilota si innesca ma non parte Mancanza del collegamento di
l’arco principale (led 6 di fig1 spento) massa al pezzo.
e, quindi, la macchina non taglia.
Verificare la distanza fra la torcia e il Collegare e/o verificare il collegamento delpezzo o l’apposito distanziale
la massa al pezzo secondo le istruzioni
Impossibilità di regolazione della
Connettore comandi esterni
corrente di taglio tramite la manopo- collegato.
la 1 di fig1
Guasto generatore
Scollegare il connettore relativo
Contattare assistenza tecnica FIMER
9
11. PARTI DI RICAMBIO
10
Profilo portamaniglia sinistro
29 Staffa supporto radiatore
2
Profilo portamaniglia destro
31 Compressore
3
Maniglia
32 Elettrovalvola
4
Traversa piccola
34 Supporto antivibranti compressore
5
Profilo sinistro guscio
6
Profilo destro guscio
7
Griglia sinistra guscio
8
Griglia destra guscio
9
Attacco centralizzato plasma
36 Serbatoio
38 Staffa supporto filtri
40 Filtro con scarico automatico
41 Staffa supporto elettrovalvola
44 Scheda interfaccia plasma
ENGLISH
37 Elettrovalvola
47 Copertura plasma
15 Staffe supporto assale
48 Teleruttore
16 Assale ruote
49 Trasformatore ausiliario
17 Ruota
52 Parete fissa sinistra
18 Anello arresto
53 Parete fissa inferiore sinistra
19 Tappo in gomma
54 Pannello comandi plasma
20 Parete fissa inferiore destra
55 Manopola
21 Parete fissa destra
56 Pannello utente
22 Portagomma
57 Regolatore di pressione con manometro
23 Innesto rapido nero
77 Raccordo
24 Pressacavo
78 Raccordo rapido
25 Magneto idraulico
79 Raccordo rapido
26 Assieme potenza *
85 Silenziatore in plastica
FRANÇAIS
46 Scheda controllo potenza
14 Ruota piroettante
DEUTSCH
45 Controllo ventilatore
11 Gifas
ESPAÑOL
10 Connettore 7 poli
ITALIANO
1
27 Induttore di potenza
*26. ASSIEME POTENZA
A
Scheda potenza
B
Supporto modulo potenza
C
Portaventole supporto potenza
D
Ventilatore
11
12.SCHEMA BLOCCHI
1
5
2
6
3
9
4
8
1. Interruttore
2. Scheda controllo potenza
3. Scheda controllo ventilatore
4. Pannello di controllo
12
5.
6.
7.
8.
9.
Trasformatore ausiliario
Inverter di potenza
Valvola aria
Arco pilota
Controllo remoto
This manual must be considered as an integral part of the unit and must accompany it
when its location is changed or it is resold.
The user must assume responsability for maintaining this manual intact and readable at
all times.
The constructor reserves the right to modify this manual at any time without notice.
All rights of translation and total or partial reproduction by any means whatsoever (including scanner, photocopy, film, and microfilm) are reserved and reproduction is prohibited
without the express written consent of constructor.
INDEX
• WARNING ................................................................................... pag. 2, 3, 4
ITALIANO
ENGLISH
The constructor thanks you for having purchased this unit, it will prove to be a useful,
problem-free tool for many years to come if the instructions contained in this manual are
followed carefully.
DEUTSCH
USE AND MAINTENANCE MANUAL
pag. 5
2. DESCRIPTION OF THE MACHINE.................................................
pag. 6
3. POWER CONNECTOR...................................................................
pag. 7
4.CUTTING GAS CIRCUIT.................................................................
pag. 7
5. REMOTE CONNECTION...............................................................
pag. 7
5.1 REMOTE CONTROL OF THE WELDING CURRENT.....................
pag. 7
6. START UP ...................................................................................
pag. 8
7. CUTTING PROBLEMS..................................................................
pag. 8
8. PRACTICAL ADVICE....................................................................
pag. 8
9. ORDINARY MACHINE MAINTENANCE.......................................
pag. 8
10. TROUBLESHOOTING.................................................................
pag. 9
ESPAÑOL
CONSULTING THE MANUAL..........................................................
FRANÇAIS
1. GENERAL FEATURES AND NOTES ON
11. SPARE PARTS........................................................................... pag. 10
12. BLOCK DIAGRAM .................................................................... pag. 12
1
WARNING SYMBOLS
DANGER
(Indicating a hazard that could cause injury or damage)
DANGER COMPRESSED GAS
Indicating the risk of injury or death in the event of improper handling or maintenance of compressed gas cylinders or regulators
ELECTRIC SHOCK
(Indicating the danger of electric shock)
FIRE
PRECAUTIONS
DANGER
OF FIRE OR EXPLOSION.
IMPORTANT INFORMATION
Indicating the precautions to be taken when installing and
using the unit.
Indicating that eye protection is required to avoid
burns and eye damage.
DISPOSAL
INFORMATION
TOXIC GAS
Indicating the risk of toxic gas hazards
INSTALLATION
INSTRUCTIONS
HOT SLAG
Indicating the risk of being burned by hot slag
OPERATING
INSTRUCTIONS
EYE PROTECTION
Indicating that eye protection is required to avoid flying debris
UNPACKING
INSTRUCTIONS
READ THE INSTRUCTION MANUAL
SUITABLE FOR ENVIRONMENT WITH INCREASED
HAZARD OF ELECTRIC SHOCK
CAUTION
SAFETY WARNINGS
This equipment is designed solely for industrial or
professional use. As such, only experienced or fully-trained people should use the equipment. The user
and/or owner is responsible for ensuring inexperienced personnel does not have access to the equipment.
A workman must look after his tools carefully ! Remember that any tool or equipment can become a hazard if
it is not looked after properly.
Equipment in a state of disrepair or neglect can be dangerous. If it
does not operate properly or overheats, the electricity supply should
be removed immediately and the unit should be returned to the supplier for repair.
Read this manual carefully before using your Welder. You can
then do a better and safer job.
By reading this manual you will learn more about the possibilities, limitations and potential dangers of the work of cutting.
Retain this manual for the entire life of the equipment. It should be
kept within the operator’s reach at all times.
All equipment connected to electric power supplies can
be dangerous if the manufacturers instructions are not
read and observed. Read, understand and observe these safety instructions to reduce the risk of death or injury from electric shock. Ensure
that even bystanders are aware of, and understand, the dangers that
exist in the welding area.
The manufacturer declines all responsibility for damage to persons or property resulting from an inexpert use, improper or
careless of their equipment.
The safety information contained in this manual is a guide to
ensure you are not subjected to unnecessary risks. However,
the operator must be competent and careful at all times.
Fires and explosions can seriously injure or cause damage ! Read, understand and observe all safety warnings
to reduce the risk of death or injury from fire or explosion. Pay careful attention to the fact that any persons assisting with
the cutting operations must be properly educated about the dangers
related to ongoing. Remember that welding, by nature, produces
sparks, hot spatter, molten metal drops, hot slag and hot metal parts
that can cause fires, can burn skin and damage eyes.
2
HIGH VOLTAGE
The unit carries potentially lethal voltage.
The high voltage areas of the equipment have been segregated
and can be reached only by using tools that are not provided with the
Welder.
All maintenance or repair operations requiring access to such areas may
only be performed by constructor-trained technicians.
FOREIGN OBJECTS
Never block the air vents with foreign objects and avoid
any contact with liquids. Clean using just a dry cloth. These safety precautions apply even when the unit is switched off.
WEIGHT LOADS
The upper part of the Welder was not designed to withstand heavy loads. Never stand on the unit.
CABLE GAUGES
Check that all cables are appropriately gauged for
the input power required by your specific Welder.
This precaution applies also to extension cables, if used. All extension
cables must be straight. Coiled cables can overheat, becoming dangerous. Twisted or coiled cables can also cause Welder malfunction.
OVERLOAD PROTECTION
Check that the power source supplying the Welder carries the correct voltage and is safety-protected. The
power switch must open all the power supply circuits. (If a singlephase connection is used, both the live and the neutral poles must
be open. If a three-wire connection is used , all three poles must be
open. Four-wire circuits require all poles and neutral open).
EARTHING
If the Welder was not already supplied with a plug, connect the
earth wire first. When removing the plug, disconnect the earth
wire last.
PLUG AND POWER SUPPLY
If the Welder already has a plug attached, check that it is
appropriate for the wall-socket you intend using. Never tamper with the power cable.
CABLE COLOURS
The green-yellow wire is for earthing. (Don’t use it for
anything else !)
RELOCATION 1
Some Welders are extremely heavy therefore care should be
taken when relocating the unit. Check the floor or platform weight load limitations before relocating the unit if the Welder is to be used,
even only temporarily, in a non-industrial environment
RELOCATION 2
Never store or move the Welder in an inclined position or on its
side.
INSTALLATION ENVIRONMENT
The equipment is not suitable for use in washrooms,
shower cubicles, pool areas or similar environments. If
you are obliged to use the unit in such areas, turn off all
water supplies and check the area has been evacuated.
OPERATING AND/OR INSTALLATION ENVIRONMENT 2
The machine is not suitable for operation and storage at
the rain or snow.
OPERATING AND/OR INSTALLATION ENVIRONMENT 3
The Welder was not designed for installation or use in areas
where it could be subject to blows or vibration, such as roadvehicles, railway carriages, cable-cars, aircraft, ships or boats
or similar environments (including cranes, conveyor-carriers or any
other mobile equipment prone to vibration)
OPERATING AND/OR INSTALLATION ENVIRONMENT 4
Never use the Welder in an explosive, corrosive, abrasive or saline environment.
EXTINGUISHER
Always place an approved fire extinguisher in the immediate vicinity
of the work area. Fire extinguishers should be checked regularly.
LOCATION
Place the Welder well away from heat sources. Place the
Welder in a well-ventilated environment. Place the Welder in
a safe, protected area. It must not be installed outdoors. Do not install the
Welder in dusty environments. Dust can get into the inner parts of the unit
and inhibit cooling. The Welder must be positioned on a flat, stable surface that extends further than the units own dimensions in all directions.
CLEAN LOCATIONS
The installation area must be kept clean and dry to
be sure the Welder fans do not draw in small objects or liquids. Not only
could the equipment malfunction but a serious risk of fire outbreak could
be created.
REPAIRS
Never attempt to repair the Welder yourself. Always
refer to the manufacturer or an authorized repairer.
All warranty provisions will immediately become null and void if any repair,
or attempt to repair, not specifically authorized in writing or handled by
the constructor is carried out. Furthermore, the constructor will accept
no responsibility for any malfunction or damage resulting as a consequence of such unauthorized action.
TECHNICAL ASSISTANCE
The equipment must be taken to an authorized Technical Assistance Centre if the equipment has been damaged in any way
or if any one of the following events occurs : liquid infiltration; damage caused by falling objects; exposure to rain or humidity (exceeding
the specified limits); malfunction; performance failure or if the equipment has been dropped.
SPARE PARTS
Use only manufacturer-recommended spare parts.
Other spare parts could cause equipment malfunction. The use of non-original spare parts will also result in the war-
PERSONNEL PROTECTION
Together with the previous instructions, the following
precautions should be strictly observed
PROTECTION MASK
Wear a protective non-flammable welding mask
to protect your neck, your face and the sides of
your head. Keep the front lens clean and replace it if it is broken
or cracked. Place a transparent protection glass between the mask
and the welding area.
CLOTHING
Wear close-fitting, closed, non-flammable, pocketless clothing.
VENTILATION
Weld in a well-ventilated environment that does not have
direct access to other work areas.
EYE PROTECTION
NEVER look at the arc without appropriate eye protection.
FUMES AND GASES 1
Clean away paint, rust or any other dirt from the item to
be cut to avoid the creation of dangerous fumes.
FUMES AND GASES 2
NEVER cut on metals containing zinc, mercury, chromium, graphite, heavy metals, cadmium or beryllium
unless the operator and the bystanders use appropriate air-supplied respirators.
HIGH VOLTAGE PROTECTION
Together with the previous instructions, the following precautions should be strictly observed
CONFINED SPACES
When welding in small environments, leave the power
source outside the area where welding will take place and
attach the grounding clamp to the part to be welded.
HUMIDITY
Never weld in wet or humid environments.
DAMAGED CABLES 1
Never use damaged cables.
DAMAGED CABLES 2
Never remove the unit side panels. If the side panels
can be opened, always checked they are closed
tightly before starting any work.
FIRE PREVENTION
Together with the previous instructions, the following precautions should be strictly observed.
Welding operations require high temperatures therefore
the risk of fire is great.
ranty provisions becoming null and void, releasing the manufacturer
WORK-AREA FLOORING
from any responsibility for malfunction or damage resulting as a con-
The work-area flooring MUST be fireproof.
sequence of such action.
3
WORK-AREA SURFACES
Work benches or tables used during welding
MUST have fireproof surfaces.
ELECTRIC SHOCK
Together with the previous instructions, the following pre-
WALL AND FLOOR PROTECTION
The walls and flooring surrounding the cut environment must be shielded using non-flammable materials. This not only reduces the risk of fire but also avoids
damage to the walls and floors during cut processes.
EXTINGUISHER
Place an approved and appropriately-sized fire extinguisher in
the work environment.
Check its working order regularly (carry out scheduled inspections)
and ensure that all parties involved know how to use one.
cautions should be strictly observed to reduce the risk of
electric shock
ELECTRIC SHOCK INJURY
DO NOT touch a person suffering from electric shock if
he/she is still in contact with the cables. Switch the mains
power source off immediately THEN provide assistance.
CLEAN ENVIRONMENT
CABLE CONTACT
Do not tamper with power cables if the mains power is still
switched on.
Remove all flammable materials away from
the work environment.
CABLE AND PLUG PRECAUTIONS
Check the power supply cable, plug and wall-socket regularly.
SERIOUS DANGER ! 1
NEVER cut in confined spaces (e.g. in a container vehicle, a cistern
This is particularly important if the equipment is relocated often.
REPAIRS
or a storeroom etc.) where toxic, inflammable or explosive materials
Never attempt to repair the Welder yourself. The result would
are, or have been, located or stored. Cisterns, in particular, may still
not only cause warranty cancellation but also high danger risks.
contain toxic, flammable or explosive gases and vapours years after
they have been emptied.
SERIOUS DANGER ! 2
NEVER cut a cistern that contains (or has stored) toxic, inflammable or explosive materials. They could still contain toxic,
flammable or explosive gases and vapours years after they
have been emptied. If you are obliged to weld a cistern, ALWAYS
passivate it by filling it with sand or a similar inert substance
OPENING OF THE AREAS ACCESSIBLE TO THE OPERATOR
Always make sure that the machine is disconnected from the
mains before performing the maneuvers of ordinary maintenance procedures contained in this manual.
ELECTROMAGNETIC COMPATIBILITY
Check no power supply cables, telephone cables or other
electrical items (e.g. computer cables, control lines etc.) are
in the vicinity of the cut.
before starting any work.
Check there are no telephones, televisions, computers or other
SERIOUS DANGER! 3
NEVER use the Welder to melt frozen water
pipes.
VENTILATION
Together with the previous instructions, the following precautions should be strictly observed
WELDING ENVIRONMENT VENTILATION
transmission devices close to the equipment.
Make sure that people with pace-makers are not in the immediate vicinity of the equipment.
Do not use the equipment in hospitals or medical environments (including veterinary surgeries). Make especially sure
there is no electrical medical equipment being used close to where equipment is being done.
Should the equipment interfere with other apparatus, take the
following precautionary measures:
Ventilate the cut environment carefully. Maintain sufficient air-flow
to avoid toxic or explosive gas accumulation. Cut processes on
certain kinds or combinations of metals can generate toxic fumes.
1. Check the equipment ’s side panels are securely fastened.
2. Shorten the power supply cables.
Place EMC filters between the Welder and the power source.
In the event of this happening, use air-supply respirators. BEFORE cut, read and understand the welding alloy safety provisions.
4
EMC compatibility : CISPR 11, Group 2, Class A.
The “DUKE 74K” and “TP 104K” generators are made using INVERTER technology. They
are extremely compact and versatile devices that can be used in all those situations that
require minimum obstruction, combined with the highest performance.
ITALIANO
1. GENERAL SPECIFICATIONS AND NOTES FOR CONSULTING THIS MANUAL
Portable, fan-cooled, with contact striking of the pilot arc.
They allow rapid cutting without buckling of the all conductor materials.
ENGLISH
Microprocessor- control inverter systems for compressed air plasma cutting.
of-the-way surfaces and for obtaining excellent results. The switching frequency of the
inverter allows controlling the electrical arc for excellent welding performances.
Changes to the mains power or load do not cause changes to the cutting current. In the
DEUTSCH
The use of inverter systems allows obtaining a very compact generator for cutting on out-
design phase, special attention was placed on producing a machine that guarantees high
components in the solid state, for both the power components and the control components.
The machine is also suitable for cutting corrugated sheet metal.
In any case, it is recommended to use the special spacer (stand-off) supplied with the cutting
FRANÇAIS
performance, durability and low maintenance; for this reason, FIMER adopted electronic
Thanks to the advanced control techniques adopted, the product is extremely reliable and
easy to use.
ESPAÑOL
torch.
This instruction manual provides detailed information on the machine settings: reading the
entire manual will allow you to appreciate the extreme flexibility and practicality of use.
Caution: the device must only be used in the manner and for the purpose described in this
manual. Never use inappropriately or for any other purpose.
5
2. DESCRIPTION OF THE EQUIPMENT
15
12 5 4 3 6
14
13
7 8
FIGURE 1:
9
11
12
10
16
18
17
19
Fig.1
20
21
22
1. Knob for adjusting the cutting current.
2. Cutting current indicator:
During cutting: this indicator shows the effective cutting
current
In condition of pilot arc: shows the current value of the
pilot arc.
Otherwise, it shows the set current.
3. Red LED: Pilot arc indicating light (torch button pressed, but
cutting arc not yet established).
4. Yellow LED: Light indicating that the mains voltage is outside
the limits.
5. Yellow LED: Low air pressure indicating light.
6. Red LED: Cutting arc indicating light.
7. Yellow LED: Thermal protection indicating light.
This signal lights up when the machine is blocked due to
overheating.
This normally occurs when the machine’s intermittence factor
has been exceeded. Check that the air grills (19) positioned on
the back, front and sides of the machine are not obstructed and
leave the machine turned on to allow the internal components
to cool down; the normal cutting operations can be resumed
once this indicating light turns off.
8. Yellow LED: Light indicating that the cutting arc is
interrupted (tearing of the cutting arc)
9. Green LED: Purge Test (see button 10)
10. Purge Test Button: (LED 9 on)
Press this button once to supply air without triggering the arc;
in this way, the air pressure can be calibrated to allow the torch
to cool down.
Press this button again to interrupt the air supply.
11. Green LED: Remote (see button 12)
12. “Remote” mode button: (LED 11 on). Press this button
once to pass from local adjustment to remote adjustment.
Press again, to go back to local adjustment.
13. Pressure control knob: Proceed as follows to adjust the
pressure:
- activate the “purge test” mode (see button 10 and LED 9)
- pull the knob outwards
- adjust the pressure to around 5/6 bar (check the value via
pressure gauge 14)
(Turn in a clockwise direction to increase the pressure)
- Once the correct pressure has been set, press the knob again
and bring it back to the initial position.
14. Pressure Gauge: (See point 13).
15. Green LED: power on
16. Connector for the cutting torch.
17. Connector for remote control.
18. Connector for ground cable.
19. Inlets for cooling the machine (other inlets are located
on the back and sides)
FIGURE 2:
Fig.2
6
20. ON-OFF switch: turns the machine on and off.
21. INPUT CABLE: connection cable to the mains power
equipped.
22. CONNECTOR FOR WELDING AIR
This valve allows the air to pass only if it is
Before connecting the machine check the
suitably piloted by the electronic logics
tension, number of phases and the power
during the post-gas and cutting process, or
supply frequency. The admissible power
if directly activated by the "PURGE TEST"
supply is indicated on the information
button of the control panel (10 of fig. 1).
ITALIANO
3. POWER CONNECTOR
earth of the welder has been connected
correctly. Furthermore, make sure that
the plug provided with the equipment is
5. REMOTE CONNECTION
Figure 3 shows the connections of the
remote connector (17 of fig 1).
compatible with the local grid sockets.
Make sure that the power supply provides
ENGLISH
plate on the machine. Check that the
sufficient power for the machine to function
The machine is provided with a specific
power cable that does not usually require an
extension lead; in the event an extension
lead is required, use one of the same
capacity or higher than the machine in use,
Fig. 3
DEUTSCH
(tension ranges)
size or larger.
Where:
Sw is the torch trigger
P is the potentiometer for controlling the
current.
4. CUTTING GAS CIRCUIT
Check that the pressure and air flow
correspond to the values requested by
the torch.
The plasma cutting machine uses a jet of
compressed air for blowing the arc and
cooling the torch.
The air circuit includes the pressure
regulator (13 of fig. 1): calibrate it to 5/6 bar,
checking the readout on the pressure gauge
(14 of fig.1).
In any case, the air supply must flow at a
minimum rate of 150 l/min.
Upon the striking of the cutting arc, a
solenoid valve opens for allowing the air
to flow.
5.1 REMOTE CONTROL CURRENT CUT
With remote connector 17 in Fig. 1, it is
possible to adjust the current near to the
point where the welding is being carried out.
To do so, it is necessary to create a
connection with potentiometer P, shown in
ESPAÑOL
mm² three-pole cable + earth, of the same
FRANÇAIS
according to the length of the cable. A 2.5
figure 3. The value of the potentiometer is
not a critical factor: between 2.2kOhm and
10kOhm 1/2W can be used.
Turn the potentiometer and select the
welding current in a range between zero and
the set value.
7
6. START UP
7. CUTTING PROBLEMS
WARNING If the torch is not inserted in the
connector provided, the generator remains
inoperative.
The circuit will block if the pressure is set
below 3.5 bar.
When adjusting the torch, it is
recommended to turn off the generator.
1) Low penetration
This may be caused by:
- Elevated speed. Always make sure that the
arc completely breaks through the workpiece
and that it never has an angle, in the forward
direction, that is greater than 10-15°.
- The electrode must be replaced when its
crater is deeper than approximately 1.6 mm.
- The nozzle must be replaced when the
central hole is ruined or much wider than the
new detail.
- The workpiece is too thick.
- Bad electrical contact between the ground
clamp and workpiece.
The functioning of these generators is based
on the concept of supplying a constant
current equal to the value set, regardless of
the arc length.
After the torch has been connected and the
generator turned on, check that the air is
circulating in the circuit, pressing the
PURGE TEST button (10 of fig. 1).
Then set the current value via knob 1 shown
in figure 1.
Table 1 shows the approximate current
values to be set depending on the
thicknesses to be cut.
MATERIAL
IRON
THICKNESS
MATERIAL
(mm.)
CURRENT
VALUE
(A)
2
10
4
20
6
30
10
50
15
60
20
70
NOTES
CUTTING ON
CONTACT
REMOTE
CUTTING
CUTTING
To start cutting, press the torch button. On
completion of the operation, release the
button to turn off the arc. The air jet will
continue to flow for around 20 seconds
(post-gas), which is necessary for allowing
the torch to cool.
TORCH SAFETY
ATTENTION: VOLTAGE ABOVE A 113 V.
TORCH IN CLASS M.
The torch supplied with the generator comes
with a safety device that prevents the user
from coming into contact with "live” parts. In
fact, the torch button can be deactivated by
unscrewing the insulated tip.
8
2) The cutting arc turns off
This may be caused by:
- Low forward speed
- Cutting current too high in relation to the
thickness of the piece to be cut; adjust to the
thickness.
8. PRACTICAL ADVICE
Although the machine is already equipped
with an air filter that is capable of filtering
impurities with dimensions of around 5mm,
if the air of the plant contains a lot of
humidity and oil, it is best to use a dry filter
to prevent excessive oxidisation, wear of the
consumables, and damage to the torch.
Air impurities promote oxidisation of the
electrode and nozzle, making it difficult to
turn on the pilot arc.
If this condition occurs, clean the tip of the
electrode and the inside of the nozzle with
fine sandpaper.
Make sure any new electrodes and nozzles
to be mounted on the machine are clean
and degreased.
To prevent damage being done to the torch,
always use FIMER original spare parts.
9. ORDINARY MACHINE
MAINTENANCE
Every three months periodically remove dust from
the suction nozzle using compressed air. Always
direct the air from the inside towards the outside of
the machine to avoid blowing dirt inside the welder.
When carrying out this operation, always make sure
the machine is not connected to the power supply.
The mains voltage drops below 360V
during the cutting process
Yellow LED 7 “THERMAL PROTECTION” of fig. 1 lights up
Intermittence factor too high
Ambient temperature above 40°C
Air inlet for the ventilation is clogged
by dirt/generator is positioned in a
way to prevent ventilation
Electric fan of the generator is broken
Yellow LED “LOW AIR PRESSU- Air pressure below 3.5 bar
RE” (5 of fig. 1) lights up
Yellow LED “LOW AIR PRESSURE” (5 of fig. 1) lights up at the
start of cutting
Air flow too low
Check the connection between the
machine and the mains power, and
the presence of voltage
Contact FIMER technical assistance
Supply power to the generator ccording to the instructions
Check the power supply cord
and any external fuses
Check the output of the mains line and
the power point where the machine is
connected
Reduce the intermittence factor
according to the instructions
Use the generator according to the
instructions
Remove dirt and position the generator
correctly according to the instructions
Contact FIMER technical assistance
Press the “PURGE TEST” button (10
of fig. 1) and adjust the pressure according to the instructions
Check the dimensioning of the air
installation (tubes, compressor, etc.),
press the “PURGE TEST” button (10
of fig. 1) and adjust the pressure according to the instructions
Disassemble the torch and check the
closing of the circuit between pins 1 and
9 of the plug with the button pressed.
When the torch button is pressed Faulty torch (internal wires or button)
the red “PILOT ARC” LED (3 of fig.
1) does not light up and the pilot
arc does not start
Torch not screwed correctly in the Install the torch correctly according
relative machine attachment
to the instructions
Torch not suitable for using with the
generator
When the torch button is pressed Failure of the torch (internal wiring
the red “PILOT ARC” LED (3 of fig. or button)
1) lights up but the pilot arc does
not start
Torch not screwed correctly in the
relative machine attachment
ITALIANO
SOLUTION
Contact FIMER technical assistance
ENGLISH
CAUSE
Use recommended torches
Remove the torch and check closing
the circuit between pins 1 and 9 of the
plug-button pressed.
Find the active protection and follow the instructions contained in this
guide
Assemble the torch correctly accorTorcia non adatta al generatore
ding to the instructions
The pilot arc is established but the No ground connection to the workpiece. Connect and/or check the ground connection to the workpiece.
main arc does not start (LED 6 of fig.
According to the instructions
1 is off) and, therefore, the machine
does not cut.
Check the distance between the tor- Check these parameters with the torch
ch and the workpiece or the spacer manual
provided.
ESPAÑOL
DEFECT
The mains fuses burn when the gene- Short circuit inside the generator
rator switch is pressed
With the generator switch ON, the No mains voltage
machine does not turn on (the green
LED (15 of fig. 1) does not light up)
Faulty generator
Power supply cord too long
With the generator on, LED 4 shown
in figure 1 turns on and the machine
A power supply phase is missing
does not function
DEUTSCH
Below are a list of some of the most common problems that may arise, with the relative solutions.
FRANÇAIS
10. TROUBLESHOOTING
Impossible to adjust the cutting cur- External command connector is connected Disconnect the relative connector
rent via knob 1 of fig. 1
Faulty generator
Contact FIMER technical assistance
9
11. SPARE PARTS
10
Handle holder profile left
29 Radiator support bracket
2
Handle holder profile right
31 Kompressor
3
Handle
32 Solenoid valve
4
Cross small
34 Support anti-vibration compressor
5
Left profile shell
6
Right profile shell
7
Left grid shell
8
Right grid shell
9
Central adapter plasma
36 Tank
38 Bracket filters
40 Filter with automatic drain
44 Plasma interface card
ENGLISH
37 Solenoid valve
41 Bracket solenoid
14 Castor wheel
47 Coverage
15 Axle support brackets
48 Contactor
16 Wheel axle
49 Auxiliary transformer
17 Wheel
52 Fixed panel left
18 Stop ring
53 Fixed panel lower left
19 Rubber stopper
54 Control panel
20 Fixed panel lower right
55 Knob
21 Fixed panel right
56 User Control Panel
22 Hose
57 Pressure regulator with pressure gauge
23 Black quick connector
77 Junction
24 Cable gland
78 Rapid junction
25 Magneto-hydraulic
79 Rapid junction
26 Together with power
85 Plastic Silencer
FRANÇAIS
46 Power control board
DEUTSCH
45 Fan control
11 Gifas
ESPAÑOL
10 7-pole connector
ITALIANO
1
27 Power inductor
A
Power board
B
Support the power module
C
Port fans support power
D
Fan
11
12. BLOCK DIAGRAM
1
5
2
6
3
9
4
8
1. Switch
2. Power control board
3. Fan control board
4. Control panel
12
5.
6.
7.
8.
9.
Auxiliary transformateur
Power inverter
Air valve
Pilot arc
Remote control
Die Rechte an Übersetzung, Vervielfältigung oder Anpassung, sei es teilweise oder vollständig, zu egal welchem
Preis (inbegriffen Kopien, Filme und Mikrofilm) sind geschützt und ohne schriftliche Erlaubnis des Herstellers
untersagt.
INHALTSANGABE
• WARNHINWEISE .............................................................................
GEBRAUCH DER ANLEITUNGEN ...........................................
pag. 5
2.
BESCHREIBUNG DES GERÄTS...............................................
pag. 6
3.
NETZANSCHLÜSSE..................................................................
pag. 7
4.
GASKREISLAUF ZUM SCHNEIDEN............................................
pag. 7
5.
FERNVERBINDUNG .........................................................................
pag. 7
5.1
FERNBEDIENUNG DER STROMSTÄRKE....................................
pag. 7
6.
ZÜNDUNG..................................................................................
pag. 8
7.
PROBLEME BEIM SCHNEIDEN................................................
pag. 8
8.
PRAKTISCHE EMPFEHLUNGEN..............................................
pag. 8
9.
NORMALE WARTUNG DES GERÄTS......................................
pag. 8
10. FEHLERSUCHE.........................................................................
pag. 9
ERSATZTEILE...........................................................................
pag. 10
12. BLOCKSCHEMA.......................................................................
pag. 12
11.
ITALIANO
FRANÇAIS
ALLGEMEINE EIGENSCHAFTEN UND HINWEISE ZUM
ESPAÑOL
1.
pag. 2, 3, 4
ENGLISH
Fimer dankt Ihnen für den Erwerb dieses Gerätes. Es wird Sie für viele Jahre ohne
Probleme bei Ihrer Arbeit begleiten, wenn Sie die folgenden Angaben und Hinweise
im diesem Hand- und Wartungsbuch richtig befolgen.
Das Handbuch ist Teil des Geräts und hat dieses bei Verkauf oder Weitergabe zu begleiten.
Es obliegt dem Verwender, das Handbuch vollständig und in gutem Zustand aufzubewahren. Der Hersteller behält sich das Recht vor, zu jedem Zeitpunkt ohne Ankündigung Änderungen am Handbuch vorzunehmen.
Jedes Produkt Fimer wurde in Italien in unserer Produktionsstätte entwickelt, geplant
und produziert.
Das garantiert beste Qualität und Zuverlässigkeit.
DEUTSCH
H A N D - U N D WA R T U N G S B U C H
1
VERWENDETE SYMBOLE
Situation, die schwere Schäden an Personen und/oder
am Gerät verursachen kann
Zeigt die Gefahr der Verletzung bzw. des Todes durch Nachlässigkeit während der Verwendung oder der
Wartung von Flaschen bzw. Ventilen für Druckgas an
GEFAHR DES STROMSCHLAGS
(Schwere Gefahr des Stromschlags für die Personen)
VORSICHTSMAßNAHMEN FÜR DAS
BRANDLÖSCHEN.
GEFAHR DER BRAND
ODER EXPLOSIONSENTWICKLUNG
die gebührend berücksichtigt werden muss. Zeigt die
Vorsichtsmaßnahmen an, die für eine bessere Installation und Verwendung berücksichtigt werden müssen.
Zeigt an dass es notwendig ist, das Schutzvisier zu tragen, um
Verbrennungen und Schäden an den Augen zu vermeiden
INFORMATIONEN IN BEZUG
AUF DIE ENTSORGUNG
Zeigt - unter anomalen Bedingungen - die Gefahr der
Entwicklung giftiger Gase an
INSTALLATIONSANLEITUNG
Zeigt die Möglichkeit an, durch glühende Schlacken
Verbrennungen zu erleiden
GEBRAUCHSANLEITUNG
Zeigt die Notwendigkeit an, eine Schutzbrille zu tragen, um
Schäden durch ausgestoßene Schlacken zu vermeiden
ANLEITUNGEN ZUM AUSPACKEN
Lesen Sie die Bedienungsanweisungen
IN UMGEBUNG MIT HÖHERER STROMSCHLAGGEFAHR VERWENDBAR
WARNHINWEISE
IN BEZUG AUF DIE SICHERHEIT DES GERÄTS
Dieses Gerät ist ein Produkt, das nur für den industriellen und professionellen Gebrauch vorgesehen
ist, und als solches darf es nur von Fachleuten bzw.
von geschulten Personen verwendet werden. Es ist Aufgabe des
Verwenders und/oder des Eigentümers, dafür zu sorgen, dass das
Gerät für nicht professionelles Personal nicht zugänglich ist.
Der Verwender muss auf sein Arbeitsmittel Acht geben! Es
wird ausdrücklich daran erinnert, dass ein Werkzeug oder
Gerät gefährlich werden kann, wenn es nicht einwandfrei ist.
Auch beschädigtes oder defektes Zubehör kann gefährlich sein:
trennen Sie bei einem anomalen Betrieb oder bei Überhitzung das
ganze Gerät sofort von der Stromleitung und geben Sie es für die
entsprechende Reparatur dem Lieferanten zurück.
Lesen Sie das vorliegende Handbuch, bevor Sie Ihr Schweißsystem verwenden. Dies hilft Ihnen dabei, eine bessere Arbeit
und die Arbeit unter höheren Sicherheitsbedingungen auszuführen. Durch das Lesen des Handbuchs lernen Sie genauer die Möglichkeiten, die Einschränkungen und die potenziellen Gefahren der
Schweißarbeit kennen.Bewahren Sie das vorliegende Handbuch für
die ganze Lebensdauer des Geräts auf und legen Sie es an einen Ort,
der für den Verwender der Maschine leicht zugänglich ist.
Alle an das Stromnetz angeschlossenen Geräte können gefährlich sein, wenn die Anleitungen in Bezug auf die sichere Verwendung des Geräts nicht bekannt sind bzw. nicht befolgt werden.
Folglich sollten Sie, um die Gefahr des Todes oder schwerer Schäden durch
Stromschlag zu senken, diese Warnhinweise zur Sicherheit lesen, verstehen
und befolgen. Beachten Sie genauestens die Tatsache, dass auch eventuelle Personen, die den Schweißarbeiten beiwohnen, über die Gefahren in
Bezug auf die laufende Tätigkeit entsprechend geschult werden müssen.
Fimer SpA lehnt jede Haftung für Schäden an Personen oder
Dingen ab, die aus einem unerfahrenen, unsachgemäßen oder
unaufmerksamen Gebrauch ihrer Geräte stammen.
Die Informationen über die Sicherheit, die Sie nachfolgend finden, müssen als ein Führer für Ihre Unversehrtheit angesehen
werden, können jedoch letztlich nicht vollständig die Kompetenz und das korrekte Verhalten des Benutzers ersetzen.
2
Feuer und Explosionen können schwere Schäden an Personen und Dingen verursachen! Um die Gefahr des Todes
bzw. schwerer Schäden durch Feuer und Explosionen zu
senken, sollten Sie diese Warnhinweise zur Sicherheit lesen, verstehen
und befolgen. Beachten Sie genauestens die Tatsache, dass auch eventuelle Personen, die den Schweißarbeiten beiwohnen, über die Gefahren
in Bezug auf die laufende Tätigkeit entsprechend geschult werden müssen. Denken Sie immer daran, dass die Schweißarbeit von Natur aus
Funken, Spritzer glühenden Materials, Tropfen geschmolzenen Metalls,
glühende Schlacken und Splitter produziert, die Brände verursachen, die
Haut verbrennen und die Augen schwer beschädigen können.
GEFÄHRLICHE SPANNUNGEN
Das Gerät enthält in seinem Innern potenziell tödliche Spannungen. Alle Spannungen im Geräteinnern sind in eigens dazu
bestimmten Bereichen isoliert, die nur zugänglich sind, wenn Werkzeug
verwendet wird, das mit der Schweißmaschine nicht mitgeliefert wird.
Alle Wartungs- oder Reparaturarbeiten, die den Zugriff zu diesen Geräteteilen erforderlich machen, dürfen nur von technischem Personal durchgeführt werden, das von Fimer S.p.A. entsprechend geschult wurde.
EINFÜHREN VON GEGENSTÄNDEN
Führen Sie keine Gegenstände in die Lüftungsschlitze
ein und vermeiden Sie den Kontakt mit jeglicher flüssiger Substanz. Reinigen Sie das Gerät nur mit einem trockenen
Tuch. Diese Angaben müssen auch bei ausgeschalteter Maschine
befolgt werden.
BEGEHBARKEIT
Die Oberseiten der Schweißmaschinen sind nicht entworfen,
um große Gewichte auszuhalten. Steigen Sie nie auf das Gerät.
KABELQUERSCHNITT
Prüfen Sie, ob die Kabel der Anlage einen für den Eingangsstrom der Schweißmaschine angemessenen Querschnitt haben. Dehnen Sie die Kontrolle auf eventuelle Verlängerungen aus. Es
wird empfohlen, dass das Verlängerungskabel immer vollständig ausgestreckt
ist: ein aufgerolltes Kabel kann sich überhitzen und gefährlich werden, außerdem kann ein auf einen Strang gewickeltes bzw. ein auf seiner Spule aufgerolltes Kabel in der Schweißmaschine erhebliche Betriebsstörungen verursachen.
SCHUTZSCHALTER
Prüfen Sie, ob die Anlage, die die Schweißmaschine speist, mit
einem entsprechenden Trenn- und Schutzorgan ausgerüstet ist.
Der Schalter muss alle Versorgungskabel öffnen (bei einer Einphasenleitung:
Phase und Nullleiter, bei einer Drehstromleitung: alle drei Phasen, bei einer
Leitung mit vier Kabeln: alle Phasen und den Nullleiter). Es wird der Gebrauch von trägen Sicherungen oder Magnetschaltern mit K-Kurve empfohlen.
ERDUNG
Schließen Sie immer zuerst das Erdungskabel an, falls die Schweißmaschine nicht mit dem Speisestecker versehen ist. Trennen Sie
beim Trennen des Geräts immer das Erdungskabel zuletzt.
ANSCHLUSSSTECKER UND STECKDOSE
Wenn die Schweißmaschine mit Anschlussstecker ans Netz versehen
ist: prüfen Sie immer aufmerksam, dass er mit dem Typ der montierten Wandsteckdose übereinstimmt. Manipulieren Sie nie das Anschlusskabel.
FARBE DER KABEL
Das grüngelbe Anschlusskabel dient für den Anschluss der
Schutzerde (verwenden Sie es nicht zu anderen Zwecken!)
TRANSPORT 1
Einige Schweißmaschinentypen sind schwere Geräte, führen Sie
aufmerksam die Transportarbeiten durch. Falls die Schweißmaschine, auch momentan, in zivilen Umgebungen verwendet wird: kontrollieren Sie immer zuvor den Halt der Platten und der „erhöhten“ Fußböden.
TRANSPORT 2
Bewahren Sie die Schweißmaschine nicht schräg bzw. auf einer Seite
angelehnt auf und transportieren Sie sie auch nicht auf diese Weise
VERWENDUNGSUMGEBUNG
Das Gerät ist nicht für Badezimmer, Duschen, Schwimmbäder oder ähnliche Bereiche geeignet. Falls es notwendig
ist, in solchen Umgebungen zu arbeiten: prüfen Sie vor der Arbeit, ob
alle Wasserzulaufhähne fest verschlossen sind, und stellen Sie sicher,
dass niemand die Umgebung für ihre eigentliche Funktion verwendet.
VERWENDUNGS
UND/ODER INSTALLATIONSUMGEBUNG 2
Die Schweißmaschine ist nicht für Gebrauch und Einlagerung bei
Regen und Schnee geeigne
VERWENDUNGS- UND/ODER INSTALLATIONSUMGEBUNG 3
Die Schweißmaschine ist nicht ausgelegt, um an Orten installiert bzw.
verwendet zu werden, die Stößen oder Schwingungen ausgesetzt
sind. Zum Beispiel: Straßen-, Schienen-, Seiltransportmittel, Flugzeuge, Wasserfahrzeuge und vergleichbare (wie Kräne, Laufkräne, Teile von Werkzeugmaschinen, die Bewegungen oder Schwingungen ausgesetzt sind...)
ZUBEHÖR
Verwenden Sie nur vom Hersteller vorgesehenes
Zubehör. Die Verwendung von Zubehör eines anderen Typs kann
schwere Betriebsstörungen des Geräts verursachen. Die Verwendung
von Nichtoriginalzubehör bedingt den sofortigen Verfall der Garantie
und das Beenden jeglicher Haftung für eventuelle Betriebsstörungen
und für die Folgen, die daraus stammen können.
SCHUTZ DES PERSONALS
Außer den zuvor aufgeführten allgemeinen Warnhinweisen müssen
auch die folgenden Vorsichtsmaßnahmen genau befolgt werden
SCHUTZMASKE
Tragen Sie eine nicht entflammbare Schutzmaske für
das Schweißen, um den Hals, das Gesicht und die Kopfseiten zu schützen.
Halten Sie die Schutzscheibe sauber und wechseln Sie sie aus, wenn sie
kaputt oder rissig ist. Positionieren Sie zwischen dem Maskenschirm und
dem Schweißbereich eine transparente Schutzscheibe
KLEIDUNG
Tragen Sie eine nicht zu weite, geschlossene, nicht
entflammbare Schutzkleidung ohne Taschen.
LÜFTUNG DES RAUMS
Schweißen Sie in einem gut gelüfteten Raum ohne Zugang
zu anderen Arbeitsplätzen.
GEFAHR FÜR DIE AUGEN
Sehen Sie ohne die entsprechenden Schutzausrüstungen NIE den Lichtbogen an.
RAUCH UND GASE 1
Reinigen Sie das zu schweißende Teil sorgfältig von
Lacken, Rost oder Schmutz, um die Emission gefährlichen Rauchs mit unbekannter Zusammensetzung zu vermeiden.
RAUCH UND GASE 2
Schweißen Sie NIE Metalle, die Zink, Quecksilber, Chrom,
Graphit, Schwermetalle, Kadmium oder Beryllium enthalten, wenn der Schweißtechniker und die Personen, die während des
Schweißens anwesend sind, keine entsprechenden Atemgeräte tragen.
SCHUTZ VOR STROMSCHLÄGEN
VERWENDUNGS- UND/ODER INSTALLATIONSUMGEBUNG 4 Verwenden Sie die Schweißmaschine nicht in Umgebungen, in denen eine explosive, korrosive, abrasive oder
salzhaltige Atmosphäre präsent ist.
Außer den zuvor aufgeführten allgemeinen Warnhinweisen
müssen auch die folgenden Vorsichtsmaßnahmen genau
befolgt werden.
Stellen Sie immer in unmittelbarer Nähe des Arbeitsbereichs einen
amtlich zugelassenen Feuerlöscher auf.Führen Sie immer die
regelmäßigen Revisionen des Feuerlöschers durch.
ENGE RÄUME
Wenn in engen Räumen gearbeitet wird, sollte die Leistungsquelle außerhalb des Bereichs bleiben, in dem das Schweißen
erfolgt, und das Erdungskabel am zu bearbeitenden Teil befestigt werden.
Stellen Sie die Schweißmaschinen entfernt von Hitzequellen
auf. Stellen Sie die Schweißmaschine in Räumen mit ausreichender Belüftung auf. Stellen Sie die Schweißmaschine in gut
geschützten Räumen auf: sie kann nicht im Freien installiert werden.Stellen
Sie die Schweißmaschine nicht in sehr staubigen Räumen auf: der Staub kann
in das Geräteinnere eindringen und seine korrekte Abkühlung verhindern. Die
Schweißmaschine muss immer auf einer ebenen und stabilen Stützfläche aufgestellt werden, die in allen Richtungen größer als die Basis des Produkts ist.
REINIGUNG DES VERWENDUNGSORTS
Der Ort, an dem die Schweißmaschine verwendet
wird, muss sauber und trocken gehalten werden,
um zu vermeiden, dass ein Gegenstand oder eine Flüssigkeit ins Geräteinnere gesaugt werden kann. Dieser Umstand kann außer zu dem
gestörten Betrieb des Geräts zu einer konkreten Brandgefahr führen.
REPARATUR
Versuchen Sie nie, das Produkt allein zu reparieren, sondern wenden Sie sich immer an den Hersteller oder an ein ermächtigtes Kundendienstzentrum. Jeder nicht schriftlich genehmigte und nicht direkt von Fimer geleitete Reparaturversuch bedingt – außer dass er objektiv gefährlich ist – den sofortigen Verfall der Garantie und das Beenden jeglicher Haftung für eventuelle
Betriebsstörungen und für die Folgen, die daraus stammen können..
KUNDENDIENST
Die Schweißmaschine muss zum Kundendienst gebracht werden,
wenn das Gerät auf irgendeine Weise beschädigt ist, wie in den
Fällen, in denen Flüssigkeit eingedrungen ist, in denen auf oder in sie Gegenstände gefallen sind, in denen sie (außerhalb den spezifizierten Werten)
Regen oder Feuchtigkeit ausgesetzt war, in denen sie eindeutige Leistungsänderungen aufweist oder in denen sie fallen gelassen wurde.
FEUCHTE BEREICHE
Führen Sie die Schweißarbeit nie in feuchten oder
nassen Umgebungen aus.
BESCHÄDIGTE KABEL 1
Verwenden Sie nie beschädigte Kabel (diese Vorsichtsmaßnahme muss sowohl für die Netzkabel als auch
für die Schweißkabel befolgt werden)
BESCHÄDIGTE KABEL 2
Entfernen Sie nie die Verkleidungsbleche der Schweißmaschine. Falls die Schweißmaschine mit Verkleidungsblechen ausgerüstet ist, die geöffnet werden können: prüfen Sie
immer, ob sie im Augenblick des Gebrauchs gut verschlossen sind.
BRANDVERHÜTUNG
Außer den zuvor aufgeführten allgemeinen Warnhinweisen müssen auch die folgenden Vorsichtsmaßnahmen genau befolgt werden. Das Schweißverfahren macht das Erzielen hoher Temperaturen erforderlich, folglich existiert ein konkretes Brandrisiko.
FUßBODEN DES ARBEITSBEREICHS
Der Fußboden des Arbeitsbereichs MUSS aus
nicht entflammbaren Material hergestellt sein.
FLÄCHE DES ARBEITSBEREICHS
Die Arbeitstischfläche, auf der das Schweißen
durchgeführt wird, MUSS aus nicht entflammbaren Material hergestellt sein.
3
SCHUTZ DER WÄNDE UND FUßBÖDEN
Die Wände um den Schweißbereich herum und
ELEKTRISCHE ENTLADUNGEN
Um das Risiko ernsthafter Schäden durch elektrische
die Fußböden müssen durch Abschirmungen aus nicht entflammbaren Material geschützt werden. Dies nicht nur, um das Brandri-
Entladungen zu vermeiden, müssen außer den zuvor auf-
siko zu senken, sondern auch, um einen Schutz zu liefern, der geei-
geführten allgemeinen Warnhinweisen auch die folgen-
gnet ist zu vermeiden, dass die Wände und/oder der Fußboden wäh-
den Vorsichtsmaßnahmen genau befolgt werden.
rend den Schweißarbeiten beschädigt werden.
UNFALL DURCH ELEKTRISCHE ENTLADUNG
FEUERLÖSCHER
Falls eine Person von einer elektrischen Entladung getroffen wird: lei-
Stellen Sie im Arbeitsbereich einen amtlich zugelassenen Feuerlö-
sten Sie KEINE Hilfe, wenn sie noch in Kontakt mit den Kabeln ist. Neh-
scher des geeigneten Typs und mit geeigneten Maßen auf.
men Sie sofort die Spannung weg und leisten Sie DANN Hilfe.
Prüfen Sie regelmäßig seinen Zustand (führen Sie die geplante Wartung durch) und vergewissern Sie sich, dass das Personal für seine
Verwendung entsprechend geschult ist.
REINIGUNG DES BEREICHS UM DEN ARBEITSPLATZ
Säubern Sie den Arbeitsplatz sorgfältig von jedem
Brennmaterial.
SEHR SCHWERE GEFAHR!1
Führen Sie die Schweißarbeiten absolut NIE in einer
engen Umgebung durch (zum Beispiel einem Container, einer Zisterne, einem Abstellplatz...), die giftiges, entflammbares oder explosives Material bzw. Flüssigkeiten enthalten hat bzw.
enthält. Beachten Sie genauestens die Tatsache, dass vor allem die
Zisternen in ihrem Innern auch Jahre nach ihrem Entleeren giftige,
entflammbare oder explosive Gase und Dämpfe bewahren können.
SEHR SCHWERE GEFAHR!2
Führen Sie die Schweißarbeiten absolut NIE auf einem
Tank aus, der giftiges, entflammbares oder explosives
Material bzw. Flüssigkeiten enthalten hat bzw. enthält. Beachten Sie
KONTAKT MIT DEN KABELN
Machen Sie keine Arbeiten auf den Eingangskabeln, wenn die
Speisung nicht unterbrochen wurde. Berühren Sie nicht den
Schweißkreis: auch wenn die Spannung des Schweißkreises normalerweise nicht sehr hoch ist, ist es dennoch eine vernünftige Vorsichtsmaßnahme, die Schweißelektroden nie zu berühren.
ERHALTUNGSZUSTAND DER KABEL UND DER STECKDOSE
Vergewissern Sie sich häufig, dass das Stromkabel, der entsprechende Stecker und die Steckdose nicht beschädigt sind.
Dies ist besonders bei den Geräten notwendig, die wiederholt
bewegt werden.
REPARATUREN
Versuchen Sie nie, Reparaturen auf der Schweißmaschine selbst auszuführen. Dies bedingt nicht nur den sofortigen Verfall
der Garantie, sondern kann Quelle ernsthafter Gefahren sein.
ÖFFNEN DER DEM SCHWEIßTECHNIKER
ZUGÄNGLICHEN BEREICHE
Prüfen Sie immer, ob die Schweißmaschine vom Netz getrennt ist,
bevor Sie die in diesem Handbuch aufgeführten Arbeiten der ordentlichen
Wartung ausführen (zum Beispiel das Auswechseln einer verbrauchten
Elektrode, des Schweißdrahts, das Wechseln des Drahtziehers usw....)
ELEKTROMAGNETISCHE VERTRÄGLICHKEIT
genauestens die Tatsache, dass Tanks in ihrem Innern auch Jahre
Vergewissern Sie sich, dass in der Nähe der Schweißmaschine
nach ihrem Entleeren entflammbare und explosive Dämpfe bewahren
keine Kontroll- und Telefonkabel und keine Signalbus verlaufen
können. Falls es notwendig ist, auf einem Tank Schweißungen durch-
(wie Computernetze, Feldbus usw...)
zuführen, sollte er IMMER passiviert werden: füllen Sie ihn mit Sand
oder äquivalenten inerten Stoffen.
SEHR SCHWERE GEFAHR!3
Verwenden Sie die Schweißgeräte nicht, um die
Vergewissern Sie sich, dass in der Nähe der Schweißmaschine
keine Telefone, Computer oder andere Kontrollgeräte stehen.
Vergewissern Sie sich, dass in der Nähe der Schweißmaschine
Wasserrohre aufzutauen.
LÜFTUNG
keine Personen sind, die Herzschrittmacher tragen.
Falls Schweißverfahren verwendet werden, die von Schutz-
Vergewissern Sie sich, dass in der Nähe der Schweißmaschine
gasen Gebrauch machen, müssen außer den zuvor aufgeführten
keine Personen sind, die Herzschrittmacher tragen.
allgemeinen Warnhinweisen auch die folgenden Vorsichtsmaßnahmen genau befolgt werden.
LÜFTUNG DES RAUMS, IN DEM DIE SCHWEIßUNG ERFOLGT.
Lüften Sie angemessen den Raum, in dem die Schweißung
erfolgt. Bewahren Sie einen ausreichenden Luftstrom, um das Anhäufen von
giftigen oder explosiven Gasen zu vermeiden. Die auf gewissen Materialtypen oder Materialkombinationen durchgeführte Schweißarbeit kann giftigen
Falls die Schweißmaschine in anderen Geräten Störungen
hervorruft, kann man versuchen, ihre Auswirkung durch die
folgenden Vorsichtsmaßnahmen zu senken:
1. Prüfen Sie, ob alle eventuell auf der Schweißmaschine vorhandenen
Türen gut verschlossen sind
2. Kürzen Sie die Stromkabel
3. Legen Sie zwischen die Schweißmaschine und die Stromleitung EMVFilter (setzen Sie sich dazu mit der technischen Abteilung von Fimer
in Verbindung)
Rauch erzeugen. Verwenden Sie in diesen Fällen immer geeignete Atmungssysteme. Lesen und verstehen Sie die Sicherheitsvorschriften der Schweißlegierung, BEVOR Sie zu schweißen beginnen.
4
Klassifikation für elektromagnetische Verträglichkeit: CISPR
11, Gruppe 2, Klasse A.
ANLEITUNGEN
Die Generatoren der Baureihe „DUKE 74K“ und „TP 104K“ sind Geräte mit INVERTERTechnik; es handelt sich um besonders kompakte und flexibel verwendbare Geräte für alle
ITALIANO
1. ALLGEMEINE EIGENSCHAFTEN UND HINWEISE ZUM GEBRAUCH DER
Einsätze, bei denen Mindestmaße verbunden mit hohen Leistungen gefordert sind.
Diese
Generatoren
sind
Inverter-Systeme
mit
Mikroprozessorsteuerung
zum
ENGLISH
Plasmaschneiden mit Druckluft.
Tragbar, belüftet, mit Zündung durch Pilot-Lichtbogen.
Die Verwendung der Invertersysteme ermöglicht einen besonders kompakten Generator,
das Schneiden an isolierten Oberflächen und erstklassige Ergebnisse. Die Hochfrequenz
mit
welcher
der
Inverter
arbeitet
(80
kHz)
ermöglicht
es,
den
Lichtbogen
anwendungsspezifisch zu steuern. Netz- oder Stromschwankungen verursachen keine
DEUTSCH
Ermöglichen einen schnellen Schnitt aller leitfähigen Werkstoffe ohne Verformungen.
Veränderung des Schneidsstroms. Bei der Projektierung wurde besonders viel Wert auf die
zu warten ein sollte; daher hat FIMER feste elektronische Komponenten eingesetzt, sowohl
für die Leistungs- als auch für die Steuerelemente.
Die Maschine ist auch zum Schneiden von Gitterrosten geeignet.
In jedem Fall sollte zum Schneiden das dafür vorgesehenen Abstandsstück (stand-off) im
FRANÇAIS
Herstellung einer hochleistungsfähigen Maschine gelegt, die außerdem dauerhaft und leicht
Dank der fortschrittlichen Steuerungen, die angewendet wurden, ist das Gerät besonders
zuverlässig und leicht zu verwenden.
ESPAÑOL
Lieferumfang des Handstücks verwendet werden.
In dieser Bedienungsanleitung werden die Einstellungen und Betriebsarten der Maschine
im Einzelnen beschrieben: Beim Lesen der gesamten Anleitung werden Sie die besondere
Flexibilität und die praktische Verwendung schätzen.
Achtung: Das Gerät darf nur zu den in dieser Anleitung beschriebenen Verwendungen
genutzt werden, andere Zwecke sind unsachgemäß.
5
2. BESCHREIBUNG DES GERÄTS
15
12 5 4 3 6
14
13
7 8
9
11
12
10
16
18
17
19
Abb.1
20
21
22
Abb.2
6
1. Drehknopf zur Regulierung der Schneidspannung.
2. Display zur Anzeige der Schneidspannung:
Beim Schneiden: wird die Ist-Schneidspannung angezeigt
Bei Pilot-Lichtbogen: wird die Spannung des Pilotbogens
angezeigt. Andernfalls wird die eingestellte Spannung
angezeigt.
3. Rote LED: Zeigt Pilot-Lichtbogen an (Taste des
Handstücks gedrückt aber Lichtbogen noch nicht gezündet).
4. Gelbe LED: Netzspannung außerhalb des Grenzbereichs.
5. Gelbe LED: zeigt an, dass die Druckluft unzureichend ist.
6. Rote LED: Anzeige des Lichtbogens.
7. Gelbe LED: Zeigt an, dass der Motorschutz ausgelöst
wurde.
Leuchtet, wenn die Maschine wegen Überhitzung blockiert
wird.
Dies geschieht normalerweise, wenn die Einschaltdauer der
Maschine überschritten wurde. Prüfen, dass die Lüftungsgitter
19 an Rückseite, Front und Seiten nicht verstopft sind und
Maschine laufen lassen, so dass sich die Innenkomponenten
abkühlen können, wenn die rote LED erlischt, kann der
normale Schneidbetrieb wieder aufgenommen werden.
8. Gelbe LED: Lichtbogen unterbrochen (Lichtbogen
abgerissen)
9. Grüne LED: Purge Test (Siehe Taste 10)
10. Purge-Test-Taste: (Led 9 brennt)
Durch einmaliges Drücken dieser Taste erfolgt das
Ausströmen von Luft ohne Zündung des Lichtbogens;
dadurch kann der Druck reguliert oder das Handstück
abgekühlt werden.
Durch erneuertes Drücken wird die Luftausströmung
unterbrochen.
11. Grüne LED: Fernbedienung (Siehe Taste 12).
12. Taste zur Fernbedienung: (LED 11 leuchtet) Durch
einmaliges Drücken auf diese Taste stellt man von Steuerung
am Gerät auf Fernsteuerung um. Durch einen weiterer
Tastendruck wird die Steuerung am Gerät wieder aktiviert.
13. Drehknopf zur Druckregulierung: Zur Regulierung des
Drucks wie folgt vorgehen.
- „Purge-Test“ betätigen (Siehe Taste 10 und LED 9)
- Drehknopf herausziehen
- Druck auf etwa 5/6 bar stellen (Wert auf dem Manometer 14
überprüfen)
(durch Drehen m Uhrzeigersinn, wird der Druck erhöht)
- ist der korrekte Druck eingestellt, Drehknopf wieder in die
Ausgangsposition drücken.
14. Manometer: (Siehe Punkt 13).
15. Grüne LED: Gerät wird mit Strom versorgt
16. Anschlussbuchse des Handstücks.
17. Anschlussbuchse der Fernbedienung.
18. Anschlussbuchse des Massekabels.
19. Schlitze zur Gerätekühlung (weitere Schlitze sind an
den Seiten und auf der Rückseite angeordnet).
ABBILDUNG 2:
20. EIN/AUS-SCHALTER: zum Ein- und Ausschalten der
Maschine
21. NETZKABEL: An das Stromnetz anschließen.
22. BUCHSE FÜR GASSCHLAUCH: ist an den
Druckminderer der Gasflasche anzuschließen.
4. GASKREISLAUF ZUM SCHNEIDEN
Prüfen; dass Luftdruck und -durchsatz den
vom Handstück geforderten Werten
entsprechen.
ein
wird
Plasmaschneiden
Beim
Druckluftstrahl sowohl zum Zünden des
Lichtbogens als auch zum Abkühlen des
Handstücks verwendet.
Der Luftkreislauf umfasst den Druckregler
(13 Abb. 1): Dieser wird auf 5/6 bar gestellt,
der Wert ist am Manometer zu überprüfen
(14 Abb. 1).
In jedem Fall muss die Luftversorgung einen
Mindestdurchsatz von 150 l/min betragen.
Beim Zünden des Lichtbogens öffnet sich
ein Magnetventil, das den Luftdurchsatz
durchströmen lässt.
5. FERNVERBINDUNG
ITALIANO
DEUTSCH
In Abb. 3 sind die Verbindungen zum
Fernanschluss (17 der Abb. 1) angegeben.
ENGLISH
es direkt durch die „PURGE-TEST“-Taste
(10 auf Abb. 1) auf der Steuertafel
eingeschaltet wird.
Fig. 3
Wo:
Sw ist der Brennerkopfschalter
P ist der Potenzregler für die Überwachung
der Stromstärke.
DER
FERNBEDIENUNG
5.1
STROMSTÄRKE
Über den Fernanschluss 17 der Abb. 1 kann
die Stromstärkenreglung dicht an den
Schweißort gebracht werden. Dafür muss
eine Verbindung zum Potenzregler P der
Abb. 3 hergestellt werden. Der Wert des
Potenzreglers ist nicht kritisch: Es können
Komponenten zwischen 2.2kOhm und
10kOhm 1/2W verwendet werden.
Durch Drehen des Potenzreglers kann die
Stromstärke auf einer Bandbreite von Null
bis zum eingestellten Wert gestuft werden.
FRANÇAIS
Vor dem Verbinden mit der Stromquelle
kontrollieren Sie die Spannung, Phasenzahl
und die Frequenz der Stromversorgung. Die
zugelassene Spannung ist im Abschnitt
Datenplakette des Geräts angegeben.
Kontrollieren Sie, dass das Gerät korrekt
geerdet ist.
Überprüfen Sie weiterhin, dass der
gelieferte Stecker mit den Steckdosen Ihres
Landes übereinstimmt. Stellen Sie sicher,
dass die gelieferte Stromstärke zum Betrieb
des Geräts ausreicht (Spannungsrange).
Das Gerät verfügt über ein spezielles
Netzkabel, das nicht verlängert werden
sollte.
Sollte dies notwendig sein, verwenden Sie
ein Verlängerungskabel mit gleichem oder
größerem Querschnitt je nach Länge des
Kabels.
Das Dreipol- + Erdungskabel muss einen
Querschnitt von mindestens 2.5 mm²
besitzen.
Dieses Ventil gestattet das Durchströmen
von Luft nur, wenn es von der Elektronik
zum Luftnachströmen und zum Schneiden
entsprechend gesteuert wird, oder wenn
ESPAÑOL
3. NETZANSCHLÜSSE
7
6. ZÜNDUNG
7. PROBLEME BEIM SCHNEIDEN
Achtung: Wird das Handstück nicht an die
entsprechende Buchse angeschlossen,
geht der Generator nicht in Betrieb.
Der Kreislauf wird unterbrochen, wenn der
Druck unter 3,5 bar eingestellt wird.
Der Generator sollte immer ausgeschaltet
werden, wenn man am Handstück arbeitet.
diesen
das
Funktionsprinzip,
Das
Generatoren zu Grunde liegt ist die
Lieferung eines gleich bleibenden Stroms
mit eingestelltem Wert und zwar
des
Länge
der
von
unabhängig
Lichtbogens.
1) Unzureichende Durchdringung
Dieses Problem kann folgende Ursachen haben:
- hohe Geschwindigkeit Sicherstellen, dass der
Lichtbogen immer vollkommen in das Werkstück
eindringt und dass er nie eine Neigung über
10-15° in Schneidrichtung aufweist.
- die Elektrode muss ausgewechselt
werden, wenn sie einen etwa 1,6 mm tiefen
Krater aufweist.
- Die Düse muss ersetzt werden, wenn die
Öffnung beschädigt oder im Vergleich zu
einem neuen Teil stark aufgeweitet ist.
- Werkstück mit zu hoher Materialstärke.
- Masseklemme bildet keinen guten
elektrischen Kontakt zum Werkstück.
2) Der Lichtbogen geht aus
Dieses Problem kann folgende Ursachen haben:
- Vorschubgeschwindigkeit zu niedrig.
- Schneidstrom zu hoch im Verhältnis zur
Materialstärke des Werkstücks, Strom an
Stärke anpassen.
Nach Anschluss des Handstücks und
Einschalten des Generators sicherstellen,
dass Luft durch den Kreislauf strömt, indem
man die PURGE-TEST-Taste (10 Abb. 1)
betätigt. Dann Stromstärke durch den
Drehknopf 1 Abb. 1 einstellen.
In der Tabelle sind die ungefähren
Stromstärken, die je nach zu schneidender
sind,
einzustellen
Materialstärke
angegeben.
MATERIALS STROMSTÄ ANMERKUN
WERKSTOFF
RKE
GEN
TÄRKE
(A)
(mm.)
EISEN
2
10
4
20
6
10
30
50
15
60
20
70
KONTAKTSCHNEIDEN
ABSTANDSCHNEIDEN
SCHNITT
Um mit dem Schneiden zu beginnen, Taste
am Handstück drücken. Nach dem Vorgang
Taste loslassen, dadurch geht der
Lichtbogen aus. Die Luftströmung wird noch
etwa 20 Sekunden lang fortgesetzt
(Nachströmen), bis das Handstück
vollkommen abgekühlt ist.
SICHERHEIT DES HANDSTÜCKS
ACHTUNG SPANNUNG ÜBER 113 V.
HANDSTÜCK KLASSE M.
Das Handstück, mit dem der Generator
ausgestattet ist, verfügt über einen
Schutz, der es verhindert, dass der
Benutzer mit Strom führenden Teilen in
Kontakt kommt, beim Abschrauben des
isolierten Endstücks wird nämlich der
Schalter am Handstück deaktiviert.
8
8. PRAKTISCHE EMPFEHLUNGEN
Obwohl das Gerät mit einem Innenfilter zur
Luftaufbereitung ausgestattet ist, der
Verunreinigungen in einer Größe über 5 mm
zurückhält, sollte bei der Arbeit in stark
feuchter oder ölhaltiger Umgebung ein
Trockenfilter verwendet werden, um ein
übermäßiges Oxidieren und Abnutzen der
Verbrauchsteile sowie die Beschädigung
verhindern.
zu
Handstücks
des
Verunreinigungen in der Luft fördern die
Oxidierung von Elektrode und Düse,
außerdem können sie das Zünden des PilotLichtbogens erschweren. In diesem Fall
Endstück der Elektrode und Düseinneres
mit feinem Schmirgelpapier bearbeiten.
Sicherstellen, dass neue Elektroden und
neue Düsen vor der Montage gut gereinigt
und entfettet sind. Um das Handstück nicht
zu beschädigen, immer Original-Ersatzteile
von FIMER verwenden.
9. NORMALE WARTUNG DES GERÄTS
Entfernen Sie regelmäßig alle drei Monate
mit schwacher Druckluft den Staub von der
Luftansaugdüse. Richten Sie den Luftstrom
vom Inneren des Geräts nach Außen, um
keinen Schmutz ins Innere des Geräts zu
blasen. Für diese Eingriffe ist zu überprüfen,
dass das Gerät nicht mit der Stromversorgung
verbunden ist.
Bei eingeschaltetem Hauptschalter Netzspannung fehlt
geht die Maschine nicht an (die grüne LED 15 Abb. 1 leuchtet nicht).
Generatorpanne
Bei eingeschaltetem Generator leu- Netzkabel zu lang
chtet LED 4 Abb. 1 auf und die Maschine geht nicht in Betrieb.
Versorgungsphase fehlt
Umgebungstemperatur über 40°C
Lufteinlass des Lüfters mit Schmutz
verstopft / Generator steht so, dass
keine Lüftung möglich ist
Elektrolüfter des Generators defekt
Die gelbe LED 5 Abb. 1 „LUFT- Luftdruck unter 3,5 bar
DRUCK NIEDRIG" leuchtet.
Die gelbe LED 5 Abb. 1 „LUFTDRUCK NIEDRIG" leuchtet zu
Beginn des Schnitts.
Beim Drücken des Schalters am
Handstück leuchtet die rote LED
„PILOT-LICHTBOGEN“ (3 Abb. 1)
nicht und der Pilot-Lichtbogen startet nicht.
Anschluss der Maschine an das Versorgungsnetz und Anliegen von Spannung prüfen
Wenden Sie sich bitte an den FIMERKundendienst
Generator entsprechend den Anleitungen versorgen
Netzkabel und eventuelle externe Sicherungen überprüfen
Leistung der Elektroanlage der Linie und
deren Anschlussbuchse überprüfen
Generator entsprechend den Anleitungen versorgen
Netzkabel und eventuelle externe
Sicherungen überprüfen
Leistung der Elektroanlage der Linie und
deren Anschlussbuchse überprüfen
Wenden Sie sich bitte an den FIMERKundendienst
„PURGE-TEST“-Taste (10 Ab. 1)
drücken und Druck entsprechend den
Anleitungen regulieren
Luftdurchsatz zu niedrig
Bemessung der Druckluftanlage
(Schläuche, Kompressor usw.) prüfen, „PURGE-TEST“ (10 Abb. 1)
drücken und Druck entsprechend den
Anleitungen regulieren
Handstück defekt (innere Drähte oder Handstück ausbauen und Herstellung
der Verbindung zwischen den Pins 1
Schalter)
und 9 des Steckers bei gedrücktem
Schalter überprüfen
Handstück nicht korrekt am Gerä- Handstück entsprechend den Anleiteanschluss angeschraubt
tungen korrekt montieren
Die in den Anleitungen vorgesehenen
Handstücke verwenden
Handstück
ausbauen und Herstellung
Handstück defekt (innere Drähte oder
der Verbindung zwischen den Pins 1
Schalter)
und 9 des Steckers bei gedrücktem
Schalter überprüfen
Handstück nicht korrekt am Gerä- Handstück entsprechend den Anleiteanschluss angeschraubt
tungen korrekt montieren
FRANÇAIS
Die gelbe LED 7 Abb. 1
„MOTORSCHUTZ" leuchtet.
Netzspannung fällt beim Schneiden
unter 360 V ab.
Einschaltdauer zu hoch
Wenden Sie sich bitte an den FIMERKundendienst
ITALIANO
Die Sicherungen der Leitung sprin- Kurzschluss im Generator
gen heraus, wenn der Hauptschalter
betätigt wird.
ENGLISH
Es folgt eine Liste der am häufigsten auftretenden Problem und deren Behebung.
LÖSUNG
URSACHE
FEHLER
DEUTSCH
10. FEHLERSUCHE
Beim Drücken des Schalters am
Handstück leuchtet die rote LED
„PILOT-LICHTBOGEN“ (3 Abb. 1)
nicht und der Pilot-Lichtbogen startet nicht.
Handstück für Generator nicht geei- die in den Anleitungen vorgesehenen
Handstücke verwenden
gnet
Der Pilot-Lichtbogen zündet, doch Massenanschluss zum Werkstück fehlt Masse am Werkstück anschließen
oder korrekten Anschluss entsprechen
der Hauptlichtbogen startet nicht
den Anleitungen überprüfen
(LED 6 Abb. 1 aus) und die Maschine schneidet daher nicht.
Abstand zwischen Handstück und Masse am Werkstück anschließen
Werkstück bzw. entsprechendes oder korrekten Anschluss entspreAbstandsstück überprüfen
chen den Anleitungen überprüfen
Entsprechende
Steckverbindung trennen
Steckverbinder
zur
Fernbedienung
angeDer Schneidstrom kann mit Drehschalter 1 Abb. 1 nicht reguliert schlossen
werden.
Generatorpanne
Wenden Sie sich bitte an den FIMERKundendienst
ESPAÑOL
Handstück für Generator nicht eeignet
9
11. ERSATZTEILE
10
2
Profil griffhalterung richtig
32 Magnetventil
3
Griff
34 Unterstützung Anti-Vibrations-Kompressor
4
Überqueren kleine
36 Panzer
5
Profil links
37 Magnetventil
6
Profil richtig
38 Bracket Filter
7
Grid links
40 Filter mit automatischer Entleerung
8
Grid richtig
41 Bracket Magnetventil
9
Stöpsel Eurobuchse
44 Plasma-Interface-Karte
10 7-poliger Buchse
45 Steuerkarte fan
11 Gifas
46 Leistungskontrollkarte
14 Drehbares Rad
47 Berichterstattung
15 Axle Halterungen
48 Schütz
16 Radachse
49 Hilfstransformer
20 Festfeld rechts unten
21 Feste Wand rechts
22 Schlauchtülle
23 Schwarze Schnellkupplung
24 Stopfbuchse
25 Magneto-hydraulische
26 Zusammen mit Macht *
27 Leistungsdrossel
29 Kühler Halterung
52 Feste linke Wand
53 Feste linke Wand senken
54 Bedienfeld
55 Drehschalter
56 Benutzer Control-Panel
FRANÇAIS
18 Splint
57 Druckminderer mit Manometer
77 Verbindung
78 Verbindung
79 Verbindung
85 Plastic Silencer
ESPAÑOL
17 Steuer
ITALIANO
31 Kompressor
ENGLISH
Profil griffhalterung links
DEUTSCH
1
*26. ZUSAMMEN MIT NETZ
A
Leistungsplatine
B
Unterstützen Sie das Power-Modul
C
Port-Fans unterstützen Macht
D
Lüfter
11
12. BLOCKSCHEMA
1
5
2
6
3
9
4
8
1. Schalter
2. Leistungskontrollplatine
6. Leistungsinverter
7. Luftventil
3. Motorkontrollplatine
4. Steuertafel
5. Nebentransformator
12
8. Pilot-Lichtbogen
9. Fernverbindung
L’utilisateur doit le conserver intègre et dans de bonnes conditions. Le fabricant se
réserve le droit d’apporter des modifications à tout moment et sans aucun préavis.
Tout produit Fimer est étudié, conçu et produit en Italie dans nos établissements.
C'est une garantie de qualité et fiabilité maximum.
Les droits de traduction, de reproduction et d’adaptation, totale ou partielle, par tout moyen (y compris les
scanners, les copies, les films et les microfilms) sont réservés et interdits sans l’autorisation écrite du fabricant.
SOMMAIRE
• AVERTISSEMENTS ............................................................................. pag. 2, 3, 4
CONSULTATION DU MANUEL............................................................ pag. 5
2.
DESCRIPTION DE L’APPAREIL.......................................................... pag. 6
3.
BRANCHEMENT DE L’ALIMENTATION.................................................. pag. 7
4.
CIRCUIT DU GAZ DE COUPE............................................................. pag. 7
5.
BRANCHEMENT À DISTANCE................................................................. pag. 7
5.1
CONTRÔLE À DISTANCE DU COURANT DE SOUDAGE..................... pag. 7
6.
ALLUMAG.......................................................................................... pag. 8
7.
INCONVÉNIENTS DE LA COUPE........................................................ pag. 8
8.
CONSEILS PRATIQUES..................................................................... pag. 8
9.
MAINTENANCE ORDINAIRE DE LA MACHINE.................................. pag. 8
ITALIANO
FRANÇAIS
CARACTÉRISTIQUES GÉNÉRALES ET REMARQUES POUR LA
ESPAÑOL
1.
ENGLISH
Fimer vous remercie d'avoir choisi cet appareil qui vous garantira de nombreuses années
de fonctionnement sans problèmes à condition d’être utilisé en respectant les indications du
manuel d’utilisation et de maintenance.
Ce manuel est partie intégrante de l’appareil et doit toujours l’accompagner lors de tous
ses déplacements ou reventes.
DEUTSCH
M A N U E L D’UTILISATION ET DE MAINTENANCE
10. DÉTECTION DES PANNES................................................................. pag. 9
11.
PIÈCES DE RECHANGE..................................................................... pag. 10
12. SCHÉMAS DES BLOCS.................................................................... pag. 12
1
SYMBOLES UTILISÉS
Situation susceptible de causer de graves dommages
aux personnes et/ou à l’appareil
Indique le danger de blessure ou de mort dû à une négligence lors de l’utilisation ou de la maintenance de bouteilles ou de soupapes de gaz comprimé
DANGER D’ÉLECTROCUTION
Grave danger d’électrocution pour les personnes
MESURES DE PRÉCAUTION À
DANGER DE DÉVELOPPEMENT
DE FLAMME OU D’EXPLOSION
Information importante dont il faut dûment tenir compte.
Indique les mesures de précaution à adopter pour une
meilleure installation et utilisation.
Indique qu’il faut porter la visière de protection pour éviter
toute brûlure ou blessure aux yeux
INFORMATIONS
CONCERNANT L’ÉLIMINATION
GAZ TOXIQUES
Indique le danger, en conditions anormales, de dégagement
de gaz toxiques
INSTRUCTIONS
CONCERNANT L’INSTALLATION
SCORIES INCANDESCENTES
Indique la possibilité d’être brûler par des scories incandescentes
INSTRUCTIONS
CONCERNANT L’EMPLOI
Indique la nécessité de porter des lunettes de protection
pour éviter toute blessure due à la projection de scories
INSTRUCTIONS
CONCERNANT LE DÉBALLAGE
Lire le manuel d’instructions
UTILISABLE EN MILIEU À RISQUE D’ELECTRIFICATION ÉLEVÉE
SUIVRE POUR L’EXTINCTION DE L’INCENDIE
AVERTISSEMENTS
SUR LA SÉCURITÉ D’EMPLOI DE L’APPAREIL
Cet appareil a été conçu pour un usage exclusivement
industriel et professionnel. Il ne doit donc être utilisé que
par du personnel spécialisé ou qualifié.
Il incombe à l’utilisateur et/ou au propriétaire de faire en sorte que le
personnel non technique ne puisse accéder à l’appareil
L’utilisateur doit prendre soin du sont outil de travail! Nous
vous rappelons expressément que tout outil ou appareil en
mauvais état peut devenir dangereux.
Même les appareils et les accessoires détériorés ou en panne peuvent
être dangereux : en cas de fonctionnement anormal ou de surchauffe,
débrancher immédiatement l’ensemble de l’appareil du réseau électrique
et le remettre au fournisseur pour effectuer la réparation appropriée.
Lire le présent manuel avant d’utiliser l’appareil de cutting, car
il vous aidera à effectuer un bon travail en meilleures conditions de sécurité. La lecture du manuel permet de connaître à
fond les possibilités, les limitations et les dangers potentiels liés aux
opérations de cutting. Conserver le présent manuel pendant toute la
durée de vie de l’appareil et le ranger dans un endroit facilement accessible par le personnel chargé de l’utilisation de la machine.
Tous les appareils branchés au réseau électrique peuvent
résulter dangereux si les instructions relatives à la sécurité
d’emploi de l’appareil sont ignorées ou non respectées. Par
conséquent, pour réduire le risque de mort ou de blessures graves dûs aux
secousses électriques, il faut lire, comprendre et respecter les avertissements
concernant la sécurité. Prêter la plus grande attention au fait que toute personne éventuellement présente pendant des opérations de cutting doit être
opportunément informée sur les dangers inhérents aux travaux en cours.
Le constructeur décline toute responsabilité en cas de dommages aux biens ou aux personnes dérivant de l’utilisation
maladroite, inappropriée ou inadaptée de ses produits.
Les informations en matière de sécurité reportées ci-après doivent
être considérées comme un guide pour votre sécurité personnelle ; toutefois, elles ne pourront jamais se substituer entièrement à
la compétence et au comportement correct de l’utilisateur.
Le feu et les explosions peuvent provoquer de sérieux dommages aux biens et aux personnes ! Pour réduire le risque
de mort ou de graves dommages dûs au feu ou à toute explosion, il faut lire, comprendre et respecter les avertissements concernant la
sécurité. Prêter la plus grande attention au fait que toute personne éventuellement présente pendant des opérations de cutting doit être opportunément informée sur les dangers inhérents aux travaux en cours. Toujours
se rappeler que de par leur nature, les opérations de cutting produisent des
étincelles, des projections de matériel brûlant, des gouttes de métal fondu,
des scories et des éclats incandescents susceptibles de provoquer un incendie, brûler la peau et causer de graves blessures aux yeux.
2
TENSIONS DANGEREUSES
L’appareil renferme des pièces dont la tension est potentiellement
mortelle. Toutes les tensions dangereuses placées à l’intérieur de
l’appareil sont confinées dans des zones particulières et accessibles uniquement en utilisant des outils non fournis en dotation à la soudeuse.Toutes les opérations de maintenance ou de réparation nécessitant l’accès
auxdites pièces de l’appareil ne doivent être effectuées que par du personnel technique expressément instruit par le constructeur.
INTRODUCTION D’OBJETS
N’introduire aucun objet dans les fissures d’aération et éviter le contact avec des substances liquides ; nettoyer en utilisant uniquement un chiffon sec. Ces mesures doivent être observées
même lorsque l’appareil est éteint.
PORTÉE
La partie supérieure des soudeuses n’est pas conçue pour supporter des poids consistants. Ne jamais monter sur l’appareil.
SECTION DES CÂBLES
Contrôler que les câbles de l’installation aient une
section appropriée au courant d’entrée de la soudeuse. Contrôler également les éventuelles rallonges. Nous vous
recommandons de toujours dérouler entièrement le câble de rallonge : un câble enroulé peut surchauffer et devenir dangereux, en outre
un câble enroulé en couronne ou sur sa propre bobine, peut entraîner de graves dysfonctionnements à la soudeuse.
INTERRUPTEUR DE PROTECTION
Contrôler que l’installation qui alimente la soudeuse soit
équipée de dispositifs de sectionnement et de protection
appropriés. L’interrupteur doit ouvrir tous les câbles d’alimentation (En cas
de ligne monophasée : Phase et neutre ; en cas de ligne triphasée : toutes les trois phases ; en cas de ligne à quatre câbles : toutes les phases et le conducteur de neutre). Nous vous conseillons d’utiliser des
fusibles lents ou des interrupteurs magnétothermiques de courbe K.
CONNEXION DE TERRE
Si la soudeuse ne dispose pas de fiche d’alimentation, connecter
toujours d’abord le câble de mise à la terre. En cas de débranchement de
l’appareil, le câble de mise à la terre devra être débranché en dernier.
FICHE ET PRISE DE BRANCHEMENT
Si la soudeuse dispose de fiche de branchement au secteur, contrôler toujours attentivement qu’elle soit conforme au type de prise montée au mur. Ne jamais modifier le câble de branchement.
COULEURS DES CÂBLES
Le câble de branchement jaune/vert sert au branchement
à la terre de protection (ne pas l’utiliser à d’autres fins !)
MANUTENTION 1
Certaines typologies de soudeuses sont des équipements
lourds ; prêter attention aux opérations de manutention. Si la
soudeuse est utilisée, même momentanément, dans des lieux
résidentiels, toujours contrôler préalablement la capacité de portée
des sols et planchers “surélevés”.
MANUTENTION 2
Ne pas stocker ni transporter la soudeuse de manière inclinée
ou posée de côté.
LIEU D’UTILISATION 1
L’appareil n’est pas adapté à l’utilisation dans des locaux
tels que salles de bains, douches, piscines ou zones
similaires. S’il s’avérait nécessaire de travailler en de
tels lieux, contrôler préalablement le bon serrage de tous les robinets d’arrivée d’eau et contrôler que personne ne soit présent ou
n’utilise les locaux.
LIEU D’UTILISATION ET/OU D’INSTALLATION 2
Ne pas stocker ni utiliser la soudeuse dans des lieux soumis
aux intempéries (pluie, neige, etc)
LIEU D’UTILISATION ET/OU D’INSTALLATION 3
La soudeuse n’est pas prévue pour être installée ou utilisée
dans des lieux soumis à chocs ou à vibrations ; par exemple
: moyens de transport sur route, sur rails, sur câble, transport aérien
ou maritime ou analogue (grues, ponts roulants, pièces de machines-outils sujettes à mouvement ou vibration)
LIEU D’UTILISATION ET/OU D’INSTALLATION 4
Ne pas utiliser la soudeuse dans des lieux à atmosphère
explosible, corrosive, abrasive ou saline.
EXTINCTEUR
Placer toujours un extincteur de type homologué à proximité du lieu de travail. Effectuer toujours les contrôles
périodiques sur l’extincteur.
MISE EN PLACE
Placer la soudeuse loin de toute source de chaleur. Placer la soudeuse dans des locaux ayant une aération suffisante. Placer la soudeuse dans des locaux bien abrités : ne pas l’installer en plein air. Ne pas placer
la soudeuse dans des locaux très poussiéreux : la poussière peut pénétrer à l’intérieur de l’appareil en en empêchant le bon refroidissement. La soudeuse doit être
placée sur une surface plane et stable plus large que la base du produit.
NETTOYAGE DU LIEU D’UTILISATION
Le lieu d’utilisation de la soudeuse doit être maintenu propre et sec pour éviter que d’éventuels objets ou liquides
ne puissent être aspirés à l’intérieur de l’appareil. En effet, ceci pourrait entraîner, outre le dysfonctionnement de l’appareil, un danger concret d’incendie.
RÉPARATION
Ne jamais tenter de réparer personnellement le produit,
mais s’adresser toujours au fabricant ou à un centre d’assistance agréé. Toute tentative de réparation non préalablement autorisée par écrit
et non gérée directement par le constructeur outre à être objectivement dangereuse, entraîne la déchéance immédiate de la garantie et l’exclusion de toute responsabilité relative à tout éventuel dysfonctionnement et autres conséquences.
ASSISTANCE
La soudeuse doit être remise au centre d’assistance si l’appareil a été
endommagé, comme par exemple en cas de pénétration de liquide, chute d’objets sur ou à l’intérieur de l’appareil, en cas d’exposition à la pluie ou à l’humidité (hors des valeurs spécifiées), en cas de fonctionnement anormal, en cas
de changements évidents des prestations ou suite à toute éventuelle chute.
ACCESSOIRES
Utiliser uniquement les accessoires prévus par le fabricant. L’utilisation d’accessoires de type différent peut
entraîner de graves dysfonctionnements à l’appareil. L’utilisation d’accessoires non originaux fait immédiatement déchoir la garantie et entraîne la
déchéance immédiate de la garantie et l’exclusion de toute responsabilité
relative à tout éventuel dysfonctionnement et autres conséquences.
PROTECTION DU PERSONNEL
Outre les avertissements généraux reportés plus haut, il
faut également observer scrupuleusement les mesures de
précaution suivantes.
MASQUE DE PROTECTION
Porter un masque de protection pour soudeur non
inflammable pour se protéger le cou, le visage et
les côtés de la tête. Maintenir bien propre le verre de protection et
le remplacer en cas de bris ou de fêlure. Placer un verre de protection transparent entre l’écran du masque et la zone de cutting.
HABILLEMENT
Porter un habillement de protection non excessivement large, fermé, ininflammable et sans poches.
VENTILATION DU LOCAL
Souder dans un local bien ventilé sans accès direct à d’autres lieux de travail
DANGER POUR LES YEUX
Ne JAMAIS regarder l’arc de cutting sans porter les
équipements de protection appropriés
FUMÉES ET GAZ 1
Nettoyer soigneusement la partie à souder en retirant toute trace de peinture, de rouille ou autre impureté, ceci pour
éviter le dégagement de fumées dangereuses de teneur incertaine.
FUMÉES ET GAZ 2
Ne JAMAIS souder des métaux contenant du zinc, du mercure, du chrome, du graphite, des métaux lourds, du cadmium ou du béryllium sans que l’opérateur et les personnes présentes
soient dûment équipés de respirateurs appropriés pendant le cutting.
PROTECTION CONTRE
LES SECOUSSES ÉLECTRIQUES
Outre les avertissements généraux reportés plus haut, il faut également
observer scrupuleusement les mesures de précaution suivantes.
ESPACES RESTREINTS
En cas de travail dans des espaces restreints, il faut laisser la source d’énergie hors de la zone où le cutting est
effectué et fixer le câble de mise à la terre à la pièce à travailler.
ZONES HUMIDES
Ne jamais effectuer aucune opération de cutting dans des
lieux humides ou mouillés.
CÂBLES ENDOMMAGÉS
Ne jamais utiliser de câbles endommagés (cette précaution doit être respectée soit pour les câbles du
secteur que pour ceux de cutting)
CÂBLES ENDOMMAGÉS 2
Ne jamais retirer les panneaux de la soudeuse. Si la
soudeuse est équipée de panneaux ouvrants, avant
toute utilisation toujours contrôler qu’ils soient bien refermés.
PRÉVENTION DE L’INCENDIE
Outre les avertissements généraux reportés plus haut, il faut également respecter scrupuleusement les mesures de précaution suivantes. Le processus de cutting nécessite d’atteindre de hautes
températures ; il existe donc un risque concret d’incendie.
SOL DU LIEU DE TRAVAIL
Le sol du lieu de travail doit être réalisé en
matériau ininflammable.
PLAN DU LIEU DE TRAVAIL
Le plan du banc de travail sur lequel sont effectuées les soudures doit être réalisé en matériau ininflammable.
3
PROTECTION DES MURS ET DES SOLS
CONTACT AVEC LES CÂBLES
Les murs et les sols de la zone de cutting doivent être
Ne pas faire d’opérations sur les câbles d’entrée si l’alimentation
n’a pas été préalablement coupée.
protégés par des écrans réalisés en matériau ininflammable ; ceci non seulement pour réduire le risque d’incendie, mais aussi pour fournir une protec-
Ne pas toucher le circuit de cutting : même si normalement la tension du
tion adéquate afin d’éviter que les murs et/ou le sol ne puissent s’endom-
circuit de cutting n’est pas très élevée, il est toujours de bonne règle et plus
mager pendant les opérations de cutting.
prudent de ne jamais toucher les électrodes de cutting.
EXTINCTEUR
Placer un extincteur homologué de type et de dimension
appropriés dans la zone de travail. En contrôler l’état pério-
ÉTAT DE CONSERVATION DES CÂBLES ET DE LA PRISE
Contrôler fréquemment le bon état du câble d’alimentation et
de la fiche et prise correspondantes. Ceci est particulièrement
nécessaire pour les appareils soumis à des déplacements répétés.
RÉPARATIONS
Ne jamais tenter d’effectuer personnellement des réparations sur
la soudeuse ; ceci entraîne non seulement la déchéance immédiate de la garantie, mais peut aussi être la source de graves dangers.
diquement (effectuer la maintenance programmée) et veiller à ce
que le personnel soit opportunément informé sur son utilisation
NETTOYAGE DE LA ZONE DE TRAVAIL
Nettoyer soigneusement la zone de travail en
OUVERTURE DES ZONES ACCESSIBLES À L’OPÉRATEUR
retirant tout éventuel matériau combustible.
Contrôler toujours que la soudeuse soit débranchée du secteur
DANGER TRÈS GRAVE !
avant d’effectuer toute opération de maintenance ordinaire reportée
Il est absolument INTERDIT d’effectuer des opéra-
dans ce manuel (par exemple, remplacement d’une électrode usagée
tions de cutting dans des espaces restreints (par exemple, un contai-
ou du fil à souder, changement du dispositif d’entraînement du fil, etc)
ner, une citerne, un débarras.) ayant contenu ou contenant des matières ou des liquides toxiques, inflammables ou explosibles. Prêter la plus
COMPATIBILITÉ ÉLECTROMAGNÉTIQUE
grande attention au fait que l’intérieur des citernes, en particulier, peut
Vérifier qu’aucun câble de contrôle, de téléphone ou bus de signal
conserver des gaz et des vapeurs toxiques, inflammables ou explosi-
(tels que réseaux d’ordinateurs, bus de champ, etc) ne passe
bles même des années après leur vidange.
à proximité de la soudeuse.
DANGER TRÈS GRAVE ! 2
Il est absolument INTERDIT d’effectuer des opérations de cutting sur un réservoir ayant contenu ou contenant des matières ou des liquides
toxiques, inflammables ou explosibles. Prêter la plus grande attention au fait
que l’intérieur des réservoirs peut conserver des vapeurs inflammables et explosibles même des années après leur vidange. S’il s’avérait nécessaire d’effectuer des soudures sur un réservoir, il faut TOUJOURS le passiver en le remplissant de sable ou d’un matériel inerte équivalent.
DANGER TRÈS GRAVE ! 3
Vérifier qu’il n’y ait aucun téléphone, téléviseur, ordinateur
ou autre appareil de contrôle à proximité de la soudeuse.
Contrôler qu’aucune personne portant un pacemacker ne soit
placée à proximité de la soudeuse.
Ne pas utiliser la soudeuse en milieu hospitalier ou sanitaire (soit médical que vétérinaire). Contrôler plus particulièrement qu’aucun appareil électro-médical ne soit en fonction à
proximité de la zone de cutting.
Attention, ne jamais utiliser les appareils de cutting our faire dégeler des conduites d’eau
VENTILATION
1-
Outre les avertissements généraux reportés plus haut, il
faut également observer scrupuleusement les mesures de
précaution suivantes.
23-
VENTILATION DU LOCAL OÙ EST EFFECTUÉ LE CUTTING
Ventiler adéquatement le local où est effectué le cutting. Maintenir un flux d’air suffisant pour éviter l’accumulation de gaz toxiques ou explosibles. L’opération de cutting effectuée sur certains types ou combinaisons de matériaux peut générer
des fumées toxiques. Dans ce cas, utiliser des appareils de respiration appropriés. Avant de commencer à souder, lire et comprendre
les prescriptions de sécurité relatives aux alliages de cutting.
DÉCHARGES ÉLECTRIQUES
Si la soudeuse provoque des perturbations à d’autres appareils,
essayer d’en diminuer l’effet en prenant les mesures de précaution
suivantes
Contrôler que tous les volets éventuellement placés sur la
soudeuse soient bien fermés
Raccourcir les câbles d’alimentation
Interposer des filtres EMC entre la soudeuse et la ligne
d’alimentation
Classification pour compatibilité électromagnétique : CISPR
11, groupe 2, classe A.
Cet appareil est un Classe A et n’est pas adapté au fonctionnement en milieux résidentiels où la puissance électrique est fournie par le réseau public en basse tension.
Des problèmes pour garantir la compatibilité électromagnétique pourraient apparaître dans ces milieux du point de
vue des parasites tant en mode conduit qu’en mode rayonné.
Pour réduire le risque de graves dommages dû aux décharges électriques, outre les avertissements généraux reportés
plus haut, il faut également observer scrupuleusement les
mesures de précaution suivantes.
Cet appareil n’est pas conforme à la norme CEI 61000-3-12.
S’il est branché à un réseau public en basse tension, l'installateur ou l'utilisateur doivent s'assurer, en contactant si nécessaire le gérant du réseau, que l'appareil peut y être branché.
ACCIDENT DÛ À UNE DÉCHARGE ÉLECTRIQUE
Si une personne a été touchée par une décharge électrique, NE
PAS lui prêter secours tant qu’elle est encore au contact des
câbles. Couper immédiatement la tension, PUIS lui prêter secours.
Cet appareil peut être utilisé dans des milieux industriels
avec un réseau protégé par un interrupteur différentiel avec
retard d’intervention, de type B avec un courant de seuil
d’intervention >200mA.
4
DU MANUEL
Les générateurs de type « DUKE 74K » et « TP 104K » sont des appareils réalisés avec la
technologie INVERTER. Il s’agit d’appareils extrêmement compacts et versatiles, pouvant
être utilisés dans toutes les situations où l’encombrement minimum doit s’allier aux
ITALIANO
1. CARACTÉRISTIQUES GÉNÉRALES ET REMARQUES POUR LA CONSULTATION
prestations les plus élevées.
découpe au plasma à air comprimé.
Portables, ventilés, avec amorçage au contact de l’arc pilote.
ENGLISH
Ces générateurs sont des systèmes à inverseur avec contrôle à microprocesseur pour la
L’utilisation des systèmes à inverseur permet d’avoir un générateur très compact, de
découper sur des surfaces isolées et d’obtenir des résultats de grande qualité. La haute
fréquence, avec laquelle l’inverseur opère, (80kHz) permet de contrôler l’arc électrique de
la manière le plus adaptée à la procédure. Des variations de réseau ou de charge ne
produisent pas de variation du courant de coupe. Une attention toute particulière a été
DEUTSCH
Ils permettent une coupe rapide, sans déformations, de tous les matériaux conducteurs.
prestations élevées, de longévité et d’entretien réduit. C’est la raison pour laquelle la société
FIMER a adopté des composants électroniques à l’état solide, aussi bien concernant la
partie réservée à la puissance que celle réservée au contrôle.
La machine est également adaptée pour effectuer la coupe de tôles grillage.
FRANÇAIS
portée à la conception afin de produire une machine capable de fournir des garanties de
(stand-off) fournie avec la torche de découpe.
Grâce aux techniques de contrôle de pointe adoptées, le produit est extrêmement fiable et
facile à utiliser.
ESPAÑOL
Dans tous les cas, il est bon d’utiliser pour la découpe une entretoise prévue à cet effet
Ce manuel d’instruction reporte en détail les réglages et les modes de fonctionnement de
la machine : sa lecture complète vous permettra d’en apprécier sa grande flexibilité et sa
commodité d’utilisation.
Attention : l’appareil peut être utilisé uniquement pour les usages décrits dans le manuel
et ils ne doit pas être utilisé à d’autres fins impropres.
5
2. DESCRIPTION DE L’APPAREIL
15
12 5 4 3 6
14
13
7 8
FIGURE 1:
9
11
12
10
16
18
17
19
Fig.1
20
21
22
1. Bouton pour le réglage du courant de coupe.
2. Affichage de l’indicateur du courant de coupe :
Pendant la coupe : il affiche le courant de coupe réel.
En condition d’arc pilote : il affiche la valeur du courant
de l’arc pilote.
Sinon, il affiche le courant prédéfini.
3. LED Rouge : Signalement de l’arc pilote (bouton de la
torche enfoncé, mais arc de coupe pas encore amorcé).
4. LED Jaune : Tension de réseau en dehors des limites.
5. LED Jaune : Signalement de pression d’air insuffisante.
6. LED Rouge : Signalement d’arc de coupe.
7. LED Jaune : Signalement de protection thermique.
Elle s’allume quand la machine est bloquée pour surchauffe.
Cela survient généralement si le facteur d’intermittence de
la machine a été dépassé. Vérifier que les grilles d’aération
(19) situées sur l’arrière, sur l’avant et sur le côté n’ont pas
été obstruées et laisser la machine allumée pour faire
refroidir les composants internes. Quand la LED s’éteint, on
peut reprendre les opérations normales de coupe.
8. LED Jaune : Arc de coupe interrompu (déchirure de l’arc
de coupe).
9. LED Verte : Purge Test (Voir le bouton 10)
10. Bouton de Purge Test : (LED 9 allumée)
En appuyant une fois sur ce bouton, l’air est distribué
sans l’amorçage de l’arc. On peut ainsi étalonner la
pression de l'air ou faire refroidir la torche.
En appuyant de nouveau, la distribution de l’air est
interrompue.
11. LED Verte : Remote (Voir le bouton 12).
12. Bouton de fonctionnement en mode « Remote » :
(LED 11 allumée) En appuyant une fois sur ce bouton, on
passe du réglage en mode local au réglage en mode distance.
Si l'on appuie une nouvelle fois, on ramène le réglage en
mode local.
13. Bouton de réglage de la pression : Pour régler la
pression, il faut procéder comme suit :
- actionner le mode « purge test » (Voir le bouton 10 et la
LED 9).
- tirer le bouton vers soi.
- régler la pression à environ 5/6 Bar (vérifier la valeur à
l’aide du manomètre 14).
(La rotation dans le sens des aiguilles d’une montre
augmente la pression.)
- une fois la bonne pression configurée, appuyer de nouveau
sur le bouton, en le remettant dans sa position initiale.
14. Manomètre : (Voir le point 13).
15. LED Verte : appareil alimenté.
16. Connecteur de la torche de découpe.
17. Connecteur pour la commande à distance.
18. Connecteur pour le câble de masse.
19. Prises pour le refroidissement de l’appareil (d’autres prises
sont prévues sur le côté arrière et latéral).
FIGURE 2:
Fig.2
6
20. INTERRUPTEUR ON/OFF : Il allume et éteint la machine.
21. CÂBLE D’ENTRÉE : Le relier à l’alimentation de
réseau.
22. CONNECTEUR POUR LE TUBE À GAZ : Il doit être
relié au réducteur de pression de la bouteille.
5. BRANCHEMENT À DISTANCE
Les branchements du connecteur à
distance (17 de la figure 1).sont indiqués
dans la fig. 3.
ITALIANO
ENGLISH
Avant de brancher l’appareil, contrôler la
tension, le nombre de phases et la
fréquence de l’alimentation. La tension de
l’alimentation admissible est indiquée sur
la plaque de la machine. Contrôler le
branchement correct à la terre du poste à
souder. Contrôler également que la fiche
fournie avec l’appareil est compatible
avec la prise du réseau local.
S’assurer que l’alimentation fournit une
le
pour
suffisante
puissance
fonctionnement de l’appareil (gamme de
tensions). L’appareil est équipé d’un
cordon d’alimentation spécifique qui ne
devrait pas être branché à une rallonge. Si
cela est nécessaire, en utiliser une avec
une section identique ou plus grande que
celle de l’appareil en fonction de la
longueur du cordon.
Cette vanne permet le passage de l’air
pilotée
est
elle
si
uniquement
convenablement par la logique électronique
pendant le post-gaz et le processus de
coupe, ou bien si elle est actionnée
directement par le bouton « PURGE TEST »
du panneau de contrôle (10 de la fig.1).
DEUTSCH
3. BRANCHEMENT DE L’ALIMENTATION
Dans tous les cas, l’alimentation de l’air doit
fournir un débit minimum de 150 l/min.
Lors de l’amorçage de l’arc de coupe, une
électrovanne s’ouvre, permettant ainsi le
passage du débit d’air.
Légende :
SW touche de la torche
P potentiomètre de contrôle du courant
5.1 CONTRÔLE À DISTANCE DU
COURANT DE SOUDAGE
Il est possible de placer le réglage du
courant près du point où le soudage est
effectué par le biais du connecteur à
distance 17 de la figure 1. Pour ce faire,
il faut réaliser le branchement au
potentiomètre P indiqué dans la figure 3.
La valeur du potentiomètre n'est pas
critique : des composants entre 2.2kOhm
et 10kOhm 1/2W peuvent être utilisés.
ESPAÑOL
4. CIRCUIT DU GAZ DE COUPE
Contrôler que la pression et les débits d’air
correspondent aux valeurs demandées par
la torche.
La découpe au plasma utilise un jet d’air
comprimé aussi bien pour le soufflage de
l’arc que pour le refroidissement de la
torche.
Le circuit de l’air inclut le régulateur de
pression (13 de la fig.1) : l’étalonner à 5/6
bar en vérifiant la lecture sur le manomètre
(14 de la fig.1).
FRANÇAIS
Fig. 3
En tournant le potentiomètre, il est
possible de régler le courant de soudage
dans un intervalle compris entre le
courant minimum à partir de l'affichage et la
valeur programmée.
7
6. ALLUMAGE
Attention : Si la torche n’est pas insérée
dans le connecteur prévu à cet effet, le
générateur reste inopérant.
Le circuit se bloque si la pression est réglée
sous les 3,5 bars.
Il est toujours bon d’éteindre le générateur
en cas d’interventions sur la torche.
Le concept, sur lequel repose le
fonctionnement de ces générateurs,
consiste à fournir un courant constant égal à
la valeur définie, indépendamment de la
longueur de l’arc.
Après avoir effectué les raccordements de
la torche et allumé le générateur, vérifier que
l’air circule dans le circuit, en agissant sur la
touche PURGE TEST (10 de la fig.1).
Régler donc la valeur de courant à l’aide du
bouton 1 de la fig.1.
Le Tableau indique approximativement les
valeurs de courant à régler en fonction des
épaisseurs à couper.
MATÉRIAU
FER
ÉPAISSEUR
DU
MATÉRIAU
(mm.)
VALEUR DE
COURANT
(A)
2
10
4
20
6
30
10
50
15
60
20
70
REMARQUES
COUPAGE À
CONTACT
COUPE À
DISTANCE
COUPE
Pour commencer à couper, appuyer sur le
bouton de la torche. Une fois l’opération
terminée, on relâche le bouton, ce qui
entraîne l’arrêt de l’arc. Le jet d’air
continuera à s’écouler pendant environ 20
secondes (post-gaz), nécessaires au
refroidissement complet de la torche.
SÉCURITÉ DE LA TORCHE
ATTENTION : TENSION SUPÉRIEURE À
113 V. TORCHE EN CLASSE M.
La torche, dont est équipé le générateur, est
pourvue d’une sécurité qui empêche à
l’utilisateur d’entrer en contact avec des
parties sous tension. En effet, en dévissant
le terminal isolé, on désactive le bouton de
la torche.
8
7. INCONVÉNIENTS DE LA COUPE
1) Pénétration insuffisante
Les causes de cet inconvénient peuvent être :
- Vitesse élevée. Toujours s’assurer que l’arc
perce complètement la pièce à couper et qu'il
n'y a jamais d'inclinaison, dans le sens de
l'avance, supérieure à 10-15°.
- L’électrode doit être remplacée quand elle
présente un cratère profond d’environ 1,6 mm.
- La buse doit être remplacée quand elle
présente le trou central abîmé ou bien très
élargi par rapport à celui de la nouvelle pièce.
- Épaisseur excessive de la pièce.
- Borne de masse pas en bon contact
électrique avec la pièce.
2) L’arc de coupe s’éteint
Les causes de cet inconvénient peuvent être:
- Vitesse d’avance trop basse.
- Courant de coupe trop élevé par rapport à
l'épaisseur de la pièce à couper ; l'adapter à
l'épaisseur.
8. CONSEILS PRATIQUES
Bien qu’un filtre pour le traitement de l’air
soit déjà prévu à l’intérieur de l’appareil, en
mesure de retenir les impuretés aux
dimensions d’environ 5 mm, si l'air de
l'installation contient de l'humidité e de l'huile
en quantité, il est bon d'utiliser un filtre
sécheur afin d'éviter une oxydation et une
usure excessives des pièces de
consommation et d’endommager la torche.
Les impuretés présentes dans l’air favorisent
l’oxydation de l’électrode et de la buse et elles
peuvent rendre l'allumage de l'arc pilote plus
difficile. Si cette condition se vérifie, il faut
nettoyer la partie terminale de l’électrode et
l'intérieur de la buse à l'aide d'un papier
abrasif fin. S’assurer que la nouvelle électrode
et la nouvelle buse sur le point d’être
montées sont bien propres et dégraissées.
Pour éviter d’endommager la torche, il faut
toujours utiliser des pièces de rechange
originales FIMER.
9. MAINTENANCE ORDINAIRE
DE LA MACHINE
Éliminer régulièrement la poussière des bouches d’aspiration de l’air en utilisant l’air comprimé à basse pression. Toujours diriger le
jet d’air de l’intérieur du poste à souder vers
l’extérieur afin d’éviter de pousser la saleté
à l’intérieur du poste à souder.
Pour effectuer cette opération, s'assurer que
la machine n'est pas branchée au réseau
électrique.
SOLUTION
Contacter l’assistance technique
FIMER.
Avec l’interrupteur du générateur
sur ON, la machine ne s’allume
pas (la LED verte 15 de la fig.1 ne
s’allume pas).
Avec le générateur allumé, la LED
4 de la fig.1 s’allume et la machine ne fonctionne pas.
Manque de tension de réseau.
Contrôler le branchement de la machine
au réseau et la présence de la tension.
Panne du générateur.
Câble d’alimentation trop long.
Contacter l’assistance technique FIMER.
Alimenter le générateur en suivant
les instructions.
Contrôler le câble d’alimentation et d’éventuels fusibles externes.
Vérifier le débit de l’installation de ligne
et la prise à laquelle le branchement
a été fait.
Alimenter le générateur en suivant
les instructions.
Contrôler le câble d’alimentation et
d’éventuels fusibles externes.
Vérifier le débit de l’installation de ligne
et la prise à laquelle le branchement a
été fait.
Manque d’une phase d’alimentation.
La tension de réseau descend sous 360
V quand on coupe.
Allumage de la LED jaune 7 de
la fig.1 « PROTECTION THERMIQUE ».
Facteur d’intermittence trop élevé.
Température ambiante supérieure
à 40 degrés centigrades.
Entrée d’air pour la ventilation bouchée
par la saleté/ générateur en position
empêchant la ventilation.
Électroventilateur du générateur en Contacter l’assistance technique FIMER.
panne.
LED jaune 5 de la fig.1 « PRESSION Pression de l’air inférieure à 3,5 Bar.
D’AIR BASSE » allumée.
Allumage de la LED jaune 5 de
la fig.1 « PRESSION D’AIR BASSE » au début de la coupe
Débit de l’air trop bas.
Lors de la pression du bouton de Panne de la torche (fils internes ou boula torche, la LED rouge « ARC PILO- ton).
TE » (3 de la fig.1) ne s’allume pas
et l’arc pilote ne part pas.
Torche pas bien vissée dans l’attache relative de la machine.
Appuyer sur le bouton « PURGE TEST
» (10 de la fig.1) et régler la pression
en suivant les instructions.
Contrôler le dimensionnement de l’installation de l’air (tubes, compresseur,
etc.), appuyer sur le bouton « PURGE TEST » (10 de la fig.1) et régler
la pression en suivant les instructions.
Démonter la torche et contrôler la fermeture du circuit entre les goupilles 1
et 9 de la fiche à bouton enfoncé.
Installer correctement la torche en
suivant les instructions.
Utiliser les torches prescrites en suivant les instructions.
Démonter
la torche et contrôler la ferLors de la pression du bouton de Panne de la torche (fils internes ou boumeture du circuit entre les goupilles 1
la torche, la LED rouge « ARC PILO- ton).
et 9 de la fiche à bouton enfoncé.
TE » (3 de la fig.1) ne s’allume pas
et l’arc pilote ne part pas.
Torche pas bien vissée dans l’atta- Installer correctement la torche en
che relative de la machine.
suivant les instructions.
ENGLISH
CAUSE
DEUTSCH
DÉFAUT
Les fusibles de la ligne grillent quand Court-circuit interne au générateur.
on agit sur l'interrupteur du générateur.
FRANÇAIS
On énumère ci-après les problèmes les plus communs que l’on peut rencontrer et les solutions
relatives.
ITALIANO
10. DÉTECTION DES PANNES
Utiliser les torches prescrites en suivant les instructions.
L’arc pilote s’amorce mais l'arc Manque de raccordement de masse à la Raccorder et/ou vérifier le raccordement de la masse à la pièce en suiprincipal ne part pas (LED 6 de pièce.
vant les instructions.
la fig.1 éteinte) et, donc, la machine ne coupe pas.
Vérifier la distance entre la torche Raccorder et/ou vérifier le raccordeet la pièce ou l’entretoise prévue à ment de la masse à la pièce en suicet effet.
vant les instructions.
Torche pas adaptée au générateur.
ESPAÑOL
Torche pas adaptée au générateur.
Impossibilité de réglage du cou- Connecteur de commandes externes Débrancher le connecteur relatif.
rant de coupe à l’aide du bouton branché.
1 de la fig.1.
Panne du générateur.
Contacter l’assistance technique FIMER.
9
11. PIÈCES DE RECHANGE
10
31 Compresseur
2
Profil porte-poignée droite
32 Électrovanne
3
Poignée
34 Support antivibratoire compresseur
4
Traverser
36 Réservoir
5
Profil gauche coque
37 Électrovanne
6
Profil droite coque
38 Filtres Bracket
7
Grille coquille gauche
40 Filtre avec purge automatique
8
Grille coquille droite
41 Solénoïde de support
9
Adaptateur central plasma
44 Carte d'interface Plasma
14 Roue pivotante
47 Couvrir plasma
15 Supports d'essieux
48 Contacteur
16 Essieu de roue
49 Transformateur auxiliaire
17 Roue
52 Panneau fixe gauche
18 Cotter
53 Panneau fixe en bas à gauche
20 Cloison fixe droite baisser
54 Contrôle écran plasma
21 Cloison fixe droite
55 Bouton
22 Tuyau
56 Panneau de contrôle de l'utilisateur
23 Enclenchement rapide noir
57 Régulateur de pression avec indicateur
DEUTSCH
46 Alimentation de la carte de contrôle
FRANÇAIS
11 Gifas
45 Contrôle du ventilateur
de pression
24 Presse-étoupe
25 Magnéto-hydraulique
77 Connecteur
26 Ensemble avec le pouvoir *
78 Connecteur
27 Inductance
79 Connecteur
29 Étrier de support des radiateur
85 Silencieux en plastique
ESPAÑOL
10 Connecteur à 7 pôles
ITALIANO
Profil porte-poignée gauche
ENGLISH
1
*26. ENSEMBLE PUISSANCE
A
Carte de puissance
B
Soutenir module de puissance
C
Portuaires fan alimentation de support
D
Ventilateur
11
12. SCHÉMAS DES BLOCS
1
5
2
6
3
9
4
8
1. Interrupteur
2. Fiche de contrôle de la puissance
5. Transformateur auxiliaire
6. Inverseur de puissance
7. Soupape d’air
3. Fiche de contrôle du moteur
4. Panneau de contrôle
12
8. Arc pilote
9. Branchament à distance
Los derechos de traducción, de producción y de adaptación, total o parcial, y con cualquier medio (incluidas
las copias fotoestáticas, las películas y los microfilms) son reservados y se prohíbe su difusión sin la
autorización escrita del constructor.
ÍNDICE
• ADVERTENCIAS ................................................................................
EL MANUAL ..................................................................................
pag. 5
2.
DESCRIPCIÓN DEL EQUIPO.........................................................
pag. 6
3.
CONEXIÓN DE LA ALIMENTACIÓN............................................
pag. 7
4.
CIRCUITO DE GAS DE CORTE......................................................
pag. 7
5.
CONEXIÓN REMOTA.............................................................................
pag. 7
5.1
CONTROL REMOTO CORRIENTE DE SOLDADURA........................
pag. 7
6.
ENCENDIDO..................................................................................
pag. 8
7.
INCONVENIENTES DE CORTE........................................................
pag. 8
8.
CONSEJOS PRÁCTICOS................................................................
pag. 8
9.
MANTENIMIENTO ORDINARIO DE LA MÁQUINA.........................
pag. 8
10. BÚSQUEDA DE FALLOS.................................................................
pag. 9
PIEZAS DE REPUESTO...............................................................
pag. 10
12. DIAGRAMA DE BLOQUES.........................................................
pag. 12
11.
ITALIANO
FRANÇAIS
CARACTERÍSTICAS GENERALES Y NOTAS PARA CONSULTAR
ESPAÑOL
1.
pag. 2, 3, 4
ENGLISH
Fimer les agradece que hayan elegido este aparato; les acompañará en su trabajo por
muchos años siéndoles de gran utilidad si lo utilizan siguiendo las indicaciones que
aparecen en este manual de uso y mantenimiento.
El presente manual forma parte del aparato y deberá estar junto a él siempre que
se desplace o se venda.
El usuario se deberá encargar de mantenerlo íntegro y en buenas condiciones.
El constructor se reserva el derecho de aportar cambios en cualquier momento y sin
ningún previo aviso.
Cada producto Fimer ha sido pensado, proyectado y producido en Italia en nuestras
fábricas.
Esto garantiza su extrema calidad y fiabilidad.
DEUTSCH
MANUAL DE USO Y MANTENIMIENTO
1
SÌMBOLOS UTILIZADOS
2
3
4
Los generadores tipo “DUKE 74K” e “TP 104K” son equipos realizados con tecnología
INVERTER; se trata de equipos sumamente compactos y versátiles, que se pueden utilizar
en todas las situaciones en las que el mínimo espacio se debe combinar con las más altas
prestaciones.
ITALIANO
1. CARACTERÍSTICAS GENERALES Y NOTAS PARA CONSULTAR EL MANUAL
Estos generadores son sistemas de invertir con control con microprocesador para el corte
Portátiles, ventilados, con activación por contacto del arco piloto.
ENGLISH
por plasma con aire comprimido.
El uso de sistemas con inverter permite tener un generador muy compacto, cortar sobre
superficies aisladas y obtener resultados de alta calidad. La alta frecuencia con la que opera
el inverter (80 kHz) permite controlar el arco eléctrico de la manera más adecuada para el
procedimiento. Las variaciones de red o de carga no producen variación de la corriente de
corte. Se ha prestado mucha atención durante el diseño con el fin de producir una máquina
DEUTSCH
Permiten un corte rápido, sin deformaciones, de todos los materiales conductores.
esta razón FIMER ha utilizado componentes electrónicos en estado sólido, tanto en lo que
se refiere a la parte de potencia, como para la de control.
La máquina también es adecuada para realizar el corte de chapas enrejadas.
FRANÇAIS
que ofrezca garantías de alto rendimiento, durabilidad y un mantenimiento reducido, y por
proporcionado con el soplete de corte.
Gracias a las técnicas avanzadas de control adoptadas, el producto es altamente fiable y
fácil de usar.
En este manual de instrucciones se detallan los ajustes y los modos de funcionamiento de
ESPAÑOL
En cualquier caso, es apropiado utilizar para cortar el espaciador apropiado (stand-off)
la máquina: su lectura completa le permitirá apreciar la gran flexibilidad y la practicidad de
uso de la misma.
Atención: el equipo solo puede ser utilizado para los usos descritos en el manual y no
debe ser utilizado para otros fines inapropiados.
5
2. DESCRIPCIÓN DEL EQUIPO
15
12 5 4 3 6
14
13
7 8
9
11
12
10
16
18
17
19
Fig.1
20
21
22
Fig.2
6
FIGURA 1:
1. Pomo para ajustar la corriente de corte.
2. Pantalla indicadora de la corriente de corte:
Durante el corte: muestra la corriente de corte real
En condición de arco piloto: muestra el valor de la corriente
de arco piloto.
De lo contrario muestra la corriente configurada.
3. LED Rojo: Señalización de arco piloto (el botón soplete está
pulsado, pero el arco de corte aún no se ha activado).
4. LED Amarillo: Tensión de red fuera de los límites.
5. LED amarillo: Señalización de presión de aire insuficiente.
6. LED Rojo: Señalización de arco de corte.
7. LED amarillo: Señalización de protección térmica.
Se enciende cuando la máquina está bloqueada por
sobrecalentamiento. Esto sucede generalmente si el factor de
intermitencia de la máquina ha sido superado. Comprobar que
las rejillas de ventilación ubicadas en la parte posterior, en la
parte frontal y en la parte lateral no estén obstruidas, y dejar
encendida la máquina para que los componentes internos se
enfríen; cuando el LED se apaga, se pueden retomar las
operaciones de corte normales.
8. LED Amarillo: Arco de corte interrumpido (tirón del arco de
corte).
9. Led Verde: Purge Test (Véase el botón 10)
10. Botón de Purge Test: (LED 9 encendido)
Pulsando una vez este botón se suministra aire sin que al arco
se active; de esta manera es posible calibrar la presión de aire
o dejar que el soplete se enfríe.
Pulsándolo nuevamente, se interrumpe el suministro del aire.
11. Led Verde: Remote (Véase el botón 12).
12. Botón de funcionamiento en “Remote”: (LED 11
encendido) Pulsando este botón una vez se pasa del ajuste en
modo local al ajuste en modo Remoto. Pulsándolo nuevamente
regresa el ajuste al modo local.
13. Pomo de ajuste de la presión: Para regular la presión es
necesario proceder de la siguiente manera:
- accionar el modo “purge test” (Véase el botón 10 y el LED 9)
- tirar el pomo hacia uno mismo
- ajustar la presión a aproximadamente 5/6 Bar (comprobar el
valor mediante el manómetro 14)
(La rotación en el sentido de las agujas del reloj aumenta la
presión)
- una vez configurada la presión correcta, presionar
nuevamente el pomo y llevarlo a la posición inicial.
14. Manómetro: (Véase el punto 13).
15. Led Verde: equipo alimentado
16. Conector del soplete de corte.
17. Conector para el mando remoto.
18. Conector para el cable de puesta a tierra.
19. Tomas para la refrigeración del equipo (hay otras tomas
previstas en la parte trasera o lateral).
FIGURA 2:
20. INTERRUPTOR ON-OFF: Enciente y apaga la máquina.
21. CABLE DE ENTRADA: Conectarlo a la alimentación de
red.
22. CONECTOR PARA TUBO DE GAS: Se debe conectar al
reductor de presión de la bombona.
5. CONEXIÓN REMOTA
En la figura 3 se muestran las conexiones
del conector remoto (17 de la fig 1).
La máquina dispone de un cable de alimentación específico que no debería prolongarse; en el caso de que esto fuese necesario,
usar uno de sección igual o mayor al de la
máquina dependiendo de la longitud del
cable.
4. CIRCUITO DE GAS DE CORTE
Controlar que la presión y los caudales de
aire correspondan con los valores
requeridos por el soplete.
El corte por plasma utiliza un chorro de aire
comprimido para el soplado del arco y para
el enfriamiento del soplete.
El circuito del aire incluye el regulador de
presión (13 fig1): calibrarlo a 5/6 bar,
comprobando la lectura en el manómetro
(14 de fig1).
En cualquier caso la alimentación del aire
debe suministrar un caudal mínimo de 150
Lt./min.
Cuando se activa el arco de corte, se abre
una electroválvula que permite el paso del
caudal de aire.
ITALIANO
DEUTSCH
Asegúrense de que la alimentación suministre una potencia suficiente para hacer funcionar la máquina (campo de variación de
las tensiones).
ENGLISH
La tensión de alimentación admisible se
indica en la placa de datos de la máquina.
Controlad si la soldadora está conectada
correctamente al potencial de tierra.
Controlad también si el enchufe entregado
con el aparato es compatible con la toma de
distribución local.
de corte, o bien si se acciona directamente
desde el botón "PURGE TEST" del panel de
control (10 de fig1).
Fig. 3
Donde:
Sw es el botón antorcha
es el potenciómetro para controlar la
P
corriente
5.1 CONTROL REMOTO CORRIENTE DE
SOLDADURA
Gracias al conector remoto 17 de la Fig 1
se puede llevar la regulación de corriente
cerca del punto en el que se está
efectuando la soldadura.
Para hacer esto hay que realizar la
conexión al potenciómetro P que se
muestra en la figura 3.
El valor del potenciómetro no es crítico: se
pueden utilizar componentes entre
2.2kOhm y 10kOhm 1/2W.
FRANÇAIS
Antes de conectar la máquina controlar la
tensión, el número de fases y la frecuencia
de la alimentación.
Dicha válvula permite el paso del aire solo si
es controlado debidamente por la lógica
electrónica durante el post-gas y el proceso
ESPAÑOL
3. CONEXIÓN DE LA ALIMENTACIÓN
Si se gira el potenciómetro se podrá ajustar
la corriente de soldadura en un campo de
variación que va de la corriente mínima de
la pantalla al valor programado.
7
6. ENCENDIDO
Atención: Si el soplete no se inserta en el
generador
el
específico,
conector
permanece inoperante.
El circuito se bloquea si la presión es
ajustada por debajo de los 3,5 bar.
Siempre se debe apagar el generador
cuando se interviene en el soplete.
El funcionamiento de estos generadores se
basa en el suministro de una corriente
constante equivalente al valor configurado,
independientemente de la longitud del arco.
Después de haber realizado las conexiones
del soplete y tras haber encendido el
generador, comprobar que el aire circule en
el circuito, accionado el botón PURGE
TEST (10 de fig1).
Configurar luego el valor de corriente
accionando el pomo 1 de fig. 1.
La tabla indica específicamente los valores
de corriente por configurar en base a los
espesores que se deben cortar.
MATERIAL
HIERRO
ESPESOR
MATERIAL
(mm.)
VALOR
CORRIENTE
(A)
2
10
4
20
6
10
30
50
15
60
20
70
NOTAS
CORTE POR
CONTACTO
CORTE A
DISTANCIA
CORTE
Para empezar a cortar, pulsar el botón del
soplete. Una vez finalizada la operación se
suelta el botón y, en consecuencia, se
apaga el arco. El chorro de aire continuará
fluyendo durante aproximadamente 20
segundos /post-gas), necesarios para que
el soplete se enfríe por completo.
SEGURIDAD DEL SOPLETE
ATENCIÓN TENSIÓN SUPERIOR A 113 V.
SOPLETE EN CLASE M.
El soplete con el que está equipado el
generador, cuenta con un dispositivo de
seguridad que impide que el usuario entre
en contacto con piezas bajo tensión, en
efecto, al desenroscar el terminal aislado,
se deshabilita el botón del soplete.
8
7. INCONVENIENTES DE CORTE
1) Penetración insuficiente
Las causas de este inconveniente pueden ser:
- Velocidad elevada. Asegurarse siempre de
que el arco desfonde por completo la pieza
por cortar y no nunca tenga una inclinación,
en el sentido de avance, superior a los 10-15°
- El electrodo debe ser sustituido cuando
presenta un cráter de aproximadamente 1,
6mm de profundidad.
- El inyector se debe sustituir cuando el
orificio central está dañado o bien muy
ensanchado en comparación con el de la
pieza nueva
- Espesor excesiva de la pieza.
- Borne de toma a tierra no en buen
contacto eléctrico con la pieza.
2) El arco de corte se apaga
Las causas de este inconveniente pueden ser:
- Velocidad de avance demasiado baja.
- Corriente de corte demasiado alta en
relación al espesor de la pieza por cortar;
adecuarla al espesor.
8. CONSEJOS PRÁCTICOS
Aunque dentro del equipo ya está previsto
un filtro para el tratamiento del aire, capaz
de
impurezas
las
retener
de
aproximadamente 5 mm de tamaño, si el
aire del sistema contiene humedad y aceite
en cantidad, se recomienda utilizar un filtro
secador para evitar la oxidación excesiva y
el desgaste de las piezas consumibles y
dañar el soplete. Las impurezas presentes
en el aire favorecen la oxidación del
electrodo y del inyector, y pueden dificultar
el encendido del arco piloto. Si esta
condición se presenta, limpiar la parte
terminal del electrodo y el interior del
inyector con papel abrasivo fino. Asegurarse
de que el electrodo y el inyector nuevos que
están por ser montados estén bien limpios y
libres de grasa.
Para no dañar el soplete, utilizar siempre
piezas de repuesto originales FIMER.
9.MANTENIMIENTO ORDINARIO DE
LA MÁQUINA
Cada tres meses quitar periódicamente el polvo de las boquillas de aspiración del aire usando aire comprimido a baja presión. Dirigir
siempre el chorro de aire desde el interior
de la máquina hacia el exterior para evitar
empujar suciedad dentro de la soldadora.
Para efectuar esta operación asegurarse
de que la máquina no esté conectada a la
red eléctrica.
Con el interruptor del generador en ON Falta tensión de red.
la máquina no se enciende (el LED
verde 15 de fig1 no se enciende)
Fallo del generador.
Controlar la conexión de la máquina
a la red y la presencia de la tensión.
Contactar asistencia técnica FIMER.
Con el generador encendido el LED Cable de alimentación demasiado Alimentar el generador según las
instrucciones.
4 de fig1 se enciende y la máquina no largo
funciona.
Falta de una fase de alimentación.
Controlar el cable de alimentación y
eventuales fusibles externos.
La tensión de red desciende por debajo Comprobar el caudal del sistema de línea
de los 360V cuando se corta.
y la toma a la cual se está conectado.
Encendido del LED amarillo 7 de
fig1 “PROTECCIÓN TÉRMICA”
Factor de intermitencia demasiado
elevado.
Temperatura ambiente superior a
40° grados centígrados.
Alimentar el generador según las
instrucciones.
Controlar el cable de alimentación y
eventuales fusibles externos.
Entrada de aire para la ventilación
obstruida por suciedad/generador en
posición tal que impide la ventilación.
Comprobar el caudal del sistema
de línea y la toma a la cual se está
conectado.
Electroventilador del generador
averiado.
LED amarillo 5 de fig1 “PRESIÓN Presión del aire inferior a 3,5 Bar
AIRE BAJA” encendido
Encendido del LED amarillo 5 de
fig1 “PRESIÓN AIRE BAJA” cuando comienza el corte
Cuando se pulsa el botón del soplete, el LED rojo “ARCO PILOTO” (3
de fig1) no se enciende y el arco
piloto no se pone en marcha.
Contactar asistencia técnica FIMER.
Pulsar el botón “PURGE TEST” (10
de fig1) y ajustar la presión según las
instrucciones.
Caudal del aire demasiado bajo
Controlar el dimensionamiento del
sistema del aire (tubos, compresor,
etc.), pulsar el botón “PURGE TEST”
(10 de fig1) y ajustar la presión según
las instrucciones.
Fallo del soplete (cables internos o botón) Desmontar el soplete y controlar el
cierre del circuito entre los pin 1 y 9
de la clavija con el botón accionado.
Soplete mal enroscado en la conexión Instalar correctamente el soplete
correspondiente de la máquina
siguiendo las instrucciones
Utilizar los sopletes prescritos según
las instrucciones
Desmontar
el soplete y controlar el
Cuando se pulsa el botón del sople- Fallo del soplete (cables internos o botón)
cierre del circuito entre los pin 1 y 9
te, el LED rojo “ARCO PILOTO” (3
de la clavija con el botón accionado.
de fig1) no se enciende y el arco
piloto no se pone en marcha.
Soplete mal enroscado en la conexión Instalar correctamente el soplete
correspondiente de la máquina
siguiendo las instrucciones
Soplete no apto para el generador
ENGLISH
SOLUCIÓN
Contactar asistencia técnica FIMER.
DEUTSCH
CAUSA
FRANÇAIS
DEFECTO
Los fusibles de línea se funden Cortocircuito interno al generador.
cuando se acciona el interruptor
del generador.
ESPAÑOL
A continuación se enumeran los problemas más comunes que se pueden presentar y las soluciones
correspondientes.
ITALIANO
10. BÚSQUEDA DE FALLOS
Utilizar los sopletes prescritos según
las instrucciones
Falta de la conexión de toma a tierra de Conectar y/o comprobar la conexión
de la toma a tierra a la pieza según
la pieza.
las instrucciones
Comprobar la distancia entre el Conectar y/o comprobar la conexión
soplete y la pieza o el separador de la toma a tierra a la pieza según
específico
las instrucciones
Desconectar
el conector corresponConector mandos externos conectado.
diente
Fallo del generador
Contactar asistencia técnica FIMER
Soplete no apto para el generador
El arco piloto se activa pero no
arranca el arco principal (LED 6 de
fig1 apagado) y, por tanto, la máquina no corta.
Imposibilidad de ajuste de la corriente
de corte mediante el pomo 1 de fig1
9
11. PIEZAS DE REPUESTO
10
Perfil portamaniglia izquierda
29 Abrazadera de soporte del radiador
2
Perfil portamaniglia derecho
31 Compresor
3
Manilla
32 Electroválvula
4
Cruzar
34 Soporte compresor antivibración
5
Shell de perfil izquierdo
6
Shell de perfil derecho
7
Rejilla shell izquierda
8
Rejilla shell derecho
9
Conexión centralizada
ITALIANO
1
37 Electroválvula
38 Abrazadera soporte filtros
40 Filtro con purga automática
41 Solenoide Soporte
ENGLISH
36 Tanque
46 Placa control potencia
14 Rueda piruetante
47 Cobertura
15 Soportes de eje
48 Contactor
16 Eje de la rueda
49 Transformador auxiliar
17 Rueda
52 Panel fijo a la izquierda
18 Dechaveta
53 Panel fijo inferior izquierda
20 Pared de fondo derecha
54 Panel de mandos
21 Pared lateral derecha
55 Pomo
22 Acople de goma
56 Panel de Control
23 Acople rápido negro
57 Regulador de presión
24 Sujetacables
77 Racor
25 Magneto-hidráulico
78 Racor
26 Junto con el poder *
79 Racor
27 Inductor de potencia
85 Silenciador de plástico
FRANÇAIS
11 Gifas
ESPAÑOL
45 El control del ventilador
DEUTSCH
44 Placa interfaz
10 Conector 7 polos
*26. JUNTO DE POTENCIA
A
Placa potencia
B
Apoyar el módulo de potencia
C
Soporte de potencia de port ventiladores
D
Ventilador
11
12. DIAGRAMA DE BLOQUES
1
5
2
6
3
9
4
8
1. Interruptor
2. Placa control potencia
3. Placa control motor
6. Inverter de potencia
7. Válvula de aire
4. Panel de control
8. Arco piloto
5. Transformador auxiliar
9. Conexiòn remota
12
NOTE:
........................................................................................
........................................................................................
........................................................................................
........................................................................................
........................................................................................
........................................................................................
........................................................................................
........................................................................................
........................................................................................
........................................................................................