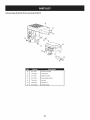
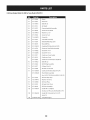
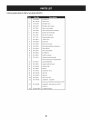
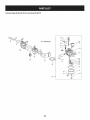
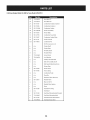
1
perator_s
nual
I:RRFrgMRN°
Electric Start
-INCH
SNOW THROWER
Model No. 247.881701
,, SAFETY
o ASSEMBLY
OPERATION
MAINTENANCE
PARTS LIST
o ESPANOL
CAUTION: Before using this product,
read this manual and follow all safety
rules and operating
instructions.
Sears Brands Management
Corporation,
Visit our website:
Hoffman
Estates,
www.craftsman.corn
IL 60179, U.S.A.
Form No.769-08167B
(August1,2013)
Warranty
Statement....................
SafeOperation Practices ................
Assembly ............................
Operation ...........................
Maintenance & Service .................
Off-Season Storage ...................
Page2
Troubleshooting ......................
Parts List ............................
Repair Protection Agreement ............
Espa_ol .............................
Contact Numbers ..................
Page 3
Page 7
Page 11
Page 15
Page 20
Page 21
Page 22
Page 41
Page 42
Back Cover
CRAFTSMANTWOYEAR FULL WARRANTY
FORTWO YEARSfrom the dateof purchase,this productis warrantedagainstanydefectsin materialor workmanship.A defective
productwill receivefree repairor replacementif repairis unavailable.
Forwarranty coverage details to obtain free repair or replacement,visit the web site: www.craftsman.com
This warranty coversONLYdefects in material and workmanship. Warranty coverage does NOT include:
•
Expendableitemsthat can wearoutfrom normalusewithin the warrantyperiod,includingbut not limitedto augers,augerpaddles,
drift cutters,skid shoes,shave plate,shearpins, sparkplug,air cleaner,belts,and oil filter.
•
Standardmaintenanceservicing,oil changes,or tune-ups.
Tire replacementor repaircausedby puncturesfrom outsideobjects,such as nails,thorns,stumps,or glass.
Tireor wheelreplacementor repair resultingfrom normalwear,accident,or improper
operationor maintenance.
Repairsnecessarybecauseof operatorabuse, including
butnot limitedto damagecausedby over-speedingthe engine,or from
impacting
objectsthat bendthe frame,auger shaft,etc.
•
•
Repairsnecessarybecauseof operatornegligence,includingbutnot limitedto, electricaland mechanicaldamagecausedby
improperstorage,failureto usethe propergradeand amountof engineoil, or failureto maintainthe equipmentaccordingto the
instructions
containedinthe operator'smanual.
Engine(fuel system)cleaningor repairscausedbyfuel determinedto be contaminatedor oxidized(stale).In general,fuel shouldbe
usedwithin30 daysof its purchasedate.
Normaldeteriorationand wearof the exteriorfinishes,or productlabel replacement.
This warrantyis void if this productis ever usedwhileprovidingcommercialservicesor if rentedto anotherperson.
This warrantygivesyou specificlegal rights,and you mayalso haveotherrights whichvary from stateto state.
Sears Brands ManagementCorporation, Hoffman Estates, IL 60179
EngineOil Type:
EngineOil Capacity:
5W-30
20 ounces
FuelCapacity:
SparkPlug:
SparkPlugGap:
2.3Quarts
F6RTC(F6TC)
.020"to .030"
Model Number.................................................................
Serial Number .................................................................
Date of Purchase .............................................................
Recordthe modelnumber,serialnumber
and dateof purchaseabove
© SearsBrands,LLC
2
Thissymbolpointsout importantsafety instructionswhich, if not
followed, couldendangerthe personalsafetyand/or property of
yourself and others.Readandfollow all instructions in this manual
beforeattempting to operatethis machine.Failureto complywith these
instructions
may resultin personalinjury.Whenyou seethis symbol, HEED
ITSWARNING!
CALIFORNIA
PROPOSITION
65
EngineExhaust,someof its constituents,and certain vehiclecomponents
containor emit chemicalsknownto Stateof Californiato causecancerand
Thismachinewasbuilt to beoperatedaccordingto the safeoperation
practicesin this manual.Aswith anytype of powerequipment,
carelessnessor error on the part of the operatorcanresultin seriousinjury.
Thismachineiscapableof amputating fingers, hands,toesandfeet and
throwingdebris. Failureto observethefollowing safety instructions
could
resultin seriousinjuryor death.
Your Responsibility--Restrict the useof this powermachineto
personswho read,understandandfollow the warningsand instructionsin
this manualandon the machine.
SAVETHESEINSTRUCTIONS!
birth defectsor other reproductiveharm.
TRAINING
Disengage
all controlleversbeforestartingtheengine.
Read,understand,andfollowall instructionsonthe machineandinthe
manual(s)beforeattemptingto assembleandoperate.Failureto dosocan
resultinseriousinjury tothe operatorand/orbystanders.Keepthis manual
inasafeplaceforfutureandregularreferenceandfororderingreplacement
Adjustcollectorhousingheightto cleargravelor crushedrocksurfaces.
parts.
Letengineandmachineadjustto outdoortemperaturebeforestartingto
clearsnow.
Befamiliarwith all controlsandtheir properoperation.Knowhowto stop
the machineanddisengagethemquickly.
Neverallowchildrenunder14yearsof ageto operatethis machine.Children
14andovershouldreadandunderstandthe instructionsandsafeoperation
practicesinthis manualandonthe machineandbetrainedandsupervised
byanadult.
Neverallowadultsto operatethismachinewithout properinstruction.
Thrownobjectscancauseseriouspersonalinjury.Planyoursnow-throwing
patternto avoiddischargeof materialtowardroads,bystandersandthe like.
Keepbystanders,
petsandchildrenat least75feetfrom the machinewhileit
isin operation.Stopmachineif anyoneentersthe area.
Exercise
cautionto avoidslippingor falling, especiallywhenoperatingin
reverse.
PREPARATION
Thoroughlyinspect
the areawherethe equipmentisto beused.Removeall
doormats,newspapers,
sleds,boards,wiresandotherforeignobjects,which
couldbetrippedoveror thrownbythe auger/impeller.
Alwayswearsafetyglasses
or eyeshieldsduringoperationandwhile
performinganadjustmentor repairto protectyoureyes.Thrownobjects
whichricochetcancauseseriousinjuryto the eyes.
Donot operatewithout wearingadequatewinteroutergarments.Donot
wearjewelry,longscarvesorotherlooseclothing,whichcouldbecome
entangledin movingparts.Wearfootwearwhichwill improve
footing on
slipperysurfaces.
Usea groundedthree-wireextensioncordandreceptacleforall machines
with electricstartengines.
Neverattemptto makeanyadjustmentswhileengineisrunning,except
wherespecificallyrecommended
inthe operator'smanual.
Safe Handling
of Gasoline:
Toavoid personalinjuryor property damageuseextreme carein handling
gasoline.Gasolineisextremely flammable andthe vaporsareexplosive.
Seriouspersonalinjurycan occurwhengasolineis spilledon yourselfor your
clotheswhichcanignite. Washyour skinandchangeclothesimmediately.
Useonlyanapprovedgasolinecontainer.
Neverfill containersinsidea vehicleor ona truckor trailerbedwitha plastic
liner.Alwaysplacecontainersonthe groundawayfrom yourvehiclebefore
filling.
Whenpractical,removegas-poweredequipmentfrom the truckor
trailer andrefuelit onthe ground.Ifthisis not possible,thenrefuelsuch
equipmenton atrailerwith aportablecontainer,ratherthanfrom agasoline
dispensernozzle.
Keepthe nozzleincontactwith the rim ofthe fuel tankor containeropening
at all timesuntil fuelingiscomplete.Donot usea nozzlelock-opendevice.
Extinguishall cigarettes,cigars,pipesandothersourcesof ignition.
Neverfuel machineindoors.
Neverremovegascapor addfuel whilethe engineishot or running.Allow
engineto coolat leasttwo minutesbeforerefueling.
Neveroverfill fueltank.Filltank to nomorethan1/2inchbelowbottomof
filler neckto allowspacefor fuelexpansion.
Replace
gasolinecapandtightensecurely.
Ifgasolineisspilled,wipeit offthe engineandequipment.Moveunitto
anotherarea.Wait.5minutesbeforestartingtheengine.
To
reduce
firehazards,
keep
machine
free
ofgrass,
leaves,
orother
debris
build-up.
Clean
upoilorfuelspillage
and
remove
any
fuelsoaked
debris.
Never
store
themachine
orfuelcontainer
inside
where
there
isanopen
flame,
spark
orpilot
light
asonawater
heater,
space
heater,
furnace,
clothes
dryer
orother
gas
appliances.
OPERATION
Useonlyattachmentsandaccessories
approvedbythe manufacturer(e.g.
wheelweights,tire chains,cabsetc.).
Whenstartingengine,pull cordslowlyuntil resistanceisfelt, thenpull
rapidly.Rapidretractionofstartercord(kickback)will pullhandandarm
towardenginefasterthanyoucanletgo. Brokenbones,fractures,bruisesor
sprainscouldresult.
Ifsituationsoccurwhicharenot coveredinthismanual,usecareandgood
judgment.
Donot put handsor feetnearrotatingparts,inthe auger/impellerhousing
or chuteassembly.
Contactwith the rotatingpartscanamputatehandsand
feet.
CLEARING
Theauger/impellercontrolleverisasafetydevice.Neverbypassits
operation.Doingsomakesthe machineunsafeandmaycausepersonal
injury.
Handcontactwith the rotatingimpellerinsidethedischargechuteisthe most
commoncauseof injuryassociated
with snowthrowers.Neveruseyourhandto
cleanout the dischargechute.
Thecontrolleversmustoperateeasilyin bothdirectionsandautomatically
returnto the disengagedpositionwhenreleased.
Toclearthe chute:
A CLOGGED
DISCHARGE
CHUTE
a.
SHUTTHE
ENGINE
OFF!
Neveroperatewith amissingor damagedchuteassembly.Keepall safety
devicesin placeandworking.
b.
Wait 10secondsto besurethe impellerbladeshavestopped
rotating.
Neverrunanengineindoors
or inapoorlyventilatedarea.Engineexhaust
containscarbonmonoxide,anodorlessanddeadlygas.
c.
Alwaysuseaclean-outtool, not yourhands.
MAINTENANCE
& STORAGE
Donot operatemachinewhileunderthe influence
of alcoholor drugs.
Nevertamperwith safetydevices.Checktheirproperoperationregularly.
Referto the maintenanceandadjustmentsectionsof thismanual.
Mufflerandenginebecomehot andcancauseaburn.Donot touch.Keep
childrenaway.
Beforecleaning,repairing,or inspecting
machinedisengageall control
leversandstopthe engine.Waituntil the auger/impellercometo acomplete
stop.Disconnect
thesparkplugwire andgroundagainstthe engineto
preventunintendedstarting.
Exercise
extremecautionwhenoperatingonor crossinggravelsurfaces.Stay
alertforhiddenhazardsor traffic.
Exercise
cautionwhenchangingdirectionandwhileoperatingonslopes.Do
not operateon steepslopes.
Checkboltsandscrewsforpropertightnessat frequentintervals
to keepthe
machineinsafeworkingcondition.Also,visuallyinspect
machineforany
damage.
Planyoursnow-throwingpatternto avoiddischargetowardswindows,
walls,carsetc.Thus,avoidingpossiblepropertydamageor personalinjury
causedbyaricochet.
Donot changethe enginegovernorsettingor over-speed
the engine.The
governorcontrolsthe maximumsafeoperatingspeedof the engine.
Neverdirectdischargeat children,bystanders
andpetsor allowanyonein
front of the machine.
Snowthrowershaveplatesandskidshoesaresubjectto wearanddamage.
Foryoursafetyprotection,frequentlycheckall componentsandreplace
with originalequipmentmanufacturer's
(OEM)partsonlyaslistedinthe
Partspagesofthisoperator'smanual.Useof partswhichdonot meetthe
originalequipmentspecifications
mayleadto improper
performanceand
compromisesafety!
Donot overloadmachinecapacitybyattemptingto clearsnowat too fastof
arate.
Neveroperatethismachinewithoutgoodvisibilityor light. Alwaysbesureof
yourfootingandkeepafirm holdon the handles.Walk,neverrun.
Disengage
powerto the auger/impellerwhen transportingor not in use.
Checkcontrolleversperiodicallyto verifytheyengageanddisengage
properlyandadjust,if necessary.
Referto the adjustmentsectioninthis
operator'smanualfor instructions.
Neveroperatemachineat hightransportspeedsonslipperysurfaces.Look
downandbehindandusecarewhenbackingup.
If the machineshouldstartto vibrateabnormally,stopthe engine,
disconnectthe sparkplugwire andgroundit againstthe engine.Inspect
thoroughlyfordamage.Repairanydamagebeforestartingandoperating.
Maintainor replacesafetyandinstruction
labels,asnecessary.
Observe
properdisposallawsandregulationsforgas,oil,etc.to protectthe
environment.
Disengage
all controlleversandstopenginebeforeyouleavethe operating
position(behindthe handles).Waituntil the auger/impellercomesto
acompletestopbeforeuncloggingthe chuteassembly,
makingany
adjustments,or inspections.
Priorto storing,runmachineafewminutesto clearsnowfrom machineand
preventfreezeupof auger/impeller.
Neverstorethe machineor fuelcontainerinsidewherethereisanopen
flame,sparkor pilot light suchasa waterheater,furnace,clothesdryeretc.
Neverput yourhandin the dischargeor collectoropenings.Donot unclog
chuteassemblywhileengineis running.Shutoff engineandremainbehind
handlesuntil all movingpartshavestoppedbeforeunclogging.
Alwaysreferto the operator'smanualforproperinstructionsonoff-season
storage.
4
Checkfuelline,tank,cap,andfittings frequentlyfor cracksor leaks.Replace
if necessary.
Donot crankenginewith sparkplug removed.
Accordingto the ConsumerProductsSafetyCommission
(CPSC)
andthe
U.S.Environmental
ProtectionAgency(EPA),
thisproducthasan Average
Useful Life of seven(7)years,or 60 hoursofoperation.Atthe endof
the Average Useful Life havethe machineinspectedannuallybyan
authorizedservicedealerto ensurethat all mechanical
andsafetysystems
areworkingproperlyandnotwornexcessively.
Failureto dosocanresultin
accidents,
injuriesor death.
DO NOT MODIFY
ENGINE
Toavoidseriousinjuryor death,do notmodifyenginein anyway. Tampering
with the governorsetting canlead to arunawayengineandcauseit to
operateat unsafespeeds.Nevertamper with factory setting of engine
governor.
NOTICE
REGARDING
EMiSSiONS
Engineswhich are certifiedto complywith Californiaandfederal EPA
emissionregulations for SORE
(SmallOff RoadEquipment)arecertified
to operate on regularunleadedgasoline,and mayincludethe following
emissioncontrol systems:EngineModification (EM),OxidizingCatalyst(0C),
SecondaryAir injection(SAI)andThreeWayCatalyst(TWC)if soequipped.
SPARK ARRESTOR
e
This machineisequippedwith an internalcombustionengine andshould
not be usedon or near any unimprovedforest-covered,brushcoveredor
grass-coveredland unlessthe engine'sexhaust systemis equippedwith a
sparkarrestormeeting applicable localor state laws (if any).
Ira sparkarrestoris used,it shouldbe maintained in effective working order
bythe operator. In the State of Californiathe aboveisrequired bylaw (Section
4442of the CaliforniaPublicResourcesCode).Otherstates mayhavesimilar
laws.Federallaws apply on federal lands.
Asparkarrestorfor the muffler is availablethrough your nearestSearsParts
andRepairServiceCenter.
SAFETY
SYMBOLS
Thispage depicts and describes safety symbols that may appear on this product. Read, understand, and follow all instructions on the machine before
attempting
to assemble and operate.
READ THE OPERATOR'S MANUAL(S)
Read, understand,
and follow
all instructions
in the manual(s) before
attempting
to assemble
and
operate
WARNING--
ROTATING BLADES
Keep hands out of inlet and discharge openings
inside
WARNING--
blades
while
machine is running. There are rotating
blades
ROTATING AUGER
Do not put hands or feet near rotating
Contact with the rotating
WARNING--THROWN
This machine
parts, in the auger/impeller
parts can amputate
can cause serious personal
injury.
IS FLAMMABLE
before refueling.
CARBON MONOXIDE
Never run an engine indoors or in a poorly ventilated
monoxide, an odorless and deadly gas.
area. Engine exhaust contains carbon
ELECTRICAL SHOCK
Do not use the engine's
WARNING--
or chute assembly.
OBJECTS
Allow the engine to cool at least two minutes
WARNING--
housing
hands and feet.
may pick up and throw and objects which
WARNING--GASOLINE
WARNING--
machine is running. There are rotating
ROTATING BLADES
Keep hands out of inlet and discharge openings
inside
WARNING--
while
electric starter in the rain
HOT SURFACE
Engine parts, especially the muffler,
muffler to cool before touching.
WARNING:
Your Responsibility--Restrict
the warnings
and instructions
in this manual
become extremely
the use of this power machine
hot during
to persons
and on the machine.
SAVETHESEiNSTRUCTIONS!
6
operation.
Allow engine and
who read, understand
and follow
IMPORTANT: This unit is shipped with the engine full of oil. After
assembly, see page 10 for fuel and oil details.
RemovingFromCarton
1.
Cutthe cornersof the cartonandlaythe sidesflat on theground. Removeall
packinginserts.
2.
Movethe snowthrowerout of the carton,
3.
Makecertainthe cartonhasbeencompletelyemptiedbeforediscardingit.
DoNOTlift the snowthrower bythe chutehandle.
Before Assembly
flOTE:Reference
to right, left, front or rearofthe unit isfrom the operating
position,facingforward,unlessotherwisestated.
Setting UpThe Handle
flOTE:Beawareof the threelooselyfitted cabletiesattachedto the lowerhandle
thatwill be utilizedlaterto securethe cables.
1.
Loosenandremovethe wing knob,saddlewasher,handletab andcarriage
screwon eachsideof the lowerhandle.SeeFigure1.
2.
Slidethe looselyfitted cabletiefrom the right sideofthe lowerhandleup to
the crossmemberof the lowerhandle.Leavethe secondcabletie in placeon
the rightsideof the lowerhandle.SeeFigure3forreference.
IMPORTANT:
It will be necessary to lift the upper handle while
sliding up this cable tie to prevent damage to the cable.
3.
Lift the upperhandleupandpositionit overthe lowerhandle,aligningthe
holeswherethe wingknobswereremoved(1).SeeFigure2.
Becareful not to bend or kinkthe cables.
4.
Inserta carriagescrewfromthe outsidethroughahandletab,the upperand
k,,,
lowerhandles,a saddlewasherandinto the wingknob(2).Repeaton the
otherside.
5.
Figure2
,,-
Tightenthe wing knobson eachsideof the handle.Referto Figure2.
/
DRIVE Cable
flOTE:Theaugercableroutesdownthe left lowerhandleandthe drivecable
isroutedacrossthe top ofthe lowerhandleanddownthe rightsideof the
lowerhandle.SeeFigure3.
6.
Twocabletieshavebeenusedto looselytie the controlcablesto the lower
handle.Apushclip isalsoincludedonthe lowerdrivecable.Positioncable
tiesnow,asinFigure3,andtighten to securecablesto the lowerhandle.
Trimoff excessmaterialof cableties.Installthe pushclipinto the holeinthe
handleprovidedasshownin the left insetin Figure3.
Cable
PUSH Clip
Figure3
7
Skid Shoe
Clean-OutTool
Thesnowthrowerskidshoesareadjustedupwardat the factoryforshipping
purposes.Adjustthemdownward,if desired,priorto operatingthe snowthrower.
Thechuteclean-outtool isfastenedto the top of the augerhousingwitha
mountingclip andacabletie at the factory.Cutthe cabletie beforeoperatingthe
snowthrower.SeeFigure5.
It isnotrecommended
that you operate this snowthrower on gravelas
it caneasilypickup andthrow loosegravel,causingpersonalinjuryor
damageto the snowthrower and surroundingproperty.
Forclosesnowremovalon asmoothsurface,raiseskidshoeshigheronthe
augerhousingto lowershaveplate.
ChuteClean-out Tool
Whenthe areato beclearedis uneven,suchasagraveldriveway,lowerskid
shoesonthe augerhousingto raisethe shaveplate.
NOTE:Ifyouchooseto operatethe snowthroweron agravelsurface,keepthe skid
shoesin lowestpositionfor maximumclearancebetweenthe groundandthe shave
plate.
Operating asnowthrower equippedwith steel skidshoesmay result
in damageto natural stonepavedsurfaces(e.g.sandstone,bluestone,
limestone). Forinformationon available polymerskidshoes,cail
1-800-4M¥-EIOME.
Figure5
Toadjust the skid shoes
I.
Tire Pressure
Loosen
thefourhexnuts(twooneachside)andcarriage
bolts.Moveskid
shoes
todesired
position.
SeeFigure
4.
Theproperinflationpressureisbetween15psiand20psi.Checkthe tire pressure
periodicallyandmaintainequalpressureinbothtiresat all times.Excessive
pressure
(above20psi)maycausethe wheel(tire/rim)assemblyto burstwith
sufficientforceto causeseriousinjury.Donot over-inflatethe tire. Usea manual
pumpor portableelectrictire inflatorto preventover-inflation.NEVER
USE
ANAIR
COMPRESSOR.
//
/
iii
/
Over-inflatingthe tire with excessivepressure(above20 psi) maycausethe
tire/rim to burst with sufficient forceto causeseriousinjury.
//
Figure
4
2.
Makecertainthe entirebottomsurfaceof skidshoeisagainstthegroundto
avoidunevenwearon the skidshoes.
3.
Retightennutsandboltssecurely.
ShearPins
Apairof replacementaugershearpinsandbowtie cotter
pinsareincludedwith yoursnowthrower.Storethemina
safeplaceuntil needed.
8
Fuel Recommendations
CheckingOilLevel
Useautomotivegasoline(unleadedor low leadedto minimizecombustionchamber
deposits)witha minimumof87 octane.Gasoline
with up to 10%ethanolor 15%
MTBE(MethylTertiaryButylEther)canbeused.Neveruseanoil/gasolinemixture
or dirty gasoline.Avoidgetting dirt, dust,or waterinthe fuel tank.DONOTuseE85
gasoline.
Theengine isshippedwith oil in the engine.Youmust, however,check
the oil level prior to operatingthe snowthrower. Runningthe engine
with insufficientoil cancauseseriousengine damageandvoid the engine
warranty.
Refuelin awell-ventilatedareawith the enginestopped.Donot smokeor
allowflamesor sparksin the areawherethe engineisrefueledor where
gasolineisstored.
flOTE:Besureto checkthe engineona levelsurfacewith the enginestopped.
1.
Removetheoil filler cap/dipstickandwipethe dipstickclean.SeeFigure7.
Donot overfillthe fuel tank.After refueling,makesurethe tank capisclosed
properlyandsecurely.
Becarefulnot to spillfuel whenrefueling.Spilledfuel or fuelvapormay
ignite.Ifanyfuel isspilled,makesuretheareaisdry beforestartingthe
engine.
Avoidrepeatedor prolongedcontactwith skinor breathingof vapor.
AddingFuel
Useextreme carewhen handling gasoline.Gasolineisextremely flammable
and the vaporsare explosive. Neverfuel the machineindoorsor while the
engine ishot or running. Extinguishcigarettes, cigars,pipesand other
[sourcesof gnt on.
Alwayskeephandsandfeet clearof equipmentmoving parts. Donotusea
pressurizedstarting fluid. Vaporsareflammable.
j
Figure7
I.
Cleanaroundfuel fill beforeremovingcapto fuel.
2.
Afuel levelindicator
islocatedinthe fueltank.Filltankuntil fuel reaches
the
Insertthe cap/dipstickinto theoil filler neck,turnthe cap1/4turn until fully
seated.
fuel levelindictor,Figure6. Becarefulnot to overfill.
NOTE:Onsomeengines,a threadedcap/dipstkkmayexistinsteadof a 1/4
turn capasdescribedabove.Inthisinstancedo not fullytighten thecapto
checkthe oil level.Simplyrestthecaponthe threadsto checkfor properoil
level.
3.
Fuel Level Indicator
TopView
Removetheoil filler cap/dipstick.Ifthe levelislow,slowlyaddoil untiloil
levelregistersbetweenhigh (H)andlow (L),Figure7. Referto the Engine
Maintenance
sectionforcorrectoil viscosityandengineoil capacity.
NO?E:Donot overfill.Overfillingwithoil mayresultinenginesmoking,hard
startingor sparkplugfouling.
4.
Figure6
9
Replace
andtightencap/dipstickfirmly beforestartingengine.
DischargeChute
2.
AugerControlTest
Loosenthe wing knobonthe upperchute,adjustchuteandchutecontrolto
desiredoperatingposition.
IMPORTANT: Perform the following test before operating the
snow thrower for the first time and at the start of each winter season.
Tightenthe wingknobon the upperchutemakingsurethe carriagebolt is
correctlypositioned.Referto Figure8.
Checkthe adjustmentof the augercontrolasfollows:
1.
F
Whenaugercontrolisreleasedandinthe disengaged
"up" position,cable
shouldhaveverylittle slack,but shouldNOTbetight.
Donot over-tighten the cable.Over-tighteningmay preventthe augerfrom
disengaging
andcompromisethe safetyof the snowthrower.
2.
Inawell-ventilatedarea,startthe snowthrowerengineasinstructedon
page10underthe headingStartingEngine.Makesurethe throttle issetin
the FAST_I
position.
3.
Whilestandinginoperator'sposition(behindunit)engageauger.
4.
Allowaugerto remainengagedforapproximatelyten (10)secondsbefore
releasingthe augercontrol.Repeatthisseveraltimes.
5.
With the enginerunninginthe FAST
_
positionandthe augercontrolin
the disengaged"up"position,walkto the front of the machine.
\
6.
Confirmthatthe augerhascompletelystoppedrotatingandshowsNOsigns
of motion
7.
Ifthe augershowsANYsignsof rotating,immediatelyreturntothe
operator'spositionandshutoff the engine.Waitforall movingpartsto stop
beforereadjustingthe augercontrol.
8.
Loosenthe rearhexbolton the cableadjustmentbracket.SeeFigure9.
Figure8
F
i Adjustment
Bracket
Auger Housing
Screws
Figure9
10
9.
Slidethe cableadjustmentbracketbackwardstakingup the slackin the
augercable.
10.
Retightenthe rearhexbolt
11.
Repeatsteps2-6aboveto verifyproperadjustmenthasbeenachieved.
Upper Handle
Drive
AugerControl
Control
Upper Chute
FuelCap
Chute Assembl
RecoilStarter
Handle
Clean-out Tool
Auger
Shave Plate
Oil Drain
Electric Starter Outlet
Befamiliar with all the controls on thesnow throwerandtheirproper operation. Knowhowto stop the machineanddisengagethem quickly.
ChuteHandle
Snowthrowercontrolsandfeaturesaredescribedbelowandillustrated
inthe
figureabove.
Thedirectionofsnowthrowingcorresponds
to the directionofthe chuteopening.
Usethe chutehandleto turn thechuteassemblyinthe directionyouwish tothrow
the snow.
DriveControl
Locatedonthe undersideofthe upperhandle,the drivecontrolisusedto engage/
disengagewheels.Squeeze
the drivecontrolagainstthe upperhandleto engage
the wheels;releaseto disengage.
ChuteKnob
Thedistancesnowisthrowncanbeadjustedbyeither raisingor loweringthe upper
chute.Loosenthe chuteknobon the sideof the upperchuteto adjust.Pivotthe
upperchuteto desiredposition,andretightenthe chuteknob.Raisingthe chute
throwsthesnowfurther.
AugerControl
Theaugercontrolisonthe front the upperhandle.Squeeze
the augercontrol
againstthe upperhandleto engagethe auger;releaseto disengagethe auger.
Shave Plate
Theshaveplatemaintainscontactwith pavementasthesnowthrowerispropelled,
allowingsnowcloseto pavement'ssurfaceto bedischarged.
Nevermakeadjustmentsto the chute assemblyunlessboth auger anddrive
controls aredisengagedandthe operatorisstanding besidethe unit.
SkidShoe
IMPORTANT:
Referto AugerControlTestin theAssemblysectionofthis manual
priorto operatingyoursnowthrower.Readandfollowall instructionscarefully
andperformall adjustmentsto verifyyoursnowthrowerisoperatingsafelyand
properly.
Thespacebetweenthe shaveplateandthe groundcanbeadjusted.Forclosesnow
removal,placeskidshoesinthe highestposition.Usemiddleor lowestposition
whenareato beclearedisunevenor on gravelsurfaces.
11
Clean-OutTool
Auger
Whenengaged,the augerrotatesanddrawssnowintothe augerhousing.
ChuteAssembly
Neveruseyour handsto cleara cloggedchuteassembly.Shutoffengine and
remainbehind handlesuntil all moving partshavestoppedbefore usngthe|
clean-outtool to clearthe chute assembly.
Snowdrawninto the augerhousingisdischarged
out the chuteassembly.
J
ChokeControl
I
Thechokecontrolaidsinstartingtheengine.For
informationon chokeusage,seeStartingTheEnginelaterin
thissection.
If
_
RecoilStarter& Starter Handle
Thismotorisfitted with arecoilactionpull startandamitten griphandleforeasy
accesswhilewearingglovesor mittens.
with a mountingclip.Shouldsnowandicebecomelodgedinthe chuteassembly
duringoperation,proceedasfollowsto safelycleanthe chuteassemblyandchute
Thechuteclean-outtoolis convenientlyfastenedtothe rearof the augerhousing
opening:
1.
Release
boththe AugerControlandthe DriveControl.
2.
Stopthe enginebyremovingthe key.
3.
Removetheclean-outtool fromthe clip whichsecuresit to the rearof the
augerhousing.
4.
Usethe shovel-shaped
endofthe clean-outtool todislodgeandscoopany
snowandicewhichhasformedinandnearthe chuteassembly.
5.
Refasten
the clean-outtool to the mountingclip onthe rearof the auger
housing,reinsertthe keyandstart the snowthrower'sengine.
6.
Whilestandinginthe operator'sposition(behindthesnowthrower),engage
the augercontrolfora fewsecondsto clearanyremainingsnowandicefrom
the chuteassembly.
Key
Thekeyisasafetydevice.It mustbefullyinsertedinorder
forthe engineto start. Remove
the keywhenthe snow
throweris not inuse.
U,,j
Ii
A
flOTE:Donotturn the keyinanattemptto startthe engine,
Doingsomaycauseit to break.
i_
0
V-,,a
ElectricStarterButton
Before Starting Engine
Pressing
the electricstarterbuttonengagesthe engine'selectricstarterwhen
pluggedinto a 120Vpowersource.
Electric Starter Outlet
Requires
the useof athree-prongoutdoorextensioncordanda 120Vpowersource/
walloutlet.
Read,understand,andfollow all instructionsand warnings onthe machine
and inthis manualbeforeoperating.
Primer
CheckEngineOil
Pressing
the primerforcesfueldirectlyinto engine's
carburetorto aidincold-weatherstarting.Refertothe
startinginstructionsinthe Operationsectionof thismanual
forproperprimerusage.Theimageto the right corresponds
with the labelon the engineidentifyingthe primer.
Theunit wasshippedwith oil inthe engine.Checkoil levelbeforeeachoperationto
ensureadequateoil inthe engine.Forfurther instructions,referto the Maintenance
& Servicesectionof thismanual.
flOTE:Besureto checkthe engineona levelsurfacewith theengine
stopped.
Oil Fill
Removeoil capto addoil. Referto the Maintenance
& Servicesectionfor checking
andaddingoil instructions.
1.
Removetheoil filler cap/dipstickandwipethe dipstickclean.
2.
Insertthe cap/dipstickinto theoil filler neck,turnthe cap1/4turn until fully
seated.
NOTE:Onsomeengines,a threadedcap/dipstkkmayexistinsteadof a 1/4
turn capasdescribedabove.Inthisinstancedo not fullytighten thecapto
checkthe oil level.Simplyrestthecaponthe threadsto checkfor properoil
level.
GasolineCap
Removegascapto addfuel. Unitrunson regulargas.
NOTE:
Thisunit mayincludeafuel plug,whichisonlyusedduringassemblyto keep
dirt anddebrisout offuel tank. Discardthe fuel plugbeforefilling thefuel tank.
Removetheoil filler cap/dipstick.Ifthe levelislow,slowlyaddoil (5W-30,
with a minimumclassificationof SF/SG)
untiloil levelregistersbetweenhigh
(N)andlow (L).
ThrottleControl
flOTE:Donot overfill.Overfillingwithoil mayresultinenginesmoking,hard
startingor sparkplugfouling.
ram---- .dli
Replace
andtightencap/dipstickfirmly beforestartingengine.
Thethrottlecontrolislocatedon the engine.It regulatesthe speedof the engine
andwill shutoff theenginewhen placedin the Stop
position.
12
Gasoline
Determinethatyourhome'swiring isathree-wiregroundedsystem.Askalicensed
electricianif youarenot certain.
Useautomotivegasoline(unleadedor low leadedto minimizecombustionchamber
deposits)witha minimumof87 octane.Gasolinewith up to 10%ethanolor 15%
MTBE(MethylTertiaryButylEther)canbeused.Neveruseanoil/gasolinemixture
or dirty gasoline.Avoidgettingdirt, dust,or waterinthe fuel tank.DONOTuseE85
gasoline.
Refuelin awell-ventilatedareawith theenginestopped.Donot smokeor
allowflamesor sparksintheareawherethe engineisrefueledor where
gasolineisstored.
Ifyouhaveagroundedthree-prongreceptacle,
proceedasfollows.If youdonot
havethe properhousewiring, DONOTusethe electricstarterunderanyconditions.
1.
Plugthe extensioncordintothe outlet locatedonthe engine'ssurface.Plug
the otherendof extensioncordintoa three-prong120-volt,grounded,AC
outlet inawell-ventilatedarea.
2.
Movethrottlecontrolto FAST(rabbit)_
3. Move
choke
contro,
tothe
CNO,E
pos I,"1/co,d
t on enginestart). If
engineiswarm,placechokecontrolin RUNposition.
Donot overfillthe fuel tank.After refueling,makesurethe tank capisclosed
properlyandsecurely.
4.
Becarefulnot to spillfuel whenrefueling.Spilledfuel or fuelvapormay
ignite.Ifanyfuelis spilled,makesurethe areaisdry beforestartingthe
engine.
Pushprimerthree(3)times,makingsureto coverventholewhenpushing.
Ifengineiswarm,pushprimeronlyonce.Alwayscovervent holewhen
pushing.Coolweathermayrequireprimingto berepeated.
5.
Pushandhold starterbuttondownto startengine.Oncethe enginestarts,
immediatelyreleasestarterbutton.Electricstarterisequippedwiththermal
overloadprotection;systemwill temporarilyshutdownto allowstarterto
coolif electricstarterbecomesoverloaded.
6.
Asthe enginewarms,slowlyrotatethe chokecontrolto RUNposition.If
the enginefalters,restartengineandrunwith chokecontrolat half-choke
positionforashortperiodoftime,andthenslowlyrotatethe chokeinto RUN
position.
7.
Afterengineis running,disconnectpowercordfrom electricstarter.When
disconnecting,
alwaysunplugthe endat thewall outlet beforeunplugging
the oppositeendfromthe engine.
Avoidrepeatedor prolongedcontactwith skinor breathingof vapor.
Useextreme carewhen handling gasoline.Gasolineisextremely flammable
and the vapors areexplosive.Neverfuel the machineindoorsor while the
engine ishot or running. Extinguishcigarettes, cigars,pipesand other
sourcesof ignition.
Cleanaroundfuel fill beforeremovingcapto fuelto avoiddirt anddebris
fallinginto fuel tank.
Afuel levelindicatorislocatedin the fueltank.Filltank until fuel reachesthe
2.
position.
RecoilStarter
fuel levelindictor.SeeFigure10inset.Becarefulnot to overfill.
StartingThe Engine
Donot pull the starter handlewhilethe engine running.
Alwayskeephandsandfeet clearof moving parts. Donot usea pressurized
starting fluid. Vaporsareflammable.
1.
Movethrottlecontrolto FAST(rabbit)_
position.
2. Move
choke
control
tothe
CHOKE
position
1,,'1(cold
enginestart).
If
engineiswarm,placechokecontrolin RUNposition.
Theextensioncordcanbe anylength, but must be ratedfor 15ampsat 125
volts,groundedand ratedfor outdoor use.
NOTE:
Allowthe enginetowarmup forafew minutesafter starting.Theenginewill
not developfull poweruntil it reachesoperatingtemperatures.
1.
Makecertainboth theaugercontrolanddrivecontrolareinthe disengaged
(released)position.
2.
Insertkeyintoslot.Makesureit snapsintoplace.Donotattempttoturnthe key.
NOTE:Theenginecannotstartwithout the keyfullyinsertedintothe switch.
ElectricStarter
Theoptional electricstarter isequippedwith a groundedthree-wire power
plug,and isdesignedto operate on 120volt AChouseholdcurrent. It mustbe
usedwith a properly groundedthree-prongextensioncordandreceptacle
at all times to avoidthe possibilityof electricshock.Followall instructions
carefully prior to operatingthe electric starter. DONOTuseelectricstarter in
the rain.
3.
Pushprimerthree(3)times,makingsureto coverventholewhenpushing.
Ifengineiswarm,pushprimeronlyonce.Alwayscovervent holewhen
pushing.Coolweathermayrequireprimingto berepeated.
4.
Pullgentlyon thestarterhandleuntil it beginsto resist,thenpullquickly
andforcefullyto overcomethe compression.
Engineshouldstart.Donot
releasethe handleandallowit to snapback.ReturnropeSLOWLY
to original
position.If required,repeatthisstep.
5.
Asthe enginewarms,slowlyrotatethe chokecontrolto RUNposition.If
the enginefalters,restartengineandrunwith chokecontrolat half-choke
positionforashortperiodoftime,andthenslowlyrotatethe chokeinto RUN
position.
Toavoid unsupervisedengineoperation, neverleavethe machine
unattended with the engine running. Turnthe engineoff after useand
removeignitionkey.
13
Stopping TheEngine
Runenginefor afewminutesbeforestoppingto helpdry off anymoistureon the
engine.
Operating
position.
1.
Movethrottle controlto STOP
_-_
2.
Removethe key.Removing
the keywill reducethe possibilityof
unauthorizedstartingof the enginewhileequipmentis not inuse.Keepthe
keyina safeplace.Theenginecannotstartwithout the key.
3.
Donot lift the snowthrower at any time bythe chutehandle.
Wipeanymoistureawayfrom the controlson the engine..
1.
Formostefficientsnowremoval,removesnowimmediately
afterit falls.
2.
Discharge
snowdownwindwheneverpossible.Slightlyoverlapeachprevious
path.
3.
Setthe skidshoes1/4"belowthe shaveplatefor normalusage.Theskid
shoesmaybeadjustedupwardfor hard-packed
snow.
ToStopTheSnowThrower
1.
Tostopthe wheels,releasethe drivecontrol.
2.
Tostopthrowingsnow,releasethe augercontrol.
3.
Tostopengine,movethrottlecontrolleverto OFF_
Donot turn key.
NOTE:It is not recommended
that youoperatethissnowthroweron gravel
asloosegravelcanbeeasilypickedupandthrown bythe augercausing
personalinjuryand/ordamageto the snowthrower.
andpullout the key.
Thetemperature of muffler andthe surrounding
areasmayexceed150o F.
Avoidthese areas.
Startthe enginefollowingstartinginstructions.
2.
Allowthe engineto warmupforafew minutesasthe enginewill not
developfull poweruntil it reachesoperatingtemperature.
3.
Rotatethe chuteassemblyto the desireddirection,awayfrom bystanders
and/orbuildings.
4.
Makingcertainnobystandersor obstaclesareinfront of the unit, squeeze
the augercontrolcompletelyagainstthe upperhandletofully engagethe
auger.
6.
Ifyouchooseto operatethesnowthrowerongravel,keepthe skidshoein
the lowestpositionfor maximumclearancebetweenthegroundandthe
shaveplate.
.5.
Cleanthe snowthrowerthoroughlyafter eachuse.
Theaugerissecuredtothe spiralshaftwith two shearpinsandbow-tieclips.If
the augershouldstrikeaforeignobjector kejam, the snowthroweris designed
sothatthe shearpinsmayshear.Ifaugerwill not turn,checkto seeif the pinshave
sheared.SeeFigure10.
CAUTION:
Checkthe areato beclearedfor foreignobjects.Removeforeignobjects,
if any.
1.
4.
ReplacingShearPins
UsingSnowThrowerto ClearSnow
5.
Tips
NEVER
replacethe augershearpinswith anything other than OEMPartNo.
738-04124replacementshearpins.SeePartsListin this Operator'sManual.
Anydamageto the snowthrower asaresultoffailing to do sowill NOTbe
coveredbyyour snowthrower's warranty.
Alwaysturn off the snowthrower's engineand removethe key priorto
replacingshearpins.
Whilethe augercontrolisengaged,squeezethe drivecontrolcompletely
againstthe upperhandleto engagethe wheels.Donot "feather"the drive
control.
f
Asthe snowthrowerstartsto move,maintainafirm holdonthe handle,and
guidethe snowthroweralongthe pathto becleared.
7.
Release
the augeranddrivecontrolsto stopthe snowthrowingactionand
forwardmotion.
..............
NOTE:Your
unit isequippedwith a clutchinthe transmission.Ifthe wheels
stopturningwhiletrying to dischargelargevolumesof snow,immediately
disengagethe drivecontrolandallowthe rotatingaugertodischargesnow
fromthe housing.Reducetheclearingwidth andcontinueoperation.
8.
//
/ /
Oneachsucceeding
pass,readjustthe chuteassemblyto the desiredposition
andslightlyoverlapthe previouslyclearedpath.
PositioningDischargeChute
Loosenthe chuteknobandpivotupperchuteto desiredposition.Tightenthe chute
knobmakingsurethecarriageboltiscorrectlypositioned.Raisingthe chutethrows
snowfurther.
1.
J
Figure10
Rotatechutehandleto desiredoperatingposition.
14
Followthe maintenanceschedulegivenbelow.This chartdescribes
serviceguidelinesonly. Use the ServiceLog columnto keeptrack
of completedmaintenancetasks.To locate the nearest Sears
Service Centeror to schedule service,simplycontact Searsat
1-800-4-MY-HOME®.
Beforeservicing,repairing,lubricatingor inspecting,
disengageall controls
andstopengine.Waitunti}all movingpartshavecometo acomp}etestop.
Removethe keyto preventunintended
starting.Alwayswearsafetyglasses
duringoperationorwhile performinganyadjustmentsor repairs.
Maintenance
Schedule
1.
Check
Unit and engine.
2.
3.
Tightenor replace
Clean
Engineoil
1.
Change
1.
Sparkplug
1.
Check
2.
3.
Controllinkagesand pivots
Wheels
4.
Gearshaft and Augershaft
2.
3.
4.
Lubewith lightoil
Lubewith multipurposeautogrease
Lubewith lightoil
Annually or 50 hours
1.
Engineoil
1.
Change
Annually or 100 hours
1.
Sparkplug
1.
Clean,adjust gap,or replaceif
necessary
Before Storage
1.
Fuel system
1.
Runengineuntilit stopsfrom lack
of fuel
Each Use and every 5
hours
1st5 hours
Annuallyor 25 hours
1.
2.
Engineoil level
Looseor missinghardware
3.
1.
ENGINEMAINTENANCE
f
CheckingEngineOil
Beforelubricating,
repairing,or inspecting,
disengageall controlsandstop
eng he. Wat unt a mov ng partshavecometo a compete stop.
NOTE:Checkthe oil levelbeforeeachuseandafter everyfive hoursofoperationto
besurecorrectoil levelis maintained.
Whenaddingoil to the engine,referto viscositychartbelow.Engineoil capacity
is600ml(approx.20oz.).Donot over-fill.Usea4-stroke,or anequivalenthigh
detergent,premiumquality motoroil certifiedto meetor exceedU.S.automobile
manufacturer'srequirementsforserviceclassificationSG,SF.Motoroilsclassified
SG,SFwill showthisdesignationon thecontainer.
1.
Removethe oil filler cap/dipstickandwipethe dipstickclean.
2.
Insertthe cap/dipstickintothe oil filler neck,turn the cap1/4turn untilfully
seated.
,,
j
Figure11
Changing Engine Oil
NOTE:Onsomeengines,a threadedcap/dipstkkmayexistinsteadof a1/4
turn capasdescribedabove.Inthis instancedonot fully tightenthe capto
checkthe oil level.Simplyrestthe capon the threadsto checkforproperoil
level.
3.
4.
NOTE:Changethe engineoil afterthe first 5 hoursof operationandonceaseason
or every50hoursthereafter.
1.
Removethe oil filler cap/dipstick.Iflevelislow,slowlyaddoil until oil level
registersbetweenhigh(H)andlow (L).SeeFigure11.
Drainfuelfrom tankbyrunningengineuntil the fuel tank isempty.Besure
fuel fill capissecure.
2.
Placesuitableoil collectioncontainerunderoil drainplug.
Replace
andtightencap/dipstickfirmly beforestartingengine.
3.
Removeoil drainplug.SeeFigure12.
4.
Tipengineto drainoil into the container.Usedoil mustbedisposedof ata
propercollectioncenter
15
Usedoil isahazardouswaste product. Dispose
of usedoil properly. Donot
discardwith household
waste. Checkwith your localauthorities or Sears
ServiceCenterfor safedisposal/recyclingfacilities.
5.
Reinstallthe drainplugandtightenit securely.
6.
Refillwith the recommended
oil andcheckthe oil level.SeeRecommended
Oil Usagechart.Theengine'soil capacityis20ounces.
i
i
Synthetic
Oil Drain
Plug
(oF)-40o-20 o 0o 200 400
(oc)
-30° -20° -10° 0°
Figure12
DONOTusenon-detergent oil or 2-strokeengine oil. It couldshorten the
engine'sservicelife.
SparkPlug
7.
Reinstallthe oil filler cap/dipsticksecurely.
Thoroughly
washyour handswith soapandwater assoonas
possibleafter handling usedoil.
CheckingSpark Plug
DONOTcheckfor sparkwith sparkplug removed.DONOTcrankenginewith
sparkplug removed.
If the engine hasbeenrunning,the muffler will beveryhot.Becareful not to
touchthe muffler.
Spark Plug Boot
NOTE:Checkthe sparkplugonceaseasonor every25 hoursof operation.Change
the sparkplugonceaseasonor every100hours.
Figure13
Toensureproperengineoperation,thesparkplugmustbeproperlygappedand
freeofdeposits.
Electrode
1.
Removethe sparkplugbootandusea sparkplugwrenchto removethe
plug.SeeFigure13.
2.
Visuallyinspectthe sparkplug.Discardthe sparkplugif thereisapparent
wear,or if the insulatoriscrackedor chipped.Cleanthe sparkplugwith a
wirebrushif it isto be reused.
3.
Measurethe pluggapwith afeelergauge.Correctasnecessary
bybending
sideelectrode.SeeFigure14.Thegapshouldbesetto .02-.03inches(0.600.80mm).
4.
Checkthatthe sparkplug washerisin goodconditionandthreadthe spark
plug inbyhandto preventcross-threading.
5.
Afterthe sparkplug isseated,tightenwith asparkplugwrenchto compress
the washer.
___,.
16
___
.02-.03 in.
(0.60-0.80 ram)
Figure14
NOTE:
Wheninstallinga newsparkplug,tighten 1/2-turnafter thesparkplugseats
to compress
the washer.Whenreinstallingausedsparkplug,tighten 1/8- to 1/4turn afterthe sparkplugseatsto compressthe washer.General
Recommendations.
Lubrication
1.
Alwaysobservesafetyruleswhen performinganymaintenance.
1.
2.
Thewarrantyonthissnowthrowerdoesnot coveritemsthat havebeen
subjectedtooperatorabuseor negligence.Toreceivefull valuefrom the
warranty,operatormustmaintainthe snowthrowerasinstructedinthis
manual.
Lubricatepivotpointson the augercontrolanddrivecontrolwith a light
engineoil onceaseason.
2.
Lubricate
theaugeridlerbracket
withalightengineoil onceaseason.
3.
Foraviewof the lubricationpointson thesnowthrower,seeFigure16.
Periodicallycheckall fastenersandhardwareto makesurethesearetight.
Replacingthe ShavePlate and Skid Shoes
Theshaveplateandskidshoeson the bottomofthe snowthroweraresubjectto
wear.Theseshouldbe checkedperiodicallyandreplacedwhennecessary.
1.
Toreplace,removetwo carriageboltsandnutssecuringeachskidshoeto
the augerhousing.SeeFigure15.
2.
Reassemble
newskidshoeswith hardwarejust removed.Makesurethe skid
shoesareadjustedto belevel.
3.
Toremoveshaveplate:Removebothskidshoesandhardwareincluding
carriageboltsandnutswhichattachshaveplateto the snowthrower
housing.Forlocationof shaveplate,seeFigure15.
Figure16
Shear Pin
Engine
Cotter Pin
Listedbelowaregeneralrecommendations
aboutmaintainingyoursnowthrower
engine.
Skid Shoe
i iii
Carriage Bolt
ShavePJate /
Lock Nut
/
Carriage Bolt
/_
Lock Nut
Figure15
4.
Reassemble
newshaveplate,makingsureheadsof thecarriageboltsareto
the insideofthe housing.Reinstallskidshoes.Tightensecurely.
ServicingAuger
Theaugerissecuredto the spiralshaftwith fourshearpinsandcotterpins.Ifyou
hit aforeignobjector icejam,the snowthrowerisdesignedsothatthe pinsmay
shear.Referto Figure15.
If the augerdoesnot turn, checkif the pinshavesheared.Replace,
if needed,with
propershearpins.Referto the PartsListinthismanualforthe correctpartnumber.
IMPORT4N_NEVER
replacethe augershearpinswith standardpinsor fasteners.
Anydamageto the augergearboxor othercomponents,asaresultof doingso,will
NOTbecoveredbyyoursnowthrower'swarranty.
17
1.
Beforeoperatingsnowthrower,checkthe oil level.
2.
Change
engineoil after first fivehoursof operationandevery50hours
thereafter.
3.
Cleansparkplug andresetthe electrodegapto 0.030"at leastonceaseason
or every100hoursof operation;replaceevery200hoursof operation.
CheckV-Belts
AugerBelt
Followinstructionsbelowto checkconditionof drivebeltsevery.50hoursof
operation.
IMPORTANE
Because
gascouldleakfrom the carburetorwhenservicingaugerbelt,
runtheengineuntilthe fuel tankisdry,aspreviouslyinstructed
in ReplacingBelts.
1.
Removethe plasticbeltcoveron the front of theenginebyremovingthe
self-tappingscrewandpressingthe plastictabsto releasethe beltcover.
1.
2.
Visuallyinspectfor frayed,cracked,or excessively
wornout belts.Replace,if
necessary,
andfollowinstructionsbelow.
Tipthe snowthrowerupandforwardsothat it restson the augerhousing.
Removethe beltkeeperascalledout in Figure19.Returnthe snowthrower
to itsuprightpositionto completethe followingsteps.
2.
Slipthe front augerbeltoffof the enginepulley,pushingit forwardand
rollinginoffof the pulley.SeeFigure18.
3.
Squeezethe augercontrolhandleto releasethe augerbrake,whichisthetab
that holdsthe belt ontothe augerpulley.Remove
the belt.
4.
Replace
with newbeltafter replacingthe drivebelt.
ReplacingBelts
NOTE:Therearetwo beltsonthissnowthrower:anaugerbelt anddrivebelt. Itis
recommended
that bothbeltsbereplacedat the sametime.
1.
2.
Removethe sparkplugwirefrom sparkplug andgroundit againstthe
engineto preventaccidentalstarting.
Belt
Engine
Pulley
Runthe engineuntil the fuel tank isdryto preventgasolineleakagewhen
replacingbelts.
Drive
Belt-
Performbelt maintenanceoutdoorsassomegasmay possibJyleak from the
carburetor.
3.
Auger
Pulley
Removethe self-tappingscrewshownin Figure17,andpressthe plastic
tabsto releasethe belt cover.Pullthe beltcoverupandout from aroundthe
engineandchuteassembly.
Setit asideandsave.
\
Belt Keeper
Idler Bracket
/
/
Figure18
J
Figure17
18
Drive Belt
AdjustingTheAugerCable
NOTE:Replace
the drivebelt beforereassembling
the newaugerbelt.
1.
Referto the Assemblysectionfor instructionsonadjustingthe augercontrolcable.
Tipthe snowthrowerupandforwardsothat it restson the augerhousing.
IMPORTANT:
Because
gascouldleakfromthe carburetorwhenservicing
augerbelt, runthe engineuntil the fueltank isdry,aspreviouslyinstructed
in ReplacingBelts.
2.
Removethe springthat connectsthe transmissionto abolt onthe engine
frame.SeeFigure19.
NOTE:It maybeeasierto first removethe flangelocknut,thenuseneedlenosedpliersto firmly gripspringandremovefrom bolt.
Spring
Figure19
3.
Pivotthe transmissionforwardto releasepressureonthe drivebelt. Remove
belt fromtransmissionpulley.
4.
Removethe drivebeltfrom aroundthe enginepulley,andawayfrom the
unit.
5.
Placethe newdrivebeltinto the grooveonthe enginepulley.SeeFigure18.
6.
Tiltthe transmissionforwardandpositionthe drivebelt ontothe
transmissionpulley.
7.
Reconnect
the springto the bolton the engineframeandsecurethe
transmission.
Reinstallthe flangelocknut.
8.
Installnewaugerbelt.
9.
Reassemble
the belt coveronthe snowthrower.
10.
Reassemble
the belt keeperto the housing.
19
If the snowthrowerwill not beusedfor 30daysor longer,or if it is theendof thesnowseasonwhenthe lastpossibilityof snowisgone,the equipmentneedsto bestored
properly.Followstorageinstructionsbelowto ensuretop performancefrom thesnowthrowerformanymoreyears.
PreparingSnowThrower
PreparingEngine
Enginesstoredover30daysneedto bedrainedof fuel to preventdeteriorationand
gumfromforminginfuel systemor on essentialcarburetorparts.If thegasolinein
yourenginedeterioratesduringstorage,youmayneedto havethe carburetor,and
otherfuel systemcomponents,servicedor replaced.
Whenstoringthe snowthrowerin anunventilatedor metalstorageshed,
careshouldbetakento rustproofthe equipment.Usinga lightoil or silicone,
coatthe equipment,especially
anychains,springs,bearingsandcables.
1.
Removeall fuel fromtank byrunningengineuntil it stops.Donot attemptto
pourfuelfrom the engine.
Followlubricationrecommendations.
2.
Changetheengineoil.
3.
Removesparkplugandpourapproximately1oz.(30ml) ofcleanengineoil
into the cylinder.Pullthe recoilstarterseveraltimesto distributetheoil, and
reinstallthe sparkplug.
4.
Cleandebrisfrom aroundengine,andunder,around,andbehindmuffler.
Applya lightfilm ofoil on anyareasthat aresusceptibleto rust.
Removeall dirt from exteriorof engineandequipment.
Storeequipmentinaclean,dry area.
Inflatethe tiresto the maximumPSI.Referto tire sidewall.
Storeinaclean,dry andwell ventilatedareaawayfromanyappliancethat
operateswith aflameor pilot light,suchasa furnace,waterheater,or
clothesdryer.Avoidanyareawitha sparkproducingelectricmotor,or where
powertoolsareoperated.
If possible,avoidstorageareaswith high humidity.
Keepthe enginelevelinstorage.Tiltingcancausefuelor oil leakage.
!
Neverstore snowthrower with fuel in tank indoorsor in poorlyventilated J
I
areas,where fuel fumesmay reachan openflame, sparkor pilotlight ason aJ
fumace,water heater,c othesdryeror gasapp ante.
j
20
Thissectionaddresses
minorserviceissues.Tolocatethe nearestSearsService
Centeror to scheduleservice,simplycontactSearsat 1-800-4-MY-HOME
®.
Beforeperforming
anytypeofmaintenance/service,
disengage
allcontrolsandstop
theengine.Waltuntilallmovingpartshavecometoacompletestop.Remove
the key
to preventunintendedstarting.Alwayswearsafetyglasses
duringoperationorwhile
performinganyadjustments
orrepairs.
Enginefailsto start
1.
Chokecontrolnot in Chokeposition.
1.
Movechokecontrolto Chokeposition.
2.
Sparkplug wiredisconnected.
2.
Connectwireto sparkplug.
3.
Faultysparkplug.
3.
Clean,adjustgap,or replace.
4.
Fueltank emptyor stalefuel.
4.
Filltank with clean,freshgasoline.
5.
Enginenot primed.
5.
Primeengineasinstructedin the OperationSection.
6.
Safetykeynot inserted.
6.
Insertkeyfullyinto the switch.
Extensioncordnot connected(whenusingelectric 7.
start button)
Connectoneendof the extensioncordto the electric
1.
Enginerunningon choke.
1.
Movechokeleverto RUNposition.
2.
Fuellineblocked,or stalefuel.
2.
Cleanfuel lineandfill tank with fresh,cleangasoline.
3.
Wateror dirt infuel system.
3.
Runengineuntil it stops.Refillwith freshfuel.
4.
Carburetorout of adjustment.
4.
Contacta SearsServiceCenter.
5.
Over-governed
engine
5.
Contacta SearsServiceCenter.
Engineoverheats
1.
Carburetornot adjustedproperly.
1.
ContactyourSearsParts& RepairCenter.
Excessive
vibration
1.
Loosepartsor damagedauger.
1.
Stopengineimmediatelyanddisconnectsparkplugwire.
Tightenall boltsandnuts.If vibrationcontinues,haveunit
servicedbyaSearsParts& RepairCenter.
Lossof power
1.
Sparkplug wireloose.
1.
Connectandtightensparkplugwire.
2.
Gascapvent holeplugged.
2.
Removeiceandsnowfromgascap.Becertainvent holeis
clear.
1.
Drivecableinneedof adjustment.
1.
Adjustdrivecontrolcable.Referto ServiceandMaintenance
section.
2.
Drivebelt looseor damaged.
2.
Replace
drivebelt. Referto Service& Maint.section.
1.
Chuteassemblyclogged.
1.
Stopengineimmediatelyanddisconnectsparkplugwire.
Cleanchuteassemblyandinsideof augerhousingwith cleanout tool or astick.
2.
Foreignobjectlodgedin auger.
2.
Stopengineimmediatelyanddisconnectsparkplugwire.
Removeobjectfrom augerwith clean-outtool or a stick.
3.
Augercablein needofadjustment.
3.
Adjustaugercontrolcable.Referto Assemblysection.
4.
Augerbelt looseor damaged.
4.
Replace
augerbelt. Referto ServiceandMaintenance
section.
5.
Shearpin(s)sheared.
5.
Replace
with newshearpin(s).
Enginerunningerratically/
inconsistentRPM(huntingor
surging)
Unitfallsto propelitself
Unitfallsto dischargesnow
NEED MORE HELP?
o Find this and all your other product raanua[s online.
o Get answers from ou_ team
Get a personalized
o Find information
of home experts.
maintenance
plan for your home.
and toots to help with home projects.
21
starteroutlet andthe otherendto athree-prong120-volt,
grounded,ACoutlet.
Craftsman
Snow Thrower
IViodel 247.881701
22
Craftsman
Snow Thrower
IViodel 247.881701
m
m
M
M
ChuteAssembly
25
731-04218B
Impeller
71o-o4o71
CarriageBolt 5/16-18x 1.0"
26
932-0611
ExtensionSpring
3
71o-o451
CarriageBolt 5/16-18
27
736-0174
WaveWasher
4
710-0260A
CarriageBolt 5/16-18x .62
28
938-0281
ShoulderScrew3/8-16
5
720-04072A
WingKnob5/16-18
29
941-0245
Hex FlangeBearing
6
731-04388A
ChuteHandle
30
941-0309
Ball Bearing
7
731-04426A
UpperChute
31
950-04191
Spacer
8
936-0267
FiatWasher.385 x .87 x .06
32
684-04358
FlatIdler
9
931-04127
LowerChute
33
784-0434-0637
Auger IdlerBracket
lO
931-04353
ChuteRing
34
790-00075
BearingHousing
11
931-2636A
ChuteAdapter5" Dia.
35
918-04292B
AugerGearboxAssembly
684-04113A-0637 AugerAssembly- LH
1
984-04037
2
12
932-04111
ChuteAdjustmentSpring
36
13
712-04064
FlangeLock Nut 1/4-20
37
684-04114A-0637 AugerAssembly- RH
14
931-2643
Clean-outTool
38
684-04166A-4043 AugerHousing,22"
15
731-2635
Clean-outToolMount
39
714-04040
Bow Tie Cotter Pin72
731-04870
Spacer,1.25x.75 x 1.00
16
725-0157
CableTie
40
17
710-0134
CarriageScrew 1/4-20x 0.62"
41
936-0351
FlatWasher
18
710-0520
HexBolt 3/8-16x 1.50"
42
738-04124A
Shear Pin,.25x 1.50
19
710-04484
AB Screw5/16-18x .750
43
741-0493A
FlangeBushing
790-00087A-0637 Hex BearingHousing
2o
712-04063
FlangeLock Nut, 5/16-18
44
21
712-04065
FlangeLock Nut, 3/8-16
45
790-00117-0637
Shave Plate2.25 x 21.66 LG
22
750-04852
ShoulderSpacer
46
784-5580-4043
Skid Shoe
23
715-04020
Spiral Pin
47
710-04606A
Belt Keeper
926-04012
PushOn Nut
24
23
Craftsman
Snow Thrower
Model
247.881701
24
Craftsman
Snow Thrower
IViodel 247.881701
m
m
M
1
71o-o572
CarriageScrew5/16-18x 2.25
30
784-o419C-4O43
2
71o-o6o5
Mach.Screw 1/4-20x 1.825
31
790-00223A-0637 AugerCable Bracket
3
71o-o4484
Screw5/16-18x .75
32
790-00224
AugerCable Adj. Bracket
4
712-o4o64
FlangeLock Nut 1/4-20
33
934-04282B
Wheel AssySnow HogGray
5
720-04072A
WingKnob5/16-18
6
725-0157
CableTie
34
710-0627
LockBolt 5/16-24x .75
7
946-04642
DriveCable
35
736-0242
BellWasher.34 x .872x .06
8
946-04640
AugerCable
36
738-04321
Axle
910-0224
HexScrew#10-16x .500
734-04322
DriveHousingFrame
Tube,Tire, 4.10/3.50-4.0
9
747-04394A-0637 AugerControl
37
lO
747-04405-0637
DriveControl
38
710-0654A
TT SemsScrew3/8-16x 1.0
11
749-04147
LowerHandle
39
710-0696
HexBolt 3/8-24x .875
12
749-04495-0637
Upper Handle
4o
710-1245B
LockBolt 5/16-24x .875
931-04162A
BeltCover
13
990-00053
HandleTab
41
14
918-04296B
TransmissionAssembly
42
736-0247
FlatWasher.406ID x 1.25OD
15
710-0809
TT Screw1/4-20x 1.25
43
736-0505
FlatWasher.34 ID x 1.50OD
16
710-1652
Screw1/4-20x .625
44
748-04067A
Pulley:Adapter.75 Dia.
950-1355
Spacer .876x 1.25x .19
17
711-1364
Clevis Pin
45
18
914-0115
Cotter Pin 1/8 x 1.0
46
950-1356
Spacer .876x 1.25x .86
19
714-04040
BowTie Cotter Pin72
47
954-04013
V-Belt 3/8 x 21.108Lg.
2o
915-0249
Roll Pin
48
954-04014
V-Belt 3/8 x 26.680Lg.
21
717-04066A
Pinion14T
49
956-04024
Auger Pulley
22
917-04073A
Gear70T
5o
756-0569
PulleyHalf
23
932-0429A
ExtensionSpring
51
729-04035
Amp SealedConnector
24
936-0192
FlatWasher
52
731-05672A
Spacer
25
738-04184A
ShoulderScrew1/4-20
53
936-0160
FlatWasher.53 x .93 x .05
26
738-0924A
ShoulderScrew1/4-28
54
936-0451
Saddle Washer
27
941-0245
Hex FlangeBearing
55
731-06749
Cable Clip
28
741-04108
Hex FlangeBearing
56
952Z265-SUA
Engine
29
756-0625
Cable Roller
25
Craftsman
Snow Thrower
IViodel 247.881701
777S32636
777X43688
f
....
..............
eONOT
IOOJLJLg0=NV313
"WRNVt_S,U01VU3d0OV3U"_;
"S33VJHRS13AVU9NO9NllVid3d0
N3HMNOllflV3VU1X33Sn"SU30NVISAB
lV 39UVHOSIQ
IO3UIOH3A3N'S3IUNFNJ
S1331'80NMOUHIQIOAVOl "_
"3NIH3V_I9NIOIAU::IS
H0 9NI99013Nll
3HO_3B03ddOlS3MH SlUVd9NIAO_llVlilNnS310NVH
ONIH:t8NIV_BUQNV':INIDN]dOlS'SUBA3IH31nl3:IDVgNBSIO
"_
"31nH339UVH3SIO501ONR OlI001IRO-NV310
3SR "Z
"133d
ONV SONVH31Vlrld_V NV3U39nVUOU_113d_i
HIiM
1OVlN0O
"U39fiV0NVH3"l'13d_l9NilVl0_l _0U:I IVMV d33H"L
USEE85 ORFUEL...........
COHTAiHiHGMOBE
THAH 10% ETHAHOL
777122164
777S32236
777i23249
i/
122164
AC
777i22138
S
777D19075
777D16340
777D18033
26
Craftsman Engine Model 265-SUAFor SnowModel 247.881721
24
23
m
D _
19
951-11282
Muffler
20
710-05001
Stud M8x36
20
751-14190
Muffler
21
951-11289
Exhaust Pipe Gasket
22
712-04214
Nut, M8
23
710-04915
Bolt M6x12
24
951-I0642B
Muffler
27
Assembly
Stud Kit
Shield
o
w
Craftsman
Engine
Model
265-SUA
ForSnowModel 247.881721
41
_42
°0
37
35
D _
o
34
951-10634
Air Cleaner Housing
35
712-04213
Nut
36
951-11284
Choke Knob
37
951-10757
Throttle
39
951-10637
Key Switch
4O
731-05632
Key
41
951-10640
Choke
42
951-10635
Heater Box
43
710-04943
Bolt M6x28
Control
Push Rod
28
Knob
0
Craftsman Engine Model265-SUAFor SnowModel 247.881721
132- GasketKit-Complete
133- GasketKit-External
134- Complete
Engine
63
62
29
Craftsman Engine Model 265-SUAForSnowModel 247.881721
D
-
®
0
52
951-11900
Piston
53
951-11901
Piston Pin
54
710-04915
Bolt M6x12
55
951-11113
Air Shield
56
951-11573
Connecting
57
951-14053
Governor
58
736-04461
Washer 5.2xl.9
59
951-11902
Governor
60
714-04078
Cotter Pin
61
951-11575
Camshaft
62
951-11369
Radial Ball Bearing, 6205
63
951-10307
Woodruff
64
951-11247A
Crankshaft
65
951-11576
Governor
66
715-04092
Dowel Pin 7x14
67
715-04096
Dowel Pin 9x14
68
951-11371
Crankcase
Cover Gasket
69
951-12125
Crankcase
Cover
951-11246
Crankcase
Cover Kit (Incl. 62,68-74)
70
710-04932
Bolt M8x32
71
951-11283
Oil Fill Plug Assembly
73
951-11577
O-Ring 15.8x2.5
74
951-11368
Oil Seal, 25x41.25x6
75
951-11248A
Crankcase
951-11062B
Short Block Assembly
Rod Assembly
Arm Shaft
Seal
Assembly
Key
Kit (Incl.62-64,74,79)
Gear/Shaft
Kit (Incl.59,62,74,75,79)
(Incl. 4,21,27-29,32,44,
76
951-11350
Oil Drain Pipe Assy.
77
736-04440
Washer 10x16x1.5
78
710-04906
Oil Drain Plug
79
951-11370
Oil Seal 25x41.25x6
131
951-10641
Oil Drain Assembly
132
951-11061A
Gasket Kit - Complete
(I n cl.4,21,27-29,32,44,
133
951-10661B
134
952Z265-SUA
Gasket Kit - External
29,32,77)
Complete
3O
Assembly
Engine
46,47,80-53,56-79)
58,59,68,74,77,79)
(Incl. 4,21,27-
Craftsman Engine ModeJ265-SUAFor SnowModeJ247.881721
48
15
44
13
17
10
132- GasketKit-CompJete
133-GasketKit-External
134- CompleteEngine
\6
31
Craftsman Engine Model 265-SUAForSnowModel 247.881721
D -
o
1
710-04968
Bolt M6x16
2
951-11054A
Valve Cover
3a
731-07059
Breather
Hose
3b
726-04101
Breather
Hose Clamp
4
951-11565
Valve Cover Gasket
o
5
951-12000
Valve Spring Retainer (Intake)
6
951-11892
Rocker Arm Assembly
7
751-11124
Nut, Pivot Locking
8
751-11123
Adjusting
9
951-11893
Rocker Arm
10
710-04902
Bolt, Pivot
11
951-12002
Exhaust Lash Cap
12
951-12003
Valve Spring Retainer (Exhaust)
13
951-12004
Valve Spring
14
951-11894
Valve Seal (Intake)
15
710-04933
Bolt M8x55
16
951-11895
Push Rod Guide
17
751-14195
Cylinder
18
951-10292
Spark Plug/F6Rtc
44
951-11898
Gasket, Cylinder
45
951-10648
Push Rod Kit
46
951-11899
Tappet
47
715-04108
Dowel
48
951-10647A
Valve Kit
49
951-10647A
Valve Kit
130
951-12626
Valve Cover Kit
132
951-11061A
Gasket Kit - Complete
Nut ,Valve
Head Assembly
(I n cl.4-14,16,17,21,27, 29,44,48,49)
Head
Pin 10x16
(I n cl.4,21,27-29,32,44,
133
951-10661B
134
952Z265-SUA
58,59,68,74,77,79)
Gasket Kit - External (Incl. 4,21,2729,32,77)
Complete
32
Engine
Craftsman Engine Model265-SUAFor SnowModel 247.881721
135- Carburetor
Kit
27
28
3O
w
31_
33
Craftsman Engine Model 265-SUAForSnowModel 247.881721
D _
o
0
25
710-04939
Stud M6x117
26
710-04910
Stud M6x105
27
951-11567
Carburetor
Insulator
28
951-11896
Carburetor
Insulator
29
951-11569A
Carburetor
Gasket
30
951-10639A
Primer Assembly
30
951-11824
Primer Bulb
31
951-12705
Ca rburetor
Assembly
32
951-11897
Carburetor
Gasket Plate
33
951-11112
Choke Control
135
951-14050
Carburetor
a
n/a
Choke Shaft
b
n/a
Choke Plate
C
n/a
Throttle
Shaft
d
n/a
Throttle
Plate
e
710-05469
Screw M3x6
f
736-04638
LockWasher
g
n/a
Gasket, Throttle
h
n/a
Idle Jet Assembly
I
n/a
Idle Speed Adjusting
J
n/a
Primer Pipe
k
951-11699
Primer Hose
I
951-11906
Hose Clamp
m
n/a
Carburetor
n
n/a
Float Pin
0
n/a
Emulsion
P
951-12875
Needle Valve
q
n/a
Main Jet (#73)
r
n/a
Needle Valve Spring
s
n/a
Float
t
951-11589
Fuel Bowl O-Ring
U
n/a
Fuel Bowl
V
951-11348
Fuel Bowl Mounting
Bolt Gasket
W
710-04945
Fuel Bowl Mounting
Bolt
X
951-11349
Fuel Bowl Drain Bolt Gasket
Y
710-04938
Fuel Bowl Drain Bolt
Gasket
Kit
(Incl.h,n,o,p,q,r,s,t,v,x)
34
Plate
(0.34)
Screw
Body
Tube (P18-019)
Craftsman Engine Model 265-SUAFor SnowModel 247.881721
82
D -
o
8O
951-10646
Ignition
81
951-11110
Air Flow Shield
82
710-04940
Bolt M6xlO
83
710-04919
Bolt M6x25
85
951-12416
Flywheel
86
951-10934
Cooling
87
951-10911
Starter Cup
88
712-04209
Nut, Special, M14x1.5
89
710-04915
Bolt M6x12
91
951-10663A
Blower Housing
92
736-04455
Gasket 6
93
710-04974
Bolt M6xlO
94
951-14151
Recoil Starter
35
Coil Assembly
Fan
o
Craftsman Engine Model 265-SUAForSnowModel 247.881721
_115
116
96
96-
103
9s
99
_117
107
105
95
m
D
_
o
o
D _
95
951-10758
Primer Bracket
108
951-11914
Dipstick
96
710-05103
Bolt M6x12
109
710-04905
Bolt
710-04915
Bolt M6x12
o
Decoration
97
951-11108
Governor
System Shield
110
98
951-11935
Governor
Spring
111
951-11913
Oil Fill Tube Assembly
99
951-10664
Throttle
Linkage Spring
112
951-11381
O-Ring
100
951-10665
Throttle
Linkage
113
951-10656
Oil Fill Tube
102
951-11106
Governor
Arm
114
951-11904
O-Ring
103
712-04212
NutM6
115
951-12482
Dipstick
104
710-04908
Governor
116
951-12533
Fuel Cap Assembly
105
951-11700
Fuel Hose Clamp
117
951-11933
Fuel Level Indicator
106
951-10650
Fuel Line Kit
118
951-10653B
Fuel Tank Assembly
107
710-04915
Bolt M6x12
Arm Bolt
36
Assembly
o
Cover
Craftsman Engine Model 265-SUAFor SnowModel 247.881721
119
120
121
123
122_
122
_i
_128
29
m
D -
119
710-04914
Bolt M6xlO
120
951-11680
Wire Clip
121
951-11114
Switch
122
712-05015
Nut, M6
123
710-04935
Bolt M4x60
124
710-04965
Bolt M4x55
125
710-05182
Bolt M6x32
126
715-04088
Dowel Pin 8x8
127
951-I0645A
Electric Starter
128
710-04915
Bolt M6x12
129
951-11109
Blower Housing
37
Housing
o
e
Mounting
Shield
Bracket
38
FEDERAL
and/or CALIFORNIA
EMISSIONCONTROL
WARRANTYSTATEMENT
YOURWARRANTYRIGHTSANDOBLIGATIONS
MTD Consumer Group Inc, the United States Environmental
Protection Agency (EPA), and for those products
California, the California Air Resources Board (CARB) are pleased to explain the emission (evaporative and/or
warranty
on your 2013 and later small off-road
spark-ignited
engine and equipment
(outdoor
equipment
engines
must be designed,
built and equipped
to meet the State's stringent
equipment
engines
must be designed,
built, and equipped
to meet the U.S. EPA small off-road
equipment
anti-smog
certified
exhaust)
engine).
standards
engine
diagnosis,
condition
exists, MTD Consumer
Group Inc will repair your outdoor
equipment
new outdoor
regulations).
of time listed below, provided
Your ECS may include parts such as the carburetor, fuel-injection
system, ignition system, catalytic converter,
valves, canisters, filters, vapor hoses, clamps, connectors,
and other associated emission-related
components.
Where a warrantable
In California,
(in other states, outdoor
spark ignition
Consumer Group Inc must warrant the ECSon your outdoor equipment
engine for the period
abuse, neglect, or improper maintenance
of the outdoor equipment
engine.
for sale in the state of
control system (ECS)
MTD
there has been no
fuel tanks, fuel lines, fuel caps,
engine at no cost to you including
parts, and labor.
MANUFACTURER'S
WARRANTYCOVERAGE:
This emission
control system is wa rranted for two years. If any emission-related
part on your outdoor
part will be repaired or replaced by MTD Consumer Group Inc. In the event that a component
Manufacturer's
equipment warranty, the longer coverage period will apply.
equipment
is covered
engine
for longer
is defective,
the
than two years by the
/
OWNERSWARRANTY
RESPONSIBILITIES:
As the outdoor equipment
engine
Consumer Group Inc recommends
Group Inc cannot deny warranty
As the outdoor
your outdoor
equipment
equipment
owner, you are responsible
that you retain all receipts
for performance
of the required maintenance
listed in your owner's manual. MTD
covering maintenance
on your outdoor equipment
engine, but MTD Consumer
solely for the lack of receipts.
engine
owner, you should
however
be aware that MTD Consumer
engine or a part has failed due to abuse, neglect,
improper
Group Inc may deny you warranty
maintenance,
or unapproved
coverage
if
modifications.
You are responsible for presenting your outdoor equipment
engine to MTD Consumer Group Inc's distribution
center or service center as soon
as the problem exists. The warranty repairs should be completed
in a reasonable amount of time, not to exceed 30 days. If you have a question
regarding
http://su
your warranty
pport.mtd
coverage,
you should contact
the MTD Consumer
Group Inc Service Department
at 1-800-800-7310
or at
prod ucts.com.
GENERALEMISSIONS
WARRANTYCOVERAGE:
MTD Consumer
designed,
Group Inc warrants
built, and equipped
cause the failure of a warranted
The warranty
period
Subject to certain
1.
to the ultimate
so as to conform
part for a period
Any warranted
and exclusions
regulations;
equipment
Group Inc according
remainder
of the period.
for replacement
to subsection
as required
Any warranted
part that is scheduled
stated above. Any such part repaired
only for regular inspection
or replaced under warranty
3.
Any warranted
for replacement
part that is scheduled
replacement
as required
to an ultimate
maintenance
(4) below. Any such part repaired
2.
of time before the first scheduled
that the outdoor
on emission-related
stated above. If the part fails during the period of warranty
Consumer
period
purchaser
and (2) free from defects
engine is delivered
as stated below, the warranty
part that is not scheduled
period
and each subsequent
equipment
in materials
engine
is: (1)
and workmanship
purchaser
or first placed into service.
parts is as follows:
in the written
coverage,
instructions
supplied
the part will be repaired
or replaced
under warranty
is warranted
or replaced
will be warranted
for the
in the written instructions
supplied is warranted for the warranty
will be warranted for the remaining warranty period.
maintenance
in the written
instructions
supplied
date for that part. If the part fails before the first scheduled
Repair or replacement
to the owner.
5.
Notwithstanding
of any warranted
the provisions
service the subject engines
6.
The outdoor
equipment
emission-related
7.
MTD Consumer
warranty
8.
Throughout
warranted
9.
herein, warranty
part, provided
the off-road
herein must be performed
services or repairs will be provided
for diagnostic
that such diagnostic
Group Inc is liable for damages
parts sufficient
provisions
is warranted
replacement,
at a warranty
at all of our distribution
period
station
for the
the part
under
at no charge
centers that are franchised
or equipment.
engine owner will not be charged
warranted
of any warranted
Any replacement
part under the warranty
for
by MTD
will be repaired or replaced by MTD Consumer Group Inc according to subsection (4) below. Any such part repaired or replaced
warranty will be warranted for the remainder of the period prior to the first scheduled replacement
point for the part.
4.
that
of two years.
begins on the date the outdoor
conditions
the warranty
purchaser
with all applicable
to other engine
labor that is directly
work is performed
or equipment
associated
at a warranty
components
with diagnosis
of a defective,
station.
proximately
caused by a failure under
part.
engine
and equipment
warranty
to meet the expected
demand
part may be used in the performance
the owner. Such use will not reduce the warranty
period
stated above, MTD Consumer
Group Inc will maintain
a supply of
for such parts.
of any warranty
obligations
maintenance
of MTD Consumer
or repairs and must be provided
Group Inc.
without
charge to
to
10. Add-on
ormodified
partsthatarenotexempted
bytheAirResources
Board
maynotbeused.
Theuseofanynon-exempted
add-on
or
modified
partsbytheultimate
purchaser
willbegrounds
fordisallowing
awarranty
claims.
MTDConsumer
Group
Incwillnotbeliable
to
warrant
failures
ofwarranted
partscaused
bytheuseofanon-exempted
add-on
ormodified
part.
WARRANTED
PARTS:
The repair or replacement
of any warranted
part otherwise eligible for warranty coverage may be excluded from such warranty coverage if
MTD Consumer Group Inc demonstrates
that the outdoor equipment
engine has been abused, neglected, or improperly
maintained, and that
such abuse, neglect,
any adjustment
coverage.
Further, the coverage
The following
1.
or improper
of a component
emission
Fuel Metering
warranty
maintenance
was the direct cause of the need for repair or replacement
that has a factory
under this warranty
parts are covered
installed,
extends
and properly
operating,
adjustment
limiting
of the part. That notwithstanding,
device is still eligible
only to parts that were present on the off-road
for warranty
engine and equipment
purchased.
(if applicable):
System
Cold start enrichment
Carburetor
system (soft choke)
and internal
parts (or fuel injection
system)
Fuel pump
Fuel tank
2.
Air Induction
System
Air cleaner
Intake manifold
3.
Ignition
System
Spark plug(s)
Magneto
4.
ignition
system
Exhaust System
Catalytic
converter
SAI (Reed valve)
5.
Miscellaneous
Items Used in Above System
Vacuum, temperature,
Connectors
6.
Evaporative
position,
time sensitive valves and switches
and assemblies
Control
Fuel hose
Fuel hose clamps
Tethered
Carbon
fuel cap
canister
Vapor lines
050790 Rev.A
Congratulations
on making a smart purchase.
Your new Craftsman®
product is designed and
manufactured
for years of dependable operation. But like all products, it may require repair
from time to time. That's when having a Repair Protection Agreement can save you money and
aggravation.
Here's
[]
[]
[]
[]
[]
what
the
Repair
Protection
Agreement*
includes:
Expert service by our 10,000 professional repair specialists
Unlimited
service and no charge for parts and labor on all covered repairs
Product replacement
up to $1500 if your covered product can't be fixed
Discount
of 25% from regular price of service and related installed parts not covered by the
agreement; also, 25% off regular price of preventive maintenance check
Fast help by phone - we call it Rapid Resolution - phone support from a Sears representative.
Think of us as a "talking owner's manual."
Once you purchase the Repair Protection
to schedule service. You can call anytime
Agreement, a simple phone call is all that it takes for you
day or night, or schedule a service appointment
online.
The Repair Protection Agreement is a risk-free purchase. If you cancel for any reason during the
product warranty period, we will provide a full refund. Or, a prorated refund anytime after the
product warranty period expires. Purchase your Repair Protection Agreement today!
Some limitations
and exclusions
call 1=800=827=6655.
*Coverage
6665.
in Canada
Sears Installation
apply.
varies on some
For prices and additional
items. For full details
information
call Sears Canada
in the U.S.A.
at 1=800=361=
Service
For Sears professional
installation
of home appliances, garage door openers,
other major home items, in the U.S.A. or Canada call 1=800=4=MY=HOME®.
31
water heaters,
and
Declaraci6n de garantia ............................
Practicas operaci6n seguras .....................
Montaje ......................................................
Operaci6n ..................................................
Servicio y Mantenimiento ..........................
GARANTiA
Pagina
Pagina
Pagina
Pagina
Pagina
42
43
47
51
56
COMPLETA
Almacenamiento fuera de temporada ....... Pagina 61
Soluci6n de problemas .............................. Pagina 62
Lista de piezas ........................................... Pagina 22
Acuerdo de protecci6n para reparaciones .... Pagina 67
NOmero de servicio ................................ 01tima pagina
CRAFTSMAN
POR DOS AltOS
PORDOSANOSa partir de la fechade la cornpra,este productoest,. garantizadopor defectosen los rnaterialesy la rnanode obra.
Los productosdefectuososser_.nreparadossin costoo reernplazadossin costosi la reparaci6nno est,. disponiNe.
La presentegarantiase anula si se utilizaeste productoalguna vezpara prestarservicioscornercialeso si se Ioalquilaa otra persona.
Paraobtener informaci6nsobre el alcance de la garantiay solieitar la reparaci6no el reemplazo,visite el sitio Web: www.craftsman.com
Esta garantia eubre0NICAMENTElos defectos en los rnateriales y en la mano de obra. Esta garantia NOcubre:
•
Elernentosno renovablesque puedendesgastarsepor el uso normal,duranteel plazode la garantia,incluyendoentreotros,las barrenas,
las paletasde las barrenas,los cortadoresde desplazarniento,laszapatasantideslizantes,la placade raspado,lospasadoresde cuchilla,
la bujia,el filtro de aire,las correasy el filtro de aceite.
•
Serviciosde rnantenirnientoest_.ndar,carnbiosde aceiteo afinaci6n.
•
Carnbiode neurn_.ticoso reparacionespor pinchadurascon objetosexternoscornoclavos,espinas,toconeso vidrios.
Reernplazoo reparaci6nde neurn_.ficos
o ruedascornoresultadodel desgastenormal,un accident&o funcionarniento
o rnantenirnientoincorrectos.
•
Reparacionesrequeridascornoresultadodel uso inadecuadopot partedel operador,incluyendoentreotros el da_oocasionadopor objetos
que irnpactanla rn_.quina
y que tuercenel bastidor,el eje de la barrena,etc., o debido a que el motorrueaceleradoen exceso.
•
Reparacionesnecesariasdebidoa negligenciadel operador,incluyendoentre otros,da_osrnec_.nicoy el_ctricoocasionadopor
un alrnacenarnientono apropiado,fallapor el uso de aceitede gradoy/o cantidadno apropiadoso falla por no dar rnantenirniento
al equipo de acuerdocon las instruccionescontenidasen el manualdel operador.
•
Lirnpiezao reparacionesdel motor(sisternade combustible)debidasa combustibleque se deterrninaest,. contarninadou oxidado(viejo).
En general,el combustibledebe utilizarseen un periodono mayorde 30 dias a partirde su adquisici6n.
•
El deterioroy desgastenormalde losacabadosexteriores,o reernplazode la etiquetadel producto.
Estagarantiale otorgaderechoslegalesespecificos,pero ustedpodria gozarde otros derechosen raz6nde su lugarde residencia.
Sears Brands
Tipode aceite del motor:
Capacidadde aceitedel motor:
Capacidadde combustible:
Bujias:
Separaci6nde las bujias:
Management
Corporation,
5W-30
20 onzas
Hoffman
Estates,
IL 60179
2.3cuartos
N_mero de rnodelo ..........................................................
N_mero de sede ..............................................................
Feehade eompra .............................................................
FeRTC(F6TC)
.020"to .030"
Registrearribael nOrnerodel rnodelo,el nOrnerode seriey la fecha
de cornpra
© Sears Brands,LLC
42
Esta rn_.quina
rue construidapara seroperadade acuerdocon
las reglasde seguridadcontenidasen este manual.AI igualque
concualquiertipo de equipo rnotorizado,un descuidoo error por
partedel operadorpuedeproducirlesionesgraves.Esta rn_.quina
es capazde arnputarrnanosy piesy de arrojarobjetoscon gran
fuerza.Deno respetarlas instruccionesde seguridadsiguientesse
puedenproducirlesionesgraveso la rnuerte.
La presenciade este sfrnboloindicaque setrata de instrucciones
irnportantesde seguridadque se deben respetarpara evitar
poner en peligrosu seguridadpersonaly/o materialy la de otras
personas.Lea y siga todaslas instruccionesde este manualantes
de poneren funcionarnientoesta rn_.quina.Si no respetaestas
instruccionespodrfaprovocarlesionespersonales.Cuandoveaeste
sfrnbolo,i presteatenci6na la advertencia!
PROPOSICION
65 DE CALIFORNIA
Su responsabilidad--Restrinja
el usode esta rn_.quina
rnotorizadaalas personasque lean,cornprendany respetenlas
advertenciase instruccionesque aparecenen este manualyen la
rn_.quina.
El escapedel motorde este producto,algunosde suscornponentes
y algunoscornponentesdel vehfculocontieneno liberan sustancias
qufrnicasque el estado de Californiaconsideraque puedenproducir
c_.ncer,defectosde nacirnientou otros problernasreproductivos.
iGUARDE
ESTAS
INSTRUCCIONES!
CAPACITACI6N
PR E PA RATIVO S
•
Inspeccionerninuciosarnenteel _.readondeutilizar_,el equipo.Saque
todos los felpudos,peri6dicos,trineos,tablas,cablesy otros objetos
extra_oscon los que podrfatropezaro que podrfanser arrojadospor
la barrena/irnpulsor.
•
Paraprotegerselosojos utilice siernpreanteojoso antiparras
de seguridadrnientrasopera la rn_.quina
o rnientrasla ajusta
o repara.Losobjetosarrojadosque rebotanpuedenproducir
lesionesocularesgraves.
•
•
•
•
•
•
•
Lea,entienday curnplatodas las instruccionesincluidasen
la rn_.quina
yen los rnanualesantes de rnontarlay utiNzarla.
Guardeeste manualen un lugarseguroparaconsultasfuturasy
peri6dicas,asf cornopara solicitarrepuestos.
Lea el Manualdel Operadory sigatodas las advertenciase
instrucciones
de seguridad.Elfracasode hacerasf puedecausar
la heridaseriaal operadory/o personaspresentes.
Farniliarfcesecontodos los controlesy con el usoadecuado
de los rnisrnos.Sepa c6rnodetenerla rn_.quinay desactivarlos
controlesr_.pidarnente.
No perrnitanuncaque los ni_osrnenoresde 14a_osutilicen
esta rn_.quina.Los ni_osde 14a_osen adelantedeben leer y
entenderlas instruccionesde operaci6ny norrnasde seguridad
contenidasen este manual,yen la rn_.quina
ydebenser entrenadosy supervisadospor un adulto.
Nuncaperrnitaque los adultosoperenesta rn_.quinasin recibir
antesla instrucci6napropiada.
Losobjetosarrojadospor la rn_.quinapuedenproducirlesiones
graves.Planifiqueel patr6nen el que va air arrojandonievepara
evitarque la descargade materialse realicehacialos carninos,
los observadores,etc.
Mantengaa losobservadores,ayudantes,rnascotasy ni_ospor
Io rnenosa 75 piesde la rn_.quina
rnientrasla rnisrnaest,.en
funcionarniento.Detengala rn_.quinasi alguienseacerca.
•
•
•
•
Sea precavidopara evitarpatinarseo caerseespecialrnente
cuandoopera la rn_.quina
en reversa.
43
Noopere la rn_.quinasin la vestirnentaadecuadaparaestar al
aire libre en invierno.No utilicealhajas,bufandaslargasu otras
prendassueltasque podrfanenredarseen las partes rn6viles.
UtiNceun calzadoespecialpara superficiesresbaladizas.
Useun prolongadory un tornacorrientede tres cables con
conexi6na tierraparatodas las rn_.quinascon rnotoresde
encendidoel_ctrico.
Ajuste la alturade la caja del tornacorrientepara Nrnpiarla grava
o las superficiescon piedrastrituradas.
Desengranetodaslas palancasde controlantesde arrancarel
motor.
•
Nuncaintenterealizarajustesrnientrasel motorest,. en rnarcha
exceptoen los casosespecfficarnenterecornendadosen el
manualdel operador.
•
Dejeque el motor y la rn_.quinase adaptena la ternperatura
exteriorantesde cornenzara sacarla nieve.
Manejo seguro de la gasolina
Paraevitar lesionespersonales0 daSosrnaterialestengarnucho
cuidadocuandotrabajecon gasolina.La gasolinaes surnarnente
inflarnabley sus vaporespuedencausarexplosiones.Si se derrarna
gasolinaencirna0 sobrela ropa se puedelesionargravernenteya que
se puedeincendiar. L&vesela piel y c&rnbiesede ropade inrnediato.
•
•
•
Utilices610los recipientespara gasolinaautorizados.
Apaguetodos los cigarrillos,cigarros,pipasy otras fuentesde
cornbusfi6n.
•
•
Noutilice la rn_.quina
bajo la influenciadel alcoholo las drogas.
El silenciadory el motorse calientany puedencausarquernaduras. Nolos toque. Mantengaa los niSosalejados.
•
•
Nuncacarguecombustibleen la rn&quinaen un espaciocerrado.
Nuncasaquela tapadel combustibleni agreguecombustible
rnientrasel motorest&caliente0 en rnarcha.
•
•
Dejeque el motorse enfriepor I0 rnenosdos rninutosantesde
volvera cargarcombustible.
Nuncallene en excesoel dep6sitode combustible.Lleneel
tanquea no rn&sde 1/2pulgadapor debajode la basedel cuello
de Ilenadodejandoespaciopara la dilataci6ndeIcombustible.
Vuelvaa colocarla tapade la gasoiinay aj_stelabien.
•
Sea surnarnenteprecavidocuandoopere la rn_.quinasobreuna
superficiecon gravao cuandola cruce.Mant_ngasealerta por si
se presentanpeligrosocultoso tr_.nsito.
Tengacuidadocuandocarnbiede direcci6no cuandoopere
la rn_.quinaen pendientes.Nouse la rn_.quina
en pendientes
pronunciadas.
•
•
•
•
•
•
•
•
•
•
Lirnpieel combustibleque se hayaderrarnadosobreel motory el
equipo.Trasladela rn&quinaa otra zona. Espere5 rninutosantes
de encenderel motor.
•
•
Nuncaalrnacenela rn&quina0 el recipientede combustibleen
un espaciocerradodonde hayafuego,chispas0 luz piloto(por
ejernplo,hornos,calentadoresde agua,calefactores,secadores
de ropa,etc.).
•
Dejeque la rn_.quinase enfriepor Io rnenos5 rninutosantesde
guardarla.
NuncaIlenelos recipientesen el interiorde un vehiculoo carni6n
o caja de rernolquecon recubrirnientospl_.sticos.Coloque
siernprelos recipientesen el pisoy lejosdel vehiculoantesde
Ilenarlos.
•
•
•
Si es posible,retireel equipoa gasolinadel carni6no rernolque
y II_neloen el suelo.Si esto no es posible,Ileneel equipoen un
rernolquecon contenedorport_.til,en vez de desdeuna boquilla
dispensadorade gasolina.
Mantengala boquilladispensadoraen contactocon el hordedel
dep6sitode combustibleo con la aberturadel recipienteen todo
rnornento,hastaterrninarla carga. No utiliceun dispositivode
apertura/cierrede boquilla.
•
FUNCIONANIIENTO
•
No pongalas rnanoso los piescerca de las piezasrotatorias,
en la cajade la barrena/ irnpulsoro en el rnontajedel canalde
descarga.Hacercontactocon piezasgiratoriaspuederesultaren
la arnputaci6nde rnanoso pies.
•
La palancade controlde la barrena/ irnpulsores un dispositivo
de seguridad.Nuncaevite su funcionarniento.De hacerlola
operaci6nde la rn_.quinaes riesgosay puedeocasionarlesiones.
Las palancasde control debenfuncionarbien en arnbasdireccionesy regresarautorn_.ticarnente
a la posici6nde desengrane
cuandose lassuelta.
•
•
44
•
Nuncaoperela rn_.quinasi falta un rnontajedel canalo si el
rnisrnoest,. daSado.Mantengatodos losdispositivosde seguridad en su lugaryen funcionarniento.
Nuncaenciendael motor en espacioscerradoso en una zona
con pocaventilaci6n.El escapedel motorcontienernon6xidode
carbono,un gas inodoroy letal.
Planifiqueel patr6nen el que va air arrojandonieveparaevitar
que la descargade materialse produzcahacialas ventanas,
las paredes,losautorn6viles,etc.y evitarasi posiblesdaSos
rnaterialeso lesionesproducidaspor los rebotes.
Nuncadirija la descargahacialos niSos,los observadoreso las
rnascotasni deje que nadiese pare delantede la rn_.quina.
Nosobrecarguela capacidadde la rn_.quina
tratandode sacarla
nievernuyr_.pidarnente.
Nuncaopereesta rn_.quinasin buenavisibilidado ilurninaci6n.
Siernpredebe estar segurode que est,. bien afirrnadoy sujetandofirrnernentelas rnanijas.Carnine,nuncacorra.
Corte la corrientea la barrena/ irnpulsorcuandotransportela
rn_.quinao cuandola rnisrnano est,. en uso.
Nuncaoperela rn_.quinaa alta velocidadde desplazarniento
sobresuperficiesresbaladizas.Mirehaciaabajoy haciaatr_.sy
tengacuidadocuandovaya rnarchaatr_.s.
Si la rn_.quinacornenzaraa vibrarde rnaneraanorrnal,detengael
motor,desconecteel cablede la bujia y p6ngalade rnaneraque
haga rnasacontra el motor.Inspeccionela rn_.quinarninuciosarnenteparaver si est,. daSada.Reparetodos los daSosantesde
encendery operar la rn_.quina.
Desengranetodas las palancasde controly detengael motor
antes de dejar la posici6nde operaci6n(detr_.sde las rnanijas).
Esperea que la barrena/ irnpulsorse detengapor cornpleto
antes de destaparel rnontajedel canalo realizarajustese
inspecciones.
Nuncapongalas rnanosen las aberturasde descargao de
recolecci6n.Utilicesiernprela herrarnientade lirnpiezaque se
adjuntaparadestaparla aberturade descarga.Nodestapeel
rnontajedel canal rnientrasel motorest,. en funcionarniento.
Antesde destaparlo,apagueel motory perrnanezcadetr_.sde las
rnanijashastaque todaslas partes rn6vilesse hayandetenido.
Uses61ounionesy accesoriosaprobadospot el fabricante(por
ejernplo,pesaspara las ruedas,cadenaspara los neurn_.ticos,
cabinas,etc.). Paraobtenerrn_.sinforrnaci6nacercade estos
ternas,Ilarneal 1-800-469-4663.
•
•
•
Paraencenderel motor,jale de la cuerdalentarnentehasta que
sienta resistencia,luegojale r_.pidarnente.
El replieguer_.pidode
la cuerdade arranque(tensi6nde retroceso)le jalar_,la rnanoy
el brazohaciael motor rn_.sr_.pidode Io que usted puedesoltar.
El resultadopuedenserhuesosrotos,fracturas,hernatornaso
esguinces.
Si se presentansituacionesque no est_.nprevistasen este
manual,seacuidadosoy use el sentidocornOn.
•
•
•
•
•
•
SegOnla Cornisi6nde Seguridadde Productosparael Consurnidor de los EstadosUnidos(CPSC)y la Agenciade Protecci6n
Arnbientalde los EstadosUnidos(EPA),este productotieneuna
vida Qtilmediade siete (7) a_os, 6 60 horasde funcionarniento.
AI finalizarla vida Otilmedia,adquierauna rn_.quinanuevao
hagainspeccionaranualrnente_sta por un distribuidorde servicio
autorizadopara cerciorarsede que todoslos sisternasrnec_.nicos
y de seguridadfuncionancorrectarnentey no tienenexcesivo
desgaste.Si no Iohace, puedenproducirseaccidentes,lesiones
o rnuerte
•
Nuncaalrnacenela rn_.quina
o el recipientede combustibleen un
espaciocerradodondehayafuego,chispaso luz pilotocornopor
ejernplo,calentadoresde agua,hornos,secadoresde ropa,etc.
•
Consultesiernpreel manualdel operadorparaobtener
instruccionesadecuadaspara el alrnacenarnientofuerade
ternporadaVerifique
frecuenternentela Ifneade combustible,el
tanque,el tap6n,y losaccesoriosbuscandorajaduraso perdidas.
Reernplacede ser necesario.
Nod_ arranqueal motorsi no est,. la bujia de encendido.
Para pedirrepuestoso serviciohorariopara este producto,Ilarne
a 1-800-469-4663.
MANTENIMIENTO
•
•
Y ALMACENAMIENTO
Nuncaalterelos dispositivosde seguridad.Controleperi6dicarnenteque funcionencorrectarnente.Rernitasealas secciones
de mantenirnientoy ajustede este manual.
Antesde realizarla lirnpieza,repararo revisarla rn_.quina,
desengranetodas laspalancasde controly detengael motor.
Esperea que la barrena/ irnpulsorse detengapor cornpleto.
Desconecteel cablede la bujfay p6ngalohaciendornasacontra
el motorpara evitarque se enciendaaccidentalrnente.
Controlefrecuenternenteque todos lospernosy tornillosest_n
bien ajustadosparacornprobarque la rn_.quinase encuentra
en condicionessegurasde funcionarniento.Adern_.s,haga una
inspecci6nvisual de la rn_.quinapara verificarsi est,. da_ada.
No carnbiela configuraci6ndel reguladordel motorni acelere
dernasiadoel rnisrno.El reguladordel motorcontrolala velocidad
rn_.xirnasegurade funcionarnientodel motor.
•
NO MODIFIQUE
EL MOTOR
Paraevitarlesionesgraveso la rnuerte,no rnodifiqueel motorbajo
ningunacircunstancia.Si carnbiala configuraci6ndel reguladorel
motorpuededescontrolarsey operara velocidadesinseguras.Nunca
carnbiela configuraci6nde f_.bricadel reguladordel motor.
AVISO REFERIDO
A EMISIONES
Losrnotoresque est&ncertificadosy curnplencon las regulaciones
Las placasde raspadoy las zapatasantideslizantesque se
de ernisionesfederalesEPAy de Californiapara SORE(Equipos
usancon la rn_.quina
quitanievese desgastany se da_an.
peque_ostodoterreno)est_.ncertificadosparaoperarcon gasolina
Para protegersu seguridad,verifiquefrecuenternentetodos los
cornOnsinplornoy puedenincluirlossiguientessisternasde control
cornponentesy reernpl_.celos
s61ocon partesde los fabricantes
de ernisiones:Modificaci6nde motor(EM) y catalizadorde tres vias
de equiposoriginales(OEM). iEI usode piezasque no curnplen
(TWO)si est_.nequipadosde esa rnanera.
con lasespecificacionesdel equipooriginalpuede resultaren
GUARDACHISPAS
rendirnientoinadecuadoadern_.sde poneren riesgola seguridad!
Reviselas palancasde controlperi6dicarnentepara verificar
que engraneny desengranenadecuadarnentey ajOstelossi es
Esta rn&quinaest,. equipadacon un motorde cornbusti6ninternay
necesario.Consultela secci6nde ajustesde este manualdel
no debe ser utilizadaen o cercade un terrenoagrestecubiertopor
operadorpara obtenerinstrucciones.
bosque,rnalezaso hierba exceptosi el sisternade escapedel motor
Mantengao reernplacelasetiquetasde seguridade instrucciones est,. equipadocon un arnortiguadorde chispasque curnplaconlas
leyeslocaleso estatalescorrespondientes,en caso de haberlas.
segQnseanecesario.
•
Respetelas norrnasreferentesa la disposici6ncorrectay las
reglarnentacionessobregasolina,aceite,etc. para protegerel
medic arnbiente.
•
Antesde alrnacenarla rn_.quinaenci_ndalaunosrninutospara
sacarla nieveque hayaquedadoen la rnisrnay paraevitarasi
que se congelela barrena/irnpulsor.
Si se utilizaun arnortiguadorde chispasel operadorIo debe rnantener
en condicionesde usoadecuadas.Enel Estadode Californialas
rnedidasanteriorrnenternencionadassonexigidaspor ley (Arficulo
4442 del C6digode RecursosPOblicosde California).Es posible
que existanleyessirnilaresen otros estados.Lasleyesfederalesse
aplicanen territoriosfederales.
Puedeconseguirel arnortiguadorde chispasparael silenciadora
travesde sudistribuidorautorizadode rnotoreso poni_ndoseen
contactocon el departarnentode servicios.
45
SiMBOLOS
DE SEGURIDAD
Esta p_ginadescribelossimbolosy figurasde seguridadinternacionalesque puedenapareceren este producto.Lea el manualdel operador
)araobtenerla informaci6nterminadasobreseguridad,reunirse,operaci6ny mantenimientoy reparaci6n.
i
LEA EL MANUAL DEL OPERADOR (S)
Lea, entienda,
y siga todas las instrucciones
en el manual (es) antes de intentar
reunirse y funcionar.
i
LA ADVERTENCIA --
PLATOS ROTATORIOS
Guarde manos de entrada y aperturas
de la descarga mientras
la m_iquina corre. Alli ellos hacen para
girar platos dentro.
LA ADVERTENCIA-
LAMINAS ROTATIVAS
Guarde manos de entrada y aperturas
dentro.
de descarga mientras
la m_iquina corre. Alli hacen girar I_iminas
LA ADVERTENCIA -- TALADRO ROTATIVO
No ponga manos o pies cerca del giro de partes, en el alojamiento
tolva. Contacto
con las partes rotativas
OBJETOS LANZADOS
Esta m_iquina
puede amputar
de taladro/aspa
o asamblea
de
manos y pies.
POR ADVERTENCIA
puede recoger y lanzar objetos
que pueden
causar la herida personal
seria.
GASOLINA DE ADVERTENCIA ESINFLAMABLE
Permita que el motor se enfrie al menos dos minutos
ADVERTENCIA
--
MONOXIDO
Nunca dirijas un motor dentro
contienen
el mon6xido
antes del reabastecimiento
DE CARBONO
o en un _irea mal ventilada.
de carbono, un gas inodoro
Los gases de combusti6n
y mortal.
ADVERTENCIA -- ELECTROCHOQUE
No use eljuez de salida el_ctrico del motor en la Iluvia.
46
de combustible.
de motor
IMPORTANTE:
EstaunldadseenviaconelmotorIlenode aceite.Despu_s
del
montaje,consultelap_gina10paralosdetallesdel combustibley elaceite.
Extracd6nde ia unidadde ia caja
1.
Cortelasesquinasdelacajadecart6ny extiendalosladosdemaneraque
quedenpianossobreel piso Quitetodoslosseparadores
deempaque.
2.
Saquelam_quinaquitanievedelacaja.
3.
Asegurese
de vaciarcompletamentelacajaantesde tirarla.
NOeieve[e m_quinaquitanievetom_ndoiade [amanija de[ canal.
Antesdel montaje
NOTA:
Lasreferencias
quecontiene
estemanual
sobreloslados
derecho
oizquierdo
delam_quina
quitanieve
sehacen
observando
lamismadesde
la posici6n
de
operaci6n
amenosqueseindique
Iocontrario.
Figure20
Configuraci6n de ia manija
NOTA:Tengaen cuentalastresunlonesdecableflojasqueest_nunldasa labarra
decontrolinferiory seutilizar_nposteriormenteparasujetarloscables.
1.
Aflojelaperilladealetas,laarandelac6ncava,
laleng_Jeta
de labarrade
controly eltornillo delcarroqueest_naambosladosde labarradecontrol
inferiory retirelos.Veala Figure20.
2.
Desliceunade lasunionesde cableflojasdesdeelladoderechodelabarra
decontrolinferiorhastael travesaffodelamisma.Dejelasegundauni6nde
cableensusitioa laderechadelabarradecontrolinferior.VealaFigure22
comoreferencia.
IMPORTANTE:
Paraevitarquesedaffeelcableresultar_necesariolevantarlabarra
decontrolsuperiormientrassedeslizaestauni6ndecablehaciaarriba.
3.
Elevelabarradecontrolsuperiory ubiquelasobrelabarrainferior,
alineando
losorificiosdeloscualesseextrajeronlasperillasdealetas(1).VealaFigure21.
Tengacuidadode no dobiar nitorcer loscables.
4.
Inserteuntornillo decarrodesdeelexteriora tray,sdeunalengGetadela
barradecontrol,lasbarrassuperiore inferior,unaarandelac6ncava,y al
interiorde laperilladealetas(2).RepitaIomismoen elotrolado.
5.
Ajustelasperillasdealetasacadaladode labarradecontrol.Consultela
Figure21.
Figure21
NOTA:
Elrecorridodelcabledelabarrenapasapot debajode labarrade
controlinferiorizquierda
y elcabledetransmisi6npasaatrav_sdelaparte
superiordelabarradecontrolinferiory pordebajodelladoderechodela
misma.YealaFigure22.
6.
Cablede la barrena
Doscablesde sujeci6nsehanutilizadoparaatarsinapretarloscablesde
controlde lamanijainferior.Unclip de presi6ntambi_nseinduyeenel cable
delaunidadinferior.Posid6nde [asatadurasdecablesahora,comoen la
Figure22,y aprieteparafijar loscablesa [amanijainferior.Recorteelexceso
dematerialde[asatadurasdecables.Instaleelclip depresi6nenelorifido
enelmangocomoelindicadoen elrecuadroalaizquierdaen laFigure22.
Impulsar Clip
Figure 22
47
Zapata antideslizante
Pasadoresde cuchiila
Laszapatasantideslizantes
de lam_quinaquitanieveseajustanhaciaarribaen
f_brica,paraelenvio.SiIodesea,puedeajustarlashaciaabajoantesdehacer
fundonarlam_quinaquitanieve.
Sum_quina
quitanieve
traeunpardepasadores
decuchilla
delabarrena
y pasadores
dechaveta
conuni6ncurvade
reemplazo.
Almac_nelos
enunlugarseguro
hastaquelos
necesite.
Herramienta
Serecomiendano operar esta m_quinaquitanievesobre gravayaque[a
unidad puederecogery [anzargravasueltaf_dlmente, causando[esiones
personaleso daffosa [am_quinay losobjetos que[a rodean.
de iimpieza
Laherramienta
delimpiezadelcanalvieneajustada
def_brica
a lapartesuperior
delacaja
delabarrena
conunpasador
deensamblado
y unauni6ndecable.Cortelauni6ndecable
antesdeoperarlam_quinaquitanieve.
VealaFigure24.
Sideseaquitar lanievealrasenunasuperfidelisa,eleveamayoraltura las
zapatasantideslizantes
de lacajadelabarrenaparabajarrasuradaplato.
f
Uselasposicionesintermediao bajacuandolasuperficiequedeseelimpiar
esdespareja,porejemploen uncaminode gravaparalevantarel platode
rasurada.
NOTA:Sidedde
usarlam_quinaquitanievesobreunasuperfidedegrava,
mantengalaszapatasantideslizantes
enlaposid6nquepermitaIograruna
separad6nm_ximaentreelsueloy laplacaderaspado.
Herlamieutade
limpi_zadelcanal
Operaraun [anzadordenieveequipadoconaceropatina zapatospueden
tener comoresuitadodaffo asuperficiesde piedranatura[esde paver (por
ejemp[o arenisca,bluestone,[a piedracaliza).Para[ainformaci6nen el
pol(merodisponible patina zapatos,la llamada 1-800-4M¥-HOME.
Para ajustar las zapatas antideslizantes
J
Afloje[ascuatrostuercashexagonales
(dosacada[ado)y lospernosdelcarro.
Muevalaszapatasantideslizantes
a laposid6ndeseada.
VealaFigure23.
Figure24
Presi6nde los neum&ticos
f
Lapresi6ndeinfladoadecuadaesdeentre15psiy 20psi.Verifiquela presi6n
de losneum_ticosregularmentey mantengasiemprelamismapresi6nen los
dosneum_ticos.
Unapresi6nexcesiva(potencimade 20psi)puedehacerque
el conjuntode larueda(neum_tico/llanta)exploteconunafuerzasufidente
comoparacausarlesionesgraves.Noinfle demasiado
el neum_tico.Utiliceuna
bombamanualo un infladordeneum_ticosel_ctricoport_til paraevitarinflarlo
excesivamente.
NOUSENUNCA
UNCOMPRESOR
DEAIRE
Elinfladoe×cesivode losneum_ticosconuna presi6nexcesiva(pot endma
de 20 psi)puedehater queelconjunto de larueda(neum_ticolllanta)
explote conunafuerzasuficiente comoparacausarlesionesgraves.
Figure23
2.
Compruebe
quetodalasuperfideinferiordelaszapatasantideslizantes
est_
contraelsueloparaevitareldesgastedesparejode lasmismas.
3.
Vuelvaaajustarbienlastuercasy lospernos.
48
Eecomendaciones
sobreel combustible
Utilicegasolinaparaautom6viles
(sinplomoobajocontenido
deplomoparaminimizar
losdep6sitos
enlac_maradecombusti6n)
conunminimode87octanos.
Sepuedeusar
gasolina
conhastaun10%deetanolo un 15%deMTBE
(_termetilicoterciario-butilico).
Nuncauseunamezcla
deaceiteygasolinanigasolinasuda.Evitequeseintroduzca
suciedad,
polvooaguaeneldep6sitodecombustible.
NOutilicegasolinaE85.
Vistasuperiordeliudicador
de
uiveldecombustible
Carguecombustibleenun _reabienventiladay conelmotorapagado.No
fumenipermitallamaso chispasenellugardondesecargacombustibleo se
almacenalagasolina.
NoIleneen excesoeldep6sitode combustible.Despuds
decargar
combustible,asegurese
de queeltap6ndeldep6sitoestdbiencerradoy
asegurado.
Tengacuidadodeno derramarcombustiblealrealizarlarecarga.El
combustiblederramadoo susvaporessepuedenincendiar.Sisederrama
combustible,asegurese
de queel_reaest_secaantesdearrancarel motor.
Eviteel contactorepetidoo prolongadoconla pielo lainhalaci6nde los
vapores.
Figure25
Cargade combustible
Verificaci6ndel nivei de aceite
Tengamucbocuidado altrabajar congasolina.Lagasolinaessumamente
Elmotor seenvia conaceiteen el motor.Sinembargo,debecontrolar el
nivel de aceiteantesde hacerfundonar la m_quinaquitanieve.Si sehace
funcionar el motor sinsuficienteaceitepuededaffarsegravementey se
anula lagarantia.
inflamable y susvaporespuedencausarexplosiones.Nuncaagregue
combustibleala m_quinaen interiores ni mientrasel motor est_ caliente
oen fu ncionamiento.Apaguedgarrillos, dgarros, pipasy otras fuentesde
combusti6n.
NOTA:Paracomprobarelmotorasegurese
dequeest_apagadoy sobreuna
superfidenivelada.
Siempremantengalasmanosy lospiesalejadosde laspiezasm6viles
del equipo.Noutilice fluidos comprimidospara arrancar.Losvaporesson
inflamables.
I.
Antesdesacareltap6nparacargarcombustible,limpiealrededor.
2.
Eneldep6sitode combustiblehayun indicadorde nivel.Lleneel dep6sito
hastaIlegaralniveldecombustibledel indicador;vealaFigure25.Tenga
cuidadoparanoIlenareldep6sitoen exceso.
Retireeltap6nde Ilenadodeaceite/lavarillade medki6ny limpielavarilla
de medid6ndeaceite.VealaFigure26.
Figure26
2.
49
Insertelatapa/ varillade medici6nenelcuellode llenadodeaceite,girela
tapaI/4 vueltahastaqueest_completamente
asentada.
3.
NOTA:
Enalgunosmotores,un tap6nderosca/ varillademedJd6npueden
existiren lugarde unatapade 1/4vueltacomosedescribeanteriormente.En
estecasonoapretarlatapaparaverificarel niveldeaceite.Simplerestode
laPACenlasroscasparacomprobarelnivelde aceitecorrecto.
2.
Enun_reabienventilada,arranqueel motordelam_quinaquitanievesegt_n
seindicaenlap_gina10bajoelencabezado"Encendido
delmotor".
Saqueel tap6n/la varillade medici6ndeaceite.Sielnivelesbajo,agregue
aceitelentamentehastaqueelregistromarqueentrenivelalto (H)y bajo
(L),Figure26.Consuitelasecd6nMantenimientodelmotorparaverla
viscosidad
y capaddaddeaceitedelmotorcorrectas.
3.
Paradoen laposici6ndeloperador(detr_sde launidad),engranela barrena.
4.
Dejelabarrenaengranadaduranteaproximadamente
diez(10)segundos
antesdesoltarelcontroldelamisma.Repitaestaoperaci6nvariasveces.
5.
Conel motorfuncionandoenposici6nFAST
(r_pida)_
y elcontrolde la
barrenaenposici6ndesengranada
arriba,caminehaciaelfrentede la
m_quina.
6.
Confirmequelabarrenahadejadode girarporcompletoy nomuestra
NINGUN
signodemovimiento.
7.
Si labarrenamuestraALGON
signode rotaci6n,vuelvainmediatamente
a
la posid6ndel operadory apagueelmotor.Espere
a quetodaslaspartes
m6vllessedetenganantesdereajustarelcabledecontroldelabarrena.
8.
Aflojelatuercahexagonalposteriorenelsoportedeajustedelcable.Veala
Figure28.
j_ resedequeel reguladorseencuentreen laposici6nFAST(r_pida)
NO@:NoIo Ileneenexceso.ElIlenadoexcesivo
de aceitepuedehacerqueel
motorgenerehumo,quecuestearrancarlooquefallelabujia.
4.
Vuelvaacolocareltap6n/la varillademedici6nde aceitebienajustados
antesde porteren marchael motor.
Canalde descarga
Aflojelaperilladealetasdelcanalsuperior,ajusteelcanaly elcontroldel
canala laposid6ndefundonamlentodeseada.
Aprletelaperilladealetasdelcanalsuperiorasegur_ndose
dequeelperno
delcarroseencuentrecorrectamente
colocado.Consulte
2.
f
laFigure27.
Soportedeajustedel
cabledelabarrena
F
Tomillo
delacajade........................
labarrenainferior
'I/
......
Tomillo
delacaja
//
J
_
delabarrenasuperior
.J
Figure28
Deslice
elsoportedeajustedelcablehaciaatr_sreduciendoeljuegodel
cablede labarrena.
Figure27
Pruebade controlde la barrena
10. Vuelvaaajustarlatuercahexagonalposterior.
11.
IMPORTANTE:
Realicelapruebasiguienteantesde operarlam_quinaquitanieve
porprimeravezy alprincipiodecadainvierno.
NO@:Silabarrenacontinuagirandoconelcontroldesengranado,
apagueel
motory reajusteelsoportedelcablehaciaadelante.Luegovuelvaacontrolar
elfuncionamientode labarrena.
Compruebe
elajustedel controlde labarrenade lasiguienteforma:
I.
Endendaelmotory verifiquequeelcontroldelabarrenaseengranay
desengrana
adecuadamente.
Cuandosesueltaelcontroldelabarrenay est_en posici6ndesengranada
arriba,elcabledebetenermuypocojuego,peroNOdebeestarajustado.
Noajustedemasiadoelcable.Elajusteexcesivopuedeimpedirquela
barrenasedesengraney porteren peligro la seguridadde lam_quina
quitanieve.
5O
j
Control
dela
barreua
Cuerda
de
arranque,
Controldela
transmisi6n
Tapadela
gasolina
\
Canalsuperior
Barradecontrolsuperior
_,
] delcanal
f
Montajedelcanal
Sileudador
Herramieula
de limpieza
Tap6nde
combustible
Manijadelarrancador
deretroceso
_
Cebador
Tap6nde
_-
aceite
Llaved,
eucendido
Bot6n de
/
Cebador,
Perilladelcanal
Barreua
Plata de raspado
Tubode drenaje de aceite
arranque
el_ctrico
Salidadel arrancador
el_ctrico
Zapata
antidesiizante
J
Familiarisecon el usodetodosloscontrolesde la m_quinaquitanievey consucorrectofuncionamiento.Sepac6modetener la m_quinay desactivarlos
controlesr_pidamente.
NOTA:ComparelaFiguraconsuequipoy sigaladescripci6ndeloscontroles,quese
ofrecenacontinuaci6n,parafamiliarizarseconsuoperaci6n.
Manija dei canal
Controlde ia transmisi6n
Ladirecd6nenquesearrojalanievecorresponde
a ladirecci6ndeaperturadel
canal.Uselamanijadelcanalparagirarelmontajedelcanalen ladirecci6nen la
quedeseearrojarlanieve.
Ubicado
enlaparteinferior
delgaucho
superior,
elcontrol
delatransmisi6n
seutiliza
paraengranar
/desengranar
lasruedas.
Apriete
elcontroldelatransmisi6n
contrala
barradecontrol
superior
paraengranar
lasruedas,
ysu_ltelo
paradesengranarlas.
Control de ia barrena
Elcontroldelabarrena
est_alladodelabarradecontrolsuperior.
Aprieteelcontrol
delabarrena
contralabarradecontrolsuperior
paraengranar
lasbarrenas,
y
su_lteloparadesengranarlas.
Periiladel canal
Esposibleajustarladistandaalacualsearrojala nieveelevandoo bajandoelcanal
superior.Aflojelaperilladelcanaldelladodelcanalsuperiorparaajustarlo.Gireel
canalsuperiorhastalaposid6ndeseaday vuelvaaajustarlaperilladelcanal.
Platade raspado
Laplacaderaspadomantieneelcontactoconelpavimentoamedidaquese
impulsalam_quinaquitanieve,permitiendoquesedescarguelanievequeest_
cercadelasuperfidedel pavimento.
Nuncarealiceajustesalmontaje del canala menosqueloscontrolesde la
barrenay latransmisi6nest_ndesengranadosyel operadorest_ parado
junto a la unidad.
Zapata antideslizante
IMPORTANTE:
ConsultelaInformaci6nsobrelapruebadecontrolde labarrenaen
lasecci6nMontajey Ajustesdeestemanualantesde hacerfuncionarlam_quina
quitanieve.Leay cumplatodaslasinstrucciones
concuidado,y realicetodoslos
ajustesparaverificarquesum_quinaquitanieveest_funcionandodeformasegura
yadecuada.
51
Sepuedeajustarelespadoqueexisteentrelaplacade raspadoy elsuelo.S[desea
quitar nievealrasdelsuelo,coloquelaszapatasantideslizantes
en laposici6nbaja.
Uselasposicionesmediaoalta cuandolasuperficiequedesealimpiarseadespareja
o est_cubiertadegrava.
Barrenas
riD..-- ,al
@andoest_nengranadas,
lasbarrenasgkany mandanlanievehaciaelinteriorde
lacajadelabarrena.
Montajedei canal
Controldel regulador
Lanieveempujadaalinteriorde lacajade labarrenasedescargaporelmontajedel
canal.
Elcontroldelreguladorest_ubicadoenelmotor.Regula
lavelocidaddelmotor,y
Ioapagacuandosepresionahadaabajocompletamente.
Laimagendeladerecha
representalasveloddades
delcontroldelreguladory coincideconlaetiquetaubkada
enelmotor.Lasim_genesa continuaci6n
ilustranladefinici6ndecadas[mbolo.
Control del cebador
AIactivarelcontroldelcebadorsecierralaplatade
cebadodelcarburadory seayudaaencenderel motor.Por
informaci6nacercadel usodelcebador,consulteArranque
delMotorm_isadelanteen estasecci6n.
Herramienta
Arrancador
deretrocesoy manija delarrancador
Nuncauselasmanospara despejarun montaje de canaltapado. Apagueel
motory permanezca
detkis delasmanijasbasraquetodaslaspartesm6viles
sehayandetenidoantesde utilizar laherramienta de limpiezapara despejar
elconjunto del canal.
Estemotorcuentaarranqueporestiramientoconacci6nderetrocesoy manijade la
empuffadurade mit6nparaun f_icilaccesousandoguantesomitones.
[.lavede encendido
LaIlavede encendidoesundispositivodeseguridad.Debe
estarcompletamenteinsertadaparaqueel motorarranque.
RetirelaIlavedeencendidocuandono uselam_quina
[[[_'_!
quitanieve.
NOTII:NogirelaIlavedeencendidoparaintentararrancarel
motor.AIhacerlopodr[aromperla.
_0
de limpieza
Laherramienta
delimpiezadelcanalest_ajustada
convenlentemente
alaparteposterior
delacajadelabarrenaconun pasador
deensamblado.
Siseacumulan
nievey hieloen
elcanaldedescarga
durantelaoperad6n,
proceda
comoseindkaacontinuaci6n
para
limpiardemaneraseguraelmontajedelcanalylaaberturadelcanal:
I
1.
Suelteelcontroldelabarrenay elcontroldelatransmisi6n.
2.
Paradetenerel motorsaquelaIlavedeencendido.
3.
Saquelaherramientade limpiezade lahorquillaquelaajustaala parte
posteriordelacajadela barrena.
4.
Useelextremoconformadepaladelaherramientade limpiezapara
desplazary recogerlanievey elhieloqueseformendentroy cercadel
montajedelcanal.
5.
Vuelvaaajustarlaherramientadelimpiezaal pasadordeensamblado
ubicadoen laparteposteriordelacajadelabarrena,insertedenuevola
Ilavedeencendidoy endendaelmotordelam_quinaquitanieve.
Cebador
6.
AIpresionarelcebadorseenviacombustibledirectamente
alcarburadordel motorparafacilitarelarranquecuando
hacefifo. Consultelasinstrucciones
de encendido
Paradoenlaposici6ndeloperador(detr_sde lam_quinaquitanieve),
engraneel controldela barrenaduranteunossegundosparaeliminarla
nieveoelhieloquehayanquedadoen elmontajedelcanal.
Antes de encender el motor
Bot6n del arrancador el_ctri¢o
Sioprimeelbot6ndelarrancador
el_ctrkoseengrana
elarrancador
el_ctricodelmotor
cuandoseIoenchufaaunafuentedeenergiade120V.
Salida del arrancador el_ctri¢o
Esnecesariousaruncord6nprolongadorparaexterioresde tresparas(seincluye)y
unafuentedeenergia/ tomacorrientede paredde 120V.
enlasecci6ndeoperad6ndeestemanualparausar
correctamente
elcebador.Laimagenqueapareceacontinuad6nalaizquierda,
coincideconlaetiquetaqueidentifkaal cebadorenelmotor.
Lea,comprendaysigatodaslasinstrucciones
y advertenciasqueaparecen
en la m_iquinayen este manualantesde operarla.
Llenado de aceite
Aceite del motor
Saqueel tap6nde aceiteparaagregaraceite.Consultelasecd6nMantenimientoy
Servicioparaobtenerinstrucciones
sobrecontroly Ilenadodeaceite.
Estaunidadseenvi6conaceiteenel motor.Controleel niveldeaceiteantesde
Tapa de la gasolina
cadaoperaci6nparaasegurarse
dequehayaaceitesuficienteenel motor.Porm_s
instrucciones,
consultelasecci6nMantenimientoy Serviciodeestemanual.
Saquelatapade lagasolinaparaagregarcombustible.Launidadoperacon
combustiblenormal.
NOTA:Paracomprobarel motorasegt_rese
dequeest_apagadoy sobreuna
superfidenivelada.
NOTA:Estaunidadpuedeincluiruntap6ndecombustible,queunicamentese
utilizaduranteelmontajeparamantenereldep6sitodecombustiblelibre de
suciedady residuos.Descarte
eltap6ndecombustibleantesde Ilenareldep6sitode
combustible.
1.
52
Retireeltap6nde [[enadodeaceite/lavarillade medki6ny Iimpielavarilla
de medici6ndeaceite.
Insertelatapa/ varillademedid6nenelcuellodeIlenadodeaceite,girelatapa
1/4vueltahastaqueest_completamente
asentada.
Saqueel tap6n/la varillade medici6ndeaceite.Sielnivelesbajo,agregue Arrancadorei ctrico
aceitelentamente(5W-30,conunaclasificaci6n
minimade SF/SG)
hastaque
elnivelregistradoestdentrelospuntosalto (H)y bajo(L).
est_equipadoconuncabledeaiimentaci6nde
flO@:NoIo Ileneenexceso.ElIlenadoexcesivo
de aceitepuedehaterqueel E[arrancadorel_ctricoopcional
treshilos
c
onectado
a
tierray
unenchufe
y est_diseffadoparaoperarconcorriente
motorgenerehumo,quecuestearrancarlooquefallelabujia.
dom_sticaCA,120voltios.Debeserutilizadoconunrecept_culo
paratrespatas
4.
Vuelvaacolocareltap6n/la varillademedici6nde aceitebienajustados
correctamente
conectadoa tierraentodomomentoparaevitarlaposibilidadde
antesde poneren marchael motor.
descargas
el_ctricas.
Sigatodaslasinstrucciones
cuidadosamente
antesdeoperarel
Gasolina
arrancadorel_ctrico.NOutiiice
elarrancadorel_ctricoen lalluvia.
3.
Utilicegasolinaparaautom6viles(sinplomoobajocontenidodeplomopara
DeterminesJelcableadode suhogaresun sistemadetrescablesconectadoa tlerra.
minimizarlosdep6sitosenlac_maradecombusti6n)conun minimode87octanos. Consulteconun electridstamatriculadosl noest_seguro.
Sepuedeusargasolinaconhastaun 10%deetanolo un15%de MTBE(_termetilico S[tieneunrecept_culo
detrestermlnalesconconexi6n
a tierra,procedadelasiguiente
terdario-butilico).Nuncauseunamezcladeaceitey gasolinanigasolinasucia.Evite manera:S[elcableado
desuhogarnoeseladecuado,
NOuseelarrancador
el_ctrlcoen
queseintroduzcasuciedad,polvoo aguaen eldep6sitodecombustible.NOutilice nlngunadrcunstanda.
3.
Conecteelprolongadora lasalidasituadaenlasuperfidedel motor.Conecte
elotto extremodelprolongadora un tomacorrientede CA,120voltioscon
conexi6natierra,paratresparas,enun_reabienventilada.
4.
Muevalapalancade controldel reguladorhastalaposid6nFAST(r_pido,
Nolleneenexceso
eldep6sitodecombustible.
Despu_s
decargarcombustible,
asegurese
dequeeltap6ndeldep6sitoest#blencerradoy asegurado.
representado
porunaliebre)_
Tengacuidadodenoderramarcombustible
alreallzarlarecarga.
Elcombustible5.
derramado
o susvaporessepueden[ncendlar.
Sisederramacombustible,
asegOrese
dequeel_reaest_secaantesdearrancarelmotor.
6.
Eviteelcontactorepetidoo prolongado
conlapielo la[nhalacl6n
delosvapores.
Tengamucbocuidadoaltrabajarcongasolina.Lagasolinaessumamente
inflamabley susvaporespuedencausarexplosiones.Nuncaagreguecombustible
7.
alam_quinaeninteriores
o mientrasel motorest_calienteoenfundonamiento.
Apaguecigarrillos,dgarros,pipasy otrasfuentesde combusti6n.
].
Antesdesacareltapbnparacargarcombustible,limpiealrededor.
2.
Eneldep6sitodecombustible
hayun indicadordenivel.Lleneeldep6sitohasta
Ilegaralniveldecombustibledelindicador.YeaelrecuadrodelaFigura10.
8.
TengacuidadodenoIlenarenexceso.
Encendidodel motor
9.
Siempremantengalasmanosy lospiesalejadosde laspartesm6viles.No
utilice fluidos comprimidosparaarrancar.Losvaporesson inflamables.
Elcablede extensi6npuedetenercualquier longitud, pero debeestar
clasificadopara 15amperiosa 125voltios, tierra y clasificadoparasuuso
al aire fibre.
.
I,,1.
Muevalapalancadel cebadorhastalaposlci6nCHOKE
(encendido)
_
Cargue
combustible
enun_ireabienventiladay conelmotorapagado.
No
fumenipermitallamasochispas
enellugardondesecargacombustible
o se
almacena
lagasollna.
H
gasolinaE85.
S[el motorest_callente,ublqueelcebadoren laposld6nRUN(apagado).
Presione
el bot6ndel cebadortres(3)veces,asegur_ndose
decubr#el
orifido deventilaci6ncuandoIohaga.SIelmotorest4caliente,presione
el bot6ndelcebadorunasolavez.Cubrasiempreelorifido deventilaci6n
cuandooprimael bot6ndelcebador.SIhacefrio puederesultarnecesario
repetirelcebado.
Presione
el bot6ndel arrancadorparaarrancarelmotor.Unavezencendido
el motor,suelteinmediatamenteelbot6ndelarrancador.Elarrancador
el_ctricotieneunaprotecd6ncontrasobrecarga
t_rmica;elsistemase
apagar_transitoriamenteparapermit#queseenfrieel arrancadorencaso
quesesobrecargue.
A medidaquesecalientaelmotor,rotelentamenteelcontroldel cebador
hastalaposid6nRUN(apagado).SIelmotorsedetiene,vuelvaaencenderlo,
h_galofundonarconelcebadorensuposid6nmediaduranteun lapsobreve
y luegogirelentamenteelcebadorhastalaposid6nRUN(apagado).
Unavezqueel motorest_en fundonamiento,desconectedelarrancador
el_ctricoel cablede alimentad6n.Paradesconectarlo,
desenchufe
siempreelextremoqueest_enchufadoaltomacorrientedeparedantesde
desenchufar
elextremoopuestoqueest_conectadoal motor.
Arrancadorde retroceso
Notire de la manijadel arrancadormientrasel motor est_en marcba.
NOTA:
Dejequeel motorsecalienteduranteunosminutostraselarranque.Elmotor
1.
Muevalapalancade controldel reguladorhastalaposid6nFAST(r_pido,
nodesarrollar_todasupotendahastaquealcancetemperaturas
operativas.
representado
porunaliebre)_
.
1.
Asegt#ese
de queelcontroldelabarrenay elcontrolde latransmisi6nest_n
enposid6ndesengranada
(sinpresionar).
2.
2.
InsertelaIlavedeencendidoen laranura.Asegt_rese
dequeentreapresi6n
ensulugar.NointentegirarlaIlave.
NOTA:
Elmotornopuedearrancarsi laIlavenoest_completamenteinsertadaenel
interruptordeencendido.
53
I,"1
Muevalapalancadel cebadorhastalaposld6nCHOKE
(encendido)
(encendido
conelmotorenfrio).SIelmotorest_caliente,ubiqueelcebador
en laposid6nRUN(apagado).
3.
4.
5.
Presioneelbot6ndelcebadortres(3)veces,asegur_ndose
decubrirel
orifido deventilad6ncuandoIo haga.Siel motorest_caliente,presione
elbot6ndelcebadorunasolavez.Cubrasiempreelorifido deventilad6n
cuandooprimaelbot6ndelcebador.Sihatefrio puederesultarnecesario
repetirelcebado.
Procedimientoparaguitar la nieve
Revisela zonaquedesealimpiar para detectar la presendade objetos
extraffos. Retirelossi loshay.
Jalesuavementelamanijadelarrancadorhastaquecomienceaofrecer
resistenda,luegoj_lelar_pidamentey confuerzaparasuperarla
compresi6n.Nosueltelamanijanipermitaquesedesenganche.
Vuelvala
sogaLENTAMENTE
asuposiddnoriginal.Desernecesario,
repitaestepaso.
Amedidaquesecalientael motor,rotelentamenteelcontroldelcebador
hastalaposki6nRUN(apagado).
Sielmotorsedetiene,vuelvaaencenderlo,
h_galofundonarconelcebadoren suposkidnmediaduranteunlapsobreve
y luegogirelentamenteelcebadorhastalaposiddnRUN(apagado).
Paraevitar queel motorfundone sincontrol, nuncadeje la m_quinasin
vigilancia mientrasest_ en marcha.Apagueel motor luego de usarloy saque
la Ilavedeencendido.
Detenci6n del motor
1.
Encienda
elmotorsiguiendolasinstrucciones
deencendido.
2.
Dejequeelmotorsecalienteunosminutosyaqueelmismonodesarrollala
potenciam_ximahastaquealcanzalatemperaturadefundonamiento.
3.
@eelconjuntodelcanalhacialadirecd6ndeseada,lejosdetransetinteso
edificios.
4.
Asegt]rese
dequenohayaningLintranseLinte
ni ningLinobjetoenfrentede
launidad,presioneelcontrolde labarrenacompletamentecontralabarra
superiorhastaengranartotalmentelasbarrenas.
5.
Mientrasengranael controlde labarrena,presioneelcontroldela
transmisi6ncompletamentecontralamanijasuperiorparaengranarlas
ruedas.Nopongahorizontalelcontroldetransmisi6n.
6.
A medidaquelam_quinaquitanievecomienzaa moverse,sostenga
firmementelamanijay gu[elam_quinaa Iolargodelcaminoquedesea
limpiar.
7.
Suelteloscontrolesde labarrenay latransmisi6nparaquelam_quinadeje
dequitar nievey dedesplazarse
hadadelante.
Dejeencendidoelmotordurantealgunosminutosantesdedetenerloparapermitir
quesesequelahumedaden elmismo.
1.
Muevaelcontroldelreguladorhastalaposid6nSTOP
(detend6n)
@.
2.
RetirelaIlavedeencendido.
AIretirarlaIlavesereducelaposibilidad
dequeel
motorseapuestoen marchasinautorizad6nmientraselequiponoest_enuso.
Guardelallaveen unlugarseguro.Elmotornopuedearrancarsinlallavede
encendido.
3.
Eliminelahumedaddeloscontroles
delmotor.
NOTA:Suunidadest_equipadaconunembragueenlatransmisi6n.Silasruedasse
detienenmientrastratadedescargargrandesvoltimenesde nieve,inmediatamente
desengrane
elcontroldelatransmisi6ny dejequelasbarrenasqueest_ngirando
descarguenlanievedelacaja.Reduzcalaanchuradeseparad6ny contint]ela
operad6n.
Antesde detener ia m quina
1.
2.
8.
Dejeencendidoelmotordurantealgunosminutosparapermitirquese
sequelahumedadenel mismo.
Ubicaci6ndel canalde descarga
Paraevitarunposiblecongelamiento
delarrancador
deretroceso,
sigaestos
pasos:
Aflojelaperilladelcanaly gireelcanalsuperiorhastalaposid6ndeseada.Ajuste
la perilladelcanalcomprobando
queelpernodecarroest_ubicadocorrectamente
Gire la manija del canal a la posici6n de operaci6n deseada.
Arrancadorde retroceso
1.
Conlaspasadas
sucesivas
reajusteelconjuntodelcanalenlaposid6ndeseada
y traslapelevementelapasadaquelimpi6previamente.
Conelmotorenmarcha,tire delacuerdadelarrancador
conmovimientor_pido
y continuodelbrazotresocuatroveces.
Procedimientoparadetener ia m quina quitanieve
Noelevenuncala m_quinaquitanievetom_ndola de lamanija del canal.
Consejosde operaci6n
1.
Paradetenerlasruedas,suelteelcontrolde latransmisi6n.
2.
Paradejarde quitarlanieve,sueltee[controldela barrena.
Paraqueelquitadodelanieveseam_sefidentedebehacerlo
inmediatamente
despu_s
de laca[dadelamisma.
3.
Paradetenere[motorpresione[apa[anca
decontroldelregu[ador
hasta[aposid6n 2.
OFF
(apagado)
_
ysaquelaIlave.NogirelaIlave.
EnIoposible,descargue
lanieveenladirecci6ndelviento.Traslape
levementecadapasadaanterior.
1.
3.
Latemperatura del silenciadoryde las_reasqueIo rodeanpuedesuperar
los1500FoEvitedichas_reaso
Configurelaszapatasantideslizantes1/4" pordebajode laplacade raspado
paraun usonormal.Laszapatasantideslizantes
sepuedenajustarhacia
arribacuandolanieveest_muycompactada.
NO@:Noserecomiendalaoperaci6nde estam_quinaquitanievesobre
grava,yaqueesposiblequelam_quinaquitanievetomelagravasueltay
labarrenalaexpulse,Iocualpodr[acausarlesionespersonales
o daffarla
m_quinaquitanieve.
54
4.
Siporalgt_nmotivotienequeusarlam_quinaquitanievesobregrava,
mantengalazapataantideslizanteen [aposici6nm_selevadaparaIograr
unaseparad6nm_ximaentreelsueloy laplacaderaspado.
5.
Limpiecuidadosamente
lam_quinaquitanievedespu_sdecadauso.
Reemplazode lospasadoresde cuchiila
Lasbarrenasest,_najustadasalejeespiralcondospasadores
decuchfllay pasadores
dechaveta.Lam_quinaquitanievehasidodisefiadaparaquelospasadores
se
quiebrensi labarrenagolpearaunobjetoextrafioo untrozodehielo.Silasbarrenas
nogiran,verifiquesi lospasadores
sehanquebrado.VealaFigure29.
NUNCA
cambielospasadoresde cucNllade [asbarrenasporotra cosaque
lospasadoresde cucNiiade repuestodel fabrkante de[ equipo original, No
de pieza-738-04124.Cualquierdaffoquesufra [acaja deengranajesde [a
barrenaocuaiquierotto componenteporrespetar[a indicaci6n
precedente,
NOestar_cubierto por [a garant[ade sum_quina quitanieve.
Siempredebeapagare[ motor de lam_quina quitanieveyretirar [a Have
antesde cambiarlospasadoresdecuchiiia.
Figure29
55
MANTENIMIENTO
DELMOTOR
f
Jletamentetodaslas )iezasm6viles.
Control dei aceite del motor
NOTA:Verifiqueel niveldeaceiteantesde cadausoy despu_sdecadadncohoras
defuncionamientoparacerciorarse
quesemantieneelhive[deaceiteindicado.
Cuando[eagregueaceitea[motor,consulte[asiguientetabladeviscosidad.La
capaddadde aceitedelmotores600ml (aprox.20onzas).No[[eneexcesivamente.
Useunaceiteparamotordecuatrotiempos,o unaceitedetergentedeca[idad
premiumequivalenteconcertificadoquecubrao excedalasexigenciasdelos
fabricantesdeautomdviiesamericanos
respectode [aclasificaci6n
de servicioSGy
SELosaceitesparamotorconlaclasificad6nSG,SFtienenest_designad6nenel
envase.
J
Retireeltap6ndeIlenadode aceite/lavarillademedicidny limpielavarilla
demedicidnde aceite.
2.
Figure30
Insertelatapa/ varillademedici6nenel cuellode Ilenadode aceite,girela
tapa1/4vueltahastaqueest_completamenteasentada.
f
NOTA:
Enalgunosmotores,untap6nderosca/ varillademedid6npueden
existiren lugarde unatapade 1/4vueltacomosedescribeanteriormente.
Enestecasonoapretarlatapaparaverificarel niveldeaceite.Simplemente
descansar
latapaenlasroscasparacomprobarelniveldeaceitecorrecto.
3.
Saqueeltap6n/[a varillademedici6ndeaceite.Sielnivelesbajo,agregue
lentamenteaceitehastaqueel nivelregistradoest_enun puntointermedio
entrealto (H)y bajo(L).YealaFigure30.
4.
Vuelvaacolocareltap6n/la varillademedici6ndeaceitebienajustados
antesde poneren marchaelmotor.
Tap6n de
drenaje de
aceite
Cambiode aceite del motor
NOTA:
Cambieelaceitedelmotordespu_s
de lasprimerasdncohorasde
funcionamientoy,en Iosucesivo,
unavezportemporadaocadadncuentahoras.
1.
2.
Vacieelcombustibledeldep6sitohaciendofuncionarelmotorhastaqueel
dep6sitodecombustibleest_vac[o.Cerci6rese
dequeeltap6ndeIlenadodel
combustibleest_bienajustado.
J
Figure31
Pararecolectarelaceitecoloqueunrecipienteadecuadobajoeltap6nde
drenajedeaceite.
Vuelvaacargarelaceiterecomendado
y controleel niveldeaceite.Consulte
elgr_ficodeusodeaceiterecomendado.
Lacapacidaddeaceitedelmotores
de 20onzas.
3.
Saqueeltap6nde drenajedelaceite.VealaFigure31.
4.
Inclineelmotorparadrenarelaceiteenel recipiente.Elaceiteusadosedebe
descartaren uncentroderecolecci6n
adecuado.
NOutilice aceitessindetergenteo para motorde dos tiempos.Podria
reducirse
lavida util del motor.
7.
instalacionesJarala eliminaci6n/redcla
5.
Vuelvaacolocary ajustareltap6nde Ilenado/lavarillade niveldeaceite.
ura(o)del aceiteusado.
L_vesebien lasmanoscon aguayjab6n inmediatamente despu_sde tocar
aceiteusado.
Vuelvaacolocareltap6ndedrenajey ajustelobien.
56
i
i
Synthetic
Electrodo
(%-40 °-20 o 0o 20o 40o
(oc)
-30° -20° -10° 0°
Control de ia bujia
--9
.e-------0,02-0,03
pulgadas
(0,60-0,80ram)
NOpruebela chispasi no est_la bujia de encendido.NOd_arranqueal
motor si noest_ [a bujia de encendido.
Figure33
Verifiquequelaarandelade labujiaest_enbuenascondidonesy enrosque
la bujiahaciaadentromanualmenteparaevitarqueseenrosquecruzada.
Si ei motor haestado funcionando,ei siienciadorestar,_muy caiiente.Tenga
cuidadode no tocar el silenciador.
flOTA:Controlelabujia unavezportemporadao cada25horasde funcionamiento.
Cambielabujiaunavezportemporadaocada100horasdefuncionamiento.
flOTA:Cuando
instaleunabujianueva,apriete1/2vuelta,despudsquela
bujiaseencuentracolocadaensulugar,paracomprimirlaarandela.Cuando
reinstaleunabujiausada,ajuste1/8- a1/4degiro,despudsquelabujiase
encuentracolocadaensulugar,afin decomprimirlaarandela.
Paraasegurarse
dequeel motorfuncionebien,labujiadebetenetunaseparaci6n
correctay debeestarlibrede dep6sitos.
1.
Retireiafundadebujiay utiliceunaIlaveparabujiasparaextraerlabujia.
VealaFigure32.
Labujia debeestar bien ajustada.Si la bujia est_floja puederecalentarse
y
daffarelmotor.
Bujiade
encendido
©
Fundadebujia
Figure32
2.
Inspeccione
visualmentelabujia. Eliminelabujiasipresentamucho
desgaste,osiel aislanteest_agrietadoo astillado.Limpielabujiaconun
cepillodealambresisevaa reutilizar.
3.
Midalaseparaci6n
debujiaconuncalibrador.Corrijade setnecesario
torciendoelelectrodolateral.Veala Figure33.Laseparaci6n
debe
establecerse
entre0,02y 0,03pulgadas(0,60-0,80mm).
Unavezquelabujiaest_colocada
en sulugar,aprieteconunaIlavepara
bujiaparacomprimirlaarandela.
57
Eecomendadonesgenerales
/_-
Pasadorde cucNlla
Pasadorde
chaveta
Respete
siempre
lasreglas
deseguridad
cuando
realice
tareasde
mantenimiento.
2.
Lagarant[adeestam_quinaquitanievenocubreelementosquehanestado
sujetosal malusoo negligendadeloperador.Pararedbirelreembolso
total de lagarant[a,eloperadordeber_darmantenimientoa lam_quina
quitanievecomoseindicaenestemanual.
3.
Reviseperi6dicamentetodoslossujetadores
y loselementosde ferreteria
paracomprobarqueest_nbienajustados.
Zapata antideslizante
Pernodel
carro
Plata de
raspado
Realiceel mantenimientode lacorreaalaire libre,ya queesposibleque
hayap_rdidasdecombustiblede[ carburadorindusocuandoseubicaun
trozode pl_stico bajo latapa de Ilenadode combustibleparaevitar que
_stesufra p_rdidas.
!
;
Tuercade
Pernodelcarro
seguridad
Tuerca
de
Figure 34
Cambiode ia plata de raspadoy iaszapatas
antidesiizantes
Laplatade raspadoy laszapatasantideslizantesubicadasen[abasede[a
m&quinaquitanieveest&nsujetasadesgaste.Debecontrolarlasperi6dicamente
y
reemplazarlas
cuandoseanecesario.
1.
Paracambiarias,quitelospernosdecarroy lastuercasqueasegurancada
zapataantideslizantea[acajade[am&quinaquitanieve.Vea[afigura 15.
2.
Vuelvaaensamblarnuevaszapatasantideslizantesconloselementosde
ferreteriaqueacabade retirar.Compruebeque[aszapatasantideslizantes
est&najustadasparaquequedenparejas.
3.
Pararetirar[a platade raspado:Retireambaszapatasantideslizantes
y los
elementosdeferreteria,induyendo
lospernosdelcarroy lastuercasque
unen[a platade raspadoa[acajade[am&quinaquitanieve.Por[aubicacidn
de[aplatade raspado,
consulte[aFigure34.
4.
Vuelvaaensamblar[aplataderaspadonueva,asegur&ndose
de quelas
cabezasdelospernosdelcarroseencuentrende[[adointeriorde [acaja.
Vuelvaa instalar
[aszapatasantideslizantes.
Ajustebien.
Figure35
Unavezportemporada,lubriqueelsoporteintermedio
delabarrenaconun
aceiteliviano.
Motor
Serviciode iasbarrenas
Acontinuaci6n
seenumeranrecomendaciones
generalessobreelmantenimiento
del motordesum_quinaquitanieve.
Lasbarrenasest_nsujetasalejeespiralconcuatropasadores
decuchillay
pasadores
dechaveta.Lam&quinaquitanieveest&diseffadademaneraquelos
pasadores
sequiebransi golpeaunobjetoextraffoo unabarradehie[o.Consulte[a
Figure34.
I.
Antesde operarlam_quinaquitanieve,controleelniveldeaceite.
2.
Silasbarrenasnogiran,verifiquesilospasadores
sequebraron.Siesnecesario,
reempl_celos
porpasadores
de cuchillaadecuados.
Consulte
el nt_merodepieza
correctoenlalistadepiezasdeestemanual.
Cambieelaceitedel motordespu_sdelasprimerascincohorasde
funcionamientoy apartirde ahicada50horas.
3.
IMPORTANTE:
NoreemplaceNUNCA
lospasadores
decuchillade lasbarrenaspor
pasadores
o sujetadoresest_ndar.Cualquierdaffoquesufraelengranajede la
barrenao cualquierotro componente
porel usodepasadores
est_ndarNOestar_
cubiertoporlagarantiadesum_quinaquitanieve.
Limpielabujiay reajustelaseparad6ndeelectrodosa0,030"almenosuna
vezportemporadaocada100horasdefuncionamiento;reempl_cela
cada
200horasdefuncionamiento.
Verifiqueiascorreasen V
Sigalasinstrucciones
quesesuministranacontinuad6nparaverificarelestadode
lascorreasdetransmisi6ncada50 horasde funcionamiento.
Lubricad6n
5aquelacubiertapl_sticadelacorreaubicadaenelfrentedelmotor.Para
ellosaquelostornillosautorroscantes
y presionelaslengiJetas
pl_sticaspara
soltarlacubiertadelacorrea.
Paraubicarlospuntosde lubricaci6ndela m&quinaquitanieve,consultela Figure
35.
Unavezportemporada,
lubriquelospuntosdegirodelcontroldelabarrena
yelcontroldelatransmisi6n
conunaceitelivianoparamotor.
58
Verifiquevisualmentelaexistendadecorreasraidas,agrietadaso
excesivamente
gastadas.Encasodesernecesario,reemplacesegt_n
las
instrucciones
queaparecenacontinuaci6n.
Reemplazode ias¢orreas
Correade barrena
Poleade[
motor
NOTA:
Estamfiquinaquitanievevieneequipadacondoscorreas:unacorreade
labarrenay unacorreadetransmisi6n.Serecomiendaqueambascorreassean
reemplazadas
almismotiempo.
1.
Retiredelabujiaelcablede lamisma,y p6ngalodemaneraquehagamasa
contrael motorparaevitarqueseenciendademaneraaccidental.
2.
Hagafuncionarel motorhastaqueeldep6sitode combustiblesevadepara
evitarunap_rdidadegasolinadurantelossiguientespasos.
Antesde realizartareasde servicio,reparaci6n,[ubricaci6no inspecci6n,
desengranetodosloscontrolesy detengael motor. Esperea quese
detengancompietamentetodas[aspiezasm6viles.Desconecteel cable
de labujia y p6ngalohaciendomasacontrael motor para evitar quese
enciendaaccidentalmente.Utilicesiempreanteojosde seguridaddurante
laoperaci6no mientras realizaajusteso reparaciones.
M_nsulaintermedia
Figure
37
3.
Retireeltornil[oautorroscantequesemuestraen laFigure36,y presionelas
lengiietaspl_sticasparasoltarlacubiertade lacorrea.Tiredelacubiertade
lacorreahaciaarribay hadaafuerasac_ndoladealrededordel motory el
montajedel canal.Ddjelaseparaday gu_rdela.
3.
Apriete[abarradecontrolde labarrenaparasoltare[frenode labarrena,
queeslaleng_ieta
quesujetalacorreasobrela poieadela barrena.Retirela
correa.
4.
Reempl_cela
pot la nuevacorreadespu_sdereemplazarlacorreade la
transmisi6n.
F
Correade ia transmisi6n
NOTA:
Reemplace
lacorrea
delatransmisi6n
antesdevolvera ensamblar
lanueva
correa
delabarrena.
1.
Inclinelam_quinaquitanievehadaarribay haciaadelantede maneraque
quedeapoyadasobrelacajadelabarrena.
IMPORTANTE:
Recuerde
quepuedehaberpdrdidadegasolinadelcarburador
enestepunto;debehaberbecbofuncionarelmotorhastavaciareldep6sitode
combustiblecomoseindic6previamente.
2.
Quiteel resortequeconectalatransmisi6na unpernoenelcuadrodel
motor.Veala Figure38.
Figure36
Correa de barrena
/MPORTANTE:
Recuerde
quepuedehaberp_rdidade gasolinadelcarburador
enestepunto;debehaberbecbofuncionarel motorhastavaciarel dep6sitode
combustiblecomoseindic6previamente.
1.
2.
Inclinelam_quinaquitanievehaciaarribay haciaadelantedemaneraque
quedeapoyadasobrelacajade labarrena.Retireelguardacorrea
comose
indicaenla Figure38.Regrese
lam_quinaquitanieveasuposici6nvertical
paracompletarlossiguientespasos.
Poleadetrausmisi6u
Correade la
Deslicelacorreadelabarrenafrontalfuerade lapoleadel motor
empuj_ndolahaciaadelantey haci_ndolarodarfuerade lapolea.Veala
Figure37.
trausmisi6u
Guardacorrea
Figure38
59
NOTA:
Puedeserm_sf_cilretirarlatuercadesegufidadbfidadaenprimerlugar,y
luegousarpinzasdepuntadeagujaparasujetarconfirmezael resortey retirarlo
delperno.
3.
Quitelacorreadetransmisi6nde alrededordela poleadelmotory s_quela
delaunidad.
5.
Instaleunanuevacorreadetransmisi6ndentrode laranuradelapoleadel
motor.VealaFigura18.
6.
Inclinelatransmisi6nhaciaadelantey ubiquelacorreadetransmisi6nen la
poleadetransmisi6n.
7.
Vuelvaaconectarelresorteal pernoen elmarcodelmotory ajustela
transmisi6n.Vuelvaa instalarlatuercadesegufidadbfidada.
Coloque
lacorrea
debarrena
nueva.
9.
Vuelva
amontarlacubierta
delacorrea
enla m_quina
quitanieve:
10. Vuelva
amontarelguardacorrea
a lacaja.
Girelatransmisi6nhadaadelanteparasoltarlapresi6nenlacorreade
transmisi6n.Retirelacorreadelapoleadetransmisi6n.
4.
8.
Ajustedei cable de ia barrena
Esposiblequeserequieranajustesperi6dicosdelcabledecontroldelabarrena
debidoalestiramientoy aldesgastenormaldelacorrea.Senecesitar_n
ajustess[
lasbarrenasparecentemblarmientrasgiranperoelmotormantienesuveloddad,o
si siguegirandoconelcontrolde labarrenadesengranado.
Refi_rase
a lasecd6nde
laAsambleaparAjustedelcablede labarrena.
Sigael cronogramademantenimientoquesepresentaacontinuad6n.Algunosajustesdebenserrealizadosperibdicamente
paraelmantenimientoadecuado
de [aunidad.
Reviseperi6dicamentetodoslossujetadores
y compruebequeest_nbienajustados.Controlesucalendariodemantenimientocompletandoelcampo"Fechas
de los
servidos"queapareceacontinuadbn.
Antesde reaiizartareasdeservicio,reparaci6n,[ubricaci6no inspecci6n,
desengranetodos loscontroiesy detenga e[ motor.Espereaquesedetengan
completamentetodaslaspiezasm6viles.Desconecteel cablede labujia y p6ngalohaciendomasacontrael motor para evitar queseencienda
accidentalmente.Utilice siempreanteojosde seguridaddurante laoperad6n o mientrasrealizaajusteso reparaciones.
Programa de mantenimiento
Antesdecadauso
1.
Reviseelniveldeaceitedel
1.
Carguade aceitesi elnivelest,_bajo
motor.
Despu_s
de cadauso
1.
Verifiqueel equipo.
1.
Limpieza
2.
Verifiqueel estadode las
2.
Limpieza
zapatas.
l ras5 horas
1.
Aceitedel motor
1.
Cambio.
Luegode25horas
1.
Compruebe
lascorreasenV.
1.
Ajusteo reparaddnsegt_nresulte
necesafio.
Antesdealmacenar
1.
Sistemadecombustible.
I.
Vadado.
Unavezportemporada
1.
Puntosdepivote.
I.
Lubricad6n.
2.
Sistemadetransmisi6ny ejede
engranajehexagonal.
2.
Lubricad6n.
3.
Engrasado.
3.
Ejede lasruedas.
4.
Bujiadeencendido.
4.
Cambiodesernecesafio.
60
Sinosevaa utiiJzaelequipodurante30diaso m_s,o sieselfinal delatemporadadenievey yano existeposibi[idaddequenieve,esnecesarioalmacenarelequipode
maneraadecuada.Siga[asinstrucdones
de a[macenamiento
queseindican
acontinuaddnparagarantizarelrendimientom_ximode [am_quinaquitanievedurante
muchosafros.
Preparad6ndel motor
Preparad6n de ia m_quina quitanieve
Losmotoresquesealmacenan
durantem_sde30diasnecesitanserdrenados
decombustibleparaevitarquesedeterioreny seformegomaenelsistemade
combustibleo enlaspiezasprindpalesdel carburador.Silagasolinade sumotorse
deterioraduranteel almacenamiento,
esposiblequedebarepararo reemplazar
el
carburadory otroscomponentes
delsistemadecombustible.
1.
Cuando
almacenelam_qulnaquitanleveen ungalpbndedepbsltomet_lico
o conpocaventilad6n,tengaespecialcuidadoderealizarleuntratamiento
anti- oxidanteal equipo.Useaceiteligeroosilic6npararecubrirel equipo,
especialmente
lascadenas,losresortes,loscojinetesy loscables.
2.
Eliminetodoelpolvodelexteriordelmotory delequipo.
1.
Eliminetodoelcombustibledeltanquehadendofundonarelmotorhasta
quesedetenga.Nointentedecombustibleparaelmotor.
3.
Sigalasrecomendaciones
delubricaci6nenlasecci6nde mantenimientode
estemanual.
2.
Cambleel aceltedel motor.
4.
Almaceneelequipoen un_readespejaday seca.
3.
Extraigalabujiadeencendidoy viertaenelciiindroaproximadamente
1
onza(30ml) deaceiteparamotorlimpio.Tirevariasvecesdel arrancadorde
retrocesoparadistribuirelaceitey reinstalelabujia.
5.
Inflarlosneum_ticosa lapresi6nde psim_xima.Consulteelcostadodel
neum_tlco.
4.
Limpielosresiduosdealrededordelmotor,y debajo,alrededor,y detr_s
delsilendador.Apliqueunacapadelgadade aceiteentodaslas_reasque
puedenIlegaraoxidarse.
Almaceneenunsectorlimp[o,secoy bienventilado,lejosde cualquier
artefactoquefuncioneconunallamao luzpiloto comoun homo,calentador
deaguaosecadorde ropa.Evitecualquiersectorconunmotorel#ctricoque
produzcachispasodondeseutilicenherramientasel#ctricas.
Nuncaaimacenelam_quinaquitanieveconcombustibleen eltanque en
un espaciocerradooen _reasconpocaventilaci6n,dondelosgasesdel
combustiblepuedanalcanzarel fuego,cNspaso unaluz piloto comolaque
tienen algunos hornos,calentadoresde agua,secadoresde ropao algun
otro dispositivoa gas.
Siesposible,evitesectoresdealmacenamiento
conmuchahumedad.
Mantengaelmotorniveladoen elalmac_n.Lainclinad6n
del motorpuede
causarp_rdidasde combustibleo aceite.
61
Antesde realizarcuaiquiertipo de mantenimiento oservicio,desenganche
todosloscontrolesy detengael motor. Espereaquesedetengan
completamentetodaslaspiezasm6viles.Desconecte
e[ cablede la bujia
y p6ngalohaciendomasacontrael motor paraevitar queseencienda
accidentalmente.Utilicesiempreanteojosde seguridaddurante la
operaci6no mientrasrealizaajusteso reparaciones.
Estasecci6nanaliza problemasmenores de servido. Paraubkar el Centro de Servido Searsm_s cercanoo para programarun servkio, simplemente
comuniqueseconSearsal tel_fono 1-800-4-MY-HOME
_.
Elmotorno arranca
Motorenmarcha
err_tica/RPM
incompatibles
(o
aumento
delacaza)
1.
Elcontroldelcebadornoest_enlaposid6nON(encendido).
1.
Pongaelcontroldel cebadoren laposid6nON(encendido).
2.
Sehadesconectado
elcabledelabuj[a.
2.
Conecteelcablea labuj[a.
3.
Labuj[anofundonacorrectamente.
3.
Limpiela,ajusteladistancladisruptivao c_mbiela.
4.
Eldep6sitode combustibleest_vac[oo elcombustibleseha
echadoaperder.
4.
Lleneeltanquecongasolinalimpiay fresca.
5.
Elmotornoest_cebado.
5.
Cebeel motortal comoseexplic6enlasecci6nFundonamiento.
6.
LaIlavedeseguridadnoseha insertado.
6.
InsertelaIlavetotalmentedentrodelinterruptor.
1.
Elmotorest_fundonandoenlaposici6n"choke"(c.
1.
Muevalapalancadelcebadora laposici6nRUN.
2.
Lalineadelcombustibleest_tapadao elcombustibleesviejo.
2.
Limpielalineadelcombustibley Ileneeldep6sitocongasolina
limpiay nueva.
3.
Hayaguao suciedad
en elsistemadecombustible.
3.
Poneren marchael motorhastaquesedetengaparavadar
eldep6sitode combustible.VuelvaaIlenareldep6sitocon
combustiblenuevo.
4.
Esnecesarioregularelcarburador.
4.
Comun[quese
conuncentrodeservidoSears.
5.
M_sgobernadosmotor
5.
Comun[quese
conuncentrodeservidoSears.
Elmotorrecalienta
1.
Elcarburadornoest_bienregulado.
1.
Contacteconsucentrodepartesy reparadonesSears.
Vibrad6nexcesiva
1.
Haypiezasqueest_nflojasolabarrenaest_daffada.
1.
Detengael motorde inmediatoy desconecte
elcablede la
bujia.Ajustetodoslospernosy lastuercas.Silavibrad6n
continua,Ilevelaunidadarepararaun centrode partesy
reparad6nSears.
P_rdidadepotencia
1.
Elcabledela bujiaest_flojo.
1.
Conectey ajusteel cabledelabujia.
2.
Elorifido deventilad6ndeltap6ndecombustibleest_
obstruido.
2.
Retireelhieloy lanievedeltap6ndecombustible.Compruebe
queelorificiodeventilad6nno est_obstruido.
Elcabledelatransmisi6nnecesitaunajuste.
1.
Ajusteelcabledelcontroldetransmisi6n.Consultelasecd6n
deServidoy Mantenimiento.
Lacorreadetransmisi6nest_flojaodaffada.
2.
Reemplace
lacorreadetransmisi6n.Consultelasecd6nde
Servidoy Mant.
Elconjuntodelcanalest_tapado.
1.
Detengael motorde inmediatoy desconecte
elcablede la
bujia.Limpieel montajedelcanaly elinteriordelacajade la
barrenaconlaherramientade limpiezaounavarilla.
2.
Hayunobjetoextrafioen labarrena.
2.
Detengael motorde inmediatoy desconecte
elcablede la
bujia.Retireelobjetode labarrenaconlaherramientade
limpiezaounavarilla.
3.
Elcabledela barrenanecesitaunajuste.
3.
Ajusteelcabledelcontroldelabarrena.Consultelasecd6n
Montaje.
4.
Lacorreadelabarrenaest_floja odafiada.
4.
Reemplace
lacorreade labarrena.Consultelasecd6nde
Servicioy Mantenimiento.
5.
Elo lospasadores
decuchillaest,(n)quebrado(s).
5.
Reemplace
connuevo(s)pasador(es)
de cuchilla.
Launidadnose
autoimpulsa
Launidadnodescarga 1.
lanieve
62
63
64
DECLARACI6N
FEDERAL
y/o DECALiFORNiA
SOBREGARANTiASENELCONTROL
DEEMISIONES
SUSDERECHOS
Y OBLIGACIONES
ENCUANTOA LAGARANTiA
MTD Consumer
Group Inc, la Agencia
venta en el estado de California,
de Proteccidn
el Departamento
al sistema de control (ECS) de emisiones
chispa para todo terreno,
peque_o,
encendido
(evaporativas
de exteriores
deben estar dise_ados, construidos
del aho 1997 y modelos posteriores
m_is abajo, siempre
y/o de escape) de su equipo
del a_o 2013 y ahos posteriores
peque_os
el sistema de control
y cuando
de los Estados Unidos (EPA), y para aquellos
(CARB) se complacen
y motor
(motor de equipos
En California,
productos
en explicar
de exteriores)
los nuevos motores
Donde
conectores
de la Agencia
de emisiones
no exista uso incorrecto,
y otros componentes
exista una condicidn
incluyendo
el diagn6stico,
para su
que cubre
de encendido
de equipos
de Proteccidn
Medioambiental
(ECS) de su motor
negligencia
de equipos
por
de exteriores
o mantenimiento
de los Estados Unidos, (EPA). MTD Consumer
de exteriores
inadecuado
por el periodo
cubierta
afines relacionados
por la garantia,
de tiempo
indicado
de dicho motor.
Su ECS puede incluir piezas tales como el carburador, el sistema de inyeccidn de combustible,
el sistema de encendido,
los depdsitos de combustible,
las lineas de combustible,
los tapones de combustible,
las wilvulas, contenedores,
filtros,
abrazaderas,
certificados
la garantia
y equipados
para cumplir con las estrictas normas antipolucidn
del Estado (en otros estados, los equipos
deben ser estar dise_ados, construidos y equipados para cumplir con las regulaciones de motores de
por chispa para todo terreno
Group Inc. debe garantizar
Medioambiental
de los Recursos del Aire de California
el convertidor
catalitico,
mangueras de vapor,
con las emisiones.
MTD Consumer
Group Inc. reparar_i su motor
de equipos
de exteriores
sin costo alguno
las piezas y la mano de obra.
COBERTURA
DELA GARANTiADELFABRICANTE:
Este sistema de control
de emisiones
es defectuosa,
se garantiza
equipos
de exteriores
cubierto
pot m_is de dos ahos pot la garantia
por el t_rmino
de dos a_os. Si alguna
pieza relacionada
MTD CONSUMER GROUP INC. reparar_i o sustituir_i
del equipo
del fabricante,
el periodo
con las emisiones
de su motor
dicha pieza. En caso de que un componente
de cobertura
de
est,1
ya no se aplicar_i.
RESPONSAI31LIDADES
DELPROPIETARiO
SEGUNLAGARANTiA:
En su car_icter de propietario
del motor
de equipos
de exteriores,
usted es responsable
del mantenimiento
requerido
que se especifica
en el
manual del propietario.
MTD Consumer Group Inc le recomienda
que conserve todos los recibos que cubren el mantenimiento
de su motor,
obstante Io cual MTD Consumer Group Inc no podr_i denegar el cumplimiento
de la garantia 0nicamente
pot la falta de los recibos.
Como propietario
la garantia
del motor
si su motor
de equipos
de exteriores,
usted debe saber que MTD Consumer
o una pieza del mismo fallan debido
a uso incorrecto,
negligencia,
Group
Inc. puede denegar
mantenimiento
indebido
la cobertura
no
de
o a modificaciones
no
aprobadas.
Usted es responsable
de presentar
su motor
al centro de distribuci6n
o servicio
aparezca el problema. Las reparaciones cubiertas
Si tiene alguna pregunta respecto de la cobertura
por la garantia
de la garantia,
Consumer
o pot correo electr6nico
Group Inc. al tel_fono
1-800-800-7310
t_cnico
de MTD Consumer
Group Inc. tan pronto
como
se deben Ilevar a cabo en un lapso razonable que no exceda de 30 dias.
p6ngase en contacto con el Departamento
del Servicio T_cnico de MTD
en http://support.mtdproducts.com
COBERTURA
DELAGARANTiADEEMISIONES
GENERALES:
MTD Consumer
Group Inc garantiza
construido
y equipado
fabricaci6n
que pudieren
de certificacidn
El periodo
de garantia
comienza
pot primera
Sujeto a ciertas condiciones
Cualquier
final y a cada comprador
con todas las regulaciones
causar la falla de una pieza garantizada
de MTD Consumer
funcionamiento
1.
al comprador
de modo de cumplir
id_ntica,
que el motor
y que se encuentra
en todos los aspectos
de equipos
de exteriores:
libre de defectos
materiales
est,1 dise_ado,
de materiales
a la pieza descripta
y de
en la solicitud
Group Inc.
en la fecha de entrega
vez. El periodo
y exclusiones
pieza garantizada
subsiguiente
aplicables
del motor
al comprador
de garantia
es de dos ahos.
que se indican
a continuaci6n,
que no est_ programada
final o en la fecha en que la m_iquina se pone en
la garantia
para set reemplazada
de las piezas relacionadas
con las emisiones
como parte del mantenimiento
requerido
es la siguiente:
en las instrucciones
escritas suministradas
se garantiza pot el periodo de garantia arriba mencionado.
Si la pieza falla durante el periodo de cobertura de la
garantia, la misma ser_i reparada o reemplazada
pot MTD Consumer Group Inc. de acuerdo con el p_irrafo (4) a continuaci6n.
Cualquier
pieza reparada
2.
o reemplazada
Cualquier
pieza garantizada
garantiza
pot el periodo
seg0n la garantia
se garantizar_i
que est_ programada
de garantia
arriba
solamente
mencionado.
por el resto del periodo
para inspecci6n
Cualquier
regular
de garantia.
en las instrucciones
pieza reparada o reemplazada
escritas suministradas
seg0n la garantia
se garantizar_i
se
pot el
resto del periodo.
3.
4.
Cualquier pieza garantizada que est_ programada
instrucciones
escritas suministradas,
se garantiza
para reemplazo seg0n el mantenimiento
requerido de conformidad
con las
pot el periodo de tiempo anterior a la primera fecha de reemplazo programada
pieza. Si la pieza falla antes del primer
programado,
acuerdo
con el p_irrafo (4) a continuaci6n.
Cualquier
anterior
al primer
puntual
La reparaci6n
deben
5.
reemplazo
reemplazo
o el reemplazo
programado
de cualquier
realizar en un centro de garantia
No obstante
de distribuci6n
las disposiciones
bajo franquicia
pieza reparada
pieza garantizada
de mantenimiento
o reemplazada
bajo garantia
pot MTD Consumer
se garantizar_i
para esa
Group Inc. de
pot el resto del periodo
para esa pieza.
sin costo alguno
que aqui se estipulan,
la misma ser_i reparada o reemplazada
de conformidad
con las disposiciones
de la garantia
que aqui se estipula
se
para el propietario.
los servicios o reparaciones
para los motores
o equipos
bajo garantia
en cuesti6n.
se suministrar_in
en todos nuestros
centros
6. Elpropietario
delmotordeequipos
deexteriores
nodeber_
pagar
eltrabajo
dediagndstico
directamente
asociado
conunapieza
garantizada
defectuosa
enrelaci6n
conlasemisiones,
siempre
ycuando
dichotrabajo
dediagn6stico
serealice
enuncentro
cubierto
pot
lagarantia.
7. MTDConsumer
Group
Incesresponsable
potdahos
causados
aotroscomponentes
demotores
oequipos
derivados
delafallabajo
garantia
decualquier
pieza
garantizada.
8. Durante
latotalidad
delperiodo
degarantia
delmotor
yequipo
para
todoterreno
arribamencionado,
MTDConsumer
Group
Inc
mantendr_
unsuministro
depiezas
bajogarantia
suficiente
para
satisfacer
lademanda
esperada
detalespiezas.
9. Cualquier
piezadereemplazo
sepodr_usarpara
elcumplimiento
delmantenimiento
o lasreparaciones
bajogarantia
ysesuministraran
sincargo
para
elpropietario.
Dicho
usonoreducir_
lasobligaciones
degarantia
deMTDConsumer
Group
Inc.
]0. Nosepodr_n
usarpiezas
adicionales
nimodificadas
quenoest_n
exentas
deacuerdo
conelDepartamento
delosRecursos
delAire
(AirResources
Board).
Elusodecualquier
pieza
adicional
omodificada
noexenta
potelcomprador
finalser_causal
deinvalidez
delos
reclamos
bajogarantia.
MTDConsumer
Group
Incnotendr_
responsabilidad
potlagarantia
defallas
depiezas
garantizadas
quefueren
causadas
potelusodeunapieza
adicional
noexenta
omodificada.
PI EZAS GARANTIZAi)AS:
La reparaci6n
o el reemplazo
tal cobertura
de garantia
inadecuado,
y que tal uso incorrecto,
dicha pieza. No obstante
funcione adecuadamente,
la cobertura
las siguientes
Sistema de medici6n
que de otro modo pudiese
Group Inc demuestra
negligencia
o mantenimiento
que el motor
inadecuado
se extiende
solo a piezas que estuvieron
piezas con garantia
para emisiones
estar cubierta
por la garantia
es objeto de uso incorrecto,
negligencia
rue causa directa de la necesidad
con un dispositivo
presentes
de limitaci6n
en el motor y equipo
podr_ ser excluida
de reparaci6n
de ajuste instalado
todo terreno
de
o mantenimiento
o reemplazo
de
en f_brica y que
adquiridos.
(de corresponder):
de combustible
Sistema de mejora
Carburador
pieza garantizada
Io antedicho, cualquier ajuste de un componente
podr_ set cubierto pot la garantia. Adem_s,
bajo esta garantia
Est_n cubiertas
1.
de cualquier
si MTD Consumer
para inicio
y piezas internas
en frfo (cebado suave)
(o sistema de inyecci6n
pot combustible)
Bomba de combustible
Dep6sito
2.
de combustible
Sistema de inducci6n
Purificador
Colector
3.
de aire
de aire
de admisi6n
Sistema de encendido
Bujia(s) de encendido
Sistema de encendido
4.
pot magneto
Sistema de encendido
Convertidor
catalitico
SAI (v_lvula Reed)
5.
Componentes
Wlvulas
varios utilizados
e interruptores
Conectores
6.
Control
en el sistema anterior
de vacio, temperatura,
posici6n
sensibles al tiempo
y montajes
evaporativo
Manguera
Abrazaderas
de combustible
de la manguera
Tap6n del combustible
de combustible
atado pot correa
Caja de carbono
Lineas de vapor
050790 Rev.A
Felicitaciones
por haber realizado una adquisici6n
inteligente.
El producto Craftsman®
que ha
adquirido esta diseSado y fabricado para brindar muchos aSos de funcionamiento
confiable. Pero
como todos los productos a veces puede requerir de reparaciones.
Es en ese momento cuando el
disponer de un Acuerdo de protecci6n para reparaciones
le puede ahorrar dinero y problemas.
A continuaci6n se detallan los puntos incluidos en el Acuerdo:
[] Servicio experto prestado por nuestros 10,000 especialistas en reparaciones profesionales
[]
[]
Servicio ilirnitado sin cargo para las piezas y la mano de obra en todas las reparacionescubiertas
Reernplazo del producto hasta 1500 d61aressi no es posible reparar el producto cubierto
[]
Descuento de 25% del precio normal del servicio y de las piezas relacionadas con el mismo que no esten cubiertas
por el acuerdo; ademas, 25% del precio normal de la verificaci6n de mantenimientopreventivo
[]
Ayuda r_pida pot tel_fono - Io IlamamosResoluci6n RApida- el apoyo telef6nico de un Chamusca al representante.
Piense en nosotros como el manual "de un dueSo hablador."
Una vez adquirido el Acuerdo, puede programar el servicio con tan s61orealizar una Ilamadatelef6nica. Puede Ilamar en
cualquier momento del dia o de la noche o programar un servicio en linea.
El Acuerdo de Protecci6nde Reparaci6nes una compra sin riesgo. Si usted anula por alguna raz6n durante el periodo de
garantia de producto, proporcionaremos un reembolso Ileno.O, un reembolso prorrateado en cualquier momento despues
del periodo de garantia de producto expira, iAdquiera hoy su acuerdode protecci6n para reparaciones!
Se aplican determinadas limitaciones y exclusiones. Para obtener informaciTn adicional y precios en los Estados
Unidos Ilame al 1-800-827-6655.
El *Coverage en Canad_ivaria en algunos articulos. Para detalles Ilenos la Ilamada Chamusca Canad_ien 1-800361-8885.
Servicio de instalaci6n de Sears
Si desea solicitar la instalaci6n profesional de Sears de aparatos domesticos, dispositivos paraabrir portones, calentadores de agua y otros articulos domesticos importantes, en los Estados Unidos o Canada flame al 1-800-4-MY-HOME®.
67
Your Home
For troubleshooting,
product manuals and expert advice:
managernylife
www.managemylife.com
For repair - in your home - of all major brand appliances,
lawn and garden equipment, or heating and cooling systems,
no matter who made it, no matter who sold it!
For the replacement parts, accessories and
owner's manuals that you need to do-it-yourself.
For Sears professional installation of home appliances
and items like garage door openers and water heaters.
1-800-4-MY-HOME
®
(1-800-469-4663)
Call anytime, day or night (U.S.A. and Canada)
www.sears.com
www.sears.ca
Our Home
For repair of carry-in items like vacuums, lawn equipment,
and electronics, call anytime for the location of your nearest
Sears Parts & Repair Service Center
1-800-488-1222
(U.S.A.)
www.sears.com
To purchase a protection
1-800-827-6655
agreement
Para pedir servicio de reparaci6n
a domicilio, y para ordenar piezas:
(1-888-784-6427)
www.sears.com
®
(Canada)
www.sears.ca
(U.S.A.)
1-888-SU-HOGAR
1-800-469-4663
on a product serviced
by Sears:
1-800-361-6665
(Canada)
Au Canada pour service
en frangais:
1-800-LE-FOYER
Mc
(1-800-533-6937)
www.sears.ca
® Registered Trademark / TMTrademark of KCD IP, LLC in the United States, or Sears Brands, LLC in other countries
® Marca Registrada ! TMMarca de Fabrica de KCD IP, LLC en Estados Unidos, o Sears Brands, LLC in otros paises
MCMarque de commerce ! MDMarque deposee de Sears Brands, LLC