1
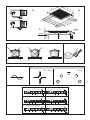
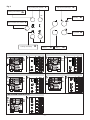
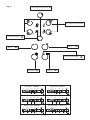
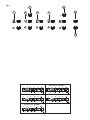
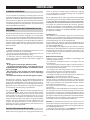
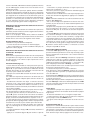
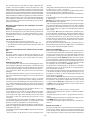
MKK - 602 IX
MKK - 603 IX
MKK - 604
MKK - 772 IX
MKK - 773
MKK - 901 IX
MKK - 902
NL
GLASCERAMIEL PLAAT - Gebruiksaanwijzing
F
TABLE VETROCERAMIQUE- Notice d'utilisation
E
PLANO DE VIDRO DE CERAMICA - Manual de utilización
GB
VITROCERAMIC HOB - User instructions
D
ELEKTRO-GLASKERAMIKMULDE - Gebrauchsanweisung
29
Fig. 1
0-
0
51
30 mm
A
58
0-
77
0-
B
90
0
48
40 mm
5
Mi 0
n
280
- 56
.5
0-
53
750
- 88
0
49
0
5
Mi 0
n
C
4 mm
25 mm
20 mm
Fig. 2
Fig. 3
Fig. 4a
Fig. 4b
58 - 75 cm
220-240 V2~ H05V2V2-F
220-240 V~ H05V2V2-F
1
2
3
4
L
4
1
2
L1
3
L2
4
L1
2
L2
3
L3
4
4
L1
4
1
2
N
4
3
L2
220-240 V3~ H05V2V2-F
L1
3
4
4
L3
L2
220-240 V2N2~ H05V2V2-F
380-415 V3N~ H05V2V2-F
1
2
N
380-415 V2N~ H05V2V2-F
1
90 cm
1
4
2
L1
N
-2-
3
L2
4
4
N1
N2
Fig. 5
- Key cooking area selection
- Heating zone indicator
F
- Key-lock on/off pilot light
E
G
F2
- Lock-key
- Key for double zone selection
L
- Key On/Off
F1
- Cooking area display
220-240V 1N ~ H05V2V2-F 3G
A
L
N
B
H
- Key (+)
C
- Key (-)
D
220-240V 2~ H05V2V2-F 3G
A
L1
L2
B
380-415V 2N~ H05V2V2-F 4G
220-240V 3~ H05V2V2-F 4G
A
A
L2
L1
L3
L1
L2
N
B
380-415V 3N~ H05V2V2-F 5G
A
L2
L1
B
L3
N
B
-3-
B
A
Fig. 6
- Key for double zone selection
L
F2
- Key cooking area selection
F
F1
- Cooking area display
- Key (-)
H
- Key (+)
D
C
- Key-lock on/off pilot light
A
- Key On/Off
- Lock-key
220-240 V2~ H05RR-F
220-240 V~ H05RR-F
1
2
3
L
4
4
1
2
L1
3
L2
L1
2
L2
3
L3
3
4
L1
4
1
2
N
4
4
4
L2
220-240 V3~ H05RR-F
3
L1
380-415 V3N~ H05RR-F
1
2
N
380-415 V2N~ H05RR-F
1
B
4
4
L3
L2
220-240 V2N2~ H05V2V2-F
1
4
2
L1
N
-4-
3
L2
4
4
N1
N2
E
Fig. 7
7
1
9
2
3
10
4
11
220-240 V~ H05RR-F
1
2
3
L
4
220-240 V2~ H05RR-F
4
1
N
2
L1
3
L2
4
L1
4
1
N
L1
2
L2
3
L3
4
2
L1
380-415 V3N~ H05RR-F
1
3
4
4
L2
220-240 V3~ H05RR-F
380-415 V2N~ H05RR-F
1
2
4
N
-5-
3
L2
4
L3
4
NEDERLAND
NL
lateur en dienen als richtlijn bij de installatie, de regeling
en het onderhoud in overeenstemming met de geldende
wetsvoorschriften en normen.
ALGEMENE INFORMATIE
Lees de inhoud van dit boekje aandachtig door, want het
verstrekt belangrijke aanwijzingen over de veilige installatie,
gebruik en onderhoud. Bewaar het boekje om het later nog
eens te kunnen raadplegen. Alle installatiewerkzaamheden/
vervanging (elektrische aansluitingen) dienen te worden
verricht door gespecialiseerd personeel, in overeenstemming
met de geldende voorschriften.
Als een inbouwoven of een ander apparaat dat warmte afgeeft
vlak onder de glaskeramieken kookplaat gemonteerd moet
worden, MOETEN DIT APPARAAT (oven) EN DE GLASKERAMIEKEN KOOKPLAAT VOLDOENDE WORDEN GEÏSOLEERD, zodat
de warmte die veroorzaakt wordt door de oven, gemeten
rechts op de onderkant van de kookplaat, een temperatuur
heeft van maximaal 60° C. Veronachtzaming van dit voorschrift
zou foutieve werking van het TOUCHCONTROL-systeem tot
gevolg kunnen hebben.
WAARSCHUWINGEN MET BETREKKING TOT DE
VEILIGHEID
Het wordt geadviseerd pannen te gebruiken met een vlakke
bodem en met een diameter die gelijk is aan, of iets groter
dan die van de verwarmingszone. Gebruik geen pannen met
een ruwe bodem, om te voorkomen dat er krassen ontstaan
op het thermische oppervlak van de plaat (Afb.2).Dit apparaat
mag niet worden gebruikt door kinderen of volwassenen die
toezicht nodig hebben. Let erop dat kinderen niet met het
apparaat spelen.
Plaatsing (Afb.1)
Het elektrische huishoudelijke apparaat is bestemd voor
inbouw in een werkblad, zoals wordt geïllustreerd op de
specifieke afbeelding. Breng afdichtmateriaal aan over de hele
omtrek (afmetingen van de uitsparing Afb.1B).
Zet het elektrische apparaat vast op het werkblad met de 4
bijgeleverde beugels, hierbij rekening houdend met de dikte
van het werkblad (Afb.1A).
Als de onderzijde van het apparaat, na de installatie, vanuit de
onderkant van de kast bereikbaar is moet een scheidingsvlak
gemonteerd worden door de aangegeven afstanden in acht
te nemen (Fig.1C). Indien het onder een oven geïnstalleerd
wordt is dat niet nodig.
Belangrijk
- voorkom overkoken, pas daarom de warmtetoevoer aan bij
het koken of verwarmen van vloeistoffen
- laat geen verwarmingselementen ingeschakeld met een
lege pan of koekenpan, of zonder pan erop
- na het koken moet het desbetreffende verwarmingselement worden uitgeschakeld met het hieronder aangegeven
bedieningselement
Elektrische aansluitingen
Vergewis u ervan, voordat de elektrische aansluitingen tot
stand worden gebracht of:
- de elektrische aardkabel minstens 2 cm langer is dan de
overige kabels;
- de installatie zodanig eigenschappen heeft dat wordt voldaan aan de gegevens die vermeld staan op de typeplaat op
de onderkant van het werkblad;
- de installatie naar behoren geaard is, in overeenstemming
met de geldende normen en wetsvoorschriften.
Aarding van het apparaat is bij de wet verplicht.
- In het geval het apparaat niet beschikt over een elektrische
kabel kunt u er een gebruiken van het type:
"H05V2V2-F" voor een vermogen tot aan 6400 Watt.
De doorsnede van de kabel moet minstens 2,5 mm2 zijn. Voor
een groter vermogen moet de doorsnede 4 mm2 zijn. De kabel
mag in geen enkel punt een temperatuur bereiken die 50°C
boven de kamertemperatuur is.
Het apparaat moet vast op het elektrische net worden
aangesloten.
Om deze reden is het noodzakelijk een meerpolige schakelaar
aan te brengen met een minimale opening van 3 mm tussen
de contacten, aangepast aan de lading aangegeven op het
typeplaatje en in overeenkomst met de geldende normen (de
groengele aardgeleider mag niet door de commutator worden
onderbroken). Na het installeren van de apparatuur moet de
meerpolige schakelaar makkelijk te bereiken zijn.
Let op:
- Er mag geen stoomreiniger gebruikt worden
- als het oppervlak gebarsten is, moet het apparaat onmiddellijk worden uitgeschakeld, om elektrische schokken te vermijden.
- Het apparaat is niet geschikt om zonder toezicht te
worden gebruikt door kinderen of door onkundige
personen.
- Controleer dat kinderen niet met het apparaat spelen.
Dit apparaat is voorzien van het keurmerk Waste Electrical
and Electronic Equipment (WEEE), zoals vastgesteld door de
Europese Norm 2002/96/EC. Door te zorgen dat de afvalverwijdering van dit product correct wordt uitgevoerd, werkt de
gebruiker mee aan het voorkomen van potentiële negatieve
consequenties voor omgeving en gezondheid.
op het product of op het bijgeleverde doHet symbool
cumentatiemateriaal geeft aan dat het niet moet worden
behandeld als normaal huisvuil, maar dat het moet worden
ingeleverd bij een speciaal verzamelpunt voor het recyclen
van elektrische en elektronische apparatuur. De afvalverwijdering moet plaatsvinden in het respect van de gemeentelijke
normen. Voor meer informatie over het onderhoud en het
recyclen van dit product kunt u contact opnemen met uw
gemeente, de locale reinigingsdienst, of de winkel waar u
het product heeft aangeschaft.
Attentie: De elektronische kaart zou, aan de hand van het
model dat u bezit, beschermd kunnen zijn tegen eventuele
verbindingsstoringen op het elektrische net door middel van
een zekering op deze kaart.
In geval van vervanging dient u een zekering te gebruiken
die dezelfde technische eigenschappen bezit.
INSTRUCTIES VOOR DE INSTALLATIE
Deze instructies zijn gericht aan een gespecialiseerd instal-
-6-
plaats nadat
gecontroleerd is of:
- De led van de sleuteltoets (afb.5-6 B) uit is, zo niet dan
moet deze
uitgeschakeld worden.
- Op de toets (afb.5-6 A) drukken om de kookplaat in te
schakelen.
- De gewenste kookpllaat kiezen en het gewenste vermogen
instellen
met de toetsen “+” of “-”.
- Is het vermogen eenmaal ingesteld dan moet de toets
(afb.5-6 L)
gekozen worden om de dubbele zone te acvtiveren.
Om de dubbele zone uit te schakelen controleren of de
betreffende plaat geselecteerd is (afb.5-6 F) en op de toets
(afb.5-6 L) drukken.
Opmerking: de functie Dubbele zone is alleen actief op
de platen
F1 en F2 (afb.5-6).
- Als er een voorwerp op de bedieningselementen wordt
gelegd, zal de kookplaat automatisch overgaan op de stand
OFF.
Wanneer een zone op OFF wordt gezet en de temperatuur
hoger is dan ongeveer 50° C, verschijnt het lichtsignaal “H” in
de buurt van de desbetreffende keuzetoets (Afb. 5- 6 H).
- de functie B blokkeert de werking van de plaat op het
moment dat er een keuze gemaakt wordt. B.v.: als de functie
wordt geactiveerd terwijl er twee zones van de plaat ingeschakeld zijn blijft het programma ook geblokkeerd als er
geprobeerd wordt een andere zone in te schakelen. Hetzelfde
gebeurt als het apparaat uit is en de functie geactiveerd wordt:
de plaat gaat niet aan.
Om hem in of uit te schakelen moet u ongeveer twee seconden lang een vinger boven de sensor B houden. De functie
is actief wanneer het lampje E brandt.
GEBRUIK EN ONDERHOUD
Onderhoud
Verwijder eventuele voedselresten en vetspatten van de kookvlakken met de speciale schraper die op bestelling geleverd
wordt (Afb.3). Maak het verwarmde gebied zo goed mogelijk
schoon met behulp van SIDOL, STAHLFIX of soortgelijke producten en een doek of papier, spoel vervolgens na met water
en maak de plaat droog met een schone doek.
Verwijder fragmenten aluminiumfolie, gesmolten plastic,
suiker of voedselresten met een hoog suikergehalte onmiddellijk van het verwarmde gebied met behulp van de speciale
schraper (optie) (Afb.3).
Zodoende wordt elke mogelijk schade aan het oppervlak van
de plaat voorkomen. Gebruik in geen geval schuursponsjes
of agressieve chemische reinigingsmiddelen zoals ovensprays
of vlekkenmiddelen.
Gebruik en werking kookplaten met knopbediening
gebruik
Stel met behulp van de bedieningsknoppen het gewenste
vermogen in. Door met de wijzers van de klok mee te draaien
wordt het maximumvermogen bereikt.
Bij platen met dubbele zonde kan het externe verwarmingselement ook ingeschakeld worden door vanaf nul te vertrekken en tegen de wijzers van de klok in te draaien.
De verklikkerlichtjes (Afb. 4)
De verschillende verklikkerlichtjes duiden volgende zaken
aan:
— het onder spanning staan van ten minste één element
(Afb. 4a).
— dat de temperatuur hoger is dan 50°C op de zone dat het
verklikkerlichtje aanduid (Afb. 4b).
Gebruik en werking tiptoetskooplaten knopbediening
Gebruik
Gebruik het touch control systeem voor de positie waarop
u wilt koken, hierbij bedenkend dat er meer warmte wordt
afgegeven naarmate het cijfer hoger is.
Heat up (Snelle verwarming)
De functie Heat up schakelt de maximum temperatuur voor
een bepaalde tijd op het kookgedeelte in. Hierna zal de
temperatuur dalen naar een lagere waarde die u voordien
heeft ingesteld.
Om de Heat up functie te activeren selecteert u de kookplaat
door te drukken op de toets +, totdat hij op stand 9 staat. Als
u nogmaals in het display op de toets drukt (naast de 9), zal
circa 5 sec. een decimaal punt "• " of de letter "A" verschijnen.
Dit betekent dat de "Heat up" functie actief is.
U dient binnen 5 seconden het gewenste vermogensniveau
te selecteren (tussen 1 en 8).
Als u het vermogen 9 selecteert wordt de functie geannuleerd.
Om de functie Heat up uit te schakelen, is het voldoende de
toets + te selecteren en hem ingedrukt te houden tot hij op
stand 9 staat en op het display het decimale punt verschijnt.
Als de functie "Heat up" actief is, is het mogelijk het voordien
ingestelde temperatuursniveau te verhogen, door te drukken
op de toets (+).
Zodra het kookgedeelte de gewenste temperatuur heeft
bereikt, zal de "Heat up" functie automatisch worden uitgeschakeld en zult u een geluidssignaal horen. Het kookgedeelte
zal op het ingestelde vermogensniveau blijven werken.
Werkingn (Afb. 5-6)
- Afhankelijk van het model dat u in uw bezit heeft, kan het
apparaat worden ingeschakeld met de startsensor (Afb. 5-6
A). Gedurende 10 seconden verschijnt er op alle displays een
nul. Als er binnen 10 seconden geen display bediend wordt,
gaat de plaat weer uit.
- Druk op de keuzetoets F voor de gewenste kookzone.
Op het bijbehorende display verschijnt een brandende “ 0
” met een decimale punt om aan te geven welke kookzone
actief is.
- Het is mogelijk een kookplaat binnen 10 seconden in te
schakelen met behulp van de sensoren "+" of "-". Als u de
sensor D gebruikt toont het display de selectie 9. Als u de
sensor C gebruikt toont het display, op basis van de uitvoering,
de selectie 1 of 5.
- Hierna kunnen de temperaturen worden ingesteld met
behulp van de toetsen “+” of “-”.
- De plaat kan worden uitgeschakeld door “0” te selecteren met
de sensor D, na 3 seconden gaat de kookzone automatisch uit.
Het is ook mogelijk een zone uit te zetten door tegelijkertijd
de sensors “+” en “-” aan te raken.
- De kookplaat kan worden uitgeschakeld door de algemene
startsensor (Afb. 5-6 A) aan te raken. Als alle zones zijn ingesteld op “0” gaat de kookplaat na 10 seconden uit.
-Mocht de kookplaat uitgerust zijn met verlengingsplaten
(afb.5-6) dan vindt de inschakeling van de tweede zone
Timer (Afb.6).
- Selecteer de plaat met het betreffende vermogen.
- Druk opnieuw op de selectietoets van de reeds geactiveerde plaat.
- Gebruik de toetsen “+” en “-” om de gewenste tijd in te
stellen.
-7-
- het decimale punt naast het vermogensniveau zal aangeven
of de TIMER-functie van de plaat actief is.
- Een geluidssignaal zal aangeven dat de kookzone uitgeschakeld is.
Werking (Afb.7)
Druk op de ON/OFF 11 knop om de kookplaat aan te zetten.
het display zal gedurende 10 seconden oplichten. Als geen
enkele kookzone binnen 10 seconden aangezet wordt, zal de
kookplaat automatisch uitschakelen. Om het element dat u
wilt gebruiken aan te zetten, drukt u binnen 10 seconden op
de bijbehorende + of - knop. Als u op de + knop drukt, zal het
display vermogensniveau 9 weergeven en wanneer u op de knop drukt, zal vermogensniveau 4 worden weergegeven.
Na deze handeling kunt u de temperatuur bijstellen met de
+/- knoppen. Om een element uit te schakelen drukt u op
de - knop tot "0" verschijnt. De bijbehorende LED zal na 10
seconden worden uitgeschakeld.
U kunt een element ook uitschakelen door tegelijkertijd de +
en - knoppen in te drukken.
Om de kookplaat uit te schakelen, drukt u op de ON/OFF knop
11. Als alle elementen op "0" zijn gezet, zal de kookplaat na
10 seconden uitschakelen.
Als er een voorwerp op het controlepaneel geplaatst wordt
of als er vloeistof wordt gemorst (water, melk, enz.) zal de
kookplaat automatisch uitschakelen en zal het 10 symbool
oplichten.
Als de kookplaat voorzien is van duo-kookzone-elementen,
schakel dan de tweede zone in door het bijbehorende 7-9
symbool 3 seconden in te drukken. Na het inschakelen van
het tweede element, kunt u de temperatuur bijstellen met
de +/- knoppen.
DE FABRIKANT IS NIET AANSPRAKELIJK VOOR SCHADE
DIE VOORTVLOEIT UIT HET NIET IN ACHT NEMEN VAN DE
BOVENSTAANDE VOORSCHRIFTEN.
-8-
FRANÇAIS
F
Si un four à encastrer ou n’importe quel autre appareillage
produisant de la chaleur doit être directement monté au-dessous du plan de cuisson en vitrocéramique, IL EST NÉCESSAIRE
QUE CET APPAREILLAGE (four) ET LE PLAN DE CUISSON EN
VITROCÉRAMIQUE SOIENT CONVENABLEMENT ISOLÉS, de
manière à ce que la chaleur produite par le four, mesurée sur
le côté droit du fond du plan de cuisson, ne dépasse pas 60°C.
Le manque de respect de cette précaution pourrait déterminer
le fonctionnement erroné du système TOUCHCONTROL.
CARACTÉRISTIQUES GÉNÉRALES
Lire attentivement le contenu du présent livret, étant donné
qu’il fournit d’importantes indications concernant la sécurité
d’installation, d’utilisation et d’entretien. Conserver le livret
pour toute consultation ultérieure. Toutes les opérations
concernant l’installation /remplacement (connexions électriques) doivent être effectuées par un personnel spécialisé
en conformité avec les normes en vigueur.
Positionnement (Fig.1)
L’appareil électroménager est réalisé pour être encastré dans
un plan de travail, suivant l’illustration sur la figure spécifique.
Préparer la colle pour sceller le périmètre dans le sens de
toute sa longueur (dimensions de la coupe Fig.1B). Bloquer
l’appareil électroménager sur le plan de travail au moyen des
4 brides fournies, compte tenu de l’épaisseur du plan de travail
(Fig.1A). Si la partie inférieure de l’appareil, après l’installation,
est accessible par la partie inférieure du meuble, il faut monter un panneau de séparation en respectant les distances
indiquées (Fig.1C). Ceci n’est pas nécessaire si l’installation
se fait sous un four.
CONSIGNES POUR LA SÉCURITÉ
Il est préférable d’utiliser des récipients au fond plat ayant un
diamètre égal ou légèrement supérieur à celui de la surface
chauffée. Il ne faut pas avoir recours à des récipients ayant une
base rugueuse, afin d’éviter d’érafler la surface thermique du
plan (Fig. 2). Cet appareil n’est pas prévu pour que les enfants
s’en servent de même que pour les personnes qui nécessitent
d’un supervision. Faire attention à ce que les enfants ne jouent
pas avec l’appareil.
Important
- éviter les sorties de liquide, dans ce but, si on veut faire
bouillir ou chauffer des liquides, réduire l’alimentation de
chaleur
- ne pas laisser les éléments chauffants mis sous tension avec
des casseroles et poêles vides ou bien sans récipients
- une fois que l’on a terminé de cuisiner, éteindre la résistance
relative au moyen de la commande indiquée ci-après
Connexions électriques
Avant d’effectuer les connexions électriques, s’assurer que:
- le câble électrique de la terre est bien de 2 cm plus long que
les autres câbles;
- les caractéristiques de l’installation sont conformes aux
indications sur la plaquette d’identification appliquée sur la
partie inférieure du plan de travail;
- l’installation est dotée d’une mise à la terre efficace conforme
aux normes et aux dispositions de la loi en vigueur.
La mise à la terre est obligatoire aux termes de la loi.
Si l'appareil n'est pas équipé d'un câble, utilisez-en un de
type:
« H05V2V2-F » pour des puissances jusqu'à 6400 Watt. La
section de ce câble doit être d'au moins 2,5 mm2, ou 4 mm2
en cas de puissances supérieures
Le câble ne doit atteindre en aucun point une température
supérieure de 50°C par rapport à la température ambiante.
L'appareil est conçu pour être raccordé de manière permanente au secteur électrique, voilà pourquoi il est nécessaire
de prévoir un interrupteur omnipolaire, avec une distance
d'ouverture des contacts d'au moins 3 mm, approprié à la
charge indiquée dans la plaquette conformément aux normes
en vigueur (le conducteur de mise à la terre jaune/vert ne doit
pas être interrompu par l'interrupteur).
Une fois l'installation terminée, l'interrupteur omnipolaire doit
être facilement accessible.
Attention :
- NE PAS UTILISER UN NOTTOYEUR A VAPEUR
- Si la surface est fêlée, éteindre l’appareil, afin d’éviter
l’éventualité de décharges électriques.
- Cet appareil n'a pas été conçu pour être utilisé par des
enfants ou par des personnes inaptes sans surveillance.
- Veiller à ce que les enfants ne jouent pas avec
l'appareil.
Cet appareil est marqué conformément à la Directive européenne 2002/96/CE sur les déchets d'équipements électriques
et électroniques (DEEE). Assurez-vous que cet appareil soit
mis au rebus selon la réglementation en vigueur, vous éviterez ainsi des conséquences néfastes sur l'environnement
et la santé.
Le symbole appliqué sur le produit ou sur la documentation jointe rappelle que cet appareil ne doit pas être traité
comme un déchet domestique mais faire l'objet d'une collecte
sélective dans une déchetterie spécialisée dans le recyclage
des appareils électriques et électroniques.Conformez-vous
aux réglementations locales sur la collecte et l'élimination
des déchets.
Pour tout autre renseignement sur le traitement, la récupération et le recyclage de cet appareil, veuillez contacter
le bureau concerné de votre ville, le service de collecte des
déchets domestiques ou le magasin où vous avez acheté
votre appareil.
Attention: Sur la base du modèle en votre possession, la
fiche électronique pourrait être protégée contre d’éventuelles
erreurs de connexion au réseau électrique par un fusible à
bord. En cas de remplacement, utiliser un fusible possédant
les mêmes caractéristiques techniques.
UTILISATION ET ENTRETIEN
Entretien
Éliminer tous résidus de nourriture éventuels ainsi que les
gouttes de graisse de la surface de cuisson à l’aide du racloir
spécial fourni sur demande (Fig. 3).
Nettoyer le mieux possible l’emplacement chauffé en ayant
INSTRUCTIONS POUR L’INSTALLATION
Les présentes instructions s’adressent à un installateur spécialisé et servent de guide pour l’installation, le réglage et l’entretien en conformité avec les lois et les normes en vigueur.
-9-
recours à du SIDOL, STAHLFIX ou à d’autres produits similaires
et à un chiffon-papier, ensuite rincer à l’eau et sécher avec un
chiffon bien propre.
Au moyen du racloir spécial (en option) éliminer immédiatement de l’emplacement chauffé de cuisson les fragments
de feuilles d’aluminium et la matière plastique qui ont fondu
par mégarde ou les résidus de sucre ou d’aliments ayant un
contenu de sucre élevé (Fig. 3). De cette façon, tout dommage
possible à la surface du plan est évité. En aucun cas il faut
se servir d’éponges abrasives ou de détergents chimiques
irritants tels que spray pour le four ou dégraisseurs.
Utilisation et fonctionnement des tables de cuisson avec
commandes manuel
Utilisation
Enregistrer à l’aide des boutons de commande la puissance
souhaitée, en tournant dans le sens des aiguilles d’une montre
jusqu’à la puissance maximale.
Dans le cas de plaques double zone, l’élément chauffant
externe peut être allumé en partant de zéro et en tournant le
bouton dans le sens inverse des aiguilles d’une montre.
Voyants lumineux (Fig.4)
Les différants voyants lumineux indiquent:
— la mise sous tension d’au moins un élément (fig.4a)
— que la température sur la zône chauffante indiquée, est
supérieure à 50° C (fig. 4b).
Utilisation et fonctionnement des tables de cuisson avec
commandes électriques
Utilisation
Avoir recours au système touch control concernant la position
correspondant aux exigences de cuisson, en tenant compte
que plus grand est le numéro et plus importante sera la
chaleur dégagée.
Fonctionnement (Fig. 5-6)
- C’est en fonction du modèle en votre possession que l’appareil peut être allumé, en activant le capteur de démarrage
(fig.5-6 A), ce qui visualisera sur tous les afficheurs un zéro
pendant 10 secondes. Si aucun afficheur n’est activé d’ici 10
secondes, le plan s’éteint une autre fois.
- Appuyer sur la touche F de sélection de la zone de cuisson
souhaitée.
Sur l’afficheur respectif est visualisé un «0» lumineux avec
un point décimal pour indiquer quelle zone de cuisson est
active.
- Possibilité d'activation d'un foyer à l'aide des touches
sensitives "+" ou "-" dans les 10 secondes. En cas d'utilisation
de la touche sensitive D, l'écran affiche la sélection 9, en cas
d'utilisation de la touche sensitive C, l'écran affiche la sélection
1 ou 5 selon le modèle.
- Une fois cette opération terminée, on peut choisir les réglages de température à l’aide des touches «+» ou «-».
- La plaque peut être éteinte, en sélectionnant «0» avec le
capteur D, après 3 secondes la zone de cuisson est automatiquement éteinte. Il est également possible d’éteindre une
plaque, en touchant simultanément les capteurs «+» et «-».
- Le plan peut être éteint, en touchant simplement le capteur
principal de démarrage (fig.5-6 A). Si toutes les plaques sont
sélectionnées sur le «0», le plan s’éteint après 10 secondes.
-Dans le cas où le plan est doté de plaques avec extension
(fig. 5- 6) l'allumage de la seconde zone se fera après avoir
vérifié que :
- le voyant du bouton clé (fig.5-6 B) est éteint, autrement il
faut l'éteindre.
- appuyer sur le bouton (fig.5-6 A) pour allumer le plande
cuisson.
- Sélectionner la plaque souhaitée et régler la puissance
voulue avec les boutons "+" ou "-".
-Une fois la puissance réglée, sélectionner le bouton (fig.5-6
L) pour activer la double zone.
- Pour désactiver la double zone s'assurer que la plaque souhaitée soit sélectionnée (fig.5-6 F) et appuyer sur le bouton
(fig.5-6 L) .
Nota: la fonction Double zone est activée seulement sur les
plaques F1 e F2 (fig.5-6).
- Au cas où un objet serait positionné au-dessus des commandes, le plan de cuisson se mettra automatiquement sur
la position OFF.
Lorsqu’on met une plaque sur la position OFF et la température est supérieure à 50° environ, il y aura une signalisation
lumineuse «H» près de la touche de sélection respective
(fig. 5-6 H).
- La fonction B bloque le fonctionnement du plan au moment
de la sélection. Exemple : si la fonction est activée, alors que
le plan se situe avec deux zones allumées, le programme
reste bloqué, même si on essaie d’allumer une autre zone. Il
se passe la même chose si l’appareil est mis hors tension et
la fonction est activée, le plan ne s’allume pas.Pour l’activer
ou la désactiver, il faut garder le doigt au-dessus du capteur
B pendant environ deux secondes. La fonction est active
lorsque le voyant E est allumé.
Heat up (Echauffement rapide)
La fonction Heat up permet de garder le foyer à sa température maximale pendant un certain laps de temps, après
quoi la température redescendra à une valeur inférieure
sélectionnée.
Pour activer la fonction Heat up sélectionner la plaque en
appuyant sur la touche + jusqu'à la position 9, une autre
pression de la touche fait apparaître pendant 5 secondes sur
l'afficheur (à côté du 9) un point décimal " • " ou la lettre " A ",
pour indiquer que la fonction " Heat up " est activée.
Il faut sélectionner dans les 5 secondes qui suivent le niveau
de puissance souhaité (entre 1 et 8).
La sélection de la puissance 9 annule la fonction.
Pour désactiver la fonction Heat up, appuyer sur la touche
+ jusqu’à atteindre la position 9, le point décimal disparaît
alors de l’afficheur.
Quand la fonction “Heat up” est activée, il est possible d’augmenter le niveau de température précédemment sélectionné
à l’aide de la touche (+).
Une fois que le foyer a atteint la température sélectionnée, la
fonction “Heat up” se désactive automatiquement et un BIP
retentit. Le foyer fonctionnera alors de façon stable au niveau
de puissance sélectionné.
Timer (Fig.6).
- Sélectionner la plaque avec la puissance correspondante.
- Appuyer de nouveau sur le bouton de sélection de la plaque
déjà activée.
- En utilisant les boutons "+" et "-" régler le temps voulu.
- Le point décimal à côté du niveau de puissance indiquera
que la plaque a la fonctio TIMER activée.
- Un signal sonore indiquera l'extinction de la zone de cuisson.
Fonctionnement (Fig. 7)
Appuyez sur la touche Marche/Arrêt 11 pour mettre la table
de cuisson sous tension. L'afficheur indiquera un tiret pendant
10 secondes. Si aucun foyer n'est activé dans les 10 secondes
qui suivent, la table de cuisson s'éteindra automatiquement.
Pour allumer le foyer désiré, appuyez sur les touches + ou -
- 10 -
correspondantes dans les 10 secondes. Lorsque vous appuyez
sur la touche +, l'afficheur indiquera le niveau de puissance
9, tandis que si vous appuyez sur la touche -, il indiquera le
niveau de puissance 4. Une fois cette opération terminée,
réglez la température à l'aide des touches +/-. Pour éteindre
un foyer à induction, appuyez sur la touche - jusqu'à ce que
l'afficheur indique "0". Le témoin correspondant s'éteindra au
bout de 10 secondes.
Vous pouvez également éteindre un foyer à induction en
appuyant simultanément sur les touches + et -.
Pour mettre la table de cuisson hors tension, appuyez sur le
bouton Marche/Arrêt 11. Si tous les foyers à induction sont
réglés sur "0", la table de cuisson se mettra hors tension au
bout de 10 secondes.
Si un objet est présent sur le panneau de contrôle ou que du
liquide (eau, lait, etc.) a été renversé, la table de cuisson s'éteindra automatiquement et le symbole 10 s'allumera. Si la table
de cuisson est équipée de doubles foyers à induction, appuyez
sur le symbole correspondant 7-9 pendant 3 secondes pour
activer la deuxième zone. Une fois que la deuxième zone a été
activée, réglez la température à l'aide des touche +/-.
NOUS DECLINONS TOUTE RESPONSABILITÉ POUR LES
EVENTUELS DÉGATS PROVOQUÉS PAR L'INOBSERVATION
DES SUSDITES INSTRUCTIONS.
- 11 -
ESPAÑOL
GENERALIDADES
Lea atentamente el contenido del presente manual porque
brinda importantes indicaciones sobre la seguridad de
instalación, de uso y de mantenimiento. Conserve el
manual para una futura consulta.Todas las operaciones
correspondientes a la instalación o a una sustitución
(conexiones eléctricas) deben ser realizadas por personal
especializado y según las normas vigentes.
ADVERTENCIAS PARA LA SEGURIDAD
Se aconsejan recipientes de fondo plano, de diametro igual o
ligeramente superior a la del área de calentamiento. No utilice
recipientes de base rugosa que puedan rayar la superifice vitrocerámica (Fig.2). Este aparato no es apto para ser usado por
niños ó personas que precisen de supervisión. Estar atentos a
que los niños no jueguen en el área del aparato.
Importante
- evite el derramamiento de liquidos, por tanto para hervir o
calentar liquidos, reduzca la alimentación del calor al punto
necesario.
- no deje sobre los elementos calefactores cazuelas o sartenes
vacías, ni tampoco elementos encendidos sin recipientes.
- Una vez terminado de cocinar, apague el elemento calefactor
mediante el mando correspondiente.
Atencion:
- No se debe utilizar un aparato de limpieza a vapor
- Si observa que la superficie está resquebrajada, apague
inmediatamente el aparato, desconectelo de la red, y avise
inmediatamente al Servicio de Asistencia Técnica.
- El aparato no ha sido diseñado para ser utilizado por
niños o personas incapaces sin vigilancia
- Controle que los niños no jueguen con el aparato
Este aparato está fabricado en conformidad con la Norma Europea 2002/96/EC, Waste Electrical and Electronic Equipment
(WEEE). Controlando que este producto sea eliminado de
modo correcto, el usuario contribuye a prevenir consecuencias negativas para el ambiente y la salud.
El símbolo en el producto o en la documentación adjunta,
indica que este producto no debe ser tratado como residuo
doméstico sino que debe ser entregado a un punto de recolección para reciclar aparatos eléctricos y electrónicos. Elimínelo
siguiendo las normas locales para la eliminación de desechos.
Para mayor información sobre el tratamiento, recuperación o
reciclaje de este producto, llame a la oficina local encargada, al
servicio de recolección de desechos domésticos o al negocio
en el cual ha comprado el producto.
INSTRUCCIONES PARA LA INSTALACION
Las presentes instrucciones están dirigidas a un instalador
especializado y sirven de guía para una correcta instalación,
regulación y mantenimeinto en conformidad con las leyes y
normas vigentes. Si un horno de encastrar o cualquier otro
aparato que genera calor debe ser montado directamente
debajo de la Vitrocerámica, ES NECESARIO QUE TAL APARATO
(Horno) Y LA VITRO QUEDEN ADECUADAMENTE AISLADOS, de
modo que el calor generado por el horno (medido en la parte
E
derecha-frontal del fondo de la Vitro), no supere los 60º C. La
falta de tal precaución podría producir un mal funcionamiento
del sistema TOUCHCONTROL.
Posicionamiento (Fig.1)
Este electrodomestico ha sido realizado para ser encastrado
en una encimera, tal y como ilustra la figura específica. Instalar el material aislante de la dotación a lo largo de todo el
perímetro del orificio practicado para acoger la Placa (Fig.1B).
Fijar el aparato a la encimera mediante las 4 grapas, teniendo
en cuenta el espesor de la encimera (Fig.1A). Si despues de
la instalación se puede acceder a la parte inferior del aparato
desde la parte inferior del mueble es necesario montar un
panel separador respetando las distancias indicadas (Fig 1C).
Si se instala debajo de un horno, esto no es necesario.
Conexión electrica
Antes de efectuar la conexión eléctrica, asegurese que:
- el cable eléctrico correspondiente a la toma a tierra sea 2 cm
más largo que los otros dos.
- Las características de la acometida y tendido se puedan
corresponder con las necesidades indicadas en la placa de
características del aparato.
- La instalación esté dotadas de la correspondiente toma a
tierra, según normas y leyes vigentes.
La toma a tierra es obligatoria por ley. Si el electrodoméstico
no tuviera cable, utilice uno del tipo:
"H05V2V2-F" si la potencia no supera los 6400 vatios; la
sección mínima del cable debe ser de 2.5 mm2, mientras que
para potencias superiores debe ser de 4 mm2. En ningún
punto el cable debe alcanzar una temperatura 50ºC mayor
que la temperatura ambiente. El aparato está destinado a ser
conectado en forma permanente a la red eléctrica, por ello, es
necesario interponer un interruptor omnipolar, con una apertura mínima entre los contactos de 3 mm., apropiado para la
carga indicada en la placa y conforme con las normas vigentes
(el cable a tierra amarillo/verde no debe ser interrumpido por
el conmutador). Una vez finalizada la instalación del aparato, el
interruptor omnipolar debe ser fácilmente accesible.
Atención: Según el modelo que usted posea la tarjeta
electrónica podría estar protegida contra posibles errores
de conexión a la red eléctrica con un fusible dentro de la
tarjeta. Si debe sustituir un fusible, utilice uno con las mismas
características técnicas.
USO Y MANTENIMIENTO
Mantenimiento
Limpie de eventuales residuos la superficie utilizando una
rasqueta con hoja de afeitar (Fig.3).
Limpie las zonas de calentamiento, usando productos comerciales (Sidol, Stahlfix, etc…) y un paño-papel de cocina, y
enjuegue y seque con un paño limpio.
Los eventuales fragmentos de papel-aluminio o material
plástico deben ser inmediatamente rascados y limpiados.
Esto es tambien válido para restos de azucar o pasteles y otros
con alto contenido de él (Fig. 3). Así evitará posibles daños a
la superficie vitrocerámica.
En ningun caso se deben usar estropajos abrasivos o detergentes químicos irritantes, como sprays para horno o
quitamanchas.
- 12 -
Uso y funcionamiento del plano de coccion con mandos
mecanicos
Uso
Programar la potencia deseada con la ayuda de las manivelas
de mando, girando en sentido horario las mismas hasta alcanzar la máxima potencia.
En el caso de placas con doble zona, el elemento de calefacción externo puede ser encendido partiendo del cero y
girándolo en sentido anti-horario.
Luces testigos (Fig.4)
Las luces testigos se encienden en los siguientes casos:
- cuando se encuentra activada al menos una placa calentadora (Fig.4a)
- cuando la temperatura máxima en el punto indicado supera
los 50ºC (Fig.4b)
Uso y funcionamiento del plano de coccion con mandos
electricos
Uso
Utilice el sistema TouchControl en el grado de escala de calentamiento según necesidad de la cocción, teniendo presente
que cuanto mayor es el grado, más calor viene emanado por
el elemento calefactor correspondiente.
Funcionamiento (Fig. 5-6)
- Actue sobre el botón on/0ff. Aparecerá un cero sobre todos
los displays durante 10 segundos. Después de ese lapso,
si ningún elemento ha sido conectado, la placa vuelve a
apagarse totalmente.
- Toque el pulsante F de selección de la zona de cocción
deseada. Sobre el display correspondiente aparece un “0”
luminoso con un punto decimal que le indicará que zona de
cocción acaba de activar.
- Es posible encender una placa utilizando los detectores "+"
o "-" antes de los 10 segundos. Si se usa el detector D, en el
display se visualizará 9, si se usa el detector C, en el display
se visualizará 1 o 5 según la versión.
- Efectuada esta operación, se puede elegir la regulación de
temperatura actuando sobre “+” ó “-“.
- El elemento calefactor puede apagarse seleccionando “0”
con el sensor D, despues de 3 segundos la zona de cocción
quedará automáticamente apagada. Pero tambien puede
apagar el elemento, tocando al mismo tiempo los sensores
“+” y “-“.
- La Vitro puede apagarse tambien tocando el sensor principal
on/off "A". Si todos los elementos están en “0”, la vitro se apaga
automáticamente dspués de 10 segundos.
En el caso en que zona de cocción sea dotada con placas de
extensión (fig.5-6) el encendido de la segunda zona sucederá
después de haber verificado que:
-el led del botón llave (fig. 5-6 B) esté apagado, de lo contrario
desinserirlo.
-Presionar el botón (fig 5- 6 A) para encender la zona de
cocción.
-Seleccionar la placa deseada y regular la potencia deseada
con los botones “+” o “-”.
-Una vez regulada la potencia seleccionar el botón (fig. 5-6 L)
para activar la zona doble.
-Para desactivar la zona doble asegúrese que la placa deseada
esté seleccionada (fig. 5-6 F) y presionar el botón (fig. 5-6 L).
Nota: la función Doble zona está activada sólo en las placas
F1 y F2 (fig. 5-6).
- En caso que un objeto involuntariamente quedara sobe
la zona TouchControl, la Vitro se pondrá automáticamente
en OFF.
Cuando se lleva un elemento a la posición OFF y la temper-
atura de la misma es superior ó entorno a 50ºC, se activa una
señal luminosa “H” intermitente en el display del elemento
(fig 5- 6 H).
- La función B bloca el funcionamiento de la Vitro en el momento de la selección. Ejem.: si se activa la función mientras
la Vitro se encuentra con dos zonas encendidas, el programa
permance bloqueado aunque se intentara encender otra
zona. Lo mismo ocurre si el aparato está apagado y se activa
la función, la Vitro no se enciende.
Para activar o desactivarla se precisa mantener el dedo sobre
el sensor B, durante dos segundos. La función está activa
cuando el led E está encendido.
Heat up (Calentamiento veloz)
La función Heat up permite tener la zona de cocción al
máximo de la temperatura durante un cierto período de
tiempo, luego la temperatura descenderá hasta un valor
inferior, ya fijado.
Para activar la función Heat up seleccione la placa presionando el botón + hasta llevarla a la posición 9, presionando
una vez más el botón, en la pantalla (al lado del 9) aparecerá
un punto decimal "•" o la letra "A" durante 5 segundos, esto
significa que se ha activado la función "Heat up".
Antes de los 5 segundos, se debe seleccionar el nivel de
potencia deseado (entre 1 y 8).
Si se selecciona una potencia 9, la función se anulará.
Para desactivar la función Heat up basta mantener presionado
el botón + hasta llevarlo a 9, en la pantalla desaparecerá el
punto decimal.
Cuando la función "Heat up" está activada, es posible aumentar el nivel de temperatura precedentemente seleccionado
presionando el botón (+).
Una vez que la zona de cocción ha llegado a la temperatura
seleccionada, la función "Heat up" se desactivará automáticamente emitiendo un sonido. La zona de cocción funcionará
de forma estable al nivel de potencia seleccionado.
Timer (Fig. 6).
-Seleccionar la placa con la potencia relativa.
-Presionar nuevamente el botón de selección de la placa ya
activada.
-Usando los botones “+” y “-” programar el tiempo deseado.
-El punto decimal junto al nivel de potencia indicará que la
placa tiene la función TIMER activa.
-Una señal acústica indicará que la zona de cocción se ha
apagado.
Funcionamiento (Fig.7)
Presione la tecla ON/OFF 11 para encender la plataforma
de cocción. El display visualizará un guion por 10 segundos.
Si dentro de los 10 segundos no se ha encendido ninguna
plataforma de cocción, la plataforma de cocción se apagará
automáticamente.
Para encender el elemento que se desea utilizar, presione la
tecla correspondiente + o – dentro de 10 segundos. Luego
de esta operación, regule la temperatura a través de las
teclas +/-.
Para apagar un elemento, presione la tecla – hasta visualizar “0”. El LED correspondiente se apagará dentro de 10
segundos.
Para apagar un elemento, también es posible presionar contemporáneamente las teclas + y -.
Para apagar la plataforma de cocción, presione la tecla ON/
OFF 11. Si todos los elementos son programados con “0”, la
plataforma de cocción se apagará después de 10 segundos.
En caso que un objeto sea colocado sobre el panel de mandos
de la plataforma de cocción o se verificquen pérdidas de
- 13 -
líquido (agua, leche, etc.), éste se apagará automáticamente
y se encenderá el símbolo 10.
Si el aparato presenta elementos en la zona de cocción doble,
encienda la zona presionando el símbolo 7-9 correspondiente
por 3 segundos. Después de haber encendido el segundo
elemento, regule la temperatura a través de las teclas + o -.
SE DECLINA TODA RESPONSABILIDAD POR EVENTUALE
DAÑOS PROVOCADOS POR LA INOBSERVANCIA DE LAS
ANTERIORES ADVERTENCIAS.
- 14 -
ENGLISH
GB
improper functioning of the TOUCHCONTROL system.
GENERAL
Carefully read the contents of this leaflet since it provides
important instructions regarding safety of installation, use
and maintenance.
Keep the leaflet for possible future consultation. All the
operations relating to installation/replacement (electrical
connections) must be carried out by specialised personnel
in conformity with the regulations in force.
SAFETY WARNINGS
It is recommended to use flat-bottom pans with a diameter
equal to or slightly larger than that of the heated area. Do not
use pans with a rough base to prevent scratching the heat
surface of the cooktop (Fig.2).
This appliance is not suitable for use by children or persons
requiring supervision. Do not let children play with the appliance.
Positioning (Fig.1)
The domestic appliance is designed to be built into a worktop
as illustrated in the specific figure. Apply sealant around the
entire perimeter (cut-out dimensions Fig.1B). Fix the domestic appliance on the worktop by means of the 4 brackets
provided, taking the thickness of the worktop into account
(Fig.1A). If the lower part of the appliance, after installation, is
accessible via the lower part of the cabinet then it is necessary
to mount a separator panel respecting the distances indicated
(Fig.1C). If the appliance is installed with an oven underneath
then the separator is not necessary.
Attention:
- Steam cleaners must not be used.
- If the surface is cracked, switch off the appliance to
prevent electric shock.
- This appliance is not intended for use by young children
or infirm persons without supervision
- Young children should be supervised to ensure they do
not play with the appliance
Electrical connections
Before making the electrical connections, check that:
- the ground cable is 2 cm longer than the other cables;
- the system ratings meet the ratings indicated on the identification plate fixed on the lower part of the worktop;
- the system is fitted with efficient earthing compliant to the
laws and regulations in force.
Earthing is obligatory by law.
If the appliance is not fitted with a cable, use type:
"H05V2V2-F" for a power level of up to 6400 Watts. The crosssection of the cable should be at least 2.5 mm2, or 4 mm2 for
greater power levels.
The cable should never reach a temperature which is 50°C
above the temperature of the room in which it is installed.
The appliance is designed for permanent connection to the
electricity supply and should therefore be fitted with an
omnipolar switch which has a minimum opening of 3 mm
between contacts. The switch should be suitable for the charge indicated on the appliance data plate and must conform to
all current legislation (the yellow/green earth wire must not
be interrupted by the switch).
The omnipolar switch must be easy to reach once the installation process has been completed.
This appliance conforms to the European Directive EC/2002/96,
Waste Electrical and Electronic Equipment (WEEE). By making
sure that this appliance is disposed of in a suitable manner, the
user is helping to prevent potential damage to the environment or to public health.
Attention: On the basis of the model in possession the electronic board may be protected by eventual errors caused in the
electrical network connection by a fuse on the board.
If replacement is necessary, use a fuse that has exactly the
same technical specifications.
The symbol on the product or on the accompanying paperwork indicates that the appliance should not be treated as
domestic waste, but should be delivered to a suitable electric
and electronic appliance recycling collection point. Follow local guidelines when disposing of waste. For more information
on the treatment, re-use and recycling of this product, please
contact your local authority, domestic waste collection service
or the shop where the appliance was purchased.
USE AND MAINTENANCE
Important
- Avoid spilling liquid, therefore to boil or heat liquids, reduce
the heat.
- Do not leave the heating elements on with empty pots and
pans or without receptacles.
- When you have finished cooking, switch off the relevant
heating element with the control indicated below.
INSTALLATION INSTRUCTIONS
These instructions address specialised installers and serve
as a guide for installation, adjustment and maintenance in
conformity with the laws and regulations in force. If a built-in
oven or any other appliance that generates heat must be fitted
directly under the glass-ceramic cooktop, THIS APPLIANCE
(oven) AND THE GLASS-CERAMIC COOKTOP MUST BE SUITABLY INSULATED in such a way that the heat generated by the
oven, measured on the bottom right of the cooktop, does not
exceed 60°C. Failure to respect this precaution may determine
Maintenance
Remove any residues of food and drops of grease from
the cooking surface using the special scraper supplied on
request (Fig.3)
Clean the heated area as thoroughly as possible using
SIDOL, STAHLFIX or similar products and a cloth/paper, then
rinse with water and dry with a clean cloth.
Using the special scraper (optional) immediately remove any
fragments of aluminium and plastic material that have unintentionally melted on the heated cooking area or residues of
sugar or food with a high sugar content (Fig.3). In this way,
any damage to the cooktop surface is prevented.
Under no circumstances use abrasive sponges or irritating
chemical detergents such as oven sprays or stain removers.
- 15 -
Use and functioning of the manual control knobs.
Use
Use the control knobs to set the desired power. Turn them
clockwise to maximum.
In the case of plates with a double area, the external heating
element can be switched on starting from zero and turning
in an anticlockwise direction.
Pilot lights (fig. 4)
The pilot lights are ON when:
— at least one element is inserted; (fig. 4a)
— the top tenperature at the Indicated spot is higher than
50°C (fig. 4b).
Use and functioning of the electronic control knobs
Use
Use the touch control system in the corresponding position
relative to the individual cooking needs. Keep in mind that the
higher the number, the more heat that it is produced.
Functioning (Fig. 5-6)
- On the basis of the model you own, the appliance can be
switched on by actuating the start-up sensor (Fig. 5-6 A). One
zero will appear on all displays within10 seconds. If no display
is actuated within 10 seconds, the top will switch off again.
- Press selection key F for the desired cooking area.
A luminous "0" will appear on the respective display with a
decimal point to indicate which cooking area is active.
- A hotplate may be switched on by activating the "+" or "-"
sensor within 10 seconds. If sensor D is used, the display will
show selection 9, while if sensor C is used, the display shows
selection 1 or 5, depending on the model.
- Once this operation has been performed choose the temperature adjustment with the "+" or "-" keys.
- The plate can be switched off by selecting "0" with the
D sensor, after 3 seconds the cooking area is automatically
switched off.
It is always possible to switch a plate off by touching the "+"
and "-" sensors at the same time.
- The cooking top can be switched off by touching the main
start-up sensor (Fig. 5-6 A). If all the plates are selected on "0"
the top will switch off after 10 seconds.
-If the top is equipped with plates with an extension (fig. 5-6)
switching on of the second area will be carried out after having checked that :
- the key button LED (fig.5-6 B) is off, otherwise de-insert it.
- Press the key (fig.5-6 A) to switch the top on.
- Choose the desired plate and adjust the power using the
"+" or "-" keys.
-Once the power has been adjusted choose the key (fig.5-6 L)
to activate the double area.
- To deactivate the double area check that the interested plate
has been selected (fig.5-6 F) and press the key (fig.5-6 L) .
Note: the Double area function is activated only on plates
F1 and F2 (fig.5-6 ).
- If an object is placed above the controls, the cooking top
will automatically move to the OFF position.
When a plate is in the OFF position and the temperature is
higher than 50° there will be a luminous signal "H" near to
the respective selection key (Fig.5- 6 H).
- the B function blocks the functioning of the top on selection.
E.g.: if the function is activated while the top has two areas
switched on the programme remains blocked even if you
try to switch another area on. The same thing happens if the
appliance is switched off and the function is activated; the
top doesn't switch on.
To activate or deactivate it hold a finger on the B sensor for
about two seconds. The function is active when warning light
E is switched on.
Heat up (Rapid heating)
The Heat up function can be used to set the cooking zone
to its maximum temperature for a specified period of time,
after which the temperature will return to a lower value
selected previously.
To activate the Heat up function, select the hotplate by pressing the + button until setting 9 is displayed; if the button is
pressed again a decimal point "•" or the letter "A" will appear
on the display (next to the digit 9) for 5 seconds. This means
the Heat up function is active.
The desired power level (between 1 and 8) should be selected
within 5 seconds. If power level 9 is selected, the function is
disabled. To deactivate the Heat up function, simply select the
+ button and hold it down until setting 9 is reached and the
decimal point disappears from the display. When the “Heat
up” function is active, the previously selected temperature
level may be increased by pressing the (+) button. Once the
cooking zone has reached the selected temperature, the “Heat
up” function is automatically deactivated and the hob emits
a BEEP. The cooking zone will operate in a constant manner,
at the set power level.
Timer (Fig.6).
- Select the plate with the relative power.
- Press the selection key again of the already-activated
plate.
- Using the "+" and "-" keys set the desired time.
- The decimal point at the side of the power level will indicate
that the plate has the TIMER function activated.
- An acoustic signal will indicate switching off of the cooking area.
Functioning (Fig.7)
Press the ON/OFF 11 button to switch on the cooktop. For
10 seconds the display will show a dash. If no cooking zone
is switched on within 10 seconds, the hob will automatically
switch off.
To switch on the element you intend to use, press the corresponding + or - button within 10 seconds. When the + button
is pressed the display will show power level 9, and when the
- button is pressed it will show power level 4. After this operation, adjust the temperature with the +/- buttons.
To switch off an element, press the - button until "0" appears.
The corresponding LED will switch off after 10 seconds.
You can also switch off an element by pressing simultaneously
the + and - buttons.
To switch off the hob, press the ON/OFF button 11. If all of
the elements are set to "0", the hob will witch off after 10
seconds.
If an object is placed on the hob control panel or any liquid
is spilt (water, milk, etc.) the hob will automatically switch off
and the 10 symbol will light up.
If the hob features double zone cooking elements, switch on
the second zone by pressing the corresponding 9-7 symbol
for 3 seconds. After switching on the second element, adjust
the temperature with the +/- buttons.
THE MANUFACTURER DECLINES ALL RESPONSIBILITY
FOR EVENTUAL DAMAGES CAUSED BY BREACHING THE
ABOVE WARNINGS.
- 16 -
DEUTSCH
ALLGEMEINE INFORMATIONEN
Lesen Sie bitte aufmerksam den Inhalt der vorliegenden
Betriebsanleitung, weil sie wichtige Hinweise über die Installation, den Gebrauch und die Wartung erteilt. Bewahren Sie
die Betriebsanleitung zum späteren Nachschlagen auf. Alle mit
der Installation/dem Austausch im Zusammenhang stehende
Vorgänge (Stromanschlüsse) sind laut gültiger Vorschriften
von Fachpersonal auszuführen.
SICHERHEITSWARNUNGEN
Es werden Behälter mit ebenem Boden mit einem Durchmesser, der gleich dem erhitzten Bereich oder etwas größer
ist, empfohlen. Keine Behälter mit rauher Unterseite verwenden, damit die Heizfläche des Kochfelds nicht zerkratzt
wird (Abb.2). Dieses Gerät ist nicht für Kinder oder Personen
geeignet, die überwacht werden müssen. Darauf achten, daß
Kinder nicht mit diesem Gerät spielen.
Wichtig
- Vermeiden, daß Flüssigkeit überläuft; deshalb zum Kochen
oder Erhitzen von Flüssigkeiten die Hitzezufuhr verringern.
- Die Heizelemente nicht brennen lassen, wenn die Töpfe oder
Pfannen leer oder nicht vorhanden sind.
- Wenn das Kochen beendet ist, den zutreffenden Heizkörper anhand der nachstehend angegebenen Bedienung
ausschalten.
Achtung:
ES DARF KEIN DAMPFREINIGUNGSGERÄT BENUTZT
WERDEN.
- Falls die Oberfläche gesprungen ist, das Gerät ausschalten, um etwaige Stromschläge zu vermeiden.
- Das Gerät ist nicht für den Gebrauch durch unbeaufsichtigte Kinder oder unfähige Personen konzipiert.
- Achten Sie bitte darauf, dass Kinder nicht mit dem Gerät
spielen.
Dieses Gerät ist gemäß der EU-Richtlinie 2002/96/EC, Waste
Electrical Electronic Equipment (WEEE) gekennzeichnet.
Sorgen Sie bitte dafür, dass das Gerät korrekt entsorgt wird, der
Benutzer trägt dazu bei, den potentiellen negativen Folgen
für Umwelt und Gesundheit vorzubeugen.
Das auf dem Produkt oder auf den Begleitpapieren
sagt aus, dass dieses Produkt nicht
befindliche Symbol
wie normaler Hausmüll behandelt werden darf, sondern
dass es einer geeigneten Sammelstelle für das Recycling
der elektrischen und elektronischen Geräteteile zugeführt
werden muss. Entsorgen Sie bitte das Altgerät gemäß der
lokalen Richtlinien. Für weitere Informationen hinsichtlich
der Behandlung, der Wiederverwertung und des Recycling
des Produkts wenden Sie sich bitte an die zuständige lokale
Stelle, an die Sammelstelle für Hausmüll, oder an den Händler,
bei dem Sie das Gerät erworben haben.
D
Gerät direkt unter dem Glasfaserkochfeld angebracht wird,
MÜSSEN DIESES GERÄT (Backofen) UND DAS GLASFASERKOCHFELD ZWECKENTSPRECHEND ISOLIERT SEIN, so daß die
vom Backofen erzeugte, rechts hinten am Kochfeld gemessene Temperatur nicht mehr als 60°C beträgt. Die mangelnde
Einhaltung dieser Vorsichtsmaßnahme könnte zu Fehlfunktionen des TOUCHCONTROL-Systems führen.
Aufstellung (Abb.1)
Das Elektrogerät ist zur Einlassung in ein Arbeitsfeld konzipiert, wie in der zutreffenden Abbildung zu sehen ist. Längs
des ganzen Umfangs (Schnittmaße Abb.1B) Isoliermaterial
anbringen.
Das Elektrogerät anhand der mitgelieferten 4 Haltebügel am
Arbeitsfeld befestigen und dabei die Dicke des Arbeitsfelds
berücksichtigen (Abb.1A). Wenn das Unterteil des Geräts
nach der Installation vom Unterteil des Schranks aus zugänglich ist, muss eine Trennwand eingebaut werden, unter
Einhaltung der vorgeschriebenen Abstände (Abb.1C). Wenn
die Installation hingegen über einem Ofen erfolgt, ist dies
nicht erforderlich.
Stromanschlüsse
Vor der Verwirklichung der Stromanschlüsse folgendes
sicherstellen:
- daß das Erdungskabel 2 cm länger als die anderen Kabel
ist;
- die Anlagenmerkmale derartig sind, daß sie den Angaben
auf dem Typenschild entsprechen, das an der Unterseite des
Arbeitsfeldes angebracht ist;
- die Anlage über eine wirksame, den geltenden Vorschriften und Gesetzesbestimmungen entsprechende Erdung
verfügt.
Die Erdung ist laut Gesetz vorgeschrieben.
Sollte das Elektrogerät nicht mit einem Netzkabel ausgerüstet
sein, ist ein Kabel folgendes Typs zu verwenden:
"H05V2V2-F" für eine Leistung bis zu 6400 Watt. Der Querschnitt des Kabels muss mindestens 2.5 mm2 betragen, für
höhere Leistungen jedoch 4 mm2.
Das Kabel darf an keiner Stelle eine Temperatur erreichen, die
die Raumtemperatur um 50°C übersteigt.
Das Gerät ist dazu bestimmt, permanent an die Netzleitung
angeschlossen zu werden. Aus diesem Grunde ist zwischen
Stromnetz und Gerät ein allpoliger, der auf dem Typenschild
angegebenen Last und den einschlägigen Richtlinien entsprechender Schalter mit einer Mindestöffnung der Kontakte von
3 mm zu installieren. (Der gelb/grüne Erdleiter darf durch
diesen Schalter nicht unterbrochen werden).Der allpolige
Schalter muss nach erfolgter Installation des Gerätes leicht
zugänglich sein.
Achtung: Je nach dem erworbenen Modell könnte die elektronische Platine durch eine am Gerät befindliche Schmelzsicherung gegen unkorrektes Anschließen an das Stromnetz
geschützt sein.
Im Falle eines Austauschs muss eine Schmelzsicherung, die
die gleichen Eigenschaften besitzt, verwendet werden.
INSTALLATIONSANLEITUNG
GEBRAUCH UND WARTUNG
Die vorliegenden Anweisungen sind für einen Fachinstallateur
gedacht und dienen als Führer für die Installation, Einstellung
und Wartung laut geltender Gesetze und Vorschriften. Falls ein
Einbaubackofen oder irgendein anderes, Hitze erzeugendes
Wartung
Eventuelle Speisereste und Fettspritzer mit dem auf Wunsch
gelieferten, speziellen Schaber (Abb. 3) entfernen.
- 17 -
Den erhitzten Bereich mit Hilfe von SIDOL, STAHLFIX oder
anderen ähnlichen Produkten und einem Papiertuch sorgfältig reinigen, dann mit Wasser nachwischen und mit einem
trockenen Tuch abtrocknen. Bruchstücke von Aluminiumfolie
und aus versehen zerschmolzenes Material aus Kunststoff oder
Rückstände von Zucker oder Speisen mit hohem Zuckergehalt
sofort mit Hilfe des auf Wunsch gelieferten Schabers entfernen
(Abb. 3). Auf diese Weise lassen sich etwaige Beschädigungen
der Kochfläche vermeiden. Keinesfalls Scheuerschwämme
oder angreifende chemische Backofensprays oder Fleckenentferner verwenden.
Gebrauch und funktionen der kochfelder mit bedienungsknopfen
Gebrauch
Mit den Schaltdrehknöpfen die gewünschte Stärke einstellen,
indem im Uhrzeigersinn bis zur Höchststärke gedreht wird.
Bei Doppelplatten kann die äußere Wärmefläche eingeschaltet werden, indem von Null gegen den Uhrzeigersinn
gedreht wird.
LEUCHTANZEIGEN (Bild 4)
Die Leuchtanzeigen sind eingeschaltet wenn:
— wenigstens eine Kochzone eingeschaltet ist (Bild 4a).
— die Temperatur bei der gewünschten Kochzone über 50
°C ist (Bild 4b).
Gebrauch und funktionen der elektronischen kochfelder
Gebrauch
Das Touch control System ist gemäß der Stellung, die den
Kochbedürfnissen entspricht, zu verwenden. Bitte beachten
Sie: Je höher die Zahl ist, um so mehr Hitze wird ausgestrahlt.
Betriebsweise (Abb. 5-6)
- Je nach Modell kann das Gerät durch Betätigung des Startsensors (Abb. 5-6 A) eingeschaltet werden. 10 Sekunden lang
erscheint auf allen Displays eine Null. Wird binnen 10 Sekunden kein Display betätigt, schaltet das Kochfeld wieder ab.
- Die Taste F zur Wahl des gewünschten Kochbereichs
betätigen.
Auf dem zutreffenden Display erscheint eine leuchtende “ 0 ”
mit einem Dezimalkomma und gibt an, welcher Kochbereich
aktiv ist.
- Eine Kochzone kann über die Sensoren "+" oder "-" innerhalb
von 10 Sekunden eingeschaltet werden. Erfolgt die Bedienung über den Sensoren D, zeigt das Display die Einstellung
9 an, erfolgt die Bedienung über den Sensoren C, zeigt das
Display, je nach der Ausführung des Modells, die Einstellung
1 oder 5 an.
- Nach diesem Vorgang lassen sich anhand der Tasten “+” o “-”
die Temperatureinstellungen vornehmen.
- Durch Wahl von “0” anhand des Sensors D kann die Platte
ausgeschaltet werden; nach 3 Sekunden wird der Kochbereich automatisch abgeschaltet. Es läßt sich auch eine Platte
ausschalten, indem man gleichzeitig die Sensoren “+” und
“-” berührt.
- Durch Berührung des Start-Hauptsensors(Abb. 5- 6 A) kann
das Kochfeld abgeschaltet werden. Sind alle Platten auf “0”
gestellt, schaltet das Kochfeld nach 10 Sekunden ab.
- Falls das Kochfeld mit Erweiterungsplatten ausgestattet ist
(Abb. 5-6), erfolgt das Einschalten der zweiten Zone, nachdem
überprüft wurde, dass:
- die LED der Haupttaste (Abb.5-6 B) nicht leuchtet, andernfalls
ausschalten.
- Die Taste (Abb. 5-6 A) drücken, um das Kochfeld einzu-
schalten.
- Die gewünschte Platte wählen und die gewünschte Leistung
mit den Tasten “+” oder “-” einstellen.
- Nach Einstellung der Leistung die Taste (Abb. 5-6 L) wählen,
um die zweifache Zone in Betrieb zu setzen.
- Um die zweifache Zone außer Betrieb zu setzen, überprüfen,
dass die
betreffende Platte gewählt ist (Abb. 5-6 F), und die Taste (Abb.
5 -6 L) drücken.
Hinweis: Die Funktion Zweifache Zone ist nur bei den Platten
F1 und F2 (Abb. 5-6) in Betrieb.
- Falls ein Gegenstand auf die Bedienungen gelegt wird, geht
das Kochfeld automatisch auf OFF . Wird eine Platte auf OFF
gestellt und ist die Temperatur höher als circa 50°, erscheint
eine Leuchtanzeige “H“ neben der zutreffenden Wahltaste
(Abb. 5- 6 H).
- Die Funktion B blockiert den Betrieb des Kochfelds gelegentlich der Wahl. Zum Beispiel: Wird die Funktion aktiviert,
wenn zwei Bereiche des Kochfelds eingeschaltet sind, bleibt
das Programm blockiert, auch wenn man versucht, einen
anderen Bereich einzuschalten. Dasselbe geschieht, wenn
das Gerät ausgeschaltet ist: Beim Aktivieren der Funktion,
schaltet das Kochfeld nicht ein.
Um sie zu aktivieren oder zu deaktivieren, mit dem Finger circa
zwei Sekunden lang auf dem Sensor B verweilen. Die Funktion
ist aktiv, wenn die Kontrollampe E leuchtet.
Heat up (Schnellheizen)
Mittels der Funktion Heat up können Sie die Kochzone über
einen bestimmten Zeitraum auf maximaler Temperatur einschalten; im Anschluss daran wird die Temperatur auf einen
ausgewählten, niedrigeren Wert gesenkt. Wählen Sie zur
Aktivierung der Funktion Heat up die Kochzone aus; drücken
Sie hierzu die Taste + solange, bis die Einstellung 9 erreicht ist.
Bei nochmaligem Drücken erscheint im Display (neben der 9)
für 5 Sekunden ein Dezimalpunkt "•" oder der Buchstabe "A",
was bedeutet, dass die Funktion "Heat up" aktiv ist.
Die gewünschte Leistungsstufe ist nun binnen 5 Sekunden
einzustellen (von 1 bis 8). Bei Anwahl der Leistungsstufe 9,
wird die Funktion annulliert.
Zur Deaktivierung der Funktion Heat up genügt es, die Taste
+ zu drücken und diese solange gedrückt zu halten, bis die
Einstellung 9 erreicht ist und die Dezimalkommastelle auf
dem Display verschwindet.
Ist die Funktion "Heat up" aktiv, kann eine zuvor angewählte
Temperatur durch Drücken der Taste (+) erhöht werden. Hat
die Kochzone die gewählte Temperatur erreicht, schaltet
sich die Funktion "Heat up" automatisch aus und es ertönt
ein BIP-Ton. Die Kochzone funktioniert weiter stabil auf der
eingestellten Leistungsstufe.
Timer (Abb. 6).
- Die Platte mit der entsprechenden Leistung wählen.
- Nochmals die Wähltaste der bereits in Betrieb gesetzten
Platte drücken.
- Mithilfe der Tasten “+” und “-” die gewünschte Zeit einstellen.
- Der Dezimalpunkt neben der Leistungsstufe zeigt an, dass
die TIMER-Funktion der Platte in Betrieb ist.
- Ein akustisches Signal zeigt das Ausschalten des Kochbereichs an.
Betriebsweise (Abb. 7)
Drücken Sie auf die Ein-/11 Ausschalttaste, um die Kochmulde
einzuschalten. Auf der Anzeige erscheint 10 Sekunden lang
ein Strich. Wenn innerhalb von 10 Sekunden keine Kochzone
eingeschaltet wird, schaltet sich die Kochmulde automatisch
- 18 -
ab. Um den von lhnen gewünschten Teil der Kochmulde in
Betrieb zu nehmen, drücken Sie die entsprechende Taste
+ oder - innerhalb von 10 Sekunden. Wenn Sie auf die +
Taste drücken, erscheint auf der Anzeige die Leistungsstufe
9. Wenn Sie dagegen auf die - Taste drücken, wird die Leistungsstufe 4 angezeigt. Stellen Sie nach diesem Vorgang
die Temperatur anhand der +/- Tasten ein. Um einen Teil
des Gerätes auszuschalten, drücken Sie auf die - Taste, bis
"0" erscheint. Die entsprechende Leuchtdiode wird nach 10
Sekunden ausgeschaltet. Sie können einen bestimmten Teil
des Gerätes auch ausschalten, indem Sie gleichzeitig auf die
Taste + und - drücken.
Zum Abschalten der Kochmulde drücken Sie auf die Ein-/
Ausschalttaste 11. Wenn alle Teile des Gerätes auf "0" stehen,
schaltet sich die Kochmulde nach 10 Sekunden ab.
Wenn Kochgeschirr o. ä. auf das Bedienfeld gestellt wird
oder wenn eine Flüssigkeit überkocht (Wasser, Milch usw.),
wird die Kochmulde automatisch abgestellt. Das Symbol 10
leuchtet dann auf.
Wenn die Kochmulde über Doppelkochzonen verfügt, wird
die zweite Zone eingeschaltet, indem Sie 3 Sekunden lang
auf das entsprechende Symbol 7-9 drücken. Regeln Sie die
Temperatur nach dem Einschalten des zweiten Elements mit
den Tasten +/- ein.
Wenn eine Zone ausgeschaltet ist und die Temperatur noch
immer über 50°C liegt, schaltet sich die Leuchtdiode H (heiß)
neben der Taste + ein. Die Leuchte H (heiß) bleibt so lange
eingeschaltet, bis die Kochmulde auf eine sichere Temperatur
abgekühlt ist.
FÜR SCHÄDEN, DIE AUF DIE NICHTBEACHTUNG DER OBEN
GENANNTEN ANWEISUNGEN ZURUCKZUFÜHREN SIND,
WIRD KEINERLEI VERANTWORTUNG ÜBERNOMMEN.
- 19 -
3LIP0201