1
Ballistic LaserScope™ User’s Guide
The Ballistic LaserScope is the most innovative and
effective hunting riflescope in the world. Burris combined
outstanding optics with pinpoint laser rangefinding and
precision trajectory compensation for the exact ammunition
you choose for your hunt.
In one fast sequence, the Ballistic LaserScope ranges the
distance to your trophy, calculates the drop of your projectile
at that distance, and displays the exact aiming point as a
single red dot on the reticle. It eliminates most of the variables
and guesswork that often cause hunters to go home
empty handed.
The Ballistic LaserScope is in a league of its own. No other
riflescope combines this level of quality, technology, accuracy, repeatability and effectiveness. It will greatly increase
the distance at which you can make an ethical shot.
Congratulations, and thank you for choosing the Ballistic
LaserScope by Burris.
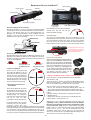
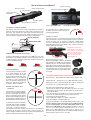
Mounting & Sighting-In
Mounting The Ballistic LaserScope™
1. Select a Weaver-style or Picatinny-style mounting base. If a two-piece
base is selected for a long action bolt rifle, the front base should be a
reversible (extension) base which will
need to be mounted with the extension
directed rearward. We recommend the
use of Burris XTB Bases (Xtreme Tactical Bases)
as they were also designed with the special mounting
considerations of the Ballistic LaserScope.
2. Read the manufacturer’s directions regarding the installation of mounts
before beginning.
3. Clean the mounting area of the rifle with a chemical that removes grease
and oil. Pay special attention to screw holes. Using the same chemical,
clean the mounts. Do not allow the cleaning chemical to come in contact
with the stock or scope lenses.
4. After installing the base(s), position the scope so it offers the proper
eye relief. To do this, shoulder the rifle as you would in the field. Position
the scope as far forward as possible while achieving a full field of view.
LaserScopeTM Rail (rear)
Rear Mount
Base
5. Note the two base slots you will use to attach the scope, and with the
mount clamps open fully, place the Mount Bolts into those slots on the
base. Now match up the Ballistic LaserScope slots and place over the
two mount bolts - rocking the scope side to side until the scope is flush
with the base and mount clamps gripping from the lip of the base to the
lip of the rail on the underside of the scope. Finger tighten only.
6. In completing step #5, position the hex nuts on the side of the rifle
opposite the side you will mount the remote transmitter. There must be
clear line of sight between the
transmitter and the remote
Mount
control receiver.
Mount Bolt
7. With hex nuts slightly loosened, push the scope forward and then firmly
tighten both hex nuts to 5.6~8 N-m.
Eyepiece Focusing
1. Aim the Ballistic LaserScope in a safe direction toward the sky or a light
colored wall. Glance through the scope and notice if the reticle is
sharply focused. Most users will find that no adjustment is necessary.
If the reticle is not in sharp focus, rotate the eyepiece focus ring until the
reticle appears in sharp focus. Double check your focus by taking quick
glances through the scope and make any fine tuning adjustments as
necessary.
Sighting In
Do all shooting in a safe, authorized area. Use proper eye and hearing
protection and follow all safe shooting rules. Select the ammunition you
intend to use in the field and use it to sight in the firearm.
1. Bore sight your scope, OR place a target about .6 meter square at 25
meters. Fire a shot at the bullseye. Make the necessary adjustments to
the Windage and Elevation knobs. Remember, a scope with a click
adjustment value of .7cm at 100 meters will require four clicks to move
the same .7cm distance at 25 meters. Burris scopes have the click
value indicated on a label under one of the adjustment caps.
2. Make adjustments on the scope by turning the adjusting screws the
necessary number of clicks. NOTE: The reticle (crosshair) is centered at
the factory. This permits adjusting the reticle equally in all directions
from the center position. Three shot groups are suggested to determine
the actual point of impact.
3. After the first group is fired, adjust the scope again. This adjustment
should bring the approximate center of the group to coincide with the
bullseye. Shoot additional groups as necessary.
4. Place the target at your desired sight-in distance of either 100 or 200
meters. Make the necessary adjustments so your group coincides with
the bullseye.
Clamp
5. Align the dial to read “0” without allowing the silver knob to turn.
Hex
Nut
6. After making the adjustments, replace the adjustment caps. They protect
your scope from dust and moisture.
1
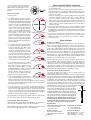
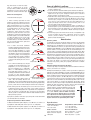
BALLISTIC LASERSCOPE™ OPERATION
Elevation Adjustment
Elevation Adjustment
Eyepiece Focus Ring
Windage Adjustment
Battery Cover
Windage Adjustment
Main Switch
Remote Control Receiver
Setup Button (detail below)
Remote Control Receiver
1. Battery Installation or Replacement
If the scope fails to get an accurate range
reading, it will display a line of three flashing
bars.
Unload the gun. Use a coin or screwdriver to unscrew the battery cap
screw on the top, rear of the scope, just in front of the eye piece. Install a
lithium CR2 battery. Reinstall the battery cover. NOTE: A sticker on the
underside of the battery contains basic set-up instructions.
Battery Cover
Remote Transmitter:
The LaserScope comes with a Remote Transmitter to make ranging more
convenient. Position the Remote Transmitter on the fore end of a rifle as
shown below. It can also be positioned on the Objective Bell of the LaserScope. The LaserScope is Remote-capable for a full 11/2 hours every time
the Main Switch is depressed.
CR2 Battery
Remote Transmitter must
be located in this area (on
either side of the LaserScope) within 20 inches of
the Remote Receiver and
in direct line of sight of the
remote control receiver
2. LaserScope Battery Life:
Battery life is nominally rated at 5000 cycles. This will vary depending on
the quality of the battery and the temperatures at which the unit is
operated. Batteries lose a good deal of their power potential in colder
temperatures.
Battery: Full
Battery: Half
Carry a spare
Remote Transmitter Battery:
Common CR2025 battery. Battery life is nominally
rated at 5000 cycles. To change, using a finger
nail or small screwdriver, pry the back over off of
the Remote. For removal, the battery must be
tilted and slid out of the holder. Reverse the
process for installation of the new battery and snap
the back over onto the Remote.
Battery: Low Replace the battery
3. Start the electronics
Press the main switch button on the left
side of the scope, just behind the Burris
logo. Look through the scope. It should
show two things: the yards(Y) or
meters(M) indication illuminated along
with the battery status indicator. The
indicators will stay on for 8 seconds.
5. Set Up the Ballistic For Your Specific Cartridge
First decision - What Units do you want to work in, Yards or Meters? Y/M
Second decision - Do you want to zero at 100 or 200 Yards / Meters?
4. Electronic Basics
Info Needed - Drop in inches of your cartridge at 500 Yards if you zero at
100 Yards (Drop Number).
Start the electronics and aim at a
target. Press either the left side button
again or the Remote Activation Switch.
The scope will display the horizontal
range to your target at the top and also
display an illuminated dot on the
crosshair.
There are several ways to determine your Drop Number:
1. For factory loads, the Ballistic Table that came with your scope will
show the drop number for most of the currently available factory ammo.
2. Factory ammo web sites sometimes provide this information.
3. The drop number may appear on the ammo box.
4. Ballistics Software Programs
5. Zero at 100 yards and shoot at a 500-yard target.
6. Burris website-www.burrisoptics.com
The range displayed is the horizontal
distance to the target. The Ballistic
LaserScope has a built-in angle sensor
and it converts the actual distance
to horizontal distance. The horizontal
distance is mostly what affects a bullet’s trajectory so no matter what the
uphill or downhill angle, the Ballistic LaserScope automatically calculates
the distance to use for determining the aiming point.
No matter what units you chose to work in (yards or meters), and no
matter what distance you intend to Zero at, the Ballistic Table is
selected based on drop at 500 Yards when zeroed at 100 Yards. Your
3 digit Ballistic Table will begin with a “1” if you intend to sight-in at 100
yards/meters or a “2” if you intend to sight-in at 200 yards/meters. This
number is followed by your Drop Number which will vary between 25 and
63. The complete Ballistic Table will be a number between 125 and 163 or
225 and 263.
2
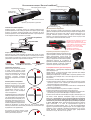
Ballistic LaserScope Essentials
There are four arrows on the Setup
button on the right side of the scope.
These are used only for programming.
They have no function during normal use
of the scope.
1. The trajectory compensation feature is calibrated for use only on 12x
magnification.
2. The center crosshair must be used for ranging.
3. An illuminated aiming dot will remain lit for approximately 80 seconds.
If you fail to shoot before the dot goes out, you will need to re-range
using the center crosshair.
4. There can be several possible causes that result in the LaserScope’s
inability to determine the distance to a target including: Nearby obstacles
between the scope and the target such as grass, twigs, or leaves; Rain,
snow, mist or other airborne debris; Dirty objective lens; Poor target
quality for reflecting the laser back to the scope, coupled with an
unsteady hold and long distances; Low battery.
5. If you have programmed the scope for a particular cartridge, and the range
to the target cannot be determined, the scope will display three horizontal
lines in the yards/meters area, and five illuminated dots that serve as a
‘custom’ Ballistic Plex that is accurately calibrated to your cartridge.
6. If the LaserScope ever seems to be working improperly, there is a good
chance that it needs a new battery. First, simply disconnect the existing
battery and reinstall and check for function. If this doesn’t solve the
issue, install a new battery.
Enter Set-Up Mode
1. Turn on the scope.
2. First press and hold the Forward Arrow
on The Setup Button and at the same
time press and hold the Main Switch
Button for about six seconds. Looking
through the scope, you will see a
change in the display. Release the two
buttons when the display changes.
This is called “Setup Mode”. First a
number appears for two seconds. That
number is the firmware version. Next
the display shows the currently selected (Y)ards or (M)eters and Ballistic
Table. On new scopes the reading will
be “Y 145”, the factory shipped table.
If a Ballistic Table has been previously
selected, the designation for that Table
is displayed.
3. With the currently selected table displayed you have 30 seconds to click
the Forward Arrow button to enter the
Ballistic Table select mode. The “T” (for
table select) is lit steady, the Unit (Y or
M) is flashing. Press the Up Arrow to
select Y (yards) or the Down Arrow to
select M (meters). When you have the
measurement unit you want flashing,
press and release the Forward Arrow
button to select your choice.
4. The “T” is still on steady, your (Y or M)
is on and steady, your first numeric
digit is flashing, and the other two are
out. Select your Zero Distance. 1 = 100
Yards/Meters, or 2 = 200 Yards/Meters.
Press the Up Arrow to increase the
number or the Down Arrow to decrease
it. When your preferred sight-in distance is displayed (flashing), press and
release the Forward Arrow button.
Firmware version
Technical Notes
Default setting
Fine Tuning and Altitude
Ammo makers generally state their bullet drop numbers at sea level. Very
generally, big game hunting bullets drop at 500 yards about ½ inch less
for each additional 1000 feet of elevation. So, if you going to hunt at 6,000
feet elevation and your ammo box says you should have 40 inches of drop
at 500 yards with a 100 yard zero, then you would want to select the
Ballistic Number 37 instead of 40. Our website www.burrisoptics.com
contains charts showing more specific altitude adjustments for each
cartridge. Other ballistics software programs can also provide you even
more precise information.
Last setting
M
Select or Change Meters
Depending on the exact ammo performance, your gun’s barrel length, the
elevation, and any extreme temperatures, you might need to increase or
decrease your Ballistic Table by a couple of digits for exacting performance. Ballistics software programs are of great benefit to get you close,
but nothing beats firing five shot groups with the actual ammo at 500
yards to provide you with the most precise information possible in order
to perfectly program your Ballistic Laserscope.
Select or Change Yards
Extreme Range Shooting (Beyond 500 yards)
The factors that influence a bullet in flight at extreme range are many and
their relationships are complex.
Set Zero Distance (1 or 2)
The BC (Ballistic Coefficient) of your bullet is a factor that describes how
fast the bullet slows down. The ACTUAL BC of a bullet and the PUBLISHED
BC can be different and can affect your Ballistic Table. In developing the
simple-to-use programming, Burris leaned more towards the premium
ammunition with premium bullets. For all practical purposes, from 100 to
500 yards, the way the Ballistic LaserScope works there exists very little
bullet flight error from one bullet to another. The BC values of most available bullets are on our website. However, going beyond 500 yards, there
can be sizable differences in actual point of impact depending on the BC
of the bullet you are using. The chart on page 4 lists the
actual BC numbers used for each Ballistic Table. To take
full and simple advantage of The Ballistic LaserScope
for shooting beyond 500 yards, one would be wise to
use a bullet that closely matches the values we represent in the chart. Also, when the Ballistic LaserScope
gets a distance reading that is beyond the capability
of the reticle’s drop compensation, the bottom four
dots will light up signifying to you that the target is
beyond the reticle’s capability.
Complete the Ballistic Table
with your Drop Number
5. The last two numbers (for your Drop Number or Ballistic Table) should
be flashing. Press the Up Arrow to increase the number, or the Down
Arrow to decrease it. When the Drop Number you want is displayed
(flashing), press and release the Back Arrow button to exit the Set-Up
mode.
6. You are ready to go shooting. Re-zero the gun if neccessary at your
selected sight-in distance. Then verify point of impact by actual shooting
at 500 yards/meters. Depending on the exact ammo performance, your
gun’s barrel length, the elevation, and any extreme temperatures, you
might need to increase or decrease your Ballistic Table by a couple of
digits for exacting performance.
Your programming is stored in the scope no matter the condition of your
battery and it will still remember your programming with no battery at all.
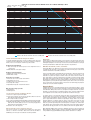
Specifications
Understanding The Ballistic Table Display:
Ballistic Table M234 means: (M)eters, 200 Meter Zero, a cartridge with
34 inches of drop at 500 yard when zeroed at 100 yards.
Ballistic Table Y157 means: (Y)ards, 100 Yard Zero, a cartridge with
57 inches of drop at 500 yards when zeroed at 100 yards.
3
Operating Temperature:
+14o to +122o fahrenheit
-10o to +50o celsius
Storage Temperature:
-13o to +158o fahrenheit
-25o to +70o degrees celsius
Effective Range:
Deer: 50 yards to 550 yards
Reflective Target: 50 yards to
800 yards
Ranging Accuracy:
Less than 100 yards: +/-1 yard
100 - 550 yards: +/-2 yards
More than 550 yards: +/-3 yards
Ballistic Reticle Holdover Capability based on the chosen Ballistic Table
Ballistic Muzzle Vel. Muzzle Vel. BC
Table
m/s
f/s
Used
63
62
61
60
59
58
57
56
55
54
53
52
51
50
49
48
47
46
45
44
43
42
41
40
39
38
37
36
35
34
33
32
31
30
29
28
27
26
25
808
813
819
825
831
837
843
849
856
862
869
876
883
890
898
906
913
922
930
942
948
972
982
992
1002
1013
1064
1076
1088
1101
1114
1180
1195
1210
1227
1244
1250
-
2650
2668
2687
2706
2725
2745
2765
2786
2807
2829
2851
2874
2897
2921
2946
2971
2997
3024
3052
3090
3110
3190
3221
3254
3288
3322
3490
3530
3570
3612
3655
3870
3920
3970
4025
4080
4100
-
.447
.447
.447
.447
.447
.447
.447
.447
.447
.447
.447
.447
.447
.447
.447
.447
.447
.447
.447
.447
.447
.407
.407
.407
.407
.407
.334
.334
.334
.334
.334
.276
.276
.276
.276
.276
.276
.276
.276
500
600
Maximum Reticle Distance with 100 yard zero
700
800
Maximum Reticle Distance with 200 yard zero
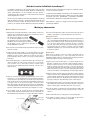
Checklist before returning a scope
Storage:
A significant number of scopes are returned to Burris each year that are
found to function perfectly. To avoid unnecessary delay and expense we
encourage you to check for the following conditions.
As with any electronic device, it is always a good idea to remove the battery when storing
for a long period of time. During storage or transportation, be sure that the Main Switch on
the LaserScope and the button on the Remote Transmitter are not inadvertently depressed
thereby running the battery down when not in use.
Insufficient windage adjustment
1. Base mounting holes drilled out of alignment with center of bore
2. Barrel threaded into receiver at an angle
Insufficient elevation adjustment
1. Receiver diameter out of specification
2. Barrel threaded in at an angle
Grouping or accuracy
1. Barrel or chamber throat erosion
2. Stock warpage
3. Stock Bedding problem
4. Loose mount
5. Heavy trigger pull Solution - Consult with a gunsmith
Focus or image not clear
1. Object too close
2. Eyepiece out of focus
When returning the scope be sure to include:
1. Include a copy of the original purchase receipt.
2. Make yourself a note of your scope’s serial number for use when calling
to check on your in-service scope.
3. Complete name and full address.
4. A short note describing the nature of the problem as accurately as possible.
5. Ship the scope prepaid and Insured. Burris can’t be responsible for your
scope until we physically receive it. Burris pays for shipping back to you.
6. Insure the shipment against loss.
Send the scope to your country service dealer
You can contact the dealer where you originally purchased the item, or ‘Find
a Dealer’ in that section of the website. The Dealer for your area will help
you solve the problem to your satisfaction.
Scope Use, Service, & Care
Your Burris scope will provide a lifetime of service if given the reasonable care and treatment
it deserves. The only maintenance required is occasional cleaning of the outside of the scope
and the exterior lenses.
All moving assemblies are permanently lubricated. Use lens covers to protect the scope
from dirt, dust, lint, and moisture. The adjustment system is waterproof even without the
turret caps in place, but keep these caps tight to keep dust and dirt out of the mechanical
system. Before cleaning the lenses, brush them with a photographer’s brush or blow them
clean, ideally with “canned air”. This removes large particles which can scratch the surface
if wiped under pressure. Never disassemble your scope. Disassembly by anyone other than
our factory will void the warranty.
Burris Warranty
The Ballistic LaserScope has a 10 year optical and 3 year electronic warranty. If your
LaserScope’s optics or mechanical systems are found to have defects in materials or
workmanship, Burris will, at our option, repair or replace it at no charge. The ranging
system and electronics are warranted for 3 years from the date of purchase. If a repair is
needed, send the product to your country service dealer.
Shipping charges to the Dealer must be prepaid by the owner. Insure the shipment. Burris
can’t be responsible for your product until we receive it. There are no other warranties, either
expressed or implied, contained herein except for such that may arise under country specific
laws. In that event, said implied warranties are limited in scope and duration to the terms
of this warranty. Burris is not liable for incidental or consequential damages including but not
limited to lost profits or other economic or commercial losses. This warranty gives the owner
certain legal rights, and possibly other rights which may vary from country to country. This
is considered a limited warranty.
Burris, Eliminator, Ballistic Plex, LaserScope and Ballistic LaserScope are trademarks of Burris
Company Inc. Patents Pending. All specifications are subject to change without notice.
© Copyright 2010 Burris Company. U.S. Patent Number 7,703,679.
4
Ballistic LaserScope™ - Manuale dell'utente
Il Ballistic LaserScope è il cannocchiale da puntamento per
fucili da caccia più innovativo ed efficace al mondo. Burris
ha unito le sue straordinarie ottiche con un telemetro laser
e un programma per la compensazione della traiettoria che
lavora a seconda della munizione scelta per la caccia.
Il Ballistic LaserScope ha una resa assolutamente straordinaria.
Nessun altro cannocchiale di puntamento è in grado di
combinare questo livello di qualità, tecnologia, precisione,
ripetibilità ed efficacia. Grazie a esso potrai aumentare
enormemente la distanza di un colpo di successo.
In rapida sequenza, il Ballistic LaserScope stima la distanza
del trofeo, calcola la caduta del proiettile a quella distanza
e visualizza il punto esatto di caduta come singolo punto
rosso sul reticolo. In tal modo vengono eliminate la maggior
parte delle variabili e ipotesi che spesso fanno sì che il
cacciatore torni a casa a mani vuote.
Congratulazioni per l'acquisto e grazie per aver scelto
Ballistic LaserScope di Burris.
Montaggio e mira
Montaggio del Ballistic LaserScope™
1. Utilizzare una slitta tipo Weaver o Picatinny. Se si è selezionata una base
di aggancio in due pezzi per un fucile bolt action lungo, quella anteriore
dovrebbe essere una base reversibile
(estensione) e dovrà essere montata con
l'estensione diretta verso il retro. Si
consiglia di utilizzare basi Burris XTB (Xtreme
Tactical Bases) dato che queste sono progettate
anche secondo le specifiche di montaggio speciali del
Ballistic LaserScope.
2. Leggere le istruzioni del produttore relative all'installazione degli
attacchi prima di iniziare.
3. Pulire l'area di montaggio del fucile con un agente chimico in grado di
rimuovere grasso e olio. Prestare particolare attenzione ai fori delle viti.
Pulire gli attacchi utilizzando lo stesso agente chimico. Fare in modo
che l'agente chimico non venga a contatto con il calcio o con le ottiche
del cannocchiale.
4. Dopo aver installato la base o le basi, posizionare il cannocchiale in
modo da garantirsi la corretta distanza focale. Per fare ciò, imbracciare
il fucile come sul campo. Posizionare il cannocchiale il più avanti
possible, mantenendo il controllo dell’intero campo visivo.
Binario del LaserScope (posteriore)
Slitta
posteriore
5. Individuare le due scanalature della base che si utilizzeranno per
attaccare il cannocchiale e, con i morsetti dell'attacco completamente
aperti, posizionare i bulloni di montaggio in queste fessure sulla base.
Allineare i denti del Ballistic LaserScope e collocarvi i due bulloni di
montaggio, scuotendo il cannocchiale da lato a lato finché non è
agganciato alla base e i morsetti di aggancio non sono ben serrati dal
margine della base al margine del binario nella parte inferiore del
cannocchiale. Fissare per il momento solo con le dita.
6. A completamento del passaggio 5, posizionare i dadi esagonali sul lato
del fucile opposto al lato su cui si monterà la trasmittente del
telecomando. Non devono esserci ostacoli tra la trasmittente e il
ricevitore del telecomando.
Bullone di montaggio
Morsetto di
attacco
Dado
esagonale
7. Con i dati esagonali leggermente svitati, spingere il cannocchiale in
avanti e quindi serrare saldamente i dati esagonali a 5,6 - 8 N-m.
Messa a fuoco dell'oculare
1. Puntare il Ballistic LaserScope in una direzione sicura verso il cielo o un
muro di colore chiaro. Dare un'occhiata nel cannocchiale e notare se il
reticolo è messo a fuoco in modo nitido. La maggior parte degli utenti
riscontrerà che non sono necessarie regolazioni. Se il reticolo non è
nitidamente a fuoco, ruotare la ghiera di messa a fuoco dell'oculare
finché il reticolo non appare a fuoco in modo nitido. Controllare la
messa a fuoco dando un'occhiata veloce attraverso il cannocchiale e,
se necessario, facendo opportune regolazioni di affinamento.
Prendere la mira
Sparare sempre in un'area autorizzata e sicura. Utilizzare adeguate
protezioni per occhi e orecchie e seguire tutte le regole per sparare in
completa sicurezza. Selezionare le munizioni da utilizzare sul campo e
impiegarle per mirare con l'arma da fuoco.
1. Calibrare il cannocchiale OPPURE posizionare un obiettivo di circa 60
cm quadrati a una distanza di 25 metri. Sparare un colpo al bersaglio.
Fare le necessarie regolazioni alle manopole della deriva e dell'alzo. Si
ricordi che un cannocchiale con un valore di regolazione di scatto di
0,7 cm a 100 metri richiederà quattro scatti per muovere la stessa
distanza di 0,7 cm a 25 metri. I cannocchiali Burris hanno il valore di
scatto indicato su un'etichetta sotto quella dei coperchietti di
regolazione.
2. Fare le regolazioni sul cannocchiale girando le viti di regolazione nel
numero di scatti necessario. NOTA: il reticolo è centrato in fabbrica.
Ciò consente di regolare il reticolo in modo uguale in tutte le direzioni
dalla posizione centrale. Si consiglia di effettuare tre gruppi di sparo
per determinare il punto d'impatto effettivo.
3. Dopo aver sparato il primo gruppo, regolare nuovamente il cannocchiale.
Questa regolazione dovrebbe portare il centro approssimato del gruppo
a coincidere con il bersaglio. Se necessario, sparare altri gruppi.
4. Posizionare l'obiettivo da mirare a una distanza di 100 o di 200 metri.
Fare le regolazioni necessarie in modo che il gruppo coincida con il
bersaglio.
5. Allineare il quadrante in modo da leggere “0” senza permettere alla
manopola argentata di girare.
6. Effettuare le regolazioni, ricollocare i coperchietti di regolazione, che
proteggono il cannocchiale dalla polvere e dall'umidità.
5
FUNZIONAMENTO DEL BALLISTIC LASERSCOPE™
Regolazione dell'alzo
Ghiera di messa a
fuoco dell'oculare
Regolazione dell'alzo
Regolazione della deriva
Coperchio della batteria
Regolazione della deriva
Interruttore principale
Ricevitore del telecomando
Pulsante di configurazione
(dettagli di seguito)
1. Installazione e sostituzione della batteria
Se il cannocchiale non riesce a ottenere una
lettura precisa della distanza visualizza tre
lineette lampeggianti.
Scaricare l'arma. Utilizzare una moneta o un cacciavite per svitare la vite
del coperchio della batteria, dietro al cannocchiale, appena davanti a
ll'oculare. Installare una batteria CR2 al litio. Reinstallare il coperchio della
batteria. NOTA: su un adesivo sotto la batteria si trovano le istruzioni
di base per l'installazione.
Coperchio della batteria
Trasmittente del telecomando:
Il LaserScope viene fornito con un telecomando per rendere più comodo
il puntamento. Posizionare la trasmittente del telecomando sull’astina della
carabina, come mostrato nella figura sotto. Essa può essere collocata
anche sulla campana dell'obiettivo del LaserScope. Il LaserScope può
essere attivabile con telecomando per un'ora e mezza piena ogni volta che
viene premuto l'interruttore principale.
Batteria CR2
La trasmittente del telecomando
deve essere posizionata in questa
zona (su uno dei lati del LaserScope) a non più di 50 cm dal
ricevitore del telecomando e tra di
essi non vi devono essere ostacoli
o ostruzioni di alcun genere.
2. Durata della batteria del LaserScope:
La durata nominale della batteria è generalmente di 5000 cicli. Questo
dato varia in base alla qualità della batteria e alle temperature alle quali si
utilizza l'unità. Le batterie perdono una buona parte del proprio potenziale
alle temperature più basse.
Batteria: Piena
Batteria: Metà carica
Munirsi di una batteria
sostitutiva
Ricevitore del telecomando
Batteria della trasmittente del telecomando:
Batteria CR2025 comune. La durata nominale
della batteria è generalmente di 5000 cicli. Per
sostituirla, aprire il coperchietto del telecomando
con un'unghia o un piccolo cacciavite. Rimuovere
la batteria sollevandola ed estraendola dal
supporto. Per installare la batteria nuova seguire la
procedura al contrario e ricollocare il coperchio sul
telecomando.
Batteria: Scarica Sostituire la batteria
3. Avvio dell'elettronica
Premere l'interruttore principale sul lato
sinistro del cannocchiale, appena dietro
il logo di Burris. Guardare attraverso il
cannocchiale. Si dovrebbero scorgere
due informazioni: l'indicazione accesa
delle iarde (Y) o dei metri (M) e l'indicatore di stato della batteria. Gli indicatori
restano accesi per 8 secondi.
5. Impostazione del Ballistic per cartucce specifiche
Prima decisione - In quali unità di misura della distanza si desidera lavorare
(iarde o metri)? I/M
Seconda decisione - Si desidera porre lo zero a 100 o a 200 iarde/metri?
Informazioni necessarie - Pollici drop-in della cartuccia a 500 iarde se si
pone lo zero a 100 iarde ("Drop Number").
4. Elementi di base dell'elettronica
Ci sono diversi modi per determinare il Drop Number:
1. Per cariche di fabbrica, la tabella balistica fornita con il cannocchiale
mostra il Drop Number relativamente alla maggior parte delle munizioni
correntemente disponibili sul mercato.
2. I siti Web dei produttori di munizioni di fabbrica forniscono queste
informazioni.
3. Il Drop Number può essere indicato sulla scatola delle munizioni.
4. Programmi software balistici
5. Porre lo zero a 100 iarde e sparare a un obiettivo distante 500 iarde.
6. Sito Web di Burris all'indirizzo www.burrisoptics.com
Avviare l'elettronica e puntare l'obiettivo.
Premere di nuovo il pulsante sul lato
sinistro oppure l'interruttore di attivazione del telecomando. Il cannocchiale
visualizza in alto la distanza lineare tra
l'arma e l'obiettivo e si illumina un punto
sulla croce di puntamento.
La distanza visualizzata è la distanza
orizzontale dall'obiettivo. Il Ballistic
LaserScope ha un sensore angolare
incorporato e riesce a convertire la
zdistanza effettiva in distanza orizzontale.
La distanza orizzontale è ciò che generalmente influenza la traiettoria del
proiettile. Pertanto non importa quale sia l'angolo di salita o di discesa,
perché il Ballistic LaserScope calcola automaticamente la distanza da
utilizzare per effettuare il corretto puntamento.
Indipendentemente dall'unità scelta per lavorare (iarde o metri) e dalla
distanza che si decide di porre a zero, la tabella balistica è selezionata
in base a un drop a 500 iarde quando lo zero è a 100 iarde. La tabella
balistica a 3 cifre inizia con un “1” se si intende puntare a 100 iarde/metri
o con un “2” se si intende puntare a 200 iarde/metri. Questo numero è
seguito dal tuo Drop Number che varierà tra 25 e 63. La tabella balistica
completa sarà un numero compreso tra 125 e 163 o tra 225 e 263.
6
Ci sono quattro frecce sul pulsante di
configurazione sul lato destro del cannocchiale. Queste sono utilizzate solo per la
programmazione, dato che nell'uso normale
del cannocchiale non svolgono alcuna
funzione specifica.
Informazioni di base sul Ballistic LaserScope
1. La funzione di compensazione della traiettoria è calibrata solo per l'uso a un
ingrandimento 12x.
2. Per prendere la mira è necessario utilizzare il centro della croce di puntamento.
3. Un punto di mira illuminato resterà acceso per circa 80 secondi. Se si fallisce uno
sparo prima che il punto di spenga, sarà necessario eseguire nuovamente la
mira utilizzando il centro della croce di puntamento.
4. Ci sono diverse possibili cause che provocano l'impossibilità del LaserScope di
determinare la distanza dell'obiettivo, tra cui: ostacoli nelle vicinanze tra il
cannocchiale e l'obiettivo, come ad esempio erba, ramoscelli o foglie; pioggia,
neve, nebbia o altri tipi di pulviscolo nell'aria; sporcizia sulle ottiche
dell'obiettivo; qualità scarsa da parte del bersaglio a riflettere il laser, associata
a una presa non salda e a lunghe distanze; batteria scarica.
5. Se si è programmato il cannocchiale per una cartuccia particolare, e la distanza
dell'obiettivo non può essere determinata, il cannocchiale visualizza tre linee
orizzontali nell'area delle iarde/metri, insieme a cinque punti illuminati che servono
da plex balistico "personalizzato" calibrato precisamente sulla propria cartuccia.
6. Se il LaserScope sembrasse non funzionare correttamente, è molto probabile
che occorra sostituire la batteria con una nuova. Dapprima fare una prova
scollegando e ricollegando la batteria esistente e verificare se funziona. Se il
problema non viene risolto, installare una batteria nuova.
Entrare nella modalità di configurazione
1. Accendere il cannocchiale.
2.Tenere premuta la freccia Avanti sul pulsante di
configurazione e contemporaneamente tenere
premuto il pulsante dell'interruttore principale per
circa 6 secondi. Guardare attraverso il cannocchiale. Si noterà una variazione nel display.
Rilasciare i due pulsanti quando la visualizzazione
cambia. Si così entrati nella “modalità di configurazione”. Come prima cosa appare un numero
per due secondi. Si tratta del numero corrispondente alla versione del firmware. La visualizzazione successiva mostra le iarde (Y) o i metri (M)
correntemente selezionati e la tabella balistica. Sui
nuovi cannocchiali si leggerà “Y 145”, la tabella
fornita di fabbrica. Se è stata selezionata
precedentemente una tabella balistica, viene
visualizzata l'indicazione di tale tabella.
3. Con la tabella correntemente selezionata si hanno
30 secondi per premere la freccia Avanti ed
entrare nella “modalità tabella balistica”. La “T”
(che sta per selezione tabella) si accende fissa,
l'unità (Y o M) lampeggia. Premere la freccia Su
per selezionare Y (iarde) o la freccia Giù per
selezionare M (metri). Quando l'unità di misura
desiderata lampeggia, premere e rilasciare il
pulsante della freccia Avanti per memorizzare la
tua scelta.
4. TLa “T” è ancora accesa fissa, la selezione Y o
M è accesa fissa, la prima cifra numerica
lampeggia e le altre due sono spente.
Selezionare la distanza zero. 1 = 100
iarde/metri, 2 = 200 iarde/metri. Premere la
freccia Su per aumentare il numero o la freccia
Giù per diminuirlo. Quando la distanza di
puntamento desiderata è visualizzata (lampeggiante), premere e rilasciare la freccia Avanti.
Versione del firmware
Note tecniche
Impostazione predefinita
Ultima impostazione
M
Selezionare o cambiare metri
Selezionare o cambiare iarde
Imposta distanza di zero (1 o 2)
5. Gli ultimi due numeri (relativi a Drop Number o
tabella balistica) d ovrebbero lampeggiare. Completare la tabella balistica
Premere la freccia Up per aumentare il numero con il proprio Drop Number
o la freccia Down per diminuirlo. Quando il Drop
Number desiderato è visualizzato (lampeggiante), premere e rilasciare la freccia
Back per uscire dalla modalità di configurazione.
6. A questo punto sei pronto per sparare. Se necessario, porre il nuovo zero
dell'arma alla distanza di puntamento selezionata. Quindi verificare il punto
d'impatto sparando realmente a 500 iarde/metri. In base alle prestazioni esatte
delle munizioni, alla lunghezza della canna dell'arma, all’altitudine ed eventuali
temperature estreme, potrebbe essere necessario aumentare o diminuire la
tabella balistica di un paio di cifre per ottenere le prestazioni ottimali.
La programmazione viene memorizzata nel cannocchiale indipendentemente dalla
condizione della batteria e l'archiviazione continuerà anche quando la batteria sarà
completamente scarica o assente.
Comprensione della visualizzazione della tabella balistica:
La tabella balistica M234 significa: (M)etri, zero a 200 metri, cartuccia con 34
pollici di drop a 500 iarde con zero a 100 iarde.
Affinamento e altitudine
I produttori di munizioni generalmente indicano i Drop Number dei propri proiettili
al livello del mare. Quasi sempre, i proiettili dei cacciatori di big game hanno un
drop a 500 iarde di circa ½ pollice meno per ogni ulteriori 1000 piedi di altitudine.
Pertanto, se si intende cacciare a un'altitudine di 6.000 piedi e la scatola delle
munizioni dice che si hanno 40 pollici di drop a 500 iarde con zero a 100 iarde,
potresti voler selezionare il numero balistico 37 invece di 40. Sul nostro sito Web
all'indirizzo www.burrisoptics.com si possono trovare ulteriori regolazioni ad
altitudini specifiche per ogni cartuccia. Anche altri programmi software balistici
possono fornire informazioni ancora più precise.
In base a prestazioni esatte delle munizioni, lunghezza della canna dell'arma,
altitudine ed eventuali temperature estreme, potrebbe essere necessario aumentare
o diminuire la tabella balistica di un paio di cifre per ottenere le prestazioni ottimali.
I programmi software balistici sono un grande vantaggio che consente di ottenere
risultati molto buoni, ma niente è meglio di cinque gruppi di spari con le munizioni
effettive a 500 iarde per fornire all'utente le informazioni più precise al fine di
programmare perfettamente il Ballistic LaserScope.
Distanza di sparo estrema (oltre le 500 iarde)
I fattori che influenzano un proiettile in volo a una distanza elevata sono molti e le
relazioni tra di essi sono complesse.
Il coefficiente balistico BC (Ballistic Coefficient) del proiettile è un fattore che
descrive con quanta velocità il proiettile rallenta. L'ACTUAL BC (effettivo) di un
proiettile e il PUBLISHED BC (pubblicato) possono essere diversi e possono influire
sulla composizione della tabella balistica. Nello sviluppo di una programmazione
facile da utilizzare, Burris si è orientata maggiormente verso munizioni di classe
premium con proiettili premium. Per scopo di allenamento, da 100 a 500 iarde, il
modo in cui lavora il Ballistic LaserScope lascia spazio solo a errori molto piccoli
da un proiettile a un altro. I valori BC dei proiettili più diffusi possono essere
consultati sul nostro sito Web. Andando oltre le 500 iarde, tuttavia, ci possono
essere differenze significative nel punto d'impatto effettivo in base al BC del
proiettile utilizzato. Il grafico a pagina 4 elenca i numeri BC effettivi utilizzati per
ogni tabella balistica. Per ottenere il massimo beneficio dall’utilizzo del Ballistic LaserScope per sparare oltre le 500 iarde, un
ottimo consiglio consiste nell'utilizzare un proiettile con valori
che si avvicinano quanto più possibile a quelli rappresentati nel
grafico. Inoltre, quando il Ballistic LaserScope ottiene una
distanza di lettura superiore alla capacità di compensazione
di caduta del reticolo, le quattro cifre inferiori si accendono
a indicare che l'obiettivo è posizionato oltre la capacità del
reticolo.
Caratteristiche tecniche
Temperaturadi utilizzo:
Da +14° a +122° Fahrenheit
Da -10° a +50° Celsius
Distanza effettiva:
Cervo: Da 50 a 550 iarde
Obiettivo riflettente: Da 50 a
800 iarde
La tabella balistica Y157 significa: (Y) iarde, zero a 100 iarde, cartuccia con 57
pollici di drop a 500 iarde con zero a 100 iarde.
7
Temperatura di conservazione:
Da -13° a +158° Fahrenheit
Da -25° a +70° Celsius
Precisione di mira::
Meno di 100 iarde: +/-1 iarda
100 - 550 iarde: +/-2 iarde
Meno di 550 iarde: +/-3 iarde
Capacità del reticolo in base alla tabella balistica scelta
Tabella Vel. bocca Vel. bocca BC
balistica
m/s
f/s
utilizzato
63
62
61
60
59
58
57
56
55
54
53
52
51
50
49
48
47
46
45
44
43
42
41
40
39
38
37
36
35
34
33
32
31
30
29
28
27
26
25
808
813
819
825
831
837
843
849
856
862
869
876
883
890
898
906
913
922
930
942
948
972
982
992
1002
1013
1064
1076
1088
1101
1114
1180
1195
1210
1227
1244
1250
-
2650
2668
2687
2706
2725
2745
2765
2786
2807
2829
2851
2874
2897
2921
2946
2971
2997
3024
3052
3090
3110
3190
3221
3254
3288
3322
3490
3530
3570
3612
3655
3870
3920
3970
4025
4080
4100
-
.447
.447
.447
.447
.447
.447
.447
.447
.447
.447
.447
.447
.447
.447
.447
.447
.447
.447
.447
.447
.447
.407
.407
.407
.407
.407
.334
.334
.334
.334
.334
.276
.276
.276
.276
.276
.276
.276
.276
500
600
Distanza reticolo massima con zero a 100 iarde
700
800
Distanza reticolo massima con zero a 200 iarde
Elenco di controllo prima di restituire un cannocchiale
Conservazione:
Ogni anno vengono restituiti a Burris una quantità di cannocchiali che
risultano perfettamente funzionanti. Per evitareritardi e costi inutili,
suggeriamo di controllarei seguenti particolari:
Come con alcuni dispositivi elettronici, è consigliabile rimuovere la batteria quando si
conserva l'unità per un periodo di tempo prolungato. Durante la conservazione o il trasporto,
verificare che l'interruttore principale sul LaserScope e il pulsante della trasmittente del
telecomando non vengano premuti inavvertitamente, consumando energia della batteria
anche quando l'unità non è in uso.
Regolazione insufficiente della deriva
1. Fori di montaggio sull'attacco praticati fuori allineamento con il centro
dicalibro
2. Canna inserita nel ricevitore a formare un certo angolo
Regolazione insufficiente dell'alzo
1. Diametro del ricevitore fuori specifica
2. Canna inserita a formare un certo angolo
Raggruppamento o precisione
1. Erosione della canna o del collo della camera
2. Deformazione del calcio
3. Problema di livellamento del calcio
4. Attacco lento
5. Soluzione di pressione del grilletto pesante - Rivolgersi a un armaiolo
Uso, assistenza e cura del cannocchiale
Il cannocchiale Burris rispetterà il suo ciclo di vita se verrà trattato con ragionevole cura e
verrà manutenuto correttamente. La sola manutenzione richiesta è una pulizia occasionale
della parte esterna e delle ottiche esterne.
Tutti i gruppi in movimento sono lubrificati in modo permanente. Utilizzare i coprilenti per
proteggere il cannocchiale da polvere, sporcizia, filaccia e umidità. Il sistema di regolazione
è impermeabile anche senza copritorretta in posizione, ma è consigliabile tenere applicati
tali coperchi per evitare l'ingresso di polvere e sporcizia nel sistema meccanico. Prima di
pulire le ottiche, strofinarle con un panno per fotografia o pulirli utilizzando aria compressa.
Questa operazione rimuove le particelle più grandi che possono graffiare la superficie se
questa viene strofinata. Non provare a smontare il cannocchiale. Lo smontaggio del
cannocchiale da parte di soggetti esterni alla fabbrica annullerà la garanzia.
Garanzia Burris
Messa a fuoco o immagine non chiara
1. Oggetto troppo vicino
2. Oculare fuori fuoco
Quando si restituisce il cannocchiale essere certi di includere: :
1. Una copia della ricevuta di acquisto originale.
2 Il numero di serie del cannocchiale così da poter controllare lo stato della
riparazione quando si chiama l'assistenza.
3. Nome e indirizzo completi.
4. Una breve nota che descrive la natura del problema nel modo più
accurato possibile.
5. Spedire il cannocchiale con invio prepagato e assicurato. Burris non sarà
da ritenersi responsabile del cannocchiale finchè non lo avrà ricevuto.
Burris pagherà l’invio per restituzione all'utente.
6. Assicurare la spedizione contro la perdita.
Spedire il cannocchiale al rivenditore del proprio paese per l'assistenz
È possibile contattare il rivenditore presso il quale si è acquistato il
cannocchiale oppure trovare un rivenditore sul nostro sito Web (sezione
"Find a Dealer"). Il rivenditore di zona aiuterà l'utente a risolvere il problema
con soddisfazione.
Il Ballistic LaserScope ha una garanzia di 10 anni sulle ottiche e di 3 anni sull'elettronica. Se
le ottiche o i sistemi meccanici del LaserScope presentano difetti in materiali o manifattura,
Burris, secondo la sua valutazione, riparerà o sostituirà la parte senza costi aggiuntivi. Il
sistema di puntamento e le elettroniche sono garantite per 3 anni dalla data di acquisto. Se
occorre effettuare una riparazione, inviare il prodotto al rivenditore del proprio paese per
l'assistenza.
Le spese di spedizione al rivenditore devono essere pagate in anticipo dal proprietario.
Assicurare la spedizione. Burris non sarà ritenuta responsabile del prodotto finchè non lo
avrà ricevuto fisicamente. Non ci sono altre garanzie, esplicite o implicite, qui contenute a
eccezione di ciò che potrebbe essere correlato a specifiche leggi di un paese. In questo
caso, dette garanzie implicite sono limitate al cannocchiale e alla durata nei termini di questa
garanzia. Burris non è responsabile per danni incidentali o consequenziali incluse e senza
limitazione altre perdite di profitto economiche o commerciali. Questa garanzia fornisce al
proprietario determinati diritti legali, e possibilmente altri diritti che possono variare da paese
a paese. La presente è da considerarsi garanzia limitata.
Burris, Eliminator, Ballistic Plex, LaserScope e Ballistic LaserScope sono marchi di fabbrica di
Burris Company Inc. Brevetti in attesa di concessione. Tutte le specifiche tecniche sono soggette
a modifica senza preavviso.
© Copyright 2010 Burris Company. Brevetto U.S. numero 7.703.679
8
Ballistic LaserScope™ Bedienungsanleitung
häufig die Ursache dafür sind, dass Jäger mit leeren Händen nach
Hause kommen.
Das Ballistic LaserScope ist eine Klasse für sich. Kein anderes
Zielfernrohr verbindet ein solches Qualitätsniveau mit Technologie,
Zielgenauigkeit, Wiederholgenauigkeit und Effektivität. Dadurch
wird die Distanz maximiert, auf der ein waidgerechter Schuß
angetragen werden kann.
Das Ballistic LaserScope ist eines der innovativsten und effektivsten Jagd-Zielfernrohre der Welt. Burris hat hervorragende
optische Eigenschaften mit punktgenauem Laser-Rangefinding
und einer exakt auf Ihre Munition ausgerichtete PräzisionsFlugbahnkompensation kombiniert.
In einer schnellen Sequenz ermittelt das Ballistic LaserScope die
Entfernung zum Ziel, berechnet den Abfall des Projektils in dieser
Distanz und zeigt den genauen Zielpunkt als einzelnen, kleinen
roten Punkt im Absehen an. Es schließt Schätzungen aus, die
Herzlichen Glückwunsch und vielen Dank, dass Sie sich für das
Ballistic LaserScope von Burris entschieden haben.
Montieren und Einschießen
Montieren des Ballistic LaserScope™
Zur Montage des Ballistic LaserScopes bieten alle namhaften
Montagehersteller entsprechende Teile an. Lassen Sie Ihr Zielfernrohr
ausschließlich bei einem erfahrenen Büchsenmacher montieren.
1. Wählen Sie eine Weaver- oder Picatinny-Montageschiene. Wenn Sie für
ein langes Repetiergewehr eine zweiteilige
Schiene verwenden, muss die vordere
Schiene eine Wendeschiene (Verlängerung)
sein, die mit der Verlängerung nach hinten
gerichtet montiert werden muss. Es wird empfohlen,
Burris XTB-Schienen (Xtreme Tactical Base) zu verwenden,
da diese für die speziellen Montagebedingungen des Ballistic
LaserScope entwickelt wurden.
2. Lesen Sie sich vor der Montage die jeweilige Installationsanleitung für
die Schienen durch.
3. Reinigen Sie den Befestigungsbereich des Gewehrs mit einer
Chemikalie, mit der Fett und Öl entfernt werden können. Achten Sie
besonders auf die Schraublöcher. Reinigen Sie mit derselben
Chemikalie die Montageblöcke. Achten Sie darauf, dass die Reinigungschemikalie nicht auf den Schaft oder die Linsen des Zielfernrohrs
gelangt.
4. Nachdem Sie die Schiene(n) installiert haben, positionieren Sie das
Zielfernrohr in einem geeigneten Augenabstand. Schultern Sie das
Gewehr wie zum Schießen. Positionieren Sie das Zielfernrohr so weit
wie möglich nach vorn, um so das volle Sehfeld einsehen zu können.
LaserScope-Schiene (Rückseite)
Rückwärtige
Montageschiene
5. Das Zielfernrohr wird in den Schlitzen befestigt. Führen Sie die
Montagebolzen bei vollständig geöffneten Montageklemmen in diese
Schlitze des Montageblocks. Richten Sie nun die Schlitze des Ballistic
LaserScope aus, und platzieren Sie es über den zwei Montagebolzen
- wackeln Sie etwas mit dem Zielfernrohr hin und her, bis es mit dem
Montageblock bündig ist und die Montageklemmen an der Unterseite
des Zielfernrohrs eingreifen. Ziehen Sie sie nur mit den Fingern fest.
6. Nachdem Sie Schritt #5 abgeschlossen haben, positionieren Sie die
Sechskantmuttern an der Seite der Waffe, an der die Fernsteuerung
nicht befestigt wird. Die Fernsteuerung muss sich in direkter Sichtlinie
zum Fernsteuerungsempfänger befinden.
Montageklemme
7. Lösen Sie die Sechskantmuttern etwas, schieben Sie das Zielfernrohr
nach vorn, und ziehen Sie dann die Sechskantmuttern mit einem
Drehmoment von 5,6-8 Nm fest.
Fokussieren des Okulars
1. Richten Sie das Ballistic LaserScope in eine in eine sichere Richtung
gegen den Himmel oder eine helle Wand. Sehen Sie durch das Zielfernrohr, und prüfen Sie, ob das Absehen scharf ist. In den meisten Fällen
ist keine Änderung der Einstellung erforderlich. Wenn das Absehen
nicht scharf ist, drehen Sie den Okularring so weit, bis das Absehen
scharf ist. Prüfen Sie erneut die Schärfe, indem Sie mehrmals kurz
durch das Zielfernrohr blicken und dabei jeweils, wenn nötig, noch
Feineinstellungen vornehmen.
Einschießen
Schießen Sie nur in sicheren, autorisierten Bereichen. Verwenden Sie eine
Schießbrille und einen Gehörschutz, und befolgen Sie die allgemeinen
Sicherheitsvorschriften für dem Umgang mit Waffen. Schießen Sie die
Waffe mit der Muntion ein, die Sie gewöhnlich verwenden wollen.
1. Richten Sie die Waffe auf ein ca. 100 Meter entferntes Ziel ein. Schauen
Sie dabei mittig durch den Lauf Ihrer Waffe. Prüfen Sie nun die Stellung
des Absehens. Justieren Sie dann das Absehen auf das durch den Lauf
anvisierte Ziel mittels der Höhen- und Seitenelevation. Geben Sie einen
Schuß auf das anvisierte Ziel ab. Korrigieren Sie das Absehen ggfs.
mittels der Seiten- bzw. Höhenverstellung. Pro Klick der
Absehenverstellung verändert sich die Lage des Absehens um 7mm
auf 100 Meter. Bei Burris-Zielfernrohren ist der Klickwert auf einem
Etikett unter dem Elevationsdeckel vermerkt.
2. HINWEIS: Das Absehen wird werkseitig zentriert. Dadurch kann das
Absehen von der Nullposition aus gleichmäßig in alle Richtungen
korrigiert werden. Es sollten drei Schussgruppen abgefeuert werden,
um die tatsächliche Treffpunktlage zu bestimmen.
3. Nachdem Einschießen, schrauben Sie die Elevationsdeckel wieder auf.
Diese schützen die Elevationen vor Staub und Feuchtigkeit.
4. Platzieren Sie das Ziel in der gewünschten Sichtentfernung von
entweder 100 oder 200 m. Nehmen Sie weitere Einstellungen vor, so
dass die Schussgruppen im Zielscheibenzentrum liegen.
5. Drehen Sie den Drehknopf auf “0”, ohne dass sich dabei der
silberfarbene Knopf mitdreht.
Montagebolzen
Sechskantmutter
6. Nachdem Sie die Einstellungen vorgenommen haben, setzen Sie die
Einstellkappen wieder auf. Diese schützen das Zielfernrohr vor Staub und
Feuchtigkeit.
9
BEDIENUNG DES BALLISTIC LASERSCOPE™
Höhenverstellung
Höhenverstellung
Okularring
Seitenverstellung
Batteriefach
Seitenverstellung
Hauptschalter
Fernbedienungsempfänger
Einrichtungstaste
(siehe unten)
Einsetzen und Auswechseln der Batterie
Fernbedienungsempfänger
Wenn das Zielfernrohr keine genaue Reichweite
ermitteln kann, wird eine Linie aus drei
blinkenden Balken angezeigt.
Entladen Sie die Waffe. Lösen Sie die Schraube der Batteriefachkappe
mit einer Münze oder einem Schraubendreher hinten oben am Zielfernrohr
genau vor dem Okular. Setzen Sie eine Lithium-CR2-Batterie ein.
Befestigen Sie die Batteriefachkappe wieder. HINWEIS: Auf dem
Aufkleber an der Unterseite der Batterie finden Sie die wichtigsten
Installationsanweisungen für die Batterie.
Batteriefach
Fernbedienung:
Das LaserScope verfügt zusätzlich über eine Fernbedienung, um die
Entfernungsmessung zu erleichtern. Richten Sie die Fernbedienung auf
das vordere Ende des Gewehrs (siehe unten). Sie kann auch am Objektivrohr des LaserScope positioniert werden. Mit jedem Betätigen des
Hauptschalters kann das LaserScope 1 1/2 Stunden fernbedient werden.
CR2-Batterie
Die Fernbedienung muss sich in
einem Abstand von höchstens
50 cm und in direkter Sichtlinie
zum Empfänger befinden
LaserScope-Batterielebensdauer:
Die Batterielebensdauer wird nominal auf 5000 Zyklen festgelegt. Das ist
abhängig von der Qualität der Batterie und der Temperatur, bei der das
Gerät verwendet wird. Bei niedrigen Temperaturen verlieren Batterien viel
von ihrer Leistungsfähigkeit..
Batterie: voll
Batterie: halbvoll
Halten Sie immer eine
Ersatzbatterie bereit
Batterie der Fernbedienung:
Herkömmliche CR2025-Batterie. Die Batterielebensdauer ist nominal auf 5000 Zyklen festgelegt. Um die
Batterie zu wechseln, hebeln Sie die Rückwärtige
Abdeckung der Fernbedienung mit dem Fingernagel
oder einem Schraubendreher auf. Nehmen Sie die
Batterie heraus, indem Sie sie herausklappen und
aus der Halterung herausziehen. Führen Sie diese
Schritte in umgekehrter Reihenfolge durch, um die
neue Batterie einzusetzen. Setzen Sie die
Abdeckung wieder auf die Fernbedienung
Batterie: fast leer Batterie muss
ausgewechselt werden
3. Starten der Elektronik
Drücken Sie auf den Hauptschalter
links neben dem Zielfernrohr, der sich
genau hinter dem Burris-Logo befindet.
Schauen Sie durch das Zielfernrohr.
Dort sehen Sie: die Entfernungsanzeige
in Yards (Y) oder Metern (M) sowie die
Batteriestatusanzeige. Die Anzeigen
werden 8 Sekunden lang angezeigt.
5. Einrichten der Ballistik auf die von Ihnen verwendete Patrone
Erste Entscheidung - Mit welcher Maßeinheit möchten Sie arbeiten,
Yard oder Meter? Y/M
Zweite Entscheidung - Möchten Sie bei 100 oder 200 Yard/Meter nullen?
Erforderliche Informationen - Abfall der Patrone in Zoll bei 500 Yards,
wenn Sie die Null-Entfernung bei 100 Yards haben (Drop-Zahl).
4. Die wichtigsten Informationen
zur Elektronik
Die Drop-Zahl kann auf verschiedene Arten bestimmt werden:
1. Die mit dem Zielfernrohr mitgelieferte Ballistik-Tabelle zeigt die
Drop-Zahl fast aller gegenwärtig verfügbaren Fabrikmunitionsarten.
2. Mitunter geben Munitionshersteller diese Informationen auf ihrer Website
bekannt.
3. Die Drop-Zahl kann auf der Munitionsverpackung vermerkt sein.
4. Ballistik-Software
5. Nullen Sie bei 100 Yard, und schießen Sie auf ein 500-Yard-Ziel.
6. Burris-Website - www.burrisoptics.com
Starten Sie die Elektronik, und richten
Sie die Waffe auf ein Ziel. Drücken Sie
entweder erneut auf den Schalter auf
der linken Seite (oder auf den Fernbedienungsschalter). Das Zielfernrohr
zeigt oben die horizontale Reichweite
zum Ziel an sowie wie einen
beleuchteten Punkt auf dem Absehen.
Unabhängig von der verwendeten Maßeinheit (Yard oder Meter) und
unabhängig von der gewählten Null-Entfernung wird die BallistikEinstellung auf der Grundlage des Drop-Werts bei 500 Yards gewählt,
wenn bei 100 Yards genullt ist. Ihre 3-stellige Ballistik- Einstellung
beginnt mit einer “1”, wenn Sie die Sichtentfernung bei 100 Yards/Meter
wählen, oder mit einer “2”, wenn Sie die Sichtentfernung bei 200
Yards/Meter wählen. Diese Zahl ist gefolgt von der Drop-Zahl, die
zwischen 25 und 63 liegt. Die vollständige Ballistik-Einstellung ist also
eine Zahl zwischen 125 und 163 oder 225 und 263.
Der angezeigte Wert ist die horizontale
Reichweite zum Ziel. Das Ballistic
LaserScope verfügt über einen
integrierten Winkelsensor, der die tatsächliche Entfernung in die horizontale
Entfernung umwandelt. Die horizontale Entfernung ist das, was die Flugbahn
eines Projektils am meisten beeinflusst. Unabhängig also davon, ob es
sich um einen Auf- oder Abwärtswinkel handelt, berechnet das Ballistic
LaserScope automatisch die Entfernung zur Bestimmung des Zielpunkts.
10
An der Einrichtungstaste rechts am Zielfernrohr befinden sich vier Pfeile. Diese dienen nur
zum Programmieren. Bei der normalen Verwendung des Zielfernrohrs haben sie keine
Funktion.
Wichtige Informationen zum Ballistic LaserScope
1. Die Flugbahnkompensationsfunktion wird nur für die Verwendung der 12-fachen
Vergrößerung kalibriert.
2. Zum Zielen muss der Absehenmittelpunkt verwendet werden.
3. Ein Zielpunkt leuchtet ca. 80 Sekunden lang. Schießen Sie nicht, bevor der Punkt
erlischt, müssen Sie mit dem Absehenmittelpunkt wieder neu zielen und
messen.
4. Es gibt verschiedene Ursachen, die dazu führen können, dass das LaserScope
nicht die Entfernung zu einem Ziel ermitteln kann: Zwischen dem Zielfernrohr
und dem Ziel befinden sich Hindernisse wie Gras, Zweige oder Blätter; Regen,
Schnee, Nebel oder Schmutzpartikel in der Luft; das Objektiv ist verschmutzt;
schlechte Zielqualität, durch die der Laser nicht zum Zielfernrohr reflektiert wird,
gekoppelt mit einer unruhigen Hand und einer zu großen Entfernung; fast leere
Batterie.
5. Wenn Sie das Zielfernrohr für eine bestimmte Patronenart programmiert haben
und die Entfernung zum Ziel nicht ermittelt werden kann, zeigt das Zielfernrohr
drei horizontale Linien im Yard/Meter-Bereich und fünf Leuchtpunkte an, die als
‘benutzerdefiniertes’ Ballistic Plex dienen, welches genau auf Ihre Patronenart
abgestimmt ist.
6. Wenn Sie den Eindruck haben, dass das LaserScope nicht richtig funktioniert, ist
es sehr wahrscheinlich, dass eine neue Batterie eingesetzt werden muss.
Nehmen Sie also die Batterie heraus, und setzen Sie sie wieder ein. Prüfen Sie
jetzt erneut die Funktionen. Wurde das Problem dadurch nicht behoben, ersetzen Sie die Batterie.
Starten des Einrichtungsmodus
1. Schalten Sie das Zielfernrohr ein.
2. Drücken Sie sechs Sekunden lang auf die Pfeilnach-vorn-taste des Einrichtungsschalters und
gleichzeitig auf den Hauptschalter. Wenn Sie
nun durch das Zielfernrohr schauen, hat sich die
Anzeige geändert. Lassen Sie die zwei Tasten
los, wenn sich die Anzeige geändert hat. Sie
befinden sich nun im “Einrichtungsmodus”.
Zunächst erscheint zwei Sekunden lang eine
Zahl. Diese Zahl ist die Firmensoftwareversion.
Danach wird die aktuell gewählte Maßeinheit
(Yards oder Meter) und die Ballistik-Einstellung
angezeigt. Bei einem neuen Zielfernrohr
erscheint “Y 145”, die werkseitig voreingestellte
Ballistik- Einstellung. Wenn zuvor eine BallistikEinstellung ausgewählt wurde, wird die
Bezeichnung dieser Tabelle angezeigt.
3. Wird die aktuelle Einstellung angezeigt, können
Sie innerhalb von 30 Sekunden auf die Pfeilnach-vorn-Taste drücken, um den BallistikEinstellungs -Auswahlmodus aufzurufen. Das
“T” (für Tafelauswahl) leuchtet, die Maßeinheit
(Y oder M) blinkt. Wählen Sie mit der Pfeil-nachoben-Taste Y (Yards) oder mit der Pfeil-nachunten-Taste M (Meter). Wenn die gewünschte
Maßeinheit blinkt, wählen Sie den Wert durch
kurzes Drücken der Pfeil-nach-vorn-Taste aus.
4. Das “T” leuchtet weiterhin, auch die Maßeinheit
(Y oder M) leuchtet, die erste Ziffer blinkt, die
anderen zwei leuchten nicht. Wählen Sie Ihre
Null-Entfernung. 1 = 100 Yards/Meter oder 2 =
200 Yards/Meter. Drücken Sie auf die Pfeil-nachoben-Taste, um die Zahl zu erhöhen, und auf die
Pfeil-nach-unten-Taste, um sie zu verringern.
Wenn die gewünschte Sichtentfernung
angezeigt wird (blinkt), drücken Sie kurz auf die
Pfeil-nach-vorn-Taste.
Firmsoftwareversion
Standardeinstellung
Technische Hinweise
Letzte Einstellung
M
Auswählen oder Meter einstellen
Auswählen oder Yards einstellen
Nullabstand einstellen (1 oder 2)
5. Nun blinken die letzten zwei Ziffern (der Drop- Vervollständigen Sie die BallistikTabelle mit Ihrer Drop-Zahl
Zahl oder Ballistik-Tabelle). Drücken Sie auf die
Pfeil-nach-oben-Taste, um die Zahl zu erhöhen, und auf die Pfeil-nach-untenTaste, um sie zu verringern. Wenn die gewünschte Drop-Zahl angezeigt wird
(blinkt), drücken Sie kurz auf die Pfeil-nach-hinten-Taste, um den Einrichtungsmodus zu beenden.
6. Die Waffe ist nun schussbereit. Nullen Sie die Waffe erneut bei der von Ihnen
gewählten Einstellung. Prüfen Sie den Auftreffpunkt bei einem Schuss aus 500
Yard/Meter Entfernung. Abhängig von der exakten Munitionsleistung, der Länge
des Laufs, der Höhenlage und der Temperatur muss u. U. die BallistikEinstellung nach oben oder unten korrigiert werden.
Die Einstellungen werden unabhängig vom Ladestand der Batterie im Zielfernrohr,
auch bei leerer Batterie, gespeichert.
Erläuterung der Schusstabelle:
Ballistik-Einstellung M234 bedeutet: (M)eter, 200 Meter Null, eine Patrone mit einer
Drop-Zahl 34 auf 500 Yards, wenn die Entfernung auf 100 Yards eingestellt ist.
Ballistik-Tabelle Y157 bedeutet: (M)eter, 100 Yard Null, eine Patrone mit einer
Drop-Zahl 57 auf 500 Yards, wenn die Entfernung auf 100 Yards eingestellt ist.
11
Feineinstellung und Höhenlage
Die von den Munitionsherstellern angegebene Drop-Zahl ist in der Regel auf Meeresspiegelhöhe bezogen. Im allgemeinen kann man sagen, dass Großwildjagdgeschosse bei jeden zusätzlichen 1000 Fuß Höhe auf 500 Yards ca. ½ Zoll
geringer abfallen. Wenn Sie also in einer Höhenlage von 6.000 Fuß jagen gehen,
und auf der Munitionsverpackung einen Abfall von 40 Zoll bei 500 Yards und eine
Entfernungseinstellung von 100 Yards angegeben ist, sollten Sie eher die
Ballistiknummer 37 anstelle von 40 wählen. Unsere Website www.burrisoptics.com
enthält Diagramme, die für jede Patrone noch spezifischere Höheneinstellungen
zeigt. Andere Ballistikprogramme bieten noch weitere Informationen.
Abhängig von der exakten Munitionsleistung, der Länge des Laufs, der Höhenlage
und der Temperatur muss u. U. die Ballistik-Einstellung nach oben oder unten
korrigiert werden. Ballistische Softwareprogramme können sehr hilfreich sein, aber
nichts geht über das Abfeuern von fünf Schussgruppen mit der verwendeten
Munition bei 500 Yards, um möglichst präzise Informationen zur richtigen
Programmierung Ihres Ballistic LaserScope zu erhalten.
Extreme Range Shooting (mehr als 500 Yards)
Es gibt zahlreiche Faktoren, die die Flugbahn eines Geschosses beim Schießen
auf große Distanzen beeinflussen, und ihre Beziehungen sind sehr komplex.
Der ballistische Koeffizient (BC; Ballistic Coefficient) eines Geschosses ist ein
Faktor, der beschreibt, wie schnell das Geschoss durch den Luftwiderstand
verzögert wird. Der TATSÄCHLICHE BC eines Geschosses und der ANGEGEBENE
BC können voneinander abweichen und Ihre Ballistik-Einstellung beeinflussen. Bei
der Entwicklung eines einfach zu bedienendes Programms hat Burris einen großen
Schwerpunkt auf Premium-Munition mit Premium-Geschossen gelegt. Das Ballistic
LaserScope funktioniert bei 100 bis 500 Yards mit wenigen Geschossflugfehlern.
Die BC-Werte der meisten verfügbaren Geschosse finden Sie auf unserer Website.
Bei einer Distanz von über 500 Yards kann es aber je nach BC-Wert des verwendeten
Geschosses beträchtliche Unterschiede beim tatsächlichen Auftreffpunkt geben.
Die Grafik auf Seite 4 listet die tatsächlichen BC-Zahlen auf, die für
die einzelnen Ballistik-Tabellen verwendet werden. Um das
Ballistic LaserScope bei einer Distanz von mehr als 500 Yards in
vollem Umfang nutzen zu können, wird empfohlen, ein Geschoss
zu wählen, das den in der Grafik angegebenen Werten am meisten
entspricht. Auch wenn das Ballistic LaserScope eine Entfernung
ermittelt, bei der das Absehen keine Fallkorrektur mehr
berechnen kann, leuchten die vier Punkte unten. Diese zeigen
an, dass das Ziel so weit außerhalb der Reichweite des Absehens
liegt, dass eine Korrektur nicht errechnet werden kann.
Spezifikationen
Betriebstemperatur:
Aufbewahrungstemperatur:
+14° bis +122° Fahrenheit
-10° bis +50° Celsius
-13° bis +158° Fahrenheit
-25° bis +70° Celsius
Effektive Reichweite:
Zielgenauigkeit:
Rotwild: 50 bis 550 Yards
Reflexzielmarke: 50 bis 800 Yards
unter 100 Yard: +/-1 Yard
100 - 550 Yard: +/-2 Yards
mehr als 550 Yard: +/-3 Yard
Holdover-Fähigkeit des Ballistik-Fadenkreuzes basierend auf der gewählten Ballistik-Tabelle
Ballistik- Mündungsgeschwindigkeit Mündungsgeschwindigkeit Verwendeter
Tablelle
m/s
f/s
BC-Wert
63
62
61
60
59
58
57
56
55
54
53
52
51
50
49
48
47
46
45
44
43
42
41
40
39
38
37
36
35
34
33
32
31
30
29
28
27
26
25
808
813
819
825
831
837
843
849
856
862
869
876
883
890
898
906
913
922
930
942
948
972
982
992
1002
1013
1064
1076
1088
1101
1114
1180
1195
1210
1227
1244
1250
-
2650
2668
2687
2706
2725
2745
2765
2786
2807
2829
2851
2874
2897
2921
2946
2971
2997
3024
3052
3090
3110
3190
3221
3254
3288
3322
3490
3530
3570
3612
3655
3870
3920
3970
4025
4080
4100
-
.447
.447
.447
.447
.447
.447
.447
.447
.447
.447
.447
.447
.447
.447
.447
.447
.447
.447
.447
.447
.447
.407
.407
.407
.407
.407
.334
.334
.334
.334
.334
.276
.276
.276
.276
.276
.276
.276
.276
500
600
Maximale Fadenkreuzentfernung bei einer Sichtentfernung von 100 Yards
Vor einer Rücksendung zu prüfende Punkte
Jedes Jahr wird eine große Anzahl an Zielfernrohren wieder an Burris zurückgesendet, die keinerlei Grund zur Beanstandung geben. Um unnötige
Verzögerungen und Kosten zu vermeiden, sollten Sie vor dem Zurücksenden
des Zielfernrohrs die folgenden Punkte prüfen.
Unzureichende Seitenverstellung
1. 1.Das Zielfernrohr wurde unfachmännisch montiert.et
2. 2.Der Lauf ist verkantet in die Systemhülse eingedreht.
Unzureichende Höhenverstellung
1. Falsches Gehäusedurchmesser
2. 2.Der Lauf ist verkantet in die Systemhülse eingedreht.
Falsche Treffpunktlage
1. Rückstände in Lauf und Kammer
2. Verzogener Schaft
3. Schaflagerprobleme
4. Lose Montage
5. Schwere Bedienung des Auslösers Lösung - wenden Sie sich an einen
Waffenschmied
Bild ist unscharf
1. Objekt zu nah
2. Okular nicht fokussiert
Sollten Sie das Zielfernrohr zurücksenden, muss Folgendes beiliegen:
1. Eine Kopie des Kaufbelegs.
2. Notieren Sie sich die Seriennummer, die Sie bei Nachfragen zum
eingesendeten Zielfernrohr benötigen.
3. Ihren vollständigen Namen und Ihre vollständige Adresse.
4. Eine kurze, aber möglichst genaue Beschreibung des Problems .
5. Bezahlen Sie den Versand des Zielfernrohrs im Voraus, und versenden
Sie es versichert. Burris ist erst ab Eingang verantwortlich für das
Zielfernrohr. Burris trägt die Kosten des Rückversands an Sie.
6. Versichern Sie die Sendung vor Verlust.
Senden Sie das Zielfernrohr an den Vertriebshändler Ihres Landes
Wenden Sie sich an den Händler, bei dem Sie das Zielfernrohr erworben
haben, oder suchen Sie auf der Website unter ‘Vertriebsnetz’ nach einem
Vertriebshändler. Dieser wird sich Ihrem Problem nach besten Möglichkeiten
annehmen.
700
800
Maximale Fadenkreuzentfernung bei einer Sichtentfernung von 200 Yards
Aufbewahrung:
Wie bei allen elektronischen Geräten ist es sinnvoll, die Batterie herauszunehmen, wenn
das Zielfernrohr über eine längere Zeit nicht verwendet wird. Achten Sie beim Aufbewahren
und Transportieren darauf, dass nicht versehentlich der Hauptschalter des LaserScope und
die Taste der Fernsteuerung gedrückt wird, damit die Batterie nicht unnötig verbraucht wird.
Verwendung, Wartung und Pflege des Zielfernrohrs
Sie können das Burris-Zielfernrohr sehr lange nutzen, wenn es sachgemäß behandelt und
gepflegt wird. Das Zielfernrohr und die äußeren Objektive müssen nur gelegentlich gereinigt
werden.
Alle beweglichen Baugruppen sind dauergeschmiert. Verwenden Sie Objektivschutzkappen,
um das Zielfernrohr vor Schmutz, Staub, Fusseln und Feuchtigkeit zu schützen. Das
Einstellsystem ist auch ohne die Kappen wasserdicht. Die Kappen sollten dennoch fest
aufgesetzt werden, um das Elevations System vor Staub und Schmutz zu schützen. Bevor
Sie die Objektive reinigen, pinseln Sie sie mit einem Reinigungspinsel ab, oder pusten Sie
sie sauber, am besten mit Druckluft. Dadurch können größere Partikel entfernt werden, die
beim Abwischen Kratzer hinterlassen könnten. Nehmen Sie das Zielfernrohr niemals
auseinander. Ein Auseinandernehmen außerhalb unseres Werks führt zum Verlust der
Garantieansprüche.
Burris-Garantie
Das Ballistic LaserScope hat eine 10-jährige Garantie für die Optik und eine 3-jährige
Garantie für die Elektronik. Wenn die optischen oder mechanischen Systeme Ihres LaserScope Material- oder Herstellungsfehler aufweisen sollten, wird das Gerät nach Ermessen
von Burris repariert oder ausgetauscht. Für das Entfernungseinstellungssystem und die
Elektronik gilt eine 3-jährige Garantie ab Kaufdatum. Ist eine Reparatur erforderlich, senden
Sie das Produkt an den Vertriebshändler Ihres Landes.
Die Versandkosten zum Händler trägt der Eigentümer. Versichern Sie den Versand. Burris
ist erst ab Eingang verantwortlich für das Zielfernrohr. Es werden keine weiteren Garantien,
weder ausdrücklicher noch stillschweigender Art, übernommen. Ausgenommen sind
Garantien, die aufgrund länderspezifischer Gesetze gültig sind. In einem solchen Fall sind
besagte stillschweigende Garantien bezüglich Umfang und Dauer auf die Bedingungen
dieser Garantie beschränkt. Burris ist nicht haftbar für zufällige Schäden oder Folgeschäden,
einschließlich entgangene Gewinne und sonstige wirtschaftliche Verluste. Diese Garantie
gibt dem Eigentümer bestimmte Rechtsansprüche, u. U. auch andere Rechte, die von Land
zu Land unterschiedlich sind. Dieses stellt eine beschränkte Garantie dar.
Burris, Eliminator, Ballistic Plex, LaserScope and Ballistic LaserScope sind Marken der Burris
Company Inc. Patente angemeldet. Alle Spezifikationen können ohne Ankündigung geändert
werden. © Copyright 2010 Burris Company. US-Patentnummer 7.703.679.
12
Guide de l’utilisateur du Ballistic LaserScope™
Le Ballistic LaserScope est la lunette de visée de chasse la plus
innovante et efficace au monde. Burris a combiné des optiques
exceptionnelles avec une mesure de distance par pointage laser
et une compensation de précision de trajectoire correspondant
exactement à la munition que vous choisissez pour votre chasse.
Dans une séquence rapide, le Ballistic LaserScope détermine la
distance jusqu’à votre gibier, calcule la flèche de votre projectile à
cette distance, et affiche le point exact de visée en un seul point
rouge sur le réticule. Il élimine la plupart des variables et des
hypothèses qui font souvent rentrer les chasseurs bredouilles.
Le Ballistic LaserScope est dans une catégorie qui lui est propre.
Aucune autre lunette de visée ne combine ce niveau de qualité, de
technologie, de précision, de rapidité d’utilisation et d'efficacité.
Elle permettra d'accroître considérablement la distance à laquelle
vous pouvez faire un tir dans l’éthique de la chasse.
Félicitations et merci d'avoir choisi le Ballistic LaserScope de Burris.
Montage et réglage
Montage du Ballistic LaserScope™
1. Sélectionnez une embase de type Weaver ou Picatinny. Si une embase
à deux parties est sélectionnée pour une carabine à longue action,
la partie avant de l’embase doit être
réversible (extension), qui doit être
montée avec l'extension dirigée vers
l'arrière. Nous recommandons l'utilisation des
embases Burris XTB (Xtreme tactique Bases)
spécialement conçues pour le montage particulier du
Ballistic LaserScope.
7. Avec des écrous légèrement desserrés, appuyez sur la lunette vers
l'avant et puis serrer les écrous hexagonaux entre 5,6 et 8 Nm.
Réglage de la partie optique
1. Dirigez le Ballistic LaserScope dans une direction sans risque vers le
ciel ou un mur légèrement coloré. Regardez à travers la lunette et notez
si la mise au point du réticule est correcte. La plupart des utilisateurs
trouveront qu'aucun réglage n'est nécessaire. Si le réticule n'est pas
parfaitement au point, tournez la bague de mise au point oculaire
jusqu'à ce que le réticule soit parfaitement net. Vérifiez votre mise au
point en jetant des coups d’œil rapides à travers la lunette et faites des
réglages fins si nécessaire.
2. Lisez les recommandations du fabricant concernant l'installation des
supports avant de commencer.
3. Nettoyez la zone de montage de la carabine avec un produit qui enlève
la graisse et l'huile. Portez une attention particulière aux trous de vis. En
utilisant le même produit, nettoyez les supports. Ne pas laisser le
produit de nettoyage entrer en contact avec la crosse ou avec les
lentilles de la lunette.
Réglage de la visée
Effectuez tous les tirs dans un endroit sans risque et autorisé. Utilisez les
protections oculaires et auditives adéquates et suivez toutes les règles de
sécurité de tir. Sélectionnez les munitions que vous comptez utiliser sur le
terrain et utilisez-les pour régler la visée de l’arme.
4. Après l'installation de l’embase (ou des embases), positionnez la lunette
de sorte qu'elle offre le dégagement oculaire approprié. Pour ce faire,
épaulez la carabine comme vous le feriez sur le terrain. Placez la lunette
le plus en avant que possible tout en offrant un champ de vision complet.
1. Réglez la visée de votre lunette avec un collimateur, OU placez une cible
d’environ 20x30cm à 25 mètres. Tirez en visant le centre de la cible.
Faites les réglages nécessaires avec les boutons de réglage latéral et
vertical. Rappelez-vous, une lunette avec une valeur de réglage de clic
de 0,7 cm à 100 mètres nécessitera quatre clics pour faire une même
correction de 0,7 cm à 25 mètres. Les lunettes Burris ont la valeur du
clic indiquée sur une étiquette placée sous l’un des capuchons de
réglage.
Rail LaserScope (arrière)
Base arrière
de montage
2. Effectuez les réglages de la lunette en tournant la vis de réglage du
nombre de clics nécessaires. REMARQUE: Le réticule (croix) est
centré en usine. Cela permet de régler de façon égale le réticule dans
toutes les directions depuis la position centrale. Trois groupes de tir
sont proposés pour déterminer le point d'impact réel.
5. Notez les deux encoches de l’embase que vous allez utiliser pour fixer
la lunette, et avec les clips de fixation complètement ouverts, placez les
boulons de montage dans ces encoches sur l’embase. Maintenant
faites correspondre les encoches du Ballistic LaserScope et placez par
dessus les deux boulons de montage – en faisant bouger la lunette
d’un bord à l'autre jusqu'à ce que la lunette soit au ras de l’embase et
monter les clips de fixation de la lèvre de l’embase à la lèvre du rail sur
le bord inférieur de la lunette. Serrez seulement à la main.
3. Après avoir tiré le premier groupe, ajustez à nouveau la lunette. Ce
réglage devrait amener le centre approximatif du groupe à coïncider
avec le centre de la cible. Faites des groupes de tirs supplémentaires
autant qu’il est nécessaire.
6. Lorsque vous exécutez l'étape 5, placez les écrous hexagonaux sur le
côté de la carabine à l’opposé du côté où vous monterez le transmetteur.
La ligne de visée doit être dégagée entre l'émetteur et le récepteur de
la télécommande.
Boulon de fixation
4. Placez la cible à votre distance de visée désirée à 100 ou 200 mètres.
Faites les réglages nécessaires afin que votre groupe coïncide avec le
centre de la cible.
5. Alignez le cadran pour lire "0" sans laisser le bouton argenté tourner.
Clip de
fixation
6. Après avoir effectué les réglages, replacez les capuchons de réglage. Ils
protègent votre lunette de la poussière et de l'humidité.
Ecrou
hexagonal
13
UTILISATION DU BALLISTIC LASERSCOPE™
Réglage vertical
Réglage vertical
Bague de mise au point oculaire
Réglage horizontal
Couvercle des piles
Réglage horizontal
Interrupteur principal
Récepteur de télécommande
Bouton de réglage
(détail ci-dessous)
1. Installation ou remplacement de la pile
Si la lunette ne parvient pas à obtenir une
lecture précise de distance, elle affiche une
ligne de trois barres clignotantes.
Déchargez le fusil. Utilisez une pièce de monnaie ou un tournevis pour
dévisser la vis du couvercle de la pile sur le dessus, à l'arrière de la lunette,
juste en face de l'oculaire. Insérez une pile CR2 au Lithium. Réinstallez le
couvercle de la pile. REMARQUE : Une étiquette sur la face inférieure de
la pile contient des instructions d’installation de base.
Couvercle des piles
Émetteur distant :
Le LaserScope est livré avec un émetteur portable pour rendre le réglage
plus commode. Positionnez l'émetteur portable sur l'extrémité avant du
fusil, comme indiqué ci-dessous. Il peut aussi être placé sur l’objectif du
LaserScope. Le LaserScope est activé en appuyant sur l'interrupteur
principal et a une durée d’utilisation minimum de 1 heure1/2.
Pile CR2
L’émetteur portable doit être
situé dans cette zone (de chaque
côté du LaserScope) dans les 20
pouces du récepteur distant et
en ligne de vue directe du
récepteur de la télécommande
2. Durée de vie de la pile du LaserScope :
La durée de vie de la pile est normalement de 5000 cycles. Cela varie en
fonction de la qualité de la pile et de la température à laquelle l'appareil
est utilisé. Les piles perdent une bonne partie de leur potentiel de
puissance à basse température.
Pile: Chargée
Pile: Moitié
Emporter une de rechange
Récepteur de télécommande
Pile de l’émetteur distant :
Pile CR2025 courante. La durée de vie de la pile
est normalement de 5000 cycles. Pour remplacer
la pile, utilisez l’ongle ou un petit tournevis,
soulevez l'arrière de la télécommande. Pour être
retirée, la pile doit être inclinée et sortie en glissant
par le support. Suivez le processus inverse de
l'installation de la pile neuve et enclenchez le dos
sur la télécommande.
Pile: Faible –
Remplacer la pile
3. Démarrer l’électronique
Appuyez sur le bouton de l’interrupteur
principal sur le côté gauche de la
lunette, juste derrière le logo de Burris.
Regardez à travers la lunette. Deux
symboles devraient apparaître : Les
voyants Y pour des yards ou M pour
mètres s’allument accompagnés de
l'indicateur d’état de la pile. Les
voyants resteront allumés pendant 8
secondes.
5. Configurez le Ballistic pour vos propres munitions
Première décision - Quelles sont les unités que vous voulez utiliser, yards
ou en mètres ? Y/M
Seconde décision - Voulez-vous établir le zéro à 100 ou 200 yards/mètres?
Informations requises - Flèche en pouces de votre cartouche à 500 Yards
si vous établissez le zéro à 100 yards (Numéro de flèche). .
4. Électroniques de base
Il existe plusieurs façons de déterminer votre Numéro de flèche :
1. Pour les charges d'usine, le tableau balistique fourni avec votre lunette
affiche le numéro de flèche pour la plupart des usines de munitions
disponibles actuellement.
2. Les sites web des usines de munition fournissent ces informations.
3. Le numéro de flèche peut apparaître sur la boîte de munition.
4. Logiciel de balistique
5. Zéro à 100 yards et tirer sur une cible à 500 yards.
6. Site web de Burris -www.burrisoptics.com
Démarrez l’électronique et visez une
cible. Appuyez à nouveau sur le bouton
gauche ou sur le commutateur d’activation de la télécommande. La lunette
affichera la distance horizontale à votre
cible en haut et affichera également un
point lumineux sur la croix.
La distance affichée est la distance
horizontale à la cible. Le Ballistic
LaserScope est doté d'un capteur
d'angle et il convertit la distance réelle
en distance horizontale. La distance horizontale est en grande partie ce
qui affecte la trajectoire d'une balle, aussi peu importe que l’angle soit
vers le haut ou vers le bas, le Ballistic LaserScope calculera automatiquement la distance à utiliser pour la détermination du point de visée.
Quelle que soit l’unité choisie (yards ou mètres), et quelle que soit la
distance choisie pour le zéro, le tableau balistique est sélectionné en
fonction de la flèche à 500 mètres quand le zéro est défini à 100
mètres. Votre tableau balistique à 3 chiffres commencera par un "1” si
vous voulez faire une visée à 100 yards/mètres ou un "2” si vous voulez
faire une visée à 200 yards/mètres. Ce numéro est suivi de votre numéro
de flèche, qui varie entre 25 et 63. Le tableau balistique complet sera un
nombre entre 125 et 163 ou 225 et 263.
14
Le bouton de réglage comporte quatre flèches
sur le côté droit de la lunette. Ils sont utilisés
uniquement pour la programmation. Ils n'ont
pas de fonction pendant l'utilisation normale de
la lunette.
Points essentiels du Ballistic LaserScope
Entrez en mode Réglage
1. Allumez la lunette.
2. Tout d’abord, appuyez et maintenez la pression
sur la flèche Avant sur le bouton de réglage et
simultanément appuyez et maintenez la pression
sur le bouton de l’interrupteur principal pendant
environ six secondes. En regardant à travers la
lunette, vous verrez un changement dans l'affichage. Relâchez les boutons quand l’affichage
change. C'est ce qu'on appelle le "Mode de
réglage". Un nombre apparaît d’abord pendant
deux secondes. Ce nombre est la version du
microprogramme. L'écran affiche ensuite
l'élément actuellement sélectionné (Y)ards ou
(M)ètres et le tableau balistique. Sur les nouvelles
lunettes vous pourrez lire "Y145”, le tableau
expédié de l’usine. Si un tableau balistique a été
sélectionné précédemment, la désignation de ce
tableau est affichée.
Version du microprogramme
Paramètre par défaut
1. La compensation de trajectoire est calibrée pour être utilisée uniquement sur
grossissement de 12 fois.
2. Le centre en forme de croix doit être utilisé pour le réglage de la distance.
3. Un point lumineux de visée reste allumé pendant environ 80 secondes. Si vous
ne tirez pas avant que le point disparaisse, vous devrez re-régler la distance à
l'aide de la croix centrale.
4. Il peut y avoir plusieurs causes possibles qui aboutissent à l'incapacité du
LaserScope à déterminer la distance d’une cible, y compris : Obstacles
proches entre la lunette et la cible comme de l'herbe, des brindilles ou des
feuilles ; la pluie, la neige, du brouillard ou d'autres débris en suspension dans
l’air; Lentille d'objectif sale; mauvaise réflexion du laser vers la lunette due à la
nature de la cible, associés à un mauvais maintien de l’arme et à une distance
importante; pile faible.
5. Si vous avez programmé la lunette pour une cartouche en particulier, et que la
distance de la cible ne peut être déterminée, la lunette affichera trois lignes
horizontales dans la zone yards/mètres, et cinq points lumineux qui servent de
Plex balistique «personnalisé» qui est calibré avec précision pour correspondre
à votre cartouche.
6. Si le LaserScope semble toujours ne pas fonctionner correctement, il y a de
grandes chances qu'il faille changer la pile. Premièrement enlevez la pile et
remettez-la et vérifiez le fonctionnement. Si cela ne résout pas le problème,
mettez une pile neuve.
Notes techniques
Réglage précis et altitude
Les fabricants de munitions indiquent généralement leur numéro de flèche de la
balle au niveau de la mer. Très généralement, les balles pour la chasse au gros
gibier ont une flèche à 500 mètres d’environ ½ pouce (25,4mm) de moins pour
chaque tranche supplémentaire de 305 mètres d'altitude. Donc, si vous allez à la
chasse à 1830 mètres d'altitude et que votre boîte de munitions dit que vous
devriez avoir 40 pouces de flèche à 500 mètres avec un zéro à 100 mètres, alors
vous sélectionnerez le numéro de balistique 37 au lieu de 40. Notre site Web
www.burrisoptics.com contient des graphiques montrant des réglages d’altitude
plus spécifiques pour chaque cartouche. D'autres logiciels de balistique peuvent
également vous fournir des informations encore plus précises.
3. Avec le tableau sélectionné actuellement affiché,
Dernier paramètre
vous avez 30 secondes pour cliquer sur le bouton
de la flèche Avant pour entrer dans le mode
sélection du tableau balistique. Le "T" (pour
sélectionner le tableau) est allumé de façon fixe,
M
l'unité (Y ou M) clignote. Appuyez sur la flèche
vers le haut pour sélectionner Y (yards) ou la Sélectionner ou changer les mètres
flèche vers le bas pour sélectionner M (mètres).
Lorsque l'unité de mesure désirée clignote,
appuyez et relâchez la pression sur le bouton de
la flèche Avant pour sélectionner votre choix.
Selon les performances exactes des munitions, la longueur du canon de votre
Sélectionner ou changer les Yards
arme, de l'altitude et des températures extrêmes, vous pourriez avoir besoin
4. Le "T" est toujours allumé fixe, votre (Y ou M) est
d’augmenter ou de diminuer votre tableau balistique de quelques chiffres pour
allumé fixe, votre premier chiffre clignote, et les
affiner les performances. Les logiciels balistiques sont d'une grande utilité pour
deux autres sont éteints. Sélectionnez votre
vous rapprocher, mais rien ne vaut des groupes de tirs de cinq tirs avec des
distance Zéro. 1 = 100 Yards/Mètres, ou 2 = 200
munitions réelles à 500 mètres pour vous fournir les informations les plus précises
Yards/Mètres. Appuyez sur la flèche vers le haut Définir la distance Zéro (1 ou 2) possible afin de programmer parfaitement votre Ballistic LaserScope.
pour augmenter le nombre ou sur la flèche vers le
Tir à distance extrême (Au-delà de 500 yards)
bas pour le diminuer. Lorsque votre distance de
Les facteurs qui influent sur une balle en vol à une distance extrême sont
mise au point choisie est affichée (clignotante),
nombreux et leurs relations sont complexes.
appuyez sur le bouton de la flèche Avant.
Le CB (Coefficient balistique) de votre balle est un facteur qui explique la rapidité
5. Les deux derniers chiffres (pour votre numéro de Compléter le tableau balistique avec laquelle la balle ralentit. Le CB réel d'une balle et le CB PUBLIÉ peuvent être
flèche ou Tableau Balistique) doivent clignoter. avec votre numéro de flèche
différents et peuvent affecter votre tableau balistique. Dans l'élaboration de la
Appuyez sur la flèche vers le haut pour augmenter
programmation simple à utiliser, Burris s’est davantage penché sur les munitions
le nombre ou sur la flèche vers le bas pour le diminuer. Lorsque le numéro de
haut de gamme avec balles haut de gamme. À toutes fins pratiques, de 100 à 500
flèche que vous voulez est affiché (clignotant), appuyez sur le bouton de la flèche
mètres, la façon dont le Ballistic LaserScope fonctionne, il existe très peu d'erreur
Retour pour quitter le mode Régler.
de trajectoire de balle, d'une balle à l'autre. Les valeurs de CB de la plupart des
balles disponibles ne sont plus sur notre site. Cependant, au-delà de 500 yards, il
6. Vous êtes prêt à aller à la chasse. Réglez à nouveau le zéro de l'arme si
peut y avoir des différences importantes au point de l'impact
nécessaire à la distance de visée sélectionnée. Ensuite, vérifiez le point d'impact
réel en fonction du CB de la balle que vous utilisez. Le tableau
par des tirs réels à 500 yards/mètres. Selon les performances exactes des
en page 4 énumère les nombres CB actuellement utilisés pour
munitions, la longueur du canon de votre arme, de l'altitude et des températures
chaque tableau balistiques. Pour profiter pleinement et simplement
extrêmes, vous pourriez avoir besoin d’augmenter ou de diminuer votre tableau
du Ballistic LaserScope pour tirer au-delà de 500 mètres, il serait
balistique de quelques chiffres pour affiner les performances.
sage d'utiliser une balle qui corresponde le mieux aux valeurs
que nous représentons dans le diagramme. Aussi, lorsque le
Votre programmation est enregistrée dans la lunette, quelle que soit l'état de votre
Ballistic LaserScope obtient une distance de lecture qui est
pile et votre programmation sera conservée même en l’absence de pile.
au-delà de la capacité de compensation de flèche du réticule,
Understanding The Ballistic Table Display:
les quatre points inférieurs s'allumeront pour vous signifier
que la cible se trouve au-delà de la capacité du réticule.
Tableau balistique M234 signifie : (M)ètres, Zéro 200 Mètres , une cartouche avec
Spécifications
34 pouces de flèche à 500 yards lorsque le zéro est fixé à 100 yards.
Température de fonctionnement : Température de stockage :
Tableau balistique Y157 signifie : (Y)ards, Zéro 100 Yards, une cartouche avec 57
+14° à +122° Fahrenheit
-13° à +158° Fahrenheit
pouces de flèche à 500 yards lorsque le zéro est fixé à 100 yards.
-10° à +50° Celsius
-25° à +70° degrés Celsius
Distance effective :
Précision de distance :
Renne : 50 yards à 550 yards
Moins de 100 yards : +/-1 yard
Cible réfléchissante : 50 yards à
100 - 550 yards : +/-2 yards
Plus de 550 yards : +/-3 yards
15 800 yards
Capacité de retenue de réticule Ballistic basé sur le tableau balistique choisi
Tableau Vitesse initiale Vitesse initiale CB
balistique
m/s
p/s
utilisé
63
62
61
60
59
58
57
56
55
54
53
52
51
50
49
48
47
46
45
44
43
42
41
40
39
38
37
36
35
34
33
32
31
30
29
28
27
26
25
808
813
819
825
831
837
843
849
856
862
869
876
883
890
898
906
913
922
930
942
948
972
982
992
1002
1013
1064
1076
1088
1101
1114
1180
1195
1210
1227
1244
1250
-
2650
2668
2687
2706
2725
2745
2765
2786
2807
2829
2851
2874
2897
2921
2946
2971
2997
3024
3052
3090
3110
3190
3221
3254
3288
3322
3490
3530
3570
3612
3655
3870
3920
3970
4025
4080
4100
-
.447
.447
.447
.447
.447
.447
.447
.447
.447
.447
.447
.447
.447
.447
.447
.447
.447
.447
.447
.447
.447
.407
.407
.407
.407
.407
.334
.334
.334
.334
.334
.276
.276
.276
.276
.276
.276
.276
.276
500
600
Distance de réticule maximum avec zéro à 100 yards
700
800
Distance de réticule maximum avec zéro à 200 yards
Liste de vérification avant de renvoyer une lunette
Rangement :
Un nombre important de lunettes est renvoyé à Burris chaque année qui
s’avèrent fonctionner parfaitement. Pour éviter les retards et les dépenses
inutiles, nous vous encourageons à vérifier les points suivants.
Comme pour tout appareil électronique, il est toujours bon de retirer la pile avant de le
ranger pendant une longue période Pendant le stockage ou le transport, assurez-vous que
l’interrupteur principal sur le LaserScope et le bouton sur la télécommande ne soient pas
enfoncés par inadvertance vidant ainsi la pile lorsqu'elle n'est pas utilisée.
Réglage horizontal insuffisant
1. Trous de montage de l’embase percés hors de l'alignement avec le
centre du trou
2. Barillet fileté dans le récepteur en angle
Réglage de hauteur insuffisant
1. Diamètre du récepteur hors spécification
2. Barillet fileté en angle
Groupement ou exactitude
1. Erosion du canon ou de la gorge de la chambre
2. Déformation de la crosse
3. Problème de mise à conformité de la crosse
4. Desserrage du montage
5. Départ direct trop lourd - Consultez un armurier
Utilisation de la lunette, service, et entretien
Votre lunette Burris vous offrira toute une vie de service si elle reçoit les soins raisonnables
et le traitement qu'elle mérite. Le seul entretien nécessaire est le nettoyage occasionnel de
l'extérieur de la lunette et des lentilles extérieures.
Tous les ensembles mobiles sont lubrifiés de façon permanente. Utilisez les capuchons de
l’objectif pour protéger la lunette de la saleté, de la poussière, des peluches, et de
l'humidité. Le système de réglage est étanche même sans les bouchons de tourelle en
place, mais gardez ces capuchons bien ajustés pour garder le système mécanique à l’abri
de la saleté et la poussière. Avant de nettoyer les lentilles, essuyez-les avec un pinceau de
photographe ou soufflez pour les nettoyer, dans l’idéal avec une bouteille "d'air comprimé".
Cela supprime les grosses particules qui pourraient rayer la surface si elles sont essuyées
avec de la pression. Ne démontez jamais votre lunette. Tout démontage par quelqu'un
d'autre que notre usine annulera la garantie.
Garantie Burris
Mise au point ou image pas claire
1. Cible trop près
2. Oculaire pas net
Lors du renvoi de la lunette n'oubliez pas d'inclure.
1. Inclure une copie du reçu d'achat original.
2. Prenez note du numéro de série de votre lunette à utiliser lors de votre
appel afin de vérifier l’état de votre lunette.
3. Nom complet et adresse complète.
4. Une courte note décrivant la nature du problème le plus précisément possible.
5. Expédiez la lunette prépayée et assurée. Burris ne peut pas être responsable de votre lunette avant que nous ne la recevions physiquement.
Burris paie pour la réexpédition vers vous.
6. Assurez le colis contre les pertes.
Envoyez la lunette au service clientèle de votre pays
Vous pouvez contacter le revendeur auprès duquel vous avez acheté
l'article, ou « Trouver un revendeur » dans cette section du site Web. Le
distributeur pour votre région vous aidera à résoudre le problème.
Le Ballistic LaserScope a une garantie d'optique de 3 ans et électronique de 10 ans. Si votre
optique de LaserScope ou des systèmes mécaniques s’avèrent avoir des défauts matériels
ou de fabrication, Burris pourra, selon le cas, les réparer ou remplacer sans frais. Le système
de distance et de l'électronique sont garantis pendant 3 ans à compter de la date d'achat.
Si une réparation est nécessaire, renvoyer le produit au revendeur de votre pays.
Les frais de port au concessionnaire doivent être payés par le propriétaire. Assurer le
transport. Burris ne peut pas être responsable de votre produit avant de le recevoir. Il
n'existe aucune autre garantie, expresse ou implicite, contenues dans les présentes, sauf
pour ce qui pourrait survenir en vertu des lois spécifiques du pays. Dans ce cas, les dites
garanties implicites sont limitées dans leur portée et leur durée, aux termes de cette
garantie. Burris n'est pas responsable des dommages fortuits ou consécutifs, y compris
mais sans s'y limiter la perte de profits ou d'autres pertes économiques ou commerciales.
Cette garantie donne au propriétaire certains droits légaux, et peut-être d'autres droits qui
peuvent varier d'un pays à l'autre. Ceci est considéré comme étant une garantie limitée.
Burris, Eliminator, Ballistic Plex, LaserScope et Ballistic LaserScope sont des marques de
Burris Company Inc. Brevets en instance. Toutes les spécifications peuvent être modifiées sans
notice préalable. © Copyright 2010 Burris Company. Numéro de brevet U.S. 7,703,679
16
Guía del usuario de Ballistic LaserScope™
La Ballistic LaserScope es la mira telescópica para caza más
innovador y efectivo de todo el mundo. Burris ha combinado una
óptica sobresaliente con un localizador láser de alcance y
compensación de la trayectoria con precisión para la munición
exacta elegida para su caza.
En una secuencia rápida, la mira telescópica Ballistic LaserScope
mide la distancia a su trofeo, calcula la caída del proyectil a esa
distancia y muestra el punto de disparo exacto como un único
punto rojo en el punto de mira. Elimina la mayoría de variables y
suposiciones que a menudo provocan que los cazadores vuelvan
a casa con las manos vacías.
La mira telescópica Ballistic LaserScope es un instrumento único.
No hay otra mira telescópica que combine este nivel de calidad,
tecnología, precisión, repetitividad y efectividad. Aumentará
enormemente la distancia a la que puede hacer blanco.
Enhorabuena y gracias por elegir la mira telescópica Ballistic
LaserScope de Burris.
Montaje y observación
Montar la Ballistic LaserScope™
7. Con las tuercas ligeramente sueltas, presione la mira telescópica hacia
adelante y luego apriete con firmeza ambas tuercas a 5.6~8 N-m.
1. Elija una base de montaje estilo Weaver o estilo Picatinny. Si selecciona
una base de dos piezas para un rifle de perno manual largo, la base
delantera debe ser una base reversible
(de extensión) que deberá ser montada
con la extensión dirigida hacia atrás.
Recomendamos el uso de las bases de Burris
XTB (Bases Tácticas Extremas) pues también han
sido diseñadas con las consideraciones especiales del
montaje del Ballistic LaserScope.
Enfoque del ocular
1. Apunte con el Ballistic LaserScope hacia una ubicación segura hacia el
cielo o una pared bien iluminada. Observe por la mira telescópica si el
punto de mira está bien enfocado. La mayoría de usuarios notarán que
no es necesario realizar ajustes. Si el punto de mira no está bien
enfocado, gire el anillo de enfoque del ocular hasta que el punto de
mira aparezca enfocado. Vuelva a comprobar el enfoque mirando
rápidamente repetidas veces a través de la mira telescópica y realice
los ajustes necesarios.
2. Lea las instrucciones del fabricante para la instalación de los montajes
antes de comenzar.
Ajustar miras
3. Limpie el área de montaje del rifle con un producto químico que quite
la grasa y el aceite. Preste especial atención a los agujeros de los tornillos.
Utilizando el mismo producto, limpie las monturas. No deje que el
producto limpiador entre en contacto con el cuerpo o la lente de la mira
telescópica.
Realice todos los disparos en una zona segura y autorizada. Utilice la
protección apropiada para ojos y oídos y siga todas las normas de
seguridad al disparar. Seleccione la munición que va a utilizar en el terreno
y utilícela para ajustar las miras en el arma de fuego.
4. Tras instalar la(s) base(s), coloque la mira telescópica de manera que
ofrezca una distancia ocular correcta. Para hacerlo, coloque el rifle
sobre el hombro como lo haría sobre el terreno. Coloque la mira
telescópica lo más adelantada posible obteniendo a la vez todo el
campo de visión.
1. Ajuste la visión de la mira telescópica, o coloque un objetivo de unos
0,6 metros cuadrados a unos 25 metros. Realice un disparo al blanco.
Realice los ajustes necesarios con los controles de resistencia aerodinámica y elevación. Recuerde, un campo con un valor de ajuste de
clic de 0,7cm a 100 metros necesitará cuatro clics para mover la misma
distancia de 0,7cm a 25 metros. Las miras telescópicas Burris tienen
el valor de clic indicado en una etiqueta bajo una de las tapas de ajuste.
Guía de la LaserScope (trasera)
Base de
montaje posterior
2. Realice los ajustes en la mira telescópica girando los tornillos de ajuste
el número necesario de clics. NOTA: El punto de mira (cruz de referencia)
ya viene centrado de fábrica. Esto permite un ajuste del punto de mira
igual en todas las direcciones desde la posición central. Se aconsejan
tres grupos de disparos para determinar el punto real de impacto.
5. Tenga en cuenta las dos ranuras que utilizará para colocar la mira
telescópica y, con las abrazaderas de montaje totalmente abiertas,
coloque los pernos de montaje en esas ranuras sobre la base. Ahora
haga coincidir las ranuras de la mira telescópica Ballistic LaserScope
y colóquelo sobre los dos pernos de montaje - moviendo la mira
telescópica de lado a lado hasta que entre en la base y las abrazaderas
de montaje agarrando desde el reborde de la base hasta el reborde de
la guía en el lado inferior de la mira telescópica. Apriete sólo a mano.
3. Tras disparar el primer grupo, ajuste de nuevo la mira telescópica. Este
ajuste debería hacer que el centro aproximado del grupo coincida con
el blanco. Realice grupos de disparo adicionales si es necesario.
4. Coloque el objetivo a la distancia de visión deseada entre 100 o 200
metros. Realice los ajustes necesarios para que el grupo coincida con
el blanco.
6. Tras completar el paso #5, coloque las tuercas en el lateral del rifle
opuesto al lado donde montará el transmisor remoto. Debe quedar una
línea visible libre entre el transmisor y el receptor del mando a distancia.
Perno de montaje
5. Alinee el dial hasta leer “0” sin dejar que el control plateado gire.
6. Tras realizar los ajustes, vuelva a colocar las tapas de ajuste. Éstas
protegen su mira telescópica del polvo y la humedad.
Abrazadera
de montaje
Tuerca
17
USO DE LA BALLISTIC LASERSCOPE™
Ajuste de la elevación
Ajuste de la elevación
Anillo de enfoque del ocular
Ajuste de la resistencia aerodinámica
Tapa de la batería
Ajuste de la resistencia
aerodinámica
Interruptor principal
Receptor del mando a distancia
Botón configurar (detalles abajo)
Receptor del mando a distancia
1. Instalación o cambio de la batería
Si la mira telescópica no obtiene una lectura
de distancia precisa, mostrará una línea con
tres barras parpadeando.
Descargue el arma. Utilice una moneda o destornillador para aflojar el
tornillo de la tapa de la batería en la parte superior trasera de la mira
telescópica, justo enfrente del ocular. Instale una batería de litio CR2.
Vuelva a instalar la tapa de la batería. NOTA: La pegatina de la parte
inferior de la batería contiene instrucciones básicas de instalación.
Tapa de la batería
Transmisor remoto:
La LaserScope viene con un transmisor remoto para que la medición se
realice de forma más cómoda. Coloque el transmisor remoto en el extremo
anterior de un rifle como se muestra a continuación. También puede
colocarse en la Campana del objetivo de la LaserScope. La LaserScope
puede disparar de forma remota durante 1 hora y media cada vez que
presiona el interruptor principal.
Batería de litio CR2
El transmisor remoto debe
estar ubicado en esta área (a
ambos lados de la LaserScope)
dentro de 0,5m del receptor
remoto y en línea recta de
visión con el receptor del
mando a distancia
2. Duración de la batería de la LaserScope:
La duración de la batería está estimada en unos 5000 ciclos. Esto varía
dependiendo de la calidad de la batería y de las temperaturas a las que
se utiliza la unidad. Las baterías pierden gran cantidad de potencial de
corriente a temperaturas bajas.
Batería: Llena
Batería: Media
Lleve repuesto
Batería del transmisor remoto:
Batería normal CR2025. La duración de la batería
está estimada en unos 5000 ciclos. Para cambiar,
utilizando una uña o un destornillador pequeño,
quite la tapa posterior del mando. Para quitarla, la
batería debe estar inclinada, deslizándola fuera del
soporte. Realice el proceso inverso para la instalación de la batería nueva y ajuste la tapa posterior
en el mando.
Batería: Baja Cambie la batería
3. Iniciar la electrónica
Presione el botón interruptor principal
en el lateral izquierdo de la mira
telescópica, justo debajo del logotipo
de Burris. Mire por la mira telescópica.
Debería mostrar dos cosas: la indicación
de yardas (Y) o metros (M) iluminada
junto con el indicador del estado de la
batería. Los indicadores permanecen
encendidos durante 8 segundos.
5. Configurar la Ballistic para su cartucho específico
Primera decisión - ¿Qué unidades desea utilizar, Yardas o Metros? Y/M
Segunda decisión - ¿Desea poner a cero a 100 o 200 yardas / metros?
Información necesaria - Caída en pulgadas de su cartucho a 500 yardas
si su puesta a cero es a 100 yardas (número de caída).
4. Instrucciones básicas de la
electrónica
Hay varias formas de determinar su número de caída:
1. Para cargas de fábrica, la Tabla de balística que viene con la mira
telescópica mostrará el número de caída para la mayoría de munición
disponible de fábrica.
2. Los sitios web de munición de fábrica a veces ofrecen esta información.
3. El número de caída puede aparecer en la caja de la munición.
4. Programas de software de balística
5. Cero a 100 yardas y disparo con objetivo a 500 yardas.
6. Sitio web de Burris - www.burrisoptics.com
Inicie la electrónica y apunte al objetivo.
Presione el botón del lateral izquierdo
de nuevo o el interruptor de activación
remoto. La mira telescópica mostrará la
distancia horizontal hasta el objetivo en
la parte superior y también mostrará un
punto iluminado en la cruz de referencia.
No importa las unidades con las que elija trabajar (yardas o metros), y no
importa la distancia a la que desea poner a Cero, la Tabla de balística
se selecciona basándose en la caída a 500 yardas cuando se ha
puesto a cero a 100 yardas. Su tabla de balística de 3 dígitos comenzará
con un “1” si va a ajustar miras a 100 yardas/metros o un “2” si va a
ajustar miras a 200 yardas/metros. Este número es seguido por su
Número de caída, que variará entre 25 y 63. La Tabla de balística completa
tendrá un número entre 125 y 163 o 225 y 263.
La distancia mostrada es la distancia
horizontal hasta el objetivo. La Ballistic
LaserScope tiene un sensor de ángulo
incorporado y convierte la distancia
real en distancia horizontal. La distancia horizontal es lo que más afecta
a la trayectoria de una bala, de manera que no importa el ángulo de
subida o bajada, la Ballistic LaserScope calculará automáticamente la
distancia a utilizar para determinar el punto de mira.
18
Hay cuatro flechas en el botón de configuración en el lateral derecho de la mira
telescópica. Éstas se utilizan solamente para
programación. No tienen ninguna función
durante el uso normal de la mira telescópica.
Bases de la Ballistic LaserScope
1. La característica de compensación de la trayectoria es calibrada para uso
exclusivo a ampliación 12x.
2. La cruz de referencia central debe utilizarse para la medición de la distancia.
3. Un punto de objetivo permanecerá iluminado durante unos 80 segundos. Si no
dispara antes de que el punto desaparezca, deberá volver a recalcular la
distancia usando la cruz de referencia central.
4. Puede haber varias causas posibles que provoquen que la LaserScope no pueda
determinar la distancia a un objetivo, incluyendo: Obstáculos cercanos entre la
mira telescópica y el objetivo, como hierba, ramas u hojas; lluvia, nieve, niebla
u otros restos en el aire; suciedad en la lente del ocular; calidad pobre en el
objetivo para reflejar el láser de nuevo a la mira telescópica, junto con una
sujeción inestable y distancias largas; batería baja.
5. Si ha programado la mira telescópica para un cartucho en particular y la
distancia al objetivo no puede ser determinada, la mira telescópica mostrará tres
líneas horizontales en el área de yardas/metros y cinco puntos iluminados que
sirven como Plex balístico ‘personalizado’ calibrado de forma precisa para su
cartucho.
6. Si la LaserScope parece funcionar de forma incorrecta, lo más probable es que
necesite una batería nueva. Primero, simplemente desconecte la batería
existente y vuelva a instalarla y compruebe su función. Si no resuelve el
problema, instale una batería nueva.
Entrar en modo Configuración
1. Encienda la mira telescópica.
2. Primero mantenga presionada la flecha
adelante en el botón de configuración y al mismo
tiempo mantenga presionado el botón del interruptor principal durante unos seis segundos.
Mirando por la mira telescópica, verá un cambio
en la pantalla. Suelte los dos botones cuando la
pantalla cambie. A esto se le llama “Modo
configuración”. Primero aparecerá un número
durante dos segundos. Ese número es la versión
del firmware. A continuación la pantalla mostrará
las (Y)ardas o (M)etros seleccionados actualmente
y la Tabla de balística. En las nuevas miras
telescópicas, la lectura será “Y 145”, la tabla
incluida de fábrica. Si una Tabla de balística ha
sido seleccionada anteriormente, aparecerá la
designación de esa tabla.
3. Con la tabla seleccionada actualmente
mostrada, tendrá 30 segundos para hacer clic
en la flecha adelante para entrar en el modo de
selección de Tabla de balística. La “T” (para
selección de tabla) se ilumina fija, la Unidad (Y
o M) parpadea. Presione la flecha arriba para
seleccionar Y (yardas) o la flecha abajo para
seleccionar M (metros). Cuando la unidad de
medida deseada esté parpadeando, presione
y suelte la flecha adelante para seleccionar su
elección.
Versión del firmware
Última configuración
M
Seleccionar o cambiar metros
Seleccionar o cambiar yardas
4. La “T” continúa encendida fija, su (Y o M) está
encendida y fija, su primer dígito numérico está
parpadeando y los otros dos desaparecen.
Seleccione su Distancia cero. 1 = 100 Yardas/
Metros, o 2 = 200 Yardas/Metros. Presione la
flecha arriba para aumentar el número o la
flecha abajo para disminuirlo. Cuando la distancia
de ajuste de miras preferida aparezca
(parpadeando), presione y suelte la flecha adelante.
Notas técnicas
Configuración predeterminada
Ajuste fino y altitud
Los fabricantes de munición generalmente ajustan sus números de caída de bala
al nivel del mar. Generalmente, las balas de caza mayor caen a 500 yardas a ½
pulgada menos por cada 300 metros de elevación adicionales. Por lo tanto, si va
a cazar a 1800 metros de elevación y su caja de munición dice que debería tener 40
pulgadas de caída a 500 yardas con un cero a 100 yardas, entonces debería seleccionar
el número balístico 37 en lugar del 40. Nuestro sitio web www.burrisoptics.com
contiene cuadros con ajustes de altitud más específicos para cada cartucho. Otros
programas de software de balística también pueden ofrecerle información más precisa.
Dependiendo del comportamiento exacto de la munición, la longitud del cañón, la
elevación y las temperaturas extremas, podría necesitar aumentar o disminuir la
Tabla de balística un par de dígitos para mayor precisión. Los programas de
software de balística ayudan mucho a acercarle, pero nada supera la realización de
cinco grupos de disparos con munición real a 500 yardas para ofrecerle la
información más precisa posible para programar perfectamente su Ballistic
LaserScope.
Disparar a distancia extrema (más de 500 yardas)
Los factores que influyen en la trayectoria de una bala a una distancia extrema son
muchos y sus relaciones son complejas.
Ajustar la distancia cero (1 o 2)
Completar la tabla de balística
5. Los dos últimos números (para su número de
con su número de caída
caída o tabla de balística) deberían estar
parpadeando. Presione la flecha arriba para aumentar el número o la flecha abajo
para disminuirlo. Cuando el número de caída deseado aparezca (parpadeando),
presione y suelte el botón de la flecha atrás para salir del modo Configuración.
6. Ahora está listo para ir de caza. Vuelva a poner a cero el arma si es necesario a
la distancia del ajuste de miras seleccionado. Luego verifique el punto de
impacto al disparar a 500 yardas/metros. Dependiendo del comportamiento
exacto de la munición, la longitud del cañón, la elevación y las temperaturas
extremas, podría necesitar aumentar o disminuir la Tabla de balística un par de
dígitos para mayor precisión.
Su programa se guarda en la mira telescópica, sin importar el estado de la batería
y se mantendrá ahí incluso sin batería.
Comprender la pantalla de la Tabla de balística:
La Tabla de balística M234 significa: (M)etros, cero a 200 metros, un cartucho con
34 pulgadas de caída a 500 yardas al volver a poner a cero a 100 yardas
La Tabla de balística Y157 significa: (Y)ardas, cero a 100 yardas, un cartucho con
57 pulgadas de caída a 500 yardas al volver a poner a cero a 100 yardas.
19
El CB (Coeficiente Balístico) de su bala es un factor que describe lo rápido que la
bala baja la velocidad. El CB REAL de una bala y el CB PUBLICADO pueden ser
diferentes y pueden afectar a su Tabla de balística. Para desarrollar la programación
fácil de usar, Burris se basa más en la munición premium con balas premium. Para
todos los propósitos prácticos, de 100 a 500 yardas, el modo en que la Ballistic
LaserScope funciona tiene un error de vuelo de bala muy bajo comparando de una
bala a otra. Los valores de CB de la mayoría de balas disponibles están en nuestro
sitio web. Sin embargo, si sobrepasa las 500 yardas, puede haber grandes
diferencias en puntos reales de impacto dependiendo del CB de la bala que está
utilizando. El cuadro de la página 4 muestra los números reales del CB usados
para cada tabla de balística. Para aprovechar todas las
ventajas complejas y sencillas de la Ballistic LaserScope para
disparar a más de 500 yardas, sería aconsejable utilizar una
bala que coincida bastante con los valores que representamos
en el cuadro. Además, cuando la Ballistic LaserScope
obtiene una lectura de distancia superior a la capacidad
de la compensación de caída del punto de mira, los cuatro
puntos de la parte inferior se encenderán indicando que el
objetivo está fuera de la capacidad del punto de mira.
Especificaciones
Temperatura de operación:
Temperatura de almacenamiento:
+14° a +122° Fahrenheit
-10° a +50° Celsius
-13° a +158° Fahrenheit
-25° a +70° grados Celsius
Alcance efectivo:
Precisión de distancia:
Ciervo: 50 yardas a 550 yardas
Objetivo reflectante: 50 yardas
a 800 yardas
Menos de 100 yardas: +/-1 yarda
100 - 550 yardas: +/-2 yardas
Más de 550 yardas: +/-3 yardas
Capacidad de eliminación de punto de sujeción en el punto de mira basándose en la tabla de balística
Tabla de Vel. boca Vel. boca CB
balística
m/s
f/s
usado
63
62
61
60
59
58
57
56
55
54
53
52
51
50
49
48
47
46
45
44
43
42
41
40
39
38
37
36
35
34
33
32
31
30
29
28
27
26
25
808
813
819
825
831
837
843
849
856
862
869
876
883
890
898
906
913
922
930
942
948
972
982
992
1002
1013
1064
1076
1088
1101
1114
1180
1195
1210
1227
1244
1250
-
2650
2668
2687
2706
2725
2745
2765
2786
2807
2829
2851
2874
2897
2921
2946
2971
2997
3024
3052
3090
3110
3190
3221
3254
3288
3322
3490
3530
3570
3612
3655
3870
3920
3970
4025
4080
4100
-
.447
.447
.447
.447
.447
.447
.447
.447
.447
.447
.447
.447
.447
.447
.447
.447
.447
.447
.447
.447
.447
.407
.407
.407
.407
.407
.334
.334
.334
.334
.334
.276
.276
.276
.276
.276
.276
.276
.276
500
600
Distancia de punto de mira máxima con cero a 100 yardas
Lista de comprobaciones antes de devolver una mira
telescópica
Muchas miras telescópicas son devueltas a Burris cada año y sin embargo
funcionan perfectamente. Para evitar atrasos y gastos innecesarios,
aconsejamos que compruebe las condiciones siguientes.
Ajuste de resistencia aerodinámica insuficiente
1. Agujeros de montaje taladrados fuera de la alineación con el centro del
calibre
2. Cañón roscado en el receptor con un ángulo
IAjuste de elevación insuficiente
1. Diámetro del receptor fuera de las especificaciones
2. Cañón enroscado a un ángulo
Agrupación o precisión
1. Erosión en el cuello del cañón o la cámara
2 Remolque del cuerpo
3 Problema de posición en el cuerpo
4 Montura suelta
5. Solución de tiro del gatillo pesado - Consulte con un armero
Enfoque o imagen no clara
1. Objeto demasiado cercano
2. Ocular fuera de enfoque
Cuando devuelva la mira telescópica asegúrese de incluir:
1. Una copia del recibo de compra original.
2. Anote el número de serie de su mira telescópica para usarlo cuando llame
para comprobar el estado del servicio.
3. Complete el nombre y la dirección.
4. Una pequeña nota describiendo la naturaleza del problema de la forma
más clara posible.
5. Realice el envío de la mira telescópica con los gastos pagados y con
seguro. En Burris no nos haremos responsables de su mira telescópica
hasta que la recibamos físicamente. En Burris le pagaremos el envío
hacia usted.
6. Asegure el envío contra pérdida.
Enviar la mira telescópica al servicio técnico en su país
Puede contactar con la tienda donde compró el artículo o buscar un
distribuidor en la sección 'Find a Dealer' en el sitio web. El distribuidor de su
zona le ayudará a resolver el problema hasta que quede satisfecho.
700
800
Distancia de punto de mira máxima con cero a 200 yardas
Almacenamiento:
Como con cualquier dispositivo electrónico, siempre se recomienda quitar la batería cuando
lo guarde durante mucho tiempo. Durante el almacenamiento o transporte, asegúrese de
que el interruptor principal de la LaserScope y el botón del transmisor remoto no queden
presionados, gastando así por completo la batería sin ser utilizada.
Uso, servicio y cuidados de la mira telescópica
Su mira telescópica Burris le ofrece un funcionamiento de por vida si realiza los cuidados
necesarios y la trata como se merece. El único mantenimiento necesario es la limpieza
ocasional del exterior de la mira telescópica y la lente exterior.
Todas las partes movibles están lubricadas permanentemente. Utilice tapas de lentes para
proteger la mira telescópica de la suciedad, polvo, pelusas y humedad. El sistema de ajuste
es acuático incluso sin las tapas de la torrecilla, pero mantenga estas tapas colocadas para
impedir que entre polvo y suciedad en el interior del sistema mecánico. Antes de limpiar las
lentes, cepíllelas con una brocha de fotografía o soplando hasta limpiarlas, idealmente con
“aire envasado”. Esto quita las partículas grandes que pueden rayar la superficie si se
limpian ejerciendo presión. Nunca desmonte la mira telescópica. Si la desmonta alguien
que no sea en nuestra fábrica, la garantía quedará anulada.
Garantía de Burris
La Ballistic LaserScope tiene garantía de 10 años para la óptica y de 3 años para la
electrónica. Si la óptica de su LaserScope o sistemas mecánicos tienen defectos de
material o mano de obra, en Burris, a nuestra propia discreción, la reparará o reemplazará
sin cargo alguno. El sistema de medición y electrónica están garantizados durante 3 años
desde la fecha de compra. Si necesita una reparación, envíe el producto al distribuidor de
servicio en su país.
Los gastos de envío al distribuidor deben estar pagados por el propietario. Asegure el envío.
En Burris no nos haremos responsables de su producto hasta que lo recibamos. No hay
otras garantías, expresas o implícitas, contenidas aquí excepto las que puedan surgir bajo
las leyes específicas del país. En tal caso, las garantías implícitas quedan limitadas a la
mira telescópica y su duración a los términos de esta garantía. Burris no se hace responsable
por cualquier daño incidental o consecuente incluyendo, pero no limitándose a, la pérdida
de beneficios u otras pérdidas económicas o comerciales. Esta garantía ofrece al
propietario ciertos derechos legales y posiblemente otros derechos que pueden variar de
un país a otro. Esto se considera una garantía limitada.
Burris, Eliminator, Ballistic Plex, LaserScope y Ballistic LaserScope son marcas de Burris
Company Inc. Patentes pendientes. Todas las especificaciones están sujetas a cambios sin
previo aviso. © Copyright 2010 Burris Company. EE.UU. Patente número 7,703,679
20
Прицел Ballistic LaserScope™ — Руководство пользователя
Прицел Ballistic LaserScope представляет собой наиболее
инновационный и эффективный прицел для охотничьих
винтовок в мире. Компания Burris объединила знаменитую
оптику с точечной лазерной дальномером и компенсацией
точности траектории, чтобы оснастить им оружие для
вашей охоты.
В единой быстрой последовательности прицел Ballistic
LaserScope измеряет расстояние до вашей добычи,
высчитывает уровень снижения вашей пули на этой
дистанции и отображает точную метку прицеливания в
виде одиночной точки в сетке прицела. Это исключает
неточност и промахи, которые зачастую вынуждают
охотников возвращаться домой с пустыми руками.
Прицел Ballistic LaserScope — просто вне конкуренции.
Ни один другой винтовочный оптический прицел не
сочетает в себе такого уровня качества, технологии,
точности, воспроизводимости и эффективности. Он
существенно увеличит дистанцию, с которой вы сможете
произвести точный выстрел.
Поздравляем Вас с приобретением и благодарим за
выбор прицела Ballistic LaserScope от компании Burris.
Установка и пристрелка
Установка прицела Ballistic LaserScope™
1. Выберите монтажное основание модели Weaver или Picatinny.
Если для длинной винтовки со скользящим затвором выбрано
основание, состоящее из двух частей,
переднее основание должно быть
реверсивным (удлинительным), и его
придется устанавливать с удлинителем,
направленным назад. Рекомендуем использовать
основания Burris XTB (Xtreme Tactical Bases — тактические
основания Xtreme), поскольку они также разрабатывались
с учетом особенностей установки прицела Ballistic LaserScope.
7. Слегка ослабив шестигранные гайки, нажмите на прицел
вперед, а затем плотно затяните обе гайки с усилием 5,6~8 Нм.
2. Перед началом работы прочтите указания производителя
крепления относительно установки крепежных элементов.
Пристрелка
Фокусировка окуляра
1. Направьте прицел Ballistic LaserScope в безопасном направлении
в небо или на светлую стену. Взгляните в прицел и проверьте,
четко ли отображается сетка. В большинстве случаев дополнительной регулировки не требуется. Если сетка не в фокусе,
настройте ее, поворачивая кольцо фокусировки окуляра. Еще
раз проверьте фокус, глядя через прицел, и при необходимости
выполните точную настройку фокуса.
Всю стрельбу следует проводить в безопасном, разрешенном для
этого месте. Используйте надлежащие средства защиты органов
зрения и слуха и следуйте всем правилам безопасной стрельбы.
Выберите патроны, которые вы собираетесь использовать на
охоте, и используйте их для пристрелки огнестрельного оружия.
3. Обезжирьте установочную поверхность винтовки подходящим
химическим реагентом. Особое внимание следует уделить
отверстиям под винты. Тем же химическим реагентом очистите
крепежные элементы. Не допускайте попадания чистящего
реагента на ложе или на линзы прицела.
1. Проведите выверку прицела по каналу ствола ЛИБО поместите
мишень в виде квадрата со стороной 0,6 метра на расстоянии
25 метров. Выстрелите в "яблочко". Внесите необходимые
поправки с помощью ручек корректировки подъема и
горизонтального сноса. Помните, что для прицела с шагом
регулировки (один щелчок) 0,7 см при дистанции 100 м
потребуется четыре щелчка, чтобы переместить прицел на те
же 0,7 см при дистанции 25 м. Шаг регулировки прицелов
Burris указан на табличке под одним из регулировочных колпачков.
4. После установки основания (ий) расположите прицел в
положении, удобном для глаз. Для этого приложите винтовку
к плечу так же, как на охоте. Поместите прицел как можно
дальше вперед, но сохраняя при этом максимально полный
обзор.
Направляющая прицела LaserScope (сзади)
Заднее монтажное
основание
2. Отрегулируйте прицел, повернув регулировочные винты на
требуемое число щелчков. ПРИМЕЧАНИЕ. Сетка (перекрестие)
отцентрована на заводе-изготовителе. Это позволяет регулировать смещение сетки равномерно во всех направлениях от
центрального положения. Для определения фактической точки
попадания рекомендуется произвести три группы выстрелов.
5. Найдите два паза в основании для крепления прицела и,
полностью раскрыв крепежные хомуты, поместите монтажные
болты в эти пазы. Затем выровните пазы прицела Ballistic
LaserScope и расположите их над двумя монтажными болтами,
покачивая прицел из стороны в сторону до тех пор, пока он не
окажется на одном уровне с основанием, а крепежные хомуты
не перещелкнутся с выступа основания на выступ направляющей
в нижней части прицела. Затягивать следует только от руки.
3. После первой группы выстрелов проведите повторную
регулировку прицела. Эта регулировка должна совместить
приблизительный центр попадания выстрелов группы с
"яблочком" мишени. При необходимости произведите
дополнительные группы выстрелов.
6. Выполнив этап 5, расположите шестигранные гайки на боковой
стороне винтовки, противоположной той, на которую вы
будете устанавливать дистанционный передатчик. Между
передатчиком и приемником дистанционного управления
должна быть линия прямой видимости.
Монтажный болт
4. Поместите мишень на желаемом расстоянии для пристрелки:
100 или 200 метров. Выполните необходимые регулировки,
чтобы совместить группу своих выстрелов с "яблочком" мишени.
5. Установите круговую шкалу в положение “0”, не допуская
поворота серебристой ручки.
Крепежный
хомут
6. По завершении регулировки установите на место регулировочные
колпачки. Они защищают прицел от пыли и влаги.
Шестигранная
гайка
21
ИсПользованИе ПРИцела BALLISTIC LASERSCOPE™
Кольцо фокусировки окуляра
Корректировка подъема
Корректировка подъема
Корректировка ветрового сноса
Крышка батарейного
отсека
Корректировка
ветрового сноса
выключатель питания
Приемник дистанционного управления
Установка или замена батарейки
Разрядите оружие. С помощью монеты или отвертки выверните винт
крышки батарейного отсека наверху в задней части прицела, прямо перед
окуляром. Установите литиевую батарейку CR2. Установите на место
крышку батарейного отсека. ПРИМЕЧАНИЕ. Наклейка на дне батарейного
отсека содержит базовые указания по установке.
Крышка батарейного
отсека
Приемник дистанционного управления
Дистанционный передатчик
Прицел LaserScope оснащен дистанционным передатчиком для более
удобного измерения расстояний. Разместите дистанционный передатчик на
цевье винтовки, как показано ниже. Либо вы можете разместить его на
раструбе объектива прицела LaserScope. Прицел LaserScope может
работать с дистанционной функцией в течение полных полутора часов
после каждого нажатия выключателя питания.
Дистанционный передатчик следует
располагать в этой области (на
любой стороне прицела LaserScope)
на расстоянии не более 20 дюймов
(50,8 см) от дистанционного
приемника и на линии прямой
видимости приемника
дистанционного управления.
Батарейка CR2
2. срок службы батарейки LaserScope:
Номинальный срок службы батарейки составляет 5000 циклов. Он может
меняться в зависимости от качества батарейки и температур, при которых
эксплуатируется устройство. В условиях холодных температур батарейки
существенно теряют свой энергетический потенциал.
Батарейка:
Батарейка: половина заряда –
позаботьтесь о запасной
полный заряд
Кнопка настройки
(увеличенный вид см. ниже)
Батарейка: разряжена
– замените
3. включение электроники
Нажмите кнопку выключателя питания
на левой стороне прицела, позади
логотипа Burris. Посмотрите в прицел.
Там должна отображаться дистанция
в ярдах (Y) или метрах (M), а также
индикатор состояния батарейки.
Индикаторы отображаются в течение 8
секунд.
4. основы работы с электроникой
Включите электронику и прицельтесь.
Нажмите еще раз кнопку на левой
стороне или выключатель измерителя
дистанции. В прицеле отобразится
горизонтальная дальность цели (в
верхней части), а также светящаяся
точка на перекрестии.
Отображаемая дальность представляет
собой дистанцию до цели по горизонтали. Прицел Ballistic LaserScope имеет
встроенный датчик измерения угла и
преобразует фактическую дальность в
горизонтальную. Траектория пули в
основном определяется горизонтальной
дальностью независимо от уклона вверх или вниз, и прицел Ballistic
LaserScope автоматически высчитывает расстояние для использования при
определении точки прицеливания.
Если прицелу не удается получить точное
значение расстояния, вместо него отображаются три мигающие черточки.
22
Батарейка дистанционного передатчика
Обычная батарейка CR2025. Номинальный срок
службы батарейки составляет 5000 циклов. Для
замены воспользуйтесь ногтем пальца или
небольшой отверткой, приподняв и сняв заднюю
крышку с передатчика. Чтобы извлечь батарейку,
необходимо наклонить ее и выдвинуть из
держателя. Установите новую батарейку, выполнив
описанные действия в обратном порядке, и
защелкните заднюю крышку передатчика.
5. настройте баллистику для своих патронов
Первое решение - какие единицы измерения вы хотите использовать: ярды
(Y) или метры (M)? Y/M
Первое решение - на какое расстояние следует установить ноль выверки
прицела: 100 или 200 ярдов / метров?
Необходимая информация - снижение вашего патрона (в дюймах) в точке
500 ярдов, если вы выбрали ноль в точке 100 ярдов (число снижения —
drop number).
Есть несколько способов определить число снижения:
1. Заводская баллистическая таблица, поставляемая в комплекте с вашим
прицелом, содержит числа снижения для большинства современных
боеприпасов заводского производства.
2. Иногда эту информацию можно найти на веб-сайтах по боеприпасам
заводского производства.
3. Число снижения может быть указано на коробке с патронами.
4. Можно воспользоваться программами расчета баллистики.
5. Можно выставить ноль выверки прицела на 100 ярдов, выстрелить в цель,
расположенную на расстоянии 500 ярдов, и измерить снижение.
6. Можно посетить веб-сайт компании Burris по адресу: www.burrisoptics.com
Не важно, какие единицы измерения (ярды или метры) вы
выберите, и независимо от того, какое расстояние вы возьмете
за ноль, баллистическая таблица будет выбираться исходя из
снижения на расстоянии 500 ярдов при нуле выверки прицела
в точке 100 ярдов. Ваша трехзначная баллистическая таблица
будет начинаться с “1”, если вы пристреливаете оружие на
расстоянии 100 ярдов/метров, или с “2”, если вы пристреливаете
оружие на расстоянии 200 ярдов/метров. За этой цифрой будет
следовать число снижения, лежащее в диапазоне от 25 до 63.
Таким образом, баллистическая таблица будет представлена
числами от 125 до 163 или от 225 до 263.
На кнопке настройки, расположенной на
правой стороне прицела, имеются четыре
стрелки. Они используются только для
программирования. При обычном использовании прицела они не выполняют
никаких функций.
вход в режим настройки
1.Включите прицел.
2. Сначала нажмите и удерживайте стрелку
вперед на кнопке настройки и одновременно
нажмите и удерживайте кнопку выключателя
питания приблизительно в течение шести
секунд. Глядя в прицел, вы увидите, что вид
его дисплея изменится. Когда это произойдет,
отпустите обе кнопки. Прицел перейдет в
режим настройки. Первое число будет
отображаться в течение двух секунд. Оно
обозначает версию программного обеспечения.
Затем на дисплее отобразятся текущие выбранные
единицы измерения: ярды (Y) или метры (M), а
также баллистическая таблица. На новых
прицелах это значение будет равно “Y 145”, что
соответствует заводской таблице. Если ранее
вами была выбрана другая баллистическая
таблица, на дисплее будет показано
соответствующее значение.
3. Текущая выбранная таблица отображается 30
секунд, в течение которых вы можете нажать
кнопку со стрелкой вперед, чтобы перейти в
режим выбора баллистической таблицы. При
этом буква “T” (выбор таблицы) горит постоянно, а буква единиц измерения (Y или M) мигает.
Нажмите стрелку вверх, чтобы выбрать
Y (ярды), или стрелку вниз, чтобы выбрать M
(метры). После выбора требуемой единицы измерения, которая продолжит мигать, нажмите
и отпустите кнопку со стрелкой вперед, чтобы
подтвердить свой выбор.
версия микропрограммного обеспечения
значение по умолчанию
Последнее значение
M
M
выберите или измените "метры"
выберите или измените "ярды"
4. Буква “T” продолжит гореть постоянно, буква Y
или M тоже загорится постоянно, начнет мигать
первая цифра, а две другие цифры погаснут.
Выберите ноль выверки прицела. 1 = 100
ярдов/метров или 2 = 200 ярдов/метров.
Нажмите стрелку вверх, чтобы увеличить число, Установите ноль выверки прицела
(1 или 2)
или стрелку вниз, чтобы уменьшить его. После
того как на дисплее отобразится требуемая
дистанция пристрелки (число будет мигать),
нажмите и отпустите кнопку со стрелкой
вперед.
внесите в баллистическую таблицу
свое число снижения
5. Начнут мигать две последние цифры (ваше
число снижения или баллистическая таблица).
Нажмите стрелку вверх, чтобы увеличить число, или стрелку вниз, чтобы уменьшить
его. После того как на дисплее отобразится требуемое число снижения (оно будет
мигать), нажмите и отпустите кнопку со стрелкой назад, чтобы выйти из режима
настройки.
6. Теперь вы готовы к стрельбе. Перенастройте ноль вашего оружия, если это
необходимо, на выбранную дистанцию пристрелки. Затем проверьте точку
попадания, выстрелив с расстояния 500 ярдов/метров. В зависимости от
характеристик конкретных боеприпасов, длины ствола вашего оружия, подъема
и крайних температур, возможно, вам придется увеличить или уменьшить свою
баллистическую таблицу на пару единиц для повышения точности.
Ваши настройки будут храниться в памяти прицела независимо от состоянии
батарейки и не пропадут даже при ее отсутствии.
Расшифровка отображаемого значения баллистической таблицы
Баллистическая таблица M234: M — метры, ноль в точке 200 метров, патрон со
снижением 34 дюйма в точке 500 ярдов при нуле в точке 100 ярдов.
Баллистическая таблица Y157: Y — ярды, ноль в точке 100 ярдов, патрон со
снижением 57 дюймов в точке 500 ярдов при нуле в точке 100 ярдов.
23
основные сведения о прицеле Ballistic LaserScope
1. Функция компенсации траектории откалибрована для использования только с
12-кратным увеличением.
2. Для измерения расстояний следует использовать центральное перекрестие.
3. Светящаяся точка прицеливания продолжает гореть около 80 секунд. Если вы
не выстрелили за это время и точка погасла, вам придется снова измерить
расстояние до цели с помощью центрального перекрестия.
4. Неспособность прицела LaserScope определить расстояние до цели может быть
вызвана несколькими возможными причинами, включая следующие:
препятствия, расположенные вблизи между прицелом и целью, такие как трава,
ветки или листья; дождь, снег, туман или другие частицы в воздухе; загрязненные
линзы объектива; низкая способность цели отражать лазерный луч обратно в
прицел в сочетании с нетвердым удержанием оружия и большими дистанциями;
низкий уровень заряда батарейки.
5. Если вы настроили прицел для конкретного вида патронов и при этом не у
дается определить расстояние до цели, прицел отобразит в области ярдов/метров
три горизонтальные черточки, а также пять светящихся точек, служащих в
качестве "пользовательской" баллистической сетки, которая точно откалибрована
под ваш вид патронов.
6. Если вы чувствуете, что прицел LaserScope не работает надлежащим образом,
скорее всего необходимо заменить батарейку. Для начала просто извлеките
имеющуюся батарейку, установите ее обратно и проверьте работу прицела. Если
проблема осталось, установите новую батарейку.
Технические указания
Точная настройка и высота над уровнем моря
Как правило, производители боеприпасов указывают число снижения для пуль на
уровне моря. В большинстве случаев охотничьи пули на крупную дичь снижаются
в точке 500 ярдов приблизительно на ½ дюйма меньше с каждой 1000 футов
подъема над уровнем моря. Поэтому если вы собираетесь охотиться на высоте
6000 футов, и на коробке с боеприпасами указано, что они должны снижаться на
40 дюймов в точке 500 ярдов при нуле в точке 100 ярдов, то вам следует выбрать
баллистическое число 37 вместо 40. На нашем веб-сайте www.burrisoptics.com
представлены графики, содержащие более точные корректировки высоты над
уровнем моря для каждого вида патронов. Кроме того, можно получить еще
более точную информацию, воспользовавшись другими программами расчета
баллистики.
В зависимости от характеристик конкретных боеприпасов, длины ствола вашего
оружия, подъема и крайних температур, возможно, вам придется увеличить или
уменьшить свою баллистическую таблицу на пару единиц для повышения точности.
Программы расчета баллистики — отличный выбор для хорошей корректировки,
но в деле получения наиболее точной информации для превосходной настройки
вашего прицела Ballistic LaserScope ничто не заменит групп из пяти выстрелов с
использованием конкретных боеприпасов с дистанции 500 ярдов.
стрельба на предельных дистанциях (более 500 ярдов)
На пулю в полете при стрельбе на предельных дистанциях оказывают влияние
множество факторов, имеющих между собой сложные взаимосвязи.
BC (баллистический коэффициент) пули — это коэффициент, определяющий
скорость снижения пули. ФАКТИЧЕСКОЕ и ОБЪЯВЛЕННОЕ значения BC могут
различаться и оказывать воздействие на вашу баллистическую таблицу. При
разработке простого в использовании процесса настройки компания Burris больше
склонялась к лучшим боеприпасам с пулями высшего качества. В сущности, на
дистанциях от 100 до 500 ярдов прицел Ballistic LaserScope имеет крайне малую
погрешность полета между пулями. Значения баллистического коэффициента для
большинства современных пуль представлены на нашем веб-сайте. Однако на
дистанциях более 500 ярдов могут наблюдаться существенные различия в
фактической точке попадания в зависимости от баллистического коэффициента
используемой пули. На графике на стр. 4 представлены
фактические значения баллистического коэффициента,
используемые для каждой баллистической таблицы. Для
оптимального и простого использования прицела Ballistic
LaserScope при стрельбе на дистанциях более 500 ярдов будет
мудрым решением использовать пули, наиболее полно
соответствующие значениям, представленным на графике.
Кроме того, когда прицел Ballistic LaserScope получает
измеренное значение дистанции, превышающее
способность компенсации снижения сеткой, загораются
нижние четыре точки,указывая на то,что цель находится
за пределами способности сетки.
Технические характеристики
Рабочая температура:
Температура хранения:
от +14° до +122° по Фаренгейту
от -10° до +50° по Цельсию
от -13° до +158° по Фаренгейту
от -25° до +70° по Цельсию
Радиус поражения:
Точность измерения расстояний:
Олень: от 50 до 550 ярдов
Отражательная цель: от 50
до 800 ярдов
Менее 100 ярдов: +/-1 ярд
100–550 ярдов: +/-2 ярда
Более 550 ярдов: +/-3 ярда
способность выноса точки прицеливания по сетке Eliminator в зависимости от выбранной баллистической таблицы
Баллистическая Дульная скорость, Дульная скорость,
таблица
м/с
футы/с
Использ
баллист. коэф.
63
62
61
60
59
58
57
56
55
54
53
52
51
50
49
48
47
46
45
44
43
42
41
40
39
38
37
36
35
34
33
32
31
30
29
28
27
26
25
808
813
819
825
831
837
843
849
856
862
869
876
883
890
898
906
913
922
930
942
948
972
982
992
1002
1013
1064
1076
1088
1101
1114
1180
1195
1210
1227
1244
1250
-
2650
2668
2687
2706
2725
2745
2765
2786
2807
2829
2851
2874
2897
2921
2946
2971
2997
3024
3052
3090
3110
3190
3221
3254
3288
3322
3490
3530
3570
3612
3655
3870
3920
3970
4025
4080
4100
-
.447
.447
.447
.447
.447
.447
.447
.447
.447
.447
.447
.447
.447
.447
.447
.447
.447
.447
.447
.447
.447
.407
.407
.407
.407
.407
.334
.334
.334
.334
.334
.276
.276
.276
.276
.276
.276
.276
.276
600
500
Максим. дистанция по сетке при нуле в точке 100 ярдов
список контрольных проверок перед возвратом прицела
Значительная часть прицелов, возвращаемых в компанию Burris, обнаруживает
отличную работоспособность. Во избежание ненужных задержек и затрат
перед возвратом прицела рекомендуем вам проверить следующие моменты.
недостаточная корректировка ветрового сноса
1. Монтажные отверстия в основании просверлены неровно относительно
центра канала ствола.
2. Ствол ввернут в ствольную коробку под углом.
недостаточная корректировка подъема
1. Диаметр ствольной коробки не соответствует техническим требованиям.
2. Ствол ввернут под углом.
Группирование или кучность
1. Эрозия ствола или пульного входа патронника.
2. Искривлено ложе.
3. Проблема с подгонкой ложа.
4. Ослаблен крепеж.
5. Высокое усилие спуска — проконсультируйтесь у оружейного мастера.
нечеткий фокус или изображение
1. Объект находится слишком близко.
2. Расфокусирован окуляр.
При возврате прицела обязательно учтите следующие моменты:
1. Вложите копию квитанции о первоначальной покупке.
2. Запишите для себя серийный номер вашего прицела, чтобы использовать
его при звонках о проверке статуса обслуживания прицела.
3. Укажите свои полные имя, фамилию и адрес.
4. Вложите небольшую записку, содержащую как можно более точное
описание сути проблемы.
5. Отправлять прицел следует с предоплатой и страховкой доставки.
Компания Burris не может нести ответственность за ваш прицел до тех
пор, пока мы физически не получим его. Компания Burris оплатит
обратную доставку прицела вам.
6. Застрахуйте доставку на случай утери изделия.
отправьте прицел сервисному дилеру вашей страны
Вы можете связаться с дилером по месту первоначальной покупки прицела
или найти дилера в разделе "Find a Dealer" на нашем веб-сайте. Дилер в
вашем регионе поможет вам решить проблему так, чтобы вы остались
удовлетворены.
700
800
Максим. дистанция по сетке при нуле в точке 200 ярдов
Хранение
Как и в случае с любым другим электронным устройством, рекомендуется извлекать
батарейку при помещении прицела на длительное хранение. При хранении или
транспортировке избегайте случайного нажатия выключателя питания на прицеле
LaserScope и кнопки на дистанционном передатчике, что может быстро разрядить
батарейку, когда прицел не используется.
Использование, обслуживание и уход за прицелом
Ваш прицел Burris подлежит обслуживанию в течение всего срока службы при условии
должного ухода за ним и надлежащего обращения. Единственной обязательной
процедурой по техобслуживанию является периодическая чистка наружной поверхности
прицела и внешних линз.
Все движущиеся узлы не требуют дополнительной смазки. Для защиты линз прицела от
попадания грязи, пыли, пуха и влаги используйте соответствующие крышки. Система
регулировки водонепроницаема даже при снятых колпачках маховичков, однако следует
всегда плотно устанавливать их на место во избежание проникновения пыли и грязи в
механическую систему. Перед чисткой линз обмахните их мягкой кисточкой или обдуйте
чистым воздухом, в идеале из баллончика со сжатым воздухом. Это позволит удалить
крупные частицы, которые могут поцарапать поверхность, если протирать ее с нажимом.
Запрещается разбирать прицел. Попытка разобрать прицел за пределами нашего завода
аннулирует гарантию.
Гарантия компании Burris
Телескопический прицел Ballistic LaserScope имеет гарантию 10 лет на оптические компоненты
и 3 года на электронные компоненты. При обнаружении в оптической или механической
системах прицела LaserScope дефектов материалов или производственных дефектов компания
Burris обязуется бесплатно провести ремонт или замену (по своему усмотрению). На
электронику и систему измерения расстояний предоставляется гарантия 3 года со дня
приобретения. Если необходим ремонт, отправьте изделие сервисному дилеру вашей страны.
Расходы на доставку изделия дилеру должны быть предварительно оплачены владельцем.
Застрахуйте доставку. Компания Burris не может нести ответственность за ваше изделие
до тех пор, пока мы не получим его. В настоящем документе не содержится никаких других
гарантий, как прямых, так и подразумеваемых, за исключением тех, что могут возникнуть
в силу законов, действующих в конкретной стране. В этом случае упомянутые
подразумеваемые гарантии ограничиваются объемом и сроками, указанными в условиях
настоящей гарантии. Компания Burris не несет ответственность за побочные или
последующие убытки, включая, помимо прочего, упущенную выгоду и другие
экономические или коммерческие убытки. Настоящая гарантия дает владельцу
определенные законные права, и, возможно, другие права, которые могут различаться в
зависимости от страны. Настоящая гарантия считается ограниченной.
Burris, Eliminator, Ballistic Plex, LaserScope и Ballistic LaserScope являются торговыми марками
компании Burris Company Inc., поданы заявки на патенты. Все технические характеристике
подлежат изменению без уведомления.
© Copyright 2010 Burris Company. Номер патента в США: 7,703,679.
24
INSTR-1034