1
DE
AT
Medion Service Center
Franz-Fritsch-Str. 11
4600 Wels
Österreich
MTC - Medion Technologie Center
45467 Mülheim / Ruhr
Deutschland
Hotline: 01805 - 633 466
Fax: 01805 - 654 654
(0,14 Euro/Minute aus dem dt. Festnetz,
Mobilfunk max. 0,42 Euro/Min)
LIFESMART TV®
MEDION® LIFE® P85252 (MD 86883)
Hotline: 0810 - 001048 (0,10 EUR/Min.)
Fax: 07242 - 93967592
Bitte benutzen Sie das Kontaktformular unter
www.medionservice.de
Servicekontakt über Homepage:
www.medion.at/service
www.medion.at
www.medion.de
UK
Medion Electronics Ltd.
120 Faraday Park, Faraday Road, Dorcan
Swindon SN3 5JF, Wiltshire
United Kingdom
Hotline: 0871 37 61 020
(Costs 7p/min from a BT landline,
mobile costs may be higher)
Fax: 01793 71 57 16
To contact us by email please visit the „Service and
Support“ section of our website at www.medion.co.uk.
www.medion.co.uk
FR
Medion France
75 Rue de la Foucaudière
72100 LE MANS
France
Service Hotline: 02 43 16 60 30 (appel non surtaxé)
Service PREMIUM hors garantie: 08 92 35 05 40
(0.34 EUR/min)
E-Mail: Pour nous contacter, merci de vous rendre sur
notre site internet (www.medion.fr) à la rubrique
« Service » puis « Contact »
86883 DE-EN-FR eCommerce Cover RC2.indd 1
Bedienungsanleitung
Instruction manual
Mode d‘emploi
25.03.2013 15:26:11
Lifesmart TV
DE
1.
2.
3.
4.
5.
6.
7.
8.
9.
10.
Hinweise zu dieser Anleitung ...........................................................3
1.1.
Bestimmungsgemäßer Gebrauch ...................................................... 4
Sicherheitshinweise...........................................................................5
2.1.
Elektrische Geräte nicht in Kinderhände .......................................... 5
2.2.
Allgemeines ................................................................................................ 5
2.3.
Umgang mit Akkus................................................................................... 6
2.4.
Aufstellort .................................................................................................... 7
2.5.
Niemals selbst reparieren! ..................................................................... 8
2.6.
Reinigung und Pflege.............................................................................. 8
2.7.
Datensicherung ......................................................................................... 8
2.8.
Stromversorgung ...................................................................................... 9
Notes on conformity ....................................................................... 10
3.1. R&TTE conformity statement............................................. 10
Lieferumfang................................................................................... 11
Allgemeines..................................................................................... 12
5.1.
Abspielbare Formate .............................................................................12
5.2.
Dateisysteme ............................................................................................12
5.3.
Über das Anzeigesymbol .....................................................................12
Geräteübersicht .............................................................................. 13
6.1.
Gerätevorderseite ...................................................................................13
6.2.
Geräterückseite .......................................................................................13
6.3.
Fernbedienung ........................................................................................14
Inbetriebnahme .............................................................................. 16
7.1.
Geräteanschlüsse vornehmen (Rückseite) ....................................16
7.2.
Geräteanschlüsse vornehmen (Vorderseite) ................................18
Verwendung der Gyro-Fernbedienung ........................................ 19
8.1.
Gyro-Fernbedienung ein-/ausschalten...........................................19
8.2.
Gyro-Fernbedienung manuell koppeln ..........................................19
8.3.
Mausfunktion der Fernbedienung verwenden ...........................19
8.4.
Aufladen der Gyro-Fernbedienung ..................................................20
Betrieb ............................................................................................. 21
9.1.
Gerät ein- und ausschalten .................................................................21
9.2.
Erstinbetriebnahme ...............................................................................22
9.3.
Netzwerk einrichten ..............................................................................22
9.4.
Hauptmenü ...............................................................................................26
Bedienung ....................................................................................... 27
10.1. Lautstärke einstellen..............................................................................27
EN
FR
GPL
Inhaltverzeichnis
1 von 198
86883 DE EN FR EComm RC1.indb 1
03.04.2013 13:04:44
Lifesmart TV
11.
12.
13.
14.
15.
16.
17.
18.
19.
20.
21.
22.
23.
24.
10.2. Navigation in den Menüs .....................................................................27
10.3. Eingabe über die Bildschirmtastatur ...............................................28
Spracheingabe über Mikrofon....................................................... 29
11.1. Einstellungen für die Spracheingabe ..............................................30
Favoritenansicht ............................................................................. 31
12.1. Favoritenansicht bearbeiten ...............................................................31
Wetteranzeige im Hauptmenü ...................................................... 32
13.1. Standorteinstellung für Accu Weather............................................32
13.2. Erweiterte Wetteranzeige ....................................................................34
Internet Browser ............................................................................. 36
14.1. Bedienelemente im Browser ............................................................36
Media Player.................................................................................... 38
15.1. Eigene Quellen .......................................................................................39
15.2. Wiedergabe...............................................................................................40
15.3. Erweiterte Bedienung ...........................................................................40
Mediathek/Portal ............................................................................ 42
16.1. Funktionen des Portals .........................................................................42
16.2. Lifesmart TV online registrieren ........................................................44
YouTube ........................................................................................... 47
Apps ................................................................................................. 48
18.1. Auf dem Lifesmart TV installierte Apps ..........................................48
18.2. Market .........................................................................................................48
18.3. Apps von externen Datenträgern installieren ..............................49
18.4. Entfernen ...................................................................................................51
Menü Einstellungen........................................................................ 52
19.1. Systemeinstellungen .............................................................................52
19.2. Anzeige-Einstellungen..........................................................................54
19.3. Netzwerk-Einstellungen .......................................................................55
19.4. Version ........................................................................................................56
Problembehebung.......................................................................... 57
20.1. Fehlersuche ...............................................................................................57
Benötigen Sie weitere Unterstützung? ......................................... 59
Reinigung ........................................................................................ 59
Entsorgung ...................................................................................... 60
Technische Daten ............................................................................ 61
2 von 198
86883 DE EN FR EComm RC1.indb 2
03.04.2013 13:05:09
Lifesmart TV
Hinweise zu dieser Anleitung
DE
1. Hinweise zu dieser Anleitung
Lesen Sie vor der ersten Inbetriebnahme diese Bedienungsanleitung gründlich durch und befolgen Sie vor
allen Dingen die Sicherheitshinweise auch wenn Ihnen
der Umgang mit elektronischen Geräten vertraut ist!
Alle Tätigkeiten an und mit diesem Gerät dürfen nur soweit
ausgeführt werden, wie sie in dieser Bedienungsanleitung beschrieben sind.
Bewahren Sie diese Bedienungsanleitung für den weiteren Gebrauch auf. Falls Sie das Gerät weitergeben, händigen Sie bitte auch
diese Bedienungsanleitung aus.
EN
FR
In dieser Anleitung verwendete Warnsymbole und
Signalwörter
GEFAHR!
Warnung vor unmittelbarer Lebensgefahr!
VORSICHT!
Hinweise beachten, um Verletzungen und Sachschäden zu vermeiden!
ACHTUNG!
Hinweise beachten, um Sachschäden zu vermeiden!
HINWEIS!
Hinweise in der Bedienungsanleitung beachten!
GPL
WARNUNG!
Warnung vor möglicher Lebensgefahr und/oder
schweren irreversiblen Verletzungen!
WARNUNG!
Warnung vor Gefahr durch elektrischen Schlag!
3 von 198
86883 DE EN FR EComm RC1.indb 3
03.04.2013 13:05:09
Hinweise zu dieser Anleitung
Lifesmart TV
HINWEIS!
Weiterführende Informationen für den Gebrauch
des Gerätes!
•
Aufzählungspunkt / Information über Ereignisse während der
Bedienung
Auszuführende Handlungsanweisung
1.1. Bestimmungsgemäßer Gebrauch
Dieses Gerät dient zur Wiedergabe von Medien über angeschlossene Datenträger oder über das Netzwerk bzw. Internet.
Für die Ausgabe von Bild und Ton kann das Gerät an einen Fernseher und/oder eine Audioanlage angeschlossen werden.
Dieses Gerät ist nur für den Gebrauch in trockenen Innenräumen geeignet.
Das Gerät ist nur für den privaten und nicht für den industriellen/kommerziellen Gebrauch bestimmt.
Bitte beachten Sie, dass im Falle des nicht bestimmungsgemäßen Gebrauchs die Haftung erlischt:
• Bauen Sie das Gerät nicht ohne unsere Zustimmung um und verwenden Sie keine nicht von uns genehmigten oder gelieferten
Zusatzgeräte.
• Verwenden Sie nur von uns gelieferte oder genehmigte Ersatzund Zubehörteile.
• Beachten Sie alle Informationen in dieser Bedienungsanleitung,
insbesondere die Sicherheitshinweise. Jede andere Bedienung
gilt als nicht bestimmungsgemäß und kann zu Personen- oder
Sachschäden führen.
• Nutzen Sie das Gerät nicht unter extremen Umgebungsbedingungen.
4 von 198
86883 DE EN FR EComm RC1.indb 4
03.04.2013 13:05:10
Lifesmart TV
Sicherheitshinweise
DE
2. Sicherheitshinweise
EN
2.1. Elektrische Geräte nicht in Kinderhände
Dieses Gerät ist nicht dafür bestimmt, durch Personen (einschließlich Kinder) mit eingeschränkten physischen, sensorischen, oder geistigen Fähigkeiten oder mangels Erfahrung und/
oder mangels Wissen benutzt zu werden, es sei denn, sie werden durch eine für ihre Sicherheit zuständige Person beaufsichtigt oder erhielten von Ihnen Anweisungen, wie das Gerät zu
benutzen ist.
Lassen Sie Kinder niemals unbeaufsichtigt elektrische Geräte
benutzen.
FR
GEFAHR!
Halten Sie das Verpackungsmaterial, wie z. B. Folien
von Kindern fern. Bei Missbrauch besteht Erstickungsgefahr.
• Öffnen Sie niemals das Gehäuse des Geräts (elektrischer Schlag,
Kurzschluss- und Brandgefahr)!
• Führen Sie keine Gegenstände durch die Schlitze und Öffnungen ins Innere des Geräts (elektrischer Schlag, Kurzschluss und
Brandgefahr)!
• Schlitze und Öffnungen des Geräts dienen der Belüftung. Decken Sie diese Öffnungen nicht ab (Überhitzung, Brandgefahr)!
• Die Fernbedienung besitzt eine Infrarot-Diode der Klasse 1. Betrachten Sie die LED nicht mit optischen Geräten.
• Stellen Sie keine mit Flüssigkeit gefüllten Gefäße, wie z.B. Vasen,
auf das Gerät, den Netzadapter oder in die nähere Umgebung
und schützen Sie alle Teile vor Tropf- und Spritzwasser. Das Gefäß kann umkippen und die Flüssigkeit kann die elektrische Sicherheit beeinträchtigen.
• Ziehen Sie bei Beschädigungen des Netzadapters, der Anschlussleitung oder des Gerätes sofort den Netzadapter aus der Steckdose.
GPL
2.2. Allgemeines
5 von 198
86883 DE EN FR EComm RC1.indb 5
03.04.2013 13:05:10
Sicherheitshinweise
Lifesmart TV
• Warten Sie mit dem Anschluss des Netzadapters, wenn das Gerät von einem kalten in einen warmen Raum gebracht wird. Das
dabei entstehende Kondenswasser kann unter Umständen das
Gerät zerstören. Wenn das Gerät Zimmertemperatur erreicht
hat, kann es gefahrlos in Betrieb genommen werden.
2.3. Umgang mit Akkus
Akkus können brennbare Stoffe enthalten. Bei unsachgemäßer
Behandlung können Akkus auslaufen, sich stark erhitzen, entzünden oder gar explodieren, was Schäden für das Gerät und
Ihre Gesundheit zur Folge haben könnte.
WARNUNG!
Explosionsgefahr bei unsachgemäßem Auswechseln der
Akkus.
Ersatz nur durch denselben oder einen gleichwertigen
Akkutyp.
Befolgen Sie folgende Hinweise:
• Akkus können bei Verschlucken lebensgefährlich sein. Bewahren Sie deshalb die Fernbedienung und die Akkus für
Kleinkinder unerreichbar auf. Wurde ein Akku verschluckt,
muss sofort medizinische Hilfe in Anspruch genommen werden.
• Vertauschen Sie niemals die Polarität.
• Entladen Sie die Akkus niemals durch hohe Leistungsabgabe.
• Schließen Sie die Akkus niemals kurz.
• Setzen Sie Akkus niemals übermäßiger Wärme wie durch
Sonnenschein, Feuer, starkem Kunstlicht oder dergleichen
aus!
• Zerlegen oder verformen Sie die Akkus nicht. Ihre Hände
oder Finger könnten verletzt werden oder Batterieflüssigkeit
könnte in Ihre Augen oder auf Ihre Haut gelangen. Sollte dies
passieren, spülen Sie die entsprechenden Stellen mit einer
großen Menge klaren Wassers und suchen Sie umgehend
einen Arzt auf.
6 von 198
86883 DE EN FR EComm RC1.indb 6
03.04.2013 13:05:10
Lifesmart TV
Sicherheitshinweise
• Vermeiden Sie starke Stöße und Erschütterungen.
• Reinigen Sie bei Bedarf Akku- und Gerätekontakte vor dem
Einlegen.
• Entfernen Sie verbrauchte Akkus sofort aus dem Gerät.
• Laden Sie entladene Akkus umgehend wieder auf, um Schäden zu vermeiden.
• Entfernen Sie die Akkus aus Ihrem Gerät, wenn dieses über
einen längeren Zeitraum nicht benutzt wird.
• Isolieren Sie die Kontakte der Akkus mit einem Klebestreifen,
wenn Sie Batterien lagern oder entsorgen wollen.
DE
EN
FR
Stellen und betreiben Sie alle Komponenten auf einer stabilen,
ebenen und vibrationsfreien Unterlage, um Stürze des Gerätes
zu vermeiden.
Setzen Sie das Gerät keinen Erschütterungen aus. Erschütterungen können der empfindlichen Elektronik schaden.
Achten Sie darauf, dass keine direkten Wärmequellen (z. B. Heizungen oder starkes Kunstlicht) auf das Gerät wirken.
Es dürfen keine offenen Brandquellen (z. B. brennende Kerzen)
auf oder in der Nähe des Gerätes stehen.
Achten Sie darauf, dass die Lüftungsschlitze nicht verdeckt sind,
damit immer eine ausreichende Belüftung gewährleistet ist.
Stellen Sie keine Gegenstände auf die Kabel, da diese sonst beschädigt werden könnten.
• Halten Sie einen Mindestabstand von ca. 10 cm zwischen
Wänden und Gerät bzw. Netzadapter ein. Sorgen Sie für eine
ausreichende Belüftung.
• Betreiben Sie Ihr Gerät nicht im Freien, da äußere Einflüsse
wie Regen, Schnee etc. das Gerät beschädigen könnten.
• Wahren Sie mindestens einen Meter Abstand von hochfrequenten und magnetischen Störquellen (Fernsehgerät, Lautsprecherboxen, Mobiltelefon usw.), um Funktionsstörungen
zu vermeiden.
GPL
2.4. Aufstellort
7 von 198
86883 DE EN FR EComm RC1.indb 7
03.04.2013 13:05:10
Sicherheitshinweise
Lifesmart TV
• Bei großen Temperatur- oder Feuchtigkeitsschwankungen
kann es durch Kondensation zur Feuchtigkeitsbildung innerhalb des Gerätes kommen, die einen elektrischen Kurzschluss
verursachen kann. Warten Sie daher immer ab, bis das Gerät
die Raumtemperatur erreicht hat, bevor Sie das Gerät in Betrieb nehmen.
2.5. Niemals selbst reparieren!
Ziehen Sie bei Beschädigung des Netzadapters, der Anschlussleitung oder des Gerätes sofort den Netzadapter aus der Steckdose.
Nehmen Sie das Gerät nicht in Betrieb, wenn Gerät oder Anschlussleitung sichtbare Schäden aufweisen oder das Gerät heruntergefallen ist.
WARNUNG!
Versuchen Sie auf keinen Fall, das Gerät selber zu
öffnen und/oder zu reparieren. Es besteht die Gefahr
des elektrischen Schlags!
Wenden Sie sich im Störungsfall an das Medion Service Center
oder eine andere geeignete Fachwerkstatt, um Gefährdungen
zu vermeiden.
2.6. Reinigung und Pflege
• Bevor Sie das Gerät reinigen, ziehen Sie unbedingt immer zuerst den Netzadapter aus der Steckdose.
• Verwenden Sie für die Reinigung nur ein trockenes, weiches
Tuch. Benutzen Sie keine chemischen Lösungs- und Reinigungsmittel, weil diese die Oberfläche und/oder die Beschriftungen des Geräts beschädigen können.
2.7. Datensicherung
• Achtung! Machen Sie nach jeder Aktualisierung Ihrer Daten Sicherungskopien auf externe Speichermedien. Die Geltendmachung von Schadensersatzansprüchen für Datenverlust und
dadurch entstandene Folgeschäden wird ausgeschlossen.
8 von 198
86883 DE EN FR EComm RC1.indb 8
03.04.2013 13:05:10
Sicherheitshinweise
DE
2.8. Stromversorgung
Bitte beachten Sie: Auch im Standby-Modus sind Teile des Gerätes unter Spannung. Um die Stromversorgung zu Ihrem Gerät
zu unterbrechen oder das Gerät gänzlich von Spannung frei zu
schalten, trennen Sie das Gerät vollständig vom Netz, indem Sie
den Netzadapter aus der Steckdose entfernen.
• Betreiben Sie den Netzadapter nur an geerdeten Steckdosen
mit AC 100-240 V~ 50 Hz. Wenn Sie sich der Stromversorgung
am Aufstellort nicht sicher sind, fragen Sie bei Ihrem Energieversorger nach.
• Verwenden Sie ausschließlich den mitgelieferten Netzadapter (Ktec KSAS0241200150HE). Versuchen Sie nie, den Stecker
des Netzadapters an andere Buchsen anzuschließen, da sonst
Schäden verursacht werden können.
• Das Gerät verbraucht, auf Grund der Ladefunktion der Fernbedienung, auch im Standby-Modus Strom.
• Wir empfehlen zur zusätzlichen Sicherheit die Verwendung
eines Überspannungsschutzes, um das Gerät vor Beschädigung durch Spannungsspitzen oder Blitzschlag aus dem
Stromnetz zu schützen.
• Betreiben Sie das Gerät nicht bei Gewitter. Es besteht Gefahr
von Schäden durch Blitzeinschlag! Trennen Sie das Gerät bei
Gewitter vollständig vom Netz, indem Sie den Netzadapter
aus der Steckdose entfernen
• Um die Stromversorgung zu unterbrechen, ziehen Sie den
Netzadapter aus der Steckdose.
• Der Netzadapter muss auch nach dem Anschließen leicht erreichbar sein, damit es im Bedarfsfall oder einer Gefahrensituation schnell vom Netz getrennt werden kann.
• Decken Sie den Netzadapter nicht ab, um eine Überhitzung
zu vermeiden.
• Fassen Sie den Netzadapter niemals mit nassen Händen an!
Es besteht Stromschlaggefahr!
EN
FR
GPL
Lifesmart TV
9 von 198
86883 DE EN FR EComm RC1.indb 9
03.04.2013 13:05:10
Hinweise zur Konformität
Lifesmart TV
• Sollten Sie ein Verlängerungskabel einsetzen, achten Sie darauf, dass dieses den VDE-Anforderungen entspricht. Fragen
Sie ggf. Ihren Elektroinstallateur.
• Verlegen Sie die Kabel so, dass niemand darauf treten oder
darüber stolpern kann.
• Stellen Sie keine Gegenstände auf die Kabel, da diese sonst
beschädigt werden könnten.
3. Hinweise zur Konformität
Dieses Gerät erfüllt mit der On-/Off Funktion die grundlegenden Anforderungen
und relevanten Vorschriften der Ökodesign Richtlinie 2009/125/EG (Verordnung
1275/2008). Eine Standbyfunktion im Sinne der Ökodesign Richtlinie wird nur
unterstützt, wenn die Einstellung „USB-Ladefunktion im Standbymodus“ in
den Systemeinstellungen auf AUS eingestellt wurde (siehe „USB-Ladefunktion
im Standbymodus“ auf Seite 53).
3.1. Konformitätsinformation nach R&TTE
Hiermit erklärt die Medion AG, dass das Produkt MD 86883 mit den Anforderungen der europäischen R&TTE Richtline 1999/5/EG (inkl. den Anforderungen
der EMV-Richtlinie 2004/108/EG und der Niederspannungsrichtlinie 2006/95/
EG), der Öko-Design Richtlinie 2009/125/EG und der RoHS-Richtlinie 2011/65/
EU übereinstimmt.
Vollständige Konformitätserklärungen sind erhältlich unter
www.medion.com/conformity.
10 von 198
86883 DE EN FR EComm RC1.indb 10
03.04.2013 13:05:10
Lifesmart TV
Lieferumfang
DE
4. Lieferumfang
Bitte überprüfen Sie die Vollständigkeit der Lieferung und benachrichtigen
Sie uns innerhalb von 14 Tagen nach dem Kauf, falls die Lieferung nicht komplett ist.
EN
FR
Mit dem von Ihnen erworbenen Produkt haben Sie erhalten:
• Lifesmart TV MD 86883
• Netzadapter (Ktec KSAS0241200150HE)
• Fernbedienung inkl. Blockakku
• USB-Ladekabel für die Fernbedienung
• HDMI-Kabel
• Video-/Audio-Cinchkabel
• Bedienungsanleitung
• Garantiekarte
GPL
GEFAHR!
Halten Sie das Verpackungsmaterial, wie z. B. Folien von Kindern fern. Bei Missbrauch besteht Erstickungsgefahr.
11 von 198
86883 DE EN FR EComm RC1.indb 11
03.04.2013 13:05:11
Allgemeines
Lifesmart TV
5. Allgemeines
5.1. Abspielbare Formate
Mit diesem Gerät können zahlreiche Dateiformate wiedergegeben und beschrieben werden. Die folgende Tabelle zeigt die abspielbaren Dateiformate
verschiedener Medientypen.
Medientyp
Dateiformate
Video
MPG, MPEG, AVI, WMV, MP4, MOV, DAT, VOB, 3GP, FLV,
MKV, TS, M2TS
Audio
MP3, WMA, WAV, AAC, OGG
Foto
JPG, BMP, PNG, GIF
HINWEIS
Aufgrund der Vielzahl unterschiedlicher Codecs, kann die
Wiedergabe aller Formate nicht gewährleistet werden.
5.2. Dateisysteme
Ihr Lifesmart TV unterstützt die Dateisysteme FAT16, FAT32 und NTFS.
5.3. Über das Anzeigesymbol
Während des Betriebs erscheint auf dem Fernsehbildschirm u. U. das Symbol
“ ” und zeigt an, dass die im Benutzerhandbuch erläuterte Funktion für diese Betriebsart nicht verfügbar ist.
12 von 198
86883 DE EN FR EComm RC1.indb 12
03.04.2013 13:05:11
Lifesmart TV
Geräteübersicht
DE
6. Geräteübersicht
EN
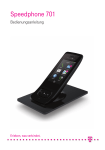
6.1. Gerätevorderseite
FR
1
2
1)
2)
3)
4)
5)
3
4
5
WLAN Transmitter (unter der Abdeckung)
SD/SDHC: SD/SDHC-Kartensteckplatz
USB: USB-Anschluss
Standby/On (Standby-LED):
Drücken, um Gerät einzuschalten/auszuschalten.
Erlischt bei ausgeschaltetem Gerät; Leuchtet im Standby-Modus rot;
Leuchtet im eingeschaltetem Zustand blau
Fernbedienungssensor
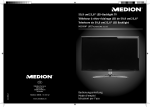
6.2. Geräterückseite
6)
7)
8)
9)
10)
11)
12)
13)
8
9 10 11 12 13
GPL
6 7
AV OUT: Analoger Audio-/Videoausgang
SPDIF: Optischer, digitaler Audioausgang
HDMI: HDMI Ausgang
microSD: microSDHC-Kartensteckplatz
USB: USB-Anschluss
RJ45: LAN Anschluss für Netzwerk
DC: Buchse für Netzadapter
Ein/Aus-Schalter
13 von 198
86883 DE EN FR EComm RC1.indb 13
03.04.2013 13:05:13
Geräteübersicht
Lifesmart TV
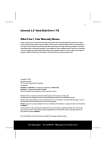
6.3. Fernbedienung
1
2
3
DE V
SC
14
ROLL
OK
13
12
4
5
11
6
7
MOD
10
8
9
15
16
17
14 von 198
86883 DE EN FR EComm RC1.indb 14
03.04.2013 13:05:14
Lifesmart TV
Status LEDs:
:
Mittlere
LED:
Rechte
LED:
2)
3)
4)
5)
6)
7)
8)
9)
10)
11)
12)
13)
14)
15)
16)
17)
DE
- Blinkt schnell violett bei Verbindungsaufbau zum
Lifesmart TV;
- Leuchtet blau bei bestehender Verbindung zum
eingeschalteten Lifesmart TV;
- Blinkt rot während des Aufladens bei getrennter
Verbindung zum Lifesmart TV;
- Leuchtet rot bei vollständig geladenen Akku bei
getrennter Verbindung zum Lifesmart TV.
EN
FR
Spracheingabe aktiv
Ohne Funktion
POWER:
Fernbedienung ein-/ausschalten
OK:
Eingaben bestätigen
RETURN:
Zurück zum letzten Menü
Favoriten:
Lesezeichen setzen
Standby/On:
Lifesmart TV einschalten/
in den Standby Modus schalten
MOD:
Taste nicht belegt/
reserviert für zukünftige Funktionen
/
:
Lautstärke verringern/ erhöhen
PLAY/PAUSE: Im Mediaplayer die Wiedergabe
starten/unterbrechen
/
SKIP/SEARCH:
MUTE:
Menütaste:
Drücken, um zum vorherigen/nächsten Titel zu
gelangen; gedrückt halten, um den Suchlauf
rückwärts/vorwärts auszuführen
Stummschaltung aktivieren/deaktivieren;
gedrückt halten, um die Fernbedienung zu
koppeln/entkoppeln
Systemeinstellungen aufrufen;
Programmoptionen/Kontextmenüs aufrufen
Hautpmenü aufrufen
GPL
1)
Geräteübersicht
HOME:
Navigationstasten/Klickregler
Akkufach
Cursortaste:
Finger auf die Taste legen, um die Mausfunktion zu
aktivieren; Klicken, um Buttons und Einträge
auszuwählen
Mikrofontaste: Google-Suche per Spracheingabe starten
15 von 198
86883 DE EN FR EComm RC1.indb 15
03.04.2013 13:05:14
Inbetriebnahme
Lifesmart TV
7. Inbetriebnahme
7.1. Geräteanschlüsse vornehmen (Rückseite)
micro
SDHC
USB
Anschluss des Lifesmart TV an einen Fernseher/Monitor mit
HDMI-Anschluss
Der Anschluss über das mitgelieferte HDMI-Kabel stellt die beste Verbindung zwischen Ihrem Lifesmart TV und einem Fernseher bzw. Monitor
dar. Bei der HDMI-Verbindung werden Bild- und Tonsignale übertragen
und in Ihrem Fernseher bzw. Monitor ausgegeben. Ebenso wird das richtige Bildformat automatisch ermittelt und eingestellt, sofern die Formateinstellung des HDMI Eingangesan Ihrem Fernseher bzw. Monitor auf
„Auto“ eingestellt ist.
Schließen Sie das HDMI-Kabel an die HDMI-Buchse des Lifesmart TV sowie
an die entsprechende HDMI-Eingangsbuchse am Fernseher/Monitor an.
HINWEISE ZUM HDMI-ANSCHLUSS
Falls Ihr Fernseher keinen Dolby Digital- oder MPEG-Decoder besitzt, stellen Sie im Menü Einstellungen die Option [Anzeige-Einstellungen] Untermenü [HDMI Audio
Mode] auf [PCM Stereo] (siehe 54).
16 von 198
86883 DE EN FR EComm RC1.indb 16
03.04.2013 13:05:16
Lifesmart TV
•
Inbetriebnahme
Beachten Sie beim Anschluss eines HDMI-kompatiblen Gerätes folgende
Punkte:
− Schalten Sie den Fernseher und das Lifesmart TV aus. Schalten Sie nun
den Fernseher ein, warten Sie ca. 30 Sekunden, und schalten Sie dann
das Lifesmart TV ein.
− Der Videoeingang des Fernsehers muss auf das Lifesmart TV eingestellt sein.
− Der angeschlossene Fernseher muss HDMI Auflösungen unterstützen.
DE
EN
FR
Anschluss des Lifesmart TV an einen Fernseher mit AVAnschluss
Verbinden Sie die Buchse AV OUT des Lifesmart TV über das mitgelieferte Audio-/Videokabel mit den Audio-/Videoeingangsbuchsen des Fernsehers. Über diesen Ausgang werden nur PAL Auflösungen unterstützt,
wenn Sie in den Genuss von HD Inhalten kommen wollen, müssen Sie
den HDMI Ausgang verwenden.
Optischer Digitalanschluss
Zur Übertragung der digitalen Audiosignale an ein digitales Audiogerät
verbinden Sie die Buchse SPDIF des Lifesmart TV mit einem optischen
Kabel (Toslink-Kabel - nicht im Lieferumfang enthalten) mit der entsprechenden Buchse an Ihrem digitalen Audiogerät (z. B. einem A/V Verstärker).
Netzwerkanschluss
Datenträger über USB anschließen
Verbinden Sie eine USB-Gerät mit Wechseldatenträgerfunktion (z. B. Digitalkamera; USB-Festplatten; USB-Sticks, etc.) mit der USB-Buchse an der
Rückseite des Geräts.
GPL
Verbinden Sie die RJ45-Buchse am Lifesmart TV über ein Netzwerkkabel
mit entsprechenden Steckern mit einer Netzwerkschnittstelle (z. B. einen
Router).
Auf diese Weise kann Lifesmart TV auf freigegebene Dateien im Netzwerk
zugreifen und bei entsprechender Konfiguration des Routers auch Internetdaten empfangen.
17 von 198
86883 DE EN FR EComm RC1.indb 17
03.04.2013 13:05:18
Inbetriebnahme
Lifesmart TV
7.2. Geräteanschlüsse vornehmen (Vorderseite)
USB
SD/
SDHC
Datenträger über USB anschließen
Verbinden Sie eine USB-Gerät mit Wechseldatenträgerfunktion (z. B. Digitalkamera; USB-Festplatten; USB-Sticks, etc.) mit der USB-Buchse an der
Vorderseite des Geräts.
Anschluss für SD/SDHC-Speicherkarten
Stecken Sie eine Speicherkarte (Typ SD/SDHC) in den Steckplatz an der
Vorderseite des Geräts, um die Dateien der Speicherkarte wiedergeben zu
können.
HINWEIS!
Ihr Lifesmart TV unterstützt SD-Speicherkarten, SDHCSpeicherkarten und MMC-Speicherkarten.
Netzadapter anschließen
Verbinden Sie den Stromversorgungsstecker des mitgelieferten Netzadapters (KSAS0241200150HE) mit der DC IN-Buchse am Gerät.
Wenn Sie alle Anschlüsse vorgenommen haben, verbinden Sie den Netzadapter mit einer Steckdose (AC 230 V ~ 50 Hz). Entnehmen Sie die Angaben des Netzadapters den technischen Daten auf 61.
18 von 198
86883 DE EN FR EComm RC1.indb 18
03.04.2013 13:05:18
Lifesmart TV
Verwendung der Gyro-Fernbedienung
8. Verwendung der Gyro-Fernbedienung
Die mitgelieferte Gyro-Fernbedienung interpretiert über einen Lagesensor
Ihre Gesten und kann so wie eine Computermaus für die Bedienung der Benutzeroberfläche des Lifesmart TV verwendet werden.
DE
EN
FR
8.1. Gyro-Fernbedienung ein-/ausschalten
Halten Sie die POWER-Taste an der Fernbedienung für etwa 3 Sekunden lang gedrückt, um die Fernbedienung einzuschalten.
Das Einschalten wird durch zwei kurze, tiefe Signaltöne bestätigt.
• Nach dem Einschalten stellt die Fernbedienung die Funkverbindung zum
Lifesmart TV her.
• Während die Fernbedienung eine Verbindung zum Lifesmart TV sucht,
blinkt die Power LED schnell violett.
• Nach erfolgreicher Verbindung leuchtet die Power LED dauerhaft blau.
HINWEIS!
Die Fernbedienung muss sich hierfür in der Reichweite
des Lifesmart TV (ca 7 Meter) befinden und das Lifesmart TV muss eingeschaltet sein!
Fernbedienung ausschalten
Um die Fernbedienung auszuschalten, halten Sie die POWER-Taste erneut für etwa 3 Sekunden lang gedrückt.
Das Ausschalten wird durch einen kurzen, hohen Signalton bestätigt.
Falls die Verbindung (Kopplung) zum Lifesmart TV nicht hergestellt werden
kann, können Sie den Kopplungsvorgang auch manuell starten, indem Sie
bei eingeschalteter Fernbedienung die Taste MUTE gedrückt halten, bis
eine kurze Vibration zu spüren ist.
Die Gyro-Fernbedienung wird sich nun erneut mit dem Lifesmart-TV koppeln.
8.3. Mausfunktion der Fernbedienung verwenden
GPL
8.2. Gyro-Fernbedienung manuell koppeln
Um den Cursor auf dem Bildschirm zu bewegen, legen Sie den Zeigefinger auf die Cursortaste unten an der Fernbedienung und bewegen Sie
die Fernbedienung dabei nach oben, unten, links und rechts.
Um einen Button, ein Bedienfeld am Bildschirm auszuwählen, drücken Sie
die Cursortaste.
Wenn Sie den Finger von der Cursortaste nehmen, ist die Bewegung gestoppt.
19 von 198
86883 DE EN FR EComm RC1.indb 19
03.04.2013 13:05:19
Verwendung der Gyro-Fernbedienung
Lifesmart TV
8.4. Aufladen der Gyro-Fernbedienung
Die Gyro-Fernbedienung verfügt über einen im Auslieferungszustand bereits
eingelegten Akku. Bevor Sie die Fernbedienung verwenden, sollten Sie sie
über das mitgelieferte USB-Kabel aufladen.
Schalten Sie die Fernbedienung hierzu aus.
Verbinden Sie den Mini USB-Anschluss der Fernbedienung über das mitgelieferte USB-Kabel mit dem USB-Anschluss des Lifesmart TV.
HINWEIS!
Die Ladefunktion ist auch im Standby Modus verfügbar, wenn Sie die Einstellung „USB-Ladefunktion im
Standbymodus“ in den Systemeinstellungen auf EIN einstellen (siehe 53).
Sie können die Gyro-Fernbedienung alternativ auch
an einem PC oder USB-Netzteil aufladen.
•
•
Während des Ladevorgangs blinkt die Status LED rot.
Bei vollständig geladenem Akku leuchtet die Status LED
dauerhaft rot.
Akkustatus überprüfen
Sie können den Akkustatus über die Status LED anzeigen lassen, indem Sie kurz auf die POWER-Taste der Fernbedienung drücken. Die
POWER LED zeigt den Akkustatus an, indem sie rot aufleuchtet:
Status LED
blinkt 4 mal auf
> 80% Akkuleistung
Status LED
blinkt 3 mal auf
> 60% Akkuleistung
Status LED
blinkt 2 mal auf
> 40% Akkuleistung
Status LED
blinkt 1 mal auf
> 20% Akkuleistung
dauerhaftes rotes Blinken
Akku muss geladen werden
20 von 198
86883 DE EN FR EComm RC1.indb 20
03.04.2013 13:05:19
Lifesmart TV
Betrieb
DE
9. Betrieb
EN
9.1. Gerät ein- und ausschalten
Wenn Sie das Gerät über den Netzadapter mit dem Stromnetz verbunden
haben, leuchtet die Taste Standby/On am Gerät rot.
Drücken Sie die Taste Standby/On auf der Fernbedienung oder die Taste Standby/On am Gerät, um das Lifesmart TV einzuschalten. Während
des Systemstarts erscheint das MEDION Logo auf dem Bildschirm. Die Taste Standby/On am Gerät leuchtet blau.
Um das Gerät in den Stand-by-Modus zu schalten, drücken Sie die Taste
Standby/On auf der Fernbedienung oder am Gerät. Die Taste
Standby/On am Gerät leuchtet im Standby-Modus rot.
Drücken Sie die Taste Standby/On auf der Fernbedienung oder die Taste Standby/On am Gerät erneut, um das Gerät aus dem Standby-Modus
heraus einzuschalten.
FR
GPL
HINWEIS!
Die Fernbedienung muss auf den Lifesmart TV gerichtet sein, wenn Sie das Gerät über die Taste Standby/
On ein oder ausschalten wollen. Alle anderen Funktionen
werden über Funk übertragen und die Fernbedienung
muss hierfür nicht auf den Lifesmart TV gerichtet sein.
21 von 198
86883 DE EN FR EComm RC1.indb 21
03.04.2013 13:05:21
Betrieb
Lifesmart TV
9.2. Erstinbetriebnahme
Wenn Sie das Gerät zum ersten Mal in Betrieb nehmen, geben Sie zunächst
die gewünschte Menüsprache und das Land ein, in dem Sie sich befinden.
Wählen Sie den Eintrag NEXTaus, um den Lifesmart TV zu starten.
Das Hauptmenü erscheint.
9.3. Netzwerk einrichten
Nachdem Sie die Menüsprache und das Land ausgewählt haben, erscheint
das Menü Netzwerk-Einstellungen und der Lifesmart TV zeigt die verfügbaren Netzwerke für eine WLAN-Verbindung an.
Wenn eine Internetverbindung über ein bereits angeschlossenes LAN-Kabel besteht, ist der Lifesmart TV automatisch mit dem Netzwerk verbunden.
Wählen Sie in diesem Fall den Eintrag „über LAN (Ethernet-Kabel) mit
dem Netzwerk verbinden“ und klicken Sie, nachdem die Verbindung hergestellt wurde, auf „Weiter“.
HINWEIS!
Sie können das Menü Netzwerk-Einstellungen auch
über das Menü Einstellungen aufrufen ([Einstellungen] -> [Netzwerk-Einstellungen]). Wenn Sie eine LANVerbindung einrichten wollen, lesen Sie weiter im Abschnitt „„LAN-Verbindung einrichten“ auf Seite 25“.
22 von 198
86883 DE EN FR EComm RC1.indb 22
03.04.2013 13:05:22
Lifesmart TV
Betrieb
DE
WLAN-Verbindung einrichten
Wenn keine Netzwerkverbindung über das LAN-Kabel erkannt wurde, scannt
Ihr Lifesmart TV automatisch die verfügbaren WLAN-Netzwerke und zeigt
eine Liste der verfügbaren Netzwerke an.
EN
FR
HINWEIS!
Sie können die Suche nach verfügbaren WLAN-Netzwerken auch aufrufen, indem Sie im Eintrag Netzwerktyp WLAN auswählen. ([Netzwerktyp] -> [WLAN]).
GPL
Wählen Sie nun ihr WLAN-Netzwerk aus.
Nach dem Sie ihr WLAN-Netzwerk ausgewählt haben, erscheint die Aufforderung, das entsprechende Passwort für Ihr Netzwerk einzugeben.
23 von 198
86883 DE EN FR EComm RC1.indb 23
03.04.2013 13:05:23
Betrieb
Lifesmart TV
Klicken Sie in das Feld für das Passwort und geben Sie das Passwort über
die Bildschirmtastatur ein (siehe auch „10.3. Eingabe über die Bildschirmtastatur“ auf Seite 28).
Schließen Sie die Eingabe ab, indem Sie auf das ENTER-Symbol der Bildschirmtastatur klicken.
Das Lifesmart TV verbindet sich nun mit dem Internet.
Schlägt die Verbindung fehlt, erscheint die Aufforderung, das Passwort zu
überprüfen und die Verbindung erneut herzustellen.
Klicken Sie für die erneute Verbindung auf die Schaltfläche „Wiederholen“.
Nach erfolgreicher Verbindung mit dem Internet, klicken Sie auf die
Schaltfläche „Weiter“, um in das Hauptmenü zu gelangen.
24 von 198
86883 DE EN FR EComm RC1.indb 24
03.04.2013 13:05:28
Lifesmart TV
Betrieb
DE
Optional: DHCP Server ausschalten
Wenn Ihr Lifesmart TV keine IP-Adressen automatisch von Router beziehen kann, stellen Sie die Option DHCP auf AUS.
Geben Sie im anschließenden Dialogfenster eine statische IP-Adresse,
eine Subnetzmaske, den DNS-Server und einen Gateway für die Internetverbindung ein. Der Lifesmart TV meldet sich dann mit dieser statischen
IP-Adresse im Netzwerk an.
EN
FR
LAN-Verbindung einrichten
Nach erfolgreicher Verbindung mit dem Internet, klicken Sie auf die
Schaltfläche „Weiter“ um in das Hauptmenü zu gelangen.
Optional: DHCP Server ausschalten
Wenn Ihr Lifesmart TV keine IP-Adressen automatisch von Router beziehen kann, stellen Sie die Option DHCP auf AUS.
Geben Sie im anschließenden Dialogfenster eine statische IP-Adresse,
eine Subnetzmaske, den DNS-Server und einen Gateway für die Internetverbindung ein. Der Lifesmart TV meldet sich dann mit dieser statischen
IP-Adresse im Netzwerk an.
GPL
Wenn Sie die Internet-Verbindung über eine LAN-Verbindung nachträglich einrichten wollen, schließen Sie das mitgelieferte LAN Kabel an Ihren
Lifesmart TV und eine RJ45-Netzwerksteckdose bzw. Ihren Router an.
Der Lifesmart TV ist automatisch mit dem Internet verbunden, wenn eine
Internetverbindung über die Netzwerkverbindung erkannt wurde.
25 von 198
86883 DE EN FR EComm RC1.indb 25
03.04.2013 13:05:33
Betrieb
Lifesmart TV
9.4. Hauptmenü
1
2 3 4 5 6
7
8
9
10
14
11
13
1)
2)
3)
4)
5)
6)
7)
8)
9)
10)
11)
12)
13)
14)
12
Uhrzeit und Datum
LAN-Status (klicken Sie auf dieses Symbol, um die Netzwerk-Einstellungen aufzurufen)
WLAN-Status (klicken Sie auf dieses Symbol, um die Netzwerk-Einstellungen aufzurufen)
HDMI-Status (klicken Sie auf dieses Symbol, um die TV-Modus-Einstellungen aufzurufen)
USB Anzeige (erscheint weiß bei angeschlossenem Speichermedium)
Anzeige SD/SDHC-Speicherkarte (erscheint weiß bei angeschlossenem Speichermedium)
Internetbrowser aufrufen
Mediaplayer aufrufen
MEDION Mediathek aufrufen
YouTube aufrufen
Anzeige des Wetters am eingestellten Standort
Geräteeinstellungen aufrufen
App-Manager aufrufen
Favoritenvorschau
26 von 198
86883 DE EN FR EComm RC1.indb 26
03.04.2013 13:05:35
Lifesmart TV
Bedienung
DE
10. Bedienung
EN
10.1. Lautstärke einstellen
Drücken Sie die Tasten
/
auf der Fernbedienung, um die Lautstärke zu verringern/erhöhen. Die Lautstärkeeinstellung wird auf dem
Bildschirm eingeblendet.
FR
10.2. Navigation in den Menüs
GPL
Neben der Gestensteuerung können Sie auch über die Tasten der Fernbedienung in den Menüs navigieren.
Mit den Navigationstasten wählen Sie Menüpunkte aus und
verändern Sie Werte in den Menüs.
Drücken Sie die Taste OK oder die Cursortaste, um einen Menüpunkt zu
bestätigen.
Bewegen Sie den Finger kreisförmig über den Ring der Navigationstasten, um einen Bildlauf nach unten und oben auszuführen. (z. B. auf Webseiten).
Mit der Taste
RETURN gelangen Sie eine Menüebene zurück.
Über die Taste HOME gelangen Sie aus jeder Einstellung/Anwendung
heraus zurück zum Hauptmenü.
27 von 198
86883 DE EN FR EComm RC1.indb 27
03.04.2013 13:05:36
Bedienung
Lifesmart TV
10.3. Eingabe über die Bildschirmtastatur
In einigen Menüs wird für die Eingabe von Text eine Tastatur auf dem Bildschirm eingeblendet:
Wählen Sie Zeichen aus und drücken Sie die Taste OK oder die Cursortaste, um es in die Textzeile einzugeben.
Über das Feld ?123 wechseln Sie zur Auswahl der Zahlen und Sonderzeichen. Über das Feld ABC gelangen Sie zurück zur Buchstabenauswahl.:
Klicken Sie auf das nun erscheinende Feld ~\{, um weitere Sonderzeichen einzublenden. Über das Feld ABC gelangen Sie zurück zur Buchstabenauswahl.
Wählen Sie das ENTER Symbol oder klicken Sie auf einen Bereich außerhalb der Tastatur, um die Bildschirmtastatur zu schließen und wieder in
das Menü zu wechseln.
28 von 198
86883 DE EN FR EComm RC1.indb 28
03.04.2013 13:05:37
Lifesmart TV
Spracheingabe über Mikrofon
DE
11. Spracheingabe über Mikrofon
Sie können Suchbegriffe über das Mikrofon der Fernbedienung eingeben,
um eine Internetsuche zu starten.
An den meisten Stellen, an denen Sie mit der Bildschirmtastatur Text eingeben können, können Sie den Text auch diktieren.
EN
FR
HINWEIS!
Die Spracheingabe steht nicht bei allen Applikationen
zur Verfügung.
GPL
Klicken Sie auf ein Textfeld oder eine Stelle in dem Text, der bereits in ein
Textfeld eingegeben wurde.
Halten Sie die Mikrofontaste gedrückt.
Es erscheint das Fenster zur Spracheingabe.
Sprechen Sie den Text ein und lassen Sie anschließend die Mikrofontaste los.
• Bei der Sprachsuche im Hauptmenü öffnet sich der
Internetbrowser und es wird die Google-Suche Ihres eingegebenen Begriffs angezeigt.
• Bei der Spracheingabe in einem anderen Menü
oder einer Anwendung klicken Sie auf das Fenster
des Menüs/der Anwendung, um die Begriffe zu verwenden.
Kann der gesprochene Befehl nicht eindeutig interpretiert werden, erscheint ein Auswahlfenster mit möglichen Ergebnissen:
Wählen Sie das zutreffende Wort aus, um es zu verwenden.
Sollte kein Treffer Ihrer Eingabe entsprechen, drücken Sie die Taste
RETURN, um eine neue Spracheingabe auszuführen.
29 von 198
86883 DE EN FR EComm RC1.indb 29
03.04.2013 13:05:40
Spracheingabe über Mikrofon
Lifesmart TV
HINWEIS!
Die Spracheingabe verwendet
den Spracherkennungsdienst von
Google. Der Lifesmart TV benötigt
eine Internetverbindung, damit Sie diese verwenden können. Sollte der Server des Spracherkennungsdienstes nicht erreichbar sein
oder Fehler bei der Internetverbindung auftreten, erscheint ein entsprechender Hinweis,
dass keine Sprachdaten erkannt wurden.
Stellen Sie in diesem Fall die Internetverbindung erneut her
oder starten Sie den Lifesmart TV erneut, indem Sie ihn aus- und
anschließend wieder einschalten.
11.1. Einstellungen für die Spracheingabe
Klicken Sie auf das Werkzeugsymbol oben rechts im Fenster der Spracheingabe.
Im folgenden Fenster können Sie nun Einstellungen für die Spracheingabe
vornehmen:
Sprache
Hier stellen Sie die Sprache ein, in der die Spracherkennung Begriffe zur Verfügung stellen soll.
Safe Search
Stellen Sie den Safe Search Filter ein, um anstößige Ergebnisse bei den Suchergebnissen der Google Suche herauszufiltern.
Anstößiges blockieren
Setzen Sie hier einen Haken in das rechte Feld, damit anstößige Begriffe für
die Spracherkennung blockiert werden.
30 von 198
86883 DE EN FR EComm RC1.indb 30
03.04.2013 13:05:42
Lifesmart TV
Favoritenansicht
DE
12. Favoritenansicht
Klicken Sie im Hauptmenü auf die Voransicht einer Webseite, um sie direkt mit dem Internetbrowser zu öffnen.
EN
FR
12.1. Favoritenansicht bearbeiten
Sie können die Vorschau der Webseiten in der Favoritenansicht bearbeiten, indem Sie den Cursor über eine Webseitenvorschau bewegen und
anschließend die Taste Favoriten drücken.
GPL
Geben Sie im anschließenden Menü entweder die Webadresse der Internetseite an, die in der Vorschau erscheinen soll, oder wählen Sie eine Internetseite aus der Liste der zuletzt aufgerufenen Webseiten aus.
31 von 198
86883 DE EN FR EComm RC1.indb 31
03.04.2013 13:05:44
Wetteranzeige im Hauptmenü
Lifesmart TV
13. Wetteranzeige im Hauptmenü
Im Hauptmenü wird bei bestehender Internetverbindung die Wetterlage am
Standort über denn Accu Weather Wetterdienst zur Verfügung gestellt.
13.1. Standorteinstellung für Accu Weather
Bei der ersten Inbetriebnahme ist noch kein Standort eingetragen, für den
die Wetterlage angezeigt werden soll.
Klicken Sie auf das Zahnradsymbol, um die Standorteinstellung aufzurufen.
Stimmen Sie der Lizenzvereinbarung zu.
Die Bildschirmtastatur wird eingeblendet.
Geben Sie im oberen Dialogfenster eine Stadt für die Anzeige der Wetterlage an oder wählen Sie das Mikrofonsymbol , um den Namen der Stadt
über das Mikrofon der Fernbedienung ein.
32 von 198
86883 DE EN FR EComm RC1.indb 32
03.04.2013 13:05:48
Lifesmart TV
Wetteranzeige im Hauptmenü
Bestätigen Sie die Eingabe mit der ENTER Taste auf der Bildschirmtastatur
oder mit dem Feld im Dialogfenster.
DE
EN
FR
HINWEIS ZUM EINTRAG „GPS“
Da die Software Ihres Lifesmart TV auf dem Betriebssystem Android basiert, wird in dieser Einstellung
standardmäßig die Standortangabe über GPS angezeigt. Da Ihr Lifesmart TV jedoch über keinen GPS
Empfänger verfügt, hat diese Option keine Funktion.
GPL
Es erscheint gegebenenfalls eine Liste, in der Sie die Angabe der Stadt näher
eingrenzen können.
Wählen Sie die zutreffende Angabe der Stadt aus.
Die Stadt wird nun in der Liste der Standorte als erster Eintrag angezeigt.
Wählen Sie den Eintrag „Standort hinzufügen“, um weitere Städte zu
der Liste der Standorte hinzuzufügen.
Markieren Sie die Standorte, deren Wetterlage Sie anzeigen wollen, indem Sie einen Haken in das Feld neben dem Standortnamen setzen.
Verlassen Sie die Einstellung, indem Sie auf das Feld „Exit“ klicken.
33 von 198
86883 DE EN FR EComm RC1.indb 33
03.04.2013 13:05:50
Wetteranzeige im Hauptmenü
Lifesmart TV
13.2. Erweiterte Wetteranzeige
Klicken Sie im Hauptmenü auf die Darstellung der Wetterlage, um die erweiterte Wetteranzeige aufzurufen.
Zusätzlich zur Temperatur und Wetterlage werden hier umfangreiche Angaben wie z. B. Luftfeuchte, Luftdruck und viele weitere Informationen für den
Standort angezeigt.
Über die Menüleiste am oberen Bildrand können Sie weitere Einstellungen
vornehmen:
1
2
3
4
5
12
11
10
9
8
7
6
1)
2)
3)
4)
5)
Pulldown Menü - Klicken Sie auf dieses Feld, um das Menü auszuklappen. Einträge, die Sie hier auswählen, erscheinen künftig beim Aufruf
der erweiterten Wetteranzeige.
Aktualisieren - Klicken Sie auf dieses Feld, um die Wetterdaten für den
Standort erneut zu laden
Da die Software Ihres Lifesmart TV auf dem Betriebssystem Android
basiert, wird in dieser Einstellung standardmäßig die Standortangabe
über GPS angezeigt. Da Ihr Lifesmart TV jedoch über keinen GPS Empfänger verfügt, hat diese Option keine Funktion.
Standorte - Hier können Sie die Liste der Standorte am linken Bildschirmrand einblenden. Über die Liste können Sie einen neuen Standort hinzufügen oder auf einen Standort in der Liste klicken, dessen
Wetterdaten im Hauptfenster angezeigt werden sollen.
Präferenzen - Hier können Sie die Einstellungen zu Accu Weather am
linken Bildschirmrand einblenden. In den Einstellungen können Sie
die Einheiten und Formatierungen für Temperatur, Geschwindigkeit,
Niederschlagshöhe (Messwert), Zeitformat und Datumsanzeige än-
34 von 198
86883 DE EN FR EComm RC1.indb 34
03.04.2013 13:05:51
Lifesmart TV
6)
7)
8)
9)
10)
11)
dern. Außerdem können Sie die Informationen zu Servicekontakt und
Lizenzbedingungen von Accu Weather einsehen.
Neuigkeiten - Aktuelle Nachrichten aus dem Themenbereich „Wetter“
anzeigen.
Videos - Aktuelle Videos zur weltweiten Wetterlage anzeigen und aufrufen.
Lifestyle - Angaben zu wetterabhängigen Aktivitäten und Lebenslagen anzeigen.
Karten - Wenn Kartenanimationen zu Niederschlagsradar oder anderen Wetterereignissen zum aktuellen Standort vorliegen, können Sie
diese hier abspielen. Klicken Sie zur Wiedergabe der Animation auf
das Feld .
15-Tage-Vorhersage - Die Wettervorhersage für die nächsten 15 Tage
anzeigen. Klicken Sie auf ein Datum, um die detaillierte Wettervorhersage zu diesem Datum im rechten Fenster anzuzeigen.
Stündlich - Die Wettervorhersagen für jede einzelne der nächsten 24
Stunden anzeigen.
Aktuelle Bedingungen - Die aktuelle Wetterlage am Standort anzeigen.
DE
EN
FR
GPL
12)
Wetteranzeige im Hauptmenü
35 von 198
86883 DE EN FR EComm RC1.indb 35
03.04.2013 13:05:53
Internet Browser
Lifesmart TV
14. Internet Browser
Klicken Sie auf das Symbol Internet, um den Internetbrowser zu öffnen.
Verwenden Sie den Browser, wie Sie es vom Browser an einem Computer
gewohnt sind.
• Wenn Sie die Cursortaste der Fernbedienung gedrückt halten, können
Sie durch Auf und Ab-Bewegungen innerhalb der Seite rollen.
• Sie können auch mit dem Scrollrad die Anzeige einer Webseite nach oben
und unten rollen.
• Mit einem Doppelklick der Cursortaste können Sie innerhalb des
Browsers hinein- bzw. herauszoomen.
14.1. Bedienelemente im Browser
1 2 3
1)
2)
3)
4)
5)
6)
7)
8)
4
5 6 7
8
Eine Seite zurück im Browserverlauf
Eine Seite vorwärts im Browserverlauf
Seite aktualisieren
Webadresse
Seite zu Favoriten hinzufügen
Auf Seite suchen
Lesezeichen, Gespeicherte Seiten und Verlauf aufrufen
Browseroptionen aufrufen (siehe folgender Abschnitt)
36 von 198
86883 DE EN FR EComm RC1.indb 36
03.04.2013 13:05:53
Lifesmart TV
Internet Browser
DE
Browseroptionen
Sie können die Browseroptionen aufrufen, indem Sie auf das Symbol in
der rechten oberen Ecke klicken.
EN
FR
Aktualisieren
Die aktuelle Webseite neu laden
Vorwärts
Im Verlauf eine Seite vorwärts.
Seitenlink teilen
Diese Funktion ist an Ihrem Lifesmart TV nicht verfügbar.
Suchen
Die aktuelle Seite nach Begriffen durchsuchen.
Desktop-Version
Zur Desktop-Version der Webseite wechseln.
GPL
Für Offline-Lesen speichern
Klicken Sie auf diesen Eintrag, um die aktuelle Webseite zu speichern.
Seiteninfo
Webadresse und Titel der Webseite anzeigen.
Einstellungen
Das Einstellmenü des Internetbrowsers aufrufen.
37 von 198
86883 DE EN FR EComm RC1.indb 37
03.04.2013 13:05:53
Media Player
Lifesmart TV
15. Media Player
Wenn Sie den Media Player das erste Mal starten, erscheint ein Kurzanleitung
zum Media Player. Diese Kurzanleitung können Sie bei jedem Start anzeigen
lassen oder Sie deaktivieren die Kurzanleitung unten links in der Ecke mit
dem Kontrollkästchen „Beim Start anzeigen“.
Sie können die Kurzanleitung zu jedem Zeitpunkt über das X in der rechten
oberen Ecke schließen.
HINWEIS!
Wenn Sie eine Medienquelle aus dem Netzwerk auswählen, werden die Daten dieser Quelle sofort eingelesen.
Dieser Vorgang kann einige Zeit dauern. Der Ladevorgang wird über das Symbol „Aktualisieren “ angezeigt.
Über das Media Player Symbol in der linken oberen Ecke gelangen Sie wieder
zum Startbildschirm.
Wählen Sie aus, welche Medien Sie wiedergeben wollen (Musik, Video
oder Fotos).
38 von 198
86883 DE EN FR EComm RC1.indb 38
03.04.2013 13:05:56
Lifesmart TV
Media Player
DE
15.1. Eigene Quellen
EN
FR
GPL
Über die Schaltfläche „Eigene Quellen“ können Sie einstellen, welche Medienquellen zur Auswahl von Mediendateien verwendet werden sollen.
• Unter LOKAL erscheinen alle direkt an den Lifesmart TV angeschlossenen
USB-Datenträger oder Speicherkarten. Dabei werden alle Datenträger mit
„USB“ (in der Reihenfolge, wie sie angeschlossen wurden) bezeichnet.
• Unter NETZWERK werden die über das Netzwerk verfügbaren Medienquellen angezeigt.
Aktivieren Sie das Kontrollkästchen links neben einer Medienquelle aus
dem Netzwerk, damit die Mediendateien dieser Quelle für die Anzeige
von verfügbaren Medieninhalten auf dem Lifesmart TV berücksichtigt
werden.
39 von 198
86883 DE EN FR EComm RC1.indb 39
03.04.2013 13:05:58
Media Player
Lifesmart TV
15.2. Wiedergabe
•
Je nach Medientyp stehen Ihnen verschiedene Sortier- und Anzeigeoptionen zur Verfügung, z. B. Alle (Lieder); Ordner/Alben; Datum; Wiedergabelisten oder Bewertung.
Wählen Sie das gewünschte Medium über eine der Optionen aus und
starten Sie die Wiedergabe.
15.3. Erweiterte Bedienung
Klicken Sie auf das Symbol in der rechten oberen Ecke des Bildschirms,
um folgende Optionen für den Mediaplayer zu öffnen:
Wiedergabelisten anlegen
Wählen Sie den Medientyp aus, für den Sie eine Wiedergabeliste erstellen wollen.
Klicken Sie auf den Eintrag „Neue Wiedergabeliste“ um eine Wiedergabeliste zu erstellen.
Geben Sie im anschließenden Dialog einen Namen für die Liste an und klicken
Sie auf OK.
Wählen Sie nun verschiedene Titel, die Sie zur Wiedergabeliste hinzufügen wollen, an, indem Sie einen Haken in das Kästchen rechts neben jedem Titel setzen.
Um die Einstellung der Wiedergabeliste abzuschließen, klicken Sie auf den Eintrag „Wiedergabeliste speichern“ am oberen Bildschirmrand.
Wiedergabeliste aufrufen:
Wählen Sie den Medientyp aus, für den Sie eine Wiedergabeliste öffnen wollen.
Klicken Sie auf den Eintrag „Wiedergabeliste“ um eine Wiedergabeliste zu
öffnen.
40 von 198
86883 DE EN FR EComm RC1.indb 40
03.04.2013 13:06:01
Lifesmart TV
Media Player
DE
Wiedergabeliste löschen
Sobald Wiedergabelisten angelegt sind, erscheint der Eintrag Wiedergabeliste löschen.
Wählen Sie anschließend die Wiedergabeliste aus, die Sie löschen wollen
und wählen Sie den Eintrag „Fertig“ am oberen Bildschirmrand.
Bestätigen Sie mit „OK“, um die Wiedergabe zu löschen.
EN
FR
Suchen
Über den Eintrag Suchen können Sie die aktuelle Medienansicht nach
Schlagworten durchsuchen.
Geben Sie das Schlagwort, nach dem Sie suchen wollen über die Bildschirmtastatur ein.
Der Lifesmart TV sucht nun nach verfügbaren Medieninhalten, die das von
Ihnen angegebene Schlagwort enthalten.
Unter der Eingabezeile erscheinen die Treffer.
Wählen Sie eine Datei aus den Treffern aus, um die Wiedergabe direkt zu
starten.
HINWEIS!
Sie können auch über die Spracheingabe nach Medien suchen.
Einstellungen
Hier können Sie folgende Einstellungen für den Mediaplayer vornehmen:
Allgemeine Einstellungen
Hier können Sie die Anzeige des Lernprogramms einstellen bzw. das Lernprogramm starten.
Dienste
Fotos
Hier können Sie die Anzeigedauer und das Design der Übergänge für die Diashow von Fotos ändern.
GPL
Hier können Sie den Namen des Lifesmart TV für den DLNA Medienserver
und DLNA-Medienrenderer ändern.
Informationen
Hier können Sie die Lizenzinformationen zum Mediaplayer einsehen.
Mediaplayer beenden
Beendet den Mediaplayer und zeigt das Hauptmenü an.
41 von 198
86883 DE EN FR EComm RC1.indb 41
03.04.2013 13:06:03
Mediathek/Portal
Lifesmart TV
16. Mediathek/Portal
Im Portal erscheinen ausgewählte Medieninhalte die von MEDION und über
Apps für ihr Lifesmart TV bereitgestellt werden. Hier können Sie zahlreiche
Videoclips und TV-Kanäle aus dem Internet wiedergeben, welche für Sie sortiert wurden und ständig aktualisiert werden. Legen Sie Favoriten an und finden Sie so einzelne Beiträge bequem per Suchfunktion wieder. Ebenso können Sie hier Anwendungen sozialer Netzwerke wie Twitter oder Facebook als
App aufrufen.
16.1. Funktionen des Portals
1 2
3
4
10
9
1)
2)
3)
4)
5)
6)
7)
8)
8
7
6
5
Neue Apps - Die Medieninhalte anzeigen, die erst kürzlich in das Medienportal aufgenommen wurden.
Empfohlene Apps - Die Medieninhalte anzeigen, die für das Medienportal empfohlen sind.
Beliebte Apps - Die Medieninhalte anzeigen, die von den meisten
der anderen Lifesmart TV Nutzer verwendet werden.
In dieser Spalte erscheinen von MEDION bereitgestellte Informationen
und Hinweise auf Updates.
Impressum - Das Impressum zum Medienportal anzeigen.
Hilfe - Eine Hilfeseite zur Verwendung des Medienportals aufrufen.
Einstellungen - In den Einstellungen können Sie auswählen, in welcher Sprache die Medieninhalte angezeigt werden sollen.
Favorit hinzufügen - Wählen Sie mit den Navigationstasten einen
42 von 198
86883 DE EN FR EComm RC1.indb 42
03.04.2013 13:06:03
Lifesmart TV
9)
10)
Mediathek/Portal
Medieninhalt aus und klicken Sie anschließend auf diesen Eintrag, um
den ausgewählten Inhalt zur Favoritenliste hinzuzufügen.
Anmelden - Wählen Sie diesen Eintrag, um sich mit ihrem Benutzernamen am Medienportal anzumelden (Siehe „16.2. Lifesmart TV online
registrieren“ auf Seite 44).
Rubriken - Über die Rubriken wählen Sie die Medieninhalte nach
Themen sortiert aus. Die jeweils aktive Rubrik erscheint in der Mitte
der Spalte.
In den Rubriken Unterhaltung, Musik, Sport, Video und Nachrichten
finden Sie Videoclips und Internet TV-Kanäle.
In der Rubrik Info finden Sie zusätzlich soziale Netzwerke wie Twitter
oder Facebook als App.
DE
EN
FR
Navigationstasten verwenden
In einigen Apps funktioniert die Auswahl der Medieninhalte über die Navigationstasten . Weitere Hinweise zur Steuerung finden Sie
meistens im Hilfemenü der jeweiligen App.
Favoriten erstellen
Sie können Medieninhalte als Favoriten ablegen.
Wählen Sie dazu mit den Navigationstasten einen Medieninhalt aus (blaue Markierung) und klicken Sie anschließend auf den unten
eingeblendeten Eintrag „Favorit hinzufügen“.
Der Medieninhalt wird der Favoritenliste hinzugefügt und wird anschließend
in der Rubrik „Favoriten“ angezeigt.
Um einen Favoriten wieder zu löschen, wählen Sie das enstprechende Feld
mit den Navigationstasten in der Favoritenliste aus und klicken Sie
anschließend auf den unten eingeblendeten Eintrag „Favorit löschen“.
HINWEIS!
Um Favoriten anlegen zu können, müssen Sie als Benutzer am
Medienportal angemeldet sein (Siehe „16.2. Lifesmart TV online
registrieren“ auf Seite 44).
GPL
Favoriten löschen
43 von 198
86883 DE EN FR EComm RC1.indb 43
03.04.2013 13:06:05
Mediathek/Portal
Lifesmart TV
16.2. Lifesmart TV online registrieren
Sie können Ihren Lifesmart TV online registrieren.
Besuchen Sie dazu die Internetseite
„http://medion.fxmconnect.com“ und legen Sie ein Benutzerprofil an.
• In ihrem Benutzerkonto können Sie nun Internetadressen als Lesezeichen
speichern bzw. Ihr Facebook- oder Twitter-Konto mit dem Lifesmart TV
verbinden
• Nachdem Sie ein Benutzerkonto bei fxmconnect angelegt haben, können
Sie sich mit Ihrem Benutzernamen und Passwort am Lifesmart TV anmelden:
Klicken Sie in der Oberfläche des Portals auf den Eintrag „Anmelden“ am
unteren Bildschirmrand.
1)
Klicken Sie auf das Feld „Benutzer hinzufügen“.
44 von 198
86883 DE EN FR EComm RC1.indb 44
03.04.2013 13:06:05
Lifesmart TV
2)
3)
Mediathek/Portal
Wenn Sie bereits über ein Benutzerkonto bei fxmconnect verfügen,
klicken Sie auf den Eintrag „Verbinden“.
Geben Sie anschließend Ihre Zugangsdaten an und klicken Sie auf
„Übernehmen“.
Wenn noch kein Benutzerkonto bei fxmconnect angelegt haben, wählen Sie im Schritt 1 den Eintrag „Registrieren“, um im anschließenden Dialog unter Angabe einer EMail-Adresse einen Benutzernamen,
ein Passwort, sowie einen TV-PIN anzulegen.
5)
Wählen Sie anschließend den Eintrag „Weiter“.
EN
FR
GPL
4)
DE
45 von 198
86883 DE EN FR EComm RC1.indb 45
03.04.2013 13:06:08
Mediathek/Portal
Lifesmart TV
6)
Bestätigen Sie die Lizenzvereinbarung.
7)
Sie erhalten eine Mail mit einem Bestätigungslink an die von Ihnen
angegebene EMail-Adresse.
8)
Bestätigen Sie den Link in Ihrem EMail-Account und klicken Sie anschließend am Lifesmart TV auf den Eintrag „Login“.
46 von 198
86883 DE EN FR EComm RC1.indb 46
03.04.2013 13:06:08
Lifesmart TV
9)
YouTube
Geben Sie anschließend Ihre Zugangsdaten an und klicken Sie auf
„Übernehmen“.
DE
EN
FR
17. YouTube
GPL
Über die YouTube App können Sie die YouTube Seite in einem Ihrem Lifesmart TV angepassten Format ansehen. Suchen Sie hier wie gewohnt nach Videos und verwenden Sie die Sortierfunktionen.
HINWEIS!
Zur Auswahl von YouTube-Inhalten können Sie auch die
Spracheingabefunktion nutzen.
47 von 198
86883 DE EN FR EComm RC1.indb 47
03.04.2013 13:06:09
Apps
Lifesmart TV
18. Apps
18.1. Auf dem Lifesmart TV installierte Apps
Wählen Sie den Eintrag Apps aus, um die auf dem Lifesmart installierten
Apps anzuzeigen.
Wählen Sie eine App aus, um sie direkt zu öffnen und zu verwenden.
18.2. Market
Hier können Sie weitere Apps für Ihren Lifesmart TV aussuchen und installieren.
HINWEIS!
Dieses Angebot ist exklusiv für Ihren Lifesmart TV zusammengestellt und ist kein Bestandteil von
Google Play!
48 von 198
86883 DE EN FR EComm RC1.indb 48
03.04.2013 13:06:09
Lifesmart TV
Apps
18.3. Apps von externen Datenträgern installieren
Um Apps auf dem Lifesmart TV zu installieren, die als .apk Datei auf einem
externen Datenträger vorliegen, schließen Sie den externen Datenträger an
den Lifesmart TV an.
Öffnen Sie den Easy App Installer, den Sie unter den bereits installierten
Apps finden.
Der Easy App Installer listet alle .apk Dateien auf, die auf Datenträgern erkannt wurden.
DE
EN
FR
GPL
Wählen Sie die .apk Datei der Anwendung (hier im Beispiel Skype) aus, die
Sie installieren wollen.
Klicken Sie anschließend auf „Installieren“.
Es erscheint eine Übersicht der Dienste, auf die die App, die Sie installieren
wollen, zugreifen wird.
Bestätigen Sie das Fenster, indem Sie auf „Installieren“ klicken.
49 von 198
86883 DE EN FR EComm RC1.indb 49
03.04.2013 13:06:10
Apps
Lifesmart TV
Die App wird installiert.
Wenn die App erfolgreich installiert wurde erscheint folgendes Fenster:
Wählen Sie „Fertig“ aus, um zurück zum App-Menü zu gelangen oder
wählen Sie „Öffnen“ aus, um die installierte App direkt zu öffnen.
HINWEIS!
Bitte beachten Sie, dass Sie aufgrund der Vielzahl von
unterschiedlichen Apps nicht jede App auf dem Lifesmart TV installieren können! Sollte es bei der Installation einer App zu Fehlern kommen, erscheint eine
entsprechende Fehlermeldung (z. B. „App nicht installiert“).
50 von 198
86883 DE EN FR EComm RC1.indb 50
03.04.2013 13:06:15
Lifesmart TV
Apps
DE
18.4. Entfernen
Wählen Sie hier eine App aus, die Sie dauerhaft vom System entfernen wollen, indem Sie auf das Icon der App klicken.
EN
FR
GPL
HINWEIS!
Die App wird sofort nach dem Klicken auf das Icon der
App entfernt und kann anschließend nicht wiederhergestellt werden!
Die folgenden Systemapps können nicht gelöscht
werden:
- Accu Weather
- Aqua Mail
- Easy App Installer
- HRS Hotels
- n-tv Mobil
- Rechner
- Uhr
51 von 198
86883 DE EN FR EComm RC1.indb 51
03.04.2013 13:06:19
Menü Einstellungen
Lifesmart TV
19. Menü Einstellungen
19.1. Systemeinstellungen
Sprache
Stellen Sie hier die Menüsprache ein.
Zeitzone
Stellen Sie hier die Zeitzone ein, in der Sie sich befinden. Über die Option
[Auto] können Sie die Uhrzeit über das Internet anpassen.
Die Zeitzone wird mit der Abweichung in Stunden von der koordinierten
Weltzeit (UTC, von englisch Coordinated Universal Time) dargestellt. In Klammern sind die Abkürzungen der Zeitzonen angeben. Wählen Sie für Mitteleuropa die Einstellung UTC +01 (CET, MEZ).
Sommerzeit
Schalten Sie hier die Sommerzeit ein bzw. aus.
HINWEIS!
Wenn Sie die Uhrzeit über das Internet abrufen, wird
auch die Sommerzeit automatisch eingestellt und
diese Auswahl bleibt ohne Funktion.
Zeigergeschwindigkeit
Hier können Sie die Zeigergeschwindigkeit des Mauscursors einstellen.
52 von 198
86883 DE EN FR EComm RC1.indb 52
03.04.2013 13:06:19
Lifesmart TV
Menü Einstellungen
DE
Freier Speicher
Rufen Sie hiermit eine Übersicht des freien Speichers auf. Angezeigt werden
der interne Speicher sowie alle angeschlossenen Speichermedien.
EN
FR
Automatische Abschaltung
Wählen Sie hier die nach welcher Zeitspanne das Gerät automatisch abschaltet.
USB-Ladefunktion im Standbymodus
Stellen Sie diese Funktion auf EIN, wenn die Fernbedienung auch im
Standbymodus über den USB-Anschluss geladen werden soll.
HINWEIS!
In dieser Einstellung verbraucht das Gerät im Standbymodus mehr Strom!
Im Auslieferungszustand ist diese Funktion auf AUS eingestellt. Die Fernbedienung wird bei dieser Einstellung nicht geladen, wenn sich das Gerät
im Standbymodus befindet.
Auf Werkseinstellungen zurücksetzen
Wählen Sie diesen Eintrag aus, um das Gerät auf die Werkseinstellungen
zurückzusetzen.
Bestätigen Sie dazu die anschließende Abfrage mit OK.
Das Gerät wird in den Auslieferungszustand zurückversetzt.
GPL
ACHTUNG!
Alle auf dem Gerät gespeicherten Daten und die Nutzereinstellungen werden bei diesem Vorgang gelöscht.
53 von 198
86883 DE EN FR EComm RC1.indb 53
03.04.2013 13:06:22
Menü Einstellungen
Lifesmart TV
19.2. Anzeige-Einstellungen
TV-System
Stellen Sie hier die TV-Auflösung ein.
Video Size
Hier können Sie die Bildgröße auf die Anzeige an Ihr Ausgabegerät anpassen.
Sollte das Bild an den Rändern beschnitten sein, stellen Sie hier eine andere
Größe, z. B. 90% ein.
HDMI Audio Mode
Stellen Sie hier das Signal für die Audioausgabe über den HDMI-Anschluss
ein:
PCM-STEREO
Es wird ein Stereoton ausgegeben. Wählen Sie diese Einstellung, wenn der
Klang nur über zwei Lautsprecher ausgegeben wird.
PASS-Thru
Wählen Sie diese Einstellung, wenn das Gerät an einen Dolby- oder dts-fähigen Decoder angeschlossen ist.
54 von 198
86883 DE EN FR EComm RC1.indb 54
03.04.2013 13:06:22
Lifesmart TV
Menü Einstellungen
DE
SPDIF Mode
Stellen Sie hier das Signal für die Audioausgabe über den optischen SPDIFAnschluss ein:
PCM-STEREO
EN
FR
Es wird ein Stereoton ausgegeben. Wählen Sie diese Einstellung, wenn der
Klang nur über zwei Lautsprecher ausgegeben wird.
PASS-Thru
Wählen Sie diese Einstellung, wenn das Gerät an einen Dolby- oder dts-fähigen Decoder angeschlossen ist.
19.3. Netzwerk-Einstellungen
Wählen Sie hier aus, ob das Gerät mit einem LAN-Netzwerk oder einem
WLAN-Netzwerk verbunden werden soll (zur Einrichtung einer WLAN oder
LAN Verbindung siehe auch „9.3. Netzwerk einrichten“ auf Seite 22).
DHCP
GPL
Netzwerktyp
Wenn das Lifesmart TV eine IP-Adresse vom DHCP-Server des Netzwerks
erhalten soll, stellen Sie diese Funktion auf EIN.
Wenn Sie die Funktion auf AUS stellen, wird keine IP-Adresse über das
Netzwerk vergeben. Sobald Sie den Lifesmart TV mit einem Netzwerk verbinden, erscheint eine Abfrage, in der Sie eine feste IP-Adresse für das
Lifesmart TV vergeben können.
55 von 198
86883 DE EN FR EComm RC1.indb 55
03.04.2013 13:06:23
Menü Einstellungen
Lifesmart TV
Wlan suchen
Wählen Sie diesen Eintrag aus, um eine Liste der verfügbaren drahtlosen
Netzwerke anzuzeigen. Zur Einrichtung einer WLAN Verbindung siehe
auch „9.3. Netzwerk einrichten“ auf Seite 22.
19.4. Version
USB Upgrade
Wählen Sie diesen Eintrag aus, wenn Ihnen ein Firmware-Update auf einem
USB-Datenträger vorliegt.
Internet Upgrade
Wählen Sie diesen Eintrag aus, um nach einem verfügbaren Firmware-Update über das Internet zu suchen.
Aktuelle Version
Hier wird die Versionsnummer der aktuell installierten Firmware angezeigt.
Android Version
Hier wird die Versionsnummer des installierten Android-Betriebssystems angezeigt.
Linux Version
Hier wird die Versionsnummer des installierten Linux-Betriebssystems angezeigt.
Hardware Version
Hier wird die Versionsnummer der Hardware angezeigt.
56 von 198
86883 DE EN FR EComm RC1.indb 56
03.04.2013 13:06:23
Lifesmart TV
Problembehebung
DE
20. Problembehebung
Fehlfunktionen können manchmal einfache Ursachen haben, aber manchmal auch von defekten Komponenten ausgehen. Wir möchten Ihnen hiermit einen Leitfaden an die Hand geben, um das Problem zu lösen. Wenn die
hier aufgeführten Maßnahmen keinen Erfolg bringen, helfen wir Ihnen gerne
weiter. Rufen Sie uns an!
EN
FR
20.1. Fehlersuche
Allgemein
Das Gerät lässt sich nicht einschalten.
•
•
•
Schließen Sie den Netzadapter fest an die Netzsteckdose an.
Überprüfen Sie den Netzschalter auf der Geräterückseite.
Schließen Sie den Netzadapter an einer anderen Steckdose an.
Kein Bild.
•
•
•
Wählen Sie den richtigen Video-Eingangsmodus des Anzeigegeräts, so
dass das Bild des Lifesmart TVs angezeigt wird.
Videokabel fest anschließen.
Starten Sie das TV Gerät und das Lifesmart TV nach dem Anschließen neu.
Verzerrtes Bild.
•
•
•
Die wiedergegebene Datei wurde in einer anderen Farbnorm als der des
Anzeigegeräts aufgenommen.
Wählen Sie eine vom Anzeigegerät unterstützte Auflösung.
Verbinden Sie die Geräte mit neuen Kabeln.
•
•
•
Das Gerät befindet sich im Mute-Modus.
Audiokabel fest anschließen.
Für den Verstärker oder den Verstärkeranschluss wurde eine falsche Einstellung im Menü Anzeige-Einstellungen [SPDIF Mode] für die Eingangsquelle vorgenommen.
GPL
Kein Ton.
Die Fernbedienung funktioniert nicht richtig.
•
•
•
•
Die Fernbedienung ist zu weit vom Gerät entfernt.
Zwischen Fernbedienung und Gerät befindet sich ein Hindernis.
Die Akku der Fernbedienung ist schwach.
Koppeln Sie die Fernbedienung erneut (siehe 19)
57 von 198
86883 DE EN FR EComm RC1.indb 57
03.04.2013 13:06:24
Problembehebung
Lifesmart TV
Die Untertitelsprache lässt sich nicht ändern oder wird nicht angezeigt.
•
Die wiedergegebene Datei enthält keine Untertitel.
MP3-/WMA-/JPEG-/DivX-Dateien lassen sich nicht wiedergeben.
•
Die Dateien wurden in einem vom Gerät nicht unterstützten Format erstellt.
HINWEIS
Aufgrund der Vielzahl unterschiedlicher Codecs, kann die
Wiedergabe aller Formate nicht gewährleistet werden.
HDMI
Auf dem angeschlossenen HDMI-Wiedergabegerät wird kein Bild angezeigt.
•
•
•
•
HDMI-Kabel abziehen und wieder anschließen.
HDMI-Gerät aus- und wieder einschalten.
Der Videoeingang des angeschlossenen Fernsehgerätes bzw. Monitors
muss auf den Lifesmart TV eingestellt sein.
Das verwendete HDMI-Kabel muss voll HDMI-kompatibel sein. Bei Anschluss eines Nicht-Standard-Kabels wird u. U. kein Bild angezeigt.
Auf dem angeschlossenen HDMI-Wiedergabegerät wird kein Ton ausgegeben.
•
•
Einige HDMI-kompatible Geräte besitzen keine Tonausgabe (schlagen Sie
in der Bedienungsanleitung des angeschlossenen Gerätes nach).
Falls Ihr Ausgabegerät keinen Dolby- oder dts-fähigen Decoder besitzt,
stellen Sie im Menü Anzeige-Einstellungen die Option [HDMI Audio
Mode] auf [PCM Stereo] (siehe 54).
Zurücksetzen des Gerätes
•
Das Gerät arbeitet nicht störungsfrei.
Das Gerät kann wie folgt zurückgesetzt werden:
•
•
Rufen Sie das Menü „Systemeinstellungen/Auf Werkseinstellungen zurücksetzen“ auf.
Wählen Sie diesen Punkt aus und drücken Sie OK, um alle eingegebenen
Einstellungen zurückzusetzen und den Auslieferzustand des Gerätes wieder herzustellen.
58 von 198
86883 DE EN FR EComm RC1.indb 58
03.04.2013 13:06:24
Lifesmart TV
Benötigen Sie weitere Unterstützung?
DE
21. Benötigen Sie weitere Unterstützung?
Wenn die Vorschläge in den vorangegangenen Abschnitten Ihr Problem
nicht behoben haben, nehmen Sie bitte Kontakt mit uns auf. Sie würden uns
sehr helfen, wenn Sie uns folgende Informationen zur Verfügung stellen:
• Welche externen Geräte sind angeschlossen?
• Welche Meldungen erscheinen auf dem Bildschirm?
• Bei welchem Bedienungsschritt ist das Problem aufgetreten?
• Welche Schritte haben Sie zur Lösung des Problems bereits unternommen?
• Wenn Sie bereits eine Kundennummer erhalten haben, teilen Sie uns diese mit.
EN
FR
22. Reinigung
Die Lebensdauer des Gerätes können Sie durch folgende Maßnahmen verlängern:
• Ziehen Sie vor dem Reinigen immer den Netzadapter und alle Verbindungskabel.
• Verwenden Sie keine Lösungsmittel, ätzende oder gasförmige Reinigungsmittel.
• Reinigen Sie das Gerät mit einem weichen, fusselfreien Tuch.
Bitte bewahren Sie das Verpackungsmaterial gut auf und benutzen Sie ausschließlich dieses, um das Gerät zu transportieren.
GPL
ACHTUNG!
Es befinden sich keine zu wartenden oder zu reinigenden
Teile innerhalb des Gerätes.
59 von 198
86883 DE EN FR EComm RC1.indb 59
03.04.2013 13:06:24
Entsorgung
Lifesmart TV
23. Entsorgung
Verpackung
Ihr Gerät befindet sich zum Schutz vor Transportschäden in einer Verpackung. Verpackungen sind Rohstoffe und somit wiederverwendungsfähig oder können dem Rohstoffkreislauf zurückgeführt werden.
Gerät
Werfen Sie Ihr Gerät am Ende seiner Lebenszeit keinesfalls in
den normalen Hausmüll! Erkundigen Sie sich bei Ihrer Stadtoder Gemeindeverwaltung nach einer umwelt- und sachgerechten Entsorgung.
Akku
Verbrauchte Akkus gehören nicht in den Hausmüll. Die Akkus
können zur Entsorgung bei einer Sammelstelle für Altbatterien
oder im Fachhandel abgegeben werden.
60 von 198
86883 DE EN FR EComm RC1.indb 60
03.04.2013 13:06:24
Lifesmart TV
Technische Daten
DE
24. Technische Daten
EN
Gerät
Standby-Stromaufnahme:
Betriebssystem:
Abmessungen (B x H x T)
Gewicht
Betriebstemperatur
Luftfeuchtigkeit während des Betriebs
Lagerungstemperatur:
FR
<0,5 W
(Bei ausgeschalteter
USB-Ladefunktion)
Android 4.0
ca. 15,9 x 6,1 x 12 cm
ca. 400 g
5°C - 35°C
5 % - 65 %
-10°C - 60°C
Anschlüsse
Kartenleser:
USB 2.0 Anschlüsse:
an der Vorderseite/Rückseite:
LAN Anschluss:
HDMI®-Ausgang:
Digitaler optischer Audioausgang:
AV Ausgang:
DC IN Netzadapter Eingang:
für SD-, SDHCund microSD/SDHC-Speicherkarten
(bis 32 GB)
(USB-Datenträger/Laufwerke bis 2 TB)
RJ-45 Buchse
HDMI A-Buchse
S/PDIF Buchse für Toslink-Kabel
3,5 mm Stereo-Klinkenbuchse
12 V
1,5 A
Unterstützte Datei-Formate
Audio:
Foto:
Unterstützte Dateisysteme
Netzwerk:
WLAN-Verschlüsselung:
MPG, MPEG, AVI, WMV, MP4, MOV,
DAT, VOB, MKV, TS, 3GP, FLV
MP3, WMA, WAV, AAC, OGG
JPG, BMP, PNG, GIF
GPL
Video:
FAT16, FAT32, NTFS
LAN (10/100 mbit)
WLAN (IEEE 802.11 b/g/n)
WEP/WPA
61 von 198
86883 DE EN FR EComm RC1.indb 61
03.04.2013 13:06:24
Technische Daten
Lifesmart TV
Netzadapter
Stromversorgung
Ktec KSAS0241200150HE
Eingang (primär):
100-240 V ~ 50/60 Hz, 0,6 A
Ausgang (sekundär):
12 V
1,5 A
Kuantech Co., Ltd., China
Hersteller:
Fernbedienung
Akku
Typ:
Kapazität:
Hersteller:
AMP02
3,7 V
750mAh
Shenzhen Drawer Technology
Development Co LTD, China
Technische und optische Änderungen sowie Druckfehler
vorbehalten.
0560
®
HDMI, das HDMI Logo sowie High-Definition Multimedia
Interface sind eingetragene Warenzeichen der
HDMI Licensing LLC.
Hergestellt unter Lizenz von Dolby Laboratories.
Dolby und das Doppel-D-Symbol sind Warenzeichen
von Dolby Laboratories.
Hergestellt unter Lizenz der US-Patentnummern:
5,451,942; 5,956,674; 5,974,380; 5,978,762; 6,487,535 und
anderen in den USA oder international erteilten und
angemeldeten Patenten. DTS und das Symbol sind
eingetragene Marken, DTS 2.0+ Digital Out und die
DTS-Logos sind Marken von DTS, Inc. Das Produkt
enthält Software. © DTS, Inc. Alle Rechte vorbehalten.
Copyright © 2013 Alle Rechte vorbehalten.
Dieses Handbuch ist urheberrechtlich geschützt. Alle Rechte vorbehalten.
Vervielfältigung in mechanischer, elektronischer und jeder anderen Form
ohne die schriftliche Genehmigung des Herstellers ist verboten. Das Copyright liegt bei der Firma MEDION®.
62 von 198
86883 DE EN FR EComm RC1.indb 62
03.04.2013 13:06:25
DE
1.
2.
3.
4.
5.
6.
7.
8.
9.
10.
Notes on how to use these instructions ........................................ 65
1.1.
Proper use..................................................................................................66
Safety instructions.......................................................................... 67
2.1.
Keep electrical equipment out of reach of children ..................67
2.2.
General points..........................................................................................67
2.3.
Use of rechargeable batteries ............................................................68
2.4.
Set-up location ........................................................................................69
2.5.
Never attempt to repair the device! .................................................70
2.6.
Cleaning and care ...................................................................................70
2.7.
Data backup..............................................................................................70
2.8.
Power supply ............................................................................................71
Notes on conformity ....................................................................... 72
3.1. R&TTE conformity statement............................................. 72
Purchased parts package ............................................................... 73
General points................................................................................. 74
5.1.
Playable formats ......................................................................................74
5.2.
File systems ...............................................................................................74
5.3.
Indicator symbol .....................................................................................74
Product parts .................................................................................. 75
6.1.
Front ............................................................................................................75
6.2.
Rear ..............................................................................................................75
6.3.
Remote control ........................................................................................76
Start of operation ........................................................................... 78
7.1.
Connection process (rear)....................................................................78
7.2.
Connection process (front)..................................................................80
Using the gyro remote control....................................................... 81
8.1.
Switching the gyro remote control on and off.............................81
8.2.
Connecting the gyro remote control manually ...........................81
8.3.
Using the mouse function on the remote control ......................81
8.4.
Charging the gyro remote control....................................................82
Operation ........................................................................................ 83
9.1.
Switching on and off .............................................................................83
9.2.
Using the product for the first time .................................................84
9.3.
Network set-up ........................................................................................84
9.4.
Main menu ................................................................................................88
Operation ........................................................................................ 89
10.1. Volume setting.........................................................................................89
EN
FR
GPL
Table of contents
63 of 198
86883 DE EN FR EComm RC1.indb 63
03.04.2013 13:06:26
11.
12.
13.
14.
15.
16.
17.
18.
19.
20.
21.
22.
23.
24.
10.2. Navigating through the menus .........................................................89
10.3. Using the on-screen keyboard ...........................................................89
Using the microphone .................................................................... 91
11.1. Voice search settings .............................................................................92
View favourites ............................................................................... 93
12.1. Edit favourites ..........................................................................................93
Weather display in main menu ...................................................... 94
13.1. Location entry for AccuWeather........................................................94
13.2. Extended weather report.....................................................................96
Internet browser ............................................................................. 98
14.1. Browser controls ...................................................................................98
Media Player.................................................................................. 100
15.1. My Media ............................................................................................... 101
15.2. Playback .................................................................................................. 102
15.3. Extended options ................................................................................ 102
Media Library/portal .................................................................... 104
16.1. Portal functions .................................................................................... 104
16.2. Online registration of Lifesmart TV ............................................... 106
YouTube ......................................................................................... 109
Apps ............................................................................................... 110
18.1. Apps installed on the Lifesmart TV................................................ 110
18.2. Market ...................................................................................................... 110
18.3. Installing apps from external data carriers ................................. 111
18.4. Delete ....................................................................................................... 112
Setup main menu.......................................................................... 113
19.1. System Setup......................................................................................... 113
19.2. TV Mode Setup ..................................................................................... 115
19.3. Network Setup ...................................................................................... 116
19.4. Version ..................................................................................................... 117
Troubleshooting ........................................................................... 118
20.1. Troubleshooting ................................................................................... 118
Do you need more help? .............................................................. 120
Cleaning......................................................................................... 120
Disposal ......................................................................................... 121
Technical data ............................................................................... 122
64 of 198
86883 DE EN FR EComm RC1.indb 64
03.04.2013 13:06:26
Notes on how to use these instructions
1. Notes on how to use these instructions
Please read these operating instructions through carefully before using the product for the first time and,
most importantly, follow the safety instructions even if
you are familiar with using electronic equipment!
This product should only be used as directed and specified in
these instructions.
Please keep these instructions in a safe place for future reference and pass them on with the product to any new owner.
DE
EN
FR
Warning symbols and keywords used in these instructions
DANGER!
Warning of immediate risk of fatal injury.
WARNING!
Warning of possible risk of fatal injury and/or
serious irreversible injuries.
WARNING!
Warning of risk of electric shock.
CAUTION!
Please follow the instructions to prevent injuries and
property damage.
GPL
ATTENTION!
Please follow the instructions to avoid property
damage.
PLEASE NOTE!
Please follow the instructions in the operating
manual.
65 of 198
86883 DE EN FR EComm RC1.indb 65
03.04.2013 13:06:26
Notes on how to use these instructions
PLEASE NOTE!
Additional information on using the product.
•
Bullet point / information on operating steps
Instructions to be carried out
1.1. Proper use
This product is designed to play media via connected data carriers or over the network or internet. The product can be connected to a television and/or an audio system for the picture and
sound output.
This product is designed for indoor use only in dry conditions.
The product is intended for private use only and not for industrial or commercial use.
Please note that we shall not be liable in cases of improper use:
• Do not modify the product without our consent and do not
use any auxiliary equipment which we have not approved or
supplied.
• Use only spare parts and accessories which we have supplied
or approved.
• Heed all the information in these operating instructions,
especially the safety information. Any other use is deemed
improper and can cause personal injury or damage to the
product.
• Do not use the product in extreme environmental conditions.
66 of 198
86883 DE EN FR EComm RC1.indb 66
03.04.2013 13:06:28
Safety instructions
DE
2. Safety instructions
EN
2.1. Keep electrical equipment out of reach of
children
FR
This product is not intended for use by people (including children) with reduced physical, sensory or mental capacity or for
those without experience and/or knowledge, unless they are supervised by a person responsible for their safety or they have
been instructed in its use.
Never allow children to use electrical equipment without supervision.
DANGER!
Keep packaging material, e.g. plastic bags, out
of reach of children. Failure to do so may lead to
suffocation.
• Never open the casing (risk of electric shock, short circuit and
fire hazard).
• Never insert any objects through the slots and openings (risk
of electric shock, short circuit and fire hazard).
• The slots and openings on the product are for ventilation
purposes. Do not cover these openings (risk of overheating,
fire hazard).
• The remote control has a class 1 infrared diode. Never use
optical devices to look at the LED.
• Do not place containers containing liquid, e.g. vases, on or
near the product or the mains adapter, and protect all the
parts from water droplets and splashes. The container may
tip over and the liquid may impair the electrical safety of the
product.
• If the mains adapter, cable or product is damaged,
disconnect the plug from the power supply immediately.
• If the product has been moved from a cold room to a warm
GPL
2.2. General points
67 of 198
86883 DE EN FR EComm RC1.indb 67
03.04.2013 13:06:28
Safety instructions
room, wait a while before connecting the mains adapter.
The ensuing condensation could damage the product. The
product can be plugged in and operated safely as soon as it
reaches room temperature.
2.3. Use of rechargeable batteries
Batteries may contain combustible materials. If not handled
properly, rechargeable batteries may leak, heat up excessively, ignite or even explode, which could result in damage to the
product and your health.
WARNING!
Risk of explosion if rechargeable batteries are
replaced incorrectly.
Replace rechargeable batteries with the same or
equivalent type only.
Please note the following safety advice:
• Rechargeable batteries can be fatal if swallowed. Therefore
keep the remote control and batteries out of reach of small
children. If a rechargeable battery is swallowed, it is essential
to seek medical assistance immediately.
• Always observe the correct polarity.
• Never discharge the batteries by excessive power output.
• Never short-circuit the batteries.
• Never expose the batteries to excessive heat, such as
sunlight, fire, strong artificial light, etc.
• Do not dismantle or deform the batteries. You could injure
your hands or fingers, or battery fluid could come into
contact with your eyes or skin. If this happens, rinse the
affected areas with plenty of clean water and consult a
doctor immediately.
• Avoid heavy knocks and vibrations.
• If necessary, clean the contacts on the batteries and on the
product before inserting the batteries.
• Remove used batteries from the product immediately.
68 of 198
86883 DE EN FR EComm RC1.indb 68
03.04.2013 13:06:28
Safety instructions
• Recharge flat batteries immediately to prevent damage.
• Remove the batteries from the product if you do not intend
to use it for a relatively long period of time.
• Cover the contacts of the batteries with adhesive tape if you
want to store the batteries or dispose of them.
DE
EN
FR
Set up and operate all the components on a stable, level and vibration-free surface to prevent the device from falling down.
Do not jolt or shake the device. Jerks and vibrations may damage the sensitive electronics.
Make sure that the product is not in the immediate vicinity of
heat sources (e.g. heaters or strong artificial light).
Do not place naked flames (e.g. lit candles) on or near the product.
Make sure that the vents are never covered so as to ensure that
there is always adequate ventilation.
Do not place any objects on the cables as they may get damaged.
• Position the product and mains adapter at a minimum
distance of approx. 10 cm from the wall. Ensure adequate
ventilation.
• Do not use the product outdoors as it could be damaged by
rain, snow, etc.
• Keep the product at least one metre away from sources of
high-frequency and magnetic interference (television set,
loudspeakers, mobile telephones, etc.) in order to avoid
malfunctions.
• Major changes in temperature or fluctuations in humidity
can cause moisture to build up inside the product due to
condensation and may ultimately cause an electrical short
circuit. Therefore always wait until the product has reached
room temperature before putting it into operation.
GPL
2.4. Set-up location
69 of 198
86883 DE EN FR EComm RC1.indb 69
03.04.2013 13:06:28
Safety instructions
2.5. Never attempt to repair the device!
If the mains adapter, cable or product is damaged, disconnect
the plug from the power supply immediately.
Do not use the product if the product or the cable is visibly
damaged or if the product has been dropped.
WARNING!
Never try to open and/or repair the product yourself.
There is a risk of electric shock!
If there is a fault, contact the MEDION Service Centre or another
specialist repair shop in the interests of safety.
2.6. Cleaning and care
• Always disconnect the product from the mains supply before
cleaning it.
• Only use a dry, soft cloth to clean the device. Do not use
chemical solutions and cleaning products because these may
damage the surface and/or the inscriptions on the product.
2.7. Data backup
• Caution! Back up your data on external storage media after
each update. We do not accept any liability for claims for
compensation arising from loss of data or any damages
incurred as a result.
70 of 198
86883 DE EN FR EComm RC1.indb 70
03.04.2013 13:06:28
Safety instructions
DE
Please note: Even in standby mode some parts of the product
are live. To disconnect the power supply to the product or to isolate the product entirely from voltage sources, disconnect the
product from the mains completely by unplugging the power
adapter.
• Plug the mains adapter into AC 100-240 V~ 50 Hz earthed
sockets only. Contact the local electricity provider if you are
not sure if the socket is earthed or not.
• Use only the mains adapter supplied (Ktec
KSAS0241200150HE). Never try to plug the mains adapter
into other sockets as this may cause damage.
• The product uses electricity in standby mode due to the
remote control charging function.
• For extra safety, we recommend using an overvoltage
protector to prevent the product from being damaged as a
result of power surges or lightning strikes.
• Do not use the product during thunderstorms. There is a risk
of damage from lightning. Disconnect the product from the
mains completely during a thunderstorm by unplugging the
adapter.
• To disconnect the power supply, unplug the mains adapter
from the socket.
• The mains adapter must still be easily accessible when
connected so that it can be unplugged quickly in an
emergency or in case of danger.
• Do not cover the mains adapter in order to avoid the risk of
overheating.
• Never touch the mains adapter with wet hands! There is a risk
of electric shock!
EN
FR
GPL
2.8. Power supply
71 of 198
86883 DE EN FR EComm RC1.indb 71
03.04.2013 13:06:28
Notes on conformity
• If you are using an extension cable, make sure that it
complies with VDE requirements. If in doubt, contact your
electrician.
• Position the cables so that they cannot be stepped on or
tripped over.
• Do not place any objects on the cables as they may get
damaged.
3. Notes on conformity
This product complete with On/Off function satisfies the basic requirements
and relevant regulations of the Ecodesign Directive 2009/125/EC
(Commission Regulation 1275/2008). Under the Ecodesign Directive, a
standby function is only supported if the "USB charging function in
standby mode" has been set to OFF in the system configuration (cf. “USB
charging function in standby mode” on page 114).
3.1. R&TTE conformity statement
MEDION AG hereby declares that the product MD 86883 complies with the
requirements of the European R&TTE directive 1999/5/EC (incl. the essential
requirements of EMC directive 2004/108/EC and the low-voltage directive
2006/95/EC), the Eco-design directive 2009/125/EC and the RoHS directive
2011/65/EU.
Full declarations of conformity are available at www.medion.com/conformity.
72 of 198
86883 DE EN FR EComm RC1.indb 72
03.04.2013 13:06:28
Purchased parts package
DE
4. Purchased parts package
EN
Please check your purchase to ensure that all the items are included and
contact us within 14 days of purchase if any parts are missing.
FR
The following items are supplied with the product you have purchased:
• Lifesmart TV MD 86883
• Mains adapter (Ktec KSAS0241200150HE)
• Remote control including block battery
• USB charging cable for remote control
• HDMI cable
• Video/audio cinch cable
• Operating instructions
• Warranty card
GPL
DANGER!
Keep packaging material, e.g. plastic bags, out
of reach of children. Failure to do so may lead to
suffocation.
73 of 198
86883 DE EN FR EComm RC1.indb 73
03.04.2013 13:06:28
General points
5. General points
5.1. Playable formats
This product has playback and write capability for a number of file formats.
The table below shows the compatible file formats for different media types.
Media type
File formats
Video
MPG, MPEG, AVI, WMV, MP4, MOV, DAT, VOB, 3GP, FLV,
MKV, TS, M2TS
Audio
MP3, WMA, WAV, AAC, OGG
Photo
JPG, BMP, PNG, GIF
NOTE
The playback of all formats cannot be guaranteed due
to the large number of different codecs.
5.2. File systems
Your Lifesmart TV supports the file systems FAT16, FAT32 and NTFS.
5.3. Indicator symbol
The " " symbol may appear on the television screen during operation to
indicate that the function covered in the user manual is not available for this
operating mode.
74 of 198
86883 DE EN FR EComm RC1.indb 74
03.04.2013 13:06:29
Product parts
DE
6. Product parts
EN
6.1. Front
FR
1
2
1)
2)
3)
4)
5)
3
4
5
WLAN transmitter (under the cover)
SD/SDHC: SD/SDHC card slot
USB: USB socket
Standby/On (standby LED):
Press to switch product on/off.
Goes out when switched off; red in standby mode; blue when
switched on
Remote control sensor
6.2. Rear
6)
7)
8)
9)
10)
11)
12)
13)
8
9 10 11 12 13
GPL
6 7
AV OUT: Analogue audio/video output
SPDIF: Digital optical audio output
HDMI: HDMI output
microSD: microSDHC card slot
USB: USB socket
RJ45: LAN socket
DC: Socket for mains adapter
On/Off switch
75 of 198
86883 DE EN FR EComm RC1.indb 75
03.04.2013 13:06:29
Product parts
6.3. Remote control
1
2
3
DE V
SC
14
ROLL
OK
13
12
4
5
11
6
7
MOD
10
8
9
15
16
17
76 of 198
86883 DE EN FR EComm RC1.indb 76
03.04.2013 13:06:31
Product parts
2)
3)
4)
5)
6)
7)
8)
9)
10)
11)
12)
13)
14)
15)
16)
17)
DE
Status LEDs:
:
- Flashes purple rapidly on connection to Lifesmart TV;
- Lights up blue when connected to Lifesmart TV and
when Lifesmart TV is switched on;
- Flashes red while charging when not connected to
Lifesmart TV;
- Lights up red when battery is fully charged when
not connected to Lifesmart TV.
Middle LED:
Voice input active
Right LED:
No function
POWER:
Remote control on/off switch
OK:
Confirm entries
RETURN:
Return to last menu
Favourites:
Set bookmark
Standby/On: Switch on Lifesmart TV/
switch to standby mode
MOD:
Not assigned/
button reserved for future functions
/
:
Increase/decrease volume
PLAY/PAUSE: Start/pause playback in Media Player
/
SKIP/SEARCH:
Press to go to previous/next track;
keep pressed to run search
backwards/forwards
MUTE:
Switch sound on/off;
keep pressed to connect/disconnect
remote control
Menu button: View system settings;
view program options/context menus
HOME:
View main menu
Navigation buttons/controls
Battery compartment
Cursor control: Place finger on the control to activate mouse
function;click to select buttons and entries
Microphone button:
Start Google search by voice command
EN
FR
GPL
1)
77 of 198
86883 DE EN FR EComm RC1.indb 77
03.04.2013 13:06:31
Start of operation
7. Start of operation
7.1. Connection process (rear)
micro
SDHC
USB
Connecting the Lifesmart TV to a television/monitor with
HDMI socket
The best way to connect your Lifesmart TV to a television or monitor is
to use the HDMI cable supplied with the product. An HDMI connection is
ideal because video and audio signals are transmitted and output on your
television or monitor. The right image format is also automatically worked
out and configured, provided that the format setting on the HDMI input
on your television or monitor is set to "Auto".
Connect the HDMI cable to the HDMI socket on the Lifesmart TV and to
the corresponding HDMI port on the television/monitor.
INFORMATION ABOUT THE HDMI CONNECTION
If your television does not have Dolby digital decoder or
MPEG decoder, go to the Setup main menu and set the
option [TV Mode Setup] sub-menu [HDMI Audio
Mode] to [PCM Stereo] (see Page 115).
78 of 198
86883 DE EN FR EComm RC1.indb 78
03.04.2013 13:06:33
Start of operation
•
Please note the following points when connecting an HDMI-compatible
device:
− Switch the television and the Lifesmart TV off. Now switch on the
television, wait approx. 30 seconds and then switch on the Lifesmart
TV.
− The video input on the television must be set to the Lifesmart TV.
− The television must support HDMI resolutions.
DE
EN
FR
Connecting the Lifesmart TV to a television with AV socket
Using the audio/video cable supplied, connect the AV OUT port on the
Lifesmart TV to the audio/video inputs on the television. This output only
supports PAL resolutions. If you want to enjoy the full benefit of HD, you
will need to use the HDMI output.
Digital optical connection
In order to transmit the digital audio signals to a digital audio unit,
connect the SPDIF port on the Lifesmart TV to the corresponding socket
on your digital audio unit (e.g. an A/V amplifier) with an optical fibre cable
(Toslink cable - not supplied with the product).
Network connection
Connect the RJ45 socket on the Lifesmart TV to a network interface (e.g.
a router) using a network cable with the correct plug fitting.
This will allow the Lifesmart TV to access enabled files in the network and
to receive internet data subject to the configuration of the router.
Connecting USB data carriers
GPL
Connect a USB unit with removable disk function (e.g. digital camera, USB
hard drives, USB sticks, etc.) to the USB port on the rear of the product.
79 of 198
86883 DE EN FR EComm RC1.indb 79
03.04.2013 13:06:34
Start of operation
7.2. Connection process (front)
USB
SD/
SDHC
Connecting USB data carriers
Connect a USB unit with removable disk function (e.g. digital camera, USB
hard drives, USB sticks, etc.) to the USB port on the front of the product.
Connection for SD/SDHC memory cards
Insert a memory card (SD/SDHC type) in the slot on the front of the
product to view the files on the card.
PLEASE NOTE!
Your Lifesmart TV is compatible with SD, SDHC and
MMC memory cards.
Connecting the mains adapter
Connect the power supply plug on the mains adapter supplied
(KSAS0241200150HE) to the DC IN socket on the product.
Once you have made all the connections, plug the mains adapter into a
socket (AC 230 V ~ 50 Hz). Please refer to the technical data on Page 122
for the mains adapter specifications.
80 of 198
86883 DE EN FR EComm RC1.indb 80
03.04.2013 13:06:34
Using the gyro remote control
DE
8. Using the gyro remote control
The position sensor in the gyro remote control supplied with the product can
interpret your gestures and can therefore be used like a computer mouse on
the user interface of the Lifesmart TV.
EN
FR
8.1. Switching the gyro remote control on and off
Press the POWER button on the remote control and keep it pressed for
about three seconds to switch on the remote control.
The sound of two short, low-pitched beeps will signal that it is switched on.
• The remote control will then establish the wireless connection to the
Lifesmart TV.
• While the remote control is searching for a connection to the Lifesmart
TV, the Power LED will be purple and will flash rapidly.
• Once the connection has been made, the Power LED will turn blue and
will stop flashing.
PLEASE NOTE!
This will only work if the remote control is within the
range of the Lifesmart TV (approx. seven metres) and
the Lifesmart TV is switched on!
Switching off the remote control
To switch the remote control off, press the POWER button again and
keep it pressed for about three seconds.
The sound of one short, high-pitched beep will confirm that it is switched off.
If the link (connection) to the Lifesmart TV cannot be established, you can
also start the connection process manually by pressing the MUTE button
on the remote control (with the remote control switched on) and keeping it
pressed until you feel a short vibration.
The gyro remote control will now link up to the Lifesmart TV again.
GPL
8.2. Connecting the gyro remote control manually
8.3. Using the mouse function on the remote control
In order to move the cursor on the screen, place your index finger on the
cursor control on the underside of the remote control and move the
remote control up and down and to the left and right.
Press the cursor control in order to select a button on the screen.
The movement will stop when you take your finger off the cursor control.
81 of 198
86883 DE EN FR EComm RC1.indb 81
03.04.2013 13:06:35
Using the gyro remote control
8.4. Charging the gyro remote control
The gyro remote control is supplied with a rechargeable battery already
fitted. Before you use the remote control, charge it using the USB cable
supplied.
To do this, switch the remote control off.
Using the USB cable supplied, connect the Mini USB port on the remote
control to the USB port on the Lifesmart TV.
PLEASE NOTE!
The charging function will also be available in standby mode if you go to the system settings and set
the "USB charging function in standby
mode" to ON (see Page 114).
Alternatively, you can also charge the gyro remote
control on a PC or a USB mains adapter.
•
•
The status LED will turn red and flash during the charging process.
When the battery is fully charged the status LED will stop flashing and
stay permanently red.
Checking the battery status
You can have the battery status displayed by the status LED by
pressing the POWER button on the remote control briefly. The POWER
LED indicates the battery status through the number of red flashes:
Status LED
flashes four times
> 80% battery power
Status LED
flashes three times
> 60% battery power
Status LED
flashes twice
> 40% battery power
Status LED
flashes once
> 20% battery power
Constant red flash
Battery needs charging
82 of 198
86883 DE EN FR EComm RC1.indb 82
03.04.2013 13:06:36
Operation
DE
9. Operation
EN
9.1. Switching on and off
If you have connected the product to the power supply using the mains
adapter, the Standby/On button on the product will light up red.
Press the
Standby/On button on the remote control or the
Standby/On button on the product to switch on the Lifesmart TV. The
MEDION logo will appear on the start-up screen. The
Standby/On
button on the product will light up blue.
In order to switch the product to standby mode, press the
Standby/
On button on the remote control or on the product. The
Standby/On
button on the product will light up red in standby mode.
Press the
Standby/On button on the remote control or the
Standby/On button on the product again to take it out of standby mode.
FR
GPL
PLEASE NOTE!
You need to point the remote control at the Lifesmart
TV if you want to switch the product on or off by the
Standby/On button. All the other functions are controlled wirelessly and the remote control need not be
pointed at the Lifesmart TV.
83 of 198
86883 DE EN FR EComm RC1.indb 83
03.04.2013 13:06:37
Operation
9.2. Using the product for the first time
When using the product for the first time, start by selecting the menu
language and enter the country in which you are located.
Select NEXTto start the Lifesmart TV.
The main menu will appear.
9.3. Network set-up
After you have selected the language and country, the Network Setup menu
will appear and the Lifesmart TV will display the networks available for a
WLAN connection.
If there is already an internet connection via an existing LAN cable, the
Lifesmart TV will automatically be connected to the network. In this case
select "use LAN connection instead of wireless" and when
the connection has been made click on "Continue".
PLEASE NOTE!
You can also access the Network Setup menu via the
Settings menu ([Set up] -> [Network Setup]). If you
want to set up a LAN connection, please refer to section "”LAN connection” on page 87".
84 of 198
86883 DE EN FR EComm RC1.indb 84
03.04.2013 13:06:39
Operation
DE
WLAN connection
EN
If no network connection has been detected via the LAN cable, your
Lifesmart TV will automatically scan the available WLAN networks and
display a list of the available networks.
FR
PLEASE NOTE!
You can also search for available WLAN networks by
selecting WLAN for the network type ([Network Type]
-> [WLAN]).
GPL
Now select your WLAN network.
After you have selected your WLAN network you will be asked to enter
the password for your network.
85 of 198
86883 DE EN FR EComm RC1.indb 85
03.04.2013 13:06:41
Operation
Click in the password box and enter the password using the on-screen
keyboard (cf. also “10.3. Using the on-screen keyboard” on page 89).
Click on the ENTER symbol on the on-screen keyboard to confirm your
entry.
The Lifesmart TV will then connect to the internet.
If the connection fails, you will be asked to check the password and to
repeat the connection attempt.
Click on "Retry" to start another attempt at connection.
Once connection with the internet is confirmed, click on "Continue" to
get to the main menu.
86 of 198
86883 DE EN FR EComm RC1.indb 86
03.04.2013 13:06:46
Operation
DE
Optional: switch off DHCP server
If your Lifesmart TV cannot source IP addresses automatically from the
router set the DHCP option to OFF.
Enter a static IP address, a subnet mask, the DNS server and a gateway for
the internet connection in the next dialogue box. The Lifesmart TV will
then use this static IP address to log onto the network.
EN
FR
LAN connection
Optional: switch off DHCP server
If your Lifesmart TV cannot source IP addresses automatically from the
router set the DHCP option to OFF.
Enter a static IP address, a subnet mask, the DNS server and a gateway for
the internet connection in the next dialogue box. The Lifesmart TV will
then use this static IP address to log onto the network.
GPL
If you subsequently want to set up a LAN connection for the internet link,
connect the LAN cable supplied with the product to your Lifesmart TV
and an RJ45 network socket or to your router.
The Lifesmart TV will automatically be connected to the internet if an
internet connection has been detected by the network link.
Once connection with the internet is confirmed, click on "Continue" to
get to the main menu.
87 of 198
86883 DE EN FR EComm RC1.indb 87
03.04.2013 13:06:52
Operation
9.4. Main menu
1
2 3 4 5 6
7
8
9
10
14
11
13
1)
2)
3)
4)
5)
6)
7)
8)
9)
10)
11)
12)
13)
14)
12
Time and date
LAN status (click on this symbol to view the network settings)
WLAN status (click on this symbol to view the network settings)
HDMI status (click on this symbol to view the TV mode settings)
USB display (appears in white if a storage device is connected)
SD/SDHC memory card display (appears in white if a storage device is
connected)
Open internet browser
Open Media Player
Open MEDION Media Library
Open YouTube
Display local weather information
View settings
Open App Manager
Favourites preview
88 of 198
86883 DE EN FR EComm RC1.indb 88
03.04.2013 13:06:54
Operation
DE
10. Operation
EN
10.1. Volume setting
Press the
/
buttons on the remote control to decrease/increase
the volume. The volume level is shown on the screen.
FR
10.2. Navigating through the menus
In addition to the gesture control facility, you can navigate through the
menus using the remote control buttons.
Use the navigation buttons to select menu items and change
settings in the menus.
Press OK or the cursor control to confirm a menu entry.
Move your finger in a circle around the mount with the navigation
buttons to scroll up and down (e.g. on websites).
Press
RETURN to go back a level in the menu.
Press HOME to return to the main menu from any setting/application.
10.3. Using the on-screen keyboard
Select characters and press OK or the cursor control to enter the text in
the space.
GPL
In some menus a keyboard appears on the screen for text input:
89 of 198
86883 DE EN FR EComm RC1.indb 89
03.04.2013 13:06:55
Operation
Press ?123 to change to the display with the numbers and special
characters. Press ABC to return to the display with the letters.
Press ~\{ which will now appear to access more special characters. Press
ABC to return to the display with the letters.
Press the key with the ENTER symbol or click outside the keyboard to
close the on-screen keyboard and return to the menu.
90 of 198
86883 DE EN FR EComm RC1.indb 90
03.04.2013 13:06:58
Using the microphone
DE
11. Using the microphone
You can speak into the remote control microphone to start an internet
search.
You can also dictate the search terms in most of the places in which the onscreen keyboard appears for text input.
EN
FR
PLEASE NOTE!
The voice search facility is not available with all applications.
GPL
Click on a text box or click anywhere in an entry
which has already been made in a text box.
Keep the microphone button pressed down.
The voice input window will appear.
Speak into the microphone and then let go of the
microphone button.
• If you do a voice search in the main menu, the
internet browser will open and the Google results
for your search will be displayed.
• If you use the voice search facility in another menu
or another window, click on the menu/application
window in order to use the terms.
If the command cannot be clearly interpreted, a window will appear with
possible options:
Select the right word in order to proceed.
If none of the options are correct, press
RETURN to try again.
91 of 198
86883 DE EN FR EComm RC1.indb 91
03.04.2013 13:07:01
Using the microphone
PLEASE NOTE!
The voice search facility uses the Google voice recognition service. The Lifesmart TV
needs an internet connection to
be able to use this service. If the voice recognition server is unavailable or if the internet
connection fails, a message will appear to inform you that the speech detection process
was unsuccessful.
In this case, reconnect to the internet or restart the Lifesmart TV by switching it off and
then back on again.
11.1. Voice search settings
Click on the tool symbol at the top right of the voice input window.
You can configure the settings for the voice search in the next window:
Language
Select the language in which terms should be provided by the voice
recognition function.
Safe Search
Enable the SafeSearch filter to screen out offensive content from the Google
search results.
Block offensive words
Tick the box on the right to block offensive terms for the speech recognition
function.
92 of 198
86883 DE EN FR EComm RC1.indb 92
03.04.2013 13:07:04
View favourites
DE
12. View favourites
Click on a website preview in the main menu to open it with the internet
browser.
EN
FR
12.1. Edit favourites
You can edit the website preview in the favourites view by moving the
cursor over a website preview and pressing the Favourites button.
GPL
In the next menu, enter either the address of the website which you want
to appear in the preview or select a website from the list of websites last
visited.
93 of 198
86883 DE EN FR EComm RC1.indb 93
03.04.2013 13:07:06
Weather display in main menu
13. Weather display in main menu
If there is an internet connection, the local weather is displayed in the main
menu by the AccuWeather forecasting service.
13.1. Location entry for AccuWeather
When the product is used for the first time you will need to enter the location
for the weather report.
Click on the wheel system to open the input window.
Agree to the licence conditions.
The on-screen keyboard will appear.
Enter the town for the weather report in the top dialogue box or select
the microphone symbol and enter the name of the town over the
remote control microphone.
94 of 198
86883 DE EN FR EComm RC1.indb 94
03.04.2013 13:07:10
Weather display in main menu
Confirm the entry by pressing the ENTER key on the on-screen keyboard
or by pressing in the dialogue box.
DE
EN
FR
NOTE ON THE "GPS" ENTRY
The Lifesmart TV software runs on the Android operating system therefore GPS is the standard display tool
for the location in this setting. This option is not available, however, because the Lifesmart TV does not have
a GPS receiver.
GPL
A list may appear prompting you to specify your town more exactly.
Select the correct town from the list.
The town will now be displayed at the top of the list of locations.
Select "Add Location" to add further towns to the list of locations.
Tick the box next to the name of the locations for which you want the
weather conditions to be displayed.
Click on "Exit" to close the window.
95 of 198
86883 DE EN FR EComm RC1.indb 95
03.04.2013 13:07:13
Weather display in main menu
13.2. Extended weather report
Click on the weather display in the main menu to access the extended
weather report.
More detail is given here in addition to the temperature and weather
conditions, such as humidity, air pressure and much more information about
the location.
You can access further settings via the task bar at the top of the display:
1
2
3
4
5
12
11
10
9
8
7
6
1)
2)
3)
4)
5)
6)
7)
8)
Drop-down menu - click here to open the menu. The items which
you select will appear in future when you view the extended weather
report.
Update - click here to refresh the weather data.
The Lifesmart TV software runs on the Android operating system
therefore GPS is the standard display tool for the location in this
setting. This option is not available, however, because the Lifesmart TV
does not have a GPS receiver.
Locations - the list of locations will appear on the left of the screen.
You can add a new location or click on a location in the list to request
that the weather data be shown in the main window.
Preferences - the AccuWeather settings will appear on the left of the
screen. You can change the units and formats for temperature, speed,
precipitation height (reading), time and date. You can also view the
AccuWeather service contact details and licence conditions.
News - see the latest on the weather.
Videos - watch videos on the weather conditions around the world.
Lifestyle - view information about activities and circumstances which
96 of 198
86883 DE EN FR EComm RC1.indb 96
03.04.2013 13:07:14
Weather display in main menu
9)
10)
11)
DE
EN
FR
GPL
12)
depend on the weather.
Maps - play any animations which are available for your location on
the precipitation radar or on other weather events. Click on to play
the animation.
15-day forecast - see the weather forecast for the next 15 days. Click
on a date to see the detailed weather forecast for this date in the
right-hand window.
Hourly - view the weather forecasts for every hour in the next 24
hours.
Current conditions - display the current local weather conditions.
97 of 198
86883 DE EN FR EComm RC1.indb 97
03.04.2013 13:07:15
Internet browser
14. Internet browser
Click on the Internet symbol to open the internet browser.
Simply use the browser as you would the browser on a computer.
• Hold the cursor control down on the remote control to scroll up and
down pages.
• You can also move up and down a website with the scroll wheel.
• Double-click with the cursor control to zoom in and out in the browser.
14.1. Browser controls
1 2 3
1)
2)
3)
4)
5)
6)
7)
8)
4
5 6 7
8
Go back a page
Go forwards a page
Refresh page
Web address
Add page to favourites
Search on page
View bookmarks, sites already visited and saved, and history
View browser options (see next section)
98 of 198
86883 DE EN FR EComm RC1.indb 98
03.04.2013 13:07:16
Internet browser
DE
Browser options
You can view the browser options by clicking on the symbol in the top
right corner.
EN
FR
Refresh
Refresh the current website.
Forward
Go forwards a page.
Share Page
This function is not available on your Lifesmart TV.
Find on page
Search for certain terms on the current page.
Request Desktop site
GPL
Change to desktop version of website.
Save for offline reading
Click on this item to save the current website.
Page info
Show web address and website title.
Settings
Open the settings menu of the internet browser.
99 of 198
86883 DE EN FR EComm RC1.indb 99
03.04.2013 13:07:17
Media Player
15. Media Player
When you start the Media Player for the first time, you will be shown a quick
guide to the Media Player. You can have this quick guide displayed every
time you start or you can skip it by disabling the checkbox in the bottom left
corner "Show on start-up".
You can close the quick guide at any time by clicking on the X in the top right
corner.
PLEASE NOTE!
When you select a media source from the network, the
data for this source will be imported immediately.
This process may take some time. The "Refresh "
symbol indicates that loading is in progress.
Click on the Media Player symbol in the top left corner to return to the Start
screen.
Make your media selection (music, video or photos).
100 of 198
86883 DE EN FR EComm RC1.indb 100
03.04.2013 13:07:20
Media Player
DE
15.1. My Media
EN
FR
GPL
Click on "My Media" to specify which sources are to be used for the media
file selection.
• All the USB data carriers or memory cards connected directly to the
Lifesmart TV are shown under LOCAL. All the data carriers are called
"USB" (in the order in which they were connected).
• The media sources available over the network are displayed under
Network.
Enable the checkbox to the left of a media source from the network for
the media files from this source to be included in the display of available
media content on the Lifesmart TV.
101 of 198
86883 DE EN FR EComm RC1.indb 101
03.04.2013 13:07:22
Media Player
15.2. Playback
•
There are various sort-by and display options depending on the media
type, e.g. All (songs); Folders/Albums; Date; Playlists and Rating.
Select the required option and start playback.
15.3. Extended options
Click on the symbol in the top right corner of the screen to access the
following Media Player options:
Create playlists
Select the media type for which you want to create a playlist.
Click on "New video playlist" to start a new playlist.
Enter a name for the list in the next dialogue box and click on OK.
Now select the items you want to include in your playlist by ticking the
box to the right of the relevant items.
Click on "Save Playlist" at the top of the screen to save and close
the playlist.
Open playlist:
Select the media type for which you want to open a playlist.
Click on "Playlist" to open a playlist.
102 of 198
86883 DE EN FR EComm RC1.indb 102
03.04.2013 13:07:25
Media Player
DE
Delete playlist
As soon as playlists have been created, the delete playlist option appears.
Select the playlist which you want to delete and then select "Done" at the
top of the screen.
Press "OK" to confirm the delete command.
EN
FR
Search
You can search for keywords in the current media display under Search.
Enter the keyword for the search using the on-screen keyboard.
The Lifesmart TV will then search for available media content containing the
keyword you have entered.
The hits appear under the input box.
Select a file from the hits to start playback.
PLEASE NOTE!
You can also use the voice input facility to search for
media.
Settings
You can enter the following settings for the Media Player here:
General Settings
You can configure the teach-in display settings here or start the teach-in
program.
Services
You can change the name of the Lifesmart TV here for the DLNA media server
and the DLNA media renderer.
Photos
GPL
You can change the display time here and the transitions between photos for
the slide show.
Information
You can view the Media Player licence terms here.
Exit Mediaplayer
The Media Player will close and the main menu will be displayed.
103 of 198
86883 DE EN FR EComm RC1.indb 103
03.04.2013 13:07:28
Media Library/portal
16. Media Library/portal
This portal features selected media content which is provided by MEDION
and via apps for your Lifesmart TV. It has the facility to show video clips and
TV channels from the internet which have been categorised for you and are
constantly updated. You can select your favourites for added convenience,
making it easier to find what you are looking for using the search function.
You can also open apps for social networks like Twitter and Facebook.
16.1. Portal functions
1 2
3
4
10
9
1)
2)
3)
4)
5)
6)
7)
8)
8
7
6
5
New apps - Display recently added media content.
Recommended apps - Display recommended media content.
Popular apps - Display media content used by most other
Lifesmart TV owners.
This column features information and update news provided by
MEDION.
Legal notice - Display legal information relating to the media
portal.
Help - View help topics in relation to the use of the media portal.
Settings - Select the language in which you want the media
content to be provided.
Add favourites - Use the navigation buttons to make your
selection and then click on it to add it to your list of favourites.
104 of 198
86883 DE EN FR EComm RC1.indb 104
03.04.2013 13:07:28
Media Library/portal
9)
10)
Login - Click here to log into the media portal with your user name
(cf. “16.2. Online registration of Lifesmart TV” on page 106).
Categories - Select the required media content by category. The
active category always appears in the middle of the column.
The Entertainment, Music, Sport, Video and News categories provide
access to video clips and internet TV channels.
The Info category also contains apps for social networks like Twitter
and Facebook.
DE
EN
FR
Using the navigation buttons
In some apps you select the media content with the navigation buttons
. The help menu for any given app usually contains further
information on how to use it.
Favourites
You can compile a selection of favourites.
Use the navigation buttons to select the required item (blue
marking) and then click on the pop-up box "Add Favorite".
The item is added to the list of favourites and is then displayed under the
heading "Favorites".
Delete Favorite
GPL
In order to delete a favourite from the list, use the navigation buttons
to select the relevant item in the list and then click on the pop-up
box "Delete Favorite".
PLEASE NOTE!
You need to be logged onto the media portal as a user in order to
be able to compile a list of favourites (cf. “16.2. Online registration
of Lifesmart TV” on page 106).
105 of 198
86883 DE EN FR EComm RC1.indb 105
03.04.2013 13:07:29
Media Library/portal
16.2. Online registration of Lifesmart TV
You can register your Lifesmart TV online.
Go to
"http://medion.fxmconnect.com" and set up a user profile.
• You can then save internet addresses as bookmarks in your user account
and connect your Facebook or Twitter account to your Lifesmart TV.
• After you have set up a user account at fxmconnect, you can log onto the
Lifesmart TV by entering your user name and password:
Click on "Login" at the bottom of the portal screen.
1)
Click on "Add User".
2)
If you already have a user account with fxmconnect click on
"Connect".
Then enter your access data and click on "Submit".
3)
106 of 198
86883 DE EN FR EComm RC1.indb 106
03.04.2013 13:07:29
Media Library/portal
DE
EN
FR
If you have not yet set up a user account with fxmconnect, select
"Register" from the first box and then enter an email address, user
name, password and TV PIN in the next box.
5)
Then select "Continue".
GPL
4)
107 of 198
86883 DE EN FR EComm RC1.indb 107
03.04.2013 13:07:32
Media Library/portal
6)
Confirm that you agree to the licence terms.
7)
You will receive an email with a confirmation link to the email address
which you entered.
8)
Confirm the link in your email account and then click on "Login" on
your Lifesmart TV.
108 of 198
86883 DE EN FR EComm RC1.indb 108
03.04.2013 13:07:37
YouTube
9)
DE
Then enter your access data and click on
"Submit".
EN
FR
17. YouTube
GPL
The YouTube app allows you to view the YouTube site in a format specially
adapted for your Lifesmart TV. You can search for videos and use the sort-by
functions in the usual way.
PLEASE NOTE!
You can also use the voice search function to select YouTube
content.
109 of 198
86883 DE EN FR EComm RC1.indb 109
03.04.2013 13:07:42
Apps
18. Apps
18.1. Apps installed on the Lifesmart TV
Select Apps to view the apps installed on the Lifesmart TV.
Simply select an app in order to open it and use it.
18.2. Market
You can find additional apps for your Lifesmart TV and install them here.
PLEASE NOTE!
This service is provided exclusively for your Lifesmart
TV and is not part of Google Play!
110 of 198
86883 DE EN FR EComm RC1.indb 110
03.04.2013 13:07:44
Apps
DE
18.3. Installing apps from external data carriers
In order to install apps on the Lifesmart TV which are in .apk file format on an
external data carrier, connect the external data carrier to the Lifesmart TV.
Open the Easy App Installer which is one of the apps already installed.
The Easy App Installer will list all the .apk files which have been detected on
data carriers.
EN
FR
GPL
Select the .apk file of the application which you want to install (Skype in
the example shown here).
Then click on "Install".
A list of the services will appear which the app which you want to install will
access.
Confirm the list by clicking on "Install".
The app will be installed.
When the app has been installed the following box will appear:
111 of 198
86883 DE EN FR EComm RC1.indb 111
03.04.2013 13:07:47
Apps
Select "Done" to return to the app menu or select "Open" to open the
app which has just been installed.
PLEASE NOTE!
Please note that there are so many different apps that
it is not possible for every app to be installed on the
Lifesmart TV! A message will appear to inform you if
an app installation process was unsuccessful (e.g. "App
not installed").
18.4. Delete
You can select apps which you want to delete from the system permanently
by clicking on the icon of the relevant app.
PLEASE NOTE!
The app will be deleted as soon as you click on the
icon and cannot be restored!
The following apps cannot be deleted from the system:
- AccuWeather
- AquaMail
- Easy App Installer
- HRS Hotels
- n-tv Mobil
- Calculator
- Clock
112 of 198
86883 DE EN FR EComm RC1.indb 112
03.04.2013 13:07:52
Setup main menu
DE
19. Setup main menu
EN
19.1. System Setup
FR
Language
Select the menu language here.
Time Zone
Select the time zone in which you are located. The option [Auto] allows you
to change the time over the internet.
The time zone is displayed with the difference in hours from Coordinated
Universal Time (UTC). The abbreviations for the time zones are given in
brackets. For Central Europe select UTC +01 (CET, MEZ).
Daylight Saving Time
PLEASE NOTE!
If you access the time over the internet, the summer
time setting is automatically displayed and the setting
is disabled.
GPL
You can enable or disable the summer time setting here.
Cursor Speed Control
You can set the cursor speed on the mouse here.
113 of 198
86883 DE EN FR EComm RC1.indb 113
03.04.2013 13:07:56
Setup main menu
Free Storage
You can find out the amount of free memory space here. The display includes
the space in the internal memory and on any data storage media which are
connected.
Auto Shutdown
Select the amount of time the product should remain on before automatic
shutdown.
USB charging function in standby mode
Set this function to ON if you want the remote control to charge via the
USB connection even in standby mode.
PLEASE NOTE!
The product uses more power in standby mode with
this setting enabled.
The product is supplied with this function disabled and set to OFF. On
this setting the remote control does not charge when the product is in
standby mode.
Reset to default
Select this option to reset the product to the factory settings.
Confirm by pressing OK in the prompt which then appears.
The product will then return to the original settings as supplied.
CAUTION!
All the data in the memory and the user settings will be
deleted during the reset process.
114 of 198
86883 DE EN FR EComm RC1.indb 114
03.04.2013 13:07:59
Setup main menu
DE
19.2. TV Mode Setup
EN
FR
TV-System
Select the TV resolution here.
Video Size
You can adjust the picture size here to the size of your screen. If you do not
want any visible edges, adjust the size accordingly, e.g. 90%.
HDMI Audio Mode
Set the signal for the audio output via the HDMI connection:
PCM-STEREO
This option produces stereo sound. Choose this setting if the sound is played
through two speakers only.
Choose this setting if the product is connected to a Dolby or DTS-capable
decoder.
GPL
PASS-Thru
115 of 198
86883 DE EN FR EComm RC1.indb 115
03.04.2013 13:07:59
Setup main menu
SPDIF Mode
Set the signal for the audio output via the optical SPDIF connection:
PCM-STEREO
This option produces stereo sound. Choose this setting if the sound is played
through two speakers only.
PASS-Thru
Choose this setting if the product is connected to a Dolby or DTS-capable
decoder.
19.3. Network Setup
Network Type
Specify whether the product is to be connected to a LAN network or a WLAN
network (cf. also “9.3. Network set-up” on page 84 on setting up a WLAN or
LAN connection).
DHCP
If you want the Lifesmart TV to have an IP address from the network's
DHCP server, set this function to ON.
If you set the function to OFF, it will not be allocated an IP address via the
network. As soon as you connect the Lifesmart TV to a network, you will
be asked to enter a fixed IP address for the Lifesmart TV.
116 of 198
86883 DE EN FR EComm RC1.indb 116
03.04.2013 13:08:02
Setup main menu
DE
Scan Aps
Select this item to see a list of the available wireless networks. See also
“9.3. Network set-up” on page 84 for information on setting up a WLAN
connection.
EN
FR
19.4. Version
USB Upgrade
Select this item if you have been sent a firmware update on a USB data
carrier.
Internet Upgrade
Select this item to search the internet for an available firmware update.
Current Version
Android Version
The number of the Android operating system version installed is displayed
here.
GPL
The number of the firmware version currently installed is displayed here.
Linux Version
The number of the Linux operating system version installed is displayed here.
Hardware Version
The number of the hardware version is displayed here.
117 of 198
86883 DE EN FR EComm RC1.indb 117
03.04.2013 13:08:05
Troubleshooting
20. Troubleshooting
Malfunctions can sometimes occur for quite simple reasons but they
may also be caused by defective components. We have included a brief
troubleshooting guide below which may help to solve any problems. If these
tips don't solve the problem then we'll be more than pleased to help you out.
Just give us a call!
20.1. Troubleshooting
General advice
The product cannot be switched on.
•
•
•
Plug the mains adapter into the power socket, ensuring that it is firmly
connected.
Check the mains switch on the rear.
Plug the mains adapter into a different socket.
No picture.
•
•
•
Select the correct video input mode on the display unit to display the
Lifesmart TV picture.
Connect video cable, ensuring that it is firmly connected.
Restart the TV set and the Lifesmart TV after connecting the cable.
Distorted picture.
•
•
•
The file being played was recorded in a different colour-encoding system
from that of the display unit.
Select a resolution compatible with the display unit.
Connect the units with new cables.
No sound.
•
•
•
The product is in mute mode.
Connect audio cable, ensuring that it is firmly connected.
An incorrect setting was selected for the input source in the menu
TV Mode Setup [SPDIF Mode] for the amplifier or the amplifier
connection.
The remote control is not working properly.
•
•
•
•
The remote control is too far from the product.
There is something blocking the path between the remote control and
the product.
The battery in the remote control is low.
Reconnect the remote control (see Page 81).
118 of 198
86883 DE EN FR EComm RC1.indb 118
03.04.2013 13:08:08
Troubleshooting
DE
The subtitle language cannot be changed or is not being displayed.
•
EN
The file being played does not contain any subtitles.
MP3/WMA/JPEG/DivX files cannot be played.
•
FR
The files were recorded in a format not supported by the product.
NOTE
The playback of all formats cannot be guaranteed due
to the large number of different codecs.
HDMI
There is no picture on the HDMI playback unit which is connected.
•
•
•
•
Disconnect HDMI cable and reconnect.
Switch HDMI unit off and back on again.
The video input on the television set or monitor must be set to the
Lifesmart TV.
The HDMI cable must have full HDMI compatibility. There may be no
picture if you are using a cable which does not conform to the standard.
There is no sound on the HDMI playback unit which is connected.
•
•
Some HDMI-compatible units have no audio output (consult the
operating instructions for the unit which is connected).
If your output equipment does not have a Dolby or DTS-capable decoder,
go to the menu TV Mode Setup and set the option [HDMI Audio
Mode] to [PCM Stereo] (see Page 115).
Reset facility
•
The product is malfunctioning.
•
•
Open the menu "System Setup/Reset to default".
Select this item and press OK to reject all the input settings and to restore
the product to its original factory settings.
GPL
The product can be reset as follows:
119 of 198
86883 DE EN FR EComm RC1.indb 119
03.04.2013 13:08:08
Do you need more help?
21. Do you need more help?
If the above suggestions did not solve your problem please contact us. The
following information would help us:
• What external devices are connected?
• What messages appear on the screen?
• When operating the product, at which step did the problem occur?
• What steps have you already taken to try and rectify the problem?
• Please provide your customer number if you have one.
22. Cleaning
Follow the instructions below to increase the service life of the product:
• Always unplug the mains adapter and disconnect all the cables before
cleaning the product.
• Do not use solvents, corrosive agents or aerosol-based detergents to
clean the product.
• Clean the product using a soft, lint-free cloth.
Please keep the packaging and do not use anything other than this
packaging to transport the product.
CAUTION!
None of the parts inside the product require cleaning or
maintenance.
120 of 198
86883 DE EN FR EComm RC1.indb 120
03.04.2013 13:08:08
Disposal
DE
23. Disposal
EN
Packaging
The product is packaged to protect it from damage in transit.
Packaging materials are raw materials and can therefore be
reused or recycled.
FR
Product
Do not under any circumstances dispose of the product with
the household rubbish at the end of its service life. Please
consult your local authority for advice on correct and ecofriendly methods of disposal.
Battery
GPL
Used batteries do not belong in the household rubbish. Please
return the batteries to a designated collection point or to a
specialist dealer for disposal.
121 of 198
86883 DE EN FR EComm RC1.indb 121
03.04.2013 13:08:08
Technical data
24. Technical data
Product
Standby power consumption:
Operating system:
Dimensions (W x H x D):
Weight:
Operating temperature:
Humidity during operation:
Storage temperature:
<0.5 W
(With USB charging function
switched off )
Android 4.0
Approx. 15.9 x 6.1 x 12 cm
Approx. 400 g
5°C - 35°C
5 % - 65 %
-10°C - 60°C
Connections
Card reader:
USB 2.0 connections:
On front/rear:
LAN connection:
HDMI® output:
Digital optical audio output:
AV output:
DC IN mains adapter input:
For SD, SDHC
and microSD/SDHC memory cards
(up to 32 GB)
(USB data carriers/drives up to 2 TB)
RJ45 socket
HDMI A socket
S/PDIF socket for Toslink cable
3.5 mm stereo jack socket
12 V
1.5 A
Supported file formats
Video:
Audio:
Photo:
Supported file systems:
Network:
WLAN encryption:
MPG, MPEG, AVI, WMV, MP4, MOV,
DAT, VOB, MKV, TS, 3GP, FLV
MP3, WMA, WAV, AAC, OGG
JPG, BMP, PNG, GIF
FAT16, FAT32, NTFS
LAN (10/100 Mbit)
WLAN (IEEE 802.11 b/g/n)
WEP/WPA
122 of 198
86883 DE EN FR EComm RC1.indb 122
03.04.2013 13:08:08
Technical data
DE
Mains adapter
Power supply:
EN
Ktec KSAS0241200150HE
Input (primary):
100-240 V ~ 50/60 Hz, 0.6 A
Output (secondary):
12 V
1.5 A
Kuantech Co., Ltd., China
Manufacturer:
FR
Remote control
Battery:
Type:
Capacity:
Manufacturer:
AMP02
3.7 V
750mAh
Shenzhen Drawer Technology
Development Co. LTD, China
Subject to printing errors and to amendments to technical
specifications and visuals.
®
HDMI, the HDMI logo and High-Definition Multimedia
Interface are registered trademarks of HDMI Licensing
LLC.
Made under licence by Dolby Laboratories.
Dolby and the double-D symbol are registered
trademarks of Dolby Laboratories.
Made under licence, US patent numbers: 5,451,942;
5,956,674; 5,974,380; 5,978,762; 6,487,535 and other
patents granted and filed in the USA or internationally.
DTS and the logo are registered trademarks, DTS 2.0+
Digital Out and the DTS logos are trademarks of DTS, Inc.
The product contains software. © DTS, Inc. All rights
reserved.
GPL
0560
Copyright © 2013 All rights reserved.
This manual is protected by copyright. All rights reserved. Mechanical,
electronic and any other form of reproduction is prohibited without the
written permission of the manufacturer. MEDION® is the owner of the
copyright.
123 of 198
86883 DE EN FR EComm RC1.indb 123
03.04.2013 13:08:09
Technical data
124 of 198
86883 DE EN FR EComm RC1.indb 124
03.04.2013 13:08:10
Lifesmart TV
DE
1.
2.
3.
4.
5.
6.
7.
8.
9.
10.
Remarques concernant le présent mode d'emploi .................... 127
1.1.
Utilisation conforme ........................................................................... 128
Consignes de sécurité ................................................................... 129
2.1.
Ne pas laisser d'appareils électriques entre les mains des enfants .......................................................................................................... 129
2.2.
Généralités ............................................................................................. 129
2.3.
Manipulation des batteries .............................................................. 130
2.4.
Lieu d'installation................................................................................. 131
2.5.
Ne jamais réparer soi-même l'appareil ! ...................................... 132
2.6.
Nettoyage et entretien ...................................................................... 132
2.7.
Sauvegarde des données.................................................................. 133
2.8.
Alimentation ......................................................................................... 133
Notes on conformity ..................................................................... 134
3.1. R&TTE conformity statement........................................... 134
Contenu de la livraison................................................................. 135
Généralités .................................................................................... 136
5.1.
Formats compatibles .......................................................................... 136
5.2.
Systèmes de fichiers............................................................................ 136
5.3.
À propos de l'icône d'affichage ...................................................... 136
Vue d'ensemble de l'appareil ....................................................... 137
6.1.
Vue avant ................................................................................................ 137
6.2.
Vue arrière .............................................................................................. 137
6.3.
Télécommande ..................................................................................... 138
Mise en service .............................................................................. 140
7.1.
Procéder aux raccordements de l'appareil (face arrière) ....... 140
7.2.
Procéder aux raccordements de l'appareil (face avant) ......... 142
Utilisation de la télécommande gyroscopique .......................... 143
8.1.
Mise en marche et arrêt de la télécommande gyroscopique143
8.2.
Connecter manuellement la télécommande gyroscopique 143
8.3.
Utiliser la fonction Souris de la télécommande ........................ 144
8.4.
Chargement de la télécommande gyroscopique .................... 144
Fonctionnement ........................................................................... 145
9.1.
Mise en marche et arrêt de l'appareil ........................................... 145
9.2.
Première mise en service .................................................................. 146
9.3.
Configurer le réseau............................................................................ 146
9.4.
Menu principal...................................................................................... 150
Utilisation ...................................................................................... 151
EN
FR
GPL
Sommaire
125 de 198
86883 DE EN FR EComm RC1.indb 125
03.04.2013 13:08:10
Lifesmart TV
11.
12.
13.
14.
15.
16.
17.
18.
19.
20.
21.
22.
23.
24.
10.1. Régler le volume .................................................................................. 151
10.2. Navigation dans les menus .............................................................. 151
10.3. Saisie sur le clavier virtuel ................................................................. 152
Saisie vocale avec le microphone ................................................ 153
11.1. Réglages pour la saisie vocale ......................................................... 154
Aperçu des favoris ........................................................................ 155
12.1. Modifier l'aperçu des favoris ............................................................ 155
Affichage de la météo dans le menu principal ........................... 156
13.1. Réglage du lieu pour Accu Weather.............................................. 156
13.2. Affichage étendu de la météo......................................................... 158
Navigateur Internet ...................................................................... 160
14.1. Éléments de commande dans le navigateur ........................... 160
Lecteur multimédia ...................................................................... 162
15.1. My Media ............................................................................................... 163
15.2. Lecture ..................................................................................................... 164
15.3. Utilisation avancée .............................................................................. 164
Médiathèque/portail .................................................................... 166
16.1. Fonctions du portail............................................................................ 166
16.2. Enregistrer le Lifesmart TV en ligne............................................... 168
YouTube ......................................................................................... 171
Applications .................................................................................. 172
18.1. Applications installées sur le Lifesmart TV.................................. 172
18.2. Market ...................................................................................................... 172
18.3. Installer des applications depuis des supports de données externes ....................................................................................................... 173
18.4. Remove.................................................................................................... 175
Menu Paramètres .......................................................................... 176
19.1. System Setup......................................................................................... 176
19.2. TV Mode Setup ..................................................................................... 178
19.3. Network Setup ...................................................................................... 179
19.4. Version ..................................................................................................... 180
Élimination des dysfonctionnements ......................................... 181
20.1. Dépannage rapide............................................................................... 181
Vous avez besoin d'une aide supplémentaire ? ......................... 183
Nettoyage ...................................................................................... 183
Recyclage....................................................................................... 184
Caractéristiques techniques ........................................................ 185
126 de 198
86883 DE EN FR EComm RC1.indb 126
03.04.2013 13:08:10
Lifesmart TV
Remarques concernant le présent mode d'emploi
1. Remarques concernant le présent mode
d'emploi
Avant d'utiliser l'appareil pour la première fois, lisez attentivement le présent mode d'emploi et veillez surtout à respecter les consignes de sécurité même si
vous êtes habitué à manipuler des appareils électroniques !
Toutes les opérations sur et avec le présent appareil
doivent être exécutées uniquement comme décrit
dans ce mode d'emploi.
Conservez ce mode d'emploi pour pouvoir vous y référer ultérieurement. Si vous donnez ou vendez l'appareil, veuillez également y joindre ce mode d'emploi.
DE
EN
FR
Symboles et avertissements utilisés dans ce mode d'emploi
DANGER !
Avertissement d'un risque vital immédiat !
PRUDENCE !
Respecter les consignes pour éviter toute blessure et
tout dommage matériel !
GPL
AVERTISSEMENT !
Avertissement d'un risque vital possible et/ou de
blessures graves irréversibles !
AVERTISSEMENT !
Avertissement d'un risque d'électrocution !
ATTENTION !
Respecter les consignes pour éviter tout dommage
matériel !
127 de 198
86883 DE EN FR EComm RC1.indb 127
03.04.2013 13:08:10
Remarques concernant le présent mode d'emploi
Lifesmart TV
REMARQUE !
Respecter les consignes du mode d'emploi !
REMARQUE !
Informations supplémentaires pour l'utilisation de
l'appareil !
•
Énumération / information sur des événements se produisant
en cours d'utilisation
Action à exécuter
1.1. Utilisation conforme
Cet appareil sert à la lecture de médias stockés sur des supports
de données raccordés ou disponibles via le réseau ou Internet.
Il est possible de raccorder l'appareil à un téléviseur et/ou à un
périphérique audio pour la reproduction d'images et de son.
Cet appareil est destiné uniquement à un usage à l'intérieur de
pièces sèches.
L'appareil est destiné exclusivement à un usage privé et non à
une utilisation industrielle/commerciale.
Veuillez noter qu'en cas d'utilisation non conforme, la garantie
est annulée.
• Ne transformez pas l'appareil sans notre accord et n'utilisez
pas de périphériques autres que ceux que nous avons nousmêmes autorisés ou livrés.
• Utilisez uniquement des pièces de rechange et accessoires
que nous avons livrés ou autorisés.
• Tenez compte de toutes les informations contenues dans le
présent mode d'emploi, en particulier des consignes de sécurité. Toute autre utilisation est considérée comme non
conforme et peut entraîner des dommages corporels ou matériels.
• N'utilisez pas l'appareil dans des conditions ambiantes extrêmes.
128 de 198
86883 DE EN FR EComm RC1.indb 128
03.04.2013 13:08:11
Lifesmart TV
Consignes de sécurité
DE
2. Consignes de sécurité
EN
2.1. Ne pas laisser d'appareils électriques entre les
mains des enfants
FR
Cet appareil n'est pas destiné à être utilisé par des personnes (y
compris les enfants) dont les capacités physiques, sensorielles
ou mentales sont limitées ou qui manquent d'expérience et/ou
de connaissances, sauf si elles sont surveillées par une personne
responsable de leur sécurité ou ont reçu de vous les instructions
d'utilisation de l'appareil.
Ne laissez jamais les enfants utiliser des appareils électriques
sans surveillance.
DANGER !
Conservez les emballages, p. ex. les plastiques, hors
de la portée des enfants : risque d'asphyxie !
• N'ouvrez jamais le boîtier de l'appareil (risque d'électrocution, de court-circuit et d'incendie) !
• N'introduisez aucun objet à l'intérieur de l'appareil par les
fentes et ouvertures (risque d'électrocution, de court-circuit
et d'incendie) !
• Les fentes et ouvertures de l'appareil servent à son aération. Ne recouvrez pas ces ouvertures (risque de surchauffe et d'incendie) !
• La télécommande contient une diode infrarouge de classe 1.
N'observez pas la LED avec des appareils optiques.
• Ne posez pas sur l'appareil et sur l'adaptateur secteur ni à
leur proximité de récipients contenant du liquide, tels que
des vases, et protégez toutes les pièces contre les gouttes
d'eau et éclaboussures. Le récipient pourrait se renverser et le
liquide porter atteinte à la sécurité électrique.
• Si l'adaptateur secteur, le cordon d'alimentation ou l'appareil
est endommagé, débranchez immédiatement la fiche de la
prise de courant.
GPL
2.2. Généralités
129 de 198
86883 DE EN FR EComm RC1.indb 129
03.04.2013 13:08:11
Consignes de sécurité
Lifesmart TV
• Si l'appareil a été transporté d'une pièce froide dans une
chaude, attendez avant de brancher l'adaptateur secteur.
L'eau de condensation due au changement de température
pourrait détruire l'appareil. Lorsque l'appareil a atteint la température ambiante, il peut être mis en marche sans danger.
2.3. Manipulation des batteries
Les batteries peuvent contenir des substances inflammables. En
cas de manipulation incorrecte, les batteries peuvent fuir, chauffer fortement, s'enflammer, voire même exploser, ce qui pourrait
endommager votre appareil et nuire à votre santé.
AVERTISSEMENT !
Risque d'explosion en cas de remplacement incorrect
des batteries.
Remplacement uniquement par des batteries du
même type ou de type équivalent.
Respectez les consignes suivantes lorsque vous manipulez des
batteries :
• En cas d'ingestion, les batteries peuvent présenter un danger
mortel. Conservez donc toujours la télécommande et le bloc
batterie hors de la portée des jeunes enfants. En cas d'ingestion d'une batterie, faites immédiatement appel à un médecin.
• N'inversez jamais la polarité.
• Ne déchargez jamais des batteries par une puissance trop
élevée.
• Ne court-circuitez jamais des batteries.
• N'exposez jamais des batteries à une chaleur excessive, p. ex.
rayonnement solaire, feu ou similaire !
• Ne démontez pas des batteries et n'essayez pas de les déformer. Vous risqueriez de vous blesser aux mains/doigts ou le
liquide qui se trouve à l'intérieur des batteries pourrait entrer
en contact avec vos yeux ou votre peau. Si cela devait se produire, rincez les parties affectées abondamment à l'eau claire
130 de 198
86883 DE EN FR EComm RC1.indb 130
03.04.2013 13:08:11
Lifesmart TV
•
•
•
•
•
•
Consignes de sécurité
et consultez immédiatement un médecin.
Évitez tout choc brutal et toute secousse.
Si nécessaire, nettoyez les contacts des batteries et de l'appareil avant d'insérer des batteries.
Si les batteries sont usées, retirez-les immédiatement de l'appareil.
Rechargez immédiatement des batteries déchargées afin
d'éviter tout dommage.
Retirez les batteries d'un appareil si vous n'avez pas l'intention de l'utiliser pendant une période prolongée.
Pour entreposer ou recycler des batteries, isolez les contacts
avec du ruban adhésif.
DE
EN
FR
Placez et utilisez tous les composants sur une surface stable,
plane et exempte de vibrations afin d'éviter que l'appareil ne
tombe.
N'exposez pas l'appareil à des vibrations. Les vibrations peuvent
endommager l'électronique sensible.
Veillez à ce que l'appareil ne soit pas exposé à des sources de
chaleur directes (p. ex. des radiateurs ou une puissante lumière
artificielle).
Aucune source de feu nu (p. ex. des bougies allumées) ne doit se
trouver sur ou à proximité de l'appareil.
Veillez à ce que les fentes d'aération ne soient pas obstruées afin
de toujours garantir une aération suffisante.
Ne posez aucun objet sur les câbles, ils pourraient être endommagés.
• Conservez une distance minimale d'environ 10 cm entre les
murs et l'appareil ou l'adaptateur secteur. Garantissez une aération suffisante de l'appareil.
• N'utilisez jamais votre appareil en plein air, des facteurs externes (pluie, neige, etc.) pourraient l'endommager.
• Prévoyez au moins un mètre de distance entre l'appareil et
GPL
2.4. Lieu d'installation
131 de 198
86883 DE EN FR EComm RC1.indb 131
03.04.2013 13:08:11
Consignes de sécurité
Lifesmart TV
les sources de brouillage haute fréquence et magnétiques
éventuelles (téléviseur, haut-parleurs, téléphone portable,
etc.) afin d'éviter tout dysfonctionnement.
• En cas de fortes variations de température ou d'humidité, il
est possible que, par condensation, de l'humidité se forme à
l'intérieur de l'appareil, pouvant provoquer un court-circuit.
Attendez donc toujours que l'appareil soit à température ambiante avant de l'allumer.
2.5. Ne jamais réparer soi-même l'appareil !
Si l'adaptateur secteur, le cordon d'alimentation ou l'appareil est
endommagé, débranchez immédiatement la fiche de la prise de
courant.
Ne mettez jamais l'appareil en marche si vous constatez des
dommages visibles de l'appareil ou du cordon d'alimentation ni
si l'appareil est tombé par terre.
AVERTISSEMENT !
N'essayez en aucun cas d'ouvrir et/ou de réparer
vous-même l'appareil. Vous risqueriez de vous électrocuter !
Pour éviter tout danger, adressez-vous en cas de problème au
centre de service après-vente Medion ou à un autre atelier spécialisé.
2.6. Nettoyage et entretien
• Avant de nettoyer l'appareil, débranchez impérativement
l'adaptateur secteur de la prise de courant.
• Pour nettoyer l'appareil, utilisez uniquement un chiffon doux
et sec. N'utilisez ni solvants ni détergents chimiques qui
pourraient endommager la surface et/ou les inscriptions figurant sur l'appareil.
132 de 198
86883 DE EN FR EComm RC1.indb 132
03.04.2013 13:08:12
Lifesmart TV
Consignes de sécurité
DE
2.7. Sauvegarde des données
• Attention ! Après chaque mise à jour de vos données, effectuez des copies de sauvegarde sur des supports de stockage
externes. Toute demande de dommages et intérêts en cas de
perte de données et de dommages consécutifs en résultant
est exclue.
EN
FR
Remarque importante : certaines pièces de l'appareil restent
sous tension même si celui-ci est en mode Veille. Pour interrompre l'alimentation de votre appareil ou pour le mettre totalement hors tension, coupez-le complètement du courant secteur en débranchant l'adaptateur secteur de la prise de courant.
• Branchez l'adaptateur secteur uniquement sur des prises
mises à la terre AC 100-240 V~ 50 Hz. Si vous avez des doutes
en ce qui concerne l'alimentation électrique sur le lieu d'installation, demandez conseil à votre fournisseur d'électricité.
• Utilisez exclusivement l'adaptateur secteur fourni (Ktec KSAS0241200150HE). N'essayez pas de brancher la fiche de
l'adaptateur secteur sur d'autres prises : vous pourriez endommager l'appareil.
• En raison de la fonction de chargement de la télécommande,
l'appareil consomme aussi du courant en mode Veille.
• Pour une sécurité supplémentaire, nous conseillons l'utilisation d'une protection contre les surtensions de manière à éviter que l'appareil ne soit endommagé par des pics de tension
ou la foudre à travers le réseau électrique.
• N'utilisez pas l'appareil en plein air : risque de dommages par
la foudre ! En cas d'orage, coupez complètement l'appareil
du courant secteur en débranchant l'adaptateur secteur de la
prise de courant.
• Pour interrompre l'alimentation, débranchez l'adaptateur
secteur de la prise de courant.
• L'adaptateur secteur doit rester facilement accessible, même
GPL
2.8. Alimentation
133 de 198
86883 DE EN FR EComm RC1.indb 133
03.04.2013 13:08:12
Informations relatives à la conformité
•
•
•
•
•
Lifesmart TV
une fois branché, de manière à pouvoir être rapidement débranché en cas de besoin.
Ne recouvrez pas l'adaptateur secteur de manière à éviter
toute surchauffe.
Ne saisissez jamais l'adaptateur secteur avec les mains mouillées ! Vous risqueriez de vous électrocuter !
Si vous utilisez une rallonge, celle-ci doit impérativement satisfaire aux exigences VDE. Demandez éventuellement les
conseils de votre électricien.
Disposez les câbles de manière à ce que personne ne puisse
marcher ou trébucher dessus.
Ne posez aucun objet sur les câbles, ils pourraient être endommagés.
3. Informations relatives à la conformité
Avec sa fonction ON/OFF, cet appareil satisfait aux exigences essentielles et
prescriptions pertinentes de la directive sur l’écoconception 2009/125/CE
(Règlement n° 1275/2008). Une fonction de veille au sens de la directive sur
l’écoconception n’est supportée que si l’option « « USB charging function in
standby mode »» a été réglée sur OFF dans les préférences système (voir « USB
charging function in standby mode » à la page 177).
3.1. Information relative à la conformité selon
R&TTE
Par la présente, la société Medion AG déclare que le produit MD 86883 est conforme aux exigences de la directive européenne R&TTE 1999/5/CE (y compris
les exigences de la directive CEM 2004/108/CE et de la directive « Basse tension
» 2006/95/CE), de la directive sur l‘écoconception 2009/125/CE et de la directive RoHS 2011/65/UE.
Vous pouvez obtenir les déclarations de conformité complètes sur
www.medion.com/conformity.
134 de 198
86883 DE EN FR EComm RC1.indb 134
03.04.2013 13:08:12
Lifesmart TV
Contenu de la livraison
DE
4. Contenu de la livraison
Veuillez vérifier si la livraison est complète et nous informer dans un délai de
deux semaines à compter de la date d'achat si ce n'est pas le cas.
EN
FR
Avec le produit que vous venez d'acheter, vous recevez :
• Lifesmart TV MD 86883
• Adaptateur secteur (Ktec KSAS0241200150HE)
• Télécommande avec bloc batterie
• Câble de chargement USB pour la télécommande
• Câble HDMI
• Câble Cinch audio/vidéo
• Mode d'emploi
• Carte de garantie
GPL
DANGER !
Conservez les emballages, p. ex. les plastiques, hors
de la portée des enfants : risque d'asphyxie !
135 de 198
86883 DE EN FR EComm RC1.indb 135
03.04.2013 13:08:12
Généralités
Lifesmart TV
5. Généralités
5.1. Formats compatibles
Cet appareil permet de reproduire et de lire de nombreux formats de fichiers.
Le tableau suivant vous indique les formats de fichiers compatibles des différents types de média.
Type de média
Formats de fichiers
Vidéo
MPG, MPEG, AVI, WMV, MP4, MOV, DAT, VOB, 3GP, FLV,
MKV, TS, M2TS
Audio
MP3, WMA, WAV, AAC, OGG
Photo
JPG, BMP, PNG, GIF
REMARQUE !
En raison du grand nombre de codecs différents, la lecture de tous les formats ne peut pas être garantie.
5.2. Systèmes de fichiers
Votre Lifesmart TV prend en charge les systèmes de fichiers FAT16, FAT32 et
NTFS.
5.3. À propos de l'icône d'affichage
En cours d'utilisation, il est possible que l'icône « » s'affiche sur l'écran du
téléviseur, indiquant que la fonction expliquée dans le mode d'emploi n'est
pas disponible pour ce mode.
136 de 198
86883 DE EN FR EComm RC1.indb 136
03.04.2013 13:08:12
Lifesmart TV
Vue d'ensemble de l'appareil
DE
6. Vue d'ensemble de l'appareil
EN
6.1. Vue avant
FR
1
2
1)
2)
3)
4)
5)
3
4
5
Émetteur WiFi (sous le cache)
SD/SDHC : fente pour cartes SD/SDHC
USB : port USB
Standby/On (LED de veille) :
Appuyer sur cette touche pour allumer/éteindre l'appareil
S'éteint lorsque l'appareil est éteint ; est rouge en mode Veille ; est
bleue lorsque l'appareil est allumé
Capteur de la télécommande
6.2. Vue arrière
6)
7)
8)
9)
10)
11)
12)
13)
8
9 10 11 12 13
GPL
6 7
AV OUT : sortie audio/vidéo analogique
SPDIF : sortie audio numérique optique
HDMI : sortie HDMI
microSD : fente pour cartes microSDHC
USB : port USB
RJ45 : port LAN pour réseau
DC : prise pour adaptateur secteur
Bouton ON/OFF
137 de 198
86883 DE EN FR EComm RC1.indb 137
03.04.2013 13:08:13
Vue d'ensemble de l'appareil
Lifesmart TV
6.3. Télécommande
1
2
3
DE V
SC
14
ROLL
OK
13
12
4
5
11
6
7
MOD
10
8
9
15
16
17
138 de 198
86883 DE EN FR EComm RC1.indb 138
03.04.2013 13:08:14
1)
2)
3)
4)
5)
6)
7)
8)
9)
10)
11)
12)
13)
14)
15)
16)
17)
Vue d'ensemble de l'appareil
DE
LED d' etat :
:
- clignote rapidement en violet en cas
d'établissement de connexion avec le Lifesmart TV ;
- est allumée en bleu en cas de connexion établie
avec le Lifesmart TV allumé ;
- clignote en rouge pendant le chargement lorsque
la connexion au Lifesmart TV est coupée ;
- est allumée en rouge lorsque la batterie est
entièrement chargée et la connexion au
Lifesmart TV, coupée.
LED centrale :
saisie vocale activée
LED de droite :
aucune fonction
POWER:
allumer/éteindre la télécommande
OK :
confirmer les saisies
RETURN :
revenir au dernier menu
Favorites :
définir des signets
Standby/On : allumer le Lifesmart TV/le mettre en mode Veille
MOD :
touche non programmée/
réservée pour de futures fonctions
/
:
augmenter/réduire le volume
PLAY/PAUSE : démarrer/interrompre la lecture
dans le lecteur multimédia
/
SKIP/SEARCH :
appuyer pour revenir au titre précédent/passer
au titre suivant ; maintenir enfoncée pour exécuter
une recherche en avant/arrière
MUTE :
activer/désactiver le son ; maintenir enfoncée pour
connecter/déconnecter la télécommande
Touche Menu : afficher les préférences système ;
afficher les options de programmation/menus
contextuels
HOME :
afficher le menu principal
Touches de navigation/sélecteur à cliquer
Compartiment à batterie
Touche de curseur:poser le doigt sur la touche pour activer la fonction
Souris ; cliquer dessus pour sélectionner boutons et options
Touche Microphone :
lancer la recherche Google par saisie vocale
EN
FR
GPL
Lifesmart TV
139 de 198
86883 DE EN FR EComm RC1.indb 139
03.04.2013 13:08:15
Mise en service
Lifesmart TV
7. Mise en service
7.1. Procéder aux raccordements de l'appareil
(face arrière)
micro
SDHC
USB
Raccordement du Lifesmart TV à un téléviseur/écran avec
prise HDMI
Le raccordement à l'aide du câble HDMI fourni permet d'établir la meilleure connexion entre votre Lifesmart TV et un téléviseur ou écran. Avec
la connexion via HDMI, les signaux d'image et de son sont transmis et restitués sur votre téléviseur ou écran. Le bon format d'image est aussi établi
et réglé automatiquement à condition que le format de l'entrée HDMI soit
réglé sur « Automatique » sur votre téléviseur ou écran.
Raccordez le câble HDMI à la prise HDMI du Lifesmart TV ainsi qu'à la
prise d'entrée HDMI correspondante du téléviseur/de l'écran.
REMARQUE RELATIVE À LA CONNEXION VIA HDMI
Si votre téléviseur ne possède pas de décodeur Dolby
Digital ou MPEG, réglez dans le menu Paramètres l'option [TV Mode Setup], sous-menu [HDMI Audio
Mode], sur [PCM Stereo] (voir page 178).
140 de 198
86883 DE EN FR EComm RC1.indb 140
03.04.2013 13:08:17
Lifesmart TV
•
Mise en service
Lorsque vous raccordez un appareil compatible HDMI, veuillez respecter
les points suivants :
− Éteignez le téléviseur et le Lifesmart TV. Puis allumez le téléviseur, patientez environ 30 secondes et allumez ensuite le Lifesmart TV.
− L'entrée vidéo du téléviseur doit être réglée sur le Lifesmart TV.
− Le téléviseur raccordé doit supporter les résolutions HDMI.
DE
EN
FR
Raccordement du Lifesmart TV à un téléviseur avec prise AV
Raccordez la prise AV OUT du Lifesmart TV aux prises d'entrée audio/vidéo du téléviseur à l'aide du câble audio/vidéo fourni. Seules les résolutions PAL sont supportées via cette sortie. Si vous souhaitez profiter de
contenus en HD, vous devez utiliser la sortie HDMI.
Raccordement numérique optique
Pour la transmission des signaux audio numériques à un périphérique audio numérique, raccordez la prise SPDIF du Lifesmart TV à la prise correspondante du périphérique audio numérique (p. ex. un amplificateur A/V)
à l'aide d'un câble optique (câble Toslink, non fourni).
Raccordement réseau
Raccordez la prise RJ45 du Lifesmart TV à une interface réseau (p. ex. un
routeur) à l'aide d'un câble réseau avec connecteurs correspondants.
Le Lifesmart TV peut alors accéder aux fichiers partagés du réseau et, si le
routeur est configuré en conséquence, aussi recevoir des données d'Internet.
Raccordement d'un support de données via USB
GPL
Raccordez un périphérique USB avec fonction de lecteur amovible (p. ex.
appareil photo numérique, disque dur USB, clé USB, etc.) au port USB situé au dos de l'appareil.
141 de 198
86883 DE EN FR EComm RC1.indb 141
03.04.2013 13:08:18
Mise en service
Lifesmart TV
7.2. Procéder aux raccordements de l'appareil
(face avant)
USB
SD/
SDHC
Raccordement d'un support de données via USB
Raccordez un périphérique USB avec fonction de lecteur amovible (p. ex.
appareil photo numérique, disque dur USB, clé USB, etc.) au port USB situé sur la face avant de l'appareil.
Fente pour cartes mémoire SD/SDHC
Insérez une carte mémoire (de type SD/SDHC) dans la fente située sur la
face avant de l'appareil pour pouvoir lire les fichiers stockés sur la carte
mémoire.
REMARQUE !
Votre Lifesmart TV est compatible avec les cartes mémoire SD, SDHC et MMC.
Raccordement de l'adaptateur secteur
Raccordez la fiche d'alimentation en courant de l'adaptateur secteur fourni (KSAS0241200150HE) à la prise DC IN de l'appareil.
Une fois tous les raccordements effectués, branchez l'adaptateur secteur sur une prise de courant (AC 230 V ~ 50 Hz). Vous trouverez les informations sur l'adaptateur secteur dans les caractéristiques techniques à la
page 185.
142 de 198
86883 DE EN FR EComm RC1.indb 142
03.04.2013 13:08:18
Lifesmart TV
Utilisation de la télécommande gyroscopique
8. Utilisation de la télécommande gyroscopique
La télécommande gyroscopique fournie interprète vos gestes via un capteur
de position et peut ainsi être utilisée comme une souris d'ordinateur pour
commander l'interface utilisateur du Lifesmart TV.
DE
EN
FR
8.1. Mise en marche et arrêt de la télécommande
gyroscopique
Maintenez la touche POWER de la télécommande enfoncée pendant
environ 3 secondes pour allumer la télécommande.
Deux brefs signaux sonores graves vous confirment que la télécommande
est bien allumée.
• Une fois allumée, la télécommande établit immédiatement la connexion
radio avec le Lifesmart TV.
• Tant que la télécommande recherche une connexion au Lifesmart TV, la
LED Power violette clignote rapidement.
• Une fois la connexion établie, la LED Power bleue reste allumée en permanence.
REMARQUE !
La télécommande doit pour cela se trouver à portée
du Lifesmart TV (env. 7 mètres) et le Lifesmart TV doit
être allumé !
Éteindre la télécommande
8.2. Connecter manuellement la télécommande
gyroscopique
Si la connexion (couplage) au Lifesmart TV n'est pas établie automatiquement, vous pouvez aussi lancer le couplage manuellement en maintenant
enfoncée la touche MUTE de la télécommande allumée jusqu'à ce que
vous sentiez une courte vibration.
La télécommande gyroscopique se reconnectera alors au Lifesmart TV.
GPL
Pour éteindre la télécommande, maintenez à nouveau la touche
POWER enfoncée pendant environ 3 secondes.
Un bref signal sonore aigu vous confirme que la télécommande est bien éteinte.
143 de 198
86883 DE EN FR EComm RC1.indb 143
03.04.2013 13:08:19
Utilisation de la télécommande gyroscopique
Lifesmart TV
8.3. Utiliser la fonction Souris de la télécommande
Pour déplacer le curseur sur l'écran, posez votre index sur la touche de
curseur au bas de la télécommande tout en bougeant la télécommande
vers le haut, le bas, la gauche et la droite.
Pour sélectionner un bouton, un champ de commande sur l'écran, appuyez sur la touche de curseur.
Lorsque vous enlevez votre doigt de la touche de curseur, le mouvement s'arrête.
8.4. Chargement de la télécommande
gyroscopique
La télécommande gyroscopique fonctionne avec une batterie déjà insérée à
la livraison. Avant d'utiliser la télécommande, vous devez charger cette batterie à l'aide du câble USB fourni.
Éteignez alors la télécommande.
Raccordez le port mini USB de la télécommande au port USB du Lifesmart
TV à l'aide du câble USB fourni.
REMARQUE !
La fonction de chargement est aussi disponible en
mode Veille si vous avez auparavant, dans les préférences système, réglé l'option « USB charging
function in standby mode » sur ON (voir page
177).
Vous avez aussi la possibilité de charger la télécommande gyroscopique sur un ordinateur ou avec un
bloc d'alimentation USB.
•
•
La LED d'état rouge clignote pendant toute la durée de chargement.
Une fois la batterie complètement chargée, la LED d'état rouge reste
allumée en permanence.
144 de 198
86883 DE EN FR EComm RC1.indb 144
03.04.2013 13:08:19
Lifesmart TV
Fonctionnement
DE
Vérifier l'état de charge de la batterie
Vous pouvez vérifier l'état de charge de la batterie à l'aide de la LED
d'état en appuyant brièvement sur la touche POWER de la télécommande. La LED POWER affiche alors l'état de charge de la batterie en s'allumant en rouge :
LED d'état
clignote 4 fois
Charge de batterie > 80%
LED d'état
clignote 3 fois
Charge de batterie > 60%
LED d'état
clignote 2 fois
Charge de batterie > 40%
LED d'état
clignote 1 fois
Charge de batterie > 20%
Clignotement rouge permanent
EN
FR
Batterie doit être rechargée
9. Fonctionnement
9.1. Mise en marche et arrêt de l'appareil
REMARQUE !
Pour allumer ou éteindre l'appareil avec la touche
Standby/On, vous devez orienter la télécommande
vers le Lifesmart TV. Toutes les autres fonctions étant
transmises par radio, vous n'avez pas besoin d'orienter
la télécommande vers le Lifesmart TV pour les utiliser.
GPL
Une fois que vous avez raccordé l'appareil au réseau électrique à l'aide de
l'adaptateur secteur, la touche Standby/On s'allume en rouge sur l'appareil.
Appuyez sur la touche Standby/On de la télécommande ou sur la
touche Standby/On de l'appareil pour allumer le Lifesmart TV. Pendant le démarrage du système, le logo MEDION est visible sur l'écran. La
touche Standby/On bleue de l'appareil est allumée.
Pour mettre l'appareil en mode Veille, appuyez sur la touche Standby/
On de la télécommande ou de l'appareil. En mode Veille, la touche
Standby/On de l'appareil est allumée en rouge.
Appuyez à nouveau sur la touche Standby/On de la télécommande ou
sur la touche Standby/On de l'appareil pour rallumer l'appareil depuis
le mode Veille.
145 de 198
86883 DE EN FR EComm RC1.indb 145
03.04.2013 13:08:20
Fonctionnement
Lifesmart TV
9.2. Première mise en service
Lors de la première mise en service de l'appareil, saisissez tout d'abord la
langue des menus souhaitée et le pays où vous vous trouvez.
Sélectionnez l'option NEXT pour démarrer le Lifesmart TV.
Le menu principal s'ouvre.
9.3. Configurer le réseau
Une fois que vous avez sélectionné la langue des menus et le pays, vous
voyez apparaître le menu Paramètres réseau et le Lifesmart TV affiche les réseaux disponibles pour une connexion WiFi.
Si une connexion Internet est établie via un câble LAN déjà raccordé, le Lifesmart TV est automatiquement connecté au réseau. Sélectionnez dans ce cas
l'option « use LAN connection instead of wireless » puis, une
fois la connexion établie, cliquez sur « Continue ».
REMARQUE !
Vous pouvez aussi ouvrir le menu Paramètres réseau
avec le menu Paramètres ([Paramètres] -> [Network
Setup]). Si vous voulez configurer une connexion LAN,
passez à la section « Configurer une connexion LAN » à
la page 149 ».
146 de 198
86883 DE EN FR EComm RC1.indb 146
03.04.2013 13:08:22
Lifesmart TV
Fonctionnement
DE
Configurer une connexion WiFi
Si aucune connexion réseau via le câble LAN n'a été reconnue, votre Lifesmart TV balaye automatiquement les réseaux WiFi disponibles et les affiche
dans une liste.
EN
FR
REMARQUE !
Vous pouvez aussi afficher la recherche de réseaux
WiFi disponibles en sélectionnant WiFi sous l'option
« Type de réseau ». ([Network Type] -> [Wired]).
GPL
Sélectionnez maintenant votre réseau WiFi.
L'appareil vous demande alors de saisir le mot de passe correspondant
pour votre réseau.
147 de 198
86883 DE EN FR EComm RC1.indb 147
03.04.2013 13:08:23
Fonctionnement
Lifesmart TV
Cliquez dans le champ pour le mot de passe et saisissez votre mot de
passe sur le clavier virtuel (voir aussi « 10.3. Saisie sur le clavier virtuel » à
la page 152).
Finalisez votre saisie en cliquant sur l'icône ENTER sur le clavier virtuel.
Le Lifesmart TV se connecte alors à Internet.
Si la connexion échoue, l'appareil vous demande de vérifier votre mot de
passe et de réessayer d'établir la connexion.
Cliquez pour cela sur le bouton « Retry ».
Une fois la connexion Internet établie, cliquez sur le bouton « Continue » pour accéder au menu principal.
148 de 198
86883 DE EN FR EComm RC1.indb 148
03.04.2013 13:08:29
Lifesmart TV
Fonctionnement
DE
Optionnel : désactiver le serveur DHCP
Si votre Lifesmart TV ne peut pas obtenir d'adresses IP automatiquement
du routeur, réglez l'option DHCP sur OFF.
Dans la fenêtre de dialogue suivante, saisissez ensuite une adresse IP
statique, un masque subnet, le serveur DNS et une passerelle pour la
connexion Internet. Le Lifesmart TV se connecte alors au réseau avec
cette adresse IP statique.
EN
FR
Configurer une connexion LAN
Une fois la connexion Internet établie, cliquez sur le bouton « Continue
» pour accéder au menu principal.
Optionnel : désactiver le serveur DHCP
Si votre Lifesmart TV ne peut pas obtenir d'adresses IP automatiquement
du routeur, réglez l'option DHCP sur OFF.
Dans la fenêtre de dialogue suivante, saisissez ensuite une adresse IP
statique, un masque subnet, le serveur DNS et une passerelle pour la
connexion Internet. Le Lifesmart TV se connecte alors au réseau avec
cette adresse IP statique.
GPL
Pour configurer ultérieurement la connexion Internet via une connexion
LAN, raccordez le câble LAN fourni à votre Lifesmart TV et à une prise réseau RJ45 ou à votre routeur.
Le Lifesmart TV est connecté automatiquement à Internet lorsqu'une
connexion Internet a été reconnue via la connexion réseau.
149 de 198
86883 DE EN FR EComm RC1.indb 149
03.04.2013 13:08:34
Fonctionnement
Lifesmart TV
9.4. Menu principal
1
2 3 4 5 6
7
8
9
10
14
11
13
1)
2)
3)
4)
5)
6)
7)
8)
9)
10)
11)
12)
13)
14)
12
Heure et date
État LAN (cliquez sur cette icône pour afficher les paramètres réseau)
État WiFi (cliquez sur cette icône pour afficher les paramètres réseau)
État HDMI (cliquez sur cette icône pour afficher les paramètres du
mode TV)
Témoin USB (apparaît en blanc si un support de stockage est raccordé)
Témoin de carte mémoire SD/SDHC (apparaît en blanc si un support
de stockage est raccordé)
Ouvrir le navigateur Internet
Ouvrir le lecteur multimédia
Ouvrir la médiathèque MEDION
Ouvrir YouTube
Affichage de la météo sur le lieu réglé
Afficher les paramètres de l'appareil
Ouvrir le gestionnaire des applications
Aperçu des favoris
150 de 198
86883 DE EN FR EComm RC1.indb 150
03.04.2013 13:08:36
Lifesmart TV
Utilisation
DE
10. Utilisation
EN
10.1. Régler le volume
Appuyez sur les touches
/
de la télécommande pour réduire/
augmenter le volume. Le volume réglé est affiché sur l'écran.
FR
10.2. Navigation dans les menus
GPL
Outre la commande par gestes, vous pouvez aussi naviguer dans les menus à
l'aide des touches de la télécommande.
Les touches de navigation vous permettent de sélectionner les
options des menus et de modifier les valeurs dans les menus.
Appuyez sur la touche OK ou sur la touche de curseur pour confirmer
une option de menu.
Effectuez une rotation du doigt sur l'anneau des touches de navigation
pour faire défiler l'écran vers le bas ou vers le haut. (P. ex. sur des sites
Web).
Avec la touche
RETURN, vous revenez un niveau en arrière dans le
menu.
La touche HOME vous permet de revenir au menu principal depuis
chaque réglage/application.
151 de 198
86883 DE EN FR EComm RC1.indb 151
03.04.2013 13:08:38
Utilisation
Lifesmart TV
10.3. Saisie sur le clavier virtuel
Dans certains menus, un clavier s'affiche sur l'écran pour la saisie de texte :
Sélectionnez un caractère et appuyez sur la touche OK ou sur la touche
de curseur pour le saisir dans la ligne de texte.
Avec le champ ?123, vous passez à la sélection des chiffres et caractères
spéciaux. Le champ ABC vous permet de revenir à la sélection des lettres :
Cliquez sur le champ ~\{ qui apparaît alors pour afficher d'autres caractères spéciaux. Le champ ABC vous permet de revenir à la sélection des
lettres.
Sélectionnez l'icône ENTER ou cliquez à un endroit en dehors du clavier
pour fermer le clavier virtuel et repasser au menu.
152 de 198
86883 DE EN FR EComm RC1.indb 152
03.04.2013 13:08:38
Lifesmart TV
Saisie vocale avec le microphone
DE
11. Saisie vocale avec le microphone
Vous pouvez saisir des mots-clés avec le microphone de la télécommande
pour lancer une recherche sur Internet.
Pratiquement partout où vous pouvez saisir du texte avec le clavier virtuel,
vous pouvez aussi dicter du texte.
EN
FR
REMARQUE !
La saisie vocale n'est pas disponible avec toutes les applications.
GPL
Cliquez sur un champ de texte ou à un endroit du texte qui a déjà été saisi dans un champ de texte.
Maintenez la touche Microphone enfoncée.
Vous voyez apparaître la fenêtre pour la saisie vocale.
Dictez votre texte puis relâchez la touche Microphone.
• Si vous effectuez une recherche vocale dans le
menu principal, le navigateur Internet s'ouvre et
la recherche Google du mot-clé que vous avez saisi s'affiche.
• Si vous effectuez une saisie vocale dans un autre
menu ou dans une application, cliquez sur la fenêtre du menu/de l'application pour utiliser les mots-clés.
Si votre instruction vocale ne peut pas être clairement interprétée, une fenêtre de sélection vous proposant des résultats possibles s'ouvre :
Sélectionnez le bon mot pour l'utiliser.
Si votre saisie ne donne aucun résultat de recherche, appuyez sur la
touche
RETURN pour saisir un autre mot-clé.
153 de 198
86883 DE EN FR EComm RC1.indb 153
03.04.2013 13:08:43
Saisie vocale avec le microphone
Lifesmart TV
REMARQUE !
La saisie vocale utilise le service de
reconnaissance vocale de Google.
Pour que vous puissiez l'utiliser, le
Lifesmart TV doit être connecté à Internet. Si
le serveur du service de reconnaissance vocale n'est pas accessible ou si une erreur se
produit lors de la connexion Internet, l'appareil vous signale qu'aucune donnée vocale n'a
été reconnue.
Dans ce cas, établissez de nouveau la connexion Internet ou redémarrez le Lifesmart TV en l'éteignant puis en le rallumant.
11.1. Réglages pour la saisie vocale
Cliquez sur l'icône d'outil en haut à droite dans la fenêtre de saisie vocale.
Dans la fenêtre suivante, vous pouvez alors procéder aux réglages pour la saisie vocale:
Language
Réglez ici la langue dans laquelle les mots-clés de la reconnaissance vocale
doivent être disponibles.
Safe Search
Réglez le filtre de Safe Search pour filtrer les résultats contenant des termes
choquants dans la recherche sur Google.
Block offensive words
Cochez ici le champ de droite pour que les résultats contenant des termes
choquants pour la reconnaissance vocale soient bloqués.
154 de 198
86883 DE EN FR EComm RC1.indb 154
03.04.2013 13:08:45
Lifesmart TV
Aperçu des favoris
DE
12. Aperçu des favoris
Cliquez dans le menu principal sur la prévisualisation d'un site Web pour
l'ouvrir directement avec le navigateur Internet.
EN
FR
12.1. Modifier l'aperçu des favoris
Vous pouvez modifier la prévisualisation des sites Web dans l'aperçu des
favoris en déplaçant le curseur sur une prévisualisation de site Web puis
en appuyant sur la touche Favoris.
GPL
Dans le menu suivant, saisissez l'adresse Web du site Internet qui doit apparaître dans la prévisualisation ou sélectionnez un site Internet dans la
liste des sites Internet que vous avez consultés en dernier.
155 de 198
86883 DE EN FR EComm RC1.indb 155
03.04.2013 13:08:48
Affichage de la météo dans le menu principal
Lifesmart TV
13. Affichage de la météo dans le menu principal
Lorsqu'une connexion Internet est établie, le temps qu'il fait dans votre ville
est affiché dans le menu principal par le biais du service de prévisions météo
Accu Weather.
13.1. Réglage du lieu pour Accu Weather
À la première mise en service, aucun lieu n'est encore réglé pour l'affichage
de la météo.
Cliquez sur l'icône de roue dentée pour afficher le réglage du lieu.
Acceptez le contrat de licence.
Le clavier virtuel s'affiche à l'écran.
Indiquez dans la fenêtre de dialogue supérieure une ville pour l'affichage
de la météo ou sélectionnez l'icône de microphone pour énoncer le
nom de la ville dans le microphone de la télécommande.
156 de 198
86883 DE EN FR EComm RC1.indb 156
03.04.2013 13:08:52
Lifesmart TV
Affichage de la météo dans le menu principal
Confirmez votre saisie avec la touche ENTER sur le clavier virtuel ou avec
le champ dans la fenêtre de dialogue.
DE
EN
FR
REMARQUE CONCERNANT L'OPTION « GPS »
Les logiciels de votre Lifesmart TV étant basés sur le
système d'exploitation Android, dans ce réglage, l'indication du lieu est affichée en standard via GPS. Mais vu
que votre Lifesmart TV ne comporte pas de récepteur
GPS, cette option n'a aucune fonction.
GPL
Il se peut qu'apparaisse une liste dans laquelle vous pouvez choisir une ville
proche de la vôtre.
Sélectionnez la ville qui convient.
Cette ville est alors affichée en premier dans la liste des lieux disponibles.
Sélectionnez l'option « Add Location » pour ajouter d'autres villes à la
liste des lieux.
Marquez les lieux dont vous souhaitez afficher la météo en cochant la
case située à côté du nom du lieu.
Pour quitter ce réglage, cliquez sur le champ « Exit ».
157 de 198
86883 DE EN FR EComm RC1.indb 157
03.04.2013 13:08:55
Affichage de la météo dans le menu principal
Lifesmart TV
13.2. Affichage étendu de la météo
Cliquez dans le menu principal sur l'affichage de la météo pour ouvrir l'affichage étendu de la météo.
En plus de la température et du temps qu'il fait, vous voyez ici des données
complètes telles qu'humidité de l'air, pression atmosphérique, etc., ainsi que
de nombreuses autres informations pour le lieu.
Vous pouvez effectuer d'autres réglages avec la barre de menu en haut de
l'écran:
1
2
3
4
5
12
11
10
9
8
7
6
1)
2)
3)
4)
5)
Menu déroulant – cliquez sur ce champ pour dérouler le menu. Les
options que vous sélectionnez ici apparaîtront désormais lorsque
vous ouvrez l'affichage étendu de la météo.
Actualiser – cliquez sur ce champ pour recharger les données météo
pour le lieu.
Les logiciels de votre Lifesmart TV étant basés sur le système d'exploitation Android, dans ce réglage, l'indication du lieu est affichée en
standard via GPS. Mais vu que votre Lifesmart TV ne comporte pas de
récepteur GPS, cette option n'a aucune fonction.
Lieux – vous pouvez ici faire apparaître la liste des lieux sur le bord
gauche de l'écran. Avec cette liste, vous pouvez ajouter un nouveau
lieu ou cliquer dans la liste sur un lieu dont les données météo doivent
être affichées dans la fenêtre principale.
Préférences – vous pouvez ici afficher sur le bord gauche de l'écran les
réglages pour le service Accu Weather. Vous pouvez dans ces réglages
modifier les unités et formatages pour température, vitesse, hauteur
des précipitations (valeur mesurée), format de l'heure et affichage de
158 de 198
86883 DE EN FR EComm RC1.indb 158
03.04.2013 13:08:56
Lifesmart TV
6)
7)
8)
9)
10)
11)
la date. Vous y trouvez en outre les données de contact du service et
les conditions de licence d'Accu Weather.
Nouvelles – afficher les nouvelles actuelles du domaine thématique «
Météo ».
Vidéos – afficher et ouvrir des vidéos actuelles sur la météo mondiale.
Lifestyle – afficher des informations sur des activités et situations dépendant de la météo.
Cartes – si des cartes animées affichant un radar de précipitations
ou d'autres événements météo sont disponibles pour le lieu actuel,
vous pouvez les regarder ici. Pour regarder l'animation, cliquez sur le
champ .
Prévisions à 15 jours – afficher les prévisions météo pour les deux prochaines semaines. Cliquez sur une date pour afficher dans la fenêtre
de droite les prévisions météo détaillées pour cette date.
D'heure en heure – afficher les prévisions météo pour chacune des
prochaines 24 heures.
Conditions actuelles – afficher la météo actuelle sur le lieu.
DE
EN
FR
GPL
12)
Affichage de la météo dans le menu principal
159 de 198
86883 DE EN FR EComm RC1.indb 159
03.04.2013 13:08:57
Navigateur Internet
Lifesmart TV
14. Navigateur Internet
Cliquez sur l'icône Internet pour ouvrir le navigateur Internet.
Utilisez le navigateur comme vous en avez l'habitude sur un ordinateur.
• Si vous maintenez la touche de curseur de la télécommande enfoncée,
vous pouvez faire défiler le site affiché avec des mouvements vers le haut
et le bas.
• Vous pouvez aussi faire défiler l'affichage d'un site Web vers le haut et le
bas avec la molette de défilement.
• En double-cliquant sur la touche de curseur, vous pouvez faire un zoom
avant ou arrière à l'intérieur du navigateur.
14.1. Éléments de commande dans le navigateur
1 2 3
1)
2)
3)
4)
5)
6)
7)
8)
4
5 6 7
8
Une page en arrière dans l'historique du navigateur
Une page en avant dans l'historique du navigateur
Actualiser la page
Adresse Web
Ajouter le site aux favoris
Rechercher sur le site
Afficher signets, sites enregistrés et historique
Afficher les options du navigateur (voir section suivante)
160 de 198
86883 DE EN FR EComm RC1.indb 160
03.04.2013 13:08:58
Lifesmart TV
Navigateur Internet
DE
Options du navigateur
Vous pouvez afficher les options du navigateur en cliquant sur l'icône
dans le coin supérieur droit.
EN
FR
Refresh
Recharger le site Web actuel.
Forward
Une page en avant dans l'historique.
Share Page
Cette fonction n'est pas disponible sur votre Lifesmart TV.
Find on page
Rechercher des mots-clés sur le site affiché.
Request Desktop site
Passer à la version de bureau du site Web.
GPL
Save for offline reading
Cliquez sur cette option pour enregistrer le site Web affiché.
Page info
Afficher adresse Web et titre du site Web.
Settings
Afficher le menu de réglage du navigateur Internet.
161 de 198
86883 DE EN FR EComm RC1.indb 161
03.04.2013 13:08:58
Lecteur multimédia
Lifesmart TV
15. Lecteur multimédia
La première fois que vous démarrez le lecteur multimédia, vous voyez s'afficher un guide de démarrage rapide du lecteur multimédia. Vous pouvez vous
faire afficher ce guide à chaque démarrage ou le désactiver en bas à gauche
dans le coin avec la case de contrôle « Show on startup ».
Vous pouvez à tout moment fermer le guide de démarrage rapide avec le X
situé dans le coin supérieur droit.
REMARQUE !
Si vous sélectionnez une source multimédia du réseau,
les données de cette source sont immédiatement lues.
Cette opération peut durer un certain temps. Le chargement est affiché avec l'icône « Actualiser ».
L'icône de lecteur multimédia dans le coin supérieur gauche vous permet de
repasser à l'écran d'accueil.
Sélectionnez quels médias vous souhaitez lire (musique, vidéos ou photos).
162 de 198
86883 DE EN FR EComm RC1.indb 162
03.04.2013 13:09:01
Lifesmart TV
Lecteur multimédia
DE
15.1. My Media
EN
FR
GPL
Avec le bouton « My Media », vous pouvez régler quelles sources multimédia doivent être utilisées pour la sélection de fichiers multimédia.
• Sous LOCAL apparaissent tous les supports de données USB ou toutes les
cartes mémoire directement raccordés au Lifesmart TV. Tous les supports
de données sont alors qualifiés d'« USB » (dans l'ordre dans lequel ils ont
été raccordés).
• Sous NETWORK sont affichées les sources multimédia disponibles via le
réseau.
Activez la case de contrôle à gauche à côté d'une source multimédia du
réseau pour que les fichiers multimédia de cette source soient pris en
compte dans l'affichage des contenus multimédia disponibles sur le Lifesmart TV.
163 de 198
86883 DE EN FR EComm RC1.indb 163
03.04.2013 13:09:04
Lecteur multimédia
Lifesmart TV
15.2. Lecture
•
Selon le type de média, vous disposez de différentes options de tri et d'affichage, p. ex. tous (chansons) ; dossiers/albums ; date ; listes de lecture
ou évaluation.
Sélectionnez le média souhaité avec l'une des options disponibles et lancez la lecture.
15.3. Utilisation avancée
Cliquez sur l'icône dans le coin supérieur droit de l'écran pour ouvrir les
options suivantes pour le lecteur multimédia :
Créer des listes de lecture
Sélectionnez le type de média pour lequel vous voulez créer une liste de
lecture.
Cliquez sur l'option « New video playlist » pour créer une liste de
lecture.
Saisissez un nom pour la liste dans la fenêtre de dialogue suivante et cliquez sur OK.
Sélectionnez maintenant différents titres que vous voulez ajouter à la liste
de lecture en cochant la case à droite à côté de chaque titre.
Pour mémoriser la liste de lecture, cliquez sur l'option « Save Playlist » en haut de l'écran.
Afficher une liste de lecture :
Sélectionnez le type de média pour lequel vous voulez ouvrir une liste de
lecture.
Cliquez sur l'option « Playlists » pour ouvrir une liste de lecture.
164 de 198
86883 DE EN FR EComm RC1.indb 164
03.04.2013 13:09:08
Lifesmart TV
Lecteur multimédia
DE
Effacer une liste de lecture
Dès que des listes de lecture ont été créées, l'option « Effacer une liste de lecture » s'affiche.
Sélectionnez alors la liste de lecture que vous voulez effacer puis l'option
« Done » en haut de l'écran.
Confirmez avec « OK » pour effacer la liste de lecture sélectionnée.
EN
FR
Search
Avec l'option Search, vous pouvez rechercher des mots-clés dans l'affichage des médias actuel.
Saisissez sur le clavier virtuel le mot-clé que vous souhaitez rechercher.
Le Lifesmart TV recherche alors les contenus multimédia disponibles contenant ce mot-clé.
Les résultats de la recherche apparaissent en dessous de la ligne de saisie.
Sélectionnez un fichier parmi les résultats pour lancer la lecture directement.
REMARQUE !
Vous pouvez aussi rechercher des médias avec la saisie vocale.
Settings
Vous pouvez ici procéder aux réglages suivants pour le lecteur multimédia :
General Settings
Vous pouvez ici régler l'affichage du programme d'apprentissage ou démarrer le programme d'apprentissage.
Services
Photos
Vous pouvez ici modifier la durée d'affichage et le design des transitions pour
le diaporama de photos.
GPL
Vous pouvez ici modifier le nom du Lifesmart TV pour le serveur multimédia
DLNA et le renderer multimédia DLNA.
Information
Vous pouvez voir ici les informations relatives à la licence pour le lecteur multimédia.
Exit Mediaplayer
Quitte le lecteur multimédia et affiche le menu principal.
165 de 198
86883 DE EN FR EComm RC1.indb 165
03.04.2013 13:09:10
Médiathèque/portail
Lifesmart TV
16. Médiathèque/portail
Vous voyez dans le portail des contenus multimédia sélectionnés qui sont
mis à disposition pour votre Lifesmart TV par MEDION et par le biais d'applications. Vous pouvez ici regarder de nombreux clips vidéo et chaînes de télévision d'Internet qui ont été classés pour vous et sont actualisés en permanence. Définissez des favoris et retrouvez ainsi des articles individuels en
tout confort avec la fonction de recherche. Vous pouvez aussi afficher ici des
applications de réseaux sociaux telles que Twitter ou Facebook sous forme
d'app.
16.1. Fonctions du portail
1 2
3
4
10
9
1)
2)
3)
4)
5)
6)
7)
8
7
6
5
New Apps – afficher les tout derniers contenus multimédia ajoutés
au portail multimédia.
Recommended Apps – afficher les contenus multimédia qui sont recommandés pour le portail multimédia.
Popular Apps – afficher les contenus multimédia qui sont utilisés
par la plupart des autres usagers de Lifesmart TV.
Dans cette colonne apparaissent des informations et renvois à des
sauvegardes mis à disposition par MEDION.
Imprint – afficher les mentions légales du portail multimédia.
Help – afficher une page d'aide à l'utilisation du portail multimédia.
Settings – vous pouvez ici sélectionner dans quelle langue les
contenus multimédia doivent s'afficher.
166 de 198
86883 DE EN FR EComm RC1.indb 166
03.04.2013 13:09:11
Lifesmart TV
8)
9)
10)
Médiathèque/portail
Add Favorite – sélectionnez un contenu multimédia avec les
touches de navigation puis cliquez sur cette option pour ajouter le
contenu sélectionné à la liste des favoris.
Login – sélectionnez cette option pour vous connecter sur le portail
multimédia avec votre identifiant (voir « 16.2. Enregistrer le Lifesmart
TV en ligne » à la page 168).
Thèmes – sélectionnez ici les contenus multimédia classés par
thèmes. La rubrique respectivement activée apparaît au milieu de la
colonne.
Aux rubriques Divertissement, Musique, Sport, Vidéo et Actualités,
vous trouvez des clips vidéo et des chaînes de télévision Internet.
À la rubrique Informations, vous trouvez en plus des réseaux sociaux
tels que Twitter ou Facebook sous forme d'application.
DE
EN
FR
Utiliser les touches de navigation
Dans certaines applications, la sélection des contenus multimédia fonctionne avec les touches de navigation . Vous trouverez généralement plus d'informations sur la commande dans le menu d'aide de l'application respective.
Créer des favoris
Vous pouvez enregistrer des contenus multimédia comme favoris.
Sélectionnez pour cela un contenu multimédia (marquage bleu) à l'aide
des touches de navigation puis cliquez sur l'option « Add
Favorites » affichée en bas.
Le contenu multimédia est ajouté à la liste des favoris puis affiché à la rubrique « Favorites ».
Pour effacer un favori, sélectionnez le champ correspondant avec les touches
de navigation dans la liste des favoris puis cliquez sur l'option
« Delete Favorite » affichée en bas.
REMARQUE !
Pour pouvoir créer des favoris, vous devez être connecté en tant
qu'utilisateur sur le portail multimédia (voir « 16.2. Enregistrer le
Lifesmart TV en ligne » à la page 168).
GPL
Effacer des favoris
167 de 198
86883 DE EN FR EComm RC1.indb 167
03.04.2013 13:09:12
Médiathèque/portail
Lifesmart TV
16.2. Enregistrer le Lifesmart TV en ligne
Vous pouvez enregistrer votre Lifesmart TV en ligne.
Rendez-vous alors sur le site Internet
« http://medion.fxmconnect.com » et créez un profil utilisateur.
• Dans votre compte utilisateur, vous pouvez ensuite mémoriser des
adresses Internet comme signets et/ou connecter votre compte Facebook
ou Twitter au Lifesmart TV.
• Une fois que vous avez créé un compte utilisateur sur fxmconnect, vous
pouvez vous connecter sur le Lifesmart TV avec votre identifiant et votre
mot de passe :
Sur l'interface du portail, cliquez sur l'option « Login » en bas de l'écran.
1)
Cliquez sur le champ « Add User ».
168 de 198
86883 DE EN FR EComm RC1.indb 168
03.04.2013 13:09:12
Lifesmart TV
2)
3)
Médiathèque/portail
Si vous possédez déjà un compte utilisateur sur fxmconnect, cliquez
sur l'option « Connect ».
Saisissez ensuite vos données d'accès et cliquez sur « Submit ».
DE
EN
FR
Si vous n'avez pas encore créé de compte utilisateur sur fxmconnect,
sélectionnez tout d'abord l'option « Register » puis créez dans la fenêtre suivante (en indiquant une adresse e-mail) un identifiant, un
mot de passe et un code PIN TV.
5)
Sélectionnez ensuite l'option « Next ».
GPL
4)
169 de 198
86883 DE EN FR EComm RC1.indb 169
03.04.2013 13:09:15
Médiathèque/portail
Lifesmart TV
6)
Acceptez le contrat de licence.
7)
Vous recevez alors un e-mail avec un lien de confirmation à l'adresse
de courrier électronique que vous avez indiquée.
8)
Confirmez ce lien dans votre compte e-mail puis cliquez sur l'option
« Login » sur votre Lifesmart TV.
170 de 198
86883 DE EN FR EComm RC1.indb 170
03.04.2013 13:09:20
Lifesmart TV
9)
YouTube
Saisissez ensuite vos données d'accès puis cliquez sur « Submit ».
DE
EN
FR
17. YouTube
GPL
L'application YouTube vous permet de consulter le site YouTube dans un format adapté à votre Lifesmart TV. Recherchez ici des vidéos comme vous en
avez l'habitude et utilisez les fonctions de tri.
REMARQUE !
Vous pouvez aussi utiliser la fonction de saisie vocale pour sélectionner des contenus sur YouTube.
171 de 198
86883 DE EN FR EComm RC1.indb 171
03.04.2013 13:09:25
Applications
Lifesmart TV
18. Applications
18.1. Applications installées sur le Lifesmart TV
Sélectionnez l'option Apps pour afficher les applications installées sur le Lifesmart.
Sélectionnez une application pour l'ouvrir et l'utiliser directement.
18.2. Market
Vous pouvez ici sélectionner et installer d'autres applications pour votre Lifesmart TV.
REMARQUE !
Cette offre est constituée exclusivement pour votre Lifesmart TV et ne fait pas partie intégrante de Google
Play !
172 de 198
86883 DE EN FR EComm RC1.indb 172
03.04.2013 13:09:27
Lifesmart TV
Applications
18.3. Installer des applications depuis des supports
de données externes
Pour installer sur le Lifesmart TV des applications stockées sous forme de fichiers .apk sur un support de données externe, raccordez ce dernier au Lifesmart TV.
Ouvrez l'Easy App Installer disponible dans les applications déjà installées.
L'Easy App Installer liste tous les fichiers .apk qui ont été reconnus sur des
supports de données.
DE
EN
FR
GPL
Sélectionnez le fichier .apk de l'application (ici p. ex. Skype) que vous voulez installer.
Puis cliquez sur « Install ».
Vous voyez apparaître un aperçu des services auxquels l'application que vous
voulez installer va accéder.
Confirmez la fenêtre en cliquant sur « Install ».
173 de 198
86883 DE EN FR EComm RC1.indb 173
03.04.2013 13:09:30
Applications
Lifesmart TV
L'installation de l'application démarre.
Si l'installation a réussi, vous voyez apparaître la fenêtre suivante :
Sélectionnez « Done » pour revenir au menu des applications ou « Open »
pour ouvrir directement l'application installée.
REMARQUE !
Veuillez noter qu'en raison du grand nombre d'applications différentes, chaque application ne peut pas
être installée sur le Lifesmart TV ! Si des erreurs se produisent lors de l'installation d'une application, un message d'erreur correspondant apparaît (p. ex. « Application non installée »).
174 de 198
86883 DE EN FR EComm RC1.indb 174
03.04.2013 13:09:35
Lifesmart TV
Applications
DE
18.4. Remove
Sélectionnez ici une application que vous voulez supprimer définitivement
du système en cliquant sur son icône.
EN
FR
GPL
REMARQUE !
L'application est supprimée dès que vous cliquez sur
son icône et ne peut ensuite pas être restaurée !
Les applications du système suivantes ne peuvent pas
être supprimées :
- Accu Weather
- Aqua Mail
- Easy App Installer
- Hôtels HRS
- n-tv mobile
- Calculette
- Horloge
175 de 198
86883 DE EN FR EComm RC1.indb 175
03.04.2013 13:09:38
Menu Paramètres
Lifesmart TV
19. Menu Paramètres
19.1. System Setup
Language
Réglez ici la langue des menus.
Time Zone
Réglez ici le fuseau horaire de l'endroit où vous vous trouvez. L'option [Automatique] vous permet d'adapter l'heure via Internet.
Le fuseau horaire est affiché avec la différence en heures par rapport au
temps universel coordonné (UTC, de l'anglais : Coordinated Universal Time).
Les abréviations des fuseaux horaires sont indiquées entre parenthèses. Pour
l'Europe de l'Ouest, sélectionnez le réglage UTC +01 (CET, MEZ).
Daylight Saving Time
Activez ou désactivez ici l'heure d'été.
REMARQUE !
Si vous affichez l'heure via Internet, l'heure d'été est
aussi réglée automatiquement et cette sélection n'a
aucune fonction.
Cursor Speed Control
Vous pouvez ici régler la vitesse du pointeur de la souris.
176 de 198
86883 DE EN FR EComm RC1.indb 176
03.04.2013 13:09:38
Lifesmart TV
Menu Paramètres
DE
Free Storage
Cette fonction affiche un aperçu de la mémoire libre, à savoir la mémoire interne et tous les supports de stockage raccordés.
EN
FR
Auto Shutdown
Sélectionnez ici au bout de combien de temps l'appareil doit s'éteindre automatiquement.
USB charging function in standby mode
Réglez cette fonction sur ON si la télécommande doit aussi être chargée
sur le port USB en mode Veille.
REMARQUE !
Avec ce réglage, l'appareil consomme plus de courant
en mode Veille !
À la livraison, cette fonction est réglée sur OFF. La télécommande n'est
alors pas chargée lorsque l'appareil se trouve en mode Veille.
Reset to default
Sélectionnez cette option pour restaurer les réglages par défaut sur l'appareil.
Puis confirmez la question consécutive avec OK.
Les réglages par défaut de l'appareil à sa livraison sont alors restaurés.
GPL
ATTENTION !
Toutes les données mémorisées sur l'appareil et les réglages utilisateur sont alors effacés.
177 de 198
86883 DE EN FR EComm RC1.indb 177
03.04.2013 13:09:41
Menu Paramètres
Lifesmart TV
19.2. TV Mode Setup
TV System
Réglez ici la résolution TV.
Video Size
Vous pouvez ici adapter la taille de l'image à l'affichage sur votre périphérique de sortie. Si l'image est coupée sur les bords, réglez ici une autre taille,
p. ex. 90 %.
HDMI Audio Mode
Réglez ici le signal pour la sortie audio via la prise HDMI :
PCM-STEREO
Le son est en stéréo. Sélectionnez ce réglage si le son est seulement restitué
sur deux haut-parleurs.
PASS-Thru
Sélectionnez ce réglage si l'appareil est raccordé à un décodeur compatible
Dolby ou dts.
178 de 198
86883 DE EN FR EComm RC1.indb 178
03.04.2013 13:09:41
Lifesmart TV
Menu Paramètres
DE
SPDIF Mode
Réglez ici le signal pour la sortie audio via la prise SPDIF optique :
EN
PCM-STEREO
FR
Le son est en stéréo. Sélectionnez ce réglage si le son est seulement restitué
sur deux haut-parleurs.
PASS-Thru
Sélectionnez ce réglage si l'appareil est raccordé à un décodeur compatible
Dolby ou dts.
19.3. Network Setup
Network Type
DHCP
Si le Lifesmart TV doit recevoir une adresse IP du serveur DHCP du réseau,
réglez cette fonction sur ON.
Si vous réglez la fonction sur OFF, aucune adresse IP n'est attribuée via
le réseau. Dès que vous connectez le Lifesmart TV à un réseau, une interrogation apparaît dans laquelle vous pouvez attribuer une adresse IP fixe
pour le Lifesmart TV.
GPL
Sélectionnez ici si l'appareil doit être connecté à un réseau LAN ou à un réseau WiFi (concernant la configuration d'une connexion WiFi ou LAN, voir
aussi « 9.3. Configurer le réseau » à la page 146).
179 de 198
86883 DE EN FR EComm RC1.indb 179
03.04.2013 13:09:44
Menu Paramètres
Lifesmart TV
Scan APs
Sélectionnez cette option pour afficher une liste des réseaux sans fil disponibles. Pour la configuration d'une connexion WiFi, voir aussi « 9.3.
Configurer le réseau » à la page 146.
19.4. Version
USB Upgrade
Sélectionnez cette option si vous disposez d'une mise à jour du firmware sur
un support de stockage USB.
Internet Upgrade
Sélectionnez cette option pour rechercher sur Internet une mise à jour du firmware disponible.
Current Version
Le numéro de version du firmware actuellement installé est affiché ici.
Android Version
Le numéro de version du système d'exploitation Android installé est affiché
ici.
Linux Version
Le numéro de version du système d'exploitation Linux installé est affiché ici.
Hardware Version
Le numéro de version du matériel est affiché ici.
180 de 198
86883 DE EN FR EComm RC1.indb 180
03.04.2013 13:09:46
Lifesmart TV
Élimination des dysfonctionnements
DE
20. Élimination des dysfonctionnements
Les dysfonctionnements ont parfois des causes simples, mais peuvent aussi résulter de composants défectueux. Vous trouverez ci-après un petit guide
destiné à vous aider à solutionner certains problèmes. Si les solutions proposées ne donnent aucun résultat, nous vous aiderons volontiers. Il vous suffit
de nous téléphoner !
EN
FR
20.1. Dépannage rapide
Généralités
L'appareil ne s'allume pas.
•
•
•
Raccordez bien l'adaptateur secteur à la prise de courant.
Vérifiez la position de l'interrupteur d'alimentation au dos de l'appareil.
Branchez l'adaptateur secteur sur une autre prise de courant.
Pas d'image.
•
•
•
Sélectionnez le mode d'entrée vidéo correct de l'appareil d'affichage de
manière à ce que l'image du Lifesmart TV soit affichée.
Raccordez bien le câble vidéo.
Après le raccordement, rallumez le téléviseur et le Lifesmart TV.
L'image est déformée.
•
•
•
Le fichier lu a été enregistré dans une autre norme de couleurs que celle
de l'appareil d'affichage.
Sélectionnez une résolution prise en charge par l'appareil d'affichage.
Raccordez les appareils avec de nouveaux câbles.
•
•
•
L'appareil se trouve en mode Désactivation du son.
Raccordez bien le câble audio.
La source d'entrée sélectionnée pour l'amplificateur ou la prise de l'amplificateur dans le menu TV Mode Setup [SPDIF Mode] est incorrecte.
GPL
Pas de son.
La télécommande ne fonctionne pas correctement.
•
•
•
•
La télécommande est trop loin de l'appareil.
Il y a un obstacle entre la télécommande et l'appareil.
La batterie de la télécommande est faible.
Reconnectez la télécommande (voir page 143).
181 de 198
86883 DE EN FR EComm RC1.indb 181
03.04.2013 13:09:49
Élimination des dysfonctionnements
Lifesmart TV
Il n'est pas possible de modifier ou d'afficher la langue des sous-titres.
•
Le fichier lu ne contient pas de sous-titres.
Il n'est pas possible de lire les fichiers MP3/WMA/JPEG/DivX.
•
Les fichiers ont été créés dans un format non pris en charge par l'appareil.
REMARQUE !
En raison du grand nombre de codecs différents, la lecture de tous les formats ne peut pas être garantie.
HDMI
Aucune image ne s'affiche sur l'appareil de lecture HDMI raccordé.
•
•
•
•
Débranchez et rebranchez le câble HDMI.
Éteignez et rallumez l'appareil HDMI.
L'entrée vidéo du téléviseur ou de l'écran raccordé doit être réglée sur le
Lifesmart TV.
Le câble HDMI utilisé doit être entièrement compatible HDMI. Il est possible qu'en cas de raccordement d'un câble non standard, aucune image
ne soit affichée.
Aucun son n'est émis par l'appareil de lecture HDMI raccordé.
•
•
Certains appareils compatibles HDMI ne produisent pas de son (consultez
le mode d'emploi de l'appareil raccordé).
Si votre périphérique de sortie ne possède pas de décodeur compatible
Dolby ou dts, dans le menu TV Mode Setup, réglez l'option [HDMI
Audio Mode] sur [PCM Stereo] (voir page 178).
Réinitialisation de l'appareil
•
L'appareil ne fonctionne pas correctement.
Procédez comme suit pour réinitialiser l'appareil :
•
•
Ouvrez le menu « System Setup/Reset to default ».
Sélectionnez cette option et appuyez sur OK pour réinitialiser tous les réglages effectués et restaurer l'état de l'appareil à sa livraison.
182 de 198
86883 DE EN FR EComm RC1.indb 182
03.04.2013 13:09:49
Lifesmart TV
Vous avez besoin d'une aide supplémentaire ?
21. Vous avez besoin d'une aide supplémentaire ?
Si les solutions proposées aux paragraphes précédents n'ont donné aucun
résultat, veuillez nous contacter. Les informations suivantes nous seraient
alors très utiles :
• Quels périphériques externes sont raccordés à l'appareil ?
• Quels sont les messages affichés à l'écran ?
• Au cours de quelle commande le problème s'est-il produit ?
• Qu'avez-vous déjà tenté pour résoudre le problème ?
• Si vous possédez déjà un numéro de client, veuillez nous le communiquer.
DE
EN
FR
22. Nettoyage
Vous pouvez prolonger la durée de vie de l'appareil en respectant les
consignes suivantes :
• Avant de nettoyer l'appareil, débranchez l'adaptateur secteur et tous les
câbles de connexion.
• N'utilisez ni solvants ni détergents corrosifs ou gazeux.
• Nettoyez l'appareil avec un chiffon doux et non pelucheux.
Veuillez conserver soigneusement les emballages et utiliser uniquement
ceux-ci pour transporter l'appareil.
GPL
ATTENTION !
L'intérieur de l'appareil ne comporte aucune pièce nécessitant un entretien ou un nettoyage.
183 de 198
86883 DE EN FR EComm RC1.indb 183
03.04.2013 13:09:49
Recyclage
Lifesmart TV
23. Recyclage
Emballage
Votre appareil se trouve dans un emballage de protection afin
d'éviter qu'il ne soit endommagé au cours du transport. Les emballages sont des matières premières et peuvent être recyclés
ou réintégrés dans le circuit des matières premières.
Appareil
Une fois l'appareil arrivé en fin de vie, ne le jetez en aucun cas
dans une poubelle classique. Informez-vous auprès de votre
municipalité des possibilités de recyclage écologique et adapté.
Batterie
Les batteries usagées ne sont pas des déchets domestiques.
Elles peuvent être déposées dans un lieu de collecte des batteries usagées ou dans les magasins spécialisés, qui se chargeront
de leur recyclage.
184 de 198
86883 DE EN FR EComm RC1.indb 184
03.04.2013 13:09:49
Lifesmart TV
Caractéristiques techniques
DE
24. Caractéristiques techniques
EN
Appareil
Consommation en veille :
Système d'exploitation :
Dimensions (l x H x P) :
Poids :
Température de fonctionnement :
Humidité de l'air en fonctionnement :
Température de stockage :
<0,5 W
(avec fonction de chargement USB
désactivée)
Android 4.0
Env. 15,9 x 6,1 x 12 cm
Env. 400 g
5° C à 35° C
5 % à 65 %
-10° C à +60° C
FR
Connectique
Lecteur de cartes :
microSD/SDHC (jusqu'à 32 Go)
Ports USB 2.0 :
sur la face avant/arrière :
jusqu'à 2 To)
Connexion LAN :
Sortie HDMI® :
Sortie audio optique numérique :
Sortie AV :
Entrée d'adaptateur secteur DC IN :
Pour cartes mémoire SD, SDHC et
(supports de données USB/lecteurs
Prise RJ-45
Prise HDMI A
Prise S/PDIF pour câble Toslink
Prise jack stéréo 3,5 mm
12 V
1,5 A
Formats de fichiers compatibles
Audio :
Photo :
Systèmes de fichiers compatibles
Réseau :
Codage WiFi :
MPG, MPEG, AVI, WMV, MP4, MOV,
DAT, VOB, MKV, TS, 3GP, FLV
MP3, WMA, WAV, AAC, OGG
JPG, BMP, PNG, GIF
GPL
Vidéo :
FAT16, FAT32, NTFS
LAN (10/100 mbits)
WiFi (IEEE 802.11 b/g/n)
WEP/WPA
185 de 198
86883 DE EN FR EComm RC1.indb 185
03.04.2013 13:09:50
Caractéristiques techniques
Lifesmart TV
Adaptateur secteur
Alimentation
Ktec KSAS0241200150HE
Entrée (primaire) :
100-240 V ~ 50/60 Hz, 0,6 A
Sortie (secondaire) :
12 V
1,5 A
Kuantech Co., Ltd., Chine
Fabricant:
Télécommande
Batterie
Type :
Capacité :
Fabricant :
AMP02
3,7 V
750 mAh
Shenzhen Drawer Technology
Development Co LTD, Chine
Sous réserve de modifications techniques et visuelles ainsi
que d'erreurs d'impression.
0560
®
HDMI, le logo HDMI ainsi que High-Definition Multimedia Interface sont des marques déposées de la HDMI Licensing LLC.
Fabriqué sous licence de Dolby Laboratories.
Dolby et le symbole Double-D sont des marques déposées de Dolby Laboratories.
Fabriqué sous licence des numéros de brevet américains : 5,451,942 ; 5,956,674 ; 5,974,380 ; 5,978,762 ;
6,487,535 et d'autres brevets accordés et déposés aux
États-Unis ou au plan international. DTS et le symbole
sont des marques déposées, DTS 2.0+ Digital Out et les
logos DTS sont des marques de DTS, Inc. Le produit
contient des logiciels. © DTS, Inc. Tous droits réservés.
Copyright © 2013 Tous droits réservés.
Le présent mode d'emploi est protégé par des droits d'auteur. Tous droits réservés. La reproduction sous forme mécanique, électronique ou sous toute
autre forme que ce soit est interdite sans l'autorisation préalable écrite du fabricant. Le copyright est la propriété de la société MEDION®.
186 de 198
86883 DE EN FR EComm RC1.indb 186
03.04.2013 13:09:50
Lifesmart TV
General Public Licence
DE
Lizenzinformation
EN
HINWEIS!
Sehr geehrte Kundin, sehr geehrter Kunde,
Im Folgenden wird hier aus juristischen Gründen die GPL/LGPLLizenz in der englischen Originalfassung abgebildet. Übersetzungen in andere Sprachen stellen keine von der FSF (Free Software
Foundation) autorisierte Versionen der GPL dar.
Die Kenntnisnahme der GPL/LGPL-Lizenz ist für den Gebrauch
des Gerätes unerheblich, sondern dient der Verpflichtung zur Veröffentlichung bei der Verwendung von Open-Source Software.
Bei Interesse können Sie den Quelltext der verwendeten GPL/
LGPL unter folgendem Link herunterladen:
http://www.medion.com. Bitte geben Sie im Download Center
die entsprechende MD Nummer oder MSN Nummer an. Diese
Nummern finden Sie auf dem jeweiligen Gerät.
Weitere Informationen über die GPL/LGPL-Lizenzen finden Sie
unter www.gnu.org.
FR
Licence information
GPL
PLEASE NOTE!
Dear customer,
The original English version of the GPL/LGPL licence document is
included below for legal reasons. Translations into other languages are not necessarily authorised versions of the GPL approved by
the FSF (Free Software Foundation).
An acquaintance with the GPL/LGPL licence is immaterial to the
use of the product but its publication is mandatory in connection
with the use of open-source software.
Anyone interested can download the source text of the relevant
GPL/LGPL by following this link: http://www.medion.com. Please
state the MD number or MSN number in the download centre.
These numbers can be found on the product.
For more information on GPL/LGPL licences please visit www.
gnu.org.
187 / 198
86883 DE EN FR EComm RC1.indb 187
03.04.2013 13:09:52
General Public Licence
Lifesmart TV
Information relative à la licence
REMARQUE !
Chère Cliente, Cher Client,
Pour des raisons juridiques, la licence GPL/LGPL est reproduite ici
dans la version originale anglaise. Les traductions dans d’autres
langues ne sont pas des versions de la GPL autorisées par la FSF
(Free Software Foundation).
La prise de connaissance de la licence GPL/LGPL n’est pas importante pour l’utilisation de l’appareil, mais sert à l’obligation de publication en cas d’utilisation de logiciels Open Source.
Si cela vous intéresse, vous pouvez télécharger le texte source
des GPL/LGPL utilisées sous le lien suivant :
http://www.medion.com. Veuillez indiquer le numéro MD ou
MSN correspondant dans le centre de téléchargement. Vous trouverez ces numéros sur l’appareil respectif.
Vous trouverez de plus amples informations sur les licences GPL/
LGPL sur www.gnu.org.
188 / 198
86883 DE EN FR EComm RC1.indb 188
03.04.2013 13:09:52
General Public Licence
DE
GNU General Public Licence
Version 2, June 1991
Copyright (C) 1989,
1991 Free Software Foundation, Inc.
51 Franklin Street, Fifth Floor, Boston,
MA 02110-1301, USA
Everyone is permitted to copy and distribute verbatim copies
of this license document, but changing it is not allowed.
Preamble
The licenses for most software are designed to take away your freedom to share and change it.
By contrast, the GNU General Public License is intended to guarantee your freedom to share and
change free software--to make sure the software is free for all its users. This General Public License applies to most of the Free Software Foundation‘s software and to any other program whose authors commit to using it. (Some other Free Software Foundation software is covered by the
GNU Lesser General Public License instead.) You can apply it to your programs, too.
When we speak of free software, we are referring to freedom, not price. Our General Public Licenses are designed to make sure that you have the freedom to distribute copies of free software (and charge for this service if you wish), that you receive source code or can get it if you
want it, that you can change the software or use pieces of it in new free programs; and that you
know you can do these things.
To protect your rights, we need to make restrictions that forbid anyone to deny you these rights
or to ask you to surrender the rights. These restrictions translate to certain responsibilities for
you if you distribute copies of the software, or if you modify it.
For example, if you distribute copies of such a program, whether gratis or for a fee, you must
give the recipients all the rights that you have. You must make sure that they, too, receive or can
get the source code. And you must show them these terms so they know their rights.
We protect your rights with two steps: (1) copyright the software, and (2) offer you this license
which gives you legal permission to copy, distribute and/or modify the software.
Also, for each author‘s protection and ours, we want to make certain that everyone understands
that there is no warranty for this free software. If the software is modified by someone else and
passed on, we want its recipients to know that what they have is not the original, so that any
problems introduced by others will not reflect on the original authors‘ reputations.
Finally, any free program is threatened constantly by software patents. We wish to avoid the danger that redistributors of a free program will individually obtain patent licenses, in effect making
the program proprietary. To prevent this, we have made it clear that any patent must be licensed
for everyone‘s free use or not licensed at all.
The precise terms and conditions for copying, distribution and modification follow.
TERMS AND CONDITIONS FOR COPYING, DISTRIBUTION AND MODIFICATION
0. This License applies to any program or other work which contains a notice placed by the copyright holder saying it may be distributed under the terms of this General Public License. The „Program“, below, refers to any such program or work, and a „work based on the Program“ means either the Program or any derivative work under copyright law: that is to say, a work containing the
Program or a portion of it, either verbatim or with modifications and/or translated into another
language. (Hereinafter, translation is included without limitation in the term „modification“.) Each
licensee is addressed as „you“.
Activities other than copying, distribution and modification are not covered by this License; they
are outside its scope. The act of running the Program is not restricted, and the output from the
Program is covered only if its contents constitute a work based on the Program (independent of
having been made by running the Program). Whether that is true depends on what the Program
does.
EN
FR
GPL
Lifesmart TV
189 / 198
86883 DE EN FR EComm RC1.indb 189
03.04.2013 13:09:52
General Public Licence
Lifesmart TV
1. You may copy and distribute verbatim copies of the Program‘s source code as you receive it,
in any medium, provided that you conspicuously and appropriately publish on each copy an appropriate copyright notice and disclaimer of warranty; keep intact all the notices that refer to
this License and to the absence of any warranty; and give any other recipients of the Program a
copy of this License along with the Program.
You may charge a fee for the physical act of transferring a copy, and you may at your option offer
warranty protection in exchange for a fee.
2. You may modify your copy or copies of the Program or any portion of it, thus forming a work
based on the Program, and copy and distribute such modifications or work under the terms of
Section 1 above, provided that you also meet all of these conditions:
a) You must cause the modified files to carry prominent notices stating that you changed the
files and the date of any change.
b) You must cause any work that you distribute or publish, that in whole or in part contains or is
derived from the Program or any part thereof, to be licensed as a whole at no charge to all third
parties under the terms of this License.
c) If the modified program normally reads commands interactively when run, you must cause it,
when started running for such interactive use in the most ordinary way, to print or display an announcement including an appropriate copyright notice and a notice that there is no warranty
(or else, saying that you provide a warranty) and that users may redistribute the program under
these conditions, and telling the user how to view a copy of this License. (Exception: if the Program itself is interactive but does not normally print such an announcement, your work based
on the Program is not required to print an announcement.)
These requirements apply to the modified work as a whole. If identifiable sections of that work
are not derived from the Program, and can be reasonably considered independent and separate works in themselves, then this License, and its terms, do not apply to those sections when you
distribute them as separate works. But when you distribute the same sections as part of a whole
which is a work based on the Program, the distribution of the whole must be on the terms of this
License, whose permissions for other licensees extend to the entire whole, and thus to each and
every part regardless of who wrote it.
Thus, it is not the intent of this section to claim rights or contest your rights to work written entirely by you; rather, the intent is to exercise the right to control the distribution of derivative or
collective works based on the Program.
In addition, mere aggregation of another work not based on the Program with the Program (or
with a work based on the Program) on a volume of a storage or distribution medium does not
bring the other work under the scope of this License.
3. You may copy and distribute the Program (or a work based on it, under Section 2) in object
code or executable form under the terms of Sections 1 and 2 above provided that you also do
one of the following:
a) Accompany it with the complete corresponding machine-readable source code, which must
be distributed under the terms of Sections 1 and 2 above on a medium customarily used for
software interchange; or,
b) Accompany it with a written offer, valid for at least three years, to give any third party, for a
charge no more than your cost of physically performing source distribution, a complete machine-readable copy of the corresponding source code, to be distributed under the terms of Sections 1 and 2 above on a medium customarily used for software interchange; or,
c) Accompany it with the information you received as to the offer to distribute corresponding
source code. (This alternative is allowed only for noncommercial distribution and only if you received the program in object code or executable form with such an offer, in accord with Subsection b above.)
The source code for a work means the preferred form of the work for making modifications to it.
For an executable work, complete source code means all the source code for all modules it con-
190 / 198
86883 DE EN FR EComm RC1.indb 190
03.04.2013 13:09:52
General Public Licence
tains, plus any associated interface definition files, plus the scripts used to control compilation
and installation of the executable. However, as a special exception, the source code distributed
need not include anything that is normally distributed (in either source or binary form) with the
major components (compiler, kernel, and so on) of the operating system on which the executable runs, unless that component itself accompanies the executable.
If distribution of executable or object code is made by offering access to copy from a designated place, then offering equivalent access to copy the source code from the same place counts
as distribution of the source code, even though third parties are not compelled to copy the source along with the object code.
4. You may not copy, modify, sublicense, or distribute the Program except as expressly provided
under this License. Any attempt otherwise to copy, modify, sublicense or distribute the Program
is void, and will automatically terminate your rights under this License. However, parties who
have received copies, or rights, from you under this License will not have their licenses terminated so long as such parties remain in full compliance.
5. You are not required to accept this License, since you have not signed it. However, nothing
else grants you permission to modify or distribute the Program or its derivative works. These actions are prohibited by law if you do not accept this License. Therefore, by modifying or distributing the Program (or any work based on the Program), you indicate your acceptance of this
License to do so, and all its terms and conditions for copying, distributing or modifying the Program or works based on it.
6. Each time you redistribute the Program (or any work based on the Program), the recipient automatically receives a license from the original licensor to copy, distribute or modify the Program
subject to these terms and conditions. You may not impose any further restrictions on the recipients‘ exercise of the rights granted herein. You are not responsible for enforcing compliance by
third parties to this License.
7. If, as a consequence of a court judgment or allegation of patent infringement or for any other
reason (not limited to patent issues), conditions are imposed on you (whether by court order,
agreement or otherwise) that contradict the conditions of this License, they do not excuse you
from the conditions of this License.
If you cannot distribute so as to satisfy simultaneously your obligations under this License and
any other pertinent obligations, then as a consequence you may not distribute the Program at
all. For example, if a patent license would not permit royalty-free redistribution of the Program
by all those who receive copies directly or indirectly through you, then the only way you could
satisfy both it and this License would be to refrain entirely from distribution of the Program.
If any portion of this section is held invalid or unenforceable under any particular circumstance,
the balance of the section is intended to apply and the section as a whole is intended to apply in
other circumstances.
It is not the purpose of this section to induce you to infringe any patents or other property right
claims or to contest validity of any such claims; this section has the sole purpose of protecting
the integrity of the free software distribution system, which is implemented by public license
practices. Many people have made generous contributions to the wide range of software distributed through that system in reliance on consistent application of that system; it is up to the author/donor to decide if he or she is willing to distribute software through any other system and a
licensee cannot impose that choice.
This section is intended to make thoroughly clear what is believed to be a consequence of the
rest of this License.
8. If the distribution and/or use of the Program is restricted in certain countries either by patents
or by copyrighted interfaces, the original copyright holder who places the Program under this License may add an explicit geographical distribution limitation excluding those countries, so that
distribution is permitted only in or among countries not thus excluded. In such case, this License
incorporates the limitation as if written in the body of this License.
DE
EN
FR
GPL
Lifesmart TV
191 / 198
86883 DE EN FR EComm RC1.indb 191
03.04.2013 13:09:52
General Public Licence
Lifesmart TV
9. The Free Software Foundation may publish revised and/or new versions of the General Public
License from time to time. Such new versions will be similar in spirit to the present version, but
may differ in detail to address new problems or concerns.
Each version is given a distinguishing version number. If the Program specifies a version number
of this License which applies to it and „any later version“, you have the option of following the
terms and conditions either of that version or of any later version published by the Free Software
Foundation. If the Program does not specify a version number of this License, you may choose
any version ever published by the Free Software Foundation.
10. If you wish to incorporate parts of the Program into other free programs whose distribution conditions are different, write to the author to ask for permission. For software which is copyrighted by the Free Software Foundation, write to the Free Software Foundation; we sometimes
make exceptions for this. Our decision will be guided by the two goals of preserving the free status of all derivatives of our free software and of promoting the sharing and reuse of software generally.
NO WARRANTY
11. BECAUSE THE PROGRAM IS LICENSED FREE OF CHARGE, THERE IS NO WARRANTY FOR THE
PROGRAM, TO THE EXTENT PERMITTED BY APPLICABLE LAW. EXCEPT WHEN OTHERWISE STATED
IN WRITING THE COPYRIGHT HOLDERS AND/OR OTHER PARTIES PROVIDE THE PROGRAM „AS IS“
WITHOUT WARRANTY OF ANY KIND, EITHER EXPRESSED OR IMPLIED, INCLUDING, BUT NOT LIMITED TO, THE IMPLIED WARRANTIES OF MERCHANTABILITY AND FITNESS FOR A PARTICULAR PURPOSE. THE ENTIRE RISK AS TO THE QUALITY AND PERFORMANCE OF THE PROGRAM IS WITH YOU.
SHOULD THE PROGRAM PROVE DEFECTIVE, YOU ASSUME THE COST OF ALL NECESSARY SERVICING, REPAIR OR CORRECTION.
12. IN NO EVENT UNLESS REQUIRED BY APPLICABLE LAW OR AGREED TO IN WRITING WILL ANY
COPYRIGHT HOLDER, OR ANY OTHER PARTY WHO MAY MODIFY AND/OR REDISTRIBUTE THE
PROGRAM AS PERMITTED ABOVE, BE LIABLE TO YOU FOR DAMAGES, INCLUDING ANY GENERAL,
SPECIAL, INCIDENTAL OR CONSEQUENTIAL DAMAGES ARISING OUT OF THE USE OR INABILITY TO
USE THE PROGRAM (INCLUDING BUT NOT LIMITED TO LOSS OF DATA OR DATA BEING RENDERED
INACCURATE OR LOSSES SUSTAINED BY YOU OR THIRD PARTIES OR A FAILURE OF THE PROGRAM
TO OPERATE WITH ANY OTHER PROGRAMS), EVEN IF SUCH HOLDER OR OTHER PARTY HAS BEEN
ADVISED OF THE POSSIBILITY OF SUCH DAMAGES.
END OF TERMS AND CONDITIONS
LGPL VERSION 2.1
GNU LESSER GENERAL PUBLIC LICENSE
Version 2.1, February 1999
Copyright (C) 1991, 1999 Free Software Foundation, Inc.
51 Franklin Street, Fifth Floor, Boston, MA 02110-1301 USA
Everyone is permitted to copy and distribute verbatim copies
of this license document, but changing it is not allowed.
[This is the first released version of the Lesser GPL. It also counts
as the successor of the GNU Library Public License, version 2, hence
the version number 2.1.]
Preamble
The licenses for most software are designed to take away your freedom to share and change it.
By contrast, the GNU General Public Licenses are intended to guarantee your freedom to share
and change free software--to make sure the software is free for all its users.
This license, the Lesser General Public License, applies to some specially designated software packages--typically libraries--of the Free Software Foundation and other authors who decide to use
192 / 198
86883 DE EN FR EComm RC1.indb 192
03.04.2013 13:09:52
General Public Licence
it. You can use it too, but we suggest you first think carefully about whether this license or the ordinary General Public License is the better strategy to use in any particular case, based on the explanations below.
When we speak of free software, we are referring to freedom of use, not price. Our General Public Licenses are designed to make sure that you have the freedom to distribute copies of free
software (and charge for this service if you wish); that you receive source code or can get it if you
want it; that you can change the software and use pieces of it in new free programs; and that
you are informed that you can do these things.
To protect your rights, we need to make restrictions that forbid distributors to deny you these
rights or to ask you to surrender these rights. These restrictions translate to certain responsibilities for you if you distribute copies of the library or if you modify it.
For example, if you distribute copies of the library, whether gratis or for a fee, you must give the
recipients all the rights that we gave you. You must make sure that they, too, receive or can get
the source code. If you link other code with the library, you must provide complete object files to
the recipients, so that they can relink them with the library after making changes to the library
and recompiling it. And you must show them these terms so they know their rights.
We protect your rights with a two-step method: (1) we copyright the library, and (2) we offer you
this license, which gives you legal permission to copy, distribute and/or modify the library.
To protect each distributor, we want to make it very clear that there is no warranty for the free library. Also, if the library is modified by someone else and passed on, the recipients should know
that what they have is not the original version, so that the original author‘s reputation will not
be affected by problems that might be introduced by others.
Finally, software patents pose a constant threat to the existence of any free program. We wish to
make sure that a company cannot effectively restrict the users of a free program by obtaining a
restrictive license from a patent holder. Therefore, we insist that any patent license obtained for a
version of the library must be consistent with the full freedom of use specified in this license.
Most GNU software, including some libraries, is covered by the ordinary GNU General Public License. This license, the GNU Lesser General Public License, applies to certain designated libraries,
and is quite different from the ordinary General Public License. We use this license for certain libraries in order to permit linking those libraries into non-free programs.
When a program is linked with a library, whether statically or using a shared library, the combination of the two is legally speaking a combined work, a derivative of the original library. The
ordinary General Public License therefore permits such linking only if the entire combination
fits its criteria of freedom. The Lesser General Public License permits more lax criteria for linking
other code with the library.
We call this license the „Lesser“ General Public License because it does Less to protect the user‘s
freedom than the ordinary General Public License. It also provides other free software developers Less of an advantage over competing non-free programs. These disadvantages are the reason we use the ordinary General Public License for many libraries. However, the Lesser license
provides advantages in certain special circumstances.
For example, on rare occasions, there may be a special need to encourage the widest possible use of a certain library, so that it becomes a de-facto standard. To achieve this, non-free programs must be allowed to use the library. A more frequent case is that a free library does the
same job as widely used non-free libraries. In this case, there is little to gain by limiting the free
library to free software only, so we use the Lesser General Public License.
In other cases, permission to use a particular library in non-free programs enables a greater
number of people to use a large body of free software. For example, permission to use the GNU
C Library in non-free programs enables many more people to use the whole GNU operating system, as well as its variant, the GNU/Linux operating system.
Although the Lesser General Public License is Less protective of the users‘ freedom, it does ensure that the user of a program that is linked with the Library has the freedom and the wherewithal
DE
EN
FR
GPL
Lifesmart TV
193 / 198
86883 DE EN FR EComm RC1.indb 193
03.04.2013 13:09:53
General Public Licence
Lifesmart TV
to run that program using a modified version of the Library.
The precise terms and conditions for copying, distribution and modification follow. Pay close attention to the difference between a „work based on the library“ and a „work that uses the library“. The former contains code derived from the library, whereas the latter must be combined
with the library in order to run.
TERMS AND CONDITIONS FOR COPYING, DISTRIBUTION AND MODIFICATION
0. This License Agreement applies to any software library or other program which contains a
notice placed by the copyright holder or other authorized party saying it may be distributed under the terms of this Lesser General Public License (also called „this License“). Each licensee is
addressed as „you“.
A „library“ means a collection of software functions and/or data prepared so as to be conveniently linked with application programs (which use some of those functions and data) to form
executables.
The „Library“, below, refers to any such software library or work which has been distributed under these terms. A „work based on the Library“ means either the Library or any derivative work
under copyright law: that is to say, a work containing the Library or a portion of it, either verbatim or with modifications and/or translated straightforwardly into another language. (Hereinafter, translation is included without limitation in the term „modification“.)
„Source code“ for a work means the preferred form of the work for making modifications to it.
For a library, complete source code means all the source code for all modules it contains, plus
any associated interface definition files, plus the scripts used to control compilation and installation of the library.
Activities other than copying, distribution and modification are not covered by this License; they
are outside its scope. The act of running a program using the Library is not restricted, and output
from such a program is covered only if its contents constitute a work based on the Library (independent of the use of the Library in a tool for writing it). Whether that is true depends on what
the Library does and what the program that uses the Library does.
1. You may copy and distribute verbatim copies of the Library‘s complete source code as you receive it, in any medium, provided that you conspicuously and appropriately publish on each
copy an appropriate copyright notice and disclaimer of warranty; keep intact all the notices that
refer to this License and to the absence of any warranty; and distribute a copy of this License
along with the Library.
You may charge a fee for the physical act of transferring a copy, and you may at your option offer
warranty protection in exchange for a fee.
2. You may modify your copy or copies of the Library or any portion of it, thus forming a work
based on the Library, and copy and distribute such modifications or work under the terms of
Section 1 above, provided that you also meet all of these conditions:
a) The modified work must itself be a software library.
b) You must cause the files modified to carry prominent notices stating that you changed the
files and the date of any change.
c) You must cause the whole of the work to be licensed at no charge to all third parties under the
terms of this License.
d) If a facility in the modified Library refers to a function or a table of data to be supplied by an
application program that uses the facility, other than as an argument passed when the facility is
invoked, then you must make a good faith effort to ensure that, in the event an application does
not supply such function or table, the facility still operates, and performs whatever part of its
purpose remains meaningful.
(For example, a function in a library to compute square roots has a purpose that is entirely welldefined independent of the application. Therefore, Subsection 2d requires that any applicationsupplied function or table used by this function must be optional: if the application does not
supply it, the square root function must still compute square roots.)
194 / 198
86883 DE EN FR EComm RC1.indb 194
03.04.2013 13:09:53
General Public Licence
These requirements apply to the modified work as a whole. If identifiable sections of that work
are not derived from the Library, and can be reasonably considered independent and separate
works in themselves, then this License, and its terms, do not apply to those sections when you
distribute them as separate works. But when you distribute the same sections as part of a whole
which is a work based on the Library, the distribution of the whole must be on the terms of this
License, whose permissions for other licensees extend to the entire whole, and thus to each and
every part regardless of who wrote it.
Thus, it is not the intent of this section to claim rights or contest your rights to work written entirely by you; rather, the intent is to exercise the right to control the distribution of derivative or
collective works based on the Library.
In addition, mere aggregation of another work not based on the Library with the Library (or with
a work based on the Library) on a volume of a storage or distribution medium does not bring
the other work under the scope of this License.
3. You may opt to apply the terms of the ordinary GNU General Public License instead of this License to a given copy of the Library. To do this, you must alter all the notices that refer to this License, so that they refer to the ordinary GNU General Public License, version 2, instead of to this
License. (If a newer version than version 2 of the ordinary GNU General Public License has appeared, then you can specify that version instead if you wish.) Do not make any other change in
these notices.
Once this change is made in a given copy, it is irreversible for that copy, so the ordinary GNU General Public License applies to all subsequent copies and derivative works made from that copy.
This option is useful when you wish to copy part of the code of the Library into a program that is
not a library.
4. You may copy and distribute the Library (or a portion or derivative of it, under Section 2) in object code or executable form under the terms of Sections 1 and 2 above provided that you accompany it with the complete corresponding machine-readable source code, which must be
distributed under the terms of Sections 1 and 2 above on a medium customarily used for software interchange.
If distribution of object code is made by offering access to copy from a designated place, then
offering equivalent access to copy the source code from the same place satisfies the requirement to distribute the source code, even though third parties are not compelled to copy the
source along with the object code.
5. A program that contains no derivative of any portion of the Library, but is designed to work
with the Library by being compiled or linked with it, is called a „work that uses the Library“. Such
a work, in isolation, is not a derivative work of the Library, and therefore falls outside the scope
of this License.
However, linking a „work that uses the Library“ with the Library creates an executable that is a
derivative of the Library (because it contains portions of the Library), rather than a „work that
uses the library“. The executable is therefore covered by this License. Section 6 states terms for
distribution of such executables.
When a „work that uses the Library“ uses material from a header file that is part of the Library, the object code for the work may be a derivative work of the Library even though the source
code is not. Whether this is true is especially significant if the work can be linked without the Library, or if the work is itself a library. The threshold for this to be true is not precisely defined by
law.
If such an object file uses only numerical parameters, data structure layouts and accessors, and
small macros and small inline functions (ten lines or less in length), then the use of the object file
is unrestricted, regardless of whether it is legally a derivative work. (Executables containing this
object code plus portions of the Library will still fall under Section 6.)
Otherwise, if the work is a derivative of the Library, you may distribute the object code for the
work under the terms of Section 6. Any executables containing that work also fall under Section
DE
EN
FR
GPL
Lifesmart TV
195 / 198
86883 DE EN FR EComm RC1.indb 195
03.04.2013 13:09:53
General Public Licence
Lifesmart TV
6, whether or not they are linked directly with the Library itself.
6. As an exception to the Sections above, you may also combine or link a „work that uses the Library“ with the Library to produce a work containing portions of the Library, and distribute that
work under terms of your choice, provided that the terms permit modification of the work for
the customer‘s own use and reverse engineering for debugging such modifications.
You must give prominent notice with each copy of the work that the Library is used in it and that
the Library and its use are covered by this License. You must supply a copy of this License. If the
work during execution displays copyright notices, you must include the copyright notice for the
Library among them, as well as a reference directing the user to the copy of this License. Also,
you must do one of these things:
a) Accompany the work with the complete corresponding machine-readable source code for the
Library including whatever changes were used in the work (which must be distributed under
Sections 1 and 2 above); and, if the work is an executable linked with the Library, with the complete machine-readable „work that uses the Library“, as object code and/or source code, so that
the user can modify the Library and then relink to produce a modified executable containing the
modified Library. (It is understood that the user who changes the contents of definitions files in
the Library will not necessarily be able to recompile the application to use the modified definitions.)
b) Use a suitable shared library mechanism for linking with the Library. A suitable mechanism
is one that (1) uses at run time a copy of the library already present on the user‘s computer system, rather than copying library functions into the executable, and (2) will operate properly with
a modified version of the library, if the user installs one, as long as the modified version is interface-compatible with the version that the work was made with.
c) Accompany the work with a written offer, valid for at least three years, to give the same user
the materials specified in Subsection 6a, above, for a charge no more than the cost of performing this distribution.
d) If distribution of the work is made by offering access to copy from a designated place, offer
equivalent access to copy the above specified materials from the same place.
e) Verify that the user has already received a copy of these materials or that you have already
sent this user a copy.
For an executable, the required form of the „work that uses the Library“ must include any data
and utility programs needed for reproducing the executable from it. However, as a special exception, the materials to be distributed need not include anything that is normally distributed
(in either source or binary form) with the major components (compiler, kernel, and so on) of the
operating system on which the executable runs, unless that component itself accompanies the
executable.
It may happen that this requirement contradicts the license restrictions of other proprietary libraries that do not normally accompany the operating system. Such a contradiction means you
cannot use both them and the Library together in an executable that you distribute.
7. You may place library facilities that are a work based on the Library side-by-side in a single library together with other library facilities not covered by this License, and distribute such a combined library, provided that the separate distribution of the work based on the Library and of the
other library facilities is otherwise permitted, and provided that you do these two things:
a) Accompany the combined library with a copy of the same work based on the Library, uncombined with any other library facilities. This must be distributed under the terms of the Sections
above.
b) Give prominent notice with the combined library of the fact that part of it is a work based
on the Library, and explaining where to find the accompanying uncombined form of the same
work.
8. You may not copy, modify, sublicense, link with, or distribute the Library except as expressly
provided under this License. Any attempt otherwise to copy, modify, sublicense, link with, or dis-
196 / 198
86883 DE EN FR EComm RC1.indb 196
03.04.2013 13:09:53
General Public Licence
tribute the Library is void, and will automatically terminate your rights under this License. However, parties who have received copies, or rights, from you under this License will not have their licenses terminated so long as such parties remain in full compliance.
9. You are not required to accept this License, since you have not signed it. However, nothing
else grants you permission to modify or distribute the Library or its derivative works. These actions are prohibited by law if you do not accept this License. Therefore, by modifying or distributing the Library (or any work based on the Library), you indicate your acceptance of this License to do so, and all its terms and conditions for copying, distributing or modifying the Library or
works based on it.
10. Each time you redistribute the Library (or any work based on the Library), the recipient automatically receives a license from the original licensor to copy, distribute, link with or modify the
Library subject to these terms and conditions. You may not impose any further restrictions on
the recipients‘ exercise of the rights granted herein. You are not responsible for enforcing compliance by third parties with this License.
11. If, as a consequence of a court judgment or allegation of patent infringement or for any other
reason (not limited to patent issues), conditions are imposed on you (whether by court order,
agreement or otherwise) that contradict the conditions of this License, they do not excuse you
from the conditions of this License. If you cannot distribute so as to satisfy simultaneously your
obligations under this License and any other pertinent obligations, then as a consequence you
may not distribute the Library at all. For example, if a patent license would not permit royaltyfree redistribution of the Library by all those who receive copies directly or indirectly through
you, then the only way you could satisfy both it and this License would be to refrain entirely
from distribution of the Library.
If any portion of this section is held invalid or unenforceable under any particular circumstance,
the balance of the section is intended to apply, and the section as a whole is intended to apply
in other circumstances.
It is not the purpose of this section to induce you to infringe any patents or other property right
claims or to contest validity of any such claims; this section has the sole purpose of protecting
the integrity of the free software distribution system which is implemented by public license
practices. Many people have made generous contributions to the wide range of software distributed through that system in reliance on consistent application of that system; it is up to the author/donor to decide if he or she is willing to distribute software through any other system and a
licensee cannot impose that choice.
This section is intended to make thoroughly clear what is believed to be a consequence of the
rest of this License.
12. If the distribution and/or use of the Library is restricted in certain countries either by patents
or by copyrighted interfaces, the original copyright holder who places the Library under this License may add an explicit geographical distribution limitation excluding those countries, so that
distribution is permitted only in or among countries not thus excluded. In such case, this License
incorporates the limitation as if written in the body of this License.
13. The Free Software Foundation may publish revised and/or new versions of the Lesser General
Public License from time to time. Such new versions will be similar in spirit to the present version, but may differ in detail to address new problems or concerns.
Each version is given a distinguishing version number. If the Library specifies a version number
of this License which applies to it and „any later version“, you have the option of following the
terms and conditions either of that version or of any later version published by the Free Software
Foundation. If the Library does not specify a license version number, you may choose any version ever published by the Free Software Foundation.
14. If you wish to incorporate parts of the Library into other free programs whose distribution
conditions are incompatible with these, write to the author to ask for permission. For software
which is copyrighted by the Free Software Foundation, write to the Free Software Foundation;
DE
EN
FR
GPL
Lifesmart TV
197 / 198
86883 DE EN FR EComm RC1.indb 197
03.04.2013 13:09:53
General Public Licence
Lifesmart TV
we sometimes make exceptions for this. Our decision will be guided by the two goals of preserving the free status of all derivatives of our free software and of promoting the sharing and reuse of software generally.
NO WARRANTY
15. BECAUSE THE LIBRARY IS LICENSED FREE OF CHARGE, THERE IS NO WARRANTY FOR THE LIBRARY, TO THE EXTENT PERMITTED BY APPLICABLE LAW. EXCEPT WHEN OTHERWISE STATED IN
WRITING THE COPYRIGHT HOLDERS AND/OR OTHER PARTIES PROVIDE THE LIBRARY „AS IS“ WITHOUT WARRANTY OF ANY KIND, EITHER EXPRESSED OR IMPLIED, INCLUDING, BUT NOT LIMITED TO, THE IMPLIED WARRANTIES OF MERCHANTABILITY AND FITNESS FOR A PARTICULAR PURPOSE. THE ENTIRE RISK AS TO THE QUALITY AND PERFORMANCE OF THE LIBRARY IS WITH YOU.
SHOULD THE LIBRARY PROVE DEFECTIVE, YOU ASSUME THE COST OF ALL NECESSARY SERVICING, REPAIR OR CORRECTION.
16. IN NO EVENT UNLESS REQUIRED BY APPLICABLE LAW OR AGREED TO IN WRITING WILL ANY
COPYRIGHT HOLDER, OR ANY OTHER PARTY WHO MAY MODIFY AND/OR REDISTRIBUTE THE LIBRARY AS PERMITTED ABOVE, BE LIABLE TO YOU FOR DAMAGES, INCLUDING ANY GENERAL, SPECIAL, INCIDENTAL OR CONSEQUENTIAL DAMAGES ARISING OUT OF THE USE OR INABILITY TO
USE THE LIBRARY (INCLUDING BUT NOT LIMITED TO LOSS OF DATA OR DATA BEING RENDERED
INACCURATE OR LOSSES SUSTAINED BY YOU OR THIRD PARTIES OR A FAILURE OF THE LIBRARY
TO OPERATE WITH ANY OTHER SOFTWARE), EVEN IF SUCH HOLDER OR OTHER PARTY HAS BEEN
ADVISED OF THE POSSIBILITY OF SUCH DAMAGES.
END OF TERMS AND CONDITIONS.
198 / 198
86883 DE EN FR EComm RC1.indb 198
03.04.2013 13:09:53
DE
AT
Medion Service Center
Franz-Fritsch-Str. 11
4600 Wels
Österreich
MTC - Medion Technologie Center
45467 Mülheim / Ruhr
Deutschland
Hotline: 01805 - 633 466
Fax: 01805 - 654 654
(0,14 Euro/Minute aus dem dt. Festnetz,
Mobilfunk max. 0,42 Euro/Min)
LIFESMART TV®
MEDION® LIFE® P85252 (MD 86883)
Hotline: 0810 - 001048 (0,10 EUR/Min.)
Fax: 07242 - 93967592
Bitte benutzen Sie das Kontaktformular unter
www.medionservice.de
Servicekontakt über Homepage:
www.medion.at/service
www.medion.at
www.medion.de
UK
Medion Electronics Ltd.
120 Faraday Park, Faraday Road, Dorcan
Swindon SN3 5JF, Wiltshire
United Kingdom
Hotline: 0871 37 61 020
(Costs 7p/min from a BT landline,
mobile costs may be higher)
Fax: 01793 71 57 16
To contact us by email please visit the „Service and
Support“ section of our website at www.medion.co.uk.
www.medion.co.uk
FR
Medion France
75 Rue de la Foucaudière
72100 LE MANS
France
Service Hotline: 02 43 16 60 30 (appel non surtaxé)
Service PREMIUM hors garantie: 08 92 35 05 40
(0.34 EUR/min)
E-Mail: Pour nous contacter, merci de vous rendre sur
notre site internet (www.medion.fr) à la rubrique
« Service » puis « Contact »
86883 DE-EN-FR eCommerce Cover RC2.indd 1
Bedienungsanleitung
Instruction manual
Mode d‘emploi
25.03.2013 15:26:11