1
Operation
Air filter
•
For correct performance and durability the air filter must
be kept clean:
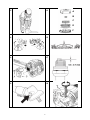
1. Remove the lid of the air filter (Fig. 16) by
unscrewing the screw (A) that fastens the lid (B).
2. Wash the filter (C) in mild soap water. Leave it to
dry. Pour on a little two-stroke oil Press out any
surplus oil. Replace an old and worn filter.
3. Filter and lid is fitted again. Make sure that the filter
and lid is secured tightened.
•
•
•
•
•
•
•
•
•
•
•
•
•
•
•
•
•
•
•
When the engine is stopped the rotating blade
must be held in grass or bush until it holds still.
Always hold the machine with both hands.
The machine must not be used if the safety guard
is not correctly fitted and in mint condition.
Always stop the engine before attempting to
remove objects that may have stuck on the blade.
Never touch or try to stop the blade while it is still
spinning.
A rotating blade may cause damage, as it
continues to spin after the engine has stopped or
the gas has been turned off. Always be in control of
the tool until the blade has stopped spinning.
Always make sure that the blade is mounted
securely and correctly before every time is used.
Only use a sharp blade. Replace blades that are
worn or damaged.
Only use original spare parts.
Only use the blade for weeds, grass and similar.
Throw back is something that may occur when the
rotating blade gets into contact with something, it
cannot cut. This contact may have the effect, which
the blade stops for a moment, and suddenly the
tool is thrown away from the hard object that was
hit. This reaction may be so violent that the user
loses control of the tool. Throw back may occur
without warning if the blade is stuck, loses speed or
impeded. This is most likely in areas where it is
difficult to see the material that is being cut.
The harness must always be used and adjusted to
fit in the correct manner.
Keep a firm grip on both handles while the blade is
running. Keep the blade away from your body and
below your waist.
High grass should always be cut from the top and
downwards. In this way you prevent the grass from
being wrapped around the trimmer head and
thereby lead to overheating and damage. If grass
and the like is wrapped around the trimmer head
the engine must be STOPPED, the spark plug cap
taken off and the grass then removed.
For moving the line forward you tap the trimmer
head lightly against the ground while the engine
runs at full speed.
Hold the trimmer at an angle towards the area that
is to be cut.
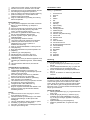
The illustration (Fig 14) shows the best cutting
direction when used as grass trimmer (nylon line)
and brush cutter (blade).
Use the line to cut. Do not force the trimmer head
into grass that has not yet been cut.
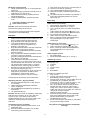
Do not allow the trimmer head to constantly come
into contact with the ground during normal cutting
(Fig. 15). Constant contact of this type can cause
damage and wear to the trimmer head
Wire and fences are hard on the line and may even
cause it to break.
Clean the air filter for every 5 hours or more often if
you work in dusty areas.
Spark plug
This machine is equipped with a spark plug with an
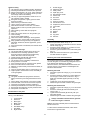
electrode distance of 0.6-0.7 mm. See Fig. 17.
For optimal performance it should be replaced once a
year.
The spark plug is located under the plastic cover on the
engine. See Fig. 1-12.
Article number for new spark plug: 10011022
Storage
1.
2.
3.
Empty all fuel into a can approved for petrol.
Let the engine run until it stops.
Clean the machine and store the machine frost free
and out of reach for children.
Observe all safety precautions concerning safe
storage and handling of gasoline.
Lubrication of bevel gear
The gear is lubricated from the factory, but for every 30hour operation Grease MUST be refilled. Top up with
grease type: MULTIFAK EP-0 using a grease gun (not
included) on the lubrication nipple. See Fig. 18.
Please note that the gear gun is not supplied!
Adjusting the idle speed
First, check that the air filter is clean, as it can effect the
result.
When the idle speed is correct, the cutting attachment
should not rotate, when machine is idling.
If adjustment is required, the idle screw (T) can be
adjusted. See Fig. 19,
Follow below procedure:
1. Close (turn clockwise) the idle adjustment screw T,
with the engine running, until the cutting
attachment starts to rotate.
2. Open (turn anticlockwise) the screw until the
cutting attachment stops.
3. The idle speed is correctly set when the engine
runs smoothly in all positions, and there is a clear
margin to the speed at which the cutting
attachment starts to rotate
Stones and walls, and wood cause the line to be
worn down very fast. Walk around trees and
bushes. Bark and trees, wood boarding and poles
are easily damaged by the line
If the ildle speed cannot be adjusted so that the cutting
attachmemt stops. Contact your dealer/service center.
Do not use the machine until it has been correctly
adjusted or repaired.
If you need to adjust the “L” and/or “H” mixture screw
contact with you dealer/service center for some help.
15