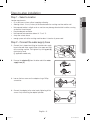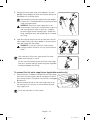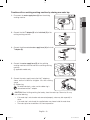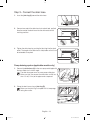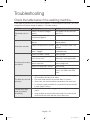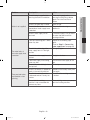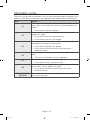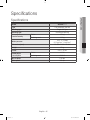
1
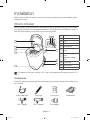
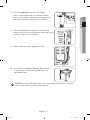
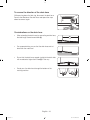
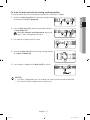
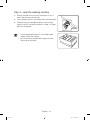
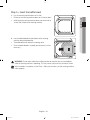
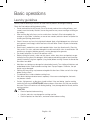
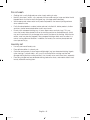
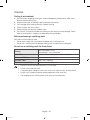
WB30H7*****
Washing machine
User manual
This manual is made with 100 % recycled paper.
Imagine the possibilities
Thank you for purchasing this Samsung product.
Untitled-1 1
2014-11-26
4:21:14
Content
3
Safety information
Icons and symbols used in this manual . . . . . . . . . . . . . . . . . . . . . . . . . . . . . . . . . . . . . . . . . . 3
Important safety instructions . . . . . . . . . . . . . . . . . . . . . . . . . . . . . . . . . . . . . . . . . . . . . . . . . . 6
Instructions about the WEEE . . . . . . . . . . . . . . . . . . . . . . . . . . . . . . . . . . . . . . . . . . . . . . . . . . 7
Location requirements. . . . . . . . . . . . . . . . . . . . . . . . . . . . . . . . . . . . . . . . . . . . . . . . . . . . . . . 7
8
Installation
What's included. . . . . . . . . . . . . . . . . . . . . . . . . . . . . . . . . . . . . . . . . . . . . . . . . . . . . . . . . . . . 8
Installation requirements. . . . . . . . . . . . . . . . . . . . . . . . . . . . . . . . . . . . . . . . . . . . . . . . . . . . . . 9
Step-by-step installation. . . . . . . . . . . . . . . . . . . . . . . . . . . . . . . . . . . . . . . . . . . . . . . . . . . . . 11
20
Basic operations
Laundry guidelines. . . . . . . . . . . . . . . . . . . . . . . . . . . . . . . . . . . . . . . . . . . . . . . . . . . . . . . . . 20
Detergent types and usage . . . . . . . . . . . . . . . . . . . . . . . . . . . . . . . . . . . . . . . . . . . . . . . . . . 23
When to add fabric softener. . . . . . . . . . . . . . . . . . . . . . . . . . . . . . . . . . . . . . . . . . . . . . . . . . 23
Handling the secure door. . . . . . . . . . . . . . . . . . . . . . . . . . . . . . . . . . . . . . . . . . . . . . . . . . . . 23
About a sanitizing wash. . . . . . . . . . . . . . . . . . . . . . . . . . . . . . . . . . . . . . . . . . . . . . . . . . . . . 24
Getting started. . . . . . . . . . . . . . . . . . . . . . . . . . . . . . . . . . . . . . . . . . . . . . . . . . . . . . . . . . . . 25
29
Maintainence
Cleaning the exterior. . . . . . . . . . . . . . . . . . . . . . . . . . . . . . . . . . . . . . . . . . . . . . . . . . . . . . . . 29
Keeping the tub clean . . . . . . . . . . . . . . . . . . . . . . . . . . . . . . . . . . . . . . . . . . . . . . . . . . . . . . 29
Cleaning the water valve mesh filter. . . . . . . . . . . . . . . . . . . . . . . . . . . . . . . . . . . . . . . . . . . . 30
Filter. . . . . . . . . . . . . . . . . . . . . . . . . . . . . . . . . . . . . . . . . . . . . . . . . . . . . . . . . . . . . . . . . . . . 31
32
Troubleshooting
Check the table below if the washing machine... . . . . . . . . . . . . . . . . . . . . . . . . . . . . . . . . . . 32
Information codes . . . . . . . . . . . . . . . . . . . . . . . . . . . . . . . . . . . . . . . . . . . . . . . . . . . . . . . . . 34
35
Specifications
Specifications. . . . . . . . . . . . . . . . . . . . . . . . . . . . . . . . . . . . . . . . . . . . . . . . . . . . . . . . . . . . . 35
English - 2
Untitled-1 2
2014-11-26
4:21:14
Safety information
SAFETY INFORMATION
Throughout this manual, you’ll see Warning and Caution symbols. These warnings, cautions, and
the important safety instructions that follow do not cover all possible conditions and situations that
may occur. The product you have purchased is designed for domestic use only. Using the product
for business purposes qualifies as a product misuse.
In this case, the product will not be covered by the standard warranty provided by Samsung and
no responsibility will be attributed to Samsung for malfunctions or damages resulting from such
misuse. It’s your responsibility to use common sense and caution when installing, maintaining, and
operating your washing machine. Samsung is not liable for damages resulting from improper use.
After reading this manual, store it in a safe place for future reference.
Icons and symbols used in this manual
These warning signs are here to prevent injury to yourself and others.
Please follow them explicitly.
WARNING: Hazards or unsafe practices that may result in severe physical injury,
death and/or property damage.
CAUTION: Hazards or unsafe practices that may result in physical injury and/or
property damage.
NOTE
Read all instructions before using the appliance.
As with any equipment that uses electricity and moving parts, potential hazards exist. To safely
operate this appliance, familiarize yourself with its operation and exercise care when using it.
English - 3
Untitled-1 3
2014-11-26
4:21:14
Do not let children (or pets) play in or on your washing machine. The
washing machine door does not open easily from the inside and
children may be seriously injured if trapped inside.
This appliance is not to be used by persons (including children) with
reduced physical, sensory or mental capabilities, or lack of experience
and knowledge, unless they have been given supervision or instruction
concerning use of the appliance by a person responsible for their
safety.
Children should be supervised to ensure that they do not play with the
appliance.
For use in Europe: This appliance can be used by children aged from
8 years and above and persons with reduced physical, sensory or
mental capabilities or lack of experience and knowledge if they have
been given supervision or instruction concerning use of the appliance in
a safe way and understand the hazards involved. Children shall not play
with the appliance. Cleaning and user maintenance shall not be made
by children without supervision.
If the supply cord is damaged, it must be replaced by the manufacturer,
its service agent or similarly qualified persons in order to avoid a
hazard.
This appliance should be positioned so that the power plug, the water
supply taps, and the drain pipes are accessible.
For appliances with ventilation openings in the base, that a carpet must
not obstruct the openings.
The new hose-sets supplied with the appliance are to be used and that
old hose-sets should not be reused.
English - 4
Untitled-1 4
2014-11-26
4:21:14
SAFETY INFORMATION
CAUTION: In order to avoid a hazard due to inadvertent resetting of
the thermal cut-out, this appliance must not be supplied through an
external switching device, such as a timer, or connected to a circuit that
is regularly switched on and off by the utility.
English - 5
Untitled-1 5
2014-11-26
4:21:14
Important safety instructions
WARNING: For safety reasons, read through the following instructions before installing
or using the washing machine.
Do not attempt to repair, disassemble, or modify your washing machine. For any repairs, contact
your nearest Samsung service center.
Do not wash items contaminated with gasoline, kerosene, solvents, or any other flammable
substances.
Do not install the washing machine in a location exposed to extreme temperatures, high-humidity
levels, and/or the weather.
Do not let children or pets play in, on, or around the washing machine. Proper supervision is
necessary at all times.
Do not use the washing machine if the washing machine or any parts of the washing machine are
damaged.
Keep all packaging materials away from children.
Do not put your hands or any objects in or under the washing machine while the washing machine
is operating.
Do not replace a damaged power cord or power plug yourself. Have Samsung or a qualified
service technician replace a damaged power cord or power plug.
Before disposing of your washing machine, remove the lid.
English - 6
Untitled-1 6
2014-11-26
4:21:14
Instructions about the WEEE
SAFETY INFORMATION
Correct Disposal of This Product (Waste Electrical & Electronic Equipment)
(Applicable in countries with separate collection systems)
This marking on the product, accessories or literature indicates that the product and its
electronic accessories (e.g. charger, headset, USB cable) should not be disposed of
with other household waste at the end of their working life. To prevent possible harm
to the environment or human health from uncontrolled waste disposal, please separate
these items from other types of waste and recycle them responsibly to promote the
sustainable reuse of material resources.
Household users should contact either the retailer where they purchased this product,
or their local government office, for details of where and how they can take these items
for environmentally safe recycling.
Business users should contact their supplier and check the terms and conditions of
the purchase contract. This product and its electronic accessories should not be mixed
with other commercial wastes for disposal.
For more information on safe disposal and recycling, visit our website www.samsung.
com or contact our Helpline numbers on the last page.
Location requirements
To ensure safe and proper installation and use of your washing machine, follow these guidelines for
selecting a location.
WARNING:
• Use caution when lifting or moving the washing machine.
• Do not install the washing machine in areas exposed to the weather.
• Do not install the washing machine in areas where the ambient temperature may drop
below 32 °F (0 °C).
• Keep the washing machine away from electrical devices.
• Do not install the washing machine in a location where gas may leak.
• Do not install the washing machine near a heater or flammable material.
Select a level, well-constructed surface that does not have carpeting or flooring that may obstruct
ventilation or contribute to vibrations.
Select a location where a grounded, 3-prong socket is easily accessible.
For the provided water hoses to reach the washing machine, make sure the water taps are within
120 cm (4 ft) of the back of the washing machine.
English - 7
Untitled-1 7
2014-11-26
4:21:14
Installation
Follow these instructions carefully to ensure that the new washing machine works properly and to
avoid physical injury.
What's included
Carefully unpack the washing machine, and make sure you’ve received all the parts shown below.
If the washing machine was damaged during delivery, or if you do not have all the parts, contact a
local Samsung customer service center or your Samsung retailer.
6
7
1
2
3
8
1
Door lid
2
Secure door lid
3
Filter
4
Tub
5
Levelling feet
6
Cold water supply
hose
7
Hot water supply
hose
(applicable models
only)
8
Power cord
9
Baffle board
10
Drain hose
4
9
10
5
This product can only be used with 220 V, and is not compatible with a power source of 110
V.
Accessories
The water supply hose and the drain hose (extension hose) can be purchased at a local Samsung
service center.
Water supply hose
Drain hose
User manual
Inlet T adaptor
Drain T adaptor
Drain adaptor
Baffle board
English - 8
Untitled-1 8
2014-11-26
4:21:15
Installation requirements
INSTALLATION
Water Supply
• The washing machine fills up with a water pressure of 0.05 Mpa ~ 0.78 Mpa (0.5~8.0 kg•f/
cm2).
• A water pressure level of less than 0.05 MPa (0.5 kg•f/cm2) may inhibit the water valve to close
completely. Or it may take longer than normal to fill the washing machine, causing the washing
machine to turn off. (The washing machine has a fill-time limit that is designed to prevent an
overflow against a loose internal hose)
• For the provided water hoses to reach the washing machine, make sure the water taps are
within 120 cm (4 ft) of the back of the washing machine.
• Before using for the first time, check all connections at the water valves and taps for any leaks.
To reduce a risk of water leaks:
• Make sure the water taps are easily accessible.
• Turn off the water taps when the washing machine is not in use.
• Check for any water leaks at the water inlet hose fittings.
Power supply
• To prevent a risk of fire, electrical shock, or physical injury, all wiring and grounding must be
performed in accordance with the National Electrical Code ANSI/FNPA, No. 70 Latest Revision
and local codes and ordinances. It is the owner's responsibility to accommodate adequate
electrical power for this product.
• Do not use an extension cord.
• Use only the power cord that comes with your washing machine.
• When preparing for installation, ensure that your power supply offers:
• A fuse or circuit breaker
• An individual branch circuit serving only your washing machine
• The washing machine must be properly grounded. Against a malfunction or breakdown of
the machine, a proper grounding will reduce the risk of electric shock by providing minimum
resistance to the electric current.
• The washing machine comes with a power cord that has a three-prong grounding plug for use
in a properly installed and grounded socket.
• Do not connect the ground wire to plastic plumbing lines, gas lines, or hot water pipes.
• Improper connection of the grounding conductor may cause electric shock. Check with a
qualified electrician or service person if the washing machine is properly grounded.
• Do not modify the plug that comes with the washing machine. If it does not fit the socket, have
a proper socket installed by a qualified electrician.
English - 9
Untitled-1 9
2014-11-26
4:21:15
Grounding
For safety, the washing machine must be grounded.
• Ensure that the washing machine is properly grounded to prevent electric shock.
If the wall socket has a ground terminal
No additional grounding is required.
(*): Ground terminal
If the wall socket has no ground terminal
• Buy a ground wire from a Samsung service
center. On the back of the washing machine,
connect one end of the wire to the marked
labelling point , and connect the other end
to the water tap or a properly grounded wall
socket.
• Plastic hoses do not have any grounding
effect.
• Use a copper wire to wind around the hose
2 or 3 times.
• Connect the grounding wire to a copper
plate. Make sure the copper plate is buried
75 cm (*) deep into the earth.
WARNING: Do not use any kinds of gas pipe for grounding. Gas pipes may cause
explosions.
If grounding is not available, add a circuit breaker between the wall socket and the washing
machine instead.
English - 10
Untitled-1 10
2014-11-26
4:21:16
Step-by-step installation
INSTALLATION
Step 1 - Select a location
Location requirements:
• On a solid, even surface without carpeting or flooring.
• Allowing at least 10 cm (4 inches) of distance between the washing machine and the wall.
• Not exposed to direct sunlight or rain as moisture may damage the electrical insulation, causing
an electrical shock hazard.
• Require adequate ventilation.
• Not exposed to temperatures below 32 °F or 0 °C.
• Away from a heat source.
• enough space so that the washing machine doesn’t stand on its power cord.
Step 2 - Connect the water supply hose
1. Connect the L-shaped arm fitting for the cold water supply
hose to the cold water supply intake at the upper rear side
of the washing machine. Then tighten it by turning part (A)
clockwise by hand.
(*): applicable models only
A
2. Remove the adaptor (B) from the other end of the water
supply hose (C).
B
C
3. Loosen the four screws on the adaptor using a Philips
screwdriver.
4. Connect the adaptor to the water tap by tightening all the
screws firmly while lifting the adaptor upwards.
English - 11
Untitled-1 11
2014-11-26
4:21:16
5. Connect the water supply hose to the adaptor. If you push
part (D) into the adaptor, the hose automatically connects to
the adaptor with a clicking sound.
After connecting the water supply hose to the adaptor,
ensure that it is connected correctly by pulling the water
supply hose downwards.
D
WARNING: Check if the water supply hose is not
twisted or bent. If the hose is twisted or bent, water may
leak, causing electric shock. If necessary, straighten
the water supply hose by loosening the L-shaped arm
fitting, rotating the hose, and retightening the L-shaped
arm fitting.
6. Open the water tap and ensure that no water leaks from the
water supply intake, water tap or adaptor. If you encounter a
water leak, repeat the steps above.
WARNING: In case of a water leak, stop using the
washing machine. Otherwise, this may result in electric
shock.
If the water tap is of the screw type, connect the water
supply hose to the tap as shown.
Use the most conventional type of tap for the water supply.
If the tap is square or too big, remove the space ring before
inserting the adaptor into the tap.
To connect the hot water supply hose (applicable models only)
1. Connect the red L-shaped arm fitting for the hot water supply
hose to the hot water supply intake at the upper rear side of
the washing machine. Then tighten it by manually turning part
(A) clockwise.
2. Connect the other end of the hot water supply hose to the
hot water tap in the same way as you connected the cold
water supply hose.
A
To use only cold water, use the Y-piece.
English - 12
Untitled-1 12
2014-11-26
4:21:16
Combine with an existing washing machine by sharing one water tap
INSTALLATION
1. Disconnect the water supply hose (A) from the existing
washing machine.
A
2. Connect the inlet T adaptor (B) to the inlet hole (C) of the
existing washing machine.
B
C
3. Connect the disconnected water supply hose (A) to the inlet
T adaptor (B).
A
B
4. Connect the water supply hose (D) for the sanitizing
washing machine to the inlet hole of the sanitizing washing
machine.
(*): applicable models only
D
5. Connect the water supply hose to the inlet T adaptor as
shown, and turn it clockwise to tighten. It fits with a clicking
sound.
(*): Rubber ring
To avoid water leaks, make sure the rubber ring is
secured around the T adaptor.
CAUTION: When finishing washing the laundry, close the water tap. Otherwise, this may
cause the following:
• If the water tap is not closed or not connected properly, water may leak especially in
winter.
• If the water tap is not closed, the supplied water may freeze inside the water hose.
• The water tap or hose could burst at a low temperature.
English - 13
Untitled-1 13
2014-11-26
4:21:17
Step 3 - Connect the drain hose
1. Insert the joint ring (A) around the drain hose.
A
2. Connect one end of the drain hose into a drain hole, and join
the other end of the drain hose into the drain outlet of the
washing machine.
3. Tighten the drain hose by pushing the joint ring into the drain
outlet. The length of the drain hose is adjustable so that it can
be extended as required.
Pump draining system (applicable models only)
1. Connect the drain hose (A) to the case pump outlet pipe with
the hose tilted at a 2 o'clock angle.
The drain hose goes over the case pump outlet pipe.
Make sure that you connect the drain hose so that less
than 1/3 rd (10 mm) of the pipe remains exposed.
A
2. Clamp the drain hose using a joint ring (B).
Make sure the joint ring is clamped with its two prongs
facing the washer.
B
English - 14
Untitled-1 14
2014-11-26
4:21:18
C
INSTALLATION
3. Insert the clamper (C) at the end of the sponge.
Make sure the clamper covers one end of the sponge.
Make sure the sponge is tightened. A loose sponge may
cause noise while the washing machine is operating.
4. Insert the included screw through the screw hole in the
clamper, then fix the screw to the hole on the rear right side of
the frame. Tighten with a screwdriver.
5. Make sure the drain hose is tightened as shown.
6. Place the drain hose 60 cm – 90 cm (*) above the floor
as shown. Make sure the end of the drain hose is not
submerged by water.
CAUTION: Once you have tightened the screw on the clamper, do not loosen it. Otherwise,
water may leak while the washing machine operates.
English - 15
Untitled-1 15
2014-11-26
4:21:18
To reverse the direction of the drain hose
While pressing down the joint ring, disconnect the drain hose.
Reverse the direction of the drain hose and repeat the steps
above to connect again.
Considerations on the drain hose
• When extending the drain hose by connecting another hose,
the total length cannot exceed 3 m (A).
A
• For a proper draining, ensure that the drain hose ends at
lower than the water level.
• Ensure that the drain hose spreads straight to the drain hole
with no obstacles higher than 5 cm (B) in the way.
B
• Do not pass the drain hose through the bottom of the
washing machine.
English - 16
Untitled-1 16
2014-11-26
4:21:18
To share the drain hole with an existing washing machine
To share one drain hole with an existing washing machine, use the drain T adaptor.
A
2. Insert the drain hose (C) of the existing washing machine in
its drain adaptor (D).
For a fully automatic washing machine, please skip
steps 2 and 3, and go directly to step 4.
INSTALLATION
1. Connect the drain hose (A) of the sanitizing washing machine
to one end of the drain T adaptor (B).
B
B
C
3. Use cable ties to tighten the joint if loose.
D
C
4. Connect the drain hose (C) of the existing washing machine
to the drain T adaptor (B).
5. Insert the drain T adaptor to the drain hole (E) as shown.
E
CAUTION
• If the drain T adaptor does not fit in the drain hole, water may leak around the drain hole.
• Ensure that the drain T adaptor covers the drain hole.
English - 17
Untitled-1 17
2014-11-26
4:21:19
Step 4 - Level the washing machine
1. Choose a location with a minimum clearance of 10 cm (4
inches) from the rear and side walls.
2. If the washing machine is not levelled, adjust the leveling feet.
3. While pressing any two diagonal corners of the washing
machine, check if the washing machine is stable. If it shakes,
adjust the leveling feet.
• If the leveling problem persists, use the adjustable
support to level the machine.
• You can purchase the adjustable support at a local
Samsung service center.
English - 18
Untitled-1 18
2014-11-26
4:21:19
Step 5 – Insert the baffle board
INSTALLATION
1. Lay the washing machine down on its side.
• Do not lay the washing machine down on its front or back.
• While laying the washing machine down, be careful not to
scratch the surface of the washing machine.
2. Insert the baffle board into the bottom of the washing
machine along the guided line.
• The baffle board can reduce the working noise.
• Once the baffle board is installed, do not remove it unless
necessary.
WARNING: Do not reach under the washing machine by hand or with any metal objects
while the washing machine is operating. This may cause a physical injury or electric shock.
After installation is complete, run the Rinse + Spin cycle to make sure the washing machine
works properly.
English - 19
Untitled-1 19
2014-11-26
4:21:19
Basic operations
Laundry guidelines
Carefully read the following instructions to avoid machine problems or damage to clothing.
Check the Care label on clothing before washing.
• Do not overload the tub with laundry. Excessive laundry reduces the washing efficiency, and
severely wears the laundry. Besides, the washing machine may cause creasing or wrinkling on
the laundry.
• When washing big, bulky items or a few smaller items that don’t fill the tub completely (for
example, a rug, a pillow, stuffed toys, or one or two sweaters) add a few towels to improve the
tumbling and spinning performance.
• Check if there are any items that might be discolored. Apply a liquid detergent to a white towel
and a garment, and strongly rub the two items with each other. Check if anyone is affected by
the other one.
• Special care is needed for scarves and imported clothes since they discolor easily. Check for
stains or dirt. For stains, add some detergent to a cloth and rub the stains in one direction. Soil
and dirt may rub against delicate garments, causing damage to the garments.
• For a badly soiled item, first dust it off and then wash it.
• Before washing the laundry, make sure that sleeves, collars, dress hems and pockets are pretreated by brushing them with detergent. Wrinkle-processed clothing made of wool should be
specially treated by tying them together (using thread) before washing. Remove the thread after
the clothes have dried.
• Metal items on clothing may damage the tub and other laundry. Turn clothing with buttons and
embroidered clothes inside out before washing them. Zip up all zippers. Otherwise, the spin
basket may be damaged.
• Clothing with long strings may become entangled with other items. Make sure to fix the strings
before starting a wash.
• Turn delicate items inside out before washing them.
• Wash black clothing and cotton towels separately. If these are washed together, the towels
may become stained.
• Curtains, light garments, or blue jeans should not float. If they are floating, stop the washing
machine by pressing the START/PAUSE button and press them down until they are soaked in
the water. If the wash continues with floating clothing, it may damage both the laundry and the
washing machine.
CAUTION
• Check all pockets before washing.
• Hair pins and coins may damage the washing machine.
• Check all pockets for metal items, and remove them before washing.
English - 20
Untitled-1 20
2014-11-26
4:21:19
Do not wash
BASIC OPERATIONS
• Clothing that is easily disfigured even when simply soaking in water.
• Neckties, brassieres, jackets, suits and coats that are made mostly of rayon and other kind of
blended fabrics that can be easily disfigured (e.g. shrinkage and discoloration).
• Wrinkle-processed, embossed, or resin processed products that are easily disfigured even
when soaked in water.
• Easily discolored products made of cotton and wool, wrinkled silk, leather products, leather
accessory, leather ornamented clothes and its accessories.
• Do not wash waterproof clothing (e.g. ski wear, diaper covers and mats/rugs). This may
cause the laundry to be ejected or cause the washing machine to vibrate abnormally, which
may result in personal injury or damage to the washer, the floor or the clothing. When the tub
rotates, water may become trapped in the waterproof clothing or fabric and can collect in a
corner, causing abnormal vibrations. In addition, the laundry rises and may be ejected and
cause personal injury.
Laundry net
• Use only commercial laundry nets.
• Place delicate clothes in a laundry net.
• Cashmilon and garments that are large and lightweight (e.g. lace decorated clothing, lingerie,
nylon stockings, synthetic fabrics, etc.) may rise to the top of the washing machine and
damage clothing and the washing machine. Use a laundry net or wash these items separately.
• Place long stringed and lace decorated clothing, bed cover sheets, and woolen clothes into a
laundry net before washing them.
English - 21
Untitled-1 21
2014-11-26
4:21:20
Checklist
Sorting & pretreatment
1. Sort the laundry according to the types, colors and degree of soiling (heavily soiled, won't
discolor, delicate clothing, etc.).
2. Keep the accessories of clothing in place and empty the pockets.
3. If any damage to the clothing, please fix it before washing.
4. Check if buttons are firmly in place.
5. Before washing, pre-treat any stubborn stains.
6. If any laundry is caught by the door lid, clothing may tear and cause water leakage. Please
make sure no laundry is caught by the door before closing the door.
Before performing a sanitizing wash
Sort and wash the laundry by color.
• Do not wash laundry that may become discolored with a sanitizing wash.
• Do not use a sanitizing wash for delicate clothing such as woolen items and lingerie.
Do not use a sanitizing wash for these items
Cottons
easily discolored T-shirts.
embroidered T-shirts knitted fibre
Linen Fibre
wrinkle resistant clothing with synthetic mixed fibre
Woolen or Silk items
only cold water wash allowed.
Synthetic Fibre
tops, shirts, stockings
Synthetic or Acetate fibre
do not use a sanitizing wash.
•
•
•
•
•
Please use an AC wall socket with 220 V 15 A or more.
Do not use an extension cord.
Using other power voltage or current may result in fire, electric shock, or power failure.
Do not use this product and other heating equipment at the same time.
The temperature of a sanitizing wash cycle varies by the environment.
English - 22
Untitled-1 22
2014-11-26
4:21:20
Detergent types and usage
BASIC OPERATIONS
• Adding more detergent doesn't increase performance. Rather, too much detergent generates
too many bubbles, reducing the rinse effect and causing environmental pollution.
• Powder detergent residue may be left over in the cleaned laundry, causing bad odors. If using
powder detergent, fully rinse the laundry.
• Bleach is strongly alkaline and can damage the laundry.
• Do not use a soap type of detergent whether it's a solid type or powder type. Using these
types of detergent may cause the following:
• A white residue of the detergent may remain on the cleaned laundry.
• Some amount of the detergent may coagulate, causing bad odors on or discolor the
laundry.
• The tub can be badly contaminated with the detergent residue, which contaminates the
laundry in turn.
The amount of fabric softener specific to wool or baby clothing differs depending on the
manufacturer of the fabric softener. Make sure you are using the standard or recommended
amount of softener by the manufacturer.
When to add fabric softener
• An alarm sounds for 20 seconds immediately before the last rinse cycle in order to remind
users of adding fabric softener to the tub.
• For the Rinse + Spin cycle, fabric softner must be input in advance.
Handling the secure door
Open the secure door
Close the secure door
Gently lift up the handle to open the door.
Lower the door until it contacts the built-in
magnet.
If the secure door is not firmly closed, the washing machine may emit noises during a spin
cycle, or steam may overflow while sanitizing the laundry. Firmly close the secure door and
lock it into place.
English - 23
Untitled-1 23
2014-11-26
4:21:20
About a sanitizing wash
The laundry for sanitizing wash at home normally needs to be washed roughly in advance. This will
help remove stains.
How can a sanitizing wash remove stains more effectively?
While the laundry is being sanitized, the laundry’s fibres fold and naturally rub each other to
facilitate the removal of stubborn stains. Also, the high temperature helps soften the material
of the laundry, and enhances the performance of the detergent. Meanwhile, the stains on the
surface of the laundry will be easily removed by the steam and bubbles that are generated by
the high temperatures of the sanitizing wash cycle.
Sterilization
The sanitizing wash has a sterilization effect. Odors and most of the bacteria that cause skin
allergies can be removed through a sanitizing wash. Keep your clothes fresh and clean.
Bleaching
The colors of clothes become brighter as stubborn stains are removed through a sanitizing wash.
Washing effect
The higher the water temperature, the better the washing effect.
The effects of a sanitizing wash are 60% better than a normal wash. Even with a half of the normal
amount of detergent, the effects of sanitizing wash increase up to 20%
Sanitizing wash instructions
• Use caution during a sanitizing wash because the inner temperature is very high.
• To drain the water safely, do not select a high water level for a sanitizing wash. Specifically, do
not put more than 1.5 kg (3 lb) of laundry into the tub. If more than 1.5 kg (3 lb) of laundry is
loaded, the fibre of clothes may be damaged. (Underwear: 130 g; short pants: 50 g; socks: 50
g; normal towel: 150 g; bath towel: 300 g)
• Do not supply hot water for the cold water valve. Operate the washing machine only after the
cold water valve is closed. For safety reasons, add cold water to cool down the hot water while
draining.
• Time required to run the sanitizing wash cycle depends on the water temperature. The lower
the water temperature is, the longer it takes to complete the cycle.
• The washing machine is designed for a sanitizing wash. Add only cold water to the hot water to
cool it down when the cycle is complete.
• If only hot water is supplied, or the water hoses are connected reversely, the washing machine
won't drain the water. If this is the case, an alarm will sound with an error message.
• The sanitizing wash cycle starts only when the door is closed.
• Once the cycle starts, the water level cannot be changed nor can hot water be added.
English - 24
Untitled-1 24
2014-11-26
4:21:20
Getting started
1
BASIC OPERATIONS
Control panel
2
3
4
5
6
7
8
1. Display
Displays the remaining washing time.
Displays an error message if a problem occurs.
2. Rinse
Press this button to perform a rinse-only cycle, or to change the number of rinse cycles.
You can set up to 6 rinse cycles.
3. Soak
Press this button to perform a soak wash.
According to the selected cycle, the soak time is determined by the minute.
4. Water Level
Press this button to select a water level from High, Mid, and Low.
5. START/PAUSE
Press this button to start or stop an operation.
To change the cycle while the washing machine is operating, press this button to stop the
operation.
Then, change the cycle, and press the button again.
6. POWER
Press this button once to turn on the washing machine.
Press it again to turn off the washing machine.
English - 25
Untitled-1 25
2014-11-26
4:21:20
7. Baby Care
Use this course for items such as baby clothes and underwear that require additional rinse
cycles for sanitary purposes without damaging the fabric.
Super Sanitize
For sterilizing and bleaching innerwear.
The laundry is heated up to a sanitizing point and maintained for
a pre-determined period of time, and then goes through 3 rinse
cycles.
(allowable load: 1.5 kg)
Sanitize
Sterilizes the laundry in power saving mode.
(allowable load: 1.5 kg)
Baby Clothes
For newborn baby clothing (including diapers), infant clothing, and
organic clothing that need extreme sanitariness without damaging
the fabric.
(allowable load: 1.5 kg)
8. Course
Select an appropriate course for the laundry type.
The tumbling pattern and the spinning speed depend on the selected course.
Fuzzy
Default course.
(allowable load: 3 kg)
Delicates
For washing a small amount of slightly stained laundry in a short
time.
(allowable load: 1.5 kg)
Super Clean
For washing delicate clothing such as lingerie and inner wear.
(allowable load: 3 kg)
Rinse + Spin
For laundry that only needs rinsing with or without a rinse-added
fabric softener.
Spin
Select this course to perform a spinning-only cycle.
You can set the spinning time between 1 and 9 minutes.
The spinning time differs depending on the remaining washing time.
Note that the remaining washing time includes the actual spinning
time plus the draining time.
Eco Tub Clean
This course cleans and sanitizes the tub.
English - 26
Untitled-1 26
2014-11-26
4:21:20
Before you start
BASIC OPERATIONS
1. Open the water tap.
Check if the water supply hoses are correctly connected to
the corresponding tap (cold/hot water).
2. Plug the power cable into a 220 V wall socket.
3. Ensure that the drain hose is placed as instructed.
1
2
3
Washing for the first time
1. Place the laundry into the tub, add an appropriate amount of detergent, and then close the
door. For effective washing, add detergent and bleach into the tub before adding the laundry.
2. Press the POWER button.
3. Press the Baby care or Course button to select a cycle.
4. Press the Water Level button to specify the water level according to the load of laundry and
select the water supply type (cold or hot water).
High
Mid
Low
1.5 - 3 kg
0.8 - 1.5 kg
0.8 kg or less
The default water level is set for each cycle, and the default water supply type is cold water.
5. Press the Rinse button to select the number of rinse cycle.
(The number of rinse cycles cannot be changed during the last rinse cycle or the spin cycle.)
6. Press the START/PAUSE button.
7. Close the door.
• If the door stays open when the washing machine starts operating, the washing machine
will stop the current operation for safety reasons. (However, the water supply will
continue even though the door is opened)
• To change the wash cycle, press the START/PAUSE button, select a cycle and then
press the START/PAUSE button again.
• If you want to add the soak cycle, press the Soak button before starting the wash. The
Soak cycle is not available for courses: Super Clean, Delicates, Rinse + Spin, Spin, or
Eco Tub Clean.
English - 27
Untitled-1 27
2014-11-26
4:21:20
Water level and temperature
For economic and effective washing, specify a proper water level and a water supply type.
The default water level is High, and the default supply type is cold water.
• Press the Water Level button to select a water level and a water supply type:
High/Cold > Mid/Cold > Low/Cold > High/Cold
• If you change the water level before the water fills up to the preset level, the washing time
changes accordingly.
CAUTION: To prevent damage to clothing, check the Care label on the clothing.
Child Lock
Child Lock is designed to prevent children from accidents.
• Once the Child Lock is set, it remains set until you release it manually. Turning off the washing
machine will not release this function.
• Press and hold the START/PAUSE button for more than 3 seconds to set or release the Child
Lock. The Child Lock indicator turns on or off accordingly.
Mute
• When the washing machine enters the mute mode, the Mute indicator turns on.
• Press and hold both the Water Level and the Soak buttons to mute or unmute the washing
machine.
Eco Tub Clean
It is advisable to clean the tub regularly for hygienic reasons.
1. Press the POWER button.
2. Press the Course button to select Eco Tub Clean.
3. Press the Water Level button. By default, the water level is fixed to Mid. You can select only
cold water.
4. Press the START/PAUSE button.
CAUTION: Do not use any cleaning agents for cleaning the drum. Chemical residues in the
drum deteriorates the washing performance.
English - 28
Untitled-1 28
2014-11-26
4:21:20
Maintainence
MAINTAINENCE
Keeping your washing machine clean improves its performance, wards off unnecessary repairs,
and lengthens its life.
Cleaning the exterior
Wipe the washing machine surfaces, including the control panel, with a soft cloth using a
nonabrasive household detergent.
Use a soft cloth to dry the surfaces.
CAUTION: Do not pour water onto the washing machine.
Keeping the tub clean
When using the machine under humid conditions for an extended time, various airborne bacteria
may stick to the tub and form mold. Keep the tub clean and sanitary at all times.
Auto Reminder
• The washing machine automatically reminds users of cleaning the tub at a certain interval.
When the Auto Reminder turns on, remove laundry from the tub if any, and press the
Course button to select Eco Tub Clean.
• The auto reminder indictor turns on for six consecutive times. However, you can safely ignore
the reminder without affecting the performance of the washing machine.
• The auto reminder activates once every one or two months, depending on the tub conditions.
• The tub cleaning time may differ depending on the weather and the water temperature.
English - 29
Untitled-1 29
2014-11-26
4:21:21
Cleaning the water valve mesh filter
1. Remove the filter and wash it thoroughly.
2. Return the filter to its place and securely connect the hose to
the inlet water valve.
3. Check if there is any water leakage.
Ensure that the water supply hose is connected tightly.
English - 30
Untitled-1 30
2014-11-26
4:21:21
Filter
MAINTAINENCE
Filters can filter and collect debris and other materials while washing.
If no filters are installed, laundry could be contaminated by other materials. Please clean the filters
periodically.
1. Lift the filter up to remove it as shown in the figure.
2. Turn the filter inside out to remove other materials.
• If the mesh of filter is clogged, the laundry could be
contaminated.
3. Thoroughly clean and rinse the filters with water.
4. Insert the lower part of filter and push it according to the
arrow direction as shown in the figure. When you hear a
'click' sound, it means the filter is in place.
• The filter is a consumable part. If damaged, please contact
your local service center.
English - 31
Untitled-1 31
2014-11-26
4:21:21
Troubleshooting
Check the table below if the washing machine...
If after requesting technical assistance and the problem is not considered a malfunction, you will be
charged for service even though the product is still under warranty.
Problem
Power does not turn
on.
Checkpoints
Action
Check if the electric voltage is
normal.
This product can only be used
with 220 V.
Check if the power cord is
completely plugged in.
Plug in the power cord.
Check if the drain hose is correctly Ensure that the drain hose is
placed.
placed properly.
Water does not drain.
Washing machine does
not operate.
Check if the drain hose is twisted.
Make sure the drain hose is not
twisted.
Check if the outlet of the drain
hose is clogged.
Unclog the outlet and the
surrounding area.
Check if the door is closed.
Close the door.
Check if the washing machine is
in the Pause status.
Press Start/Pause button again
and check if washing proceeds.
Check if water has reached the
preset water level.
If the water pressure is low, it
takes a longer time.
Check if the water tap is closed.
Open the tap.
Check if the Child Lock is set.
No key is enabled if the Child
Lock is set. Release the Child
Lock.
The drain hose and tub
are frozen
• Apply some hot water on the tap to disconnect the water supply
hose and place the hose in hot water.
• Pour warm water into the tub and wait about 10 minutes.
• Cover a hot, wet cloth around the connection of the water hose.
• As the water supply hose defrosts, reconnect the hose and check
if water supply is normal.
The tub won't keep
water and it drains
immediately.
• Check if the water outlet is clogged with something, such as coins
or pins.
• Hang the drain hose on the drain hose hook. Pour water into the
tub to the half-way mark and then run the Spin cycle.
English - 32
Untitled-1 32
2014-11-26
4:21:21
Problem
The water leaks at
the water supply hose
connector.
There are loud noises
and vibrations when
spinning.
Action
Water won't supply unless
pressing the Start/Pause button
again. Press the Start/Pause
button.
Check if the water tap is closed.
Open the tap.
Check if the filter at the
connection of water supply hose
is blocked.
Clean the filter net using a
toothbrush.
Check if water supply cut-off
occurred.
If the water supply is cut off, close
the water tap and turn off the
washing machine.
If the tap connecting part is loose,
water may leak.
Repeat the assembling steps
again.
(Refer to “Step 2 - Connect the
water supply hose” on page 11)
Check if the rubber ring of the
water supply hose is in the right
position.
Fit it tightly again.
Check if the water supply hose is
twisted.
Straighten the hose.
If the water supply is too strong,
water may leak.
Fine tune the water supply of the
tap.
Check if the water leaking is from
the tap itself.
Fix the tap.
Check if the laundry is spread out
evenly in the washing machine.
Spread out the laundry evenly and
start again.
Check if the washing machine
is balanced and on a sturdy, flat
surface.
Ensure that the washing machine
is leveled.
Ensure that the washing
machine is not surrounded with
unnecessary items.
Move anything unnecessary away
from the washing machine.
TROUBLESHOOTING
Water is not supplied.
Checkpoints
Check if water is supplied after
pressing the Start/Pause button.
English - 33
Untitled-1 33
2014-11-26
4:21:21
Information codes
When your washing machine malfunctions, you may see an information code on the display. If that
happens, please check this table and try the suggested solution before calling Customer Service.
Error
Solution
4E
If the supplied amount of water does not change for 4 minutes, or the
water supply is not complete after 60 minutes, this error appears with
a beep.
• Ensure that the water tap is opened.
5E
If the water does not drain completely after 30 minutes, this error
appears with a beep.
• Ensure that the drain hose is placed correctly.
• Ensure that the drain hose is not clogged.
CE
If the temperate of the drain water is so high as to cause injury, this
error appears with a beep for safety reasons.
• Ensure that the cold water tap is opened.
• Ensure that the cold water tap and the hot water tap are
connected correctly.
dE
If the door is opened during an operation, this error appears with a
beep.
• In this case, close the door, and resume operation.
UE
This error appears with a beep if a spin operation fails.
• Ensure that the laundry is spread out evenly.
4E2
If the temperature of the supplied water is so high as to cause damage
to the laundry, this error appears with a beep.
• Ensure that the cold water tap and the hot water tap are
connected correctly.
IE/tE1/HE/HE1/dE1/
dE2/LE/8E
The washing machine is not working properly. Contact the nearest
Samsung service center.
English - 34
Untitled-1 34
2014-11-26
4:21:21
Specifications
SPECIFICATIONS
Specifications
Model
WB30H7*****
Fully-Automatic Washer
Type
Washing type
Single Coil Type
Spinning type
Centrifugal Spinning
Load of laundry
Cotton
3.0 kg
Sanitizing wash
1.5 kg
0.05 - 0.78 Mpa
(0.5 kg•f/cm2- 8 kg•f/cm2)
Water pressure
W 450 x D 540 x H 809
Dimensions (mm)
27 kg
Weight
220 V / 50 Hz
Power
Rated power
consumption
Cotton
215 W
Sanitizing wash
2000 W
Wash speed
150 rpm
Spin speed
900 rpm
English - 35
Untitled-1 35
2014-11-26
4:21:21
QUESTIONS OR COMMENTS?
COUNTRY
CALL
OR VISIT US ONLINE AT
INDIA
1800 3000 8282 - Toll Free
1800 266 8282 - Toll Free
30308282 - Non Toll Free"
www.samsung.com/in/support
DC68-00815G-01
Untitled-1 36
2014-11-26
4:21:22