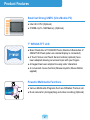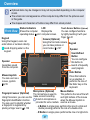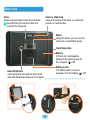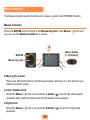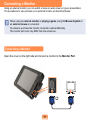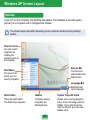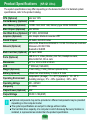
1
Chapter 1. Getting Started Product Features 2 Before You Start 4 Contents 8 Safety Precautions 9 Proper Posture During Computer Use 23 Important Safety Information 25 Replacement Parts and Accessories 27 Regulatory Compliance Statements 29 WEEE SYMBOL INFORMATION 39 Overview 41 Turning the Computer On and Off 49 Product Features Small but Strong UMPC (Ultra Mobile PC) ● Intel ULV CPU (Optional) ● 512MB~Up To 1GB Memory (Optional) 7” WSVGA TFT LCD ● Basic Resolution of 1024x600 Pixels, Maximum Resolution of 2048x1536 Pixels (when an external display is connected) ● A Touch Screen and Touch Sensor buttons (optional) have been adopted allowing convenient input with your fingers. ● A Keypad has been adopted to easily enter characters ● A convenient mouse function (Mouse/Joystick, Mouse Button applied) Powerful Multimedia Functions ● Various Multimedia Programs Such as AVStation Premium etc. ● Dual camera for photographing and video recording (Optional) Multiple Network Support ● Wired LAN, Wireless LAN, Bluetooth (Optional) ● Resolves Space Restrictions through the Wireless Communication Function Compact, Light-Weight Design for Portability / Polished Design ● A mere 690g (1.52lb) (Without optional items) ● High-Gloss Front Panel Optional Accessories for Additional Convenience ● USB Data Cable Enabling Data Exchange with another PC. ● USB External ODD(Optical Disk Drive), Ultra-Slim USB External Keyboard ● Power Bank to Extend Usage Time Before You Start Before reading the User Guide, first check the following information. User Guide Information Utilizating the User Guide This product is supplied with an Getting Started Guide, and a User Guide. Be sure to read the Safety Precautions before using the computer. For basic usage of the computer refer to You can even more easily and conveniently use the computer by using any of the guides depending on your needs. the additionally supplied Getting Started Guide. Refer to the User Guide for the procedures to use the computer. Using the Index of the User Guide, you Getting Started Guide can easily find any information you are looking for. This guide is provided so that you can conveniently refer to this guide when using the computer for the first time after purchasing it. Using the Glossary of the User Guide, you can easily find meanings for technical terms. If a problem occurs, refer to the Q & A included in the User Guide. User Guide You are currently reading the User Guide. To open the file at any time, double-click the icon on the Desktop. ■ Some devices and software referred in the User Guide may not be provided and/or changed by upgrade. Note that the computer environment referred in the User Guide may not be the same as your own environment. ■ The image used for the cover and text of the User Guide may not be the same as actual product. Alternatively, select Start > All Programs > Samsung>User Guide > User Guide. This document includes the computer functions, how to use the functions, and how to use the program. Text Notations ■ This guide decribes procedures for both the mouse and the stylus pen together. A ‘Click’ in this manual refers to a ‘Single-tap’ for the Stylus Pen. ■ The figures in this guide are provided assuming that your operating system is Windows XP. The figures are subject to change. ■ The User guide supplied with computer may be varied depending on model. Icon Notation Before You Start Content included in this section includes information required before using a function. Content included in this section includes Caution information required about the function. Note Safety Precaution Notations Icon Notation Description Content included in this section includes helpful information to use the function. This notation represents the page number you can Page XX refer to for information about related functions or as a reference. Description Failing to follow instructions marked with Warning this symbol, may cause personal injury and or fatality. Start > All Programs > Samsung > User Guide > User Guide Failing to follow instructions marked with Caution this symbol, may cause slight injury to yourself or damage your property. This represents a menu path to run a program. Click the Start button and then select All Programs > Samsung > User Guide > User Guide in this order from the menu. Copyright Precautions for Operating System Support © 2008 Samsung Electronics Co., Ltd. If a problem occurs because of the reinstallation of other operating systems(OS) or a previous version of a OS pre-installed on this computer, or a software that does not support the OS, the company will not provide technical support, a replacement or refund, and if our service engineer visits you due to this problem, a service charge will be applied. Samsung Electronics Co., Ltd. owns the copyright of this manual. No part of this manual may be reproduced or transmitted in any form or by any means, electronic or mechanical, without the consent of Samsung Electronics Co., Ltd. The information in this document is subject to change without notice due to improving the performance of the product. Samsung Electronics shall not be liable for any data loss. Please take care to avoid losing any important data and backup your data to prevent any such data loss. About the Product Capacity Representation Standard The capacity of the storage device (HDD, SSD) of the manufacturer is calculated assuming that 1KB=1,000 Bytes. However, the operating system (Windows) calculates the storage device capacity assuming that 1KB=1,024 Bytes, and therefore the capacity representation of the HDD in Windows is smaller than the actual capacity due to the difference in capacity calculation. (E.g. For a 80GB HDD, Windows represents the capacity as 74.5GB) In addition, the capacity representation in Windows may be even smaller because some programs such as Recovery Solution may reside in a hidden area of the HDD. Contents Chapter 1. Getting Started Product Features Before You Start Contents Safety Precautions Proper Posture During Computer Use Important Safety Information Replacement Parts and Accessories Regulatory Compliance Statements WEEE SYMBOL INFORMATION Overview Turning the Computer On and Off Chapter 5. Using Applications 2 4 8 9 23 25 27 29 39 41 49 Introducing Programs CyberLink DVD Suite (Optional) AVStation premium (Optional) AVStation Viewer (Optional) Play Camera (Optional) Samsung Update Plus (Optional) Using McAfee SecurityCenter (Optional) OmniPass (Fingerprint Identification software, Optional) Using Samsung Magic Doctor (Optional) Reinstalling Software Samsung Recovery Solution (Optional) Chapter 2. Using the Computer Stylus Pen Entering Text Using the Buttons Multi Card Slot Connecting a Monitor Adjusting the Volume BIOS Setup Setting a Boot Password Changing the Boot Priority Battery 75 77 81 Reinstalling Windows XP Q & A Product Specifications Glossary Index Contact SAMSUNG WORLD WIDE 156 161 164 165 Chapter 7. Appendix Chapter 4. Using the Network Wired Network Wireless Network Using the Samsung Network Manager Bluetooth 136 142 143 145 Chapter 6. Settings 52 56 57 64 67 71 Chapter 3. Using Microsoft Windows XP About Microsoft Windows XP Windows XP Screen Layout Control Panel 106 109 112 122 127 130 132 87 89 93 98 172 177 196 206 209 210 Safety Precautions For your security and to prevent damage, please read the following safety instructions carefully. Since this is commonly applied to Samsung Computers, some figures may differ from actual product. Warning Failing to follow instructions marked with this symbol may cause personal injury and even fatality. Installation Related Do not install the product in places exposed to humidity such as a bathrooms. There is a danger of electric shock. Use the product within the operating conditions specified in the Manufacturers User Guide. Keep the plastic bags out of the reach of children. There is a danger of suffocation. Keep a distance of 15cm or more between the computer and the wall and do not place any objects between them. Avoid exposing any part of your body to the heat from the computer vent for a long time when it is on. This may increase the internal temperature of the computer and may cause an injury. Exposing a part of your body to the heat from the vent for long periods of time may cause a burn. Do not install the computer on a slant or a place prone to vibrations, or avoid using the computer in that location for a long time. This increases the risk that a malfunction or damage to the product will occur. Avoid blocking the vent at the bottom or side of the computer when using it on a bed or cushion. If the vent is blocked, there is a danger of damaging the computer or overheating the inside of the computer. UMPC v1.4 Power Related The power plug and wall outlet figures may differ depending on the country specifications and the product model. Do not touch the mains plug or power cord with wet hands. If the power cord or power outlet makes a noise, disconnect the power cord from the wall outlet and contact a service center. There is a danger of electric shock or fire hazard. Plug the power cord firmly into the power outlet and AC adapter. Failing to do so may cause fire hazard. There is a danger of electric shock. Do not exceed the standard capacity (voltage/current) of a multi-plug or power outlet extension when using it for the product. There is a danger of electric shock or fire hazard. Do not use a damaged or loose mains plug or power cord or power outlet. There is a danger of electric shock or fire hazard. 10 Do not unplug the power cord out by pulling the cable only. If the cord is damaged, it may cause electric shock. AC Adapter Usage Precautions Do not bend the power cord excessively or do not place a heavy object over the power cord. It is especially important to keep the power cord out of reach of infants and pets. If the cord is damaged, it may cause electric shock or fire. If water or another substance enters the power input jack, AC adapter or the computer, disconnect the power cord and contact the service center. Damage to the device within the computer may cause electric shock or fire hazard. 11 Do not place heavy objects or step onto the power cord or AC adapter to avoid damaging the power cord or AC adapter. If the cord is damaged, there is a danger of electric shock or fire. Use only the AC adapter supplied with the product. Using another adapter may cause the screen to flicker. Battery Usage Related Authorized Parts Connect the power cord to the AC adapter firmly. Otherwise, there is a danger of fire due to an incomplete contact. Keep the battery out of the reach of infants and pets, as they could put the battery into their mouths. There is a danger of electric shock or choking. Use an authorized battery and AC adapter only. Please use an authorized battery and adapter approved by Samsung Electronics. Unauthorized batteries and adapters may not meet the proper safety requirements and may cause problems or malfunctions and result in an explosion or fire. 12 it off, the computer may overheat and there is a danger of fire. Shut the computer down properly before moving it. Do not use the computer in a badly ventilated location such as on bedding, on a pillow or cushion, etc, and do not use it in a location such as room with floor heating as it may cause the computer to overheat. Take care that the computer vents (on the side or the bottom) are not blocked especially in these environments. If the vents are blocked, the computer may overheat and it may cause a computer problem, or even explosion. Do not use the computer in a humid location such as a bathroom or sauna. Please use the computer within the recommended temperature and humidity range 5ºC, RH). Power Off Do not close the LCD panel and put the computer into your bag to move it when it is still turned on. If you put the computer into your bag without turning 13 Never heat the battery or put the battery into a fire. Do not put or use the battery in a hot location such as a sauna, inside a vehicle exposed to the heat, and so on. There is a danger of an explosion or fire. Take care not to allow metal objects such as a key or clip to touch the battery terminal (metal parts). If a metal object touches the battery terminals, it may cause excessive current flow and it may damage the battery, or result in a fire. If liquid leaks out of the battery or there is a funny smell coming from the battery, remove the battery from the computer and contact a service center. There is a danger of an explosion or fire. 14 To use the computer safely, replace a dead battery with a new, authorized battery. Please charge the battery fully before using the computer for the first time. Usage Related Disconnect all cables connected to the computer before cleaning it. If you are using a notebook computer, remove the battery. There is a danger of electric shock or damage to the product. Do not connect a phone line connected to a digital phone to the modem. There is a danger of a electric shock, fire or damage to the product. Do not place any container filled with water or chemicals over or near the computer. If water or chemicals enter the computer, this may cause fire or electric shock. If the computer is broken or dropped, disconnect the power cord and contact a service center for a safety check. Using a broken computer may cause electric shock or fire hazard. 15 Avoid direct sunlight when the computer is in an air-tight location such as inside a vehicle. There is a danger of a fire hazard. The computer may overheat and also present opportunity to thieves. Upgrade Related Never disassemble the power supply or AC adapter. There is a danger of electric shock. When removing the RTC (Real Time Clock) battery, keep it out of the reach of children as they could touch and/or swallow it. There is a danger of choking. If a child has swallowed it, contact a doctor immediately. Use only authorized parts (multi-plug, battery and memory) and never disassemble parts. There is a danger of damaging the product, electric shock or fire hazard. 16 Shut down the computer and disconnect all cables before disassembling the computer. If there is a modem, disconnect the phone line. If you are using a notebook computer, make sure to remove the battery. Failing to do so, may cause electric shock. Custody and Movement Related Follow the instructions for the relevant location (e.g. airplane, hospital, etc.) when using a wireless communication device (wireless LAN, Bluetooth, etc.). When carrying the notebook computer with other items, such as the adapter, mouse, books etc, take care not to press anything against the notebook computer. If a heavy object is pressed against the notebook computer, a white stop or stain may appear on the LCD. Therefore, take care not to apply any pressure to the notebook. In this case, place the notebook computer in a separate compartment away from the other objects. 17 Caution Failing to follow instructions marked with this symbol may cause slight injury or damage to the product. Installation Related Do not block the ports (holes), vents, etc. of the product and do not insert objects. Damage to a component within the computer may cause electric shock or fire. When using the computer with it lying on its side, place it so that the vents face upwards. Failing to do so, may cause the internal temperature of the computer to rise and the computer to malfunction or halt. Do not place a heavy object over the product. This may cause a problem with the computer. In addition, the object may fall and cause injury, or damage the computer. Battery Usage Related Dispose of worn-out batteries properly. ■ There is a danger of fire or explosion. ■ The battery disposal method may differ depending on your country and region. Dispose of the used battery in an appropriate way. Do not throw or disassemble the battery and do not put it into water. This may cause an injury, fire or explosion. Use only a battery authorized by Samsung Electronics. Failing to do so may cause an explosion. 18 Avoid contact with metal objects such as car keys or clips when keeping or carrying a battery. Contact with a metal may cause excessive current and a high temperature and may damage the battery or cause a fire. Charge the battery according to the instructions in the manual. Failing to do so, may cause an explosion or fire from damage to the product. Do not heat the battery or expose it to heat (e.g. inside a vehicle during the summer). There is a danger of explosion or fire. Usage Related Do not place a candle, lighted cigar, etc. over or on the product. There is a danger of fire. Use a wall outlet or multiplug with a grounding part. Failing to do so may cause an electric shock hazard. Make sure to have the product tested by a safety service engineer after repairing the product. Authorized Samsung Repair Centers will carry out safety checks after a repair. Using a repaired product without testing it for safety may cause an electric shock or fire. In case of lightning, immediately turn the system off, disconnect the power cord from the wall outlet and line do not use a modem or phone. There is a danger of electric shock or fire. Do not use your computer and AC-Adapter on your lap or soft surfaces. If the computer temperature increases, there is a danger of burning yourself. Connect only permitted devices to the connectors or ports of the computer. Failing to do so, may cause electric shock and fire. Close the LCD panel only after checking if the notebook computer is turned off. The temperature may rise and it may cause overheating and deformation of the product. 19 Do not press the Eject Button while the Floppy Disk/CD-ROM drive is in operation. You might lose data and the disk might be suddenly ejected and could cause an injury. Take care not to drop the product while using it. This may cause personal injury or loss of data. Do not contact the antenna with electricity facility such as the power outlet. There is a danger of electric shock. When handling computer parts, follow the instructions on the manual supplied with the parts. Failing to do so, may cause damage to the product. Upgrade Related If the computer emits smoke, or there is a burning smell, disconnect the power plug from the wall outlet and contact a service center. If your computer is a notebook computer, make sure to remove the battery. There is a danger of fire. Do not use a damaged or modified CD/Floppy Disk. There is a danger of damaging the product or personal injury. Do not insert your fingers into the PC Card Slot. There is a danger of injury or electric shock. Use recommended computer cleansing solution when cleaning the product and only use the computer when it is completely dried. Failing to do so may cause electric shock or fire. Emergency disk eject method using paperclip should not be used while the disk is in motion. Make sure to use the emergency disk eject method only when the Optical Disk Drive is stopped. There is a danger of injury. Do not place your face close to the Optical Disk Drive tray when it is operating. There is a danger of injury due to an abrupt ejection. Check CDs for cracks and damage prior to use. It may damage the disc and cause disorder of device and injury of user. 20 Take care when touching the product or parts. The device may be damaged or you may be injured. Take care not to throw or drop a computer part or device. This may cause injury or damage to the product. Make sure to close the computer cover before connecting the power after a reassembly. There is a danger of electric shock if your body touches an internal part. Custody and Movement Related Use parts authorized by Samsung Electronics only. Failing to do so, may cause fire or damage the product. Never disassemble or repair the product by yourself. There is a danger of electric shock or fire. To connect a device that is not manufactured or authorized by Samsung Electronics, enquire at your service center before connecting the device. There is a danger of damaging the product. When moving the product, turn the power off and separate all connected cables first. The product might be damaged or users may trip over the cables. Use a computer cleansing solution when cleaning the product. Using a cleansing solution or chemical that is not developed for a computer may damage the product. For long periods of not using the notebook computer, discharge the battery and preserve as it is detached. The battery will be preserved at its best condition. Do not operate or watch the computer while driving a vehicle. There is a danger of a traffic accident. Please concentrate on driving. Keep the Stylus Pen out of reach of children. hildren may injure themselves by swallowing it or damaging their eyes. 21 LCD Related LCD Bad Pixels The limits of LCD manufacturing technology permit a maximum of 4 abnormal or bad pixels, which does not affect the system performance. This system may have the same level of abnormal or bad pixels as any other company’s products. Cleaning the LCD When cleaning the LCD panel, use only computer specific cleaners with a soft cloth, and lightly wipe in one direction. Pressing down hard may damage the LCD. Cautions on Preventing Data Loss (Hard Disk Management) Take care not to damage the data on a hard disk drive. ■ A hard disk drive is so sensitive to external impact that an external impact may cause loss of data on the surface of the disk. ■ Take extra care, because moving the computer or an impact on the computer when it is turned on may damage the data of the hard disk drive. ■ The company is not liable for any loss of any data caused by a customer’s careless usage or bad environmental conditions. Causes that may damage the data of a hard disk drive and the hard disk drive itself. ■ The data may be lost when an external impact is applied to the disk while disassembling or assembling the computer. ■ The data may be lost when the computer is turned off or reset by a power failure while the hard disk drive is operating. ■ The data may be lost and irrecoverable due to a computer virus infection. ■ The data may be lost if the power is turned off while running a program. ■ Moving or causing an impact to the computer while the hard disk drive is operating, may cause files to be corrupted or bad sectors on the hard disk. To prevent data loss due to damage to the hard disk drive, please backup your data frequently. 22 Proper Posture During Computer Use Maintaining a proper posture during computer use is very important to prevent physical harm. The following instructions are about maintaining a proper posture during computer use developed through human engineering. Please read and follow them carefully when using the computer. Otherwise, the probability of (RSI: Repetitive Strain Injury) from repeated operations may increase and serious physical harm may be caused. The instructions in this manual have been prepared so that they can be applied within the coverage of general users. If the user is not included in the coverage, the recommendation is to be applied according to the user’s needs. Since this is commonly applied to Samsung Computers, some figures may differ from actual product. Proper Posture Eye Position ■ Do not use the computer on your lap or close to your skin for a long time. Keep a distance of at least 50cm between the LCD and your eyes. There is a danger of burns due to the high temperature of the computer. ■ Adjust the height of the LCD screen so that its top height is equal to or lower than your eyes. ■ To use the computer while talking over the telephone, use the ear-microphone phone. ■ Avoid setting the LCD excessively bright. ■ Keep the LCD screen clean. When using the computer while holding a phone over your shoulder and talking on the phone, your posture becomes bad. ■ When wearing glasses, clean them before using the computer. ■ Keep frequently used work items within an easy working range (where you can reach them with your hands easily). 23 Hand Position Use Time (Break Time) ■ It is recommended to connect and use an external keyboard and mouse when using the computer for a long time. ■ Take a break for 10 minutes or more after a 50-minute period when working for more than one hour. ■ Do not hold the Stylus Pen with excessive force. Illumination ■ Do not press the touch screen with excessive force. ■ Do not use the computer in dark locations. The illumination level for computer use must be as bright so for reading a book. Volume Control (Headphones and Speakers) ■ Indirect illumination is recommended. Use a curtain to prevent reflection on the LCD screen. Check your volume first to listen to music. Operation Condition ■ Do not use the computer in hot and humid locations. ■ Use the computer within the allowed temperature and humidity range specified in the User Guide. Check your volume!! ■ Check if the volume is too loud before using headphones. ■ Do not turn the volume to the maximum level right from the start. Instead, start the volume at a low level and increase it slowly while listening to the sound. ■ It is not recommended using headphones for long periods of time. 24 Important Safety Information Safety instructions Your system is designed and tested to meet the latest standards for safety of information technology equipment. However, to ensure safe use of this product, it is important that the safety instructions marked on the product and in the documentation are followed. ■ Ensure that the electrical outlet you are using to power your equipment is easily accessible in case of a fire or short circuit. ■ If your computer has a voltage selector switch, make sure that the switch is in the proper position for your area. ■ Openings in the computer case are provided for ventilation. Do not block or cover these openings. Make sure you provide adequate space, at least 6 inches (15 cm), around the system for ventilation when you set up your work area. Never insert objects of any kind into the computer ventilation openings. Always follow these instructions to help guard against personal injury and damage to your system. Setting Up your System ■ Ensure that the fan vents on the bottom of the casing are clear at all times. Do not place the computer on a soft surface, doing so will block the bottom vents. ■ Read and follow all instructions marked on the product and in the documentation before you operate your system. Retain all safety and operating instructions for future use. ■ If you use an extension cord with this system, make sure that the total power rating on the products plugged into the extension cord does not exceed the extension cord power rating. ■ Do not use this product near water or a heat source such as a radiator. ■ Set up the system on a stable work surface. ■ The product should be operated only with the type of power source indicated on the rating label. 25 Care During Use The Instruction On Safety Operation of NotePC ■ Do not walk on the power cord or allow anything to rest on it. When installing and operating devices 1 please refer to safety requirements in ■ Do not spill anything on the system. The best way to avoid spills is to not eat or drink near your system. the user guide. ■ Some products have a replaceable CMOS battery on the system board. There is a danger of explosion if the CMOS battery is replaced incorrectly. Replace the battery with the same or equivalent type recommended by the manufacturer. Dispose of batteries according to the manufacturers instructions. If the CMOS battery requires replacement insure that a qualified technician performs the task. Devices can be used only with the 2 equipment specified in the technical specifications of the devices. If there is a smell of burning or smoke 3 coming from the computer, the unit should be switched off and the battery removed. The unit should be checked by a qualified technician before reuse. ■ When the computer is turned off, a small amount of electrical current still flows through the computer. To avoid electrical shock, always unplug all power cables, remove the battery and modem cables from the wall outlets before cleaning the system. Service and repair of devices should 4 be carried out by authorized service centers. ■ Unplug the system from the wall outlet and refer servicing to qualified personnel if: not allow your portable computer 5 toDooperate with the base resting directly on exposed skin for extended periods of time. The surface temperature of the base will rise during normal operation (particularly when AC Power is present). Allowing sustained contact with exposed skin can cause discomfort or eventually a burn. – The power cord or plug is damaged. – Liquid has been spilled into the system. – The system does not operate properly when the operating instructions are followed. – The system was dropped or the casing is damaged. – The system performance changes. 26 Replacement Parts and Accessories Use only replacement parts and accessories recommended by SAMSUNG. Connect and Disconnect the AC adapter Do not use this product in areas classified as hazardous. Such areas include patient care areas of medical and dental facilities, oxygen rich environments, or industrial areas. The socket-outlet shall be installed near the equipment and easily accessible. Do not unplug the power plug by pulling the cable. Battery Disposal Do not put rechargeable batteries or products powered by non-removable rechargeable batteries in the garbage. Power Cord Requirements The power cord set (power plug, cable and AC adapter plug) you received with your computer meets the requirements for use in the country where you purchased your equipment. Contact the Samsung Helpline for information on how to dispose of batteries that you cannot use or recharge any longer. Follow all local regulations when disposing of old batteries. Power cord sets for use in other countries must meet the requirements of the country where you use the computer. For more information on power cord set requirements, contact your authorized dealer, reseller, or service provider. IF YOU REPLACE THE BATTERYWITH AN INCORRECT TYPE, THERE IS A RISK OF EXPLOSION. DISPOSE OF USED BATTERIES ACCORDING TO THE INSTRUCTIONS. 27 General Requirements The requirements listed below are applicable to all countries: ■ The length of the power cord set must be at least 6.00 feet (1.8m) and a maximum of 9.75 feet (3.0m). ■ All power cord sets must be approved by an acceptable accredited agency responsible for evaluation in the country where the power cord set will be used. ■ The power cord set must have a minimum current capacity of 7 A and a nominal voltage rating of 125 or 250 volts AC, as required by each country’s power system. ■ The appliance coupler must meet the mechanical configuration of an EN 60 320/IEC 320 Standard Sheet C7 connector, for matching with appliance inlet on the computer. 28 Regulatory Compliance Statements Wireless Guidance Low power, Radio LAN type devices (radio frequency (RF) wireless communication devices), operating in the 2.4GHz/5GHz Band, may be present (embedded) in your notebook system. The following section is a general overview of considerations while operating a wireless device. Additional limitations, cautions, and concerns for specific countries are listed in the specific country sections (or country group sections). The wireless devices in your system are only qualified for use in the countries identified by the Radio Approval Marks on the system rating label. If the country you will be using the wireless device in, is not listed, please contact your local Radio Approval agency for requirements. Wireless devices are closely regulated and use may not be allowed. The RF field strength of the wireless device or devices that may be embedded in your notebook are well below all international RF exposure limits as known at this time. Because the wireless devices (which may be embedded into your notebook) emit less energy than is allowed in radio frequency safety standards and recommendations, manufacturer believes these devices are safe for use. Regardless of the power levels, care should be taken to minimize human contact during normal operation. This transmitter must not be collocated or operate in conjunction with any other antenna or transmitter except the installed Bluetooth transmitter. Some circumstances require restrictions on wireless devices. Examples of common restrictions are on the following page: 29 ■ Radio frequency wireless communication can interfere with equipment on commercial aircraft. Current aviation regulations require wireless devices to be turned off while traveling in an airplane. 802.11ABGN (also known as wireless Ethernet or Wifi) and Bluetooth communication devices are examples of devices that provide wireless communication. ■ In environments where the risk of interference to other devices or services is harmful or perceived as harmful, the option to use a wireless device may be restricted or eliminated. Airports, Hospitals, and Oxygen or flammable gas laden atmospheres are limited examples where use of wireless devices may be restricted or eliminated. When in environments where you are uncertain of the sanction to use wireless devices, ask the applicable authority for authorization prior to use or turning on the wireless device. ■ Every country has different restrictions on the use of wireless devices. Since your system is equipped with a wireless device, when traveling between countries with your system, check with the local Radio Approval authorities prior to any move or trip for any restrictions on the use of a wireless device in the destination country. ■ If your system came equipped with an internal embedded wireless device, do not operate the wireless device unless all covers and shields are in place and the system is fully assembled. ■ Wireless devices are not user serviceable. Do not modify them in any way. Modification to a wireless device will void the authorization to use it. Please contact manufacturer for service. ■ Only use drivers approved for the country in which the device will be used. See the manufacturer System Restoration Kit, or contact manufacturer Technical Support for additional information. 30 United States of America Use On Aircraft Caution Regulations of the FCC and FAA prohibit airborne operation of radio-frequency wireless devices because their signals could interfere with critical aircraft instruments. USA and Canada Safety Requirements and Notices Do not touch or move the antenna while the unit is transmitting or receiving. Do not hold any component containing the radio such that the antenna is very close or touching any exposed parts of the body, especially the face or eyes, while transmitting. Other Wireless Devices Safety Notices for Other Devices in the Wireless Network: Refer to the documentation supplied with wireless Ethernet adapters or other devices in the wireless network. Do not operate the radio or attempt to transmit data unless the antenna is connected; if not, the radio may be damaged. The Part 15 radio device operates on a non-interference basis with other devices operating at this frequency. Any changes or modifications to this product is not approved by Intel and could void the user’s authority to operate this device. Use in specific environments: The use of wireless devices in hazardous locations is limited by the constraints posed by the safety directors of such environments. The use of wireless devices on airplanes is governed by the Federal Aviation Administration (FAA). Unintentional Emitter per FCC Part 15 The use of wireless devices in hospitals is restricted to the limits set forth by each hospital. This device complies with Part 15 of the FCC Rules. Operation is subject to the following two conditions:(1) this device may not cause harmful interference, and (2) this device must accept any interference received, including interference that may cause undesired operation. Explosive Device Proximity Warning Do not operate a portable transmitter (such as a wireless network device) near unshielded blasting caps or in an explosive environment unless the device has been modified to be qualified for such use. 31 This is available at FCC local regional offices. Our company is not responsible for any radio or television interference caused by unauthorized modifications of this equipment or the substitution or attachment of connecting cables and equipment other than those specified by our company. The correction will be the responsibility of the user. Use only shielded data cables with this system. This equipment has been tested and found to comply with the limits for a Class B digital device pursuant to Part 15 of the FCC Rules. These limits are designed to provide reasonable protection against harmful interference in a residential installation. This equipment generate uses and can radiate radio frequency energy and if not installed and used in accordance with the instructions may cause harmful interference will not occur in a particular installation. If this equipment does cause harmful interference to radio or television reception, which can be determined by turning the equipment off and on, the user is encouraged to try to correct the interference by one or more of the following measures: ■Reorient or relocate the receiving antenna. ■Increase the separation between the equipment and receiver. ■Connect the equipment into an outlet on a circuit different from that to which the receiver is connected. ■Consult the dealer or an experienced radio/TV technician for help. Intentional emitter per FCC Part 15 Low power, Radio LAN type devices (radio frequency (RF) wireless communication devices), operating in the 2.4GHz/5GHz Band, may be present (embedded) in your notebook system. This section is only applicable if these devices are present. Refer to the system label to verify the presence of wireless devices. Wireless devices that may be in your system are only qualified for use in the United States of America if an FCC ID number is on the system label. This device is restricted to indoor use due to its operation in the 5.15 to 5.25 GHz frequency range. FCC requires this product to be used indoors for the frequency range 5.15 to 5.25 GHz to reduce the potential for harmful interference to co-channel Mobile Satellite systems. High power radars are allocated as primary users of the 5.25 to 5.35 GHz and 5.65 to 5.85 GHz bands. These radar stations can cause interference with and /or damage this device. If necessary, the user should consult the dealer or an experienced radio/television technician for additional suggestions. The user may find the following booklet helpful: “Something About Interference.” 32 The FCC has set a general guideline of 20 cm (8 inches) separation between the device and the body, for use of a wireless device near the body (this does not include extremities). This device should be used more than 20 cm (8 inches) from the body when wireless devices are on. The power output of the wireless device (or devices), which may be embedded in your notebook, is well below the RF exposure limits as set by the FCC. telephone company. This equipment uses the following USOC jacks : RJ11C. An FCC compliant telephone cord and modular plug is provided with this equipment. This equipment is designed to be connected to the telephone network or promises wiring using a compatible modular jack which is Part 68 compliant. See Installation Instructions for details. This transmitter must not be collocated or operate in conjunction with any other antenna or transmitter except the installed Bluetooth transmitter. The REN is used to determine the quantity of devices which may be connected to telephone line. Excessive RENs on the telephone line may result in the devices not ringing in response to an incoming call. In most, but not all areas, the sum of RENs should not exceed five (5.0). To be certain of the number of devices that may be connected to a line, as determined by total RENs, contact the local telephone company to determine the maximum REN for the calling area. Operation of this device is subject to the following two conditions: (1) This device may not cause harmful interference, and (2) this device must accept any interference received, including interference that may cause undesired operation of the device. Wireless devices are not user serviceable. Do not modify them in any way. Modification to a wireless device will void the authorization to use it. Contact manufacturer for service. If the terminal equipment causes harm to the telephone network, the Telephone Company will notify you in advance that temporary discontinuance of service may be required. But if advance notice is not practical, the telephone company will notify the customer as soon as possible. Also, you will be advised of your right to file a complaint with the FCC if you believe it is necessary. FCC Part 68 (If fitted with a modem device.) This equipment compiles with part of the FCC rules. On the back of this equipment is a label that contains, among other information, the FCC registration number and ringer equivalence number (REN) for this equipment. If requested, this information must be provided to the The telephone company may make changes in its facilities, equipment, operations, or procedures that could affect the operation of the equipment. If this happens, the telephone company will provide advanced notice in order for you to make necessary modifications to 33 European Union maintain uninterrupted service. If trouble is experienced with this equipment (Modem) for repair or warranty information, please contact your local distributor. If the equipment is causing harm to the telephone network, the telephone company may request that you disconnect the equipment until the problem is resolved. European Union CE Marking and Compliance Notices Products intended for sale within the European Union are marked with the Conformité Européene (CE) Marking, which indicates compliance with the applicable Directives and European standards and amendments identified below. This equipment also carries the Class 2 identifier. The user must use the accessories and cables supplied by the manufacturer to get optimum performance from the product. No repairs may be done by the customer. This equipment cannot be used on public coin phone service provided by the telephone company. Connection to party line service is subject to state tariffs. The following information is only applicable to systems labeled with the CE mark . The Telephone Consumer Protection Act of 1991 makes it unlawful for any person to use a computer or other electronic device, including fax machines, to send any message unless such message clearly contains in a margin at the top or bottom of each transmitted page or on the first page of the transmission, the date and time it is sent and an identification of the business or other entity, or other individual sending the message and the telephone number of the sending machine or such business, other entity, or individual. (The telephone number provided may not be any number for which charges exceed local or long-distance transmission charges.) European Directives This Information Technology Equipment has been tested and found to comply with the following European directives: ■EMC Directive 89/336/EEC with amending directives 92/31/EEC & 93/68/EEC as per – EN 55022 Class B – EN 61000-3-2 – EN 61000-3-3 – EN 55024 ■Low Voltage Directive (Safety) 73/23/EEC as per EN 60950-1:2001+A11 ■Radio and Telecom Terminal Equipment Directive 199/5/EC as per – CTR21 (if fitted with a modem device) In order to program this information into your fax machine, refer to your communications software user manual. 34 – EN 300 328 (if fitted with a 2.4 GHz band See 802.11b and 802.11g restrictions for specific countries or regions within countries under the heading “European Economic Area Restrictions” below. embedded wireless device) – EN 301 489-1 (if fitted with a 2.4 GHz band embedded wireless device) – EN 301 489-17 (if fitted with a 2.4 GHz band embedded wireless device) – EN 301 893 (if fitted with a 5GHz band embedded wireless device) Translated Statements of Compliance [English] This product follows the provisions of the European Directive 1999/5/EC. European Radio Approval Information (for products fitted with EU-approved radio devices) [Danish] Dette produkt er i overensstemmelse med det europæiske direktiv 1999/5/EC This Product is a Notebook computer; low power, Radio LAN type devices (radio frequency (RF) wireless communication devices), operating in the 2.4GHz/5GHz band, may be present (embedded) in your notebook system which is intended for home or office use. This section is only applicable if these devices are present. Refer to the system label to verify the presence of wireless devices. [Dutch] Dit product is in navolging van de bepalingen van Europees Directief 1999/5/EC. [Finnish] Tämä tuote noudattaa EU-direktiivin 1999/5/EC määräyksiä. [French] Wireless devices that may be in your system are only qualified for use in the European Union or associated areas if a CE mark with a Notified Body Registration Number and the Alert Symbol is on the system label. Ce produit est conforme aux exigences de la Directive Européenne 1999/5/EC. [German] Dieses Produkt entspricht den Bestimmungen der Europäischen Richtlinie 1999/5/EC The power output of the wireless device or devices that may be embedded in you notebook is well below the RF exposure limits as set by the European Commission through the R&TTE directive. [Greek] Το προϊόν αυτό πληροί τις προβλέψεις της Ευρωπαϊκής Οδηγίας 1999/5/ΕC. 35 European Economic Area Restrictions [Icelandic] Þessi vara stenst reglugerð Evrópska Efnahags Bandalagsins númer 1999/5/EC Local Restriction of 802.11b/802.11g Radio Usage [Italian] [Note to integrator: The following statements on local restrictions must be published in all enduser documentation provided with the system or product incorporating the Wireless product. Questo prodotto è conforme alla Direttiva Europea 1999/5/EC. [Norwegian] Dette produktet er i henhold til bestemmelsene i det europeiske direktivet 1999/5/EC. Due to the fact that the frequencies used by 802.11b/802.11g wireless LAN devices may not yet be harmonized in all countries, 802.11b/802.11g products are designed for use only in specific countries or regions, and are not allowed to be operated in countries or regions other than those of designated use. As a user of these products, you are responsible for ensuring that the products are used only in the countries or regions for which they were intended and for verifying that they are configured with the correct selection of frequency and channel for the country or region of use. Any deviation from permissible settings and restrictions in the country or region of use could be an infringement of local law and may be punished as such. [Portuguese] Este produto cumpre com as normas da Diretiva Européia 1999/5/EC. [Spanish] Este producto cumple con las normas del Directivo Europeo 1999/5/EC. [Swedish] Denna produkt har tillverkats i enlighet med EGdirektiv 1999/5/EC. The European variant is intended for use throughout the European Economic Area. However, authorization for use is further restricted in particular countries or regions within countries, as follows: 36 General 2.400 - 2.4835 GHz for indoor use. European standards dictate maximum radiated transmit power of 100 mW effective isotropic radiated power (EIRP) and the frequency range 2400 – 2483.5 MHz. 2.420 - 2.4835 GHz for outdoor use (channels 5 to 13) The low band 5.15 - 5.35 GHz is for indoor use only. The low band 5.15 - 5.35 GHz is for indoor use only. Belgium The product may be used outdoors, but for outdoor transmissions over a distance of 300m or more, a license from the BIPT is required. This restriction should be indicated in the manual as follows: Dans le cas d’une utilisation privée, à l’extérieur d’un bâtiment, au-dessus d’un espace public, aucun enregistrement n’est nécessaire pour une distance de moins de 300m. Pour une distance supérieure à 300m un enregistrement auprès de l’IBPT est requise. Pour une utilisation publique à l’extérieur de bâtiments, une licence de l’IBPT est requise. Pour les enregistrements et licences, veuillez contacter l’IBPT. France For Metropolitan departments: 2.400 - 2.4835 GHz for indoor use. 2.400 - 2.454 GHz (channels 1 to 7) for outdoor use. For Guadeloupe, Martinique, St Pierre et Miquelon, Mayotte: 2.400 - 2.4835 GHz for indoor and outdoor use. For Reunion, Guyane: 37 European Telecommunication Information (for products fitted with EU-approved modems) However, due to differences between the individual PSTNs provided in different countries, the approval does not, of itself, give an unconditional assurance of successful operation on every PSTN termination point. In the event of problems, you should contact manufacturer Technical Support. Marking by the symbol indicates compliance of this equipment to the Radio and Telecom Terminal Equipment Directive 1999/5/EC. Such marking is indicative that this equipment meets or exceeds the following technical standards: CTR 21 – Attachment requirements for panEuropean approval for connection to the analogue Public Switched Telephone Networks (PSTNs) of TE (excluding TE supporting voice telephony services) in which network addressing, if provided, is by means of Dual Tone Multi-Frequency (DTMF) signaling. Although this equipment can use either loop disconnect (pulse) or DTMF (tone) signaling, only the performance of the DTMF signaling is subject to regulatory requirements for correct operation. It is therefore strongly recommended that the equipment is set to use DTMF signaling for access to public or private emergency services. DTMF signaling also provides faster call setup. This equipment has been approved to Council Decision 98/482/EEC-“CTR 21” for PanEuropean single terminal connection to the Public Switched Telephone Network (PSTN). 38 WEEE SYMBOL INFORMATION Correct Disposal of This Product (Waste Electrical & Electronic Equipment) (Applicable in the European Union and other European countries with separate collection systems) This marking shown on the product or its literature, indicates that it should not be disposed with other household wastes at the end of its working life. To prevent possible harm to the environment or human health from uncontrolled waste disposal, please separate this from other types of wastes and recycle it responsibly to promote the sustainable reuse of material resources. Household users should contact either the retailer where they purchased this product, or their local government office, for details of where and how they can take this item for environmentally safe recycling. Business users should contact their supplier and check the terms and conditions of the purchase contract. This product should not be mixed with other commercial wastes for disposal. Correct disposal of batteries in this product Pb (Applicable in the European Union and other European countries with separate battery return systems.) This marking on the battery, manual or packaging indicates that the batteries in this product should not be disposed of with other household waste at the end of their working life. Where marked, the chemical symbols Hg, Cd or Pb indicate that the battery contains mercury, cadmium or lead above the reference levels in EC Directive 2006/66. If batteries are not properly disposed of, these substances can cause harm to human health or the environment. To protect natural resources and to promote material reuse, please separate batteries from other types of waste and recycle them through your local, free battery return system. 39 USA ONLY This Perchlorate warning applies only to primary CR (Maganese Dioxide) Lithium coin cells in the product sold or distributed ONLY in California USA. “Perchlorate Material- special handling may apply, See www.dtsc.ca.gov/hazardouswaste/ perchlorate.” Contains Mercury, Dispose According to Local, State or Federal Laws. For details see lamprecycle.org, eise.org, or call 1-800-Samsung. 40 Overview ■ Optional items may be changed or may not be provided depending on the computer model. ■ The actual color and appearance of the computer may differ from the pictures used in this guide. ■ The shapes and characters of buttons may differ from actual product. Front View Status Indicators LCD Shows the computer Displays the operating status. p.42 computer screen. Keypad Using the Keypad, users can enter letters or numbers directly. Avoid dropping water on the keypad. Touch Sensor Buttons (Optional) You can configure functions by lightly touching it with your finger. p.43 Camera (Optional) Using the front side camera, Keypad you can take pictures or record video. p.127 Speaker User-Defined Button You can configure this button to launch a frequently used program. Speaker Generates sound from the computer. Enter Button Press this button to run a selection. It performs the role of the Enter key on the keyboard. Mouse Button Microphone (Optional) Fingerprint sensor (Optional) The microphone is used to This performs the role of the left make a sound recording. and right buttons of the mouse Using this sensor, you can use the A built-in microphone is when the Mouse/Joystick is fingerprint identification function. provided for some models. used as a mouse. You can use it to identify whether a fingerprint is registered by - L Button: A single press performs the role of a click and placing a finger over it. p.136 double pressing performs the role of a double-click. - R Button: A single press performs the role of a right-click. Mouse/Joystick You can use it as a mouse, joystick. p.59 41 Status Indicators Joystick Press the MOUSE button above Mouse/Joystick. If the Joystick icon is lit, you can use it as a joystick when playing a game. HDD This is lit when the hard disk drive is accessed. Wireless LAN This is lit for models with wireless LAN capability when the Wireless LAN function is in operation. Mouse Press the MOUSE button above Mouse/Joystick. If the Mouse icon is lit, you can use it as a mouse. Power This shows the computer’s operating status. On: When the computer is turned on. Blink: When the computer is in Sleep mode. To wake the computer up from Sleep mode, slide the Power Switch downwards. Charge This shows the AC adapter and battery status. Green: When the battery is completely charged or is not installed. Amber: When the battery is being charged. Blink: When the HOLD switch is lifted up or a button is pressed in the HOLD (Lock) status. Off: When the computer is running on battery power without an AC power supply. 42 Touch Sensor Buttons You can run a function by lightly touching a Touch Sensor Button with your finger. The Touch Sensor Buttons are optional and may not be provided depending on your computer model. MENU If you touch this button, the MENU program will be launched. The menu program provides a menu with the computer’s frequently used functions. You can conveniently configure the functions. UDF If you touch this button, the Easy Button Manager appears in which you can configure the User-Defined Button function. VOL-, VOL+ You can adjust the volume. 43 Precautions for using the Touch Sensor Buttons - The Touch Sensor Buttons only work when the computer is turned on. - If you touch the Touch Sensor Buttons when the computer is locked, the lock icon will appear and the buttons will not work. - Please ensure your hands are clean and dry when using the Touch Sensor Buttons. In a humid environment, remove any moisture from your hands and the Touch Sensor Button surface before use. - Since the Touch Sensor Buttons are sensitive, do not press them using excessive force. Take care as excessive force may damage the sensor of the Touch Sensor Buttons. - Do not press the buttons with a sharp object such as a Stylus Pen or ballpoint pen, as this may damage them. - When you need to press a Touch Sensor Button, press the relevant Touch Sensor Button precisely using your finger taking care not to touch another Touch Sensor Button. - The Touch Sensor Buttons may not work properly when you are wearing gloves or if the buttons are covered by plastic packaging or a protection panel. - A Touch Sensor Button may malfunction when the Touch Sensor Button surface is touched by a conductive material such as a metal object. 44 Top View Shutter (Optional) (Only for the camera model) You can take pictures using the camera shutter. p.127 Multi-Card Slot (Optional) You can connect SD or MMC cards using this slot. Headphone Jack You can connect headphones using this jack. Internet Button (Optional) (Only for some models that camera is not applied.) Launch Internet. MENU Button (Optional) (For models without a Camera and Touch Sensor buttons) Launches the MENU program. Vents Emits heat generated inside the computer. Avoid blocking the vents as this may overheat the computer. USB Port You can connect USB devices such as a USB keyboard/mouse, USB ODD (Optical Disk Drive), etc. using this port. 45 Right View Windows Security Button Pressing this button is the same as pressing the <Ctrl>+<Alt>+<Del> keys on the keyboard. Press with the Stylus Pen. Power IN Jack The AC adapter which supplies power for the computer is connected here. LAN Port You can connect a LAN cable using this port. USB Port You can connect USB devices such as a USB keyboard/mouse, USB ODD, etc. using this port. Open the cover. Monitor Port You can connect a monitor, TV or projector supporting a 15pin D-SUB interface using this port. p.67 Stylus Pen / Stylus Slot Using this pen, you can enter information on the touch screen. You can keep the Stylus Pen in the Stylus Slot. 46 Left View Hand Strap Hole You can attach a hand strap using this hole. AV Button If you press the AV button when the computer is turned off, Windows will boot up and the AVStation Viewer will be launched. p.122 Power Switch / HOLD Switch z Power Switch Function Slide the switch downwards to turn the computer on. x HOLD Switch (Lock) Function If you slide the switch upwards to the end (HOLD position), the Lock icon appears and the computer is Locked and you will not be able to use any function. Slide the switch to the mid position to release the lock. Then you can use the computer normally. 47 Back View Vents Emits heat generated inside the computer. Avoid blocking the vents as this may overheat the computer. Camera (Optional) Using the camera at the back, you can take pictures or record video. Stand Using the stand, you can use the screen at a comfortable angle. Hand Strap Hole Battery A lithium-Ion rechargeable battery that supplies power for the computer. p.165 Hand Strap Hole Connecting this hole and the hole of left side with hand strap allow you to fix hand. z x 48 Battery Latch The battery latch is used to separate or fix the battery. p.165 c Turning the Computer On and Off Turning the computer on 1 Install the battery and connect the AC adapter. (Refer to the Getting Started Guide.) 2 Adjust the stand at the back of the computer to a comfortable angle. the Power Switch downwards. 3 Slide The computer is turned on. When running the computer on battery power, the LCD brightness is dimmed automatically to save battery power. For the models with Touch Sensor buttons, press the MENU button and then press the , buttons for the Brightness to adjust the LCD brightness. p.57 For models without Touch Sensor buttons, press the User Defined buttons (▲/▼) while holding down the INTERNET button below the Mouse/Joystick buttons to adjust the LCD brightness. 49 Turning the computer off 1 Click the start button ( ) on the taskbar. 2 Click Turn Off Computer. 3 Click Turn Off. If the computer does not shutdown due to a system error, slide the power switch down and hold it for more than 4 seconds to forcefully turn it off. When turning the computer on again after it was turned off by sliding the power switch down and holding it, the system examination program may run. 50 Chapter 2. Using the computer Stylus Pen 52 Entering Text 56 Using the Buttons 57 Multi Card Slot 64 Connecting a Monitor 67 Adjusting the Volume 71 Stylus Pen A Stylus Pen is used instead of a mouse and provides the same function. It is recommended to connect and use a USB keyboard and mouse when using the computer for a long time. Taking the Stylus Pen Out Take the Stylus Pen out to the right. When finishing using the pen, return it to the Stylus Slot. Operate the touch screen LCD with a Stylus Pen or your finger. Sharp objects may scratch or damage the LCD surface. 52 Stylus Pen Functions Mouse Using the Stylus Pen Function Singleclick Singletap Single-tap with the pen to select an item. Doubleclick Doubletap Double-tap with the pen to run an item. Rightclick Press and Hold Drag Drag Press and hold for more than 3 seconds with the pen to display the Pop-up menu. Tap an item and drag it with the pen to move the item. 53 Calibrating the Screen Enhancing the Accuracy If greater precision is required, you can correct the pointing position by using 9-Points or 25-Points Calibration. To setup 9-Point or 25 Point Calibration, follow these steps: When using the Stylus Pen for the first time or the pointing position of the Stylus Pen is incorrect, you can correct the pointing position using the TouchKit program. 1. Before beginning with the Calibration, click on the Settings tab in the TouchKit. Start > All Programs > 1 Select Touchkit > Configure Utility. 2. In the Linearization Style item in the Settings tab, select 9-Points or 25-Points and then press the Apply button. In the Tools tab, select 4 Points 2 Calibration. 3. To calibrate, click the Tools tab. 4. Select Linearization from the Tools tab. The higher the number, the more precise the correction. Press and hold the X-symbol 3 displayed on the screen until it stops blinking. The X-symbol appears repeatedly according to the selected number of points. 54 If the Calibration Result window 4 appears, click the OK button. The pointing position of the Stylus Pen is corrected. 55 Entering Text You can enter characters using the Keypad or a USB keyboard(Optional). This product is supplied with Windows XP Home Edition, therefore handwriting recognition, is not supported in this product. For example, the procedures to enter text in the Notepad will be described below. Using the Keypad Using the keypad you can enter characters and numbers directly. The Keypad image may differ from the actual Keypad. Character/Numeric Key You can directly enter characters/numbers to the screen by pressing this key. This key performs the role of the Backspace key on a keyboard. If you press this key, you can erase the last characters on the screen. Shift To switch between capital and small letters, press the key while holding the Shift key down. SYM You can enter special key it is below the Character key by pressing this key. Entering special keys Press the SYM key once and press the corresponding key. The special key below the corresponding key is entered. To enter special keys successively, repeat the above operation. Space This key performs the role of the space key. Shift Num Lock If you press the Num Lock key and then a first line key, a digit is entered. If you press the Num Lock key again, the numeric key mode is canceled and you can enter characters. 56 Using the Buttons The functions of the MENU button, User-Defined button, Mouse/Joystick, and mouse buttons are described below. The MENU Button When the MENU button is pressed, the MENU program appears. MENU button (For models with the Touch Sensor button only) MENU button (For models without the Touch Sensor button only) The MENU Program provides shortcuts to frequently used functions on the computer. You can easily change the settings. Press the MENU button again or press a point on the screen to hide the MENU Program. MENU Program 57 MENU Items You can select the display device when an external monitor is connected. Whenever you press the button to the right of the LCD/CRT button, the computer screen is output to LCD > CRT > LCD+CRT Clone > LCD+CRT Dual View mode, in this sequence. LCD / CRT Brightness Displaying the computer screen on an external monitor only, may not be supported with the MENU button. In this case, to display the screen on an external monitor, try using the Intel program. p.69 / Backlit On / Off Rotation Sound On / Off Etiquette Mode On / Off Wireless LAN On / Off Battery Function Whenever this item is pressed, the LCD brightness is increased(decreased) by one step. If you press Off, the LCD screen is turned off. To turn it on again, press down on the LCD screen once. Whenever you press this button, the screen rotates clockwise or counterclockwise by 90 degrees. When rotating the screen, a part of the screen image may not be displayed in some software programs. Press this item to turn the volume on or off. Turns Etiquette mode on or off. Use Etiquette mode when you need a quiet working environment. Since Etiquette Mode makes the CPU run at its slowest, the program operating speed may slow down and the computer may overheat due to the slow fan speed. Press this item to turn the Wireless LAN on or off. Shows the remaining battery charge. 58 Mouse/Joystick The Mouse/Joystick has the functions of a mouse, joystick and INTERNET button. Mouse Function Press the MOUSE part at the top of the Mouse/Joystick. If the Mouse ( you can use the Mouse/Joystick as a mouse. ) icon is lit, Mouse button (L / R buttons) MOUSE Mouse/Joystick Moving the Cursor Place your left hand thumb on the Mouse/Joystick, and move it in the direction you want to move the cursor. Click / Double-Click When the Mouse ( ) icon is lit, press the L button ( ) once for the click (select) operation and press the button twice for the double-click operation. Right-Click When the Mouse ( operation. ) icon is lit, press the R button ( 59 ) once for the right-click Joystick Function Press the MOUSE button above the Mouse/Joystick. If the Joystick ( ) icon is lit, you can use the Mouse/Joystick as a joystick. MOUSE INTERNET Button Function If you press the INTERNET button below the Mouse/ Joystick, you can connect to the Internet. The INTERNET button function may not be provided depending on your computer model. 60 INTERNET User-Defined Button A User-Defined Button refers to a button which can be configured so that pressing it launches a frequently used program or plays the role of pressing a particular key combination. It is convenient to set your frequently-used programs or key combinations as groups. User-Defined Button The button shapes and program screens may differ from actual product. Default Group Setting The Internet, Explorer and Presentation are provided as a basic group and the Internet group is set by default when purchasing the computer. However, you cannot change the settings for the basic group. Internet Group Setting Status Button Function Description ▲ MouseScrollUP ► Forward Moves forward in Internet or Windows Explorer to display the next page. ▼ MouseScrollDown Scrolls down in a window as with a mouse scroll. ◄ Back Scrolls up in a window as a mouse scroll. Moves back in Internet or Windows Explorer to display the previous page. 61 Configuring Additional Groups Below are procedures to add an additional group to the default group and for setting up functions for the four buttons. As an example, the procedures to add a new group named “Test”, configure the ▲ button to a particular key combination, and configure the ► button to a program are described below. 1 Double-click the Easy Button Manager icon ( Alternatively, press the UDF ( buttons. ) on the Desktop. ) Touch Sensor button if there are Touch Sensor 2 In the Main screen, click Add. Enter a name in the Group Name 3 field by clicking the keys on the onscreen keyboard. For example, enter “Test”. For information on how to use the Keypad, refer to the descriptions for Entering Text. p.56 4 After selecting the ▲ button, select the Key Combination Function. Key Combination Function: You can set a User Button to a particular key combination. Mouse Function: You can set a User Button to a mouse operation. Program Link Function: You can set a User Button to launch a frequently used program. 62 5 Press a required key combination. For example, if you have pressed the Ctrl, Alt, Delete key in order, “Ctrl + Alt + Delete” is displayed on the left side of the screen. To continue with setting up the ► button, select the ► button and click the 6 Program Link Function. Select the program you want and click the OK button. If the program you want is not in the list, click the Search button and select a program. 2 1 3 7 You can view the settings for each button in the Main screen. Select a group from the Group Name and click the OK button. The user buttons perform the roles set in the selected group. ■ To use the functions of the added group or another group Launch Easy Button Manager, select a group from the Group Name of the main screen and click OK. ■ To delete or modify the group list Launch Easy Button Manager, select a group from the Group Name of the main screen and click Delete or Modify. 63 Multi Card Slot You can use SD and MMC cards using the multi card slot. You can use storage cards as removable disks and use them to conveniently exchange data with digital devices such as digital cameras, digital camcorders, MP3 players, etc. ■ A multi card slot is optional and is provided for some models only. ■ Users have to purchase storage cards according to their needs. ■ While the multi card slot enables users to use memory cards as data storage, it does not support a copyright protection function. ■ Remove and keep the cards in a separate location when carrying the computer as they may become lost while moving. Supported Card Types Using a Memory Card Insert the memory card into the multi 1 card slot according to the direction printed on the slot. SD Card Example) SD Card MMC Card 64 card drive appears. Click Open 2 The folder to view files. You cannot use an unformatted card. If the card is not formatted, format the card first, referring to the ‘Formattung a Card’ section. p.66 If the window does not appear, click Start > My Computer. To use a Mini SD or RS-MMC card These cards cannot be inserted into the slot because they are too small. You can use the cards by inserting the cards into the corresponding card adapter and then inserting the adapter into the multi card slot. However, depending on the adapter’s body material, some RS-MMC cards may not be recognized properly. Samsung recommend that you check the card is recognized correctly prior to purchasing. the corresponding drive 3 toDouble-click save, move or delete data. Removing a Card 1 Push the end of the card slightly. The card clicks and pops out. 2 Remove the card from the slot. 65 Formatting a Card You have to format a card before using it. If you format a card, all the data saved on the card will be removed. Make sure to backup data before formatting a card if data has been saved to the card. 1 Select Start > My Computer. Right-click over the card drive and 2 select Format from the pop-up menu. If you click Start, formatting will 3 begin. To use a card to exchange data with a digital device such as a digital camera, formatting the card in the digital device is recommended. Some digital devices may fail to recognize a card formatted on a computer. In this case, you have to format the card in the digital device. 66 Connecting a Monitor Using an external monitor, you can watch a movie on wide screen or give a presentation. The procedures to view pictures on an external monitor are described below. When using an external monitor or playing a game, using the Mouse/Joystick or an external mouse is convenient. You have to purchase the monitor connection cable additionally. The monitor port color may differ from the actual one. Connecting a Monitor Open the cover on the right side and connect a monitor to the Monitor Port. 67 Method 1. Configuring with the MENU Button 1 Connect the monitor and touch the MENU button to launch the MENU program. MENU button (For models with the Touch Sensor button only) MENU button (For models without the Touch Sensor button only) LCD/CRT Item 2 Press the button to the right of the LCD/CRT button to switch to a different mode. Whenever you press the button to the right of the LCD/CRT button, the computer screen is output to LCD > CRT > LCD+CRT Clone > LCD+CRT Dual View mode, in this sequence. ● LCD: You can view the computer screen through the LCD only. ● CRT: You can view the computer screen on an external monitor. ● LCD+CRT Clone: When selecting this mode, you can view the same screen on both the LCD and the external monitor. ● LCD+CRT Dual View: When selecting this mode, you can view a screen spanning over the LCD and the external monitor, and you can set different resolutions for each display device. Displaying the computer screen on an external monitor only, may not be supported with the MENU button. In this case, to display the screen on an external monitor, try using the Intel program. p.69 68 Method 2. Configuring with the Intel Program * The terms and the screen figures in the manual may differ from actual product. the monitor and click the Intel(R) Graphics Media Accelerator Driver for 1 Connect Mobile icon ( ) on the Taskbar. Or right-click on the desktop. The pop-up menu appears. Select Graphics Options and Output To from the 2 pop-up menu. Select a display mode from among the available Display Modes 1~4 in the 3 Graphics Options menu. 2 To View through the External Monitor Only 1 To View through a Notebook Computer (LCD) Only 3 To View through the LCD + External Monitor (Clone Mode) 4 To View through the LCD + External Monitor (Extended Mode) 69 Display Device Display Mode 1 When carrying it 2 3 Select Notebook. Select Monitor. When playing a game When playing a game, using only the external monitor is better. Select the Intel(R) Dual Display Clone. When giving a presentation (Clone Mode) When selecting this mode, you can view the same screen on both the LCD and the external monitor. Select the Extended Desktop. When giving a presentation 4 (Extended Mode: Dual View) When selecting this mode, you can view a screen spanning over the LCD and the external monitor, and you can set different resolutions for each display device. 70 Adjusting the Volume You can control the volume with the Volume Control button or Volume Control program. Using the Volume Control with the Volume Control Button For models with the Touch Sensor Alternatively, double-click on the Volume icon ( ) and adjust the master volume control. buttons only Press the VOL-button ( ) with your finger to turn the volume down. Press the VOL+button ( ) to turn the volume up. For models without the Touch Sensor buttons only Press the User Defined buttons (◀/▶) while holding down the INTERNET button to adjust the volume. Adjusting the Volume using the Volume Adjustment Program Click the Volume icon ( ) on the taskbar and slide the volume control bar to adjust the volume. Using the Sound Recorder The procedures to record sound using the Windows Recorder are described below. Connect a microphone to the 1 microphone jack. Start > Control Panel > 2 Click Sounds, Speech, and Audio Devices > Sounds and Audio Devices. Mute Click Advanced from Volume and 3 then, click Options > Properties. 71 Select Realtek HD Audio input from Start > All Programs > 4 the 7 Click Accessories >Entertainment > mixer device to select Recording Sound Recorder. from Adjust Volume for. Click the Record button to perform 8 recording. The default recording duration of Windows is 60 seconds. Download a dedicated recording program from the Internet to record audio data for a long time. Recording Control and Mic 5 inSelect Volume from Show the following volume controls and click OK. When Recording Control window 6 appears, make sure all the Mute boxes are unchecked. Increase the recording volume to increase the recording sensitivity and close the window. 72 Using SRS ● WOW XT (Music): Select to listen to music. ● TruSurround XT (Movie/Video): Select to watch a movie. The SRS function enables you to experience more stereophonic sound by expanding the space-perception through the stereo speaker. The SRS function supports the computer’s built-in speaker and headphones only. This function is available for specific models only. Start > Control Panel > 1 Click Sound, Speech and Audio Devices > SRS Control Panel. Check the Enable checkbox and 2 select a mode. Then you can listen to sound through the selected SRS effect. 73 Chapter 3. Using Microsoft Windows XP About Microsoft Windows XP 75 Windows XP Screen Layout 77 Control Panel 81 The screen shots used in this chapter may differ from actual screens depending on the Windows XP version and model. About Microsoft Windows XP Microsoft Windows XP (hereinafter referred to as Windows) is the basic operating system for computers. You should know how to use Windows in order to use your computer properly. Use Tour Windows XP as well as Help and Support to learn about how to use Windows. Tour Windows XP Tour Windows XP introduces the basic features and characteristics of Windows. Click Start > Tour Windows XP. Or, click Start > All Programs > Accessories > Tour Windows XP. Click the title at the right to view the description of the Windows features. The screen layout may differ depending on the computer model and the operating system. Click the title. 75 Help and Support Help and Support allows you to view the features and usage of Windows. Also, it allows you to search the information you want by entering a search keyword. Click Start > Help and Support. Search: Enter a search keyword to view the Help. Fixing a problem: If a problem occurs, you can get help. How to Change Desktop (Background Picture) What's new in Windows XP > Windows XP articles : Walkthrough ways to use your PC. After clicking Walkthrough : Personalize your PC, you can view the way to change the background picture on Customize Desktop. 76 Windows XP Screen Layout Desktop If you turn on the computer, the Desktop will appear. The Desktop is the work space (screen) of a computer and is configured as follows: The screen layout may differ depending on the computer model and the operating system. Shortcut Icons You can launch programs by clicking the shortcut icons on the Desktop. Recycle Bin You can drop useless files and folders here. Start Menu The menu from which you can launch programs. Language Bar Switches text input language. Start button Press the start button. The Start menu appears. Taskbar Currently running programs are displayed here. 77 System Tray with Clock Shows some running program icons. Icons not being used are hidden. If you click the arrow mark on the left, you can view hidden icons. Start Menu The menu from which you can launch programs. Click Start. The Start menu appears. Alternatively, press the Windows key ( ) on the keyboard. User account name My Documents folder Items that are pined to the Start menu. My Computer Control Panel Frequently used programs Help and Support Search Run All Programs My Computer Displays the contents of the hard disk, the CD-ROM drive, the network drive(s), and floppy disks. It can also be used to search and open files and folders. Control Panel Enables users to configure settings on the computer. Help and Support Provides on-line help, information on Windows and troubleshooting. Search Enables users to search for information in files or the Internet. Run Run programs or documents. 78 Window A window is a basic foundation for operating your computer. For instance, a window of your computer is configured as follows: Click Start > My Computer. Displayed menus and names may be varied. Double-click the Local Disk, which is a hard disk drive, to view the folders and files saved in your computer. If any folder or file is not shown, click Show Folder Contents. Minimize button Close button Maximize button Title Bar Menu Bar Toolbar Folder Icon Fast Operation Window Drive Icon (Memory) 79 What is a Drive? A drive is a storage device that can read or write data such as folders and files. What is a Folder? A folder is just like a cabinet that keeps files or folders. You can keep files or folders of similar kinds in a folder. What is a File? A file is the minimum unit of materials created by using a program and is also called data. How to View the Entire Drive Structure Click the folder icon from the Toolbar to view the drive structure. Click the icon again to return to the Fast Operation window. 80 Control Panel The Control Panel has a group of tools that enable to configure the Windows-related settings. Running Control Panel Click Start > Control Panel. Appearance and Themes Change the appearance of desktop items, apply a theme or screen saver to your computer, or customize the Start menu and Taskbar. Network and Internet Connections Connect to the Internet, create a home or small office network, configure network settings to work from home, or change modem, phone, and Internet settings. Add or Remove Programs Install or remove programs and Windows components. Sounds, Speech, and Audio Devices Change the entire sound scheme or individual sounds made by your computer, or configures the settings for your speakers and recording devices. Performance and Maintenance Schedule regular maintenance checks, increase space on your hard disk, or configure energy-saving settings. 81 Click Start > Control Panel. Printers and Other Hardware Change the settings for your printer, keyboard, mouse, camera, and other hardware. User Accounts Change user account settings, passwords, and pictures. Date, Time, Language, and Regional Options Change the date, time, and time zone for your computer, the language to use, and the way numbers, currencies, dates, and times are displayed. Accessibility Options Adjust your computer settings for vision, hearing, and mobility. Security Center View your current security status and access important settings to help protect your PC. 82 User Account Windows XP allows to set multiple users with accounts. This section describes how to add a user account and to switch a it. 3 4 How to Add a User Account 1 2 Click Start > Control Panel. Click User Account and Create a new Account in sequence. 5 Enter your name and click Next. Select an account type and click the Create Account button. Then, check the created account from the User Account window. Click the target account and change the user account information. You can change the account name, password, account type, and picture. 83 To Delete User Account How to Switch a User 1 1 2 2 Click Start > Control Panel > User Account. Select the user account to be deleted and click Delete Account. Click Start > Logoff. Click Switch User. The administrator account cannot be deleted. It can only be renamed or disabled. 3 84 Click the user name to be switched from the Welcome screen. Then you can log on with a new user name. Changing Resolution and Color A resolution is the number of pixels displayed on the screen. If you set the resolution to a higher value, items on the screen will be displayed smaller and the screen looks wider than the pervious. As color quality gets higher, more colors can be represented. 1 2 Click Start > Control Panel > Appearance and Themes > Change the screen resolution. Click Settings and change the resolution and color quality. Then, click OK. You can select a graphic chip set. Move the slider bar to set the resolution. Click the pull-down menu button to select the number of colors you want. It is recommended to set the resolution and color quality depending on the LCD type of your computer as the following: LCD Type Resolution Color Quality 7” WSVGA 1024 x 600 Highest (32-bit) 85 Chapter 4. Using the Network Wired Network 87 Wireless Network 89 Using the Samsung Network Manager 93 Bluetooth 98 Wired Network A wired network is a network environment used for a company network or broadband internet connection at home. You can also configure the network settings using the Samsung Network Manager. p.93 Connect a LAN cable to the 1 computer’s LAN port. Right-click the Local Area 5 Connection icon and click Properties. 2 Click Start > Control Panel. Network and Internet 3 Click Connections in the [Control Panel] window. Click Network Connections in the 4 [Network and Internet Connections] window. 87 On the General tab, select “Internet 6 Protocol(TCP/IP)” and click Properties. To use a static IP: On the General tab, select “Use the following IP address” and fill in the IP address, Subnet mask, Default gateway, Preferred DNS server, and Alternative DNS server fields. Click OK. To use both DHCP and static IP simultaneously: On the Alternate Configuration tab, click User configured and fill in the fields. Click OK. use DHCP: 7 To On the General tab, select “Obtain an IP address automatically” and “Obtain DNS server address automatically”. Click OK. 88 Wireless Network A wireless network (Wireless LAN) environment is a network environment that enables communicating between multiple computers at home or a small-size office through wireless LAN devices. ■The descriptions below are for computer models with a Wireless LAN card or device. You can also configure the wireless network settings using the Samsung Network Manager. p.93 A Wireless LAN device is optional. To view the installed wireless LAN card, click Start > Control Panel > Performance and Maintenance > System > Hardware tab > Device Manager > Network Adapter and click the + symbol. ■The figures in this manual may differ from the actual product depending on your wireless LAN device model. ■To use the wireless LAN, you have to turn the wireless LAN on first. To turn it on, click the MENU button and set the Wireless LAN item to On. If the wireless LAN is turned on, the Wireless LAN LED is lit. Wireless LAN Connections ■ Computer-to-computer (ad hoc) network The small office network interconnects computers where wireless LAN is enabled wirelessly and is called Peer-to-Peer (or Ad HOC). This method enables the configuration of a small office network in one computer. Then, another computer is connected to the computer wirelessly for communications. For more information on how to establish connections, see the information from Start > Help and Support > Networking and Web. Wireless network connections can be classified into 3 categories and this manual describes the connection procedures for connecting through an Access Point (AP). ■ Access Point (AP) You can connect to the Internet or another computer on the network through an AP. What is an Access Point (AP)? An AP is a network device that bridges wired and wireless LANs, and corresponds to a wireless hub in a wired network. You can connect multiple wireless LAN installed computers to an AP. When you use Ad-Hoc, you have to change the McAfee Firewall settings. p.187 89 Connecting to a Wireless LAN Enter the Network Key and click the Connect button. This section describes how to connect to an AP. You can access the network when you are connected to an AP. For more detailed information, about your network, such as the network key (encryption key), ask your network administrator. To connect to an AP, follow these steps: Right-click on the Wireless Network 1 Connections ( ) icon on the taskbar, and select View Available Wireless Networks. When a network key is defined for a selected AP, click on Link to display the warning message box. Then click on Connect again in the box. From now on, when Connected is 3 displayed in the right corner of the AP information window, you can access the network. Select an AP (E.g. see the Test 2 network diagram below) to connect to and click Connect. If there is a configured network key for the AP, the Enter Network Key window appears. 90 Checking the network connection status Move the mouse pointer over the Wireless Network Connection ( taskbar to display the connection status. ) icon on the Setting up a Wireless Network Setup Using the Wireless LAN Setup Program Select System Software Media > User Installation > Wireless LAN Driver ReadMe, click ReadMe and install the program according to the instructions. The procedures to connect to an access point using a wireless LAN configuration program are described below. Since the wireless LAN configuration program is included on the System Software Media, the user has to install the program. Right-click on the wireless LAN 2 configuration program ( ) on the To use the system software media, the external USB ODD must be connected to the computer. The following descriptions presuppose that the external ODD is connected. taskbar and select Open Atheros Client Utility. Alternatively, click Start > All Programs > Atheros Client Utility > Atheros Client Utility. Insert the System Software Media 1 into the CD drive and install the wireless LAN configuration program (ACU: Atheros Client Utility). 91 In the Profile Management tab, click 3 Scan to search for available wireless Refer to the following when configuring a WEP key. networks. ■Data encryption (WEP): The IEEE 802.11 WEP (Wired Equivalent Privacy) standard defines two levels of encryption, a 64-bit key (this is sometimes represented by 40bits) and a 128-bit key. When connecting to an Atheros access point, you can use the 152bit key (32 hexadecimal digits or 16 ASCII characters). ■Key index: Select the current encryption key index used by the access point from between 1 to 4. ■Using an encryption key: Enter 5 (for 64-bit) or 13 (for 128bit) alphanumeric characters (represented by 0-9, a-z, or A-Z). Select the name of an access point 4 (AP) to connect to from the network name (SSID) and then click Activate. Enter a profile name to be used for 5 the connection and select the security settings of the AP to be connected to in the Security tab. The network authentication, encryption type and password of an access point are configured through the access point management program. For the security information, check the security settings of an access point or ask your wireless network administrator. Click OK and then OK again in the 6 Profile Management window. If the profile is created, the profile appears in the Profile Management tab list and the connection is established. 92 Using the Samsung Network Manager The Samsung Network Manager is a program that helps configure the network settings. The Samsung Network Manager provides the following features. You can easily configure the network and printer settings. You can immediately use the network without having to define new network settings again after moving to another location. By configuring the network settings (IP address, printer settings, etc.) for each location, you can immediately access the network without following the network setting procedures each time regardless of your location. You can diagnose the network status. Network Settings Samsung Network Manager. 2 Run This section describes the procedures to connect to the Internet by setting up a network. The setting up procedures include procedures to add a printer to the network. Select Start > All Programs > Samsung > Samsung Network Manager > Samsung Network Manager or double click the Samsung Network Manager ( ) icon on the Desktop. use a wireless LAN, make sure it 1 isToon. Press the MENU button and click the Wireless LAN On item to turn it on. When the wireless LAN is turned on, the Wireless LAN LED lights up. the Add button. You may need 3 toClick rotate the screen to access the Add button. Select a network location icon and 4 enter the name of the location (e.g. Home). Click the Next button. 93 Select Internet direct connection 5 and click the Next button. When the Printer Setting window 7 appears, click Finish. To add a printer, click Add Printer. The Add Printer Wizard appears. Set up the printer according to the instructions displayed on the screen. When the printer has been added, click the Show printer button, select the newly added printer and then click the Finish button. To not add a printer, select No Default Printer and then click the Finish button. Select the LAN device, configure the 6 IP address, and click the Next button. Select Device Select a device to be connected to the Internet. Select either Wired LAN or Wireless LAN. IP Settings To use a static IP address, fill in the fields. For the IP address information, ask your network administrator. Obtain an IP address automatically Select DHCP to use this option (automatic IP setting). 94 When the network setting is complete, the ’Do you want to move to newly added location now?’ message appears. If you select ’Yes’, the network settings for the added location are applied. When the network settings for the added location are applied, the added place and the corresponding network connection information is displayed in The detailed Information for window. When the network setting is complete, an icon for the added location is created within the Saved Locations window. Now you can use the Internet at that location or add a new network location. Select an available wireless network (e.g. SAMSUNG) and click the Connect button. For information on available wireless LAN APs, ask your network administrator. Menu Current Place Information Saved Locations Available AP Connect 3. The network key (security key) input window appears. Wireless LAN AP Connection Procedures To use a wireless LAN, first connect to a wireless LAN AP to access the network even when at a different location. Or moving location and then you can access the network even when connecting to a wireless LAN AP. - If a network key has been configured for the wireless LAN AP, enter the network key and click the Connect button. For the network key information, ask your network administrator. - If no network key has been configured for the wireless LAN AP, click the Connect button without entering the network key. 1. Right-click over the Wireless Network Connection ( ) icon on the Taskbar and click View Available Wireless Networks. 4. When the computer is connected to the wireless LAN AP, the Connected message will appear on the Wireless Network icon in the Taskbar. 2. Click Search AP from the Wireless menu to search for wireless LAN APs. 95 Using in Another Location By configuring the network settings (IP address, printer setting, etc.) for each location, you can immediately access the network in one click, without performing the network setting procedures regardless of your location. Right-click over the Wireless Network Connections ( ) icon on the Taskbar using the mouse and select View Available Wireless Networks. Select an available AP and click the Connect button. If a network key is required, ask your network administrator for the key information. Start > All Programs > 1 Click Samsung > Samsung Network Manager > Samsung Network Manager when connected to the Internet. Select an icon that represents the 2 corresponding location from the Saved Locations window and then click Move. If the Internet connection is a wired 3 LAN, you can immediately load the settings for the new location and the corresponding network connection information is displayed in the Current Location Information window. If the Internet connection is a wireless LAN, you have to select an AP as follows. 96 Diagnosing the Network Status the diagnosis is complete, 4 aWhen device with a problem is marked You can diagnose the network state and find solutions for why you cannot connect to the network. by an exclamation mark icon with a description of the problem at the bottom of the window. Launch Samsung Network 1 Manager. Select Management and Diagnose 2 Status from the menu. The Network Connections window 3 appears. Click Start to start the network diagnosis. 97 Bluetooth Bluetooth is wireless communications technology that allows access to nearby devices such as another computer, cell phone, printer, keyboard, mouse, etc. without a cable connection. Using Bluetooth, you can exchange files, connect to the Internet, and construct a private network. ■The Bluetooth supporting function is only available between devices (a computer, cell phone, PDA, printer, etc.) and the connection may be restricted according to the profile of the corresponding device. ■The Bluetooth function is optional and may not be supported depending on your model. ■Compatibility to devices without the authentication or logo of Bluetooth is not guaranteed. Bluetooth Function File Transmission Network Access You can exchange files between two Bluetooth devices. You can exchange files with another Bluetooth device such as another computer, cell phone, PDA, etc. You can connect to another Bluetooth-installed computer in the same way as an Ad-Hoc mode in wireless LAN and connect to the network via an AP or an Internet connection sharing server. Network Access through a Phone Connection You can connect to the network via a Bluetooth cell phone. Data Sync (Synchronization) You can synchronize PIMS data (Outlook E-mail address data) with Bluetooth devices such as a cell phone, PDA, another notebook computer, etc. Electronic Business Card (Vcard) Exchange You can exchange business cards with Bluetooth devices such as a cell phone, PDA, another notebook computer, etc. 98 Sound Output You can output computer sound to another Bluetooth device or vice versa. HID Connections You can connect and use Bluetooth peripherals such as a keyboard, mouse, joystick, etc. For more information about using the Bluetooth function, refer to the online help for the Bluetooth Device. Bluetooth Software Setup Bluetooth software is installed on computers supporting Bluetooth. For first time use, set up the Bluetooth software as follows. Also, a step appears for selecting the services to be provided by your Bluetooth device for other Bluetooth devices. At this point, the program automatically detects available services and displays them as selected. It is recommended not to change the default selection. Double-click My Bluetooth Places 1 icon ( ) on the Desktop. Click the Next button to start setting 2 up. In the setting up steps, enter a device name to be displayed in t he Bluetooth Manager program. Enter a name in the Computer Name field and select Laptop for the Computer Type field. 99 If the settings are complete, the My 4 Bluetooth Environment window If you change the service settings, the driver necessary for the additionally selected services are installed. At this point, a warning message may appear informing you that there is no Microsoft logo. Since it does not affect the operation, continue the installation. appears. If the driver installation is complete, 3 the next step proceeds which searches for nearby Bluetooth devices. Since you do not have to search while setting up, click Skip and finish the settings. 100 Using Bluetooth Describes how to exchange files between computers supporting Bluetooth and how to use other Bluetooth devices. Bluetooth Help Bluetooth Help provides detailed procedures on using Bluetooth functions. Exchanging Files between Bluetooth computers The procedures to exchange files and folders between Bluetooth computers are described below. On the computer that is sending a file 1 (hereafter Computer A), right-click the Double-click My Bluetooth Settings on the Desktop and press the <F1> key (Help). Bluetooth icon ( ) in the notification area and select Quick Connection > File Transmission > Search for Device. In the Select Device window, click a 2 computer to be connected (hereafter Select Start > Help and Support > Networking and the Web > Networking > Wireless networking > Bluetooth devices (wireless) to view Windows Help. Computer B). 101 After a short while, the Bluetooth PIN 4 Code required dialog box appears on Computer B, enter the code that you have input in Step 3 above. If the FTP File Access Privilege 5 Request window appears on When the Bluetooth Security Setting 3 window appears, enter the Bluetooth Computer B, click the window. If the Select Access Permission window appears, click OK. security code (or Bluetooth PIN) and click Start Pairing. The file transmission window appears 6 on computer A. Drag files or folders to send onto the window, and the files or folders are automatically transmitted. The Bluetooth PIN Code is a password used for the connection between two Bluetooth devices, the user just enter the same PIN Code (for example, same numbers) on both Bluetooth devices to make a connection. If the file transmission is complete, 7 close the File Transmission window. The received files are saved in the C:\Documents and Settings\[user name]\My Documents\Bluetooth Exchange folder. 102 If the My Bluetooth Settings window 3 appears, click View devices in Connecting Keyboard, Mouse, Joystick and Headset devices range. If the device to connect to appears, click the device. (for example, mouse) The procedures to use Bluetooth HID devices (keyboard, mouse, joystick, etc.) or a headset, etc. on the computer are described below. The Bluetooth PIN Code is a password used for the connection between two Bluetooth devices, the user just enter the same PIN Code on both Bluetooth devices to make a connection. If the device does not appear, click View devices in range. If the device has not appeared yet, since this menu changes to Search devices in range, click Search devices in range to show the device. Turn on the Bluetooth function on 1 the device to connect to (mouse, keyboard, joystick or headset). Some devices have a button to turn on the Bluetooth function, so see the corresponding device manual. If the Bluetooth PIN Code input 4 window appears, enter a PIN code referring to the manual of the corresponding device. The PIN code for an HID device is generally printed in the manual of the corresponding device. the My Bluetooth 2 Double-click Settings icon ( ) on the Desktop. If you enter the PIN code, you can 5 immediately use the device. 103 You can connect to only one Bluetooth device at a time for a phone connection, data syncing, electronic business card exchange, FAX transmission/reception, sound related functions, and serial port functions. A Bluetooth keyboard and mouse work only in Windows. They will not work in MS-DOS mode or in Hibernation mode. Stopping a Bluetooth device It is recommended using only one Bluetooth device at a time as connecting multiple Bluetooth or other wireless devices at the same time may slow or destabilize the Bluetooth connection. Right-click the Bluetooth icon ( ) on the Taskbar and select Stop the Bluetooth device. Data communications via Bluetooth may be poor when the CPU load is at full capacity or there are insufficient system resources. To use a Bluetooth device after stopping it, select Start Bluetooth device like above. The Bluetooth function of a Bluetooth PDA, mobile phone, mouse or keyboard may be turned off. To use them in connection with a Samsung computer supporting Bluetooth, you must check if the Bluetooth function of the device to connect to is turned on. Usage Instructions Generally, Bluetooth devices deliever stable performance while connected within a 3m(10 ft.) distance. For the procedures on turning on the Bluetooth function of a device, refer to the relevant device manual. For Bluetooth to operate smoothly, use the computer in an open environment with no walls or obstacles in the way and having low radio interference. The services provided by Bluetooth devices may vary depending on their capabilities. For the services provided by the Bluetooth device, refer to the device manual. 104 Chapter 5. Using Applications Introducing Programs 106 CyberLink DVD Suite (Optional) 109 AVStation premium (Optional) 112 AVStation Viewer (Optional) 122 Play Camera (Optional) 127 Samsung Update Plus (Optional) 130 Using McAfee SecurityCenter (Optional) 132 OmniPass (Fingerprint Identification software, Optional) 136 Using Samsung Magic Doctor (Optional) 142 Reinstalling Software 143 Samsung Recovery Solution (Optional) 145 Introducing Programs Using the software supplied with the Samsung computer, you can easily use functions and troubleshoot problems. Try to use the software after learning about the basic use of the software. For detailed information, refer to the help section of the corresponding software. Every software program may not be provided or the version may differ depending on your computer model. In addition, the screen capture images may differ from actual product depending on the computer model and software version. 106 Multi Media Functions Management Functions CyberLink DVD Suite ( , Optional) Using this program, you can use multimedia functions such as playing a DVD, burning a DVD/CD etc. The CyberLink DVD Suite program is only supplied when you have purchased an external ODD, and you have to install the program additionally. p.109 Samsung Update Plus ( , Optional) Samsung Update Plus is a software function that examines and updates the Samsung software and drivers installed on your Samsung computer to the most recent versions. p.111 Samsung Network Manager ( , Optional) Samsung Network Manager is a program that enables you to easily configure the network settings. You can configure the network settings for each location and you can also diagnose the network status. p.91 AVStation premium ( , Optional) AVStation premium is an integrated multimedia program that enables users to enjoy better music, photographs, video, movies, etc. quality all with a single program. p.113 Samsung Battery Manager ( , Optional) Samsung Battery Manager is a power management program that provides easy-to-use power management and power saving settings so that the battery usage time can be extended. p.150 AVStation Viewer ( , Optional) This is a program that allows you to easily play AVStation premium in full screen. p.123 Play Camera ( , Optional) This software enables taking pictures and video recording by using the cameras on the front and back of the computer. p.128 Touchkit ( , Optional) Touchkit is a program used to calibrate the Stylus Pen when the pointer position is not correct. p.47 107 Troubleshooting Functions OmniPass ( , Fingerprint Identification software, Optional) OmniPass is fingerprint identification software. You can register your fingerprint and use it by placing your finger on the fingerprint identification sensor instead of using a password. You can turn the computer on, login to Windows and encrypt a file, all using your fingerprint. p.131 SAMSUNG Magic Doctor ( , Optional) SAMSUNG Magic Doctor is troubleshooting software provided by Samsung Computer for system diagnosis, and restoring the system. The system diagnosis function enables users to diagnose system problems without assistance from others. Samsung Recovery Solution ( , Optional) Using this program, you can restore your computer to its initial status before a problem occured while using the computer. 108 CyberLink DVD Suite (Optional) The CyberLink DVD Suite provides you with multimedia functions such as playing a DVD, burning a DVD/CD etc. The CyberLink DVD Suite program can only be used when you have purchased an CD/DVD drive, and you have installed the program. It is optional and is not supplied with some models. a DVD title into the CD/DVD 1 Insert drive. the DVD title is not automatically 3 Ifplayed, click Start > All Programs > CyberLink DVD Suite > Power DVD > CyberLink PowerDVD. Play DVD Video Using 2 Select PowerDVD and click the OK button. Play from the CyberLink skin 4 Click menu. The DVD movie starts to play. After a moment, the DVD title will play. 109 Play Undock Player Panel ■Detailed Usage For more detailed usage, click Start > All Programs > CyberLink PowerDVD > PowerDVD Help. If you click the Undock Player Panel button, the program control panel transforms as follows. ■DVD Region Code A DVD title has a region code according to the international specifications so that it can be played only in that specific region. DVD titles with a region code will only play on DVD drives and program for playing with the same region code. A DVD drive is sold with an empty region code and the region code is set when the user inserts a DVD title into the drive for the first time. Whenever a DVD title is inserted with a region code different from that of the DVD drive, the region code of the DVD drive is automatically changed to the region code of the DVD title. However, changing the region code of a DVD drive is limited to 5 changes. After that, the region code is permanently fixed to the last region code. If you need to change the region code after changing the code 5 times, contact a service center. Although a service center can help you in this case, you will be charged a service fee. 110 Using Additional Functions The Cyberlink DVD Suite provides functions to record data, burn a DVD/CD title, edit videos/photos etc. 1 2 3 Click Start > All Programs > CyberLink DVD Suite > CyberLink DVD Suite. Alternatively, double-click the CyberLink ) icon on the Desktop. DVD Suite ( The User Registration screen appears. Enter your personal information including your last name, first name and e-mail address when connected to the Internet and click the Register Now button. The Cyberlink DVD Suite screen appears. Favorites You can save frequently used menus so that you can use them quickly. Movie Player You can play a DVD title. Data You can record data to a CD or DVD. Music You can create an audio/ WMA CD or WMA DVD, and rip an audio CD. Video & Photo You can create a DVD title, save HDV/DV video, edit video, and record a DVD folder. Copy & Backup You can copy DVD/CD data. Utility You can create a disk image, save and delete an image and print a label. For the detailed usage procedures for each of the functions, refer to the help section of the corresponding program. Menu Functions Menu 111 AVStation premium (Optional) AVStation premium is an integrated multimedia program that enables users to enjoy music, photographs, video, movies, etc. all with a single program. ■The AVStation premium program is optional and may not be provided depending on the computer model. ■The screens used in this manual may differ from actual screens according to the program version. ■TV Station is only available for systems supporting a TV function. This computer is not supported. ■ To play an audio CD or DVD, you have to connect an external ODD. Use the description below provided that an external ODD is connected. ■For detailed usage, refer to the program help. Start and Screen Layout To launch the program, select Start > All Programs > Samsung > AVStation premium > AVStation premium. Alternatively double-click the AVStation premium icon ( ) on the Desktop. Exit Menu Bar Station Bar Library 112 MUSIC: You can play a music file or an audio CD. PHOTO: You can view or edit a photograph (image), and also view the photographs in a SlideShow. MOVIE: You can play a video (movie) file. MUSIC Station Launch AVStation premium and click MUSIC on the Station Bar. MUSIC Menu Bar Station Bar MUSIC Library Playlist Playlist Control Buttons Register a File Play Options Volume Control Play Control Buttons Playing an Audio CD The procedures to play an audio CD are described below. AVStation premium and insert an audio CD into a CD drive connected to 1 Launch this computer. 113 the Audio CD window, select 2 InPlay Audio CD using Samsung If an audio CD is already in the CD drive, double-click the album title in the Audio CD folder of the Library and add the tracks to the Playlist. The tracks added to the Playlist are played. AVStation and click the OK button. Playing a Music File If a music file is registered to the MUSIC Library, you can easily play the music file. For the procedures to register tracks to the Library, refer to p.116. to MUSIC Station and double1 Move click on All Musics. tracks on the audio CD are 3 The displayed in the Playlist and the first a music file. The file is 2 Double-click added to the playlist and played. track is automatically played. 114 ■Playing a Track not registered to the Library Click File > Open, select a music file to be played and click Open. The selected track is registered to the Library and played. ■Creating My Playlist My Playlist is a personal album used to collect, manage and play your favorite music files. For the procedures to create My Playlist, refer to the descriptions of MUSIC Station in Help. a folder which includes music 2 Select files and click the OK button. The music files in the folder are added to the Library. Adding Music Files to the Library MUSIC Library is a library of music files used by MUSIC Station. The procedures to add music files saved on the computer to the Library are described below. You can add files, folders or search and add files. As an example, the procedures to add a folder are described below. The tracks used in AVStation are automatically added to the Library. on the Register a File ( ) 1 Click button below the Library and click on Add by Folders. 115 PHOTO Station Launch AVStation premium and click PHOTO on the Station Bar. PHOTO Menu Bar Station Bar PHOTO Library Preview / Zoom-in Image Viewer Tab / Image Editor Tab Move to a HigherLevel Folder Register a File on a folder which includes 2 Click images, and the images in the folder Viewing an Image The procedures to view images registered to the PHOTO Library individually or via a SlideShow are described below. For the procedures to register image files to the Library, refer to p.120. are displayed in the Image Viewer window. to PHOTO Station and double1 Move click on All Images. 116 ■Viewing an Image not registered to the Library Click File > Open, select an image file to view and click Open. The selected image file is registered to the Library and displayed in the Image Viewer window. ■Viewing an Image in Full Screen or through a SlideShow. Image Click the Full Screen ( ) button or SlideShow ( ) button below the Image Viewer window. To return to the Image Viewer window, double-click on the screen. ■Watching a SlideShow while Listening to Music To view a SlideShow while listening to music, play music from MUSIC Station and run SlideShow. ■Setting an Image as the Background. Click the Set as Background ) button below the Image ( Viewer window. The selected image is set as the Desktop background. Image Viewer Window on an image. 3 Double-click The selected image is zoomed in on. 117 the image using the Shape, Edit 2 Edit and Effect tools. Editing an Image You can change the shape of an image, edit an image or apply special effects to an image. The image editor functions are described below. Shape tool: Change the shape of an image through cut, resize. Edit tool: Draw a line, add some clip art or enter letters. Select an image to edit in the Image 1 Viewer window, and select the Effect tool: Apply various effects to an image. Image Editor tab. The Image Editor screen appears. The Image Editor screen consists of an Image Workspace window and 3 Tool tabs. Tool Tabs Zoom In / Zoom Out 3 When finishing editing an image, click the Save Edited Image ( ) button below the Image Editor window. The edited image is saved. Image Workspace 118 Adding Images to the Library The PHOTO Library is a library storing image files to be used by PHOTO Station. The procedures to add image files saved on the computer to the Library are described below. You can add files, add folders or search and add files. As an example, the procedures to add folders are described below. the Register a File ( ) 1 Click button below the Library and click on Add by Folders. a folder with image files and 2 Select click the OK button. The image files in the folder are added to the Library. The image files used in AVStation are automatically added to the Library. 119 MOVIE Station Launch AVStation premium and click on MOVIE on the Station Bar. MOVIE Menu Bar Station Bar MOVIE Library Video Play window Register a File Capture Button Play Control Buttons Volume Control a video file. The file is 2 Double-click played. Playing a Movie File The procedures to play a video file registered to the MOVIE Library are described below. For the procedures to register files to the Library, refer to p.122. to MOVIE Station and double1 Move click All Movies. 120 Adding Videos to the Library ■Playing a Video File not Registered to the Library Click File > Open File, select a movie file to be played and click Open. The selected file is automatically registered to the Library and played. The MOVIE Library is a library storing video files to be used by MOVIE Station. The procedures to add video files saved on the computer to the Library are described below. You can add files, add folders or search and add files. As an example, the procedures to add folders are described below. ■Playing a Video File in Full Screen 1.Double-click on the current playback screen. 2.The video is played in full screen. In full screen, move the mouse pointer to the bottom of the screen to show the Play Control bar. To play at the default screen size, double-click on the screen. ■Capturing the Video Screen Click on Capture Current Screen ( ) below the Play window when the desired image appears on the screen and click the OK button. Captured images are saved in the C:\Program Files\Samsung\ AVStation premium x.x\Data\ Captured Images folder. In addition, you can view captured images in the PHOTO Station > Captured Images folder. the Register a File ( ) 1 Click button below the Library and click Add by Folders. a folder which includes video 2 Select files and click the OK button. The video files in the folder are added to the Library. The video files used in AVStation are automatically added to the Library. 121 AVStation Viewer (Optional) Using AVStation Viewer, you can easily and quickly play music, photographs, movies and DVDs when the computer is on/off. ■The AVStation Viewer program is optional and may not be provided depending on the computer model. ■AVStation Viewer Restrictions Using AVStation Viewer, you can only play files registered to the AVStation premium Library. (For the procedures to register files to the Library, refer to p.116, p.120 and p.122.) ■The screenshots figures may differ from actual product depending on the program version. Start AVStation Viewer Starting Exiting the program When the computer is on or off, press the AV button ( ). Move the mouse pointer to the top of the screen and click the Exit ( ) button. The AVStation Viewer program is launched. Alternatively, click Start > All Programs > Samsung > AVStation premium > AVStation Viewer. If the HOLD switch on the left side of the computer is slid upwards all buttons of the computer are locked and do not work. If AVStation Viewer is not launched, check the position of the HOLD switch. 122 Screen Layout Music: You can play a music file or audio CD. Photo: You can view a photograph or image file one by one or in a SlideShow. Movie: You can play a video (movie) file. Settings: You can configure the Music, Photo and Movie settings. Move to the start screen while using the program Click over the top left in the current screen. Then the this icon, you can move to the start screen. 123 icon appears. When clicking Music Station The procedures to play a music file or an audio CD are described below. Playing a Music File Playing an Audio CD The procedures to play a music file registered to the Music Library are described below. AVStation Viewer and 1 Launch insert an audio CD into a CD drive (For the procedures to register files, refer to p.116.) Viewer start screen, 2 InclicktheonAVStation Music. connected to this computer. the Audio CD in the left 3 Double-click AVStation Viewer and click on 1 Launch pane and double-click on an album Music. or music file in the right pane. The selected music file is played. on All Musics and double-click 2 Click a file in the right pane. The music file is played. All Musics Music File Playlist Window 124 Photo Station 3 The selected image is zoomed in on. The procedures to view images registered to the Photo Library one by one and through a SlideShow are described below. (For the procedures to register files, refer to p.120.) AVStation Viewer and click on 1 Launch Photo. on All Images and double-click 2 Click on an image file in the right pane. To view an image in Full Sreen or via a SlideShow. Click on the SlideShow or Full Screen button below the zoomed in image. To return to the previous status in the SlideShow or Full Screen, doubleclick on the screen. All Images Image File 125 Movie Station The procedures to play a video (movie) file are described below. Playing a Movie File The procedures to play a video file registered to the Movie Library are described below. (For the procedures to register files, refer to p.122.) 1 Launch AVStation Viewer and click the Movie. on All Movies and double-click a movie file in the right pane. The movie file is 2 Click played. All movies movie File Displaying the Play Control window When clicking on the screen once, the Play Control window appears at the bottom. 126 Play Camera (Optional) This computer provides an optional dual camera on the front and back so that users can take pictures or record video. If your computer model is equipped with the dual camera, you can take pictures or record video using the Play Camera software. ■This function is applied to some models only. ■The program version number in this manual is subject to change and the screen figures and terminologies may differ from the actual product. ■For more detailed usage procedures, refer to the program Help. Precautions when Taking a Picture ■ Do not take a picture or record video of a person without that person’s consent. ■ Do not take a picture or record video where photographing is prohibited. ■ Do not take a picture or record video where you may violate another person’s privacy. Photographing Procedures 1. 1 Select Start > All Programs > Samsung > Play Camera > Play Camera. 127 Close the Window Preview Window Open Folder: Opens the folder which includes photos or videos. Record: Records video. Capture Screen (Still Picture): Takes a picture. Rear Camera: Select to use the rear camera. Preview Window: Shows or Front Camera: Select to use the front camera. hides the Preview window. the Front Camera ( ) or Rear Camera ( ) button, focus on an object 2Press and press the Capture Screen ( ) button. To record video, press the Record ( button. To stop a video recording, press the Stop ( 3 Press the Open Folder ( ) button. Recording will stop. ) button to view pictures or recorded videos. - You can view a photo by double-clicking it. - Since you cannot view recorded video files using the Play Camera, please use another video player (e.g. Windows Media Player, Cyberlink PowerDVD, etc.) to view video files. 128 ) Photographing Procedures 2. 1 When the computer is on, press the SHUTTER button at the top. the Play Camera program is launched, press the Shutter button again. A 2 When picture will be taken. To switch the active camera to the rear or front camera, press the Front Camera ( ) or Rear Camera ( ) in the Play Camera screen and press the Shutter button. To record video, click the Record ( ) button of the Play Camera program. 3 Press the Open Folder ( ) button to view pictures and recorded videos. ■ In the Preview window, right-click to configure the camera settings, the resolution and device settings, the save folder, etc. ■ The Play Camera supports up to 1280 x 1024 pixels. Photographs are taken with the resolution selected but the photographs displayed on screen are only 640 x 480 pixels due to restrictions of the screen size. ■ Video files recorded by the Play Camera are saved with a 320 x 240 pixels resolution. ■ Since you cannot view recorded video files using the Play Camera, please use another video player (e.g. Windows Media Player, Cyberlink PowerDVD, etc.) to view video files. ■ Switch front/rear camera by Play Camera program while you are video chatting through any other program. You can not preview images, take pictures, or record video with Play Camera when you are using other program. You can not take pictures while you are video chatting. 129 Samsung Update Plus (Optional) Samsung Update Plus is software that examines and updates the Samsung software and drivers installed on your Samsung computer to the latest version. ■To search for updates and update your computer using Samsung Update Plus, your computer must be connected to the Internet. ■The update search result may differ depending on your computer model. Samsung Update Plus does not provide updates for applications installed after purchasing the computer. Search for and Install 2 Click Updates and click the Search for To update the software and drivers New Updates button. Start > All Programs > 1 Click Samsung > Samsung Update Plus > Samsung Update Plus. If this is the first time you are running the program, a window will appear asking you if you agree to the agreement in the window. Click Agree to use this software. 130 there are available software or 3 Ifdriver updates for your computer, the Automatic update items display By default, your computer is configured to automatically search for updates. If there is a new update available, this is displayed in the notification area. Click the balloon help icon in the notification area. Here you will be able to find the latest available updates. available updates will be listed. Select the required updates from the list and click on Install Updates to start the update. Updates that must be installed separately. If you select Install for an update item that must be installed separately, a message appears informing you of this. Follow the instruction message to correctly install it. 131 Using McAfee SecurityCenter (Optional) McAfee SecurityCenter (a virus/spyware detection and protection software that includes a firewall function. Hereafter, referred to as “McAfee”) is software that protects your PC from various Internet threats as well as detecting and removing viruses. ■For more detailed information on the program, refer to the McAfee help. ■You can register McAfee when connected to the Internet. ■McAfee software is optional. It may not be supplied for some models or it may be supplied through the McAfee installation icon. When the installation icon is provided, you have to install the program referring to the Installing McAfee section. ■ A different anti-virus program may be provided depending on the computer model. Installing McAfee Double click the Install McAfee 1 Web Essentials icon ( ) on the Desktop. For some models, an Install McAfee Web Essentials icon is located on the Desktop. In this case, you can install the McAfee software according to the following procedures and then use the McAfee software. The Chain Installer window 2 opens and the installation begins automatically. Please wait for a moment. For some models, a McAfee Security Center icon ( ) is located on the Desktop, since the software is already installed, the installation step is not required. When the instillation is complete, the 3 Chain Installer window disappears. 132 The End User License Agreement 2 appears. Using McAfee Check if the country has been correctly selected and then click Accept. To use McAfee, user registration is required. If a user is not registered, even though virus inspection is supported, your PC will not be completely protected because the virus information will not be updated with the latest information. The procedures to inspect and heal viruses after the user registration will be described below. The Create New McAfee Account 3 item appears. Be sure to fill in all the fields and click Next. The Program Setup Completed window appears. If you have already registered with McAfee, click Login and enter the registered email address and password to login. The Program Setup Completed window appears. User Registration The Program Setup screen appears 1 while booting. Click Next. If the Program Setup screen does not appear, right-click over the McAfee icon ( ) in the Taskbar and then select Product Setup from the pop-up menu. 133 Inspecting and Healing Viruses The viruses are listed. Since the corresponding viruses have already been removed, you can use your computer without any concern. The procedures to check if the computer’s files or information have been infected by a virus and to heal viruses found by McAfee are described below. ■For possible virus infections (where it is not completely certain), the Detected message appears. In this case, the items will be maintained or deleted depending on your decision. ■ To deal with new viruses, please always keep McAfeeSecurityCenter up to date. In general, it is automatically updated when connected to the Internet. Alternatively, you can update it manually by clicking Update ) after connecting to the ( Internet. Start > All Programs > McAfee 1 Click > McAfee SecurityCenter. the Scan button on the left side 2 ofClick the program. The Scan begins. At this time, if a virus is found, it is immediately healed during the inspection. Configuring the McAfee Firewall The McAfee Firewall is configured for the product when purchasing the product in order to protect the computer from viruses. However, if the firewall is activated, you may not connect to the network or the Internet properly. In this case, you have to change the settings as follows. a virus has been found, click View 3 IfResults. 134 Method 1) When you need to select Allow Access in the Server or Internet Access Request window. However, since it may cause a security problem, be careful when doing so. When you connect to a bank, stock market, or gaming website, an access request window appears. In this case, select Allow Access in the window and click OK. Then you can install the program normally or open the page. 1. Double-click the McAfee Security Center icon from the Desktop. 2. Click the Advanced menu at the bottom left and click Configure > Internet&Network. 3. Turn the Internet&Network at the right to Off, set the Select when to re-enable firewall to Never and then click OK. 4. Click Home in the left menu pane and click Ignore next to the ‘Firewall protection is disabled’ message. It is recommended activating the Windows Firewall for your computer’s safety when you have disabled the McAfee Firewall. To activate the Windows Firewall, click Start > Control Panel>Security>Turn Windows Firewall on or off> On(recommended) (When your Control Panel is set to the ‘Classic View’ of Windows Vista or when you are using Windows XP, click Start > Control Panel > Windows Firewall > Change Settings > On(recommended).) Method 2) When you need to deactivate the Firewall If you cannot connect to the Internet when using a broadband Internet service, you can connect to the Internal normally if you disable the McAfee Firewall. 135 OmniPass (Fingerprint Identification software, Optional) (Fingerprint Identification, Integrated Password Authentication) Using the OmniPass program, you can use the following functions. Fingerprint Identification Function You can register your fingerprint and use it instead of a password. Integrated Password Authentication Function You can use your Windows user account information using the Integrated Password Authentication Function. If you register your Windows user account(s) information with the OmniPass program, you can login to Windows or onto websites using a single password. ■ This function is applied to some models only. ■ The program version described in this manual is subject to change and some functions may not be provided due to restrictions in the program. ■ This model does not support the function which turns the computer on via a fingerprint. For more detailed information on the usage procedures, refer to the Help section in the OmniPass program(Fingerprint Identification, Integrated Password Authentication). Signing Up You have to register your fingerprint and Windows user account information as follows to use the fingerprint identification and integrated password authentication functions. When using the fingerprint identification sensor Keep your finger clean and dry when touching the sensor. Place your finger over the fingerprint sensor and push gently down. Start > All Programs > Omnipass > OmniPass Control Center. 1 Select Turn the computer on and click the Start button in the Omnipass window. 136 Run Enrollment Wizard to start 4 To register a fingerprint, click on 2 Click the registration. AuthenTec Fingerprint Device and then click the Next button. fingerprint registration begins. 5 The Select the finger to be registered and click the Next button. the fingerprint by placing your 6 Register finger over the fingerprint identification sensor and placing it down slowly. Repeat this at least 3 times until the next screen appears automatically. the integrated password 3 For authentication step, complete the following. Enter the Windows user ID and logon password and click the Next button. If you do not enter a logon password, the integrated password authentication function will be permitted to anyone; it is therefore recommended entering a logon password. Creating a user logon password. z Select Start > Control Panel > User Accounts > Create password for user account. x Enter a password in the New Password field, and re-enter the password in the Confirm New Password field. Click Create Password. A password has been created. the registered finger over the 7 Place fingerprint identification sensor again and click the Next button. appears asking if you want 8 Ato window register an additional fingerprint. Click No to proceed to the next window. If you click Yes, Steps 4~7 are repeated. with the settings and click the 9 Proceed Next button. 137 When the user profile backup 10instruction window appears, read Logging onto Windows you turn the computer on after 1 Ifcompleting the user information the contents and click on Current Backup. Specify a path to save the user profile to and save the name. When the backup file password window appears, enter a password and click the OK button. registration step, the Logon Authentication window appears. (To use the fingerprint identification function) In the Logon Authentication window, select AuthenTec Fingerprint Driver, place your finger over the fingerprint identification sensor and place it down slowly. What is a user profile backup? This is a function for backing up the OmniPass information (fingerprint and user account information) registered on a computer so that the information can be used on another computer. For information on how to use a backed up user profile on another computer, refer to the Help section. Click Finish. Registering 11information for using the fingerprint identification and integrated password authentication functions has been completed. 138 If your fingerprint is not recognized, the fingerprint is displayed in red in the fingerprint display window. In this case, place your finger over the fingerprint identification sensor again and push it down slowly until the fingerprint is displayed in green. The procedures to encrypt files are described below. (To use the integrated password authentication function) In the Logon Authentication window, select Integrated Password Authentication. Enter the username and the login password and click the OK button. This function is applied to some models only. Start > All Programs > 1 Select Omnipass > OmniPass Control Center > File Protection. a folder or file to be encrypted 2 Select and click Encrypt. User Name: User account name Password : User account password Domain, ID: These fields are automatically entered. the fingerprint identification or 2 When password authentication is complete, you can logon to Windows. To decrypt encrypted folders and files The procedures are the same as those for the encryption process except for selecting Decrypt instead of Encrypt in the figure above. Encrypting/Decrypting Files You can encrypt folders and files so that only specified users can open or modify them. 139 the file encryption 3 When authentication window appears, Logging into Internet Sites You can easily login to frequently used Internet sites using the fingerprint identification or password authentication functions instead of entering your user ID and password. select AuthenTec Fingerprint Driver, place your finger over the fingerprint identification sensor and push it down slowly. Alternatively, select Integrated Password Authentication and enter the login password. As an example, the procedures for logging into the Hotmail site are described below. If your fingerprint is not recognized, the fingerprint is displayed in red in the fingerprint display window. In this case, place your finger over the fingerprint identification sensor again and push it down slowly until the fingerprint is displayed in green. The following describes the procedures for registering your user ID and password. Once the user ID and password of a site are registered, you can login to the site automatically. ■ This function is applied to some models only. the fingerprint is recognized, the 4 Iffollowing window appears. Click OK ■ This function may not be supported for some Internet sites. to encrypt the file. Internet Explorer ( ) and 1 Launch open the Hotmail site. (http://www. hotmail.com) Enter your user ID and password. over the ( ) icon in 2 Right-click the Taskbar and click on Save Right-click over a folder or file to be encrypted and select OmniPass Encrypt File(s) from the pop-up menu. The selected folder or file will be encrypted. Password. 140 the mouse pointer changes 3 When to a yellow key icon ( ), click the login window, but not the Sign in button. If you wait a moment, the mail address and password information are retrieved. x Select AuthenTec Fingerprint Device, place your finger over the fingerprint identification sensor and push it down slowly once. Alternatively, select Integrated Password Authentication and enter the login password. c If the fingerprint identification or password authentication is complete, your ID and password are automatically entered and you are logged into the website. Login Window an easy to remember name and 4 Enter click Finish. you can login to your 5 Thereafter registered websites using your fingerprint or password. z When opening a registered site, the Access Authentication window appears. 141 Using Samsung Magic Doctor (Optional) Magic Doctor is troubleshooting software provided by Samsung Computer. A user can diagnose system problems via one-click or by selecting diagnostic items. The screens used in this manual may differ from actual screens according to the program version. Diagnosing the System When the system diagnosis is 3 completed, the diagnostic result Diagnosing the System is a function to check system connections and diagnose problems affecting to system operation and solve it. appears. Start > All Programs > 1 Click Samsung > Samsung Magic Doctor > Samsung Magic Doctor. Click on Diagnose the System to 2 start diagnosing the system. 142 If problems are found, click the Cure button to correct the problem. Samsung Magic Doctor starts the corrective operations. Reinstalling ��������� Software You can reinstall software using the System Software Media, when a device driver or computer application is not working properly. ■When software is not working properly, it is recommended removing the software using the Add or Remove Programs of the Control Panel and reinstalling the software using the System Software Media. ■The System Software Media in the text is supplied as a CD or DVD depending on your computer model. ■To use the system software media, the external USB ODD must be connected to the computer. The following descriptions presuppose that the external USB ODD is connected. Running the System Software Media ►Standard Installation Insert the System Software Media into the external USB ODD. The initial screen appears automatically. If you select this option, programs not currently installed on the computer are listed. You can conveniently use this option, when installing all the programs on the media after reinstalling Windows. ►Minimum Installation If you select this option, programs are listed that need to be installed on the computer (drivers, Windows updates, etc.). You can conveniently use this option, when you need to install essential programs only. 143 If the Start Standard Installation 2 window appears, click the OK button. ►Custom Installation If you select this option, you can select the programs to be installed. You can conveniently use this option, when you need to install an individual driver or program that is causing a problem. The drivers and programs, which were installed in the computer when you purchased the computer, are installed again. 3 When done, restart the system. Installing Software As an example, the installation procedures for the Standard Installation options are described below. Select Standard Installation in 1 the System Software Media main screen. z x 144 Samsung Recovery Solution (Optional) For models with a hard disk drive of 60GB or less, Samsung Recovery Solution supports the Basic Restore and Complete Restore functions except for the Backup functions. What is Samsung Recovery Solution? Samsung Recovery Solution enables you to easily restore your hard disk drive to a previous state when a problem occurs with your computer. Samsung Recovery Solution Functions Samsung Recovery Solution provides the following functions. Function Basic Restore Restore Complete Restore Backup Factory Status Backup Description This function restores major Windows files without touching the user configuration and data when a problem occurs with the computer. It restores the files over a short time (2~3 minutes). Using this function, you can restore your computer’s hard disk drive to its initial status when your computer is no longer working properly. You can use this function even if no restoration point was saved. A Complete Restore will delete all data on drive C. Therefore, make sure to backup your data to another storage device before restoring it to the initial status. This function saves the factory status image of drive C as a compressed image in a secure area. The factory status is automatically backed up after the computer is purchased so that users can restore the computer to the factory status. 145 Backup User Backup This function saves the image of drive C to drive D at a user’s specified time. If a user has backed up the disk image using User Backup, the user can restore the computer to the backup image using Complete Restore. Example) You can backup the disk image after installing a favorite game or MS Office. The function for the right case! ► I cannot start Windows! (The booting file is missing or a corrupted error message appears.) This happens when Windows files are corrupted. In this case, use the Basic Restore function of Restore. If the problem continues even after a Basic Restore is performed, use the Complete Restore function. ► The boot time increases, the system crashes and errors occur frequently! In this case, use the Basic Restore function of Restore. If the problem continues even after a Basic Restore, use the Complete Restore function. ► I want to reinstall Windows only, without touching my documents! In this case, use the Basic Restore function of Restore. It overwrites Windows and system files only. 146 Restoring Your Computer Samsung Recovery Solution operates as follows when the computer is used for the first time. You have to create a backup of the factory status according to the following procedures immediately after purchasing the computer to use the restoration function. The overall procedures will be described here. For more detailed information on steps 3, 4 and 5, see p.167. Setting Up Procedures z Turn on the power Turn on the power for the first time after purchasing the computer. for the first time. If you turn the power on for the first time, the Register Windows screen appears. x Register Windows. If you register Windows according to the instructions on the screen, the computer will be restarted. c The Partitioning hard disk drive function is automatically launched. v Samsung Recovery Solution is automatically launched - Factory Status Backup. When the computer is restarted, the partition disk screen appears for the efficient use of disk space. The partition disk function is only available when turning the computer on for the first time and will not be available thereafter. Once you have completed the partitions, you cannot resize the partitions. Therefore partition the disk carefully. When the partitioning is complete, a screen appears which allows you to backup the factory status of drive C to drive D. This is a required step for backing up the factory status of drive C for the normal operation of Samsung Recovery Solution. 147 This backup image is used for the Complete Restore function that restores your computer to its factory status when the computer is not working properly. For the backup procedures, refer to page 166. b After 3 days, backup the hard disk, if necessary. (p.168) 3 days after the Factory Status Backup, a message appears asking if you want to backup the current status of drive C. The current image of drive C is saved to drive D and the last user backup image is removed. Backup Function This function saves the image of drive C to drive D. If you backed up the disk image, you can easily restore the computer to the backup image when Windows does not work properly. This function saves the factory status image of drive C to a secure area so that users can restore the computer to the factory status using the Complete Restoration function. The backup function provides Factory Status Backup and User Backup functions. Therefore, there are 2 backup images available (Factory Status Backup and User Backup) for the restoration function. Factory Status Backup is only performed once after the computer is purchased. If you turn the power on for the first 1 time, the Register Windows screen appears. If you register Windows according to the instructions on the screen, the computer will be restarted for the Factory Status Backup. Factory Status Backup If you turn your computer on for the first time, the Factory Status Backup function is performed after registering Windows. 148 When the computer is restarted, the 2 partition disk screen appears before When the partitioning is complete, the 4 Factory Status Backup is performed proceeding with the Factory Status Backup. Read the instructions on the screen carefully and click the Next button. to backup the factory status of drive C to a secure place. The partition disk function is only available when the computer is turned on for the first time and will not be available afterwards. Partition your disk into drives C and 3 D. Adjust the partition size using the slide bar and click the Next button. This backup image is used for the Complete Restore function that restores your computer to the factory status when the computer is not working properly. When the Partition and Factory 5 Status Backup is complete, restart Windows. Once you have completed the partitions, you cannot resize the partitions. Therefore partition the disk carefully. 149 User Backup This function saves the image of drive C to drive D at a time specified by the user. You can backup and maintain only one copy of a User Backup image. Since the backup image is saved on drive D, if drive D is formatted or the drive D partition is deleted, the backup image is also deleted so that you will not be able to restore the computer with the backup image. Start > All Programs > Samsung 1 Click > Samsung Recovery Solution > a brief description for this backup 3 inEnter the Description input box and click the Next button. The computer is restarted in restoration mode. Samsung Recovery Solution. When you cannot start Windows Turn the computer on and press the F4 or F7 key when the boot screen (SAMSUNG logo) appears. (If you press the key multiple times, the Windows Boot Manager screen may appear. In this case, press Enter.) After a while, the computer boots up in Restoration mode displaying the SAMSUNG Recovery Solution screen. If the initial menu screen appears, click 2 Backup. A description of the backup will be displayed on the screen. 150 If the Samsung Recovery Solution program is launched for the first time after purchasing the computer, the license agreement screen appears before starting the backup. Read the agreement and click Agree to continue. 4 Select drive D to save the backup file. 5 Restoration Function When your computer does not work properly due to a problem with the computer, you can restore the computer a previous stable condition using Samsung Recovery Solution. Samsung Recovery Solution provides Basic Restore and Complete Restore functions. When the backup is complete and the system restart message appears, click OK to restart the system. When the backup is complete, a Samsung Recovery folder is created on drive D and the backup disk image is saved in the folder. This image is used for the Complete Restoration function when the computer is not working properly. What is Basic Restore? This function restores major Windows files without touching the user configuration and data when a problem occurs with the computer. What is Complete Restore? This function restores your computer using the Factory Status Backup or User Backup image when the computer does not work properly. However, note that the Complete Restore function will delete all data on drive C. If the problem continues even after the above Basic Restore function has been performed, a Complete Restore is recommended. 151 If the initial menu screen appears, 2 click Select by Symptom. Restoring Your Computer Start > All Programs > 1 Click Samsung > Samsung Recovery Solution > Samsung Recovery Solution. When you cannot start Windows Since you can use it only when an external keyboard is connected, connect an external keyboard before turning the computer on. If you connect a USB keyboard during the installation, the system will not recognize the keyboard. If you select a symptom, Samsung Recovery Solution will display the recommended restoration menu. Turn the computer on and press the F4 or F7 key when the boot screen (SAMSUNG logo) appears. (If you press the key multiple times, the Windows Boot Manager screen may appear. In this case, press Enter.) After a while, the computer boots up in Restoration mode displaying the SAMSUNG Recovery Solution screen. If the Samsung Recovery Solution program is launched for the first time after purchasing the computer, the license agreement screen appears before starting the restoration. Read the agreement and click Agree to continue. 152 If you fail to find your symptom using 3 Select by Symptom, close the Select by Symptom screen and click Restore from the main menu. The system is restarted in restoration mode. The first time the computer boots up after a Complete Restore has been performed, the boot speed may slow down due to the system optimization process. Available restoration points for the Complete Restore function In the Complete Restoration function, you can select either Factory Status Backup or User Backup. If you have not created a User Backup, you cannot select User Backup. When the computer boots up in restoration mode, the restoration progress message appears. If you click OK, the restoration is performed. When the ‘Restart the System’ message appears after the restoration is complete, click OK to restart the system. Select either Basic Restore or 4 Complete Restore from the Restoration menu. If you have selected Basic Restore, 5 and you click the Next button, the system is restarted and boots up in restoration mode.If you have selected Complete Restore, select a restoration point, and then click the Next button. 153 Removing Recovery Solution If you do not need or use Samsung Recovery Solution, you can remove the Recovery Solution program. ►Removing the Samsung Recovery Solution Program Even if you remove the Samsung Recovery Solution program, only the program is removed leaving the restoration area on the disk unchanged. Therefore you can use the Backup, Restore and Install functions by pressing the F4 or F7 key while booting up even after the Samsung Recovery Solution program is removed. 1 Click Start > Control Panel > Add or Remove Programs. Select Samsung Recovery Solution and click the Change/Remove button. Then 2 the Samsung Recovery Solution program will be removed. 154 Chapter 6. Settings BIOS Setup 156 Setting a Boot Password 161 Changing the Boot Priority 164 Battery 165 BIOS Setup The BIOS Setup enables you to configure your computer hardware according to your needs. ■Use the BIOS setup to define a boot password, change the booting priority, or add a new device. Since incorrect settings may cause your system to malfunction or crash, take care when configuring the BIOS. ■The functions of the BIOS setup are subject to change for product function enhancement purposes. The BIOS Setup menus and items may differ depending on your computer model. Entering the BIOS Setup 1 Slide the Power Switch down. The computer is turned on. The booting screen (SAMSUNG logo) appears. Press the R button ( ) on the 2 right side of the computer. When an external keyboard is connected, press the F2 key. 156 After a moment, the BIOS setup screen appears. 3 The items in the BIOS setup may differ depending on the product. Setup Menu Help Help for the selected item appears automatically. Setup Items 157 The BIOS Setup Screen Menu Main Advanced Security Description Used to change the basic system and environment settings. Used to configure advanced functions on your computer around devices and chipsets. Used to configure security functions, including passwords. Boot Used to set the boot priority and other boot options Exit Used to exit the Setup either saving the changes or not. 158 System Setup Buttons (Keys) The following Buttons(keys) are used in System Setup. When an external keyboard is connected, you can use the key enclosed in parentheses. For example, press the F1 key on the exernal keyboard instead of the L button. Setup Key L Button (F1 Key) Button Function If you press the L button, Help appears. If you press it again, Help disappears. Mouse/ Joystick Up & Down (↑↓Keys) If you push the Mouse/Joystick up or down, you can move up or down the item list. Mouse/ Joystick Left & Right (← →Keys) If you push the Mouse/Joystick left or right, you can move to another menu. ▼ (F5 Key) / ▲ (F6 Key) Press the ▼ (F5) / ▲ (F6) buttons to change the value of an item. ◄ (Esc Key) Press the ◄ button to return to a higher-level menu or to move to the Exit menu. 159 Enter Button (Enter Key) Selects an item or opens a submenu. (F9 Key) To initialize the setup settings, press the F9 key on the external keyboard. If an external keyboard is not connected, select Exit > Load Setup Default from the setup menu. (F10 Key) To save the changes press the F10 key on the external keyboard. If an external keyboard is not connected, select Exit > Exit Saving Changes from the setup menu. Exiting the System Setup 1. Move to Exit Menu > Exit Saving Changes by using the Mouse/Joystick and press the Enter button. 2. Select Yes and press the Enter button. The System Setup is closed and Windows is started. 160 Setting a Boot Password When setting a password, you have to enter a password to use the computer or enter the BIOS Setup. By configuring a password, you can restrict system access to authorized users only and protect data and files saved on the computer. Do not lose or forget your password. If you have forgotten your password, contact a Samsung service center. In this case, a service fee will be charged. For the setup buttons, refer to the description of ‘System Setup Buttons (Keys)’. p159 Setting a Supervisor Password A Supervisor Password is required to turn the computer on or to start the System Setup. When setting a Supervisor Password, users other than a supervisor cannot use the computer. Select the Security menu in the 1 BIOS Setup. 161 In the Set Supervisor Password 2 item, press <Enter>. Enter the password with the keypad 3 and press the Enter button. Setting a User Password Users can start the system with a user password, but cannot enter the System Setup. By doing this, you can prevent other users from entering Setup. Reenter the password and press the Enter button. You can use up to 7 alphanumeric characters for a password but you cannot use special characters. The ← key on the keypad performs the role of Delete and the ◄ button performs the role of the Cancel (Esc) function. Before configuring a user password, a supervisor password must have been configured. Deactivating the supervisor password also deactivates the user password. In the Set User Password item, press <Enter> and complete the procedures of Step 3 of Setting a Supervisor Password. To enter a number, press Num Lock and then enter the number. If you do not press Num Lock, the characters of the corresponding keys are entered instead of digits. Activating the Booting Password Before activating the booting password, a supervisor password must have been configured. Set the Password on boot option to Enabled. From now on, system booting will not proceed without the password. When a message confirming the 4 password configuration appears in the [Setup Notice] window, press <Enter>. The supervisor password has been set. The supervisor password is required to turn the computer on or to enter System Setup. 162 Deactivating the Password On the password to be deactivated, 1 press <Enter>. For example, to deactivate a supervisor password in the Set Supervisor Password item, press <Enter>. In the Enter Current Password item, 2 enter the current password and press <Enter>. Leave the Enter New Password item 3 field empty, and press <Enter>. Leave the Confirm New Password 4 field empty, and press <Enter>. In the [Setup Notice] window, press 5 <Enter>. The password is deactivated. 163 Changing the Boot Priority The default boot priority of your computer is the CD-ROM first, then a removable device and then the hard disk drive in this order. You can change the booting priority using the Boot menu of the System Setup. As an example, the procedures to change the highest boot priority device to the hard disk drive are described below. Select the Boot menu in the BIOS 1 Setup. Push the Mouse/Joystick down to 3 move the booting device upwards. Alternatively, you can move the booting device by using the ▲ or ▼ buttons. Press <Enter> on the Boot Device 2 Priority item. Press the ◄ button to exit the Boot 4 menu. Move to Exit > Exit Saving Changes by using the Mouse/ Joystick and press the Enter button. The changes are saved and Setup is closed. 164 Battery Please refer to the following instructions when running the computer on battery power without connecting the AC power. A Lithium-Ion smart battery is supplied with this computer. Carefully read and follow the precautions printed on the battery before using the battery. Precautions Use only chargers specified in the User Guide. Never heat the battery pack, put it near or in a fire or use at a temperature higher than 60°C, as this may cause fire. Never cause a short circuit between the battery pack terminals or disassemble the battery pack. Carefully read and follow the precautions printed on the battery and the safety instructions in the User Guide before using the battery. Please refer to the system operation environment ( p.196) of this guide. Operate and store the battery at room temperature. Installing/Removing the Battery Shutdown the system and place 1 the computer upside down on a flat surface. Lift the Stand up and push the Battery 2 Latch down into the Release ( ) position. Lift the battery up and separate it. Release 165 To reinstall the battery, align the 3 battery to the outside of the computer Charging the Battery and insert the battery. Lift the battery latch up to the Lock ( ) position and put the Stand down. Attach the battery and connect the 1 AC adapter to the DC-in jack of the computer. The battery will then start charging. When charging is complete, the 2 Charge LED turns green. Lock Status Charge LED Charging Amber Charging complete Green AC adapter not connected Off Measuring the Remaining Battery Charge When you are unable to insert the battery, check if the battery latch is in the Release ( ) position. If it is in the Lock ( ) position, you cannot insert the battey. You can view the battery charge status by completing the following procedures. Viewing through the MENU button Press the MENU button and press on Battery. 166 To view on the battery Battery Usage Time Information Press the button on the outside of the battery to check the remaining battery charge. A battery is an expendable supply, so when using it over a long time, the capacity/battery life is shortened. If the battery life is reduced to under half of its initial time, we recommend purchasing a new battery. For long periods of not using the battery, keep the battery after discharging it. This extends the battery life time. Battery Warning ■You will hear an alarm when the remaining battery charge reaches below 10%. In this case, connect the AC adapter or turn off the computer and install a fully charged battery. ■When the remaining battery charge is under 3%, the computer automatically saves the current work and turns off. 167 Extending the Battery Usage Time Decreasing the LCD Brightness For the models with Touch Sensor buttons, press the MENU button and click from the Brightness item to decrease the LCD brightness. Then you can extend the battery usage time. For models without Touch Sensor buttons, press the User Defined button (▼) while holding down the INTERNET button. The LCD brightness is decreased and you can extend the battery usage time. Using Samsung Battery Manager Samsung Battery Manager is a power management program that enables using the battery power efficiently. You can select an optimized power mode according to your requirements. Click Start > All Programs > Samsung > Samsung Battery Manager > Samsung Battery Manager. Change Power Mode Power Saving Effects You can only change the detailed configuration in Custom Mode. 168 Maximum Battery Saving Mode This mode is appropriate for conditions which require the maximum battery usage time. This may degrade the performance of the system. Normal Mode This mode is appropriate for normal conditions. Both system performance and battery usage time are optimized. Maximum Performance Mode This mode is appropriate for conditions that require maximum system performance. Therefore, the battery usage time may be reduced in this mode. When Running a Game or Multimedia Application A game or multimedia application may not work smoothly in Maximum Battery Saving Mode. Using this is recommended when the AC adapter is connected or in Normal or higher modes. Samsung Battery Manager Power Modes •Since the Maximum Battery Saving Mode of the Samsung Battery Manager controls the system operating speed to extend the battery usage time, the performance of the system may be degraded. Custom Mode In this mode, you can configure the unit to save battery usage. You can adjust the LCD brightness, the system standby time, the screen color quality, and the graphics mode values. •When changing the power settings in Custom Mode in the Samsung Battery Manager, the settings of the Power Options Properties window are changed accordingly. •To use Normal Mode in Samsung Battery Manager after reinstalling Windows XP, you have to install the Samsung Battery Manager using the system software media. Power Saving Effect This shows the relative battery usage time for each power mode. The more effective the power saving, the longer the graph will appear. 169 Using the arrow keys, select Smart 3 Battery Calibration in the Boot Using the Battery Calibration Function menu and press Enter. When charging/discharging the battery repeatedly for a short time only, the battery usage time may be reduced by the difference between the actual battery charge and the remaining charge display. In this case, the actual battery charge and the remaining charge display will be the same by discharging the battery completely using the Battery Calibration function, and then recharging it again. Disconnect the AC power adapter 1 after turning off the computer. Highlight Yes in the Battery 4 Calibration Confirmation window and Turn the computer on again. When 2 the SAMSUNG logo appears, press press <Enter>. The Battery Calibration function is activated and the battery is forcefully discharged. To stop the operation, press the ◄ (Esc) button. This operation requires 3~5 hours depending on the battery capacity and the remaining battery charge. the R button to enter Setup. 170 Chapter 7. Appendix Reinstalling Windows XP Q & A Display Related Sound Related Wired Network (LAN) Related Wireless Network (WLAN) Related Bluetooth Game and Program Related Samsung Recovery Solution Other Product Specifications Glossary Index Contact SAMSUNG WORLD WIDE 172 177 177 180 181 183 189 191 193 194 196 206 209 210 Reinstalling Windows XP You can reinstall Windows using the System Recovery Media when Windows does not work properly. ■System Recovery Media is optional and may not be provided depending on your computer model. These descriptions are only for models supplied with the System Recovery Media. ■There are two Windows installation modes: Standard Installation, which allows users to change options, and Quick Installation, which allows users to install Windows easily. ■To install Windows, an external-type ODD and a USB keyboard are required. Connect the external-type ODD and USB keyboard before turning the computer on. If you connect a USB keyboard during the installation, the computer will fail to recognize the USB keyboard. ■To reinstall Windows when Windows does not boot, refer to p.176. Reinstalling Windows may delete data (files and programs) saved on the hard disk drive. Make sure to backup all important data. Samsung Electronics shall not be held liable for any loss of data. Running the System Recovery Media ● Preparation 1. Connect an external-type ODD through the USB Port of the computer. 2. Connect the external-type USB keyboard. 3. Turn the computer on to boot up Windows. 172 Insert the System Recovery Media into the external USB ODD. The start screen will appear automatically. Windows folders are preserved, you do not have to reinstall device drivers and programs. Quick Installation The Windows Quick Installation procedures are described below. In the System Recovery Media start 1 screen, click Quick Installation. ►Standard Installation You can change the settings for Regional and Language Options, Date and Time, Computer Name, User Accounts, etc. during the Windows installation. However, after reinstalling Windows, you have to manually reinstall device drivers and programs using the system software media. The description for the Quick 2 Installation appears. ►Quick Installation This reinstalls Windows with the user data and the system settings intact by overwriting the Windows folder. Since the user data and the system settings in the already existing Click Yes to start Windows installation. When the installation is complete, the Windows Desktop appears. Remove the System Recovery Media from the ODD. 173 Standard Installation The Windows Standard Installation procedures are described below. Click Yes to start the Windows installation. The system restarts and the Windows installation begins. If you have set a booting password, enter the booting password when booting the system to continue the installation. For the Standard Installation, a USB keyboard is necessary. You have to connect the USB keyboard before turning the computer on. The descriptions assume that you are using an external USB ODD and USB keyboard. After the system has restarted, the 3 message ‘Press any key to boot from DVD’ appears. Do not press any key at this time. After a moment the partition configuration screen appears. To leave the partition unchanged, move to the C:Partition 2 using the direction key (↓) and press <Enter>. In the System Recovery Media start 1 screen, click Standard Installation. Partition setting is a function that divides the hard disk drive into one or several partitions. Note that changing the partition deletes all data on the hard disk drive. The description for the Standard 2 Installation appears. 174 Select the folder to install the 4 Windows operating system. When a window that requires your 7 name and organization pops up, To delete the previous version of Windows and install in the current folder, press <L> on the keyboard. enter your name and the organization and click Next. A window that requires the computer name and the administrator password appears. Enter the computer name and the administrator password and click Next. When pressing the <ESC> key to select another folder for the installation, a new Windows folder is created causing the risk of dual booting. 5 When the Date and Time Settings 8 window appears, click Next. Setup After the installation process copies the necessary folders for the Windows installation, restart the system, and the message “Press any key to boot from DVD” is displayed. You do not need to enter anything. The Windows XP installation screen will appear shortly to proceed with the installation. continues and the system restarts. When the system restarts, the 9 message “Press any key to boot from DVD” is displayed. You do not need to enter anything. In a moment, the Windows XP Desktop appears. When you see the Windows desktop, this means that the installation process is completed. the Regional and Language 6 When Options window appears, click Next. Remove the System Recovery 10Media and install the device drivers and applications from the System Software Media. p.143 175 Select a file system (format). To 4 keep the current file system, press Reinstalling when Windows does not start <Enter>. When Windows does not start, boot up with the System Recovery Media and from there you can reinstall Windows. Select the folder to install the 5 Windows operating system. To delete the previous version of Windows and install in the current folder, press <L> on the keyboard. Connect the external-type ODD and USB keyboard before turning the computer on. If you connect a USB keyboard during the installation, the computer will fail to recognize the USB keyboard. The subsequent procedures are 6 the same as those after Step 5 of <Standard Installation>. Insert the System Recovery Media 1 into the DVD drive and restart the computer. the Press any key to boot from 2 IfDVD message appears while booting, press any key on the keyboard. The partition configuration screen 3 will appear. To install Windows in the selected partition without change, press <Enter>. 176 p.174 Q&A This section provides information on possible problems, solutions and other references for using the system. Display Related QThe LCD screen is too dark or too bright A Adjust the LCD brightness. For the models with Touch Sensor buttons, press the MENU button and click on Brightness or . For models without Touch Sensor buttons, press the User Defined buttons (▲/▼) while holding down the INTERNET button. screen saver disturbs Media Player playing a movie or video clip after QThe the screen saver is activated while Media Player is playing. A Unselect Tools > Options > Player > Allow screen saver during playback in the Media Player. QIn the following cases, the screen blinks or displays noise for a short time. Click the Graphics Related tab, Change Resolution, Change Display Device, Remove the AC Adapter, Restart the System, Change Power Scheme. A This may happen while the video driver is examining the connected device. While busy detecting, any connected display devices may blink or some noise may occur. 177 I connect a projector, and change the settings to display the screen QWhen image on both the LCD and the projector by pressing the MENU button, the screen is not displayed properly. A Press the MENU button and press the button to the right of the LCD/CRT button to switch to LCD+CRT Clone. The screen may not be displayed or only part of the screen may be displayed when the LCD resolution is too low or too wide and the projector cannot support the resolution. Right-click over the Desktop, select Properties, select the Settings tab and change the Resolution to 800x600. shortcut icons are not displayed on the screen even if I press the QThe shortcut key. A The shortcut icons only appear when the Easy Display Manager program is installed. have connected a monitor (or projector) to the computer, but the colors on QIthe monitor are abnormally displayed. A Check if the monitor and computer are properly connected with the signal cable and reconnect the cable if necessary. QThe picture on the screen trembles. A The picture on the screen may tremble when you view some Internet pages or play some on-line games. In this case, using an external monitor is recommended. 178 run the Rotation function from the Menu, and the pointer on the screen QI’ve does not correspond to the pointer position. A It is recommended using an external USB mouse when the screen is pivoted. If the above problem appears, complete the following steps. z Right-click on the TouchKit ( ) icon from the Taskbar and confirm that the Display Pivot Support function is selected (V). If it is not selected, select it by selecting the Display Pivot Function. If you cannot find the TouchKit icon on the Taskbar, click Start > All Programs > TouchKit > TouchMon. x Click on Start > All Programs > TouchKit > Configure Utility and click on 4-Point Calibration from the Tools tab. If the Stylus Pen Calibration screen appears, proceed according to the instructions on the screen. 179 Sound Related QHow can I configure the Recording Mixer while I am video or audio chatting? A z Double-click the volume icon from the Taskbar and select Options > Properties from the menu. x In the Mixer device field, select Realtek HD Audio Input. c Unselect ‘Mute all’ in the Recording control and unselect ‘Mute’ in the Microphone volume. v Select ‘Mute’ in the Stereo Mixer. QHow can I configure the Recording Mixer while playing music in WinAMP? A z Double-click the Volume icon in the Taskbar and click on Options. x In the Mixer device field, select Realtek HD Audio Input. c Unselect ‘Mute all’ in the Recording control and unselect ‘Mute’ in the Microphone volume. v Select ‘Mute’ in the Stereo Mixer. 180 Wired Network (LAN) Related QThe <Wake On LAN> function A <Wake On LAN> is a function that activates the system from Sleep mode when a signal (such as a ping or magic packet command) arrives over the network (wired LAN). Using the <Wake On LAN> Function z Click on My Network Place > View network connections on the Desktop. x Right-click(press and hold the Stylus Pen for more than 3 seconds) the Local Area Connection and click Properties. c Click Configure, and select the Power Management tab. Select ‘Allow this device to bring the computer out of standby’, then click OK. Restart the system. ■If the system in standby mode is activated when there is no received signal, use the system after disabling the <Wake On LAN> function. ■When turning the power off when <Wake On LAN> is disabled, the LAN LED may continue to be lit up. ■The <Wake On LAN> function operates only when the LAN is ON. ■Connecting a wired LAN while using a wireless LAN may not activate the <Wake On LAN> function. Set the Wireless LAN to ‘Disable’ to use the <Wake On LAN> function. z Click on My Network Place > View network connections on the Desktop. x Right-click(press and hold the Stylus Pen for more than 3 seconds) over Wireless Network Connection and select Disable. 181 I am connected to a 100Mbps/1Gbps wired LAN and the computer exits QWhen Sleep/hibernation mode, a message appears informing you of a connection to a 10Mbps/100Mbps wired LAN. A When the computer exits standby/hibernate mode, restoring the network takes about 3 seconds. When the network is restored, it operates at 100Mbps/1Gbps. 182 Wireless Network (WLAN) Related QI cannot find an AP. ► Check the Wireless LAN LED. A Check if the Wireless LAN LED is on. If off, click the MENU button and select Wireless LAN ON to turn the Wireless LAN on. ► Reinstall the driver. A Reinstall the driver using the software media. ► Check the Wireless Zero Configuration (WZC) service. A If the “Windows cannot make this wireless connection” message appears while searching for wireless networks, it indicates that a program other than Windows is set to manage the wireless LAN settings. ► To use the wireless LAN settings using Windows: A z Click Start > Control Panel > Network and Internet Connections > Network Connections > Wireless LAN Connection, right-click and check if the “Windows manages wireless network settings (W)” option is selected in the Wireless Network tab of the Properties window. If not, select the option. x Click Start > Control Panel > Performance and Maintenance > Administrative Tools > Computer Management and click Services and Applications > Services. In the right pane, double-click the Wireless Zero Configuration and check if the Startup Type is Automatic and the Status is Started. cannot connect to an AP. (The wireless connection is disconnected QIfrequently.) ► Check the Network Key. A Right-click the Wireless Network Connections icon from the Taskbar and click 183 on ‘View available wireless networks’. If wireless networks are found, it indicates that the device is operating properly but the network settings may have a problem. Please check the Network Key (Encryption Key) and the AP settings. ► Check if there is a device nearby using the same frequency band. A1If there is a device nearby using the same frequency band such as another wireless LAN device, wireless video transceiver, microwave oven, plasma bulb, etc., channel interference may occur. If you experience interference from another device, it is recommended changing the AP channel. A2When operating in EEE802.11g mode, if there is a IEEE802.11b device operating nearby, you may experience low data rates or even disconnection as it operates in Hybrid mode. ► Check the authentication type. A A connection may be disconnected after a period of time if the “Use IEEE 802.1x network authentication” option is selected when IEEE 802.1x authentication is not being used. View the properties of the corresponding AP in the Wireless Network Properties. In the Authentication tab, unselect the “Use IEEE 802.1x authentication in this network” option. For detailed information on the authentication server, ask your network administrator. ► Check the AP settings. A1Check if the surroundings are appropriate for a wireless LAN. A wireless LAN connection may be limited by the surrounding environment and distance. Obstacles such as walls and door mats affect the quality of the wireless LAN signal. You have to install an AP in a high, open position far away from any other radio signal sources. If the AP is excessively far away, or is installed at the end of a building and you are attempting to use the wireless LAN from the other end, you may not be able to use the wireless communication normally because the signal is blocked by obstacles between you and the AP (such as a wall). A2Check if the AP operates properly. If the AP is not operating properly, turn it off and on again and try again. 184 A3Check if the AP firmware is the latest version. (For more information on the AP firmware, ask the AP manufacturer or your product provider.) A4Check if the AP is properly connected to the network. Connect the LAN cable from the AP to a computer and check if the network is connected properly. A5Check the Network Key (Encryption Key) settings again. If the automatic password converting function (passphrase function) is enabled and the wireless connection is normal but you cannot send data over the connection, please enter the Network Key (Encryption Key) manually. A6Check the AP settings as follows. If there are multiple APs running at the same time, check the channel setting of each AP. If the interval between the channels of the APs is narrow, you may experience electromagnetic interference. Set the channel numbers of the APs so that the internals between the channels are maximized. (E.g., Ch1, Ch5, Ch9, Ch13) If the SSID option is set to Hide, you will not be able to find the AP on your computer. It is recommended unselecting the Hide option of the AP. SSID (Service Set ID) is a name used to distinguish a wireless LAN from other wireless LANs. It is recommended using Long Preamble. Preamble is a signal for data transmission synchronization. Although some APs support Short Preamble, there might be a compatibility problem. Because ‘Fixed’ channel selection is more stable then ‘Auto’ channel selection, ‘Fixed’ channel selection is recommended. It is recommended not using the ‘Block Any’ and ‘Any Connection Block’ functions. Although these functions block connections at the client side when the network name is Any or Blank, it may cause a compatibility problem. For more information on the AP settings, refer to the owner’s manual supplied with the AP. 185 a connection has been established, I cannot connect to the QAlthough Internet. ► Check the TCP/IP settings. A If you cannot connect to the Internet but you are connected to an AP, check if the TCP/IP settings are configured properly. When you are not connected to an AP, an X mark appears over the ‘Wireless Network Connections’ ( ) icon in the Taskbar. If you double-click the icon, the Search for Wireless Connections window appears. Reconnect to a wireless network referring to the descriptions of Connecting to a Wireless LAN in the Using the Network section. When you are connected to an AP, an X mark appears over the ‘Wireless Network Connections’ ( ) icon in the Taskbar. Double-click the icon and check if the IP address is properly allocated on the Support tab. If the IP address is not properly allocated, the IP address will be displayed as follows; (e.g. 169.254.xxx.xxx). If your network does not support DHCP, you have to manually configure an IP address by asking your network administrator. In addition, even if your network supports DHCP, the Internet connection may not be available if the DHCP server fails to allocate an IP address to your computer. have configured both wired and wireless connections with the same IP QIaddress, but the network connections do not work properly. A You cannot use the same IP address for wired and wireless connections. To use only one IP address for both wired and wireless connections, you must disable one of them according to your requirements in Network Connections in the Control Panel. 186 installing the Wireless LAN Setting program, the “AEGIS Protocol (IEEE QAfter 802.1x)” protocol appears in the [Local Area Connect Properties] window. A The protocol is a security authentication protocol that is automatically installed when the Wireless LAN Settings program is installed and does not affect the program operation. want to use the Wireless LAN power saving function to extend the system QIbattery use time. A You can configure this in the Samsung Battery Manager program. Run the Samsung Battery Manager and select Options > Wireless LAN Power Saving > On from the menu. However, this setting may affect the performance of the Wireless LAN. In addition, the wireless LAN connection might be disconnected while configuring this. cannot share Internet access/ files when a small office network has been set QIup. A Check the McAfee SecurityCenter settings. Launch McAfee SecurityCenter and select Advanced > Settings > Internet and Network > Advanced > Trusted or Prohibited IP. Check if the IP address you wish to use has already been added. If the IP address is not added, add it by clicking the ‘Add’ button. 187 cannot search another network on my network when a small office QInetworking(Ad-hoc) has been configured. A To search Ad-hoc in Windows XP SP3, you should set up the wireless network connection properties as follows. z Click START > Connect To > Wireless Network Connection > Change the order of preferred networks under Related Tasks on the left. x Select the network you want to configure and click Properties. c Select Connect even if this network is not broadcasting. v Move to the Connection tab, and select Connect when this network is in range. When the settings are completed, click OK. 188 Bluetooth Korean or Chinese characters in a business card received via Bluetooth QThe are broken. A1If you send a business card including Korean or Chinese characters by selecting a Select a business card in the file (*.vcf, *.vcd) option, the characters on the received card will be broken. This is because the contents of the business card file are not set to Korean or Chinese characters (CHARSET). To resolve this problem, edit the contents of the business card file manually as follows. z Right-click over a business card file (*.vcf, *.vcd) to be sent and select Connect Program > Select Program. x Select Notepad from the program list. c Edit the file as follows. Example) “N:Magic Sens” => “N;CHARSET=KS_C_5601:Magic Sens” For Korean, add “CHARSET=KS_C_5601” For Chinese Simplified (CHS), add “CHARSET=gb2312” For Chinese Traditional (CHT), add “CHARSET=Big5” A2Perform Send business card immediately in the Address Book of Microsoft Outlook or select Transmission by Outlook business card selection, and you will be able to transmit a business card without broken characters and without editing the VCF file. QWhen no headset is found or cannot be connected. A1If the headset is already connected to another device, you will not be able to find the headset and cannot connect to the headset even if the headset is found. Disconnect the connection to the other device and then start the search again. 189 A2If the headset is connected to a power adapter, you cannot make a Bluetooth connection. Disconnect the power adapter and then retry. A3In general, a Bluetooth headset has 2 operating modes, On/Off mode and Pairing mode. To connect the headset to another Bluetooth device such as a PC or cell phone, the headset must be in Pairing mode. Switch the headset to Pairing mode and then retry the search operation. In general, the headset in Pairing mode automatically returns to On/Off mode after a certain period of time. is no sound or sound is intermittently interrupted after connecting a QThere headset. A1If a Bluetooth headset is connected to a PC, the Sound playback device in the Control Panel is to be changed to Bluetooth Audio (for a mono headset) or High Quality Bluetooth Audio (for a stereo headset). If the Sound playback device in the Control Panel is not changed properly, there may be no sound through the headset. Check the audio settings of the Control Panel according to the procedures given below. Configuring the Audio Device in the Control Panel z Click Start > Control Panel and double-click on Sound and Audio Devices. x Select the Audio tab in the Sound and Audio Devices Properties window. c Check if the Sound playback device and the Sound recording device are set to Bluetooth Audio (for a mono headset) or High Quality Bluetooth Audio (for a stereo headset). A2When using a Bluetooth headset with another Bluetooth device, you may experience no sound, data transmission rate degradation, transmission errors or the disconnection of the device. Therefore, it is recommended not using another Bluetooth device when using a Bluetooth headset. 190 A3Check if the headset is properly connected and working properly. A4Check the volume level of the headset and PC. A5When running a multimedia program such as Windows Media Player that accesses the audio device, a headset may not be properly connected or used. To resolve this problem, exit the multimedia program, connect the headset and then launch the multimedia program again. Game and Program Related QA 3D game does not work, or some functions are not working. A Change the graphics settings of the game to ‘2D’ or ‘Software Renderer’, then run the program again. playing a game, the screen may not be displayed or may be displayed QWhile abnormally when pressing the MENU button and then pressing the button to the right of the LCD/CRT button. A Since the controls change for games and some 3D applications due to the system properties when the display device changes, pressing the MENU button and the button to the right of the LCD/CRT button while a program is running may cause the program to exit or cause the screen to be displayed abnormally. Please use the button to the right of the LCD/CRT button before running a program. Using the button while a program is running is not recommended. 191 QRunning speed of a game is too slow or fast. A Change the setting of the Power Schemes to ‘Always On’. (Click the Start > Control Panel > Performance and Maintenance > Power Options > Power Schemes tab, then configure the Power schemes field to ‘Always On’.) QThe picture is not displayed properly for some games. A Some games such as ‘Harry Potter and the Sorcerer’s Stone’, ‘Harry Potter and the Chamber of Secrets’, etc. may not display the picture properly when the screen resolution is set to 1024x768 and the color quality is set to 32 bit. For these games, set the screen resolution to 1024x768, and the color quality to 16 bit. QThe game is not displayed smoothly on the screen. A For 3D games, the texture data for the 3D screen display is saved to the system memory. If there is insufficient system memory, the data is saved to the hard disk drive and loaded to memory when required. This operation may temporarily stop displaying the picture on the screen. In this case, lower the game resolution or the screen settings. 192 Samsung Recovery Solution performing a User Backup, the ‘Insufficient free space in the hard disk QAfter drive’ message appears. ► This message appears when there is insufficient free space for the User Backup. A If there is insufficient free space on the hard disk drive, the User Backup file cannot be saved. For the User Backup, move or delete some files from the hard disk drive and then try again. QThe hard disk drive capacity is different from the specifications. A ● The hard disk drive capacity displayed in My Computer or Windows Explorer is calculated by regarding 1024 bytes as 1kbyte and is smaller then the actual capacity. This is just a difference from the calculation method and the capacity of the hard disk drive is the same as the specifications. ● If your computer model is supplied with a fingerprint identification or system diagnosis program, the hard disk drive capacity may be displayed smaller then it should be because the programs use some of the hard drive capacity. ● Since Samsung Recovery Solution is installed on your computer and it reserves approximately 10 GB to save the restoration image, the hard disk drive capacity will be smaller than the actual capacity in My Computer or Windows Explorer. The amount of hard disk drive space used by Samsung Recovery Solution may differ depending on the computer model. You can check the actual hard disk drive capacity in the BIOS SETUP, by pressing the <F2> key while booting up the computer. 193 Other QI cannot run any functions. A1This may happen when the computer is in the HOLD status. When pressing a button or switch in the HOLD status, the Charge LED blinks for a moment. Slide the HOLD switch downwards and try again. A2If the computer is running on battery power, check the battery charge status. QThe [Power Switch] does not work. A1 This may happen when the computer is in the HOLD status. When pressing a button or switch in the HOLD status, the Charge LED blinks for a moment. Slide the HOLD switch downwards and try again. A2 If the computer is running on battery power, check the battery charge status. Q How can I install the program? A You can additionally purchase and install the following devices for UMPC. (See the Installing Programs section of the ‘Getting Started Guide’. ● External USB ODD dedicated to UMPC or Compatible External USB ODD ● External USB HDD ● USB Data Cable ● LAN Cable (direct cable or cross cable), etc. : Since the usage of a direct cable is the same as that of a cross cable, refer to the ‘Getting Started Guide’. 194 have turned the LCD screen off with a portable USB keyboard, but I cannot QIturn it on again. A When you are using an optional Portable USB Keyboard Dedicated to UMPC, if you have turned the Backlit OFF (Screen Off) by pressing the <Fn>+<F5> keys, press the <Fn>+<F5> keys on the keyboard again to turn the Backlit ON (Screen On). QI want to replace the pointing stick cap of a portable USB keyboard. A A portable USB keyboard has a pointing stick that can be used instead of a mouse. Since a spare pointing stick cap is supplied when you purchase a USB keyboard, you can remove the cap and then insert a new one if necessary. QThe Touch Sensor Buttons do not work. A1Try to press a Touch Sensor Button with your finger and not with your finger tip, so that a broader surface of your finger makes contact with the button. A2The UDF button only works when the Easy Button Manager program icon is registered to the Taskbar notification area. When you cannot find the icon in the Taskbar, select Start > All Programs > Samsung > Easy Button Manager > Easy Button Manager to launch Easy Button Manager, and try again. A3The VOL+/- buttons only work when the Easy Display Manager program icon is registered to the Taskbar notification area. When you cannot find the icon in the Taskbar, select Start > All Programs > Samsung > Easy Display Manager > Easy Display Manager to launch Easy Display Manager, and try again. 195 Product Specifications (NP-Q1 Ultra) The system specifications may differ depending on the derived models. For detailed system specifications, refer to the product catalog. CPU (Optional) Cache Memory (Optional) Main Memory (Optional) Main Chipset (Optional) Hard Disk Drive (Optional) Graphics (Optional) Sound Chipset Intel ULV CPU 512KB 512MB~1GB, MAX 1GB, Memory type: DDR2 SODIMM Intel 945GU 1.8” HDD, 40/60/80GB Intel Graphic Media Accelerator 945 HD Audio, ALC262 Codec Wired LAN: Broadcom BCM4401E 10/100 PCI Ethernet Controller Network (Optional) Wireless LAN: 802.11BG Bluetooth 2.0+EDR Multi Card Slot (Optional) SD Card / MMC USB 2.0 x 2, Video (Monitor) Out Port, Headphone Jack, Ports (Optional) Wired LAN Port, DC-in Jack Dimensions 227.5 x 123.9 x 22.9~23.9mm LCD 7” WSVGA (1024x600) Weight (Optional) A mere 690g (1.52lb) (Without optional items) Battery (Optional) Lithium-Ion smart battery: 4 Cells or 6 Cells Temperature (storage) : -5 ~ 40°C (operation) : 10 ~ 35°C Operating Environment Humidity (storage) : 5% ~ 90% (operation) : 20% ~ 80% Operating Voltage 100 - 240VAC Frequency 50 / 60Hz Output Power (Optional) 60W Output Voltage 19VDC 3.16A(60W) ■Optional components may not be provided or different components may be provided depending on the computer model. ■The system specifications are subject to change without notice. ■The hard disk drive capacity of a computer in which Samsung Recovery Solution is installed, is represented as smaller than the product specification. 196 Wireless LAN Specifications (802.11a/b/g, 802.11n Card) Intel 802.11ABG WLAN The Name of the Registered Equipment : Special Low Power Wireless Device for Wireless Data Communication Systems. Item Dimensions Physical Operating Specifications Temperature And Humidity Power Power Specifications Compatibility Detailed Specifications 30.0 × 50.95mm (Width X Height) Same as System Operations Temperature: Bet. 0°C and 70°C, Humidity: Less than 85% 3.3V IEEE 802.11a, IEEE 802.11b, IEEE 802.11g Operating System Microsoft Windows XP/Vista Network Media Access Specifications Protocol (MAC) Security CSMA/CA (Collision Avoidance) with Acknowledgement (ACK) Wired Equivalent Privacy support (WEP) 64bit/128bit WPA* * This device supports the Wireless LAN Security Specifications WPA (Wi-Fi Protected Access) for Wi-Fi. To connect to a WPA wireless network, you have to configure the settings according to the network connection environment. For detailed setting information, ask your network administrator. 197 Radio Specifications RF Band 2.4GHz, 5GHz Supported Channels Channels allowed per country. Device Transceiver Standard Output Power MAX 10mW 11a mode : OFDM Modulation Scheme 11b mode : DSSS 11g mode : OFDM 11a mode** : 54, 48, 36, 24, 18, 12, 9, 6 Data Rate (Mbps)* 11b mode : 11, 5.5, 2, 1 11g mode*** : 54, 48, 36, 24, 18, 12, 9, 6 Antenna Type Built-in Antenna * The data rate may differ from the real data transmission rate. ** 11a mode is only supported when the device is connected to an IEEE 802.11a device. (e.g. Access Point supporting IEEE 802.11a) ***11g mode is only supported when the device is connected to an IEEE 802.11g device. (e.g. Access Point supporting IEEE 802.11g) 198 Intel 802.11AGN WLAN The Name of the Registered Equipment : Special Low Power Wireless Device for Wireless Data Communication Systems. Item Dimensions Physical Operating Specifications Temperature And Humidity Power Power Specifications Compatibility Detailed Specifications 30.0 × 50.95mm (Width X Height) Same as System Operations Temperature: Bet. 0°C and 70°C, Humidity: Less than 85% 3.3V IEEE 802.11a, IEEE 802.11b, IEEE 802.11g, IEEE 802.11n Operating System Microsoft Windows XP/Vista Network CSMA/CA (Collision Avoidance) with Specifications Media Access Protocol (MAC) Acknowledgement (ACK) Security Wired Equivalent Privacy support (WEP) 64bit/128bit WPA* * This device supports the Wireless LAN Security Specifications WPA (Wi-Fi Protected Access) for Wi-Fi. To connect to a WPA wireless network, you have to configure the settings according to the network connection environment. For detailed setting information, ask your network administrator. 199 Radio Specifications RF Band 2.4GHz, 5GHz Supported Channels Channels allowed per country. Device Transceiver Standard Output Power MAX 10mW 11a mode : OFDM Modulation Scheme 11b mode : DSSS 11g mode : OFDM 11n mode : MIMO 11a mode** : 54, 48, 36, 24, 18, 12, 9, 6 11b mode : 11, 5.5, 2, 1 Data Rate (Mbps)* 11g mode*** : 54, 48, 36, 24, 18, 12, 9, 6 11n mode**** : 300, 270, 243, 216, 162, 144, 130, 117, 108, 104, 81, 78, 54, 52, 39, 27, 26, 13 Antenna Type Built-in Antenna * The data rate may differ from the real data transmission rate. ** 11a mode is only supported when the device is connected to an IEEE 802.11a device. (e.g. Access Point supporting IEEE 802.11a) *** 11g mode is only supported when the device is connected to an IEEE 802.11g device. (e.g. Access Point supporting IEEE 802.11g) ****11n mode is only supported when it is connected to an IEEE802.11n device (e.g. Access Point supporting IEEE802.11n). 200 Wireless LAN Specifications (802.11BG Card) Intel 802.11BG WLAN The Name of the Registered Equipment : Special Low Power Wireless Device for Wireless Data Communication Systems. Item Dimensions Physical Operating Specifications Temperature And Humidity Power Power Specifications Compatibility Detailed Specifications 30.0 × 50.95mm (Width X Height) Same as System Operations Temperature: Bet. 0°C and 70°C, Humidity: Less than 85% 3.3V IEEE 802.11b, IEEE 802.11g Operating System Microsoft Windows XP/Vista Network Media Access Specifications Protocol (MAC) Security CSMA/CA (Collision Avoidance) with Acknowledgement (ACK) Wired Equivalent Privacy support (WEP) 64bit/128bit WPA* * This device supports the Wireless LAN Security Specifications WPA (Wi-Fi Protected Access) for Wi-Fi. To connect to a WPA wireless network, you have to configure the settings according to the network connection environment. For detailed setting information, ask your network administrator. 201 Radio Specifications RF Band 2.4GHz Supported Channels Channels allowed per country. Device Transceiver Standard Output Power MAX 10mW Modulation Scheme Data Rate (Mbps)* Antenna Type 11b mode : DSSS 11g mode : OFDM 11b mode : 11, 5.5, 2, 1 11g mode** : 54, 48, 36, 24, 18, 12, 9, 6 Built-in Antenna * The data rate may differ from the real data transmission rate. **11g mode is only supported when the device is connected to an IEEE 802.11g device. (e.g. Access Point supporting IEEE 802.11g) 202 Atheros 802.11BG WLAN The Name of the Registered Equipment : Special Low Power Wireless Device for Wireless Data Communication Systems. Item Dimensions Detailed Specifications 30.0 × 50.95mm (Width X Height) Physical Operating Specifications Temperature And Humidity Temperature: Bet. 0°C and 70°C, Humidity: Less than 85% Power Power Specifications 3.3V Compatibility IEEE 802.11b, IEEE 802.11g Operating System Microsoft Windows XP/Vista Network Media Access Specifications Protocol (MAC) Security CSMA/CA (Collision Avoidance) with Acknowledgement (ACK) Wired Equivalent Privacy support (WEP) 64bit/128bit WPA* * This device supports the Wireless LAN Security Specifications WPA (Wi-Fi Protected Access) for Wi-Fi. To connect to a WPA wireless network, you have to configure the settings according to the network connection environment. For detailed setting information, ask your network administrator. 203 Radio Specifications RF Band 2.4GHz Supported Channels Channels allowed per country. Device Transceiver Standard Output Power MAX 10mW Modulation Scheme Data Rate (Mbps)* Antenna Type 11b mode : DSSS 11g mode : OFDM 11b mode : 11, 5.5, 2, 1 11g mode** : 54, 48, 36, 24, 18, 12, 9, 6 Built-in Antenna * The data rate may differ from the real data transmission rate. **11g mode is supported only when you are connected to an IEEE 802.11g device (e.g. An Access Point supporting IEEE 802.11g). 204 Registered Trademarks Samsung is a registered trademark of Samsung Co., Ltd. SENS is a registered trademark of Samsung Electronics Co., Ltd. Intel, Pentium/Celeron are registered trademarks of the Intel Corporation. Microsoft, MS-DOS, and Windows are registered trademarks of the Microsoft Corporation. “Memory Stick” and are trademarks of the Sony Corporation. All other product or company names mentioned herein are registered trademarks of their respective companies. ENERGY STAR® Partner As an ENERGY STAR® Partner, SAMSUNG has determined that this product meets the ENERGY STAR® guidelines for energy efficiency. 205 Glossary The Glossary lists the terminologies used in this User Guide. For terminologies other than these, look in Windows Help. Backup A way to save the current data to restore it later if necessary. A backup is a way to restore computer data when the data or computer is damaged. Direct X An application interface developed to enable Windows application programs to access hardware devices at a very high speed. Since the operating speed of graphics, memory and sound cards must be very fast to provide high quality video and sound for games, Direct X enables faster control and interaction between applications and hardware devices. By using Direct X, the multimedia performance of Windows has been hugely improved. Client This refers to a computer that uses a shared network resource provided by a server. DDR SDRAM (Double Data Rate Synchronous Dynamic Random Access Memory) DRAM is a memory type whose cells consist of a capacitor and transistor manufactured at a low price. SDRAM is a memory type whose performance has been improved by synchronizing the clock with the external CPU clock. DDR SDRAM is a memory type whose performance has been improved by doubling the operating speed of the SDRAM and is widely used nowadays. This computer uses DDR SDRAM. Driver Software that interacts between the hardware and the operating system. An operating system knows the hardware information and controls the hardware. In general, a driver is supplied with the corresponding hardware device. DVD (Digital Versatile Disk) DVD was developed to replace CD (compact disk). Although the shape and size of the disc are the same as that of a CD, the capacity of a DVD is at least 4.7GB while the capacity of a CD is 600MB. DVD video is digital unlike VHS (analog) video and supports MPEG2 compression and digital audio. To play a DVD, a DVD drive is required. Device Manager An administrative tool used to manage computer devices. You can add or remove hardware or update a device driver using the Device Manager. 206 Firewall A security system used to protect an internal network or intranet from external networks through an authentication procedure. LCD (Liquid Crystal Display) There are Passive Matrix and Active Matrix LCD types. This computer uses the Active Matrix type LCD called a TFT LCD. Since an LCD is implemented by transistors instead of a cathode-ray tube unlike a CRT, its size can be slim. And because it does not blink, it reduces eye strain. Hibernation Mode A power mode that saves all data in memory to the hard disk and turns the CPU and hard disk off. When canceling Hibernation Mode, all application programs that were running are restored to their last state. Icon This refers to a small image that represents a file that users can use. LAN (Local Area Network) A communications network connecting computers, printers and other devices within a local area such as within a building. A LAN enables all connected devices to interact with other devices on the network. The current LAN uses the Ethernet media access control method developed in the early 1980s. To connect to an Ethernet, a network card called a LAN card, Ethernet card or network interface card is required. To exchange data between computers, a protocol is required besides the hardware equipment. Windows XP uses TCP/IP as the default protocol. Network A group of computers and devices, such as printers and scanners, connected by a communications link. A network can be either small or large and can be connected permanently through cables or temporarily through telephone lines or wireless links. The biggest network is the Internet, a worldwide network. Network Administrator A user who plans, configures and manages network operations. Sometimes, a network administrator is called a system administrator. Notification Area This refers to the right area of the Taskbar including program icons such as the volume control, the power options and the time. Power Schemes This refers to a pre-determined power management option group. For example, you can set the time the computer waits before entering Standby Mode, or before the monitor or hard drive turns off. The settings are saved as a power scheme. 207 Quick Launch This refers to a toolbar that can be configured so that you can launch a program such as Internet Explorer or display the Windows Desktop with one click. You can add any icon to the quick launch area of the Taskbar and launch frequently used program by clicking that icon. USB (Universal Serial Bus) This refers to a serial interface standard developed to replace the conventional interface standards such as Serial and PS/2. While USB 1.1 supports 12Mbps (12 million bits per second), USB 2.0 supports a data rate that is 40 times (480Mpbs) faster than that of USB 1.1. The data rate of USB 2.0 is equivalent to that of IEEE1394. Therefore USB 2.0 is used for A/V devices supported by IEEE 1394 and a 2nd HDD and CDRW that require a high data rate. Server In general, a server refers to a computer that provides shared resources for network users. Windows Media Player A multimedia program included with Windows. Using this program, you can play a media file, create an audio CD, listen to a radio broadcast, search and manage media files, and copy files to a portable device, etc. Share This refers to setting a resource of a computer such as a folder or printer so that other users can also use it. Shared Folder A folder that can be used by other users on the network. Sleep Mode A power mode that enables computers to save power consumption when they are not being used. When a computer is in Sleep Mode, the data on the computer memory is not saved to the hard disk. If the power is tuned off, the data in memory will be lost. System File System Files refer to files that are read and used by the Windows operating system. In general, system files must not be deleted or moved. 208 Index A Adjusting the Volume AVStation premium AVStation Viewer 71 112 122 B Battery Battery Calibration BIOS Bluetooth Boot Priority Button 165 170 156 98 164 57 C Charge Connect / Output Monitor Connecting AP / AP Control Panel CyberLink DVD Suite 166 67 89 81 109 D Desktop / Change E Entering Text H Help M Multi Media N Network Network Status Diagnosis P Password Playing Music Product Specifications Program 77 71 166 85 S Safety Precautions Samsung Update Plus SlideShow Status Indicators Stylus Pen 9 130 117 42 52 V Video Play Volume Control 76 W Windows XP Wired Network Wireless Network 107 209 161 113, 124 196 106 R Recorder Remaining Battery Charge Resolution / Color U User Accounts / Switch User 56 86 97 83 120 71 75 87 89 Contact SAMSUNG WORLD WIDE [U.S.A. / U.K.] Contact SAMSUNG WORLD WIDE If you have any comments or questions regarding a Samsung products, contact the SAMSUNG customer care center. Customer Care Center TEL Web Site U.S.A. 1-800-SAMSUNG (726-7864) www.samsung.com/us U.K. 0870-SAMSUNG (726-7864) www.samsung.com/uk [GERMANY] Kontakt zu Samsung Falls Sie Fragen oder Anregungen zu Samsung-Produkten haben, wenden Sie sich bitte an den Samsung-Kundendienst. Customer Care Center TEL Web Site GERMANY 01805 121213 (€ 0,14/Min) www.samsung.de [FRANCE] Comment contacter Samsung dans le monde Si vous avez des suggestions ou des questions concernant les produits Samsung, veuillez contacter le Service Consommateurs Samsung. Customer Care Center TEL Web Site FRANCE 3260 SAMSUNG (726-7864) 08 25 08 65 65 (€ 0,15/Min) www.samsung.com/fr [SPAIN] Contacte con SAMSUNG WORLD WIDE Si tiene alguna pregunta o comentario referente a nuestros productos, por favor contacte con nuestro Servicio de Atencion al Cliente. Customer Care Center SPAIN TEL 902 10 11 30 Web Site www.samsung.com/es [ITALY] Contatta SAMSUNG Se hai commenti o richieste sui prodotti Samsung contatta il nostro Servizio Clienti. Customer Care Center ITALY TEL 800-SAMSUNG (726-7864) 210 Web Site www.samsung.com/it [POLAND] Kontakt z firmą SAMSUNG W sprawie jakichkolwiek pytań, czy wątpliwości dotyczących produktów SAMSUNG, prosimy o kontakt z telefonicznym Centrum Obsługi Klienta. Customer Care Center TEL Web Site POLAND 0801-1-SAMSUNG (726-78) 022-SAMSUNG (726-7864) www.samsung.com/pl [RUSSIA / UKRAINE] Связывайтесь с SAMSUNG по всему миру Если у вас есть предложения или вопросы по продуктам Samsung, связывайтесь с информационным центром Samsung. Customer Care Center RUSSIA UKRAINE TEL 8-800-555-55-55 8-800-502-0000 Web Site www.samsung.ru www.samsung.ua TEL 400-810-5858 Web Site www.samsung.com.cn [CHINA] Customer Care Center CHINA [HONGKONG] Contact SAMSUNG WORLD WIDE If you have any comments or questions regarding a Samsung products, contact the SAMSUNG customer care center. Customer Care Center HONGKONG TEL 3698-4698 Web Site www.samsung.com/hk 211 [NETHERLAND / BELGIUM] Contact opnemen met SAMSUNG klantenservice Als u vragen of opmerkingen heeft met betrekking tot een Samsung-product, kunt u contact opnemen met de Samsung klantenservice: Si vous avez des suggestions ou des questions concernant les produits Samsung, veuillez contacter le Service Consommateurs Samsung. Customer Care Center NETHERLAND BELGIUM TEL 0900-SAMSUNG (726-786 4) (0,10 €/min.) 02 201 24 18 Web Site www.samsung.com/nl www.samsung.com/be [TURKEY] SAMSUNG Turkiye’ye Ulasin Samsung ürünleriyle ilgili tüm soru ve yorumlarınız için Samsung Çağrı Merkezi ile temasa geçebilirsiniz. Customer Care Center TURKEY TEL 444 77 11 Web Site www.samsung.com/tr 212 Rev.2.0