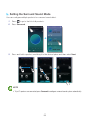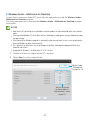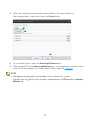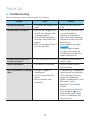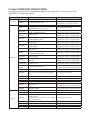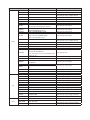
1
WAM7500/WAM7501/WAM6500/WAM6501 Wireless Audio - 360 R7/R6 Portable User Manual imagine the possibilities Thank you for purchasing this Samsung product. To receive more complete service, please register your product at www.samsung.com/register Contents Getting Started Connect with Bluetooth function Accessories.................................... 4 Connecting to Bluetooth Devices... 22 Front Panel..................................... 5 Using the Samsung Multiroom App Rear Panel - WAM6500/WAM6501... 7 Standby Mode................................ 7 Connecting to the Wi-Fi network App at a glance............................ 23 Playing Music............................... 24 Playing a music file stored in the smart device......................................24 Preparing connection..................... 8 Installing the Samsung Multiroom App...8 Listen to the music through the phone speaker...................................25 Accessing the Samsung Multiroom App......................................................8 Listening to streaming music..............26 Connecting to Wi-Fi........................ 9 Listening to the internet radio....... 27 Connecting to Wi-Fi automatically (Android/iOS)........................................9 Following a station.............................28 Setting Presets...................................29 Connecting to Wi-Fi manually (Android)............................................11 Connecting TV to the speaker...... 30 Connecting to Wi-Fi manually (iOS).....13 Connecting to TV via bluetooth (TV SoundConnect)............................30 Connecting with a HUB (Not Included)............................... 16 Connecting to TV via Wi-Fi.................32 Listening to music from other devices in network..........................................33 Adding a HUB....................................19 Adding additional speaker(s)......... 20 Using playback menu................... 33 Adjusting Equaliser and DRC.............34 Managing a queue.............................35 Managing a playlist.............................37 44 2 Appendix Using the Settings menu............... 40 Add Speaker......................................40 Troubleshooting............................ 55 Guide.................................................41 Open Source License Notice........ 57 Services.............................................41 Licences....................................... 57 Speaker Mode...................................42 Specifications............................... 58 Device Settings..................................42 Regulatory Compliance Statements................................... 60 Clock.................................................45 Support..............................................47 Warning.............................................60 Information.........................................47 CAUTION...........................................60 Connecting multiples products CAUTION...........................................60 Wiring the Main Power Supply Plug (UK Only)............................................61 Setting Groups............................. 48 Important Safety Instructions..............61 Setting the Surround Sound Mode............................................ 50 Safety precautions........................ 62 Power Supply Precautions.................62 Using miscellaneous functions Installation Precautions.......................63 Usage Precautions.............................63 Cleaning Precautions.........................64 Playing Media Content Saved in a PC................................................ 52 Additional Information................... 64 Samsung Link....................................52 About the Network Connection..........64 Wireless Audio - Multiroom for Desktop.............................................53 Compatible products..........................65 Copyright..................................... 65 44 3 Getting Started AA Accessories Confirm you have the supplied accessories shown below. • WAM7500/WAM7501 Quick Setup Guide • WAM6500/WAM6501 Power Adapter Quick Setup Guide 44 4 AA Front Panel q w Be careful not to insert your hand or finger into the tweeter opening on top of the product. < WAM7500/WAM7501 > e r t < WAM6500/WAM6501 > Source button ( ) Touch this button to switch to TV SoundConnect or Bluetooth. Touch and hold this button for more than 5 seconds to re-search TV SoundConnect. 2 Standby button ( ) Touch this button to switch to Standby mode (in which the product turns off the basic operation of its product and maintains Wi-Fi connections only). If you touch and hold this button for 5 seconds, the product turns off. (WAM7500, WAM7501 only) 3 Play/Pause button ( ) Touch this button to play or pause playback. The sound is muted when TV SoundConnect function is enabled. Volume Control button ( Controls the volume level. Press the + key to increase the volume level and press the - key to decrease the volume level. Press and hold both the + and - buttons simultaneously for 5 seconds to reset the product. 1 4 ) 44 5 You can check product's battery status through the LED indicator under the battery icon. 5 Battery Status ( ) (WAM6500, WAM6501 Only) Battery LED indicator when power adapter is connected. • Red LED : Charging. • LED OFF : Fully charged. • Rapid red blinking : Not charging. Battery LED indicator when power adapter is not connected. • Green LED : 100% to 10% of charge remaining. • Slow red blinking : 10~0% remaining. -- Slow red blinking indicates that the battery requires charging. Connect the power adapter. -- You can play the product for 6 hours with fully charged battery. (The playback time may differ depending on music source, volume, battery status, etc.) -- The sound volume may decrease and the product may turn off automatically when the battery is low. NOTES + Add Speaker : Press and hold both buttons simultaneously for 5 seconds to use the Add Speaker function. 99 + Wi-Fi Setup : Press and hold both buttons simultaneously for 5 seconds when connecting this product to your network using the Wi-Fi Setup method. -- For more details, follow the instructions in the app on your smart device. 99 You can check battery status connected to the product in the App. (WAM6500, WAM6501 Only) 99 Whole icon flashes. (flashing) Less than 10% of battery energy is left. Charging. If volume 25 or above. -- Will not charge. Reduce to below volume 25 to charge. Whole icon flashes. (flashing) Abnormal charge. -- Try charging the product within the charging temperature range (5°C to 35°C). 99 1 bar represents about 30% of battery life. 3 bars represent the whole battery life. (WAM6500, WAM6501 Only) (Remaining battery display may vary depending on sound source and volume.) 44 6 AA Rear Panel - WAM6500/WAM6501 POWER DC24V q w e POWER DC24V SERVICE SERVICE < WAM6500/WAM6501 > 1 POWER To turn the product on or off, press and hold this button for more than 2 seconds. 2 DC 24V The connection for the product's power adapter. Charging stops if the volume level reaches 25 or more. (The maximum volume level of this product is 30.) 3 SERVICE For service only. Lets service technicians update the firmware of the product. AA Standby Mode `` In Wi-Fi / Bluetooth / TV SoundConnect mode -- The product switches to Standby mode if there is no operation (music playing, button operation, app use) for 15 minutes. NOTES 99 While playing music in the Wi-Fi, Bluetooth, or TV SoundConnect connection modes, the product will not switch to Standby mode. 99 The WAM6500 and WAM6501 models use battery power if the power adapter is disconnected and the Standby mode is activated. (You can minimize battery consumption by pressing the POWER button on the rear of the product and turning the product off.) POWER POWER 44 7 DC24V SERVICE DC24V SERVICE Connecting to the Wi-Fi network AA Preparing connection Internet Wireless Router Smart Device 1 Requirements: Wireless Router, Smart Device 2 The wireless router should be connected to the Internet. 3 The smart device should be connected to the router via a Wi-Fi connection. ❚❚ Installing the Samsung Multiroom App To use the product, you must download and then install the Samsung Multiroom App by accessing the app through Google play or App Store. With the Samsung Multiroom App installed, you can play music stored in your smart device, from connected devices and other content providers, and from Internet radio stations through the product. Android Market search : Samsung Multiroom ANDROID APP ON ANDROID APP ON iOS Market search : Samsung Multiroom ❚❚ Accessing the Samsung Multiroom App Samsung Multiroom NOTE 99 Please terminate the Samsung Multiroom App when speaker are not used because the battery of your smart device can be consumed quickly if the app is working. 44 8 AA Connecting to Wi-Fi ❚❚ Connecting to Wi-Fi automatically (Android/iOS) Wireless Router 1 Plug the product into an electrical outlet. 2 On your Smart device, select the Samsung Multiroom app. 3 Run the Tutorial if you want, and then press Done. 4 Press Connect Now. • It searches for the device available for pairing. 44 9 5 Once an available device is found, it attempts to connect to the wireless network. In case of secure network, the password prompt appears on the smart device screen. Use the on-screen keyboard to enter the password. • Depending on the network environments, the product(s) may not be automatically connected. In such cases, select the Manual, and then proceed the next steps by referring to pages 11~15. Click here. 6 Press Done. • Network connection is completed. NOTES 99 To connect to your wireless network safely, you must enter the valid password. -- For connecting to the home or work wireless network, consult your service provider or the network administrator. 99 If the product fails to connect to a network or the network connection does not work normally, move the product closer to the hub or router, and then try again. 99 The distance between devices or obstruction and interference from other wireless devices may influence communication between the product and network. 99 This product may be found by some other Wi-Fi devices. However, they are not allowed to connect to this product. 99 Once the Wi-Fi connection is established initially, it is maintained unless the wireless router is replaced or its network settings are changed. 444 10 ❚❚ Connecting to Wi-Fi manually (Android) Depending on the network environments, the product(s) may not be automatically connected. In that case, you can set up the product manually to connect to the network. 1 If the automatic setup fails, select the Manual. 2 Press and hold both Play/Pause and Standby buttons simultaneously for more than 5 seconds to configure the Wi-Fi Setup. • The product can wait for 2 minutes in its standby mode until the Wi-Fi connection is established. Wireless Router 444 11 3 On your smart device, press Next. • It searches for the device available for pairing. 4 Once an available device is found, the product tries to connect to the newly found smart device first, then it attempts to connect to the wireless network. In case of secure network, the password prompt appears on the smart device screen. Use the on-screen keyboard to enter the password. 5 Press Done. • Network connection is completed. To connect to another wireless network, press this. 444 12 ❚❚ Connecting to Wi-Fi manually (iOS) 1 If the automatic setup fails, select the Manual. 2 Press and hold both Play/Pause and Standby buttons simultaneously for more than 5 seconds to configure the Wi-Fi Setup. • The R7/R6 can wait for 2 minutes in its standby mode until the Wi-Fi connection is established. Wireless Router 444 13 3 On your smart device, press Next. • It searches for the device available for pairing. 4 Go to Settings ; Wi-Fi in iOS, and then select the Samsung Wireless Audio. 5 To connect your smart device to the R7/R6, use the keyboard that appears to enter your password. • The default password is 1234567890. • The R7/R6 and the smart device are connected to each other. 444 14 6 Go back to the Samsung Multiroom app. 7 Select Next. 8 From the wireless network list, select the desired one for R7/R6 connection. 9 In case of secure network, the password prompt appears on the smart device screen. Use the on-screen keyboard to enter the password. • Once you finish entering, the R7/R6 connects to the network. 10 Go to Settings ; Wi-Fi in iOS, and then select the network which the R7/R6 is connected to. (The R7/R6 and the smart device should be connected to the same wireless router.) • The smart device connects to the network. 11 When the R7/R6 is completely connected, press Next. 12 Go back to the Samsung Multiroom app. • All network connections are finished. 444 15 AA Connecting with a HUB (Not Included) • If the product fails to connect to your network or its network connection operates abnormally, place the product closer to the HUB or your router and try again. • The product is a wireless network device. Its communications with your network may be disrupted because of the distance between it and other devices on the network, obstructions, or interference from other wireless devices. HUB Wireless Router LAN Plug In Plug In 1 Connect a LAN cable to the router and the ETHERNET SWITCH on the back of the HUB. NOTE 99 You can connect the LAN cable to any ETHERNET SWITCH Port on the HUB. 2 Attach the HUB's power cord to the power port on the rear of the HUB, and then plug the power cord into an electrical outlet. 3 The power ( ) and the HUB ( ) indicators on the HUB's front turn on. ) begins to flash, plug the product(s) into an outlet. When the pairing indicator ( The LED indicator on the product starts to flash. If the HUB's pairing indicator does not flash, press the SPK ADD button on the rear of the HUB. NOTE 99 If you are adding multiple Products, connect all the Product's to electrical outlets. If you are not connecting all the Products, refer to pages 20~21. Click here. 444 16 4 Wait until the LED indicator on the Product stops flashing. If the Product's LED indicator turns solid blue, pairing is complete. The Product may also beep. NOTES 99 Place each Product at least 20 inches (50 cm) from the HUB when connecting them to the HUB. 99 Your smart device cannot connect to the Product or the HUB if there is no wireless router. 99 To confirm you have a proper connection, check the pairing indicator on the front of the HUB. -- When you turn on the HUB for the first time, there is a 20 minute pairing period. The pairing indicator ( ) will blink for these 20 minutes or until pairing occurs. When you press the SPK ADD button to pair additional Products, the pairing period is reduced to 10 minutes. The pairing indicator ( ) flashes for 10 minutes or until pairing occurs. Turn on the Product you want to pair while the pairing indicator is flashing. -- If pairing mode is turned off, start pairing mode again by pressing the SPK ADD button on the rear side of the hub and restart the product, or press and hold both Source and Standby buttons at the same time for more than 5 seconds. 99 For a proper connection, connect the HUB to your router before turning on the Product. -- Connecting the Product to the HUB may take a few minutes. -- There will be a brief sound when the connection is established. 5 Connect your smart device to your Wi-Fi network. (The HUB and the smart device should be connected to the same router.) 444 17 6 Download the Samsung Multiroom app from Google Play or the App Store. 7 On your smart device, select the Samsung Multiroom app. Setup starts. 8 If the automatic setup fails, run the App again. 444 18 ❚❚ Adding a HUB An product and a HUB may not pair successfully if the product and HUB are too far apart or are on different floors. In such cases, you can link two HUBs together by setting the second HUB to Repeater mode. The additional HUB amplifies the signal and lets you pair the product to the closest HUB. 1 Set the HUB that is connected to the wireless router to Pairing mode by pressing its SPK ADD button for 1 second. 2 Plug in the new HUB you are using as an extender, and then press its SPK ADD button for 10 seconds. 3 The newly added HUB's LED indicators turn off and on, and it switches to Repeater mode. 4 Once the connection between the two HUBs has been established, the added HUB's ( ) indicator stops blinking. NOTES Product Used as a extender 99 If your smart device is not connected to the wireless router with a Wi-Fi connection, the product will not appear on the HUB Samsung Multiroom app. 99 Place the HUB that is in Repeater mode in an appropriate location between the product and the HUB that is connected to the wireless router. 99 You can set only one HUB to Repeater mode. Relocating the product When relocating your product, refer to the below table. HUB Wireless router Without a HUB If you want to connect your product to If you want to connect your product to the current wireless router. a different wireless router. Turn off the product, relocate it and then turn it on. With a HUB 444 19 Turn off the product, relocate it, then establish the new connection as described in the installation instructions on pages 9 through 15. Click here. Connect a LAN cable between the HUB and the new wireless router, turn on the HUB, and then turn on the product. AA Adding additional speaker(s) To add additional speaker(s) to an existing speaker connection, use Add Speaker function. 1 Connect the power cable of the speaker to be added to a wall outlet. • If connecting the power cable of the speaker to a wall outlet, the Wi-Fi is automatically switched into standby mode. • The speaker can wait for 2 minutes in its standby mode until the Wi-Fi connection is established. 2 Run the Samsung Multiroom app on your smart device. 3 Press 4 Press . to view the list of all speakers. 5 Press Add Speaker. 6 Once an available device is found, it attempts to connect to the wireless network. In case of secure network, the password prompt appears on the smart device screen. Use the onscreen keyboard to enter the password. • Depending on the network environments, the speaker(s) may not be automatically connected. In such cases, refer to pages 11~12 Click here. for Android, or pages 13~15 Click here. for iOS devices to continue. 444 20 7 The additional new speaker is completely added. 444 21 Connect with Bluetooth function AA Connecting to Bluetooth Devices You can connect the product to a Bluetooth device to enjoy the music stored in your Bluetooth device. 1 Turn on the speaker, and then press the Source button on its top panel. 2 Turn on the Bluetooth function of your smart device, and then select Search. 3 Select the [Samsung] R7 or [Samsung] R6 Portable. The Bluetooth connection between the smart device and the product is made. NOTES 99 A Bluetooth device may cause noise or malfunction, depending on usage, when: -- A part of your body is in contact with the receiving/transmitting system of the Bluetooth device or the product. -- It is subject to electrical variation from obstructions caused by a wall, corner, or by office partitioning. -- It is exposed to electrical interference from same frequency-band devices including medical equipment, microwave ovens, and wireless LANs. 99 Pair the product with the Bluetooth device while they are close together. 99 Bluetooth connection mode, the Bluetooth connection will be lost if the distance between the product and the Bluetooth device exceeds 32 feet (10 m). Even within range, the sound quality may be degraded by obstacles such as walls or doors. 99 This product may cause electric interference during its operation. 99 The product supports SBC data (44.1kHz, 48kHz). 99 The AVRCP feature is not supported. 99 Connect only to a Bluetooth device that supports the A2DP (AV) function. 99 You cannot connect to a Bluetooth device that supports only the HF (Hands Free) function. 99 Only one Bluetooth device can be paired at a time. 99 If you unplug the product, the Bluetooth connection is terminated. To re-establish the connection, plug the product into an outlet, and then set the Bluetooth connection again. 22 444 Using the Samsung Multiroom App AA App at a glance y q w u e i r o t p 1 Check the full list of connected products to either change or setup. 2 Change sound source. 3 Either check the queue or edit the playlist. 4 Rotate while dragging the wheel to select a music from the queue. Release the wheel to play the music. - You can select a music by turning the inside of the wheel. 5 Play menu 6 Enter a keyword to search for the music desired. 7 Change to another song from the current source. 8 If you slightly touch the outside of the wheel on screen, you can go to the playback bar screen to check total playback time for all the music pieces. 9 Play, Pause, or Previous/Next Song 10 To change only the product of the music currently playing. 444 23 AA Playing Music ❚❚ Playing a music file stored in the smart device 1 Press Source. 2 Select the Songs on Phone (files stored in the smart device). 3 Press , and then select your desired category. • Songs : Lists all the music files by name. • Albums : Lists all the music files by album. • Artists : Lists all the music files by artist. • Genres : Lists all the music files by genre. • Folders : Lists all the music files by stored folder. • Playlists : Lists all the music files by playlist. • Favourites : Lists all the music files marked as favourites. 4 After selecting a category, find and select your desired music. 444 24 ❚❚ Listen to the music through the phone speaker 1 Press in the home screen, and the select Phone Speaker. Or 1-1 Select Phone Speaker from the list of All Speakers. 2 You can listen to the music stored in your mobile phone through the Phone Speaker. NOTES 99 If Wi-Fi connection is not established, enjoy music through your Phone Speaker. 99 You can enjoy only the music stored in your mobile phone through the Phone Speaker. 444 25 ❚❚ Listening to streaming music You can select your desired contents service to listen to music. 1 Press Source. 2 Select More. The entire list of Music Services is displayed. 3 From the Music Services, select your desired service. 4 Drag to change the order of displayed music services. NOTES 99 Depending on your region or manufacturer, supported content services may differ. 99 Some music services may require you to sign up for a membership or log in. 99 You may not subscribe to a service using your smart device. To use a for-pay service, first subscribe to the service through your computer. 99 Some Tunein radio channels may be restricted according to their site policy. 99 Supported music service may be added or deleted according to corresponding policy. 444 26 AA Listening to the internet radio 1 Press Source. 2 Select TuneIn. 3 Select your desired category. • Following : Shows the list of stations added to the preset list or marked as you are following. By default, 3 radio stations are displayed in the preset list. • Browse : Lists all supported Internet radio stations. • Search : Allows you to search for a desired internet radio station using keypad input. 4 Find and select a station. 444 27 ❚❚ Following a station You can add a channel to the Following list. 1 Select the desired channel. 2 Press to display a popup menu, and then select + Following. 3 Press Save. • The channel you are currently listening to is added to the Following list. 444 28 ❚❚ Setting Presets You can add the internet radio channel you are following into the preset list, or rearrange the displaying order in the list. 1 Press , and then press Following. 2 Press Edit. 3 Drag the desired channel from the Following to the Presets. 4 To finish editing, press Done. 444 29 AA Connecting TV to the speaker ❚❚ Connecting to TV via bluetooth (TV SoundConnect) TV SoundConnect function allows you to conveniently connect Samsung TV to external speaker(s) wirelessly and enjoy the TV sound. 1 Turn on the speaker, and then press the Source button on its top panel. TV Or 1-1 Press Source in the home screen, and the select TV SoundConnect. 444 30 2 A message asking whether to proceed with Bluetooth pairing appears. NOTE 99 Set Add New Device to On in the TV's TV SoundConnect Settings menu. (Refer to the TV's user manual for details.) 3 When a message appears to check whether to establish Bluetooth pairing or not, select Yes. The product is paired to the TV. NOTES 99 Press and hold the Source button for more than 5 seconds to reset the TV SoundConnect. 99 Optimal pairing distance is 6.5 feet(2 m) or less. 99 If you unplug the product, the TV SoundConnect connection is terminated. To re-establish the connection, plug the product into an outlet, and then set the TV SoundConnect connection again. 99 When the speaker is in Standby mode, the TV SoundConnect connection is not terminated. 99 Operational range of TV SoundConnect -- Recommended pairing range: up to 6.5 feet(2 m). -- Recommended operating range: up to 32 feet(10 m). -- The connection may be lost or sound may stutter if the distance between the TV and the product exceeds 32 feet(10 m). 99 The SoundConnect feature is available on some Samsung TVs released since 2012. Check whether your TV supports the SoundShare or SoundConnect function. (For further details, refer to the TV's user's manual.) 99 Instability in the network environment may cause connection to be lost or sound to stutter. 444 31 ❚❚ Connecting to TV via Wi-Fi 1 Set the TV and speaker to the same Wi-Fi network. 2 Press Source at Home screen and select the TV to connect from Other Music Sources list. 3 A message appears to ask if you want to perform network pairing process to TV. 4 Select Yes to connect TV to the speaker. 5 You can enjoy music on TV through the speaker. 444 32 ❚❚ Listening to music from other devices in network You can listen to music stored on another device that is connected to the same network. Go to www.samusng.com to download and install the Wireless Audio - Multiroom for Desktop program. You can share music stored in your PC connected smart devices. For details, refer to "Wireless Audio - Multiroom for Desktop" on pages 53~54. Click here. 1 Press Source. 2 From the Nearby Devices, select the desired device. 3 You can play music files stored in your selected device through the product. AA Using playback menu 1 Press . 2 When a popup menu appears, select your desired function. • Shuffle : It randomly plays back music files from the standby list. • Repeat : It repeats the current music file or all the music files from the standby list. • Add to Playlist : Creates a new playlist or adds currently playing music into the current playlist. • Favourite : Adds the currently playing music file to the favourites list. • Equaliser : You can suitably adjust the volume of music currently playing by frequency depending on the genre, preference and place. 444 33 ❚❚ Adjusting Equaliser and DRC You can select one of the presets provided by default in the Equaliser option or create your own settings by adjusting the frequencies manually. In addition, set DRC to On to change volume smoothly. If the volume is turned down, you can listen to the quiet and gentle voice clearly. 1 Press . 2 When a popup menu appears, press Equaliser. 3 To adjust the bass or treble frequency ranges, drag the slider up or down. Set DRC, and then press Save. 4 Press Custom, and then enter a name. Press Done. 5 Press Yes, and then select OK. NOTE 99 This function is not available if speakers are grouped. 444 34 ❚❚ Managing a queue `` Adding music to the queue You can add new music to the current music list or edit the music list. 1 Press , and then select Songs. 2 Select of the music to add, and then select Add to Queue. (Select Select Multiple to save multiple music pieces in the Queue at the same time.) 3 Select the music title at Home screen to check the saved Queue. NOTES 99 You can save up to 360 pieces of music in the queue. 99 You cannot save music played by station-based music providers such as Tunein, Pandora, etc. in the queue. 444 35 `` Editing the queue 1 Select the music title at Home screen, and then press Edit. 2 Drag to change the order of music, select your desired music to delete, and then press Done. 3 Press Yes. 444 36 ❚❚ Managing a playlist `` Creating a Playlist You can create your own playlist to save or edit. 1 Press , and then select Playlists. 2 Select Create Playlist, and then enter a name for the playlist. Press Done. 3 Select Playlists, and then press the created playlist. 444 37 4 Press Add Songs, and then select Songs. 5 Select your desired music to save in playlist, and then press Add. NOTE 99 You can save up to 360 pieces of music in the playlist. 444 38 `` Editing a Playlist 1 Press 2 Select , and then select Playlists. of Playlists or the of the music to use additional menu. 444 39 AA Using the Settings menu 1 On your Smart device, select the Samsung Multiroom app. 2 Press 3 Press . to view the list of all speakers. ❚❚ Add Speaker `` Add Speaker To add additional speaker(s) to an existing speaker connection, refer to "Adding additional speaker(s)" on pages 20~21. Click here. 444 40 ❚❚ Guide `` Tutorial Select the Tutorial to learn how to use the app. ❚❚ Services Displays a list of available services. NOTES 99 Depending on your region or manufacturer, supported content services may differ. 99 Some music services may require you to sign up for a membership or log in. 99 You may not subscribe to a service using your smart device. To use a for-pay service, first subscribe to the service through your computer. 99 Some Tunein radio channels may be restricted according to their site policy. 99 Supported music service may be added or deleted according to corresponding policy. 444 41 ❚❚ Speaker Mode `` Bluetooth • Off : Turns off the Bluetooth. • On : Turns on the Bluetooth. ❚❚ Device Settings `` Front LED • Off : Turns off the product's Front LED indicators. • On : Turns on the product's Front LED indicators. NOTES 99 Product LED indicator status -- Blue (on) : Wi-Fi network connection established -- Blue (flashing) : preparing Wi-Fi network connection -- Purple (turning off after flashing at an interval of 1 second) : update finished -- Red, Green : indicates battery status. Refer to the instructions on page 6. (WAM6500, WAM6501 Only) Click here. 444 42 `` Sound Feedback Sound Feedback is a function to indicate current status of product through the sound. • Off : Turns off the Sound Feedback. • On : Turns on the Sound Feedback. `` Software Update Shows the product's current software version, and lets you turn auto update on or off. • On : When on, automatically updates the software when new firmware is released. • Off : Turns off the auto update function. 444 43 NOTES 99 Auto update is available when your product is connected to a network and the Software Auto Update function is set to On. 99 It is strongly recommended that Software Auto Update settings on all the products used are set to On. Problems with networked functions may otherwise occur due to incompatibility issues when a variety of product software versions is used on linked products. 99 Software Auto Update will only update the speaker when the speaker is in Standby mode. To manually place the speaker in Standby mode: 1) Set Software Auto Update to On. 2) Touch the Standby button on the speaker. Update Now You can update your speaker's software manually using Update Now. 1 Press . 2 Select Software Update. 3 Select Update Now. 4 Update Now searches for a current software update. If an update is available, it will download and install the update on your speaker. If you already have the most current software on you speaker, Update Now displays "Latest version already installed.". `` Continuous Play Since this function allows you to switch the sound output from your mobile device into the product automatically, you can just enjoy the music seamlessly. 444 44 ❚❚ Clock `` Alarm (WAM7500, WAM7501 only) 1 Press Alarm, and then press Add Alarm. 2 Select the alarm date, time, day of the week, alarm volume and duration. 3 Press Music, select Sound or TuneIn to select your desired alarm sound. 444 45 `` Sleep Timer You can turn off the product by setting sleep time. 1 Press Sleep Timer, and then press Off. 2 Drag to On, set your desired time, and then select Start. 444 46 ❚❚ Support `` Term & Conditions Lets you check the Term & Conditions. `` Device ID Lets you check the Device ID. `` Contact Samsung Provides a link to the Samsung website. `` Open Source Licenses Lets you view the Open Source Licenses. ❚❚ Information `` Samsung Multiroom Allows you to check the software version number of the product. `` App Version Allows you to check the Samsung Multiroom app version. 444 47 Connecting multiples products AA Setting Groups You can group multiple speakers into one group that plays the same music. Grouping is available only when multiple speakers are connected to the same network. 1 Press to go to the list of all speakers. 2 Press Group. 3 Select other products to add into the group, and then press Done. NOTE 99 Group playback is not available for Bluetooth and TV SoundConnect connections. `` Editing group 1 Press Edit. 2 Select the speaker to edit and press Done. 444 48 `` Ungrouping Press Ungroup. 444 49 AA Setting the Surround Sound Mode You can configure multiple products for surround sound effect. 1 Press to go to the list of all products. 2 Press Surround. 3 Press and hold a product, and drag it to the desired place and then select Next. 1 2 2 1 NOTE 99 If just 2 speakers are connected, press Surround to configure surround sound system automatically. 444 50 4 Test products and adjust product volume, and then press Done. NOTES 99 The Surround Mode may be cancelled automatically if the network connection is unstable. 99 When enabling the Surround Sound mode, it is recommended to set the same speakers you assign to Front L and Front R. 99 You can configure 4.1 channel surround sound system with a soundbar and 2 speakers. 99 You cannot configure Surround sound system with a soundbar and one speaker. 444 51 Using miscellaneous functions AA Playing Media Content Saved in a PC ❚❚ Samsung Link Install the Samsung Link program for easier playback of music stored in your PC through M5. Visit http://link.samsung.com and download the Samsung Link application and finish installing it. 1 Visit http://link.samsung.com and login with your Samsung account. Follow the instructions shown to install the program. 2 Select the folder to be shared. 1) Move the mouse pointer over the Samsung Link icon from the icons tray, right click on it and select "1". 2) On the screen displayed, you can add or delete shared folders. After adding or changing contents of shared folders, make sure to press the button. 1 3 Select the Devices from the Samsung Multiroom app to select PC. Shared PC folders and music files will be displayed. (For further details, refer to page 33.) Click here. NOTES 99 Note that the PC containing the shared folders and your M5 must be connected to the same wireless router. 99 Samsung Link software should have been installed on the computer. The mobile device should support Samsung Link. For more information, visit Samsung's content and service portal at http://link.samsung. com. 99 You may experience compatibility issues when attempting to play media files via a third-party DLNA server. 99 However, the content shared by a computer device may not play depending on the encoding type and file format of the content. In addition, some functions may not be available. 99 The media content may not smoothly play depending on the network status. If this is the case, use a USB storage device. 444 52 ❚❚ Wireless Audio - Multiroom for Desktop To play iTunes system and shared PC music files through product, install the Wireless Audio Multiroom for Desktop program. Visit www.samsung.com to download the Wireless Audio - Multiroom for Desktop program and install it. NOTES 99 Note that the PC containing the shared folders and your product must be connected to the same wireless router. 99 If the connected Windows PC or the Mac switches to off-display mode, power saving or hibernation mode, the App will stop. 99 If the firewall of the Windows computer is activated, the App may not work. In such a case, deactivate the firewall of Windows or other vaccine firewall. 99 The *.pkg file is for Mac while *.msi is for Windows installation. Download the appropriate file for your computer and install it. 99 Supported OS: Windows 7 or higher, Mac OS X 10.7 or later. 1 Double click the icon created on the PC's desktop. 2 Select Next to set the shared folders. Wireless Audio - Multiroom for Desktop: Off, On You can set the app to allow or block an external device's access to your PC. 444 53 3 Select the content type and add the selected folder to the shared folders list. After sharing folders, make sure to press the Done button. 1 2 3 4 On your Smart device, select the Samsung Multiroom app. 5 Select desired PC on the Samsung Multiroom app, and shared folders and files stored in the PC will be displayed. (For further details, refer to page 33) Click here. NOTE 99 After adding or changing contents of shared folders, make sure to press the button. If you don't press the button, the files shared by a computer device may not displayed in the Samsung Multiroom app. 444 54 Appendix AA Troubleshooting Before requesting service, please check the following. Symptom The unit will not turn on. Hub and product is not paired. A function does not work when the button is pressed. Sound is not produced. Check Remedy •• Is the power cord plugged into the •• Connect the power cord to the outlet? outlet. •• Reset the HUB. (Refer to the HUB's •• When the Hub is plugged in, do the HUB's front indicators show user manual for details.) it's operating properly? Unplug the HUB and plug it in again. Check whether the pairing •• Is the LAN cable connected to indicator on the front of the HUB is the wireless router and the HUB blinking or not. properly? •• Make sure the product's front LED •• Reset the product (see page 5). Click here. turns from red to blue. Unplug the product and plug it in again. Check whether the LED indicator on the front of the product is blinking or not. •• Is there static electricity in the air? •• Disconnect the power plug and connect it again. •• Is the volume set to minimum? The TV SoundConnect (TV pairing) •• Does your TV support TV failed. SoundConnect? •• Is your TV firmware the latest version? •• Does an error occur when connecting? 444 55 •• Connect the product correctly. •• Adjust the volume. •• TV SoundConnect is supported by some Samsung TVs released after 2012. Check your TV to see if it supports TV SoundConnect. •• Confirm TV SoundConnect is set to On in your TV's menu. •• Update your TV with the latest firmware. •• Contact the Samsung Call Centre. •• Press and hold the Source button for more than 5 seconds to reset TV SoundConnect and connect a new TV. Symptom Check HUB doesn't work properly •• Is the HUB plugged in? •• Is the LAN cable connected to the wireless router and the HUB properly? •• When the Hub is plugged in, do the HUB's front indicators show it's operating properly? Product doesn't work properly •• Is the product plugged in? •• Does the product's front LED indicator remain red 5 minutes after turning on? Remedy •• Plug in the HUB. •• Connect the LAN cable to the ETHERNET SWITCH on the back of the HUB and to your wireless router. •• Reset the HUB. (Refer to the HUB's user manual for details.) •• If you experience troubles with connecting the HUB and product, try relocating the product so that the product is closer to the wireless router or HUB. •• Plug in the product. •• Check whether the Wi-Fi router you're using had been certified for Wi-Fi. •• Unplug the product, plug it back in, and then reconnect it to the router. •• Reset the product (see page 5). Click here. •• If used with a HUB -- Make sure the smart device and the HUB are connected to the same Wi-Fi network. -- Make sure the HUB's indicator LED's show that it is working correctly. (See page 16, item 3.) Click here. -- If the problem persists, reset the HUB. (Refer to the HUB's user manual for details.) -- Unplug, then plug in the HUB. Then, unplug and plug in the product. -- If you experience troubles with connecting the HUB and product, try relocating the product so that the product is closer to the wireless router or HUB. 444 56 Symptom Check I cannot group products. •• Is the product connected to the network via Wi-Fi? App doesn't work properly •• Does an error occur when accessing the app? Remedy •• If the product is connected to the network via Bluetooth or TV SoundConnect, you cannot use the group products function. •• Make sure your smart device is compatible with the app. (See page 65) Click here. •• Make sure the app is the latest version. •• Make sure the product's front LED turns from red to blue. •• If used with a HUB -- Make sure the HUB and the smart device are connected to same router. -- Make sure the HUB's indicator LED's show that it is working correctly. (See page 16, item 3.) Click here. -- If you experience troubles with connecting the HUB and product, try relocating the product so that the product is closer to the wireless router or HUB. NOTE 99 If the problem persists, consult the service centre for troubleshooting. AA Open Source License Notice • For further information on Open Sources used in this product, please visit the website: http:// opensource.samsung.com AA Licences • The Spotify Software is subject to third party licenses found here : www.spotify.com/connect/third-party-licenses. • For more information about Spotify Connect, please visit www.spotify. com/connect 444 57 AA Specifications • WAM7500/WAM7501 General Weight 3.4 Kg Operating Temperature Range +5°C to +35°C Dimensions 181 (W) X 181 (D) X 422 (H) mm Operating Humidity Range 10 % to 75 % Wireless LAN Network Built-in WEP (OPEN/SHARED) Security WPA-PSK (TKIP/AES) WPA2-PSK (TKIP/AES) Overall Standby Power consumption (W) (When all network ports are set to on) 2.2 W Press the Standby button on the product's front for 5 seconds to deactivate Wi-Fi and Bluetooth and turn the power off. • WAM6500/WAM6501 Power Requirements General DC24V Weight 1.8 Kg Operating Temperature Range +5°C to +35°C Dimensions 157 (W) X 157 (D) X 232 (H) mm Operating Humidity Range Network 2.5A 10 % to 75 % Wireless LAN Built-in Security WPA-PSK (TKIP/AES) WEP (OPEN/SHARED) Overall Standby Power consumption (W) (When all network ports are set to on) WPA2-PSK (TKIP/AES) 4.3 W While the product is turned on, press the POWER button on the product's rear side for 2 seconds to deactivate Wi-Fi and Bluetooth and turn the power off. POWER 444 58 DC24V SERVICE POWER DC24V SERVICE -------- Network speeds equal to or below 10Mbps are not supported. Design and specifications are subject to change without prior notice. For the power supply and power consumption, refer to the label attached to the product. See product bottom for important safety information. Weight and dimensions are approximate. This user manual is based on the product using the Android or iOS operating system. App screen is based on Android operating system and it may change after you upgrade the software version. -- For further details on using the product, visit www.samsung.com. • An administration fee may be charged if either (a) an engineer is called out at your request and there is no defect in the product (i.e. where you have failed to read this user manual). (b) you bring the unit to a repair center and there is no defect in the product (i.e. where you have failed to read this user manual). • The amount of such administration charge will be advised to you before any work or home visit is carried out. 444 59 AA Regulatory Compliance Statements CAUTION RISK OF ELECTRIC SHOCK DO NOT OPEN The lighting flash and arrowhead within the triangle is a warning sign alerting you to dangerous voltage inside the product. ❚❚ Warning CAUTION: TO REDUCE THE RISK OF ELECTRIC SHOCK, DO NOT REMOVE THE COVER (OR BACK). NO USER SERVICEABLE PARTS INSIDE. REFER SERVICING TO QUALIFIED SERVICE PERSONNEL. The explanation point within the triangle is a warning sign alerting you to important instructions accompanying the product. • To reduce the risk of fire or electric shock, do not expose this appliance to rain or moisture. • Do not expose this apparatus to dripping or splashing. Do not put objects filled with liquids, such as vases on the apparatus. • To turn this apparatus off completely, you must pull the power plug out of the wall socket. Consequently, the power plug must be easily and readily accessible at all times. ❚❚ CAUTION TO PREVENT ELECTRIC SHOCK, MATCH WIDE BLADE OF PLUG TO WIDE SLOT, FULLY INSERT. • This apparatus shall always be connected to a AC outlet with a protective grounding connection. • To disconnect the apparatus from the mains, the plug must be pulled out from the mains socket, therefore the mains plug shall be readily operable. ❚❚ CAUTION • Do not expose this apparatus to dripping or splashing. Do not put an object filled with liquid, such as a vase, on the apparatus. • To turn this apparatus off completely, you must pull the power plug out of the wall socket. Consequently, the power plug must be easily and readily accessible at all times. 444 60 ❚❚ Wiring the Main Power Supply Plug (UK Only) IMPORTANT NOTICE The mains lead on this equipment is supplied with a moulded plug incorporating a fuse. The value of the fuse is indicated on the pin face of the plug and if it requires replacing, a fuse approved to BS1362 of the same rating must be used. Never use the plug with the fuse cover removed. If the cover is detachable and a replacement is required, it must be of the same colour as the fuse fitted in the plug. Replacement covers are available from your dealer. If the fitted plug is not suitable for the power points in your house or the cable is not long enough to reach a power point, you should obtain a suitable safety approved extension lead or consult your dealer for assistance. However, if there is no alternative to cutting off the plug, remove the fuse and then safely dispose of the plug. Do not connect the plug to a mains socket as there is a risk of shock hazard from the bared flexible cord. Never attempt to insert bare wires directly into a mains socket. A plug and fuse must be used at all times. IMPORTANT NOTICE The wires in the mains lead are coloured in accordance with the following code:– BLUE = NEUTRAL BROWN = LIVE As these colours may not correspond to the coloured markings identifying the terminals in your plug, proceed as follows:– The wire coloured BLUE must be connected to the terminal marked with the letter N or coloured BLUE or BLACK. The wire coloured BROWN must be connected to the terminal marked with the letter L or coloured BROWN or RED. WARNING : DO NOT CONNECT EITHER WIRE TO THE EARTH TERMINAL WHICH IS MARKED WITH THE LETTER E OR BY THE EARTH SYMBOL , OR COLOURED GREEN OR GREEN AND YELLOW. ❚❚ Important Safety Instructions Read these operating instructions carefully before using the unit. Follow all the safety instructions listed below. Keep these operating instructions handy for future reference. 1 Read these instructions. 2 Keep these instructions. 3 Heed all warnings. 4 Follow all instructions. 5 Do not use this apparatus near water. 6 Clean only with a dry cloth. 7 Do not block any ventilation openings. Install in accordance with the manufacturer's instructions. 444 61 8 Do not install near any heat sources such as radiators, heat registers, stoves, or other apparatus (including AV receivers) that produce heat. 9 Do not defeat the safety purpose of the polarized or grounding-type plug. A polarized plug has two blades with one wider than the other. A grounding type plug has two blades and a third grounding prong. The wide blade or the third prong are provided for your safety. If the provided plug does not fit into your outlet, consult an electrician for replacement of the obsolete outlet. 10 Protect the power cord from being walked on or pinched particularly at plugs, convenience receptacles, and the point where it exits the apparatus. 11 Only use attachments/accessories specified by the manufacturer. 12 Use only with the cart, stand, tripod, bracket, or table specified by the manufacturer, or sold with the apparatus. When a cart is used, use caution when moving the cart/apparatus combination to avoid injury from tip-over. 13 Unplug this apparatus during lightning storms or when unused for long periods of time. 14 Refer all servicing to qualified service personnel. Servicing is required when the apparatus has been damaged in any way, such as when the power-supply cord or plug is damaged, liquid has been spilled or objects have fallen into the apparatus, the apparatus has been exposed to rain or moisture, does not operate normally, or has been dropped. AA Safety precautions ❚❚ Power Supply Precautions • Do not overload outlets or extension cords. -- This may result in abnormal heat or fire. • Do not plug in or unplug the power cord with wet hands. • Do not place the product near heating equipment. • To clean the power plug blades, remove the plug from the wall outlet and wipe the blades with a dry cloth only. • Do not bend the power cord or pull it forcefully. • Do not put heavy objects on the power cord. • Do not plug the power cord into a loose or damaged outlet. • Fully insert the power cord's plug into the the wall outlet so that the plug is firmly attached to the outlet. -- If the connection is unstable, there is a risk of fire. 444 62 ❚❚ Installation Precautions • Do not install the product near equipment or objects that generate heat or produce fire (candles, mosquito coils, heaters, radiators, etc.). Do not install in direct sunlight. • When moving the product, turn off the power and disconnect all cords (include the power cord) from the unit. -- A damaged cord may cause a fire and poses a risk of electric shock. • Installing the product in environments with high heat or humidity, dust, or extreme cold, can lead to quality problems or cause the product to malfunction. Before you install the product in an environment that is outside the norm, please contact a Samsung service centre for additional information. • When placing the product on a shelf, cabinet, or desk, make sure the top panel faces upwards. • Do not place the product on an unstable surface (e.g. a shaky shelf, a tilted desk, etc.). -- Dropping the product can cause it to malfunction and poses a risk of injury. Severe vibration or impact can also cause the product to malfunction and lead to a fire hazard. • Install your product with enough space around it for ventilation. -- Leave at least 4 inches (10cm) at the rear of the product and more than 2 inches (5cm) on each side of the product. • Keep the plastic packing materials out of reach of your children. -- Children playing with the plastic packing materials run the risk of suffication. ❚❚ Usage Precautions • Using for an extended time at high volume may cause serious damage to your hearing. -- If you are exposed to sound louder than 85db for an extended time, you may adversely affect your hearing. The louder the sound is, the more seriously damaged your hearing may become. Note that an ordinary conversation is between 50 to 60 db and road noise is approximately 80 db. • This product contains dangerous high voltage. Do not attempt to disassemble, repair, or modify it yourself. -- Contact a Samsung service centre when your product is in need of repair. • Do not place any container that contains liquid on the product (e.g. a vase, beverages, cosmetics, chemicals, etc.). Do do not allow any metal objects (e.g. coins, hair clips, etc.) or flammable material (e.g. paper, matches, etc.) to enter the product (through the air vents, I/O ports, etc.). -- If any harmful material or liquid enters the product, turn off the product immediately, unplug the power cord, and then contact a Samsung service centre. 444 63 • Do not drop the product. In case of a mechanical breakdown, disconnect the power cord and contact a Samsung service centre. -- There is a risk of fire or electric shock. • Do not hold or pull the product by the power cord or the signal cable. -- A damaged cable can cause the product to malfunction, cause a fire, and poses a risk of electric shock. • Do not use or keep flammable materials near the product. • If the product emits an abnormal sound or a burnt smell or smokes, unplug the power-cord immediately and contact a Samsung service centre. • If you smell gas, ventilate the room immediately. Do not touch the power plug of the product. Do not turn the product off or on. • Do not strike or subject the product to a sudden shock. Do not pierce the product with a sharp object. • This product can be moved and placed indoors. • This product is not waterproof or dustproof. • Be careful when moving the product to avoid dropping it and possibly damaging it. ❚❚ Cleaning Precautions • Never use alcohol, solvents, waxes, benzene, thinners, air freshener, or lubricants to clean the product, or spray insecticide on the product. -- Using any of these materials can discolor the exterior coating or cause it to split or peel off, or remove the labelling on the product. • To clean the product, unplug the power cord, and then wipe the product with a clean, dry, soft cloth (Microfiber, cotton). -- Avoid leaving dust on the product. Dust can scratch its the surface. AA Additional Information ❚❚ About the Network Connection • Depending on the wireless router used, some network operations may perform differently. • For detailed information on networking with a wireless router or modem, refer to the router's or modem's documentation. • Select one wireless channel that is not used currently. If the selected channel is used by another communication device nearby, radio interference may result in communication failure. 444 64 • In compliance with the newest Wi-Fi certification specifications, the HUB does not support WEP, TKIP, or TKIP-AES (WPA2 Mixed) security encryption in networks running in the 802.11n mode. • By its nature, wireless LAN may experience radio interference depending on the environmental conditions (such as wireless router performance, distance, obstruction, interference with other wireless devices, etc.) • WEP encryption does not work with WPS (PBC) / WPS (PIN). ❚❚ Compatible products • Mobile : Android 2.3.3 (Gingerbread) or above, iOS (6.0) or above NOTES 99 Some devices may not be compatible with the product. 99 Note that a product of an older version may not be supported. AA Copyright © 2015 Samsung Electronics Co.,Ltd. All rights reserved; No part or whole of this user's manual may be reproduced or copied without the prior written permission of Samsung Electronics Co.,Ltd. • Hereby, Samsung Electronics, declares that this equipment is in compliance with the essential requirements and other relevant provisions of Directive 1999/5/EC. The original Declaration of Conformity may be found at http://www.samsung.com, go to Support > Search Product Support and enter the model name. This equipment may be operated in all EU countries. This equipment may only be used indoors. 444 65 Contact SAMSUNG WORLD WIDE If you have any questions or comments relating to Samsung products, please contact the SAMSUNG customer care centre. Country U.S.A North America CANADA MEXICO BRAZIL COSTA RICA DOMINICAN REPUBLIC ECUADOR EL SALVADOR GUATEMALA HONDURAS JAMAICA Latin America NICARAGUA PANAMA PUERTO RICO TRINIDAD & TOBAGO VENEZUELA 1-800-SAMSUNG (726-7864) 01-800-SAMSUNG (726-7864) 0800-124-421 (Demais cidades e regiões) 4004-0000 (Capitais e grandes centros) 0-800-507-7267 00-800-1-SAMSUNG (726-7864) 1-800-751-2676 1-800-10-7267 1-800-SAMSUNG (72-6786) 800-6225 800-0726-7864 1-800-299-0013 1-800-299-0033 800-2791-9267 800-2791-9111 1-800-234-7267 1-800-SAMSUNG (726-7864) 001-800-5077267 800-7267 800-0101 1-800-682-3180 1-800-SAMSUNG(726-7864) CHILE BOLIVIA PERU ARGENTINE 0-800-SAMSUNG (726-7864) Bogotá 600 12 72 Gratis desde cualquier parte del país 01 8000 112 112 800-SAMSUNG(726-7864) 800-10-7260 0800-777-08 0800-555-SAMSUNG (0800-555-7267) PARAGUAY 009-800-542-0001 COLOMBIA URUGUAY UK EIRE Europe Contact Centre 1-800-SAMSUNG (726-7864) GERMANY FRANCE ITALIA SPAIN PORTUGAL 000-405-437-33 0330 SAMSUNG (7267864) 0818 717100 0180 6 SAMSUNG bzw. 0180 6 7267864* (*0,20 €/Anruf aus dem dt. Festnetz, aus dem Mobilfunk max. 0,60 €/Anruf) 01 48 63 00 00 800-SAMSUNG (800.7267864) 0034902172678 808 20 7267 Web Site www.samsung.com/us/support www.samsung.com/ca/support (English) www.samsung.com/ca_fr/support (French) www.samsung.com/mx/support www.samsung.com/br/support www.samsung.com/latin/support (Spanish) www.samsung.com/latin_en/support (English) www.samsung.com/latin/support (Spanish) www.samsung.com/latin_en/support (English) www.samsung.com/latin/support (Spanish) www.samsung.com/latin_en/support (English) www.samsung.com/latin/support (Spanish) www.samsung.com/latin_en/support (English) www.samsung.com/latin/support (Spanish) www.samsung.com/latin_en/support (English) www.samsung.com/latin/support (Spanish) www.samsung.com/latin_en/support (English) www.samsung.com/latin_en/support (English) www.samsung.com/latin/support (Spanish) www.samsung.com/latin_en/support (English) www.samsung.com/latin/support (Spanish) www.samsung.com/latin_en/support (English) www.samsung.com/latin/support (Spanish) www.samsung.com/latin_en/support (English) www.samsung.com/latin/support (Spanish) www.samsung.com/latin_en/support (English) www.samsung.com/ve/support www.samsung.com/co/support www.samsung.com/cl/support www.samsung.com/cl/support www.samsung.com/pe/support www.samsung.com/ar/support www.samsung.com/latin/support (Spanish) www.samsung.com/latin_en/support (English) www.samsung.com/latin/support (Spanish) www.samsung.com/latin_en/support (English) www.samsung.com/uk/support www.samsung.com/ie/support www.samsung.com/de/support www.samsung.com/fr/support www.samsung.com/it/support www.samsung.com/es/support www.samsung.com/pt/support Country LUXEMBURG NETHERLANDS BELGIUM NORWAY DENMARK FINLAND SWEDEN POLAND HUNGARY SLOVAKIA AUSTRIA Europe SWITZERLAND CZECH CROATIA BOSNIA MONTENEGRO 815 56480 70 70 19 70 030-6227 515 0771 726 7864 (0771-SAMSUNG) 801-172-678* lub +48 22 607-93-33 * * (koszt połączenia według taryfy operatora) 0680SAMSUNG (0680-726-786) 0680PREMIUM (0680-773-648) 0800 - SAMSUNG (0800-726 786) 0800-SAMSUNG (0800-7267864) [Only for Premium HA] 0800-366661 [Only for Dealers] 0810-112233 0800 726 78 64 (0800-SAMSUNG) LITHUANIA LATVIA ESTONIA RUSSIA BELARUS GEORGIA ARMENIA AZERBAIJAN KAZAKHSTAN UZBEKISTAN KYRGYZSTAN TAJIKISTAN MONGOLIA MOLDOVA CHINA 0-800-614-40 400-810-5858 SERBIA BULGARIA ROMANIA CYPRUS GREECE UKRAINE China 02-201-24-18 800 - SAMSUNG (800-726786) 072 726 786 055 233 999 020 405 888 080 697 267 (brezplačna številka) 090 726 786 (0,39 EUR/min) klicni center vam je na voljo od ponedeljka do petka od 9. do 18. ure. 011 321 6899 800 111 31, Безплатна телефонна линия 08008 726 78 64 (08008 SAMSUNG ) Apel GRATUIT 8009 4000 only from landline, toll free 80111-SAMSUNG (80111 726 7864) only from land line 8-800-77777 8000-7267 800-7267 8-800-555-55-55 (VIP care 8-800-555-55-88) 810-800-500-55-500 0-800-555-555 0-800-05-555 0-88-555-55-55 8-10-800-500-55-500 (GSM: 7799, VIP care 7700) 8-10-800-500-55-500 (GSM: 7799) 00-800-500-55-500 8-10-800-500-55-500 +7-495-363-17-00 SLOVENIA CIS Contact Centre 261 03 710 0900-SAMSUNG (0900-7267864) (€ 0,10/Min) HONG KONG MACAU 0-800-502-000 (852) 3698 4698 0800 333 Web Site www.samsung.com/support www.samsung.com/nl/support www.samsung.com/be/support (Dutch) www.samsung.com/be_fr/support (French) www.samsung.com/no/support www.samsung.com/dk/support www.samsung.com/fi/support www.samsung.com/se/support www.samsung.com/pl/support www.samsung.com/hu/support www.samsung.com/sk/support www.samsung.com/at/support www.samsung.com/ch/support (German) www.samsung.com/ch_fr/support (French) www.samsung.com/cz/support www.samsung.com/hr/support www.samsung.com/support www.samsung.com/support www.samsung.com/si www.samsung.com/rs/support www.samsung.com/bg/support www.samsung.com/ro/support www.samsung.com/gr/support www.samsung.com/lt/support www.samsung.com/lv/support www.samsung.com/ee/support www.samsung.com/ru/support www.samsung.com/support www.samsung.com/support www.samsung.com/support www.samsung.com/support www.samsung.com/support www.samsung.com/support www.samsung.com/kz_ru/support www.samsung.com/support www.samsung.com/support www.samsung.com/ua/support (Ukrainian) www.samsung.com/ua_ru/support (Russian) www.samsung.com/support www.samsung.com/cn/support www.samsung.com/hk/support (Chinese) www.samsung.com/hk_en/support (English) www.samsung.com/support Country SINGAPORE AUSTRALIA NEW ZEALAND VIETNAM THAILAND S.E.A MYANMAR MALAYSIA INDONESIA PHILIPPINES TAIWAN JAPAN S.W.A INDIA BANGLADESH SRI LANKA EGYPT ALGERIA IRAN SAUDI ARABIA MENA PAKISTAN TUNISIA U.A.E OMAN KUWAIT BAHRAIN QATAR TURKEY JORDAN SYRIA MOROCCO SOUTH AFRICA BOTSWANA NAMIBIA ZAMBIA MAURITIUS REUNION MOZAMBIQUE NIGERIA Africa Ghana Cote D'Ivoire SENEGAL CAMEROON KENYA UGANDA TANZANIA RWANDA BURUNDI DRC SUDAN Contact Centre 1800-SAMSUNG(726-7864) 1300 362 603 0800 726 786 1800 588 889 0-2689-3232, 1800-29-3232 +95-01-2399-888 1800-88-9999 603-77137477 (Overseas contact) 021-56997777 08001128888 1-800-10-7267864 [PLDT] 02-4222111 [Other landline] 0800-329999 0120-363-905 1800 3000 8282 - Toll Free 1800 266 8282 - Toll Free 09612300300 94117540540 08000-7267864 16580 021 36 11 00 021-8255 [CE] 8002474357 0800-Samsung (72678) 80-1000-12 800-SAMSUNG (800 - 726 7864) 800-SAMSUNG (800 - 726 7864) 183-CALL (183-2255) 8000-GSAM (8000-4726) 800-CALL (800-2255) 444 77 11 0800-22273 06 5777444 18252273 080 100 22 55 0860 SAMSUNG (726 7864) 8007260000 08 197 267 864 0211 350370 23052574020 262508869 847267864 / 827267864 0800-726-7864 0800-10077 0302-200077 8000 0077 800-00-0077 7095-0077 0800 545 545 0800 300 300 0800 755 755 / 0685 889 900 9999 200 499999 1969 Web Site www.samsung.com/sg/support www.samsung.com/au/support www.samsung.com/nz/support www.samsung.com/vn/support www.samsung.com/th/support www.samsung.com/support www.samsung.com/my/support www.samsung.com/id/support www.samsung.com/ph/support www.samsung.com/tw/support www.samsung.com/jp/support www.samsung.com/in/support www.samsung.com/in/support www.samsung.com/support www.samsung.com/eg/support www.samsung.com/n_africa/support www.samsung.com/iran/support www.samsung.com/sa/support www.samsung.com/sa_en/support (English) www.samsung.com/pk/support www.samsung.com/n_africa/support www.samsung.com/ae/support (English) www.samsung.com/ae_ar/support (Arabic) www.samsung.com/tr/support www.samsung.com/Levant/support (English) www.samsung.com/Levant/support (English) www.samsung.com/n_africa/support www.samsung.com/support www.samsung.com/africa_en/support www.samsung.com/africa_fr/support www.samsung.com/support Correct Disposal of This Product (Waste Electrical & Electronic Equipment) (Applicable in the European Union and other European countries with separate collection systems) This marking on the product, accessories or literature indicates that the product and its electronic accessories (e.g. charger, headset, USB cable) should not be disposed of with other household waste at the end of their working life. To prevent possible harm to the environment or human health from uncontrolled waste disposal, please separate these items from other types of waste and recycle them responsibly to promote the sustainable reuse of material resources. Household users should contact either the retailer where they purchased this product, or their local government office, for details of where and how they can take these items for environmentally safe recycling. Business users should contact their supplier and check the terms and conditions of the purchase contract. This product and its electronic accessories should not be mixed with other commercial wastes for disposal.