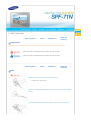
1
|
Safety Symbols
|
Power
| Installation |
Using and
Cleaning
|
Safety Symbols
Make sure to follow the directions below to prevent accidents and damage to the product by using the product correctly.
Failure to follow the accompanying directions may lead to serious injury or death.
Failure to follow the accompanying directions may lead to serious injury or death.
|
Safety Symbols
|
Power
| Installation |
Using and
Cleaning
|
Power
Insert the power plug correctly until it is firmly in place.
z
Failing to do so, may cause fire.
Do not use a damaged power plug, cord or outlet, as this may cause electric shock
or fire.
Do not touch the power plug with wet hands, as this may cause electric shock.
Do not connect more than one appliance to a single outlet, as an overheated outlet
may cause fire.
Do not use force to pull the power cord.
z
Don't place anything heavy on the power cord, as this may cause electric shock or
fire.
Make sure to turn the power off and disconnect the power plug from the outlet
before moving the product. Make sure to disconnect the connection cables from
other devices as well.
z
Moving the product without disconnecting the power cord may damage it while
moving, and may cause electric shock or fire.
Hold and pull out the plug by its body when disconnecting it from the outlet, as
pulling the plug out by the cord may cause it to be damaged.
z
Failing to do so, may cause fire, or the product may not turn on normally.
Ensure that the power plug is disconnected before cleaning the product.
z
Failing to do so, may cause electric shock or fire.
Do not let water come into contact with or enter the power adapter, as this may
cause electric shock or fire.
z
It is highly recommended not using the product outdoors in snowy or rainy weather,
or near any water.
z
When cleaning the floor with water, avoid any water contact with the power adapter.
Do not place the power adapter near a heater, as this may cause fire.
|
Installation
Safety Symbols
|
Power
| Installation |
Using and
Cleaning
|
When installing the product on a cabinet or shelf, do not let the front end of the
product project beyond its front edge.
z
Failing to do so, may cause the product to fall, resulting in a product malfunction or
personal injury.
Do not place the power cord near a heater, as the power cord may melt, causing
electric shock or fire.
Do not install the product in a location exposed to oil, smoke, moisture, water, or
rainwater, or in a car.
z
Any contact of these materials with the product may cause electric shock or fire.
Disconnect the power plug when there is thunder or lightning.
z
Failing to do so, may cause electric shock or fire.
Place the product down gently when installing it.
z
Failing to do so, may cause product damage or personal injury.
Avoid dropping the product when moving, as this may cause product damage or
personal injury.
Do not install the product in a location easily reached by children.
z
|
Using and Cleaning
As the product may fall and cause personal injury.
Safety Symbols
|
Power
| Installation |
Using and
Cleaning
|
Do not insert any metal objects such as chopsticks, wire, or gimlets, or flammable
items such as paper or matches into the terminals at the back of the product, as
this may cause electric shock or fire.
z
If water or any foreign substance enters the product, make sure to turn the product
off disconnect the power plug from the outlet, and contact a service center.
Never disassemble, repair, or modify the product yourself.
z
If you need to repair your product, contact a service center. Failing to do so, may
cause electric shock or fire.
If you hear a strange sound, smell anything burning, or see smoke, disconnect the
power plug immediately and contact a service center.
z
Failing to do so, may cause electric shock or fire.
Always remove dust and water from the pins and connections of the power plug.
z
Failing to do so, may cause electric shock or fire.
We recommend contacting a service center at least once a year for cleaning the
inside of the product.
z
If dust remains inside the product for a long time, the product may malfunction.
When cleaning the product, first disconnect the power plug and clean it with a
soft, dry cloth.
z
Do not use any chemicals such as benzene, alcohol, thinners, mosquito repellant,
aromatic, lubricant, detergent or wax.
When not using the product for a long time, make sure to disconnect the power
plug.
z
Heavy accumulated dust may generate heating or ignition, causing electric shock or
fire.
If the product needs to be installed to a particular location, rather than under
general conditions, make sure to contact one of our service engineers about the
installation as the product may encounter serious quality problems due to its
environment.
z
This refers to places exposed to conditions such as heavy fine dust, chemicals, high or
low temperature, moisture, or when the product needs to be used continually without
a break over a long time.
If the product has been dropped or the product casing is damaged, turn it off and
disconnect the power plug.
z
Using the product without verifying that it has not been damaged may cause electric
shock or fire. Please contact a service center.
Correct Disposal of This Product
(Waste Electrical & Electronic Equipment) - Europe only
(Applicable in the European Union and other European countries with separate
collection systems)
This marking shown on the product or its literature, indicates that it should not be disposed
with other household waste at the end of its working life. To prevent possible harm to the
environment or damage to health from uncontrolled waste disposal, please separate this from
other types of waste and recycle it responsibly to promote the sustainable reuse of material
resources.
Household users should contact either the retailer where they purchased this product, or their
local government office, for details of where and how they can take this item for
environmentally safe recycling.
Business users should contact their supplier and check the terms and conditions of the
purchase contract. This product should not be mixed with other commercial wastes for
disposal.
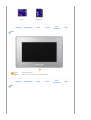
| Features
| Components |
Front
|
Back
|
Side
(Buttons)
|
Side
|
Features
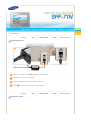
Image display solutions through networking
You can view digital images without turning on your PC or printing out images.
Images stored by a web content provider such as Server are transmitted to your digital photo frame via a network.
(Server provides inter operability allowing you to send photos from your cell phone or photos on a web site to your
digital photo frame via a photo (mms) mail.)
With a networked digital photo frame, you can collect several of your photo albums and family albums into
one location.
This digital photo frame uses images stored on Server. You do not need a mass storage device to manage your
photos. This provides a clean and convenient way to manage your photos.
Enjoy your photos using a variety of effects
With your networked digital photo frame, you can also use various effects that Server provides such as decorating
photos, adding music, and creating an image set.
You can send your photos to a networked digital photo frame of a family member or friend at a remote location.
Expand the memory capacity with a memory card. Enjoy stored images immediately.
By connecting a CF or SD/MMC memory card of your digital camera to your digital photo frame, you can enjoy the
images on your digital photo frame quickly and easily. This also provides a way to expand the memory capacity of
your digital photo frame.
Stylish design
With its sleek and clean, high class design, your digital photo frame doubles as an ornament for your desk or table.
A 90 degree rotating stand allows both horizontal and vertical installations.
| Features
| Components |
Front
|
Back
|
Side
(Buttons)
|
Side
Please check that all components are contained in the delivered package.
If anything is omitted, contact the local distributor where the product was purchased. For optional items, contact a service center.
Never use a power adapter other than the adapter provided with the product.
Components
|
Digital Photo Frame
(Colors may differ for each product.)
Manual
Quick Start
Warranty
User Manual
Cleaning cloth
Cables
LAN cable
Power cord
Sold separately
USB cable
(A-B type)
Power Adapter
CF card
| Features
| Components |
SD/MMC card
Front
|
Back
|
Side
(Buttons)
|
Side
|
|
Side
|
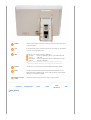
Front
Power
Shows the power status.
Indicator
When the product is powered on, the power light turns on.
| Features
Back
| Components |
Front
|
Back
|
Side
(Buttons)
POWER
Connect the power adapter to this jack. Connect the power cord to the power terminal
of the power adapter.
LAN
If your digital photo frame is connected to a Server site via the LAN, you can download
its contents to your digital photo frame.
USB
Connect a PC or an external device using a USB cable.
Up stream
Connect your digital photo frame to a PC's USB terminal with
terminal
a USB cable.
Down stream
Connect your digital photo frame to a USB-supporting storage
terminal
device with a USB cable.
Make sure to use the USB cable (A-B type) provided with the product when
connecting your digital photo frame to a PC through the up stream terminal.
Speaker
You can listen to music files and movies without additionally installing a speaker.
Stand
A 90 degree rotating stand allows both horizontal and vertical installations. If your
digital photo frame is installed vertically, you can rotate your photos using the rotation
function to fit to the vertical installation.
Sliding Prevention
Supports the product so that it stays firmly in place on slippery surfaces.
Holder
| Features
Side (Buttons)
| Components |
Front
|
Back
|
Side
(Buttons)
|
Side
|
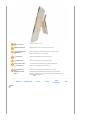
[
] Power Button
[MENU] Menu Button
Displays the menu at the center bottom of the screen.
[
] Brightness Button
Adjusts the brightness when displaying photos or playing movies.
[
] Up Button
Moves the selected frame in the menu up.
[ ] Left Button
Moves the selected frame in the menu to the left.
[ ] Right Button
Moves the selected frame in the menu to the right.
[VOL] Volume Button
Adjusts the sound volume when playing music files or movies.
[
] Down Button
Moves the selected frame in the menu down.
[
] Select Button
Selects a file to play back, a setting in the menu, or an item.
[SHOW] Slide Show
Files are displayed in thumbnails at the bottom of the screen during
Button
playback. To play a file, use the Right and Left buttons to select a file and
press the
/SHOW button.
| Features
Side
Turns the product on or off.
| Components |
Front
|
Back
|
Side
(Buttons)
|
Side
|
Memory Card
You can insert a CF card or SD/MMC card into this slot to view and use the content stored on
Slot
them. Open the cover using the groove marked OPEN and insert a card.
CF CARD
You can insert a CF card into this slot to view and use the
contents stored on it.
You cannot use a CF card that is not properly formatted.
SD /MMC
You can insert a SD/MMC card into this slot to view and use the
CARD
contents stored on it.
SD/MMC cards bigger than 2-GB are not supported.
|
Power
|
LAN
|
Wireless LAN
|
USB
|
Memory Card
|
|
USB
|
Memory Card
|
Connecting the Power
Connect the power adapter to the POWER terminal at the back of the product.
Connect the power cord to the power adapter.
If all cables are connected, insert the power plug into a 220V outlet.
Press the
button at the right of the product to turn the product on.
|
Power
Connecting to a LAN
|
LAN
|
Wireless LAN
First connect a LAN cable before turning the product on.
Connect a LAN cable which is connected to a network to the LAN port.
For information on how to use content services, contact the Server administrator.
If your internet service is normal but you cannot connect to Server, contact a service center so that a service
engineer visits your home to solve the problem. For other problems, you need to visit a Samsung service center.
If the Internet service for transmitting photos is not provided in your area, the networking functions may not
function.
|
Power
|
LAN
|
Wireless LAN
|
USB
|
Memory Card
Connecting to a Wireless LAN
Connect a Wireless LAN-supporting USB Adapter to the USB terminal of your digital photo frame before turning it
on.
To use a wireless LAN, you need a USB card that supports wireless LAN and an access point.
Wireless LAN-supporting USB Adapter: Enables communication on a wireless LAN when connected to a digital photo
frame. (Optional)
Available wireless LAN cards: 3CRUSB100075 (3COM), WL-54G (Unicorn), WL-167G (ASUS), DWL-G122 (D-Link)
Access Point: Connects a USB card (dongle) to an external Internet network. Depending on the environment, you
can use a wire/wireless sharing device. (Optional)
Configure a wireless LAN.
z
When there is no authentication functionality (ESSID) configured at the access point:
|
First, check whether the IP address for the access point is fixed or dynamically allocated. Then configure the
settings in the Settings > Network > IP Settings menu of your digital photo frame.
z
When an authentication process (ESSID) is configured at the access point:
{
Save your ID and password to your digital photo frame.
1.
On your PC, run Notepad and write down your ID and password as shown in the figure below,
and save it as 'essid.txt'.
2.
Connect your PC to your digital photo frame using a USB cable.
3.
Copy the Essid.txt file from your PC to the internal memory of your digital photo frame.
If the ID and password are different from those configured at the access point you are using, you cannot connect to
the network. If no password is configured at the access point and a password is set in the essid.txt file, or if a
password is configured at the access point and no password is set in the essid.txt file, you will also not be able to
connect to the network either.
If you add anything except your ID and password in the essid.txt file, you may not connect to the network.
|
Power
|
LAN
|
Wireless LAN
|
USB
|
Memory Card
|
Connecting via USB
Up Stream
Terminal
Used to connect your digital photo frame to a PC.
When connecting your digital photo frame to a PC through the up stream terminal, make sure to use
the USB cable provided with the product.
Down Stream
Used to connect an external USB-supporting device to your digital photo frame.
Terminal
This product does not support USB card readers. Only USB storage is supported.
When connecting an external device to the down stream terminal, use the USB cable provided with
the external device. (For more information on external devices and their cables, contact a relevant
service center.)
Samsung carries no liability for external device malfunctions caused by using any cable except the
standard cables specified for each device.
Some external products provide a cable that does not meet USB standards. Hence, they may cause a
malfunction.
If an external storage device does not work normally when connected to your digital photo frame, try
to connect it to your PC. If it still does not work normally when connected to your PC, contact a service
center for that external device or your PC.
Connect to the up stream terminal of your digital photo frame.
Connect the USB terminal of your PC.
|
Power
|
LAN
|
Wireless LAN
|
USB
|
Memory Card
Connecting a Memory Card
CF CARD
Slide the card into in the direction marked on the top of the card. To remove a memory card, press
the button at the top of the card slot.
SD/MMC
Slide the card in the direction marked on the top of the card.
CARD
Removing the memory card while playing MP3s, movies, or photos, may
cause the product to operate abnormally. In this case, turn the product off
and on.
|
| Direct button
|
|
|
|
Direct button
MENU
The menu is automatically hidden after one minute.
Button
MENU
(MENU button)
(Up button)
Description
Shows the menu at the bottom center of the screen.
Pressing the menu button releases the Volume/Brightness mode.
Action/Stop
Button
(Up button)
Description
Action/Stop
Moves the selected frame on the menu up.
Operating
During Playback
Position
Menu
(Bottom)
Thumbnail
Volume Up
Play Mode
(when the volume adjustment window is displayed)
Brightness Up
Moves up.
-
(When the brightness adjustment window is displayed)
Operating
Contents List
Position
Sub menu of
Setting
Moves up
Moves up
Adjust number
Popup
Moves up
(Down button)
Button
(Down button)
Description
Action/Stop
Moves the selected frame in the menu down.
Operating
During Playback
Position
Menu
(Bottom)
Thumbnail
Volume Down
Play Mode
(When the volume adjustment window is displayed)
Brightness Down
Moves down
-
(When the brightness adjustment window is displayed)
Operating
Contents List
Position
Sub menu of
(Left button)
Moves down
Setting
Moves down
Adjust number
Popup
Moves down
Button
Description
Action/Stop
Moves the selected frame on the menu to the left.
(Left button)
(Right button)
Button
(Right button)
Description
Action/Stop
Moves the selected frame on the menu to the right.
/ SHOW (Select / Slide Show button)
Button
Button Operation
/ SHOW
Description
(Select / Slide Show button)
Operating
Position
Play Mode
Operating
Position
Sub menu of
Basic operation
Selects a file to play back or a setting on the menu.
During Playback
Shows/Hides the list of thumbnails
at the bottom.
Menu
Select and play
Shows/Hides the list of thumbnails, or
Select
Contents List
(Bottom) Thumbnail
select a thumbnail.
Setting
Select
Popup
Select
| Direct button
|
|
|
|
HOME
Play
If there is an existing content item that was played, it returns to that playback screen.
Contents List
Loads the contents stored on the media connected via USB port.
If the Content List screen doesn't work about 30 minutes, it's switched over as the Clock screen automatically.
Items
OSD
All
Media file type
Description
Loads all files from the selected media.
Photo
Loads JPEG files from the selected media.
Music
Loads MP3 files from the selected media.
Movie
Loads MPEG4 and WMV9 compressed movie files from the
selected media.
Lists the selected media and files in the left and right menu,
respectively.
Action/Stop
List
Shows on the
screen
Server
Internal
Memory
Connected Storage Media
SD / MMC
CF
USB
Connected Storage
Shows the selected file in an amber frame.
If there are no supported files on the connected media, "No
Contents Available." is displayed.
Loads the contents onto the Server.
Loads the contents stored in the Internal Memory.
Loads the contents stored on a SD/MMC card.
Loads the contents stored on a CF card.
Loads the contents stored on the media connected via USB port.
List
Media
Media File Types
Server
All: Loads all files.
Internal Memory
SD / MMC
Photo: Loads JPEG image files.
Shows the contents list that corresponds to the left and
right menus.
CF
Music: Loads MP3 files.
Movie: Loads MPEG4 and WMV9 compressed
movie files.
USB
Setup
Upper Menu
Sub Menu
Detail Menu
Slideshow Effect - Select an effect to give when displaying images
on the screen. If Repeat One is selected for Play Mode, only tiling
Speed &
Effect
effect is given during playback.
No Effect, Random, Fade-In/Out, Checkers, Blind, Zoom,
Trans.Move, Hor.Move, Ver.Move
Slideshow Speed - Select the speed for displaying images.
Faster, Fast, Normal, Slow, Slower
Volume - Adjust volume from 0 to 100 levels.
0~100
Background Music - Select a file to be used as background music.
If background music is activated, the Slideshow Effect is fixed to
Sound
fade-in/out.
Off, Memory, SD/MMC, CF, USB, Server
System Effect Sound - Activates or deactivates the sounds to be
Play
emitted according to product operations.
Off / On
Auto Volume Control - Each music file can have a different volume
level. This functionality adjusts all music files to the same volume
level automatically.
Sound Effect
Off / On
Stereo Effect - Enhances small mono sound to output a bright and
clear sound.
Off / On
Picture Ratio
Select an aspect ratio for images to display.
Original, Fit to Width, Fit to Screen
Select whether to playback the files sequentially or in shuffle mode.
Action/Stop
If Repeat One is selected for Play Mode, only tiling effect is given
Play Mode
during playback.
Repeat All , Random, Repeat One
Information Display - Displays product status and other information
Info. Display
you select.
Play Mode, BG Music, Number of Files, Server Cond.,
Date & Time, File Location
Auto Play - Select whether to playback the Server contents automatically or not
Play the content automatically.
Layout
List
Arrangement
Picture
Select the number of thumbnails to display in the contents list.
3X2 Format, 6X4 Format
Select how to sort the thumbnails displayed in the list.
Standard
Brightness - Adjust brightness from 0 to 100 levels.
0~100
Current Time
Date - Enter and set day, month, or year.
Time - Enter and set hour, minutes, or AM/PM.
Alarm - Check the "Alarm Available." option and set a time. Alarm
will ring at the specified time.
Alarm Available.
Alarm
Alarm Sound - Select an alarm sound.
Alarm 1, Alarm 2, Alarm 3
Time
Auto Picture Off - Check the "Auto Picture Off Available." and set a
time. Your product will turn off at the specified time automatically.
Auto Picture Off Available.
1~12 : 00~59 a.m. / p.m.
Auto Picture
On/Off
Auto Picture On - Check the "Auto Picture On Available." and set a
time. Your product will turn on at the specified time automatically.
Auto Picture On Available.
1~12 : 00~59 a.m. / p.m.
Select Language - Select a language to use for your product.
Language
If you want to use the information you registered on the Server,
the IP address of you Digital Photo Frame should be correct.
Auto IP Address (DHCP) - Auto Configuration
IP Setup
Using the IP Address Below - Manual Configuration
Networks
- IP Address, Subnet Mask, Gateway, DNS
Server
Address
Reset
Server Address- Use the factory defaults for the server address.
If there is any change, visit the Server and check the address.
IP Address
Reset - Reverts the product settings to factory defaults.
View the product information.
Update the product using a USB memory stick.
Info
(See Using>I want to update firmware.)
Manufacturer, Model, Model Name, MAC Address, Firmware Version
Update
Clock
Shows the set time in full screen mode.
| Direct button
|
Play Menu
OSD
Description
|
|
|
Play
Play the file.
Stop
Return to the first of the slide show.
Previous File
Play the previous file in the contents list.
Next File
Play the next file in the contents list.
| Direct button
MENU
|
|
|
|
: Stops the file being played back
MP3
OSD
Description
Mode
Select a mode among Repeat All, Random, and Repeat One.
Save
Save the file being played back in the selected location.
Delete
Info
Action/Stop
Delete the file being played back.
Show the information on the file being played back.
Photo (Image)
OSD
Speed
Effect
Rotation
Mode
Description
Select a mode among Faster, Fast, Normal, Slow, and Slower.
Select an effect among No Effect, Random, Fade-In/Out, Checkers, Blind,
Zoom, Trans.Move, Hor.Move, Ver.Move. .
Select one among 90 CCW, Original, and 90 CW. You can install your Digital
Photo Frame vertically.
Select a mode among Repeat All, Random, and Repeat One.
Action/Stop
Save
Delete
Info.
Save the file being displayed in the selected location.
Delete the file being displayed.
Show the information on the file being displayed.
Movie
OSD
Description
Mode
Select a mode among Repeat All, Random, and Repeat One.
Save
Save the file being played back in the selected location.
Delete
Info.
Delete the file being played back.
Show the information on the file being played back.
Action/Stop
I want to use content using multiple connections.
I want to set multiple times.
I want to move to other screens.
I want to display other information including the time while my digital photo frame is
turned on.
I want to update firmware.
I want to connect to a monitor by using MINI-MO program.
I want to use content using multiple connections.
By connecting a USB storage media or a CF/SD/MMC card to your digital photo frame and turning it on, the
Contents List screen appears automatically and your digital photo frame loads the contents from the connected
storage media and card.
Configuring the
Address Before
Using Server
Select the Setup of
.
Select the Networks.
Enter the IP address of your digital photo frame in the IP Setup.
Enter the IP address that Server provides in the Server Address.
Select OK.
Using Server
Select the Contents List of
.
Select Server.
View the images uploaded to Server.
If your internet service is normal but you cannot connect to Server, contact a service
center so that a service engineer calls on you. For other problems, you need to
personally visit a Samsung service center.
Using a Device
Connected via
USB Port
Select the Contents List of
.
Select USB.
Connect an external storage media and turn on your digital photo
frame. It will automatically load the contents from the external
media.
It loads all files from the external storage media.
The more files there are, the more time is required to list the files in
the Contents List.
Using
Insert a memory card into the card slot in the correct direction.
SD/MMC/CF
Select the Contents List of
Card
.
Select SD/MMC or CF according to the type of the card inserted.
When stopping using the external memory and inserting a memory
card into the card slot, your digital photo frame loads the contents
automatically.
Loading the contents from a memory card may take some time.
To remove a memory card, press the button at the top of the card
slot.
Using Memory
with a Card
Adapter
Only applicable to memory supported by the CF card adapter or SD card adapter.
No guarantee is supported for memory cards and adapters other than CF, SD, MMC,
and USB.
Insert a memory card such as T-flash or Mini SD into the slot of the CF card adapter
or SD card adapter.
Insert the memory adapter into the card slot in the correct direction.
Select Contents List of
.
Select SD/MMC or CF according to the type of memory adapter inserted.
I want to set multiple times.
Alarm
Select the Setup of
.
Select Time>Alarm.
Check the Alarm Available. and set an alarm time.
Auto Picture
On/Off
Select the Setup of
.
Select Time >Auto Picture On/Off .
Check the Auto Picture On/Off and set an On/Off time
I want to move to other screens.
Viewing the
Clock
Select the Clock of
.
Playback is stopped and a clock is displayed in full screen mode.
You can configure the current time in the menu Setup>Time>Current Time.
This product does not save time when its power plug is disconnected and then
connected again. Therefore, you need to set time again. However, if you are
connected to Server, time is automatically set or synchronized.
Returning to
the Playback
Screen
Viewing Other
Files
Select the Play of
.
Playback resumes from the previous stop point.
By pressing the
/ SHOW button during a slide show, files are listed as sorted on
the bottom of the screen.
Move to a file using the
,
buttons and select it using the
button.
I want to display other information including the time while my digital photo frame is turned on.
Configuring the
Information to
Display
Select the Setup of
.
Select Show Info..
Select all items you want to display from among the Play Mode, BG Music,
Number of Files, Server Cond., Date & Time and File Location.
I want to update firmware.
Preparations
Digital Photo Frame
Firmware update file.
USB memory card or USB compatible external storage media.
Connect USB
memory card to
PC
If you are ready, connect the USB memory card to your PC.
Copy the firmware update file you downloaded to the USB memory card.
(To save a firmware file to a USB memory card, you have to first create the
"firmware" folder in the root directory and save it to that folder.)
Connect USB
Remove the USB memory card from your PC, and connect it to your Digital Photo
Memory Card to
Frame.
Digital Photo
Frame
Select Update
If your Digital Photo Frame is off, turn it on.
Select Setup of
.
Select Product Info.
Select Update.
The USB memory card must remain connected during the update operation.
Updating
The update progression is displayed on the screen.
When the update finishes, your Digital Photo Frame will be restarted automatically.
After boot-up, turn your Digital Photo Frame off, remove the USB memory card, and
turn your Digital Photo Frame on again, for maximum safety.
Do not remove the USB memory card during the update operation.
Do not press any key during the update operation.
Do not insert any other card during the update operation.
Do not turn your Digital Photo Frame off during the update operation.
You can identify whether the update operation has finished successfully or not by
checking the firmware version of your Digital Photo Frame is changed to the version
of the firmware update.
I want to connect to a monitor by using MINI-MO program.
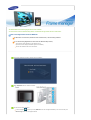
MINI-MO is a function that enables the Digital Photo Frame to be operated as the Secondary Monitor.
Installing Frame Manager
z
System Requirements
z
Installation
z
Installing USB driver
z
Setting up the Mini-Monitor
Frame Manager User's Manual
z
How To Use Digital Photo Frame As Mini-Mo
z
How To Use Digital Photo Frame As Mass Storage
z
How to switch current mode to another
z
Brightness Control
z
Update Firmware
Caution
z
The Installation may not run properly under other OS except Widows XP SP2 and we are not responsible for any problems
z
It returns to PC Connect screen by selecting Exit from the Frame Manager when a USB cable is connected.
z
Follow the proper installation procedures of the installation guide.
z
Do not set the MINI-MO to Primary.
occurred by in goring this caution.
The user is responsible for any problems occurred by in goring this caution.
z
Move the program to the Primary Monitor after it is displayed and uesd in the MINI-MO.
z
We highly recommend setting the background of the Desktop to "(None)" in order to smoothly used the MINI-MO
function.
System Requirements
z
OS : Windows XP SP2
z
USB : Extended Host Controller (EHCT) for USB 2.0
z
RAM : 256 MB or above
Attention
Windows XP Service Pack 2 must be installed.
We recommend a CPU clock speed of 2.4 GHz or higher.
For speeds less than this, the screen speed may decrease or your Photo Frame
may not work properly.
MINI-MO must be used as the Secondary monitor. If used as the Primary
monitor, no scenes may be displayed.
You must use the USB cable provided with the product.
When operating in the MINI-MO, all buttons except for the Power button do not
work.
When operating in the MINI-MO, only scenes can be sent. Sound is not
supported.
In the MNI-MO function, the Brightness Bar will appear to control the Brightness
once you click the Frame Manager Icon.
Application
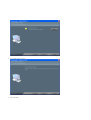
Connect the Digital Photo Frame with a PC using a USB cable.
In the Digital Photo Frame, a screen appears as shown above to select the Mass
Storage or the MINI-MO.
Find the directory installed above to connect when the Digital Photo Frame
Driver is requested.
The Driver is installed automatically and a tray icon(Frame Manager) as shown
below will appear at the system tray.
When the Mass Storage or the MINI-MO is selected, the pertinent function will
be run.
A screen appears to select between the Mass Storage and the MINI-MO by
right-clicking the mouse on the tray icon(Frame Manager) of the Windows.
When the Digital Photo Frame is running as the MINI-MO, a Bar to adjust the
brightness will appear by left-clicking the mouse on the tray icon(Frame
Manager) of the Windows.
-
| System Requirements
|
Installation
|
Installing USB
driver
|
Setting up
the MINI-Monitor
|
System Requirements
z
z
z
OS : Windows XP SP2
USB : Extended Host Controller (EHCT) for USB 2.0
RAM : 256 MB or above
| System Requirements
|
Installation
|
Installing USB
driver
|
Setting up
the MINI-Monitor
Installation
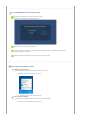
Install the Application first before connecting the Digital Photo Frame to a PC.
To Install the Frame Manager Software and USB Secondary Display 1.
Click Frame Manager icon in the first page of the CD manual to run the install file.
2.
Press "Next" button.
3.
Click on "Change" button to Select the path on your PC where you want the software to be stored/installed.
|
4.
Press "Install" button to proceed.
5.
Press "Yes" Button.
6.
Select "Yes, I want to restart my computer now" to boot the system.
Click on "Finish" button.
| System Requirements
|
Installation
|
Installing USB
driver
|
Setting up
the MINI-Monitor
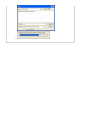
Installing USB driver
Now Switch on the device (Samsung Digital Photo Player) and connect the USB cable
(provided in the box with the unit) to the PC.
1.
Connect the larger "standard USB" connector to the USB port of the PC. Connect the smaller "mini-USB" connector to the "PC"
connector of the Samsung Digital Photo Fame.
2.
Select "No, not this time" button.
3.
Click on "Next" button.
|
4.
Select "Install from a list of specific location (Advanced)".
Click on Next button.
5.
Select "Search for the best driver in these locations" option.
Check "Include this location in the search:"
Now click on "Browse" button to select the directory where the Frame Manger software is
installed.
(Refer to Frame Manager Installation step 3).
6.
Now press "Next" button.
7.
Press "Continue Anyway" button.
8.
Press "Finish" button.
9.
Now the system is ready to be used.
| System Requirements
|
Installation
|
Installing USB
driver
Setting up the MINI-Monitor
When the PC is restarted the Frame Manager icon will appear in system tray.
1.
To use the Samsung Digital Photo Frame as USB Secondary Display Go to Control Panel -> Display -> Settings ->Select Samsung MiniMonitor Display Card.
Check Button "Extend my windows desktop on to this monitor"
|
Setting up
the MINI-Monitor
|
NOTE : Never make this as primary monitor.
2.
Press "Ok" or "Apply".
The Default Mode of the Samsung Digital Photo Frame is Album.
To use the Photo Frame as USB Secondary Monitor or USB Mass-Storage follow the below instructions.
How To Use Digital Photo Frame As MINI-MO
If USB cable is not connected, and Photo Frame is switched on, it starts working as Album.
To use the Samsung Digital Photo Frame device as USB Secondary Monitor,
First install the Frame Manager on the Windows XP PC.
(Follow the Frame Manager Installation guide for installation).
Connect the USB cable with the PC and Device.
On Samsung Digital Photo Frame, following screen will appear:
Select MINI-MO option by clicking the button.
On the device desktop will appear.
In Frame Manager
System tray menu, MINI-MO menu item will appear disabled (i.e. the current mode) and
Mass Storage menu item will appear enabled.
How To Use Digital Photo Frame As Mass Storage
If USB cable is connected to PC, Disconnect and connect again.
Following screen will be shown on Digital Photo Frame.
Select Mass-Storage option by clicking the button.
Use up-down (button 4 and button 6 in above figure) button on device for selection and by pressing menu button
(button 3 in above figure) on device.
A dialog box (Windows Default) dialog will appear and you can open the folder.
How to switch current mode to another
1. MINI-MO To Mass-Storage
If the USB Cable is connected and Photo Frame is being used as Monitor,
1.
Right click on the Frame Manager System tray icon.
2.
From the Menu, Click on menu item Mass Storage.
2. Mass-Storage To MINI-MO
If the USB Cable is connected and Photo Frame is being used as Mass-Storage,
1.
Right click on the Frame Manager System tray icon.
2.
From the Menu, Click on menu item MINI-MO.
3. Rotate to 90 in MINI-MO Mode
When the device is in MINI-MO mode 0 Degree, select "Rotate to 90°" to rotate the display by 90 degrees.
4. Rotate to 0 in MINI-MO Mode
When the device is in MINI-MO mode 90 Degree, select "Landscape" to rotate the display back to normal 0 degrees
position.
Brightness Control
To control the brightness in MiniMo Mode (i.e. when Digital Photo Frame is being used as USB Secondary Monitor)
Click Left Mouse Button on the Frame Manager Tray Icon.
Brightness slider will appear.
To Increase the brightness
Drag the slider pointer to upward OR
Press Up-Arrow/ Left-Arrow/ PgUp Key on keyboard
To Decrease the brightness
Drag the slider pointer downwards OR
Down-Arrow/ Right-Arrow/ PgDn Key on keyboard
To Maximize the brightness
Press Home Key on keyboard
To Minimize the brightness
Press End Key on keyboard
To Close Frame Manager application Click on Exit menu item.
Update Firmware
To update the firmware from PC through USB cable, please ensure the following :
SAMSUNG Digital Photo Frame must be connected with PC using USB cable
Device Mode must be connected as MINIMO or MASS STORAGE
Do not disconnect USB cable during UPDATE operation
Do not operate or switch of Digital Photo Frame Device during UPDATE operation
Remove SD/MMC or CF card, USB stick, if inserted into device before running UPDATE.
All the files required for the update must be available on the PC
Browse to the folder containing these files after PROCEED
- Click Right Mouse Button on the Frame Manager Tray Icon.
1.
Following tray menu will appear.
2.
Click on Update item.
3.
Following instruction dialog will appear.
4.
If you do not want to update firmware click, click on Cancel button.
5.
If you want to update firmware, click on Proceed button.
6.
Following dialog will appear.
7.
Select the path where the new firmware is available on disk/PC.
8.
Select the file and click Open button.
9.
10.
During the transfer of file/files, following progress bas will appear.
After this please wait for completion of update on device.
|
Specifications
|
Supported Files
Specifications
Items
Specifications
Type
7" TFT
Resolution
800 x 480
Brightness
360 cd/m2
Contrast Ratio
300 : 1
View Angle
40/60/60/60 (Up-Down/Right-Left)
Interface
6-bit
Panel
Supported Formats
JPEG, MPEG4, WMV9
Built-in Memory
128 MB
Wired
10/100 Ethernet
Network
Wireless
Sound
An external USB device that supports wireless connection
(3Com 3CRUSB10075, ASUS WL-167g)
1 W x 1 built-in speaker
Version 2.0, 2 channels
USB
(One up stream (host) and one down stream (slave))
Media (Memory Card)
CF x 1, SD/MMC x 1
Power
External DC power adapter (12V, 2A, 24W)
Slide show
Run/Edit/Interval/Screen transformation effect/Sorting,
Content Files
Photo File
Thumbnail View
FAT16,FAT32
Recommended image resolution: 800*600 ~1600*1200
(200 Characters)
Max. image resolution: 3200*2400
|
Music File
MP3
Movie File
MPEG4, WMV9
User authentication,
Networking
Adjustment
IP Setting, Service Registration,
Receiving and moving images and movies from/to the server
Networking
Information on screen
Size, File info, Status info
I/O Device
Key (7 keys, 2-dimensional searching)
Memory Card
MPV-based/Predefined Local Policy
File Management
Copying photo files
The product design may differ according to the model, and specifications are subject to change without prior
notice for product performance enhancement.
Class B Equipment (Information Communication equipment for residential use)
This product complies with the Electromagnetic Compatibility Directives for residential Use and can be
used in all areas including common residential areas. (Class B equipment radiates less electromagnetic
influences than class A equipment.)
|
Specifications
Supported Files
Movie file formats :MPEG 4, WMV9
Resolution : Less than 1024x768
MPEG4 SP, ASP/L3,L5 (720x480, 2Mbps, 30fps)
WMV9 SP, MP/medium level (720x480, 2Mbps, 30fps)
Supported image file format : JPEG, 3200x2400
The Digital Photo Frame uses these modules:
It complies to GPL licensing.
Linux Kernel 2.6.11, AAC, ffmpeg MP3
For more information, visit the following web sites:
AMD AU1200 website (http://wwwd.amd.com/amd/devkits.nsf)
AMD developer website (http://developer.amd.com)
|
Supported Files
|
| Troubleshooting |
Terminology
|
Service Centers
|
Troubleshooting
This section lists various problems and solutions encountered by users while using the digital photo frame. When encountering a problem,
first check the list below and follow the suggested action if one matches your problem. If the problem still persists, contact or visit the
nearest service center.
Symptoms
My Digital Photo Frame does not turn
on.
Possible Causes and Suggested Actions
Check the power connection between the product and the power adapter.
Check whether the Samsung logo is displayed in full screen mode when
pressing the power button.
If Auto Picture On and Auto Picture Off are set to the same time, they do not
Auto Picture On/Off does not work.
work.
Please check these times.
Check the memory card type. If this is not inserted correctly or is not of a
supported type, the photo may not display on the screen. (This product
My digital photo frame turns on but
supports CF and SD/MMC cards only.)
the screen remains off.
Check the file extensions if the card and other connections are correct. (This
product supports the JPEG image format, MPEG4 and WMV9 movie formats,
and MP3 music file format only. See Specifications.)
It takes some time to display an image
Loading a file from an external memory card may take several seconds. (This
after the digital photo frame turns on.
depends on the file format and size.)
Loading a large sized file may take quite a long time. (This is a matter of
No screen is displayed and just sound is
specifications.)
heard for MPEG4 and WMV9 movies.
If only sound is heard continually, try to press any of the buttons on the right
side of the product.
The aspect ratio of the screen looks
abnormal.
Select one of the three values in the Setup>Play>Picture Ratio menu using the
buttons on the right side of the product.
(See Setup>Play>Picture Ratio)
Adjust the brightness in the Setup>Picture>Brightness menu using the buttons
The screen color is dimmed or too strong.
on the right side of the product.
(See Setup>Picture>Brightness)
Only the Samsung logo is displayed on
the entire screen.
Check the file extension. If it is not of a supported format, only the Samsung
logo is displayed while the file is being played. (Only MPEG4 and WMV9
movies are supported.)
Cannot operate devices during online
First, disconnect the LAN cable at the back of the product and try to turn the
services.
product off and on. If a Server related screen is displayed and you can operate
menus using the buttons at the right side of the product, it means the product
is operating normally. (Please contact a Server service center.)
Check the cable connection between the product and the external device.
I have connected an external device (USB
Check whether the external device works as a standalone, and check the
memory device or MP3 player), but it
format of the files stored on it.
does not work.
Only USB devices supporting Linux 2.6.x. can be supported.
Please check that your USB device supports Linux 2.6.x.
Try to change the settings in the Setup>Play>Speed & Effect, and Slideshow
The screen is displayed but there is no
Effect menus using the buttons on the right side of the product.
sound for MPEG4 and WMV9 movies.
If there is no noticeable error in the settings, it may take some time to switch
to the next file depending on the file size and format.
The screen is displayed but there is no
Change the settings on Setup>Play>Sound menu using the buttons on the
sound for MPEG4 and WMV9 movies.
right side of the product.
Freezing may happen depending on the status of the movie file.
Breakings could happen during playback depending on the type and size of
The movie freezes at some points.
movie file.
Movie file formats : MPEG 4, WMV9
Resolution : Less than 1024 x 768
This product has no built-in battery. When the power turns off, the time info
Whenever I turn my Digital Photo Frame
off and on, I find the time goes wrong.
also goes off. Therefore, you need to set time again whenever your Digital
Photo Frame turns on. However, if you are connected to Server, you don't
have to set time again because your Digital Photo Frame gets time info from
the Server and sets its time automatically.
A menu is not displayed immediately
Displaying the menu and other operations may take some time while the
when I press the menu button.
product is loading an image to display on the screen.
| Troubleshooting |
Terminology
|
Service Centers
Terminology
Terms
Description
MPEG4 is a movie compression technology for video communications which
MPEG4
(Motion Picture Expert Group4)
enables implementing bi-directional multimedia. It was developed to make it
possible to transmit movies over low speed lines on the Internet or for mobile
communications. It is used widely on PCs, TVs and cell phones. A movie file
formatted in the MPEG4 format is called an MPG or MPEG file.
WMV9
(Window Media Video9)
A video codec in the MPEG4 format developed by Microsoft
MP3 is a high quality audio compression technology. It provides a 50 times
MP3
(MPEG Audio Layer-3)
higher compression than CD. Because it provides high quality and a low size
for its compression ratio, it is commonly used on the Internet and for FM radio
transmissions, etc. An audio file formatted in the MP3 format is called an MP3
file.
JPEG is an image compression technology. It provides the smallest loss of all
JPEG
(Joint Photographic Coding Expert
Group)
image compression technologies. It is used widely to transmit multimedia files
on the Internet and for other uses. An image file formatted in the JPEG format
is called a JPEG or JPG file. Usually, a JPEG file is created by taking a picture
with a digital camera, by drawing on a computer, or by a graphic package and
then by compressing the graphics image into the JPEG format.
A CF card provides a higher capacity than other types of memory card.
CF Card
Because the controller is embedded in the memory, it provides high
(CompactFlash Card)
compatibility. It is widely used in various digital products such as PDAs, digital
cameras, MP3 players, cell phones, and notebook PCs.
An SD card is a Flash memory card the size of a postage stamp. It provides
|
high stability and high capacity. It is widely used in various digital products
SD Card
such as PDAs, digital cameras, MP3 players, cell phones, and notebook PCs. Its
(Secure Digital Card)
appearance is similar to that of MMC, but the number of pins and their
thickness is different. It also has a password setting function for data security.
MMC is external Flash memory used for small mobile devices, as in the case of
MMC
the SD card. Because it has smaller footprints than SD/MMC cards, it has
(Multi Media Card)
become widely accepted as the standard for memory cards. It is usually used
to save movies and photos.
Use the up stream terminal when connecting to a PC. This product supports
USB 2.0. An A-B type cable which is used to connect your digital photo frame
USB Cable
to a PC is provided with the product. The A type is the USB connector used to
1) A-B TYPE
connect to a PC. The B type is the USB connector used to connect to an
external device. You can connect your digital photo frame to a PC using an A-B
type USB cable.
Use this type of cable when using the down stream terminal. This product
USB Cable
2) Cable for Connecting Other Devices
supports USB 2.0. When connecting an external device to the down stream
terminal, use the USB cable provided with the external device.
When using a cell phone, you will hear frequently about a "repeater." In a
wireless LAN, AP plays the same role as a repeater. That is, it a intermediate
AP
equipment through which wireless LAN cards receive signals. As a cell phone
(Access Point)
makes a call through a repeater, a wireless LAN card sends and receives data
through an AP.
SSID is a 32-bit unique identifier which is attached to each header of every
packet being transmitted on a wireless LAN. It is used as a password when a
wireless device connects to a Basic Service Set (BBS). Because SSID allows
SSID
(Universal Plug & Play)
differentiating a wireless LAN from other wireless LANS, all APs and wireless
devices that want to access to a wireless LAN must use the same SSID. If a
device does not know the unique SSID of a certain BBS, it cannot connect to
that BBS.
| Troubleshooting |
Terminology
|
Service Centers
Service Centers
If you need a product service, contact or visit a Samsung service center.
For services for network connection and the Server.
Services
Samsung Electronics web site
Contacts
http://www.samsung.com
If you have any questions or comments relating to Samsung products, please contact the SAMSUNG
customer care center.
North America
U.S.A
1-800-SAMSUNG (7267864)
http://www.samsung.com
CANADA
1-800-SAMSUNG (7267864)
http://www.samsung.com/ca
MEXICO
01-800-SAMSUNG (7267864)
http://www.samsung.com/mx
|
Latin America
ARGENTINE
0800-333-3733
http://www.samsung.com/ar
BRAZIL
4004-0000
http://www.samsung.com/br
CHILE
800-726-7864 (SAMSUNG)
http://www.samsung.com/cl
COLOMBIA
01-8000112112
http://www.samsung.com.co
COSTA RICA
0-800-507-7267
http://www.samsung.com/latin
ECUADOR
1-800-10-7267
http://www.samsung.com/latin
EL SALVADOR
800-6225
http://www.samsung.com/latin
GUATEMALA
1-800-299-0013
http://www.samsung.com/latin
JAMAICA
1-800-234-7267
http://www.samsung.com/latin
PANAMA
800-7267
http://www.samsung.com/latin
PUERTO RICO
1-800-682-3180
http://www.samsung.com/latin
REP. DOMINICA
1-800-751-2676
http://www.samsung.com/latin
TRINIDAD & TOBAGO
1-800-7267-864
http://www.samsung.com/latin
VENEZUELA
0-800-100-5303
http://www.samsung.com/latin
Europe
BELGIUM
02 201 2418
http://www.samsung.com/be
CZECH REPUBLIC
844 000 844
http://www.samsung.com/cz
DENMARK
70 70 19 70
http://www.samsung.com/dk
FINLAND
030-6227 515
http://www.samsung.com/fi
FRANCE
3260 SAMSUNG(7267864) (€ 0,15/min)
http://www.samsung.com/fr
GERMANY
01805-121213 (€ 0,14/Min)
http://www.samsung.de
HUNGARY
06-80-SAMSUNG (7267864)
http://www.samsung.com/hu
ITALIA
800 SAMSUNG (7267864)
http://www.samsung.com/it
LUXEMBURG
0032 (0)2 201 24 18
http://www.samsung.lu
NETHERLANDS
0900 20 200 88 (€ 0,10/Min)
http://www.samsung.com/nl
NORWAY
815-56 480
http://www.samsung.com/no
POLAND
0 801 801 881
http://www.samsung.com/pl
PORTUGAL
80 8 200 128
http://www.samsung.com/pt
REPUBLIC OF IRELAND
0818 717 100
http://www.samsung.com/uk
SLOVAKIA
0800-SAMSUNG (7267864)
http://www.samsung.com/sk
SPAIN
902 10 11 30
http://www.samsung.com/es
SWEDEN
0771-400 200
http://www.samsung.com/se
SWITZERLAND
0800-7267864
http://www.samsung.com/ch
U.K
0870 SAMSUNG (7267864)
http://www.samsung.com/uk
CIS
ESTONIA
800-7267
http://www.samsung.ee
LATVIA
800-7267
http://www.samsung.com/lv
LITHUANIA
8-800-77777
http://www.samsung.lt
KAZAKHSTAN
8 800 080 1188
http://www.samsung.kz
RUSSIA
8-800-200-0400
http://www.samsung.ru
UKRAINE
8-800-502-0000
http://www.samsung.com/ur
UZBEKISTAN
140-1234
http://www.samsung.uz
Asia Pacific
AUSTRALIA
1300 362 603
http://www.samsung.com/au
CHINA
800-810-5858, 010- 6475 1880
http://www.samsung.com.cn
HONG KONG
3698-4698
http://www.samsung.com/hk
INDIA
3030 8282, 1800 1100 11
http://www.samsung.com/in
INDONESIA
0800-112-8888
http://www.samsung.com/id
JAPAN
0120-327-527
http://www.samsung.com/jp
MALAYSIA
1800-88-9999
http://www.samsung.com/my
PHILIPPINES
1800-10-SAMSUNG (7267864)
http://www.samsung.com/ph
SINGAPORE
1800-SAMSUNG (7267864)
http://www.samsung.com/sg
THAILAND
1800-29-3232, 02-689-3232
http://www.samsung.com/th
TAIWAN
0800-329-999
http://www.samsung.com/tw
VIETNAM
1 800 588 889
http://www.samsung.com/vn
Middle East & Africa
SOUTH AFRICA
0860 7267864 (SAMSUNG)
U.A.E
800SAMSUNG (7267864)
8000-4726
MÉXICO
IMPORTADO POR:
SAMSUNG ELECTRONICS MÉXICO. S.A. de C.V.
Vía Lopez Portillo No. 6, Col. San Fco. Chilpan
Tultitlán, Estado de México, C.P. 54940
Tel: 01-55-5747-5100 / 01-800-726-7864
EXPORTADO POR:
Samsung Electronics CO.,LTD.
http://www.samsung.com/za
http://www.samsung.com/mea
416, Mae tan-3dong, Yeongtong - gu,
Suwon City, Gyeonggi-do Korea