1
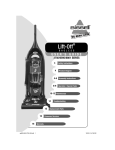
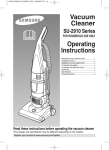
SU33 SERIES
Vacuum Cleaner
user manual
✻ Before operating this unit, please read the instructions carefully.
✻ For indoor use only.
imagine the possibilities
Thank you for purchasing a Samsung product.
To receive a more complete service,
please register your product at
www.samsung.com/register
English
safety information
IMpORTANT SAFETY INSTRUcTIONS
Thank you for purchasing a Samsung vacuum cleaner. When using an electrical
appliance, basic precautions should always be followed, including the following :
PLEASE READ ALL WARNINGS AND INSTRUCTIONS BEFORE USING THIS
VACUUM CLEANER.
WARNING : To reduce the risk of fire, electric shock, or injury.
•
•
•
•
•
• •
•
• •
•
•
•
•
•
•
•
•
•
Do not leave vacuum cleaner unattended when it is plugged in.
Unplug from outlet when not in use and before servicing.
Do not use outdoors or on wet surfaces.
Do not allow children to operate vacuum cleaner or use as a toy.
Close attention is necessary when used by or near children.
Use only as described in this manual. Use only manufacturer’s recommended
attachments.
Do not use with damaged cord or plug.
If vacuum cleaner is not working as it should, or has been dropped, damaged,
left outdoors or dropped into water, return it to a service center.
Do not pull or carry by cord, use cord as a handle, close a door on cord, or pull
the cord around sharp edges or corners. Keep cord away from heated surfaces.
Do not unplug by pulling on the cord. To unplug, grasp the plug, not the cord.
Do not handle vacuum cleaner or plug with wet hands.
Do not put any object into openings. Do not use with any opening blocked; keep
openings free of dust, lint, hair and anything that may reduce air flow.
Keep hair, loose clothing, fingers and all parts of body away from openings and
moving parts.
Do not pick up anything that is burning or smoking, such as cigarettes, matches
or hot ashes.
Do not use without dirt cup or filters in place. Empty dirt cup and clean filter
frequently when picking up very fine materials such as powder.
Turn off all controls before unplugging vacuum cleaner.
Use extra care when cleaning on stairs.
Do not use to pick up flammable or combustible materials such as gasoline or
fine wood, fine wood sandings or use in areas where they may be present.
Store your vacuum cleaner indoors, in a cool and dry area. 2_ safety information
safety information
• A
void picking up hard, sharp objects with the cleaner. They may damage the
cleaner.
• Always turn off this appliance before connecting or disconnecting the hose,
removing the bottom plate for maintenance.
• Use only on dry, indoor surfaces, never change the plug in any way.
• Do not modify the polarized plug to fit a non-polarized outlet or extension cord.
• Do not touch the brush roller when it is rotating.
• Keep suction away from your face when using nozzles and pipe.
• Do not pull the power cord around sharp corners and do not allow it to be
trapped.
• Unplug before connecting turbine nozzle.(only using turbine-brush model)
• This appliance is not intended for use by persons (including children) with
reduced physical, sensory or mental capabilities, or lack of experience and
knowledge, unless they have been given supervision or instruction concerning
use of the appliance by a person responsible for their safety.
Children should be supervised to ensure that they do not play with the
appliance.
• The plug must be removed from the socket-outlet before cleaning or maintaining
the appliance.
• If the supply cord is damaged, it must be replaced by the manufacturer or its
service agent or a similarly qualified person in order to avoid a hazard.
SAVE THESE INSTRUCTIONS
This vacuum cleaner is intended for household use only.
FOR RESIDENTS OF THE UNITED KINGDOM ONLY
If your appliance is fitted with a nonrewireable BS 1363 plug it must not be used
unless a 13 amp (ASTA approved to BS 1362) fuse is fitted in the carrier contained
in the plug. If for any reason the plug is cut off, it must be disposed of, as it is an
electric shock hazard should it be inserted into a 13 amp socket.
safety information _3
safety information
SAFETY INFORMATION
•
•
WARNING
Before operating the appliance, please read this manual thoroughly and retain
it for your reference.
WARNING
Because these following operating instructions cover various models,
the characteristics of your vacuum cleaner may differ slightly from those
described in this manual.
CAUTION/WARNING SYMBOLS USED
WARNING
CAUTION
CAUTION
CAUTION
Indicates that a danger of death or serious injury exists.
Indicates that a risk of personal injury or material damage exists.
When using the hose attachment, please ensure that vacuum remains flat
and level on the floor surface to prevent contact from the brush roller with
the floor surface. If the vacuum does not remain flat and level, this could
result in damage to the flooring.
To reduce risk of injury and potential damage to floor surface, do not use the
vacuum on a staircase. Always use vacuum from the bottom of the staircase
and ensure that the vacuum remains securely flat on the floor surface.
4_ safety information
Contents
assembling the cleaner
06
06. Product View
07. Attach Handle to Vacuum
07. Attach Dust Bin to Vacuum
07. Attach Vacuum Hose and Tools
OpeRATING The CleANeR
08.
08.
08.
08.
09.
09.
Power Switch
Handle Positions
Height Adjustment
Transporting Cleaner
Special On-Board Tools
Power Cord Storage
maintenance
10.
10.
11.
11.
12.
12.
Empty Dust Bin
Cleaning the Grille
Cleaning the Pre-motor Filter
Replacing the Post-Motor Filter
Check Rotating Brush and Drive Belt
Replace Drive Belt
08
10
13. Mini Turbo Brush
troubleshooting
14
contents _5
Assembling the cleaner
Product View
Handle
*option
Bracket Brush
(Select Models Only)
Cord Clip
Hose Clip
*option
Mini Turbo Brush
(Select Models Only)
Quick
Release
Cord Wrap
Power
Cord
Carrying
Handle
Grille
Cyclone
Dust Bin
Post-Motor Filter
(Post-Motor Filter
is located behind
the door.)
Powerfoot
Power
Switch
Combination
Dusting Brush/
Upholstery Tool
Handle
Release
Pedal
Stretch
Hose
Crevice
Tool
Extension
Wand
Lower Cord
Wrap
Hose
Wand
Hose
Wand
Base
Height Adjustment
Knob
CAUTION
Do not plug in your vacuum cleaner until you are familiar with all instructions
and operating procedures.
WARNING
Plastic film can be dangerous. To avoid danger of suffocation, keep away from
babies and children.
6_ assembling the cleaner
Assembling the cleaner
Attach Handle To Vacuum
Attach Dust Bin To Vacuum
Fit the groove located on the lower
front side of the Dust Bin to the hook
located on the vacuum body and
attach the hook located on the
Dust Bin Handle to the vacuum body
as shown.
Attach Vacuum Hose and Tools
1. Attach the Twist Snap Hose by lining up the
taps on the base with the corresponding
notches on the back of the vacuum as shown.
2. Turn the Twist Snap Hose clockwise to lock
the hose into place.
3. Grasping the Hose Wand, slide the end of the
it onto the Hose Wand Base. Snap the Hose
into the Hose Clip.
Note : The vacuum will not operate effectively
unless the Hose Wand is firmly
attached.
4. Attach the Lower Cord Wrap by lining up
the tab on the base with the corresponding
notch on the back of the vacuum and turn it
* Select Models Only
clockwise as shown.
5. Attach the Extension Wand and the Crevice Tool
together into the holder on the right side of the body
as shown.
6. Attach the Combination Tool into the holder on the
left side of the body as shown.
7. Attach the Bracket Brush on the front of the handle
and clip the Mini Turbo Brush into the Bracket Brush as shown.
assembling the cleaner _7
01 asembling the cleaner
1. Stand the vacuum upright and slide the base of the handle
firmly into the grooves at the top of the vacuum body.
2. Check to be sure the handle is fitted to the vacuum body. If
there is a gap, continue to push firmly until the handle is flush.
3. Insert the screw provided from the screw packet into the
existing hole. Tighten securely with a screwdriver.
Operating the cleaner
pOwer Switch
The Power Switch is located on the side of the vacuum.
Push the rocker switch “ON” to vacuum, and “OFF”
when cleaning is complete.
hANdle Positions
Press the handle release pedal, located on the lower left side of the vacuum, with
your foot to place your vacuum into one of three cleaning positions.
1.Upright
– For storage and above floor cleaning with tools.
2.Normal Cleaning
– Press handle release pedal once. Position used for
most household floor cleaning tasks.
3.Low Cleaning
– With the vacuum in normal cleaning position, press
handle release pedal again. Use for reaching under
low furniture such as tables, chairs or beds.
hEIght Adjustment
The Powerfoot/Rotating Floor Brush can be adjusted to clean several floor surfaces.
Note : F
or optimal cleaning performance, adjust to the lowest practical setting. If your
cleaner is difficult to push, adjust to the next higher setting. Always ensure that
the correct height setting is used for your flooring type as damage may occur if
the height setting is not changed to reflect your flooring type.
1. Turn Height Adjustment Knob to desired setting.
Bare floor Setting
– For bare floors.
Medium Settings
– For short and medium pile carpets.
Highest Setting
– For plush pile carpet
TransporTINg cleaner
1.To move your cleaner from room to room,
put the Handle in the upright position, tilt the
cleaner back on its rear wheels and push
forward.
2.The cleaner can also be moved by using the
Carrying Handle located on the top of the
Dust Bin.
8_ operating the cleaner
Carrying
Handle
Operating the cleaner
Special on-board toOls
Combination Dusting Brush/
Upholstery Tool:
Two Types of cleaning tools are
included in one attachment : rotate
for desired tool.
Quick
Release Cord
Wrap
Crevice
Tool
Power Cord
Extension
Wand
• Use Brush side to dust furniture, blinds,
Combination
books, lamps, shelves, and baseboards. Dusting Brush/
Upholstery Tool
• Use Upholstery side for curtains,
draperies, cushions, fabrics.
Hose Wand
Crevice Tool:
Use in tight narrow spaces.
Hose Wand
Base
Extension Wand:
Use with desired attachment for a
longer reach.
Mini Turbo Brush (Select Models):
Use rotating brush action for small areas such as stairs and upholstery.
*option
Select Models Only
Note : P
ress gently when using Mini Turbo Brush to gain maximum cleaning. Too
much pressure could cause the brush to stop rotating.
Power Cord Storage
1. To use your vacuum, remove the cord and plug it into an electrical outlet. For
your convenience, there is a quick release cord wrap for easy cord removal.
2. When you are finished cleaning, turn vacuum cleaner off.
3. Unplug power cord by grasping the polarized plug (NOT the cord) and
disconnect from outlet.
4. Loop power cord around cord wraps on the back of the vacuum as shown.
5. Clip molded plug to power cord to secure.
operating the cleaner _9
02 operating the cleaner
Your vacuum is not only a powerful carpet and rug cleaner, it’s also a versatile
above floor vacuum cleaner when you select one of the special tools.
1. Raise Handle to Upright Position.
2. Grasp the end of the Hose Wand and lift Hose Wand to separate from the
Hose Wand Base.
3. Attach tools by firmly pushing onto
Vacuum Hose or Extension Wand.
Maintenance
To maintain maximum cleaning performance, the following maintenance
steps must be performed:
1. Empty the Dust Bin when the dirt reaches the
“MAX” line on the side.
2. Cleaning the Grille Cyclone when the Dust Bin
become clogged.
3. Check the Pre-Motor Filter at least once a month
and clean or replace as needed.
4. Replace the Post-Motor Filter every three to six
months.
Note : More frequent filter cleaning or replacing
may be necessary if you are vacuuming new
carpet, fine dust, or have allergy concerns.
Follow the instructions on the following pages
to perform these simple maintenance steps.
WARNING
To reduce the risk of electronic
shock, turn Power Switch OFF
and disconnect polarized plug
from electrical outlet before
performing maintenance or
troubleshooting checks.
Tip:
For maximum cleaning
performance, check and
clean or replace all filters as
suggestsd.
Empty Dust Bin
The Dust Bin needs to be emptied when the dirt reaches the “MAX” line on the
side of it.
1. Unplug cleaner from electrical outlet.
2. To remove the Dust Bin from the vacuum body, push the Dust Bin release button as shown.
3. Hold dust bin and push down bin release empty button to empty dirt into
garbage container as shown.
Note : The Dust Bin may be washed in warmwater with a mild detergent.
Reassemble and makesure it is completely
dry before using again.
Cleaning the Grile
If the suction is weak although the dust bin is empty, open the cover and clean the Grille.
Grille
Cyclone
Note : Whenever the Grille is clogged, check the pre-motor filter and clear it.
10_ Maintenance
Maintenance
cleanINg the Pre-Motor Filter
Sponge
Filter
03 Maintenance
Micro
Filter
< Washable >
1. Unplug the Vacuum Cleaner from electrical outlet.
2. The Pre-Motor Filter(Sponge Filter, Micro Filter) protects the motor from dirt
particles. It is located underneath the Dust Bin.
If the Pre-Motor Filter becomes dirty, remove and clean it.
Note : The Pre-Motor Filter may be hand washed in cold water with mild
detergent. Rinse well and air dry thoroughly before re-installing.
CLEANING THE POST-MOTOR FILTER
Post-Motor Filter
*Option
<Micro Filter>
(Select Models Only)
<Hepa Media Filter>
(Select Models Only)
1. Unplug the Vacuum Cleaner from electrical outlet.
2. The Post-Motor Filter assists in the filtration process to return clean air to the
room. It is located behind the door on the front of the Cleaner. When the filter
becomes dirty, open the door, remove the filter and shake the dust off the filter.
Note : The Post-Motor Filter is not washable, therefore do not wash it in the water.
Maintenance _11
Maintenance
Check Rotating Brush and Drive Belt
You should check your vacuum cleaner’s Rotating
Floor Brush and Drive Belt regularly for wear or
damage. You should also clean the brush and brush
ends of strings, hair, and carpet fibers. These can
wrap around the brush and hamper its ability to
effectively clean your carpet. Also remove any debris
that has accumulated under the brush cover.
WARNING
To reduce the risk of injury
from moving parts, turn
off vacuum cleaner and
disconnect Power Plug
from electrorical outlet.
1. Unplug the Vacuum Cleaner from electrical outlet.
2. Place handle in Low position and turn vacuum cleaner
over so bottom side is up.
3. Remove the six screws as shown with screwdriver. Lift
the Brush Cover off.
4. Grasp Rotating Floor Brush at both ends and lift.
5. Clean strings, hair and other debris from Rotating Floor
brush, paying particular attention to brush ends.
6. Clean strings, hair and other debris from Motor
Pulley and Drive Belt areas.
7. Check Drive Belt carefully for wear, cuts or
Motor
Pulley
stressed areas.
8. Check Air Passageway for obstructions. Remove
debris from this area.
Brush
Cover
Air
Passageway
Replace Drive Belt
1. Unplug cleaner from electrical outlet.
2. With Rotating Floor Brush removed from vacuum
cleaner grasp old Drive Belt and remove from
Motor Pulley. Discard old Drive Belt.
3. Place new Drive Belt over Motor Pulley and stretch
other end over Rotating Floor Brush in the space
between the bristles.
4. Place ends of Rotating Floor Brush down into slots
on sides as shown.
5. Turn Rotating Floor Brush by hand several times in
the direction of Motor Pulley. If properly installed,
Drive Belt will center itself on Rotating Brush
crown.
6. Reposition Brush Cover and screws. Insert the
hook on the Brush Cover into the corresponding
groove on the brush and tighten scerws securely.
WARNING
①
③
②
Hook
②
①
Be careful of your hands when you replace the drive belt, to avoide physical
injury from sharp plastic film.
12_ Maintenance
Maintenance
Mini Turbo Brush
Brushbar Replacement
03 Maintenance
1. Remove the tool from the hose, and turn upside down.
Slide the switch to unlock position and remove bottom
plate.
2. Unscrew the one screw and remove belt guard.
3. Remove brushbar including end plates and discard.
4. Inspect belt to ensure that it is in good condition. If
broken or cracked, please replace. (See below for
details.)
5. With the curved ends facing down, slide end plates of
brushbar into slots on the tool.
6. To replace bottom plate, insert the four tabs on edge
of bottom plate into slots on front of tool. Pivot bottom
plate down and snap closed.
Belt Replacement
1. Grasp turbine and pull firmly to remove.
2. Remove a screw, and lift the cover belt off.
3. Remove belt from turbine pulley. Replace with new belt.
4. With flat sides of turbine retainers pointing down, slide
retainers into grooves in tool housing and snap into
place.
5. Replace brushbar and bottom plate.
Cleaning Brushbar
• Cut off pet hairs or threads surrounding brush with
scissors.
Maintenance _13
Troubleshooting
Check this list of possible problems and solutions before bringing your vacuum to a
service center.
PROBLEM
possible solution
Vacuum cleaner won’t run
• Power cord not plugged in
• Blown fuse/tripped breaker in home
• Check electrical plug
• Check/ Replace fuse or reset breaker
Vacuum cleaner and tools won’t pick up dirt
• Incorrect Height Adjustment
• Hose not attached to suction opening
• Twist Snap Hose not securely
attached
• Crack or hole in Hose
• Broken or worn Drive Belt
• Rotating Floor Brush bristles worn
• Rotating Floor Brush jammed
• Clog in vacuum
• Dust Bin full
• Dust Bin not installed properly
• Filters are dirty
• Mini Turbo Brush is clogged or debris
is wrapped around the brush roll
• Adjust Powerfoot to correct height setting
• Firmly push Hose Wand onto the suction
opening
• Make sure Twist Snap Hose is snapped into
locked position.
• Check Hose and replace if needed
• Replace Drive Belt, see pg.12
• Replace Brush
• Remove brush and clean debris from brush
ends
• Clear clog, see pg.10-11
• Empty Dust Bin
• Position correctly and lock in place
• Check Pre-motor and Post-motor filters
• Maintaining Mini Turbo Brush, see pg.13
Visible dirt escaping from cleaner
• Dust Bin full
• Filters missing or installed incorrectly
• Dust Bin installed incorrectly
• Empty Dust Bin
•C
heck Pre-motor and Post-motor filters for
correct installation
•P
ull out and re-attach Dust Bin correctly
This Vacuum cleaner is approved the following.
Electromagnetic Compatibility Directive : 2004/108/EEC
Low Voltage Directive : 2006/95/EC
14_ Troubleshooting
Memo
memo _15
If you have any questions or comments relating to Samsung products,
please contact the SAMSUNG customer care center.
Country
Customer Care Center
☎
Web Site
U.K
0330 SAMSUNG (7267864)
www.samsung.com
SOUTH AFRICA
0860 7267864 (SAMSUNG)
www.samsung.com
Code No. DJ68-00450K REV(0.1)