1
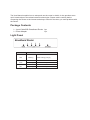
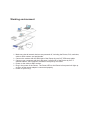
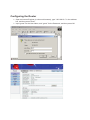
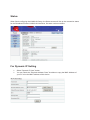
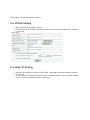
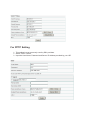
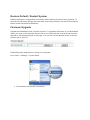
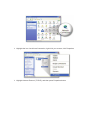
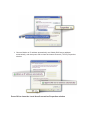
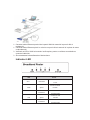
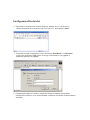
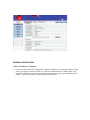
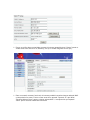
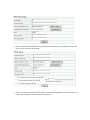
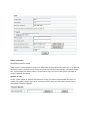
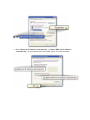
4-Port Cable/DSL Broadband Router
User Manual
The User Manual explains how to setup and use the router in details. It also provides some
quick introductions to the related network technologies. Please read it carefully before
connecting the Router to the Internet and always consult it first when you meet problems with
the Router.
Package Contents
¾ 4-port Cable/DSL Broadband Router 1pc
¾ Power Adapter
1pc
Light Panel
LED
Function
Power on CPU on WLAN ACT
SYS
WAN
LAN
Flashing
On
Flashing
On
Flashing
WPS working (orange)
WAN Connection normal
Data transmitting
LAN Connection normal
Data transmitting
Working environment
¾ Make sure that all network devices are powered off, including the Router, PCs, switches,
cable or DSL modem, and peripherals.
¾ Connect the modem with the WAN port of the Router by one CAT 5 Ethernet cable.
¾ Connect your computers with the LAN ports (1x/2x/3x/4x) of the Router by CAT 5
ethernet cables. One computer connects to one port by one cable.
¾ Power on the cable or DSL modem.
¾ Plug in the power of the Router. The Power LED on the Router’s front panel will light up
as soon as the power adapter is connected properly.
¾ Power on your PC(s).
Configuring the Router
¾ Open an Internet Explorer (or other web browser), type “192.168.10.1” in the address
bar, and then press “Enter”.
¾ Input “guest” for the User Name, and “guest” for the Password, and then press OK.
Status
When finish configuring the WAN/LAN Setup, the Status screen will list up the connection status
for the Broadband Routers' WAN/LAN interfaces, firmware version numbers.
For Dynamic IP Setting
¾
¾
Select “Dynamic IP User” button.
You can check the “Physical Address Clone” checkbox to copy the MAC Address of
your PC to be the MAC address of this device.
Click “Apply” button then finish of setting
For PPPoE Setting
¾ Select “PPPoE User (ADSL)” button.
¾ PPPoE Account and PPPoE Password, Enter the User Name and Password provided
by your ISP
For Static IP Setting
¾ Input the IP Address sub mask ,Primary DNS , Secondary DNS and Gateway provided
by your ISP.
¾ You can check the “Physical Address Clone” checkbox button to copy the MAC Address
of your PC to be the MAC address of this device.
For PPTP Setting
¾ This setting is most commonly used by DSL providers.
¾ Select “PPTP” button.
¾ Input the User Name, Password and Server IP Address provided by your ISP.
Restore Default / Restart System
Restore the Router’s configuration to its factory default settings. Restore Factory Defaults. To
clear all of the Router’s settings and reset them to its factory defaults, click the Restore Default
button. Router will restart automatically.
Firmware Upgrade
Upgrade the Broadband router’s system firmware. To upgrade the firmware of your Broadband
router, you need to download the firmware file to your local hard disk, and enter that file name
and path in the appropriate field on this page. You can also use the Browse button to find the
firmware file on your PC.
Please follow the steps below to setup your computer:
Go to: Start -> Settings -> Control Panel
¾ Click Network and Internet Connections
¾ Highlight the icon Local Area Connection, right click your mouse, click Properties
¾ Highlight Internet Protocol (TCP/IP), and then press Properties button
¾ Choose Obtain an IP address automatically and Obtain DNS server address
automatically, and then press OK to close the Internet Protocol (TCP/IP) Properties
window.
Press OK to close the Local Area Connection Properties window
RPC-IP2105A
Broadband Router
Ghid de instalare
Routerul poate fi configurat foarte usor folosind wizard-ul gasit pe CD-ul de instalare din pachet. Wizardul
este o unealta la indemana ce perminte o configurare rapida si eficienta a conexiunii la internet, SSID,
securitate wireless, upgrade de firmware si schimbarea parolei routerului.Cand porneste wizard-ul pe
ecran va aparea o imagine de bun venit . Va rugam sa alegeti limba pentru a porni configurarea. Nu vom
oferi nici un fel de instructiune pentru wizard in acest ghid.
Daca pierdeti CD-ul sau preferati configurarea traditional de tip web, va rugam sa urmariti procedurile
din acest ghid de instalare rapida pentru setarea de baza a routerului.
Continutul Pachetului
Inainte sa incepeti sa folositi routerul va rugam verificati daca lipseste ceva din pachet si daca
da, va rugam contactati dealer-ul dvs pentru a reclama acest lucru.
¾ Broadband router ( 1 buc)
¾ Ghid de instalare (1 buc)
¾ CD-ROM (1 buc)
¾ 12V adaptor de putere (1 buc)
Inainte de a incepe
Trebuie sa aveti la dispozitie cel putin urmatoarele:
¾ Acces in banda larga la internet
¾ Placa de retea 10/100
¾ Internet Explorer 5.0 sau o versiune superioara pentru conficurarile WEB
Instalarea Hardware
¾ Conectati cablul Ethernet pornind de la portul WAN al routerului la portul LAN al
modemului.
¾ Conectati cablul Ethernet primit in cutie intr-un port LAN al routerului si in placa de retea
a calculatorului.
¾ Verificati ca LED-ul LINK al routerului sa fie aprins, pentru a confirma corectitudinea
conectarii cablurilor.
¾ Se conecteaza la transformatorul de tensiune.
Indicator LED
LED
SYS
Functii
Intermitent
Pornit
Conexiune WAN
WAN
LAN
Aprins
normala
Intermitent
Transmite date
Conexiune LAN
Aprins
normala
Intermitent
Transmite date
Configurarea Routerului
¾ Deschideti un browser web (Internet Explorer, Mozilla, etc.) si introduceti in
campul de adresa IP-ul routerului http://192.168.10.1, apoi apasati „Enter”
¾ Fereastra de login va aparea pe ecran. Introduceti “User Name” si “Password”
si apoi click pe butonul “OK” pentru a va loga. User name-ul este “guest” si
password (parola) este “guest”.
¾ Fereastra principala va fi afisata. In bara din stanga va aparea meniul pentru
configurarea routerului, iar in partea dreapta a ecranului veti putea vizualiza setarile
efectuate.
Setarea sistemului
Setari conexiune la internet
¾ Cele mai multe conexiuni utilizeaza IP-ul dinamic (DHCP) care este setat implicit. Daca
aveti un alt tip de conexiune (static IP), trebuie sa apasati butonul “WAN Setup” si sa
introduceti setarile pe care le-ati primit de la furnizorul de internet apoi apasati butonul
“Apply” , apoi “Save” pentru a salva modificarile efectuate.
¾ Pentru a verifica daca sunteti deja conectat la internet apasati butonul “Status” pentru a
vedea daca aveti alocat un IP, Gateway, etc (a se vedea imaginea de mai jos).
¾ Daca nu sunteti conectat, furnizorul de internet probabil necesita clonarea adresei MAC
a computerului la router. Pentru a face acest lucru apasati “Dynamic IP” apoi bifati
“Physical Adress Clone” pentru a obtine adresa MAC a computerului apoi apasati
“Save” pentru a salva modificarile efectuate.
¾ Pentru setari de tipul PPoE trebuie sa introduceti Username-ul si Parola pe care le-ati
primit de la furnizorul de internet.
¾ Pentru o conexiune de tipul PPTP trebuie sa introduceti Username, Parola si Server IPul pe care le-ati primit de la furnizorul de internet.
Setari avansate
Restabilirea setarilor initiale
Daca router-ul se blocheaza in timp ce se efectueaza unele scimbari de setari sau nu va amintiti
adresa IP pentru a accesa meniul router-ului puteti folosi butonul de resetare din spatele routerului. Tineti apasat acel buton pentru 2-3 secunde in timp ce router-ul este pornit si acesta va
reveni la setarile din fabrica.
Update de soft
Pentru a face update la sistemul de operare al router-ului trebuie sa download-ati fisierul cu
sistemul de operare de pe internet sa il salvati pe HDD, dupa care din meniul router-ului se
selecteaza Firmware Upgrade.
Configurarea IP-ului in PC
Configurati calculatorul pentru a obtine un IP automat urmand pasii de mai jos:
¾ Click pe butonul “Start”, apoi selectati “Control Panel”
¾ Click pe butonul “Switch to Classic View” aflat in partea din stanga-sus pentru
a beneficia de mai multe detalii.
¾ Gasiti iconita “Network Connections” si faceti dublu-click pe aceasta pentru a
deschide fereastra ce permite sa faceti diferite setari caracteristice conexiunii
dumneavoastra la retea.
¾ Selectati iconul “Local Area Connection”; faceti click-dreapta si selectati
“Properties” pentru a seta IP-ul.
¾ Selectati optiunea “Internet Protocol (TCP/IP)” si dati click pe butonul
“Properties”.
¾ Bifati “Obtain an IP address automatically” si “Obtain DNS server address
automatically”, iar apoi apasati pe butonul “OK” pentru a inchide fereastra.


![Manual de utilizare[DOWNLOAD]](http://vs1.manualzilla.com/store/data/005723533_1-258331d4abba7698d1081b2119c4c2bf-150x150.png)