1
LOGOSOL Speed Saw
lifting instructions & setup
Fit the guide bar and chain after the saw has been
mounted on the LOGOSOL Sawmill. The Speed Saw should
be mounted on the guide rail of the sawmill before power
is connected to the machine.
The Speed Saw can be driven by electric or manual feed.
In both cases a line holder is fitted to the rear edge of the
Speed Saw. Read the user manuals for the electric feeder
E37 and for the manual feed unit for further instructions on
connection and operation.
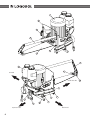
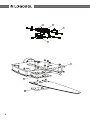
The saw unit weighs 40/47 kg (88/104 lbs). Best is if you
have another person helping you lift the saw onto the ramp
and hold it steady until it is correctly pushed onto the guide
rail of the sawmill. Carefully slide the saw onto the guide
rail so that the track in the plastic slide strips clasps the
edges of the guide rail.
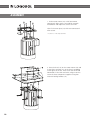
The sawmill should be secured to the floor or foundation
and equipped with supports under both ends of the guide
rail. On the side of the feed unit, you use the support leg
of the feed unit, and on the other side of the guide rail the
support leg with ref. no. 6600-000-3001.
Make sure that the slide strips of the Speed Saw shut tightly
around the edges of the guide rail in all four corners before
guide bar and chain are fitted and the power is connected.
Before the Speed Saw is removed from the guide rail, the
power must be disconnected, the line holder unscrewed
and the guide bar removed.
fitting guide bar & chain
Make sure that the power cable is unplugged.
•
•
•
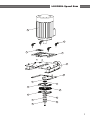
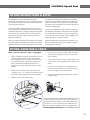
Loosen the guide bar bolts on the top side of the saw
until the cover plate comes in such a low position
that the guide bar can be inserted. Ensure that there
is no sawdust between the bar plate and the cover
plate. The guide bar should be fitted as far in as
possible to ensure that the oil hole comes in correct
position.
Loosen the chain tension knob at the back of the
saw about 3 cm (1 3/16’’). Loosen the excentric locking
handles and push the motor towards the guide bar.
•
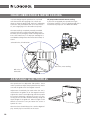
Fit the chain on the chain pulley under the motor.
The outer chain guide has a recess on which the
chain is placed.
•
Gently pull the chain so that the pulley rotates. The
cahin will then come in position on the teeth of the
pulley.
•
Fit the chain in the groove in the guide bar and
push the moter back in place. Tension the chain a
final time using the chain tension knob.
•
Secure the motor by tightening the four excentric
locking handles.
Hold the chain so that it forms a loop.
Correct chain tension: If you hold the chain between
your thumb and forefinger, you should be able to pull
the chain out from its groove at the middle point of
the bar. When releasing the chain it should snap back
into the groove in the bar.
17