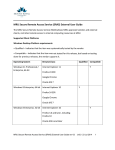
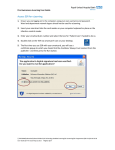
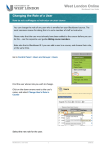
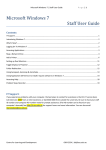
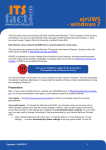
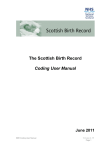
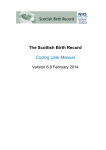
1
MRU Secure Remote Access Service (SRAS) User Guide The MRU Secure Remote Access Service (SRAS) allows MRU employees and students remote access to internal computing resources including data and computer systems accessible to the user. Available service types: Basic service The following basic services are provided to each user by default. MRU employees and students access to their home/department files. Requested service Employees may request the following services by contacting the MRU Service Desk Remote Desktop (RDP) to internal computers. Web access to internal computer systems. Special network access to meet the business needs of individual users. Vendor remote access. MRU Secure Remote Access Service (SRAS) User Guide rev 06 Jv8.0 23 Jul 2014 1 Supported Client Platforms Windows Desktop Platform requirements • Qualified – Indicates that the item was systematically tested by vendor. • Compatible – Indicates that the item was not tested for this release, but based on testing done for previous releases, vendor supports it. Operating System Browser/Java Windows 8.1 Professional / Enterprise, 64‐bit Internet Explorer 11 Qualified Compatible Y Firefox 24 ESR Google Chrome Oracle JRE 7 Windows 8 Enterprise, 64‐bit Internet Explorer 10 Y Firefox 24 ESR Google Chrome Oracle JRE 7 Windows 8 Enterprise, 32‐bit Internet Explorer 10 Y Firefox 3.0 and later, including Firefox 10 Oracle JRE 6 and later Windows 8 basic edition / Professional, 32‐bit or 64‐bit Internet Explorer 10 Y Firefox 3.0 and later, including Firefox 10 Oracle JRE 6 and later MRU Secure Remote Access Service (SRAS) User Guide rev 06 Jv8.0 23 Jul 2014 2 Windows 7 Enterprise SP1, 64‐bit Internet Explorer 11,10, 9 Y Firefox 24 ESR Google Chrome Oracle JRE 7 Windows 7 Enterprise SP1, 32‐bit Internet Explorer 11,10, 9, 8, 7 Y Firefox 3.0 and later, including Firefox 10 Oracle JRE 6 and later Windows Vista Enterprise / Ultimate / Business / Home‐ Basic / Home‐Premium, 32‐ bit or 64‐bit Internet Explorer 11,10, 9, 8, 7 Y Firefox 3.0 and later, including Firefox 10 Oracle JRE 6 and later Windows XP SP3 Home / Professional, 32‐bit Internet Explorer 9, 8, 7 Y Firefox 3.0 and later, including Firefox 10 Oracle JRE 6 and later *On Windows 8.1, 8 platforms the endpoint must use desktop mode and enable plug‐ins in the Internet Explorer configuration. MRU Secure Remote Access Service (SRAS) User Guide rev 06 Jv8.0 23 Jul 2014 3 Non‐Windows Desktop Platform requirements Operating System Browser/Java Linux Redhat Enterprise Linux 5 Firefox 3.0 and later Linux openSUSE 12.1 Firefox 24 ESR Qualified Compatible Y Oracle JRE 6 and later Y Oracle JRE 7 Linux openSUSE 12.1 Google Chrome Y Linux openSUSE 11.x, 10.x Firefox 3.0 and later Y Oracle JRE 6 and later Linux Ubuntu 12.04 LTS Firefox 24 ESR Y Oracle JRE 7 Linux Ubuntu 12.04 LTS Google Chrome Y Linux Ubuntu 11.x, 10.x, 9.10 Firefox 3.0 and later, including Y Firefox 10 Oracle JRE 6 and later Mac OS 10.9 Safari 7.0 Y Oracle JRE 7 Mac OS X 10.8, 64‐bit Safari 6.0, 5.1 Y Oracle JRE 7 Mac OS X 10.7.4, 10.6 64‐bit and 32‐bit Safari 6.0, 5.1, 5.0 Oracle JRE 6 and later MRU Secure Remote Access Service (SRAS) User Guide rev 06 Jv8.0 Y 23 Jul 2014 4 Mac OS X 10.8, 10.7, 32‐bit Safari 6.0, 5.1, 5.0 X Y Oracle JRE 6 and later Non‐Windows Desktop Platform requirements for Network Connect Operating System Browser/Java Qualified Compatible Linux Fedora 12 Firefox 24 ESR Y Oracle JRE 7, 6 Iced‐Tea Web 1.2 with OpenJDK 7, 6 Linux Fedora 12 Google Chrome Linux openSUSE 12.1 Firefox 24 ESR Y Y Oracle JRE 7, 6 Iced‐Tea Web 1.2 with OpenJDK 7, 6 Linux openSUSE 12.1 Google Chrome Linux Ubuntu 12.04 LTS Firefox 24 ESR Y Y Oracle JRE 7, 6 Iced‐Tea Web 1.2 with OpenJDK 7, 6 Linux Ubuntu 12.04 LTS Google Chrome Mac OS X 10.8, 64‐bit Safari 6.0, 5.1 Y Y Oracle JRE 7 Mac OS X 10.7.4, 10.6 64‐bit and 32‐bit Safari 6.0, 5.1, 5.0 Oracle JRE 6 and later MRU Secure Remote Access Service (SRAS) User Guide rev 06 Jv8.0 Y 23 Jul 2014 5 Mac OS X 10.8, 10.7, 32‐bit Safari 6.0, 5.1, 5.0 Y Oracle JRE 6 and later Operation Guides This is a quick starting guide covering the following common operations: 1. Access the SRAS service 2. Access a file from a network drive 3. Save a file to your network drive 4. Manage your files and folders on a network drive 5. Remote Desktop (RDP) to a computer inside the MRU network 6. Access MRU web pages 7. Use Network Connect 8. Lotus Notes client 9. CMS Remote Access 10. Banner Forms and Reports Access 11. Session timeout warning 12. Configure the user page 13. Potential Issues For more details, please refer to the product help page by clicking the home page. MRU Secure Remote Access Service (SRAS) User Guide rev 06 Jv8.0 icon on your 23 Jul 2014 6 1. Access the SRAS service Enter secure.mtroyal.ca into the address/URL field of a browser window. Enter your MRU username and password. Click the button to continue. MRU Secure Remote Access Service (SRAS) User Guide rev 06 Jv8.0 23 Jul 2014 7 Once you have successfully logged on, the following page will be displayed. Please wait until it is completed. Your home page will now display all of the services that SRAS provides you as shown below or on the next page. Shown below is a typical user screen with basic service: MRU Secure Remote Access Service (SRAS) User Guide rev 06 Jv8.0 23 Jul 2014 8 Users granted additional services may see the following screen: MRU Secure Remote Access Service (SRAS) User Guide rev 06 Jv8.0 23 Jul 2014 9 Key elements on your home page: User Toolbar Description Click to go back to your home page shown above. Click to activate the user preference configuration page. Displays how long your session will remain open. This example shows 9 hours 57 minutes remaining. Click to bring up the online user help manual. Click to sign out of the Juniper connection. Please sign out once the service is no longer required. Service Pane Description This allows users to access their folders and files in their MRU home and department network drive folders. Files service pane This allows users to run Remote Desktop (RDP) to internal MRU computers which they have been granted access to. Sometime this service is referred to as Microsoft Terminal Services. Terminal Sessions pane This allows users access to internal webpage(s) they have access to. Web Service pane This provides different levels of VPN/network access into the MRU internal environment. VPN Service pane MRU Secure Remote Access Service (SRAS) User Guide rev 06 Jv8.0 23 Jul 2014 10 2. Access files from a network drive The File Pane shows the root of the network drives you have access to. Click the folder link to access your files. For example, your home folder or the H: drive as shown below. MRU Secure Remote Access Service (SRAS) User Guide rev 06 Jv8.0 23 Jul 2014 11 Clicking the link to access the file test.txt will open the following window: Select whether you want to open or save the file and then click OK. In this example we are choosing to open the file. Please note that when you save the file, it will only be saved on your local PC, not back to the network drive. You must upload it to the share if you want to save it there. Please see the section Save a file to your network drive on the next page for instructions. MRU Secure Remote Access Service (SRAS) User Guide rev 06 Jv8.0 23 Jul 2014 12 3. Save a file to your network drive If you want to save a file called nice.txt to the Test folder. Click the folder link . The following window will be displayed. Click the button. The following window will be displayed. Click the button to access the file you want to upload. The Save As: and Uncompress .zip fields are optional. MRU Secure Remote Access Service (SRAS) User Guide rev 06 Jv8.0 23 Jul 2014 13 Click the window: button at the bottom of the screen. You will see the following pop‐up Click the The file is now in the Test folder as shown below. button when the upload is completed. MRU Secure Remote Access Service (SRAS) User Guide rev 06 Jv8.0 23 Jul 2014 14 Note: If a file or folder with the same name already exists in the directory and you do not specify a name, the uploaded file is saved with the name: filename.timestamp.ext. See screen capture below. To overwrite an existing file or folder, you must enter the name in the Save As field. For example, to overwrite the file test.txt in our example, you must enter test.txt in the Save As field. MRU Secure Remote Access Service (SRAS) User Guide rev 06 Jv8.0 23 Jul 2014 15 4. Manage your file and folder on network drive When you click a folder link under the Files Pane, you will see its content as shown below. From here, you can bookmark folder (for quicker access without the need to go through the file tree again), delete folder/file, download folder/file, upload folder/file, or create folder by following the on screen instruction. Please refer to the online However, it is worth to mention here that for details. and are not the same. allows you to bookmark a folder selected on this screen. For example, when you have selected be bookmarked. as shown above. This folder will MRU Secure Remote Access Service (SRAS) User Guide rev 06 Jv8.0 23 Jul 2014 16 But on screen. will only bookmark which is the current folder MRU Secure Remote Access Service (SRAS) User Guide rev 06 Jv8.0 23 Jul 2014 17 5. Remote desktop (RDP) to a computer inside MRU network Note: For PCs not running Microsoft Windows, you will need to use the Network Connect feature (See section 9, Use Network Connect) and the RDP client of your choice to connect. The Terminal Sessions Pane provides you this capability. The target system could be a server or a desktop. However, you must have already been granted remote desktop access to the MRU computer you want to connect to. There are 2 ways to do this: 1. Entering the IP address or the hostname of the internal computer into the window and click the some situations, using the IP address may work better. icon. In Acceptable hostname examples: mrdt509999 mrdt509999.ad.mtroyal.ca 2. Or click the icon to add a permanent session link. MRU Secure Remote Access Service (SRAS) User Guide rev 06 Jv8.0 23 Jul 2014 18 To set up a permanent link, click icon. The following window will be launched. Follow the example on the screen to enter the hostname of the computer. Click the button at the bottom of the screen. MRU Secure Remote Access Service (SRAS) User Guide rev 06 Jv8.0 23 Jul 2014 19 Once completed, the Terminal Sessions pane will have the new link added as shown below. You can now click the new link to launch the connection. MRU Secure Remote Access Service (SRAS) User Guide rev 06 Jv8.0 23 Jul 2014 20 6. Access MRU web pages The Web Service Pane provides you this capability. To create web links, click the icon. The following window will be displayed. Enter the appropriate information as shown above and click the to create the link. MRU Secure Remote Access Service (SRAS) User Guide rev 06 Jv8.0 button 23 Jul 2014 21 The new link appears in the Web Service Pane on your home page Click the access to it. link. The webpage will be launched if you have been granted MRU Secure Remote Access Service (SRAS) User Guide rev 06 Jv8.0 23 Jul 2014 22 7. Use Network Connect You may need to use the Network Connect service under certain circumstances such as: You are not using a Microsoft Windows based PC. The RDP functions provided on the Terminal Sessions Panel may not work as Terminal Services may not be natively supported on the system. If this is the case, you can start the Network Connect service and run your Terminal Services client of your choice on your system. You may be pre‐approved with other network access to MRU computers. Click the Start button in the service pane to start up the service. It will install software on your system. Please follow the on screen instructions to allow the installation. Wait until the Network Connect icon fully active (not grayed out) as shown below. Microsoft Windows: or MRU Secure Remote Access Service (SRAS) User Guide rev 06 Jv8.0 23 Jul 2014 23 Apple Mac/Linux: You can double click the small icon shown above to see the connection status and disconnect it. Shown below are the expanded icon views for different platforms. Microsoft Windows: MRU Secure Remote Access Service (SRAS) User Guide rev 06 Jv8.0 23 Jul 2014 24 Apple Mac: Linux: Once successfully connected, you can launch applications, such as RDP client, on your local computer to access internal MRU computing resources. MRU Secure Remote Access Service (SRAS) User Guide rev 06 Jv8.0 23 Jul 2014 25 8. Lotus Notes client You can use a web browser to access Lotus Notes remotely instead of its client. It will provide you with most of the common functions. The address/URL is notes.mtroyal.ca. Please check to ensure the Terminal Session Pane as shown immediately below is displayed on your SRAS home page. If it is not, please contact the MRU Service Desk to request the Lotus Notes client remote access service. To remotely access Lotus Notes service using its client, please launch the Network Connect described above in section 7 and then run your Lotus Notes client. 9. CMS Remote Access Please check to ensure the Terminal Session Pane as shown immediately below is displayed on your SRAS home page. If it is not, please contact the MRU Service Desk to request the CMS remote access service. To access CMS service remotely, please launch the Network Connect described above in section 7 and then access the CMS as you normally do. MRU Secure Remote Access Service (SRAS) User Guide rev 06 Jv8.0 23 Jul 2014 26 10. Banner Forms and Reports Access Launch Network Connect described above in section 7 and then access Banner Forms and Reports as you normally do. Please note that only computers running Microsoft Windows provided by MRU are allowed access via SRAS. 11. Session timeout SRAS will time out a user session which has been idle for more than 15 minutes. The system will prompt the user with the following message. Click OK to continue. It may ask you for a username and password again. Most of the time the system will resume the last state the user was in when the session was timed out. The maximum session time for each successful log on is 10 hours. MRU Secure Remote Access Service (SRAS) User Guide rev 06 Jv8.0 23 Jul 2014 27 12. Configure the user page The end user can customize the user interface by clicking the icon. The following window will then be displayed. The end user can then change the settings allowed on the different tabs. MRU Secure Remote Access Service (SRAS) User Guide rev 06 Jv8.0 23 Jul 2014 28 13. Potential Issues 1. You may see the following or similar pop‐up messages, please check the Always trust/accept check box and click Yes or Save to allow the process to finish. 2. Occasionally, you may be asked to save and run the JuniperSetupClientInstaller.exe as shown below. Please follow the instructions on screen to complete the installation. 3 Remote desktop issues: a. If you already have been granted RDP access, you may need to reboot your internal system to allow the computer policy to take effect. b. If you do not have RDP access, please contact the MRU Service Desk to request access. c. MRU Secure Remote Access Service (SRAS) User Guide rev 06 Jv8.0 23 Jul 2014 29 4. To run Net Connect on a supported 64 bits Linux platform. Please follow instruction on this link: http://www.juniper.net/techpubs/en_US/sa7.3/topics/reference/general/secure‐access‐nc‐ 64‐bit‐linux‐support.html Also xterm is needed to allow the install script to ask for root/sudo password. Please contact the MRU Service Desk for assistance at local 6000 or via email at [email protected]. MRU Secure Remote Access Service (SRAS) User Guide rev 06 Jv8.0 23 Jul 2014 30