1
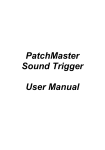
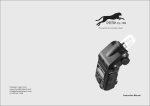
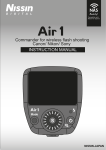
LR Digital Remote Control System User Guide Table of Contents Install LR Digital Remote Control System Page 2 Set Up Group / Id for each Flash Page 3 Remote Control Operation Page 3 - 4 LR Digital Remote Control System User Guide June 01, 2010 Install LR Digital Digital Remote Control System The 2.4 GHZ LR Digital Remote Control System is made up of 3 components (sold separately or as a kit): a receiver, a transmitter and a hand-held remote controller. 1. Remove plastic cover from receiver socket (located at top of flash control panel) and insert receiver with antennae attached, ensuring it is properly seated. a. The receiver draws its power from the flash. 2. Insert battery into transmitter. a. It comes with one 3V battery (CR123A-UI). 3. Mount transmitter – with antennae attached - onto the hotshoe of your camera. a. Locate the power switch on the back-side of the transmitter. b. Turn power switch to left - ON position. 4. Use the M button on the top of the transmitter to identify which GROUP of flashes you wish to trigger: A, B, C, D, or E See next page for instructions on setting up a GROUP / ID on each flash. a. T = Test Fire Flash 5. Press camera shutter to activate transmitter and fire the flash. Lightrein 2 LR Digital Remote Control System User Guide June 01, 2010 Set Up Group and ID on each Flash You need to set up a Group and ID for on each flash when you want to control that flash from the hand-held remote controller. This set-up is done on the flash itself. There are five GROUP SETTINGS (A, B, C, D, E): each of these can have 10 flashes assigned to them (ID SETTINGS 1 to 10). To set the GROUP and ID on each flash you will use the • XB button, • LCD display and • both flash and modeling light dials. 1. Press the XB button for approximately 3 seconds a. The LCD screen will display the GROUP/ID SETTING screen (opposite) MODE REM A-‐01 b. The GROUP/ID SETTING screen will revert back to the default screen if you do not activate steps 2 and 3 below GROUP SETTING A B C D E ID SETTING 1 2 3 4 5 6 7 8 9 10 2. Rotate the Flash dial to set the GROUP SETTING: A, B, C, D, E GROUP-ID Displayed here 3. Rotate the Modeling Light dial to set the ID SETTING: 1 to 10 a. After setting GROUP and ID, the screen will revert back to default screen after several seconds. Remote Control Operation You can fire and control the functions of each flash (up to 50) with the hand held remote control. 1. Press the POWER button to turn the remote control ON…it will power OFF on its own after approx 1 minute. 2. Press SCAN to identify flashes “connected” to the remote controller. 3. Use alphanumeric pad to select a flash: GROUP (A to E) and ID (1 to 10) 4. Press the REM button…the “default” screen will display on the remote control. Functions of the controller are explained in chart (next page). Lightrein 3 LR Digital Remote Control System User Guide Adjust Flash Output June 01, 2010 Press Flash controller (blue triangles) to adjust flash output up or down…press flash controller (center) to rotate through maximum, minimum and last power setting used. This can also be used to select an F-stop, IF the aperture control system has been set up (page 3). Adjust Modeling Light Output Press Modeling Light controller (red triangles) to adjust model light output up or down. Press modeling Light controller (center) to rotate through maximum, minimum, last power setting used and OFF. Turn Cell ON/OFF Press the CELL button to turn photo cell on or off. When Cell is turned on, the CEL display on the default screen is filled in with grey. Turn Sound ON/OFF Press the SOUND button to turn audible alert on or off…this will indicate that the flash is ready to fire again. When Cell is turned on, the SND display on the default screen is filled in with grey. Set Proportional Lighting Press the PROP button to turn proportional lighting on…press and hold to turn on Continuous lighting. When PROP is turned on, the PRO display on the default screen is filled in with grey. When Continuous is turned on, the CON display on the default screen is filled in with grey. Test Fire Flash Press the TEST button to trigger flash. Turn Flash Off Press the STROBE OFF button to turn flash off. Note: You can turn strobe on again using this button, as long as the strobe power button is in the ON position. Lightrein 4