1
BlackICE Defender
User Guide
Version 2.9
BLACKICE DEFENDER USER GUIDE ! COPYRIGHT INFORMATION ! i
BlackICE Defender User Guide – Version 2.9
Copyright © 1998 - 2001, Internet Security Systems Corporation
All Rights Reserved
Authors: Susanna Breiling, Andrew Plato, Ted Kuster
The use and copying of this product is subject to a license agreement. Any other use is strictly prohibited. No part of this
publication may be reproduced, transmitted, transcribed, stored in a retrieval system or translated into any language, in
any form, by any means without the prior written consent of the Internet Security Systems Corporation. Information in
this user’s guide is subject to change without notice and does not constitute any commitment on the part of the Internet
Security Systems Corporation.
Internet Security Systems Corporation may have patents or pending patent applications, trademarks, copyrights, and
other intellectual property rights covering the subject matter of this user’s guide. Furnishing of this document does not
in any way grant you license to these patents, trademarks, copyrights, or any other intellectual property of the Internet
Security Systems Corporation.
BlackICE™, ICEcap™, ICEpac™, Network ICE™, and the Network ICE logo are all trademarks of the Internet
Security Systems Corporation.
Windows® and Microsoft® are registered trademarks, and Windows NT™, Windows 2000™, Windows 98™,
Windows 95™, Windows Me™ and Internet Explorer™ are all trademarks of the Microsoft Corporation.
Solaris™ is a trademark of Sun Microsystems, Inc.
All other products mentioned in this manual are the trademarks or registered trademarks of their respective owners.
Internet Security Systems, Inc. Software License Agreement (Binary Code)
This software is licensed, not sold. by installing this software, you agree to all of the provisions of this Software License
Agreement ("License"). if you are not willing to be bound by this License, return all copies of the software and license
keys to ISS within fifteen (15) days of receipt for a full refund of any paid license fee. if the software was obtained by
download, you may certify destruction of all copies and license keys in lieu of return.
1. License - Upon payment of the applicable fees, Internet Security Systems, Inc. ("ISS") grants to you as the only end
user ("Licensee") a nonexclusive and nontransferable, limited license for the accompanying ISS software product in
machine-readable form and the related documentation ("Software") for use only on the specific network configuration,
for the number of devices, and for the time period ("Term") that are specified in Licensee’s purchase order, as accepted
by ISS, and the invoice and license key furnished by ISS. ISS limits use of Software based upon the number and type of
devices upon which it may be installed, used, gather data from, or report on, depending upon the specific Software
licensed. A device includes any network addressable device connected to Licensee’s network, including remotely,
including but not limited to personal computers, workstations, servers, routers, hubs and printers. Licensee may
reproduce, install and use the Software on multiple devices, provided that the total number and type are authorized in
Licensee’s purchase order, as accepted by ISS, and the invoice and license key furnished by ISS. Licensee may make a
reasonable number of backup copies of the Software solely for archival and disaster recovery purposes. If Software is
ISS’ SAFEsuite Decisions product, then it is delivered with Seagate Info, a third party software product of Seagate
Software Information Management Group Holdings, Inc. Seagate Info is restricted to use with ISS SAFEsuite Decisions
and no other application. A license of ISS SAFEsuite Decisions allows Licensee to implement up to three (3) copies of
SAFEsuite Decisions of which one (1) of these copies may be for production use. Each Seagate Info license includes ten
(10) "Client" licenses and one (1) Report/Query Add-In "Designer" license. Additional copies require additional licenses.
Seagate Info is subject to the terms and conditions of the license agreement accompanying such software. ISS will
provide to Licensee, upon request and in any event upon delivery of such software, copies of licensing documentation
applicable to such software. Seagate Info is supplied by ISS “AS IS”, without any warranties of ISS whatsoever.
2. Covenants - ISS reserves all intellectual property rights in the Software. Licensee agrees: (a) the Software is owned by
ISS and/or its licensors, is a valuable trade secret of ISS, and is protected by copyright laws and international treaty
provisions; (b) to take all reasonable precautions to protect the Software from unauthorized access, disclosure, copying
or use; (c) not to modify, adapt, translate, reverse engineer, decompile, disassemble, or otherwise attempt to discover the
source code of the Software; (d) not to use ISS trademarks; (e) to reproduce all of ISS’ and its licensors’ copyright
notices on any copies of the Software; (f) not to transfer, lease, assign, sublicense, or distribute the Software or make it
available for timesharing, service bureau, or online use; and (g) not to disseminate performance information or analysis
(including without limitation benchmarks) from any source relating to the Software.
3. Support and Maintenance - During the term for which Licensee has paid the applicable support and maintenance fees,
ISS will, upon request, provide software maintenance and support services that it makes generally available under its then
current Maintenance and Support Policy. Support and maintenance include telephone support and electronic delivery to
Licensee of error corrections and updates to the Software (but NOT new releases or products that substantially increase
functionality and are marketed separately) and documentation as described in ISS’ then current Maintenance & Support
Policy.
BLACKICE DEFENDER USER GUIDE ! COPYRIGHT INFORMATION ! ii
4. Limited Warranty - The commencement date of this limited warranty is the date on which ISS furnishes to Licensee
the license key for the Software. For a period of ninety (90) days after the commencement date or for the Term
(whichever is less), ISS warrants that the Licensed Software will conform to material operational specifications described
in its then current documentation. However, this limited warranty shall not apply unless (i) the Software is installed,
implemented, and operated in accordance with all written instructions and documentation supplied by ISS, (ii) Licensee
notifies ISS in writing of any nonconformity within the warranty period, and (iii) Licensee has promptly and properly
installed all corrections, new versions, and updates made available by ISS to Licensee. Furthermore, this limited warranty
shall not apply to nonconformities arising from any of the following: (i) misuse of the Software, (ii) modification of the
Software, (iii) failure by Licensee to utilize compatible computer and networking hardware and software, or (iv)
interaction with software or firmware not provided by ISS. If Licensee timely notifies ISS in writing of any such
nonconformity, then ISS shall repair or replace the Software or, if ISS determines that repair or replacement is
impractical, ISS may terminate the applicable licenses and refund the applicable license fees, as the sole and exclusive
remedies of Licensee for such nonconformity. This warranty gives Licensee specific legal rights, and Licensee may also
have other rights that vary from jurisdiction to jurisdiction. ISS does not warrant that the Software will meet Licensee's
requirements, that the operation of the Software will be uninterrupted or error-free, or that all software errors will be
corrected. Licensee understands and agrees that licensed Software is no guarantee against intrusions, viruses, trojan
horses, worms, time bombs, cancelbots or other similar harmful or deleterious programming routines affecting
Licensee's network, or that all security threats and vulnerabilities will be detected or that the performance of the licensed
software will render Licensee’s systems invulnerable to security breaches. The remedies set out in this Section 4 are the
sole and exclusive remedies for breach of this limited warranty.
5. Warranty Disclaimer - Except for the limited warranty provided above, the Software is provided “AS IS” and ISS
hereby disclaims all warranties, both express and implied, including implied warranties respecting merchantability, title,
noninfringement, and fitness for a particular purpose. Some jurisdictions do not allow disclaimers of implied warranties,
so the above limitation may not apply to licensee. Licensee expressly acknowledges that no representations other than
those contained in this License have been made regarding the goods or services to be provided hereunder, and that
Licensee has not relied on any representation not expressly set out in this License.
6. Proprietary Rights - ISS represents and warrants that ISS has the authority to license the rights to the Software that are
granted herein. ISS shall defend and indemnify Licensee from any final award of costs and damages against Licensee for
any actions based on infringement of any U.S. copyright, trade secret, or patent as a result of the use or distribution of a
current, unmodified version of the Software; but only if ISS is promptly notified in writing of any such suit or claim, and
only if Licensee permits ISS to defend, compromise, or settle same, and only if Licensee provides all available
information and reasonable assistance. The foregoing is the exclusive remedy of Licensee and states the entire liability of
ISS with respect to claims of infringement or misappropriation relating to the Software.
7. Limitation of Liability - Licensee acknowledges that some of the Software is designed to test the security of computer
networks and may disclose or create problems in the operation of the systems tested. Licensee accepts the risk of such
possibility and hereby waives all rights, remedies, and causes of action against ISS and releases ISS from all liabilities
arising therefrom. ISS' entire liability for monetary damages arising out of this License shall be limited to the amount of
the license fees actually paid by Licensee under this License, prorated over a three-year term from the date Licensee
received the Software. in no event shall ISS be liable to Licensee under any theory including contract and tort (including
negligence and strict products liability) for any special, punitive, indirect, incidental or consequential damages, including,
but not limited to, costs of procurement of substitute goods or services, damages for lost profits, loss of data, loss of
use, or computer hardware malfunction, even if ISS has been advised of the possibility of such damages.
8. Termination - Licensee may terminate this License at any time by notifying ISS in writing. All rights granted under
this License will terminate immediately, without prior written notice from ISS, at the end of the term of the license, if
not perpetual. If Licensee fails to comply with any provisions of this License, ISS may immediately terminate this
License if such default has not been cured within ten (10) days following written notice of default to Licensee. Upon
termination or expiration of the License, Licensee shall cease all use of the Software and destroy all copies of the
Software and associated documentation. Termination of this License shall not relieve Licensee of its obligation to pay all
fees incurred prior to such termination and shall not limit either party from pursuing any other remedies available to it.
9. General Provisions - This License, together with the identification of the Software, pricing and payment terms stated
in the applicable Licensee purchase order as accepted by ISS and ISS invoice and license key, constitute the entire
agreement between the parties respecting its subject matter. Standard and other additional terms or conditions contained
in any purchase order or similar document are hereby expressly rejected and shall have no force or effect. This License
will be governed by the substantive laws of the State of Georgia, USA, excluding the application of its conflicts of law
rules. This License will not be governed by the United Nations Convention on Contracts for the International Sale of
Goods, the application of which is expressly excluded. If any part of this License is found void or unenforceable, it will
not affect the validity of the balance of the License, which shall remain valid and enforceable according to its terms. This
License may only be modified in writing signed by an authorized officer of ISS.
BLACKICE DEFENDER USER GUIDE ! COPYRIGHT INFORMATION ! iii
10. Notice to United States Government End Users - Licensee acknowledges that any Software furnished under this
License is commercial computer software developed at private expense and is provided with RESTRICTED RIGHTS.
Any use, modification, reproduction, display, release, duplication or disclosure of this commercial computer software by
the United States Government or its agencies is subject to the terms, conditions and restrictions of this License in
accordance with the Unites States Federal Acquisition Regulations at 48 C.F.R. Section 12.212 and Subsection 227.72023 or applicable subsequent regulations. Contractor/manufacturer is Internet Security Systems, Inc., 6303 Barfield Road,
Atlanta, GA 30328, USA.
11. Export and Import Controls; Use Restrictions - Licensee will not transfer, export, or reexport the Software, any
related technology, or any direct product of either except in full compliance with the export controls administered by the
United States and other countries and any applicable import and use restrictions. Licensee agrees that it will not export
or reexport such items to anyone on the U.S. Treasury Department's list of Specially Designated Nationals or the U.S.
Commerce Department's Denied Persons List or Entity List, or to any country to which the United States has
embargoed goods, or for use with chemical or biological weapons, sensitive nuclear end-uses, or missiles. Licensee
represents and warrants that it is not located in, under control of, or a national or resident of any such country or on any
such list. Many ISS software products include encryption and export outside of the United States or Canada is strictly
controlled by U.S. laws and regulations. Please contact ISS’ Customer Operations for export classification information
relating to the Software ([email protected]). Licensee understands that the foregoing obligations are U.S. legal
requirements and agrees that they shall survive any term or termination of this License.
12. Authority - Because the Software is designed to test or monitor the security of computer network systems and may
disclose or create problems in the operation of the systems tested, Licensee and the persons acting for Licensee
represent and warrant that: (a) they are fully authorized by the Licensee and the owners of the computer network for
which the Software is licensed to enter into this License and to obtain and operate the Software in order to test and
monitor that computer network; (b) the Licensee and the owners of that computer network understand and accept the
risks involved; and (c) the Licensee shall procure and use the Software in accordance with all applicable laws, regulations
and rules.
13. No High Risk Use - Licensee acknowledges that the Software is not fault tolerant and is not designed or intended
for use in hazardous environments requiring fail-safe operation, including, but not limited to, aircraft navigation, air
traffic control systems, weapon systems, life-support systems, nuclear facilities, or any other applications in which the
failure of the Licensed Software could lead to death or personal injury, or severe physical or property damage. ISS
disclaims any implied warranty of fitness for High Risk Use.
Revised September 24, 2001
BLACKICE DEFENDER USER GUIDE ! COPYRIGHT INFORMATION ! iv
T ABLE OF C ONTENTS
Preface .......................................................................................................................... vi
Section 1: I N T R OD U C T I O N
TO
B L AC K ICE D E F E N D E R
Overview ....................................................................................................... 1
How BlackICE Works .................................................................................... 2
Inside BlackICE ............................................................................................. 5
Traffic Filtering............................................................................................... 7
Terminology................................................................................................. 13
Section 2: S E T T I N G U P B L AC K ICE D E FE N D E R
Installing BlackICE Defender ....................................................................... 15
Updating BlackICE ...................................................................................... 18
Uninstalling BlackICE Defender................................................................... 21
Using BlackICE on a Home LAN ................................................................. 23
Stopping and Starting the BlackICE Engine................................................. 25
Setting Alarm Preferences........................................................................... 28
Selecting Columns to View .......................................................................... 31
Section 3: C O N FI GU R I N G B L AC K ICE D E FE N D E R
Accessing the Configuration Settings .......................................................... 33
Filtering the Events List ............................................................................... 35
Freezing the BlackICE Tabs ........................................................................ 37
Section 4: D E T E C T I N G I N T R U S I ON S
Understanding the Severity of an Intrusion .................................................. 38
Ignoring an Event ........................................................................................ 40
Trusting an Intruder ..................................................................................... 43
Trusting an Address .................................................................................... 45
Deleting or Changing a Trusted Address or Ignored Event .......................... 47
Tracking Down Intruders: Back Tracing ....................................................... 49
Tracking Down Intruders: Collecting Evidence............................................. 51
Tracking Down Intruders: Collecting Packets............................................... 54
Exporting BlackICE Data ............................................................................. 56
Section 5: B L O C K I N G I N T R U S I O N S
Understanding Response Levels ................................................................. 57
Choosing a Protection Level........................................................................ 58
Managing Your Firewall ............................................................................... 60
Blocking an Intruder..................................................................................... 61
Blocking or Accepting an IP Address or Port ............................................... 62
Section 6: T H E B L AC K ICE D E F E N D E R S C R E E N S
Tabs for Operating BlackICE ....................................................................... 67
Tabs for Configuring BlackICE .................................................................... 79
The Advanced Firewall Settings Dialog Box ................................................ 92
The Menu Bar.............................................................................................. 96
Glossary ..................................................................................................................... 101
Index ........................................................................................................................... 109
BLACKICE DEFENDER USER GUIDE ! CONTENTS ! V
PREFACE
Thank you for purchasing BlackICE Defender from Internet Security Systems.
BlackICE is a powerful new way to defend your computer from suspicious and
illegal activity on the Internet.
This guide describes how to use BlackICE Defender to monitor, analyze, and stop
hacking activity.
Related Documents
For more information about using BlackICE, see these related documents:
BlackICE Guide to
Computer Security
BlackICE Advanced
Administration Guide
Intrusions Reference
Guide
Background information about computer security,
firewalls, networking, and the culture of hackers. A great
place to start if you are new to the world of computer
security.
Details on advanced security and configuration
concepts. Intended for those who want to know the
inner workings of BlackICE.
Detailed information about all the intrusions BlackICE
can detect and block. Includes information about
stopping attacks as well.
All these documents are available free of charge on the BlackICE web site at:
www.networkice.com/support/documentation.html.
BLACKICE DEFENDER USER GUIDE ! PREFACE ! VI
Conventions Used in this Manual
Bold
Italics
Monospaced
Monospaced Bold
Monospaced Italics
[Inside Brackets]
Note:
Caution:
Tip:
The names of screen objects, such as menu choices, field
names, and items in lists.
Italics are used for emphasis or to highlight an important
word or concept.
Pathnames, filenames, and code are shown in monospaced
font.
Values you must type in are shown in monospaced, bold
font.
Variables, such as a server name, are shown in
monospaced, italic font. These are usually enclosed in
angled brackets < servername> as well.
Keyboard keys, such as [ENTER] or [Page Up] are shown
inside brackets.
Notes include important information about the operation
or use of the product.
Warnings contain critical information that may cause harm
to your computer or the proper operation of the product.
Helpful information about optimizing or using the
software.
Getting Help with BlackICE Defender
For more help with your copy of BlackICE Defender, refer to these sources:
Online Help
The online Help provides quick answers to many issues regarding . To access Help,
perform one of these procedures:
From the Menu Bar
1. Select Help.
2. From the submenu, click BlackICE Help Topics.
The BlackICE Application Help Index tab appears.
3. Click the index entry for which you want information.
The Help page for the selected entry appears.
From the BlackICE Local Console Tabs
! Click the Help button.
The Help for the open tab appears.
BLACKICE DEFENDER USER GUIDE ! PREFACE ! VII
The BlackICE Web Site
The BlackICE Web site, at www.networkice.com, includes the latest information
about . In addition to FAQs (Frequently Asked Questions) and a support
Knowledge Base, the site includes the advICE library, an extensive online resource
for network security information.
To Access the BlackICE Web site
1. From the Local Console Menu Bar, select Help.
2. From the submenu, click WWW Network ICE.
A Web browser session opens and the BlackICE home page appears.
Note: Your system must be connected to the Internet to show this page.
To Access the BlackICE Frequently Asked Questions (FAQ)
1. From the Local Console Menu Bar, select Help.
2. From the submenu, click Online Support.
Your Web browser opens and the BlackICE Support Web page appears.
Product Documentation
The latest product documentation is available from the BlackICE Web site at
www.networkice.com/support/documentation.html.
Technical Support
Web:
http://www.networkice.com/support
Email:
[email protected]
For updates and upgrade information, please visit the BlackICE Web site at
www.networkice.com. For information on how to receive the latest update of
BlackICE Defender, see “Updating BlackICE” on page 18.
BLACKICE DEFENDER USER GUIDE ! PREFACE ! VIII
Section 1
INTRODUCTION TO BLACKICE DEFENDER
Overview
BlackICE is a revolutionary Intrusion Detection System (IDS) that not only detects
and monitors the activities of hackers, but can also stop them before your computer is
compromised. This section explains why you need to protect your computer and
how BlackICE works.
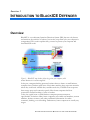
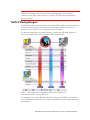
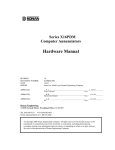
Figure 1 – BlackICE stops hackers before they get into your computer, while
normal Internet access remains unaffected.
In the past, computer hacking presented a minor threat to home or small-business
computer users. Hackers spent most of their time attacking large corporate networks
where they could steal valuable data, vandalize web sites, or benefit from corporate
data storage space and connection speeds. Most home computers had slow
connections and held nothing of value to hackers.
Today, the typical home or small-business computer presents numerous
opportunities for hackers. Many home computers store credit card numbers, account
numbers, business contacts, and other confidential information for online
commerce, banking, or stock trading. Furthermore, home computers are usually easy
targets.
BLACKICE DEFENDER USER GUIDE ! INTRODUCTION TO BLACKICE DEFENDER ! 1
Most home computers have little, if any, protection from hackers. Additionally,
“always-on” Internet connections, such as cable modems or DSL connections, make
the problem worse. With a dial-up modem, your computer is only online to the
Internet while connected. With an “always on” connection, your system is online
whenever your computer is turned on.
For hackers to break into your system, they must first locate your computer. The
more time your system is exposed to the Internet, the more likely hackers will find it.
Even if your system does not hold credit card numbers, a hacker can still use your
computer for other criminal activities. One common trick involves planting remotely
controlled hacking programs on unsuspecting computers. While you are asleep, a
hacker triggers the program. Before you know it, your computer is hacking a
company’s credit card database and the police are looking for you.
Until now, detecting and stopping hackers meant purchasing expensive hardware or
mastering complex networking tools. BlackICE’s easy-to-use software gives your
home computer the same advanced, powerful intrusion detection and protection
tools that big corporations use.
How BlackICE Works
BlackICE is an extremely powerful detection and analysis engine that constantly
monitors the inbound and outbound traffic between your computer and the Internet
or any other computers on a network.
Since BlackICE monitors all network traffic for attacks, all communications are
analyzed, but only intrusions are blocked. Normal network activity is never affected.
BlackICE responds to incoming traffic in three basic ways.
! If the traffic is safe, BlackICE allows it to enter the computer unhindered.
! If the traffic contains a potential attack that is not immediately threatening to the
computer, BlackICE logs the event. The event is then listed in the Events tab in
the Local Console. See “The Events Tab” on page 67 for more information.
! If the incoming traffic contains an attack that poses a direct threat to your
computer, the BlackICE firewall automatically blocks the hacker’s
communications. The event is then logged to the Local Console. If you do not
want BlackICE to automatically block threatening attacks, see “Ignoring an
Event” on page 40.
BLACKICE DEFENDER USER GUIDE ! INTRODUCTION TO BLACKICE DEFENDER ! 2
Superior Technology
When it comes to detecting hackers, BlackICE is a technological leap ahead
compared with other personal firewalls. BlackICE uses superior protocol analysis
technology that detects more attacks with greater accuracy.
The Failure of Pattern-Matching Firewalls
When hackers break into a computer, they have to “break the rules” of networking
to make their attacks look safe. Most intrusion detection systems (IDS) use “patternmatching” technologies to spot these “broken rules.” This involves matching each
incoming transmission to a huge database of attack “signatures,” or patterns.
For pattern-matching systems to work they must know all the possible ways hackers
can break the rules. Because hackers are constantly inventing new ways to hack
systems, pattern-matching systems can quickly become obsolete.
Pattern-matching systems also require greater computing resources to effectively
compare incoming transmissions to the attack database. This makes it easy for
hackers to overload and blind such personal firewalls.
The BlackICE Solution
Rather than simple pattern-matching, BlackICE structurally analyzes all incoming
communications to ensure they obey the network “rules.” Rather than knowing all
the ways hackers can break the rules, BlackICE just knows the rules, and makes sure
incoming transmissions obey those rules. When hackers try to break the rules,
BlackICE shuts them down. This allows BlackICE to detect many more attacks,
even attacks the hacker community has not discovered yet.
Protocol analysis is also more effective at detecting attacks on heavily used
connections. Independent tests show that BlackICE can accurately detect 98% of the
intrusions on a fully loaded network connection. Most pattern-matching systems
only catch about 9% of the attacks under these conditions. This is because the
BlackICE engine requires considerably less computing resources than patternmatching systems. This makes it impossible for hackers to blind BlackICE with
millions of phony transmissions.
Intelligent Firewall
The superior BlackICE intrusion detection technology is paired with a dynamic
firewall. Together, they protect your computer from hackers without any noticeable
degradation in traffic speed or computer performance.
Moreover, the BlackICE firewall stops attacks other firewalls miss. For example,
most firewalls lack the ability to detect intrusions embedded in badly fragmented or
corrupted transmissions. Hackers use this knowledge, and break-up their attacks into
numerous “fragmented” packets that pass right through conventional firewalls.
Because BlackICE analyzes the entire communications package entering the
computer, instead of looking at each individual packet on its own, the BlackICE
firewall detects the attack and can immediately shut it down.
BLACKICE DEFENDER USER GUIDE ! INTRODUCTION TO BLACKICE DEFENDER ! 3
Additionally, the BlackICE firewall can spot and stop “spoofed” attacks. Some
hackers forge (“spoof”) the IP addresses of other computers to trick intrusion
detection systems into believing their transmitted attacks are safe. For this reason,
when the BlackICE firewall automatically blocks these intruders, the blocks last only
24 hours. After 24 hours the firewall releases these auto-blocked IP addresses. This
provides enough time to stop the hacker from causing any damage, but reopens the
connection for the legitimate IP address user.
What BlackICE Blocks
BlackICE can monitor and/or stop several hundred different attacks. Many of these
attacks are automated scans that pose little threat to your computer, but might
summon a hacker to look at your system later.
Other attacks are extremely dangerous and can cause your computer to crash.
Possible damages include lost data, corrupted files, and crippled operating systems.
BlackICE can reject and stop all these attacks, thus deterring hackers from trying to
access your computer again.
For a complete list of the intrusions BlackICE can stop, download the Intrusions
Reference Guide from the BlackICE web site at:
www.networkice.com/support/documentation.html.
The Hacker Sleuth
Besides detecting intrusions, BlackICE can gather extensive information about the
computers trying to break into your system.
As soon as BlackICE detects an attack of sufficient severity, it starts tracing the
intruder’s network connection back to its origin. Along the way it gathers as much
information as possible. This includes valuable data like the hacker’s IP address,
computer names (NetBIOS and DNS), and hardware address (MAC address).
In addition to back tracing, BlackICE can also collect evidence files that contain data
the hacker sent to your computer. In the hands of an experienced network engineer
at your Internet Service Provider, these files show exactly what happened. This can
be very valuable if you need to pursue legal action against the intruder.
BLACKICE DEFENDER USER GUIDE ! INTRODUCTION TO BLACKICE DEFENDER ! 4
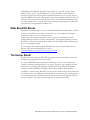
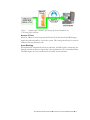
Inside BlackICE
BlackICE’s sophisticated intrusion detection system (IDS) has four main
components:
! IDS engine
! Firewall
! Evidence gathering monitor
! Local Console
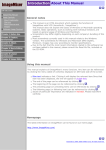
Figure 2 – BlackICE components.
The BlackICE Intrusion Detection Engine
The core of the BlackICE product is the intrusion detection engine. This engine
analyzes incoming and outgoing network traffic in real time for intrusions. If the
engine detects an intrusion or improper access to the computer, it commands the
BlackICE firewall to shut down all access to the intruder.
BLACKICE DEFENDER USER GUIDE ! INTRODUCTION TO BLACKICE DEFENDER ! 5
The BlackICE Firewall
The BlackICE firewall controls access into your computer. When the BlackICE
engine detects an intrusion, it commands the BlackICE firewall to block the hacker’s
IP address. Since the BlackICE firewall controls transmissions at the network
TCP/IP stack level, hackers cannot circumnavigate a block from BlackICE.
The BlackICE engine independently analyzes each hacker transmission. Therefore, it
can command the firewall to erect a temporary barrier to stop attacks regardless of
where the attack originated. Even if a hacker uses a forged (“spoofed”) IP address,
BlackICE blocks the address if the attack is threatening to your computer.
The BlackICE firewall allows you to manually configure IP addresses, TCP ports and
UDP ports to block or accept. For information on how to create and modify firewall
settings, see “Blocking Intrusions” on page 57.
The Evidence Gathering Monitor
As described in “What BlackICE Blocks” on page 4, BlackICE can keep an accurate
log of everything a hacker sent to your computer. BlackICE gathers three types of
evidence:
! Back Tracing Information: This includes the intruder’s IP address, computer
names (NetBIOS and DNS addresses), and hardware addresses (MAC
addresses). For information on back tracing intruders, see “Tracking Down
Intruders: Back Tracing” on page 49.
! Evidence Files: These are raw captures of the transmissions from a hacker.
Evidence Files are encoded in special “sniffer”-format trace-files. You must have
a program that can decode such files. Only the transmissions from a hacker are
captured. Normal (safe) traffic is not. For more information, see “Tracking
Down Intruders: Collecting Evidence” on page 51.
! Packet Logs: These files capture a raw log of ALL communications with your
computer. These files are also encoded in special “sniffer”-format trace files.
These files are useful for spotting unauthorized access to your computer. For
more information, see “Tracking Down Intruders: Collecting Packets” on page
54.
The Local Console
The Local Console is the user interface for BlackICE. It consists of three tabs
(Events, Intruders and History) reporting information about the intrusion events
BlackICE has detected. Details about the attacks on your system, including
information about the intruders performing these attacks and BlackICE’s response
to these events, help you determine the severity and location of the intrusions.
Additionally, the Local Console shows the recent network traffic and attacks in
graph format to allow you to view patterns or spikes in network activity.
For more information about the BlackICE Local Console tabs, see “The Events
Tab” on page 67, “The Intruders Tab” on page 73 or “The History Tab” on page 77.
BLACKICE DEFENDER USER GUIDE ! INTRODUCTION TO BLACKICE DEFENDER ! 6
Traffic Filtering
Besides automatically blocking intruders, you can also manually configure BlackICE
to ignore, trust, or block specific intruders or types of attacks. This allows you to
manually control access to your computer.
Intrusion Detection Filtering
The BlackICE intrusion detection engine can be configured to trust specific
intruders and ignore specific types of attacks.
Ignoring Events and Intruders
Some intrusions on your computer may be the result of automated port scans or
other legitimate Internet tools. For example, some Internet Service Providers carry
out routine port scans and ping sweeps to check the state of downstream clients. To
concentrate on real dangers, you may want to configure BlackICE to ignore these
harmless recurring intrusions.
When an entire event type is ignored, BlackICE does not log any information about
attacks of that type. However, it is not advisable to disregard an event type. You also
have the option of ignoring a specific type of event only when it comes from a
particular intruder. For example, if you have a server that performs regular port
scans, you can have BlackICE ignore any port scanning attacks from that server’s IP
address.
For information on ignoring event types from particular intruders, see “Traffic
Filtering” on page 7.
Trusting Intruders
When an address is trusted, BlackICE assumes all communication from that address is
authorized and excludes the address from any intrusion detection. Trusting ensures
that BlackICE does not inadvertently block systems whose intrusions on your local
computer may be useful to you.
For example, if you have several computers on a network, you may want to trust
them and stop BlackICE from reporting activity from these systems as attacks. For
more information on trusting an intruder, see “Ignoring an Event” on page 40.
Caution: Trust or ignore only addresses that do not pose any threat to your system.
Keep in mind that intruders can “spoof,” or fake, the IP addresses of internal
systems. It is possible, though very unlikely, for an intruder to spoof a trusted
address and avoid detection from BlackICE.
BLACKICE DEFENDER USER GUIDE ! INTRODUCTION TO BLACKICE DEFENDER ! 7
Firewall Settings
BlackICE blocks intruders only when they initiate an event that is an immediate
threat to the computer. Most intrusions are harmless port scans or ping sweeps that
are not immediately threatening. Under normal conditions, BlackICE does not
automatically block or reject these “attacking” addresses. BlackICE allows other
systems to access your computer without hindering network traffic in any way.
The firewall component of BlackICE can block or accept incoming communications
from a particular IP address or TCP/UDP port number. When an intrusion does
pose an immediate threat to the computer, BlackICE adds the intruder’s IP address
to a list of blocked addresses, and the firewall then rejects all incoming packets from
that address.
BlackICE’s firewall is dynamic, meaning it can add addresses or ports to the firewall
list and remove them as necessary to protect your computer.
When you want to manually block an intruder that BlackICE does not find
immediately threatening, you can edit the firewall configuration to block systems at
your own discretion. On the other hand, there may be systems that you do not want
BlackICE to block. In this case, you can instruct the firewall to accept all traffic from
that specific system.
Reject (Block)
IP address blocks explicitly stop all traffic from the selected address. You can configure
IP address blocks from the Local Console tabs (see page 61) or from the Advanced
Firewall Settings (see page 93). Port blocks, which stop all traffic on the selected
TCP/UDP port, are only configurable from the Advanced Firewall Settings.
Accept
When an IP address or TCP/UDP port is set to Accept, BlackICE allows any
communications from that address or over that port. However, the intrusion
detection engine of BlackICE still reports attacks from the accepted address or port.
Therefore, a BlackICE automatic block, triggered as the result of a direct attack, can
override the Accept setting.
Accepting traffic using the firewall settings is not the same as trusting an address. A
trusted address is free from any intrusion detection. Accepting an address clears any
traffic from that system to enter the computer, but still monitors that traffic for
potentially harmful intrusions. Addresses that are trusted and accepted are free from
any automatic blocking.
Accepting ports ensures that BlackICE keeps certain TCP or UDP ports open for
particular applications. For example, if you play Quake II or III on your computer
you should explicitly accept UDP ports 27910 and 27970. Other applications use
different ports. Check with the application manufacturer for specific port
assignments if you are having problems using network or Internet applications.
For information about blocking an IP address from the Local Console, see
“Blocking an Intruder” on page 61. For more information about configuring the
BlackICE firewall, see “Blocking Intrusions” on page 57. For more information
about TCP and UDP ports, see the BlackICE Guide to Computer Security.
BLACKICE DEFENDER USER GUIDE ! INTRODUCTION TO BLACKICE DEFENDER ! 8
Caution: Be careful which systems you block. Your Internet Service Provider (ISP)
may carry out routine, innocuous port scans. Blocking these scans could be a
violation of your ISP’s terms of service. Contact your ISP for more information
about such scans.
Traffic Filtering Dangers
Traffic filtering has a profound effect on how BlackICE handles communications. In
general, trust only those systems that you are absolutely certain are safe, such as
systems on a local LAN or at your Internet Service Provider.
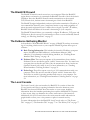
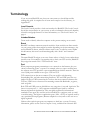
To illustrate the problem with traffic filtering, consider the following diagram. It
shows how traffic filter settings can affect traffic from a hacker.
Figure 3 – What happens to incoming network traffic when confronted by the
various intrusion defense settings of BlackICE.
For example, if you set the BlackICE firewall to accept an IP address, and a hacker
uses that address to break into your computer, BlackICE stops the attack and reports
the intrusion.
BLACKICE DEFENDER USER GUIDE ! INTRODUCTION TO BLACKICE DEFENDER ! 9
However, if you accept and trust the IP address, the hacker succeeds in penetrating
BlackICE’s defenses and BlackICE does not report the intrusion. If you trust an
address, your computer is open to any communications from that address, even
direct attacks. BlackICE does not report or block intrusions from a “trusted” or
“trusted and accepted” address.
Intrusion Detection vs. Firewalling
Intrusion detection and firewall protection are separate BlackICE features that work
together to secure your computer. To get the most out of BlackICE, it is important
to know the differences.
Intrusion Detection
The BlackICE Intrusion Detection System (IDS) is responsible for analyzing
network traffic for intrusions. When it detects an intrusion it reports that event to
the Local Console. The IDS only monitors traffic; it does not actually control that
traffic. Traffic control is the responsibility of the firewall component. For
information on how to configure your intrusion detection settings, see “Traffic
Filtering” on page 7 and “Ignoring an Event” on page 40.
Trusting
When you trust an IP address, the BlackICE IDS component does not analyze any
inbound traffic from that IP address for intrusions.
Figure 4 – Trusted traffic is still eligible for firewalling, but is not analyzed for
intrusions.
The BlackICE firewall may still block trusted addresses if traffic from that address
violates any firewall rule. For example, if a firewall rule blocks all traffic on TCP port
3000, and the trusted system attempts to connect to your computer using port 3000,
BlackICE blocks it.
Ignoring
When you ignore a type of event (also known as a signature), the BlackICE IDS
disregards any event of that type. BlackICE may be instructed to ignore all events of
a given signature, or just events originating from a particular IP address.
Similar to a trust setting, the BlackICE firewall can still block ignored events or
event/address combinations if they violate any existing firewall rules.
BLACKICE DEFENDER USER GUIDE ! INTRODUCTION TO BLACKICE DEFENDER ! 10
Figure 5 – Ignored Signatures or Signature/Address combinations are not
analyzed for intrusions, but all other traffic is.
Firewall
The BlackICE firewall component is responsible for controlling network traffic. It
can block or allow traffic based on firewall rules. The firewall does not analyze traffic
for intrusions, it merely blocks or allows traffic based on whatever rules are in effect.
For information on how to configure your firewall, see “Blocking Intrusions” on
page 57.
Rejecting (Blocking)
When you create a reject (block) rule, the BlackICE firewall stops any network
traffic inbound from the IP address or TCP/UDP port identified in the rule. For
example, you can create a reject rule that stops all inbound traffic on TCP port 5000.
Any time another computer on the network attempts to connect to TCP port 5000
on your system, BlackICE blocks it.
Figure 6 – Rejected (Blocked) traffic is stopped at the BlackICE firewall.
Accepting
An accept rule is the exact opposite of a reject rule. These rules explicitly allow
traffic from a specific IP address or TCP/UDP port.
Instructing the firewall to accept traffic from an IP address is not the same as
instructing the IDS to trust the address. Accepting an address clears any traffic from
that system to enter the computer. However, the BlackICE IDS engine will continue
to analyze that traffic for intrusions.
BLACKICE DEFENDER USER GUIDE ! INTRODUCTION TO BLACKICE DEFENDER ! 11
Figure 7 – Accepted traffic is allowed to pass through the firewall unhindered, but
is still analyzed for intrusions.
Accept & Trust
When an address is both Accepted and Trusted, both the firewall and IDS engine
permit the inbound traffic to access the system. This setting should only be used for
addresses that are absolutely safe.
Auto-Blocking
When BlackICE automatically blocks an intrusion, the IDS engine is instructing the
firewall to block an address or port that it has determined to be an immediate threat.
The IDS engine does not actually block the traffic; the firewall does.
BLACKICE DEFENDER USER GUIDE ! INTRODUCTION TO BLACKICE DEFENDER ! 12
Terminology
If you are a new BlackICE user, these are some terms you should know while
reading this guide. A complete list of terms and concepts is in the Glossary, in
Appendix B.
Local Console
The Local Console provides a local user interface for BlackICE. The Local Console
lists all the recent attacks on your system, as well as information about each intruder,
in both list and graph format. For more information, see “The Local Console” on
page 6.
Intruder/Attacker
Terms used to identify either the computer or the person carrying out an attack.
Event
BlackICE can detect numerous network activities. Some activities are direct attacks
on your system, while others might be attacks depending on the circumstances. Any
activity BlackICE detects, whether a direct attack or not, is called an event. Within
this document, this term is used interchangeably with “attack” and “intrusion.”
Issue
The name BlackICE assigns to an event. Issues refer to a kind of event, rather than a
specific event. For example, if an attacker tries to hack your FTP services, BlackICE
may assign that attack to the “FTP Port Probe” issue.
Port
When computer programs communicate over a network or the Internet, they use
virtual “connection points” or ports. For example, when you open a web browser,
the software uses TCP port 80 to open communications with the network. There are
over 65,000 ports available in two types: UDP and TCP.
TCP connections are the most common. They are used for web browsing,
downloading files, and other networking functions. TCP and UDP ports are very
similar. However, UDP connections do not have the error correction features that
TCP has. UDP is most often used for streaming content like RealAudio, or games,
such as Quake.
Both TCP and UDP ports are divided into two categories: System and Application. The
lower or system ports (1 - 1023) represent established ports used by common
Internet and network applications. They are tightly regulated by international
standards. These ports are used for services installed on a computer, such as e-mail
or web browsing. The higher or application ports (1024 - 65535) are typically used by
very specialized client programs (Internet telephone or chat) and as such are not as
tightly regulated.
Hackers often exploit open ports on computers to hack into a system. For more
information, please see the Guide to Computer Security, available from Network ICE.
BLACKICE DEFENDER USER GUIDE ! INTRODUCTION TO BLACKICE DEFENDER ! 13
Intrusion Protection/Decoding Engine
The core intrusion analysis engine of BlackICE. This component is responsible for
analyzing incoming communications. It is separate from the firewall, which performs
the actual blocking of intruders. See The BlackICE Intrusion Detection Engine on
page 5 for more information.
Firewall
A hardware or software barrier that restricts access in and out of a network. Firewalls
are most often used to separate an internal Local Area Network (LAN) or a Wide
Area Network (WAN) from the Internet. A gateway can serve as a firewall between
two or more networks. For more information, see The BlackICE Firewall on page 6.
BLACKICE DEFENDER USER GUIDE ! INTRODUCTION TO BLACKICE DEFENDER ! 14
Section 2
SETTING UP BLACKICE DEFENDER
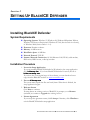
Installing BlackICE Defender
System Requirements
! Operating Systems: Windows 95, Windows 98, Windows Millennium Edition,
Windows XP Home or Professional, Windows NT 4.0 (Service Pack 4 or better),
or Windows 2000 (Service Packs 1 or 2).
! Processor: Pentium or better.
! Memory: 16 MB or more.
! Hard Drive Space: 10 MB free.
! Network Protocol: TCP/IP.
! Internet/Network Connection: 10/100 Ethernet LAN/WAN, cable modem,
DSL router, ISDN router, or dial-up modem.
Installation Procedure
1. Locate the Setup Application
If you are installing BlackICE Defender for Workstation, the setup application
file is bidsetup.exe.
bidsetup.exe If you have BlackICE Defender for server, the file is
bidserversetup.exe.
bidserversetup.exe
If you have lost your original copy of the software, you can download a new
copy from the BlackICE web site at www.networkice.com.
2. Execute bidsetup.exe
The system must unpack the files and verify them. When that is finished, the
setup application begins.
3. Welcome Screen
Click Next to continue.
If setup detects an existing version of BlackICE, it prompts you to Remove
(uninstall) or continue to Upgrade the existing version.
4. License Agreement
If you accept the agreement terms, click I Accept. Otherwise, click I Decline to
exit the BlackICE Defender setup application.
BLACKICE DEFENDER USER GUIDE ! SETTING UP BLACKICE DEFENDER ! 15
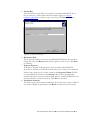
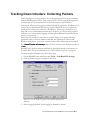
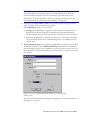
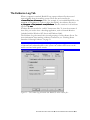
5. License Key
Enter the license key provided to you when you purchased BlackICE. If you
have lost this key, contact Network ICE customer support at [email protected] to obtain a copy of your key. Click Next to continue.
Figure 8 – Enter your license key.
6. Destination Path
This is the folder where you want to install BlackICE Defender. If you wish to
change the path, click Browse and locate the path you wish to use. Click Next
to continue.
7. Program Shortcuts
In the Select Program Folder window, verify the folder where BlackICE
shortcuts are located on the Windows Start menu. If you wish to use a different
folder, select it from the list or enter a name in the Program Folders field. Do
not place BlackICE shortcuts in the Startup folder. The setup application
automatically places a shortcut in the Startup folder to launch the BlackICE user
interface when the system is turned on. Click Next to continue.
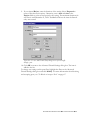
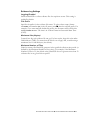
8. Installation Summary
The Start Copying Files window summarizes all the selections you have made. If
you need to change any parameters, click Back to retrace the previous steps.
BLACKICE DEFENDER USER GUIDE ! SETTING UP BLACKICE DEFENDER ! 16
Figure 9– BlackICE Installation Parameters.
If the information is correct, click Next.
9. Copy Files
The installation begins. When finished, the BlackICE Defender service is started.
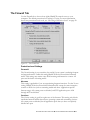
10. Release Notes
The system then prompts you to read the Release Notes. If this is your first time
installing this version of BlackICE Defender, it is a good idea to review this
information. To avoid reviewing the release notes, uncheck I would like to view
the README file. Otherwise, leave this box checked.
Click Finish to complete the BlackICE Defender setup.
Figure 10 – Final setup screen.
The BlackICE Defender setup is complete.
BLACKICE DEFENDER USER GUIDE ! SETTING UP BLACKICE DEFENDER ! 17
Updating BlackICE
ISS issues regular updates to BlackICE to ensure that it can detect and stop the latest
attacks. Check the BlackICE web site periodically for updates at
www.networkice.com/downloads.
To update an existing installation of BlackICE you must download the update. There
are two ways to do this: BlackICE can automatically check the BlackICE web site for
updates at regular intervals; or you can manually instruct BlackICE to check for
updates.
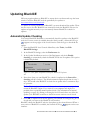
Automatic Update Checking
You can set BlackICE Defender to automatically check for updates at the BlackICE
web site. If a new version is available when the check is made, a Network ICE logo
( ) appears on the top right of the Local Console. Click the logo to download the
update.
1. From the BlackICE Local Console Menu Bar, select Tools, then Edit
BlackICE Settings.
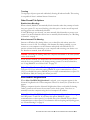
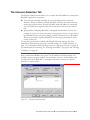
2. In the BlackICE Settings, select the Preferences tab.
3. In the Update Notification section of the Preferences tab, check Enable
checking to automatically check the BlackICE Web site for updates. This option
is disabled by default.
Figure 11 –The Update Notification section of the BlackICE Preferences
tab.
4. Enter how often you want BlackICE to check for updates in the Interval for
checking edit box (in days). The default automatic update check time is every 3
days. This would cause BlackICE to check for an update after 3 continuous days
of operation.
Note: The interval cycle is restarted if you reboot the computer or stop and
restart the BlackICE engine. If you turn off your computer each night, it is
probably best to perform manual update checks. (For information on manual
updating, see page 20.) Exiting or closing the Local Console does not affect the
update cycle. BlackICE continues to check for newer versions even if closed.
5. Click OK to implement automatic updating. The BlackICE Settings dialog box is
closed and you return to the BlackICE user interface.
BlackICE checks the BlackICE web site for updates at the selected interval. When a
new version of BlackICE is available, the Network ICE logo
appears on the user
interface.
BLACKICE DEFENDER USER GUIDE ! SETTING UP BLACKICE DEFENDER ! 18
Note: If you access the Internet via a dial-up connection, your system may
automatically initiate your connection when checking for updates.
Figure 12 –The Network ICE logo at the top right of the user interface
informs you that a BlackICE Defender update is available from the
BlackICE Web site.
! Click the logo to connect to the BlackICE update Web site. Your Web browser
opens.
Note: If you access the Internet via a dial-up connection, your system may
automatically initiate your connection when updating BlackICE.
! You are prompted to run a setup file. You can either download the file locally
and run it later, or execute it immediately. If you download the update, doubleclick the downloaded update.exe to update BlackICE.
BLACKICE DEFENDER USER GUIDE ! SETTING UP BLACKICE DEFENDER ! 19
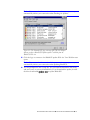
Manual Update Checking
If you do not wish to have BlackICE Defender automatically notify you about
updates, you can manually instruct BlackICE to connect to the BlackICE Web site
and check for new versions.
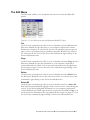
1. From the BlackICE Local Console Menu Bar, click Tools.
2. A sub-menu appears. Select Download Update.
Figure 13 – Download the BlackICE update.
3. BlackICE Defender opens a Web browser session and connects to the BlackICE
Web site. The site checks your version against the Network ICE database. If
there is a newer version available, click the indicated link.
You are prompted to run the setup file across the network or given the option to
download and save the update file. If you download the update, double-click the
downloaded update.exe to update BlackICE.
If you have the latest version, the Web page shows your version number and license
key.
BLACKICE DEFENDER USER GUIDE ! SETTING UP BLACKICE DEFENDER ! 20
Uninstalling BlackICE Defender
When you buy a new computer or switch to a different computer, you may need to
remove BlackICE from the old machine. Use the Uninstalling from Windows
instructions to remove BlackICE. If this does not work, proceed to Uninstalling with
the biremove Utility. Only use biremove.exe as a last resort.
Before removing BlackICE, make note of your license key. You will need this to
reinstall the product later.
Note: Once BlackICE is uninstalled, your system is no longer protected from
intrusions.
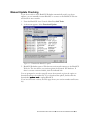
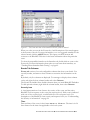
Uninstalling with the Windows Control Panel
1. From the Start menu, select Settings, then Control Panel.
2. Double-click Add/Remove Programs.
Figure 14 – The Add/Remove Programs dialog box in Windows 98.
3. Locate BlackICE in the list of programs.
4. Select BlackICE and click Add/Remove (Windows 98 or NT) or
Change/Remove (Windows 2000).
BLACKICE DEFENDER USER GUIDE ! SETTING UP BLACKICE DEFENDER ! 21
5. You are prompted to confirm the removal of BlackICE Defender and all its
components in the Confirm File Deletion dialog box. Click OK to continue.
6. The application prompts you regarding all remaining data files. Click Yes to
remove the files and delete the BlackICE directory. Click No to leave the
remaining files and the BlackICE directory in place.
If the uninstall encounters any errors or is unable to remove some components,
a Details button appears. Click Details to display the uninstallation log. You
may need to manually delete the folders where you installed BlackICE.
7. In the Maintenance Complete dialog box, click Finish to conclude the removal.
BlackICE Defender is removed from your system.
Note: You can also execute bidsetup.exe to uninstall BlackICE Defender. When
the setup detects the existing version of BlackICE, select Remove BlackICE. For
more information, see “Installing BlackICE Defender” on page 15.
Uninstalling with the biremove Utility
If you fail to uninstall BlackICE through Windows, you can run the biremove utility
to remove BlackICE Defender.
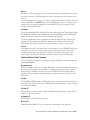
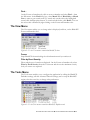
1. Locate the biremove.exe utility on the BlackICE CD.
Alternatively, locate the utility in the <installation directory> folder. For
example, if you installed BlackICE to the Program Files directory on the C:
drive (the default), the biremove.exe utility would be located in C:/Program
Files/Network ICE/BlackICE.
Figure 15 - Locate the biremove utility in the BlackICE folder.
2. Double-click biremove.exe to launch the utility. This utility will remove both
the blackice.exe (the Local Console component of BlackICE) and the
blackd.exe (the intrusion detection engine) programs.
BLACKICE DEFENDER USER GUIDE ! SETTING UP BLACKICE DEFENDER ! 22
3. When the utility has finished deleting the appropriate files from your system, the
folder where biremove.exe is located will show two new log files. These log
files are prefixed AgentRemove.
In the log file named AgentRemoveAgentRemove-<your system name>.log, look for this
entry:
AgentRemove() successful on <your system name>
or this entry:
AgentRemove() failed on <your system name>. Retcode =
You can report the Retcode to Technical Support for further investigation.
4. To remove BlackICE Defender completely from your system, you must
manually delete the BlackICE directory.
BlackICE Defender is removed from your system.
Using BlackICE on a Home LAN
If you have a network, you must enable Windows resource sharing to ensure that
each of the computers on your LAN (Local Area Network) can communicate with
each other using Network Neighborhood.
Enabling the Windows sharing features exposes your computers to some risk. One
way to minimize this risk is to password protect all shared devices, especially hard
drive folders. However, this does not prevent hackers. To thwart hacking activity,
while still allowing internal file sharing between computers, you can implement one
of the following solutions: Install the NetBEUI Protocol, Install a Hardware Router,
or Build a Dual-Interface Proxy Server.
Solution One: Install the NetBEUI Protocol
Your computers use NetBIOS to communicate with each other over Network
Neighborhood. By default, Windows uses the TCP/IP protocol for NetBIOS
resolution. Your network uses the TCP/IP protocol to communicate and route to
the Internet. Therefore, all those files you can access internally are also available to
the Internet and any hackers.
To allow internal file sharing without exposing any information to the Internet, you
can install the NetBEUI protocol on all the computers on your network. NetBEUI
(NetBIOS Extended User Interface) is a non-routable protocol that Windows can
also use for NetBIOS resolution. Since NetBEUI transmissions cannot be
transmitted over the Internet, this is a better protocol to use for NetBIOS, rather
than the exposed TCP/IP.
Instructing your systems to use the NetBEUI protocol for NetBIOS resolution
allows the network to access internal shares without the danger of hackers finding
you. However, communication over the Internet is still routed using TCP/IP.
Therefore, you must make sure that you do not remove this protocol from your
computer.
To use NetBEUI for internal access, follow these steps:
BLACKICE DEFENDER USER GUIDE ! SETTING UP BLACKICE DEFENDER ! 23
1. Install NetBEUI on all the computers on your internal network. For more
information about how to install NetBEUI, see the documentation included with
your copy of Windows.
2. On the BlackICE Local Console, select Edit BlackICE Settings from the
Tools menu. On the Protection tab, make sure that Internet File Sharing and
NetBIOS neighborhood are enabled.
3. In the network properties of Windows, disable NetBIOS over TCP/IP. Since
the computers on the internal network communicate and route over the Internet
using TCP/IP, this prevents your computer from reporting any NetBIOS
information over the Internet.
When you disable NetBIOS over TCP/IP, Windows starts using NetBEUI for
NetBIOS resolution. Because NetBEUI is non-routable, Windows cannot
expose shared resources to the Internet.
Note: NetBEUI is intended for small networks only. If you are installing BlackICE
on a large network, it is not advisable to use NetBEUI, as it cannot be routed across
multiple subnets. This may ultimately slow down your communications with remote
computers on your network.
Solution Two: Install a Hardware Router
You can also allow internal file sharing by installing a gateway router connected to
your DSL or cable modem. The router can isolate your internal network, providing
some protection from hackers while allowing you to keep NetBIOS enabled.
Additionally, many hardware routers can offer Network Address Translation (NAT)
firewall features. NAT firewalls are quite simple and easy to penetrate, but they stop
many casual or inexperienced hackers from probing your computer for open ports or
vulnerabilities.
Several manufacturers, such as NetGear and LynkSys, sell these hardware routers.
See the information included with the gateway router for installation and setup
instructions.
Solution Three: Build a Dual-Interface Proxy Server
Another way to solve the sharing problem is to build a dual-interface proxy server
and disable the WINS/NetBIOS interface on the external network interface.
Such an arrangement requires some advanced experience with computer networking.
It also requires proxy server software. This solution is ideal for larger networks that
cannot use NetBEUI and need the services of a proxy server.
This arrangement requires two network interface cards in the proxy server computer.
Building a dual-interface proxy server will stop attacks directed at the proxy server
system, but will not protect computers on the internal network. Therefore, make
sure to purchase copies of BlackICE for your internal computers.
BLACKICE DEFENDER USER GUIDE ! SETTING UP BLACKICE DEFENDER ! 24
Stopping and Starting the BlackICE Engine
Although it is not recommended, there may be special circumstances that require you
to manually stop BlackICE on a system. When the BlackICE engine is stopped, the
system is no longer protected from network intrusions.
There are several ways to stop the BlackICE engine. This section describes how to
stop or restart BlackICE from the Local Console.
If the BlackICE application is running but the engine is stopped, the system tray icon
shows a red line through the BlackICE icon.
For information about removing BlackICE Defender, see “Uninstalling BlackICE
Defender” on page 18. For information about the BlackICE intrusion detection and
protection engine, see “Inside BlackICE” on page 5.
Note: Closing or exiting the BlackICE Local Console does not stop the BlackICE
monitoring and protection engine. Opening the BlackICE Local Console does not
restart a stopped BlackICE engine. You must either restart the engine using one of
the methods described in this section, or reboot your system.
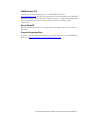
From the Local Console (All Windows Operating Systems)
From the Menu Bar, select Tools, then Stop BlackICE Engine.
If the BlackICE engine is not running, the only available option is Start BlackICE
Engine.
Figure 16 – Stopping the BlackICE engine from the Local Console.
The BlackICE engine is stopped, and the BlackICE service is no longer protecting
your system.
BLACKICE DEFENDER USER GUIDE ! SETTING UP BLACKICE DEFENDER ! 25
To restart BlackICE, follow the same steps as above, but select Start BlackICE
Engine. BlackICE also restarts when the system is rebooted.
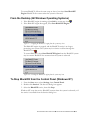
From the Desktop (All Windows Operating Systems)
1. If the BlackICE engine is running, right-click the system tray icon.
2. If the BlackICE engine is stopped, select Start BlackICE Engine.
Figure 17 – Stopping the BlackICE engine from the system tray icon.
The BlackICE engine is stopped, and the BlackICE service is no longer
protecting your system. The system tray icon shows a red line through the
BlackICE icon.
To restart BlackICE, select Start BlackICE Engine from the BlackICE system
tray icon menu. BlackICE also restarts when the system is rebooted.
Figure 18 – Starting the BlackICE engine from the system tray icon.
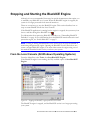
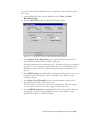
To Stop BlackICE from the Control Panel (Windows NT)
1. From the Start menu, select Settings, then Control Panel.
2. Double-click Services. The Services dialog box appears.
3. Select the BlackICE service, then click Stop.
Windows NT stops the service. BlackICE restarts when the system is rebooted, or if
the service is restarted from the Services dialog box.
BLACKICE DEFENDER USER GUIDE ! SETTING UP BLACKICE DEFENDER ! 26
To Stop BlackICE from the Control Panel (Windows 2000)
1. From the Start menu, select Settings, then Control Panel.
2. Double-click Administrative Tools.
3. Double-click Services. The Services Console appears.
4. Right-click the BlackICE service.
5. Select Stop from the shortcut menu.
Windows 2000 stops the service. BlackICE restarts when the system is rebooted, or
if the service is restarted from the Services dialog box.
BLACKICE DEFENDER USER GUIDE ! SETTING UP BLACKICE DEFENDER ! 27
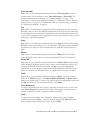
Setting Alarm Preferences
The BlackICE Local Console can set off a visual and sound alarm when an intrusion
is detected. You can choose how and when BlackICE sets off these alarms. By
default, alarms are triggered when a suspicious (yellow), serious (orange), or critical
(red) event is recorded.
For more information about Alarm Preferences, see “The Notifications Tab” on
page 87.
Visual Alert
The visual alert is a flashing system tray icon. When an attack is detected, the
BlackICE tray icon (in the task bar) flashes red, orange or yellow, depending on the
severity of the event. The BlackICE icon continues flashing the color of the most
severe event detected until you open the Local Console. For example, if the tray icon
starts to flash orange , a “serious” event is the most severe event detected since
the Local Console was last opened.
Sound Alert
BlackICE can play a .wav file of your choice whenever an attack is detected. Your
computer must have a sound card and speakers for you to hear the sound alarm.
Note: The sound alert is triggered whether the BlackICE window is open or closed.
The visual alert option, however, only notifies you of an event if the Local Console is
closed, minimized, or hidden.
BLACKICE DEFENDER USER GUIDE ! SETTING UP BLACKICE DEFENDER ! 28
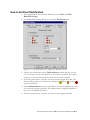
How to Set Event Notification
1. From the BlackICE Local Console Menu Bar, select Tools, then Edit
BlackICE Settings.
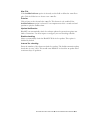
2. On the BlackICE Settings dialog box, select the Notifications tab.
Figure 19– Use the Notifications tab to configure your BlackICE alarms.
3. Under Event Notification, select Visible Indicator to flash the tray icon the
color of the most severe event until the Local Console is opened. This option
notifies you of an event when the Local Console is closed or hidden.
4. From the options below, select the severity level that triggers the alarm. The
default setting notifies you visually if any suspicious , serious or critical
attacks are detected.
5. Select Audible Indicator to play a .wav file of your choice whenever an event
of the selected severity is detected. The audible alarm is triggered regardless of
the state of the BlackICE window.
6. From the options below, select the severity level that triggers the alarm.
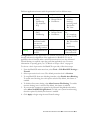
BLACKICE DEFENDER USER GUIDE ! SETTING UP BLACKICE DEFENDER ! 29
(Critical): The selected alarm option is triggered only when BlackICE detects
a critical event.
(Critical and Serious): The selected alarm option is triggered when
BlackICE detects a critical or serious event.
(Critical, Serious and Suspicious): The selected alarm option is
triggered when BlackICE detects a critical, serious, or suspicious event. This is
the default alarm option.
7. If the Audible Indicator option is selected, the WAV File field shows the
default alarm sound (bialarm.wav). To change the .wav file used in audible
notification, click the folder icon to browse your system, and locate the desired
file. The selected alarm file is now shown in the WAV File field. To listen to the
selected .wav file, click Preview. Your computer must have a sound card and
speakers to play the audible alarm.
8. Click OK to implement the selected preference settings.
BLACKICE DEFENDER USER GUIDE ! SETTING UP BLACKICE DEFENDER ! 30
Selecting Columns to View
You can add and remove data columns on the Events or Intruders tabs at any time.
Removing columns from the screen does not remove that column’s information
from BlackICE.
For information on the Events tab, see “The Events Tab” on page 67. For
information on the Intruders tab, see “The Intruders Tab” on page 73.
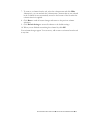
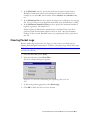
To select which data columns you wish to view or hide, follow these steps:
1. From the tab where you want to hide or show columns, right-click any column
header.
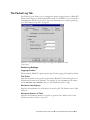
2. Select Columns... from the pop-up menu. The Columns window opens.
Figure 20 – Select a column to show, hide or move.
3. To add a column to the tab, select the column name and click Show.
Alternatively, you can check the columns you wish to show.
4. To modify the order of the columns, select a column and click Move Up or
Move Down. The top column is the leftmost column on the tab.
5. To modify the width of a column, select the column name and enter the size (in
pixels) in the The Selected column should be … pixels wide box.
6. You can always resize the columns normally within the tab. Place the cursor near
the column divider until a resize icon appears, then click and drag the column to
the desired size.
BLACKICE DEFENDER USER GUIDE ! SETTING UP BLACKICE DEFENDER ! 31
7. To remove a column from the tab, select the column name and click Hide.
Alternatively, you can uncheck the column name. Columns that are not selected
in the Columns list are automatically moved to the bottom of the list when the
column selection is applied.
8. Click Reset to undo all recent changes and return to the previous column
selections.
9. Click Default Settings to revert all columns to the default settings.
10. When you are finished customizing the column list, click OK.
Your column changes appear. You can move, add or remove columns from the tab
at any time.
BLACKICE DEFENDER USER GUIDE ! SETTING UP BLACKICE DEFENDER ! 32
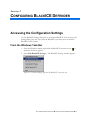
Section 3
CONFIGURING BLACKICE DEFENDER
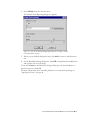
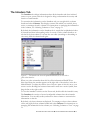
Accessing the Configuration Settings
Use the BlackICE Settings dialog box to customize BlackICE. You can access the
Settings dialog box two ways: from the BlackICE system tray icon or from the
BlackICE Local Console.
From the Windows Task Bar
1. From the Windows taskbar, right-click the BlackICE system tray icon. A
submenu of choices appears.
2. Select Edit BlackICE Settings… The BlackICE Settings window appears.
Figure 21 – From the desktop, right-click the BlackICE system tray icon.
BLACKICE DEFENDER USER GUIDE ! CONFIGURING BLACKICE DEFENDER ! 33
From the BlackICE Local Console
1. From the BlackICE Local Console Menu Bar, select Tools.
Figure 22 – From the Local Console Menu Bar, select Tools, then Edit
BlackICE Settings...
2. Select Edit BlackICE Settings… from the shortcut menu. The BlackICE
Settings window appears.
BLACKICE DEFENDER USER GUIDE ! CONFIGURING BLACKICE DEFENDER ! 34
Filtering the Events List
When BlackICE has been protecting your computer for an extended time, the
BlackICE Events tab may contain more events than you need to track. To reduce the
number of irrelevant events, you can filter which types of events are displayed.
1. From the BlackICE Local Console, select Filter by Event Severity from the
View menu.
Figure 23 – From the Menu Bar, select the View option, then click Filter
by Event Severity.
2. From the submenu, select the least severe events to show. For example, if you
select Suspicious, all suspicious, serious, and critical attacks are displayed.
Informational events are not listed.
To return the list to its default setting, select Informational. This causes
BlackICE to show all intrusions.
Tip: When the list is filtered, the Filter by Event Severity list shows only the
severity icons for the attacks. For example, if the list is filtered to show only serious
and critical attacks, the suspicious and informational icons are not displayed.
BLACKICE DEFENDER USER GUIDE ! CONFIGURING BLACKICE DEFENDER ! 35
Clearing the Events List
You can delete any event from the Events list, or you can delete all event reports in
the Event List. To clear the Events list entirely, follow these steps:
Note: Clearing the event list does not stop BlackICE from trusting, blocking or
ignoring any events or intruders.
1. From the Menu Bar, select Tools.
2. From the sub-menu, select Clear Files…
Alternatively, in the Events tab, right-click anywhere on the event list and select
Clear Event List.
The Files to Delete dialog box appears.
Figure 24 – Use the Files to Delete dialog box to clear unwanted intrusion
data.
•
To delete all intrusion records from the Events tab, select attack-list.csv.
This is the file that contains the intrusion records that you see on the Events
tab.
•
To delete all evidence logging data, select Evidence logs. For more
information on evidence log data, see “Tracking Down Intruders: Collecting
Evidence” on page 51.
•
To delete all packet logging data, select Packet logs. For more information
on packet log data, see “Tracking Down Intruders: Collecting Packets” on
page 54.
3. Click OK to delete the data you have selected.
BLACKICE DEFENDER USER GUIDE ! CONFIGURING BLACKICE DEFENDER ! 36
Freezing the BlackICE Tabs
By default, BlackICE automatically refreshes the Events, Intruders and History tabs
each time a new event is detected. If your system is experiencing repeated attacks,
this auto-refreshing may make it difficult to view the information in the tabs. For this
reason, you may want to temporarily freeze the tab.
Freezing stops BlackICE from refreshing the tab information until you unfreeze it.
However, freezing does not stop the monitoring, detection, and protection features
of BlackICE Defender.
Note: Remember to unfreeze the application after viewing the tabs so that the Local
Console can show new attacks. When you close the Local Console or restart the
computer, BlackICE resets to an unfrozen state.
1. From the Menu Bar, select View.
Figure 25 – From the Menu Bar, select the View option, then click Freeze.
2. From the submenu, select Freeze.
BlackICE stops showing new information on the tabs. As a reminder, “Display
Frozen” appears in the title bar of the application.
To unfreeze and refresh the BlackICE tabs, follow the steps above and select
Unfreeze.
BLACKICE DEFENDER USER GUIDE ! CONFIGURING BLACKICE DEFENDER ! 37
Section 4
DETECTING INTRUSIONS
Understanding the Severity of an Intrusion
BlackICE assigns a severity level to all detected events and intruders, and indicates
that level graphically and with a number. Each individual event reported on the
Events tab is ranked by its severity. Each intruder tracked on the Intruders tab is
ranked by the most severe attack associated with that intruder.
Figure 26 – BlackICE can represent the severity of an intruder’s actions
graphically and numerically.
BLACKICE DEFENDER USER GUIDE ! DETECTING INTRUSIONS ! 38
BlackICE defines the severity of events as critical, serious, suspicious, or informational.
Icon
Severity
Value
7-10
4-6
1-3
0
Description
Critical event: Red exclamation point. Deliberate attacks on a
system for the purpose of damaging data, extracting data,
or crashing the computer. Critical events always trigger
protection measures.
Serious event: Orange exclamation point. Deliberate attempts
to access information on a system without directly
damaging anything. Some serious events trigger protection
measures.
Suspicious event: Yellow question mark. Network activities
that are not immediately threatening, but may indicate that
someone is attempting to locate security vulnerabilities in
the system. For example, intruders often scan the available
ports or services on a system before attacking it. Suspicious
events do not trigger protection measures.
Informational event: Green “i.” Network events that are
not threatening but are worthy of attention. Informational
events do not trigger protection measures.
Internal software errors or issues are also reported as events, and are assigned a
severity based on the seriousness of the problem. Refer to the support section of the
BlackICE Web site (http://www.networkice.com/support) if BlackICE is
experiencing repeated internal errors.
BLACKICE DEFENDER USER GUIDE ! DETECTING INTRUSIONS ! 39
Ignoring an Event
You can tell the BlackICE intrusion detection engine to ignore an event of a
particular type when it comes from a specific intruder, or ignore an event type
altogether. Be careful about which events you ignore. For more information about
ignoring attacks, see “Ignoring Events and Intruders” on page 7.
Caution: When an entire event type is ignored, BlackICE does not log any
information about that type of event. Be careful which events you ignore, because
some innocuous events could signal a prelude to a serious attack.
From the Events tab
You can choose an event from the Events tab and tell BlackICE to ignore all events
of that type. Follow these steps:
1. From the Events tab, right-click the event/intruder combination to ignore.
2. From the shortcut menu, select Ignore Event.
3. A submenu appears. Select how you want BlackICE to ignore the event.
! This Event instructs BlackICE to ignore all future instances of the event.
! This Event by this Intruder instructs BlackICE to ignore all future instances of
this event by the referenced intruder. If a different intruder executes the same
attack, BlackICE still logs that event.
Figure 27 – Use the Events tab to ignore events of a particular type or from
a particular intruder.
BLACKICE DEFENDER USER GUIDE ! DETECTING INTRUSIONS ! 40
4. Click Yes to ignore the event.
BlackICE immediately begins ignoring the selected event. The event is added to
the list of ignored events on the Detection tab in BlackICE Settings.
For more information on ignoring events, see “The Intrusion Detection Tab” on
page 86.
From the Intrusion Detection Tab
You can also identify an event type before it occurs and tell BlackICE to ignore it.
Follow these steps:
1. From the BlackICE Local Console Menu Bar, select Tools, then Edit
BlackICE Settings.
2. Select the Intrusion Detection tab in the BlackICE Settings window.
3. To place a new ignored signature in the list, click Add. The Exclude from
Reporting dialog box appears.
Figure 28 – The Exclude from Reporting dialog box.
4. To instruct BlackICE to ignore all future events of a particular type, regardless of
the originating system, follow these steps:
! In the Addresses to Trust section, select All to ignore an event type on all IP
addresses.
! In the Name selection box, which lists all the signatures BlackICE can identify,
select the event type to ignore, or select the event ID number from the ID
selection box.
BLACKICE DEFENDER USER GUIDE ! DETECTING INTRUSIONS ! 41
5. To instruct BlackICE to ignore all future events coming from a specific intruder,
follow these steps. If a different intruder executes an attack of the same type,
BlackICE still logs that event.
! Enter the IP address for the system whose event you want to ignore in the IP
box. Use the standard 000.000.000.000 notation. To specify an IP address
range, place a dash between each distinct IP address (no spaces). For example,
192.168.10.23–192.168.10.32.
! Clear All in the Attacks to Ignore section to enable the event Name and ID
selection boxes. The Add Firewall Entry checkbox is now disabled.
! In the Name selection box, which lists all the signatures BlackICE can identify,
select the event to ignore, or select the event ID number from the ID selection
box.
6. Click Add. The new ignored event is added to the Detection tab.
BLACKICE DEFENDER USER GUIDE ! DETECTING INTRUSIONS ! 42
Trusting an Intruder
When an intruder’s IP address is trusted, BlackICE assumes all communication from
that address is authorized and excludes the address from any intrusion detection.
Trusting ensures that BlackICE does not inadvertently block systems whose
intrusions on your local computer may be useful to you. For example, if you have
several computers on a network, you may want to trust them and stop BlackICE
from reporting activity from these systems as attacks.
You can choose to trust a system that has already intruded on your machine, or you
can identify a potential intruder to trust ahead of time. This section tells you how to
trust an existing intruder. For information on naming a system to be trusted in the
future, see “Trusting an Address” on page 45.
Trust only those systems that you are absolutely certain are safe, or are legitimately
executing network scans, such as servers from an ISP.
Note: Trusting a system is not the same as accepting a system. For an explanation
of the difference between trusting and accepting, see “Traffic Filtering” on page 7.
1. From the Intruders tab, right-click the intruder to trust. Alternatively, from the
Events tab, right-click the event/intruder combination that includes the intruder
you want to trust.
2. From the shortcut menu, select Trust Intruder.
Figure 29 – You can use the Intruders tab to manually trust an address.
3. From the submenu, select the appropriate option. For more information about
these options, see “The Events Tab” on page 67.
BLACKICE DEFENDER USER GUIDE ! DETECTING INTRUSIONS ! 43
! Trust and Accept: The intrusion detection engine ignores all attacks from the
selected intruder; and the BlackICE firewall accepts all communications from the
intruder’s IP address. The selected intruder is free from any BlackICE detection
or protection.
! Trust Only: The intrusion and detection engine ignores all attacks from the
selected intruder.
Be very careful which systems you trust. Because intruders often
mask their true identity through forged or “spoofed” IP addresses, an intruder could
use your trusted addresses as a mechanism against you. Network ICE recommends
only trusting those systems that are authorized, trustworthy and secure.
Caution:
4. Click Yes to trust the intruder.
BlackICE immediately begins trusting the selected intruder. The address is added
to the list of trusted IP addresses on the Detection tab in BlackICE Settings.
For more information on trusting an intruder, see “The Intrusion Detection Tab” on
page 86. For information on how to stop trusting an intruder, see “Deleting a
Trusted Address or Ignored Event” on page 47. For information on how to stop
accepting the intruder’s traffic, see “Blocking an Intruder” on page 61.
BLACKICE DEFENDER USER GUIDE ! DETECTING INTRUSIONS ! 44
Trusting an Address
When an address is trusted, BlackICE assumes all communication from that address is
authorized and excludes the address from any intrusion detection. Trusting ensures
that BlackICE does not inadvertently block systems whose intrusions on your local
computer may be useful to you. For example, if you have several computers on a
network, you may want to trust them and stop BlackICE from reporting activity
from these systems as attacks.
You can identify a potential intruder to trust ahead of time, or you can choose a
system that has already intruded on your machine and tell BlackICE to trust it. This
section tells you how name an IP address to be trusted in the future. For information
on trusting an existing intruder from the Events tab or the Intruders tab, see
“Trusting an Intruder” on page 40.
Caution: Trust or ignore only addresses that do not pose any threat to your system.
Keep in mind that intruders can “spoof,” or fake, the IP addresses of internal
systems. It is possible, though very unlikely, for an intruder to spoof a trusted
address and avoid detection from BlackICE.
1. From the BlackICE Local Console Menu Bar, select Tools, then Edit
BlackICE Settings.
2. Select the Detection tab in the BlackICE Settings window.
3. To place a new trusted address in the list, click Add. The Exclude from
Reporting dialog box appears.
Figure 30 – Use the Exclude from Reporting dialog box to add trusted
addresses or ignored signatures.
BLACKICE DEFENDER USER GUIDE ! DETECTING INTRUSIONS ! 45
4. Enter the IP address for the system to trust in the IP box. Use the standard
000.000.000.000
000.000.000.000 notation. To specify a range of IP addresses, place a dash
between two addresses. For example, the range 192.168.10.23–
192.168.10.32 instructs BlackICE to trust ten IP addresses, beginning with
192.168.10.23 and ending with 192.168.10.32. The IP box is disabled if
All (addresses) is selected.
5. To add an ACCEPT entry in the BlackICE firewall for this IP address, select
Add Firewall Entry. This instructs BlackICE to trust the IP address and to
allow all communications from the selected address, regardless of content. For
more information about trusting IP addresses, see “Trusting Intruders” on page
7.
6. Click Add. The new trusted address is added to the Intrusion Detection tab.
BLACKICE DEFENDER USER GUIDE ! DETECTING INTRUSIONS ! 46
Deleting or Changing a Trusted Address or
Ignored Event
To stop trusting an intruder or ignoring an event, you must remove the entry from
the Intrusion Detection tab. You can also use this tab to modify trusted addresses or
ignored attacks from this tab. For more information on managing trusted addresses
and ignored signatures, see “The Intrusion Detection Tab” on page 86.
Deleting a Trusted Address or Ignored Event
To delete a trusted address or ignored event from the Detection tab, you can rightclick the entry or use the Delete button.
1. From the BlackICE Local Console, select Edit BlackICE Settings from the
Tools menu.
2. Select the Detection tab.
3. On the Detection tab, right-click the entry to delete.
4. Select Delete from the shortcut menu.
5. Click Yes to delete the entry.
6. Click OK on the BlackICE Settings dialog box to remove the trusted IP address
or ignored event from the Detection tab and return to the Local Console.
BlackICE resumes monitoring the intruder and event.
If you click Cancel on the BlackICE Settings dialog box, the trusted address or
ignored event is not deleted.
Editing a Trusted Address or Ignored Event
To edit a trusted address or ignored event from the Intrusion Detection tab, you can
right-click the entry or use the Modify button.
1. In the BlackICE Local Console, select Edit BlackICE Settings from the Tools
menu.
2. Select the Detection tab.
3. Right-click the entry to edit.
BLACKICE DEFENDER USER GUIDE ! DETECTING INTRUSIONS ! 47
4. Select Modify from the shortcut menu.
The Exclude from Reporting dialog box appears.
Figure 31– Use the Exclude from Reporting dialog box to change a trusted
or accepted address or port.
5. When you are finished editing the entry, click Add to return to the Detection
tab.
6. On the BlackICE Settings dialog box, click OK to implement the modification
and return to the Local Console.
If you click Cancel on the BlackICE Settings dialog box, the trusted address or
ignored event is not modified.
For more information about excluding addresses or events from reporting, see
“Ignoring an Event” on page 40.
BLACKICE DEFENDER USER GUIDE ! DETECTING INTRUSIONS ! 48
Tracking Down Intruders: Back Tracing
Back tracing is the process of tracing a network connection back to its origin. When
somebody connects to your computer via a network such as the Internet, your
system and the intruder’s system exchange packets. Before an intruder’s packets
reach your system they travel through several routers. BlackICE can automatically
read information from these packets and identify each router the intruder’s packets
traveled through. Eventually, BlackICE can “hop” all the way back to the intruder’s
system.
BlackICE can back trace information indirectly or directly.
! An indirect trace uses protocols that do not make contact with the intruder’s
system, but collect information indirectly from other sources along the path to
the intruder’s system. Indirect back tracing does not make contact with the
intruder’s system, and therefore does not acquire much information. Indirect
traces are best suited for lower-severity attacks.
! A direct trace goes all the way back to the intruder’s system to collect
information. Direct back tracing makes contact with the intruder’s system and
therefore can acquire a lot of information. Direct back traces are best for highseverity attacks, when you want as much information about the intruder as
possible.
Intruders cannot detect an indirect trace. However, they can detect and block a direct
trace. Fortunately, most intruders are not experienced enough to block direct traces.
The Back Trace tab allows you to set the threshold when an indirect or direct back
trace is set off. The severity of the incoming event, not the address of the intruder,
triggers the back trace.
BlackICE shows all the back tracing information it has collected about the intruder
next to the Intruder List. When BlackICE back traces an intruder it attempts to
gather the IP address, DNS name, NetBIOS name, Node Name, Group name and
MAC address. Savvy intruders will likely block BlackICE from acquiring this
information.
Back trace information is also stored in standard text files in the Hosts folder in the
directory where BlackICE is installed. Each file is prefixed with the intruder’s IP
address.
BLACKICE DEFENDER USER GUIDE ! DETECTING INTRUSIONS ! 49
To control when and how BlackICE looks for information about intruders, follow
these steps:
1. From the BlackICE Local Console Menu Bar, select Tools, then Edit
BlackICE Settings.
2. Select the Back Trace tab in the BlackICE Settings window.
Figure 32– Use the Back Trace tab to gather information about intruders.
3. In the Indirect Trace Threshold text box, type the numeric severity level at
which BlackICE should initiate an indirect back trace.
The default threshold for an indirect trace is 3. With this setting, any event with a
severity of 3 or above triggers an indirect back trace. For an explanation of the
BlackICE severity levels, see “Understanding the Severity of an Intrusion” on
page 38.
4. Select DNS Lookup to have BlackICE query Domain Name Service servers for
information about the intruder as part of an indirect trace. DNS Lookup is
enabled by default.
5. In the Direct Trace Threshold text box, type the numeric severity level at
which BlackICE should launch a direct trace.
The default event severity for the direct trace threshold is 6. With this setting,
any event with a severity of 6 or above triggers a direct back trace.
6. Select NetBIOS nodestatus to have BlackICE find out the machine address of
the intruder’s computer using a NetBIOS lookup on the intruder’s system.
NetBIOS Node Status is enabled by default.
BLACKICE DEFENDER USER GUIDE ! DETECTING INTRUSIONS ! 50
Tracking Down Intruders: Collecting Evidence
When an intruder attempts to break into your system, BlackICE Defender can
capture network traffic attributed to the intruder and place that information into an
evidence file. Because BlackICE captures and actually decodes each packet coming into
the system, it can generate files that contain detailed information about the intruder’s
network traffic.
BlackICE evidence files are located in the <installation directory> folder. For
example, if you installed BlackICE in the Program Files directory on the C: drive
(the default), the evidence files are located in C:/Program Files/Network
ICE/BlackICE. Each file has an *.enc extension.
The intruder’s activities are logged into special trace files in “sniffer” format. To view
the contents of these files, you need a trace file decoding application. Many
networking and security product companies produce such decoders. Some shareware
decoders are also available on the Internet. If you are running Windows NT or
Windows 2000 Server, you can install the Network Monitoring service, which
includes Network Monitor, a decoding application. See the Windows NT or
Windows 2000 documentation for more information.
To an experienced network engineer, evidence files show exactly what the intruder
did or attempted to do. Because evidence files provide proof of the attacker’s
activities, this can be very useful to law enforcement or legal counsel in tracking
down criminal intruders.
You can choose the number of evidence files BlackICE captures, the filename prefix,
and the size of each evidence file on the Evidence Log tab in BlackICE
Configuration. For more information about the Evidence Log tab, see “Evidence
Log Settings” on page 82.
To collect evidence files for suspicious events, follow these steps:
1. On the BlackICE main menu bar, click Tools > Edit BlackICE Settings.
2. Click the Evidence Log tab to bring it to the front.
BLACKICE DEFENDER USER GUIDE ! DETECTING INTRUSIONS ! 51
Figure 33– Use the evidence log tab to gather detailed information about
intrusions.
3. Select Logging Enabled. This setting is enabled by default.
4. In the File Prefix text box, specify the prefix for the evidence file names.
To place a date stamp (format YYYYMMDD) and number (NN) in the file name,
enter %d after the selected prefix. For example, if you enter evd%d, the file names
will look like this: evdYYYYMMDD-NN.enc. The time is in 24-hour format in
Greenwich Mean Time (GMT).
5. In the Maximum Size text box, specify how big each evidence file can get. For
best results, keep this value under 2048 kilobytes (2 MB).
6. In the Maximum Number of Files text box, choose how many files BlackICE
should generate in the specified collection time period. For example, if the
Maximum Number of Files is 32 (the default value), BlackICE does not generate
more than 32 evidence files in any given 24 hour period.
BLACKICE DEFENDER USER GUIDE ! DETECTING INTRUSIONS ! 52
Clearing Evidence Logs
Evidence logs contain a large amount of information, and over time they can grow
to take up a large amount of disk space. To save disk space, you can delete logs you
no longer need. To delete your evidence logs, follow these steps:
Note: Clearing evidence log data does not affect the BlackICE intrusion detection
and firewall functions.
1. From the Menu Bar, select Tools.
2. From the sub-menu, select Clear Files…
The Files to Delete dialog box appears.
Figure 34 – Use the Files to Delete dialog box to delete evidence log data you
do not need.
3. To delete all evidence logging data, select Evidence logs.
4. Click OK to delete your evidence logs.
BLACKICE DEFENDER USER GUIDE ! DETECTING INTRUSIONS ! 53
Tracking Down Intruders: Collecting Packets
Packet logging lets you keep track of who is attempting intrusions on your machine
without recording their actions. This can be useful if you have limited disk space for
evidence files or if your Internet Service Provider requests only IP address
information. When packet logging is enabled, BlackICE records the IP address of all
systems that communicated with the local system. BlackICE does not capture the
actual packet content, only a record of IP addresses. Packet logs can become very
large and use up considerable hard disk space. However, if you are having repeated
intrusions on a system, packet logging can help gather additional information about
activity on the system.
Packet logs are encoded as trace files in “sniffer” format. You need a decoding
application such as Network Monitor, included with Windows NT Server and
Windows 2000 Server, to view the contents of these files. Packet logs are located in
the <installation directory> folder. The file extension for all packet log files is
*.enc.
BlackICE also captures network traffic that is specifically related to an intrusion in
Evidence Files. For more information, see “The Evidence Log Tab” on page 82.
To track intruders’ IP addresses, follow these steps:
1. On the BlackICE main menu bar, click Tools > Edit BlackICE Settings.
2. Click the Packet Log tab to bring it to the front.
Figure 35– Use teh Packet Log tab to collect detailed information on
intrusions.
3. Select Logging Enabled. Packet logging is disabled by default.
BLACKICE DEFENDER USER GUIDE ! DETECTING INTRUSIONS ! 54
4. In the File Prefix text box, specify the prefix for the packet log file names.
BlackICE automatically places an incremented counter in the filename. For
example, if you enter ABC, the file names will be ABC0001.enc, ABC0002.enc,
etc.
5. In the Maximum Size text box, specify the largest size, in kilobytes, for each log
file. It is a good idea to keep this under the default value, 2048 kilobytes (2 MB).
6. In the Maximum Number of Files text box, specify the maximum number of
log files to generate. The default is 10.
Packet log files are filled until a maximum size is reached. Then a new file is
generated, until the maximum number of files are used. Once the maximum
number of files are used, BlackICE starts over, replacing the first log file with a
new file.
Clearing Packet Logs
Because packet logs can become very large, you may want to save disk space by
deleting unneeded packet information. To delete your packet logs, follow these steps:
Note: Clearing packet log data does not affect the BlackICE intrusion detection
and firewall functions.
1. From the Menu Bar, select Tools.
2. From the sub-menu, select Clear Files…
The Files to Delete dialog box appears.
Figure 36 – Use the Files to Delete dialog box to packet log data you do not
need.
3. To delete all packet logging data, select Packet logs.
4. Click OK to delete the data you have selected.
BLACKICE DEFENDER USER GUIDE ! DETECTING INTRUSIONS ! 55
Exporting BlackICE Data
The BlackICE export feature allows you to copy event information from the Local
Console to the Windows clipboard for use in any other application such as a
spreadsheet or database. From those applications you can archive information,
develop custom reports, or develop your own analysis programs.
To export data from BlackICE, follow these steps:
! On the Events tab, the Intruders tab, or any of the Firewall Settings tabs, rightclick a list entry and select Copy from the shortcut menu. BlackICE copies the
information to your computer’s clipboard in comma-delimited text format. You
can paste the information into any application that accepts text input.
! To copy all the events on the list, right-click a list entry combination and choose
Select All from the shortcut menu. You can right-click the list again and select
Cut or Copy to put all the highlighted information on your computer’s
clipboard, from which you can paste the information into any application that
accepts text input.
Figure 37 – Select Copy to bring data from BlackICE into other
applications.
! To copy the data and remove the record from BlackICE, right-click a list entry
and select Cut from the shortcut menu. BlackICE deletes the event/intruder
combination from the Events list and copies the information to your computer’s
clipboard in comma-delimited text format. You can paste the information into
any application that accepts text input.
! To send the contents of the list directly to a printer, right-click a list entry and
select Print… from the shortcut menu. In the Print dialog box, choose a printer
and the number of copies, then click OK.
BLACKICE DEFENDER USER GUIDE ! DETECTING INTRUSIONS ! 56
Section 5
BLOCKING INTRUSIONS
Understanding Response Levels
When BlackICE detects an event, it can initiate a response to that event. The response
level indicates how BlackICE reacted to a particular event. Lower-severity events
rarely prompt a response, as they do not pose any threat to the system. However,
higher severity intrusions may prompt more decisive responses.
The BlackICE response levels are displayed as an individual icon, or as an overlay on
the severity icon. For example, if BlackICE blocks an event of critical severity, a black
diagonal line like this appears over the critical event icon to create this image: .
Icon
Overlay Description
Attack Blocked: Black line overlay. BlackICE successfully blocked
the attack. Depending on the severity of the event, BlackICE may
also have blocked the attacking system. To see if BlackICE is
currently blocking the attacker, double-click the event.
Attack Unsuccessful: Gray line overlay. Other defenses of your
computer, such as the operating system, successfully blocked the
intrusion. Therefore, BlackICE did not need to block the event.
The event did not compromise the system.
Attack Status Unknown: No overlay. BlackICE triggered protection
measures as soon as it identified the attack, but some attacking
packets may have made it through to the computer. It is unlikely
that the event compromised the system.
Attack Possible: Orange Overlay. Similar to the Event Status
Unknown response, BlackICE triggered protection measures as
soon as it identified the intrusion. However, some attacking packets
were able to get into the computer. The event may have
compromised the system.
Attack Successful: Red overlay. BlackICE detected abnormal traffic
entering or exiting the system as a result of the intrusion. However,
the protection measures of BlackICE could not block the intrusion.
The event has thus compromised the system.
BLACKICE DEFENDER USER GUIDE ! BLOCKING INTRUSIONS ! 57
Choosing a Protection Level
You can choose a Protection Level to define how rigorously BlackICE blocks
unsolicited traffic. The more restrictive the protection level, the more likely
BlackICE will block unsolicited inbound traffic. Outbound traffic is never blocked,
to ensure that Web browsing and other regular networking functions remain
unaffected.
Protection levels can prevent some attacks. For example, when set to the Paranoid
level, a computer is practically invisible on the Internet. You can surf the Web and
get email, but not much else. BlackICE locks all but the most critical TCP ports.
You can choose your BlackICE protection level in the BlackICE configuration
settings. For information on setting protection levels, see “Protection Level Settings”
on page 84.
Paranoid
The Paranoid setting is very restrictive, but useful if your system is enduring frequent
and repeated attacks. Under this setting, BlackICE blocks all unsolicited inbound
traffic. This setting may restrict some Web browsing and interactive content.
Nervous
This setting is preferable if you are experiencing frequent intrusions. Under the
Nervous setting, BlackICE blocks all unsolicited inbound traffic except for some
interactive content on Web sites (such as streaming media and other applicationspecific uses of the Internet).
Cautious
This setting is good for regular use of the Internet. This setting only blocks
unsolicited network traffic that accesses operating system and networking services.
This is the default protection level setting.
Trusting
With this setting, all ports are open and unblocked and all inbound traffic is allowed.
This setting is good if you have a minimal threat of intrusions.
BLACKICE DEFENDER USER GUIDE ! BLOCKING INTRUSIONS ! 58
Different applications interact with the protection levels in different ways:
Protection level
Blocked
Paranoid
#
#
#
#
Nervous
#
#
Cautious
Trusting
Configurable
IRC file transfer
(DCC)
NetMeeting
PC Anywhere
ICQ
#
IRC file transfer
(DCC)
NetMeeting
#
Only blocks
unsolicited traffic
that accesses
operating system and
networking services.
No applications are
blocked.
#
#
Quake (II/III)
Internet Phone
Net2Phone
#
ICQ
Internet Phone
Net2Phone
#
None
#
None
#
Not Blocked
FTP file
transfers
# Sending/
receiving email
# Real Audio
# IRC Chat
All of the above
plus:
# PC Anywhere,
Quake (II, III)
All of the above plus
# IRC file transfer
(DCC)
# NetMeeting
#
This setting allows
all inbound traffic.
Configurable means the applications are normally blocked, but can be unblocked
through advanced configuration of the application or BlackICE. To use an
application that is blocked under a selected protection level, use the Advanced
Firewall Settings to explicitly open the ports that application uses. For more
information on opening ports, see “To Block or Accept a Port” on page 64.
To choose a level of protection for BlackICE to provide, follow these steps:
1. From the BlackICE main menu bar, select Tools > Edit BlackICE Settings >
Firewall.
2. Select a protection level to use. The default protection level is Cautious.
3. To stop BlackICE from auto-blocking intruders, clear Enable Auto-Blocking.
To enable auto-blocking, leave this option selected. By default, this feature is
enabled.
4. To disable all resource sharing, clear Allow Internet File Sharing. To enable
resource sharing, leave it selected. By default, this feature is enabled.
5. If you want this computer to appear in the Network Neighborhood window,
select Allow NetBIOS Neighborhood. To hide your system from browsing,
clear this option. By default, this feature is enabled.
6. Click Apply to begin using the new Firewall settings.
BLACKICE DEFENDER USER GUIDE ! BLOCKING INTRUSIONS ! 59
Managing Your Firewall
BlackICE enables you to control the kinds of traffic that enter your machine by
managing the Advanced Firewall Settings. You can access the Advanced Firewall
Settings dialog box from the BlackICE system tray icon or from the BlackICE Local
Console.
1. From the BlackICE Local Console Menu Bar, select Tools.
Figure 38 – From the Menu Bar, select Tools, then Advanced
Firewall Settings.
2. Select Advanced Firewall Settings from the shortcut menu. The BlackICE
Advanced Firewall Settings window appears.
Alternatively, you can right-click the BlackICE system tray icon in the
Windows taskbar and select Advanced Firewall Settings from the shortcut
menu.
Figure 39 – From the desktop, right-click the BlackICE system tray icon.
BLACKICE DEFENDER USER GUIDE ! BLOCKING INTRUSIONS ! 60
Blocking an Intruder
BlackICE Defender does not automatically block every intruder that attacks your
computer. Only events that are a direct and immediate threat to the functioning of
the local system are blocked. However, you can manually block any intruders that are
not automatically blocked. For more information about blocking, see “Traffic
Filtering” on page 7 and “Managing Your Firewall” on page 60.
Caution: Some systems may carry out routine, innocuous port or resource access
scans. Blocking these systems may harm the ability of network servers, Internet
Service Providers (ISPs), and probes to properly monitor your system.
1. From the Intruders tab, right-click the intruder to block.
Alternatively, from the Events tab, right-click the event/intruder combination
whose intruder you want to block.
2. From the shortcut menu, select Block Intruder.
3. On the submenu, select the duration of the block: For an Hour, For a Day, For a
Month, or Forever. “For a Month” is defined as 30 days.
Figure 40 – You can use the Intruders tab to manually block an intruder.
4. Click Yes to block the intruder for the selected amount of time.
BlackICE immediately begins blocking the selected intruder. When an intruder is
blocked, an Event Blocked icon appears in the Blocked State Column next to the
intruder’s name. When you right-click a blocked intruder, a check mark shows the
length of time the intruder is to be blocked. For information on unblocking an
intruder, see “Ignoring an Event” on page 40.
BLACKICE DEFENDER USER GUIDE ! BLOCKING INTRUSIONS ! 61
Blocking or Accepting an IP Address or Port
The BlackICE firewall provides the basic blocking mechanism for stopping
intruders. When BlackICE detects a threatening event, the firewall automatically
blocks all network packets from that intruder.
BlackICE also allows you to manually configure what IP addresses or ports it should
reject (block) or accept. This can be very useful if you need to explicitly instruct
BlackICE to leave a port or address open for use by a special application. For
example, if you use your computer to play Quake II or III games, you should create
a port accept setting for UDP ports 27910 and 27970.
For detailed information about the Accept and Reject firewall settings, and for more
information on configuring your firewall, see “The Advanced Firewall Settings
Dialog Box” on page 92. For an explanation of ports and IP addresses, see the
BlackICE Guide to Computer Security.
Note: Firewall filters are intended for users with advanced networking experience.
To Block or Accept an IP Address
1. From the BlackICE Local Console, select Advanced Firewall Settings from the
Tools menu. The Advanced Firewall Properties dialog box appears.
2. Click Add to create a new IP address firewall entry. The Add Firewall Entry
dialog box appears.
3. Enter a Name for the IP address filter. This should be the name of the system
to accept or block, if you know it. For example, if you are creating a filter to
allow all port scans from your Internet Service Provider, use the ISP’s name for
the name of this address filter.
4. Enter the IP address for the system to accept or block in the IP Address box.
Use the standard 000.000.000.000 notation. To specify an IP address range,
place a dash between each distinct IP address. For example, 192.168.10.23–
192.168.10.32.
5. To block or accept transmissions from all IP addresses through a specific port,
select All Addresses. The IP Address text box is disabled.
Note: You cannot use Add Firewall Entry to block all transmissions from all
IP addresses through all ports. To instruct BlackICE to block all unsolicited
inbound traffic, select the “Paranoid” protection level on the Firewall tab. To
accept all traffic, select the “Trusting” protection level. For more information,
see “Protection Level Settings” on page 84.
6. Select the firewall Mode.
•
Accept causes BlackICE to explicitly accept all packets from the IP address.
However, BlackICE still monitors the traffic. Therefore, if BlackICE detects
a direct, threatening attack from the accepted address, it can still auto-block
the address.
BLACKICE DEFENDER USER GUIDE ! BLOCKING INTRUSIONS ! 62
•
Reject causes BlackICE to explicitly stop any packets from the IP address.
Blocks are performed at the network level, so there is no way for a rejected
IP address to communicate with your system.
7. If you selected Accept, and you also want BlackICE to exclude the IP address
from all intrusion detection, select Add Trusted Entry. BlackICE now assumes
all traffic from the address is safe, regardless of what the remote system sends.
To allow BlackICE to continue reporting any security issues on this address,
leave the box cleared.
Figure 41 – Use the Add Firewall Entry dialog box to add a trusted address.
For more information about trusting and accepting, see “Intrusion Detection vs.
Firewalling” on page 10.
8. If you selected Reject, select the length of the block: Hour, Day, Month, or
Forever. The IP address block is started as soon as the blocked address entry is
created.
BLACKICE DEFENDER USER GUIDE ! BLOCKING INTRUSIONS ! 63
Figure 42 – Use the Add Firewall Entry dialog box to reject traffic from an
IP address.
9. Click Add. The item is added to the list in the Advanced Firewall Settings dialog
box.
To change any settings on this IP address filter, highlight the filter on the Advanced
Firewall Settings dialog box and click Modify. For more information about the
contents of this screen, see “The Advanced Firewall Settings Dialog Box” on page
92.
To Block or Accept a Port
1. From the BlackICE Local Console, select Advanced Firewall Settings from the
Tools menu.
2. Click Add to create a new port firewall entry. The Add Firewall Entry dialog box
appears.
3. Enter a Name for the port filter. This can be any name.For example, you can
use the name of the protocol or software using the port, such as “Quake” or
“SMTP.”
4. Enter the Port Number you want BlackICE to accept or reject. You must use a
whole number between 1 and 65536. To enter a range of ports, use the format
9-999.
5. To open or close all ports on your local system to communications from a
specific IP address, select All Ports. The Ports text box is disabled.
BLACKICE DEFENDER USER GUIDE ! BLOCKING INTRUSIONS ! 64
Note: You cannot use Add Firewall Entry to block or accept all transmissions
from all IP addresses through all ports. To instruct BlackICE to block all
unsolicited inbound traffic, select the “Paranoid” protection level on the
Firewall tab. To accept all traffic, select the “Trusting” protection level. For
more information, see “Protection Level Settings” on page 84.
6. Select the port Type: UDP or TCP. If you need to create an entry for both
types, you must create two separate port filters.
7. Set the Blocking setting to Accept or Reject.
•
Accept causes BlackICE to explicitly accept all packets through this port.
BlackICE can still block specific IP addresses that attempt threatening
attacks through this port. However, the port remains open for other users.
•
Reject causes BlackICE to explicitly close the port. A closed port prohibits
any system or software from communicating with your computer on that
specific port.
8. If you selected Accept, and you also want BlackICE to exclude this port from
all intrusion detection, select Add Trusted Entry. BlackICE now assumes all
traffic through this port is safe, regardless of what the remote system sends. To
allow BlackICE to continue reporting any security issues on this port, leave the
box cleared.
Figure 43 – Use the Add Firewall Entry dialog box to accept all traffic
through a port.
For more information about trusting and accepting, see “Intrusion Detection vs.
Firewalling” on page 10.
BLACKICE DEFENDER USER GUIDE ! BLOCKING INTRUSIONS ! 65
9. If you selected Reject, enter the duration of the setting. Select Perpetual to
create a filter that never expires. Otherwise, enter a date and time in the
Expires fields to select an end-point for the setting. The maximum duration for
any filter is until December 31, 2038. The Set field shows the time the firewall
entry was created.
Figure 44 – Use the Add Firewall Entry dialog box to reject all traffic
through a port.
10. Click OK to return to the Advanced Firewall Settings dialog box. The item is
added to the list.
To change any settings on this port filter, highlight the filter on the Advanced
Firewall Settings dialog box and click Modify. For more information about blocking
and accepting ports, see “To Block or Accept a Port” on page 67.
BLACKICE DEFENDER USER GUIDE ! BLOCKING INTRUSIONS ! 66
Section 6
THE BLACKICE DEFENDER SCREENS
Tabs for Operating BlackICE
The Local Console consists of three tabs (Events, Intruders and History) for
reporting information about the intrusions BlackICE has detected. Details about
these events, including the intruders performing the attacks and BlackICE’s
responses, help you determine their severity and source. The Local Console also
shows recent network traffic and attacks in graph format to so you can view patterns
or spikes in network activity.
The Events Tab
The Events tab summarizes all intrusion and BlackICE system events on the local
computer. The tab columns show the time, type, and severity of an event; the
intruder’s name and IP address; how BlackICE has responded to the event, and
other information.
To customize the information on the Events tab, you can right-click a column
header and select Columns. A dialog box appears, with which you can hide, show,
resize, or rearrange the tab’s columns. By default, the information on the Events tab
is sorted first by severity, then by time. To sort the list according to the information
in a particular column, click that column’s header. To sort the list in the reverse
order (ascending or descending), click the column header again.
For more information on controlling the information shown on the Events tab, see
“Filtering the Events List” on page 35.
BLACKICE DEFENDER USER GUIDE ! THE BLACKICE DEFENDER SCREENS ! 67
Figure 45 – The Events tab shows all the intrusions the local system has detected.
When you select an event in the Events tab, a brief description of the attack appears
at the bottom of the tab. For more information, or to see suggested remedies for the
selected attack, click the advICE button. This opens your Web browser and
connects to the BlackICE Web site for the latest information about that particular
event.
To show the responsible intruder on the Intruders tab, double-click an event on the
Events tab. For more information about what you can learn about intruders, see
“Tracking Down Intruders: Back Tracing” on page 49.
Events Tab Columns
Events tab consists of several configurable columns that show event details. You
can add, reorder, and remove these columns to customize the information on the
tab.
By default, only five columns are displayed. To rearrange or display other columns
on the tab, right-click any column header and select Columns.
The Events tab includes these default columns when you install BlackICE Defender.
To add optional columns, right-click the column header, then select Columns.
Severity Icon
A visual representation of two factors: the severity of the event; and the action
BlackICE took in response to the event (the response level). Each event is indicated
with one of four severity levels, overlaid with one of five response levels. For
descriptions of the BlackICE event severity and response levels, see “Understanding
the Severity of an Intrusion” on page 38.
Time
Date and time of the event, in the format: MM-DD-YY hh:mm:ss. The time is in 24hour format for the time zone applicable to the local system.
BLACKICE DEFENDER USER GUIDE ! THE BLACKICE DEFENDER SCREENS ! 68
Event
The name of the event type. For more information about a particular event, select
the event in the list. A brief description of the event appears at the bottom of the
screen.
For a full description of an event, as well as suggested remedies, select the event of
interest and click the advICE button. For extra options on how to respond to an
attack or how to report an intruder, see the BlackICE Guide to Computer Security
available from Network ICE.
Intruder
The best name BlackICE can gather from the attacking system. This column shows
the NetBIOS (WINS) name or DNS name for the attacking system. If BlackICE
cannot determine a name, it shows the intruder’s IP address.
For more information about a particular intruder, double-click an event on the
Events tab. The application shows the Intruders tab, which collects all known
information about each intruder who has provoked an event on your system.
Count
If an intruder executes the same attack several times in a row, BlackICE shows the
collection of events as one event, instead of showing each instance. The count
column displays how many times the intruder executed the same attack. The
timestamp on attacks with multiple counts represents the most recent event.
Optional Events Tab Columns
You can add these columns to the display by right-clicking the column header and
selecting Columns…
Parameter(s)
When an intruder carries out an attack, BlackICE can often determine details about
the event. For example, if the intruder is scanning a particular port, this column
shows the port number(s) scanned. See the advICE Web site for details about a
specific event’s parameters. The Parameter(s) column cannot be used to sort the
Events list.
Victim
The NetBIOS (WINS) name or DNS name of the attacked system (the victim). In
most cases, this is the local system. If BlackICE cannot determine a name, it shows
the victim’s IP address.
Victim IP
The IP address of the attacked system. For BlackICE Agent this is always the IP
address of the local system.
Intruder IP
The IP address of the attacking system.
Event ID
Internal number BlackICE uses to reference each unique event signature.
BLACKICE DEFENDER USER GUIDE ! THE BLACKICE DEFENDER SCREENS ! 69
Response Level Icon
A visual representation of the protection BlackICE provided against the intrusion.
Each event is indicated with one of five response levels. For information on how
BlackICE responds to events, see “Inside BlackICE” on page 5.
Severity (numeric)
A numeric representation of the severity of the event. For more information, see
“Understanding the Severity of an Intrusion” on page 38.
IP Flags
Data in the packet header specifying the intended treatment of the packet. For
example, R (RESET), P (PUSH), U (URGENT).
Protocol Type
The network protocol (such as HTTP, FTP or NetBIOS) applicable to the intruder’s
communications. For example, if the intruder was sending malicious Web site
commands, the protocol would likely be HTTP.
Destination Port
The TCP/UDP port on the local system that was the target of the attempted
intrusion.
Source Port
The TCP/UDP port on the intruder’s system where the event originated.
Other Events Tab Features
Event Description
Below the event list, BlackICE displays a brief description of the selected event. For
additional information about the event, click advICE.
advICE Button
Opens a browser session that accesses the advICE section of the BlackICE Web site.
Select the particular event of interest and click advICE. Information about that
specific intrusion appears.
Close Button
Closes the BlackICE Local Console. The detection and protection engine remains
active.
Help Button
Shows the online help for the Events tab.
Events Tab Shortcut Menu Commands
Right-click any item in the Events tab for these commands.
BLACKICE DEFENDER USER GUIDE ! THE BLACKICE DEFENDER SCREENS ! 70
Figure 46 – Right-click an event to show additional options.
Ignore Event
Right-click an event/intruder combination and select Ignore Event from the
shortcut menu. On the submenu, select whether to ignore all events of this type (This
Event), or ignore events of this type only when sent from this particular intruder (This
Event by this Intruder). Ignoring event types is a useful way to stop BlackICE from
reporting routine scans from ISPs or network probes. For more information about
ignoring event types, see “Ignoring Events and Intruders” on page 7. For
information on how to stop ignoring an event, see “Deleting a Trusted Address or
Ignored Event” on page 47.
Select Most Recent
Right-click an event and click Select Most Recent from the shortcut menu.
BlackICE highlights the event that occurred last.
Block Intruder
Right-click an event/intruder combination and select Block Intruder from the
shortcut menu. This action instructs BlackICE to block the intruder. On the
submenu, choose how long to block the intruder: For an Hour, For a Day, For a Month,
or Forever. For more information about blocking, see “Traffic Filtering” on page 7. For
information on unblocking an intruder, see “The Intrusion Detection Tab” on page
86.
BLACKICE DEFENDER USER GUIDE ! THE BLACKICE DEFENDER SCREENS ! 71
Trust Intruder
Right-click an event/intruder combination and select Trust Intruder from the
shortcut menu. On the submenu, select Trust and Accept or Trust Only. For
detailed information about trusting, see “Trusting Intruders” on page 7. For
information on how to stop trusting an intruder, see “Deleting a Trusted Address or
Ignored Event” on page 47. For information on how to stop accepting an intruder,
see “Blocking an Intruder” on page 61.
Cut
Right-click an event/intruder combination and select Cut from the shortcut menu.
BlackICE removes the event/intruder combination from the Events list and copies
the information to your computer’s clipboard in comma-delimited text format. You
can paste the information into any application that accepts text input, such as a word
processing or spreadsheet program.
Copy
Right-click an event/intruder combination and select Copy from the shortcut menu.
BlackICE copies the information to your computer’s clipboard in comma-delimited
text format. You can paste the information into any application that accepts text
input.
Delete
Right-click an event/intruder combination and select Delete from the shortcut
menu. BlackICE removes the event/intruder combination from the Events list.
Select All
Right-click an event/intruder combination and choose Select All from the shortcut
menu. BlackICE highlights all the events you have viewed during this session. You
can right-click the list again and select Cut or Copy to put all the highlighted
information on your computer’s clipboard in comma-delimited text format, from
which you can paste the information into any application that accepts text input.
Find…
Right-click an event/intruder combination and select Find… from the shortcut
menu. In the Find dialog box, select Match Whole Word Only or Match Case to
narrow your search terms. To search only records above the highlighted record, click
the Up option button. To search records below, click Down.
Clear Event List
To remove all attacks from the event list, right-click anywhere in the event list and
select Clear Event List from the shortcut menu. Clearing the event list does not
change any blocked, trusted, or ignored intruders or attacks.
Print…
To print the entire contents of the Events list, right-click any event/intruder
combination and select Print… from the shortcut menu. In the Print dialog box,
choose a printer and the number of copies, then click OK.
BLACKICE DEFENDER USER GUIDE ! THE BLACKICE DEFENDER SCREENS ! 72
The Intruders Tab
The Intruders tab collects information about all the intruders who have initiated
events on your system. This tab is designed to help you determine the severity and
location of each intruder.
To customize the information on the Intruders tab, you can right-click a column
header and select Columns. This displays a menu with which you can hide, show,
resize, or rearrange the tab’s columns. For instructions on arranging the information
in the columns, see “Selecting Columns to View” on page 31.
By default, the information on the Intruders tab is sorted first in alphabetical order
by intruder and then in descending order of severity. Click a column header to resort the list by that column. To reverse the sort order (ascending to descending or
vice versa), click the column head again.
Figure 47 – The Intruders tab shows the information BlackICE has been able to
gather about attackers.
When you select an intruder from this list, all the information BlackICE has
discovered about the attacker appears on the right side of the window, in the box
labeled Details. To adjust the relative sizes of the two parts of this tab, move your
cursor over the dividing line between them until it turns into a resize symbol, then
drag the line to the right or left.
To view the intruder’s activities on the Events tab, double-click the intruder’s entry.
The Intruders tab consists of several configurable columns that show intruder
information. You can add, reorder, and remove these columns to customize the
information on the tab.
By default, only three columns are displayed. To rearrange or show other columns
on the tab, right-click any column header and select Columns. For instructions on
arranging the information in the columns, see “Selecting Columns to View” on page
31.
BLACKICE DEFENDER USER GUIDE ! THE BLACKICE DEFENDER SCREENS ! 73
Default Intruders Tab Columns
The Intruders tab includes these columns when you first install BlackICE Defender:
Severity Icon
This is a visual representation of the intruder’s rank. The severity level reflects the
most severe attack attributed to this intruder. For an explanation of the BlackICE
severity levels, see “Understanding the Severity of an Intrusion” on page 38.
Blocked State Icon
If a blocked icon appears, BlackICE is blocking all network traffic from that
intruder. If there is no icon, the intruder is not blocked.
You can see the start and end time of the block, check if the block is manual or
automatic, or unblock the intruder. For information on how to set blocking policies,
see “Blocking an Intruder” on page 61.
Intruder
The best name BlackICE can gather from the attacking system. This column shows
the NetBIOS (WINS) name or DNS name for the attacking system. If BlackICE
cannot determine a name, it shows the intruder’s IP address.
For details about a particular intruder, select the intruder on the list. A description of
all the information discovered about the attacking system appears in the right side of
the window. For information about the intruder’s attacks, double-click the intruder.
The attacks attributed to this intruder are shown on the Events tab.
Optional Intruders Tab Columns
You can add these columns to the display by right-clicking the column header and
selecting Columns…
Intruder IP
The IP address of the attacking system.
Severity (numeric)
A numeric representation of the highest severity rating attributed to this intruder.
For an explanation of the BlackICE severity levels, see “Understanding the Severity
of an Intrusion” on page 38.
Other Intruders Tab Options
Details
BlackICE shows all the back tracing information it has collected about the intruder
next to the Intruder List. When BlackICE back traces an intruder it attempts to
gather the IP address, DNS name, NetBIOS name, Node Name, Group name and
MAC address. Savvy intruders will likely block BlackICE from acquiring this
information.
Back trace information is also available in standard text files in the Hosts folder in
the directory where BlackICE is installed. Each file is prefixed with the intruder’s IP
address.
For more information about back tracing, see “Tracking Down Intruders: Back
Tracing” on page 49.
BLACKICE DEFENDER USER GUIDE ! THE BLACKICE DEFENDER SCREENS ! 74
Close
Closes the BlackICE Local Console. The detection and protection engine remains
active.
Help
Shows the online help for the Intruders tab.
Intruders Tab Shortcut Menu Commands
Right-click any item in the Intruder list for these commands.
Figure 48 – Right-click an intruder to show additional Intruders tab options.
Block Intruder
To instruct BlackICE to block an intruder, right-click the intruder and select Block
Intruder from the shortcut menu. On the submenu, choose how long BlackICE
should block the intruder: For an hour, a day, a month, or forever. For more information
on blocking and unblocking intruders, see “Blocking an Intruder” on page 61.
Trust Intruder
Once an intruder is trusted, all attacks from that intruder are totally ignored. To trust
an intruder, right-click the intruder and select Trust Intruder from the shortcut
menu. From the submenu, select Trust Only or Trust and Accept. For more
information about trusting and accepting, see “Ignoring an Event” on page 40. For
information on how to stop trusting an intruder, see “Deleting a Trusted Address or
Ignored Event” on page 47.
BLACKICE DEFENDER USER GUIDE ! THE BLACKICE DEFENDER SCREENS ! 75
Cut
Right-click an intruder and select Cut from the shortcut menu. BlackICE removes
the entry from the Intruders list and deletes all events associated with this intruder
from the Events tab. BlackICE copies the intruder entry to your computer’s
clipboard in comma-delimited text format. You can paste the text into any
application that accepts text input, such as a word processing or spreadsheet
program.
Copy
Right-click an intruder and select Copy from the shortcut menu. BlackICE copies
the information to your computer’s clipboard in comma-delimited text format. You
can paste the information into any application that accepts text input.
Delete
Right-click an intruder and select Delete from the shortcut menu. BlackICE
removes the entry from the Intruders list.
Select All
Right-click an intruder and choose Select All from the shortcut menu. BlackICE
highlights all the events you have viewed during this session. To put all the
highlighted information on your computer’s clipboard in comma-delimited text
format, right-click the list again and select Cut or Copy. You can then paste the
information into any application that accepts text input.
Find…
Right-click an intruder and select Find… from the shortcut menu. In the Find
dialog box, select Match Whole Word Only or Match Case to narrow your search
terms. To search only records above the highlighted record, click the Up option
button. To search records below, click Down.
Print…
To print the entire contents of the Intruders list, right-click any intruder and select
Print… from the shortcut menu. In the Print dialog box, choose a printer and the
number of copies, then click OK.
BLACKICE DEFENDER USER GUIDE ! THE BLACKICE DEFENDER SCREENS ! 76
The History Tab
The History tab graphs network and intrusion activity on your computer. This tab is
useful for monitoring intrusion trends and general network use.
Figure 49 – The History tab is a good way to spot trends in intrusions.
Note: For detailed information on activity in the Events graph, click the graph near
the marker that shows the time you are interested in. The Events tab appears,
highlighting the intrusion closest to that time.
Interval
Use these option buttons to select the interval for both graphs. To show activity over
the last 90 minutes, select Min (for Minute). For the last 90 hours, select Hour. For
the last 90 days, select Day. BlackICE automatically shows the most informative
interval.
Total In 90 Hours (Days, Minutes)
Displays summary statistics for the selected interval.
! Critical: The total number of events rated as critical for the selected interval.
The events of this type are tracked on the Events graph with a red line.
! Suspicious: The total number of events rated as serious and suspicious. The
events of this type are tracked on the Events graph with a yellow line.
! Traffic: The total amount of network traffic, measured in number of packets.
Traffic is tracked on the Network Traffic graph with a green line.
BLACKICE DEFENDER USER GUIDE ! THE BLACKICE DEFENDER SCREENS ! 77
Events Graph
Tracks the number of Critical and Suspicious events BlackICE detects per second
during the period shown. The maximum number of events per second during the
period appears at the upper left corner of the Events graph.
The display changes to reflect the interval selected with the Interval option buttons:
! If the interval selected is Min., the graph shows a period of 90 minutes, and the
caption shows tick marks for every half hour.
! If the interval selected is Hour, the graph displays a period of 90 hours, with a
tick mark at noon of each day.
! If the interval selected is Day, the graph shows 90 days, with a tick mark at noon
on Sunday of each week.
! The red graph line represents events that BlackICE considers Critical. The yellow
line represents Suspicious events. A dotted line shows the average number of
events per second. If the average is less than 1, the dotted line is not shown.
Network Traffic Graph
Tracks the number of packets your system sends and receives during the period
shown. The maximum number of events per second during the period appears at the
upper left corner of the Events graph. The dotted line represents the average
number of packets sent and received per second during the period shown on the
graph.
The display changes to reflect the interval selected with the Interval option buttons:
! If the interval selected is Min., the graph shows a period of 90 minutes, and the
caption shows tick marks for every half hour.
! If the interval selected is Hour, the graph shows a period of 90 hours, with a tick
mark at noon of each day.
! If the interval selected is Day, the graph shows 90 days, with a tick mark at noon
on Sunday of each week.
Close
Closes the BlackICE Local Console. The detection and protection engine remains
active.
Help
Displays the online help for the History tab.
BLACKICE DEFENDER USER GUIDE ! THE BLACKICE DEFENDER SCREENS ! 78
Tabs for Configuring BlackICE
The Back Trace Tab
The Back Trace tab allows you to control when and how BlackICE looks for
information about intruders.
When BlackICE’s monitoring engine detects a suspicious event, it immediately starts
collecting information. One method BlackICE uses to locate an intruder is a
networking procedure called back tracing.
Back tracing is the process of tracing a network connection back to its origin. When
somebody connects to your computer via a network such as the Internet, your
system and the intruder’s system exchange packets. Before an intruder’s packets
reach your system they travel through several routers. BlackICE can read
information from these packets and identify each router the intruder’s packets had to
travel through. Eventually, BlackICE can “hop” all the way back to the intruder’s
system.
BlackICE can back trace information indirectly or directly.
! An indirect trace uses protocols that do not make contact with the intruder’s
system, but collect information indirectly from other sources along the path to
the intruder’s system.
! A direct trace goes all the way back to the intruder’s system to collect
information. Direct traces generally gather more reliable information than
indirect traces.
Intruders cannot detect an indirect trace. However, they can detect and block a direct
trace. Fortunately, most intruders are not experienced enough to block direct traces.
The Back Trace tab allows you to set the threshold when an indirect or direct back
trace is set off. The severity of the incoming event, not the address of the intruder,
triggers the back trace.
BLACKICE DEFENDER USER GUIDE ! THE BLACKICE DEFENDER SCREENS ! 79
Figure 50 – The Back Trace tab.
Back Trace Settings
Indirect Trace
Indirect back tracing does not make contact with the intruder’s system, and therefore
does not acquire much information. Indirect traces are best suited for lower-severity
attacks.
Threshold
Indicates the event severity level that triggers an indirect trace of the attack. Severity
refers to the numeric level of each event. The default event severity for the indirect
trace threshold is 30. With this setting, any event with a severity of 30 or above
triggers an indirect back trace. For an explanation of the BlackICE severity levels, see
“Understanding the Severity of an Intrusion” on page 38.
DNS Lookup
When DNS Lookup is selected, BlackICE queries available DNS (Domain Name
Service) servers for information about the intruder. DNS Lookup is enabled by
default.
Direct Trace
Direct back tracing makes contact with the intruder’s system and therefore can
acquire a lot of information. Direct back traces are best for high-severity attacks,
when you want as much information about the intruder as possible.
BLACKICE DEFENDER USER GUIDE ! THE BLACKICE DEFENDER SCREENS ! 80
Threshold
Indicates the event severity that triggers a direct trace of the intruder. The default
event severity for the direct trace threshold is 60. With this setting, any event with a
severity of 60 or above would trigger a direct back trace. For an explanation of the
BlackICE severity levels, see “Understanding the Severity of an Intrusion” on page
38.
NetBIOS Nodestatus
When NetBIOS nodestatus is selected, BlackICE performs a NetBIOS lookup on
the intruder’s system. The NetBIOS Node Status is enabled by default.
BLACKICE DEFENDER USER GUIDE ! THE BLACKICE DEFENDER SCREENS ! 81
The Evidence Log Tab
When a computer is attacked, BlackICE can capture evidence files that record
network traffic from the attacking system. These files are located in the
<installation directory> folder. For example, if you installed BlackICE to the
Program Files directory on the C: drive (the default), the evidence files are in
C:/Program
C:/Program Files/Network ICE/BlackICE. The file extension for all evidence
log files is *.enc.
Evidence files are encoded as “sniffer”-format trace files. To view the contents of
these files, you need to have a decoding application, such as Network Monitor
(included with the Windows NT Server and Windows 2000).
The Evidence Log tab controls the size and grouping of each evidence file set. For
more information about tracking evidence of intrusions, see “Tracking Down
Intruders: Collecting Evidence” on page 51.
Note: Evidence files are not the same as packet logs. Packet logs are a summary of
all inbound and outbound traffic on the system. An evidence file focuses on the
traffic associated with specific attacks.
Figure 51 – The Evidence Log tab controls how BlackICE collects evidence files.
BLACKICE DEFENDER USER GUIDE ! THE BLACKICE DEFENDER SCREENS ! 82
Evidence Log Settings
Logging Enabled
Instructs BlackICE to collect evidence files for suspicious events. This setting is
enabled by default.
File Prefix
Specifies the prefix for the evidence file names. To place a date stamp (format
YYYYMMDD) and number (NN) in the file name, enter %d after the selected prefix. For
example, if you enter evd (the default file prefix), the file names will look like this:
evdYYYYMMDD-NN.enc. The time is in 24-hour format in Greenwich Mean Time
(GMT).
Maximum Size (kbytes)
Controls how big each evidence file can get. For best results, keep this value under
2048 kilobytes (2 MB). To ensure that the file fits on a floppy disk, consider using a
maximum size of 1400 kilobytes (the default).
Maximum Number of Files
Limits how many files BlackICE generates in the specified collection time period (as
defined by the Maximum Number of Secs value). For example, if the Maximum
Number of Files is 32 (the default value), BlackICE does not generate more than 32
evidence files in any given 24 hour period.
BLACKICE DEFENDER USER GUIDE ! THE BLACKICE DEFENDER SCREENS ! 83
The Firewall Tab
Use the Firewall tab to choose how tightly BlackICE controls access to your
computer. The default protection level setting is Trusting. For more information
about how protection levels work, see “Choosing a Protection Level” on page 58.
Figure 52 – The Firewall tab.
Protection Level Settings
Paranoid
The Paranoid setting is very restrictive, but useful if your system is enduring frequent
and repeated attacks. Under this setting BlackICE blocks all unsolicited inbound
traffic. This setting may restrict some Web browsing and interactive content. All
ports are blocked to incoming traffic.
Nervous
This setting is preferable if you are experiencing frequent intrusions. For the Nervous
setting, BlackICE blocks all unsolicited inbound traffic except for some interactive
content on Web sites (such as streaming media and other “application specific”
Internet usage). All system ports are blocked, and TCP application ports 1024
through 6635 are blocked.
Cautious
The Cautious setting is good for regular use of the Internet. This setting only blocks
unsolicited network traffic that accesses operating system and networking services.
All system ports are blocked, but all application ports that you have not explicitly
blocked are open.
BLACKICE DEFENDER USER GUIDE ! THE BLACKICE DEFENDER SCREENS ! 84
Trusting
Trusting keeps all ports open and unblocked, allowing all inbound traffic. This setting
is acceptable if there is minimal threat of intrusions.
Other Firewall Tab Options
Enable Auto-Blocking
When selected, BlackICE automatically blocks intruders when they attempt to break
into your system. To stop auto-blocking, clear this option. Attacks are still reported
and logged, but not automatically blocked.
If Auto-Blocking is not selected, you must manually block intruders to protect your
system. For more information about how to manually block intruders, see “Blocking
an Intruder” on page 61.
Allow Internet File Sharing
Internet or Windows file sharing allows you to share files with others across the
Internet or over a LAN. For example, with Internet file sharing enabled, you can
connect to your computer over the Internet and upload or download files. To
prevent systems from connecting to your computer and accessing your shares over
the Internet or network, clear this checkbox.
Caution: Disabling file sharing makes the computer unavailable to all other systems
on the local network.
If you are on a network, you should leave this item selected (enabled), unless your
network does not perform any file sharing among systems. For more information,
see “Using BlackICE on a Home LAN” on page 23.
Note: The Allow Internet File Sharing option modifies the firewall setting for
TCP port 139. If you select this option, BlackICE accepts communications on port
139; if you disable this option, BlackICE rejects or blocks communications on port 139.
On Windows 2000, this setting also affects port 445.
Allow NetBIOS Neighborhood
When Allow NetBIOS Neighborhood is selected, your computer appears in the
Network Neighborhood of other computers. When it is cleared, the system does not
appear.
Hiding a computer from the Network Neighborhood does not disable file sharing.
Other systems can still access the resources on the local system. Users have to
manually locate the computer using the local computer’s IP address.
Note: The Allow NetBIOS Neighborhood option modifies the firewall setting
for UDP ports 137 and 138. If you select this option, BlackICE Accepts
communications on these ports; if you disable this option, BlackICE Rejects/Blocks
communications on these ports. For information about accepting and rejecting ports,
see “Firewall Settings” on page 8.
BLACKICE DEFENDER USER GUIDE ! THE BLACKICE DEFENDER SCREENS ! 85
The Intrusion Detection Tab
The Intrusion Detection tab allows you to control which IP addresses or attacks the
BlackICE engine trusts or ignores.
! Trusting means manually excluding one or more addresses from intrusion
detection. When an address is trusted, BlackICE excludes the system from any
monitoring and protection. All network traffic from that address is considered
safe, and attacks that originate from that system are not shown on the Events
tab.
! Ignoring means configuring BlackICE to disregard certain kinds of events. For
example, if you have a server that carries out regular port scans, you may want to
have BlackICE ignore any port scanning “attacks” from that server’s IP address.
When an event type is ignored, BlackICE does not log any information about
events of that type.
Trusting and ignoring work in tandem with BlackICE firewall settings. For more
information about trusting, ignoring or firewall settings, see “Traffic Filtering” on
page 7. For information about ignoring events, see “Ignoring an Event” on page 40.
For information about trusting, see “Trusting an Intruder” on page 43 and “Trusting
an Address” on page 45.
Caution: Trust or ignore only addresses that do not pose any threat to your system.
Keep in mind that intruders can “spoof” the IP address of internal systems. It is
possible, though extremely unlikely, for an intruder to spoof a trusted address and
avoid detection from BlackICE. A seemingly innocuous event can also signal a
prelude to a serious attack.
Figure 53 – The Intrusion Detection tab.
BLACKICE DEFENDER USER GUIDE ! THE BLACKICE DEFENDER SCREENS ! 86
The Notifications Tab
The Notifications tab allows you to control some noncritical interface and
notification functions of the Local Console.
Figure 54 –The BlackICE Notifications tab
Notification Settings
Event Notification
BlackICE alarm preferences control how and when the application notifies you of an
event. For more information about setting BlackICE alarms, see “Setting Alarm
Preferences” on page 28.
Visible Indicator
Select this option to have the BlackICE System Tray icon flash when an event is
reported. The visible indicator is triggered only if the Local Console is closed or
hidden. The three options below Visible Indicator determine which events trigger
an alert.
Audible Indicator
Select this option to have BlackICE play a .wav file when an event is reported. The
audible alarm is triggered whether the BlackICE window is open or closed. The three
options below Audible Indicator determine which events trigger a sound alert.
BLACKICE DEFENDER USER GUIDE ! THE BLACKICE DEFENDER SCREENS ! 87
Wav File
If the Audible Indicator option is selected, use this field to define the .wav file to
play. Click the folder icon to locate a new .wav file.
Preview
Click to listen to the selected alert .wav file. This feature is only enabled if the
Audible Indicator option is selected. Your computer must have a sound card and
speakers to play the audible alarm.
Update Notification
BlackICE can automatically check for software updates for protection against new
kinds of intrusions. Use these inputs to configure your own checking schedule.
Enable checking
Select to automatically check the BlackICE Web site for updates. This option is
disabled by default.
Interval for checking
Enter the number of days between checks for updates. The default automatic update
check time is every 3 days. This would cause BlackICE to check for an update after 3
continuous days of operation.
BLACKICE DEFENDER USER GUIDE ! THE BLACKICE DEFENDER SCREENS ! 88
The Packet Log Tab
The Packet Log tab allows you to configure the packet logging features of BlackICE.
When packet logging is enabled, BlackICE records the IP address of all systems that
communicated with the local system. For more information on evidence gathering,
see “The Evidence Log Tab” on page 82.
Figure 55 – You can use the Packet Log tab to configure how BlackICE tracks
system traffic.
Packet Log Settings
Logging Enabled
When selected, BlackICE captures packet logs. Packet logging is disabled by default.
File Prefix
Specifies the prefix for the packet log file names. BlackICE automatically places an
incremented counter in the filename. For example, if you enter ABC, the file names
will be ABC0001.enc, ABC0002.enc, etc. The default file prefix is log.
Maximum Size (kbytes)
Specifies the maximum size, in kilobytes, for each log file. The default value is 2048
kilobytes.
Maximum Number of Files
Specifies the maximum number of log files to generate. The default value for the
maximum number of files to log is 10.
BLACKICE DEFENDER USER GUIDE ! THE BLACKICE DEFENDER SCREENS ! 89
The Prompts Tab
The Prompts tab enables you to choose the level of feedback you want from the
BlackICE user interface.
Figure 56 – The Prompts tab.
Tab Options
Show Confirm Dialogs
Select this option to have BlackICE prompt for confirmation when deleting items,
clearing the event list, and when other significant changes are made to BlackICE.
Clear to turn off such confirmations. By default, this checkbox is enabled.
Tooltips
A Tooltip is the descriptive text that appears when the mouse cursor hovers over a
user interface item. Select the option corresponding to the level of information you
need. To show information appropriate to a new user, click Beginner. To show
information useful for a user who is familiar with computers, click Intermediate. To
hide these Tooltips, click None. By default, Beginner is selected.
Show Prompt When Service Stopped
Select this option to have BlackICE remind you when the BlackICE intrusion
detection engine is stopped and your local system is unprotected. When you restart
your computer after stopping the BlackICE service, BlackICE asks if you want to
restart the service. Click Yes to restart BlackICE. To instruct BlackICE not to
remind you when the service is stopped, select Don’t ask me again.
BLACKICE DEFENDER USER GUIDE ! THE BLACKICE DEFENDER SCREENS ! 90
Figure 57 – BlackICE can remind you when the BlackICE intrusion detection
engine is not protecting your system.
BLACKICE DEFENDER USER GUIDE ! THE BLACKICE DEFENDER SCREENS ! 91
The Advanced Firewall Settings Dialog Box
The firewall component of BlackICE blocks or accepts incoming and outgoing
packets from a particular IP address or TCP/UDP port number. The BlackICE
firewall is dynamic. You can add and remove addresses or ports from the firewall list
as necessary to modify and protect your computer.
In addition to manually editing the firewall settings to accept or block IP addresses
or ports, you can reject (block) an IP address from the BlackICE Local Console tabs.
Caution: This firewall editor is intended for users with advanced understanding of
computers and systems networking.
Use the Advanced Firewall Settings dialog box to create, modify and delete firewall
settings for IP addresses and ports. It shows the IP addresses and ports that
BlackICE is currently blocking. Clicking a column header re-sorts the list by that
column. Clicking the column header again reverses the sort order from ascending to
descending or vice-versa.
For more information about how the firewall settings work, see “Firewall Settings”
on page 8. For information on managing individual IP addresses, see “To Block or
Accept an IP Address” on page 62. For more information on working with ports, see
“To Block or Accept a Port” on page 64.
Figure 58 – The Advanced Firewall Settings screen.
BLACKICE DEFENDER USER GUIDE ! THE BLACKICE DEFENDER SCREENS ! 92
Firewall Settings
Icon
A visual representation of the firewall setting. Green indicates that all
communication is accepted from the address. A slash through the icon indicates
that the IP address is blocked and all network traffic from that system is rejected.
Owner
Shows who created the firewall entry. Entries generated through the BlackICE
automatic blocking feature display auto. Entries created manually from the BlackICE
Local Console show BIgui.
Address
The IP address of the accepted or blocked system. If the firewall entry is for a port,
the word ALL appears.
Port
The accepted or rejected port number. If the firewall entry is for an IP address, the
word ALL appears.
Type
The type of port: UDP or TCP.
Start Time
The date and time the setting was created, in MM/DD/YY hh:mm:ss format. Times
are in 24-hour format.
End Time
The termination time and date for the setting in MM/DD/YY hh:mm:ss format. Times
are in 24-hour format. Permanent settings show the text PERPETUAL.
Name
The best name BlackICE has for the IP address. This may be a DNS or NetBIOS
(WINS) name. If the setting was configured from the Advanced Firewall Settings
screen, this column is empty.
Buttons
Options
To be notified when BlackICE is about to stop blocking an IP address, select Warn
Before Block Expires.
Add
To manually add a new IP address filter or a new port configuration, click Add. The
Add Firewall Entry dialog box appears. For information on managing individual IP
addresses, see “To Block or Accept an IP Address” on page 62. For information on
managing ports, see “To Block or Accept a Port” on page 64.
Delete
To delete a firewall setting, select the setting and click Delete. Click Yes to remove
the IP address from the BlackICE firewall.
BLACKICE DEFENDER USER GUIDE ! THE BLACKICE DEFENDER SCREENS ! 93
Modify
Select a firewall setting to change and click Modify. A Modify Firewall Entry dialog
box appears. For more information on managing Firewall entries, see “Blocking
Intrusions” on page 57.
Advanced Firewall Settings Dialog Box Shortcut Menu Commands
These commands are available when you right-click any item. Accept and Reject
settings prompt different right-click options.
Figure 59 – Right-click an entry to show additional options.
Commands for Accepted Entries
Modify
Opens a Modify Firewall Entry dialog box that allows you to change the firewall
setting. See “Blocking or Accepting an IP Address or Port” on page 62.
Delete
Removes the accepted address from the firewall. Click Yes to remove the address.
Cut
Removes the address from the list and copies the information to your computer’s
clipboard in comma-delimited text format. You can paste the information into any
application that accepts text input, such as a word processing or spreadsheet
program.
BLACKICE DEFENDER USER GUIDE ! THE BLACKICE DEFENDER SCREENS ! 94
Copy
Copies the selected address to your computer’s clipboard in comma-delimited text
format. You can paste the information into any application that accepts text input,
such as a word processing or spreadsheet program.
Find…
Searches the list of addresses for the string or letters or numbers that you enter.
Print…
Sends the contents of the Advanced Firewall Settings window to the default printer
in comma-separated text format.
Commands for Rejected Entries
Unblock Only
Removes the blocked address from the firewall. Click Yes to remove the address.
Unblock and Accept
Changes the blocked addresses’ firewall setting from
REJECT to
ACCEPT.
Unblock, Accept and Trust
Changes the entry’s firewall setting from REJECT to ACCEPT, and then trusts
the address or port. When trusting the entry, the BlackICE intrusion detection
engine adds it to the BlackICE Settings Intrusion Detection tab (see “The Intrusion
Detection Tab” on page 86) and ignores any attacks from the address.
Modify
Opens a dialog box that allows you to change a firewall entry.
Copy
Copies the selected address to your computer’s clipboard in text format, with values
separated by commas. You can open another application, such as a word-processing
or email program, and paste this information into a text message, or you can import
it into a spreadsheet program.
Find…
Searches the address list for information that you specify.
Print…
Sends the contents of the Advanced Firewall Settings window to the default printer
in comma-separated text format.
BLACKICE DEFENDER USER GUIDE ! THE BLACKICE DEFENDER SCREENS ! 95
The Menu Bar
The menu bar appears above the BlackICE Defender Local Console tabs. The
Menus contain features that enable you to control how BlackICE works and how it
looks.
The File Menu
The File menu allows you to control the essential operations of BlackICE Defender.
Figure 60– Use the File menu to control BlackICE basics.
Print…
Sends information from the BlackICE Local Console to the default printer. On the
Events or Intruders tab, select an event or intruder. Click Print… on the File menu.
In the Print dialog box, choose a printer and the number of copies, then click OK.
You can also access this command by right-clicking on the Events and Intruders
tabs.
Exit
Click Exit to close the BlackICE Local Console. The BlackICE icon is removed
from the taskbar. The intrusion-monitoring engine remains active.
BLACKICE DEFENDER USER GUIDE ! THE BLACKICE DEFENDER SCREENS ! 96
The Edit Menu
The Edit menu enables you to manipulate the intrusion records that BlackICE
gathers.
Figure 61– Use the Edit menu to work with information BlackICE gathers.
Cut
On the Events or Intruders tab, click an event or intruder and select Cut from the
Edit menu. BlackICE copies the entry to your computer’s clipboard in commadelimited text format. You can paste the text into any application that accepts text
input, such as a word processing or spreadsheet program. BlackICE also removes
the entry from the list. You can also access this command by right-clicking on the
Events and Intruders tabs.
Copy
On the Events or Intruders tab, click an event or intruder and select Copy from the
Edit menu. BlackICE copies the information to your computer’s clipboard in
comma-delimited text format. You can paste the information into any application
that accepts text input. You can also access this command by right-clicking on the
Events and Intruders tabs.
Delete
On the Events or Intruders tab, click an event or intruder and select Delete from
the Edit menu. BlackICE removes the entry from the list. You can also access this
command by right-clicking on the Events and Intruders tabs.
Select All
On the Events or Intruders tab, click an event or intruder and choose Select All
from the Edit menu. BlackICE highlights all the events you have viewed during this
session. To put all the highlighted information on your computer’s clipboard in
comma-delimited text format, right-click the list again and select Cut or Copy. You
can then paste the information into any application that accepts text input. You can
also access this command by right-clicking on the Events and Intruders tabs.
BLACKICE DEFENDER USER GUIDE ! THE BLACKICE DEFENDER SCREENS ! 97
Find…
On the Events or Intruders tab, click an event or intruder and select Find… from
the Edit menu. In the Find dialog box, select Match Whole Word Only or Match
Case to narrow your search terms. To search only records above the highlighted
record, click the Up option button. To search records below, click Down. You can
also access this command by right-clicking on the Events and Intruders tabs.
The View Menu
The View menu enables you to change what is displayed, and how, on the BlackICE
Events and Intruders lists.
Figure 62– Use the View menu to control what BlackICE shows.
Freeze
Stops BlackICE from refreshing the tab information until you unfreeze it.
Filter by Event Severity
Filters which types of attacks are displayed. On the Events or Intruders tab, select
Filter by Event Severity from the View menu and choose the minimum severity
level you want to see reported.
The Tools Menu
The Tools menu enables you to configure the application by editing the BlackICE
Defender settings; edit the Advanced Firewall settings; start or stop the BlackICE
engine; clear the event list; or change other preferences.
Figure 63– Use the Tools menu to control how BlackICE Defender works.
BLACKICE DEFENDER USER GUIDE ! THE BLACKICE DEFENDER SCREENS ! 98
Edit BlackICE Settings
Displays the configuration tabs that control the operation of the BlackICE engine.
Stop BlackICE Engine
Turns off the BlackICE Intrusion detection engine.
Clear Files…
Deletes intrusion information by removing the attack-list.csv file, the evidence
log files or the packet log files. You can also do this by right-clicking on the Events
tab and choosing Clear Event List.
Advanced Firewall Settings
Shows the Advanced Firewall Settings window, which enables you to control which
IP addresses or TCP/UDP port numbers BlackICE blocks or accepts.
The Help Menu
The Help menu offers links to the online help system, the World Wide Web site for
BlackICE, or information about BlackICE.
Figure 64– Use the Help menu to get more information about using BlackICE.
BlackICE Help Topics
Displays the BlackICE online help. The online help provides quick answers to many
questions about using BlackICE Defender.
You can also get online help from the BlackICE Local Console Tabs. Click the Help
button at the bottom of any tab. For quick help on most screen options, press [ShiftF1] or click the ! button in the top right corner of the screen, then click the option.
Tip: The latest product documentation is available from the BlackICE Web site at
www.networkice.com/support/documentation.html.
Online Support
Launches your browser and points it to the BlackICE support Web site at
www.networkice.com/support.html. You can also get online support by writing to
[email protected].
BLACKICE DEFENDER USER GUIDE ! THE BLACKICE DEFENDER SCREENS ! 99
WWW Network ICE
Launches your browser and points it to the BlackICE Web site at
www.networkice.com. The Web site includes the latest information about BlackICE
Defender, such as FAQs (Frequently Asked Questions), a support Knowledge Base
and the advICE library, an extensive online resource for network security
information.
About BlackICE
Shows your BlackICE license key and provides information about your version of
BlackICE.
Support Knowledge Base
Launches your Web browser and points it to the advICE section of the BlackICE
Web site at advice.networkice.com/advICE/Support/KB.
BLACKICE DEFENDER USER GUIDE ! THE BLACKICE DEFENDER SCREENS ! 100
GLOSSARY
Anonymous Re-mailer: A program that removes header information from an email message, making it impossible to tell where it actually came from. See SPAM.
Application Port: TCP and UDP ports from 1024 to 65536. These ports are
available for applications to use for special networking use. See System Ports.
Application Program Interface: API is a set of routines, protocols, and tools for
building software applications. A good API makes it easier to develop a program by
providing all the building blocks. A programmer puts the blocks together.
Most operating environments, such as MS-Windows, provide an API so that
programmers can write applications consistent with the operating environment.
Although APIs are designed for programmers, they are ultimately good for users
because they guarantee that all programs using a common API will have similar
interfaces. This makes it easier for users to learn new programs.
ARP: Address Resolution Protocol. A TCP/IP protocol used to convert an IP
address into a physical address (called a DLC or MAC address), such as an Ethernet
address. A host wishing to obtain a physical address broadcasts an ARP request onto
the TCP/IP network. The host on the network that has the IP address in the request
then replies with its physical hardware address.
Authenticity: Proof that the information came from the person or location that
reportedly sent it. One example of authenticating software is through digital
signatures.
Back Door: A deliberately planned security breach in a program. Back doors allow
special access to a computer or program. Sometimes back doors can be exploited
and allow a cracker unauthorized access to data.
BackOrifice: BackOrifice is a remote administration tool that allows a user to
control a computer across a TCP/IP connection using a simple console or GUI
application. BackOrifice is a potentially disastrous Trojan horse since it can provide
the user unlimited access to a system.
Blue Screen of Death (BSoD): When a Windows NT based system encounters a
serious error, the entire operating system halts and displays a screen with information
regarding the error. The name comes from the blue color of the error screen.
Brute Force Hacking: A technique used to find passwords or encryption keys.
Brute Force Hacking involves trying every possible combination of letters, numbers,
etc. until the code is broken.
Camping Out: Staying in a “safe” place once a hacker has broken into a system.
The term can be used with a physical location, electronic reference, or an entry point
for future attacks.
BLACKICE DEFENDER USER GUIDE ! GLOSSARY ! 101
CGI: Common Gateway Interface. A standardized way for web servers to execute
applications and use those applications for web site content. CGI applications can be
written in many different languages, including C, Perl, Java, or Visual Basic.
CGI programs are the most common way for Web servers to interact dynamically
with users. Many HTML pages that contain forms, for example, use a CGI program
to process the form's data once it is submitted.
Hackers often attempt to exploit CGI applications since some programs can provide
administrative level access to the web server.
Cipher Text: Text that has been scrambled or encrypted so that it cannot be read
without deciphering it. See Encryption
Cookie: A string of characters saved by a web browser on the user's hard disk. Many
web pages send cookies to track specific user information. Cookies can be used to
retain information as the user browses a web site. For example, cookies are used to
“remember” the items a shopper may have in a shopping cart.
Countermeasures: Techniques, programs, or other tools that can protect your
computer against threats.
Cracker: Another term for hackers. Generally, the term cracker refers specifically to
a person who maliciously attempts to break encryption, software locks, or network
security.
Cracker Tools: Programs used to break into computers. Cracker tools are widely
distributed on the Internet. They include password crackers, Trojan Horse applications,
viruses, war-dialers, and worms.
Cracking: The act of breaking into computers. Cracking is a popular, growing
subject on the Internet. Many sites are devoted to supplying crackers with programs
that allow them to crack computers. Some of these programs contain dictionaries for
guessing passwords. Others are used to break into phone lines (called phreaking).
Cryptoanalysis: The act of analyzing secure documents or systems that are
protected with encryption for the purpose of breaking into the systems or exposing
weaknesses.
Decryption: The act of restoring an encrypted file to its original, plain text state.
Denial of Service: Act of preventing customers, users, clients, or other machines
from accessing data on a computer. Denial of service is usually accomplished by
interrupting or overwhelming the computer with bad or excessive information
requests.
DES: Data Encryption Standard. An encryption algorithm developed by the US
government. It allows the use of variable length keys.
BLACKICE DEFENDER USER GUIDE ! GLOSSARY ! 102
Digital Signature: Digital code that authenticates whomever signed the document
or software. E-mail, software, messages, and other electronic documents can be
signed electronically so that they cannot be altered by anyone else. If someone alters
a signed document, the signature is no longer valid. Digital signatures are created
when someone generates a hash from a message, then encrypts and sends both the
hash and the message to the intended recipient. The recipient decrypts the hash and
original message, makes a new hash on the message itself, and compares the new
hash with the old one. If the hashes are the same, the recipient knows that the
message has not been changed. See Public Key Encryption.
DNS: Domain Name System (or Service). A database of domain names and their IP
addresses. DNS is the primary naming system for many distributed networks,
including the Internet.
Encryption: The act of substituting numbers and characters in a file so that the file
is unreadable until it is decrypted. Encryption is usually done using a mathematical
formula that determines how the file is decrypted.
Event: Information regarding a possible intrusion or security vulnerability reported
to BlackICE. The term event is used to refer generically to anything reported to
BlackICE.
Finger: A UNIX based user-management tool. Finger servers gather information
about users logged on to the system and can report that information when queried.
Firewall: A hardware or software barrier that restricts access in and out of a
network. Firewalls are most often used to separate an internal LAN or WAN from
the Internet. See Gateway.
FTP: File Transfer Protocol. A common protocol used for exchanging files between
two sites across a network. FTP is popular on the Internet because it allows for
speedy transfer of large files between two systems. Like all networking protocols, it
too has some significant vulnerabilities.
Gateway: A gateway is a system that provides access between two or more
networks. Gateways are typically used to connect unlike networks together. A
gateway can also serve as a firewall between two or more networks.
Hacker: Generally, a hacker is anyone who enjoys experimenting with technology,
including computers and networks. Not all hackers are criminals breaking into
systems. Many are legitimate users and hobbyists. Nevertheless, some are dedicated
criminals or vandals. See Cracker.
HTTP: Hyper Text Transfer Protocol. The most common protocol used on the
Internet. HTTP is the primary protocol used for web sites and web browsers. It is
also prone to certain kinds of attacks.
ICMP: Internet Control Message Protocol. ICMP, an extension to the Internet
Protocol (IP), supports packets containing error, control, and informational
messages. The PING command, for example, uses ICMP to test an Internet
connection.
Integrity: Proof that the data is the same as originally intended. Unauthorized
software or people have not altered the original information.
Internet Worm: See Worm.
BLACKICE DEFENDER USER GUIDE ! GLOSSARY ! 103
Intruder: Person or software interested in breaking computer security to access,
modify, or damage data. See Cracker.
Intrusion: A network event where an unauthorized person or program attempts to
gain access to systems or resources.
IP: Internet Protocol. Specifies the format of packets, also called datagrams, and the
addressing scheme. Most networks combine IPs with a higher-level protocol called
Transport Control Protocol (TCP), which establishes a virtual connection between a
destination and a source. IP by itself is something like the postal system. It allows
you to address a package and drop it in the system, but there's no direct link between
you and the recipient. TCP/IP, on the other hand, establishes a connection between
two hosts so that they can send messages back and forth for a period of time.
Current IP standards use 4 numbers between 0 and 255 separated by periods to
create a 32-bit numeric IP address such as 192.168.10.32.
IRC: Internet Relay Chat. IRC was developed in the late 1980s as a way for multiple
users on a system to “chat” over the network. Today IRC is a very popular way to
“talk” in real time with other people on the Internet. However, IRC is also one
avenue hackers use to get information from you about your system and your
company. Moreover, IRC sessions are prone to numerous attacks that, while not
dangerous, can cause your system to crash.
Issue: One of the many types of intrusions or security vulnerabilities that BlackICE
can identify. The term issue is often used interchangeably with the term event.
LAN: Local-Area Network. LAN is a computer network that spans a relatively small
area. One LAN connected via telephone lines or radio waves to other LANs over
any distance create a WAN (a Wide-Area network).
Linux: A version of the UNIX operating system.
Logic Bomb: A virus that only activates itself when certain conditions are met.
Logic bombs usually damage files or cause other serious problems when they are
activated.
MAC Address: Media Access Control Address. A unique identification code used
in all networked devices. The MAC address defines a specific network node at the
hardware level and cannot be altered by any software.
Name Resolution: The allocation of an IP address to a host name. See DNS.
NetBIOS: Network Basic Input / Output System. NetBIOS is an extension of the
DOS BIOS that enables a PC to connect to and communicate with a LAN (Local
Area Network).
NetBEUI: NetBIOS Extended User Interface. NetBEUI is the primary protocol
used by Windows for Workgroups to communicate with a LAN.
NAT: Network Address Translation. An Internet standard that enables LAN, WAN
(Wide Area Network), and MAN networks to use extended IP addresses for internal
use by adding an extra number to the IP address. This standard translates internal IP
addresses into external IP addresses and vice versa. In doing so, it generates a type of
firewall by hiding internal IP addresses.
Packet Filter: A filter used in firewalls that scans packets and decides whether to let
them through.
BLACKICE DEFENDER USER GUIDE ! GLOSSARY ! 104
Password Cracker: A program that uses a dictionary of words, phrases, names, etc.
to guess a password.
Password encryption: A system of encrypting electronic files using a single key or
password. Anyone who knows the password can decrypt the file.
Password Shadowing: The storage of a user's username and password in a network
administrator database.
Penetration: Gaining access to computers or networks by bypassing security
programs and passwords.
Phreaking: Breaking into phone or other communication systems. Phreaking sites
on the Internet are popular among crackers and other criminals.
Ping: Packet Internet Groper. PING is a utility to determine whether a specific IP
address is accessible. It works by sending a packet to the specified address and
waiting for a reply. PING is used primarily to troubleshoot Internet connections.
Ping Attack: An attack that slows down the network until it is unusable. The
attacker sends a “ping” command to the network repeatedly to slow it down. See also
Denial of Service.
Pirate: Someone who steals or distributes software without paying the legitimate
owner for it. This category of computer criminal includes several different types of
illegal activities:
! Making copies of software for others to use.
! Distributing pirated software over the Internet or a Bulletin Board System.
! Receiving or downloading illegal copies of software in any form.
Pirated Software: Software that has been illegally copied, or that is being used in
violation of the software's licensing agreement. Pirated software is often distributed
through pirate bulletin boards or on the Internet. In the Internet underground it is
known as “Warez.”
Plain Text: The opposite of Cipher Text, Plain Text is readable by anyone.
POP: Post Office Protocol. This is a common protocol used for retrieving mail
messages.
Port: A connection point where a computer communicates with other devices.
Computers have hardware ports such as parallel ports for printers or USB ports for
digital cameras. Networks use virtual ports for assigning a communications channel
that the computer can control. For example, when browsing the web, most HTTP
based communications take place using the TCP port 80. When a computer needs to
access a web site, it opens a channel on TCP port 80, sends the packets through that
port and then receives them back. There are two types of ports, TCP and UDP.
UDP is the same as a TCP port except it lacks the error checking mechanism that
TCP uses. There are over 131,000 ports available for use in a TCP/IP environment
(64K TCP, 64K UDP). Most of these ports are unused, unassigned, or restricted.
Some are very common ports, such as port 80. Others are used exclusively for a
brand of software. For example, Quake games use TCP port 26000 (and others) for
network games.
BLACKICE DEFENDER USER GUIDE ! GLOSSARY ! 105
When hackers break into a system they typically exploit ports that are either
accidentally or purposefully opened. For example, one of the easiest ways to see if
the Trojan application BackOrifice is installed on a computer is to scan for activity
on TCP port 54320. This is the TCP port BackOrifice uses when communicating
with other systems.
Promiscuous Packet Capture: Actively capturing packet information from a
network. Most computers only collect packets specifically addressed to them.
Promiscuous packet capture acquires all network traffic it can regardless of where
the packets are addressed.
Protocol: A “language” for communicating on a network. Protocols are sets of
standards or rules used to define, format, and transmit data across a network. There
are many different protocols used on networks. For example, most web pages are
transmitted using the HTTP protocol.
Proxy Server: A server that performs network operations in lieu of other systems on
the network. Proxy Servers are most often used as parts of a firewall to mask the
identity of users inside a corporate network yet still provide access to the Internet.
When a user connects to a proxy server, via a web browser or other networked
application, he submits commands to the proxy server. The server then submits
those same commands to the Internet, yet without revealing any information about
the system that originally requested the information. Proxy servers are an ideal way
to also have all users on a corporate network channel through one point for all
external communications. Proxy servers can be configured to block certain kinds of
connections and stop some hacks.
Public Key Encryption: System of encrypting electronic files using a key pair. The
key pair contains a public key used during encryption, and a corresponding private
key used during decryption.
Reconnaissance: The finding and observation of potential targets for a cracker to
attack.
Remote Procedure Call. RPC is a type of protocol that allows a program on one
computer to execute a program on a server computer. Hackers looking to trigger
applications remotely often exploit RPC.
Router: A device that connects two networks together. Routers monitor, direct, and
filter information that passes between these networks. Because of their location,
routers are a good place to install traffic or mail filters. Routers are also prone to
attacks because they contain a great deal of information about a network.
SATAN: A UNIX program that gathers information on networks and stores it in
databases. It is helpful in finding security flaws such as incorrect settings, software
bugs and poor policy decisions. It shows network services that are running, the
different types of hardware and software on the network, and other information. It
was written to help users find security flaws in their network systems.
Severity: A visual and numerical value BlackICE assigns to all detected events and
intruders. For more details see page COSSREF TO SEVERITY SECTION.
BLACKICE DEFENDER USER GUIDE ! GLOSSARY ! 106
Shell: A command processor for a computer’s operating system. All computers must
have some kind of shell for users to interact with the programs. Windows computers
have a robust graphical shell whereas many UNIX systems use more rudimentary
command-line shells. Operating systems often have numerous command shells that
hackers can attempt to gain access to.
Shoulder Surfing: Looking over someone's shoulder to see the numbers they dial
on a phone, or the information they enter into a computer.
SMB: Server Message Block. SMB is a message format used by DOS and Windows
to share files, directories and devices. NetBIOS is based on the SMB format, and
many network products use SMB. These SMB-based networks include LAN
Manager, Windows for Workgroups, Windows NT, and LAN Server. There are also
a number of products that use SMB to enable file sharing among different operating
system platforms. A product called Samba, for example, enables UNIX and Windows
machines to share directories and files.
SMTP: Simple Mail Transfer Protocol. SMTP is a protocol for sending e-mail
messages between servers. Most e-mail systems that send mail over the Internet use
SMTP to send messages from one server to another; the messages can then be
retrieved with an e-mail client. In addition, SMTP is generally used to send messages
from a mail client to a mail server.
SNMP: Simple Network Management Protocol. SNMP is a set of protocols for
managing complex networks. The first versions of SNMP were developed in the
early 80s. SNMP works by sending messages, called protocol data units (PDUs), to
different parts of a network. SNMP-compliant devices, called agents, store data about
themselves in Management Information Bases (MIBs) and return this data to the
SNMP requesters.
Snooping: Passively watching a network for information that could be used to a
hacker's advantage, such as passwords. Usually done while Camping Out.
SOCKS: A protocol that handles TCP traffic through proxy servers. SOCKS acts
like a simple firewall because it checks incoming and outgoing packets and hides the
IP addresses of client applications.
SPAM: Unwanted e-mail, usually in the form of advertisements.
Spoofing: To forge something, such as an IP address. IP Spoofing is a common way
for hackers to hide their location and identity.
SSL: Secured Socket Layer. Technology that allows you to send information that
only the server can read. SSL allows servers and browsers to encrypt data as they
communicate with each other. This makes it very difficult for third parties to
understand the communications.
System Port: TCP and UDP ports 1 to 1024. These ports are reserved for operating
system functions and other established networking protocols. For example, most
web browsers use TCP port 80. See Application Port.
TCP: Transmission Control Protocol. TCP is one of the main protocols in TCP/IP
networks. Whereas the IP protocol deals only with packets, TCP enables two hosts
to establish a connection and exchange streams of data. TCP guarantees delivery of
data and also guarantees that packets will be delivered in the same order in which
they were sent.
BLACKICE DEFENDER USER GUIDE ! GLOSSARY ! 107
Telnet: A program that connects a computer to a server on a network. It allows a
user to control some server functions and to communicate with other servers on the
network. Telnet sessions generally require a valid username and password. Hackers
commonly use Telnet to hack into corporate network systems.
Tempest: Illegal interception of data from computers and video signals.
Trojan or Trojan Horse: Like the fabled gift to the residents of Troy, a Trojan
Horse is an application designed to look innocuous. Yet, when you run the program
it installs a virus or memory resident application that can steal passwords, corrupt
data, or provide hackers a back door into your computer. Trojan applications are
particularly dangerous since they can often run exactly as expected without showing
any visible signs of intrusion.
UDP: User Datagram Protocol. UDP is a connectionless protocol that, like TCP,
runs on top of IP networks. Unlike TCP/IP, UDP/IP provides very few error
recovery services, offering instead a direct way to send and receive datagrams
(packets) over an IP network. UDP is used primarily for broadcasting messages over
a network.
UNIX: A widely used operating system in large networks.
VPN: Virtual Private Network. These networks use public connections (such as the
Internet) to transfer information. That information is usually encrypted for security
purposes.
Vulnerability: Point where a system can be attacked.
War Dialer: A program that automatically dials phone numbers looking for
computers on the other end. They catalog numbers so that hackers can call back and
try to break in.
Warez: A term that describes Pirated Software on the Internet. Warez include
cracked games or other programs that software pirates distribute on the Internet.
Whois: An Internet utility that can gather information about an IP or DNS address.
Whois servers are an excellent way to track down the origin of a hacker’s
transmissions.
Wire Tapping: Connecting to a network and monitoring all traffic. Most wire
tapping features can only monitor the traffic on their subnet.
Worm: A program that seeks access into other computers. Once a worm penetrates
another computer it continues seeking access to other areas. Worms are often
equipped with dictionary-based password crackers and other cracker tools that
enable them to penetrate more systems. Worms often steal or vandalize computer
data.
BLACKICE DEFENDER USER GUIDE ! GLOSSARY ! 108
INDEX
A
Accepting
addresses or ports, 11
and trusting, 12
IP addresses, 65
ports, 67
Address
changing trusted, 50
deleting trusted, 50
Advanced Firewall Settings
Dialog Box, 95
advICE Button, 71, 73, 103
Alarms
audible, 31
visual, 31
Attackers
blocking, 8, 64
Audible Alarms, 31
E
B
Back Trace
indirect vs. direct, 53, 83
results, 52, 77
tab, 82
Blocking
intruders, 64
IP addresses, 65
ports, 67
Edit Menu, 100
End Time, for Firewall settings, 96
Events
changing ignored, 50
deleting ignored, 50
Graph, 81
ID, 73
ignoring, 10, 43
Events Tab
clearing, 39
filtering, 38
Evidence
files, 54
logging, 85
tab, 85
Exporting Data, 59
F
C
Cautious (Protection Level), 61, 87
Clearing the Event List, 39
Columns
Advanced Firewall Settings window, 96
Events tab, 71
Intruders tab, 77
sorting, 70, 76, 95
Configuring BlackICE
alerts, 90
back tracing, 82
evidence logging, 85
firewall settings, 87
intrusion detection, 89
notifications, 90
packet logging, 92
prompts, 93
Tooltips, 93
Control Panel
stopping BlackICE from, 30
Critical Event, 42
D
Data, Exporting, 59
Desktop
starting BlackICE from, 29
stopping BlackICE from, 29
Destination Port, 73
DNS Lookup, 83
Documentation, vii
Dynamic
firewall, 95
File Menu, 99
Files, Evidence Log, 55, 86
Filtering the Event List, 38
Firewall, 11
dynamic, 95
tab, 87
vs. intrusion detection, 10
Freezing tabs, 40
G
Graph
Events, 81
Network Traffic, 81
H
Help, vii
manuals, viii
on the Web, viii
online, vii
Help Menu, 102
I
Icons
firewall settings, 96
response level, 60
severity level, 42, 71
system tray, 31, 63
Ignored Events, 10, 43
adding, 44
BLACKICE DEFENDER USER GUIDE ! INDEX ! 109
changing, 50
deleting, 50
Informational event, 42
Intruders
blocking, 64
trusting, 46
Intrusion Detection
tab, 89
vs. firewall, 10
IP Address
accepting, 11, 65
blocking, 65
rejecting, 11
trusting, 10
IP Flags, 73
S
L
Launching BlackICE
from the desktop, 29
from the local console, 28
Local Console
starting or stopping BlackICE from, 28
M
Menu
Edit, 100
File, 99
Help, 102
Tools, 101
View, 101
Menu Bar, 99
T
N
Nervous (Protection Level), 61, 87
Network Traffic Graph, 81
Notifications Tab, 90
O
Online Help, vii
P
Packet Log tab, 92
Parameter(s), 72
Paranoid (Protection Level), 61, 65, 68, 87
Port
accepting, 11, 67
blocking, 67
destination, 73
rejecting, 11
source, 73
Prompts Tab, 93
Protection Levels, 61, 87
R
Rejecting
addresses or ports, 11
Response Levels, 60
Security Levels. See Protection Levels
Serious Event, 42
Severity, 41
icons, 42
threshold, 83
Sorting Columns
Events tab, 70
Firewall window, 95
Intruders tab, 76
Sound Alarms, 31
Source Port, 73
Start Time, for firewall settings, 96
Starting BlackICE
from the desktop, 29
from the local console, 28
Stopping BlackICE
from the control panel, 30
from the desktop, 29
from the local console, 28
Support, viii
Suspicious Event, 42
System Tray Icon, 63
alerts, 31
Tab
Back Trace, 82
Evidence Log, 85
Firewall, 87
Intrusion Detection, 89
Notifications, 90
Packet Log, 92
Prompts, 93
Tabs
freezing, 40
Technical Support, viii
Threshold, Severity, 83
Tools Menu, 101
Tooltips, 93
Traffic Filtering, 7
Trusted Address
adding, 48
changing, 50
deleting, 50
Trusting
addresses, 48
and accepting, 12
intruders, 46
IP addresses, 10
Trusting (Protection Level), 61, 65, 68, 87
V
Victim, 72
View Menu, 101
Visual Alarms, 31
W
Windows Control Panel
stopping BlackICE from, 30
BLACKICE DEFENDER USER GUIDE ! INDEX ! 110