1
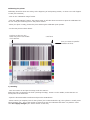
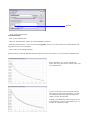
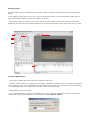
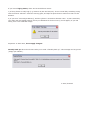
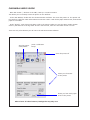
CHROMIRA USER’S GUIDE
Starting the printer
CHROMIRA
USER’S GUIDE
- Start VNC viewer (= Chicken of the VNC) Host ip is 132.205.134.204
- Start VNC viewer (= Chicken of the VNC). Host ip is 132.205.134.204
This allows you to remotely access the printer pc on the 4th floor.
This allows you to remotely access the printer on the 4th floor.
- In the VNC Window, double click the Chromira Printer software. This turns the printer on. The print- In the VNC Window, double click the Chromira Printer software. This turns the printer on. The printer will
er will first perform a self-test which takes about two minutes.
first perform a self-test which takes about two minutes. Note: it will fail the paper tenstion test, because the
paper is not loaded.
- Under “Supply”, verify how much paper is left in the printer:
! Make sure it is the same number written down by the last user in the log sheet (if this is not the
- Under “Supply”, verify how much paper is left in the printer: Make sure it is the same number written
case, please let us know).
down by the last user in the log sheet. If this is not the case, leave one line blank and let us know.
! Make sure the “Exposed” section is at zero (if not, click the “Reset” button)
There are only a few buttons you will use in the Chromira Printer software:
There are only a few buttons you will use in the Chromira Printer software:
sets the printer
online/offline
prints a calibration
image
turns the printer off
shows you the status
of the printer
shows you how much paper
is left in the printer
Please leave all other buttons/settings the way they are!
Calibrating the printer
Calibrating the printer
Calibrating should be done at the beginning of each printing session, or when a new roll of paper is
Calibrating should be done once a day, at the beginning of each printing session, or when a new roll of paper
used (new emulsion).
is used (new emulsion).
- Click on the “calibration image” button.
- Click on the “Test print” button.
- Click the “Offline/Online” button. The printer starts. It will take about 2 minutes to print the calibration file.
- Click the “Offline/Online” button.The printer starts. It will take about 2 minutes to print the calibraYou can verify the remaining time in the printer window.
tion file. Please verify the remaining time in the printer window.
- When your print is ready, process the print and bring the calibration print upstairs.
- When your print is ready, process the print and bring the test print upstairs.
- Cut the test print as shown below:
- Cut the test print as shown below:
Cut here so that you can
center the print in the middle
of the scanner
...and here!
here you must cut parallel
between the lines
1) Scanning
-Turn the scanner on and put the image under the scanner:
-Turn sure
the scanner
onaligned
and putinthe
under the the
scanner:
Make
that it is
theimage
front (touching
edge). Place it in the middle, so that the two
Make
sure that
is the
aligned
in the front (touching the edge). Center it in the middle, so that the two cut
cut marks
pointit to
A4 arrows.
marks point to the A4 arrows.
- Open the Chromira Balance software
- Open the Chromira Balance software and press the SCAN button.
- Press the SCAN button
- When scanning is complete, look for the Q-factor (the number behind the Q). The Q-factor is usually somewhere
between
100
300. If the
number
higher than 500, this indicates that there is a problem. I that
- When
scanning
is -complete,
click
“Applyischanges”.
case
apply
changes
(see “Known
issues”
at The
the Q-factor
end).
Lookdon’t
for the
Q-factor
(the number
behind
the Q).
is usually somewhere betwenn 100 300. If the number is higher than 500, this indicates that there is a problem (see troubleshooting
guide).
Q-Factor
- Turn
on the Densitometer
2)
Densitometer
Clickonthe
- -Turn
the“Densitometer”
Densitometer button in Chromira Balance software
Readthe
the“Densitometer”
patches from 0button
- 16 (press
the button
until
you see the values on the densitometer dis- -Click
in Chromira
Balance
software
play, then move to the next patch).
- Read the patches from 0 - 16. Press the button gently, until you see the values on the densitometer dis- Click
“Done”,
Changes”
play,
then
move then
to the“Apply
next patch.
- Click “Done”, then “Apply Changes”
Always do both, scanning AND Densitometer! Never do just one of them, it can corrupt the calibration file.
,
Known Calibration Problems:
—If there is little paper left on the roll (20 ft. or less), the paper tends to curve. It will be
difficult to put the paper flat on the scanner. If the paper
is not
flat, you you
will curves
get an should
error look
After
calibration,
message saying you should adjust the drum (please ignore!).
Also,very
do not
apply
changes
linear, and
close
to the
existing ones, like
when you get a strange Q -factor!
the example here.
Solutions: Tape down the test image, or wait until a new roll is loaded.
— Message “D-Max failure”
Solution:
Say ‘yes’ to lowering the values.
In the “Dmax target” fields, lower the values as suggested.
Remeasure the test (or print a new test).
—Message “Scanner not found”
Solution: Turn scanner off, and turn it on again.
If your curves have some non-linear bumps,
then there is most likely a problem, e.g. with
the Densitometer. Don’t apply changes and
make a screen shot instead.
Inspect your calibration image visually. If you
see something unusual, print another one. If
it looks ok, measure it again.
Printing images
All your images must be 8 bit RGB files in tiff format. Also, no Layers or Alpha channels are accepted by the
Printing images
printer.
All your images must be 8 bit RGB files in tiff format. Also, no Layers or Alpha channels are accepted
If you images is wider than 40 inch (e.g. a 40 x 50 landscape format), it is recommended to rotate your imby the printer.
ages in Photoshop. (Best done when you create your tif file.)
- Move all the images you want to print to the “Chromira prints” folder on the server (Groups > HEX-GRP- Move all the images you want to print to the “Chromira prints” folder on the server (Groups > HEXdigitalimg) You will need your Hexagram Network user name and password, which was sent to you by e-mail.
GRP-digitalimg) You will need your Hexagram Network user name and password.
Chromira Workstation
- Open the Chromira Workstation software:
- Click on the Image button and import the image from the server.
- Click on the Image button and open the image you want to print
- Borders: set the borders you want around the image. If all borders are set to zero, the image will be placed
at the edge of the roll - this is problematic because of processor marks. Try to set a border so that the image
Settings:
is
in the middle of the roll. A minimum of 0.25 inch border is recommended.
Borders: set the
yousize
want around the image. If all borders are set to zero, the image will be
-- Width/Height:
Setborders
your print
placed at the edge of the roll (this is problematic). Try to set a border so that the image is in the midof the
roll.several
A minimum
0.25
border
is recommended
on the
-dle
If you
have
prints of
with
theinch
same
settings:
Go > file > Save
as edges.
default print. Then the borders will
be saved for future prints. Important: Set the image scaling always to “Scale”:
- Width/Height: Set your print size
All other settings usually remain at the default settings (see screenshot).
- Click on the “Print” button (or use Ctrl+P) and your print appears in the waiting list.
- With a right mouse click, activate “Release job” and your print will be sent to the Chromira Printer.
- Go the VNC Window, turn the printer online, and your image will be printed.
-- When you have several small images: Release them all at the same time. Chromira will nest the images automatically, so that you will not waste any paper. If you have many large files you want to print small,
you need to down size them first (e.g. make them 300 dpi at the print size. You can *not send 10 files @
200MB each at once.)
-- For large scale prints: There is no need to upsample them. Sent them at their native resolution. If your
40” x 50 is only 80 dpi, this is not a problem. Send it as it is. There is a max file size of 700MB the Chromira
can handle.
-- Joint printing: If the Chromira is already booked, you can joint-print under the conditions that:
- you have a booking on another workstation
- the person who has the Chromira booking agrees that you join (we will provide you with the name if necessary).
-- Roll change: If you run out of paper, we provide roll change service Mo - Fr from 9 - 5 pm. If print often
after hours, we can show you how to change the roll.
-- Colex hours: The Colex run during the hours of the photo techs. It usually closes at 10 pm, and is also
closed on Sundays. If you want to print after hours, we can show you how to start / shut down
When you are done:
- Turn off the printer by closing the Chromira software in the VNC window. Also make sure that the scanner
and the densitometer are turned off (power switch).
- Fill out the error log sheet in case you encountered any problems
- Fill out the log sheet and write down your paper usage.
- Delete your files from the server once you are done with your project.
Some Numbers:
- each time the paper is cut you lose 2.5 feet
- start up calibration: 3.5 feet (paper cut 2.5 feet + test print 1 ft.)
- the Chromira prints 4 inch per minute
----------
Known issues
Processor marks: When you feed the roll, after 5.5 inch the processor leaves a line. There can be also
other marks at the beginning of a processed roll. Solution: Send non-critical prints at the end (e.g. tests),
press the white button twice, OR print the “6in_Send_this_last.tif” file at the very end.
Balance Focus Warning after scanning: This error message can be ignored
At the end of a roll, the paper tension gets low, and you see often the following error message, even though
there is still paper left. You can click “ignore” (about every 2 sec.), and the printer keeps printing no problem. The error should only pop up when there is 20ft or less paper left.
If you have a high Q-Factor, there can be two different causes:
1) If the Q-factore is really high (e.g. between 50,000 and 500,000): There is most likely something wrong
with the scanner. Solution: Clean the scanning glass, and tape the prints down to make sure that is is flat.
Rescann.
2) If you see a “Drum Adjust Warning”, and the Q-factor is somewhere between 1000 - 10,000: Most likely
your paper was not loaded properly. Check you calibration file for thin lines (1/4 inch appart). If you find
some, print a new calibration image.
Important: In both cases, do not apply changes!
Monthly back up: When the Chromira asks you to send a “Monthly back up”: This message can be ignored
(simply quit outlook!).
3-2014/ thomask