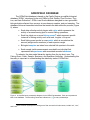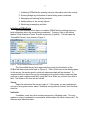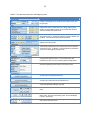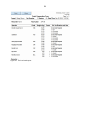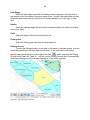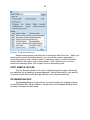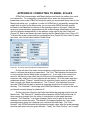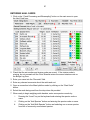
1
A User’s Guide to GFBioField: The Pacific Region At-Sea Data Acquisition System for Groundfish Trawl Surveys N. Olsen Fisheries and Oceans Canada Marine Ecosystem and Aquaculture Division Science Branch, Pacific Region Pacific Biological Station 3190 Hammond Bay Road Nanaimo, BC V9T 6N7 2010 Canadian Technical Report of Fisheries and Aquatic Sciences 2887 Canadian Technical Report of Fisheries and Aquatic Sciences Technical reports contain scientific and technical information that contributes to existing knowledge but which is not normally appropriate for primary literature. Technical reports are directed primarily toward a worldwide audience and have an international distribution. No restriction is placed on subject matter and the series reflects the broad interests and policies of the Department of Fisheries and Oceans, namely, fisheries and aquatic sciences. Technical reports may be cited as full publications. The correct citation appears above the abstract of each report. Each report is abstracted in Aquatic Sciences and Fisheries Abstracts and indexed in the Department’s annual index to scientific and technical publications. Numbers 1-456 in this series were issued as Technical Reports of the Fisheries Research Board of Canada. Numbers 457-714 were issued as Department of the Environment, Fisheries and Marine Service, Research and Development Directorate Technical Reports. Numbers 715-924 were issued as Department of Fisheries and the Environment, Fisheries and Marine Service Technical Reports. The current series name was changed with report number 925. Technical reports are produced regionally but are numbered nationally. Requests for individual reports will be filled by the establishment listed on the front cover and title page. Out-of-stock reports will be supplied for a fee by commercial agents. Rapport technique canadien des sciences halieutiques et aquatiques Les rapports techniques contiennent des renseignements scientifiques et techniques qui constituent une contribution aux connaissances actuelles, mais qui ne sont pas normalement appropriés pour la publication dans un journal scientifique. Les rapports techniques sont destinés essentiellement à un public international et ils sont distribués à cet échelon. Il n’y a aucune restriction quant au sujet; de fait, la série reflète la vaste gamme des intérêts et des politiques du ministère des Pêches et des Océans, c’est-à-dire les sciences halieutiques et aquatiques. Les rapports techniques peuvent être cités comme des publications complètes. Le titre exact paraît au-dessus du résumé de chaque rapport. Les rapports techniques sont résumés dans la revue Résumés des sciences aquatiques et halieutiques, et ils sont classés dans l’index annuel des publications scientifiques et techniques du Ministère. Les numéros 1à 456 de cette série ont été publiés à titre de rapports techniques de l’Office des recherches sur les pêcheries du Canada. Les numéros 457 à 714 sont parus à titre de rapports techniques de la Direction générale de la recherche et du développement, Service des pêches et de la mer, ministère de l’Environnement. Les numéros 715 à 924 ont été publiés à titre de rapports techniques du Service des pêches et de la mer, ministère des Pêches et de l’Environnement. Le nom actuel de la série a été établi lors de la parution du numéro 925. Les rapports techniques sont produits à l’échelon régional, mais numérotés à l’échelon national. Les demandes de rapports seront satisfaites par l’établissement auteur dont le nom figure sur la couverture et la page du titre. Les rapports épuisés seront fournis contre rétribution par des agents commerciaux. Canadian Technical Report of Fisheries and Aquatic Sciences 2887 2010 A USER’S GUIDE TO GFBIOFIELD: THE PACIFIC REGION AT-SEA DATA ACQUISITION SYSTEM FOR GROUNDFISH TRAWL SURVEYS by N. Olsen Fisheries and Oceans Canada Marine Ecosystem and Aquaculture Division Science Branch, Pacific Region Pacific Biological Station 3190 Hammond Bay Road Nanaimo, BC V9T 6N7 E-mail: [email protected] ii © Her Majesty the Queen in Right of Canada, 2010 Cat. No. Fs 97-6/2887E ISSN 0706-6457 Correct citation for this publication: Olsen, N. 2010. A user’s guide to GFBioField: The Pacific Region’s at-sea data acquisition system for groundfish trawl surveys. Can. Tech. Rep. Fish. Aquat. Sci. 2887: x + 76 p. iii TABLE OF CONTENTS TABLE OF CONTENTS ..................................................................................................iii LIST OF TABLES ............................................................................................................ v LIST OF FIGURES..........................................................................................................vi ABSTRACT .....................................................................................................................ix RÉSUMÉ......................................................................................................................... x INTRODUCTION............................................................................................................. 1 GFBIOFIELD DATABASE............................................................................................... 3 DATA ENTRY FORMS.................................................................................................... 4 STARTING GFBIOFIELD................................................................................................ 6 TASKS ............................................................................................................................ 6 CHIEF SCIENTIST’S TASKS............................................................................ 6 Initializing GFBioField.................................................................................... 7 Entering Bridge Logs ................................................................................... 10 Managing and Tracking Fishing Locations .................................................. 19 Using the Survey Logbook .......................................................................... 22 Viewing the Bio-Sample Report................................................................... 23 CATCH PROCESSING................................................................................... 25 Catch Processing Step-By-Step .................................................................. 28 BIOLOGICAL SAMPLING............................................................................... 35 Age Samples ............................................................................................... 39 Stratified Age Samples ................................................................................ 40 Length Frequency Samples......................................................................... 41 PORT SAMPLING .......................................................................................... 43 Port Sample Offload Header ....................................................................... 44 Fishing Information...................................................................................... 45 Species Landed........................................................................................... 48 Samples and Specimens............................................................................. 49 TOOLS .......................................................................................................................... 52 DATA EXPLORER.......................................................................................... 52 SPECIES LOOKUP ........................................................................................ 53 PORT SAMPLE UPLOAD............................................................................... 54 iv DATABASE BACKUP ..................................................................................... 54 APPENDIX A: USING THE SCANTROL FISHMETER FISH MEASURING BOARD.... 55 USING THE FISH MEASURING BOARD WITH GFBIOFIELD....................... 57 USING A BLUETOOTH FISH MEASURING BOARD ..................................... 59 APPENDIX B: CONNECTING TO MAREL SCALES .................................................... 61 APPENDIX C: DATA ENTRY QUICK REFERENCE GUIDES...................................... 63 STARTING A NEW SURVEY ......................................................................... 63 ENTERING BRIDGE LOGS............................................................................ 64 ENTERING HAUL CARDS ............................................................................. 67 SUB-SAMPLING DURING CATCH PROCESSING........................................ 69 BIOLOGICAL SAMPLING............................................................................... 70 Setting up a Sample .................................................................................... 70 Entering Age Samples................................................................................. 73 Entering Length Stratified Age Samples...................................................... 74 Entering Length Frequency Samples .......................................................... 75 REFERENCES.............................................................................................................. 76 v LIST OF TABLES Table 1. Common controls used in GFBioField data entry forms. .................................. 5 Table 2. The data-entry sections of the Bridge Log form.............................................. 12 Table 3. Toolbar command buttons of the Survey Map form........................................ 21 Table 4. Fields of the Haul Card form species detail section........................................ 26 Table 5. Controls of the Haul Card footer section. ........................................................ 27 Table 6. Fields of the Basket Weights form detail section. ........................................... 32 Table 7. Basket utilization codes.................................................................................. 33 Table 8. Command buttons on the footer section of the Port Sample form. ................. 44 Table 9. Controls of the Fishing Ground form. ............................................................. 47 Table 10. Fish measuring board function keys as they are used in GFBioField........... 58 vi LIST OF FIGURES Figure 1. Locations of the modern synoptic groundfish trawl surveys on the coast of British Columbia, Canada................................................................................................ 1 Figure 2. A simplified entity-relationship diagram for the GFBioField database. Each box represents a table in the database. The branching connectors indicate one to many relationships. ......................................................................................................... 3 Figure 3. An example of a data entry form consisting of various controls used to enter, edit, and view data. ......................................................................................................... 4 Figure 4. The main menu of GFBioField. ....................................................................... 6 Figure 5. The Groundfish Research Survey form........................................................... 7 Figure 6. The Vessel Lookup Utility................................................................................ 8 Figure 7. The Captain Lookup Utility. ............................................................................. 9 Figure 8. Command buttons of the Survey form........................................................... 10 Figure 9. The Bridge Log form. .................................................................................... 11 Figure 10. The Employee Lookup Utility....................................................................... 13 Figure 11. The Block Properties form........................................................................... 16 Figure 12. The Trawl Specifications form. .................................................................... 17 Figure 13. The CTD and Environmental Data from. ..................................................... 18 Figure 14. The Bridge Log report. ................................................................................ 19 Figure 15. The Fishing Locations form. ........................................................................ 20 Figure 16. The Block Status report............................................................................... 20 Figure 17. The Survey Design form.............................................................................. 22 Figure 18. The Survey Logbook form. .......................................................................... 23 Figure 19. The text-formatting toolbox of the Survey Logbook..................................... 23 Figure 20. The Bio-Sample Report Setup dialog. ......................................................... 24 Figure 21. The Bio-Sample Report............................................................................... 24 Figure 22. The Haul Card form..................................................................................... 25 Figure 23. The Haul Card header section. ................................................................... 26 Figure 24. The Haul Card details section. To view hidden species records use the vertical scroll bar located on the right. ........................................................................... 26 Figure 25. The Haul Card footer section. ..................................................................... 27 Figure 26. A typical Haul Card station setup. ............................................................... 28 Figure 27. A standard Pacific Region catch basket sitting on top of a full catch sorting bin. ................................................................................................................................ 29 vii Figure 28. The Add Species helper form (a). After selecting species and clicking OK, the species are inserted into the Haul Card (b). ............................................................ 30 Figure 29. The Species Search form............................................................................ 30 Figure 30. An example of an “active” species record. .................................................. 31 Figure 31. The Basket Weights form. ........................................................................... 31 Figure 32. The samples and specimens summary grid of the Basket Weights form. ... 32 Figure 33. The haul card report.................................................................................... 34 Figure 34. A typical biological sampling station consists of a ruggedized laptop computer (A) connected via a serial cable (B) to a bench-top scale (C), and to a fish measuring board (D) via a USB cable (E). .................................................................... 35 Figure 35. An example Haul Card species record flagged for an age sample.............. 35 Figure 36. The Sample form......................................................................................... 36 Figure 37. The Bio-Sample Entry form. ........................................................................ 37 Figure 38. After connecting a USB or Bluetooth fish measuring board the “Connect Bluetooth FMB” button and “BT Port” field (a) are replaced by the “Setup FMB” and “Start FMB” buttons (b).................................................................................................. 37 Figure 39. The Bio-Sample Setup form ........................................................................ 38 Figure 40. The Sample report. ..................................................................................... 40 Figure 41. The Bio-Sample Setup form configured for a stratified age sample. ........... 40 Figure 42. For length stratified age samples, fish from which age structures are to be collected are indicated by the “Sample” field................................................................. 41 Figure 43. When conducting a length frequency or length/sex frequency sample, manually enter the sample weights into the sample header prior to starting. ................ 41 Figure 44. The Port Sample form showing the Offload Header screen. ....................... 43 Figure 45. The Fishing Information screen of the Port Sample form. ........................... 45 Figure 46. The Fishing Ground form. ........................................................................... 46 Figure 47. The Species Landed screen of the Port Sample form................................. 48 Figure 48. The Samples and Specimens screen of the Port Sample form. .................. 49 Figure 49. The Port Sample Cover Page report includes summary information for the sample on page one (a) as well as graphical length by sex and maturity by sex frequency plots on page two (b). ................................................................................... 51 Figure 50. The Data Explorer. ...................................................................................... 52 Figure 51. Use the Data Explorer to rearrange data by clicking and dragging an item from one level (a) and dropping it on another (b), after which it will appear at the new level (c).......................................................................................................................... 53 Figure 52. The Species Search form............................................................................ 54 viii Figure 53. A 100 cm Scantrol FishMeter fish measuring board. A: Magnetic activation strip. B: Function keys. C: Mode selection keys. D: Millimeter measuring strip.......... 55 Figure 54. Measurements are recorded using a magnetic device attached to the operator’s index finger................................................................................................... 56 Figure 55. Measurements should always be taken using the raised triangular region of the finger magnet as the alignment guide. Do not use your finger as a guide.............. 56 Figure 56. When activating function keys, swipe the finger magnet over the magnetic strip directly above the brown target spot on the key. ................................................... 57 Figure 57. The Bluetooth Security Code Request dialog box....................................... 59 Figure 58. Make a note of the serial port used for the Bluetooth connection................ 60 Figure 59. The Scale Communications Configuration form. ......................................... 61 ix ABSTRACT Olsen, N. 2010. A user’s guide to GFBioField: The Pacific Region’s at-sea data acquisition system for groundfish trawl surveys. Can. Tech. Rep. Fish. Aquat. Sci. 2887: x + 76 p. GFBioField is a data acquisition system designed for the at-sea collection of groundfish trawl survey data. It runs on Windows platforms (XP, Vista, and 7) using a Microsoft Access 2007 project to provide user interfaces and business logic, with a SQL Server 2008 database as the back-end. Various third-party and custom ActiveX and COM components provide the ability to communicate with serial, USB, and networked devices including Scantrol FishMeter fish measuring boards, Marel marine scales, GPS, and others. The system utilizes off-the-shelf ruggedized laptops and weather-proof marine scales and measuring boards to provide a complete at-sea data acquisition solution. This document is a guide to using GFBioField with a task-oriented focus on entering the data generated by groundfish trawl surveys. It is not intended as a technical reference to GFBioField and does not describe hardware or software configuration. x RÉSUMÉ Olsen, N. 2010. A user’s guide to GFBioField: The Pacific Region’s at-sea data acquisition system for groundfish trawl surveys. Can. Tech. Rep. Fish. Aquat. Sci. 2887: x + 76 p. GFBioField est un système d’acquisition de données conçu pour la collecte en mer de données relatives aux poissons de fonds visés par la pêche au chalut. Il fonctionne sous les systèmes d’exploitation Windows XP, Vista, et 7. Il utilise un projet Microsoft Access 2007 afin de fournir aux utilisateurs des interfaces et une logique métier reposant sur une base de données SQL Server 2008. Divers éléments personnalisés ActiveX et COM fournis par un tiers permettent de communiquer avec des dispositifs en série, USB et en réseau, notamment des planches de mesure des poissons de type Scantrol FishMeter, des balances marines de type Marel, des GPS, etc. Le système utilise des ordinateurs portables standards renforcés, ainsi que des balances et des planches de mesure à l’épreuve des intempéries afin d’offrir une solution complète d’acquisition de données en mer. Ce document est un manuel d’utilisation de GFBioField qui met l’accent sur les tâches d’entrée de données générées par les relevés de poissons de fond visés par la pêche au chalut. Il n’est pas conçu pour être un outil de référence technique pour GFBioField et il ne décrit pas les configurations matérielle ou logicielle. INTRODUCTION In DFO’s Pacific Region, groundfish bottom trawl surveys constitute an important component of groundfish stock assessment activity, providing biological data of selected species and fishery-independent estimates of fish abundance. Historically, most groundfish trawl surveys focused on one or a few commercially important groundfish species such as Pacific ocean perch, but largely ignored other species. Starting in 2003 however, four series of long term “synoptic” groundfish trawl surveys were initiated that are designed to provide estimates of all bottom-dwelling species encountered in the trawl net (Figure 1; see also Olsen et al. 2007; Sinclair et al. 2003; Workman et al. 2007, 2008a, and 2008b). Figure 1. Locations of the modern synoptic groundfish trawl surveys on the coast of British Columbia, Canada. Data collection during a trawl survey has historically been accomplished using pencil and waterproof paper only, due to the harsh working environment. However, in recent years there have been advances made in ruggedized technology, especially motion-compensating balances, waterproof electronic measuring boards, and water resistant computers, all of which can operate reliably at sea. These new technologies, along with advances in software (in particular, robust and reliable operating systems, powerful relational databases, and rapid development 2 tools) have made it possible to develop completely paperless, at-sea data acquisition systems. The Pacific Region’s at-sea data acquisition system, also known as GFBioField, is a client/server application consisting of a Microsoft Access 2007 project 1 front-end connected to a SQL Server 2008 database. Most of the business logic is implemented in the Access front-end using Visual Basic for Applications 2 (VBA), with the remainder being provided by SQL Server Transact-SQL code. This technical report is intended as a user’s guide to the operation of GFBioField. It does not cover installation or configuration of the system or hardware requirements. However, it does assume that certain hardware is being employed with the system. In particular, Marel platform and bench-top scales, as well as Scantrol FishMeter Fish Measuring Boards. 1 An Access project is an Access data file that provides native-mode access to a SQL Server database to create a true client/server application. 2 Microsoft Visual Basic for Applications (VBA) is a programming environment designed to enable developers to build custom solutions using Visual Basic to automate and extend application functionality. 3 GFBIOFIELD DATABASE The GFBioField database is based on the Pacific Region groundfish biological database “GFBio”, developed in the mid 1990s by Rick Stanley, Gord Coulson, Tony Lee, and Kate Rutherford. GFBio is an Oracle database designed to store groundfish biological data collected from surveys, at-sea observer samples, and port samples. The database follows a hierarchical structure that models the data collection process (Figure 2), where: Each data collection activity begins with a trip, which represents the activity of a vessel leaving port to conduct fishing operations. Each trip yields one or more fishing events 3 which represent specific instances of fishing activity such as a trawl, longline, or trap set. Each fishing event results in some catch, which is recorded as the amount (weight and/or numbers) of each species caught. Biological samples are taken from selected fish species in the catch. Each sample yields measurements recorded from individual fish, represented as specimens with associated recorded attributes. To reiterate, the data model hierarchy starting from the top level, runs: Trip, Fishing Event, Catch, Sample, Specimen, and Specimen Attributes. Understanding this hierarchy is important to understanding the data entry tasks of GFBioField. Figure 2. A simplified entity-relationship diagram for the GFBioField database. Each box represents a table in the database. The branching connectors indicate one to many relationships. 3 Some common synonyms for “fishing event” that are used in this document, include “set”, “tow”, and “haul”. 4 DATA ENTRY FORMS Entering, editing, and viewing data in GFBioField is accomplished through the use of data entry forms. Forms are programmable objects that can contain a variety of control elements (also known simply as “controls”) that provide data entry functionality (Figure 3, Table 1). Figure 3. An example of a data entry form consisting of various controls used to enter, edit, and view data. Most of the forms in GFBioField are associated with an underlying table in the GFBioField database. Such forms are referred to as “bound” forms because they are bound to a specific table and the controls on them are associated with specific fields from that table. For example, the form shown in Figure 3 is bound to the TRIP table of the GFBioField database, and the text box control labeled “Start Date” is associated with the field TRIP_START_DATE. Thus, changing the value of the “Start Date” control also changes the value of the TRIP_START_DATE field in the TRIP table. Controls that are associated with database fields in this way are often simply referred to as “fields” to reflect this relationship and I will use this terminology throughout this document. Only certain control types can be associated with table fields, including the text box, list box, combo box, check box, and radio button controls. As you enter or edit data in a form you can navigate between controls using a variety of methods. With the keyboard, you can use the Tab or Enter key to move to the next control, or the Shift + Tab key combination to move to the previous control. Using the mouse, you can simply click on a given control to give it the “focus” (i.e. make it the active control). However, keep in mind that clicking on command buttons will cause them to immediately perform the action for which they were programmed. The controls on a form are arranged in a logical sequence that models the dataentry task. For example, a form might contain “start time” and “end time” fields, where the “start time” field is logically prior to the “end time” field. Thus, when entering a new record, it’s best to proceed through the controls on a form by pressing the Tab or Enter key after updating each. You’ll notice when starting data entry on a new form, that some of the fields already contain values even though you haven’t entered anything yet. Those fields are 5 displaying “default” values. Default values speed up the data entry process by providing commonly used values for certain fields or valid values for critically important fields. For example, a date field might default to the current day. You may also notice that some of the fields have yellow backgrounds. The yellow backgrounds are intended to highlight the fields that are either absolutely necessary for data entry to continue, or are at least considered very important. In general you should always try to provide a value for a field with a yellow background and you may find that you are unable to proceed with data entry if you do not. Table 1. Common controls used in GFBioField data entry forms. Control Name Label Command Button Toggle Button Text Box Example Description Displays static (non-editable) text, usually used to describe other controls. Performs some action when pushed. E.g. opens another form or runs a Visual Basic procedure. Toggles a programmed feature on and off. E.g. turns on and off the display of block labels on the Survey Map Form. Allows you to enter free-form text using the keyboard. List Box Displays lists of items. You can select items by clicking on them. Combo Box (or Drop-Down List) Similar to a list box but also allows you to enter items by typing them. Check Box Allows you to select or deselect options by checking or unchecking them. The checked state indicates “true” or “yes”, while unchecked indicates “false” or “no”. Similar to a check box but only allows you to select one of a mutually exclusive group of items. Available for date-time fields only, calendar controls allow you to interactively pick a date from a graphical calendar. Radio Button Calendar Data Grid Displays records as rows in a grid, with column names displayed at the top. Depending on the configuration, you can enter new records or view and edit existing ones. Record Navigation Buttons Found on the bottom of many forms, these buttons allow you , previous , next , and last to navigate to the first records in the set of available records. In addition, the “add new” button adds a new record to the set and navigates indicates the to the new record. The central box currently active record of the total number of records. You can enter a record number into this box to navigate to that record. 6 STARTING GFBIOFIELD Start GFBioField by launching the Microsoft Access Project file named “GFBioFieldSQL.adp”. On Pacific Region field computers, a shortcut to this file is located on the desktop. When the application opens, the main menu or “switchboard” form automatically loads. This form consists of two sets of command buttons; three buttons are under the heading of “Tasks”, while four buttons are under the heading of “Tools” (Figure 4). The Task buttons are used to begin various data-entry tasks, while the Tools buttons provide supplementary functionality not directly related to data entry. Figure 4. The main menu of GFBioField. TASKS CHIEF SCIENTIST’S TASKS The button labeled “Chief Scientist’s Tasks” is intended for use by the Chief Scientist of a research survey. The Chief Scientist is the individual who has overall responsibility for survey operations and typically, in consultation with the fishing master and/or vessel captain, makes the decisions of where and when to fish. With respect to GFBioField, the Chief Scientist’s main tasks are: 7 1. Initializing GFBioField by entering top-level information about the survey. 2. Entering bridge log information for each fishing event conducted. 3. Managing and tracking fishing locations. 4. Adding entries to the survey logbook. 5. Monitoring biosampling activities. Initializing GFBioField The Chief Scientist’s first task is to initialize GFBioField by entering some toplevel information about the survey being conducted. To begin, click on the button labeled “Chief Scientist’s Tasks” from the main menu (Figure 4). This will open the “Groundfish Survey” form shown in Figure 5. Figure 5. The Groundfish Research Survey form. The Groundfish Survey form represents the top trip-level hierarchy of the GFBioField data model (refer back to Figure 2). Think of this form as the starting place for the survey; the anchor point to which all subsequent data will be attached. To complete this form start at the top by entering the survey that is being conducted then continue on and complete each field, using the Tab or Enter key to move from field to field. The fields on this form are as follows: Survey Select the series that the survey is part of. If the survey you are conducting is not part of a long-term series, select “Individual survey without a series” from the dropdown list. Hail-In No. If available, enter the hail-in number assigned for offloading catch. This only applies to surveys conducted on commercial vessels when the catch is being sold. On other surveys leave this blank. 8 Trip-Type Select the type of research trip being conducted. Typically this will be either “Research” for surveys conducted on DFO research vessels like the W. E. Ricker, or “Charter” for surveys conducted using commercial vessels. Start Date Enter the date that the vessel left home port to begin the survey. You can select a date interactively from a calendar by clicking on the small calendar icon that appears to the right of this field ( ). End Date Leave this blank for now. At the end of the survey you will enter the date that the vessel returned to home port. As with the start date field you can click on the calendar icon to interactively select a date from a calendar. Vessel Enter the name of the vessel used to conduct the survey. You have three options to complete this field; you can enter the vessel name by typing it into the field, you can select a vessel from the available drop-down list, or you can click on the question mark icon ( ) to the right of the field to open the Vessel Lookup Utility (Figure 6). Figure 6. The Vessel Lookup Utility. To use the Vessel Lookup Utility, type the name or partial name of the vessel into the “Vessel Name” field. You may use the “*” character as a wildcard. For example, to find all vessels that begin with “Viking”, type “Viking*” and then press the enter key or click on the “Search” button to return the list of all matching vessels. To enter a matching vessel into the survey form, simply double-click on the vessel id. Doing so will update the survey form and close the Vessel Lookup Utility. 9 Captain Enter the name of the captain of the survey vessel. As with the vessel name, you may type in a name (last name followed by a comma, a space, and then first name), you may select a name from the drop-down list provided, or you may use the Captain Lookup Utility (Figure 7) by clicking on the question mark icon to the right of the field ( ). The Captain Lookup Utility operates in the same manner as the Vessel Lookup Utility except that you can search on either first name or last name or both. Figure 7. The Captain Lookup Utility. IOS Trip ID If available, enter the identification number for the survey as provided by the Institute of Ocean Sciences in Victoria, British Columbia. In practice this field is rarely used and can normally be left blank. Catch Sold? For charters using commercial vessels where the catch will be sold, indicate this by selecting “Yes” from the drop-down list, otherwise leave the default value of “No”. Offload Date When the catch is being sold enter the date of the last offload. As with the other date fields you may interactively select a date from a calendar by clicking on the small calendar icon to the right of this field. Sample Rules From the drop-down list, select the sampling protocol rules to be used during catch processing to select species for biological sampling. The value of this field determines what rules will be applied during catch processing so ensure that this field is updated appropriately. 10 Survey Comment Enter any miscellaneous comments regarding the survey. Often a simple description of the survey is useful. Survey Form Buttons At the bottom of the Groundfish Survey form are six command buttons (Figure 8). The two buttons on the right allow you to save the current record and exit the form, respectively. The four buttons on the left provide access to the additional Chief Scientist’s tasks. Each of these is discussed in subsequent sections. Figure 8. Command buttons of the Survey form. Entering Bridge Logs Entering bridge logs is probably the most important duty of the Chief Scientist. The bridge log represents the where, when, how, and why of each fishing event. Accurate and complete bridge log records are vital for the analysis and interpretation of survey results. To open the Bridge Log form click on the button labeled “Bridge Logs” at the bottom of the Survey Form (Figure 8). The Bridge Log form is perhaps the most complex form in GFBioField; this is a reflection of the level of detail that is captured at the fishing event level (Figure 9). To make things a little less confusing the form is divided into two vertically oriented panels and the related controls within each panel are organized into sections (Table 2). Despite its apparent complexity, most of the fields on this form are automatically populated so the job of entering a Bridge Log is quite simple in practice. 11 Figure 9. The Bridge Log form. 12 Table 2. The data-entry sections of the Bridge Log form. Section Description The Header Information section provides fields for the date and number of the fishing event, as well as the recorder’s name, and the gear type. The Fishing section contains the four command buttons that represent the four key events that occur during a fishing event. Clicking on these buttons triggers the automated data collection actions associated with these events. The Start and End Positions section lists the start and end position of the fishing event, in degrees and decimal minutes of latitude and longitude. These fields are automatically populated. The Usability section provides a single field for updating the usability of the fishing event. The Spatial Information section lists several fields that are automatically populated from the recorded start and end positions of the fishing event. In addition, a command button is provided for access to the fishing block properties form. The Bottom Depth section provides fields for the beginning and ending bottom depth plus units. A command button is also provided for access to a form containing additional depth fields. The Comments section provides five fields for recording ad-hoc comments regarding various aspects of the fishing event. The Trawl Specifications section provides a command button for accessing the Trawl Specifications form. The Environmental Data section provides a command button for accessing the CTD and Environmental Data form. The Bridge Log Report section provides a command button for viewing and printing the Bridge Log report. The Timer section provides a timer used for timing the fishing event. These buttons are used to open the Catch form, delete the current fishing event, save the current fishing event, and exit the Bridge Log form, respectively. The navigation buttons are used to navigate between fishing events and to add new events. 13 Header Information Data entry in the Bridge Log begins with the Header Information section, which consists of the following four fields: Date Enter the date that the fishing event occurs on. This field defaults to the current date so normally you should not have to enter anything. Recorder Enter your name by typing it (last name, followed by first name), by selecting it from the drop-down list, or by using the Employee Lookup Utility (Figure 10), which can be accessed by clicking on the question mark icon ( ) to the left of the field. Much like the Captain Lookup Utility, the Employee Lookup Utility allows you to search for employee by first name, last name, or both. Double click on an employee id to insert it back into the Bridge Log form. The default value for the recorder is the name of the person who entered the bridge log for the previous fishing event. Thus, once you’ve entered your name once, it will continue to appear on the bridge log for subsequent fishing events. Figure 10. The Employee Lookup Utility. Set Number The first fishing event has a default set number of 1 and is automatically incremented with each new fishing event so you should not have to manually enter or update this field for the duration of the survey. 14 Gear Select the fishing gear used from the drop-down list. The default is “Bottom Trawl”, which should be the correct gear type for all groundfish trawl surveys. Once you update this field, the new value will serve as the default for all subsequent fishing events. Conducting Fishing Operations The section labeled “Fishing” is where almost all the action takes place on the bridge log form. The four buttons in this section numbered 1 to 4 represent the four most significant events that take place during a fishing event, which are in order: The start of gear deployment, which occurs when the trawl doors enter the water. The start of fishing, which occurs when the trawl net reaches the sea floor and begins to actively fish. This moment is a bit trickier to determine as it depends in part on the geometry of the net as it settles to the sea floor. In general you should let the vessel captain and/or fishing master determine the moment when the net begins to fish. The end of fishing, which occurs when the net is pulled off the sea floor. To mark this event, use the moment when the winches engage and begin winding on the trawl warps (this isn’t really the exact moment when the net stops fishing, but more on that a bit later). The end of gear retrieval, which occurs when the trawl doors exit the water. As these events occur you simply click on the associated event buttons as follows: 1. As the trawl doors enter the water click “1. Start Gear Deployment”. This inserts the current date and time into the field to the right of the button. 2. Once the net is fishing on the bottom click “2. Start Fishing”. This starts the fishing event timer at the bottom right of the bridge log, which counts down from 19 minutes (or however long you’ve set it to). In addition, a number of form fields are automatically populated using data obtained over the network. At the very minimum, this includes the start latitude and 15 longitude of the vessel, but also usually includes the starting bottom depth. Finally, the current date and time are entered into the field to the right of the button. 3. When the timer alarm sounds, ask the vessel captain or fishing master to begin retrieving the trawl gear. When that happens click “3. End Fishing”. As with the “Start Fishing” button this causes a number of form fields to be automatically populated but this time the number of fields involved is much more extensive. First, the end latitude and longitude of the vessel is populated, and usually the end bottom depth. Next, the average vessel speed, average trawl doorspread, and average headrope height are calculated and populated into fields in the trawl specs form (described later). Finally, a number of spatially derived fields, located in the bridge log section labeled “Spatial Information” are populated. These are all based on the track created by the vessel during the fishing event and include what fisheries areas were occupied (major and minor statistical areas, locality, and Pacific Fisheries Management Area (PFMA) and subarea), the total distance traveled during the fishing event, the overall direction of the track, and the grouping (or stratum) code and block designation Id of the targeted fishing block. Also the name of the fishing ground, if available, is appended to the “Fishing Ground Comment” field. 4. When the trawl doors re-emerge from the water, click “4. End Gear Retrieval”. As with “1. Start Gear Deployment”, this enters the current date and time into the field to the right of the button. After completing this sequence of button clicks the Bridge Log form is essentially complete. In particular, both the “Start and End Positions” and the “Spatial Information” sections should be fully populated. However, there are there are a few important tasks that remain. Usability Once the fishing event is complete it’s extremely important to update the usability of the event. In fact it’s so important that usability occupies its very own section labeled “Usability”, which consists of a single field called “Usability”. As if that weren’t enough, there’s even a message next to the field that indicates just how important this field is. In short, do not forget to update the usability at the end of the event! It’s sometimes the only recorded indication you will have of whether or not the tow was successful and can be used in various analyses later on. Block Information It’s also important to update the information for the targeted fishing block. To do this, click on the button labeled “View/Update” under the block designation id field of the “Spatial Information” section. This will open up the Block Properties form (Figure 11). 16 Figure 11. The Block Properties form. At the top of the Block Properties form is a section labeled “Current Block Status:” which shows the current status of the block as it relates to the current survey, followed by a section labeled “Block History” that shows the entire history of the block as it relates to the current and all past surveys. Click on the button labeled “Auto Update” to automatically update the current block status based on the set number and the usability of the fishing event that you just completed (which is another example of why updating the usability of the event is so important). Any time the current status is updated, either by using the Auto Update button or by manually updating, a record is automatically inserted into the Block History section. This allows you to keep track of everything that happens to a fishing block over the course of many surveys. You can also enter ad-hoc records into the Block History section. Just click in the field titled “Description of Activity” in a new record (denoted by in the record selector bar to the left of the record) and begin typing. The current the date and time will be automatically inserted into the “Date” column. On the bottom left of the Block Properties form is a small diagram of the current fishing block showing the block designation id in the center of the block and a representation of the vessel track showing the start (S) and finish (F) locations joined by a straight line. When you are finished updating the block properties click on the save button and then the exit button to close the form and return to the Bridge Log form. 17 Trawl Specifications I’ve skipped over the “Bottom Depth” and “Comments” sections, which are both optional, especially given that the start and end bottom depths should have already been automatically populated. The “Trawl Specifications” section is not optional however as it includes one field “Warp Length” that can only be manually updated. In addition, several trawl specification fields that remain constant throughout the survey, must nevertheless be initialized on the first tow. To open the Trawl Specifications form (Figure 12), click on the sole control in this section, the button labeled “View/Update Trawl Specifications”. Figure 12. The Trawl Specifications form. The top of the Trawl Specifications form consists of several fields (Trawl Type, Net Type, Door Type, Door Wt, Mens. Device, and Net Sounder) that contain static information (i.e. information that is unlikely to change throughout the survey). Once you update these fields for a given set, their values will propagate forward for all future sets until you change them again. For the other fields, “Trawl Speed” and “Doorspread” (and usually “Mouth Height”) are automatically populated when the button “3. End Fishing” is clicked. All other fields must be manually updated. In practice this usually just entails updating the “Warp Length” field as this value is fairly important and usually changes with each set. CTD and Environmental Data The “CTD and Environmental Data” section consists of a single command button labeled “View/Update Environmental Data”, which you can click on to open up the CTD and Environmental Data form (Figure 13). 18 Figure 13. The CTD and Environmental Data from. CTD and environmental data-entry is optional. Fill these fields in at your discretion. Bridge Log Report When you have finished entering information into the Bridge Log form, you should create a paper copy of the information by printing a Bridge Log report (Figure 14). To view the report, click on the button labeled “View/Print the Bridge Log Report” found in the “Bridge Log Report” section. The Bridge Log report does not show all of the fields available on the Bridge Log form but it does include all of the important fields and effectively mimics the old bridge log paper forms that were historically filled out on groundfish surveys. Printing the bridge log report also serves as a backup of bridge log information in the event of a system failure. After printing the Bridge Log report, you can close the Bridge Log form using the Exit button on the bottom right of the form. 19 Figure 14. The Bridge Log report. Managing and Tracking Fishing Locations Conducting a groundfish survey involves visiting a number of pre-selected fishing locations and one of the key tasks of the Chief Scientist is to keep track of these locations as the survey unfolds. At any given time the Chief Scientist has to know exactly how many fishing locations have been visited, which of these have been fished successfully, which ones have not and the reason why, and how many remain to be visited. To help answer these questions GFBioField contains a Fishing Locations form that allows the Chief Scientist to track and manage survey activity as it relates to fishing locations (Figure 15). To open this form click on the button labeled “Fishing Locations” on the main Groundfish Survey form (Figure 5). 20 Figure 15. The Fishing Locations form. The main window of the Fishing Locations form is taken up by a map of the survey area, which shows all of the survey locations (or “blocks”) as well as the B.C. coastline and selected depth contours. The fishing blocks are colour-coded with respect to their current status, with a legend for the colour codes given on the top right hand corner of the form. Below the legend is a button that allows you to view a summary report of the number of blocks that fall in each status category (Figure 16) and below that a button for modifying and initializing the survey design. The location of the mouse cursor as it is moved over the map is shown on the right side of this form, in decimal degrees. Finally, the bottom of the form consists of a command toolbar that provides various functions for changing the map display and viewing and annotating fishing blocks (Table 3). Figure 16. The Block Status report. 21 In addition to showing the fishing blocks for the survey, the Fishing Locations form also displays all completed fishing event tracks. These are shown as simple straight lines that connect the track start point (shown as a blue dot) with the track end point (shown as a red dot). If the fishing event ended in failure (e.g. with a hang-up) the end point is shown as a red triangle. Table 3. Toolbar command buttons of the Survey Map form. Toolbar Button Function mouse Changes the mouse cursor mode to “Zoom In”, indicated by a magnifying glass pointer. In this mode, click and hold down the left mouse button to draw a box around the region you would like to view. Release the mouse button to zoom into the selected region. Alternatively you can simply click the left mouse button once on the map to zoom in by 10% with the new view centered on the mouse pointer. In the same manner, right clicking will zoom out by 10%. Changes the mouse cursor mode to “Zoom Out”, indicated by a mouse pointer. In this mode, click the left mouse button to zoom out by 10%, or the right mouse button to zoom in by 10%. Changes the mouse cursor mode to “Pan”, indicated by a mouse pointer. In this mode, click and hold down the left mouse button and move the mouse in any direction to move the map display. Zooms to the full extent of the survey region, as defined by the extents of the fishing blocks. Changes the map display to the previous view. mouse pointer. In Changes the mouse cursor mode to “Block Info.” Mode, indicated by a this mode, click the left mouse button on any fishing block to open the Block Properties form. Click to display labels for each fishing block. The value of the label is the block designation id. Click again to turn off the labels. Shows the current location of the fishing vessel. Click to turns on continuous tracking of the vessel position. The position of the vessel is updated every 5 seconds. Click again to turn off. Take a snap-shot of the current map view. You can then copy the snap-shot to the clipboard for pasting into other applications. Refresh the map display. 22 Modifying the Survey Design Modifying the survey design should only be done prior to conducting the survey. In general you will rarely need to change the survey design once you have begun the survey. However, there are exceptions, as discussed below. To open the Survey Design form, click on the button labeled “Modify the Survey Design” on the Fishing Locations form (Figure 15). The Survey Design form is a simple form that displays the number of allocated blocks per survey grouping code, or stratum (Figure 17). Figure 17. The Survey Design form. To select an entirely new set of randomly selected survey locations (known as a sampling “frame”) click on the button labeled “New Frame” at the bottom of the form. This will completely eliminate any existing blocks and randomly select a number of new blocks in each stratum, as specified in the “Allocated Blocks” column. Because of the disastrous potential to over-write the blocks of an on-going survey, you are asked twice to verify this operation before proceeding. To add blocks to an existing sampling frame, click on the button labeled “Add Blocks”. This will randomly select a number of new blocks in each stratum, as specified in the “Allocated Blocks” column, without removing previous blocks. This is useful if you wish to increase the number of blocks included in the survey. To remove blocks from the existing sampling frame, click on the button labeled “Remove Blocks”. This will randomly remove a number of existing blocks in each stratum, as specified by the “Allocated Blocks” column. Only blocks that have the status of “unfished” will be considered for removal. This is useful if you wish to decrease the total number of blocks included in the survey. Click the “Close” button to close the Sample Design form. Using the Survey Logbook Over the course of a survey the Chief Scientist often has a requirement to record ad-hoc comments that are relevant to the survey but that have no formal storage location in the database. For example, incidence reports or general remarks regarding survey operations. The GFBioField Survey Logbook is designed to capture and store 23 these comments for future reference. To open the Survey Logbook form (Figure 18), click on the button labeled “Logbook” on the Groundfish Survey form (Figure 5). Figure 18. The Survey Logbook form. The Survey Logbook form automatically opens to the most recent entry made. Add a new entry by clicking on the button labeled “Add a New Entry” (Figure 18). The Employee Id and name default to the person who made the last entry so update these as required. Next, select an appropriate category for the entry from the available list of Biological, Equipment, Operational, Personal, or Uncategorized. In the yellow entry field, type in your comment and click the Save button when done. To view a report of all the entries made for the current survey, click on the button labeled “View the Logbook”. Although logbook entries are restricted to text (i.e. no images, tables, etc.), there are a number of text formatting options available. To format text, highlight the text with your mouse and then hover the cursor over the highlighted text to view the formatting toolbox from which you can set various formatting options (Figure 19). You can also access these formatting options by clicking on the “Home” menu item on the main Access menu. Figure 19. The text-formatting toolbox of the Survey Logbook. Viewing the Bio-Sample Report The Bio-Sample Report allows you to view summary reports of all of the biosamples taken to date. You can configure the report to include samples with any combination of sampled attributes. For example, you might want to view a report including only samples where age structures were collected, or one including all samples where length was recorded. To view the Bio-Sample Report, click on the button labeled “Bio-Sample Report” on the Groundfish Survey Research form (Figure 5). This will open the Bio-Sample Report Setup dialog, where you can select various sample attributes to include in the report (Figure 20). Each of the sample attribute types of Length, Sex, Weight, Maturity, and Age, is represented by a triple-state check box. To include samples where an 24 attribute was recorded, leave the attribute in the checked state. To omit samples where an attribute was recorded, leave the attribute in the un-checked state. Finally, to include samples whether or not an attribute was recorded, leave the attribute in the grayed-out state. For example, consider the example shown in Figure 20 where Length, Sex, and Weight are checked, Maturity is grayed-out, and Age is un-checked. This means that the report will include all samples in which length, sex, and weight were recorded, regardless of whether or not maturity was recorded, and will exclude all samples in which age structures were collected. Figure 20. The Bio-Sample Report Setup dialog. When you have configured the Bio-Sample Report Setup dialog to include all of the samples you want to summarize, click the OK button to view the report. The report shows the number of specimens and samples collected by species and survey stratum, from all the samples that meet the criteria you specified (Figure 21). You can omit individual species or strata from the results by un-checking them using the drop down menus labeled “Species” and “Stratum”. Figure 21. The Bio-Sample Report. 25 CATCH PROCESSING Once the Chief Scientist has completed the bridge log entry for a given fishing event, you (the Lab Boss) can proceed with catch processing for that event. Data generated from catch processing is entered into the Haul Card form (the term “haul card” is the name given to the paper form historically used to enter catch records). To open the Haul Card form (Figure 22), click on the button labeled “Catch Processing and Biosampling” on the main menu (Figure 4). Figure 22. The Haul Card form. The Haul Card form consists of a header section at the top, containing information about the current fishing event and general information about the catch, a middle section that lists the individual species records, and a bottom, footer section that provides various command buttons and other controls. The header section (Figure 23) consists of 10 fields, the first 7 of which are shown with gray backgrounds. These 7 fields are derived from information entered into the Bridge Log by the Chief Scientist and cannot be modified. The others, “Recorder”, “General Comment” and “Sorting Comment” can all be edited as required. 26 Figure 23. The Haul Card header section. The details section (Figure 24, Table 4) consists of the individual species records. This section grows as more species records are added until, when no more records can fit on the form, they become hidden. When that happens you can use the vertical scroll bar located on the right side of the section to scroll up and down through the record set. Figure 24. The Haul Card details section. To view hidden species records use the vertical scroll bar located on the right. Table 4. Fields of the Haul Card form species detail section. Field Description Code The official Pacific Region 3-character species code for the species. Species Name The common name of the species. Weight The weight in kilograms of the species. Count The count of the species. This is only displayed for species in which all baskets were counted. Verification The method used to verify the weight of the species. Comment General comment for the catch record. R The sample importance rank of the species. L The minimum number of pieces required to conduct a length frequency sample. A The minimum number of pieces required to conduct an age sample. Sample? The sample indicator (Yes = take a sample; No = do not take a sample), and the type of sample to take if Yes is indicated (L = length frequency; W = weight; A = age). 27 The footer section consists of several command buttons and a drop-down list (Figure 25, Table 5). Figure 25. The Haul Card footer section. Table 5. Controls of the Haul Card footer section. Control Function Add a single species to the details section. Opens the “Add Species” form for adding one or more species to the details section. Opens the “Species Lookup” form for searching for species. Opens the Haul Card Report. Starts the platform scale (opens a connection) for automatically recording basket weights. Opens the “Platform Scale Communications Configuration” form for configuring the platform scale communications parameters. Drop-down list for indicating which platform scale is being used to weigh baskets. Opens the Lab Boss Logbook form. Refreshes the records shown in the Haul Card. Allows you to change trips if more than one trip is available in the database. Saves the current records. Exits the Haul Card form. Allows you to navigate among all fishing events in the current survey. 28 Catch Processing Step-By-Step It’s useful to describe a typical catch processing scenario in detail in order to illustrate the mechanics of catch processing and to explain the use of the haul card. For this discussion imagine that you are the Lab Boss and that the trawl net has just been brought on deck and its contents have been dumped into a large sorting bin. As Lab Boss your duties are to enter species records and basket weights into the Haul Card and to make biosampling decisions. To perform these duties you will occupy the Haul Card station, which consists of a ruggedized laptop computer running GFBioField connected via a serial cable to a large platform scale used to weigh the catch baskets (Figure 26). Figure 26. A typical Haul Card station setup. Step 1: Opening the Haul Card and Setting Up To begin, open the Haul Card (Figure 22) by clicking on the “Catch Processing and Biosampling” button on the main menu of GFBioField (Figure 4). 29 Step 2: Entering Species Records The first step in catch processing is to identify the species caught and sort them separately into baskets for weighing (Figure 27). Figure 27. A standard Pacific Region catch basket sitting on top of a full catch sorting bin. You will normally not take part in the sort which is performed by the rest of the catch processing crew (the “sorting crew”). While the sorting crew is busy sorting the catch into baskets you might find it useful to begin entering the species records in preparation for recording the basket weights. There are 3 methods for inserting new species records into the Haul Card: 1. Press the “Insert” button on the computer keyboard. This will take you to a new record in the species detail section of the Haul Card and place the insertion mark into the species code field. You can enter the new species by either typing in the 3-character species code, or by tabbing over to the species name field and typing in the common name. on the Haul Card footer 2. Click on the “Add Species” button section. This will also take you to a new record as described above. on the Haul Card footer 3. Click on the “Add Multi Species” button section. This will open up the “Add Species” helper form (Figure 28). From this form you can select one or more commonly encountered species from lists of different species groups. After you have selected the desired species from the lists, click on the “OK” button to insert them into the Haul Card. 30 (b) (a) Figure 28. The Add Species helper form (a). After selecting species and clicking OK, the species are inserted into the Haul Card (b). If you need to look up a species in order to find its code or common name you can use the Species Search form (Figure 29). To access this form click the “Lookup Species” button . At the top of the Species Search form, enter a word or phrase to search on in the “Search Phrase” field. Below that indicate whether to search on common name, taxonomic name, or species code by selecting the appropriate option. If you want to limit the search results to a particular group of species, select the species group from the “Limit Results To” section. When you have defined your search parameters, click on the “Search” button to perform the search. Results are reported in a grid at the bottom of the search form. Figure 29. The Species Search form. After you insert a new species, take note of the numbers listed in the fields “R”, “L”, and “A” on the right side of the species record on the Haul Card form. The “R” field denotes the age sampling importance rank of the species, which can range in order of importance from 1 to 3. The meaning of these ranks in terms of actual sampling activity can vary by survey and year as the sampling protocols are adjusted. The “L” field 31 indicates the minimum number of fish that are required to conduct a length frequency sample, and the “A” field gives the minimum number required for an age sample. Together these three fields “R”, “L”, and “A”, are used by the Lab Boss to make biological sampling decisions, within the guidelines set out by the sampling protocol for the survey. Step 3: Weighing Baskets Prior to weighing any baskets, ensure that the scale is properly calibrated and tared with an empty catch basket. Open the connection between the GFBioField and the scale by clicking on the “Start Scale” button on the Haul Card. While the catch sorting is ongoing, the sorting crew will transport full catch baskets to the haul card station and place them on the platform scale. If you haven’t done so already, enter a species record for the species in the basket and make that record active by clicking in any field in the record. There can be only one active record at a time; it’s denoted by the presence of a small black pointer on the right side of the record on the record selection bar (Figure 30). Figure 30. An example of an “active” species record. With the active species record on the Haul Card matching the species in the catch basket on the scale, wait for the ready indicator on the scale readout (this is usually a green or red light that lights up to indicate that the scale has obtained a valid weight) and push the record button on the scale. This will send the basket weight directly to the Haul Card. When the Haul Card receives the basket weight, the Basket Weights form will automatically open and display the recorded weight in the weight field (Figure 31). Figure 31. The Basket Weights form. The Basket Weights form is a bit like the Haul Card itself in that it consists of a header section, a details section, and a footer section. The header section (shown in 32 yellow in Figure 31) shows the name of the species being weighed as well as a small grid that summarizes the number of samples and specimens already collected for this species in the current survey stratum (Figure 32). In this grid, each column represents a sample type (L = length frequency; W = weight; A = Age) and each row represents the total number of samples (S) and the total number of specimens (N) collected. This information will help you to determine whether or not to take a sample and if so, what kind of sample to take. If that sounds a bit vague, it is; a discussion of sampling protocols is beyond the scope of this manual. Incidentally, the header section of the Basket Weights form is not always shown in yellow. Only species with an importance rank of 1 are shown with a yellow header. This is to further remind the Lab Boss that an age sample of this species should be taken, as long as there are enough individuals. Figure 32. The samples and specimens summary grid of the Basket Weights form. The details section of the Basket Weights form consists of 5 fields (Table 6). The weight field, as already discussed, is automatically populated when the record button is pressed on the scale. The count field should be manually updated whenever convenient but it is not mandatory. Typically counts are only entered when the number of pieces in the basket is small enough to easily count without wasting too much time. The “Use” field is used to indicate how the basket is used. This is where you will indicate if the basket will be used for a biological sample or some other use (Table 7). The comment field can contain any relevant comment about the basket. Finally, the Scale Id is the Id number of the scale used to weigh the basket. This defaults to the Id of the scale entered on the main Haul Card form so normally you can just ignore this field. However, there might be occasions when you need to use a different scale to weight the basket contents. For example, for very small catch amounts where the precision of the platform scale is not sufficient to record the weight. In such cases you will need to change the scale Id to reflect the scale used to measure the basket contents. Table 6. Fields of the Basket Weights form detail section. Field Description Weight The weight (kg) of the basket. Count The number of pieces in the basket. Use How the basket was used: 0 = Discarded; 1 = Length frequency sample; 2 = Weight sample; 3 = Age sample; 4 = Other sample; 5 = Retained for sale; 6 = Retained for identification; 7 = Retained for food. Comment Any general comment about the basket. Scale Id The sequential Id of the basket for the current species in this set, starting at “1”. 33 Table 7. Basket utilization codes. Code Description 0 Discarded: Basket contents were discarded. 1 Length: Basket contents were used for a length frequency sample. 2 Weight: Basket contents were used for a weight sample. 3 Age: Basket contents were used for an age sample. 4 Other: Basket contents were used for some other kind of sample (specify the sample type in the comments field). 5 Retained for sale: Basket contents were retained for sale. 6 Retained for ID: Basket contents were retained for species identification. 7 Crew retained for food: Basket contents were retained for consumption by the crew. When you indicate via the “Use” field that a basket should be subject to a biological sample, you should immediately tag the basket and set it aside for later sampling. In the Pacific Region, catch baskets are tagged using a white plastic card on which the Lab Boss writes down the set number, the type of sample to take (e.g. “LS” for length/sex frequency) and whether the sample is a total catch or random sample. After writing down this information, the Lab Boss places the card on top of the fish in the basket, such that it is plainly visible, and sets the basket to the side for later sampling. Every time you complete a basket weight entry, close the Basket Weights form by pressing the “End” key on the keyboard, or by clicking on the “OK” button. As the form closes, the total weight of all baskets recorded for the species is automatically summed and shown in the Weight field of the Haul Card. In fact, it is not possible to enter or edit the weight shown on the Haul Card; all additions or changes made to a species total weight must be made via the Basket Weights form. If you need to open the Basket Weights form to make manual corrections, press the F2 key while the Haul Card Weight field is active. When you’ve completed catch processing for the fishing event, make sure you print a hard copy of the Haul Card report, which can be accessed using the “Haul Card Report” button on the footer section of the Haul Card (Figure 33). 34 Figure 33. The haul card report. 35 BIOLOGICAL SAMPLING Biological sampling is conducted after the catch processing has been completed (or while it’s still ongoing, as long as one or more catch baskets have been set aside for sampling). To begin, take the sample baskets to a biological sampling station (Figure 34). Baskets tagged for sampling will contain a white plastic card lying on top of the fish that indicates what set the fish came from, what kind of sample should be conducted, and whether the sample is total catch or random. Figure 34. A typical biological sampling station consists of a ruggedized laptop computer (A) connected via a serial cable (B) to a bench-top scale (C), and to a fish measuring board (D) via a USB cable (E). At the biological sampling station, launch GFBioField if it’s not already running and open the Haul Card form by clicking on the “Catch Processing and Biosampling” button on the main menu. On the Haul Card form, locate the record for the species you are sampling and check that the sample indicator button contains a “Yes” to indicate that this species should be sampled, and that the type of sample shown on the Haul Card matches the sample type written on the white plastic card (Figure 35). Figure 35. An example Haul Card species record flagged for an age sample. Click on the green sample indicator button to open the Sample form, which consists of a header section that provides information about the sample and also some summary information about the recorded fish, a details section consisting of individual fish records, and a footer section that provides several command buttons (Figure 36). 36 Figure 36. The Sample form. At the very top of the sample form there is a label that indicates what kind of sample is being conducted, whether it is a random or total sample, what species is being sampled, and from which set (fishing event). Check this information carefully and make sure it matches the sample you are about to do. If it doesn’t, don’t proceed with the sample; consult with the Lab Boss to establish where the error is and how to correct it before proceeding. Below that label is the sample date, which defaults to the current date, and below that is a field that indicates the sample type (random, total, or other). This field also has a default value that is based on the recorded catch baskets for the species. You should confirm that this default value is accurate prior to continuing. If the label and default values are correct, proceed by entering the names of the sampler and the recorder (if applicable) in the form header. You can enter an employee id in the first field provided or a full name (last name, first name) in the second field. If maturities will be recorded, enter the maturity convention code into the next field. Finally, enter any ad-hoc comments about the type of sample being conducted into the Sample Type Comment field, and more generally about the sample itself, into the Sample Comment field. If you are conducting a length frequency sample, during which individual fish weights are not recorded, you should enter the total sample weights of the males and females (and unknown if applicable) into the “Sample Weights” header section. If sex will not be recorded just enter the total sample weight. After entering the sample weights of the males and females, you can click on the sum button (Σ) to automatically calculate the total weight. If you are conducting any other type of sample where individual fish weights will be recorded, you can leave this section blank as the sample weights will be automatically calculated after the sample is completed. When you are ready to begin measuring individual fish, click on the button labeled “Record Fish” on the footer section of the Sample form, which will open the Bio- 37 Sample Entry form. As with most other forms in GFBioField this form consists of a header section containing several fields and some command buttons, a details section where individual fish are recorded, and a footer section containing more command buttons (Figure 37). At this point, if you haven’t already done so, plug in the Scantrol fish measuring board (FMB) into an available USB port on the computer, or if it’s a Bluetooth board, turn the board on, enter the correct Bluetooth port into the field labeled “BT Port” on the Bio-Sample Entry form, and click on the “Connect Bluetooth FMB” button (refer to Appendix A for instructions on using a Bluetooth fish measuring board). Once a USB or Bluetooth fish measuring board is connected, the “Connect Bluetooth FMB” button and the “BT Port” field will disappear and be replaced by two buttons labeled “Setup FMB” and “Start FMB”, respectively (Figure 38). Figure 37. The Bio-Sample Entry form. (a) (b) Figure 38. After connecting a USB or Bluetooth fish measuring board the “Connect Bluetooth FMB” button and “BT Port” field (a) are replaced by the “Setup FMB” and “Start FMB” buttons (b). If you will be recording individual fish weights, make sure the bench-top scale is turned on and connected to the laptop computer via a serial cable and that the communications parameters are configured properly (refer to Appendix B for instructions on setting up GFBioField to communicate with scales). To begin recording individual fish, click on the button labeled “Setup” on the top left of the Bio-Sample Entry form. This will open the Bio-Sample Setup form shown in Figure 39. Use the Bio-Sample Setup form to check off each of the attributes that you will be recording from the fish. Notice that length is not included in the list of attributes. This is because length is always recorded from every type of sample. 38 Figure 39. The Bio-Sample Setup form After you have checked off the attributes to be recorded, click on the “Ok” button to return to the Bio-Sample Entry form. You may notice that some of the fields that were previously shown in the form details section have disappeared while some others may have appeared. The fields shown in the details section are specific to the attributes checked off in the Bio-Sample Setup form and are automatically adjusted based on your selected sample attributes. For example, if you selected “Otoliths Collected?” from the setup form, the details section on the Bio-Sample Entry form will contain the fields “Otoliths”, “Tray”, “Cell”, and “OtoChk”, which are all related to the collection of otoliths. At this point the discussion diverges depending on what kind of sample is being conducted. The types of sample used in the Pacific Region are as follows: 1. Age samples involve the collection of structures that can be used to determine the age of a fish. For flatfish and rockfish, which comprise the majority of the fish sampled on groundfish trawl surveys, the collected structure is the otolith. For other fish, the structure may be a spine (e.g. the dorsal spine of spiny dogfish) or fin rays (e.g. the dorsal fin rays of Pacific cod and lingcod). In addition to ageing structures, age samples also involve recording fish length, weight, sex, and usually maturity stage. 2. Stratified Age Samples are like regular age samples except that only a specific number of age structures are collected for each of a pre-defined set of length ranges. Often the stratification is also applied to sex as well. For example, you might collect 3 age structures per 10 centimeter length increment from female fish only. 3. Length Frequency Samples are the simplest type of sample to conduct and involve recording only the length or the length and sex of each fish. In the following step-by-step discussion of each type of sample, imagine that you have already filled out the header information on the Sample form and have setup the Bio-Sample Entry form using the Bio-Sample Setup form, and connected the fish measuring board and, if applicable, the bench-top scale, as discussed above. 39 Age Samples 1. Open connections to the fish measuring board and bench-top scale by clicking on the “Start FMB” and “Start Scale” buttons, respectively. 2. Verify that all of the header information at the top of the Bio-Sample Entry form is accurate, including starting fish number, fish prefix, otolith tray and cell number, and length and weight types and units. 3. Enter the Ids of the fish measuring board and scale used. 4. Place the first fish on the bench-top scale and when the ready light indicator lights up press the record button on the scale to record the fish weight. 5. Transfer the fish onto the fish measuring board and, using the finger magnet, swipe the magnetic strip at the appropriate spot on the fish’s tail (e.g. the fork of the tail when recording fork length). 6. Slide the fish forward off the measuring board and onto the attached cutting board. Cut open the fish and record the sex and maturity code. If you are sampling on your own, enter the sex and maturity code by placing the measuring board into function mode by swiping the “F” key, and then swiping the appropriate sex and maturity code keys. If you have an assistant, have him or her enter the sex and maturity codes using the laptop’s keyboard. 7. Extract the otoliths and hand them to your assistant for cleaning and storage into the otolith tray. For every 5th pair of otoliths taken, cross reference the otolith tray cell with the cell indicated on the Bio-Sample Entry form and make sure they match. If they do match, indicate that you have performed the cross-reference by checking off the “OtoChk” field. If they don’t match, do not continue with the sample until you have resolved the discrepancy. 8. Move on to the next fish by swiping the “E” function key with the board in function mode, or have your assistant manually move to the next record on the BioSample Entry form, and repeat steps 4-7 until the sample is completed. 9. When you’re finished recording all the fish in the sample, press the “Process” button on the Bio-Sample Entry form to process the recorded fish records back on to the Sample form. 10. On the Sample form, note that the sample weights for male, female, and total have been automatically populated, as well as the sampled attributes. To complete the sample click on the Sample Report button to view and print the sample report to create a paper copy of the sample (Figure 40). 40 Figure 40. The Sample report. Stratified Age Samples When setting up to conduct a stratified age sample, you must check off the “Length Stratified?” field on the Bio-Sample Setup form and also select the stratification scheme to use (Figure 41). Currently the Pacific Region is only conducting length stratified age samples on spiny dogfish and Pacific cod. Figure 41. The Bio-Sample Setup form configured for a stratified age sample. The steps required to conduct a stratified age sample are the same as those listed for a regular age sample. However, when the sex code for a given fish is entered, GFBioField checks the length of that fish against the stratification protocol and lets you know if the fish should be sampled for age structures, both by audibly telling you to “sample fish” and by lighting up the “Sample” indicator field (Figure 42). Other than that difference, you should proceed with a stratified age sample by following the steps given under “Age Samples” on page 39. 41 Figure 42. For length stratified age samples, fish from which age structures are to be collected are indicated by the “Sample” field. Length Frequency Samples Because length frequency samples do not include recording the weight of individual fish, you must obtain a total weight for the sample prior to starting. For simple length frequency samples that involves weighing all the baskets of fish to be sampled and summing them to obtain a total sample weight. For length/sex frequencies you must separate all the fish by sex into baskets and obtain separate total weights for each sex. Enter these weights manually into the “Sample Weights” section of the Sample form header section prior to starting the sample (Figure 43). If you are entering weights by sex, you can click on the “sum” button to automatically obtain a total weight. Figure 43. When conducting a length frequency or length/sex frequency sample, manually enter the sample weights into the sample header prior to starting. When configuring the Bio-Sample Setup form all you need to do is check off whether or not sex will be recorded (length is recorded by default for all samples) and then click Ok to return to the Bio-Sample Entry form. You’ll notice that the “Setup Scale” and “Start Scale” buttons have disappeared from the bottom of the Bio-Sample Entry form as they are not required for a length frequency sample. Click on the “Start FMB” button to connect to the fish measuring board. For length frequency samples, the board starts off in function mode, and in centimeter units as indicated by the “F” and “CM” on the bottom of the form (length frequency samples are always recorded in centimeters). In addition, the Bio-Sample Entry form is put into data “entry” mode, indicated by the word “ENTRY” on the bottom of the form (more on that later). If you are recording sex, start the sample by swiping the sex key appropriate for the first basket of fish. Next, switch the measuring board to length mode and proceed to measure each fish of the same sex. As you measure each fish, the record on the BioSample Entry form is automatically incremented and the previous sex code is carried forward. Thus, all you have to do is continue measuring all fish of the same sex until done. When you switch to the next sex, place the board back into function mode, swipe the appropriate sex function key, place the board back into length mode, and proceed to record fish lengths until finished. Normally, having the fish record automatically increment is very helpful as it saves you from having to manually increment the record between each fish. However, if you accidentally swipe an incorrect length, this feature makes it more difficult to make a correction. For that reason the Bio-Sample form operates in both data-entry and dataedit modes that you can switch between using the “E” function key. In data-entry mode the auto record increment feature is turned on but in data edit mode it’s turned off. So, 42 if you swipe an incorrect length, place the form in data-edit mode by placing the measuring board into function mode and swiping the “E” key. Next, move up to the record with the incorrect length by using the up-arrow function key, then switch the board back to length mode and swipe the correct length. Next, switch the board back to function mode and swipe the “E” key again to return to data-entry mode, which will automatically position you on a new fish record, ready to accept the next fish in the sample. When you’re finished recording all fish in the sample, click on the Process button to process the records back to the Sample form. From there, click on the Sample Report button to view and print a paper copy of the sample (Figure 40). 43 PORT SAMPLING Port samples are normally conducted by an individual sampler during vessel offloads at fish processing plants. Because port samples are taken at the end of a fishing trip (or sometimes from mid-trip offloads) from catch that was caught from multiple fishing events, the standard GFBioField data model employed during research surveys has to be modified somewhat. In particular for port samples, the concept of “fishing event” is defined not as a single event in space and time, but as an aggregate event representing several fishing sets occurring in a general area, depth range and time. In addition, port samplers are not privileged to the kind of detailed information that is collected on surveys. Thus, the bridge log and haul card fields that are populated during a port sample are limited to just the essential ones, with the overall emphasis being the recording of biological attributes. To begin a port sample click on the button labeled “Port Sampling” from the GFBioField main menu (Figure 4), which opens the Port Sample form (Figure 44). The Port Sample form is specifically designed to work on small screen notebooks and tablet computers. Thus, the form width and height are reduced compared to other GFBioField forms, and the font used for labels and fields is larger to make it more readable on small screens. To simplify data entry, the form uses a familiar wizard-like interface that allows the sampler to focus on a limited number of related fields at a time before moving on to the next set. I refer to these sets of related fields as “screens”. At the top of each screen are labels on the left and right that indicate what the previous and next screens are, respectively. At the bottom of each screen is a record navigation bar that you can use to navigate among records and to add new records and below that, on the footer section of the Port Sample form, are a number of command buttons that are available on every screen (Table 8). Figure 44. The Port Sample form showing the Offload Header screen. 44 Table 8. Command buttons on the footer section of the Port Sample form. Command Button Function Navigate to the previous data entry screen. Navigate to the next data entry screen. Open the Data Explorer used to quickly navigate through the available data in GFBioField. Delete the current record (and all attached information). Save the current record. Exit the Port Sample form. Each of the Port Sample Port Sample data entry screens is discussed in the following sections: Port Sample Offload Header The Port Sample Offload Header screen (Figure 44) represents the trip-level information of the port sample and includes the following fields: Captain Enter the name of the vessel captain (last name followed by first) or select the captain from the drop-down list. Vessel Enter the name of the vessel or select it from the drop-down list. Hail-In Enter the hail-in number assigned to the vessel prior to offloading. Offload Date Enter the date that the fish were offloaded. Remarks Enter any remarks you’d like to make regarding the offload. Notice that even after you’ve filled in the fields on this screen, the “Next” command button at the bottom of the form remains grayed out and disabled. This is because you must save the current screen first before moving on to the next by clicking on the save button ( ) at the bottom right of the form. This is true for all of the screens; you must save each before you can move to the next. 45 The “Export” button and check box at the bottom of the screen are for exporting a completed port sample to an Excel workbook. Use this feature only after you’ve completed a sample. The exported workbook provides a convenient format for transferring samples from remote sites back to centralized locations for storage and processing. In the Pacific Region, port samplers email their Excel workbooks to the GFBio data manager who then uploads them into a master Port Sample database before porting them to the GFBio database. Once a sample has been exported to a workbook, the check box next to the Export button will be in the checked state to indicate that the export has occurred. After completing the Offload Header screen, click on the save button and then click on “Next” to continue to the Fishing Information screen (Figure 45). Figure 45. The Fishing Information screen of the Port Sample form. Fishing Information The Fishing Information screen represents the fishing event information for the offload which, as I mentioned previously, is actually information that relates to several fishing events. In particular, all the events that may have captured the fish you are about to sample. The fields on this screen are: Haul Enter a number for the haul (incidentally, the terms “haul”, “fishing event”, “tow”, and “set” are all equivalent). This is not a real haul number that represents a sequential series of events over the course of a trip. Rather, it is a dummy haul number that we use to denote that a fishing event represents many events recorded from a port sample. Our practice in the Pacific Region is to begin the haul number at “900” for a given port sample and increment it for any additional port samples obtained for the same offload. Thus for example, if you were to take three different samples from the same vessel offload, the haul numbers for these samples would be 900, 901, and 902. 46 Date Range Enter the date range over which the fishing events took place, from the date of the earliest event to the date of the most recent event. As with other date fields you can select the date interactively by clicking on the small calendar icon to the right of each field. Depths Enter the minimum depth followed by the maximum depth over which the fishing events took place. Units Select the depth units from the drop-down list. Fishing Gear Select the fishing gear used from the drop-down list. Fishing Ground To enter the fishing ground you can type in the name of a known ground, you can select the ground from the drop-down list provided, or you can click on the fishing ground map command button to the right of the field ( ), which opens up the Fishing Ground form (Figure 46, Table 9). You can use the Fishing Ground form to interactively select the fishing ground from a map showing all of the known grounds. Figure 46. The Fishing Ground form. 47 Table 9. Controls of the Fishing Ground form. Control Function Changes the mouse cursor to “select” mode. In this mode you can click anywhere in a fishing ground to select that ground, which then appears in the “Selected Ground” field. Zooms in the map display by 10%. Zooms out the map display by 10%. Changes the mouse cursor to “pan” mode. In this mode you can click and drag the map display in any direction. Zooms to the full extent of the map. Turns on and off fishing ground labels. Shows the current location of the mouse pointer in degrees and decimal minutes. Indicates the selected fishing ground. Shows the top boundary of the current map display in degrees and decimal minutes. Shows the bottom boundary of the current map display in degrees and decimal minutes. Shows the left boundary of the current map display in degrees and decimal minutes. Shows the right boundary of the current map display in degrees and decimal minutes. Closes the Fishing Ground form and transfers the selected fishing ground to the fishing ground field of the Fishing Information screen. Closes the Fishing Ground form without making any changes to the fishing ground field of the Fishing Information screen. Areas: Major, Minor, and Locality These three fields indicate the major and minor statistical fishing areas, and the fishing locality. They are automatically populated when you enter the fishing ground. When you’ve completed the Fishing Information screen, click the save button and then the “Next” button to move to the Species Landed screen (Figure 47). 48 Figure 47. The Species Landed screen of the Port Sample form. Species Landed The Species Landed screen shows information for the landed species that you are going to sample. It includes the following fields: Species Code Enter the three character Pacific Region code for the species. When you enter a valid species code the species name is automatically updated. Species Name Enter the common name of the species. When you enter a valid species name the species code is automatically updated. Landed Weight Enter the landed weight of the species in pounds. This should represent the total landed weight of the species for the area, not just the weight of fish that you are sampling. Verification Enter the weight verification method used to determine the total landed weight. Once you’ve finished with the Species Landed screen, click the save button to save the record, and then the “Next” button to move on to the Samples and Specimens screen (Figure 48). 49 Figure 48. The Samples and Specimens screen of the Port Sample form. Samples and Specimens The Samples and Specimens screen consists of a header section that shows information for a sample and a details section that shows records for the individual sampled fish. You should begin this screen by filling out the sample header, which includes the following fields: Sample Date Enter the date that the sample was conducted. Sampler Enter your name (last followed by first) or select your name from the list provided. Port Enter the name of the port where the fish were sampled or select it from the list provided. Plant Enter the name of the processing plant where you sampled the fish, or select it from the list provided. Sample Type Enter the sample type, which is the method you used to select fish for the sample. This will usually be “random”. Storage Method Enter the method used by the vessel to store the fish prior to offloading. 50 Form Enter the physical form of the fish, i.e. whether or not they were processed in any way, such as heads cut off, prior to you sampling them. “Round” indicates that the fish have not been cut or modified in any way. Mat. Conv. Enter the maturity convention code used for samples in which maturity stages are recorded. Sex Conv. Enter the sex convention code used when sexes are recorded. Weights: Sample, Female, and Male Enter the total sample weight and the weight of females and males in the sample. If you are recording individual fish weights as part of your sample, you can leave these fields blank for now. After you have completed processing the sample, you can click on the sum button (∑) to automatically populate these fields based on the individual fish weights. Unit Enter the units used for the total, female, and male sample weights. Sample Comment Enter any miscellaneous comment regarding the sample. Sample Type Comment Enter any comment regarding the sample type (i.e. comments about how you selected fish to be sampled). Once you’ve finished entering the sample header information you are ready to begin recording individual fish via the Bio-Sample Entry form, which you can open by clicking the “Add Fish” button at the bottom of the screen. At this point the procedure is exactly the same as it is for a regular groundfish survey. So rather than repeat the information here, please refer back to the section titled “BIOLOGICAL SAMPLING” on page 35. When you’ve completed recording individual fish you can click on the “Cover Page” button to view a summary report of the sample that includes length frequency by sex and maturity frequency by sex (Figure 49). The Cover Page report is a recreation of an historic paper “cover sheet” that was traditionally included by Pacific Region port samplers with their submitted samples. 51 (a) (b) Figure 49. The Port Sample Cover Page report includes summary information for the sample on page one (a) as well as graphical length by sex and maturity by sex frequency plots on page two (b). A button labeled “Report” is also provided, which brings up the same detailed report accessed by the “Sample Report” button of the Sample form (Figure 36). 52 TOOLS DATA EXPLORER The Data Explorer provides a simple tree view of all of the surveys, fishing events, catches, and samples in the GFBioField database. By expanding individual tree nodes you can quickly navigate through a given survey to locate specific items, and by double-clicking on a particular item, can open up the corresponding data entry form showing the associated data. For example, Figure 50 shows the Data Explorer with two surveys displayed, one conducted on the vessel Frosti on April 12, 2010, and one on the Viking Storm on July 7, 2009. The Viking Storm survey has been expanded to show the fishing events, which start at set #2. Set # 4 has been expanded to show the catch for that set, and the catch of Pacific cod has been expanded to reveal a sample, with sample id = 4285. Double-clicking on the “Sample 4285” item opens the Sample form with the associated sample data loaded. (a) (b) Figure 50. The Data Explorer. In addition to providing a convenient way to navigate through the data in GFBioField, the Data Explorer also allows you to rearrange data by dragging and dropping from one level to another. For example, suppose that a catch of Arrowtooth flounder was inadvertently entered into set 5 but actually should have been entered into set 6. Using the Data Explorer you can click and drag the Arrowtooth flounder item under set 5 (Figure 51 (a)) and drag it onto the set 6 label (Figure 51 (b)) to relocate it there (Figure 51 (c)). 53 (a) (b) (c) Figure 51. Use the Data Explorer to rearrange data by clicking and dragging an item from one level (a) and dropping it on another (b), after which it will appear at the new level (c). SPECIES LOOKUP The Species Lookup tool, which can also be accessed from the Haul Card form allows you to search for different species based on their common or taxonomic names, or their Pacific Region codes (Figure 52). At the top of the form, enter the phrase you want to search on in the “Search Phrase” field. Below that, in the “Search On” section, indicate if you want to search on common name, taxonomic name, or species code by clicking on the appropriate item. In the “Limit Results To” section below that, you can further limit your search region by selecting only certain species groups such as rockfish or flatfish. When you are ready to begin the search, click on the “Search” button at the top of the form. Note that partial matches are supported by default, without the use of wildcards. For example, if you wanted to find all species with “squid” in the common name you would enter “squid” into the search phrase field, select “Common Name” and “All Species” (or “Inverts”) from the “Search On” and “Limit Results To” sections, and then click on the “Search” button. 54 Figure 52. The Species Search form. Search results appear in the data grid on the bottom half of the form. When your search results consist of multiple species, you can sort the results in ascending or descending order by code, common name, or taxonomic name, by clicking the small button located to the right of each column header. Click a button once to sort the results into ascending order; click it again to sort in descending order. PORT SAMPLE UPLOAD The Port Sample Upload tool is used to upload biological samples collected by port samplers into a master port sample database. As this functionality is very specific to protocols used at the Pacific Biological Station it won’t be discussed here. DATABASE BACKUP The Database Backup tool provides a convenient method for creating a backup of the GFBioField SQL Server database. Simply click on the Database Backup button and enter a filename for the backup. 55 APPENDIX A: USING THE SCANTROL FISHMETER FISH MEASURING BOARD The Scantrol FishMeter fish measuring board is a waterproof (to IP67 specifications), electronic measuring board that consists of an array of magnetic sensors capable of recording lengths to a ½ centimeter resolution. The board is available in both USB and Bluetooth versions. The USB version requires no external power supply as it obtains power from the USB port, while the Bluetooth version requires 4 AA batteries that are housed in a water-tight bulkhead at the base of the board. The array of magnetic sensors is located in a single strip that runs the length of the board (Figure 53 – A). This strip is used to both record fish lengths and to activate the function keys, which lie directly below the strip (Figure 53 – B). This dual-mode functionality transforms the measuring board from a simple measuring device into a secondary input device much like a keyboard, allowing a single operator to conduct a detailed biological sample and control the sampling software, without having to switch between the measuring board and a keyboard or mouse. To support this dual-mode capability, the measuring board has mode switching keys located at the end of the board, to the far right of the measurement scale (Figure 53 – C). Activating the “L” key puts the board into length mode, while activating the “F” key puts it into function mode. Figure 53. A 100 cm Scantrol FishMeter fish measuring board. A: Magnetic activation strip. B: Function keys. C: Mode selection keys. D: Millimeter measuring strip. During operation, measurements are recorded using a plastic magnetic device that attaches to the operator’s index finger (Figure 54). I’ll refer to this device as the “finger magnet”. The finger magnet contains a small magnet that, when swiped or tapped against the fish measuring board’s array of magnetic sensors, activates the sensor directly under the magnet, which results in a measurement at that point. Due to the alignment of the magnetic array and the location of the magnet in the tip of the finger magnet, the finger magnet has to be worn in a specific way, such that the small raised triangle highlighted in Figure 54 is on the left side of the operator’s index finger. Wearing the finger magnet in any other configuration will result in inaccurate measurements. 56 Figure 54. Measurements are recorded using a magnetic device attached to the operator’s index finger. When recording a length, swipe the finger magnet over the magnetic sensor with the raised triangular region of the device aligned exactly at the length you want to record. Do not use the tip of your finger to align the length as doing so will result in an incorrect measurement (Figure 55). Figure 55. Measurements should always be taken using the raised triangular region of the finger magnet as the alignment guide. Do not use your finger as a guide. While in function mode, activate a function key by swiping the finger magnet over the magnetic strip directly above the function key. Each function key is marked with a light brown spot to help you target your swipe correctly (Figure 56). 57 Figure 56. When activating function keys, swipe the finger magnet over the magnetic strip directly above the brown target spot on the key. USING THE FISH MEASURING BOARD WITH GFBIOFIELD In GFBioField, the fish measuring board is used in conjunction with the BioSample Entry form (Figure 37) during biological sampling. At the bottom of this form are some indicator letters that display the current operating mode of the board (“L” for length mode and “F” for function mode) as well as the measurement unit (“MM” for millimeters and “CM” for centimeters). These indicators update automatically as you change the board mode and measurement units. In addition to these indicators, all measuring board operations are accompanied by audible feedback using synthesized speech. Function keys on the measuring board have been programmed specifically to operate with GFBioField and thus, not all of the function keys are active, nor do they all provide the functions they were originally intended for by the board manufacturer. A complete list of the active keys and their functions is provided in Table 10. 58 Table 10. Fish measuring board function keys as they are used in GFBioField. Key Label Function Change the measurement units to millimeters. Voice feedback is “millimeters”. Change the measurement units to centimeters. Voice feedback is “centimeters”. Toggle the board between “normal length” and “length plus 100” mode. In “length plus 100” mode, the board measuring strip starts at 100 cm. This allows you to measure fish that are over 100 cm. Voice feedback is “normal length” and “length plus 100”. Move “up” one record to the previous fish in the set of sampled fish, or “down” one record to the next fish in the set of sampled fish. Voice feedback is “up” and “down”. Move one field left (F1) or right (F2) on the current fish record. Voice feedback is “left” and “right”. Enter a sex code (♀ = female; ♂ = male). Voice feedback is “female” and “male”. Enter a sex code (1 = male; 2 = female; 3 = unknown). Voice feedback is “male”, “female”, and “sex unknown”. For age and weight samples: Start a new fish (move to a new record). Voice feedback is “next fish”. For length frequency samples: Switch between data entry and data edit modes. Voice feedback is “data entry mode” and “data edit mode”. Enter a maturity code, from 1 to 20. Voice feedback is “maturity” + the number selected. to Switch the board to function mode. Voice feedback is “function”. Switch the board to length mode. Voice feedback is “length”. Delete the current record (remove the current fish). Voice feedback is “are you sure you want to delete the current fish?” accompanied by a confirmation dialog box. 59 USING A BLUETOOTH FISH MEASURING BOARD Before you can use a Bluetooth fish measuring board with GFBioField, the board must be “paired” with the computer it will be used with. Bluetooth pairing refers to the process by which two Bluetooth devices establish a communications connection. The devices in this case are the Bluetooth fish measuring board and the Bluetooth adapter of the computer running GFBioField. The process of pairing involves the exchange of a password (or “passkey”) between the two devices. The actual steps required to create a pairing differ depending on the Bluetooth software that is running on the computer. However, the basic steps are the same. In this example, I will discuss how to create a pairing between a Bluetooth fish measuring board, and a Windows XP computer with a D-Link Bluetooth adapter and WIDCOMM Bluetooth software version 5.1. First, turn on the Bluetooth measuring board. Next, start the Bluetooth device manager on your computer by double-clicking on the Bluetooth icon ( ) which is normally found on the desktop or in the system tray, or the control panel (or all three). From the device manager, select “Search for devices in range”. After a few moments you should see the Bluetooth fish measuring board show up in the list of devices in range. Our current versions of the Bluetooth fish measuring boards show up as devices labeled “SparkFun-BT”. Next, right-click on the “SparkFun-BT” device and select “Pair Device” from the context menu. In the resulting dialog box, enter “default” (without quotes) as the Bluetooth security code and then click “OK” to pair the device (Figure 57). This could take several seconds; wait for the dialog box to disappear before continuing. Figure 57. The Bluetooth Security Code Request dialog box. After the pairing has been established, return to the Bluetooth device manager software, right-click on the “SparkFun-BT” device again, and this time select “Connect COM0” from the context menu. You should then see a status dialog box indicating that the connection is taking place. Once the connection has been established you should see a dialog box telling you what COM port is being used for the connection (Figure 58). Make a note of this port as you will need it later on to configure GFBioField to connect to the board. 60 Figure 58. Make a note of the serial port used for the Bluetooth connection. Now, when you are conducting a biological sample in GFBioField you can establish a connection to the Bluetooth measuring board via the “Connect Bluetooth FMB” button and “BT Port:” field located at the bottom of the Bio-Sample Entry form (Figure 37). When you first open this form to begin recording fish, enter the serial port number noted above into the “BT Port:” field and then click on the “Connect Bluetooth FMB” button. The connection may take several seconds to complete but when it does you will hear a voice message stating “fish measuring board connected” and the “Connect Bluetooth FMB” button and “BT Port:” field will disappear and be replace by two buttons labeled “Setup FMB” and “Start FMB” respectively. From that point you can proceed with the sample as you normally would. After you have successfully paired a specific Bluetooth fish measuring board with a specific computer, the pairing will remain in place until such time as you un-pair the devices. Turning off the computer or the fish measuring board will not break the pairing. Thus, once you pair a given computer with a given fish measuring board, you should continue to use the two together for the remainder of the survey. Also GFBioField tracks the serial port number every time a successful connection is used and thereafter uses that number as the default for the connection. Thus you need not worry about changing or remembering the serial port number after you have successfully used a board. 61 APPENDIX B: CONNECTING TO MAREL SCALES GFBioField communicates with Marel platform and bench-top scales via a serial port connection. To successfully communicate with a scale, the communications parameters used on the GFBioField computer serial port must match those used on the Marel scale serial port. In addition, in order for GFBioField to successfully interpret the weight that is output by the Marel scale, you must provide GFBioField with specific information that describes the nature of the message output by the scale. Both the serial port communications parameters and the scale message identification information can be configured independently for the platform scale used by the Haul Card form (Figure 22), and for the bench-top scale used by the Bio-Sample Entry form (Figure 37). To access the scale communications configuration form (Figure 59) from either of these two forms, click on the button labeled “Scale Setup”. Figure 59. The Scale Communications Configuration form. On the left side of the scale communications configuration form are the fields used to configure the serial port parameters. The “Port:” field indicates the serial port on the computer that the Marel scale is plugged in to. If you click on the combo box arrow for this field you can select the port from a list of the available ports on the computer (only valid ports for that computer will be shown). All of the other serial port parameters except “Timeout:” should be set to match the values used on your Marel scale (consult your Marel documentation). The “Timeout:” field indicates how many seconds GFBioField will wait to receive an incoming weight from the scale before aborting. The “Enabled?:” field simply tells GFBioField whether or not to use the scale and should normally always be checked off. On the right side of the form are fields that define the message output from the Marel scale. The “Record ID:” identifies what characters GFBioField should look for when receiving a weight from the scale, to indicate that a valid weight has been received. The “Delimiter:” is a single character that is used to split up the scale message into component parts. The default is the space character so if your scale message uses a space for a delimiter you can leave this field blank. The “Field Number:” tells GFBioField what field contains the weight value, after the scale message has been split apart using the given delimiter. Finally, the “Start Position:” and “Length:” 62 fields tell GFBioField what part of the weight field to use in order to extract the weight. If the entire field is used, you can leave these fields blank. For the information shown in Figure 59, a valid scale message might be “23.65 kg”, where “kg” identifies the message, a space denotes the delimiter for splitting the message, and field number 1 contains the weight value. If you’re not sure what your scale output message looks like, you can use the “Test” button on the configuration form to obtain an example message from your scale. With the scale connected to the computer (and providing the communications parameters have already been set correctly), click on the “Test” button and then, within the timeout period, press the record button on the scale. The message that appears in the field under the “Test” button represents an unprocessed message from the scale. 63 APPENDIX C: DATA ENTRY QUICK REFERENCE GUIDES STARTING A NEW SURVEY 1. Start GFBioField and, from the main menu, click on the “Chief Scientist’s Tasks” button, which opens the Survey form: 2. Select the survey that is being conducted from the “Survey” drop down list. 3. Select the trip type (normally “Research” or “Charter” from the “Trip Type” drop down list. 4. Enter the start date or select it from the interactive calendar. 5. Enter the vessel name or select it from the drop down list (or use the Vessel Lookup utility by clicking on the question mark button). 6. Enter the captain name (last name, first name) or select it from the drop down list (or use the Captain lookup utility by clicking on the question mark button). 7. Indicate if the catch will be sold or not. 8. Select the sample protocol rules from the drop down list. 9. Click on the Save button. 64 ENTERING BRIDGE LOGS 1. Start GFBioField and open the Survey form by clicking on the “Chief Scientist’s Tasks” button on the main menu. 2. From the survey form, click on the “Bridge Logs” button on the bottom left of the form to open the Bridge Log form: 3. Verify the date. 4. Verify that your name is in the “Recorder” field. 5. Verify the set number. 6. Verify the gear type. 7. When the trawl net is deployed and the trawl doors enter the water, click the “1. Start Gear Deployment” button. 8. When the fishing master or captain indicates that the trawl net is on the sea floor and fishing, click the “2. Start Fishing” button. Verify that the start latitude and longitude fields populate. Enter them manually if they do not. 65 9. When the timer alarm sounds tell the fishing master or captain to retrieve the trawl net and click the “3. End Fishing” button. Verify that the end latitude and longitude fields populate. Enter them manually if they do not. 10. When the trawl doors exit the water click the “4. End Gear Retrieval” button. 11. Verify that that all eight start and end position fields have been populated. 12. Select the usability of the set from the drop down list. 13. Ensure that the Grouping (Stratum) and Block Designation fields are populated, then click on the “View/Update” button to open the Block Properties form: i. Click on the “Auto Update” button to update the current block status. ii. Enter any additional comments regarding the fishing block into the Block History section in the “Description of Activity” field. iii. Click on the exit button to close this form. 14. Click on the “View/Update Trawl Specifications” button to open the Trawl Specifications form: 66 i. Check the trawl specifications fields in the top half of the form and change as required. ii. Enter the warp length (in meters). iii. Click the exit button to close this form. 15. Click on the “View/Update Environmental Data” button to open the CTD and Environmental Data form. Enter or edit fields at your discretion then click the exit button to close this form. 16. Click on the “View/Print the Bridge Log Report” button to open the Bridge Log Report: i. Click the “PRINT” button to print and close the report. 17. Click on the save button. 18. When starting the next set, click on the new record button to start a new Bridge Log record. 67 ENTERING HAUL CARDS 1. Click on the “Catch Processing and Biosampling” button on the main menu to open the Haul Card form: 2. Check that the set number and stratum code are correct. If the stratum code is missing, do not proceed until the Chief Scientist enters the correct stratum code on the Bridge Log form. 3. Enter your name into the “Recorder” field. 4. Enter any relevant comments about the catch and sort. 5. Open a connection to the Marel platform scale by clicking on the “Start Scale” button. 6. Select the scale being used from the drop down list provided. 7. When ready to begin weighing catch baskets, enter new species records by: i. Pressing the “Insert” key on the keyboard and entering the species code or name. ii. Clicking on the “Add Species” button and entering the species code or name. iii. Clicking on the “Add Multi Species” button and selecting one or more species from lists of commonly encountered species. 68 8. After inserting each new species, refer to the fields labeled “R”, “L”, “A” on the right side of the species record, which indicate the importance rank, the minimum length frequency piece count, and the minimum age sample piece count, respectively. Use the information from these fields to help you determine when to take a sample. 9. As catch baskets are placed on the platform scale, activate the associated species on the Haul Card by tapping anywhere on the species record. Active species records are denoted with a yellow background. 10. When the “ready” light on the platform scale indicates that the catch basket is ready to be weighed, press the “record” button on the scale readout to send the weight to the Haul Card. When the weight is recorded the Basket Weights form will automatically open with the newly recorded weight showing in the “Weight” field: i. Enter the piece count, if readily available. ii. Enter the use code for the basket. Refer to the codes listed at the bottom of the form. iii. Enter a comment for the catch basket as required. iv. Check that the scale id matches the scale used to weigh the basket. v. Use the samples and specimens grid at the top of the form to help determine when to flag a basket for sampling. vi. Click on the “OK” button to close the form (or press the “End” key on the keyboard). 11. Repeat steps 7 through 10 until the catch has been completely sorted and weighed and selected catch baskets have been flagged and set aside for biosampling. 69 SUB-SAMPLING DURING CATCH PROCESSING 1. Weigh (or obtain an estimate of the weight) all of the unsorted catch. 2. Enter a new species record into the Haul Card using species code “003” for “All Unsorted Species”. Set the Verification to “18: Weighed But Not Sorted”. 3. For each species sub-sampled and weighed from the unsorted catch, enter the Verification as “2: Sub-Sampled And Weighed”. To be done by the Chief Scientist: 4. After all sub-sampling and catch processing for the set has been completed open the Bridge Log for the set and click on the “Catch” button on the lower right of the form. This will open the Catch form for the set: 5. Click on the “Extrapolate Sub-Samples” to extrapolate all catch weights recorded with a Verification Code of “2”. Note after the extrapolation that these catch weights have increased and that their sum now equals the weight of the “All Unsorted Species” record: 70 BIOLOGICAL SAMPLING Setting up a Sample Setting up a sample is similar for all sample types and involves entering some header information into the Sample form and configuring the Bio-Sample Entry form. 1. Transfer the catch basket (or baskets) flagged for a sample to a bio-sampling station. 2. Open the Haul Card form by clicking on the “Catch Processing and Biosampling” button on the main menu. 3. On the Haul Card, locate the species to be sampled. Its sample indicator field should be green and have a “Yes” value to indicate that a sample should be conducted on the species. In addition, the letter next to the sample indicator should indicate what kind of sample to conduct: A= age; W = weight; L = length frequency. Click on the green sample indicator button to continue on to the Sample form: 4. Verify the sample date. 5. Verify the sample type. 6. Enter the employee id or name (last, first) of the person conducting the sample. 7. Enter the employee id or name (last, first) of the person recording the sample. 8. If you will be recording maturities, select the maturity convention from the drop down list. 9. Enter any comments for the sample and sample type. 71 10. If you are conducting a length frequency sample enter the total sample weight of each sex into the Sample Weights section and click the sum button to calculate a total sample weight. 11. When you are ready to begin recording individual fish, click on the “Record Fish” button on the lower left of the Sample form to open the Bio-Sample Entry form: 12. Verify that the caption at the top of the Bio-Sample Entry form is correct. 13. Click on the “Setup” button to open the Bio-Sample Setup form. Check off all the attributes that you will be recording during the sample. Click on OK to return to the Bio-Sample Entry form: 14. Click on the “Start FMB” button to start the fish measuring board. 15. For age and weight samples, click on the “Start Scale” button to start the bench-top scale. Steps 16 through 19 apply to age samples only: 16. Verify the starting fish number. Fish numbers for age samples run sequentially throughout the survey. 72 17. Verify fish prefix. It should be the species code for the species (this is a standard convention for age samples). 18. Verify the otolith tray number. 19. Verify the otolith cell number. Valid cell numbers follow the format RCC where R = the row label (A to E) and CC = the column number (01 to 20). 20. Verify the length type. 21. Verify the length unit. 22. Verify the weight type. 23. Verify the weight unit. 24. Enter the ID of the fish measuring board. 25. If applicable, enter the ID of the scale. 26. Setup is now complete and you are ready to begin measuring individual fish. 73 Entering Age Samples 1. Follow the instructions given in “Setting up a Sample” on page 70. 2. For each fish in the sample: a. Place the fish on the scale and when the “ready” indicator lights up, press “record”. b. Place the fish on the measuring board and with the board in Length mode record the length. c. Slide the fish forward onto the cutting board and make a longitudinal incision on the ventral side of the fish from near the pectoral fins through to the anus. Note the sex and maturity stage and … i. Record the sex code and maturity state code with using the fish measuring board in Function mode, or ii. Call out the sex and maturity stage code to the recorder who will enter them manually into GFBioField. d. Keeping the fish on the cutting board, extract the age structure (e.g. otoliths or dorsal fin) and hand them to the recorder for cleaning and storage. e. For every 5th fish, verify that the otolith tray cell number on the Bio-Sample Entry form matches the cell number used to store the otoliths. If it does, check off the “OtoChk.” field. If it doesn’t match do not proceed with the sample until you resolve the discrepancy. f. Repeats steps a through e until all the fish are processed. 3. At the end of the sample, after all fish have been recorded, click on the “Process” button to transfer the individual fish records from the Bio-Sample Entry form to the Sample form. 4. Back at the Sample form, click on the “Bio-Sample Report” button and when the report opens, click on the “PRINT” button to print a hard copy. 5. Close the Sample form to finish. 74 Entering Length Stratified Age Samples 1. Follow the instructions given in “Setting up a Sample” on page 70. When selecting attributes from the Bio-Sample Setup form, make sure to select “Length Stratified” and choose the correct stratification scheme from the drop-down list. 2. For each fish in the sample: a. Place the fish on the scale and when the “ready” indicator lights up, press “record”. b. Place the fish on the measuring board and with the board in Length mode record the length. c. Slide the fish forward onto the cutting board and make a longitudinal incision on the ventral side of the fish from near the pectoral fins through to the anus. Note the sex and maturity stage and … i. Record the sex code and maturity state code with using the fish measuring board in Function mode, or ii. Call out the sex and maturity stage code to the recorder who will enter them manually into GFBioField. d. When the sex code is entered the sample indicator field will indicate either “Yes” (with a green background) or “No” indicating whether to take an age sample or not. When “Yes” is indicated, perform the next step, otherwise skip to step f. e. Keeping the fish on the cutting board, extract the age structure (e.g. dorsal fin or spine) and hand it to the recorder for storage. f. Repeats steps a through e until all the fish are processed. 3. At the end of the sample, after all fish have been recorded, click on the “Process” button to transfer the individual fish records from the Bio-Sample form to the Sample form. 4. Back at the Sample form, click on the “Bio-Sample Report” button and when the report opens, click on the “PRINT” button to print a hard copy. 5. Close the Sample form to finish. 75 Entering Length Frequency Samples 1. If applicable, split the fish by sex into separate baskets and record the total weight of each sex. 2. Follow the instructions given in “Setting up a Sample” on page 70. 3. In the Bio-Sample Entry form, enter the sex code for the first basket of fish being recorded. 4. For all fish of the same sex in the sample, place each fish on the measuring board and record its length. 5. Repeat steps 3 and 4 for the fish in each sex. 6. If the length frequency is not being done by sex, treat all fish in the sample as sex “0” (= sex not recorded). 7. At the end of the sample, after all fish have been recorded, click on the “Process” button to transfer the individual fish records from the Bio-Sample form to the Sample form. 8. Back at the Sample form, click on the “Bio-Sample Report” button and when the report opens, click on the “PRINT” button to print a hard copy. 9. Close the Sample form to finish. 76 REFERENCES Sinclair, A., Schnute, J., Haigh, R., Starr, P., Stanley, R. D., Fargo, J., and Workman, G. 2003. Feasibility of multispecies groundfish bottom trawl surveys on the BC coast. Can. Stock Assess. Sec. Res. Doc. 2003/049. Olsen, N., Workman, G.D., and Stanley, R.D. 2007. Queen Charlotte Sound groundfish bottom trawl survey July 3rd to August 10th, 2003. Can. Manuscr. Rep. Fish. Aquat. Sci. 2782: vi + 58 p. Workman, G. D., Olsen, N., and Rutherford, K. L. 2007. West Coast Queen Charlotte Islands groundfish bottom trawl survey, August 28th to September 25th, 2006. Can. Manuscr. Rep. Fish. Aquat. Sci. 2804: vii + 44 p. Workman G. D., Olsen, N., Fargo, J., and Stanley, R. D. 2008a. West Coast Vancouver Island groundfish bottom trawl survey, R/V WE RICKER, May 25th to June 10th, 2004. Can. Manuscr. Rep. Fish. Aquat. Sci.2826: viii + 64 p. Workman, G. D, Rutherford, K. L., and Olsen, N. 2008b. Hecate Strait Groundfish Bottom Trawl Survey May 25th to June 29th, 2005. Can. Manuscr. Rep. Fish. Aquat. Sci. 2805: 53p.