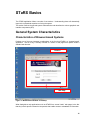
1
English Language Services for Adults (ELSA) Student Tracking and Reporting System User's Guide Version 3.0.0 January 2004 Copyright © 2004 Province of British Columbia. All Rights Reserved. Trademarks Trademarks and Registered Marks referenced are the property of their respective owners. Changes The material in this document is for information only and is subject to change without notice. Please consult online Help, Protocol document and other documentation as required. The Province reserves the right to make changes in the design of the Student Tracking and Reporting System (STaRS) application without reservation and without notification to its users. Disclaimer Support The ability of this product to record and track information should not be inferred as authorization for the collection and recording of this information. Any user who uses this application to record information on individuals will be required to act in accordance with all applicable legislation, regulation and agreements. For STaRS Support please contact the STaRS support team, By Telephone By E-mail Guide Version Publication Date Software Development & Initial Project Management (604) 775-0499 [email protected] 2.0.1 January 31, 2004 Cycle24 Systems Group Inc. PO Box 1051 STN CSC Victoria BC V8W 2S6 http://www.cycle24.com (250) 361-5442 Please Note: Look for these warning notes to normally highlight warnings and/or advice. Hint: Look for these hint notes to get further background or usage information. ii Cycle24 Systems Group Inc. Table of Contents Welcome to STaRS...................................................................................................5 Business Background ...........................................................................................5 STaRS Architecture ..............................................................................................6 STaRS Business Functions...................................................................................6 STaRS Application Functions................................................................................8 Assessment Centre (AC) focused functions ....................................................9 Language Training Organization (LTO) focused functions...............................9 Common Service Provider (SP) functions......................................................10 Ministry functions ...........................................................................................10 Accessing STaRS ...................................................................................................11 Technical Requirements......................................................................................11 End-User Workstation....................................................................................11 Internet Connection .......................................................................................12 Logon Account...............................................................................................12 Accessing the STaRS Server..............................................................................13 STaRS Basics .........................................................................................................15 General System Characteristics..........................................................................15 Characteristics of Browser-based Systems ...................................................15 Browser Tips, DOs and DON’Ts ....................................................................17 STaRS Pages Described ....................................................................................19 STaRS Page Types ............................................................................................27 STaRS Setup Tasks............................................................................................42 Tasks for the Ministry application administrator .............................................42 Tasks for All Service Providers (SP) ..............................................................42 Assessment Centre (AC) Tasks.....................................................................42 Language Training Organization (LTO) Tasks...............................................43 STaRS Data Management ..................................................................................44 Security..........................................................................................................44 Data Retention...............................................................................................45 STaRS Application Maintenance.........................................................................46 Planned System Outages ..............................................................................46 Un-Planned System Outages ........................................................................46 STaRS Application Contacts..........................................................................46 Client / Application Management ..........................................................................47 Maintain Client Applications ................................................................................48 Schedule Assessments .......................................................................................52 Maintain Assessments ........................................................................................55 Class Availability Inquiry .....................................................................................57 Referral Management .............................................................................................59 Create Referrals..................................................................................................60 STaRS User's Guide iii Accept / Refuse Referrals ................................................................................... 63 Student Management ............................................................................................. 67 Maintain Student Information .............................................................................. 68 Manage Waitlist Items......................................................................................... 73 Class Placement ................................................................................................. 75 Class Management................................................................................................. 77 Maintain Classes................................................................................................. 78 Maintain Class Availability .................................................................................. 82 Record Student Attendance................................................................................ 85 Continue Students .............................................................................................. 87 Discontinue Students .......................................................................................... 89 Transfer Students ............................................................................................... 92 Childminding / Daycare ......................................................................................... 95 Maintain Child Information .................................................................................. 96 Record Childminding / Daycare Attendance ....................................................... 99 Letters & Reports ................................................................................................. 101 Print Reports ..................................................................................................... 102 List of Reports ............................................................................................. 103 Print Letters ...................................................................................................... 106 List of Letters ............................................................................................... 107 Utilities .................................................................................................................. 109 Change Password............................................................................................. 110 Set Assessment Schedule ................................................................................ 111 Maintain Service Provider Contacts / Users...................................................... 113 Maintain Periods ...............................................................................................115 Maintain Functions / Roles................................................................................ 117 Maintain Service Providers / Locations ............................................................. 119 Maintain System Parameters............................................................................ 122 Maintain Code Values....................................................................................... 123 Maintaining LTO Instructors/Teachers .............................................................. 126 Maintaining Part Time Hours ............................................................................ 128 Maintain Geographical Regional Mapping ........................................................ 131 Browser & Network Configuration...................................................................... 133 Internet Explorer ............................................................................................... 133 Netscape Navigator .......................................................................................... 139 Network Settings...............................................................................................143 FAQ........................................................................................................................145 Glossary................................................................................................................ 148 Acronyms and Abbreviations ............................................................................ 150 Production notes: .............................................................................................. 151 iv Cycle24 Systems Group Inc. Welcome to STaRS This User’s Guide tells you how to use the Student Tracking and Reporting System (STaRS). Although basic ELSA processes are summarized in the section entitled “STaRS Business Functions,” readers are expected to be familiar with ELSA and the associated business processes. The Guide documents the following information: • Basic access requirements • General application standards • How to connect with the STaRS application • How the various functions operate Readers of this guide are also expected to be familiar with Windows based personal computers and web browser operation. Business Background The Province of British Columbia, offers an English Language Services for Adults (ELSA) program through the Aboriginal, Multiculturalism and Immigration Programs Division of the Ministry of Community, Aboriginal and Women’s Services (MCAWS). The program funds two private English language assessment centres located in the Lower Mainland and three individual, itinerant English language assessors located outside of the Lower Mainland. The assessment centres and itinerant assessors: ensure service eligibility; assess for English language ability; and refer, with client involvement, to an English language training organization. Approximately fifty-five English language training organizations (public and private, for profit and not-for-profit) are funded to provide English language instruction. About twenty of these organizations are also funded to provide on-site childminding for pre-school dependants of the adult learners. Funding is provided, in part, by the federal government, under the auspices of Agreement for Canada – British Columbia Co-operation on Immigration. This agreement sets out specific reporting requirements and, consequently, the provider organizations are required to track, among other things, client progress, report on attendance, and report on childminding service use. The Student Tracking and Reporting System (STaRS) was conceived to establish a centralized repository for client, student, class and childminding data. As a result, STaRS was designed to collect the ELSA delivery data remotely from the language training organizations and assessment centres and to store those data in a central database for program reporting purposes. This is expected to lead to an expanded ability for the assessment centres, the training organizations and the Province to monitor, track and analyze ELSA delivery data and ELSA delivery performance. In addition to enabling the required reporting capabilities, this integrated data approach also allows the sharing of information (where security and privacy requirements permit) to minimize duplication of data entry (i.e.: certain client related data elements are entered at the assessment centre and then shared with the language training organizations). STaRS User's Guide STaRS Architecture STaRS was designed to be accessible through the Internet from PCs equipped with contemporary web browsers. This means that the application is accessible from each service provider’s location without installation of special desktop software. The overall technical architecture for STaRS is outlined in the following diagram: 56KB (or better) ISP Link Client PC Database Server Internet Span/BC MMI Network Application Server Figure 1 - Technical Architecture STaRS Business Functions STaRS supports the flow of clients from initial assessment, at Assessment Centres (ACs) or through itinerant assessors, through to delivery of training services at Language Training Organizations (LTOs). It therefore provides specific functions to support business processes in two groups of ELSA Service Providers, namely: • Assessment Centres including itinerant assessors (AC), and • Language Training Organizations (LTO). 6 Welcome to Stars The following ELSA processes are supported by STaRS: Process Client Applications Clients Schedule Assessment Bookings Record Assessments Class Availability Inquiry Refer Clients Assessment Centre Print Reports / Letters Perform Student Registration (Including Children) Set Up / Manage Classes Language Training Organization Maintain Class Availability Record Student Attendance Record Childminding / Daycare Attendance Print Reports / Letters Figure 2 - ELSA Processes 7 STaRS User's Guide STaRS Application Functions The available functions are outlined below. In order to review specific security considerations please consult the section entitled “Security” starting on page 44: Logon Main STaRS Menu Referrals Students Class Management Childminding / Daycare Letters / Reports Utilities Maintain Client Applications (CLNT0110) Create Referrals (RFRL0100) Manage Waitlist (SDNT0120) Maintain Classes (CLAS0110) Maintain Child Information (CHLD0110) Print Reports (REPT0100 -1) Change Password (SYST0010) Schedule Assessments (CLNT0130) Accept / Refuse Referrals (SDNT0110) Maintain Student Information (SDNT0130) Maintain Class Availability (CLAS0130) Print Letters (REPTt0100 -3) Set Assessment Schedule (CLNT0120) Class Placement (SDNT0140) Record Student Attendance (SDNT0200) Maintain Assessments (ASMT0100) Class Availability Inquiry (CLAS0130) Continue Students (CLAS0140) Discontinue Students (CLAS0150) Transfer Students (CLAS0160) Assessment Centre focus Language Training Organization (LTO) focus Ministry focus Common functions Figure 3 - STaRS Menu Structure 8 Record Childminding Attendance (CHLD0120) Maintain Periods (CLAS0120) Maintain Users (SYST0100) Maintain Functions / Roles (SYST0110) Maintain Service Providers (SYST0120) Maintain Code Values (SYST0130) Maintain System Parameters (SYST0140) Maintain Geo. Regional Mapping (SYST0150) Exit Clients Welcome to Stars Assessment Centre (AC) focused functions Business Function Application Function(s) Main Menu Management of Client and Applications Maintain Client Applications Clients Scheduling of Client Assessment Set Assessment Schedule Utilities Schedule Assessments Clients Class Availability Inquiry Clients Create Referrals Referrals Referring Clients to LTOs Table 1 - Assessment Centre Functions Language Training Organization (LTO) focused functions Business Function Application Function(s) Main Menu Referral Management Accept/Refuse Referrals Referrals Maintain Class Availability Class Management Manage Waitlists Students Maintain Student Information Students Class Placement Students Maintain Periods Utilities Maintain Classes Clients Create Referrals Referrals Record Student Attendance Class Management Continue Students Class Management Discontinue Students Class Management Transfer Students Class Management Maintain Child Information Childminding/ Daycare Record Childminding Attendance Childminding/ Daycare Student Management Class Management Childminding/ Daycare Table 2 – Language Training Organization Functions 9 STaRS User's Guide Common Service Provider (SP) functions Business Function Application Function(s) Main Menu Reporting Print Reports Letters / Reports Mail Merge Letters Print Letters Letters / Reports User & Password management Change Password Utility Maintain Users Utility Maintain Code Values Utility Maintain System Parameters Utility System setup Table 3 – Common & System Management Functions Ministry functions Business Function Application Function(s) Main Menu Reporting Print Reports Letters / Reports Mail Merge Letters Print Letters Letters / Reports User & Password management Change Password Utility Maintain Users Utility System setup Maintain Function / Roles Utility Maintain Service Provider Locations Utility Maintain Code Values Utility Maintain System Parameters Utility Maintain Geographical Region Mapping Utility Table 4 – Ministry Functions 10 Accessing STaRS The STaRS application is browser-based which means it can be accessed from any Internet connected computer that has an appropriate web browser installed. The specific requirements for accessing STaRS are outlined below. Technical Requirements End-User Workstation Category Operating System Web Browser Report viewer applet Computer Processor Monitor Memory Available hard drive space to support Web Browser Minimum Specification Recommended Specific Windows 95 Windows 98, 2000, NT, XP1 Internet Explorer 4.01 or better Internet Explorer 5.5 or better Netscape Navigator 4.5 or better Netscape Navigator 5.0 or better Browsers MUST support 56 bit encryption. N.B. The appropriate Crystal Decisions report view be automatically installed by the STaRS application on an as and when needed basis. More than 100 Mhz2 Pentium II – 200 Mhz 14” Monitor (or larger) capable of The higher the better displaying 800 x 600 pixel resolution and 256 colour palette 64 MB 128 MB3 45 MB to install browser; 27 MB 100 MB to subsequently run the browser. Table 5 - End-User Workstation Requirements To access the form letter capabilities of the system, you require Microsoft Word 97 (Windows version) or later. If you do NOT have a web browser, one can be downloaded from the following locations: • Microsoft Internet Explorer: http://www.microsoft.com/ie • Netscape Navigator: http://home.netscape.com/computing/download/index.html Please Note: There are a number of special browser settings that are required. These are are outlined in section “Browser & Network Configuration.” As well, STaRS versions 2.0.00 and later are not accessible via Netscape. 1 2 3 Windows ME is NOT recommended. Macintosh based systems can access STaRS although visual rendering of the application may differ and form letter functions cannot be accessed. 128MB RAM is recommended for Windows 2000 or XP 11 STaRS User's Guide Internet Connection Your Internet connection must be reliable and as fast as possible. The system operates over 56KB dialup lines but a high bandwidth (i.e. fast) Internet connection is recommended. These include: • Asynchronous Digital Subscriber Line (ADSL) service provided by your local telephone company. • Cable service from your local cable operator. • Direct connection through a high speed corporate network. Logon Account In order to access the STaRS application, each user requires a User ID and Password. Each service provider organization will be provided with a User ID that has appropriate access privileges to allow administrative user to create additional User IDs. Please Note: When enrolling new users, please be sure to review the applicable system access policies with each prospective user. 12 Welcome to Stars Accessing the STaRS Server In order to actually access the STaRS server: • Launch your web browser. • Enter the published Universal Resource Locator (URL) for the STaRS server Please enter the URL here for future reference: Production _________________________________________________________________ Test ______________________________________________________________________ Hint: You may wish to save the STaRS URL in your browser favorites or save a shortcut on your desktop. A desktop shortcut will allow you to simply double-click on the shortcut to automatically launch the browser and connect with the STaRS server. 13 STaRS Basics The STaRS application follows a number of conventions. Understanding these will dramatically improve the operational experience of using the system. This section outlines the general system characteristics and describes the various graphical user interface components (GUI). General System Characteristics Characteristics of Browser-based Systems Perhaps one of the most important considerations is the fact that STaRS is a “browser-based” application. That is to say, it actually consists of a series of web pages that operate inside a standard web browser. Browser Web Page Figure 4 - Web Browser Window on Desktop What distinguishes web applications such as STaRS from normal “static” web pages is the fact that they include specific interactive components that enable access to a database of information. 15 STaRS User's Guide These types of web applications incorporate data entry fields and hot links that are visually represented as buttons or menus on the page in order to simulate a traditional software application. URL Form Fields Buttons Web Page Figure 5 - Web Browser Application Web based applications face a number of constraints, particularly when compared to other desktop based software applications. For example, the look and feel of the application may change (ideally only slightly) depending on the type and version of the browser used. A key design objective for STaRS was to enable support for multiple browser brands. This means that the application was designed to use very standard HTML capabilities to improve compatibility rather than exploit a variety of browser-specific capabilities to embellish the user experience. 16 STaRS Basics Browser Tips, DOs and DON’Ts There are a number of very specific guidelines that must be kept in mind when operating STaRS: Guideline Do maximize the browser to full screen mode when you can. Do not use the browser’s navigation buttons (or associated functions). Notes and Explanations The STaRS application will look most appropriate when it can expand to an 800 x 600 pixel resolution. Please note that on large monitors with very fine resolution, you may not need to maximize the browser in order to get an 800 x 600 pixel window. Keep in mind that when the browser is expanded to full screen, certain pop-up windows may be hidden behind the browser. Check the Windows menu bar to see if other windows are open. Please use the STaRS menu entries to navigate to system functions. Use the button rather than the browser’s Also, please note that pressing the Backspace key on your keyboard normally activates the browser’s “Back” function. Therefore, use this key only when editing the contents of a specific field. Other browser buttons (and functions) to use cautiously or avoid altogether: Forward, Refresh, Home. Don’t close browser without logging out. Do not be surprised if the application logs you out by itself. Be sure to check the URL for STaRS. Be sure to click the STaRS finished using STaRS. button when you are Browser-based applications have no way of determining if your session is finished or not. If you do NOT log out, it may take some time for your session to actually “time out”. During this time, any system resources allocated to your session will remain unavailable to others. The application will eventually “time out” and force you to log back on. As noted above, this is necessary due to the way in which browser-based applications work. It also helps improve overall security since it is impossible to leave a session logged on indefinitely. Note that the actual time out period will be set by the Ministry’s system administrator to balance various objectives including: convenience, security and system resource efficiency. When logging on to the Production version of STaRS, be sure to check that you are connected using a URL that starts with “https” rather than “http”. This ensures that you are using a secured session and protects the information you view and update from unauthorized Internet eavesdroppers. When in secure mode, a little SSL padlock appears in the browser’s status line: 17 STaRS User's Guide Guideline Be careful when using only the keyboard. Notes and Explanations There are a number of keys on your keyboard that may trigger inadvertent functions of your browser. The keys listed below should be used judiciously. The Backspace key will trigger the browser’s “Back” function unless it is pressed while editing a form field. It should not be used while browsing the page and while the cursor is NOT in a data entry field. The Enter key will trigger the currently highlighted graphical element. It may inadvertently cause a button to be invoked. Other keys may trigger windows functions in the normal manner (e.g. Alt, Ctrl, etc.) Note that the Tab key (or Shift+Tab) can be used to tab forward (or backward) to the next (or previous) field. If you are using only the keyboard to navigate the STaRS application, choosing an item from a drop down list must be done in the following manner: Be careful when selecting information from drop-down lists. Be patient after clicking a button. To access a drop down list without triggering the 'change' event (most of the application is driven by changing info in drop down lists), you have to hold down the following keys at the same time: 1. The Alt key 2. The Down Arrow key This will open the combo box in a fashion similar to clicking on it with a mouse, however, it will be open in a selection mode rather than a change mode. You are then able to make a selection using the arrow keys and/or hitting a character. Finally, to select the list item simply press the Enter key and the change event will be triggered. Certain functions can take multiple seconds to complete. For instance, the generation of an assessment schedule over many days or months may take up to 30 seconds to complete. Please do NOT press another button while the system is working. The progress bar in the status line indicates when the system has finished processing the most recent request. The vast majority of functions are expected to have relatively rapid response time (subject primarily to the impact of communications delays). Table 6 - Browser Tips 18 STaRS Basics STaRS Pages Described Please note that this document will use the term “page” or “screen” interchangeablely to refer to the content of a particular functional area of the system as shown inside the browser window. Page Areas Page Title Area Side Panel Area Sub-Menu Area Status Line Area Main Menu Area Content Area Figure 6 - STaRS Page Areas 19 STaRS User's Guide Each of the page areas outlined in the figure above has a specific purpose as outlined below: Page Area Page Title Area Main Menu Area Purpose This area (inside the browser window title bar) displays the name of the current page. This area provides access to the main system menu. The menu is a series of buttons that take you to the appropriate start page for a specific functional area. Note ONLY functional areas to which the currently logged on user has access will be displayed. The side panel area provides the following: Side Panel Area Sub-Menu Area It shows the currently logged on user ID (e.g. “MLTO1”). It shows the current functional module and version number to assist in trouble shooting (e.g. “REPT0100-1 1-01”). It provides access to a Help button which launches the STaRS Help System. It provides access to a Logout button which allows the currently logged on user to logout from the application and will then redisplay the logon page. This area provides access to the sub menu items and will change depending on which area of the application is currently active (as indicated by the grey highlighted main menu entry). The sub-menu is a series of buttons that take you to the appropriate start page for a specific functional page. Note ONLY functional areas to which the currently logged on user has access will be displayed. This area shows the status line. When viewing a particular data record, this line will show the following: Status Line Area User ID of the user who initially created this data record Date/time the data record was initially created User ID who most recently updated this data record Date/time the data record was most recently updated This area is reserved for the actual information or content to be displayed or updated. Note the following general conventions are followed: Content Area A heading is normally centered near the top of the data area. This heading describes the information being displayed or the type of function. The fields are normally in the middle of this data area but aligned towards the left. Buttons are normally along the bottom of the data area, also aligned to the left. Table 7 - STaRS Page Areas 20 STaRS Basics Page Elements The Referrals page outlines almost all significant elements: Drop Down Box Radio Button Lookup Selector Calendar Selector Textbox Field Button Figure 7 - STaRS Page Elements Example I The remaining elements are shown on the next page. 21 STaRS User's Guide Label Checkbox Multi-line Field Tab Dialog Mandatory Field Indicator Figure 8 - STaRS Page Elements Example II STaRS pages contain a number of page elements that provide operational functionality. These include the following: Page Element Drop Down Box Radio Button Lookup Selector Calendar Selector Checkbox 22 Purpose A drop down box allows for the selection of a single value from a list. For instance, as illustrated above, the “Preference” may be “Full time” or “Part time”. The Drop Down minimizes typing and ensures that only valid values can be entered. Radio buttons always come as a set and are used to select ONE item out of several items. On search pages these are used to select one particular search field. This icon will bring up a lookup pop-up list from which a value may be selected. Alternatively, data can be entered into the adjacent text box manually. Single-clicking this icon will bring up a calendar pop-up to allow selection of a specific date. Checkboxes provide a means for entering true/false, yes/no type values. Checked equals Yes or True; Unchecked equals No or Not True. STaRS Basics Page Element Button Tab Dialog Label Purpose Buttons provide access to various operations within the current function. They may initiate a search, cause data to be saved/deleted or return to a previous page. For hints on button functionality, tips are accessible by hovering the mouse pointer over the applicable button to view the text. Tab dialogs (which are only simulated in web applications) provide another menu structure by which different groupings of information can be displayed. Through selection of the title text in a tab header, a different view of the page can be selected. Labels are simple text that is displayed and may or may not describe the content of an adjacent data display/entry field. Textbox fields provide the primary mechanism for data entry. These fields display data and can accept updates. Textbox Field Textbox Field – COMMENTS Textbox Field – NOTES Multi-line Field Text boxes which are read-only are normally indicated by displaying the associated label in normal text rather than bold. “Comments” may optionally be entered in the appropriate text box for most data objects (e.g. Clients, Referrals, Students, Contacts, Children, etc.). Any User may see this information. “Notes” may optionally be entered in the appropriate text box for most data objects (e.g. Clients, Referrals, Students, Contacts, Children, etc.). These are intended for display to only the originating Service Provider who entered the note. Multi-line text boxes accept more than one line of information. The Enter key may be pressed while the text cursor is active inside the field in order to move to a new line. Mandatory Field Indicator A little red asterisk (*) is used to mark fields that are mandatory and may not be left blank. Bottom and Top icons ) and Top ( Some pages also include Bottom ( provide a quick mechanism for repositioning the page. (Not shown in illustration) Active / Inactive Status (not shown in illustration) Active / Inactive Checkbox (not shown in illustration) ) icons which Click the Top or Bottom icons to reposition the page to the top or bottom respectively. Various functions/displays incorporate status codes of Active and Inactive. Although the terminology is the same, the meaning is different depending on the context (i.e.: Active Students can have Inactive Class Placements, etc.). For some items, status can change back and forth over time. Note: the Active Flag has a completely different meaning. An additional checkbox appears on some screens labeled “Active”. This is commonly referred to as the Active / Inactive Flag. Its meaning and functionality is different than Active / Inactive Status. It is advisable to leave the checkbox alone if possible as unchecking it renders the item inactive and will usually result in the applicable screen never being displayed again. Note the data is not deleted since it is required for statistical purposes. Table 8 - STaRS Page Elements 23 STaRS User's Guide Pop-Up Elements There are three significant interface elements that appear in pop-up windows. Note these pop-up elements are actually separate web browser windows with a number of visual elements (e.g. standard browser buttons, address field, status bar, etc.) turned off. Calendar Pop-up Month/Year Selection Hotlinks for date selection Figure 9 - STaRS Pop-Up Calendar Use this pop-up to enter a date by single-clicking on the icon then: • Selecting the applicable month and year (note that the current month and year are always defaulted) • Pick the correct day by clicking the associated hotlink. The calendar pop-up will automatically close itself and enter the date on the appropriate field on the page from which it was launched. You may close the pop-up manually but may need to then manually select the appropriate browser window again to resume your work. Note pop-up calendars may not be resized. Please Note: Single clicking the calendar icon where it appears throughout the application activates the calendar pop-up window. If double clicked, the first click opens the window on top of the current application window. The second moves it underneath the current application window. To retrieve the calendar window for use, minimize the current application window. Hint: To Manually enter dates in the date field, format is YYYY/MM/DD, with the slashes. 24 STaRS Basics Lookup Pop-up Sort Tool Filter Tool Search Column Value Selection Figure 10 - STaRS Lookup Pop-Up Use this pop-up to pick a value by selecting the applicable value and clicking a hotlink anywhere on the associated row. The lookup pop-up will automatically close itself and enter the applicable value on the appropriate field on the page from which it was launched. You may close the pop-up manually but may need to then manually select the appropriate browser window again to resume your work. Note that some pop-up dialogs may also provide additional functionality such as: • Sorting by a particular column by clicking the column title. • Repositioning the list by entering a complete or partial key value in the available field and clicking the button. Note that the Go button will search the column as indicated by the label next to the data entry text box (In the example shown in the figure above, the Class Number will be searched). If this search fails to get the expected results, you may need to click the header of the search column in order to ensure that the list of values is sorted by the search column values. Note lookup pop-ups may not be resized but scroll-bars will appear as necessary. 25 STaRS User's Guide Error Pop-up Figure 11 - STaRS Error Pop-Up This type of pop-up will be displayed under certain circumstances where one or more error messages must be displayed. Clicking the OK button allows you to return and correct the error(s). Note error pop-ups may not be resized but scroll-bars will appear as necessary. 26 STaRS Basics STaRS Page Types There are several significant types of STaRS pages: • Logon page • Search or selection page • Search result page • Data entry/edit page with or without multiple tabs • Report/Letter parameter page • Report viewer page (including report viewer applet) • Letter page • Pop-up page • Help page Pop-up pages are described in the previous section. The other page types are briefly reviewed in this section. 27 STaRS User's Guide Logon page Figure 12 – Logon Page To logon to STaRS simply enter your User ID and Password and then click the button. Once logged on, users will be directed to another browser window automatically to use to work in the application. Please Note: You should always verify that you are accessing the correct system (Production or Test). When accessing the Production system, ensure you have a secure session by verifying that the URL starts with “https” rather than “http” and/or by verifying that the SSL padlock is displayed in the web browser status line. 28 STaRS Basics The first time you access the STaRS application you will see the following dialog box Figure 13 – SSL Warning message You must click OK to continue, and in most browser versions, you will have the option to check off "In the future, do not show this warning". Please Note: Netscape users accessing earlier versions of the application may have seen a slightly different alert message. STaRS versions 2.0.00 and later are not accessible via Netscape. 29 STaRS User's Guide Search/Selection Page Search and/or selection pages typically provide a way in which to find and/or add records to the system. Enter entire number, no hyphen Enter entire IMM 1000 Number, including “W” Enter both ID number AND Type For text tips, see next page Figure 14 – Search/Selection Page To search, use the following general approach: • Select the desired search field by clicking the applicable radio button. • Enter a search value in the corresponding field. See hints for various fields above. • Click the • If only a single row is found, then the applicable detail page will be displayed. If multiple rows are qualified, then a search result page will be displayed. button. To add or update information: • Select the desired search field by clicking the applicable radio button. • Enter a search value in the corresponding field. • Click the applicable new (e.g. button. The 30 ) or update (e.g. button will simply clear all fields of entered data. ) STaRS Basics Most name fields support use of standard Oracle wildcard characters (‘%’ percent sign and ‘_’ underline character). Note for these fields, a trailing ‘%’ is automatically appended by the application’s software. Use of these wildcard characters enables a number of advanced search strategies as outlined in the table below. Search String %, John Mac%, John %John Jones, M %, _a Explanation Will search for all rows where the first name starts with “John” Will search for all rows where surname starts with “Mac” Will search for all rows where surname starts with “John” Will search for all rows where the “John” appears anywhere in the name. Will bring up all rows where surname is “Jones” and first name starts with “M”. Will search for all rows where the first name has an ‘a’ as the second letter. Table 9 - Advanced Name Searching Please note the following: • Searches are NOT case sensitive. In other words, ‘Smith’, ‘SMITH’ and ‘SmItH’ will all match to the same name. • Only rows which the currently logged on user has sufficient data access authority to view will be returned. Please Note: Searching with a ‘%’ wildcard is not always possible. Moreover, using the wildcard on fields that are optional may NOT qualify rows where that field is empty (i.e. NULL). And using the ‘%’ wildcard only for a search where a large number of rows could be returned is not recommended. 31 STaRS User's Guide Search Result Page In the event that a search qualifies multiple data rows, a search result page will be displayed. Rows Displayed Search Title Page Displayed Result Navigation Tools Number of Rows Qualified Row Selector Figure 15 – Search/Selection Page Search result pages will show multiple rows over one or more pages. To select a row, simply click the radio button of the desired row and then click the button. To run another search, simply click the button. To scroll through the pages, either select the applicable page or use the Next and Last links at the bottom right. To go to the top or bottom of the current page, use the Top or Bottom icons respectively. Note the number of rows displayed per page can be set by adjusting the “NUMBER OF ROWS” system parameter for each Service Provider. The total number of rows that may be returned by a search query is also controlled by a system parameter (“RECORDSET SIZE”). For further information related to system parameters, please consult the Operations Guide and/or Ministry. 32 STaRS Basics Please Note: If the count of “Total Records” returned is the same as the maximum number of rows to be retrieved as per the “RECORDSET SIZE” system parameter then there may be additional records in the database that were NOT retrieved. Refine your query, use a report, or ask the system administrator to amend the “RECORDSET SIZE” system parameter. Hint: To sort resulting returns by any column, simply click on the column header. 33 STaRS User's Guide Data Entry/Edit Page Data entry/edit pages will vary in terms of their specific functional capabilities. In general they will be similar to the following: Content Title Row Status Figure 16 – Date Entry/Edit Page Note the status line indicates who inserted or updated the data as well as the associated insert/update date and time. Hint: When the Status Line is blank, this normally indicates you are entering a new row and this row has NOT yet been saved. Enter/update information as needed and then use the buttons to effect the desired function. The button will typically save all onscreen changes back to the database. Note without pressing this button, information will NOT be saved. Once data are saved, a message such as Data saved Successfully will be displayed in red immediately above the Content Title in the message area (see figure below). 34 STaRS Basics Figure 17 – Message Area button will simply clear all fields of entered and UN-saved data and The revert the displayed fields to the retrieved values. Once changes are saved, this button will have no effect. The button will typically return you to the search page. Other buttons may provide additional, function specific capabilities. In this example, the button will link to the Schedule Assessments page. Selecting one of the Tab dialog tab titles (see below), will navigate to the applicable tab page and display the associated information. Figure 18 – Tab Selectors 35 STaRS User's Guide Navigating Away from the Page Please Note: If you click , , migrate to another tab, select another submenu entry, or select another main menu entry but have not saved any changed data, the dialog window shown in the figure below will be displayed Figure 19 – Data Entry/Edit Page Click OK to ignore this warning and proceed without saving. Click Cancel to ignore your navigation request and return to working with the current page. Closing the Browser Please Note: The STaRS application CANNOT detect if you attempt to close the web browser and therefore cannot warn you of potential data loss. If you have unsaved data displayed on the page and close the browser (either by selecting Close or Exit from the File menu, by clicking the Windows close icon, or through another Windows operation), these changes will be lost! 36 STaRS Basics Report/Letter Parameter Page Report and letter parameter pages will vary in terms of their specific functional capabilities. In general, they will be similar to the following: Report Title Selection Criteria Sort Criteria Figure 20 – Report Parameter Page Enter/update Report selection and sort criteria as needed and then click generate the report. For Letters, enter the desired selection information as needed and then click to . Select the desired letter recipients from the resulting selection screen and click to generate the merged letters. 37 STaRS User's Guide Report Viewer Page The STaRS application generates Reports on the server and then sends these to the web browser window as shown below. Print Icon Export to Other File Type Icon Report Viewer Toolbar Figure 21 – Report Viewer Page Note the Report is actually displayed by a special report viewer “applet” from Seagate Software. This applet allows you to view the Report online using “Crystal Reports” and eventually either print it to a printer attached to your workstation or export it to a variety of different file formats. Please Note: To print the Report, do NOT use your browser print buttons. Simply click the print icon from the report viewer toolbar. Once you are finished with the Report, click the button to go back to the Report Selection Page. (You will need to scroll to the BOTTOM of the page to see the Return button). 38 STaRS Basics Please note when the report viewer is loaded for the first time or if an updated report viewer applet is available from the server, the following install warning dialog is displayed: Figure 22 – Report Viewer install warning This is a warning from your browser that software is being installed on your PC. Please note this is a safe applet that can be trusted and must be installed before reports can be viewed. Simply click “Yes” to install the applet when prompted. Separate documentation is available on the features and capabilities of the Crystal Decisions report viewer. 39 STaRS User's Guide Letter Page The STaRS application generates Letters on the server and then sends these to a separate web browser window as shown below. Figure 23 – Letter Page Note the letter(s) is/are displayed by an MS-Word object that runs inside the browser window. You may either: • Print the Letter(s) by selecting the Print option from the File menu and/or using the Print icon on the visible toolbar, or • Save the Letter(s) by selecting the Save option from the File menu and/or using the Save icon on the visible toolbar. Please Note: MS Word MUST be installed on the workstation for the Letter(s) to be displayed properly. 40 STaRS Basics Help Page The STaRS application has a number of help pages. These are organized around a Help Index frameset as shown below. Figure 24 – Main Help Page When a help topic is launched from a button, the help file is loaded into a separate browser window. Note individual help topic files are NOT loaded as a frameset. However, the frameset can be launched from each individual topic file by clicking the STaRS Help link as shown above. 41 STaRS User's Guide STaRS Setup Tasks When a Service Provider (SP) is preparing for day-to-day operations utilizing the STaRS application, there are some common tasks that must be performed. These are noted below. Tasks for the Ministry application administrator The following tasks pertain to the Ministry application administrator: • All Service Providers and Service Provider locations will need to be defined. If data are preloaded, they need to be confirmed and amended as necessary. • Initial User IDs for each service provider must be created. • System parameters and code values should be reviewed and amended as necessary. • Other typical implementation activities including but not limited to training and establishment of help facilities should be undertaken. Tasks for All Service Providers (SP) The following tasks pertain to all SPs, regardless of type: • You will need to consider any procedural changes that may be required in relation to your day-to-day activities. For example, one significant item to note is that you will not be utilizing a “green card” to have the client pass to the next Service Provider . This has been replaced by referral functionality in the STaRS application. • You will need to decide who will have access to the STaRS application and the role that will be assigned to each user. • You can then enter Service Provider contact information into the application and assign a User ID to each individual who will be permitted to logon to STaRS (using the Maintain Service Provider Contacts / Users function on the Utilities Menu). • You will then set up the system parameters that will customize how some application functionality will operate when you and other users under your organization are using the application (using the Maintain System Parameters function on the Utilities Menu). Assessment Centre (AC) Tasks The following tasks pertain to ACs: • You will need to set up an assessment schedule in the application (using the Set Assessment Schedule function on the Utilities Menu) against which you will be assigning assessment bookings. Note this will be an ongoing task as you set up additional schedule entries to accommodate bookings in the future. • 42 Since you will be booking assessment bookings into the future, initially you will have to parallel your existing mechanism for handling assessment bookings. All new bookings would be assigned under STaRS. STaRS Basics Language Training Organization (LTO) Tasks The following tasks pertain to LTOs: • You will begin by defining the periods that are valid. Typically you will want to initially set up at a minimum one year of periods (using the Maintain Periods function on the Utilities Menu). • You will need to define your valid instructors (under the Maintain Code Values function on the Utilities Menu). • The classes under which you will train students will then need to be set up (using the Maintain Classes function on the Class Management Menu). You will also associate the periods with the classes to define when each class is offered. This will be an ongoing task over time. • You will then be able accept client referrals, either setting up students or placing them on waitlists. Hint: If you are utilizing the “Calculate End Date” function, you will need Periods set up far enough in advance for the function to access during its calculation. For example, in the case of a Student assessed at ELSA Level 1, you might need three years worth of Periods set up in order for the function to calculate successfully. 43 STaRS User's Guide STaRS Data Management Security STaRS security is based on User IDs, Passwords and roles (“STaRS roles”). The role to which each user is assigned entirely controls the authorities he or she has within the system. The menu items that are displayed by the system as well as the specific fields visible on certain pages are controlled through the role framework. Different users will therefore see differences as they navigate through the application. The following table outlines the 10 STaRS roles and summarizes the access capabilities for each role: "9" = Full access 9 9 9 9 9 9 9 9 9 V 9 V 9 9 9 V 9 9 9 9 V 9 9 9 9 9 9 9 9 9 9 9 9 9 9 9 9 9 9 9 9 9 9 9 9 9 9 9 9 9 9 9 9 9 9 9 9 9 9 9 9 9 9 9 9 9 V V V V V 9 9 9 9 9 9 9 9 9 9 9 9 9 9 "V" = View access 9 V V V V V V V V V V V 9 9 9 9 9 9 9 9 <Blank> = No access Table 10 – STaRS Roles For further information related to roles, please consult the System’s Operations Guide. 44 Technical Staff V 9 9 9 9 9 9 9 9 9 9 9 9 9 9 9 9 V "9" = Full access to Provider data only Regional Pgm. Co-ordinator 9 9 9 9 9 9 9 V V Program Management 9 9 9 9 9 9 9 V V 9 V V V 9 Teacher 9 9 9 9 9 9 9 V V 9 V V V 9 V V V V V V V V V V V V V Management 9 9 9 9 9 9 9 V V Ministry Admin. Staff Management Logon Maintain Client Applications Schedule Assessments Maintain Assessments Class Availability Inquiry Create Referrals Accept / Refuse Referrals Manage Waitlist Maintain Student Information Class Placement Maintain Classes Maintain Class Availability Record Student Attendance Continue Students Discontinue Students Transfer Students Maintain Child Information Record Childminding Attendance Print Reports Print Letters Change Password Set Assessment Schedule Maintain Periods Maintain Users Maintain Functions / Roles Maintain Service Providers Maintain Code Values Maintain System Parameters Admin. Staff (In Menu Order) Referral Counselor Function LTO Assessor Assessment Centre STaRS Basics Data Retention STaRS limits deletion capabilities in order to retain clear audit trails of information. This is achieved through use of an “Active Flag” on certain information entities. Instead of deleting the associated information row, it is marked as inactive and therefore remains available to ad hoc reporting or for subsequent archiving. Two of the more significant entities are fully audited, again, through use of the Active Flag. These entities are: • Clients, and • Students Note there are also very specific security rules related to these entities. These rules may constrain an individual user’s ability to retrieve and view or edit specific client and student records. For further information related to roles and system security please consult the System’s Operations Manual. Please Note: Since both the database and application are hosted on Ministry servers, there is no impact to STaRS by the reliability of a User’s PC. Users are not required to backup or recover anything at the User’s end. Users are, however, expected to save their data while working in the application, before moving from screen to screen and before exiting. 45 STaRS User's Guide STaRS Application Maintenance Planned System Outages At times, the Application will need to be rendered unavailable to users for regular and scheduled system maintenance. Prior to taking the database down, 72-hours notice will be provided to all users by means of an email to the Service Provider contact on file. It is then the responsibility of that user to inform all others at the Service Provider location of the impending outage. Where possible, planned system outages will occur Thursday evenings and Fridays. Un-Planned System Outages At times, the Application may be unavailable. Users should troubleshoot on-site prior to reporting any system outages to ensure the problem is not simply a localized one (e.g.: power interruption, Internet connection interruption, etc.). Should it prove necessary to report the system outage, following is the contact information. STaRS Application Contacts To report system outages, system enhancements, user hints/tips and tricks, User Guide enhancements or Help Text enhancements: By telephone: (604) 775-0499 By email: [email protected] 46 Client / Application Management The Maintain Client Applications function is used primarily by Assessment Centres to manage ELSA client data (including demographic data, application data, preference data, and assessment data). The functions described can also be accessed by Language Training Organization (LTO) users to add/update Client data. It also provides support for scheduling of assessment bookings and access to Class Availability information maintained by Language Training Organizations. When selecting the Clients option from the main menu, the Client Search page of the Maintain Client Applications function is displayed as shown below: Figure 25 – Client / Application Management Main Page 47 STaRS User's Guide Maintain Client Applications Use this function to maintain client information. Both AC and LTO users can access functions to add/update client information. Recording NEW Clients To record a NEW client, follow these steps: 1 Select Clients from the main menu and wait for the Client Search page from the Maintain Client Applications function to display fully. 2 Select the radio button adjacent to the IMM/PRC NUMBER field or adjacent to the Other ID/Type fields and enter the applicable IMM/PRC NUMBER number (including the “W”) or Other ID number. If an Other ID number is entered, select the appropriate Type using the drop down. Note: If Other ID is initially entered, IMM/PRC NUMBER number should be added when available. 3 Click Note: button and wait for the client detail page to display fully. If the entered ID already exists, the warning Client already exists in the System will be displayed and the page will be redisplayed. Simply try again or click the Enter/Update Client Details page. to edit the existing client information using 4 Enter the required information taking care to ensure that all mandatory fields are completed. 5 Click 6 Click the Application Info tab and wait for this tab to display fully. Note: 7 Regardless of the number of applications submitted by a Client, they all share the same Client details information in STaRS. If there are multiple Client Applications that have been entered for a Client, then a search results page will be displayed indicating this. Enter the required information taking care to ensure that all mandatory fields are completed. Note: 8 to save the data. Click Users should make sure the following information, which is not shown as mandatory, is entered: phone number, landing date and highest education level. to save the data. If CONTACT information is to be recorded, 1 Click the Contact Info tab and wait for this tab to display fully. 2 Enter the required information taking care to ensure that all mandatory fields are completed. 48 Client / Application Management Note: 3 Click Note: The Primary Contact checkbox is optional; however, one of the contacts should be designated as primary. Where Client Contact information is to print on reports, the primary contact will be selected for printing. to save the data. Contact details entered here are separate from both Student and Child Contact info. If PREFERENCE information is to be recorded, 1 Click the Preference Info tab and wait for this tab to display fully. 2 Enter the required information taking care to ensure that all mandatory fields are completed. 3 Click Note: to save the data. Any data recorded here will be included on any Referrals created in the future. After the client information has been saved, you may: • Click • Add additional contacts simply clicking the • Create an assessment booking by clicking the to return to the Client Search page. button. button. Updating Information for EXISTING Clients To update information for an existing client, follow these steps: 1 Select Clients from the main menu and wait for the Client Search page from the Maintain Client Applications function to display fully. 2 Enter the desired search criteria and click Note: . If multiple client rows are qualified, a Client Search Results page will be displayed. Select the desired row by clicking the radio button after paging through the table as needed. Then click to edit the existing client information. If only one client row is qualified, the Enter/Update Client Details page will be displayed. 3 Update the information as desired taking care to ensure that all mandatory fields are completed. 4 Click to save the data. 49 STaRS User's Guide After the client information has been saved you may: • Review previous versions of client data by selecting the List of Client History pop-up and selecting a specific history row. Note you are NOT able to update the information from an audit history row. The information is provided for audit purposes only. Please Note: The system has special security safeguards related to Client and Student information. LTO users generally may see only Client records they entered for which they have a corresponding Student record and Student records can only be created for Clients electronically ‘referred’ to an LTO. Hint: If “Other” is specified for either Mother Tongue or Birth Country, then the specific description must be entered using the applicable Description field. If, as part of initial data conversion, “Conversion” or “Unknown” were specified for either field and subsequent, specific definition is obtained, data should be updated. To do so, any text in a Description field must first be deleted prior to selecting an item from the pick list. 50 Client / Application Management Creating an Assessment Booking From Enter/Update Client Details page, you may also create assessment bookings as follows providing an appointment schedule has been set using the Set Assessment Function: button and wait for the Schedule Appointment page to fully 1 Click the display. 2 Select the appropriate Service Provider Location and Appointment Booking Type. 3 If this is a Priority Booking, as dictated by ELSA Program policy, then check the applicable checkbox. Tip: 4 To force a specific appointment date and time, you need to check the Priority Booking checkbox to be linked to the applicable Schedule Assessments function. Click to create the booking. Note: If the appointment schedule has NOT yet been set up using the Set Assessment Function, then a warning message will be displayed: Bookings for Current Selected Date finished or Assessment Schedule not generated. You must generate the schedule prior to booking appointments. 5 On the Schedule Appointment page, enter Provider Comments and Provider Notes as necessary, select Appointment Letter and click Note: . If an Appointment Letter is selected, the Assessment Appointment Letter (LT0010) selection page is displayed. If not, skip to step 7. 6 Enter an optional paragraph, if required, and click Appointment Letter. 7 Click in order to generate an to return to the Enter/Update Client Details page. Please Note: Automatic (i.e. non-priority) assessment bookings are always allotted forward from an internal booking date. The user is prompted for this date under the following circumstances: The first time a booking is made. When all available assessment slots are filled. 51 STaRS User's Guide Schedule Assessments Use this function to book assessment appointments. Use Assessments Appointment Report to view schedule. Please Note: Prior to scheduling assessment bookings please, ensure the assessment schedule has been setup using the Set Assessment Schedule function from the Utilities menu. Hint: The booking function can be accessed in two ways: Directly from this menu entry From the button on the Enter/Update Client Details page Creating an Assessment Booking To create a regular assessment booking, follow these steps: 1 Select Clients from the main menu and wait for the Client Search page from the Maintain Client Applications function to display fully. 2 Select Schedule Assessments option from the sub-menu and wait for the Client Appointment Search page to display fully. 3 Select the radio button adjacent to the IMM/PRC NUMBER field or adjacent to the Other ID/Type fields and enter the applicable IMM/PRC NUMBER number (including the “W”) or Other ID number. If an Other ID number is entered please select the appropriate Type using the drop down. 4 Click button and wait for the client detail page to display fully. Note1: If the appointment schedule has NOT yet been set up using the Set Assessment Function, then a warning message will be displayed Bookings for Current Selected Date finished or Assessment Schedule not generated. You must generate the schedule prior to booking appointments. Note2: All users entering / maintaining Assessment Appointments are required to alter the value for Appointment Type every time, from the default setting, [---], to the applicable value. 5 On the Schedule Appointment page, select the Service Provider Location. 6 Please enter Provider Comments and Provider Notes as necessary, select Appointment Letter and click 52 . Client / Application Management Note: If an Appointment Letter is selected, the Assessment Appointment Letter (LT0010) selection page is displayed. If not, skip to step 8. 7 Enter an optional paragraph, if required, and click Appointment Letter. 8 Click in order to generate an to return to the Enter/Update Client Details page. Creating a PRIORITY Assessment Booking To create a priority assessment booking, as dictated by ELSA Program policy, follow these steps: 1 Select Clients from the main menu and wait for the Client Search page from the Maintain Client Applications function to display fully. 2 Select Schedule Assessments option from the sub-menu and wait for the Client Appointment Search page to display fully. 3 Select the radio button adjacent to the IMM/PRC NUMBER field or adjacent to the Other ID/Type fields and enter the applicable IMM/PRC NUMBER number (including the “W”) or Other ID number. If an Other ID number is entered please select the appropriate Type using the drop down. 4 Click button and wait for the client detail page to display fully. Note1: If the appointment schedule has NOT yet been set up using the Set Assessment Function, then a warning message will be displayed: Bookings for Current Selected Date finished or Assessment Schedule not generated. You must generate the schedule prior to booking appointments. Note2: All users entering / maintaining Assessment Appointments are required to alter the value for Appointment Type every time, from the default setting, [---], to the applicable value. 5 On the Schedule Appointment page, select the Service Provider Location. 6 Check the Priority Booking check box. 7 Adjust the Appointment Date as needed. 8 Please enter Provider Comments and Provider Notes as necessary, select Appointment Letter and click Note: 9 . If an Appointment Letter is selected, the Assessment Appointment Letter (LT0010) selection page is displayed. If not, skip to step 10. Enter an optional paragraph, if required, and click Appointment Letter. 10 Click in order to generate an to return to the Enter/Update Client Details page. 53 STaRS User's Guide Hint: “Pretending” to create a Priority Booking is the only way to view – on screen – the existing, available appointment slots. To view scheduled appointments, use Assessment Appointments Report. Update or Cancel an Existing Booking Use this function to update an assessment booking (adding additional details subsequent to the occurrence of the assessment) or cancel an assessment booking (to free the slot for another Client). Follow these steps: 1 Select Clients from the main menu and wait for the Client Search page from the Maintain Client Applications function to display fully. 2 Select Schedule Assessments option from the sub-menu and wait for the Client Assessment Search page to display fully. 3 Enter the desired search criteria and click the Note: button. If multiple appointment rows are qualified, a Client Appointment Search Results page will be displayed. Select the desired row by clicking the radio button after paging through the table as needed. Then click information. to edit the existing client appointment If only one appointment is qualified, the Schedule Appointment page will be displayed. 4 Update or cancel the appointment as desired taking care to ensure that all mandatory fields are completed. Note the time and date of the appointment cannot be updated. If these are incorrect, the appointment must be cancelled. Tip: 5 Use the the slot for another Client. Click button to quickly cancel the appointment and free to save the data. Hint: To reflect accurate details for reporting purposes, assessment appointment records must be updated subsequent to their occurrence. The optional Reassessment and Reschedule check boxes are for information purposes to indicate if either a reassessment of the Client is required or if the appointment needs to be rescheduled. While maintaining an existing appointment, the final status of the appointment should also be updated (via pick from the Appointment Status drop down box). 54 Client / Application Management Maintain Assessments Use this function to maintain assessment data. Record an Assessment To maintain assessments, follow these steps: 1 Select Clients from the main menu and wait for the Client Search page from the Maintain Client Applications function to display fully. 2 Select Maintain Assessments option from the sub-menu and wait for the Client Assessment Search page to display fully. 3 Select the radio button adjacent to the IMM/PRC NUMBER field or adjacent to the Other ID/Type fields and enter the applicable IMM/PRC NUMBER number (including the “W”) or Other ID number. If an Other ID number is entered please select the appropriate Type using the drop down. 4 Click the Details page to fully display. 5 Enter the required information taking care to ensure that all mandatory fields are completed. button and wait for the Enter/Update Client Assessment Select Results Notification to automatically generate a printed Results Notification letter. Note: 6 All users entering / maintaining Assessments are required to alter the value for Assessment Test every time, from the default setting, [---], to the applicable value. Click to save the data. Alternatively you may click to save the information and proceed to the Schedule Assessments function. Note: If the client will subsequently have a stage 2 assessment for Reading and / or Writing, update the Reading and / or Writing Benchmark values in this assessment rather than create a completely new assessment for that purpose. Hint: Current assessments record scores for three benchmarks: Listening/Speaking, Reading and Writing. As ELSA has determined Listening and Speaking are to be split in the future, the STaRS application was designed to record four separate scores. Until such time as Listening and Speaking are separated, the numbers recorded in STaRS for the two benchmarks must be identical for the automated calculation of the final ELSA level to occur. 55 STaRS User's Guide Update an Existing Assessment To update/maintain assessments please follow these steps: 1 Select Clients from the main menu and wait for the Client Search page from the Maintain Client Applications function to display fully. 2 Select Maintain Assessments option from the sub-menu and wait for the Client Assessment Search page to display fully. 3 Enter the desired search criteria and click the Note: button. If multiple assessment rows are qualified, a Client Assessment Search Results page will be displayed. Select the desired row by clicking the radio button after paging through the table as needed. Then click information. to edit the existing client assessment If only one assessment is qualified, the Enter/Update Client Assessment Details page will be displayed. 4 Update the required information taking care to ensure that all mandatory fields are completed. Select Results Notification to automatically generate a printed Results Notification letter. 5 Click to save the data. Alternatively you may click to save the information and proceed to the Schedule Assessments function. Hint: To reflect accurate details for reporting purposes, Assessment Booking records must be updated subsequent to their occurrence. Users can indicate if Reassessment or Rescheduling was required (via checkboxes) and final status of appointment (via pick from drop down box). 56 Client / Application Management Class Availability Inquiry Use this function to inquire as to class availability. Each LTO is responsible for maintaining their own information on a timely basis. To inquire about class availability, follow these steps: 1 Select Clients from the main menu. 2 Select Class Availability Inquiry from the sub-menu and wait for the Class Availability Inquiry page to display fully. 3 Enter the desired search criteria and click the button. Please Note: At least one of Geographical Group, Geographical Region, or LTO Name must be specified in this search by the applicable radio button. Refined searches, using additional parameters are also possible utilizing the following guidelines. Note 1: Search on the Class Availability Grouping information utilizing the following guidelines. Searches can be conducted by entering single or multiple parameters for any/all fields without a radio button. ELSA Level Description – The following codes have been used to describe the levels of Classes: 1, 2, 3, 1lit, 1/1lit, 2b, 3b, 1/2, 2/3, 1/2/3. School Days Description - The following codes have been to describe the days of the week (i.e. Mo,Tu,We,Th,Fr, Mo to Th, etc.). Time Description – The following codes have been used to describe time, leading zero if applicable, no spaces around hyphen and only one reference to AM/PM. For example: 08:30-11:00 AM, 09:30-12:30 PM, 6:00-9:00 PM Start Date Description – 0 months, 1 month, 2 months, 3 months, 4 months, 5 months, 6 months, closed. (This item refers to the duration of the wait.) Shift Description – AM, PM, Afternoon, Evening, as applicable. Shift – Select one of the options available via the drop down box. Note 2: If multiple Class Availability Headers (from multiple Service Provider’s locations) qualify, a results page will be displayed. Select the desired row by clicking the radio button after paging through the table as needed. Then click to review the desired header information. If only one header is qualified, the Class Availability Header page will be displayed. 4 After reviewing the Class Availability Header information, click on the Class Availability Grouping tab and wait for the Class Availability Grouping page to fully display. 57 STaRS User's Guide 5 Review the various class availability rows, paging through the table as needed. If you would like to see more information about a particular row, click the applicable radio button and then click to review the desired class grouping information. This information will be displayed in the Class Availability Grouping Details pop-up dialog. To dismiss this popup, click 58 . To return to the search page click . Referral Management The Referral management function is used primarily by Assessment Centres to refer clients to Language Training Organizations. When selecting the Referrals option from the main menu, the Referral Search page of the Create Referrals function is displayed as shown below: Figure 26 - Referral Management Main Page Please Note: ALL users can create Referrals: ACÆ LTO; AC Æ AC; LTO Æ LTO; LTO Æ AC. ALL users can accept/refuse Referrals. Hint: In the case of hybrid Service Providers, those LTOs who perform various AC functions, Referrals must be made to their own organization. This is due to the fact that Referral data is tracked by the Ministry. 59 STaRS User's Guide Create Referrals Use this function to create referrals and/or to review / update existing referrals. This function is primarily used by ACs to create Referrals however all users can create Referrals. This function effectively replaces the “Green Card” as a means of sharing information. It is key as a method of allowing other Service Providers access to Client information. Without a Referral (to an LTO), Student intake cannot occur. Make a Referral To create a referral, follow these steps: 1 Select Referrals from the main menu and wait for the Referral Search page from the Create Referrals function to display fully. 2 Select the radio button adjacent to the IMM/PRC NUMBER field or adjacent to the Other ID/Type fields and enter the applicable IMM/PRC NUMBER number (including the “W”) or Other ID number. If an Other ID number is entered, select the appropriate Type using the drop down. 3 Click fully. 4 Enter the required information taking care to ensure that all mandatory fields are completed. button and wait for the Enter/Update Referral page to display Use the FROM Provider Status field to reflect the status of this referral. For referrals created by an AC, leaving the status as per the default setting “From Assessment Centre” is probably all that is required. For referrals created by LTOs, the status code should be reviewed. Select Referral Slip to automatically generate a printed referral slip. 5 Click to save the data. After the referral information has been saved, you may: • Go directly to the Class Availability Inquiry function by clicking • Go directly to the Client Inquiry function . Hint: The Client Inquiry function button will direct the user to a series of screens containing a snap-shot view of ‘read-only’ Client information. Please Note: In the case of hybrid Service Providers, those LTOs who perform various AC functions, Referrals must be made to their own organization. This is due to the fact that Referral data is tracked by the Ministry. 60 Referral Management 61 STaRS User's Guide Update an existing Referral To modify/update a referral, follow these steps: 1 Select Referrals from the main menu and wait for the Referral Search page from the Create Referrals function to display fully. 2 Enter the desired search parameters. 3 Click Note: button and wait for the Enter/Update Referral page to display fully. If one or more referrals already exist for this client, you will either be directly presented with the Enter/Update Referrals page (if there is only one referral) or Referral Search Result page (if there are multiple). If multiple referrals exist, select the desired row by clicking the radio button after paging through the table as needed. Then click 4 to review the referral. Update the required information taking care to ensure that all mandatory fields are completed. Use the FROM Provider Status field to reflect the status of this referral. Select Referral Slip to automatically generate a printed referral slip. 5 62 Click to save the data. Referral Management Accept / Refuse Referrals This function is primarily used by LTOs to accept / refuse Referrals however all users can Accept / Refuse Referrals. All users should regularly review Referral list for new, incoming to-do items. This function effectively replaces the “Green Card” as a means of sharing information. It is key as a method of allowing other Service Providers access to Client information. Without a Referral (to an LTO), Student intake cannot occur. When selecting the Referrals option from the main menu then the Accept / Refuse Referrals function, the Referral Search page is displayed as shown below: Figure 27 – Accept / Refuse Referral Main Page Referral Search Hints: Search fields can be used alone or in combination. Utilizing multiple search criteria will result in fewer returns as the Referral list will build as history is created. 63 STaRS User's Guide Viewing the Referrals List To accept / refuse referrals, follow these initial steps: 1 Select Referrals from the main menu, then select the Accept / Refuse Referrals option from the sub-menu and wait for the Referral Search page display fully. 2 Enter the desired search parameters. 3 Click button and wait for the Referral page to display fully. Note1: If multiple referrals qualify, the results page will be displayed. Select the desired row by clicking the radio button after paging through the table as needed. Then click to review the desired referral. If only one referral is qualified, the Referrals details page will be displayed. Note2: If the TO Provider Status Code has been set to “Cancelled”, then you will only be able to review the referral information; however, will not be permitted to change it. Please Note: Over time, the Referral list will build. When acting on Referrals, users should change the TO Provider Status Code and TO Status Date to the applicable value(s) before pressing any of the buttons to continue on to another function in order to limit results on future Referral searches. Accept Referred Client as a Student To accept a referred Client as a Student, follow this step: 1 Change the TO Provider Status Code and TO Status Date and click set the Student up under the Maintain Student Information function. to Continue with the steps under the Maintain Student Information function to create the Student’s information. Place the Referred Client on a Waitlist To create a waitlist item for the referred Client, follow this step: 1 Change the TO Provider Status Code and TO Status Date and click create waitlist item in the Manage Waitlist function. to Continue with the steps in the Manage Waitlist function to create a waitlist item for this Client and prior to future actions from the Waitlist. 64 Referral Management Please Note: Student intake can occur at any time. Clients placed on the Waitlist can remain as Clients until such time as they are taken off the Waitlist and placed into a class. Service Providers are encouraged to develop business rules and consistent processes around when Student intake occurs, either at the time the Client is placed on the Waitlist or just prior to the Student’s Class Placement. Refuse the Client Referral To refuse the referral, you must create another referral, typically back to an Assessment Centre or another LTO who can better service the client’s needs, by following the steps below: 1 Change the TO Provider Status Code and TO Status Date and click create another referral in the Create Referrals function. to Continue with the steps in the Create Referrals function to create the new referral for this Client. Update the Referral Information To update the referral, follow these steps: 1 Make any appropriate changes to the desired referral and click save the changes. This button will not navigate to any other screen. 2 Click to simply to return to the search page. 65 Student Management The Student Management function is used by Language Training Organizations to maintain student information, deal with waitlists and place students into classes. When selecting the Students option from the main menu, the Student Search page of the Maintain Student Information function is displayed as shown below: Figure 28 - Student Management Main Page Hint: Some of the functions described in this section can be accessed in more than one way. Users may be directed to various screens automatically from other areas of the application thereby avoiding the need to execute searches to access the desired screens. 67 STaRS User's Guide Maintain Student Information Use this function to maintain student information. Setting up a NEW Student To set up a new student, follow these steps: 1 Select Students from the main menu and wait for the Student Search page from the Maintain Student Information to display fully. 2 Specify the LTO Location under which the student is to be set up. 3 Select the radio button adjacent to the IMM/PRC NUMBER field or adjacent to the Other ID/Type fields and enter the applicable IMM/PRC NUMBER number (including the “W”) or Other ID number. If an Other ID number is entered please select the appropriate Type using the drop down. 4 Click button and wait for the student details page to display fully. Note1: If the entered IDs already identify an existing student, the warning ”Student already exists in the System for the supplied IMM/PRC NUMBER Number. Please provide a new value” will be displayed and the page will be redisplayed. Simply try again or click to edit the existing client information using the Enter/Update Student Details page. Note2: If accessing this function from the Referral screen, searching for the applicable student may not be required as you may be automatically presented with a data entry screen. 5 Enter the required information ensuring all mandatory fields are completed. Note1: It is recommended that you provide some value in the optional Student Number field since this will be displayed on pages and reports. Note2: The Previous Hours represents all hours of ELSA training that the student has taken in all LTOs prior to being set up as a student at this location and must be manually inserted based on available attendance information. Note3: The Original Start Date is for informational purposes to indicate the date when the Client first began ELSA training (under any LTO). The Current Start Date is used to record start date(s) at the current LTO. Note4: Effective STaRS Version 3.0, the Original ELSA Level field will populate automatically with data from the Client’s Assessment detail. If there is no Assessment, the value will display as a “P” where “P” equals Pending, until such time as the user updates the value from actual assessment results. It is the value in this field that is the basis for the population of the “Max. Allotted Hours” field and therefore it is key for the calculation function to run successfully. Note5: Effective STaRS Version 3.0, initially, the Current ELSA Level field will populate automatically with data from the Client’s Assessment detail. STaRS will then populate this field automatically with data from the Student’s Attendance detail when it is updated to a different value as part of Attendance recording. If/when altered, 68 Student Management STaRS will then populate the ELSA level field on all future Class Placements with the new Current ELSA Level designation. 6 You may optionally press the Date and Expected End Period. button to calculate the Expected End Note1: if you select this button then the Current Start Date and Max Allotted Hours must be specified. The formula takes the (Max Allotted Hours + Extension Hours) – Previous Hours divided by the default number of hours. The result is the number of periods. The number of periods is counted forward to determine Expected End Date and Expected End Period. The default number of hours is based upon the FULL TIME Service-Provider system parameter and is used if the Full Time Student checkbox is checked. If not, the PART TIME Service-Provider system parameter is used. If there are not sufficient periods defined at this point, then the following error is displayed: ”No Period Exists…” Note2: The Expected End Date and Expected End Period must be blank for the calculation to be run or re-run. Hint: Full and part time hours parameters can be customized by each LTO, specific to their location. To change from the application default settings for Full Time Hours (Full time = 100 hours), utilize the Maintain System Parameters function from the Utilities menu. To change from the application default settings for Part Time Hours (Part time = 50 hours), utilize the Maintain Code Values function from the Utilities menu. 7 Click to save the data. If CONTACT information is to be recorded, 1 Click the Contact Information tab and wait for this tab to display fully. 2 Enter the required information taking care to ensure that all mandatory fields are completed. Note: 3 Click Note: The Primary Contact checkbox is optional; however, one of the contacts should be designated as primary. Where Student Contact information is to print on reports, the primary contact will be selected for printing. to save the data. Contact details entered here are separate from both Client and Child Contact info. If BREAK information is to be recorded, 1 Click the Break Information tab and wait for this tab to display fully. 69 STaRS User's Guide 2 Enter the required information taking care to ensure that all mandatory fields are completed. 3 Click 4 To add additional breaks click the to save the data. button and repeat steps 2 and 3 above. After the student information has been saved, you may: • Click • Add additional contacts simply clicking the • button, and the Class To place the student in a class, click the Placement function will be called. This step can also be performed at a later time (and is noted as a separate set of steps below). to return to the Student Search page. button. After the student information has been saved, you may: • Review previous versions of student data by selecting the List of Student History popup and selecting a specific history row. Note that you are NOT able to update the information from an audit history row. The information is provided for audit purposes only. Updating Information for an EXISTING Student To update information for an existing student, follow these steps: 1 Select Students from the main menu and wait for the Student Search page from the Maintain Student Information to display fully. 2 Enter the desired search criteria and press the Note: button. If multiple student rows are qualified, a Student Search Results page will be displayed. Select the desired row by clicking the radio button after paging through the table as needed. Then click information. to edit the existing student If only one student row is qualified, the Enter/Update Student Details page will be displayed. 3 Update the information as desired taking care to ensure that all mandatory fields are completed. 4 Click to save the data. If EXTENSION / EXIT Information is to be updated/recorded, 1 Click the Extension / Exit Information tab and wait for this tab to display fully. 2 Enter/update the required information taking care to ensure that all mandatory fields are completed. 70 Student Management 3 Click to save the data. To update an existing student contact, 1 Click the Contact Information tab and wait for this tab to display fully. 2 Select the List of Contacts pop-up and select the desired contact. 3 Enter/update the required information taking care to ensure that all mandatory fields are completed. 4 Click to save the data. If BREAK information is to be updated/recorded, 1 Click the Break Information tab and wait for this tab to display fully. 2 Enter/update the required information taking care to ensure that all mandatory fields are completed. 3 Click 4 To add additional breaks click the to save the data. button and repeat steps 2 and 3 above. After the student information has been saved, you may: • Click • Add additional contacts by selecting the Contact Information tab and clicking the to return to the student search page. button. • If the student is not already placed in a class, you may place the student by clicking the button, and the Class Placement function will be called. This step can also be performed at a later time (and is noted as a separate set of steps below). • View the student’s attendance history at the current LTO by clicking the button. This will display a summary of attendance by ELSA Level. Select the Detail Student Information tab to display a history of attendance details by class / class period. View the student’s attendance history for all previous LTOs by clicking the [Complete History] button. Placing a Student in a Class To place a student into a class, follow these steps: 1 Select Students from the main menu and wait for the Student Search page from the Maintain Student Information to display fully. 2 Enter the desired search criteria and press the button. 71 STaRS User's Guide Note: If multiple student rows are qualified, a Student Search Results page will be displayed. Select the desired row by clicking the radio button after paging through the table as needed. Then click information. to edit the existing student If only one student row is qualified, the Enter/Update Student Details page will be displayed. 3 Click the Note: button, and the Class Placement function will be called. If a current Active Class Placement exists, the screen called as part of the above step will be a ‘read-only’ one as only one active Class Placement can exist at one time. 4 Enter the required information taking care to ensure that all mandatory fields are completed. 5 Click 72 to save the data. Student Management Manage Waitlist Items Use this function to manage waitlist items. Use Waitlist Report to view waitlist items. Waitlist items, Referrals, and Student records are independent of each other. The only common factor is that they pertain to a particular Client. Per ELSA rules, there may be only one Waitlist item for a Client, for one LTO Location at any one time Setting up a NEW Waitlist Item To place a client on a waitlist, follow these steps: 1 Select Students from the main menu and then select the Manage Waitlist sub-menu option. Wait for the Waitlist Search page from the Manage Waitlist function to display fully. 2 Specify the LTO Location under which the waitlist item is to be created. 3 Select the radio button adjacent to the IMM/PRC NUMBER field or adjacent to the Other ID/Type fields and enter the applicable IMM/PRC NUMBER number (including the “W”) or Other ID number. If an Other ID number is entered please select the appropriate Type using the drop down. 4 Click 5 Enter the required information ensuring all mandatory fields are completed. 6 Click button and wait for the waitlist details page to display fully. to save the data. Please Note: Student intake can occur at any time. Clients placed on the Waitlist can remain as Clients until such time as they are taken off the Waitlist and placed into a class. Service Providers are encouraged to develop business rules and consistent processes around when Student intake occurs, either at the time the Client is placed on the Waitlist or just prior to Class Placement. Updating an EXISTING Waitlist Item To update information for an existing waitlist item as status is changed (i.e.: Class Placement, Dropped, etc.), follow these steps: 1 Select Students from the main menu and then select the Manage Waitlist sub-menu option. Wait for the Waitlist Search page from the Manage Waitlist function to display fully. 2 Enter the desired search criteria and press the button. Note1: If multiple waitlist rows are qualified, a Waitlist Search Results page will be displayed. Select the desired row by clicking the radio button after paging through the table as needed. Then click to edit the existing waitlist item. 73 STaRS User's Guide If only one waitlist item is qualified, the Enter/Update Waitlist Details page will be displayed. Note2: The LTO Location is ignored when you are searching for an existing waitlist item. 3 Update the information as desired taking care to ensure that all mandatory fields are completed and change the Waitlist Status Code and Waitlist Status Date. 4 Click to save the data. Hint: Waitlist information is NOT tied to defined classes. Please Note: Over time, the Waitlist will build. When acting on Waitlist items, users should change the Waitlist Status Code and Waitlist Status Date to the applicable value(s) before pressing any of the buttons to continue on to another function in order to limit results on future Waitlist searches. Refer the Client to an Assessment Centre or Another LTO To refer the client from a waitlist item to an Assessment Centre, follow these steps: 1 Select Students from the main menu and then select the Manage Waitlist sub-menu option. Wait for the Waitlist Search page from the Manage Waitlist function to display fully. 2 Enter the desired search criteria and press the Note: button. If multiple waitlist rows are qualified, a Waitlist Search Results page will be displayed. Select the desired row by clicking the radio button after paging through the table as needed. Then click to edit the existing waitlist item. If only one waitlist item is qualified, the Enter/Update Waitlist Details page will be displayed. 3 74 Click to call the Create Referrals function. Student Management Class Placement This is used to place students into classes. It can be accessed from the Students main menu either via the Maintain Student Information or Class Placement sub-menu items. Itemized below is the process from the Class Placement sub-menu item. Itemized on previous pages is the process from the Maintain Student Information process. The Student is initially placed into a Class / Class Period. They are subsequently continued or transferred to the next Class / Class Period using Class Management functions (using the Continue Students or Discontinue Students functions on the Class Management menu). A Class Placement record is required to be able to enter attendance information for the Student under the specified Class / Class Period (in the Record Student Attendance function on the Class Management menu). Place a Student in a Class To place a student into a class / class period, follow these steps: 1 Select Students from the main menu and then select the Class Placement sub-menu option. Wait for the Class Placement Search page from the Class Placement function to display fully. 2 Specify the LTO Location under which the student is to be placed. 3 Select the radio button adjacent to the IMM/PRC NUMBER field or adjacent to the Other ID/Type fields and enter the applicable IMM/PRC NUMBER number (including the “W”) or Other ID number. If an Other ID number is entered please select the appropriate Type using the drop down. 4 Click Note: button and wait for the placement details page to display fully. If the entered ID already identifies a student with an existing class placement, the warning ”Client/Student corresponding to the given IMM/PRC NUMBER Number already Placed in the system for the given Location. Please provide a new value.” will be displayed and the page will be redisplayed. to edit the existing student class placement information using Click the Enter/Update Placement Details page. 5 Enter the required information ensuring all mandatory fields are completed. 6 Click to save the data. After the class placement has been saved you may: • View the student’s attendance history at the current LTO by clicking the button. This will display a summary of attendance by ELSA Level. Select the Detail Student Information tab to display a history of attendance details by class / class period. View the student’s attendance history for all previous LTOs by clicking the [Complete History] button. 75 STaRS User's Guide Canceling an Existing Student Class Placement To update/cancel an existing student class placement, follow these steps: 1 Select Students from the main menu and then select the Class Placement sub-menu option. Wait for the Class Placement Search page from the Class Placement function to display fully. 2 Enter the desired search criteria and press the button. Note1: If multiple class placement rows are qualified, a Class Placement Search Results page will be displayed. Select the desired row by clicking the radio button after paging through the table as needed. Then click waitlist item. to edit the existing If only one class placement row is qualified, the Enter/Update Placement Details page will be displayed. 3 Select the dropdown box and change the Placement Status to “Inactive”. 4 Click Note: to save the data. For Class Placements definitely made in error, users may alternately unclick the Active Flag instead which will result in the incorrect Class Placement no longer being displayed anywhere in the application in the future. However, once unclicked, it can never be clicked again so users should utilize this function with caution. To view the student’s attendance history while at the current LTO, 1 Click the 2 The Student Attendance Summary tab will display a summary of attendance by ELSA Level. 3 Select the Detail Student Information tab to display a history of attendance details by class / class period. 4 Click button. to return to the Enter/Update Placement Details page. Hint: There may only be one record per Student with an Active Placement Status of “Active” at one time. This indicates the current Class / Class Period under which the Student has been placed or continued, i.e.: Student cannot be continued by an LTO if they have been transferred to another. 76 Class Management The Class Management function is used by Language Training Organizations to maintain class information as well as class availability information. When selecting the Class Management option from the main menu, the Class Search page of the Maintain Classes function is displayed as shown below: Figure 29 – Class Management Main Page 77 STaRS User's Guide Maintain Classes Use this function to manage Classes. Please Note: You cannot change a Class Number for a Class once it has been saved. You must first delete the Class and set it up again. However, you cannot do this if Class Periods have been defined against that Class. Create a NEW Class To create a new Class, follow these steps: 1 Select Class Management from the main menu and wait for the Class Search page to display fully. 2 Specify the LTO Location AND Class Number. Hint: It is recommended all LTOs utilize the same number of characters to define all class numbers to ensure all future lists sort in order. The field allows up to four alpha-numeric characters. 3 Click button and wait for the Class details page to display fully. 4 Enter the required information ensuring all mandatory fields are completed. Note 1: The Class Progress Level field is a numeric value that may optionally be used to define which Classes are grouped together. Any numbering scheme may be used to define the grouping as long as it is a numeric one (with higher numbers denoting higher level classes). For example there may be a number of Classes defined that are primarily ELSA Level 1 Classes (using, for example, numbers in the 100 series) and others may be defined as primarily ELSA Level 2 Classes (using, for example, numbers in the 200 series). By numbering all the ELSA Level 1 Classes with the same/similar progress level value, when a Student is continued from an ELSA Level 1 Class to an ELSA Level 2 Class, then the Level Progression Date will be updated for the Student in their Student Attendance Summary information. Note 2: The Print Monday through Print Sunday flags are used to determine which days in a Class Period are printed on the Attendance Sheet (RP0040) for each class. There are system parameters used to determine the system wide print flag defaults for Saturdays and Sundays. Note 3: The Default Instructor 1 and Default Instructor 2 drop downs are populated from the instructors set up under Maintain Code Values function under the Utilities menu. Hint: It is recommended to set up instructors prior to using this function in order to have the list populated when it is needed. 78 Class Management to save the data. 5 Click 6 Now select the Class Periods tab. 7 Click the Note: button. The Period drop down is populated from the periods set up under Maintain Periods function under the Utilities menu. Hint: It is recommended to set up periods prior to using this function in order to have the list populated when it is needed. 8 Enter the required information ensuring all mandatory fields are completed. 9 Click to save the data. Updating an EXISTING Class To update information for an existing Class, follow these steps: 1 Select Class Management from the main menu and wait for the Class Search page to display fully. 2 Enter the desired search criteria and press the Note: button. If multiple Class rows are qualified, a Class Search Results page will be displayed. Select the desired row by clicking the radio button after paging through the table as needed. Then click to edit the existing class item. If only one Class is qualified, the Enter/Update Class Details page will be displayed. 3 Update the information as desired taking care to ensure that all mandatory fields are completed. 4 Click to save the data. Hint: When searching for an existing class, it is not necessary to specify both the LTO Location AND Class Number. Specifying both parameters is only required as part of initial class creation. 79 STaRS User's Guide Adding Additional Class Periods If you wish to add additional Class periods to a Class, follow these steps: 1 Select Class Management from the main menu and wait for the Class Search page to display fully. 2 Enter the desired search criteria and press the Note: button. If multiple Class rows are qualified, a Class Search Results page will be displayed. Select the desired row by clicking the radio button after paging through the table as needed. Then click to edit the existing class item. If only one class is qualified, the Enter/Update Class Details page will be displayed. 3 Select the Class Periods tab. 4 Click the Note: button. The Period drop down is populated from the periods set up under Maintain Periods function under the Utilities menu. 5 Enter the required information ensuring all mandatory fields are completed. 6 Click 7 Repeat steps 4 through 6 to add additional Class Periods as appropriate. to save the data. Changing a Class Number To change a Class number, you must delete the Class and replace it. Follow these steps: 1 Select Class Management from the main menu and wait for the Class Search page to display fully. 2 Enter the desired search criteria and press the Note: button. If multiple Class rows are qualified, a Class Search Results page will be displayed. Select the desired row by clicking the radio button after paging through the table as needed. Then click to edit the existing class item. If only one Class is qualified, the Enter/Update Class Details page will be displayed. 3 Click Note: 4 80 Click to delete the Class. You can NOT delete the Class if Class Periods have already been defined against this Class. If one or more Class Periods have been defined, then “Class period exists for the class. Class cannot be deleted.“ will be displayed. to return to the Class Search page. Class Management 5 Specify the LTO Location and the replacing Class Number. 6 Click 7 Enter the required information as before ensuring all mandatory fields are completed. Note: button and wait for the Class details page to display fully. The Default Instructor 1 and Default Instructor 2 drop downs are populated from the instructors set up under Maintain Code Values function under the Utilities menu. 8 Click 9 If you are satisfied with the Class Number then select the Class Periods tab to add Class Periods against the Class. to save the data. 10 Click the Note: button. The Period drop down is populated from the periods set up under Maintain Periods function under the Utilities menu. 11 Enter the required information ensuring all mandatory fields are completed. 12 Click to save the data. 13 Repeat steps 10 through 12 to add additional Class Periods as appropriate. 81 STaRS User's Guide Maintain Class Availability Use this to maintain class availability information. Any user with access to the STaRS application can view the posted information utilizing the Class Availability Inquiry function from the Client menu. Details should be added/updated on a timely basis as per business rules in place between various Service Providers. Please Note: To support searching on the Class Availability Grouping information, use the following standards for data entry: ELSA Level Description – Use only the following codes to describe the levels of your Classes: 1, 2, 3, 1lit, 1/1lit, 2b, 3b, 1/2, 2/3, 1/2/3. School Days Description - It is highly unlikely that an Assessment Centre will search for class availability by day of the week. Nevertheless, for consistency, fill in the School Days Description using just the first two letters of the day of the week (i.e.: Mo,Tu,We,Th,Fr, Mo to Th, etc.). Time Description – Format is as per data table, standard time, leading zero if applicable, no spaces around hyphen and only one reference to AM/PM. For example: 08:30-11:00 AM, 09:30-12:30 PM, 6:00-9:00 PM Start Date Description – 0 months, 1 month, 2 months, 3 months, 4 months, 5 months, 6 months, closed. (This item refers to the duration of the wait.) Shift Description – AM, PM, Afternoon, Evening, as applicable. Shift – Select one of the options available via the drop down box. Service Duration Comments – If not year-round, state summer closure dates. General Comments – Use the word “childminding” in this section if childminding is offered at the location and shift time of the specific Class(s). Hint: Class availability information is NOT tied to defined classes. You may enter any free-format text you desire to describe the availability of classes. Follow the above guidelines for data entry and remember, there is no spell-check. Think of the Class Availability information as an ad you post to indicate the availability of classes at various ELSA levels to referring assessment centres. 82 Class Management Create Class Availability Information for a Location To create new class availability information for a location, follow these steps: 1 Select Class Management from the main menu and then select the Maintain Class Availability sub-menu option. Wait for the Class Search page to display fully. 2 Specify the LTO Location. 3 Click fully. 4 Enter the required information ensuring the mandatory field is completed. button and wait for the class availability details page to display Note1: This information is free-format text. There is no spell-check. Note2: IF the Childminding Availability flag is checked, it will be matched when the Childminding Required flag has been selected by anyone searching under the Class Availability Inquiry function on the Clients menu. Use the word “childminding” in the General Comments section of the Class Availability Grouping detail of the specific Class(s) where childminding is available. 5 Click 6 Now select the Class Availability Grouping tab. 7 Click the 8 Enter the required information ensuring all mandatory fields are completed. Note: 9 Click to save the data. button. As previously indicated, there is no direct correlation between class availability information and classes that have been defined. You may specify one grouping row for one class or may have a grouping row identify availability of multiple classes. to save the data. To jump to the Class Availability Inquiry function you may: • Click button. This displays the Class Availability Search page. Updating Class Availability Information To maintain/update class availability information, follow these steps: 1 Select Class Management from the main menu and then select the Maintain Class Availability sub-menu option. Wait for the Class Search page to display fully. 2 Enter the desired search criteria and press the button. 83 STaRS User's Guide 3 Update the information as desired taking care to ensure that all mandatory fields are completed. 4 Click 84 to save the data. Class Management Record Student Attendance This is used to record student attendance totals for the Class / Class Period. Use the Attendance Sheet Report as the turnaround document to keep track of attendance throughout the period in preparation for data-entry via this function. A Class Placement record is required to be able to enter attendance information for the Student under the specified Class / Class Period. Class placement may be inactive when attendance is entered if Continue/Discontinue/Transfer Student function has already been executed. Enter Student Attendance To enter student attendance, follow these steps: 1 Select Class Management from the main menu and then select the Record Student Attendance sub-menu option. Wait for the Class / Class Period Search page to display fully. 2 Specify the LTO Location and / or the Class Number and / or the Class Period as search criteria. 3 Click fully. button and wait for the Class Period Information page to display Note1: If you have specified only the LTO Location and none are found then “No Student is placed in the System for the supplied LTO Location. Please provide a new value” will display. If you have specified the LTO Location and the Class Number and none are found then “No Student is placed in the System for the supplied Class Number. Please provide a new value” will display. If you have specified the LTO Location and the Class Number and the Class Period and none are found then “No Student is placed in the System for the supplied Class Period. Please provide a new value” will display. Note2: If multiple classes are qualified, a Class / Class Period Search Results page will be displayed. Select the desired row by clicking the radio button after paging through the table as needed. Then click to enter student attendance. If only one class is qualified, the Class Period Information page will be displayed. 4 Enter Attendance Hours. To enter the default number for Attendance Hours for all the button. This will fill in the students in the class / class period, click the default hours as defined for the class / class period for each student displayed. IF the default number of hours is used, it should be manually changed for any students who stopped/started mid-month. Note1: If you have previously specified a value for Attendance Hours for one or more students, these will be overwritten by the default hours should you click the [default] button. Note2: As of application Release 1.40N, there is one decimal position permitted to enter attendance hours. Prior to Release 1.40N, fractions of hours were not allowed. 5 Also enter the Excused Hours and Non-Excused Hours for the students as applicable. 85 STaRS User's Guide Note1: The ELSA level defaults from the Current ELSA Level field on Student details record. If the student has continued to another ELSA Level during the period, you may optionally change the ELSA Level. Note2: The Status field will indicate “Active” if this represents the current class / class period under which the student was placed or continued. It will indicate “Inactive” if the student was continued to another class / class period or discontinued/transferred prior to data-entry of attendance. 6 Click 7 Repeat Steps 4-6 for each page of Student records returned as part of the Class. to save the data. To view a student’s attendance history at the current LTO, 1 Select the row for the student whose attendance history you wish to view. 2 Click the 3 The Student Attendance Summary tab will display a summary of attendance by ELSA Level. 4 Select the Detail Student Information tab to display a history of attendance details by class / class period. 5 Click button. to return to the Class Period Information page. Update Student Attendance To update student attendance, follow the same steps followed to enter the student attendance as noted above. Simply override any data already entered, on an individual basis (see note on Item 4, previous page). If any changes are made subsequent to report generation, Reports may need to be rerun. Please Note: Only attendance totals are entered into STaRS. Data-entry of totals does not eliminate the need for paper filing of the attendance sheets themselves. Refer to Ministry staff for the process to be used to enter PRE-STaRS attendance hours in STaRS. Hint: LTOs are NOT to deduct Excused Hours (student has notified the LTO of his/her absence) and/or Non-Excused Hours (student has NOT notified LTO of his/her absence) from attendance hours. STaRS will calculate hours of entitlement (upon which the ‘graduation report’ is issued) from attendance hours, i.e.: the gross figure rather than the reduced net hours of actual attendance. 86 Class Management Continue Students This is used to continue students to another class / class period within the same LTO. When continuing students via this method, STaRS automatically creates a new active class placement record for the continued TO class / class period while at the same time marking the continued FROM class placement as inactive. Please Note: You should discontinue and/or transfer individual students prior to continuing the remainder of the students. Additionally, if applicable, you should continue individual students prior to continuing by class. Continue INDIVIDUAL STUDENTS To continue one or more students, follow these steps: 1 Select Class Management from the main menu and then select the Continue Students sub-menu option. Wait for the Class / Class Period Search page to display fully. 2 Enter the desired search criteria and press the Note: button. If multiple classes are qualified, a Class / Class Period Search Results page will be displayed. Select the desired row by clicking the radio button after paging through the table as needed. Then click to select the appropriate Class. If only one Class is qualified, the Continue Students page will be displayed on the Class / Class Period Information tab. 3 Select the Student Information tab. Note: The Class / Class Period Information tab looks much like Student Information tab. 4 Check which student(s) you wish to continue. 5 Specify the Service Provider Location, Next Class and Next Class Period. Note: 6 Click period. 7 Click First select the Service Provider Location (if different than the current one) and then choose a class from the Next Class pop up. At that point, the pop up for Next Class Period will display current or future periods under the selected class. to continue selected student(s) to the next class / class to return to the Class / Class Period Search page. 87 STaRS User's Guide 8 Repeat Steps 6 and 7 for each subsequent page of student records to ensure entire class is continued to appropriate next class(s). Continue BY CLASS To continue all students in the class, follow these steps: 1 Select Class Management from the main menu and then select the Continue Students sub-menu option. Wait for the Class / Class Period Search page to display fully. 2 Enter the desired search criteria and press the Note: button. If multiple classes are qualified, a Class / Class Period Search Results page will be displayed. Select the desired row by clicking the radio button after paging through the table as needed. Then click to select the appropriate Class. If only one Class is qualified, the Continue Students page will be displayed on the Class / Class Period Information tab. 3 Specify the Service Provider Location, Next Class and Next Class Period. Note: 4 Click 5 Click First select the Service Provider Location (if different than the current one) and then choose a class from the Next Class pop up. At that point the pop up for Next Class Period will display current or future periods under the selected class. to continue all students to the next class / class period. to return to the Class / Class Period Search page. Hint: Prior to continuing an entire class, it is recommended the list of students currently in the class be reviewed to ensure only applicable students are being continued. Hint: If the User continued a Student to the wrong Class / Class Period, they should change this record’s Active Placement Status to “Inactive” and unclick the Active flag. The User would then display the Class Placement record from which the Student was continued and change the Active Placement Status on that record back to “Active”. This will in effect undo the Student’s continuance. 88 Class Management Discontinue Students This is used to discontinue students from further ELSA training. When dis-continuing students via this method, STaRS automatically sets the FROM class placement to INactive. Should students be dis-continued via other methods, users will manually have to set current class placement to INactive to ensure student is not inadvertently continued. Discontinue a Student To discontinue a student, follow these steps: 1 Select Class Management from the main menu and then select the Discontinue Students sub-menu option. Wait for the Class / Class Period Search page to display fully. 2 Enter the desired search criteria and press the Note: button. If multiple Classes are qualified, a Class / Class Period Search Results page will be displayed. Select the desired row by clicking the radio button after paging through the table as needed. Then click to select the appropriate Class. If only one Class is qualified, the Class Period Information page will be displayed. 3 Select which student you wish to discontinue. 4 Click the 5 The Extension / Exit Information tab will display under the Maintain Student Information function. button to discontinue the student. Note1: If discontinuation is due to completion, complete the following fields: Completion Date, Complete Type and Completion Comments. Note2: If discontinuation is due to something other than completion, complete the following fields: Discontinuance Date, Discontinuance Type and Discontinuance Reason. 6 Specify the appropriate exit information for the student. 7 Click 8 Select the Student Information tab and change the Student Status to “Inactive” and update the Student Status Date. 9 Click to save the data. to save the data. 10 Click to return to the Class / Class Period Search page under the Discontinue Students function. 89 STaRS User's Guide Discontinue a Student by Placing them on a Waitlist To discontinue a student to a waitlist, follow these steps: 1 Select Class Management from the main menu and then select the Discontinue Students sub-menu option. Wait for the Class / Class Period Search page to display fully. 2 Enter the desired search criteria and press the Note: button. If multiple Classes are qualified, a Class / Class Period Search Results page will be displayed. Select the desired row by clicking the radio button after paging through the table as needed. Then click to select the appropriate Class. If only one Class is qualified, the Class Period Information page will be displayed. 3 Select which student you wish to discontinue. 4 Click the 5 The Waitlist Details tab will display under the Manage Waitlist Items function. 6 Specify the appropriate waitlist information for the student ensuring mandatory fields are completed. 7 Click 8 Click to return to the Class / Class Period Search page under the Discontinue Students function. Note: button to discontinue the student to a waitlist. to save the data. If applicable, you may also wish to add break information for the student on the Break Information tab of the Maintain Student Information function. Please Note: Each Service Provider is to define their own business rules around when Break functionality is used and how, taking into consideration ELSA Rules. Refer to Maintain Student Information section for instructions on the Break tab. Reactivating the Class Placement for a Student Discontinued in Error To reactivate the Student’s Class Placement, follow these steps: 1 Select Students from the main menu and then select the Class Placement sub-menu option. Wait for the Class Placement Search page from the Class Placement function to display fully. 2 Enter the desired search criteria and press the Note: If multiple Class Placement rows are qualified, a Class Placement Search Results page will be displayed. Select the desired row by clicking the radio button after paging through the table as needed. Then click Class Placement record. 90 button. to edit the existing Class Management If only one Class Placement row is qualified, the Enter/Update Placement Details page will be displayed. 3 Ensure the Active flag is checked and change the Placement Status to “Active”. Note: If student status was also changed to “Inactive” as part of the discontinuation process, it will also need to be updated to “Active.” 4 Click to save the data. 91 STaRS User's Guide Transfer Students This is used to either transfer a student to another location within the LTO, if the Service Provider has been set up with multiple, separate locations, or to refer the student to another LTO (or possibly back to an Assessment Centre). When transferring students via this method, STaRS automatically sets the FROM class placement to INactive. Should students be transferred via other methods, users will manually have to set current class placement to INactive to ensure student is not inadvertently continued/discontinued. Please Note: You can use the Continue Students function to continue a student to a class / class period within the same LTO location. Use the Transfer Student function if the student is either moving to another, separate LTO location or to another LTO. Transfer a Student to Another Location (Within the LTO) To transfer a student to another location within the LTO, follow these steps: 1 Select Class Management from the main menu and then select the Transfer Students submenu option. Wait for the Student Search page to display fully. 2 Enter the desired search criteria and press the Note: button. If multiple Classes are qualified, a Student Search Results page will be displayed. Select the desired row by clicking the radio button after paging through the table as needed. Then click to select the appropriate Class. If only one Class is qualified, the Student Information page will be displayed. 3 Select the New LTO Location, New Class Number, and New Class Period. 4 Click the 5 The Student Information tab will display under the Maintain Student Information function. 6 Specify the student information for the Student in the new location. button to transfer the Student. Optionally check Print Transfer Slip to automatically generate a printed transfer slip. 7 Click to save the data. Note1: If applicable, you may also wish to add contacts for the Student at this new location. Note2: The Student Status will be changed to “Inactive” for the Student and the Student’s Class Placement under the location FROM which they transferred. A Class 92 Class Management Placement will also be created for the student based upon the Class and Class Period that were specified on the transfer page. Transfer a Student to Another LTO (or Assessment Centre) Transferring a student to another LTO (or Assessment Centre) is, in essence, creating a Referral. Follow these steps: 1 Select Class Management from the main menu and then select the Transfer Students submenu option. Wait for the Student Search page to display fully. 2 Enter the desired search criteria and press the Note: button. If multiple classes are qualified, a Student Search Results page will be displayed. Select the desired row by clicking the radio button after paging through the table as needed. Then click to select the appropriate Class. If only one Class is qualified, the Student Information page will be displayed. 3 Click the button to refer the student. Note1: The class placement FROM which the student is transferring will have the Placement Status changed to “Inactive”. This will mean that this student can not be continued or discontinued at this point since they have been transferred. Note2: When you’ve completed saving the Referral, you will also need to enter the appropriate exit information for the student on the Extension / Exit Information tab of the Maintain Student Information function (complete the following fields: Discontinuance Date, Discontinuance Type and Discontinuance Reason). While there, you will also want to change the Student Status to “Inactive” on the Student Information tab and update the Student Status Date. 4 The Referral Details tab will display under the Create Referrals function. 5 Specify the referral information including the Target Service Provider and Target Location ensuring the other mandatory fields have also been completed. If the Print Referral Slip checkbox is checked, one will be automatically generated. 6 Click to save the data. 93 Childminding / Daycare The Childminding / Daycare function is used by Language Training Organizations to maintain childminding / daycare information. When selecting the Childminding / Daycare option from the main menu, the Child Search page of the Maintain Child Information function is displayed as shown below: Figure 30 – Childminding / Daycare Main Page Please Note: ELSA rules dictate children are not eligible for childminding services unless there is a parent student, therefore there must be a student record for a parent student before child detail can be entered. 95 STaRS User's Guide Maintain Child Information This is used to maintain child information for children that require childminding / daycare services. Setting up a NEW Child To set up a new child, follow these steps: 1 Select Childminding / Daycare from the main menu and wait for the Child Selection Criteria tab from the Maintain Child Information to display fully. 2 Select the Client Selection Criteria tab. 3 Select the LTO Location where the child will receive childminding / daycare services. 4 Then select the radio button adjacent to the IMM/PRC NUMBER field or adjacent to the Other ID/Type fields and enter the applicable IMM/PRC NUMBER number (including the “W”) or Other ID number. If an Other ID number is entered please select the appropriate Type using the drop down. Note: 5 Click the Note: 6 The intent is to identify the parent student of the child. button and wait for the child details page to display fully. You may add as many children as you wish under a parent student. Enter the required information ensuring all mandatory fields are completed. Note1: Childminding Units are set by the system using a system parameter based upon the age of the Child as determined by the entered Birth Date. Note2: You may also optionally select an Other Parent Name for this child. The selection list will be based upon all students within this LTO. 7 Click to save the data. Hint: If “Other” is specified for Mother Tongue, then the specific description must be entered applicable Description field. If CONTACT information is to be recorded, 1 Click the Contact Information tab and wait for this tab to display fully. 2 Enter the required information taking care to ensure that all mandatory fields are completed. Note: 3 Click Note: 96 The Primary Contact checkbox is optional; however, one of the contacts should be designated as primary. Where Child Contact information is to print on reports, the primary contact will be selected for printing. to save the data. Contact details entered here are separate from both Client and Student Contact info. Childminding / Daycare To indicate which periods under which the child requires childminding / daycare services, 1 Click the Location Placement Info tab and wait for this tab to display fully. 2 Click the 3 Enter the required information ensuring all mandatory fields are completed. Note: button. You may also optionally select a different LTO Location for a period than under which the child has been defined. 4 Click to save the data. 5 Click to return to the Location Placement tab. 6 Repeat steps 2 through 5 for each period you want to indicate the child will be receiving childminding / daycare. Note: You may also return later to indicate additional periods for this child to correspond to those Periods the parent student is in attendance. Each LTO will need to define business processes as to when this information is entered, i.e.: when the child is initially entered OR as/when the parent student is continued. Updating Child Information To update information for a new child, follow these steps: 1 Select Childminding / Daycare from the main menu and wait for the Child Selection Criteria tab from the Maintain Child Information to display fully. 2 Specify the child’s name whose data you wish to update. Note: 3 You may optionally select the Client Selection Criteria tab to search for children by searching for the parent of the child. Press the Note: button. If multiple children are qualified, a Child Search Results page will be displayed. Select the desired row by clicking the radio button after paging through the table as needed. Then click to select the child. If only one child is qualified, the Child Details page will be displayed. 4 Update the information as desired taking care to ensure that all mandatory fields are completed. 5 Click to save the data. 97 STaRS User's Guide To update an existing child contact, 1 Click the Contact Information tab and wait for this tab to display fully. 2 Select the List of Contacts pop-up and select the desired contact. 3 Enter the required information taking care to ensure that all mandatory fields are completed. 4 Click to save the data. Adding Additional Childminding / Daycare Periods to a Child If you wish to associate additional periods of childminding / daycare services with a child, follow these steps. Each LTO will need to define business processes as to when additional period information is entered, i.e.: when the child is initially entered OR when the parent student is continued. 1 Select Childminding / Daycare from the main menu and wait for the Child Selection Criteria tab from the Maintain Child Information to display fully. 2 Specify the child’s name that you wish to update. Note: 3 You may optionally select the Client Selection Criteria tab to search for children by searching for the parent of the child. Press the Note: button. If multiple children are qualified, a Child Search Results page will be displayed. Select the desired row by clicking the radio button after paging through the table as needed. Then click to select the child. If only one child is qualified, the Child Details page will be displayed. 4 Click the Location Placement Info tab and wait for this tab to display fully. 5 Click the 6 Enter the required information ensuring all mandatory fields are completed. Note: button. You may also optionally select a different LTO Location for a period than under which the child has been defined. 7 Click to save the data. 8 Click to return to the Location Placement tab. 9 Repeat steps 5 through 8 for each period you want to indicate the child will be receiving childminding / daycare. 98 Childminding / Daycare Record Childminding / Daycare Attendance This is used to record childminding / daycare attendance (units). Use the Childminding / Daycare Attendance Sheet Report as the turnaround document to keep track of attendance throughout the period in preparation for data-entry via this function. Enter Childminding / Daycare Attendance To record childminding / daycare attendance, follow these steps: 1 Select Childminding / Daycare from the main menu and then select the Record Childminding / Daycare Attendance sub-menu option. Wait for the Childminding Attendance Search page to display fully. 2 Specify the LTO Location and / or the Period as search criteria. 3 Click display fully. Note: button and wait for the Childminding Search Results page to If you have specified only the LTO Location and none are found then “No Child Placed for the supplied Service Provider Location. Please provide a new value” will display. If you have specified the LTO Location and the Period and none are found then “No Child Placed for the supplied Period Number. Please provide a new value” will display. 4 The Class / Class Period Search Results page will be displayed. Select the desired row by clicking the radio button after paging through the table as needed. 5 Then click 6 Specify the total number of Childminding AM Units and Childminding PM Units by day. 7 Click 8 Repeat steps 5-7 for each page of records returned as part of the Period. to enter the attendance units. to save the data. Update Childminding / Daycare Attendance To update childminding / daycare attendance units, follow the same steps followed to enter childminding / daycare attendance units as noted above. Simply override any data already entered, on an individual basis. If any changes are made subsequent to report generation, Reports may need to be re-run. Please Note: Only attendance totals (units) are entered into STaRS. Data-entry of unit totals does not eliminate for paper filing of the attendance sheets themselves. Childminding Units are set by the system using a system parameter based upon ELSA rules and the age of the Child as determined by the entered Birth Date. 99 Letters & Reports The Letters & Reports function is used to select and run merge letters and reports. When selecting the Letters & Report option from the main menu, the Report Identification page of the Print Reports function is displayed as shown below: Figure 31 – Letters & Reports Main Page Please Note: ALL Reports have been designed to print in landscape format. Change printer setting to landscape via Properties on the print menu presented after pressing the Printer icon. ALL Letters have been designed in portrait format so no changes to printer settings are required. 101 STaRS User's Guide Print Reports This is used to print reports. All reports are landscape format. To print reports, follow these steps: 1 Select Letters / Reports from the main menu and wait for the Report Identification page to display fully. 2 Select a report from the drop down list. 3 Click the 4 The appropriate selection / sort criteria page will display for the report selected. button. Note1: All Reports have multiple options for customization by Service Provider via various selection and sort criteria. Some reports have the option to print all rows or active ones only. Review and experiment to find the best variation for your location. Note2: To globally turn off printing of report cover pages, set “Print Title Page” code value to “Inactive” via the Maintain System Parameters section under the Utilities menu. 5 Specify the appropriate selection criteria. 6 Optionally indicate sort criteria. 7 Click the 8 A separate browser window will display the report viewer page showing the report information. button to print the report. Note: Reports are displayed by a special report viewer “applet” opened in a separate browser window. Review Report Viewer Page instructions under STaRS Basics section of this User Guide for further information. 9 Navigate through the pages of the report utilizing the VCR-type buttons on the viewer page. Note: You may optionally print the report by pressing the Printer icon or save the report as a file (in one of a variety of formats, i.e.: MS Word, MS Excel, Adobe Acrobat/PDF, and Rich Text Format/RTF). 10 Click to return to the selection / sort criteria for the report. Hint: To print the report, do NOT use your browser print button. Simply click the print icon from the report viewer toolbar. Remember to change to printer setting landscape format if printing to paper. 102 etters & Reports List of Reports The following table outlines reports printed by both Assessment Centres and LTOs: Report Client / Student Report (RP0020) Description List of Client / Student Information on Record. Note that this report can get quite large due to the amount of data that can be printed for a Client as well as for related Student information. Class Availability (RP0090) Lists the Class Availability information. Typically used to show to Clients to assist in evaluating their Preferences and to support the Create Referrals process. Table 11 – List of Reports – Assessment Centre & LTOs The following table identified reports typically printed by an Assessment Centre: Report Monthly Assessment Activity Report (RP0110) Description List of the Client Assessments that have been performed over a period of time. Referral Statistics Report (RP0120) Prints Referral Statistics for the current reporting month and year-to-date. Includes various percentage comparisons. CLB Breakdown by Current Month and YTD (RP0160) Summarizes the statistics involving the number of Clients assessed by ELSA Level / Benchmarks over a specified period of time. Assessment Appointments Report (RP0180) Lists the Clients to be assessed on an appointment date. Used as a turn-around report for subsequent entry of appointment information. Also lists appointment information that may have been entered for an appointment (e.g. Appointment Status). Table 12 – List of Reports – Assessment Centre 103 STaRS User's Guide The following table identified reports typically printed by LTOs: Report Class Schedule (RP0010) Description List of current Classes offered by a Language Training Organization (LTO). Can either print the Class specifications (regardless of the Class Period), or may print the Classes offered by a selected Class Period. Class Information Sheet (RP0030) Is a summary list of Students in Classes. Can also print basic Child information. Attendance Sheet (RP0040) Lists the Students by Class for a Class Period. Prints up to 25 Days within the selected Class Period. Used by teacher to record attendance. Subsequently used to enter attendance information (totals). Attendance Report (RP0050) Lists the entered attendance hours. Prints hours for both for a Class Period and to-date. Student Placement Next Period (RP0070) Lists the next Class / Class Period assignment for Students in a current Class / Class Period. Used to support the process of continuing Students. Potential and Mandatory Grad List by Period (RP0080) Lists Students who are reaching or have reached the end of their ELSA training. • The report can only be called for the current Period, once all attendance detail for the past Period has been entered and before any attendance is entered for the current Period. Only those Students for whom there is a positive match to either Potential or Mandatory formula criteria will print on the report. • As well, once a Student’s status has been changed to IN-active and/or any information has been entered for Completion (either Date, Type or Comments on the Student’s Extension / Exit Information tab), the Student will not print on the report as either Potential or Mandatory. 104 etters & Reports Report Childminding / Daycare Attendance Sheet (RP0100) Description Lists the Children under a Location / Period utilizing Childminding / Daycare services. Used to record the daily attendance of Children at Childminding / Daycare LTO Locations. Attendance is based upon a daily summary of Childminding Units written manually on the document. Subsequently used to enter Childminding total units. Waitlist Report (RP0190) List the Clients on a Waitlist. Table 13 – List of Reports - LTO 105 STaRS User's Guide Print Letters This is used to print letters. The letter templates were developed utilizing MS Word. The appropriate data from the database is placed onto the letter template by means of the mail merge functionality of MS Word. A Service Provider may choose to customize one or more letter templates. If this is done, then their copy of the letter template is called instead of the standard one. To print letters, follow these steps: 1 Select Letters / Reports from the main menu and wait for the Report Identification page to display fully. 2 Select the Print Letters option from the sub-menu and wait for the Letter Identification page to display fully. 3 Select a letter from the drop down list. 4 Click the 5 The appropriate selection criteria page will display for the letter selected. 6 Specify the appropriate selection criteria. 7 Click the 8 A Search Results page will be displayed. 9 Select the desired row by clicking the radio button after paging through the table as needed. Some letters will permit you select multiple rows by means of check boxes. 10 Then click button. button to search for the appropriate individuals. to select the individual(s) for whom letters are to be printed. 11 A letter details page will display permitting you to specify additional parameters (as appropriate) and an Optional Paragraph that will be printed on the letter(s). 12 Click the button to print the letter(s). 13 A separate browser window will display the MS Word document generated. Use the standard Word toolbar at the top of the window to navigate the page. 14 You may then print the letter(s) or save them to disk. Note: When saving Letter(s), users are saving a copy of the requested extract only. 15 Close the browser window containing the letter when you are finished. 16 Click 106 to return to the selection criteria for the letter. etters & Reports List of Letters The following table identifies the letters printed both by Assessment Centres and LTOs: Letter Referral / Transfer Slip (LT0030) Description This Letter is printed and given to the Client to provide directions to the LTO Location to whom they are being Referred for ELSA Training. It may also be used to direct a Student Back to an Assessment Centre (or another LTO Location). It also serves as the reminder to the Client that they need to proceed to location to which they are being referred / Transferred. Table 14 – Assessment Centre and LTO Letter The following table identifies the letters typically printed by an Assessment Centre: Letter Assessment Appointment Letter (LT0010) Assessment Results Letter (LT0020) Application Rejection (LT0040) Description This Letter is printed pertaining to a Client Assessment Appointment. This Letter is printed pertaining to a Client’s Assessment Results. This Letter is printed to indicate to the Client that their application for ELSA training has been rejected. The reason for rejection is also indicated. Table 15 – List of Letters – Assessment Centre The following table identifies the letters typically printed by LTOs: Letter Attendance Warning Letter (LT0050) Termination Letter (LT0060) ELSA Student Confirmation (LT0070) Completion Certificate (LT0080) Student Labels (LT0090) Report to Class Letter (LT0100) Description This Letter is printed to warn the Student that their poor attendance may jeopardize their being permitted to continue ELSA training unless they immediately improve their attendance. This Letter is printed as a last resort when all other means of contacting the Student have been attempted. This Letter is printed as a “To whom it may concern” letter to indicate that the Client is taking ELSA training under a LTO. It is printed on request by the Student. This is a certificate that indicates the Student has completed ELSA training. These are the labels for either a single Student or labels for Students for whom a Completion certificate is being printed. This Letter is printed as an instruction to report to class or a “Welcome Letter” for a Student. Table 16 – List of Letters – LTO 107 Utilities The Utilities function is to maintain administrative information within the system. When selecting the Utilities option from the main menu, the Change Password page of the Change Password function is displayed as shown below: Figure 32 – Utilities Main Page Please Note: Not all users have access to all the functions outlined in this section. Specific submenu items appearing are role specific. Review STaRS Roles chart, illustrated in Data Management section of this User Guide for further information. 109 STaRS User's Guide Change Password Use this function to maintain a User’s password and/or to unlock a User’s Id. Changing Passwords To change a password, follow these steps: 1 Select Utilities from the main menu and wait for the Change Passwords page from the Change Passwords function to display fully. 2 Enter the password into the Old Password field. 3 Enter the new password into the New Password and Confirm New Password fields. 4 Click the button to change the password. Please note that an administrative user will be able to select other user IDs to change their passwords. In this case, the current password need not be entered. Please Note: The administrator password must be closely guarded so that other user’s User ID and password credentials are not compromised. An administrator may change the password for any User under their own Service Provider. Unlocking an Account To unlock an account, follow these steps: 1 Select Utilities from the main menu and wait for the Change Passwords page from the Change Passwords function to display fully. 2 Select the Unlock Account tab and wait for this tab to display fully. 3 Click the button to unlock the account. Please note that an administrative user will be able to select other user IDs to unlock their accounts. Please Note: Accounts will be locked after three unsuccessful log in attempts. 110 Utilities Set Assessment Schedule The Set Assessment Schedule function is used by Assessment Centres to pre-generate a series of assessment booking slots. These slots must be generated before assessment bookings can be made in the in the Schedule Assessments function on the Clients menu. Create Assessment Schedule Slots To create assessment schedule slots, follow these steps: 1 Select Utilities from the main menu and wait for the Change Passwords page from the Change Passwords function to display fully. 2 Select Set Assessment Schedule option from the sub-menu and wait for the Set Assessment Schedule page to display fully. 3 Enter the required elements, namely the location, the target date range (From Date and To Date), the number of assessors, the normal appointment booking ‘slot’ length (Duration of Session), the lunch period and the day start and end. Note: If there is no lunch break for a day, the Lunch Start Time and Lunch End Time should be set to a value past the end of the end time entered. 4 Click to generate the booking slots. Hint: Users may specify assessment schedule slots one day at a time or via a date range. Note however, the dates are contiguous. This means if there are no bookings taken on the weekend, then the most that can be indicated in a date range is Monday to Friday. Please Note: Following system parameters can be set by each Service Provider to default on the page: ASSESSMENT START and END TIMES, LUNCH START and END TIMES. Remove Assessment Schedule Slots To remove assessment schedule slots, follow these steps: 1 Select Utilities from the main menu and wait for the Change Passwords page from the Change Passwords function to display fully. 2 Select Set Assessment Schedule option from the sub-menu and wait for the Set Assessment Schedule page to display fully. 3 Enter the required elements, namely the location, the target date range (From Date and To Date), the number of assessors, the normal appointment booking ‘slot’ length (Duration of Session), the lunch period and the day start and end. 4 Click to remove the booking slots. Please Note: Only empty slots can be removed. 111 STaRS User's Guide Add Assessment Schedule Slots To add assessment schedule slots, follow these steps: 1 Select Utilities from the main menu and wait for the Change Passwords page from the Change Passwords function to display fully. 2 Select Set Assessment Schedule option from the sub-menu and wait for the Set Assessment Schedule page to display fully. 3 Enter the required elements, namely the location, the target date range (From Date and To Date), the number of assessors, the normal appointment booking ‘slot’ length (Duration of Session), the lunch period and the day start and end. 4 Click 112 to add the booking slots. Utilities Maintain Service Provider Contacts / Users Use this function to maintain contacts for each service provider and to enable User IDs for some or all of these contacts. A Service Provider Contact does not have to have a User ID defined for it, however, a User ID must have a Service Provider Contact. Creating a Service Provider Contact To create a new Service Provider Contact, follow these steps: 1 Select Utilities from the main menu and wait for the Change Passwords page from the Change Passwords function to display fully. 2 Select Maintain Service Provider Contacts / Users option from the sub-menu and wait for the Maintain Service Provider Contacts page to display fully. 3 Click Note: Use Contact Type “Other” from the dropdown list for all Service Provider Contacts. 4 Enter the required information taking care to ensure that all mandatory fields are completed. 5 Click to save the data. Once the Contact has been created, you may then create a user ID if applicable. instructions next page.) (See Updating an EXISTING Service Provider Contact To update a Service Provider Contact, follow these steps: 1 Select Utilities from the main menu and wait for the Change Passwords page from the Change Passwords function to display fully. 2 Select Maintain Service Provider Contacts / Users option from the sub-menu and wait for the Maintain Service Provider Contacts page to display fully. 3 Select the List of Contacts pop-up and select the desired contact. 4 Enter/update the required information taking care to ensure that all mandatory fields are completed. 5 Click to save the data. Once the Contact has been created/updated, you may then create a user ID if applicable. (See instructions next page.) 113 STaRS User's Guide Creating a new STaRS user To create a new STaRS user, follow these steps: 1 Select Utilities from the main menu and wait for the Change Passwords page from the Change Passwords function to display fully. 2 Select Maintain Service Provider Contacts / Users option from the sub-menu and wait for the Maintain Service Provider Contacts page to display fully. 3 Either add a new contact or retrieve an existing contact. 4 Select the User Details tab and wait for this tab to display fully. 5 Enter a unique User ID and User Name. 6 Assign the new user to an appropriate STaRS role. 7 Enter other data as required. 8 Click to save the data. Please Note: Only an administrator is able to create new users. Please Note: User IDs must be a maximum of eight characters, the first being the first letter of the user’s first name. The remaining characters are the characters of the user’s last name, up to maximum of seven. 114 Utilities Maintain Periods The Maintain Periods function is used by Language Training Organizations (LTO) to define a series of periods and to enable or disable specific dates within those periods. These periods must be created before class periods can be defined in the Class Management function. Creating a New Period To create a new Period, follow these steps: 1 Select Utilities from the main menu and wait for the Change Passwords page from the Change Passwords function to display fully. 2 Select Maintain Periods option from the sub-menu and wait for the Maintain Periods page to display fully. 3 Enter the desired Period Number (e.g. “200101”). 4 Click the 5 Enter the required information taking care to ensure all mandatory fields are completed. button and wait for the Period Details page to display fully. Note: The following fields, must be filled in for statistical purposes: Ministry Period Code (to fill in, pick from drop down box) and Ministry Period Year (automatically entered as a concatenation of the years involved, for example the 2001 – 2002 contract year would be entered as “0102”). 6 Click 7 Select the Period Days tab. to save the data. Note: A multi-row/multi-page view of dates for the selected period will be displayed. 8 Select the desired day row and click to edit the existing information using the Period Day Information page. De-activate the date or disable the date from printing as necessary. 9 Click to save the data and wait for the confirmation message. 10 Click to return to the Period Days page. Repeat steps 5 through 8 as needed. 11 Click on the Period Days page when done. Please Note: Period number codes must be six numeric characters in the following format: yyyymm, i.e.: 200201. “yyyy” equals the calendar year, i.e.: 2002. “mm” equals the month the period represents, i.e.: January equals 01. 115 STaRS User's Guide Updating a Period To update a Period, follow these steps: 1 Select Utilities from the main menu and wait for the Change Passwords page from the Change Passwords function to display fully. 2 Select Maintain Periods option from the sub-menu and wait for the Maintain Periods page to display fully. 3 Enter the desired period number (e.g. “200101”) or use the pop-up selector to lookup the period number. 4 Click the 5 Update period information or deactivate the Period. 6 Click 7 Click button and wait for the Period Details page to display fully. to save the data and wait for the confirmation message. . Deleting a Period To delete a Period, follow these steps: 1 Select Utilities from the main menu and wait for the Change Passwords page from the Change Passwords function to display fully. 2 Select Maintain Periods option from the sub-menu and wait for the Maintain Periods page to display fully. 3 Enter the desired period number (e.g. “200101”) or use the pop-up selector to lookup the period number. 4 Click the 5 Click 6 Click button and wait for the Period Details page to display fully. to delete the Period. . Please Note: Once a period is used to define Class Periods, it can no longer be deleted. A warning message to that effect will be displayed, however, a Period can be deactivated. 116 Utilities Maintain Functions / Roles Use this function to maintain descriptions for functions and roles. Updating an existing Function Description To update an existing Role Description, follow these steps: 1 Select Utilities from the main menu and wait for the Change Passwords page from the Change Passwords function to display fully. 2 Select Maintain Functions / Roles option from the sub-menu and wait for the Maintain Functions / Roles page to display fully. 3 Select the radio button adjacent to the Function Name / Type field. 4 Select the function using the pop-up selector. 5 Click to select the function and wait for the Maintain Functions / Roles page to redisplay fully. 6 Update the Function Name Description as needed. 7 Click to save the data. 8 Click to return. Hint: This function is only accessible to the Ministry technical staff. This function highlights which STaRS roles have access to which STaRS functions. 117 STaRS User's Guide Updating an existing Role Description To update an existing Role Description follow these steps: 1 Select Utilities from the main menu and wait for the Change Passwords page from the Change Passwords function to display fully. 2 Select Maintain Functions / Roles option from the sub-menu and wait for the Maintain Functions / Roles page to display fully. 3 Select the radio button adjacent to the STaRS Role Description field. 4 Select the desired role. 5 Click display fully. 6 Update the Role Description as needed. 7 Click to save the data. 8 Click to return. 118 .to select the function and wait for the Maintain Roles page to Utilities Maintain Service Providers / Locations This function is used exclusively by Ministry staff to add new service providers. It is also used by service provider locations to maintain their own data. Creating a NEW Service Provider To create a new Service Provider, follow these steps: 1 Select Utilities from the main menu and wait for the Change Passwords page from the Change Passwords function to display fully. 2 Select Maintain Service Provider / Locations option from the sub-menu and wait for the Maintain Service Providers / Locations page to display fully. 3 Enter a new (unique) Provider Name. 4 Click fully. 5 Enter the required information taking care to ensure that all mandatory fields are completed. 6 Click and wait for the Maintain Service Providers page to display to save the data. You may then create service provider locations. See next page. Updating an EXISTING Service Provider To update an existing Service Provider, follow these steps: 1 Select Utilities from the main menu and wait for the Change Passwords page from the Change Passwords function to display fully. 2 Select Maintain Service Provider / Locations option from the sub-menu and wait for the Maintain Service Providers / Locations page to display fully. 3 Enter a Provider Name using the pop-up selector. 4 Click 5 Update the required information taking care to ensure that all mandatory fields are completed. Updating may include making the Service Provider inactive within the system. 6 Click and wait for the Maintain Service Providers page to display fully. to save the data. You may then update or create service provider locations. See next page. 119 STaRS User's Guide Create Service Provider Locations To create Service Provider Locations, follow these steps: 1 Select Utilities from the main menu and wait for the Change Passwords page from the Change Passwords function to display fully. 2 Select Maintain Service Provider / Locations option from the sub-menu and wait for the Maintain Service Providers / Locations page to display fully. 3 Add or retrieve a Service Provider as necessary. 4 Once for the Maintain Service Providers page is displayed, select the Service Provider tab and wait for the Service Provider Location page to fully display the tab’s data. 5 Click 6 Enter the required information taking care to ensure that all mandatory fields are completed. 7 Click to save the data. 8 Click to return to the Location Table View page. 9 Repeat steps 5 through 9 as needed to create more locations. (if no existing location has been defined). Update Service Provider Locations To Update Service Provider Locations, follow these steps: 1 Select Utilities from the main menu and wait for the Change Passwords page from the Change Passwords function to display fully. 2 Select Maintain Service Provider / Locations option from the sub-menu and wait for the Maintain Service Providers / Locations page to display fully. 3 Add or retrieve a Service Provider as necessary. 4 Once the Maintain Service Providers page is displayed, select the Service Provider tab and wait for the Service Provider Location page to fully display the tab’s data. 5 Select the desired Service Provider Location row and click 6 Update the required information taking care to ensure that all mandatory fields are completed. Updating may include making the Service Provider Location inactive within the system. 7 Click to save the data. 8 Click to return to the Location Table View page. 120 Utilities 9 Repeat steps 5 through 9 as needed to create more locations. Hint: Service Provider name, address and location information entered as part of this function is also printed on various letters. 121 STaRS User's Guide Maintain System Parameters Use this function to maintain system parameters. Not all users have access to all the functions outlined in this section. Specific sub-menu items appearing are role specific. Review STaRS Roles chart, illustrated in Data Management section of this User Guide. System-wide parameters may only be maintained by Ministry program management staff and those with technical roles. Service-Provider-specific system parameters are maintained by the administrator User at each Service Provider location. In the cases where a parameter is defined both at the system level and for a specific Service Provider, then the Service-Provider-specific one takes precedence (as long as it is active and has not been set to a blank value). Additionally, if a Service-Provider-specific parameter has not been defined then the system-wide parameter is used. Updating a System Parameter To update a System Parameter, follow these steps: 1 Select Utilities from the main menu and wait for the Change Passwords page from the Change Passwords function to display fully. 2 Select Maintain System Parameters option from the sub-menu and wait for the Maintain System Parameters page to display fully. 3 If visible select the radio button labeled either System Wide Parameters or Service Provider System Parameters. 4 Select the Specific System Parameter Name using the pop-up selector. 5 If necessary select the Service Provider Name using the pop-up selector. (This is only needed if a ministry administrator is setting service provider parameters.) 6 Click .to select the parameter and wait for the Maintain System Parameters page to redisplay fully. 7 Update the System Parameter Value as needed. 8 Click to save the data. 9 Click to return. Please Note: System parameters affect the way the STaRS application operates and must be changed with caution. The specific setting for a parameter value is NOT verified. Please consult the System Operations Manual or Ministry staff for a list of possible parameters and their purpose. 122 Utilities Maintain Code Values Use this function to maintain code values. Only the Ministry program management and technical roles may maintain the system-wide codes. LTOs will define their Instructors under the CD-Instructor Code attribute and will define their Part Time Hours under the CD-Part Time Hours attribute (see following pages for instructions). Assessment Centres will not need to use this function. Updating a Code Value To update a Code Value, follow these steps: 1 Select Utilities from the main menu and wait for the Change Passwords page from the Change Passwords function to display fully. 2 Select Maintain Code Values option from the sub-menu and wait for the Maintain Code Values page to display fully. 3 If visible select the radio button labeled either System Wide Code Entries or Service Provider Code Entries. 4 Select the Specific Code Attribute Name using the pop-up selector. 5 If necessary select the Service Provider Name using the pop-up selector. (This is only needed if a ministry administrator is setting service provider code values.) 6 Click .to select the parameter and wait for the Maintain Code Values page to redisplay fully. This page will show zero or more existing code values for the current Code Attribute Name. 7 Select the desired Code Value by clicking the applicable radio button and then click to edit the existing Code Value. 8 Update the information as desired taking care to ensure that all mandatory fields are completed. 9 Click 10 Click to save the data. to return. Please Note: System code values affect the way the STaRS application operates and must be changed with caution. Please consult the System Operations Manual or Ministry staff for a list of possible Cove Value attributes and their purpose. 123 STaRS User's Guide Adding a Code Value To add a Code Value, follow these steps: 1 Select Utilities from the main menu and wait for the Change Passwords page from the Change Passwords function to display fully. 2 Select Maintain Code Values option from the sub-menu and wait for the Maintain Code Values page to display fully. 3 If visible select the radio button labeled either System Wide Code Entries or Service Provider Code Entries. 4 Select the Specific Code Attribute Name using the pop-up selector. 5 If necessary select the Service Provider Name using the pop-up selector. (This is only needed if a ministry administrator is setting service provider code values) 6 Click .to select the parameter and wait for the Maintain Code Values page to redisplay fully. This page will show zero or more existing code values for the current Code Attribute Name. 7 Click 8 Enter the information as desired taking care to ensure that all mandatory fields are completed. 9 Click 10 Click to add a new Code Value. to save the data. to return. Please Note: System code values affect the way the STaRS application operates and must be changed with caution. Please consult the System Operations Manual or Ministry staff for a list of possible Cove Value attributes and their purpose. 124 Utilities Deactivating a Code Value To deactivate a Code Value, follow these steps: 1 Select Utilities from the main menu and wait for the Change Passwords page from the Change Passwords function to display fully. 2 Select Maintain Code Values option from the sub-menu and wait for the Maintain Code Values page to display fully. 3 If visible select the radio button labeled either System Wide Code Entries or Service Provider Code Entries. 4 Select the Specific Code Attribute Name using the pop-up selector. 5 If necessary select the Service Provider Name using the pop-up selector. (This is only needed if a ministry administrator is setting service provider code values) 6 Click .to select the parameter and wait for the Maintain Code Values page to redisplay fully. This page will show zero or more existing code values for the current Code Attribute Name. 7 Select the desired Code Value by clicking the applicable radio button and then click to edit the existing Code Value. 8 Uncheck the Active flag. 9 Click 10 Click to save the data. to return. Please Note: System code values affect the way the STaRS application operates and must be changed with caution. Please consult the System Operations Manual or Ministry staff for a list of possible Cove Value attributes and their purpose. 125 STaRS User's Guide Maintaining LTO Instructors/Teachers Use this function to maintain the Instructors/Teachers associated with Classes. These are defined in the same manner as STaRS code values using the Maintain Code Values functionality, however, they are specific to each LTO. By way of this function, users are basically creating their own drop down list of Teacher/Instructor names to be used during the Maintain Classes function of the Class Management menu. Adding an Instructor/Teacher To add a Code Value for an Instructor/Teacher, follow these steps: 1 Select Utilities from the main menu and wait for the Change Passwords page from the Change Passwords function to display fully. 2 Select Maintain Code Values option from the sub-menu and wait for the Maintain Code Values page to display fully. 3 Select the Code Attribute Name “CD-INSTRUCTOR CODE” from the drop down list. 4 Click to select the Instructors and wait for the Maintain Code Values page to redisplay fully. This page will show zero or more existing Instructor code values. 5 Click 6 Enter a value for the Instructor in the Code Value field. This could either be part of the Instructor’s name or an Instructor Number. Up to 15 characters may be entered. to add a new Instructor Code Value. Also enter the Instructor’s Name in the Short Description field (up to 20 characters). This value will be displayed in the Instructor drop down list when defining Classes. Then enter the Instructor’s Name again in the Long Description field (up to 60 characters). 7 Click to save the data. 8 Click to return. Updating an Instructor/Teacher To update an Instructor’s Code Value, follow these steps: 1 Select Utilities from the main menu and wait for the Change Passwords page from the Change Passwords function to display fully. 2 Select Maintain Code Values option from the sub-menu and wait for the Maintain Code Values page to display fully. 3 Select the Code Attribute Name “CD-INSTRUCTOR CODE” from the drop down list. 126 Utilities 4 Click to select the Instructors and wait for the Maintain Code Values page to redisplay fully. This page will show zero or more existing Instructor code values. 5 Select the desired Instructor Code Value by clicking the applicable radio button and then click to edit the existing Instructor’s information. 6 Update the Instructor’s information as desired. 7 Click to save the data. 8 Click to return. Deactivating an Instructor/Teacher To deactivate an Instructor’s Code Value, follow these steps: 1 Select Utilities from the main menu and wait for the Change Passwords page from the Change Passwords function to display fully. 2 Select Maintain Code Values option from the sub-menu and wait for the Maintain Code Values page to display fully. 3 Select the Code Attribute Name “CD-INSTRUCTOR CODE” from the drop down list. 4 Click to select the Instructors and wait for the Maintain Code Values page to redisplay fully. This page will show zero or more existing Instructor code values. 5 Select the desired Instructor Code Value by clicking the applicable radio button and then click to edit the existing Instructor’s information. 6 Uncheck the Active Flag. 7 Click to save the data. 8 Click to return. At any time, the Active flag can be re-checked should the Instructor/Teacher become active again. 127 STaRS User's Guide Maintaining Part Time Hours Use this function to maintain the default values for Part Time Hours. These are defined in the same manner as STaRS code values using the Maintain Code Values functionality, however, they are specific to each LTO. By way of this function, users are basically creating their own drop down list of Part Time Hours values to be used whenever and wherever it is viewed in the application, for example: the Maintain Student Information function of the Maintain Students menu. Hint: Full and part time hours’ parameters can be customized by each LTO, specific to their location. To change from the application default settings for Full Time Hours (Full time = 100 hours), utilize the Maintain System Parameters function from the Utilities menu. To change from the application default settings for Part Time Hours (Part time = 50 hours), utilize the Maintain Code Values function from the Utilities menu. Note: Full and part time hours’ parameters have always been customizable by each LTO. As of application Release 3.0, LTO users have the ability to set more than one value for part time hours. Prior to Release 3.0, more than one definition was not allowed. Adding a value for Part Time Hours To add a Code Value for Part Time Hours, follow these steps: 1 Select Utilities from the main menu and wait for the Change Passwords page from the Change Passwords function to display fully. 2 Select Maintain Code Values option from the sub-menu and wait for the Maintain Code Values page to display fully. 3 Select the Code Attribute Name “PART TIME HOURS” from the drop down list. 4 Click to select the Part Time Hours and wait for the Maintain Code Values page to redisplay fully. This page will show zero or more existing part time hours code values. 5 Click 6 Enter a value for the Part Time Hours in the Code Value field. Only numeric values are allowed, including up to one decimal point. to add a new Part Time Hours Code Value. The entered value will automatically copy into both the Short Description and Long Description fields. This value will be displayed in the Part Time Hours drop down list whenever and wherever it is viewed. Users must also specify the desired display order utilizing the Display Sequence field (only numeric values are allowed, with the smallest being displayed first). 128 Utilities 7 Click to save the data. 8 Click to return. Updating a Part Time Hours value To update a Part Time Hours Code Value, follow these steps: 1 Select Utilities from the main menu and wait for the Change Passwords page from the Change Passwords function to display fully. 2 Select Maintain Code Values option from the sub-menu and wait for the Maintain Code Values page to display fully. 3 Select the Code Attribute Name “PART TIME HOURS” from the drop down list. 4 Click to select the Part Time Hours and wait for the Maintain Code Values page to redisplay fully. This page will show zero or more existing Part Time Hours code values. 5 Select the desired Part Time Hours Code Value by clicking the applicable radio button and then click to edit the existing Instructor’s information. 6 Update the Part Time Hours information as desired. 7 Click to save the data. 8 Click to return. Deactivating a Part Time Hours value To deactivate an Part Time Hours Code Value, follow these steps: 1 Select Utilities from the main menu and wait for the Change Passwords page from the Change Passwords function to display fully. 2 Select Maintain Code Values option from the sub-menu and wait for the Maintain Code Values page to display fully. 3 Select the Code Attribute Name “PART TIME HOURS” from the drop down list. 4 Click to select the Instructors and wait for the Maintain Code Values page to redisplay fully. This page will show zero or more existing Instructor code values. 5 Select the desired Part Time Hours Code Value by clicking the applicable radio button and then click to edit the existing Instructor’s information. 129 STaRS User's Guide 6 Uncheck the Active Flag. 7 Click to save the data. 8 Click to return. At any time, the Active flag can be re-checked should the Part Time Hours value become active again. 130 Utilities Maintain Geographical Regional Mapping Use this function to maintain the relationship between Geographical Region code values and the applicable Geographical Group code value. Updating a Geographical Regional Mapping To update a Geographical Region’s mapping, follow these steps: 1 Select Utilities from the main menu and wait for the Change Passwords page from the Change Passwords function to display fully. 2 Select Maintain Geographical Regional Mapping option from the sub-menu and wait for the Maintain Geographical Regional Mapping page to display fully. 3 Select the desired Geographical Region using the pop-up selector. 4 Click redisplay fully. 5 Select the appropriate Geographical Group using the pop-up selector. 6 Click to save the data. 7 Click to return. and wait for the Maintain Geographical Regional Mapping page to Please Note: The Geographical Region and Geographical Group values are set up as Code Values. This function is simply used to associate them together. Service Providers and Service Provider Locations are associated with a Geographical Region. There are various search criteria pages and reports that will permit selection of either the Geographical Region or Geographical Group. 131 Browser & Network Configuration There are a number of steps to configure your browser and network. These are outlined below. Note that the specific configuration dialogs may vary among browser release versions. Internet Explorer Verify Internet Explorer version and encryption level 1 To check Internet Explorer version and the encryption level click the About Internet Explore option from the Help menu. 2 Verify the browser version and that the cipher strength is at least 56-bit. 133 STaRS User's Guide Set Page Check Option 1 134 Set the browser to check for newer versions of stored pages at every visit to the page as follows: Open Internet Explorer and select Tools Æ Internet Options. From this window select the General tab and click the Settings… button. Browser & Network Configuration 2 From the Settings window ensure the 'Every visit to the page' option button is selected and then click 'OK' Configure Security Settings 1 Ensure that cookies and JavaScript security are properly configured by selecting Tools Æ Internet Options. 135 STaRS User's Guide 2 136 From the Internet Options window select the 'Security' tab and click the 'Custom Level' button. Browser & Network Configuration 3 In the Security Settings window ensure that cookies are enabled. 137 STaRS User's Guide 4 138 In the Security Settings window ensure that scripting is enabled. Browser & Network Configuration Netscape Navigator Verify Netscape version and encryption level Please Note: STaRS versions 2.0.00 and later are not accessible via Netscape. 1 To check Netscape Navigator version and the encryption level click the About Netscape Communicator option from the Help menu. 139 STaRS User's Guide 2 Verify the browser version. 3 Click the security button. 140 Browser & Network Configuration 4 Select either SSL v2 or SSL v3 depending on instructions from the STaRS administrator. 5 Then enable the applicable cipher strengths. At least 40 bit encryption must be enabled. 141 STaRS User's Guide Set Font Size to properly display STaRS text values 1 To increase the Netscape Navigator font size, select the “Increase Font” option form the View menu. Configure Security Settings 1 142 Ensure that cookies, JavaScript and ActiveX security are properly configured by selecting Edit Æ Preferences. Browser & Network Configuration 2 Ensure that cookies, JavaScript and image load preferences are properly configured by selecting the Advanced category from the tree menu and ensuring the settings are configured as indicated below. Network Settings Pop-Up Window Support If you are using firewall, or other software to filter your internet content there may be a setting to disable pop-up windows. Pop-up windows must be enabled for STaRS to operate correctly. The steps to accomplish this will depend on the software or hardware you have installed. 143 FAQ Q: What Browsers does STaRS support? Earlier STaRS versions support both Netscape and Internet Explorer. Please consult section entitled “Technical Requirements.” STaRS versions 2.0.00 and later are not accessible via Netscape. Q: Why does this application not work like my other Windows applications? STaRS is a web browser based application that was designed to be accessible without installation of specialized software and by a range of browser versions (under either MS Internet Explorer or Netscape; STaRS versions 2.0.00 and later are not accessible via Netscape). Web browser applications are limited by the behaviour of the forms capabilities inherent in the various browsers. While these capabilities are more limited than those available to native Windows applications, there are also a number of usage benefits. In addition to being able to run the application on any browser-equipped workstation, the ability to hotlink between functions allows for a variety of usability features that are not easily duplicated in normal Windows applications. Although some browser limitations can be overcome with programming effort, this often comes at the cost of compatibility. For instance, to exploit some of the new browser features often disqualifies earlier browser versions or different browser types (e.g. Netscape) Please see sections entitled “Characteristics of Browser-based Systems” and “Browser Tips, DOs and DON’Ts.” Q: Why does the application sometimes run fast and sometimes run slowly? As a web browser based application, STaRS is dependent on a number of factors for its performance. These include: • • • • The speed and capacity of the workstation … including what other applications are currently running. The speed and capacity of the network connection being used to access the Internet. The overall traffic levels of the Internet path being taken between the user’s site and the location of the servers. The speed and capacity of the STaRS servers (application AND database) … including what other applications are currently running and how many users are accessing STaRS. By far the biggest factors are expected to be the Internet connection. Without question: the faster, the better! Q: Why can I not see the same clients a colleague can see in another LTO? STaRS maintains strict security around personal records. LTO service providers may only see those client rows under the following circumstances: 145 STaRS User's Guide • • • They originally entered the client. They received a referral for the client. They have a student linked to the client. (Which effectively implies that they previously received a referrals). Q: Why do my staff see different fields or buttons on some screens? STaRS configures the screens and capabilities based on the security privileges of the currently signed-on user. For further information please consult section entitled “Security.” Q: What do I do if my User ID is locked? If a User attempts to log on three times with the wrong password, their User ID is locked and must be released by the system administrator for the applicable Service Provider (using the Unlock Account tab of the Change Passwords function on the Utilities Menu). Q: Who do I inform if I cannot access STaRS? The Ministry has designated a contact in Vancouver (Patricio Ibarra at time of writing). He will be the contact with the Ministry technical staff. Q: What happens if I find a bug in a function? Report this to the Ministry-designated individual. Please ensure you’ve identified the menu and sub-menu item along with the information that was entered onto the page when the error occurred. The User ID and role of the individual reporting the problem should also be included. Note any error messages that displayed. Q: What do I need to do if one of my staff leaves my organization? Uncheck the Active Flag of their User ID to prevent it from being used again (on the User Details tab of the Maintain Service Provider Contacts / Users function on the Utilities menu). Q: If one of my staff begins working with another Service Provider, can they use the same User ID? No, a new User ID must be set up under the new Service Provider (using the Maintain Service Provider Contacts / Users function on the Utilities menu). Note: the name used for the new ID will have to be altered as a User ID must be unique across all Service Providers. Q: A Student has discontinued/transferred from my organization. Do I need to go back and amend status detail on the original Referral? No, it is not necessary to go back and amend history information. One or many Referrals may exist in the future for any one Client/Student prior to their completion of the ELSA program. 146 Error! Reference source not found. 147 Glossary Terms Assessment An evaluation of the English abilities of an ELSA applicant (see also Client). The assessment includes an evaluation of: Listening. Speaking. Reading. Writing The assessment may also include testing an applicant's abilities in their first language (including: reading, writing, and numeracy abilities). Assessment Centre A service provider who received applications from Clients and upon determining eligibility of the Client for ELSA training, performs an assessment of their English abilities (see also Assessment). They refer Clients to Language Training Organizations to be enrolled under ELSA training classes. Browser The web browser under which STaRS functionality is executed (i.e. MS Internet Explorer or Netscape Navigator). Child A child of a Student taking ELSA training. This however is restricted to a child who requires childminding / daycare services. Class An instance of an ELSA training curriculum covering one or more ELSA Levels. Client An applicant for ELSA training. The Client is referred to a Language Training Organization for training (see also Student). Contact Hyper Text Markup Language Various contact names and phone numbers associated with one of the following: Client, Student, Child and Service Provider The technical coding language used to construct web pages. Hyper Text Markup Language (HTML) defines how a page is supposed to look and is interpreted by the web browser in order to display the page. Itinerant Assessor Is an Assessor who travels within a regional area performing Assessments of Clients. They perform the same services as an Assessment Centre, however, with the exception that they are mobile. Language Training Organization A service provider who offers ELSA training classes (also known as a School). They may also offer childminding / daycare services. See also Language Training Organization Location. Language Training Organization Location Menu A specific Location under a Language Training Organization. The STaRS Menu displayed to Users from which a menu item may be selected. 148 Error! Reference source not found. Ministry of Community, Aboriginal and Women’s Services Service Provider Screens STaRS database Student Student Break Sub-Menu Turn-around Document The BC Ministry responsible for the English Language Services for Adults (ELSA) funding stream of the BC Settlement and Integration Program (BCSIP). Refers to an organization providing services under the BC Ministry of Community, Aboriginal and Women’s Services ELSA Program. These include: Assessment Centres. Language Training Organizations. Represent the screens that will be displayed to the User. The database containing the STaRS tables. It is an Oracle database. Multiple copies will be available (i.e. for testing, training, and production). It is hosted in a central location a the Ministry of Community, Aboriginal and Women’s Services. A Client who is taking ELSA training from a Language Training Organization. A duration of time when a Student has interrupted their ELSA training due to a variety of personal circumstances. Contains the individual Sub-menu items available for execution under a Menu item. A report that is printed with spaces provide within which information is manually filled in. Subsequently, the information is used as the source for data entry. For example, the Attendance Sheet is printed for teachers to enter Student daily attendance. At the end of the period, the total hours per Student is entered into the system under the appropriate Class Period. Universal Resource Locator A naming mechanism to locate files and other resources on the web. Typically used to designate the address for a page on a web site. Example: http://www.cycle24.com User ID Identifies a valid STaRS User (maximum 8 characters). Waitlist A list of Clients waiting to be placed into a Class. 149 STaRS User's Guide Acronyms and Abbreviations AC See Assessment Centre. EI Employment Insurance (used to indicate if a Student was recommended for ELSA training by this source). ELSA English Language Services for Adults HTML See Hyper Text Markup Language LTO See Language Training Organization (noted the glossary above). SP Service Provider URL See Universal Resource Locator 150 Error! Reference source not found. Production notes: This Guide was produced using Microsoft Word 2002. Although it may be edited using earlier versions of Word, for best results it should receive final production printing using that specific version. Special formatting hints: • Each chapter is organized as a separate section, formatted to commence on an odd page with a gutter margin of 0.5” suitable for double sided production and subsequent binding. • Odd page chapter headers are manually configured to reflect the chapter heading. • Index section requires manual reformatting upon each index regeneration due to the way in which MS-Word rebuilds the index. 151