1
Advanced User Guide
for Database Extensions
PowerSchool
Student Information System
Released March 2014
Version 1.2
Document Owner: K-12 Sales
This edition applies to Release 7.11.x of the PowerSchool software and to all subsequent releases and
modifications until otherwise indicated in new editions or updates.
The data and names used to illustrate the code examples, reports and screen images may include
names of individuals, companies, brands, and products. All of the data and names are fictitious; any
similarities to actual names are entirely coincidental.
PowerSchool is a trademark, in the U.S. and/or other countries, of Pearson Education, Inc. or its
affiliate(s).
Copyright © 2014 Pearson Education, Inc. or its affiliates. All rights reserved. All trademarks are
either owned or licensed by Pearson Education, Inc. or its affiliates. Other brands and names are the
property of their respective owners.
Advanced User Guide for Database Extensions
Contents
Introduction ........................................................................................................... 2
Page Customization and Database Extensions ....................................................... 3
One-To-One Table Extensions ............................................................................... 3
Sample Code: Various Form Elements Using One-To-One Extensions ..................... 3
One-To-Many Table Extensions ............................................................................. 4
tlist_child ...................................................................................................... 4
Independent Table Extensions .............................................................................. 5
tlist_standalone ............................................................................................. 5
Special Formatting of tlist_child and tlist_standalone Columns ................................... 6
Using A Proper File Record Number (FRN) For Staff ........................................... 10
Custom Insertion Points and Page Fragments ...................................................... 12
How it Works .................................................................................................... 12
Page Fragments ................................................................................................ 12
Standard Insertion Points .............................................................................. 13
Specify Insertion Points................................................................................. 13
Auto-Insertions: How to Use Defined Insertion Points ........................................ 14
URL-Based Auto-Insertion of Page Fragments................................................... 14
Wildcard-Based Auto-Insertion of Page Fragments ............................................ 16
Moving Inserted Page Fragments To Another Location On the Target Page ........... 16
XML-Based Movement of Page Fragments ........................................................ 17
jQuery-Based Movement of Page Fragments .................................................... 18
Upload Custom Web Page Files ............................................................................ 20
Plugin Packages ................................................................................................... 20
ZIP File Format ............................................................................................ 20
MessageKey Properties File Format ................................................................. 20
Plugin Package Example Layout...................................................................... 21
Creating a Plugin Package ............................................................................. 21
Installing a Plugin Package ............................................................................ 22
Important Information on Plugin Package Enable/Disable/Delete ......................... 23
Appendix A: List of Insertion Points ..................................................................... 24
Contents
3
Advanced User Guide for Database Extensions
Revision History
Release Date
Version
Changes
November 2013
1.0
Initial release for PowerSchool 7.9
February 2014
1.1
3 Minor corrections to page fragment section
March 2014
1.2
3 Updated for new features in PowerSchool 7.11
o
tlist_child and tlist_standalone new JSON output type
o
XML-Based Movement of Page Fragments
o
MessageKey files in Plugin Packages
3 New appendix listing all insertion points
3 Cleaned up form elements sample code
3 Using CSS Styles to Resize Input Fields
3 Sample HTML code for a page fragment
3 jQuery-Based Movement of page fragments
3 Added screenshots for examples
3 Added more details to the Plugin Packages section
Introduction
1
Advanced User Guide for Database Extensions
Introduction
This guide is designed for advanced users working with the Database Extension features
originally released in PowerSchool 7.9 and new features released thereafter.
For details on Database Extensions, see the Database Extensions section of the PowerSchool
online help, or the System Administrator User Guide for PowerSchool 7.x, available on
PowerSource.
Introduction
2
Advanced User Guide for Database Extensions
Page Customization and Database Extensions
You can create customized pages using HTML that access one-to-one table extensions, oneto-many child tables, and stand-alone table data elements using various interface elements
(such as drop-down menus, radio buttons, checkboxes, etc.) as well as allow for conditional
elements based on database extension data element values.
One-To-One Table Extensions
To work with a one-to-one table extension on a page in PowerSchool, reference the primary
table, the database extension group name, and the field name in the following format:
[PrimaryTable.ExtensionGroupName]Field_Name
The examples below show a variety of ways to reference a one-to-one extension to the
Students table. For this example we have added a table extension to track loaned laptops.
The extension group name in these examples is U_Laptop.
Sample Code: Various Form Elements Using One-To-One Extensions
<!-- Entry Field -->
<tr>
<td class="bold">Model Number</td>
<td>
<input type="text" name="[Students.U_Laptop]Model_Number" value="" size="15">
</td>
</tr>
<!-- Static/Read Only Field Display -->
<tr>
<td class="bold">Barcode # (Read Only)</td>
<td>
~([Students.U_Laptop]Barcode)
</td>
</tr>
<!-- Static/Read Only Field Inside Input Box -->
<tr>
<td class="bold">Barcode # (Read Only)</td>
<td>
<input type="text" name="[Students.U_Laptop]Barcode" value=""
readonly="readonly">
</td>
</tr>
<!-- Radio Button -->
<tr>
<td class="bold">Operating System</td>
<td>
<input type="radio" name="[Students.U_Laptop]OS" value="Windows">Windows
<input type="radio" name="[Students.U_Laptop]OS" value="Mac">Mac
</td>
</tr>
<!-- Check Box -->
<tr>
<td class="bold">Laptop Lost?</td>
Page Customization and Database Extensions
3
Advanced User Guide for Database Extensions
<td>
<input type="checkbox" name="[Students.U_Laptop]IsLost" value="1">
</td>
</tr>
<!-- Drop Down/Popup Menu -->
<tr>
<td class="bold">Manufacturer</td>
<td>
<select name="[Students.U_Laptop]Manufacturer">
<option value="">Select a Company</option>
<option value="Acer">Acer</option>
<option value="Alienware">Alienware</option>
<option value="Apple">Apple</option>
<option value="Asus">Asus</option>
<option value="Compaq">Compaq</option>
<option value="Dell">Dell</option>
</select>
</td>
</tr>
<!-- Text Area -->
<tr>
<td class="bold">Damages Comments</td>
<td>
<textarea name="[Students.U_Laptop]Damages_Comments" cols="50" rows="5">
</textarea>
</td>
</tr>
One-To-Many Table Extensions
A one-to-many table extension creates a child table to the designated parent table and
allows multiple records to be created that are tied back to a single parent record. Examples
of existing one-to-many tables in PowerSchool where the Students table is the parent are
Special Programs, Logs, and Historical Grades. To view, store, and retrieve data from your
own one-to-many tables use a special HTML tag called tlist_child. This tag can autogenerate an HTML table to display rows of records from the designated child table, including
an Add button and Delete button for each row you create.
tlist_child
The following is the format for the tlist_child HTML tag.
~[tlist_child:<CoreTableName>.<ExtensionGroup>.<ExtensionTable>;displaycols:<
List of Fields>;fieldNames:<List of Column Headers>;type:<FormatName>]
The following provides additional information on this tag:
·
The <CoreTableName>.<ExtensionGroup>.<ExtensionTable> narrows the
query down to a single child table. For example, a child table to track college
applications could be Students.U_CollegeApp.U_Applications
·
The displaycols are a comma-separated list of fields from the one-to-many table,
and can include any or all of the defined fields in that table. Two special ID fields
may also be referenced: ID and <CoreTableName>DCID. In the college example
above this would be STUDENTSDCID.
Page Customization and Database Extensions
4
Advanced User Guide for Database Extensions
·
The fieldNames are a comma-separated list of the labels that should appear in the
auto-generated HTML table heading. These labels may contain spaces.
·
The type parameter specifies a format. Valid format options are "html" or "json"
o
html: Automatically generate an HTML table that allows for dynamic record
creation and deletion.
o
json: The output of the tlist_child will be a JSON array with an object name
of "Results". It is not necessary to include fieldNames when using
JSON. The first field in the array will always be the ID field.
Add the tlist_child tag wherever you would like the table to appear on your page.
The following is an example for the college application tracker page:
~[tlist_child:STUDENTS.U_COLLEGEAPP.U_APPLICATIONS;displaycols:Institution,Re
quest_Date,Request_Status,Scholarship,Completion_Date,Outcome,Notes;fieldName
s:Institution,Request Date,Status,Scholarship?,Completion Date,Outcome,Notes;
type:html]
Independent Table Extensions
An independent table extension creates a table that is not associated with any existing
PowerSchool table. Examples of existing independent tables in PowerSchool are States,
CountryISOCodeLU, LocaleTimeFormat, and MIMETypes. To view, store, and retrieve data
from your own independent tables use a special HTML tag called tlist_standalone. This tag
can auto-generate an HTML table to display your rows of records, including an Add button
and Delete buttons for each row that has been created.
tlist_standalone
The following is the format for the tlist_standalone HTML tag.
~[tlist_standalone:<ExtensionGroup>.<ExtensionTable>;displaycols:<List of
Fields>;fieldNames:<List of Column Headers>;type:<FormatName>]
The following provides additional information on this tag:
·
The <ExtensionGroup>.<ExtensionTable> narrows the query down to a single
independent table. For example, an independent table created to maintain a master
list of all higher education institutions could be U_CollegeApp.U_Institutions.
·
The displaycols are a comma-separated list of fields from the standalone table, and
can include any or all of the defined fields in that table. A database record ID field
may also be referenced using the field name ID. This field is automatically created
when the table is initially defined.
·
The fieldNames are a comma-separated list of the labels that should appear in the
auto-generated HTML table heading. These labels may contain spaces.
·
The type parameter specifies a format. Valid format options are "html" or "json"
o
html: Automatically generate an HTML table that allows for dynamic record
creation and deletion.
Page Customization and Database Extensions
5
Advanced User Guide for Database Extensions
o
json: The output of the tlist_standalone will be a JSON array with an object
name of "Results". It is not necessary to include fieldNames when using
JSON. The first field in the array will be the ID field.
Add the tlist_standalone tag wherever you would like the table to appear on your page.
The following is an example for the master list of all higher education institutions:
~[tlist_standalone:U_CollegeApp.U_Institutions;displaycols:IPEDS_ID,Instituti
on_Name,Institution_Type,Phone,URL;fieldNames:IPEDS ID,Institution
Name,Institution Type,Phone Number,Web Address;type:html]
Special Formatting of tlist_child and
tlist_standalone Columns
By default all of the columns in an auto-generated HTML table will be input fields
approximately 20 characters wide unless the extended field type is date or Boolean. Date
fields include the pop-up calendar widget. Boolean fields are displayed as check boxes.
Special code and tags have been created which allow the remaining input fields to be
changed to drop-down menus, radio buttons, text area or static text. It is possible to modify
the width of the input fields using Cascading Style Sheets.
Drop-Down Menu Example
·
·
·
Within the <head> tag, add the tlistCustomization.js JavaScript file.
Within the <form> tag, use tlist_child or tlist_standalone tag to add the tlist autogenerated table.
Directly after the tlist tag, use a script similar to the following example for field(s) you
want to change from input text to a drop-down menu. The script will define the dropdown menu options that should be displayed to users and be assigned a variable name.
Any variable name may be used. This script could be repeated if more than one field
needs to be displayed as a drop-down menu. In this case unique variable names must
be used for each. After the variable defines the value options, the following command
completes the script:
tlistText2DropDown('<FieldName',<JavaScript_Variable_Name>);
<!DOCTYPE html>
<html>
<!-- start right frame -->
<head>
<title>College Applications</title>
~[wc:commonscripts]
<script language="JavaScript" src="/scripts/tlistCustomization.js"
type="text/javascript"></script>
<link href="/images/css/screen.css" rel="stylesheet" media="screen">
<link href="/images/css/print.css" rel="stylesheet" media="print">
</head>
<body>
<form action="/admin/changesrecorded.white.html" method="POST">
~[wc:admin_header_frame_css]<!-- breadcrumb start --><a href="/admin/home.html"
target="_top">Start Page</a> > <a href="home.html?selectstudent=nosearch"
target="_top">Student Selection</a> > College Applications<!-- breadcrumb end ->~[wc:admin_navigation_frame_css]
Page Customization and Database Extensions
6
Advanced User Guide for Database Extensions
~[wc:title_student_begin_css]College Applications~[wc:title_student_end_css]
<!-- start of content and bounding box -->
<div class="box-round">
~[tlist_child:STUDENTS.U_COLLEGEAPP.U_APPLICATIONS;displaycols:Institution,Request_Dat
e,Request_Status,Scholarship,Complettion_Date,Outcome,Notes;fieldNames:Institution,Req
uest Date,Request Status,Scholarship,Completion Date,Outcome,Notes;type:html]
<script type="text/javascript">
var InstValues = {};
InstValues['1']='Option 1';
InstValues['2']='Option 2';
InstValues['3']='Option 3';
InstValues['4']='Option 4';
InstValues['5']='Option 5';
InstValues['6']='Option 6';
InstValues['7']='Option 7';
InstValues['8']='Option 8';
InstValues['9']='Option 9';
InstValues['10']='Option 10';
tlistText2DropDown('INSTITUTION',InstValues);
</script>
<br>
<div class="button-row">
<input type="hidden" name="ac" value="prim">~[submitbutton]
</div>
</div>
<br>
<!-- end of content of bounding box -->
~[wc:admin_footer_frame_css]
</form>
</body>
</html><!-- end right frame -->
Radio Button Example
·
·
·
Within the <head> tag, add the tlistCustomization.js JavaScript file.
Within the <form> tag, use tlist_child or tlist_standalone tag to add the tlist autogenerated table.
Directly after the tlist tag, use a script similar to the following example for field(s) you
want to change from input text to radio buttons. The script will define the radio buttons
that should be displayed to users and be assigned a variable name. Any variable name
may be used. This script could be repeated if more than one field needs to be displayed
as a radio buttons. In this case unique variable names must be used for each. After the
variable defines the value options, the following command completes the script:
tlistText2RadioButton('<FieldName',<JavaScript_Variable_Name>);
Page Customization and Database Extensions
7
Advanced User Guide for Database Extensions
Note: The following is the same code as the drop-down example, but only the tlist_child
and script are shown.
~[tlist_child:STUDENTS.U_COLLEGEAPP.U_APPLICATIONS;displaycols:Institution,Request_Dat
e,Request_Status,Scholarship,Complettion_Date,Outcome,Notes;fieldNames:Institution,Req
uest Date,Request Status,Scholarship,Completion Date,Outcome,Notes;type:html]
<script type="text/javascript">
var rbValues = {};
rbValues ['1']='Yes';
rbValues ['2']='No';
tlistText2RadioButton('Scholarship',rbValues);
</script>
Text Area Example
·
·
·
Within the <head> tag, add the tlistCustomization.js JavaScript file.
Within the <form> tag, use tlist_child or tlist_standalone tag to add the tlist autogenerated table.
Directly after the tlist tag, use a script similar to the following example for field(s) you
want to change from input text to a text area. The script will define the size of the text
area that should be displayed to users and be assigned a variable name. This script
could be repeated if more than one field needs to be displayed as a text area.
tlistText2TextArea('<Field_Name>',<rows>,<columns>);
Note: The following is the same code as the drop-down example, but only the tlist_child
and script are shown.
~[tlist_child:STUDENTS.U_COLLEGEAPP.U_APPLICATIONS;displaycols:Institution,Request_Dat
e,Request_Status,Scholarship,Complettion_Date,Outcome,Notes;fieldNames:Institution,Req
uest Date,Request Status,Scholarship,Completion Date,Outcome,Notes;type:html]
<script type="text/javascript">
tlistText2TextArea('Notes',4,50);
</script>
Static/Read Only Text Example
·
·
·
Within the <head> tag, add the tlistCustomization.js JavaScript file.
Within the <form> tag, use tlist_child or tlist_standalone tag to add the tlist autogenerated table.
Directly after the tlist tag, use a script similar to the following example for field(s) you
want to change from input text to read only text. This script could be repeated if more
than one field needs to be displayed as a text area.
tlistText2StaticText('<Field_Name>');
Page Customization and Database Extensions
8
Advanced User Guide for Database Extensions
Note: The following is the same code as the drop-down example, but only the tlist_child
and script are shown.
~[tlist_child:STUDENTS.U_COLLEGEAPP.U_APPLICATIONS;displaycols:Institution,Request_Dat
e,Request_Status,Scholarship,Complettion_Date,Outcome,Notes;fieldNames:Institution,Req
uest Date,Request Status,Scholarship,Completion Date,Outcome,Notes;type:html]
<script type="text/javascript">
tlistText2StaticText('Outcome');
</script>
Multiple Special Formatting Tags Example
The following example shows all of the above examples used together.
Note: The following is the same code as the drop-down example, but only the tlist_child
and script are shown.
~[tlist_child:STUDENTS.U_COLLEGEAPP.U_APPLICATIONS;displaycols:Institution,Request_Dat
e,Request_Status,Scholarship,Complettion_Date,Outcome,Notes;fieldNames:Institution,Req
uest Date,Request Status,Scholarship,Completion Date,Outcome,Notes;type:html]
<script type="text/javascript">
var InstValues = {};
InstValues['1']='Pearson University';
InstValues['2']='American University';
InstValues['3']='University of DDA';
tlistText2DropDown('INSTITUTION',InstValues);
var rbValues = {};
rbValues ['1']='Yes';
rbValues ['2']='No';
tlistText2RadioButton('Scholarship',rbValues);
tlistText2TextArea('Notes',4,50);
tlistText2StaticText('Outcome');
</script>
Using CSS Styles to Resize Input Fields
As previously noted, the default width of all fields in a tlist_child or tlist_standalone table,
except Boolean fields, which are shown as a checkbox, is 20 characters wide (about 180px).
To adjust the size of individual columns in the auto-generated HTML table use Cascading
Style Sheets (CSS). Each column in the auto-generated HTML table will be tagged with a
class attribute equal to the field name. In our college application tlist_child example, the
Institution input tag would include class="Institution". Define CSS styles for these
classes to control the width of the column.
The following example shows the definition of CSS styles for several columns in our
tlist_child table.
Page Customization and Database Extensions
9
Advanced User Guide for Database Extensions
Note: Only the HTML code necessary to demonstrate this example has been included.
<html>
<head>
:
:
<style>
.Institution
.Request_Date
.Request_Status
.Scholarship
{width:215px;}
{width:90px;}
{width:60px;}
{width:50px;}
</style>
</head>
<body>
:
:
~[tlist_child:STUDENTS.U_COLLEGEAPP.U_APPLICATIONS;displaycols:Institution,Request_Dat
e,Request_Status,Scholarship,Complettion_Date,Outcome,Notes;fieldNames:Institution,Req
uest Date,Request Status,Scholarship,Completion Date,Outcome,Notes;type:html]
Using A Proper File Record Number (FRN) For Staff
In order to allow Teachers to access multiple schools using a single account with the Unified
Teacher Record feature, it was necessary to split the TEACHERS table into two different
tables – A USERS table to contain all data directly related to the user, and the
SCHOOLSTAFF table to contain all data directly related to the Teacher/School relationship.
For more detailed information see Knowledgebase article 69896, Technical Information and
Field List for Unified Teacher Record, available on PowerSource.
Understanding this new table structure for staff will be important when creating custom
pages for staff that use the tlist_child tag. When creating a link to the new custom page the
proper FRN must be part of the link. Historically this has been done by adding "?frn=~(frn)"
to the end of the link. For example:
<a href="schedulematrix.html?frn=~(frn)">
·
·
·
schedulematrix.html is the page we are linking to.
?frn= is located immediately after the page address.
~(frn) is a special tag that would insert the full proper FRN for the staff member
currently being viewed on the staff page. An FRN consists of two parts; the 3-digit
table number and the DCID field from that table.
In older versions of PowerSchool the ~(frn) tag would always be 005+Teachers.DCID. The
Teachers table was table 005. So for a staff member with a DCID of 134 the ~(frn) would
return 005134. Starting with PowerSchool 7.9 and the ability to create database extensions
to the Users table (204) or SchoolStaff table (203), it is critical to create page links that
pass the proper FRN. For example, you want to create a database extension to the Users
table and a custom web page to track teacher credentials. After creating a U_Certificates
extension table use the following tlist_child tag on your custom web page to create, view,
and delete records.
~[tlist_child:Users.U_Credentials.U_Certificates;displaycols:CredNum,CredType,CredIssu
er,CredStart,CredEnd;fieldNames:Credential Number,Credential Type,Credential
Issuer,Start Date,Expires Date;type:html]
Page Customization and Database Extensions
10
Advanced User Guide for Database Extensions
Because the records on this page all relate to the Users table (table 204), construct your
page link using "204~([teachers]USERS_DCID)" rather than ~(frn) or the tlist_child
table will not function properly. This is what the link might look like:
<a href="credentials.html?frn=204~([teachers]USERS_DCID)">Credentials</a>
This will ensure the records in the tlist_child table use the DCID field from the Users table
rather than the Teachers table.
Page Customization and Database Extensions
11
Advanced User Guide for Database Extensions
Custom Insertion Points and Page Fragments
Insertion points are special locations within the source code of a page where customizers
can more easily insert dynamic content (page fragments).
PowerSchool insertion points have the following characteristics:
·
With insertion points, the original source page does not have to be customized in
order to add new content to that page. This can help dramatically cut down on the
number of custom pages that need to be created and subsequently updated when a
new version of PowerSchool is released.
·
Page fragments can be dynamically inserted in to the default source page.
·
Multiple standard Pearson-provided insertion points can exist on a page, and new
insertion points can be added.
·
You can physically move fragments around on the page using client-side DOM
manipulation via standardized XML metadata files or by using JavaScript.
·
You can customize every existing and new page in PowerSchool.
How it Works
Pearson has specified a set of standard insertion points. This set of insertion points is
expandable, but primarily consists of a small number of predefined places on the page. The
standardized insertion points are generally placed in common header and footer wildcards
and significant navigation menus. This allows standard insertion points to be defined for the
vast majority of pages in PowerSchool with minimal effort.
You decide which page(s) to customize and then choose an insertion point on the page.
With these two pieces of information, a page fragment file can be created on the local file
system (often referred to as the custom web_root) or in the Custom Web Page Management
feature in the PowerSchool System Administrator application. When rendering the page,
PowerSchool will gather together all the page fragment insertions for that page and render
them as inline HTML with the page. Note that each insertion point may have multiple
inserted page fragments for any given page and will all be rendered on the page.
See Appendix A for a complete list of insertion points.
Page Fragments
A page fragment is simply a snippet of content to be added to a target page. It could be
something simple like the following example:
<p>Hello world! I'm an auto-inserted page fragment.</p>
Or, a page fragment could be a complex combination of HTML code and jQuery scripts.
Because page fragments will be inserted in to existing PowerSchool HTML pages they do not
require any of the standards HTML <head>, <body>, or other tags. The main page already
contains those tags.
Custom Insertion Points and Page Fragments
12
Advanced User Guide for Database Extensions
Standard Insertion Points
PowerSchool includes a set of standard insertion points available on every page. This means
that, typically, you never need to think about insertion points: the common ones will be
available to you. This also has a benefit in allowing standardized naming: you will not have
one page where the footer insertion point is called content.footer and another where it is
called content_footer.
The following insertion points should be available on every page in PowerSchool:
·
content.header - top of the page above the blue bar
·
content.footer - near the bottom of the page, above the copyright bar within the
content area
·
leftnav.footer - right below the left navigation but above any PowerSource and/or
Mobile App content
·
page.header – located within the commonscripts wildcard (should rarely be used)
The following example displays the first few lines of code from the admin_footer_css
wildcard:
<div id="cust-content-footer">~[cust.insertion_point:content.footer]</div>
<div id="legend" style="display:none;">
<h3>~[text:psx.txt.wildcards.admin_footer_css.legend]</h3>
</div>
</div><!--end content-main-->
The very first line defines an insertion point with a name of content.footer.
Special Cases
On the Visual Scheduler and Seating Chart pages, the content.footer will be hidden and
unsupported.
Specify Insertion Points
You can add your own insertion points. Note that the standard insertion points use this
same naming scheme, just in standard header and footer files. To define an insertion point
within the HTML of a PowerSchool page, use the following tag:
~[cust.insertion_point:POINTNAME;DEFAULT_CONTENT]
The POINTNAME is required and is the name of the insertion point: it should be in dotseparated form, such as "page.header", "leftnav.footer", or "content.footer". When adding
your own insertion points to a page, be sure to use new unique names.
The DEFAULT_CONTENT is an optional block of content that will be inserted in the page if no
insertions are found for this insertion point. This should be used rarely. If there is no
associated content with an insertion point on a page, the point should be invisible.
The following example adds a new insertion point named "help.pages":
~[cust.insertion_point:help.pages]
Custom Insertion Points and Page Fragments
13
Advanced User Guide for Database Extensions
To define an insertion point in an FTL file, you can use a similar construction, only in
FreeMarker syntax:
<@cust.insertion name="POINTNAME">DEFAULT_CONTENT</@cust.insertion>
The following example adds a new insertion point named "help.pages" to an FTL file in the
/admin/ftl/ directory:
<@cust.insertion name="help.pages"></@cust.insertion>
Auto-Insertions: How to Use Defined Insertion Points
An auto-insertion is simply the act of taking one or more defined page fragments and
dynamically loading them in to the designated PowerSchool page at the specified insertion
points. There are two ways to define auto-insertions:
·
URL-based. The page fragment chosen is based on the URL (Uniform Resource
Locator) used by the browser to request the page from the system.
·
Wildcard-based. The page fragment chosen is based on wildcards that are included
on the page using the HTML ~[wc:WILDCARD_FILE] syntax.
These operate essentially identically. The only difference is in how the system constructs the
conventional file name to fetch the fragment from the file system or Custom Web Page
Management application. Note that data validation and language translation functionality
can be applied to page fragments.
URL-Based Auto-Insertion of Page Fragments
When creating a page fragment, the name of that file is critical for proper operation. In
URL-based auto-insertions, the source page URL is used in constructing the name of the
page fragment. For example, the URL of the page to be customized is the following:
http://<server_address>/admin/some_directory/some_page.html
Note: The file's extension may be any of the typically used PowerSchool URL extensions,
including .html, .htm, and .action.
Upon processing a page with this URL, the customization module considers all the insertion
points on the page, looking for a page fragment with the following name:
/admin/some_directory/some_page.FRAGMENT_NAME.INSERTION_POINT_NAME.txt
The page fragment file name is constructed from several parts:
·
/admin/some_directory – a page fragment file must be placed in the same
directory as the source page's file
·
some_page - prefix must be the same as the name of the source page, without the
extension (i.e. html).
·
FRAGMENT_NAME - any arbitrary name to help identify the page fragment and
keep its name unique. PowerSchool allows multiple fragments to be inserted in to the
Custom Insertion Points and Page Fragments
14
Advanced User Guide for Database Extensions
same page without impacting each other. If multiple page fragment insertions are
defined for a page, the insertion order is intentionally undefined.
·
INSERTION_POINT_NAME – must match the name of the insertion point to be
used in the page to be customized (i.e. "content.footer").
·
.txt – page fragments are always named with extension ".txt".
Example
District administrators have requested that a table with emergency phone numbers be
placed just below the What's New box on the Start Page. Examining the HTML source code
for /admin/home.html shows you:
73
74
75
76
77
<!-- end of search menu -->
</form>
</div>
~[wc:admin_startpage_whats_new]
~[wc:admin_footer_css]
Line 76 inserts the wildcard /wildcards/admin_startpage_whats_new.txt
Line 77 inserts the wildcard /wildcards/admin_footer_css.txt, which begins with a
content.footer insertion point. If you create a page fragment and use the content.footer
insertion point on the Start Page, the table of emergency numbers would be displayed just
below the What's New box as requested.
This is the proper file name format for the example page fragment, assuming a fragment
name of "Emergency_Numbers" is used:
The page fragment file would be placed in the /admin folder because that is the same
location as our targeted file, /admin/home.html.
Example of /admin/home.Emergency_Numbers.content.footer.txt page fragment:
<div class="box-round">
<h2 class="toggle expanded">Emergency Numbers</h2>
<ul class="text">
<li>Police/Fire/Ambulance: 911</li>
<li>Poison Control: 1-800-222-1222</li>
<li>Superintendent's Office: 555-555-1000</li>
<li>General Hospital: 555-555-0911</li>
<li>Children's Hospital: 555-555-2300</li>
<li>Gas Leak: 888-555-6000</li>
<li>Mechanical Issues: 555-555-1043</li>
<li>District Emergency Notification System: 877-555-9911</li>
</ul>
</div>
Custom Insertion Points and Page Fragments
15
Advanced User Guide for Database Extensions
Example screenshot of results:
Wildcard-Based Auto-Insertion of Page Fragments
Wildcard-based auto-insertions are exactly the same as URL-based insertions, except for the
method of determining the file name:
/wildcards/some_wildcard_name.EXTENSION_NAME.INSERTION_POINT_NAME.txt
Note that the content will be inserted on every page where this wildcard is used. This means
you can cause the same inserted content to show up on many pages by associating with a
common wildcard file that is used on all of those pages. For example, since
commonscripts.txt is included on every PowerSchool HTML page, you can cause content to
be inserted at the top of every page in the system by creating a file named like:
/wildcards/commonscripts.EXTENSION_NAME.page.header.txt
Note that the page fragment file will always be placed in the /wildcards folder.
Moving Inserted Page Fragments To Another Location On
the Target Page
In many cases the predefined insertion point is not the location on the page where you
would like to dynamically insert your page fragment contents. Rather than adding a custom
insertion point to the page, which would once again require modifying the source page,
different techniques can be used to dynamically move the contents of the page fragment to
a different location on the page. Examples might include adding a link to the student pages
menu (/admin/students/more2.html), adding a link to a custom report on the System
Reports menu, or adding additional input fields to the student demographics page. In each
of these examples our page fragments could be added to each page using the standard
insertion points on each of those pages, but our page fragment content would look out of
place near the bottom of each page if we used the content.footer insertion point. Use one of
the following methods to move your content.
Custom Insertion Points and Page Fragments
16
Advanced User Guide for Database Extensions
XML-Based Movement of Page Fragments
To move your page fragment contents to a specified location on the target page, create an
XML file that is paired with your page fragment file. As with page fragments, the name of
the XML file is critical. Create an XML file with the following naming convention:
/admin/some_directory/some_page.FRAGMENT_NAME.INSERTION_POINT_NAME.xml
The name is the same as the page fragment file it is paired with, except with an .xml file
extension instead of a .txt file extension.
To move your content to a different location on the page, the contents of the XML file
should use the following format:
1
2
3
4
5
<insertionMetadata xmlns="http://www.powerschool.com"
xmlns:xsi="http://www.w3.org/2001/XMLSchema-instance"
xsi:schemaLocation="http://www.powerschool.com insertionmetadata.xsd">
<inject location="h1" how="before" />
</insertionMetadata>
Only the contents of line four would change. The attributes of the inject tag on line four
have the following meanings:
·
location - The location in the page where the content from the matching page
fragment is to be inserted. The location is a jQuery selector, and as such can have
any CSS3 selector value plus extensions supported by jQuery.
·
how - How the injection is to be done. The following four options (which operate in
the same manner as their jQuery counterparts) are supported:
o
before – Inject the content as a block before the given location
o
after – Inject the content as a block after the given location
o
insert – Insert the content as a block at the beginning of the body of the
element at the given location. For example, an "insert" for the "h1" tag would
insert the content at the beginning of an <h1> element
o
append – Insert the content as a block at the end of the content at the given
location
Example
In the page fragment example, district administrators requested that a table with
emergency phone numbers be placed just below the What's New box on the Start Page. It
has been decided the long list of phone numbers would look better in a dialog popup
window triggered by clicking on an emergency icon. The location of this icon should be to
the right of the words "Start Page". After updating the contents of our page fragment to
display the new icon and link to our popup window we are ready to create our XML file to
place the icon in the desired location instead of the default content.footer insertion point
below the What's New box.
Our file name would be:
/admin/home.Emergency_Numbers.content.footer.xml
Custom Insertion Points and Page Fragments
17
Advanced User Guide for Database Extensions
The contents of our XML file would look like this example:
<insertionMetadata xmlns="http://www.powerschool.com"
xmlns:xsi="http://www.w3.org/2001/XMLSchema-instance"
xsi:schemaLocation="http://www.powerschool.com insertionmetadata.xsd">
<inject location="h1" how="append" />
</insertionMetadata>
Note the location attribute is "h1" because "Start Page" is wrapped in an <h1> tag. The
how attribute is set to "append", which will add our content after "Start Page" but before
the closing <h1> tag.
Example screenshot of results:
jQuery-Based Movement of Page Fragments
A second method to move your page fragment content to a specified location on the target
page is through the use of jQuery, which is already included with PowerSchool. When using
jQuery it is not necessary to create a separate file as described in "XML-Based Movement of
Page Fragments" above. The page fragment content is wrapped within a jQuery script.
The following example displays sample code using jQuery rather than an XML file for the
emergency numbers example:
<script>
$j("h1").append('\
<span style="align:right;position:relative;z-index:10;">\
<a class="dialogDivC" title="Emergency Numbers" href="#hiddenDivDialog">\
<img src="/images/emergency_number.png">\
</a>\
</span>')
</script>
<div id="hiddenDivDialog" class="hide">
<ul class="text">
<li>Police/Fire/Ambulance: 911</li>
<li>Poison Control: 1-800-222-1222</li>
<li>Superintendent's Office: 555-555-1000</li>
<li>General Hospital: 555-555-0911</li>
<li>Children's Hospital: 555-555-2300</li>
<li>Gas Leak: 888-555-6000</li>
<li>Mechanical Issues: 555-555-1043</li>
<li>District Emergency Notification System: 877-555-9911</li>
</ul>
Custom Insertion Points and Page Fragments
18
Advanced User Guide for Database Extensions
</div>
Example screenshot of results after clicking on the telephone icon:
Custom Insertion Points and Page Fragments
19
Advanced User Guide for Database Extensions
Upload Custom Web Page Files
To upload Custom Web Page files, use the PowerSchool System Administrator application.
For more information, see the Custom Web Page Management User Guide, available on
PowerSource.
Plugin Packages
Plugin packages offer a new way to distribute custom solutions between different
PowerSchool servers. The creation of a plugin package builds a single complete zip file
containing database extensions, custom pages and page fragments, and any associated
message keys that have been extracted from the custom pages included in the package.
Message keys include one or more language translations of text on a custom page.
ZIP File Format
The zip file must be in a specific format. Any contents of the zip file that do not conform to
the following specifications will be ignored:
·
An XML file named "plugin.xml" must be in the root directory of the zip file. This file
is mandatory. If the uploaded zip file does not contain it, the plugin installation
process will fail.
·
Zero or more database extension definition files under the zip file directory
"user_schema_root". Each is an XML file describing a database extension.
·
Zero or more page customization files under the zip file directory "WEB_ROOT".
These may include various types of web files listed below under "Installing a Plugin
Package".
·
Zero or more MessageKey properties files directly under the zip file directory
"MessageKeys". There must be one file per localization. The name of the MessageKey
properties file is PluginName.locale.properties where locale is the upper case
standard country code, followed by an underscore, followed by the lower case
standard language code. For example: PluginName.US_en.properties.
MessageKey Properties File Format
MessageKey properties files are auto-generated when the Plugin Package is created and not
normally created manually. They contain a list of custom message keys used on a particular
custom page. Each line in the file contains a Key Name = Value pairing. The Key Name is:
psx.htmlc.directory_path.pagename.original_text={translated text}
·
·
·
psx.htmlc – the standard prefix for messagekeys on customizations
directory_path – an underscore separated version of the path
original_text – the original text with spaces replaced by underscores
For example, CA_fr (Canadian French) key=value pairs for the phrases "Operating System"
and "Model Number" on page /admin/students/laptop.html would look like this:
psx.htmlc.admin_students.laptop.operating_system= Système d'exploitation
psx.htmlc.admin_students.laptop.model_number= Numéro de modèle
Upload Custom Web Page Files
20
Advanced User Guide for Database Extensions
Plugin Package Example Layout
The following is an example layout for a "Laptop.zip" plugin package. The file names in red
must be as shown. The user_schema_root folder will not be included in a package that
contains only web page files. The MessagerKeys folder will not be included in a package that
does not contain custom message keys.
It is possible to unzip a plugin package you download from the Internet, examine or change
the contents to suit your PowerSchool installation, and then re-zip the file to be imported.
For example, if you wanted to change the field names used in the package you could modify
the database extension XML file and any web pages that referenced those fields.
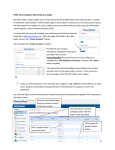
Creating a Plugin Package
To create a plugin package navigate to the Create Plugin Package page, select which assets
should be included, then click the Create Plugin Zip File button.
1. Sign in at the District Office.
2. Navigate to
https://<server>/admin/customization/CreatePackagePage.action
The Create Plugin Package page appears.
Plugin Packages
21
Advanced User Guide for Database Extensions
3. Use the following table to enter information in the fields:
Note: Asterisks indicate required fields.
Field
Description
Plugin Name
Enter a name for the plugin file.
Plugin Version
Enter the version of this plugin file.
Plugin Description
Enter a description of the plugin.
Publisher Name
Enter the name of the person who is creating this plugin.
Publisher Contact
Email
Enter the contact email for the person creating this plugin.
Plugin File Name
Enter the file name for the plugin. The .zip extension will
automatically be added.
Select Individual
Files
Navigate to and select the files to be included in the
package. Only modified or added files appear. The list
includes both web files and database extensions, which are
listed under the "user_schema_root" folder at the end of
the list. When a file is selected, it appears in the Selected
Files box.
Select Files By
Search Mask
Select files by searching for the file name. Enter the name
of a file to search for and click Search. All files matching
the term are added to the Selected Files box. Use an
asterisk as a wildcard character. For example: lap* would
add the file /admin/students/laptop.html or *.html would
add all custom files that end in .html.
Selected Files
A list of all selected files appears. Select one or more files
and click Remove Selected to clear those selections from
the list.
4. Click Create Plugin Zip File. The system creates the required plugin.xml file and
packages it and the selected extension files in one .zip file that you can download.
Note: If your browser preference is set to open safe files after downloading, disable
this preference before creating the .zip file. Otherwise, you will have to re-zip the
package files before you import the package on the Plugin Install page.
Known Issue Note: When a plugin containing a database extension is installed or
modified, you must restart the PowerSchool/PowerTeacher and ReportWorks services before
the new extensions may be used. To restart these services, open the PowerSchool Installer.
On the Start page, click Restart ReportWorks Services and Restart
PowerSchool/PowerTeacher Services.
Installing a Plugin Package
Plugin Management is used to import, house, and manage packaged database extensions
and web customizations. You can import zipped plugin packages that contain a plugin
definition file and at least one web file or database extension.
The plugin package can include one or more of the following file assets in the .zip file:
Plugin Packages
22
Advanced User Guide for Database Extensions
o
Database extension definition .xml files
o
Custom pages
o
Page fragments
o
Page fragment XML files
o
Image files (GIF, PNG, JPEG, JPG)
o
PDF files (PDF)
o
CSS files
o
JavaScript files
o
Other web directory artifacts
o
MessageKey properties files
How to Import a Plugin Package
Use the following procedure to import and install a plugin package.
1. Sign in to PowerSchool.
2. Navigate to System > System Settings > Plugin Management Configuration.
The Plugin Management Dashboard page appears.
3. Click Install.
4. Click the Browse button for the " Plugin Installation File" and locate the .zip file that
contains the plugin package, then click Install.
Note: If any of the plugin's file assets you are importing already exist in the Custom
Web Page Management site structure, PowerSchool will display an error message with
details of the problem and the plugin file will not be installed. This is to help ensure that
different plugins do not overwrite each other.
Important Information on Plugin Package
Enable/Disable/Delete
When the Disable function is selected for a plugin on the Plugin Management Dashboard,
all associated assets (database extensions, page customizations, message keys, etc.) are
disabled as well. Custom pages and files associated with a plugin package will not be served
from the Custom Web Page Manager while a plugin is disabled. Currently, PowerSchool does
not have a mechanism to indicate if a custom page is associated with a plugin when viewed
in the Custom Web Page Manager.
When the Delete function is selected for a plugin on the Plugin Management Dashboard, all
file assets associated with a plugin are deleted. However, deleting the plugin will not delete
any tables and fields from the Oracle database that were created by a database extension
definition.
Plugin Packages
23
Advanced User Guide for Database Extensions
Appendix A: List of Insertion Points
Page URL
Insertion Point(s)
/admin/constraints/menu.html
leftnav.footer
/admin/faculty/more2.html
leftnav.footer
/admin/powerschedule/menu.html
leftnav.footer
/admin/powerschedule/menu_task_nav.html
leftnav.footer
/admin/powerschedule/constraints/menu.html
leftnav.footer
/admin/powerschedule/coursecatalog/menu.html
leftnav.footer
/admin/powerschedule/coursegroups/menu.html
leftnav.footer
/admin/powerschedule/faculty/menu.html
leftnav.footer
/admin/powerschedule/requestsetup/menu.html
leftnav.footer
/admin/powerschedule/sections/menu.html
leftnav.footer
/admin/powerschedule/students/menu.html
leftnav.footer
/admin/reports/reporttabs.html
report.tabs
/admin/sections/menu.html
leftnav.footer
/admin/studentlist/counselor/massprintresults.html
leftnav.footer
/admin/studentlist/counselor/menu.html
leftnav.footer
/admin/students/more2.html
leftnav.footer
/admin/students/morecustom.html
leftnav.footer
/admin/teacherschedules/menu.html
leftnav.footer
/teachers/menu.html
leftnav.footer
/wildcards/admin_footer_css.txt
content.footer
/wildcards/admin_footer_frame_css.txt
content.footer
/wildcards/admin_header_css.txt
content.header
/wildcards/admin_header_frame_css.txt
content.header
/wildcards/admin_header_frame_sched_css.txt
content.header
/wildcards/admin_nav_menu_left_css.txt
leftnav.footer
/wildcards/commonscripts.txt
page.header
Appendix A: List of Insertion Points
24
Advanced User Guide for Database Extensions
Page URL
Insertion Point(s)
/wildcards/guardian_footer.txt
content.footer
/wildcards/guardian_footer_yui.txt
content.footer
/wildcards/guardian_header.txt
/wildcards/guardian_header_yui.txt
/wildcards/sm_psadmin__no_admin_nav_menu_content.txt
/wildcards/sm_psadmin_content.txt
/wildcards/sm_psguardian_content.txt
/wildcards/sm_psteacher_content.txt
content.header
leftnav.footer
content.header
leftnav.footer
content.footer
content.footer
leftnav.footer
content.footer
leftnav.footer
content.footer
leftnav.footer
/wildcards/subs_footer_css.txt
content.footer
/wildcards/subs_header_css.txt
content.header
/wildcards/subs_navigation_css.txt
leftnav.footer
/wildcards/teachers_footer_css.txt
content.footer
/wildcards/teachers_footer_fr_css.txt
content.footer
/wildcards/teachers_footer_nf_css.txt
content.footer
/wildcards/teachers_header_css.txt
content.header
/wildcards/teachers_header_fr_css.txt
content.header
/wildcards/teachers_nav_css.txt
leftnav.footer
/wildcards/title_student_end_css.txt
student.alert
Appendix A: List of Insertion Points
25