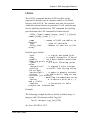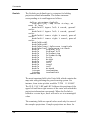
1
EASI
User Guide
Version 9.0
May 2003
50 West Wilmot Street
Richmond Hill, Ontario, Canada, L4B 1M5
Phone: (905) 764-0614
Fax:
(905) 764-9604
Email: [email protected]
© 2003 PCI Geomatics Enterprises Inc.®. All rights reserved.
COPYRIGHT NOTICE
Software copyrighted (c) by PCI Geomatics, 50 West Wilmot St., Richmond Hill, Ontario, CANADA L4B 1M5
Telephone number: (905) 764-0614
RESTRICTED RIGHTS
Canadian Government
Use, duplication, or disclosure is subject to restrictions as set forth in DSS 9400-18 “General Conditions - Short Form - Licensed
Software”.
U.S. Government
Use, duplication, or disclosure is subject to restrictions as set forth in FAR clause 52.227-19 “Commercial Computer Software Restricted Rights” and in subparagraph (c) (1) (ii) of the “Rights in Technical Data and Computer Software Clause” at DFARS 52.2277013.
ACE, ACE & Design (logo), ACE Advanced Cartographic Environment, AGROMA, EASI/PACE, EOScape, FLY!, GCPWorks,
GeoAnalyst, GeoGateway, ImageWorks, OrthoEngine, PCI OrthoEngine, PCI, PCI & Logo, Committed to GeoIntelligence Solutions,
PCI Author, PCI Visual Modeler, RADARSOFT, RasterWorks, and SPANS are registered trademarks of PCI Geomatics Enterprises Inc.
PCI Geomatics and Geomatica are registered trademarks of PCI Geomatics Enterprises Inc.
InstallShield is a registered trademark of InstallShield Software Corporation.
Microsoft is a registered trademark, and Windows is a trademark of Microsoft Corporation.
MrSID is a registered trademark of LizardTech Inc. Copyright 1995-2003 LizardTech, Inc. All rights reserved.
UNIX is a registered trademark of The Open Group.
Copyright (c) 2002, Mapping Science, Inc. GeoJP2™ is a trademark of Mapping Science, Inc. The GeoJP2™ format is the intellectual
property of Mapping Science, Inc.
All other trademarks and registered trademarks are the property of their respective owners.
Table of Contents
Chapter 1
Introduction
Purpose of EASI ............................................................................... 1
Chapter 2
Using EASI
Overview of Using EASI.................................................................... 5
Getting Help (HELP) ......................................................................... 8
Parameters ....................................................................................... 9
Setting and Changing Parameters, Variables (LET) ....................... 11
Displaying Parameters (PRINT)...................................................... 12
Examining Parameter Sets (STATUS)............................................ 13
Searching For Parameter Names (SEE)......................................... 14
Running Procedures (RUN) ............................................................ 14
Keeping a Record of Your Work (LOG) .......................................... 15
When You Are Finished .................................................................. 18
Summary......................................................................................... 18
Chapter 3
Developing Simple Scripts
A Simple Procedure ........................................................................ 21
Interaction With Procedures............................................................ 23
Defining New Parameter Entries (DEFINE) ................................... 25
SEEing Defaults of Parameters ...................................................... 28
Procedure Documentation .............................................................. 31
Commenting Procedures (REM) ..................................................... 34
The Entire “ENHANCE.EAS” Script ................................................ 35
Chapter 4
EASI Programming
Overview ......................................................................................... 39
Scripts, Functions, and Intrinsics .................................................... 39
EASI Variables................................................................................ 41
Expressions .................................................................................... 56
Procedure Control........................................................................... 60
User Defined Functions .................................................................. 72
Chapter 5
Working with Data
Text Files ........................................................................................ 81
i
Table of Contents
Binary Files ..................................................................................... 83
Database Files ................................................................................ 86
Projections ...................................................................................... 92
Vector Data ..................................................................................... 95
Data Modelling ................................................................................ 98
Chapter 6
Error Handling
Overview ....................................................................................... 105
Statement Level Error Trapping .................................................... 106
Error Information Functions........................................................... 108
Error Casting Functions ................................................................ 110
Trapping Errors in Blocks of Code ................................................ 111
Chapter 7
Object Oriented Programming With EASI
Overview ....................................................................................... 117
Class Declarations ........................................................................ 118
A Sample Class............................................................................. 126
Chapter 8
EASI Language Reference
Commands.................................................................................... 137
Expressions................................................................................... 185
Functions....................................................................................... 194
Notes............................................................................................. 198
Appendix A
Error Message List ........................................................... 203
Appendix B
System Parameter Definitions
EASI System Parameters ............................................................. 205
Index .................................................................................. 207
ii
PCI Geomatics
C
Introduction
H A P T E R
1
Purpose of EASI
EASI, the Engineering Analysis and Scientific
Interface, is both a command environment for
interactive executing tasks and a scripting language for
the construction of applications. EASI is independent of
its host environment and eliminates the differences
between host operating systems, presenting the user
with a simple, powerful environment.
As a command environment, EASI provides a simple
and convenient mechanism for querying and setting
input parameters required by an executable module,
referred to as a “task”. The interactive user is able to
view a complete list of all the parameters required as
input by a task, check their current values, modify their
values, and execute the task.
As a scripting language, EASI can be used to automate
those manual procedures that are performed by a user
interactively. A set of commands can be placed in an
ordinary text file, called an EASI script, to specify
parameter values and execute tasks. Chains of such
commands in an EASI script can be used to
EASI User’s Guide
1
Purpose of EASI
automatically compute more complex or time-consuming
results.
In addition to support for simple automation scripts, the EASI
scripting language includes a complete set of control structures
with which complex applications can be built. EASI also
includes a rich set of intrinsic functions which permit the
manipulation of data in a platform independent way. Examples
of data that can be accessed and manipulated include raster
imagery, vector data, projection information, and general
binary and text files.
The EASI User’s Guide
The EASI user’s guide describes in detail the interactive
command and programming capabilities of EASI.
2
•
Chapter 2, “Using EASI”, focuses on the use of EASI as a
command environment, demonstrating how tasks can be
executed and their input parameters set.
•
Chapter 3, “Developing Simple Scripts”, describes how
simple scripts can be created to automate the types of tasks
performed manually in Chapter 2.
•
Chapter 4, “EASI Programming”, provides an in-depth
description of EASI as a scripting language, including
coverage of data-types and control structures.
•
Chapter 5, “Working with Data”, touches upon some of the
more important intrinsic functions available in EASI, using
examples to demonstrate their use.
•
Chapter 6, “Error Handling”, describes techniques which can
be used to take appropriate action when errors occur so that
more robust and reliable applications can be created.
•
Chapter 7, “Object Oriented Programming with EASI”,
describes support for object oriented programming, such as
the ability to define classes and member functions.
PCI Geomatics
Chapter 1 - Introduction
•
Chapter 8, “EASI Command Line Interface”, presents
reference material on all of the commands and intrinsic
functions available in EASI.
•
Appendix A, “Error Messages”, lists all of the error messages
generated by EASI in alphabetical order.
•
Appendix B, “System Parameter Definitions”, contains
procedures used to define system parameters and error
messages for EASI.
Throughout the manual, numerous examples are used. These
examples are set apart from the text of the manual by being
printed in a separate type face. Many of these examples are
given in the form of commands which can be entered
interactively at the EASI command line. Examples of this type
can be recognized as they are preceded by the standard EASI
prompt, “EASI>”, as follows:
EASI>print “Hi!”
In this example, the command entered to the right of the EASI
prompt simply prints the message “Hi!”. Other examples given
in the manual are in the form of commands which are part of an
EASI script file. These example differ from the interactive
example above in that they are not preceded by an EASI
prompt:
print “Hi!”
Sometimes, the general syntax of a command is presented. The
syntax is given in a highlighted type face, followed by a
description of any special portions of the command. Square
brackets “[]” are used to indicate portions of the command
syntax which are optional, and ellipses “...” are used to indicate
portions of the command where a variable number of items can
be put. For example:
PRINT expression [, expression...]
EASI User’s Guide
3
Purpose of EASI
where [expression] is of one of the following types:
•
a numeric expression
•
a string expression
This simplified example shows the syntax of the print
command. The brackets indicate that additional expressions to
print can be given by separating them using commas.
Summary
EASI is a powerful tool used for controlling the execution of
tasks and for developing platform independent applications.
This manual describes the capabilities of EASI, giving
examples where appropriate to illustrate important features and
techniques. Complete reference documentation is also
included. Although not intended as a general introduction to
programming, nor as a specific aide to any particular
application-domain, this manual provides the in-depth
understanding required by an EASI user to take full advantage
of its features and capabilities.
4
PCI Geomatics
C
Using EASI
H A P T E R
2
This chapter is directed to users with little or no
knowledge of PCI's EASI software. By the end of this
chapter, you will have gained enough knowledge to use
EASI as a command environment to set up and execute
tasks and to be able to obtain help using the on-line help
system.
Overview of Using EASI
This chapter and the rest of the manual assumes that
EASI has been successfully installed and setup on your
system. Once setup, EASI may be invoked from a
command line by typing the command easi:
prompt> easi
In some situations, EASI may also be invoked by
clicking the EASI icon. Once EASI is running, an EASI
prompt will appear:
EASI>
Commands are entered interactively at this prompt for
two main purposes:
1. To manipulate parameters
EASI User’s Guide
5
Overview of Using EASI
2. To execute tasks.
“Parameters” are special variables that control the execution of
tasks. For example, the DBIC parameter allows you to specify
which image channel contains the data to be processed.
Parameters come in two forms: string (text) and numeric
(numbers). Parameters are stored in a file in the local working
directory, so they retain their values between EASI sessions.
“Tasks” are individual programs designed to accomplish
specific jobs. For example, there is a run task to run (or execute)
a program.
To create a local working copy of the master parameter file, run
the COPPRM task, as shown. At the end of the line, press the
carriage return (<cr>, Enter).
EASI>run copprm
EASI is not case sensitive. Commands can be entered in upper,
lower, or mixed case.
To view the parameters that a specific task requires, use the
STATUS command.
EASI>status CDL
The status command will display parameters required by a task
along with their descriptions and current values. If a parameter
is not yet set, but is required in order for a task to run, it will be
marked as MISSING.
CDL
Channel Descriptor Listing
V7.0 EASI/PACE
FILE
- Database File Name
:irvine.pix
DBCL
- Database Channel List
}
DTYP
- Description Type: SHORT/FULL
:SHORT
REPORT - Report Mode: TERM/OFF/filename
:TERM
6
PCI Geomatics
Chapter 2 - Using EASI
To view the value of a single parameter, use the PRINT
command:
EASI>print file
irvine.pix
This displays the contents of the predefined string parameter
FILE to the screen. There are many predefined parameters. An
example of a numeric parameter is DBIC, which stands for
Database Input Channel. Notice here a special abbreviation of
the print command is used, the single letter “p”.
EASI>p DBIC
1
Parameters can be modified by assigning values to them:
EASI>FILE = "irvine.pix"
EASI>FILE = \""irvine.pix" (on Windows NT
systems)
EASI>DBIC = 1, 2
String parameters like FILE are assigned values by putting the
value in quotes. Note that on Windows NT systems, the double
quotes have a special meaning, so a different format is required
to achieve the same ends.
Numeric parameters like DBIC are assigned values by listing
these values, separated by commas.
After the parameters for a given task have been set, the task can
be run:
EASI>r CDL
Here the abbreviation “r” is used for the RUN command. A task
will typically produce output to the screen, or to data files
located on disk.
To exit EASI, use the command QUIT.
EASI>quit
EASI User’s Guide
7
Getting Help (HELP)
Getting Help (HELP)
EASI provides extensive on-line help documentation. Typing
HELP (or “?”) followed by the name of a subject will put you
into the on-line help system of EASI.
To exit the on-line help, press <cr> until the usual EASI>
prompt reappears.
Try typing:
EASI>HELP
or
EASI>?
This will display general help information on the screen.
Typing HELP EASI displays information about EASI. Typing
HELP HELP shows information about the EASI on-line help
feature.
Help topics often have subtopics associated with them. You can
access these subtopics directly by typing the subtopic name
after the topic. For example, type:
EASI>HELP EASI COMMANDS LET
This will display information about the LET command
subtopic.
If the topic you choose has subtopics, you will see a list of those
subtopics at the end of the help information. For example, if
you started the help feature by typing HELP EASI, the
following prompt would appear at the end of the help text for
the EASI topic:
Subtopics:
Commands
Expression
EASI Subtopic?
8
Functions
Notes
PCI Geomatics
Chapter 2 - Using EASI
In this case, there are 4 subtopics available to you: Commands,
Expression, Functions, and Notes The first word of the prompt
is the name of your current topic (EASI, in this example). You
can now choose a subtopic from the list in the help text by
typing either its full name or the first few letters of its name
which distinguish it from the other subtopics on the list. For
example:
EASI Subtopic? COM
This will display the list of EASI commands. Each of these
commands is a subtopic and one of them may be entered to see
the specific help about that command.
You have several other options when prompted to choose a
subtopic. To review the information on the current topic, type a
question mark (?).
If you are currently looking at the help of a subtopic, pressing
<cr> (carriage return) steps you back up the help levels
towards the larger (parent) topic. Pressing <cr> one or more
times will eventually get you out of the on-line help facility,
and back to the EASI> prompt.
Parameters
This section details the information needed to understand how
parameter values interact with application programs and EASI
commands.
Numeric Parameters
Numeric parameters are vectors of 16 real elements. During
the definition of the parameter, a lower bound and upper bound
are specified which define the range of values the elements may
EASI User’s Guide
9
Parameters
take. An attempt to assign a value outside of this range to an
element would result in an error.
Elements which have never been assigned a value are said to be
“missing” or undefined. Elements may be missing elements as
a result of an assignment or LET command. For example,
VECTOR=1,2 sets the first two elements of VECTOR to 1 and
2, the other 14 values to “missing”.
During parameter definition, a default value is also specified.
(This value may or may not be in the range allowed by the upper
and lower bounds). During the execution of application tasks,
this default is used for missing elements.
String Parameters
A sequence of characters enclosed in double quotes ("aBc") is
called a string. String parameters vary in length from 0 (zero)
to 64 characters. A string with no characters in it (i.e., has a
length of zero) is called a null string. For example "A2" has a
length of two but "" (adjacent double quotes) has a length of
zero and is a null string. In the case of a string parameter, the
null string may be interpreted as a missing value. Some
application tasks may require non-null string(s) before
executing.
Subscripted Parameters
Each of the 16 elements in a numeric parameter and the 64
characters in a string parameter can be individually accessed
through the use of subscripting. This has the form:
parm (numexp)
where
[parm] is a defined parameter.
10
PCI Geomatics
Chapter 2 - Using EASI
[numexp] is a numeric expression used as a
subscript.Subscripts start with a value of
1.
For example, if TEXT has the value "ABCD123" then TEXT(3)
addresses the third position, which contains the value "C". If
VECTOR has the values 1,3,5,2, then VECTOR(2) addresses the
second position in VECTOR, which contains the value 3.
This subscripting capability is useful for loop control, list
checking. and limited forms of text manipulation. These
programming techniques will be introduced over the next few
chapters.
Setting and Changing Parameters, Variables
(LET)
During the course of work, the normal progression is to decide
which procedure to run, examine the parameters that control it,
perhaps modify some of them, and then actually run the
procedure.
The LET command allows you to change the current value of a
parameter. Its two most common forms are:
LET parm = number, number, ... , number
LET parm = "text string"
where
[parm] is the name of a parameter
The form used depends on the original definition of the
parameter (numeric or string) and this does not change. EASI
will tell you if you use the wrong form and you can try again.
Remember, a string parameter must be enclosed in double
quotes.
EASI User’s Guide
11
Displaying Parameters (PRINT)
Type the following to the EASI prompt:
EASI>LET VECTOR=2,3,5,6.4
EASI>LET FUNCTION="SQUARE"
For convenience, you can omit the verb LET from any
assignment statement. This short form is easier to enter and
simpler to read. For example,
EASI>VECTOR=2,3,5,6.4
EASI>LET VECTOR=2,3,5,6.4
produce exactly the same result.
It is possible to allow a parameter to take the value(s) of another
parameter. The form of this assignment command is:
[LET] parm1 = parm2
where
[parm1, parm2] are existing parameters of
the same type.
Displaying Parameters (PRINT)
The PRINT command allows procedures to print a line of
information made up of numeric and/or string expressions to
the user's terminal. Advanced options also allow direct cursor
addressing, limited graphics, screen clearing, and the changing
of character attributes. With this command, elaborate menus
and reports can be generated.
The general form of this command is:
PRINT expression [, expression...]
where
[expression] is of one of the following
types:
12
PCI Geomatics
Chapter 2 - Using EASI
•
a numeric expression
•
a string expression
•
a format expression
•
a BOX or BOXCLEAR expression
Example: PRINT "The square of 4.1 is ",
4.1*4.1
Use of a comma (“,”) on a print line, as shown in the example
above, denotes a separation between various print expressions.
In this way, various print expressions may be intermixed.
Examining Parameter Sets (STATUS)
There will be perhaps hundreds of parameters in the parameter
file and each procedure will likely use a different subset of
these. You can examine the parameters for a procedure without
running the procedure itself by issuing the STATUS command:
STATUS proc
where
[proc] is the name of a procedure.
Type:
EASI>STATUS EX1
Your screen will clear and the following will appear:
EX1 Example Task 1
EASI V5.2
HH:MM DD-MMM-YY
FUNCTION - Function to Perform ROOT/SQUARE
:SQUARE
VECTOR - Vector of Real Values
>
2
3
5 6.4
The first line gives a short description of the program, the
current software version and the time and date. Following this
EASI User’s Guide
13
Searching For Parameter Names (SEE)
is a list of parameters needed to run EX1 and their current
values.
Type:
EASI>VECTOR=4
EASI>STATUS EX1
Notice that the FUNCTION parameter was unchanged, while
VECTOR is different.
STATUS does not change the parameters: it is simply an aid that
frees you from memorizing the parameters used by each
program.
Searching For Parameter Names (SEE)
The SEE command is used to search for parameters. This is
useful when you cannot quite remember how a parameter was
spelled, or if you wish to see a group of parameters which have
similarly spelled names. This command has the form:
SEE [parm] [define]
where
[parm] is one to eight characters of the
name of a group of parameters to search.
[define] is an option that will show the
defined minimum, maximum and default
values of that parameter.
Running Procedures (RUN)
Once you have set up the parameters for a procedure using LET
(and checked them using SEE or STATUS), you can RUN the
procedure. This command has the form:
RUN name
14
PCI Geomatics
Chapter 2 - Using EASI
where
[name] is the name of the procedure you
wish to run.
Type the following:
EASI>FUNCTION="ROOT"
EASI>VECTOR=1,2
EASI>RUN EX1
The following should appear on your screen:
The square root of 1.000 is
The square root of 2.000 is
1.0000
1.4142
Type:
EASI>FUNCTION="SQUARE"
EASI>RUN EX1
You should see the squares of the two given VECTOR values:
The square of 1.000 is
The square of 2.000 is
1.0000
4.0000
Try experimenting with EX1. Remember that once EASI
completes a procedure, it will tell you it is ready for another
command by returning the EASI> prompt.
To expedite your work, instead of typing RUN each time you
wish to execute a procedure, just type "R" (or "r"), followed by
the procedure name. This is the short form of the RUN
command.
Example: r EX1
Keeping a Record of Your Work (LOG)
The history log file allows you to keep a record of the work you
have done. When logging is active and you run any procedure,
EASI automatically generates an entry in the log file. Each time
EASI User’s Guide
15
Keeping a Record of Your Work (LOG)
a procedure completes, a second log entry is made. The log is a
file on disk named "EASI.LOG".
In general, the log file will consist of a list of procedures run
and the times, interspersed with optional entries. Each log entry
has the form:
! HH:MM:SS operation message
where
[HH:MM:SS] is the current time.
[operation] is the type of log entry
[message] is a short description message
A sample history log might appear as:
! 09:15:36
RUN EX1
! 09:15:56
BEGIN
EX1
END
EX1
Start Logging
To start history logging enter:
EASI>LOG START
This will open the current log file and start adding log messages
to the bottom of it. If no log file exists, a new one will be
created.
To indicate that logging was started the following line is
entered into the file:
! HH:MM:SS
LOG STARTED
DD-MMM-YY
If the log file was already open, this command is ignored.
Stop Logging
To stop history logging enter:
16
PCI Geomatics
Chapter 2 - Using EASI
EASI>LOG STOP
This will close the log file, preventing any further entries. To
indicate that logging was stopped the following message is
entered into the log file just before closing:
HH:MM:SS
LOG STOPPED
DD-MMM-YY
If the log file is already closed, this command is ignored.
Entering A Log Message
To force a message into the log file, type:
LOG "message"
This will create the following entry in the log file without a time
stamp.
message
If logging is not enabled this command is ignored.
Examining The Log
To list the log file to your terminal, type:
EASI>LOG LIST
The entire log file will be sent to your screen for review. As the
log file can be very long, you should use this command with
caution. The log file can be either open or closed when you
execute this command.
Starting A New Log File
To start a new log file, first delete the old log file using
instruction:
EASI User’s Guide
17
When You Are Finished
EASI>LOG DELETE
This deletes the old log file (if it existed). A new file will be
created when you start logging again.
Example Logging Session
EASI>LOG DELETE
EASI>LOG START
EASI>LOG "Example log message"
EASI>LOG STOP
EASI>LOG LIST
! 13:15:02 LOG STARTED 30-FEB-83
Example log message
! 13:15:30 LOG STOPPED 30-FEB-83
When You Are Finished
Once you have completed your work and you wish to leave your
terminal, you can exit EASI using the BYE or EXIT commands.
These two commands are identical in function.
Type:
EASI>BYE
You should only exit using the BYE or EXIT commands. This
allows EASI to clean up before it exits. If you exit any other
way, you may lose or harm files, or lock devices.
Summary
EASI functions as an interactive command environment for
executing tasks. Input values required by tasks are specified
through setting parameters which come in two main types:
string, and numeric. Within EASI, parameter values can be
18
PCI Geomatics
Chapter 2 - Using EASI
viewed using the PRINT and SEE commands, and parameters
may be assigned new values using the LET command.
Tasks generally declare a set of parameters which they use as
input. To view the parameters used by a particular task, the
STATUS command followed by the task name is used. After
setting a tasks’ input parameters, the RUN command is used to
execute the task.
Logging is available through the LOG command. Log files can
be created to save the contents of an EASI session to a text file.
Extensive on-line help is available in EASI with the HELP
command.
EASI User’s Guide
19
Summary
20
PCI Geomatics
C
Developing Simple Scripts
H A P T E R
3
An EASI script or procedure is a list of EASI
commands stored in a text file. Procedures can be as
complex as an entire production/research facility, or as
simple as a few interactive steps. With procedures, you
can tailor the EASI system to your unique requirements.
This section assumes that you have read Chapter 2,
“Using EASI”, and now have some experience working
with EASI.
A Simple Procedure
Suppose, for example, a hypothetical user often
executes a sequence of tasks to resize and enhance an
image. Typically, this user creates a new database using
the CIM task, copies data to it using the III1 task,
computes a look-up table for enhancement using the
FUN task, and then applies the look-up table to the
image using the LUT task. Normally, the user sets the
parameters for the first task manually, then executes it,
then sets the parameters for the second task and
executes it, and so on for each task in the list. Such a
1. CIM, III, FUN, and LUT are tasks that perform operations on database files, and are not part of EASI itself.
EASI User’s Guide
21
A Simple Procedure
sequence of steps is an excellent candidate for automation using
a simple EASI script. An example of such a script is presented
below.
The script is created by entering the commands that form the
script in a text editor. The script is then saved to a file with a
maximum 8 character name, all which must be upper-case, and
followed by the extension “.EAS”. In the example below, the
script is stored in the file “ENHANCE.EAS”. Once created, the
script can be executed by entering its name with the RUN
command, as follows:
EASI>run enhance
The body of the script contains exactly the commands the user
would enter manually in order to accomplish the desired task.
Typically, this consists of setting parameters required by a
particular task, running that task, and so on to obtain the final
result. The example below is a listing of part of the
ENHANCE.EAS script, in which the first step of the process is
done, namely the creation of a new database file. The lines
beginning with an exclamation mark “!” are comment lines and
are ignored by EASI, as are blank lines.
! ENHANCE.EAS: image resizing and
enhancement
! Set parameters for the CIM task
FILE = “Newname.pix”
TEX1 = “Down-sampled image”
TEX2 =
DBSZ = 512, 512
PXSZ = 1, 1
DBNC = 1
DBLAYOUT = “BAND”
! execute the CIM task
RUN CIM
In order to locate the script in order to execute it, the script file
must be located in the current working directory (this is usually
the same directory where EASI is started).
22
PCI Geomatics
Chapter 3 - Developing Simple Scripts
When the script is run, EASI will execute the commands in
“ENHANCE.EAS” in order starting at the beginning of the file
and ending when there are no more commands to execute, at
which time control will return to the EASI prompt.
Although the enhancement process is automated by the script,
their are still a number of deficiencies:
1. The file names are hard-coded into the script making it
inconvenient to use.
2. There is no on-line help available.
3. The script lacks any kind of error checking capability.
The remaining sections of this chapter will describe techniques
on how to specify input values for scripts and to create on-line
documentation. Error handling will be left to a separate chapter.
A complete version of the simple ENHANCE script will be
presented at the end of this chapter.
Interaction With Procedures
A script will typically need to input some data on which to act.
It will also need some way to output its results. Information can
be written to the screen using the PRINT command, and input
data can be specified either interactively using the ASK
command, or by using parameters combined with the STATUS
command.
Printing a Line (PRINT)
The PRINT command allows procedures to print a line of
information made up of numeric and/or string expressions to
the user's terminal. Advanced options also allow direct cursor
addressing, limited graphics, screen clearing, and the changing
EASI User’s Guide
23
Interaction With Procedures
of character attributes. With this command, elaborate menus
and reports can be generated.
The general form of this command is:
PRINT expression [, expression...]
where
[expression] is of one of the following
types:
•
a numeric expression
•
a string expression
•
a format expression
•
a BOX or BOXCLEAR expression
Examples:
print "The square of 4.1 is ", 4.1*4.1
print “DBIC: “, DBIC
Use of a comma (“,”) on a print line, as shown in the example
above, denotes a separation between various print expressions.
In this way, various print expressions may be intermixed.
Interactive Data Input
Data can either be entered interactively at a prompt or through
the use of parameters in the same way that tasks use parameters
to specify input. Interactive input is accomplished using the
ASK command, followed by a prompt enclosed in quotes and
then the name of the parameter to which the data will be read.
ASK “Enter file name: ” file
When executed, this command will cause the prompt message
to be printed and EASI will then wait for the user to enter the
requested data, which in this case will be stored in the
parameter “FILE”.
24
PCI Geomatics
Chapter 3 - Developing Simple Scripts
Enter file name: test.pix
Data Input With Parameters
An EASI procedure can use parameters to specify input. In this
case, the parameters must be set by the user before the
procedure is executed. Pre-defined system parameters may be
used, or new parameters may be created specially for the use of
the procedure.
Since parameters are globally defined, there is no need for
formal parameter passing to procedures. However, to improve
ease of use, procedures can be made to generate status reports
which are displayed when the status of a procedure is requested.
Status reports are useful in allowing the user of a procedure to
check which parameters are used so they can be set before the
procedure is run. It is up to the writer of the procedure to check
the values of the parameters when the procedure is executed to
ensure they are valid.
Defining New Parameter Entries (DEFINE)
In addition to all the standard system and application
parameters, you can define new ones for your own personal
applications (for example, work parameters for procedures or
new parameters for tasks). However, unless these definitions
are included in the system definitions by the system manager,
they will be local to your account only and will be lost if your
parameter file is deleted. (You can save your new definitions in
a procedure file to run whenever you create a new parameter
file).
Parameter names are from one to eight characters long. The
first character must be a letter (A-Z). The following zero to
seven characters can be any combination of: letters (A-Z),
EASI User’s Guide
25
Defining New Parameter Entries (DEFINE)
digits (0-9), underscore (_), hatch (#) or colon (:). By
convention, hatches and colons are rarely used, and even then
only as the last character in a name.
There are three types of parameters: Message, String, and
Numeric.
Message parameters are used to hold messages of up to 64
characters. Once defined they should not be changed. The
syntax for defining a message parameter is:
DEF parm = M, "message" [,"descriptor"]
where
[parm] is the 1 to 8 character name of the
message
[M] indicates a message parameter
["message"] is a message of up to 64
characters
["descriptor"] is a descriptor of up to 32
characters
String parameters are used to hold character information (e.g.,
file names, text strings). The syntax for defining a string
parameter is:
DEF parm = C, "default"
[,"prompt"]
where
[parm] is the parameter name (up to 8
characters)
[C] indicates string parameter type
["default"] is a default value (0 to 12
characters)
["prompt"] is a prompt message (up to 32
characters)
Numeric parameters are used to hold up to 16 real data values.
The syntax for defining a numeric parameter is:
DEF parm = N, min, max, default
[,"prompt"]
26
PCI Geomatics
Chapter 3 - Developing Simple Scripts
where
[parm] is the parameter name (up to 8
characters)
[N] indicates the numeric parameter type
[min] is a real minimum value for data
values
[max] is a real maximum value for data
values
[default] is a real default for specified
data values (if this is outside the min-max
range, it forces unspecified data values to
be "missing")
["prompt"] is a prompt message (up to 32
characters)
Examples:
DEF MESG = M, "please enter your ID code"
DEF USRTEXT = C, "NONE", "User text
parameter"
DEF NTAPES = N,1,16,0,”Enter number of
tapes"
Defining Input Parameters for ENHANCE.EAS
The method of specifying input using parameters can be applied
to the ENHANCE script, removing its dependence on hardcoded input values. ENHANCE requires three input values, the
name of the input file, the channel within the input file
containing the data to be read, and the name of the output file
to create.
Existing parameters can be used as input parameters. For
example, the parameter DBIC can be used to specify the input
channel number to ENHANCE. New parameters can also be
created with specific names and descriptions tailored to the
script. A pair of parameters called INFILE and OUTFILE can
be created to specify the files used by ENHANCE as follows:
DEFINE INFILE = C, ““, “Input Database
File”
EASI User’s Guide
27
SEEing Defaults of Parameters
DEFINE OUTFILE = C, ““, “New Output
Database File”
SEEing Defaults of Parameters
A special form of the SEE command will display the
characteristics given to a parameter when it was defined. The
form of the command is:
SEE parm DEF[INE]
where
[parm] is the parameter name
When the define option is used, the SEE command will output
the defined min/max and defaults of the parameter along with
its current value.
For Numeric parameters, an extra line is printed:
Minimum> number Maximum> number Default>
number (may be none)
For string parameters this extra line will be:
Default: string
(12 characters)
For example, if:
EASI>DEF NM1=N,0,10,-1,"Temp. Numeric
vector"
EASI>NM1=1,2,3
then,
EASI>SEE NM1 DEF
NM1
- Temp. Numeric vector
Minimum> 0 Maximum>
10
28
> 1
2
3
Default> none
PCI Geomatics
Chapter 3 - Developing Simple Scripts
Procedure Status Reports
Procedure status reports are generated by the use of STATUS
commands (STATUS_END, STATUS_SHOW,
STATUS_TITLE) placed within a procedure. In general, a
procedure would typically contain a STATUS_TITLE command
to generate identification of the procedure, followed by one or
more STATUS_SHOW commands to show which parameters
are required, and a STATUS_END command to indicate the end
of the STATUS commands. While the STATUS commands can
be anywhere in a procedure, it is conventional to place them
near the top.
When a status report is requested, the procedure is searched line
by line for STATUS commands. All other commands are
ignored. In RUN or HELP mode, STATUS commands are
treated like REMark statements and have no effect.
Generating A Title (STATUS_TITLE)
The STATUS_TITLE command allows EASI to generate a
header when you request the status of your procedure. This
header includes the date, time, software identification and a
title/description of up to 40 characters.
The form of this command is:
STATUS_TITLE
"string"
where
[string] is a title/description of 1 to 40
characters
The STATUS_TITLE command must be the first STATUS
command in a procedure. If it is missing, a default title is
generated.
EASI User’s Guide
29
SEEing Defaults of Parameters
Showing Parameters (STATUS_SHOW)
This command has the form:
STATUS_SHOW parm [max[,min]]
where
[parm] is the name of a parameter
[max] is a numeric constant indicating how
many (at most) values will be shown (1 to
16 for numeric parameters, 1 to 64 for
character parameters)
[min] is a numeric constant indicating at
least how many values will be shown (0 to
16 for numeric parameters, 0 to 64 for
character parameters)
When a request for the status of a procedure is made, EASI
scans the procedure for STATUS_SHOW statements and does a
SHOW on each parameter specified.
Ending a Status Report (STATUS_END)
The STATUS_END command forces EASI to stop searching a
procedure for STATUS commands. It has the form:
STATUS_END
and should be placed after the last STATUS_SHOW command.
STATUS_END is optional since it is implied at the end of a
procedure; however, status reports for long procedures can be
made faster using this command since only a part of the
procedure is searched for STATUS statements.
Note
Any STATUS commands after a STATUS_END will not be found.
30
PCI Geomatics
Chapter 3 - Developing Simple Scripts
Example: Using STATUS With ENHANCE.EAS
In order to make the ENHANCE script work with STATUS, the
following lines are added to near the beginning of the script:
STATUS_TITLE
Enhancement”
STATUS_SHOW
STATUS_SHOW
STATUS_SHOW
STATUS_END
“ENHANCE
INFILE
DBIC
OUTFILE
Image Resizing and
64,1
1,1
64,1
With this addition, the current values of the input parameters to
ENHANCE can be determined interactively by the user using
the STATUS command:
EASI>status enhance
The user of the script will then be able to set the parameters to
appropriate values as with any other EASI task.
Procedure Documentation
Procedure Help
The DOC statement is used to enter on-line help documentation
for procedures. This statement has the form:
DOC text
where
[text] is any character text to the end of
the line.
When requesting help for a procedure, EASI will scan the
procedure and print to your screen the text associated with
every DOC statement it finds until it encounters a subtopic, a
DOC_END statement, or the end of the procedure. It is standard
practice to put DOC statements at the beginning of a procedure.
EASI User’s Guide
31
Procedure Documentation
A special form of the DOC statement is used to identify
subtopics. Subtopic identification lines have the form:
DOC # topic
where
[#] is a subtopic level from 1 to 9
[topic] is a 1 to 15 character subtopic
identifier
Note
There must be only one space between the DOC statement and
the subtopic level number. Also, note that during procedure
execution, DOC lines are ignored like REM statements.
DOC statements associated with subtopics are only printed
when the user requests them. The EASI help system will
automatically scan the procedure and list the subtopics of any
topic the user chooses. Example:
DOC
This is an example of on-line
documentation
DOC 1 FIRST
DOC This line is associated with subtopic
FIRST
DOC 2 SECOND
DOC
These two lines are associated with
subtopic SECOND
DOC
which is itself a subtopic of FIRST.
DOC 3 THIRD
DOC
This is a subtopic of SECOND.
DOC 3 FOURTH
DOC
This is another subtopic of SECOND.
DOC 1 FIFTH
DOC
This is another first-level subtopic
like FIRST,
DOC
but this topic has no subtopics of
its own.
32
PCI Geomatics
Chapter 3 - Developing Simple Scripts
Example: Documenting ENHANCE.EAS
The DOC statement can be used to add on-line documentation
to the ENHANCE script. Such documentation could include a
general description of the function of the script, specification of
its input parameters, and/or an example of its use.
DOC
DOC ENHANCE
DOC
DOC Given an input file and channel number,
create a new
DOC file containing a 512x512 sized copy of
the input with
DOC equalization enhancement applied.
DOC
DOC 1 PARAMETERS
DOC
DOC ENHANCE requires the following input
parameters:
DOC
DOC Name
Prompt
Count
Type
DOC
DOC INFILE Name of input file to be
processed
1-64
Char
DOC DBIC
Database Input File Name
0-1
Int
DOC OUTFILE Name of output file to be
created
1-64
Char
DOC
DOC 2 INFILE
DOC
DOC The name of the input file from which
data will be enhanced.
DOC
DOC 2 DBIC
DOC
DOC The channel within the input file which
is to be enhanced.
DOC
DOC 2 OUTFILE
DOC
DOC The new file to create which will be of
size 512x512, and contain
DOC a single channel with the enhanced (by
equalization) input data.
DOC
EASI User’s Guide
33
Commenting Procedures (REM)
DOC 1 EXAMPLE
DOC
DOC Enhance the contents of channel 3 of a
file called “input.pix”,
DOC creating and putting the results in a
file called “output.pix”.
DOC
DOC INFILE=”input.pix”
DOC DBIC=3
DOC OUTFILE=”outfile.pix”
DOC
DOC RUN ENHANCE
DOC_END
With the documentation added, the user of the ENHANCE
script will be able to easily get help on the usage of the script
using the HELP command:
EASI>help enhance
Commenting Procedures (REM)
It is considered good technique to include comments and
programming notations in with your procedures. These
comments (remarks) can be included by first placing a “!”
command marker at the start of the line, as shown in the
following example:
! Comments and program notes are placed
here.
The “!” symbol is a short-cut instead of typing the long form
of the command marker, the REM command. For example:
REM Comments and program notes are placed
here.
Once EASI encounters a ! or a REM, it will ignore the rest of
that input line. Remark lines have no effect on a procedure's
execution. Text following a ! or REM marker need not be
enclosed in double quotes. Comments must appear on lines by
themselves and cannot appear on a line following a command.
34
PCI Geomatics
Chapter 3 - Developing Simple Scripts
The Entire “ENHANCE.EAS” Script
The following is the completed ENHANCE script, including
built-in on-line documentation and status report. In general,
EASI scripts should follow the same overall structure. Note that
while it is a great improvement over manually entering
commands, the ENHANCE script is still limited in that it
follows a rigid linear control flow and lacks any error handling.
However, capabilities such as control-flow to produce more
complex procedures and advanced error handling may be added
using the more advanced features of EASI that will be
introduced in later chapters.
! ENHANCE.EAS: image resizing and
enhancement
DOC
DOC ENHANCE
DOC
DOC Given an input file and channel number,
create a new
DOC file containing a 512x512 sized copy of
the input with
DOC equalization enhancement applied.
DOC
DOC 1 PARAMETERS
DOC
DOC ENHANCE requires the following input
parameters:
DOC
DOC Name
Prompt
Count
Type
DOC
DOC INFILE Name of input file to be
processed
1-64
Char
DOC DBIC
Database Input File Name
0-1
Int
DOC OUTFILE Name of output file to be
created
1-64
Char
DOC
DOC 2 INFILE
DOC
DOC The name of the input file from which
data will be enhanced.
DOC
DOC 2 DBIC
DOC
EASI User’s Guide
35
The Entire “ENHANCE.EAS” Script
DOC The channel within the input file which
is to be enhanced.
DOC
DOC 2 OUTFILE
DOC
DOC The new file to create which will be of
size 512x512, and
DOC contain
DOC a single channel with the enhanced (by
equalization) input
DOC data.
DOC
DOC 1 EXAMPLE
DOC
DOC Enhance the contents of channel 3 of a
file called
DOC “input.pix”,
DOC creating and putting the results in a
file called
DOC “output.pix”.
DOC
DOC INFILE=”input.pix”
DOC DBIC=3
DOC OUTFILE=”outfile.pix”
DOC
DOC RUN ENHANCE
DOC_END
STATUS_TITLE
Enhancement”
STATUS_SHOW
STATUS_SHOW
STATUS_SHOW
STATUS_END
“ENHANCE
INFILE
DBIC
OUTFILE
Image Resizing and
64,1
1,1
64,1
! Set parameters for the CIM task
FILE = “Newname.pix”
TEX1 = “Down-sampled image”
TEX2 =
DBSZ = 512, 512
PXSZ = 1, 1
DBNC = 1
DBLAYOUT = “BAND”
! execute the CIM task
RUN CIM
! Set parameters for the III task
36
PCI Geomatics
Chapter 3 - Developing Simple Scripts
FILI =
FILO =
! DBIC
DBOC =
DBIW =
DBOW =
“Oldname.pix”
“Newname.pix”
already set by user
1
!execute the III task
RUN III
! Set the parameters for the FUN task to
! generate a look-up table to enhance the
image
! ( use `Equalization’ enhancement)
FILE = “Newname.pix”
FUNC = “EQUA”
DBIC = 1
DBLUT =
DBSN = “Equalize”
DBSD = “Equalization enhancement”
OSTR =
SDPT =
TRIM =
MASK =
DBHC =
! execute the FUN task
RUN FUN
! The fun task creates a data segment, the
number of which
! is recorded in the parameter LASC.
! Set the parameters for the LUT task
FILE = “Newname.pix”
DBIC = 1
DBLUT = LASC
DBOC = 1
MASK =
! execute the LUT task
RUN LUT
EASI User’s Guide
37
The Entire “ENHANCE.EAS” Script
38
PCI Geomatics
C
EASI Programming
H A P T E R
4
Overview
In addition to being a command environment for
interactively executing tasks, EASI is also a fullfeatured interpreted programming language. EASI
supports control-structures such is FOR, WHILE, and
IF statements, the definition of variables and structures,
the definition of functions taking any number of
arguments and providing a return value, and a powerful
set of built-in intrinsic functions. EASI can be used to
develop specialized and powerful applications.
Scripts, Functions, and Intrinsics
Like the simple scripts introduced in the previous
section, EASI programs are stored in text files with
upper-case names ending with the extension “.EAS”.
These files may be created with any text editor. In fact,
there is no difference between the EASI scripts from the
previous section and the more powerful programs
described here, except that these programs draw upon
the full set of EASI commands.
EASI User’s Guide
39
Scripts, Functions, and Intrinsics
It is possible for an EASI script to call another EASI script,
providing subroutine-type capability, and for an EASI script to
call itself, providing recursion. However, EASI scripts are
limited in that there is no direct way to pass data to them nor for
them to return a value, except through setting EASI parameters
and manipulating external data files. However, EASI allows the
definition of functions, which are similar to scripts but which
may be called with a list of arguments, and which are able to
return a specified value. The definition of a function is done
within an EASI script. In other words, functions are defined in
text files with the same naming conventions as EASI scripts.
Functions are not normally defined interactively at the
command line.
An example of an EASI function definition is:
! file USERFUNC.EAS
! function to compute the average of two
values
DEFINE FUNCTION Average ( x, y )
return ( (x+y)/2 )
ENDDEFINE
The statements within the body of the function are executed
when the function is called:
EASI>print
5
Average( 4, 6 )
Note that a function should not have the same name as the script
in which it is defined, for example a function named “test”
should not be defined in a file called “TEST.EAS”. Details on
defining and using functions will be presented in a later section.
There are a number of special built-in functions available in
EASI, which are known as intrinsic functions. These special
functions provide a number of important capabilities, such as
common numeric computations, and file access. An example
of a simple numeric function is COS(), which returns the cosine
of an angle in radians:
40
PCI Geomatics
Chapter 4 - EASI Programming
EASI>print cos(0.5)
0.877583
Many useful intrinsic functions will be described throughout
the remainder of this manual. A complete list of intrinsic
functions is available in the EASI reference section of the
manual, and in the on-line help.
EASI Variables
In addition to the parameters defined earlier, EASI allows the
definition of variables. Variables differ from parameters in that
they are not stored in an external file, and hence do not remain
defined between EASI sessions. Variables may be defined to be
of many different types, including simple types like integers
and aggregate types like structures. The region of code in
which a variable may be accessed is referred to as its scope;
EASI variables may be defined in one of two different scopes:
local and global. The implications of using either or these
scopes will be described in a later section. A variable called ‘a’
defined in a local scope can be declared interactively with the
statement:
EASI>local integer a
Once declared, the variable may be used:
EASI>print a
0
When a variable is created, it is normally given a default value.
The default value for an integer variable is 0. Variables can be
assigned values:
EASI>a = 5
EASI>print a
5
EASI User’s Guide
41
EASI Variables
Variables may also be used in assignments to other variables
and also to parameters.
EASI>local integer b
EASI>b = a
EASI>print b
5
EASI>DBIC = a
EASI>print DBIC
5
Variables may also be used in expressions such as addition:
EASI>a = a + b + 1
EASI>print a
11
Further details on expressions will be given in a later section.
Variable Names
Variables names are comprised of the letters A-Z, the numbers
1-9, and the underscore character “_”. The first character of the
variable name must always be a letter. As with the rest of EASI,
variable names are not case sensitive, so for example, variables
named “delta”, “DELTA”, “Delta” will all be considered to be
the same. Variable names may be arbitrarily long. It is illegal to
declare variables with the names of certain EASI keywords
(that is, certain words that have special meaning to the
language). For example, a variable may not be called “RUN”
since “RUN” is an EASI command. Attempting to define a
variable with such an illegal name will result in EASI
generating an error. The following are some valid variable
names:
i
amount
file_name
x2
NumberOfTableEntries 1
42
PCI Geomatics
Chapter 4 - EASI Programming
Variable Types
There are five basic types of variables available in EASI.
Table 1: Variable Types and Descriptions
Integer
4 byte signed integer number
Float
4 byte single precision floating point number
Double
8 byte double precision floating point number
Char
single character (1 byte)
Byte
single unsigned byte
Integer
4 byte signed integer number
A variable of type integer can represent a signed four byte
integer value. That is, any variables listed as an integer will
recognize only whole numbers (ie, 0, 2, -47). If a numeric input
for such a variable is not entered as a whole number (for
example, if 3.999 is entered), then the variable will only accept
the value to the left of the decimal (in this case, 3). The number
will not be rounded off. On most platforms, integers in the
range -2,147,483,648 to 2,147,483,647 can be represented.
If a variable is declared as a double, then the variable will
represent real numbers with an 8 byte double precision floating
point value, for example 12.9. Numbers in the range 10-308 to
10+308 can be represented with 15 to 17 decimal digits of
accuracy. Similarly, a float variable will represent real
numbers with a 4 byte floating point value. Numbers in the
range 10-38 to 10+38 can be represented with 6 to 9 decimal
digits of accuracy.
1. The capitalization is for readability only. “numberoftableentries”
represents the same variable!
EASI User’s Guide
43
EASI Variables
A char or character variable will represent single characters
such as “A”, and “3”. Finally, a byte variable will represent
only the integers from 0 to 255.
Note that unlike parameters, EASI variables represent single
values and not vector values. For example, an EASI float
variable represents a single number, unlike an EASI numeric
parameter which represents 16 numeric floating point values.
If a value is assigned to a variable that is not within the range
of legal values the variable may represent, the result of the
assignment is undefined and should not be relied upon.
Arrays
Arrays provide a convenient way to handle large sets of
variable values of a particular type. Arrays are declared like
other variables using the LOCAL or GLOBAL commands, but
also require a size specifier in square brackets after the variable
name. For example, an array of 3 integers called ‘x’ can be
declared with the command:
EASI>local integer x[3]
The number 3 in square brackets in the declaration statement
sets the size of the array. The values in an array are
manipulated in expressions and assignments using indexing.
An index is a numeric value that is used to access a particular
element of an array. The first element of an array is always
accessed with the index 1, and the remaining values are
accessed with the indices 2, 3, and so on up to the declared size
of the array. Indices appear in square brackets following the
array name. For example, to assign the value 5 to the first
element of the array x:
EASI>x[1] = 5
EASI>x[2] = x[1] + 10
EASI>print x[1], x[2], x[3]
5
15 0
44
PCI Geomatics
Chapter 4 - EASI Programming
The maximum size of which an array may be declared is limited
only by available memory. Arrays may only be declared for the
basic types available in EASI (byte, char, integer, float, and
double), and also for structures which will be described later. It
is not currently possible to declare multi-dimensional arrays in
EASI.
Arrays of characters may be handled in a simplified way in
addition to being manipulated using the indexing technique
described above. It is possible to assign a list of characters
enclosed in double quotes, commonly referred to as a string,
directly to the array. For example:
EASI>local char filename[8]
EASI>filename = “irvine”
EASI>print filename
irvine
It is still possible to access individual elements of the character
array using indexing:
EASI>print filename[3]
v
If an assigned string is too large to fit within the size allocated
for the array, the assigned string is truncated:
EASI>filename = “irvine.pix”
EASI>print filename
irvine.p
Special
Types
In addition to the 5 basic types, EASI provides three special
types of variables. These are the STRING, MSTRING, and
MVAR.
Table 2: Special Variable Types and Descriptions
EASI User’s Guide
String
arbitrarily long string of characters
Mstring
multi-line string
45
EASI Variables
Table 2: Special Variable Types and Descriptions
Mvar
modelling intermediate array
A string is very similar to an array of characters, except that its
size is not fixed as it is for an array of characters. This makes
a string very convenient to use.
local string name
name = “John”
name = “John Smith”
name = ““
EASI automatically allocates and manages the memory storage
for a string so that there is enough space to hold the value
assigned. Individual characters within the string may still be
accessed using array style indexing as with arrays of characters:
name = “abcdefg”
print name[3]
c
An mstring is a multi-line string, which is a convenient way to
represent textual data. An mstring can be thought of as a list of
strings which can grow to accommodate new strings being
appended to it.
As with strings, EASI manages the memory storage of an
mstring, allocating enough space to hold the assigned data. An
MSTRING initial contains no data. When an initial value is
assigned to the MSTRING, it becomes the first string in the
string-list, and is accessed using array style indexing with the
index 1.
EASI>local mstring ListOfNames
EASI>ListOfNames = “Alfred”
EASI>print ListOfNames
Alfred
EASI>print ListOfNames[1]
Alfred
46
PCI Geomatics
Chapter 4 - EASI Programming
A new strings can be appended to the end of an MSTRING by
assigning it to the next available index. For example, a second
string can be added to the list by assigning it to index 2.
EASI>ListOfNames[2] = “Betty”
EASI>print ListOfNames
Alfred
Betty
More new strings can be added to the list, and any of the
previously assigned strings can be replaced with new values.
EASI>ListOfNames[3] = “Charles”
EASI>ListOfNames[1] = “Alexander”
EASI>print ListOfNames
Alexander
Betty
Charles
Note that it is not possible to insert a string into the middle of
an MSTRING, nor to delete a string from an MSTRING. There
is no automatic reshuffling of indices.
The third special type available in EASI is the MVAR, which is
a modelling intermediate array. Further discussion on this
variable and on modelling in general is deferred to a later
chapter.
Variables of these special types are declared in the same
manner as the basic types using the LOCAL or GLOBAL
statements. Note however that it is not legal to declare arrays
of type STRING, MSTRING, or MVAR, nor to declare pointers
to these variables.
Structures
It is possible to build aggregate variables in EASI by defining
and using structures. A structure is composed of any number of
basic variables, strings, mstrings, and other structures
associated together into a single unit. Once defined, a structure
EASI User’s Guide
47
EASI Variables
is equivalent to a new variable type available to EASI.
Variables of this new type can be declared using LOCAL and
GLOBAL statements just like other variables.
Structures are defined using the DEFINE command. Since a
single structure definition consists of may lines, structures are
not defined interactively at the EASI prompt, but normally only
in EASI procedures.
An example of a simple structure definition is:
DEFINE STRUCTURE Point
DOUBLE X
DOUBLE Y
ENDDEFINE
The name of the structure is specified immediately after the
“DEFINE STRUCTURE” keywords (in the example above, the
structure name is “Point”), and the structure definition ends
with the “ENDDEFINE” keyword. The fields that make up the
structure are given in the body of the structure definition. After
a structure has been defined, variables may be declared of the
new type:
LOCAL Point p
The fields of the structure are accessed by appending a period
“.” and the field name after the name of the structure variable.
p.x = 1.5
p.y = -5
It is possible for structures to include arrays and other
structures as fields.
DEFINE STRUCTURE DatasetInfo
STRING Filename
CHAR MapUnits[24]
Point UpperLeft
Point LowerRight
ENDDEFINE
LOCAL DatasetInfo Irvine
48
PCI Geomatics
Chapter 4 - EASI Programming
Irvine.Filname = “irvine.pix”
Irvine.MapUnits = “LONG/LAT”
Irvine.UpperLeft.X = 2342.233
Note here how the “Filename” field is a string, and can hence
be of any length, but the “MapUnits” field is an array of chars,
and is limited in length to 24 characters. Finally, it is possible
to declare arrays of structures:
LOCAL DatasetInfo data[5]
data[1].Filename = “test1.pix”
data[2].Filename = “test2.pix”
EASI has some predefined structures: Vertex and GeoInfo.
These structures are available for use in any program. The
Vertex structure represents a single three-dimensional point,
and is equivalent to the following structure definition:
Table 3: Predefined Structures and Descriptions
Vertex
single 3-dimensional point
GeoInfo
projection information
DEFINE STRUCTURE Vertex
DOUBLE x
DOUBLE y
DOUBLE z
ENDDEFINE
The GeoInfo structure is more complex, and its use will be
discussed in a later chapter.
Pointers and Dynamic Allocation
EASI provides functions that allow the user to directly allocate
and manage blocks of memory, and make it possible to build
data structures such as trees and linked lists. In some situations
however, considerable opportunities for misuse are available,
making it possible to not only cause errors, but also to possibly
EASI User’s Guide
49
EASI Variables
terminate EASI itself. These powerful facilities should be used
with care.
Pointers are special variables used to refer to allocated blocks
of memory. Pointers also have types, indicating to EASI how a
block of memory should be interpreted. It is possible to declare
pointers for any of the basic types in EASI, as well as for
structures. The keyword PTR is used in LOCAL and GLOBAL
declaration statements to indicate that a variable is a ptr.
For example, the following statement will declare a pointer to
a block of integers called “pData”.
local integer ptr pData
When a pointer variable is declared it does not point to any
block of memory; the pointer is said to be initialized to
“NULL”. NULL is a keyword in EASI, and can be used to test
if a pointer is currently pointing to any data.
if ( pData = NULL ) print “The pointer is
set to NULL”
A block of memory can be allocated using the EAlloc() intrinsic
function. EAlloc() takes two arguments, the first is the type of
the memory, and the second is the number of units of memory
of that type to allocate. To allocate a block of 10 integers, use
the statement:
pData
= EAlloc( int, 10 )
The actual data being pointed to can then be manipulated using
array style indexing:
pData[1] = 10
pData[2] = pData[1] + 5
The length of the block of data being pointed to can be obtained
using the F$LEN() intrinsic function:
EASI>print f$len( pData )
50
PCI Geomatics
Chapter 4 - EASI Programming
10
Pointers can be assigned to other pointers:
local int ptr pData2
pData2 = pData
In the above example, pData2 will be pointing to the same data
as pData.
EASI>pData2[3] = 100
EASI>print pData[3]
100
A block of data can be reallocated to a larger size using the
ERealloc() intrinsic function. ERealloc() takes the same
arguments as EAlloc(), along with a third argument which is a
pointer to the block of memory to be allocated to a larger size.
pData = ERealloc( int, 20, pData )
When a block of data is reallocated to a larger size, it may be
necessary to move it within memory to a new location (EASI
manages this automatically). The previous contents of the
block of data will be maintained, however since the block may
have moved, other pointers referring to the same memory may
no longer be valid (and should be assumed to be invalid). In the
preceding example, the second pointer “pData2” may no longer
point to a valid block of memory, and should be either
reassigned to “pData”, or no longer used.
When a block of data is no longer required, it should be released
using the EFree() intrinsic:
call EFree( pData )
After being freed, the block of data should no longer be referred
to.
EASI User’s Guide
51
EASI Variables
Variable Scopes
The scope of a variable is the region of code in which it is
defined and can be used. There are two types of scopes in EASI:
local and global. The particular scope in which a variable exists
depends on the way in which it is declared. Local variables are
declared with the LOCAL command, and global variables with
the GLOBAL command.
Local variables exist only while the procedure in which they
were declared is being executed, and may only be accessed
within the procedure in which they were declared. Each
procedure has its own distinct local scope. If a procedure is
designed to access and run other procedures outside of its own
programming, the locally declared variables of the initial
procedure will remain declared while the second procedure
runs, but will not be available to the second procedure. Once
any procedure completes (returns), all its local variables are
lost. The advantage of using local variables is that by declaring
variables local the user is guaranteed that no other procedure
has access to those variables.
Unlike local variables, global variables are available to any
procedure after they are declared, and continue to exist until
EASI itself terminates. In previous versions of EASI, a special
statement called IMPORT was required in order for a global
variable to be used within a procedure other than the one in
which it was declared. However, the use of the IMPORT
statement is no longer required, and global variables are
automatically available to all procedures.
If both a local and global variable have the same name, then any
references to that variable are considered by EASI to be
references to the local version. Hence access to the global
variable of the same name will no longer be possible.
52
PCI Geomatics
Chapter 4 - EASI Programming
For example, suppose a procedure declares two variables:
variable A is declared to be global and variable B is declared to
be local. The procedure is able to access and set both of these
variables.
global integer A
local integer B
A = 1
B = 2
Suppose next that this procedure calls a second procedure,
called Func2.
call Func2()
The new procedure Func2 will be able to access the global
variable A since it was declared global, but will be unable to
access the variable B since it was declared local to the other
procedure.
A = 5
Scope Rules With Examples
EASI variables were designed to allow speed, flexibility and,
above all, modularity. By declaring variables local the user is
guaranteed that no other procedure has access to those
variables. Global variables, however, can be accessible to other
procedures; no accidental cross-references can be made
between the two types of variables.
The following give examples of variable interaction and scope
rules.
Procedure X
GLOBAL NUMERIC A, B
NUMERIC B
A = 1
B = 2
RUN Y
PRINT "A= ",A,"B= ",B
EASI User’s Guide
Procedure Y
LOCAL
A = 5
B = 6
RETURN
53
EASI Variables
The result from running procedure X would be:
A= 5
B= 2
Procedure Y uses global A from procedure X; thus the
assignment "A=5" in procedure Y assigns 5 to the global
variable A. However, since procedure Y declares B to be local
to procedure Y, there is no connection between the local
variable B in procedure Y and the global variable B in
procedure X (i.e., the fact that they have the same name is of no
importance; they are separate variables stored in separate
memory locations.).
One significant advantage for connecting values through the
careful use of locally and globally declared variables is
achieving greater modularity. It becomes possible to connect
collections of procedures together without having global
variables in one procedure affected by the global variables used
in a called procedure.
An string assignment variation on the above example would be:
Procedure U
W
GLOBAL STRING C
"C= ",C
C=”From U”
RUN V
C=”Back to U”
PRINT C
Procedure V
Procedure
C=”From V”
PRINT
RUN W
RETURN
RETURN
The output from running U would be:
C= From V
Back to U
Variable Declaration
Local and global variables are declared using the LOCAL and
GLOBAL statements, respectively.
54
PCI Geomatics
Chapter 4 - EASI Programming
The LOCAL statement is used to declare one or more local
variables of a particular type. This statement has the basic
form:
LOCAL [type] name [,name,name...]
where
[type] is the type of local EASI variable
to declare
[name] is the name of a local EASI variable
to declare
Examples:
LOCAL INTEGER first, second, third
LOCAL DOUBLE distance, speed, i
LOCAL STRING winner, teamname, mvp
If no type declaration follows a LOCAL statement, EASI
assumes the declaration type to be double, however it is
generally considered sloppy programming practice to declare a
variable without explicitly specifying its type.
The GLOBAL statement has the same syntax as the LOCAL
statement:
GLOBAL [type] name [, name, name,...]
where
[type] is the type of global EASI variable
to declare
[name] is the name of a global EASI
variable to declare
The GLOBAL and LOCAL declaration statements may be used
any number of times at any place within a procedure. The
variable that is declared becomes available to the procedure
immediately after the declaration statement is executed by
EASI.
EASI User’s Guide
55
Expressions
Expressions
Expressions are used to compute new values from data, and can
be composed of operators, variables, and parameters.
Expressions commonly appear on the right-hand-side of
assignment statements, and in argument lists to function calls.
Most expressions are classified as being either numeric, logical
(also known as relational), or string. Brackets may be used in
any type of expression to group sub-expressions in order to
ensure the are evaluated in the intended order.
Numeric Expressions
Numeric expressions are formed using numeric elements and
arithmetic operators. The evaluation of the expression returns a
single numeric value.
A numeric element can be any of the following:
•
a numeric constant, such as 3.14
•
a subscripted numeric parameter, such as VECTOR[2]
•
a numeric intrinsic function, such as COS(0.5)
•
a numeric user defined function, such as Average(4,6) from
the earlier example.
•
an EASI numeric variable, of type byte, integer, float, or
double.
•
a subscripted EASI numeric array variable.
Arithmetic operators specify the computation to be performed.
The operators are:
*
/
+
^
56
Multiplication
Division
Addition
Subtraction
Exponentiation
PCI Geomatics
Chapter 4 - EASI Programming
These are binary operators, since each is used with two
elements. A subscripted numeric parameter or local numeric
value must have a defined value before it can be used in an
expression.
Numeric expressions are evaluated using real arithmetic.
Examples:
1 + 2 + 3 yields 6
2 * (1 + 3.3) yields 8.6
2 ^ .5 yields 1.41421 (i.e., square root)
SIN(3.1415927 / 2) yields 1
String Expressions
String expressions are formed using string elements and the
concatenation operator. Concatenation is the act of placing
strings together. The result of a string expression is a single
string.
A string element can be any of the following:
•
a string constant
•
a subscripted string parameter
•
a string parameter
•
a string function
•
an EASI string variable
•
a character variable, character array, or subscripted character
array
•
a subscripted mstring variable
The single string operator is concatenation (or string joining),
written “+”.
EASI User’s Guide
57
Expressions
Example:
EASI>print "AB" + "B13" + "?"
"ABB13?"
The double-quote(“) character may be included within a string
by preceding it with a back-slash character (\):
EASI>local string message
EASI>message = “Finished processing file
\”irvine.pix\”.”
EASI>print message
Finished processing file “irvine.pix”.
MString Expressions
Mstring expressions are formed using mstring elements along
with the concatenation operator. The result of an mstring
expression is an mstring.
EASI>local mstring a, b, c
EASI>a[1] = “mstring a line
EASI>a[2] = “mstring a line
EASI>b[1] = “mstring b line
EASI>b[2] = “mstring b line
EASI>c = a + b
EASI>print c
mstring a line 1
mstring a line 2
mstring b line 1
mstring b line 2
1”
2”
1”
2”
Mixed String/MString Expressions
Mstring expressions are formed using string and mstring
elements along with the concatenation operator. Mstring
expressions differ from string expressions in that they contain
at least one mstring variable. The result of an mstring
expression is an mstring.
58
PCI Geomatics
Chapter 4 - EASI Programming
If an expression has the form “MSTRING + STRING”, the
result is a new mstring formed by appending the given string as
a new line at the end of the given MSTRING.
EASI>local string s
EASI>local mstring ms, result
EASI>s = “apples”
EASI>ms[1] = “bananas”
EASI>ms[2] = “pears”
EASI>result = ms + s
EASI>print result
bananas
pears
apples
If the expression is of the form “STRING + MSTRING”, the
result is an mstring formed by prepending a new line containing
the given string to the beginning of the given mstring.
EASI>result = s + ms
EASI>print result
apples
bananas
pears
If an expression contains a series of concatenations, they are
evaluated from left to right as either string concatenations, or
mstring concatenations, or mixed string/mstring concatenations
depending on the types of data involved at that point in the
evaluation. This may produce unexpected results if care is not
taken, for example:
EASI>result = ms + s + s
EASI>print result
bananas
pears
apples
apples
but
EASI>result = s + s + ms
EASI>print result
applesapples
bananas
pears
EASI User’s Guide
59
Procedure Control
This is because the EASI first evaluates s+s as a string
concatenation, producing the result “applesapples”, then the
next concatenation operation results in the string
“applesapples” being prepended to the given mstring. The use
of brackets is useful to ensure that concatention occurs in the
way intended. For example, brackets around the previous
example give a different result:
EASI>result = s + ( s + ms )
EASI>print result
apples
apples
bananas
pears
Procedure Control
Procedure control is the ability to alter the flow of execution of
a procedure. It allows you to execute only certain sections of a
procedure, and to handle errors and special conditions.
Conditional Statements (IF) (THEN) (ELSEIF)
(ELSE) (ENDIF)
EASI allows the conditional execution of statements with the
IF statement. The IF statement can have various forms. The
simplest is a single test, which if successful, will cause a single
statement to be executed:
if (condition) then
statement
endif
The condition to be tested may be any valid logical expression.
For example:
if (a = 3) then
print “success”
endif
60
PCI Geomatics
Chapter 4 - EASI Programming
If the variable a is set to the value 3, then the print statement is
executed. If a is not set to 3, then the print statement is ignored.
For a complete discussion on conditions, see the section on
logical expressions. Any valid EASI statement can be put in
place of the print statement. Note that when the equals operator
“=” is used in an if statement, it is used as a test of equality, and
no assignment is performed. This is unlike the usual use of the
equals operator outside of an if statement where it will cause
variable assignment to take place.
A more complex form of the if statement allows the execution
of a block of statements if the test is satisfied, instead of just a
single statement:
if (condition) then
statement list
endif
where
[statement list] is a list of command
statements to execute if the condition is
true.
For example:
if (channel > 10) then
print “Error, channel is too large!”
print “Channel will be reset to default
value of 1”
channel = 1
endif
There may be an arbitrarily long list of statements between the
if and endif statements, to be executed if the result of the
condition is TRUE. If the condition evaluates to false, then the
next statement to be executed is the first statement after the
endif. Note that a common source of syntax errors is accidently
omitting the then keyword at the end of the if statement.
The use of an else clause with the if statement allows a second
block of code to be executed if the condition tested in the if
statement fails:
EASI User’s Guide
61
Procedure Control
if (condition) then
statement list1
else
statement list2
endif
For example:
if (a > b) then
max = a
else
MAX = b
endif
Finally, the elseif clause can be used to test additional
conditions in an if statement:
if (condition) then
statement list1
elseif (condition) then
statement list2
else
statement list3
endif
For example:
if ( NumberOfPixels < 1 ) then
print “Window is too small”
elseif ( NumberOfPixels > 100000 ) then
print “Window is too large”
else
print “Window size is acceptable”
endif
The else clause may be omitted, and there may also be any
number of elseif clauses instead of just one.
If statements may be nested within other if statements; in this
case it is very useful to use indentation to make the program
logic easier to understand.
62
PCI Geomatics
Chapter 4 - EASI Programming
Logical Expressions
Logical expressions are special statements that evaluate to
either TRUE or FALSE. Note that there is currently no way to
directly represent a logical value in EASI. There are two basic
types of logical expressions: Numeric and String.
Logical
Numeric
Expressions
Logical numeric expressions are simply the comparison of two
numeric values using one of the following relational operators:
•
=
equals
•
<
less than
•
<=
•
>
•
>=
greater than or equal to
•
<>
not equal
less than or equal to
greater than
The numerical values being compared can be literal numeric
values such as ‘8’ or numeric variables of type byte, integer,
float, or double, or an expression that evaluates to a numeric
value, or an indexed numeric parameter.
For example, if an integer variable called VALUE is set to 3
then the statement:
if (VALUE * 3 > 8) then
print “SUCCESS”
endif
would result in the condition evaluating to TRUE and the print
statement would be executed.
Logical
String
Expressions
A logical string expression is the comparison of two strings
using one of the following logical operators:
•
EASI User’s Guide
=
equals
63
Procedure Control
•
<>
not equal
The two strings are compared character by character until the
condition is satisfied. If the strings do not match in length, the
shorter one is padded with blanks to yield equal lengths. The
comparison is not case sensitive, so the strings “abc” and “aBc”
are considered to be the same. The two strings in the expression
may be:
•
literal strings such as “abc”
•
string variables
•
an indexed element of an mstring variable,
•
a character or character array variable
•
a character parameter.
For example, if a string variable called ANSWER is set to "NO"
then the statement
if (answer <> "YES") print “SUCCESS”
will result in the condition evaluating to TRUE and the print
statement to be executed.
A string expression can also be used to compare a string with a
logical expression using the following operator:
•
~=
equals regular expression
In this case, the string on the right side of the “~=” operator is
interpreted as a regular expression. A regular expression is a
way to represent a set of strings in a compact way using a
pattern. At the current time, regular expressions in EASI only
support single-character wildcard matching (using the “?”
character), and multi-character wildcard matching (using the
“*” character). For example, the comparison in the statement
if ( filename ~= “set?.pix” ) print
“success”
64
PCI Geomatics
Chapter 4 - EASI Programming
will evaluate to true if filename matches the pattern “set?.pix”
with any character substituted for the wildcard character “?”,
such as “set1.pix”, or “set2.pix” or “seta.pix”. However, it will
evaluate to false if filename is “set.pix” or “set10.pix”, or the
empty string ““, or any other string that doesn’t match the
pattern. Similarly, the comparison in the statement
if ( filename ~= “*.pix” ) print “success”
will evaluate to true of if the variable filename matches the
pattern “*.pix” where any characters are substituted for the
wildcard character “*”, such as “test.pix”, or even just “.pix”
(in this last case, the “*” has been substituted with the empty
string”).
Regular expressions may include any number of wildcard
characters. If the characters “?” or “*” need to be used in the
regular expression, but not as wildcards but as themselves, then
they must be preceded by the escape character “\”.
Logical
Relations
(AND, OR,
NOT)
The basic logical expressions described above can be combined
with the logical relations AND, OR, and NOT to form more
complex logical tests.
The AND relation applies to two logical expressions, and will
evaluate to TRUE if both logical expressions are themselves
TRUE.
if ( file = “irvine.pix” AND channel = 1 )
print “success”
The OR relation applies to two logical expressions, and will
evaluate to TRUE if one or both of the expressions is TRUE.
if ( file = “irvine.pix” OR file =
“demo.pix” ) print “success”
The NOT relation applies to a single logical expression, and
will evaluate to the opposite (or logical complement) of the
EASI User’s Guide
65
Procedure Control
expression. That is, the NOT relation applied to an expression
will evaluate to TRUE of the expression is FALSE, and will
evaluate to FALSE if the expression is TRUE.
if ( NOT file = “irvine.pix” ) print
“success”
Since the use of a logical relation is itself a logical expression,
logical relations can be combined to form more complex tests.
When combining logical relations, it is often best to use
brackets to ensure that the meaning of the test is clear.
if ( ((a = 1) AND (b=2)) OR ((a=2) AND
(b=1)) ) print “success”
In this case, either ‘a’ must equal 1 and ‘b’ must equal 2, or
alternatively ‘a’ must equal 2 and ‘b’ must equal 1 for the
logical expression to evaluate to TRUE and ‘success’ to be
printed.
Looping (WHILE)
The EASI WHILE command provides a general purpose
looping construct.
while (log_expr)
statement list
endwhile
where
[log-expr] is a logical expression which is
evaluated before each iteration of the
loop.
[statement list] is the list of command
statements to execute while the conditions
for the loop hold true
The statements in the body of the WHILE loop are executed as
long as the logical expression in the WHILE statement
evaluates to TRUE. That is, when execution reaches a WHILE
statement, the logical expression is evaluated, and if TRUE, the
66
PCI Geomatics
Chapter 4 - EASI Programming
body of the loop is executed. When execution reaches the
ENDWHILE statement, it jumps (or loops) back to when
WHILE statement at which point the logical expression is
evaluated again. When the logical expression becomes FALSE,
execution transfers to the statement following the ENDWHILE,
otherwise the looping continues.
For example, consider the following program:
local double NumberA
input "Enter a number between 1 and 25: "
NumberA
while (NumberA < 0 or NumberA > 25)
print "This number is not within
the required range!"
input "Please enter a number between
1 and 25: " NumberA
endwhile
print "Thank You!"
This WHILE loop makes sure that only a number that falls
within a specified range (from 1 to 25) is entered. The user will
keep being asked to enter numbers until the number entered
satisfies the condition. Once this happens, the PRINT command
that follows the ENDWHILE command will be executed.
Counted Loop (FOR)
The EASI FOR command is similar to the WHILE looping
function in that it also provides a general purpose looping
construct. However, unlike the WHILE command, which
continues to loop until a criteria is met, the FOR command will
execute the statement list only a specific number of times.
The FOR statement generally has the following form:
for iter_var = start_val TO end_val [By
incr_val]
statement list
endfor
EASI User’s Guide
67
Procedure Control
where
[iter_var] is the iteration variable
(which may be any numeric variable type,
including a parameter)
[start_val] is the initial value to assign
to the iter_var
[end_val] is the value at which the
iter_var will stop at when reached
[incr_val] is the value by which to
increment the iter_var at each iteration
(the default is “1”)
The FOR statement initializes the iteration variable to the initial
value and then executes the statement list. When the ENDFOR
statement is reached, the iteration variable is increased by the
increment value (or by 1 if using the default value). The new
value is then compared to the end value. If this value is not
exceeded, the statement is executed again. When the procedure
has executed the required number of times, the loop will stop
and the program will continue on to the next command
immediately following the ENDFOR command.
For example, in the following program, a FOR statement is
used to repeat a calculation only a certain number of times
(specified by the user):
local double i, NumberA, Highest
print "This program will show a
multiplication table for a given” print
“number."
input "Enter the multiplier number: "
NumberA
input "Enter the highest number to show on
the table: " Highest
for i = 0 TO Highest BY 1
print NumberA, " multiplied by ",
i , " = " , i * NumberA
endfor
Notice that the counting variable, i, needs to be declared in the
LOCAL statement.
68
PCI Geomatics
Chapter 4 - EASI Programming
In the example, Highest is the end value. If 10 is entered as the
highest number to be multiplied, the procedure will run the
calculation 10 times. Each time, “i” will increase “BY” one (1).
Note that the increment value specified after the BY keyword
in the FOR statement is set to 1, but since 1 is also the default
increment value, its specification may be omitted. A for loop
can by made to count by two’s by specifying “BY 2”, or to
count backwards by specifying “BY -1”. A For loop may also
count by non-integral values, using an increment such as “BY
0.5”.
Branching (GOTO)
It is possible to transfer execution to any line within the same
procedure by using the GOTO statement. The form of the
statement is:
GOTO location
where
[location] is an existing line number
between 1 and 9999, or a statement label
Example 1:
goto 1500
Example 2:
if (VALUE > 0) then
goto 57
endif
Example 3:
SMALL: \
print "This amount is insignificant."
! This next part comes later in the program
if (AMOUNT < 5) then
goto SMALL
EASI User’s Guide
69
Procedure Control
endif
The GOTO statement can redirect the path of your procedure in
a host of new directions, freeing you from programming in a
strictly linear fashion.
You may have noticed that, until now, there has not been any
discussion regarding the use of line numbers. EASI can accept
a program that uses line numbers to identify command lines but
line numbers are not necessary. Since EASI follows your
instruction in a line-by-line fashion, lines of procedure are
executed in order. This makes editing the structure of a
procedure much less tedious.
However, commands such as the GOTO command present
special concerns since they clearly need some form of specific
direction or address to complete their task. Using labels along
with the GOTO command solves this problem.
A label is not so much a command as it is a beacon. Label
formats are limited only to the following criteria:
•
All labels must be placed at the beginning of their line.
•
All label addresses must be followed by a colon and then a
statement.
When told to GOTO a specific label, the procedure will prompt
the computer to look for a specific label within the instruction
rather than a line number. An example that illustrates the use of
a label would be:
local string yn
print "This program demonstrates using
labels with GOTO statements"
ASKAGAIN: \
input "Do you wish to run this program? (Y/
N): " yn
if (yn <> "Y" and yn <> "N") then
goto ASKAGAIN
endif
70
PCI Geomatics
Chapter 4 - EASI Programming
print "Thank You"
The label being used is ASKAGAIN. Without the input of a “Y”
or an “N”, the program will continue to loop back to the
ASKAGAIN label. Once the requirements of the IF statement
are met, the final PRINT statement will be executed.
Labels are not variables and label names are not declared at the
beginning of a program with a LOCAL command.
Note that a “backslash” (\) follows the first ASKAGAIN
statement. Recall that when the backslash is the last character
on a line of text, the next line is considered to be part of the
current line.
There are certain circumstances where GOTO’s should not be
used. GOTO’s should not be used to exit TRY or MODEL
statements (these statements are described in detail in later
chapters).
Returning (RETURN)
The RETURN statement terminates execution of the procedure
currently running and returns control to the procedure that
invoked it. The calling procedure then resumes execution with
the next statement. This command has the form:
RETURN [(expr)]
where
[expr] is an expression whose value can be
given to the user when control is returned.
A RETURN statement can be placed anywhere in a procedure.
Example:
if (STATUS = "DONE") then
EASI User’s Guide
71
User Defined Functions
return
endif
The RETURN statement is often used to return values from user
defined functions. See the section on user defined functions for
further examples.
Stopping (STOP)
The STOP command terminates all procedures and returns
control to the user. This is different from the RETURN
command. This command has the form:
STOP
and can be placed anywhere in a procedure.
Example:
PRINT "ERROR IN COMPUTATION"
STOP
User Defined Functions
As introduced earlier, a function can be defined in EASI using
the DEFINE keyword. A function is a unit of EASI code
typically designed to accomplish a specific task. The body of a
function can contain any EASI commands.
A function definition appears within an EASI script file, and an
EASI script file may declare any number of functions. Once
declared, a function is available for use by any other function
or script regardless of which file the function was declared
within.
A function definition includes specification of some number of
arguments, which are values passed to the function when it is
72
PCI Geomatics
Chapter 4 - EASI Programming
invoked. A function may optionally return a value using the
RETURN command.
The syntax for a function definition is
DEFINE FUNCTION function_name ( arg1,
arg2, ... )
easi_command_list
ENDDEFINE
where
function_name is a unique name given to the
function, following the same rules as
variable names. That is, functions names
must begin with a letter a-z, and followed
by any number of letters, digits 0-9, and
underscore characters “_”.
arg1, arg2, ... argN are a list of argument
names. There may be any number of
arguments, or no arguments. It is also
possible to specify a variable number of
arguments.
easi_command_list is the body of the
function, comprised of any number of EASI
commands.
The following is an example of a very simple function requiring
no arguments, and which does not return any value. It can be
used to temporarily halt the execution of a script.
define function WaitForUserResponse()
local string InputValue
input “Please press enter to continue:
“ InputValue
enddefine
The function prints a prompt to the screen using the INPUT
command, and waits for the user to press the enter key. Any
input the user types is stored in the local string variable
InputValue, but since this value is not needed, it is never used.
When execution reaches the end of a function definition, the
function terminates, its local variables are lost, and control
EASI User’s Guide
73
User Defined Functions
returns to where the function was invoked from; usually either
another function or script, or the EASI command line.
Loading and Executing Functions
In order to use a function, its definition must first be loaded into
EASI. If the function in the previous example is defined in a
file called “USERFUNC.EAS”, then the LOAD command can
be used as follows:
load “USERFUNC.EAS”
After it has been loaded, the function may then be invoked
using the CALL command:
call WaitForUserResponse()
The empty brackets after the function name indicate the
function requires no arguments.
Passing Arguments
A function that requires arguments must declare the arguments
in the define command. The names given to the arguments are
used to access the data within the body of the function. Ten
following simple function takes two arguments, and prints the
maximum value given.
define function PrintMax( a, b )
local integer MaximumValue
if ( a > b ) then
MaximumValue = a
else
MaximumValue = b
endif
printf “The maximum value is %d\n”,
MaximumValue
enddefine
74
PCI Geomatics
Chapter 4 - EASI Programming
Once the function has been loaded, it can be executed using the
CALL statement as before, this time specifying the arguments
in brackets following the function name:
call PrintMax( 3, 7 )
When the function is executed, the value ‘3’ will be assigned to
the argument variable ‘a’, and the value ‘7’ will be assigned to
the argument variable ‘b’. Of course, the function call will
result in the value ‘7’ being printed. In addition to using literal
values in the call statement, variables and expressions may also
be used.
local integer x, y
x = 3
y = 2
call PrintMax( x, y+2 )
The argument variables declared in the variable definition are
very similar to local variables. For example, it is possible to
assign values to argument variables within the body of the
function. In most situations modifying the argument variable
within the body of the function has no effect on the invoking
procedure. For example, when the arguments in the function
call are variables of any of the basic types like integer or float,
then even if the argument variable inside the function is
modified, the original variable when the function was called is
not modified.
For example, consider the following function which simply
adds one to its argument:
define function increment( a )
a = a + 1
enddefine
Once the function is loaded, the following sequence of
commands can be executed:
local integer x
x = 10
EASI User’s Guide
75
User Defined Functions
call increment( x )
print x
However, the final value of the variable ‘x’ will still be 10, not
11. Only the value of the argument ‘x’ is passed to the
function.
However, in some situations, changes to an argument variable
will cause changes in the invoking procedure. This occurs when
passing arrays, pointers, structures, and MSTRING variables.
For example, consider another function:
define function IncrementArray( a )
local integer i
for i = 1 to f$len(a)
a[1] = a[1] + 1
endfor
enddefine
This function will add the value 1 to each element of an array.
The intrinsic function f$len() is used to determine the length of
the array. The function can be used as follows:
local integer data[5]
local integer i
for i = 1 to f$len(data)
data[i] = i
endfor
call IncrementArray( data )
The array “data” is initialized to the values (1,2,3,4,5). After
the function IncrementArray is called, the array will hold the
values (2,3,4,5,6). In this case, the array is passed by reference
to the function, and modifications to the data within the
function will affect the original data.
No type checking is performed on arguments when they are
passed to a user-defined EASI function. It is possible for a
function to be invoked with an argument of a type other than
what was intended by the author of the function. In this case,
76
PCI Geomatics
Chapter 4 - EASI Programming
execution will continue until and unless an error occurs. It is
possible to explicitly determine type information from a
variable using the intrinsic function f$partyp(). Refer to the
reference-manual or on-line help for more information on this
function.
Returning Values
The return command is used to terminate the execution of a
function, and to optionally return a value. The syntax of the
return command is:
return optional_expression
where
optional_expression is a value or
expression to evaluate and return.
The following function returns the maximum of two values:
define function Max( a, b )
local integer MaximumValue
if ( a > b ) then
MaximumValue = a
else
MaximumValue = b
endif
return( MaximumValue )
enddefine
This function requires two arguments, and will return a single
value using the RETURN command. Functions that return a
value are not executed using the CALL statement, since the
CALL statement will not allow use of the value returned by the
function. However, functions that return a value can be used
within any expression. For example, they can be used in print
statements:
print Max( 3, 6)
Or they can be used in assignments:
EASI User’s Guide
77
User Defined Functions
m = Max( 3, 6)
Or they can be used in calls to other functions:
m = Max(Max(3, 6), 1)
In the last case, the function Max is called with two arguments,
one of which is the expression Max(3, 6), which evaluates to 6.
When the statement executes, the variable m will be assigned
the value 6.
A function can have more than one return statement. The Max
function could also be coded as:
define function Max( a, b )
if ( a > b ) return( a )
return( b )
enddefine
When the RETURN statement is used without an expression to
return, it simply causes the function to terminate, just as if it
reached the end of the function definition.
Variable Argument Lists
It is possible in EASI to define a function that takes a variable
number of arguments. This is accomplished by using the
VARARGS keyword in the function definition’s argument list,
and the intrinsic function of the same name within the body of
the function to access the additional arguments.
The VARARGS keyword always appears at the end of the
functions argument list, after any number fixed arguments
(possibly none). For example, a function which takes a
minimum of two arguments, followed by any number of
additional arguments can be defined using a definition that
starts with:
define function v( a, b, varargs )
...
78
PCI Geomatics
Chapter 4 - EASI Programming
Once defined, the function can be called with two or more
arguments.
Within the body of a function that uses VARARGS, the number
of additional arguments can be determined using the F$LEN
intrinsic, and each of the arguments can be extracted by calling
the intrinsic function VarArgs() with the number of the
argument to extract.
The following is a variable argument version of the Max()
function presented earlier:
define function vmax( arg1, arg2, varargs
)
local double MaximumValue
local integer i
MaximumValue = arg1
if( arg2 > MaximumValue )then
MaximumValue = arg2
endif
for i = 1 to f$len(varargs)
if( varargs(i) > MaximumValue )then
MaximumValue = varargs(i)
endif
endfor
return( MaximumValue )
enddefine
The vmax() function must be called with at least two, and an
arbitrarily large number of arguments.
EASI User’s Guide
79
User Defined Functions
80
PCI Geomatics
C
Working with Data
H A P T E R
5
EASI provides a number of functions that provide the
ability to access and manipulate a large variety of image
data and image related information. This includes the
ability to directly access raster imagery, bitmaps, lookup-tables, vector segments, and projection information.
Using these functions, powerful applications can be
quickly and conveniently built.
Text Files
Access to text files is available through the use of the
TextOpen(), TextClose(), TextRead(), and TextWrite()
Intrinsic Functions.
Access to a textfile is initiated using TextOpen(). This
function takes the filename, and an access specifier, and
returns a file handle. The file handle is an integer which
is associated by EASI with the open file, and is used in
all subsequent access to that file, until it is closed. The
access specifiers may be either “r” for read-only access
to the file, “w” for write access to the file, or “a” for
append access to the file.
EASI User’s Guide
81
Text Files
For example, to open an already existing text file called
“data.txt”:
local integer fd
fd = TextOpen( “data.txt”, “r” )
Once the file has been opened, the TextRead() intrinsic can be
used to read a line of data.
local string dataline
dataline = TextRead( fd )
The TextRead() intrinsic is given the handle (in this case, fd) of
the open which is to be read. The first time it is called, it will
return the first line of the text file. On each subsequent call, it
will return the next line of the text file. When the end of the
file is reached, it will return the string “<EOF>”.
Once access to a file is no longer needed, it should be closed
using TextClose().
call TextClose( fd )
In order to create a new file, it should be opened with “w”
access. Should the file already exist, its contents will be
deleted. Once open, the new file may be written to using the
TextWrite() intrinsic
fd = TextOpen( “new.txt”, “w” )
call TextWrite( fd, “a line of text to be
written to the file” )
call TextClose( fd )
TextWrite() may be called as many times as desired to write
more lines to the file.
Lines can be appended to the end of an existing file by opening
it with “a” access. If the file does not already exist, then a new
one will be created.
fd = TextOpen( “file.txt”, “a’ )
82
PCI Geomatics
Chapter 5 - Working with Data
call TextWrite( fd, “a line of data to be
appended to the file” )
call TextClose( fd ).
TEXT$Import() is a convenient intrinsic that allows an entire
text file to be imported directly into an MSTRING. It requires
only the file name as an argument, and there is no need to open
and close the file to use TEXT$Import().
local mstring textdata
textdata = TEXT$Import( “filename.txt” )
Similarly, TEXT$Export() allows an mstring to be written
directly to a text file.
call TEXT$Export( “newfile.txt”, textdata
)
Binary Files
Access to binary files is accomplished in a very similar fashion,
using the DKOpen, DKClose, DKRead, and DKWrite
commands. Unlike the text access commands, which operate
on a line-by-line basis, the binary access commands allow data
to be read from and written to specific places within the file.
Further information on these commands is available in the
EASI reference manual, and in the on-line help. Direct access
to binary files is useful to allow access to un-supported file
types. If sufficient file-format information is available, it is
often possible to write file-format translators in EASI.
Manipulating Strings
A set of EASI intrinsic functions perform useful operations on
strings.
The length of a string is given by the f$len() intrinsic function:
EASI User’s Guide
83
Binary Files
EASI>print f$len(“file”)
4
The case of a string can be changed using the f$upcase() and
f$lowcase() intrinsic functions, as follows:
EASI>print f$upcase(“abc”)
ABC
EASI>print f$lowcase(“ABC”)
abc
A numeric value stored within a string can be extracted using
the f$value() intrinsic:
local float x
x = f$value(“-3.25”)
Conversely, the f$string function can be used to convert a
numeric value to a string:
local string s
s = f$string(-3.25)
The FindSubString() intrinsic function can be used to find the
location within a string of a given substring. It returns the index
of the start of the substring if successful, or -1 if unsuccessful.
The search is case-insensitive.
EASI>print FindSubString( “Pixels: 256
Lines:512”, “lines” )
13
FindSubString() takes an optional third argument, which is the
location within the string at which to start searching. This can
be used to continue searching for a subsequent occurrence of
the string:
EASI>print Coordinates
X:24 Y:32 Z:18 X:23 Y:32 Z:19
EASI>print FindSubString(Coordinates, “y”)
6
EASI>print FindSubString(Coordinates, “y”,
7)
21
84
PCI Geomatics
Chapter 5 - Working with Data
FindSubString() can also be used to return the line within an
mstring that contains a given substring. For example suppose
an mstring called “Header” contains the following data:
EASI>print Header
Channels: 10
Pixels: 256 Lines: 512
8-Bit Unsigned
EASI>print FindSubString(Header, “Lines”)
2
The FindSubString() intrinsic could then be used again on the
resulting line to determine the location within that line of the
desired string. The f$extract() intrinsic function will extract a
substring from a given string given the location and length of
the substring to extract. For example, to extract a string starting
from the 11 character of the string called “data” that is 10
characters long:
EASI>print data
filename: irvine.pix
EASI>print f$extract(data, 11, 10)
irvine.pix
The Tokenize() intrinsic function is used to break-up a whitespace delimited string into an mstring. White-space is any
number of spaces, tabs, and newline characters. For example,
given a string called data that contains four numeric values:
EASI>print data
3.5 7
-9 5.5
EASI>local mstring t
EASI>t = Tokenize( data )
EASI>print t
3.5
7
-9
5.5
The resulting mstring called “t” will have four lines, each
containing a substring from the input line with the white-space
removed. The Tokenize() function also takes an optional
second argument specifying alternate delimiters. For example,
EASI User’s Guide
85
Database Files
to separate a string by commas and spaces, the following form
of the Tokenize() command could be used.
EASI>print data
3.5,7
-9,5.5
EASI>t = Tokenize(data, “, “)
EASI>print t
3.5
7
-9
5.5
The f$char() and f$ascii() intrinsic functions can be used to
convert between characters and their ASCII representations.
Further information on these and all the other string intrinsics
are available in the EASI reference manual and on-line help.
Database Files
EASI provides an interface to image data built on top of
GeoGateway, a technology allowing access to data in many
geomatics file formats in a uniform way. A database is a
grouping of data layers usually referring to a single file, and can
contain raster layers (channels), vector layers (or segments),
look up tables, and a variety of other auxiliary information. A
complete description of GeoGateway can be found in the
manual “GeoGateway: Translations and Projections”; of
particular interest is the section on the GeoGateway Data
Model.
Note
Not all file types support all of the possible capabilities. If an
unsupported operation is attempted on a file, it will either be
ignored, cause the function to return a special value indicating the
error, or cause an EASI error to occur.
86
PCI Geomatics
Chapter 5 - Working with Data
Documentation on each of the EASI database access intrinsics
is available in the reference manual. To illustrate various
techniques examples are presented here with detailed
explanations.
Opening a Database File
The first step in accessing the database file is to open it. This is
accomplished using the DBOpen() intrinsic.
local int fd
fd = DBOpen( “irvine.pix”, “r” )
if ( fd = 0 ) then
print “The file was not found!”
return
endif
DBOpen returns an integer file handle on success, or 0 if it fails
to open the file. As with the other file access intrinsics, the file
handle is used to access the file in all subsequent commands
after it has been opened. The second parameter “r” in the call to
DBOpen() indicates the file is to be opened with read-only
access. Specifying “r+” will open the file with read-write
access.
Reading General File Information
It is often useful to obtain some information about the file, like
the number of channels it contains, and their dimensions. This
information can be obtained once the file has been opened using
the DBPixels(), DBLines(), and DBChannels() intrinsics:
local int NumberOfChannels, PixelSize,
LineSize
PixelSize = DBPixels( fd )
LineSize = DBLines( fd )
NumberOfChannels = DBChannels( fd )
if ( NumberOfChannels < 1 ) then
printf “The file %s contains no image
data!\n”, FileName
EASI User’s Guide
87
Database Files
return
endif
The type of a data channel can be determined using the
DBChanType() intrinsic function. This intrinsic returns one of
the strings “8U”, “16U”, “16S”, or “32R” representing the four
possible data types supported.
printf “The first channel in the file is of
type %s\n”, \ DBChanType( fd, 1 )
Reading and Writing Image Data
A line of data can be read into memory using the
DBReadLines() intrinsic. First a data buffer needs to be
allocated to hold the data being read from the file.
local float databuffer[LinesSize]
DBReadLines() can be used to read any part of a line from
anywhere within the image directly into the data buffer. If the
buffer is not of the same type as the data on the file, the data is
automatically translated to the appropriate type. DBReadLines
takes 6 arguments (in order): a file descriptor, channel number,
a pixel offset from the left side of the image at which to start
reading, a line offset from the top of the image at which to start
reading, the number of pixels to read, and the data buffer. For
example, the following command will read all of the first line
of data of the first channel:
call DBReadLine( fd, 1, 0, 0, NumPixels,
DataBuffer )
Once the data has been read, the contents of the buffer can be
examined and manipulated. For example, the following loop
determines the maximum value in the line of data.
local float MaxValue
local integer i
MaxValue = DataBuffer[1]
for i = 2 to NumPixels
88
PCI Geomatics
Chapter 5 - Working with Data
if ( DataBuffer[i] > MaxValue ) then
MaxValue = DataBuffer[i]
endif
endfor
printf “The maximum value in the line is
%f\n”, MaxValue
The DBWriteLine() intrinsic is used to write data back to the
file. For example, to copy the contents of DataBuffer into the
last line of channel 2:
call DBWriteLine( fd, 2, 0, NumLines-1,
NumPixels, DataBuffer )
In this case the third and fourth arguments to the function are
the x and y offsets to the start of the last line of the channel.
Maintaining History Records
The database interface includes the ability to access history
records. History records are one-line descriptions that can be
associated with a file, with an image channel within a file, and
with a data segment within a file. Whenever a file is modified,
it is good practice to add a history record describing the change.
When a new record is added, the previous records are “pushed
down”. Most file formats maintain the last 8 history records,
with each record being a maximum of 56 characters.
For example, to write a new history record containing the
message “Linear Enhancement” to image channel 2 of an
already open file:
call DBWriteHistory( fd, “IMG”, 2, “Linear
Enhancement” )
The second argument “IMG” specifies that the history record is
being written to an image channel, and the third argument gives
the channel number being written.
EASI User’s Guide
89
Database Files
A specifier of “FIL” as the second argument indicates that a
record for the overall file should be written, and in this case the
third argument is ignored:
A specifier of “LUT”, “PCT”, or any other valid segment
descriptor indicates that the corresponding segment type should
be written, and in this case the third argument gives the
corresponding segment number.
If the processing of an image database file is aborted for some
reason, the data being operated on may be left in an incorrect
state. In this case, it is useful to have a special history record
written to indicate this state. This is accomplished by calling
DBWriteHistory() without specifying a message. A special
message, “Operation Aborted” will be written to the file. When
the operation is completed successfully, a new history message
can be written, and special logic will cause it to overwrite the
“Operation Aborted” message instead of pushing it down.
When using this technique, EASI code has the following form
(where the variables filename, channel, and message are
assumed to have been defined):
fd = DBOpen( filename, “r+”)
call DBWriteHistory( fd, “IMG”, channel )
! ... do some processing on the channel
call DBWriteHistory( fd, “IMG”, channel,
message )
call DBClose( fd )
History records can be read using the DBReadHistory()
intrinsic. For example, to read the most recent history record
for the look-up table in the segment stored in the variable
segnum into a string variable called description:
description = DBReadHistory(fd, “LUT”,
segnum)
The second and third arguments to DBReadHIstory() follow the
same conventions as for DBWriteHistory(). An optional fourth
argument to DBReadHistory() specifies a specific history
90
PCI Geomatics
Chapter 5 - Working with Data
record to read. For example, to read the third most recent
history record:
description = DBReadHistory( fd, “LUT”,
segnum, 3 )
Accessing Database Segments
The database interface also includes functions to access
database segments or layers. Segments are parts of the database
that can hold various types of auxiliary information such as
look-up tables, vector data, and ground control points. For
example, look-up tables can be accessed using the
DBReadLUT() and DBWriteLUT() intrinsics. The following
example will read the look-up table in segment 5 of the already
open file referred to by the handle fd.
local byte LookUpTable[256]
call DBReadLUT( fd, 5, LookUpTable )
Similar functions exist to manipulate Pseudo-color tables,
DBReadPCT() and DBWritePCT().
Segments of a particular type may be located within a database
file using the DBNextSeg() intrinsic. For example, to locate the
first segment of type LUT:
local int segnum
segnum = DBNextSeg( fd, “LUT”, -1 )
The second argument to DBNextSeg() is the segment type to
be searched for, and must be one of “PCT”, “LUT”, “BIT”,
“VEC”, “GCP”, “TEX”, “SIG”, “BIN”, “ARR” or “ORB”. The
third argument is always -1 to find the first segment of the given
type. To find the subsequent segment of the given type, the
result from the previous call to DBNextSeg() should be given
as the third argument. DBNextSeg() will return -1 if no further
segments of the given type could be found.
EASI User’s Guide
91
Projections
The following example counts the number of LUT segments in
the database file:
local integer NumLUTs
segnum = DBNextSeg( fd, “LUT”, -1 )
while ( segnum != -1 )
NumLUTs = NumLUTs + 1
segnum = DBNextSeg( fd, “LUT”, segnum )
endwhile
printf “The file contains %d look-up
tables\n”, NumLUTs
Closing a Database File
Once file access is completed, the file is closed using the
DBClose() intrinsic.
call DBClose( fd )
Projections
Projections are coordinate systems used for representing points
on the Earth. EASI includes intrinsic functions for accessing
projection information from database files, and for translating
points between projections.
Projection information is stored in EASI in a pre-defined
structure named GeoInfo.
define structure GeoInfo
char Units[24] ! Map Units string, at most
16 long
double ULX ! Upper left X coord, georef
units
double ULY ! Upper left Y coord, georef
units
double LRX ! Lower right X coord, georef
units
double LRY ! Lower right Y coord, georef
units
double DEarth1
double DEarth2
double RefLong ! Reference Longitude
92
PCI Geomatics
Chapter 5 - Working with Data
double RefLat ! Reference Latitude
double StdParallel1
double StdParallel2
double FalseEasting
double FalseNorthing
double Scale
double Height
double Long1
double Lat1
double Long2
double Lat2
double Azimuth
integer LandsatNum
integer LandsatPath
enddefine
Database files often have projection information stored with
them. The projection of a database file can be read into a
GeoInfo structure using the DBReadGeoInfo() intrinsic, and
written to the file using the DBWriteGeoInfo intrinsic. For
example, to read projection information into a GeoInfo
structure called gi:
local GeoInfo gi
local Integer fd
fd = DBOpen( “irvine.pix”, “r” )
call DBReadGeoInfo( fd, gi )
printf “Projection String:%s\n”, gi.Units
Similarly, a projection information can be written to a database
file using the DBWriteGeoInfo intrinsic. The following
example creates a new database file using the DBCreate
intrinsic, and writes to this file the projection information
previously read into gi. The database created in this case will be
a TIFF file.
local integer fdnew
fdnew = DBCreate(“new.tif”, “TIF”,
DBPixels(fd), \
DBLines( fd ), 1, DBChanType( fd,
1 ) )
call DBWriteGeoInfo( fdnew, gi )
call DBClose( fdnew )
call DBClose( fd )
EASI User’s Guide
93
Projections
The Reproject() intrinsic function can be used to translate
coordinates between projections. This function takes a list of
coordinate pairs stored in an array, and a pair of GeoInfo
structures defining the input and output projections as input. On
return the array will contain the corresponding coordinates in
the output projection. For example, to translate the coordinates
the coordinates of the upper-left and lower-right corners of the
input projection to Long/Lat:
local GeoInfo go
go.units = “LONG”
local double plist[4]
plist[1]
plist[2]
plist[3]
plist[4]
=
=
=
=
gi.ULX
gi.ULY
gi.LRX
gi.LRY
printf “ulx: %g uly: %g\n”, plist[1],
plist[2]
printf “llx: %g lly: %g\n”, plist[3],
plist[3]
call Reproject( gi, go, 2, plist )
printf “ulx: %g uly: %g\n”, plist[1],
plist[2]
printf “llx: %g lly: %g\n”, plist[3],
plist[3]
The Reproject() intrinsic may not be used to translate points
from a projection to pixel/line coordinates. However, this
transformation is simple enough to perform directly using the
information stored in the GeoInfo structure. The following
example converts the x and y coordinates in the first two
elements of PLIST to pixel/line:
local double xoffset, yoffset, xsize,
ysize
xoffset = gi.ulx
yoffset = gi.uly
xsize = ( gi.lrx-gi.ulx ) / DBPixles( fd )
ysize = (gi.lry-gi.uly ) / DBLines( fd )
94
PCI Geomatics
Chapter 5 - Working with Data
plist[1] = ( plist[1]-xoff ) / xsize
plist[2] = ( plist[2]-yoff ) / ysize
Similarly, a pixel/line coordinate can be transformed to a
projection as follows:
plist[1] = plist[1]*xsize + xoff
plist[2] = plist[2]*ysize + yoff
Finally, note that it is possible to read and write separate
projection information to vector layers in a database file; for
further details refer to the help for the intrinsic functions
VecReadGeoInfo() and VecWriteGeoInfo() in the EASI
reference manual or the on-line help.
Vector Data
The previous section focuses on working with raster data in a
database file. Some types of database files also contain vector
data, and the EASI database interface includes functions to
access and manipulate vector information.
Vector data is stored in a segment or layer within a database
file. Each segment containing vector data is referred to as a
vector layer. Each vector layer contains some number of shapes
(possibly zero), where a shape is a structure containing a list of
points and a set of attribute information. An attribute is a
named field of a particular type, such as string, integer, or float.
A shape may have any number of attributes associated with it,
but all the shapes within a given layer must have the same
number and types of attributes. The following examples
illustrate techniques used to access vector data.
The first step is to open the file containing the data:
local int fd
fd = DBOpen( “irvine.pix”, “r” )
EASI User’s Guide
95
Vector Data
Given that a segment number stored in the integer variable
layer exists, access to the shapes within the layer is
accomplished using the VECNextShape() intrinsic. This
intrinsic returns the integer identifier associated with a shape.
Each shape is accessed using a unique integer identifier, called
a shape ID. No assumptions should be made about the
numbering of these identifiers.
In particular, it should not be assumed that the shape IDs are
numbered in the sequence [1, 2, 3, ...] since vector operations
may result in an irregular (though valid) numbering. The
identifier associated with the first shape is given by
VECNextShape() when called with the value ‘-1’ as its third
argument, and the identifier associated with subsequent shapes
can be obtained using VECNextShape() called with the shape
ID of the previous shape as the third argument.
There are no more shapes when the shape ID returned by
VECNextShape() is -1.
The following example loops over all the shapes in a vector
layer, and prints the number of vertices belonging to each shape
using the VECGetVertices() intrinsic function:
local integer shape
shape = VECNextShape( fd, layer, -1 )
while ( shape != -1 )
printf “Shape %d has %d vertices\n”, \
shape, VECGetVertices( fd, layer,
shape )
shape = VECNextShape( fd, layer, shape )
endwhile
The number of attribute fields that each shape in the layer has
is obtained using the intrinsic VECGetFieldCount(). Attribute
fields are referred to by number from 1 to the number of fields
in the layer. The name of each attribute field is obtained using
VECGetFieldName().
96
PCI Geomatics
Chapter 5 - Working with Data
The following code prints the names of each of the attributes in
the layer:
local integer NumberOfAttributeFields,
attribute
NumberOfAttributeFields =
VECGetFieldCount( fd, layer )
for attribute = 1 to
NumberOfAttributeFields
print VECGetFieldName( fd, layer,
attribute )
endfor
The actual value in an attribute field for a given shape is
obtained using the VECGetField() intrinsic function. The next
piece of code prints the attribute names and values for each of
the attributes belonging to the first shape:
shape = VECNextShape( fd, layer, -1 )
for attribute = 1 to
NumberOfAttributeFields
print VECGetFieldName( fd, layer,
attribute ), “ = “ , \
VECGetField( fd, layer, shape,
attribute )
endfor
The vertices for a given shape can be are obtained using the
VECGetVertices() intrinsic function. This function returns a
pointer to a list of Vertex structures, which must be freed using
EFree() when finished with. The following code extracts and
prints all of the vertices belonging to the first shape:
local Vertex ptr Vertices
Vertices = VECGetVertices( fd, layer,
shape )
for index = 1 to f$len( Vertices )
printf “Point %d: X=%f Y=%f Z=%f\n”,
index, \
Vertices[index].X,
Vertices[index].Y, Vertices[index].Z
endfor
call EFree( Vertices )
EASI User’s Guide
97
Data Modelling
Intrinsic functions also exist to write a list of vertices to a
shape, VECSetVertices(), to set attribute fields,
VECSetField(), to create vector layers, VECCreateLayer(), to
create new shapes, VECCreateShape, and to add new attribute
fields to all the vectors in a layer, VECAddField(). Further
information on all of the vector intrinsics can be found in the
on-line help.
Data Modelling
EASI provides a powerful and convenient way to manipulate
image data in database files through the use of its modelling
facility. The MODEL command is used to introduce a block of
commands which are to be applied over an area of a database.
The basic syntax of the MODEL commands is
MODEL [ON filespec [OVER window_spec]]
modelling_command_list
ENDMODEL
The filespec may be a database name, or the handle returned by
a previous DBOpen() call. The window_spec specifies a
subwindow of the database to operate on, and is given in XOff,
YOff, XSize, YSize format.
The modelling_command_list can be any of a variety of
commands. The most important command that can be applied
in a model is a modelling assignment. This is a normal
assignment (LET) statement, using database channel specifiers
for “assigned to”, and “source” values.
Using Image Channels
An example of a simple modelling command to set channel one
of a file to the value zero is:
model on “irvine.pix”
98
PCI Geomatics
Chapter 5 - Working with Data
%1 = 0
endmodel
As shown in this example, a channel is specified using the
special symbol “%”. Similarly, to set the first channel to the
sum of the second and third channels, the command
%1 = %2 + %3
can be used within the body of the model command. It is also
possible to use variables or even expressions that evaluate
channel numbers in a modelling expression. To do this, curly
braces are used around the expression that specifies the
channel.
%{i} = %{i+1} + %{i+2}
All of the channels being referred to in the modelling
expression must exist on the file referred to in the MODEL
command, however, it is possible to specify channels in
different files. In this case, the file specifier of an open file
needs to be given in addition to the channel number within the
braces. The following example copies channel 1 of the file
“file.pix” to the file “irvine.pix”
local int fd
fd = DBOpen( “file.pix”, “r” )
model on “irvine.pix”
%1 =%{fd, 1}
endmodel
call DBClose( fd )
When multiple files are being used, the window on which the
operation is performed is the window corresponding to the
default file, that is, the file specified in the MODEL command.
Since no window has been specified in the previous example,
the entire database size of “irvine.pix” is used. If “irvine.pix”
has a size of 512 pixels 512 lines, and “file.pix” has size 1024
pixels by 1024 lines, only the 512 by 512 subwindow in the top
left corner of “file.pix” will be copied.
EASI User’s Guide
99
Data Modelling
Subscript Expressions
A simple subscript expression may be given along with each
channel specification to change the pixels being accessed.
These expressions are given in square brackets after the channel
specification, and use the special symbols “@x” and “@y” to
represent the particular pixel and line locations when the
expression is evaluated for each point. For example, the
following modelling expression will shift image channl 1
upwards by one pixel:
%1 = %1[@x, @y+1]
If the modelling expression refers to a pixel outside of the
image, the edge pixels are copied outward and used instead.
This allows filters to be created and used, which can be applied
over an entire image, including the edges. The subscript
expressions used must be linear and uni-variate. When no
subscript expression is given, it is equivalent to the
specification [@x,@y].
Using Bitmap Segments
In addition to image channels, bitmap segments may also be
accessed by modelling expressions. The specification of a
bitmap is exactly the same as of a channel, except that the
special symbol “%%” is used. The following example will
clear any pixels in a database channel that are not under a mask,
where the mask is a bitmap segment in database segment 5.
%1 = %1 * %%5
Each point in a bitmap may only have the values one or zero,
the assignment of any non-zero value to a bitmap is treated as
setting the bitmap pixel to one.
100
PCI Geomatics
Chapter 5 - Working with Data
Special Variables
A number of special variables are available within an EASI
model region. These variables may not be assigned to, but
rather are set to appropriate values by EASI, and are available
for use within the model.
Table 4: Special Modelling Variables and Descriptions
@x
current x (pixel) processing location
@y
current y (line ) processing location
@dbx
size of database in x (pixel) direction
@dby
size of database in y (line ) direction
@meterx
size of a pixel in x direction in metres
@metery
size of a pixel in y direction in metres
@geox
x georeferenced centre of current pixel
@geoy
y georeferenced centre of current pixel
@sizex
x size of a pixel in georeferenced units
@sizey
y size of a pixel in georeferenced units
In addition to the modelling expressions described above, the
body of a MODEL statement may include other EASI
statements, such as IF statements, to perform more complex
operations.
Modelling Examples
Filtering
Example
Perform a 3x3 smoothing filter on channel 4. Note the use of
backslashes to extend a statement over multiple lines.
EASI User’s Guide
101
Data Modelling
MODEL
%7 = (%4[@x-1,@y-1] + %4[@x,@y-1] +
%4[@x+1,@y-1] +
\
%4[@x-1,@y ] + %4[@x,@y ] +
%4[@x+1,@y ] +
\
%4[@x-1,@y+1] + %4[@x,@y+1] +
%4[@x+1,@y+1] ) / 9
ENDMODEL
When processing pixels on the border of the image, the
neighbourhood of the current pixel will extend off the database.
To ensure that referenced pixels that are off the database (such
as %4[@x-1,@y-1] in the top left corner) are usable the image
values are replicated out from the edge of the database to supply
values that are missing.
Grid
Example
A file is georeferenced in UTM coordinates. As part of the final
processing steps, the user wishes a grid to be superimposed on
the imagery along 1000-metre intervals in both the x and y
directions. The input imagery is an RGB-enhanced image on
channels 1, 2, 3. The output will be to channels 7, 8, and 9.
if (mod(@geox,1000)<=@sizex) or
(mod(@geoy,1000)<=@sizey) then
%7 = 255
%8 = 255
%9 = 255
else
%7 = %1
%8 = %2
%9 = %3
endif
The following model prompts the user for the spacing (in
pixels) for a regular grid as well as an input and output channel.
local int spacing, in_chan, out_chan
input “Enter the grid spacing:
“
spacing
input “Enter the input channel: “
in_chan
input “Enter the output channel: “
out_chan
102
PCI Geomatics
Chapter 5 - Working with Data
if (mod(@x,spacing)=0) or
(mod(@y,spacing)=0) then
%{out_chan} =255
else
%{out_chan} = %{in_chan}
endif
Test Image
Example
Create a grey level ramp of 0 to 255 across an image plane.
Blending
Example
Create an image which smoothly blends channel 1 into channel
2 as we move across the image. The output is placed in channel
7. In this case we want to operate on the whole default database.
The default database in this case is implied by the FILE
parameter. The MODEL command does not have to be
explicitly listed as it is implied by the ``channel variable’’ in
the equation.
model on filo
%7 = ((@x-1)*255) / @dbx
endmodel
FILE = “irvine.pix”
%7 = (@x-1)/@dbx)*%2 + (@dbx-@x)/@dbx*%1
Arithmetic
Example
Perform a `Vegetative Index’ calculation using channels 1 and
2, saving the result to channel 7. If channel 7 is 32 bit real, the
following model is used:
MODEL ON “irvine.pix” OVER dbiw
%7=(%1-%2)/(%1+%2)
ENDMODEL
If channel 7 is 8-bit, some scaling and adjustment is necessary:
MODEL ON “irvine.pix” OVER dbiw
%7=((%1-%2)/(%1+%2))*128 + 127.5
ENDMODEL
Bitmap
Example
Create a bitmap mask (segment 2) which is true (1) everywhere
channels 1 and 2 are less than 25. Then this mask, and the mask
EASI User’s Guide
103
Data Modelling
in segment 3 are used to determine a region that should be
zeroed in image channels 1 and 2.
if( %1 < 25 and %2 < 25 )then
%%2 = 1
else
%%2 = 0
endif
if( %%2 = 1 and %%3 = 0 )then
%1 = 0
%2 = 0
endif
LUT
Example
The following example reads an LUT using DBReadLUT() and
then applies it to an image channel using a MODEL expression.
local byte lut[256], integer fd
fd = DBOpen( “/pci/demo/irvine.pix”, “w”
)
call DBReadLUT( fd, 2, lut )
%1 = lut[%1+1]
call DBClose( fd )
History
Records
Perform a ratioing of two channels into a third. Before starting
an abort message is set, and if the operation succeeds a
descriptive history record is written.
fd = DBOpen(file, “r+”)
call DBWriteHistory( fd, “IMG”, 3 )
%{fd,3} = %{fd,2} / (%{fd,1}+1)
call DBWriteHistory( fd, “IMG”, 3, \
“Ratio of Channels
1 and 2” )
call DBClose( fd )
104
PCI Geomatics
C
H A P T E R
Error Handling
6
Overview
The execution of tasks, intrinsic, scripts and user
functions can cause an error to occur, as can even the
execution of a simple statement. Every EASI error is
identified by a numeric error code and corresponding
textual error message.
If an error occurs in EASI, it normally causes execution
to halt and control to return to the main EASI prompt.
However, it is possible to trap errors and continue
execution of an EASI script using the ONERROR
statement suffix and the TRY-ONERRORENDONERROR construct. In addition, intrinsic
functions exist for examining the last error-code, and
the corresponding error message.
Default Error Behaviour
As a simple example of the behaviour of EASI when
encountering an error, consider the following user
defined function:
DEFINE FUNCTION Invert( x )
local float y
EASI User’s Guide
105
Statement Level Error Trapping
y = 1 / x
return( y )
ENDDEFINE
Once the function has been loaded into EASI, it can be used
interactively as follows:
EASI>print Invert( 2 )
0.5
However, when called with an argument of zero, an error will
occur:
EASI>print Invert( 0 )
E608:Divide by zero.
The error number 608 indicates an illegal operation was
attempted, in this case division by zero has occurred. It is
important to note that once the error happens, execution
immediately halts. No statements after the statement on which
the error actually occurred are executed; in the example above
the statement “return(y)” is not executed. Instead, the function
simply terminates.
Similarly, if the function causing the error was called from
within another function or script, the calling function would
also be terminated. In general, once a statement causing an
error is executed, all execution is terminated, including all
levels of calling functions, up to the top level. Control then
returns to the EASI prompt, and the error number and message
are displayed.
Statement Level Error Trapping
Some statements in EASI allow the programmer to trap errors
through the use of the ONERROR statement suffix. The general
form for statements which accept the ONERROR suffix is
[statement1] ONERROR [statement2]
106
PCI Geomatics
Chapter 6 - Error Handling
where
statement1 is a statement that supports the
ONERROR suffix.
Statement2 is any valid EASI statement to
be executed only if an error occurs while
executing statement1.
Statements which support the ONERROR suffix are LET
(assignment), ASK, RUN, CALL, DELETE, EVAL, and
INPUT.
For example, if x=0 in the Invert() function presented above,
using the ONERROR form of the assignment (LET statement)
provides a way for execution to continue:
y = 1 / x ONERROR y = 0
y = 1 / x ONERROR goto ErrorHandler
y = 1 / x ONERROR error =
GetLastErrorNumber()
In the first case shown above, the variable y will be assigned the
value 0 if an error occurs. Note that this will occur regardless
of what error actually occurred. That is, if the user called invert
with a string instead of a numeric argument, a different error
would occur represented by a different error code, but the error
will be handled in the same way by executing the ONERROR
statement.
In the second case, control will transfer to the point marked by
the label ErrorHandler. The function Invert() should define this
the label followed by appropriate code to execute if an error
occurs, for example:
define function Invert( x )
local integer y
y = 1 / x ONERROR goto ErrorHandler
return( y )
ErrorHandler: \
print “An error occurred while executing
Invert(“, x, “)”
return ( 0 )
enddefine
EASI User’s Guide
107
Error Information Functions
Finally, in the last case the variable error will be assigned the
error code which is obtained using the GetLastErrorNumber()
intrinsic function. This error code can then be examined by
subsequent code to determine a course of action.
define function Invert( x )
local integer y, error
error = 0
y = 1 / x ONERROR error =
GetLastErrorNumber()
if ( error = 0 ) then
return( y )
else
print “An error has occurred”
return( 0 )
endif
enddefine
In the above example, the code prints a message and returns
zero if any error has occurred.
The NOERROR keyword can be used to completely suppress
errors in the supported statements.
y = 1 / x NOERROR
In this case, if any error occurs it is ignored, and execution
continues with the next statement. No assignment will occur,
and the variable y will contain the value it had before the
assignment statement causing the error was executed. A more
common example is to delete a file if it exists, and continue
executing even if the deletion failed (as when the file doesn’t
exist):
DELETE “tmpfile.pix” NOERROR
Error Information Functions
A pair of intrinsic functions exist to allow the identification of
the last error to occur, GetLastErrorNumber() and
108
PCI Geomatics
Chapter 6 - Error Handling
GetLastErrorMessage(). These functions can be used in
conjunction with the various error-trapping techniques
available in EASI to allow an appropriate course of action to be
taken depending on the error that has occurred.
GetLastErrorNumber()
The GetLastErrorNumber() intrinsic function returns the
number of the last EASI error that occurred. A zero is returned
if no error has occurred since EASI began executing.
define function Invert( x )
local integer y
y = 1 / x ONERROR goto ErrorHandler
return( y )
ErrorHandler: \
printf “Trapped error%d, returning 0\n”,
GetLastErrorNumber()
return ( 0 )
enddefine
GetLastErrorMessage()
The GetLastErrorMessage() intrinsic function returns the text
message of the last EASI error that occurred. An empty string
is returned if no error has occurred since EASI began executing.
define function Invert( x )
local integer y
y = 1 / x ONERROR goto ErrorHandler
return( y )
ErrorHandler: \
print “The following error was
trapped:\n”
print GetLastErrorMessage()
return ( 0 )
enddefine
EASI User’s Guide
109
Error Casting Functions
Error Casting Functions
A pair of intrinsic functions exist to allow an EASI function to
cause an error condition to occur, EASIError() and
ReCastEASIError(). The errors generated by these functions
are identical to those raised by statements and intrinsics, and
are handled in the same way.
EASIError()
The EASIError() intrinsic function allows the user to raise an
error specifying both a numeric error code, and an error
message which may be formatted using C-style format
specifiers. The following are examples of the use of
EASIError():
call EASIError(
call EASIError(
only”, filename
call EASIError(
700, “Invalid data” )
701, “File %s is read)
702 )
In the last case where no message is specified, a default
message will be produced.
The range of numeric error codes from 700-899 is reserved for
user applications, and values in this range can be specified
when using the EASIError() function to raise new application
specific errors. Other standard error codes may also be used
when the meaning is appropriate.
When an EASIError() command is executed, processing will
continue in the same manner as if any error had occurred on the
line containing the call to EASIError().
110
PCI Geomatics
Chapter 6 - Error Handling
ReCastEASIError()
The ReCastEASIError() intrinsic function will cause the
previous error to be triggered again. This is typically used in
conjunction with an error-handler in the situation where an
error was trapped and examined, but no appropriate way to
handle it could be determined, so it is re-cast as if it was never
trapped. Re-casting the error allows it to then be trapped by a
higher-level error handler in another block of code, or for the
error to cause processing to halt and control to return to the
main EASI prompt. See the error handling example at the end
of this chapter for an example of this function’s usage.
Trapping Errors in Blocks of Code
The TRY statement provides a convenient syntax for trapping
and handling errors that occur within blocks of code. It is
normally used in conjunction with the GetLastErrorNumber(),
EASIError(), and ReCastEASIError() intrinsics, providing a
powerful and flexible technique for generating and trapping
errors. The general form of the TRY command is:
TRY
statement_list_1
ONERROR
statement_list_2
ENDONERROR
where
statement_list_1 - One or more statements
to be executed normally.
statement_list_2 - One or more statements
to be executed only if an error occurs
while executing statement_list_1.
When execution reaches a TRY statement, the statements in the
block immediately after TRY will be executed. If no error
occurs during the execution of this block of code, then control
EASI User’s Guide
111
Trapping Errors in Blocks of Code
will continue with the next statement after the entire TRYONERROR-ENDONERROR clause. If however an error does
occur anywhere within the block, then control will immediately
be transferred to the statements after ONERROR. After the
error-handling has been executed, control continues with the
next statement after the TRY ONERROR-ENDONERROR
clause. Note that if an error occurs while executing the
ONERROR block, it is treated normally, just as an error
occurring immediately outside of the TRY statement.
For example, the Invert() function given above could be coded
as follows using the TRY statement:
define function Invert( x )
local integer y
try
y = 1 / x
onerror
print “Invert: the following error
occurred:”
print GetLastErrorMessage()
y = 0
endonerror
return( y )
enddefine
Nested TRY statements
It is possible to nest TRY statements within other TRY
statements. If an error occurs, it will be handled by the
innermost TRY statement that encompasses the offending line
of code. This allows general error-handling blocks to be created
for large sections of code, while more specific error handlers
can be used for important subsections of code.
GOTOs with TRY statements
Certain uses of GOTO statements when using TRY style error
handling can cause unexpected behaviour if care is not taken. If
112
PCI Geomatics
Chapter 6 - Error Handling
a GOTO statement is used to jump into the body of a TRY
statement from outside of the TRY statement, the ONERROR
block will not be invoked if an error occurs. Execution must
flow naturally into a TRY statement for error handling to be
properly initialized by EASI.
Similarly, if a GOTO statement is used to jump outside of a
TRY block from with the TRY block, a subsequent error in the
same procedure or function will still cause the ONERROR
block to be invoked. Execution must flow naturally out of a
TRY block for the error handling to be properly disabled by
EASI.
In general, GOTO statements should not be used to enter or exit
TRY statements.
Error Handling Example
Suppose a user needs direct access to the data within a database
channel. The following function does all the work in opening
and closing the file, allocating sufficient memory, and reading
the file. The function could fail for a variety of reasons, such
as the file doesn’t exist, the specified channel does not exist, or
failure to allocate sufficient memory. To handle possible
failures, the function uses a TRY block to do the work, and
executes clean-up code in the corresponding ONERROR block.
! function to read an entire database
channel into
! a float buffer, and return a pointer to
that buffer.
DEFINE FUNCTION ReadChannel( filename,
channel )
TRY
local integer fd, error, i
local float ptr buffer
fd = DBOpen(filename, “r”)
if ( fd = 0 ) then
call EASIError( 700 )
EASI User’s Guide
113
Trapping Errors in Blocks of Code
endif
buffer = EAlloc(float, DBPixels(fd)
* DBLines(fd))
for i = 0 to DBLines(fd)-1
call DBReadLine(fd, channel, i, 0,
DBPixels(fd), \
buffer +
i*DBPixels(fd))
endfor
call DBClose(fd)
return(buffer)
ONERROR
if (fd<= 0) then
call DBClose(fd)
endif
if (buffer<= NULL) then
call EFree(buffer)
endif
call ReCastEASIError()
ENDONERROR
ENDDEFINE
The ONERROR block ensures the file is closed, and that
allocated memory is freed when any errors occur anywhere
during the execution of the TRY block. The error is then re-cast
at the end of the onerror block, so that it can be detected by a
higher-level error handler. Since the DBOpen() function
returns zero if an error occurs instead of causing an EASI error,
the EASIError() intrinsic is used directly to trigger an error so
that the error handling code can immediately take over.
The ReadChannel() function could then be used as follows, for
example, to compute the average value within an image
channel:
local float ptr buffer
local integer i
local double sum, average
try
buffer = ReadChannel( “irvine.pix”, 1 )
for i = 1 to f$len(buffer)
sum = sum + buffer[i]
114
PCI Geomatics
Chapter 6 - Error Handling
endfor
average = sum / f$len(buffer)
call EFree(buffer)
onerror
print “The following error occured:”
print GetLastErrorMessage()
endonerror
Note that using EASI to perform a large computation such as in
the above example is not particularly efficient, and could take
a relatively long time for even moderately sized images!
EASI User’s Guide
115
Trapping Errors in Blocks of Code
116
PCI Geomatics
C
H A P T E R
7
Object Oriented Programming With
EASI
Overview
EASI supports object oriented programming. The
subject of object-oriented programming in general is
addressed in a large body of literature, much of which
can be applied to the implementation in EASI. Among
the benefits for this style of programming are the
promotion of code reuse, increased reliability through
data-hiding, and a more balanced emphasis on data as
well as function in software design.
Primary to EASI’s support of object oriented
programming is the definition of classes. Classes tie
together both data and functions. A class can be defined
to contain data of various types, in a manner similar to
structures. Unlike structures, however, access to data
within a class can be restricted. An instance of a
particular class is called an object, and each object has
its own copy of all the data fields defined in the class.
Functions that are associated with a class are called
methods, and act on instances or objects of the class. A
class may be defined to inherit both data fields and
EASI User’s Guide
117
Class Declarations
methods from another (parent) class, and can enhance or
specialize the capabilities of the parent class by adding
additional data fields and methods, and by superseding methods
of the parent class with new versions.
Class Declarations
A class is created in a manner similar to a structure, using the
DEFINE command. A simple class declaration has the form:
DEFINE CLASS new_class_name
field1_type
field1_name
field2_type
field2_name
...
ENDDEFINE
For example, the following declaration creates a class called
Circle:
DEFINE CLASS Circle
double
double
double
double
ENDDEFINE
CenterX
CenterY
Radius
Area
Once the class has been declared, objects of the class can be
declared using the LOCAL and GLOBAL commands. This has
the general form:
local class_name obj_name
For example:
local Circle c
c.CenterX = 5
c.CenterY = 3
c.Radius = 2
c.Area = 12.57
118
PCI Geomatics
Chapter 7 - Object Oriented Programming With EASI
Data Field Access Restrictions
The class Circle described above is hardly any different than a
structure with the same name. However, class definitions in
EASI allow restrictions to be put on the data fields belonging to
a class. A data field may be either PUBLIC, READONLY, or
PRIVATE. These restrictions control if a data field belonging
to a class may be read, or modified by arbitrary EASI functions.
PUBLIC is the default access level and requires no special
syntax during declaration. In the previous example, all the data
fields of the class Circle, such as Radius and Area, have
PUBLIC access. A data field of type public is unrestricted, and
may be read and modified by any outside function. Note that a
STRUCTURE definition can be thought of as a class definition
where all the data fields have public access, and in which there
are no member functions.
READONLY data fields may be read any function, but may not
be modified by any function except methods (member
functions) defined on the class. READONLY data fields are
specified by enclosing their definitions between the keywords
ReadOnly and EndReadOnly. For example, the following
definition of the Circle class will make the Radius and Area
fields readonly:
DEFINE CLASS Circle
double
double
ReadOnly
double
double
EndReadOnly
ENDDEFINE
CenterX
CenterY
Radius
Area
With this new definition, the CenterX and CenterY fields are
still public and can be read and modified by any function:
local Circle c
c.CenterX = 5
EASI User’s Guide
119
Class Declarations
print c.CenterX
Since the Radius and Area are ReadOnly, they can be printed,
and used in assignments and expressions
print c.Area
local double SphereVolume
SphereVolume = 4/3 * 3.142 * c.Radius^3
However, they cannot be directly assigned to. The following
statement would result in an error:
c.Radius = 3.0
Private data fields are the most restricted, and may not be read
nor modified by outside functions and may only accessed or
modified by methods defined on the class. Private fields are
specified by enclosing their definitions between the keywords
Private and EndPrivate. The following definition makes the
Area field private in class Circle:
DEFINE CLASS Circle
double
double
ReadOnly
double
EndReadOnly
Private
double
EndPrivate
ENDDEFINE
CenterX
CenterY
Radius
Area
An attempt to print, or use a private field in an expression
anywhere except within a method belonging to the fields class
will result in an error.
A class definition may contain any number of ReadOnly/
EndReadOnly and Private/EndPrivate constructs, in any order,
and each such construct may contain any number of individual
field definitions.
120
PCI Geomatics
Chapter 7 - Object Oriented Programming With EASI
Member Functions
Member functions, called methods, are not defined within the
class definition itself. Rather, they are defined separately in a
manner similar to regular function definitions.
DEFINE METHOD method_name(arg1, arg2,...)
ON class_name
easi_command list...
ENDDEFINE
For example, suppose the class Circle has been defined as
follows:
DEFINE CLASS Circle
ReadOnly
double
double
double
double
EndReadOnly
ENDDEFINE
CenterX
CenterY
Radius
Area
Then a method to set the centre of a circle could be defined:
DEFINE METHOD SetCenter(x, y) ON Circle
this.CenterX = x
this.CenterY = y
ENDDEFINE
The special identifier “this” is available automatically in all
methods, and is used to access the data fields and other methods
of the object being acted upon. Methods are able to access and
modify data fields belonging to the objects on which they are
invoked regardless of the access restrictions on those fields.
A method is invoked through an object instance using the dot
notation in the same fashion as a data reference:
local Circle c
call c.SetCenter(3.0, 5.0)
Like regular functions, methods can take any number of
arguments, define local variables, and may return a value. A
EASI User’s Guide
121
Class Declarations
class can have any number of methods associated with it. The
definition of the Circle class can be completed with a method to
set the circle’s radius, and automatically compute the circle’s
area:
DEFINE METHOD SetRadius(new_radius) ON
Circle
this.Radius = new_radius
this.Area = 3.1415927 * this.Radius *
this.Radius
ENDDEFINE
The following interactive example demonstrates use of the
class Circle:
EASI>local Circle c
EASI>call c.SetCenter(3,5)
EASI>print c.Area
0
EASI>call c.SetRadius(2)
EASI>print c.Area
12.5664
It is not possible to overload a function name providing
different function definitions depending on the number or type
of its arguments. It is possible to achieve some of the same
affect in a manual way by using functions with variable number
of arguments, and the f$partyp() intrinsic to extract type
information from arguments.
Inheritance
A class may inherit data fields and method definitions from
another class using the INHERITS keyword in its class
definition:
define class class_name(arg1, arg2,...)
inherits parent_class
...
enddefine
122
PCI Geomatics
Chapter 7 - Object Oriented Programming With EASI
The newly defined class will contain all the data fields and
methods belonging to the parent class, which in turn may
inherit some of these definitions from still another class. The
class being inherited from is called a base class for the new
class.
For example, consider the following definition for a class called
Shape:
define class Shape
ReadOnly
double CenterX
double CenterY
EndReadOnly
enddefine
define method SetCenter(X, Y) on Shape
this.CenterX = x
this.CenterY = y
enddefine
Using Shape as a base class, the class Circle can be defined
using inheritance as follows:
define class Circle inherits Shape
ReadOnly
double Radius
double Area
EndReadOnly
enddefine
define method SetRadius(radius) on Circle
this.Radius = radius
this.Area = 3.1415927 * this.Radius *
this.Radius
enddefine
Since this new definition of class Circle inherits from class
Shape, the read-only data fields CenterX and CenterY of Shape
automatically become part of Circle. Similarly, the method
SetCenter defined on Shape also becomes a method of Class
Circle. Hence this new definition of class Circle is equivalent
to the earlier definition that did not use inheritance.
EASI User’s Guide
123
Class Declarations
An advantage of using inheritance is that a base class can be
used to derive other similar classes all sharing some common
behaviour, providing a convenient way to reuse definitions and
code. For example, another class called Rectangle could also
build upon shape as follows:
define class Rectangle inherits Shape
ReadOnly
double height
double width
double Area
EndReadOnly
enddefine
define method SetSize(height, width) on
Rectangle
this.Height = height
this.Width = width
this.Area = height*width
enddefine
A newly created subclass may not redefine any data fields that
have already been defined by its parent class, nor can it change
the access restrictions on data fields defined by the parent class.
Methods may, however, be defined on the new class with the
same name as methods defined on the parent class. In this case,
the new class will no longer be able to access the method of the
same name belonging to its parent class.
Note
Although a class may have one parent class, multiple inheritance
is not supported.
Initialization and Cleanup of Objects
A pair of special methods called Initialize() and Destroy() may
be defined on a class. These two methods provide a way to
automatically perform some processing whenever an object of
124
PCI Geomatics
Chapter 7 - Object Oriented Programming With EASI
the class is created or destroyed, and may be optionally defined
for any class.
The Initialize() method must be defined without any arguments.
If it has been defined for a class, the Initialize() method is
executed automatically when an object of that particular class
is allocated, either when it is declared by a LOCAL or
GLOBAL statement, or by a call to the EAlloc() intrinsic
function. The Initialize() method is typically used for presetting data fields within the object to particular values. For
example, the initialize method could be defined on the Circle
class presented above to initialize a circle object to unit size:
define method Initialize() on Circle
this.SetRadius(1.0)
enddefine
Now, whenever a circle is created, it will automatically have its
radius pre-set to 1:
EASI>local Circle c
EASI>print c.Radius
1.0
If an objects’ initialization requires arguments to specify values
for the initialization, this can only be accomplished by defining
a separate initialization method (with a different name), and
calling it explicitly for each object. If an object has a parent
class, the Initialize() method of the parent class will also be
executed, prior to the objects own Initialize() method.
Similarly, the Destroy() method must also be defined without
any arguments. If it has been defined, it will be executed
automatically when an object is deallocated. The Destroy()
method is typically used for freeing memory that was
dynamically allocated by the object using the EAlloc()
intrinsic, for closing files that the object may have opened, and
for other such clean-up type activities. For objects that are
allocated using a LOCAL declaration, its Destroy() method will
EASI User’s Guide
125
A Sample Class
be executed when the function in which it was declared
terminates. For objects that are allocated dynamically using
EAlloc(), the Destroy() method is called when they are
deallocated by a corresponding call to EFree(). If an object has
a parent class, the Destroy() method of the parent class will be
executed also, after the objects own Destroy() method. Note
however that if a function exits due to an EASI error, the
Destroy() methods of local objects declared in the function will
not be called.
A Sample Class
The following definition creates a class called VLShape, that
allows simplified access to a shape within a vector layer. It is
built on top of the EASI vector intrinsics functions. It serves as
an example of defining and using a class. It includes the use of
the Initialize() and Destroy() methods, as well as the
GetDynamicField() and SetDynamicField() methods.
The complete definition of VLShape includes the class
declaration, which holds various information about the file and
vectors being accessed, and the definition of 8 methods. These
include an Open() and Close() method for initiating and
terminating access to a database file, First() and Next() methods
for iterating between shapes in a vector layer, GetVertices() and
SetVertices() methods for manipulating vertex lists, and finally
the dynamic field methods for accessing attribute fields
belonging to a shape directly, as if they were fields within the
class definition.
The Class Definition
The class definition itself holds various information about the
file, including the name of the file, its access type, the number
126
PCI Geomatics
Chapter 7 - Object Oriented Programming With EASI
of the vector layer being accessed, and various other
information. A field called AtEnd is used to indicate if there are
any more shapes in the layer. Since there is no boolean type in
EASI, AtEnd will be defined as a string variable, and by
convention will hold only the string values “TRUE” and
“FALSE”.
define class VLShape
ReadOnly
string filename
string access
integer layer
mstring fieldnames
integer numfields
integer shape
string AtEnd
Vertex ptr Vertices
integer NumVertices
EndReadOnly
Private
integer fd
EndPrivate
enddefine
Initialize() and Destroy() Methods
The Initialize() method will set default values to the fields in
the class definition. Note that by default, EASI already sets
numeric variables to 0, and string fields to empty.
define method Initialize() on VLShape
this.AtEnd = “TRUE”
this.fd = 0
this.filename = ““
this.shape = -1
this.layer = 0
this.access = ““
this.fieldnames = ““
enddefine
The Destroy() method will ensure that the file has been closed
when the object is destroyed. It will do this by simply calling
the objects Close() method. The Destroy() method also frees the
list of vertices belonging to the shape.
EASI User’s Guide
127
A Sample Class
define method Destroy() on VLShape
call this.Close()
if (this.Vertices!= NULL) then
call EFree(this.Vertices)
this.Vertices = NULL
endif
enddefine
Open() and Close() Methods
The Open() method of class VLShape will be used to open a
file, and set it to a vector layer. The method will be defined to
take a variable number of arguments, as indicated by the
VARARGS keyword, either two or three. The first two
arguments will be the file name and layer number respectively.
The third argument, if given, will be the access specifier. If a
third argument is not given, read-only access will be initiated.
define method Open(filename, layer,
varargs) on VLShape
try
! determine file access
local string access
if (f$len(varargs) = 0) then
access = “r”
else
access = varargs(1)
endif
! attempt to open the file
this.fd = DBOpen(filename, access)
if (this.fd = 0) call EASIError(700)
this.filename = filename
this.access = access
this.layer = layer
! Initialize shape id to the first
shape in the layer
call this.First()
! read the number of fields and the
fieldnames
this.numfields =
VECGetFieldCount(this.fd, this.layer)
local integer i
128
PCI Geomatics
Chapter 7 - Object Oriented Programming With EASI
for i = 1 to this.numfields
this.fieldnames[i] =
VECGetFieldName(this.fd,
\
this.layer, i )
endfor
onerror
! if an error occurred, close the file
call this.Close()
call EASIError(700, “File could not
be opened”)
endonerror
enddefine
Observe that the body of the Open() method is enclosed in a
TRY statement to trap errors. Since a call to DBOpen() returns
a value of 0 if the file could not be opened, instead of raising an
EASI error, an explicit call to EASIError() is made. This allows
the TRY statement to handle the error just as any other. Since
the error will never propagate out of the function, no error
message is required.
The Close() method will close the file if one is open.
define method Close() on VLShape
if (this.fd!= 0) then
call DBClose(this.fd)
this.fd = 0
endif
enddefine
First() and Next() Methods
The First() and Next() methods are used to iterate between
shapes within a vector layer. Both of these methods simply call
the VECNextShape() intrinsic appropriately, and store the
result in the field shape. In addition, if there are no more shapes,
the variable AtEnd is set to “TRUE”. The GetVertices() method
is used to read the vertex-list of the first shape.
define method First() on VLShape
if ( this.fd = 0 ) then
EASI User’s Guide
129
A Sample Class
call EASIError( 703, “No Currently
open file” )
endif
this.shape = VECNextShape(this.fd,
this.layer, -1)
if ( this.shape = -1 ) then
this.AtEnd = “TRUE”
call this.ClearVertices()
else
this.AtEnd = “FALSE”
call this.GetVertices()
endif
enddefine
The definition of Next() is very similar.
define method Next() on VLShape
if ( this.fd = 0 ) then
call EASIError( 703, “No Currently
opened file” )
endif
this.shape = VECNextShape(this.fd,
this.layer, this.shape)
if ( this.shape = -1 ) then
this.AtEnd = “TRUE”
call this.clearvertices
else
this.AtEnd = “FALSE”
call this.GetVertices()
endif
enddefine
Vertex Access Methods
The list of vertices for the current shape is maintained in the
field “Vertices”. The ClearVertices() method sets the vertex list
for the current shape to empty.
define method ClearVertices() on VLShape
if (this.vertices!= NULL) then
call EFree(this.vertices)
this.vertices = NULL
this.numvertices = 0
if (this.shape!= -1) then
call VECSetVertices(this.fd,
this.layer, this.shape,0,\
this.vertices )
130
PCI Geomatics
Chapter 7 - Object Oriented Programming With EASI
endif
endif
enddefine
The GetVertices() method reads the vertex list for the current
shape into memory.
define method GetVertices() on VLShape
local Vertex ptr v
if (this.vertices!= NULL) then
call EFree(this.vertices)
this.vertices = NULL
endif
if (this.AtEnd!= “TRUE”) then
v = VECGetVertices(this.fd,
this.layer, this.shape)
this.numvertices = f$len(v)
this.vertices = v
endif
enddefine
The SetVertices() method sets the list of vertices for the current
shape to a given vertex list.
define method SetVertices(num, vertices)
on VLShape
call VECSetVertices(this.fd,
this.layer, this.shape, num, \
vertices)
call this.GetVertices()
enddefine
The AddVertex() function adds a single vertex to the list of
vertices belonging to the current shape.
define method AddVertex(v) on VLShape
local int n
n = this.numvertices+1
this.vertices = ERealloc(Vertex, n,
this.vertices)
this.vertices[n].x = v.x
this.vertices[n].y = v.y
this.vertices[n].z = v.z
call VECSetVertices(this.fd,
this.layer, this.shape, n, \
this.vertices)
EASI User’s Guide
131
A Sample Class
this.numvertices = n
enddefine
Using the VLShape Class
The VLShape class provides a convenient and concise way to
access data within a vector layer. For example, the following
script checks the vertex lists of all the shapes, and if the first
and last vertex do not match, it adds an extra vertex to the end
of the list matching the first vertex, thus ensuring each shape
represents a closed area. The height or ‘z’ value of the vertices
is ignored. Note also that errors are trapped, and the script
ensures the file is correctly closed if an error does occur.
try
local VLShape shape
local Vertex v
local integer n
call shape.Open( “irvine.pix”, 25, “w” )
call shape.First()
while (shape.AtEnd!= “TRUE”)
n = shape.numvertices
if ( n > 0 AND \
(shape.vertices[1].x!=
shape.vertices[n].x OR
\
shape.vertices[1].y!=
shape.vertices[n].y)) then
v.x = shape.vertices[1].x
v.y = shape.vertices[1].y
call shape.AddVertex( v )
endif
call shape.Next()
endwhile
call shape.Close()
onerror
call shape.Close()
print getlasterrormessage()
call EASIError( 800, “Failed to close
shapes!” )
endonerror
132
PCI Geomatics
Chapter 7 - Object Oriented Programming With EASI
Dynamic Fields
EASI classes provide a way to access pieces of data as if they
are fields belonging to the object even if they aren’t actual
fields. This method of access can be used to access dynamic
data without having to build it directly into the objects
corresponding class definition, which should normally remain
static. Access to dynamic fields is obtained through two special
methods which may optionally be defined for any class:
GetDynamicField() and SetDynamicField().
The GetDynamicField() method must be defined with a single
argument, expected to be a string. If the method has been
defined for a class, when a field reference is performed for any
object of the class and that field does not exist in the class
definition, then the GetDynamicField() method is
automatically executed. The name of the field which could not
be found will be passed to the function as its only argument.
The function would use this argument to determine an
appropriate value and return that value using the RETURN
statement.
The SetDynamicField() method must be defined with two
arguments. The first argument will be a string containing a field
name that was accessed but could not be found as part of an
object on the left-hand side of an assignment statement. The
second argument contains the value which was being assigned
to the field. The SetDynamicField() method should take
appropriate action based on the field and value being assigned.
Dynamic Field Methods in VLShape
The GetDynamicField() method will be used to access
attributes fields in the current shape. If a field reference is
performed that doesn’t refer to an actual field in the class
VLShape, then the GetDynamicField() function will be invoked
EASI User’s Guide
133
A Sample Class
automatically with the field name as its only argument. The
function will use that argument to search the list of field names
kept in memory to determine the corresponding field number.
The field number can then be used to allow VECGetField() to
access the field value.
define method GetDynamicField(field) on
VLShape
if ( this.fd = 0 ) then
call EASIError( 703, “No Currently
opened file” )
endif
local integer fieldnum
fieldnum =
FindSubString(this.fieldnames, field)
if (fieldnum = -1 OR
\
field!= this.fieldnames[fieldnum])
then
call EASIError( 701, “Field %s not
found”, field )
endif
return(VECGetField(this.fd, this.layer,
this.shape, \
fieldnum))
enddefine
The SetDynamicField() method operates in an analogous
manner to GetDynamicField(), except it receives an extra
argument containing the value to which the given field should
be set.
define method SetDynamicField(field,
value) on VLShape
if ( this.fd = 0 ) then
call EASIError( 703, “No Currently
opened file” )
endif
if ( this.access <> “w” AND this.access
<> “r+” ) then
call EASIError( 702, “Invalid access
for operation” )
endif
134
PCI Geomatics
Chapter 7 - Object Oriented Programming With EASI
local integer fieldnum
fieldnum =
FindSubString(this.fieldnames, field)
if (fieldnum = -1 OR
\
f$len(field)!=
f$len(this.fieldnames[fieldnum])) then
call EASIError(701, “Field %s not
found”, field)
endif
call VECSetField(this.fd, this.layer,
this.shape,
\
fieldnum, value)
enddefine
The dynamic field access methods make it particularly
convenient if a script is written for vector layers with a known
set of attribute names. For example, the following script can be
used to iterate over all the shapes in a layer, and print the
attributes called “Attribute” and “Group” for each shape to the
screen.
local VLShape shape
call shape.open( “irvine.pix”, 25 )
call shape.First()
while (shape.AtEnd!= “TRUE”)
printf “Attribute:%s\n”,
shape.Attribute
printf “Group:%s\n”, shape.Group
call shape.Next()
endwhile
call shape.Close()
EASI User’s Guide
135
A Sample Class
136
PCI Geomatics
C
H A P T E R
EASI Language Reference
8
Commands
EASI is a command language tailored for the launching
of PACE programs and raster modelling. This chapter
contains an extensive list of EASI Commands.
ALIAS
The ALIAS command is used to create and maintain
command line aliases, which can cut down on typing
and will allow for the configuration of the command
environment.
ALIAS
or
ALIAS token
or
ALIAS token alias-string
token
- The aliased token.
It must follow the usual
rules for an identifier.
alias-string - The string to be
substituted for the token.
The alias command has three forms. The first is with no
arguments and produces a list of the currently defined
aliases. The second takes one argument and reports the
EASI User’s Guide
137
Commands
alias applied to the given token. The third form is used to attach
the specified alias string to the the token. Thereafter, when the
token is the first item on an interactively entered command line,
the token will be replaced by the given alias-string.
Example 1:
This is a simple example is the following alias which replaces
‘ls’ with ‘system "ls"’. Thereafter, typing ‘ls’ in EASI would
result in the ls command being passed to the operating system.
alias ls "system \"ls\""
ls
The alias-string can in fact take on a more complex syntax. It is
possible to have command line arguments substituted into the
alias string. Individual command lines arguments may be
indicated by number, i.e., $1, $2 or $3. The set of all command
line argument may be indicated as $*. All command line
arguments that are not explicitly referenced in the alias
expansion are appended to the end of the resulting string.
Example 2:
An example of using argument substitution is shown by the ls
alias, with all arguments also passed to the operating system. In
this case all arguments on the EASI command line to ‘ls’ will
be put inside the string passed to the operating system.
alias ls "system \"ls $*\""
ls *.pix
Example 3:
The following (more complex) example sets up an alias called
‘clear’ which takes two arguments. The first is the name of a
PCIDSK file, and the second is an image plane to clear to zero.
Note that the quotes, and the backslashes in the alias string have
to be escaped with the backslash.
138
PCI Geomatics
Chapter 8 - EASI Language Reference
alias clear "file=\"$1\" \\ dboc=$2 \\
valu = 0 \\ run clr"
clear eltoro.pix 1
clear irvine.pix 1,2,3
The arguments are determined from the command line string by
breaking on white space. Hence, in the above example, the
channel list "1,2,3" is taken as one argument. There are limits
to what can be accomplished with the aliases alone; however,
aliases can be used to invoke a user defined function, passing
all the arguments as a single string. This user defined function
can then parse the arguments however it pleases.
Example 4:
The following example demonstrates this without showing
what the user defined function editfunc does to parse the passed
arguments.
alias edit "call editfunc( \"$*\" )"
edit file=irvine.pix segment=11
Currently, there is no command to remove aliases once
instituted and it is important to remember that aliases are only
applied to interactive input, not procedures.
See Also: Startup File
ASK
The ASK command prompts the user for a new value for the
parameter.
ASK ["prompt"] parm [ONERROR statement]
"prompt" - optional prompt string to
replace default prompt
parm
- parameter file entry name
ONERROR - error condition handler
EASI User’s Guide
139
Commands
For numeric parameters the value provided by the user is parsed
as a comma separated series of expressions. Each of the
expressions is evaluated before being assigned to the
corresponding entry in the numeric parameter. If there is an
error evaluating any of the expressions, and an ONERROR
statement is available it will be invoked. ONERROR
statements are never invoked for character parameters.
Example:
The following statement asks the user for a value to assign to
the character parameter FILE and overrides the standard FILE
parameter prompt.
ask "PCIDSK Database To Create:" file
See Also: INPUT
BYE
The commands BYE and QUIT terminate EASI. Note that the
STOP command just terminates execution of a procedure,
returning control to the user.
EASI> BYE
See Also: STOP
CALL
CALL function(arguments...) [> mstring]
[ONERROR statement]
The CALL command is used to invoke user defined or intrinsic
functions. Argument expressions passed to the function should
be separated by commas. If there are no arguments, the brackets
enclosing the arguments may be omitted. If the CALLed
140
PCI Geomatics
Chapter 8 - EASI Language Reference
function has a return value, it will be discarded when the
function is invoked using the CALL statement.
In order to capture all terminal output of a subprocedure, the
‘‘>’’redirection clause may be used. All text output of the
subprocedure will be captured and placed in the provided multiline string variable (type MString).
The statement supports an optional ONERROR statement
which will be invoked if an error occurs during processing of
the called function. Alternatively, the NOERROR postfix may
be used instead of using ONERROR with a statement.
Note
Functions with return values can also be invoked directly from
within an expression.
Example:
CALL DBOpen("abc.txt", "r")
...
CALL DBClose("abc.txt") ONERROR PRINT
"DBClose failed."
CASE
CASE (expr) case1;line1, case2;line2
[,...]
expr - is a numeric or string expression.
casen - is a numeric expression if expr is
numeric or
is a string expression of expr is
a string.
linen - is a line number or line label.
EASI User’s Guide
141
Commands
The CASE statement allows multiway branching to any line
within the same procedure or function depending on the
matching of one of a number of conditions.
The test expression expr is evaluated and then sequentially
compared to the values case1, case2, etc. When a match is
found, control then branches to the line corresponding with the
line number or line label following the case value. If no match
is found, execution will continue with the next statement after
the CASE statement.
NOTE: The CASE statement cannot be used in within raster
models.
Example:
CASE (command) "HELP"; help_cmd, "STOP";
stop_cmd
See Also: IF
DEFINE
The DEFINE command is used to define a number of different
things. It can be used to define new parameters in the
PRM.PRM file, new data types, and new functions.
Parameter
The DEFINE command defines a new parameter in the
parameter file.
DEF[INE] parm =
DEF[INE] parm =
DEF[INE] parm =
[,"desc"]
M, "text" [,"desc"]
C, "def" [,"desc"]
N, rmin, rmax, rdef
parm
- up to 8 character parameter name
M,C,N
- parameter type (Message,
Character, Numeric)
"text" - up to 64 character text message
142
PCI Geomatics
Chapter 8 - EASI Language Reference
"desc" - optional 32 character prompt/
descriptor
"def"
- zero to twelve character default
string
rmin
- minimum real value
rmax
- maximum real value
rdef
- default real value
If the parameter already exists, it will be assigned the new
definition. Note that this changes the value of the parameter
back to the assigned default.
The PACPRM.EAS procedure is normally used to build new
PRM.PRM files, and consists of a group of procedures in the
F$PCIHOME()/pro directory such as DEFKERNE.EAS. These
procedure contain a DEFINE statement for each parameter in
the PRM.PRM file.
Example:
DEFINE FILE = C, "", "Database File Name"
DEFINE DBIC = N,99999,99999,100000,"Database Input Channel
List"
Function
The DEFINE command can be used to define new EASI
functions which operate in a manner analogous to the
predefined intrinsic functions. These functions may take an
arbitrary number of arguments and may optionally return a
value.
DEF[INE] FUNCTION function_name ( arg1,
arg2, ...)
easi_command_list...
ENDDEFINE
e.g.
define function isprime(a)
local max_div, i
max_div = F$INT(a^0.5 + 1)
EASI User’s Guide
143
Commands
for i = max_div... 2 by -1
if((a/i) = F$INT(a/i)) return("FALSE")
endfor
return("TRUE")
enddefine
The arguments may be of any defined type. The invocation of a
user defined function is, in many ways, analogous to invoking
a new EASI procedure file. The function has a new variable
scope, but may access global variables declared by calling
levels. The advantage of user defined functions over separate
procedure files is the ability to pass arguments and return
values, simplifying encapsulation.
See Also: VarArgs, AddShared()
Structure
The DEFINE command can be used to declare new complex
data types consisting of named fields of various types.
DEF[INE] STRUCTURE structure_name
field1_type
field1_name[(array_size)]
...
ENDDEFINE
Once the ‘define structure’ command has been parsed, the
named data type is available for use at any later time in the same
EASI session. The fields may be intrinsic types such as ’char’
or ’float’, or may be ’String’ or ’MString’, or other complex
structures defined using the DEFINE STRUCTURE command;
however, structure fields may not be of type ’MVar’.
Note
An array size specifier should not be used if the field is of type
String or MString.
144
PCI Geomatics
Chapter 8 - EASI Language Reference
Example:
Define a structure to hold information about a file, create a
variable of the new type, and assign values to it.
DEFINE STRUCTURE DatasetInfo
char
Filename[128]
char
double
double
double
double
int
int
ENDDEFINE
Mapunits[24]
ULX
ULY
LRX
LRY
HasRasterData
HasVectorData
LOCAL DatasetInfo
DSInfo
DSInfo.Filename = file
DSInfo.MapUnits = "LONG/LAT"
DSInfo.ULX = 12.5
DSInfo.ULY = 45.0
DSInfo.LRX = 13.0
DSInfo.LRY = 44.5
DSInfo.HasRasterData = 0
DSInfo.HasVectorData = 1
Class
The DEFINE command can be used to declare new object
classes. Defining a class is similar to defining a structure,
except that a class can have special functions called ‘methods’
associated only with objects (variables) of that class. Classes
also support data hiding for data fields.
DEF[INE] CLASS new_class_name [INHERITS
base_class_name]
field1_type
field1_name[(array_size1)]
field2_type
field2_name[(array_size2)]
...
[ReadOnly
fieldn_type
fieldn_name[(array_sizen)]
...
EASI User’s Guide
145
Commands
EndReadOnly]
[Private
fieldm_type
fieldm_name[(array_sizem)]
...
EndPrivate]
ENDDEFINE
Note that an array size specifier should not be used if the field
is of type String or MString.
The ReadOnly/EndReadOnly and Private/EndPrivate keywords
can be used to declare special access restrictions on some data
fields. The ReadOnly field can only be updated by methods of
the class. Private fields can only be read and updated by
methods of the class.
The INHERITS keyword can be used to specify a base class for
the newly defined class. If this is done, then all fields and
methods previously defined on the base class will be included
in the new class. This implements single inheritance. Multiple
inheritance is not supported.
Example:
Define a class called Circle, with two initialization methods.
DEFINE CLASS Circle
ReadOnly
double
double
double
double
EndReadOnly
ENDDEFINE
CenterX
CenterY
Radius
Area
DEFINE METHOD SetCenter( x, y ) ON Circle
this.CenterX = x
this.CenterY = y
ENDDEFINE
DEFINE METHOD SetRadius( new_radius ) ON
Circle
146
PCI Geomatics
Chapter 8 - EASI Language Reference
this.Radius = new_radius
this.Area = 3.1415927 * this.Radius *
this.Radius
ENDDEFINE
Method
The DEFINE command can be used to define new methods on
user defined or predefined classes. A method is similar to a
function, except that it is associated with objects of a particular
type (Class).
DEF[INE] METHOD method_name ( arg1, arg2,
... ) ON class_name
easi_command_list ...
ENDDEFINE
The object on which the method is invoked will be known as
‘this’ within the method.
If the method is named Initialize(), then it will be used as a
constructor for the class. It will be automatically invoked each
time an object of the class is created. Normally, the constructor
is used to assign initial values to the class fields. The Initialize()
method cannot take any arguments.
If the method is named Destroy(), then it will be used as a
destructor for objects in the class. It will be automatically
invoked each time an object of the class is destroyed. Normally,
the destructor is used to free any additional memory associated
with the class.
Example:
Define a class called Circle with two initialization methods.
DEFINE CLASS Circle
ReadOnly
double
double
double
double
EndReadOnly
EASI User’s Guide
CenterX
CenterY
Radius
Area
147
Commands
ENDDEFINE
DEFINE METHOD SetCenter( x, y ) ON Circle
this.CenterX = x
this.CenterY = y
ENDDEFINE
DEFINE METHOD SetRadius( new_radius ) ON
Circle
this.Radius = new_radius
this.Area = 3.1415927 * this.Radius *
this.Radius
ENDDEFINE
DEBUG
The DEBUG command provides an interface to a set of
command-line debugging tools. These include setting and
manipulating breakpoints and single-stepping through lines of
code.
The various debugging commands are executed by entering
DEBUG followed by additional key-words and options. The
debugging commands are intended for interactive use.
Example
Consider the function following EASI script defined in the file
TEST.EAS: (The line numbers are for reference only and are
not part of the actual code).
1 local int fd, num_pixels
2
3 fd = DBOpen( "/pci/demo/irvine.pix",
"r" )
4 num_pixels = DBPixels( fd )
5
6 local int dataline[num_pixels]
7 call DBReadLine( fd, 1, 0, 0,
num_pixels, dataline )
8 call DBClose( fd )
9
10 local int i, min_val, maxval
11 min_val = 257
12 max_val = -1
148
PCI Geomatics
Chapter 8 - EASI Language Reference
13
14 for i = 0 to num_pixels-1
15
if ( dataline[i] < min_val ) min_val
= dataline[i]
16
if ( dataline[i] > max_val ) max_val
= dataline[i]
17 endfor
18
19 printf "The minimum value is %d\n",
min_val
20 printf "The maximum value is %d\n",
max_val
The script is intended to load the first line of data from the first
channel of the file irvine.pix and then compute the minimum
and maximum data values in the file. When run, however, the
following error occurs:
TEST.EAS:15:E600:Expression type mismatch
(<).
if ( dataline[i] < min_val ) min_val
= dataline[i]
It may not be immediately obvious why this happens. To find
out more, we’ll use the DEBUG support in EASI.
After entering EASI, the script is first loaded.
EASI>load "TEST.EAS"
next a breakpoint is set at the offending line.
EASI>debug break test 15
The script can now be run. It stops at the breakpoint:
EASI>run test
Halted at breakpoint 1 (function TEST,
file TEST.EAS, line 15)
Halted at function TEST, file TEST.EAS,
line 15:
if ( dataline[i] < min_val ) min_val
= dataline[i]
EASI DEBUG 1>
EASI User’s Guide
149
Commands
The special DEBUG prompt is printed, indicating that
execution is halted during the execution of a script. The current
values of variables can be examined.
EASI DEBUG 1>print i
0
EASI DEBUG 1>print min_val
257
EASI DEBUG 1>print dataline[i]
{array of 512 INTEGER(s) at 0x8347b48}
The value of dataline[i] (= dataline[0]) is unexpected. In fact,
arrays in EASI are indexed starting at the value 1 instead of 0
as in C. This is the source of the bug. Execution of the program
is halted:
EASI DEBUG 1>debug quit
EASI>
The code can now be modified, changing line 14 to:
for i = 1 to num_pixels
After rerunning the program, it now results in the following
output:
EASI>run test
The minimum value is 50
The maximum value is 81
This is the correct result that was desired.
Limitations
The following limitations exist in the current implementation of
EASI DEBUG support.
* The line-numbers of ENDFOR statements are wrong, and will
appear to be garbage values when an ENDFOR statement is
reached.
* An IF statement with an in-line statement to execute when the
test is true is really two statements on one line. If the test is
150
PCI Geomatics
Chapter 8 - EASI Language Reference
satisfied, it will appear that the debugger is stopping twice on
the same line. Actually, the second time it stops on that line
corresponds to executing the statement associated with the IF.
* If you type QUIT (or BYE, or EXIT) from the DEBUG
prompt, execution of the script will continue until it terminates,
after which EASI will itself terminate.
Abbreviatio
ns
Since the DEBUG family of commands are somewhat long to
enter, it is convenient to define aliases to abbreviate these
commands. The following is a reasonable set of aliases to use:
alias
alias
alias
alias
alias
alias
alias
dbl
dbb
dbs
dbc
dbe
dbd
dbq
"DEBUG
"DEBUG
"DEBUG
"DEBUG
"DEBUG
"DEBUG
"DEBUG
LIST"
BREAK"
STEP"
CONTINUE"
ENABLE"
DISABLE"
QUIT"
Aliases can be set in the easi startup file so that they may be
automatically loaded each time EASI is run.
See Also: STARTUP, ALIAS
Break
The DEBUG BREAK command is used to set breakpoints. A
breakpoint is a special marker associated with a line of code
that will cause execution to halt and a special interactive mode
to be entered where variables can be examined, from which
execution can be allowed to continue.
DEBUG BREAK function-name linenumber
DEBUG BREAK "file-name" linenumber
DEBUG BREAK ONERROR
Example:
Set a break-point in function Test() at line 5:
DEBUG BREAK test 5
EASI User’s Guide
151
Commands
Set a break-point in file TEST.EAS at line 5:
DEBUG BREAK "TEST.EAS" 5
The function in which the break is being set should already be
loaded, using for example the LOAD command.
Each breakpoint that is set is assigned a numeric identifier. This
identifier is used in subsequent commands to CLEAR,
DISABLE, or ENABLE the breakpoint.
The BREAK ONERROR form of the command will cause
debug mode to be entered automatically when an error occurs.
Breakpoints are removed with the CLEAR command.
Clear
The DEBUG CLEAR command is used to remove existing
breakpoints set using the DEBUG BREAK command.
DEBUG CLEAR breakpoint_id
DEBUG CLEAR ALL
DEBUG CLEAR ONERROR
Example:
Clear breakpoint number 1.
DEBUG CLEAR 1
Continue
The DEBUG CONTINUE command is used to continue
execution after it has been halted by reaching a breakpoint.
DEBUG CONTINUE
Execution will continue until the next breakpoint is
encountered, or execution completes.
152
PCI Geomatics
Chapter 8 - EASI Language Reference
Disable
The DEBUG DISABLE command is used to disable
breakpoints. A disabled breakpoint will not cause execution to
halt when it is reached. A disabled breakpoint may later be reenabled.
DEBUG DISABLE breakpoint_id
DEBUG DISABLE ALL
Example:
Disable breakpoint number 3:
DEBUG DISABLE 3
Enable
The DEBUG ENABLE command is used to enable breakpoints.
An enabled breakpoint will cause execution to halt when it is
reached.
DEBUG ENABLE breakpoint_id
DEBUG ENABLE ALL
Example:
Enable breakpoint number 3:
DEBUG ENABLE 3
List
The DEBUG LIST command is used to list all the current
breakpoints, the source files and names of the associated
functions, the line numbers at which they are set, and whether
they are enabled or disabled.
DEBUG LIST
Step
The DEBUG STEP command is used to execute the next line of
code.
DEBUG STEP
DEBUG STEP OVER
EASI User’s Guide
153
Commands
If the additional modifier OVER is given to the DEBUG STEP
command, then execution will not stop inside called functions.
Otherwise, when stepping at a function call, execution will halt
at the first line of the called function.
When stepping past the end of the current function, the
execution will halt at the next line of the calling function.
Quit
The DEBUG QUIT command is used to return from the
DEBUG prompt immediately to the main EASI prompt without
executing any further statements.
DEBUG QUIT
DELETE
The DELETE command deletes the named file, assuming the
user has permission to do so. The ONERROR statement is
invoked if the delete fails. A NOERROR clause may be used
instead to suppress any errors.
DEL[ETE] filename [ONERROR statement]
filename
- a string expression for the
filename to delete
Example:
The following example converts a TIFF file to a PCIDSK file
and then deletes the TIFF file using the DELETE command.
fili="irvine.tif"
filo="irvine.pix"
run fimport
delete fili noerror
154
PCI Geomatics
Chapter 8 - EASI Language Reference
DOC
The DOC command marks a line of text as documentation
rather than commands. This documentation is used for on-line
help.
DOC text
text
- any line of text
EVAL
The EVAL command is used to evaluate an EASI subprogram
provided as a string argument. This accomplishes
approximately the same thing as writing the string expression
to a file and then running it using the RUN command.
EVAL prog_line [ONERROR statement]
prog_line: string expression to be
evaluated as a subprogram.
The subprogram must be a single string expression (not a multiline expression) but it may contain many logical lines separated
by backslash characters. An ONERROR clause may be added
to perform a statement if an error occurs.
The EVAL command exists so that procedures can easily
evaluate arbitrary expressions created at run time. The
evaluated sub-expression has its own variable scope, similar to
a subprogram invoked with CALL or RUN. No value is
returned, so results are normally exported only via side-effects.
Example:
A user enters a parameter name, and the value is extracted and
assigned to NUM.
EASI User’s Guide
155
Commands
local string var_name, int error
input "Parameter Name: " var_name
error = 0
EVAL "NUM1 = "+var_name ONERROR error = 1
if( error = 1 )then
print var_name+" is not a legal numeric
parameter."
else
print var_name+" value is:",num1
endif
FOR
The EASI FOR command provides a simple looping construct
over a series of numeric values.
FOR iter_var = start_val TO end_val [BY
incr_val]
statement_list
ENDFOR
iter_var
- The iteration variable.
This may be any
numeric variable type,
including a parameter.
start_val
- This initial value to
assign to the ‘iter_var’.
end_val
- When ‘iter_var’ passes this
value, iteration
stops.
incr_val
- Value by which to increment
‘iter_var’ each
iteration. The default is
‘1’.
The FOR statement initializes the iteration variable to the initial
value, checks it against the end value, and if the end value is not
exceeded it executes the statement list. When the ENDFOR
statement is reached, the iteration variable is incremented by
the increment value and compared to the end value. If the end
value is not exceeded, the statement list is executed again.
156
PCI Geomatics
Chapter 8 - EASI Language Reference
The start value may be greater than the end value and the
increment value may be negative, but if the increment value
does not take the iteration variable value closer to the end value
each iteration, the FOR loop will never terminate.
It is possible to alter the value of the iteration variable inside the
FOR loop and also to use GOTO’s to escape or enter the loop,
but this is poor style and may cause problems in future versions
of EASI.
Example:
The following example runs the PACE task CLR on the first
128 channels of the PCIDSK file hyper1.pix in groups of 16
channels at a time.
local i,j
file = "hyper1.pix"
valu = 0
for i = 1 to 128 by 16
for j = 1 to 16
dboc(j) = i + j - 1
endfor
run clr
endfor
See Also: WHILE
GLOBAL
The GLOBAL command declares EASI variables of the
requested or default type in a manner similar to LOCAL;
however, with GLOBAL the variables will persist after the
current procedure or function terminates. They can also be
accessed from any function or procedure.
GLOBAL [type] name[(array_size)] [,[type]
name[(array_size)],...]
name
declare
EASI User’s Guide
- names of EASI variables to
157
Commands
type
array_size
array
- type of variable
- number of entries in the
Possible types include:
byte
- a single unsigned byte
char
- a single character (1 byte)
double
- an 8 byte double precision
floating point value
float
- a 4 byte floating point
value
integer(int) - a signed 4 byte integer
mstring
- a multi-line string array
(no arrays)
pointer(ptr) - a generic memory pointer
string
- an arbitrarily long string
variable (no arrays)
mvar
- modeling intermediate array
Vertex
- a structure with an x, y
and z field.
GeoInfo
- a structure to hold
projection information
Example:
The following example declares a globally available array of
integers with 256 elements called "img_lut".
global integer img_lut[256]
See Also: LOCAL
GOTO
The GOTO command transfers execution control to the
statement at the specified label or line number. GOTO
commands can be used to escape or enter loops, although this
is poor style and may cause problems in future versions of
EASI.
GOTO label
158
PCI Geomatics
Chapter 8 - EASI Language Reference
label
- an existing line number, or
statement label.
Execution control is transferred to the statement at the label /
line number indicated. Note that statement labels are indicated
by an identifier at the beginning of a line followed by a colon
and a statement. If it is undesirable to place a statement on the
same line for formatting purposes, it may be placed on the next
line and a backslash used to mark the split of the virtual line (as
shown in the example).
Example:
run cim onerror goto Error
...
Error: \
print "An error has occurred in creating
the new database."
HELP
The HELP command (HELP, H or ?) prints online help for
specified topic and subtopics. The EASI online help facility is
modeled after the VAX/VMS online help command. The topic
defaults to the EASI/PACE system help, if a topic is not
specified. Up to 9 subtopics may be specified for a given topic.
In practice, a maximum of 3 subtopics may exist for a topic.
Topic names must NOT be abbreviated but subtopic names can
be abbreviated if they are unique.
HELP [topic] [subtopic1] [subtopic2]
[subtopic3] ...
The user can respond to the subtopic prompt by entering a
subtopic (if one exists) or a command (<return> or ?).
1.
2.
EASI User’s Guide
<return>
?
backup one level
redisplay help
159
Commands
The return key takes the help facility back one subtopic level.
It may be used in succession to return to the EASI level.
The question mark prints the text for the current help topic
again (in other words, run that by me one more time). It does
not change the current subtopic help level.
The following diagram illustrates some of the help topics and
subtopics that are available within the help facility. The topic
specifies the program or procedure on which information is
requested. Most topics contain several nested subtopic levels.
H E L P
|
+-----------------------------------------+
|
|
|
|
|
|
program CIM procedure SHELL HELP
SYSTEM HELP
|
|
|
|
|
|
MORE
+-----------------+
|
|
|
|
DETAILS
(this help)
EXAMPLE DETAILS PARAMETERS
|
+-----------------------------+
|
|
|
|
|
|
FILE TEX1 TEX2 DBSZ PXSZ DBNC
Example:
HELP CIM
See Also: KEY
IF
The IF statement is used to conditionally execute statements.
IF( logical_expression )THEN
statement_list
160
PCI Geomatics
Chapter 8 - EASI Language Reference
[ELSEIF( logical_expression )THEN
statement_list]
[ELSE
statement_list]
ENDIF
logical_expr
described
- A logical expression as
in the Logical Expression
topic.
statement_list- A list of one or more
statements.
Each logical_expression is evaluated in turn until one of them
evaluates to be true. When one is true, the corresponding
statement_list will be executed, and control will continue
beyond the ENDIF. If none of the logical expressions is true
and an ELSE clause exists, the associated statement_list will be
executed.
Example:
if( f$input() = "x" )then
goto Exit
elseif( f$input() = "" )then
goto PromptAgain
else
print "An error has occurred:"+f$input()
endif
See Also: Logical Expression, WHILE, FOR
IMPORT
The IMPORT command is redundant. In the past it was used to
allow access to variables declared with the GLOBAL
statement, but now all variables declared with the GLOBAL
statement are available in all functions and procedures.
See Also: GLOBAL
EASI User’s Guide
161
Commands
INPUT
The INPUT command prompts the user with text and waits for
user input to the EASI variables. If ONERROR is specified, it
overrides normal error reprompting.
INPUT "text" locvar [,locvar,...]
[ONERROR statement]
"text" - text string used for prompt
locvar - EASI string or EASI numeric
variables
ONERROR - error condition handler
For numeric variables, the input provided by the user is parsed
as a comma separated series of expressions. Each of the
expressions is evaluated before being assigned to the
corresponding numeric variable. If there is an error evaluating
any of the expressions and an ONERROR statement is
available, it will be invoked. ONERROR statements are never
invoked for character input.
Example:
input "Enter the X,Y location in UTM
Metres" UTMX, UTMY
See Also: ASK
KEY
The KEY command is used to perform a keyword search of all
the help topics online with a provided keyword predicate. The
first 100 help topics that match the keyword predicate are
displayed and any one can be selected at the ‘‘Enter topic name
or <RETURN> for more:’’ prompt. Once a topic has been
selected from the matching list, the user is placed in the normal
help browser.
KEY keyword [[AND,OR] keyword]...
162
PCI Geomatics
Chapter 8 - EASI Language Reference
The keyword predicate is a series of keywords, each with an
optional logical operation. For instance ‘‘vector OR image’’
would list all topics with the vector or the image keywords,
while ‘‘vector AND image’’ would list all topics with both
vector and image keywords. The only possible operations are
‘‘AND’’ and ‘‘OR’’, but the default operation is ‘‘OR’’ if none
is provided. Thus, ‘‘vector line polygon’’ is the same as
‘‘vector OR line OR polygon’’.
Keyword searches are case insensitive and will match any
subset of the keyword stored for a topic. Therefore ‘‘vector’’
would find a topic with ‘‘vectors’’ or ‘‘eigenvector’’.
Example:
KEY rasterize
KEY vector AND export
See Also: HELP, KEYWORDS
LET
The LET command assigns the value of an expression to a
variable.
[LET] lvalue = expression [ONERROR
statement]
lvalue
- parameter, subscripted
parameter, or EASI variable.
expression - A numeric, string or vector
valued expression.
If no expression is given, the LET command attempts to assign
a default value to the variable.
If the variable does not exist, the LET command will attempt to
create a local variable of the given name with a type depending
on the type of the expression being assigned. Numeric
EASI User’s Guide
163
Commands
expressions will result in the creation of a float variable. Other
types such as strings and mstrings result in the creation of a
variable of the same type. Note that if the expression is a data
reference such as a pointer, structure, or array, a new reference
to the same data is created and the actual data itself is not
duplicated.
It is an error to attempt to default the value of an undefined
variable.
The LET keyword is optional.
The ONERROR clause can be used to trap errors that occur
during the evaluation of the expression or other errors during
the execution of the LET statement. If the ONERROR clause is
activated, the actual assignment will not take place, although
some or all of the expression may have been evaluated.
See Also: Expression
LOAD
The LOAD command loads the procedure into EASI without
executing it. This effectively parses the procedure, making all
defined functions and types in the procedure available for use.
LOAD "file"
"file"
- complete file specifier
Note that previous forms of this command, where the procedure
name was not a string expression, are not supported in EASI.
Example:
LOAD "/pci/pro/SHELL.EAS"
164
PCI Geomatics
Chapter 8 - EASI Language Reference
LOCAL
The LOCAL command declares EASI variables of the
requested or default type in a manner similar to GLOBAL;
however with LOCAL, the variables may only be accessed
within the current function or procedure. Local variables may
also be implicitly declared by a LET command. See the help
provided under the LET command for further details.
LOCAL [type] name[(array_size)] [,[type]
name[(array_size)],...]
name
declare
type
array_size
array
- names of EASI variables to
- type of variable
- number of entries in the
Possible types include:
byte
- a single unsigned byte
char
- a single character (1 byte)
double
- an 8 byte double precision
floating point value
float
- a 4 byte floating point
value
integer(int) - a signed 4 byte integer
mstring
- a multi-line string array
(no arrays)
pointer(ptr) - a generic memory pointer
string
- an arbitrarily long string
variable (no arrays)
mvar
- modeling intermediate array
Vertex
- a structure with an x, y
and z field.
GeoInfo
- a structure to hold
projection information
Example:
The following example declares a locally available array of
integers with 256 elements called "img_lut".
local integer img_lut[256]
See Also: GLOBAL, LET
EASI User’s Guide
165
Commands
GeoInfo
The GeoInfo pre-defined type is a structure for holding
projection related information. The define statement
corresponding to it would appear as follows.
define structure GeoInfo
char Units[24] ! Map Units string, at
most 16 long
double ULX ! Upper left X coord, georef
units
double ULY ! Upper left Y coord, georef
units
double LRX ! Lower right X coord, georef
units
double LRY ! Lower right Y coord, georef
units
double DEarth1
double DEarth2
double RefLong ! Reference Longitude
double RefLat ! Reference Latitude
double
StdParallel1
double
StdParallel2
double
FalseEasting
double
FalseNorthing
double
Scale
double
Height
double
Long1
double
Lat1
double
Long2
double
Lat2
double
Azimuth
integer
LandsatNum
integer
LandsatPath
enddefine
The most important field is the Units field, which contains the
map units string defining the georeferencing system. For
instance, from irvine.pix this would be "UTM 11 S E000".
The ULX, ULY, LRX and LRY fields are the positions of the
upper left and lower right corners of the raster with which this
projection information corresponds. When the GeoInfo is
related to a vector layer, these will not be set to a meaningful
value.
The remaining fields are special values used only for some of
the complex projections. Complex projections are those for
166
PCI Geomatics
Chapter 8 - EASI Language Reference
which the map units string does not fully define the projection.
UTM, SPCS and LONG are examples of simple projections
defined fully by the Units value while Transverse Mercator and
Lambert Conformal Conic are examples of projections where
additional values are required.
See Also: Projections, DBReadGeoInfo(), VECReadGeoInfo(),
Reproject()
LOG
The LOG command is used to control the user session log file.
When logging is active, a record of various events is made in
the log file, such as the assignment of parameters and the
launching of PACE programs.
LOG START
LOG START filename
LOG START level_number
The LOG START command is used to activate session logging.
The default filename is EASI.LOG, which would be created in
the local directory. If another filename is supplied in the LOG
START command, it will override the default name. If the log
file already exists when logging is initiated, additional log
entries will be appended to the end of the log file.
If LOG START is given a numeric level number as an
argument, the ‘‘Level of Interest’’ can be modified. The default
level is four.
•
Level 1: Record only user commands.
•
Level 2: Record only messages from the LOG command.
•
Level 3: Record LOG command messages, and all PACE
program executions.
•
Level 4: (the default) Record LOG command messages,
PACE program executions and assignments to parameters.
EASI User’s Guide
167
Commands
LOG STOP
The LOG STOP command is used to terminate logging.
LOG LIST
The LOG LIST command will dump the contents of the
currently active log (or EASI.LOG if logging is not active) to
the terminal.
LOG DELETE
The LOG DELETE command will terminate logging and delete
the current log file. If logging is not active, the file EASI.LOG
will be deleted.
LOG string_expression
The LOG command can be given an arbitrary string expression
as an argument. The contents of the string expression will be
appended to the log file.
Log files record the things that occur in a session in such a way
that the session can be reconstructed to some extent. If the
logfile is renamed as a .EAS procedure, it is possible to run the
file and reinvoke the commands. To some extent new "macros"
can be created by recording user actions.
Other uses of the LOG commands are to record a session for
debugging by PCI or other users and to record progress and
timing for batch operations.
Example:
The following example records a couple of simpled steps into a
.EAS file so that it can be played back later as shown.
log start "MYMACRO.EAS"
file="/pci/demo/irvine.pix"
run cdl
log stop
168
PCI Geomatics
Chapter 8 - EASI Language Reference
run mymacro
MODEL
The MODEL command is used to introduce a block of
commands which are to be applied over an area of a database.
MODEL [ON filespec [OVER window_spec]]
modeling_command_list
ENDMODEL
The filespec may be a database name, or the handle returned by
a previous DBOpen() call. The window_spec specifies a
subwindow of the database to operate on and is given in XOff,
YOff, XSize, YSize format.
The modeling_command_list can be any of a variety of
commands. The most important command that can be applied
in a model is a modeling assignment. This is a normal
assignment (LET) statement, using database channel specifiers
for ‘‘assigned to’’ and ‘‘source’’ values.
If the window specification is not provided, the entire source
database area is operated on. If no database name is provided,
the last database opened with DBOpen() is used. If no databases
are open, the FILE parameter is inspected and used. If this
database cannot be opened, the MODEL command will fail.
It is also possible to enter modeling assignment operations
without the MODEL/ENDMODEL command in some cases.
Any assignment statement for which the ‘‘assigned to’’ value is
a channel, will be considered an implicit model and the usual
rules for a default database of operation will apply.
For example, the following commands will set all of channel 8
of irvine.pix to zero in a manner similar to the CLR PACE task.
FILE="irvine.pix"
EASI User’s Guide
169
Commands
%8 = 0
Modeling can be used for both imagery and raster GIS
applications. The examples presented here have been selected
to show a range of possible applications and to stir the user’s
imagination.
See Also: Modeling Expressions
Arithmetic
Example
Perform a ‘Vegetative Index’ calculation using channels 1 and
2, saving the result to channel 7. If channel 7 is 32 bit real, the
following model is used:
MODEL ON "irvine.pix" OVER dbiw
%7=(%1-%2)/(%1+%2)
ENDMODEL
If channel 7 is 8-bit, some scaling and adjustment is necessary:
MODEL ON "irvine.pix" OVER dbiw
%7=((%1-%2)/(%1+%2))*128 + 127.5
ENDMODEL
Blending
Example
Create an image which smoothly blends channel 1 into channel
2 as we move across the image. The output is placed in channel
7. In this case we want to operate on the whole default database.
The default database in this case is implied by the FILE
parameter. The MODEL command does not have to be
explicitly listed as it is implied by the ‘‘channel variable’’ in
the equation.
FILE = "irvine.pix"
%7 = (@x-1)/@dbx)*%2 + (@dbx-@x)/@dbx*%1
Test Image
Example
170
Create a grey level ramp of 0 to 255 across an image plane.
model on filo
%7 = ((@x-1)*255) / @dbx
endmodel
PCI Geomatics
Chapter 8 - EASI Language Reference
See Also: TIG
Grid
Example
A file is georeferenced in UTM coordinates. As part of the final
processing steps, the user wishes a grid to be superimposed on
the imagery along 1000-metre intervals in both the x and y
directions. The input imagery is an RGB-enhanced image on
channels 1, 2, 3. The output will be to channels 7, 8, and 9.
if (mod(@geox,1000)<=@sizex) or
(mod(@geoy,1000)<=@sizey) then
%7 = 255
%8 = 255
%9 = 255
else
%7 = %1
%8 = %2
%9 = %3
endif
The following model prompts the user for the spacing (in
pixels) for a regular grid as well as for an input and output
channel.
local int spacing, in_chan, out_chan
input "Enter the grid spacing:
" spacing
input "Enter the input channel: "
in_chan
input "Enter the output channel: "
out_chan
if (mod(@x,spacing)=0) or
(mod(@y,spacing)=0) then
%{out_chan} =255
else
%{out_chan} = %{in_chan}
endif
Filtering
Example
Perform a 3x3 smoothing filter on channel 4. Note the use of
backslashes to extend a statement over multiple lines. Also note
that PACE program FAV performs this operation more
efficiently.
EASI User’s Guide
171
Commands
MODEL
%7 = (%4[@x-1,@y-1] + %4[@x,@y-1] +
%4[@x+1,@y-1] +
\
%4[@x-1,@y ] + %4[@x,@y ] +
%4[@x+1,@y ] +
\
%4[@x-1,@y+1] + %4[@x,@y+1] +
%4[@x+1,@y+1] ) / 9
ENDMODEL
When processing pixels on the border of the image, the
neighbourhood of the current pixel will extend off the database.
To ensure that referenced pixels that are off the database (such
as %4[@x-1,@y-1] in the top left corner) are usable the image
values are replicated out from the edge of the database to supply
values that are missing.
See Also: FAV
PRINT
The PRINT command is used to generate output to the user’s
terminal.
P[RINT] expression, expression, ...,
expression
expression - a string, numeric, format,
box or PCILOGO expression
The arguments to the print command are a comma separated list
of numeric expressions, string expressions, or special format
expressions which are evaluated and displayed.
Numeric
Expressions
172
Each numeric expression is evaluated to give a single numeric
value which is displayed in a field of eight characters. The
decimal place is floated to take maximum advantage of the field
size. If the resulting value is an integer, the decimal place will
be dropped.
PCI Geomatics
Chapter 8 - EASI Language Reference
The width of the numeric field can be modified with the
@(RFIELD=n) expression.
String
Expressions
Each string expression is evaluated and displayed with no extra
padding between it and the previous field.
Format
Expressions
The format expression allows you to print data anywhere on the
terminal, quickly and easily clear portions of the screen, and
highlight characters in a number of different ways.
The syntax of this expression is:
@(column,row,command[,command...])
where
•
‘‘column’’ is the terminal column to start printing
•
‘‘row’’ is the terminal row to start printing
•
‘‘command’’ is a format subcommand CLREOS, CLREOL,
BOLD, BLINK, REVERSE, UNDER, ALLOFF or RFIELD.
The cursor position (column,row) is optional. If it is present,
both column and row must be specified. If it is not present, the
current cursor position is used.
Examples:
PRINT@(10,5)
move cursor to
column 10, row 5
PRINT@(1,1,BOLD)
home cursor,
switch bold attribute on
PRINT@(CLREOL)
clear from cursor
to end of line
Cursor
Position
On a standard video terminal, the screen has 24 lines of 80
columns (132 columns on advanced terminals). The print
statement can move the cursor to any of these positions using
EASI User’s Guide
173
Commands
the format expression. (The upper left corner is column 1, row
1). Once the cursor has been moved, all subsequent output will
be after that position. This allows a user to place output
anywhere on the screen. At the end of a print statement, the
cursor is moved to the first column of the next line.
CLREOS
and CLREOL
CLREOS and CLREOL are format expression subcommands
which clear portions of the terminal screen quickly.
CLREOS clears the screen from the current cursor position to
the end of the screen (Note that on some terminals this
command always clears the entire screen). CLREOL clears
from the current cursor position to the end of the current line.
Examples:
PRINT @(1 ,1,CLREOS)
screen
PRINT @(10,5,CLREOL)
from column 10
clear the whole
clear line 5
to the end of
the line
BOLD,
BLINK,
REVERSE,
UNDER,
ALLOFF
The following format subcommands assign attributes to
characters being printed in order to highlight text and diagrams:
BOLD
Brightens printed characters
BLINK
Causes printed characters to
blink on and off
REVERSE
Creates characters on a reverse
background
UNDER
Underlines characters
ALLOFF
Switches off all active
attributes
Any combination of attributes can be used.
Example:
PRINT @(REVERSE),"THIS WILL BE
HIGHLIGHTED",@(ALLOFF)
174
PCI Geomatics
Chapter 8 - EASI Language Reference
Note: Not all attributes are supported on all terminals.
Previously selected terminal options (e.g., cursor type) may
affect the attributes. If an attribute is not supported on the
selected terminal, it will have no effect.
RFIELD
By default, numeric values are printed in fields eight characters
wide. The RFIELD subcommand allows you to specify a field
width of 1 to 40 characters. This is useful for formatting output
or allowing a larger field for more significant digits. The
numeric field width is set back to the default of eight after the
PRINT statement completes. The form of the subcommand is:
@(RFIELD=numexpr)
where ‘‘numexpr’’ is a numeric expression with a value from 0
to 40.
Note
If RFIELD is set to 0, the field width will automatically be altered to
exactly the width required by the printed numeric value.
Examples:
PRINT 1,2,3
yields
1
3
PRINT @(RFIELD=1),1,2,3
yields
123
PRINT @(RFIELD=4),-4.567
yields
4.5
PRINT @(RFIELD=0),1,-2,5.1
yields
1-25.1
2
BOX
-
The BOX expression is used to draw boxes on most terminal
types (it is ignored on other terminal types).
The form of this expression is:
EASI User’s Guide
175
Commands
BOX
(upperleftcol,upperleftrow,lowerrightcol,
lowerrightrow)
Example:
PRINT BOX(1,1,60,5)
draws a rectangle with the upper left corner at column 1, row 1
and the lower right corner at column 60, row 5, using a special
graphics character set.
The BOX expression can be used to draw horizontal lines (a
box on only one row) or vertical lines (a box in only one
column).
BOXCLEAR
The BOXCLEAR expression is used to clear rectangular areas
on most terminal types (it is ignored on other terminal types).
The form of the expression is:
BOXCLEAR(upperleftcol,upperleftrow,lowerr
ightcol,lowerrightrow)
Example:
PRINT BOXCLEAR(5,5,10,15)
clears a rectangle with the upper left corner at column 5, row 5
and the lower right corner at column 10, row 15, using blank
characters.
PCILOGO
The PCILOGO expression is used to write out the PCI company
logo on a CRT screen. The logo is contained in a box 15
columns by 7 rows. The quality of the logo depends on the
terminal type. The form of the expression is:
PCILOGO (upperleftcol,upperleftrow)
176
PCI Geomatics
Chapter 8 - EASI Language Reference
Example:
PRINT PCILOGO (10,5)
prints the PCI logo with its upper left corner at column 10, row
5.
Carriage
The $ character is used to leave the cursor at the end of the
Return
printed line, rather than return it to the beginning of the next
Suppression line. This feature allows INPUT or ASK statements to request
($)
user input starting at any screen position. The $ character must
be the last character in the PRINT statement.
Note
Any output EASI does is always to a new line. Therefore, the $
character cannot be used to hold the cursor to allow subsequent
output to start at the end of current output. The $ character is only
valid if followed by input (i.e., an INPUT or ASK statement) with no
associated prompt. Also note that INPUT and ASK have internal
default error handling and reprompting which may yield
unexpected cursor movement.
Example:
The two procedures shown below may not have the same effect,
since the prompt output by the INPUT statement always starts
at the beginning of a new line.
10 LOCAL $A
20 PRINT @(5,20),"ENTER DATA:
30 INPUT $A
10 LOCAL $A
20 PRINT @(5,20),$
30 INPUT "ENTER DATA:
EASI User’s Guide
",$
" $A
177
Commands
PRINTF
The PRINTF command is an alternative to the PRINT
command that allows format control in the spirit of the C
function printf().
PRINTF format_specifier, arg, arg, ...
The format_specifier can be almost any legal printf() format.
The argument expressions will be evaluated and the result
output according to the format_specifier.
The format_specifier should consist of plain text interspersed
with argument formats. The argument formats consist of a
percent sign ‘%’followed by an argument type which may be
one of ‘d’ for integer, ‘s’ for string and ‘f’ for floating point. In
actual fact almost the entire printf() format syntax is supported,
but will not be described here.
Example:
PRINTF "Hello %s, how is your day?\n",
myname
"Hello Frank, how is your day?"
PRINTF "File %s is %d x %d with %d
channels.\n", file, dbsz(1), dbsz(2), dbnc
"File irvine.pix is 512 x 512 with 11
channels."
A newline specifier ("\n") must be given in the format in order
to force the cursor onto a new line. This is different than the
PRINT statement where a dollar sign ("$") must be appended to
the PRINT statement to suppress the default new line.
REM
REM is an internal remark (comment) statement which is
ignored during execution. The exclamation mark (!) is a an
acceptable synonym for REM.
178
PCI Geomatics
Chapter 8 - EASI Language Reference
REM text
text
- any line of text
RESET
The RESET command forces EASI to reload system values
from the parameter file.
RETURN
The RETURN command returns execution control to the
calling procedure and may optionally take an argument
containing an expression whose value is to be returned to the
caller. Note that only user defined functions can effectively
return a value.
RETURN [expression]
Example:
define function Square( x )
return( x * x )
enddefine
RUN
The RUN command runs a saved procedure file or PACE task.
R[UN] proc ["text"] [ONERROR statement]
proc
- a procedure name or PACE task
"text"
- optional message to pass to
procedure
statement - error condition handler
EASI User’s Guide
179
Commands
SEE
The SEE command shows the current value of the parameter.
DEFINE is used to optionally print the min, max, and defaults.
SEE [parm] [DEFINE]
parm
- one to eight character identifier
Example:
SEE dbiw DEFINE
SHOW
The SHOW command shows the current parameter values
within a specified range.
SHOW parm [max[,min]]
parm
max
min
- name of parameter file entry
- maximum number of values to show
- minimum number of values to show
Min defaults to 0 if not specified; max defaults to the number
of values in the parameter.
STATUS
The STATUS command shows all parameters and their current
values used in controlling a procedure or PACE task. Is is
primarily used interactively.
S[TATUS] task
task
- the name of an EASI procedure or
PACE task
180
PCI Geomatics
Chapter 8 - EASI Language Reference
STATUS_SHOW
The STATUS_SHOW command displays parameters when a
procedure is statused.
STATUS_SHOW parm [max [,min]]
parm
max
required
min
required
- name of a parameter
- maximum number of data values
(expression)
- minimum number of data values
(expression)
This command is placed within EASI procedures to define the
parameters the procedure expects. When a STATUS command
is used on a procedure, a parameter is listed for each
STATUS_SHOW command.
Example:
In the following example the DBIC parameter is displayed. If
there are more or less than three values assigned to the
parameter, a warning will be generated.
status_show dbic 3, 3
See Also: STATUS_TITLE, STATUS
STATUS_TITLE
The STATUS_TITLE command generates a header title when
the procedure is statused.
STATUS_TITLE "text"
"text"
- is name of the task to
appear in the header.
STATUS_TITLE generates a title using ‘‘text’’ as the task
name for the header. If the provided text is "GEOREP", and if
a text parameter named "GEOREP" is defined,
EASI User’s Guide
181
Commands
STATUS_TITLE will be used to add a descriptive message to
the title.
Example:
status_title "georep"
See Also: STATUS_SHOW, STATUS
STOP
The STOP command stops execution and returns control to the
user.
SYSTEM
The SYSTEM command evaluates a string expression and
passes it directly to the host operating system. If the optional
redirection is employed, the results of the operating system
command are assigned to the indicated MSTRING variable
(multi_var).
SYS[TEM] expn [> multi_var]
expn
multi_var
- a string expression
- a variable of type MSTRING
Example:
The following example is specific to Unix. It will collect a list
of names of .pix files in the local directory and run CDL on
them one after the other.
local mstring flist, int i, string dummy
system "ls *.pix" > flist
for i = 1 to F$LEN(flist)
file = flist(i)
run cdl
input "Hit <Enter> to continue:" dummy
endfor
182
PCI Geomatics
Chapter 8 - EASI Language Reference
TRY
The TRY command provides a convenient syntax for trapping
and handling errors within blocks of code. It is typically used in
conjunction with the F$ERRNUM, EASIError, and
ReCastEASIError intrinsics.
TRY
statement_list_1
ONERROR
statement_list_2
ENDONERROR
statement_list_1 - One or more statements.
statement_list_2 - One or more statements
to be executed only if an
error occurs while executing
statement_list_1.
When execution reaches a TRY-ONERROR-ENDONERROR
clause, the statements after TRY will be executed
(statement_list_1). If no error occurs during the execution of
this block of code, then control continues with the next
statement after the entire TRY-ONERROR-ENDONERROR
clause. If, however, an error does occur, then control will
immediately be transferred to the statements after ONERROR
(statement_list_2). After the error-handling has been executed,
control continues with the next statement after the TRYONERROR-ENDONERROR clause.
Example:
Define a simple procedure to compute frequency from period.
It returns a large value if period is zero and raises an error if
some other error is encountered, such as a non-numeric value
for period.
DEFINE FUNCTION freq( period )
local double frequency
local int error
TRY
EASI User’s Guide
183
Commands
frequency = 1 / period
ONERROR
! extract the error
error = F$ERRNUM()
! if the error was divide-by-zero,
then set frequency to a large value
IF ( error = 608 ) THEN
frequency = 1.0e+10
! otherwise, something unexpected
happened, re-cast the error
ELSE
ReCastEASIError()
ENDIF
ENDONERROR
return( frequency )
ENDDEFINE
See Also: F$ERRNUM
UNDEFINE
The UNDEFINE command removes a parameter from the
parameter file.
UNDEFINE parm
parm
- name of a parameter
Example:
undefine file
WHILE
The EASI WHILE command provides a general purpose
looping construct.
WHILE( log_expr )
statement_list
ENDWHILE
log_expr
- a logical expression which
is evaluated before
184
PCI Geomatics
Chapter 8 - EASI Language Reference
each iteration of the loop.
The logical expression in the WHILE statement is evaluated
and if the result is true, the statement list is executed; otherwise,
control skips to the statement following the ENDWHILE. After
the statement list has been executed, control returns to the
WHILE statement to test the logical expression again.
It is possible to jump into, or out of, the WHILE loop using the
GOTO statement, but this is poor style and may not work in
future versions of EASI.
Example:
The following example prompts the user for a yes or no answer
to a question and continues prompting until an acceptable
answer is given.
local string answer
input "Enter <Yes> to proceed or <No> to
abort: " answer
while( answer != "yes" & answer != "no" )
input "Please answer either <Yes> or
<No>: " answer
endwhile
Expressions
An expression represents a single value. It can be a single basic
component, such as a constant, or a combination of basic
components with one or more operators. Operators specify
computations to be performed, using the values of the basic
components to obtain a single value.
EASI User’s Guide
185
Expressions
Numeric
Numeric expression in EASI are normally operated on in
double precision floating point. Values with less precision are
promoted to double precision before operations are performed.
A wide set of built-in operations are available in numeric
expressions. They are listed below accompanied by a short
description.
a + b
a - b
a * b
a / b
a ^ b
( a )
brackets [].
- a
Addition
Subtraction
Multiplication
Division
Exponentiation
Parenthesis, also square
Unary negation
A numeric element can be any of the following:
•
A numeric constant.
•
An EASI variable of type byte, int, float or double.
•
An element of a numeric variable array.
•
A numeric intrinsic function.
•
A numeric user defined function.
•
A subscripted numeric parameter.
Numeric constants can be entered as decimal or scientific
notation numbers with an optional negative sign. Scientific
notation is denoted with the "E" or "D" character as show
below.
Example:
print 1.23e5, 12300, 1.23 * 10 ^ 5
See Also: Intrinsics
186
PCI Geomatics
Chapter 8 - EASI Language Reference
String
String expressions in EASI are performed upon arrays of
characters with a known, but unlimited, length. The only builtin operation supported for string expressions is the
concatenation operation which is denoted with a "+" sign.
String variables can be subscripted to return a string value
consisting of only one character.
A string element can be any of the following:
•
A string constant enclosed in double quotes.
•
An EASI variable of type string.
•
A subscripted EASI variable of type string.
•
A subscripted variable of type mline.
•
A string intrinsic function.
•
A string user defined function.
•
A string parameter
String constants are enclosed in double quotes and may include
additional quotes if they are escaped with back-slashes. String
constants can not span lines and do not require a closing quote
if they are the last item on a line.
Example:
local string s
s = "Hello World"
s = "Hello" + " " + "World"
s = "Hello World
See Also: Intrinsics
Logical
Logical expressions in EASI are used to compute TRUE/
FALSE results for use with the IF and WHILE conditional
EASI User’s Guide
187
Expressions
statements. There is currently no way to store a pure logical
value in an EASI variable. Logical expressions consist of
comparisons between numeric and string expressions combined
with the use of the logical operations AND, OR, and NOT.
The equality and inequality tests may be used with either two
numeric expressions or two string expressions. When
comparing two strings, the shorter is temporarily padded out
with spaces and the comparison is case insensitive. The equal
sign ("=") is used to test for equality, while inequality is tested
with "<>" or "!=".
Examples:
if( name = "Frank" )then
...
if( size != 0 )then
...
while( flag <> 1 )
...
The "~=" operator is a regular expression matching test of
equality for use between strings and tests whether the left side
argument matches the right side regular expression. Note that
the string comparison is case insensitive and length of string
matters. Only ‘‘*’’ (multicharacter wildcard) and ‘‘?’’ (single
character wildcard) operators are supported in the regular
expression matching at this time.
Examples:
if( filename ~= "*.pix" )then
print "Apparently ",filename," is a
PCIDSK file."
endif
The ">", "<", ">=" and "<=" operations may only be performed
on numeric expressions and perform in the expected way.
188
PCI Geomatics
Chapter 8 - EASI Language Reference
Examples:
while( total <= 100 )
while( total < 101 )
while( NOT total > 100 )
while( NOT total >= 101 )
The logical operations AND and OR operate on two logical
expressions, while NOT operates on one logical expression.
The symbols "&", "|" and "!" are considered to be equivalent to
AND, OR, and NOT.
Examples:
if( A = 1 AND B = 1 )then
...
endif
if( A = 1 & b = 1 )then
...
endif
Modelling
Modelling expressions are similar to numeric expressions but
have some special extensions and limitations. The special
extensions include the ability to use channels in the expressions
and a number of special modelling variables.
To understand the limitations of modelling expressions it can
be helpful to realize that modelling expressions are evaluated in
"chunks" over the whole requested region. Each operation in
the expression is done over a chunk, taking zero or more blocks
of image data as input and creating an output block of image
data. This means that modelling expressions cannot generally
be used in place of numeric expressions unless the function
treats modelling values specially.
EASI User’s Guide
189
Expressions
Nevertheless, use of modelling expressions is fairly intuitive
when used in simple assignment (LET) statements.
See Also: Model Command
Channel
Variables
Channels may be specified in a modelling expression using any
of the following forms:
%n
%{ n }
%{ file_spec, n }
[(x_expr, y_expr)]
[(x_expr, y_expr)]
[(x_expr, y_expr)]
The first case is the channel sign (%) followed by literal
numeric value such as 1, 2 or 3, indicating channel 1, 2 or 3 of
the implicit database. The second example is similar, but the
channel number may be a numeric expression that is evaluated
to be the channel number.
The third case is more general yet. The file_spec may be a
database file name or a file handle returned by DBOpen(), and
the channel number is evaluated as an expression. Overriding
the file modifies the database that the channel is assumed to
exist on, but the area of operation is still that indicated in the
MODEL statement, not necessarily that of the override
database.
The following commands are an example of this. The irvine.pix
file is 512x512 and eltoro.pix is 1024x1024. The following
operation copies channel 1 of eltoro.pix to channel 8 of
irvine.pix, but because irvine.pix is the implicit database, the
area of operation is 0, 0, 512, 512 and so only the top left
quarter of eltoro.pix is copied into channel 8 of eltoro.pix.
MODEL ON "irvine.pix"
%8 = %{"/pci/demo/eltoro.pix", 1}
ENDMODEL
190
PCI Geomatics
Chapter 8 - EASI Language Reference
The second part of the channel specification is the subscript
specification which is optional. In the above case, we used the
default subscript specification which x --> x, y --> y. The
subscript specification allows us to indicate what pixel should
be operated on for the current value of X and Y and may be
given as an expression.
The following example is similar to the last, but actually
assigns a sampled copy of eltoro.pix to irvine.pix. The @x and
@y symbols are the current pixel location when the expression
is evaluated for each pixel.
MODEL ON "irvine.pix"
%8 = %{"/pci/demo/eltoro.pix",1}
(@x*2+1,@y*2+1)
ENDMODEL
In the above expression, X and Y vary from 0 to 511 as the
implicit window of operation is 0, 0, 512, 512 ... the area of
irvine.pix. However, channel 1 of eltoro.pix is sampled for
values of 1 to 1023. As @x and @y value from 0 to 511, the
expression @x*2+1 varies from 1 to 1023.
There are limits on the complexity of the subscript expressions.
The MODEL command is implemented in such a way that
"chunks" of the database are operated one at a time and the
subscripts area evaluated only at the corners of each chunk. As
long as the subscript expressions are linear in @x and @y, this
is equivalent, but if non-linear expressions or bi-variate
expressions are used, then the results will not be that which is
expected. These limitations represent an area of research and
they may be relaxed at a latter time.
It is also legal for the subscript expressions to extend of the
source database. In this case image values from the edge of the
database are replicated out as far as is need to satisfy requests.
Thus, a simple filter such as the following will work in a
reasonable manner, even on the edge of the database.
EASI User’s Guide
191
Expressions
MODEL
%7 = (%4[@x-1,@y-1] + %4[@x,@y-1] +
%4[@x+1,@y-1] +
\
%4[@x-1,@y ] + %4[@x,@y ] +
%4[@x+1,@y ] +
\
%4[@x-1,@y+1] + %4[@x,@y+1] +
%4[@x+1,@y+1] ) / 9
ENDMODEL
Bitmap
Variables
Bitmaps, or graphic planes, are a form of one bit deep image
primarily used to serve as masks for regions where operations
are to take place and may be specified in a manner very similar
to image channels. All the rules previously indicated for image
channels also apply to bitmap layers, except that the variables
are prefixed with two percent characters instead of one. Also,
the index number is the segment number (or graphic plane) of
the bitmap layer to be used.
%%n
%%{ n }
%%{ file_spec, n }
[(x_expr, y_expr)]
[(x_expr, y_expr)]
[(x_expr, y_expr)]
Bitmap variables will only assume values of zero or one. Any
non-zero value assigned to a bitmap layer will be treated as one.
Example:
Create a bitmap mask (segment 2) which is true (1) everywhere
channels 1 and 2 are less than 25. Then this mask and the mask
in segment 3 are used to determine a region that should be
zeroed in image channels 1 and 2.
if( %1 < 25 and %2 < 25 )then
%%2 = 1
else
%%2 = 0
endif
if( %%2 = 1 and %%3 = 0 )then
%1 = 0
%2 = 0
endif
192
PCI Geomatics
Chapter 8 - EASI Language Reference
Special
Variables
Special variables allow access to information about the size and
georeferencing information of channels being operated on, as
well as the position of the current pixel.
The following special variables may be treated as elements in
modelling expressions.
@x
current x (pixel) processing
location
@y
current y (line ) processing
location
@dbx
size of database in x (pixel)
direction
@dby
size of database in y (line
) direction
@meterx
size of a pixel in x direction
in metres
@metery
size of a pixel in y direction
in metres
@geox
x georeferenced centre of
current pixel
@geoy
y georeferenced centre of
current pixel
@sizex
x size of a pixel in
georeferenced units
@sizey
y size of a pixel in
georeferenced units
Note that @x, @y, @geox and @geoy change value for each
pixel processed, while @dbx, @dby, @meterx, @metery,
@sizex and @sizey remain constant over the whole image.
It is usually necessary to use the @x and @y special variables
when constructing subscript expressions for channel
expressions. For example, the following assignment would
mirror an image across a vertical centre line. The @dbx is used
in computing the centre line.
%2 = %1[@dbx-@x+1,@y]
EASI User’s Guide
193
Functions
Functions
The following subtopics are classes of intrinsic functions. EASI
functions supply capabilities which make developing
procedures simpler and allow EASI to be used for calculator
operations.
See Also: DEFINE FUNCTION
Calculator
EASI has a number of intrinsic mathematical functions. They
return a numeric value and operate in double precision.
Function Type Description
Argument Result
SIN
N sine
radians
COS
N cosine
radians
TAN
N tangent
radians
ASIN
N inverse sine
note 1 radians
ACOS
N inverse cosine
note 1 radians
ATAN
N inverse tangent
note 1 radians
LN
N natural logarithm
note 2
LOG10
N base 10 logarithm
note 2
F$EXP
N natural exponent
EXP10
N base 10 exponent
RAD
N convert degrees to radians degrees radians
DEG
N convert radians to degrees radians degrees
ABS
N absolute value
INT
N integer part of value
FRAC
N fractional part of value
MOD
N modulus
note 3
FLOOR
N largest integer smaller than
value
CEILING N largest integer larger than
value
ROUND
N nearest integer to value
MIN
N smallest value in list
note 4
MAX
N largest value in list
note 4
•
194
Note 1: magnitude of the argument must not be greater than 1
PCI Geomatics
Chapter 8 - EASI Language Reference
•
•
•
Note 2: argument must be greater than 0
Note 3: compute modulus of first argument relative to second
argument
Note 4: takes any number of arguments from 1 to 128
Examples:
print "Tangent of 45 degrees = ",
TAN(RAD(45))
Previous versions of EASI required all mathematical functions
to be prepended with F$ (i.e., F$TAN). This notation is still
accepted, but not encouraged. All of the functions listed above
will also work in modeling expressions, except for MIN and
MAX.
Core Intrinsic Functions and Classes
EASI’s core intrinsic functions and classes are described in an
Appendix to the Focus online Help. This appendix covers:
Table 5:
EASI User’s Guide
AddGroupIcon()
AddShared()
ChangeProtection()
CloseAllEASIFiles()
CopyFile()
CreateGroup()
DBChanType()
DBChannels()
DBClose()
DBCreate()
DBDelete()
DBExecuteScript()
DBGetBinaryLength()
DBGetChanInfo()
DBHashImage()
DBHashVector()
DBImageHistogram()
DBLines()
DBMouseEventRead()
DBNextSeg()
DBOpen()
DBPixels()
195
Functions
Table 5:
196
DBReadArray()
DBReadBinary()
DBReadChanDesc()
DBReadGeoInfo()
DBReadHistory()
DBReadLUT()
DBReadLine()
DBReadMetaData()
DBReadPCT()
DBSegCreate()
DBSetChanInfo()
DBSync()
DBTransferInfo
DBWriteArray()
DBWriteBinary()
DBWriteChanDesc()
DBWriteGeoInfo()
DBWriteHistory()
DBWriteLUT()
DBWriteLine()
DBWriteMetaData()
DBWritePCT()
DKClose()
DKOpen()
DKRead()
DKSize()
DKTruncate()
DKWrite()
DestroyIdent()
EASIError()
EAlloc()
ECast()
EFree()
ERealloc()
F$ASCII()
F$CHAR()
F$DATE
F$ERRNUM
F$EXTRACT()
F$INPUT
F$LEN()
F$LOWCASE()
F$PARDEF()
F$PARMAX()
F$PARMIN()
F$PARTYP()
F$SECS
F$STRING()
F$TIME
F$UPCASE()
PCI Geomatics
Chapter 8 - EASI Language Reference
Table 5:
EASI User’s Guide
F$VALUE()
F$VERSION
FDDereference()
FDFilename()
FDFlags()
FDReference()
FDReferenceCount()
FDType()
FindSubString()
GetAsyncChar()
GetCWD()
GetDirectory()
GetEnv()
GetFileBasename()
GetFileExtension()
GetFreeDiskSpace()
GetGeoInfoParm()
GetLastErrorMessage()
GetLastErrorNumber()
GetMemory()
GetPID()
GetPathComponents()
GetRegistry()
GetRegistryPCI()
GetStat()
KillTask()
LicenseCheck()
MEMCopy()
MetaData Objects
MkDirectory()
NETLink
NETLinkOpen()
NETPort
NETPortCreate()
NLSLookup()
NLSSetLocale()
NormalizePath()
ProgressCounter()
Random()
ReCastEASIError()
Reproject()
RunTask()
SetCWD()
SetEnv()
SetGeoInfoParm()
SetRegistry()
SetRegistryPCI()
SetupNCPolling()
Sleep()
TEXT$Export()
197
Notes
Table 5:
TEXT$Import()
TEXTClose()
TEXTOpen()
TEXTRead()
TEXTWrite()
TapeClose()
TapeControl()
TapeOpen()
TapeRead()
TapeStatus()
TapeWrite()
TmpNam()
Tokenize()
VECAddField()
VECClearLayer()
VECCreateLayer()
VECCreateShape()
VECGetField()
VECGetFieldCount()
VECGetFieldFormat()
VECGetFieldName()
VECGetFieldType()
VECGetSelection()
VECGetVertices()
VECNextShape()
VECQueryAttribute()
VECQueryNearest()
VECQueryRadius()
VECQueryRect()
VECReadGeoInfo()
VECSetField()
VECSetSelection()
VECSetVertices()
VECTopoConsistencyCheck()
VECWriteGeoInfo()
VarArgs()
This online Help reference is updated periodically, as new
intrinsic functions and classes are added to EASI.
Notes
The following topics contain additional information that may
be useful.
198
PCI Geomatics
Chapter 8 - EASI Language Reference
Statement Syntax
A statement in EASI is the basic unit of operation. A statement
consists of an optional line number, or line label, followed by a
command. Note that line numbers and line labels may not
appear on a line all by themselves, or on lines that are part of a
multi-line statement (such as the ENDIF of an IF construct or
the ENDFOR of a FOR loop). Normally each statement appears
on it’s own line. Blank lines are also legal.
Examples:
run ivi
100 run ivi
user_answered_yes: run ivi
Multiple lines can may be placed on the same line by separating
the statements with a statement separator. The backslash and
semi-colon characters can be used interchangeable for this
purpose. A line of input may be almost any length.
Examples:
file = "/pci/demo/irvine.pix" \ run ivi
file = "/pci/demo/irvine.pix" ; run ivi
It is also possible to split very long statements over multiple
lines by placing a backslash character (but not a semi-colon!) at
the end of each incomplete line.
Example:
this_string = one_long_string +
a_second_long_string + \
another_long_string +
a_really_long_long_string + \
a_short_string
EASI User’s Guide
199
Notes
Startup File
To facilitate the tailoring of the EASI execution environment,
it is possible to read a set of EASI commands from a startup file
each time EASI starts.
On Unix the startup file is named ‘‘.easirc’’ and may appear in
the local directory or the users home directory (as determined
from the HOME environment variable). On VAX/VMS and
OpenVMS systems, the file is named EASIRC.EAS and must
be in the local directory. On Windows, Windows NT, and OS/
2 systems, the file is named EASIRC.EAS and may be in the
local directory or at the top directory of the current disk.
The startup file is run as if it where a normal procedure and may
hold any commands that could be placed in a procedure.
Typically, the startup file is used to establish aliases, but it can
also be used for a number of other purposes.
The startup file is invoked before the initial prompt appears.
See Also: ALIAS
Reserved Words
The following keywords are reserved by EASI and can not be
used as identifiers such as variables names, functions, or types.
An attempt to use these keywords as identifiers will result in a
syntax error.
Table 6:
200
ALIAS
BYE
CASE
CLEAR
DEFINE
DEL
DELETE
DOC
DOC_END
ELSE
ELSEIF
ENDDEFINE
PCI Geomatics
Chapter 8 - EASI Language Reference
Table 6:
EASI User’s Guide
ENDFOR
ENDIF
ENDMODEL
ENDONERROR
ENDPRIVATE
ENDREADONLY
ENDWHILE
EVAL
EXIT
GOTO
H
HELP
IF
KEY
LET
LIST
LOAD
LOG
METHOD
NOERROR
P
PRINT
PRINTF
PRIVATE
PTR
QUIT
READONLY
REM
RETURN
RUN
START
STATUS
STATUS_END
STATUS_S
STATUS_SHOW
STATUS_TITLE
STOP
SYS
SYSTEM
THEN
UNDEFINE
WHILE
201
Notes
202
PCI Geomatics
A
P P E N D I X
Error Message List
A
This appendix lists, in alphabetical order, all the error
messages generated by EASI. These error codes define
classes of errors. Each error will have additional textual
information provided in the error message. EASI will
also print error messages of the form:
E600 Type Mismatch
This error indicates that the incorrect data type was used
when passing an argument to a function or assigning a
value to a variable.
E601 Undefined Identifier
This indicates that a variable, parameter, or function
was used that is not recognized. Check the spelling of
parameters or variables.
E602 Illegal Assignment
This indicates that the target of an assignment (the
“lvalue”) is not legal. Typically this occurs when
assigning to a non-existent variable or to a function.
E603 Can't Find Procedure/Executable
EASI User’s Guide
203
Appendix A
This indicates that the target of a RUN, STATUS or CALL
command could not be found.
E604 Internal Consistency Failure
This error indicates an unexpected internal error. This error
should not occur in response to user mistakes.
E605 Subscript Out Of Range
This occurs when entries in a numeric parameter or array are
accessed that do not exist. Array indices start at 1.
E606 System Error
This occurs when an operating system function fails
unexpectedly.
E607 Syntax Error
This error indicates that the user entered command line or
command procedure could not be parsed. Carefully review the
provided input.
E608 Illegal Argument Value
This normally indicates that an illegal argument value was
passed to an intrinsic function.
E609 Bad File
The requested file was not found or was corrupt.
E610 Task Terminated/Aborted
This error is generated when a PACE task terminates
abnormally. This can occur in response to a user error in
establishing task parameters or if the task is not runable.
204
PCI Geomatics
A
P P E N D I X
System Parameter Definitions
B
This appendix contains procedures used to define
system parameters and error messages for EASI.
EASI System Parameters
10 DOC --- Procedure DEFSYS: EASI
System Parameter Definitions
20 DOC
30 DOC This procedure defines the
required system parameters for
40 DOC EASI/PACE. For
efficiency,these parameters should
be
50 DOC defined at the beginning of
the parameter file, by running
60 DOC this procedure first when
creating a new parameter file.
70 DOC
80 local #min,#max,#out
90 #min = 10000000000000000000000000
100 #max =
10000000000000000000000000
110 #out =
20000000000000000000000000
120 rem
130 DEF MODE
=C,"RUN
","Application Mode: RUN/MENU/STAT"
140 DEF SYSLABEL=C,"EASI/
PACE","System/Site Label"
EASI User’s Guide
205
Appendix B
150 DEF TERMINAL=C,"VT100","Terminal Type:
See EASI Guide"
160 DEF BELL
=C,"OFF","Terminal Bell:
ON/OFF"
170 DEF MISSING =M," MISSING","Missing
Keyword for Status Reports"
180 DEF REPORT =C,"TERM","Report Mode:
TERM/OFF/filename"
190 DEF MONITOR =C,"ON","Program Progress
Monitor: ON/OFF"
200 DEF SYSERROR=N,#min,#max,0,"EASI
System Error Parameter"
210 DEF E_PROMPT=C,"EASI>","EASI Prompt
String"
215 DEF XPACERC =N,0,#max,-1,"Xpace
Configuration"
220 rem
230 rem The following parameters are
required by EX1 & EX2 programs.
240 rem
250 DEF EX1.
=M,"EASI Example Program
1","EASI Program"
260 DEF EX2.
=M,"EASI Example Program
2","EASI Program"
270 DEF FUNCTION=C,"","Function: SQUARE/
ROOT"
280 DEF VECTOR =N,#min,#max,#out,"Vector
of Real Values"
290 DEF POWER =N,#min,#max,#out,"Power to
Raise Values"
206
PCI Geomatics
Index
A
access
data field, 119
alias
command, 137
debug, 151
argument
function, 74
variable list, 78
array
variable, 44
ask
command, 24, 139
B
binary files
as data files, 83
bitmap
variable, 192
bitmap segments
using, 100
box
expression, 175
break
debug, 151
bye
command, 140
C
call
command, 140
case
command, 142
changing
parameter, 11
channel
variable, 190
class
declaration, 118
inheritance, 122
cleanup
object, 125
command
alias, 137
ask, 24, 139
bye, 140
call, 140
case, 142
debug, 148
define, 142
define class, 145
define function, 143
define method, 147
define structure, 144
delete, 154
doc, 155
enhance.eas, 31
eval, 155
for, 156
global, 157
goto, 158
help, 159
import, 161
input, 162
log, 167
model, 98, 169
parameter, 7
print, 12, 23, 172
printf, 178
return, 179
status, 6, 29
status_end, 30
status_show, 30
status_title, 29
comments
inserting, 34
conditional
statement, 60
D
data field
access, 119
data file
definition, 81
data files
binary files, 83
207
Index
text files, 81
database files
using, 86
debug
alias, 151
break, 151
command, 148
declaration
class, 118
default
error, 105
parameter, 28
define
command, 142
define class
command, 145
define function
command, 143
define method
command, 147
define structure
command, 144
defining
parameter, 25
definition
data files, 81
expression, 56
delete
command, 154
displaying
parameter, 12
doc
command, 155
documenting
enhance.eas, 33
dynamic allocation
pointer, 49
E
EASI
help, 8
introduction, 1
OOP, 117
overview, 5
programming, 39
script, 21
system parameters, 205
task, 6
using, 5
enhance.eas
208
command, 31
documenting, 33
script, 35
error
default, 105
handling, 105
information function, 108
message, 203
trap, 106
error casting
function, 110
eval
command, 155
execute
function, 74
expression
box, 175
definition, 56
format, 173
logical, 63, 187
modelling, 189
numeric, 56, 172, 185
string, 57, 173, 187
subscript, 100
F
for
command, 156
format
expression, 173
function
argument, 74
error casting, 110
execute, 74
loading, 74
mathematic, 194
member, 121
user defined, 72
functions
defined, 39
G
geoinfo
type definition, 166
global
command, 157
goto
command, 158
statement, 69
PCI Geomatics
Index
H
N
handling
error, 105
help
command, 159
EASI, 8
procedure, 31
name
variable, 42
notes
reserved words, 200
setup file, 200
syntax, 199
numeric
expression, 56, 172, 185
parameter, 9
I
if
statement, 160
import
command, 161
information function
error, 108
inheritance
class, 122
initialization
object, 124
input
command, 162
parameter, 25
inserting
comments, 34
introduction
EASI, 1
L
loading
function, 74
log
command, 167
record, 15
logical
expression, 63, 187
loop for
statement, 67
M
mathematic
function, 194
member
function, 121
message
error, 203
model
command, 98, 169
modelling
expression, 189
O
object
cleanup, 125
initialization, 124
OOP
EASI, 117
overview, 117
overview
EASI, 5
OOP, 117
P
parameter
changing, 11
commands, 7
default, 28
defining, 25
displaying, 12
enhance.eas, 27
input, 25
numeric, 9
search, 14
set, 13
setting, 11
string, 10
subscribed, 10
pointer
dynamic allocation, 49
print
command, 12, 23, 172
printf
command, 178
procedure
help, 31
run, 14
status report, 29
programming
EASI, 39
projections
209
Index
using, 92
R
record
log, 15
reserved words
notes, 200
return
command, 179
statement, 71
value, 77
run
procedure, 14
S
scope
variable, 52
scope rule
variable, 53
script
EASI, 21
enhance.eas, 35
using, 23
scripts
defined, 39
search
parameter, 14
set
parameter, 13
setting
parameter, 11
setup file
notes, 200
special
variable, 193
special type
variable, 45
special variable
using, 101
statement
conditional, 60
goto, 69
if, 160
loop for, 67
loop while, 66
return, 71
stop, 72
status
command, 6, 29
status report
210
procedure, 29
status_end
command, 30
status_show
command, 30
status_title
command, 29
stop
statement, 72
string
expression, 57, 173, 187
parameter, 10
strings
using, 83
structure
variable, 47
subscribed
parameter, 10
subscript
expression, 100
syntax
notes, 199
system parameters
EASI, 205
T
task
EASI, 6
text files
as data files, 81
trap
error, 106
type
variable, 43
type definition
geoinfo, 166
U
user defined
function, 72
using
bitmap segments, 100
database files, 86
EASI, 5
projections, 92
scripts, 23
special variable, 101
strings, 83
vector data, 95
PCI Geomatics
Index
V
value
return, 77
variable
array, 44
bitmap, 192
channel, 190
declaration, 54
defined, 41
name, 42
scope, 52
scope rule, 53
special, 193
special type, 45
structure, 47
type, 43
variable list
argument, 78
vector data
using, 95
211
Index
212
PCI Geomatics