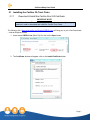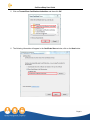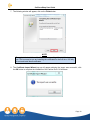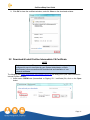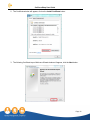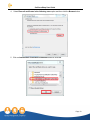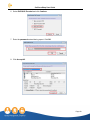
1
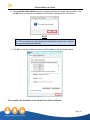
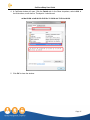
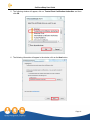
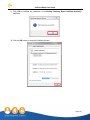
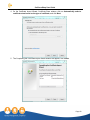
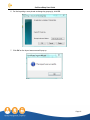
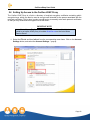
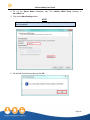
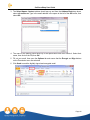
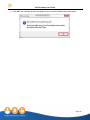
Carillon eShop User’s Guide Prepared by: Version: Updated on: Status: Carillon Information Security, Inc. 3.0 2015-01-29 PUBLIC Carillon eShop User Guide Contents 1 Introduction .................................................................................................. 4 1.1 2 Prerequisites ........................................................................................... 4 1.1.1 Workstation ....................................................................................... 4 1.1.2 Network Environment ......................................................................... 5 HOW-TO: SET UP A CA CERTIFICATE CHAIN (TRUST CHAIN) IN WINDOWS 7 ......... 6 2.1 Installing the Carillon CA Trust Chain .......................................................... 7 2.1.1 2.2 Download & Install Carillon Intermediate CA Certificate ................................ 11 2.2.1 2.3 Download & Install the Carillon Root CA Certificate ................................. 7 Validate the Root Certificate Thumbprint...............................................16 Installing the Boeing Trust Chain ...............................................................18 2.3.1 Download Boeing Certificates ..............................................................18 2.3.2 Install the Boeing Root CA Certificate ...................................................19 2.3.3 Install Boeing Intermediate CA Certificate .............................................24 2.4 Verifying the Trusted Site and Validating the EVSSL .....................................29 3 THE RETRIEVAL PROCESS ..............................................................................33 4 THE ACKNOWLEDGING PROCESS ....................................................................39 5 HOW TO EXPORT ID, SIG, & ENC CERTIFICATES ...............................................42 6 7 5.1 Export ID, SIG & ENC Certificates from Your Personal Store ..........................42 5.2 Deletion of Certificates from Hard Drive ......................................................47 5.3 To Import Certificates ..............................................................................48 5.4 Setting Up Access to the Carillon LDAP Proxy ..............................................52 5.5 Confirming LDAP is Properly Configured ......................................................56 HOW TO USE YOUR CERTIFICATES IN OUTLOOK ...............................................58 6.1 Setting up Outlook to use your Certificates .................................................58 6.2 Signing and Encrypting E-mail ..................................................................63 INSTRUCTIONS FOR LOTUS NOTES USERS .......................................................66 7.1 Download the Carillon Trust Chain: ............................................................66 7.2 Downloading & Installing Personal Certificates .............................................66 7.3 LDAP Proxy Setup ...................................................................................66 7.4 Enable Certificates in Lotus Notes ..............................................................67 Page 2 Carillon eShop User Guide 8 FREQUENTLY ASKED QUESTIONS ....................................................................71 9 NETWORK ADMINISTRATOR TROUBLESHOOTING ..............................................73 9.1 10 Test link to the Carillon LDAP Proxy ...........................................................73 CUSTOMER SERVICE ..................................................................................76 Page 3 Carillon eShop User Guide 1 Introduction This document serves as a guide to assist you through the various steps that need to be performed using the Carillon eShop Interface: from downloading the Carillon CA Certificate Chain (Trust Chain), retrieving and acknowledging your certificates, through to setting up Outlook in order to be able to use these certificates on your computer or laptop. 1.1 Prerequisites In order to successfully acquire your Certificates, you need to ensure the following prerequisites are met with regards to your workstation and the network environment you will be operating on: 1.1.1 Workstation Windows 7 Internet Explorer 8.0 or higher – for security reasons we recommend that SSLv2 and SSLv3 be disabled. Java 1.7 or higher (32-bit version) – it is recommended that you have the latest version of Java installed That the Carillon Trust Chain, including the Carillon Root CA and the Carillon Signing CA Certificates are installed. These must be installed either by a workstation administrator, or Active Directory administrator to the appropriate Trust Stores. Instructions to download can be found in Section 2 of THIS document. That the user who will be provisioned with Certificates has the ability to generate keys and install certificates into their personal trust store. That the “CARILLON.CA” domain is allowed to send emails to the users to be provisioned with certificates without having any URLs in the emails being modified, replaced, or otherwise altered. This may involve whitelisting the CARILLON.CA domain in your email filtering software or provider. This is required to ensure that users can interact with the Certification Authority in a secure manner. Should the users be using provisioned certificates for encrypted email, the following will need to be ensured in the user environment: o Each user must be able to access dir.carillon.ca on port TCP 389, and be able to communicate using the LDAP protocol. Please ask your Carillon Sales representative about our enterprise Certificate Discovery Service if this is not desirable in your environment. Page 4 Carillon eShop User Guide o That emails that are encrypted using S/MIME be configured to not be filtered, disallowed, or blocked when passing through your organisations mail filtering and content scanning systems or services. That there are no network proxies that interfere with Client/Server mutual TLS authentication between any of the following URLs o https://pub.carillon.ca/ o https://certstore.carillon.ca/ o https://www/carillon.ca/ This includes any TLS/SSL firewall or inspection products that involve technology that “man in the middle” TLS sessions for the purposes of content scanning. If such products are used, the above URLs must be white listed to pass through such devices without any interference or interception. That the Java applet is not prohibited from running in “Secure” mode (i.e.: is able to perform security sensitive operations, and is able to interact with the smartcard and Microsoft Cryptographic Application layer. That the user’s computer is synchronized to a timesource that ensures that the system clock is no more than 20 seconds out of alignment with ”true” time in that users timezone or GMT. That there be no Javascript blockers, popup blockers or other content filters at the user’s browser that would interfere with the operation of the CertServ or other Carillon provided or hosted applications. 1.1.2 Network Environment Many corporate computer networks enforce something called Group Policy Objects (GPOs) which set rules on any workstation that is connected to the enterprise Active Directory systems. We cannot recommend that GPOs not be enforced, however be aware that some of these network “rules” may prevent you from successfully connecting to the provisioning system (CertServ), or prevent you from properly retrieving and installing the certificates onto your smartcard. It is recommended that your network administration and security teams be engaged and to have testing for the various functionalities required by CertServ added to the desktop management quality assurance process to ensure that no network or Active Directory changes prevent CertServ from correctly and securely enabling Certificate Provisioning to the user population. Ideally you will need open access to the internet. PLEASE NOTE: The instructions in this handbook are typical guidelines of how to download and install CA certificates on your system. There may be some variance between what is presented here, and what your own system will display. Please be aware that you may require Administrator rights to perform these actions. If you do not have Administrator rights on your workstation, seek assistance of your System Administrator to help with this setup. Page 5 Carillon eShop User Guide 2 HOW-TO: SET UP A CA CERTIFICATE CHAIN (TRUST CHAIN) IN WINDOWS 7 This section describes the steps for installing the Carillon Trust Chain and the Boeing Trust Chain on a Windows 7 computer or laptop. We refer to the Carillon CA and Boeing Trust Chains as our principle examples because these are the ones we use for Carillon CA issued certificates purchased from our Carillon eShop. Installing the appropriate Trust Chain certificates on your computer or laptop ensures that your personal certificates will then be correctly installed, recognized and trusted by your applications, such as your web browser or email client. You will need to first download the Carillon Trust Chain certificates. These trust chain certificates are required in order to validate the certificates that will be purchased from the Carillon Certificate eShop. The Carillon Trust Chain is comprised of the following two certificates: The https://pub.carillon.ca/CAcerts/CISRCA1.cer (Root Certificate); and The Carillon PKI Services CA 1 https://pub.carillon.ca/CAcerts/CISCA1.cer (Intermediate or Signing Certificate). These certificates can also be downloaded directly from the Carillon PKI public repository website: https://pub.carillon.ca/ by clicking on the DER button for each certificate. If you are using these certificates as part of the Boeing supply chain, you need to download the Boeing Trust Chain certificates. The Boeing Trust Chain certificates are required for secure email communication between Boeing and its partners. The Boeing Trust Chain is comprised of the following two certificates: The Boeing Root CA certificate (The Boeing Company Root Certificate Authority.crt); and The Boeing Secure Messaging G2 certificate (Boeing Secure Messaging G2.crt) These certificates can be downloaded individually from the Boeing PKI public repository website: http://www.boeing.com/crl/ Page 6 Carillon eShop User Guide 2.1 Installing the Carillon CA Trust Chain 2.1.1 Download & Install the Carillon Root CA Certificate IMPORTANT NOTE: Lotus Notes Users: Please note that you must have Administrator rights on your machine in order to download and Install the Carillon Trust Chain. The following link: https://pub.carillon.ca/CAcerts/CISRCA1.cer will bring you to your View Downloads – Internet Explorer window. 1. Under name CISRCA1.cer (Root CA) file; click on the Open button. 2. The Certificate window will appear; click on the Install Certificate button. Page 7 Carillon eShop User Guide 3. The following Certificate Import Wizard window will appear, click the Next button. 4. Select the Place all certificates in the following store option and then click the Browse button. Page 8 Carillon eShop User Guide 5. Click on Trusted Root Certification Authorities and then click OK. 6. The following information will appear in the Certificate Store window, click on the Next button. Page 9 Carillon eShop User Guide 7. The following window will appear, click on the Finish button. NOTE: Throughout the installation of the Trust Chain, you will get Security Warning popups. This is normal as you are installing the certificates for the first time. It is okay to trust and install these certificates. 8. The Certificate Import Wizard pop-up will appear advising the Import was successful; click the OK button to complete the installation of the Carillon Root CA Certificate. Page 10 Carillon eShop User Guide 9. Click OK to close the certificate windows, and click Close on the downloads window. 2.2 Download & Install Carillon Intermediate CA Certificate NOTE For Lotus notes users: Please ensure that the trust chain has been properly configured for use in Lotus Notes by your System Administrator or Notes Administrator before proceeding with the download and installation of your personal certificates. The following link: https://pub.carillon.ca/CAcerts/CISCA1.cer will bring you to your View Downloads – Internet Explorer window. 1. Under name CISCA1.cer (Intermediate or Signing CA 1 certificate) file; click on the Open button. Page 11 Carillon eShop User Guide 2. The Certificate window will appear; click on the Install Certificate button. 3. The following Certificate Import Welcome Wizard window will appear, click the Next button. Page 12 Carillon eShop User Guide 4. Select Place all certificates in the following store option and then click the Browse button. 5. Click on Intermediate Certification Authorities and then click OK. Page 13 Carillon eShop User Guide 6. The following information will appear in the window, click on the Next button. 7. The following window will appear, click on the Finish button. Page 14 Carillon eShop User Guide 8. The Certificate Import Wizard pop-up will appear advising the Import was successful; click the OK button to complete the installation of the Carillon Intermediate CA 1 Certificate. NOTE: Throughout the installation of the Trust Chain, you will get Security Warning popups. This is normal as you are installing the certificates for the first time. It is okay to trust and install these certificates. 9. Click OK to close the certificate windows, and click Close on the downloads window. This completes the installation of the Carillon Trust Chain Certificates. Page 15 Carillon eShop User Guide 2.2.1 Validate the Root Certificate Thumbprint 1. Click on the Start icon: 2. Type in the Search programs and files box: certmgr.msc and press enter. 3. The certmgr window will appear. Click Trusted Root Certification Authorities, then click Certificates. On the right panel, locate and double-click the CISRCA1 certificate. Page 16 Carillon eShop User Guide 4. A Certificate window will open. Click the Details tab. In the Show: dropdown, select <All> In the field column, scroll down to Thumbprint. It should read: a6 9e 03 36 c4 e5 90 23 ff 65 3c 71 f9 28 eb 73 f2 1c 00 f0. 5. Click OK to close the window. Page 17 Carillon eShop User Guide 2.3 Installing the Boeing Trust Chain 2.3.1 Download Boeing Certificates 1. Visit the Boeing website at the following address: http://www.boeing.com/crl/ 2. Under the Authority Information heading, download the Boeing Secure Messaging G2.crt by right-clicking on the link, then in the pop-down menu select the Save target as… to save the file. 3. Select a directory on your computer to save the file to and click the Save button. 4. Repeat steps 2 and 3 for the downloading of The Boeing Company Root Certificate Authority.crt and then close your browser. You have now successfully downloaded the Boeing Trust Chain Certificates. Page 18 Carillon eShop User Guide 2.3.2 Install the Boeing Root CA Certificate 1. Go to the folder where the Boeing Certificates were downloaded. Double-click on The Boeing Company Root Certificate Authority certificate and the following window will appear, click on the Open button: 2. Click on the Install Certificate button. Page 19 Carillon eShop User Guide 3. The following Certificate Import Wizard window will appear, click on the Next button. 4. Select the Place all certificates in the following store option and the click the Browse button. Page 20 Carillon eShop User Guide 5. The following window will appear, click on Trusted Root Certification Authorities and then click OK. 6. The following information will appear in the window, click on the Next button. Page 21 Carillon eShop User Guide 7. The following window will appear, click on the Finish button: 8. The following window may appear, click on the Yes button. NOTE: Throughout the installation of the Trust Chain, you will get Security Warning pop-ups. This is normal, as you are installing the certificates for the first time. It is okay to trust and install these certificates. Page 22 Carillon eShop User Guide 9. Click OK to complete the installation of the Boeing Company Root Certificate Authority certificate. 10. Click the OK button to close the Certificate window. Page 23 Carillon eShop User Guide 2.3.3 Install Boeing Intermediate CA Certificate 1. Go to the folder where the Boeing Certificates were downloaded. Double-click on the Boeing Secure Messaging G2 certificate and the following window will appear, click on the Open button: 2. Click on the Install Certificate button. Page 24 Carillon eShop User Guide 3. The following Certificate Import Wizard window will appear, click on the Next button. 4. Select on the Place all certificates in the following store and then click the Browse button. Page 25 Carillon eShop User Guide 5. Click on Intermediate Certification Authorities and then click on the OK button. 6. The following information will appear in the window, click on the Next button. Page 26 Carillon eShop User Guide 7. The following window will appear, click on the Finish button: NOTE: Throughout the installation of the Trust Chain, you may have Security Warning popups. This is normal, as you are installing the certificates for the first time. It is okay to trust and install these certificates. Page 27 Carillon eShop User Guide 8. Click OK to complete the installation of the Boeing Secure Message G2 Certificate 9. Click the OK button to close the certificate window. This completes the installation of the Boeing Trust Chain. Close all remaining windows. Page 28 Carillon eShop User Guide 2.4 Verifying the Trusted Site and Validating the EVSSL To verify if: https://pub.carillon.ca/; https://www.carillon.ca and http://certstore.carillon.ca are trusted sites on your computer: 1. On the web browser menu click on the Tools menu and select Internet Options. In the Internet Options window, select the Security tab. 2. Click on the Trusted Sites check mark then click on the Sites button. Page 29 Carillon eShop User Guide 3. If in the box of Websites you do not see the above addresses; you will have to click on the Add button and add them and then click Close button. 4. On the Internet Options pop-up, click on the Advanced tab. Page 30 Carillon eShop User Guide 5. In the Settings window, scroll down to Security and make sure Use SSL 2.0 and Use SSL 3.0 are unchecked, and ensure that all the Use TLS options are checked, and then click the OK button. 6. In the address bar, type https://pub.carillon.ca/ and press Enter. There will be a lock icon as in the following screenshot. Click the lock and click the View certificates button. Page 31 Carillon eShop User Guide 7. Click the Certification Path tab, which shows pub.carillon.ca in the Certification path. The Certificate status should read: This certificate is OK. Page 32 Carillon eShop User Guide 3 THE RETRIEVAL PROCESS NOTE For Lotus Notes users: Please ensure that the trust chain has been properly Configured for use in Lotus Notes by your System Administrator or Notes Administrator before proceeding with the download and installation of your personal certificates. 1. You will receive a Certificate Issuance email (similar to the one below) with instructions, a link to pick up your certificates and an access code. Sample email: Page 33 Carillon eShop User Guide 2. Click on the link mentioned in the email; it will bring you to the following Certificate Services page. Enter your email address and click on the Submit button. 3. Enter the Access Code from the email and click on the Log In and Retrieve Certificates button: Page 34 Carillon eShop User Guide 4. Click on the Pick up your certificates button. 5. Click Yes: Page 35 Carillon eShop User Guide 6. Your browser will be checked, then click on the Continue button. 7. Read and confirm the Terms of Service and place a check in the I hereby accept the terms of service box and then click Continue. Page 36 Carillon eShop User Guide 8. Click Yes: 9. The following screen will appear, click on the Continue button. 10. The generating certificates screen will appear. Page 37 Carillon eShop User Guide 11. You will have to Click Yes a few times: 12. Your certificates have now been retrieved and installed. You must RESTART YOUR BROWSER before acknowledging them. Page 38 Carillon eShop User Guide 4 THE ACKNOWLEDGING PROCESS You will receive two emails: a Certificate Acknowledgement Instructions email and an Encryption Acknowledgement Code email. 1. OPEN the Certificate Acknowledgement Instructions email to acknowledge your certificates; then click on the link which will bring you to a Windows Security page. 2. Select your ID certificate with the Issuer: CIS and then click OK. Page 39 Carillon eShop User Guide 3. The following window will appear. Click on the I acknowledge button to acknowledge your Signature Certificate. 4. Enter your Acknowledgement Code from your Encryption Acknowledgement Code email and click on the I acknowledge button. Page 40 Carillon eShop User Guide 5. Your certificates have now been acknowledged. 6. Click on the Return to main Page option from the menu bar on the right; you will now see serial numbers beside your issued certificates. Page 41 Carillon eShop User Guide 5 HOW TO EXPORT ID, SIG, & ENC CERTIFICATES NOTE: Lotus Notes users will need to perform steps 6.1 Export ID, SIG & ENC Certificates from Your Personal Store INDIVIDUALLY and 8.4 Enable Certificates in Lotus Notes BEFORE acknowledging their certificates. Failure to do so will make acknowledgment emails unreadable. 5.1 Export ID, SIG & ENC Certificates from Your Personal Store 1. Click on the Start icon: 2. Type in the search box: certmgr.msc and press enter; the certmgr – Certificates screen will appear. 3. Under: Personal > Certificates highlight the three certificates you want to export; right click on them, then click on All Tasks and click on Export. Page 42 Carillon eShop User Guide 4. The Certificate Export Wizard will appear; click Next. 5. On the Export Private Key screen; click on Yes, export the private key. Click Next. Page 43 Carillon eShop User Guide 6. The Export File Format screen will appear; ensure that the Personal Information Exchange – PKCS #12(.PFX) button is highlighted; click Next. 7. On the Password Screen; create a password and retype it; then click Next. Page 44 Carillon eShop User Guide 8. The File to Export screen will appear showing the file name to export; click Browse. 9. The Save As window will appear; name the file and then save it to wherever you want i.e.: desktop and then click Save. Page 45 Carillon eShop User Guide 10. The Certificate Export Wizard window will appear; click Finish. 11. On the Exporting your private exchange key pop-up; click OK. Page 46 Carillon eShop User Guide 12. On the Certificate Export Wizard pop-up advising the export was successful; click OK. 5.2 Deletion of Certificates from Hard Drive Any files containing your private key should be kept on removable media only. When first exporting your certificates, copy them to a local drive that is not accessible to a network. Import your certificates into applications as necessary, then remove them and any related files from your machine after you're done! It is important to remember that all certificates exported from your web browser onto your computer be DELETED. Failure to do so will put the security of your certificates and keys at risk. Also ensure that once the certificates have been deleted that your recycling bin (or trash) has been emptied. Page 47 Carillon eShop User Guide 5.3 To Import Certificates 1. Double click on certificate file you saved and the Certificate Import Wizard screen will appear; click Next. Page 48 Carillon eShop User Guide 2. On the Certificate Import Wizard; File to Import screen; click Next. 3. On the Certificate Import Wizard, Password screen; enter the Password you created during export. Make sure that you check off all three boxes; especially “Mark this key as exportable”. This will allow you to back up or transport your keys at a later time. Click Next. Page 49 Carillon eShop User Guide 4. On the Certificate Import Wizard, Certificate Store window; click on Automatically select a certificate store based on the type of certificate; and click Next. 5. The Completing the Certificate Import Wizard window will appear; click Finish. Page 50 Carillon eShop User Guide 6. On the Importing a new private exchange key pop-up(s); click OK. 7. Click OK on the Import was successful pop-up. Page 51 Carillon eShop User Guide 5.4 Setting Up Access to the Carillon LDAP Proxy The Carillon LDAP Proxy is a link to a directory of recipient encryption certificates containing public encryption keys, which can then be used to encrypt email intended for the person associated with the retrieved certificates. This is done in order to avoid having to manually enter each person’s certificates so that you may send/receive encrypted e-mail with them. IMPORTANT NOTE: Lotus Notes Users: The System Administrator or Lotus Notes Administrator needs to set up the LDAP proxy to include dir.carillon.ca on the Lotus Notes Domino Server. 1. Select the File tab and then Info tab from the corresponding menu items. Click on the Account Settings button, and select the Account Settings… pop-up. Page 52 Carillon eShop User Guide 2. In the Accounts Settings window, select the Address Books tab and click on the New… button. 3. Make sure the Internet Directory Service (LDAP) option is selected and click the Next button. Page 53 Carillon eShop User Guide 4. Fill out the Server Name information only. The Carillon LDAP Proxy directory is dir.carillon.ca. 5. Click on the More Settings button. NOTE: Do not select “This server requires me to log on”. User Name and Password are not required. 6. On the Add E-mail Account pop-up click OK. Page 54 Carillon eShop User Guide 7. In the Microsoft LDAP Directory window ensure that dir.carillon.ca is the Display Name and that the Connection Details Port is set to 389; then click OK or Apply as necessary. 8. Click the Finish button. 9. Click the Close Button. 10. You will need to RESTART Microsoft Outlook for the email account changes to take effect. You have now completed setting up the Carillon LDAP Proxy Page 55 Carillon eShop User Guide 5.5 Confirming LDAP is Properly Configured To confirm that the changes have been applied, open Outlook and select the File tab and Info tab from the corresponding menu items. 1. Click on the Account Settings button and select the Account Settings… pop-up. In the Accounts Settings window, select the Address Books tab. Page 56 Carillon eShop User Guide 2. Your directory should appear in the list on this page. 3. Double click on dir.carillon.ca 4. Click on More Settings 5. Verify that dir.carillon.ca is the Display Name and that the Port is 389, click OK. 6. Click the Close button to close the window. You have now verified that you have access to the Carillon LDAP Proxy Page 57 Carillon eShop User Guide 6 HOW TO USE YOUR CERTIFICATES IN OUTLOOK This section gives step by step instructions on how to set up and use Secure Email (S/MIME) with your email client and how to properly import the certificates into the Microsoft Office Outlook 2010 email management tool. These instructions will guide you on how to set up your email account to use these certificates, as well as set up your email client to use the Carillon LDAP Proxy so that you can look up and find other users with whom you may wish to exchange secure email. To ensure these certificates are properly recognized and trusted by your email client, be sure to install the associated Trust Chain certificates on your computer or laptop before proceeding. 6.1 Setting up Outlook to use your Certificates 1. Start Outlook. 2. Select the File tab and then select Options. Page 58 Carillon eShop User Guide 3. In the Outlook Options window, select Trust Center from the side menu, and then select the Trust Center Settings… button. 4. In the Trust Center window, under the E-mail Security tab, click the Settings button. Page 59 Carillon eShop User Guide 5. In the Change Security Settings window, under Security Settings Name, enter a name for your security setting (this would be a name you designate to your certificates). Under the Certificates and Algorithms section, setup your Signing certificate by clicking on Choose. 6. On the Windows Security window, select the signature certificate you wish to use (if you have more than one) and click the OK button. Page 60 Carillon eShop User Guide 7. For the Hash Algorithm, select SHA1. 8. Setup your Encryption Certificate by clicking on Choose. Page 61 Carillon eShop User Guide 9. On the Windows Security window, select the encryption certificate you wish to use (if you have more than one) and click the OK button. 10. For the Hash Algorithm, select AES (256-bit). 11. Click the OK button to complete your Personal Certificate setup. You have now finished setting up your Personal Certificates for use in Outlook. Page 62 Carillon eShop User Guide 6.2 Signing and Encrypting E-mail The reasons for digitally signing and encrypting a document are simple: It ensures that the document was actually sent by YOU. It ensures that the document wasn’t modified in route. Additionally, the reason for encrypting an email is that it ensures that no one else can read your message. To proceed: 1. Open Outlook, and select New E-mail on the Home tab. 2. Click on the To…. Page 63 Carillon eShop User Guide 3. The Select Names: Contact window should pop up and from the Address Book drop down, select: dir.carillon.ca. Type in the email address in the space to the left of the GO button; then select GO. 4. The name of the person should show up in the space below with ENC beside it. Select their name, then click on the TO, then OK. 5. Fill out your email, then open the Options tab and ensure that the Encrypt and Sign buttons on the Permission menu are selected. 6. Click Send to send the digitally signed and encrypted email. Page 64 Carillon eShop User Guide Delivered messages display the signing icon, encryption icon, or both, depending on the options you selected. You have now successfully sent a signed and encrypted email. NOTE: If you are using Windows Vista or Windows 7, recipients of your emails may not be able to read your encrypted messages if they are using an older email client. To fix this problem, follow the steps below: 1. From the File menu, select Options, then click the Trust Center tab, Trust Center button. 2. Under the Encrypted email header, click the Setting button. Under the Certificates and Algorithms section, from the Encryption Algorithm drop-down menu, select 3DES. 3. Click OK, and then click OK again. Page 65 Carillon eShop User Guide 7 INSTRUCTIONS FOR LOTUS NOTES USERS 7.1 Download the Carillon Trust Chain: Lotus Notes users need to determine whether the Carillon Trust Chain needs to be installed on the Lotus Notes Domino Server. To accomplish this; using the following links for the root and signing certificates, download and install the Carillon Trust Chain: https://pub.carillon.ca/CAcerts/CISRCA1.cer (Root CA) and https://pub.carillon.ca/CAcerts/CISCA1.cer (Intermediate or Signing CA). Please notify your System Administrator or Lotus Notes Administrator if the Carillon Trust Chain must be installed on the Lotus Notes Domino Server. 7.2 Downloading & Installing Personal Certificates The indicated way in this Guide for downloading, retrieving and installing certificates is the same for Lotus Notes users; although Lotus Notes users may need Administrator rights on their machine. 7.3 LDAP Proxy Setup The System Administrator or Lotus Notes Administrator may need to set up the LDAP proxy to include dir.carillon.ca on the Lotus Notes Domino Server. The method for configuring Lotus Notes with the LDAP proxy may differ from the outlined instructions provided. Be sure to contact your Lotus Notes Administrator should you require assistance to set this up on your system. Page 66 Carillon eShop User Guide 7.4 Enable Certificates in Lotus Notes These instructions are general guidelines only and may differ from the Lotus Notes currently deployed at your organization. Should you encounter inconsistencies, consult with your Lotus Notes Administrator. 1. Select File > Security > User Security. 2. On the left-hand panel expand Your Identity. Select Your Certificates. Page 67 Carillon eShop User Guide 3. On the right-hand side select Get Certificates > Import Internet Certificates. 4. Navigate to your PKCS#12 file which you either downloaded or exported from your browser. 5. Select and Open your PKCS#12 file. Page 68 Carillon eShop User Guide 6. Select PKCS#12 Encoded and click Continue. 7. Enter the password entered during export. Click OK. 8. Click Accept All. Page 69 Carillon eShop User Guide 9. Click OK. The certificate should now appear in your Internet Certificate drop down menu. Page 70 Carillon eShop User Guide 8 FREQUENTLY ASKED QUESTIONS Q: Why do you ask for Date of Birth and Place of Birth when applying to purchase certificates? A: These are used for the creation of your certificates. They are unique markers that will allow the system to differentiate between two people with the same name. Ex: John Doe born on 10/10/1970 in Austin Texas as compared to John Doe born on 15/09/1991 in Burlington, VT. Q: I do not have Java installed on my workstation – is it necessary? A: Yes, Java is a requirement for you to be able to retrieve and acknowledge your certificates, as well as perform other functions through the Carillon eShop or the Carillon CA Provisioning System. Q: How do I use this certificate in Thunderbird? A: Please download and read (from the Carillon e-Shop website) the How To guide for information on using your certificate in Thunderbird. Q: I tried to retrieve my certificates but I got an error instead. What went wrong? A: It is absolutely necessary to have downloaded and installed the Carillon CA Trust Chain on your workstation BEFORE attempting to retrieve your Carillon CA-issued certificates. The presence of the Trust Chain allows for a path to the Carillon Certificate Authority (CA) to be made so that it can digitally sign the certificates you are requesting. Q: I get "unable to validate" errors with these certificates - what should I do? A: Please ensure that the CISRCA1.cer (Root CA) certificate is configured as a trust anchor in your application, or installed in the Trusted Root Store of certificates. If you have already attempted to validate your certificates before the trust anchor was installed, you will need to contact us to cancel your current certificate request and have new certificates requested. Q: My computer was rebuilt and I lost my certificate. Can I get it back? A: The certificate you use to access the Carillon Provisioning System and sign/encrypt emails is stored on your personal computer. Carillon does not have a copy. If your computer is rebuilt, and you do not have a backup copy of your certificate, you will need to request a new one. You may want to store a backup copy of your Carillon- issued certificates in a secure location such as a password protected USB key kept in a secure location (such as a safe or a locked drawer). Page 71 Carillon eShop User Guide Q: I have a certificate, but am unable to access the Carillon Provisioning System. A: Make sure you are using the same browser that you created your certificate with. You cannot create a certificate in Internet Explorer and then use Mozilla Firefox to access the Carillon Provisioning System without first transferring the certificate into Mozilla Firefox. Check your browser to be sure that it supports 256-bit encryption. If it does not, you will need to upgrade your browser. Also, verify that SSL 2.0 and SSL 3.0 are disabled, and ensure that Use TLS 1.0, 1.1 and 1.2 are enabled through Tools > Internet Options > Advanced tab. Q: Why can I receive encrypted e-mails but I cannot send encrypted e-mails? A: There may be a problem with how your LDAP proxy was configured on your Workstation. Using Outlook: Check under Account Settings > Address books, verify that the LDAP is setup and pointing to dir.carillon.ca. Under Name: double click on the directory: dir.carillon.ca. Click on the More Settings button to verify that port 389 is selected. If in the Connection Details box the port setting is not correct, you should change it to 389. If the configuration is properly setup as described, then there may be some firewall policies in place on the network, and you will need to resolve those issues with your company’s Network Administrators. Page 72 Carillon eShop User Guide 9 NETWORK ADMINISTRATOR TROUBLESHOOTING This section is to assist Network Administrators in diagnosing certain common problems that may occur after setting up the certificates on your system. References are made to tools that the Network Administrator will have at their disposal in order to perform these tasks. 9.1 Test link to the Carillon LDAP Proxy 1. To test your configuration to the Carillon LDAP Proxy, click the Start Menu button , and in the Search programs and files field type cmd and press the [Enter] key to open the Windows Command Prompt. 2. The following window will appear; type the command: ping dir.carillon.ca Page 73 Carillon eShop User Guide 3. If you were successful in connecting to the directory, you should have 0% lost packets, receiving the following output: 4. If no connection was established (100% packet loss), try again. 5. Telnet to port 389 – if you get a connected message, the firewall from your organization will let the traffic through. If you get a connection denied message, please open your company firewall to allow traffic on TCP 389 to dir.carillon.ca. 6. To ensure that you can, in fact, lookup certificates, open the shell and make sure you are in the directory with OpenLDAP (or equivalent tool) in order to do an “ldapsearch”. 7. Then type this command: ldapsearch -xh dir.carillon.ca [email protected] Where [email protected] is the email address of the certificates you are looking for. If the search was successful, you should see a user Certificate entry returned (a giant block of text (certificate) should be displayed.) This means the email is correct. If you're still unable to send the person email, it is likely due to their certificate being expired or revoked. Page 74 Carillon eShop User Guide If the search was not successful, the following output will be returned. This means that this email address is not in the certificate directory. Contact the owner of the email address and make sure the email address you typed in is correct. If the email address is spelled correctly, the owner does not hold a certificate and should not be communicated with. NOTE: You CANNOT use a directory browser to verify connectivity. The directory is configured to answer specific queries for user Certificate entries by people knowing email addresses, and to not allow for browsing. This is to ensure confidentiality. Page 75 Carillon eShop User Guide 10 CUSTOMER SERVICE Should you require assistance at any time, please feel free to contact us and we will be happy to assist you: Carillon Information Security Inc., Customer Service Group 9:00AM-5:00PM Eastern Telephone: 1-514-485-0789 Email: [email protected] Page 76