1
PASS
Pilot Anthropometric Screening System
User Guide
Version
Version 1.0
1.0
RCAF
RCAF Edition
Edition
VisImage Systems Inc.
7676 Woodbine Ave. • Markham, ON, L3R 2N2 • Canada
Phone +1-905-946-0000 • Fax 905-946-1060 • www.vis.ca
PASS USER GUIDE
END USER LICENSE AGREEMENT
Important: this End User License Agreement
("EULA") is a legal agreement between you
(either an individual or, if purchased or
otherwise acquired by or for an entity, an
entity) and VisImage. Read it carefully before
completing the installation and using the
System. It provides a license to use the system
and contains warranty information and liability
disclaimers. By acquiring and using the system,
you are agreeing to become bound by the
terms of this agreement. If you do not agree to
be bound by these terms, then do not install or
use the system.
DEFINITIONS
"VisImage" or means VisImage Systems
Incorporated and its licensors, if any.
"System" means the Hardware and Software
that comprise BoSS-21, supplied by
VisImage,
and
corresponding
documentation, media, printed materials,
and online or electronic documentation, and
all updates or upgrades of the above that
are provided to you.
LICENSE GRANTS
1. You may use the Software only on a single
desktop or laptop computer that was
provided by VisImage. A license for the
Software may not be shared, installed or
used concurrently on different computers.
2. You agree that VisImage may audit your use
of the Software for compliance with these
terms at any time, upon reasonable notice.
In the event that such audit reveals any use
of the Software by you other than in full
compliance with the terms of this
Agreement, you shall reimburse VisImage
for all reasonable expenses related to such
audit in addition to any other liabilities you
may incur as a result of such noncompliance.
LICENSE RESTRICTIONS
1. You may not use the Software on any device
that was not supplied by VisImage.
2. You may not make or distribute copies of
the Hardware or Software, or electronically
transfer the Software from one computer to
another or over a network.
3. You may not alter, merge, modify, adapt or
translate the System, or decompile, reverse
engineer, disassemble, or otherwise reduce
the System to a human-perceivable form.
4. You may not sell, rent, lease, or sublicense
the System without explicit authorization
from VisImage.
5. You may not modify the System or create
derivative works based upon the System, or
replace any parts unless specifically
authorized by VisImage to do so.
6. In the event that you fail to comply with this
EULA, VisImage may terminate the license
and you must return the System to VisImage
(with all other rights of both parties and all
other provisions of this EULA surviving any
such termination).
7. You shall not use the System to develop any
software or other technology having the
same primary function as the System,
including but not limited to using the System
in any development or test procedure that
seeks to develop like hardware, software, or
other technology, or to determine if such
hardware, software, or other technology
performs in a similar manner as the System.
OWNERSHIP
The foregoing license gives you limited license
to use the System. VisImage and its suppliers
retain all right, title and interest, including all
copyright and intellectual property rights, in
and to, the System and all copies thereof. All
rights not specifically granted in this EULA,
i
PASS USER GUIDE
including Federal and International Copyrights,
are reserved by VisImage and its suppliers.
WARRANTY DISCLAIMER
1. The software is provided to you free of
charge, and on an "as-is" basis. VisImage
provides no technical support, warranties or
remedies for the software.
2. VisImage and its suppliers disclaim all
warranties and representations, whether
express, implied, or otherwise, including the
warranties of merchantability or fitness for a
particular purpose. Also, there is no
warranty of non-infringement and title or
quiet enjoyment. VisImage does not warrant
that the system is error-free or will operate
without interruption. No rights or remedies
will be conferred on you unless expressly
granted herein. The system is not designed,
intended or licensed for use in hazardous
environments.
VisImage
specifically
disclaims any express or implied warranty of
fitness for such purposes.
3. If applicable law requires any warranties
with respect to the system, all such
warranties are limited in duration to ninety
(90) days from the date of delivery.
4. No oral or written information or advice
given by VisImage, its dealers, distributors,
agents or employees shall create a warranty
or in any way increase the scope of any
warranty provided herein.
5. VisImage shall have no responsibility if the
system has been altered in any way, or for
any failure that arises out of use of the
system other than that recommended in the
User Guide.
interruption or the like), arising out of the
use of, or inability to use, the system and
based on any theory of liability including
breach of contract, breach of warranty, tort
(including negligence), product liability or
otherwise, even if VisImage or its
representatives have been advised of the
possibility of such damages and even if a
remedy set forth herein is found to have
failed of its essential purpose.
2. VisImage’s total liability to you for actual
damages for any cause whatsoever will be
limited to the amount paid by you for the
software that caused such damage.
3. The foregoing limitations on liability are
intended to apply to all aspects of this EULA.
BASIS OF BARGAIN
The Warranty Disclaimer and Limited Liability
set forth above are fundamental elements of
the basis of the agreement between VisImage
and you. VisImage would not be able to provide
the System on an economic basis without such
limitations. Such Warranty Disclaimer and
Limited Liability inure to the benefit of
VisImage’s licensors.
The limitations or exclusions of warranties and
liability contained in this EULA do not affect or
prejudice the statutory rights of a consumer,
i.e., a person acquiring goods otherwise than in
the course of a business.
The limitations or exclusions of warranties,
remedies or liability contained in this EULA shall
apply to you only to the extent such limitations
or exclusions are permitted under the laws of
the jurisdiction where you are located.
THIRD PARTY HARDWARE AND SOFTWARE
LIMITATION OF LIABILITY
1. Neither VisImage nor its suppliers shall be
liable to you or any third party for any
indirect, special, incidental, punitive, cover
or consequential damages (including, but
not limited to, damages for the inability to
use equipment or access data, loss of
business, loss of profits, business
The System may contain third party hardware
or software which requires notices and/or
additional terms and conditions. Such required
third party hardware or software notices
and/or additional terms and conditions are
included with the System and are made a part
of and incorporated by reference into this
EULA. By accepting this EULA, you are also
ii
PASS USER GUIDE
accepting the additional terms and conditions,
if any, set forth therein.
GENERAL
This EULA shall be governed by the internal
laws of Ontario, Canada, without giving effect
to principles of conflict of laws. You hereby
consent to the exclusive jurisdiction and venue
of the courts sitting in Toronto, Ontario to
resolve any disputes arising under this EULA. In
each case this EULA shall be construed and
enforced without regard to the United Nations
Convention on the International Sale of Goods.
may not remove or alter any trademark, trade
names, product names, logo, copyright or other
proprietary notices, legends, symbols or labels
in the System. This EULA does not authorize
you to use VisImage’s or its licensors' names or
any of their respective trademarks.
This EULA contains the complete agreement
between the parties with respect to the subject
matter hereof, and supersedes all prior or
contemporaneous
agreements
or
understandings, whether oral or written. You
agree that any varying or additional terms
contained in any purchase order or other
written notification or document issued by you
in relation to the System licensed hereunder
shall be of no effect. The failure or delay of
VisImage to exercise any of its rights under this
EULA or upon any breach of this EULA shall not
be deemed a waiver of those rights or of the
breach.
No VisImage dealer, agent or employee is
authorized to make any amendment to this
EULA.
If any provision of this EULA shall be held by a
court of competent jurisdiction to be contrary
to law that provision will be enforced to the
maximum extent permissible and the remaining
provisions of this EULA will remain in full force
and effect.
All questions concerning this EULA shall be
directed to: VisImage Systems Inc. 14 – 7676
Woodbine Ave., Markham, ON. L3R-2N2
Canada.
VisImage and other trademarks contained in
the System are trademarks or registered
trademarks of VisImage Systems Incorporated
in Canada and/or other countries. Third party
trademarks, trade names, product names and
logos may be the trademarks or registered
trademarks of their respective owners. You
iii
PASS USER GUIDE
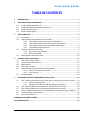
TABLE OF CONTENTS
1
INTRODUCTION .................................................................................................................1
2
PASS INSTALLATION AND REMOVAL ..................................................................................2
2.1
2.2
2.3
2.4
3
PASS OPERATIONS .............................................................................................................3
3.1
3.2
3.3
3.4
4
Launch PASS ....................................................................................................................... 3
Input Anthropometric Measurements to PASS .................................................................. 3
3.2.1
Load a Measurement Record from a MS Excel File ........................................ 3
3.2.2
Load a Measurement Record from a PASS Database File .............................. 5
3.2.3
Load a Measurement Record from Boss Database File .................................. 6
3.2.4
Input Measurements Manually ...................................................................... 6
Compute and Analyze the Result. ...................................................................................... 6
3.3.1
Aircraft Summary Window ............................................................................. 7
3.3.2
Bivarplot Window ......................................................................................... 10
Starting PASS Inside BoSS Combo .................................................................................... 10
ADVANCED PASS OPERATIONS......................................................................................... 11
4.1
4.2
4.3
4.4
4.5
4.6
5
Install DotNetFrameworks 2.0............................................................................................ 2
Install MCR (Matlab Component Runtime) 7.9 .................................................................. 2
Install PASS1.0 Program ..................................................................................................... 2
Remove PASS program ....................................................................................................... 2
Clear Anthro Values Button .............................................................................................. 11
Compute/Store Results Button ........................................................................................ 12
Report Button ................................................................................................................... 12
Auto Report Printing......................................................................................................... 14
Admin Functions For PASS Advanced User/Designer ...................................................... 14
4.5.1 Unlock The Functions Protection .................................................................. 15
4.5.2 Train Aircrafts ................................................................................................ 16
Run Batch Mode ............................................................................................................... 19
ADD/MODIFY AIRCRAFT SCREENING CRITERIA IN PASS ..................................................... 21
5.1
5.2
5.3
5.4
5.5
5.6
Case 1: When No Individual Factor Thresholds or Inequality Constraints Are Used ....... 23
5.1.1 Setting up the Main Tab ................................................................................ 23
5.1.2 Setting up the Additional Tabs Containing Training Data ............................. 26
Case 2: When Additional Anthropometric Threshold Values are Used ........................... 28
Case 3: When Additional Linear Programming Inequalities are Used ............................. 30
Case 4: Using Both Anthropometric Thresholds & Linear Programming Inequalities ..... 31
Troubleshooting: Common Errors .................................................................................... 34
Summary/Conclusion ....................................................................................................... 35
ACRONYMS AND ABBREVIATIONS............................................................................................ 36
CUSTOMER SUPPORT .............................................................................................................. 37
iv
PASS USER GUIDE
TABLE OF FIGURES
FIGURE 1: PASS INSTALLATION FOLDER SELECTION ........................................................................... 2
FIGURE 2: PASS MAIN GUI AND BIVARPLOT WINDOW ...................................................................... 3
FIGURE 3: LOAD A RECORD FROM MS EXCEL FILES ............................................................................ 4
FIGURE 4: SELECT A MS EXCEL FILE ...................................................ERROR! BOOKMARK NOT DEFINED.
FIGURE 5: PILOT MEASUREMENTS IDS. ...............................................ERROR! BOOKMARK NOT DEFINED.
FIGURE 6: LOAD A RECORD FROM A PASS DATABASE FILE .................................................................. 5
FIGURE 7: PILOT IDS IN PASS DATABASE ........................................................................................ 6
FIGURE 8 : LOAD A RECORD FROM BOSS DATABASE FILE .................................................................... 6
FIGURE 9: AIRCRAFT SUMMARY WINDOW ....................................................................................... 7
FIGURE 10: UP/DOWN ADJUSTABLE SEAT POSITION ......................................................................... 8
FIGURE 11: DETAILS ON A SEAT POSITION ........................................................................................ 8
FIGURE 12: FORWARD/BACKWARD ADJUSTABLE SEAT POSITION ......................................................... 9
FIGURE 13: UP/DOWN + FORWARD/BACKWARD ADJUSTABLE SEAT POSITION ....................................... 9
FIGURE 14: NON-ADJUSTABLE SEAT POSITION ................................................................................. 9
FIGURE 15: BIVARPLOT WINDOW WITH THE CURRENT RECORD......................................................... 10
FIGURE 16: CLEAR ANTHO VALUE BUTTON .................................................................................... 11
FIGURE 17: COMPUTE/STORE RESULTS BUTTON ............................................................................. 12
FIGURE 18: A PASS REPORT FOR A PILOT ...................................................................................... 13
FIGURE 19: AUTO REPORT PRINTING SELECTION ............................................................................. 14
FIGURE 20: UNLOCK ADMIN FUNCTIONS ....................................................................................... 15
FIGURE 21: PASSWORD FOR UNLOCK ADMIN FUNCTIONS ................................................................. 15
FIGURE 22: TRAIN AIRCRAFT USING DFA ...................................................................................... 16
FIGURE 23: SELECT AIRCRAFT ...................................................................................................... 17
FIGURE 24: ONLY THE LATEST TRAINING AIRCRAFTS ARE HIGHLIGHTED ................................................ 17
FIGURE 25: TRAINING ALL AIRCRAFTS SELECTION ............................................................................ 18
FIGURE 26: THE PROGRESS BAR IN THE TRAINING PROCESS ............................................................... 19
FIGURE 27: RUN BATCH MODE TO COMPUTE ALL THE PILOT IN AN MS EXCEL FILE............................... 19
FIGURE 28: SELECTION WINDOW FOR THE OUTPUT......................................................................... 20
FIGURE 29: BATCH CALCULATION RESULT ...................................................................................... 20
FIGURE 30: MULTI-TABBED MS EXCEL WORKSHEET ........................................................................ 22
FIGURE 31: DETAILED INFORMATION IS SHOWN AS COMMENT IN EXCEL FILE ....................................... 23
FIGURE 32: ADDITIONAL TABS CONTAINING TRAINING DATA ............................................................. 26
FIGURE 33: ADDING THRESHOLDS TO ANTHROPOMETRIC FACTORS ..................................................... 28
FIGURE 34: SPECIFYING THRESHOLD VALUES FOR INDIVIDUAL FACTORS/ACTION ITEMS .......................... 29
FIGURE 35: ADDING LINEAR PROGRAMMING INEQUALITY CONSTRAINTS (MAIN TAB) ............................ 30
FIGURE 36: SPECIFYING INEQUALITY AND THRESHOLD CONSTRAINTS FOR INDIVIDUAL FACTOR/ACTIONS .... 31
FIGURE 37: ADDING THRESHOLD AND LINEAR PROGRAMMING INEQUALITY CONSTRAINTS ....................... 32
FIGURE 38: SPECIFYING INEQUALITY CONSTRAINTS FOR INDIVIDUAL FACTOR/ACTION ITEM .................... 33
v
PASS USER GUIDE
1. INTRODUCTION
PASS (Pilot Anthropometrical Screening System) is a patented technology1 owned by Canadian
Government and implemented by VisImage Systems Inc.
PASS is a method and system for determining a subject’s suitability for workstations such as
aircraft cockpits, based on the subject’s anthropometric measurements. The subject’s
measurements are used as input to a workspace accommodation model that predicts an
individual’s ability to perform the tasks that are judged to be critical to the safe operation of
said workspace.
The workspace accommodation model is derived from experimentation and testing to
determine the critical anthropometric measurements which will allow a subject ti acceptably
accomplish the tasks required for the workspace. Further the model is modular and adaptable
such that it can improve the accuracy of its predictions with new cases, and thus learn over
time.
PASS 1.0 has been implemented in such a way that it is integrated with the automatic body
sizing system – BoSS-21—AutoPASS. AutoPASS makes it easy to determine a subject’s
suitability for workstation. PASS RCAF (Royal Canadian Air Force) Edition contains most aircraft
cockpits models used in RCAF.
PASS 1.0 is the first implementation of the PASS technology. Not all the desirable features are
implemented in this version, such as on-line help and password modification. Your valuable
feedback and suggestions are welcome.
A Word About Passwords
Depending on the environment in which you use your PASS system, you may be more or less
concerned about the security of your system and the privacy of your data.
In some environments it is very important to separate different functionality, and to restrict
these tasks to different people by using passwords. In other environments these distinctions
are irrelevant and you may find the password requirements intrusive.
The default password for “Unlock admin Functions” is “2468”. The password for modify the
air plane model files in aircraft_input folder is “VisImage”
1
US patent No. US2010/0179918A1, Pilot Anthropometric Screening System
1
PASS USER GUIDE
2. PASS INSTALLATION AND REMOVAL
This section describes the procedures to install and remove PASS software.
2.1 INSTALL DotNetFrameworks 2.0
Install DotNetFrameworks 2.0 version provided by Microsoft. DotNetFrameworks is free to
download from the Microsoft website.
2.2 INSTALL MCR (MATLAB COMPONENT RUNTIME) 7.9
Matlab MCR 7.9 is a free library. You can download it from the Matlab website.
2.3 INSTALL PASS 1.0 PROGRAM
Install PASS software is easy, there’s no difference between PASS installation and any
other standard windows application.
a. Double click the setup.exe in the folder PASS Setup.
b. Select the installation folder and click Next button.
Figure 1: PASS Installation Folder Selection
c. Click button [Close] when Installation is done.
2.4 REMOVE PASS PROGRAM
Go to <Control Panel>, double click <Add or Remove Programs> icon and Select PASS1.0 to
remove.
2
PASS USER GUIDE
3. PASS OPERATIONS
3.1 LAUNCH PASS
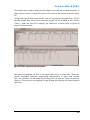
Upon the execution of PASS program, two main PASS operation windows appear on
computer screen: a “Pass” window and a “Bivarplot” window as shown in figure 1 below.
Figure 2: PASS Main GUI and Bivarplot Window
The “Pass” window displays a set of anthropometric measurement for a given pilot. The
“Bivarplot” window displays a distribution of seated-height and thigh-length according to
the anthropometric survey from Canadian Forces in 1997.
To predict if a pilot is suitable to an aircraft, a set of anthropometrical measurements from
this individual need to be input to PASS as displayed. When the required anthropometrical
measurements are presented to PASS, press Compute/Store results button will invoke the
Aircraft Summary window as shown in Figure 9.
3.2 INPUT ANTHROPOMETRIC MEASUREMENTS TO PASS
There are four methods for PASS to input the anthropometrical measurements of a pilot
and each of them will be described in detail in this section.
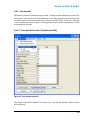
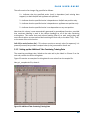
3.2.1 Load a Measurement Record from a MS Excel File
There are several ways to load record to PASS program. You can load from the excel file,
you can load from PASS Database or you can load from the BoSS Combo Database.
3
PASS USER GUIDE
Figure 3: Load a Record from MS Excel Files
Select the file that
contains
the
anthropometric
data to open.
This function will
display a list of
record
IDs,
corresponding to a
set
of
anthropometric
measures of a
pilot.
Figure 4: Select a MS excel file
4
PASS USER GUIDE
Select one ID and click OK to load. The record ID and
measurement values will show on the Pass window.
3.2.2 Load a Measurement Record from a Pass
Database File
A measurement record can be loaded from the PASS
Database. Go to menu [Database Link] [Retrieve
Anthro record]
Figure 5: Pilot Measurement IDs
Figure 6: Load a Record from a PASS Database File
5
PASS USER GUIDE
Select one an ID and click Process button to input the anthropometric measurement into
PASS.
Figure 8: Pilot IDs in PASS Database
Figure 7 : Load a Record from BoSS Database File
3.2.3 Load a Measurement Record from BoSS Database File
Pass can retrieve BoSS records directly. When PASS reads the list of Ids in BoSS Database,
it will automatically remove the ids that already exist in the PASS database from the list.
To retrieve the record from the BoSS Combo database you need click the [Get new
records] button in the main user interface. Then like the other 2 functions, just select a ID
from the list to load.
3.2.4 Input Measurements Manually
Anthropometric measurement for an individual can be entered into PASS using on-screen
interface and keyboard directly.
3.3 COMPUTE AND ANALYZE THE RESULT.
Once the anthropometrical measurements are loaded, PASS can compute and check if this
pilot can operate certain aircraft. The result will be displayed and save.
To make the computation on the current record, click the button [Compute/Store results].
PASS will pop up aircraft summary window and bivarplot window.
6
PASS USER GUIDE
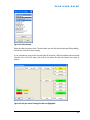
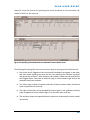
3.3.1 Aircraft Summary Window
The Aircraft summary window, as shown in Figure 9, displays the summary of the result on
checking if a pilot can operator certain aircraft, as shown in the figure below. The color
background surrounding an aircraft name indicates the result.
Red represents Fail for that aircraft, Green represents pass and Yellow represents
Borderline.
Figure 9: Aircraft Summary Window
The aircraft summary window shows which aircraft could be operated by this subject from
the anthropometric point of view. The green means <Pass>, Yellow means <Borderline>,
Red means <Fail> and Grey means <No Data>. <No Data> happens only if the specific
aircraft module has not been trained.
A seat position summary window is available by click on the button for each aircraft. In
PASS, aircraft seats are divided into 4 different types. They are:
a. Up/down adjustable seat
b. Forward/backward adjustable seat
7
PASS USER GUIDE
c. Up/down + Forward/backward adjustable seat
d. Non-adjustable seat
Each seat type and the corresponding position summary is described in the following s To
look into specific aircraft seat position summary, click the button with the correspondent
aircraft name.
a. Up/Down Adjustable Seat
If the seat can only be moved up and down, Seat position summary window (figure 10) will
only display up and down position as shown below.
Figure 10: Up/Down Adjustable Seat Position
Further details for each seat position can be
retrieved and displayed by click a colored button
in the seat position summary window as shown in
figure 11.
Figure 11: Details on a Seat Position
8
PASS USER GUIDE
b. Forward/Backward Adjustable Seat
Figure 12: Forward/Backward Adjustable Seat Position
c. Up/Down + Forward/Backward Adjustable Seat
Figure 13: Up/Down + Forward/Backward Adjustable Seat Position
d. Non-Adjustable Seat
For non-adjustable seat, PASS will display confidence result for the actions directly.
Figure 14: Non-Adjustable Seat Position
9
PASS USER GUIDE
3.3.2 Bivarplot Window
Figure 15: Bivarplot Window With The Current Record
Bivarplot window shows the Seated Height and Thigh length coordinates distribution.The
small rectangle black square shows current record point. The red-color crosses represent
the Female distribution and the blue-color crosses represent the male distribution.
3.4 STARTING PASS INSIDE BOSS COMBO
PASS application can be invoked within BoSS XXI2 upon the completion of automatically
measurement on a pilot. In such a case, the anthropometrical measurements obtained by
BoSS will be automatically input into PASS and the Aircraft Summary report will be
generated in the PASS report folder. (the default folder is Program Files/VisImage Systems
Inc/PASS 1.0/reports.
2
For the instruction to start PASS within BoSS XXI, please refer to BoSS Combo v2.0 UserGuide
10
PASS USER GUIDE
4. ADVANCED PASS OPERATIONS
4.1 CLEAR ANTHRO VALUES BUTTON
Figure 16: Clear Antho Value Button
Click this button to clear all the anthro measurements values in the Pass window.
11
PASS USER GUIDE
4.2 COMPUTE/STORE RESULTS BUTTON
Figure 17: Compute/Store Results Button
Compute/Store results button calculates the current record in the PASS and store it in the
PASS Database. It’s very necessary to use this button to compute and save each time after
you manually modified measurement values in the main window.
4.3 REPORT BUTTON
Report button generates the PASS report for the current record. The report file is in the
MS word format and it’s compatible with Microsoft Word 2000 and Microsoft Word 2003.
The report file will overwrite/replace the old one when generating the new one if old one
exists.
During this process, you will see the aircraft summary window (Figure 9) pops up or
updates if it’s already opened.
12
PASS USER GUIDE
The aircraft summary window disappears after the report is saved and a message pops up
shows “Report is saved in C:\Program files\VisImage Systems Inc\Pass
1.0\reports\Pilot_Report_1.doc!” Then you can go to this folder and open the report.
Report is saved as MS word document. It’s compatible with MS Word 2000 and MS Word
2003 format.
The report contains aircraft summary window (a snapshot of bivarplot window), table of
measurements and bivarplot chart (a snapshot of the bivarplot window).
Figure 18: A PASS Report for a Pilot
13
PASS USER GUIDE
The VCR (Vision, Clearance and Reach) result is for the best seat position for
correspondent aircraft. And also the Green or Red highlighted background for the weight
decision. The background weight color is green if within the weight range, or red if out of
the weight range.
4.4 AUTO REPORT PRINTING
Figure 19: Auto Report Printing Selection
Check this option to have report printed right after you finish processing the record.
4.5 ADMIN FUNCTIONS FOR PASS ADVANCED USER/DESIGNER
The admin functions are protected by Password to prevent unsafe or unexpected changes.
Admin functions generate the train data which is used for the DFA functions to predict
results. These functions include Train/Retrain DFA, Train All and Run Batch Mode.
14
PASS USER GUIDE
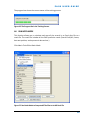
4.5.1 Unlock the Functions Protection
Figure 20: Unlock Admin Functions
Click Admin ToolsUnlock Admin Functions.
Figure 21: Password for Unlock Admin Functions
Input password 2468 and click OK to unlock the admin functions. If the Admin functions are
unlocked, the admin functions menu will be enabled.
15
PASS USER GUIDE
4.5.2 Train aircrafts
PASS Admin functions include training aircrafts. Training aircrafts backup the current DFA
binary result, take the excel aircraft module file as the input, generate the new binary DFA
train data, save it to hard drive and use it as the current DFA result. There are 2 methods
to train the DFA data. One of them is Training all the aircrafts at one time, the other is only
training specific aircrafts.
4.5.2.1 Train Specific Aircrafts (Train/Retrain DFA)
Figure 22: Train Aircraft Using DFA
Click Admin ToolsTrain/Retrain DFA menu item. You will see Window [Select aircraft
file(s)] pops up.
16
PASS USER GUIDE
Figure 23: Select Aircraft
Select aircrafts you want to train. To multi-select, you can click the aircraft excel file by holding
the Crtl key. Press OK to start training.
If you trained only some of the aircrafts (Not All aircrafts), PASS will update these involved
aircrafts info in the DFA binary file and all the other aircrafts will remain the same as
before.
Figure 24: Only the Latest Training Aircrafts are Highlighted
17
PASS USER GUIDE
To make the retrained aircrafts have some special with the others, PASS only displays
colors for the latest trained aircrafts and also PASS only output these latest trained
aircrafts to the batch file. In this case we trained aircraft “Griffon”, “Aurora” and
“Challenger”, so only these 3 aircrafts have color identified by the aircraft summary
window.
4.5.2.2 Train All Aircrafts (Train All)
This function allows you train all the aircraft in one time. PASS will use all the aircraft excel
files in the installation folder\aircraft input.
Figure 25: Training All Aircrafts Selection
18
PASS USER GUIDE
The progress bar shows the current status of the training process.
Figure 26: The Progress Bar in the Training Process
4.6 RUN BATCH MODE
This function allows you to calculate and save all the records in an Excel pilot file to a
result file. The result file includes all the PASS prediction result (Overall Pass/fail, factors,
best seat position, anthropometric data and etc.)
Click Admin ToolsRun Batch Mode
Figure 27: Run Batch Mode to Compute All The Pilot In An MS Excel File
19
PASS USER GUIDE
Select an Excel pilot file and designate the output file name.
Figure 28: Selection Window For The Output
There are only 3 aircrafts in this batch result file, because we only trained these 3 aircrafts
previously.
Figure 29: Batch Calculation Result
20
PASS USER GUIDE
5. ADD/MODIFY AIRCRAFT SCREENING
CRITERIA IN PASS
This chapter introduces how to edit aircraft (cockpit) model files. These operations are
very serious and may affect PASS prediction results.
Upon installation of the software suite, (accomplished easily by running the install
program), several sample files are included that can be used for this tutorial, or as
templates for adding additional aircraft. These files are installed in a sub-directory named
tutorial of the root installation directory chosen at the time of installation.
The files used in this exercise (found in the tutorial folder) are:
1.
New_air_template.xls – Sample template for adding new aircraft using DFA only.
2.
New_air_template2.xls – Sample template for new aircraft using DFA and individual
factor thresholds.
3.
New_air_template3.xls – Sample template for new aircraft using DFA and linear
regression (inequality) constraints.
4.
New_air_template4.xls – Sample template for new aircraft using DFA, factor thresholds
and linear regression (inequality) constraints.
These files may be used to train the PASS tool (for testing purposes only), appearing as the
‘Primary Trainer’ aircraft. Note that the tutorial files do not contain real training data for
that aircraft, but are supplied for documentation and training purposes only.
Detailed Guide / Specifications for Adding / Modifying Aircraft Model Files
for PASS
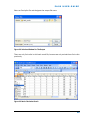
For each aircraft there is one multi-tabbed MS Excel Worksheet that contains all of the
DFA training data, anthropometric factors, critical actions (reaches, vision, clearances),
and seat position dependency.
This file may also contain optional threshold constraints (maximum and minimum
anthropometric dimensions), and/or optional linear regression inequality constraints.
These files are stored as Excel spreadsheets located in the aircraft_input sub-directory of
the root installation directory. These input files are implemented in the program’s
prediction database through a training command found on the Administrator menu of the
data_entry graphical interface.
To ensure successful program operation, precise construction of these aircraft model files
is needed.
21
PASS USER GUIDE
The simplest way to add or modify aircraft model is to modify the provided templates, or
adapt another aircraft’s training file similar to the new one with respect to factors, limits,
etc.
To begin the tutorial, please open the file “new_air_template.xls” using MS Excel. This file
contains sample data used in this guide (the sample can be installed as the ‘Primary
Trainer’). When the Excel file is opened, you should see a screen similar to Figure 30
(shown split horizontally).
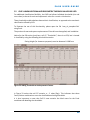
Figure 30: Multi-Tabbed MS Excel Worksheet
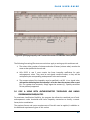
Note the small diagonal red lines in the upper right corner of some cells. These cells
contain embedded comments summarizing characteristics of those (and related)
cells. The comments can be viewed by pointing to the cell with the cursor, as shown in
Figure 31. They may also be displayed by right clicking and selecting the Show Comment
command.
22
PASS USER GUIDE
Figure 31: Detailed Information Is Shown As Comment in Excel File
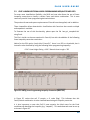
Note, as shown in Figure 31, that the Excel file has multiple worksheet tabs.
There are four possible cases to consider in setting up the training files
5.1 CASE 1: WHEN NO INDIVIDUAL FACTOR THRESHOLDS OR INEQUALITY
CONSTRAINTS ARE USED
5.1.1 Setting up the Main Tab
The first tab ‘main’ contains a summary of all the factors (anthro variables), actions
(reaches, etc.) and their relationships (or dependencies).
The main tab also defines the display labels for all of the items, and contains links to the
training data tab labels (each other tab contains training data for individual Actions, one
per tab).
Finally, this page also may contain a link to the special constraints (if present), allowing
absolute minimum and maximum thresholds for anthropometric measurements, and/or
linear programming inequality constraints.
Below is a detailed summary of the required cells in the main worksheet tab; these should
be modified as needed for new aircraft:
Cell A1 (e.g. “Primary Trainer”) – Contains a string with the name of the aircraft. It must
precisely match one of the names shown in the Aircraft Summary (see Figure 1).
23
PASS USER GUIDE
Cell A2 (e.g. “Actions”) – Descriptive heading only, should have no effect on analysis. Can
be changed, must be a string (not number). Recommend leaving to default vale.
Cells A3 (e.g. “Reach1-R”) – This column defines the display title of each relevant critical
reach, clearance or vision action for the given aircraft.
The length of the list is variable, depending on the aircraft. These alphanumeric titles are
displayed in the graphics summary of the predict program, and are also contained in the
report from the batch mode of the program.
The actions can be classified using DFA, thresholds, and/or linear programming
inequalities. Note that the last character can indicate if the action is related to reach ‘-R’,
vision ‘-V’, or clearance ‘-C’. (e.g. ‘R’ in this case for Reach). These are used in the seat
position display to show the source of predicted failing actions.
Cells B2 ... P2 (e.g. “Stature”, etc.) – This row defines the display titles of the
anthropometric factors (human dimensional measurements) that are used to predict the
success/failure of the listed actions. The display titles may be changed/modified as
needed; however, adding additional anthropometric functions requires source code
modification. Unlike the action labels, that are unique for each aircraft, these
anthropometric variables must be identical for all aircraft.
The actual assignment or dependency of each action to each anthropometric factor takes
place in three ways:
1.
By providing matched training data on a worksheet tab linked to a particular row or
action.
2.
By providing a flag indicating the factors that each action (or row) is dependent upon
(see below).
3.
By providing a flag indicating which seat movements are also modeled for each action,
such as (up/down, fwd/aft, both, or none) (also see below).
The column order of these factors is on the main tab, and their related relative position in
the training data must be consistent. Thus, columns in the training data must appear in a
fixed order from left to right, as described later in this document.
Renaming anthropometric variables is possible, though care must be used to ensure that
the names are consistent internally for each excel aircraft input file (making sure that the
training data column titles are exact matches to those on the main tab). For renaming
anthropometric variables, it is recommended to use a third party Excel search and replace
tool, such as one provided by www.replsoft.com. It can search and replace in batch mode,
renaming variables across multiple workbook files and worksheet tabs.
It is also important to ensure that the anthropometric names and labels are consistent
across the various aircraft. In general, if renaming anthropometric factors titles is needed,
it is recommended to contact Array for assistance.
24
PASS USER GUIDE
Note that due to dependencies with specific fields in the sample database, and certain
error checking routines, at this time the reordering of anthropometric variables is not
supported. This feature is planned for future versions of the program.
Cell S1 (e.g., ‘none’) – Used to specify an optional special constraints tabbed sheet that
contains individual Factor thresholds (minimum/maximums) and/or linear programming
inequalities. This cell must contain either the string ‘none’, or a string containing the label
of the worksheet tab containing the thresholds and/or inequalities.
For more information on using and specifying thresholds, please see Case 2 below.
Cells R3 (to end of actions list) – (e.g., ‘r1’) – Link of each specified action (in column A)
with its training data (on named worksheet tab). Each cell contains a string with the exact
name of the tab (or worksheet) that contains the training data for the action contained on
that row.
If the action (row) is only dependant on thresholds (min/max) and/or inequalities, enter
the string ‘none’ (no quotes) in the corresponding cell in column R.
Cells B3 (to end of actions list) -- (e.g., 0) – These numeric cells define the condition
matrix that consists of integer flags that link the actions and anthropometric
measurements, thresholds, inequalities and their relationship/dependence. In other
words, it specifies which measurements each critical action (row of reach, vision or
clearance action) depends upon.
The matrix consists of integer flags as follows:
1 = Indicates that the specified Anthro/Action is classified using DFA (trained)
0 = Indicates that the specified Anthro/Action are not related.
-2 = Indicates that the specified Anthro/Action is classified using thresholds
(specified min-max limits for related anthropometric measurements.
-3 = Indicates that the specified Anthro/Action is classified using a linear
programming inequality.
For the 0’s and 1’s with respect to training data, the spreadsheet contains functions that
automatically generate these flags, provided that the column headings and labels for the
Anthro names are identical on both the main worksheet tab and the related training data
tab.
Currently, it is required to manually specify anthro/action combinations that depend upon
special factors such as min/max thresholds and/or inequalities. Thus, at this time, the –2
and –3 flags must be entered manually. Note also that for the –3 flags (inequalities), only
the first anthro term in the inequality need be specified on the main tab, as all provided
terms on the special conditions tab (specified in cell S1 on the main tab) will be applied.
Cells Q3 (to end of Actions list) (e.g., 0) – This numeric column contains integer flags that
indicate the seat position dependency or model for each action (or row).
25
PASS USER GUIDE
The cells consist of an integer flag, specified as follows:
0 = Indicates that the specified action (row) is dependant (and training data
supports) on both fwd/aft and up/down seat positions.
2 = Indicates that the specified action is dependant on fwd/aft seat position only.
3 = Indicates that the specified action is dependant on up/down seat position only.
5 = Indicates that the specified action is not dependant on any seat position.
Note that this column is now automatically generated by spreadsheet functions, provided
that consistent labelling is used in the column headings on all of the tabs containing
training data. This means that each column heading (Row A) on each training data tab
must contain either an exact anthro label matching the main tab, or the label ‘%up’, ‘%aft’,
or the name of the critical action.
Cells S3 (to end of actions list) – This column contains a numeric value (in sequence), it is
presently unused, but provides a unique index (or key) reserved for future use.
5.1.2 Setting up the Additional Tabs Containing Training Data
The remaining worksheet tabs, linked to the main tab by the labels in Column R on the
main tab, contain the DFA training data.
Figure 32 contains an example of training data for one action from the sample file:
New_air_template.xls file, sheet r1:
Figure 32: Additional Tabs Containing Training Data
26
PASS USER GUIDE
The following format restrictions exist for specifying the training data on each tab:
1.
Duplicate rows are not allowed, these will cause a run-time error (as they create singular
matrices).
2.
The first row contains column titles that must be present and each must contain a
string. (e.g. ‘% aft’) They must match exactly to either the anthropometric variable
names in the main tab (across Row 2), or seat positions must match the labels ‘%up’ or
‘%aft’. The string matching is used to automatically populate the condition factor matrix
on the main tab.
3.
The column order for the actual training data must be specified from left to right as
follows:
a. Dependant factor training data (discrete values), one per column (Columns
A) (up to the number of factors for that action)). These must be in same
order (column-wise left to right) as the coefficient flags appear on the main
tab.
b. If there is a seat up/down dependence (which will show on the seat flag on
the main tab), it must appear in the next column.
c. If there is a seat fwd/aft dependence (which will show on the seat flag on
the main tab), it must appear in the next column.
d. It is important to note that the seat up column must come before the seat
aft column.
4.
For seat position, an unsigned decimal value (as opposed to % value) must be used,
0=0%, 1=100%, 0.5=50% (or neutral), etc.
5.
All columns must have the same number of rows.
6.
All training data values must be numeric only (integer or real).
7.
The last column must indicate the classification, and must contain either an integer 1
(specifying a pass), or 2 (specifying a fail). Strings are not allowed, nor are any values
other than 1 or 2.
8.
IMPORTANT: The last row entry for each column must contain all zeros, (0), except for
the entry in the final column (the PASS/FAIL column), final row. This cell (here shown as
C32 for example), must contain a 0 or 1, which is a flag indicating how to set the priori
variance for the DFA. A zero (0) indicates that equal priori weighting should be used
(50/50, or .5 for each). A one (1) indicates that the priori estimated variances should be
computed from the training set, based on the number of classifications (pass/fail) in the
training set.
All of the remaining tabs in the Excel file are configured similarly, based on the relevant
factors/actions/seat positions.
27
PASS USER GUIDE
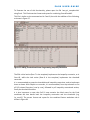
5.2
CASE 2: WHEN ADDITIONAL ANTHROPOMETRIC THRESHOLD VALUES ARE USED
For additional classification flexibility, the PASS tool allows individual thresholds (min and
max values) to be set for each anthropometric value for a certain critical action.
These thresholds enable absolute deterministic classification, as opposed to the stochastic
classification offered by DFA.
To illustrate the use of this functionality, please open the file ‘new_air_template2.xls’
using Excel.
The previous format and syntax requirements of Case #1 must be applied, and in addition:
Notice for the fifth action (row) item, cell A7, ‘Threshold-C’, there is no DFA, but it instead
is classified by using the following threshold constraint:
Sitting Height (for clearance purposes) must be between 0-1000 mm
Figure 33: Adding Thresholds to Anthropometric Factors
In Figure 33 notice that cell O7 contains a – 2 value (flag). This indicates that these
Factor/Action combinations are to be classified based using thresholds.
It is also important to note that Cell S1 now contains the label name for the Excel
worksheet tab detailing the thresholds.
28
PASS USER GUIDE
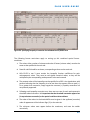
Figure 34 shows the format for specifying the actual thresholds on the worksheet tab
named in Cell S1 on the main tab.
Figure 34: Specifying Threshold Values for Individual Factors/Action Items
The following formatting/file structure restrictions apply to setting up this worksheet tab:
1.
Each action that is flagged on the main tab with thresholds must appear in row order,
with each action requiring two rows; the first row specifying the minimum threshold,
the second the maximum. Both minimum and maximum values must be specified for
each flagged action. Note that an arbitrarily large or small number might need to be
entered to satisfy this condition.
2.
The column titles, number of columns and order of factors (column order) must be the
same as specified in the main tab.
3.
The order of the Actions in the threshold file must be given in the up/down (row-wise)
order of appearance of the indicator flags (-2) on the main sheet, main tab.
4.
The minimum values must appear before the maximums, and naturally must be smaller
numerically.
29
PASS USER GUIDE
5.3
CASE 3: WHEN ADDITIONAL LINEAR PROGRAMMING INEQUALITIES ARE USED
For even more classification flexibility, the PASS tool now also allows the use of linear
inequality constraints to classify a certain Factor and Action combination. This is most
commonly used in linear programming derived solutions.
The previous format and syntax requirements of Case #1 must be applied, and in addition:
These inequalities allow deterministic classification with functions that contain multiple
anthropometric variables.
To illustrate the use of this functionality, please open the file ‘new_air_template3.xls’
using Excel.
This file is similar to the one examined in Case #1, but with the addition of the following
linear inequality constraint restrictions:
Notice for the fifth action (row) titled ‘LinearP-C’, there is no DFA or thresholds, but it
instead is to be classified by using the following linear programming inequality:
0.24 * Knee Height Sitting + 1.00 * Buttock-Knee Length < 795
Figure 35: Adding Linear Programming Inequality Constraints (Main Tab)
In Figure 35, notice that cell J7 contain a –3 value (flag). This indicates that this
Factor/Action combination is to be classified based using an inequality constraint.
It is also important to note that Cell S1 now contains the label name for the Excel
worksheet tab detailing the inequality (e.g. ‘inequal1’). This worksheet tab must be set up
as shown in Figure 36.
30
PASS USER GUIDE
Figure 36: Specifying Inequality and Threshold Constraints for Individual Factor/Actions
The following formatting/file structure restrictions apply to setting up this worksheet tab:
1.
The column titles, number of columns and order of factors (column order) must be the
same as that specified in the main tab.
2.
Cells B3-P3 in row 3 must contain the linear inequality coefficients for each
anthropometric value. They must be real signed numerical values, as they will be
multiplied by the corresponding anthropometric value and summed.
3.
The constant value of the inequality must be specified in cell R3. It is a signed value,
with positive indicating that the inequality is to be less than the constant value to pass
(<). For a greater than constraint, simply negate the constant (>). Equality constraints
are not presently supported.
5.4 CASE 4: USING BOTH ANTHROPOMETRIC THRESHOLDS AND LINEAR
PROGRAMMING INEQUALITIES
For maximum classification flexibility, the program also allows the combined use of both
anthropometric value thresholds and linear inequality constraints to classify a certain
factor/action combination.
The previous format and syntax requirements of Case #1 must be applied, in addition to
the additional requirements given in this section.
31
PASS USER GUIDE
To illustrate the use of this functionality, please open the file ‘new_air_template4.xls’
using Excel. This file shows the format and syntax for combining Cases #2 and #3.
This file is similar to the one examined in Case #3, but with the addition of the following,
as shown in Figure 37.
Figure 37: Adding Threshold and Linear Programming Inequality Constraints
The fifth critical action (Row 7 in the template) implements the inequality constraint, as in
Case #3, while the sixth action (Row 8 in the template) implements the threshold
constraint.
It is recommended to group the thresholds and inequality constraints, and to implement
them as shown. With respect to row order, it is recommended, from top to bottom to list
all DFA related functions (row by row), followed by all inequality constrained actions,
finally the threshold functions.
It is also important to note that Cell S1 now contains the label name for the Excel
worksheet tab that details both the inequality constraints and the thresholds (e.g.
‘sp_cond1’). The correct format and syntax for the combined factors worksheet tab is
shown in Figure 38.
32
PASS USER GUIDE
Figure 38: Specifying Inequality Constraints for Individual Factor/Action Item
The following format restrictions apply to setting up this combined special factors
worksheet:
1.
The column titles, number of columns and order of factors (column order) must be the
same as that specified in the main tab.
2.
Rows #1 and #2 should be as shown, corresponding to those on the main tab.
3.
Cells B3-P3 in row 3 must contain the inequality function coefficients for each
anthropometric value. They must be real signed numerical values, as they will be
multiplied by the corresponding anthropometric value and summed.
4.
The constant value of the inequality must be specified in cell R3. It is a signed value, with
positive indicating that the inequality is to be less than the constant value to pass (<).
For a greater than constraint, simply negate the constant (>). Equality constraints are
not presently supported.
5.
Following each inequality constraint row, there are two rows for each anthropometric
threshold related constraint. It is important that the threshold constraints appear last
(in top to bottom row order) on the special conditions tab worksheet.
6.
The order of the actions in the threshold file must be given in the up/down (row-wise)
order of appearance of the indicator flags (-2) on the main tab.
7.
The minimum values must appear before the maximums, and must be smaller
numerically.
33
PASS USER GUIDE
5.5 TROUBLESHOOTING: COMMON ERRORS
Errors in the training data and/or aircraft template will result in either program
exceptions, or invalid predictions/classifications. The former are much easier to detect.
Here is a list of potential common errors:
1.
Auto-generated flag settings inconsistent with Training Data.
2.
Anthropometric names on main tab worksheet don’t exactly match those in training
data worksheet. Cut and paste is recommended to match names.
3.
Missing values or flags on main tab.
4.
Name of first worksheet is not set to ‘main’.
5.
Names of training worksheets are not set correctly.
6.
Incorrect data format type (string instead of number, etc.).
7.
Number of flagged dependant variables doesn’t match training data.
8.
Duplicated rows in training data.
9.
Incorrect spelling of aircraft name, extra whitespace.
10.
Tab names don’t match specified labels in Column R.
11.
Name of threshold/inequality tab incorrectly specified or located in wrong cell.
12.
Incorrect order of columns in training data – they must follow the ordering requirement
given previously.
13.
Incorrect specification of pass/fail in training data, they must be numeric only: 1=pass,
2=fail.
14.
Real values entered for integer columns such as flags.
15.
Numeric values entered in string required columns such as tab names.
16.
Hidden or extra data/whitespace is present on the spreadsheet.
17.
Sign of inequality constant is incorrect (+ is less than <).
18.
Extra rows or columns appear in the worksheets. These must be deleted.
34
PASS USER GUIDE
5.6 SUMMARY/CONCLUSION
In summary, for every aircraft, the following information must be supplied in the Excel file,
in the manner and format previously indicated:
1.
Aircraft Name (Must exactly match one name on the figure)
2.
List of Critical Actions (Each critical reach, vision, clearance, etc.) (One per row)
3.
List of Anthropometric Factors (Variables) (One per column as shown)
4.
Auto-generated indications of dependant seat positions (Columns Q)
5.
Auto-generated condition matrix of indexes indicating the dependencies of the above
items 2-4
6.
Training data (one action per tab)
7.
Flag indicating how to compute priori variance for DFA (Last value on each training data
tab)
8.
Links to tab worksheets with training data for each action (Column R)
9.
Link to tab worksheet with threshold values/inequality constraints if needed (Cell S1)
10.
Separate tab sheet with threshold values and inequalities as shown above
35
PASS USER GUIDE
ACRONYMS AND ABBREVIATIONS
Table 1 shows the acronyms and abbreviations used in this document.
Acronyms and
Abbreviations
Explanation
Array
Array Systems Computing Inc.
DFA
Discriminate Function Analysis
DND
Department of National Defence
DRDC
Defence Research and Development Canada
GUI
Graphical User Interface
ODBC
Open Database Connectivity
RCAF
Royal Canadian Air Force
PASS
Pilot Anthropometric Screening Software
Table 1 - Acronyms and Abbreviations
36
PASS USER GUIDE
CUSTOMER SUPPORT
If you have questions concerning the operation of PASS, you may contact VisImage Systems Inc.
customer support. E-mail your questions to: [email protected], or send them by fax to 905-9461060. A customer service representative will reach you within 24 hours.
If you want to speak to us directly, please call 1-905-946-0000. Within the U.S. and Canada, a
toll-free number is also available: 1-866-VIS-IMAGE (1-866-847-4624).
VisImage Systems Inc.
14-7676 Woodbine Ave
Markham ON
L3R 2N2 Canada
Phone 905 946-0000
Fax 905 946-1060
www.vis.ca
37