1
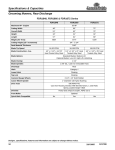
WARNING
Please read the following instruction booklet carefully. Failure to fully read instructions
and follow the cautions and warnings could result in severe injury or death.
Recommended Operating Instructions:
Cleaning Behind Equipment
I. Disconnecting the Gas Line
1) Turn off the equipment.
2) Carefully pull the equipment away from the wall,
stopping when the restraining cable is taut.
3) Shut-off the gas supply by turning the lever on the gas
ball valve (located off the main manifold line) to the
“off” position. Unplug any electrical cords.
4) Disconnect the gas line by pulling back the sleeve of
the quick-disconnect coupling. Be careful not to drop
the coupling on the floor, which may damage
the unit.
5) Detach the snap-hook of the restraining cable.
6) Carefully pull the equipment away from the wall.
7) Clean behind the equipment, making sure no foreign
substance, grease, cleaning solution or dirt enter the
quick-disconnect coupler or gas line.
II. Reconnecting the Gas Line
1) Reattach the quick-disconnect coupling by inserting
the plug (nipple) end into the coupler.
2) Reattach the restraining cable.
3) Reattach any electrical cords.
4) Turn the lever on the gas ball valve to the
“on” position.
5) Carefully push the equipment back toward the wall,
taking great care so that the gas connector is not
twisted or kinked in a severe angle. Be sure that the
gas connector is not damaged or crushed by the
equipment rolling over it.
6) If required, relight the pilot light. Turn the
equipment on.
Dormont Engineering Support
The Dormont Engineering team is available to help with the design and layout of foodservice equipment installations. We can design the proper gas connection to work with your equipment and
kitchen requirements.
Dormont has worked with consultants, national chains, and equipment manufacturers to solve tough
gas installations problems.
The previous CAD drawings are just a few examples of the kind of technical support we can provide.
Contact one of our Customer Service Specialists at 1-800-DORMONT (367-6668), for details.
Returns
No returns are to be made to Dormont Manufacturing Company without first obtaining a return
authorization number. Absolutely no returns will be accepted or credited without this prior approval.
Returns may be subject to a 25% restocking charge plus any transportation charges incurred.
8
6015 Enterprise Drive • Export, PA 15632 USA
(724) 733-4800 • FAX (724) 733-4808 • 1-800-DORMONT (367-6668) • www.dormont.com
DM-153A, Rev. 8, 8/10
Dormont Safety System Gas Connector
Installation Instructions
TM
Warning
Please read the following instruction booklet carefully. Failure to fully read instructions and
follow the cautions and warnings could result in severe injury or death.
CAUTIONS AND WARNINGS
1. The installation MUST BE in compliance with the National Fuel Gas Code (ANSI Z223.1 - latest edition) and all local gas
installation codes.
2. Installation and testing MUST BE performed by qualified personnel. Ensure that the gas supply and all the appliance control
knobs are turned off before connecting to the gas supply.
3. Gas outlet shall be in same room as appliance and the connector must not be concealed within or run through any wall, floor, or
partition. Flexible gas connections shall not come into contact with surfaces at temperatures in excess of 110°C (230°F), sharp
edges or wiring.
4. The final assembly shall be tested for leaks. CAUTION: Open flame or other sources of ignition shall not be used for this
purpose. Leak test solutions may cause corrosion. WATER RINSE AFTER TEST. To check gas supply piping system for leakage,
see National Fuel Gas Code Z223.1 latest edition. If odor of gas is detected, turn off the gas to the appliance and have a qualified
professional correct the source of the leak.
5. WARNING: STRONG CLEANING SOLUTIONS OR CHEMICAL SUBSTANCES MUST NOT COME IN
CONTACT WITH THE CONNECTOR. These may include acids, solvents, fluxes with zinc chloride, or other
chlorinated chemicals. In case of contact, rinse down the connector with water and dry thoroughly.
6. An accessible manual shutoff valve must be installed at the outlet of the gas supply piping system upstream of the connector.
7. Contact with foreign objects, wiring or substances shall be avoided.
8. Avoid movement after installation on fixed appliances.
9. Bending and flexing of connectors on moveable appliances (e.g. those factory equipped with casters) should be limited to pulling
and pushing the appliance in or out for cleaning or maintenance.
10. Connectors are for use only on piping systems having fuel gas pressure not in excess of 1/2 psi (3.5 kPa) for the US and 1 psi
(7kPa) for Australia. Flexible connections are suitable for use with 1st, 2nd and 3rd family gases only on piping systems operating
at a pressure not exceeding 50 mbar.
11. All parts of the flare union, supplied with the connector, must be utilized and no attempt will be made to assemble union flare
nuts directly to IPS pipe threads.
12. DO NOT REUSE FOR ANOTHER APPLIANCE OR AT ANOTHER LOCATION.
13. In addition to the main gas supply shut-off valve, an approved accessible manual gas shut-off valve MUST BE installed
upstream of the gas connector (within 6 feet of the equipment it serves). Each piece of equipment must have its own shut-off
valve. The quick-disconnect coupling is NOT TO BE USED as the primary gas shut off.
14. WARNING: THE QUICK-DISCONNECT MUST BE INSTALLED SO THAT THE GAS ENTERS THE COUPLING HALF AND EXITS THE NIPPLE HALF. YOU MUST FOLLOW THE FLOW DIRECTION ARROWS
THAT ARE PERMANENTLY MARKED ON THE COUPLER.
15. NEVER INSERT screwdrivers, probes, etc. into the quick-disconnect coupling. The valve seat can be damaged or forced
off center.
16. The connector shall not be kinked, twisted, or torqued when installed.
17. DO NOT USE pipe dope, teflon tape or any other sealing compound in flare seat of gas connector.
18. Make sure that all fittings are tightened properly. When installing the connector, two (2) 14 inch crescent wrenches (minimum
size) are recommended as installation tools.
19. Adequate means must be provided to limit the movement of castered appliances. A restraining device is REQUIRED
for all types of moveable gas appliances. (ANSI Z223.1 & ANSI Z21.69).
20. The recommended restraining device for castered appliances is Dormont’s Restraining Device. Installation instructions for this
Dormont product are part of this booklet. This “restrainer” should be inspected as part of the regular maintenance and safety
procedures. Restraining cable MUST BE connected at all times when appliance is in use. You must follow the instructions
on page 4.
21. When installing an equipment line-up with dual-fed front manifold gas inlets, DO NOT use a quick-disconnect coupling.
22. For installations that require greater mobility, Dormont SwivelMAXTM gas connector assemblies are recommended.
23. Appliance MUST BE disconnected prior to maximum movement. Warning: DO NOT OVEREXTEND the gas connector
assembly. When moving equipment (for cleaning, maintenance, etc.), you must follow the instructions on page 8.
Dormont Manufacturing Company
Export, PA 15632 USA
1
INSTALLATION INSTRUCTIONS (FIGURE 1)
1.
2.
3.
4.
5.
6.
7.
8.
Before proceeding, CAREFULLY read this full set of instructions, including the CAUTION AND WARNINGS section and the
INSTALLATION RIGHTS AND WRONGS section of this
instruction booklet.
The manual gas shut-off ball valve (B), located in the gas manifold
line (A), must be in the fully-closed (off) position. If there is no gas
shut-off valve in the manifold line, the main gas supply line valve
(not shown) must be turned off. DO NOT CONTINUE unless the
gas is turned off.
Remove the gas connector and contents from the bag or box.
The location of the two connection end points for the gas appliance
connector - the gas supply line and the equipment stub-out –
can vary greatly. It is not possible to show every possible installation
combination. These instructions include several examples of common
Drawing 1 - offset
installations. The installer must always take great care to ensure that
the connector is not kinked, twisted or torqued when installed and
that the end fittings of the connector are not subjected to sharp bends. (Please refer to Installation Rights and Wrongs).
For installations that may result in a sharp bend, Dormont SwivelMAXTM gas connectors are recommended.
It is recommended that the main gas supply manifold be located 30''- 42'' off the ground. There should be pipe tees pointed in the
downward direction.
To facilitate moving equipment as close to the wall as possible, the two ends of the Dormont gas connector should be offset to the
side from each other. (+/ – 3'' offset recommended) see drawing 1.
Each piece of equipment MUST have its own approved manual shut-off valve off of the main gas supply line. If there is not an accessible manual gas shut-off valve for each piece of equipment, make sure that the gas has been shut off at the main gas shut-off valve for
each piece of equipment before continuing.
MANUAL SHUT-OFF VALVE INSTALLATION –
Female x Female valve ends
a. If the pipe tee is a male thread: Apply thread tape or sealant to accessible pipe threads located at the gas supply line. Thread the
gas shut-off ball valve onto the male iron pipe and tighten wrench tight. Locate ball valve as close as you can to the manifold
leaving enough clearance to turn on and off. Preferred valve position is vertical. (see Figure 1).
b. If the pipe tee is female: Apply thread tape or sealant to the threads of a pipe nipple (not supplied/preferred length is three inches). Thread pipe nipple into female pipe tee off main gas line. Then thread the shut-off valve onto the pipe nipple and tighten
wrench tight.
OPTION 1
FIGURE 1
SnapFastTM Device Installed at the Appliance
This installation method, commonly used in North
America, shows the quick-disconnect coupling
attached at the appliance side. The nipple MUST
always be on the appliance side, attached to the
appliance stub-out. This enables the operator to move
the equipment away from the wall in an equipment
line-up and safely disconnect the gas connector from
the back side of the appliance.
A Gas Supply Line
(Gas Manifold)
E
GAS
GAS FLOW DIRECTION
B Gas Shut-Off Ball
Valve/Valve Iron Pipe
C Gas Connector
TM
D SnapFast
Quick-Disconnect
E 90° Street Elbow
F Appliance Male Stub-Out
G Restraining Device
H Female Adapter
I Flare Nut
J Quik-Disconnect
Coupling (female)
K Quik-Disconnect
Nipple (male)
Operating Instructions
To Connect: Push nipple straight into coupler until sleeve snaps forward
against retaining ring. Open shut-off valve to turn on gas.
To Disconnect: Close shut off valve to turn off gas. Retract sleeve and
pull out nipple.Important: Coupling is not to be used as the
primary shut off.
2
GAS FLOW DIRECTION
Warranty
Certifications
Warranties and Remedies
a. Warranty. Seller warrants to Buyer that it holds and will pass marketable
title to the commercial gas connectors sold hereunder. Seller further warrants to Buyer that Seller’s commercial gas connector will be free from
defects in material and workmanship causing gas leakage during the life of
the equipment to which the commercial gas connector is originally connected or installed.
Seller warrants to Buyer that the items and components manufactured by
Seller other than commercial gas connectors will be free from defects in
material and workmanship for a period of five (5) years from tender of
delivery to Buyer. For items not manufactured by Seller, the only warranty
extended is that of the manufacturer or suppliers, if any.
b. Exclusions and Conditions. Seller's obligations with respect to the express
warranties and remedies contained herein are conditioned on the following: (i) Seller’s liability and Buyer’s exclusive remedy is expressly limited to
Seller’s replacement of the defective gas connector or other goods at
Seller’s cost (excluding labor and freight); it being understood such
replacement will be made only upon return of the defective item in accordance with Seller’s shipping instructions and return authorization and subject to Seller’s inspection; (ii) Buyer shall not assign its rights under these
express warranties and any attempted assignment shall render such warranties, but not any disclaimers or limitations, void and the goods shall be
sold AS IS; and (iii) all commercial gas connectors and other goods shall
be carefully inspected for damage by Buyer upon receipt, be installed by
individuals trained and certified as professionals with respect to such installation, and be installed, used, repaired and maintained by Buyer in accordance with local codes or regulations, standards set by American National
Standard Institute and/or American Gas Association Standards. The commercial gas connectors and other goods shall be warranted in conjunction
with the original installation only and the express warranties and remedies
contained herein shall not apply to, and shall be void and of no further
force or effect upon, damage and/or failure of the commercial gas connectors and other goods caused by or resulting from shipping; improper or
unauthorized handling,
installation, alteration or repair; misuse, abuse or other occurrences or conditions other than normal use thereof; application or conformity to local
codes or regulations not previously made known to Seller; or accident or
other casualty.
Disclaimer of Implied Warranties
Seller gives no warranties except those expressly contained herein. Seller disclaims all other warranties implied by law, usage of the trade, course of dealing or course of performance including, but not limited to, the implied warranties of merchantability and fitness for a particular purpose.
Conditions
Limitations of Liability.
The following limitations of Seller’s liability are acknowledged by the parties to be fair and reasonable and shall apply to any act or omission hereunder, and to any breach of this contract of which these terms and conditions form a part.
Certifications
USA
Canadian Standards Association International
ANSI Z21.24 —
Connectors for Gas Appliances
ANSI Z223.1 —
National Fuel Gas Code-National.
Fire Prevention Association — N.F.P.A. #54
Connectors for Moveable Appliances.
Connectors for outdoor gas appliances and
manufactured homes
ANSI Z21.69 —
ANSI Z21.75 —
ANSI Z21.41 —
City of New York —
Approved by the Commonwealth of Massachusetts Board of State
Examiners of Plumbers & Gas Fitters. (36'' maximum length)
CANADA
Canadian Gas Association International
CSA - 6.10 —
CSA - 6.16 ––
CSA - 6.9 ––
CSA - B149.1
UK
CORGI
BELGIUM
Connectors for Gas Appliances.
Connector for Moveable Appliances.
Quick-disconnect devices for use
with gas fuel appliances.
Natural Gas and Propane Installation Code.
Certified to BS 669-2: 1997
License # KM39643
Dormont Hoses have been Tested By BSI,
and Meet with and Exceed the Essential Safety
and Performance Requirements of BS669 Part
1 and Part 2.
Technical Bulletin 54
Association Royale Des Gaziers Belges
Societe Technique De L’Industrie Du Gaz En
Belgique A.S.B.L.
Test reports LDG/95/2166-2170
December 1995
AUSTRALIA
Disclaimer of Damages
In no event shall seller be liable for special, indirect, consequential or
incidental damages, whether arising under contract, warranty, tort, negligence, strict liability or any other theory of liability. Such damages
include but are not limited to loss of profits, loss of use of the goods, damage to property, and claims of third parties. Some states do not allow the
exclusion or limitation of incidental or consequential damages, or any limitations on how long an implied warranty lasts, so the above exclusion or
limitation may not apply to you. This warranty gives you specific legal
rights, and you may also have other rights which vary from state to state.
Quick-Disconnect devices for use with
gas fuel appliances.
Design certified to ANSI/U.L. 567,
Pipe Connectors for Flammable and
Combustible Liquids and LP-Gas. For use
with natural gas and propane.
National Sanitation Foundation
Criteria C-2 special equipment.
MEA #98-83, 99-84, 100-83
AS 1869-1991
Hose and hose assemblies for liquefied
petroleum gases (LPG), natural gas and
town gas.
DENMARK
Danish Government Gas Institute
type-examination certificate no. 3419-3422
Notice and Time of Claim
(i) Buyer agrees to check and inspect all products against shipping papers
and for damage or shortage upon receipt of goods at destination; (ii) Every
claim for loss, damage in transit, or other cause visible upon inspection
shall be made with carrier. Claims for shortage must be made within five
(5) days of receipt; (iii) The parties expressly waive the statute of limitations and agree that any legal proceeding for any breach of this contract shall be waived unless held within two (2) years after the accrual of the cause of action therefor.
7
Installation Rights and Wrongs
Wrong
Avoid sharp bends and kinks when pulling equipment away from wall. Maximum
pull will kink ends, even if installed properly, and reduce connector life.
Right
Minimum pull of equipment away from wall permissible for accessibility to Safety
Quik-Disconnect.
WRONG
RIGHT
Sharp Bends The correct way to install metal hose
for vertical traverse is with a single, natural loop.
Avoid sharp bends that strain and twist the metal
hose to a point of early failure at the coupling.
WRONG
RIGHT
Fatigue Maintain the minimum or larger bending
diameter between the couplings creates double
bends causing work fatigue at the fittings.
Note: Appliance must be disconnected prior
to maximum movement. Minimum movement is acceptable to leave connected.
Nominal
connector
I.D. inches
1/2”
3/4”
1”
1 1/4”
WRONG
RIGHT
Twisting Couplings and hose should be installed in the
same vertical plane. Failure to do so causes torsional
twisting and undue strain causing premature failure.
WRONG
RIGHT
Self-Draining In all installations where “self-draining”
is not necessary, connect metal hose in a vertical loop.
Do not connect metal hose horizontally unless “selfdraining” is necessary, then use support on lower plane.
Note: Never insert such objects as screwdrivers,
probes, etc. into the Safety QuikTM Valve. The
valve’s seat can be damaged or forced off center.
Note: Restraining Device is mandatory for
all types of moveable gas appliances.
CONNECTOR CAPACITY
Straight Length Capacity - BTU per Hr (w)
0.64 Sp Gr 1000 BTU per Cu. Ft. Gas at 0.5 in.
Water Column Pressure Drop
2ft.
150,000
290,900
581,800
1,075,000
4ft.
106,000
215,000
442,700
817,500
6ft.
86,600
173,900
347,800
634,000
NOTE: When using 0.2 water column pressure drop, capacity can be determined by multiplying the figures above by 0.632. For capacities at conditions other than noted, contact your servicing gas supplier.
Nominal
connector
I.D. inches
1/2”
3/4”
1”
1 1/4”
NOTE:
6
CAPACITY WITH QUICK-DISCONNECT DEVICE
Straight Length Capacity - BTU per Hr (w)
0.64 Sp Gr 1000 BTU per Cu. Ft. Gas at 0.5 in.
Water Column Pressure Drop
2ft.
4ft.
87,000
232,000
414,000
699,000
68,000
180,000
334,000
541,000
Capacity was determined under test conditions specified by ANSI Z21.69
6ft.
55,000
139,000
279,000
419,000
I
I
NSTALLATION NSTRUCTIONS (CONT.)
9. WARNING: The quick-disconnect coupling (D) MUST BE oriented so that the gas enters the female (valved)
coupling half and exits the male nipple half. FOLLOW the flow direction arrows permanently marked on the coupler.
10. NOTE: There are two options for the orientation of the quick-disconnect couplings: OPTION #1, quick-disconnect at the
appliance. OPTION #2, quick-disconnect at the piping system. WARNING: Our gas appliance connector assembly
is supplied with the threads of the quick-disconnect tightened into the gas connector. This process is
implemented in the factory to facilitate an Option 1 installation.
11. OPTION 1: Quick-disconnect attached at the appliance side.
A. Gas Supply Side: Apply thread sealant (pipe dope) or thread tape to the valve nipple. Thread the gas
connector’s adapter (H) end onto the pipe nipple extending from the gas shut-off valve and tighten.
B. Tighten the flare nut of the gas appliance connector (I) to the flare end of the adapter (H).
Tighten with wrench.
C. Appliance Side: Apply thread sealant (pipe dope) or thread tape to the appliance’s male stub-out (F) and
thread street elbow (E) onto male stub-out.
D. The location of both the equipment stub-out and the tees for the gas supply line manifold can vary greatly.
E. Apply thread sealant (pipe dope) or thread sealant to male street elbow (E)threads.
F. Separate quick-disconnect coupling male end, or nipple (K) off of the female end, or coupling (J). Thread
the male nipple (K) onto the street elbow (E) of the appliance and tighten. Note: The quick-disconnect
MUST BE ORIENTED so that the gas enters the coupling half and exits the nipple half. Installation
personnel MUST follow the flow direction arrows permanently marked on the coupler.
G. Connect quick-disconnect female coupling (J) to the male nipple (K).
H. Check tightness of all connections. Leak test in accordance with accepted testing procedures.
I. After installation of the connector, carefully push the appliance back to its normal operating position and
check that the connector is not kinked, over bent, or caught under the equipment casters.
12. *OPTION 2: Quick-disconnect attached at the gas supply line side.
A. WARNING: If you decide to select an Option 2 installation (quick-disconnect at the gas supply side), the
quick-disconnect must be disassembled from the connector. The female coupler part of the quick-disconnect
coupling must be upstream and attached to the gas supply.
B. Appliance Side: Apply thread tape or sealant to the appliance’s stub-out (F) and thread street elbow (E)
(supplied) onto stub-out. Tighten.
C. Apply thread tape or sealant to the street elbow (E) threads and thread the connector’s adapter (H) end
onto the street elbow (E). Tighten the adapter to the street elbow. Thread connector flare nut onto the flare
end of the adapter. Tighten with wrench.
D. Gas Supply Side: Separate the quick-disconnect female coupler (J) from the male nipple (K). Apply pipe
dope or thread tape to valve nipple. Thread the quick-disconnect female coupler onto threads of the pipe
nipple from the gas shut-off valve.
E. Connect quick-disconnect male nipple (K) to the female coupler (J).
F. Check tightness of all connections. Leak test in accordance with accepted testing procedures.
G. After installation of the connector, carefully push the appliance back to its normal operating position and
check that the connector is not kinked, over bent, or caught under the equipment casters.
FIGURE 2
OPTION 2*
SnapFastTM Device Installed at the Gas Supply
This installation method, commonly used in Europe, shows the quickdisconnect coupling attached at the gas supply side. The coupler MUST
always be on the supply side, attached to the supply side piping. This enables
the operator to move the equipment away from the wall in an equipment lineup and safely disconnect the gas connector from the gas supply line.
A
B
House Pipe Inlet
D
Gas Connector
C
E
GAS
GAS FLOW DIRECTION
E
F
Full Port Gas Ball Valve
SnapFast Disconnect
Coupling
TM
90° Street Elbow
G Restraining Cable
H Female Adapter
I Flare Nut
J Quik-Disconnect Coupling
(female)
K Quik-Disconnect Nipple (male)
Appliance Male Stub-Out
*This installation method is in compliance with BS669: Part 2 and BS6173.
3
Restraining Cable
Installation Instructions
Restraining Cable Installation
THIS RESTRAINING DEVICE MUST ALWAYS BE RECONNECTED
WHEN THE APPLIANCE IS IN SERVICE
The restraining device should be disconnected for movement,
such as, servicing or cleaning, only after gas has been
shut off and the connector has been disconnected.
Reconnect retsraining cabel before reconnecting the gas
connector and moving back to its original position.
RESTRAINING CABLE:
1. Restraining Device should be installed parallel (in line with the gas
appliance connector.)
2. Attach the staple bracket (C) to a stud in the wall, using the four
1'' #10 screws (D) and the plastic anchors (E) if needed.
3. Locate a structural area (frame) on the rear side of the
equipment that is in line with the wall attachment. Drill a 1/4''
diameter hole. Use caution when drilling hole, so that internal
components are not damaged.
4. Thread the hex nut (G) and a washer (I) onto the eye-bolt (F).
Slide one washer onto the nut. Slide the eye-bolt through the
drilled hole and place a washer (I) and the nylon lock nut (H)
onto the eye-bolt on the inside frame of the equipment and tighten
securely.
5. Attach one of the snap hooks (B) to the staple bracket on the wall
(Step 2 above) and the other to the eye-bolt (Steps 3 and 4
above).
Note: For adjustable restraining devices, the cable is manufactured to
be shorter than the length of the gas connector.
A - Restraining Cable with
B - Two Snap Hooks
C - Staple Bracket
G - 1/4'' Hex Nut
D - 1'' #10 Screws (4)
H - 1/4'' Nylon Lock Nut
E - Plastic Anchors (4)
I - 1/4” x 1 1/4'' Washers (2)
F - Eye-Bolt
WRONG
Set the length of the restraining device so that the
connector is not kinked when the restraining device is
fully extended.
Installation Examples
VERTICAL LOOP
WALL:
Medium-Level Gas Supply
EQUIPMENT:
Rear High Inlet Connection
RECOMMENDATION:
Dormont Double
SwivelMAXTM Kit Installation
Model #1675 KIT2S 48
HORIZONTAL LOOP
WALL:
Floor Level Gas Supply
EQUIPMENT:
Rear Low Inlet Connection
RECOMMENDATION:
Dormont Single
SwivelMAXTM Kit Installation
Model #1675 KITS 48
4
RIGHT
SAFETY QUIKTM Installation
COMBINATION LOOP
WALL: High Level Gas Supply
EQUIPMENT: Rear Low Inlet Connection
RECOMMENDATION: Dormont Double
SwivelMAX Kit Installation
Model #1675 KIT2S 48
WALL: High Level Gas Supply
EQUIPMENT: Rear High Inlet Connection
RECOMMENDATION: Dormont Safety Quik
QD/Valve with Double SwivelMAX Fittings
SwivelMAXTM Instruction
DESIGN CERTIFIED FOR USE WITH DORMONT GAS CONNECTORS ONLY
1.
2.
3.
4.
5.
6.
7.
8.
Do not conceal swivel within or run through walls, floor, or partitions.
For use on piping systems having fuel gas pressures not exceeding 1/2 psig.
Install per Installation Instructions included with gas connector.
Install downstream of the gas supply piping manual shutoff valve only.
Use thread sealant only on pipe threads; DO NOT USE TEFLON TAPE.
Tighten snugly; DO NOT OVER TIGHTEN.
After installation, leak test with suitable solution; rinse off solution after test.
Swivel complies with applicable sections of UL 567 & ANSI Z21.69 for natural gas
and propane service only.
9. When a swivel fitting is used, the gas connector capacity does not comply with
ANSI Z21.69, latest edition, Section 2.11, Capacity.
U.S. Patent #5,178,422 Canadian Patent # 2,079,825
Instructions for Safety Quik™
Gas Appliance Connector Installation:
The Safety Quik™ Quick-Disconnect Valve Combination Fitting must be installed at the
outlet of the gas supply piping system upstream of the connector
HOW TO USE:
To disconnect:
1. Turn the easy turn handle to the off position, as shown in diagram #1, (horizontal to
the gas appliance connector).
2. Push the safety sleeve up towards the handle. This will cause the unit to disconnect.
Note: The gas appliance connector can not be disconnected until the valve is in the
off position.
To reconnect:
1. Firmly push the quick-disconnect nipple, diagram 1A, (attached to the gas appliance
connector) into the coupler body. This will allow the safety sleeve to return to it’s original
position.
2. Turn the easy turn handle to the on position, diagram 2, (vertical/in line with the gas
appliance connector).
Note: The valve can not be turned to the on position until the gas appliance connector
is properly attached.
(Diagram 1)
Shut-Off
Valve
Safety
Sleeve
Nipple
Off position
(Diagram 2)
Flow
Coupling
On position
5