1
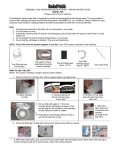
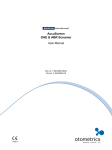
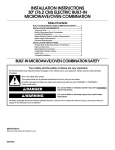
INSTALLATION AND OPERATING INSTRUCTIONS MODEL QS2, QS2K, QS2X (Please save for future reference.)
INTRODUCTION
Your Rainfresh TWIST Dual Drinking Water System uses a premium dual-stage filtering process,
providing cleaner, safer, better tasting drinking water for your family. It reduces lead, VOC
(volatile organic compounds), cysts, chloramines, chlorine, bad tastes and odours
(see performance data sheet for details)*. The system is designed for installation under the
kitchen sink and includes a ceramic-disc faucet for dispensing filtered water.
*Contaminants reduced by this system are not necessarily in your water.
A fridge connection kit is included with the QS2K system in case you choose to also have
filtered water from your water-dispensing fridge and for your ice cubes.
The “Twist ON/Twist OFF” design makes cartridge replacement quick and easy, using no tools
and without having to shut off the water.
Both cartridges should be replaced after
• 350 US Gal (1,324 L) or 6 months for models QS2, QS2K
• 250 US Gal (946 L) or 4 months for model QS2X
The system features a unique electronic monitor (QS2 & QS2K only) that tracks both the gallons used and time in service and triggers a blinking orange LED when either of these limits is
reached
advising you to replace the cartridge.
**Note: Cartridge life is directly dependant on water conditions and volume of water filtered. Excessive sediment may cause more frequent replacement.
INSTALLATION (Please read carefully before proceeding)
Contents Included:
Filter assembly, faucet & faucet parts bag, parts kits bag with saddle valve, battery, mounting screws (3), tube compression fittings,
1/4” union tee connector, 19 feet of 1/4” OD tubing (5 ft for models QS2 & QS2X), installation/operating instructions.
Installation shall comply with applicable plumbing codes and regulations. This unit comes complete with all necessary fittings to install the unit
below the counter to copper or CPVC rigid plastic pipe. The water supply saddle valve is included for use in areas where codes permit. Where not
permitted, the installer must provide approved fittings to tap the cold water pipe for a feed water source to the filter system (must adapt to ¼” OD
tubing).
INSTALLATION NOTES AND CAUTIONS
1. The system is designed for point-of-use (POU) under-sink installation for single faucet dispensing. However the unit can be
installed in a remote location with tubing running up to the faucet. Note: additional tubing (not included) may be required.
2. Installation of this unit may involve some water spillage. Keep an ample supply of paper towels or an absorbent cloth handy.
3. This system is intended for use with cold water only. DO NOT INSTALL ON HOT WATER.
4. Protect filter from direct sunlight. Not intended for outdoor use.
5. Protect unit from freezing.
6. Not intended for installation in multi-storey buildings.
TOOLS REQUIRED FOR INSTALLATION
Drill (cordless or electric), ½” drill bit, adjustable wrenches, Phillips and flat screwdrivers, utility knife, pencil.
UNPACKING THE UNIT
Remove both cartridges by turning them 1/4 turn clockwise, then pulling away from head
assembly. Place them aside in a safe place until final assembly.
MOUNTING THE FAUCET (See Fig. 2)
Faucet may be installed in hole in sink (if available) or in countertop. Note: The faucet may also
be installed in the sink sprayer hole if available.
1. Position faucet on counter top beside sink in desired position. Ensure that swivel spout will extend over sink and that there is room under the counter for faucet shank and to tighten nuts.
2. Mark the location and drill a ½” hole. Protect your countertop by applying a layer of
masking tape and use a sharp drill.
3. Insert faucet shank through escutcheon plate (1040-9) after peeling off protective film and escutcheon washer (1040-10) and then through countertop. Install plastic locating
washer(1040-12), lock washer (1040-13) and locking nut (1040-14). Tighten locking nut securely while someone holds the faucet body so it does not turn.
1.
Fig. 2
1040-9
1040-10
Countertop
1040-12
1040-13
1040-14
1603
1008-3
726-0
1/4” tube
Comptoir
MOUNTING THE UNIT
Before mounting the unit, install the monitor battery. Remove head cover insert (2718) by gently pulling away the insert from the
head. Unwrap coin battery (2545) and insert into battery slot between contacts with + side out. Do not reattach the head cover insert
yet.
Locate best position for mounting unit undersink near faucet. The higher and closer to the front you mount the unit the easier it will
be for regular maintenance. There are 3 mounting bracket screw locations – 2 located on the bottom of the head cover and 1 is
located at the center between the two filter heads.
Note: Screw holes at bottom should be at least 12 inches up from the base of the cabinet (you must allow at least 3 inches of
clearance below the cartridges for easy removal). Screw in the 3 screws making sure that the head assembly is level.
Note: If wall is too thin to accept screw then use round head nuts and bolts (not supplied) to mount head assembly.
Now re-attach the head cover insert (2718), carefully aligning it so that the black button on the monitor lines up through the hole on
the cover insert.
CONNECTING THE FAUCET
Measure the tubing required to connect faucet to the white OUTLET Acculink™ fitting (arrow pointing away from the fitting) and cut
this length from the tubing supplied. Slide compression nut (726-0), sleeve (1008-3) onto tube and insert (1603) into 1/4” tube as
shown in Fig. 2.
Push tube into end of faucet shank and hold firmly in place. Now tighten nut securely with a wrench. Push the other end of tubing
into white OUTLET Acculink™ fitting as shown in Fig. 5.
INSTALLING THE SELF-PIERCING SADDLE VALVE
The saddle valve (1008-0) can be installed on copper or CPVC rigid plastic pipe of 3/8” to 1” diameter. (Not recommended for flexible
plastic pipe such as PEX).
Note: If your cold water line is other than described, use fittings (not included), that adapt the pipe size to 1/4” compression or
contact Envirogard for assistance.
Orient saddle valve with outlet threads pointing towards grey Acculink™ INLET fitting to prevent unnecessary bends in the tubing.
Back off handle on saddle valve to retract piercing tip. See Fig. 3. With rubber gasket in a fixed position clamp entire assembly to pipe
using bolts provided. Tighten bolts, keeping brackets parallel until rubber gasket is firmly compressed. Caution: Do not over-tighten
bolts. Do not turn handle back in at this time.
Measure and cut length of 1/4” plastic tubing required to connect saddle valve to the grey INLET Acculink™ fitting. Slide compression
nut (726-0) and sleeve (1008-3) onto tube, then put tube insert (1603) into tube as shown in Fig. 4. Push tube into end of saddle valve
fitting and hold firmly in place. Securely tighten the compression nut while holding other end of fitting with a wrench. Connect other
end of tubing to grey INLET Acculink™ fitting (arrow pointing towards the fitting) on head as shown in Fig. 5.
Fig. 4
Tube
Insert 1603 Compression
5"
Nut 726-0
16
Fig. 3
1/4” Plastic
Tubing
Right
Wrong
Cold
Water
Pipe
1/4” tube
1/4” tube
Collet
Collet
O-ring
tube stop
O-ring
tube stop
Fig. 5
2.
1/4”
Compression
Sleeve 1008-3
Wide end into nut
CONNECTING TO THE ACCULINK FITTING
To ensure an optimal seal, tubing should be cut straight. An angled
cut or distortion of the tubing will not provide an efficient seal and
may cause a leak.
To install the 1/4” tube into the ACCULINK fitting, mark it 5/8” from
the end and push it firmly 5/8” through the collet, past the “O” ring
until it seats on the tube stop.
To remove, push in the collet with two fingers on two sides of the
tube and pull out the tube.
STARTING UP
- Reconnect QCA cartridge on the head below the inlet fitting (left side of unit) and QLV cartridge on the other head (right side of
unit). To connect cartridge, turn it to the right until it stops turning and the lock marks on the cartridge and head line up (lock position). The cartridge is now locked in place.
- Turn the faucet handle to ON position.
- Turn saddle valve handle clockwise. After some free rotations, the needle on the valve will start to pierce the pipe. Continue to rotate the handle until it can go no further. You have now pierced the pipe, but the valve is closed. Now turn handle counter clockwise all the way to open and start water flow.
- Close faucet and check all connections for leaks. Carefully re-tighten any leaking fittings. It is a good idea to check the unit a few times for slow leaks shortly after installation.
Flushing and conditioning: Allow water to flow from the faucet for 10 minutes to flush unit before beginning service.
YOUR UNIT IS NOW IN OPERATION.
Note: Some carbon fines may persist for several days and the water may also
Fig. 6
appear milky because of trapped air bubbles coming out of the unit. These are
harmless and frequent running of the unit will clear them more quickly.
Running the unit for extended periods of time will NOT help.
CONNECTING THE SYSTEM TO THE FRIDGE (Model QS2K only)
If you also wish to enjoy filtered water from your fridge water dispenser, then:
- Measure and check the remaining 1/4” tubing to ensure that it is long enough to connect the filter unit to your fridge. Note: If your fridge is farther away, you may require additional ¼” tubing (not included).
- Shut the water off by turning the handle on the saddle valve clockwise until stop.
- Open the faucet to release water pressure.
- Cut the tube connecting the faucet with the outlet fitting at the center,
making sure that your cut is straight. Caution: Do not cut the tube at an angle as that can cause a leak.
- Connect the open ends of the tubing now to the ¼” union tee (2612)
included with the unit.
- Now connect the open end of the union tee (2612) to your fridge using the 1/4” tubing.
SETTING THE RAINFRESH FILTER LIFE MONITOR (Models QS2 and QS2K only)
Press and hold black monitor button. The orange LED will glow and after 5 seconds it will blink 4 times and turn off. Now release the
button as the monitor has been reset. The monitor tracks both the gallons used and time. When either 350 gallons or 6 months have
expired the orange LED will blink every 5
seconds advising you to replace the cartridge.The LED will continue to blink until monitor is reset as above. Note: Excessive sediment
may cause more frequent filter cartridge replacement.
Monitor Battery - After approx 2 years yellow LED will blink every 5 seconds advising you to change battery.
To replace battery - remove head cover insert (2718) by gently pulling away the insert from the head. Insert new battery (2545) into
battery slot between contacts with + side out and reattach cover insert to head assembly.
To test battery – With faucet off, press the black button for two seconds or less. If the orange LED lights up then power is on and
monitor is working. If LED does not light then battery is expired and must be replaced. NOTE: If faucet is on and water is running, LED
will not light if button is pressed.
REPLACING FILTER CARTRIDGES
For best results, the QCA and QLV filter cartridges must both be replaced after 250 gallons (950 liters approx) or 4 months
whichever comes first. This will be signaled by the orange LED blinking every 5 seconds. There is no need to shut water off for
cartridge change.
Note: Filter cartridge life depends on water quality. Excessive sediment can substantially reduce the filter cartridge life. This will be
signaled by a sudden drop in water flow or no flow from the faucet before the 4 month life is up. If your water has excessive sediment,
we recommend installing a Rainfresh whole house water filter available from the same retailer where you purchased this unit. Call
Rainfresh for assistance in locating a retailer and product selection.
To replace filter cartridges - simply hold the cartridge and turn about 1/4 turn left and lower it away from head while holding it
vertically to retain water. Empty the old cartridge in the kitchen sink by holding it upside down and discard. Use a dry absorbent cloth
or a paper towel to wipe off any water that may fall on the cabinet floor. To install new filter cartridge, turn it to the right until it stops
turning and the lock marks on the cartridge and head line up (lock position). The cartridge is now locked in place.
MAINTENANCE / PRECAUTIONS
1) Do not subject unit to freezing temperatures at any time.
2) Do not clean housing with organic solvents such as those found in sprays for cleaning products or insecticides as these may cause
cracking or crazing and lead to failure and leakage.
3)Replace filters periodically as above.
3.
TROUBLESHOOTING
PROBLEM
POSSIBLE CAUSE & SOLUTION
Saddle valve is leaking
•
•
•
•
•
Flow rate is very slow after installation of unit
• You may not have pierced the water pipe fully. Turn valve handle clockwise all the way until it can go no further to make
sure that valve needle has fully pierced the water pipe.
• Call Rainfresh to review installation procedure
There are some black fines in the water
• Some carbon fines may persist for several days. These are harmless and frequent running of the unit will clear them more
quickly. Running the unit for extended periods of time will NOT help.
Water appears milky after installation or after
replacing cartridges
• Water can appear milky after a new cartridge is installed because of tiny air bubbles coming out. These will clear out if you
leave the water standing for a few seconds and are harmless. After a few days of use the bubbles will slowly clear away.
The cartridge came undone from the head on it’s
own
• This may indicate high water pressure or water hammer conditions exceeding 100 psi . You may need to install a pressure
regulator (set at 60-70 psi max) and a water hammer arrestor on the line. Call Rainfresh for further assistance
The faucet continues to drip even after shut-off
•
•
Monitor does not light up when I press the button
• If water is not running through the system and the monitor LED does not light up, you may need to replace the battery
(2545) . Call Rainfresh to order
Turn valve handle clockwise to shut water off
Make sure that the tube insert (1603) and sleeve (1008-3) is correctly installed as per fig 4
Fully tighten the compression nut to make sure seal is made
Turn valve handle counter clockwise to start water flow
If problem persists, call Rainfresh for assistance
Replace faucet cartridge
Call Rainfresh to order ceramic disc cartridge kit (1040-2)
Limited 1 Year Warranty
This system (excluding filter cartridge(s) and battery) is warranted to the original consumer purchaser/owner, for a period of one (1) year, from the date of purchase,
against defects in materials or workmanship. The company’s obligation under this warranty shall consist of repair, replacement or credit, at its option, of any part found
by company inspection to be defective, provided that the product has not been misused, abused, altered or damaged as determined by the company and provided
that only approved Enivrogard/Rainfresh replacement cartridges have been used. This warranty does NOT apply to the replacement cartridge(s) or battery which by
nature will diminish in performance through normal use and require(s) regular replacement. This warranty does NOT cover, and is intended to exclude, any liability on
the part of Envirogard for any incidental damages, consequential damages, labour charges or any other costs incurred in connection with the purchase, installation, use,
maintenance or repair of the water filter whether under this warranty or any other warranty implied by law. Some provinces/states do not allow the exclusion of incidental or consequential damages, so the above limitation or exclusion may not apply to you. This warranty gives you specific legal rights and you may also have other
rights, which vary from province to province/state to state. This warranty applies only to water filters/systems purchased and installed in Canada or the U.S.A.
PARTS LIST
Part #
Description
QCA
Cartridge for chloramine, chlorine, taste and odour
Qty
1
QLV
Cartridge for lead, VOC, cyst, chlorine, taste and odour
1
726-0
Compression Nut 1/4’
2
1008-1
Saddle Valve Complete
1
1008-3
Tube Sleeve 1/4”
2
1011-0
Mounting Screws
3
1040-0
Faucet Assembly Complete
1
1040-2
Ceramic Disc Assembly
1
1040-5
Handle Collar
1
1040-6
Handle
1
1040-7
Spout O-ring
1
1040-8
Spout
1
1040-9
Escutcheon Plate
1
1040-10
Escutcheon Washer
1
1040-12
Locating Washer
1
1040-13
Lock Washer
1
1040-14
Lock Nut
1
1603
1/4” Tube Insert
2
2612
Acculink T-fitting to attach unit to your refrigerator (QS2K only)
1
2545
Battery
1
2718
Dual Head Cover Insert
1
2711-1
Monitor Assembly
1
2714-1
Dual Bridge Connector
1
2723
Cartridge Top “O” ring
4
2726
Sump “O” ring
2
2728
QS2 Head Assembly Complete
2730-19
1/4” plastic tubing
2612
1011-0
1
19 ft
Thank you for purchasing one of our water filters.
We are committed to ensuring that you are totally satisfied.
If you have any problems, don’t go back to the store, please contact us !
Help Line: 1-800-667-8072 Toronto & Area: (905) 884-9388
Web Site: www.rainfresh.ca
ENVIROGARD PRODUCTS LIMITED
6-446 MAJOR MACKENZIE DR. E., UNIT 6, RICHMOND HILL, ON L4C 1J2 CANADA
4.
© COPYRIGHT • ENVIROGARD PRODUCTS LIMITED 2014 • ALL RIGHTS RESERVED
QS2K Inst EF Feb/14