1
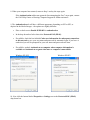
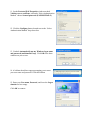
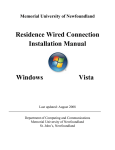
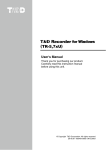
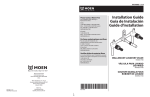
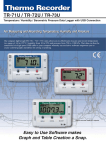
Memorial University of Newfoundland
Residence Wired Connection
Installation Manual
Last updated: August 2008
Department of Computing and Communications
Memorial University of Newfoundland
St. John’s, Newfoundland
A1C 5S7
Introduction
This document will take you through the process of configuring your personal computer to work with the
wired ports in Residence.
Who should use this document?
This document should be used only by MUN students who wish to use wired ports in Residence and have
the Windows XP operating system.
Help
For assistance during the configuration process please contact:
Computing and Communications Help Centre
Phone: 737-4595
E-mail: [email protected]
Hours: 8:30am - 5:00pm (fall & winter); 8:30 - 4:30 (summer)
Requirements
•
•
•
A computer running Windows XP with Service Pack 2 (SP2) or Service Pack 3 (SP3).
A network interface card that supports IEEE 802.1x authentication with the latest drivers
installed.
Your account credentials, which can be generated through the Device Authorization Tool
(DAT) at www.mun.ca/cc. These credentials are used for both wired and wireless access
on campus, so if you already have a wireless account then you know your user name and
password. Remember, you must be a current MUN student to submit the DAT form.
Configuration
1. Plug in your computer cable to the port in your computer, and connect the other end to the
network port on your wall.
2. On your computer click Start > Control Panel and in
the new window that appears double-click Network
Connections
3. Right click the Local Area Connection icon that corresponds to your network
interface card and select Properties.
4. Verify that you have the Authentication tab – it should be located next to the General tab.
Click the tab if you do have it and jump ahead to Step 9.
If you do not have the Authentication tab, move on to Step 5.
5. Click Start > Run and in the Run window type
SERVICES.MSC and click OK.
6. In the Services window locate the Wired AutoConfig
service, it should be near the bottom of the list. Right click
Wired AutoConfig and select Properties.
7. In the new window click the Startup type: drop down box
and select Automatic. Click OK to save the change.
Now close all windows, and restart your computer.
8. When your computer has restarted, return to Step 1 and try the steps again.
If the Authentication tab has not appeared after attempting the first 7 steps again, contact
the C&C Help Centre or Housing Computer Support for further assistance.
9. The Authentication tab will have a different appearance depending on SP2 or SP3, as
depicted in the labeled images – the options are slightly different.
•
Place a check next to Enable IEEE 802.1x authentication
•
In the drop down box below that select Protected EAP (PEAP).
•
If available, check the box labeled Cache user information for subsequent connections
to this network to save your user name and password for automatic login. If you leave it
unchecked you will be prompted for your user name and password each time.
•
If available, uncheck Authenticate as computer when computer information is
available and Authenticate as guest when user or computer is unavailable.
Windows XP SP 2
Windows XP SP3
10. Now click the button labeled Properties or Settings next to the Protected EAP (PEAP)
drop down box.
11. On the Protected EAP Properties window uncheck
Validate server certificate, and under “Select Authentication
Method” choose Secured password (EAP-MSCHAP v2)
12. Click the Configure button located next to the “Select
Authentication Method” drop down box.
13. Uncheck Automatically use my Windows logon name
and password (and domain if any). Click OK to the three
windows on your screen.
14. A balloon should now appear prompting you to enter
your user name and password. Click this balloon.
15. Enter your User name, Password, and leave the Logon
domain text box empty.
Click OK to connect.