1
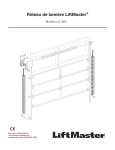
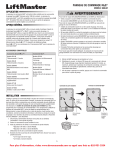
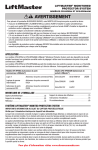
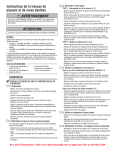
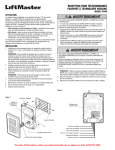
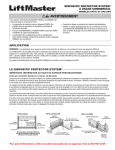
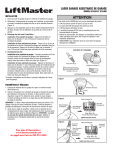
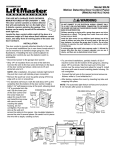
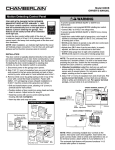
SMART CONTROL PANEL®
Model 880LM
A
To prevent possible SERIOUS INJURY or DEATH from
electrocution:
• Be sure power is NOT connected BEFORE installing door
control.
• Connect ONLY to 12 VOLT low voltage wires.
To prevent possible SERIOUS INJURY or DEATH from a closing
garage door:
• Install door control within sight of garage door, out of reach
of children at a minimum height of 5 feet (1.5 m), and away
from ALL moving parts of door.
• NEVER permit children to operate or play with door control
push buttons or remote control transmitters.
• Activate door ONLY when it can be seen clearly, is properly
adjusted, and there are no obstructions to door travel.
• ALWAYS keep garage door in sight until completely closed.
NEVER permit anyone to cross path of closing garage door.
Yellow LEARN Button
Safety Reversing Sensors
A
Smart Control Panel®
FEATURE OVERVIEW
The features are adjustable and may be turned off or on as desired. Refer to the Feature Settings section.
SCREEN
MOTION SENSOR
The screen will display the time and temperature until the menu
button is pressed, and then it will display the menu options. If
there is a problem with the garage door opener the screen will
display the Diagnostic Code.
The motion sensor will automatically turn on the garage door
opener lights when motion is detected. The lights will come on for
the set period of time, then shut off. The factory setting is on and
set at 4-1/2 minutes.
LIGHT BUTTON
LOCK
Press the LIGHT button to turn the garage door opener lights on or
off. When the lights are turned on they will stay on until the LIGHT
button is pressed again, or until the garage door opener is
activated. Once the garage door opener is activated the lights will
turn off after the specified period of time (the factory setting is
4-1/2 minutes). The LIGHT button will not control the lights when
the door is in motion. The duration of the light timing can be
adjusted by accessing the menu using the navigation buttons.
The LOCK feature is designed to prevent activation of the garage
door opener from remote controls while still allowing activation
from the door control and keyless entry. This feature is useful for
added peace of mind when the home is empty (i.e. vacation).
TIMER-TO-CLOSE (TTC)
DO NOT enable TTC if operating a one-piece door. TTC is to be
used ONLY with sectional doors. Factory default is set to off. TTC
can be set to automatically close your garage door from the fully
open position after a specified period of time (1, 5, 10 minute
1
intervals or a custom setting up to 99 minutes). The garage door
opener will beep and the lights will flash before closing the door.
The screen on the door control can display the status of the TTC.
TTC WILL NOT work if the garage door opener is operating by
battery power or if the safety reversing sensors are misaligned.
This feature is NOT intended to be the primary method of closing
the door. A keyless entry should be installed in the event of an
accidental lock out when using this feature.
MAINTENANCE ALERT SYSTEM (MAS)
This feature assists the homeowner in ensuring the garage door
opener system stays in good working condition. A maintenance
alert message will display on the screen indicating the garage door
opener may be in need of maintenance.
The MAS feature MUST be activated at time of installation. The
factory setting is off.
For more information, please visit www.devancocanada.com or call toll free at 855-931-3334
B
C
D
HARDWARE
1
DRYWALL
6ABx1-1/4"
2
1
GANG BOX
Drywall Anchors
7/16" (11 mm)
6-32x1"
2
7/16" (11 mm)
7
4
WHITE
RED
GREY
6
3
3
5
1
2
INSTALLATION
B
WIRE THE DOOR CONTROL
Install the door control within sight of the door at a minimum
height of 5 feet (1.5 m) where small children cannot reach, and
away from the moving parts of the door. For gang box installations
it is not necessary to drill holes or install the drywall anchors. Use
the existing holes in the gang box.
NOTE: Pre-wiring means that your garage already has wires
installed for the door control.
1 Unplug the garage door opener to prevent the garage door
opener from activating during wiring.
2 Strip 7/16 inch (11 mm) of insulation from one end of the wire
and separate the wires.
3 Connect one wire to each of the two screws on the back of the
door control. The wires can be connected to either screw.
PRE-WIRED INSTALLATIONS: Choose any two wires to
connect, but make note of which wires are used.
C
MOUNT THE DOOR CONTROL
1 Mark the location of the bottom mounting hole and drill a 5/32
inch (4 mm) hole.
2 Install the bottom screw, allowing 1/8 inch (3 mm) to protrude
from the wall.
3 Position the bottom hole of the door control over the screw and
slide down into place.
4 Lift the push bar up and mark the top hole.
5 Remove the door control from the wall and drill a 5/32 inch
(4 mm) hole for the top screw.
6 Position the bottom hole of the door control over the screw and
slide down into place. Attach the top screw.
7 Close the push bar.
2
D
WIRE TO GARAGE DOOR OPENER
1 Strip 7/16 inch (11 mm) of insulation from the end of the wire
near the garage door opener.
2 Connect the wire to the red and white terminals on the garage
door opener. The wires can be connected to either terminal. To
insert or release wire, push in tab with screwdriver tip.
3 Reconnect power to the garage door opener. If the door control
has been installed and wired correctly, a message will display
on the screen. To synchronize the garage door opener and the
door control, press the push bar up to 3 times, until the garage
door opener activates. The time and temperature will display on
the door control when the door control and the garage door
opener are synchronized.
PRE-WIRED INSTALLATIONS: Connect the same wires to the
garage door opener that were previously connected to the
door control.
E
Push Bar
Screen
Navigation Buttons
Motion Sensor
LIGHT Button
E
OPERATION
PUSH BAR
TIMER-TO-CLOSE (TTC)
Press the push bar to open or close the door.
DO NOT enable TTC if operating a one-piece door. TTC is to be
used ONLY with sectional doors.
Once the TTC has been set and the door is open, the selected
close interval will be displayed on the screen and toggle between
the time and TTC message. The garage
door opener will beep and the lights will
flash before closing the door.
When the TTC is on the following
message will display on the door control:
NAVIGATION BUTTONS
Use the navigation buttons to make selections and program
features.
GARAGE DOOR OPENER LIGHTS
Press the LIGHT button to turn the garage door opener lights on
or off. When the lights are turned on they will stay on until the
LIGHT button is pressed again, or until the garage door opener is
activated. Once the garage door opener is activated the lights will
turn off after the specified period of time (the factory setting is
4-1/2 minutes). The LIGHT button will not control the lights when
the door is in motion.
MOTION SENSOR
This feature will automatically turn on the garage door opener
lights when motion is sensed. The lights will come on for the set
period of time, then shut off.
LIGHT FEATURE
The lights will turn on when someone enters through the open
garage door and the safety reversing sensor infrared beam is
broken.
If using the garage door opener light as a work light, turn the light
on using the light button on the wall control or the light will turn
off if you are beyond the range of the sensor.
To temporarily suspend the TTC feature
press and release the HOLD button.
Press REL button to resume normal TTC
operation.
The TTC feature will deactivate if the garage door encounters two
sequential obstructions; or the safety reversing sensors are
incorrectly installed. The garage door will reverse open and WILL
NOT close until the obstructions are removed or the safety
reversing sensors are correctly installed.
When the obstruction has been cleared
or the safety reversing sensors have
been aligned, the door will close when
the garage door opener is activated.
3
LOCK
When the Lock feature is on, your
remote controls have been
disabled and the following
message will display on the door
control:
BATTERY BACKUP ONLY
If your garage door opener has
a battery backup one of the
following messages will display
on the door control if there is a
problem with the battery:
MAINTENANCE ALERT (MAS)
When the maintenance alert is
on and the garage door opener
needs maintenance the following
message will display on the
screen:
G
F
FIGURE 1
1
2
FIGURE 2
4a
Navigation Buttons
3
TO REMOTE
4b
1
2ABC
3DEF
4GHI
5JKL
6MNO
7PRS
8TUV
9WXY
0 QZ
#
*
?
?
?
?
FIGURE 3
*
0 QZ
FIGURE 4
#
ENTER
ENTER
PIN
PROGRAM
F
TO ADD, REPROGRAM, OR CHANGE A REMOTE
CONTROL/KEYLESS ENTRY PIN
1 Press the navigation button below “MENU” to view the
Features menu.
2 Use the navigation buttons to scroll to “PROGRAM” and
to continue.
press the navigation button under
3 Select “REMOTE” or “KEYPAD” to program from the program
to continue.
menu. Press
4a Press the button on the remote control that you wish to operate
your garage door.
4b Enter a 4-digit personal identification number (PIN) of your
choice on the keyless entry keypad. Then press the ENTER
button.
The garage door opener lights will flash (or two clicks will be
heard) when the code has been programmed. Repeat the steps
above for programming additional remote controls or keyless entry
devices. If programming is unsuccessful, refer to the remote
control instructions.
G
MENU NAVIGATION
The features on the door control can be programmed through a
series of menus on the screen and the navigation buttons. Refer to
the descriptions below.
SCREEN
The main screen displays the time, temperature, and current battery
charge (if applicable) (Figure 1).
WI-FI SETUP
SERVICE
NOTE: If Wi-Fi option is not listed, your garage door opener is not
Wi-Fi compatible.
Select “MENU”. Select “PROGRAM”. Select “Wi-Fi SETUP”. When
“ON” is displayed, you may begin Wi-Fi setup.
Press and hold the LIGHT button, then press the second navigation
button to view the Service menu (Figure 4).
FEATURES
Press the navigation button below "MENU" to view the Features
menu (Figure 2).
CLOCK SETUP: Set the time, choose 12 or 24 hour clock and
show/hide clock.
TTC SETTINGS: Set the TImer-to-Close feature off/on and set the
time interval before door closes. NOTE: DO NOT enable TTC if
operating a one-piece door. TTC is to be used ONLY with sectional
doors.
LOCK: Enable/disable lock.
PROGRAM: Add remote controls, MyQ® devices, an extra remote
button to control your garage door opener lights, a keyless entry,
and enable Wi-Fi. NOTE: If Wi-Fi option is not listed, your garage
door opener is not Wi-Fi compatible.
SETTINGS
Press the navigation button below the down arrow till you see
TEMPERATURE to view the Settings menu (Figure 3).
TEMPERATURE: Display the temperature in Fahrenheit or Celsius
and show/hide the temperature.
LANGUAGE: Select a language (English, French, or Spanish).
LIGHT SETTINGS: Set duration for garage door opener light to stay
on after operation, selectable range of 1-1/2 to 4-1/2 minutes. Turn
the Motion sensor off/on, and turn the entry light feature off/on.
CONTRAST: Adjust the contrast of the screen.
SOFTWARE REVISION: Displays software version information.
CYCLE COUNT ON/OFF: Turn the Maintenance Alert (MAS) on/off.
TRANSMITTERS: Displays the number of remote controls, MyQ®
devices, door controls and keyless entries currently programed to
operate the garage door opener.
DISPLAY ERROR: Displays any errors that have occurred.
WARRANTY
ONE YEAR LIMITED WARRANTY
LiftMaster warrants to the first consumer purchaser of this product
that is free from defect in materials and/or workmanship for a
period of 1 year from the date of purchase.
NOTICE: To comply with FCC and or Industry Canada rules (IC), adjustment or modifications of this
receiver and/or transmitter are prohibited, except for changing the code setting or replacing the
battery. THERE ARE NO OTHER USER SERVICEABLE PARTS.
Tested to Comply with FCC Standards for Home or office use. Operation is subject to the following
two conditions: (1) this device may not cause harmful interference, and (2) this device must accept
any interference received, including interference that may cause undesired operation.
This Class B digital apparatus complies with Canadian ICES-003.
Cet appareil numérique de la classe B est conforme à la norme NMB-003 du Canada.
FOR SERVICE DIAL OUR TOLL FREE NUMBER:
For
more information,
1-800-528-9131
please visit www.devancocanada.com
LiftMaster.com
or call toll free at 855-931-3334
HOW TO ORDER REPAIR PARTS
DEVANCO CANADA
19192 HAY ROAD, UNIT Q
SUMMERSTOWN, ON K0C 2E0
TOLL FREE: 855-931-3334
www.devancocanada.com
WHEN ORDERING REPAIR PARTS
PLEASE SUPPLY THE FOLLOWING INFORMATION:
3 PART NUMBER
3 DESCRIPTION
3 MODEL NUMBER