1
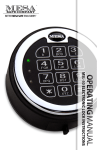
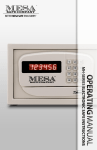
© 2013 MESA SAFE COMPANY
CATEGORY
PAGE
INSTALL BATTERIES
2
OPENING YOUR SAFE
3
CHANGING THE MASTER CODE
3
ADDING & CHANGING ADDITIONAL USER CODES
3
DELETING USER CODES
4
CHANGING THE DISPLAY MODE
4
VIEWING THE LOG
4
DELETING THE LOG
5
QUICK-REFERENCE KEY
6
CAUTION : FIRE SAFE CONTENT STORAGE
6
IMPORTANT INFORMATION ON SAFE USAGE
6
HOW TO ORDER KEYS
7
SAFE WARRANTY
7
PG.2 | MFS-SERIES ELECTRONIC LOCK INSTRUCTIONS
DEAR VALUED CUSTOMER:
Congratulations on choosing your new M ESA S AFE to secure and protect your
valuables! You have made an excellent choice in your security measures.
M ESA S AFE C OMPANY has built a solid reputation on integrity and quality
craftsmanship.
We pride ourselves on delivering the best products in the industry and
consistently exceed customer expectations.
Before using your unit, thoroughly read and understand the Operating Instructions
of the unit. This will ensure maximum efficiency and usability.
! IMPORTANT : DO NOT RETURN SAFE TO STORE
If you are missing parts, have difficulty programming the lock or opening your
safe, or any additional questions regarding the use and care of your safe, DO
NOT RETURN your safe to the store. Please contact M ESA S AFE C OMPANY Technical
Support : 800.490.5624 [Monday thru Friday 7AM - 4PM/PST ] for assistance.
C
r
AA
1
2ABC
3DEF
4GHI
5JKL
6MNO
7PRS
8TUV
9WXY
*
0Z
Q
r
AA
#
r
ƵƩŽŶ
AA
r
AA
“*”
ƵƩŽŶ
“
#
”
ĂƩĞƌLJ
ŽŵƉĂƌƚŵĞŶƚ
ĂƩĞƌŝĞƐ
CHECK LIST
n 4AA Batteries
m 2 Manager Keys [used to lock handle]
m 2 Interior Drawer Keys
Shelves & Shelf Clips [refer to your model’s specifications to make sure all
required shelving is in your safe]
INSTALL BATTERIES
1 Slide the battery cover off the right hand side of the lock face
2 Insert the 4AA Batteries [included] into the battery compartment &
replace cover [Battery Compartment; refer to graph above]
You will hear a ‘Beep’ once the batteries are properly installed
MFS-SERIES ELECTRONIC LOCK INSTRUCTIONS | PG.3
OPENING YOUR SAFE [For the first time]
1 Input : * [Start Button; refer to graph]
2 Input the given Factory Code
3 Input : # [End Button; refer to graph]
-4-5-6-0-#
*
4 If entered correctly, [[ MATCH! ]] will appear on the display. You will hear a
Example :
slight ‘Click’, and have approximately 3 seconds to open the door
5 Pull the handle downward to open the door
If a wrong code is entered, the lock will ‘Beep’ 2 times & [[ ERROR ]] will
appear on the display
If a wrong code is entered 3 times consecutively, the lock will go into
Lock-Out Mode for 3 minutes, [[ WAIT ]] will appear on the display & ‘Beep’
every couple seconds for the duration of the Lock-Out period
NOTE : During Lock-Out Mode you will not be able to insert any codes. If
you attempt to remove the batteries & reinsert them, the Lock-Out Mode
time will reset.
CHANGING THE MASTER CODE
IMPORTANT : Because the codes are factory set, we highly recommened
changing the codes to your own unique codes immediately!
NOTE : Always perform this operation with the door open! Test the new
code several times before closing the door.
1 Press the Reset button located inside the door panel [Reset Button; refer to
2
3
4
graph]
[[ NEW_PW ]] will appear on the display along with a ‘Beep’
Input your new Personal Code. You will have approximately 10 seconds to
enter your new code [1-8 Digits long]
Input: # ; [[ NEW_PW ]] will appear on the display and ‘Beep’ 3 times
IMPORTANT : Try your new code at least 3 times with the door open
before closing the safe shut.
ADDING & CHANGING ADDITIONAL USER CODES
NOTE : You must know the Master Code to set additional User Codes.
1 Input: *
2 Input: # ; [[ MASTER_PW ]] will appear on the display
3 Input : Master Code - # ; [[ 0_EXIT ]] will appear on the display
4 Input : 1; [[ C-NO: ]] will appear on the display
PG.4 | MFS-SERIES ELECTRONIC LOCK INSTRUCTIONS
5 Input the User Number you would like to set or change:
2 = User 2; 3 = User 3; 4 = User 4; 5 = User 5
[[ NEW_PW: ]] will appear on the display
6 Input a new code for that User [1-8 Digits long]
7 Input: # ; [[ SUCCESS!]] will appear on the display if entered correctly
*
Example : - # - 4560 - # - 1 - 2 - 1234 - # - 1234 - #
If at any Step you get a [[ FAILURE ]] or any errors, you must begin from
Step 1 again
DELETING USER CODES
NOTE : You must know the Master Code to delete User Codes.
1 Input: *
2 Input: # ; [[ MASTER_PW ]] will appear on the display
3 Input : Master Code - # ; [[ 0_EXIT ]] will appear on the display
4 Input : 2; [[ D-NO: ]] will appear on the display
5 Input the User Number you would like to delete:
2 = User 2; 3 = User 3; 4 = User 4; 5 = User 5
[[ 1=YES OR 0=NO ]] will appear on the display
6 Input: 1; [[ SUCCESS!]] will appear on the display
*
Example : - # - 4560 - # - 2 - 2 - 1
If you change your mind & decide not to delete the selected User Code,
press 0 instead of 1 & the procedure will cancel (as it appears on display: [[
...0=NO ]])
CHANGING THE DISPLAY MODE
NOTE : You must know the Master Code to change the Display Mode.
1 Input: *
2 Input: # ; [[ MASTER_PW ]] will appear on the display
3 Input : Master Code - # ; [[ 0_EXIT ]] will appear on the display
4 Input : 7; [[ DISPLAY MODE ]] will appear on the display
If the Display Mode is changed successfully, all codes
will now appear as asteriks [ ] instead of digits
To change the Display Mode back, repeat Steps 1-4
Example : - # - 4560 - # - 7
*
*
VIEWING THE LOG
NOTE : You must know the Master Code to view the Log.
1 Input: *
2 Input: # ; [[ MASTER_PW ]] will appear on the display
MFS-SERIES ELECTRONIC LOCK INSTRUCTIONS | PG.5
3 Input : Master Code - # ; [[ 0_EXIT ]] will appear on the display
4 Input : 8; Several digits will appear on the display
2 Input: # to scroll from page to page
Each page is one full screen
Example : - # - 4560 - # - 8 - #...
*
KEY TO IDENTIFYING THE LOG
If number 1-5 appears on the display, the safe was opened successfully
using the User 1 Code [the Master Code], & so forth
If A-E is shown on the display, a User Password was changed [A=Master
Code B=User 2 Code, and so on through the letter E]
If B-E is shown on the display, User 2-5 was deleted
If 0 is shown on the display, the safe was opened with the Factory Code
If X is shown on the display, 3 wrong codes were entered & the safe went
into Lock-Out Mode
!
>
"
#
$
%
&
'
#
(
)
*
+
$
,
(
-
#
.
'
#
*
)
(
#
,
"
)
.
#
)
$
,
"
#
/
-
.
0
1
2
3
?
4
7
@
A
5
.
:
B
7
,
)
#
2
.
:
C
D
E
2
(
.
#
2
(
#
(
.
#
(
7
.
#
(
7
.
#
(
#
/
2
6
6
(
<
)
9
(
8
,
.
6
8
,
7
3
.
)
/
/
9
#
#
#
)
#
/
0
/
#
/
)
)
2
/
)
6
#
#
2
$
.
2
/
#
/
2
9
#
,
"
#
.
2
*
#
/
0
9
#
$
.
.
/
#
5
2
,
1
#
"
/
2
/
"
,
#
$
;
6
)
#
8
)
0
#
$
#
/
,
"
#
.
2
*
#
=
)
0
#
$
#
/
,
"
#
.
2
*
#
#
.
2
*
#
/
#
/
/
F
DELETING THE LOG
NOTE : You must know the Master Code to delete the Log.
1 Input: *
2 Input: # ; [[ MASTER_PW ]] will appear on the display
3 Input : Master Code - # ; [[ 0_EXIT ]] will appear on the display
4 Input : 9; [[ 1=YES OR 0=NO ]] will appear on the display
2 Input: 1; [[ SUCCESS!]] will appear on the display
*
Example : - # - 4560 - # - 9 - 1
If you change your mind & decide not to delete the Log, press 0 instead
PG.6 | MFS-SERIES ELECTRONIC LOCK INSTRUCTIONS
of 1 & the procedure will cancel (as it appears on display: [[ ...0=NO ]])
QUICK-REFERENCE KEY
G
Adding & Changing Additional User Codes:
- # - MASTER CODE - # - 1
H
*
*
Changing the Display Mode:
- # - MASTER CODE - # - 7
*Viewing
the Log:
- # - MASTER CODE - # - 8
*Deleting
the Log:
- # - MASTER CODE - # - 9
*
Deleting User Codes:
- # - MASTER CODE - # - 2
I
J
K
n CAUTION FIRE SAFE CONTENT STORAGE
A fire safe contains insulation material, which may cause humidity to be
present when closed extended periods of time. It is recommended that the
safe is opened on a regular basis and iterior allowed to air out. It is also
recommended that safe contents sensitive to moisture be kept in a sealed
container [i.e., zip lock bag, etc.]
L
L
L
L
L
L
L
L
u IMPORTANT INFORMATION ON SAFE USAGE
Hold on to your Proof of Purchase [receipt/invoice].
You will need this to order keys or use the Warranty Service
Do not open your safe if it is lying on its side, back or top.
Only open your safe when it is in the upright position
Do not slam the door. Extreme shock can damage the lock or jam the
bolt work system
Do not shut the door with the locking bolts in the locked position.
This may damage the locking bolts & create problems unlocking &
locking the safe
Do not stack contents of the safe so that the door must be forced shut.
Bolt works may jam as a result
Keep liquids away from the keypad. Liquids can damage the keypad
The safe door is removeable. To remove door, unlock the safe, open the door
& lift the door up. Do not lose the hinge pins - they may slide out of the
hinge when removing the door. If they happen to slide out, you can easily
insert them back into the hinge.
If you experience a difference in the feel of the operation, inconsistency
or difficulty opening or operating the safe, DO NOT LOCK THE SAFE.
MFS-SERIES ELECTRONIC LOCK INSTRUCTIONS | PG.7
Immediately contact our Professional Tech Assistants at M ESA S AFE
C OMPANY Customer Care : 800.490.5624 [Monday thru Friday 7AM - 4PM/PST ]
HOW TO ORDER KEYS
1 Contact Mesa Safe’s Sales Department for availability & prices :
2
800.490.5624
You will need to provide your Proof of Purchase [receipt/invoice]. If you
can’t provide a Proof of Purchase, please send a notarized document
stating that you are the owner of the safe [must send the original notartized
document by mail, copies will NOT be accepted]
2 Make sure these items are on your notarized document: Name, Safe
Number, Key Number [stamped on the key lock], Mailing Address
~ MESA SAFE COMPANY LIMITED 1 YEAR WARRANTY
Mesa Safe Company will gurarantee your Mesa Safe free from defects for a
period of one year from original purchase date on maufacture defects only.
This warranty is non-transferable and only applies to original owner with
proof of purchase from an authorized dealer.
Mesa Safe Company will not, under any circumstances, be liable to the initial
consumer for any incidental, consequential, special, exemplary, or punitived
damages arising out of the purchase or use of any Mesa Safe Company
product(s). Mesa Safe Company’s liability for any breach of this warranty shall
be limited exclusively to repair or replacement of the defective product(s),
as described above or a refund of the product(s). In no event shall Mesa Safe
Company’s obligation under this warranty exceed the price of the original
product(s). Under no circumstances will Mesa Safe Company be held liable for
contents stored inside the Safe(s).
This warranty is limited to the terms stated herin. All expressed and implied
warranties including the warranties of merchantability and fitness for a
particular purpose are excluded, except as stated above. Mesa Safe Company
disclaims all liabilities for incidental or consequential damages resulting from
the use of this product, or arising out of any breach of this warranty. Some
states do not allow the exclusion or limitation of incidental or consequential
damages, so the above limitation may not apply to you. This warranty gives
you specific legal rights, and you may have other rights as well, which will
vary from state to state.