1
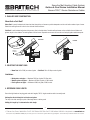
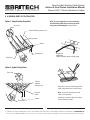
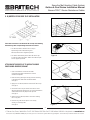
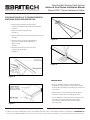
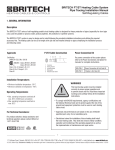
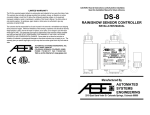
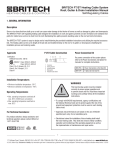
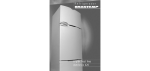
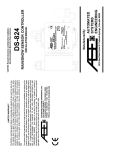
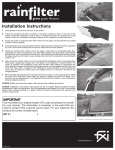
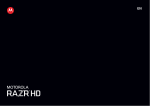
Snow/Ice Melt Heating Cable System Gutters & Roof Drains Installation Manual Nexans TXLP/1 Series Resistance Cables heating cables & controls 1. GENERAL INFORMATION Description Snow or ice dams that have built up on a roof can cause water damage to the interior of homes as well as damage to gutters and downspouts. This custom TXLP/1 single conductor heating cable system is normally used due to high loads and varying gutter and drain lengths for different projects. When installed properly on roofs and gutters it will prevent ice dam formation and maintains flow paths for melted snow and ice to drain from the roof. Maintaining flow paths prevents standing water on the roof and icicle formations. Technical Information • Max. continuously operating temperature outer jacket 65 °C (149 °F) • Min. bending radius is 5x cable diameter Overall diameter approx. 6.5 mm (1/4”) • Tolerance on conductor resistance: -5 to + 10% • Highest system voltage: 600 V • Stranded resistance wire, XLPE insultation, earthing conductor, metallic sheath (aluminum), PVC outer jacket. Mounting Accessories Accessories required to install your custom Nexans TXLP heating cable system for frost protection of gutters and roof drains. Controls Weather proof thermostats, snow sensors and controls are available for any application. Contact Britech for selection assistance. Approvals RCK-1 Roof Clip BT-50 Britech Roof Clip (Matt Black) 10068944 Plastic Spacers for Gutters/Drains BRIPP-75 Galvanized Clip Strip BRISS-75 Stainless Steel Clip Strip 10191134 Stainless Steel Suspension Hanger For Technical Assistance: For product selection, design assistance and technical questions please contact Britech at 1-877-33-57790 Typical Roof & Gutter Installation A & B: Downspout Installation C: Valley Configuration D: Over the Dormer Installation • Height and width of the loops on the roof edge varies. • One return in the gutter. CAUTION: Series resistance heating cables such as TXLP/1 must not cross or touch each other at any point, on the roof or in the downspout. Failure to use the heating cable spacers and/or maintain a 2” separation along the entire length of the cable may result in burnout, cable failure and will void the warranty. 1 17 Pullman Court, Toronto, ON M1X 1E4 • Tel: 877-335-7790/416-335-7790 • Fax: 877-335-3166/416-335-8071 • [email protected] • www.britech.ca © 2014, Britech Corp. Disclaimer of liability: Any information given here is understood as a guideline without any legal obligation. Technical data subject to alteration without notice. 03/2014 Snow/Ice Melt Heating Cable System Gutters & Roof Drains Installation Manual Nexans TXLP/1 Series Resistance Cables heating cables & controls 2. EVALUATE ROOF CONSTRUCTION Warm Roof or Cold Roof? Warm Roof: A poorly insulated roof where heat loss through the roof causes a positive temperature on the roof surface under a layer of snow. Water from melting snow will collect in the cold roof drains and freeze. Cold Roof: A well insulated roof where icing occurs, often in the late winter. Sunshine will melt snow on the roof while the roof drains and gutters may be in the shadow. The melting water will then freeze. Repeated occurrences will harm the roof and split gutters and downspouts. ÷ Warm Roof ÷ ÷ ÷ ÷ ÷ Cold Roof ÷ ÷ Warm Warm Cable Cable + + + + + + + + 3. SELECTING THE RIGHT LOAD • Warm Roof: 40 to 50 W per meter of gutter • Cold Roof: 30 to 40 W per meter of gutter Limitations: • Metal gutters and pipes — Maximum 50 W/m of gutter, 25 W/m cable • Wooden gutters and pipes — Maximum 36 W/m of gutter, 18 W/m cable • Plastic gutters and pipes — Maximum 40 W/m of gutter, 20 W/m cable 4. DETERMINE CABLE LENGTH Due to the high loads and varying gutter and drain lengths, TXLP/1 single conductor cable is normally used. Add together the total length of roof drains and gutters. The loop in the drain must go to point of discharge above or below grade. Multiply this length by 2 to determine the cable length. 2 17 Pullman Court, Toronto, ON M1X 1E4 • Tel: 877-335-7790/416-335-7790 • Fax: 877-335-3166/416-335-8071 • [email protected] • www.britech.ca © 2014, Britech Corp. Disclaimer of liability: Any information given here is understood as a guideline without any legal obligation. Technical data subject to alteration without notice. 03/2014 Snow/Ice Melt Heating Cable System Gutters & Roof Drains Installation Manual Nexans TXLP/1 Series Resistance Cables heating cables & controls 5. INSTALLATION ON GUTTERS & ROOF DRAINS Heating cable fastened at the outlet TXLP Cable with spacer and clip strip Downspout hanger • Length of downspout up to 35 metres • Cable continues on both sides of the drain Tips for Installing TXLP/1 Cables Drain with downspout hanger • Cables are fastened at the end Note: Beware of possible sharp edges inside drains • Two rows of cable in gutter and drain • Spacers with arc facing up. Approximately 3 used per metre. • Downspout hanger installed to support weight of cable on vertical run • Heating cable should be fastened at the outlet Roof & Gutter Accessories • At the top provides the best protection A) Clip Strip • At the bottom prevents icing in the opening B) Roof Clip • Always run cable to point of water discharge to prevent freezing C) Suspension Hook B D) Plastic Spacer A ✘ do not cross ✘ do not overlap ✘ C do not group IMPORTANT: Do not cross, overlap or group cables D !CAUTION: Series resistance heating cables such as TXLP/1 must not cross or touch each other at any point, on the roof or in the downspout. Failure to use the heating cable spacers and/ or maintain a 2” separation along the entire length of the cable may result in burnout, cable failure and will void the warranty. 4 17 Pullman Court, Toronto, ON M1X 1E4 • Tel: 877-335-7790/416-335-7790 • Fax: 877-335-3166/416-335-8071 • [email protected] • www.britech.ca © 2014, Britech Corp. Disclaimer of liability: Any information given here is understood as a guideline without any legal obligation. Technical data subject to alteration without notice. 03/2014 Snow/Ice Melt Heating Cable System Gutters & Roof Drains Installation Manual Nexans TXLP/1 Series Resistance Cables heating cables & controls Roof clip Roof clip eam roof 6. A) GENERAL ROOF CLIP INSTALLATION Sloped standing Sloped standing seam roof Option 1: Slope Standing Seam Roof Roof clip utter NOTE: For some applications, it may be necessary to install heating cable loops on the roof as well as in the gutters and downspouts. Consult Britech. Deicing cable Deicing cable Sloped standing seam roof Gutter G Deicing cable ut Downsp Downspout Gutter Drip Loop Drip Loop Single Clip Installation: Downspout Install clip/nails under shingle edge. Single Clip Installation: Install clip/nails under shingle edge. Drip Loop Single Clip Installation: Install clip/nails under shingle edge. Option 2: Asphalt Shingle Roof Roof clip Roof clip Typical asphalt shingle roof 24 ” wi Tra dt ce h Roof clip 24 ” wi Tra dt ce h Deicing cable Cable in gutter Cable n gutter Gutter 24 ” wi Tra dt ce h Drip Loop Typical asphalt shingle Using pliers, close the clips firmly aboutroof the cable, being careful not to crush the cable. Note: use clip strip and spacers to hold Deicing cable in place in gutters. cable Typical Install clips as shown to attach theasphalt cable to shingle roof the roof, shingle and gutter. Gutter Drip Loop Deicing cable Cable 3 in gutter 17 Pullman Court, Toronto, ON M1X 1E4 • Tel: 877-335-7790/416-335-7790 • Fax: 877-335-3166/416-335-8071 • [email protected] • www.britech.ca Gutter © 2014, Britech Corp. Disclaimer of liability: Any information given here is understood as a guideline without any legal obligation. Technical data subject to alteration without notice. 03/2014 Drip Loop Snow/Ice Melt Heating Cable System Gutters & Roof Drains Installation Manual Nexans TXLP/1 Series Resistance Cables heating cables & controls 6. B) BRITECH BT-50 ROOF CLIP INSTALLATION Figure 1. Follow these instructions to use Britech BT-50 roof clips when attaching Britech deicing cable to asphalt shingle and metal roof surfaces. • Use adhesive/sealant to adhere BT-50 roof clips to asphalt shingles and metal/aluminum gutter. Adhesive/sealant must be supplied by installer. Figure 2. • Use double-sided adhesive pads to adhere BT-50 roof clips to metal roof surfaces and gutters. Double-sided adhesive pads must be supplied by installer. Figure 1. ATTACHING BT-50 ROOF CLIP TO ASPHALT SHINGLE ROOFS USING ADHESIVE/SEALANT 1. Clean roof with water to remove dirt and debris. Consult adhesive/sealant manufacture for minimum installation temperature. 2.Figure Determine 2. deicing cable layout and clip placement according to the Britech Roof-Gutter-Drain Installation Manual. See Figure 1. Figure 3. 3. Apply 0.2 oz. of adhesive/sealant to the back of BT-50 roof clip. See Figure 2. 4. Orient the BT-50 roof clip as needed. Press down to ensure adhesive/sealant flows through holes. Do not trim back adhesive/ sealant beads because they help hold the clip down. See Figure 3. 5. Allow 24 hours for adhesive/sealant to cure before installing the de-icing cable. Figure 3. 6. Install de-icing cable and use pliers to close clamps, ensuring not to damage cable. See Figure 4. Figure 4. 5 17 Pullman Court, Toronto, ON M1X 1E4 • Tel: 877-335-7790/416-335-7790 • Fax: 877-335-3166/416-335-8071 • [email protected] • www.britech.ca © 2014, Britech Corp. Disclaimer of liability: Any information given here is understood as a guideline without any legal obligation. Technical data subject to alteration without notice. 03/2014 Snow/Ice Melt Heating Cable System Gutters & Roof Drains Installation Manual Nexans TXLP/1 Series Resistance Cables heating cables & controls Figure 7. ATTACHING BT-50 ROOF CLIP TO STANDING SEAM METAL ROOFS USING DOUBLE-SIDED ADHESIVE PADS 1. Determine deicing cable layout and clip placement according to the Britech Roof-Gutter-Drain Installation Manual. See Figure 5. 2. Prepare roof surface removing oil and dirt. See Figure 6. 3. Apply one double-sided adhesive pad to the back of BT-50 roof clip. See Figure 7. Figure 8. 4. Orient BT-50 roof clip as needed on prepared surface. Press down to ensure double-sided adhesive pad adheres to surface. See Figure 8. 5. Install deicing cable and use pliers to close clamps, ensuring not the damage cable. See Figure 9. Figure 5. Figure 9. Figure 6. IMPORTANTNOTES: • Please refer to adhesive directions for minimum application temperature and duration of adhesive curing time before installing the deicing cable. Depending upon your adhesive you may also need to use a primer. • When using pliers to close the clips firmly around the cable, be careful not to crush the cable. This may damage the system. • For some applications, it may be necessary to install heating cable loops on the roof as well as in the gutters and downspouts. Consult Britech for additional products required in installing your deicing system. Figure 7. 6 17 Pullman Court, Toronto, ON M1X 1E4 • Tel: 877-335-7790/416-335-7790 • Fax: 877-335-3166/416-335-8071 • [email protected] • www.britech.ca © 2014, Britech Corp. Disclaimer of liability: Any information given here is understood as a guideline without any legal obligation. Technical data subject to alteration without notice. 03/2014 CONTROL CARD Heating Cable System heating cables & controls Product Name: Model #: Watts: Volts: Supplier/Purchased from: APPLICATION: floor warming radiant heating snow melting roof de-icing pipe tracing other LOCATION : TEST Before commencing installation After installation but before final surface After final surface installation Continuity Resistance of Cable (OHMS) Insulation Resistance (M OHMS) Address of Installation: Date of Installation: (MM/DD/YY) Name of Qualified Electrician: Signature of Qualified Electrician: IMPORTANT:The system warranty is not valid without evidence that the system resistance has been tested. Control Card must be completed and given to the property or homeowner upon completion of installation and required testing. For assistance with your heating cable product please contact Britech by calling 1-877-335-7790 or email [email protected] 7 CONTROL CARD 17 Pullman Court, Toronto, ON M1X 1E4 • Tel: 877-335-7790/416-335-7790 • Fax: 877-335-3166/416-335-8071 • [email protected] • www.britech.ca © 2014, Britech Corp. Disclaimer of liability: Any information given here is understood as a guideline without any legal obligation. Technical data are subject to alteration without notice. 03/2014 WARRANTY INFORMATION Policy Summary / Terms & Conditions heating cables & controls WARRANTYPOLICY All products sold in Canada by Britech Corp. carry the original manufacturers warranties. Britech’s policy is to exchange any non-performing product with a similar product or product of equal value during its warranty period as outlined in the terms below. Full product warranties can be obtained from the manufacturer online and/or by request. Britech will administer and promptly process all warranties in accordance with the manufacturer’s specific warranty policies and procedures. Britech will provide technical assistance to assist the end user or installer in the best method of operation, application and installation. Custom heating cables carry a twenty (20) year warranty. Warranty on custom TXLP cables is provided by Nexans (refer to their warranty statement summary). For more information regarding warranty terms or for assistance with your heating cable product please contact Britech Corp. at 1-877-335-7790 WarrantyTermsforHeatingCables, Mats&CustomCableUnits: BRITECH Terms of Limited Warranty (Summary): This guarantee applies to the following Britech label products: TECH-MAT™, SNOW-MAT™, SNOW-MELT™ and BRI-THIN™ Cables. Britech warrants to the original purchaser only, that the product is to be free of any defects in material or workmanship during the first twenty (20) years after the date of purchase under proper and normal use of the system. This guarantee is a material warranty only and does not cover any labor or other installation cost. The warranty does not cover installations made by unauthorized persons or faults caused by incorrect design by others, misuse, damage caused by others, damage in transit, incorrect installation and any other subsequent damage that may occur. Repair and/or replacement will be fully chargeable if damage is result of any of the above reasons. The buyer must give Nexans Norway written notice of any defect within thirty (30) days following the discovery of the defect, and in no event later than two (2) weeks after the expiry of the warranty period. www.nexans.com WarrantyTermsforControls, Thermostats&Sensors: ASE / Automated Systems Engineering Terms of Limited Warranty (Summary): ASE Products are warranted against defects in workmanship and materials for two (2) years from date of sale. This warranty does not apply to damage resulting from accident, misuse, or alteration nor where connected voltage is more than 5% above the configured operating voltage, nor to equipment improperly installed or wired or maintained in violation of the Owner’s Manual. No other written or oral warranty applies. No employee, agent, dealer or other person is authorized to give any warranties on behalf of ASE. The customer shall be responsible for all costs incurred in the removal or reinstallation and shipping of the product for repairs. Within the limitations of this warranty, inoperative units should be returned, freight prepaid, to ASE, and we will repair or replace, at our option, at no charge to you with return freight paid by ASE. It is agreed that such repair or replacement is the exclusive remedy available from ASE and that ASE IS NOT RESPONSIBLE FOR DAMAGES OF ANY KIND, INCLUDING INCIDENTAL AND CONSEQUENTIAL DAMAGE. www.goase.com BRITECH / HONEYWELL Terms of Limited Warranty (Summary): Honeywell warrants it’s products, excluding battery, to be free from defects in the workmanship or materials, under normal use and service, for a period of three (3) years from the date of manufacture. If at any time during the warranty period the product is determined to be defective or malfunctions, Honeywell shall repair or replace it (at Honeywell’s option) through Britech. If product is defective, return it to the following address: Britech Corp., 17 Pullman Court, Toronto, Ontario M1X 1E4 Toll Free: 1-877-335-7790 • Email: [email protected] Britech is under no circumstances liable for any incidental, special, or consequential damages or losses including without limitation the loss or profit arising from any cause whatsoever. To obtain a replacement under this warranty, please send a description of the defect, proof of purchase, and the damaged product, shipping paid to Britech at the address noted below. The warranty is void if there is any payment default and if data is not filled-in on the control card. www.britech.ca This warranty does not cover removal or reinstallation costs. This warranty shall not apply if it is shown by Honeywell that the defect or malfunction was caused by damage which occurred while the product was in the possession of a consumer. Honeywell’s sole responsibility shall be to repair or replace the product within the terms stated above. www.honeywell.com NEXANS Terms of Limited Warranty (Summary): The Company warrants all products manufactured by it to be free from defects in workmanship or materials under normal use and service. If any part of the product herein described, and sold by the Company proves to be defective in workmanship or material, and if such part is within three (3) years from date of sale, returned to the Company transportation charges prepaid and if the same is found by the Company to be defective in workmanship or material, credit based on current prices will be allowed. The date of sale must be established by a receipt showing the purchase date, seller and product sold. If the date of sale cannot be determined, the warranty shall extend for three (3) years from the date of manufacture. www.jci.com Nexans Norway warrants the products manufactured by it to be free from defects in material and workmanship from the date the warranty form attached to the product is correctly and completely filled in and for a period of twenty (20) years thereafter, or a period of twenty-one (21) years after the production date, whichever period ends first, under proper and normal use and service. Nexans Norway’s responsibility does not include defects caused by material obtained by the buyer or by constructions specified by it. Nexans Norway further warrants that the products will have passed those performance tests, if any, called for in the applicable specifications. JOHNSON CONTROLS Terms of Limited Warranty (Summary): 8 NEXTRON Terms of Limited Warranty (Summary): The manufacturer warrants each control that it manufactures to be free from defective material or workmanship for a period of 12 months from date of purchase. Under this warranty, the obligation of the manufacturer is limited to repairing or replacing the defective control at its option, when returned to the manufacturer’s factory with shipping charges prepaid. If failure has been caused by misuse, incorrect application or alteration of the control, this warranty will be void. UNLESS SPECIFICALLY PROVIDED FOR IN WRITING IN THIS WARRANTY, EACH CONTROL IS PROVIDED WITHOUT ANY WARRANTY OF ANY KIND EITHER EXPRESSED OR IMPLIED. The user shall be made aware that if the equipment is used in a manner not specified by the manufacturer, the protection provided by the equipment may be impaired. www.nextron.ca WarrantyTermsforBRI-GFI GroundFaultInterrupter: BRITECH Terms of Limited Warranty (Summary): Britech warrants the BRI-GFI (Ground Fault Interrupter) is manufactured to be free from defective material or workmanship for a period of 12 months from date of purchase. Under this warranty, the obligation of Britech is limited to repairing or replacing the defective control at its option, when returned to the manufacturer’s factory with shipping charges prepaid. If failure has been caused by misuse, incorrect application or alteration of the control, this warranty will be void. BRITECH IS UNDER NO CIRCUMSTANCES RESPONSIBLE FOR DAMAGES OF ANY KIND, INCLUDING INCIDENTAL AND CONSEQUENTIAL DAMAGES. This guarantee is a material warranty for components only and does not cover any labor. To obtain a replacement under this warranty, please send a description of the defect, proof of purchase, and the damaged product, shipping paid to Britech at the address noted herein. WarrantyTermsforSelf-Regulating Cables(FT-FREEZETRACE/ST-SMARTTRACE) BRITECH Terms of Limited Warranty (Summary): This guarantee applies to Britech’s Self-Regulating Cables: FT (5) five years / ST (2) two years Britech warrants to the original purchaser only, that the product is to be free of any defects in material or workmanship (during warranty term as noted above) after the date of purchase under proper and normal use of the system. This guarantee is a material warranty only and does not cover any labor or other installation cost. The warranty does not cover installations made by unauthorized persons or faults caused by incorrect design by others, misuse, damage caused by others, damage in transit, incorrect installation and any other subsequent damage that may occur. Repair and/or replacement will be fully chargeable if damage is result of any of the above reasons. Britech is under no circumstances liable for any incidental, special, or consequential damages or losses including without limitation the loss or profit arising from any cause whatsoever. To obtain a replacement under this warranty, please send a description of the defect, proof of purchase, and the damaged product, shipping paid to Britech at the address noted herein. The warranty is void if there is any payment default and if data is not filled-in on the control card. www.britech.ca WARRANTY TERMS 17 Pullman Court, Toronto, ON M1X 1E4 • Tel: 877-335-7790/416-335-7790 • Fax: 877-335-3166/416-335-8071 • [email protected] • www.britech.ca © 2014, Britech Corp. Disclaimer of liability: Any information given here is understood as a guideline without any legal obligation. Technical data are subject to alteration without notice. 03/2014