1
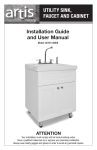
3 person
Infrared Corner Sauna
INST RUCT ION MANU A L
Model 2JOS016CDH
DESIGNED FOR INDOOR USE
DO NOT PLUG THE UNIT INTO THE POWER OUTLET BEFORE READING ALL INSTRUCTIONS
IMPORTANT
Carefully check the unit prior to installation to ensure there is no damage. Do not
dispose of any packaging until you are satisfied with this unit.
If you have any problems with this unit or there are missing or damaged
parts, please call toll free: 1-800-459-4409 (Monday to Friday, 8:30am to
5:00pm, EST). DO NOT RETURN THE UNIT TO THE PLACE OF PURCHASE
before calling the toll free number above.
2
IMPORTANT SAFETY INSTRUCTIONS
WHEN USING ELECTRICAL APPLIANCES, BASIC PRECAUTIONS SHOULD ALWAYS
BE FOLLOWED TO REDUCE THE RISK OF FIRE, ELECTRIC SHOCK, AND INJURY TO
PERSONS, INCLUDING THE FOLLOWING:
1. Read all instruction before using the
sauna.
2. To reduce the risk of injury, do not allow
children to use the sauna unless they are
closely supervised at all times.
3. Do not use the sauna immediately following strenuous exercise. Wait at least 30
minutes to allow the body to cool down
completely.
4. Excessive temperatures have a high potential for causing fetal damage during
the early months of pregnancy. Pregnant
or possibly pregnant women should get
permission from their physician prior to
using the sauna.
5. WARNING: The use of alcohol,
drugs, or medication can greatly increase the risk of fatal hyperthermia.
Hyperthermia Danger: Prolonged exposure to hot air will induce hyperthermia.
Hyperthermia occurs when the internal
temperature of the body reaches a level
several degrees above the normal body
temperature of 37 ˚C (98.6 ˚F). The symptoms of hyperthermia include an increase
in the internal temperature of the body,
dizziness, lethargy, drowsiness, and fainting. The effects of hyperthermia include:
a) Failure to recognize the effects of the
heat
b) Failure to recognize the need to exit the
sauna
c) Unawareness of impending hazard
d) Fetal damage in pregnant women
e) Physical inability to exit the room
f) Unconsciousness
3
6. Persons suffering from obesity or with a
medical history of heart disease, low or
high blood pressure, circulatory system
problems, or diabetes should consult a
physician prior to using the sauna.
7. Persons using medications should consult
a physician before using the sauna since
some medications may induce drowsiness while others may affect heart rate,
blood pressure and circulation.
8. Exercise care when entering or exiting the
sauna.
9. Never sleep inside the sauna while the
unit is in full operation.
10.Do not use liquid cleaners or aerosol
cleaners inside the sauna. Unplug the
sauna from the wall outlet before cleaning. Use a damp cloth for cleaning.
11. Do not stack or store any objects on top of
or inside the sauna.
12. Do not operate the sauna with damaged
cord/wires or plug or after the unit has
malfunctioned. If power supply cord becomes damaged, it must immediately be
replaced by a qualified electrician to avoid
a hazard.
13. Do not use the unit during an electrical
storm, as there is a remote risk of shock.
14. Altering or tampering of any electrical
connections on the power supply will
void the manufacturer’s warranty.
15. Dry your hands before handling electrical
controls. Never unplug the power cord
or adjust the controls with wet hands
or when you have wet bare feet as the
danger of electrical shock exists.
16. Do not attempt any repair without consulting
the manufacturer first. Any unauthorized repair
will void manufacturer’s warranty.
17.Do not use the sauna near water, e.g.
near a bathtub, in a wet basement, or near
a swimming pool or similar wet/damp location.
18. Do not shower inside the sauna. Wood material may warp if it becomes too wet. Do not pour
water or other liquids on heaters and electrical
equipment.
19. Do not run the power supply cord over carpeting or other heat insulators. Keep the cord
away from traffic area or from being pinched
by items placed on or against it. Do not step on
the the power cord or submerge it in water.
20. Unplug the unit from the power supply when
not in use for long periods of time.
21. CAUTION: For indoor household use only.
22. Install in accordance with all the manufacturers installation instructions.
23. CAUTION: Use only time delay fuses or
low-melting point fuses marked “D” or HRC
form 1 fuses.
24. CAUTION: If the manual resettable (reset
plug-14) temperature-limiting control trips
frequently, a qualified serviceman should be
contacted.
25. Minimum room size for assembly:
210cm W x 180cm D x 210cm H
(82.6 in W x 70.8 in D x 82.6 in H)
Tips for use
1. If you feel the need for more cooling, simply
leave the door open until the air around you
feels comfortable.
2. By leaving the thermostat at the highest setting you will get continuous output from the
infrared heaters.
3. Drink plenty of fluids prior to, during, and after
your session.
4. If you take a hot/warm shower or bath before
your sauna session, you may perspire more.
Try it with and without bathing or showering
first to determine which you prefer.
5. To utilize the sauna’s heat therapy effect, give your hair a hot oil treatment while
in the sauna. Apply oil or treatment into
your hair and wrap it with a towel. After the
session is over, rinse your hair thoroughly.
6. Use at least 2-3 towels. Sit on one towel folded
over several times for added cushioning. Place
another towel on the floor to absorb extra per-
4
7.
8.
9.
10.
11.
12.
spiration. Drape a third towel over your knees.
This will add comfort and is useful to towel off
perspiration.
Towelling off excess perspiration during your
session helps the body perspire more freely.
To help relieve sore and tense muscles, massage the affected areas while in sauna.
Do not put any lotions or oils on the body
or face when using the sauna. This may block
the pores and hinder perspiration.
Shaving your face or legs with a razor while
perspiring in a sauna yields an incredibly
smooth result without the use of gels or foams.
Do not eat anything for at least one hour before your sauna session. It is better to take a
sauna on an empty stomach. You are more
likely to feel uncomfortable sitting in a sauna
with a full stomach.
To make the most out of your sauna session,
work your muscles while in the sauna. Stretch
your arms and legs, massage your neck, feet,
etc.
13. You can benefit from the relaxing and soothing effects of a regular sauna session by going
to sleep afterwards. The peaceful and relaxed
state rendered by a sauna session may help
you get to sleep easier.
14.After the session is over, do not immediately take a shower. Since your
body was heated up during the session,
it will continue to perspire even after the heaters are off. Sit in the sauna with the door open
and let the body perspire a little more while
as you cool down. After you feel comfortable
enough, take a warm shower followed by a
cold shower, to cool off completely.
Thank you for choosing our infrared sauna and congratulations on your purchase. We are confident that your entire family will enjoy the many benefits of
using this product for coming years.
Carefully and thoroughly read this manual before using the sauna for the
first time. We recommend keeping this manual for regular review and future
reference.
What is infrared?
Infrared refers to electromagnetic waves whose wavelengths lie between visible light and microwave. Depending on its wavelength, infrared can be further
divided into close-range, mid-range, and distant-range. The distant-range infrared has the longest wavelength and highest efficiency among the three.
5
Introduction
The infrared sauna is composed of a wood structure, five infrared heaters and a control system. The wood structure includes front panel, left back panel, right back panel, bench riser panel with heater, short bench top, wide bench panel, bottom panel,
and top panel. Inside, the walls are installed with infrared heaters and back protection
frames. On the front exterior wall is the control panel. You can use the interior lamp
to read inside sauna room, and there’s an MP3 plug in the back corner for you to
enjoy music, by connecting it to an MP3 player (not included) while taking a sauna.
PanEl PArts
B. INTERIOR (see figure 2)
A. FRONT PANEL
(see figure 1)
6. Ventilation grid
7. Light
8. MP3 holder
9. Speaker
10. Wooden frame
11. Heater
12. Bench panel
13. Bench riser panel without heater
14. Bench riser panel with heater
1.
2.
3.
4.
5.
Control panel
Window safety glass
Handle
Glass door
Air inlet hole
6
1
7
2
9
8
10
3
11
12
4
5
fig. 1
6
14
13
fig. 2
PARTS LIST
Bottom Panel
x1
Top Panel
x1
Front Panel
x1
Bench Riser
Panel / with
Heater x 1
Bench Panel
Long x 1
Door Handle
(outside) x 1
Bulb
x1
Mounting
Screw x 6
MP3 Cable
x1
Right Back
Panel x 1
Bench
Heater x 1
Left Back
Panel x 1
Bench Panel
Short x 1
Door Handle Lamp Frame
(inside) x 1
x1
Power Supply
Cord x 1
LED Control Panel
Cable x 1
Mounting
Screw x 2
Illustrations may vary from actual product
7
1. CONTROL BOX
The control box is the control centre of the sauna room. It’s installed on the
lower back panel (see figure 3).
fig. 3
2. Component Markings
For easy and proper installation, please read the information below thoroughly
to make sure all connections are correct (see form 1).
Form 1
8
ASSEMBLY instructions
IMPORTANT: Please read the operating instructions carefully before assembly.
Three adults are required for the sauna installation.
SAUNA LOCATION
Choose a good location to install the corner sauner. The MAIN POWER cord
must be easily accessible. The location must be dry and level, and far from any
water sources.
PARTS ASSEMBLY IN ORDER
1) BASE PANEL 2) LEFT PANEL / LEFT BACK PANEL 3) RIGHT PANEL /
RIGHT BACK PANEL 4) FRONT PANEL 5) TOP PANEL 6) BENCH HEATER
PANEL 7) BENCH PANEL
STEP 1 - BASE PANEL
Place the BASE PANEL on a flat surface and make sure the front (front side is
marked with a “Front” label) is facing the direction where you want the front of
the sauna to face (see figure 4).
figure 4
STEP 2 - LEFT PANEL / LEFT BACK PANEL
Place the LEFT PANEL / LEFT BACK PANEL onto the BASE PANEL, the
control box is placed at the bottom of the LEFT BACK PANEL (see figure 5).
9
figure 5
STEP 3 - RIGHT PANEL / RIGHT BACK PANEL
Place the RIGHT PANEL / RIGHT BACK PANEL onto the BASE PANEL, align
the tongues of the RIGHT BACK PANEL with the grooves of the LEFT BACK
PANEL, and insert them together. Make sure the air inlet hole is at the bottom
of RIGHT PANEL (see figure 6).
figure 6
10
STEP 4 - FRONT PANEL
Place the FRONT PANEL into the recessed area on the BASE PANEL. Align
the tongues on both sides of the FRONT PANEL with the grooves of side panels, and insert them together. Make sure the front and side panels are horizontally aligned. Secure the LEFT BACK PANEL to the RIGHT BACK PANEL with
2 screws. Secure the LEFT BACK PANEL and the RIGHT BACK PANEL to the
FRONT PANEL with the remaining 4 screws. (see figure 7).
figure 7
STEP 5 - TOP PANEL
Place the top panel onto the top of the sauna walls, but allow room to connect
the wiring (see figure 8).
figure 8
11
Feed the wires through the holes in the TOP PANEL (see figure 9).
figure 9
When all wires are set, lower the TOP PANEL into place (see figure 10).
figure 10
CAUTION: Do not plug in power cord during installation.
12
STEP 6 - Attaching the bench heater panel
Slide the BENCH RISER PANEL WITH HEATER down, while aligning its sides
with the vertical guides on each side panel.
The heater grid faces outward (toward the front of the sauna); Push the bench
heater panel all the way down until it is touching the BASE PANEL and is
securely in place (see figure 11).
figure 11
Plug in the bench heater connector to the inlet located on the RIGHT BACK
PANEL (see figure 12).
figure 12
13
Put the short BENCH HEATER PANEL into the vertical guides on RIGHT
PANEL and BENCH RISER PANEL WITH HEATER (see figure 13).
figure 13
Install the LONG BENCH PANEL by sliding it over the horizontal bench guides
on the LEFT PANEL and RIGHT BACK PANEL. Push the bench all the way in
until it touches the LEFT BACK PANEL (see figure 14).
figure 14
Install the SHORT BENCH PANEL in the same way (see figure 15).
figure 15
14
INSTALLATION OF PARTS
Screw light bulb into light socket and install the lamp frame with 2 mounting
screws (see Figure 16).
figure 16
TEMPERATURE SENSOR
IMPORTANT: After ensuring all the plugs are firmly connected, REMOVE THE
ADHESIVE FILM from the temperature sensor (see Figure 17).
figure 17
PLUG IN
Plug the unit into a grounded (3 prong) outlet (120V 60Hz). The sauna is ready
to be used.
READ AND FOLLOW ALL OPERATING INSTRUCTIONS BEFORE
FIRST USE.
15
VENTILATION
There is a ventilation grid on the bottom of the right panel as well as the top
panel. Move the sliding doors to open/close the ventilation grids.
SAUNA OPERATION
NOTE: Before powering on the sauna for the first time, check to confirm
the connections of all wiring (CONTROL BOX, HEATERS, TEMPERATURE
SENSOR etc.) are correct and are not damaged.
Control panel Function
Power On/Off: Press to control the main power of the sauna unit.
Work Start/Stop: Press to control the working functions of the sauna.
Power indicator: Indicates the status of the sauna’s main power.
16
Work indicator: Indicates the working status of the sauna.
Heat indicator: Indicates the status of heating functions.
Reading Lamp: Press to control the lighting function.
Time Display: Displays the heating time of the sauna in minute(s).
Time: Press to adjust the setting of the timer.
Temperature Display: Displays the actual interior temperature of the sauna room
in oC/oF.
Temperature: Press to adjust the temperature setting.
oC/oF:
Press to change the temperature display between oC or oF.
1. MAIN POWER: Plug in the main power to your household power.
2. SAUNA POWER: To power on the sauna, press POWER ON/OFF one time on the
inside control panel. The POWER light should then light up. The TIME DISPLAY will
flash 90. TEMPERATURE DISPLAY will flash 60. Pressing POWER ON/OFF again, will
power down the sauna.
3. HEATING TIME: To set the heating time, power on the sauna, press the TIME up or
down arrow to increase or decrease the heating time of sauna room. When you press
one time, it increases or decreases 1 minute. If you press the set-up button continuously for more than 2 seconds, the digital read out will fast forward to the desired
setting. If you don’t press the button for more than 5 seconds, the digital read-out will
stop flashing, and the set-up value will be memorized. This value will be shown when
you restart the sauna the next time.
During your sauna session, the set-up time will count down by minute increments.
When there is 5 minutes remaining, the equipment will make a warning sound for 15
seconds. The time display will then begin flashing. When display time reaches 0, the
sauna will power off automatically.
4. TEMPERATURE UNITS: To switch between Fahrenheit and Celsius, press the oF /
oC button. The display value will change accordingly.
5. HEATING TEMPERATURE: To set the heating temperature, power on the sauna and
press the TEMPERATURE up or down arrows to increase or decrease the heating
temperature of sauna room. The temperature will increase or decrease by one degree
for each press of the button. Holding the button continuously for more than 2 seconds
will fast forward to the desired setting. This value will then be the sauna temperature.
If you don’t press the button for more than 5 seconds, the digital read-out will stop
flashing and the value will be memorized. It will show this value when you restart the
sauna the next time.
17
6. STOPPING/STARTING HEATERS: To start or stop the heating units, press
WORK START/STOP button once. If the WORK/HEAT light is on, the heaters
will start heating. If you press the button again, the heaters will shut off and
the light will go out. In the summer (with ambient room temperature at 30 ˚C
/ 86 ˚F), the heating time and actual sauna temperature will be approximate.
When the ambient room temperature is low, heating times will increase. The
data shown below is for reference only and heating time will vary.
When the sauna temperature reaches the set value, the digital control will switch
the heaters off. The WORK light remains on and the HEATER light goes out.
When the heaters stop, the sauna will keep the set temperature until the temperature reduces by 2 ºC from the set value. Then the heaters will turn back on,
bringing the temperature back up to the set values. This will continue for the
entire sauna session, maintaining the internal temperature within 2 ºC of the
desired temperature.
READING LAMP: To use the inside reading light, press the light ON/OFF one
time to switch on, press again to switch off.
MP3 PLUG: Connect your MP3 player or radio (not supplied) to the MP3 PLUG
with the supplied MP3 cable. This allows you to hear your music through the
interior speakers.
OVERHEAT PROTECTION
On the rear wall of the sauna is a temperature sensor with a recessed reset
button. In the event the sauna room overheats, the heaters will automatically
shut off. Once the sauna cools down to a safe temperature, press the reset
button to restart the heaters. The sauna turns off automatically when the reset
button trips. If this happens:
1.Open the sauna door until the temperature drops below 30 ºC.
2. Insert a pin or unfolded paper clip into the reset slot and press it until you
hear a click.
3. Press "POWER" on the control panel and the sauna heaters will restart.
18
SAFEGUARDS
1) Do not use your sauna near water, e.g. bathtub, in a wet basement, or near
a swimming pool.
2) Do not take a shower inside the sauna as excessive water will damage or warp
the wood. Do not pour water or other liquids on heaters or electrical equipment.
3) Do not use liquid cleaners or aerosol cleansers inside the sauna. Unplug the
sauna from the wall outlet before cleaning. Use a damp cloth for cleaning.
4) The power supply cord should be routed so it is not likely to be walked on or
pinched by items placed on it or against it. Disconnect power cord when not
in use.
5) When replacement parts are required, be sure they are specified by the
manufacturer. Unauthorized parts may result in fire, electric shock or other
hazards. After repair, ask the service technician to perform safety checks to
determine that your sauna is in proper operational condition.
WARNING:
Disconnect power and unplug before attempting any maintenance or
cleaning to reduce the risk of fire or electric shock.
WARNING:
Do not plug anything other than this sauna into a 2 outlet receptacle.
Plugging an appliance into the second outlet while the sauna is in use
may cause the circuit to trip.
19
LAMP REPLACEMENT
1. Remove the LAMP FRAME. Slide the lamp cover up to remove.
2. Remove the burnt out bulb and replace with new energy saving Bulb MAX
11W with E26 base.
CLEANING INSTRUCTIONS
Clean the unit with clean, damp cloth. Do not use abrasive cleaners or spray
liquids on this unit. Any chemical that can damage the wood will damage the
sauna and the protective finish that is on the wood.
20
TROUBLE SHOOTING GUIDE
1
PROBLEMS
Indicator light for power
supply not working
EXPLANATION
The socket doesn’t work
properly
SOLUTIONS
Check the power supply and socket, or
replace a new one
The fuse is burned out
2
3
4
5
6
7
21
Indicator light for function is
not working
Infrared heater won’t
work to produce heat and
infrared rays
Incorrect temperature
inside the sauna room
Burning smell inside sauna
The light is not working
Cannot hear sound from the
speakers
The corresponding indicator light
is broken
Repair or replace the control panel
The circuit or some accessories
are broken for relevant functions
Repair or replace the circuit for corresponding
functions
The heater is broken
Replace with a new heater with the same
specifications
Intensity will gradually diminish
after being used for many times
The fuse is burned out
Replace with a new fuse with the same
specifications
The circuit connection for the
heater has become loose
Disconnect from power source, check it, and
reconnect them correctly
The circuit for corresponding
control panel or accessories
is broken
Repair or replace it
Some problems with heater
See the previous section
Wrong setting
Reset it
The circuit for temperature
control or some
accessories are broken
Replace the control panel
Circuit problems (broken accessories, short circuit, failure
for controlling system) may
have caused the burning of
some accessories and electrical
controlling center
Disconnect from power source, check the
power supply and voltage
The bulb burned out
Disconnect the sauna replace the bulb
The bulb and the lamp fixture
are loose
Disconnect the sauna, replace the bulb and
raise the reed in the middle of the lamp
fixture, screw in the bulb again and reconnect
them properly
The speaker is broken
Replace with a new one of the same
specifications
The electrical connection is
loose
Disconnect the sauna, reconnect speakers
wires
Call 1-800-459-4409 (Monday-Friday / 8:30am 5:00pm EST)
NOTE: Keep the serial number for product warranty, which is shown on the sauna front panel and
outside package. Give this information to your distributor for after-sale service.
WIRING DIAGRAM
CTRL
READING LIGH T
TEMP. SENSOR
RESET
MP3 AUX
SPEAKER
63 70
16 38 16
150
R/SPEAKER
L/SPEAKER
TEMP SENSOR
CTRL
AC 120V
22
70
25
4 4
ONE YEAR WARRANTY
Every sauna is tested before it leaves the factory and it is guaranteed for one
year. If the unit should fail to operate correctly within one year from the date
of purchase, call customer service at 1-800-459-4409 (8:30 am – 5:00 pm,
EST). We will at our discretion either repair or replace the unit. It will have to be
returned to us freight prepaid and we will return the repaired or replaced unit
to you freight prepaid. The company’s sole obligation is to repair or replace
the unit.
This warranty is void if in the opinion of Quality Craft the unit has been tampered with, altered, misused, damaged, abused or used with the wrong
power source. Light bulbs are not covered by this warranty. The warranty is for
homeowner use only and does not cover units used in commercial situations.
Warranty claim procedure
If a claimable defect occurs, please fill out a claim form through our website at:
www.qualitycraft.com or contact our customer service department at
1‑800‑459‑4409 (8:30 am – 5:00 pm, EST).
Before you make your claim call, please make sure you have:
1.
The description of the sauna
2.
Proof of sale
3.
Details regarding the defect
4.
Name and address of the owner and installer
Claims must be filled out in writing and returned within six (6) months of
appearance of defect. Failure to comply with this stipulation will make the
warranty null and void. We reserve the right to a thirty-day (30) delay following
receipt of claim in which to inspect the product. We assume no responsibility
for labor costs or removing/replacing a previously installed product or
transportation or return of a product.
Imported by
Quality Craft Ltd.
Laval, Quebec
Canada, H7S 2G7
Toll free: 1-800-459-4409
www.qualitycraft.com
Made in China
23